


4K 8x8 HDBaseT™
Matrix with 6 Receivers
PN 39670 RS-232 GUIDE

2
INTRODUCTION
This Blackbird™ device can be controlled by a computer using an RS-232 serial connection
and by issuing commands using RS-232 control software.
CONNECTION
This device includes a 3-pin to DB-9 RS-232 cable, which is used to connect your PC to the
matrix or one of the receivers to allow for matrix control. You can also control of third
party devices connected to the matrix or one of the receivers. If your PC lacks a DB-9 serial
port, you will need to use a USB to Serial adapter cable (available separately P/N 3726).
Refer to the full
User's Manual
for connection details.
Controlling the Matrix with a PC Connected to the Matrix
• Plug one end of the included RS-232 cable into the RS232 connector on the matrix
rear panel, then plug the other end into an available COM port on your PC.
3
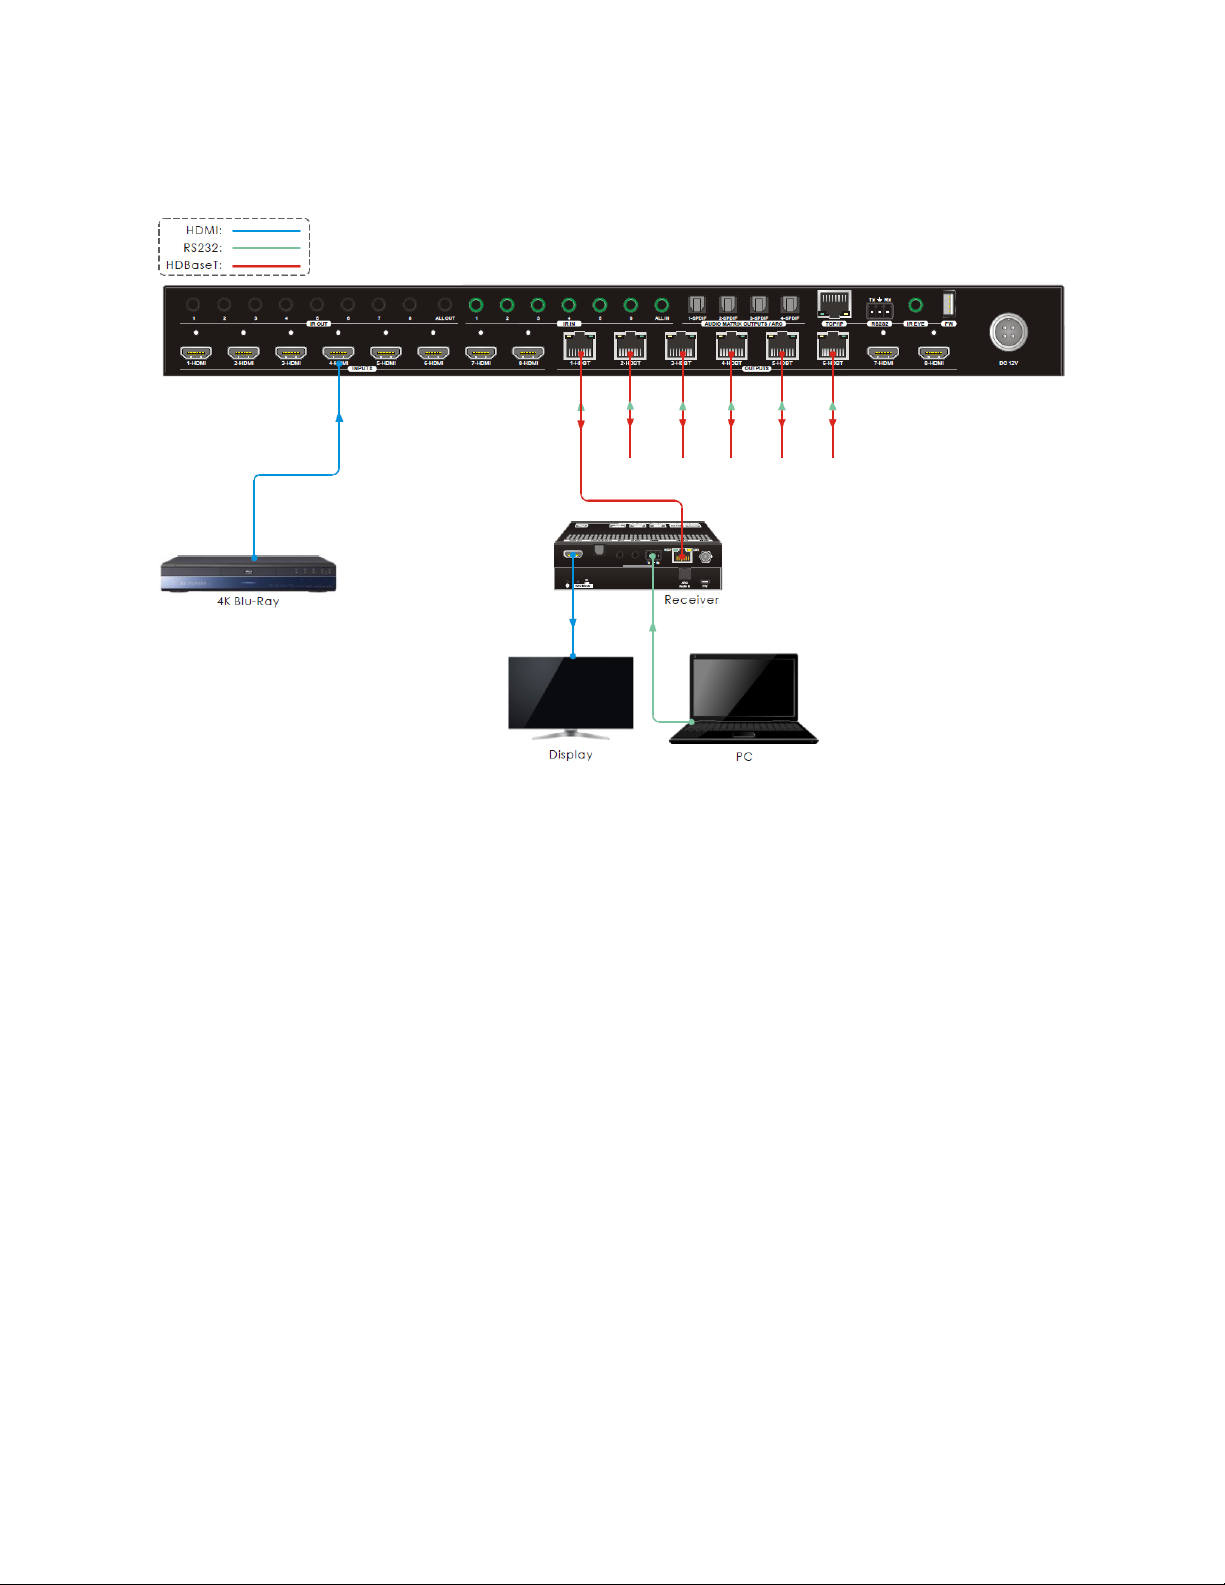
Controlling the Matrix with a PC Connected to a Receiver
1. Plug one end of the included RS-232 cable into the RS232 connector on one of the
receivers, then plug the other end into an available COM port on your PC.
2. Using RS-232 control software, send the RS232RCMxxON. command to enable
remote RS-232 control, where xx=00 for all HDBaseT™ receivers or 01-06 for an
individual receiver. Refer to the
RS-232 COMMANDS
section for command details.
4
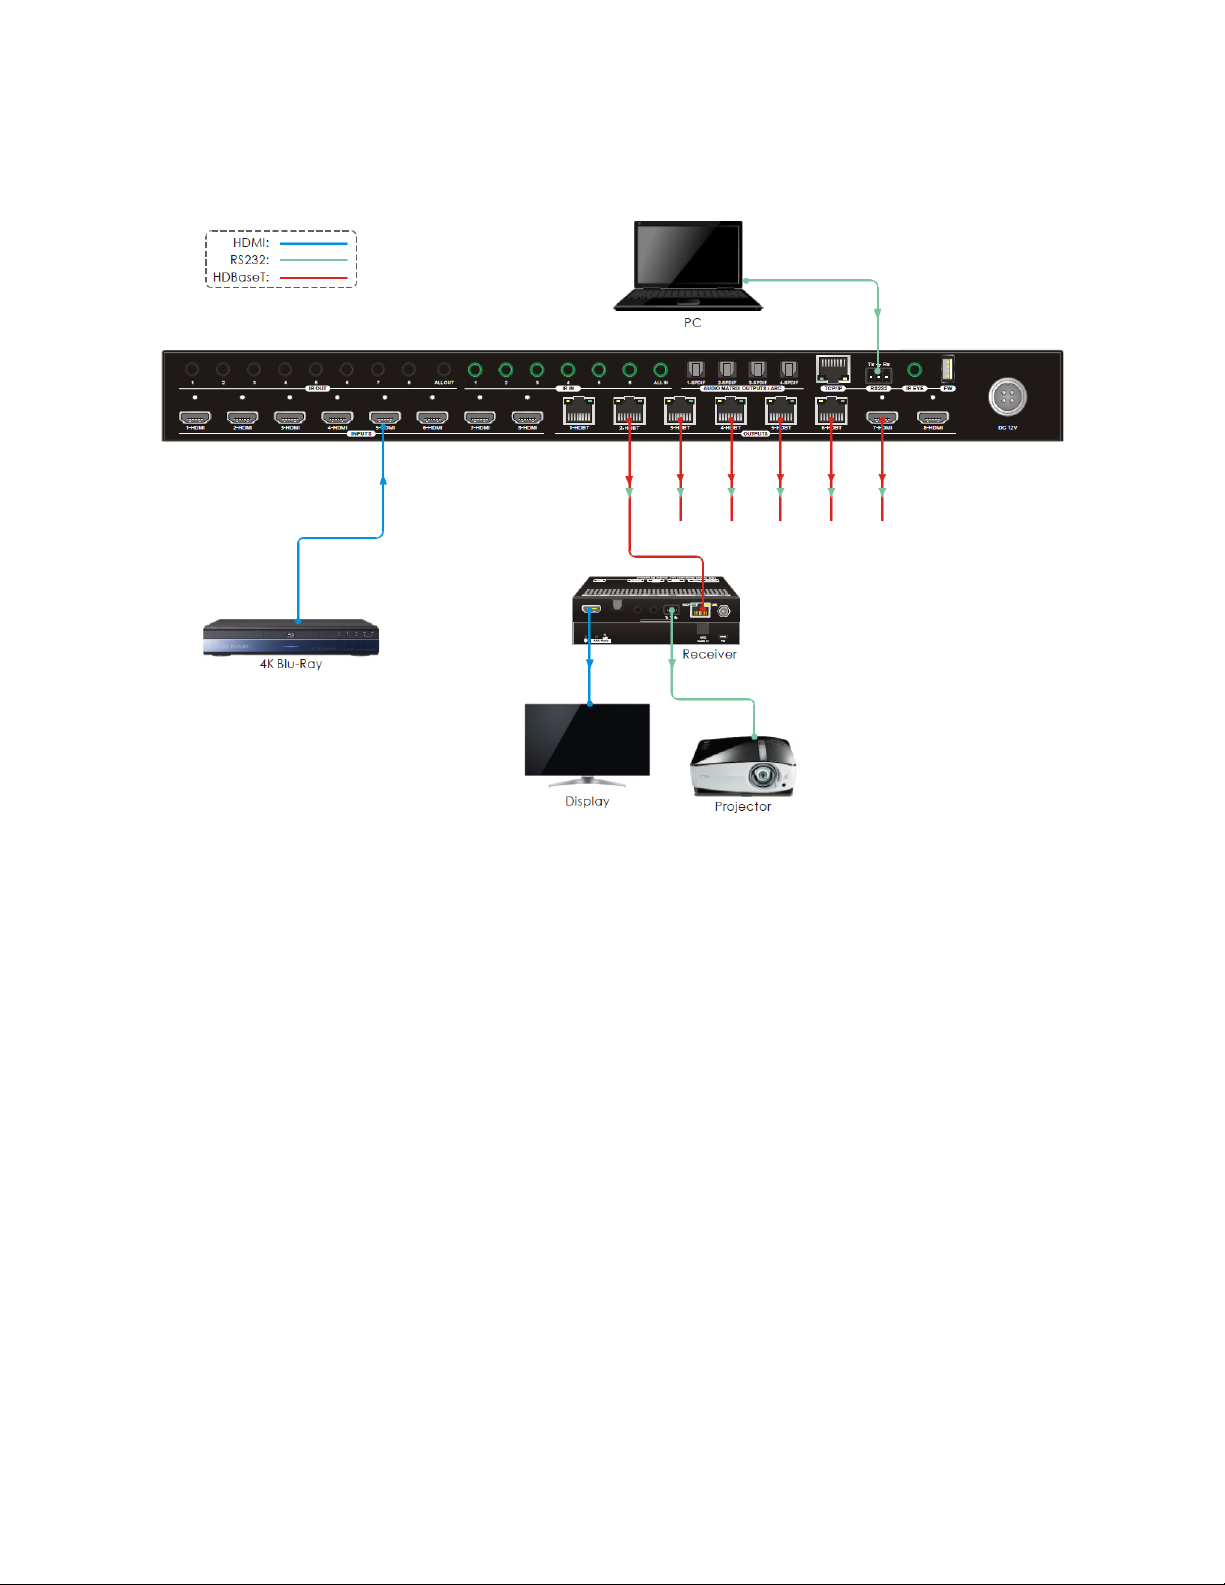
Controlling a Remote Third-Party Device with a PC Connected to the Matrix
1. Plug one end of the included RS-232 cable into the RS232 connector on the matrix
rear panel, then plug the other end into an available COM port on your PC.
2. Plug one end of a second RS-232 cable (not included) in the RS232 connector on one
of the receivers, then plug the other end into the RS-232 control connector on your
third-party device.
5
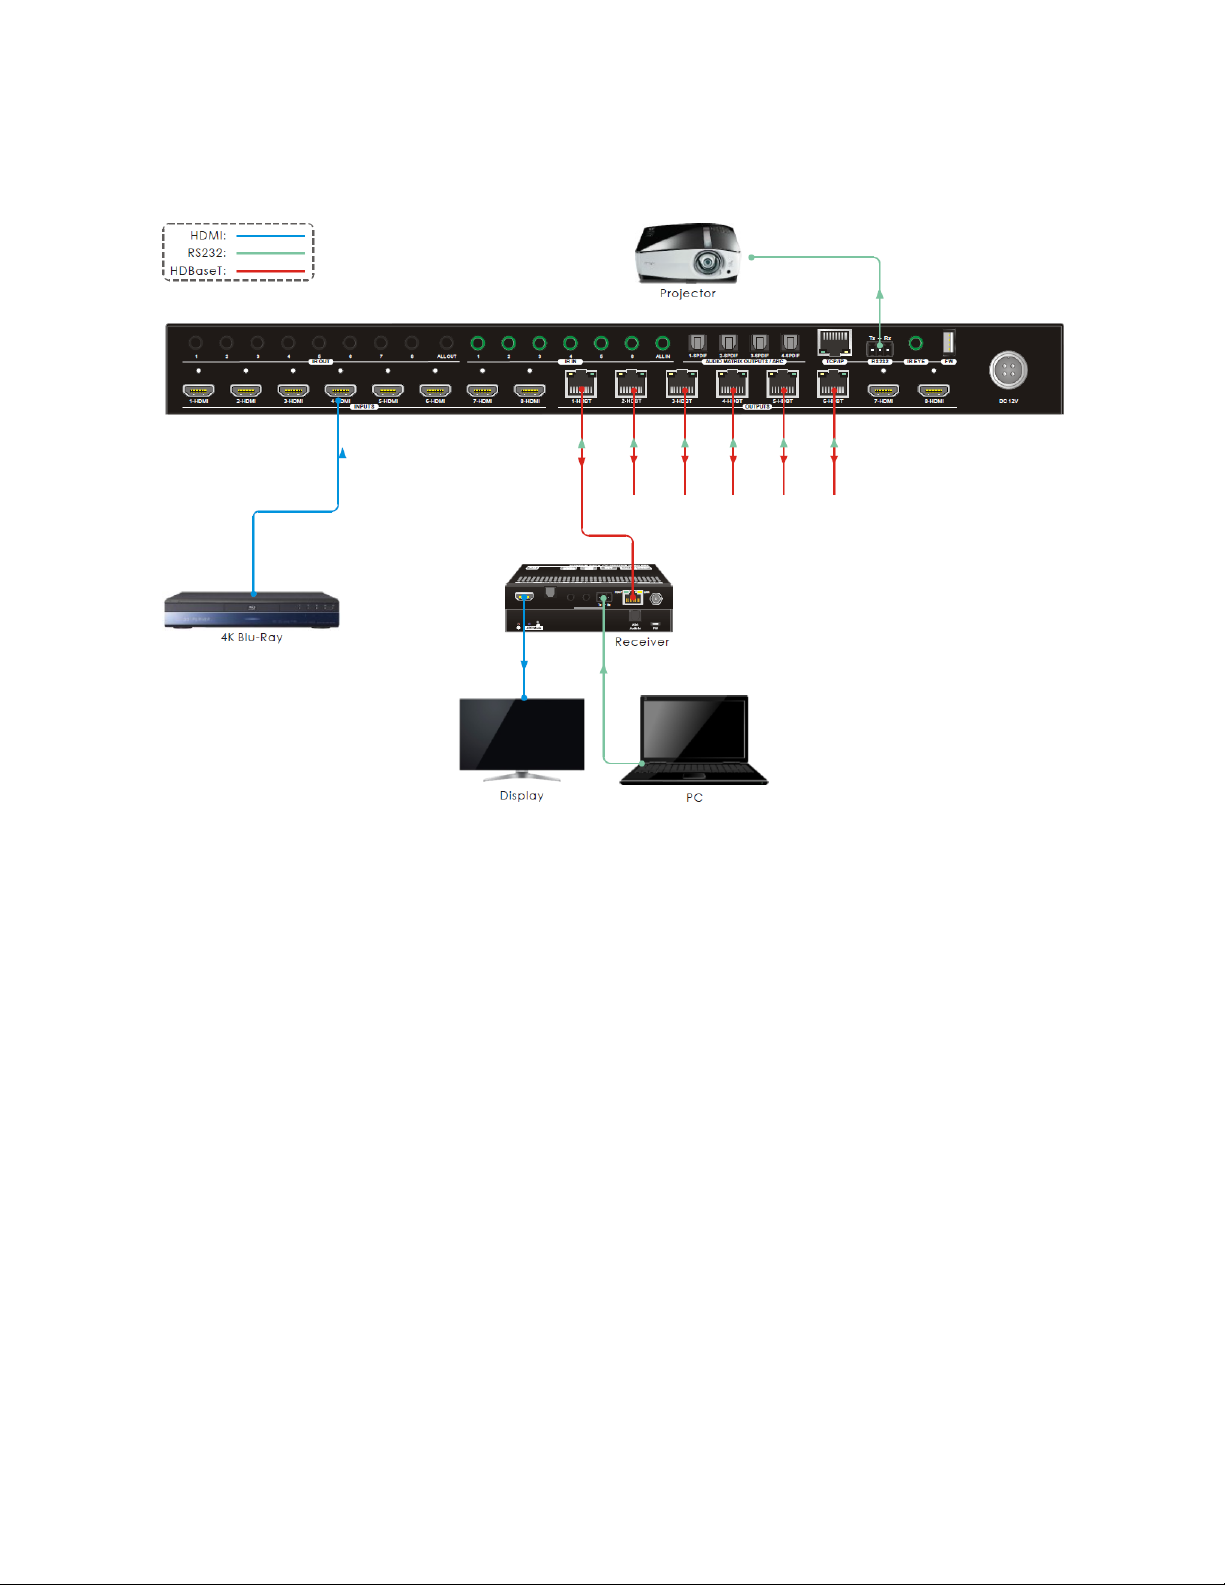
Control a Local Third-Party Device with a PC Connected to a Receiver
1. Plug one end of the included RS-232 cable into the RS232 connector on one of the
receivers, then plug the other end into an available COM port on your PC.
2. Plug one end of a second RS-232 cable (not included) in the RS232 connector on the
matrix, then plug the other end into the RS-232 control connector on your third-
party device.
3. Using RS-232 control software, send the RS232RCMxxON. command to enable
remote RS-232 control, where xx=00 for all HDBaseT™ receivers or 01-06 for an
individual receiver. Refer to the
RS-232 COMMANDS
section for command details.
6
SOFTWARE
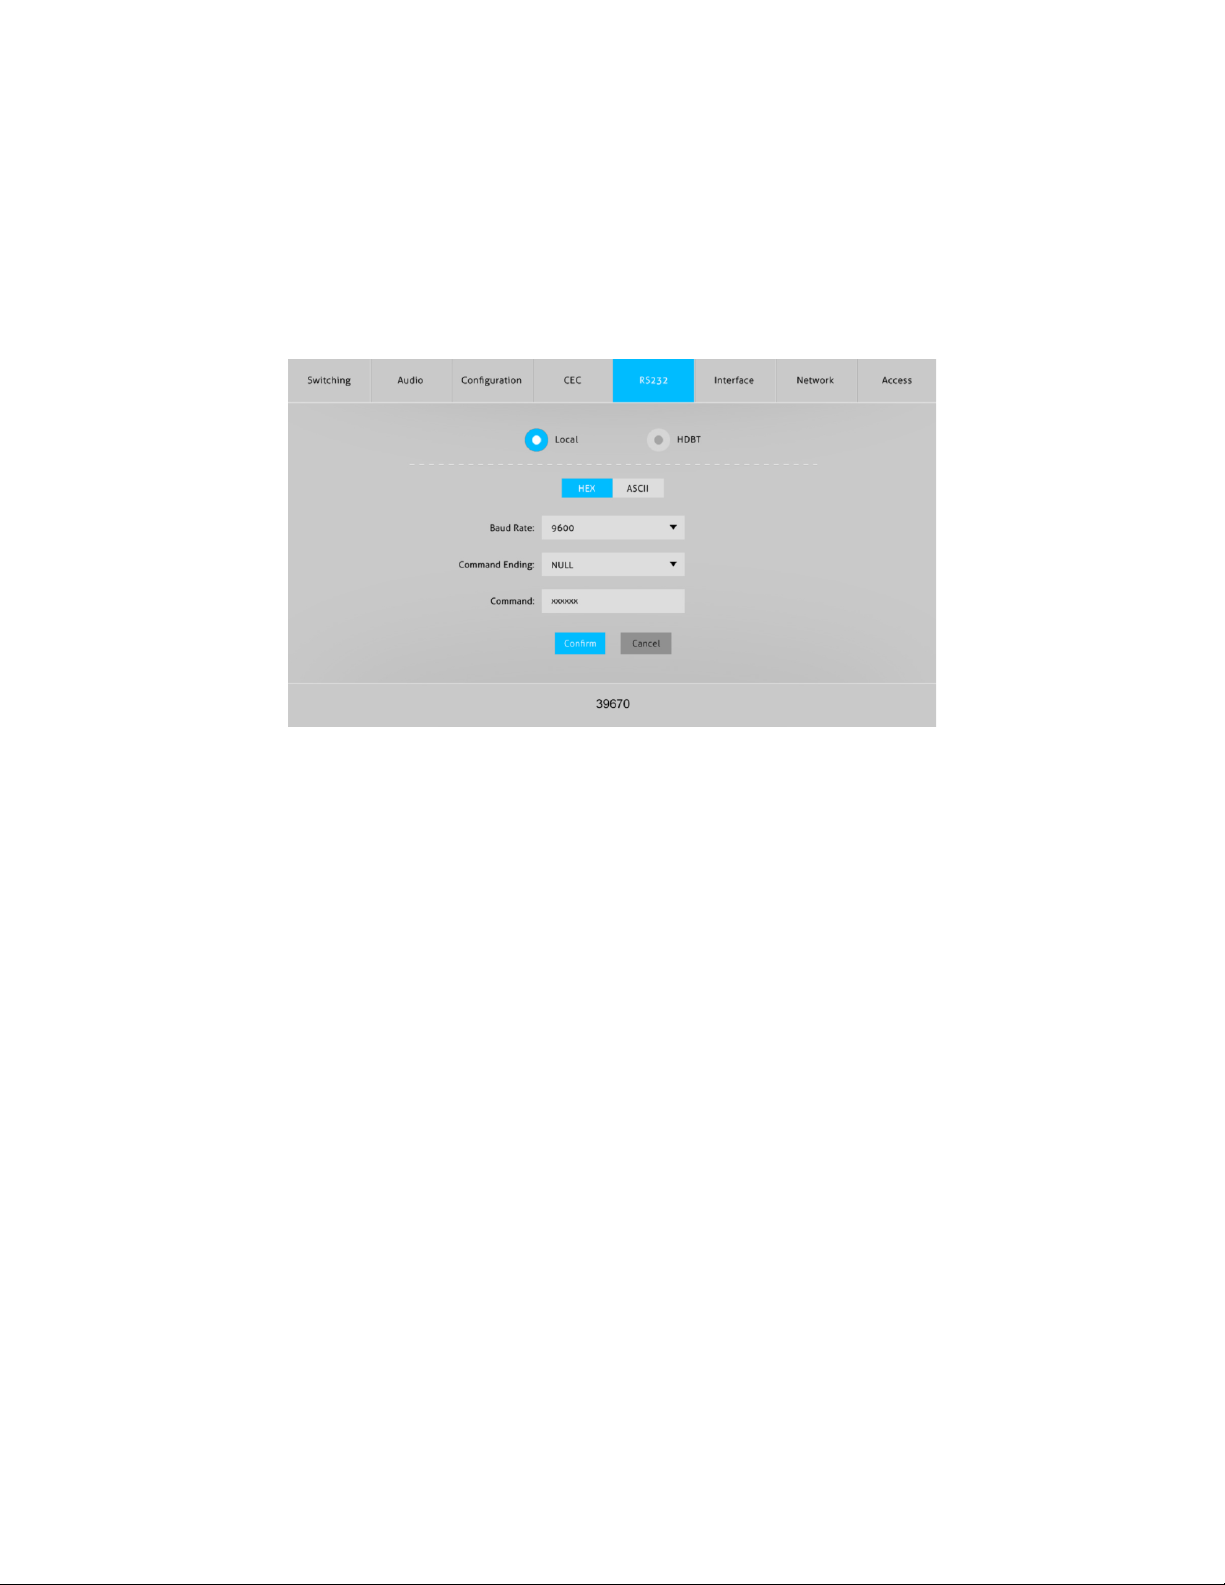
Web GUI RS-232 Control
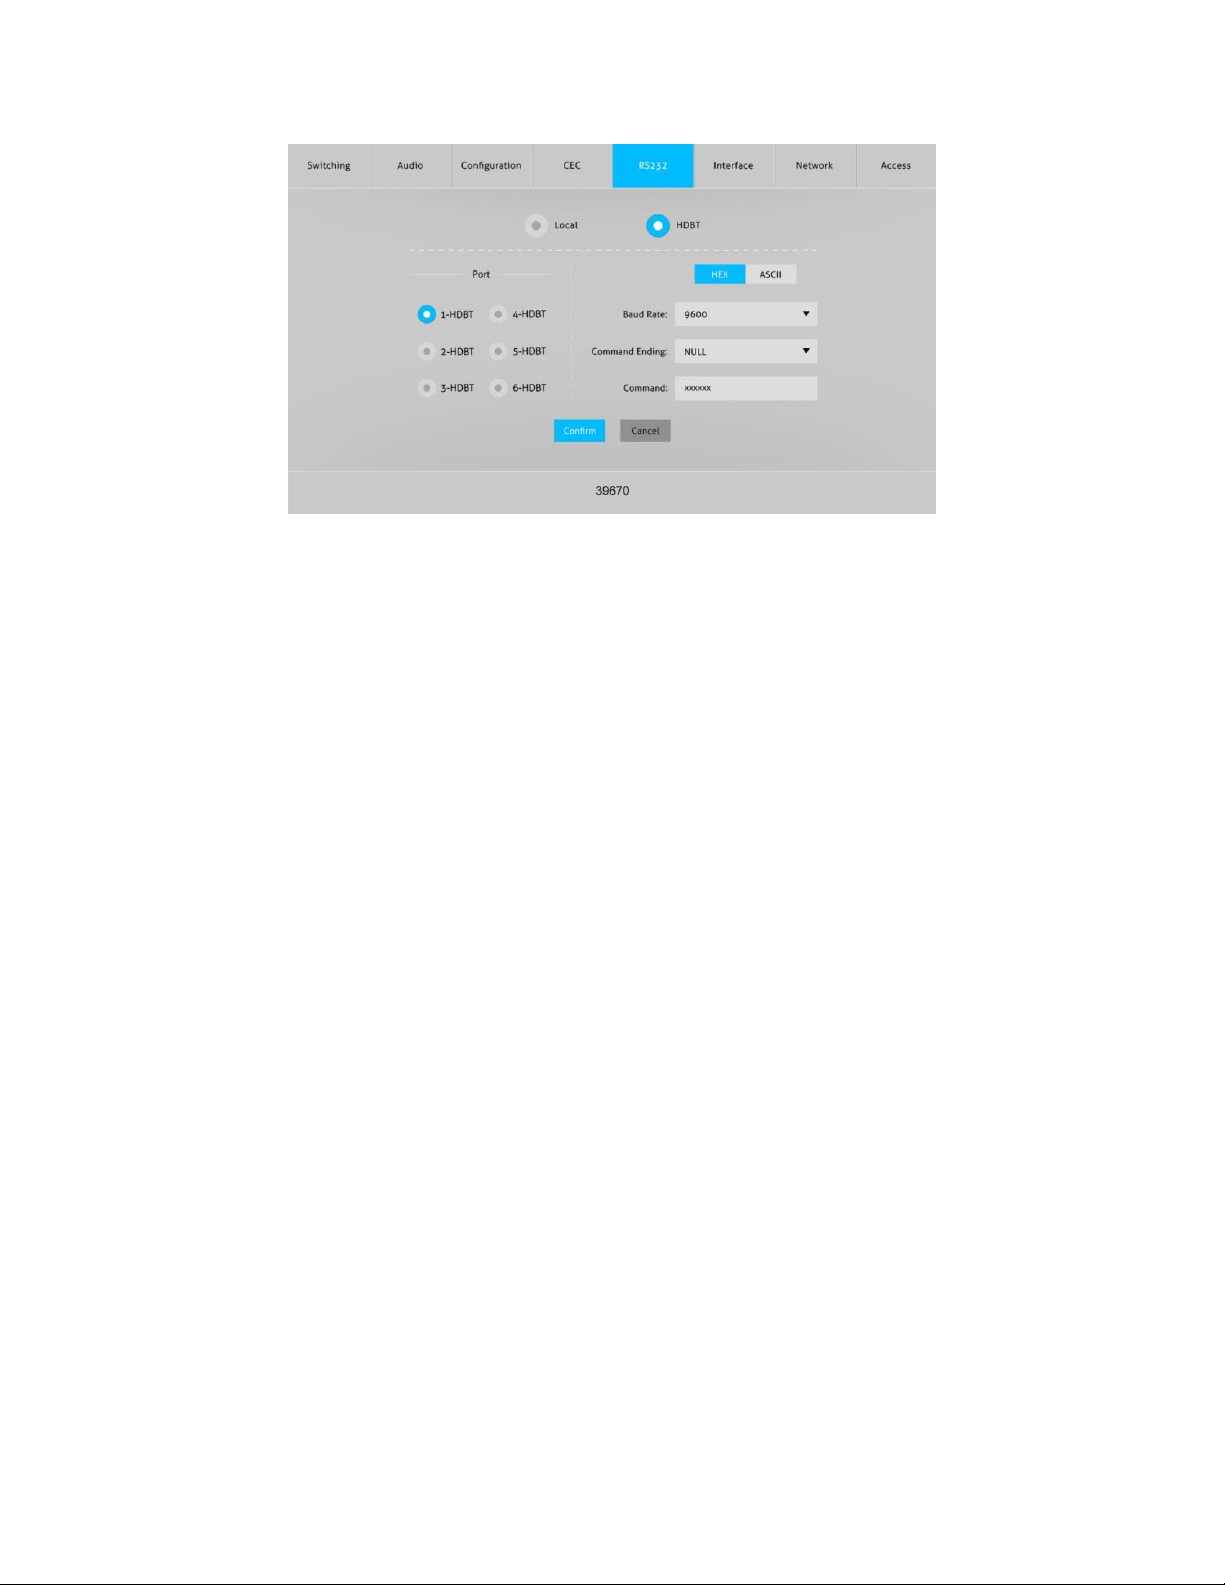
You can issue RS-232 commands using the RS232 tab of the built-in Web GUI system. Refer
to the full
User's Manual
for connection details to use this interface.
• Click the Local radio button to send RS-232 commands to the matrix.
• Click the HEX button to specify that your RS-232 command will be in hex format or
click the ASCII button to specify that your RS-232 command will be in ASCII format.
• Use the pull-down list box next to the Baud Rate label to select the speed at which
your RS-232 command is sent. You can select 2400, 4800, 9600, 19200, 38400,
57600, and 115200 baud.
• Use the pull-down list box next to the Command Ending label to select the
termination for your RS-232 command. You can select NULL, CR, LF, or CR+LF.
• Type your RS-232 command into the Command field, then click the Send button to
send the command using the selected format, baud rate, and termination settings.
See the
RS-232 COMMANDS
section for a list of valid RS-232 commands.
• Click the Cancel button at any time to clear any unsent command.
7
• Click the HDBT radio button to send RS-232 commands to one of the HDBaseT™
receivers to control a connected third-party device.
• Click one of the radio buttons in the Port section to select which HDBaseT receiver
will receive the RS-232 command.
• Click the HEX button to specify that your RS-232 command will be in hex format or
click the ASCII button to specify that your RS-232 command will be in ASCII format.
• Use the pull-down list box next to the Baud Rate label to select the speed at which
your RS-232 command is sent. You can select 2400, 4800, 9600, 19200, 38400,
57600, and 115200 baud.
• Use the pull-down list box next to the Command Ending label to select the
termination for your RS-232 command. You can select NULL, CR, LF, or CR+LF.
• Type your RS-232 command into the Command field, then click the Send button to
send the command using the selected format, baud rate, and termination settings.
See the
RS-232 COMMANDS
section for a list of valid RS-232 commands.
• Click the Cancel button at any time to clear any unsent command.
8
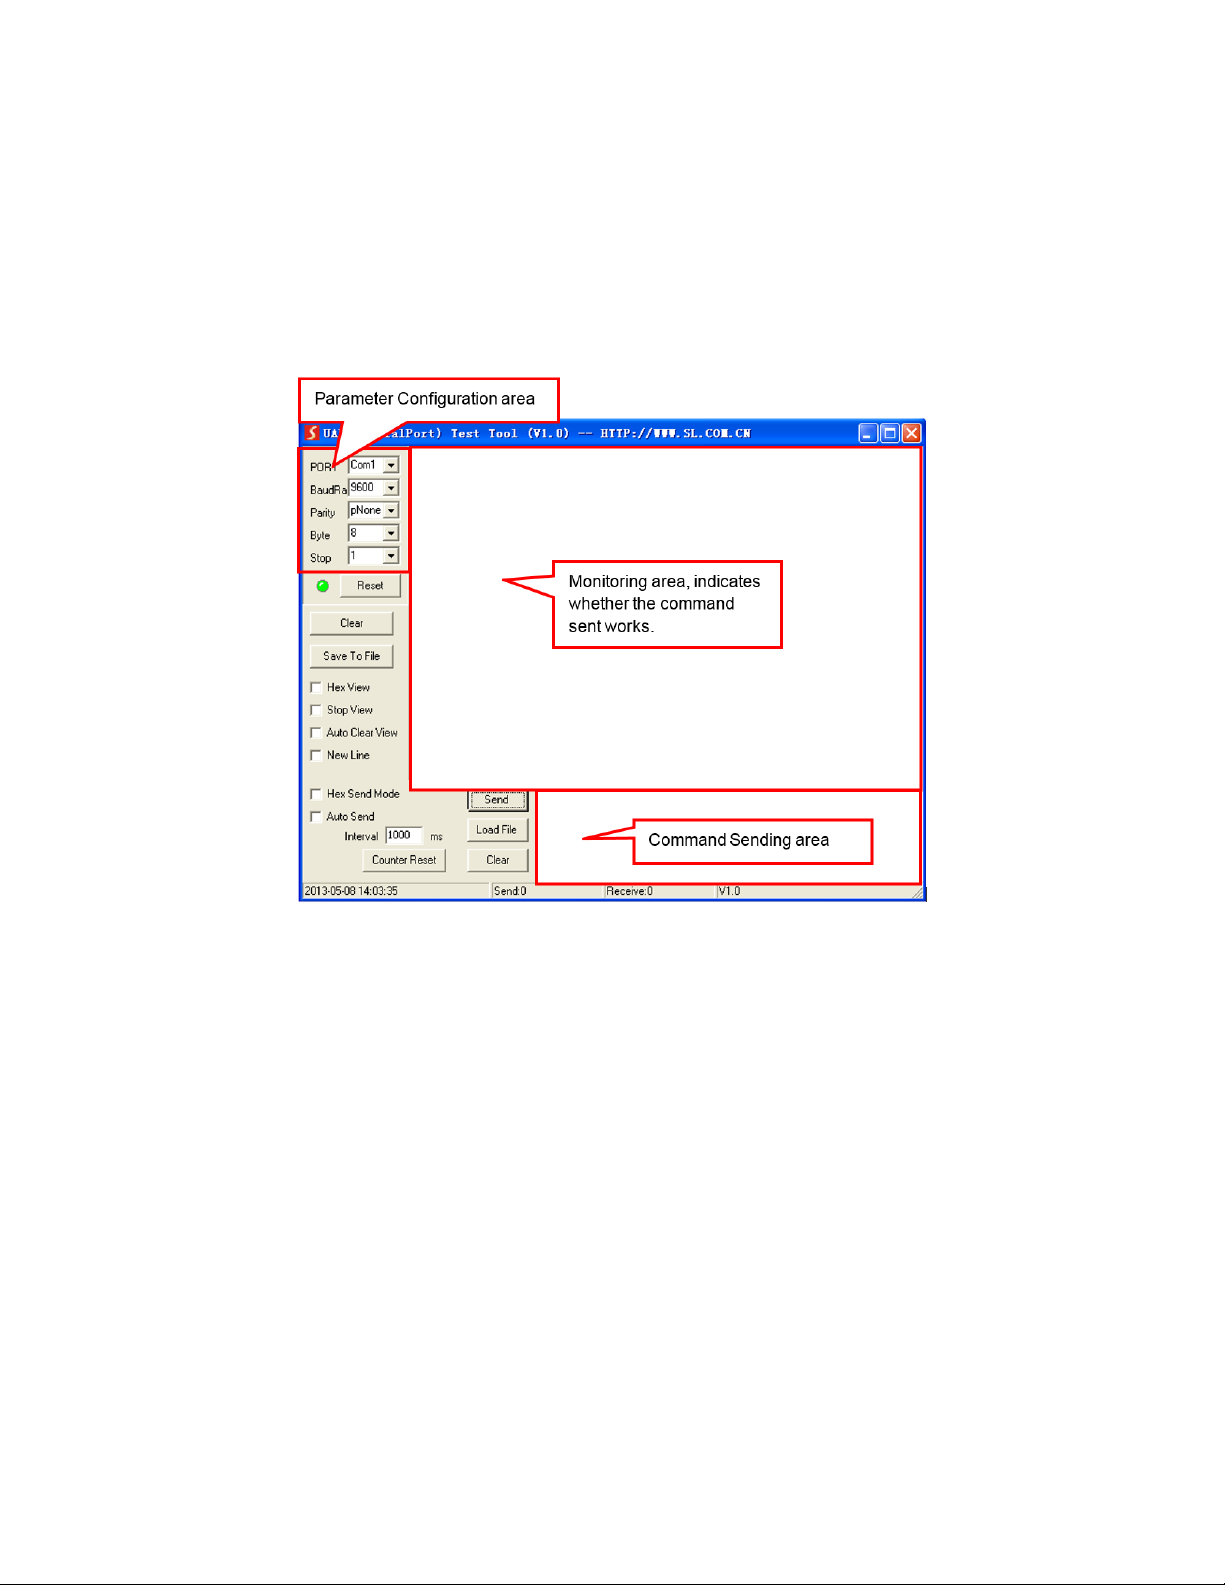
RS-232 Control Software
Other than the built-in Web GUI interface, this device does not include custom RS-232
control software. If you wish to control this device from your PC using an RS-232
connection, you will need to use a third party RS-232 control software package, such as
CommWatch.exe, whose interface is depicted below.
Set the communications parameters to the following:
Baud Rate: 9600
Data Bits: 8
Stop Bits: 1
Parity Bits: None

9
RS-232 COMMANDS
The following guidelines apply to the RS-232 control commands.
1. The brackets [ and ] in the commands are for clarity purposes to make the variable
more obvious. Do not type these symbols when typing the commands.
2. Other than the brackets, type in all commands exactly as they appear. They are case
sensitive and require the trailing period (.) or semicolon (;) as part of the command.
3. Disconnect all HDBaseT™ receivers from the matrix/transmitter prior to performing
any of the upgrade commands.
System Settings
Command
Description
Feedback Example
PowerON.
Turns the system on.
Power ON!
HDBT 01 Power ON!
HDBT 02 Power ON!
HDBT 03 Power ON!
HDBT 04 Power ON!
HDBT 05 Power ON!
HDBT 06 Power ON!
Front Panel UnLock!
PowerOFF.
Turns the system off.
Power OFF!
/*Name.
Displays the system name.
39670
/*Type.
Displays the system model.
HDBaseT Matrix
/^Version.
Displays the firmware and video
driver versions.
V1.0.0
CPLD:V1.0.0
VideoDriverVersion:V1.0.0

10
Command
Description
Feedback Example
RST.
Resets the matrix to the factory
default values.
Factory Default!
System Initialization......
HDBaseT Matrix
39670
V1.0.0
Power ON!
. . . . . .
Lock.
Locks the front panel buttons.
Front Panel Locked!
Unlock.
Unlocks the front panel buttons.
Front Panel UnLock!
GetGuiIP.
Displays the GUI IP address.
GUI_IP:192.168.0.178!
SetGuiIP:xxx.xxx.xxx.xxx
Sets the GUI IP to xxx.xxx.xxx.xxx.
SetGuiIP:192.168.0.178!
Baudrate115200.
Sets the baud rate of the matrix
to 115200 baud.
Set Local RS232 Baudrate Is
115200!
Baudrate57600.
Sets the baud rate of the matrix
to 57600 baud.
Set Local RS232 Baudrate Is
57600!
Baudrate38400.
Sets the baud rate of the matrix
to 38400 baud.
Set Local RS232 Baudrate Is
38400!
Baudrate19200.
Sets the baud rate of the matrix
to 19200 baud.
Set Local RS232 Baudrate Is
19200!
Baudrate9600.
Sets the baud rate of the matrix
to 9600 baud.
Set Local RS232 Baudrate Is
9600!
IRFVON.
Enable IR switching to follow
video switching.
IR Follow Video ON!
IRFVOFF.
Disable IR switching to follow
video switching.
IR Follow Video OFF!

11
Command
Description
Feedback Example
PHDBT[xx]:ON
Turns on the Power over Cable
(PoC) feature for HDBT output
[xx]. [xx]=00~06, where 00
represents all HDBT outputs.
Example: PHDBT00:ON
Feedback:
HDBT 01 Power ON!
HDBT 02 Power ON!
HDBT 03 Power ON!
HDBT 04 Power ON!
HDBT 05 Power ON!
HDBT 06 Power ON!
PHDBT[xx]:OFF.
Turns off the Power over Cable
(PoC) feature for HDBT output
[xx]. [xx]=00~06, where 00
represents all HDBT outputs.
Example: PHDBT00:OFF.
Feedback:
HDBT 01 Power OFF!
HDBT 02 Power OFF!
HDBT 03 Power OFF!
HDBT 04 Power OFF!
HDBT 05 Power OFF!
HDBT 06 Power OFF!
STA_PHDBT.
Displays the Power over Cable
(PoC) status of the HDBT
outputs.
HDBT 01 Power ON!
HDBT 02 Power ON!
HDBT 03 Power OFF!
HDBT 04 Power ON!
HDBT 05 Power ON!
HDBT 06 Power OFF!

12
Command
Description
Feedback Example
RS232RCM[xx]ON.
Enables RS-232 remote control
mode for HDBT output [xx] to
allow for control of the matrix
from the HDBaseT™ receiver [xx].
[xx]=00~06, where 00 represents
all HDBT outputs.
Example: RS232RCM00ON.
Feedback:
RS232 Remote 01 Control
MCU ON!
RS232 Remote 02 Control
MCU ON!
RS232 Remote 03 Control
MCU ON!
RS232 Remote 04 Control
MCU ON!
RS232 Remote 05 Control
MCU ON!
RS232 Remote 06 Control
MCU ON!
RS232RCM[xx]OFF.
Disables RS-232 remote control
mode for HDBT output [xx] to
allow for control of the matrix
from the HDBaseT™ receiver [xx].
[xx]=00~06, where 00 represents
all HDBT outputs.
Example: RS232RCM00OFF.
Feedback:
RS232 Remote 01 Control
MCU OFF!
RS232 Remote 02 Control
MCU OFF!
RS232 Remote 03 Control
MCU OFF!
RS232 Remote 04 Control
MCU OFF!
RS232 Remote 05 Control
MCU OFF!
RS232 Remote 06 Control
MCU OFF!

13
Command
Description
Feedback Example
STA_RS232RCM.
Displays the RS-232 remote
control mode status.
RS232 Remote 01 Control
MCU OFF!
RS232 Remote 02 Control
MCU ON!
RS232 Remote 03 Control
MCU ON!
RS232 Remote 04 Control
MCU ON!
RS232 Remote 05 Control
MCU OFF!
RS232 Remote 06 Control
MCU OFF!
IRRCM[xx]ON.
Enables IR remote control mode
for HDBT output [xx] to control
the matrix using the included IR
remote control from the
HDBaseT™ receiver locations.
[xx]=00~06, where 00 represents
all HDBT outputs.
Example: IRRCM00ON.
Feedback:
IR Remote 01 Control MCU
ON!
IR Remote 02 Control MCU
ON!
IR Remote 03 Control MCU
ON!
IR Remote 04 Control MCU
ON!
IR Remote 05 Control MCU
ON!
IR Remote 06 Control MCU
ON!

14
Command
Description
Feedback Example
IRRCM[xx]OFF.
Disables IR remote control mode
for HDBT output [xx] to control
the matrix using the included IR
remote control from the
HDBaseT™ receiver locations.
[xx]=00~06, where 00 represents
all HDBT outputs.
Example: IRRCM00OFF.
Feedback:
IR Remote 01 Control MCU
OFF!
IR Remote 02 Control MCU
OFF!
IR Remote 03 Control MCU
OFF!
IR Remote 04 Control MCU
OFF!
IR Remote 05 Control MCU
OFF!
IR Remote 06 Control MCU
OFF!
STA_IRRCM.
Displays the IR remote control
mode status.
IR Remote 01 Control MCU
OFF!
IR Remote 02 Control MCU
ON!
IR Remote 03 Control MCU
ON!
IR Remote 04 Control MCU
ON!
IR Remote 05 Control MCU
OFF!
IR Remote 06 Control MCU
ON!

15
Command
Description
Feedback Example
@OUT[xx].
Turns on output [xx]. [xx]=00~08,
where 00 represents all outputs.
Example: @OUT00.
Turn ON Output 01!
Turn ON Output 02!
Turn ON Output 03!
Turn ON Output 04!
Turn ON Output 05!
Turn ON Output 06!
Turn ON Output 07!
Turn ON Output 08!
$OUT[xx].
Turns off output [xx].
[xx]=00~08, where 00 represents
all outputs.
Example: $OUT00.
Feedback:
Turn OFF Output 01!
Turn OFF Output 02!
Turn OFF Output 03!
Turn OFF Output 04!
Turn OFF Output 05!
Turn OFF Output 06!
Turn OFF Output 07!
Turn OFF Output 08!
STA.
Displays the system status.
GUI OR RS232 Query
Status:
HDBaseT Matrix
39670
V1.0.0
Power ON!
. . . . . .

16
Command
Description
Feedback Example
STA_POUT.
Displays the status of all outputs.
Turn ON Output 01!
Turn ON Output 02!
Turn OFF Output 03!
Turn OFF Output 04!
Turn ON Output 05!
Turn ON Output 06!
Turn OFF Output 07!
Turn ON Output 08!
STA_IN.
Displays the connection status of
all HDMI® inputs.
IN 1 2 3 4 5 6 7 8
LINK Y N N Y Y Y Y Y
STA_OUT.
Displays the connection status of
all HDMI and HDBT outputs.
OUT 1 2 3 4 5 6 7 8
LINK Y N N Y Y Y Y Y
Signal Switching
OUT[xx]:[yy].
Switch video input [yy] to video
output [xx]. [xx]=00~08, where
00 represents all outputs.
[yy]=01~08.
Example: OUT01:03.
Feedback:
Output 01 Switch To In 03!
Local 03 IR Out Switch To
Remote 01 IR IN!
STA_VIDEO.
Displays the selected input for
each output.
Output 01 Switch To In 03!
Output 02 Switch To In 07!
Output 03 Switch To In 03!
Output 04 Switch To In 01!
Output 05 Switch To In 02!
Output 06 Switch To In 08!
Output 07 Switch To In 04!
Output 08 Switch To In 04!

17
Command
Description
Feedback Example
IR[xx]:[yy].
Switches remote IR IN [yy] to
local IR OUT [xx]. [xx]=01~08.
[yy]=00~06, where 00 represents
all remote IR IN ports.
Example: IR01:03.
Feedback:
Local 01 IR Out Switch To
Remote 03 IR IN!
STA_IR.
Displays the IR switching status.
IR Follow Video OFF!
Local 01 IR Out Switch To
Remote 01 IR IN!
Local 01 IR Out Switch To
Remote 02 IR IN!
Local 01 IR Out Switch To
Remote 03 IR IN!
Local 01 IR Out Switch To
Remote 04 IR IN!
Local 01 IR Out Switch To
Remote 05 IR IN!
Local 01 IR Out Switch To
Remote 06 IR IN!
PresetSave[xx].
Saves the current switching
layout to preset [xx]. [xx]=01~09.
Example: PresetSave09.
Feedback:
Preset 09 Sta:
Out 01 In 01!
Out 02 In 04!
Out 03 In 05!
Out 04 In 04!
Out 05 In 06!
Out 06 In 03!
Out 07 In 06!
Out 08 In 08!

18
Command
Description
Feedback Example
PresetRecall[xx].
Loads the switching layout for
preset [xx]. [xx]=01~09.
Example: PresetRecall09.
Feedback:
Output 01 Switch To In 01!
Output 02 Switch To In 04!
Output 03 Switch To In 05!
Output 04 Switch To In 04!
SPDIF Out 03 Switch To
Video Out 04!
Output 05 Switch To In 06!
Output 06 Switch To In 03!
Output 07 Switch To In 06!
Output 08 Switch To In 08!
PresetSta[xx].
Displays the switching layout for
preset [xx]. [xx]=01~09.
Example: PresetSta06.
Feedback:
Preset 06 Sta:
Out 01 In 01!
Out 02 In 01!
Out 03 In 03!
Out 04 In 04!
Out 05 In 03!
Out 06 In 03!
Out 07 In 06!
Out 08 In 05!

19
Audio Settings
Command
Description
Feedback Example
SPDIF[xx]:[yy].
Selects audio source [yy] for
SPDIF audio output [xx].
[xx]=00~08, where 00 represents
all SPDIF audio outputs.
[yy]=01~22.
[yy]=01~08 represents Input 1~8.
[yy]=09~16 represents Output
1~8.
[yy]=17~22 represents ARC on
Output 1~6.
Example: SPDIF01:04.
Feedback:
SPDIF Out 01 Switch To
Video In 04!
STA_SPDIF.
Displays the S/PDIF audio status.
SPDIF Out 01 Switch To
Video In 01!
SPDIF Out 02 Switch to
ARC 03!
SPDIF Out 03 Switch to
Video Out 04!
SPDIF Out 04 Switch to
ARC 06!

20
EDID® Management
EDIDMInit.
Resets the EDID® of all inputs to
the factory default setting.
All Input EDID Set Default!
EDIDUpgrade[xx].
Upgrades the EDID® data of
input port [xx]. [xx]=00~08 or U,
where 00 represents all inputs
and U instructs to upload a user-
defined EDID.
When the command is applied
the system prompts to upload
the EDID file (.bin). The operation
will be cancelled after 10
seconds. Please disconnect the
HDBT connection before sending
the command to ensure the data
can be successfully received.
256
9600bps
Input XX/User Define EDID
Upgrade OK BY RS232 Or
GUI!

21
Command
Description
Feedback Example
EDID/[xx]/[yy].
Assign embedded EDID® [yy] to
input [xx]. [xx]=00~08, where 00
represents all inputs. [yy]=01~09,
where:
01=1920x1080@60Hz, 8-bit
Stereo Audio
02=1920x1080@60Hz 8-bit High
Definition Audio
03=3840x2160@30Hz 8-bit
Stereo Audio
04=3840x2160@30Hz Deep Color
High Definition Audio
05=3840x2160@60Hz 4:2:0 Deep
Color Stereo Audio
06=3840x2160@60Hz Deep Color
Stereo Audio
07=3840x2160@60Hz Deep Color
High Definition Audio
08=3840x2160@60Hz Deep Color
HDR LPCM 6-channel Audio
09=User-defined EDID®
Example: EDID/03/01.
Feedback:
Input 03 EDID Upgrade OK
By 01 Internal EDID!
EDIDGOUT[xx].
Displays the EDID data from
output [xx]. [xx]=01~08.
Example: EDIDGOUT04.
Feedback:
. . . . . .

22
Command
Description
Feedback Example
EDIDM[xx]B[yy].
Copies the EDID® data of output
[xx] to input [yy]. [xx]=01~08.
[yy]=00~08, where 00 represents
all inputs.
Example: EDIDM04B01.
Feedback:
Input 01 EDID Upgrade OF
By 04 EXT EDID!
EDIDSTA[xx].
Displays the EDID status of input
[xx]. [xx]=00~08, where 00
represents all inputs.
Example: EDIDSTA00.
Feedback:
Input 01 EDID From 01
Internal EDID!
Input 02 EDID From 02
Internal EDID!
. . . . . .
Input 07 EDID From 06
Internal EDID!
Input 08 EDID From User
Define EDID!
HDCP™ Management
HDCP[xx]MAT.
The HDCP™ content of output
[xx] follows the HDCP version of
the connected display.
[xx]=00~08 where 00 represents
all outputs.
Example: HDCP00MAT.
Feedback:
OUT 01 HDCP MAT Display!
OUT 02 HDCP MAT Display!
OUT 03 HDCP MAT Display!
OUT 04 HDCP MAT Display!
OUT 05 HDCP MAT Display!
OUT 06 HDCP MAT Display!
OUT 07 HDCP MAT Display!
OUT 08 HDCP MAT Display!

23
Command
Description
Feedback Example
HDCP[xx]PAS.
Sets the HDCP™ mode of output
[xx] to Passive. The HDCP
content of output [xx]
automatically follows the HDCP
version of the source device.
[xx]=00~08, where 00 represents
all outputs.
Example: HDCP00PAS.
Feedback:
OUT 01 HDCP PASSIVE!
OUT 02 HDCP PASSIVE!
OUT 03 HDCP PASSIVE!
OUT 04 HDCP PASSIVE!
OUT 05 HDCP PASSIVE!
OUT 06 HDCP PASSIVE!
OUT 07 HDCP PASSIVE!
OUT 08 HDCP PASSIVE!
HDCP[xx]BYP.
Sets the HDCP mode of output
[xx] to Active. If the input video
has HDCP content, the HDCP
version of the HDMI® output is
HDCP 1.4 for broader video
compatibility. If the input video
has no HDCP content, the HDMI
output has no HDCP, either.
[xx]=00~08 where 00 represents
all outputs.
Example: HDCP00BYP.
Feedback:
OUT 01 HDCP BYPASS!
OUT 02 HDCP BYPASS!
OUT 03 HDCP BYPASS!
OUT 04 HDCP BYPASS!
OUT 05 HDCP BYPASS!
OUT 06 HDCP BYPASS!
OUT 07 HDCP BYPASS!
OUT 08 HDCP BYPASS!
STA_HDCP.
Displays the HDCP mode of all
outputs.
OUT 01 HDCP PASSIVE!
OUT 02 HDCP PASSIVE!
OUT 03 HDCP MAT
DISPLAY!
OUT 04 HDCP BYPASS!
OUT 05 HDCP BYPASS!
OUT 06 HDCP BYPASS!
OUT 07 HDCP BYPASS!
OUT 08 HDCP BYPASS!

24
Third Party Device Control
Command
Description
Feedback Example
/+[x]/[yy]:xxx.
Sends the ASCII command xxx at
baud rate [x] to control the
remote third-party device
connected to the HDBaseT™
receiver connected to HDBT
output [yy].
xxx=ASCII string.
[x]=1~7 represents the baud rate
of the third-party device.
[x]=1, the baud rate is 2400
[x]=2, the baud rate is 4800
[x]=3, the baud rate is 9600
[x]=4, the baud rate is 19200
[x]=5, the baud rate is 38400
[x]=6, the baud rate is 57600
[x]=7, the baud rate is 115200
[yy]=00~06 where 00 represents
all HDBT outputs.
Example: +3/01:123456.
Sends the ASCII command
123456 at 9600 baud to the
third-party device
connected to the HDBaseT
receiver connected to
HDBT output port 1.

25
Command
Description
Feedback Example
CMDON/+[x]/[yy]:xxx.
When the matrix is powered on,
automatically sends the ASCII
command xxx at baud rate [x] to
the third-party device connected
to the HDBaseT™ receiver
connected to HDBT output [yy].
xxx=ASCII string.
[x]=1~7 represents the baud rate
of the third-party device.
[x]=1, the baud rate is 2400
[x]=2, the baud rate is 4800
[x]=3, the baud rate is 9600
[x]=4, the baud rate is 19200
[x]=5, the baud rate is 38400
[x]=6, the baud rate is 57600
[x]=7, the baud rate is 115200
[yy]=00~06 where 00 represents
all HDBT outputs.
Example:
CMDON/+3/01:123456.
Automatically sends the
ASCII command 123456 at
9600 baud to the HDBaseT
receiver connected to
HDBT output 1 when the
matrix is powered on.

26
Command
Description
Feedback Example
CMDOFF/+[x]/[yy]:xxx.
When the matrix is powered off,
automatically sends the ASCII
command xxx at baud rate [x] to
the third-party device connected
to the HDBaseT™ receiver
connected to HDBT output [yy].
xxx=ASCII string.
[x]=1~7 represents the baud rate
of the third-party device.
[x]=1, the baud rate is 2400
[x]=2, the baud rate is 4800
[x]=3, the baud rate is 9600
[x]=4, the baud rate is 19200
[x]=5, the baud rate is 38400
[x]=6, the baud rate is 57600
[x]=7, the baud rate is 115200
[yy]=00~06 where 00 represents
all HDBT outputs.
Example:
CMDOFF/+3/01:123456.
Automatically sends the
ASCII command 123456 at
9600 baud to the HDBaseT
receiver connected to
HDBT output 1 when the
matrix is powered off.
Monoprice™, Blackbird™, the Blackbird logo, and all Monoprice logos are trademarks of Monoprice
Inc.
HDBaseT™ and the HDBaseT Alliance logo are trademarks of the HDBaseT Alliance.
HDMI®, the HDMI Logo, and High-Definition Multimedia Interface are trademarks or registered
trademarks of HDMI Licensing LLC in the United States and other countries.
EDID® is a registered trademark of the Video Electronics Standards Association.
HDCP™ is a trademark of Digital Content Protection LLC.
Blu-ray Disc™, Blu-ray™, and the logos are trademarks of the Blu-ray Disc Association.

TECHNOLOGY AT PRICES TH AT MAKE SENSE
Need Help? We’re here for you!
Contact us www.monoprice.com/contactus
Product pictures are for reference only.
Specifications described herein are subject to change without prior notification.
All trademarks are the sole property of their respective companies.
Blackbird™ is a Sub-brand of Monoprice Inc.
Copyright © 2021 Monoprice, Inc. All rights reserved.
www.monoprice.com
 Loading...