

Page 1

Revised 10.19.2018
SS-IM-002.03
Combi-King® Gas Boilerless
and Symbiotic Steam System
Combination Oven Series
Series: ETG & EHG Installation Manual
Page 2

DEAR CUSTOMER
COMBI OVEN INSTALLATION MANUAL
Congratulations on the purchase of your new
Combi-King® Combination Oven. By purchasing
this new oven, you have entered into a new era of
cooking. With the new technology and simplicity
built into the Combi-King® Combination Oven, you
will receive excellent results in no time at all. The
oven’s ease and simplicity of operation will help you
realize savings in training dollars.
With the Combi-King one touch, simply identify
the relevant food, push start, and you are cooking.
The simplicity of operation guarantees consistently
produced products without having to set times,
temperatures, and finishes.
For the Chef, the Combi-King oers a wide array of
functions and steps that once tested can be saved
and recreated by experienced kitchen sta as well
as the first time operator.
BKI Worldwide, Inc. is a wholly owned subsidiary of
Standex International Corporation.
Appliance Model _______________________________
S/N ___________________________________________
Dealer ________________________________________
Installer _______________________________________
Date of Install _________________________________
NOTICE
Please read the operations manual in full before
starting up the appliance to make sure all the
benefits and safety information is understood.
For more information, culinary support, and
customer service please contact 1- 800-927-6887
2
Page 3

COMBI OVEN INSTALLATION MANUAL
TABLE OF CONTENTS
INTRODUCTION ......................................................................................................................................................................... 4
INTENDED USE .................................................................................................................................................................... 4
SAFETY INFORMATION ............................................................................................................................................................. 4
SAFETY PRECAUTIONS ...................................................................................................................................................... 4
SAFETY SIGNS AND MESSAGES ....................................................................................................................................... 4
SAFE WORK PRACTICES .................................................................................................................................................... 5
SPECIFIC PRECAUTIONS ................................................................................................................................................... 6
GENERAL SAFETY GUIDELINES FOR INSTALLERS, USERS, AND SERVICE TECHNICIANS .................................. 7
HEALTH AND SANITATION PRACTICES ................................................................................................................................ 8
SPECIFICATIONS ........................................................................................................................................................................9
PRE-INSTALLATION CHECKLIST .......................................................................................................................................... 21
VENTILATION REQUIREMENTS ............................................................................................................................................ 22
WATER QUALITY ....................................................................................................................................................................... 23
INSTALLATION ..........................................................................................................................................................................24
GENERAL INFORMATION ................................................................................................................................................24
UNPACKING AND HANDLING ........................................................................................................................................ 24
REQUIRED CLEARANCES/POSITIONING ........................................................................................................................... 25
DOOR ADJUSTMENT ..............................................................................................................................................................26
ELECTRICAL CONNECTION .................................................................................................................................................. 27
WATER CONNECTION ............................................................................................................................................................28
DRAIN CONNECTION .............................................................................................................................................................29
GAS CONNECTION ................................................................................................................................................................. 30
PRODUCT REGISTRATION/INSTALLATION CHECKLIST ............................................................................................... 32
WIRING DIAGRAMS .................................................................................................................................................................34
BKI LIMITED WARRANTY ........................................................................................................................................................ 37
3
Page 4
COMBI OVEN INSTALLATION MANUAL
INTRODUCTION/SAFETY INFORMATION
Intended Use
BKI® Combi-King® Combination Ovens are solely
intended for use in commercial kitchens.
The units may only be used for cooking food using
the correct racks, containers, baking sheets, and
slide in pans. Roll in rack dollies and cassettes must
only be supplied by BKI.
Units should only be used with purest quality
drinking water for unit protection. The owner of the
oven should test water for filtration needs. Water
quality needs can be found in the manual under
“Water Quality.”
Your new Combi-King® oven should not be used for
the following purposes, among others:
• As a dishwasher
• Drying towels, paper, or dishes
• As a storage container
• Heating brines, oils, or other chemicals
• Heating closed containers (i.e. canned goods)
• Heating flammable liquids
• Deep frying
• Cleaning air filters or equipment parts
Safety Precautions
Always follow recommended safety
precautions listed in this manual. To the
left is the safety alert symbol. When you
see this symbol on your equipment, be alert to the
potential for personal injury or property damage.
Safety Signs and Messages
The following safety signs and messages are placed
in this manual to provide instructions and identify
specific areas where potential hazards exist and
special precautions should be taken. Know and
understand the meaning of these instructions, signs,
and messages.
DANGER
This message indicates an imminently
hazardous situation which, if not avoided, will
result in death or serious injury.
WARNING
This message indicates a potentially hazardous
situation, which, if not avoided, could result in
death or serious injury.
CAUTION
This message indicates a potentially hazardous
situation, which, if not avoided, may result in
minor or moderate injury. It may also be used
to alert against unsafe practices.
NOTICE
This message is used when special information,
instructions or identification are required
relating to procedures, equipment, tools,
capacities and other special data.
WARNING
California Residents Only
WARNING: This product can expose you to
chemicals including chromium which is known to
the State of California to cause cancer and birth
defects or other reproductive harm. For more
information go to www.P65Warnings.ca.gov.
4
Page 5

COMBI OVEN INSTALLATION MANUAL
+
911
SAFETY INFORMATION–SAFE WORK PRACTICES
Beware of High Voltage
This equipment uses high
voltage. Serious injury can
occur if you or any untrained
or unauthorized person
installs, services, or repairs this
equipment. ALWAYS use an
AUTHORIZED SERVICE AGENT
to service your equipment.
Beware of Hot Surfaces–
DO NOT Touch
The door on this unit reaches
temperatures that can cause
burns. Use caution when
opening and closing the
door. Do not touch any of
the surfaces when the unit is
heated.
Protect Children
Keep children away from
this equipment. Children
may not understand that this
equipment is dangerous for
them and others.
Know Your Responsibilities
as an Employer
• Make certain your
employees know how to
operate the equipment.
• Make certain your
employees are aware of the safety precautions on
the equipment and in this manual.
• Make certain that you have thoroughly trained
your employees about operating the equipment
safely.
• Make certain the equipment is in proper working
condition. If you make unauthorized modifications
to the equipment, you will reduce the function
and safety of the equipment as well as void the
warranty.
Keep this Manual With the
Equipment
This manual is an important
part of your equipment.
Always keep it nearby for easy
access.
NEVER allow children to play
near or operate your equipment.
Be Prepared for Emergencies
Be prepared for fires, injuries,
or other emergencies.
Keep a first aid kit and a
fire extinguisher near the
equipment. You must use
a 40-pound type BC fire
extinguisher and keep it
within 25 feet of your equipment. Keep emergency
numbers for doctors, ambulance services, hospitals,
and the fire department near your telephone.
+
911
If you need to replace this manual, contact:
BKI
Technical Services Department
2812 Grandview Dr.
Simpsonville, SC 29680
Or call toll free: 1-800-927-6887
Outside the U.S., call 864-963-3471
Or visit www.bkideas.com
5
Page 6

COMBI OVEN INSTALLATION MANUAL
WARNING
WARNING
NOTICE
NOTICE
NOTICE
SAFETY INFORMATION–SPECIFIC PRECAUTIONS
CAUTION
Equipotential Ground Plane
When a high current flows through a conductor,
dierences in potential appear between the
conductor and nearby metallic surfaces near the
appliance. As a result, sparks may be produced
between the appliance and surrounding metal
surfaces. These sparks could cause serious
injury, damage, or fire.
BKI provides an Equipotential ground
terminal for the connection of a bonding
conductor after the installation of the
appliance per lEC60417-1. This terminal
is located on the inside of the Power
Entry Supply box near the Earth connection
and is marked with this symbol
WARNING
Disconnect power before servicing.
Improper installation, adjustment, alteration,
service, or maintenance can cause property
damage, injury, or death. Read the installation,
operating and maintenance instructions
thoroughly before installing or servicing this
equipment.
For Your Safety
DO NOT store or use gasoline or other
flammable vapors or liquids in the vicinity of this
or any other appliance.
For Your Safety
All service must be performed by a qualified BKI
authorized technician.
For Your Safety
This manual is a part of your new Combi-King®
Combination oven. You must keep and maintain
it for the entire life span of your
Combi-King and pass it on to the next owner
of the unit.
Retain this manual for reference, keep it where
you can use it.
This manual may be subject to new technical
developments, modifications, and unforeseen
errors.
DO NOT operate or attempt to operate this
appliance or any accessories without reading
completely and fully understanding this manual.
DO NOT connect Combi oven drain connection
to any drain material that cannot sustain 175° F.
6
Page 7

COMBI OVEN INSTALLATION MANUAL
SAFETY INFORMATION
General Safety Guidelines for Installers, Users, and
Service Technicians
• Read, understand, and follow the instructions, and
heed and obey the warnings of the Installation
Manual, the Operator’s Manual, and the labels
on the Combi oven, accessories, and supporting
products.
• Improper installation, maintenance, cleaning, or
modifications to the Combi oven can lead to injury
or death of the operator(s), and equipment and
property damage.
• Steam – To avoid steam burns, open the Combi
door by turning the handle to the left or clockwise
(“airing”) position and waiting for the steam and
condensate to clear. Then, turn to the right or
counterclockwise and slowly open the door. Never
breathe steam, superheated steam, or hot air.
NOTE: The cooking program is interrupted
whenever the door is opened.
• Heat – The Combi, cooking containers, shelves,
and inner door and anything else inside the
cooking compartment are HOT, as are many of
the component parts. Wear DRY heatproof gloves
or mitts.
• Exhaust Vents – The top of the Combi, and the
gas and steam exhaust vents are very hot during
operation and remain hot for some time. Never
breathe gas or steam from the exhaust vents.
Use extreme caution when working on or near
this area and component parts.
• Grease Spatter – Hot grease will spatter and cause
burns if sprayed with water. Locate fryers and
similar appliances outside the range of the Combi
hand shower.
• Electric Shock – Use the hand shower only on
the inside of the oven. Use of the hand shower,
hoses, power cleaners, or pressure washers on
the outside of the Combi can cause electric
shock and/or damage to electrical and electronic
components.
• Cleaning and Daily Maintenance – Wait for the
Combi to cool before cleaning and performing
daily maintenance. DO NOT spray water in a hot
cooking compartment. Do not use hoses, power
cleaners, pressure washers, or harsh or abrasive
cleaning agents inside OR outside the cooking
compartment.
• Cleaning Agents – Use only BKI approved
cleaning and descaling products. Follow the
instructions and heed and obey the warnings on
the labels. Other products can damage the Combi,
cause injury, or present health hazards.
• Wear appropriate shoes/boots to the work area to
help protect feet and to help prevent slips
and falls.
• Use non-slip, draining, anti-fatigue FLOOR MATS
(not included) rated for use in wet, greasy, and dry
work areas to help prevent slipping and / or falling
injuries. Obtain the best mats for your needs from
your local supplier.
• Scalds – DO NOT place containers with liquid
contents or contents that become liquid on oven
racks higher than you can see. You must be able to
see into the container. Cover containers (individual
or on trolleys) containing hot or hot liquid items
to help prevent spills during transport. Observe
and heed, and obey the additional warning labels
posted on the Combi.
7
Page 8

COMBI OVEN INSTALLATION MANUAL
HEALTH AND SANITATION PRACTICES
BKI Combi Ovens are manufactured to comply with
health regulations and are tested and certified to
UL®, cUL®, and NSF® standards. You must operate
the equipment properly using only quality products
and use meat thermometers to insure meats are
thoroughly cooked.
Food Handling
• Wash hands thoroughly in warm, soapy water after
handling raw poultry or meats.
• Clean and sanitize all utensils and surfaces that
have been in contact with raw products. Clean
and sanitize the meat forks or baskets between
cooking.
• Never place cooked meats on the same surfaces
used to prepare raw meats, unless the area has
been thoroughly cleaned and sanitized.
Storage of Raw Meats
• Designate an area or shelf strictly for the storage
of all raw meats to be used in the oven.
• Raw product must always be stored at
temperatures below 38° F. (3° C.).
Coding Cooked Foods
• All products cooked during the day should be sold
the same day.
NOTE: Follow your company’s procedures for the
handling of any leftover product.
Storage of Prepared Foods
• Cold foods should be kept at or below
38° F. (3° C.).
• Hot foods must be maintained to meet local
health codes, usually a minimum 145° F (63°).
• Never store or mix raw foods above cooked foods,
as this is a health hazard. The drippings from raw
foods contaminate cooked or processed foods.
• All chicken and chicken parts to be stored
overnight must be thoroughly iced down
and refrigerated.
8
Page 9

66,5 29.13” (740 mm) 56,5
33.98” (863 mm)
31.34” (796 mm)
33.66” (855 mm)
71,5 22.05” (560 mm)
77
32.87” (835 mm)
34.68” (881 mm)
Ă
50
115
R574
241
129
290
204,5
298,5
610
30.43” (773 mm)
63 75
126,5
128,5
139
EQUIPMENT DIMENSIONS
COMBIKING® COMBINATION OVEN SYMBIOTIC STEAM SYSTEM TOUCHSCREEN CONTROLS
Model EHG061R
MECHANICAL SPECIFICATIONS
Dimension Uncrated Crated
Height 34.68" (881 mm) 40.25" (1023 mm)
Width 33.98" (863 mm) 36.75" (934 mm)
Depth 33.66" (855 mm) 36" (915 mm)
Weight 300 lb (137 kg) 344 lb (157 kg)
ELECTRICAL OPTIONS
Volts Phase Cycle/Hz kW Amps Wires
120 1 60 1.2 10 2+Grnd
NOTE: Cord and plug are included with the unit
PAN CAPACITY
6 ea. 12" x 20" x 2.5" (65 mm) Steam table pans
6 ea. 13" x 18" half size sheet pans
OPTIONS & ACCESSORIES
• Stands
• Stacking system
• Hot & cold smoker
• Reversible doors
(consult with factory
about additional width
considerations)
• Rack configuration for
baking trays (600 x 400 mm)
• Core probe
REQUIRED CLEARANCES
Left 0" (20" (508 mm) for service)
Right 0"
Front 23" (585 mm) for door swing
CONNECTIONS
3/4" GHT cold water for wash
3/4" GHT treated water for
cooking as per BKI water
requirements below
Back 3" (75 mm) for plumbing
2" (50 mm) drain
3/4” NPT gas inlet
WATER REQUIREMENTS
Pressure (min-max): 35 • 87 PSI
Hardness (CaC03) = Less than 7.5 GPG (Grains per Gallon)
TDS (Total Dissolved Solids)= Less than 100.0 mg/L (Milligrams per Liter
Free Chlorine = Less than 0.5 mg/L (Milligrams per Liter)
Chlorides =Less than 20 mg/L (Milligrams per Liter)
Chloramines = Less than 0.5 mg/L (Milligrams per Liter)
Total Alkalinity= Less than 20 mg/L (Milligrams per Liter)
Total Silica = Less than 10mg/L (Milligrams per Liter) pH level= 7.0 to 8.0
Conductivity (Boiler Models only) = Minimum of 20 µS/ecm (microSiemens per cm)
• Not maintaining water quality to factory requirements voids warranty
BTUH
• Tablet detergent
• Water filtration systems
• Culinary components
41,000
bkideas.com
© BKI LI0283C/08-06
Specifications are subject to
change without notice.
Visit bkideas.com to view all
accessories available for this model.
BKI Worldwide, Inc.
2812 Grandview Drive
Simpsonville, SC 29680
Telephone: (864) 963-3471
Toll Free: (800) 927-6887
BKI Worldwide, Inc. is a wholly owned subsidiary
of Standex International Corporation.
Dimensions nominal.
Shipping Class: #110
FOB Simpsonville, SC
Cooking Solutions Group
9.26.2018
Page 10

34.09” (866 mm)
36.42” (925 mm)
34.61” (879 mm)
32.87” (835 mm)
77,5
Ă
50
67 27.17” (690 mm)
39.57” (1005 mm) 5464
115
A
R834
53,5
90,5
251
88,5
220
55 75
441
75,5
70,5
697
44.21” (1123 mm)
33.19” (843 mm)
196,5
EQUIPMENT DIMENSIONS
COMBIKING® COMBINATION OVEN SYMBIOTIC STEAM SYSTEM TOUCHSCREEN CONTROLS
Model EHG062R
MECHANICAL SPECIFICATIONS
Dimension Uncrated Crated
Height 34.61" (879 mm) 40.25" (1022 mm)
Width 44.21" (1123 mm) 45.5" (1156 mm)
Depth 36.42" (925 mm) 38.5" (978 mm)
Weight 448 lb (204 kg) 492 lb (224 kg)
ELECTRICAL OPTIONS
Volts Phase Cycle/Hz kW Amps Wires
120 1 60 1.2 10 2+Grnd
NOTE: Cord and plug are included with the unit
PAN CAPACITY
12 ea. 12" x 20" x 2.5" (65 mm) steam table pans
12 ea. 13" x 18" half size sheet pan
6 ea. 18" x 26" full size sheet pan
OPTIONS & ACCESSORIES
• Stands
• Stacking system
• Hot & cold smoker
bkideas.com
© BKI LI0283C/08-06
Specifications are subject to
change without notice.
• Reversible doors
(consult with factory
about additional width
considerations)
Visit bkideas.com to view all
accessories available for this model.
BKI Worldwide, Inc.
2812 Grandview Drive
Simpsonville, SC 29680
Telephone: (864) 963-3471
Toll Free: (800) 927-6887
REQUIRED CLEARANCES
Left 0" (20" (508 mm) for service)
Right 0"
Front 28" (705 mm) for door swing
Back 3" (75 mm) for plumbing
WATER REQUIREMENTS
Pressure (min-max): 35 • 87 PSI
Hardness (CaC03) = Less than 7.5 GPG (Grains per Gallon)
TDS (Total Dissolved Solids)= Less than 100.0 mg/L (Milligrams per Liter
Free Chlorine = Less than 0.5 mg/L (Milligrams per Liter)
Chlorides =Less than 20 mg/L (Milligrams per Liter)
Chloramines = Less than 0.5 mg/L (Milligrams per Liter)
Total Alkalinity= Less than 20 mg/L (Milligrams per Liter)
Total Silica = Less than 10mg/L (Milligrams per Liter) pH level= 7.0 to 8.0
Conductivity (Boiler Models only) = Minimum of 20 µS/ecm (microSiemens per cm)
• Not maintaining water quality to factory requirements voids warranty
• Rack configuration for
baking trays (600 x 400 mm)
• Core probe
BKI Worldwide, Inc. is a wholly owned subsidiary
of Standex International Corporation.
Dimensions nominal.
Shipping Class: #110
FOB Simpsonville, SC
• Tablet detergent
• Water filtration systems
• Culinary components
CONNECTIONS
3/4" GHT cold water for wash
3/4" GHT treated water for
cooking as per BKI water
requirements below
2" (50 mm) drain
3/4” NPT gas inlet
BTUH
68,200
Cooking Solutions Group
9.26.2018
Page 11
R574
241
129
290
204,5
298,5
610
30.433” (773 mm)
63 75
126,5
128,5
139
33.98” (863 mm)
66,5
29.13” (740 mm) 56,5
33.66” (855 mm)
31.34” (796 mm)
45.71” (1161 mm)
77
Ă
50
115
71,5
22.05” (560 mm)
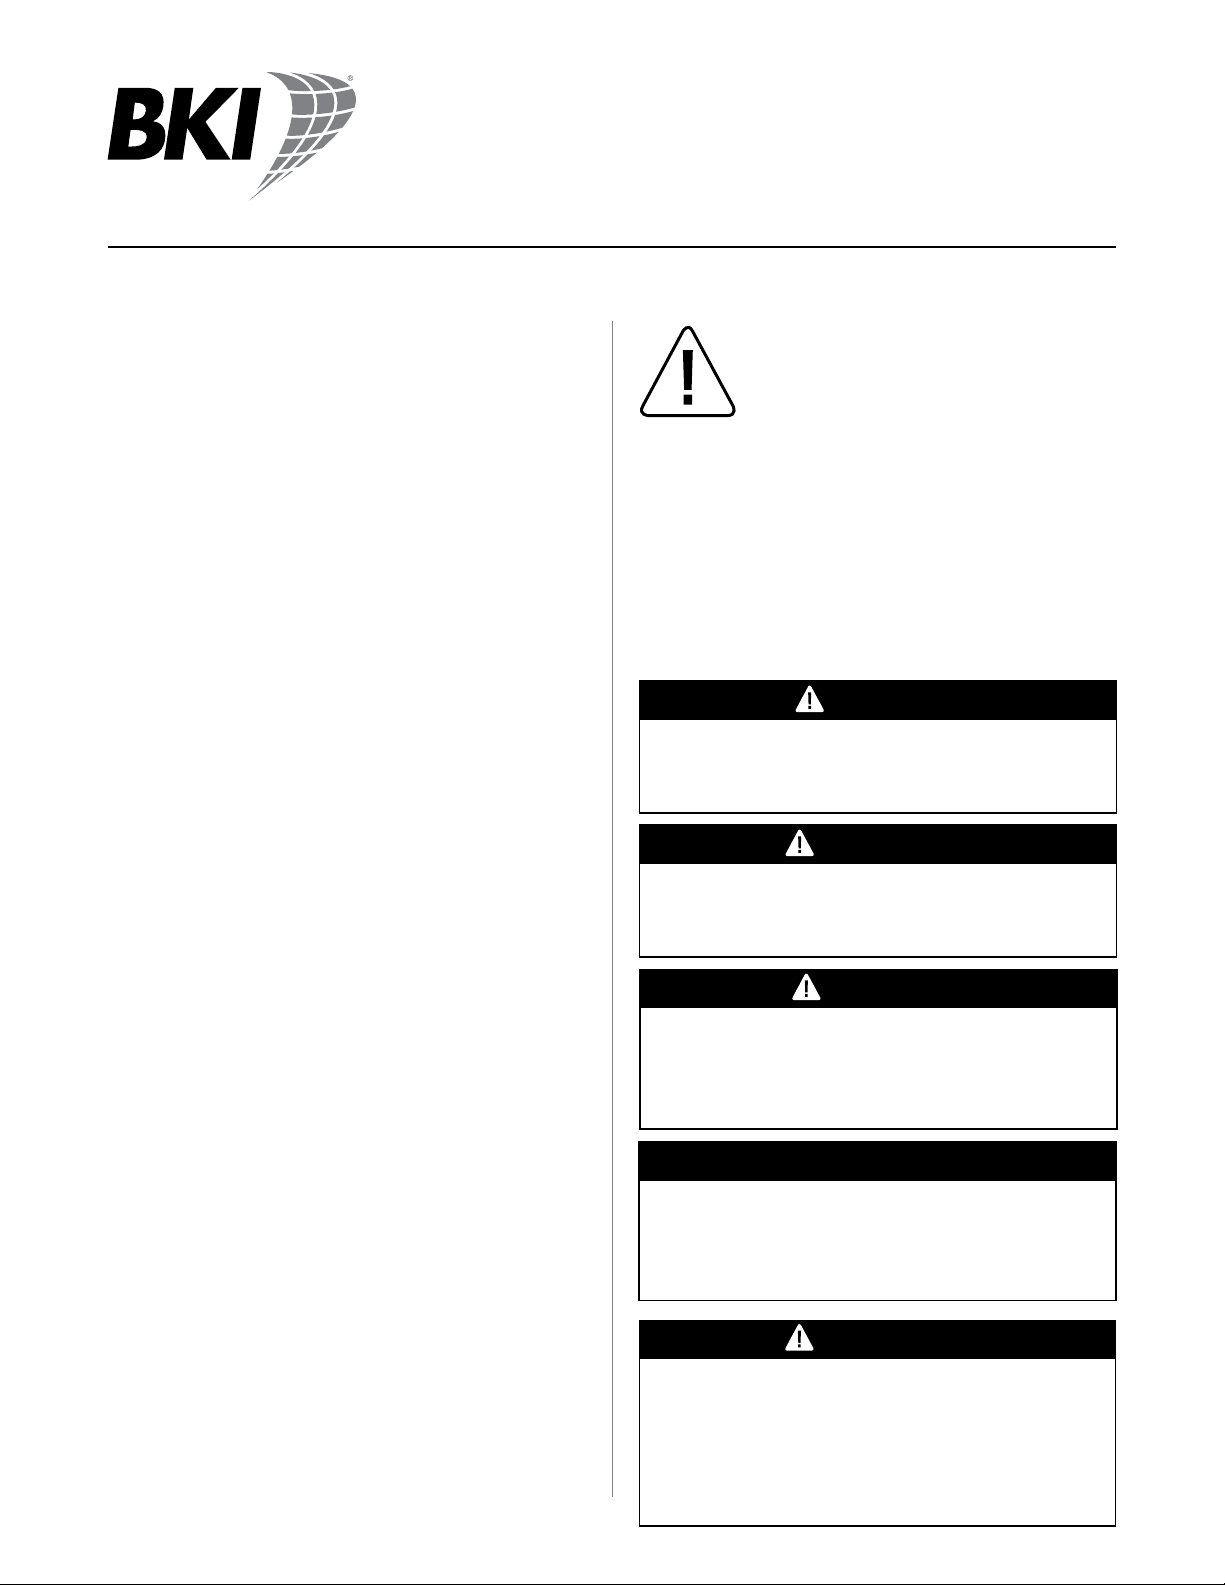
EQUIPMENT DIMENSIONS
COMBIKING® COMBINATION OVEN SYMBIOTIC STEAM SYSTEM TOUCHSCREEN CONTROLS
Model EHG101R
MECHANICAL SPECIFICATIONS
Dimension Uncrated Crated
Height 45.71" (1161 mm) 51.25" (1302 mm)
Width 33.98" (863 mm) 36.75" (934 mm)
Depth 33.66" (855 mm) 36" (915 mm)
Weight 362 lb (164 kg) 413 lb (188 kg)
ELECTRICAL OPTIONS
Volts Phase Cycle/Hz kW Amps Wires
120 1 60 1.5 12.5 2+Grnd
NOTE: Cord and plug are included with the unit
PAN CAPACITY
10 ea. 12" x 20" x 2.5" (65 mm) Steam table pans
10 ea. 13" x 18" half size sheet pan
OPTIONS & ACCESSORIES
• Stands
• Stacking system
• Hot & cold smoker
• Reversible doors
(consult with factory
about additional width
considerations)
• Rack configuration for
baking trays (600 x 400 mm)
• Core probe
REQUIRED CLEARANCES
Left 0" (20" (508 mm) for service)
Right 0"
Front 23" (585 mm) for door swing
CONNECTIONS
3/4" GHT cold water for wash
3/4" GHT treated water for
cooking as per BKI water
requirements below
Back 3" (75 mm) for plumbing
2" (50 mm) drain
3/4” NPT gas inlet
WATER REQUIREMENTS
Pressure (min-max): 35 • 87 PSI
Hardness (CaC03) = Less than 7.5 GPG (Grains per Gallon)
TDS (Total Dissolved Solids)= Less than 100.0 mg/L (Milligrams per Liter
Free Chlorine = Less than 0.5 mg/L (Milligrams per Liter)
Chlorides =Less than 20 mg/L (Milligrams per Liter)
Chloramines = Less than 0.5 mg/L (Milligrams per Liter)
Total Alkalinity= Less than 20 mg/L (Milligrams per Liter)
Total Silica = Less than 10mg/L (Milligrams per Liter) pH level= 7.0 to 8.0
Conductivity (Boiler Models only) = Minimum of 20 µS/ecm (microSiemens per cm)
• Not maintaining water quality to factory requirements voids warranty
BTUH
• Tablet detergent
• Water filtration systems
• Culinary components
65,000
bkideas.com
© BKI LI0283C/08-06
Specifications are subject to
change without notice.
Visit bkideas.com to view all
accessories available for this model.
BKI Worldwide, Inc.
2812 Grandview Drive
Simpsonville, SC 29680
Telephone: (864) 963-3471
Toll Free: (800) 927-6887
BKI Worldwide, Inc. is a wholly owned subsidiary
of Standex International Corporation.
Dimensions nominal.
Shipping Class: #110
FOB Simpsonville, SC
9.26.2018
Cooking Solutions Group
Page 12
39.567” (1005 mm) 5464
36.42” (925 mm)
43.90” (1115 mm)
45.63” (1159 mm)
77,5
67
27.17” (690 mm)
115
Ă
50
34.09” (866 mm)
R834
53,5
90,5
251
88,5
220
55 75
441
75,5
70,5
697
44.21” (1123 mm)
33.19” (843 mm)
196,5
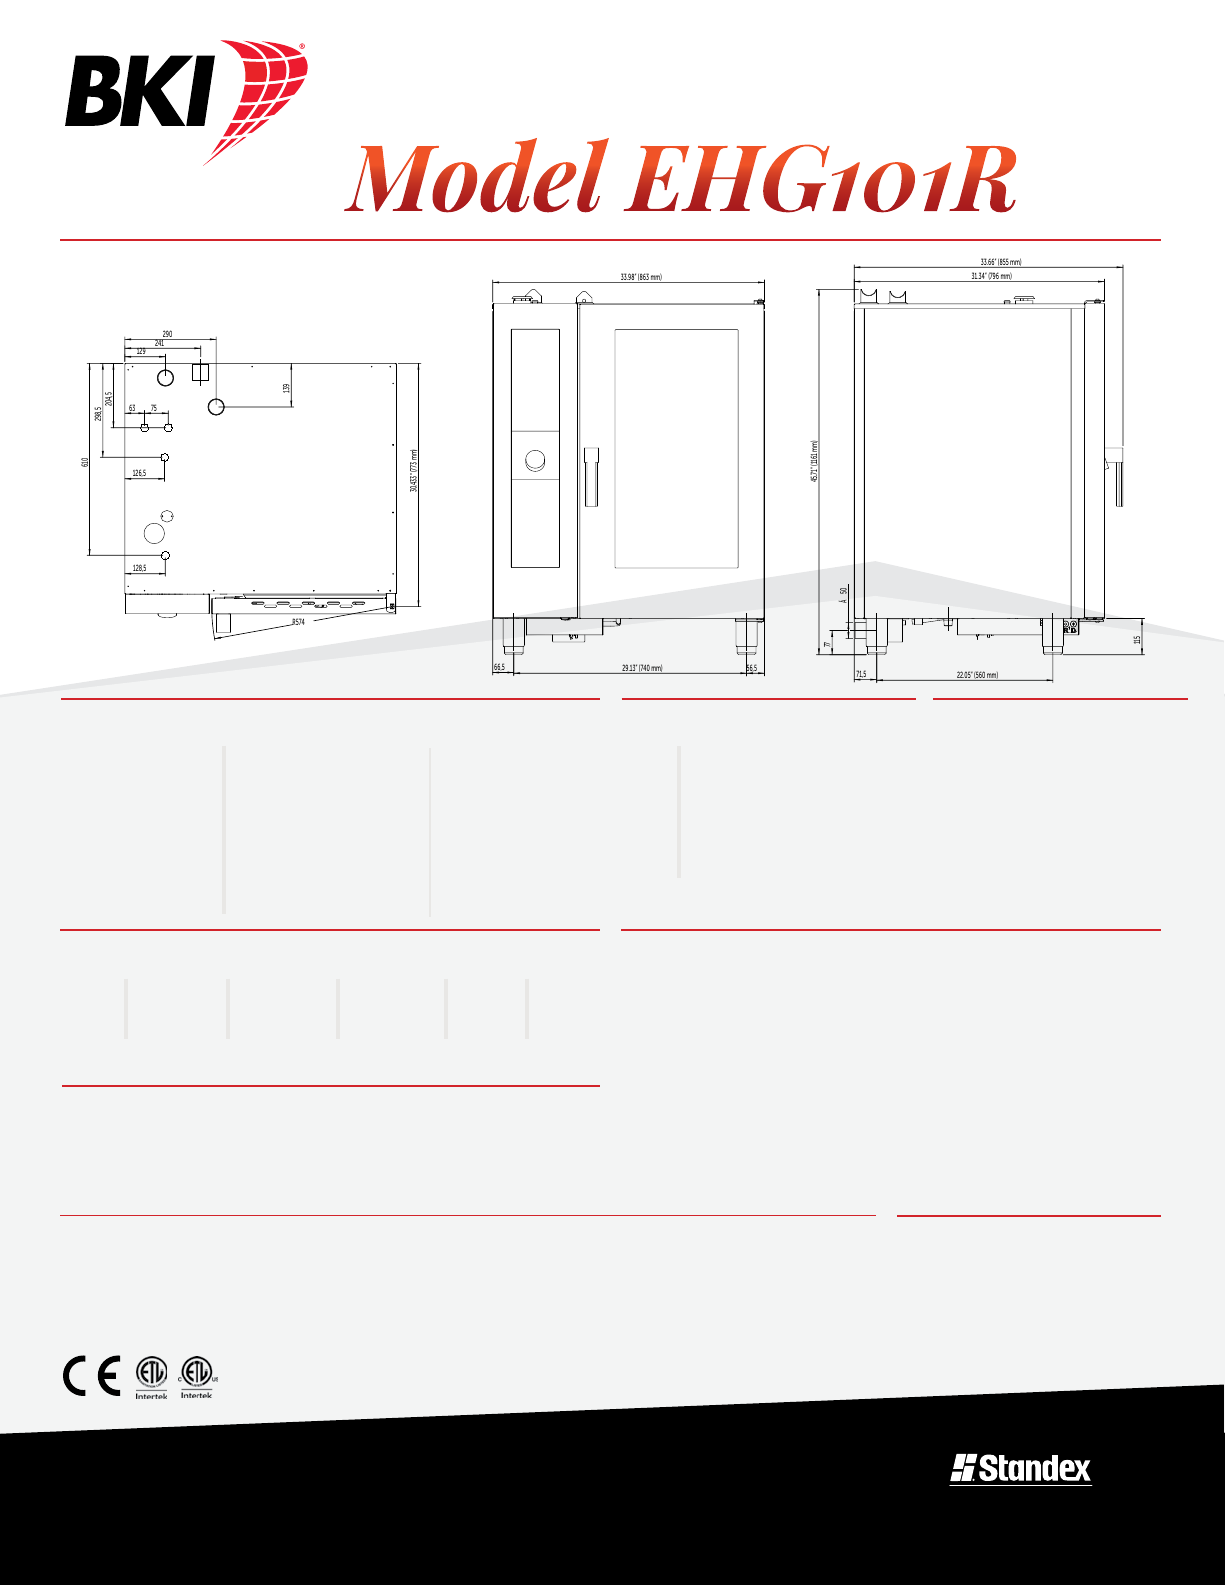
EQUIPMENT DIMENSIONS
COMBIKING® COMBINATION OVEN SYMBIOTIC STEAM SYSTEM TOUCHSCREEN CONTROLS
Model EHG102R
MECHANICAL SPECIFICATIONS
Dimension Uncrated Crated
Height 45.63" (1159 mm) 51.25" (1302 mm)
Width 44.21" (1123 mm) 45.5" (1156 mm)
Depth 36.42" (925 mm) 38.5" (978 mm)
Weight 466 lb (212 kg) 514 lb (234 kg)
ELECTRICAL OPTIONS
Volts Phase Cycle/Hz kW Amps Wires
120 1 60 2.3 19 2+Grnd
NOTE: Cord and plug are included with the unit
PAN CAPACITY
20 ea. 12" x 20" x 2.5" (65 mm) Steam table pans
20 ea. 13" x 18" half size sheet pan
10 ea. 18" x 26" full size sheet pan
OPTIONS & ACCESSORIES
• Stands
• Stacking system
• Hot & cold smoker
• Reversible doors
(consult with factory
about additional width
considerations)
Visit bkideas.com to view all
accessories available for this model.
REQUIRED CLEARANCES
Left 0" (20" (508 mm) for service)
Right 0"
Front 28" (705 mm) for door swing
Back 3" (75 mm) for plumbing
WATER REQUIREMENTS
Pressure (min-max): 35 • 87 PSI
Hardness (CaC03) = Less than 7.5 GPG (Grains per Gallon)
TDS (Total Dissolved Solids)= Less than 100.0 mg/L (Milligrams per Liter
Free Chlorine = Less than 0.5 mg/L (Milligrams per Liter)
Chlorides =Less than 20 mg/L (Milligrams per Liter)
Chloramines = Less than 0.5 mg/L (Milligrams per Liter)
Total Alkalinity= Less than 20 mg/L (Milligrams per Liter)
Total Silica = Less than 10mg/L (Milligrams per Liter) pH level= 7.0 to 8.0
Conductivity (Boiler Models only) = Minimum of 20 µS/ecm (microSiemens per cm)
• Not maintaining water quality to factory requirements voids warranty
• Rack configuration for
baking trays (600 x 400 mm)
• Core probe
BKI Worldwide, Inc. is a wholly owned subsidiary
of Standex International Corporation.
• Tablet detergent
• Water filtration systems
• Culinary components
CONNECTIONS
3/4" GHT cold water for wash
3/4" GHT treated water for
cooking as per BKI water
requirements below
2" (50 mm) drain
3/4” NPT gas inlet
BTUH
95,000
9.26.2018
bkideas.com
© BKI LI0283C/08-06
Specifications are subject to
change without notice.
BKI Worldwide, Inc.
2812 Grandview Drive
Simpsonville, SC 29680
Telephone: (864) 963-3471
Toll Free: (800) 927-6887
Dimensions nominal.
Shipping Class: #110
FOB Simpsonville, SC
Cooking Solutions Group
Page 13
59 25.79” (655 mm)
72.56” (1843 mm)
149
33.66” (855 mm)
36.46” (926 mm)
74.25” (1886 mm)
56,5 56,5
39.29” (998 mm)
33.66” (855 mm)
R695
32.52” (826 mm)
259
Ă
50
129,8
106,2
208,5
283,5
628,5
714
79
75,6
138
323,3
33
15588
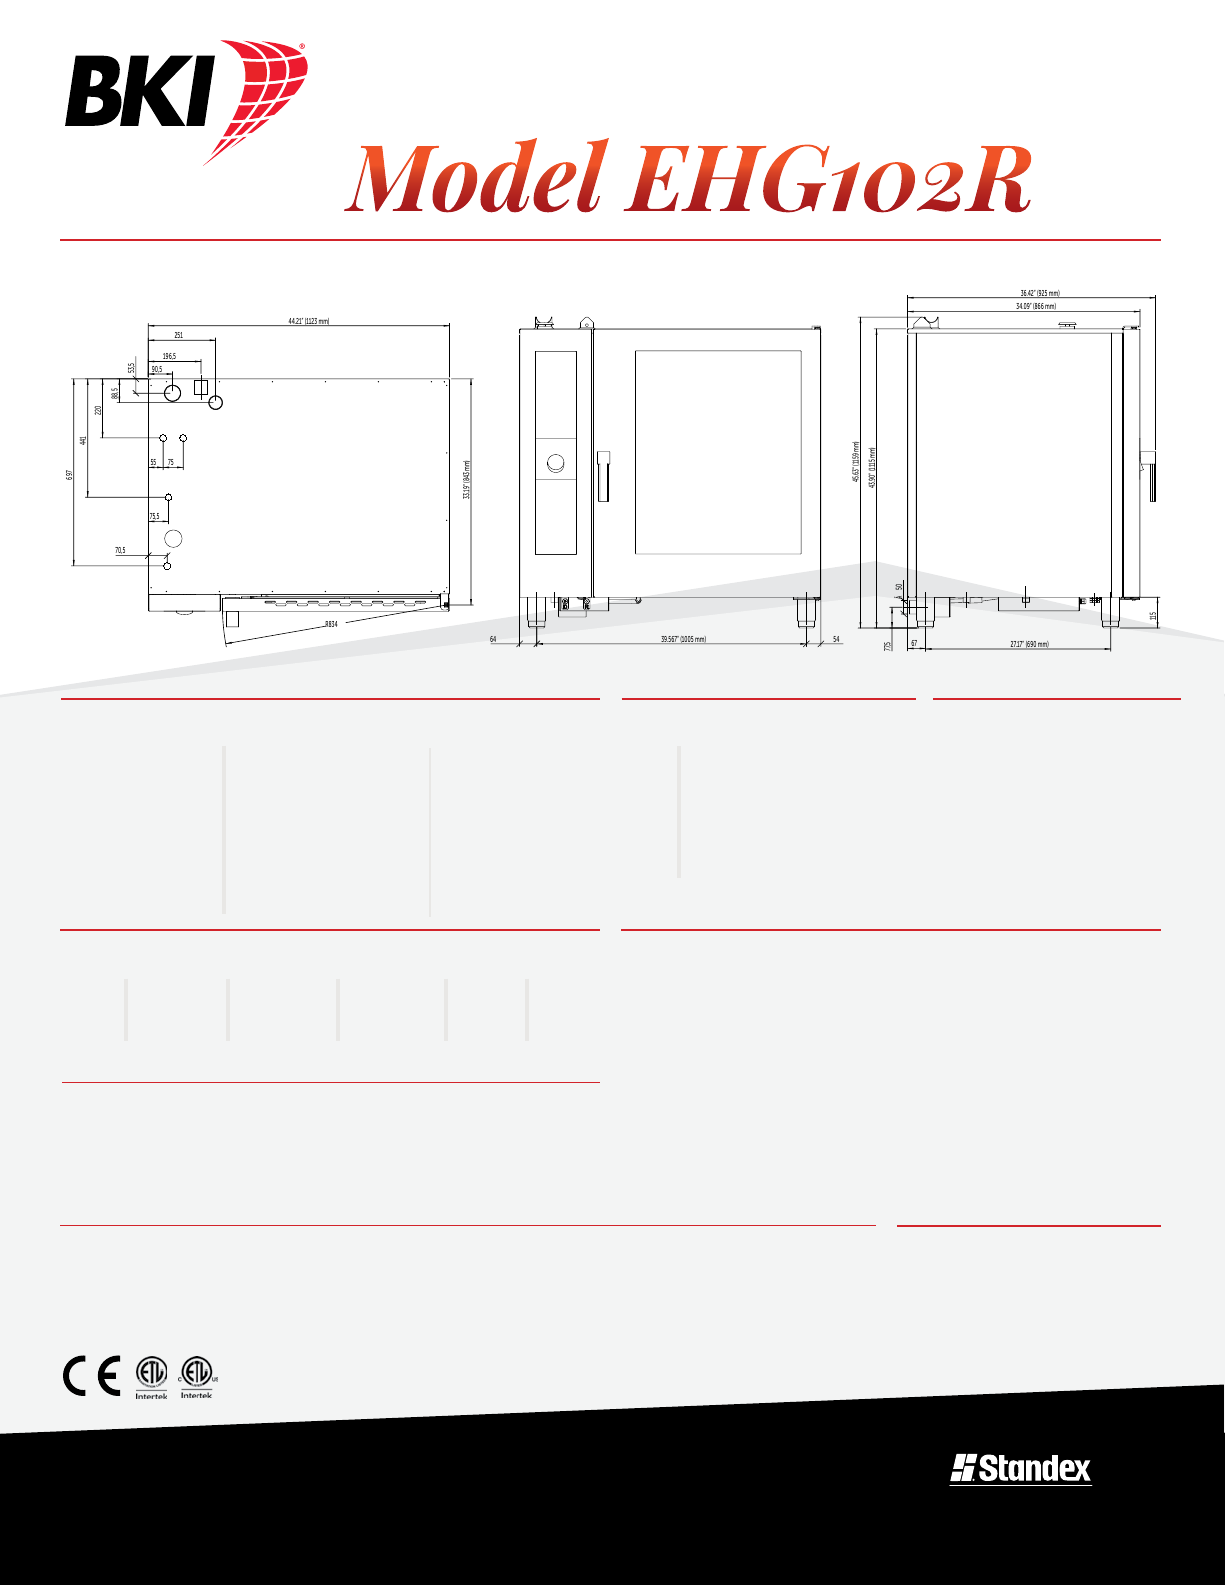
EQUIPMENT DIMENSIONS
COMBIKING® COMBINATION OVEN SYMBIOTIC STEAM SYSTEM TOUCHSCREEN CONTROLS
Model EHG201R
MECHANICAL SPECIFICATIONS
Dimension Uncrated Crated
Height 74.25" (1886 mm) 83" (2108 mm)
Width 39.29" (998 mm) 45.5" (1156 mm)
Depth 36.46" (926 mm) 41.75" (1061 mm)
Weight 781 lb (355 kg) 847 lb (385 kg)
ELECTRICAL OPTIONS
Volts Phase Cycle/Hz kW Amps Wires
120 1 60 2.5 21 2+Grnd
NOTE: Cord and plug are included with the unit
PAN CAPACITY
20 ea. 12" x 20" x 2.5" (65mm) Steam table pans
20 ea. 13" x 18" half size sheet pan
OPTIONS & ACCESSORIES
• Trolley configuration for
baking trays (600 x 400 mm)
• Core probe
• Tablet detergent
• Water filtration systems
• Culinary components
Visit bkideas.com to view all
accessories available for this model.
REQUIRED CLEARANCES
Left 0" (20" (508 mm) for service)
Right 0"
Front
Back 3" (75 mm) for plumbing
WATER REQUIREMENTS
Pressure (min-max): 35 • 87 PSI
Hardness (CaC03) = Less than 7.5 GPG (Grains per Gallon)
TDS (Total Dissolved Solids)= Less than 100.0 mg/L (Milligrams per Liter
Free Chlorine = Less than 0.5 mg/L (Milligrams per Liter)
Chlorides =Less than 20 mg/L (Milligrams per Liter)
Chloramines = Less than 0.5 mg/L (Milligrams per Liter)
Total Alkalinity= Less than 20 mg/L (Milligrams per Liter)
Total Silica = Less than 10mg/L (Milligrams per Liter) pH level= 7.0 to 8.0
Conductivity (Boiler Models only) = Minimum of 20 µS/ecm (microSiemens per cm)
• Not maintaining water quality to factory requirements voids warranty
• Hot & cold smoker
• Leveling plate for trolley
BKI Worldwide, Inc. is a wholly owned subsidiary
of Standex International Corporation.
39.3" (1000 mm) for trolley exit
BTUH
130,000
CONNECTIONS
3/4" GHT cold water for wash
3/4" GHT treated water for
cooking as per BKI water
requirements below
2" (50 mm) drain
3/4” NPT gas inlet
9.26.2018
bkideas.com
© BKI LI0283C/08-06
Specifications are subject to
change without notice.
BKI Worldwide, Inc.
2812 Grandview Drive
Simpsonville, SC 29680
Telephone: (864) 963-3471
Toll Free: (800) 927-6887
Dimensions nominal.
Shipping Class: #110
FOB Simpsonville, SC
Cooking Solutions Group
Page 14
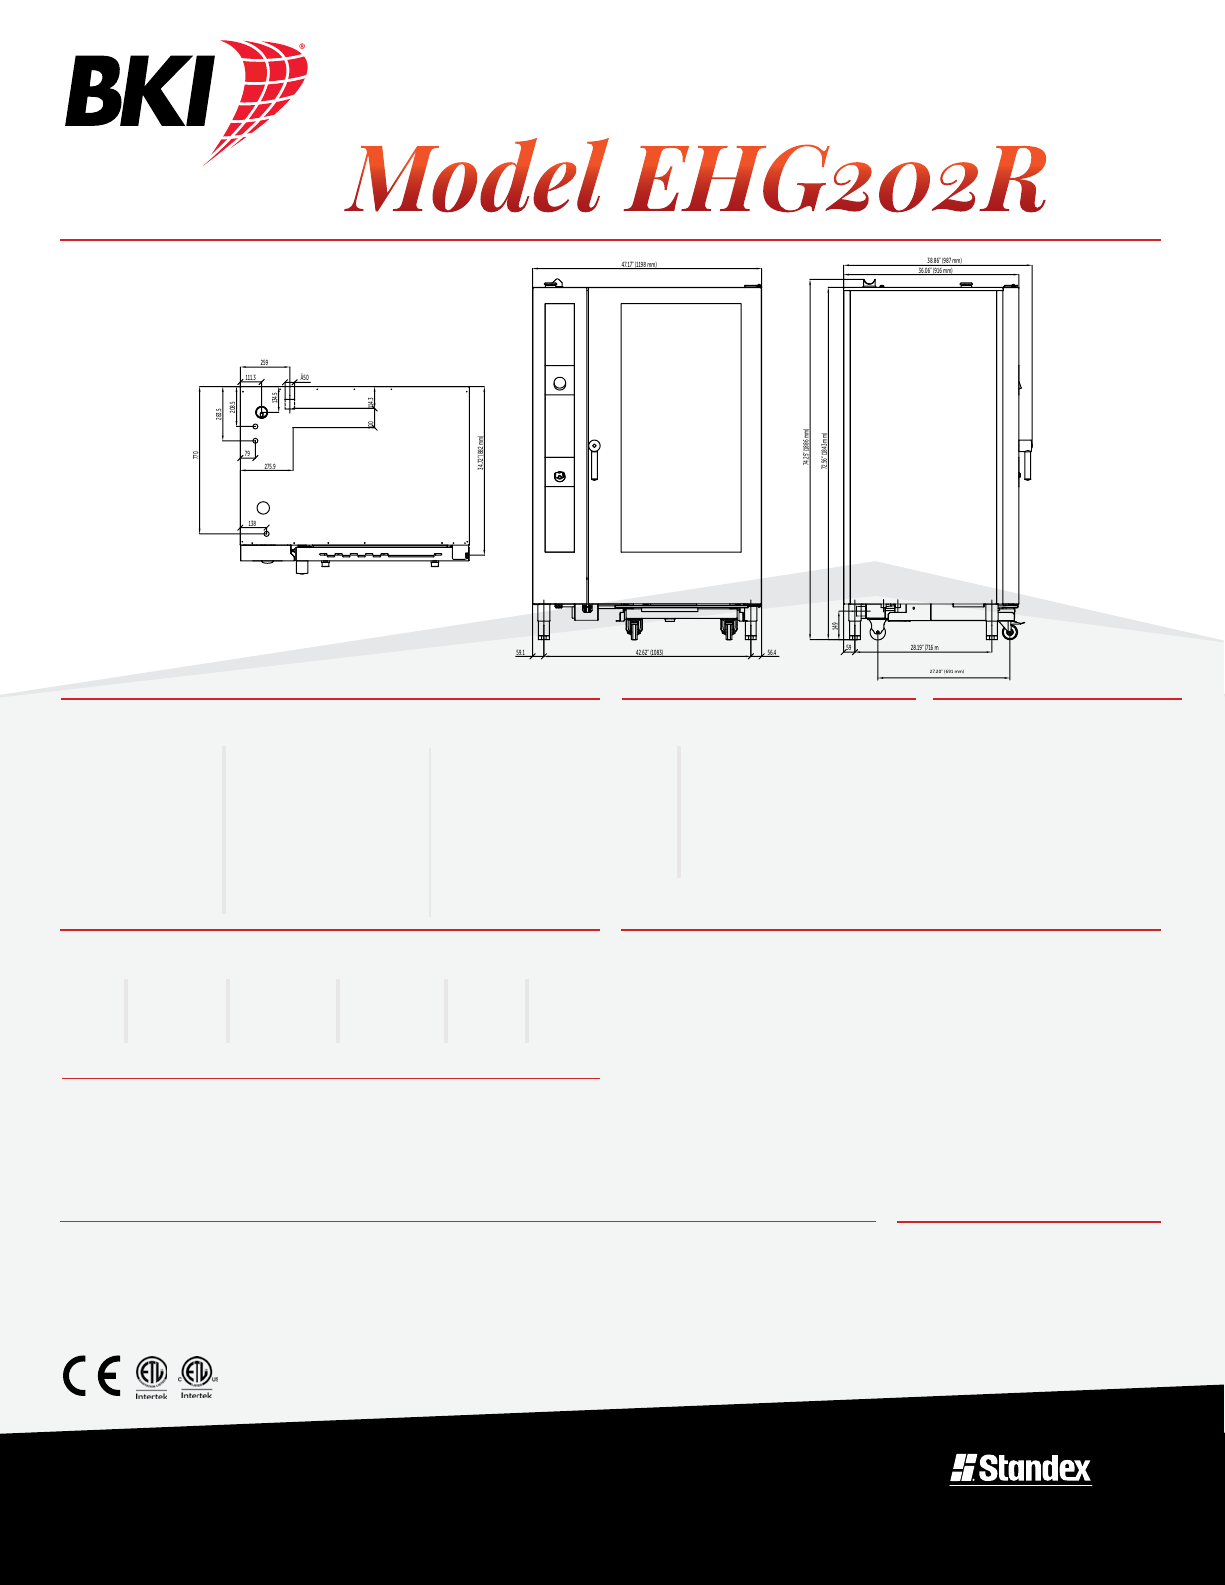
42.62” (1083)59.1 56.4
47.17” (1198 mm)
34.72” (882 mm)
259
Ă50
111.3
134.5
208.5
283.5
770
79
138
275.9
114.3100
59 28.19” (716 m
72.56” (1843 mm)
74.25” (1886 mm)
149
36.06” (916 mm)
38.86” (987 mm)
27.20” (691 mm)
EQUIPMENT DIMENSIONS
COMBIKING® COMBINATION OVEN SYMBIOTIC STEAM SYSTEM TOUCHSCREEN CONTROLS
Model EHG202R
MECHANICAL SPECIFICATIONS
Dimension Uncrated Crated
Height 74.25" (1886 mm) 83" (2108 mm)
Width 47.17" (1198 mm) 52" (1321 mm)
Depth 38.86" (987 mm) 44.5" (1131 mm)
Weight 860 lb (391 kg) 926 lb (421 kg)
ELECTRICAL OPTIONS
Volts Phase Cycle/Hz kW Amps Wires
120 1 60 3.1 26 2+Grnd
NOTE: Cord and plug are included with the unit
PAN CAPACITY
40 ea. 12" x 20" x 2.5" (65mm) Steam table pans
40 ea. 13" x 18" half size sheet pans
20 ea. 18" x 26" full size sheet pans
OPTIONS & ACCESSORIES
• Hot & cold smoker
• Leveling plate for trolley
• Trolley configuration for
baking trays (600mm x
400mm)
• Core probe
• Tablet detergent
REQUIRED CLEARANCES
Left 0" (20" (508 mm) for service)
Right 0"
Front
43.4" (1100 mm) for trolley exit
CONNECTIONS
3/4" GHT cold water for wash
3/4" GHT treated water for
cooking as per BKI water
requirements below
Back 3" (75 mm) for plumbing
2" (50 mm) drain
3/4” NPT gas inlet
WATER REQUIREMENTS
Pressure (min-max): 35 • 87 PSI
Hardness (CaC03) = Less than 7.5 GPG (Grains per Gallon)
TDS (Total Dissolved Solids)= Less than 100.0 mg/L (Milligrams per Liter
Free Chlorine = Less than 0.5 mg/L (Milligrams per Liter)
Chlorides =Less than 20 mg/L (Milligrams per Liter)
Chloramines = Less than 0.5 mg/L (Milligrams per Liter)
Total Alkalinity= Less than 20 mg/L (Milligrams per Liter)
Total Silica = Less than 10mg/L (Milligrams per Liter) pH level= 7.0 to 8.0
Conductivity (Boiler Models only) = Minimum of 20 µS/ecm (microSiemens per cm)
• Not maintaining water quality to factory requirements voids warranty
BTUH
• Water filtration systems
• Culinary components
191,000
bkideas.com
© BKI LI0283C/08-06
Specifications are subject to
change without notice.
Visit bkideas.com to view all
accessories available for this model.
BKI Worldwide, Inc.
2812 Grandview Drive
Simpsonville, SC 29680
Telephone: (864) 963-3471
Toll Free: (800) 927-6887
BKI Worldwide, Inc. is a wholly owned subsidiary
of Standex International Corporation.
Dimensions nominal.
Shipping Class: #110
FOB Simpsonville, SC
9.26.2018
Cooking Solutions Group
Page 15

66,5 29.13” (740 mm) 56,5
33.98” (863 mm)
31.34” (796 mm)
33.66” (855 mm)
71,5 22.05” (560 mm)
77
32.87” (835 mm)
34.68” (881 mm)
Ă
50
115
R574
241
129
290
204,5
298,5
610
30.43” (773 mm)
63 75
126,5
128,5
139
EQUIPMENT DIMENSIONS
COMBIKING® COMBINATION OVEN BOILERLESS TOUCHSCREEN CONTROLS
Model ETG061R
MECHANICAL SPECIFICATIONS
Dimension Uncrated Crated
Height 34.68" (881 mm) 40.25" (1023 mm)
Width 33.98" (863 mm) 36.75" (934 mm)
Depth 33.66" (855 mm) 36" (915 mm)
Weight 300 lb (137 kg) 344 lb (157 kg)
ELECTRICAL OPTIONS
Volts Phase Cycle/Hz kW Amps Wires
120 1 60 0.4 3.5 2+Grnd
NOTE: Cord and plug are included with the unit
PAN CAPACITY
6 ea. 12" x 20" x 2.5" (65 mm) Steam table pans
6 ea. 13" x 18" half size sheet pans
OPTIONS & ACCESSORIES
• Stands
• Stacking system
• Hot & cold smoker
• Reversible doors
(consult with factory
about additional width
considerations)
• Rack configuration for
baking trays (600 x 400 mm)
• Core probe
REQUIRED CLEARANCES
Left 0" (20" (508 mm) for service)
Right 0"
Front 23" (585 mm) for door swing
CONNECTIONS
3/4" GHT cold water for wash
3/4" GHT treated water for
cooking as per BKI water
requirements below
Back 3" (75 mm) for plumbing
2" (50 mm) drain
3/4” NPT gas inlet
WATER REQUIREMENTS
Pressure (min-max): 35 • 87 PSI
Hardness (CaC03) = Less than 7.5 GPG (Grains per Gallon)
TDS (Total Dissolved Solids)= Less than 100.0 mg/L (Milligrams per Liter
Free Chlorine = Less than 0.5 mg/L (Milligrams per Liter)
Chlorides =Less than 20 mg/L (Milligrams per Liter)
Chloramines = Less than 0.5 mg/L (Milligrams per Liter)
Total Alkalinity= Less than 20 mg/L (Milligrams per Liter)
Total Silica = Less than 10mg/L (Milligrams per Liter) pH level= 7.0 to 8.0
Conductivity (Boiler Models only) = Minimum of 20 µS/ecm (microSiemens per cm)
• Not maintaining water quality to factory requirements voids warranty
BTUH
• Tablet detergent
• Water filtration systems
• Culinary components
41,000
bkideas.com
© BKI LI0283C/08-06
Specifications are subject to
change without notice.
Visit bkideas.com to view all
accessories available for this model.
BKI Worldwide, Inc.
2812 Grandview Drive
Simpsonville, SC 29680
Telephone: (864) 963-3471
Toll Free: (800) 927-6887
BKI Worldwide, Inc. is a wholly owned subsidiary
of Standex International Corporation.
Dimensions nominal.
Shipping Class: #110
FOB Simpsonville, SC
Cooking Solutions Group
9.26.2018
Page 16

34.09” (866 mm)
36.42” (925 mm)
34.61” (879 mm)
32.87” (835 mm)
77,5
Ă
50
67 27.17” (690 mm)
39.57” (1005 mm) 5464
115
A
R834
53,5
90,5
251
88,5
220
55 75
441
75,5
70,5
697
44.21” (1123 mm)
33.19” (843 mm)
196,5
EQUIPMENT DIMENSIONS
COMBIKING® COMBINATION OVEN BOILERLESS TOUCHSCREEN CONTROLS
Model ETG062R
MECHANICAL SPECIFICATIONS
Dimension Uncrated Crated
Height 34.61" (879 mm) 40.25" (1022 mm)
Width 44.21" (1123 mm) 45.5" (1156 mm)
Depth 36.42" (925 mm) 38.5" (978 mm)
Weight 448 lb (204 kg) 492 lb (224 kg)
ELECTRICAL OPTIONS
Volts Phase Cycle/Hz kW Amps Wires
120 1 60 0.4 3.5 2+Grnd
NOTE: Cord and plug are included with the unit
PAN CAPACITY
12 ea. 12" x 20" x 2.5" (65 mm) steam table pans
12 ea. 13" x 18" half size sheet pan
6 ea. 18" x 26" full size sheet pan
OPTIONS & ACCESSORIES
• Stands
• Stacking system
• Hot & cold smoker
bkideas.com
© BKI LI0283C/08-06
Specifications are subject to
change without notice.
• Reversible doors
(consult with factory
about additional width
considerations)
Visit bkideas.com to view all
accessories available for this model.
BKI Worldwide, Inc.
2812 Grandview Drive
Simpsonville, SC 29680
Telephone: (864) 963-3471
Toll Free: (800) 927-6887
REQUIRED CLEARANCES
Left 0" (20" (508 mm) for service)
Right 0"
Front 28" (705 mm) for door swing
Back 3" (75 mm) for plumbing
WATER REQUIREMENTS
Pressure (min-max): 35 • 87 PSI
Hardness (CaC03) = Less than 7.5 GPG (Grains per Gallon)
TDS (Total Dissolved Solids)= Less than 100.0 mg/L (Milligrams per Liter
Free Chlorine = Less than 0.5 mg/L (Milligrams per Liter)
Chlorides =Less than 20 mg/L (Milligrams per Liter)
Chloramines = Less than 0.5 mg/L (Milligrams per Liter)
Total Alkalinity= Less than 20 mg/L (Milligrams per Liter)
Total Silica = Less than 10mg/L (Milligrams per Liter) pH level= 7.0 to 8.0
Conductivity (Boiler Models only) = Minimum of 20 µS/ecm (microSiemens per cm)
• Not maintaining water quality to factory requirements voids warranty
• Rack configuration for
baking trays (600 x 400 mm)
• Core probe
BKI Worldwide, Inc. is a wholly owned subsidiary
of Standex International Corporation.
Dimensions nominal.
Shipping Class: #110
FOB Simpsonville, SC
• Tablet detergent
• Water filtration systems
• Culinary components
CONNECTIONS
3/4" GHT cold water for wash
3/4" GHT treated water for
cooking as per BKI water
requirements below
2" (50 mm) drain
3/4” NPT gas inlet
BTUH
68,200
Cooking Solutions Group
9.26.2018
Page 17

R574
241
129
290
204,5
298,5
610
30.433” (773 mm)
63 75
126,5
128,5
139
33.98” (863 mm)
66,5
29.13” (740 mm) 56,5
33.66” (855 mm)
31.34” (796 mm)
45.71” (1161 mm)
77
Ă
50
115
71,5
22.05” (560 mm)
EQUIPMENT DIMENSIONS
COMBIKING® COMBINATION OVEN BOILERLESS TOUCHSCREEN CONTROLS
Model ETG101R
MECHANICAL SPECIFICATIONS
Dimension Uncrated Crated
Height 45.71" (1161 mm) 51.25" (1302 mm)
Width 33.98" (863 mm) 36.75" (934 mm)
Depth 33.66" (855 mm) 36" (915 mm)
Weight 362 lb (165 kg) 413 lb (188 kg)
ELECTRICAL OPTIONS
Volts Phase Cycle/Hz kW Amps Wires
120 1 60 0.7 6 2+Grnd
NOTE: Cord and plug are included with the unit
PAN CAPACITY
10 ea. 12" x 20" x 2.5" (65 mm) Steam table pans
10 ea. 13" x 18" half size sheet pan
OPTIONS & ACCESSORIES
• Stands
• Stacking system
• Hot & cold smoker
• Reversible doors
(consult with factory
about additional width
considerations)
• Rack configuration for
baking trays (600 x 400 mm)
• Core probe
REQUIRED CLEARANCES
Left 0" (20" (508 mm) for service)
Right 0"
Front 23" (585 mm) for door swing
CONNECTIONS
3/4" GHT cold water for wash
3/4" GHT treated water for
cooking as per BKI water
requirements below
Back 3" (75 mm) for plumbing
2" (50 mm) drain
3/4” NPT gas inlet
WATER REQUIREMENTS
Pressure (min-max): 35 • 87 PSI
Hardness (CaC03) = Less than 7.5 GPG (Grains per Gallon)
TDS (Total Dissolved Solids)= Less than 100.0 mg/L (Milligrams per Liter
Free Chlorine = Less than 0.5 mg/L (Milligrams per Liter)
Chlorides =Less than 20 mg/L (Milligrams per Liter)
Chloramines = Less than 0.5 mg/L (Milligrams per Liter)
Total Alkalinity= Less than 20 mg/L (Milligrams per Liter)
Total Silica = Less than 10mg/L (Milligrams per Liter) pH level= 7.0 to 8.0
Conductivity (Boiler Models only) = Minimum of 20 µS/ecm (microSiemens per cm)
• Not maintaining water quality to factory requirements voids warranty
BTUH
• Tablet detergent
• Water filtration systems
• Culinary components
65,000
bkideas.com
© BKI LI0283C/08-06
Specifications are subject to
change without notice.
Visit bkideas.com to view all
accessories available for this model.
BKI Worldwide, Inc.
2812 Grandview Drive
Simpsonville, SC 29680
Telephone: (864) 963-3471
Toll Free: (800) 927-6887
BKI Worldwide, Inc. is a wholly owned subsidiary
of Standex International Corporation.
Dimensions nominal.
Shipping Class: #110
FOB Simpsonville, SC
9.26.2018
Cooking Solutions Group
Page 18

39.567” (1005 mm) 5464
36.42” (925 mm)
43.90” (1115 mm)
45.63” (1159 mm)
77,5
67
27.17” (690 mm)
115
Ă
50
34.09” (866 mm)
R834
53,5
90,5
251
88,5
220
55 75
441
75,5
70,5
697
44.21” (1123 mm)
33.19” (843 mm)
196,5
EQUIPMENT DIMENSIONS
COMBIKING® COMBINATION OVEN BOILERLESS TOUCHSCREEN CONTROLS
Model ETG102R
MECHANICAL SPECIFICATIONS
Dimension Uncrated Crated
Height 45.63" (1159 mm) 51.25" (1302 mm)
Width 44.21" (1123 mm) 45.5" (1156 mm)
Depth 36.42" (925 mm) 38.5" (978 mm)
Weight 466 lb (212 kg) 514 lb (234 kg)
ELECTRICAL OPTIONS
Volts Phase Cycle/Hz kW Amps Wires
120 1 60 0.8 6.5 2+Grnd
NOTE: Cord and plug are included with the unit
PAN CAPACITY
20 ea. 12" x 20" x 2.5" (65 mm) Steam table pans
20 ea. 13" x 18" half size sheet pan
10 ea. 18" x 26" full size sheet pan
OPTIONS & ACCESSORIES
• Stands
• Stacking system
• Hot & cold smoker
• Reversible doors
(consult with factory
about additional width
considerations)
Visit bkideas.com to view all
accessories available for this model.
REQUIRED CLEARANCES
Left 0" (20" (508 mm) for service)
Right 0"
Front 28" (705 mm) for door swing
Back 3" (75 mm) for plumbing
WATER REQUIREMENTS
Pressure (min-max): 35 • 87 PSI
Hardness (CaC03) = Less than 7.5 GPG (Grains per Gallon)
TDS (Total Dissolved Solids)= Less than 100.0 mg/L (Milligrams per Liter
Free Chlorine = Less than 0.5 mg/L (Milligrams per Liter)
Chlorides =Less than 20 mg/L (Milligrams per Liter)
Chloramines = Less than 0.5 mg/L (Milligrams per Liter)
Total Alkalinity= Less than 20 mg/L (Milligrams per Liter)
Total Silica = Less than 10mg/L (Milligrams per Liter) pH level= 7.0 to 8.0
Conductivity (Boiler Models only) = Minimum of 20 µS/ecm (microSiemens per cm)
• Not maintaining water quality to factory requirements voids warranty
• Rack configuration for
baking trays (600 x 400 mm)
• Core probe
BKI Worldwide, Inc. is a wholly owned subsidiary
of Standex International Corporation.
• Tablet detergent
• Water filtration systems
• Culinary components
CONNECTIONS
3/4" GHT cold water for wash
3/4" GHT treated water for
cooking as per BKI water
requirements below
2" (50 mm) drain
3/4” NPT gas inlet
BTUH
95,000
9.26.2018
bkideas.com
© BKI LI0283C/08-06
Specifications are subject to
change without notice.
BKI Worldwide, Inc.
2812 Grandview Drive
Simpsonville, SC 29680
Telephone: (864) 963-3471
Toll Free: (800) 927-6887
Dimensions nominal.
Shipping Class: #110
FOB Simpsonville, SC
Cooking Solutions Group
Page 19

59 25.79” (655 mm)
72.56” (1843 mm)
149
33.66” (855 mm)
36.46” (926 mm)
74.25” (1886 mm)
56,5 56,5
39.29” (998 mm)
33.66” (855 mm)
R695
32.52” (826 mm)
259
Ă
50
129,8
106,2
208,5
283,5
628,5
714
79
75,6
138
323,3
33
15588
EQUIPMENT DIMENSIONS
COMBIKING® COMBINATION OVEN BOILERLESS TOUCHSCREEN CONTROLS
Model ETG201R
MECHANICAL SPECIFICATIONS
Dimension Uncrated Crated
Height 74.25" (1886 mm) 83" (2108 mm)
Width 39.29" (998 mm) 45.5" (1156 mm)
Depth 36.46" (926 mm) 41.75" (1061 mm)
Weight 781 lb (355 kg) 847 lb (385 kg)
ELECTRICAL OPTIONS
Volts Phase Cycle/Hz kW Amps Wires
120 1 60 1.0 8 2+Grnd
NOTE: Cord and plug are included with the unit
PAN CAPACITY
20 ea. 12" x 20" x 2.5" (65mm) Steam table pans
20 ea. 13" x 18" half size sheet pan
OPTIONS & ACCESSORIES
• Trolley configuration for
baking trays (600 x 400 mm)
• Core probe
• Tablet detergent
• Water filtration systems
• Culinary components
Visit bkideas.com to view all
accessories available for this model.
REQUIRED CLEARANCES
Left 0" (20" (508 mm) for service)
Right 0"
Front 40" (1016 mm) for trolley exit
Back 3" (75 mm) for plumbing
WATER REQUIREMENTS
Pressure (min-max): 35 • 87 PSI
Hardness (CaC03) = Less than 7.5 GPG (Grains per Gallon)
TDS (Total Dissolved Solids)= Less than 100.0 mg/L (Milligrams per Liter
Free Chlorine = Less than 0.5 mg/L (Milligrams per Liter)
Chlorides =Less than 20 mg/L (Milligrams per Liter)
Chloramines = Less than 0.5 mg/L (Milligrams per Liter)
Total Alkalinity= Less than 20 mg/L (Milligrams per Liter)
Total Silica = Less than 10mg/L (Milligrams per Liter) pH level= 7.0 to 8.0
Conductivity (Boiler Models only) = Minimum of 20 µS/ecm (microSiemens per cm)
• Not maintaining water quality to factory requirements voids warranty
• Hot & cold smoker
• Leveling plate for trolley
BKI Worldwide, Inc. is a wholly owned subsidiary
of Standex International Corporation.
CONNECTIONS
3/4" GHT cold water for wash
3/4" GHT treated water for
cooking as per BKI water
requirements below
2" (50 mm) drain
3/4” NPT gas inlet
BTUH
130,000
9.26.2018
bkideas.com
© BKI LI0283C/08-06
Specifications are subject to
change without notice.
BKI Worldwide, Inc.
2812 Grandview Drive
Simpsonville, SC 29680
Telephone: (864) 963-3471
Toll Free: (800) 927-6887
Dimensions nominal.
Shipping Class: #110
FOB Simpsonville, SC
Cooking Solutions Group
Page 20

42.62” (1083)59.1 56.4
47.17” (1198 mm)
34.72” (882 mm)
259
Ă50
111.3
134.5
208.5
283.5
770
79
138
275.9
114.3100
59 28.19” (716 m
72.56” (1843 mm)
74.25” (1886 mm)
149
36.06” (916 mm)
38.86” (987 mm)
27.20” (691 mm)
EQUIPMENT DIMENSIONS
COMBIKING® COMBINATION OVEN BOILERLESS TOUCHSCREEN CONTROLS
Model ETG202R
MECHANICAL SPECIFICATIONS
Dimension Uncrated Crated
Height 74.25" (1886 mm) 83" (2108 mm)
Width 47.17" (1198 mm) 52" (1321 mm)
Depth 38.86" (987 mm) 44.5" (1131 mm)
Weight 860 lb (391 kg) 926 lb (421 kg)
ELECTRICAL OPTIONS
Volts Phase Cycle/Hz kW Amps Wires
120 1 60 1.6 13 2+Grnd
NOTE: Cord and plug are included with the unit
PAN CAPACITY
40 ea. 12" x 20" x 2.5" (65mm) Steam table pans
40 ea. 13" x 18" half size sheet pans
20 ea. 18" x 26" full size sheet pans
OPTIONS & ACCESSORIES
• Hot & cold smoker
• Leveling plate for trolley
• Trolley configuration for
baking trays (600mm x
400mm)
• Core probe
• Tablet detergent
REQUIRED CLEARANCES
Left 0" (20" (508 mm) for service)
Right 0"
Front 44" (1118 mm) for trolley exit
CONNECTIONS
3/4" GHT cold water for wash
3/4" GHT treated water for
cooking as per BKI water
requirements below
Back 3" (75 mm) for plumbing
2" (50 mm) drain
3/4” NPT gas inlet
WATER REQUIREMENTS
Pressure (min-max): 35 • 87 PSI
Hardness (CaC03) = Less than 7.5 GPG (Grains per Gallon)
TDS (Total Dissolved Solids)= Less than 100.0 mg/L (Milligrams per Liter
Free Chlorine = Less than 0.5 mg/L (Milligrams per Liter)
Chlorides =Less than 20 mg/L (Milligrams per Liter)
Chloramines = Less than 0.5 mg/L (Milligrams per Liter)
Total Alkalinity= Less than 20 mg/L (Milligrams per Liter)
Total Silica = Less than 10mg/L (Milligrams per Liter) pH level= 7.0 to 8.0
Conductivity (Boiler Models only) = Minimum of 20 µS/ecm (microSiemens per cm)
• Not maintaining water quality to factory requirements voids warranty
BTUH
• Water filtration systems
• Culinary components
191,000
bkideas.com
© BKI LI0283C/08-06
Specifications are subject to
change without notice.
Visit bkideas.com to view all
accessories available for this model.
BKI Worldwide, Inc.
2812 Grandview Drive
Simpsonville, SC 29680
Telephone: (864) 963-3471
Toll Free: (800) 927-6887
BKI Worldwide, Inc. is a wholly owned subsidiary
of Standex International Corporation.
Dimensions nominal.
Shipping Class: #110
FOB Simpsonville, SC
9.26.2018
Cooking Solutions Group
Page 21

COMBI OVEN INSTALLATION MANUAL
PRE-INSTALLATION CHECKLIST
®
The following points are a listing of requirements that should be verified prior to the installation of the BKI
Combi Oven. For more specific installation requirements, refer to instruction manual that comes with the
oven.
1. Verify ventilation requirements. Will the installation use an existing hood or ventless hood?
2. Verify ventilation height requirements. What is the clearance under the hood?
3. If a ventilation hood is installed above the oven, it should project 19.69” (500 mm) over the front of the
oven. The suction eect should be 400 to 800 m3/h (523 to 1046 yd3/h).
4. Verify the drain is accessible and will not be located directly under the oven.
5. Verify the drain for the oven is made of stainless steel or an equally temperature-resistant material,
minimum 175° F.
6. Verify the drain for the oven is at least 1.97” (50 mm) in diameter and a fall of at least 3° or 5%.
7. Verify correct power supply (1 Phase, 3 wire, 120V, Amperage) is available and within 10 feet of oven
location. Power cord exits oven on right hand side (facing the unit).
8. Verify proper Electrical Supply Voltage, Amperage, and Phase. Typical requirements are 120VAC, 3 Phase,
60 Hz with 3 wires (2 legs with a ground).
NOTE: There is no NEUTRAL.
9. Verify gas supply pressure and volume capacity.
10. Verify the installation area for the oven will have minimum clearances of 3” (75 mm) from the rear wall,
0” from any objects on the right side of the oven and 0” for clearance on the left side of the oven while
in operation. The left side requires 20” (508 mm) clearance for servicing (page 23).
NOTE: High heat source equipment should not be located to the left of the oven.
11. Verify cold water supply to the oven will be between 40-60 PSI (flowing).
12. Verify the water concentrations:
____ Hardness (GPG of CaCO3), ____ Iron, ____ pH, ____ TDS, ____ Chlorine, ____ Chloride.
NOTE: If water hardness exceeds the allowable limit noted, an approved water treatment system capable
of removing Chlorine and Chloramines should be installed in the water supply line to the oven. Installing
a water treatment system will extend the life the oven and minimize the potential for future corrosion.
Potential Install Location: _______________________________ Store Number: ____________________________
Customer Name: _______________________________________ Customer Title: ____________________________
Phone Number: _______________________________________ Date: _____________________________________
21
Page 22

COMBI OVEN INSTALLATION MANUAL
DANGER
VENTILATION REQUIREMENTS
Gas combi ovens must be located under an
exhaust hood. Information on the construction and
installation of ventilating hoods may be obtained
from Vapor Removal from Cooking Equipment,
NFPA Standard No. 96 (latest edition).
• Kitchen ventilation must include a provision for
an adequate flow of fresh air for gas combustion
and to prevent a negative-pressure condition. The
bottom of the oven provides air supply access
for gas combustion and must be kept clear at all
times. DO NOT obstruct or restrict ventilation nor
the air flow required to support combustion.
• DO NOT obstruct the flow of the exhaust flue at
the top rear of the oven. It is especially critical that
gas supply piping and electrical support cord and/
or receptacle be routed away from the path of the
hot combustion fumes.
Exhaust Hood
NOTE: all hood and ducting of ovens must comply
to local codes interpreted by fire and building
inspectors in the municipality where the oven is
installed.
Ventilation hoods must ensure an adequate amount
of incoming air during operation and must be
operated whenever the Combination oven/steamer
is used in order to avoid the accumulation of
condensation in the hood area.
FAILURE TO VENT THIS APPLIANCE PROPERLY
MAY BE HAZARDOUS TO THE HEALTH
OF THE OPERATOR. Equipment damage,
operational problems, and unsatisfactory baking
performance may also be the consequence of
improper venting. Any damages sustained by a
failure to properly vent this oven are not
covered under warranty.
22
Page 23

WATER QUALITY
COMBI OVEN INSTALLATION MANUAL
As with all steam related products, water filtration
and regular filter replacements may be necessary
with the Combi. It is strongly recommended to have
a water analysis performed prior to installing the
Combi. Poor water quality can have a big impact
on cook quality, performance, and longevity of
the Combi. Varying combinations of pH; alkalinity;
hardness; chlorides; total dissolved solids; and other
chemical characteristics, when subjected to high
temperatures, will cause water to have a tendency
to either scale or corrode.
There are a number of dierent water filter/
treatment systems available and each has its own
benefits and specialties. Below are a dierent styles
and their benefits. Multiple styles may need to be
used to get the water to proper levels.
• Particle Filter
When the water contains sand, iron particles, or
suspended matter, we recommend a 5-15 µm
(micrometer) particle filter.
• Active Carbon Filter
When the level of chlorine (Cl) in the water
exceeds 0.5 mg/L (ppm) (information available
from the water company), an active carbon filter
should be installed.
• Phosphate Additive System
A Phosphate Additive (Feeder) System is
recommended for steam generator units
only when a moderate level of scale (not
containing chloride) is experienced. The system
recommended is Kleensteam from Everupure.
• Ion Exchange System
An ion exchange system is recommended for a
steam generator based unit when a high level of
scale (not containing chloride) is experienced and
for a spritzer based unit when any scale (not
containing chloride) is experienced. Systems
recommended: Claris from Everpure (H+ Ion
Exchanger). Sodium ion exchangers (as used in
dishwashers) must not be used.
• Blended Reverse Osmosis (RO)
When the water has a chloride (Cl) concentration
above 20 mg/L (= 20 ppm), a blended RO system
should be installed to avoid corrosion.
NOTE: Make sure a minimum conductivity of 20
µS/cm (microSiemens) remains in the water for
steam generator units.
Water quality must conform to the below
requirements. If water does not meet the minimum
quality and damage to the oven is determined to
be due to water quality, it will be considered nonwarranty and will not be covered under the stated
warranty policy.
BKI Minimum Water Quality Requirements
– Hardness (CaCO3) = Less than
7.5 GPG (Grains per Gallon)
– TDS (Total Dissolved Solids) = Less than
100.0 mg/L (Milligrams per Liter)
– Free Chlorine = Less than 0.5 mg/L
(Milligrams per Liter)
– Chlorides = Less than 20 mg/L
(Milligrams per Liter)
– Chloramines = Less than 0.5 mg/L
(Milligrams per Liter)
– Total Alkalinity = Less than 20 mg/L
(Milligrams per Liter)
– Total Silica = Less than 10 mg/L
(Milligrams per Liter)
–pH level = 7.0 to 8.0
– Conductivity (Boiler Models only) = Minimum
of 20 µS/cm (microSiemens per cm)
Water Usage
Average Water Flow = 8.5 gal/hour at 36 psi inlet
pressure for half size 6 grid oven; 9.8 gal/hour at
36 psi inlet pressure for half size 10 grid oven; 11.6
gal/hour at 36 psi inlet pressure for full size 10 grid
oven; Peak Water consumption = 2.6 gal/min
23
Page 24

INSTALLATION
WARNING
WARNING
COMBI OVEN INSTALLATION MANUAL
General Information
Serious injury, equipment damage or death
could result if attempting to install this Combi
oven yourself. Ensure that an authorized BKI
service agent installs the Combi oven.
Only qualified, professional plumbers, pipe
fitters, and electricians should install this
equipment.
• The installation of this Combi must conform with:
– The Basic Plumbing Code of the Building
Ocials and Code Administrators
International, Inc. (BOCA).
– The National Fuel Gas Code, ANSI Z223.1 /
NFPA 54 (latest edition) or the Natural Gas
and Propane Installation Code CSA B1 49.1 as
applicable.
– The National Electrical Code, ANSI/NFPA 70
(latest edition), or the Canadian Electrical
Code, CSA C22.2 as applicable.
Unpacking and Handling
It is the owners’ responsibility to file all freight
claims with the delivering truck line. Inspect all
cartons and crates for damage as soon as they
arrive. If damage to cartons or crates is found, or if a
shortage is found, note this on the bill of lading (all
copies) prior to signing.
If damage is found when the equipment is opened,
immediately call the delivering truck line and
follow up the call with a written report indicating
concealed damage to your shipment. Ask for an
immediate inspection of your concealed damage
item. Packaging material MUST be retained to show
the inspector from the truck line.
Remove all packing from the interior and exterior of
the oven.
– The Food Service Sanitation Manual of the
Food and Drug Administration (FDA).
– All applicable national, state, and local laws,
codes, and regulations.
Death, injury, and equipment damage can
result from improper lifting. Use adequate
workers with training and experience lifting
heavy equipment to place the Combi oven on
the supporting surface.
24
Page 25

COMBI OVEN INSTALLATION MANUAL
INSTALLATION–REQUIRED CLEARANCES/POSITIONING
Required Clearances
BB
AA
D
D
A. Left Side – 0" and 20" (servicability)
B. Rear – 3" (utilities)
C. Right Side – 0"
D. Front – Dependent on model door swing
– If next to a high heat source (i.e. fryer or broiler),
ensure that there is adequate distance or a heat
shield is installed.
– Allow for adequate clearance on left side for
service.
C
C
Positioning
Follow the criteria below when selecting a location
for your Combi oven:
• Ensure the Combi oven will go through any
doorways or passages (see Shipping Weights and
Dimensions table below).
• If Combi oven is going on a counter top or
stand not supplied by BKI, ensure the supporting
structure can hold the weight of the Combi oven
fully loaded with food (see Shipping Weights and
Dimensions table below).
• The floor/stand must be level to ensure proper
door sealing and operation.
• The position of the Combi oven should be that the
Combi oven will not slide or tip.
• The area around the Combi oven should be free
from combustibles.
• The ambient temperature should be within
40° F to 95° F.
• Ensure the Combi oven air vents are not blocked.
NOTE: Do not install the Combi over a drain. Rising
steam out of the drain can have adverse aects
on operation, impede cooling air circulation, and
damage electrical and electronic components.
SHIPPING WEIGHTS & DIMENSIONS
Steam Generator Model Weight Lbs (kg) Width in (mm) Depth in (mm) Height in (mm)
ETG & EHG 061R 344 (157) 36.75 (934) 36 (915) 40.25 (1023)
ETG & EHG 062R 492 (224) 45.5 (1156) 38.5 (978) 40.25 (1023)
ETG & EHG 101R 413 (188) 36.75 (934) 36 (915) 51.25 (1302)
ETG & EHG 102R 514 (234) 45.5 (1156) 38.5 (978) 51.25 (1302)
ETG & EHG 201R 847 (385) 45.5 (1156) 41.75 (1061) 83 (2108)
ETG & EHG 202R 926 (421) 52 (1321) 44.5 (1131) 83 (2108)
25
Page 26

COMBI OVEN INSTALLATION MANUAL
INSTALLATION–POSITIONING/DOOR ADJUSTMENT
1
1
2
Move the Combi oven into final position. Level front
to back and side to side by turning lower legs for
proper operation.
33
2
2
2
1 3
To adjust the door seal, loosen the hinge bolts and
move the door to desired position. Once adjusted,
tighten the hinge bolts again. See dimensions on
door gap.
Door Adjustment
Once the oven has been correctly positioned in its
designated place for installation, check the oven
compartment door closing and
seal of the gaskets.
The door hinges must be
adjusted to assure maximum
seal of the oven door during its
operation. See dimensions on
door gap.
The door’s catch can be
adjusted in depth to eliminate
any steam leaks during cooking.
12-14 mm
Door Gap
3-5 mm
NOTE: Both the upper and lower hinges should be
adjusted.
3
1
2
2
To adjust pressure applied by the door on the
gasket, open the oven door and locate the catch
pin. Using a 1/2" wrench, loosen the nut on the
back of the pin. Turn the pin clockwise to increase
the pressure or turn the pin counterclockwise to
decrease the pressure. Retighten the nut.
26
Page 27

COMBI OVEN INSTALLATION MANUAL
INSTALLATION–ELECTRICAL CONNECTION
Check to make sure the electrical rating on the
rating plate (located on the back of the Combi
oven) matches the supplied electrical connection.
The Combi oven must be properly grounded
and have the electrical power lines installed in
accordance to all applicable codes, regulations, and
laws.
A dedicated main disconnect switch and a separate
fuse or breaker for each Combi oven should be
installed.
The customer connection terminals are located
behind the left side panel.
T ELECTRICAL OPTIONS
ETG061R
ETG062R
ETG101R
ETG102R
ETG201R
ETG202R
Volts
120
120
120
120
120
120
Phase
1
1
1
1
1
1
Cycle/Hz
60
60
60
60
60
60
4
Remove the left side panel. Connect the wiring
to the termial as shown. For all other models, #8
electrical wires are required.
kW
0.4
0.4
0.7
0.8
1.0
1.6
Amps
3.5
3.5
6
6.5
8
13
Wires
2+Grnd
2+Grnd
2+Grnd
2+Grnd
2+Grnd
2+Grnd
H ELECTRICAL OPTIONS
Volts
EHG061R
EHG062R
EHG101R
EHG102R
EHG201R
EHG202R
120
120
120
120
120
120
Phase
1
1
1
1
1
1
Cycle/Hz
60
60
60
60
60
60
27
kW
1.2
1.2
1.5
2.3
2.5
3.1
Amps
10
10
12.5
19
21
26
Wires
2+Grnd
2+Grnd
2+Grnd
2+Grnd
2+Grnd
2+Grnd
Page 28

COMBI OVEN INSTALLATION MANUAL
INSTALLATION–WATER CONNECTION
The Combi oven requires two 3/4" GHT (Garden
Hose Thread) cold water connections. One is for
treated water that feeds the spritzer and/or steam
generator, and one for untreated water that feeds
the hand shower, drain quench, and cleaning
system. Both connections need to be connected
to a cold water supply for proper operation of the
Combi oven.
• If the water supply meets the minimum water
quality requirements, then a single water supply
configuration may be used. If a single water
connection is used, a water distributor or tee
should be sized appropriately to handle both water
connections.
• The minimum water temperature for the correct
functioning of the oven is 43° F. The maximum
water temperature for the correct functioning of
the oven is 80° F.
• Dynamic Pressure = minimum of 35 PSI. Should
the incoming water pressure be lower than
the minimum value, install a pump or adjust
the pressure regulator upstream of the oven to
achieve the required minimum pressure.
• Static Pressure = maximum 87 PSI. Should the
incoming water pressure be higher than maximum
value, install a pressure reducer upstream of the
Combi oven.
Before connecting, let sucient amount of water
flow to clean the pipes from any residues.
5
Shut o valve
Treated
Water
Connect the cold water supply lines to Combi oven
water connection outlets. Make sure there is a shut
o between the lines and the oven, placed in an
area where it can be seen and reached in case of
emergency.
• Install the water supply lines before positioning
the Combi oven.
• Water supply lines should be located so that the
Combi oven can be easily moved for servicing.
• Check that the check valve of the solenoid valve is
clean.
• Backflow Prevention — The equipment must be
installed with adequate backflow protection to
comply with applicable federal, state, and local
codes.
28
Page 29

COMBI OVEN INSTALLATION MANUAL
NOTICE
INSTALLATION–DRAIN CONNECTION
The Combi oven is supplied with a 50 mm (2”)
drain pipe out the back of the unit. The drain line
is to be installed in compliance with the Basic
Plumbing Code of the Building Ocials and Code
Administrators International, Inc. (BOCA) and the
Food Service Sanitation Manual of the Food and
Drug Administration (FDA) and any other applicable
national, state, or local codes and regulations.
Do Not install the Combi oven directly over a drain.
Steam rising up out of the drain will adversely aect
operation, impede cooling air circulation, and
damage electrical and electronic components.
Improper installation of drain outlet line voids
the Combi oven warranty.
The following requirements are critical to the safety
of personnel and equipment and must be adhered
to under any circumstances.
• The drain for the Combi oven should be made of
stainless steel or an equally temperature-resistant
material (minimum 175° F).
The total length of pipe and number of bend
fittings required to reach the open drain determines
the pipe size used to extend the drain line to an
open drain.
6a
2" pipe
(6' or less connection)
For drain pipe connections of 6 feet or less
(requires no more than two elbows), connect
2” drain pipe to outlet extension on lower back
of Combi oven. Use a hose clamp, as required, to
secure the drain pipe to the oven drain.
• Do Not connect drains from any other equipment
to the drain line of the Combi oven.
• Do Not connect the drain outlet extension line
directly into a floor drain or a sewer line.
• The drain line must be free air vented, have gravity
flow from the Combi oven, and terminate outside
the perimeter of the Combi oven.
Note: Free air venting requires minimum 1”
clearance between the end of the drain line and
the top of the floor drain.
• The drain line must have gravity flow from the
Combi drain outlet to floor drain.
• Do Not install a trap in the drain line.
6b
2 1/2" pipe
(6' to 12' connection)
For drain pipe connections of 6 to 12 feet
(requires three elbows), connect 2 1/2” drain pipe to
outlet extension on lower back of Combi oven.
29
Page 30

COMBI OVEN INSTALLATION MANUAL
DANGER
INSTALLATION–GAS CONNECTION
Death, injury, and equipment damage can
result from improper lifting. Use adequate
workers with training and experience lifting
heavy equipment to place the Combi oven
on the supporting surface.
If the installer smells gas, or suspects there is
gas leak, immediately refer to posted gas leak
instructions. The posted instructions are provided
by the local gas supplier and supersede any
other instructions.
Install Gas Supply Lines
Installer/owner is responsible for furnishing and
installing gas supply lines, valves, regulators,
and accessories.
When installing gas supply lines and accessories,
observe the following:
• The installation must conform with local codes, or
in absence of local codes, with National Fuel Gas
Code, ANSI Z223.1 / NFPA 54 (or latest edition), or
Natural Gas and Propane Installation Code, CSA
B1 49.1, and any other applicable national, state, or
local codes and regulations.
Observe the following precautions in addition to
the posted instructions:
• DO NOT light or start any appliance.
• DO NOT touch any electrical switch.
• DO NOT use any phone in the building.
• Immediately call the gas supplier from a phone
away from the building. Follow the gas supplier’s
instructions.
• I f the gas supplier cannot be reached, call the fire
department
Gas Supply
• Make sure gas supply type matches type of gas
shown on the rating plate.
• Make sure that gas supply pressure does not
exceed 14" water column (1/2 psi), and falls within
acceptable gas pressure range shown below:
– Natural gas pressure must be between
5 1/2" – 7" water column
• GAS SUPPLY PRESSURE TO THE COMBI MUST
NEVER EXCEED 14" WATER COLUMN (1/2 psi). If
the gas supply pressure exceeds 14” water column,
a pressure regulator must be installed in gas supply
plumbing to reduce pressure to the Combi.
7
Gas
shut o valve
3/4" NPT gas inlet
Gas line
– Propane gas pressure must be between
11" – 14" water column
Install the gas line on the 3/4" NPT gas inlet. It is
located on the bottom right of the Combi.
• Install main manual shut o valve between gas
supply and the Combi.
30
Page 31

COMBI OVEN INSTALLATION MANUAL
INSTALLATION–GAS CONNECTION
• Install sediment trap (drip leg) in gas supply line.
• Use a pipe sealant resistant to LP gas.
Leak Test Gas Supply
• Before turning on gas to the Combi or after any
service to gas supply:
– Test all pipe joints for leaks with soap and
water solution.
– All leaks must be corrected before attempting
to operate the Combi.
Pressure Testing the Gas Supply Lines
If any pressure testing is required, the Combi must
be isolated from the gas supply system
during any pressure testing as follows:
• HIGH PRESSURE TESTING:
The Combi and its main manual shut-o valve
must be disconnected from the gas supply piping
system during any pressure testing of that system
at test pressures in excess of 14" Water Column
(1/2 psi or 3.45 kPa). Leak test all joints and fittings
with a soap and water solution after reconnecting
gas supply
• LOW PRESSURE TESTING:
The COMBI must be isolated from the gas supply
piping system by closing its main manual shut-o
valve during any pressure testing of the gas supply
piping system at test pressures equal to or less
than 14" water column (1/2 psi or 3.45kPa). Leak
test all joints and fittings with a soap and water
solution after opening the main manual shut-o
valve.
31
Page 32

COMBI OVEN INSTALLATION MANUAL
PRODUCT REGISTRATION/INSTALLATION CHECKLIST
In order for the oven to qualify for warranty, this checklist must be filled out by an Authorized Service
Technician and returned to BKI within 30 days of the date of installation. The Authorized Service Technician
must sign this document, obtain the customer’s signature, and send this form via fax to 864-963-5316 or via
e-mail to: customerservice@bkideas.com. Refer to instruction manual for all specific installation requirements.
Model #: ______________________________________ Serial #: _________________________________________
Machine Voltage & Phase: _______________________ Installed by (Name): ______________________________
Company Name/Address: _______________________ Gas Type: _______________________________________
Start-Up by (Name): ____________________________ Date of Installation: ______________________________
Date of Start-Up: ______________________________ Company Name/Address: _________________________
Store Name: ___________________________________ Install Location: __________________________________
Customer Title: ________________________________ Customer Name: _________________________________
Signature: _____________________________________ Date: ___________________________________________
1. Check for missing or loose hardware.
2. Verify all plastic covering is removed and oven has no dents, scratches, or shipping damage.
NOTE: any missing or damaged items on a separate sheet. If shipping damage has occurred, report to
shipping carrier immediately.
3. Verify the following items are included with the oven:
___ Installation Manual, ___Operators Manual, ___ Oven Drip Tray Hose, ___Cooking Probe,
___ Rack Guides.
4. Verify oven is level and adequate spacing is provided on all sides per instruction manual.
5. Verify door operates properly and latches without excessive force.
6. Verify fan/s operates properly (rotate, stop and change direction) without any rubbing or noises.
7. Verify oven drain line is connected to an open air gap drain (per local code); and oven drip tray hose is
installed properly.
8. Verify electrical component connections are secure and machine is properly grounded.
9. Verify Supply Voltage and Phase match the machine data plate. Record information:
Supply Pressure: in H2O__________ .
32
Page 33

COMBI OVEN INSTALLATION MANUAL
INSTALLATION CHECKLIST (continued)
10. Verify and record average oven temperature @ 350 F in Convection Mode (geometric center of the
oven after three complete cycles).
11. Verify no steam leaks occur around door during operation.
12. Verify cavity vent operates properly in Convection, Combi and Steam modes.
13. Verify oven is draining properly.
14. Verify steam generator is draining properly when oven is turned o.
15. Verify correction operation of all:
___ Control Functions, ___ Convection Mode, ___ Steam Mode, ___ Combi Mode,
___ Cooking Probe.
16. Verify cold water supply to the oven is 40-60 PSI (flowing).
17. Verify water supply line including water treatment system is connected properly and not leaking (single
water connection on oven).
18. Record manufacturer’s name and type of water treatment system connected to oven.
_________________________
19. Verify an approved water treatment system capable of removing Chlorine and Chloramines is installed
in the water supply line to the oven.
20. Verify the water concentrations:
___ Hardness, ___ Iron, ___ pH, ___ TDS, ___ ___ Chloride, ___ Chlorine.
21. Verify wash system is pumping and spraying during a clean cycle.
22. Verify detergent and rinse pump tubes are inserted into approved commercial liquid detergent
containers (for automatic clean cycle).
23. Show the customer the location of utilities and shut o valves in case of emergency.
24. Customer:
___ knows proper oven operation,
___ knows general maintenance, cleaning and deliming procedures,
___ understands importance of stainless steel equipment care and cleaning of the cooking cavity,
___ understandsimportance of a water treatment system and proper maintenance,
___ has warranty card and understands warranty.
Error Messages
In case of an alarm, see the Operation Manual to identify the Error Message actions and solutions needed to
resolve the specific error.
33
Page 34

COMBI OVEN INSTALLATION MANUAL
Wiring Diagram Model: EHG061R
34
Page 35

COMBI OVEN INSTALLATION MANUAL
Wiring Diagram Model: EHG062R
35
Page 36

COMBI OVEN INSTALLATION MANUAL
Wiring Diagram Model: EHG101R
36
Page 37

COMBI OVEN INSTALLATION MANUAL
Wiring Diagram Model: EHG102R
37
Page 38

COMBI OVEN INSTALLATION MANUAL
Wiring Diagram Model: EHG201R
38
Page 39

COMBI OVEN INSTALLATION MANUAL
Wiring Diagram Model: EHG202R
39
Page 40

COMBI OVEN INSTALLATION MANUAL
Wiring Diagram Models: ETG061R, ETG062R, ETG101R, ETG102R,
40
Page 41

COMBI OVEN INSTALLATION MANUAL
Wiring Diagram Model: ETG201R
41
Page 42

COMBI OVEN INSTALLATION MANUAL
Wiring Diagram Model: ETG202R
42
Page 43

COMBI OVEN INSTALLATION MANUAL
BKI LIMITED WARRANTY
2 Year Standard Warranty–adjusted to 2 years
LIMITED WARRANTIES AND REMEDIES. Seller warrants that at the time of shipment the Products will be
free from defects in material and workmanship for a period of no longer than TWO YEAR from the original
installation by an authorized representative or no longer than TWO YEAR AND THREE MONTHS from the date
of shipment from the factory. Defective conditions caused by abnormal use or misuse lack of or improper
maintenance damage by third parties alterations by unauthorized personnel acts of God failure to follow
installation and/or operating instructions or any other events beyond the reasonable control of the Seller
will NOT be covered under this Warranty. The obligations of the Seller under this warranty shall be limited to
repairing or replacing (at the option of the Seller) any part with the exception of lamps, fuses, door gaskets,
and glass (which are not covered under this warranty) which is found defective in the reasonable opinion of
the Seller. Any part found defective by the Seller will be repaired or replaced without charge F.O.B. factory
Simpsonville South Carolinaor F.O.B. authorized BKI Distributor. Seller and/or its authorized representatives
will assume the normal replacement labor expense for the defective part for the period of the warranty as
stated above including reasonable (up to 100 mile or 2 hr round trip) travel time where replacement work is
performed during standard business hours and not subject to overtime holiday rates and/or any additional
fees. IN NO EVENT SHALL THE SELLER BE LIABLE FOR LOSS OF USE LOSS OF REVENUE OR LOSS OF
PRODUCT OR PROFIT OR FOR INDIRECT INCIDENTAL SPECIAL OR CONSEQUENTIAL DAMAGES INCLUDING
BUT NOT LIMITED TO FOOD SPOILAGE OR PRODUCT LOSS. THIS WARRANTY DOES NOT COVER GLASS
BREAKAGE. THE ABOVE WARRANTY IS EXCLUSIVE AND ALL OTHER WARRANTIES EXPRESS OR IMPLIED ARE
EXCLUDED INCLUDING THE IMPLIED WARRANTIES OF MERCHANTABILITY AND FITNESS FOR A PARTICULAR
PURPOSE. Any appliance replacement part (with the exception of lamps, fuses, gaskets and glass) which
proves to be defective in material or workmanship within ninety (90) days of installation will be replaced
without charge F.O.B. Factory Simpsonville SC or F.O.B. authorized BKI Distributor. The user shall have the
responsibility and expense of removing and returning the defective part to the Seller as well as the cost of
reinstalling the replacement or repaired part.
43
Page 44

Notes
44
 Loading...