

Page 1
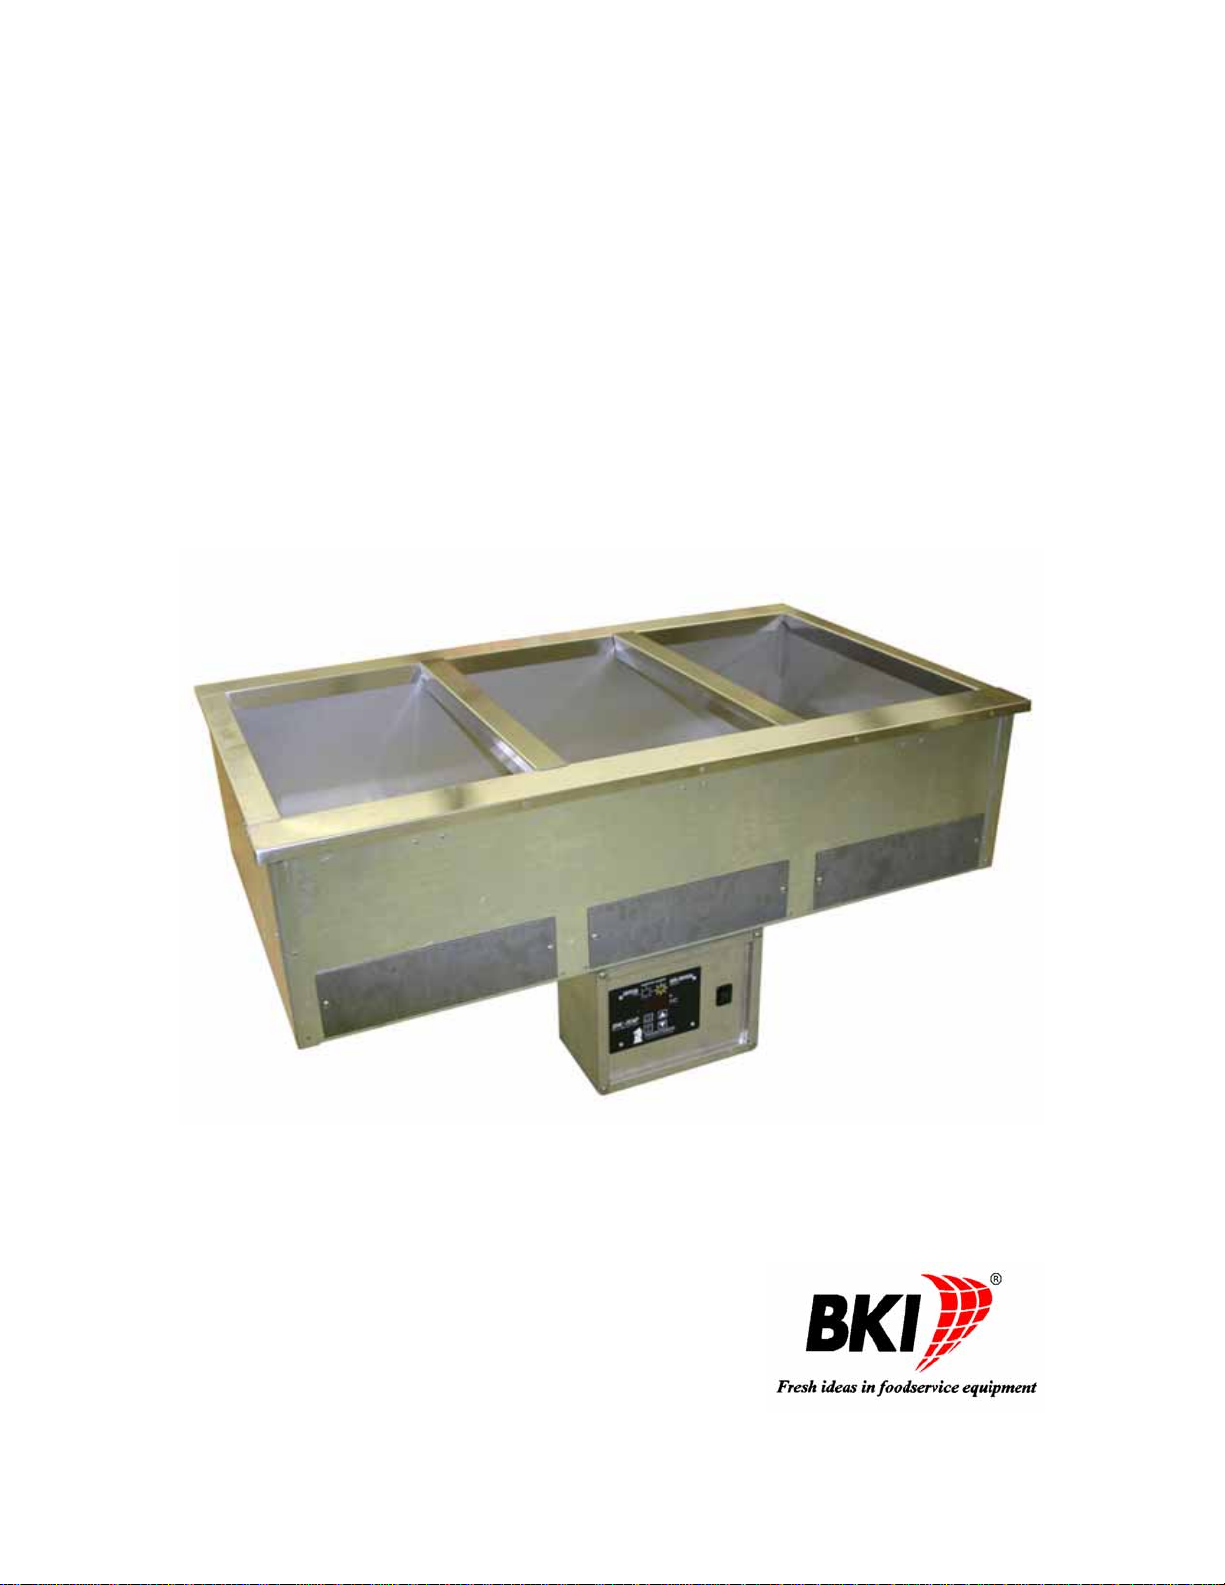
Waterless Drop-In
Merchandiser
MODELS DRPN1, DRPN3, DRPN5, DRPN7
Installation & Operation Manual
Serial Numbers 122157 and Higher
Page 2

Warranty Information
LIMITED ONE YEAR WARRANTY
BKI (The “Company”) warrants to the original purchaser/user, that at time of shipment from the
Company factory, this equipment will be free from defect in materials and workmanship. Written
notice of a claim under this Warranty must be given within ONE YEAR AND THREE MONTHS
from date of shipment from the factory. Defective conditions caused by abnormal use or misuse,
lack of maintenance, damage by third parties, alterations by unauthorized personnel, acts of God,
failure to follow installation instructions or any other events beyond the control of the company will
NOT be covered under Warranty. The obligation of the Company under this Warranty shall be
limited to repairing or replacing (at the option of the company) any part that is defective in
reasonable opinion of the Company. The user will have the responsibility and expense of
removing and returning the defective part to the Company as well as the cost of reinstalling the
replacement or repaired part.
IN NO EVENT SHALL THE COMPANY BE LIABLE FOR LOSS OF USE, LOSS OF REVENUE
OR LOSS OF PRODUCT OR PROFIT OR FOR INDIRECT OR CONSEQUENTIAL DAMAGES
INCLUDING BUT NOT LIMITED TO, FOOD SPOILAGE OR PRODUCT LOSS . WAR RANTY
DOES NOT COVER GLASS BREAKAGE. THE ABOVE WARRANTY IS EXCLUSIVE AND ALL
OTHER WARRANTIES, EXPRESS OR IMPLIED, ARE EXCLUDED INCLUDING THE IMPLIED
WARRANTIES OF MERCHANTABILITY AND FITNESS FOR A PARTICULAR PURPOSE.
THIS WARRANTY SHALL APPLY ONLY WITHIN THE CONTINENTAL UNITED STATES, ITS
TERRITORIES, AND POSSESSIONS AND IN CANADA.
LIMITED NINETY DAY LABOR WARRANTY
All labor necessary to repair or replace factory defective parts will be performed, without charge,
to the end user, by service personnel of a BKI Authorized Distributor during the first ninety days
after the date of installation of the new equipment.
Replacement parts: Any appliance replacement part, except lamps and fuses, which proves to
be defective in material or workmanship within 90 days from date of original installation will be
repaired or replaced without charge F.O.B. Factory, Simpsonville, S.C. or F.O.B. authorized
distributor.
Page 3

Waterless Drop-In Merchandiser Table of Contents
Table of Contents
Table of Contents........................................................................................................................................1
Introduction .................................................................................................................................................2
Safety Precautions....................................................................................................................................2
Safety Signs and Messages.................................................................................................................2
Safe Work Practices.............................................................................................................................3
Operation .....................................................................................................................................................5
Controls and Indicators.............................................................................................................................5
Operational Guidelines.............................................................................................................................5
Unit Startup and Preheating .....................................................................................................................5
Temperature Adjustment..........................................................................................................................5
Unit Shutdown...........................................................................................................................................5
Installation ...................................................................................................................................................6
Instructions For Shipping Damage ...........................................................................................................6
Installation Instructions.............................................................................................................................6
Electrical Information ................................................................................................................................6
Maintenance ................................................................................................................................................7
Scheduled Maintenance...........................................................................................................................7
Cleaning ...............................................................................................................................................7
Troubleshooting........................................................................................................................................7
Appendix A - Digital Controller Information.............................................................................................8
Turning Controller On and Off ..................................................................................................................8
Reading the Display..................................................................................................................................8
Programming Temperature Setpoints ......................................................................................................8
Historical Duty Cycle.................................................................................................................................8
Error Codes...............................................................................................................................................9
1
Page 4
Waterless Drop-In Merchandiser Introduction
Introduction
Congratulations! You have chosen a Waterless Drop-In Merchandi ser. It consists of one or more hot food
waterless wells and a digital controller for setting, monitoring and controlling the temperature of each well.
This unit is manufactured by BKI which assures you of the finest in design and engineering -- that it has
been built with care and dedication -- using the best materials available. Attention to the operating
instructions regarding proper installation, operation, and maintenance will result in long lasting
dependability to insure the highest profitable return on your investment.
PLEASE READ THIS ENTIRE MANUAL BEFORE OPERATING THE UNIT. If
you have any questions, please contact your BKI Distributor. If they are unable to
answer your questions, contact the BKI Technical Service Department, toll free:
1-800-927-6887. Outside the U.S., call 1-864-963-3471.
This unit is to be sealed to the surface where installed to conform to NSF
requirements. (Dow Corning RTV #732 Multi purpose Sealant.)
Safety Precautions
Always follow recommended safety precautions listed in this manual. Below is the safety alert symbol.
When you see this symbol on your equipment, be alert to the potential for personal injury or property
damage.
Safety Signs and Messages
The following Safety signs and messages are placed in this manual to provide instructions and identify
specific areas where potential hazards exist and special precautions should be taken. Know a nd
understand the meaning of these instructions, signs, and messages . Damage to the equipment, death or
serious injury to you or other persons may result if these messages are not followed.
This message indicates an imminently hazardous situation which, if not avoided,
will result in death or serious injury.
This message indicates a potentially hazardous situation, which, if not avoided,
could result in death or serious injury.
This message indicates a potentially hazardous situation, which, if not avoided,
may result in minor or moderate injury. It may also be used to alert against
unsafe practices.
This message is used when special information, instructions or identification are
required relating to procedures, equipment, tools, capacities and other spe cial
data.
2
Page 5

Waterless Drop-In Merchandiser Introduction
Safe Work Practices
Beware of High Voltage
This equipment uses high voltage. Serious injury can occur if you or
any untrained or unauthorized person installs, services, or repairs this
equipment. Always Use an Authorized Service agent to Service Your
Equipment.
Keep this manual with the Equipment
This manual is an important part of your equipment. Always keep it
near for easy access.
If you need to replace this manual, contact:
BKI
Technical Services Department
P.O. Box 80400
Simpsonville, S.C. 29680-0400
Or call toll free: 1-800-927-6887
Outside the U.S., call 864-963-3471
Protect Children
Keep children away from this equipment. Children may not understand
that this equipment is dangerous for them and others.
NEVER allow children to play near or operate your equipment.
Keep Safety Labels Clean and in Good Condition
Do not remove or cover any safety labels on your equipment. Keep all
safety labels clean and in good condition. Replace any damaged or
missing safety labels. If you need a new safety label, obtain the
number of the specific label then contact:
BKI
Technical Services Department
P.O. Box 80400
Simpsonville, S.C. 29680-0400
Or call toll free: 1-800-927-6887
Outside the U.S., call 864-963-3471
3
Page 6

Waterless Drop-In Merchandiser Introduction
Be Prepared for Emergencies
Be prepared for fires, injuries, or other emergencies.
911
Keep a first aid kit and a fire extinguisher near the equipment. You
must use a 40-pound Type BC fire extinguisher and keep it within 25
feet of your equipment.
Keep emergency numbers for doctors, ambulance services, hospitals,
and the fire department near your telephone.
Know your responsibilities as an Employer
• Make certain your employees know how to operate the equipment.
• Make certain your employees are aware of the safety precautions
on the equipment and in this manual.
• Make certain that you have thoroughly trained your employees
about operating the equipment safely.
• Make certain the equipment is in proper working condition. If you
make unauthorized modifications to the equipment, you will reduce
the function and safety of the equipment.
4
Page 7

Waterless Drop-In Merchandiser Operation
Operation
Controls and Indicators
The Control Box Assembly contains a Digital Controller and power switch that you will interact with. For
controls and indicator information pertaining to the Digital Controller (CP0105) refer to Appendix A. The
power switch is used to turn power to the unit on or off.
Operational Guidelines
• All meats and vegetables should be preheated to 160 degrees F. before being placed in the
case.
• Keep portable meat thermometers on hand. Check the food temperatures hourly. Check Federal
and State Health and Sanitation Regulations for internal temperature required for holding cooked
foods for sale. Maintaining these temperatures often tend to allow continued cooking of certain
products. Therefore, smaller amounts of bulk foods should be displayed at non-peak periods and
the warmer refilled as needed.
• A screen liner can be used in the bottom of the display pans that are used for holding meats. This
will keep meats from sticking to the bottom of the pans.
• Rotate the food products. Foods loaded in first should be served first as much as is practical.
• Foods held for long periods of time are more difficult to maintain at proper temperature. Also,
freshness and product quality diminish if foods are held too long. Most areas of the country have
sanitation regulations governing how long foods can be held. Make certain to check with your
local authorities.
Unit Startup and Preheating
1. Place the power ON/OFF switch on the Control Box Assembly in the ON position. The controller
will display a startup sequence and show the code HUP indicating that the elements are heating
up.
2. When the display no longer shows the code HUP for each well, place food pans containing
product in the wells.
Temperature Adjustment
Refer to Appendix A for information on how to adjust the temperature of an individual well.
Unit Shutdown
Place the power ON/OFF switch on the Control Box Assembly in the OFF position.
5
Page 8

Waterless Drop-In Merchandiser Installation
Installation
Serious injury, equipment damage or death could result if attempting to install this
unit yourself. Ensure that an authorized BKI service agent installs the unit.
Instructions For Shipping Damage
You are responsible for filing all freight claims with the delivering truck line. Inspect all cartons and crates
for damage when they arrive. If there is damage noted to shipping crates or cartons, or, if a shortage is
found, note this on the bill of lading (all copies) before signing.
If damage is detected when the equipment is uncrated, immediately call the delivering truck line and
follow up the call with a written report indicating concealed damage to your equipment. Ask for an
immediate inspection of your concealed damage item. Crating material MUST be retained to show the
inspector from the truck line.
Installation Instructions
1. Obtain a suitable countertop location for the unit.
2. Cut a hole in the countertop measuring 41 7/16” x 24 3/8”.
3. Orient the unit for proper positioning of the controller then carefully lower unit into the cutout area.
4. Wire the unit according to the guidelines below.
5. Seal the countertop to conform to NSF Standard 4, Item 4.28. (Dow Corning RTV #732 Multi
purpose Sealant.)
Electrical Information
Electrocution, equipment failure or property damage could result if an unlicensed
electrician performs the electrical installation. Ensure that a licensed electrician
perform the electrical installation in accordance with local codes, or in the absence
of local codes, with the National Electrical Code, ANSI NFPA 70-20XX.
This unit, when installed by an authorized BKI service agent, must be wired for use in accordance with all
applicable local, state, and federal codes. For specific electrical requirements and conne ction s refer to the
wiring diagram attached to the unit or provided in the Service Manual.
6
Page 9

Waterless Drop-In Merchandiser Maintenance
Maintenance
Failure to comply with the maintenance below could result in a serious accident.
Electrocution, equipment failure or property damage could result if an unlicensed
electrician performs electrical repair. Ensure that a licensed electrician performs
electrical repair.
Scheduled Maintenance
Cleaning
This unit should be cleaned at the end of each day. Use the following procedure:
Failure to remove power from this unit may cause severe electrical shock. This
unit may have more than one disconnect switch.
1. Turn the unit ‘off ‘ and allow it to cool down.
2. Remove any food pans.
Using abrasive cleaners may damage the cabinet finish. Use only a mild soap
and water solution.
Never steam clean or get excess water in the interior of the cabinet as this can
damage unit.
3. Use a mild soap and water solution to clean parts.
4. Sponge the inside and outside with a mild soap and water solution.
5. Wipe the parts and unit dry with a soft, clean cloth.
Troubleshooting
Problem Cause Possible Solution
Electrical
Power switch is off. Place power switch on.
Blown Fuse in Control
Holding
Temperature
Not Adequate
Red or Yellow
Controller
Indicator
flashing
No Power to the unit. Check circuit breaker or fuses at building power panel.
If problem persists, contact an authorized BKI service
agent for corrective action.
Contact an authorized BKI service agent for corrective
Box Assembly.
Unit has not been
preheated.
Product is below 160° F
when loaded.
Heating element,
contactor, temperature
probe, unit wiring or
controller buttons faulty.
action.
Preheat unit. If problem persists, contact an authorized
BKI service agent for corrective action.
Check product temperature before loading the case.
Match error code on display with error codes in
Appendix A and follow recommended corrective action.
If problem persists, contact an authorized BKI service
agent for corrective action.
7
Page 10

Waterless Drop-In Merchandiser Appendix A - Digital Controller Information
Appendix A - Digital Controller Information
Turning Controller On and Off
Hold CTRL RESET down for 20 seconds to turn controller off. The display shows “OFF”. Press CTRL
RESET to turn controller on. Upon start up or reset, sequence display shows “][3” then “DrY”.
Reading the Display
The wells are numbered from left to right. The display will cycle through well number (-1-, -2-, -3-) then the
corresponding temperature of well. The display contains three (3) decimal points. The decimal points turn
on and off to denote elements cycling. The heat light turns on if any element is on.
Programming Temperature Setpoints
Pressing and holding the TEMP SET button will cause the controller to beep and the display will
intermittently flash between the well number and the programmed setpoint temperature.
To adjust setpoint temperature, hold TEMP SET down and press UP or DOWN arrows to adjust
temperature. Each press of the UP or DOWN arrow will adjust the setpoint temperature one increment.
Press and hold the UP or DOWN arrow to increment rapidly.
To change well setting, hold TEMP SET down and press RESET. The display will intermittently flash the
well number (-1-, -2-, -3-). Each additional press of RESET will increment the well number.
Historical Duty Cycle
The controller is equipped to operate temporarily with the loss of one or more temperature probes or with
temperature probes out of calibration. When the unit is operating in historical duty cycle mode, the unit
will run at the approximate equivalent temperatures as when temperature probes were functional. To
denote that the unit is functioning in historical duty cycle mode the display will cycle with well number then
“20d” or some number with “d” instead of a temperature.
To adjust the setpoint when in historical duty cycle, hold TEMP SET down and press UP or DOWN
arrows to adjust the setpoint. Each press of the UP or DOWN arrow will adjust the setpoint one
increment. Press and hold the UP or DOWN arrow to increment rapidly.
8
Page 11

Waterless Drop-In Merchandiser Appendix A - Digital Controller Information
Error Codes
FLASHER ERROR CODE PROBLEM DESCRIPTION/(SERVICE PARTS)
RED Combination of
codes below
RED r1F, r2F, and/or
r3F (All Elements
Off)
RED r1O, r2O, and/or
r3O (All Elements
On)
YELLOW TC1, TC2, and/or
TC3
YELLOW 0-1, 0-2, or 0-3 Thermocouple that is used by the display has been disconnected or
NONE/RED CCC Set and Up buttons are stuck down and will not release. Gently push
NONE/RED HI, UP Up button is stuck down and will not release. Gently push on the Up
NONE/RED Lo, DN Down button is stuck down and will not release. Gently push on the
NONE/RED rLo, RES Reset button is stuck down and will not release. Gently push on the
NONE/RED Slo, SET Set button is stuck down and will not release. Gently push on the Set
NONE Xd One or more temperature probes have failed or are out of
NONE ][ 3, DrY Startup sequence display for X3 control identifier and 3 element dry
NONE OFF Reset button has been held down for 20 seconds thus turning off
NONE HUP System is heating up. Heat-up can take up to an hour depending on
Multiple failures have occurred and have caused a critical situation
(RED). This means a piece of equipment needs immediate attention
because it cannot hold its temperature or an alternative backup plan
needs to be started.
Heating element or contactor has failed to turn on or all elements
have failed to turn on. Turn off power and breakers and then turn
them back on. Call for service immediately if this does not work and
all error codes display. (HEATING ELEMENT, FUSE, ON/OFF
SWITCH, MERCURY CONTACTOR)
Element(s) are stuck on. Turn power switch and breaker off then
back on. If problem persists call for service. The problem could be
shorted wires inside unit. It could also be a temporary side effect of
temperature probes broken and intermittently touching.
(TEMPERATURE PROBES, WIRES, CONTROLLER)
Temperature probe is outside its standard calibration and heat cycl e
times. System will default into Historical Duty Cycle Mode. Turn
on/off unit to see if the problem comes back. If so call for service.
(TEMPERATURE PROBE, ELEMENTS)
broken. Probe wire may have been cut, pulled on, or temperature
probe needs to be replaced. (TEMPERATURE PROBE)
on the Set and Up buttons and attempt to free the buttons. Have
service re-adjust the board distance to the buttons. (CONTROLLER)
button and attempt to free the button. Have service re-adjust the
board distance to the button. (CONTROLLER)
Down button and attempt to free the button. Have service re-adjust
the board distance to the button. (CONTROLLER)
Reset button and attempt to free the button. Have service re-adjust
the board distance to the button. (CONTROLLER)
button and attempt to free the button. Have service re-adjust the
board distance to the button. (CONTROLLER)
calibration. The unit is now running in safe mode called historical
duty cycle mode. The unit will run at approximately the same
temperature as it did when the temperature probe was present.
(TEMPERATURE PROBE)
well configuration.
controller. Push reset button to start back up.
the elements of your system.
9
Page 12

P.O. Box 80400, Simpsonville, S.C. 29680-0400, USA
http://www.bkideas.com
Made and printed in the U.S.A
LI0183/0604
 Loading...