


MaxFire

STOP - READ!
PREPARING THE BIXBY MaxFire STOVE FOR BURNING
Basic Guidelines:
1) The stove does not react quickly to any changes made to it.
2) When making any adjustments to the Trim Pot Knobs, only turn them 1 line/number at a time. Each
line/number represents a 6% increase or decrease change.
3) After making any adjustments….DO NOT MAKE ANY OTHER ADJUSTMENTS FOR AT LEAST
20 MINUTES!
4) When first setting up a MaxFire for a proper burn, start out with the Trim Pot Knobs set at the
a. Factory Presets, which are:
Exhaust Fan: +/-0
Feed Rate: +/-0
This is a starting reference point for the stove but not necessarily the point at which the stove will
perform at its best. (Start by leaving the exhaust fan knob on 0 and adjusting the feed rate).
5) After about 10-15 minutes into the startup of the stove, you should watch the flame for
characteristics of the burn. Watch the flame for 10 minute periods. During this time note the burn
characteristics as explained in the “Trim Pot Adjustment.”
6) Characteristics of a Lean Burn are:
a) Hard Clinkers (cookie, hockey puck, hamburger, biscuit, wafer for example.)
b) An oscillating flame – slowly graduating from a high to a low to a high to a low flame over a
period of 3 to 8 minutes. (High flame decreasing to a low flame (5 min.) going to a high
flame (5 min.) etc.
c) A build up in only one side of the Burn Pot
d) The flame seemingly coming out one side of the Burn Pot only.
NOTE: Colder air contains more oxygen per cubic foot of air than warmer air. A cold snap or sudden
change in the weather can cause the stove to run Lean and you may have to increase the Feed
Rate during this time.
NOTE: The outside air temperature, the corn moisture content, the corn type and the conditions which it
was grown will all be factors in how the stove burns.
7) Charasteristics of a Rich Burn are:
a) An even build up in the Burn Pot.
b) A darker, lazier flame.
c) Excessive soot build up on the glass door.
NOTE: Fuel build up on one side of the burn pot is a Lean Burn.
Fuel build up evenly in the burn pot is a Rich Burn.

How to adjust the Trim Pot Knobs
Both the Exhaust Fan Trim Pot knob and the Feed Rate Trim Pot knob accomplish the
same thing BUT they work inverse to each other. Thus, if both trim pot knobs are turned
in the same direction, they cancel each other's effect on the flame, therefore it is best and
our recommendation to work with just the Feed Rate Trim Pot knob initially.
We suggest writing down the changes you make. This will remind you of what you have done
last and its' effect on the flame.
A good burning flame will be yellowish in color and very lively.
Rich Burning Flame:
• If the flame is consistent
pot, turn the feed rate knob down.
• The flame will be orange in color - the darker the orange, the richer the flame.
• It is best to adjust feed rate, one notch (6%) down at a time, to maintain flame control.
This adds fuel less often thus "leaning" the flame out.
• Moving the exhaust fan knob in the positive direction (adding more air) will have a similar
effect, however we recommend making adjustments using the Feed Rate Trim Pot knob
for maximum performance.
• If this is the case, the ash may be more of a black color instead of grey.
Lean Burning Flame:
• If the flame varies from a very small flame to a larger than normal flame, then the feed
rate is too low or lean.
• There may also be an ash buildup on ONE side of the burn pot.
• The stove may go out at times. When this happens it may also give a #2 or a #2 & #3
error indication.
and the ash is slowly building up evenly in the bottom of the fire
• The problem is that the stove is burning the available fuel at a rate faster than it is being
delivered, burning down to a small flame and then as more fuel is delivered, the fire
becomes larger than normal. To fix this, turn the feed rate trim pot knob up one notch
(6%) positive at a time until the stove becomes consistent.
It is most important to remember to wait 15 to 20 minutes between
adjustments to allow the stove to stabilize at the new setting.

Trouble Shooting the Flame
You must first determine if the flame is rich or lean to aid in trouble shooting the problem.
Besides trim pot adjustments, other things to look for are:
Feed wheel has lifted off the back plate do to a buildup of fines or other material that may get
under the feed wheel. This will cause a rich flame.
To remove the feed wheel, remove the four screws, springs and spacers and cle an the area
under the feed wheel.
Set the feed wheel tension if necessary. See “115_Setting the Feeder Wheel Tension.”
Check the upper burn plate gasket for air leaks. This is best done with an ash buildup on the
upper burn plate. If you can see the upper burn plate any where around the peri meter, an air leak
could be possible. Air will blow the ash away from the perimeter of the upper burn plate thus
showing you the position of an air leak. This will cause a rich burn.
Check the firebox door for a tight fit. Adjust the pawl on the door handle as necessary for a tight
fit. Inspect the gasket around the door damage or any signs of leakage.
It could be possible that there is an exhaust leak. An exhaust leak will cause the burn to be rich.
To eliminate that the venting is the cause, pull the ask drawer out 5 or 6 inches. Allow the stove to
run this way for 3 or 4 minutes. This will allow air from inside the house to be the combustion air
for the flame. Observe the flame during this time. The height of the flame is not important. If the
flame becomes brighter and livelier, you most likely have venting problems. If there is no change
in the flame, the venting system is most likely O.K. An exhaust leak comes from any exhaust
leaking from the center 3 inch vent pipe into the larger 5 inch fresh combustion air vent pipe.
Exhaust may also be drawn back into the stove at the termination cap do to the wind or the
deterioration of the termination cap.
Make sure the stove is clean by checking the following items:
The exhaust manifold at the bottom of the convection tubes. This area is about 3-1/2 inches deep
at the bottom and behind the convection tubes. If it fills up it will cause the flame to run rich.
There are 109 holes in the lower paddle. These must be open to affect a good flame.
The convection tube cover plates must be installed properly. Correct if necessary.
The bottom of the fuel deflector should be centered on the burn pot.
The Ash Dump Process
The ash dump of the Maxfire and UBB is done according to the amount of fuel that it is
fed. At the time of an ash dump, there should be about 1/2" to 3/4" of burning embers in
the upper burn pot. This is required to maintain a flame during and after an ash dump. If
you are still getting too much fuel in the pot at this time, you could be a little LEAN or
RICH. There is an adjustment for the ash dump frequency on the UBB, but not on the
115. Each time fuel is added to the burn pot, a pre-set number is added to an internal
counter on the Mother Board. When a preset number is reached, the stove goes into the
ash dump mode sequence.
No matter the heat setting, the ash dump works off of the FEED RATE.
The Higher the Feed Rate...the sooner the ash dump.
The Lower the Feed Rate...the later the ash dump
(The Ash Dump frequency can be changed on the UBB.)
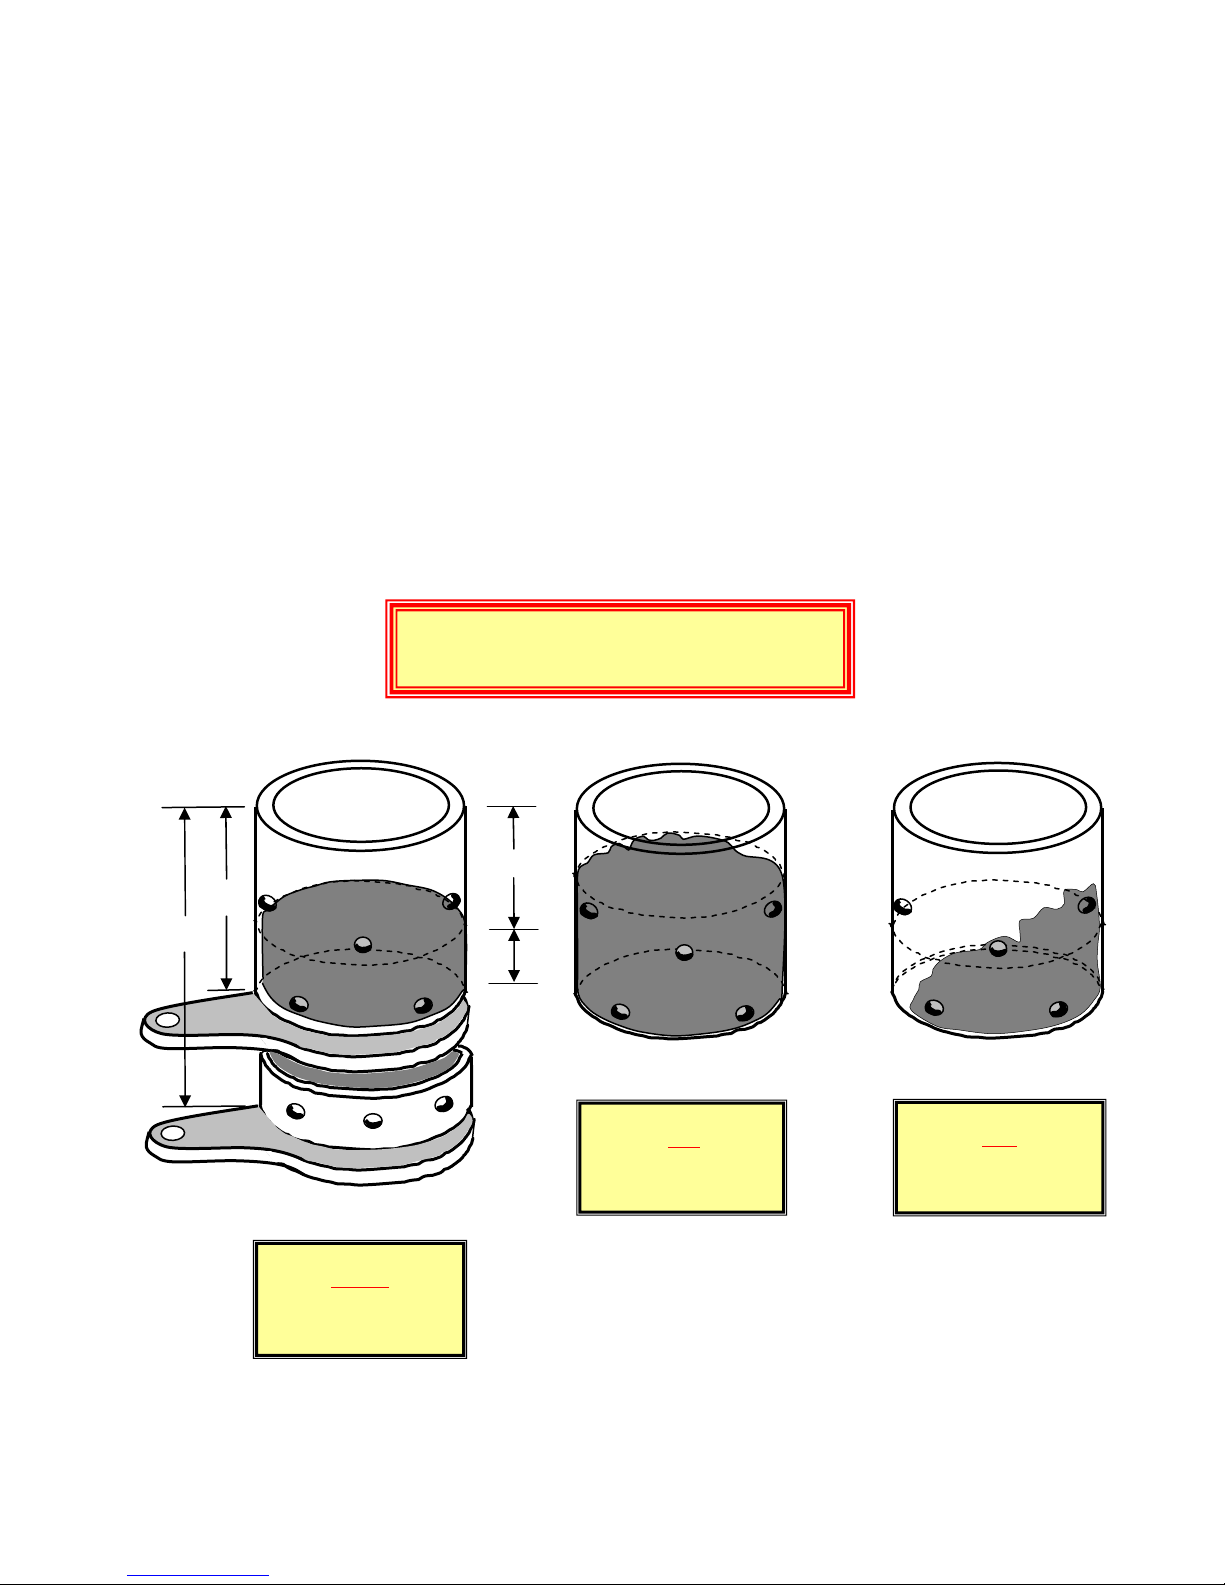
3-3/4"
5"
Typical ash height of a
NORMAL
burn at the beginning of the
Ash Dump Sequence
Figure 1 - Approximate Ash Height
BURN POT AT BEGINNING OF THE ASH
DUMP SEQUENCE
3-1/4 to 3"
1/2" to 3/4"
normal
depth
Typical ash height of a
burn at the beginning of the
RICH
Ash Dump Sequence
Typical ash height of a
Ash Dump
LEAN
Sequence
burn at the beginning of the

Cleaning the 110 Exhaust Manifold
03/2007
Page 3
110_Maintenance and Adjusting Procedures
To effectively clean the Bixby 110 MaxFire to allow maximum burn efficiency, the
exhaust manifold BEHIND the lower portion of the convection tubes must be kept clean and
open. If the exhaust manifold becomes clogged, the stove will not perform properly or even
may not start at all.
To clean this area, cut a 12-14 inch long piece of a heavy coat hanger. On one end
bend a handle. About ½ to ¾ inch from the other end, bend a 90º hook. This hook can than
be used to get BEHIND the convection tubes to scrape and to loosen any buildup in the
exhaust manifold. The exhaust manifold runs the total length right to left. On the right side
is where the exhaust enters the exhaust pipe and then into the exhaust fan cleanout box.
After scraping this area clean, it then can be blown clear using the exhaust clean
out. (Instructions are included if there is no cleanout plug installed.) After the cleaning is
completed, adjust the stove using the included trim pot knob adjustment sheet.
It is quite important to keep the exhaust manifold area clean as the performance of
the stove relies on the total area of the exhaust manifold for top performance.
 Loading...