

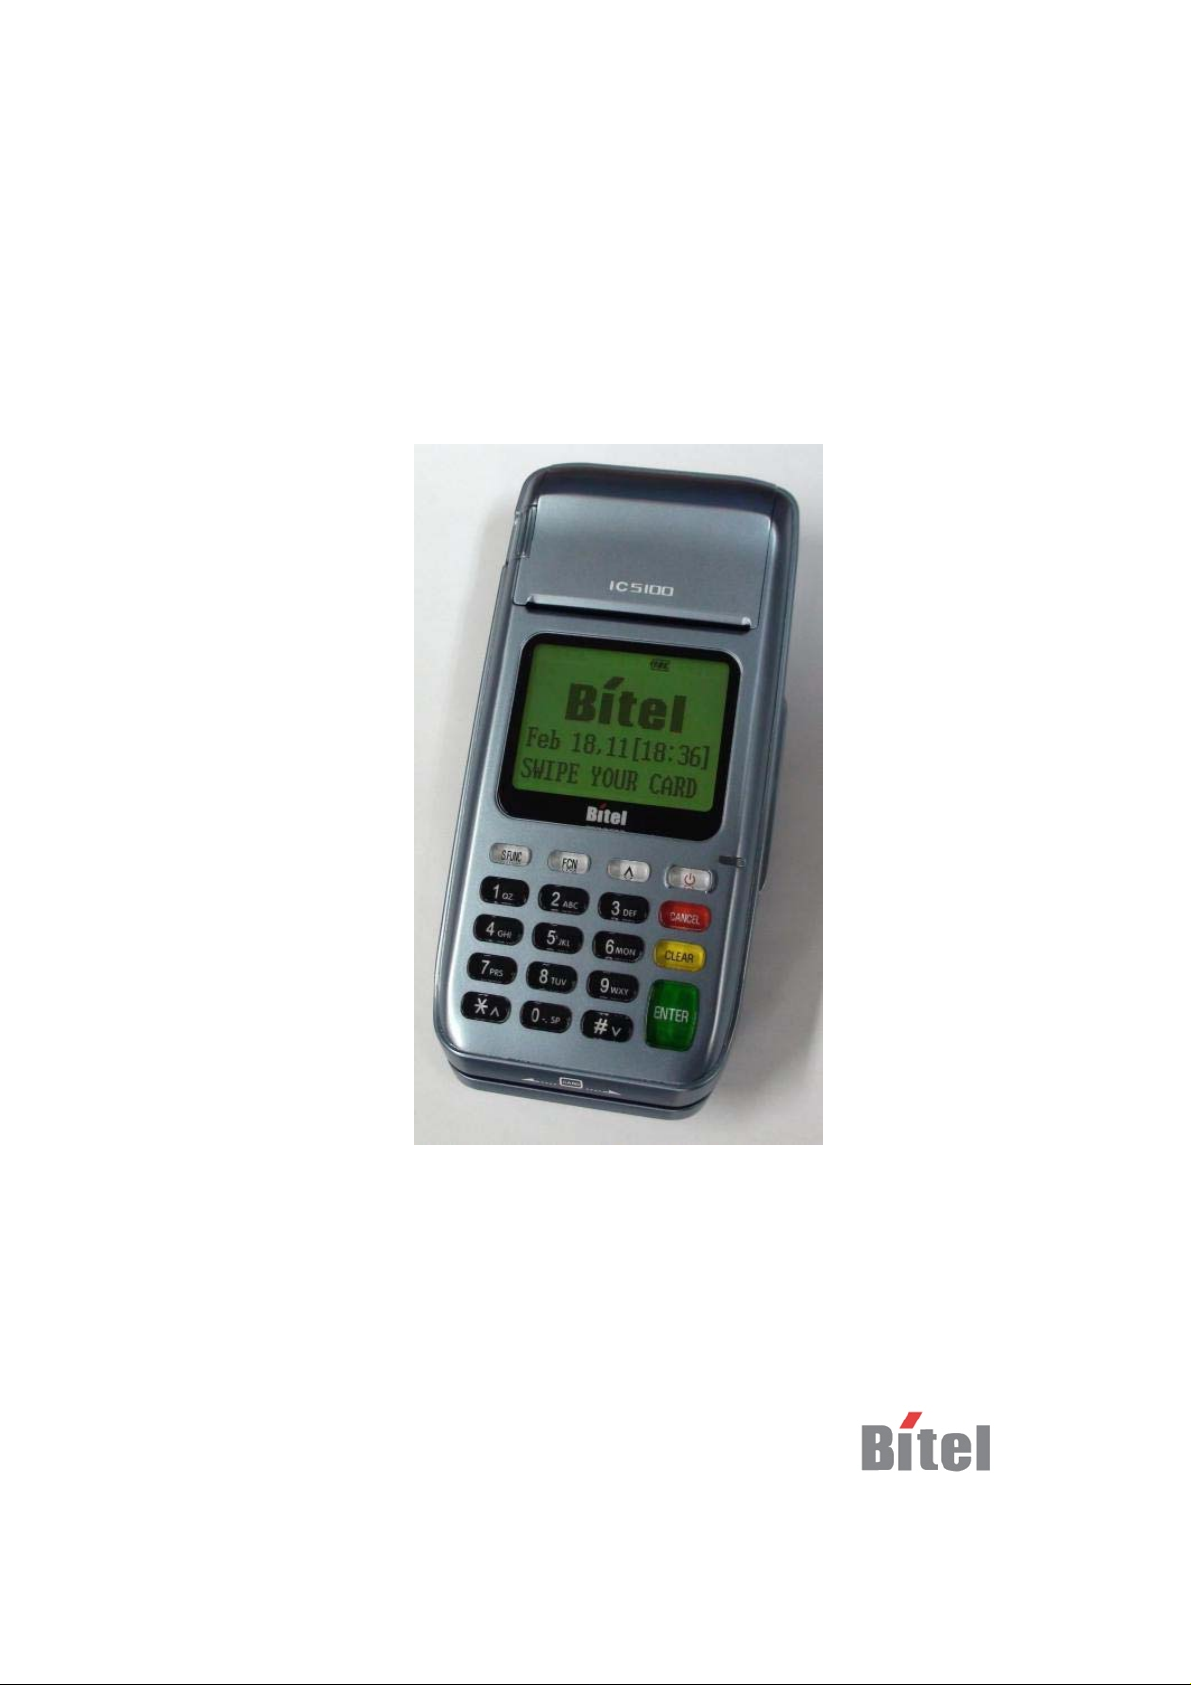
IC5100 Manual
MODEL : IC5100
User’s Manual
Bitel Co., Ltd.
1/60

IC5100 Manual
TABLE OF CONTENTS
User’s warning. …………………..…………………………… …… ………………………1
Product component…………………………….……………………………………………2
IDLE PROMPT / MAIN MENU……..…………………………………….………………3
New Transaction MENU……………………………………………………………………4
Credit Sale MENU………………………………………………………….……………….5
Debit Sale MENU………………………………………… …………………….…………..6
Check Authorization / Verification MENU…………………………………………………7
Refund Credit Card MENU…………………………………………………………….…...8
Refund Debit Card MENU………………………………………………………………… 9
Off-line Sale MENU(also called force sale)… …………………………………………… 10
Auth only……………………………………………………………………………… ….11
Mail / Phone Order(AVS) Sale MENU……………………………………………………12
Reports MENU – Bath Reporting………………………………………………………….13
Batch Functions…………………………………………………………………………....14
Setup……………………………………………………………………………………….15
IC5100(EMV approval) / New Transaction………….......…………………………… …. .16
IC5100(EMV approval) / Credit Sale…………….......…………………………………....17
IC5100(EMV approval) / Balance Inquiry……….......……………………………………18
IC5100(EMV approval) / Cash Advance……….......……………………………………..19
IC5100(EMV approval) / Refund…………………….......………………………………..20
IC5100(EMV approval) / Void……………………….......………………………………..21
IC5100(EMV approval) / Settlement………………….......……… ……………………….22
IC5100(EMV approval) / View Transaction…………...........…………………………….23
IC5100(EMV approval) / Print Total………………….......……………………………….24
5100(EMV approval) / Logon Terminal…………….......………………………………25
IC
IC5100(EMV approval) / Terminal Setup…………….......……………………………… 26
IC5100(EMV approval) / Contrast Set………………….......……………………………..27
IC5100(EMV approval) / Changing Pin………………….......……………………………28
IC5100(EMV approval) / Basic Test……………………….......………………………….29
Key, ICON component of
SAM, SIM, RUIM SOCKET………………………………………………………………31
Troubleshooting………………………………
IC5100………………......................…………………………..30
...…………………………………….… ...32
Bitel co., Ltd.
2/60
User’s Warning
IC5100 Manual
Bitel co., Ltd.
3/60
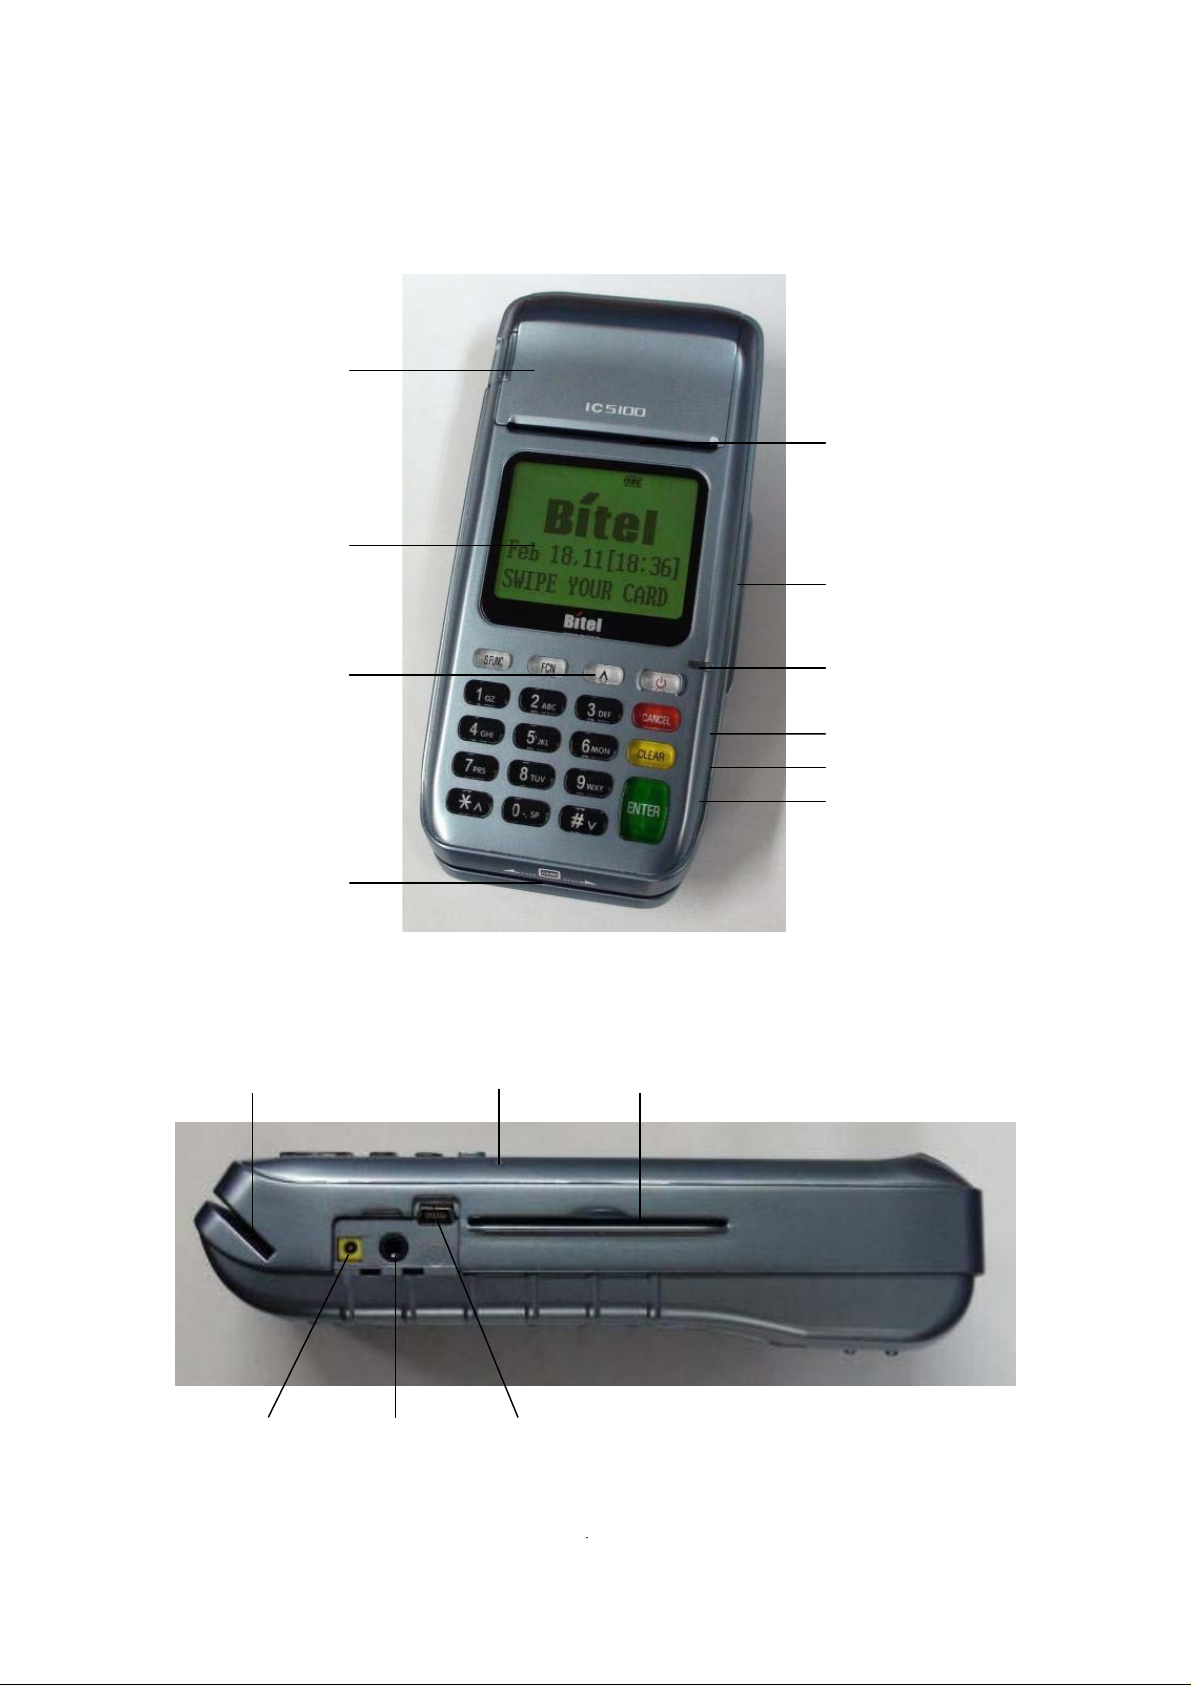
Product component
Receipt Box
Display screen
device
IC5100 Manual
Receipt Out
IC card opening
Paper forward key
Magnetic card
opening
Magnetic card opening IC card opening
Battery charge
LED
Battery charge
LED
USB port
Serial port
Power plug
Power plug
Serial port USB port
Bitel co., Ltd.
4/60

IC5100 Manual
IDLE PROMPT / MAIN MENU
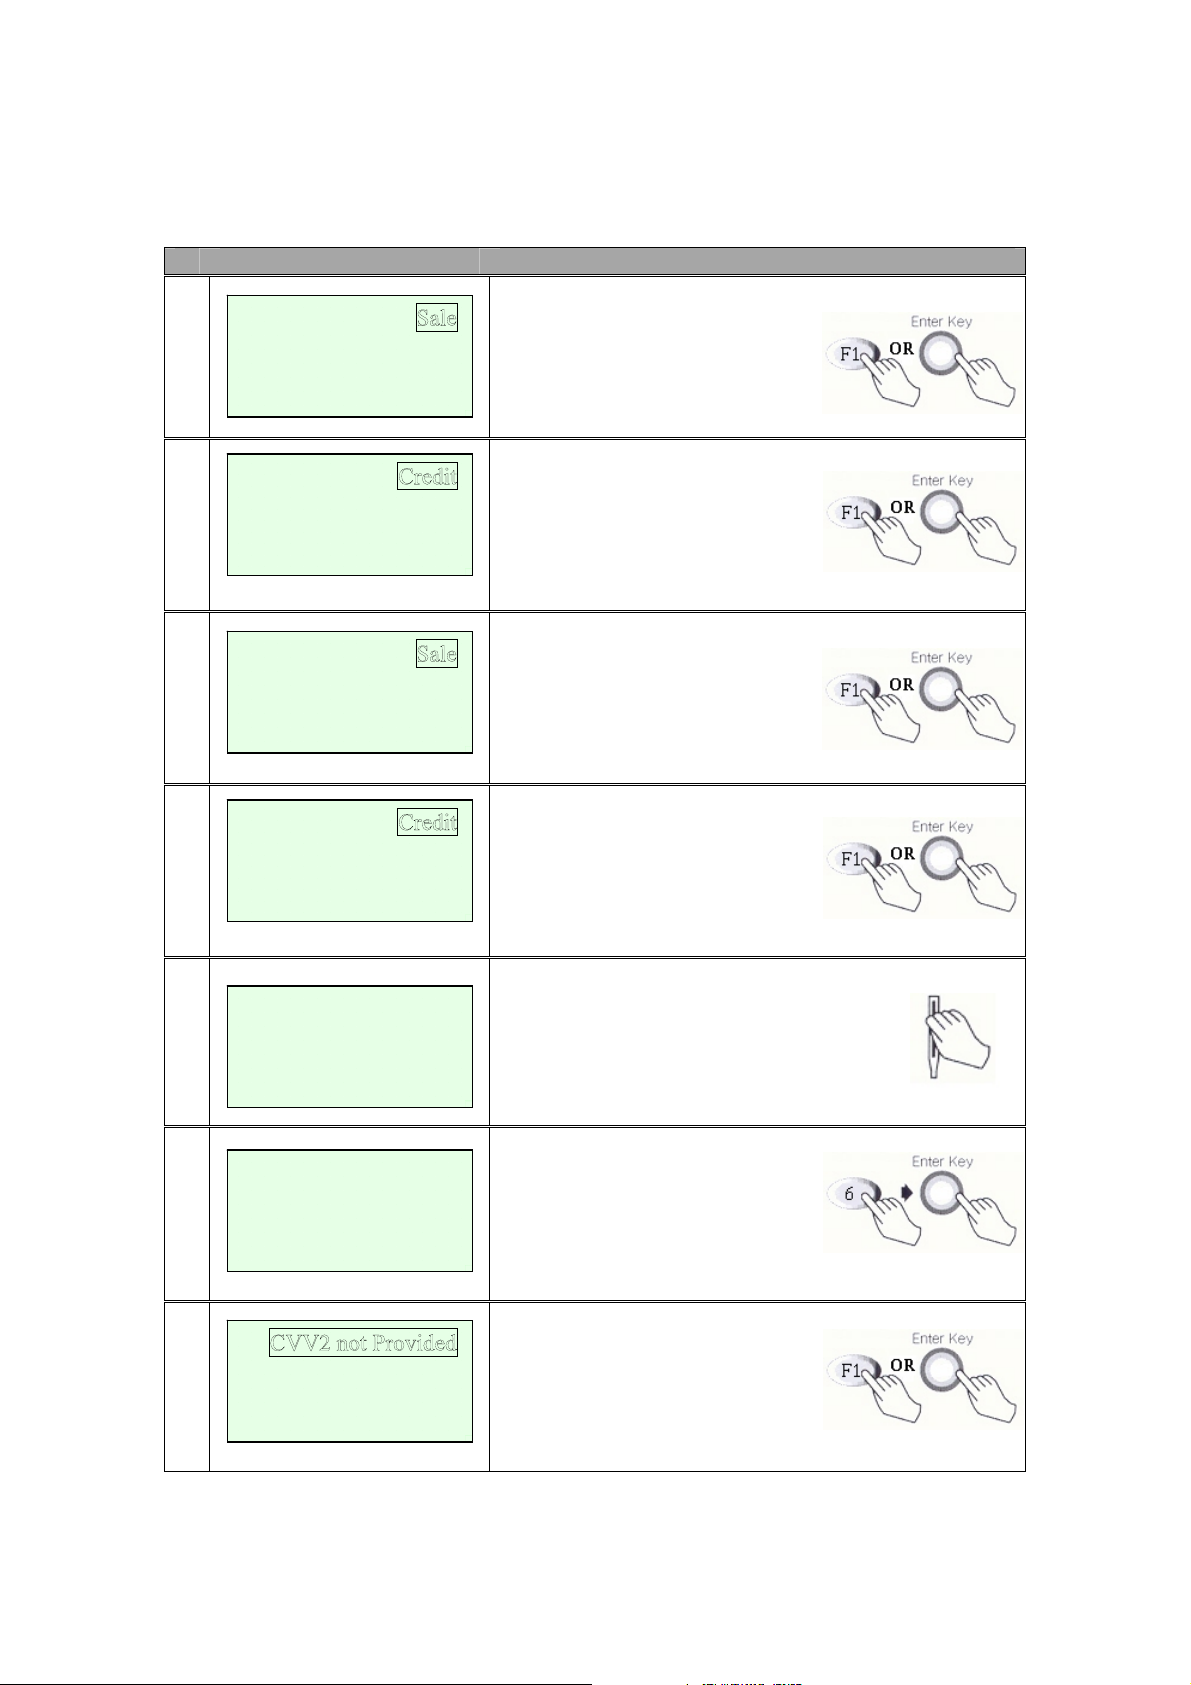
# Terminal Screen Descriptions for Key Operation and Summary
F L E X 5 1 0 0
1
SWIPE CARD
MAY 01, 03 23:51
2
<- -> Setup
Reports
Batch Functions
3
<- ->
Enter or Swipe Card.
*, # keys are scroll menu.(1 line)
Displays next page of menu items.
*, # keys are scroll menu.(1 line)
New Transaction MENU
# Terminal Screen Descriptions for Key Operation and Summary
1
Setup
Batch Functions
Reports
Press any key (0-9, *, #) to
Activate Main Menu.
Press Enter Key to select
New transaction function.
2
<- -> Off-line Sale
Refund
Void
3
Mail / Phone Order
<- ->
New Transaction Menu.
*, # keys are scroll menu.(1 line)
Bitel co., Ltd.
5/60
IC5100 Manual
Credit Sale MENU
# Terminal Screen Descriptions for Key Operation and Summary
A
1
A
2
B
1
<- -> Off-line Sale
<- -> EBT
<- -> Ticket Onl
Refund
Void
Debit
Check
Refund
Void
Press F1 or Enter key to begin
Sale transaction.
Press F1 for Credit Sale or Press
Enter key.
Press F1 or Enter key to begin
Sale transaction.
y
B
2
3
Swipe Card
Or
Debit
Key Account Number
Press F1 for Credit Sale or Press
Enter key.
Swipe Card or Input Account Number.
Enter
4a
Expiration Date
[ MM/YY ]
/
4b
CVV2 Present
CVV2 Illegible
CVV2 Not Presen
Manual Entry: Enter expiration
Date and press enter.
Display only when CVV2 processing option is ON. Press F1,
F3, F4 and move to Step 6.
Press F2 and move to step 4c.
t
6/60
IC5100 Manual
4c
5
6
Enter CVV2 data
From
Customer Card
Enter Last 4 Num
From
Account Number
Enter Amount
$00.00
Skip to step 6 after CVV2 is
entered.
Card Swipe Only: Enter 4 digits
and press Enter key.
Enter Amount.
Press Enter key.
7
8
9
10
Enter Tip Amount
Enter
Server ID
PROCESSING NOW.
>
LINE CONNECTED.
$00.00
Enter Tip Amount.
Press Enter key.
Enter Server ID
Press Enter key.
No key operation.
Line Connected..
No key operation.
7/60

IC5100 Manual
11
DATA SENDING
Data Sending.
No key operation.
12
DATA RECEIVING
Data Receiving.
No key operation.
13
Display and P r i nt Out Sales and A ut h or i z a tion Code.
APPROVAL 123456
8/60

IC5100 Manual
Debit Sale MENU
# Terminal Screen Descriptions for Key Operation and Summary
A
1
A
2
B
1
<- -> Off-line Sale
<- -> EBT
<- -> Ticket Onl
Refund
Void
Credit
Check
Refund
Void
Press F1 or Enter key to begin
Sale transaction.
Press F2 for Debit Sale or Press
scroll key to highlight Debit
function then press the Enter key.
Press F1 or Enter key to begin
Sale transaction.
y
B
2
Credit
Press F2 for Debit Sale or Press
scroll key to highlight Debit
Function then press the Enter key.
3
4
Enter Amount
$00.00
A
Cashback ? YES
5
Amount $00.00
Swipe Card
NO
Swipe Card.
Enter Amount.
Press Enter key.
Cash back?
No answer skip to step 6. (F2)
Yes answer show amount entry.
(F1)
9/60

IC5100 Manual
B
5
6
7
8
Enter
Cashback Amount
$00.00
Sale Amt $xxxxx.xx
Cash Amt $xxxxx.xx
Total Amt $xxxxx.xx
ENTER PIN
Amount $00.00
Waiting for PIN
LINE CONNECTED.
Enter Cash back Amount.
Next Step 7
Display on PINPad Screen and wait for PIN entr y.
Display on Terminal when External PIN Pad is used.
Line Connected..
No key operation.
9
DATA SENDING
10
DATA RECEIVING
11
APPROVAL 123456
Data Sending.
No key operation.
Data Receiving.
No key operation.
Display and Print Out Sales and Authorization Code.
10/60
IC5100 Manual
Check Authorization/Verification MENU (A Type)
# Terminal Screen Descriptions for Key Operation and Summary
1
<- -> Off-line Sale
2
<- -> EBT
3
<- ->
Enter
4
Micr Number
Refund
Void
Credit
Debit
ACH Check
ACH Prior
Press F1 or Enter key to begin
Sale transaction.
Press F3 for Check Sale or Press
scroll key to highlight Check
function then press the Enter key.
Press F1 for paper check or
press Enter key.
Micr Number may be required
for entry such as Drivers License
Number, Check Number.
5
6
7
Enter Amount
$00.00
PROCESSING NOW.
>
LINE CONNECTED.
Enter Amount.
Press Enter key.
No key operation.
Line Connected..
No key operation.
11/60

IC5100 Manual
8
DATA SENDING
9
DATA RECEIVING
10
APPROVAL 123456
Data Sending.
No key operation.
Data Receiving.
No key operation.
Display and P r i nt Out Sales and A ut h or i z a tion Code.
12/60

IC5100 Manual
Refund Credit Card MENU
# Terminal Screen Descriptions for Key Operation and Summary
A
1
A
2
B
1
<- -> Off-line Sale
<- ->
<- -> Ticket Onl
Sale
Void
Debit
EBT
Sale
Void
Press F2 or Enter key to begin
Refund transaction.
Press F1 for Credit Refund or
Press Enter key.
Press F2 or Enter key to begin
Refund transaction.
y
B
2
<- ->
Debit
Press F1 for Credit Refund or
Press Enter key.
3
Swipe Card
Or
Key Account Number
Swipe Card or Input Account Number.
Enter
4
Expiration Date
[ MM/YY]
/
5
Enter Amount
$00.00
Manual Entry: Enter expiration
date and press enter.
Amount is enter.
Press Enter key.
13/60

IC5100 Manual
6
APPROVAL 123456
Display and Print Out Sales and Authorization Code.
14/60
IC5100 Manual
Refund Debit Card MENU
# Terminal Screen Descriptions for Key Operation and Summary
A
1
A
2
B
1
<- -> Off-line Sale
<- ->
<- -> Ticket Onl
Sale
Void
Credit
EBT
Sale
Void
Press F2 or Enter key to
begin Refund transaction.
Press F2 for Debit Refund or
Press Enter key.
Press F2 or Enter key to
begin Refund transaction.
y
B
2
<- ->
3
4
5
Swipe Card
Enter Amount
$00.00
Amount $00.00
Waiting for PIN
Credit
Press F2 for Debit Refund or
Press Enter key.
Swipe Card.
Amount is enter.
Press Enter key.
Display on PINPad. Display ‘Waiting for PIN’ on
terminal screen when external PINPad is used.
15/60

IC5100 Manual
6
APPROVAL 123456
Display and P r i nt Out Sales and A ut h or i z a tion Code.
16/60
IC5100 Manual
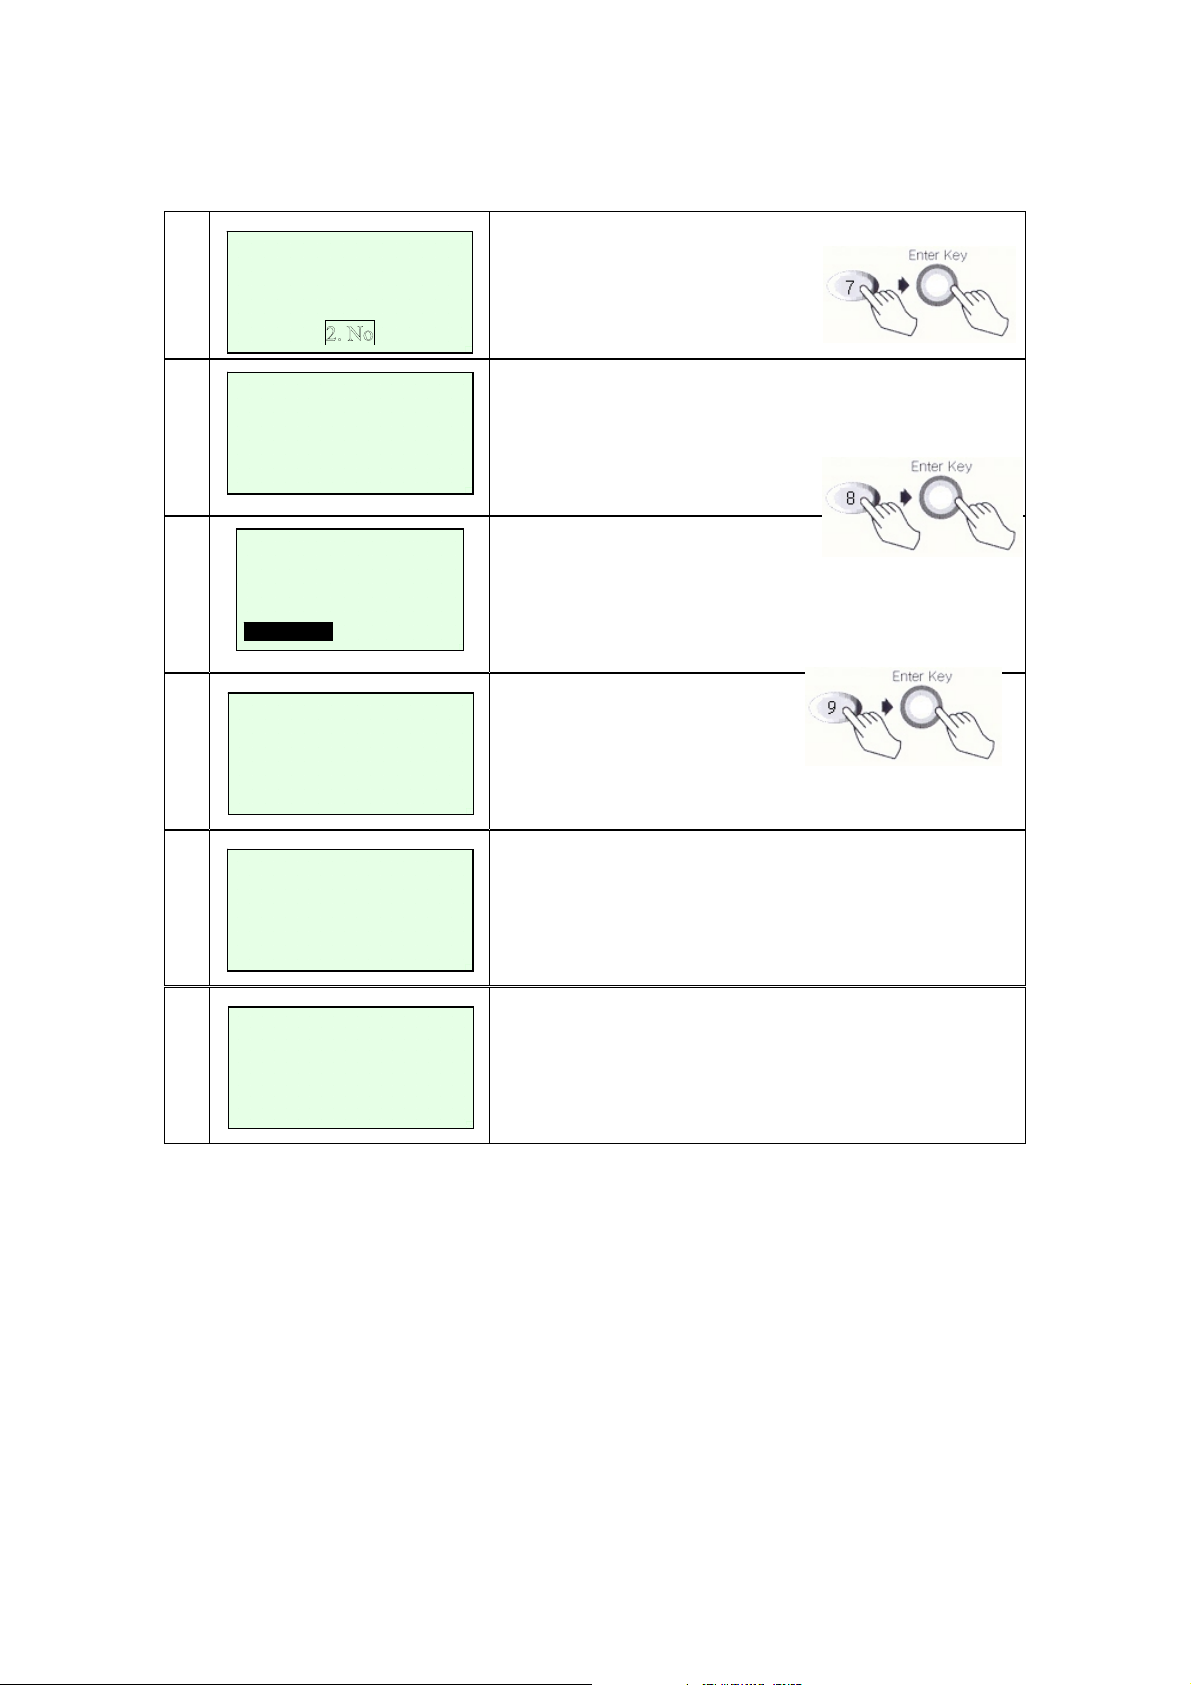
Void
# Terminal Screen Descriptions for Key Operation and Summary
A
1
B
1
A
2
<- -> Off-line Sale
<- -> Ticket Only
Enter
Invoice Number
xxxxxx
Sale
Refund
Sale
Refund
Press F3 or Enter key to begin
Void transaction.
Press F3 or Enter key to begin
Void transaction.
Enter Invoice Number.
B
2
3
4
Enter
Item Number
xxx
CREDIT REFUND
AMOUNT: $xx.xx
xxxxxxxxxxxxxx
Offline Transaction
Void ?
Enter Item Number.
Confirm the Transaction.
Select Yes(Void) or No(Return Main Menu).
2. No
17/60
IC5100 Manual
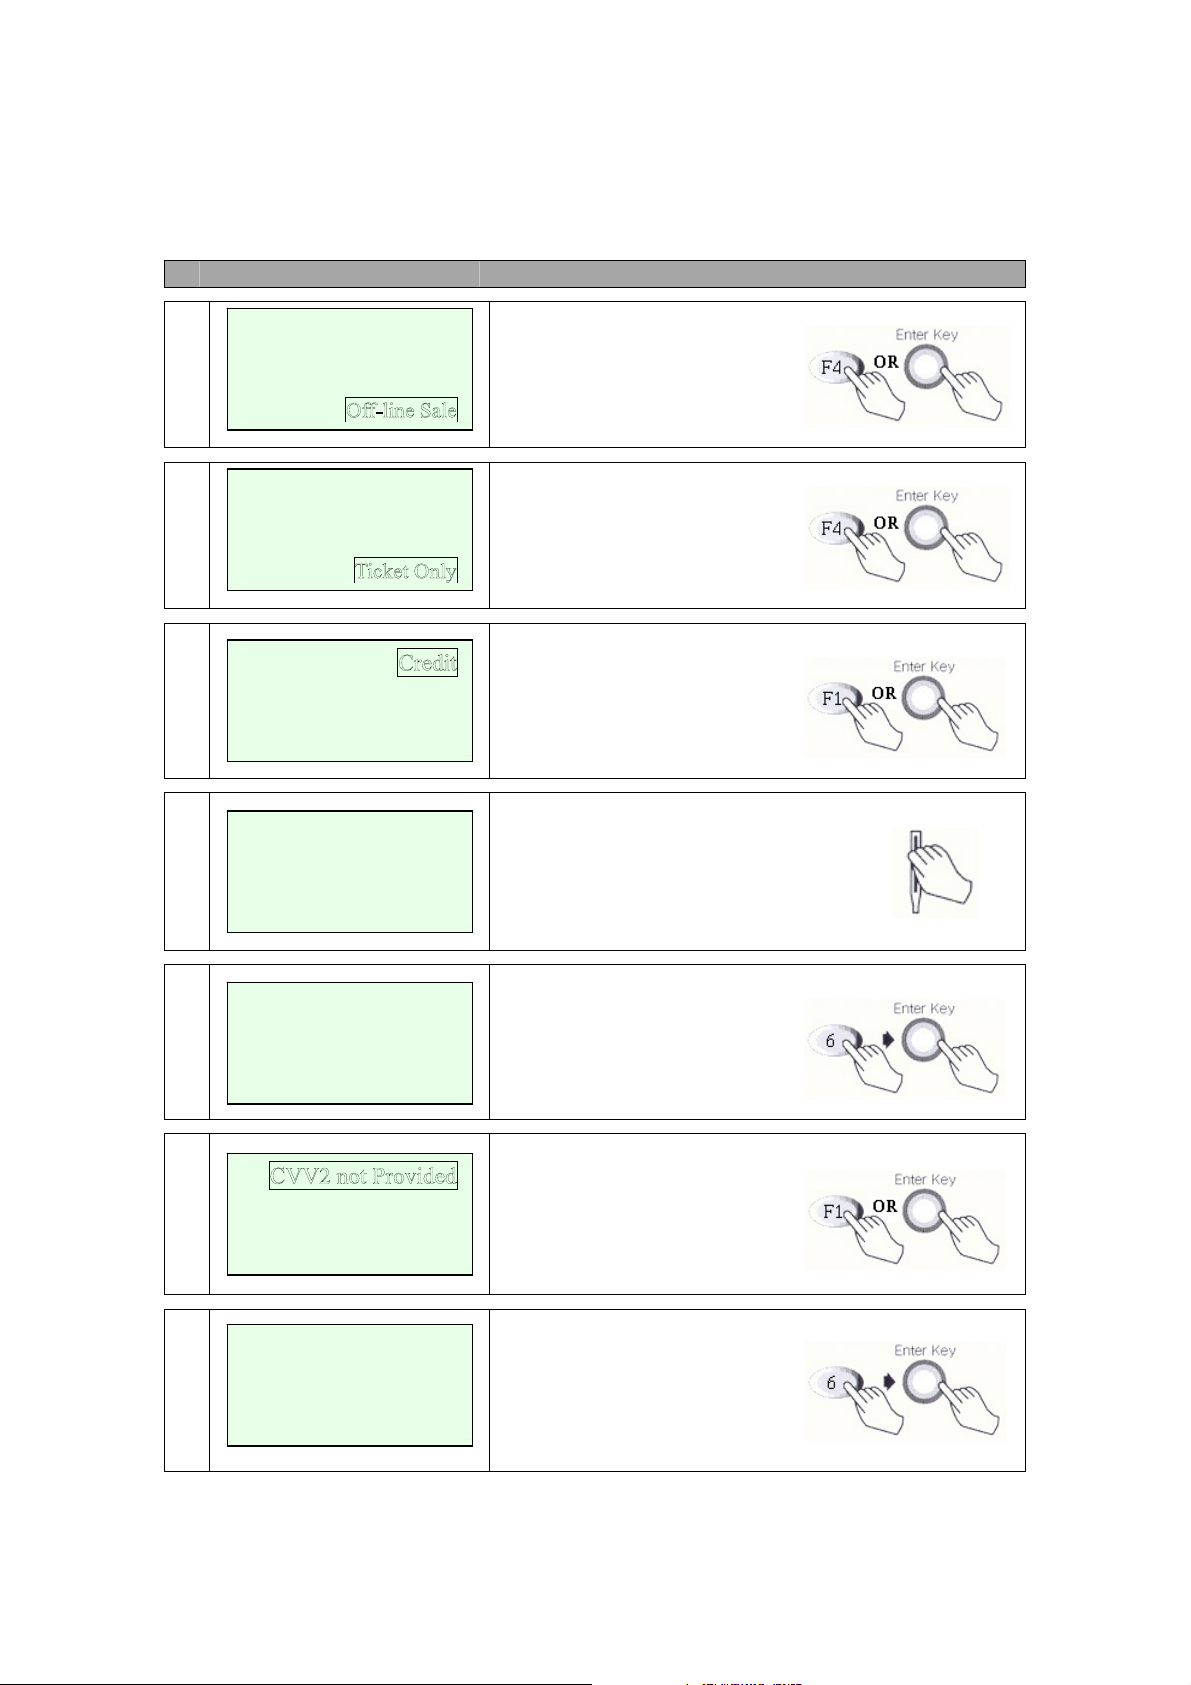
Off-line Sale MENU (also called Force Sale, Ticket Only)
# Terminal Screen Descriptions for Key Operation and Summary
A
1
B
1
2
<- ->
<- ->
<- ->
Sale
Refund
Void
Sale
Refund
Void
EBT Refund
EBT Prior
Press F4 or Enter key to begin
Off-line Sale transaction.
Press F4 or Enter key to begin
Off-line Sale transaction.
Next Step 3
Press F1 for Credit Force Sale
or Press Enter key.
3
Swipe Card
Or
Swipe Card or Input Account Number.
Key Account Number
Enter
4a
Expiration Date
[ MM/YY]
/
4b
CVV2 Present
CVV2 Illegible
CVV2 Not Presen
Manual Entry: Enter expiration
date and press enter
Display only when CVV2 processing option is ON. Press F1,
F3, F4 and move to Step 6.
Press F2 and move to step 4c.
t
4c
Enter CVV2 data
From Customer Card
Skip to step 6 after CVV2 is
entered.
18/60

IC5100 Manual
5
6
7
8
Enter Last 4 digits
from
Account Number
Enter Amount
$00.00
Enter
Approval Code
xxxxxx
APPROVAL 123456
Card Swipe Only: Enter 4 digits
and press Enter key.
Amount is enter.
Press Enter key.
Enter Approval Code.
Display and P r i nt Out Sales and A ut h or i z a tion Code.
19/60
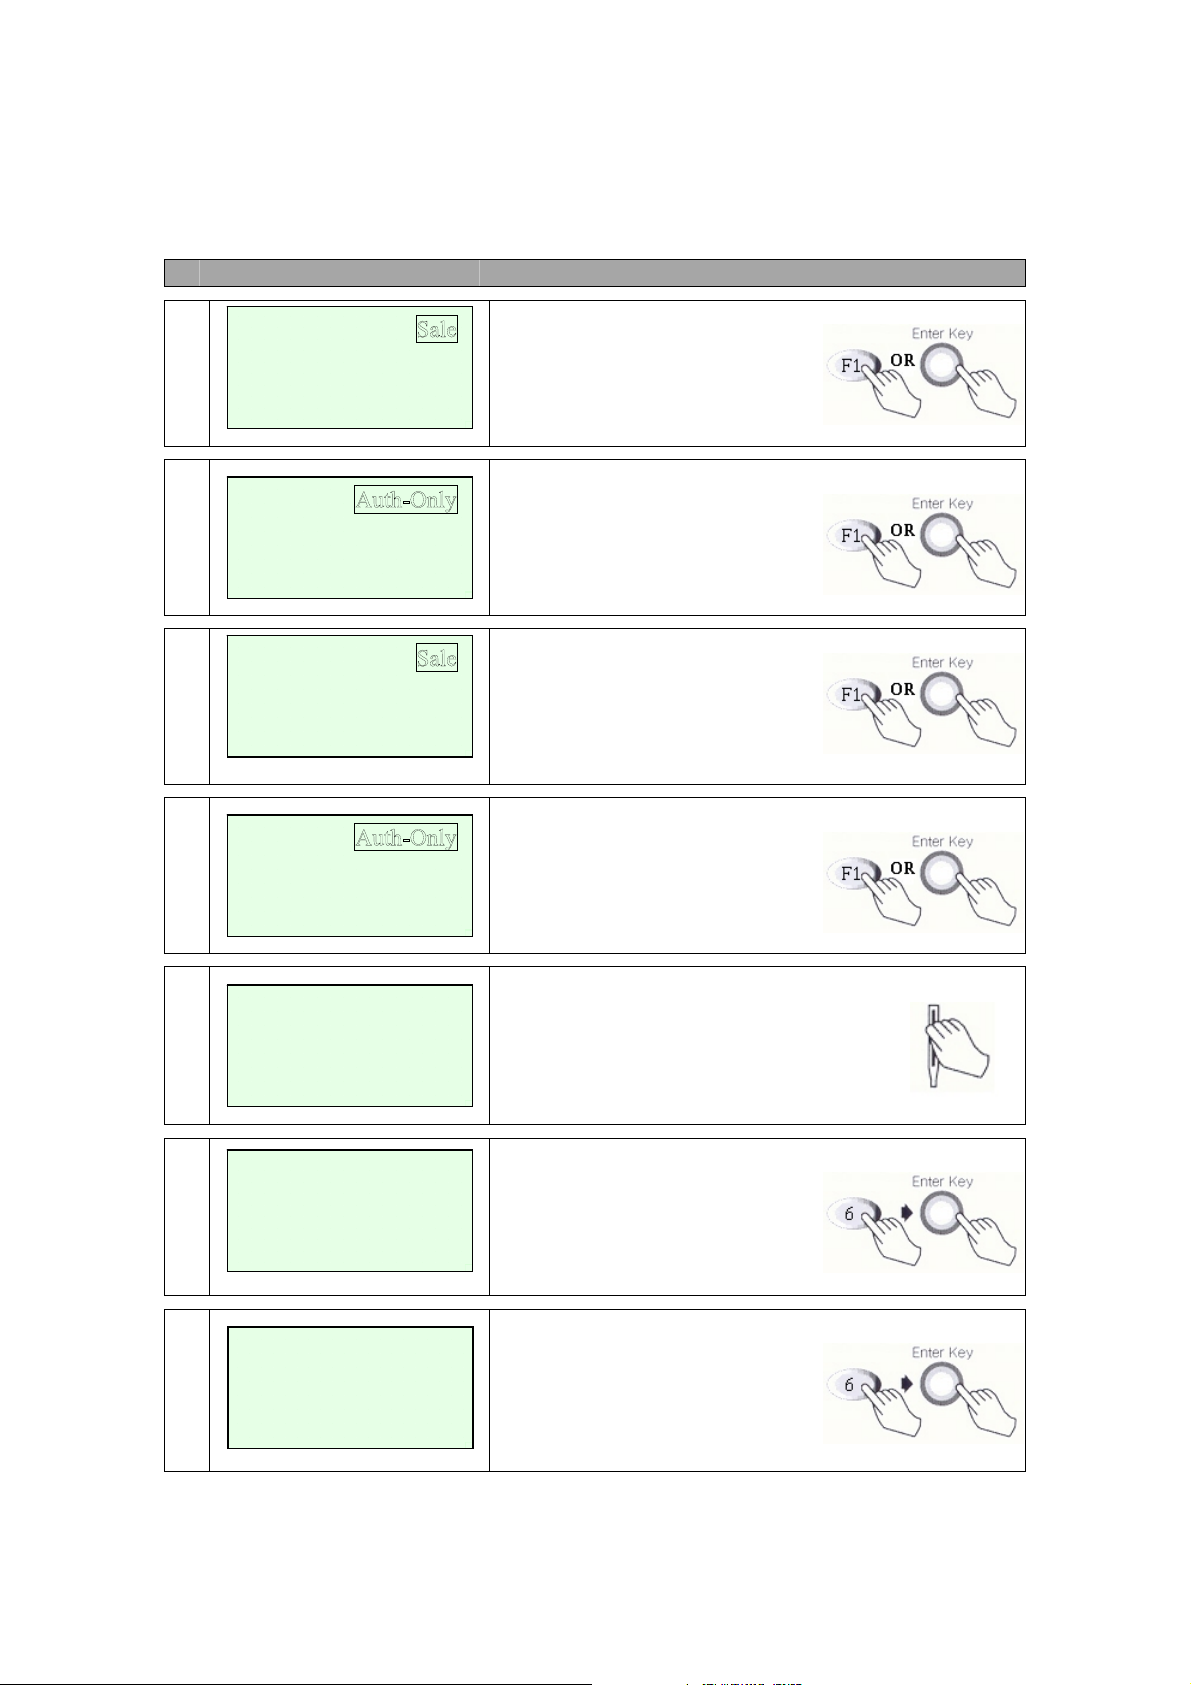
IC5100 Manual
Auth Only
# Terminal Screen Descriptions for Key Operation and Summary
A
1
A
2
B
1
<- -> Off-line Sale
Mail / Phone Order
<- ->
<- -> Off-line Sale
Refund
Void
Refund
Void
Press F1 or Enter key to begin
Auth-Only transaction.
Press F1 for Auth Only or
Press Enter key.
Press F1 or Enter key to begin
Auth-Only transaction.
B
2
EBT
<- ->
3
Swipe Card
Or
Key Account Number
Enter
4
Expiration Date
[ MM/YY]
Press F1 for Auth Only or
Press Enter key.
Swipe Card or Key Account
Number.
Manual Entry: Enter expiration
date and press enter.
/
Amount is enter.
Press Enter key.
5
Enter Amount
$00.00
20/60

IC5100 Manual
No key operation.
Line Connected..
No key operation.
Data Sending.
No key operation.
Data Receiving.
No key operation.
6
7
8
9
PROCESSING NOW.
>
LINE CONNECTED.
DATA SENDING
DATA RECEIVING
10
APPROVAL 123456
Display and P r i nt Out Sales and A ut h or i z a tion Code.
21/60
IC5100 Manual
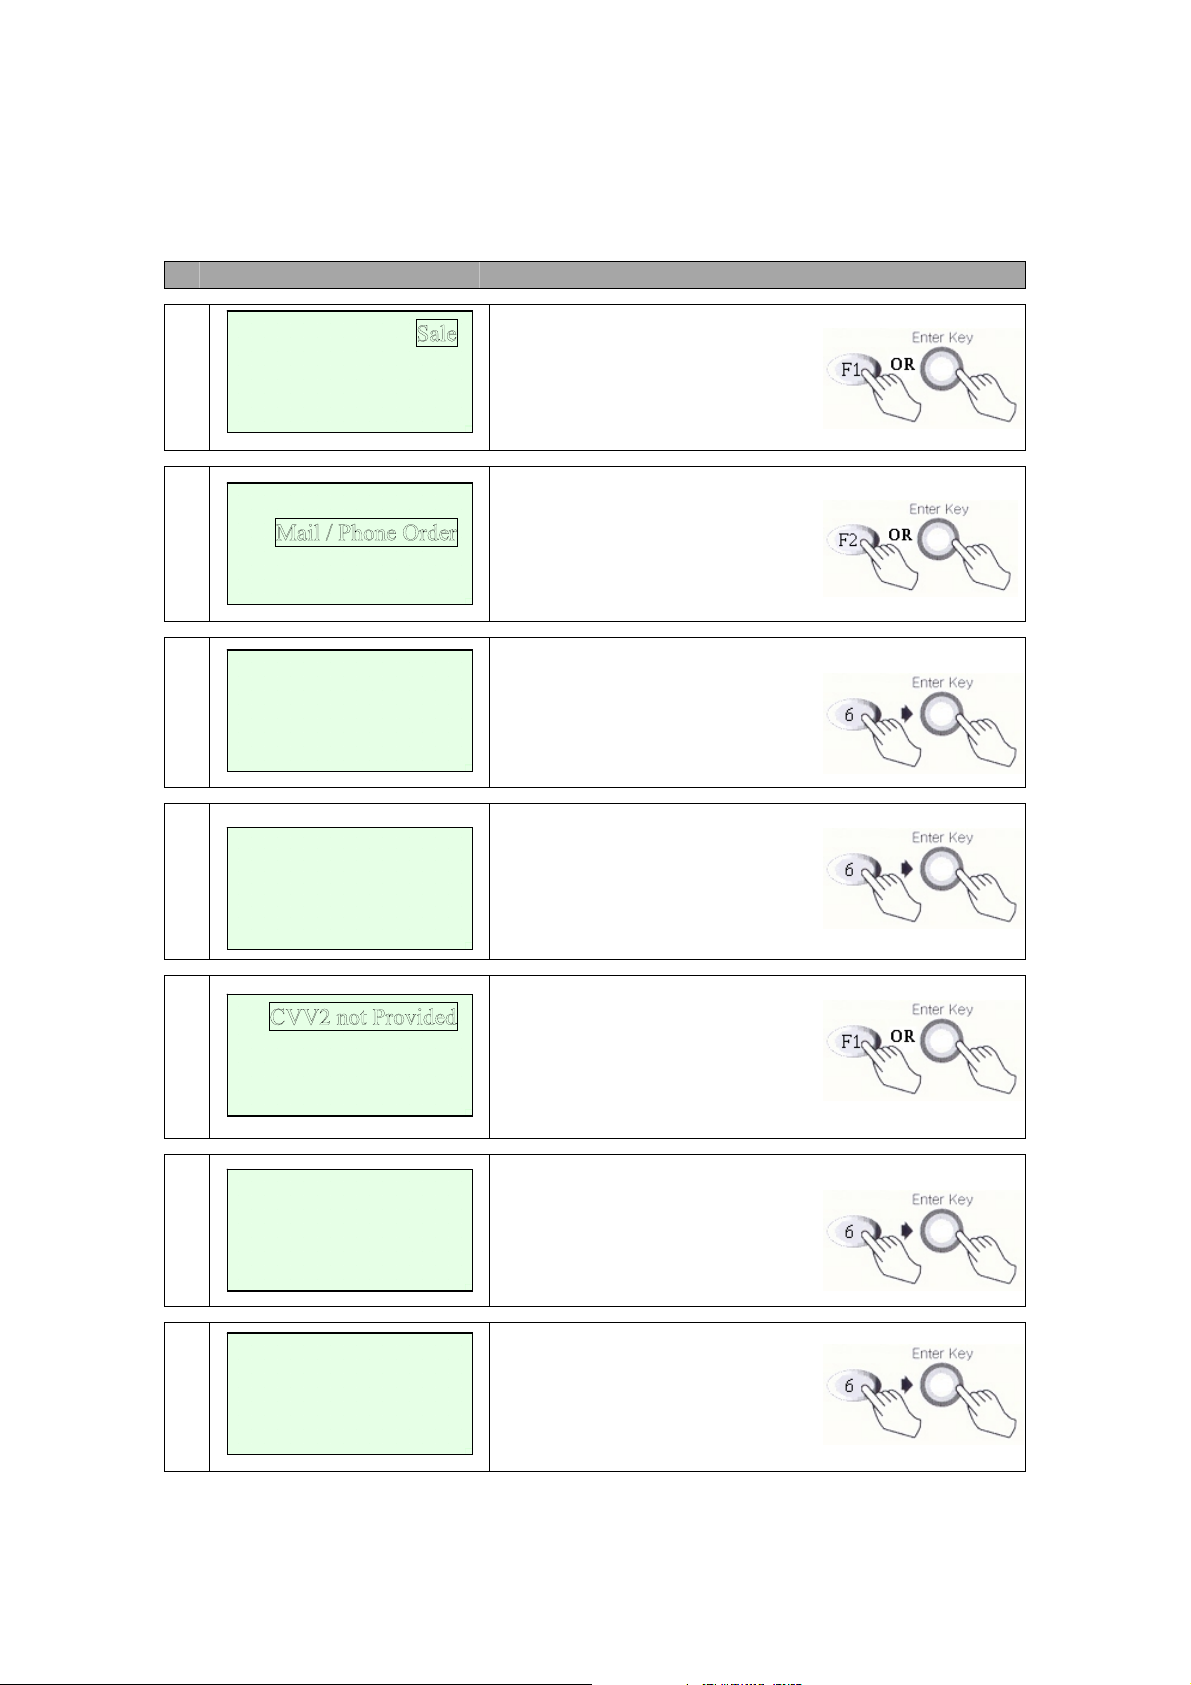
Mail / Phone Order (AVS) Sale MENU (A Type)
# Terminal Screen Descriptions for Key Operation and Summary
1
<- -> Off-line Sale
2
<- ->
Key
3
Account Number
Refund
Void
Auth-Only
Press F1 or Enter key to begin
Sale transaction.
Press F2 for Mail / Phone Order.
Input Key Account Number.
Enter
4a
4b
4c
5
Expiration Date
[ MM/YY]
/
CVV2 Present
CVV2 Illegible
CVV2 Not Presen
Enter CVV2 data
From Customer Card
Enter Street Address
xxxxxxxxxxxx
Manual Entry: Enter expiration
date and press enter.
Display only when CVV2 processing option is ON. Press F1,
F3, F4 and move to Step 6.
Press F2 and move to step 4c.
t
Skip to step 6 after CVV2
is entered.
Note some hosts may only require
the house number and not the
street name. Enter Street Address.
22/60

IC5100 Manual
5a
6
7
8
Enter Zip Code
xxxxx-xxxx
Enter Amount
$00.00
PROCESSING NOW.
>
LINE CONNECTED.
Enter Zip Code.
5 digits required… last 4 optional.
Amount is enter.
Press Enter key.
No key operation.
Line Connected.
No key operation.
9
DATA SENDING
10
DATA RECEIVING
11
APPROVAL 123456
Data Sending.
No key operation.
Data Receiving.
No key operation.
Display and P r i nt Out Sales and A ut h or i z a tion Code.
23/60
IC5100 Manual
EBT – Food Sale, Food Return, Cash Sale, Cash Only (B Type)
# Terminal Screen Descriptions for Key Operation and Summary
A
1
B
1
2
<- -> Off-line Sale
<- -> Ticket Onl
<- ->
Refund
Void
Refund
Void
Auth-Only
Press F1 or Enter key to begin
Sale transaction.
Press F1 or Enter key to begin
Sale transaction.
y
Press F2 for Mail / Phone Order.
3a
Food VCHR Retu
3b
4
Key Account Number
5
$00.00
Food Return
Food VCHR Sale
rn
Food Balance
Cash Only
Cash Balance
Swipe Card
Or
Enter Amount
Select Food Sale or Food Return.
Use Scroll Key (*,#).
Select Cash Sale or Cash Only.
Use Scroll Key (*,#).
Swipe Card or Key Account
Number.
Amount is enter.
Press Enter key.
24/60

6
7
8
9
Amount $00.00
Waiting for PIN
LINE CONNECTED.
DATA SENDING
DATA RECEIVING
IC5100 Manual
Display on Terminal when External PIN Pad is used.
Line Connected..
No key operation.
Data Sending.
No key operation.
Data Receiving.
No key operation.
10
APPROVAL 123456
Display and P r i nt Out Sales and A ut h or i z a tion Code.
25/60

IC5100 Manual
EBT – Food VCHR Sale, Food VCHR Return (B Type)
# Terminal Screen Descriptions for Key Operation and Summary
A
1
B
1
2
<- -> Off-line Sale
<- -> Ticket Onl
<- ->
Refund
Void
Refund
Void
Auth-Only
Press F1 or Enter key to begin
Sale transaction.
Press F1 or Enter key to begin
Sale transaction.
y
Press F2 for Mail / Phone Order.
3
Food VCHR Return
4
5
6
Swipe Card
Key Account Number
Enter Amount
$00.00
Enter
Voucher Number
xxxxxxxxxxx
Food Sale
Food Return
Or
Select Food VCHR Sale or
Food VCHR Return.
Swipe Card or Key Account
Number.
Amount is enter.
Press Enter key.
Enter Voucher Number.
26/60
IC5100 Manual
Enter
7
8
Approval Code
xxxxxx
APPROVAL 123456
Enter Approval Code.
Display and P r i nt Out Sales and A ut h or i z a tion Code.
27/60

IC5100 Manual
EBT – Food Balance, Cash Balance (B Type)
# Terminal Screen Descriptions for Key Operation and Summary
A
1
B
1
2
<- -> Off-line Sale
<- -> Ticket Onl
<- ->
Refund
Void
Refund
Void
Auth-Only
Press F1 or Enter key to begin
Sale transaction.
Press F1 or Enter key to begin
Sale transaction.
y
Press F2 for Mail / Phone Order.
3a
Food VCHR Return
3b
4
Key Account Number
Amount $00.00
5
Waiting for PIN
Food Return
Food VCHR Sale
Cash Sale
Cash Only
Cash Balance
Swipe Card
Or
Use Scroll Key (*,#).
Select Cash Sale or Cash Only.
Use Scroll Key (*,#).
Swipe Card or Key Account
Number.
Display on Terminal when External PIN Pad is used.
28/60

IC5100 Manual
6
LINE CONNECTED.
7
DATA SENDING
8
DATA RECEIVING
9
APPROVAL 123456
Line Connected..
No key operation.
Data Sending.
No key operation.
Data Receiving.
No key operation.
Display and P r i nt Out Sales and A ut h or i z a tion Code.
29/60

IC5100 Manual
Reports MENU – Batch Reporting
# Terminal Screen Descriptions for Key Operation and Summary
1
A
2
B
2
New Transaction
Batch Functions
Setu
<- -> Re
Batch Detail
Server
print Recpt
Batch Detail
Server
Press F2 or Enter Key to select
Reports function.
p
Press F1 key to print batch summary report.(step 5)
Press F2 key to print Batch Detail report.(step 5)
Press F3 key to print Server.(step 3)
Press F4 key to Reprint Receipt.(step 5)
Press F1 key to print batch summary report.(step 5)
Press F2 key to print Batch Detail report.(step 5)
Press F3 key to print Server.(step 3)
3
4
5
Enter Server
Number
Server No.:
Batch Summary
Report
Printin
Detail
g….
Press F1 key to print server summary report.(ste p 5)
Press F2 key to print server Detail report.(step 5)
Enter Server Number.
Display and Print Out Batch Summary Report.
30/60

IC5100 Manual
Batch Functions (A Type)
# Terminal Screen Descriptions for Key Operation and Summary
1
2a
2b
New Transaction
Report
Setup
Review Batch
Tip Adjust
print Receipt
Re
Batch History
Press F3 or Enter Key to select
Batch functions.
Press F1 key to Settle Batch. Next Step 3.
Press F2 key to Review Batch.
Press F3 key to Tip Adjust.
Press F4 key to Reprint Receipt.
Press F1 key to AutoSettle Batch.
Press F2 key to Batch History.
3
4
5
6
Batch Settlement
Sales=$xx.xx
Refunds=$xx.xx
Yes No
PROCESSING NOW.
>
LINE CONNECTED.
DATA SENDING
Yes (F5 key) to step 4.
No (F7 key) to Main Menu.
No key operation.
Line Connected.
No key operation.
Data Sending.
No key operation.
31/60

IC5100 Manual
7
DATA RECEIVING
8
BATCH #00001 OK!
Data Receiving.
No key operation.
Display and Print Out Sales and Batch Code.
32/60
IC5100 Manual
Batch Functions (B Type)
# Terminal Screen Descriptions for Key Operation and Summary
1
2
3
4
New Transaction
Report
Setup
Deposit Inquiry
PROCESSING NOW.
>
LINE CONNECTED.
Press F3 or Enter Key to select
Batch functions.
Press F1 key to Close Batch.
Press F2 key to Deposit Inquiry.
No key operation.
Line Connected.
No key operation.
5
DATA SENDING
6
DATA RECEIVING
7
BATCH #00001 OK!
Data Sending.
No key operation.
Data Receiving.
No key operation.
Display and Print Out Sales and Batch Code.
33/60
IC5100 Manual
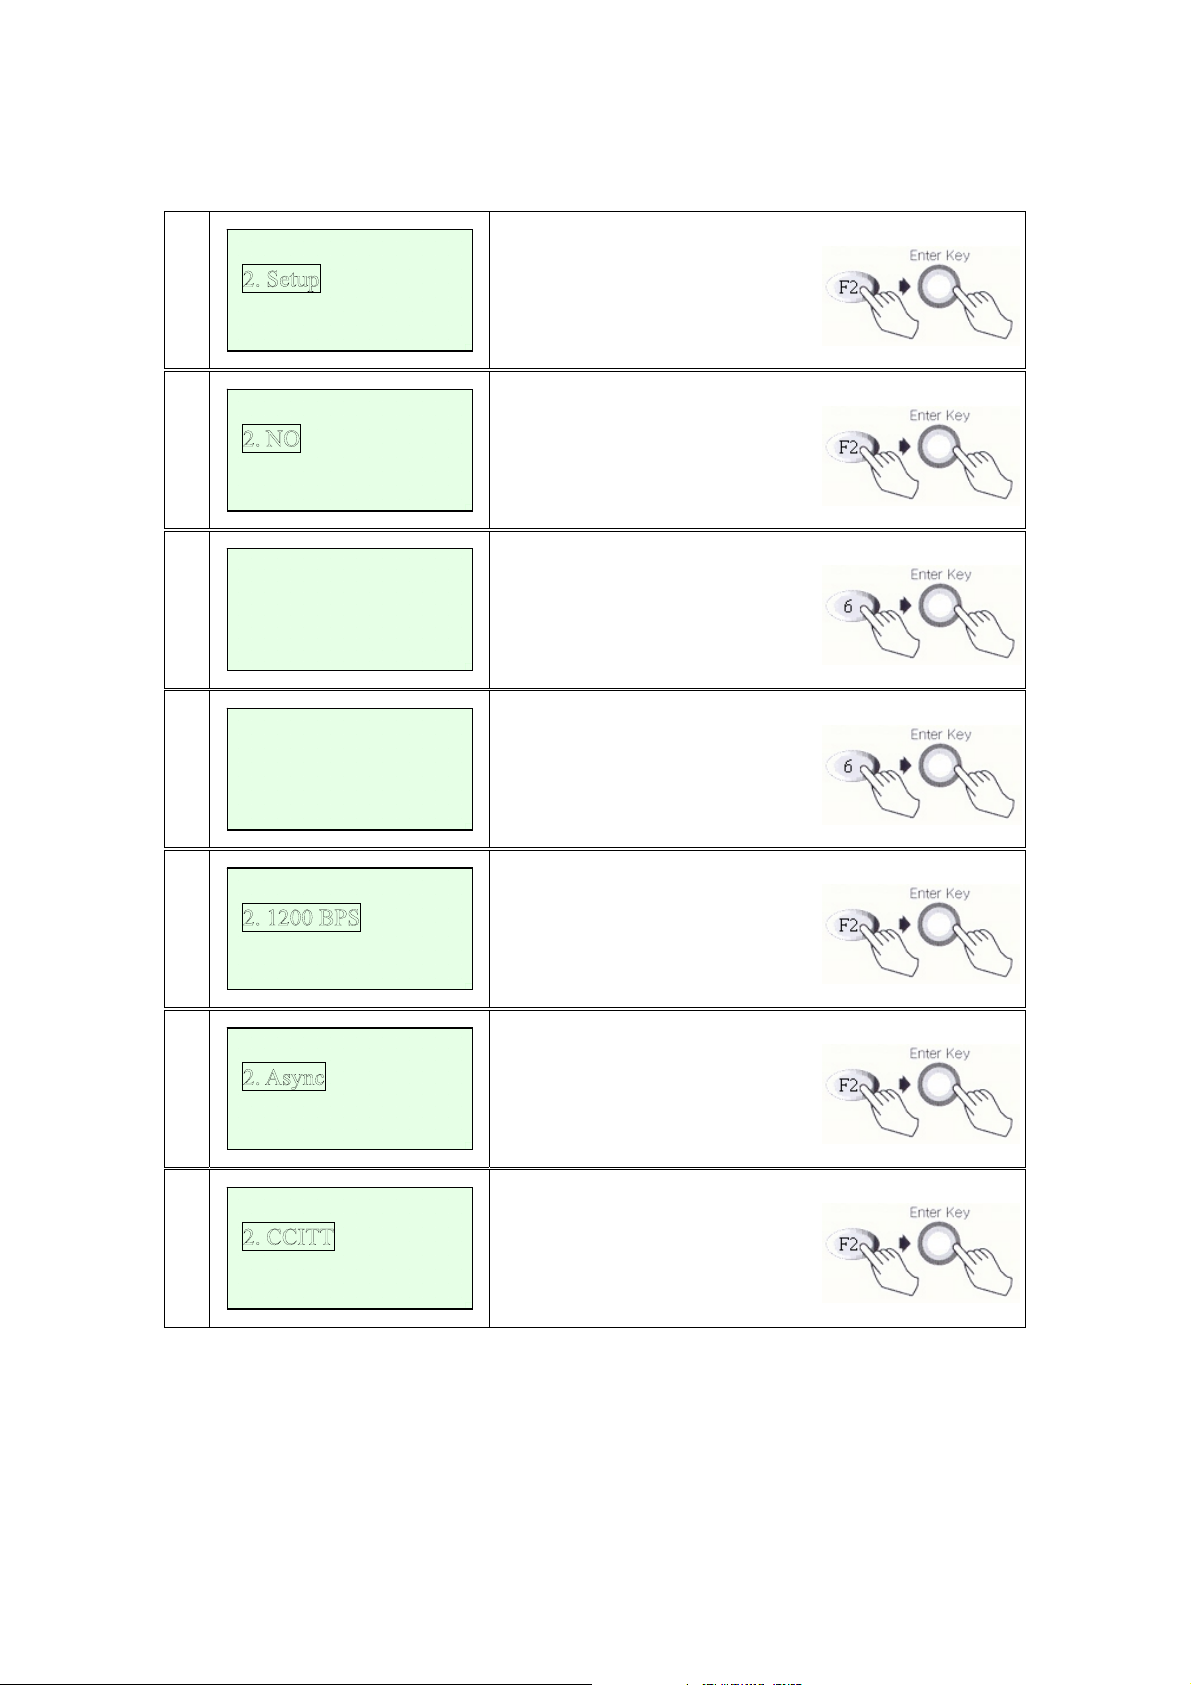
Setup (A Type)
# Terminal Screen Descriptions for Key Operation and Summary
1
2
3a
New Transaction
Batch Functions
<ADMIN>
Select No (00-99)
[00]
<ADMIN>
Client Number
Reports
xxxx
Press S.FUNC Key or
Press F4 or Enter Key to select
Admin functions.
Admin Main Screen.
Select 00-99 digit Number.
(1, 2, 3, 4, 5, 6, 7, 8, 9, 10 Available)
Select 1, This Screen.
Input Client Number.
3b
<ADMIN>
Merchant Number
xxxxxxxxxxxx
<ADMIN>
3c
Retail
Input Merchant Number.
Select Industry Type.
Use Scroll Key (*, #).
MOTO
3d
4
<ADMIN>
Terminal Number
<ADMIN>
Telephone Number
xxxxxxxxxxxxxxxx
Restrant
xxx
Input Restrant Terminal Number.
Select 2, This Screen.
Input Telephone Number.
34/60
IC5100 Manual
5a
5b
5c
6
<ADMIN>
CVV2 ?
2. No
<ADMIN>
AVS ?
1. Yes
<ADMIN>
Tip Use ?
2. No
<ADMIN>
2. Del Server ID
3. Server ID Use
Select 3, This Screen.
CVV2 ? Yes or No.
AVS ? Yes or No.
Use Scroll Key (*, #).
Select Tip Usage.
Yes or No.
Use Scroll Key (*, #).
Select 4, This Screen.
Select 1. Add Server ID
Select 2. Del Server ID
Select 3. Server ID Use
7
8
9
10
<ADMIN>
Init Memory ?
1. Yes
<ADMIN>
Footer Line #1
xxxxxxxxxxxxx
<ADMIN>
Training Mode ?
1. Yes
< SPECIAL FUNC.>
INPUT TIME
YYMMDDhhmmss D
0305010103148 5
Select 5, This Screen.
Init Memory ?
Select Yes or No.
Use Scroll Key (*, #).
Select 6, This Screen.
Footer Line ? (#1 ~ # 4)
Input the Character.
Select 7, This Screen.
Training Mode ?
Select Yes or No.
Use Scroll Key (*, #).
Select 8, This Screen.
Input Current Time.
35/60

11
12
12
a
12
b
< SPECIAL FUNC.>
LCD CONTRAST
[25]
<ADMIN>
Old Manager
Password ?
<ADMIN>
New Manager
Password ?
<ADMIN>
Old Manager
Password Again ?
IC5100 Manual
Select 9, This Screen.
Control LCD Contrast.
Select 10, This Screen.
Input Old Manager Password.
xxxx
Input New Manager Password.
xxxx
Input New Manager Password.
xxxx
36/60

IC5100 Manual
Setup (B Type)
# Terminal Screen Descriptions for Key Operation and Summary
1
2
3a
New Transaction
Reports
Batch Functions
<ADMIN>
Select No (00-99)
[00]
<ADMIN>
Merchant Number?
xxxxxxxxxxxx
Press S.FUNC Key or
Press F4 or Enter Key to select
Admin functions.
Admin Main Screen.
Select 00-99 digit Number.
(1, 2, 3, 4, 5, 6, 7, 8, 9, 10 Available)
Select 1, This Screen.
Input Merchant Number.
3b
<ADMIN>
Device ID ?
xxxx
Input Device ID.
3c
3d
<ADMIN>
Retail
Hotel
<ADMIN>
Restrant
Select Industry Type.
Use Scroll Key (*, #).
Input Terminal ID.
Terminal ID ?
xxxxx
4a
<ADMIN>
PABX Use?
2.No
Select 2, This Screen.
PABX Use?
Select Yes(4b) or No(4c).
37/60

IC5100 Manual
4b
4c
5a
5b
<ADMIN>
Enter
PABX Number
x
<ADMIN>
Enter
Telephone Number
xxxxxxxxxxxxxxxx
<ADMIN>
CVV2 ?
2. No
<ADMIN>
AVS ?
1. Yes
Enter PABX Number.
Enter Telephone Number.
Select 3, This Screen.
CVV2 ? Yes or No.
AVS ? Yes or No.
Use Scroll Key (*, #).
5c
6
7
8
<ADMIN>
Tip Use ?
2. No
<ADMIN>
2. Del Server ID
3. Server ID Use
<ADMIN>
Init Memory ?
1. Yes
<ADMIN>
Footer Line #1
xxxxxxxxxxxxx
Select Tip Usage.
Yes or No.
Use Scroll Key (*, #).
Select 4, This Screen.
Select 1. Add Server ID
Select 2. Del Server ID
Select 3. Server ID Use
Select 5, This Screen.
Init Memory ?
Select Yes or No.
Use Scroll Key (*, #).
Select 6, This Screen.
Footer Line ? (#1 ~ # 4)
Input the Character.
38/60
IC5100 Manual
9
10
11
12
<ADMIN>
Training Mode ?
1. Yes
<ADMIN>
200305010103148
YYYYMMDDhhmmss
> 20
<ADMIN>
LCD CONTRAST
[25]
<ADMIN>
Old Manager
Password ?
xxxx
Select 7, This Screen.
Training Mode ?
Select Yes or No.
Use Scroll Key (*, #).
Select 8, This Screen.
Input Current Time.
Select 9, This Screen.
Control LCD Contrast.
Use Scroll Key (*, #)
Select 10, This Screen.
Input Old Manager Password.
12
a
12
b
<ADMIN>
New Manager
Password ?
<ADMIN>
Old Manager
Password Again ?
Input New Manager Password.
xxxx
Input New Manager Password.
xxxx
39/60
IC5100 Manual
IC5100(EMV approval) / New Transaction
# Terminal Screen Descriptions for Key Operation and Summary
1
Oct 14, 03[10:55]
SWIPE YOUR CARD
ge
2
3
2. Balance Inq.
3. Cash Advance.
4. Next Pa
2. View Trans.
3. Print Totals
4. Lo
gon Terminal
Swipe Your Card.
Or Key Input(0-9).
F5 (step2), F6 (step3), F7(step4)
F1, F2, F3, F4 key select Menu.
Transaction Menu.
(Credit, Balance, Cash, Refund,
Void)
Settlement Menu.
(View, Print and Logon Function)
4
2. Contrast SET
3. Change PIN
4. Basic TEST
Setup and Test Menu.
(Terminal Setup and Basic Test)
40/60
IC5100 Manual
IC5100 (EMV approval) / Credit Sale
# Terminal Screen Descriptions for Key Operation and Summary
1
Oct 14, 03[10:55]
SWIPE YOUR CARD
ge
2
3a
2. Balance Inq.
3. Cash Advance
4. Next Pa
SWIPE YOUR CARD
Press F5 key.
Enter Transaction Menu.
Select Credit Sale.
(F1 + Enter key)
Swipe card(step 4) or
Key Input.(step 3b)
3b
3c
4
5
xxxxxxxxxxxxxxxxxx
xxxxxxxxxxxxxxxxxx
YYMM : xxxx
INPUT AMOUNT
<Push Enter Ke
Sale
APPROVED
0.00
y>
Input card number.
Input expiration date.
Input Amount.
Dialing and Data Transfer.
Transaction is successful.
And print out the receipt.
41/60

IC5100 Manual
IC5100 (EMV approval) / Balance Inquiry
# Terminal Screen Descriptions for Key Operation and Summary
1
Oct 14, 03[10:55]
SWIPE YOUR CARD
1. Credit Sale
2
3. Cash Advance
ge
3a
4. Next Pa
SWIPE YOUR CARD
Press F5 key.
Enter Transaction Menu.
Select Balance Inquiry.
(F2 + Enter key)
Swipe card(step 4) or
Key Input.(step 3b)
3b
3c
4
5
xxxxxxxxxxxxxxxxxx
xxxxxxxxxxxxxxxxxx
YYMM : xxxx
INPUT AMOUNT
<Push Enter Ke
Balance Inquiry
APPROVED
0.00
y>
Input card number.
Input expiration date.
Input Amount.
Dialing and Data Transfer.
Transaction is successful.
And print out the receipt.
42/60
IC5100 Manual
IC5100 (EMV approval) / Cash Advance
# Terminal Screen Descriptions for Key Operation and Summary
1
Oct 14, 03[10:55]
SWIPE YOUR CARD
1. Credit Sale
2
2. Balance Inq.
4. Next Page
SWIPE YOUR CARD
3a
Press F5 key.
Enter Transaction Menu.
Select cash advance
(F3 + Enter key)
Swipe card(step 4) or
Key Input.(step 3b)
3b
3c
4
5
xxxxxxxxxxxxxxxxxx
xxxxxxxxxxxxxxxxxx
YYMM : xxxx
INPUT AMOUNT
<Push Enter Ke
Cash Advance
APPROVED
0.00
y>
Input card number.
Input expiration date.
Input Amount.
Dialing and Data Transfer.
Transaction is successful.
And print out the receipt.
43/60

IC5100 Manual
IC5100 (EMV approval) / Refund
# Terminal Screen Descriptions for Key Operation and Summary
1
Oct 14, 03[10:55]
SWIPE YOUR CARD
1. Credit Sale
2
2. Balance Inq.
3. Cash Advance
PLEASE ENTER PIN
3
????
CANCEL OR ENTER
Press F5 key.
Enter Transaction Menu.
Select Next page.
(F4 + Enter key)
Enter Pin.
(Teaching mode : 0000)
4
5a
5b
5c
2. Void
3……………………..
4. Prev. Pa
ge
SWIPE YOUR CARD
xxxxxxxxxxxxxxxxxx
xxxxxxxxxxxxxxxxxx
YYMM : xxxx
Select Refund Menu.
(F1 + Enter key)
Swipe card(step 6) or
Key Input.(step 5b)
Input card number.
Input expiration date.
44/60

IC5100 Manual
INPUT AMOUNT
6
7
Refund
APPROVED
<Push Enter Ke
0.00
y>
Input Amount.
Dialing and Data Transfer.
Transaction is successful.
And print out the receipt.
45/60

IC5100 Manual
IC5100 (EMV approval) / Void
# Terminal Screen Descriptions for Key Operation and Summary
1
Oct 14, 03[10:55]
SWIPE YOUR CARD
1. Credit Sale
2
3
2. Balance Inq.
3. Cash Advance
PLEASE ENTER PIN
????
CANCEL OR ENTER
Press F5 key.
Enter Transaction Menu.
Select Next page.
(F4 + Enter key)
Enter Pin.
(Teaching mode : 0000)
1. Refund
4
3……………………..
4. Prev. Pa
5
ge
Retrieval Number
xxxxxxxxxxx
<Push Enter Ke
y>
Select Void Menu.
(F2 + Enter key)
Input Retrieval Number.
46/60

IC5100 Manual
IC5100 (EMV approval) / Settlement
# Terminal Screen Descriptions for Key Operation and Summary
1
Oct 14, 03[10:55]
SWIPE YOUR CARD
PLEASE ENTER PIN
2
3
????
CANCEL OR ENTER
2. View Trans.
3. Print Totals
4. Lo
gon Terminal
Press F6 key.
Enter Settlement Menu.
Enter Pin.
(Teaching mode : 0000)
Select Settlement Menu.
(F1 + Enter key)
Settlement
4
APPROVED
Dialing and Data Transfer.
Settlement is successful.
47/60

IC5100 Manual
IC5100 (EMV approval) / View Transaction
# Terminal Screen Descriptions for Key Operation and Summary
1
Oct 14, 03[10:55]
SWIPE YOUR CARD
PLEASE ENTER PIN
2
3
????
CANCEL OR ENTER
1. Settlement
3. Print Totals
gon Terminal
4. Lo
Press F6 key.
Enter Settlement Menu.
Enter Pin.
(Teaching mode : 0000)
Select View Transaction Menu.
(F2 + Enter key)
1234567890123456
4
001 Sale
031014131010
000000000001
1 Line : Card Number.
2 Line : Trade Information.
3 Line : Date and Time
4 Line : Amount
48/60

IC5100 Manual
IC5100 (EMV approval) / Print Totals
# Terminal Screen Descriptions for Key Operation and Summary
1
Oct 14, 03[10:55]
SWIPE YOUR CARD
PLEASE ENTER PIN
2
3
????
CANCEL OR ENTER
1. Settlement
2. View Trans.
4. Logon Terminal
Press F6 key.
Enter Settlement Menu.
Enter Pin.
(Teaching mode : 0000)
Select Print Totals Menu.
(F3 + Enter key)
Print out Totals
49/60
IC5100 Manual
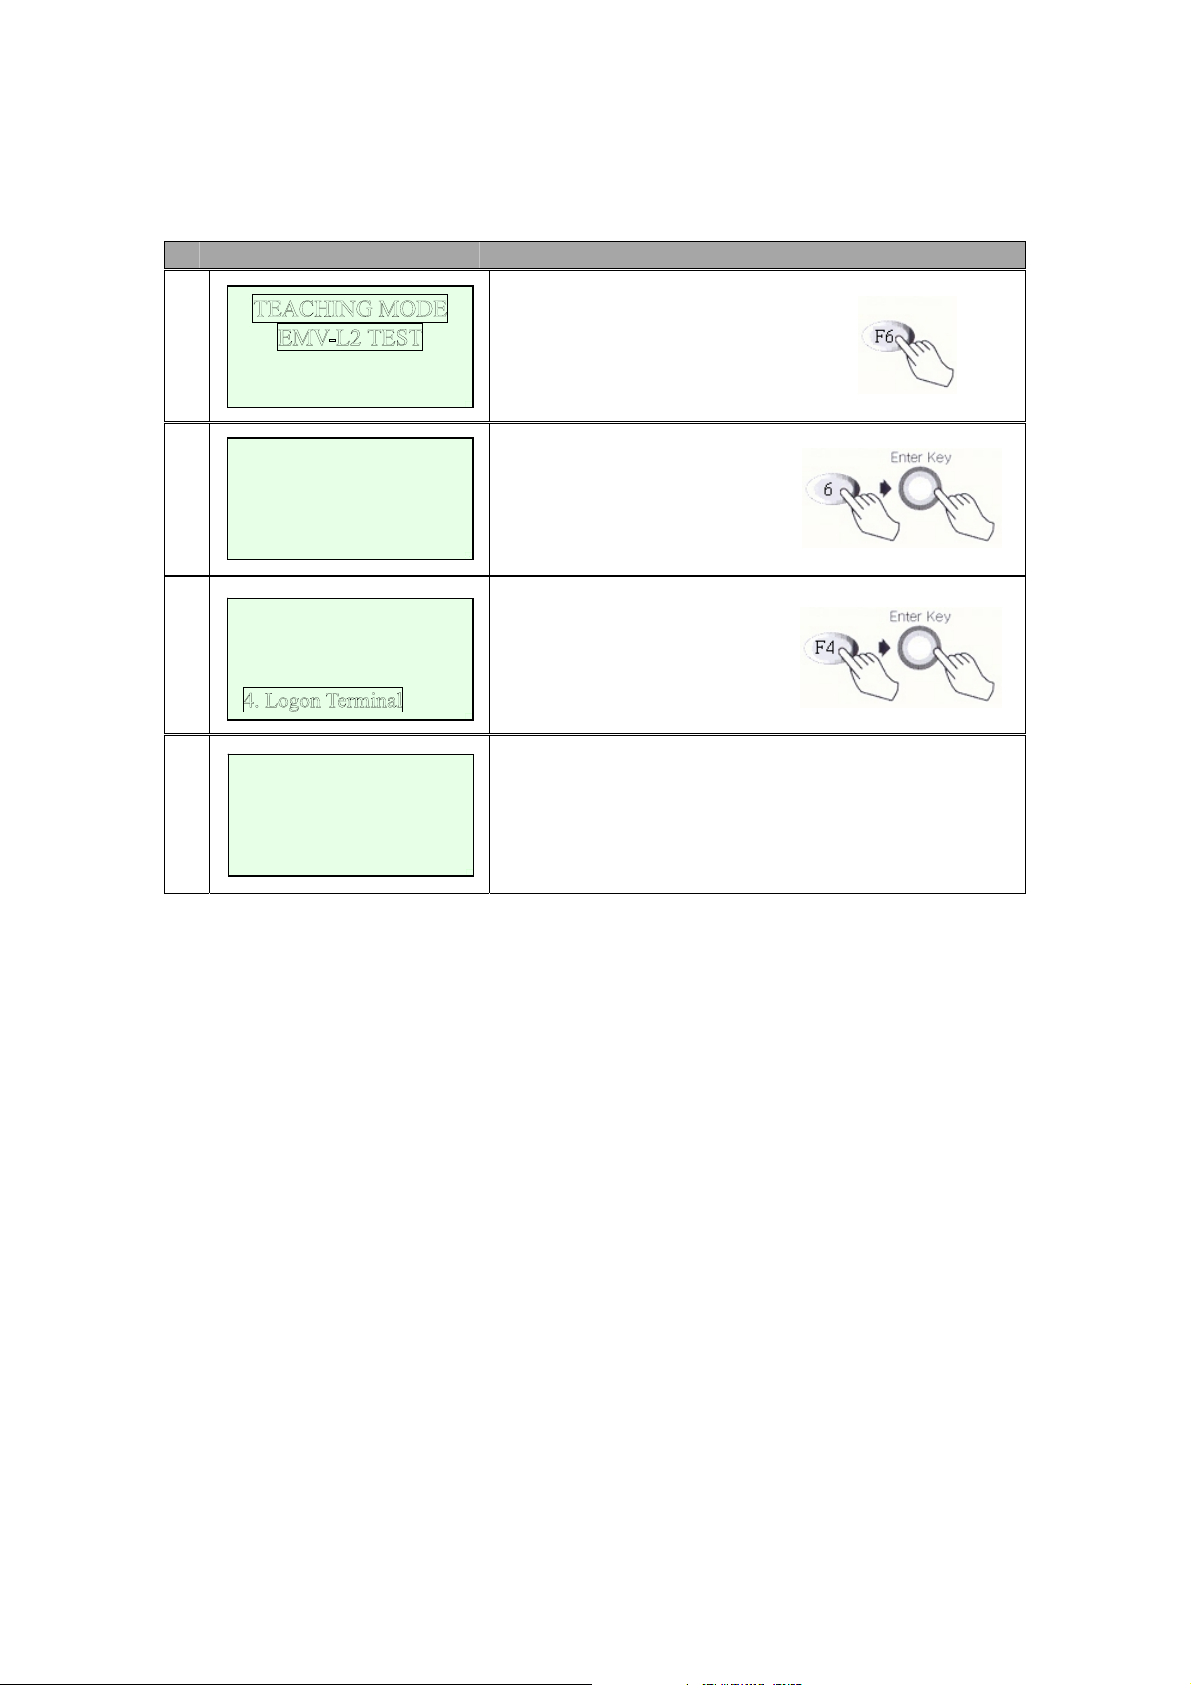
IC5100 (EMV approval) / Logon Terminal
# Terminal Screen Descriptions for Key Operation and Summary
1
Oct 14, 03[10:55]
SWIPE YOUR CARD
PLEASE ENTER PIN
2
????
CANCEL OR ENTER
1. Settlement
3
2. View Trans.
3. Print Totals
Press F6 key.
Enter Settlement Menu.
Enter Pin.
(Teaching mode : 0000)
Select Logon Terminal Menu.
(F4 + Enter key)
Logon Terminal
4
APPROVED
Logon Terminal Successful.
50/60

IC5100 Manual
IC5100 (EMV approval) / Terminal Setup
# Terminal Screen Descriptions for Key Operation and Summary
1
Oct 14, 03[10:55]
SWIPE YOUR CARD
PLEASE ENTER PIN
2
3
????
CANCEL OR ENTER
2. Contrast SET
3. Change PIN
4. Basic TEST
Press F7 key.
Enter Terminal Setup Menu.
Enter Pin.
(Teaching mode : 0000)
Select Terminal Setup Menu.
(F1 + Enter key)
4
5a
5a
1
5b
2. Download FILE
3. Set Date Time
4. Setu
PABX ACCESS
3. YES
PABX ACCESS Code
9_
TELEPHONE NO
xxxxxxxxxxxxxxx
p Others
Select Setup Modem.(step 5a)
Select Download FILE.(step 6a)
Select Set Date Time.(step 7a)
Select Setup Others.(step 8a)
NO (step 5b)
YES (step 5a1)
Input PABX ACCESS code.
Input Telephone Number.
51/60
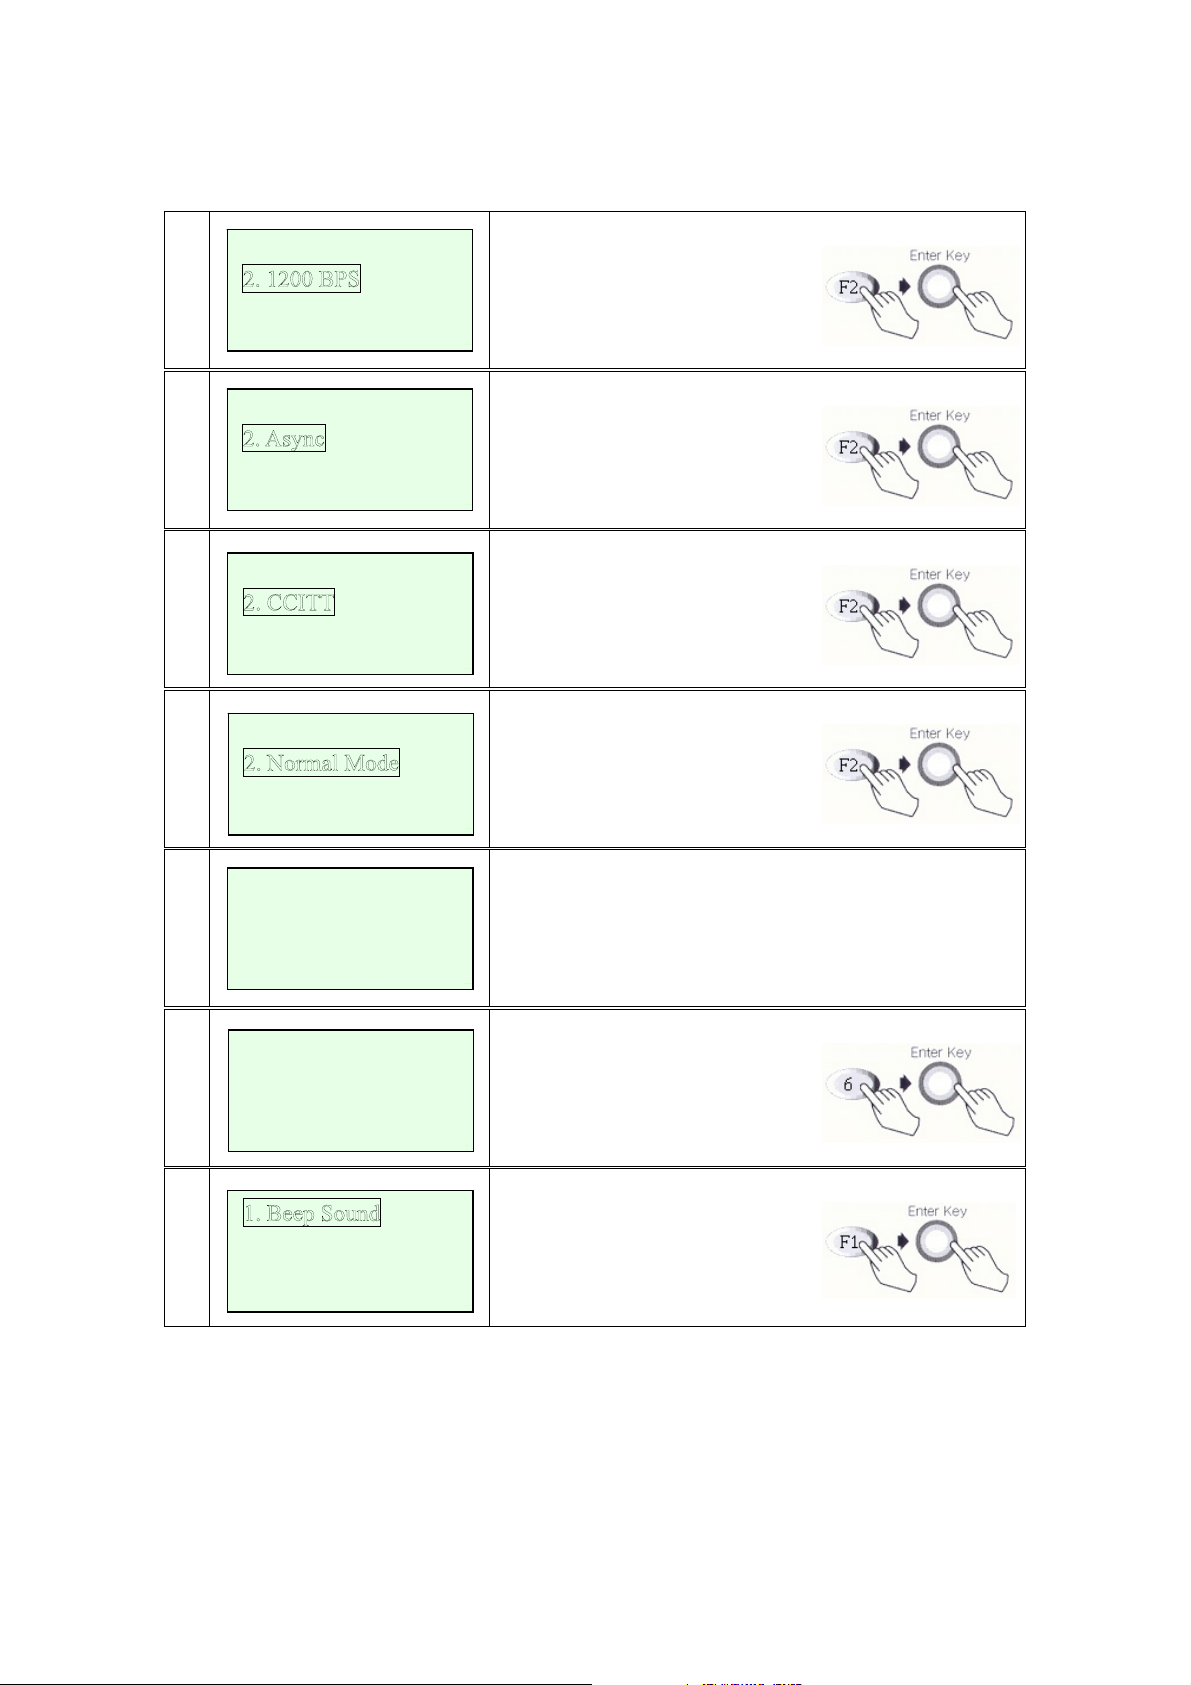
IC5100 Manual
Modem Speed
5c
3. 2400 BPS
Com Mode
5d
3. Sync
Standard
5e
3. BELL
Dialing Mode
5f
3. Blind Mode
Select Modem Speed.
Select Com Mode.
Select Standard.
Select Dialing Mode.
DownLoading…
6a
7a
8a
Request FILEname
&FILEsize
CLEAR OR ENTER
<Set Date & Time>
YYMMDDhhmmss W
031014141224 2
2. System Font
3. Force OnLine
4. Teachin
g Mode
File Downloading..
Request Screen.
Set Date & Time
Beep Sount On & Off
System Font On & Off
Force Online On & Off
Teaching Mode Yes or No
52/60

IC5100 Manual
IC5100 (EMV approval) / Contrast SET
# Terminal Screen Descriptions for Key Operation and Summary
1
Oct 14, 03[10:55]
SWIPE YOUR CARD
PLEASE ENTER PIN
2
3
????
CANCEL OR ENTER
1. Terminal Setup
3. Change PIN
4. Basic TEST
Press F7 key.
Enter Terminal Setup Menu.
Enter Pin.
(Teaching mode : 0000)
Select Contrast Setting.
(F2 + Enter key)
SET CONTRAST
3
3. DARK
24
Adjust LCD Contrast.
(F2 : bright, F3 : Dark)
53/60

IC5100 Manual
IC5100 (EMV approval) / Changing PIN
# Terminal Screen Descriptions for Key Operation and Summary
1
Oct 14, 03[10:55]
SWIPE YOUR CARD
PLEASE ENTER PIN
2
3
????
CANCEL OR ENTER
1. Terminal Setup
2. Contrast SET
4. Basic TEST
Press F7 key.
Enter Terminal Setup Menu.
Enter Pin.
(Teaching mode : 0000)
Select Change PIN.
(F3 + Enter key)
ENTER NEW PIN
4
5
????
CANCEL OR ENTER
CONFIRM NEW PIN
????
CANCEL OR ENTER
Enter New Pin.
CONFIRM New Pin.
54/60
IC5100 Manual
IC5100 (EMV approval) / Basic TEST
# Terminal Screen Descriptions for Key Operation and Summary
1
Oct 14, 03[10:55]
SWIPE YOUR CARD
PLEASE ENTER PIN
2
????
CANCEL OR ENTER
1. Terminal Setup
3
2. Contrast SET
3. Change PIN
Press F7 key.
Enter Terminal Setup Menu.
Enter Pin.
(Teaching mode : 0000)
Select Basic TEST.
(F4 + Enter key)
4
2. MSR Card Test
3. Modem Test
3. Print Test
5a
Searching Card…
Please Wait!
ICC Card Test.(step 5a)
MSR Card Test.(step 6a)
Modem Test.(step 7a)
Print Test.(step 8a)
IC Card Searching Screen.
6a
SWIPE YOUR CARD
SWIPE YOUR CARD
6b
1234567890123456
MSR TEST.
SWIPE CARD.
View Card Number.
MSR test successful.
55/60
IC5100 Manual
Select Func.
7a
3. Communication
PABX ACCESS
7b
3. YES
PABX ACCESS Code
7b
1
7c
9_
TELEPHONE NO
xxxxxxxxxxxxxxx
Modem Test.
Setup (step 7b)
Communication (Dialing…)
NO (step 7c)
YES (step 7b1)
Input PABX ACCESS code.
Input Telephone Number.
Modem Speed
7d
3. 2400 BPS
Com Mode
7e
3. Sync
Standard
7f
3. BELL
Select Modem Speed.
Select Com Mode.
Select Standard.
56/60

IC5100 Manual
Dialing Mode
7g
3. Blind Mode
<Printer Test>
8a
3. Printing…
Select Dialing Mode.
Paper Check or
Print Out.
57/60

IC5100 Manual
Key, ICON component of IC5100
Power key or
Settlement key
Keypad(0~9)
Scroll up
Scroll down
Cancel key
Clear key
Enter key
Bitel co., Ltd.
58/60

IC5100 Manual
SAM, SIM, RUIM SOCKET
SAM #2
SAM #1
SIM/RUIM #2
SIM/RUIM #1
Bitel co., Ltd.
59/60

IC5100 Manual
Troubleshooting
Problem Cause Follow-up measures
When Power On,
LCD screen do
not operation
LCD show too
Dark or too
Bright
Paper is not clear Printer head error
When Printer pa
per hanging on
Printer device
Character is not
normal at LCD
screen
When card don’t
Read
When pinpad do
not operate
When time is not
correct
Power supply error
LCD contrast error
Terminal error
LCD adjustment error
LCD device error
Terminal error
Printer device error
Bad paper
Terminal error
Bad paper use
Paper Insert error
Terminal error
LCD error
LCD device error
Terminal error
Card Insert error
Bad card use
Terminal error
Pinpad error Confirm connection between terminal and
TimeSetting is wrong
Timer error
Confirm a wall socket.
Confirm connection Between a wall socket
and power plug.
Confirm power plug.
Adjust LCD contrast.
Request A/S.
Adjust LCD contrast.
Request A/S.
Open the printer cover and Confirm printer
device.
Request A/S.
* Paper keep in dry place.
Use Up key. And eliminate the paper.
Clean paper Insert.
Request A/S.
Request A/S.
Confirm insert direction.
Confirm card.
Confirm magnetic line.
Request A/S.
pinpad.
Request A/S.
Time Setting. (Date & Time)
Request A/S.
Bitel co., Ltd.
60/60

.
Regulatory Information
FCC compliance Information
This device complies with part 15 of FCC Rules. Operation is subject to the following two
conditions: 1. This device may not cause harmful interference, and 2. This device must accept any
interference received. Including interference that may cause undesired operation.
Information to User
NOTE: This equipment has been tested and found to comply with the limits for a Class A digital
device, pursuant to Part 15 of the FCC Rules. These limits are designed to provide reasonable
protection against harmful interference when the equipment is operated in a commercial
environment. This equipment generates, uses, and can radiate radio frequency energy and, if not
installed and used in accordance with the instruction manual, may cause harmful interference to
radio communications. Operation of this equipment in a residential area is likely to cause
harmful interference in which case the user will be required to correct the interference at his own
expense.
FCC WARNING:
This equipment may generate or use radio frequency energy. Changes or modifications to this
equipment may cause harmful interference unless the modifications are expressly approved in the
instruction manual. The user could lose the authority to operate this equipment if an
unauthorized change or modification is made.
Body-worn Operation
This device was tested for typical body-worn operations with the back of the INDUSTRIAL PDA
POS kept 1.5cm from the body .To maintain compliance with FCC RF exposure compliance
requirements, use only belt-clips, holsters or similar accessories that maintain a 1.5cm separation
distance between the user’s body and the back of the INDUSTRIAL PDA POS, including the
antenna, whether extended or retracted. The use of third-party belt-clips, holsters and similar
accessories should not contain metallic components in its assembly. The use of accessories that
do not satisfy these requirements may not comply with FCC RF exposure composure compliance
requirements, and should be avoided.

CONTACT INFORMATION
Manufacturer Address : 11F Yohyun B/D, 242-29, Nonhyun-dong, Gangnam-gu, Seoul, South Korea
To locate in-country Bitel Co., Ltd. distributors of the IC5100
please refer to the Bitel Co., Ltd. Website http://www.bitel.co.kr/
These distributor(s) represent local contacts for this product.
CORPORATE HEADQUARTERS:
Bitel Co., Ltd.
11F Yohyun B/D, 242-29, Nonhyun-dong, Gangnam-gu, Seoul, South Korea
Tel: 82-2-545-2630
Fax: 82-2-545-0190
Web: http://www.bitel.co.kr/

EUROPEAN UNION “DECLARATION OF CONFORMITY”
DECLARATION OF CONFORMITY
Bitel Co., Ltd.
11F Yohyun B/D, 242-29, Nonhyun-dong, Gangnam-gu, Seoul,
South Korea
declare under our sole responsibility that the product(s)
INDUSTRIAL PDA POS – IC5100
to which this declaration relate(s) is in conformance with the following standards:
EN 301 489-1 V1.8.1:2008
EN 301 489-7 V1.3.1 :2005
EN60950-1:2006
EN 301 511-1 V9.0.2:2003
following the provisions of the 1999/5/EC Directives.
 Loading...