

Page 1

2015/08/V1.3
1
Page 2

BarCode Decode Setup Manual
Directory
Setup Flow Chart: ............................................... 9
Part I System Information ................................... 10
1.1 Reset to default: ..................................... 10
1.2 Firmware Version: .................................... 10
Part II System Setting ........................................ 11
2.1 Interface: ............................................... 11
Part III Keyboard wedge parameters .................... 12
3.1 Terminal Type: ........................................ 12
3.2 Language Selection: ................................ 12
3.3 Function Key Emulation:........................... 14
3.4 ALT Mode: .............................................. 14
3.5 Caps Lock : ............................................ 15
3.6 Numeric Key: .......................................... 15
3.7 Inter-Character Delay: ........................... 16
3.8 Delay After Transmit (Keyboard Wedge): .... 16
3.9 Keyboard Speed:..................................... 16
3.10 Keyboard Wedge Terminator: .................. 17
Part IV RS-232 Protocol: ................................... 18
4.1 Baud Rate: ........................................... 18
4.2 Data Bits: ............................................... 19
4.3 Stop Bits: ............................................... 19
4.4 Parity Check: .......................................... 20
4.5 Inter-Character Delay: ............................. 20
4.6 Delay After Transmit: ............................... 21
4.7 Response Delay Time: ............................. 21
4.8 Flow Control: .......................................... 22
4.9 RS232- Interface Terminator: ................... 22
Part V System Setting: ....................................... 24
5.1 Scan Mode: ............................................ 24
5.2 Buzzer ................................................... 27
2
Page 3

5.2.1 Buzzer Frequency: ................................ 27
5.2.2 Duration .............................................. 27
5.2.3 Power up Buzzer: ................................. 28
5.2.4 Good Read Buzzer: .............................. 28
5.3 String ..................................................... 29
5.3.1 Prefix and Suffix: .................................. 29
5.3.2 Insert Character Group (G1/G2): ............ 30
5.3.3 Code Type Transmit: ........................... 31
5.4 Barcode Inverse: ................................... 32
Part VI Barcode Type Setting: ............................. 33
6.1 UPC-A ................................................... 34
6.1.1 Enable/Disable UPC-A: ......................... 34
6.1.2 Code ID setting: ................................... 34
6.1.3 Convert UPC-A to EAN-13: ................... 34
6.1.4 Transmit Check Digit: ............................ 35
6.1.5 Truncate Leading Zero: ......................... 35
6.1.6 Truncate Leading Digits:........................ 35
6.1.7 Truncate Ending Digits: ......................... 36
6.1.8 Insert Characters: ................................. 36
6.1.9 Decode UPC-A Supplemental: ............... 36
6.2 UPC-E ................................................... 37
6.2.1 Enable/Disable UPC-E: ......................... 37
6.2.2 Code ID setting .................................... 38
6.2.3 Convert UPC-E to UPC-A: .................... 38
6.2.4 Transmit Check Digit: ............................ 38
6.2.5 Truncate Leading Zero: ......................... 39
6.2.6 Truncate leading digits: ......................... 39
6.2.7 Truncate Ending Digits: ......................... 39
6.2.8 Insert Characters: ................................. 40
6.2.9 Decode UPC-E Supplementals: ............. 40
6.3 EAN-13 .................................................. 41
6.3.1 Enable/Disable EAN-13: ....................... 41
6.3.2 Code ID Setting: ................................... 41
3
Page 4

6.3.3 Transmit Check Digit: ............................ 42
6.3.4 Convert to ISBN/ISSN: .......................... 42
6.3.5 Truncate leading digits: ......................... 42
6.3.6 Truncate Ending digits: ......................... 43
6.3.7 Insert Characters: ................................. 43
6.3.8 Decode EAN-13 Supplemental: .............. 43
6.4 EAN-8 ................................................... 44
6.4.1 Enable/Disable EAN-8: ......................... 44
6.4.2 Code ID Setting: ................................... 45
6.4.3 Transmit Check Digit: ............................ 45
6.4.4 Truncate Leading Digits:........................ 45
6.4.5 Truncate Ending Digits: ......................... 45
6.4.6 Insert Characters: ................................. 46
6.4.7 Decode EAN-8 Supplemental: ............... 46
6.5 Code39 .................................................. 47
6.5.1 Enable/Disable CODE39: ....................... 47
6.5.2 Code ID Setting .................................... 47
6.5.3 Code 39 Check Digit Verification: ........... 48
6.5.4 Transmit Check Digit: ............................ 48
6.5.5 Code 39 Full ASCII Conversion: .............. 48
6.5.6 Transmit Start/End Character: ................ 49
6.5.7 Min Code Length: (defult:00) ................. 49
6.5.8 Max Code Length: (default:32H) ............. 49
6.5.9 Truncate Leading Digits:........................ 49
6.5.10 Truncate ending digits: ........................ 50
6.5.11 Insert Characters: ............................... 50
6.6 Codabar ................................................. 51
6.6.1 Enable/Disable CODABAR ..................... 51
6.6.2 Code ID setting .................................... 51
6.6.3 Check Digit: ......................................... 51
6.6.4 Transmit Check Digit: ............................ 52
6.6.5 Data Combine: ..................................... 52
6.6.6 Start/End Transmit Type: ....................... 52
4
Page 5

6.6.7 Start/End Transmit: ............................... 53
6.6.8 Min Code Length: (default:00)................ 53
6.6.9 Max Code Length: (default:32H) ............. 53
6.6.10 Truncate Leading Digits: ...................... 53
6.6.11 Truncate Ending Digits: ....................... 54
6.6.12 Insert Characters: ............................... 54
6.7 Code93 .................................................. 55
6.7.1 Enable/Disable CODE93: ....................... 55
6.7.2 Code ID Setting: ................................... 55
6.7.3 Check Digit: ......................................... 55
6.7.4 Transmit Check Digit: ............................ 56
6.8 Code 128 ............................................... 57
6.8.1 Enable/Disable CODE128: ..................... 57
6.8.2 Code ID Setting: ................................... 58
6.8.3 Check Digit: ......................................... 58
6.8.4 Transmit Check Digit ............................. 58
6.8.5 FNC2 Data Combine: ............................ 59
6.8.6 UCC/EAN128 AIM code ID: .................... 59
6.8.7 FNC1 Transmit: .................................... 59
6.8.8 Min Code Length: (default:00)................ 60
6.8.9 Max Code Length: (default:32H) ............. 60
6.8.10 Truncate Leading Digits: ...................... 60
6.8.11 Truncate Ending Digits: ....................... 60
6.8.12 Insert Characters: ............................... 61
6.9 Interleaved 2 of 5 .................................... 61
6.9.1 Enable/Disable Interleaved 2 of 5: .......... 61
6.9.2 Code ID Setting: ................................... 62
6.9.3 Check Digit: ......................................... 62
6.9.4 Transmit Check Digit: ............................ 62
6.9.5 Min Code Length: (default:00)................ 62
6.9.6 Max Code Length: (default:32H) ............. 63
6.9.7 Truncate Leading Digits:........................ 63
6.9.8 Truncate Ending Digits: ......................... 63
5
Page 6

6.9.9 Insert Characters: ................................. 63
6.10 Industrial 2 of 5 ..................................... 64
6.10.1 Enable/Disable Industrial 2 of 5: ........... 64
6.10.2 Code ID Setting: ................................. 64
6.10.3 Check Digit: ....................................... 65
6.10.4 Transmit Check Digit: .......................... 65
6.10.5 Min Code Length: (default: 00) ............. 65
6.10.6 Max Code Length: (default:32H) ........... 65
6.10.7 Truncate Leading Digits: ...................... 66
6.10.8 Truncate ending digits: ........................ 66
6.10.9 Insert Characters: ............................... 66
6.11 Matrix 2 of 5 ......................................... 67
6.11.1 Enable/Disable Matrix 2 of 5: ............... 67
6.11.2 Code ID Setting: ................................. 67
6.11.3 Check Digit: ....................................... 67
6.11.4 Transmit Check Digit: .......................... 68
6.11.5 Min Code Length: (default: 00) ............. 68
6.11.6 Max Code Length: (default:32H) ........... 68
6.11.6 Truncate Leading Digits: ...................... 68
6.11.7 Truncate Ending Digits: ....................... 69
6.11.8 Insert Characters: ............................... 69
6.12 MSI/Plessey .......................................... 69
6.12.1 Enable/Disable MSI/Plessey: ................ 69
6.12.2 Code ID Setting: ................................. 70
6.12.3 Check Digit: ....................................... 70
6.12.4 Transmit Check Digit: .......................... 71
6.12.5 Min Code Length: (default:00) .............. 71
6.12.6 Max Code Length: (default:32H) ........... 71
6.12.6 Truncate Leading Digits: ...................... 71
6.12.7 Truncate Ending Digits: ....................... 72
6.12.8 Insert Characters: ............................... 72
6.13 CODE 32 .............................................. 72
6.13.1 Enable/Disable CODE 32: .................... 72
6
Page 7

6.13.2 Code ID Setting: ................................. 73
6.13.3 Check Digit: ....................................... 73
6.13.4 Transmit Check Digit: .......................... 73
6.13.5 Truncate Leading Digits: ...................... 74
6.13.6 Truncate Ending Digits: ....................... 74
6.13.7 Insert Characters: ............................... 74
6.14 CODE 11 .............................................. 75
6.14.1 Enable/Disable CODE 11: .................... 75
6.14.2 Code ID Setting: ................................. 75
6.14.3 Check Digit ........................................ 75
6.14.4 Transmit Check Digit ........................... 76
6.14.5 Min Code Length: (default:00) .............. 76
6.14.6 Max Code Length: (default:32H) ........... 76
6.14.7 Truncate Leading Digits ....................... 77
6.14.8 Truncate Ending Digits ........................ 77
6.14.9 Insert Characters ................................ 77
6.15 GS1 Databar ......................................... 78
6.15.1 Enable/Disable GS1 Databar ................ 78
6.15.2 Enable/Disable GS1 Databar Limited ..... 78
6.15.3 Enable/Disable GS1 Databar Expanded . 78
6.15.4 GS1 Databar to UPC/EAN .................... 79
6.16 Telepen ................................................ 79
6.16.1 Enable/Disable Telepen: ...................... 79
6.16.2 Code ID Setting .................................. 79
6.16.3 Check Digit: ....................................... 80
6.16.4 Transmit Check Digit: .......................... 80
6.16.5 Min Code Length: (default: 00) ............. 80
6.16.6 Max Code Length: (default:32H): .......... 80
6.16.7 Truncate Leading Digits ....................... 81
6.16.8 Truncate Ending Digits ........................ 81
6.16.9 Insert Characters ................................ 81
6.17 China Post Code ................................... 82
6.17.1 Enable/Disable China post: .................. 82
7
Page 8

6.17.2 Code ID Setting: ................................. 82
6.17.3 Check Digit: ....................................... 83
6.17.4 Transmit Check Digit: .......................... 83
6.17.5 Min Code Length: (default:00) .............. 83
6.17.6 Max Code Length:
6.17.7 Truncate Leading Digits: ...................... 84
6.17.8 Truncate Ending Digits: ....................... 84
6.17.9 Insert Characters: ............................... 84
6.17.10 Redundancy Level: ............................ 85
Appendix A ASCII Code ......................... 86
ASCII Table: ................................................. 87
Appendix B Function Key Emulate Table: ......... 88
Function Key Emulate Barcode: .......................... 89
(default:32H) ........... 83
8
Page 9
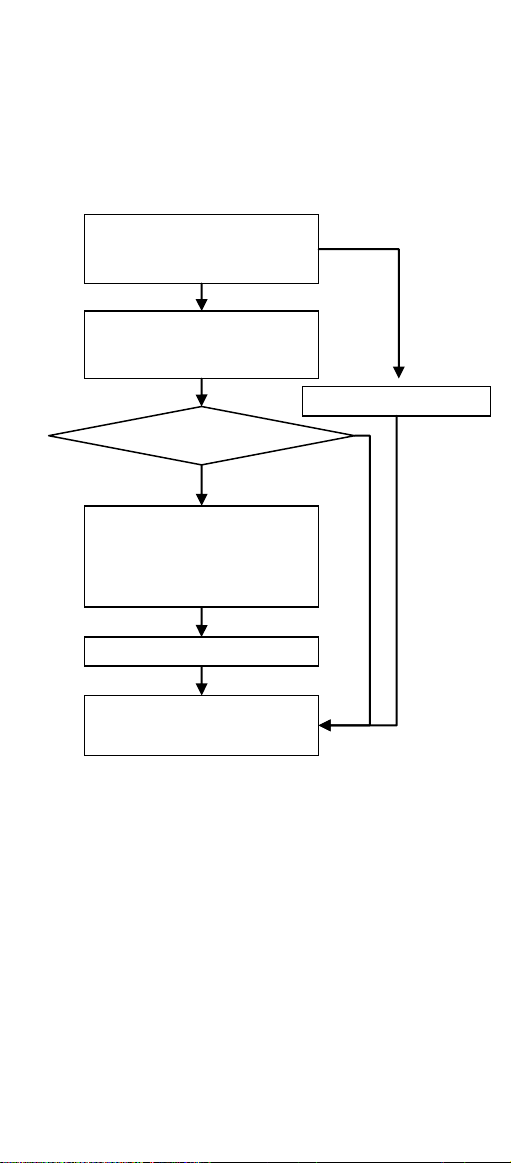
Scan “End” barcode
Scan “Start
Configuration” barcode
Scan the barcode you
like to change
Scan two HEX digits in
Appendix A to
represent one ASCII
Hex or ASCII Code
Scan “End
Configuration” barcode
Reset to default
YES
NO
Setup Flow Chart:
Note:
1. Scan “firmware version barcode”, the
Version No. will be displayed on
monitor.
2. The default settings are shown with < >
and bold in the following sections.
9
Page 10

Part I System Information
Start Configuration
1.1 Reset to default:
Reset to factory default settings. The default
settings are shown with < > and bold.
Reset to default
1.2 Firmware Version:
Scan barcode to display firmware
version.
Firmware Version
End Configuration
10
Page 11

Part II System Setting
2.1 Interface:
Start Configuration
RS-232
< USB HID >
USB Virtual COM
End Configuration
11
Page 12
Part III Keyboard wedge
parameters
3.1 Terminal Type:
Start Configuration
< IBM AT >
End Configuration
3.2 Language Selection:
Start Configuration
American
Italian
12
Page 13

Spanish
France
Germany
Japanese
End Configuration
Note:
Scan the barcode to select local keyboard
language, if your keyboard language can't be
found, please turn on ALT Mode which is an
alternate way to find your language.
13
Page 14
3.3 Function Key Emulation:
Start Configuration
< Disable >
Enable
3.4 ALT Mode:
Start Configuration
< Disable >
Enable
14
Page 15
3.5 Caps Lock :
< Disable >
Enable
3.6 Numeric Key:
< Disable >
Enable
End Configuration
Note 1:
ALT Mode can emulate most of local
keyboard languages in Microsoft system.
Note 2:
The barcode reader can emulate to
enable/disable Caps Lock key.
Note 3:
The barcode reader can emulate to
enable/disable Numeric Key.
15
Page 16

3.7 Inter-Character Delay:
Start Configuration
Enable (00H, 00-64H*1msec)
3.8 Delay After Transmit (Keyboard
Wedge):
Enable(00H, 00-0AH*100msec)
3.9 Keyboard Speed:
Enable (00H, 00-08H)
16
Page 17
3.10 Keyboard Wedge Terminator:
None
< CR >
TAB
ESC
End Configuration
Note:
Keyboard Wedge Terminator is to set up the
termination character of barcode reader
output to adapt to applications.
17
Page 18
Part IV RS-232 Protocol:
4.1 Baud Rate:
Start Configuration
1200bps
2400bps
4800bps
< 9600bps >
19200bps
38400bps
18
Page 19
4.2 Data Bits:
4.3 Stop Bits:
7 Digits
< 8 Digits >
End Configuration
Start Configuration
< 1 Digit >
2 Digits
19
Page 20

4.4 Parity Check:
< None >
Odd
Even
Mark
Space
4.5 Inter-Character Delay:
Enable (00H, 00-64H*1msec)
20
Page 21

4.6 Delay After Transmit:
Enable (00H, 00-0AH*100msec)
4.7 Response Delay Time:
Enable (00H, 00-0AH*100msec)
End Configuration
Note:
Response Delay Time is the time of
barcode reader waiting for host to
response. The delay time=setting
data*100(ms).
21
Page 22
4.8 Flow Control:
< None >
RTS/CTS
ACK/NAK
Start Configuration
Xon/Xoff
4.9 RS232- Interface Terminator:
None
< CR+LF >
22
Page 23

CR
LF
TAB
STX/ETX
EOT
End Configuration
Note:
RS232- Interface Terminator is to set up
the termination character of barcode
reader output to adapt to applications.
23
Page 24

Part V System Setting:
5.1 Scan Mode:
Trigger Mode
< Auto Off Mode >
Continuous/Trigger Off Mode
Start Configuration
Test Mode
Continuous Mode
Continuous/Timeout Off Mode
24
Page 25

Flash Mode
Continuous/No Trigger
End Configuration
Note:
Trigger Mode:
Press trigger to turn on scanner. To turn off
the scanner, just release trigger or after
barcode decoded.
Auto off Mode:
Press trigger to turn on scanner. Scanner
will be a utomatically off when time out or
after barcode decoded.
Continuous (Trigger Off) Mode:
Press trigger to activate continuous scan
mode. Scanner will keep scanning and
decoding barcodes.
If the same barcode is scanned, it will only
decode once. Press trigger again to turn off
the scanner.
Test Mode:
Press trigger to activate test mode, scanner
will scan and decode barcodes
continuously until trigger is pressed again.
25
Page 26

Continuous Mode:
Press trigger to activate continuous scan
mode, scanner will keep scanning and
decoding barcodes. If the same barcode is
scanned, it will only decode once and the
red LED is always on.
Continuous (Timeout Off) Mode:
Press trigger to activate test mode.
Scanner will scan and decode barcodes
continuously until trigger is pressed again.
If the scanner doesn’ tdecode during
timeout, then the red LED will be off.
Flash Mode:
Press trigger to activate continuous scan
mode, the red LED will be on for 3 seconds
and then off for 3 seconds. If the decoding
is correct,
the red LED will be off immediately and
then proceed next flash cycle.
Continuous /No trigger Mode:
When turn on barcode reader, it will
activate Continuous /No trigger mode
automatically.
26
Page 27
5.2 Buzzer
5.2.1 Buzzer Frequency:
Start Configuration
Low
Medium
< High >
5.2.2 Duration
End Configuration
Start Configuration
< Long >
27
Page 28

Medium
Short
5.2.3 Power up Buzzer:
Disable
< Enable >
5.2.4 Good Read Buzzer:
Disable
< Enable >
End Configuration
28
Page 29

5.3 String
Prefix
string
Barcode
data
Suffix
string
5.3.1 Prefix and Suffix:
Start Configuration
Set up prefix (00H)
Set up suffix (00H)
End Configuration
Note:
The maximum characters can be set as prefix
and suffix are 10 ASCII characters, if the
setting is 0 means there is no prefix or suffix.
Formats of prefix and suffix are as follows:
The steps to setup prefix and suffix:
Scan “Enter to Setup” and “Prefix” barcode.
Find the ASCII code in appendix B.
Scan the desired barcode to set as
prefix/suffix.
Scan “End” barcode.
Scan “End Configuration Setup”.
29
Page 30

5.3.2 Insert Character Group (G1/G2):
Start Configuration
Set G1 string (00H)
Set G2 string (00H)
The start position of
barcode to insert G1 string (00H)
The start position
of barcode to insert G2 string (00H)
End Configuration
Note:
Up to 10 ASCII codes can be inserted in a
group. When the setting is zero, no codes
will be inserted.
Steps to insert characters:
Scan “Start Configuration” and then Scan
30
Page 31

“set G1string” barcode.
Scan ASCII code barcode in appendix B.
Scan “End Configuration”
Repeat step 2 and step 3 if you wish to
setup G2 Insert Character.
Scan “End Configuration”
Position to insert character: Choose a
position to insert characters, when the
setting is zero, non-zero characters will not
be inserted.
Scan “Start Configuration”
Scan “The start position of barcode to insert
G1 string” for G1
Scan ASCII code barcode in appendix B.
Scan “End Configuration”
Repeat the steps the start position of
barcode to G2 string.
Scan “End Configuration”
5.3.3 Code Type Transmit:
Start Configuration
< Disable >
Enable
31
Page 32

End Configuration
Note:
To transmit Code Type, you have to enable
Code Type Transmit. The format is Code
Type ID + Barcode Data.
5.4 Barcode Inverse:
If background is back, choose Bar = White. If
background is white, choose Bar = Black.
Start Configuration
< Bar = Black>
Bar = White
End Configuration
32
Page 33

Part VI Barcode Type Setting:
Enable/Disable barcode:To enable/disable
different barcode symbologies decoding, scan
the Enable/Disable barcode.
Code ID:Set to enable to transmit Code ID of
barcode type. How to set Code ID:
1. Scan “Start Configuration”.
2. Scan “Code ID”.
3.
Scan ASCII Code of Code ID in Appendix A.
4. Scan “End” in Appendix A.
5. Scan “End Configuration”.
Calculate Check Digit: Calculate Check
Digit of Barcode to verify code of Decoding.
Transmit Check Digit: Enable/Disable
Check Digit transmit.
Left Trim Digits: If set to 0, Left Trim will be
Disable.
Right Trim Digits: If set to 0, Left Trim will
be Disable.
Insert Characters: Range can be from 0 to
2, if set to 0 Insert Characters will be Disable.
The Insert Character is setting by “G1/G2
Insert Characters”.
Max Length: To limit Barcode length, if data
length is more the setting value the decoder
will not decode.
Supplements: Supplemental are bar codes
appended according to specific format
conventions (e.g., UPC A+2, UPC E+2, EAN
13+2).
Trim Leading 0: Trim the leading 0 of
Barcode.
33
Page 34

6.1 UPC-A
6.1.1 Enable/Disable UPC-A:
Start Configuration
Disable
< Enable>
6.1.2 Code ID setting:
Set up Code ID (46H, 20-7EH)
6.1.3 Convert UPC-A to EAN-13:
< Disable >
Enable
34
Page 35

6.1.4 Transmit Check Digit:
Disable
< Enable >
6.1.5 Truncate Leading Zero:
< Disable >
Enable
6.1.6 Truncate Leading Digits:
Set up leading digits(00H, 00-0DH)
35
Page 36

6.1.7 Truncate Ending Digits:
Set up ending digits(00H, 00-0DH)
6.1.8 Insert Characters:
< None >
G1
G2
6.1.9 Decode UPC-A Supplemental:
< None >
2 digits
36
Page 37

5 digits
2 or 5 digits
End Configuration
6.2 UPC-E
6.2.1 Enable/Disable UPC-E:
Start Configuration
Disable
< Enable >
37
Page 38

6.2.2 Code ID setting
Code ID setting (47H, 20-7EH)
6.2.3 Convert UPC-E to UPC-A:
< Disable >
Enable
6.2.4 Transmit Check Digit:
Disable
< Enable>
38
Page 39

6.2.5 Truncate Leading Zero:
< Disable >
Enable
6.2.6 Truncate leading digits:
Set up leading digits(00H, 00-0DH)
6.2.7 Truncate Ending Digits:
Set up ending digits(00H, 00-0DH)
39
Page 40

6.2.8 Insert Characters:
< None >
G1
G2
6.2.9 Decode UPC-E Supplementals:
< None >
2 digits
5 digits
2 or 5 digits
40
Page 41

End Configuration
6.3 EAN-13
6.3.1 Enable/Disable EAN-13:
Start Configuration
Disable
< Enable >
6.3.2 Code ID Setting:
Code ID setting (48H, 20-7EH)
41
Page 42

6.3.3 Transmit Check Digit:
Disable
< Enable >
6.3.4 Convert to ISBN/ISSN:
< Disable >
Enable
6.3.5 Truncate leading digits:
Set up leading digits (00H, 00-0DH)
42
Page 43

6.3.6 Truncate Ending digits:
Set up ending digits(00H, 00-0DH)
6.3.7 Insert Characters:
< None >
G1
G2
6.3.8 Decode EAN-13 Supplemental:
< None >
2 digits
43
Page 44

5 digits
2 or 5 digits
End Configuration
6.4 EAN-8
6.4.1 Enable/Disable EAN-8:
Start Configuration
Disable
< Enable >
44
Page 45

6.4.2 Code ID Setting:
Set up Code ID(49H, 20-7EH)
6.4.3 Transmit Check Digit:
Disable
< Enable >
6.4.4 Truncate Leading Digits:
Set up leading digits(00H, 00-0DH)
6.4.5 Truncate Ending Digits:
Set up ending digits(00H, 00-0DH)
45
Page 46

6.4.6 Insert Characters:
< None >
G1
G2
6.4.7 Decode EAN-8 Supplemental:
< None >
2 digits
5 digits
2 or 5 digits
46
Page 47

End Configuration
6.5 Code39
6.5.1 Enable/Disable CODE39:
Start Configuration
Disable
< Enable >
6.5.2 Code ID Setting
Set up Code ID(4AH, 20-7EH)
47
Page 48

6.5.3 Code 39 Check Digit Verification:
< Disable >
Enable
6.5.4 Transmit Check Digit:
Disable
< Enable >
6.5.5 Code 39 Full ASCII Conversion:
< Disable >
Enable
48
Page 49

6.5.6 Transmit Start/End Character:
< Disable >
Enable
6.5.7 Min Code Length: (defult:00)
Set up min code length(00H, 00-32H)
6.5.8 Max Code Length: (default:32H)
Set up max code length(00H, 00-32H)
6.5.9 Truncate Leading Digits:
Set up leading digits(00H, 00-32H)
49
Page 50

6.5.10 Truncate ending digits:
Set up ending digits(00H, 00-32H)
6.5.11 Insert Characters:
< None >
G1
G2
End Configuration
50
Page 51

6.6 Codabar
6.6.1 Enable/Disable CODABAR
Start Configuration
Disable
< Enable >
6.6.2 Code ID setting
Set up Code ID(4BH, 20-7EH)
6.6.3 Check Digit:
< Disable >
Enable
51
Page 52

6.6.4 Transmit Check Digit:
Disable
< Enable >
6.6.5 Data Combine:
< Disable >
Enable
6.6.6 Start/End Transmit Type:
< ABCD/ABCD >
abcd/abcd
abcd/tn*e
52
Page 53

6.6.7 Start/End Transmit:
< Disable >
Enable
6.6.8 Min Code Length: (default:00)
Set up Min Code Length(00H, 00-3CH)
6.6.9 Max Code Length: (default:32H)
Set up Max Code Length(00H, 00-3CH)
6.6.10 Truncate Leading Digits:
Set up Leading Digits(00H, 00-3CH)
53
Page 54

6.6.11 Truncate Ending Digits:
Set up ending digits(00H, 00-3CH)
6.6.12 Insert Characters:
< None >
G1
G2
End Configuration
54
Page 55

6.7 Code93
6.7.1 Enable/Disable CODE93:
Start Configuration
Disable
< Enable >
6.7.2 Code ID Setting:
Set up Code ID(4CH, 20-7EH)
6.7.3 Check Digit:
Disable
< Enable >
55
Page 56

6.7.4 Transmit Check Digit:
< Disable >
Enable
6.7.5 Min Code Length: (default:00)
Set up min code length(00H, 00-50H)
6.7.6 Max Code Length: (default:32H)
Set up max code length(00H, 00-50H)
6.7.6 Truncate Leading Digits:
Set up leading digits(00H, 00-50H)
56
Page 57

6.7.7 Truncate Ending Digits:
Set up ending digits(00H, 00-50H)
6.7.8 Insert Characters:
< None >
G1
G2
End Configuration
6.8 Code 128
6.8.1 Enable/Disable CODE128:
Start Configuration
57
Page 58

Disable
< Enable >
6.8.2 Code ID Setting:
Set up Code ID(4DH, 20-7EH)
6.8.3 Check Digit:
Disable
< Enable >
6.8.4 Transmit Check Digit
< Disable >
58
Page 59

Enable
6.8.5 FNC2 Data Combine:
< Disable >
Enable
6.8.6 UCC/EAN128 AIM code ID:
< Disable >
Enable
6.8.7 FNC1 Transmit:
< Disable >
Enable
59
Page 60

6.8.8 Min Code Length: (default:00)
Set up Min Code Length(00H, 00-7FH)
6.8.9 Max Code Length: (default:32H)
Set up Max Code Length(00H, 00-7FH)
6.8.10 Truncate Leading Digits:
Set up Leading Digits(00H, 00-7FH)
6.8.11 Truncate Ending Digits:
Set up Ending Digits(00H, 00-7FH)
60
Page 61

6.8.12 Insert Characters:
< None >
G1
G2
End Configuration
6.9 Interleaved 2 of 5
6.9.1 Enable/Disable Interleaved 2 of
5:
Start Configuration
Disable
< Enable >
61
Page 62

6.9.2 Code ID Setting:
Set up Code ID(4EH, 20-7EH)
6.9.3 Check Digit:
< Disable >
Enable
6.9.4 Transmit Check Digit:
Disable
< Enable >
6.9.5 Min Code Length: (default:00)
Set up Min Code Length(00H, 00-50H)
62
Page 63

6.9.6 Max Code Length: (default:32H)
Set up Max Code Length(00H, 00-50H)
6.9.7 Truncate Leading Digits:
Set up Leading Digits(00H, 00-50H)
6.9.8 Truncate Ending Digits:
Set up ending digits(00H, 00-50H)
6.9.9 Insert Characters:
< None >
G1
63
Page 64

G2
End Configuration
6.10 Industrial 2 of 5
6.10.1 Enable/Disable Industrial 2 of 5:
Start Configuration
< Disable >
Enable
6.10.2 Code ID Setting:
Set up Code ID(4FH, 20-7EH)
64
Page 65

6.10.3 Check Digit:
< Disable >
Enable
6.10.4 Transmit Check Digit:
Disable
< Enable >
6.10.5 Min Code Length: (default: 00)
Set up Min code length(00H, 00-32H)
6.10.6 Max Code Length: (default:32H)
Set up Max code length(00H, 00-32H)
65
Page 66

6.10.7 Truncate Leading Digits:
Set up leading digits(00H, 00-32H)
6.10.8 Truncate ending digits:
Set up Ending digits(00H, 00-32H)
6.10.9 Insert Characters:
< None >
G1
G2
End Configuration
66
Page 67

6.11 Matrix 2 of 5
6.11.1 Enable/Disable Matrix 2 of 5:
Start Configuration
< Disable >
Enable
6.11.2 Code ID Setting:
Set up Code ID(50H, 20-7EH)
6.11.3 Check Digit:
< Disable >
Enable
67
Page 68

6.11.4 Transmit Check Digit:
Disable
< Enable >
6.11.5 Min Code Length: (default: 00)
Set up Min Code Length(00H, 00-50H)
6.11.6 Max Code Length: (default:32H)
Set up Max Code Length(00H, 00-50H)
6.11.6 Truncate Leading Digits:
Set up Leading Digits(00H, 00-50H)
68
Page 69

6.11.7 Truncate Ending Digits:
Set up Ending Digits(00H, 00-50H)
6.11.8 Insert Characters:
< None >
G1
G2
End Configuration
6.12 MSI/Plessey
6.12.1 Enable/Disable MSI/Plessey:
Start Configuration
69
Page 70

< Disable >
Enable
6.12.2 Code ID Setting:
Set up Code ID(52H, 20-7EH)
6.12.3 Check Digit:
< Disable >
MOD 10
MOD 10/10
MOD 11/10
70
Page 71

6.12.4 Transmit Check Digit:
Disable
< Enable >
6.12.5 Min Code Length: (default:00)
Set up Min Code Length(00H, 00-3CH)
6.12.6 Max Code Length: (default:32H)
Set up Max Code Length(00H, 00-3CH)
6.12.6 Truncate Leading Digits:
Set up Leading Digits(00H, 00-3CH)
71
Page 72

6.12.7 Truncate Ending Digits:
Set up Ending Digits(00H, 00-3CH)
6.12.8 Insert Characters:
< None >
G1
G2
End Configuration
6.13 CODE 32
6.13.1 Enable/Disable CODE 32:
Start Configuration
72
Page 73

< Disable >
Enable
6.13.2 Code ID Setting:
Set up Code ID(53H, 20-7EH)
6.13.3 Check Digit:
Disable
< Enable >
6.13.4 Transmit Check Digit:
Disable
73
Page 74

< Enable >
6.13.5 Truncate Leading Digits:
Set up leading digits(00H, 00-0AH)
6.13.6 Truncate Ending Digits:
Set up ending digits(00H, 00-0AH)
6.13.7 Insert Characters:
< None >
G1
G2
74
Page 75

End Configuration
6.14 CODE 11
6.14.1 Enable/Disable CODE 11:
Start Configuration
< Disable >
Enable
6.14.2 Code ID Setting:
Set up Code ID(54H, 20-7EH)
6.14.3 Check Digit
Disable
75
Page 76

< Enable >
6.14.4 Transmit Check Digit
< Disable >
Enable
6.14.5 Min Code Length: (default:00)
Set up Min Code Length(00H, 00-50H)
6.14.6 Max Code Length: (default:32H)
Set up Max Code Length(00H, 00-50H)
76
Page 77

6.14.7 Truncate Leading Digits
Set up Leading Digits(00H, 00-50H)
6.14.8 Truncate Ending Digits
Set up Ending Digits(00H, 00-50H)
6.14.9 Insert Characters
< None >
G1
G2
End Configuration
77
Page 78

6.15 GS1 Databar
6.15.1 Enable/Disable GS1 Databar
Start Configuration
< Disable >
Enable
6.15.2 Enable/Disable GS1 Databar
Limited
< Disable >
Enable
6.15.3 Enable/Disable GS1 Databar
Expanded
< Disable >
78
Page 79

Enable
6.15.4 GS1 Databar to UPC/EAN
< Disable >
Enable
6.16 Telepen
6.16.1 Enable/Disable Telepen:
Start Configuration
< Disable >
Enable
6.16.2 Code ID Setting
79
Page 80

Set up Code ID(56H, 20-7EH)
6.16.3 Check Digit:
Disable
< Enable >
6.16.4 Transmit Check Digit:
Disable
< Enable >
6.16.5 Min Code Length: (default: 00)
Set up Min Code Length(00H, 00-32H)
6.16.6 Max Code Length:
80
Page 81

(default:32H):
Set up Max Code Length(00H, 00-32H)
6.16.7 Truncate Leading Digits
Set up Leading Digits(00H, 00-0DH)
6.16.8 Truncate Ending Digits
Set up ending digits(00H, 00-0DH)
6.16.9 Insert Characters
< None >
G1
81
Page 82

G2
End Configuration
6.17 China Post Code
6.17.1 Enable/Disable China post:
Start Configuration
< Disable >
Enable
6.17.2 Code ID Setting:
Set up Code ID(51H, 20-7EH)
82
Page 83

6.17.3 Check Digit:
< Disable >
Enable
6.17.4 Transmit Check Digit:
Disable
< Enable >
6.17.5 Min Code Length: (default:00)
Set up min code length(00H, 00-50H)
6.17.6 Max Code Length: (default:32H)
Set up max code length(00H, 00-50H)
83
Page 84

6.17.7 Truncate Leading Digits:
Set up leading digits(00H, 00-50H)
6.17.8 Truncate Ending Digits:
Set up ending digits(00H, 00-50H)
6.17.9 Insert Characters:
< None >
G1
G2
End Configuration
84
Page 85

6.17.10 Redundancy Level:
Start Configuration
<One>
Two
End Configuration
85
Page 86

Appendix A ASCII Code
86
Page 87

Appendix A
0 1 2 3 4 5 6 7 0 NUL
DLE
SP 0 @ P ` p 1
SOH
DC1
! 1 A Q a q 2
STX
DC2
“ 2 B R b r 3
ETX
DC3
# 3 C S c s 4
EOT
DC4
$ 4 D T d t 5
ENQ
NAK
% 5 E U e u 6
ACK
SYN
& 6 F V f v 7
BEL
ETB
‘ 7 G W G w 8
BS
CAN
( 8 H X h
x
9
HT
EM ) 9 I Y i y
A
LF
SUM
* : J Z j z B
VT
ESC
+ ; K [ k { C
FF
FS , < L \ l | D CR
GS - = M } m } E SO
RS . > N ^ n ~ F SI
US / ? O _ o DEL
ASCII Table:
End of Setting
End Configuration
87
Page 88

Appendix B Function Key Emulate
0 1
0
NULL
1
UP
F1
2
DOWN
F2
3
LEFT
F3
4
RIGHT
F4
5
PAGE UP
F5
6
PAGE DOWN
F6
7 F7
8
BS
F8
9
TAB
F9
A F10
B
HOME
ESC
C
END
F11
D
ENTER
F12
E
INSERT
F
DELETE
Table:
88
Page 89

Function Key Emulate Barcode:
UP($A)
F1($Q)
DOWN($B)
F2($R)
LEFT($C)
F3($S)
RIGHT($D)
F4($T)
PAGE UP($E)
F5($U)
PAGE DOWN($F)
F6($V)
F7($W)
Before Scan the barcode below, please
Enable Full ASCII Code39.
89
Page 90

BS($H)
F8($X)
TAB($I)
F9($Y)
F10($Z)
HOME($K)
ESC(%A)
END($L)
F11(%B)
ENTER($M)
F12(%C)
INSERT($N)
F13(%D)
DELETE($O)
F14(%E)
90
 Loading...