

Page 1
User’s Guide for IT7000 GPRS Model
WinCE. NET Rugged PDA
Dec. 06. 2005
Page 2

Table of Contents
Chapter 1. Introduction
1.1: About this Manual P1-1
1.2: User and Product Safety P1-1
1.3: Insert IT7000 into Holster P1-2
1.4: Radio Frequency Interference Information P1-5
1.5: System specifications P1-6
1.6: Environment standard P1-7
Chapter 2. Getting Started
21: Handling the PDA
2.1.1 Starting the PDA P2-1
2.2: Initiating a Network Connection P2-1
2.3 GPRS Function
2.3.1 Setup GPRS program P2-3
2.3.2 Interface layout P2-5
2.3.3 SELECTING COMMUNICATIONS SETTING P2-10
2.3.4 MAKING A VOICE CALL P2-11
2.3.5 MANAGING PHONEBOOKS P2-12
2.3.6 DIALER P2-14
2.3.7 SMS P2-19
2.3.8 DIAL-UP NETWORKING P2-24
i
Page 3

Chapter 1
Introduction
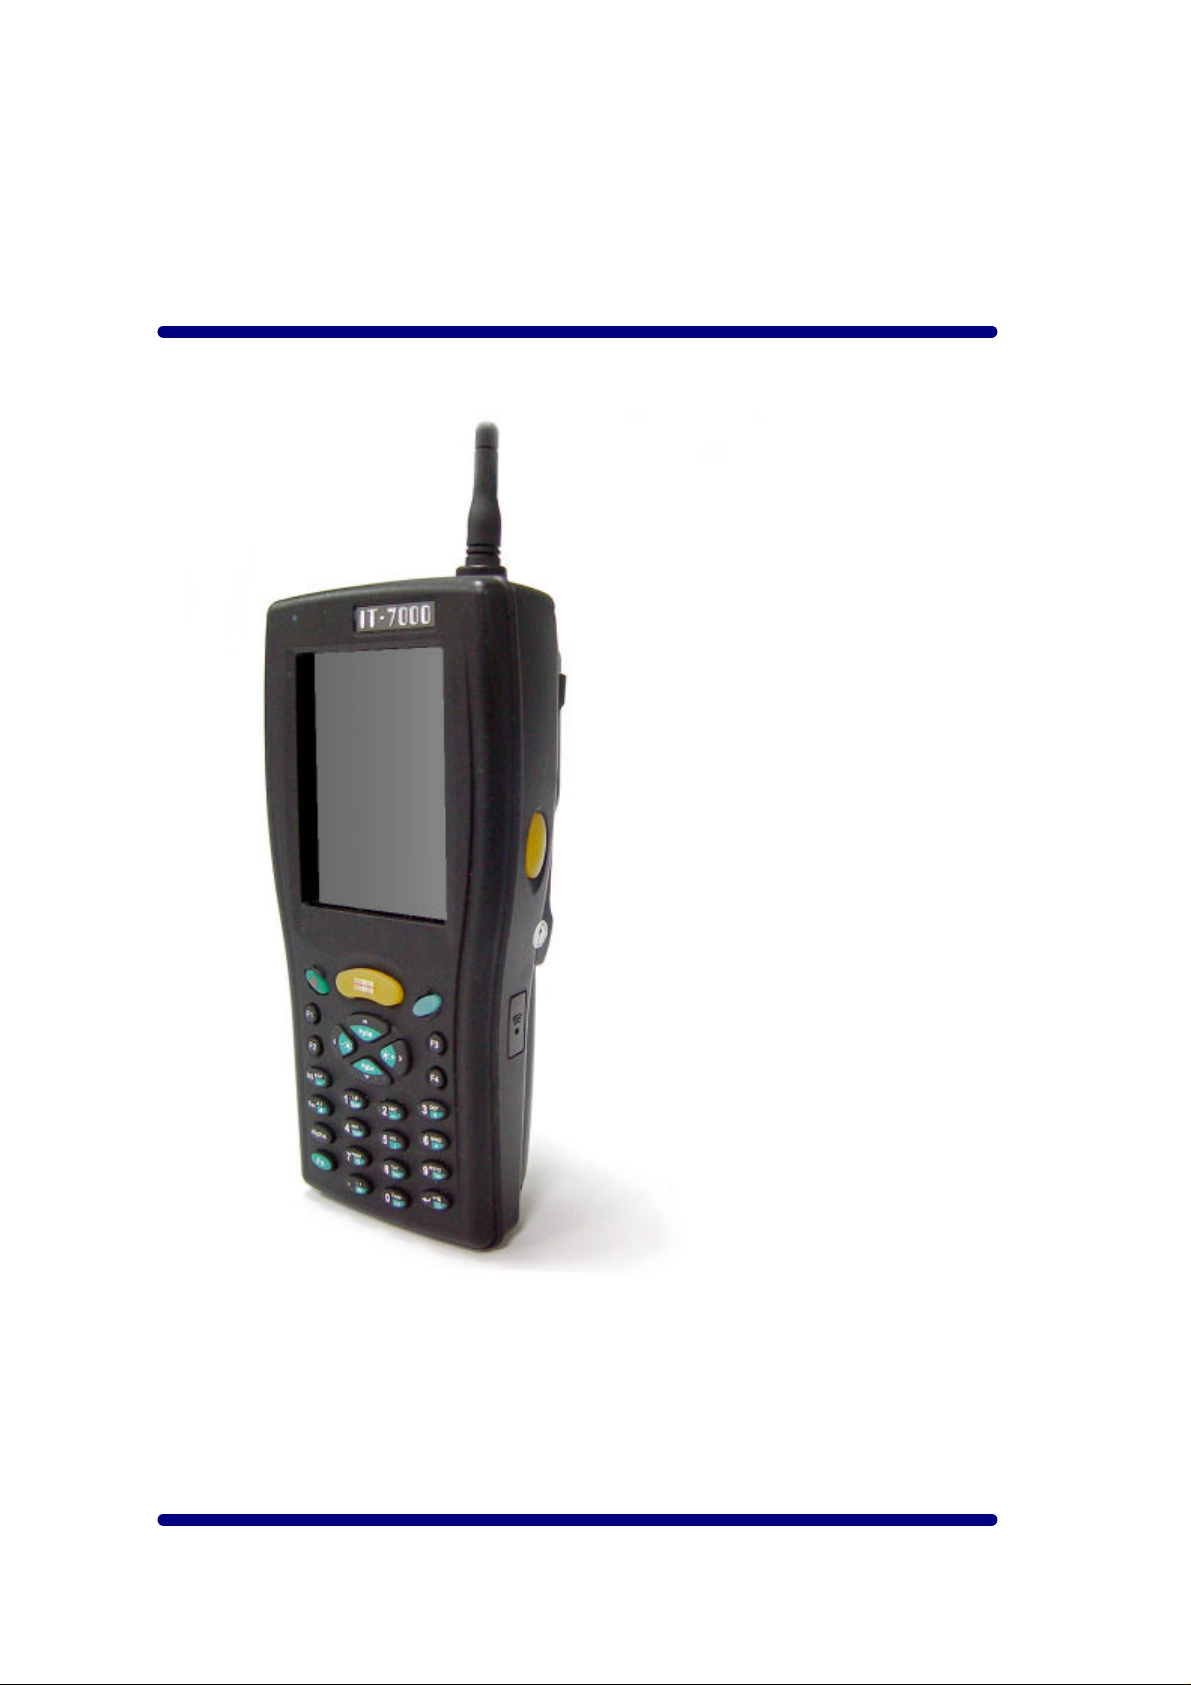
Congratulations on purchasing the IT7000 PDA with GPRS module, a Microsoft
Windows® CE .Net rugged PDA. Its special combination of features make it perfect for
using in a wide range of applications. These features as:
˙Small rugged lightweight form factor
˙Microsoft Windows CE. Net operating system
˙Flexible module design
˙Wireless mobility via 802.11b
˙Robust expansion capability
˙Long battery life
˙Transflective type color LCD display
˙Backlit keypad
1.1 About this Manual
The following chapters contained in this manual are:
Chapter 1: Introduction --- Present the general information about the PDA.
Chapter 2: Getting started --- Describe the basic use of the PDA.
Chapter 3:Setting – Provide basic instructions for customizing the PDA by adjusting
settings
Chapter 4:Communication--- Describe how to use all kinds of communication of the PDA.
1.2 User and Product Safety
◆ Do not stare into the laser beam directly or shine it into eyes.
◆ Never use strong pressure onto the screen or subject it to severe impact, as the LCD
panel could become cracked and possibility cause personal injury. If the LCD panel is
broken, never touch the liquid inside, for such contact would irritate the skin.
◆ Although the IT7000 PDA with GPRS module has been passed the test of IP54 standard
for water and dust resistance, avoid prolonged exposure to rain or other concentrated
moisture. For these conditions exceed the IP54 standard, and could result in water or other
contaminants entering into the PDA.
◆ Use only the approved AC Adapter with the PDA. Use of an unapproved AC Adapter
could result in electrical problems, or even cause a fire or electrical shock to the user.
P1-1
Page 4

User Guide
To comply with FCC RF exposure rule, please use only the supplied holster (the supplied holster
does not have any metallic components in the structure and will limit this product only in an
orientation that back-face will toward user’s body), Third-party belt-clips, holsters, and similar
accessories may not comply with this requirement and should be avoided.
Introduction
◆ Be sure that only authorized supplier are allowed to disassemble and reassemble the
device. If the device or parts has been damaged due to any wrong handling, shall void
the product and parts warranty.
◆ Always make back-up copies of all important data. Easy done by using a cable to
transfer data to the computer. Manufacturer is not liable for any data damages or data
loss caused by deletion or corruption by using of this device, or due to the drained
battery.
◆ Lithium-ion battery packs might get hot, explode, ignite and/or cause serious injury if
exploded by abusive using. Please follow the safety warnings listed as below:
˙Do not place the battery pack in fire or heat the battery.
˙Do not install the battery pack backwards so the polarity is reserved.
˙Do not connect the positive Battery pack with negative battery pack to each other with
any metal object (like wire).
˙Do not carry or store battery pack together with metal objects.
˙Do not pierce the battery pack with nails, strike the battery pack with a hammer,
step on the battery pack or otherwise put it to strong impacts or shocks.
˙Do not solder directly onto the battery pack.
˙Do not expose battery pack to liquid, or allow the battery contacts to get wet.
˙Do not disassemble or modify the battery pack. The battery pack contains safety
and protection devices, which, if damaged, may cause the battery pack to
generate heat, explode or ignite.
˙Do not discharge the battery pack using any device except for the specified device.
When it is used in devices other than the specified devices, the battery pack can be
damaged or its life expectancy reduced. If the device causes any abnormal current to
flow, it may cause the battery pack to become hot, explode or ignite and cause
serious injury.
˙In the event the battery pack leaks and the fluid gets into one’s eye, do not rub the
eye. Rinse well with water and immediately seek medical care. If left untreated, the
battery fluid could cause damage to the eye.
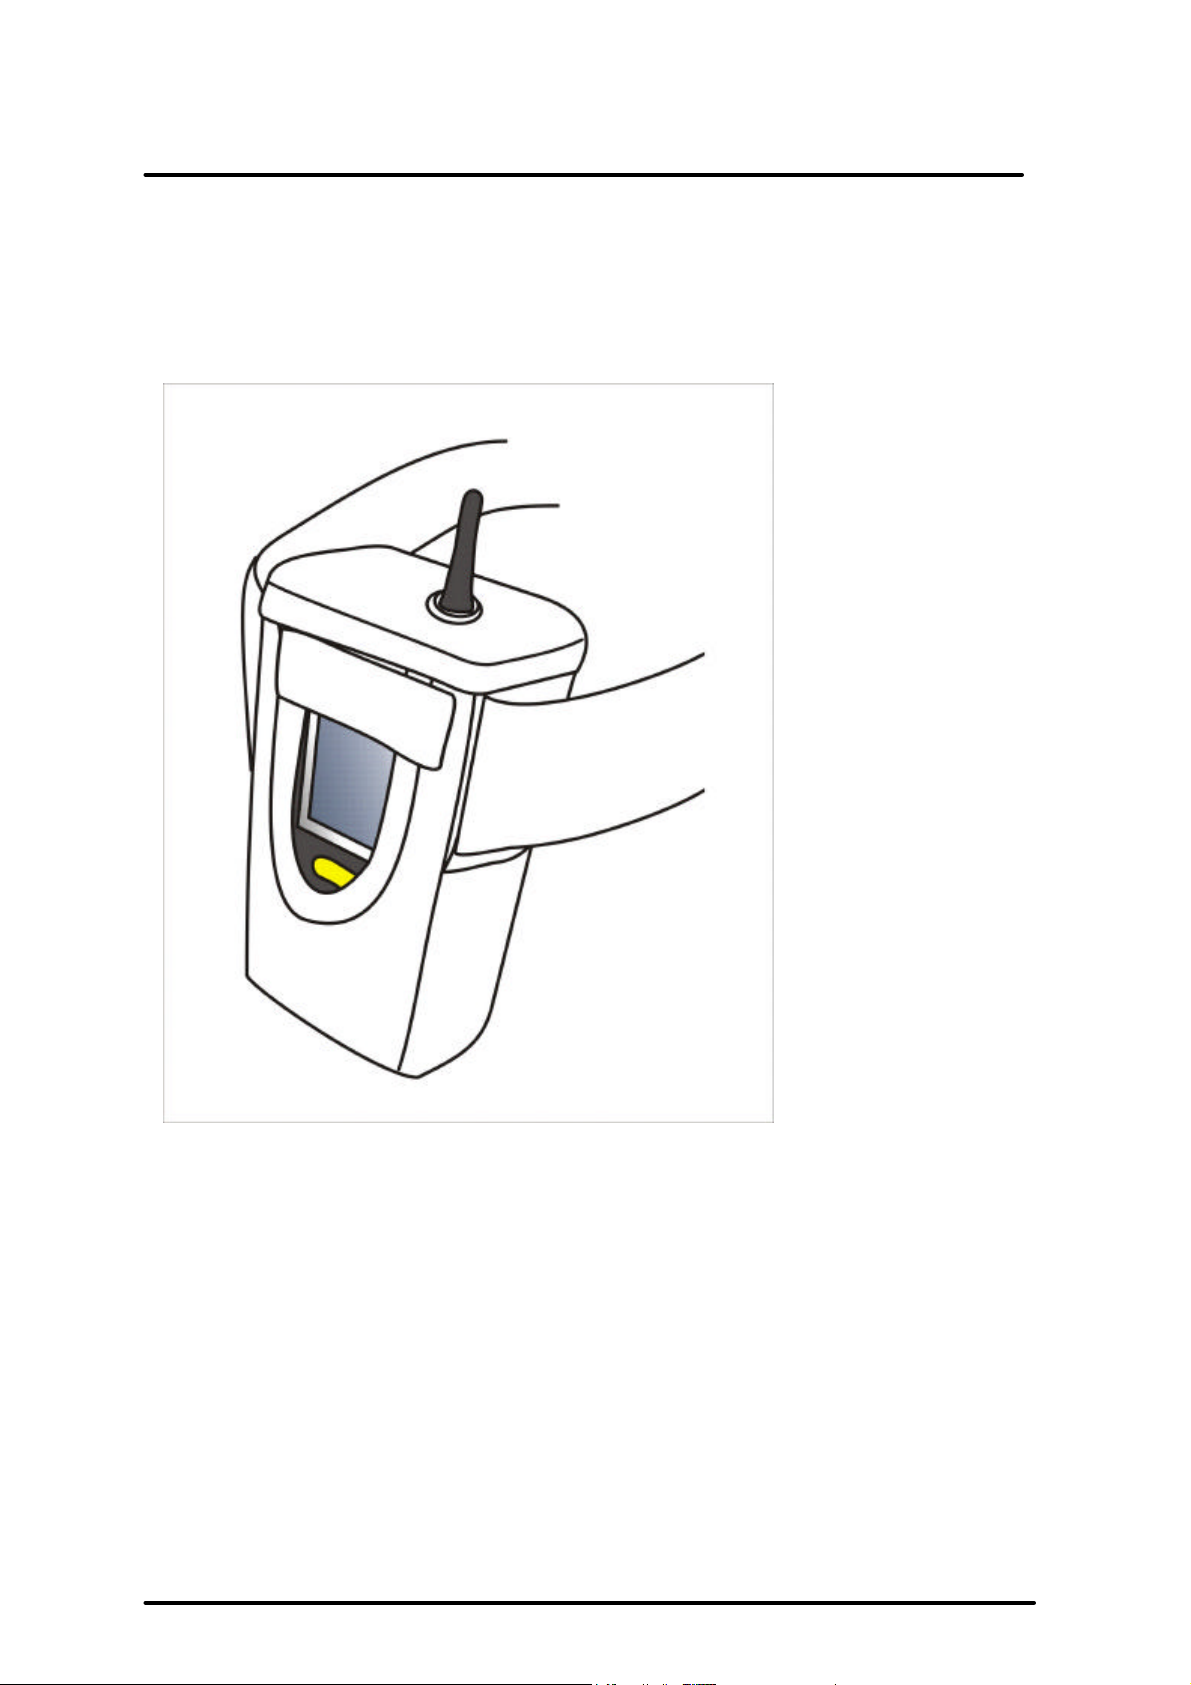
1.3 Insert IT7000 into Holster
Please insert bottom of IT7000 into holster at first, and keep LCM face to outside in this
uni-direction way same as the below figure.
P1-2
Page 5
User Guide
Introduction
P1-3
Page 6

User Guide
Introduction
1.4 Radio Frequency Interference Information
1.4.1 FCC Radiation Exposure Statement:
This equipment has been tested and found to comply with the limits for a Class B
digital device, pursuant to Part 15 of the FCC Rules. These limits are designed
to provide reasonable protection against harmful interference in a residential
installation. This equipment generates, uses and can radiate radio frequency
energy and, if not installed and used in accordance with the instructions, may
cause harmful interference to radio communications. However, there is no
guarantee that interference will not occur in a particular installation. If this
equipment does cause harmful interference to radio or television reception, which
can be determined by turning the equipment off and on, the user is encouraged
to try to correct the interference by one of the following measures:
- Reorient or relocate the receiving antenna.
- Increase the separation between the equipment and receiver.
- Connect the equipment into an outlet on a circuit different from that
to which the receiver is connected.
- Consult the dealer or an experienced radio/TV technician for help.
FCC Caution: Any changes or modifications not expressly approved by the party
responsible for compliance could void the user's authority to operate this
equipment.
This device complies with Part 15 of the FCC Rules. Operation is subject to the
following two conditions: (1) This device may not cause harmful interference, and
(2) this device must accept any interference received, including interference that
may cause undesired operation.
P1-4
Page 7

User Guide
IMPORTANT NOTE:
FCC Radiation Exposure Statement:
Introduction
This equipment complies with FCC RF radiation exposure limits set forth for an
uncontrolled environment. To maintain compliance with FCC RF exposure
compliance requirements, please avoid direct contact to the transmitting antenna
during transmitting.
This transmitter must not be co-located or operating in conjunction with any other
antenna or transmitter.
This equipment has been SAR-evaluated for normal using condition.
Caution:
The FCC ID of IT7000 for GSM function only is SPY-IT7000PDT-G
The FCC ID of IT7000 for WLAN function only is SPY-IT7000PDT-W
The FCC ID of IT7000 for Bluetooth function only is SPY-IT7000PDT-B
Note: 1.A firmware set the used function of each FCC ID when shipping.
2.Only its bottom side of IT7000 with GPRS module will touch the
human body during handling the IT7000 by hand because The
GPRS Module is placed the bottom side of IT7000.
P1-5
Page 8
) and charger
User Guide
Introduction
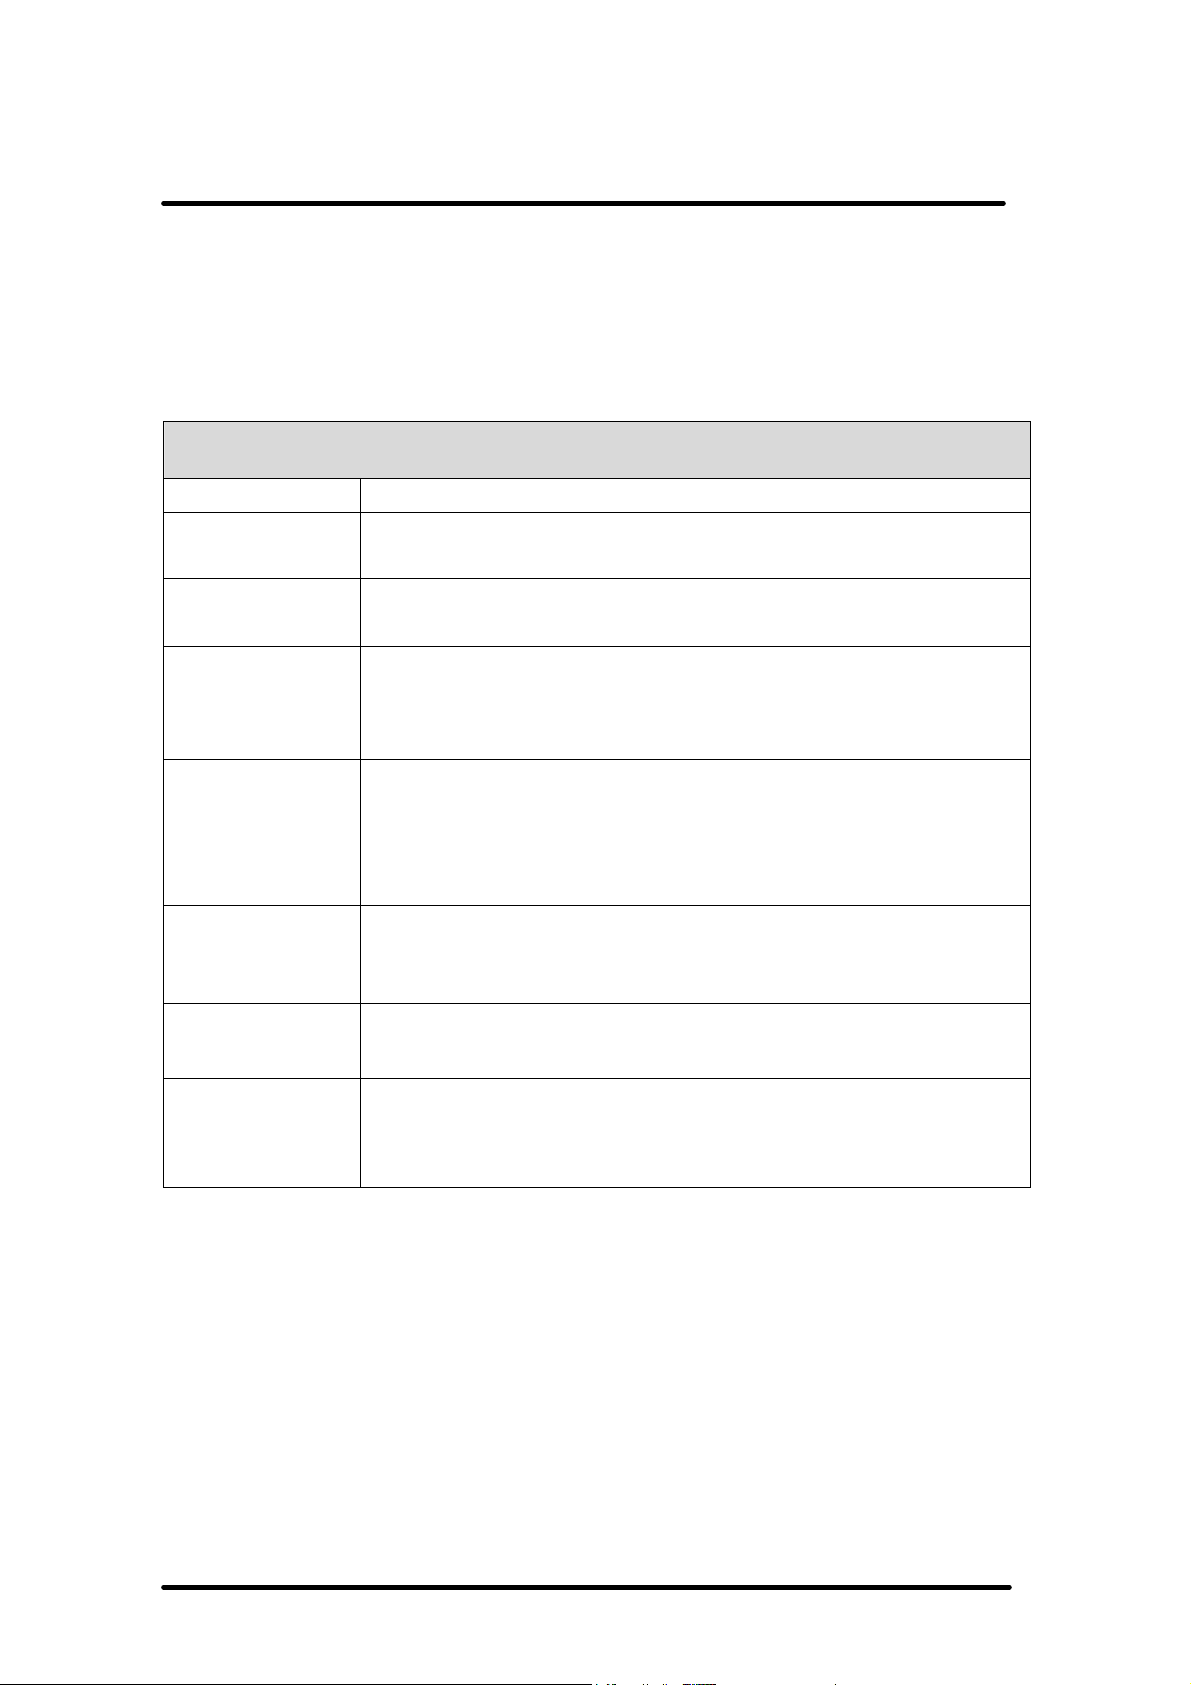
1.5 System Specifications
The detailed specifications as follows. Unless otherwise noted, all the specifications are
subject to change without prior notification.
System Specification
IT7000
Processor
Memory
Display
Radio Support
Communication
Ports
Scan Engine
Expansion Slot
- Intel® XScale PXA255 400Mhz 32 bits RISC
- 64MB (M-System) Flash ROM
- 64 or 128MB SDRAM
- Support 240 x 320 TFT 256K Color LCD
- Transflective type TFT LCD with back light
-Wireless LAN: 802.11b
-Siemens MC55 Tri-Band GSM/GPRS Module:
900/1800/1900MHz
-Infrared: One IrDA 1.2 compliant port
-USB: Support USB v1.1 both host and client
(PDA and Cradle)
-Serial: RS232 via optional cable or Cradle
-Default: Symbol SE800
-Optional: Symbol SE900, Opticon VLM4000,
Intermec EV-10 CCD, HHP 4080 2D Imager.
- One Compact Flash Type-II slot (support 3.3V)
- One SD Card slot (support SD memory)
- One three-color LED for Alarm notification (Blue
LED
indicator (RED & Green)
- One two-color LED for scanner indicator
P1-6
Page 9
& 100 standby hours in 64MB
rechargeable backup battery (It will hold the
mm
P1
-7
User Guide
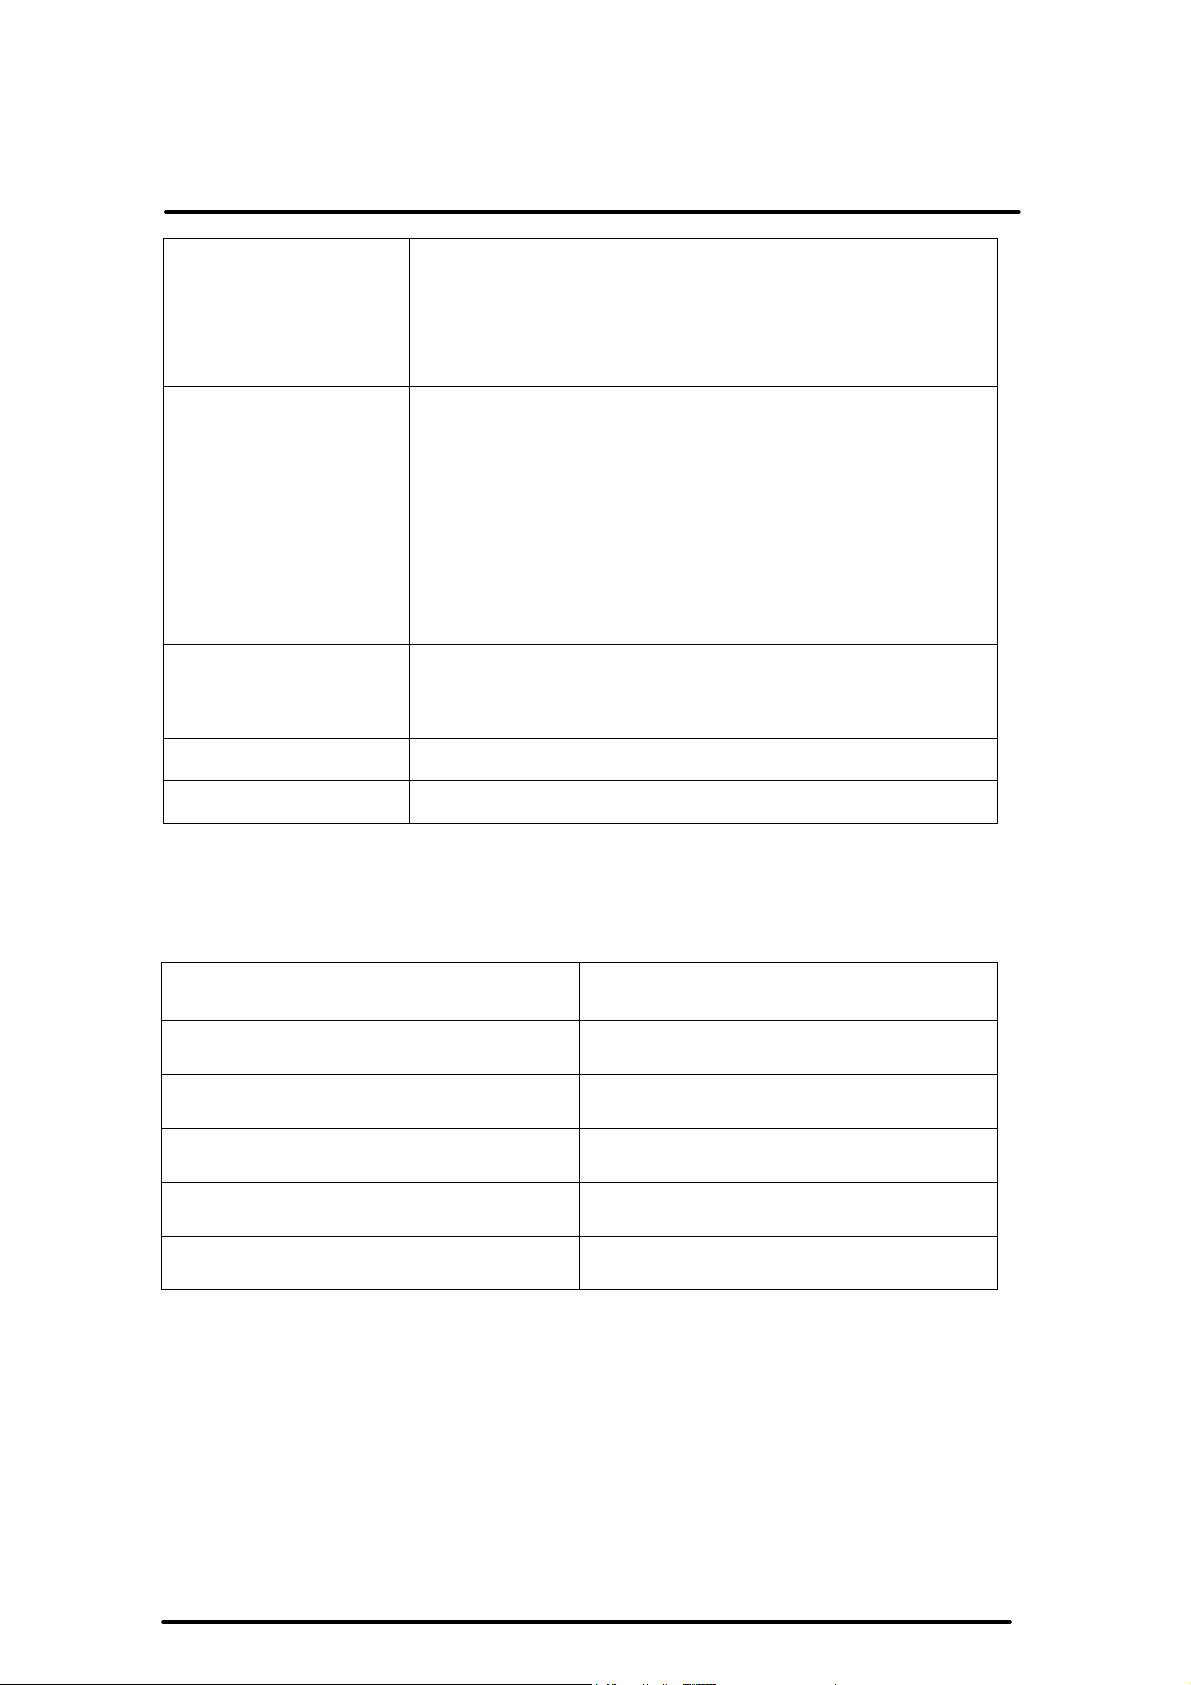
Power System
Button/Key
- Built in 7.4V, 2200mAh Li-ion removable battery pack
(10 operation hours
DRAM and 64 ROM module)
- 140mA
system data at least 3 hours)
- Power/Front light on/off button
- LED light Key
- 4-way navigation button
- 4 Application Keys
- 3 Scanner Enable Keys
- SW Reset input button
-16 alphanumeric keyboard
Introduction
Dimensions and
Weight
Color
Software
- Dimensions: 91/76mm (W) x 187mm (L) x 58/43
(H)
- Weight: 350g
- Black
- Microsoft WinCE.NET 4.2 (Professional Version)
1.6 Environment Standard:
Storage Temperature
Operating Temperature
Humidity
Drop
Water & Dust proof
-20℃~60℃
-10℃~50℃
5% to 90% (non-condensing)
5ft (1.5m) drop to concrete
IEC 529 rating IP54DW
Vibration
MIL STD 810F
Page 10
Chapter 2
Getting Started
2.1 Handling the PDA
2.1.1 Starting the PDA
Press the Power key to turn on/off the PDA. If the PDA does not power on, perform a
cold boot.
Figure 2-1
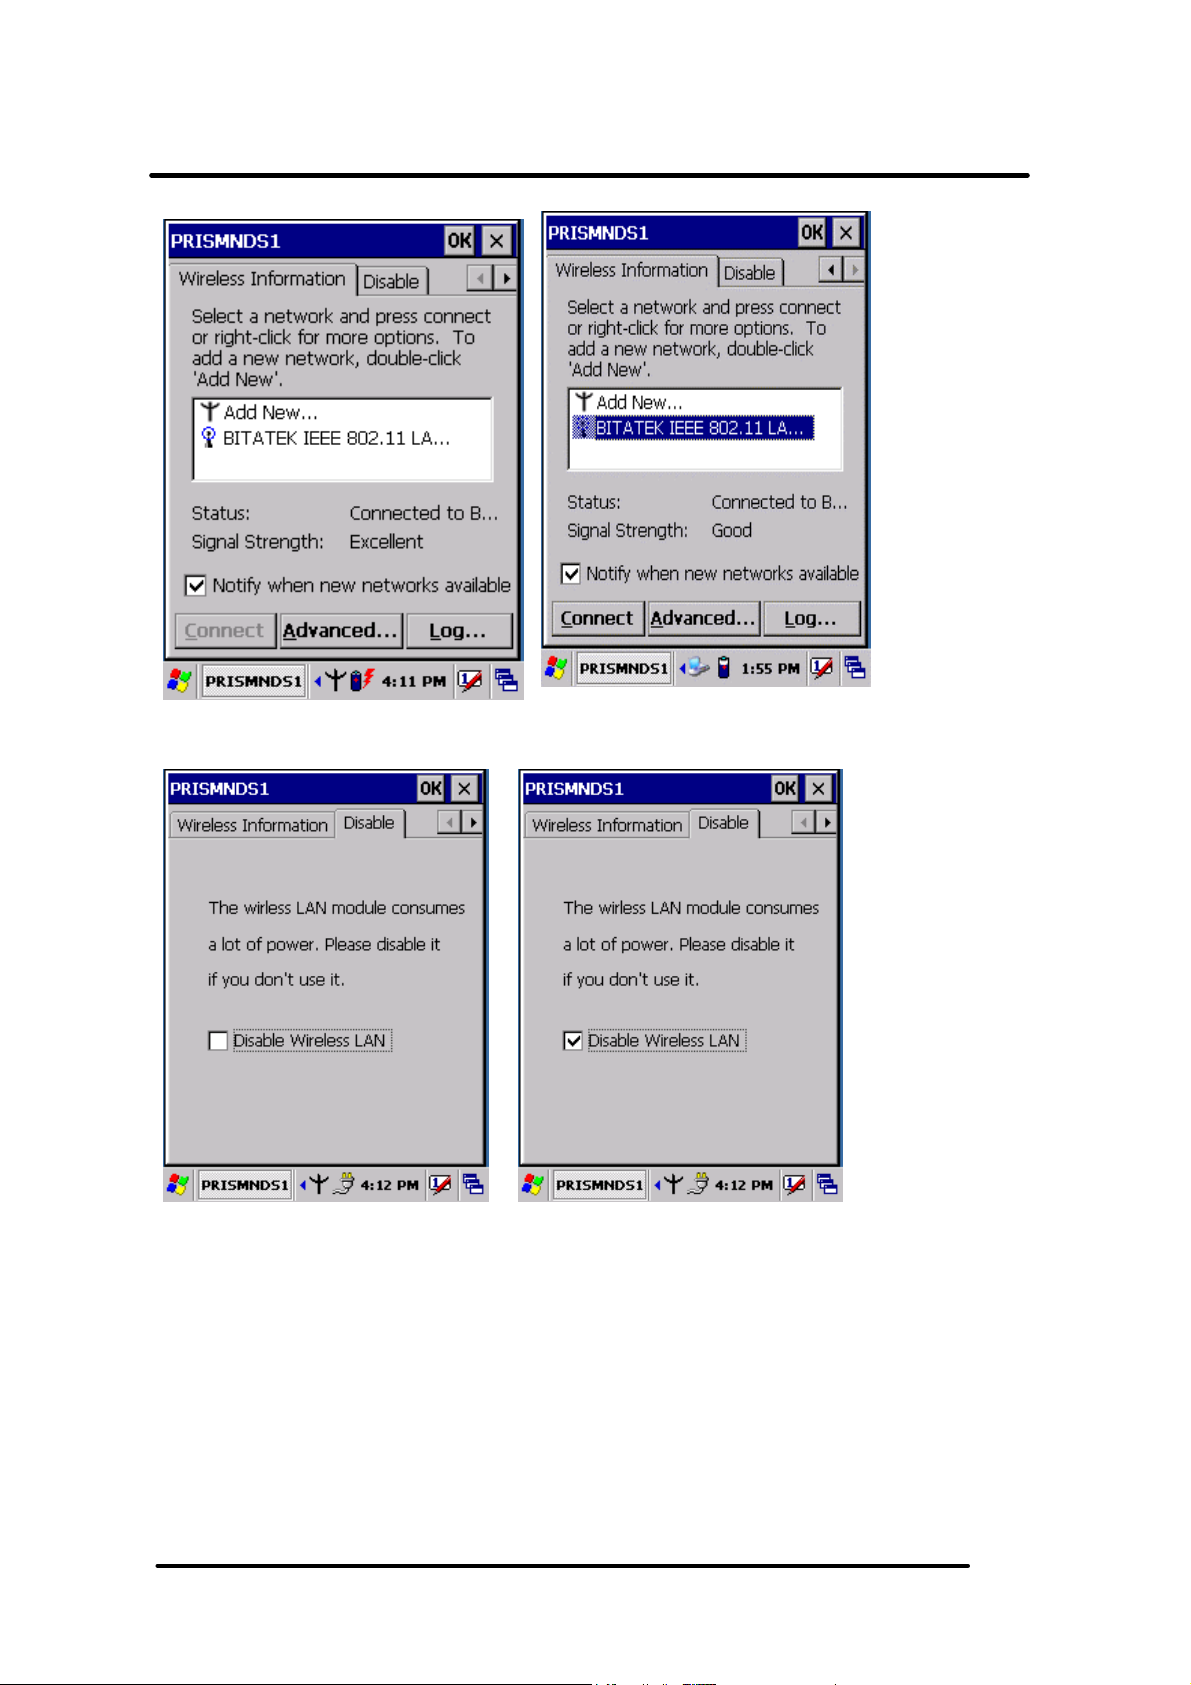
2.2: Initiating a Network Connection
To tap the icon at Task bar, then a Wireless LAN screen “PRISMNDS1”(Figure 2-2-
1), select page “Wireless Information”. There is a list of Wireless access points.
Select one by double-clicking the access point you want. Or double-click “Add New “ to
add a new access point.
To Click “Connect” icon to connect WLAN with Access point.( Figure 2-2-2)
To select page “ Disable” to disable WLAN to save power consumption. ( Figure 2-2-3
& Figure 2-2-4)
P2-1
Page 11
User Guide
Figure 2-2-1 Figure 2-2-2
Getting Start
Figure 2-2-3 Figure 2-2-4
P2-2
Page 12

User Guide
Getting Start
2.3: GPRS Function:
2.3.1 Setup GPRS program
1. Put the SIM card into SIM slot of PDA ( See Figure 2-3-5)<Must Turn off PDA>
2. Enter into Start ? SettingsàControl PanelàSIEMENS GPRS (Figure 2-3-
1)àTag ”OK”
3. A setup screen is showing as Figure 2-3-2
Figure 3-2-1 Figure 3-2-2
4. Please tag “OK” ICON to continue the program setup(Figure 3-2-3)
Figure 2-3-3
5. The GPRS program will be finalized setup after the blue bar is fulfilled in the below
figure.(Figure 2-3-4)
P2-3
Page 13

User Guide
Figure 2-3-4
Getting Start
Figure 2-3-5
P2-4
Page 14

User Guide
Interface layout
2.3.2 INTERFACE LAYOUT
Depending on options available and the capabilities of your PDA, the main interface enables
you to:
- Look up all your messages using the Inbox,
- Create and send Fax
- Make a phone call using the Dialer
functions.
-
-
- Connect to the Internet.
Note:
When you start the application for the first time, the communications settings screen is displayed
automatically. You will not be able to access the main interface until these settings have been
specified. See Selecting communications settings, page 2-10.
Manage several Phonebooks.
Look up WAP
sites.
and SMS
messages.
, which also enables you to access SMS and fax
Reading messages
Inbox
Clicking the Inbox
Unread messages on this list appear in bold.
The message content is displayed in the lower frame.
icon displays a list of all messages received at the center of the screen.
P2-5
Outbox
and Sent
icons.
Page 15

User Guide
P2
-6
Interface layout
Depending on the type of message, in order to send, see properties, move, resend, display,
annotate or delete a message on the list:
1. Select the message and hold the selection with the stylus for a few seconds until a
To collect your messages, click on the Tools
Messages received are placed in the Inbox
automatically.
context menu is displayed.
2. Select the desired option.
3. Depending on the option selected, follow the usual procedure or click Cancel
OK
icon, located in the top right-hand corner of the screen, to return to the main
interface.
menu, then Retrieve SMS
or the
from the list that shows up.
Outbox
Clicking the Outbox
message content is displayed in the lower frame. This is a listing of messages waiting to be sent or
sent from the application as well as those downloaded from your mobile phone.
icon displays a list of all messages sent at the center of the screen. The
Page 16

User Guide
Interface layout
Depending on the type of message, in order to send, see properties, move, resend, display,
annotate or delete a message on the list:
1. Select the message and hold the selection with the stylus for a few seconds until a
context menu is displayed.
2. Select the desired option.
4. Depending on the option selected, follow the usual procedure or to return to the
main interface click the Cancel
corner of the screen.
button or the OK
icon, located in the top right- hand
Sent box
Clicking the Sent
the selected message is displayed in the frame.
icon will display the list of messages sent from the outbox. The content of
To send, see properties, transfer, display, annotate or delete a message from the list:
1. Select the message and hold the selection with the stylus for a few seconds until a
context menu is displayed.
2. Select the desired option.
3. Depending on the option selected, follow the usual procedure or click the
Cancel
return to the main interface.
button or the OK icon, located in the top right-hand corner of the screen, to
P2-7
Page 17

User Guide
Interface layout
Phonebooks
Clicking on the Phonebooks
have created or imported. Select the one you wish to set as the default phonebook from the list to be
looked up or edited.
If the drop-down list is empty and you would like to import contacts from your mobile phone, select the
Tools>Read a phonebook
See Managing Phonebook, page 2-12.
menu.
icon displays a drop-down list containing the phonebooks you
Icons and menus
Display icons
Clicking the icon located at the bottom of the screen symbolizing two arrows on a blank page,
displays the fast access icons for available functions (which are as follows, from left to right: send and
receive Fax
Click this icon again to hide them.
, send and receive SMS,
Phonebook,
Dialer
or Remote network access).
P2-8
Page 18

User Guide
Interface layout
Drop-down menus
The New
and options available:
and Tools drop-down menus have several functions, depending on the context
New menu
Click on the New
o SMS:
26.
o Phonebook
o Phonebook Contact
o Call.
menu at the bottom of the screen, then select:
follow the steps to prepare and send SMS messages as described on page
. To create a phonebook, see Managing Phonebook, page 2-10.
Phonebook, page 2-10.
To speed-dial the telephone number for one of your Contacts, see page 2-11.
. To add a contact to your phonebook, see Managing
Click on the Tools menu at the bottom of the screen, then select:
o Read SMS messages.
page 27.
o Look up a phonebook
mobile phone or the one in your SIM card. See Phonebook, page 2-8.
o Reply
o Resend
o Transfer
o View. To
o Annotate
o Delete
o Select all
o Options. To
page 11.
o Dialer. To
o Dial-up networking
WAP services. See Dial-up networking, page 2-24.
o About.
o Exit.
Tools menu
Fax, page 17.
: This command will be available if a message is selected in the Inbox.
. To resend the selected message.
. To transfer the selected message.
display the content of the selected message.
. To annotate a fax which is to be resent, transferred or saved. See
. To delete one or more messages selected from the list.
. To select all messages on the list.
make a call directly from the application. See Dialer, page 2-14.
To access information about the application.
To shut down the application.
The application retrieves the SMS messages. See SMS,
. To look up and download a phonebook: the one in your
configure the application's communications settings. See Settings,
. To manage remote access networks such as Internet or
P2-9
Page 19

User Guide
Selecting communications settings
2.3.3 SELECTING COMMUNICATIONS SETTINGS
Before using the communications features, ensure that the communications port and the equipment
you are using have been declared correctly.
Communications tab
1. Select Tools>Options>
Communications
telephone).
3. Select Connection type being used.
2. Select the Manufacturer
4. Click the
confirm.
and the Model
icon located at the top right-hand corner of the screen to
The Detect
application.
The Status
button prompts you to search your equipment automatically and to configure the
button returns information on your equipment.
P2-10
of your equipment (modem or
Page 20

User Guide
Making a voice call
2.3.4 MAKING A VOICE CALL
1. Select Call
2. Select the contact you wish to call. If this contact has more than one telephone
number listed, select one of them and click Continue.
3. Click OK to make the call and follow the instructions displayed on screen. This
function enables you to make a call rapidly from the main screen.
If your mobile phone supports the Dialer function you can also make a voice call using it. See page
20 for more details on the Dialer.
P2-11
from the New menu in the main screen. The contacts list shows up.
Page 21

User Guide
Managing phonebooks
2.3.5 MANAGING PHONEBOOKS
Pocket PhoneTools enables you to create phonebooks, import contacts listed in your mobile phone
(memory + SIM card) and synchronize various phonebooks.
Creating a phonebook
1. Select
2.
3. Click OK.
New>Phonebook.
Enter the phonebook name.
Adding a contact
1. Click the Phonebooks
3.
4.
phonebook to which you wish to add a contact.
2.
Select
New>Phonebook contact
Enter Recipient Name
Click OK
. The entry will be added to the contacts
icon then select from the drop-down list the
or click .
and Phone Number.
P2-12
Page 22

User Guide
Managing phonebooks
Renaming a phonebook
1. Click the Phonebooks
drop-down list displayed.
2. Select the Tools>Change
3.
Type your changes in the Name
icon then select the phonebook to be renamed from the
menu.
field and click OK.
Changing a contact
1. Click the Phonebooks
to be changed from the drop-down list displayed.
2.
Select the contact you wish to change.
3. Select Tools>Change
context menu is displayed.
4. Select the Change
5. In the Correspondent
Comments
fields and click OK.
icon then select the phonebook containing the contact
using the stylus and hold the pressure until a
option in this menu. A new window is displayed.
tab, enter your changes in the Name,
Number
and
Downloading your mobile phonebook
1. Select the Phonebooks
2. Select Tools>Retrieve phonebook.
3.
When prompted by the application, select the memory where the phonebook
you want to download is stored.
4. Click OK
. Your phonebook is downloaded.
folder.
Transferring a phonebook to your mobile phone
1. In the Phonebooks
2. Select Tools>Transfer to cellular.
3.
When prompted by the application, select the memory to which the phonebook
Is to be transferred.
4. Click OK
. Your phonebook is transferred.
folder, select the phonebook to be transferred.
P2-13
Page 23

User Guide
Dialer
2.3.6 DIALER
The Dialer
y
y
y
y
y
y
y
y
y
Access the Remote network access
y
y
Warning!
Certain dialer functionalities may be disabled due to incompatibility with the communications
equipment.
Accessing the dialer
module simulates the operation of a mobile phone in your PDA. It enables you to:
Make calls in various ways:
- by directly selecting an entry in the Contacts
- by selecting from a Fast calls
- by entering a number directly using the keyboard.
- by redialing one of the last 10 numbers dialed.
- using the missed calls log if the caller has not withheld his/her number.
Receive calls showing, where possible, the last and first names of your caller and playing a
tune identifying the Contacts
Reject incoming calls.
Save outgoing, incoming as well as missed calls in call logs.
Send digits with the call to enable navigation across most voice servers.
Save the number of your message system for speed dialing.
Check microphone and speaker volume for certain items of equipment.
Send and receive SMS messages.
Read signal strength and battery level of your mobile directly when external equipment is
being used or of your PDA for an internal card.
Request the dialer to be called automatically on starting up the application.
folder of your PDA.
list you will have pre-programmed.
category to which your caller belongs.
module to connect to the Internet using a single button.
Starting from the main interface, select the Tools
initializes your communications equipment then displays signal strength and battery level as well as
the name of your service provider. The keyboard will be enabled once the initialization stage is
complete.
menu then the Dialer
option or click . The dialer
P2-14
Page 24

User Guide
Dialer
Dialer:
Making a voice call
1. Access the dialer and use one of the following methods:
- Direct entry,
the last digit displayed, click on the icon showing an arrow pointing to the left and
a C. To make the call, click the icon showing a green receiver.
dial the number using the keys on the numeric keypad. To delete or correct
-
From Phonebook
more than one number is assigned to the person being called, a new window will open
enabling you to select the number to be called. Click OK
-
Speed dialing
- Again
2. The number and name of the person being called (if not withheld) is displayed in
the top frame during the call.
, click the green button without entering any number. A listing of the last numbers
dialed appears.
, click on the Contacts
, press
to retrieve the number you are calling.
icon to retrieve the number you are calling. If
next to make the call.
P2-15
Page 25

User Guide
Dialer
It is just as easy to connect to your voicemail by pressing and holding the "1" key. If you have not
specified this number yet, the dialer will prompt you to configure it.
To end the call, click on the icon showing a red receiver. Call duration will then be displayed and an
entry in the Dialer log created.
If one or more callers have attempted to contact you in your absence, the dialer will inform you
accordingly with an on-screen message. If your callers have not withheld their numbers, you can call
them back using the following procedure:
1. Click the Logs
tab is for missed calls.
2. Select the contact to be called then press the Call
button which will open a tabbed box, in which the first
Receiving a call
Ringer
The dialer issues a ringing sound to alert you to a caller trying to reach you. The tune played at this
time can depend on how the caller is recorded in your Contacts
contacts in your folder (Work, Friends, F amily, etc.) and list your callers in one of them. Refer to the
user manual for your PDA for further information on this subject.
The application may be configured to play different tunes depending on the category of the caller.
Warning!
This will only work if the caller’s number is not withheld.
If this is the case, the application searches in the Contacts folder for an entry associated with the
number, it then determines its category and, if applicable, plays the tune you have configured for it.
folder. You can in fact specify
Information
If the caller's number has not been withheld and if the caller is listed in Contacts,
display his or her name. If he or she is not listed, only the number will be displayed. If the caller's
number has been withheld, the dialer will then display Number withheld.
the dialer will
Accepting / Rejecting a call
Click the green button to accept the call and click the red button to reject it.
P2-16
Page 26

User Guide
SMS messages are downloaded automatically as soon as your communications equipment informs
the application that messages have been received. If the message received has high priority, its
content is displayed automatically, otherwise you have to use the Envelope
SMS, page 25).
Logs
The application records dates, durations and caller identifiers as the dialer is used, dividing them into
three categories: missed calls, incoming calls and outgoing calls. You can look up details of these
lists at any time by pressing the Logs
by category and, under the Durations
resetting the counters.
Receiving SMS messages
Dialer
button to read it (see
button. This will take you to a tabbed box listing the calls logged
tab, the various cumulative totals recorded, with a facility for
Remote network access
The dial-up networking button enables connections to be made to remote services and to start
up applications associated with them (see page 29 ).
Warning!
On most equipment, the fact of connecting to the Internet prevents the Dialer from being used.
You can use either the red key or the dial-up networking button to close the dial- up
networking session again.
Setup
Accessing setup
Before setting up the application's dialer function, select the communications equipment and the
mobile telephony service provider using the Options command on the Tools
dialer configuration by clicking on the Dialer
menu. Next, access
link.
Configuring the answering machine
You can add the number of your answering machine in the Network operator
(
Tools>Options
"1" key of the dialer.
menu). It will be dialed automatically if you leave the stylus resting on the
selection dialogue box
P2-17
Page 27

User Guide
Dialer
Configuring a ringer
1. From the main interface, select the Tools>Options
2. Click the Dialer link. You can specify the various tunes to be played according to
the categories to which the callers belong in the window displayed.
3. Select the type of call to which a ringer is to be assigned in the first drop-down
4. If you have selected Incoming call, a
listing the various categories specified in Contacts
you would like to associate a tune.
5. Select the ringer in the Sound
6. Use the Play
with a ringer, click OK
7. Repeat these steps for each type of call to which you would like to assign a
ringer.
menu in the Events
and Stop
buttons to test the selected ringer. Once you are happy
to confirm.
field: Incoming call,
second drop-down list will be displayed
drop-down menu.
menu.
Incoming fax call or Receive SMS.
. Select the category to which
Calling the dialer automatically on application start-up.
1. Starting from the main interface, select the Tools>Options
2. Click the Dialer
3. Check the Enable on start -up
link.
box in the window that shows up.
menu.
P2-18
Page 28

User Guide
SMS
2.3.7 SMS
What is 'Short Message Service' (SMS)?
The Short Message Service enables you to send messages in text format over a mobile phone
network. This service requires a specific subscription.
Short messages are sent first to the SMS Service Center
which then forwards the message to the recipient.
Received messages are stored in the memory. You cannot receive any more new messages once
this memory is full. For this reason, ensure you delete them regularly or configure the application
so it transfers them to your PDA.
SMS settings
Setting up the service center
1. Starting from the main interface, select Tools>Options and click on the
Network operator
link.
run by the mobile phone network,
2. Select your country and mobile telephony service provider. The number of the
default Service Center is displayed. If it is not the number sent by your service
provider, you can change it manually.
P2-19
Page 29

User Guide
SMS
interrogate your equipment and configure these settings.
4. Enter the number for the answering machine suggested by your service provider.
It will be used by the dialer.
5. Click OK
3. You can also use the Detect automatically
to confirm.
button for the application to
SMS message settings
1. From the main interface, select Tools>Options
and click on the SMS
link.
Validity period
center can log it in and resend it later. This list specifies for how long your message
will be repeated.
Message type:
message format in line with the service center and the recipient.
Sending
: if your message cannot be delivered immediately, the service
to be used in very specific cases, this option configures the
Transferring SMS messages received
from the communications equipment to the PDA. If you opt for the "copy" mode
(option unchecked), messages received will accumulate in the communications
equipment until it fills up and you risk losing messages to come. In this case you
can always delete them from the application's inbox.
2. Click OK
Receiving
to confirm.
: they may be either copied or moved
Setting up templates
If you frequently use the same words or sentences in your messages, you can record them in a list
so they can be quickly added to your message. To do this:
1. From the main interface, select Tools>Options
2. Select an entry to be edited from the upper list and click the Edit
pointing downwards) for the entry to be copied to the editing area.
3. Once your sequence has been entered, click the Change
upwards) to save it.
and click on the My text
button (arrow
button (arrow pointing
link.
P2-20
Page 30

User Guide
SMS
Sending an SMS message
1. Starting from the main interface, select New>SMS
2. Enter the recipients' numbers using one of the following methods:
ƒ
information directly then click the Next button. If you have more than one
the list.
ƒ
the
3. Click OK
4. Enter the text of the message in the frame displayed. A character and SMS
counter displays size as entry proceeds. A typical message contains up to 160
characters but the application can send content longer than this by linking more
than one message
your message using the My text
5. The default setting is for transmission requests not to be implemented
immediately. This enables you to prepare your message off-line and to send it
later on (to do this, select it in the Outbox
Check the desired options:
ƒ
Direct entry
recipient, enter their numbers then press the Add
From Phonebook
Contacts
your recipients and their numbers.
if the message content entry dialog box is not yet active.
Send now
: to send your message immediately.
method: if you have a single recipient only, enter his or her
method: if your message recipients are listed in
folder of your PDA, click the Contacts
together. You can insert pre-recorded passages of text in
menu.
, then select Tools>Send).
or click
.
button to add them to
button and select
ƒ
recipient's mobile phone screen.
ƒ
ƒ
languages.
6. Click OK.
High priority:
Request return receipt
UCS2 format:
To display the content of your message directly on the
: to receive an acknowledgement.
to ensure compatibility with pocket PCs in different
P2-21
Page 31

User Guide
SMS
Downloading received SMS messages
-
Select Tools>Retrieve SMS
they will be automatically copied or transferred to the Inbox
bold. To select a tool, simply click on it.
. If you have received SMS messages on your mobile phone,
. Unread messages appear in
Viewing an SMS
1. Select the SMS you wish to view.
2. Select the Tools>View
and select the View
date and time of sending are displayed. If the inbox contains a number of messages,
you can go directly from one to the next using the same dialog box.
3. Click OK to return to the main screen.
menu or hold the click until a context menu is displayed
option on it. The content of the message, as well as the sender,
Note:
Unread messages appear in bold. To select a message, simply click on it.
Replying to an SMS message
1. In the Inbox
2. Hold the selection until a context menu is displayed in which to select the Reply
option, otherwise select Tools>Reply.
Mobile phone
3. Click OK.
4. Enter the message text.
5. The default setting is for transmission requests not to be implemented
immediately. This enables you to prepare your message off-line and to send it
later on (to do this, select it in the Outbox
desired options referring to SMS send options on drafting below.
6. Click OK.
, select the message you want to answer.
The SMS send screen is displayed. The
and, if applicable, Name
and Company
, then select Tools>Send
fields are already filled in.
). Check the
Resending an SMS message
1. In the Sent
2. Select Tools>Resend.
3. Follow the standard procedure for sending a message (see page2-21).
folder, select the SMS message you want to send again.
P2-22
Page 32

User Guide
SMS
SMS send options on drafting
- Send now: the transmission request is implemented as soon as you click Send
Otherwise, the transmission request is stored in the Outbox.
message, you need to select it, then select Tools>Send.
- High priority:
recipient's mobile phone screen.
- Request return receipt
- UCS2 format
PCs.
check this box to display the content of your message directly on the
: check this box to receive an acknowledgement.
: check this box to ensure compatibility with non-European language pocket
In order to send your
.
P2-23
Page 33

User Guide
Dial-up networking
2.3.8 DIAL-UP NETWORKING
The application assists the user when setting up dial-up networking, especially for Internet access.
Since this setup relates to the service provider, you must configure it before anything else.
Configuring the service provider
1. Starting from the main interface, select Tools>Options and click on the
Network operator
2. Select your country and mobile telephony service provider.
link.
Accessing the connections list
1. Starting from the main interface, select Tools>Options.
2. Click the Dial-up networking link. The dialog box displays a list of dial-up
configurations handled by the application. From this list you will be able to create,
change and delete your configurations.
P2-24
Page 34

User Guide
Dial-up networking
Creating an access setup
1. Access the connections
2. Select the New option from the list. The first box appears, enabling you to
enter the name to be assigned to your configuration.
3. Press the Next
this connection is live. This choice is optional.
4. Press the Next
network
button. The application will list software that can be run while
button. If your service provider handles different types of
Warning!
Using "high speed" networks such as GPRS is subject to subscription options.
5. Select a Context number
containing all settings for use over "high speed" networks, such as GPRS. In order
to avoid overwriting a pre-programmed setup on your mobile, select a free storage
profile using its context number. If your service provider is recognized by the
application, you will be able to use the default settings directly; to do this, check the
Use standard settings
ƒ
Specify the APN or phone number, Name and Password settings as
required. Repeat for subsequent screens for IP address, DNS and QOS if
applicable.
6. Press Next.
created for high-speed network access, to be applied if the high-speed connection
is unsuccessful. If you request a backup configuration to be created, the application
will display the entry screens shown previously for "standard" networks.
The following dialog box enables a backup configuration to be
. Certain telephone devices offer connection profiles
box.
Changing an access setup
1. Access the connections list.
2.
Click the connection to be changed or display the context menu by holding the
stylus on the connection to be changed and select the Change
3.
Follow the procedure for creating access setups.
option.
Deleting
and select the Delete
1. Access the connections list.
2. Display the context menu by holding the stylus on the connection to be changed
option.
P2-25
Page 35

User Guide
Dial-up networking
Connecting
You can set up the connection from the main interface, from the Tools>Dial-up networking
menu or by clicking on .
- You will be shown a list if more than one access is configured.
- If no access has been configured, the application will prompt you to access the Setup
program to create one.
P2-26
 Loading...