

Page 1
Bitatek Co. Ltd. has been acquired by iMotion Group in 2019.
Ownership of all products and trade marks of Bitatek
Co. Ltd. shall be assumed by iMotion Inc. and its subsidiaries
unless otherwise specified.
Glider X1
Please confirm if there is any item missing or broken in the package
when opening it.
Contact your supplier immediately if any.
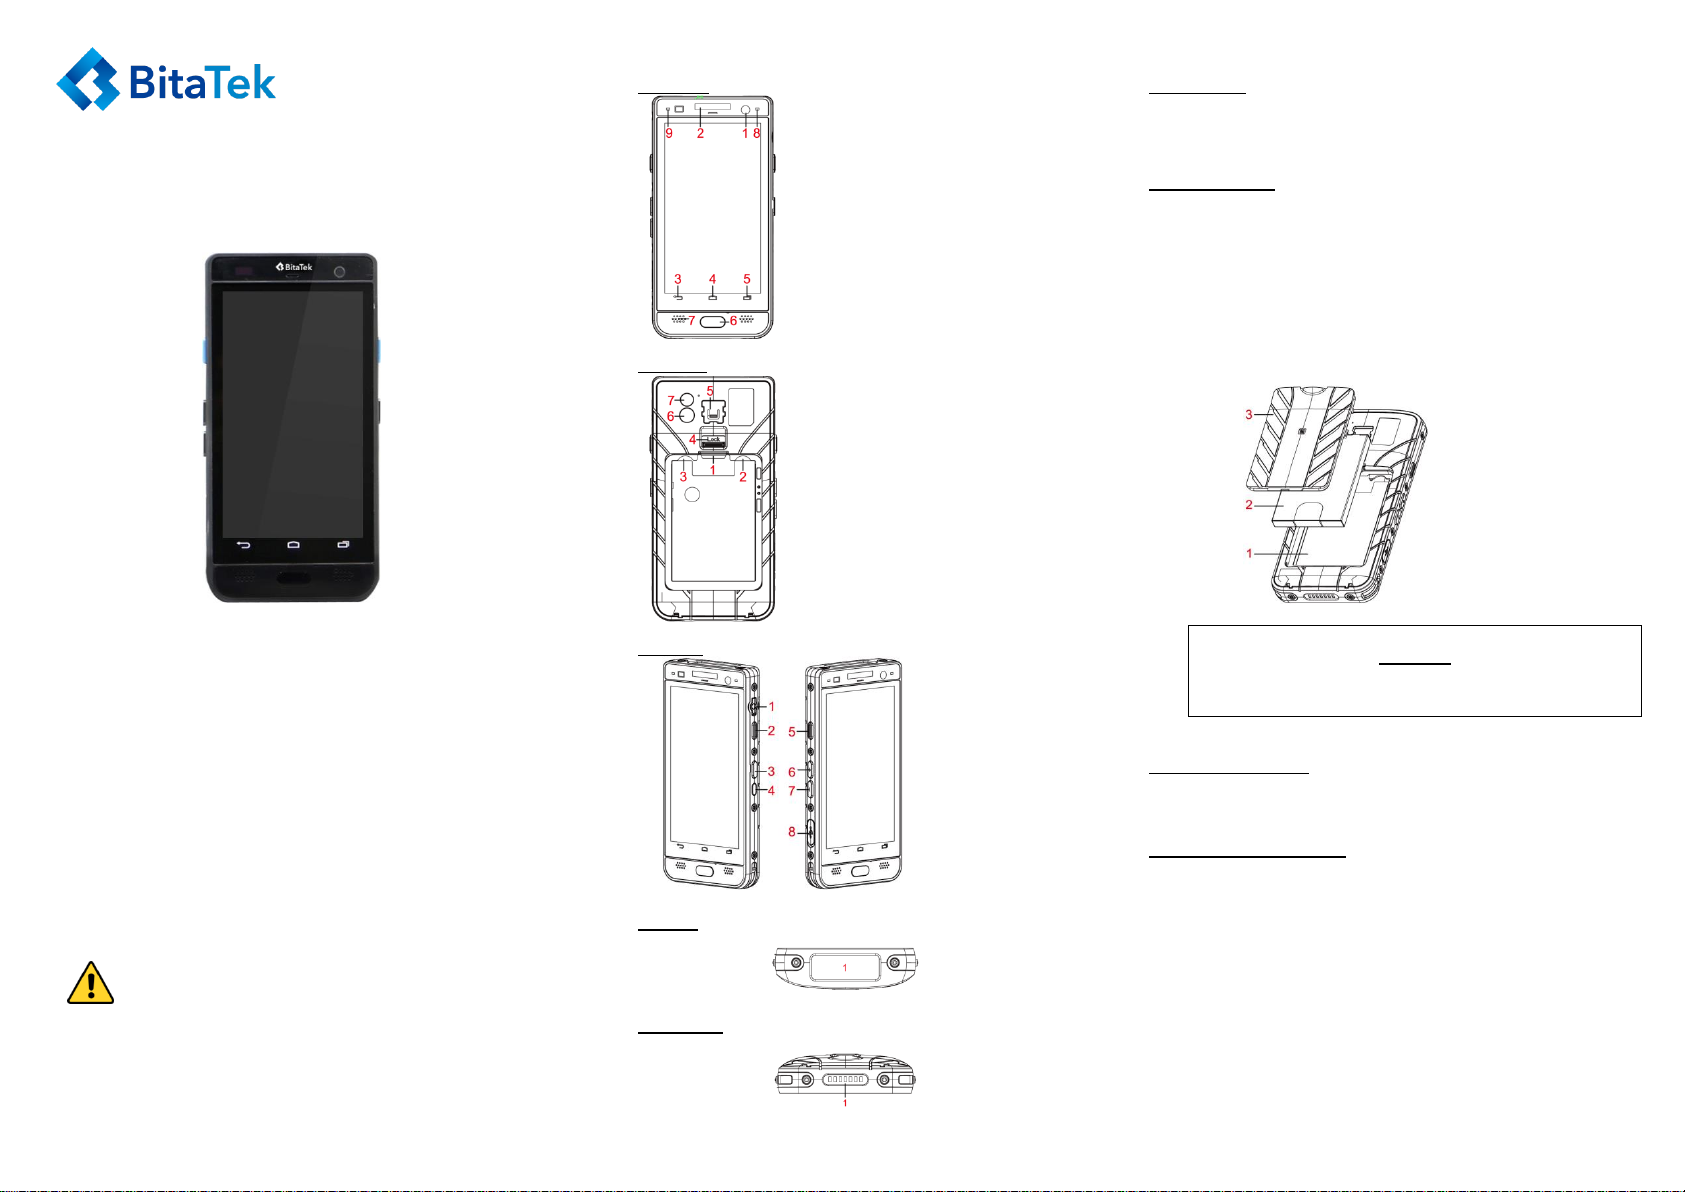
1.
Front Camera
2.
Logo LED
3.
Back key
4.
Home Key
5.
Menu key
6.
Scan Button
7.
Speaker
8.
Information LED
9.
Charging LED
1. 6
Battery Pin
2. 2
SIM Card Slot
3. 3
Micro SD Card Slot
4. 4
Battery Cover lock Switch
5. 5
Hand Strap hook
6. 6
Back Camera
7. 7
Flash LED
1
Ear Phone Connect
2
Scan Button
3
Function Button
4
Power Button
5
Scan Button
6
Volume Up
7
Volume Down
8
USB Connecter
1
Scan Window
1
Cradle IO connect
1. Battery Slot
2. Battery pack
3. Battery Cover
CAUTION
RISK OF EXPLOSION IF BATTERY IS REPLACED BY AN INCORRECT TYPE.
DISPOSE OF USED BATTERIES ACCORDINGTO THE INSTRUCTIONS
Glider X1 WWAN
Rugged PDA
Quick Start Guide
General View
Front View
Back View
Charging Instructions
Charging Time
Charging time required will vary depending on the actual application of Glider X1 / Glider X1
WWAN and the condition of Glider X1 battery pack.
Glider X1 / Glider X1 WWAN is shipped with Lithium-ion battery but not fully charged. Please
fully charge it before the 1st time use under the environmental temperature of 0℃~45℃.
Battery Installation
Glider X1 battery pack is not initially fully charged. After installing the battery pack, please
charge it via the USB cable or the charging cradle.
As default, the battery pack is disconnected at the factory to avoid damage caused by
excessive draining.
Annual replacement of the battery pack can avoid possible risks or abnormalities and ensure
maximum performance.
Avoid storing batteries for long period of time in fully charged or very low battery level status.
We recommend charging the spared battery packs every two to three months to keep its
charge at a moderate level to maximize battery life
Please remove the hand strap first when opening the battery compartment.
Please push the battery Cover Lock Switch to Open position then remove the battery cover.
General Safety Rules
Please read this Guide thoroughly and carefully before you start using this device.
Use only the components and accessories supplied by the manufacturer for Glider X1 you
are using.
Do not attempt to disassemble Glider X1 / Glider X1 WWAN, as it does not contain parts that
can be repaired by the user. Any tampering will void the warranty.
When replacing the battery pack or at the end of life of Glider X1 / Glider X1 WWAN, disposal
must be performed in compliance with the laws in force in your jurisdiction.
Do not submerge Glider X1 in any liquid ( water, detergent, ---etc ).
Content in the Package
Glider X1 / Glider X1 WWAN (device)
USB Charge/Communication Cable & Quick Charge compliant Power Adapter
Battery Box (With Rechargeable Battery)
Hand Strap
Quick Start Guide
Side View
Top View
Bottom View
Charging via USB Cable
You can use the provided USB charge / communication cable together with the Quick Charge
compliant power adapter enclosed in the standard package to charge Glider X1 from a power
outlet.
Charging via Charging Cradle
You can sit Glider X1 on the cradle and the cradle plugged in with the power adapter
enclosed in the cradle package to charge Glider X1 from a power outlet.
SD / SIM Card installation
1. Turn off Glider X1 or put it in Battery Swap Mode
2. Remove the battery cover
3. Remove the battery pack by pulling the tab on the end of the battery
4. Lift the retaining door
5. Please see the Back View
6. Insert the micro SD card into the left slot
7. Insert the SIM card into the right slot (Only for Glider X1 WWAN)
8. Insert the battery pack into the battery compartment.
9. Restore the battery cover and lock the battery cover lock switch
Page 2
Imager data capture
Please do not stock this device under conditions of high temperature
which will cause the battery to become hot, fire, or broken etc. leading to
failure and safety concerns.
When the charging time is noticed longer than standard required
(CHARGING LED, RED, is still ON), please stop charging immediately.
Please charge this device in place without any water-spray or moisture.
If there is any dust on the plug of AC adapter, please wipe clean using
dry cloth to avoid fire accident.
Please do not drop this device with strong strike and impact.
Please do not put any heavy weight on top of this device as it might
cause device enclosure crack then lead to cutting injury.
Please do not use wet hand to pull out the AC adapter which might
cause electric shock.
Please do not use Glider X1 AC adapter on any other different devices.
Please do not put the device into water which may cause short-circuit or
fire.
Please do not put this device in place close to open fire.
If the power or USB cable is seriously twisted or broken, please stop
using immediately or it may cause electric shock, short-circuit, or fire.
Please stop using immediately when there is any unusual smell or
overheat during charging or operation.
Please stop using immediately when there is any liquid or dew on the
device.
Please do not use the AC adapter outdoor. Please do not wrap the AC
adapter with cloth which will block heat dissipation and will cause
electric shock or fire.
Except charging, please remove the AC adapter plug from the wall AC
outlet socket or it will cause fire accident.
To prevent possible hearing damage.
Do not listen at high volume levels for long periods.
Head: 0.776 W/kg@ 10g (CE)
Body: 1.400 W/kg@ 10g (CE)
Head: 0.074 W/kg@ 10g (CE)
Body: 0.181 W/kg@ 10g (CE)
Radio Type
Description
Frequency
Maximum Output
Bluetooth
Bluetooth BR+EDR
2400~2483.5 MHz
4dBm
Bluetooth 4.0-LE
2400~2483.5 MHz
4dBm
WLAN
2.4GHz
2400~2483.5 MHz
17dBm
5GHz
5150~5350 MHz
21dBm
5470~5725 MHz
22dBm
GSM
GSM 900
880~915 MHz
33dBm
GSM 1800
1710~1785 MHz
30.5dBm
WCDMA
WCDMA Band I
1920~1980 MHz
24dBm
WCDMA Band VIII
880~915 MHz
24dBm
LTE
LTE Band 1
1920~1980 MHz
23.5dBm
LTE Band 3
1710~1785 MHz
23dBm
LTE Band 7
2500~2570 MHz
23dBm
LTE Band 8
880~915 MHz
23dBm
LTE Band 20
832~862 MHz
23dBm
LTE Band 38
2570~2620 MHz
23dBm
LTE Band 40
2300~2400 MHz
23dBm
other
NFC
13.56 MHz
GPS
1575.42 MHz
Radio Type
Description
Frequency
Maximum Output
Bluetooth
Bluetooth BR+EDR
2400~2483.5 MHz
4dBm
Bluetooth 4.0-LE
2400~2483.5 MHz
4dBm
WLAN
2.4GHz
2400~2483.5 MHz
17dBm
5GHz
5150~5350 MHz
21dBm
5470~5725 MHz
22dBm
other
NFC
13.56 MHz
To scan a barcode label:
1. Point the scan window at the barcode
2. Tap Scan on the screen or press one of the scan buttons on Glider X1 / Glider X1 WWAN.
The imager will project a laser aiming pattern. The aiming pattern is used to position the
barcode or object within the field of view of the imager
3. Center the barcode in any orientation within the aiming pattern. Ensure the entire barcode
is within the rectangular area formed by the brackets in the aiming pattern, then either wait
for the timeout or release the scan key to capture the image. A red light will illuminate the
barcode to capture and decode it.
Laser Safety
The following information applies to the Imager Aiming System. The laser light is visible to
the human eye and is emitted from the window indicated in the figure below.
LASER LIGHT - DO NOT STARE INTO BEAM CLASS 2 LASER PRODUCT MAX OUTPUT
RADIATION 1 mW COMPLIANT WITH EN 60825-1 (2007)
For Safe Use Concern, Please Pay Special Attention on the Following
Notices:
The manufacturer has taken safety as first priority during design stage. To avoid any potential
accident, please be cautious on the following alert points:
Bluetooth
This device is designed based on Bluetooth standard specifications but compatibility
problem might be encountered if trying to connect with other Bluetooth device.
Before using this device, please make sure there is no other wireless device been
operated in the same application area within short distance as that may cause wireless
signal interference.
Signal Interference From TV or Radio
Sometimes data transmission or receiving might be failed due to signal interference from
TV or radio nearby.
Audio Safety
European Union Regulatory Notes
1. Requirements in AT/BE/BG/CZ/DK/EE/FR/DE/IS/IE/IT/EL/ES/CY/LV /LI/LT/LU/HU
/MT/NL/NO/PL/PT/RO/SI/SK/TR/FI/SE/CH/UK/HR.5150MHz~5350MHz is for indoor use
only
2. Hereby, Bitatek CO., LTD declares that the radio equipment type Glider X1 is in
compliance with Directive 2014/53/EU
The full text of the EU declaration of conformity is available at the following internet
address:www.bitatek.com.tw
SAR Compliance (For Glider X1 WWAN model)
SAR Information (for European Union):
This device is restricted to indoor use when operating to the 5150 to 5350 MHz frequency
range.
SAR Compliance (For Glider X1 model)
SAR Information (for European Union):
Power and Frequency Ranges
For Glider X1 WWAN model
For Glider X1 model
Important Notices When Using
Before replacing battery pack due to failure, shortened life, or any other unusual behavior,
please confirm if the device has been used correctly and there has no user operation issue
involved.
It is possible there will be some missed data or interference encountered during the
wireless transmission. It is not a situation can be controlled by the manufacturer.
Please do not use any alcohol, benzene, organic solvent, cleaner liquid, or steel-wool on
the surface of this device.
Please do not scratch the surface of Scan Window in any way as which will cause problem
on barcode scanning.
This device is restricted to indoor use when operating to the 5150 to 5350 MHz frequency
range.
Body - worn Operation
This device was tested for typical body-worn operations. A minimum separation distance
must be maintained between the user’s body and the handset, including the antenna:
0.5 cm to comply with the RF exposure requirements in Europe Third-party belt-clips,
holsters and similar accessories used by this device should not contain any metallic
components. Body-warn accessories that do not meet these requirements may not comply
with RF exposure requirements and should be avoided.
 Loading...