

Page 1

Bitatek Co. Ltd. has been acquired by iMotion Group in 2019.
Ownership of all products and trademarks of Bitatek Co. Ltd. shall be
assumed by iMotion Inc. and its subsidiaries unless otherwise specified.
Glider X1
Enterprise Touch Computer
Version 2
January/ 02/ 2020
Page 2

Table of Contents
Chapter 1. Revision History ....................................................................................... 4
Chapter 2. About this manual ..................................................................................... 5
Chapter 3. Overview .................................................................................................. 6
3.1. Specification ................................................................................................. 6
3.2. Package ......................................................................................................... 8
3.3. Getting Start .................................................................................................. 9
3.3.1. Front & Site View ............................................................................. 9
3.3.2. Back, Top & Bottom View ............................................................. 10
3.3.3. Battery Installation .......................................................................... 11
3.3.4. SIM Card/SD card Installation ....................................................... 13
3.3.5. Charging the battery ....................................................................... 14
3.3.6. Switch the power ON or OFF ......................................................... 15
3.3.7. Transfer file between Glider X1 and Computer ............................. 17
Chapter 4. Installation & Operation ......................................................................... 19
4.1. Barcode ....................................................................................................... 19
4.1.1. Scanner Setting ............................................................................... 19
4.1.2. Scan Demo ...................................................................................... 22
4.2. Wireless & Networks .................................................................................. 23
4.2.1. Wi-Fi ............................................................................................... 23
4.2.2. Bluetooth ........................................................................................ 24
4.2.3. Airplane mode ................................................................................ 25
4.2.4. NFC ................................................................................................ 26
4.2.5. Set Fey Glider as a portable hotspot ............................................... 27
4.2.6. Sharing Glider X1 internet connect by Bluetooth .......................... 28
4.3. Backup & Reset .......................................................................................... 28
4.4. Phone .......................................................................................................... 30
4.5. People ......................................................................................................... 31
4.6. Message ...................................................................................................... 32
4.7. Email ........................................................................................................... 34
4.8. Camera ........................................................................................................ 35
4.9. Calendar ...................................................................................................... 38
4.10. Calculator ............................................................................................... 39
4.11. File Manager ............................................................................................... 40
4.12. Widgets/APPS ........................................................................................ 43
Glider X1 Enterprise Touch Computer User’s Guide
2
Page 3

Chapter 5. Appendix ................................................................................................ 44
5.1. Regulatory .................................................................................................. 44
5.2. Battery Notes .............................................................................................. 44
5.3. Storage and safety notice ............................................................................ 45
5.4. Product Operation and Storage Notice ....................................................... 45
5.5. Adapter Notes ............................................................................................. 45
5.6. Support Barcode information ..................................................................... 46
Glider X1 Enterprise Touch Computer User’s Guide
3
Page 4
Date
Change Description
Version
2017/04/30
First release
V1.0
2017/08/01
Modify
V1.1
Chapter 1. Revision History
Glider X1 Enterprise Touch Computer User’s Guide
4
Page 5

Chapter 2. About this manual
Thank you for purchasing Bitatek Glider X1 Enterprise Touch Computer. This
manual explains how to install, operate and maintain our product. No part of
this publication may be reproduced or used in any form, or by any electrical or
mechanical means, such as photocopying, recording, or information storage
and retrieval systems, without permission in writing received from BitaTek.
The material in this manual is subject to change without prior notice.
Glider X1 Enterprise Touch Computer User’s Guide
5
Page 6
Processor
Qualcomm APQ8052 Octa core 64-bit Processor
Memory
eMCP, 16GB eMMC Flash ROM plus 2GB LPDDR3
RAM
Display and Touch
Panel
5.0”, Color FHDCapacitive type 5 points multi-touch
touch panel with Gorilla Class 3 Glass.
Support finger(including wet finger), glove and, stylus
Expansion Slot
One user accessible Micro SD Memory Slot
One user accessible Micro SIM slot
External
Connector
One user accessible micro SD Memory slot with SDHC
compliance and software image upgrade features
One user accessible Micro SIM slot
Micro USB (B type) support USB 2.0 OTG and USB
charge
Cradle connector support USB 2.0 and DC power
input
Wireless PAN
Bluetooth 4.1 LE
Support profile : HID, A2DP, OPP, SPP
Wireless LAN
802.11a/b/g/n/ac Wireless LAN, 2.4GHz and 5GHz
Compliant with WEP, WPA and IEEE 802.11i WPA2
Fast roaming under 100ms
Enterprise security
Wireless WAN
(Option)
Europe:
FDD LTE: B1/B3/B5/B7/B8/B20
TDD LTE: B38/B40/B41
WCDMA: B1/B5/B8
GSM: 900/1800
Japan (by request)
FDD LTE: B1/B3/B8/B18/B19/B26/B41
WCDMA: B1/B6/B19
North America-V
FDD LTE: B4/B13
Chapter 3. Overview
3.1. Specification
Glider X1 Enterprise Touch Computer User’s Guide
6
Page 7
North America-A (by request)
FDD LTE: B2/B4/B12
WCDMA : B2/B4/B5
Australia (by request)
FDD LTE: B1/B3/B5/B7/B28
WCDMA: B1/B5
GPS
GPS/GLONASS (Only for WAN model)
NFC
ISO14443-4 (Type A, Type B), ISO15693
Mifare, Felica (ISO/IEC18092)
Power Adapter
100~240Vac, 50/60Hz Input
5V, 2A / 9V, 2A output
Camera
Rear camera: 16M pixels CMOS color camera with
Phase-Detection Auto-Focus (PDAF)
Front camera: 5.0M pixels CMOS color camera
LED flash light with torch
Audio and Voice
Dual speaker
One receiver and dual noise-cancelling microphones
3.5mm DIA stereo headset jack with MIC. In
Sensor
Accelerometer, Light sensor, Proximity sensor
Gyroscope, E-compass
Battery
Replaceable Main Battery : 3.7V, min. 2860mAh Li-Ion
battery pack(standard), min. 5720mAh(extended)
One rechargeable RTC backup battery
One rechargeable backup battery for battery swap
Indicator
One 2- color (green/red) LED for charging LED.
Two 2- color (green/red) LED for Logo LED.
One 3- color (green/red/blue) LED for information LED.
One vibrator for scan or ring in indication
Audio tone indication
Scanner
Zebra SE4750 2D scan engine
Datalogic Halogen 2(option)
Keypad and
Buttons
Front key : standard Android 3 keys(touch key together
with touch panel) and one function key.
Side Key : Scan key left and right., volume key up and
down, power key and function key.
Dimension and
Weight
Dimensions: 158 X 77 X 16.9 mm (Estimation)
Weight: 250g (Estimation)
Glider X1 Enterprise Touch Computer User’s Guide
7
Page 8

Software
Android 6.0.1
User Environment
Operation Temperature: -20~50℃
Storage Temperature: -30~60℃ (without Battery)
Humidity: 10%~90% non-condensing
Sealing: IP67 Standard
Drop: 1.5m MIL-STD 810G
Tumble: 0.5m tumbles for 300 cycles and 600 drops
ESD: +/-8KV direct discharge, +/-15KV air discharge
NO
Description
Q’ty
1
Glider X1 (This Device)
1
2
Battery
1
3
Hand strip
1
4
Quick guide
1
5
USB cable
1
6
Adapter
1
3.2. Package
Glider X1 Enterprise Touch Computer User’s Guide
8
Page 9

1
Front Camera
2
Logo LED
3
Back key
4
Home Key
5
Menu key
6
Scan Button
7
Speaker
1
Ear Phone Connector
2
Scan Button
3
Function Button
4
Power Button
5
Scan Button
6
Volume Up
7
Volume Down
8
USB Connector
3.3. Getting Start
3.3.1. Front & Site View
Front view
Site view
Glider X1 Enterprise Touch Computer User’s Guide
9
Page 10
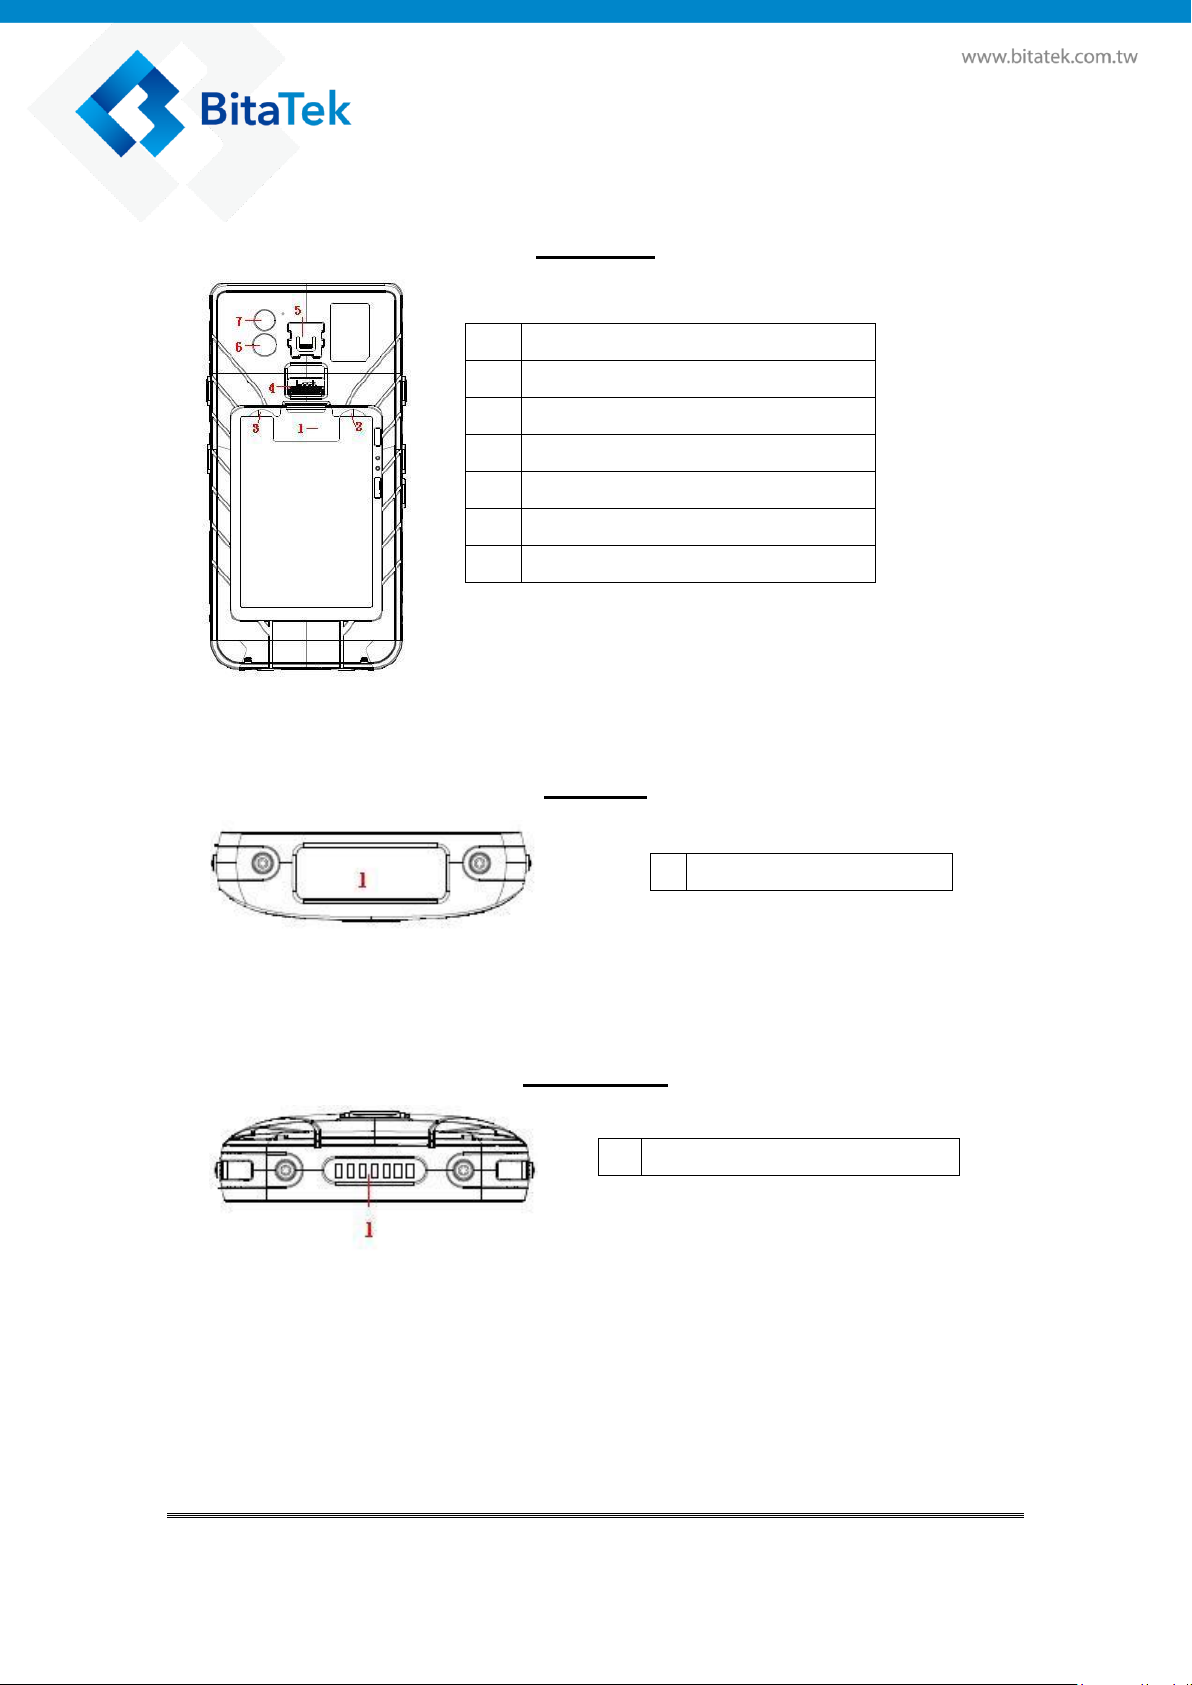
1
Battery Pin
2
SIM Card Slot
3
Micro SD Card Slot
4
Battery Cover Lock Switch
5
Hand Strap Hook
6
Back Camera
7
Flash Led
1
Scan Window
1
Cradle IO Connect
3.3.2. Back, Top & Bottom View
Back View
Top View
Bottom View
Glider X1 Enterprise Touch Computer User’s Guide
10
Page 11
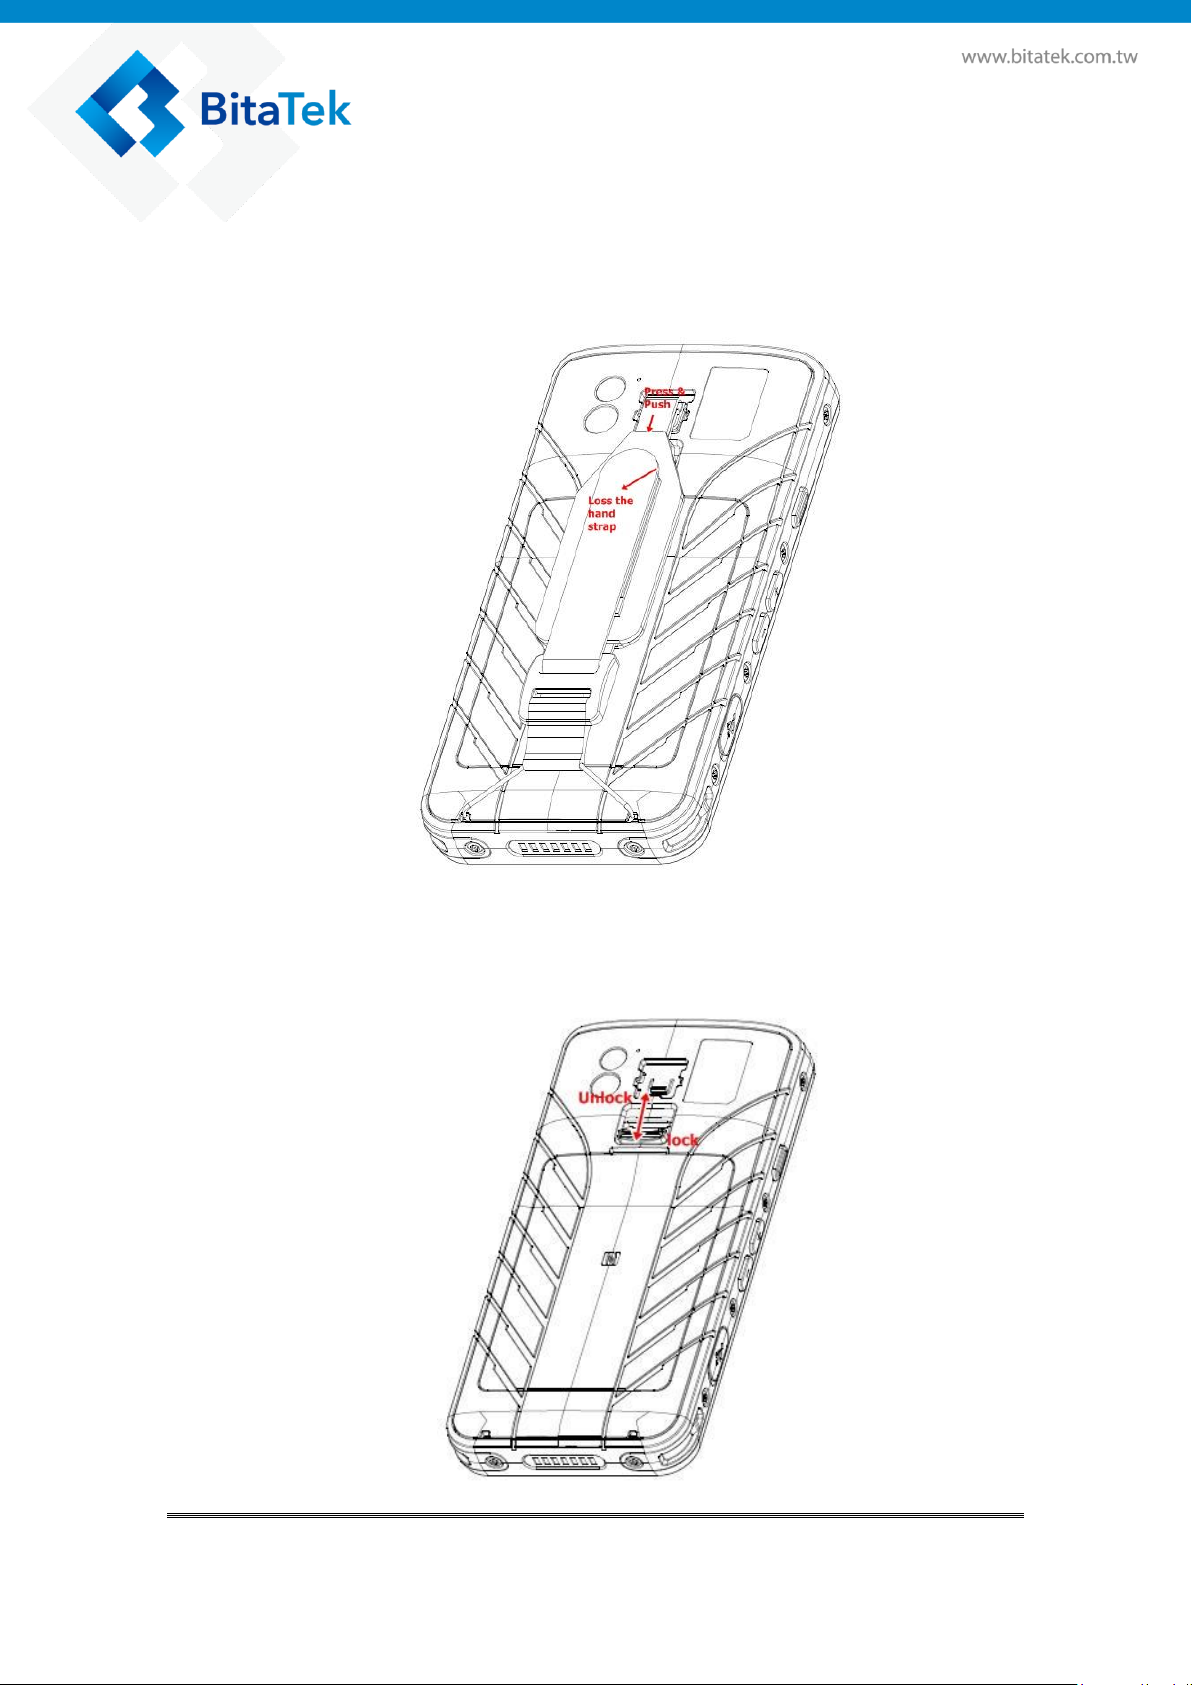
3.3.3. Battery Installation
To install the battery pack, please follow the steps below:
1. Remove the hand strap from the hand strap hook, then to lose the
hand strap from the bottom cover.
2. Push the battery cover switch to “open”, and remove Battery Cover
from the device bottom cover.
Glider X1 Enterprise Touch Computer User’s Guide
11
Page 12
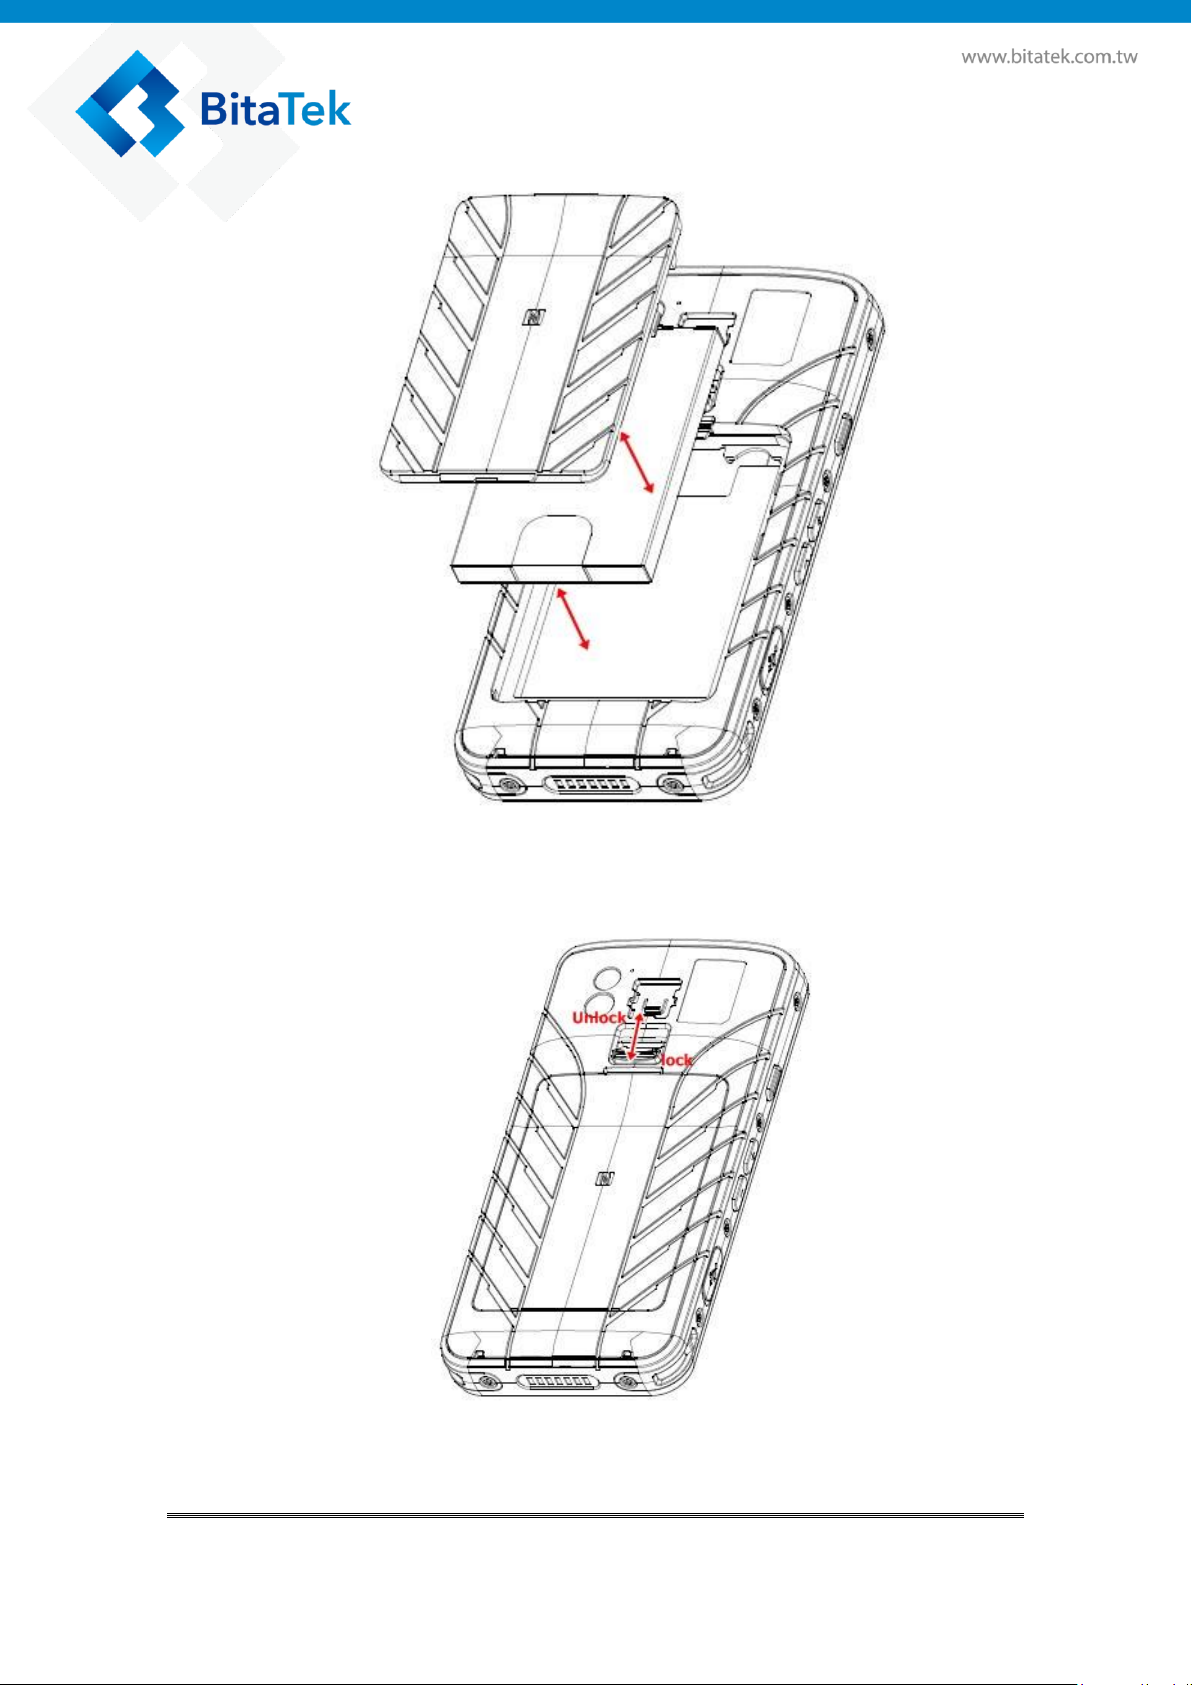
3. Insert the battery pack, and restore Battery Cover
4. Push the battery cover switch to “close”
Glider X1 Enterprise Touch Computer User’s Guide
12
Page 13
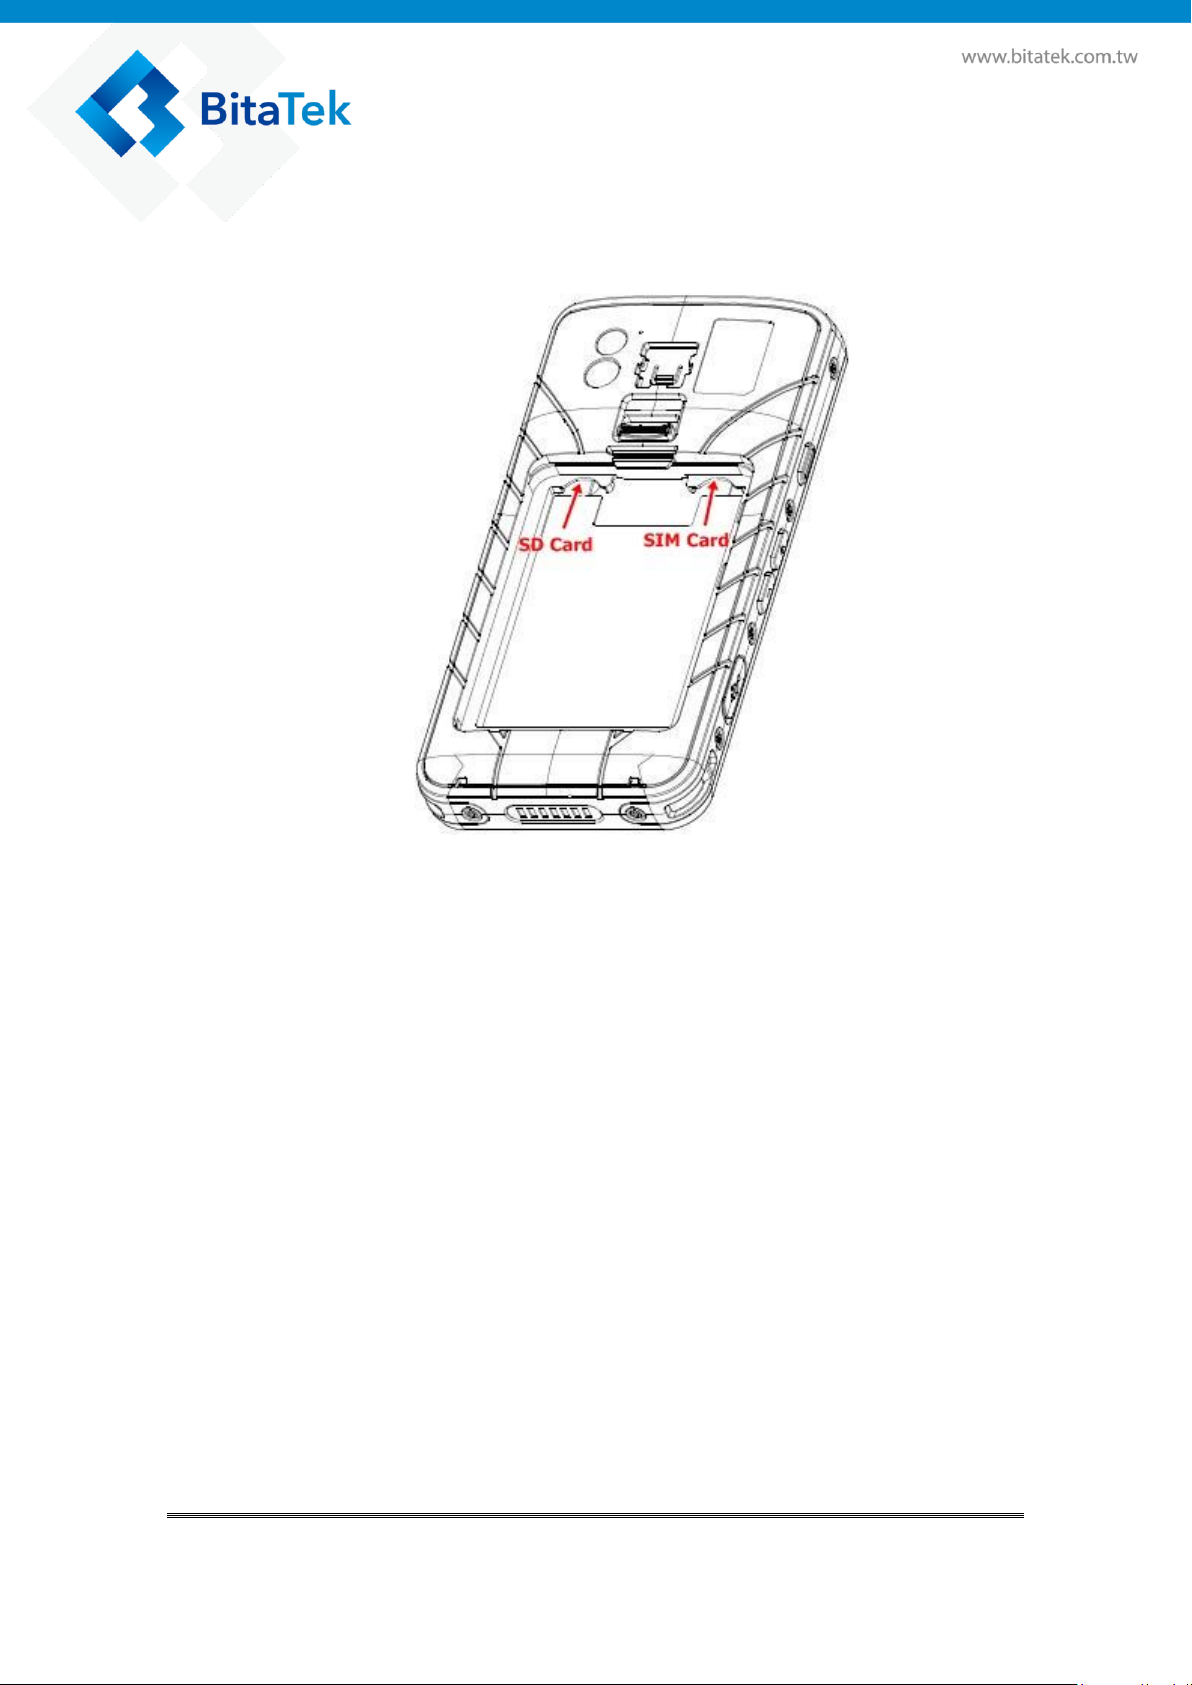
3.3.4. SIM Card/SD card Installation
< Picture 1 >
To install the SIM card / SD Memory card, follow the steps below:
1. Remove the battery cover and battery pack (see Battery Installation,
step 1 & 2)
2. Insert the SD card to the left slot(please see picture 1)
3. Insert the SIM card to the right slot(please see picture 1)
4. Restore the battery pack and battery cover
5. Push the battery cover switch to “close”
Glider X1 Enterprise Touch Computer User’s Guide
13
Page 14
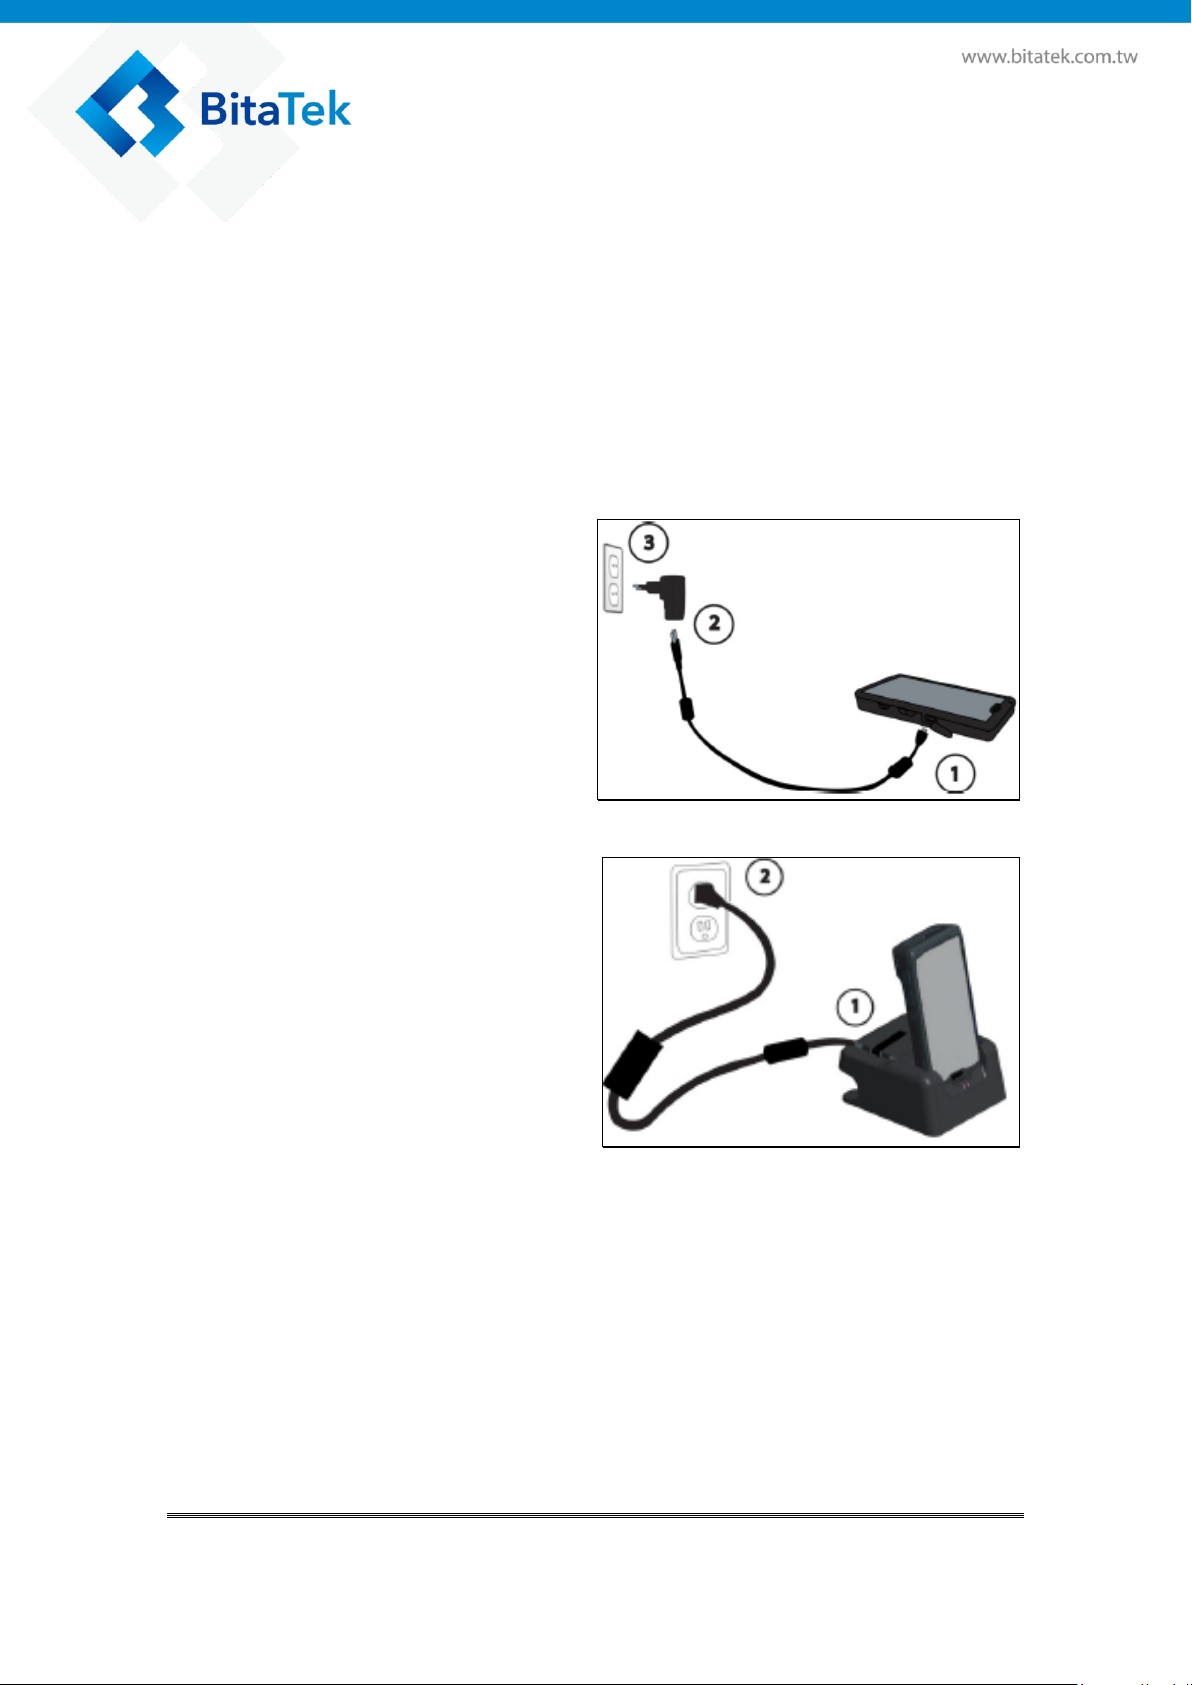
Charge with USB:
(diagrammatical picture)
Charge with Dock:
(diagrammatical picture)
3.3.5. Charging the battery
Before turning on and starting Glider X1, it is recommended that you
fully charge the battery first.
If the battery has been discharged for several days, you may need to
charge for several minutes before powering it on.
Use only the adapter and the USB cable that came with this device to
charge the battery. When the battery power is too low, make sure to use
the power adapter or put into the charging cradle to charge, instead od
using the USB cable to charge via your computer.
Glider X1 Enterprise Touch Computer User’s Guide
14
Page 15

3.3.6. Switch the power ON or OFF
Switch Power On
Press the POWER button until Glider X1 screen start.
When you turn on Glider X1 for the first time, you can put the app on the
desktop, then press OK button.
When you turn on Glider X1 for the first time, you can put the app on the
desktop, then press Ok button
Switch Power Off
1. If the display is off, press the POWER button to turn it back ON.
2. Press and hold the POWER button for a few seconds.
3. Tap Power off on the options menu.
Glider X1 Enterprise Touch Computer User’s Guide
15
Page 16
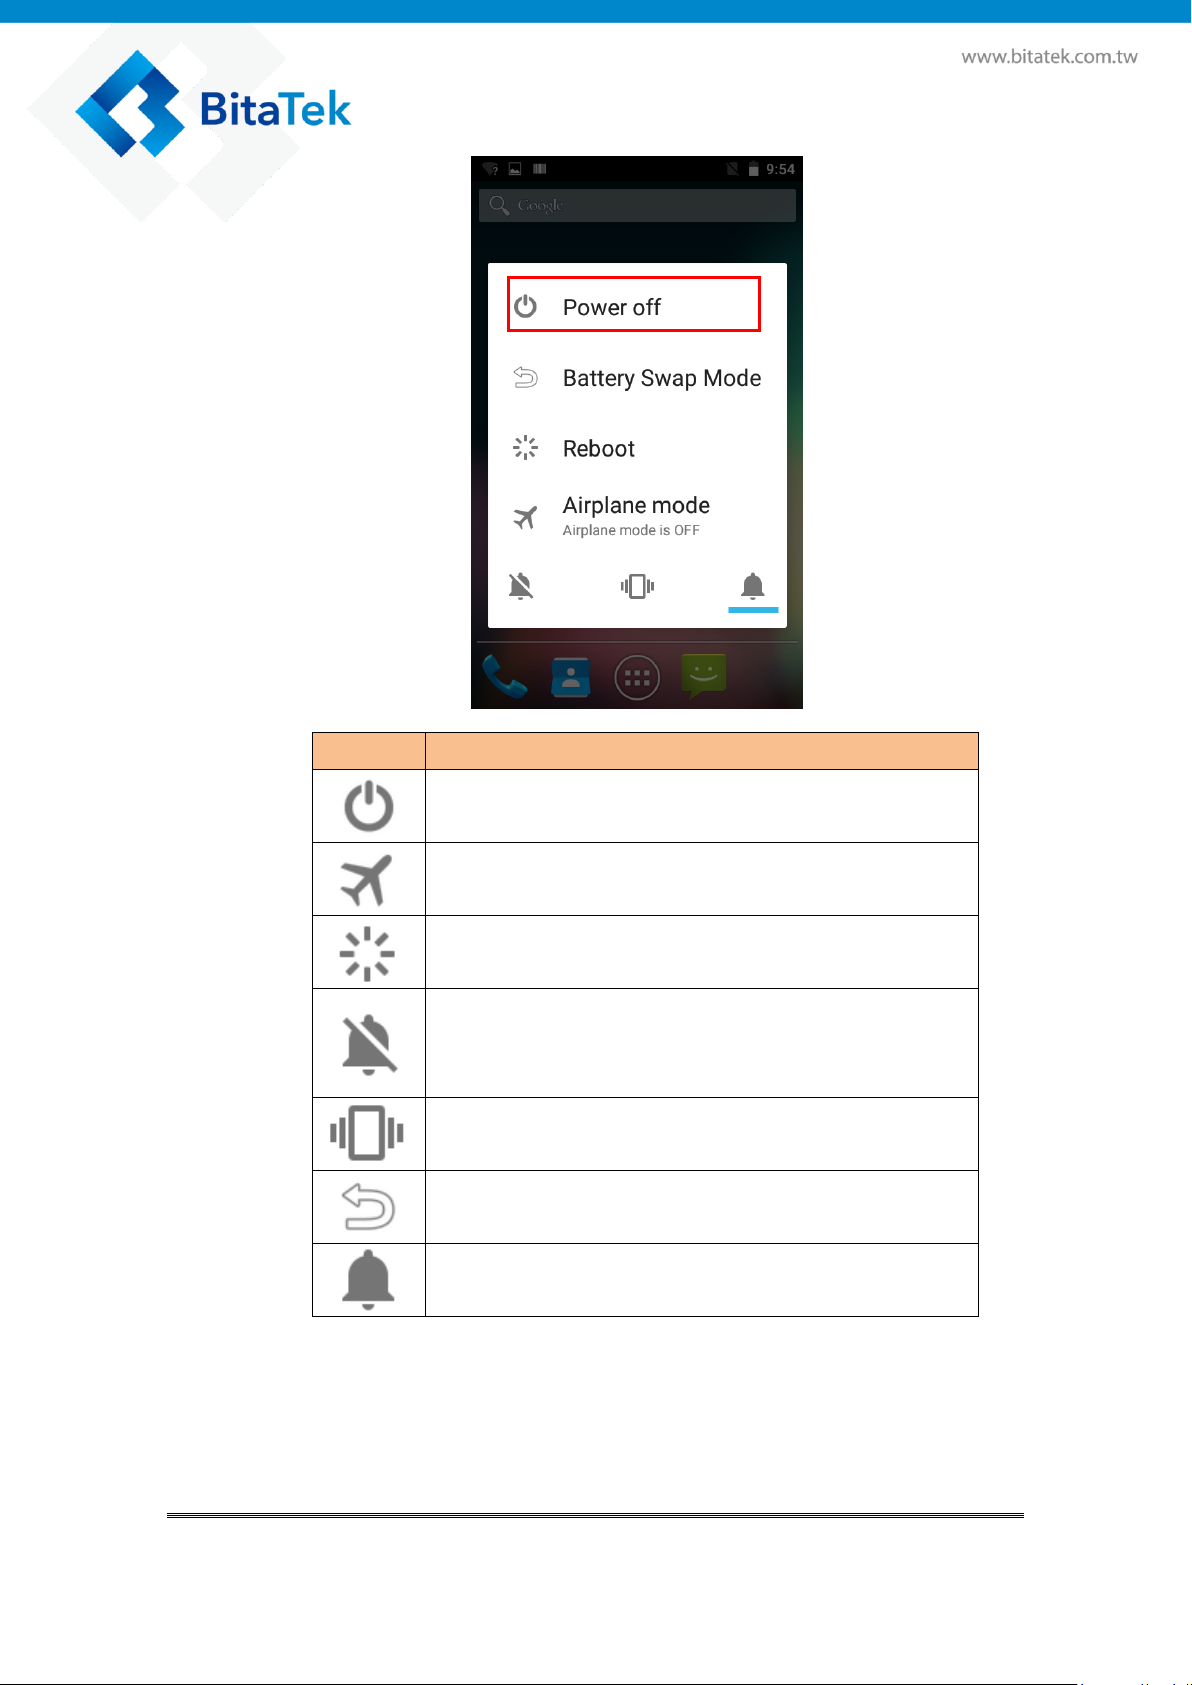
Item
Description
The system will shut down.
Enable Airplane mode.
The system will shut down and reboot system.
Set the Ringtone & notifications item of volumes
Setting to Sound OFF.
Set the Ringtone & notifications item of volumes
Setting to Vibrator.
The System will shut down and all data will be
kept.
Set the Ringtone & notifications item of volumes
Setting to Sound ON.
Glider X1 Enterprise Touch Computer User’s Guide
16
Page 17
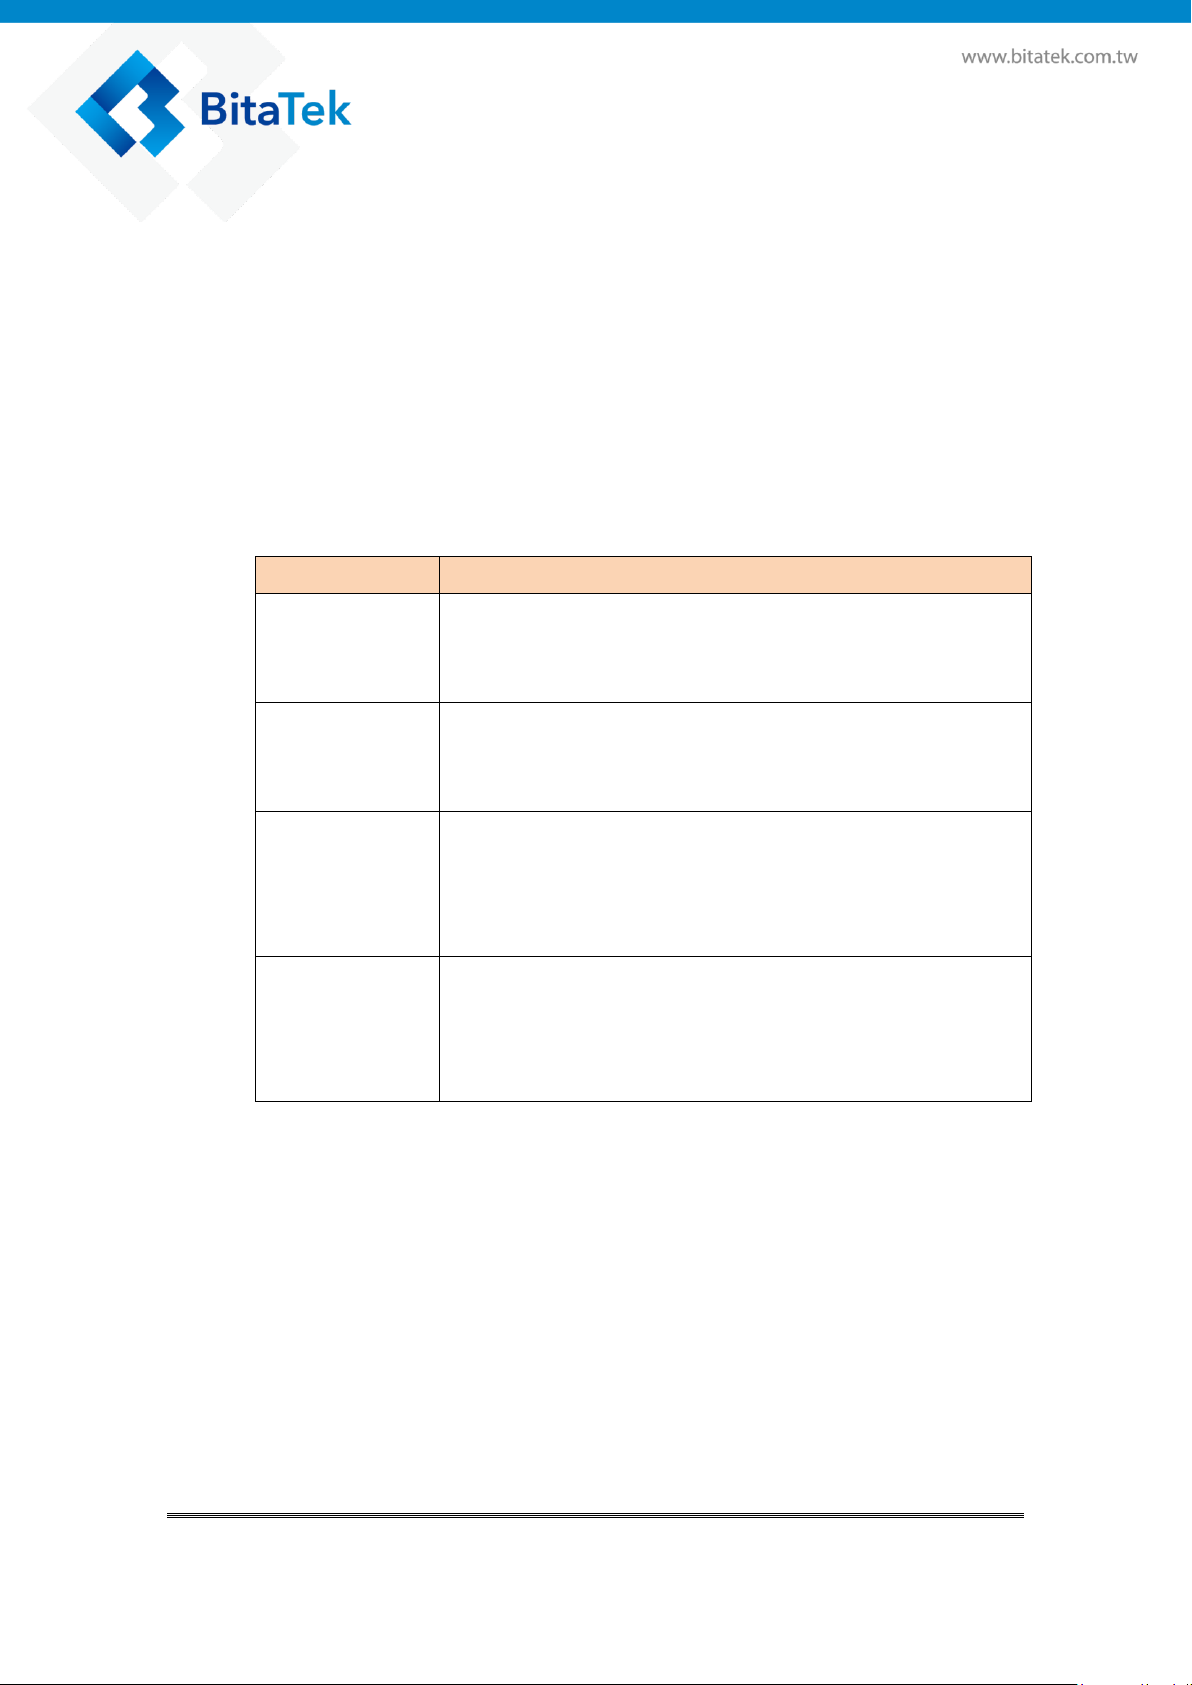
Use USB for
Description
Charging
For charging when you connect with PC host.
If your OS of PC host is Windows XP, only this item
be available and you can’t select other items.
File Transfers
For file transfer when you connect with PC host.
You can find a storage device (ET5001) on your PC
screen.
Photo Transfer
(PTP)
For image file transfer when you connect with PC
host.
You can find DCIM folder of storage device (ET5001)
on your PC host site.
MIDI
Device makers can enable optional MIDI support in
the platform. Android directly supports USB, draft
BLE, and virtual (inter-app) transports. Android
indirectly supports MIDI 1.0 via an external adapter.
3.3.7. Transfer file between Glider X1 and
Computer
You can transfer your file from or to your computer. The OS of host side
please use Windows 7 or beyound.
Connect Glider X1 to your computer. Your computer will recognize it
is USB charging.
Then slide from top, the system will show as the picture below, then
you can select File transfers.
Glider X1 Enterprise Touch Computer User’s Guide
17
Page 18
You can see a device icon then double click the
device icon to list the file folder.
You may need download the Google sync device manager software
into your computer. You can set it up to automatically get music,
photos, and videos files of Glider X1 to your computer.
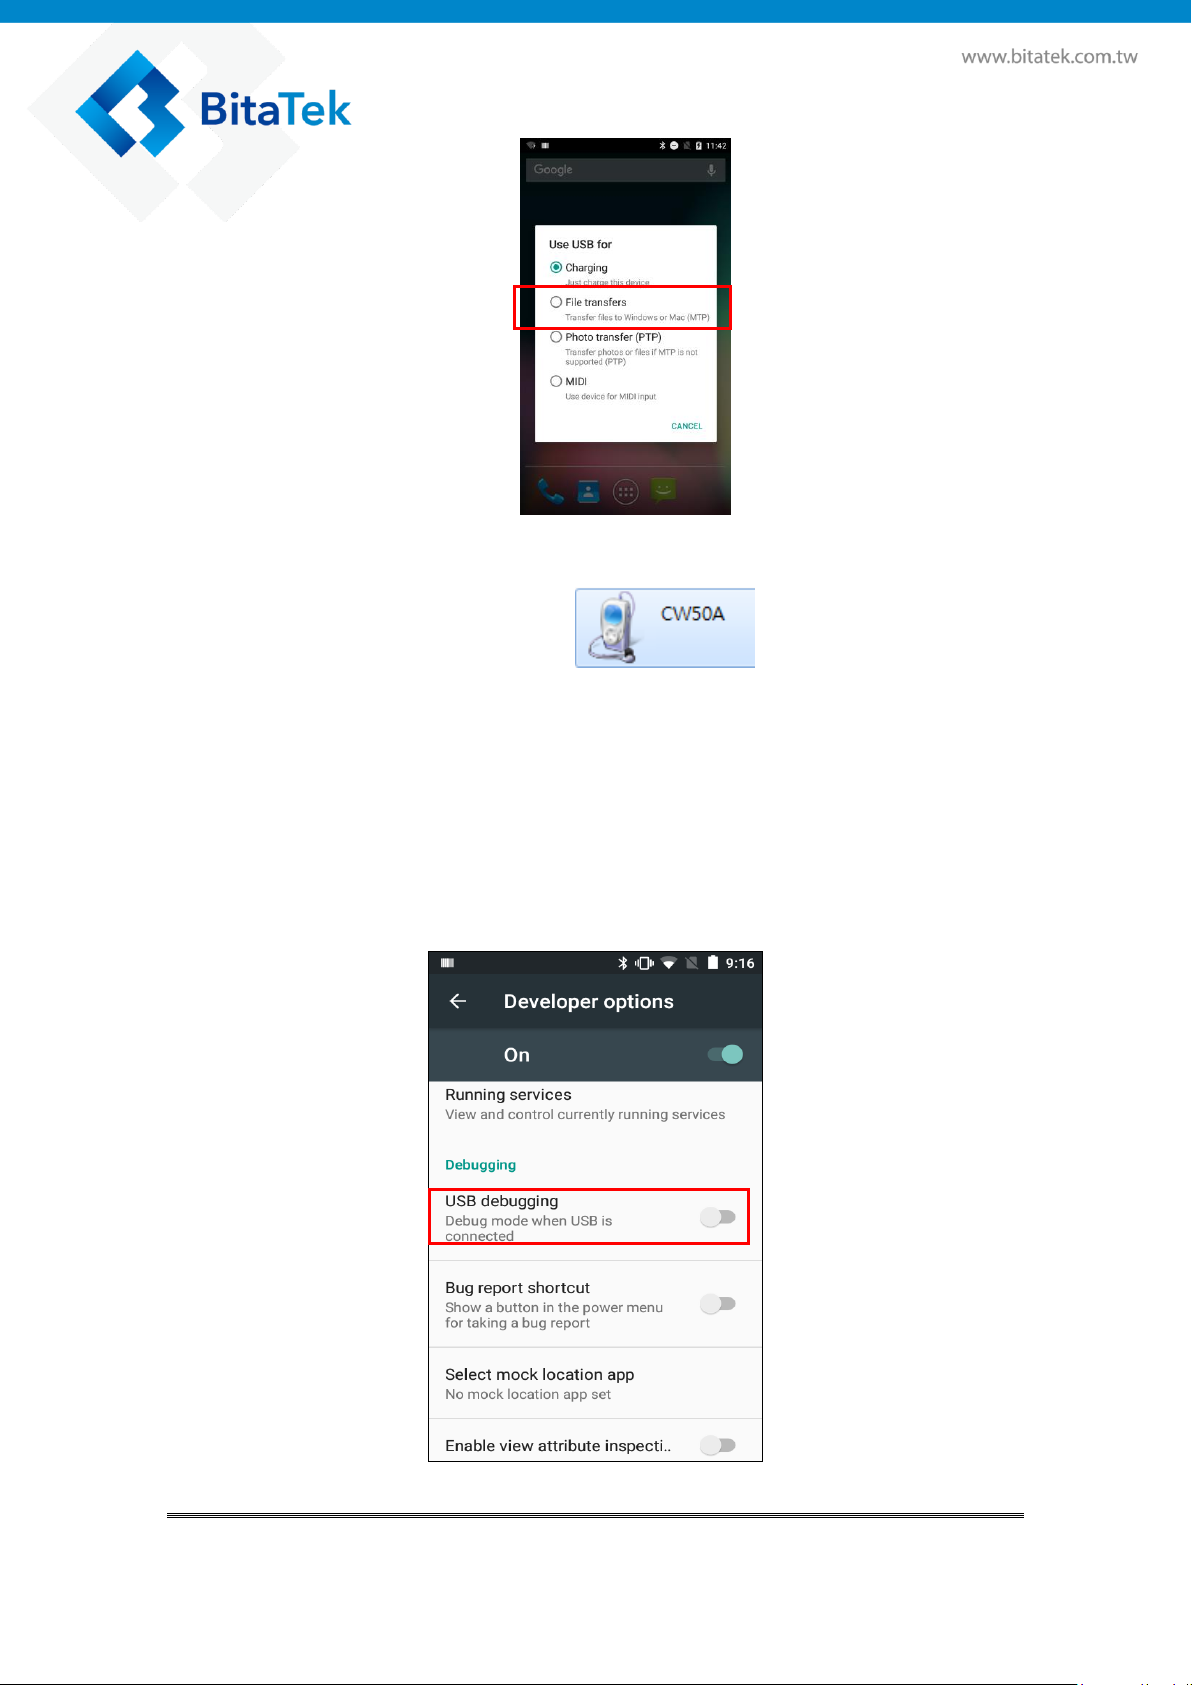
Please disable check box of “USB debugging” on the “Developer
options” item of Android Setting when you want transfer files from
your computer to Glider X1.
Glider X1 Enterprise Touch Computer User’s Guide
18
Page 19
Chapter 4. Installation & Operation
4.1. Barcode
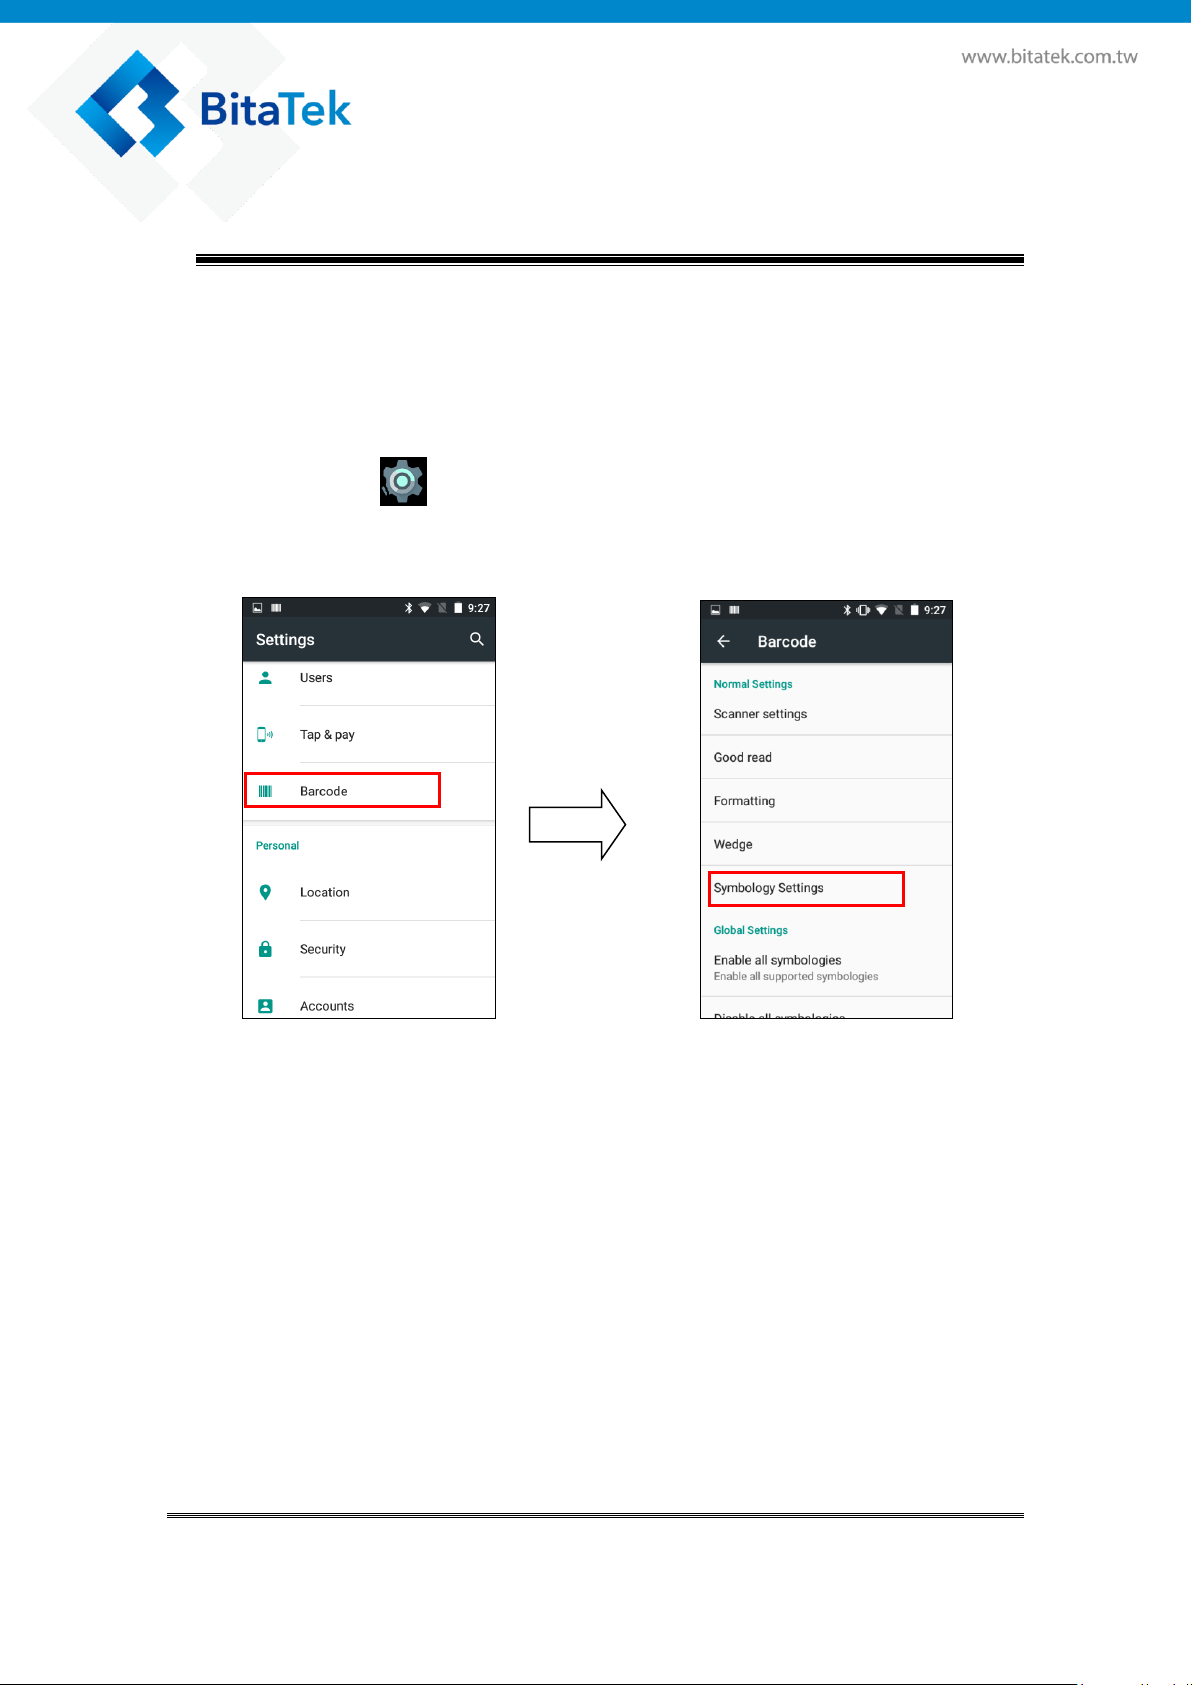
4.1.1. Scanner Setting
Please tap to go to Setting of Android
Select “Barcode” to go to barcode parameter set up screen.
Select “Symbology Settings” item that you can change the detail
setting of all symbologies. Every parameter of each symbology is
different.
For detail of symbologies supported, please refer to 6.6 Barcode
support information.
Glider X1 Enterprise Touch Computer User’s Guide
19
Page 20
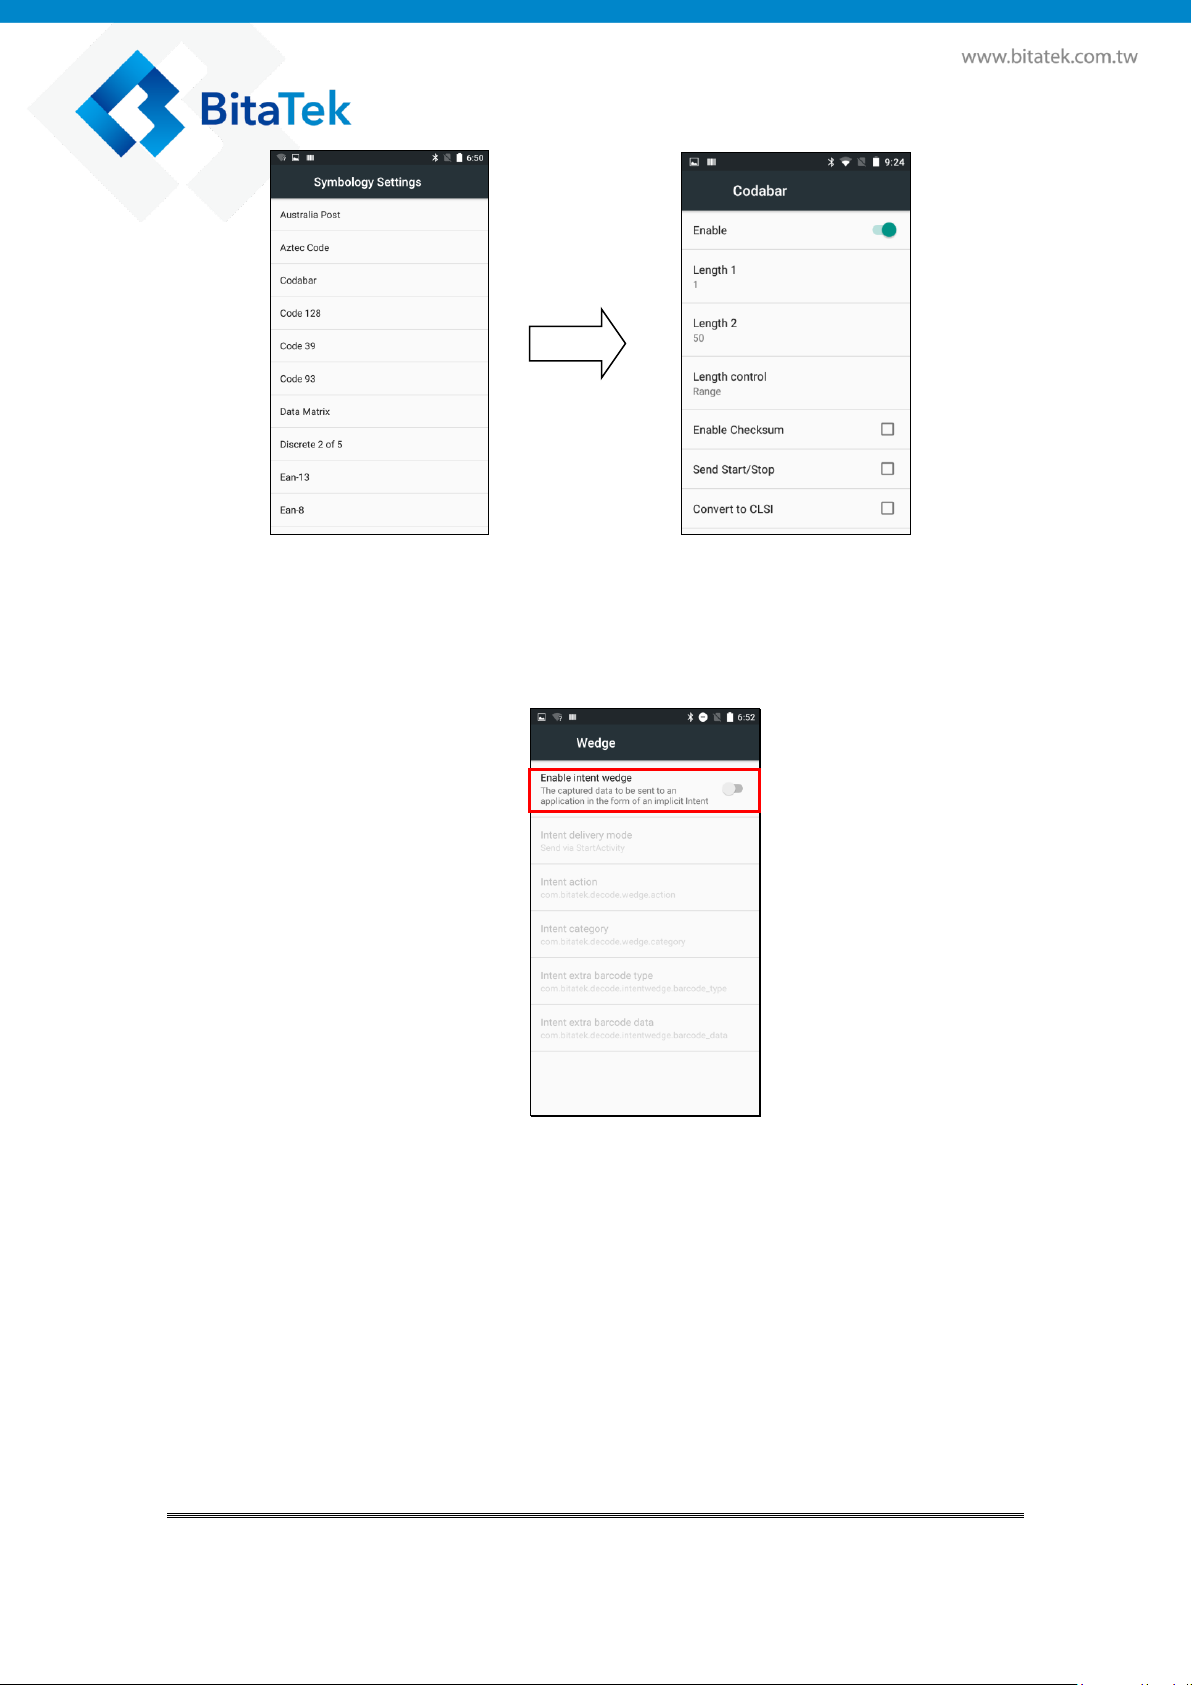
Select “Wedge” to enable intent wedge / keyboard wedge.
You can enable /disable “intent wedge”, then to enable / disable the
other settings of intent wedge.
Select “Formatting” item that you can set up prefix /suffix.
You can enable/disable code ID, or set up separator character of data
format when you scan a barcode.
Glider X1 Enterprise Touch Computer User’s Guide
20
Page 21

Select “Scanner Settings” that you can set up of Scanner engine
behavior.
Select “Good Read” item that you can enable / disable vibrator and
other settings about Good read behavior.
Glider X1 Enterprise Touch Computer User’s Guide
21
Page 22
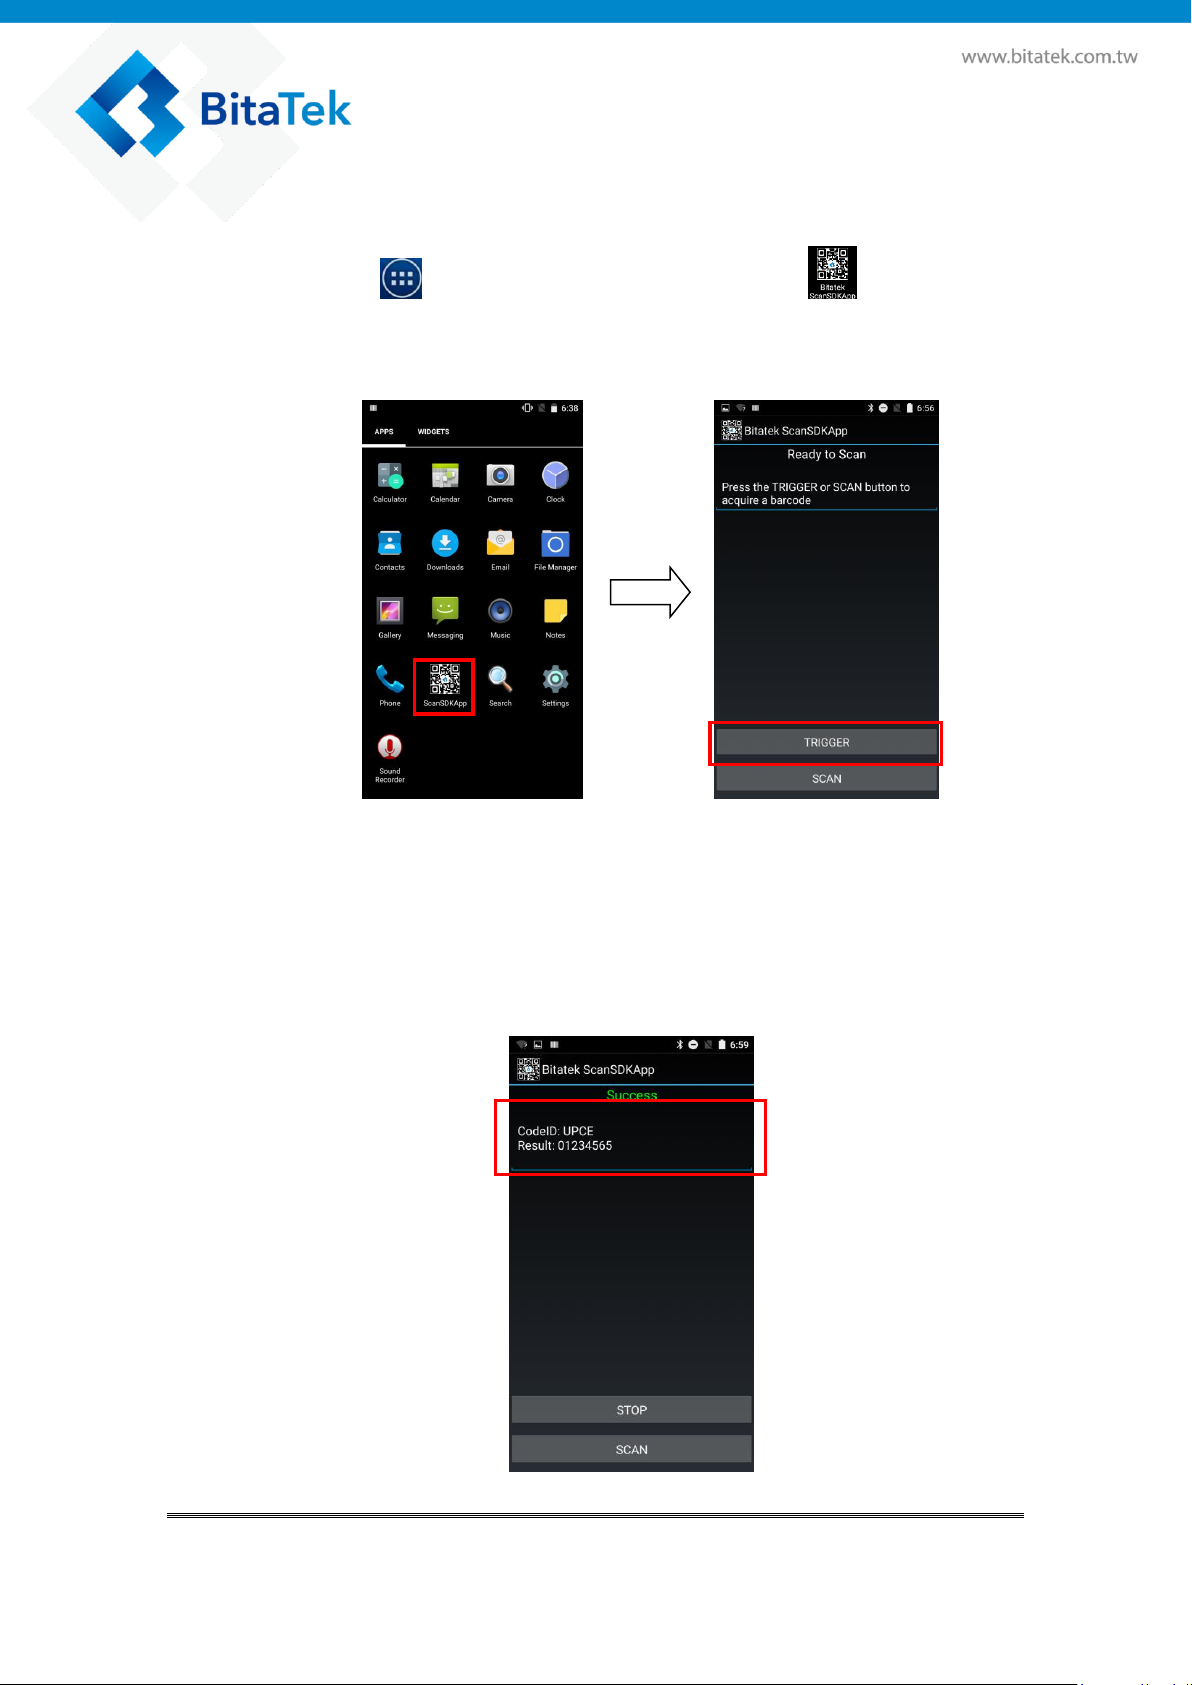
4.1.2. Scan Demo
Please tap to all application desktop, then tap to enable
Scan demo app.
Press Trigger button or Scan Key and aim to a barcode, it will display
the content of barcode after decode complete.
Press Back Button to quite this App.
Glider X1 Enterprise Touch Computer User’s Guide
22
Page 23
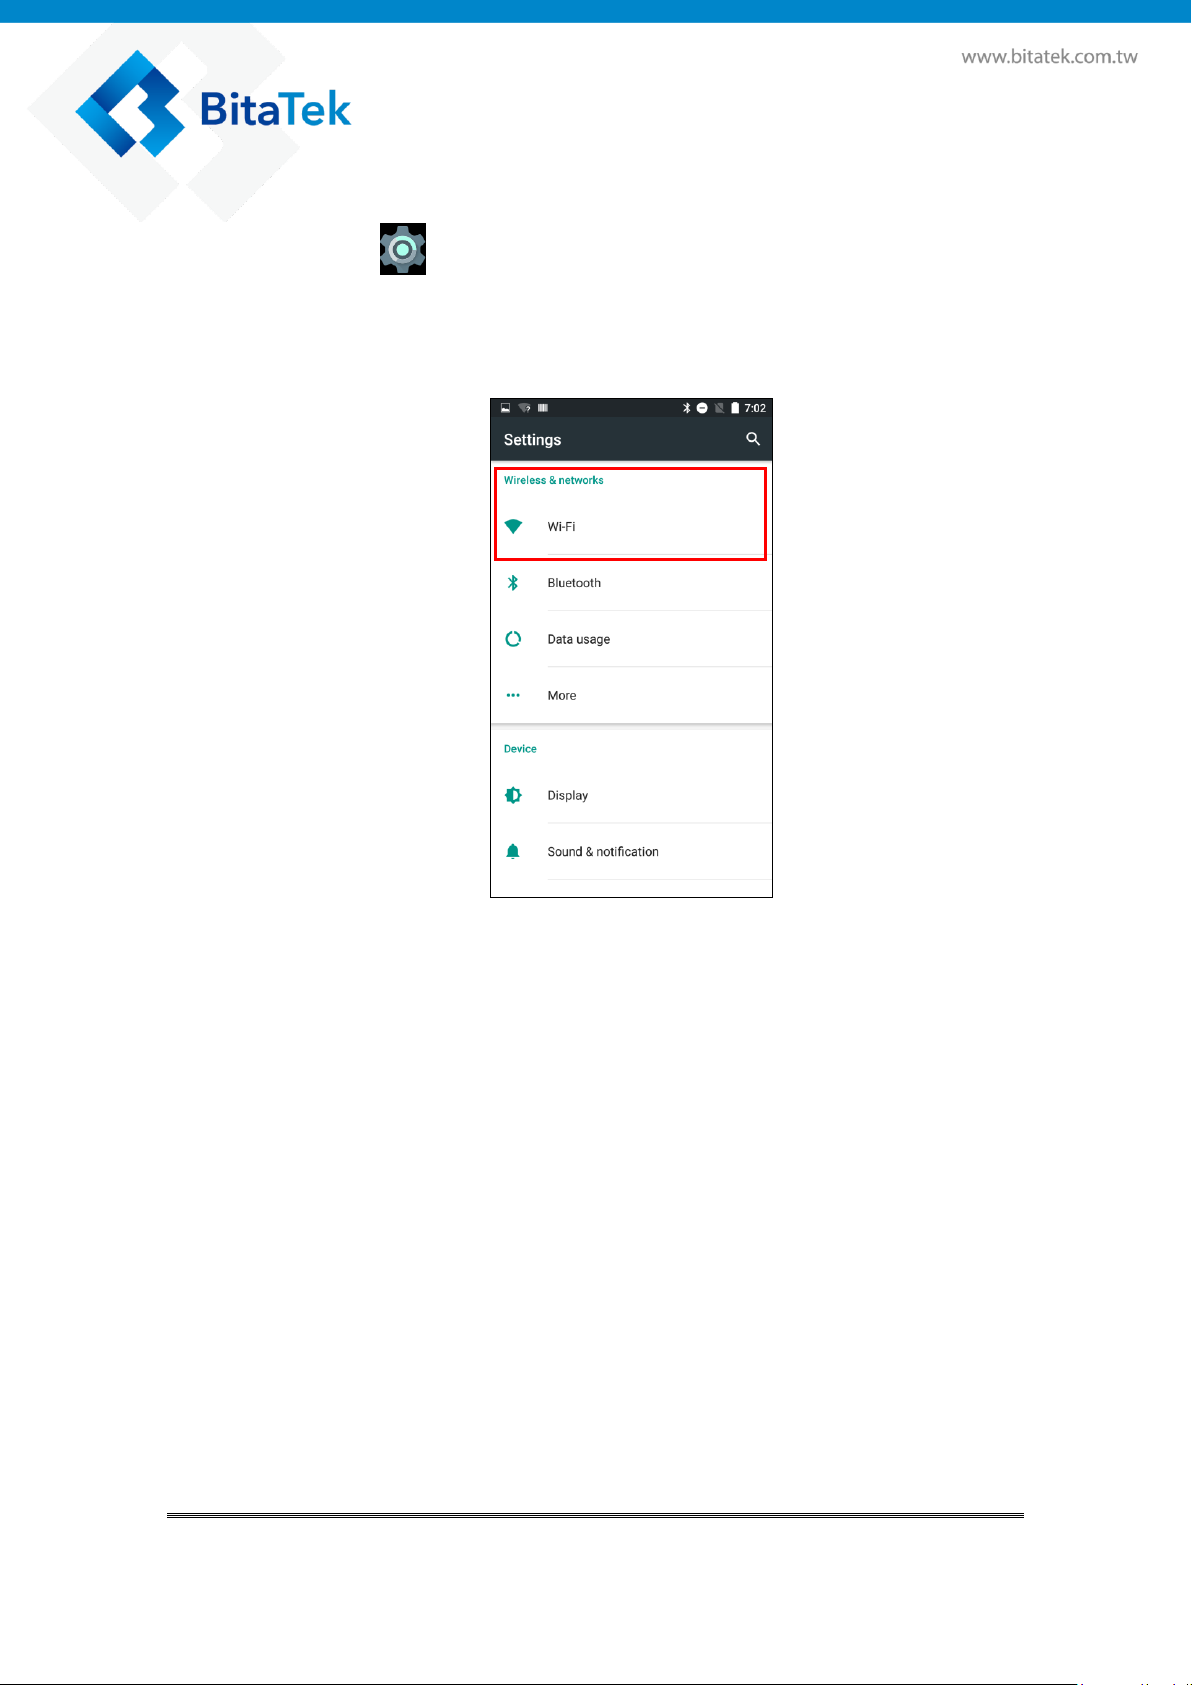
4.2. Wireless & Networks
Please tap to go to Setting of Android
Select Wireless & Networks item.
You can enable/ disable Wi-Fi and Bluetooth settings.
4.2.1. Wi-Fi
To use Wi-Fi, you need access to a wireless access point or “hotspot”.
Tap the Wi-Fi tile to turn Wi-Fi on.
Tap the Wi-Fi to see a list of detected wireless networks.
Tap a Wi-Fi network you want to connect to.
If you selected a secured network, enter the network key or
password.
Tap connect. You'll see the Wi-Fi icon in the status bar when
connected.
Tap and hold a Wi-Fi network that you already connected, then you
can select Forget network to disconnect or select modify network
to reenter the network key or password.
Glider X1 Enterprise Touch Computer User’s Guide
23
Page 24
If the wireless network that you want is not listed, tap + to manually add
it.
When enabled, the Wi-Fi icon is displayed on the status bar.
If you insert 3G SIM card into Glider X1, the icon is displayed on
the status bar.
4.2.2. Bluetooth
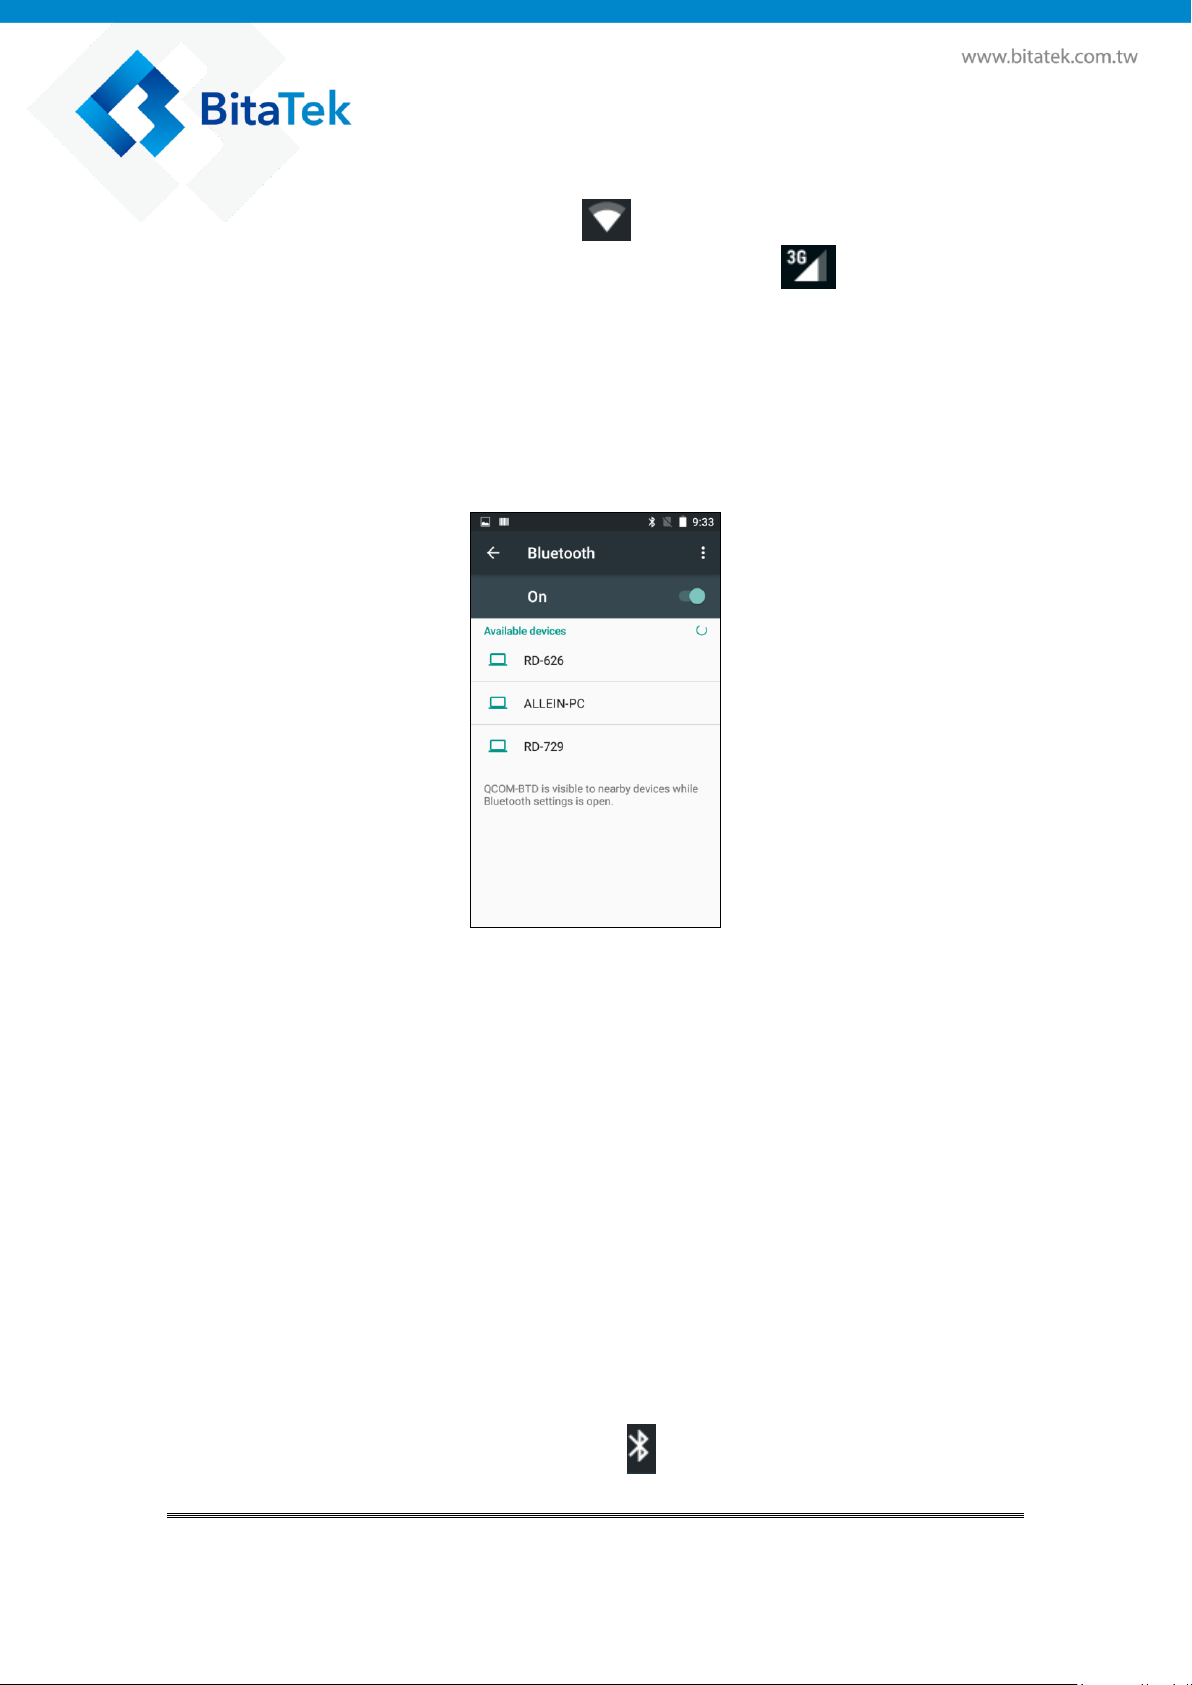
Tap the Bluetooth tile to turn Bluetooth on.
Tap the Bluetooth to see a list of available devices.
If you don't see your headset listed, tap SEARCH FOR DEVICE to
refresh the list.
Tap the name of your headset in the Available Devices section. Glider
X1 pairs with the headset and the headset connection status is
displayed in the Paired Devices section.
If prompted to enter a passcode, try 0000 or 1234, or consult the
headset documentation to find the passcode.
When the Bluetooth headset is connected, you'll see in the status bar.
Normally, you can easily reconnect your headset by switching on
Bluetooth on Glider X1, and then turning on the headset.
However, you might have to connect manually if your headset has been
used with another Bluetooth device.
When enabled, the Bluetooth icon is displayed in the status bar.
Glider X1 Enterprise Touch Computer User’s Guide
24
Page 25
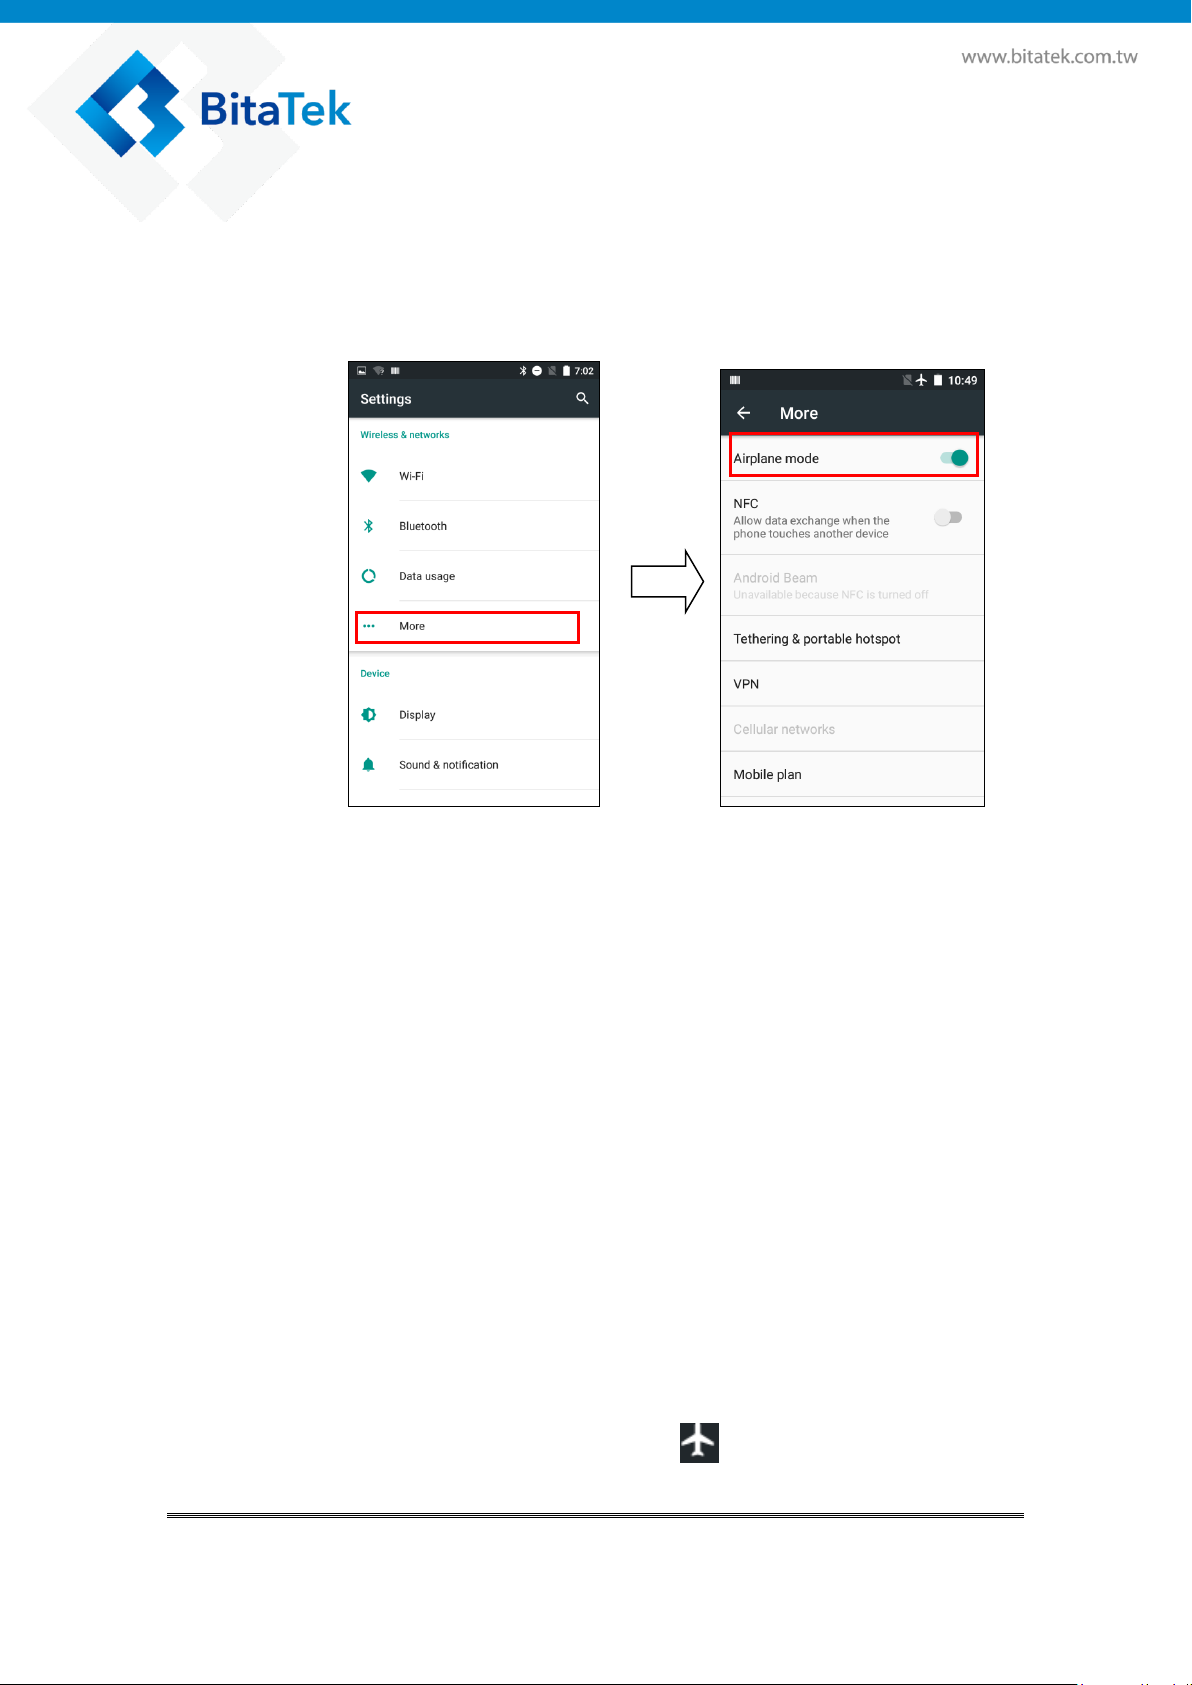
4.2.3. Airplane mode
Two ways to enable / disable Airplane
One is select the Airplane Item when you press Power button until the
message windows display. The other one is select more items of
Android settings.
When you enable Airplane (Flight) mode, all wireless radios on
Glider X1 are turned off, including the call function, data services,
Bluetooth, and Wi-Fi.
When you disable Airplane mode, the call function is turned back on and
the previous state of Bluetooth and Wi-Fi is restored.
You can manually turn Bluetooth and Wi-Fi back on after enabling
Airplane mode.
Do any of the following to turn Airplane mode on or off:
Press and hold POWER button, and then tap Airplane mode.
With finger, swipe down from the status bar to open the Quick
Settings panel. Tap the Airplane mode tile to turn airplane mode on or
off.
When enabled, the Airplane mode icon is displayed on the status
bar.
Glider X1 Enterprise Touch Computer User’s Guide
25
Page 26

4.2.4. NFC
With built-in NFC (near field communication) on Glider X1, you can
share content to another NFC capable mobile device in an instant.
Beam WebPages, photos, contact information, and more by holding
Glider X1 and the other device back to back.
Turning NFC on or off
Go to Settings, and then under Wireless & networks, tap More… .
Tap NFC check box to Enable / disable NFC function
If enable / disable NFC check box, it will also enable / disable
Android Beam too.
1. Make sure that both devices are unlocked and have NFC turned on. If
the other device has an Android Beam option, make sure it is also
turned on.
2. Make sure that the NFC area (shaded part) of Glider X1 and the other
phone's NFC area are close to one another. Experiment by slightly
moving the phones until a connection is made.
3. Tap the screen.
Glider X1 Enterprise Touch Computer User’s Guide
26
Page 27

The shared content appears on the other screen. For some items that
you've shared (such as contact information), additional instructions on
how to save the item will appear on the receiving device.
4.2.5. Set Fey Glider as a portable hotspot
Share your data connection with other devices by turning Glider X1 into
a Wi-Fi hotspot.
Please tap to go to Setting of Android
1. Open the Settings app
2. Under Wireless & Networks, tap More.
3. Tap Tethering & portable hotspot
4. Tap portable Wi-Fi hotspot
The first time you want turn on the Wi-Fi hotspot, you'll need to set it
up
5. Enter a hotspot name or use the default.
6. Enter a password or use the default.
7. Tap the Portable Wi-Fi Hotspot check box to enable switch to turn it
on.
When enabled, the Hotspot icon is displayed in the left side of
status bar.
Glider X1 Enterprise Touch Computer User’s Guide
27
Page 28

4.2.6. Sharing Glider X1 internet connect by
Bluetooth
Please tap to go to Setting of Android
1. Open the Settings app
2. Under Wireless & Networks, tap More.
3. Tap Bluetooth tethering check box
Connect Glider X1 to your computer using Bluetooth.
4.3. Backup & Reset
Please tap to go to Setting of Android,
You can reset to factory default when you select Factory data reset
item, it will erase all include enterprise folder.
Glider X1 Enterprise Touch Computer User’s Guide
28
Page 29

< Factory Data Reset > < Network Setting Reset >
You can reset to factory default when you select Network Setting reset
item, it will erase all RF data.
Glider X1 Enterprise Touch Computer User’s Guide
29
Page 30

4.4. Phone
Please tap to start Phone App
You can press then dial a number directly, or use Smart dial to
quickly place a call. Smart dial searches and calls a stored/synced
contact or a number from your call history.
You'll see the missed call icon in the status bar when you miss a
phone come in.
Glider X1 Enterprise Touch Computer User’s Guide
30
Page 31

4.5. People
The People app lists all contacts you've stored on Glider X1 and from online
accounts you're logged in to. Use the People app to easily manage
communications with people that matter to you.
Please tap to start People App
Please tap to Add new People. Then input more information. Then
tap to save.
Glider X1 Enterprise Touch Computer User’s Guide
31
Page 32
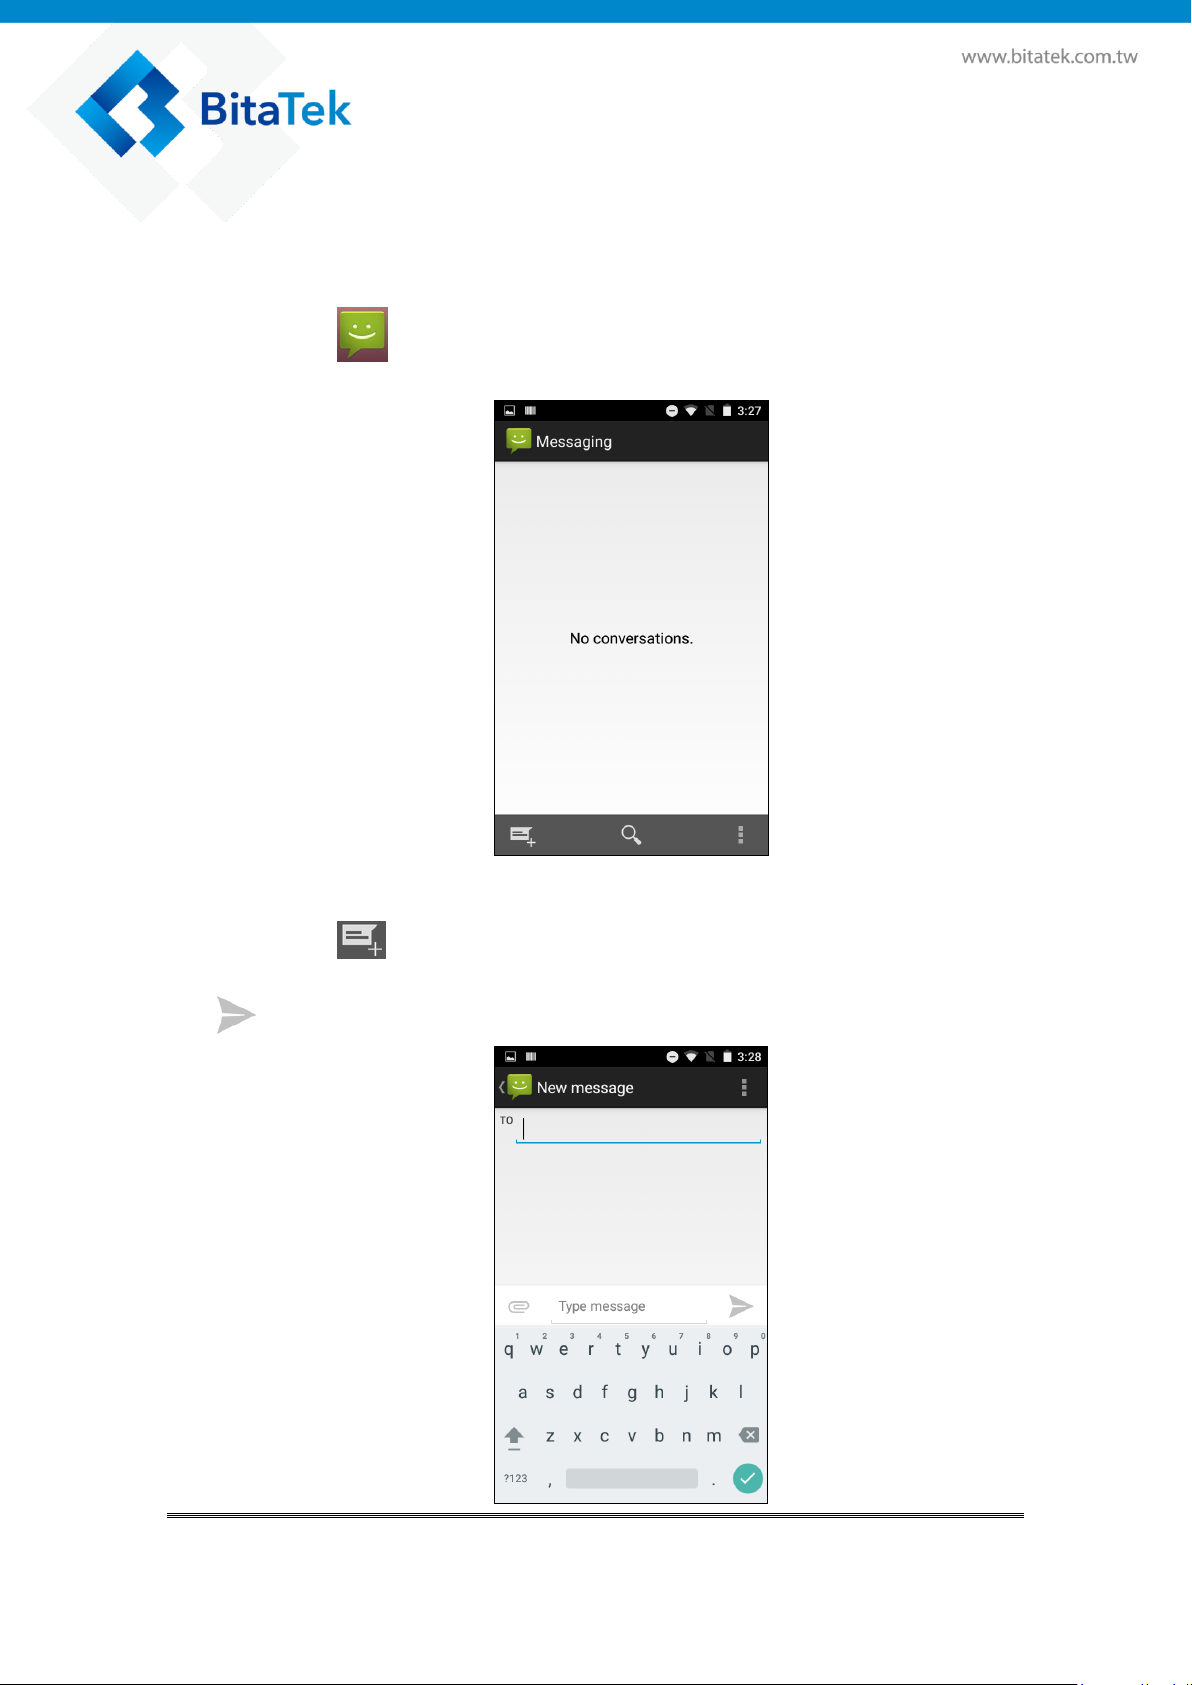
4.6. Message
There is a limit on the number of characters for a single text message, the
default value is 500.
Please tap to start Message App
Please tap to Add new Message, then input the phone number of the
people that you want send to. And write the content of message. And press
to start send.
Glider X1 Enterprise Touch Computer User’s Guide
32
Page 33
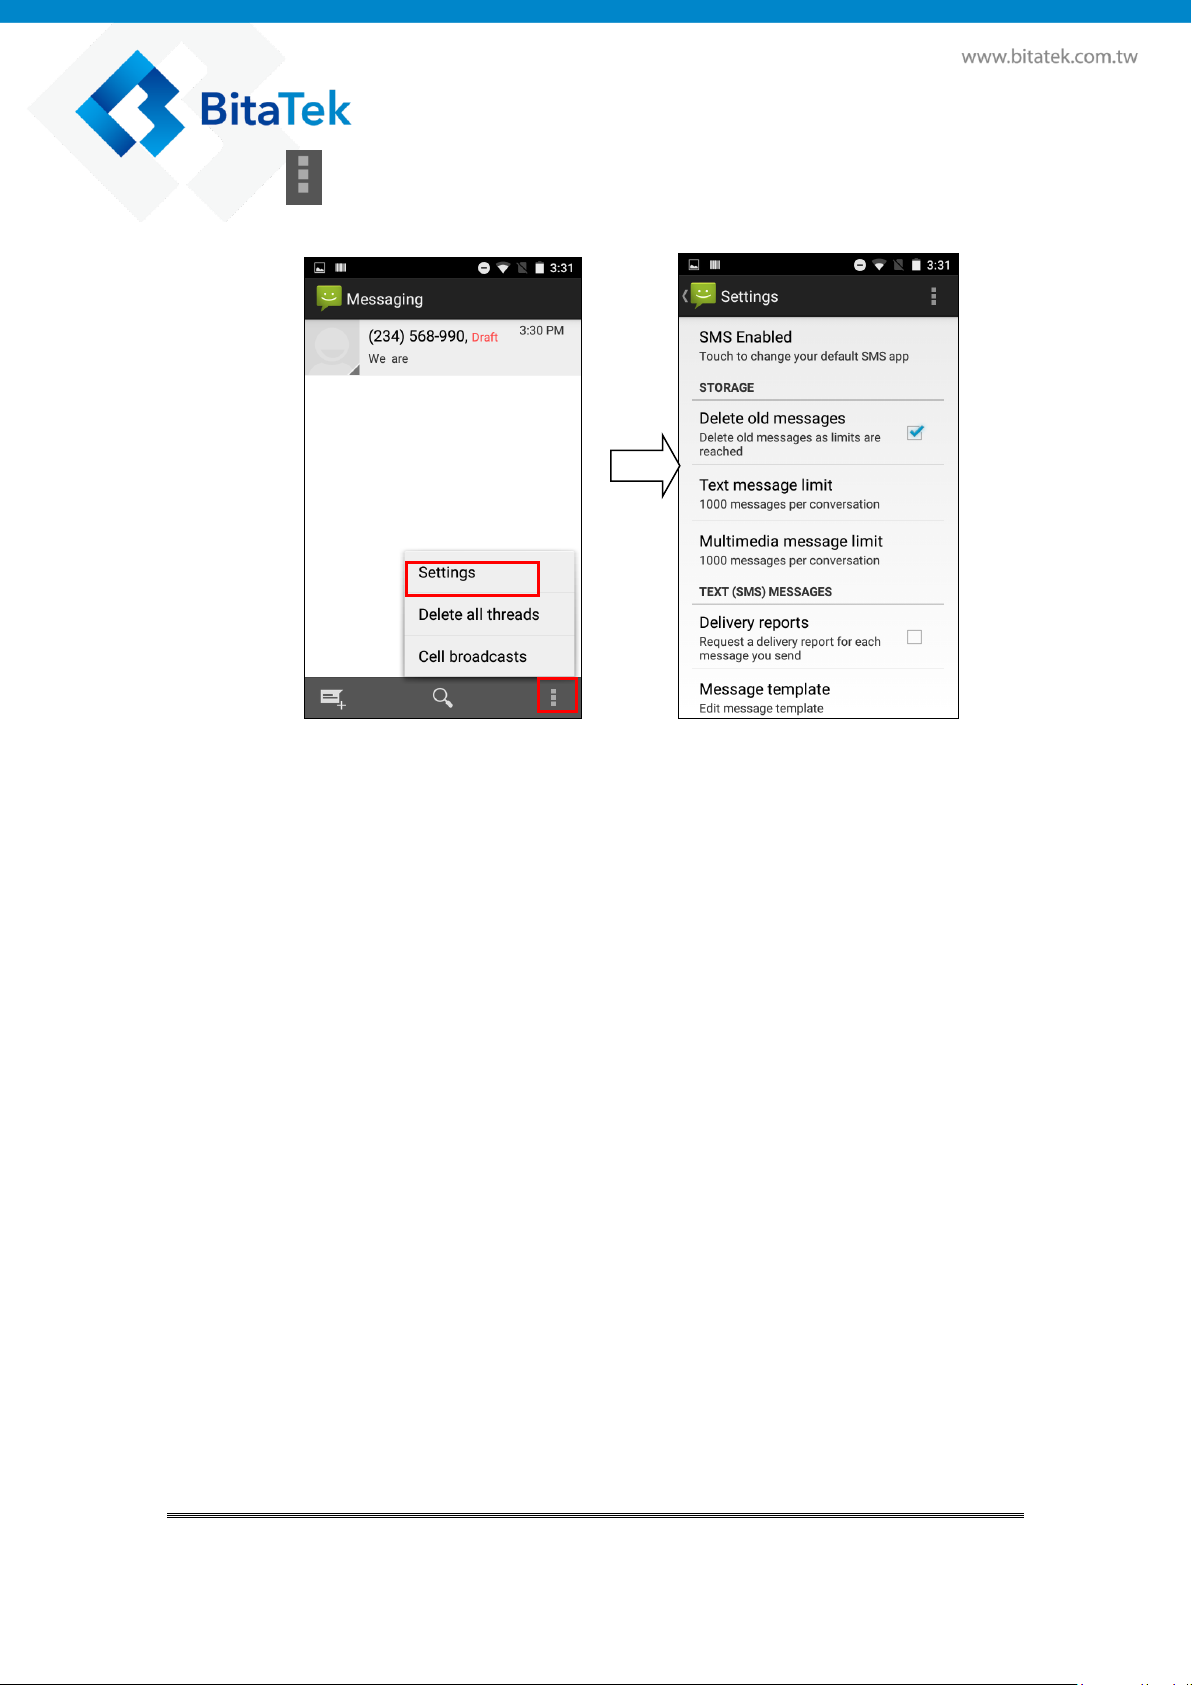
Press Button and select Settings item to enable message setting.
Glider X1 Enterprise Touch Computer User’s Guide
33
Page 34
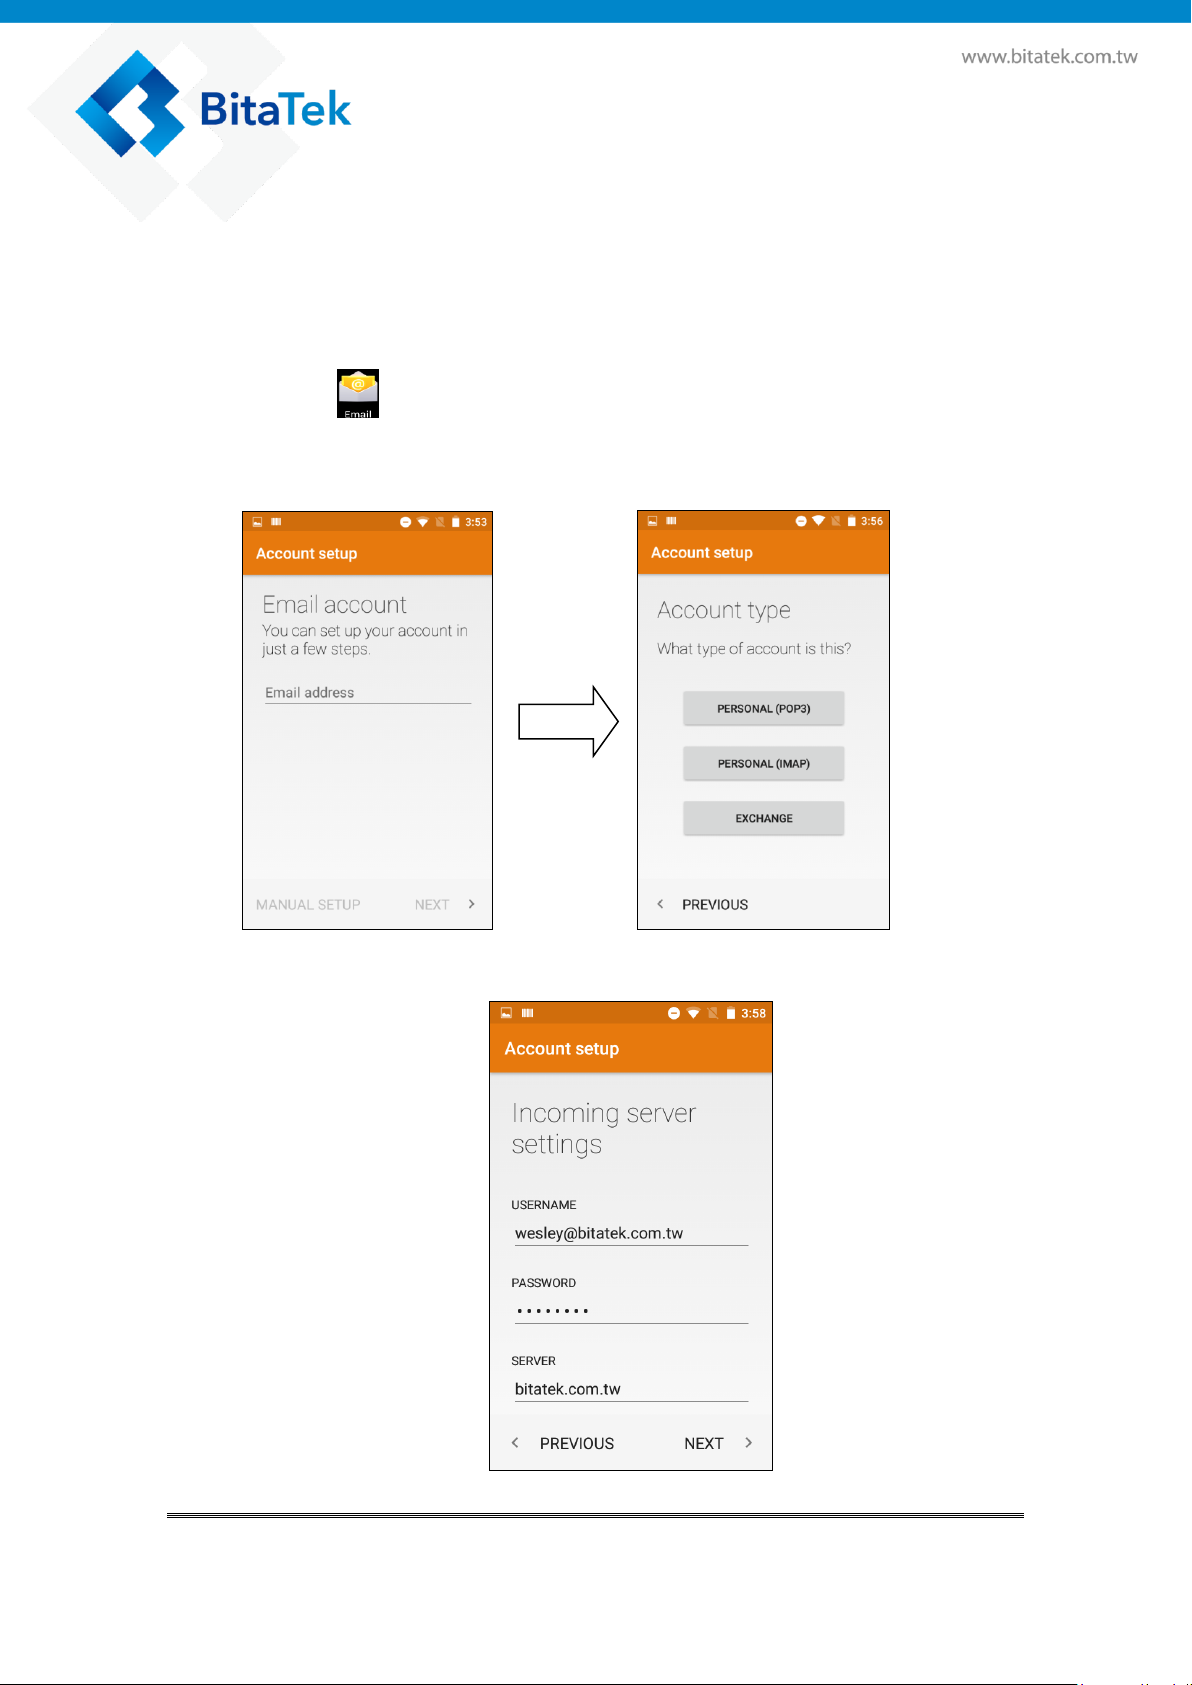
4.7. Email
The Mail app is where you read, send, and organize email messages from
one or more email accounts that you’ve set up on Glider X1.
Before use Email, you must set the mail account first.
Please make sure the WiFi is Ok, when you set the mail account.
Please tap to start Email app
If you use Mail app first time, please contact your MIS people to help to set
the Mail account if you need.
After set up your mail account complete
Glider X1 Enterprise Touch Computer User’s Guide
34
Page 35
Camer
Video
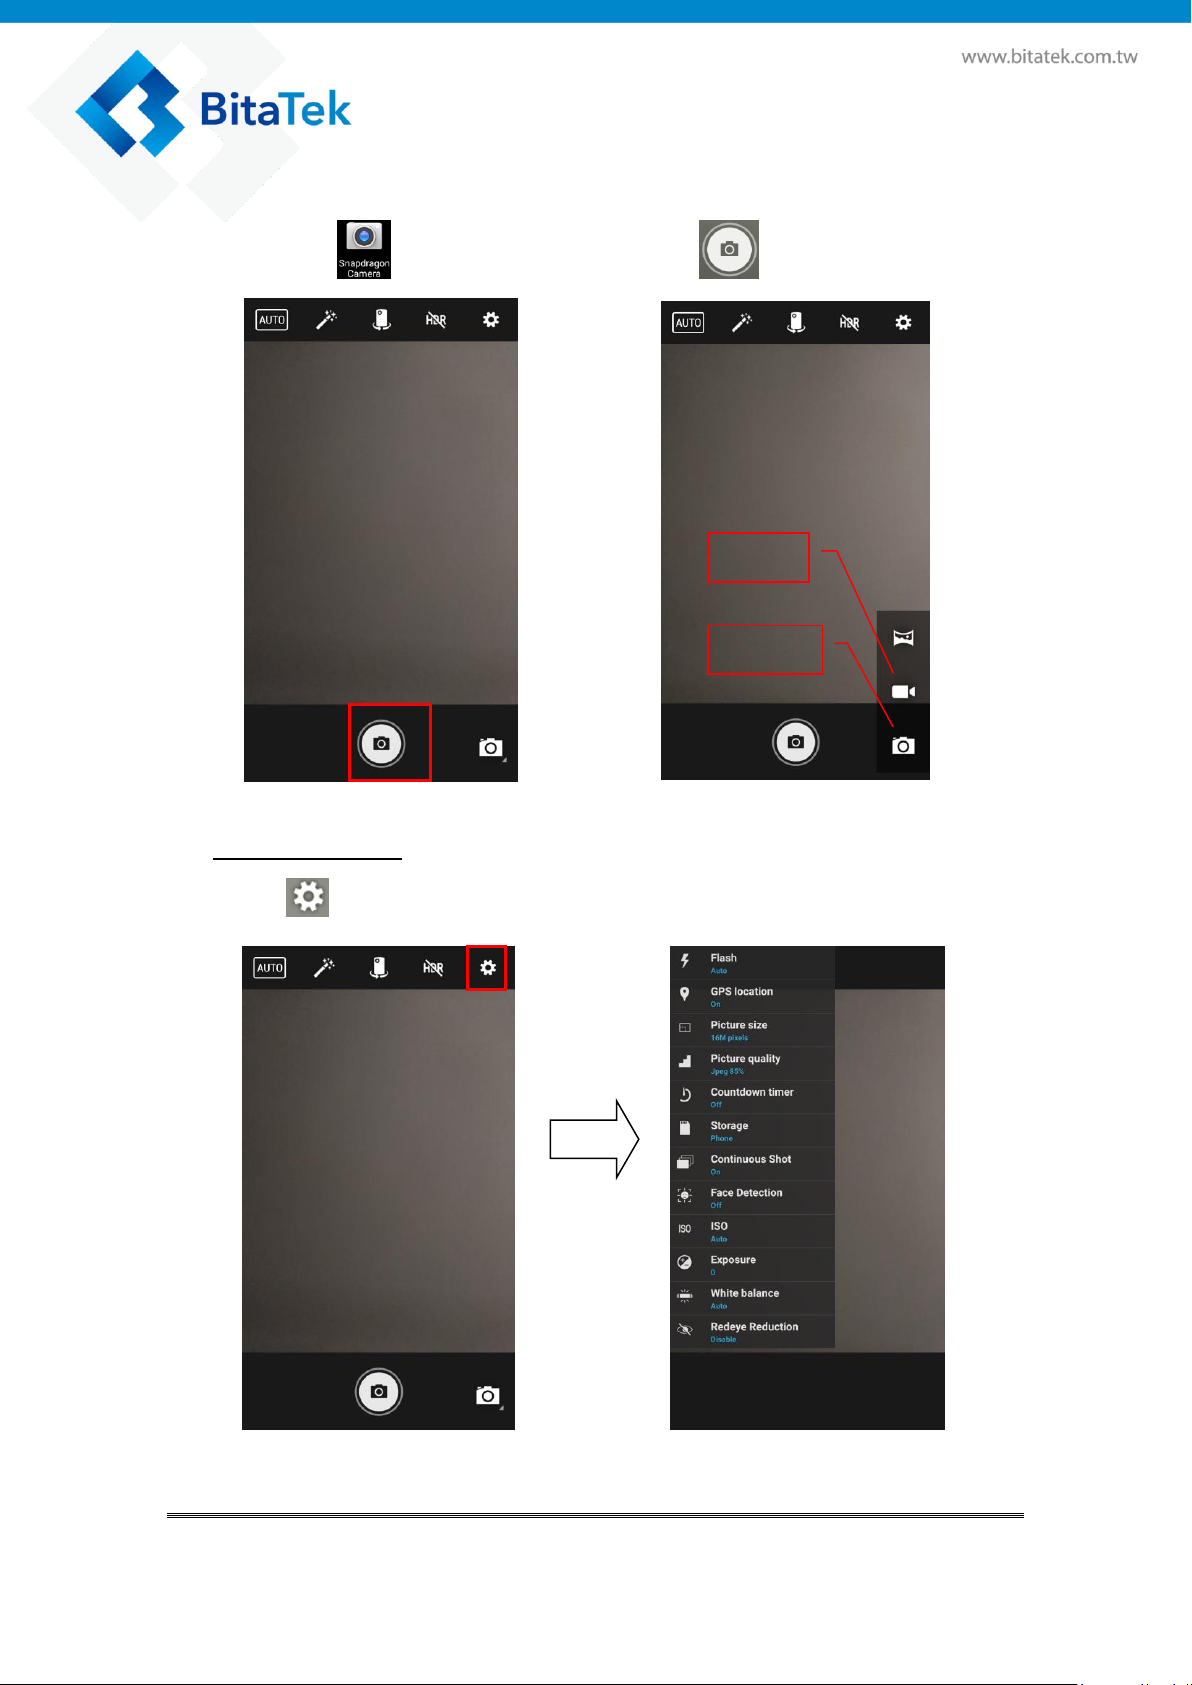
4.8. Camera
Please tap to start Camera App, press to take a picture.
Camera Settings
Press to do advance setting.
Glider X1 Enterprise Touch Computer User’s Guide
35
Page 36

Press to do mode setting
Press to do effects setting
Press or , it is change the camera on the front or back.
Press or , it is disable or enable HDR setting.
Glider X1 Enterprise Touch Computer User’s Guide
36
Page 37
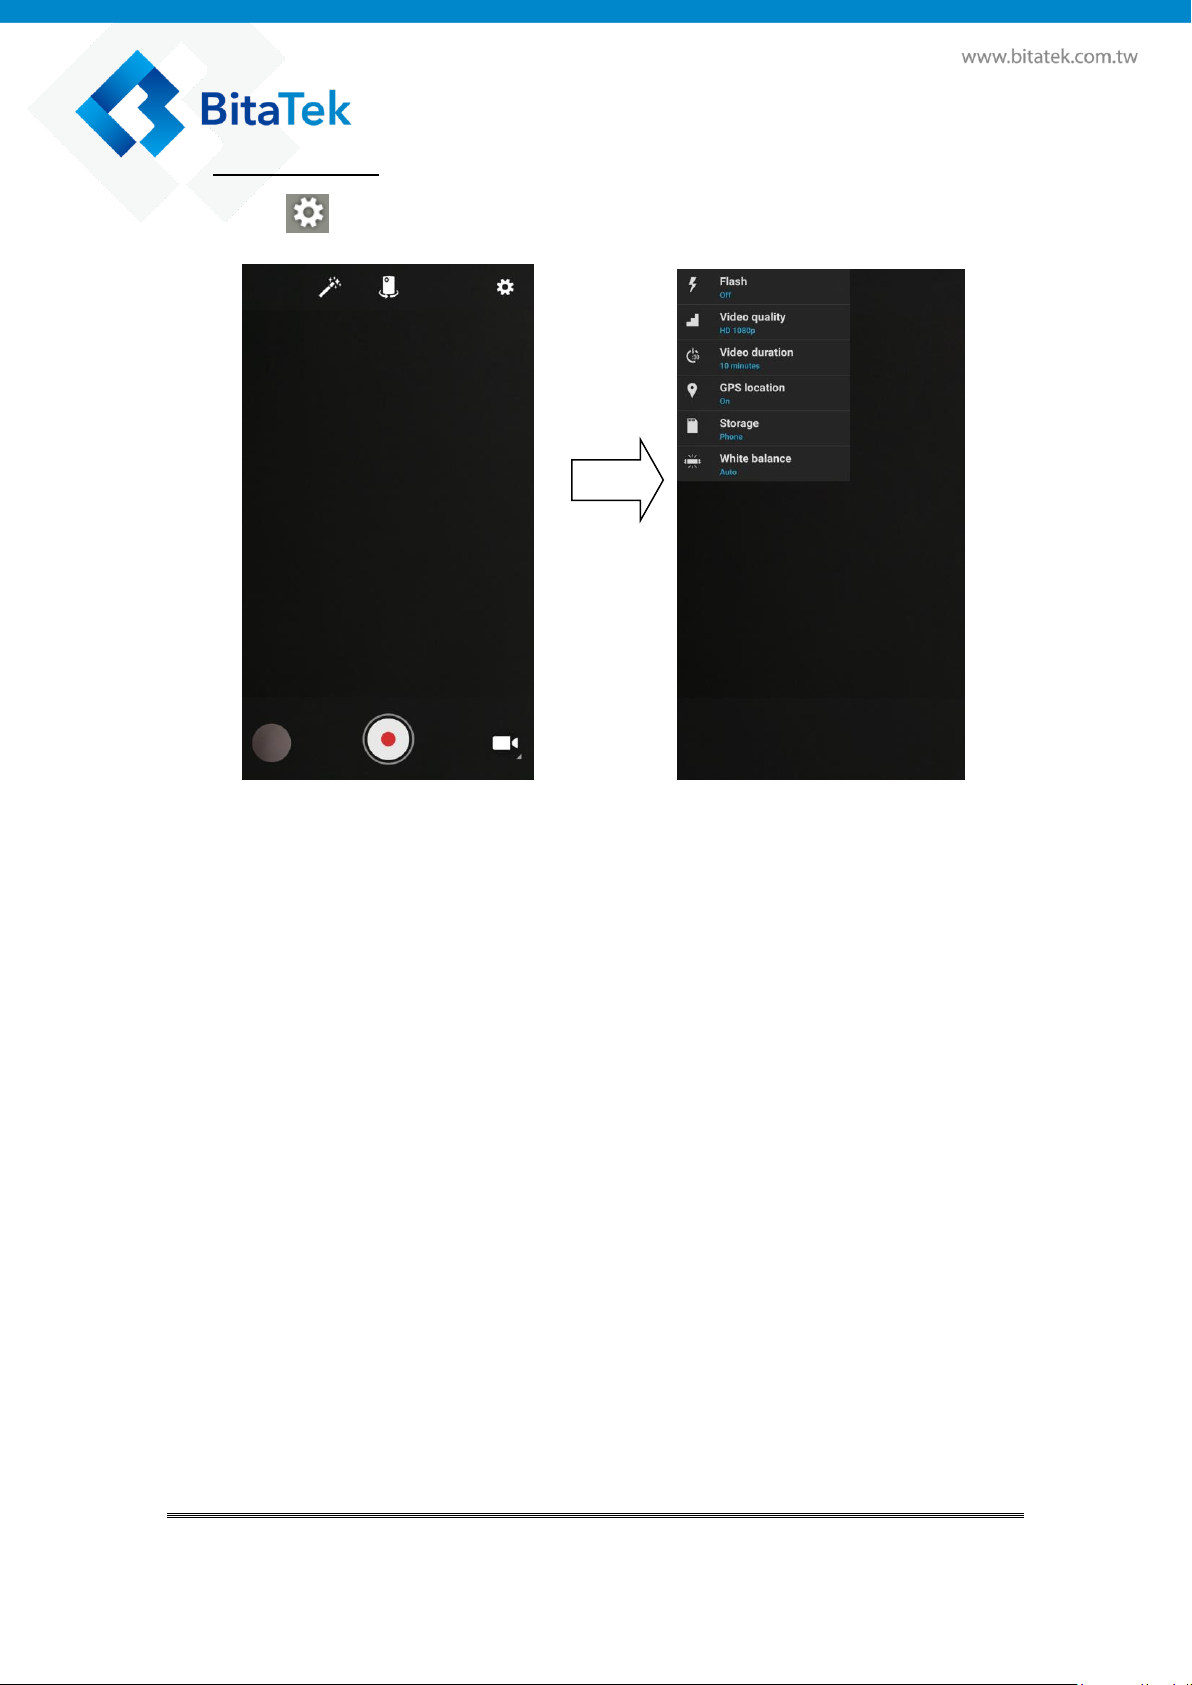
Video Settings
Press to do advance setting.
Glider X1 Enterprise Touch Computer User’s Guide
37
Page 38
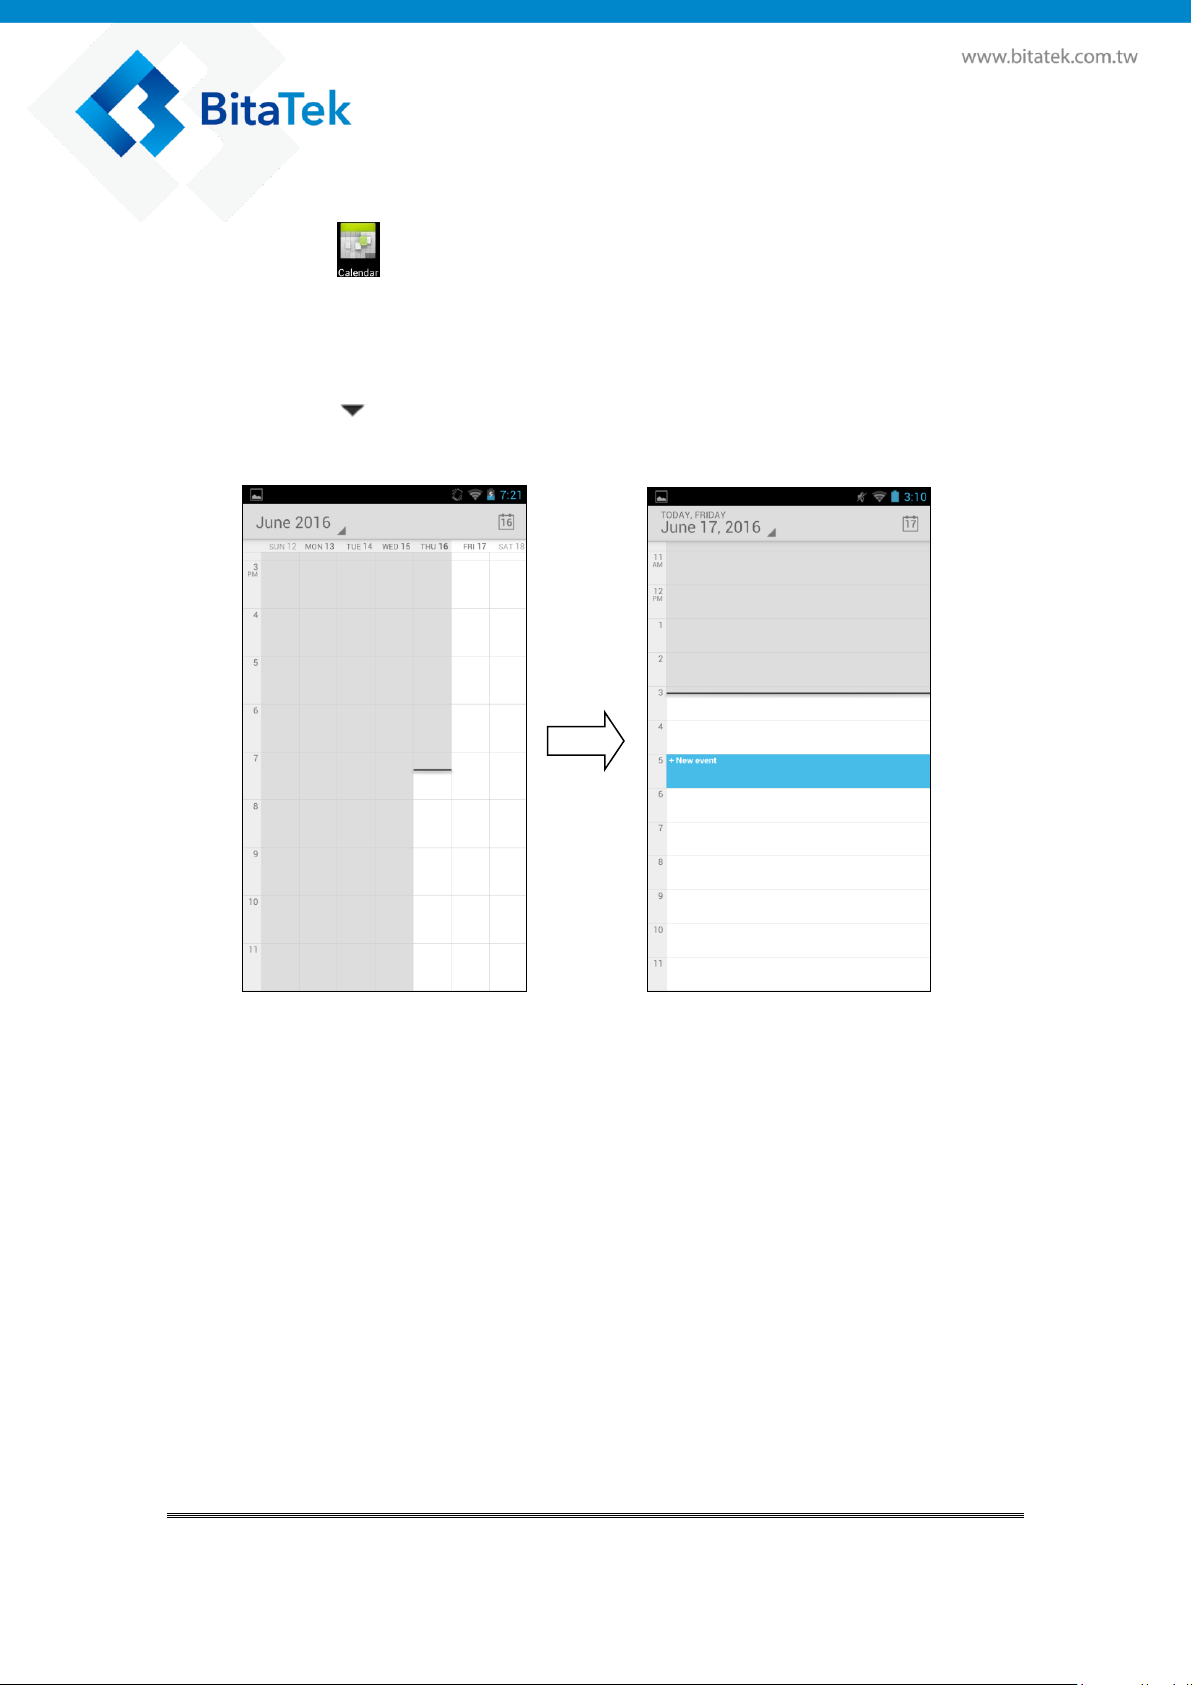
4.9. Calendar
Please tap to start Calendar App
Use the Calendar app to view your events, meetings, and appointments. If
you've signed into your online Google mail accounts, related events will also
appear in Calendar.
Please tap , and then choose a calendar view display mode.
Glider X1 Enterprise Touch Computer User’s Guide
38
Page 39
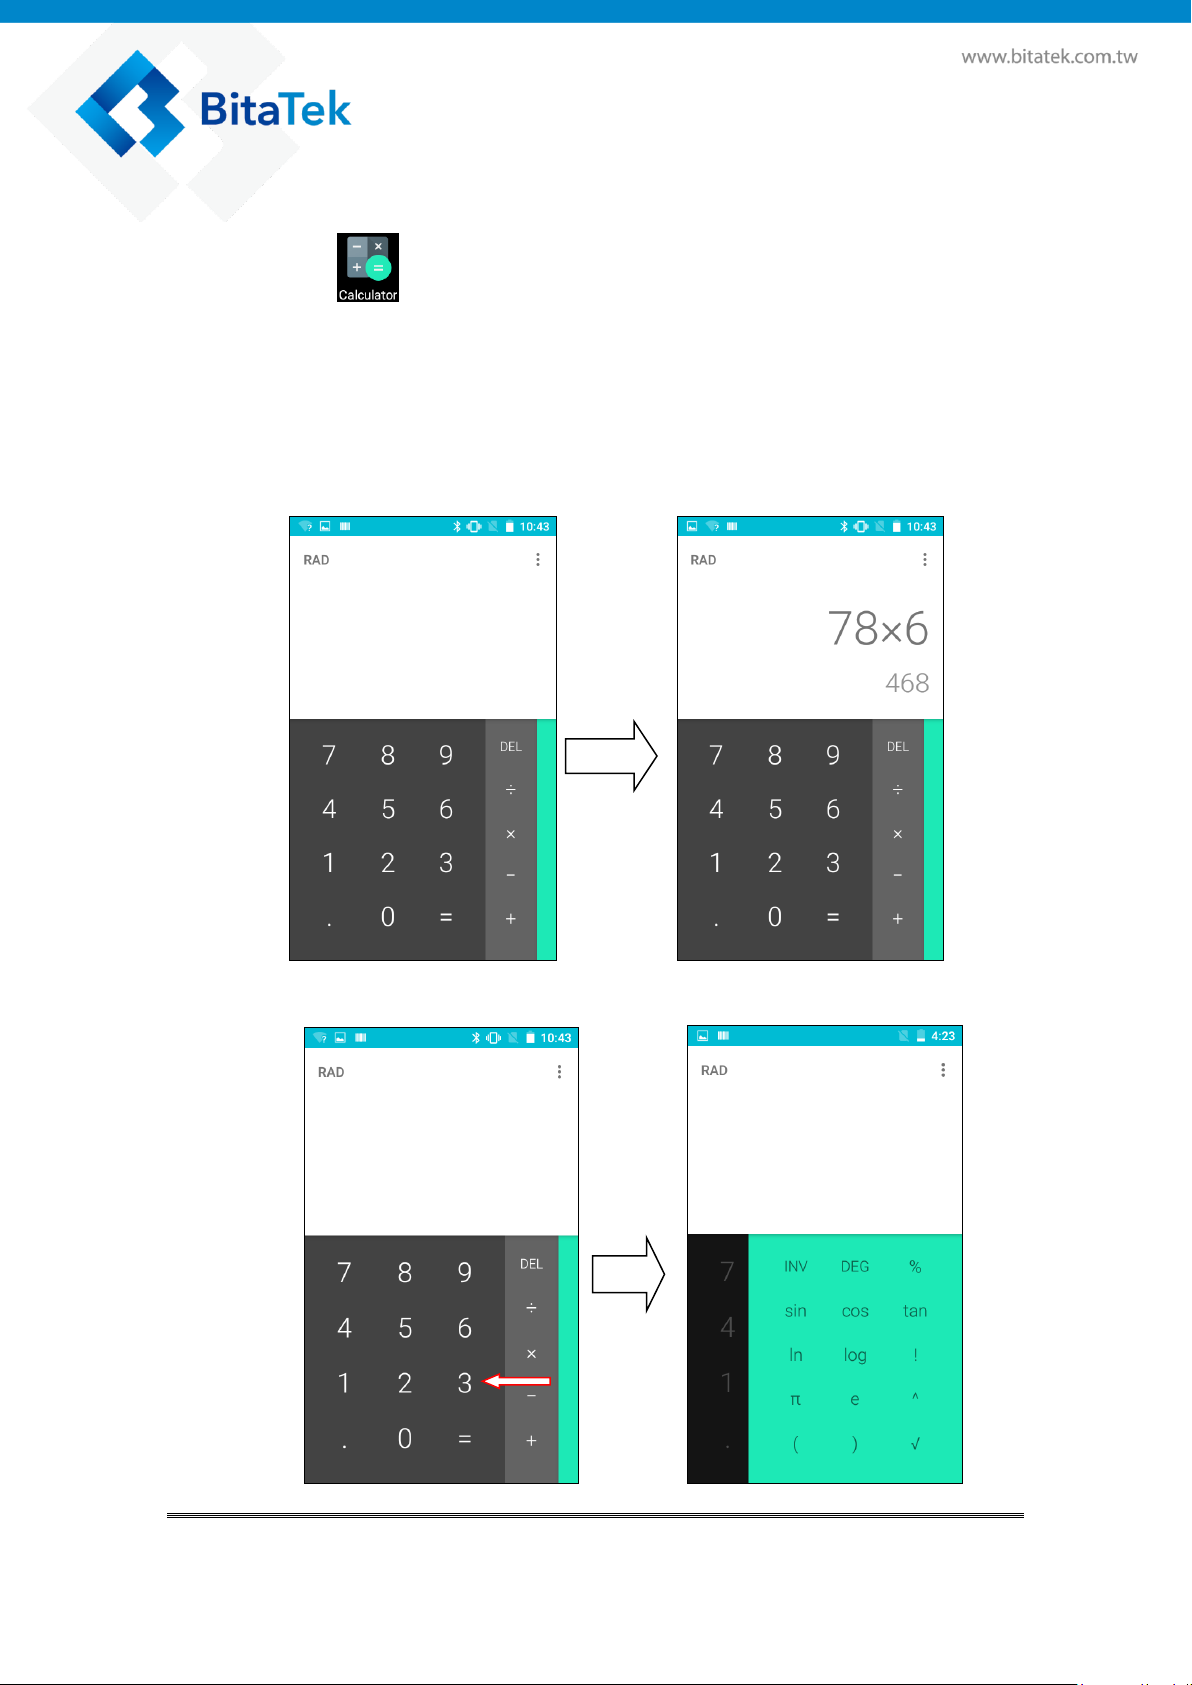
4.10. Calculator
Please tap to start Calculator App
The Calculator App have two panels.
You can press Menu Button or slid screen to right /left to change panel
between Basic and advance panel.
Basic Panel as follow
Press and slide to left to Advance Panel
Glider X1 Enterprise Touch Computer User’s Guide
39
Page 40
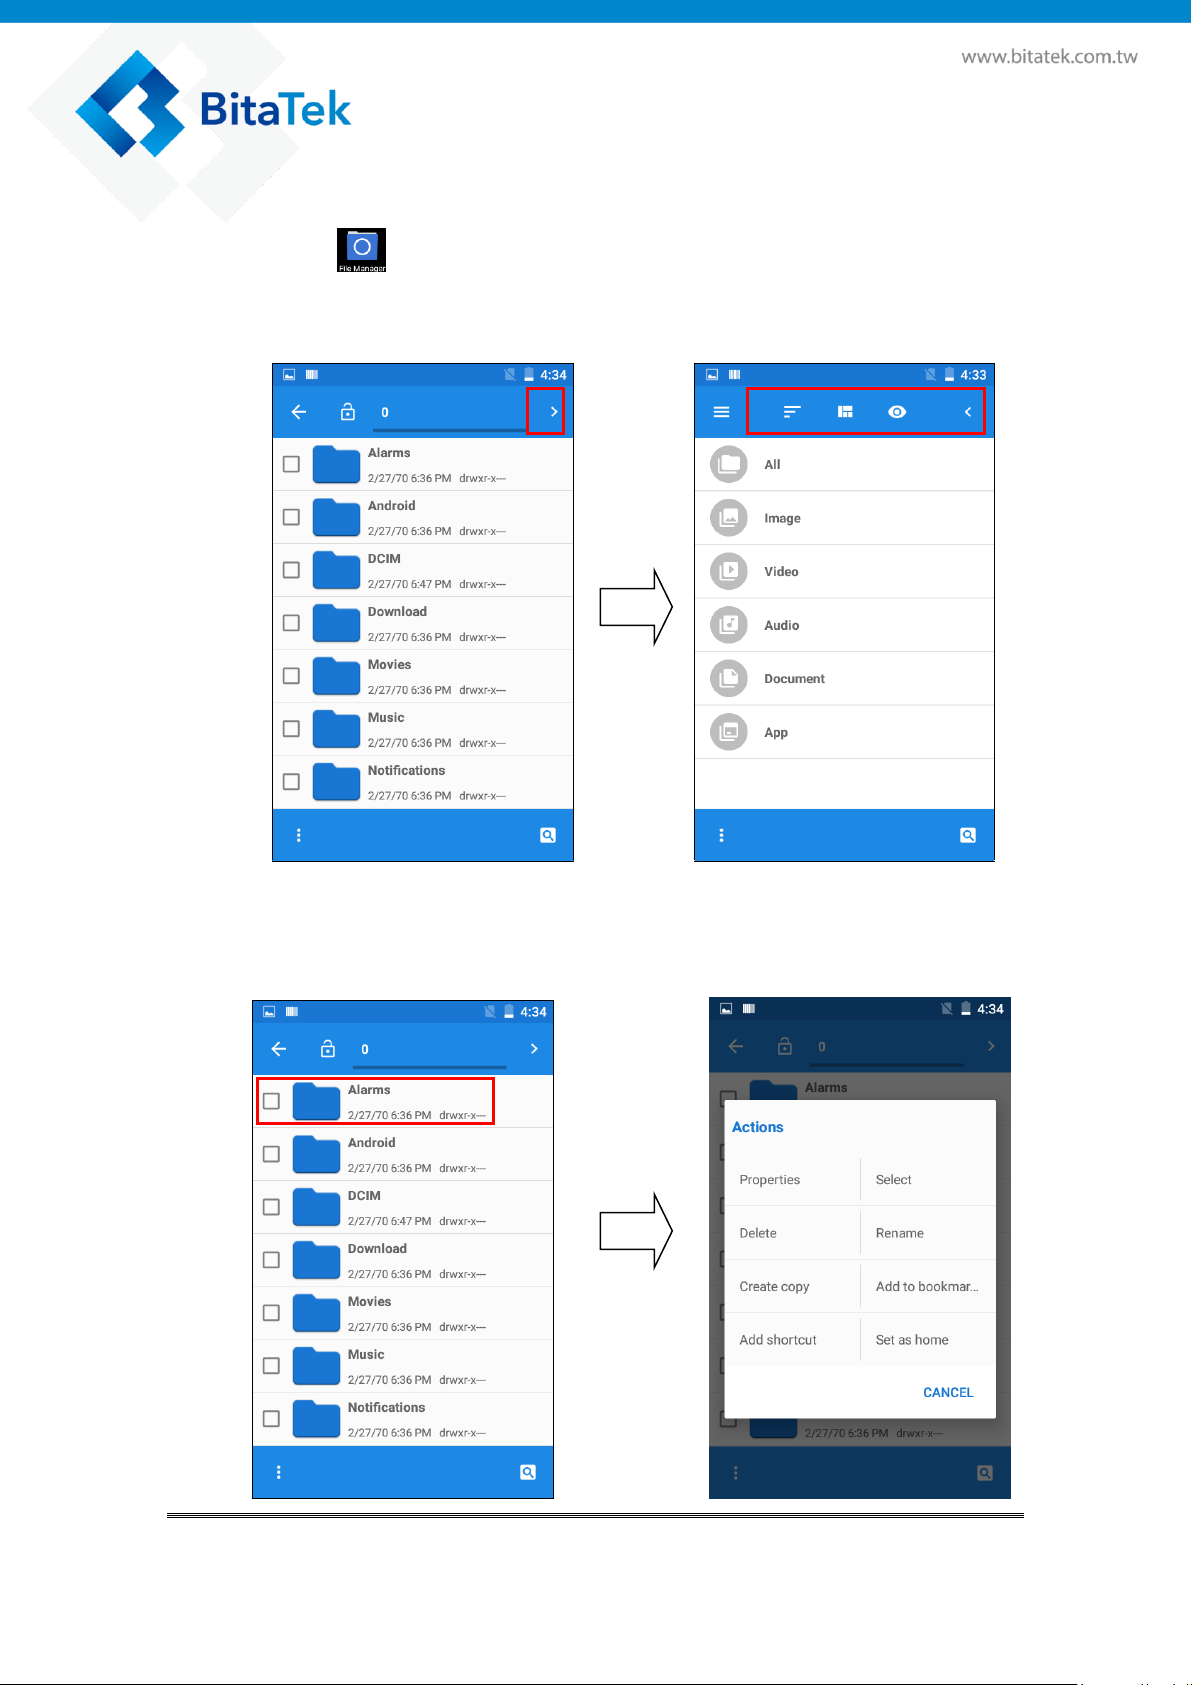
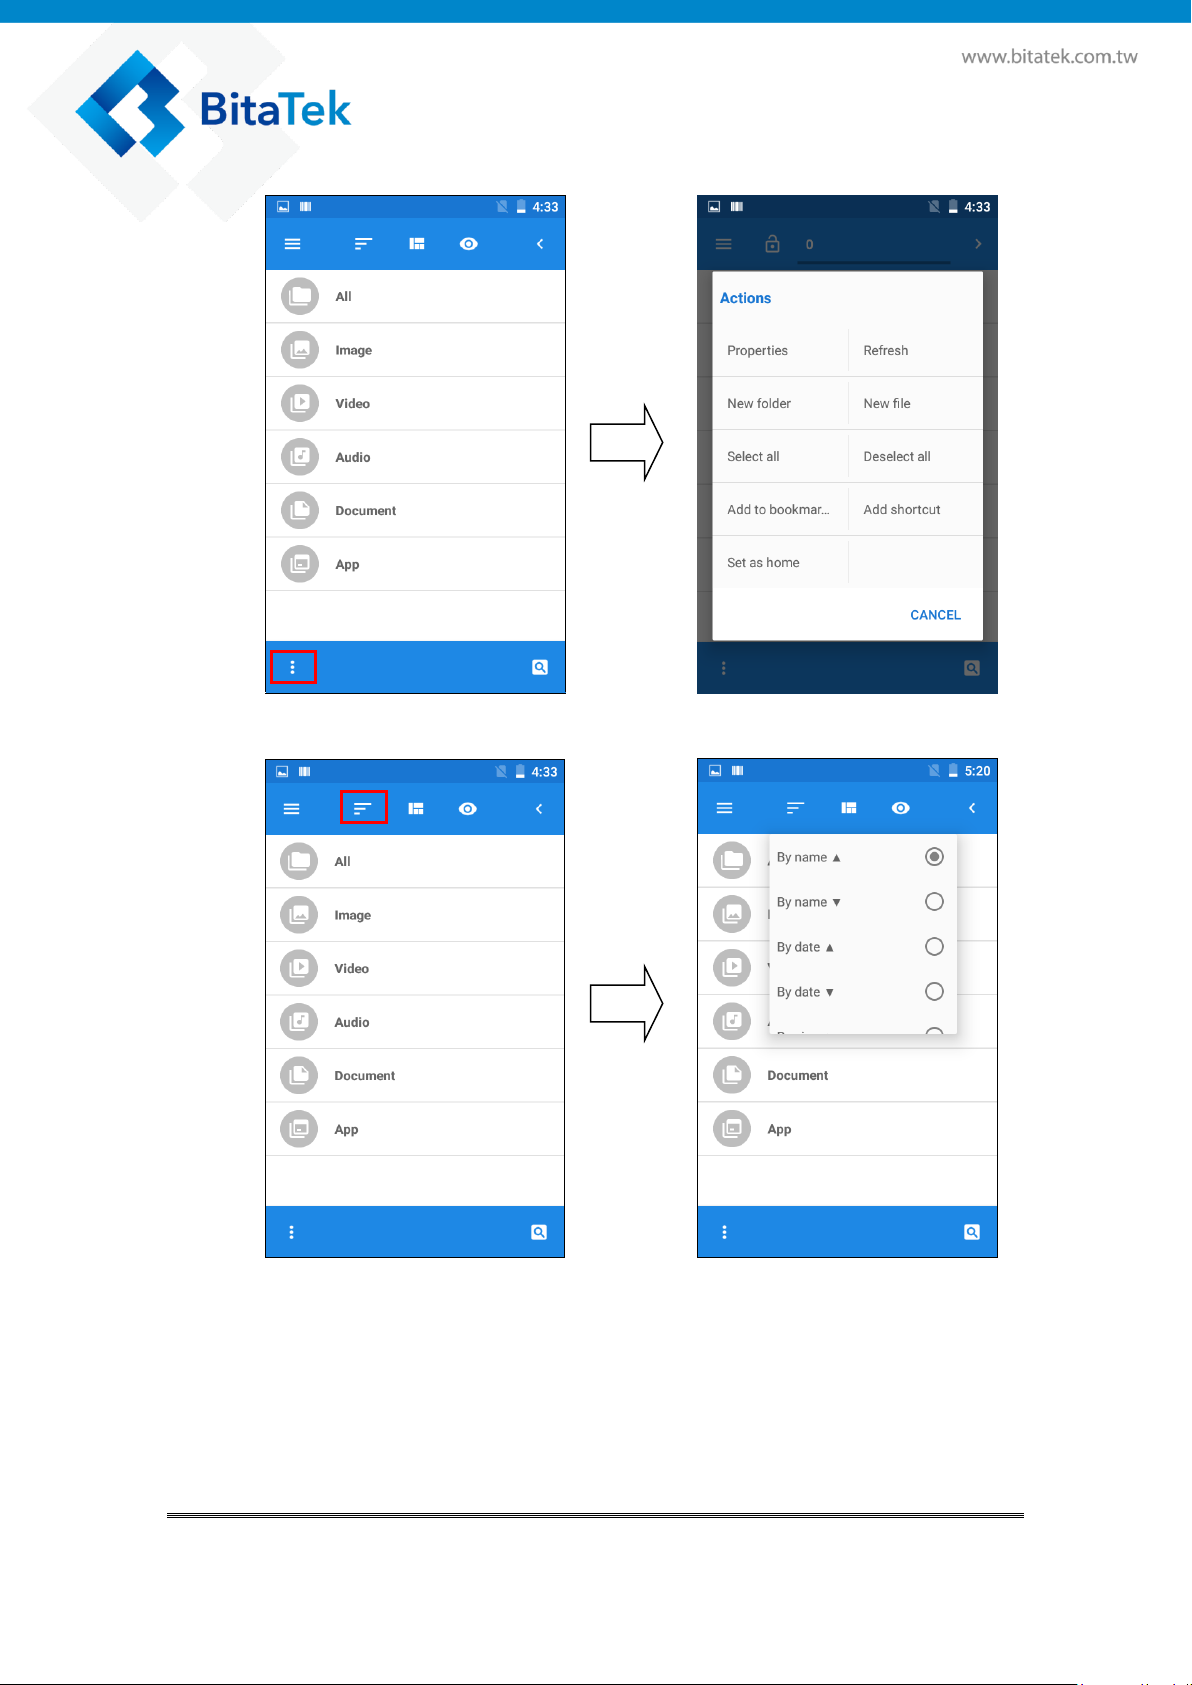
4.11. File Manager
Please tap to start File Manager App. You can open /copy/
move/delete file or folder.
Press the fold name than you can do another actions.
Glider X1 Enterprise Touch Computer User’s Guide
40
Page 41
Glider X1 Enterprise Touch Computer User’s Guide
41
Page 42

Glider X1 Enterprise Touch Computer User’s Guide
42
Page 43

4.12. Widgets/APPS
You can press some Widget tools and add the widget tools to the home
Screen or other application screen.
Glider X1 Enterprise Touch Computer User’s Guide
43
Page 44

Chapter 5. Appendix
5.1. Regulatory
This device has been tested and found to comply with the limits for a Class
B digital device, pursuant to part 15 of the FCC rules. These limits are
designed to provide reasonable protection against harmful interference in a
residential installation. This equipment generates, uses and can radiate
radio frequency energy and, if not installed and used in accordance with
the instructions, may cause harmful interference with radio
communications. However, there is no guarantee that interference will not
occur in a particular installation.
5.2. Battery Notes
It is important to consider temperature when the battery pack is charging.
Charging is most efficient at normal room temperature or in a slightly cooler
environment. It is essential that batteries are charged within the stated
range of 0°C to 40°C. Charging batteries outside of the specified range
could damage the batteries and shorten their life cycle.
1. To guarantee optimal performance, it is recommended that
rechargeable batteries be replaced every year, or after 500 charging
cycles are completed. It is normal for the battery to balloon or expand
after one year or 500 cycles. Although it does not cause damage, it
cannot be used again and must be disposed of according to the
location's safe battery disposal procedures.
2. If a battery performance decreases more than 20%, the battery is at the
end of its life cycle. Stop use and ensure the battery is disposed of
properly.
Glider X1 Enterprise Touch Computer User’s Guide
44
Page 45

5.3. Storage and safety notice
Although charged batteries may be left unused for several months, their
capacity may be depleted due to build up of internal resistance. If this
happens, they will require recharging prior to use. Batteries may be stored at
temperatures between -20°C to 60°C, however they may deplete more
rapidly at higher temperatures. It is recommended to store batteries at room
temperature.
5.4. Product Operation and Storage
Notice
The BitaTek product has applicable operation and storage temperature
conditions. Please follow the limitation of suggested temperature conditions
to avoid failure, damage or malfunction.
5.5. Adapter Notes
1. Please do not leave the power adapter in the socket when it is not
connected to your bitatek product for charging.
2. Please remove the power adapter when the battery is fully recharged.
3. The bundled power adapter that comes with your Bitatek product is not
meant to be used outdoors. An adapter exposed to water or rain, or a very
humid environment can cause damage to both the adapter and the
product.
4. Please only use the bundled power adapter or same specification of
adapter to charge your Bitatek product. Using the wrong power adapter
can damage your Bitatek product.
Glider X1 Enterprise Touch Computer User’s Guide
45
Page 46

1D Symbologies
2D Symbologies
UPC/EAN
PDF417
ISSN EAN
MicroPDF417
Code 128
Data Matrix
Code 39
Aztec
Code 32
Maxicode
Code 93
QR Code
Interleaved 2 of 5
MicroQR
Discrete 2 of 5
Codabar
MSI
Matrix 2 of 5
GS1 DataBar
US Postnet
US Planet
UK Postal
Japan Postal
Australian Postal
Netherlands KIX Code
USPS 4CB/One
Code/Intelligent Mail
5.6. Support Barcode information
The following bar code types are supported and can be individually enabled
or disabled:
Glider X1 Enterprise Touch Computer User’s Guide
46
 Loading...