

Page 1
USER'S GUIDE
44L6 SERIES 220-240V
2
Thank You
3
Safety Instructions
4
Product View
5
Assembly
6-11
Operations
12
Maintenance and Care
13
Troubleshooting
14
Replacement Parts
14
Accessories
15
Warranty
16
Consumer Care
Page 2

T
hanks for buying a BISSELL PowerWash™ PowerBrush Select Deep Cleaner
We’re glad you purchased a BISSELL PowerWash PowerBrush Select deep
cleaner. Everything we know about floor care went into the design and
construction of this complete, high-tech home cleaning system.
Your BISSELL PowerWash PowerBrush Select deep cleaner is well made,
and we back it with a limited two-year warranty. We also stand behind it
with a knowledgeable, dedicated Consumer Care department, so, should
you ever have a problem, you’ll receive fast, considerate assistance.
My great-grandfather invented the floor sweeper in 1876. Today,
BISSELL is a global leader in the design, manufacture, and service
of high quality homecare products like your BISSELL PowerWash
PowerBrush Select deep cleaner.
Thanks again, from all of us at BISSELL.
Mark J. Bissell
Chairman & CEO
2
www.bissell.com
Page 3

IMPORTANT SAFETY INSTRUCTIONS
When using an electrical
basic precautions should be observed,
including the following:
appliance,
READ ALL INSTRUCTIONS
BEFORE USING YOUR
DEEP CLEANER.
Always connect to a properly Earthed
outlet. Unplug from outlet when not in use
and before conducting maintenance or
troubleshooting.
WARNING: To
reduce the risk of fire,
electric shock, or injury:
■
Use indoors only
■
Do not immerse; use only on surfaces
moistened by cleaning process
■
Do not leave machine when it is plugged in
■
Do not service machine when it is plugged in
■
If the supply cord is damaged, it must
be replaced by the manufacturer or its
service agent in order to avoid a hazard
■
Do not use machine if it has been
dropped, damaged, left outdoors or
dropped into water
■
Do not pull or carry by cord, use cord as a
handle, close door on cord, pull cord around
sharp corners or edges, run appliance over
cord, or expose cord to heated surfaces
■
Do not carry the appliance while in use
■
Do not unplug by pulling on cord;
unplug by grasping plug not the cord
■
Do not handle plug or appliance with
wet hands
■
Do not put any object into appliance openings,
use with blocked opening or restrict air flow
■
Do not expose hair, loose clothing, fingers
or body parts to openings or moving parts
■
Do not pick up hot or burning objects
■
Do not pick up flammable or combustible
materials (lighter fluid, petrol, kerosene,
etc.) or use in the presence of explosive
liquids or vapours
■
Do not use appliance in an enclosed space
filled with vapours given off by oil base
paint, paint thinner, some moth proofing
substances, flammable dust, or other
explosive or toxic vapours
■
Do not operate the appliance unless the
belt door is securely assembled in the
location provided
www.bissell.com
■
Remove plug from electrical outlet before
cleaning or maintaining the appliance
■
Not intended for use by persons (including
children) with reduced physical, sensory or
mental capabilities, or lack of experience
and knowledge, unless they have been
given supervision or instruction concerning
use of the appliance by a person responsible for their safety
■
Young children should be supervised to ensure
that they do not play with the appliance
■
Do not pick up toxic material (chlorine
bleach, ammonia, drain cleaner, petrol, etc.)
■
Do not modify the Earthed plug
■
Do not use for any purpose other than
described in this User’s Guide
■
Use only manufacturer’s recommended
attachments
■
Use only cleaning products formulated
by BISSELL for use in this appliance to
prevent internal component damage
■
Keep openings free of dust, lint, hair, etc.
■
Keep appliance on a level surface
■
Turn off all controls before unplugging
■
Be extra careful when cleaning stairs
■
Pay close attention when working
around children
SAVE THESE
INSTRUCTIONS
FOR FUTURE USE
This model is for household use only.
WARNING:
This appliance must be Earthed
.
IMPORTANT
FOR OPERATION ON A 220-240 VOLT
A.C. 50/60 Hz POWER SUPPLY ONLY.
If your appliance is fitted with a
nonrewireable BS 1363 plug it must not be
used unless a 13 amp (ASTA approved to BS
1362) fuse is fitted in the carrier contained
in the plug. (Spares may be obtained from
your BISSELL supplier). If for any reason the
plug is cut off, it must be disposed of, as it is
an electric shock hazard should it be inserted
into a 13 amp socket.
3
Page 4
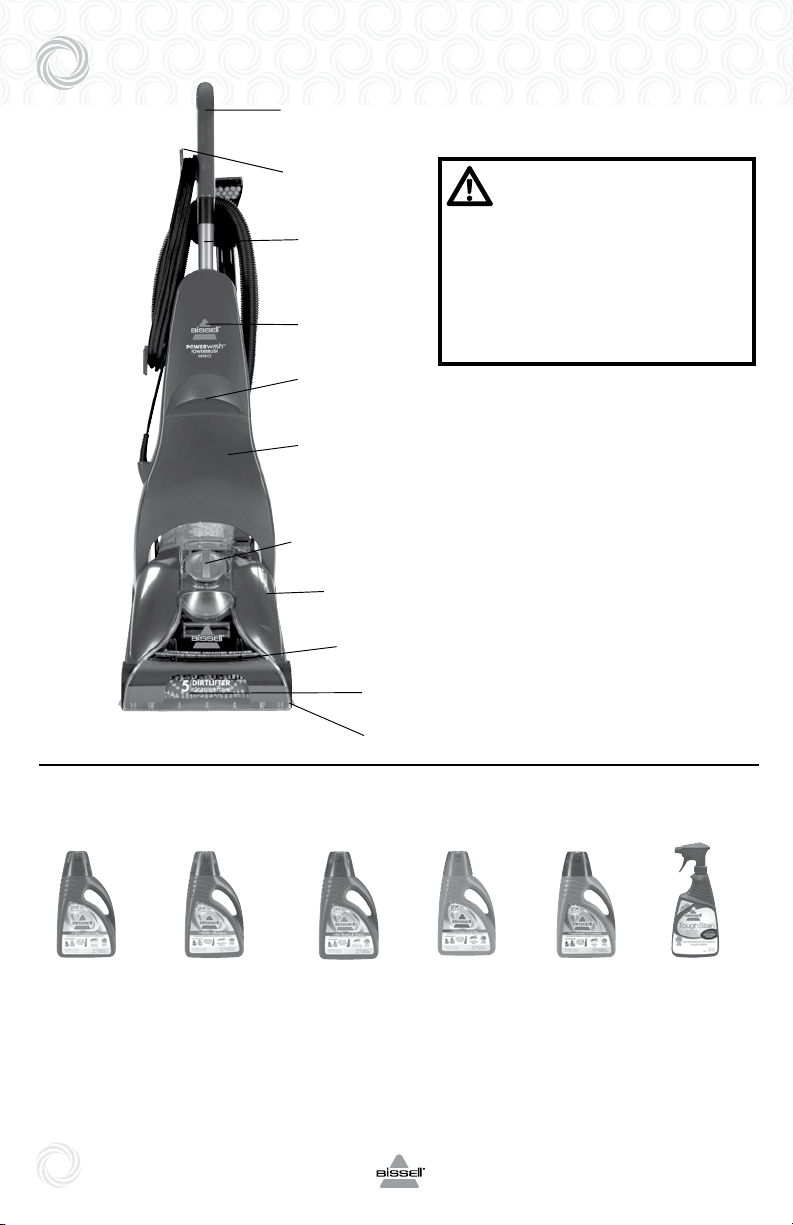
Product view
Cleaning formula:
Ergonomically
Designed
™
Handle
Quick Release™
Cord Wrap
Handle
Assembly
Upper Body
Assembly
Easy Carry
Handle
Lower Body
Assembly
ReadyTools
™
Dial
Belt Access
Door
Removable
Nozzle
DirtLifter™
PowerBrush
EdgeSweep
Brushes
WARNING:
To reduce the risk of fire and electric
shock due to internal component
damage,use only BISSELL cleaning
formulas intended for use with the
deep cleaner. Non-BISSELL cleaning
formulas may harm the machine and
void the warranty.
™
Keep plenty of genuine BISSELL 2X cleaning formula on hand so you can clean and protect
whenever it fits your schedule. Always use genuine BISSELL deep cleaning formulas.
Non-BISSELL cleaning formulas may harm the machine and will void the warranty.
709 mL BISSELL
2X Fibre
Cleansing
Advanced
Formula with
Scotchgard™
protector
#62E5-E
4
www.bissell.com
709 mL BISSELL
2X Multi-Allergen
Advanced
Formula with
Scotchgard™
protector
#89Q5-E
709 mL BISSELL
2X Pet Stain &
Odor Advanced
Formula with
Scotchgard™
protector
#99K5-E
709 mL BISSELL
2X Natural
Orange
Advanced
Formula with
Scotchgard™
protector
#83P3-E
709 mL BISSELL
2X Lavendar
Essence
Advanced
Formula with
Scotchgard™
protector
#34B5-E
651 mL
Tough Stain
Precleaner
#0400-E
Page 5
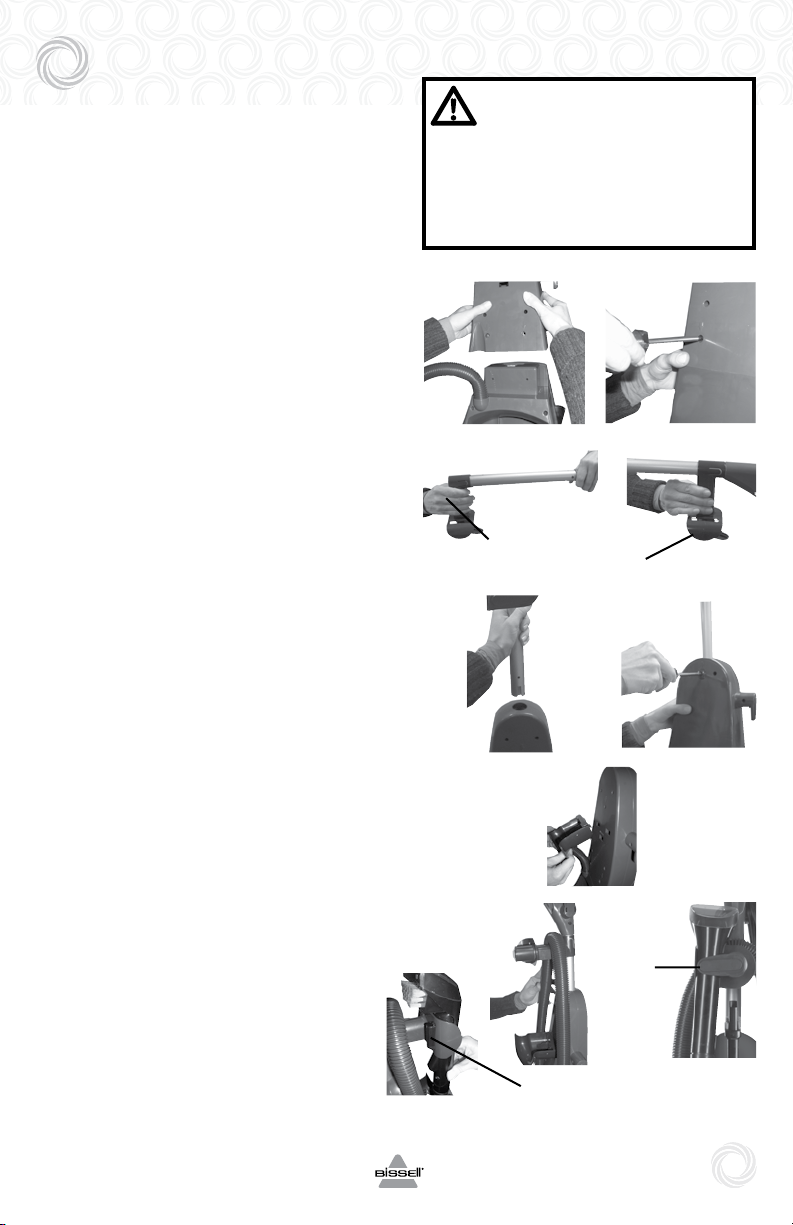
Assembly
Your PowerWash PowerBrush Select
deep cleaner comes in five easy to
assemble components:
•Handleassembly
•Upperbodyassembly
•Upperhoserack
•Lowerbodyassembly
•Lowerhoserack
Three Phillips head screws are
included and can be found taped
to the handle assembly.
The only tool you will need to
assemble your cleaner is a Phillips
head screwdriver.
1. Slide upper body assembly onto lower
body and secure with two screws.
2. With the “tabs” on upper hose rack
pointing toward top of handle, attach
upper hose rack to handle assembly
by sliding it to top of handle until it
can go no further. Turn hose rack until
it snaps into place.
3. Slide handle assembly down into upper
body until it will go no further and
secure with screw.
4. Attach lower hose rack to back of
upper body by pushing into open
slots and sliding down until it snaps
into place.
5. Wrap flex hose around hose rack
and secure it into notched out holder
as shown.
WARNING:
Do not plug in your cleaner
until you have completely assembled
it per the following instructions and
are familiar with all instructions and
operating procedures.
1.
2.
Tab
Upper Hose Rack
3.
4.
6. Keep flex hose locked in place with
hose secure latch.
www.bissell.com
5.
6.
Hose
Secure
Latch
Notch
5
Page 6

Operations
Special features
™
DirtLifter
The DirtLifter PowerBrush is designed to
enhance cleaning performance. The bristle
pattern safely lifts out the deep down dirt while
gently grooming carpet fibers. The floating
suspension self-adjusts to all carpet heights.
When the power is ON and the machine is in
the upright position, your carpet is protected
because the brushes are lifted up off the carpet.
ReadyTools
The ReadyTools feature allows you to choose
between FLOOR CLEANING or cleaning with
TOOLS simply by turning the dial. The TOOLS
setting allows for above floor cleaning of
upholstery, stairs, creases along baseboards,
and other hard to reach areas. Simply choose
the tool that is appropriate for the job, attach to
flex hose and you are ready to go.
Measuring cup
Your deep cleaner is equipped with a measuring
cup for adding the proper amount of formula to
the 2-in-1 tank. For convenience the measuring
cup is built into the lid of the 2-in-1 tank.
2-in-1watertank
Our 2-in-1 water tank system is designed with a
heavy duty bladder inside for clean water. As you
clean, the clean water in the bladder will empty
and mix with the cleaning formula. Dirty water
pulled out of your carpet will collect around the
outside of the bladder so clean and dirty water
are always kept separate. This allows the user to
maximize tank space, yet only carry one tank to
and from the sink for emptying and filling.
Scotchgard™ Protector
Carpet protection applied at the mill typically
wears down over time from heavy foot traffic and
everyday cleaning, including deep cleaning. To
help restore this important protection, only BISSELL
offers cleaning formulas with Scotchgard protector.
This offers extra protection against dirt and tough
stains to keep your carpets looking good longer.
Powerbrush
™
Dial
More than 7 million Australians
suffer from asthma and allergies.
The Sensitive Choice program has
been developed by the National
Asthma Council Australia to help
Australians and New Zealanders
make better lifestyle choices that
may help manage asthma and
allergies more effectively.
The BISSELL range of deep carpet
cleaners and deep carpet
cleaning formulas has been
approved by the National Asthma
Council Australia’s Sensitive
Choice program, and carries the
Sensitive Choice butterfly logo.
The Sensitive Choice blue butterfly
symbol is a way of recognising
products and services that support
asthma and allergy care. Products
that carry the blue butterfly may
be better choices for people with
asthma and allergies.
To learn more about managing
asthma and allergies, visit the
Sensitive Choice website at:
www.sensitivechoice.com.au
ReadyTools
Dial
WARNING:
To reduce the risk of fire, use only BISSELL deep
cleaning formula for full size machines in your
deep cleaner. Use of cleaning formulas that contain
lemon or pine oil may damage this appliance and
void the warranty. Chemical spot cleaners or solvent-based soil removers should not be used. These
products may react with the plastic materials used
in your deep cleaner causing cracking or pitting.
6
www.bissell.com
Measuring Cup
Carry
Handle
Page 7

Operations
Before you clean
1. Plan activities to give your carpet time to dry.
2. Move furniture to another area if
cleaning an entire room (optional).
3. Vacuum area with a dry vacuum
cleaner before deep cleaning.
4. Plan your cleaning route to leave an exit
path. It is best to begin cleaning in the
corner farthest from your exit.
5. Pretreating (optional)
Pretreating is recommended to improve
cleaning effectiveness for heavily soiled
carpet in high traffic areas such as entry
ways and hallways.
To pretreat:
A. Using the BISSELL Tough Stain
Precleaner, generously spray evenly
over soiled area, do not overwet.
B. Wait 3-5 minutes before deep
cleaning.
C. Clean as normal using your BISSELL
deep cleaner, following the
instructions below.
Fillthe2-in-1watertank
1. Remove the tank from the base of the
machine by lifting the tank carry handle.
2. Carry like a bucket to the sink. Rotate
the handle forward to unlatch the lid.
Remove lid, turn over and locate built in
measuring cup.
EXIT
11
12
6
5
4
3
9
10
7
1
2
START
HERE
4'
ATTENTION:
Some Berber carpets have a tendency to
fuzz with wear. Repeated strokes in the
same area with an ordinary vacuum or
deep cleaner may aggravate this condition.
1.
2.
3'
3. Fill with BISSELL 2X formula to the
indicated fill line on the built in
measuring cup and pour into mouth
of the bladder.
4. Fill the bladder with clean hand hot
tap water.
*Do not boil or microwave
water as it can destroy the
bladder.
www.bissell.com
3.
4
7
Page 8

Operations
Fillthe2-in-1watertank(cont)
5. Replace the top of the tank by matching
the lid and tank edges. Handle must
be in the forward position in order to
replace lid. Rotate the handle to the
carrying position to latch the lid.
Note: Remember to secure the lid
andtesttomakesureitissecure
beforepickingupthetank.
6. Place tank into machine base, seating
firmly in place. Rotate tank handle back
into latched position.
Carpet cleaning
1. Plug the deep cleaner into a proper
outlet. Turn the power ON by pressing the red power switch on the back
of the unit with your foot.
2. With your foot, press the gray handle
release lever located on the back of
unit below water tank.
3. While pressing the spray trigger,
make one slow forward wet pass
and another back. Let the BISSELL 2X
deep cleaning formula and DirtLifter
PowerBrush do the work for you.
Caution: Do not overwet.
5.
6.
Tip: Thorough vacuuming
before deep cleaning will
prevent early clogging of
the lint trap.
WARNING:
To reduce the risk of fire and electric
shock due to internal component
damage, use only BISSELL cleaning
formulas intended for use with the
deep cleaner. Non-BISSELL cleaning
formulas may harm the machine and
void the warranty.
4. Release the spray trigger and make
one slow forward and backward pass
over the same area to remove any
residual dirty water and aid in drying.
5. Repeat cleaning passes until solu-
tion being pulled up appears clean.
Continue passes without pressing the
spray trigger until you can’t see any
more water being suctioned up.
Handle Release Power Switch
Emptythe2-in-1watertank/cleanremovablenozzle
1. Turn power switch OFF. Remove the 2-in-1
water tank from the base using the tank
carry handle. Carry the tank like a bucket
to a utility sink or outside where you will
dispose of the collection water. Remove the
top of the tank by rotating the handle forward to unlatch lid and lifting lid off tank.
8
www.bissell.com
1.
Page 9

Operations
Adsdfdd ghg bvh
cvbbj jkn hnbj jkvh
gcghhjj jhffhl kllgh
Emptythe2-in-1watertank(cont)
2. Empty collection water from bottom of tank.
3. After each use, remove and rinse the lint
screen located on the tank lid.
4. If nozzle needs to be cleaned, remove
by grasping handle at the top and
pulling forward. Clean removable
nozzle by rinsing under running water.
5. When finished, replace nozzle by slightly
raising front of machine to line up slots on
the base with the hooks on nozzle. Attach at
base first and then click nozzle into place.
NOTE:Ifnozzleisnotattached
properly loss of suction will occur.
6. To continue carpet cleaning, refer back to
pages 7 through 8, beginning with “Fill the
2-in-1 water tank” on page 7.
If cleaning is complete, refer to the
“Maintenance and care” section on
page 12.
Ready Tools™
Your PowerWash PowerBrush Select
deep cleaner comes equipped with a
hose and at least one attachment for
cleaning stairs, upholstery, and more.
Important! If using the machine to clean
upholstery,checkupholsterytags.
1. Check manufacturer’s tag before cleaning.
“W” or “WS” on the tag means you can use
your deep cleaner. If the tag is coded with
“X” or “S” (with a diagonal strike through),
or says “Dry Clean Only,” do not proceed.
Do not use on velvet or silk. If manufacturer’s
tag is missing or not coded, check with your
furniture dealer.
3.
5.
2.
Lint Screen
4.
2. Check for colourfastness in an
inconspicuous place.
3. If possible, check upholstery stuffing.
Coloured stuffing may bleed through fabric
when wet.
4. Plan activities to give upholstery time to dry.
5. Vacuum thoroughly to pick up loose debris
and pet hair. Use a vacuum with a brush
attachment and a crevice tool to clean in
fabric folds and tufts.
www.bissell.com
Manufacturer’s tag
9
Page 10

Operations
ReadyTools™(cont)
6. To begin cleaning with attachments, follow
the instructions on pages 7-8 for filling the
2-in-1 water tank.
7. Set the ReadyTools dial to the TOOLS
setting. This will allow spray and suction
from the hose.
8. Attach the cleaning tool to the end of
the hose.
9. Clean by pressing the spray trigger
to spray solution onto the area to be
cleaned. Slowly move the tool back and
forth over the soiled surface. Release
the spray trigger to suction dirty water.
Continue to clean in the area, working
in small sections, until dirt is removed.
Caution: Do Not Overwet.
10. When finished cleaning, remove and rinse
tool(s) in clean, running water.
11. It is recommended that you suction clean
water from a tap to rinse out the hose.
12. Before wrapping hose onto tool rack, lift
end of hose and stretch out to ensure all
water is cleared from hose.
13. Wrap flex hose around tool rack.
14. Empty 2-in-1 water tank and rinse out,
following instructions on pages 8
through 9.
15. If the ReadyTools dial becomes difficult to
turn, the diverter assembly that holds the
dial may need to be cleaned. To clean,
first remove nozzle and locate screw that
holds the diverter assembly in place. With
a Phillips screwdriver, remove the screw
and set aside.
16. Remove diverter assembly; hold under
running water making sure water flows
through and around the dial. Turn the dial
about 10 times clockwise and 10 more
times counter clockwise. This should free
up any debris.
17. Wipe diverter assembly with a soft
cloth and replace back on machine.
Replace nozzle.
18. Return ReadyTools dial to FLOOR
CLEANING setting.
Tip: To clean with sliding
crevice tool, slide brushes
forward to clean stain, slide
back to suction
7.
11.
15.
Screw
12.
Run water through here
16.
10
www.bissell.com
Page 11

Operations
Hard Floor Cleaning
Your PowerWash PowerBrush Select
deep cleaner may have included
a hard floor tool and Hard Floor
Solutions. The hard floor tool provides
effective cleaning for linoleum, vinyl,
and tile floors.
Caution: Do not use on unsealed
hardwood floors.
1. Thoroughly vacuum or sweep floor to
pick up any debris.
NOTE: Prior to filling with formula
and water be sure all carpet
cleaning formula is thoroughly
rinsedfromthe2-in-1watertank.
2. Fill BISSELL Hard Floor Solutions to the
indicated fill line in the built in measuring
cup and pour into mouth of bladder.
3. Fill the bladder with clean hand hot tap
water and set aside.
4. Attach the hard floor tool to the bottom
of the machine by hooking it into the
nozzle and swinging it down until it
clicks into place.
5. Be sure the ReadyTools dial is set to
FLOOR CLEANING.
6. Plug into an outlet and turn the power on.
7. Plan your cleaning route to leave an
exit path. Be sure to allow adequate
time for floors to dry.
8. While pressing the spray trigger, make
one slow forward wet pass and another
back.Caution: Do Not Overwet.
9. Repeat the motion without pressing the
spray trigger using the hard floor tool to
squeegee and suction up the dirty water.
10. When finished, remove hard floor tool,
rinse and let dry before storing. Refer
to the Maintenance and care section
on page 12 for machine clean up and
storage instructions.
Hard Floor Tool
www.bissell.com
11
Page 12

Maintenance and care
Machine care
For best results, a few simple steps can
assure your machine is well maintained
after your cleaning is complete.
1. Turn power switch OFF. Unplug the machine
and wrap the power cord.
2. After emptying the 2-in-1 water tank, rinse
it with running hot tap water, taking care
to clean underneath and around the heavy
duty bladder. Clean out red lint screen.
Removable nozzle may be rinsed if necessary. Refer to page 9.
3. Replace the 2-in-1 water tank on the machine.
4. Any loose hair or debris can be pulled from
the brush roll and thrown away.
5. To clean attachments, remove from hose and
rinse in clean, running water. Dry before
storing. Clean the hose by suctioning clean
water from a tap. Before wrapping back on
machine, lift end of hose and stretch out to
ensure all water is cleared from hose. Refer
to page 10, illustrations 11 and 12.
6. Wipe the machine’s exterior with a soft cloth.
7. After carpet is dry, vacuum again to remove
hair and fuzz.
Machine storage
Put the unit away in a closet or basement for the next use. Store cleaner in
a protected, dry area. Since this product
uses water, it must not be stored where
thereisadangeroffreezing.Freezing
will damage internal components and
void the warranty.
12
www.bissell.com
Page 13

Troubleshooting
WARNING:
To reduce the risk of fire, electric shock or
Reduced Spray OR No Spray
Possible causes Remedies
1. Bladder may be empty. 1. Turn power switch OFF; Refill bladder
with clean hot tap water.
2. 2-in-1 tank may not be seated properly. 2. Turn power switch OFF; remove tank
and reseat tanks.
3. Pump may have lost prime. 3. Turn power switch OFF; after 1 minute
turn ON and depress spray trigger.
4. The pump belt may be broken. 4. Turn power switch OFF and unplug from the outlet. To
check if a pump belt has broken, you will need a flat
A.
head screwdriver.
Insert the blade end into the slot of the belt access
door to release. Examine the belt for breakage. You
should be able to see the pump belt looped around the
motor shaft. If it is broken or missing, please refer to
Replacement Parts on page 14. A replacement belt may
be ordered by calling BISSELL Consumer Care.
Complete installation instructions will accompany the
replacement belt.
When replacing belt access door be sure to line up
slots of belt access door with slots in machine,
DirtLifterPowerBrushDoesNotTurn
slide door into place and snap shut.
SlotsB.Pump Belt
Possible causes Remedies
1. The brush belt or pump belt is off or broken. 1. Refer to Remedy 4 above to check if brush
belt or pump belt is broken.
CleanerNotPickingUpSolution
Possible cause Remedies
1. ReadyTools dial may be on the wrong setting. 1. Set ReadyTools dial to either FLOOR CLEANING or
TOOLS for the cleaning job.
2. Poor tool position. (Hand held attachments only). 2. Adjust angle; apply more downward pressure.
3. Removable nozzle may not be properly attached. 3. Make sure nozzle is on correctly by slightly raising
front of machine to line up slots on the base of
the machine with the hooks on nozzle. Attach at
base first and then click nozzle into place. Refer to
image 5 on page 9.
4. 2-in-1 tank lid is not properly installed. 4. Re-install lid; refer to image 5 on page 8.
5. 2-in-1 tank is not properly seated. 5. 2-in-1 tank must be firmly seated to function;
remove and reseat 2-in-1 tank.
6. 2-in-1 tank has picked up maximum dirty water. 6. Empty 2-in-1 tank and refill, refer to the
Operation section.
7. The lint screen may be clogged. 7. Clean out lint screen. Refer to page 9.
Other maintenance or service not included in the manual should be
performedbyanauthorizedservicerepresentative.
ThankyouforselectingaBISSELLproduct.
injury, unplug from the outlet before servicing.
Please do not return this product to the store.
www.bissell.com
13
Page 14

Replacement parts
Item Part No. Part Name
1 203-0104 Tank Assembly Complete
2 203-0102 Tank Base
3 203-8114 Removable Nozzle
4 215-0628 Replacement Pump Belt (with instructions)
5 015-0621 Replacement Brush Belt (with instructions)
6 203-0105 Lint Screen
1
2
3 4
5
6
Accessories
While not all of these parts may not have come with your machine,
all are available to you for purchase, if desired.
Item Part No. Part Name
1 203-0149 Hard Floor Tool
2 203-6651 3" Tough Stain Tool
3 203-8114 4" Upholstery Tool
4 203-6654 6" Stair Tool
5 203-6652 Powered TurboBrush™ Hand Tool
6 203-0116 Spraying 2-in-1 Crevice Tool w/Brush
7 203-6655 Spraying Crevice Tool
8 210-3040 Mesh Tool Storage Bag
1
2
3 4 5
6
Cleaning Formula: Refer to the bottom of page 4 of this guide for a full selection of
cleaning formula available for purchase.
14
www.bissell.com
7 8
Page 15

Warranty
This warranty gives you specific legal rights, and you may also have other rights which may vary from country to country. If
you need additional instruction regarding this warranty or have questions regarding what it may cover, please contact BISSELL
Consumer Care by E-mail, telephone, regular mail as described below, or contact your local in country distributor.
LimitedTwoYearWarranty
Subject to the *EXCEPTIONS AND EXCLUSIONS identified below, BISSELL will repair or replace (with new or
remanufactured components or products), at BISSELL’s option, free of charge from the date of purchase by the original
purchaser, for two years any defective or malfunctioning part due to manufacturer defect.
This warranty applies to product used for personal, and not commercial or rental service. This warranty does not apply
to fans or routine maintenance components such as filters. Damage or malfunction caused by negligence, abuse,
neglect, unauthorized repair, or any other use not in accordance with the User's Guide is not covered.
BISSELL recommends that the original packaging be kept for the duration of the warranty period in case such need
arises within the warranty period that the item need re-packing and transportation.
For Australian inquiries:
Monday – Friday 9 am - 5 pm
BISSELLAUSTRALIAPTYLIMITED
42 Rocco Drive
Scoresby 3179
Victoria
Australia
Telephone: 1-800-811-183
*EXCEPTIONSANDEXCLUSIONSFROMTHETERMSOFTHELIMITEDWARRANTY
BISSELL AND ITS IN-COUNTRY DISTRIBUTORS ARE NOT LIABLE FOR INCIDENTAL OR CONSEQUENTIAL
DAMAGES OF ANY NATURE ASSOCIATED WITH THE USE OF THIS PRODUCT. BISSELL’S LIABILITY WILL NOT
EXCEED THE PURCHASE PRICE OF THE PRODUCT.
THIS WARRANTY IS EXCLUSIVE AND IN LIEU OF ANY OTHER WARRANTIES EITHER ORAL OR WRITTEN. ANY
IMPLIED WARRANTIES WHICH MAY ARISE BY OPERATION OF LAW, INCLUDING THE IMPLIED WARRANTIES OF
MERCHANTABILITY AND FITNESS FOR A PARTICULAR PURPOSE, ARE LIMITED TO THE TWO YEAR DURATION
FROM THE DATE OF PURCHASE AS DESCRIBED ABOVE.
FORAUSTRALIANCONSUMERSONLY:OUR GOODS COME WITH GUARANTEES THAT CANNOT BE
EXCLUDED UNDER THE AUSTRALIAN CONSUMER LAW. YOU ARE ENTITLED TO A REPLACEMENT OR REFUND
FOR A MAJOR FAILURE AND FOR COMPENSATION FOR ANY OTHER REASONABLY FORESEEABLE LOSS OR
DAMAGE. YOU ARE ALSO ENTITLED TO HAVE THE GOODS REPAIRED OR REPLACED IF THE GOODS FAIL TO BE
OF ACCEPTABLE QUALITY AND THE FAILURE DOES NOT AMOUNT TO A MAJOR FAILURE.
THIS WARRANTY IS IN ADDITION TO OTHER RIGHTS OR REMEDIES UNDER LAW. NOTHING IN THIS
WARRANTY EXCLUDES, LIMITS OR MODIFIES ANY LIABILITY OF BISSELL WHICH IS IMPOSED BY LAW, OR LIMITS
OR MODIFIES ANY REMEDY AVAILABLE TO THE CONSUMER WHICH IS GRANTED BY LAW.
TO MAKE A CLAIM UNDER THIS WARRANTY CONTACT BISSELL AUSTRALIA PTY LTD (DETAILS ABOVE). CONTACT
BISSELL PRIOR TO RETURNING ANY GOODS. WHERE AGREED, BISSELL WILL REIMBURSE REASONABLE
POSTAGE / HANDLING COSTS (IF ANY) FOR RETURNING GOODS TO BISSELL.
For New Zealand inquiries:
Monday – Friday 9 am - 5 pm
ParexIndustriesLTD.
5 Tolich Place
Henderson 0610
Auckland
New Zealand
Telephone: 0800-247-735
www.bissell.com
15
Page 16

BISSELL consumer care
IfyourBISSELLproductshouldrequireservice:
Call BISSELL Consumer Care at the numbers below and we will give you the location of
a BISSELL Authorized Service Center in your area. If you have questions about your warranty
or need replacement parts please contact the numbers below.
For Australian inquiries:
Monday – Friday 9 am - 5 pm
BISSELLAUSTRALIAPTYLIMITED
42 Rocco Drive
Scoresby 3179
Victoria
Australia
Telephone: 1-800-811-183
For New Zealand inquiries:
Monday – Friday 9 am - 5 pm
ParexIndustriesLTD.
5 Tolich Place
Henderson 0610
Auckland
New Zealand
Telephone: 0800-247-735
Or visit the BISSELL website - www.bissell.com
When contacting BISSELL, have model number of cleaner available.
Please record your Model Number: ___________________
Please record your Purchase Date: ___________________
NOTE:Pleasekeepyouroriginalsalesreceipt.
It provides proof of purchase date in the event
of a warranty claim. See Warranty on page 15
for details.
Do not throw the appliance away with the normal
household waste at the end of its life, but hand it in
at an official collection point for recycling. By doing
this you will help to preserve the environment.
16
www.bissell.com
©2012 BISSELL Homecare, Inc
All rights reserved. Printed in China
Part Number 120-4482
Rev 3/12
Visit our website at:
www.bissell.com
Scotchgard is a trademark of 3M
 Loading...