

Page 1
ICONPET® CORDLESS VACUUM
MODEL SERIES 2288, 2774
Go online for a comprehensive walkthrough
of your product!
This guide has everything you need to get ready for first use,
including setting up, using and maintaining your machine,
but online you’ll find additional resources like tips and
troubleshooting, videos, product registration, parts and more.
Go to support.BISSELL.com.
Page 2

IMPORTANT SAFETY INSTRUCTIONS
READ ALL INSTRUCTIONS BEFORE USING YOUR APPLIANCE.
When using an electrical appliance, basic precautions should be observed, including the following:
WARNING
TO REDUCE THE RISK OF FIRE, ELECTRIC SHOCK OR INJURY:
• Keep ha ir, loose clothing, f ingers, and all p arts of body away fro m openings
and moving p arts. Brush Ro ll continues to rotate wh en in use.
• Brus h Roll continues to turn w hile product is tu rned ON and handl e is in use.
To avoid damage to carpet, rugs, furniture and flooring, avoid tipping cleaner
or settin g it on furniture, fri nged area rugs, o r carpeted stair s during tool use.
• With Br ush Roll ON, do not all ow cleaner to sit in one lo cation for an exten ded
period of ti me, as damage to floo r can result.
• Do not expose to rain. Store indoors.
• Do not u se on wet surfaces .
• Do not a llow to be used as a toy.
• Clos e attention is neces sary when used by o r near children.
• Child ren should be supe rvised to ensure tha t they do not play with the
appliance.
• Plas tic film can be dang erous. To avoid danger of s uffocation, kee p away
from children.
• Do not i mmerse in water or li quid.
• Do not u se for any purpose oth er than describ ed in this user guide.
• Use only manufacturer’s recommended attachments.
• If app liance is not working a s it should, has bee n dropped, dama ged, left
outdoor s, or dropped into wa ter, have it repaired at an aut horized service
center.
• Do not charge the appliance outdoors.
• Do not i ncinerate the appl iance even if it severely da maged. The bat teries
can explo de in a fire.
• Do not p ut any object into ope ning.
• Do not u se with any opening bl ocked.
• Keep op enings free of dust , lint, hair and any thing that may reduce a irflow.
• Use ex tra care when clea ning stairs.
• Do not p ick up flammable m aterials (lighter fl uid, gasoline, kero sene, etc.) or
use in the pr esence of explosive l iquids or vapors .
• Always t urn OFF this applia nce before connec ting or disconnec ting the
motorized n ozzle.
• Do not p ick up toxic material (chlori ne bleach, ammo nia, drain clean er, etc.).
• Do not u se vacuum cleane r in an enclosed spa ce filled with vapor s given
off by oil-based paint, paint thinner, some moth-proofing substances,
flamma ble dust, or other ex plosive or toxic vapor s.
• Do not p ick up hard or sharp ob jects such as glas s, nails, screws , coins, etc.
• Do not p ick up anything that i s burning or smoki ng, such as cigaret tes,
matches or h ot ashes.
• Do not u se without Dirt Tank or f ilters in place.
• Use on ly on dry, indoor sur faces.
• Keep ap pliance on a level sur face.
• Disco nnect batter y pack before cleani ng or servicing.
• If the ch arger supply cord is d amaged, it must b e replaced by the
manufa cturer, its service a gent or similarly q ualified perso n in order to avoid
a hazard.
• Do not p ull or carry charg er by cord, use cord as a ha ndle, close door o n cord,
or pull cord a round sharp edge s or corners.
• Keep ch arger cord away from hea ted surfaces.
• To unplug , grasp the charge r plug, not the cord.
• Do not h andle charger pl ug or appliance with wet h ands.
• Bat tery pack, charg ing port on the han d vac and charger ou tput are not to
be short-circuited.
• The ap pliance must be dis connected from t he battery charg er when
removing th e battery.
• The b attery is to be dispos ed of safely.
• Do not re charge, disass emble, heat above 6 0°C/140° F, or incinerate.
• Keep ba tteries out of reac h of children.
• Dispo se of used batteri es promptly.
• This a ppliance contain s batteries that are o nly replaceable by s killed persons .
• Prevent u nintentional sta rting. Ensure th e switch is in the OFF-po sition
before pick ing up or carryin g the appliance. Ca rrying the appli ance with your
finger o n the switch or energizi ng appliance that h ave the switch on invites
accidents.
• Unde r abusive condition s, liquid may be ejec ted from the batter y; avoid
contact . If contact accide ntally occurs, f lush with water. If liquid co ntacts eyes,
additio nally seek medic al help. Liquid eje cted from the batte ry may cause
irritation or burns.
• Do not use appliance that is damaged or modified. Damaged or modified
batteries may exhibit unpredictable behavior resulting in fire, explosion or
risk of injury.
• Do not e xpose appliance to f ire or excessive tempe rature. Exposur e to fire or
temperat ure above 130°C/2 66°F may cause expl osion.
• Follow a ll charging instr uctions and do no t charge the applia nce outside of
the temper ature range speci fied in the instru ctions. Chargi ng improperly or
at tempera tures outside of th e specified rang e may damage the bat tery and
increase the risk of fire.
• Have servicing performed by a qualified repair person using only identical
replacem ent parts. Th is will ensure that the s afety of the produc t is
maintained.
• Do not m odify or attempt to r epair the applian ce except as indicated i n the
instruc tions for use and ca re.
• Keep th e temperature rang e of between 4-40° C/40-104°F when cha rging
batter y, storing uni t or during use.
• Use on ly with charger provid ed by manufactu rer SIL, Model SSC-320110US .
• Recha rge only with the char ger specified by th e manufacturer. A cha rger that
is suitab le for one type of bat tery pack may create a ri sk of fire when used
with anoth er battery pack .
• Unpl ug charger from ele ctrical socket wh en not in use, before cle aning,
maintai ning or servicing t he appliance, and i f your appliance has a n
accesso ry tool with a moving br ush, before connec ting or disconne cting
the tool.
• This a ppliance contain s batteries that are n on-replaceab le.
• The b attery must be rem oved from the applian ce before it is scrapp ed.
• Do not u se with damaged cord o r charger. If applian ce is not working as it
should , has been dropped , damaged, lef t outdoors, or dro pped into water,
return it to a se rvice center.
• Turn OFF all controls before unplugging.
SAVE THESE INSTRUCTIONS
THIS MODEL IS FOR HOUSEHOLD USE ONLY.
COMMERCIAL USE OF THIS APPLIANCE VOIDS THE MANUFACTURER’S WARRANTY.
WARNING
This product contains Lithium-Ion rechargeable batteries. DO NOT mix Lithium-Ion batteries with general household waste.
According to Fe deral and State reg ulations, removal a nd proper dispos al of Lithium-Io n batteries is requ ired.
For speci fic battery disp osal instruct ions please conta ct Call2Recycle a t 877-723-1297 o r visit www.call2rec ycle.org.
For full in structions on ba ttery removal for re cycling visit supp ort.BISSELL .com.
2 BISSELL.com
Page 3
We’re so happy you chose ICONPET® High-Powered Cordless
Vacuum. We put this guide together to help you set up, use and
maintain your cordless vacuum. We’ve also included some tips we
think will come in handy when you first start using your cordless
vacuum, so let’s get started!
For a comprehensive walkthrough of your product, go to
support.BISSELL.com.
What’s in the Box? ..................4
Getting to Know Your Vacuum ......4
Assembly ...........................5
Installing the Wall Storage &
Charging Station ....................5
Charging the Battery ................6
Using the Vacuum ...................7
Using the Parking Brake .............7
Attaching Tools for Hand Vac Use ...8
Emptying the Dirt Tank ..............9
Removing the Brush Roll ............9
Cleaning & Replacing the Filters ....10
Troubleshooting.....................11
Warranty............................11
BISSELL.com 3
Page 4
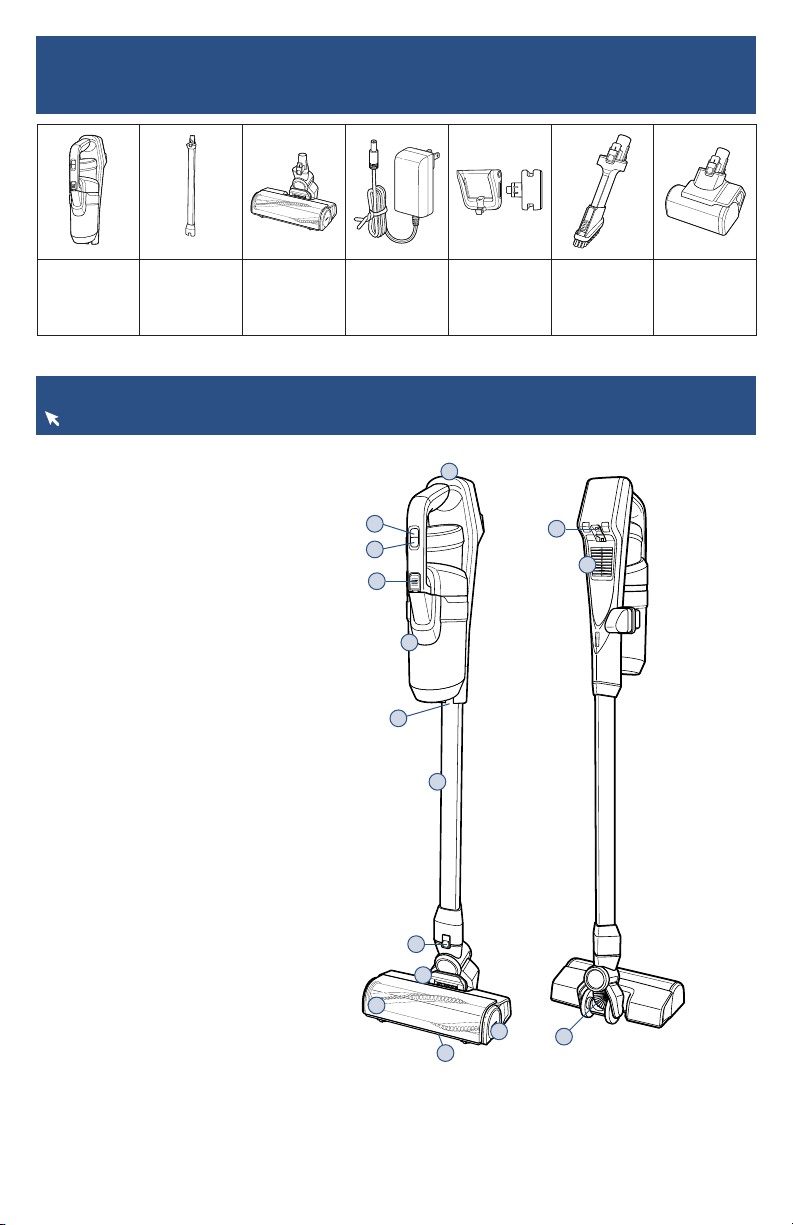
What’s in the Box?
Standard accessories may vary by model.To identify what should be included with your purchase,
please refer to the “Carton Contents” list located on the underside of the insert inside the carton.
Hand
Vacuum
Assembly
Extension
Wand
Motorized
Floor
Cleaning
Foot
Battery
Charger
Wall Storage
& Charging
Station
Lighted
Crevice Tool
& Dusting
Brush
Motorized
Tur boB rush®
Too l
Getting to Know Your Vacuum
For additional support videos and information about your vacuum, visit support.BISSELL.com.
1
Product View
1. Hand Vacuum Assembly
2. Power Button
3. Cleaning Mode Button
4. Tank Release Button
5. Dirt Tank
6. Hand Vacuum Release Button
7. Extension Wand
8. Foot Release Button
9. Tangle-Free Brush Roll
10. Parking Brake
11. Motorized Floor Cleaning Foot
12. LED Headlights
13. Charging Port
14. Post-Motor Filter
15. Foot Hose
2
3
4
5
6
7
13
14
4 BISSELL.com
8
9
10
11
12
15
Page 5

Assembly
Go to support.BISSELL.com for assembly videos.
1. Connect the Extension Wand
to Motorized Floor Cleaning
Foot. You’ll hear a “click” when
they’re connected.
2. Connect the Hand Vacuum
Assembly to the Extension
Wand. You’ll hear a “click”
when they’re connected.
3. Make sure to charge your
stick vacuum before first use.
Refer to page 6, “Charging the
Battery” for instructions.
Installing the Wall Storage & Charging Station
Go to support.BISSELL.com for more tips and video instructions on installing the Wall Storage
& Charging Station.
1. Open the Wall Storage &
Charging Station, use the
bubble level to ensure it is
level and insert two screws
to secure to wall. In order to
charge the machine, ensure
the Wall Storage & Charging
Station is mounted near a wall
outlet.
2. Insert the tool holders into
the side of the Wall Storage
& Charging Station. To install
the charging cord, remove the
power cord clip from the Wall
Storage & Charging Station.
Insert the charging cord and
secure it with the charging
cord clip.
3. Plug the power adapter
into the wall and place the
machine on the Wall Storage &
Charging Station for charging.
Refer to page 6, “Charging the
Battery” for instructions.
BISSELL.com 5
Page 6

Charging the Battery
Go to support.BISSELL.com for additional how-to videos.
Before first use, make sure to fully charge your stick vacuum for 4 hours to get a full charge.
To charge the battery you can plug the charger directly into the Hand Vacuum Assembly or into the
Wall Storage & Charging Station.
Charging with the Hand Vacuum
4
1. Plug the battery charger into
the wall.
2. Plug the charger into the
charging port on the back side
of the hand vacuum.
Charging with the Wall Storage & Charging Station
4
1. Follow instructions on
page 5 for installing the Wall
Storage & Charging Station.
Once installed, hang the
machine onto the station.
6 BISSELL.com
2. Let the vacuum charge for 4
hours or until all three sections
of the battery charge icon are
illuminated.
3. Let the hand vacuum charge
for 4 hours or until all three
sections of the battery charge
icon are illuminated.
Page 7

Using the Vacuum
Looking for more guidance? Go to support.BISSELL.com for tips and 24-7 support while
cleaning.
ICONPET® Cordless can be used as a stick vacuum, hand vacuum or for extended reach with hand
vacuum + wand.
1. Press the Power Button to
begin cleaning and to turn OFF
the machine when finished
cleaning.
2. Press the Cleaning Mode Button to toggle between the
three settings:
••• Recommended for maximum suction. It’s the most powerful
setting which is great for cleaning carpets, however has the
shortest run time. This is the default suction mode when the
vacuum is turned ON.
•• Recommended for everyday cleaning. It’s great for hard
floors, low pile carpets and area rugs. It balances power and run
time.
• Recommended for the longest run time. It’s great for hard
floors and offers the quietest sound.
Using the Parking Brake
Go to support.BISSELL.com for additional how-to videos.
1. The built-in brake helps
prevent the machine from
slipping on the floor when it is
leaning against a wall.
2. To engage the brake,
simply push the brake on the
motorized foot forward.
3. To disengage the brake, pull
it forward.
WARNING Do not use your vacuum until you are familiar with all instructions and operating procedures.
BISSELL.com 7
Page 8

Attaching Tools for Hand Vac Use
Go to support.BISSELL.com for additional how-to videos.
Clean stairs or furniture easily with the tools provided. Pair your desired tool with the hand vacuum
or Extension Wand. Go to support.BISSELL.com for tips on above floor cleaning tools.
1. To use as a hand vacuum,
press the release button
to disconnect it from the
Extension Wand.
8 BISSELL.com
2. Attach your chosen tool. 3. Use the tool to clean
furniture, stairs or other
surfaces in your home.
Page 9

Emptying the Dirt Tank
More of a video person? Go to support.BISSELL.com for additional how-to videos.
1. Turn OFF your machine.
Remove the Dirt Tank from the
hand vacuum by sliding the
latch on the front of the tank.
4. Dump dirt from the tank
into the trash bin.
2. Grab the top of the tank
and pull up. This will activate a
wiping feature to remove debris
from the mesh filter screen.
5. Slide the separator back
into the tank, ensuring the
notch is seated into the tank
correctly.
3. Fully remove the separator
from the tank and tap the
mesh screen on the side of the
trash bin.
2
1
6. Put the whole tank into
the hand vacuum by guiding
the notched out area on the
bottom of the tank onto the
hook on the hand vacuum.
Push into place.
Removing the Brush Roll
Go to support.BISSELL.com for a full list of maintenance and troubleshooting support.
1. Turn the machine OFF and
press the Foot Release Button
to disconnect the Motorized
Floor Cleaning Foot from the
Extension Wand.
2. With a flathead screwdriver
or coin, twist the slot on the
side of the foot clockwise and
pull the Brush Roll out.
3. To replace, push the Brush
Roll back in the chamber and
twist counter-clockwise with a
tool or coin to lock in place.
WARNING
» Before using your vacuum, make sure that the Dirt Tank is in locked position and that all filters, both pre and post-filters, are in
place. DO NOT operate your vacuum without these filters.
BISSELL.com 9
Page 10

Cleaning & Replacing the Filters
Go to support.BISSELL.com for tips on maintaining and replacing your vacuum filters.
Pre-Motor Filters
For best cleaning performance, always clean your pre-motor filter after each use.
1. To clean the pre-motor filter,
turn OFF machine and remove
Dirt Tank from the hand
vacuum.
2. Pull filter from the top of
the tank. Remove the filter
from the filter frame housing.
Tap the filter against the side
of a trash bin to remove dust
and debris.
3. To clean, rinse under warm
water and squeeze to remove
dirt. Lay out for 24 hours, until
completely dry. Make sure
to replace your filter into the
frame with the tag side down
(touching the frame) before
using your machine.
Post-Motor Filter
1. To clean your post-motor
filter, turn OFF machine and
press the latch on the back of
the hand vacuum.
2. Remove the post-motor
filter from the vacuum.
3. If there’s debris on the filter,
tap it on a trash bin and rinse
under warm water. Let dry
for at least 24 hours before
putting it back in the vacuum
and replacing the filter cover.
WARNING
» Do not use your vacuum until you are familiar with all instructions and operating procedures.
» Before using your vacuum, make sure that the Dirt Tank is in locked position and that all filters, both pre and post-filters, are in
place. DO NOT operate your vacuum without these filters.
10 BISSELL.com
Page 11

Troubleshooting
For a comprehensive walkthrough of your product and support visit support.BISSELL.com.
This guide has everything you need to get ready for first use, including setting up, using and
maintaining your machine, but online you’ll find additional resources like tips and troubleshooting,
videos, product registration, parts, and more.
Problem Possible Cause Remedies
Vacuum
won’t pick
up dirt
Dirt is
escaping
from the
vacuum
Vacuum
won’t
charge
Filters are dirty. Remove and rinse pre-motor filters. Allow
There is a clog in the vacuum. Remove the foot and Extension Wand from the
Dirt Tank is not seated correctly. Remove the tank and reseat properly.
Dirt Tank is full. Empty the tank.
Filters are missing or dirty. Check to see if the pre- and post-motor filters
There is a clog in the vacuum. Remove the foot and Extension Wand from the
Wrong charger is being used. Use only the charger that comes with the
Charger is not plugged into the
machine properly.
enough time for them to dry properly before
reinserting. Remove and dust off post-motor
filter.
hand vacuum. Check for debris buildup or clogs
in each of these sections. Clear any debris or
clogs before reassembling.
are in place and clean, if necessary.
hand vacuum. Check for debris buildup or clogs
in each of these sections. Clear any debris or
clogs before reassembling.
machine.
Remove the charger and reinstall into the hand
vacuum.
Errors
Cause: Suction motor fault.
Remedy: Turn machine
OFF. Check and clean
filters. Check and clean the
machine of clogs. If this
doesn’t solve the problem,
contact Consumer Care.
Cause: Brush Roll stall.
Remedy: Turn machine OFF.
Check and clean the Brush
Roll of any clogs. Brush
Roll can be removed for
thorough cleaning (page 8).
Turn machine ON.
Cause: Battery issue.
Remedy: Contact Consumer
Care.
Air flow issue.
Remedy: Turn machine
OFF. Check and clean
filters. Check and clean the
machine of clogs. If this
doesn’t solve the problem,
contact Consumer Care.
Warranty
2-Year limited warranty, may vary by state. Visit support.BISSELL.com or call 1-800-237-7691
for complete warranty information.
NOTICE Disconnecting the battery will destroy the appliance and invalidate the warranty.
BISSELL.com 11
Page 12

We’re Waggin’ Our Tails!
BISSELL® proudly supports BISSELL Pet Foundation® and its mission to help
save homeless pets. When you buy a BISSELL product, you help save pets,
too. We’re proud to design products that help make pet messes, odors and
pet homelessness disappear. Visit BISSELLsavespets.com to learn more.
But wait, there’s more!
Join us online for a complete guide to your new product, including
troubleshooting, product registration, parts and more.
Go to support.BISSELL.com.
INFOREGISTER PAR TS SUPPORT
VIDEOS
©2021 BISSE LL Inc. All right s reserved.
Part Nu mber 1625990 11 /20 RevB
 Loading...