

Bissell 1660-3, 1660-1 Owner’s Manual
BissEII"
deep cleaner. Everything we know about floor care went into
the design and construction of this complete, high-tech home
cleaning system.
flfllone-year warranty. We also stand behind it with a
knowledgeable, dedicated Consumer Services department,
so, should you ever have a problem, you'll receive
fast, considerate assistance.
Powerlifter _
Powerlifter®Plus Series
• Assembly
• Operation
• Safety
• Storage
We're glad you purchased a BISSELLPowerlifler<_'
YourPowerlifleris well made, and we back it with a
Mygreat-grandfather invented the floor sweeper
in 1876. Today,BISSELLisa global leader in the design,
manufacture, and service of high quality
homecare products like
your Powerlifier.
Thank you once again,
from all of us at BISSELL.
MarkJ.Bissell
PresidentandChiefExecutiveOfficer
• More powerful suction than
upright deep cleaners
• Lightweight wand easily
maneuvers under and around
furniture
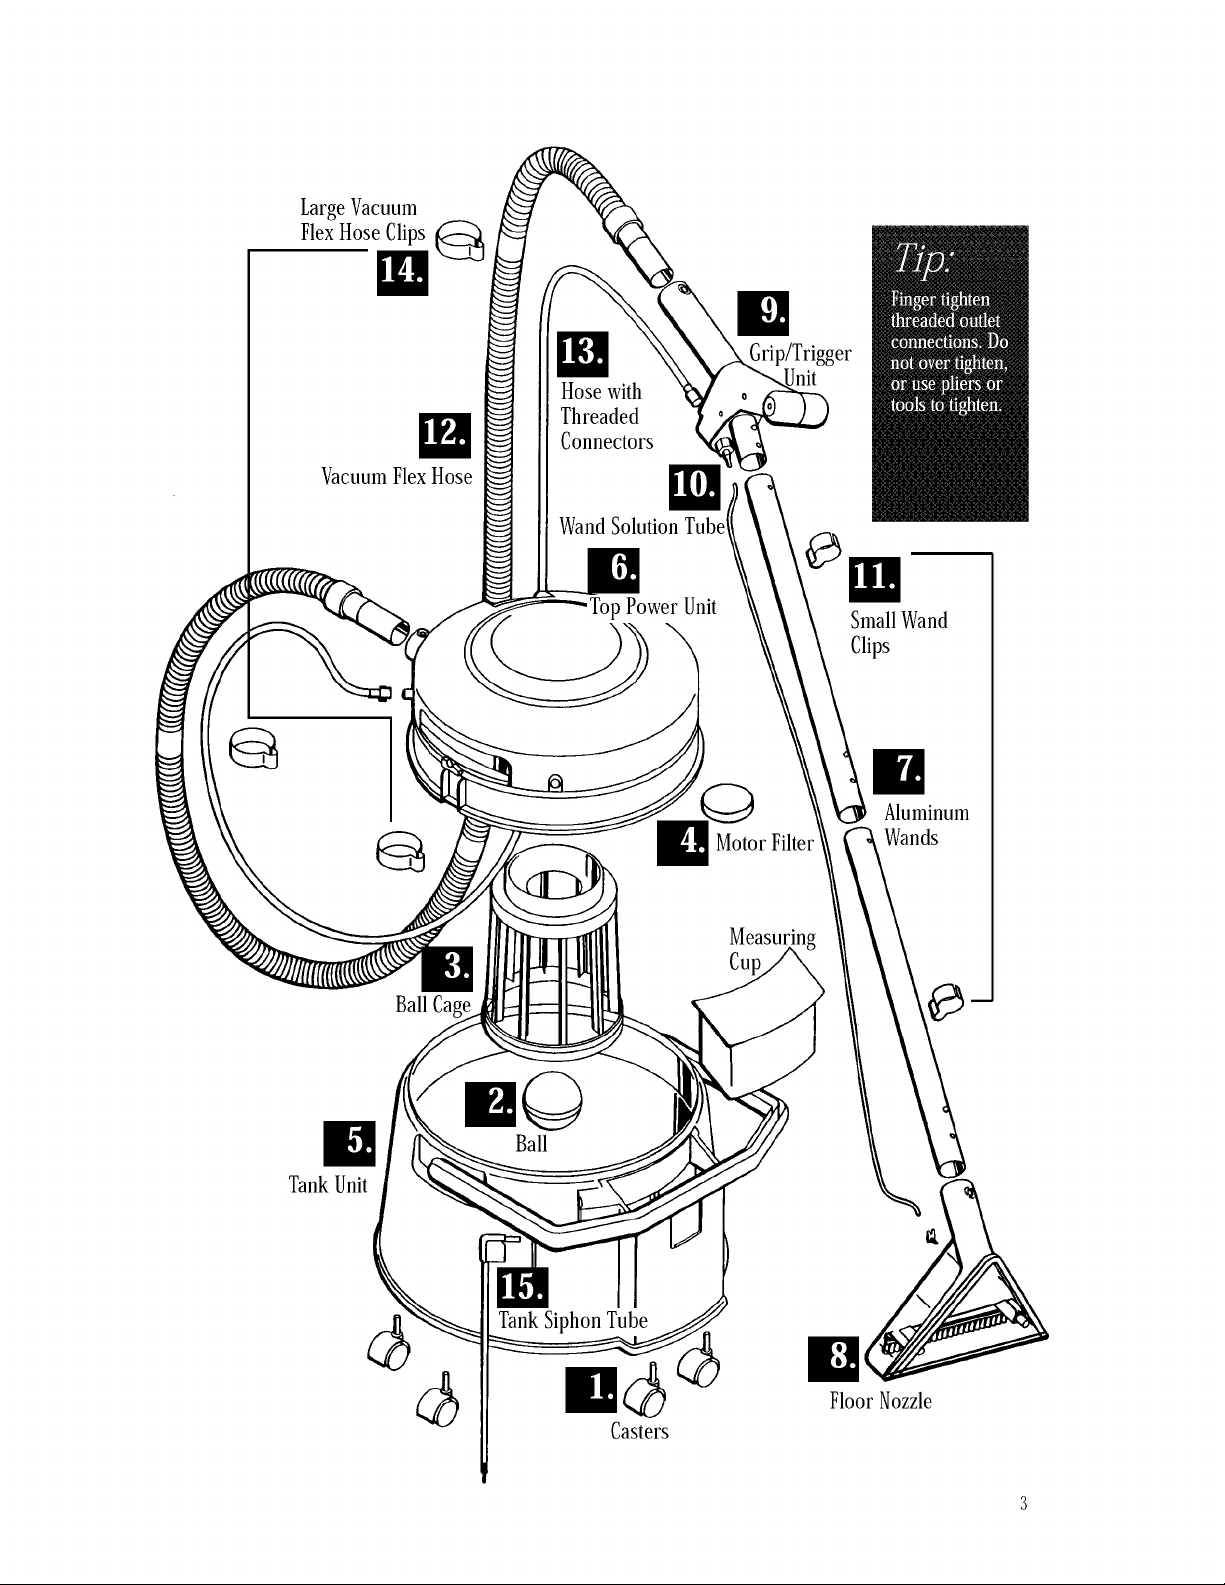
LargeVacuum
FlexHoseClips
VacuumFlexHose
Grip/Trigger
Hosewith
Threaded
Connectors
WandSolutionTube/_ _ _I_
topPower Unit _ \ \ _mi;_lWand
Tank Unit
M_otorFilte_r____ lau_n_nUm
Measurin
Cu
Ball Ca
w©
Ball
Tank Siphon Tube
Casters
Floor Nozzle
ThisUser'sGuidehasbeendesignedtohelpyou
gettheutmostsatisfactionfromyourPowerlifler
DeepCleaner.You'llfindassemblyinstructionsforall
cleaningtasks,safetyprecautions,pre-cleaningtips,
andmaintenanceandtroubleshootinginstructions.
PleasereadthisGuidethoroughlybeforeassembling
yourPowerlifiei:
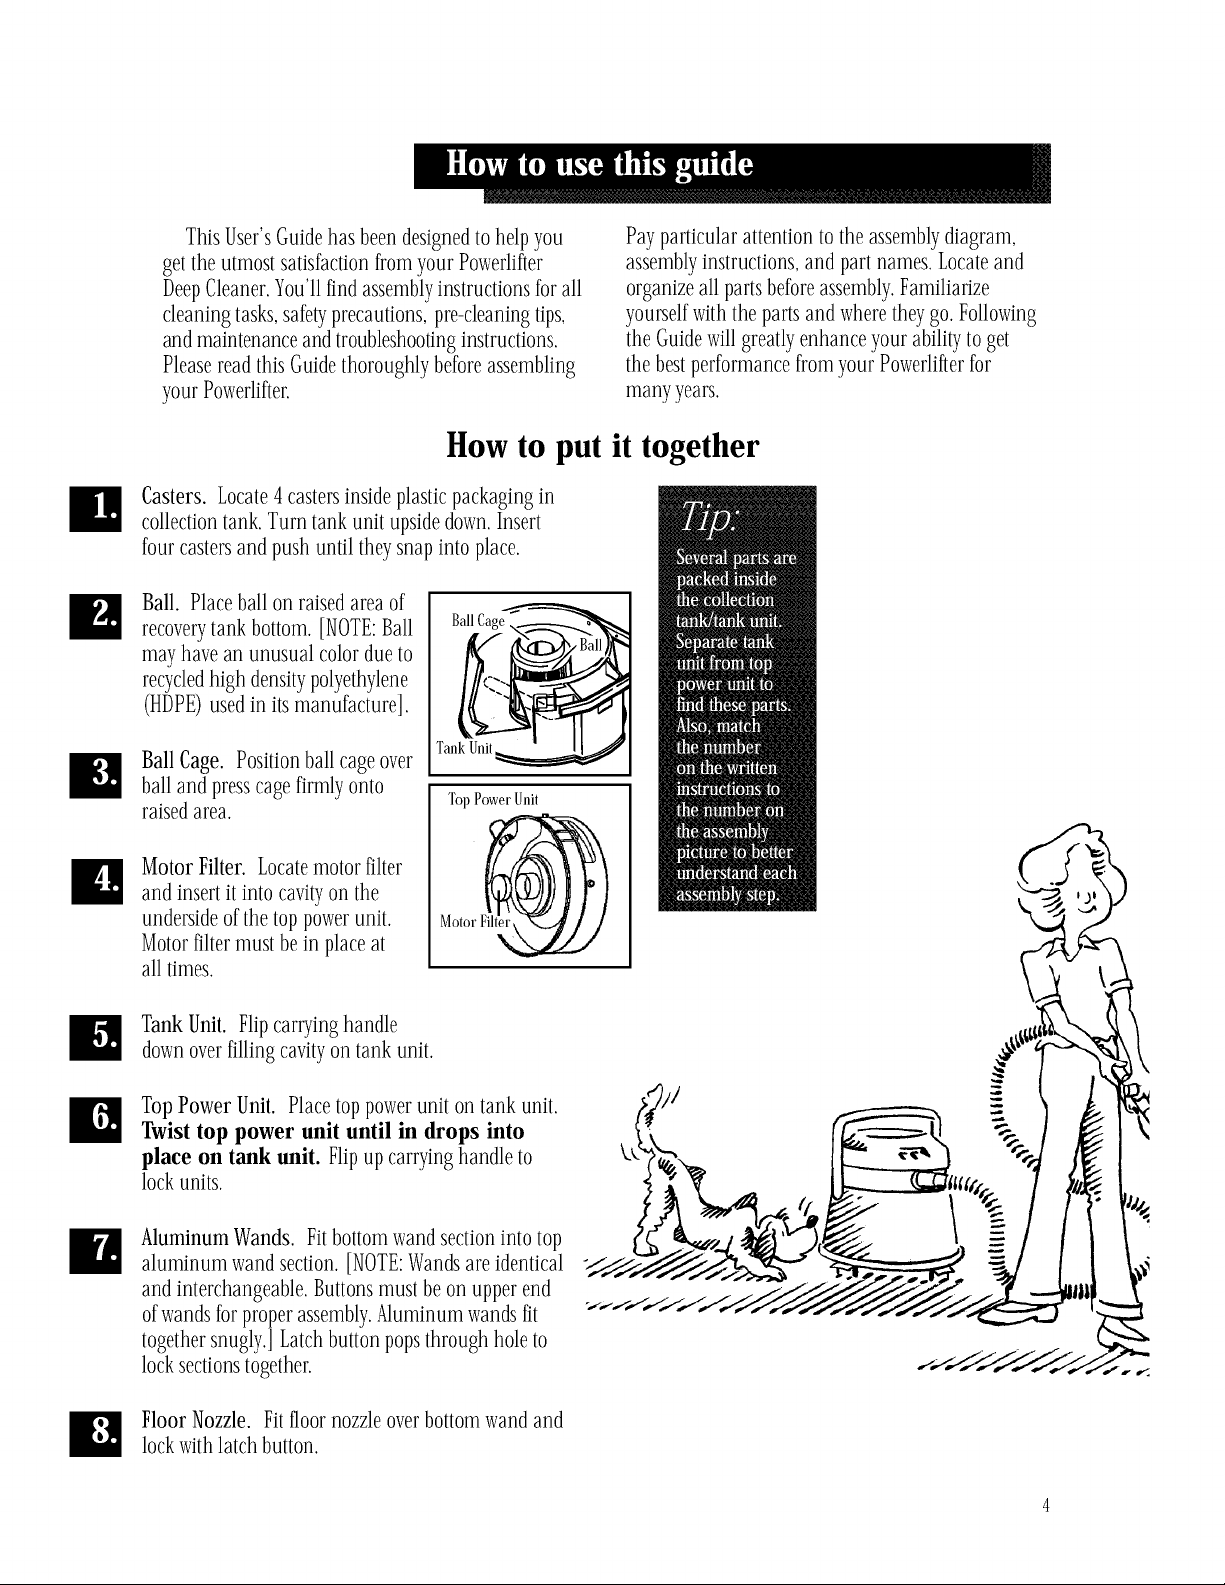
How to put it together
Casters. Locate 4 casters inside plastic packaging in
collection tank. Turn tank unit upside down. Insert
four casters and push until they snap into place.
Ball. Placeballonraisedareaof
recoverytankbottom.[NOTE:Ball
mayhavean unusualcolordueto
recycledhighdensitypolyethylene
(HDPE)usedinitsmanufacture].
Ball Cage ,,
Payparticularattentiontotheassemblydiagram,
assemblyinstructions,andpartnames.Locateand
organizeallpartsbeforeassembly.Familiarize
yourselfwiththe partsandwheretheygo.Following
the Guidewillgreatlyenhanceyourabilitytoget
thebestperformancefromyourPowerliflerfor
manyyears.
Ball Cage. Position ball cage over
ball and press cage firmly onto
raised area.
Tank
Top Power Unit
MotorFilter.Locatemotorfilter
andinsertitinto cavityon the
undersideofthetoppowerunit.
Motor F@
Motorfiltermustbein placeat
alltimes.
Tank Unit. Flip carrying handle
down over filling cavity on tank unit.
Top Power Unit. Placetop powerunit on tank unit.
Twist top power unit until in drops into
place on tank unit. Flipup carryinghandle to
lockunits.
Aluminum Wands. Fit bottom wand section into top
aluminum wand section. [NOTE: Wands are identical
and interchangeable. Buttons must be on upper end
ofwands fbr proper assembly. Aluminum wands fit
together snugly.[ Latch button pops through hole to
lock sections together.
Floor Nozzle. Fit floor nozzle over bottom wand and
lock with latch button.
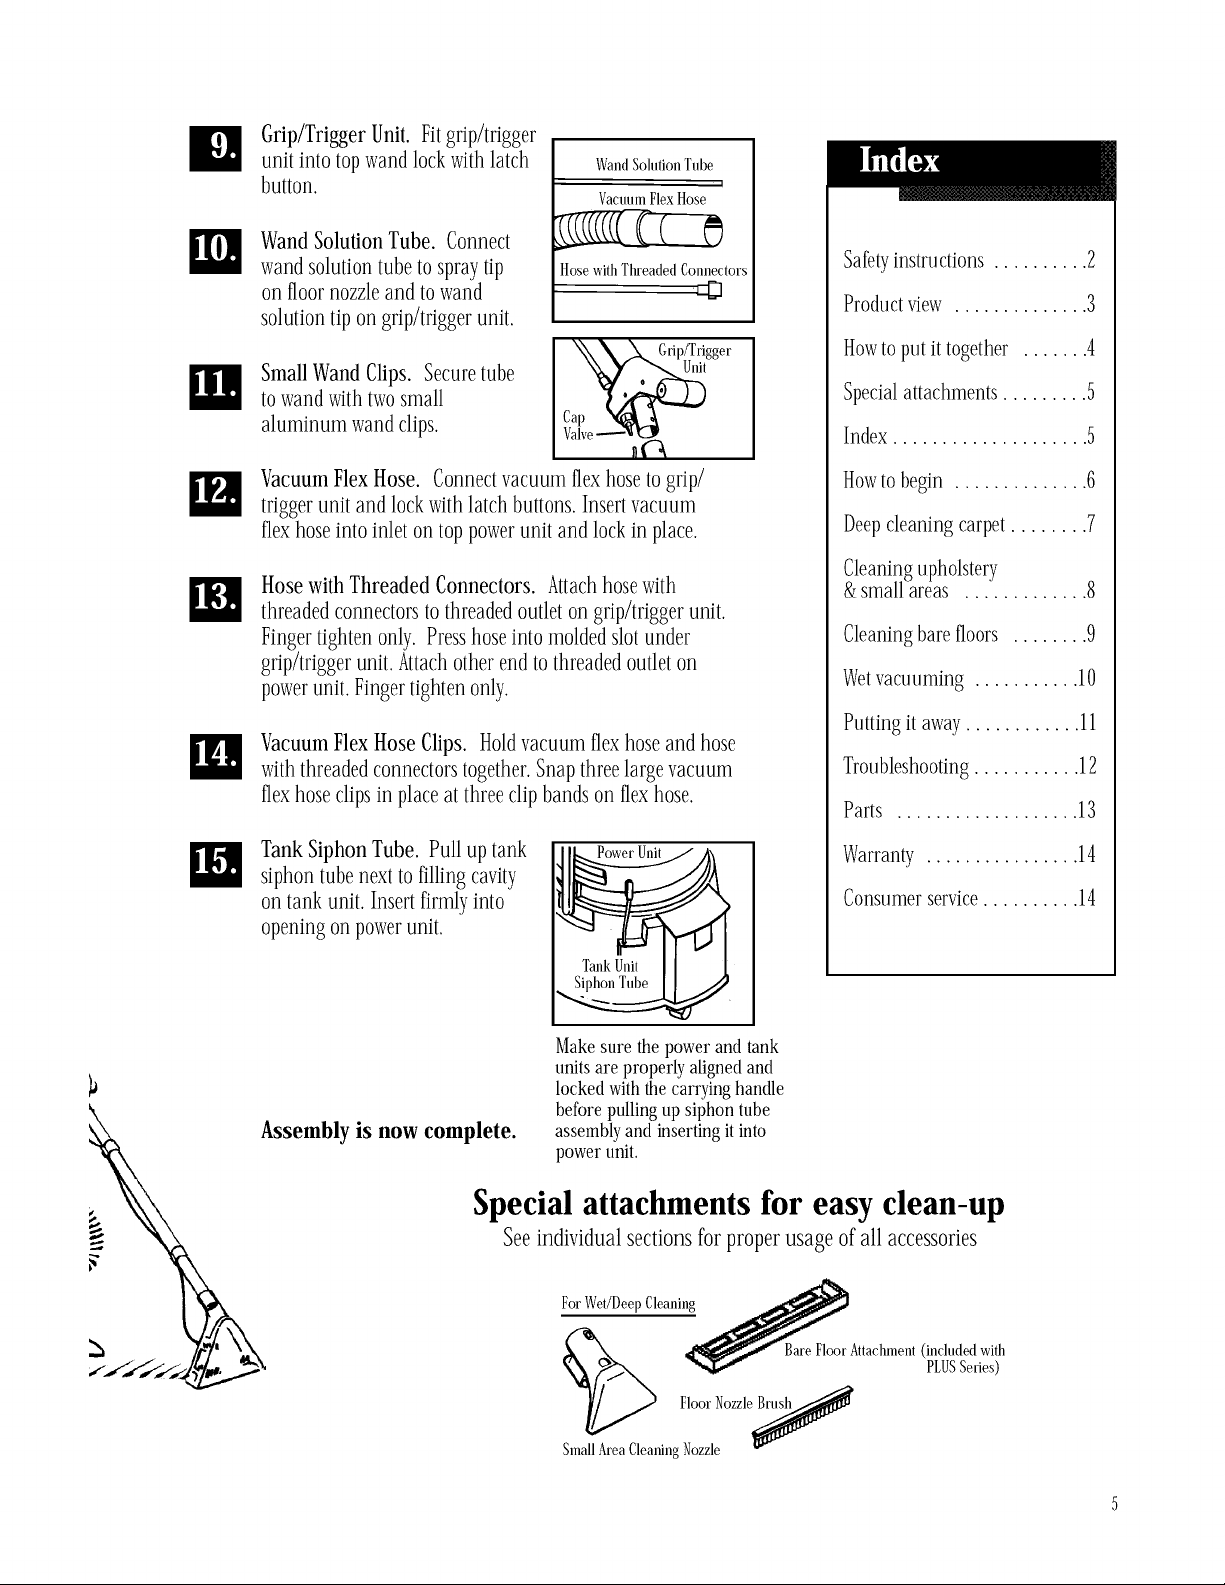
Grip/TriggerUnit. Fitgrip/trigger
unitintotopwandlockwithlatch
button.
WandSolutionTube. Connect
wandsolutiontubetospraytip
onfloornozzleand towand
solutiontipongrip/triggerunit.
SmallWandClips.Securetube
towandwithtwosmall
aluminumwandclips.
Wand Solution Tube
Vacnum Flex Hose
Hose with Threaded Connectors
Cap v_A
[ XX_, _.. Gtip/Tligger
i
Safetyinstmctions .......... 2
Productview .............. 3
Howtoput ittogether ....... 4
Specialattachments ......... 5
Index .................... 5
Vacuum Flex Hose. Connect vacuum flex hose to grip/
trigger unit and lock with latch buttons. Insert vacuum
flex hose into inlet on top power unit and lock in place.
HosewithThreadedConnectors. Attachhosewith
threadedconnectorstothreadedoutletongrip/triggerunit.
Fingertightenonly. Presshoseintomoldedslotunder
grip/triggerunit.Attachotherendtothreadedoutleton
powerunit.Fingertightenonly.
Vacuum Flex Hose Clips. Hold vacuum flex hose and hose
with threaded connectors together. Snap three large vacuum
flex hose clips in place at three clip bands on flex hose.
Tank Siphon Tube. Pull up tank
siphon tube next to filling cavity
on tank unit. Insert firmly into
opening on power unit.
Assembly is now complete.
Power Unit
Make sure the power and tank
units are properly aligned and
locked with the carrying handle
before pulling up siphon tube
assemblyand inserting it into
power unit.
Howtobegin .............. 6
Deepcleaning carpet........ 7
Cleaningupholstery
&small areas ............. 8
Cleaningbare floors ........ 9
Wetvacuuming ........... 10
Putting it away ............ 11
Troubleshooting........... 12
Parts ................... 13
Warranty ................ 14
Consumerservice.......... 14
Special attachments for easy clean-up
Seeindividualsectionsfor properusage of all accessories
F"
For Wet/Deep Cleaning _,-_
..,r Ba_ Fl_r Attachment (included with
SmallArea CleaningFiiiill Ozzle_
PLUSSeries)
 Loading...