

PETHAIR
ERASER
ENGINEERED FOR
HOMES WITH PETS
QUICK START/USER GUIDE
1650 Series
®
More of a video
person? Look for this
icon and go online
for an instructional
how-to video at
www.BISSELL.com
Quick Start Guide
REFER TO PAGE 5 FOR COMPLETE USER GUIDE INSTRUCTIONS, PRODUCT VIEW, AND IMPORTANT SAFETY NOTICES.
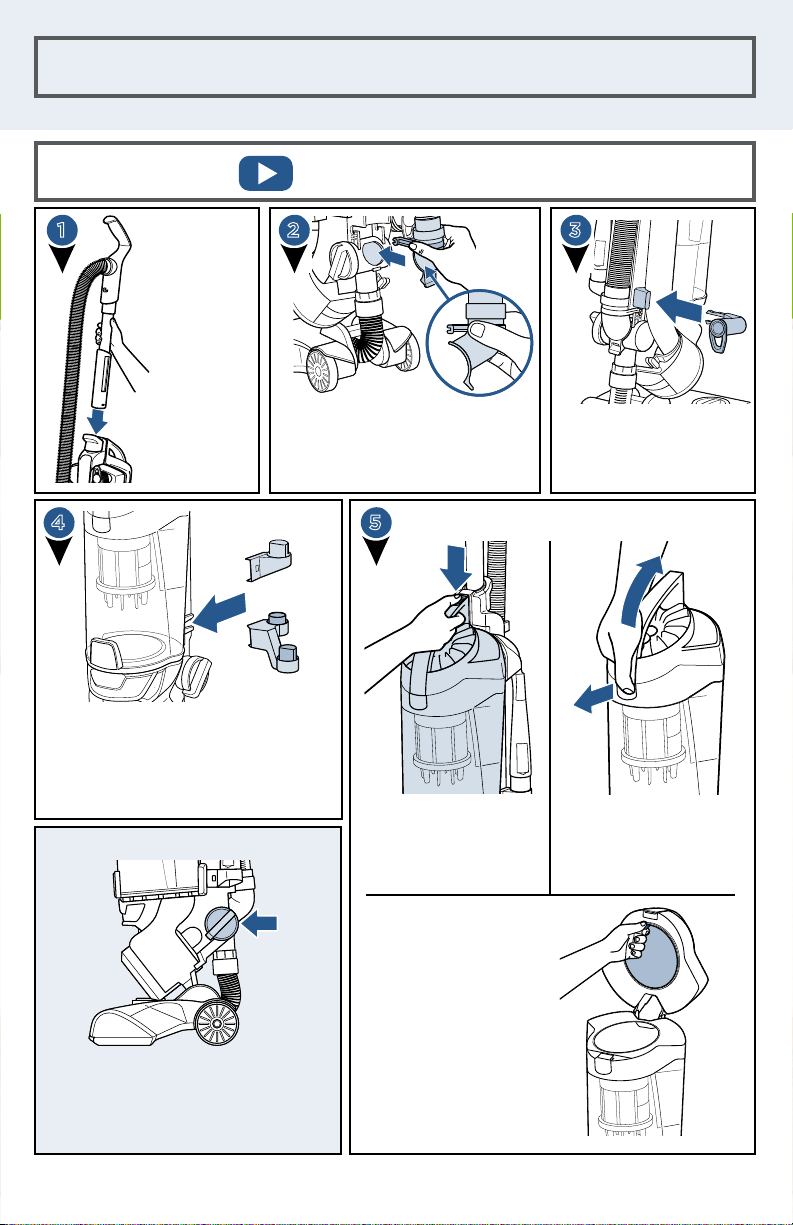
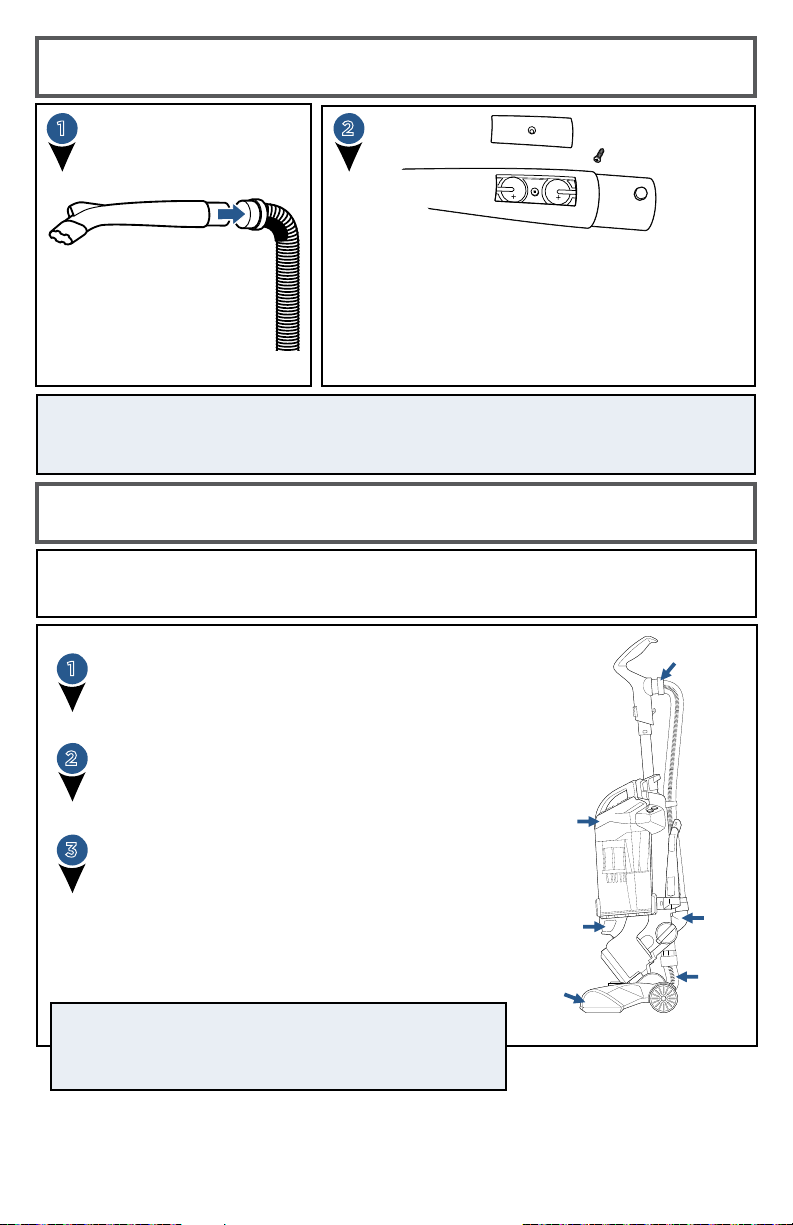
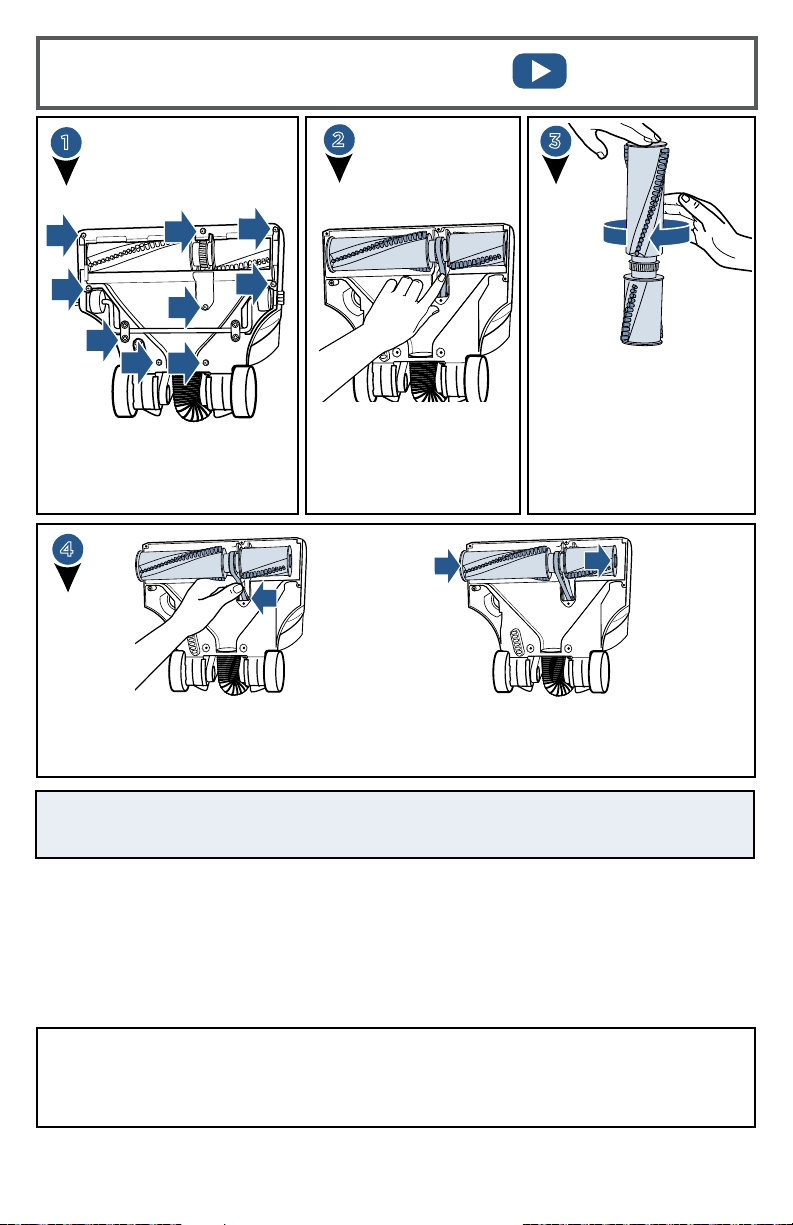
Assembly
2 31
Slide End
of Wand
into top
of base. It
will “Click”
when
inserted
correctly.
“Click”
Insert end of Hose into vacuum
base by sliding the arms in and
down first. Press down hard on
the bottom tab with both your
thumbs to “click” in.
Push Cord Wrap in firmly
until you hear “Click”.
Wrap power cord around
cord wraps.
4
SINGLE
TOOL CADDY
OR
DOUBLE
TOOL CADDY
You have the option to store just the
LED Lighted Crevice Tool or both
that and the Pet TurboEraser Tool.
Pick the single tool caddy or double
tool caddy and push hard to slide it
on the base of vacuum.
IMPORTANT REMINDER
Your vacuum came in floor cleaning
mode, to use your tools, be sure to
turn the Vacuum Suction Knob to
align arrow with “hose/tool suction.”
See page 9 for further instructions.
Febreze and related trademarks are owned by the Procter & Gamble
Company, Cincinnati, Ohio and used under license by BISSELL Homecare, Inc.
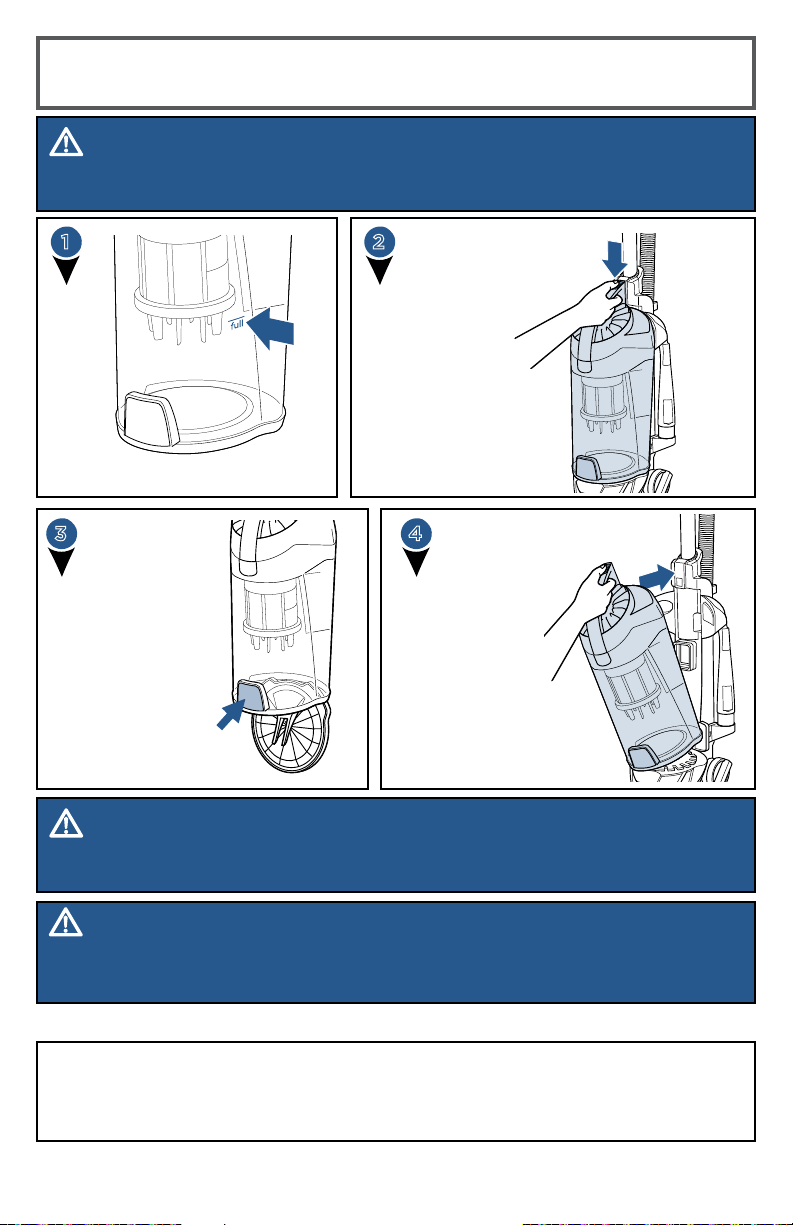
INSTALL OPTIONAL FEBREZE® FILTER
5
Press Tank Release
Button and pull
container away from
vacuum.
Remove the yellow
foam filter (nonFebreze®) and replace
with black Febreze®
filter (included
separately) last. Be
sure black filter faces
out, covering white
mesh filter.
Place dirt container
back on vacuum.
Pull tab out on front
of dirt container
and pull handle up
to open.
www.BISSELL.com
2
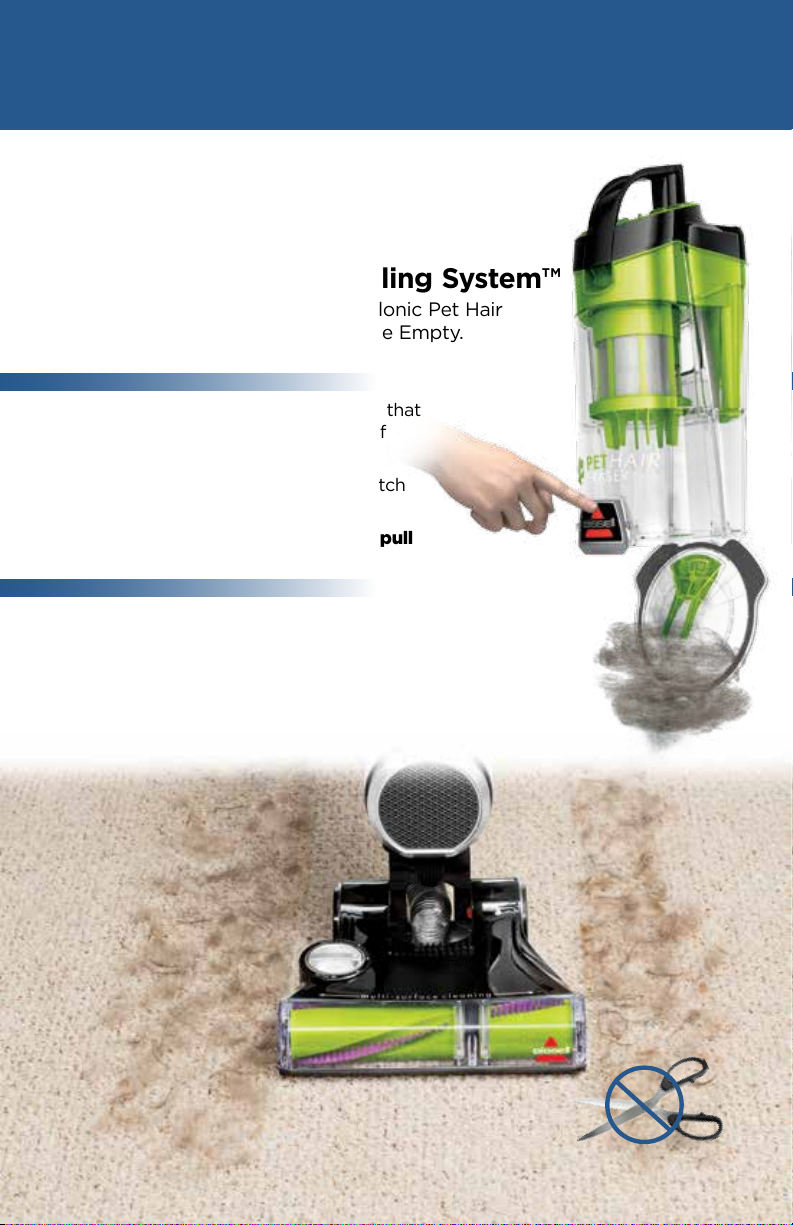
Built for Pet Owners
Cyclonic Pet Hair Spooling System™
BISSELL’s first vacuum with a Cyclonic Pet Hair
Spooling System™ for a Hands Free Empty.
A patented hair management system that
spools and traps hair to keep it out of
your filters and off your hands.
Just press the release button and watch
the ball of pet hair drop right out.
You no longer have to reach up and pull
the ‘yuck’ out.
Tangle Free Brush Roll
Pick up pet hair without having
to cut if off your brush roll.
The Tangle Free Brush Roll’s
unique design helps reduce
hair from wrapping and
catching on the bristles,
and uses the carpet to pull
the hair off the brush roll.
www.BISSELL.com
3
Cut the hassle NOT the hair!
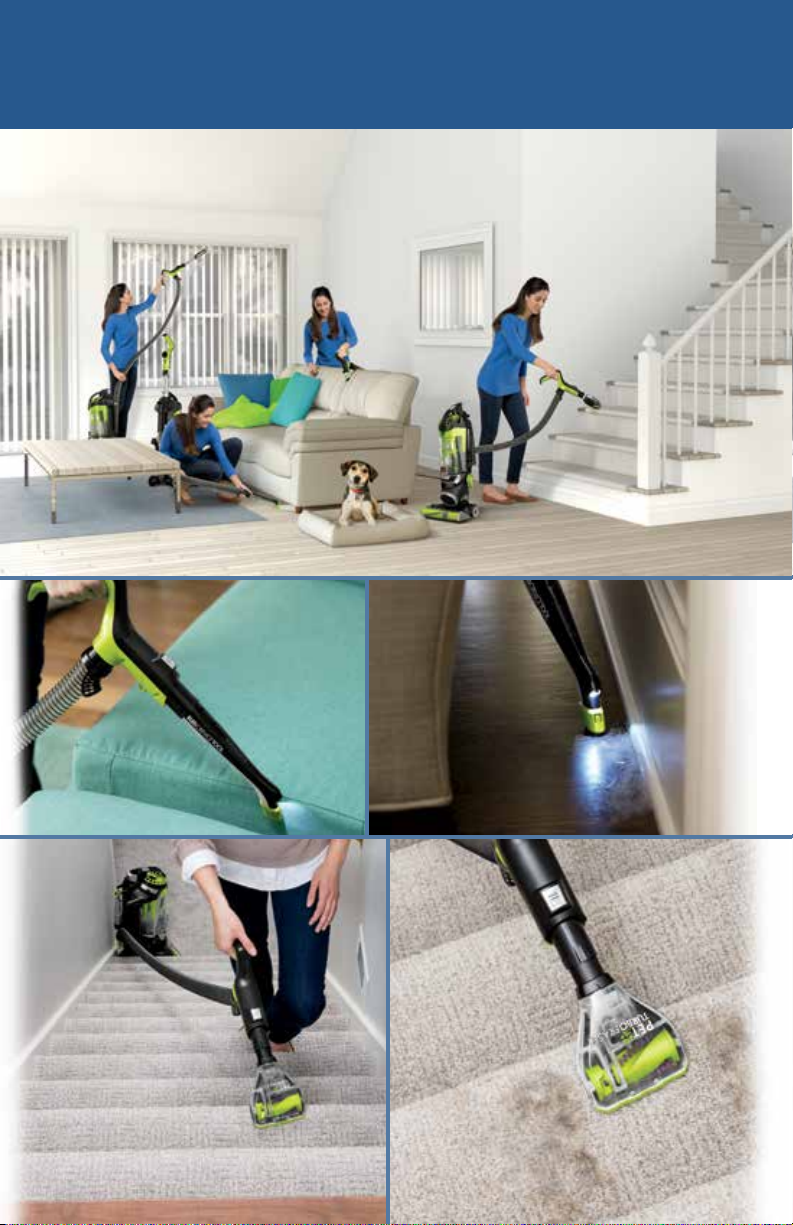
by Pet Owners
New Specialized Pet Tools
Customize your cleaning with interchangeable
tools stored right on board.
Uncover hidden dirt
and pet hair with the
LED Lighted Crevice Tool
that allows you to reach
in tight places.
Soft dusting side for
delicate surfaces and
rubber fingers on the
other side remove
embedded pet hair on
stairs and furniture.
Power through pet
hair on stairs and
furniture with the Pet
TurboEraser® Tool.
www.BISSELL.com
4

IMPORTANT SAFETY INSTRUCTIONS
READ ALL INSTRUCTIONS BEFORE USING YOUR UPRIGHT VACUUM.
Always connect to a polarized outlet (one slot is wider than the other). Unplug from outlet when not in
use and before conducting maintenance. When using an electrical appliance, basic precautions should be
observed, including the following:
WARNING
TO REDUCE THE RISK OF FIRE,
ELECTRIC SHOCK, OR INJURY:
» Do not leave vacuum cleaner
when it is plugged in. Unplug
from outlet when not in use
and before servicing.
» Do not use outdoors or on
wet surfaces.
» Do not allow to be used as a toy.
Close attention is necessary when
used by or near children.
» Do not use for any purpose other
than described in this User’s
Guide. Use only manufacturer’s
recommended attachments.
» Do not use with damaged cord or
plug. If appliance is not working
as it should, has been dropped,
damaged, left outdoors, or
dropped into water, have it repaired
at an authorized service center.
» Do not pull or carry by cord, use
cord as a handle, close a door on
cord, or pull cord around sharp
edges or corners. Do not run
appliance over cord. Keep cord
away from heated surfaces.
» Do not unplug by pulling on
cord. To unplug, grasp the plug,
not the cord.
» Do not handle plug or vacuum
cleaner with wet hands.
» Do not put any object into
openings. Do not use with any
opening blocked; keep openings
free of dust, lint, hair, and anything
that may reduce air flow.
» Keep hair, loose clothing, fingers,
and all parts of body away from
openings and moving parts.
» Turn off all controls before
plugging or unplugging
vacuum cleaner.
» Use extra care when cleaning
on stairs.
» Do not use to pick up flammable
or combustible materials (lighter
fluid, gasoline, kerosene, etc.)
or use in areas where they may
be present.
» Do not use vacuum cleaner in an
enclosed space filled with vapors
given off by oil base paint, paint
thinner, some moth proofing
substances, flammable dust, or
other explosive or toxic vapors.
» Do not use to pick up toxic
material (chlorine bleach,
ammonia, drain cleaner, etc.).
» Do not pick up anything that is
burning or smoking, such as
cigarettes, matches, or hot ashes.
» Do not use without filters in place.
» Do not pick up hard or sharp
objects such as glass, nails, screws,
coins, etc.
» Use only on dry, indoor surfaces.
» Keep appliance on a level surface.
» Do not carry the vacuum cleaner
while it is running.
» Unplug before connecting or
disconnecting the TurboBrush®
Tool.
LED LIGHTED CREVICE TOOL WARNING
• Caution: Risk of fire and burns. Do not recharge, disassemble, heat above 60°c (140°F) or incinerate.
Keep batteries out of reach of children and in original package until ready to use. Dispose of used
batteries promptly.
• Never put batteries in mouth. If swallowed, contact your physician or local poison control.
• Replace Battery With CR1632 Only. USE OF ANOTHER BATTERY MAY PRESENT A RISK OF FIRE
OR EXPLOSION. CR1632 cells may be purchased anywhere batteries are sold.
READ OPERATOR’S MANUAL
SAVE THESE INSTRUCTIONS
This model is for household use only.
WARNING
›› Plastic film can be dangerous. To avoid danger of suocation, keep away from children.
›› Do not plug in your vacuum cleaner UNTIL you are familiar with all instructions and
operating procedures.
›› To reduce the risk of electrical shock, turn power switch o and disconnect polarized
plug from electrical outlet BEFORE performing maintenance or troubleshooting checks.
www.BISSELL.com
5
Thanks for buying a BISSELL vacuum!
We love to clean and we’re excited to share one of our new innovative
products with you. We want to make sure your vacuum works as well in five
years as it does today, so this guide has tips on using (page 7-11), maintaining (pages 12-15), and if there is a problem, troubleshooting (page 16).
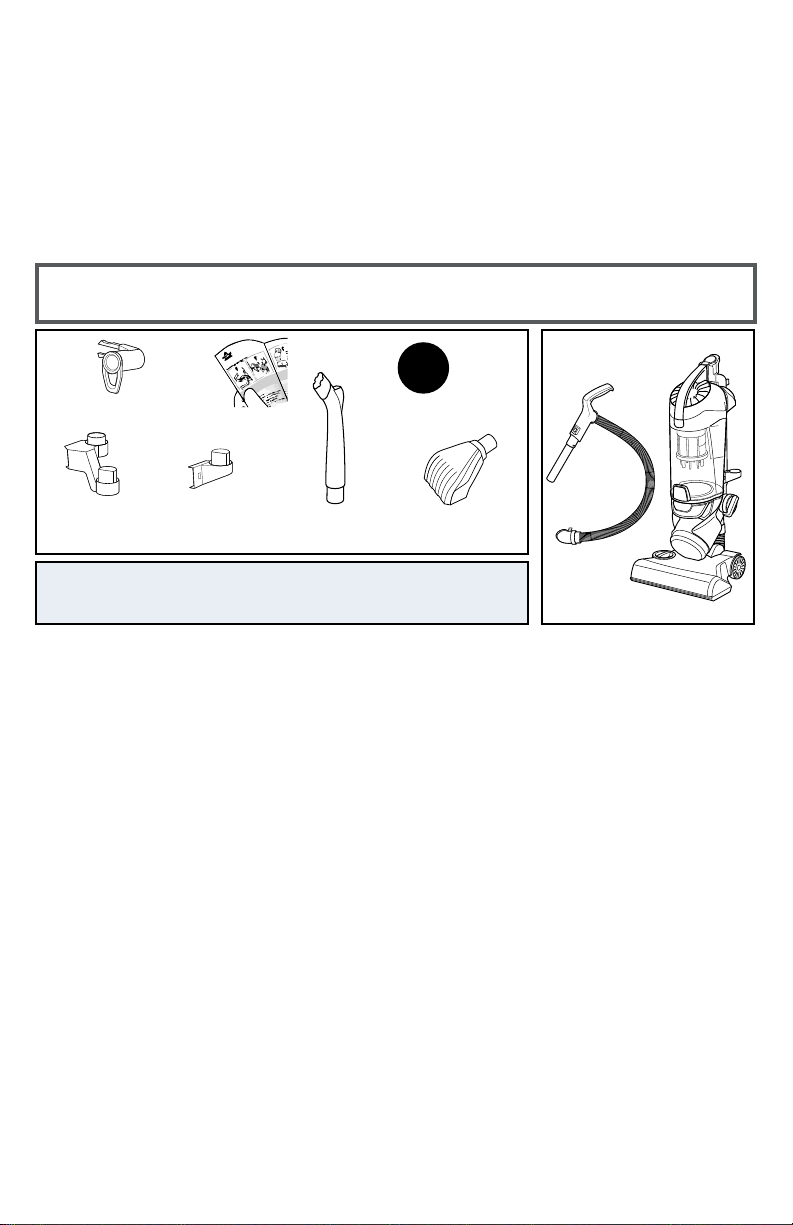
What’s in the Box?
Vacuum
Base
Lower Cord Wrap
User Guide
Febreze® Filter
(optional use)
Double Tool
Caddy
(optional use)
Single Tool
Caddy
(optional use)
LED Lighted
Crevice Tool
Pet TurboEraser®
Tool
NOTE: Standard accessories may vary by model.To identify
what should be included with your purchase, please refer to
the “Carton Contents” list located on the carton top flap.
Quick Start / Assembly ......2
New Pet Innovation ........3-4
Safety Instructions...........5
Product View................7
Operations ................8-11
Maintenance & Care ......12-15
Troubleshooting ............16
Warranty ...................17
Service .....................17
Contact Information ........17
Product Registration........18
Parts & Supplies ............18
Hose/
Wand
www.BISSELL.com
6
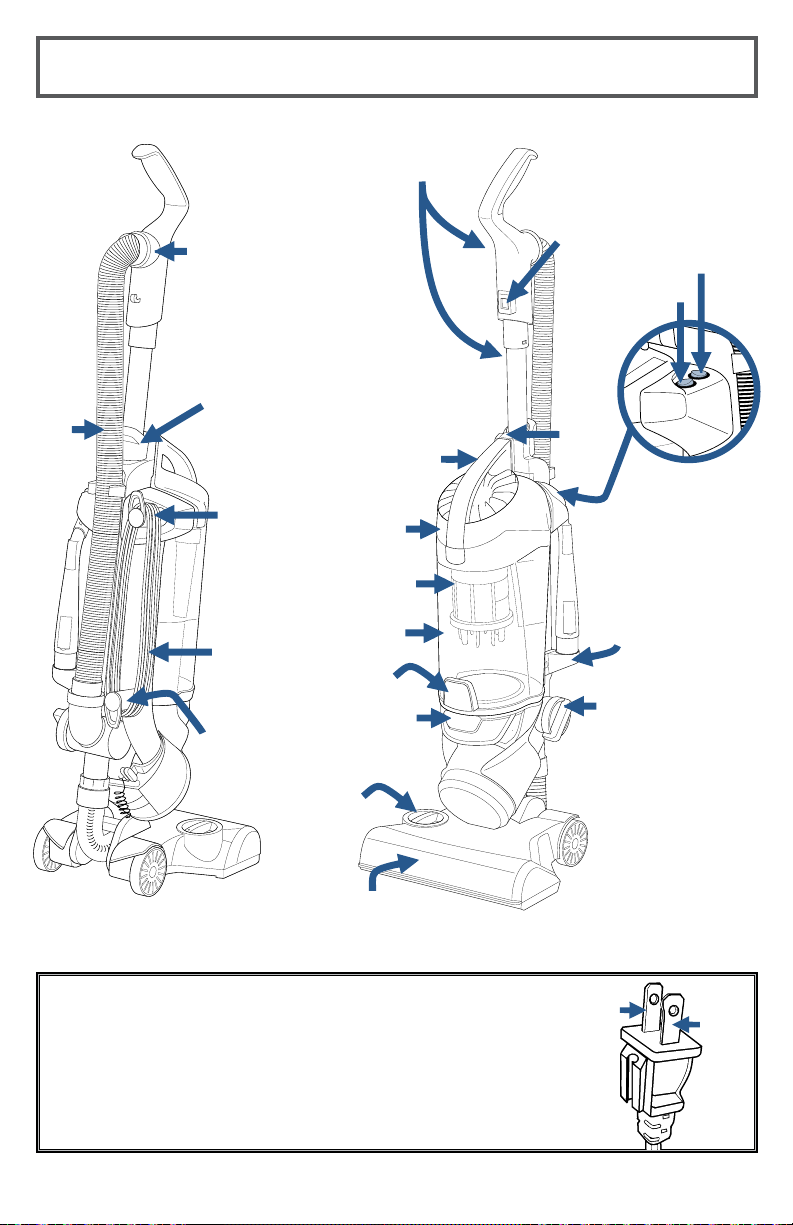
Product View
Hose
Connector
Handle & Wand
Handle
Release
Button
Power
On/O
Switch
Brush Roll
On/O
Switch
Main
Hose
Wand Release
Latch
Cord
Release
Cord
Lower
Cord
Wrap
Inner Cyclone
Container
Tank Button
Post-Motor
Height
Adjustment
Knob
Brush Roll
Carry
Handle
Pre-Motor
Filters
Separator
Dirt
Empty
Filter
Tank
Release
Button
Tool
Caddy
Hose/Wand
& Vacuum
Suction
Knob
THIS APPLIANCE HAS
A POLARIZED PLUG
To reduce the risk of electric shock, this appliance has a polarized plug (one blade
is wider than the other). This plug will fit in a polarized outlet only one way. If the
plug does not fit fully in the outlet, reverse the plug. If it still does not fit, contact a
qualified electrician to install a proper outlet. Do not change the plug in any way.
Hot
Neutral
www.BISSELL.com
7
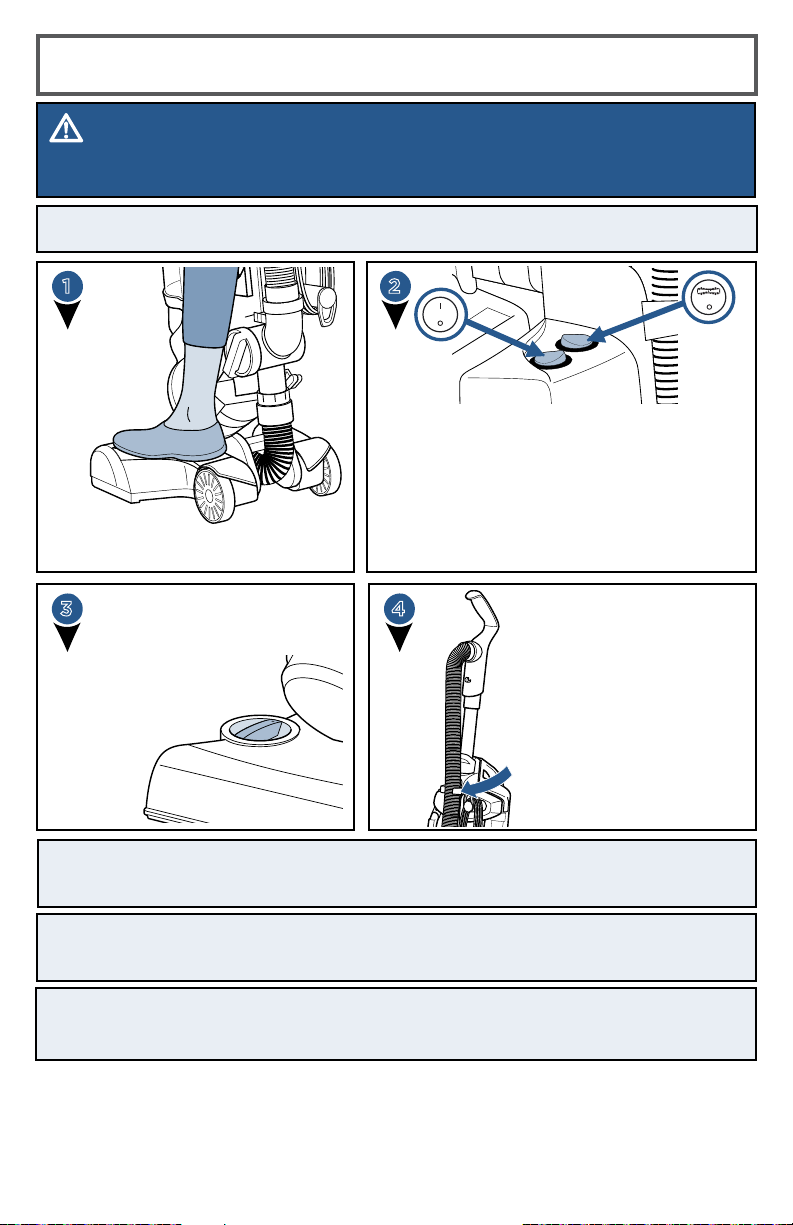
Operations
WARNING
Do not plug in your vacuum until you are familiar with all instructions and operating
procedures.
NOTE: Be sure the green suction knob on side of vacuum is turned to
“Floor Suction” before use.
21
Power
On/O
Switch
Turn vacuum on by pressing Power Switch on
(I - ON and O - OFF). Press Brush roll switch to
run the PowerBrush for carpet cleaning (brush
roll is on when light on switch is illuminated).
See page 15 to maintain the brush roll.
NOTE: The brush roll will automatically shut off
Step gently on base and pull back on
handle to recline.
when vacuum is locked in upright position,
recline to reactivate.
Brushroll
On/O
Switch
3
Turn Height
Adjustment Knob
to desired carpet
cleaning level.
4
Utilize the clip on the
back of your vacuum to
hold the hose in place.
Pull out when using hose
with tool attachments.
NOTE: For optimal carpet cleaning performance, adjust to the lowest practical
setting. If your vacuum is dicult to push, adjust to the next higher setting.
NOTE: In the unlikely event that hair wrapped around your brush roll, run vacuum
back and forth on clean carpet several times to help release any wrapped hair.
NOTE: Turn o the brush roll when vacuuming hard or delicate surfaces that may
be caught by the rotating brush. This could include hard wood, tiled floors, small
area rugs or frieze carpets that have long delicate fibers or threads.
www.BISSELL.com
8
Brush roll Safety Feature
1 2
If red light
illuminates
around height
adjustment
knob, you
have tripped
your brush roll
motor safety
feature.
It may have
3
tripped because
of use on premium
soft carpet. Turn
Height Adjustment
Knob to the “high
carpet” setting.
Also check if
debris is clogged
in brush roll. Clear
debris if necessary.
Power
On/O
Switch
Put vacuum in upright position and turn it off.
4
Power
On/O
Switch
Turn vacuum back on and try again.
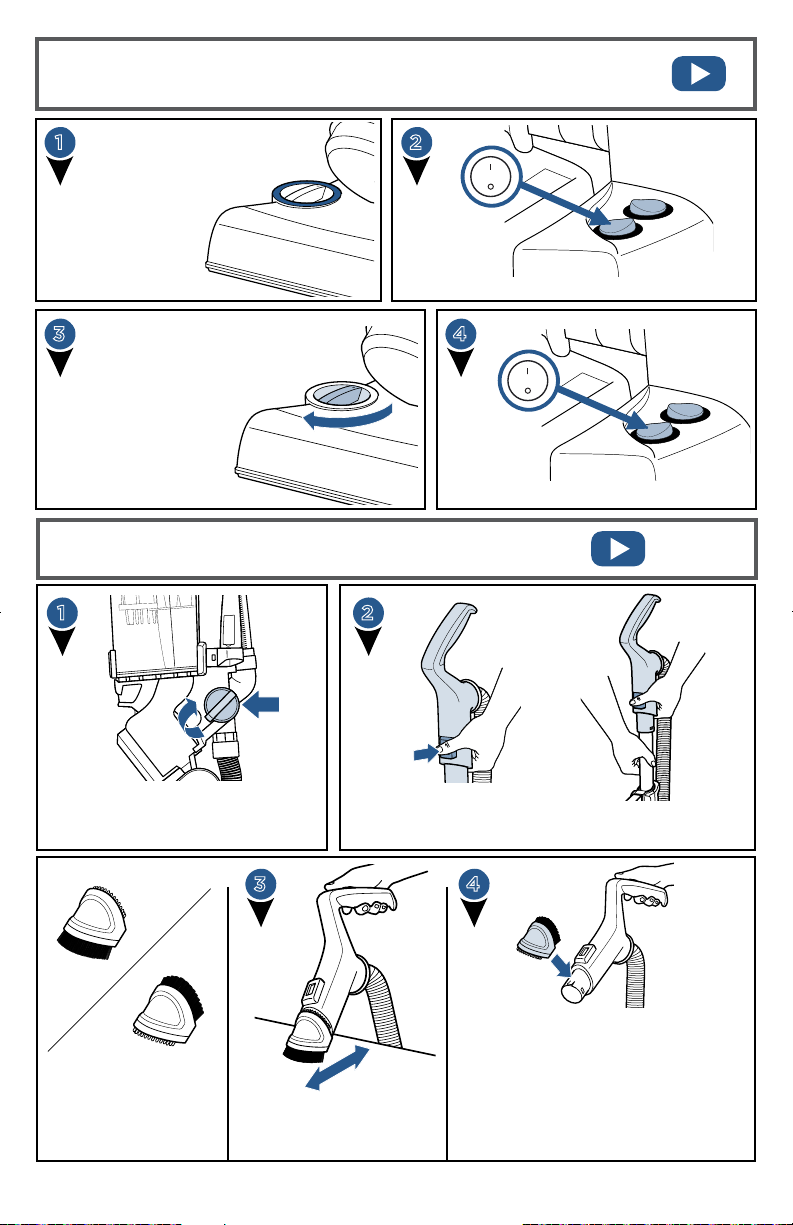
Above Floor Cleaning: Handle
21
To use tools and the hose/wand;
turn the green knob aligning
arrow with “hose/tool suction.”
3
2-in-1 Pet Brush has
white soft bristles
for those gentle uses
and rubber knobs for
embedded pet hair.
Use the collar with the
white soft bristles side for
delicate surfaces.
Press Handle Release
Button to release handle
from wand.
4
Un-click the collar and flip around to
use the rubber fingers for removing pet
hair from your furniture. Listen for 2
“clicks” when reattaching.
Once done using Handle, slide back on
to Wand until it “clicks.”
Be sure to turn the green knob back to
“Floor Suction” mode after using tools.
Pull straight up
and out.
www.BISSELL.com
9

Above Floor Cleaning: Wand
1
To have more
reach, press down
on Wand Release
Latch and pull out
the handle.
2
Attach
desired
tool to end
of wand.
Above Floor Cleaning: Hose
1
Grab Hose
Connector,
twist counter
clockwise and
pull hose out.
2
Attach desired tool
to end of hose
3
www.BISSELL.com
10
Push hose back in,
aligning tabs; twist
clockwise to lock
into place. Be sure
the hose relief is on
bottom.
NOTE:
LED Lighted Crevice Tool each fit any
of the above floor cleaning modes;
Handle, Wand, or Hose!
The Pet TurboEraser® Tool and
NOTE:
to turn the green knob back to “Floor
Suction” mode after using tools.
Be sure to always remember
LED Lighted Crevice Tool
1
Pull tabs out of battery door
area before use to activate.
Connect to handle, wand or
hose and the LED Light will
automatically come on.
NOTE:
When the small tab on the connection point of Crevice tool comes into contact
2
To replace LED battery, unscrew the small screw with
a Phillips head screw driver. Pull cover off to reveal
two batteries (CR1632 3V). Slide and pull out each
battery and replace with new. Be sure the “+” sign on
battery is facing out.
Dispose of used battery promptly. Keep away from
children. Do not disassemble and do not dispose of
in fire.
with the handle, wand, or hose; that triggers the LED light to come on. When using
with the Wand, be sure it does not pop through the opening at the end of the Wand.
Vacuum Motor Protection
An internal thermal protector has been designed into your vacuum to protect it from
overheating. When the thermal protector activates, the main vacuum motor will stop
operating. If this happens, proceed as follows.
1
Turn vacuum OFF and unplug from electrical outlet.
Check for the source of overheating problem (full
2
dirt cup, dirty filters or, a clog) and fix by following
the maintenance instructions.
3
When the motor cools for approximately
30 minutes, the thermal protector automatically
resets and cleaning may continue. If the vacuum
will not turn on or the thermal protector continues
to activate, your vacuum may need servicing.
Call BISSELL Consumer Care.
NOTE: The thermal protector controls the main vacuum
motor only, not the brush motor. If the thermal protector
activates, the brush will continue to operate normally;
however, there will be no suction.
Filter
Filter
Possible areas that could clog.
www.BISSELL.com
11
Removing/Emptying Dirt Tank
WARNING
To reduce the risk of electrical shock, turn power switch o and disconnect polarized plug
from electrical outlet before performing maintenance or troubleshooting checks.
1 2
Press Tank Release
Button. Grab handle
Vacuum tank is full. Time to empty!
to pull Dirt Container
away from vacuum.
3
Holding Dirt Container
over a trash bin, press
Tank Empty Button.
Snap bottom back
into place.
4
Place tank back
on the vacuum.
Be sure you
place the front
of the tank first
and push back to
“click” into place.
WARNING
Do not operate vacuum with damp or wet filters. Allow components to dry before
reassembling the Dirt Container.
WARNING
Before using your vacuum, make sure that the dirt container is in locked position and
that all filters, both pre and post-filters are in place. DO NOT operate your vacuum without
these filters.
Parts & Supplies
For Parts and Supplies, go to www.BISSELL.com and enter
your model number in the search field.
www.BISSELL.com
12
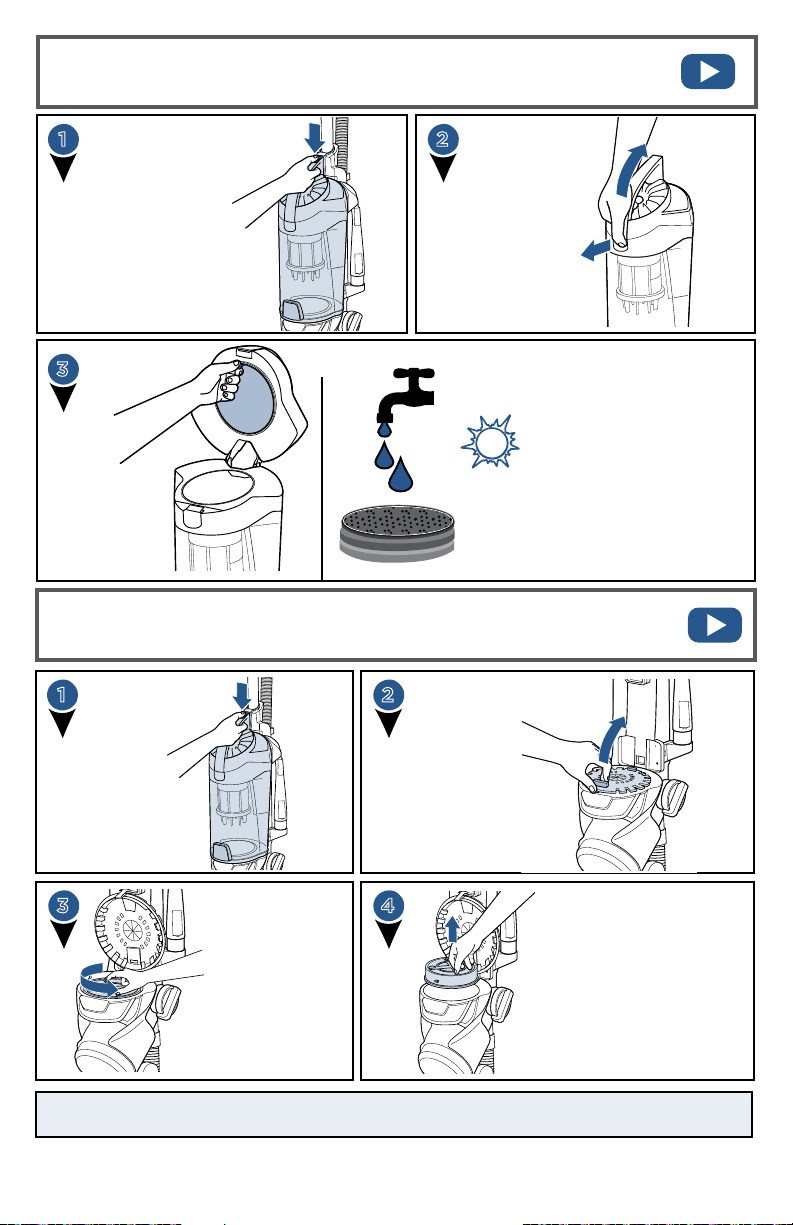
Cleaning & Replacing Top Pre-Motor Filters
1
Press Tank Release
Button and pull away
from vacuum.
3
Remove
pre-motor
filters from top
of dirt
container lid
by pulling out.
2
Pull tab out on
front of dirt
container and
pull handle up
to open filter
location.
Both the Pre-Motor Mesh and
Foam filters are washable.
Clean with mild detergent,
rinse and squeeze all excess
water. Allow filters to dry
completely before reinserting.
24
Place dry pre-motor filters
h
back in the top of dirt
container placing the thick
foam filter last.
Cleaning & Replacing Bottom Post-Motor Filter
21
Press Tank
Release
Button
and pull
away from
vacuum.
NOTE:
Replace this filter every 3 to 6 months. Visit BISSELL.com for Model 1650 filter
replacements.
Twist filter
counter-clockwise to
unlock and remove
from vacuum.
With dirt container
removed, pull tab up to
access post-motor filter.
43
Lift to remove filter.
When reassembling, place
filter back in unit and twist
clockwise to “click” into place.
The pleated filter may NOT be
washed. If dust/debris
accumulates, gently tap the filter
on inside of a trash bin.
www.BISSELL.com
13
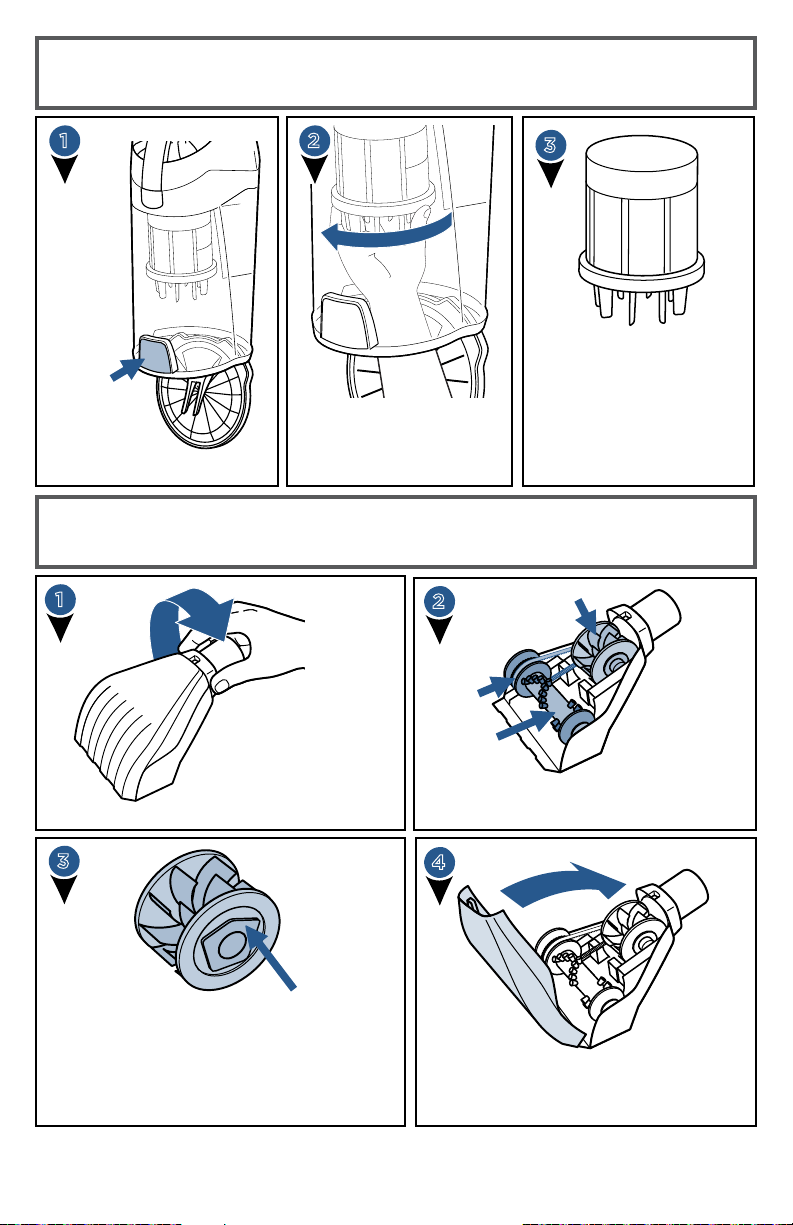
Cleaning Inner Cyclone Separator
1
Push Empty
Tank Button
to access
Inner Cyclone
Separator.
2
Twist counter-clockwise
to remove seperator
from dirt container and
pull down.
3
Tap separator against
inside of trash bin and
rinse under warm water if
necessary. Be sure to let
it completely dry before
placing back in Dirt
Container.
Maintain the Pet TurboEraser® Tool
1
2
Belt
Paddle Wheel
Twist gray collar
counter-clockwise, until
slot appears, and then
separate faceplate.
3
To reassemble, align two clips on each end
of paddle wheel with belt on and pop back
into place.
Place brush roll with belt back in.
Faceplate will not close properly if all parts
are not aligned correctly.
www.BISSELL.com
14
Roller
Remove brush roll, belt, and paddle
wheel. Inspect for damages and replace
if necessary.
4
To put faceplate back on, align the tabs
in the top of the cover and place it down
to “click” into place.
Replace the Brush & Belt
1
Unplug vacuum, turn over and
unscrew 9 Silver Phillips head
screws to remove bottom
cover.
4
1. Place belt back on brush roll.
2. Pinch belt around brush roll & hook
back around the silver motor gear.
2
Pull roller straight out
and slide belt off motor
gear. Replace roller and/
or belt.
3. Rotate brush roll into place and line up
end caps.
4. Re-attach bottom cover with 9 screws.
3
1. Inspect brush roll by
placing it on its end and
spin. The brush roll should
spin freely, multiple times
by one flick. If it doesn’t,
replace brush roll.
2. Inspect belt, replace if it
appears damaged.
NOTE: If an object becomes lodged in foot and brush shuts o, turn vacuum
o and unplug from electrical outlet. Remove obstruction and brush will
automatically reset when vacuum is plugged and turned back on.
Parts & Supplies
For Parts and Supplies, go to www.BISSELL.com and enter
your model number in the search field.
www.BISSELL.com
15

Troubleshooting
WARNING
To reduce the risk of electric shock, turn power switch o
and disconnect plug from electrical outlet before performing
maintenance or troubleshooting checks.
Problem Possible causes Remedies
Brush roll switch is turned off Make sure Brush roll switch is on
Brush roll
doesn’t rotate
Vacuum is locked in upright
position
Vacuuming on Premium Soft
Carpet
Brush roll safety feature
triggered (blue changes to red
light illuminating around height
adjustment knob)
Brush roll has lodged debris or
other entanglements, keeping the
brush from rotating
Vacuum Suction Knob is in “hose/
tool suction” mode
Filters are dirty Remove and rinse pre-motor filters.
There is a clog in the vacuum Remove debris and any other
Recline vacuum and switch on the Brush
roll
Turn Height Adjustment Knob to the
“high carpet” setting. Turn vacuum off
and back on
Unplug, check for debris, and remove the
debris
Unplug, check for debris, and remove the
debris
Turn knob aligning arrow with “Floor
Suction”
Allow enough time for them to dry
properly before reinserting. Remove
and dust off post-motor filter
entanglements that may be
restricting the brush rolls rotation
Vacuum won’t
pick
up dirt
Dirt is
escaping from
the vacuum
Hose won’t
pick up dirt
www.BISSELL.com
16
Dirt Container is not seated
correctly
There is a crack or hole in the
Main Hose
Main Hose is not connected Locate the Main Hose and
There is a clog in the hose or
wand
Hair wrapped around brush roll
Dirt Container is full Empty the Dirt Container
Filters are missing Check to see if all of the Pre-Motor and
Vacuum Suction Knob is in
“Floor Suction” mode
Press the Tank Release to release the
Dirt Container and reseat properly
If there is a crack or hole, order a new
Main Hose from the BISSELL website
reconnect by pushing the hose
connection to secure the latch
Check inside of hose for clogs
by disconnecting from handle.
Disassemble wand and check for clogs
Run vacuum back and forth on clean carpet
several times to release wrapped hair
Post-Motor filters are in place
Turn knob aligning arrow with “hose/
tool suction”

Warranty
This warranty gives you specific legal rights,
and you may also have other rights which
may vary from state to state. If you need
additional instruction regarding this warranty or have questions regarding what it may
cover, please contact BISSELL Consumer
Care by E-mail, telephone, or regular mail
as described below.
Limited Five-Year Warranty
Subject to the *EXCEPTIONS AND
EXCLUSIONS identified below, upon receipt
of the product BISSELL will repair or replace
(with new or remanufactured components
or products), at BISSELL’s option, free of
charge from the date of purchase by the
original purchaser, for five years any
defective or malfunctioning part.
See information below on "If your BISSELL
product should require service".
This warranty applies to product used for
personal, and not commercial or rental
service. This warranty does not apply to
fans or routine maintenance components
such as filters, belts, or brushes. Damage or
malfunction caused by negligence, abuse,
neglect, unauthorized repair, or any other
use not in accordance with the User's Guide
is not covered.
BISSELL IS NOT LIABLE FOR INCIDENTAL
OR CONSEQUENTIAL DAMAGES OF ANY
NATURE ASSOCIATED WITH THE USE OF
THIS PRODUCT. BISSELL’S LIABILITY WILL
NOT EXCEED THE PURCHASE PRICE OF
THE PRODUCT.
Some states do not allow the exclusion or
limitation of incidental or consequential
damages, so the above limitation or
exclusion may not apply to you.
*EXCEPTIONS AND EXCLUSIONS FROM
THE TERMS OF THE LIMITED WARRANTY
THIS WARRANTY IS EXCLUSIVE AND
IN LIEU OF ANY OTHER WARRANTIES
EITHER ORAL OR WRITTEN. ANY IMPLIED
WARRANTIES WHICH MAY ARISE
BY OPERATION OF LAW, INCLUDING
THE IMPLIED WARRANTIES OF
MERCHANTABILITY AND FITNESS FOR
A PARTICULAR PURPOSE, ARE LIMITED
TO THE FIVE YEAR DURATION FROM
THE DATE OF PURCHASE AS DESCRIBED
ABOVE.
Some states do not allow limitations on
how long an implied warranty lasts so the
above limitation may not apply to you.
NOTE: Please keep your original sales receipt. It provides proof of date of
purchase in the event of a warranty claim.
Service
If your BISSELL product should require service:
Contact BISSELL Consumer Care to locate a BISSELL Authorized Service Center in your area.
If you need information about repairs or replacement parts, or if you have questions about
your warranty, contact BISSELL Consumer Care.
Website:
www.BISSELL.com
E-mail:
www.BISSELL.com/email-us
Please do not return this product to the store.
Other maintenance or service not included in the manual should be
performed by an authorized service representative.
For any questions or concerns, BISSELL is happy to be of service.
Contact us directly at 1-800-237-7691.
Call:
BISSELL Consumer Care
1-800-237-7691
Monday – Friday 8am - 10pm ET
Saturday 9am - 8pm ET
Sunday 10am - 7pm ET
www.BISSELL.com
17

Register your product today!
Registering is quick, easy and offers you benefits over the lifetime of your product.
You’ll receive:
BISSELL Rewards Points
Automatically earn points for
discounts and free shipping on
future purchases.
Faster Service
Supplying your information now
saves you time should you need to
contact us with questions regarding
your product.
Product Support Reminders
and Alerts
We’ll contact you with any
important product maintenance
reminders and alerts.
Special Promotions
Optional: Register your email
to receive notice of offers,
contests, cleaning tips and more!
Visit www.BISSELL.com/registration!
Visit the BISSELL website: www.BISSELL.com
When contacting BISSELL, have model number of cleaner available.
Please record your Model Number: ___________________
Please record your Purchase Date: ___________________
NOTE: Please keep your original sales receipt. It provides proof of purchase
date in the event of a warranty claim. See Warranty on page 17 for details.
Parts & Supplies
For Parts and Supplies, go to www.BISSELL.com and enter
your model number in the search field.
18
We c’t wait to ar from y!
Rate this product and let us (and millions
of your closest friends) know what you think!
www.BISSELL.com
©2016 BISSELL Homecare, Inc
Grand Rapids, Michigan
All rights reserved. Printed in China
Part Number 161-0602 10/16
Visit our website at: www.BISSELL.com

PETHAIR
®
ERASER
DISEÑADO PARA HOGARES
CON MASCOTAS
GUÍA DE INICIO RÁPIDO/
GUÍA DEL USUARIO
Serie 1650
¿Prefiere ver videos?
Busque este ícono y
conéctese para ver un
video instructivo en
www.BISSELL.com

Guía de inicio rápido
CONSULTE LA PÁGINA 5 PARA LAS INSTRUCCIONES COMPLETAS DE LA GUÍA DEL USUARIO, VISTA DEL PRODUCTO
E IMPORTANTES INDICACIONES DE SEGURIDAD.
Ensamblaje
1
Deslice el
extremo de la
vara en la parte
superior de la
base. Este hará
clic cuando se
haya insertado
correctamente.
“clic”
4
PORTAHERRAMIENTAS SIMPLE
2
Introduzca el extremo de la manguera en la base de
la aspiradora deslizando primero los brazos hacia
adentro y hacia abajo. Presione fuerte la lengüeta
inferior con los dos pulgares hasta que escuche un clic.
O
PORTAHERRAMIENTAS DOBLE
Tiene la opción de almacenar solo el accesorio
para ranuras iluminado con un LED o los dos
accesorios: el accesorio para ranuras y el accesorio para mascotas TurboEraser. Elija el portaherramientas simple o el doble y presione fuerte
para deslizarlo hacia la base de la aspiradora.
RECORDATORIO IMPORTANTE
3
Presione la cubierta del cable
firmemente hasta que escuche
un “clic”.
INSTALE EL FILTRO FEBREZE® OPCIONAL
6
Presione el botón de
liberación de tanque y
jale el contenedor para
retirarlo de la aspiradora.
Jale de la lengüeta hacia afuera
de la parte frontal del contenedor
de suciedad y jale la manija hacia
arriba para abrir el contenedor.
Su aspiradora viene en el modo de limpieza de
pisos. Para utilizar sus herramientas, asegúrese
de encender la perilla de succión de la aspi
radora, alineando la flecha con la inscripción
“Manguera/herramienta de succión”. Consulte
la página 9 para obtener más instrucciones.
Febreze y las marcas relacionadas son propiedad de Procter & Gamble
Company, Cincinnati, Ohio. BISSELL Homecare, Inc. las usa bajo licencia.
-
Saque el filtro de espuma
amarillo (no el Febreze®)
y reemplácelo por el filtro
negro Febreze® (incluido
por separado) en último
lugar. Asegúrese de que
el filtro negro mire hacia
afuera, cubriendo el
filtro de malla blanca.
Vuelva a colocar el
contenedor de suciedad
en la aspiradora.
www.BISSELL.com
2

Creado para dueños de mascotas por dueños de mascotas.
Cyclonic Pet Hair Spooling System™
Cyclonic Pet Hair Spooling System™
Primera aspiradora de BISSELL con Cyclonic Pet Hair
Spooling System™ para un vaciado sin manos.
Un sistema patentado de control del pelo
que enrolla y atrapa el pelo para mantenerlo
alejado de los filtros y de las manos.
Simplemente presione el botón de liberación
y mire cómo cae afuera la bola de pelos de
mascota.
Ya no tiene que meter la mano y sacar los
pelos con disgusto.
Rodillo de cepillo que no se enreda
Recoja el pelo de mascota sin tener que
cortarlo del rodillo del cepillo.
El diseño único del rodillo de
cepillo sin enredos ayuda a
reducir la cantidad de pelo
que envuelve las cerdas y se
enreda, y usa la alfombra para
jalar el pelo del rodillo.
www.BISSELL.com
3
No se complique con los pelos

Nuevas herramientas especializadas para mascotas
Personalice su limpieza con herramientas
intercambiables que se almacenan en el lugar.
Descubra polvo
oculto y pelo de
mascotas con el
accesorio para
ranuras con
iluminación LED que
le permite alcanzar
lugares estrechos.
Lado suave para
limpiar superficies
delicadas y dedos de
goma en el otro lado
para retirar el pelo de
mascota adherido en
escaleras y muebles.
Retire el pelo de
mascotas de
escaleras y muebles
con la herramienta Pet
TurboEraser®.
www.BISSELL.com
4

INSTRUCCIONES IMPORTANTES DE SEGURIDAD
LEA TODAS LAS INSTRUCCIONES ANTES DE USAR SU ASPIRADORA VERTICAL.
Conéctela siempre a un tomacorriente polarizado (una ranura es más ancha que la otra).
Desenchúfela del tomacorriente cuando no esté en uso y antes de realizar el mantenimiento.
Al utilizar un electrodoméstico, siempre deben seguirse las precauciones básicas, incluidas las
siguientes:
ADVERTENCIA
» No deje la aspiradora desatendida
cuando esté enchufada. Cuando
no esté en uso y antes de repararla
desenchúfela del tomacorriente.
» No utilice este electrodoméstico
en exteriores o en superficies
húmedas.
» No permita que se use como un
juguete. Es necesaria una estricta
supervisión cuando los niños
utilicen el electrodoméstico o estén
cerca de él.
» No use este electrodoméstico para
otro fin que no sea el especificado
en esta guía del usuario. Use solo
los accesorios recomendados por
el fabricante.
» No utilice el electrodoméstico si el
enchufe o el cable están dañados.
Si el electrodoméstico no está
funcionando correctamente,
ha sufrido caídas, se ha dañado,
se ha dejado en el exterior o se ha
caído en el agua, llévelo a un cen
tro de servicio autorizado para su
reparación.
» No jale ni transporte del cable,
no use el cable como manija, no
cierre puertas sobre el cable ni
-
PARA DISMINUIR EL RIESGO DE INCENDIO, DESCARGAS ELÉCTRICAS O LESIONES:
jale el cable alrededor de esqui
nas o bordes filosos. No pase el
electrodoméstico sobre el cable.
Mantenga el cable alejado de
superficies calientes.
» No jale del cable para desenchu
farlo. Para desenchufarlo, tome el
enchufe, no el cable.
» No manipule la aspiradora o el
enchufe con las manos mojadas.
» No coloque ningún objeto en las
aberturas. No la use si hay aber
turas bloqueadas. Mantenga las
aberturas libres de polvo, pelusas,
cabellos o cualquier objeto que
pueda reducir el flujo de aire.
» Mantenga el cabello, las ropas
holgadas, los dedos y todas las
partes del cuerpo lejos de las aber
turas y piezas en movimiento.
» Apague todos los controles antes
de enchufar o desenchufar la aspi
radora.
» Tenga sumo cuidado cuando
limpie sobre escaleras.
» No la use para aspirar líquidos
inflamables o combustibles
(líquido para encendedores, gasolina, queroseno, etc.), ni la use en
-
-
áreas en que estos estén presentes.
» No use la aspiradora en un
ambiente cerrado lleno de los
vapores despedidos por pintura
a base de aceite, disolventes de
pintura, algunas sustancias a contra
polillas, polvo inflamable u otros
vapores explosivos o tóxicos.
» No la use para aspirar materiales
tóxicos (blanqueador de cloro,
amoníaco, limpiador para desagüe,
etc.).
» No aspire objetos encendidos o
con humo, tales como cigarrillos,
fósforos o cenizas calientes.
» No la use si los filtros no están en
su lugar.
» No aspire objetos duros o filosos
tales como vidrio, clavos, tornillos,
monedas, etc.
» Úsela solo en superficies secas e
interiores.
» Mantenga el electrodoméstico
sobre una superficie nivelada.
» No transporte la aspiradora
mientras está funcionando.
» Desenchúfela antes de
conectar o desconectar el
accesorio TurboBrush®.
ADVERTENCIA PARA ACCESORIO PARA RANURAS CON ILUMINACIÓN LED
• Precaución: riesgo de incendio y quemaduras. No recargue, desensamble, incinere ni permita que el accesorio
esté a mayor temperatura que 60 °C (140 °F). Mantenga las baterías fuera del alcance de los niños y dentro del
paquete original hasta que estén listas para usar. Deseche rápidamente las baterías usadas.
• Nunca se ponga las baterías en la boca. Si se ingieren, póngase en contacto con su médico o un centro local
de control de envenenamientos.
• Reemplace la batería únicamente con CR1632. EL USO DE OTRA BATERÍA PUEDE REPRESENTAR UN
RIESGO DE INCENDIO O EXPLOSIÓN. Las baterías CR1632 se pueden
comprar en cualquier tienda que venda baterías.
LEA EL MANUAL DEL USUARIO
GUARDE ESTAS INSTRUCCIONES
Este modelo es solo para uso doméstico.
ADVERTENCIA
››
La película plástica puede ser peligrosa. Para evitar el riesgo de sofocación, manténgala alejada de
los niños.
›› No enchufe su aspiradora HASTA no haber comprendido todas las instrucciones y procedimientos de
funcionamiento.
›› Para reducir el riesgo de descarga eléctrica, lleve el interruptor a la posición de apagado y
desconecte el enchufe polarizado del tomacorriente ANTES de realizar mantenimiento a la unidad o
solucionar problemas.
www.BISSELL.com
5

Gracias por comprar una aspiradora BISSELL.
Nos gusta mucho la limpieza y nos emociona compartir uno de nuestros nuevos
e innovadores productos con usted. Queremos asegurarnos de que, en cinco
años, la aspiradora siga funcionando tan bien como hoy. Por lo tanto, esta guía
tiene sugerencias para el uso (páginas 7 a 11), el mantenimiento (páginas 12 a
15) y, si tiene algún inconveniente, la solución de problemas (página 16).
¿Qué hay en la caja?
Accesorio
inferior para
enrollar el
Portaherramientas
(Uso opcional)
cable
doble
Portaherramientas
simple
(Uso opcional)
Guía para el
usuario
Accesorio para
iluminación LED
ranuras con
Filtro Febreze®
(Uso opcional)
Accesorio Pet
TurboEraser®
NOTA: los accesorios estándar pueden variar según el modelo. Para
saber qué incluye su compra, consulte la lista “Contenido de la caja”,
ubicada en la solapa superior de la caja.
Guía de inicio rápido ............2
Una nueva innovación
Solución de problemas..........16
Garantía........................17
para mascotas................3-4
Reparación .....................17
Instrucciones de seguridad......5
Información de contacto........17
Vista del producto ..............7
Registro del producto...........18
Funcionamiento ..............8-11
Piezas y suministros ............18
Mantenimiento y cuidado ....12-15
Base para
aspiradora
Manguera/
Vara
www.BISSELL.com
6

Vista del producto
Caliente
Manija y vara
Manguera
principal
Conector
de manguera
Pestillo de liberación
de la vara
Manija de transporte
Sistema de
liberación
del cable
extractor de polvo interno
Cable
vaciado del tanque
Filtro posmotor
Accesorio
inferior para
enrollar
el cable
Perilla de
ajuste
de altura
Filtros
premotores
Separador del
Contenedor
de suciedad
Botón de
Botón de
liberación
de la manija
de encendido
Botón
de
liberación
del
tanque
Portaherramientas
Perilla de succión
de manguera/vara
y aspiradora
Botón de
cepillo
eléctrico
Botón
Cepillo eléctrico
ESTE ELECTRODOMÉSTICO TIENE UN
ENCHUFE POLARIZADO
Para reducir el riesgo de descarga eléctrica, este electrodoméstico posee
un enchufe polarizado (una pata es más ancha que la otra). Este enchufe
se inserta en un tomacorriente polarizado de una sola manera. Si el enchufe
no encaja por completo en el tomacorriente, inviértalo. Si aún no encaja,
póngase en contacto con un electricista calificado para instalar el
tomacorriente apropiado. No altere el enchufe de ninguna manera.
www.BISSELL.com
Neutro
7

encendido/apagado
del rodillo de cepillo
Ensamblaje
ADVERTENCIA
No enchufe la aspiradora hasta que no comprenda todas las instrucciones y los
procedimientos de funcionamiento.
NOTA:
asegúrese de que la perilla de succión verde que se encuentra en el lateral de la
aspiradora esté en “Succión para piso” antes de utilizar la aspiradora.
21
Interruptor
de encendido/
apagado de energía
Para encender la aspiradora, presione el Interruptor de energía
(I - Encendido y O - Apagado). Presione el interruptor de rodillo
de cepillo para hacer funcionar el cepillo eléctrico con el fin de
limpiar la alfombra (el rodillo del cepillo está encendido cuando
la luz del interruptor está prendida). Consulte la página 15 para
leer sobre el mantenimiento del rodillo del cepillo.
Pise suavemente en la base y jale hacia
atrás la manija para reclinar.
3
Gire la perilla de
ajuste de altura
hasta el nivel de
limpieza de alfombra
deseado.
NOTA: el rodillo del cepillo se apagará automáticamente cuando la
aspiradora esté bloqueada en posición vertical. Reclínela para
reactivarla.
4
Utilice el sujetador en
la parte posterior de la
aspiradora para sostener
la manguera en su lugar.
Jale cuando utilice la
manguera con los
accesorios.
Interruptor de
NOTA: para una limpieza óptima de las alfombras, ajuste la aspiradora en la configuración más baja.
Si le resulta difícil empujar la aspiradora, ajústela en la configuración superior siguiente.
NOTA: en el caso poco probable de que el pelo quede enredado en el rodillo del cepillo, mueva
la aspiradora hacia atrás y hacia adelante en la alfombra limpia varias veces. Esto ayudará a sacar
cualquier pelo enredado.
NOTE: apague el rodillo del cepillo cuando esté aspirando fuerte o las superficies delicadas
pueden quedar atrapadas por el cepillo giratorio. Esto puede incluir pisos de madera dura, pisos de
cerámica, pequeñas áreas de alfombras o alfombras de pelo frisado que tienen fibras o hilos largos y
delicados.
www.BISSELL.com
8

Característica de seguridad del cepillo de rodillo
Si una luz roja se prende
1 2
alrededor de la perilla de ajuste
de altura, es porque
ha activado la
característica
de seguridad
del motor
del rodillo
del cepillo.
Puede haberse activado por el uso en
3
una alfombra suave de primera calidad.
Gire la perilla de ajuste de altura hasta
la configuración de “Alfombra
alta”. También verifique si los
desechos están
obstruyendo
el rodillo del cepillo.
Limpie los desechos
si es necesario.
Coloque la aspiradora en
posición vertical y apáguela.
Encienda nuevamente
la aspiradora y vuelva a intentarlo.
Interruptor
de encendido/
apagado de energía
4
Interruptor
de encendido/
apagado de energía
Limpieza por sobre el nivel del piso: manija
21
Para utilizar las herramientas y la manguera/vara,
gire la perilla verde alineando la flecha con la
inscripción “Manguera/herramienta de succión”.
3
Cepillo para mascotas 2
en 1 con cerdas suaves y
blancas para usos suaves y
perillas de goma para pelo
de mascotas incrustado.
Utilice la parte con cerdas
suaves y blancas para
superficies delicadas.
Presione el botón de
liberación para liberar la
manija de la vara.
4
Separe el collar y voltéelo para utilizar los dedos de
goma y eliminar el pelo de mascota de sus muebles.
Debe escuchar 2 clics cuando vuelva a colocarlo.
Una vez que ha finalizado de utilizar la manija, deslice
hacia atrás la vara hasta que haga clic.
Asegúrese de girar la perilla verde de vuelta al
modo “limpieza de piso” luego de utilizar las
herramientas.
Jálela hacia arriba y hacia
afuera.
www.BISSELL.com
9

Limpieza sobre el nivel del piso: vara
1
Para un mayor alcance,
presione hacia abajo el
pestillo de liberación
de la vara y jale de la
manija.
2
Agregue la
herramienta
deseada al
extremo de
la vara.
Limpieza sobre el nivel del piso: manguera
1
Tome el conector
de la manguera,
gire en dirección
contraria a las
manecillas del reloj
y jale la manguera
hacia afuera.
2
Conecte la herramienta
deseada al extremo de la
vara.
3
www.BISSELL.com
10
Coloque nuevamente
la manguera, alinee
las lengüetas y gire
en dirección de las
manecillas del reloj
para fijarla en su lugar.
Asegúrese de que la
liberación de la
manguera esté
en la parte inferior.
NOTA: tanto la herramienta Pet TurboEraser®
y el accesorio para ranuras con iluminación
LED funcionan en cualquiera de los modos
de limpieza de suelo mencionados: manija,
vara o manguera.
NOTA: asegúrese de siempre recordar
girar la perilla verde de vuelta al modo
“limpieza de piso” luego de utilizar las
herramientas.

Accesorio para ranuras con iluminación LED
1
Jale la lengüeta de la cubierta
de la batería antes de usarla
para activarla. Conecte a la
manija, vara o manguera y se
encenderá automáticamente
la luz LED.
2
Para reemplazar la batería LED, afloje el tornillo pequeño
con un destornillador Phillips. Retire la cubierta para visualizar las dos baterías (CR1632 3V). Deslice y retire cada
batería y reemplácelas por baterías nuevas. Asegúrese de
que el signo “+” de la batería esté orientado hacia afuera.
Deseche la batería usada inmediatamente. Mantenga lejos
del alcance de los niños. No desarme las baterías ni las
incinere.
NOTA: cuando la lengüeta pequeña en el punto de conexión del accesorio para ranuras entre
en contacto con la manija, vara o manguera, se enciende la luz LED. Cuando la use con la
vara, asegúrese de que no salga a través de la bertura en el extremo de la vara.
Protección del motor de la aspiradora
Su aspiradora posee un protector térmico interno diseñado para protegerla del sobrecalentamiento.
Si se activa el protector térmico, el motor principal de la aspiradora dejará de funcionar. Si esto ocurre,
haga lo siguiente.
1
APAGUE la aspiradora y desconéctela del tomacorriente.
Busque la fuente del problema de sobrecalentamiento
2
(por ejemplo, recipiente de suciedad lleno, filtros sucios
o una obstrucción) y proceda según las instrucciones de
mantenimiento.
3
Cuando el motor se enfría por aproximadamente 30 minutos,
el protector térmico se reinicia automáticamente y se puede
continuar con la limpieza. Si la aspiradora no se enciende o
el protector térmico se sigue activando, es posible que su
aspiradora necesite reparación. Llame a Atención al
Consumidor de BISSELL.
NOTA: el protector térmico solo controla el motor principal
de la aspiradora, no controla el motor del cepillo. Si el
protector térmico se activa, el cepillo continuará funcionando
normalmente pero sin succión.
Filtro
Filtro
Posibles zonas que se pueden
obstruir.
www.BISSELL.com
11

Retirar/Vaciar el tanque de suciedad
ADVERTENCIA
Para reducir el riesgo de descarga eléctrica, apague el interruptor de energía y desconecte el enchufe
polarizado del tomacorriente antes de realizar mantenimiento a la unidad o solucionar problemas.
1 2
Presione el botón de
liberación del tanque.
Tome la manija para
extraer el contenedor
de suciedad de la
aspiradora.
El tanque de la aspiradora está lleno.
Es hora de vaciarlo.
3
Mientras sostiene
el contenedor de
suciedad sobre un
cesto para basura,
presione el botón de
vaciado de tanque.
Vuelva a conectar la
parte inferior en su
lugar.
4
Vuelva a colocar
el tanque en la
aspiradora.
Asegúrese de
colocar el frente
del tanque primero
y presione para
que haga clic al
acomodarse en su
sitio.
ADVERTENCIA
No use la aspiradora con filtros húmedos o mojados. Deje secar los componentes antes de reensamblar
el contenedor de suciedad.
ADVERTENCIA
Antes de usar la aspiradora, asegúrese de que el contenedor de suciedad esté en la posición de
bloqueo y que ambos filtros, premotor y posmotor, estén en su lugar. NO utilice su aspiradora
sin estos filtros.
Piezas y suministros
Si necesita piezas y suministros, visite www.BISSELL.com e ingrese su número de
modelo en el campo de búsqueda.
www.BISSELL.com
12

Limpieza y reemplazo de los filtros premotor superiores
1
Presione el botón de
liberación del tanque
y retire el tanque de la
aspiradora.
3
Jale los filtros
premotores de
la parte superior
del contenedor
de suciedad
para retirarlos.
2
Jale de la lengüeta
que se encuentra
frente al contenedor
de suciedad y jale la
manija hacia arriba
para abrir la
ubicación del filtro.
24
Tanto el filtro de malla como el
de espuma son lavables.
Limpie con detergente suave,
enjuague y retire todo exceso
de agua. Deje que los filtros se
sequen completamente antes
de volver a insertarlos.
Coloque los filtros premotores
secos nuevamente en la parte
h
superior del contenedor de
suciedad, colocando en
último lugar el filtro de
espuma gruesa.
Limpieza y reemplazo de los filtros posmotor inferiores
21
Presione el botón
de liberación del
tanque y retire el
tanque de la
aspiradora.
Gire el filtro en
dirección contraria
a las manecillas
del reloj para
desbloquearlo
y retírelo de la
aspiradora.
Después de retirar el
tanque sucio, levante la
lengüeta para acceder el
filtro posterior del motor.
43
Levante para retirar el filtro.
Para rearmarlo, coloque el filtro
nuevamente en la unidad y gire en
dirección de las manecillas del reloj
hasta escuchar un “clic”.
El filtro plisado NO debe lavarse.
Si el polvo o los desechos se acumulan,
golpee suavemente el filtro en el
interior de un cesto para la basura.
NOTA: remplace este filtro de carbón cada 3 a 6 meses. Visite BISSELL.com para solicitar
reemplazos del filtro del modelo 1650.
www.BISSELL.com
13

Limpieza del separador extractor de polvo interno
1
Presione
el botón de
vaciado de
tanque para
acceder al
separador del
extractor de polvo interno.
2
Gire en dirección contraria a
las manecillas del reloj para
retirar el separador del
contenedor de suciedad
y jale hacia abajo.
3
Golpee suavemente el
separador contra el interior
del cesto para la basura y
enjuague con agua caliente
si es necesario. Deje secar
completamente antes de
volver a colocar en el
contenedor de suciedad.
Mantenimiento: reemplace el cepillo y la correa
1
Gire el collar gris en
dirección contraria a
las manecillas del reloj
hasta que aparezca la
ranura y luego separe
la placa frontal.
2
Correa
Rodillo
Extraiga el rodillo del cepillo, la correa y
la rueda de la paleta. Inspeccione si hay
daños y haga reemplazos si es necesario.
Rueda de la paleta
3
Para reensamblar, alinee dos sujetadores en
cada extremo de la rueda de la paleta con
la correa puesta y colóquelo de nuevo en su
lugar.
Coloque el rodillo del cepillo con la correa
nuevamente en su posición. La placa frontal
no cerrará bien si una de las piezas no está
alineada correctamente.
www.BISSELL.com
14
4
Para colocar nuevamente la placa frontal,
alinee las lengüetas en la parte superior de
la cubierta y colóquela hacia abajo hasta
escuchar un “clic”.

Mantenimiento: reemplace el cepillo y la correa
1
Desenchufe la aspiradora,
voltéela y desatornille los 9
tornillos con cabezal Phillips
para retirar la cubierta inferior.
2
Jale hacia afuera el
rodillo y deslice la
correa fuera del
engranaje del motor.
Remplace el rodillo
o la correa.
4
1. Coloque la correa nuevamente en el rodillo
del cepillo.
2. Apriete la correa alrededor del rodillo del
cepillo y engánchela nuevamente alrededor
del engranaje del motor plateado.
3
1. Inspeccione el rodillo del cepillo
colocándolo en su extremo y girándolo. El rodillo del cepillo debería
girar libremente varias veces con
solo un golpecito. Si no lo hace,
remplace el rodillo del cepillo.
2. Inspeccione la correa, reemplace
si parece estar dañada.
3. Rote el rodillo del cepillo para acomodarlo en
su sitio y alinee las tapas de extremo.
4. Vuelva a colocar la placa de la base con 9
tornillos.
NOTA: si un objeto queda atrapado en la base y el cepillo se apaga, apague la
aspiradora y desenchúfela del tomacorriente. Retire las obstrucciones y el cepillo
se reiniciará automáticamente cuando la aspiradora se enchufe y vuelva a
encenderse.
Piezas y suministros
Si necesita piezas y suministros, visite www.BISSELL.com e ingrese su número de
modelo en el campo de búsqueda.
www.BISSELL.com
15

Solución de problemas
ADVERTENCIA
de alimentación y desconecte el enchufe del tomacorriente antes de
realizar mantenimiento o solución de problemas a la unidad.
Problema Causas posibles Soluciones
Para reducir el riesgo de descargas eléctricas, apague el interruptor
El rodillo del
cepillo no gira
La aspiradora no
aspira la suciedad
El interruptor del rodillo de cepillo se apagó. Asegúrese de que el interruptor del rodillo del
La aspiradora está bloqueada en posición
vertical.
Se está intentando aspirar en una alfombra
suave de primera calidad.
La característica de seguridad del rodillo de
cepillo se activó (la luz azul se convierte en
roja e ilumina alrededor de la perilla de ajuste
de altura).
El rodillo de cepillo tiene suciedad atascada
o algunos enredos, lo que evita que el cepillo
gire.
La perilla de succión de la aspiradora se
encuentra en el modo “manguera/
herramienta de succión”.
Los filtros están sucios. Retire y enjuague los filtros premotor. Espere
Hay una obstrucción en la aspiradora. Elimine la suciedad y cualquier enredo que
El contenedor de suciedad no está
colocado correctamente.
Hay una fisura u orificio en la manguera
principal.
La manguera principal no está conectada. Ubique la manguera principal y vuelva a
Hay una obstrucción en la manguera o
vara.
Hay pelo enredado en el rodillo del cepillo. Lleve la aspiradora hacia atrás y adelante en
cepillo esté en posición de encendido.
Recline la aspiradora y encienda el rodillo del
cepillo.
Gire la perilla de ajuste de altura hasta la
configuración de “alfombra alta”. Apague la
aspiradora y vuelva a encenderla.
Desconecte la aspiradora, revise si hay desechos
y elimínelos.
Desconecte la aspiradora, revise si hay desechos
y elimínelos.
Gire la perilla alineando la flecha con la
inscripción “Limpieza de pisos”.
lo suficiente para que se sequen bien antes
de volver a insertarlos. Retire y limpie el filtro
postmotor.
pudiera limitar la rotación.
Presione el botón de vaciado para liberar el
contenedor de suciedad y vuelva a colocarlo de
forma adecuada.
Si hay una fisura o un orificio, pida una nueva
manguera principal desde la página web de
BISSELL.
conectarla presionando la conexión para
asegurar el pestillo.
Verifique que no haya obstrucciones en el
interior de la manguera desconectándola de
la manija. Desensamble la vara y revise que no
haya obstrucciones.
la alfombra limpia varias veces para eliminar el
pelo enredado.
La suciedad
se sale de la
aspiradora
La manguera no
aspira la suciedad
www.BISSELL.com
16
El contenedor de suciedad está lleno. Vacíe el contenedor de suciedad.
No están colocados los filtros. Revise si todos los filtros premotor y posmotor se
La perilla de succión se encuentra en el
modo “limpieza de piso”.
encuentran en su lugar.
Gire la perilla alineando la flecha con la inscripción “manguera/herramienta de succión”.

Garantía
Esta garantía le otorga derechos legales específicos y
usted podría tener también otros derechos que pueden
variar de estado a estado. Si necesita instrucciones
adicionales con respecto a esta garantía o tiene
preguntas sobre lo que esta cubre, póngase en
contacto con Atención al Consumidor de BISSELL
por correo electrónico, teléfono o correo regular
como se describe a continuación.
Garantía limitada de cinco años
Sujeta a las *EXCEPCIONES Y EXCLUSIONES
detalladas a continuación, presentando el
comprobante de compra del producto, BISSELL
reparará o reemplazará (con componentes o productos
nuevos o refabricados) a discreción de BISSELL, sin
costo para el comprador original a partir de la fecha de
compra y durante cinco años, cualquier pieza
defectuosa o con mal funcionamiento.
Vea la información a continuación sobre “Si su
producto BISSELL necesita un servicio de
mantenimiento”.
Esta garantía se aplica al producto utilizado para el
servicio personal y no comercial o de alquiler. Esta
garantía no se aplica a los ventiladores o a los
componentes de mantenimiento de rutina como filtros,
correas o cepillos. Los daños o el mal funcionamiento
causados por negligencia, abuso, descuido, reparación
no autorizada o cualquier otro uso que no se ajuste a la
guía del usuario no están cubiertos.
BISSELL NO SERÁ RESPONSABLE POR DAÑOS
ACCIDENTALES O RESULTANTES DE CUALQUIER
NATURALEZA ASOCIADOS CON EL USO DE ESTE
PRODUCTO. LA RESPONSABILIDAD DE BISSELL NO
SUPERARÁ EL PRECIO DE COMPRA DEL PRODUCTO.
Algunos estados no permiten la exclusión o limitación
de los daños accidentales o resultantes, de modo que
es posible que la exclusión o limitación anterior no se
apliquen en su caso.
*EXCEPCIONES Y EXCLUSIONES DE LOS TÉRMINOS
DE LA GARANTÍA LIMITADA
ESTA GARANTÍA ES EXCLUSIVA Y REEMPLAZA A
CUALQUIER OTRA GARANTÍA ORAL O ESCRITA.
CUALQUIER GARANTÍA IMPLÍCITA QUE PUEDA
SURGIR POR UNA OPERACIÓN LEGAL, INCLUYENDO
LAS GARANTÍAS IMPLÍCITAS DE COMERCIABILIDAD
E IDONEIDAD PARA UN PROPÓSITO EN PARTICULAR,
ESTÁ LIMITADA A UNA DURACIÓN DE CINCO AÑOS
A PARTIR DE LA FECHA DE COMPRA, COMO SE
DESCRIBIÓ ARRIBA.
Algunos estados no permiten limitaciones sobre el
tiempo de duración de la garantía implícita, de modo
que la limitación anterior tal vez no se aplique en su
caso.
NOTA: conserve el recibo de venta original. Es el comprobante de la fecha de compra en
caso de un reclamo de garantía.
Reparación
Si su producto BISSELL necesita un servicio:
Póngase en contacto con Atención al Consumidor de BISSELL para ubicar un centro de servicio
autorizado de BISSELL en su área.
Si necesita información sobre reparaciones o piezas de repuesto, o si tiene preguntas sobre la garantía,
póngase en contacto con Atención al Consumidor de BISSELL.
Sitio Web:
www.BISSELL.com
Correo electrónico:
www.BISSELL.com/email-us
No devuelva este producto a la tienda.
Un mantenimiento o servicio no incluido en el manual debe ser realizado por un representante de
servicio autorizado.
Si tiene alguna pregunta o duda, en BISSELL le ayudaremos con gusto.
Póngase en contacto con nosotros directamente al 1-800-237-7691.
Llame al:
Atención al Consumidor de BISSELL
1-800-237-7691
Lunes a viernes de 8 a.m. a 10 p.m., hora del Este
Sábados de 9 a.m. a 8 p.m., hora del Este
Domingos de 10 a.m. a 7 p.m., hora del Este
www.BISSELL.com
17

¡Registre su producto hoy!
Registrarse es rápido, fácil y le ofrece beneficios para todo el período de vida útil del producto.
Usted recibirá:
Puntos de recompensa BISSELL
Obtenga automáticamente puntos para
descuentos y entrega a domicilio gratis en
compras futuras.
Servicio más rápido
Si envía la información ahora, ahorrará
tiempo en caso de necesitar ponerse en
contacto con nosotros con preguntas rela
cionadas con el producto.
Recordatorios y alertas del
centro de servicio de productos
Nos pondremos en contacto con usted
ante cualquier recordatorio y alerta
importante relacionada con el
mantenimiento del producto.
Promociones especiales
-
Opcional: registre su correo electrónico para
recibir notificaciones de ofertas,
concursos, consejos de limpieza y más.
Visite www.BISSELL.com/registration
Visite el sitio Web de BISSELL: www.BISSELL.com
Cuando se ponga en contacto con BISSELL, tenga a mano el número de modelo de la aspiradora.
Registre su número de modelo: ___________________
Registre su fecha de compra: ___________________
NOTA: conserve el recibo de venta original. Es el comprobante de la fecha de compra
en caso de un reclamo de garantía. Para obtener más detalles, consulte la garantía en
la página 17.
Piezas y suministros
Si necesita piezas y suministros, visite www.BISSELL.com e ingrese su número de
modelo en el campo de búsqueda.
18
¡Queremos ner noticias suyas!
Califique este producto y cuéntenos (a nosotros
y a millones de sus amigos cercanos) su opinión.
www.BISSELL.com
©2016 BISSELL Homecare, Inc.
Grand Rapids, Michigan
Todos los derechos reservados. Impreso en China.
Número de pieza 161-0602 10/16
Visite nuestro sitio Web en: www.BISSELL.com

PETHAIR
®
ERASER
CONÇU POUR LES DEMEURES
OÙ VIVENT
GUIDE DE DÉMARRAGE
RAPIDE ET GUIDE DE
L’UTILISATEUR
Série 1650
DES ANIMAUX
Vous préférez les
vidéos? Cherchez
cette icône et
visionnez une vidéo
de démonstration
en ligne à l’adresse
www.BISSELL.com

Guide de démarrage rapide
REPORTEZ-VOUS À LA PAGE 8 POUR LES INSTRUCTIONS COMPLÈTES D’UTILISATION, UNE VUE DU PRODUIT ET LES
AVIS DE SÉCURITÉ IMPORTANTS.
Assemblage
1
Faites glisser
l’extrémité du
manche dans la
partie supérieure
de la base.
Vous entendrez
un déclic s’il
est inséré
correctement.
«clic»
4
SUPPORT
À OUTILS
SIMPLE
2
Insérez le bout du tuyau dans la base de l’aspirateur en faisant d’abord glisser les bras vers le bas.
Appuyez solidement sur la languette inférieure
avec vos pouces jusqu’à ce qu’elle s’enclenche.
OU
SUPPORT
À OUTILS DOUBLE
Vous avez la possibilité de ranger uniquement
le suceur plat à lumière DEL ou cet accessoire
et l’outil Pet TurboEraser pour poils d’animaux.
Poussez fermement sur le support à outils simple
ou le support à outils double pour le faire glisser
sur la base de l’aspirateur.
RAPPEL IMPORTANT
3
Poussez fermement le
rembobineur de cordon
jusqu’à ce que vous
entendiez un déclic.
INSTALLATION DU FILTRE FEBREZE® FACULTATIF
6
Appuyez sur le bouton de
dégagement du réservoir
et tirez sur le godet en
l’éloignant de l’aspirateur.
Tirez la languette située sur le
devant du godet à poussière vers
l’extérieur et tirez la poignée vers
le haut pour ouvrir le godet.
Retirez le filtre en
mousse jaune (autre
que le filtre Febreze®)
et remplacez-le par
le filtre Febreze® noir
(inclus séparément).
Assurez-vous que le
filtre noir est placé
Par défaut, votre aspirateur est réglé en mode de
nettoyage de planchers. Pour utiliser les outils,
assurez-vous de tourner le bouton d’aspiration de
l’aspirateur en plaçant la flèche vis-à-vis du mode
« hose/tool suction » (aspiration par le tuyau et
un outil). Consultez la page 9 pour obtenir des
instructions supplémentaires.
La marque Febreze et les marques de commerce reliées sont la propriété de Procter & Gamble Company,
Cincinnati, Ohio et sont utilisées sous licence par BISSELL Homecare, Inc.
vers l’extérieur et qu’il
est par-dessus le filtre
à tamis blanc.
Remettez le godet en
place sur l’aspirateur.
www.BISSELL.com
2

Conçu pour les propriétaires d’animaux, Conçu par les propriétaires d’animaux.
Cyclonic Pet Hair Spooling System™
Voici le premier aspirateur BISSELL muni du Cyclonic
Pet Hair Spooling System™ (système à enroulement
cyclonique des poils d’animaux), qui permet de vider
l’appareil en gardant les mains libres.
Ce système de gestion des poils breveté enroule et
retient les poils afin d’éviter qu’ils entrent en con-
tact avec les filtres et avec vos mains.
Appuyez simplement sur le bouton de
dégagement pour faire tomber la boule
de poils d’animaux.
Vous n’avez plus à vous fatiguer pour retirer
l’amas de poils et de saletés.
Rouleau à brosse non emmêlant
Ramassez les poils d’animaux sans avoir à les couper
pour les retirer de votre rouleau à brosse.
La conception unique du rouleau
à brosse non emmêlant réduit la
quantité de poils qui s’enroulent
autour des soies du rouleau et qui
s’y accrochent, et permet de les
retirer à l’aide de la moquette.
www.BISSELL.com
3
Fini les ennuis : ne coupez PLUS les poils!

Nouveaux outils spécialisés pour les animaux
Personnalisez votre nettoyage grâce aux outils
interchangeables à portée de main.
Atteingnez la
saleté et les
poils d’animaux
dissimulés grâce
au suceur plat
illuminé par DEL
qui vous permet
d’atteindre les
espaces étroits.
Le côté souple sert à
épousseter les surfaces
délicates et celui doté de
bosses en caoutchouc
permet d’éliminer les
poils d’animaux incrustés
sur les meubles et les
escaliers.
Débarrassez-vous des
poils sur les meubles
et les escaliers avec
aisance grâce à l’outil
TurboEraser® pour poils
d’animaux.
www.BISSELL.com
4

CONSIGNES DE SÉCURITÉ IMPORTANTES
LISEZ TOUTES LES INSTRUCTIONS AVANT D’UTILISER VOTRE ASPIRATEUR VERTICAL.
Branchez-le toujours sur une prise polarisée (une fente est plus large que l’autre). Débranchez
l’appareil de la prise lorsque vous ne l’utilisez pas et avant d’en effectuer l’entretien. Lorsque
vous utilisez un appareil électrique, vous devez suivre, entre autres, les consignes de sécurité
élémentaires suivantes :
AFIN DE RÉDUIRE LES RISQUES D’INCENDIE, DE CHOC ÉLECTRIQUE OU DE
AVERTISSEMENT
» Ne laissez pas l’aspirateur sans
surveillance lorsqu’il est branché.
Débranchez l’appareil de la prise
lorsque vous ne l’utilisez pas et avant
d’en effectuer l’entretien.
» N’utilisez pas l’appareil à l’extérieur ni
sur des surfaces mouillées.
» Cet appareil ne doit pas être utilisé
comme un jouet. Une surveillance
étroite est de rigueur lorsque
l’appareil est manipulé par des enfants
ou à proximité de ces derniers.
» N’utilisez pas cet appareil pour un
usage autre que celui décrit dans le
présent guide de l’utilisateur. Utilisez
uniquement les pièces
recommandées par le fabricant.
» N’utilisez pas l’appareil si le
cordon d’alimentation ou la fiche
sont endommagés. Si l’appareil ne
fonctionne pas bien, s’il est tombé
sur le sol ou dans l’eau, s’il est
endommagé ou s’il est resté à
l’extérieur, faites-le réparer par un
centre de service autorisé.
» Évitez de tirer sur le cordon
d’alimentation, de transporter
l’appareil par le cordon, d’utiliser le
cordon comme poignée, de coincer
le cordon dans une porte ou de faire
passer le cordon autour d’un rebord
BLESSURE :
ou d’un coin coupant. Évitez de
passer l’appareil sur le cordon. Tenez
le cordon d’alimentation loin des
surfaces chaudes.
» Évitez de le débrancher en tirant
sur le cordon d’alimentation. Pour le
débrancher, saisissez la fiche et non le
cordon d’alimentation.
» Ne touchez pas à la fiche ni à
l’aspirateur lorsque vous avez les
mains humides.
» Ne placez aucun objet dans les
ouvertures. N’utilisez pas l’appareil
lorsque les ouvertures sont bloquées.
Assurez-vous que les ouvertures sont
exemptes de poussière, de peluches,
de cheveux ou de tout objet qui
pourrait réduire le débit d’air.
» Gardez les cheveux, les vêtements
amples, les doigts et toutes les parties
du corps loin des ouvertures et des
pièces mobiles.
» Fermez toutes les commandes avant
de brancher ou de débrancher
l’aspirateur.
» Redoublez de vigilance lorsque vous
nettoyez des escaliers.
» N’aspirez pas de matériaux
inflammables ou combustibles (de
l’essence à briquet, de l’essence,
du kérosène, etc.) et n’utilisez pas
l’appareil dans des zones où ces
matériaux peuvent être présents.
» N’utilisez pas l’aspirateur dans un
endroit fermé où il y a des particules
inflammables, des vapeurs de
peinture à l’huile, de diluant ou d’un
traitement antimite ou toute autre
vapeur explosive ou toxique.
» N’aspirez pas de matériaux toxiques
(agent de blanchiment chloré,
ammoniac, produit de débouchage,
etc.).
» N’aspirez jamais d’objets brûlants
ou fumants, par exemple une cigarette, une allumette ou des cendres
chaudes.
» N’utilisez pas l’appareil si les filtres
ne sont pas en place.
» N’aspirez pas d’objets durs ou
tranchants comme du verre, des
clous, des vis, de la monnaie, etc.
» Utilisez l’appareil uniquement à
l’intérieur, sur des surfaces sèches.
» Entreposez l’appareil sur une surface
plane.
» Évitez de soulever l’aspirateur lorsqu’il
est en marche.
» Débranchez l’appareil avant de
brancher ou de débrancher la brosse
TurboBrush®.
AVERTISSEMENT CONCERNANT LE SUCEUR PLAT À LUMIÈRE DEL
• Attention : Risque d’incendie et de brûlure. Évitez de recharger, de démonter, de chauffer à plus de 60 °C
(140 °F) ou d’incinérer l’article. Tenez les piles hors de la portée des enfants et gardez-les dans leur emballage
original jusqu’au moment de l’utiliser. Débarrassez-vous rapidement des piles usagées.
• Ne mettez jamais de piles dans la bouche. En cas d’ingestion, communiquez avec un médecin ou avec le
centre antipoison local.
• Remplacez la pile uniquement par une pile CR1632. L’UTILISATION D’UNE AUTRE PILE PEUT
PRÉSENTER UN RISQUE D’INCENDIE OU D’EXPLOSION. Les piles CR1632 peuvent
être achetées partout où l’on vend des piles.
LISEZ LE GUIDE D’UTILISATION
CONSERVEZ CES INSTRUCTIONS
Ce modèle est conçu pour un usage domestique seulement.
AVERTISSEMENT
››
La pellicule de plastique peut être dangereuse. Gardez-la hors de la portée des enfants pour prévenir
les risques de suocation.
›› Ne branchez pas l’aspirateur AVANT de bien connaître toutes les directives et le mode d’emploi qui
s’y rattachent.
›› Pour réduire les risques d’incendie ou de choc électrique, placez l’interrupteur en position d’arrêt et
débranchez la fiche polarisée de la prise AVANT de réparer l’appareil ou d’en eectuer l’entretien.
www.BISSELL.com
5

Merci d’avoir acheté un aspirateur BISSELL!
Nous adorons nettoyer et sommes heureux de partager l’un de nos nouveaux
produits innovateurs avec vous. Comme nous voulons nous assurer que votre
aspirateur fonctionnera aussi bien aujourd’hui que dans cinq ans, ce guide
contient des conseils d’utilisation (page 7 à 11), d’entretien (page 12 à 15) et,
en cas de problème, de dépannage (page 16).
Contenu de la boîte
Rembobineur
de cordon
inférieur
Support à outils
double
(Utilisation facultative)
Guide de
l’utilisateur
Support à outils
simple
(Utilisation facultative)
Suceur plat à
lumière DEL
Filtre Febreze®
(Utilisation facultative)
Outil TurboEraser®
pour poils
d’animaux
REMARQUE : Les accessoires standard peuvent varier selon le modèle. Pour
savoir quels accessoires devraient être inclus à l’achat, veuillez consulter la liste «
Contenu de l’emballage » située sur le rabat supérieur de l’emballage.
Guide de démarrage rapide .....2
Innovation pour les
Dépannage.....................16
Garantie........................17
propriétaires d’animaux .......3-4
Réparation .....................17
Consignes de sécurité .......... 5
Coordonnées...................17
Vue du produit .................7
Enregistrement du produit ......18
Fonctionnement..............8-11
Pièces et accessoires ...........18
Entretien ....................12-15
Base de
l’aspirateur
Tuyau et
manche
www.BISSELL.com
6

Vue du produit
Chargée
Raccord de tuyau
Tuyau
principal
Loquet de déblocage
du manche
Poignée et manche
Bouton de
dégagement
du réservoir
Poignée de transport
Bouton de
dégagement
de la poignée
Interrupteur
Interrupteur
de la
brosse
PowerBrush
Dispositif de
déverrouillage
du cordon
Godet à poussière
Cordon
Rembobineur
de cordon
inférieur
de réglage
de la hauteur
Filtres
prémoteur
Séparateur
cyclonique
intérieur
Bouton de
vidange
du réservoir
Filtre postmoteur
Bouton
Brosse PowerBrush
CET APPAREIL EST MUNI D’UNE
FICHE POLARISÉE
Afin de réduire les risques de choc électrique, cet appareil est muni
d’une fiche polarisée (une lame est plus large que l’autre). Cette fiche
ne peut être branchée sur une prise polarisée que dans un sens. Si la fiche
ne s’enfonce pas complètement dans la prise, essayez dans l’autre sens.
Si elle ne s’y enfonce toujours pas, faites appel à un électricien qualifié
pour installer une prise appropriée. Ne modifiez la prise d’aucune façon.
Support
à outils
Bouton d’aspiration
par le tuyau ou
l’aspirateur
Neutre
www.BISSELL.com
7

Rouleau à brosse
Fonctionnement
AVERTISSEMENT
Ne branchez pas l’aspirateur avant de bien connaître toutes les directives et le mode
d’emploi qui s’y rattachent.
REMARQUE : Assurez-vous que le bouton d’aspiration vert sur le côté de l’aspirateur est en
position « Floor Suction » (aspiration sur un plancher) avant l’utilisation.
21
Interrupteur
marche-arrêt
Posez délicatement votre pied sur la base et
tirez sur la poignée pour incliner l’aspirateur.
3
Tournez le bouton de
réglage de la hauteur
jusqu’au niveau de
nettoyage de
moquette
désiré.
Alimentation
Interrupteur
marche-arrêt
Allumez l’aspirateur en appuyant sur l’interrupteur (I – marche
et O – arrêt). Appuyez sur l’interrupteur du rouleau à brosse
pour mettre la brosse PowerBrush en mode de nettoyage de la
moquette (
du rouleau à brosse). (La lumière de l’interrupteur s’allume pour
indiquer que le rouleau à brosse est en marche).
Consultez la page 15 pour l’entretien du rouleau à brosse.
REMARQUE : Le rouleau à brosse s’éteint automatiquement lorsque l’aspirateur est verrouillé en position verticale; inclinez-le pour le remettre
en marche.
I
– arrêt du rouleau à brosse et O – mise en marche
4
Utilisez l’attache à l’arrière
de l’aspirateur pour maintenir le boyau en place.
Retirez-la lorsque vous
utilisez le boyau avec les
accessoires.
REMARQUE : Pour un meilleur rendement en matière de nettoyage, réglez le niveau le plus bas
possible selon vos besoins. Si votre aspirateur est dicile à pousser, utilisez le prochain réglage plus
élevé.
REMARQUE : Dans le cas peu probable où des poils s’enroulent autour du rouleau à brosse, passez l’aspirateur dans
un mouvement de va-et-vient à plusieurs reprises sur une moquette propre. Vous dégagerez ainsi les poils enroulés.
REMARQUE : Éteignez le rouleau à brosse lorsque vous passez l’aspirateur sur des surfaces dures ou délicates
qui peuvent se prendre dans la brosse rotative. Cela pourrait comprendre le bois franc, le carrelage, les
carpettes ou les tapis frisés dotés de fibres ou de fils longs et délicats.
www.BISSELL.com
8

Dispositif de sécurité du rouleau à brosse
Si la lumière rouge s’allume
1 2
autour du bouton de réglage
de la hauteur, cela signifie que
vous avez déclenché le
dispositif de
sécurité du
moteur du
rouleau à
brosse.
Le déclenchement peut être causé
3
par l’utilisation sur une moquette
moelleuse de première qualité.
Tournez le bouton de réglage
de la hauteur au réglage
« high carpet »
(moquette épaisse).
Vérifiez aussi si des
débris obstruent le
rouleau à brosse.
Enlevez-les au besoin.
Alimentation
marche-arrêt
Interrupteur
Placez l’aspirateur en position verticale et
éteignez-le.
4
Alimentation
marche-arrêt
Interrupteur
Remettez l’aspirateur en marche et
essayez de nouveau.
Nettoyage en hauteur : poignée
21
Pour utiliser les
outils et le tuyau, tournez le bouton vert en
plaçant la flèche vis-à-vis du mode « hose/tool
suction » (aspiration par le tuyau et un outil).
3
La brosse pour poils d’animaux 2 en 1 est dotée de
soies blanches souples pour
les surfaces délicates et de
bosses en caoutchouc pour
les poils d’animaux incrustés.
Utilisez le côté de la bague
présentant des soies blanches
souples pour les surfaces délicates.
Appuyez sur le bouton de
dégagement de la poignée
pour détacher celle-ci du
manche.
4
Détachez la bague et tournez-la sur elle-même
pour utiliser les bosses en caoutchouc servant à
débarrasser vos meubles des poils d’animaux.
Vous devriez entendre 2 déclics lorsque vous la
fixez de nouveau.
Assurez-vous de tourner le bouton vert pour le
remettre en position « Floor Suction » (aspiration
sur un plancher) après avoir utilisé les outils.
Retirez-la en tirant
vers le haut.
www.BISSELL.com
9

Nettoyage en hauteur : tuyau
1
Saisissez le raccord de
tuyau, tournez-le dans
le sens contraire des
aiguilles d’une montre
et tirez sur le tuyau.
2
Fixez
l’accessoire
désiré à
l’extrémité
du manche.
Nettoyage en hauteur : tuyau
1
Saisissez le raccord de
tuyau, tournez-le dans
le sens contraire des
aiguilles d’une montre
et tirez sur le tuyau.
2
Fixez l’accessoire désiré à
l’extrémité du tuyau.
3
www.BISSELL.com
10
Réinsérez le tuyau en
alignant les languettes,
puis tournez-le dans le
sens des aiguilles d’une
montre pour le fixer
en place. Assurez-vous
que le soutien du tuyau
se trouve au bas de
celui-ci.
REMARQUE : L’outil TurboEraser® pour poils
d’animaux et le suceur plat à lumière DEL
conviennent tous deux à tous les modes de
nettoyage en hauteur, que ce soit à l’aide de
la poignée, du manche ou du tuyau.
REMARQUE : Assurez-vous de ne jamais oublier de
tourner le bouton vert pour le remettre en position
« Floor Suction » (aspiration sur un plancher) après
avoir utilisé les outils.

Suceur plat à lumière DEL
1
Tirez la languette hors de la
zone du couvercle du compar
timent à piles avant l’utilisation
afin d’activer l’accessoire.
La lumière à DEL s’allume
automatiquement lorsque
vous raccordez l’accessoire à
la poignée, au manche ou au
tuyau.
-
2
Pour remplacer la pile de la lumière à DEL, dévissez la petite
vis à l’aide d’un tournevis cruciforme. Retirez le couvercle pour
exposer les deux piles (CR1632 3 V). Faites glisser chaque pile,
retirez-la, puis remplacez-la par une nouvelle. Assurez-vous
que le symbole « + » sur la pile est orienté vers l’extérieur.
Débarrassez-vous rapidement des piles usagées. Gardez
l’article hors de la portée des enfants. Ne le démontez pas et
ne le jetez pas au feu.
REMARQUE : La lumière à DEL s’allume lorsque la petite languette sur le point de raccord du suceur
plat entre en contact avec la poignée, le manche ou le tuyau. Lorsque vous utilisez cet accessoire avec
le manche, assurez-vous qu’il ne dépasse pas de l’ouverture située à l’extrémité du manche.
Dispositif de protection du moteur de l’aspirateur
Un dispositif de protection thermique intégré à votre aspirateur le protège contre la surchauffe.
L’activation du dispositif de protection thermique provoque l’arrêt du moteur principal de l’aspirateur.
Si cela se produit, procédez comme suit :
1
Éteignez l’aspirateur et débranchez-le de la prise.
Déterminez la source du problème de surchauffe (godet
2
à poussière plein, filtres sales ou obstruction) et réglez-le
en suivant les instructions pour l’entretien.
3
Le dispositif de protection thermique se réinitialise
automatiquement une fois que le moteur a refroidi
pendant environ 30 minutes. Vous pouvez ensuite reprendre
le nettoyage. Si l’aspirateur ne s’allume pas ou que le dispositif
de protection thermique ne cesse de s’activer, il est possible que
votre aspirateur doive être réparé. Appelez le service
à la clientèle de BISSELL.
REMARQUE : Le dispositif de protection thermique contrôle uniquement
le moteur principal de l’aspirateur, et non le moteur de la brosse. Si le
dispositif de protection thermique s’active, la brosse continuera de
fonctionner normalement; cependant, il n’y aura aucune aspiration.
Filtre
Filtre
Zones qui peuvent s’obstruer.
www.BISSELL.com
11

Retrait et vidange du godet à poussière
AVERTISSEMENT
Pour réduire les risques d’incendie ou de choc électrique, placez l’interrupteur en position d’arrêt et
débranchez la fiche polarisée de la prise avant de réparer l’appareil ou d’en eectuer l’entretien.
1 2
Appuyez sur le bouton
de dégagement de
réservoir. Saisissez la
poignée pour tirer le
godet à poussière en
Le réservoir de l’aspirateur est plein.
Il est temps de le vider!
l’éloignant de
l’aspirateur.
3
Tenez le godet à
poussière au-dessus
d’une poubelle et
appuyez sur le
bouton de vidange.
Enclenchez la partie
inférieure en place.
4
Replacez le
réservoir sur
l’aspirateur.
Assurez-vous de
mettre l’avant du
réservoir en place
avant de pousser
celui-ci vers
l’arrière jusqu’à ce
qu’il s’enclenche.
AVERTISSEMENT
N’utilisez pas l’aspirateur si les filtres sont humides ou mouillés. Laissez les composants sécher avant
de remettre le godet à poussière en place.
AVERTISSEMENT
Avant d’utiliser l’aspirateur, assurez-vous que le godet à poussière est en position verrouillée et que
tous les filtres, les filtres prémoteur comme les fils postmoteur, sont en place. N’utilisez PAS l’aspirateur
sans ces filtres.
Pièces et accessoires
Pour obtenir des pièces et des accessoires, visitez le site www.BISSELL.com et entrez
le numéro de modèle dans le champ de recherche.
www.BISSELL.com
12

Nettoyage et remplacement des filtres prémoteur supérieurs
1
Appuyez sur le bouton
de dégagement du
réservoir et tirez ce
dernier en l’éloignant
de l’aspirateur.
3
Retirez les filtres
prémoteur en
les tirant hors
du couvercle
du godet à
poussière.
2
Tirez la languette
située sur le devant
du godet à poussière
vers l’extérieur et
tirez la poignée vers
le haut pour ouvrir
le compartiment des
filtres
Les filtres prémoteur en filet
et en mousse sont lavables.
Nettoyez-les à l’aide d’un
détergent doux, rincez-les
et évacuez l’excédent d’eau.
Laissez les filtres sécher
complètement avant de les
réinsérer.
24
Remettez les filtres prémoteur
h
secs en place dans la partie
supérieure du godet à
poussière en plaçant le filtre
en mousse épais en dernier.
Nettoyage et remplacement du filtre postmoteur inférieur
21
Appuyez sur le
bouton de dégage
ment du réservoir
et tirez ce dernier
en l’éloignant de
l’aspirateur.
-
Tournez le filtre
dans le sens
contraire des
aiguilles d’une
montre pour le
retirer de
l’aspirateur.
Une fois le godet à
poussiere retiré, tirez la
languette pour accéder au
filtre postmoteur.
43
Soulevez-le pour le retirer.
Lors du remontage, replacez le filtre
dans l’appareil et tournez-le dans le
sens des aiguilles d’une montre jusqu’à
ce qu’il s’enclenche.
Vous ne pouvez PAS nettoyer le filtre
plissé. Si de la poussière ou des débris
s’accumulent, tapotez-le au-dessus
d’une poubelle.
REMARQUE : Remplacez ce filtre tous les 3 à 6 mois. Visitez le site BISSELL.com pour
obtenir des filtres de rechange pour le modèle1650.
www.BISSELL.com
13

Nettoyage du séparateur cyclonique intérieur
1
Appuyez
sur le bouton
de vidange du
réservoir pour
accéder au
séparateur cyclonique intérieur.
2
Tournez le séparateur dans
le sens contraire des aiguilles
d’une montre pour le retirer du
godet à poussière et tirez-le
vers le bas.
3
Frappez le séparateur con
tre l’intérieur d’une poubelle
et rincez-le à l’eau tiède, au
besoin. Assurez-vous de le
laisser sécher complètement
avant de le réinstaller dans
le godet à poussière.
Outil TurboEraser® pour poils d’animaux
1
Tournez le collier gris
dans le sens contraire
des aiguilles d’une
montre jusqu’à ce qu’une
fente devienne visible,
puis détachez la plaque
frontale.
2
Courroie
Retirez le rouleau à brosse, la courroie et la
roue à palettes. Vérifiez si des pièces sont
endommagées et remplacez-les au besoin.
Roue à palettes
Rouleau
-
3
Pour les réassembler, alignez les deux attaches
à chaque extrémité de la roue à palettes à la
courroie en place et remettez le tout en place.
Remettez le rouleau à brosse et la courroie en
place. La plaque frontale ne se ferme pas
correctement si toutes les pièces ne sont pas
alignées de manière adéquate.
www.BISSELL.com
14
4
Alignez les languettes situées sur le dessus
de la plaque frontale pour réinstaller celle-ci,
puis abaissez-la jusqu’à ce qu’elle s’enclenche.

Remplacement de la brosse et de la courroie
1
Débranchez l’aspirateur,
retournez-le et dévissez les 9 vis
cruciformes argentées pour retirer
le couvercle inférieur.
4
1. Remettez la courroie sur le
rouleau à brosse.
2. Placez la courroie autour du rouleau à
brosse et accrochez-la de nouveau autour
de la roue du moteur argentée.
2
Tirez directement le
rouleau pour le retirer et
faites glisser la courroie
pour la dégager de la roue
du moteur. Remettez le
rouleau ou la courroie en
place.
3. Tournez le rouleau à brosse en place
et alignez les capuchons d’extrémité.
4. Réinstallez le couvercle inférieur à
l’aide des 9 vis.
3
1. Inspectez le rouleau à brosse en le
plaçant sur son extrémité et en le
faisant tourner. Le rouleau à brosse
devrait tourner sans difficulté
plusieurs fois en donnant une
poussée. Si ce n’est pas le cas,
remplacez le rouleau à brosse.
2. Inspectez la courroie et remplacezla si elle semble endommagée.
REMARQUE : Si un objet se coince dans le bas de l’appareil et que la brosse
cesse de fonctionner, éteignez l’aspirateur et débranchez-le de la prise. Retirez
ce qui cause l’obstruction et la brosse sera automatiquement réinitialisée lorsque
l’aspirateur sera branché sur la prise et mis en marche.
Pièces et accessoires
Pour obtenir des pièces et des accessoires, visitez le site www.BISSELL.com et entrez
le numéro de modèle dans le champ de recherche.
www.BISSELL.com
15

Dépannage
AVERTISSEMENT Pour réduire les risques de choc électrique, placez l’interrupteur
en position d’arrêt et débranchez la fiche de la prise avant de réparer l’appareil ou d’en eectuer l’entretien.
Problème Causes possibles Solutions
Le rouleau à
brosse ne tourne
pas
L’interrupteur du rouleau à brosse est en
position d’arrêt.
L’aspirateur est verrouillé en position
verticale.
Vous passez l’aspirateur sur une moquette
moelleuse de première qualité.
Le dispositif de sécurité du rouleau à brosse
est activé (la lumière bleue devient rouge
autour du bouton de réglage de la hauteur).
Le rouleau à brosse est obstrué par des
débris ou d’autres enchevêtrements qui
empêchent la brosse de tourner.
Assurez-vous que l’interrupteur du rouleau à
brosse est en position de marche.
Inclinez l’aspirateur et mettez le rouleau à brosse
en marche.
Tournez le bouton de réglage de la hauteur au
réglage « high carpet » (moquette épaisse).
Éteignez l’aspirateur et remettez-le en position
de marche.
Débranchez l’appareil, vérifiez s’il y a des débris
et retirez-les.
Débranchez l’appareil, vérifiez s’il y a des débris
et retirez-les.
L’aspirateur
n’aspire pas la
saleté
De la poussière
s’échappe de
l’aspirateur
Le bouton d’aspiration de l’aspirateur est
en mode « hose/tool suction » (aspiration
par le tuyau et un outil).
Les filtres sont sales. Retirez et rincez les filtres prémoteur. Laissez-les
L’aspirateur est obstrué. Retirez les débris et tout autre enchevêtrement
Le godet à poussière n’est pas bien placé. Appuyez sur le bouton de vidange pour
Le tuyau principal est troué ou fissuré, ou il
n’est pas raccordé.
Le tuyau principal n’est pas raccordé. Repérez le tuyau principal et raccordez-le en
Le tuyau ou le manche sont obstrués. Vérifiez si l’intérieur du tuyau est obstrué en le
Des poils sont enroulés autour du rouleau
à brosse.
Le godet à poussière est plein. Videz le godet à poussière.
Les filtres sont manquants. Vérifiez si tous les filtres prémoteur et postmoteur
Tournez le bouton en plaçant la flèche vis-à-vis
du mode « Floor Suction » (aspiration sur un
plancher)
sécher suffisamment longtemps avant de les
réinsérer. Retirez le filtre postmoteur et éliminez
la poussière qui s’y trouve.
qui pourrait limiter sa rotation.
dégager le godet à poussière, puis réinstallez-le
correctement.
Si le tuyau principal est troué ou fissuré,
commandez-en un nouveau sur le site Web de
BISSELL.
poussant le raccord de tuyau jusqu’à ce que le
loquet s’enclenche.
détachant de la poignée. Démontez le manche
et vérifiez s’il est obstrué.
Passez l’aspirateur dans un mouvement
de va-et-vient sur une moquette propre à
plusieurs reprises pour dégager les poils
enchevêtrés.
sont en place.
Le tuyau n’aspire
pas la saleté
www.BISSELL.com
16
Le bouton d’aspiration de l’aspirateur est
en mode « Floor Suction » (aspiration sur
un plancher).
Tournez le bouton en plaçant la flèche vis-à-vis
du mode « hose/tool suction » (aspiration par
le tuyau et un outil).

Garantie
Cette garantie vous confère des droits précis. Il est
possible que vous disposiez également d’autres droits,
qui varient d’un État ou d’une province à l’autre. Si vous
avez besoin de directives supplémentaires relatives à
cette garantie ou si vous avez des questions au sujet
de ce qu’elle couvre, veuillez communiquer avec le ser
vice à la clientèle de BISSELL par courrier électronique,
par téléphone ou par la poste de la manière décrite
ci-dessous
Garantie limitée de cinq ans
Sous réserve des *EXCEPTIONS ET EXCLUSIONS
stipulées ci-dessous et à condition d’avoir reçu le pro
duit, BISSELL s’engage pendant cinq ans à compter
de la date d’achat par l’acheteur initial à réparer ou
à remplacer (par des pièces ou des produits neufs
ou réusinés), à sa discrétion et sans frais, toute pièce
défectueuse ou défaillante.
Voir ci-dessous la partie intitulée « Si votre produit
BISSELL doit être réparé ».
Cette garantie ne s’applique que si le produit a été utilisé à des fins personnelles, et non à des fins commer
ciales ou locatives. La présente garantie ne s’applique
pas aux ventilateurs ni aux pièces d’entretien de routine
telles que les filtres, les courroies et les brosses. Les
dommages et défaillances causés par de la négligence,
un usage abusif, une réparation non autorisée ou tout
autre motif non conforme au guide de l’utilisateur ne
sont pas couverts.
BISSELL N’EST PAS RESPONSABLE DES DOMMAGES
ACCESSOIRES OU CONSÉCUTIFS DE TOUTE SORTE
RÉSULTANT DE L’UTILISATION DE CE PRODUIT. LA
RESPONSABILITÉ DE BISSELL NE DOIT PAS EXCÉDER
LE PRIX D’ACHAT DU PRODUIT.
Certains États ou certaines provinces ne permettent
pas l’exclusion ou la limitation des dommages acces
soires ou consécutifs, de sorte que les exclusions ou
limitations mentionnées ci-dessus peuvent ne pas
s’appliquer à vous.
-
* EXCEPTIONS ET EXCLUSIONS DES CONDITIONS DE
LA GARANTIE LIMITÉE
CETTE GARANTIE EST EXCLUSIVE ET PRÉVAUT
SUR TOUTE AUTRE GARANTIE, QU’ELLE SOIT
ÉCRITE OU VERBALE. TOUTE GARANTIE IMPLICITE
PAR OBLIGATION D’UNE LOI, Y COMPRIS LES
GARANTIES IMPLICITES DE QUALITÉ MARCHANDE
ET D’APTITUDE À UN USAGE PARTICULIER, EST
LIMITÉE À UNE PÉRIODE DE CINQ ANS À COMPTER
DE LA DATE D’ACHAT, TEL QUE CELA EST STIPULÉ
-
CI-DESSUS.
Certains États ou certaines provinces ne permettent
pas de limitations quant à la durée des garanties
implicites, de sorte que les limitations indiquées
ci-dessus peuvent ne pas s’appliquer à vous.
REMARQUE : Veuillez conserver votre reçu de vente original. Il servira de preuve de la
date d’achat si vous devez faire une réclamation au titre de la garantie.
-
Entretien
Si votre produit BISSELL doit être réparé :
Communiquez avec le service à la clientèle de BISSELL pour connaître l’emplacement du centre de service agréé le plus près de chez vous.
Si vous avez besoin d’information sur les réparations ou les pièces de rechange ou si vous avez des ques
tions au sujet de la garantie, communiquez avec le service à la clientèle de BISSELL.
Site Web :
www.BISSELL.com
Adresse courriel :
www.BISSELL.com/email-us
Veuillez ne pas retourner ce produit au magasin.
Toute autre réparation ou opération d’entretien n’apparaissant pas dans le présent guide doit être
effectuée par un représentant autorisé.
Si vous avez des questions ou des préoccupations au sujet de ce produit, le personnel de BISSELL
sera heureux de vous aider.
Communiquez directement avec nous au 1 800 237-7691.
Composez le :
Service à la clientèle de BISSELL
1800237-7691
Du lundi au vendredi, entre 8 h et 22 h (HNE)
Le samedi de 9 h à 20 h (HNE)
Le dimanche de 10 h à 19 h (HNE)
www.BISSELL.com
-
17

Enregistrez votre produit dès aujourd’hui!
L’enregistrement est rapide et facile, et vous conférera des
avantages pendant toute la durée de vie du produit.
Vous recevrez :
Des points de récompense
BISSELL
Obtenez automatiquement des points qui
vous permettront d’obtenir des réductions
ou de faire livrer gratuitement vos achats
futurs.
Un service plus rapide
Le fait de nous fournir les renseignements
vous concernant vous permettra d’écono
miser du temps si vous communiquez avec
nous pour nous poser des questions au
sujet du produit.
Des rappels et des alertes du
soutien technique
Nous vous transmettrons des rappels ou
des alertes au sujet des opérations
d’entretien importantes concernant
le produit.
Des offres spéciales
Facultatif : Inscrivez votre courriel pour
recevoir de l’information sur des offres,
des concours, des conseils d’entretien et
plus encore!
Rendez-vous sur le site www.BISSELL.com/registration
Consultez le site Web de BISSELL : www.BISSELL.com
Lorsque vous communiquez avec BISSELL, ayez le numéro de modèle de l’appareil de nettoyage
en main.
Veuillez inscrire le numéro de modèle : ___________________
Veuillez inscrire la date d’achat : ___________________
REMARQUE : Veuillez conserver votre reçu de vente original. Il servira de preuve de
la date d’achat si vous devez faire une réclamation au titre de la garantie. Consultez la
rubrique sur la garantie à la page 17 pour plus de détails.
Pièces et accessoires
Pour obtenir des pièces et des accessoires, visitez le site www.BISSELL.com et entrez
le numéro de modèle dans le champ de recherche.
Ns sommes impatients d’avoir de vos nvees!
Évaluez ce produit et partagez votre opinion avec nous
(et avec des millions de personnes autour de vous).
www.BISSELL.com
©2016 BISSELL Homecare, Inc.
Grand Rapids (Michigan)
Tous droits réservés. Imprimé en Chine
Numéro de pièce 161-0602 10/16
18
Visitez notre site Web au www.BISSELL.com
 Loading...