

Page 1
Page 2

This manual provides instructions on how to use your Dive Computer for recreational diving. We
believe this manual is useful in learning the right usage of a Dive Computer for people who use
it at C-card training as well as people who have obtained a C-card through proper training at an
internationally recognized diving instruction organization.
Please carefully read and digest the contents of this manual before use. We also suggest that
you take this manual with you to refer to before diving.
Keep this manual in a safe place. Should you lose it, contact your original dealer or authorized
distributor of our company for a replacement. We are constantly researching and improving our
Dive Computers, and so the product you purchased may differ in certain details from the one
described in this manual. If you have any queries regarding the Dive Computer or the information contained in this manual, please feel free to contact our company at the following address.
Introduction
Bism CORPORATION
TOOK Bldg. 3F, 16-8, Tomizawa-cho, Nihonbashi, Chuo-ku, Tokyo 103-0006 Japan
Phone: +81-3-5640-8126 Fax: +81-3-5640 -8131
E-mail: [email protected]
URL: http://www.bism.co.jp
2
This product is diving gear for recreational diving use. It monitors depth and time, and displays
information useful for safe recreational diving.
Thank you for purchase of our product.
Page 3
Danger is used to indicate the presence of a hazard which highly causes severe
personal injury, death if the warning is ignored.
Warning is used to indicate the presence of a hazard which can probably cause
severe personal injury, death if the warning is ignored.
Caution is used to indicate the presence of a hazard which can possibly cause
personal injury, property damage if the caution is ignored
Danger
Warning
Caution
3
Safety Precautions
We use a various symbols in this manual and on the product indication to have you use the
product correctly and safely, and to prevent the danger and damage to the property of you and
other people.
The indications and their meanings are as follows;
IMPORTANT INFORMATION
It is vital to safety that you use and maintain your Dive Computer correctly and have it inspected
periodically. Carefully read and understand the advice on safety given in this manual before
diving.
Danger
●Before use of this product, obtain a C-card after completing a proper training program at an
internationally recognized diving instruction organization, and be familiar with the proper use of a
diving gear, or use it under the direction of the diving instruction organization. It may cause accident
resulting in injury or death
●Never dive without a buddy. Make sure you keep buddy system. The diving without a buddy is very
dangerous as it may lead to a serious accident.
●When you use it for Nitrox (EANx) diving, you are required to attend and complete a class of the Nitrox
(EANx) diving. Please do not use it for the Nitrox (EANx) diving if you do not take and complete the
lectures.
Reference: EANx: Enriched Air Nitrox (Abbr.: Nitrox)
The mixed gases which raised a ratio of oxygen than usually use compressed air (21% of FO2).
●Please always set the fraction of oxygen (FO2) every diving. It is very dangerous when the fraction of
oxygen (FO2) of the tank and the setting value of this product are not equal.
[Note]: Useful Information to know.
Page 4
IMPORTANT INFORMATION
Warning
●When you perform scuba diving, please always perform it with good health condition. When you feel
uneasiness in physical condition, avoid unreasonableness and stop the diving.
●Avoid to drink alcohols and to take medicines before performing scuba diving. Those who are in bad
physical condition and are with the chronic disease have to see a doctor beforehand.
●This product is designed with a normal healthy person of average physical strength as a standard.
●Each diver is requested to take own responsibility to make and accomplish the safe diving plan that
tted oneself each.
●This product cannot always prevent conditions such as decompression sickness. Dive more cautiously
than the display data indicate. Otherwise it may cause decompression sickness and other diseases
come from diving.
●Do not attempt decompression diving. This product is designed for no-decompression diving. Although
it will do decompression calculations in an emergency if you accidentally enter a decompression dive,
diving under such condition may cause accident resulting in injury or death.
●Do not use this product in a purpose except the recreational diving.
●This product is designed for diving using compressed air (21% of FO2) and Nitrox (EANx) gas (22 50% of FO2). It cannot be used for other mixed gases.
●Do not y or ascend to high place within 24 hours after diving. There is high possibility that you suffer
from decompression sickness due to the drop in barometric pressure. We recommend that you
should rest for at least 24 hours, or 48 hours if possible, before ying or ascending to altitudes.
●Please follow the display of warning and caution message of this product immediately. Otherwise, it is
much possible that you suffer from decompression sickness.
Danger
●Before use of this product, please recognize handling methods, warnings and cautions in
this manual. In addition, please understand how to use it before you actually use it in the
ocean.
●When the warnings of decompression stop violation and violation gauge are displayed,
always cancel the diving of the day, and a symptom like decompression sickness appears,
see a specialist doctor for the medical examination.
●When abnormality occurs to this product, stop to use it immediately, and please consult with
your original dealer or authorized distributor of our company.
4
Page 5
IMPORTANT INFORMATION
Warning
●Use other equipment as backup (a depth gauge, diver’s watch, etc.) with this product together when
using this product.
●This product does not measure, display or control your remaining air in a tank. Use a pressure gauge
to check your air supply.
●In the state that residual nitrogen remains after using this product, you must not lend it to or share it
with another person.
●Do not use the data of this product as data of divers other than a user.
●Do not disassemble, repair, modify, replace a rechargeable battery or chamber test under pressure by
yourself. It causes the trouble when you perform these things in a state without appropriate
knowledge and is very dangerous.
●When you remove the battery (rechargeable battery) used in this product, prevent you from
swallowing it by mistake. Please put the battery out of reach of small child. Please see a doctor
immediately when child swallows it by any chance.
●Regardless of frequency in use, please check the product regularly once a year. Particularly, when
you do not use it more than three months from the last season, please use it after checking it.
Caution
●Solvents such as gasoline, sprays and cleaners such as cosmetic, adhesives and paints will adhere
to the product, and substances such as alkali and acid cause it to deteriorate. Please mind these
chemicals as they may damage the product and reduce its waterproofness .
●Do not blow air at high pressure. This could damage the sensor.
●Because a sensor of this product is a precision instrument, never dismantle it. In addition, do not
push the sensor part with a thin stick, and, mind so that garbage and dust do not enter the sensor. In
the case of use in seawater, always wash it away with fresh water as it may lead to the trouble of the
sensor.
●Please do not leave the product in the dashboard of the car or the place near the heater where the
temperature becomes high. In addition, please do not leave it for a long time in the cold place either
as they cause the trouble such as delay, progress and stop of the time.
●Please be careful that liquid crystal screen may be affected when you leave the product in the place
where the temperature is more than +60 C for a long time. The liquid crystal display may become
hard to show indication under the temperature less than 0 C and more than +40 ℃.
5
Page 6
Caution
●Please keep a record of the data memorized in this product in the notebook, etc. Memory data may be
lost by trouble, repair and low battery of the product.
●When you watch the information displayed by this product, for the prevention of the unexpected injury
and accident, please do it at the place where the safety is secured enough. Please be careful
watching the display as it may cause the accident during diving in particular. In addition, please be
careful enough about accident prevention by the contact to a third party.
●Because the metal portion of the main body and the belt produces rust from a dirt and may pollute the
cuffs of clothes, please use it as always keeping it clean. Particularly, it becomes easy to be rusted
after having used it in the seawater and leave it as it is.
●You may get a rash from the body and the belt depending on a using condition, as they touch direct
your skin.
1. Allergy for metal and the plastic.
2. The dirt, rust and sweat, etc. of the body of the product and the belt.
3. Poor physical condition, etc.
●When you fasten a belt too tightly, it becomes easy to sweat and the air does not ow smoothly,
then it becomes easy to get a rash. In normal use, please fasten the belt with some room.
●When abnormality occurs to your skin by any chance, stop to use it, and please see a doctor.
●In order to prevent the rash due to unexpected injury and allergy, please take off the product at the
time to go to bed.
●When you embrace or contact an infant, in order to prevent the rash from an injury and allergy of the
infant, please take off this product.
●When a product protection seal is put on the body, including the battery hatch, and the belt, please
remove it off completely before start to use. Otherwise dirt attaches to the opening between “the body
and belt” and “the seal” and may cause rust and the rash.
●When auto light switch is on, if you drive a car while wearing the product to your arm, the light turns
on unexpectedly and it disturbs the driving. So please stop to wear the product while driving as it is
dangerous and it may cause the trafc accident.
●Do not remove the battery hatch on the case back. It causes submergence and the trouble.
●Low battery, static electricity and shocks may cause trouble, computer resetting and log data loss.
IMPORTANT INFORMATION
6
Page 7
IMPORTANT INFORMATION
7
Caution
●Though magnetism does not affect the operation of the product, please be careful that it affects the
precision if the product itself becomes magnetized. In addition, please also be careful that the
extremely strong magnetism such as the medical equipment causes malfunction and damage of
electronic parts.
●When the plastic parts stick rmly to other products or leave with other products while being wet for
long time, as it discolors or the color of other products may move to the plastic parts, please wipe off
water immediately and do not keep on sticking to other products.
●When the plastic parts are exposed to the direct rays of the sun (ultraviolet rays) and are left
with a dirt for long time, the plastic parts may fade in color.
●The painted parts may wear and discolor caused by the working condition such as excessive external
force, continued rubbing and shocks.
Page 8

◆Introduction ・・・・・・・・・・・・・・・・・・・・・・・・・・・・・・
∇Important Information ・・・・・・・・・・・・・・・・・・・・・・・・・・
◆Safety Precautions ・・・・・・・・・・・・・・・・・・・・・・・・・・・
∇Contents ・・・・・・・・・・・・・・・・・・・・・・・・・・・・・・・・・
∇Names of Parts, Main Functions and Special Features ・・・・・・・・・・・・
∇Before Use ・・・・・・・・・・・・・・・・・・・・・・・・・・・・・・・・
◆Conrmation of Charging Amount ・・・・・・・・・・・・・・・・・・・・・
∇Charge by Light (Solar Charge) ・・・・・・・・・・・・・・・・・・・・・・
◆How to Charge ・・・・・・・・・・・・・・・・・・・・・・・・・・・・・
◆Shortage of and Out of Battery ・・・・・・・・・・・・・・・・・・・・・
◆Charging Time ・ ・・・・・・・・・・・・・・・・・・・・・・・・・・・・
◆Charging Level Warning ・・・・・・・・・・・・・・・・・・・・・・・・・
◆Power Saving Function ・・・・・・・・・・・・・・・・・・・・・・・・・
∇Watch Mode ・・・・・・・・・・・・・・・・・・・・・・・・・・・・・・・・
∇Home City Setting and the Time Adjusting ・・・・・・・・・・・・・・・・・
◆Home City and Summer Time Setting ・・・・・・・・・・・・・・・・・・・
◆Watch and Date Setting ・・・・・・・・・・・・・・・・・・・・・・・・・
∇Dive Mode (DIVE) ・・・・・・・・・・・・・・・・・・・・・・・・・・・・・
◆Dive Mode ・・・・・・・・・・・・・・・・・・・・・・・・・・・・・・・
◆No-decompression Diving ・・・・・・・・・・・・・・・・・・・・・・・・
◆Safety Stop ・・・・・・・・・・・・・・・・・・・・・・・・・・・・・・
◆Surface Mode ・・・・・・・・・・・・・・・・・・・・・・・・・・・・・・
◆Repetitive Diving ・・・・・・・・・・・・・・・・・・・・・・・・・・・
◆Nitrox (EANx) Diving ・・・・・・・・・・・・・・・・・・・・・・・・・・
∇Dive Mode (Decompression Dive) ・・・・・・・・・・・・・・・・・・・・・・
◆Decompression Dive Warning ・・・・・・・・・・・・・・・・・・・・・・・
◆Decompression Dive (Before Decompression Stop) ・・・・・・・・・・・・・
◆Decompression Dive (Under Decompression Stop) ・・・・・・・・・・・・・
∇Warning While Diving ・・・・・・・・・・・・・・・・・・・・・・・・・・・
◆Ascent Rate Warning ・・・・・・・・・・・・・・・・・・・・・・・・・・
◆Decompression Stop Violation Warning ・・・・・・・・・・・・・・・・・・
CONTENTS
2
3
3
8
11
15
15
16
16
17
18
18
19
20
20
21
21
24
24
25
30
32
33
34
35
35
36
39
44
44
45
8
Page 9

◆High Oxygen Accumulation Alarm (High O2 Alarm)・・・・・・・・・・・・・・
◆High Partial Pressure of Oxygen Alarm (High PO2 Alarm)・・・・・・・・・・
◆Violation Gauge Warning ・・・・・・・・・・・・・・・・・・・・・・・・・
Log Mode (LOG)・・・・・・・・・・・・・・・・・・・・・・・・・・・・・・・
◆Enter the Log Mode・・・・・・・・・・・・・・・・・・・・・・・・・・・・
◆Check a Log ・・・・・・・・・・・・・・・・・・・・・・・・・・・・・・・
◆Button Operation・・・・・・・・・・・・・・・・・・・・・・・・・・・・・
◆Check a History ・・・・・・・・・・・・・・・・・・・・・・・・・・・・・
∇Plan Mode (PLAN)・・・・・・・・・・・・・・・・・・・・・・・・・・・・・・
◆Check a Plan・・・・・・・・・・・・・・・・・・・・・・・・・・・・・・・
◆Safety Factor Setting ・・・・・・・・・・・・・・・・・・・・・・・・・・
◆Fraction of Oxygen (FO2) Setting・・・・・・・・・・・・・・・・・・・・・
∇Altitude Diving and Fresh Water Diving・・・・・・・・・・・・・・・・・・・
∇Direction Reading (COMP)・・・・・・・・・・・・・・・・・・・・・・・・・・
◆Digital Compass Measurement ・・・・・・・・・・・・・・・・・・・・・・・
◆Calibrate a Bearing Sensor・・・・・・・・・・・・・・・・・・・・・・・・
◆Precautions at Digital Compass Measurement・・・・・・・・・・・・・・・・
∇Stopwatch (STW) ・・・・・・・・・・・・・・・・・・・・・・・・・・・・・・
◆Enter the Stopwatch Mode・・・・・・・・・・・・・・・・・・・・・・・・・
◆Time Measurement・・・・・・・・・・・・・・・・・・・・・・・・・・・・・
∇Timer (TMR) ・・・・・・・・・・・・・・・・・・・・・・・・・・・・・・・・
◆Select a Timer・・・・・・・・・・・・・・・・・・・・・・・・・・・・・・
◆Setting a Timer ・・・・・・・・・・・・・・・・・・・・・・・・・・・・・
◆Use a Timer ・・・・・・・・・・・・・・・・・・・・・・・・・・・・・・・
∇Alarm・Hourly Time Signal (ALM) ・・・・・・・・・・・・・・・・・・・・・・
◆Using Alarm・Hourly Time Signal ・・・・・・・・・・・・・・・・・・・・・
◆Setting an Alarm Time ・・・・・・・・・・・・・・・・・・・・・・・・・・
◆Turn Alarm On and Off ・・・・・・・・・・・・・・・・・・・・・・・・・・
∇World Time (WT) ・・・・・・・・・・・・・・・・・・・・・・・・・・・・・・
◆Enter the World Time Mode ・・・・・・・・・・・・・・・・・・・・・・・・
◆View the Time in Another Time Zone・・・・・・・・・・・・・・・・・・・・
46
46
47
48
49
50
51
55
56
56
57
58
59
60
61
61
63
64
64
65
66
66
67
67
68
68
69
70
71
71
72
CONTENTS
9
Page 10

◆Summer Time (DST) Setting ・・・・・・・・・・・・・・・・・・・・・・・
∇Barometric Pressure and Temperature (BARO) ・・・・・・・・・・・・・・・・
◆Barometric Pressure and Temperature Measuring ・・・・・・・・・・・・・
∇Illumination ・・・・・・・・・・・・・・・・・・・・・・・・・・・・・・・
◆Turn the Auto Light Switch On and Off ・・・・・・・・・・・・・・・・・
∇Other Settings ・・・・・・・・・・・・・・・・・・・・・・・・・・・・・・
◆Turn the Button Operation Tone On and Off ・・・・・・・・・・・・・・・
◆Illumination Duration Setting ・・・・・・・・・・・・・・・・・・・・・
◆Turn Power Saving On and Off ・・・・・・・・・・・・・・・・・・・・・・
◆Unit Setting ・・・・・・・・・・・・・・・・・・・・・・・・・・・・・・
◆DISP Screen Setting ・・・・・・・・・・・・・・・・・・・・・・・・・・
∇Troubleshooting ・・・・・・・・・・・・・・・・・・・・・・・・・・・・・
∇Maintenance ・・・・・・・・・・・・・・・・・・・・・・・・・・・・・・・
∇Service After the Sales ・・・・・・・・・・・・・・・・・・・・・・・・・
∇Specications ・・・・・・・・・・・・・・・・・・・・・・・・・・・・・・
∇City Code Table ・・・・・・・・・・・・・・・・・・・・・・・・・・・・・
CONTENTS
72
73
73
74
75
76
77
78
78
79
80
81
84
85
86
88
10
Page 11
11
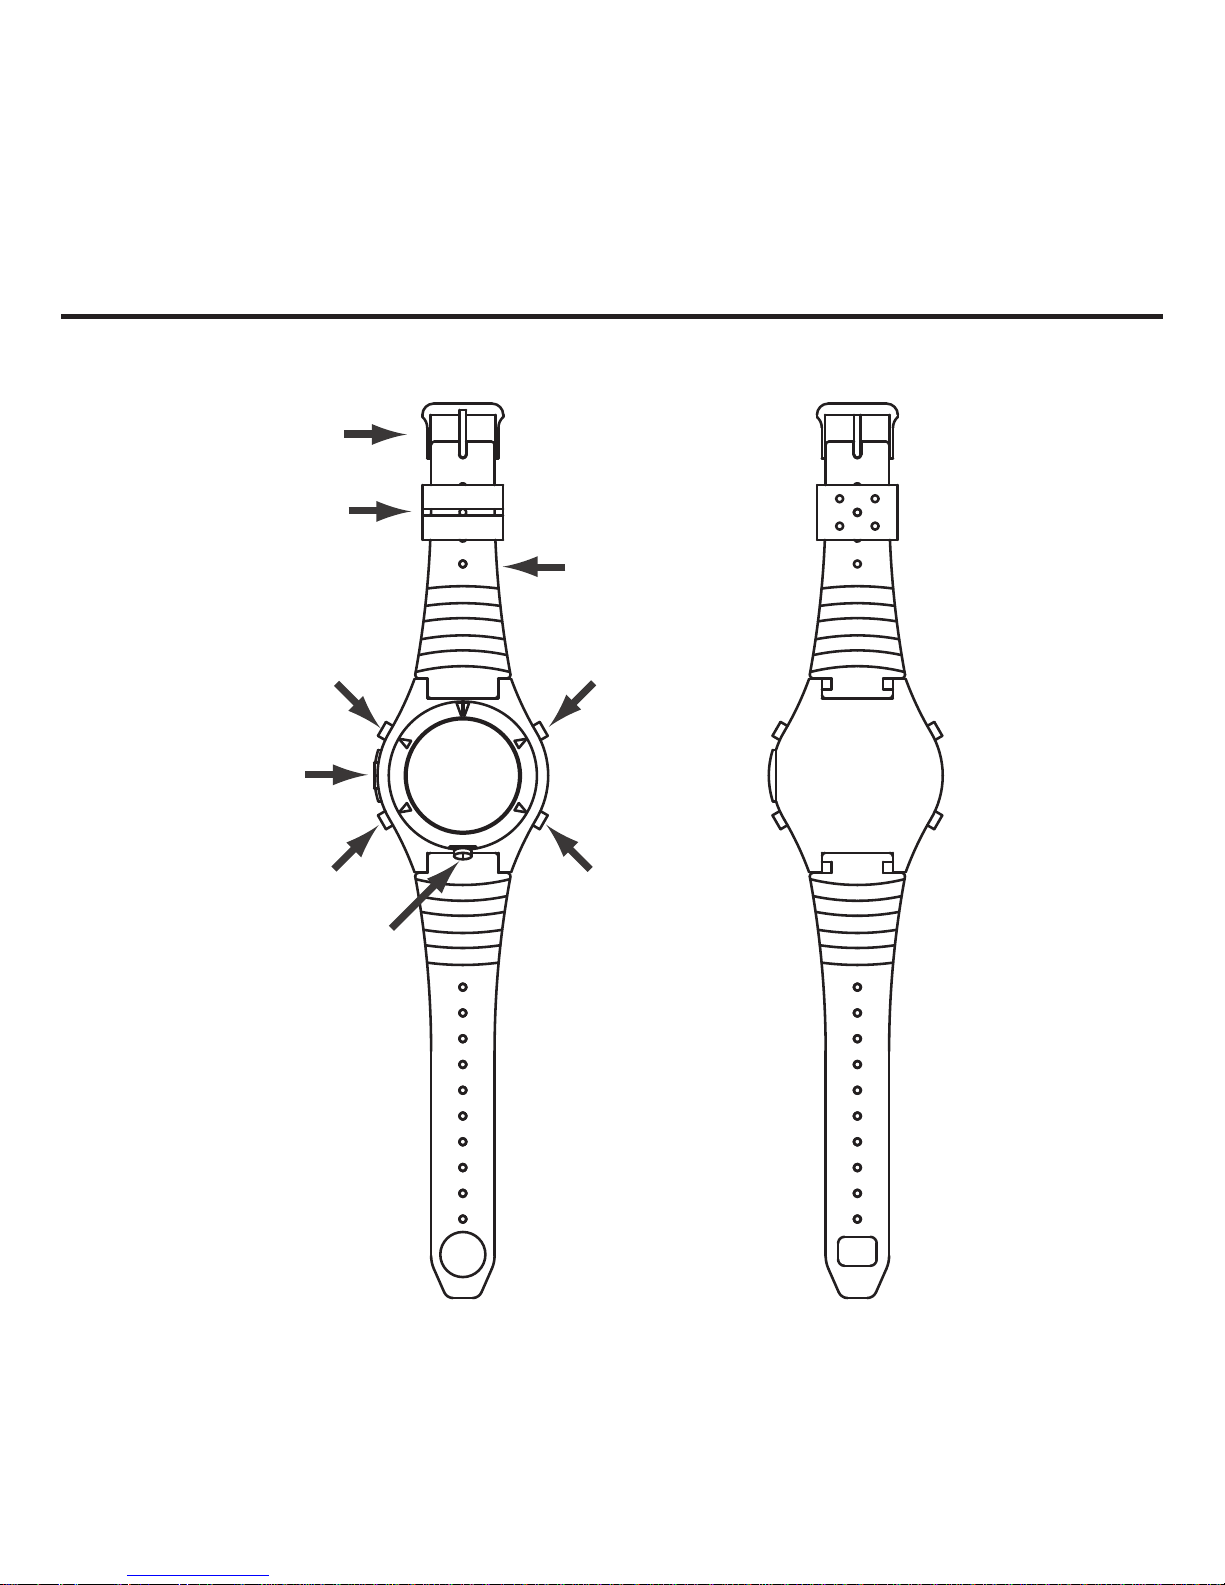
NAMES OF PARTS, MAIN FUNCTIONS AND SPECIAL FEATURES
Buckle
Retainer
Belt
M Button
P Button
A Button
B Button
L Button
Pressure sensor
DIVE DEMO SOLIS
Page 12
12
This product has 8 kinds of watch modes.
○Watch Mode 1 “TIME 1” display
Hour/Minutes, Date, Day of the week
○Watch Mode 2 “TIME 2” display
Hour/Minutes, Date, Seconds
○Direction Reading “COMP” display
Measurement of direction and angle value
○Stopwatch “STW” display
Measurement of the elapsed time
○Timer “TMR” display
Setting and measurement of timer
○Alarms “ARM” display
Setting of alarms and hourly time signal
○World Time “WT” display
Display the time of 48 cities, 31 time zones, of the world
○Barometric Pressure Indication “BARO” display
Measurement of barometric pressure and temperature
Function as watch
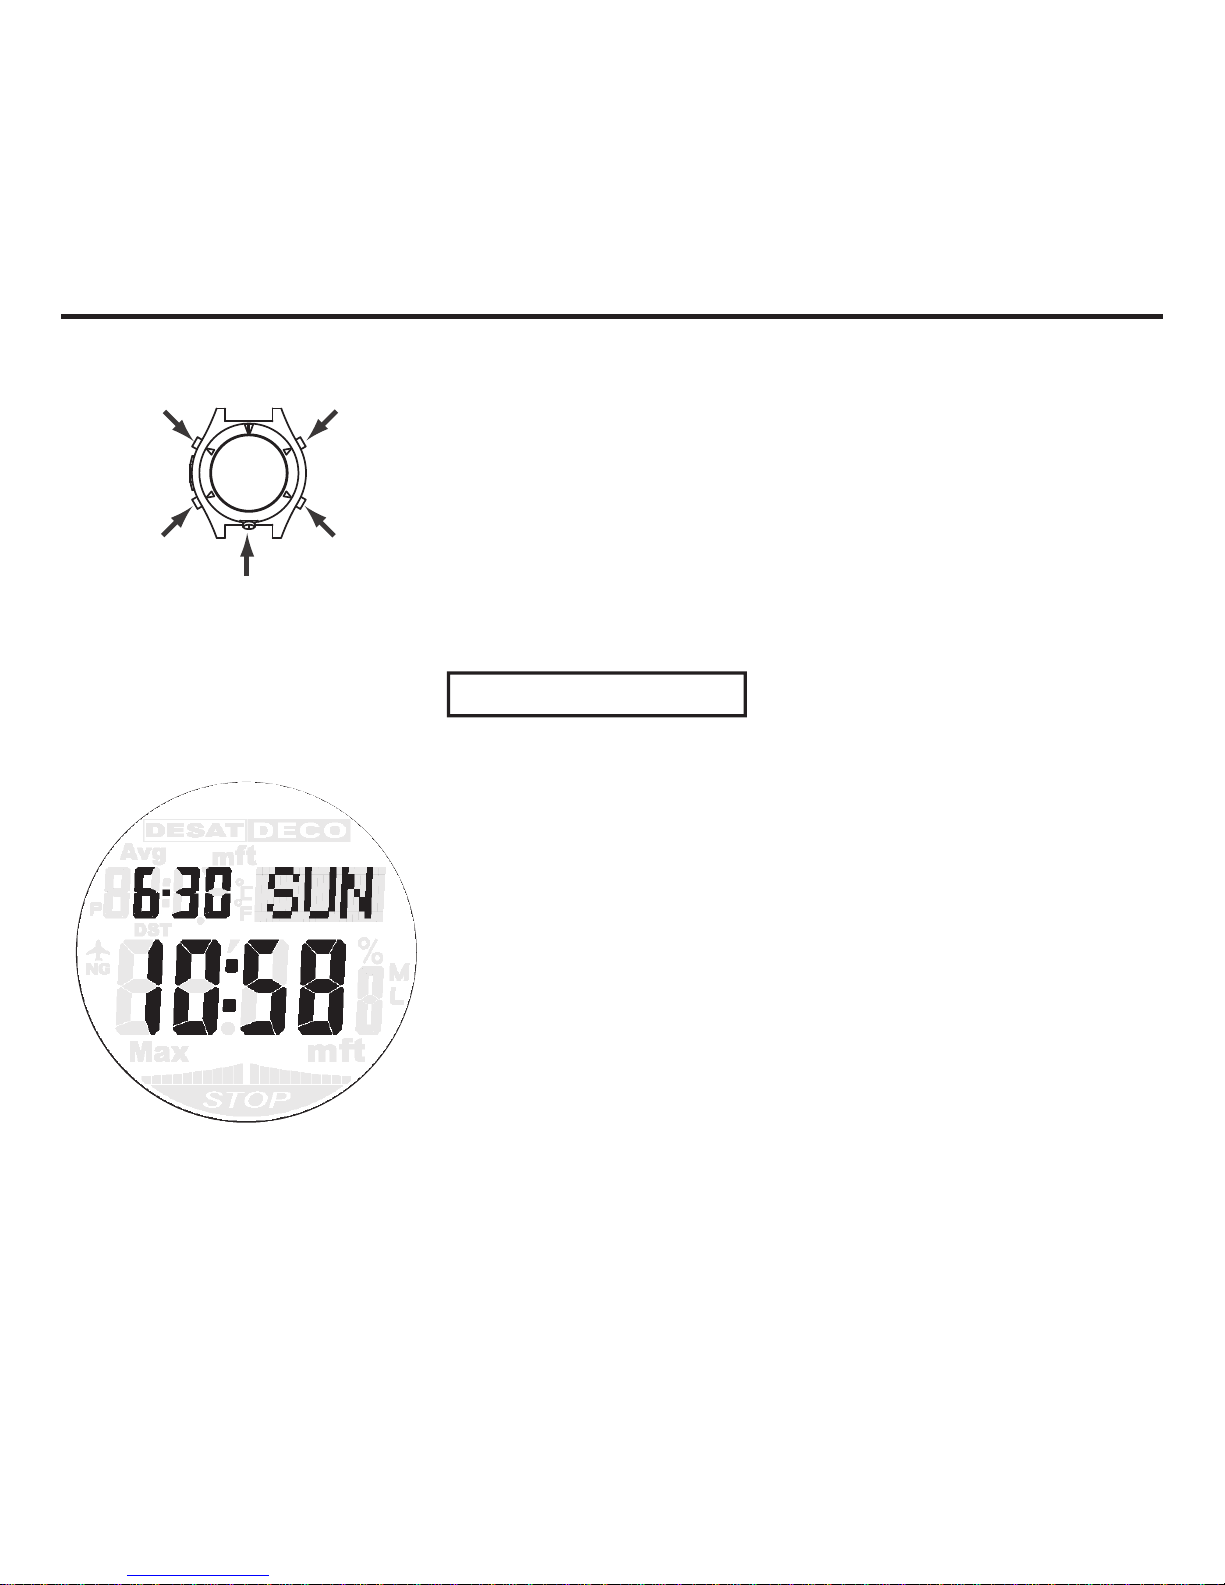
This product has 5 operation buttons.
Upper left - M (Mode) button
Upper right - P (Plan) button
Lower right - L (Log) button
Lower left - A (Adjust) button
Lower center - B (Backlight) button
In this manual, they are described under the name of M button, P button, L button, A button and B button respectively.
M Button
P Button
A Button
B Button
L Button
NAMES OF PARTS, MAIN FUNCTIONS AND SPECIAL FEATURES
Page 13
13
This product has 4 kinds of dive computer modes.
○Dive Mode “DIVE” display
No-decompression limit
Safety stop
Decompression diving
Nitrox
○Surface Mode “TIME 1 and 2” display
Desaturation time
Surface time
○Log Mode “LOG” display
Dive log
(Dive prole)
Dive history
○Plan Mode “PLAN” display
Dive plan
Fraction of oxygen
Safety factor
Functions as Dive computer
NAMES OF PARTS, MAIN FUNCTIONS AND SPECIAL FEATURES
Page 14

NAMES OF PARTS, MAIN FUNCTIONS AND SPECIAL FEATURES
14
□ Time accuracy : ±15 seconds a month
□ Sensor precision
Bearing sensor : Within ±10°
Temperature sensor : Within ±2 ℃
Pressure sensor : ±1% + 0.5m
□ Measuring interval
Depth measurement : 1 sec.
Water temperature measurement : 1 sec.
Barometric pressure measurement : 20 sec.
□ Measuring range
Depth : 1.5m~99.9m
Dive time : 0~599 min.
Operating barometric pressure : More than 460 hPa (Approx. up to 6,000m)
Temperature : -10 ℃ ~ 60 ℃
Direction : 0~359°Bearing sensor calibration function
(Bidirectional calibration□ Fraction of oxygen : 21% (compressed air)~50%
□ Waterproof : 100m
□ Log data : 30 dives
□ Battery : Rechargeable battery
Operating time from the full charge condition
without the solar generation:
Approx. 1 month (1 one-hour dive a day)
□ Decompression model : A. A. Buhlman 16 tissue
[ Note ]
About the battery life time, this product works with battery (rechargeable battery) which
charges the electricity generated by solar panel. When you take off the product, put it in a
bright place getting light. It can be more stable to use when you expose it to the light for
approximately half day a month to charge it. When you ware it on your wrist, please keep it in
mind so that the cuff of clothing does not cover the dial (solar panel) of the product. When the
dial (solar panel) hides even partly, generation efciency decreases.
Page 15
15
Con rmation of Charging Amount
BEFORE USE
■Charging status
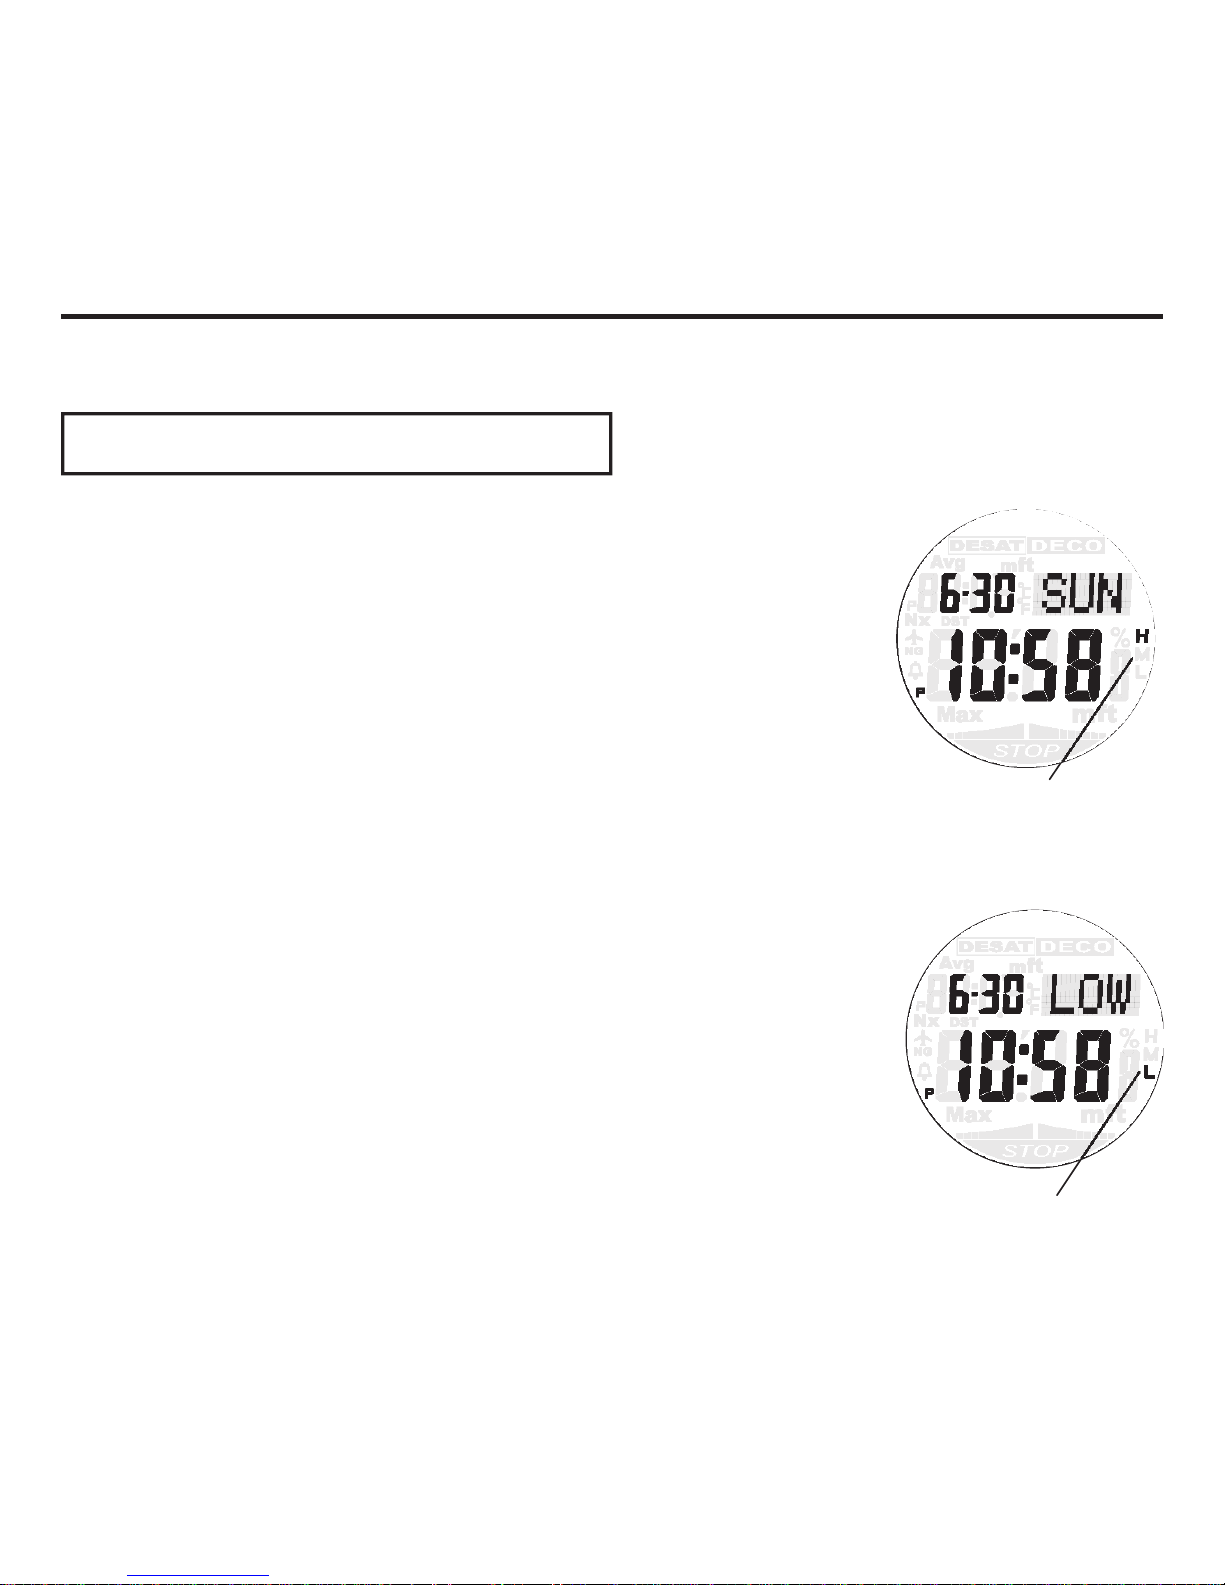
Please con rm the charging status by “H”, “M” and “L” displays at
the right side of the screen.
Battery Indicator
Battery Indicator
Before using this product, “charge” and “the setting of the time and date” are necessary. Please
use it after charge it enough and set the display of time and date.
“H” lights up.
“M” lights up.
Battery is charged.
→ Please go to “Home city setting and the time adjusting”
(To p.20)
“LOW” ashes.
“L” lights up.
“CHG” ashes.
Charging amount is not enough.
→ Expose the product to the light to charge.
(To p.16)
Page 16
How to charge
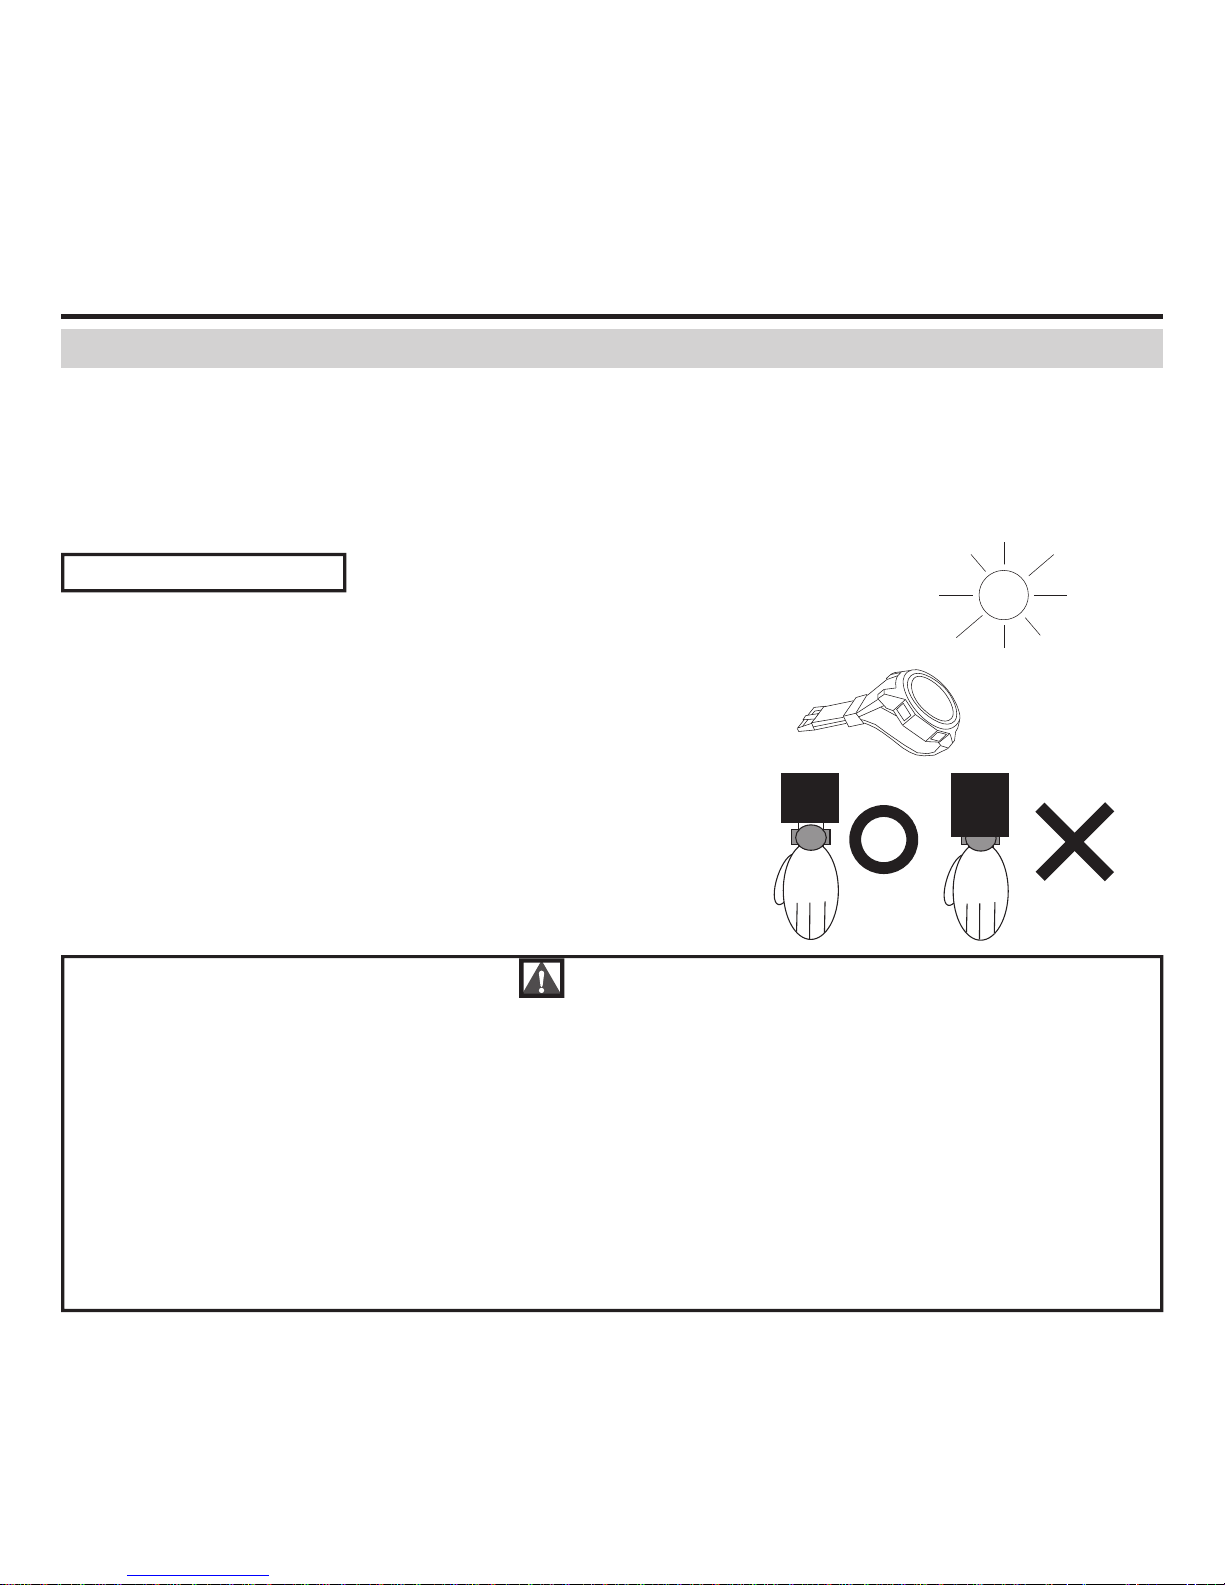
When you take off the product, put it in a bright place
getting light.
It can be more stable to use when you expose it to the
light for approximately half day a month to charge it.
When you ware it on your wrist, please keep it in mind
so that the cuff of clothing does not cover the dial (solar
panel) of the product. When the dial (solar panel) hides
even partly, generation ef ciency decreases.
This product works with battery (rechargeable battery) which charges the electricity generated
by solar panel.
●Solar panel is united with dial.
●When the dial gets enough light, it generates and charges.
When you use it, please keep it in mind to expose the dial (solar panel) to light.
Caution
●When you charge the product, the body may become very hot depending on a condition and
the environment of the light source. Please be careful not to burn yourself. In addition, please
avoid to charge under the following high temperatures.
- On the dashboard of a car parking under hot weather.
- The place close to the heating element such as incandescent lamps.
- The place where the temperature becomes high because of the direct sunlight for long time.
●Liquid crystal panel may become black under the extreme high temperature, but comes back
normally if temperature falls.
Charge by Light (Solar Charge)
16
BEFORE USE
Page 17
17
CHARGE BY LIGHT (SOLAR CHARGE)
Shortage of and Out of Battery
[ Note ]
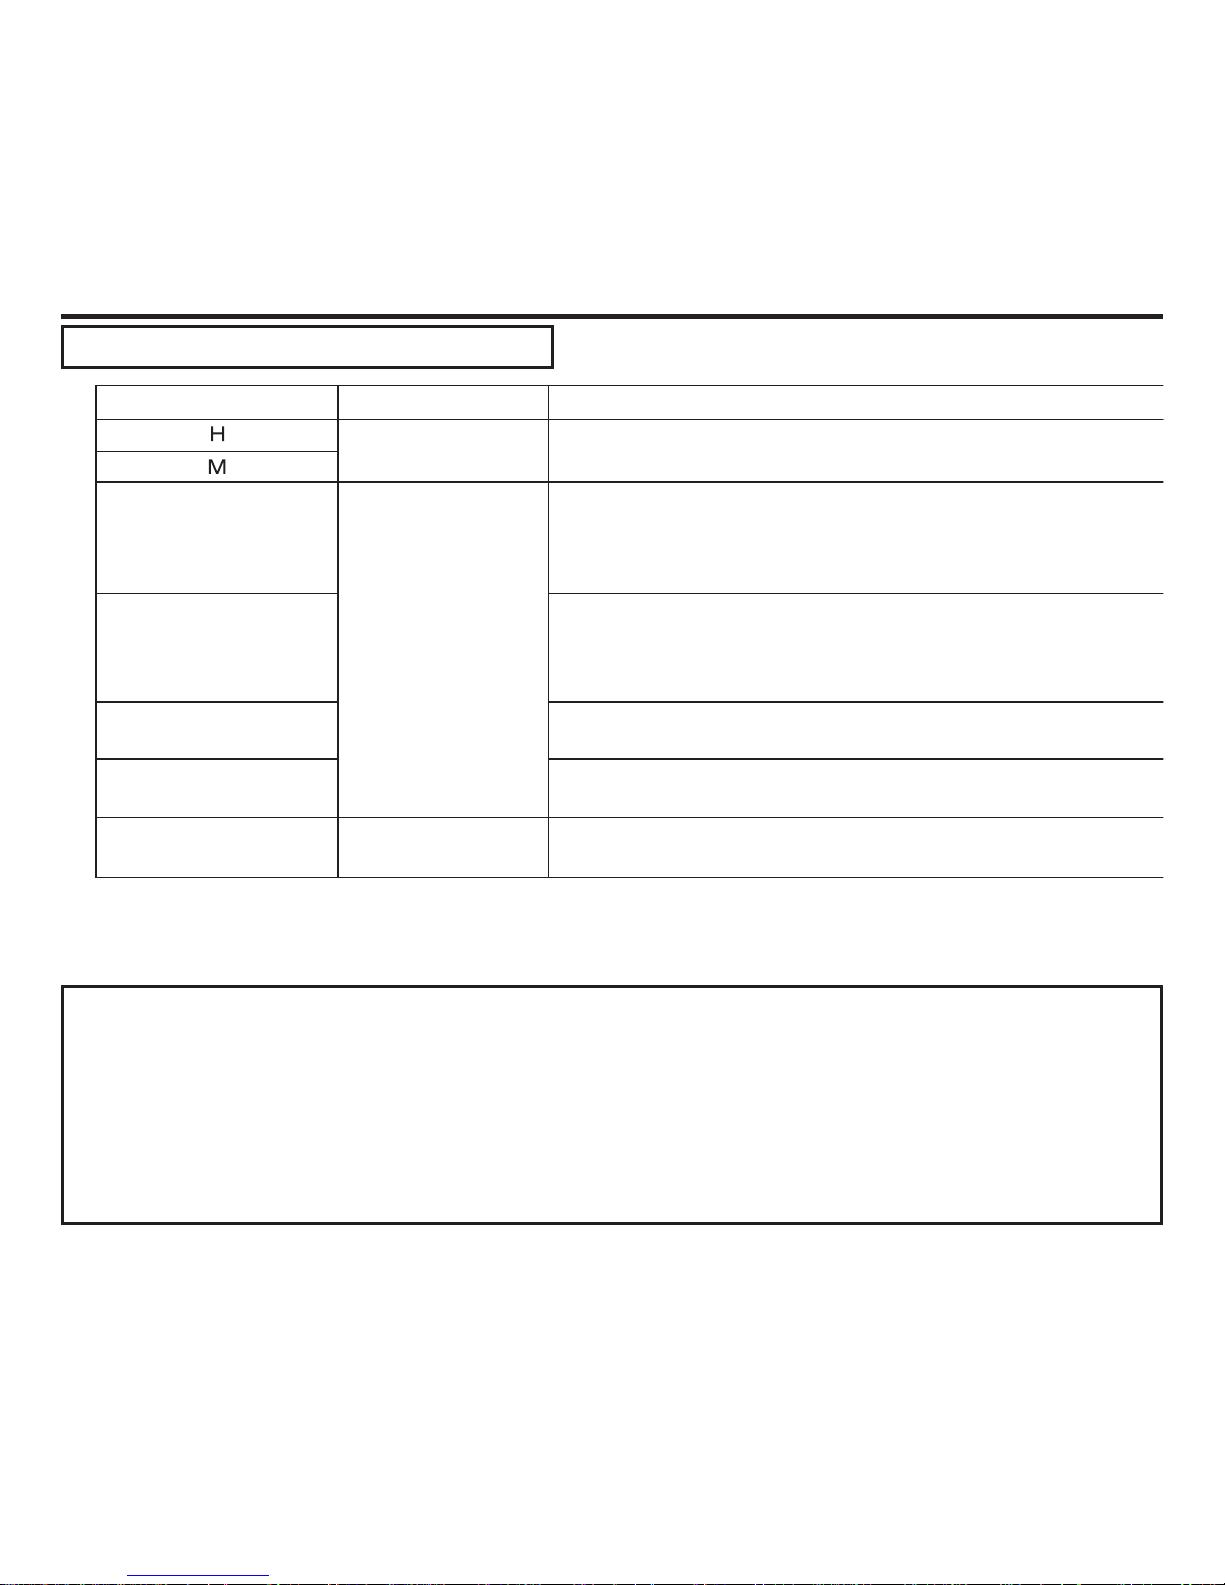
●Functions stop if the product becomes out of battery, and all setting returns to the state of
the initial setting (at the time of factory shipment). When you set various functions such as
the time and the date again, please charge it until display at right side of the screen becomes
“M” or “H”.
●When you charge the product at the place getting direct rays of the sun and strong light, it
may display the charging level higher than the actual one temporarily.
All breakdowns. Condition of the initial setting
(at the time of factory shipment).
DISPLAY
CHARGING STATUS
CONDITION OF THIS PRODUCT
Good condition Normal condition
Just “CHG” flashes
“LOW” or “L” flashes
Shortage of battery
When just a letter of "CHG" flashes, and other indication
lights up as usual, it cannot move to the dive mode.
You cannot use it in diving.
Other functions are available as usual.
When "LOW" and "L", sometimes "L" only, flashes,
you cannot use the following functions.
・Dive mode ・Direction reading
・Light on ・Sound (such as alarm)
“H”, “M”, “L”
and “CHG” flashes
When "H", "M", "L" and "CHG" flash together, you can use
some functions including the indication of the current time.
Just “CHG” flashes
(All lights out)
All lights out
Out of battery
When just "CHG" flashes, and all other indication
disappear, you cannot use all functions.
Page 18
CHARGE BY LIGHT (SOLAR CHARGE)
Charging Time
Please use the list below as the Standard Time of charge.
◆Time required for charging a battery.
All breakdowns. Condition of the initial setting
(at the time of factory shipment).
DISPLAY
CHARGING STATUS
CONDITION OF THIS PRODUCT
Good condition Normal condition
Just “CHG” flashes
“LOW” or “L” flashes
Shortage of battery
When just a letter of "CHG" flashes, and other indication
lights up as usual, it cannot move to the dive mode.
You cannot use it in diving.
Other functions are available as usual.
When "LOW" and "L", sometimes "L" only, flashes,
you cannot use the following functions.
・Dive mode ・Direction reading
・Light on ・Sound (such as alarm)
“H”, “M”, “L”
and “CHG” flashes
When "H", "M", "L" and "CHG" flash together, you can use
some functions including the indication of the current time.
Just “CHG” flashes
(All lights out)
All lights out
Out of battery
When just "CHG" flashes, and all other indication
disappear, you cannot use all functions.
ENVIRONMENT (ILLUMINATION)
CHARGING TIME FROM CHARGING
LEVEL WARNING TO THE STATE
BECOMING ABLE TO DIVE
CHARGING TIME FROM CHARGING
LEVEL WARNING TO THE STATE OF
FULL CHARGE
Outdoors on a fine day (50,000 luces)
Window side on a fine day (10,000 luces)
Window side on a cloudy day (5,000 luces)
Indoors under fluorescent light (500 luces)
Approx. 1 hour
Approx. 2 hours
Approx. 8 hours
Approx. 30 hours
Approx. 60 hours
Approx. 4 hours
Approx. 36 hours
*Actual charging time varies depending on environment.
Charging Level Warning
Charging level warning is the function to urge charge by alarm and a message when charging
amount falls down to a certain battery level in order to use it in diving safely.
As sensors do not work when the charging level becomes “L”, you cannot use this product for
diving. For example, when you start diving in the state of charging level of “M” and becomes
“L” in the middle of diving, the product cannot display the information about the diving. In order
to avoid such a dangerous condition, the product has the mechanism to urge charge until it
becomes “H” and prevent you from diving until it gets “H” when the charging amount is less than
certain battery level.
All breakdowns. Condition of the initial setting
(at the time of factory shipment).
DISPLAY
CHARGING STATUS
CONDITION OF THIS PRODUCT
Good condition Normal condition
Just “CHG” flashes
“LOW” or “L” flashes
Shortage of battery
When just a letter of "CHG" flashes, and other indication
lights up as usual, it cannot move to the dive mode.
You cannot use it in diving.
Other functions are available as usual.
When "LOW" and "L", sometimes "L" only, flashes,
you cannot use the following functions.
・Dive mode ・Direction reading
・Light on ・Sound (such as alarm)
“H”, “M”, “L”
and “CHG” flashes
When "H", "M", "L" and "CHG" flash together, you can use
some functions including the indication of the current time.
Just “CHG” flashes
(All lights out)
All lights out
Out of battery
When just "CHG" flashes, and all other indication
disappear, you cannot use all functions.
ENVIRONMENT (ILLUMINATION)
CHARGING TIME FROM CHARGING
LEVEL WARNING TO THE STATE
BECOMING ABLE TO DIVE
CHARGING TIME FROM CHARGING
LEVEL WARNING TO THE STATE OF
FULL CHARGE
Outdoors on a fine day (50,000 luces)
Window side on a fine day (10,000 luces)
Window side on a cloudy day (5,000 luces)
Indoors under fluorescent light (500 luces)
Approx. 1 hour
Approx. 2 hours
Approx. 8 hours
Approx. 30 hours
Approx. 60 hours
Approx. 4 hours
Approx. 36 hours
*Actual charging time varies depending on environment.
"WARNING! ! BATT " is displayed 5 times as flowing, and at the same time,
“M” icon at the right side of the screen flashes. Alarm sounds for six seconds.
MODE BEING USED WARNING TO BE DISPLAYED
Watch Mode and Surface Mode Letter of “CHG” flashes
Dive Mode
*The warning continues until the charging level becomes "H". Meanwhile,
you cannot use it for diving.
18
Page 19
19
CHARGE BY LIGHT (SOLAR CHARGE)
Power Saving Function
Power saving function is the mechanism which becomes the power saving state automatically
when you put this product in the dark place from 10:00 p.m. to 6:00 a.m.
A power saving state has two phases of level 1 and level 2.
All breakdowns. Condition of the initial setting
(at the time of factory shipment).
DISPLAY
CHARGING STATUS
CONDITION OF THIS PRODUCT
Good condition Normal condition
Just “CHG” flashes
“LOW” or “L” flashes
Shortage of battery
When just a letter of "CHG" flashes, and other indication
lights up as usual, it cannot move to the dive mode.
You cannot use it in diving.
Other functions are available as usual.
When "LOW" and "L", sometimes "L" only, flashes,
you cannot use the following functions.
・Dive mode ・Direction reading
・Light on ・Sound (such as alarm)
“H”, “M”, “L”
and “CHG” flashes
When "H", "M", "L" and "CHG" flash together, you can use
some functions including the indication of the current time.
Just “CHG” flashes
(All lights out)
All lights out
Out of battery
When just "CHG" flashes, and all other indication
disappear, you cannot use all functions.
ENVIRONMENT (ILLUMINATION)
CHARGING TIME FROM CHARGING
LEVEL WARNING TO THE STATE
BECOMING ABLE TO DIVE
CHARGING TIME FROM CHARGING
LEVEL WARNING TO THE STATE OF
FULL CHARGE
Outdoors on a fine day (50,000 luces)
Window side on a fine day (10,000 luces)
Window side on a cloudy day (5,000 luces)
Indoors under fluorescent light (500 luces)
Approx. 1 hour
Approx. 2 hours
Approx. 8 hours
Approx. 30 hours
Approx. 60 hours
Approx. 4 hours
Approx. 36 hours
*Actual charging time varies depending on environment.
"WARNING! ! BATT " is displayed 5 times as flowing, and at the same time,
“M” icon at the right side of the screen flashes. Alarm sounds for six seconds.
MODE BEING USED WARNING TO BE DISPLAYED
Watch Mode and Surface Mode Letter of “CHG” flashes
Dive Mode
*The warning continues until the charging level becomes "H". Meanwhile,
you cannot use it for diving.
When the state of Level 1 continues for 6 to 7 days.
POWER SAVING LEVEL
TIME REQUIRED TO START POWER SAVING
CONDITION
Level 1
Level 2
Approx. 1 hour after putting it in the dark place.
Sensors stop in Watch Mode.
Only a watch function works.
You can cancel the power saving state by the following methods.
・Depress either button.
・Put the product in the bright place.
・Angle the product to turn on “Auto Light Switch”.
[ Note ]
●When you wear the product, it may become the power saving state when solar panel is
covered by a cuff.
●It does not become the power saving state at the time of Stopwatch Mode, Timer Mode and
Dive Mode.
●You can turn power saving function on and off. (Refer to p. 78)
Page 20
20
WATCH MODE
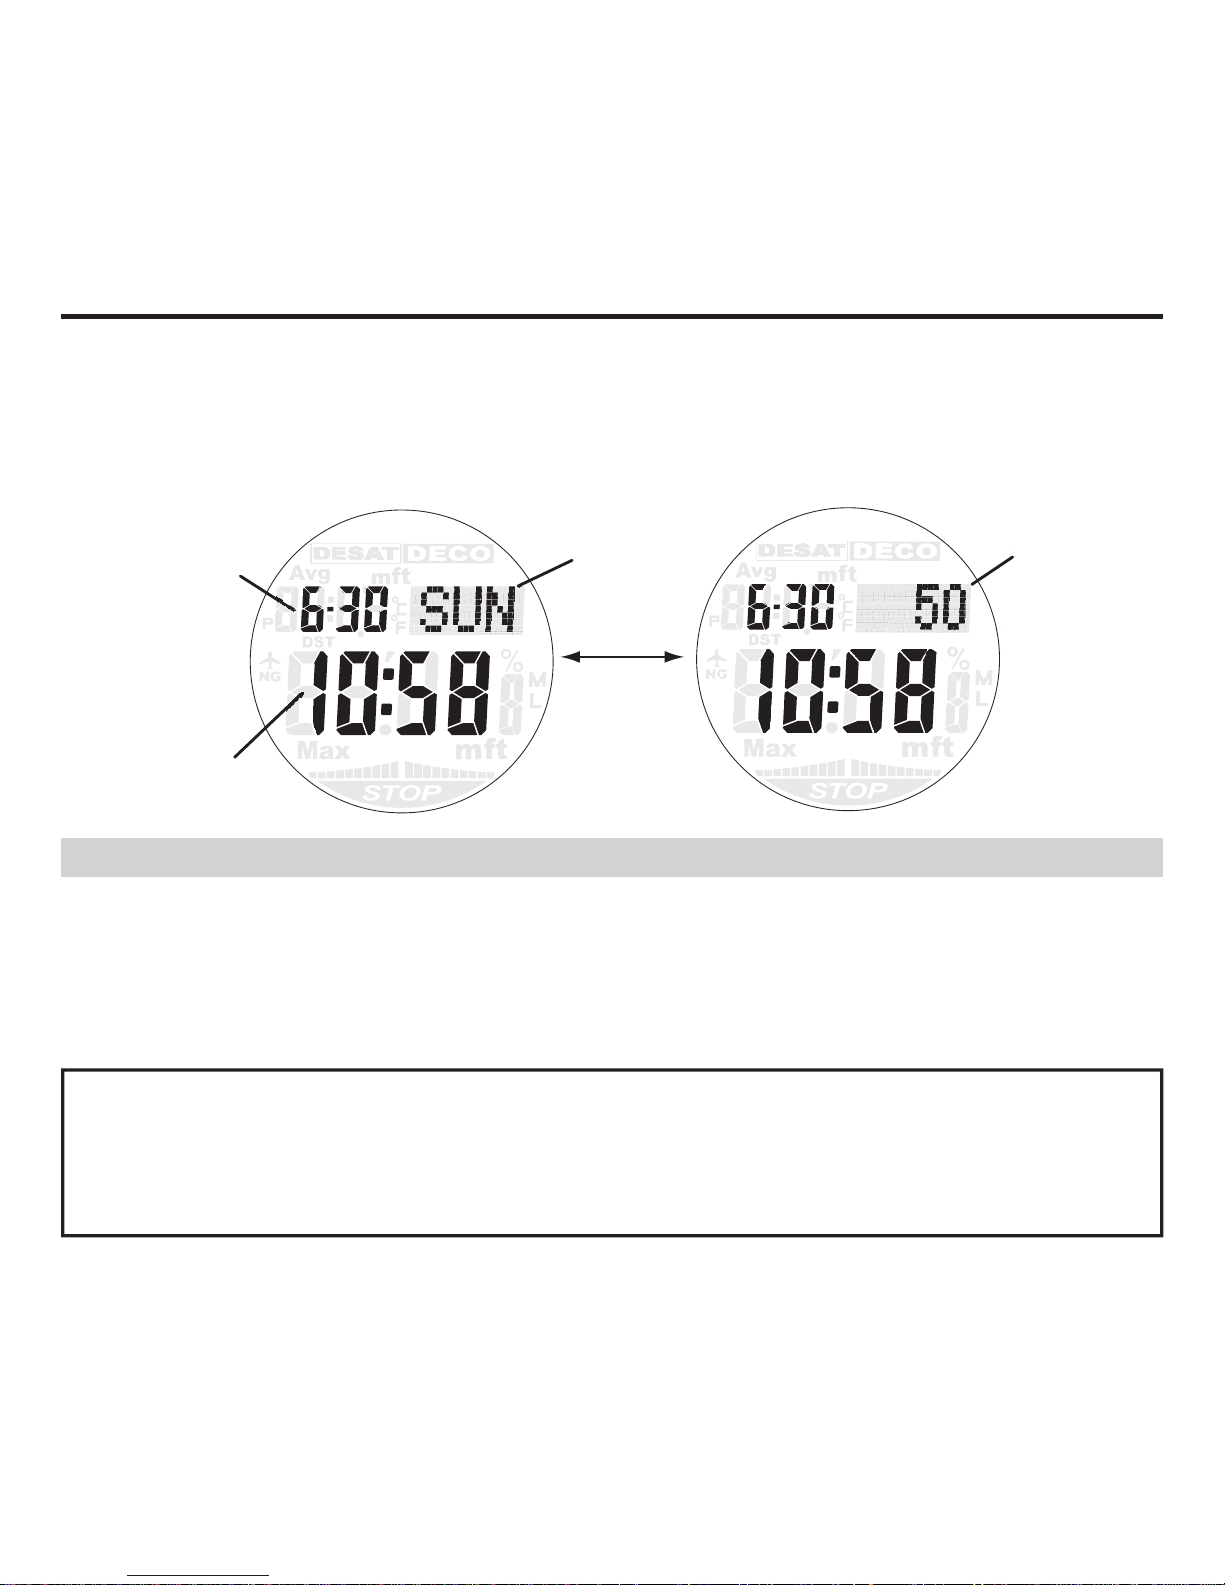
In Watch Mode, you can set and display the current time and a date.
Display is switched by depressing the A button.
Watch Mode 1 Watch Mode 2
Day of the week display Seconds display
Day of the week
Date
Time
A button
Seconds
Select the city of the place using the product as the Home City in the same time zone from 48
cities (31 time zones) in the City Code Table. Also select Standard Time or Summer Time (DST)
depending on a country and an area to use the product.
* When you use it in Japan, select the city in Tokyo (TYO).
[ Note ]
●The Summer Time, also called DST (Daylight Saving Time), is the system adjusting 1 hour
faster from the normal time (Standard Time). An enforcement period and the enforcement
area of the Summer Time vary according to a country. In addition, there is a country and the
area that do not adopt the Summer Time system.
Home City Setting and the Time Adjusting
Page 21
21
Home City and Summer Time Setting
HOME CITY SETTING AND THE TIME ADJUSTING
1) While in the Watch Mode, continue to depress the A button for more than 2 seconds.
Release the button when a City Code and its city name are displayed as owing following the
display of “CITY” for about 1 second after ”SET” “Hold” ashes.
2) Select a City by depressing P button or L button.
Depress P button or L button until it displays the City you need.
Continue to depress P button or L button for fast-forward.
3) Depress M button.
4) Depress P button and select Summer Time (DST) setting.
It switches on and off by depressing the P button as follows.
“DST OFF” : Displays Standard Time.
“DST ON” : Displays Summer Time.
5) Depress A button.
Setup is completed.
When Summer Time DST) is on, the screen displays “DST” while in Watch Mode.
[ Note ]
●When you select “UTC” (Universal Time Coordinated) as the Home City, the Summer Time
(DST) setting cannot be changed.
●Please refer to “City Code Table” as to the City Code. (p. 88)
Page 22
22
HOME CITY SETTING AND THE TIME ADJUSTING
Watch and Date Setting
1) While in the Watch Mode, continue to depress A button for more than 2 seconds.
Release the button when a City Code and its city name are displayed as owing following
the display of “CITY” for about 1 second after ”SET” “Hold” ashes.
2) Depress M button and select the item to set up.
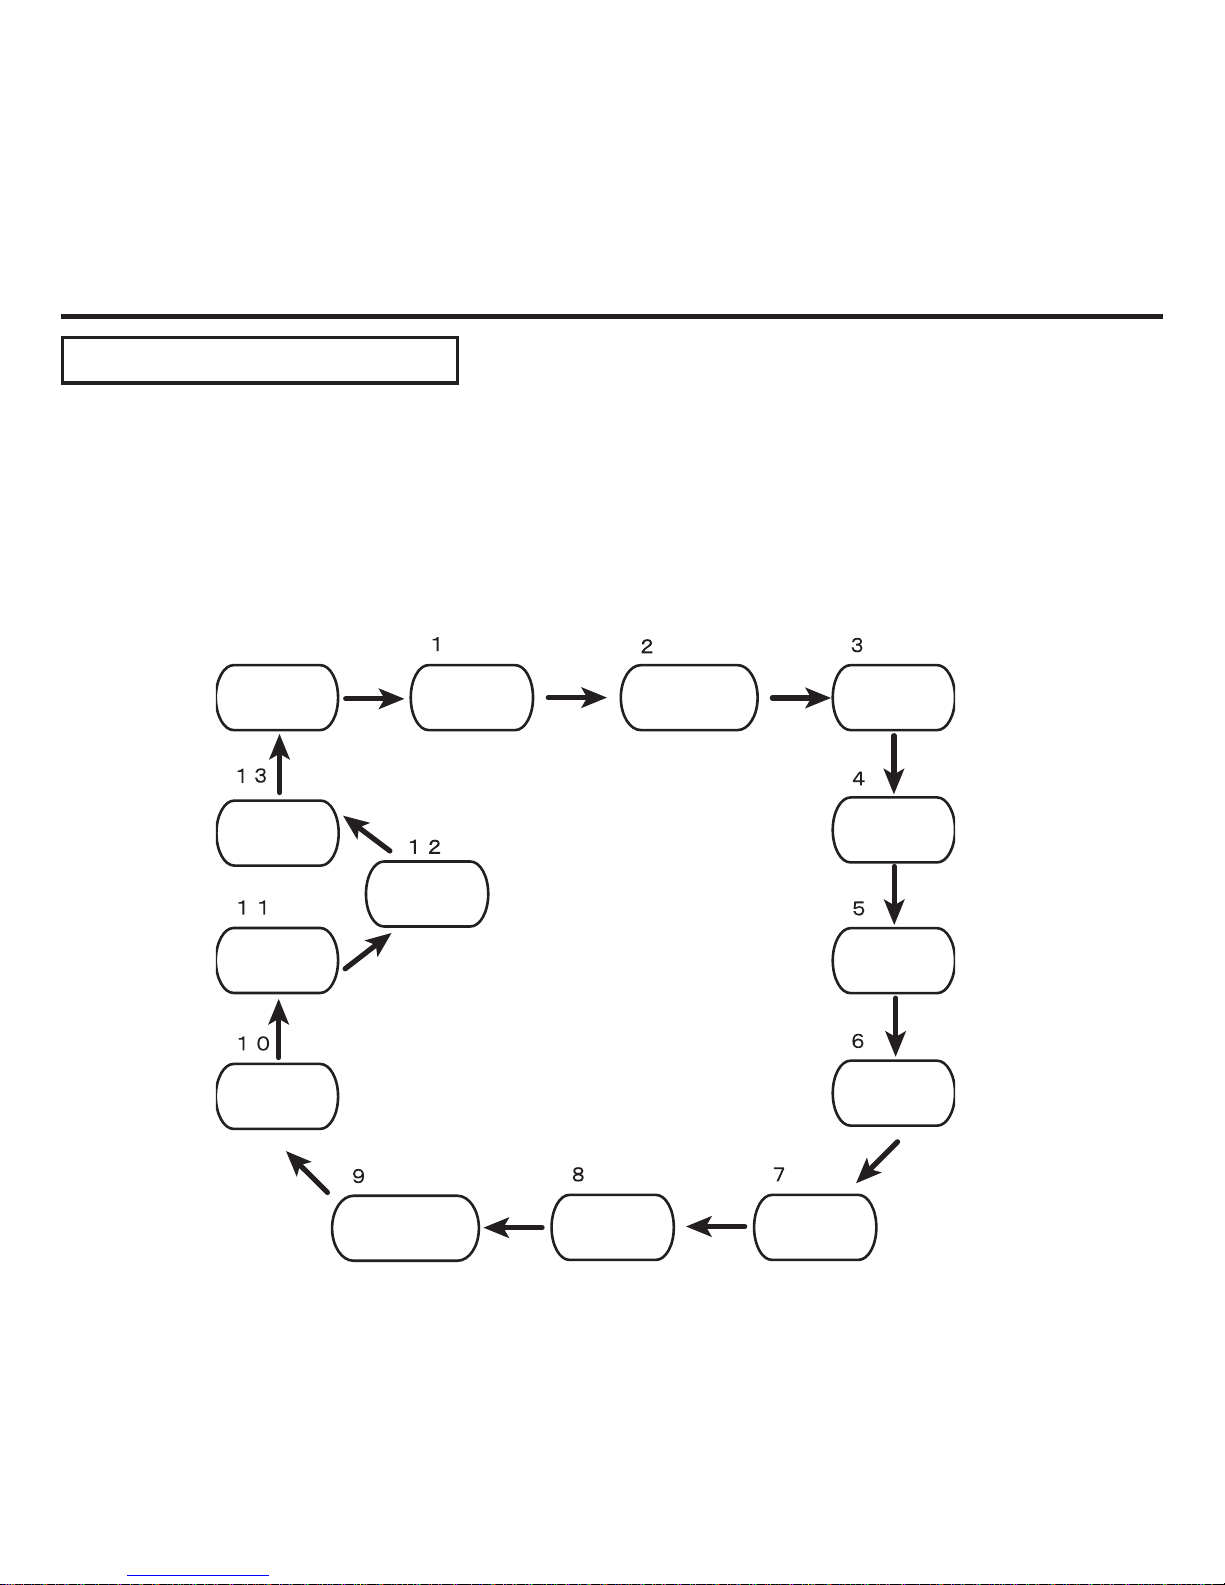
Setup item changes by depressing the M button as following order.
Please do not set the watch and date before setting Home City.
Home City
SUMMER TIME
( DST )
12/24 Hour
Format
Seconds
Hour
Minutes
Year
Month
Date
Button Operation
Tone On/Off
Illumination
Duration
Power
Saving
Unit
DISP
Screen
*
The number expresses the number of times to depress the M button.
Page 23

23
HOME CITY SETTING AND THE TIME ADJUSTING
3) In each setup item, depress P button (UP) or L button (DOWN) to change the setup.
Display Item to Change Button
TYO・・・Change the city code. ・・・・・・・・・・・・・・・・P or L button
OFF・・・Switch the Summer Time (DST) and Standard Time. ・・・P button
12H・・・Switch the 12-hour and 24-hour format. ・・・・・・・・P button
50・・・・Reset the seconds to “00”. ・・・・・・・・・・・・・・P button
When the seconds count is between 30 and 59,
one is added to the minutes count.
10:58・・ Change the hour or minutes ・・・・・・・・・・・・・P or L button
2014・・ Change the year. ・・・・・・・・・・・・・・・・・・P or L button
2,17 ・・ Change the month or day. ・・・・・・・・・・・・・・P or L button
4) Depress A button.
Setup is completed.
[ Note ]
●While the 12-hour format is selected, “P” as p.m. indicator lights up for the times from noon to
11:59 p.m. With 24-hour format, “P” does not light up.
●Once you set the date, it allows different month lengths and leap years. (Full automatic
calendar up to 2099.)
●Once you set the year, month and date, the day of the week is set automatically.
●When you use the product at the place except the Home City, please reset similarly the city at
which you stay as the Home City.
●You can change unit of temperature and depth when you set the Home City in any place
other than Tokyo (TYO). Please refer to “Unit Setting” in page 79 for the way of setting.
●As to the settings after the time and date, please refer to “Other Settings” in page 76.
Page 24
DIVE MODE (DIVE)
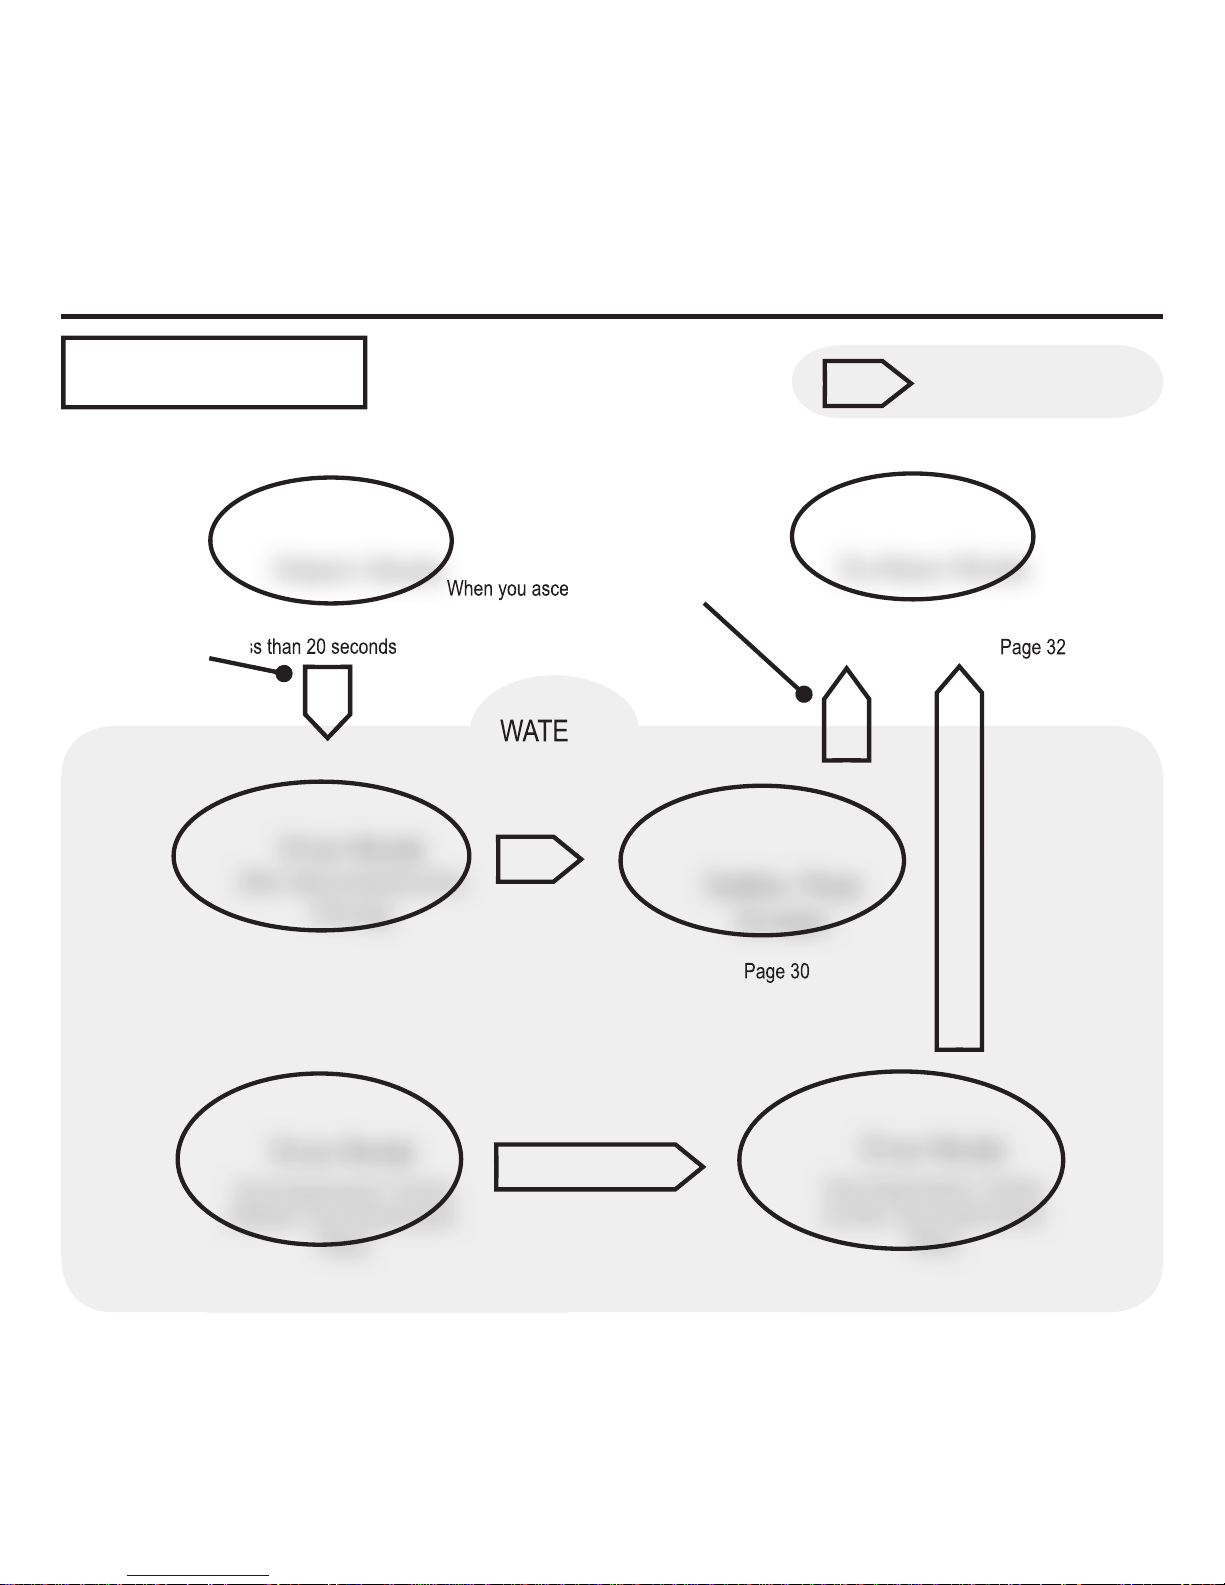
DIVE MODE
No button operation
Page 32
Page 30
Safety Stop
Screen
Surface Mode
When you descend
deeper than 1.5m for less than 20 seconds
When you ascend to the depth of 1.5m
WATER
Watch Mode
Dive Mode
(No-decompression
Diving)
Page 26
Dive Mode
Decompression Diving
(Before Decompression
Stop)
Dive Mode
Decompression Diving
(Under Decompression
Stop)
24
Page 39PAge 36
Page 25
DIVE MODE (DIVE)
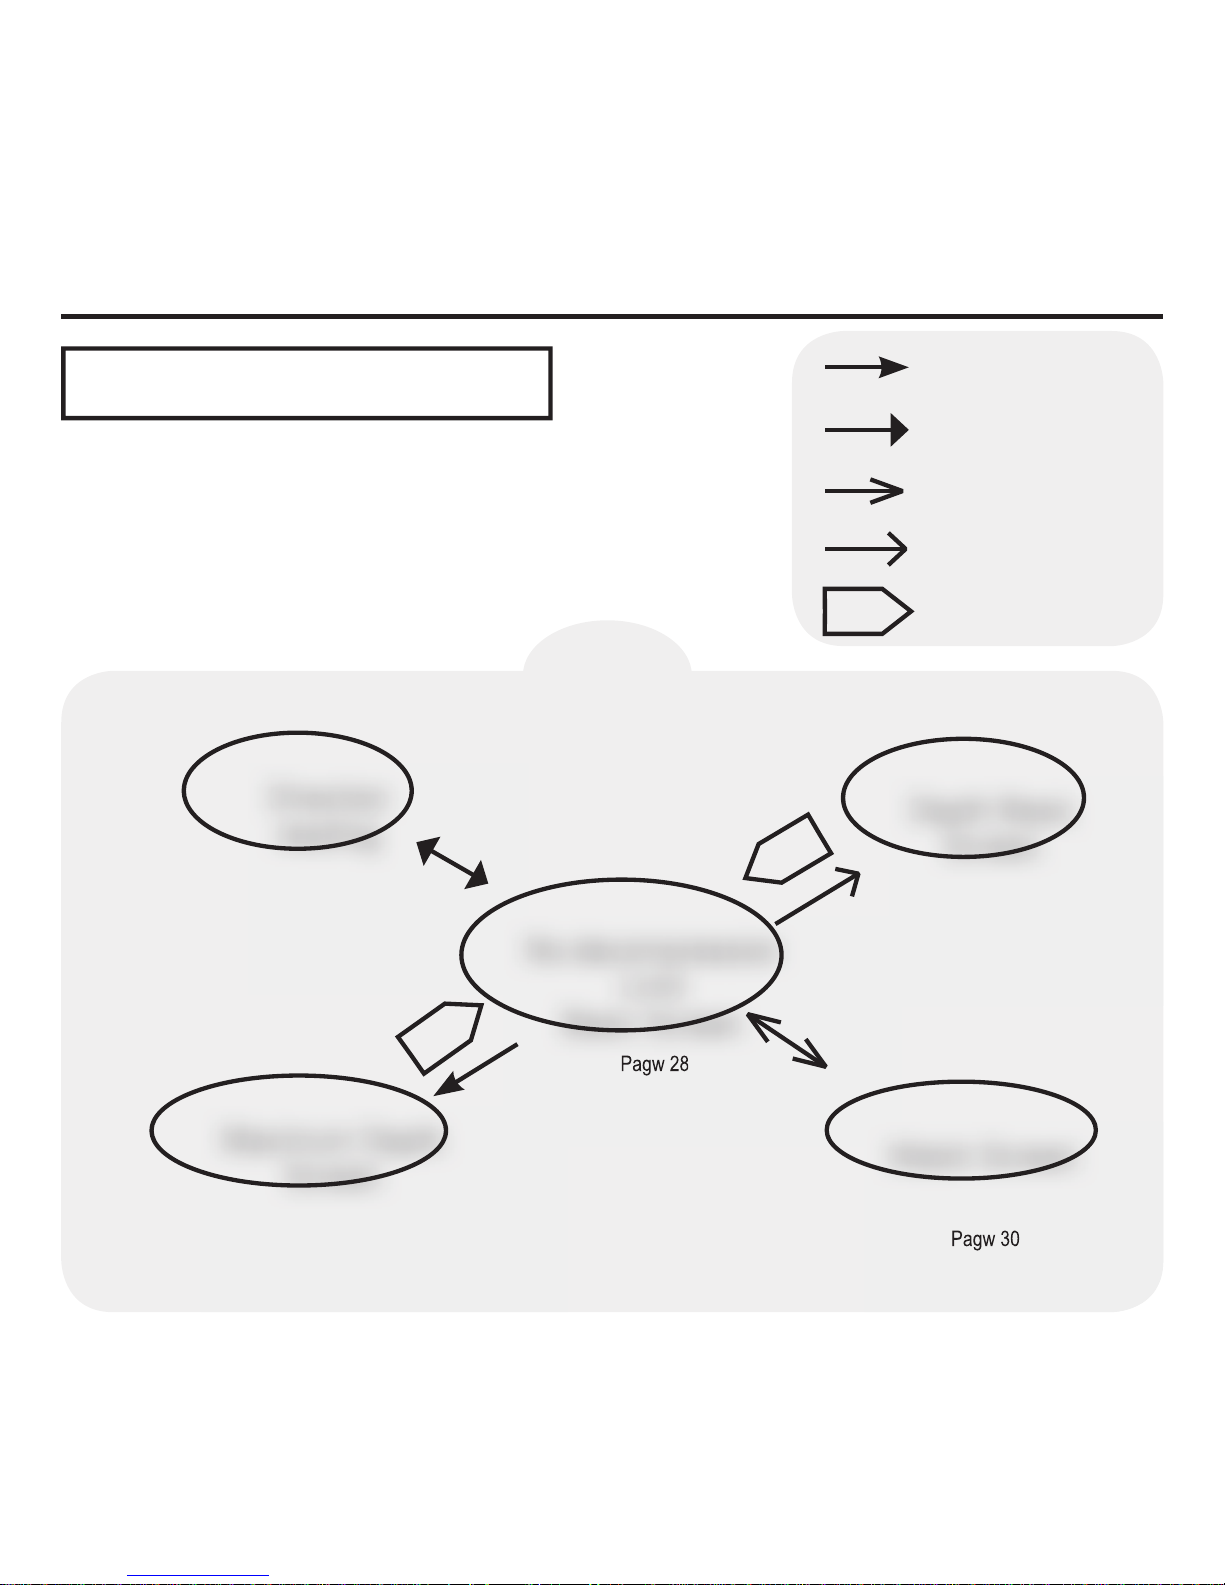
Depth Basic
Screen
Maximum Depth
Screen
Direction
reading
Pagw 28
Pagw 30
Pagw 28
No-decompression
Limit
Basic Screen
Watch Screen
Pagw 29
Pagw 29
A Button
No button operation
M Button
P Button
M Button
THE WATER
No-decompression Diving
25
Page 26
26
DIVE MODE (DIVE)
In the Dive Mode, it displays important information necessary at the time of scuba diving.
This product enters to Dive Mode automatically within 20 seconds after entry and sensing
pressure of the water equivalent to the depth of 1.5m. When you want to change it to Dive Mode
at the time of entry immediately, please change it manually by depressing B and M buttons at
the same time just before diving. It keeps the Dive Mode for one minute.
When no-decompression limit becomes less than 3 minutes, alarm starts to beep for 3 seconds.
[ NOTE ]
●This product judges that the diving starts when you descend deeper than 1.5m, and start
counting of the elapsed dive time.
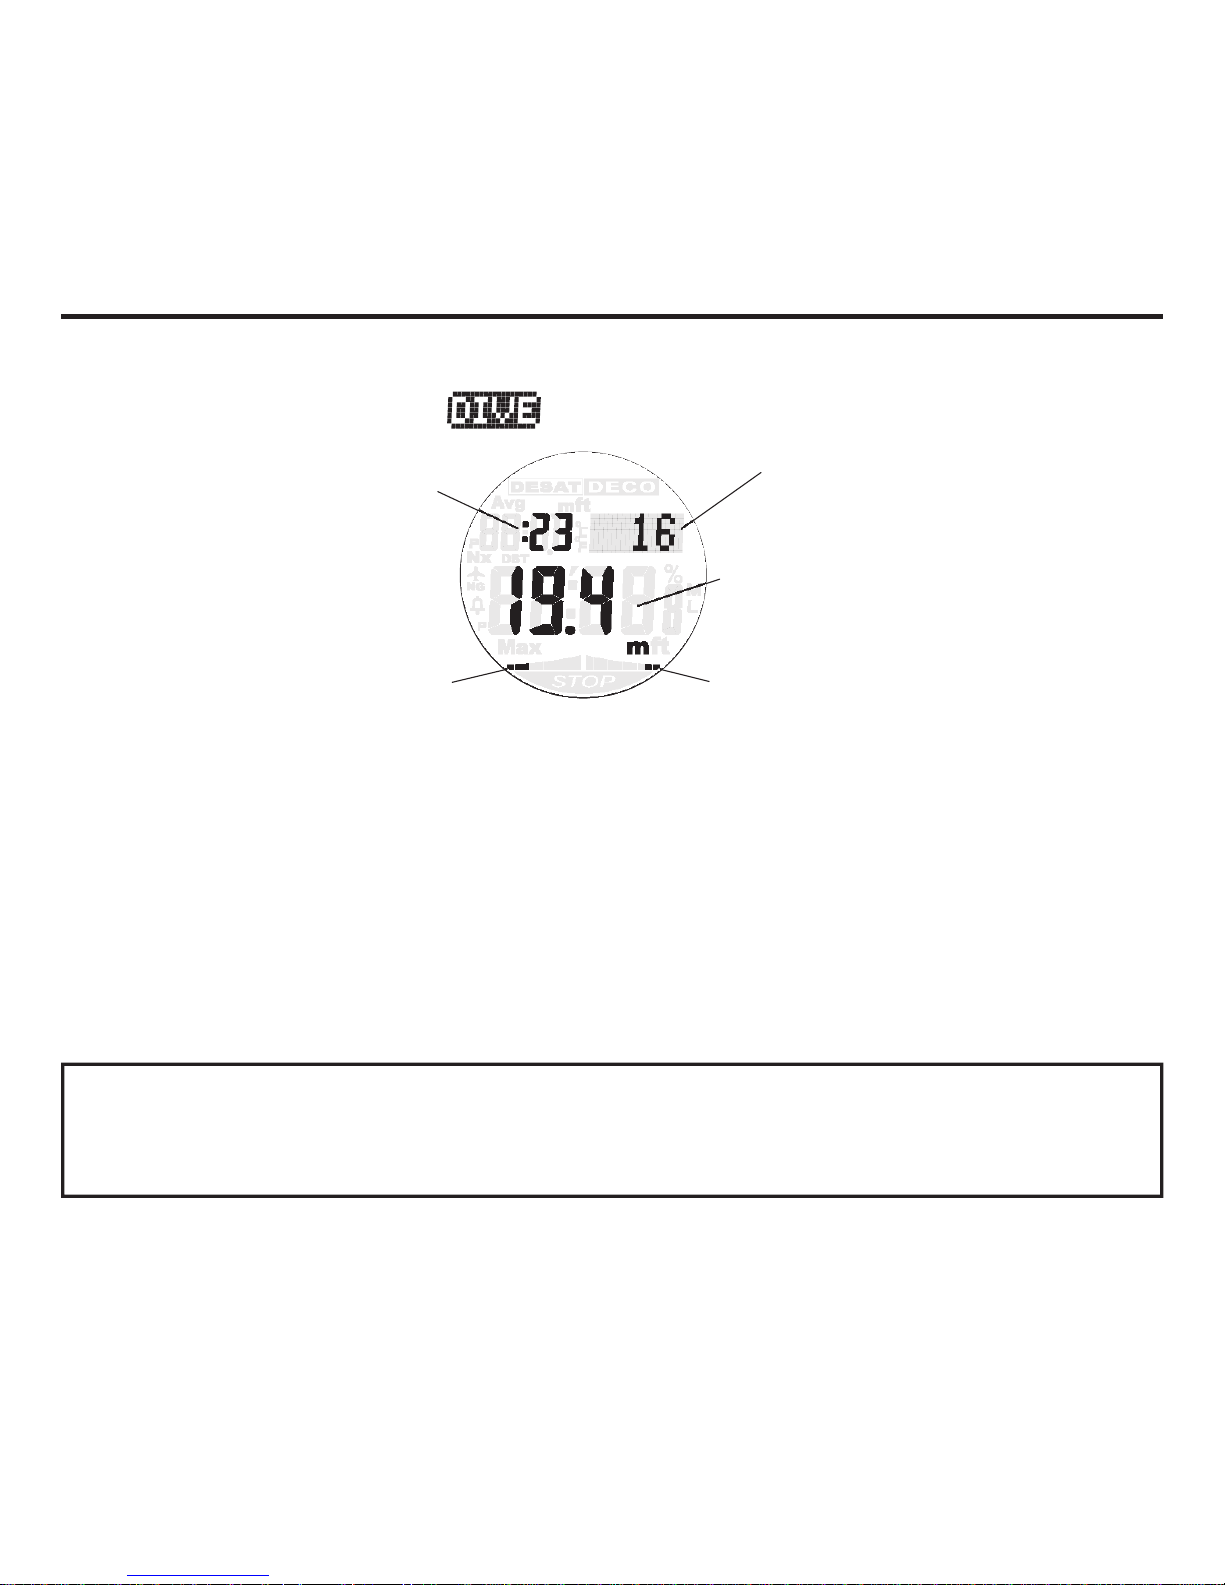
No-decompression limit
Current depth
Elapsed dive time
Tissue Loading Bar Graph
(TLBG)
Oxygen Accumulation (O2) or
Partial Pressure of Oxygen
(PO2) Bar Graph
Page 27

27
DIVE MODE (DIVE)
When in no-decompression diving, the following information is displayed.
○No-decompression Limit (NDL)・・・Possible time to stay at the current depth as
no-decompression.
*Maximum 200 minutes.
○Current Depth (DEPTH)・・・・・・Current depth of water. It displays by 0.1m unit
starting from 1.5m.
*Maximum 99.9m.
○Elapsed Dive Time・・・・・・・・ Time elapsed since the start of diving.
*Maximum 599 minutes.
○Tissue Loading Bar Graph・・・・・Displays degree of risk of the quantity of nitrogen
(TLBG) accumulated in the body tissue with ten phases.
○Oxygen Accumulation (O2) or・・・ Displays degree of risk of the quantity of oxygen
Partial Pressure of Oxygen (PO2) accumulated in the body or current partial pressure
Bar Graph of oxygen with ten phases.
*Displays either one with higher risk.
○Maximum Depth (MAX)・・・・・・ Maximum depth reached during the dive.
*Maximum 99.9m
○Current Water Temperature・・・・・Displays current water temperature.
○Current Time・・・・・・・・・・・Displays current time with hour, minutes and seconds.
(TIME 2 screen)
○Direction and Angle Value・・・・・ Direction reading.
Page 28
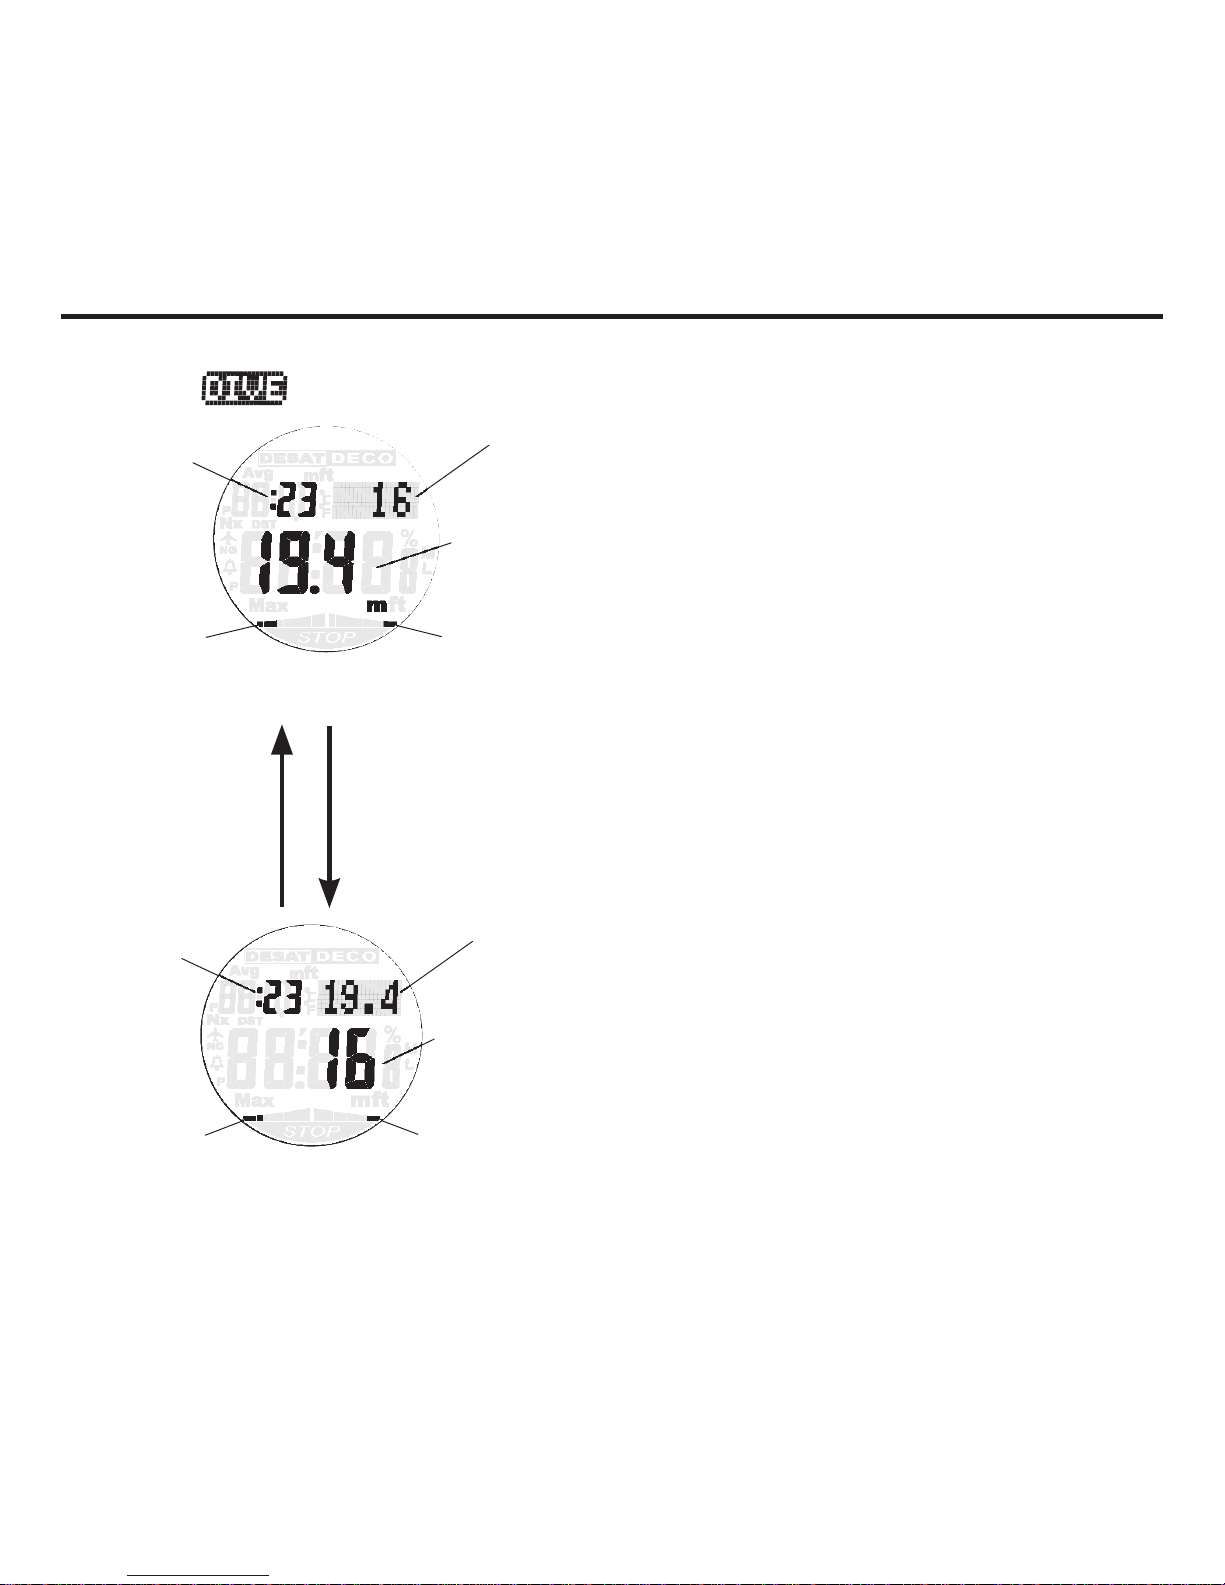
DIVE MODE (DIVE)
■Basic screen
Basic screen of Dive Mode displays the following
information
・Elapsed dive time (Minutes)
・No-decompression limit (Minutes)
・Current depth
・Tissue loading bar graph (TLBG)
・Oxygen accumulation (O2) or
partial pressure of oxygen (PO2) bar graph
Display position of the current depth and
no-decompression limit interchange when you
depress the P button.
Display goes back to the basic screen in 4
seconds automatically.
You can choose the basic screen with “Current
Depth” as a basic display or the one with
“No-decompression Limit”as a basic display.
(Please refer to “DI SP Screen Setting” of “Other
Settings” in page 80)
No-decompression limit
Current depth
Elapsed dive time
Tissue Loading Bar Graph
(TLBG)
Oxygen Accumulation (O2) or
Partial Pressure of Oxygen
(PO2) Bar Graph
No-decompression limit
Current depth
Elapsed dive time
Tissue Loading Bar Graph
(TLBG)
Oxygen Accumulation (O2) or
Partial Pressure of Oxygen
(PO2) Bar Graph
P Button4 Seconds Later
28
Page 29
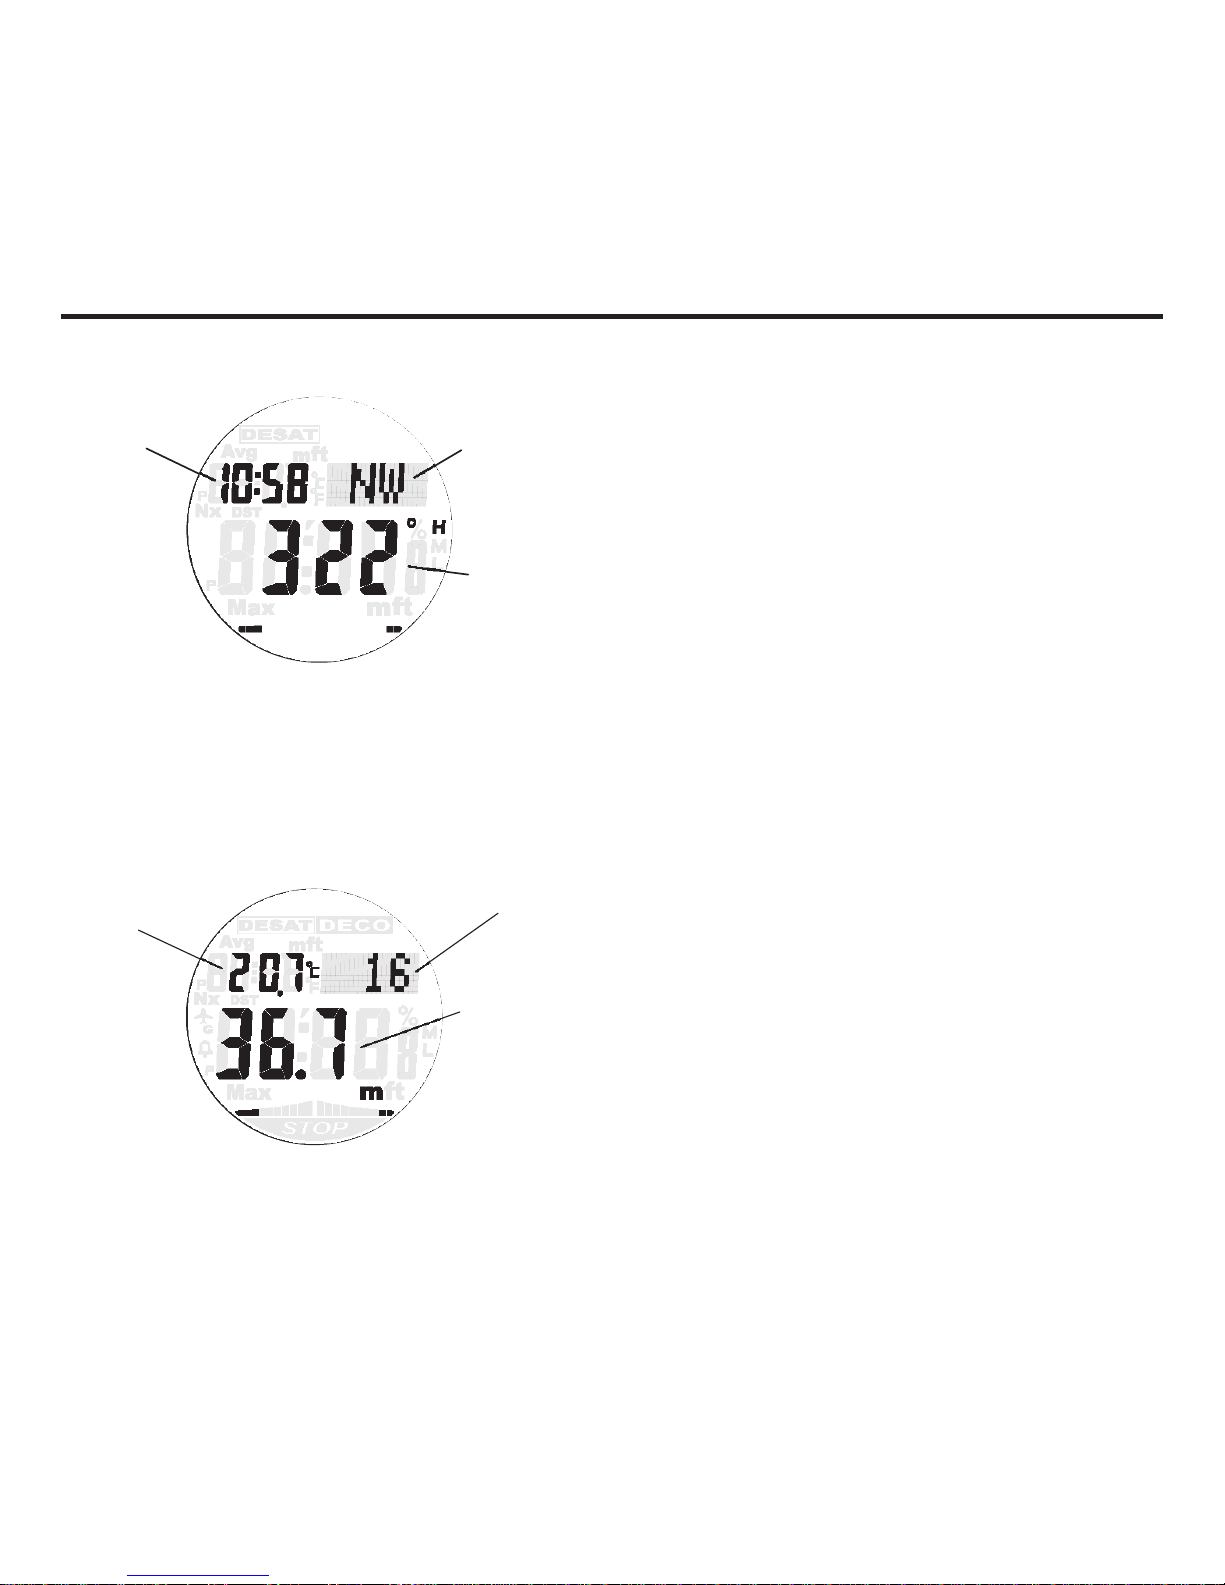
DIVE MODE (DIVE)
■Depress A button to display
maximum depth screen.
Maximum depth screen displays the following
information.
・Current water temperature
・No-decompression limit (Minute)
・Maximum depth
Display goes back to the basic screen in 4
seconds automatically.
■Depress M button to display digital compass
reading screen.
Digital compass reading screen displays the
following information.
・Current time
・Direction
・Angle value
Depress P button for remeasurement.
Depress M button to return to the basic screen.
Please refer to page 60 as to directionreading.
Direction Indicator
Angle Value
Current Time
No-decompression Limit
Current Water
Temperature
Maximum Depth
29
Page 30
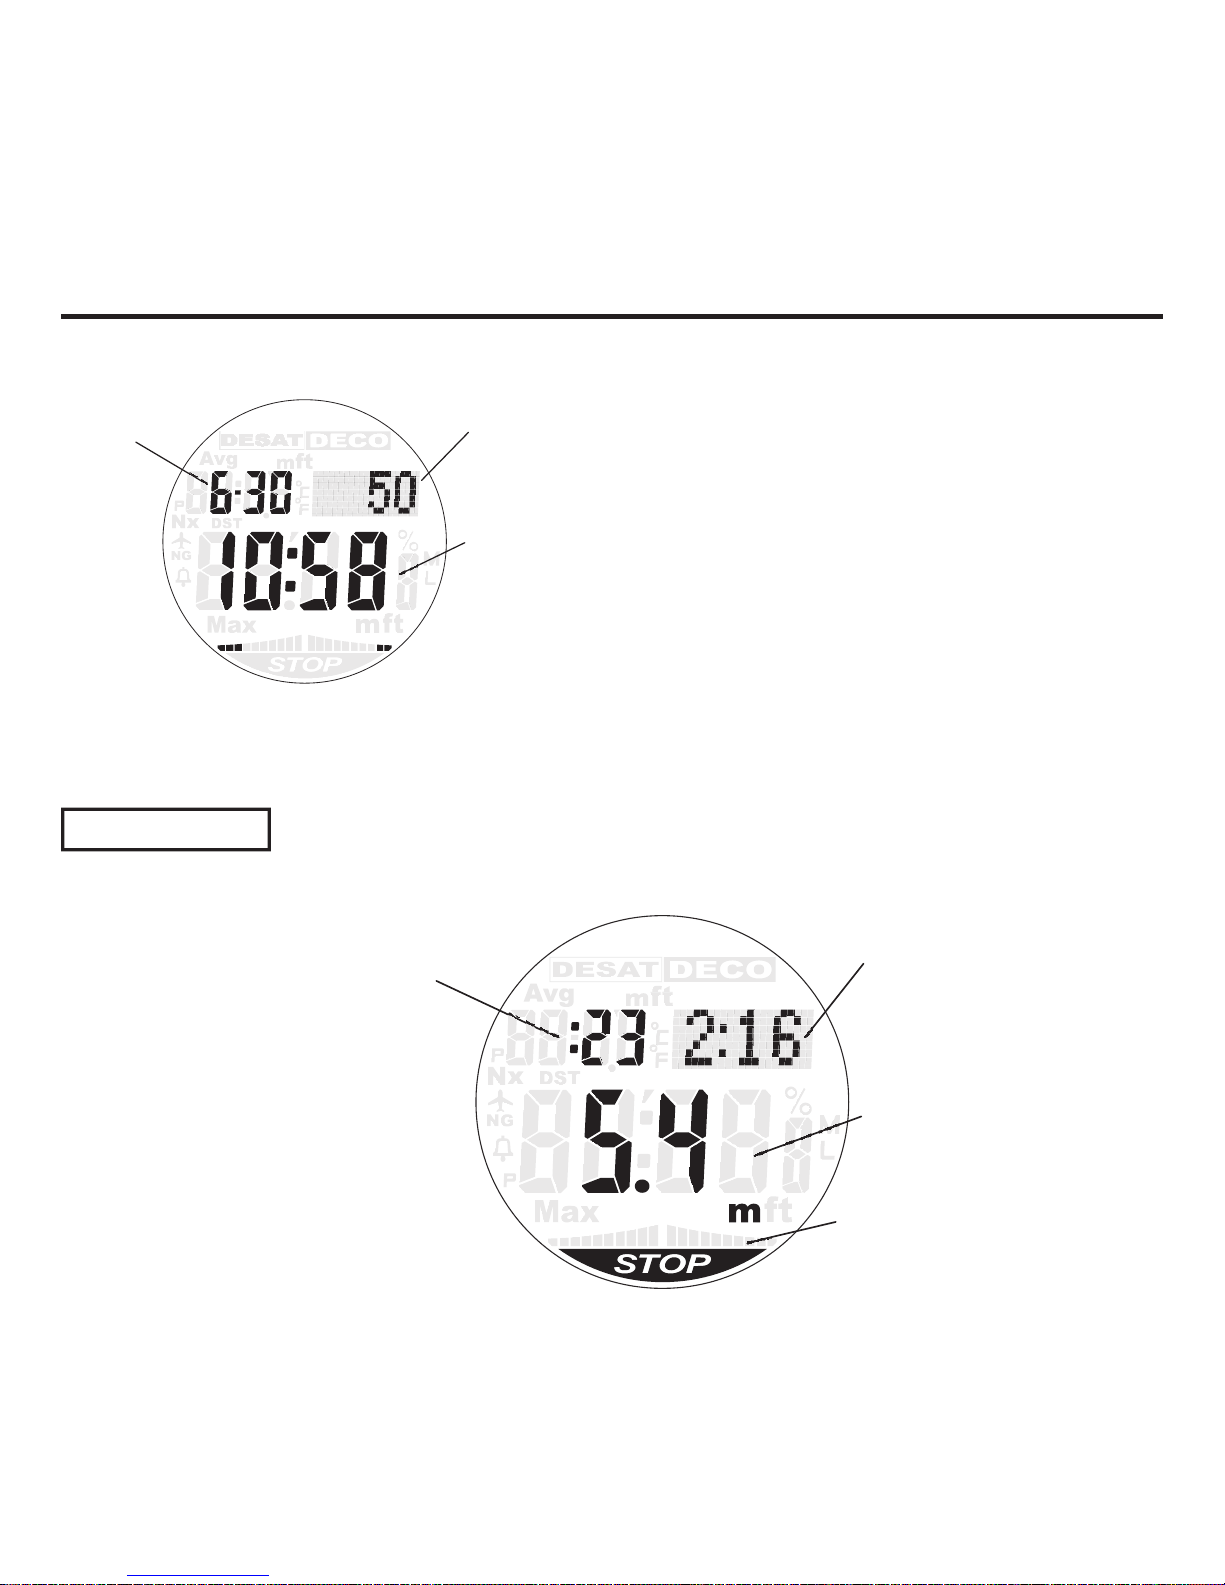
DIVE MODE (DIVE)
■Depress L button to display watch screen.
Watch screen displays the following information.
・Date
・Seconds
・Hour
・Minutes
Watch screen is displayed for 1 minute.
After 1 minute, it goes back to the basic screen
automatically. For immediate return to the basic
screen, please depress L button.
Seconds
Date
Time
Safety Stop
This product has a function to recommend “Safety Stop” for 3 minutes at the 5m depth.
Elapsed Dive Time
Countdown
Current Depth
STOP Indicator
30
Page 31

DIVE MODE (DIVE)
When you ascend in a no-decompression diving condition after having descended to the depth
deeper than 10m, 3-minute timer starts automatically from the depth of 6.5m and continues
while you stay at the depth of 1.5m to 9.9m. We recommend that you perform “Safety Stop” until
the 3-minute countdown is completed without ascending to the surface of the water.
1)At the depth of 6.5m, safety stop alarm starts to beep.
・STOP indicator lights up.
2)Countdown timer is displayed as “ SAFE → 5m → 03:00”, and 3-minute timer starts. Also, the
timer displays as “SAFE → 5m → 02:30” and “SAFE → 5m → 02:00” every 30 seconds until
the last 1 minute, and it displays only countdown indication for the last 1 minute.
3)As “↑ OK “ is displayed for 5 seconds at the time of 3 minutes have elapsed, please start to
ascend to the surface of the water.
Safety Stop completes;
・When 3 minutes have elapsed.
・When you ascend to a depth of less than 1.5m.
・When you descend to the depth deeper than 10m again.
(When you ascend to the depth of 6.5m again after descending to the depth deeper than 10m
again, the countdown begins all over again.)
31
Page 32
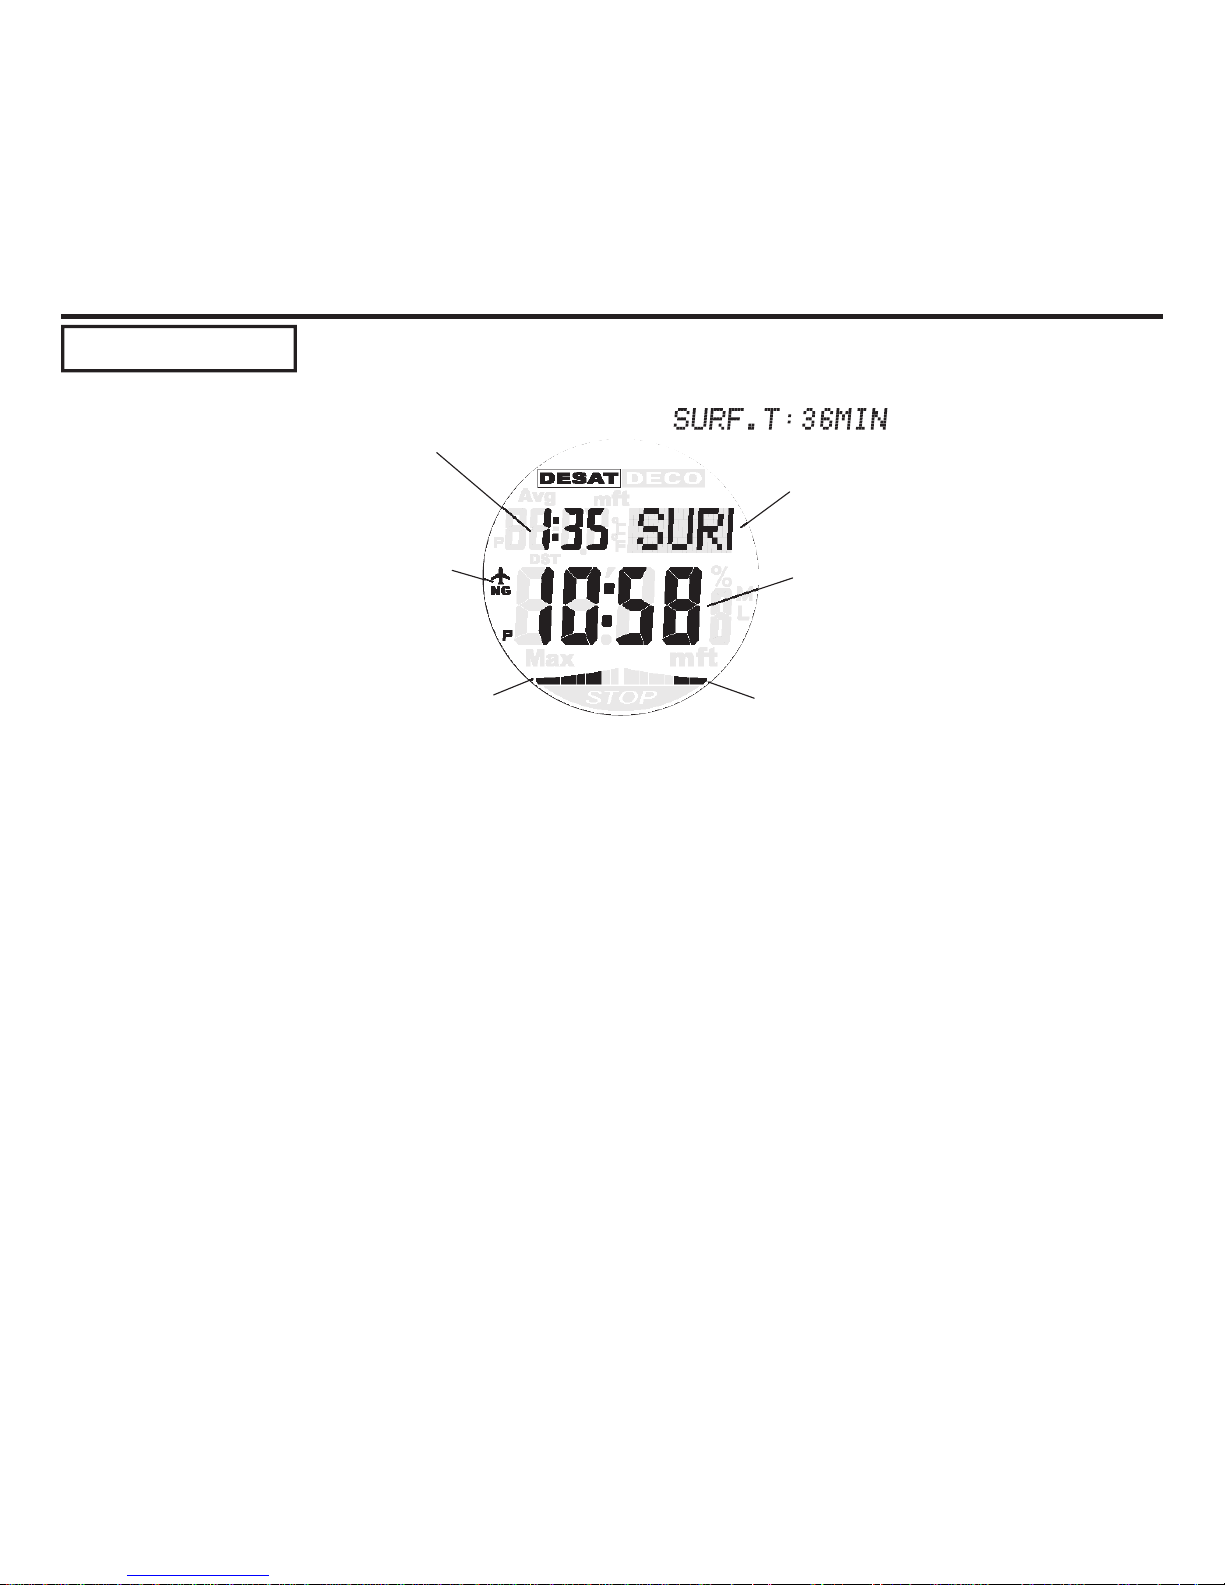
DIVE MODE (DIVE)
Surface Mode
Surface Mode is a display mode when residual nitrogen is still in the body tissue after diving.
In addition to the current time, date and day of the week displayed in a normal Watch Mode, it
displays desaturation time and surface interval time.
Tissue Loading Bar Graph
(TLBG)
Oxygen Accumulation (O2) or
Partial Pressure of Oxygen
(PO2) Bar Graph
Surface Interval Time
Current Time
Desaturation Time
Airplane Boarding
Prohibition Indicator
In addition to the current time, date and day of the week displayed in a normal Watch Mode, it displays
desaturation time and surface interval time.
Surface Mode screen displays the following information.
○Desaturation Time (DESAT)・・・The time when nitrogen accumulated in the body tissue
is released outside a body
○Surface Interval Time(SURF. T)・The time elapsed since the last diving.
○Airplane Boarding・・・・・・・ Prohibit to board to airplane. (Prohibit it during lighting)
Prohibition Indicator
○Tissue Loading Bar Graph ・・・ Displays degree of risk of the quantity of nitrogen
(TLBG) accumulated in the body tissue with ten phases.
○Oxygen Accumulation (O2) or・・・Displays degree of risk of the quantity of oxygen
Partial Pressure of Oxygen (PO2) accumulated in the body or current partial
Bar Graph pressure of oxygen with ten phases.
*Display either one with higher risk.
32
Page 33
DIVE MODE (DIVE)
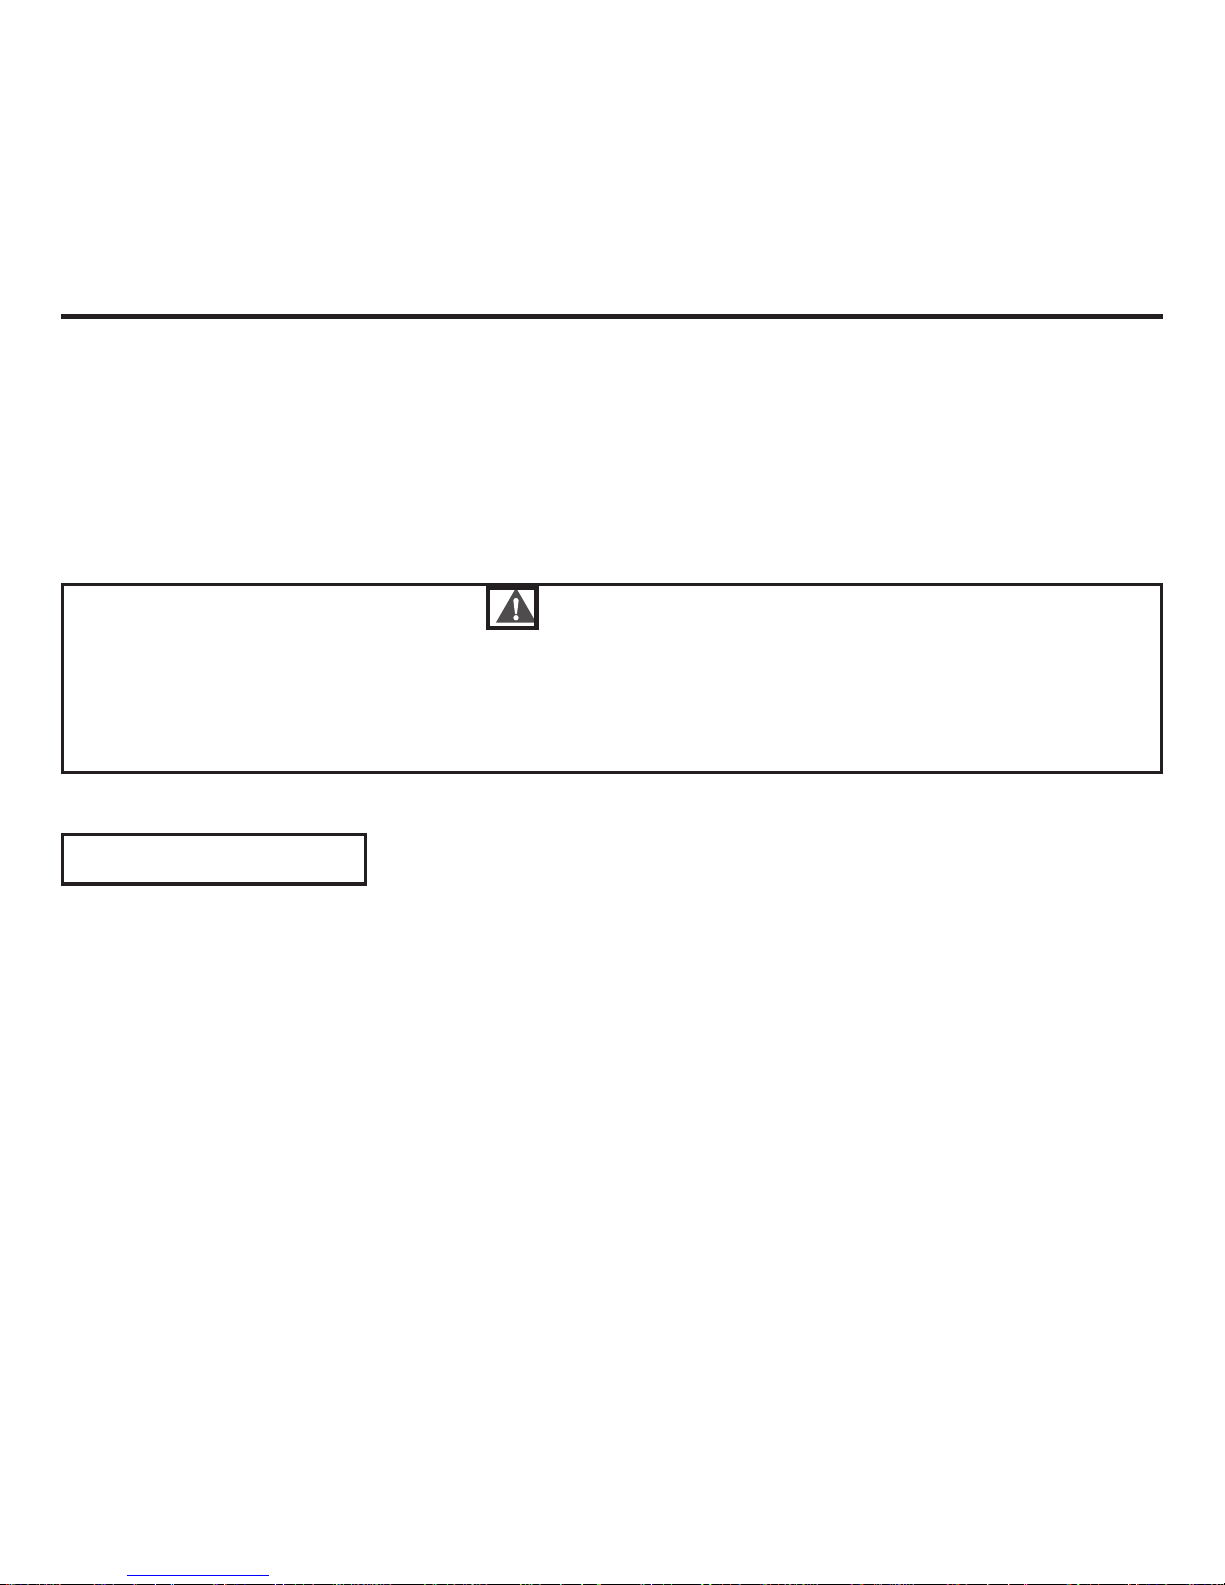
●When nitrogen and oxygen remaining in the body tissue disappear, Surface Mode returns to
Watch Mode automatically.
●Even a state with nitrogen and oxygen remaining in the body tissue, when it passes for 48
hours, the screen returns to the Watch Mode automatically.
●Airplane boarding prohibition indicator continues turning on for 24 hours after diving.
Even if nitrogen and oxygen remaining in the body tissue disappear and the screen returns to
the Watch Mode, the indicator turns on until it passes for 24 hours.
Warning
Never board to airplane in the following states. The risk to contract decompression sickness
increases.
・When the airplane boarding prohibition indicator turns on.
・When desaturation time (DESAT) still remains.
Repetitive Diving
When you descend to the depth deeper than 1.5m again after having changed from Dive Mode
to Surface Mode, this product judges it as repetitive diving (A new diving).
●A timing to change to Surface Mode is 10 minutes after you ascend to the depth less than
1.5m
33
Page 34
DIVE MODE (DIVE)
Nitrox (EANx) Diving
●EANx : Enriched Air Nitrox (Abbr. : Nitrox)
The mixed gases which raised a ratio of oxygen than compressed air (Fraction of oxygen 21%)
of usually use
You can use this product to the diving using usually use compressed air with 21 % fraction of
oxygen and EANx with 22 to 50% fraction of oxygen.
In the case of diving using Nitrox (EANx), this product monitors in uence on human body with
oxygen by the fraction of oxygen and the depth in consideration of oxygen poisoning by the
excess oxygen absorbed to the body tissue in addition to the normal diving display.
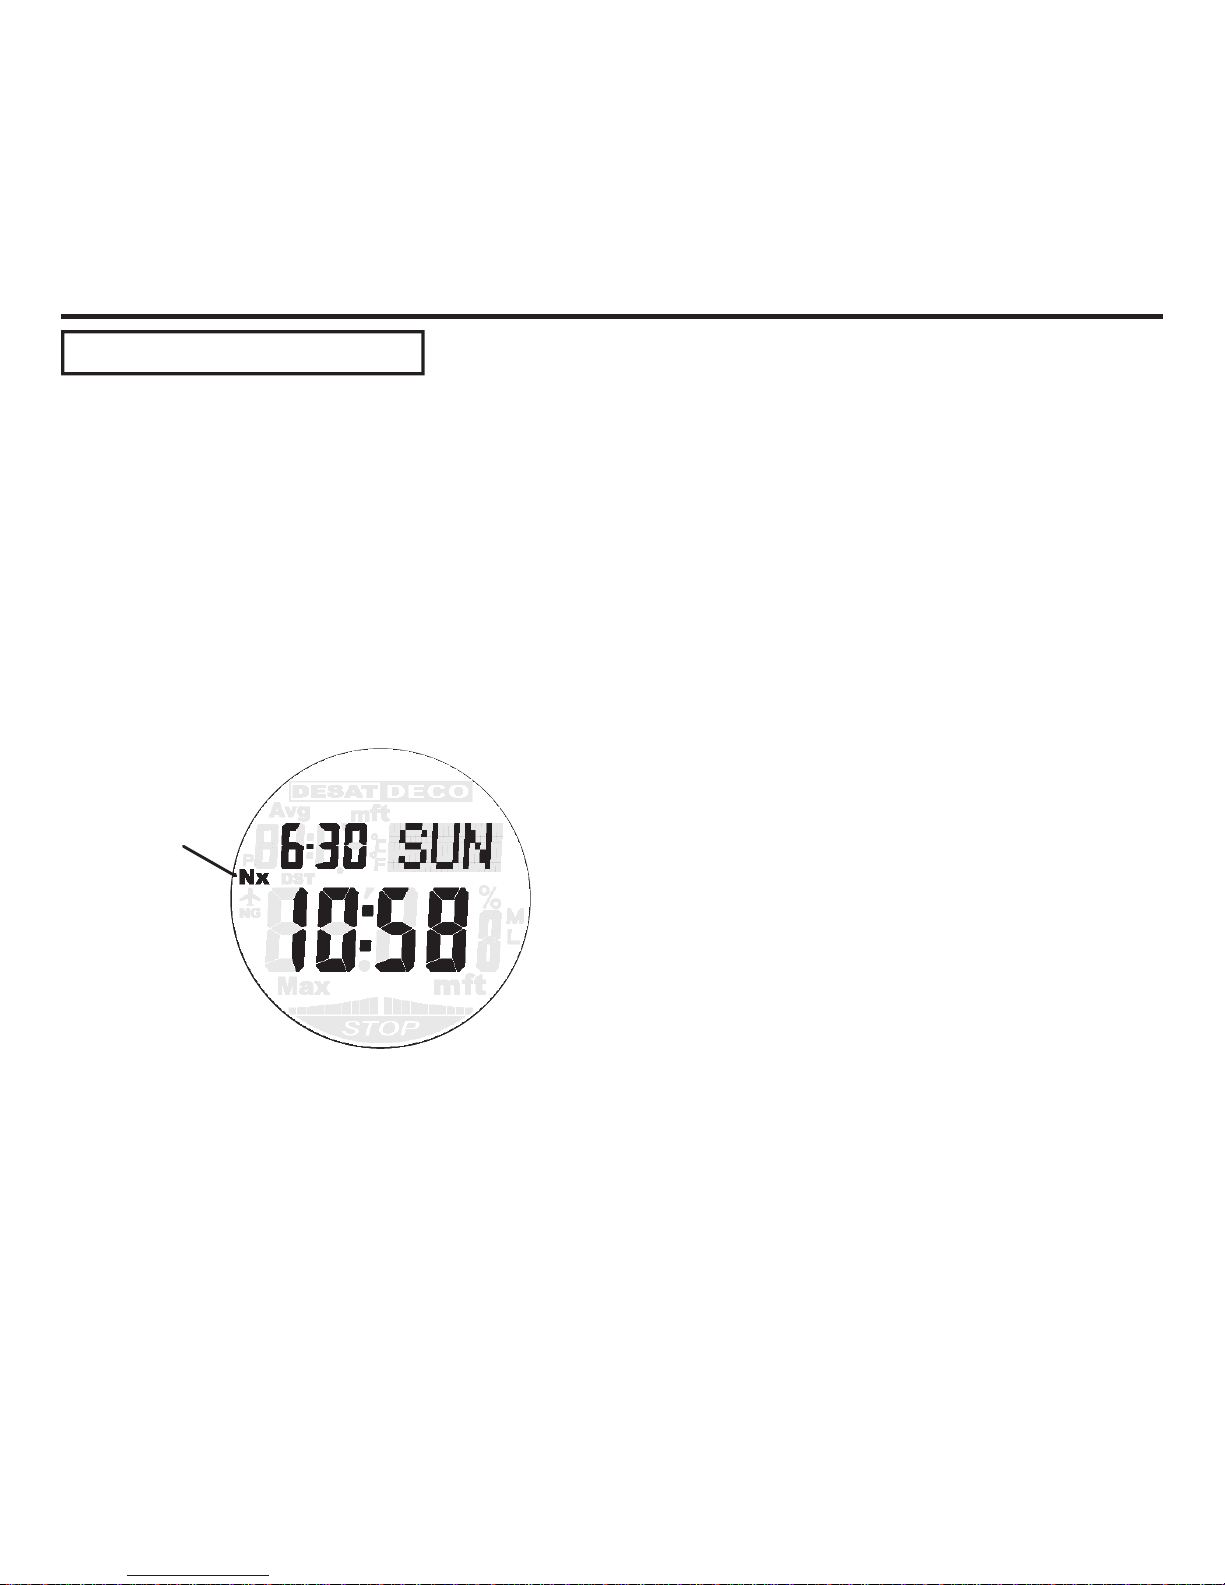
When it is Nitrox (EANx) diving, the screen displays
the following information.
・Nx mark lights up
Nitrox (EANx) setting with fraction of oxygen 22
to 50% is selected, Nx mark lights up in all mode
except Log Mode.
It always monitors oxygen accumulation (O2) and
partial pressure of oxygen (PO2) even when using
compressed air with fraction of oxygen 21%.
As to the setup of fraction of oxygen, please refer to
“Plan Mode, Fraction of Oxygen Setting” in page 58.
Nx Mark
34
Page 35
DIVE MODE (DECOMPRESSION DIVE)
35
Dive Mode (Decompression Dive)
Decompression Dive Warning
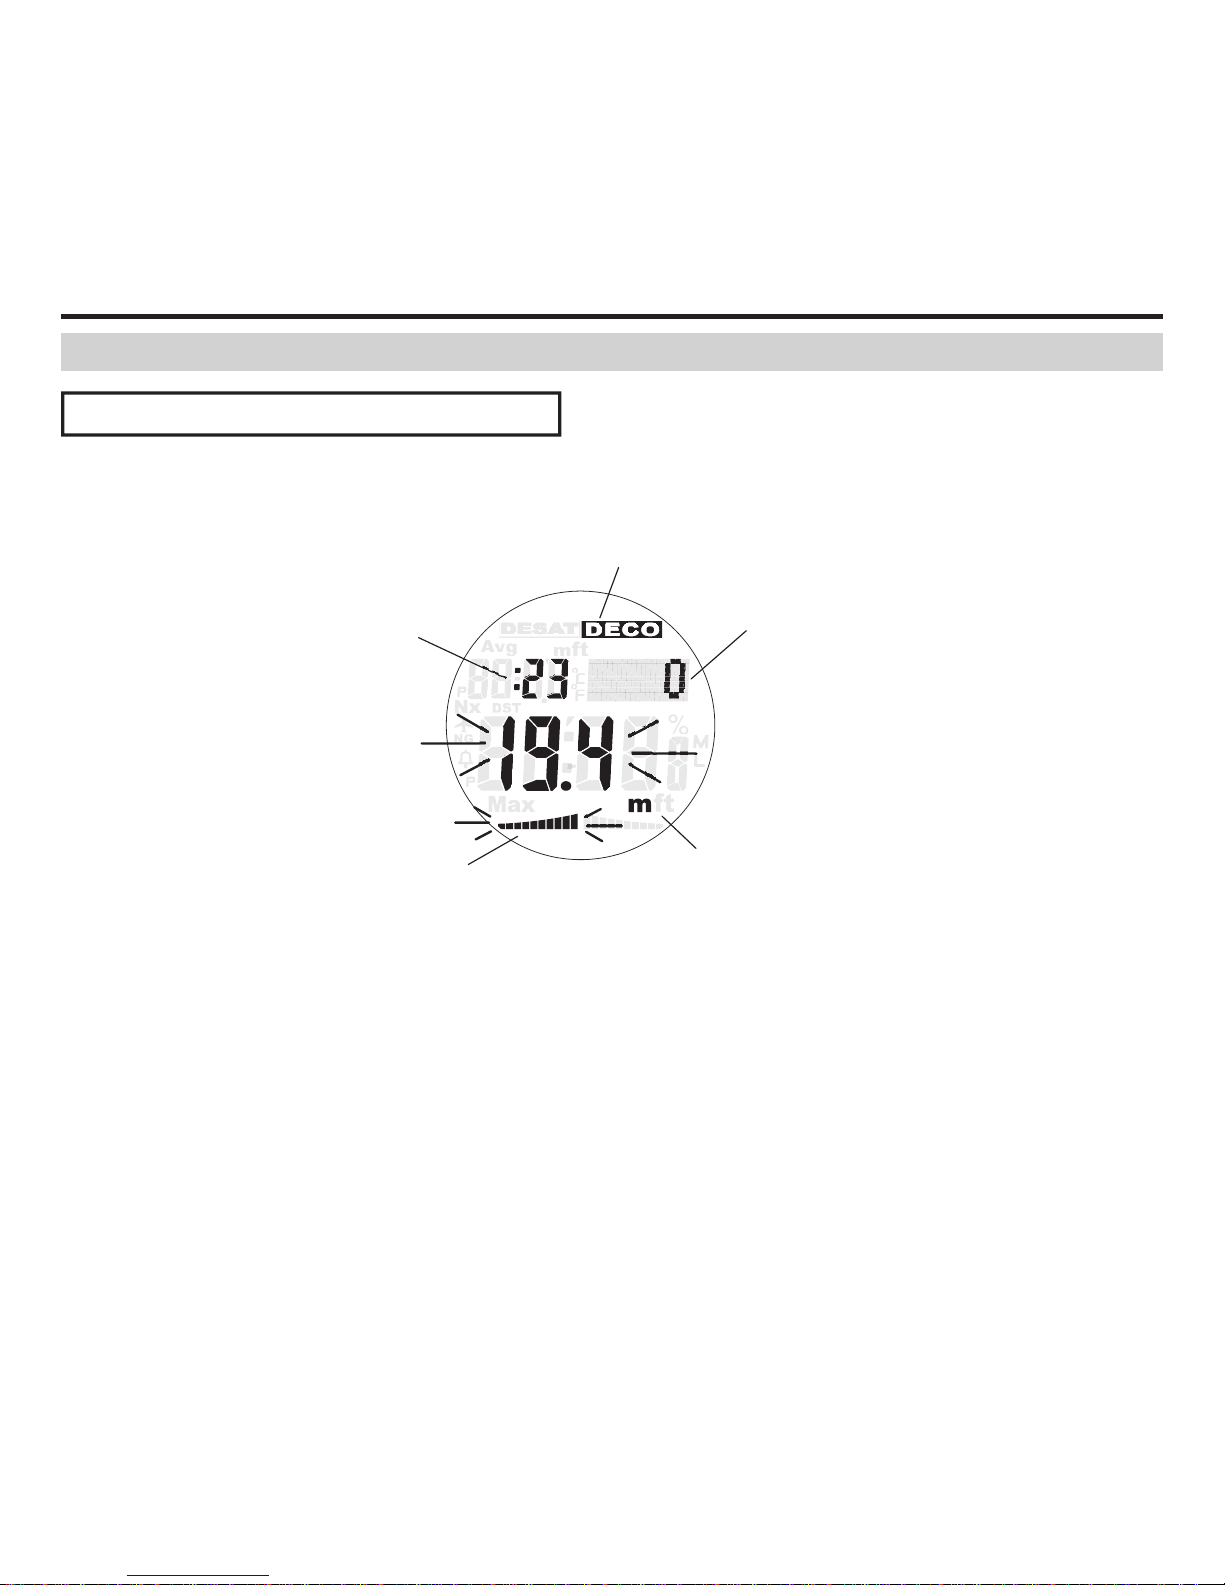
The warning activates when the no-decompression time is exceeded and decompression stop
becomes necessary.
1)DECO Mark lights up, Tissue Loading Bar Graph (TLBG) and Current Depth ash.
2)Alarm sounds for 6 seconds.
3)After that, the screen switches to the Decompression Dive Screen (Before Decompression
Stop) automatically. (Page 37)
4)When you complete the decompression stop at the depth required, DECO mark lights off,
Tissue Loading Bar Graph (TLBG) switches to light up, and it becomes no-decompression
dive.
●If warning occurs even once, it will be recorded on dive log.
DECO Mark
No-decompression Limit
Current Depth
Tissue Loading Bar Graph
Elapsed Dive Time
Page 36

DIVE MODE (DECOMPRESSION DIVE)
At the time of decompression dive (Before decompression stop), it displays the following
information.
○Decompression Stop Depth ・・・・・Decompression stop depth is displayed every 3m
depending on the diving situation.
○DECO ・・・・・・・・・・・・・・Decompression stop mark. When you exceed
no-decompression limit, this mark turns on.
○Current Depth (DEPTH) ・・・・・・・Current depth of water. It displays by 1m unit starting
from 1.5m. *Maximum 99.9m.
○Elapsed Dive Time ・・・・・・・・・Time elapsed since the start of diving.
*Maximum 599 minutes.
○Tissue Loading Bar Graph ・・・・・ Displays degree of risk of the quantity of nitrogen
(TLBG) accumulated in the body tissue with ten phases.
○Oxygen Accumulation(O2) or・・・・・ Displays degree of risk of the quantity of oxygen
Partial Pressure of Oxygen (PO2) accumulated in the body or current partial
Bar Graph pressure of oxygen with ten phases.
*Displays either one with higher risk.
○Total Ascent Time (TOTAL) ・・・・・・Time required to ascend from present depth to
surface at proper speed with decompression stop.
○Maximum Depth (MAX) ・・・・・・ Maximum depth reached during the dive.
*Maximum 99.9m
○Current Water Temperature ・・・・・Displays current water temperature.
○Current Time ・・・・・・・・・・・Displays current time with hour, minutes and seconds.
(TIME 2 screen)
○Direction and Angle Value ・・・・・ Direction reading.
36
Decompression Dive (Before Decompression Stop)
When the screen switches to Decompression Dive (Before Decompression Stop),
decompression stop depth is displayed.
It displays the depth every 3m depending on the diving situation. (Decompression stop depth
display, 3~33m)
Page 37
DIVE MODE (DECOMPRESSION DIVE)
37
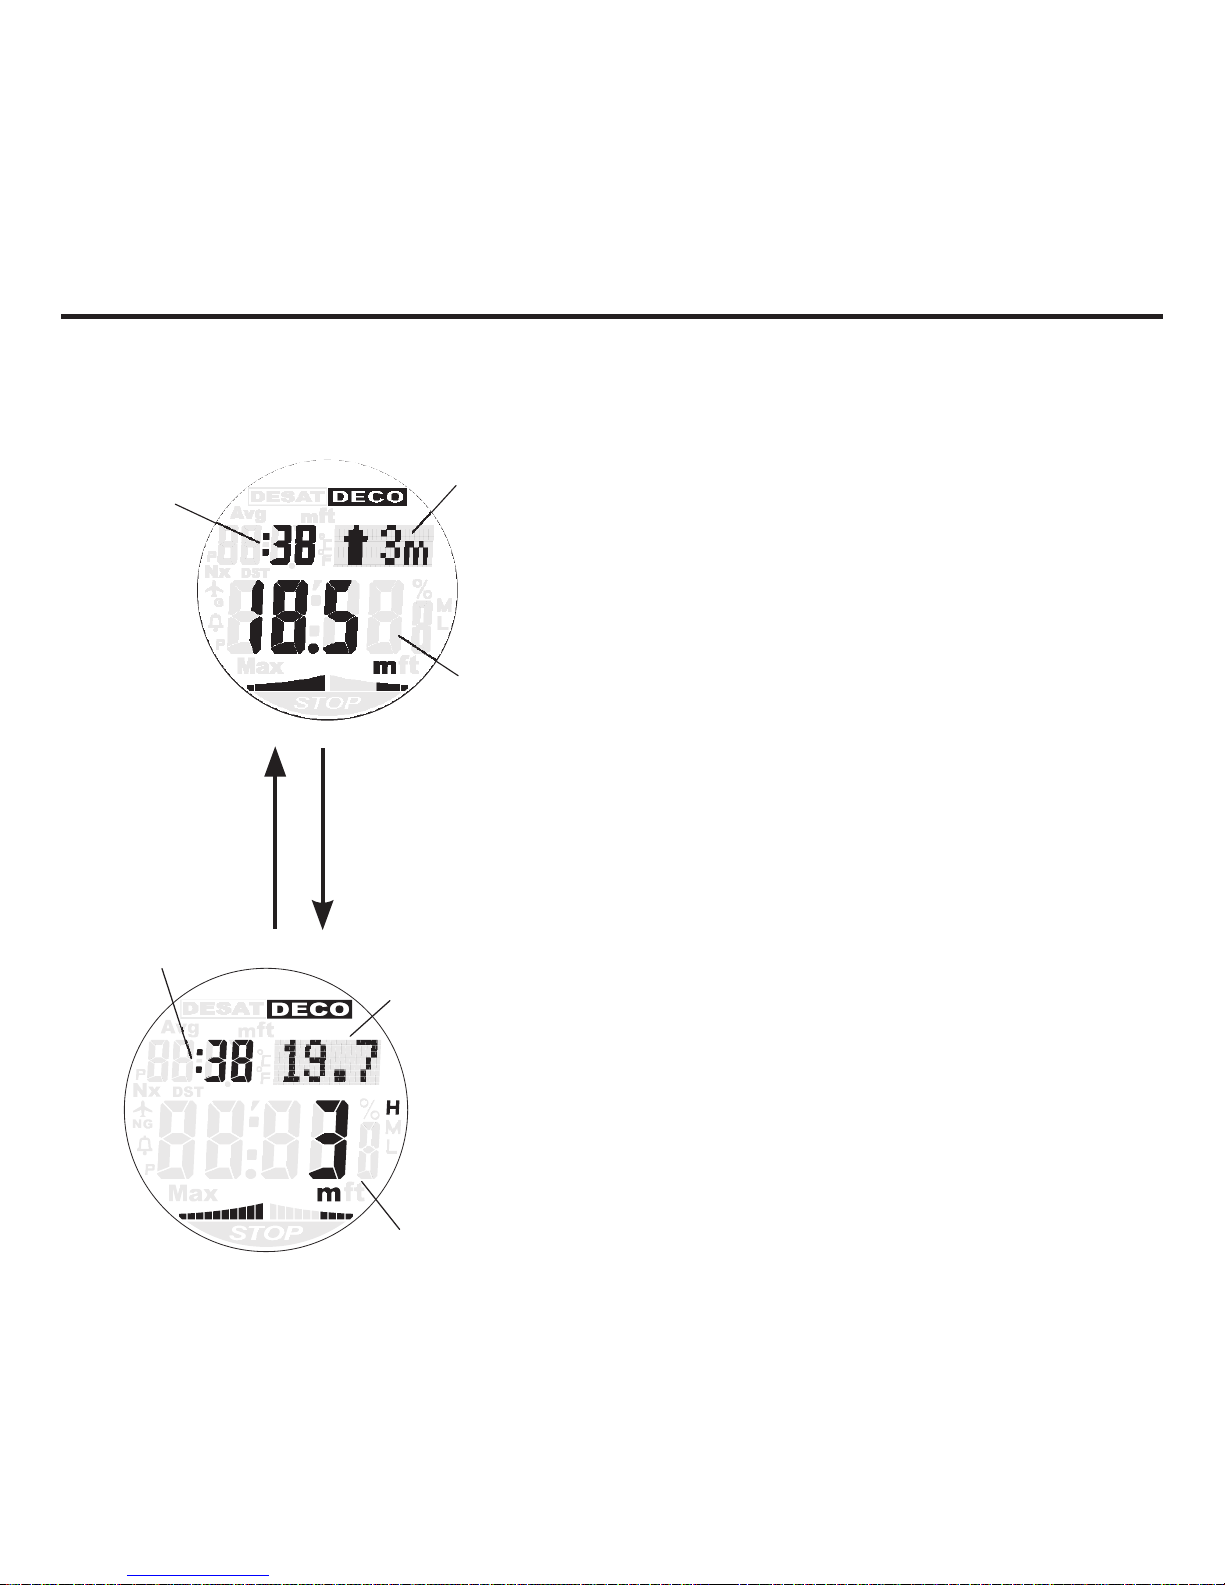
■Decompression Dive Screen
(Before Decompression Stop)
Decompression dive basic screen of Dive Mode
(Before decompression stop) displays the
following information.
・Elapsed dive time (Minutes)
・Decompression stop depth
・Current depth
・Tissue loading bar graph (TLBG)
・Oxygen accumulation (O2) or partial
pressure of oxygen (PO2) bar graph
Display position of the decompression stop depth
and current depth interchange when you depress
the P button.
Display goes back to the decompression dive
basic screen (Before decompression stop)in 4
seconds automatically.
Decompression Stop
Depth
Elapsed Dive Time
Current Depth
P Button4 Seconds Later
Elapsed Dive Time
Current Depth
Decompression Stop Depth
Page 38
DIVE MODE (DECOMPRESSION DIVE)
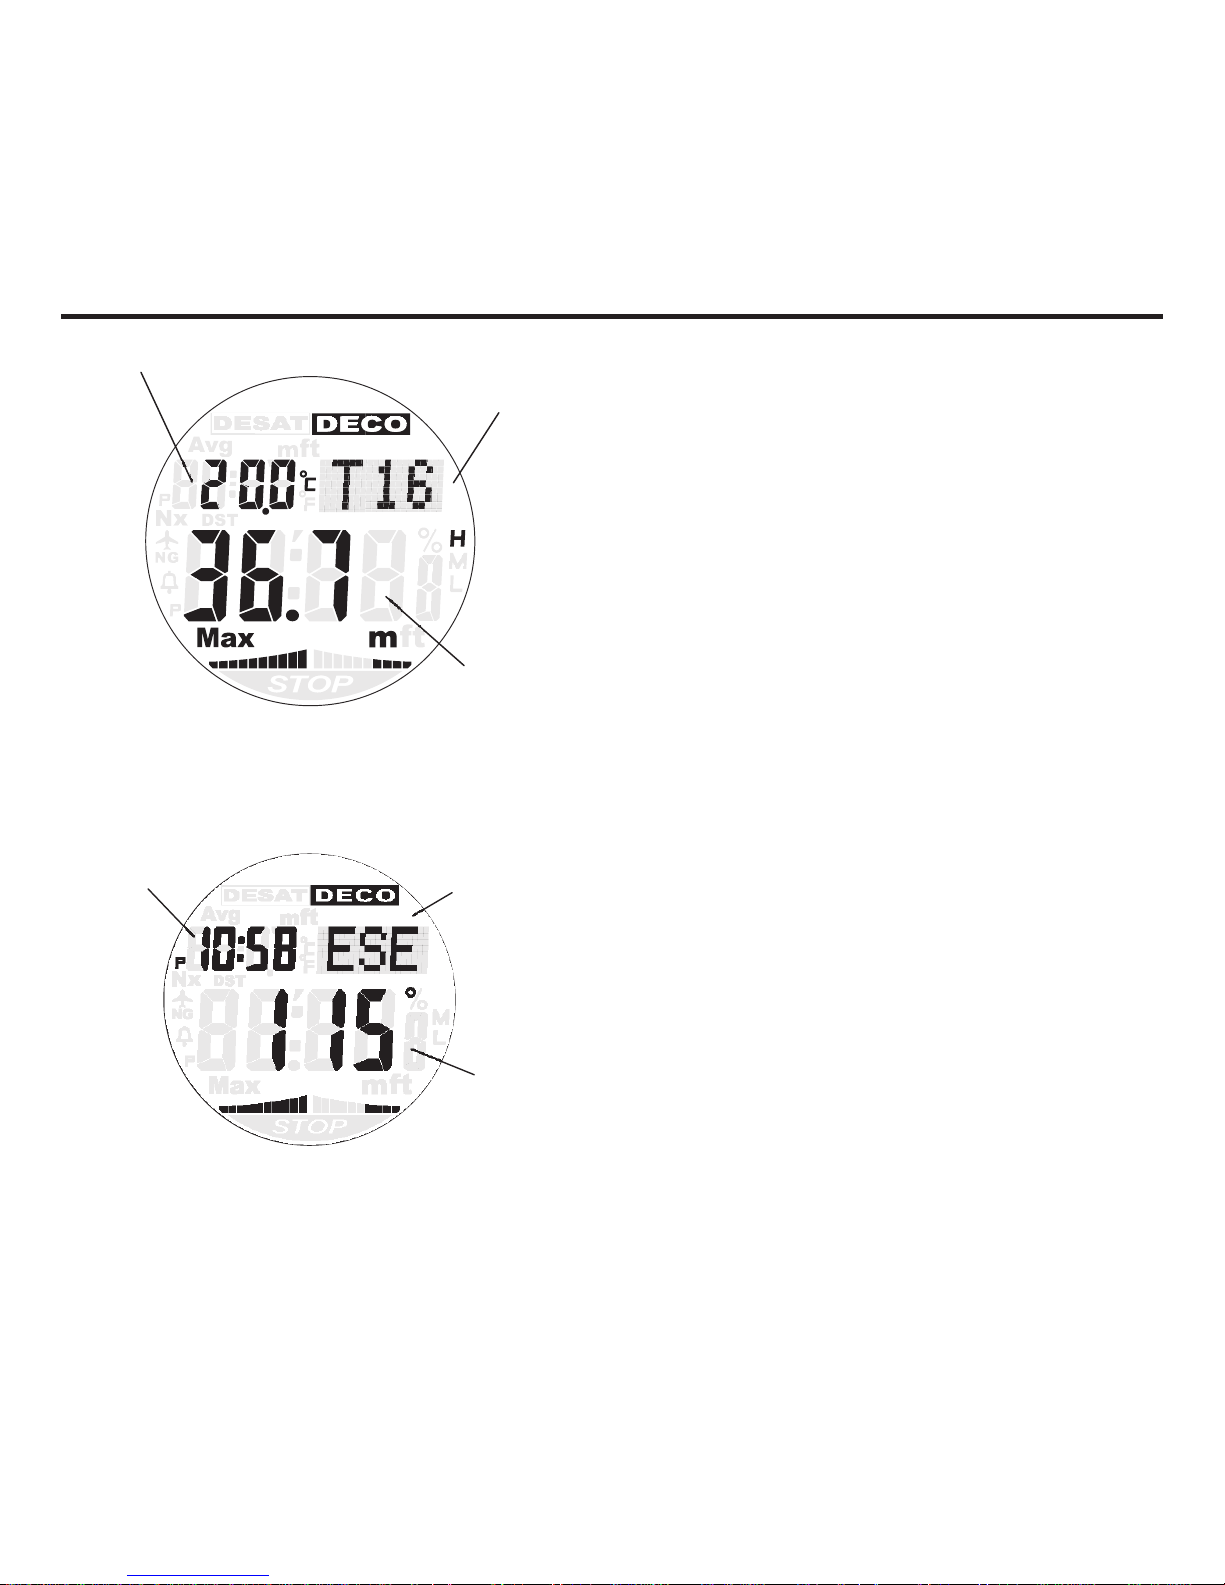
■Depress A button to display maximum depth
screen.
Maximum depth screen displays the following
information.
・Current water temperature
・Total ascent time (TOTAL)
・Maximum depth
Display goes back to the decompression dive
basic screen (Before decompression stop)in 4
seconds automatically.
■Depress M button to display digital compass
reading screen.
Digital compass reading screen displays the
following information.
・Current time
・Direction
・Angle value
Depress P button for remeasurement.Depress
M button once to return to the decompression
dive basic screen (Before decompression stop).
Direction Indicator
Current Time
Angle Value
Total Ascent Time
Current Water Temperature
Maximum Depth
38
Page 39
DIVE MODE (DECOMPRESSION DIVE)
39
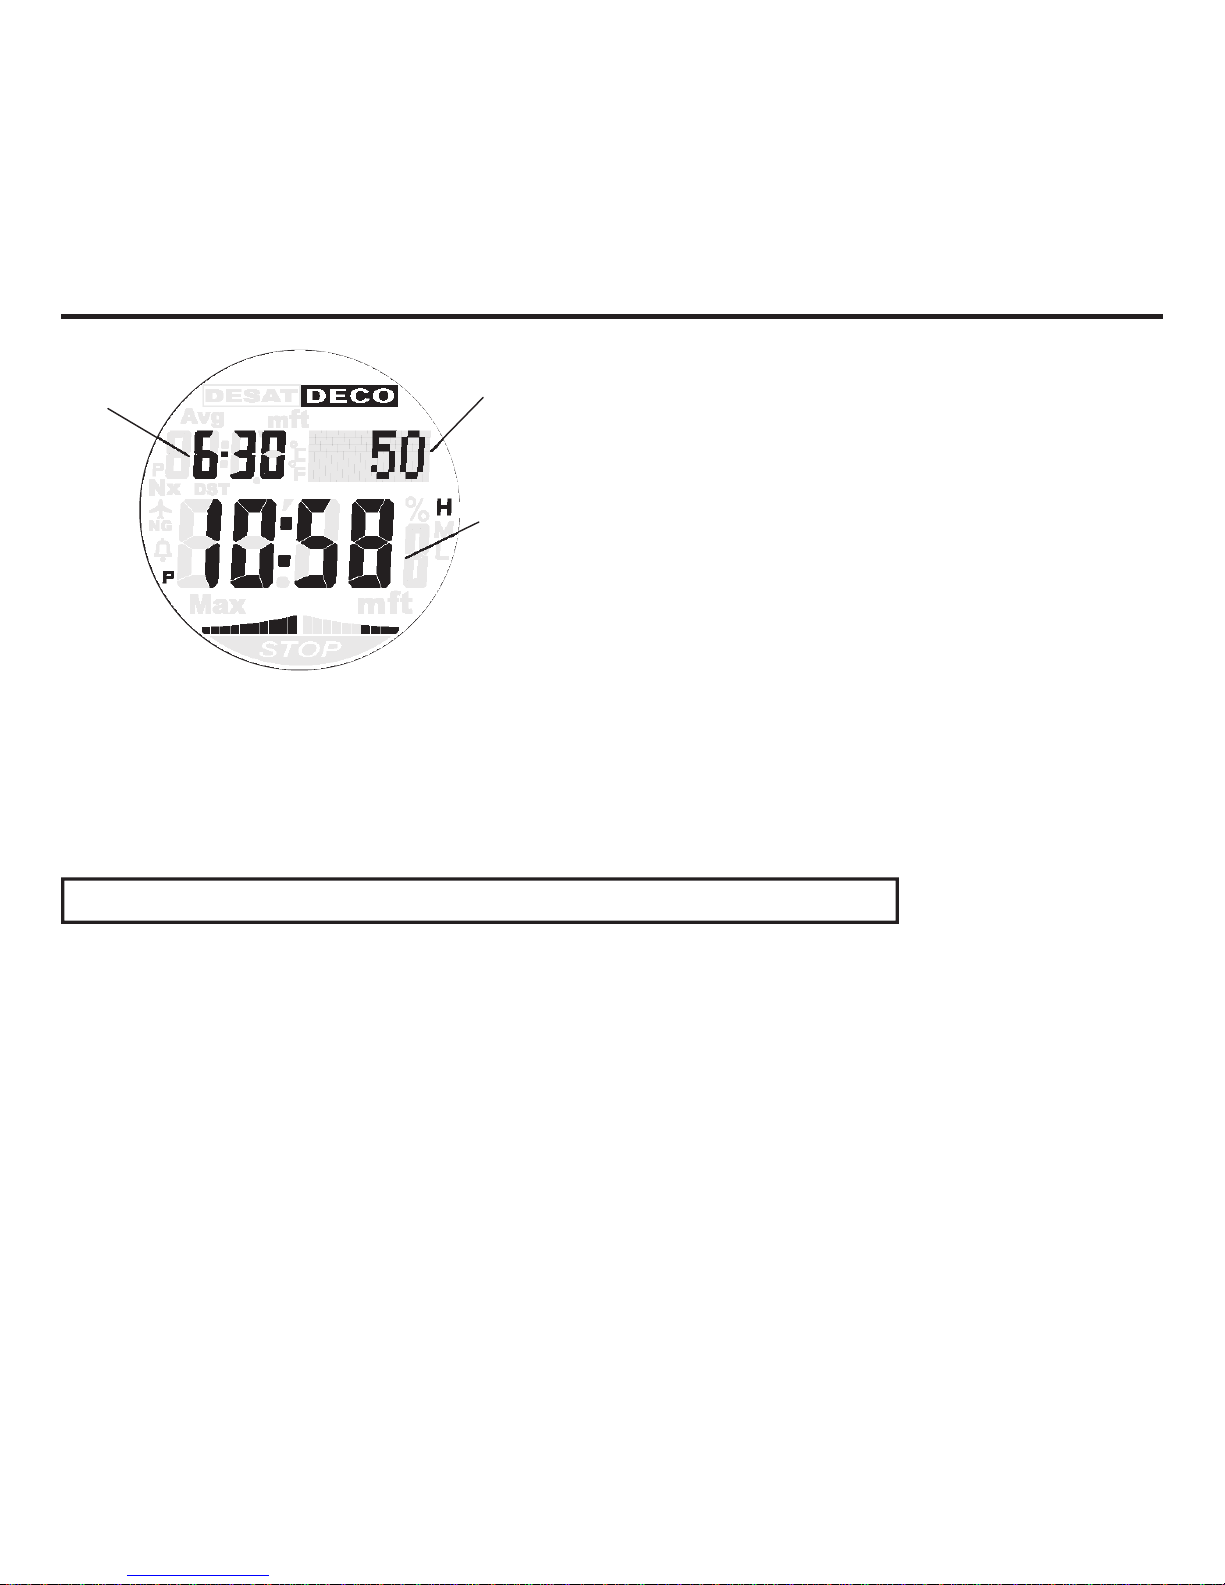
■Depress L button to display watch screen.
Watch screen displays the following information.
・Date
・Seconds
・Hour
・Minutes
Watch screen is displayed for 1 minute. After 1
minute, it goes back to the
decompression dive basic screen (Before
decompression stop) automatically.
For immediate return to the decompression
dive basic screen ( Before decompression
stop), please depress L button.
Date
Seconds
Time
Decompression Dive (Under Decompression Stop)
When you ascend to the decompression stop depth, the screen switches to decompression dive
(Under decompression stop), “STOP” mark turns on and a decompression stop timer starts.
●Stop range of the decompression stop is an interval of -0.5<Decompression stop
depth<+1.0m.
When your depth is within the range, it starts countdown.
(Example) In the case that the decompression stop depth is 3m, interval of 2.5 to 4m is the stop
range.
Page 40

DIVE MODE (DECOMPRESSION DIVE)
At the time of decompression dive (Under decompression stop), it displays the following
information.
○Decompression Stop Depth・・・・・Decompression stop depth is displayed every 3m
depending on the diving situation.
○Decompression Stop Timer・・・・・ It displays the time necessary for decompression stop.
○DECO・・・・・・・・・・・・・・ Decompression stop mark
When you exceed no-decompression limit,
this mark turns on.
○Current Depth (DEPTH)・・・・・・ Current depth of water. It displays by 1m unit
starting from 1.5m. *Maximum 99.9m.
○Elapsed Dive Time・・・・・・・・・Time elapsed since the start of diving.
*Maximum 599 minutes.
○Tissue Loading Bar Graph・・・・・・Displays degree of risk of the quantity of nitrogen
(TLBG) accumulated in the body tissue with ten phases.
○Oxygen Accumulation (O2) or・・・・ Displays degree of risk of the quantity of oxygen
Partial Pressure of Oxygen (PO2) accumulated in the tissue or current partial
Bar Graph pressure of oxygen with ten phases.
*Displays either one with higher risk.
○Total Ascent Time (TOTAL)・・・・・Time required to ascend from present depth to
surface at proper speed with decompression stop.
○Maximum Depth (MAX)・・・・・・ Maximum depth reached during the dive.
*Maximum 99.9m
○Current Water Temperature・・・・・Displays current water temperature.
○Current Time・・・・・・・・・・・Displays current time with hour, minutes and seconds.
(TIME 2 screen)
○Direction and Angle Value・・・・・ Direction reading.
40
Page 41
DIVE MODE (DECOMPRESSION DIVE)
41
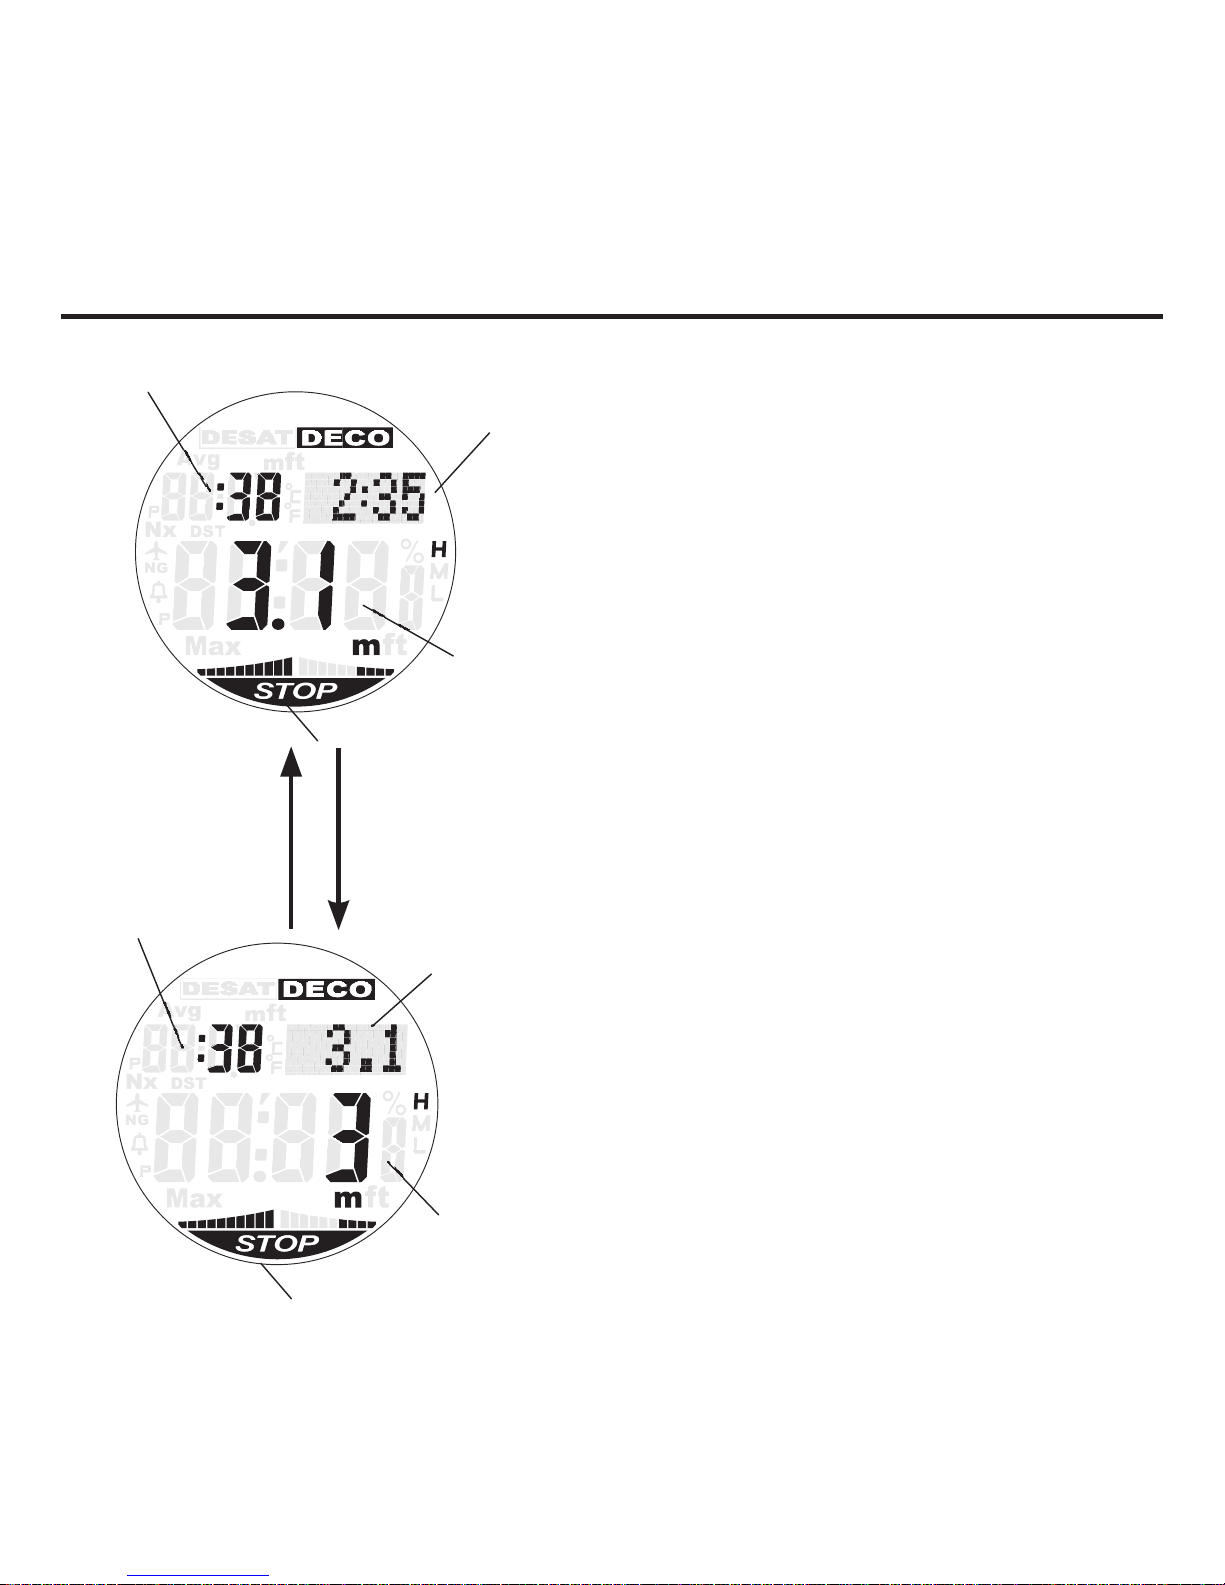
■Decompression Dive Screen
(Under Decompression Stop)
Decompression dive basic screen of Dive
Mode (Under decompression stop) displays the
following information.
・Elapsed dive time (Minutes)
・Decompression stop timer (Minutes)
・Decompression stop depth
・Current depth
・Tissue loading bar graph (TLBG)
・Oxygen accumulation (O2) or partial
pressure of oxygen (PO2) bar graph
Display of the decompression timer switches
to the current depth, and the current depth to
decompression stop depth when you depress
the P button.
Display goes back to the decompression dive
basic screen (Under decompression stop) in 4
seconds automatically.
Decompression
Stop Timer
Elapsed Dive Time
Current Depth
STOP Mark
Elapsed Dive Time
Current Depth
Decompression Stop Depth
STOP Mark
P Button4 Seconds Later
Page 42
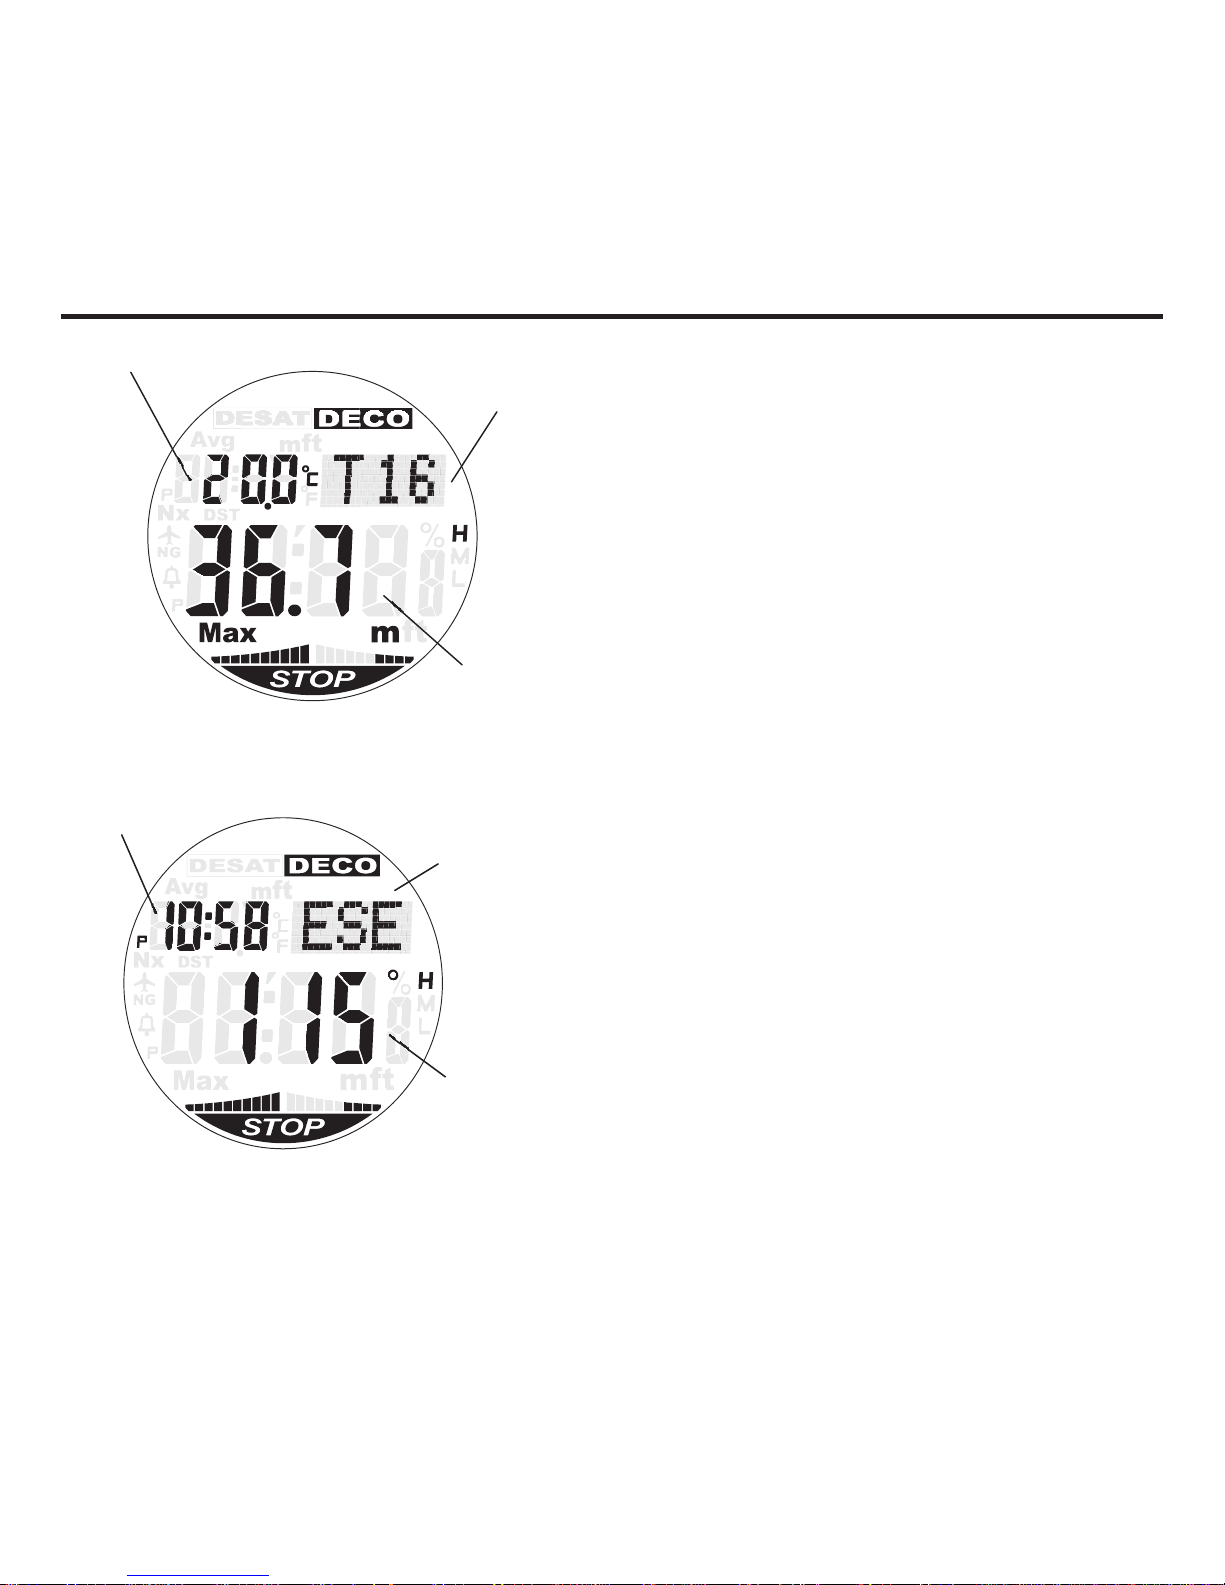
■ Depress A button to display maximum depth
screen.
Maximum depth screen displays the following
information.
・Current water temperature
・Total ascent time (TOTAL)
・Maximum depth
Display goes back to the decompression dive
basic screen (Under decompression stop)
in 4 seconds automatically.
■ Depress M button to display direction reading
screen.
Direction reading screen displays the following
information.
・Current time
・Direction
・Angle value
Depress P button for remeasurement.
Depress M button to return to the
decompression dive basic screen (Under
decompression stop).
Direction Indicator
Current Time
Angle Value
Current Water Temperature
Total Ascent Time
Maximum Depth
DIVE MODE (DECOMPRESSION DIVE)
42
Page 43
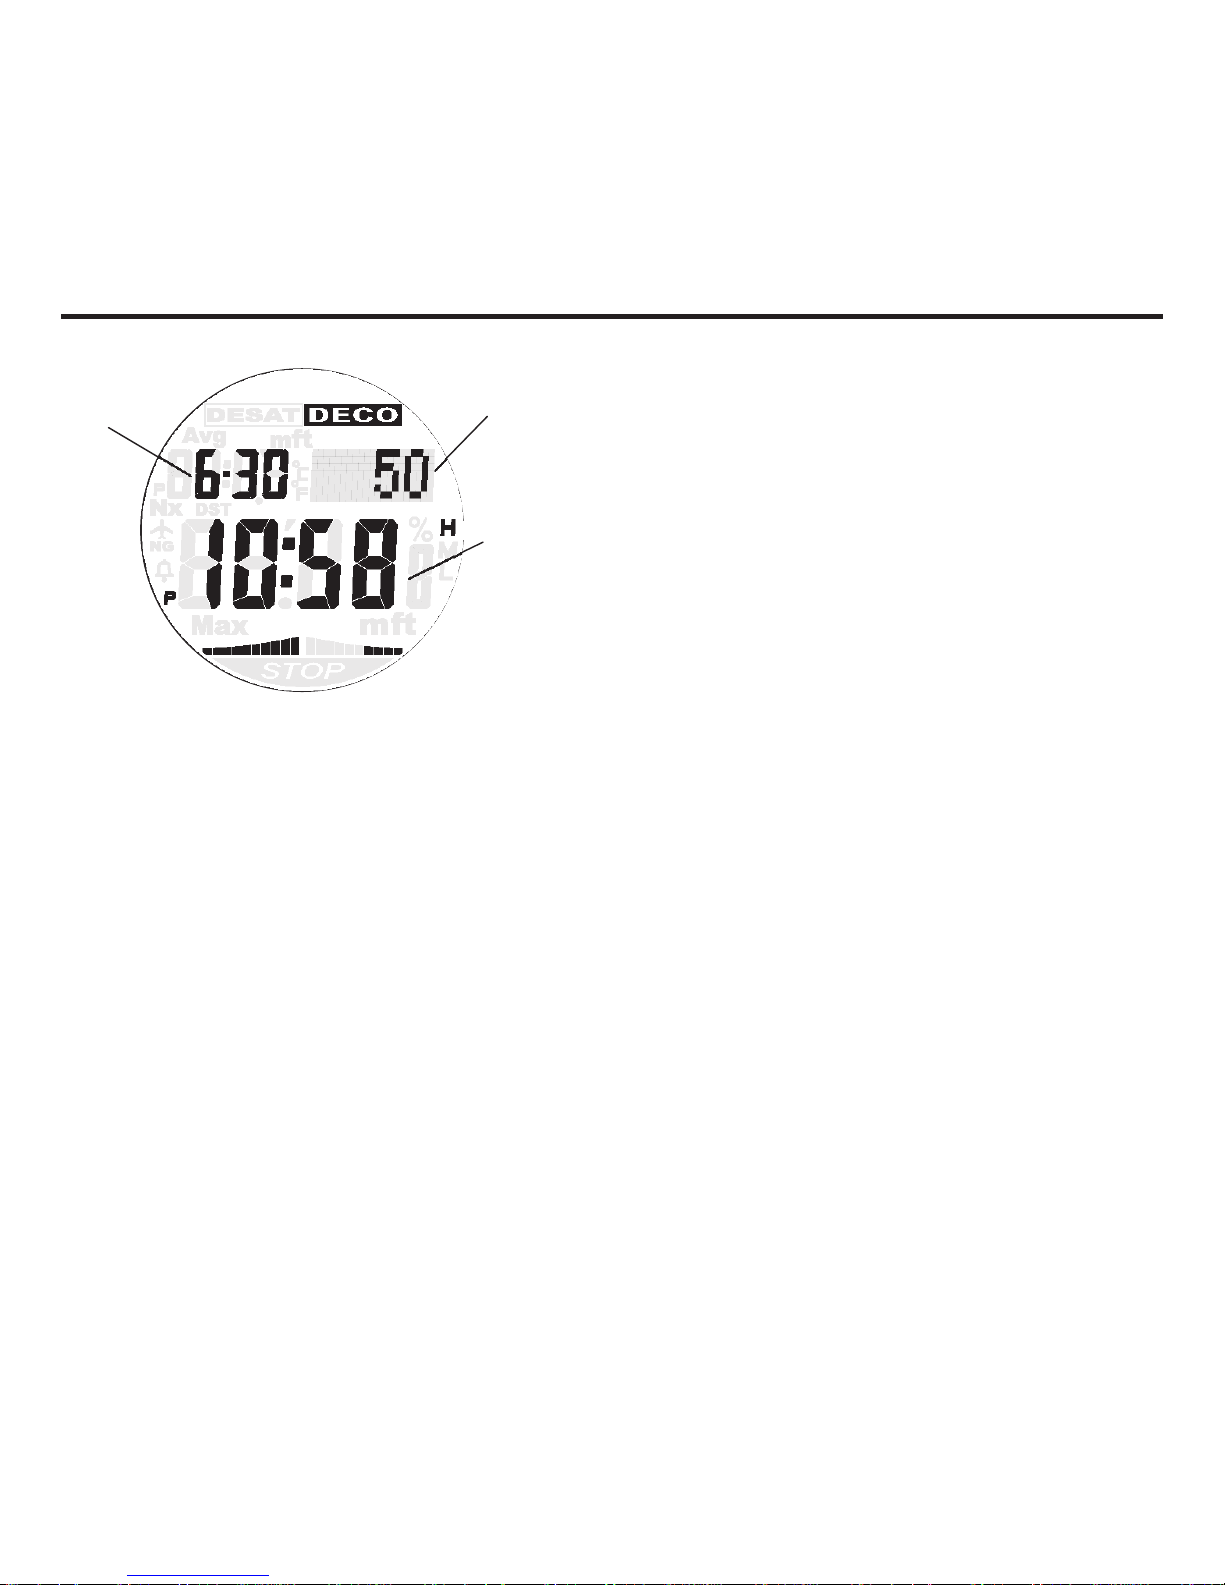
DIVE MODE (DECOMPRESSION DIVE)
43
■ Depress L button to display watch screen.
Watch screen displays the following information.
・Date
・Seconds
・Hour
・Minutes
Watch screen is displayed for 1 minute.
After 1 minute, it goes back to the decompression
dive basic screen (Under decompression stop)
automatically. For immediate return to the
decompression dive basic screen (Under
decompression stop), please depress L button.
Date
Seconds
Time
Page 44
WARNING WHILE DIVING
44
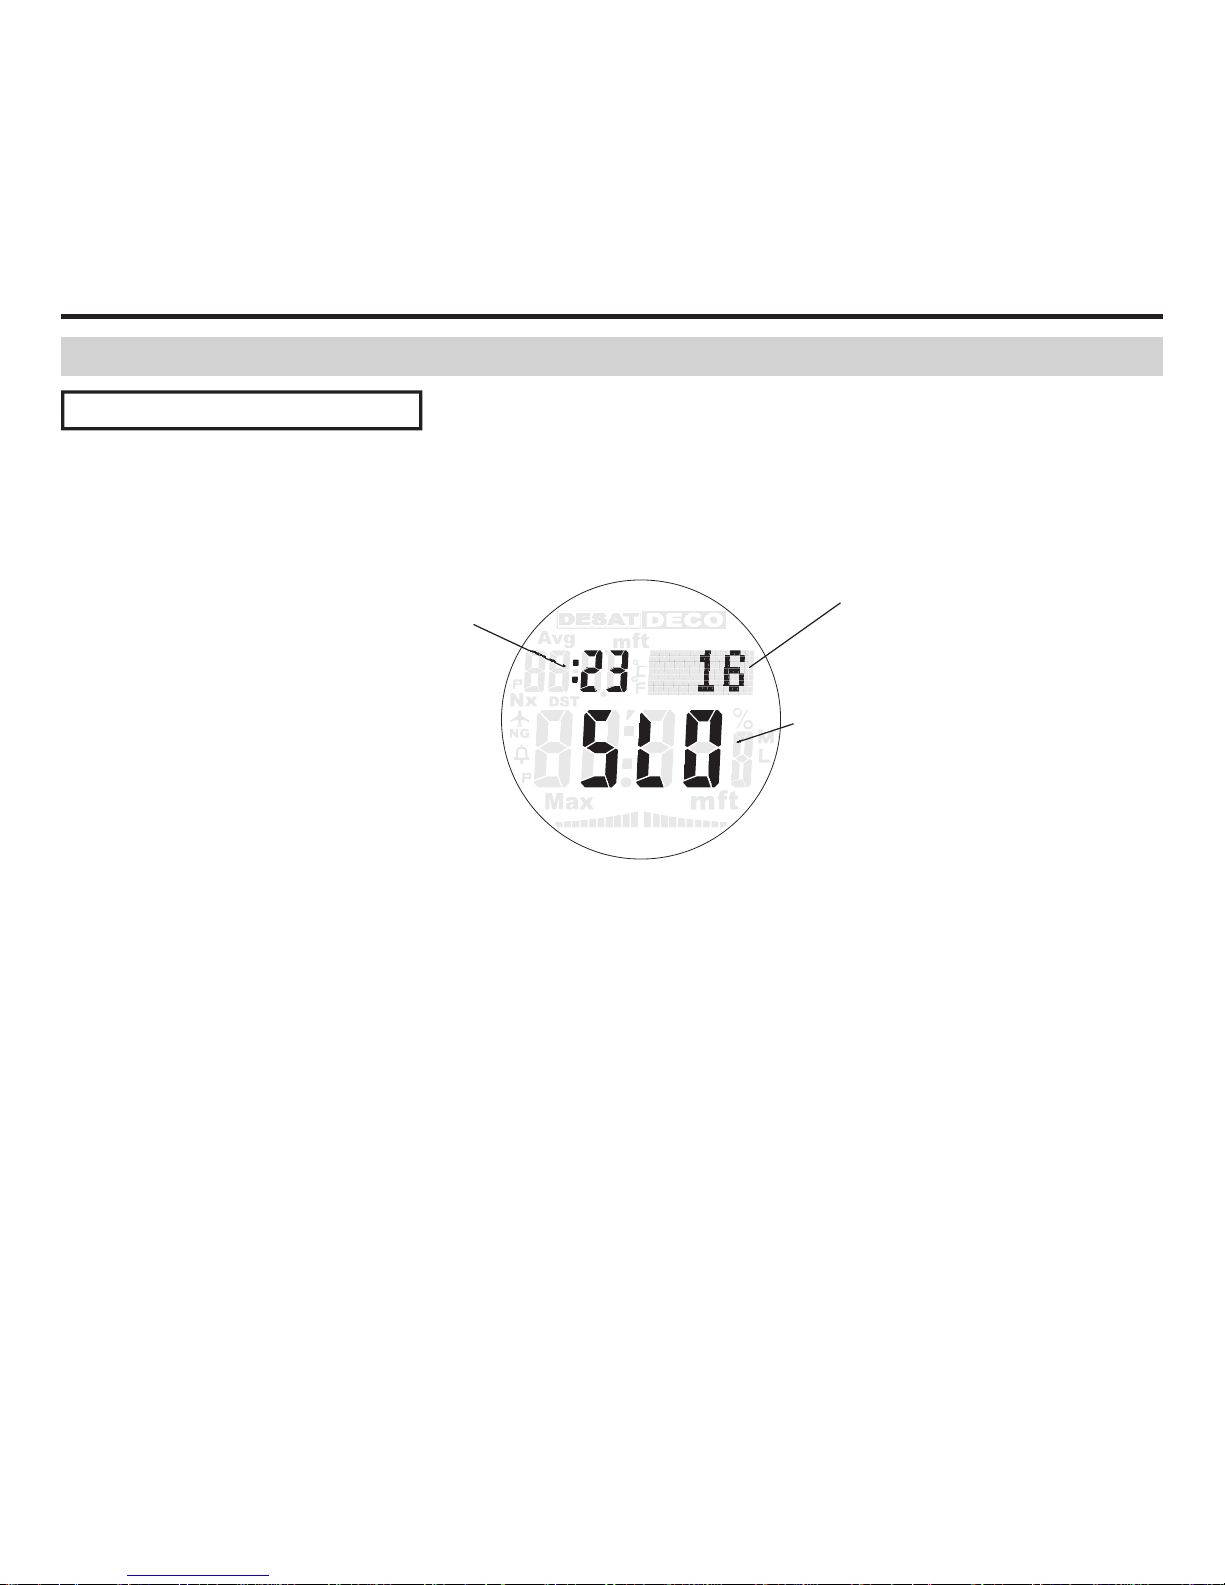
It monitors ascent rate and gives warning when the ascent rate exceeds the speci ed rate. The
speci ed rate is 10m/minute.
●When the ascent rate exceeds 10m/minute, warning of “SLO” displays in the main portion of
the screen and alarm beeps for 3 seconds.
●When the ascent rate becomes the appropriate one, the warning of “SLO” disappears, and the
warning is canceled.
●When the ascent rate warning is given twice in one dive, it is recorded on a dive log.
No-decompression Limit
Elapsed Dive Time
Ascent Rate Warning
(SLO)
Warning While Diving
Ascent Rate Warning
Page 45
WARNING WHILE DIVING
Decompression Stop Violation Warning
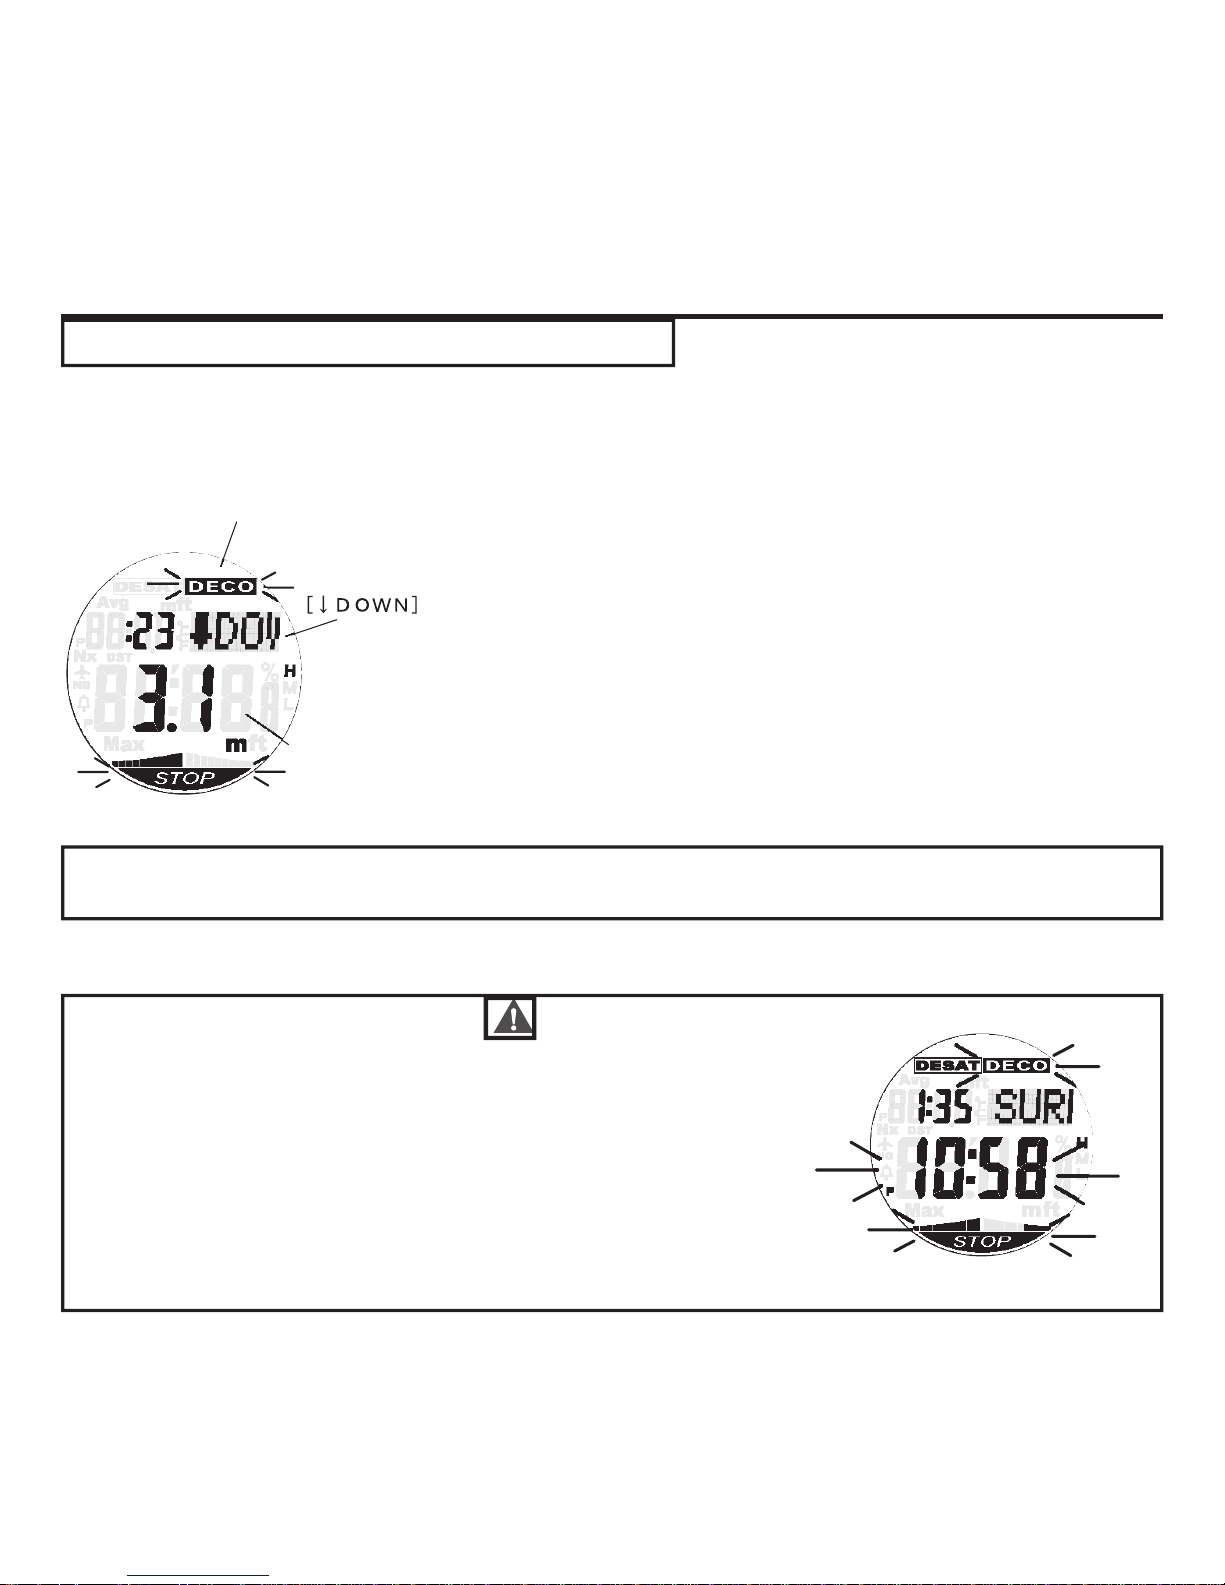
When you are in the depth within the range of -0.5<Decompression stop depth<+1.0m, it performs countdown.
When the depth becomes -0.5m less than the decompression stop depth while under decompression stop, it gives
warning.
[ Note ]
●In the case that the decompression stop depth is 3m, it starts warning at the depth less than 2.5m.
DECO MARK
Current Depth
1. When current depth becomes less than the range of
decompression stop depth, a warning letter of
“↓DOWN” ows.
2. DECO mark and STOP mark ash, and alarm sounds for 6
seconds.
3. It cancels the warning automatically when you return to the
depth within the range of the decompression stop depth, but
continues warning when you do not return.
●If warning occurs even once, it will be recorded on dive log.
Warning
●When you ascend (less than 1.5m depth) ignoring the
decompression stop, alarm sounds every 1 minute for
10 minutes after ascent. After 10 minutes, the use of this
product for diving becomes impossible until it passes for 48
hours since then.
●During the basic Watch and Surface Mode, DECO mark,
STOP mark and the current time ash and is in a condition
to be locked.
Please perform the decompression stop at the depth required. Do not perform the
decompression stop at the depth less than the one required.
45
Page 46
WARNING WHILE DIVING
High Oxygen Accumulation Alarm (High O2 Alarm)
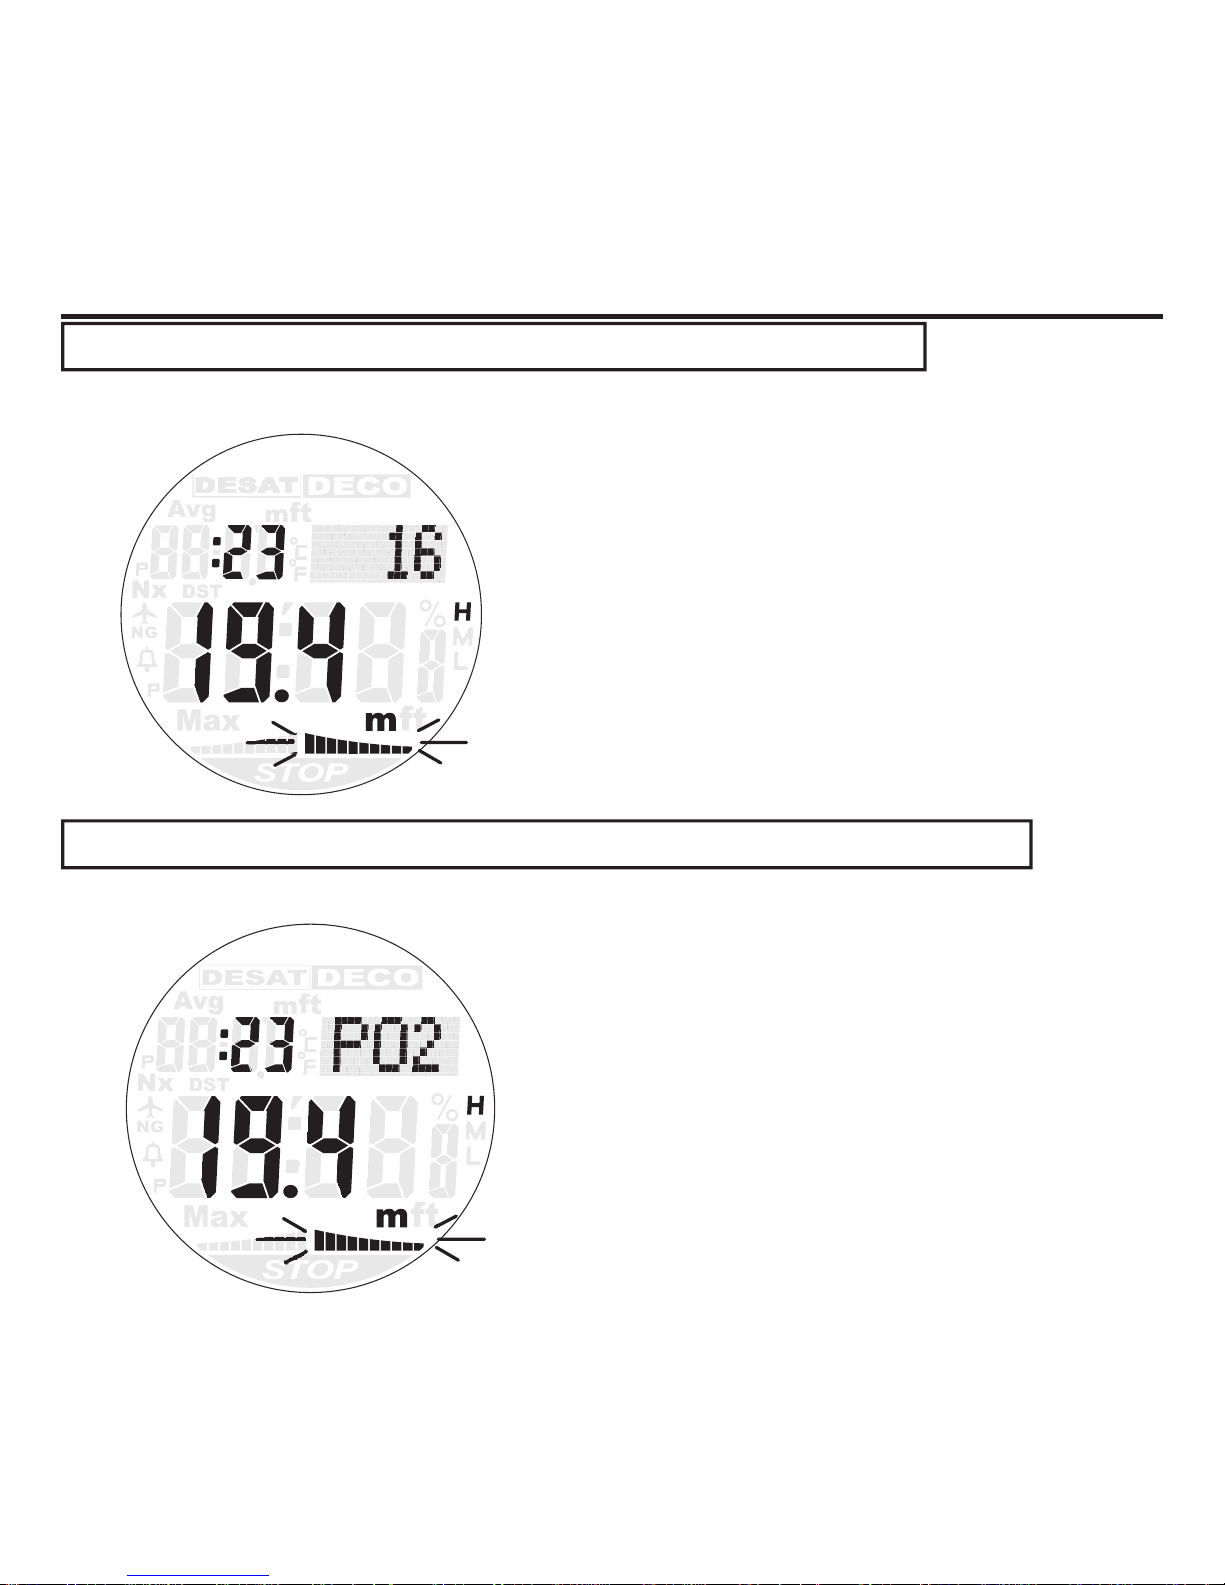
The warning activates when the oxygen accumulation exceeds acceptable range.
1. Oxygen accumulation (O2) and partial pressure of
oxygen (PO2) bar graph ash.
2. Alarm sounds for 6 seconds.
3. The warning continues until the oxygen
accumulation (O2) returns to the normal range.
●If warning occurs even once, it will be recorded on
dive log.
High Partial Pressure of Oxygen Alarm (High PO2 Alarm)
The warning activates when the partial pressure of oxygen becomes 1.4 or more.
1. Oxygen accumulation (O2) and partial pressure of
oxygen (PO2) bar graph ash, and at the same
time, the dot display shows the letter of “PO2”.
2. Alarm sounds for 6 seconds.
3. The warning continues until the partial pressure of
oxygen (PO2) returns to the normal range.
●If warning occurs even once, it will be recorded on
dive log.
46
Page 47
WARNING WHILE DIVING
Violation Gauge Warning
Violation gauge warning activates when applied to the following conditions;
When the depth exceeds 99.9m.
When the elapsed dive time exceeds 599 minutes.
When decompression is needed at the depth of deeper than 33m while decompression diving.
When decompression stop time or total ascent time exceeds 99 minutes, while decompression
diving.
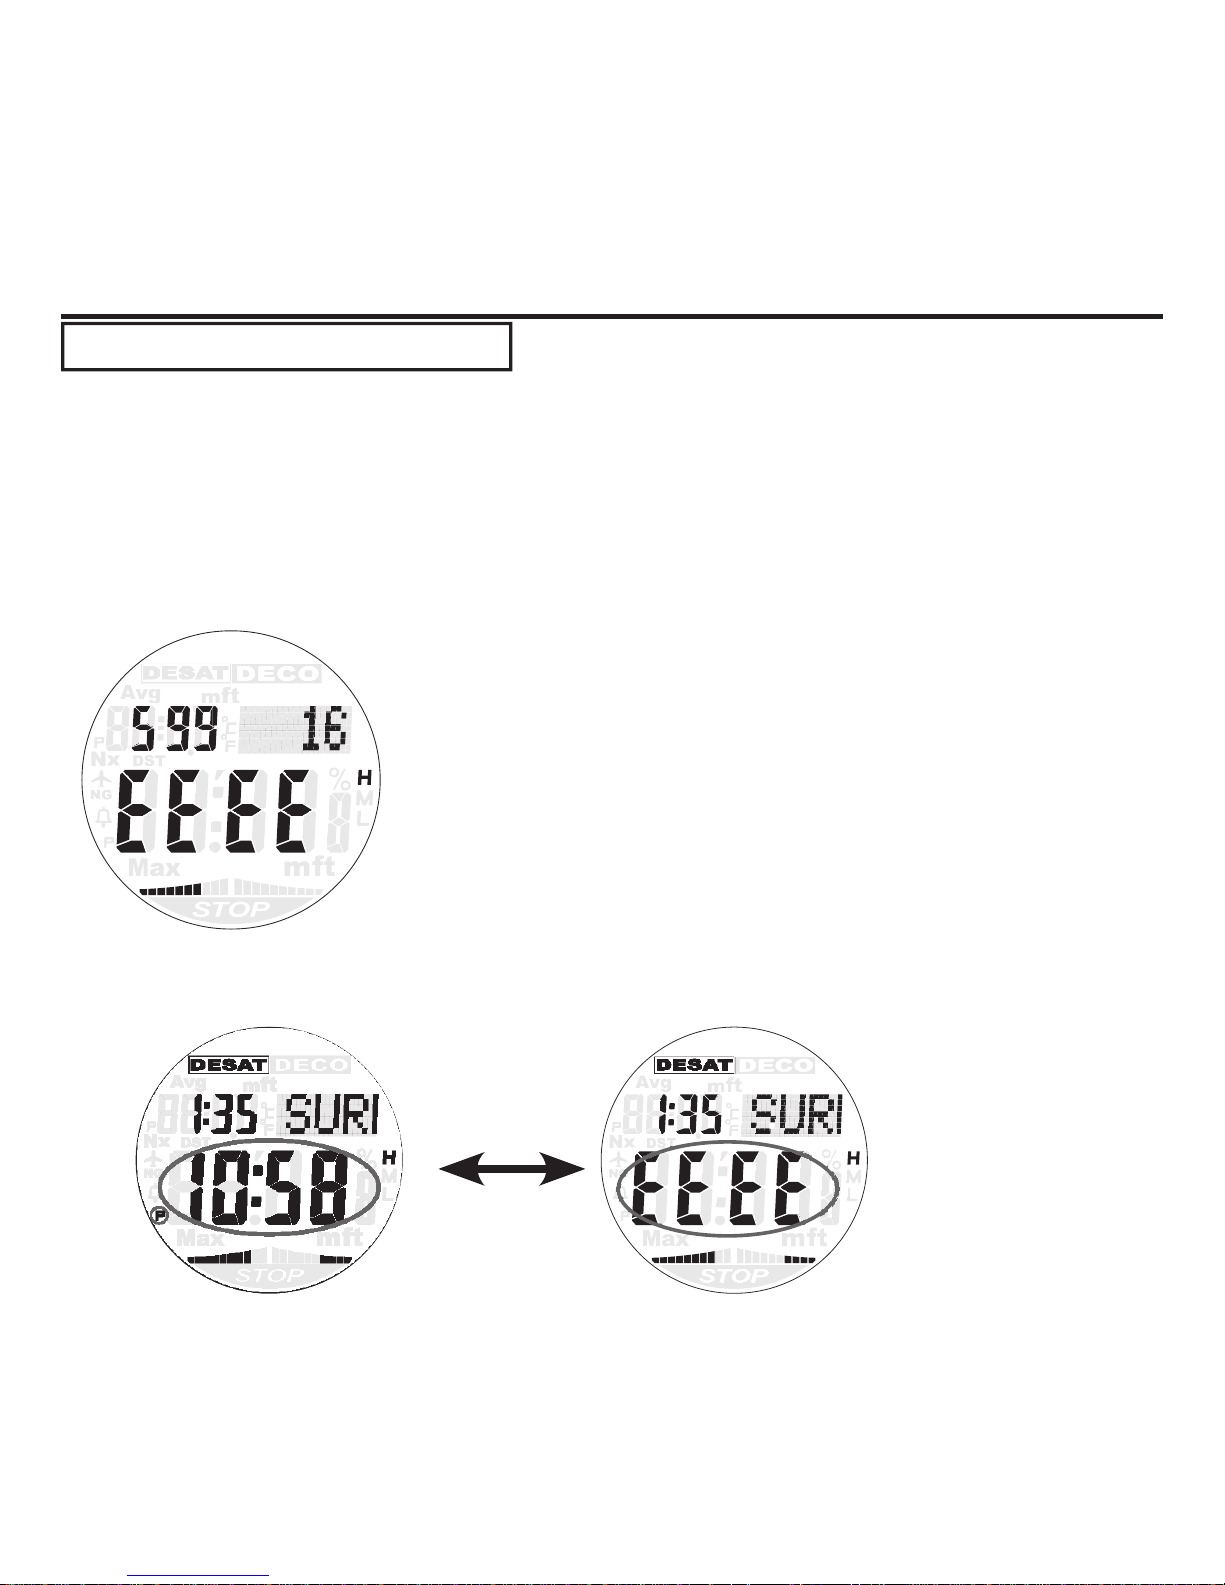
1. “E E E E” mark lights up in a main display portion.
2. Alarm sounds for 3 seconds.
●If warning occurs even once, it will be recorded on dive log.
●When the violation gauge warning occurs, it judges that
dangerous diving is performed and it becomes impossible to use
it in diving for 48 hours after ascent to surface.
●During the basic Watch and Surface Mode, it displays “E E E
E” mark and the current time alternately and is in a condition to
be locked.
Alternate Display
47
Page 48
LOG MODE ( LOG )
Log Mode
Watch Mode
Surface Mode
A Button
L Button
P Button
M Button
(for more than
2 seconds)
48
Page 49
LOG MODE ( LOG )
Log can be used in Watch Mode and Surface Mode.
It displays logs of 30 dives from the newest one.
Since a simple diving prole can be checked, you can get to know the depth change according
to the dive time elapsed. (Max. 200 minutes / 1 dive)
Also, as a history is displayed on the last of a log, you can check total data.
[ Note ]
A log is recorded when you dive into the depth deeper than 1.5m for more than 3 minutes.
Enter the Log Mode
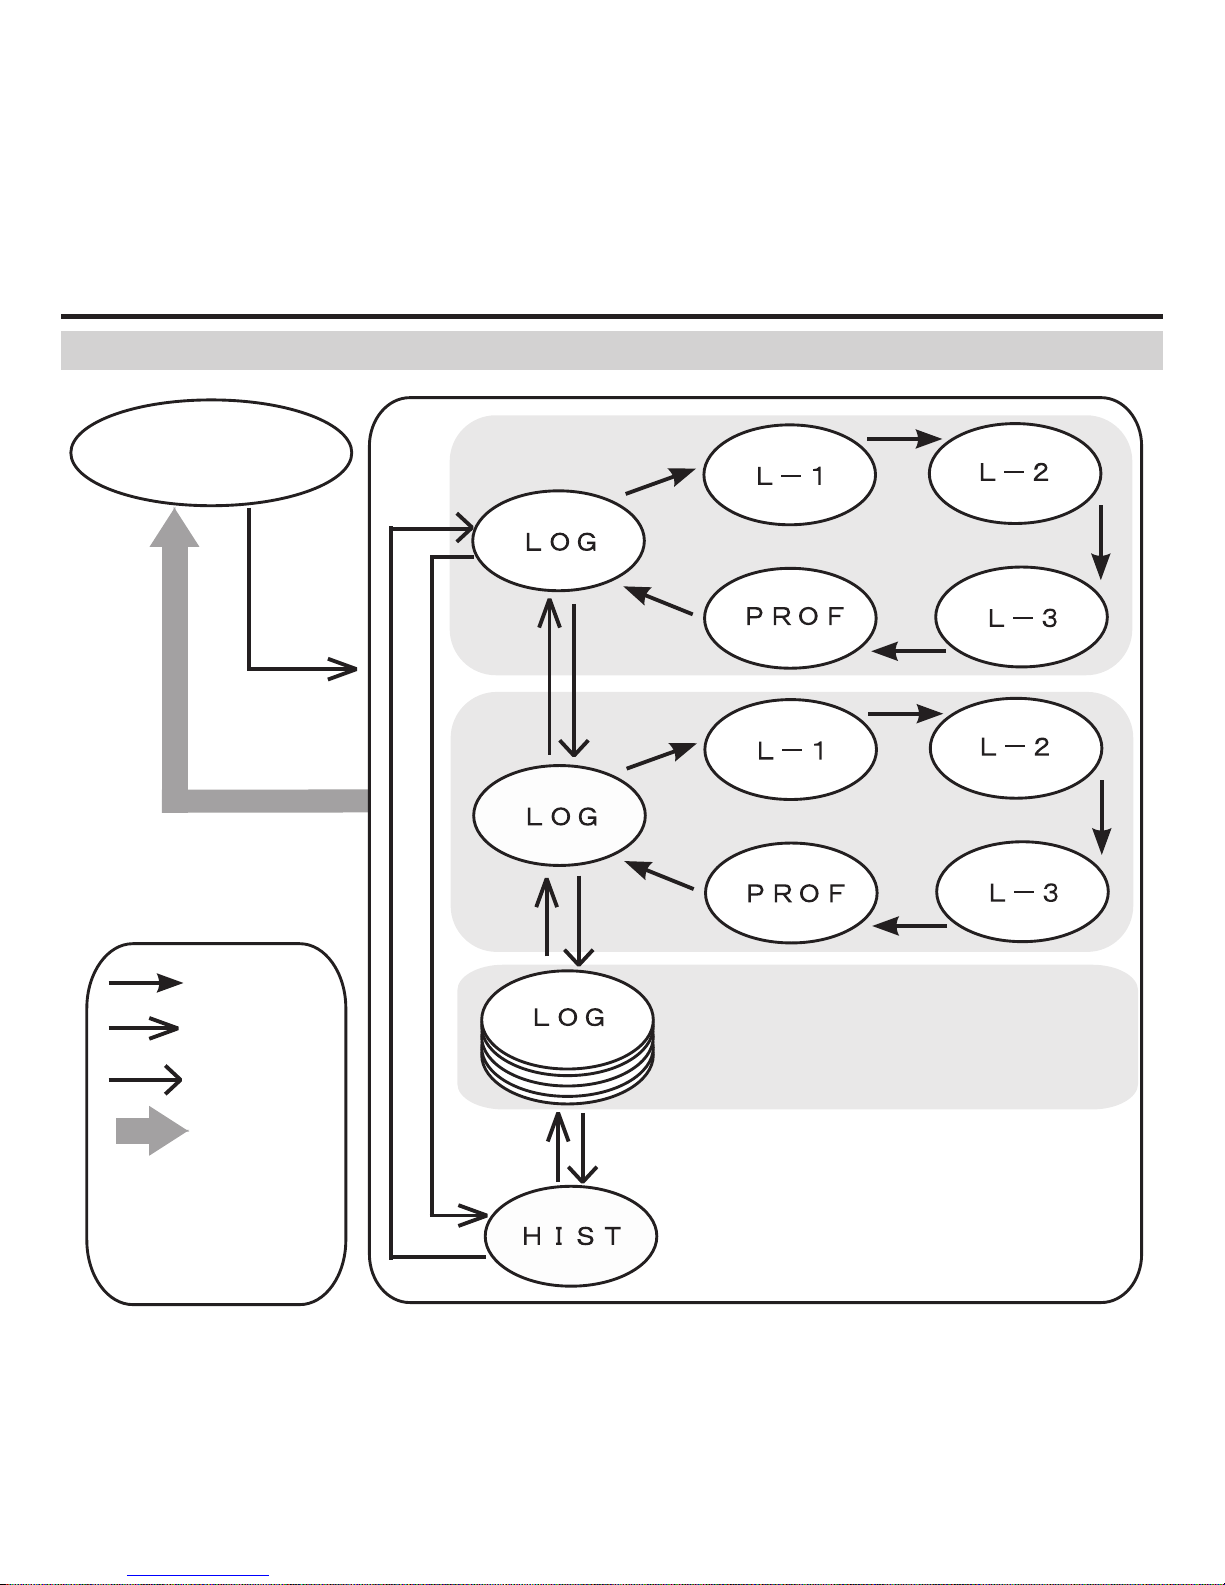
Depress L button once at the time of Watch Mode or Surface Mode to Log Mode.
It switches to Log Mode in 1 second after the screen displays “LOG”.
It displays the newest log once it switches to Log Mode.
Depress P button to display the 2nd newest log data.
Depress P button furthermore to display the 3rd newest log data.
Depress L button to display history screen.
Depress L button furthermore to display the oldest log data recorded.
When you depress and hold M button (for more than 2 seconds), it switches to Watch Mode or
Surface Mode after ashing “TIME” and “Hold”.
When no operation is performed, it returns to Watch Mode or Surface Mode after 2 minutes.
49
Page 50
LOG MODE ( LOG )
Check a Log
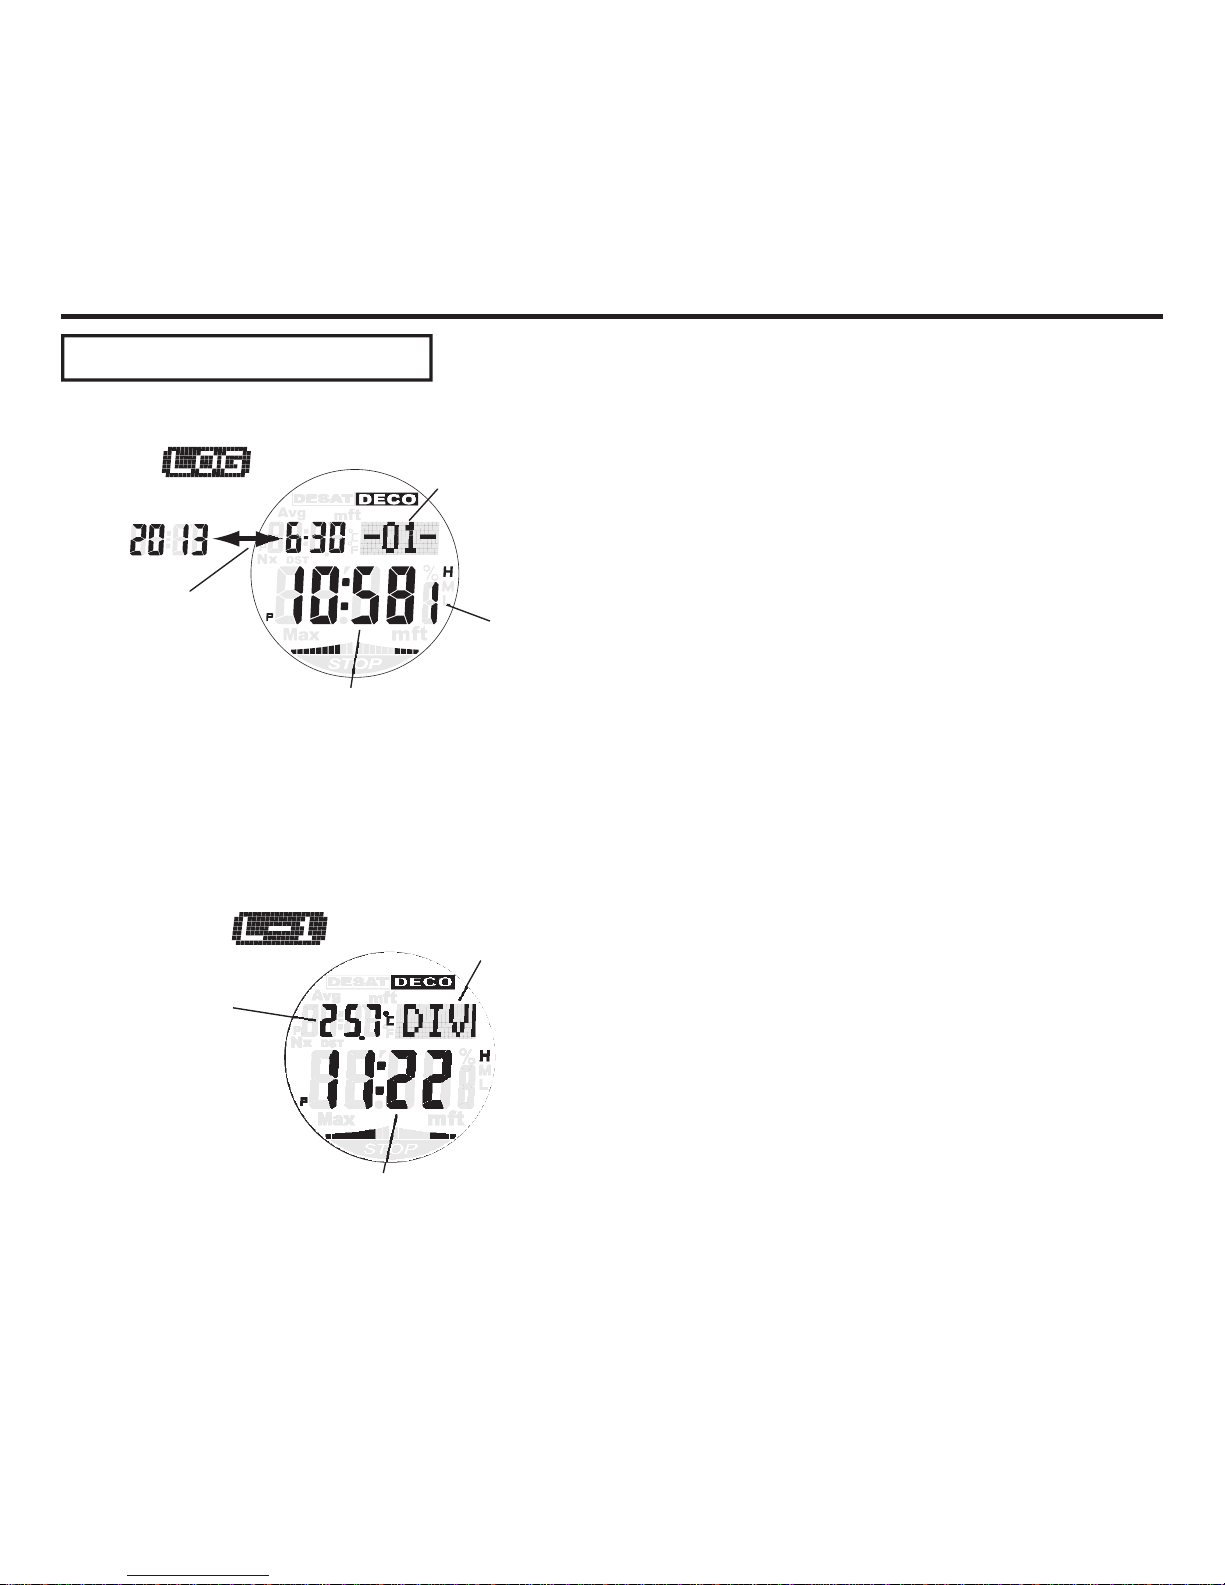
Log consists of ve screens.
○LOG
Log No. ・・・Number is given to each dive in order.
Dive date・・・Year, month and date of dive.
Dive No.・・・Number showing the order of diving on the day.
Entry time・・・Time dive started.
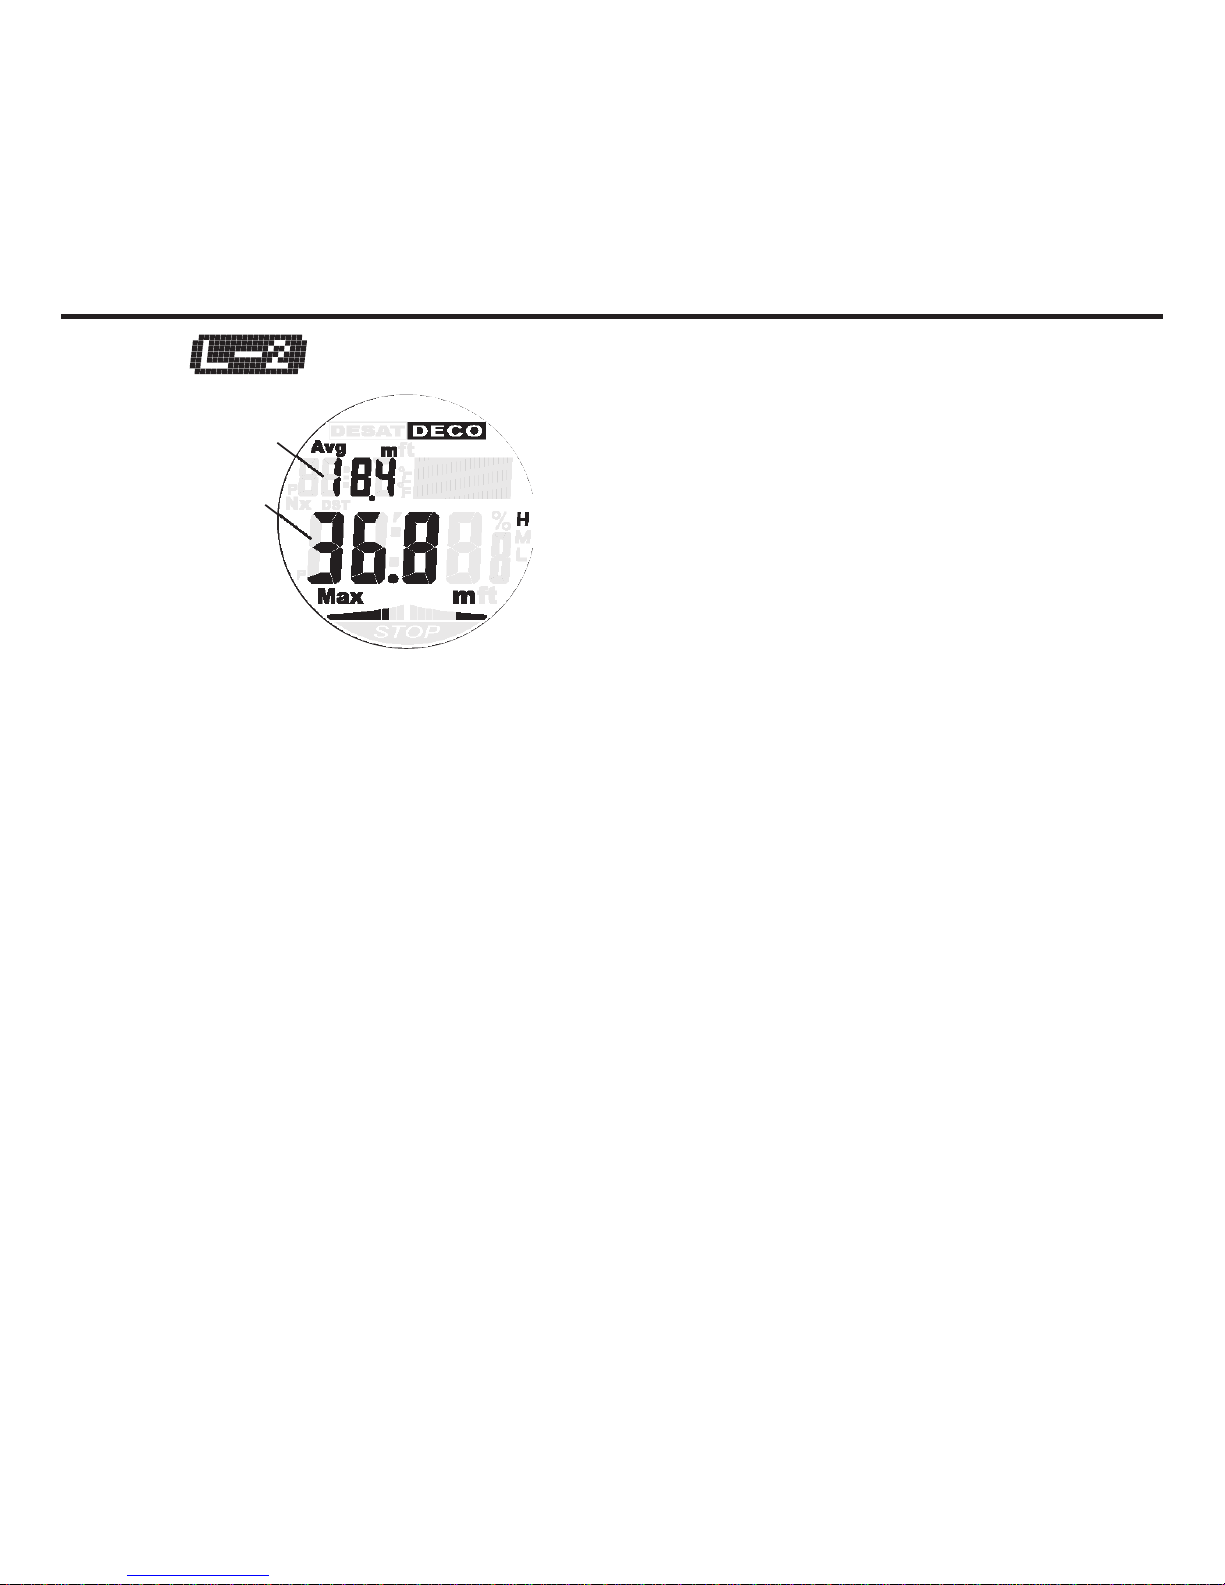
○L-1
Exit time・・・Time dive ended.
Dive time・・・Time from dive started to dive ended.
Temperature at・・・Water temperature at maximum depth of dive.
maximum depth
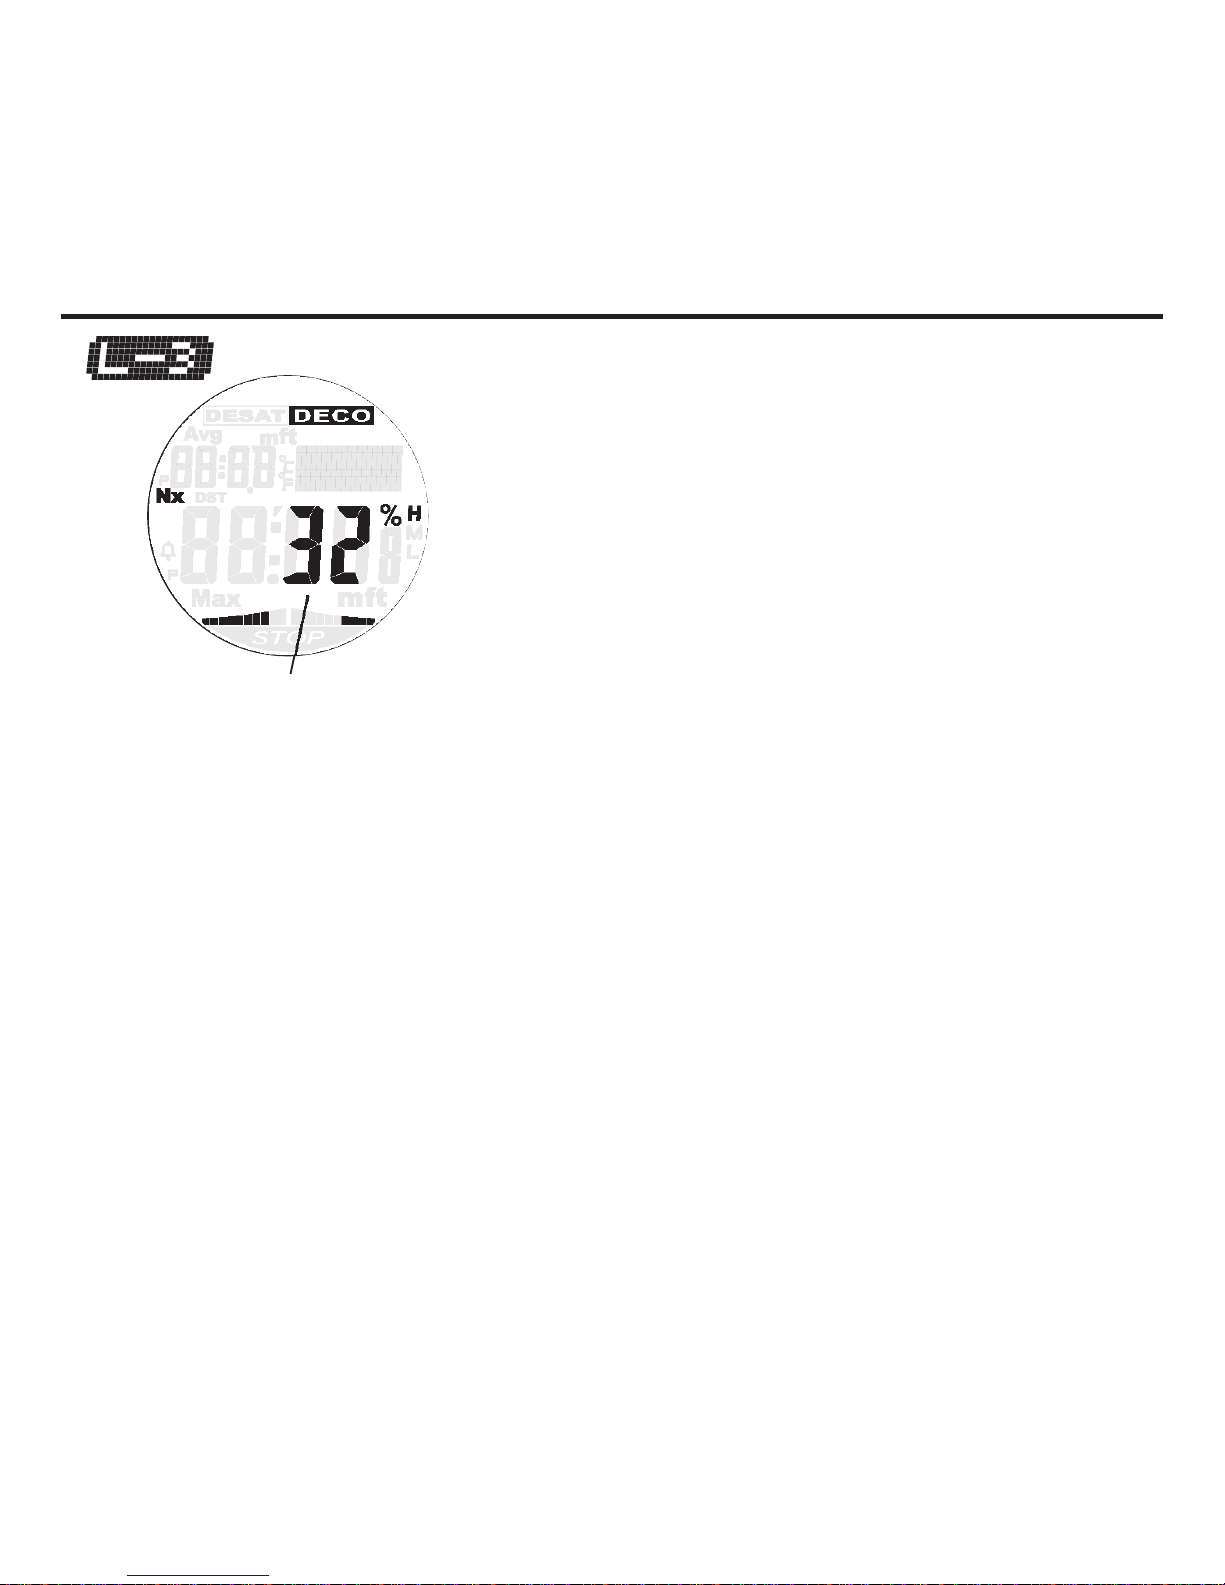
○L-2
Maximum depth・・・Maximum depth reached during the dive.
Average depth・・・Average depth during the dive.
Warning occurred・・・Warning occurred during the dive.
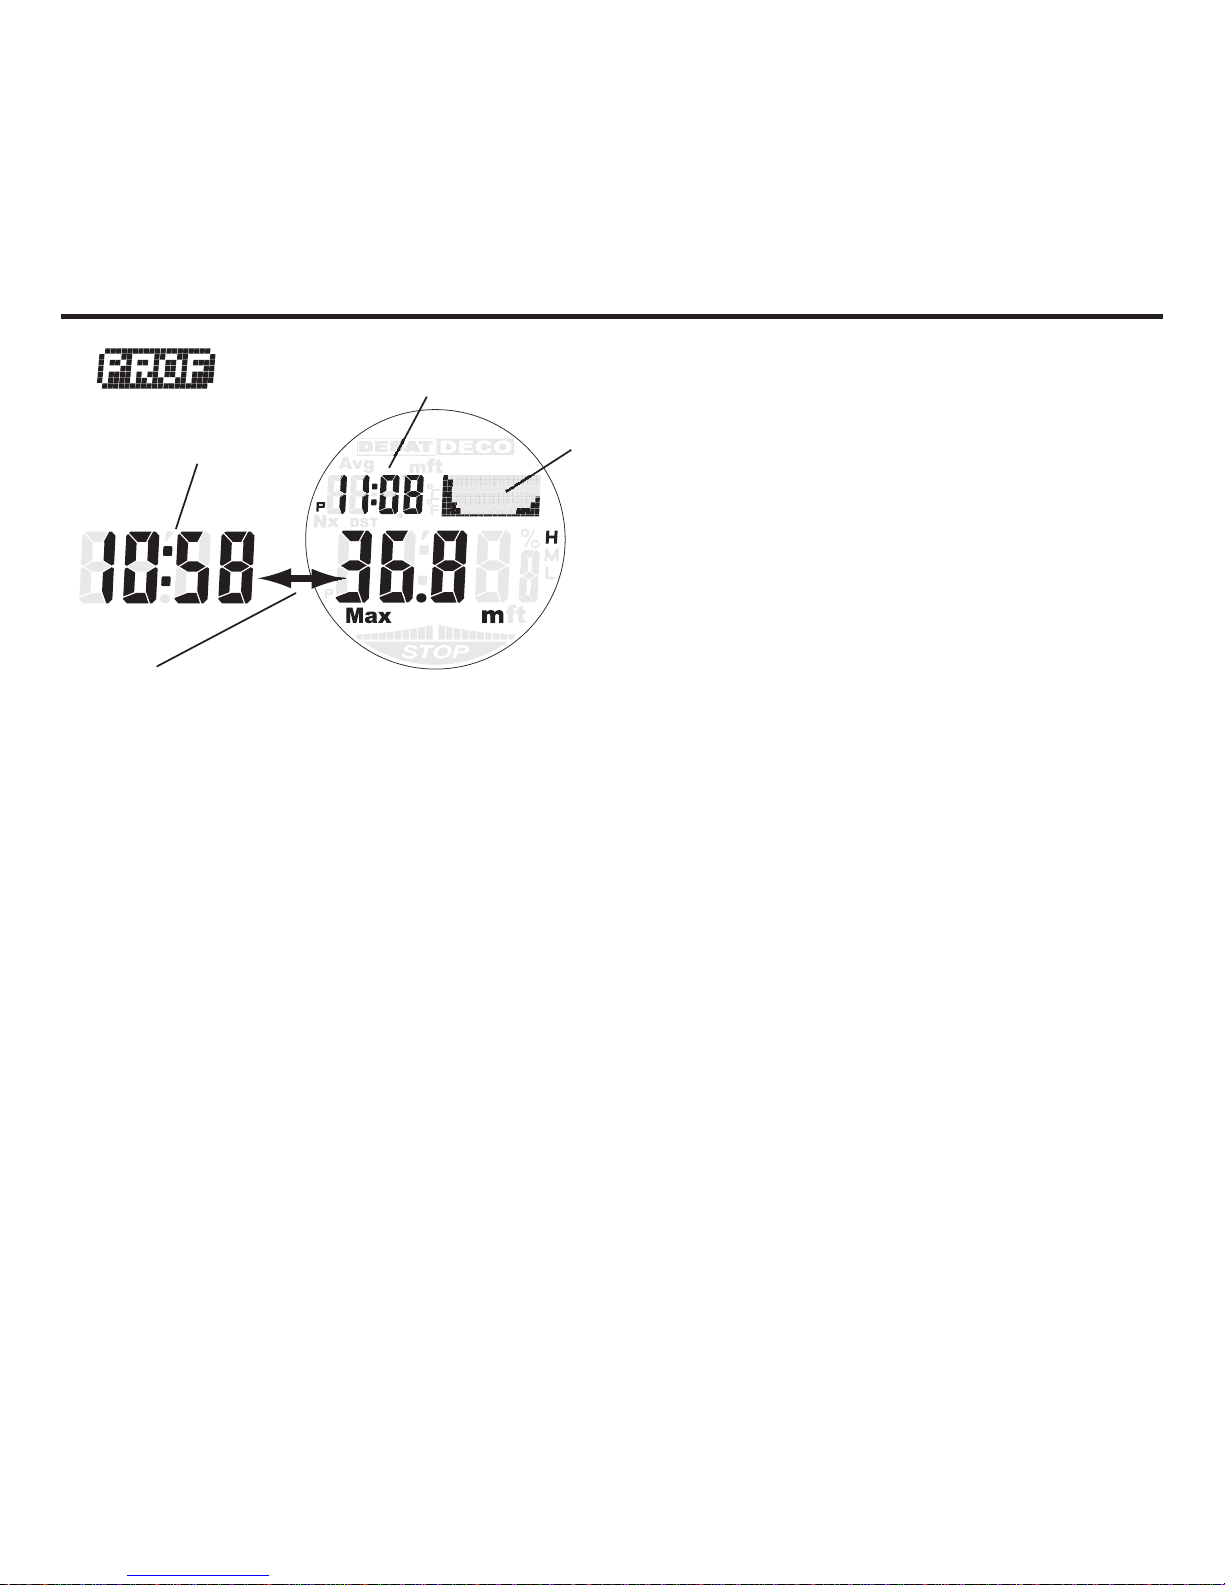
○L-3
Fraction of oxygen used・・・Fraction of oxygen of tank used during the dive.
○Common items
Tissue loading・・・Displays the quantity of nitrogen accumulated during the dive with ten
phases.
Oxygen accumulation or・・・Displays the quantity of oxygen accumulated, or partial
Partial pressure of oxygen pressure of oxygen during the dive with ten phases.
○Dive prole
Graph start time or・・・Displays graph start time and maximum depth of the dive
Maximum depth alternately.
Graph nish time・・・Graph nish time of the dive.
50
Page 51
LOG MODE ( LOG )
Button Operation
■ LOG
When you enter the Log Mode, the newest diving
log is displayed.
Log screen displays the following information.
・Log No.
・Dive date
・Dive No.
・Entry time
Depress A button to display “L-1” screen.
Alternate display of
year/month and date
Entry Time
Log No.
Dive No.
■ L-1
L-1 screen displays the following information.
・Exit time
・Dive time
・Temperature at maximum depth
Depress A button to display “L-2” screen.
Exit Time
Dive Time
Temperature at
Maximum Depth
51
Page 52
LOG MODE ( LOG )
■ L-2
L-2 screen displays the following information.
・Maximum depth
・Average depth
・Warning occurred
Depress A button to display “L-3” screen.
■ Warning to be recorded in log.
There are 6 warning as follows;
○Ascent Rate Warning ↑SLOW When the ascent rate exceeds 10m/minute, and the
ascent rate warning is given twice continuously.
○Decompression Dive DECO Mark When the no-decompression time is exceeded,
Warning Lighting and decompression stop becomes necessary.
○Decompression Stop ↓DOWN When the depth becomes less than the
Violation Warning decompression stop depth required while under
decompression stop.
○High Partial Pressure ! ! PO2 When the partial pressure of oxygen becomes 1.4
of Oxygen Alarm or more.
(High PO2 Alarm)
○High Oxygen Accumulation ! ! O2 When the oxygen accumulation exceeds
Alarm (High O2 Alarm) dangerous level.
○Violation Gauge Warning LIMIT When the depth exceeds 99.9m.
When the elapsed dive time exceeds 599 minutes.
When decompression is needed at the depth of
deeper than 33m while decompression diving.
Average Depth
Maximum Depth
●When it displays the depth in the Log Mode, if the depth is less than 50m, it becomes 0.2m
unit, and is deeper than 50m, it becomes 0.4m unit.
52
Page 53
LOG MODE ( LOG )
■ L-3
L-3 screen displays the following information.
・Fraction of oxygen used
Depress A button to display “PROF” screen.
Fraction of Oxygen Used
53
Page 54
■ Dive Pro le (PROF)
Dive pro le (PROF) screen displays the
following information.
・Time graph ended
・Graph
・Alternate display of time graph started
and maximum depth.
Depress A button to display “LOG” screen.
Time Graph Ended
Time Graph Started
Alternate Display of Depth and Time
Graph
●Whenever you depress the P button, data is updated at intervals of 30 seconds, and the time
graph started and the time graph ended progress.
●Whenever you depress the L button, data is updated at intervals of 30 seconds, and the time
graph started and the time graph ended return.
Continue to depress P or L button for fast forward
●Since it is a 30-second interval, there may be no change in the time graph started and the time
graph ended.
The time which can be displayed on a graph is 10 minutes.
LOG MODE ( LOG )
When you depress P or L button on a detailed screen, it changes to an old log, a new log, a
history, etc.
When you depress and hold M button, it changes from every screen in “LOG” mode to Watch
Mode or Surface Mode after “TIME” “Hold” display.
54
Page 55
LOG MODE ( LOG )
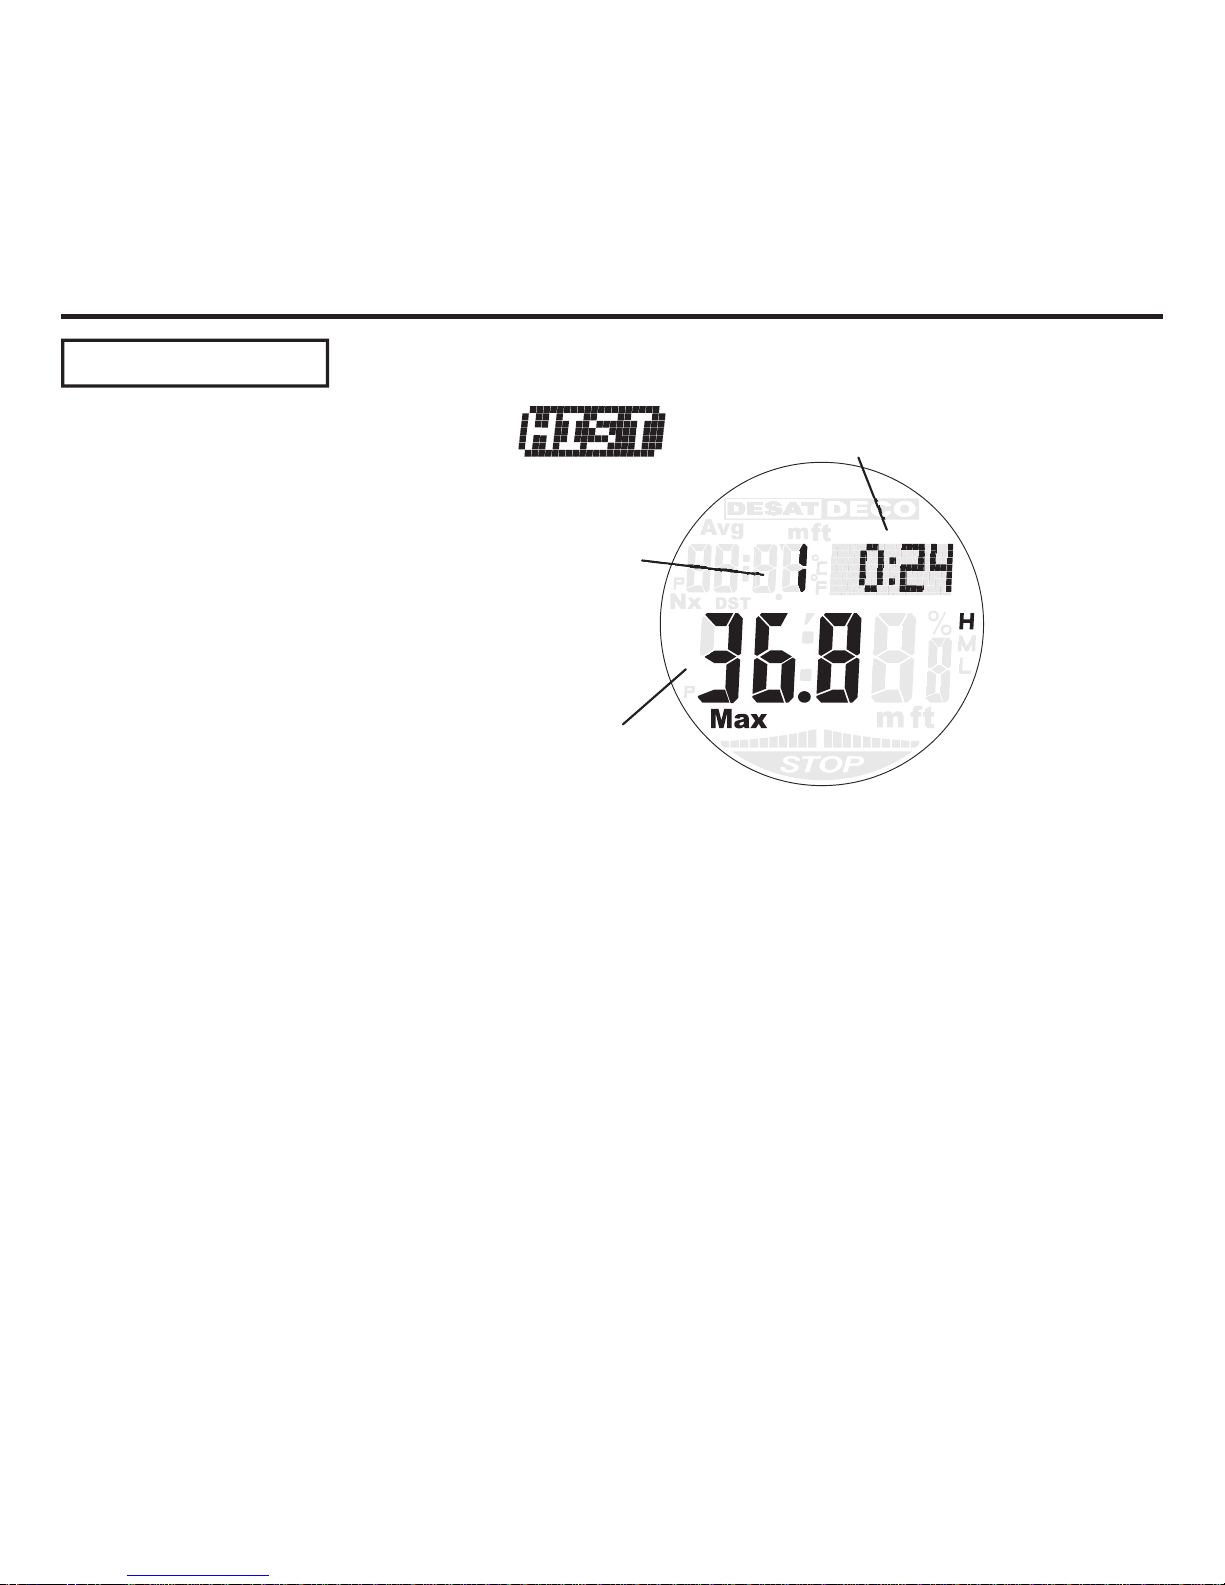
Check a History
Total Dive Time
Total Number of Dive
Maximum Depth
1. Enter the Log Mode.
・Depress L button once at the time of Watch Mode or Surface Mode.
・”LOG” is displayed on a screen and it switches to Log Mode in about 1 second.
・The newest log is displayed when it switches to Log Mode.
2. Depress L button again.
・”HIST” is displayed on a screen and it displays history in about 1 second.
History (HIST) screen displays the following information.
・Total number of dive.
・Total dive time.
・Maximum depth
55
Page 56
PLAN MODE ( PLAN )
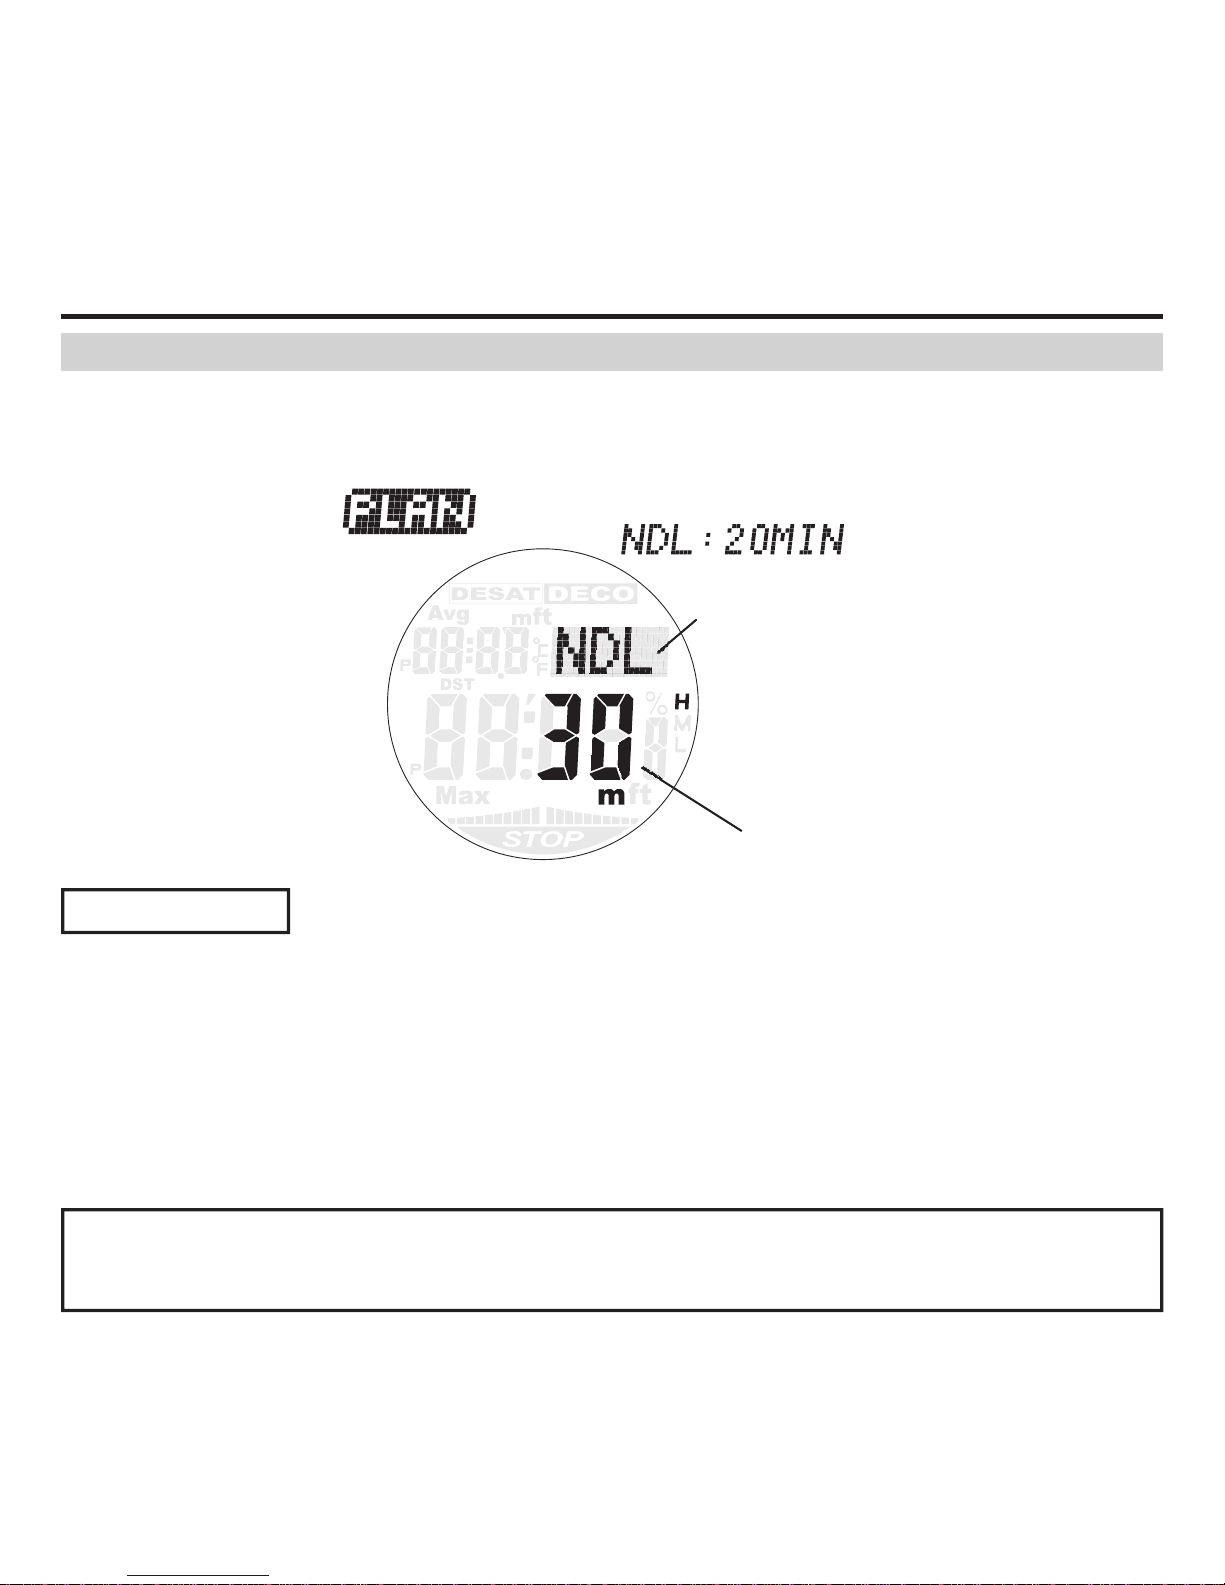
In Plan Mode, no-decompression limit corresponding to the safety factor in compressed air and
Nitrox (EANx) diving can be checked.
Setup of fraction of oxygen (FO2) and the safety factor is performed in Plan Mode.
[ Note ]
●No-decompression limit is calculated based on fraction of oxygen (FO2) and safety factor,
etc. set at that time.
No-decompression Limit
Scheduled Dive Depth
Check a Plan
Plan Mode
1. Depress P button once at the time of Watch Mode or Surface Mode.
・”PLAN” is displayed on a screen and it switches to Plan Mode in about 1 second.
2. Depress P button (UP) or L button (DOWN) to set scheduled dive depth “9~48m”.
・Scheduled dive depth is displayed at intervals of 3m, and the no-decompression limit
calculated with the depth is displayed.
・Continue to depress P or L button for fast forward
56
Page 57
PLAN MODE ( PLAN )
Safety Factor Setting
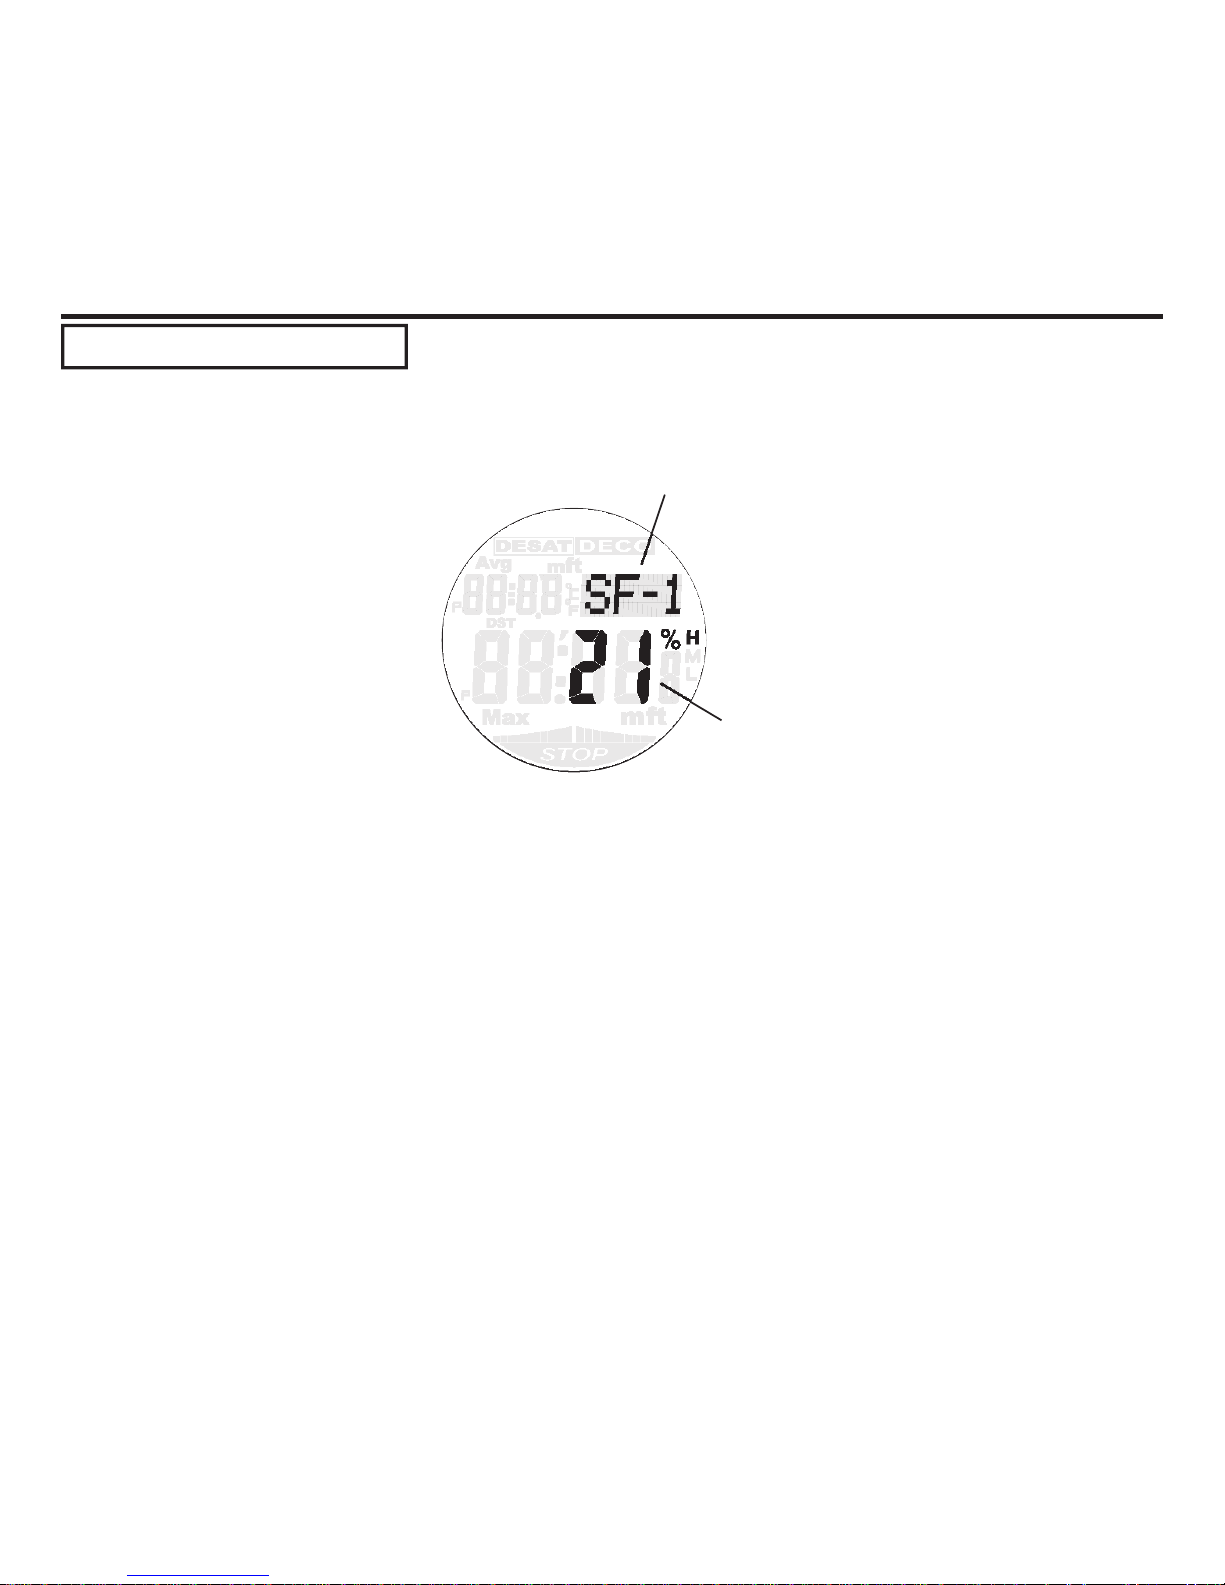
Safety factor can be selected from 3 steps of levels. Default value is SF- 0.
The safety factor becomes high in order of SF- 0, SF-1 and SF-2.
Safety Factor
Fraction of Oxygen (FO2)
1. Enter the Plan Mode.
・Depress P button once at the time of Watch Mode or Surface Mode.
・”PLAN” is displayed on a screen and it switches to Plan Mode in about 1 second.
2. Depress and hold A button (for about 2 seconds).
・Release the button when “SF-0~2” and “21~50%” are displayed after “SET” “Hold” ashes
3. Every time you depress the M button, it is set up as follows.
・”SF-0” (Default value) → “SF-1” → “SF-2”
4. Depress A button to return to Plan Mode.
・Setup is completed. (As to the details of safety factor, please refer to the page 87.)
57
●Precautions at safety factor setting.
・Once you set up the safety factor, it becomes effective until you change it.
The safety factor also in uences the calculation under diving and after diving.
・Check of a setting situation and setup/change of the safety factor in Dive Mode cannot be
performed.
Page 58
Fraction of Oxygen (FO2) Setting
PLAN MODE ( PLAN )
1. Enter the Plan Mode.
・Depress P button once at the time of Watch Mode or Surface Mode.
・”PLAN” is displayed on a screen and it switches to Plan Mode in about 1 second.
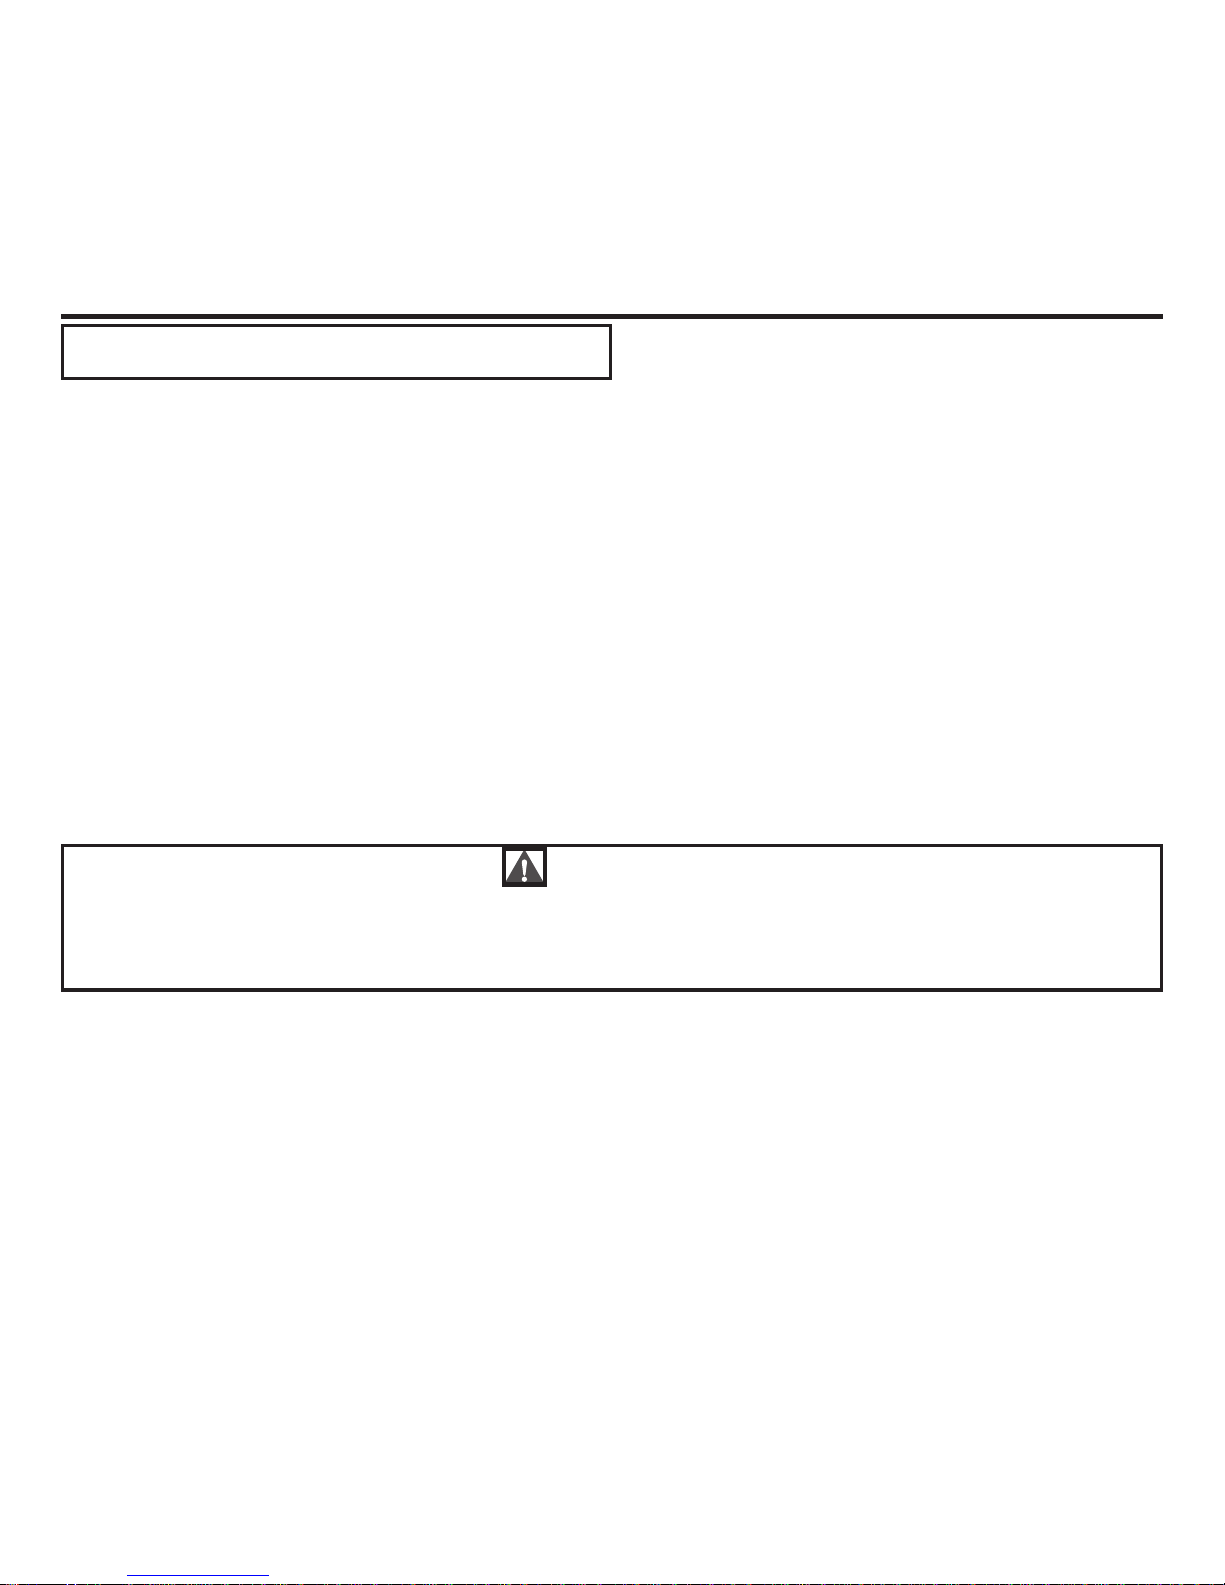
2. Depress and hold A button (for about 2 seconds).
・Release the button when “SF-02” and “21~50%” are displayed after “SET” “Hold” ashes.
3. Depress P button (UP) or L button (DOWN) to set fraction of oxygen “21%~50%”.
・”22%~50%” is Nitrox (EANx).
・Continue to depress P (UP) or L (DOWN) button for fast forward.
It stops once at 21% and 32%.
When you set up to “22%~50%”, “Nx” mark lights up.
4. Depress A button to return to Plan Mode.
・Setup is completed.
Caution
●In Nitrox (EANx) diving, you have to set up fraction of oxygen (FO2) ratio for every dive.
●Check of a setting situation and setup/change of the fraction of oxygen in dive mode cannot
be performed.
When repetitive diving is performed without carrying out a re-setup of the fraction of oxygen
after Nitrox (EANx) diving, it calculates at 50% of the fraction of oxygen by oxygen calculation
and at 79% of the fraction of nitrogen by nitrogen calculation for safety.
After the Nitrox (EANx) setup, it returns to a compressed air setup (21% fraction of oxygen)
automatically in 24 hours, and “Nx” mark disappears.
58
Page 59
59
ALTITUDE DIVING AND FRESH WATER DIVING
Warning
●When performing altitude diving, no-decompression limit (NDL) becomes shorter than the one
at sea level of 0m.
Please reconrm NDL in the low state of barometric pressure which passed 15 minutes or
more after you ascend to the high place.
Otherwise, you may get decompression sickness.
As this product measures the barometric pressure of the place which the diver moved, and
calculates the release of residual nitrogen and oxygen by non-step automatically, it also can be
used at high place without any switch operation or a special setup.
Moreover, since depth displayed is based on sea water, it displays somewhat shallower depth
in fresh water of the light specic gravity. This also shows that the depth displayed is sea water
standard, and at the same time, the water pressure which the diver has received is equal to the
pressure at the depth in sea water
Since it calculates on this pressure standard, there is no adverse effect on decompression
calculations in fresh water.
Page 60
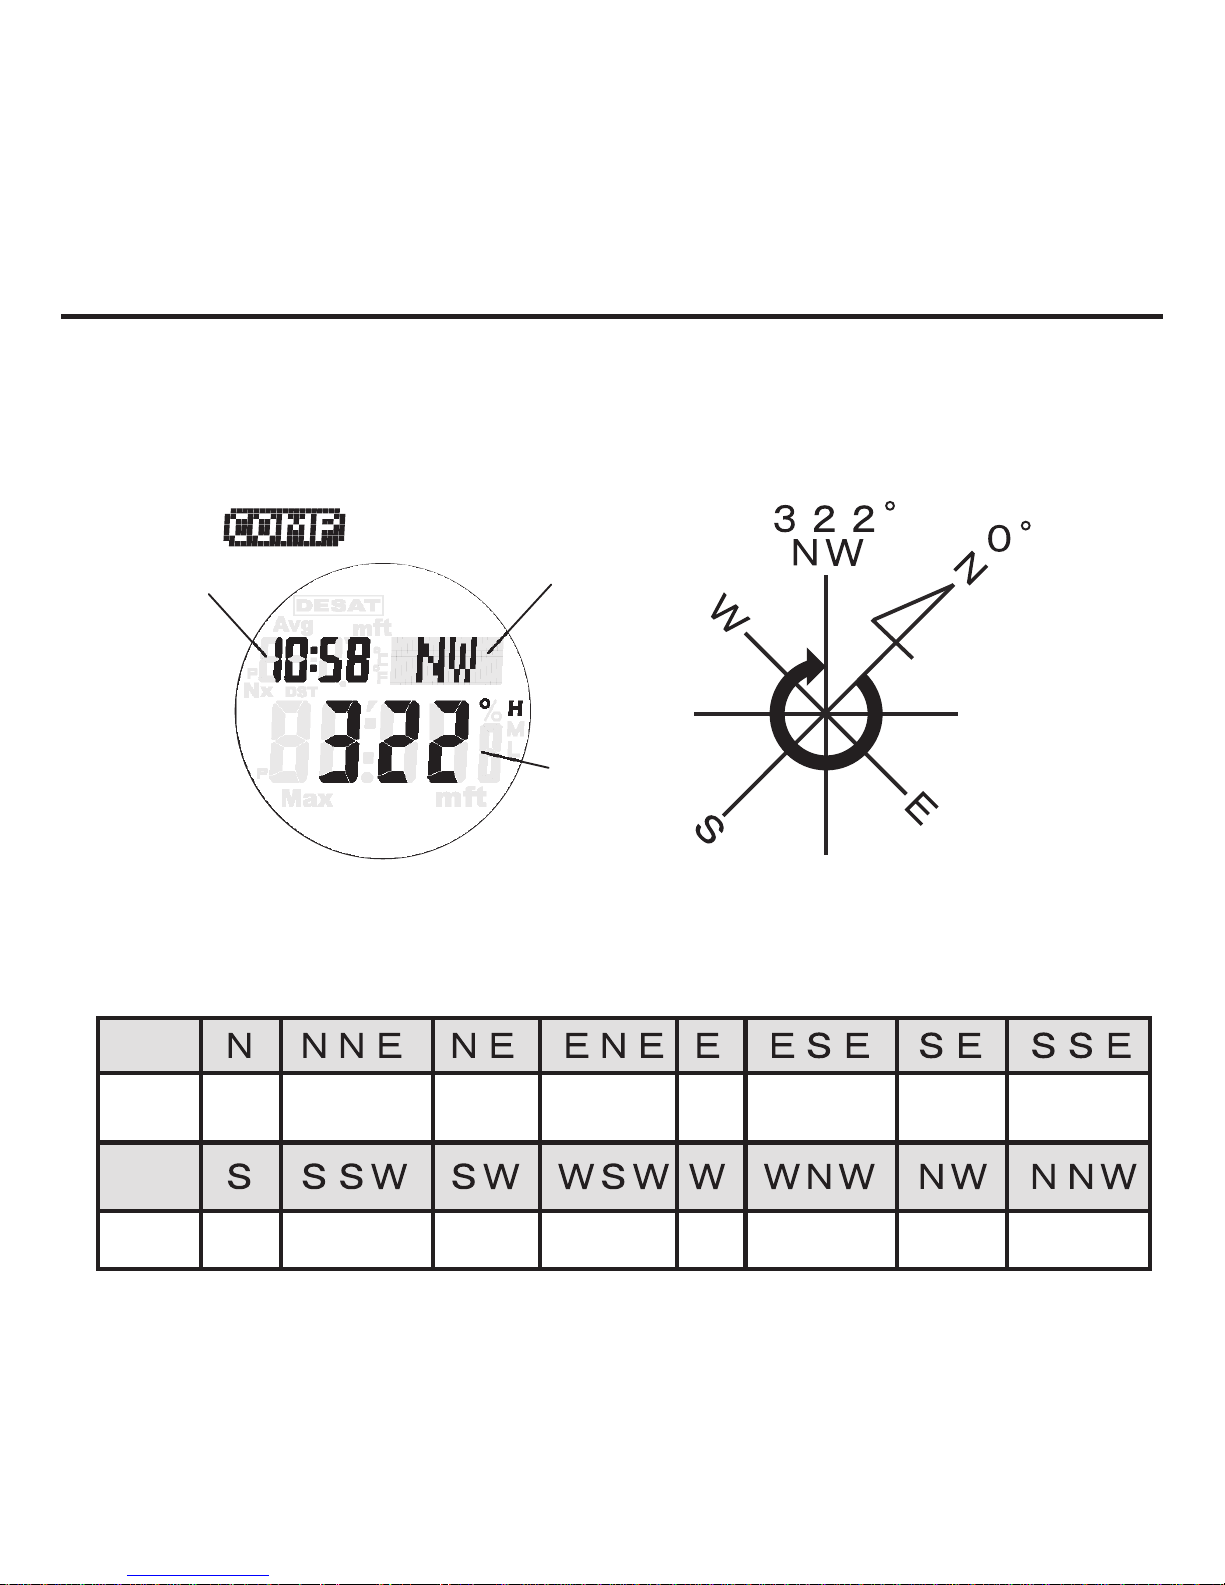
It measures direction with the bearing sensor built in this product.
Direction abbreviations (16 directions) and angle value are displayed.
・In order to measure correctly, please refer to “Calibrate Bearing Sensor” and “Precautions at
Digital Compass Measurement”.
・It can be used in Watch Mode, Surface Mode and Dive Mode.
<Meanings of the Direction Abbreviations>
Meaning North North-northeast Northeast East-northeast East East-southeast Southeast
South-southeast
Direction
Direction
Meaning South
South-southwes
t Southwest
West-southwest
West West-northwest Northwest
North-northwest
DIRECTION READING ( COMP )
Direction Indicator
Angle Value
Current Time
How to get Angle Value
60
Page 61
1. When you depress M button once at the time of Watch Mode or Surface Mode, it switches to
Digital Compass Mode.
・”COMP” is displayed and it switches to Digital Compass Mode in about 1 second.
2. The 12 o’clock position of this product is “Measuring Direction”.
3. Depress P button while placing this product on a at surface.
・When it starts digital compass measurement, it shows an abbreviation and an angle value
in about 1 second.
Even after displaying the rst measuring result, it continues measurement and display in every
second for about 60 seconds.
After measurement nishes, the display of the direction abbreviation and angle value changes
to “---”.
DIRECTION READING ( COMP )
In order to raise the accuracy of measurement, please calibrate the bearing sensor before
measurement.
Digital Compass Measurement
61
Calibrate a Bearing Sensor
“Bidirectional Calibration”: Please use it when the angle value has shifted as compared with an
accurate compass, and at the preparation before diving.
■ How to calibrate the bearing sensor.
◆ Precautions about bidirectional calibration
・Do not move the product and keep it placing on a at surface while calibration is in progress.
・If bidirectional calibration is performed to the every digital compass measurement, a more
accurate measuring result can be obtained.
・Please perform bidirectional calibration whenever environment to use changes.
・At the place with strong magnetism such as near home electronics, OA equipment and
cellular phone, it may be unable to calibrate correctly.
・Please make sure to select two opposing directions that are 180 degrees opposite each
other.
Page 62

●If nothing is operated for 2 to 3 minutes, the display of the direction abbreviation and angle
value switches to “---”, nishes calibration screen automatically in 2 to 3 minutes after, and
returns to Watch Mode, Surface Mode or Dive Mode.
DIRECTION READING ( COMP )
■Bidirectional Calibration
1.Continue to depress A button for more than 2 seconds in Digital Compass Mode.
・Release the button if “CALIBRATION” “-1-“ is displayed after “SET” “Hold” ashes
“CALIBRATION” is displayed as owing.
2. epress L button.
・It starts to calibrate the rst direction.
・“---“ is shown on the display while calibration is being performed.
・When calibration is successful, display shows “Turn 180°”, then “CALIBRATION” “-2-“ is
displayed.
・When “ERR” “-1-“ is displayed, please repeat the same procedure by depressing L button
again.
3. Rotate the product 180 degrees.
4. Depress L button.
・It starts to calibrate the second direction.
・“---“ is shown on the display while calibration is being performed.
・When calibration is successful, display shows “OK”, then it switches to digital compass
measurement.
・Calibration is completed.
・When “ERR” “-2-“ is displayed, please repeat the same procedure starting from 2.
62
Page 63
●Magnetic north and True north.
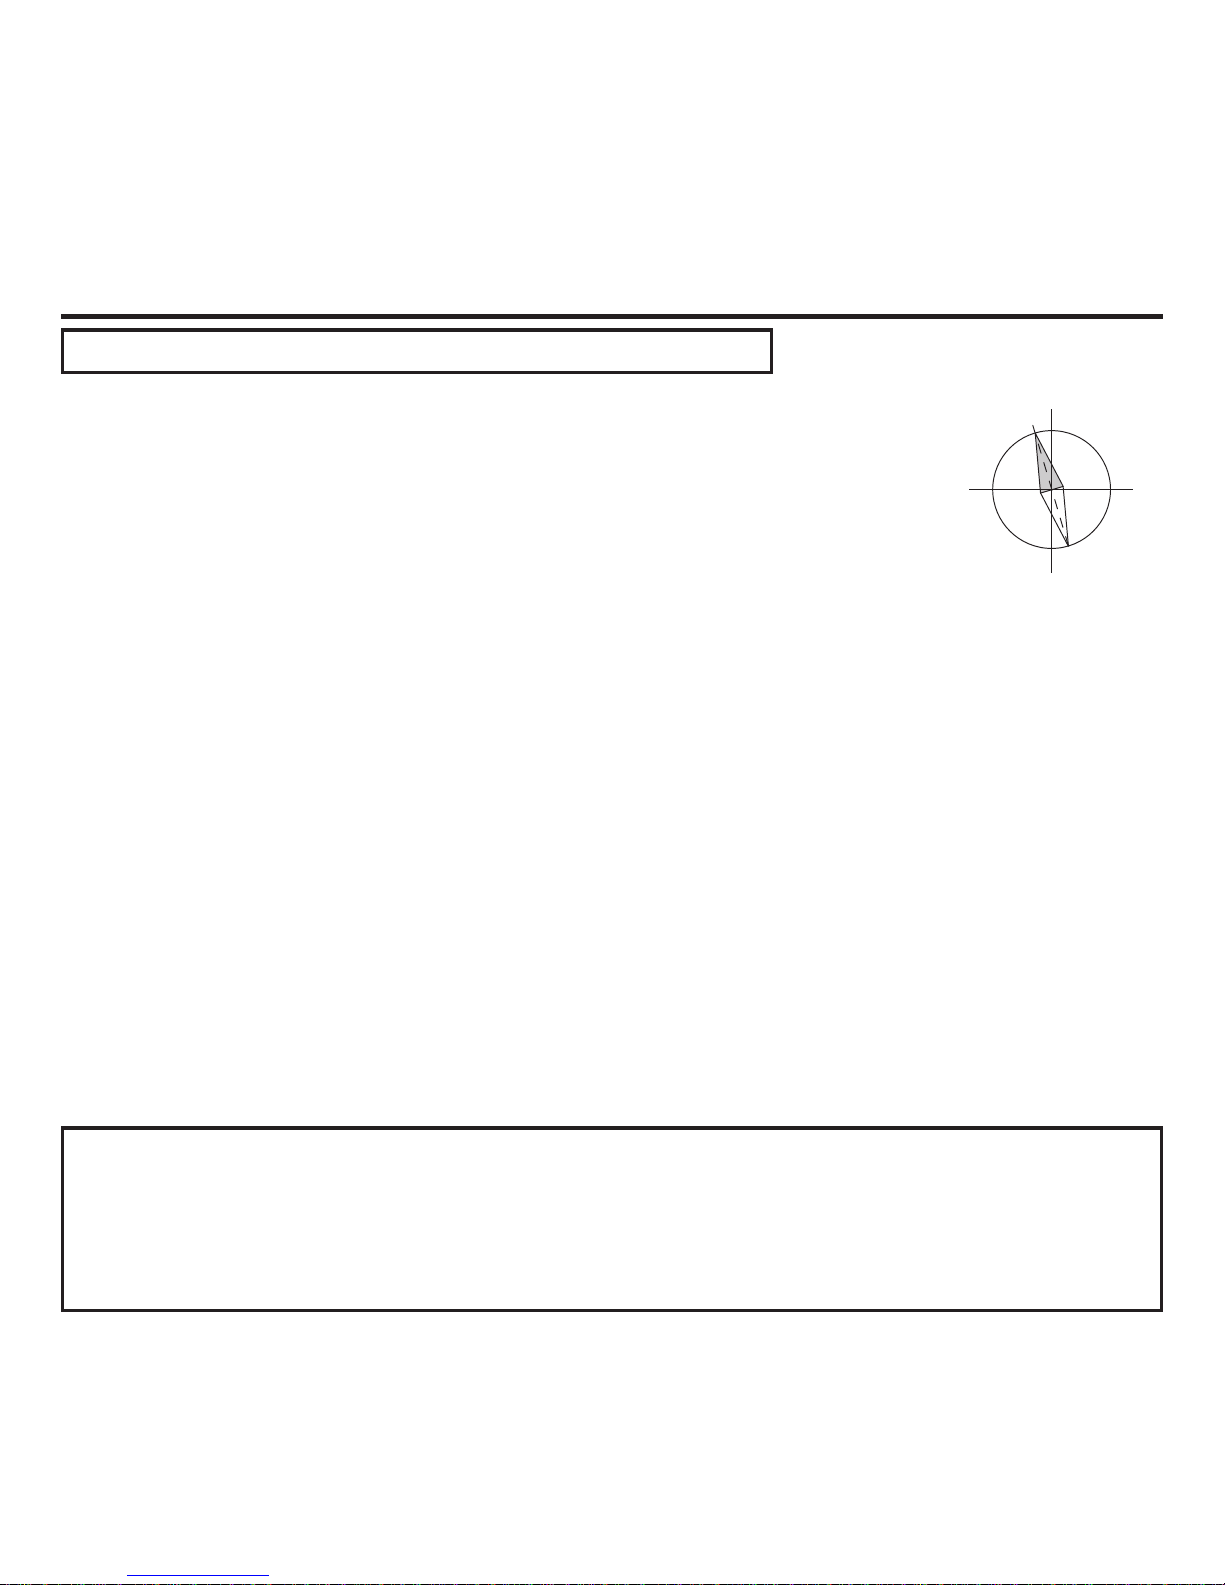
There are two kinds of geography terms showing north, magnetic north
and true north.
・Magnetic north : north which compass (bearing magnetic needle) indicates.
・True north : the direction of the North Pole point.
As shown in the right gure, the magnetic north and the true north are not same.
●The “north” of the map generally marketed is true north.
●This product indicates magnetic north.
●Place to use.
If you measure a direction near what has strong inuence to geomagnetism, an error arise at a
measurement value.
Please use it keeping away from the following items.
・Permanent magnet (Wrist compass, Magnetic necklace etc.)
・Metal (Metal door, Metal locker etc.) ・High-voltage line
・Overhead wires ・Electrical home appliances (Television, Personal computer, Washing machine and
Refrigerator etc.)
Accurate measurement cannot be performed in vehicles, such as a train, a ship and an airplane.
Accurate measurement cannot be performed in a room, especially in the building of reinforced concrete
construction.
●Place to keep.
When this product becomes magnetized, the accuracy of digital compass measurement may be affected.
Please do not keep it near the items which become magnetized strongly such as permanent magnet
(wrist compass, magnetic necklace etc.), electrical home appliances (TV, PC, washing machine and
refrigerator etc.)
When the measured direction has an error, there is a possibility that the product became magnetized.
Please perform the bidirectional calibration.
DIRECTION READING ( COMP )
True North
Magnetic North
EastWest
South
[ Note ]
●The auto light switch is disabled during the 60 seconds that digital compass measurement is being
performed.
●When an alarm sounds or a light is turned on by having depressed B button during the digital
compass measurement, it stops the measurement temporarily and resumes the measurement after
the alarm stops and the light turned off.
63
Precautions at Digital Compass Measurement
Page 64
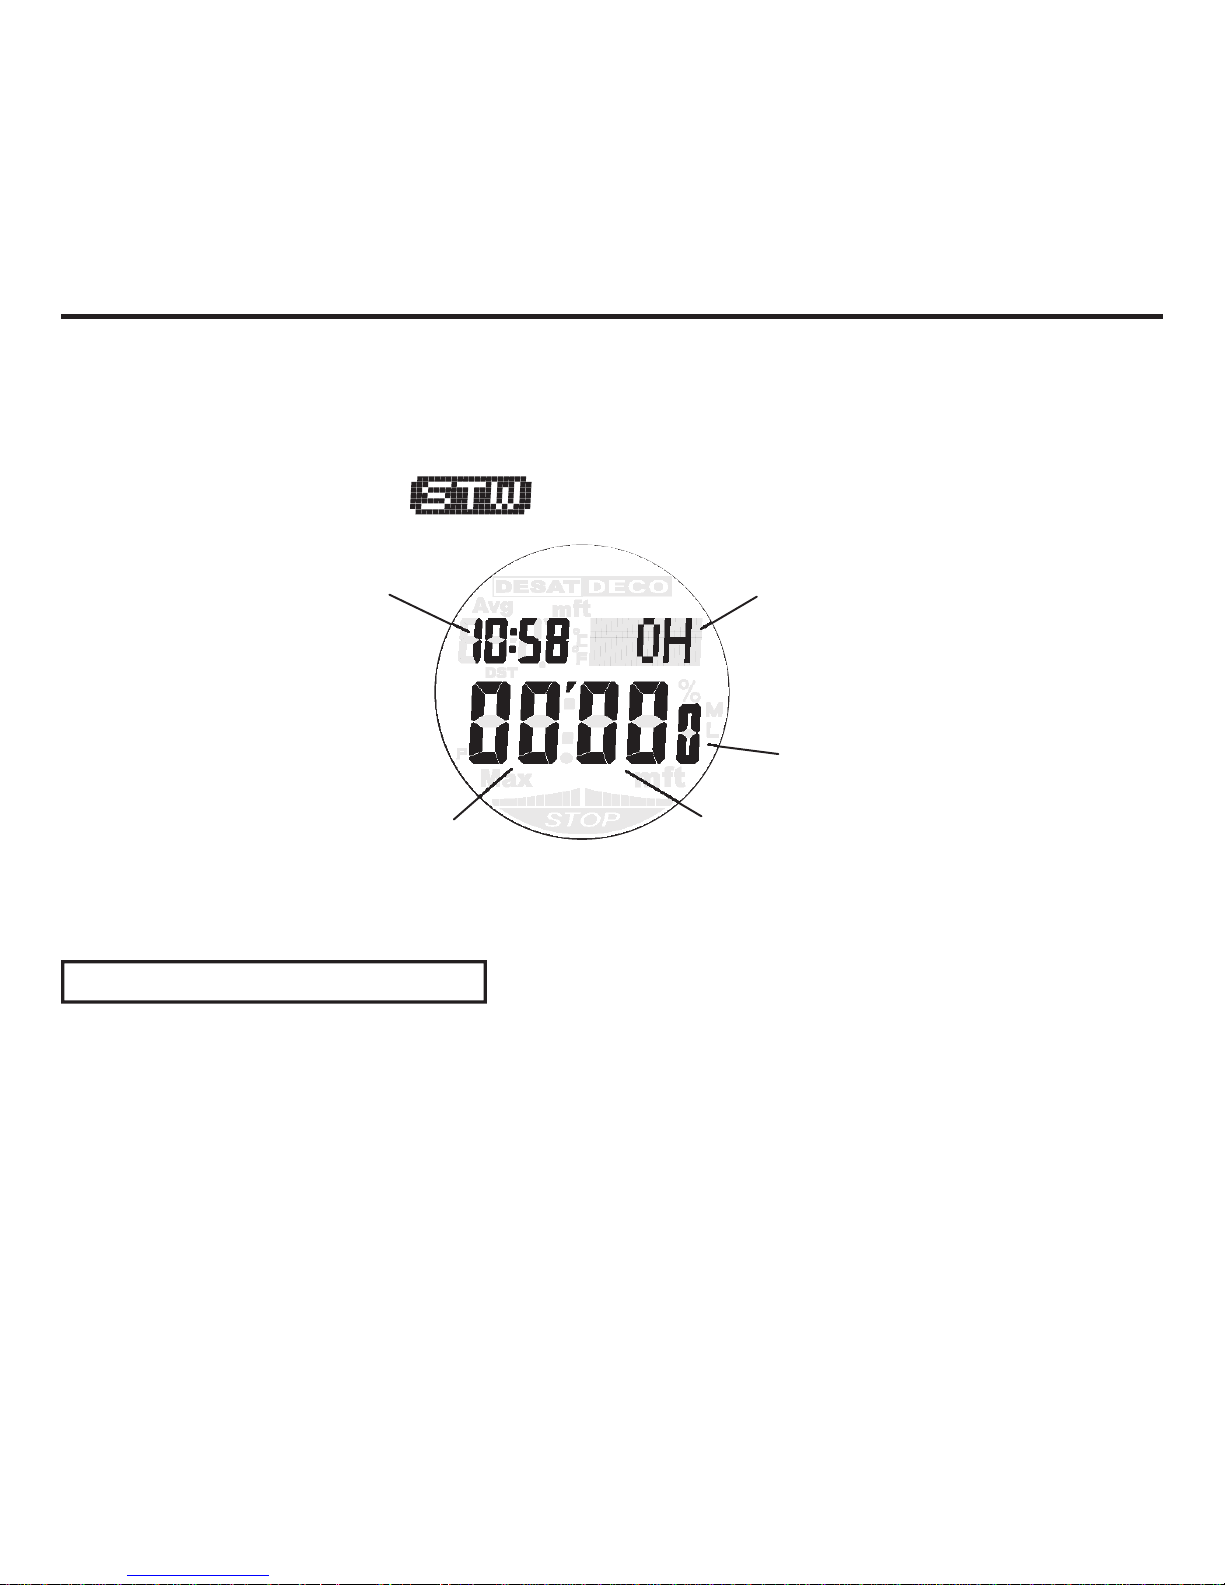
STOPWATCH ( STW )
The stopwatch measures elapsed time up to 999 hours, 59 minutes, 59.9 seconds by 1/10
second unit.
When a measuring range is exceeded, it returns to 0 and continues measurement.
Stopwatch can be used at the time of Watch Mode and Surface Mode.
When you depress M button twice at the time of Watch Mode or Surface Mode, it switches to
the Stopwatch Mode.
“STW” is displayed and it switches to the Stopwatch Mode in about 1 second.
Enter the Stopwatch Mode
Hour
Current Time
Minutes
Second
1/10 Second
64
Page 65
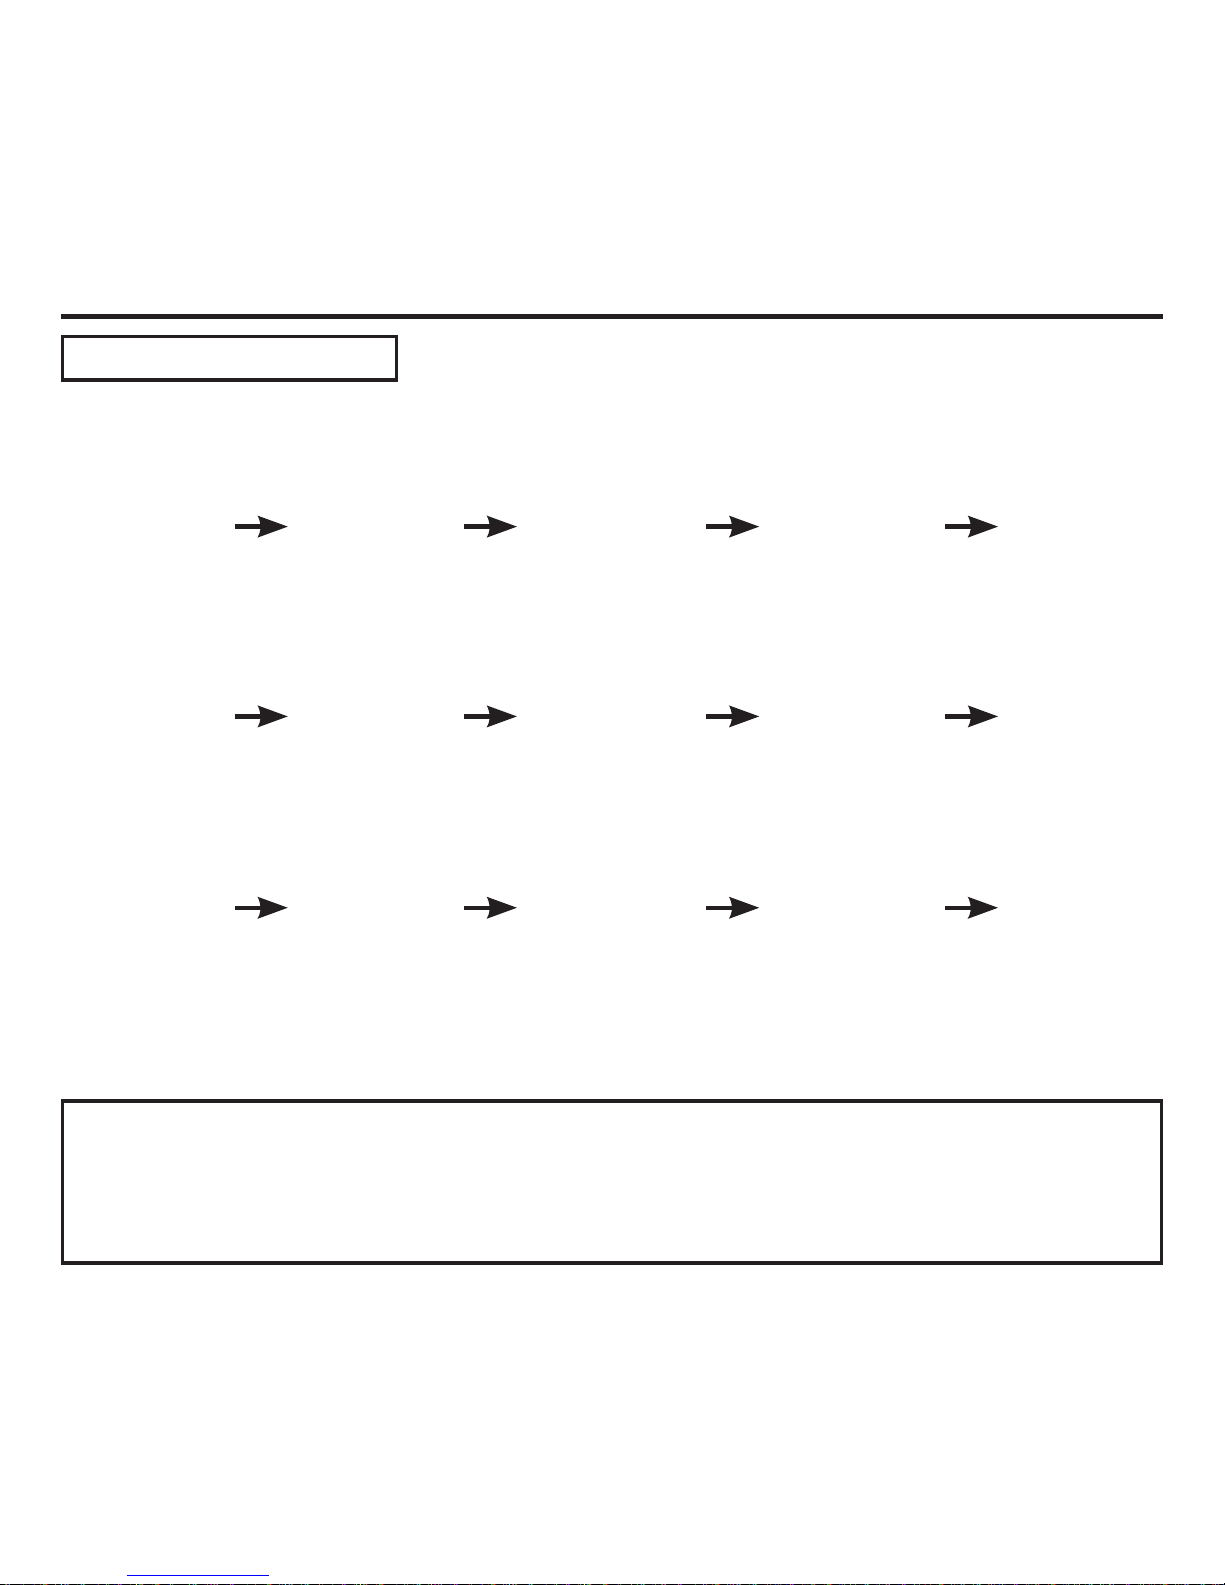
[ Note ]
●Once you started, stopwatch continues until you depress L button for reset even if you switch
to another mode or it reaches the stopwatch limit.
●When you switch to another mode while measuring a split time, it clears the split time and
returns to elapsed time measurement.
Time Measurement
■ To pause at a split time
STOPWATCH ( STW )
65
P button
Start
P button
Stop
P button
Restart
P button
Stop
L button
Reset
P button
Start
L button
Split
L button
Reset release
L button
Reset
L button
Reset
P button
Start
L button
Split
First runner nishes
(Display time ofrst
runner)
P button Stop
Second runner
nishes
L button
Split relese
(Display time ofrst
runner)
L button
Reset
■ To perform an elapsed time operation
■ To measure two nishes
Page 66
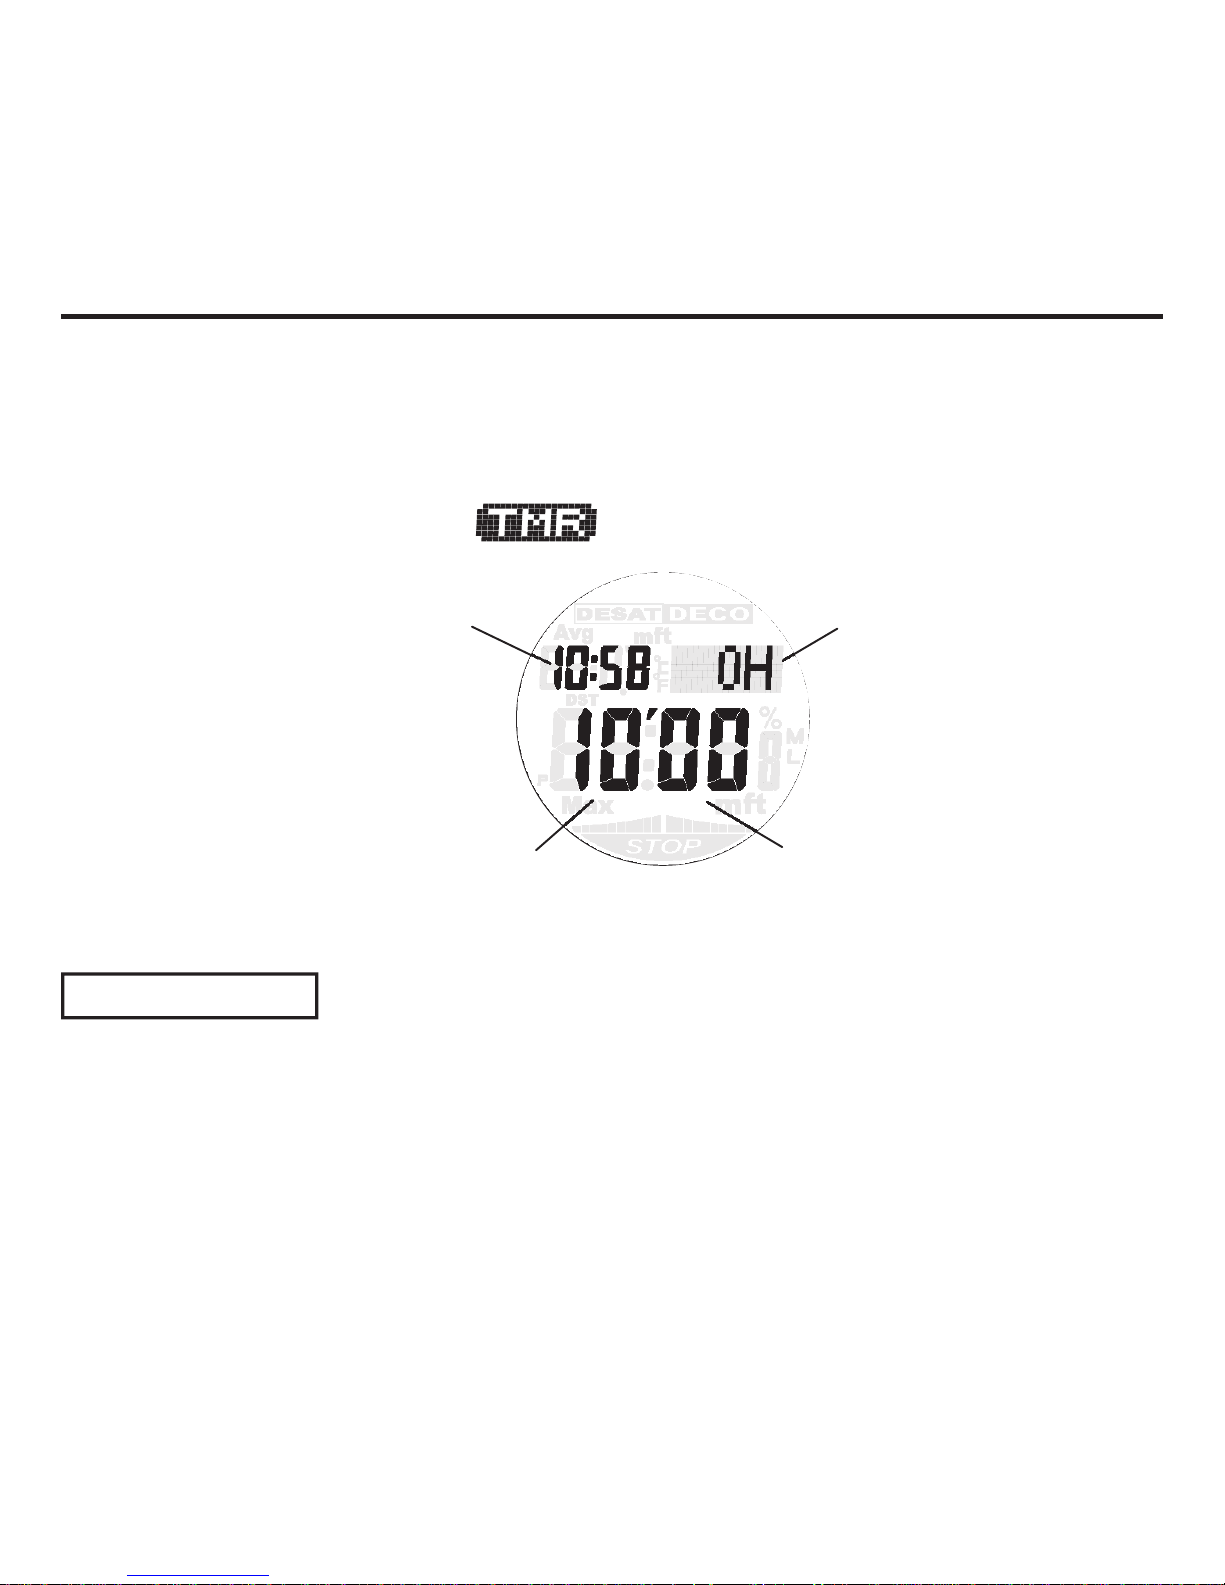
TIMER (TMR)
You can set up a timer from 1 minute to 24 hours.
When it reaches the time you selected, time up alert sounds for 10 seconds.
Timer can be used at the time of Watch Mode and Surface Mode.
When you depress M button three times at the time of Watch Mode or Surface Mode, it switches
to the Timer Mode.
“TMR” is displayed and it switches to the Timer Mode in about 1 second.
Select a Timer
66
Hour
Current Time
Minutes
Second
Page 67
1. Continue to depress A button for more than 2 seconds.
・Release the button if “Hour” display of Timer ashes after “SET” “Hold” ashes,
2. Depress M button to select “Hour” or “Minutes”.
・The one you selected ashes.
3. Depress P button (UP) or L button (DOWN) to set up “Hour” or “Minutes”.
・Continue to depress P (UP) or L (DOWN) button for fast forward.
・When you set up a timer for 24 hours, adjust the display of timer to “0H00’00”.
4. Depress A button.
・Setting is completed.
・If nothing is operated for 2 to 3 minutes, it nishes the setup screen automatically.
Setting a Timer
67
TIMER (TMR)
Use a Timer
[ Note ]
●When it reaches the time you selected, time up alert sounds for 10 seconds and the screen
returns to the state before using a timer.
●Even if it has changed to other modes, such as dive mode, time up alert sounds.
P button
Start
P button
Stop
P button
( Restart )
P button
Stop
L button
Reset
Page 68
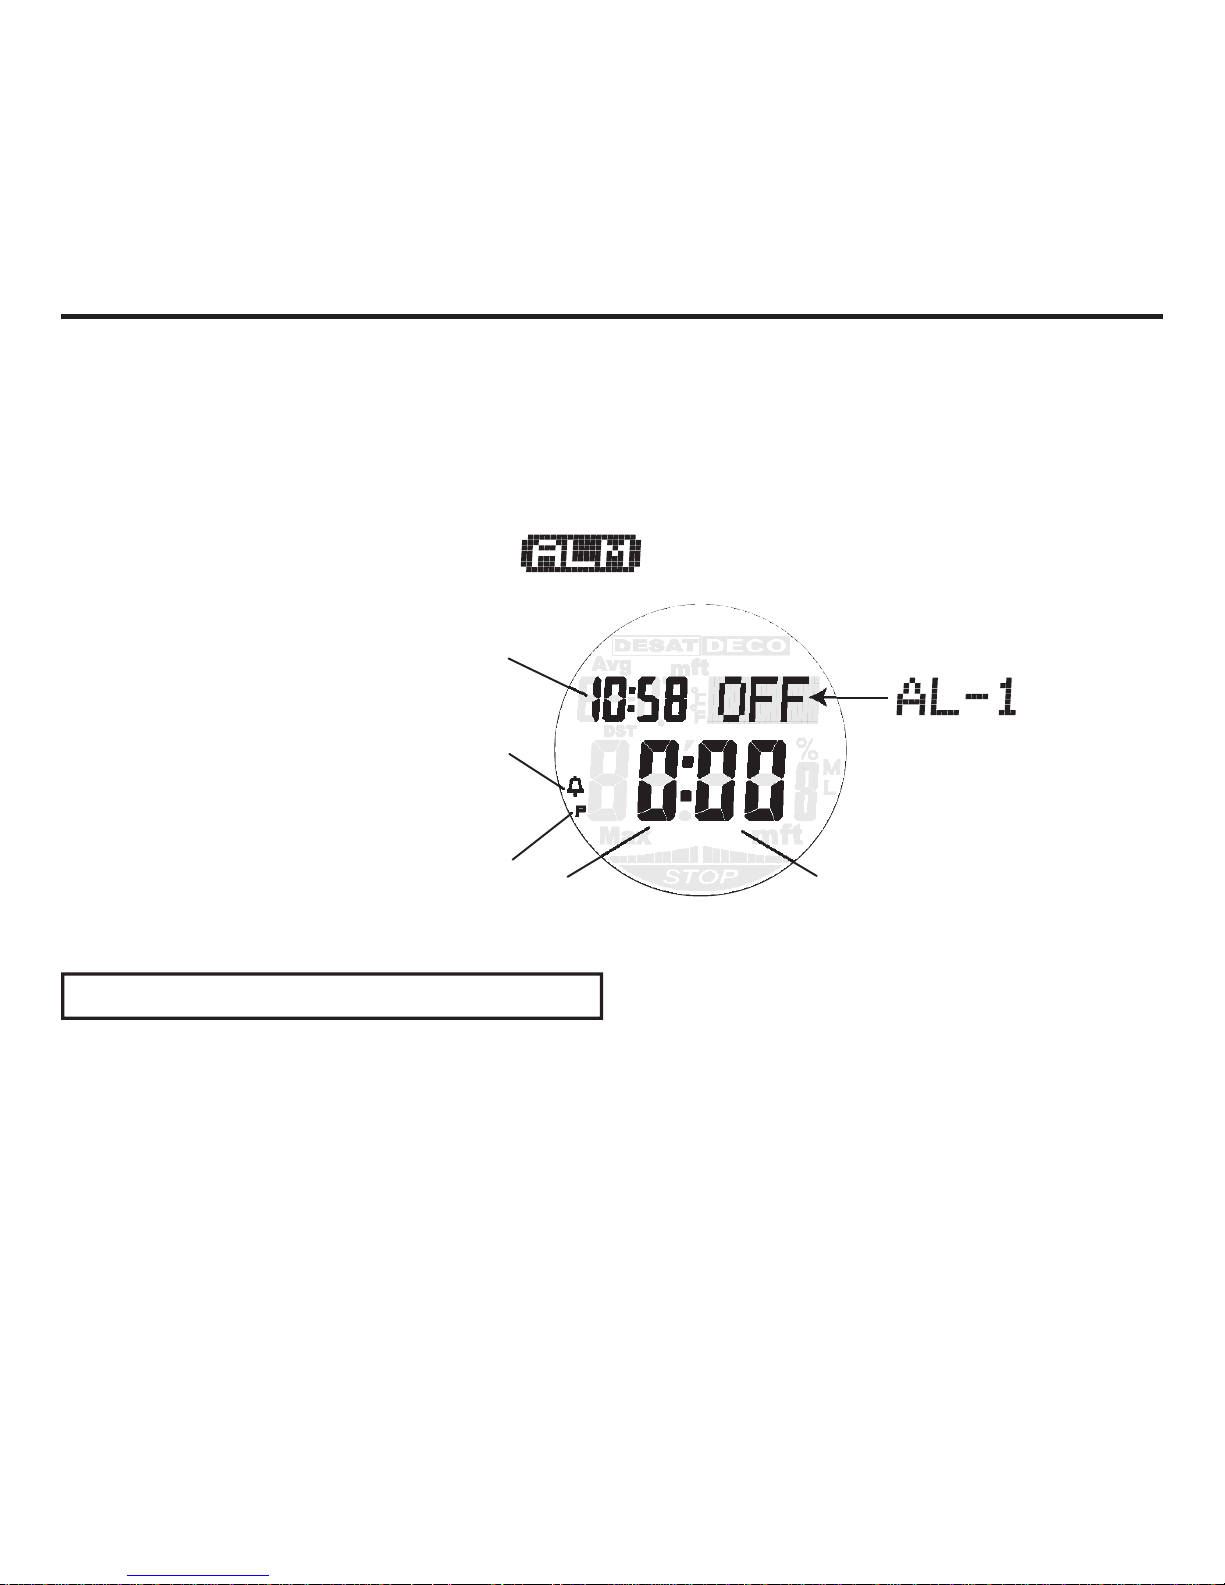
ALARM / HOURLY TIME SIGNAL (ALM)
Four usual alarms and one snooze alarm can be set up.
In the case of usual alarm, when the time reaches the time preset, alarm sounds for about 10
seconds.
In the case of snooze alarm, when the time reaches the time preset, alarm sounds for about 10
seconds, and repeats it 7 times in every 5 minutes.
You can also turn on an hourly time signal every hour on the hour (00 minutes).
Minutes
Hour
P (p.m.) Indicator
Alarm Indicator
Current Time
Using Alarm / Hourly Time Signal
When you depress M button four times at the time of Watch Mode or Surface Mode, it switches
to the Alarm Mode.
“ALM” is displayed and it shows alarm number such as “AL-1~AL-4”, “SNZ” and “SIG” in about
1 second.
68
Page 69
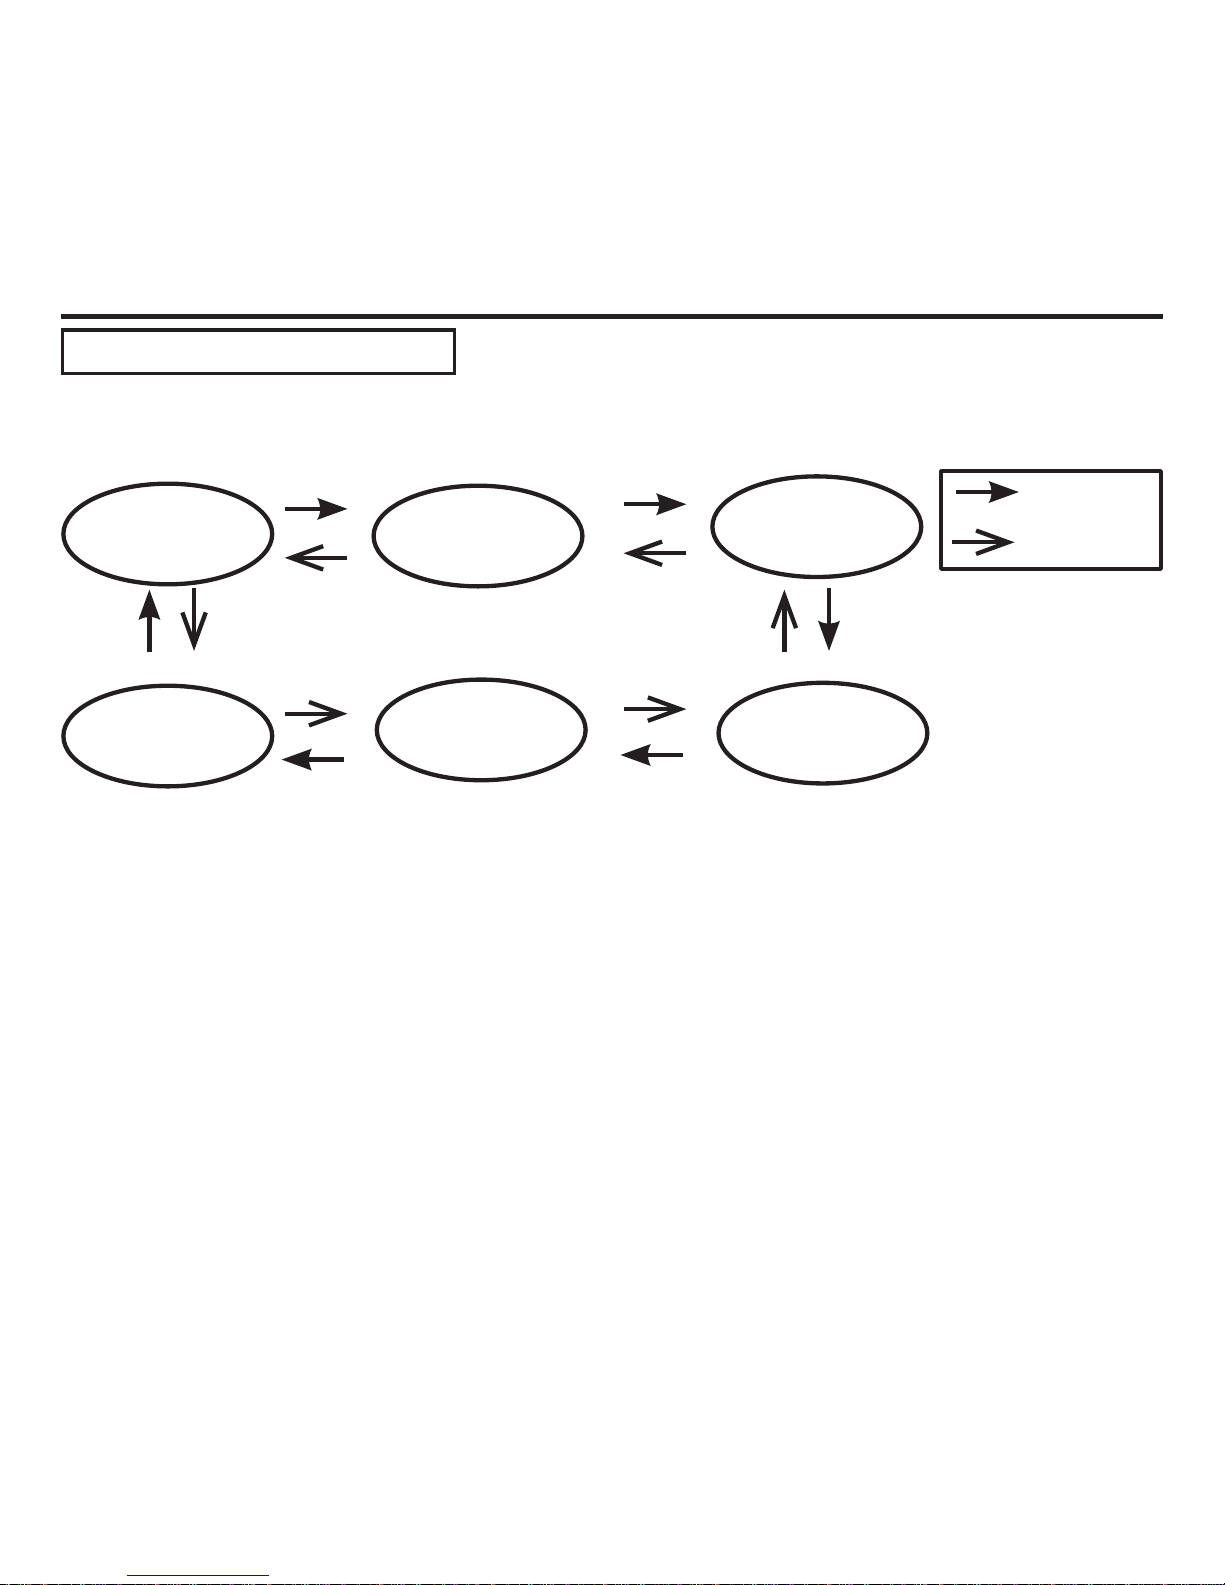
2. Continue to depress A button for more than 2 seconds.
・Release the button if “Hour” display of Alarm ashes after “SET” “Hold” ashes,
3. Depress M button to select “Hour” or “Minutes”.
・The one you selected ashes.
4. Depress P button (UP) or L button (DOWN) to set up “Hour” or “Minutes”.
・Continue to depress P (UP) or L (DOWN) button for fast forward.
・When using the 12-hour format, it displays P indicator in p.m.
5. Depress A button.
・Setup is completed.
・Alarm number set up the time becomes “ON”.
・If nothing is operated for 2 to 3 minutes, it nishes the setup screen automatically.
・In this case too, the alarm number you tried to set up the time becomes “ON”.
・There is no time setting in hourly time signal.
ALARM / HOURLY TIME SIGNAL (ALM)
Setting an Alarm Time
1. Depress P button (UP) or L button (DOWN) to nd alarm number to set up while in Alarm
Mode.
P button
L button
69
AL-1
AL-2
AL-3
AL-4
SNZ
( Snooze )
SIG
( Time Signal )
Page 70
70
ALARM / HOURLY TIME SIGNAL (ALM)
Turn Alarm On and Off
1. Depress P button (UP) or L button (DOWN) to nd alarm number to set up while in Alarm
Mode.
2. Depress A button to turn alarm or time signal on and off.
・When any alarm (one or multiple among ve) is turned on, “ALM” indicator lights up.
・The “ALM” indicator does not light up even when snooze alarm or hourly time signal is on.
[ Note ]
●Depress any button to stop the alarm.
●Even if it is switched to other displays such as dive mode, alarm sounds.
●In the case of snooze alarm, when the time reaches the preset alarm time, alarm sounds for
about 10 seconds, and repeats it 7 times in every 5 minutes.
●If the following operations are carried out when snooze alarm is on, a snooze alarm function
will be interrupted.
・When you turn the snooze alarm off.
・When you start to set up a snooze alarm time.
・When you start to perform various settings in Watch Mode.
・When you change a setup of summer time in world time while the home city and the world
time city are same.
Page 71
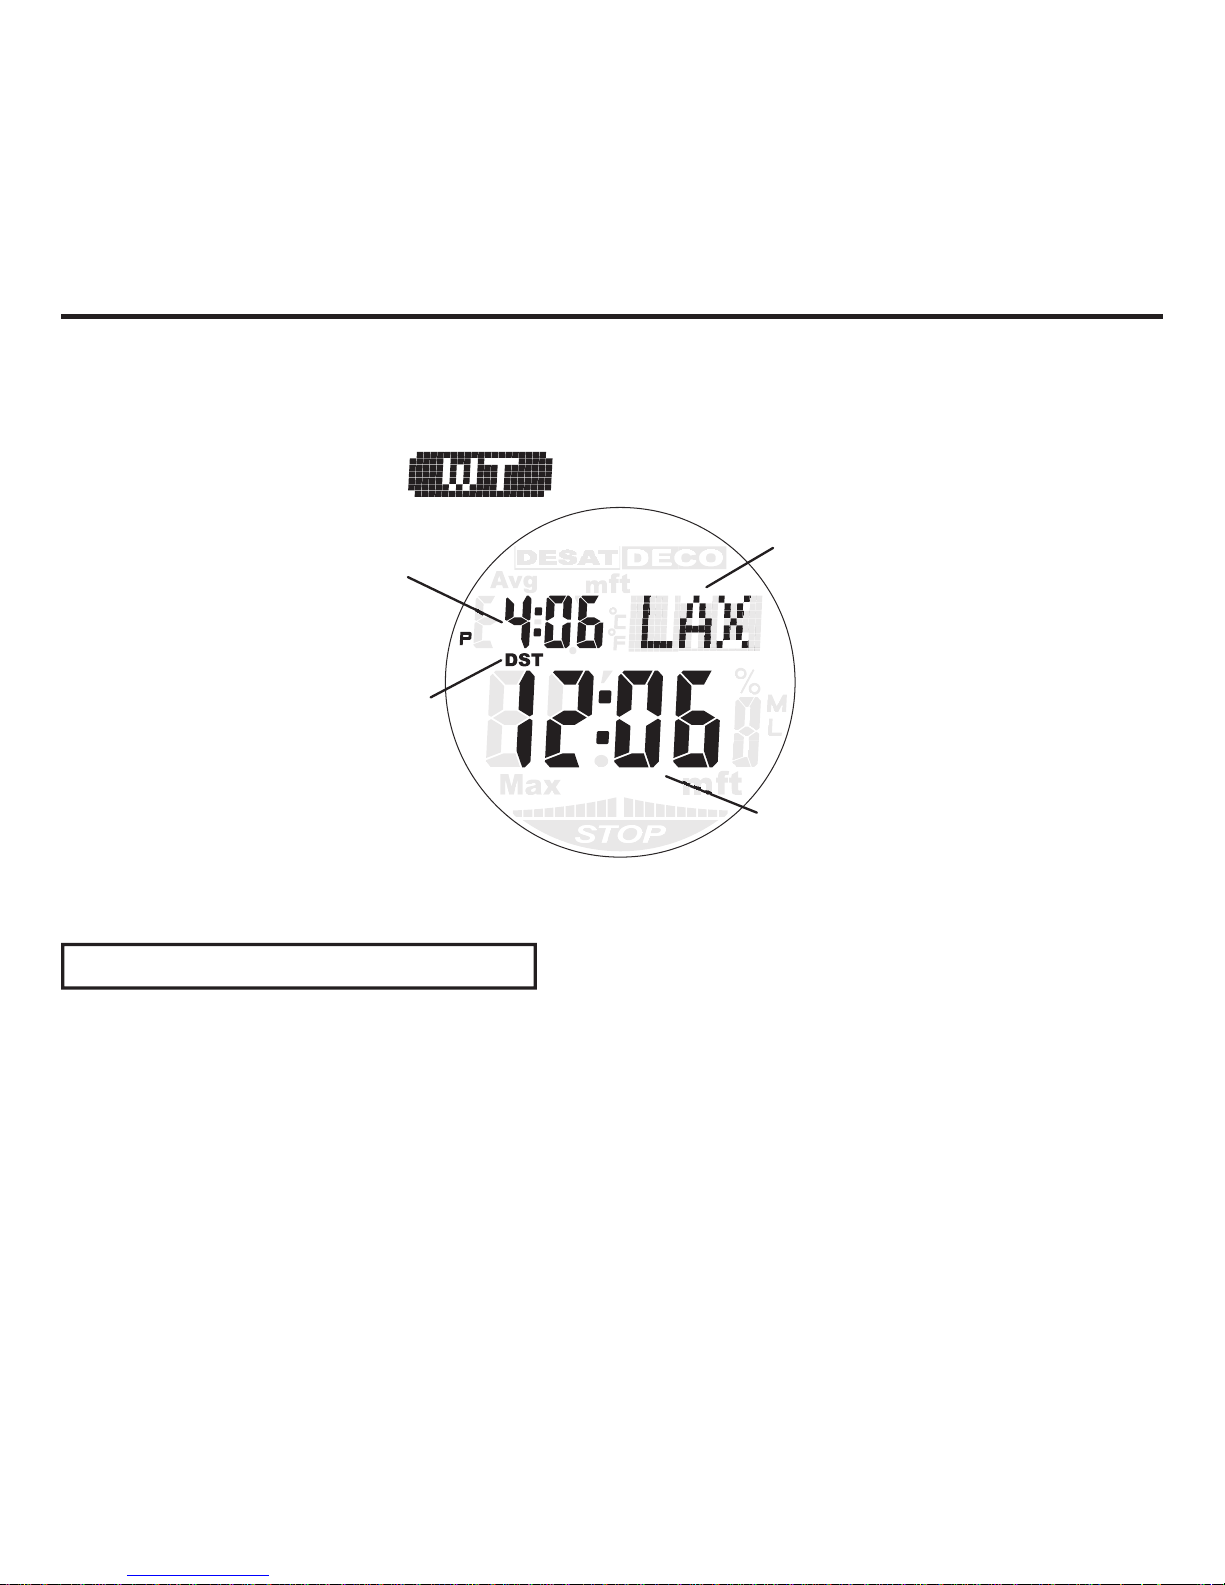
71
WORLD TIME ( WT )
You can view the current time in one of 48 cities (31 time zones) around the world.
The city that is selected in the World Time Mode is called the “World Time City”.
Please refer to City Code Table as to the City Code. (p. 88)
Selected World Time City
Current Time at the
Selected City
Current Time
Summer Time
Indicator
Enter the World Time Mode
When you depress M button ve times at the time of Watch Mode or Surface Mode, it switches
to the World Time Mode.
・”WT” is displayed and it shows once currently selected City Code and its city name as owing
in about 1 second. After that it displays just City Code.
Page 72
72
WORLD TIME ( WT )
View the Time in Another Time Zone
1. Depress P button (UP) or L button (DOWN) to select a City Code while in World Time Mode.
2. Continue to depress A button for more than 2 seconds.
・Setting switches after “DST” “Hold” “ON” or “DST” “Hold” “OFF” ashes.
・When “DST” Hold” “ON” ashes, summer time (DST) is set up. It displays summer time.
・When “DST” Hold” “OFF” ashes, summer time (DST) is released. It displays standard time.
・It displays “DST” when it is in summer time (DST) setting.
Depress P button (UP) or L button (DOWN) to select a City Code while in World Time Mode.
・It displays current time of the selected city.
・Continue to depress P button or L button for fast forward.
Summer Time (DST) Setting
[ Note ]
●The Summer Time, also called DST (Daylight Saving Time), is the system adjusting 1 hour
faster from the normal time (Standard Time). An enforcement period and the enforcement
area of the Summer Time vary according to a country. In addition, there is a country and the
area that do not adopt the Summer Time system.
●You cannot switch between standard time/summer time (DST) while “UTC” is selected as the
World Time City.
●The standard time/summer time (DST) setting affects only the currently selected city (time
zone).
Page 73
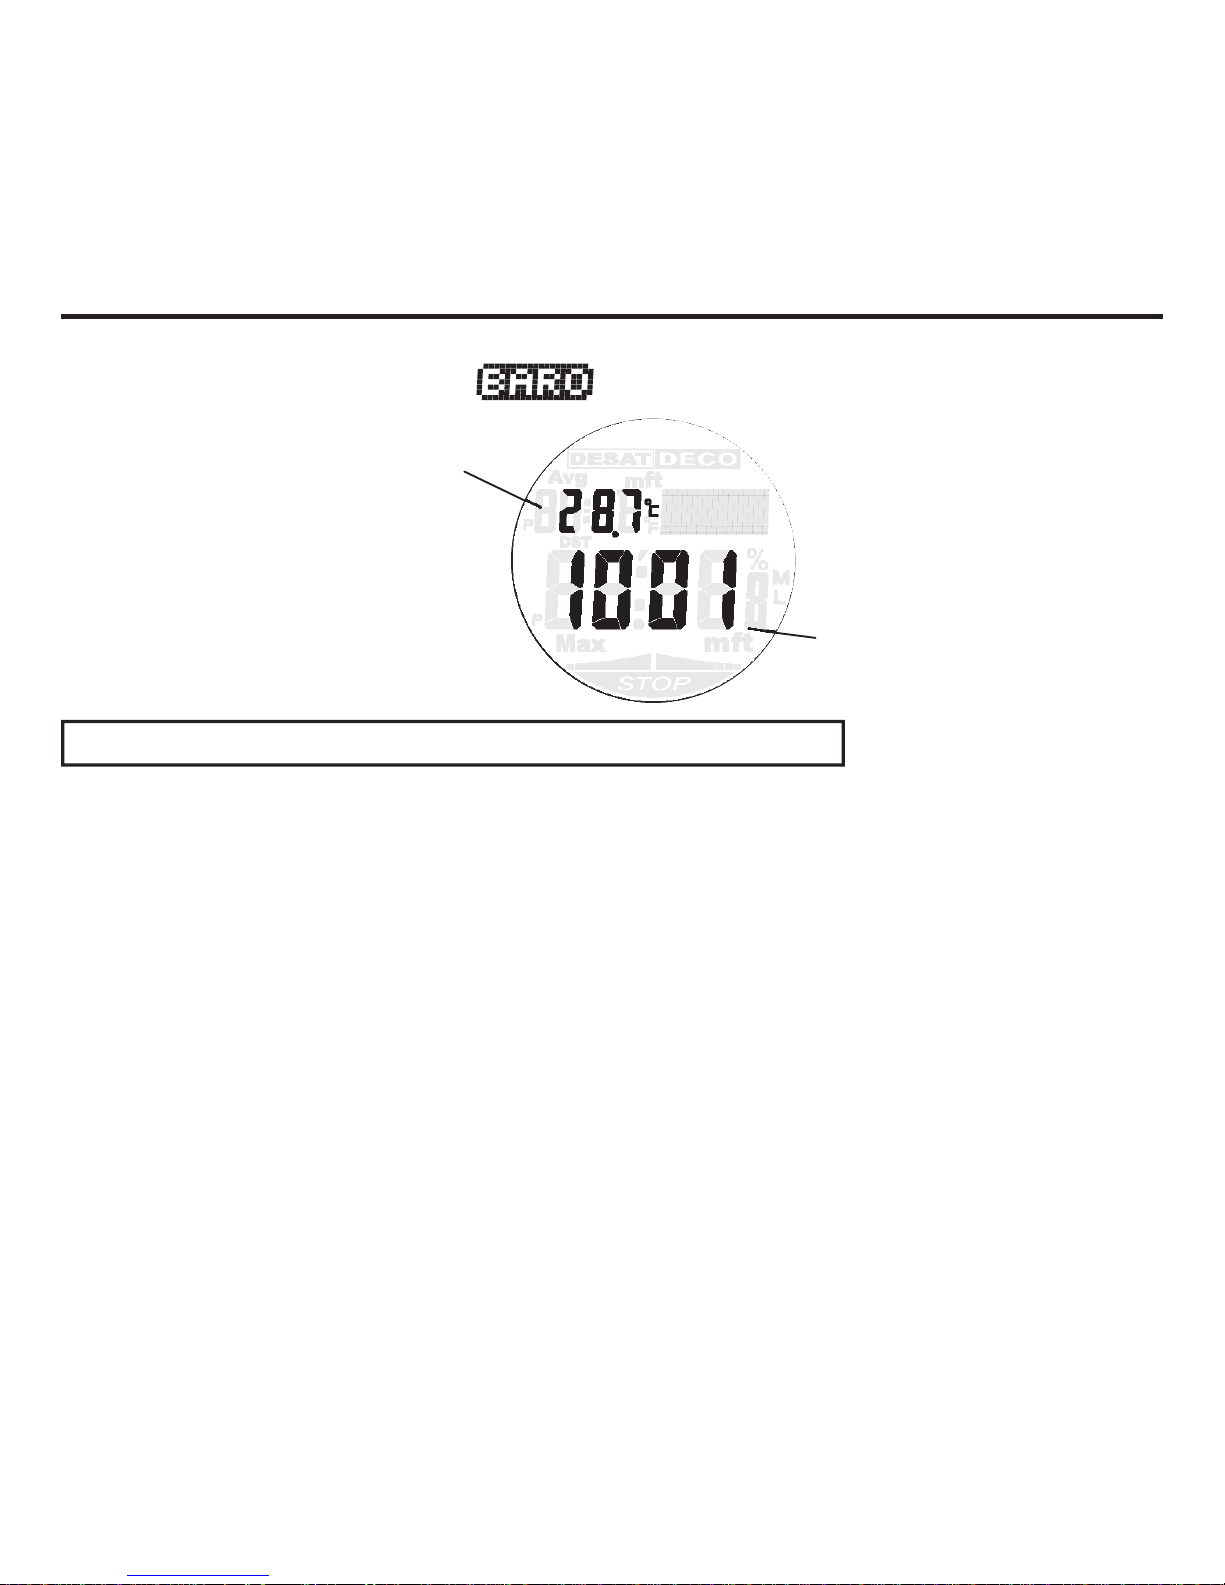
73
BAROMETRIC PRESSURE AND TEMPERATURE (BARO)
It displays current barometric pressure and temperature.
Temperature
Barometric Pressure (hPa)
Barometric Pressure and Temperature Measuring
While in the Watch Mode or the Surface Mode, depress M button six times to enter the
Barometer/Thermometer Mode.
・”BARO” is displayed and the current barometric pressure and temperature are displayed in
about 1 second.
・It calculates every 5 seconds. It performs remeasurement by depressing P button.
・The screen continues to display for 60 minutes.
■ Barometric Pressure Display
Measuring unit : 1 hPa (hectopascals)
Measuring range : 0~9999 hPa
When the barometric pressure deviates from the measuring range, numeric display changes to
“---“ and dot display indicates “ERR”.
■ Temperature Display
Measuring unit : 0.1℃
Measuring range : -10~+60 ℃
When the temperature deviates from the measuring range, numeric display changes to “---“
and dot display indicates “ERR”.
Page 74
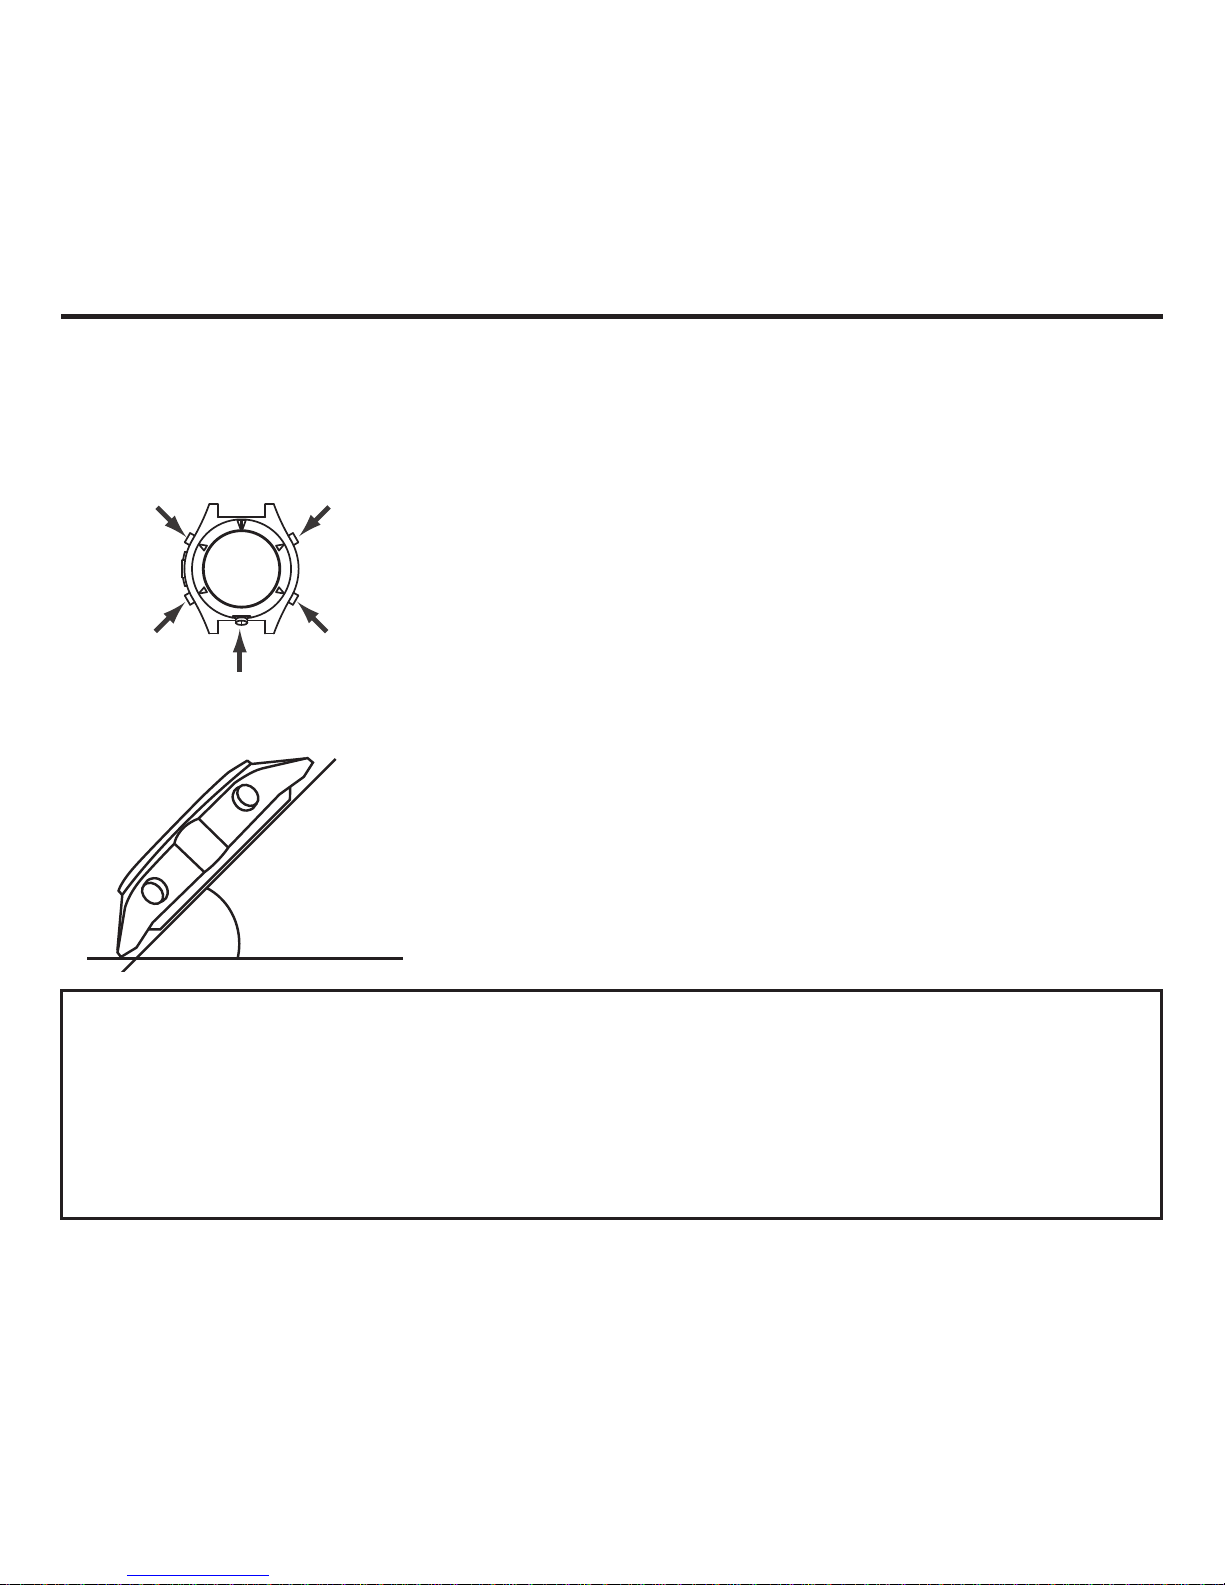
ILLUMINATION
The display is illuminated for easy reading in the dark.
Also, auto light switch turns on illumination automatically when you angle it in the dark.
M Button
P Button
A Button
B Button
L Button
●Turn on illumination manually.
・Depress B button to turn on illumination.
Illumination is disabled while an alarm is sounding.
Illumination is disabled during sensor measurement.
●Turn on illumination automatically. (Auto Light)
・Illumination turns on automatically when you angle the
product more than 40°while the Auto Light Switch is on.
[ Note ]
●The auto light switch does not illuminate the display under bright light.
●The auto light function does not operate when under the following conditions.
・While an alarm is sounding.
・During a bearing sensor calibration is being performed in Digital Compass Mode.
●The auto light function operates after sensor measurement is completed.
・Depending on timing, illumination may turn on late.
More than 40°
74
Page 75
75
Turn the Auto Light Switch On and Off
ILLUMINATION
While in the Watch Mode or the Surface Mode, continue to depress B button for more than 3
seconds.
・Dot display indicates “LT” while the auto light switch is turned on.
・Dot display indicates “OFF” while the auto light switch is turned off.
[ Note ]
●The auto light switch turns off automatically whenever battery power drops and display
indicates “CHG”.
◆Auto light switch precautions
・Illumination may not turn on if the face of this product is more than 15 degree above or below
parallel.
・Wearing this product under your sleeve can cause frequent illumination of the display and
may run down the battery.
・Static electricity or magnetic force may interfere with proper operation of the auto light switch.
In that case, try moving this product back to the position that is parallel to the ground and
then tilt it again.
・You may notice a clicking sound coming from this product when you tilt it. This sound is
caused by operation of the auto light switch, and does not indicate a problem with the
product.
You can change the illumination duration.
Please refer to “Illumination Duration Setting” in Other Settings (Page 78).
Page 76
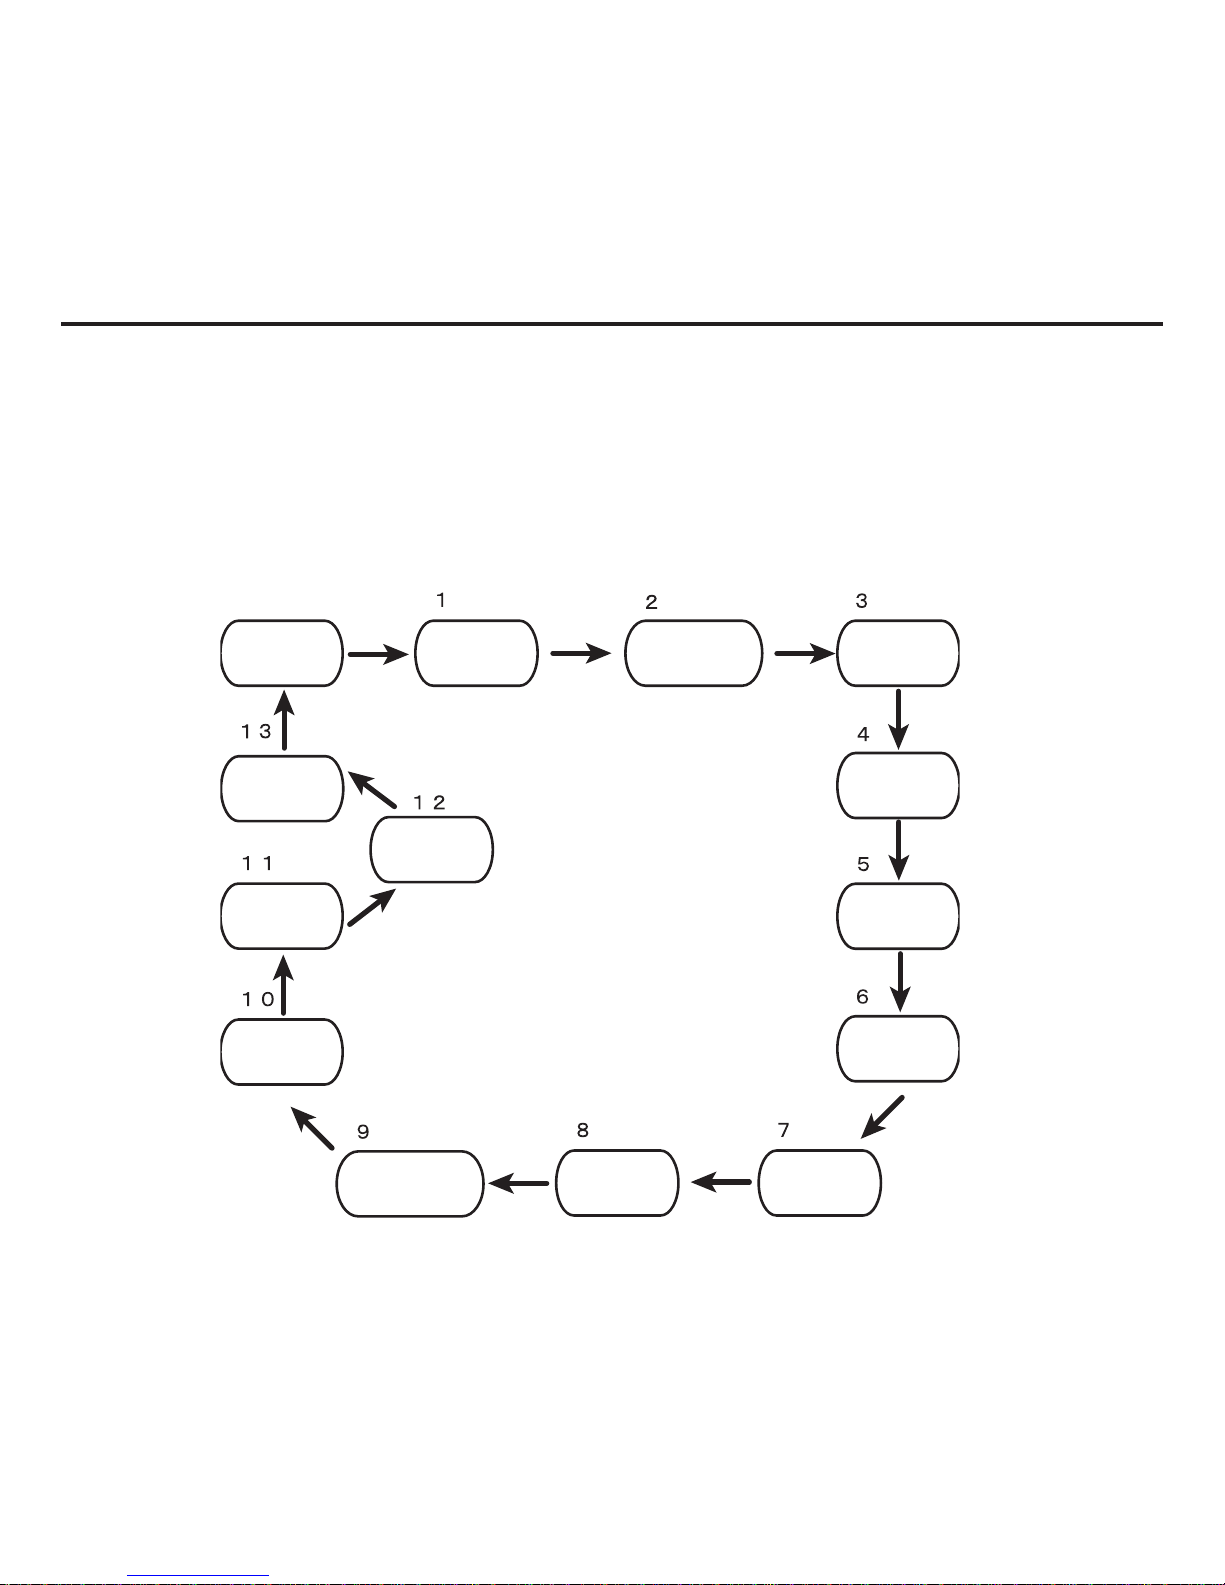
OTHER SETTINGS
Home City
SUMMER TIME
( DST )
12/24 Hour
Format
Seconds
Hour
Minutes
Year
Month
Date
Button Operation
Tone On/Off
Illumination
Duration
Power
Saving
Unit
DISP
Screen
*
The number expresses the number of times to depress the M button.
Other than time settings, you can change the following settings.
・Button operation tone
・Illumination duration
・Turn power saving on and off
・Unit setting
・DISP screen setting
76
Page 77
You can turn the button operation tone on or off as desired.
1. While in the Watch Mode or the Surface Mode, continue to depress A button for more than 2
seconds.
・Release the button when a City Code and its city name are displayed as owing following
the display of “CITY” for about 1 second after “SET” “Hold” ashes.
2. Depress M button nine times.
・It enters the screen to select the button operation tone on and off.
・”Key♪” or “MUTE” is displayed.
3. Depress P button to select “Key♪” (operation tone on) or “MUTE” (operation tone off).
4. Depress A button.
・Setting is completed.
Turn the Button Operation Tone On and Off
[ Note ]
●Even if you turn off the button operation tone, the alarm, Hourly Time Signal, and time up
alert operate normally.
OTHER SETTINGS
77
Page 78
Illumination Duration Setting
You can select the illumination duration.
1. While in the Watch Mode or the Surface Mode, continue to depress A button for more than 2
seconds.
・Release the button when a City Code and its city name are displayed as owing following
the display of “CITY” for about 1 second after “SET” “Hold” ashes.
2. Depress M button ten times.
・Screen displays “LIGHT”.
・”1” or “3” lights up in the middle of the screen.
3. Depress P button to select “1” (1.5 seconds duration) or “3” (3 seconds duration).
4. Depress A button.
・Setting is completed.
OTHER SETTINGS
Turn Power Saving On and Off
You can turn power saving on and off.
1.While in the Watch Mode or the Surface Mode, continue to depress A button for more than 2
seconds.
・Release the button when a City Code and its city name are displayed as owing following
the display of “CITY” for about 1 second after “SET” “Hold” ashes.
2. Depress M button eleven times.
・Screen displays “POWER SAVING” as owing and ”ON” or “OFF” ashes in the middle of
the screen.
3. Depress P button to select “ON” or “OFF”.
4. Depress A button.
・Setting is completed.
78
Page 79
OTHER SETTINGS
DISP Screen Setting
You can set up DISP screen.
You can select “Current Depth” or “No-decompression Limit” as the basic screen of Dive Mode.
1. While in the Watch Mode or the Surface Mode, continue to depress A button for more than 2
seconds.
・Release the button when a City Code and its city name are displayed as owing following
the display of “CITY” for about 1 second after “SET” “Hold” ashes.
2. Depress M button thirteen times.
・Screen displays “DISP” and it switches to setup screen in about 1 second.
・Screen displays “DEP” “1” or “NDL” “2”.
3. Depress P button to select “DEP” “1” (Current Depth) or “NDL” “2” (No-decompression Limit).
4. Depress A button.
・Setting is completed.
79
[ Note ]
●In the above operation 2., when “TOKYO” is selected as the Home City, “DISP” is displayed
by depressing M button twelve (12) times.
Page 80

Unit Setting
You can change unit of temperature and depth when you set the Home City in any place other
than Tokyo (TYO).
When you select Tokyo (TYO) as the Home City, you cannot change the unit.
The unit of temperature is Celsius and the one of depth is meter when you select Tokyo (TYO)
as the Home City.
1. While in the Watch Mode or the Surface Mode, continue to depress A button for more than 2
seconds.
・Release the button when a City Code and its city name are displayed as owing following
the display of “CITY” for about 1 second after “SET” “Hold” ashes.
2. Select any city other than Tokyo (TYO) as the Home City by depressing P or L button.
・Continue to depress P or L button for fast forward.
3. Depress M button twelve times.
・Dot display indicates “UNIT”, “℃” or “℉” is shown in the top of the screen and “m” or “ft” is
displayed in the bottom of the screen.
4. Depress P button to select “m” or “ft”. Depress L button to select ”℃” or “℉”.
5. Depress A button.
・Setting is completed.
OTHER SETTINGS
80
Page 81
81
TROUBLESHOOTING
CAUSES AND MEASURES
Display is weak.
At the time of low temperature, display may become weak. Please leave it
as it is to see how it is going for a while. When a situation does not improve,
please consult with your original dealer.
Inside of the glass
screen mists.
When cooled suddenly, the inside of glass may mist. If the mist disappears
soon, there is no problem. When the mist does not disappear or water
remains inside, please stop use immediately and consult with your original
dealer.
Log data has been
recorded since I
bought it.
These are test data left from quality inspection when shipped from the factory.
It is not fault or abnormality.
DECO mark and STOP
mark are ashing on the
water surface.
It is because decompression stop violation was carried out. If it has been less
than 10 minutes since the decompression stop violation warning came out,
please perform the decompression stop at the depth required again. When
10 minutes or more have passed, you cannot use the product in diving for the
next 48 hours.
EEEE mark and time are
displayed alternately on
the water surface.
It is because the violation gauge warning was given. You cannot use the
product in diving for the next 48 hours.
It does not enter Dive
Mode.
・Decompression stop violation warning or violation gauge warning was
given. You cannot use the product in diving. It returns normal automatically
when 48 hours pass after warning is issued.
・The product identies that it is equivalent to the altitude level of 6,000m.
Please leave it for a while or move to a lower altitude place.
・The shortage of battery can be considered. Please check a charge level.
Please refer to “Shortage of and Out of battery” (Page 17).
When it does not correspond the above cases, failure of a sensor can
be considered. Please consult with your original dealer.
SITUATIONS
Page 82
TROUBLESHOOTING
The current time
display is off by hours.
Your Home City setting may be wrong. Check your Home City setting.
Please refer to “Home City and Summer Time Setting” (Page 21).
The current time
display is off by one
hour.
Check your summer time (DST) setting and adjust it if necessary.
Please refer to “Home City and Summer Time Setting” (Page 21).
“ERR” is displayed on
the screen while using
a sensor.
When sensor or internal circuitry is damaged, “ERR” (error) is displayed
on the screen and sensor operation is disabled.
・If “ERR” is displayed while a measurement operation is being
performed, restart the measurement. If “ERR” is displayed again,
sensor malfunction is considered.
・When “ERR” does not disappear, sensor trouble is considered.
Please consult with your original dealer.
“ERR” is displayed
after having performed
bidirectional calibration
If “ERR” is displayed after showing the calibration screen, sensor
malfunction is considered.
・When “ERR” disappears in about 1 second, try to perform the
calibration again.
・When “ERR” does not disappear, please consult with your original
dealer.
Correct compass
measurement cannot
be performed.
・Bidirectional calibration is not performed correctly.
Please refer to “Calibrate a Bearing Sensor” (Page 61).
・Nearby source of strong magnetism, such as a home appliance, a
large steel bridge, a steel beam, overhead wires, move away from large
metal objects. Also compass measurement cannot be performed inside
a train, boat, etc.
Please refer to “Precautions at Digital Compass Measurement” (Page
63).
82
CAUSES AND MEASURESSITUATIONS
Page 83
TROUBLESHOOTING
Different compass
measurements give
different results at the
same place.
Magnetism generated by nearby high-tension wires is interfering with
detection of terrestrial magnetism. Move away from the high-tension
wires and try it again.
Correct compass
measurement indoors
cannot be performed.
TV, personal computer, speakers, or some other object is interfering
with terrestrial magnetism detection. Move away from the object
causing the interference or perform the compass measurement
outdoors. Indoor compass measurement is particularly difcult inside
ferroconcrete structures. You cannot perform compass measurement
inside of trains, airplanes, etc.
The time set as the
World Time City is off.
Summer time (DST) setting (standard time and summer time) is
incorrect.
Please refer to “Home City and Summer Time Setting” (Page 21)
“H”, “M” and “L” are all
ashing.
The product is in the power recovery mode. Battery power will recover
in about 15 minutes. Expose the product to bright light for faster
recovery.
Please refer to “How to Charge” (Page 16).
・Performing multiple sensor in a short period may cause the shortage
of battery, and it enters in the power recovery mode. “H”, “M” and “L”
are all ashing during the power recovery mode. During the mode, as
the condition is the same as “Shortage of Battery”, the functions which
can be used are restricted. After recovery it returns to the usual state.
Please refer to “Shortage of and Out of Battery” (Page 17)
・When “H”, “M”, “L” and “CHG” are all ashing, the battery level is very
low. Expose the product to bright light as soon as possible.
Even if it is exposed
against light and
charged, the battery
operating time
becomes short.
Since battery (rechargeable battery) is charged by the light which solar
panel receives, it is not necessary for periodical battery exchange, but
performance deteriorates by repeating of charge and discharge for long
time. We recommend you battery exchange if the state interferes with
use. Please consult with your original dealer.
83
CAUSES AND MEASURESSITUATIONS
Page 84

MAINTENANCE
■How to maintain this product.
You wear a Dive Computer directly on your body like clothing. In order to use it for a long time,
please wipe off any dirt, sweat and water, etc. frequently with a soft cloth. Use this product by
keeping it always clean.
When sea water and mud stick, please wash away well with fresh water. Especially after diving
in sea water, please wash away well after dipping in fresh water for a while.
When you nd abnormalities on belt such as no elasticity, cracking, discoloration, slack, and
running out / falling out of the pin of a buckle, please stop use. Please consult with your original
dealer on check, repair, or exchange with a new belt.
Scrub and wash the metallic portion of a metal belt and a plastic belt with a soft toothbrush
by using thinned neutral detergent with water and soapsuds. Then, please rinse a detergent
ingredient well with water and wipe off the water with soft hygroscopic cloth. Also, when you
wash, please keep detergent and soapsuds away from the body by rolling “kitchen wrap” around
the body.
Please wash the plastic belt with water and wipe off the water with soft cloth. Although a pattern
like a spot may come out on the surface of a plastic belt, it does not have the inuence on a
human body and clothing. Please wipe off with cloth.
If a button is not operated for a long period of time, a motion may worsen. Please touch a button
sometimes.
In order to maintain waterproof performance, we recommend you a periodical airtight inspection
(standard is 2 to 3 years). When a problem of airtightness is revealed in the airtight inspection,
please ask your original dealer for maintenance service, such as exchange of packing seal.
84
Page 85

85
SERVICE AFTER THE SALES
■Precautions when you ask for repair.
・As the all log data currently recorded in the product may be eliminated when it is repaired,
please copy the data in a logbook etc.
・When you send it to repair, please specify your request of repair, your name, your address
and telephone number, and send it to your original dealer.
■ Reserving period of parts.
Our company reserves the performance parts (the parts required to maintain the function of the
product) for dive computer repair for at least seven years after the production is discontinued.
Since repair may be possible depending on a problem even after this reserving period passes,
please consult with your original dealer or authorized distributor of our company.
Page 86

SPECIFICATIONS
□ Time accuracy : ±15 seconds a month
Basic functions : Hour, minutes, seconds, year, month, day, day of the week, a.m./p.m. (P), 24hour format, full auto-calendar (up to year 2099)
□ Sensor precision
Bearing sensor : Within ±10°
Temperature sensor : Within ±2℃
Pressure sensor : ±1% + 0.5m
□ Measuring interval
Depth measurement : 1 second
Water temperature measurement : 1 second
Barometric pressure measurement : 20 seconds
□ Measuring range
Depth : 1.5m~99.9m (Based on sea water)
Dive time : 0~599 min.
Operating barometric pressure : More than 460 hPa (Approx. up to 6,000m)
Temperature : -10~60℃
Direction : 0~359°Bearing sensor calibration function
(Bidirectional calibration)
□ Fraction of oxygen : 21 (compressed air)~50% (1% interval)
□ Waterproof : 100m
□ Log data : 30 dives
□ Stopwatch
Measuring unit : 1/10 second
Measuring range : 999 hours 59 minutes 59.9 seconds
Measuring precision : ±0.0006%
Measuring modes : Time, elapsed time, split time, two nishes
86
Page 87
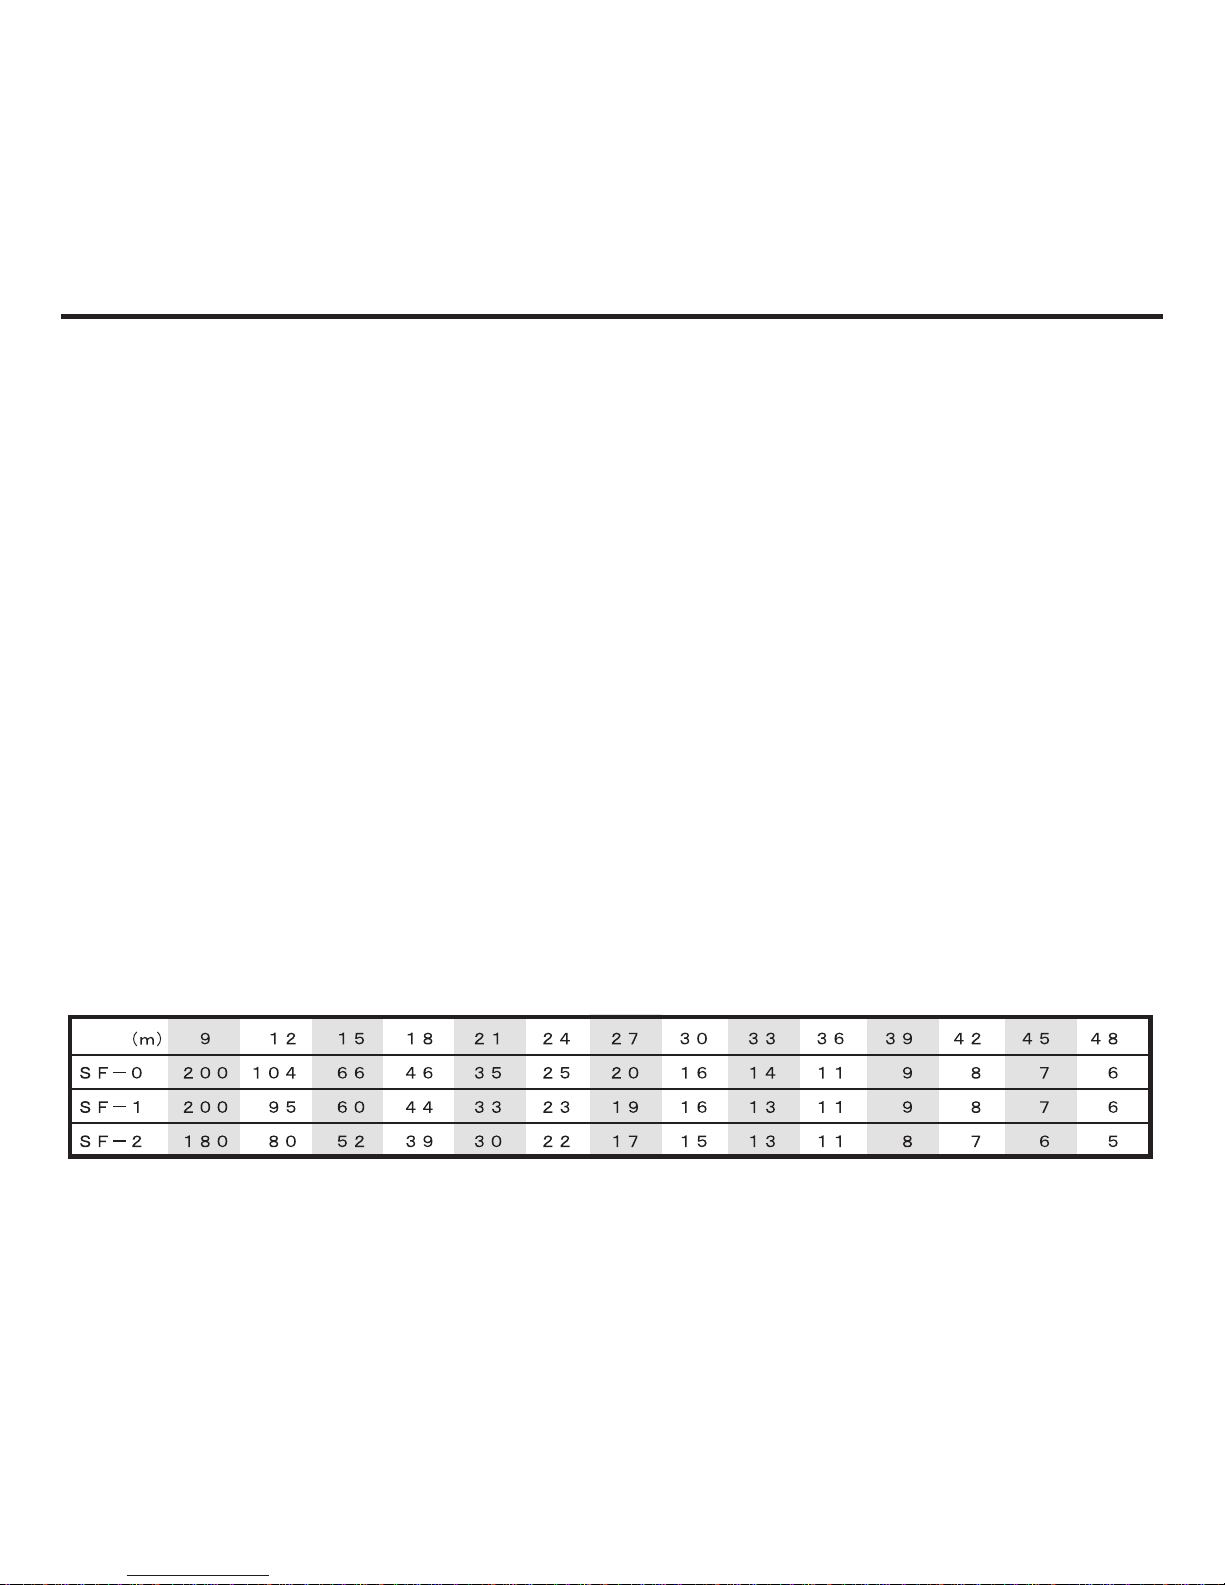
SPECIFICATIONS
□ Alarm : Time alarm
4usual alarms
1 snooze alarm
Setting unit : Hour, minutes
Alarm sounds for 10 seconds.
Hourly time signal : Electronic sound reports twice every hour on the hour.
□ Other : LED light. Selectable illumination duration. Full Auto Light. Power Saving
Battery power indicator. Button operation tone on and off.
□ Battery : Rechargeable battery
Operating time from the full charge condition without the solar generation:
Approx. 1 month (1 one-hour dive a day)
□ Decompression model : A. A. Buhlman 16 tissue
□ Altitude diving : Barometric pressure linked non-step calculation system
The system measures the barometric pressure of the place where the
diver moves, and calculates accumulation and discharge of nitrogen and
oxygen by non-step according to the barometric pressure.
This calculation system is higher-precision than an altitude rank switching.
□ Safety factor : 3 level switching system
Setting standard of each safety level. (NDL at the time of 1013hPa)
87
Setting standard of each safety level. (NDL at the time of 1013hPa)
Depth
Page 88
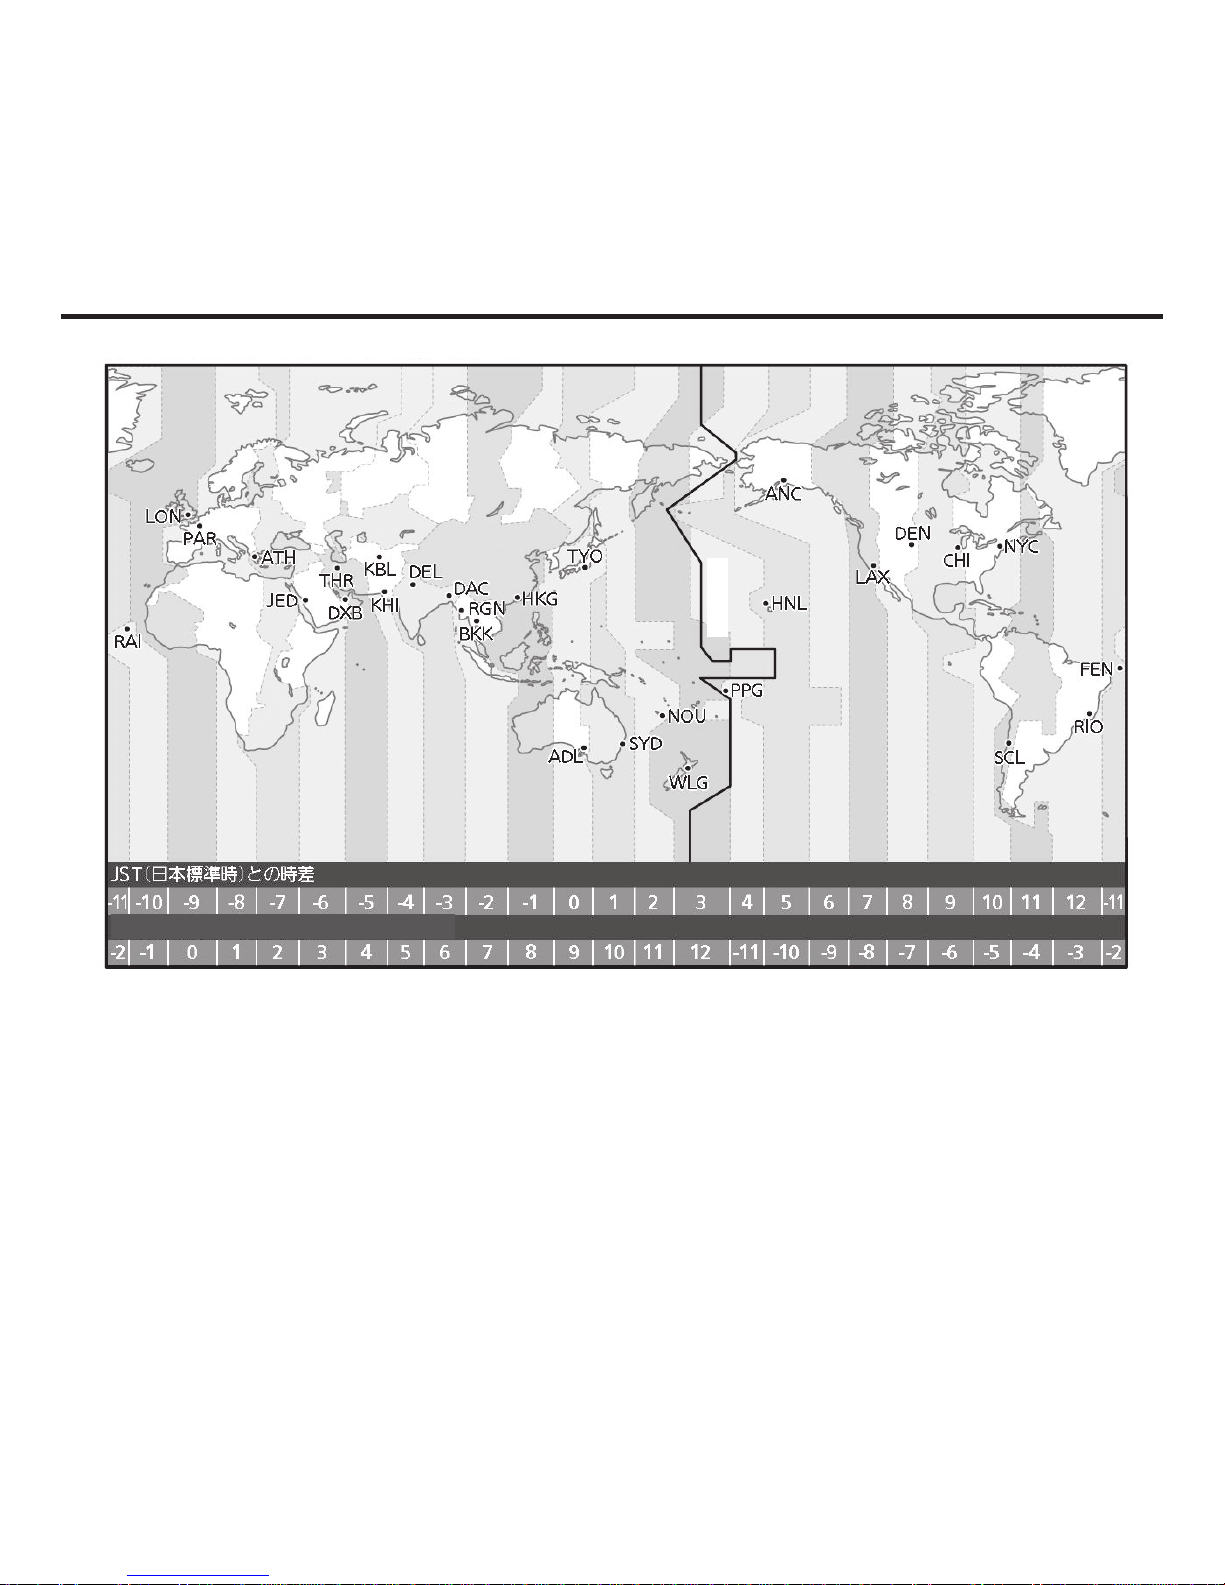
CITY CODE TABLE
Please confirm the time zone you need on the map.
DATELINE
UTC Offset / GMT Differential
City Code Table
City Code City UTC Offset / GMT Differential
UTC 0
LIS Lisbon 0
LON London 0
MAD Madrid +1
PAR Paris +1
ROM Rome +1
BER Berlin +1
STO Stockholm +1
ATH Athens +2
CAI Cairo +2
88
Page 89

CITY CODE TABLE
City Code City UTC Offset / GMT Differential
JRS Jerusalem +2
MOW Moscow +3
JED Jeddah +3
THR Tehran +3.5
DXB Dubai +4
KBL Kabul +4.5
KHI Karachi +5
DEL Delhi +5.5
KTM Kathmandu +5.75
DAC Dhaka +6
RGN Yangon +6.5
BKK Bangkok +7
SIN Singapore +8
HKG Hong Kong +8
BJS Beijing +8
TPE Taipei +8
SEL Seoul +9
TYO Tokyo +9
ADL Adelaide +9.5
GUM Guam +10
SYD Sydney +10
NOU Noumea +11
WLG Wellington +12
PPG Pago Pago -11
HNL Honolulu -10
ANC Anchorage -9
YVR Vancouver -8
LAX Los Angeles -8
YEA Edmonton -7
DEN Denver -7
MEX Mexico City -6
CHI Chicago -6
NYC New York -5
SCL Santiago -4
YHZ Halifax -4
89
Page 90

CITY CODE TABLE
City Code City UTC Offset / GMT Differential
YYT St. Johns -3.5
RIO Rio De Janeiro -3
FEN Fernando de Noronha -2
RAI Praia -1
●As of December, 2012, though the time difference (UTC offset) of Moscow has been changed
to “+4”, it does not correspond with this product. Please use it by setting summer time (DST)
forward for 1 hour.
●This list is the city code table of this product.
●When the city code to set up is unknown, please check the time difference (UTC offset) of the
place to use and choose the city code with the same time difference.
●Time difference is based on Universal Time Coordinated (UTC).
90
Page 91

91
memo
Page 92

memo
92
Page 93

memo
93
Page 94

memo
94
Page 95

memo
95
Page 96

memo
96
Page 97

memo
97
Page 98

memo
98
Page 99

memo
99
Page 100
 Loading...