


BIS S.r.l.
Via Trieste, 31
20080 Bubbiano MI –
Tel.: +39 02 90834207
Fax: +39 02 90870542
e-mail: info@BilanceOnLine.it
www.BilanceOnLine.it
COUNTING SCALE
BILANCIA CONTAPEZZI
ASW
OPERATING MANUAL
MANUALE OPERATIVO
ASW_1.24_08.06_UK_IT
P.IVA e C.F.: 03774900967

LANGUAGES
LINGUE
ENGLISH........................................................................................................page 3
ITALIANO.......................................................................................................pag. 14
2

ENGLISH
INDEX
1. INTRODUCTION........................................................................................................................................................page 4
2. MAIN TECHNICAL SPECIFICATIONS......................................................................................................................page 4
3. INSTALLATION.........................................................................................................................................................page 4
3.1 POWER SUPPLY AND START-UP....................................................................................................................page 5
3.2 BATTERY POWERED.......................................................................................................................................page 5
4. FRONT PANEL KEYS AND INDICATORS...............................................................................................................page 5
4.1 FUNCTION OF THE KEYS................................................................................................................................page 6
4.2 FUNCTION OF THE INDICATORS....................................................................................................................page 6
5. SYMBOLS ON LCD DISPLAY...................................................................................................................................page 7
6. OPERATION..............................................................................................................................................................page 7
6.1 AUTOMATIC ZERO UPON START-UP..............................................................................................................page 7
6.2 SCALE ZERO FUNCTION.................................................................................................................................page 8
6.3 TARE FUNCTION..............................................................................................................................................page 8
6.4 OVERLOAD MESSAGE.....................................................................................................................................page 8
6.5 TOTALISATION OF THE WEIGHT.....................................................................................................................page 8
6.5.1 MANUAL OR AUTOMATIC TOTALISATION...........................................................................................page 8
6.6 COUNTING PIECES..........................................................................................................................................page 9
6.7 SAMPLE WEIGHT PERCENTILE......................................................................................................................page 9
6.8 CHECKING QUANTITIES..................................................................................................................................page 9
6.8.1 SETTING THE WEIGHT THRESHOLDS................................................................................................page 9
6.8.2 ACOUSTIC ALARMS IN CORRESPONDENCE TO THE HI-OK-LO LIMITS.......................................page 10
6.8.3 VISUAL INDICATION OF THE WEIGHT CHECK.................................................................................page 10
6.9 CHANGE OF THE UNIT OF MEASURE..........................................................................................................page 10
6.10 AUTO SWITCH-OFF FUNCTION....................................................................................................................page 10
7. SET-UP ENVIRONMENT.........................................................................................................................................page 10
7.1 SET-UP ENVIRONMENT BLOCK DIAGRAM....................................................................................................page 11
8. CALIBRATION.........................................................................................................................................................page 13
9. VISUALISATION OF A/D CONVERTER POINTS .................................................................................................page 13
10. ERROR MESSAGES.............................................................................................................................................page 13
RECYCLING INSTRUCTION.......................................................................................................................................page 13
DECLARATION OF CONFORMITY............................................................................................................................page 25
WARRANTY................................................................................................................................................................page 25
3

1. INTRODUCTION
This manual was created to help you install and learn all about the functional possibilities of the ASW scale.
WARNINGS
The scales should be sited in a location that will not degrade the accuracy.
Avoid extremes of temperature. Do not place in direct sunlight or near air conditioning vents.
Avoid unsuitable tables. The tables or floor must be rigid and not vibrate. Do not place near vibrating machinery.
Avoid unstable power sources. Do not use near large users of electricity such as welding equipment or large motors.
Avoid high humidity that might cause condensation. Avoid direct contact with water. Do not spray or immerse the scales in
water.
Avoid air movement such as from fans or opening doors. Do not place near open windows.
Keep the scales clean.
Do not stack material on the scales when they are not in use.
2. MAIN TECHNICAL SPECIFICATIONS
Model Plate
(dimensions in mm)
ASW3 225x300 3 0.1 0,01
ASW30 225x300 30 1 0,1
Stabilisation Time 1 Seconds typical.
Operative Temperature: 0°C - 40°C / 32°F - 104°F.
Power supply: with fitted 240 Vac mains power adapter or with fitted battery
Battery life: up to 70 hours of continuous use.
Recharge time: 12 hours.
Parameter Setup: Calibration fully digital and programmable from the keyboard.
Display : LCD backlit with 6 digits 24 mm high.
Case: ABS Plastic.
Zero range: +/- 20% of max load capacity.
Auto zero at start-up: +/- 2% of max load capacity.
Capacity kg Division g Resolution g
3. INSTALLATION
a) Unpack then product.
b) Level the platform by adjusting the adjustable feet until the bubble is in the centre of the level. The stability of the
platform is very important.
ALL THE CORNERS MUST REST IN A UNIFORM WAY. Carefully check that all feet fully rest on the ground and that the
platform, loaded on the corner, is not unstable (if a corner is not resting on the ground its relative foot is easier to turn).
4

3.1 POWER SUPPLY AND START-UP
The indicator can be powered with a fitted 240 Vac external power adapter or just with the fitted battery.
NOTE: it is advisable to completely recharge the battery (12 hours) with the first installation of the instrument.
TO POWER the instrument through the 240 Vac mains put the AC/DC power plug in the appropriate socket under the
scale and the power adapter in the 240 Vac mains socket.
TO TURN ON/TURN OFF the instrument press the key under the scale and release it.
3.2 BATTERY POWERED
The weighing indicator can be operated from the battery if desired.
When the battery needs charging the symbol on the weight display will turn on. The battery should be charged
when the symbol is on. The scale will still operate for about 10 minutes after which it will automatically switch off to protect
the battery.
To charge the battery simply plug into the mains power. The scale does not need to be turned on.
The battery should be charged for 12 hours for full capacity.
You can find the “Charge” LED at the left of display to indicate the status of battery charging. When the scale is plugged
into the mains power the internal battery will be charged. If the LED is green the battery has a full charge. If it is Red
the battery is nearly discharged and yellow indicates the battery is being charged.
As the battery is used it may fail to hold a full charge. If the battery life becomes unacceptable then contact your distributor
4. FRONT PANEL KEYS AND INDICATORS
5
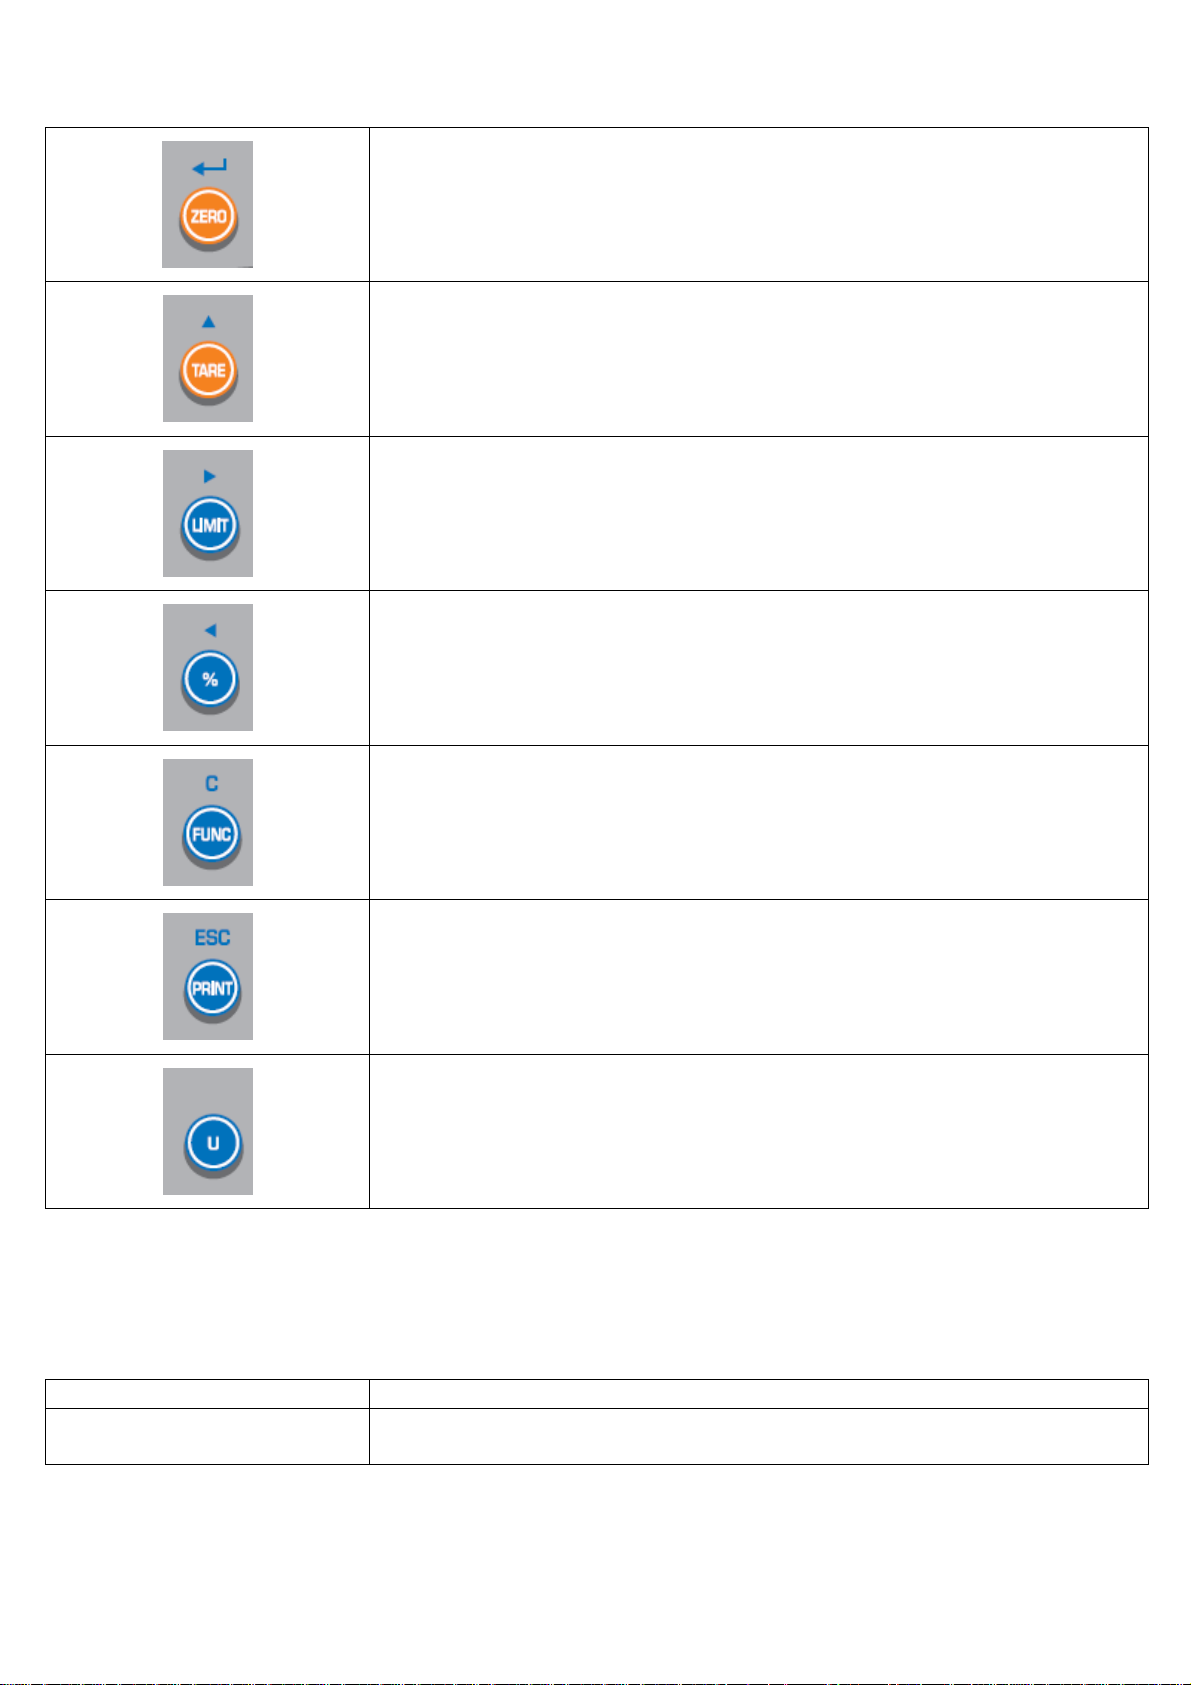
4.1 FUNCTION OF THE KEYS
- Clears the displayed gross weight if it’s within +/- 2% of the total capacity.
- A secondary function of "Enter" key when setting parameters or other functions.
- If pressed for an instant it executes the semiautomatic tare;
- A secondary function of incrementing the active digit when setting a value for
- If pressed for an instant it allows to set the thresholds for the QUANTITY CHECK
- In the numeric or alphanumeric input, it selects the digit to be modified, from left to
- If pressed for an instant it allows to link a weight to the 100 percentile (see section 6.7)
- In the numeric or alphanumeric input, it selects the digit to be modified, from left to
- If pressed for an instant it allows to execute the reference operation (see section
- In the numeric input phase, it quickly clears the present value.
- If pressed for an instant it adds the value to the accumulation memory if the
- Secondary function (ESC) is to return to normal operation when the scale is in a
- It allows to convert in the configured secondary units of measure (see section 6.9).
parameters or other functions.
function (see section 6.8).
right.
right.
6.6)
accumulation function is not automatic.
parameter setting mode.
4.2 FUNCTION OF THE INDICATORS
INDICATOR FUNCTION
CHARGE
Indicates that the battery is going to recharge (see chapter 3.2).
6

5. SYMBOLS ON THE LCD DISPLAY
The LCD display has symbols which show the indicator’s functioning status; you will find the description for each symbol
below.
SYMBOL FUNCTION
Indicates that the battery is low (see section 3.3)
Managed for the QUANTITY CHECK BY WEIGHT (see section 6.8).
Indicates that the weight is stable.
GROSS Indicates that the displayed value is a gross weight.
NET
ZERO
Indicates that the displayed weight is a net weight.
Indicates that the weight detected on the weighing system is near zero.
TARE Indicates that a tare is enabled.
AUTO
Σ
g
Indicates that the automatic totalisation function is enabled.
Indicates that the weight has been totalised.
Indicates the unit of measure in use (gram).
pcs Indicates that the number of sampled pieces is being displayed (see section 6.6).
g / pcs Indicates that the average piece weight is being displayed (see section 6.6).
%
Indicates that the weight is displayed in percentile of the sample weight (see section 6.7).
t Indicates the unit of measure in use (tons).
HOLD Not used in this application.
kg Indicates the unit of measure in use (kilogram).
lb Indicates the unit of measure in use (pounds).
OZ Indicates the unit of measure in use (ounces).
6. OPERATION
6.1 AUTOMATIC ZERO UPON START-UP
The indicator has an “auto zero at start-up” function: in other words it means that if at start-up a weight within +/- 20%
of the capacity is detected, it will be zeroed; if the weight is not within this tolerance, the display shows “Err 4” and the
present weight after a few instants.
7

6.2 SCALE ZERO FUNCTION
You can press the ZERO key at any time to set the zero point from which all other weighing and counting is measured,
within +/- 2% of power up zero. This will usually only be necessary when the platform is empty. When the zero point is
obtained the display will show the indicator for zero.
The scale has an automatic rezeroing function to account for minor drifting or accumulation of material on the platform
(see step “AZ”, section 7.1). However you may need to press the ZERO key to rezero the scale if small amounts of
weight are shown when the platform is empty.
6.3 TARE FUNCTION
Zero the scale by pressing the ZERO key if necessary. The zero symbol will be on.
Place a container on the platform, a value for its weight will be displayed.
Press the TARE key to tare the scale when the “stable” is light. The weight that was displayed is stored as the tare
value and that value is subtracted from the display, leaving zero on the display. The "NET" indicator will be on. As
product is added only the weight of the product will be shown. The scale could be tared a second time if another type
of product was to be added to the first one. Again only the weight that is added after taring will be displayed.
When the container is removed a negative value will be shown.
To remove the tare, unload the scale and press again TARE.
6.4 OVERLOAD MESSAGE
Please do not add item that is over the maximum capacity. When reading “—OL—“ and hear beeping sound,
remove the item on the platter to avoid damage to the load cell.
6.5 TOTALISATION OF THE WEIGHT
The scale can be set to accumulate manually the weight on the scale by pressing the PRINT key (see step “AU”,
chapter 7.1).
The weight displayed will be stored in memory when the PRINT key is pressed and the weight is stable.
The display will show "ACC 1" and then the total in memory for 2 seconds before returning to normal.
Remove the weight, allowing the scale to return to zero and put a second weight on. Press the PRINT key, the
display will show " ACC 2" and then the new total.
Continue until all weights have been added.
To view the totals in memory press PRINT key when current scale in zero status (Zero indicator on)
To clear the accumulated total weight, press the PRINT key when show total values.
NOTE:
- The totalisation functions with a minimum weight of 20d.
- The maximum number of totalisations is 999 while the maximum total value which may be accumulated is
999999.
Once reached these limits, one should clear the total; by pressing PRINT the message “AdErr” will appear on the
display.
- The total values will be cleared when it’s turned off.
6.5.1 MANUAL OR AUTOMATIC TOTALIZATION
The operation of accumulation, normally done manually with key PRINT, can be done automatically when the weight
is stable. In regards to the choice of the totalisation execution mode, see step “AU”, section 7.1.
8

6.6 COUNTING PIECES
Through the reference function it’s possible to use the scale as a piece counter.
COUNTING PROCEDURE
The operations to be carried out are the following:
1) Place the empty container on the scale and press TARE to tare it.
2) Check that the zero is on the display and put the quantity of pieces chosen for the SAMPLE on the scale and
press FUNC.
3) The display suggests a REFERENCE QUANTITY. The possible options are: 10, 20, 50, 100, and 200.
4) Press TARE the number of times needed to reach the desired sample size.
5) Press ZERO; the display will indicate "- - - - - -" and the indicator will calculate the Average Piece Weight (APW).
After a few instants the display will indicate the quantity selected put on the platform.
5) Add the rest of the items to count in the container and whose value will appear on the display.
6) Unload the scale, the APW will remain stored in memory for the next counting of similar pieces, without having to
repeat the REFERENCE operation.
7) By pressing the % key one switches from the display of the number of pieces to the display of the average piece
weight and of the net weight.
9) Per cancel or to carry out a new reference operation, press the FUNC key and repeat the operations as
describe in point 1).
6.7 SAMPLE WEIGHT PERCENTILE
In this functioning mode, the display shows the weight expressed as a percentile, comparing it with a reference weight
for which the 100 percentile has been already linked.
MATCHING PROCEDURE
- Put the reference weight on the scale.
- Press the % key.
- The scale has executed the percentile matching and displays the percentile of the weight on the scale.
- Unload the scale: the following weighs will be expressed as a percentage in reference to the reference weight.
- To cancel or execute a new matching operation, press the FUNC key and repeat the operations described
above.
6.8 CHECKING QUANTITIES
The scale is fitted with the quantity check function with 2 thresholds. An acoustic alarm and three reference symbols
on the display are enabled on the basis of the set thresholds and the weighing result.
The check can be made on the weight, the prices or on the percentile.
To check the pieces one should execute the reference operation (see section 6.6) and then configure the thresholds.
To check the percentage one should link a weight to the 100 percentile (see section 6.7) and then configure the
thresholds.
6.8.1 SETTING OF THE WEIGHT THRESHOLDS
Press LIMIT:
- The display enables the “HI” icon and shows “000.000”, with the first blinking digit. In this step one configures the
upper threshold.
- Use the FUNC key to clear the value, the TARE key to increase the value of the digit, the % key to go on the
previous digit and the FUNC key to go on the following digit.
- Confirm the entered value with ZERO or press PRINT to exit without confirming.
- The display enables the “LO” icon and shows “000.000”, with the first digit blinking. In this step one configures the
lower threshold.
- Use the FUNC key to clear the value, the TARE key to increase the value of the digit, the % key to go on the
previous digit and the FUNC key to go on the following digit.
- Confirm the entered value with ZERO or press PRINT to exit without confirming.
- The thresholds are configured and the indicator returns to weighing.
9

6.8.2 ACOUSTIC ALARM IN CORRESPONDENCE OF THE HI-OK-LO LIMITS
One can decide if the acoustic alarm should enable when the “OK” symbol is on or when the “HI” or “LO” symbols are
on. To choose the alarm enabling mode, see step “bEEP”, section 7.1.
6.8.3 VISUAL INDICATION OF THE WEIGHT CHECK
Put a weight on the plate of the scale.
The indication symbols will enable depending on which thresholds have been configured:
WITH BOTH THRESHOLDS CONFIGURED
- The HI symbol of the LCD display will turn on when the detected weight exceeds the UPPER THRESHOLD.
- The OK symbol of the LCD display will turn on when the detected weight is between the LOWER THRESHOLD
and the UPPER WEIGHT THRESHOLD.
- The LO symbol of the LCD display will turn on when the detected weight is less than the LOWER THRESHOLD.
WITH THE UPPER THRESHOLD CONFIGURED AND THE LOWER THRESHOLD = 0
- The OK symbol of the LCD display will turn on when the detected weight exceeds the UPPER THRESHOLD.
- The LO symbol of the LCD display will turn on when the detected weight is less than the UPPER THRESHOLD.
WITH THE UPPER THRESHOLD = 0 AND THE LOWER THRESHOLD CONFIGURED
- The HI symbol of the LCD display will turn on when the detected weight exceeds the LOWER THRESHOLD.
- The OK symbol of the LCD display will turn on when the detected weight is less than the LOWER THRESHOLD.
NOTES
- The weight check function is enabled when the limit values are entered. To disable the function one should set the
limit values at zero.
- The function is not valid when one enters a lower limit greater than the upper limit.
- The weight check is enabled with a weight greater than the minimum weight (20d).
6.9 UNIT OF MEASURE CONVERSION
By pressing various times the U key the conversion into the configured secondary units of measure takes place (see
“Unit” step, section 7.4); the relative symbol will turn on in the display (see section 5).
NOTE: The function is not available if the counting function or the percentile function is enabled.
6.10 FUNCTION OF AUTOMATIC TURN-OFF
The scale is fitted of a programmable automatic turn-off function, which allows to save energy in case of not using it
temporarily; the automatic turn-off starts functioning when the scale is unloaded (gross weight = 0) for the time (in
minutes) programmed in oF step.
The values vary among:
00 DISABLED
03 3 minutes
05 5 minutes
15 15 minutes
30 30 minutes
7. SET-UP ENVIRONMENT
The scale has various parameters that can be configured in the SET-UP environment.
enter in the SET-UP environment press FUNC and PRINT simultaneously in the weighing phase.
- The display will show the first function, which is "inC":
- Use TARE or set a value, using the % key and the LIMIT key to move the active digit, and then using the TARE key to
increment a digit
- Press the ZERO key to confirm the modification and pass to the following step.
- Press the % key to pass to the previous step or the LIMIT key to pass to the following step without confirming the
modification.
- To exit from the set-up, press the ZERO key on the "RETURN" step or the C key on any step.
10

7.1 SET-UP ENVIRONMENT BLOCK DIAGRAM
inC
inC 1, inC 2,
inC 5
SETUP
ENVIRONMENT
EL
AU
baud
printer
ACC
AZ
units
EL on, EL AU,
EL oFF,
AU on,
AU oFF,
P Cont
b600, b1200,
b2400, b4800,
b9600
tP, LP-50
ACC on,
ACC oF
AZ 0.5d,
AZ 1d, AZ 2d,
AZ 4d
g Ut on, Ut oFF
Ut on, Ut oFF
Ut on, Ut oFF
t Ut on, Ut oFF
lb
OZ
bEEP 0,
bEEP
SPEEd 7.5, 15, 30, 60
oF 0, 3, 5, 15, 30
bEEP 1,
bEEP 2
Ut on, Ut oFF
Ut on, Ut oFF
inC MINIMUM SCALE DIVISION
By pressing TARE one selects one of the minimum scale divisions: 1, 2, 5, 10, 20, and 50.
EL DISPLAY BACKLIGHTING
EL oFF backlighting always off
EL on backlighting always on.
EL AU backlighting on only when the weight is greater than 20d or when a key is pressed. When a key is pressed,
if the weight is less than 20d, the backlighting remains active for 5 seconds.
11

AU SETTING MANUAL OR AUTOMATIC TOTALISATION
The accumulation operation, normally done manually through the PRINT key, can be made automatically when the
weight stability is reached. The choice of the execution mode of the totalisation is executed in this parameter.
Press TARE to select one of the suggested values:
AU on Automatically upon weight stability.
AU oFF Manually through the PRINT key.
P Cont Not used in this application.
baud NOT USED IN THIS APPLICATION
Press PRINT to pass to the following step
printer NOT USED IN THIS APPLICATION
Press PRINT to pass to the following step
ACC ENABLING THE TOTALISATION FUNCTION
By pressing TARE one enables (on) or disables (oFF) the weight totalisation function.
AZ ZERO TRACKING
By pressing TARE one sets the divisions' number for the zero tracking, in other words, scale’s thermal drift
compensation parameter; the set value corresponds to the number of divisions which is cleared.
Select one of the suggested divisions: 0.5d, 1d, 2d, 4d.
units CONFIGURATION OF SECONDARY UNITS OF MEASURE
By pressing TARE it’s possible to choose the units of measure for the conversion function (see section 6.9), enabling
(on) or disabling (oFF) the suggested secondary units of measure:
1) The display proposes the first secondary unit of measure to be enabled or disabled.
2) Press TARE to change the options and confirm with ZERO, or press PRINT to exit without confirming and pass to
the following unit.
3) The display proposes the 2nd secondary unit to be enabled or disabled.
4) Proceed as described in point 2 up until the last proposed unit of measure.
bEEP ACOUSTIC ALARM
bEEP 0 acoustic alarm disabled
bEEP 1 active acoustic signal with active “OK” symbol.
bEEP 2 active acoustic signal with active “HI” or “LO” symbol.
SPEED SETTING ADC CONVERTER READING SPEED
By pressing TARE one select the reading speed of the ADC converter; the set value corresponds to the number of
readings made in a second.
Select one of the suggested reading speeds: 7.5, 15, 30, 60.
oF AUTO SWITCH-OFF
By pressing TARE one sets the minutes of not being used for the auto switch-off (see section 6.10):
0 (disabled)
3 (3 minutes of not being used)
5 (5 minutes of not being used)
15 (15 minutes of not being used)
30 (30 minutes of not being used)
12

8. CALIBRATION
Premise: The unit of measure of the calibration is fixed at kilogram (“kg”).
It’s possible to calibrate the scale by using two defined sample weights or by manually entering a sample weight (can be
useful if one does not have defined sample weights).
PROCEDURE WITH DEFINED SAMPLE WEIGHTS
- Upon start-up, press simultaneously the LIMIT and % keys during the countdown.
- The display shows “UNLOAD”;
- Empty the platter, after Stable indicator on, press ZERO key to sure;
- The display shows “A XX.XXX” in which XX.XXX is the value of the first sample weight to be used;
- Put the first sample weight on the scale and press ZERO when the stability indicator is on;
- The display shows “A XX.XXX” in which XX.XXX is the value of the second sample weight to be used;
- Put the second sample weight on the scale and press ZERO when the stability indicator is on;
- The indicator returns to weighing;
PROCEDURE WITH FREE SAMPLE WEIGHT
- Upon start-up, simultaneously press the TARE and % keys during the countdown.
- The display shows “UNLOAD”;
- Empty the platter, after Stable indicator on, press ZERO key to sure;
- Set the value of the mass weight by using the FUNC key to clear the value, the TARE key to increase the value of the
digit, the % key to go on the previous digit and the LIMIT key to go on the following digit. Confirm the entered value with
ZERO; the display shows “LOAD”;
- Put the mass on platter, after stable indicator on, press ZERO key to sure;
- The indicator returns to weighing;
9. VISUALISATION OF A/D CONVERTER POINTS
- Upon start-up, press simultaneously the ZERO and % keys during the countdown.
- The instrument shows the A/D converter points relative to the weight on the scale.
- Press PRINT/M+ to exit the step.
10. ERROR MESSAGES
ERROR MESSAGES DESCRIPTION RESOLUTION
- - oL - - Over range Remove weight from the scale.
Err 4 Zero Setting Error Upon start-up or when the ZERO key is pressed, the weight on the
scale exceeds the percentage programmed on the max. capacity.
Remove the excess weight and retry.
Err 6 Input signal greater
than 3mV/V
Indicates that the A/D converter value is greater than the maximum
value:
- Remove the weight from the scale if it’s exceeding.
- The load cell or the electronics could be damaged.
RECYCLING INSTRUCTION
The crossed-out wheeled bin on the product means that at the product end of life, it must be taken to
separate collection or to the reseller when a new equivalent type of equipment is purchased. The
adequate differentiated refuse collection in having the product recycled, helps to avoid possible
negative effects on the environment and health and supports the recycling of the materials of which
the equipment is made. The unlawful disposal of the product by the user will entail fines foreseen by
the current regulations.
13

ITALIANO
1. INTRODUZIONE.....................................................................................................................................................pag. 15
2. PRINCIPALI CARATTERISTICHE TECNICHE......................................................................................................pag. 15
3. INSTALLAZIONE....................................................................................................................................................pag. 15
3.1 ALIMENTAZIONE E ACCENSIONE................................................................................................................pag. 16
3.2 ALIMENTAZIONE A BATTERIA......................................................................................................................pag. 16
4. TASTI E INDICATORI DEL PANNELLO FRONTALE.............................................................................................pag. 16
4.1 FUNZIONE DEI TASTI....................................................................................................................................pag. 17
4.2 FUNZIONE INDICATORI................................................................................................................................pag. 17
5. SIMBOLI SUL DISPLAY LCD.................................................................................................................................pag. 18
6. OPERAZIONI..........................................................................................................................................................pag. 18
6.1 AUTOZERO ALL’ACCENSIONE.....................................................................................................................pag. 18
6.2 ZERO BILANCIA.............................................................................................................................................pag. 19
6.3 FUNZIONE DI TARA.......................................................................................................................................pag. 19
6.4 MESSAGGIO DI OVERLOAD.........................................................................................................................pag. 19
6.5 TOTALIZZAZIONE DEL PESO.......................................................................................................................pag. 19
6.5.1 TOTALIZZAZIONE MANUALE O AUTOMATICA.................................................................................pag. 19
6.6 CONTEGGIO PEZZI.......................................................................................................................................pag. 20
6.7 PERCENTUALE PESO CAMPIONE .............................................................................................................pag. 20
6.8 CONTROLLO QUANTITÀ...............................................................................................................................pag. 20
6.8.1 SETTAGGIO DELLE SOGLIE.............................................................................................................pag. 20
6.8.2 ALLARME ACUSTICO IN CORRISPONDENZA DEI LIMITI HI-OK-LO...............................................pag. 21
6.8.3 SEGNALAZIONE VISIVA DEL CONTROLLO......................................................................................pag. 21
6.9 CONVERSIONE DELL’UNITÀ DI MISURA.....................................................................................................pag. 21
6.10 FUNZIONE DI AUTOSPEGNIMENTO............................................................................................................pag. 21
7. AMBIENTE DI SETUP............................................................................................................................................pag. 21
7.1 SCHEMA A BLOCCHI AMBIENTE DI SETUP.................................................................................................pag. 22
8. CALIBRAZIONE.....................................................................................................................................................pag. 24
9. VISUALIZZAZIONE PUNTI CONVERTITORE A/D ..............................................................................................pag. 24
10. MESSAGGI DI ERRORE......................................................................................................................................pag. 24
ISTRUZIONI PER LO SMALTIMENTO.......................................................................................................................pag. 24
DICHIARAZIONE DI CONFORMITA’..........................................................................................................................pag. 25
GARANZIA.................................................................................................................................................................pag. 25
INDICE
14

1. INTRODUZIONE
Questo manuale è stato creato per aiutarla nell'installazione e nella conoscenza delle possibilità funzionali della bilancia
serie ASW.
AVVERTENZE
La bilancia deve essere situata in un luogo che non diminuisce la sua accuratezza.
Evitare le temperature estreme. Non esporre lo strumento alla luce diretta del sole o vicino a fonti di calore.
Appoggiare o fissare l'indicatore e la piattaforma su una base esente da vibrazioni. Non posizionare vicino a macchinari
vibranti.
Evitare sorgenti di alimentazioni instabili. Non utilizzare vicino a grosse fonti di elettricità.
Evitare zone ad alta umidità che possono causare condensazione. Evitare il contatto diretto con l’acqua. Non spruzzare o
immergere la bilancia nell’acqua.
Evitare movimenti d’aria come correnti d'aria o porte aperte. Non posizionare vicino a finestre aperte.
Mantenere pulita le bilancia.
Non lasciare materiale sulla bilancia quando non è utilizzata.
2. PRINCIPALI CARATTERISTICHE TECNICHE
Modello Piatto
Portata kg Divisione g Risoluzione g
(dimensioni in mm)
ASW3 225x300 3 0.1 0,01
ASW30 225x300 30 1 0,1
Tempo di integrazione 2 sec tipici.
Temperatura di funzionamento: 0°C - 40°C / 32°F - 104°F.
Alimentazione: con alimentatore esterno 240 Vac (di serie) oppure a batteria (di serie).
Durata della batteria: fino a 70 ore di uso continuo.
Tempo di ricarica: 12 ore.
Setup parametri: Calibrazione completamente digitale programmabile da tastiera.
Display : LCD retroilluminato a 6 cifre da 24 mm.
Contenitore: Involucro in plastica ABS.
Campo di azzeramento: +/- 20% della portata max.
Autozero all’accensione: +/- 2% della portata max.
3. INSTALLAZIONE
a) Togliere l'imballo.
b) Livellare la piattaforma agendo sui piedini a vite fino a che la bolla di livello non è al suo centro. Riveste molta
importanza la stabilità della piattaforma.
TUTTI GLI ANGOLI DEVONO APPOGGIARE IN MODO UNIFORME. Controllare con cura che tutti i piedini oppongano
resistenza al suolo e che la piattaforma, caricata in angolo, non sia instabile (se un angolo non appoggia il relativo piedino
è più agevole da girare).
15

3.1 ALIMENTAZIONE E ACCENSIONE
L’indicatore può essere alimentato con alimentatore esterno 240 Vac (di serie) oppure solo a batteria (di serie).
NOTA: si consiglia di effettuare la ricarica completa della batteria (12 ore) alla prima installazione dello strumento.
PER ALIMENTARE lo strumento attraverso la rete 240 Vac, inserire lo spinotto dell'alimentatore AC/DC nella apposita
presa posta sotto la bilancia e l’alimentatore alla vostra presa di rete a 240Vac.
PER ACCENDERE/SPEGNERE lo strumento premere il tasto posto sotto la bilancia e rilasciarlo.
3.2 ALIMENTAZIONE A BATTERIA
Se si desidera è possibile alimentare l’indicatore solo con la batteria.
Quando la batteria sta per scaricarsi si accende il simbolo di segnalazione ad indicare che la batteria deve essere
ricaricata. La bilancia resta in funzione per circa 10 minuti dall’accensione del simbolo dopo il quale si spegne
automaticamente per proteggere la batteria.
Per ricaricare la batteria occorre semplicemente collegare lo strumento alla rete. Non occorre che la bilancia sia accesa.
La batteria deve restare in carica per 12 ore per una completa ricarica.
Il LED “Charge” a sinistra del display indica lo stato di ricarica della batteria. Quando si collega lo strumento alla rete la
batteria interna viene ricaricata. Se il LED è verde la ricarica della batteria è completata. Se il LED è rosso la batteria è
quasi scarica. Se il LED è giallo indica che la batteria è in stato di ricarica.
Se la batteria è utilizzata potrebbe non ricaricarsi completamente. Se la durata di vita della batteria risulta inaccettabile
contattare il rivenditore.
4. TASTI E INDICATORI DEL PANNELLO FRONTALE
16

4.1 FUNZIONE DEI TASTI
- Azzera il peso lordo visualizzato, se esso rientra nel +/- 2% della portata totale.
- Funzione secondaria di conferma nell’impostazione di un parametro o di altre
funzioni.
- Premuto un istante esegue la tara semiautomatica;
- Funzione secondaria di incremento della cifra selezionata o selezione
nell’impostazione di un parametro o di altre funzioni.
- Premuto un istante permette di impostare le soglie per la funzione di CONTROLLO
QUANTITÀ (vedere paragrafo 6.8).
- In fase di input numerico o alfanumerico, seleziona la cifra da modificare, da sinistra
verso destra.
- Premuto un istante permette di seguire l’associazione di un peso alla percentuale
100 (vedere paragrafo 6.7)
- In fase di input numerico o alfanumerico, seleziona la cifra da modificare, da destra
verso sinistra.
- Premuto un istante permette di eseguire l’operazione di referenza (vedere paragrafo
6.6).
- In fase di input numerico, azzera velocemente il valore presente.
- Premuto un istante esegue l’accumulo del valore nella memoria se la funzione di
accumulo non è automatica.
- Funzione secondaria di uscita da un parametro o dall’ambiente di SETUP.
- Permette di eseguire la conversione nelle unità di misura secondarie configurate
(vedere paragrafo 6.9).
4.2 FUNZIONE INDICATORI
INDICATORE FUNZIONE
CHARGE
Indica che la batteria è in ricarica (vedere paragrafo 3.2).
17

5. SIMBOLI SUL DISPLAY LCD
Il display LCD è provvisto di simboli che danno indicazione sullo stato di funzionamento dell’indicatore; qui di seguito la
descrizione per ogni simbolo.
SIMBOLO FUNZIONE
Indica che il livello di carica della batteria si sta esaurendo: vedere paragrafo 3.2.
Gestiti per il CONTROLLO QUANTITÀ (vedere paragrafo 6.8).
Indica che il peso è stabile.
GROSS Indica che il valore visualizzato è un peso lordo.
NET
ZERO
Indica che il valore visualizzato è un peso netto.
Indica che il peso rilevato dal sistema di pesatura si trova in prossimità dello zero.
TARE Indica che è attiva una tara.
AUTO
Σ
g
Indica che è attiva la funzione di totalizzazione automatica.
Indica che il peso è stato totalizzato.
Indica l’unita di misura in uso (grammo).
pcs Indica che si sta visualizzando il numero di pezzi campionato (vedere paragrafo 6.6).
g / pcs Indica che si sta visualizzando il peso medio unitario (vedere paragrafo 6.6).
%
Indica che si sta visualizzando il peso espresso in percentuale del peso campione (vedere paragrafo 6.7).
t Indica l’unita di misura in uso (tonnellate).
HOLD Non utilizzato in questa applicazione.
kg Indica l’unita di misura in uso (chilogrammo).
lb Indica l’unita di misura in uso (libbre).
OZ Indica l’unita di misura in uso (once).
6. OPERAZIONI
6.1 AUTOZERO ALL’ACCENSIONE
L’indicatore è dotato di una funzione di “autozero all’accensione”: ciò significa che se all’accensione viene rilevato un
peso rientrante nel +/- 20% della portata, esso viene azzerato; se il peso non rientra in questa tolleranza, il display
visualizza il messaggio “Err 4” e dopo qualche istante visualizza il peso presente.
18

6.2 ZERO BILANCIA
Se non ci sono oggetti sulla bilancia e il display mostra un peso diverso da 0, premere il tasto ZERO per azzerare (si
accende l’indicatore “ZERO”). Se il peso è superiore al +/- 2% della portata, l’azzeramento non avrà effetto.
La bilancia ha una funzione di inseguimento automatico dello zero per azzerare gli accumuli minori di materiale sulla
piattaforma (vedere passo “AZ”, paragrafo 7.1). Può essere comunque necessario premere il tasto ZERO per
azzerare la bilancia, se sono visualizzate maggiori quantità di peso con piattaforma scarica.
6.3 FUNZIONE DI TARA
Azzerare il display premendo ZERO se necessario. Si accende il simbolo “ZERO”.
Mettere il contenitore sulla bilancia e, quando il peso è stabile, premere il tasto TARE: il peso viene messo in tara e si
accende l’indicatore “NET”; quando occorre rimuovere la tara, scaricare la bilancia e premere di nuovo TARE.
Quando si aggiunge un prodotto, viene visualizzato solo il suo peso. A questo punto è possibile mettere in tara un
altro peso che verrà aggiunto al primo. Quindi di nuovo solo il peso aggiunto verrà visualizzato.
Quando si rimuove il contenitore viene visualizzato un valore negativo.
Per rimuovere la tara, scaricare la bilancia e premere di nuovo TARE.
6.4 MESSAGGIO DI OVERLOAD
Si raccomanda di non superare la portata massima della bilancia; quando appare il messaggio
“—OL—“ accompagnato da un segnale sonoro, rimuovere immediatamente il peso per evitare un danno alla cella di
carico.
6.5 TOTALIZZAZIONE DEL PESO
La bilancia può essere settata per poter totalizzare manualmente il peso presente sulla bilancia premendo il tasto
PRINT (vedere passo “AU”, paragrafo 7.1).
Il peso netto visualizzato viene memorizzato quando si preme il tasto PRINT e risulta stabile.
Il display visualizza “ACC 1” e poi il peso netto totale accumulato in memoria per 2 secondi dopo il quale ritorna alla
normale visualizzazione.
Per effettuare una nuova totalizzazione rimuovere il peso fino a che la bilancia non ritorna a zero e posizionare un
secondo peso. Premere il tasto PRINT, il display visualizza “ACC 2” e poi il nuovo valore di totale.
Continuare fino a quando tutti i pesi sono stati totalizzati.
Per visualizzare il peso totale accumulato premere il tasto PRINT quando la bilancia è a zero (indicatore di zero
acceso). Per cancellare il peso totale accumulato, premere il tasto FUNC quando viene visualizzato il totale.
NOTA:
- La totalizzazione funziona con un peso minimo di 20d.
- Il numero massimo di totalizzazioni è 999 mentre il valore massimo di totale accumulabile è 999999.
Raggiunto questi limiti, occorre azzerare il totale; premendo il tasto PRINT infatti, verrà visualizzato il messaggio
“AdErr” sul display.
- Allo spegnimento i valori di totali vengono azzerati.
6.5.1 TOTALIZZAZIONE MANUALE O AUTOMATICA
L’operazione di accumulo, normalmente eseguita manualmente tramite il tasto PRINT, può essere eseguita
automaticamente al raggiungimento della stabilità del peso. Per la scelta della modalità di esecuzione della
totalizzazione vedere passo “AU”, paragrafo 7.1.
19

6.6 CONTEGGIO PEZZI
Tramite la funzione di referenza è possibile utilizzare la bilancia come conta pezzi.
PROCEDURA DI REFERENZA
Le operazioni da eseguire sono le seguenti:
1) Caricare sulla bilancia il contenitore vuoto, se esiste, e premere TARE per metterlo in tara.
2) Assicurarsi che la bilancia sia a zero, mettere sulla bilancia la quantità di pezzi campione e premere FUNC.
3) Il display suggerisce una QUANTITA' DI REFERENZA tra quelle previste:10, 20, 50, 100, 200.
4) Premere TARE più volte fino a visualizzare la quantità scelta.
5) Premendo ZERO, il display indica "- - - - - -" mentre l’indicatore calcola il Peso Medio Unitario. Dopo qualche
istante il display indica la quantità selezionata e messa sulla bilancia.
6) Aggiungere sulla bilancia la quantità da contare il cui valore apparirà sul display.
7) Scaricare la bilancia. Il PMU rimane in memoria e permette di eseguire un nuovo conteggio di pezzi dello stesso
tipo, senza ripetere l'operazione di REFERENZA.
8) Premendo il tasto % si commuta dalla visualizzazione del numero di pezzi alla visualizzazione del peso medio
unitario e del peso netto.
9) Per annullare o eseguire una nuova operazione di referenza, premere il tasto FUNC e ripetere le operazioni
come descritto dal punto 1).
6.7 PERCENTUALE PESO CAMPIONE
In questo modo di funzionamento, lo strumento visualizza sul display il peso espresso in percentuale, confrontandolo
con un peso di riferimento cui è stata preventivamente associata la percentuale 100.
PROCEDURA DI ABBINAMENTO
- Posizionare sulla bilancia il peso di riferimento.
- Premere il tasto %.
- La bilancia ha eseguito l’abbinamento percentuale e visualizza la percentuale di peso presente sulla bilancia.
- Scaricare la bilancia: le successive pesate saranno espresse in percentuale riferite al peso di riferimento.
- Per annullare o eseguire una nuova operazione di abbinamento, premere il tasto FUNC e ripetere le
operazioni sopra descritte.
6.8 CONTROLLO QUANTITÀ
La bilancia è fornita della funzione di controllo quantità a due soglie. Un allarme acustico e tre simboli di riferimento
sul display si attivano in base alle soglie impostate e al risultato della pesatura.
Il controllo può essere effettuato sul peso, sui pezzi o sulla percentuale.
Per eseguire il controllo sui pezzi occorre eseguire l’operazione di referenza (vedere paragrafo 6.6) e
successivamente impostare le soglie.
Per eseguire il controllo sulla percentuale occorre eseguire l’associazione di un peso alla percentuale 100 (vedere
paragrafo 6.7) e successivamente impostare le soglie.
6.8.1 SETTAGGIO DELLE SOGLIE
Premere il tasto LIMIT:
- il display attiva l’icona “HI”e mostra “000.000”, con la prima cifra lampeggiante. In questo passo si imposta la
soglia superiore.
- Utilizzare il tasto FUNC per azzerare il valore, il tasto TARE per incrementare il valore della cifra, il tasto % per
posizionarsi sulla cifra precedente e il tasto FUNC per posizionarsi sulla cifra successiva.
- Confermare con ZERO il valore inserito o premere PRINT per uscire senza confermare.
- il display attiva l’icona “LO”e mostra “000.000”, con la prima cifra lampeggiante. In questo passo si imposta la
soglia inferiore.
- Utilizzare il tasto FUNC per azzerare il valore, il tasto TARE per incrementare il valore della cifra, il tasto % per
posizionarsi sulla cifra precedente e il tasto FUNC per posizionarsi sulla cifra successiva.
- Confermare con ZERO il valore inserito o premere PRINT per uscire senza confermare.
- Le soglie sono impostate e l’indicatore torna in pesatura.
20

6.8.2 ALLARME ACUSTICO IN CORRISPONDENZA DEI LIMITI HI-OK-LO
E’ possibile decidere se l’allarme acustico deve attivarsi quando è acceso il simbolo “Ok” o quando sono accesi i led
“HI” o “LO”. Per la scelta della modalità di attivazione dell’allarme vedere passo “bEEP”, paragrafo 7.1.
6.8.3 SEGNALAZIONE VISIVA DEL CONTROLLO
Posizionare un peso sul piatto della bilancia.
I simboli di segnalazione si attiveranno a seconda di quali soglie sono state impostate:
CON ENTRAMBE LE SOGLIE IMPOSTATE
- Il simbolo HI del display LCD si attiverà quando il valore rilevato eccede la SOGLIA SUPERIORE.
- Il simbolo OK del display LCD si attiverà quando il valore rilevato si trova tra la SOGLIA INFERIORE e la
SOGLIA DI PESO SUPERIORE.
- Il simbolo LO del display LCD si attiverà quando il valore rilevato è minore della SOGLIA INFERIORE.
CON SOGLIA SUPERIORE IMPOSTATA E SOGLIA INFERIORE = 0
- Il simbolo OK del display LCD si attiverà quando il valore rilevato eccede la SOGLIA SUPERIORE
- Il simbolo LO del display LCD si attiverà quando il valore rilevato è minore della SOGLIA SUPERIORE.
CON SOGLIA SUPERIORE = 0 E SOGLIA INFERIORE IMPOSTATA
- Il simbolo HI del display LCD si attiverà quando il valore rilevato eccede la SOGLIA INFERIORE
- Il simbolo OK del display LCD si attiverà quando il valore rilevato è minore della SOGLIA INFERIORE.
NOTE
- La funzione di controllo si attiva quando si inseriscono i valori limite. Per disattivare la funzione bisogna impostare
a zero i valori limite.
- La funzione non è valida quando si inserisce un limite inferiore maggiore del limite superiore.
- Il controllo si attiva con un peso superiore al peso minimo (20d).
6.9 CONVERSIONE DELL’UNITÀ DI MISURA
Premendo più volte il tasto U avviene la conversione nelle unità di misura secondarie configurate (vedere passo “Unit”,
paragrafo 7.1); nel display si accenderà il relativo simbolo (vedere paragrafo 5).
NOTA: La funzione non è disponibile se è attiva la funzione contapezzi o la funzione percentuale.
6.10 FUNZIONE DI AUTOSPEGNIMENTO
La bilancia è dotata di una funzione di autospegnimento programmabile, che permette il risparmio di energia in caso
di temporaneo inutilizzo; l’autospegnimento entra in funzione a bilancia scarica ( peso lordo = 0) dopo il tempo (in
minuti) programmato nel passo oF dell’ambiente di setup.
I valori variano da:
00 DISABILITATO
03 3 minuti
05 5 minuti
15 15 minuti
30 30 minuti
7. AMBIENTE DI SETUP
La bilancia ha diversi parametri che possono essere settati nell’ambiente di SETUP.
Per entrare nell’ambiente di SETUP premere il tasto FUNC e PRINT contemporaneamente in fase di pesatura.
- Il display visualizza il primo parametro, “inC”.
- Utilizzare il tasto TARE per selezionare un valore o impostare il valore, usando i tasti % e LIMIT per selezionare la cifra
da modificare, e il tasto TARE per incrementarla.
- Premere il tasto ZERO per confermare le modifiche e passare al passo successivo.
- Premere il tasto % per passare al passo precedente o il tasto LIMIT per passare al passo successivo senza confermare
le modifiche.
- Per uscire dall'ambiente di setup, premere il tasto ZERO sul passo "RETURN" o il tasto C su qualsiasi passo.
21

7.1 SCHEMA A BLOCCHI AMBIENTE DI SETUP
inC
inC 1, inC 2,
inC 5
SETUP
ENVIRONMENT
EL
AU
baud
printer
ACC
AZ
units
EL on, EL AU,
EL oFF,
AU on,
AU oFF,
P Cont
b600, b1200,
b2400, b4800,
b9600
tP, LP-50
ACC on,
ACC oF
AZ 0.5d,
AZ 1d, AZ 2d,
AZ 4d
g Ut on, Ut oFF
Ut on, Ut oFF
Ut on, Ut oFF
t Ut on, Ut oFF
lb
OZ
bEEP 0,
bEEP
SPEEd 7.5, 15, 30, 60
oF 0, 3, 5, 15, 30
bEEP 1,
bEEP 2
Ut on, Ut oFF
Ut on, Ut oFF
InC DIVISIONE MINIMA BILANCIA
Premendo il tasto TARE si seleziona la divisione minima della bilancia tra quelle proposte: 1, 2, 5, 10, 20, 50.
EL RETROILLUMINAZIONE DISPLAY
EL oFF retroilluminazione sempre spenta
EL on retroilluminazione sempre accesa.
EL AU retroilluminazione accesa solo quando il peso è maggiore di 20d o, quando si preme un tasto. Alla pressione
di un tasto se il peso è inferiore a 20d la retroilluminazione rimane attiva per 5 secondi.
22

AU IMPOSTAZIONE TOTALIZZAZIONE MANUALE O AUTOMATICA
L’operazione di accumulo, normalmente eseguita manualmente tramite il tasto PRINT, può essere eseguita
automaticamente al raggiungimento della stabilità del peso. La scelta della modalità di esecuzione della totalizzazione
viene eseguita in questo parametro.
Premere il tasto TARE per selezionare un valore tra quelli proposti:
AU on Automatica a stabilità di peso.
AU oFF Manuale tramite il tasto PRINT.
P Cont Non utilizzato in questa applicazione.
baud NON UTILIZZATO IN QUESTA APPLICAZIONE
Premere PRINT per passare al passo successivo
printer NON UTILIZZATO IN QUESTA APPLICAZIONE
Premere PRINT per passare al passo successivo
ACC ABILITAZIONE FUNZIONE DI TOTALIZZAZIONE
Premendo il tasto TARE si abilita (on) o disabilita (oFF) la funzione di totalizzazione del peso.
AZ INSEGUIMENTO DI ZERO
Premendo il tasto TARE si seleziona il numero di divisioni per l'inseguimento di zero, cioè il parametro di
compensazione della deriva termica della bilancia; il valore impostato corrisponde al numero di divisioni che viene
azzerato.
Selezionare un numero di divisioni tra quelli proposti: 0.5d, 1d, 2d, 4d.
units CONFIGURAZIONE UNITA’ DI MISURA SECONDARIE
Premendo il tasto TARE è possibile scegliere le unità di misura per la funzione di conversione (vedere paragrafo 6.9),
abilitando (on) o disabilitando (oFF) le unità di misura secondarie proposte:
1) Il display propone la prima unità secondaria da abilitare o disabilitare.
2) Premere il tasto TARE per cambiare le opzioni e confermare con ZERO, o premere PRINT per uscire senza
confermare e passare all’unità successiva.
3) Il display propone la seconda unità secondaria da abilitare o disabilitare.
4) Procedere come descritto nel punto 2 fino all’ultima unità di misura proposta.
bEEP ALLARME ACUSTICO
bEEP 0 allarme acustico disabilitato
bEEP 1 segnale acustico attivo con simbolo “OK” attivo.
bEEP 2 segnale acustico attivo con simbolo “HI” o “LO” attivo.
SPEED IMPOSTAZIONE VELOCITA DI LETTURA CONVERTITORE ADC
Premendo il tasto TARE si seleziona la velocità di lettura del convertitore ADC; il valore impostato corrisponde al
numero di letture effettuate al secondo.
oF AUTO SPEGNIMENTO
Premendo il tasto TARE si selezionano i minuti di non utilizzo per l'autospegnimento (vedere paragrafo 6.10) :
0 (disattivato)
3 (3 minuti di non utilizzo)
5 (5 minuti di non utilizzo)
15 (15 minuti di non utilizzo)
30 (30 minuti di non utilizzo)
23

8. CALIBRAZIONE
Premessa: L’unità di misura di calibrazione è fissa al chilogrammo (“kg”).
E’ possibile calibrare la bilancia utilizzando due pesi campioni definiti oppure introducendo manualmente un peso
campione (utile qualora non si disponesse dei pesi campioni definiti).
PROCEDURA CON PESI CAMPIONE DEFINITI
- All’accensione, premere contemporaneamente i tasti LIMIT e % durante il conto alla rovescia.
- Il display visualizza “UNLOAD”;
- Scaricare la bilancia e premere il tasto ZERO quando l’indicatore di stabilità è acceso;
- Il display visualizza “A XX.XXX” dove XX.XXX è il valore del primo peso campione da utilizzare;
- Caricare sulla bilancia il primo peso campione e premere il tasto ZERO quando l’indicatore di stabilità è acceso;
- Il display visualizza “A XX.XXX” dove XX.XXX è il valore del secondo peso campione da utilizzare;
- Caricare sulla bilancia il secondo peso campione e premere il tasto ZERO quando l’indicatore di stabilità è acceso;
- L’indicatore ritorna in pesatura;
PROCEDURA CON PESO CAMPIONE LIBERO
- All’accensione, premere contemporaneamente i tasti TARE e % durante il conto alla rovescia.
- Il display visualizza “UNLOAD”;
- Scaricare la bilancia e premere il tasto ZERO quando l’indicatore di stabilità è acceso;
- Impostare il valore del peso campione usando il tasto FUNC per azzerare il valore, il tasto TARE per incrementare il
valore della cifra, il tasto % per posizionarsi sulla cifra precedente e il tasto LIMIT per posizionarsi sulla cifra successiva.
Confermare con ZERO il valore inserito, il display visualizza “LOAD”;
- Caricare sulla bilancia il peso campione e premere il tasto ZERO quando l’indicatore di stabilità è acceso;
- L’indicatore ritorna in pesatura;
9. VISUALIZZAZIONE PUNTI CONVERTITORE A/D
- All’accensione, premere contemporaneamente i tasti ZERO e % durante il conto alla rovescia.
- Lo strumento visualizza i punti del convertitore A/D relativi al peso sulla bilancia.
- Premere PRINT per uscire.
10. MESSAGGI DI ERRORE
MESSAGGI DI ERRORE DESCRIZIONE SOLUZIONE
- - oL - - Peso superiore alla
portata
Err 4 Errore autozero
all’accensione /
zero manuale
Err 6 Segnale in ingresso
superiore a 3mV/V
ISTRUZIONI PER LO SMALTIMENTO
Il simbolo del cassonetto barrato riportato sul prodotto, indica che il prodotto alla fine della propria
vita utile deve essere conferito agli idonei centri di raccolta differenziata, oppure riconsegnato al
rivenditore al momento dell’acquisto di un nuovo prodotto equivalente. L’adeguata raccolta
differenziata per l’avvio successivo del prodotto al riciclaggio, contribuisce ad evitare possibili effetti
negativi sull’ambiente e sulla salute e favorisce il riciclo dei materiali. Lo smaltimento abusivo del
prodotto da parte dell’utente comporta l’applicazione delle sanzioni amministrative previste dalla
legge.
Rimuovere il peso in eccesso dalla bilancia.
All’accensione o quando viene premuto il tasto di ZERO, il peso sulla
bilancia supera la percentuale programmata sulla portata max.
Rimuovere il peso in eccesso e riprovare.
Indica che il valore del convertitore A/D è superiore al valore massimo:
- Rimuovere il peso dalla bilancia se in eccesso.
- La cella di carico o l’elettronica può essere danneggiata.
24

DECLARATION OF CONFORMITY
BIS S.r.l.
Via Trieste, 31
20080 Bubbiano MI –
Tel.: +39 02 90834207
Fax: +39 02 90870542
e-mail: info@BilanceOnLine.it
www.BilanceOnLine.it
DICHIARAZIONE DI CONFORMITA’
This device conforms to the essential standards and norms relative to the applicable European
regulations. The Declaration of conformity is available in the web site www.scalehouse.it.
Il presente dispositivo è conforme agli standard essenziali e alle altre normative pertinenti dei regolamenti
europei applicabili. La Dichiarazione di Conformità è disponibile all'indirizzo Internet www.scalehouse.it.
WARRANTY
GARANZIA
The TWO-YEAR warranty period begins on the day the instrument is delivered. It includes spare
parts and labour for repairs at no charge if the INSTRUMENTS ARE RETURNED prepaid to the
DEALER’S PLACE OF BUSINESS. Warranty covers all defects NOT attributable to the Customer
(such as improper use) and NOT caused during transport.
La garanzia è di DUE ANNI dalla consegna dello strumento e consiste nella copertura gratuita della
manodopera e dei ricambi per STRUMENTI RESI FRANCO SEDE della VENDITRICE. La garanzia è
valida in caso di guasti NON imputabili al Committente (ad es. uso improprio) e NON imputabili al
trasporto.
If on site service is requested (or necessary), for any reason, where the instrument is used, the
Customer will pay for all of the service technician’s costs: travel time and expenses plus room
and board (if any).
Se, per qualsiasi ragione, l'intervento è richiesto (o é necessario) presso il luogo di utilizzo, saranno a
carico del Committente le spese per la trasferta del tecnico: tempi e spese di viaggio ed
eventualmente vitto e alloggio.
The customer pays for shipping costs (both ways), if the instrument is shipped to the DEALER or
manufacturer for repair.
Se lo strumento è spedito a mezzo corriere, le spese di trasporto (a/r) sono a carico del Committente.
The WARRANTY is VOIDED if faults occur due to work done by unauthorised personnel or due to
connections to equipment installed by others or incorrect connection to the power supply.
La GARANZIA DECADE nel caso di guasti dovuti ad interventi di personale non autorizzato o di
collegamenti ad apparecchiature applicate da altri o per errato inserimento alla rete di alimentazione.
This warranty DOES NOT provide for any compensation for losses or damages, direct or indirect,
incurred by the Customer due to complete or partial failure of instruments or systems sold, even
during the warranty period.
E' ESCLUSO qualsiasi indennizzo per danni, diretti o indiretti, provocati al Committente dal mancato o
parziale funzionamento degli strumenti od impianti venduti, anche se durante il periodo di garanzia.
AUTHORISED SERVICE CENTRE STAMP
TIMBRO CENTRO ASSISTENZA AUTORIZZATO
P.IVA e C.F.: 03774900967
25
 Loading...