


BIS S.r.l.
Via Trieste, 31
20080 Bubbiano MI – Italia
Tel.: +39 02 90834207
Fax: +39 02 90870542
e-mail: info@BilanceOnLine.it
www.BilanceOnLine.it
PRICE COMPUTING SCALE
PREISRECHNENDE WAAGE
BALANCE POIDS / PRIX
BILANCIA PESO / PREZZO
ASGPP
USER MANUAL
BENUTZERHANDBUCH
NOTICE DE L‘UTILISATEUR
MANUALE UTENTE
ASGPP_1.019_13.03_EN_DE_FR_IT
P.IVA e C.F.: 03774900967

2
LANGUAGES
SPRACHEN
LANGUES
LINGUE
ENGLISH ................................................................................................... 3
DEUTSCH ................................................................................................ 22
FRANÇAIS ............................................................................................... 41
ITALIANO ................................................................................................. 60

3
ENGLISH
INDEX
ENGLISH ................................................................................................... 3
1. INTRODUCTION ................................................................................................................................................................. 5
2. MAIN TECHNICAL SPECIFICATIONS ............................................................................................................................... 5
3. INSTALLATION ................................................................................................................................................................... 6
3.1 POWER SUPPLY AND START-UP .............................................................................................................................. 7
3.2 BATTERY POWERED .................................................................................................................................................. 7
4. FRONT PANEL KEYS AND INDICATORS ......................................................................................................................... 7
4.1 FUNCTION OF THE KEYS .......................................................................................................................................... 7
4.2 FUNCTION OF THE INDICATORS .............................................................................................................................. 8
5. DESCRIPTION OF THE LCD DISPLAYS ........................................................................................................................... 9
6. OPERATION ....................................................................................................................................................................... 9
6.1 AUTOMATIC ZERO UPON START-UP ........................................................................................................................ 9
6.2 ZEROING THE SCALE .............................................................................................................................................. 10
6.3 TARE FUNCTION ....................................................................................................................................................... 10
6.3.1 LIMITATION OF THE TARE FUNCTIONS....................................................................................................... 10
6.4 OVERLOAD WARNING ............................................................................................................................................. 10
6.5 CHANGE PRICE UNIT ............................................................................................................................................... 10
6.6 UNIT PRICE SETTING ............................................................................................................................................... 10
6.7 UNIT PRICE MEMORY .............................................................................................................................................. 10
6.7.1 SAVE THE UNIT PRICE .................................................................................................................................. 10
6.8 AUTOMATIC UNIT PRICE CLEAR ............................................................................................................................. 11
6.9 PRINTING AND TOTALISATION OF THE AMOUNT ................................................................................................. 11
6.9.1 PREPARE TO ACCUMULATE AND/OR PRINT ............................................................................................. 11
6.9.2 TOTALISATION AND/OR PRINTING .............................................................................................................. 11
6.9.3 PIECES ACCUMULATION FUNCTION .......................................................................................................... 11
6.9.4 SELF-SERVICE MODE ................................................................................................................................... 11
6.9.5 NOTES ............................................................................................................................................................ 11
6.10 TOTAL AND ACCOUNT OPERATION ...................................................................................................................... 11
6.11 BACKLIGHT ............................................................................................................................................................. 12
6.12 AUTO POWER OFF ................................................................................................................................................. 12
6.13 VISUALISATION WITH SENSITIVITY TIMES 10 ..................................................................................................... 12
7. SET-UP ENVIRONMENT .................................................................................................................................................. 12
SET-UP ENVIRONMENT BLOCK DIAGRAM .................................................................................................................. 13

4
“F0” - CALIBRATION (*) ................................................................................................................................................... 14
“F1” - NUMBER OF DIVISIONS (*) .................................................................................................................................. 14
“F2” - MAIN PRICE UNIT ................................................................................................................................................. 14
“F3” - SCALE CAPACITY (*) ............................................................................................................................................ 14
“F4” - NUMBER OF SCALE DECIMALS (*) ..................................................................................................................... 14
“F5” - NUMBER OF AMOUNT DECIMALS ....................................................................................................................... 14
“F6” - AUTOMATIC ZERO AT START-UP (*) .................................................................................................................... 15
“F7” - MANUAL ZERO RANGE (*) ................................................................................................................................... 15
“F8” - LIMITATION OF THE TARE FUNCTIONS (*) ......................................................................................................... 15
“F9” - A/D CONVERTER POINTS .................................................................................................................................... 15
“F10” - SPEED
SETTING ADC CONVERTER READING SPEED ........................................................................... 15
“F11” - BAUD RATE .......................................................................................................................................................... 15
“F12” - MINIMUM AMOUNT DIVISION ............................................................................................................................. 15
“F13” - PRINTER (*) ......................................................................................................................................................... 15
“F14” - PRICE INTRODUCTION MODE........................................................................................................................... 15
“F15” - PRINTING LANGUAGE AND CURRENCY SYMBOL .......................................................................................... 15
“F16” - GRAVITY ZONE OF USE (*) ................................................................................................................................ 16
“F17” - SELF-SERVICE MODE ........................................................................................................................................ 16
“F18” - PRINTING FORMAT ............................................................................................................................................. 16
“F19” - PRINTOUT HEADER LINES ................................................................................................................................ 16
“F20” - PRINTOUT FOOTER LINES ................................................................................................................................ 16
“F21” - RESET (*) ............................................................................................................................................................. 16
8. PRINTER ........................................................................................................................................................................... 17
8.1 OUTPUT DATA FORMAT ........................................................................................................................................... 17
8.2 SET DATE AND TIME ................................................................................................................................................ 18
9. CONNECTING TO CASH REGISTERS LYNX AND PUMA.............................................................................................. 19
10. SEALING ACCESS TO THE BALANCE SETTINGS ..................................................................................................... 20
11. ERROR MESSAGES ...................................................................................................................................................... 20
RECYCLING INSTRUCTION ................................................................................................................................................ 20
DECLARATION OF CONFORMITY ...................................................................................................................................... 21
WARRANTY .......................................................................................................................................................................... 21

5
1. INTRODUCTION
Model
Plate
Capacity kg
Division g
ASG
PP15 240x370
6/15 2/5
ASG
PP30 240x370
15/30
5/10
This manual was created to help you install and learn all about the functional possibilities of the ASGPP scales.
The scales should be sited in a location that will not degrade the accuracy.
Avoid extremes of temperature. Do not place in direct sunlight or near air conditioning vents.
Avoid unsuitable tables. The tables or floor must be rigid and not vibrate. Do not place near vibrating machinery.
Avoid unstable power sources. Do not use near large users of electricity such as welding equipment or large motors.
WARNINGS
Avoid high humidity that might cause condensation. Avoid direct contact with water. Do not spray or immerse the scales
in water.
Avoid air movement such as from fans or opening doors. Do not place near open windows.
Keep the scales clean.
Do not stack material on the scales when they are not in use.
2. MAIN TECHNICAL SPECIFICATIONS
(dimensions in mm)
◆
6 Large LCD displays.
◆
Rechargeable battery.
◆
Selectable price unit (kg or hg).
◆
Accumulate operation.
◆
Account function, do memory recall, give change and memory clear one time.
◆
Auto backlight.
◆
Built-in thermal printer

6
3. INSTALLATION
a) Unpack then product.
b) If present (depending on the model), it is necessary to unscrew and remove the locking screw for the transportation
placed under the scale, as shown in the figure below:
c) Level the platform by adjusting the adjustable feet until the bubble under the plate is in the centre of the level. The
stability of the platform is very important.
ALL THE CORNERS MUST REST IN A UNIFORM WAY. Carefully check that all feet fully rest on the ground and that
the platform, loaded on the corner, is not unstable (if a corner is not resting on the ground its relative foot is easier to
turn).
During installation BE CAREFUL to the flat cable, it can be damaged by compression between base and column. To
avoid this it's necessary insert the cable inside the column as shown in pictures.

7
ZERO
It
zeroes the scale.
TARE
It
subtracts tare values and changes the
scale
from gross
mode (no tare) to net mode.
M+ It adds data to the accumulators and executes the relative printing.
U It is used change unit.
3.1 POWER SUPPLY AND START-UP
The indicator can be powered with a fitted 240 Vac external power adapter or just with the fitted battery.
NOTE: it is advisable to completely recharge the battery (12 hours) with the first installation of the instrument.
TO POWER the instrument through the 240 Vac mains put the AC/DC power plug in the appropriate socket under the
scale and the power adapter in the 240 Vac mains socket.
TO TURN ON the instrument press downwards the button under the scale until it turns on; then release it.
TO TURN OFF the instrument press upwards the button under the scale until it turns off; then release it.
After the self-check the scale will show “hi rES” (in case of NOT approved instrument) or “LEGAL” (in case of approved
instrument).
3.2 BATTERY POWERED
The weighing indicator can be operated from the battery if desired.
1. When battery goes low, the light will be turned on automatically.
It is the time to charge the battery with the AC power. If the scale goes on being used without proper charging, the
display window will show “BAT LO” every 10 minutes, and the scale would be shut down automatically after 50
minutes of warning in order to protect the battery. Please charge the battery immediately, or the scale cannot be
used.
2. The “Recharge” LED is orange when battery is being charged, and green when battery is fully charged.
3. As the battery is used it may fail to hold a full charge. If the battery life becomes unacceptable then contact your
distributor.
4. FRONT PANEL KEYS AND INDICATORS
4.1 FUNCTION OF THE KEYS

8
C It is used for canceling the memorized data.
PRINT
It executes a simpl
e printing without totalisation, or the printing of
the total if at least an
accumulation is done with M+ key (see section 6.10).
FEED
It f
eeds
the print paper for the printer.
“ACCOUNT”
It is used to do memory recall, give change and memory clear in one time.
LOCK
It is
used to disable or enable the pri
ce and tare auto
-
clear function
.
PLU, 1(A)
~28
It is used to store unit price memory and recall unit price from memory.
0~9 They are used for setting unit price data.
00 In the entry mode of the unit price with fixed decimal point this allows to enter 2
decimals “00”.
. In the entry mode of the unit price with floating decimal point this allows to enter the decimal
INDICATOR
FUNCTION
point of the price. See F14 step, section 7.
4.2 FUNCTION OF THE INDICATORS
Recharge
Indicates that the battery is going to recharge (see section 3.2).

9
5. DESCRIPTION OF THE LCD DISPLAYS
SYMBOL
FUNCTION
The battery is low (see section 3.2).
The weight detected by the weighing system is near
zero
, within the interval of
–
1/4 ÷ +1/4 of the division.
~ The weight is unstable
.
NET The displ
ayed weight is a net weight.
kg Indicates the weight unit in use
(
kilo
gram
).
LOCKED
The automatic unit price clear is disabled
(see section
6.8)
€/kg Indicates the price unit in use
(per
kilo
gram
).
€/100g
Indicates the price unit in use
(
per hectogram
).
M+ The total amount is greater than 0.
Displays ASGPP
FIRST DISPLAY (kg)
The weight on the plate is shown in this display.
SECOND DISPLAY (€/kg €/100g)
The entered average price is shown in this display.
THIRD DISPLAY (€)
The amount is shown in this display.
FUNCTION OF THE SYMBOLS
The LCD displays have symbols which show the indicator’s functioning status; you will find the description for each
symbol below.
0
The displayed value is the return money.
6. OPERATION
6.1 AUTOMATIC ZERO UPON START-UP
The indicator has an “auto zero at start-up” function: in other words it means that if at start-up a weight within the
configured percentage (see F6 step, section 7) of the capacity is detected, it will be zeroed; if the weight is not within
this tolerance, the display shows “Err 4” and with a non approved instrument the present weight after a few instants,
while with an approved instrument “Err 4” is shown continuously.

10
6.2 ZEROING THE SCALE
When there is no item on the scale but reading is not zero, press the ZERO key to turn on ZERO indicator. If the
weight is greater than the programmed percentage (see F7 step, section 7) in respect to the capacity, the zeroing
will have no effect.
6.3 TARE FUNCTION
Put container on the platter, once the weight reading is stable, press the TARE key, the TARE indicator will be on
and the container’s weight will be deducted. When it is time to clear the TARE, take off the container, and press
TARE key again.
6.3.1 LIMITATION OF THE TARE FUNCTIONS
It is possible to limit the tare functions, selecting "oFF" in the F8 step of the set-up environment (see section 7)
The SEMI AUTOMATIC TARE could be made only if the tare is equal to 0.
NOTE: With approved instrument, the F8 step is not settable.
6.4 OVERLOAD WARNING
Please do not add item that is over the maximum capacity. When reading “—OL—“ and hear beeping sound,
remove the item on the platter to avoid damage to the load cell.
6.5 CHANGE PRICE UNIT
You can use the U key to change unit. Press U key will change the weighing unit circularly, and the pertinent
indicator will on.
NOTE: at start-up the scale suggests automatically the main price unit set in the set-up (see F2 step, section 7).
6.6 UNIT PRICE SETTING
To trade with your scale, it is necessary to setting a unit price of the goods, the scale then uses this unit price to
determine how much that goods are on the platter. When the scale is displaying the weight of the goods placed on
the scale, set the unit price through numeric keys. Set unit price is showed in the second display, the third display
shows the total price of the goods. To cancel the previous unit price, press C key.
6.7 UNIT PRICE MEMORY
The scale can store 127 sets unit price, 28 with direct key.
6.7.1 SAVE THE UNIT PRICE
DIRECT KEY PLU
To link the unit price to a direct key, hold the desired memory key (
one is asked to enter the PLU name (Article Description) through the A
price is linked to the selected key.
PLU MEMORY
To save the unit price in the PLU memory hold the PLU key for 3 seconds, it will show “SAVE PoS 00” , press
numeric key 0~9 to select which memory location you want to use from 0 to 99. After you do one is asked to enter
the PLU name (Article Description) through the A
scale.
6.7.2 LOAD THE UNIT PRICE
DIRECT KEY PLU
If you want to use the unit price linked to a direct key, press the correspondent desired memory key (
unit price will change to the value stored in the memory.
PLU MEMORY
If you want to use the unit price stored in the scale, press PLU key, the scale will shows “LoAd PoS 00”, press
numeric key 0~9 to select which memory location’s price you want to use from 0 to 99, current unit price will change
~Z keys,
1~28)
for 3 seconds, after you Key in the unit price;
~Z keys, confirm with the TARE key:
the unit
confirm with the TARE key: the unit price is stored in the
1~28),
current

11
to the value stored in the memory.
6.8 AUTOMATIC UNIT PRICE CLEAR
The scale can set automatic unit price clear, when return to zero, the scale will clear the unit price automatically.
Press LOCK key will turn on / off automatic unit price clear function, when LOCK indicator on, automatic unit price
clear disable, when LOCK indicator off, automatic unit price clear enable.
6.9 PRINTING AND TOTALISATION OF THE AMOUNT
The scale can be set to manually print the weight and amount data on printer and accumulate the amount (see F13
step, section 7).
6.9.1 PREPARE TO ACCUMULATE AND/OR PRINT
Each time before printing, please make sure the platter is empty, the current accumulator values is reset to
zero, and the weight reading is stable.
6.9.2 TOTALISATION AND/OR PRINTING
Put the weighing item on platter, wait for the weight reading to be stable, press the M+ key to accumulate or
PRINT key to print without accumulate, the weight and amount data will be printed. If the weight and amount
will be accumulated, the first display will show “total” during the third display shows the total amount.
6.9.3 PIECES ACCUMULATION FUNCTION
It is possible to calculate the amount on the basis of free number of pieces instead of weight and then totalize
it:
1) press M+ with empty scale,
2) enter the number of pieces,
3) press M+,
4) repeat the operation from point 2 if necessary or press ZERO to exit.
6.9.4 SELF-SERVICE MODE
The scale can be set to automatically accumulate the amount after selecting the PLU (see F17 step, section 7),
therefore accumulate and print directly by pressing the PLU keys (see section 6.7.2).
6.9.5 NOTES
- The printing functions with a minimum weight of 20d.
- The maximum total amount value which may be accumulated is 999999. Once reached these limits, one
should clear the total.
- The total values will be cleared when it’s turned off.
6.10 TOTAL AND ACCOUNT OPERATION
After do accumulate operates, it is possible to
a) Print and clear just the total amount, by pressing the PRINT key with empty scale
or
b) Visualize the total amount on the first display, by pressing the account key, then during this visualization:
- key in the paid money by keyboard, that will be shown on the second display, and show on the third display the
return value;
- print and clear the total amount, paid and return money by pressing the PRINT key, and automatically exit from the
visualization;
- just print the total amount, paid and return money by pressing the M+ key, and remain in the visualization;
- return normal weighing mode by pressing ZERO key if you don’t want clear the memory or by pressing TARE key
to clear also the memory.
Note: if you haven’t do accumulate operation, you also can use Account function, the summed price is current total
price.

12
6.11 BACKLIGHT
The scale has three backlight mode: on, off and auto.
ON: backlight will turn on however current weight is zero or not zero.
OFF: backlight will turn off however current weight is zero or not zero.
AUTO: backlight will turn on when current weight is not zero and it will turn off if current weight is zero
To set backlight mode you can keep pressed LOCK key until display will show current setting, press M+ key to
select backlight mode (ON/OFF/AUTO), after you select, press TARE key to sure.
6.12 AUTO POWER OFF
The scale have auto shut off function, you can set this parameter.
Press ACCOUNT key during self-checking, display shows “sleep mode”, press M+ key to select 0/1/5/30 (not use
auto power off / turn off power after scale leisure for 1 minutes / turn off power after scale leisure for 5 minutes / turn
off power after scale leisure for 30 minutes), press TARE key to sure.
6.13 VISUALISATION WITH SENSITIVITY TIMES 10
It’s possible to use this function as a test in the calibration phase.
Keep the TARE key pressed for three seconds and release: the display will show the weight with the minimum
division times 10 (a blinking digit is added).
After about 5 seconds the display will return in the standard mode.
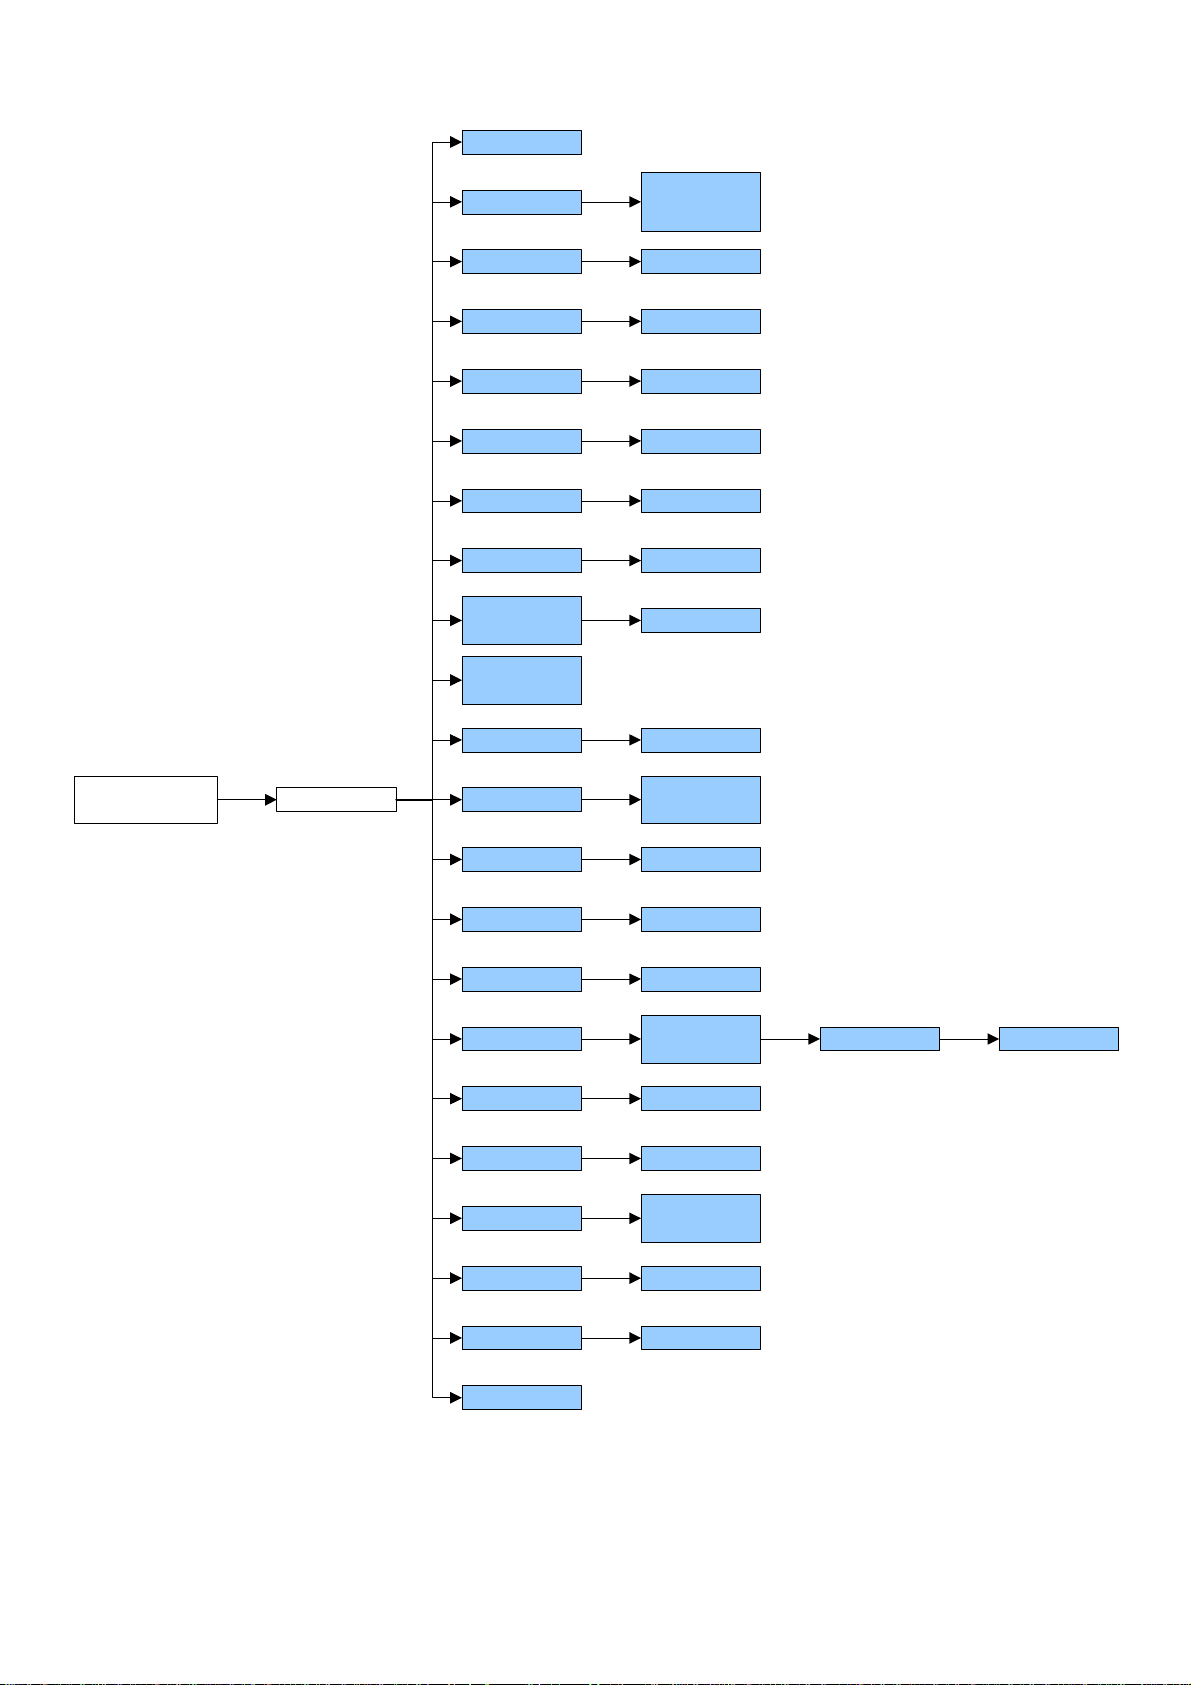
7. SET-UP ENVIRONMENT
The scale has various parameters that can be configured in the SET-UP environment.
To enter in the SET-UP environment press during the start-up the TARE key during the countdown.
One is asked to enter the password. The default password is 0000.
- Enter the password and press the TARE key:
- The second display will show the first function, "F0":
- Pressing the M+ will cycle through the other functions.
- Pressing TARE will allow you to set the function.
- Use M+ or set a value using the numeric keys,
- Press TARE key to enter the value or use the ZERO key to leave a parameter unchanged or to escape set-up
environment.
13
SET-UP ENVIRONMENT BLOCK DIAGRAM
F0 CAL
F1 rES
1 3000,
1 6000,
dUaL rAnGE
SETUP
ENVIRONMENT
F2 Unit
F3 CAPA
F4 Point
F5 Point
F6 init ZEro
F7 rE ZEro 0 … 20
F8 SCSIUE
TARE
F9 A-D
COUNTS
F10 SPEED 7.5, 15, 30, 60
F11 BAUDPin
kiLoS, 100
3, 6, 15, 30
0, 1, 2, 3, 4
0, 1, 2
0 … 20
On, oFF
2400, 4800,
9600, 19200
F12 Min Coin
F13 SEriES
F14 Point
F15 LAnG
F16 GrU
F17 SELF oFF, on
F18 FORMAT
F19 HEADER Text 1...Text 4
F20 FOOTER Text 1...Text 2
F21 rESEt
1, 2, 5, 10
On, oFF
FiXED, FLoAt
En, it, ES,
Fr, DE
9,XXXXX
Normal, List1,
List2
Symbol, Text
In the parameter description:
- The METRIC parameters are shown with the (*) symbol, and, with approved instrument, these are read only. See
section 9.
XXX

14
“F0” - CALIBRATION (*)
Premise: The unit of measure of the calibration is fixed at kilogram (“kg”).
1) The displays show “CAL F0”: press the TARE key to get into the step.
2) The displays show the acceleration value set in the F16 step: enter the gravitational acceleration value of the
calibration zone if different from the use zone and press the TARE key to confirm; one must modify all the 6
digits of the gravitational acceleration. The value will be set also in the F16 step.
3) The display shows “UnLoAd”: unload the scale and press TARE.
4) The displays show “LoAd X KiLoS”, in which X is the sample weight to be put on the scale; press several time the
M+ key if one wants to change the calibration weight.
5) Put the weight on the scale, please wait for the weight stability and press TARE.
6) If the calibration is correct, the displays show for an instant “SPAN PASS”, and then “CAL F0”.
If the calibration is uncorrect, the displays show for an instant “SPAN FAIL LOW” (if the weight is too low) or
“SPAN FAIL HI” (if the weight is too high) and then “CAL F0”.
IN CASE THE ZONE OF USE IS DIFFERENT FROM THE CALIBRATION ZONE ONE SHOULD:
1) Carry out the calibration as previously described.
2) Enter the F16 step and set the gravity acceleration value for the ZONE OF USER.
3) Press the TARE key to confirm
4) Save and exit the SET-UP environment (press many times the ZERO key).
5) The weight error, caused by the different gravitational attraction value between the calibration zone and the zone of
use, is corrected automatically.
“F1” - NUMBER OF DIVISIONS (*)
By pressing TARE one selects the scale divisions number.
Press M+ key to select one value of the following:
Value Divisions
1 3000 3000
1 6000 6000
dUAL rAnGE 3000 + 3000
“F2” - MAIN PRICE UNIT
By pressing TARE one selects the main price unit.
Press M+ to select one of the possible unit:
kiLoS kilogram
100 100 grams
“F3” - SCALE CAPACITY (*)
By pressing TARE one selects the total capacity of the scale.
Press M+ key to select one of these capacities: 3, 6, 15, 30 kg.
“F4” - NUMBER OF SCALE DECIMALS (*)
By pressing TARE one selects the number of scale decimals.
Press M+ to select one of the suggested values: 0.0 (a decimal), 0.00 (two decimals), 0.000 (three decimals), 0.0000
(four decimals), 0 (no decimal); confirm with ZERO.
“F5” - NUMBER OF AMOUNT DECIMALS
By pressing TARE one selects the number of amount decimals.
Press M+ to select one of the suggested values: 0.0 (a decimal), 0.00 (two decimals), 0 (no decimal).

15
“F6” - AUTOMATIC ZERO AT START-UP (*)
Trough this step one sets the weight percentage for the automatic acquisition of the gross zero at start-up. If at the
start-up a weight is detected that is within the programmes percentage of the total capacity, it will be cleared; if the weight
is not within this tolerance, the display, after a few instants, shows the current weight.
Press M+ to select one of the suggested percentages: from 0 to 20.
“F7” - MANUAL ZERO RANGE (*)
Trough this step one sets the weight percentage for the manually acquiring the gross zero; if, in the normal weighing
phase, by pressing ZERO, a weight within the programmed percentage of the total capacity, it will be cleared.
Press M+ to select one of the suggested percentages: from 0 to 20.
“F8” - LIMITATION OF THE TARE FUNCTIONS (*)
on limitation disabled
oFF limitation enabled
Refers to the 6.3.1 section for the functioning mode.
“F9” - A/D CONVERTER POINTS
By pressing TARE the instrument shows the A/D converter points relative to the weight on the scale.
By pressing ZERO one zero the value.
Press TARE to exit the step.
“F10” - SPEED SETTING ADC CONVERTER READING SPEED
By pressing TARE one sets the reading speed of the ADC converter; the set value corresponds to the number of
readings made in a second.
Press M+ to select one of the suggested reading speeds: 7.5, 15, 30, 60.
“F11” - BAUD RATE
By pressing TARE one selects the baud rate.
Press M+ to select one of the possible speeds: 2400, 4800, 9600, 19200.
“F12” - MINIMUM AMOUNT DIVISION
By pressing TARE one selects the minimum amount division.
Press M+ to select one of the suggested values: 1, 2, 5, 10.
“F13” - PRINTER (*)
off disabled
on enabled
“F14” - PRICE INTRODUCTION MODE
FLoAt introduction with floating decimal point
FiXEd introduction with fixed decimal point
“F15” - PRINTING LANGUAGE AND CURRENCY SYMBOL
By pressing TARE one selects the printing language.
Press M+ to select one of the suggested values: En, it, ES, Fr, DE.
By confirming with TARE one sets the text or the symbol of the currency to be printed.
Press M+ to select
- TEXT: Confirm with TARE, insert the text of the CURRENCY on 3 characters and confirm with TARE.
- SYMBOL: Confirm with TARE, enter the ASCII decimal code of the CURRENCY on 3 digits (€=254) and press
TARE.

16
“F16” - GRAVITY ZONE OF USE (*)
Through this step one selects the acceleration value of use of the instrument:
Manual entry of the g value: one may manually enter the gravitational acceleration value; one must modify the 6
decimal digits of the gravitational acceleration.
In case one enters a wrong g value: the minimum decimal value is suggested (9,75001); a wrong value is any decimal
number that is not between 9,75001 and 9,84999 (inclusive).
“F17” - SELF-SERVICE MODE
off disabled
on enabled
See section 6.9.4 for details.
“F18” - PRINTING FORMAT
Press the M+ key to select one of the possible printing format: Normal, List1, List2.
See section 8 for details.
Confirm with TARE or press ZERO to exit without confirming.
“F19” - PRINTOUT HEADER LINES
By pressing TARE one can configure up to 4 lines that will be printed as header of the printout with the List1 and List2
format (see step F18):
- select the line to configure with M+ key;
- press the TARE key to enter: one is asked to enter the header line through the A
- confirm with the TARE key;
- repeat the operation for all the desired lines or press the ZERO key to exit.
~Z
keys;
“F20” - PRINTOUT FOOTER LINES
By pressing TARE one can configure up to 2 lines that will be printed as footer of the printout with the List1 and List2
format (see step F18):
- select the line to configure with M+ key;
- press the TARE key to enter: one is asked to enter the header line through the A
- confirm with the TARE key;
- repeat the operation for all the desired lines or press the ZERO key to exit.
~Z
keys;
“F21” - RESET (*)
For use of the manufacturer.

17
8. PRINTER
Specifications
Speed: 70 mm/sec.
Resolution: 8 dot/mm.
384 dots per line.
Paper width: 58mm.
Roll diameter: 50mm.
8.1 OUTPUT DATA FORMAT
In the normal weighing operations by pressing the PRINT key the data format is the following:
2011/08/02 13:38
BANANAS
NET WEIGHT: 0.335 kg
UNIT PRICE: 2.00 €/kg
AMOUNT: 0.67 €
In the normal weighing operations when one is accumulating the weight (see section 6.9) and when the totals are
recalled from the storage (see section 6.10) the data format is depending the format set in the F18 step:
“Normal” format
Accumulation
2011/08/02 13:38
N. 1
BANANAS
NET WEIGHT: 0.335 kg
UNIT PRICE: 2.00 €/kg
AMOUNT: 0.67 €
Total
Date and time (see section 8.2)
PLU description (see section 6.7)
€= currency set in the F15 step; /kg= “/kg” or “/100g” (see section 6.5)
Date and time (see section 8.2)
Progressive of totalization
PLU description (see section 6.7)
€= currency set in the F15 step; /kg= “/kg” or “/100g” (see section 6.5)
2011/08/02 13:38
TOTAL
N. 1
AMOUNT: 0.67 €
- - - - - - - - - - - - - - - - - - - - - - - -
Date and time (see section 8.2)
Progressive of totalization
€= currency set in the F15 step

18
“List1” format
DINI ARGEO SRL
Header line 1
(see F19 step, section
7)
DINI ARGE
O SRL
Header line 1 (see F19 step, section 7)
V. DELLA FISICA 20
41042 FIORANO
WWW.DINIARGEO.COM
02/08/2011 13:38
N. NET(kg) €/kg €
- - - - - - - - - - - - - - - - - - - - - - #001 BANANAS
0.100 1.00 0.10
#002 CHERRIES
1 X 1.00 1.00
- - - - - - - - - - - - - - - - - - - - - - #002 TOTAL 1.10
PAID 2.00
RETURN 0.90
THANK YOU
AND HAVE A NICE DAY
“List2” format
Header line 2 (see F19 step, section 7)
Header line 3 (see F19 step, section 7)
Header line 4 (see F19 step, section 7)
Date and time (see section 8.2)
€= currency set in the F15 step; /kg= “/kg” or “/100g” (see section 6.5)
PLU description (see section 6.7)
PLU description (see section 6.7)
Footer line 1 (see F20 step, section 7)
Footer line 2 (see F20 step, section 7)
V. DELLA FISICA 20
41042 FIORANO
WWW.DINIARGEO.COM
02/08/2011 13:38
N. NET(kg) €/kg €
- - - - - - - - - - - - - - - - - - - - - - #001 0.100 1.00 0.10
#002 1 X 1.00 1.00
- - - - - - - - - - - - - - - - - - - - - - #002 TOTAL 1.10
PAID 2.00
RETURN 0.90
THANK YOU
AND HAVE A NICE DAY
Header line 2 (see F19 step, section 7)
Header line 3 (see F19 step, section 7)
Header line 4 (see F19 step, section 7)
Date and time (see section 8.2)
€= currency set in the F15 step; /kg= “/kg” or “/100g” (see section 6.5)
Footer line 1 (see F20 step, section 7)
Footer line 2 (see F20 step, section 7)
8.2 SET DATE AND TIME
ASGPP can set the date and time, then print out on the label.
Hold the 00 key until the weight window shows “DATE” and unit price window shows “MM.DD.YY”. Input the new date
using directly the numeric keys then press the TARE key to confirm or press ZERO key to escape.
Then it will enter into the time setting mode, the weight window shows “TIME” and unit price window shows “HH.MM.SS”.
Input the new time using directly the numeric keys then press the TARE key to confirm or press ZERO key to escape.

19
9. CONNECTING TO CASH REGISTERS LYNX AND PUMA
Wiring diagram:
To connect the cash register to the instrument it’s necessary set Baud Rate on 9600 (Setup step “F11”) and totalization
on ECR (Setup step “F13”).
On the cash register it’s necessary to do the following operation (Lynx only):

20
ERROR
MESSAGES
DESCRIPTION
RESOLUTION
- - oL - -
Over range
Remove weight from the scale.
Err 4
Zero Setting Error
Upon start
-
up or when the
ZERO
key is pressed, the weight on the
Err 5
Keyboard error
The keyboard could be damaged.
Err 6
Input signal greater
Indicates that the A/D converter value is greater than the maximum
10. SEALING ACCESS TO THE BALANCE SETTINGS
For legal for trade applications, the balance must be sealed to prevent access to the metrological parameters.
To seal the balance, press the recessed Lock switch at the bottom of the balance, momentarily during power up (the
message “LEGAL” appears an instant), then cover the Lock switch access hole. A cover seal and paper seal may be
installed as shown.
To regain access to the locked balance settings, break the seal and press the recessed Lock switch
momentarily during power up (the message “HIRES” appears an instant).
11. ERROR MESSAGES
than 3mV/V
RECYCLING INSTRUCTION
The crossed-out wheeled bin on the product means that at the product end of life, it must be taken
to separate collection or to the reseller when a new equivalent type of equipment is purchased. The
adequate differentiated refuse collection in having the product recycled, helps to avoid possible
negative effects on the environment and health and supports the recycling of the materials of which
the equipment is made. The unlawful disposal of the product by the user will entail fines foreseen
by the current regulations.
scale exceeds the percentage programmed on the max. capacity.
Remove the excess weight and retry.
value:
- Remove the weight from the scale if it’s exceeding.
- The load cell or the electronics could be damaged.

21
DECLARATION OF CONFORMITY
BIS S.r.l.
Via Trieste, 31
20080 Bubbiano MI – Italia
Tel.: +39 02 90834207
Fax: +39 02 90870542
e-mail: info@BilanceOnLine.it
www.BilanceOnLine.it
This device conforms to the essential standards and norms relative to the
applicable European regulations. The Declaration of conformity is available in the
web site www.scalehouse.it
WARRANTY
Scale House products are guaranteed for a period of twelve months from delivery,
excluding the parts classified as expendable materials such as mechanical
printing heads, batteries, electric motors and wheels. The warranty for these
expendable materials is three months. The warranty refers to breakdowns
resulting from any construction defect or material defect of the product supplied
and covers the cost of labor and spare parts. The product must be returned to the
Seller address in its original packaging with shipping paid by the sender. The
warranty does not apply to breakdowns due to improper use or non-observance
of the operating instructions, electrical phenomenon, unauthorized repair attempt,
connection to other equipment or removal of any product identification elements
(serial number, label, etc.). This warranty does not provide for any compensation
for damages, direct or indirect, incurred by the user due to complete or partial
failure of instruments, even during the warranty period. The warranty for the load
cells excludes the damages caused by knocks and overloads.
AUTHORISED SERVICE CENTRE STAMP
P.IVA e C.F.: 03774900967

22
DEUTSCH
INHALTSVERZEICHNIS
1. EINLEITUNG ..................................................................................................................................................................... 24
2. TECHNISCHE HAUPTEIGENSCHAFTEN ....................................................................................................................... 24
3. INSTALLATION ................................................................................................................................................................. 25
3.1 STROMVERSORGUNG UND INBETRIEBNAHME ................................................................................................... 26
3.2 BATTERIEBETRIEB ................................................................................................................................................... 26
4. TASTEN UND ANZEIGEN AUF DEM FRONTPANEL ...................................................................................................... 26
4.1 FUNKTION DER TASTEN .......................................................................................................................................... 26
4.2 FUNKTION DER KONTROLLEUCHTEN ................................................................................................................... 27
5. SYMBOLE DER LCD ANZEIGE ....................................................................................................................................... 27
6. FUNKTIONEN ................................................................................................................................................................... 28
6.1 AUTOMATISCHE NULLSTELLUNG BEIM EINSCHALTEN ....................................................................................... 28
6.2 NULLSTELLUNG DER WAAGE ................................................................................................................................. 28
6.3 TARA FUNKTIONEN .................................................................................................................................................. 28
6.3.1 BESCHRÄNKUNG DER TARA-FUNKTIONEN .............................................................................................. 28
6.4 ÜBERLAST WARNUNG ............................................................................................................................................. 28
6.5 EINHEIT ÄNDERN ..................................................................................................................................................... 28
6.6 EINSTELLEN DES PREISES PRO EINHEIT ............................................................................................................. 28
6.7 PLU VORGÄNGE ....................................................................................................................................................... 29
6.7.1 SPEICHERN DES PREISES PRO EINHEIT ................................................................................................... 29
6.7.2 LADEN DES PREISES PRO EINHEIT ............................................................................................................ 30
6.8 AUTOMATISCHES LÖSCHEN DES PREISES PRO EINHEIT .................................................................................. 30
6.9 SUMMIERUNG DES BETRAGES UND AUSDRUCKEN ........................................................................................... 30
6.9.1 VOREINSTELLUNGEN ZUM ADDIEREN UND / ODER AUSDRUCK ........................................................... 30
6.9.2 ADDIERVORGÄNGE UND / ODER AUSDRUCK ........................................................................................... 30
6.9.3 STÜCKZAHL AKKUMULATION FUNKTION .................................................................................................. 30
6.9.4 SEBLSTBEDIENUNGS-MODUS .................................................................................................................... 30
6.9.5 HINWEIS: ........................................................................................................................................................ 30
6.11 HINTERGRUNDBELEUCHTUNG ............................................................................................................................ 31
6.12 AUTOMATISCHE ABSCHALTUNG .......................................................................................................................... 31
6.13 ANZEIGE MIT „EMPFINDLICHKEIT X 10“ ............................................................................................................... 31
7. SETUP-UMGEBUNG ........................................................................................................................................................ 31
“F1” – ANZAHL ZIFFERNSCHRITTE DER WAAGE (*) .................................................................................................... 33
“F2” – PREISBEZUG ........................................................................................................................................................ 33
“F3” – WÄGEBEREICH (*) ............................................................................................................................................... 33

23
“F4” – DEZIMALSTELLEN (*) ........................................................................................................................................... 33
“F5” – DEZIMALSTELLEN DES BETRAGES ................................................................................................................... 34
“F6” – AUTOMATISCHE NULLSTELLUNG BEIM EINSCHALTEN (*) .............................................................................. 34
“F7” – MANUELLE NULLSTELLUNG (*) .......................................................................................................................... 34
“F8” – BESCHRÄNKUNG DER TARAFUNKTIONEN (*) .................................................................................................. 34
“F9” – A/D-WANDLER-PUNKTE ...................................................................................................................................... 34
“F10” – A/D-WANDLER LESEZEIT .................................................................................................................................. 34
“F11” – BAUD RATE ......................................................................................................................................................... 34
“F12” – MINDESTTEILUNG DES BETRAGES ................................................................................................................ 34
“F13” – DRUCKER (*) ...................................................................................................................................................... 34
“F14” – KOMMASTELLEN FÜR DEN PREIS ................................................................................................................... 34
“F15” – AUSDRUCK DER SPRACHE UND DER WÄHRUNG ......................................................................................... 34
“F16” – GRAVITATIONSWERT (G-FAKTOR) DER GEBRAUCHSZONE (*) .................................................................... 35
“F17” – SELBSTBEDIENUNGS-MODUS ......................................................................................................................... 35
“F18” – DRUCK-FORMAT ................................................................................................................................................ 35
“F19” – DRUCK DER KOPFZEILEN ................................................................................................................................ 35
“F20” – DRUCK DER FUßZEILEN ................................................................................................................................... 35
“F21” – RESET (*) ............................................................................................................................................................ 35
8. DRUCKER ........................................................................................................................................................................ 36
8.1 DRUCKBELEGE - BEISPIELE ................................................................................................................................... 36
8.2 DATUM UND UHRZEIT EINSTELLEN ....................................................................................................................... 37
9.ANSCHLUSS AN REGISTRIERKASSEN LYNX UND PUMA ........................................................................................... 38
10. ZUGRIFF AUF DIE WAAGEN-EINSTELLUNGEN SPERREN (VERSIEGELN) ............................................................. 39
11. FEHLERMELDUNGEN ................................................................................................................................................... 39
ANWEISUNGEN ZUM RECYCLING .................................................................................................................................... 39
KONFORMITÄTSERKLÄRUNG ........................................................................................................................................... 40
GARANTIE ............................................................................................................................................................................ 40

24
1. EINLEITUNG
Version
Schale
Wägebereich
Ziffer
nschritt [g]
ASGP
P15
240x370
6/15 2/5
ASGP
P30
240x370
15/30
5/10
Diese Beschreibung erklärt Ihnen den Einsatz und die Funktionen der ASGPP Waagen.
Die Waage soll an einem Ort eingesetzt werden, welcher die Genauigkeit nicht beeinträchtigt.
Extreme Temperaturen vermeiden. Nicht in direktem Sonnenlicht oder in der Nähe von Ventilatoren betreiben.
Achten Sie auf stabile Unterlage. Tisch oder Boden müssen eben und frei von Vibrationen sein. Nicht in der Nähe von
vibrierenden Maschinen betreiben.
Achten Sie auf ein sauberes Netz. Nicht an der gleichen Steckdose mit großen Geräten oder Motoren anschließen.
Nicht in hoher Luftfeuchtigkeit betreiben. Direkten Kontakt mit Wasser vermeiden. Nicht in Wasser eintauchen oder
ansprühen.
Vermeiden Sie Zugluft von offenen Fenstern oder Ventilatoren. Nicht in der Nähe von Türen (Zugluft) platzieren.
Halten Sie die Waage sauber. Vermeiden Sie ätzende oder scharfe Reinigungs- oder Lösungsmittel; nehmen Sie am
besten ein leicht angefeuchtetes, weiches Reinigungstuch.
Stapeln Sie keine Waren auf die unbenutzte Waage, die Wägezelle könnte so unbemerkt überlastet werden!
HINWEISE
2. TECHNISCHE HAUPTEIGENSCHAFTEN
(Abmessungen mm)
- 6 große LCD-Displays (3 auf Bediener- und 3 auf Kundenseite)
- Wiederaufladbare Batterie
- Auswählbare Preiseinheit (kg oder 100g)
- Addiervorgänge
- Rechenfunktion, Speicheraufruf, Wechselgeldfunktion und Speicherlöschung
- Automatische Hintergrundbeleuchtung
- Integrierter Thermodrucker
kg

25
3. INSTALLATION
a) Die Verpackung öffnen.
b) Entfernen Sie die Transportsicherungs-Schraube(n) - je nach Modell verschieden -, die sich unterhalb der Waage
befindet. Verwahren Sie diese Schraube für einen eventuellen, späteren Transport. Siehe Bild unten.
c) Nivellieren Sie die Waage mittels der Stellfüße und Wasserlotlibelle aus, bis sich die Blase im Zentrum der Libelle
befindet. Ein stabiler, fester und ebener Standort der Waage ist sehr wichtig.
ALLE ECKEN MÜSSEN GLEICHMÄSSIG STEHEN. Überprüfen Sie gründlich, dass alle Füße auf dem Untergrund
feststehen und dass die Waage nicht „kippelt.
Während der Installation, bitte Vorsicht an dem Anschlussflat zwischen dem Saeule und der Stuetze.Der Kabel muss
innerhalb den Saeule durchgehen, um zu vermeiden,dass es beschaedigt wird.

26
ZERO
Taste zur Nullstellung der Waage.
TARE
Abzug der Tarawerte und Änderung von Brutto
- auf Netto
-
Modus.
M+ Addieren von Werten und Durchführung des Drucks
,
oder druckt die Summe aus, sofern verher
3.1 STROMVERSORGUNG UND INBETRIEBNAHME
Die Waage kann mit dem Netzteil oder der internen Batterie betrieben werden.
ANMERKUNG: Bei Batteriebetrieb wird empfohlen, vor der Inbetriebnahme die Batterie voll aufzuladen (ca. 12
Stunden).
ZUR STROMVERSORGUNG des Gerätes mit Netzspannung 240 VAC, muss der kleine Stecker des serienmäßig
mitgelieferten AC/DC-Netzteils in die dafür vorgesehene Buchse unter der Waage gesteckt werden.
ZUM EINSCHALTEN des Gerätes, den Taster unter der Waage aufwärts drücken, bis die Waage sich einschaltet. Dann
den Taster wieder loslassen. Schließlich zeigt die Waage nach einer Selbsprüfung “hi rES” (ungeeichte Waage) oder
“LEGAL” (geeichte Waage) an.
ZUM AUSSCHALTEN den gleichen Vorgang - wie beim Einschalten - wiederholen.
3.2 BATTERIEBETRIEB
Wenn gewünscht, kann die Waage über eingebaute Batterie betrieben werden.
1 . Bei niedrigem Batteriestand, schaltet sich die Leuchte mit dem Symbol automatisch ein.
Die Batterie muss dann über das Netzteil geladen werden. Bei Nutzung der Waage ohne Aufladung zeigt das
Display alle 10 min “BAT LO”. Die Waage schaltet sich nach etwa 50 Min. mit gleichzeitiger Warnung automatisch ab,
um die Batterie vor Extrem-Entladung und Zerstörung zu schützen. Bitte laden Sie die Batterie sofort wieder auf, um
die Waage weiter (auch während der Aufladezeit) benutzen zu können.
2 . Die Farbe “Recharge” LED ist orange, wenn die Batterie geladen wird und wechselt zu grün, wenn die Batterie voll
aufgeladen ist.
3 . Ältere Batterien haben möglicherweise eine verkürzte Betriebszeit. Kontaktieren Sie in diesem Fall Ihren Händler.
4. TASTEN UND ANZEIGEN AUF DEM FRONTPANEL
4.1 FUNKTION DER TASTEN

27
eine Akkum
ulation mit der M+ Taste durchgeführt wurde (siehe Kapitel 6.10).
U Wechsel der Einheit.
PRINT
Führt einen einfachen Ausdruck ohne
Summierung
aus.
FEED
Papiertransport im Drucker ohne zu Drucken.
“ACCOUNT”
Speicherabruf, Wechselgeldberechnung und Spei
cherlöschung.
LOCK
Aktivierung/Deaktivierung des Preises und der automatischen Tara
-Löschfunktion.
PLU, 1(A)
~28
Speicherung des Preises pro Einheit und Aufruf des Preises pro Einheit.
C Stornierung der gespeicherten Daten
0~9 NUMERISCHE
Tasten (0~9) z
ur Eingabe de
s
Preise
s pro Einheit.
00 „00“ Eingabe bei F
ix-Komma. Kommaeingabe bei
Fließ
-
Komma. Siehe
Parameter
F14 Abs. 7.
. Kommaeingabe bei
Fließ
-
Komma. Siehe
Parameter
F14 Abs. 7.
KONTROLLEUCHTEN
FUNKTION
Recharg
e Anzeige wenn die Batterie zur Neige geht (Siehe Abschnitt 3.2).
4.2 FUNKTION DER KONTROLLEUCHTEN
5. SYMBOLE DER LCD ANZEIGE
ERSTES DISPLAY (WEIGHT kg)
Zeigt das Gewicht auf der Waage an.
ZWEITES DISPLAY (UNIT PRICE €/kg €/100g)
Zeigt den eingegebenen Preis
DRITTES DISPLAY (AMOUNT €)
Zeigt den Verkaufspreis

28
FUNCTIONEN DER SYMBOLE
SYMBOLE
FUNKTION
Die Batterie ist leer (Siehe Abschnitt 3.2).
Mitte
-
Null-Anzeige
, das Gewicht ist
innerhalb von
–
1/4 ÷ +1/4
eines Ziffernschritts
.
~ Zeigt an, dass das Gewicht instabil ist.
NET Zeigt an, dass es sich um ein Nettogewicht handelt.
kg Zeigt
die verwendete Ma
ß
einheit an (Kilogramm)
LOCKED
Das a
utomatische L
öschen des Preises pro Einheit ist ausgeschaltet
(Siehe
Kapitel
6.8)
€/kg Zeigt an
, dass
der Preis per Kilogramm
ist.
€/100g
Zeigt an
, dass
der Preis per 100 Gramm
ist
M+ Zeigt an, dass sich ein Wert im Speicher befindet
Die LCD-Display hat Symbole, die den Funktionsstatus anzeigen; Beschreibung für jedes Symbol siehe unten.
0
Zeigt an, dass der Wert das Wechselgeld ist.
6. FUNKTIONEN
6.1 AUTOMATISCHE NULLSTELLUNG BEIM EINSCHALTEN
Wird die Waage eingeschaltet, wenn sich ein Gewicht auf der Wägeplattform befindet, dann prüft die Elektronik ob
sich das aufgelegte Gewicht innerhalb des eingestellten Prozentwertes (siehe F6 Parameter, Kapitel 7) befindet;
wenn dies zutrifft, wird die Waage nullgestellt. Ist das Gewicht außerhalb dieses Wertes, erscheint “Err 4”. Bei
ungeeichten Waagen wird die Waage nach kurzer Zeit nullgestellt, jedoch erscheint periodisch “Err 4”.
6.2 NULLSTELLUNG DER WAAGE
Wenn kein Gegenstand auf der Waage liegt, aber nicht Null angezeigt wird, drücken Sie die ZERO-Taste, um das
Anzeigegerät auf Null zu stellen.
Wenn der Wert größer als der programmierte Prozentwert (siehe F7 Parameter, Kapitel 7) in Bezug auf den
Wägebereich ist, hat der Tastendruck keine Auswirkung.
6.3 TARA FUNKTIONEN
Stellen Sie einen Behälter auf die Wägeplattform. Warten Sie auf eine stabile Gewichtsanzeige und drücken Sie
dann die TARE-Taste. Durch die Tarierfunktion wird das Gewicht des Behälters abgezogen. Zum Löschen der Tara,
nehmen Sie den Behälter herunter und drücken erneut TARE-Taste.
6.3.1 BESCHRÄNKUNG DER TARA-FUNKTIONEN
Die Tarierfunktion kann eingeschränkt werden, wenn man "oFF" im F8 Parameter in der Setup-Umgebung (siehe
Kapitel 7) eingibt. Die halbautomatische Tarierung ist nur wirksam, wenn die Tara gleich 0 ist.
ANM.: Bei geeichten Waagen kann der Parameter F8 nicht geändert werden.
6.4 ÜBERLAST WARNUNG
Bitte legen Sie keine Gegenstände auf die Waage, deren Gewicht die maximale Kapazität übersteigt.
Wenn “—OL—“ angezeigt wird und ein akustischer Alarm ertönt, nehmen Sie den Gegenstand von der
Wägeplattform, um eine Überlastung und Beschädigung der Wägezelle zu vermeiden.
6.5 EINHEIT ÄNDERN
Benutzen Sie die U-Taste zum Ändern der Einheit. Durch Drücken der U-Taste ändert sich die Wägeeinheit in einer
Schleife, und das zugehörige Anzeigesymbol schaltet sich ein.
Anm.: Beim Einschalten erscheint automatisch die Hauptpreiseinheit von (F2 Parameter, Kapitel 7)
6.6 EINSTELLEN DES PREISES PRO EINHEIT
Um mit der Waage richtig zu arbeiten, müssen Sie einen Preis pro Einheit der Ware eingeben. Die Waage nimmt
diesen Preis pro Einheit, um den Wert der auf der Wägeplattform liegenden Ware zu ermitteln. Wenn die Waage im
ersten Display ( kg ) das Gewicht der Ware anzeigt, geben Sie den Preis pro Einheit über die numerischen

29
Tasten ein. Der eingestellte Preis pro Einheit wird im zweiten Display (€/kg €/100g) angezeigt. Das dritte
Display ( € ) zeigt den Gesamtpreis der Ware. Um einen vorherigen Preis pro Einheit zu löschen, drücken
Sie die C-Taste.
6.7 PLU VORGÄNGE
Die Waage kann 127 Preise pro Einheit speichern, 28 direkt über Schnell-Tasten
6.7.1 SPEICHERN DES PREISES PRO EINHEIT
DIREKTE PLU-TASTEN
Um den Preis pro Einheit einer direkten Taste zuzuordnen, geben Sie den Preis pro Einheit ein. Dann halten Sie die
gewünschte Speicher-Taste (
Bezeichnung (Artikelbezeichnung) mit Hilfe der A-Z Tasten einzugeben. Die TARA-Taste zum Bestätigen drücken:
Der Preis pro Einheit ist nun mit der ausgewählten Taste verbunden.
PLU-SPEICHER
Geben Sie den Preis pro Einheit ein und halten Sie dann die Taste PLU für 3 Sekunden gedrückt. Es wird “SAVE
PoS 00” angezeigt. Drücken Sie die numerischen Tasten 0~99, um den Speicherplatz auszuwählen. Danach
werden Sie aufgefordert, die PLU-Bezeichnung (Artikelbezeichnung) mit Hilfe der A-Z Tasten einzugeben. Die
TARA-Taste zum Bestätigen drücken: Der Preis pro Einheit ist in der Waage unter dem gewählten Speicherplatz
gespeichert.
1~28)
3 Sekunden lang gedrückt. Danach werden Sie aufgefordert die PLU

30
6.7.2 LADEN DES PREISES PRO EINHEIT
DIREKTE PLU-TASTEN
Wenn Sie den Preis pro Einheit verwenden möchten, der bereits einer direkten Taste zugeordnet worden ist, dann
drücken Sie die gewünschte Speichertaste (
1~28);
der aktuelle Preis pro Einheit wird vom gespeicherten Wert
überlagert.
PLU-SPEICHER
Wenn Sie einen in der Waage gespeicherten Preis pro Einheit verwenden möchten, drücken Sie die PLU-Taste. Die
Waage zeigt “LoAd PoS 00”. Drücken Sie die numerische Taste 0~99, um den Speicherplatz auszuwählen, den
Sie verwenden möchten. Der aktuelle Preis pro Einheit wird vom gespeicherten Wert überlagert.
6.8 AUTOMATISCHES LÖSCHEN DES PREISES PRO EINHEIT
An der Waage kann ein automatisches Zurücksetzen des zuletzt verwendeten Preises pro Einheit eingestellt werden.
Wenn die Gewichtsanzeige der Waage auf Null zurück geht, wird der Preis pro Einheit gelöscht.
Durch Drücken der Taste LOCK kann die Funktion ein- oder ausgeschaltet werden. Wenn die Anzeige LOCK an ist,
ist die Funktion deaktiviet. Wenn die Anzeige LOCK aus ist, ist die Funktion aktiviert.
6.9 SUMMIERUNG DES BETRAGES UND AUSDRUCKEN
Die Waage kann auf Summierung der Preise eingestellt werden; hierbei erfolgt auch automatisch ein Ausdruck des
Gewichtes und Preisangaben. (Siehe F13 Parameter, Kapitel 7).
6.9.1 VOREINSTELLUNGEN ZUM ADDIEREN UND / ODER AUSDRUCK
Vor dem Addieren stellen Sie bitte sicher, dass die Wägeplattform leer ist, der derzeitige addierte Wert auf Null
zurückgesetzt ist und die Gewichtsanzeige stabil ist.
6.9.2 ADDIERVORGÄNGE UND / ODER AUSDRUCK
Legen Sie das Wägegut auf die Wägeplattform. Warten Sie auf eine stabile Gewichtsanzeige. Drücken Sie die
M+Taste zum Akkumulieren oder die PRINT-Taste, um ohne Akkumulation zu drucken. Das dritte Display ( € ) zeigt
die Gesamtsumme an, und es erfolgt ein Ausdruck des Gewichtes und Preisangaben.
6.9.3 STÜCKZAHL AKKUMULATION FUNKTION
Es ist möglich, den Wert auf der Basis einer freien Anzahl von Stückzahlen anstelle des Gewichtes zu
errechnen und zu summieren:
1) drücken Sie bei leerer Waage die M+ Taste,
2) geben Sie die Stückzahl ein,
3) drücken Sie die M+ Taste,
4) sofern notwendig, wiederholen Sie den Vorgang ab Punkt 2 oder Sie drücken die ZERO-Taste, um die
Funktion zu verlassen.
6.9.4 SEBLSTBEDIENUNGS-MODUS
Die Waage kann so eingestellt werden, dass sie nach dem Drücken einer gewählten PLU-Taste automatisch
den Wert akkumuliert (siehe F17 Parameter, Kapitel 7), deshalb erfolgt nach dem Drücken einer PLU-Taste
automatisch eine Akkumulation und Ausdruck (siehe Kapitel 6.7.2).
6.9.5 HINWEIS:
- Die Summierfunktion geht nur ab einem Minimalgewicht von 20d (d = Ziffernschritt).
- Die höchste Totalsumme ist 999999. Wenn diese erreicht ist, muss gelöscht werden.
- Beim Ausschalten wird die Summe gelöscht.

31
6.10 RECHENVORGÄNGE UND SUMMIERUNG
Nach dem Errechnen der Gesamtsumme, ist es möglich:
a) durch das Drücken der PRINT-Taste bei leerer Waage die Totalsumme zu drucken und zu löschen
oder
b) sich den Gesamtbetrag auf dem ersten Display anzeigen zu lassen, wenn Sie die Account-Taste drücken, danach
können Sie bei dieser Anzeige:
- den Betrag des Zahlgeldes über die Tastatur eingeben; dieser Wert wird im zweiten Display angezeigt und das
dritte Display zeigt an, wieviel Rückgeld herauszugeben ist.
- durch das Drücken der Print-Taste einen Druckbeleg mit der Totalsumme erstellem, die Totalsumme löschen,
das Zahlgeld und Rückgeld veranlassen und automatisch die Visualisierung verlassen;
- durch das Drücken der M+ Taste nur die Totalsumme ausdrucken, das Zahlgeld und Rückgeld veranlassen und
in dieser Visualisierung verbleiben;
- durch Drücken der ZERO-Taste in den normalen Wägemodus zurückkehren oder durch das Drücken der
TARA-Taste den Speicher zu löschen.
Anmerkung: Auch wenn Sie keinen Addiervorgang durchgeführt haben, können Sie die Account-Funktion
anwenden, der summierte Preis ist der aktuelle Gesamtpreis.
6.11 HINTERGRUNDBELEUCHTUNG
Die Waage hat drei Modi der Hintergrundbeleuchtung: An, Aus und Automatisch.
ON (AN): Hintergrundbeleuchtung eingeschaltet, egal ob das Gewicht Null oder nicht Null ist.
OFF (AUS): Hintergrundbeleuchtung ausgeschaltet, egal ob das Gewicht Null oder nicht Null ist.
AUTO: Hintergrundbeleuchtung schaltet sich ein, wenn das aktuelle Gewicht nicht Null ist und schaltet sich aus,
wenn das aktuelle Gewicht Null ist.
Halten Sie die LOCK-Taste gedrückt, um den Modus der Hintergrundbeleuchtung einzustellen. Das Display zeigt
den aktuellen Modus. Drücken Sie die M+ Taste, um einen anderen Modus auszuwählen (ON/OFF/AUTO). Nach
der Auswahl drücken Sie die TARE-Taste, um diesen zu speichern.
6.12 AUTOMATISCHE ABSCHALTUNG
Die Waage hat eine Funktion zur automatischen Abschaltung, die über einen Parameter eingestellt werden kann.
Drücken Sie die ACCOUNT-Taste während der Selbstüberprüfung beim Einschalten. Das Display zeigt “sleep
mode”, drücken Sie die M+ Taste, um 0 - 1 - 5 oder 30 (keine Selbstabschaltung / Selbstabschaltung nach 1 Min.
Nichtbenutzung / Selbstabschaltung nach 5 Min. Nichtbenutzung / Selbstabschaltung nach 30 Min.
Nichtbenutzung) auszuwählen. Drücken Sie die TARE-Taste, um zu speichern.
6.13 ANZEIGE MIT „EMPFINDLICHKEIT X 10“
Es ist möglich, diese Funktion zum Test bei der Kalibrierung zu verwenden.
Halten Sie die TARA-Taste drei Sekunden lang gedrückt: das Display wird das Gewicht mit dem kleinsten
Ziffernschritt mal 10 (aus z.B. 2g werden 0,2g) anzeigen (eine blinkende Ziffer wird angefügt).
Nach ca. 5 Sekunden kehrt die Anzeige automatisch in den Standard-Modus zurück.
7. SETUP-UMGEBUNG
Die Waage hat konfigurierbare Parameter.
Um in die SETUP-Umgebung zu gelangen, drücken Sie nach dem Einschalten beim Herunterzählen die TARE-Taste.
Ein Passwort wird gefragt. Das vorgegebene Standard-Passwort ist 0000.
- Zum Bestätigen des Passwortes die TARE-Taste drücken:
- Das zweite Display zeigt den erste Funktions-Parameter "F0":
- Mit der M+ Taste gelangen Sie zum jeweils nächsten Parameter, zur jeweils nächsten Funktion.
- Mit der TARE-Taste kommen Sie zur Einstellung.
- Mit der M+ Taste können Sie wählen oder es kann über die numerische Tastatur eine Werteingabe erfolgen.
- Mit der TARE-Taste können die Eingabe oder Auswahl bestätigen.
- Mit der ZERO-Taste können Sie den Parameter unverändert ohne zu Speichern oder die SETUP-Umgebung verlassen.

32
BLOCKSCHALTBILD DER SETUP-UMGEBUNG
F0 CAL
F1 rES
1 3000,
1 6000,
dUaL rAnGE
SETUP
ENVIRONMENT
F2 Unit
F3 CAPA
F4 Point
F5 Point
F6 init ZEro
F7 rE ZEro 0 … 20
F8 SCSIUE
TARE
F9 A-D
COUNTS
F10 SPEED 7.5, 15, 30, 60
F11 BAUDPin
kiLoS, 100
3, 6, 15, 30
0, 1, 2, 3, 4
0, 1, 2
0 … 20
On, oFF
2400, 4800,
9600, 19200
F12 Min Coin
F13 SEriES
F14 Point
F15 LAnG
F16 GrU
F17 SELF oFF, on
F18 FORMAT
F19 HEADER Text 1...Text 4
F20 FOOTER Text 1...Text 2
F21 rESEt
1, 2, 5, 10
On, oFF
FiXED, FLoAt
En, it, ES,
Fr, DE
9,XXXXX
Normal, List1,
List2
Symbol, Text
XXX
Bei der Beschreibung der Parameter:
- Die meßtechnisch relevanten Parameter sind mit dem Symbol (*) gekennzeichnet, die bei einem geeichten
Instrument nur lesbar und nicht änderbar sind. Siehe Kapitel 9.

33
“F0” – KALIBRIERUNG (*)
Hinweis: Die Maß-Einheit für die Kalibrierung ist in Kilogramm. (“kg”).
1) Das Display zeigt “CAL F0”: Drücken Sie die TARE-Taste, um in diesen Schritt zu gelangen.
2) In dem Displays wird der Gravitationswert (G-Faktor) angezeigt, der im Parameter F16 eingestellt wurde: Falls der
G-Faktor zwischen Herstell- bzw. Eich-Ort zum Gebrauchs-Ort unterschiedlich ist, können Sie die Einstellung des
G-Wertes über die TARE-Taste ändern; nun müssen Sie 6 Zeichen für den G-Wert am Gebrauchs-Ort eingeben.
(Den für Sie gültigen G-Wert erfahren Sie z.B. beim zuständigen Eichamt.) Der Gravitationswert kann auch im
Parameter F16 eingestellt werden.
3) Das Display zeigt “UnLoAd”: Entladen Sie die Waage und drücken Sie TARE-Taste.
4) Das Display zeigt “LoAd X KiLoS”, dabei ist X das Eichgewicht, das auf die Waage gelegt werden soll; drücken
Sie mehrmals die M+ Taste, wenn Sie den Wert des Eichgewichts ändern möchten.
5) Legen Sie das Gewicht auf die Waage, warten Sie bis die Gewichtsanzeige stabil ist und drücken dann TARE-Taste.
6) Wenn die Kalibrierung korrekt ist, zeigt das Display für einen Moment “SPAN PASS” und danach “CAL F0” an.
Wenn die Kalibrierung nicht korrekt ist, zeigt das Display für einen Moment “SPAN FAIL LOW” (wenn das
Gewicht zu niedrig ist) oder “SPAN FAIL HI” (wenn das Gewicht zu hoch ist) an und danach “CAL F0”.
WENN DER GEBRAUCHSORT ANDERS ALS DER HERSTELLUNGS- ODER EICHORT IST, FOLGENDES
DURCHFÜHREN:
1) Die Kalibrierung durchführen wie vorher angegeben.
2) Zum Parameter F16 gehen und den G-Faktor für den Gebrauchs-Ort eingeben.
3) Drücken Sie die TARE-Taste zum Bestätigen der Eingabe.
4) Speichern Sie und verlassen Sie die SETUP-Umgebung durch mehrmaliges Drücken der ZERO-Taste bis zum
Wägemodus.
5) Der Gewichtsfehler, der in den unterschiedlichen Erdanziehungskräften (G-Faktor) begründet ist, wird so
automatisch korrigiert.
“F1” – ANZAHL ZIFFERNSCHRITTE DER WAAGE (*)
Mit der M+ Taste auswählen.
Mit der TARE-Taste bestätigen.
Wert Anzahl Ziffernschritte
1 3000 3000
1 6000 6000
dUAL rAnGE 3000 + 3000
“F2” – PREISBEZUG
Mit der M+ Taste auswählen.
Mit der TARE-Taste bestätigen.
kiLoS Kilogramm
100 100 Gramm
“F3” – WÄGEBEREICH (*)
Mit der M+ Taste auswählen.
Mit der TARE-Taste bestätigen.
3, 6, 15, 30 kg
“F4” – DEZIMALSTELLEN (*)
Mit der M+ Taste auswählen:
0.0 (1 Dezimalstelle),0.00 (2 Dezimalstellen), 0.000 (3 Dezimalstellen), 0.0000 (4 Dezimalstellen), 0 (keine
Dezimalstelle).
Mit der TARE-Taste bestätigen.

34
“F5” – DEZIMALSTELLEN DES BETRAGES
Mit der M+ Taste auswählen:
0.0 (1 Dezimalstelle),0.00 (2 Dezimalstellen), 0.000 (3 Dezimalstellen), 0.0000 (4 Dezimalstellen), 0 (keine
Dezimalstelle).
Mit der TARE-Taste bestätigen.
“F6” – AUTOMATISCHE NULLSTELLUNG BEIM EINSCHALTEN (*)
Hier wird der Prozentwert (vom Wägebereich) eingestellt, den die Waage beim Einschalten nullstellen kann. Ist das
Gewicht beim Einschalten nicht innerhalb dieses Bereichs, wird nach kurzer Zeit das aktuelle Gewicht angezeigt.
Mit der M+ Taste auswählen: 0....20
Mit der TARE-Taste bestätigen.
“F7” – MANUELLE NULLSTELLUNG (*)
Hier wird der Prozentwert (vom Wägebereich) eingestellt, der über die Zero-Taste nullgestellt werden kann.
Mit der M+ Taste auswählen: 0....20
Mit der TARE-Taste bestätigen.
“F8” – BESCHRÄNKUNG DER TARAFUNKTIONEN (*)
on keine Einschränkungen
oFF Einschränkungen
Siehe Kapitel 6.3.1 für die Beschreibung dieser Funktion.
“F9” – A/D-WANDLER-PUNKTE
Durch Drücken der TARE-Taste sehen Sie die A/D-Wandler-Punkte entsprechend dem derzeitig auf der Waage
liegenden Gewichts.
Durch Drücken der ZERO-Taste kann (natürlich bei leerer Waage oder dauerhaftem Tara-Gewicht) dieser Wert
nullgestellt werden.
TARE-Taste drücken, um den Parameter zu verlassen.
“F10” – A/D-WANDLER LESEZEIT
Durch Drücken der ENTER-Taste wird die Lesezeit des A/D-Wandlers in Lesungen je Sekunde eingestellt.
Mit der M+ Taste auswählen: 7.5, 15, 30, 60 (Lesungen je Sekunde).
Mit der TARE-Taste bestätigen.
“F11” – BAUD RATE
Mit der TARE-Taste können Sie eine Auswahl der Baud Raten durchführen.
Drücken Sie die M+ Taste zum Auswählen der möglichen Übertragungs-Geschwindigkeit:
2400, 4800, 9600, 19200 Baud.
“F12” – MINDESTTEILUNG DES BETRAGES
Hier kann der Teilungsfaktor zur Errechung des Verkaufspreises eingegeben werden.
Mit der M+ Taste auswählen: 1, 2, 5, 10.
Mit der TARE-Taste bestätigen.
“F13” – DRUCKER (*)
off deaktiviert
on aktiviert.
“F14” – KOMMASTELLEN FÜR DEN PREIS
FLoAt Fließ-Komma
FiXEd Festes Komma (Stellenzahl wird in Parameter F5 eingestellt)
“F15” – AUSDRUCK DER SPRACHE UND DER WÄHRUNG
Drücken Sie die TARE-Taste, um zwischen den Sprachen auszuwählen.
Drücken Sie die M+ Taste, um eine der möglichen Sprachen auszuwählen: En, it, ES, Fr, DE.

35
Durch Bestätigung mit der TARE-Taste wird die Text-Bezeichnung oder das Symbol für die Währung, in der gedruckt
werden soll, ausgewählt.
Drücken Sie die M+ Taste für die Auswahl von:
- TEXT: Mit der TARE-Taste bestätigen; die Bezeichnung der WÄHRUNG mit Hilfe von 3 Zeichen eingeben und
anschließend mit der TARE-Taste bestätigen.
- SYMBOL: Mit der TARE-Taste bestätigen. Geben Sie dann den ASCII-Code für die Währung mittels 3 Ziffern
(€=254) ein und drücken Sie die TARE-Taste zur Bestätigung.
“F16” – GRAVITATIONSWERT (G-FAKTOR) DER GEBRAUCHSZONE (*)
In diesem Parameter wird der G-Faktor für die Erdanziehungskraft am Gebrauchs-Ort (sofern vom Herstell- oder Eich-Ort
unterschiedlich) eingestellt.
Manuelle Eingabe des Wertes für die Schwerkraft g: Der unterschiedliche G-Faktor (6-stellig) für den Gebrauchs-Ort
muss manuell eingegeben werden.
Im Falle eines falsch eingegebenen G-Wertes: Wird der niedrigste Wert angezeigt (9,75001). Ein falsch eingegebener
Wert ist außerhalb von 9,75001 und 9,84999 (inklusive); ein Wert innerhalb dieses Zahlenbereichs, wird als richtig
anerkannt. Den richtigen Wert für den Gebrauchs-Ort können Sie zum Beispiel bei dem zuständigen Eichamt erfahren.
“F17” – SELBSTBEDIENUNGS-MODUS
off deaktiviert
on aktiviert
Siehe Kapitel 6.9.4 für die Beschreibung.
“F18” – DRUCK-FORMAT
Drücken Sie die M+ Taste zur Auswahl der möglichen Druck-Formate: Normal, List1, List2.
Siehe Kapitel 8 für die Beschreibung.
Bestätigung Sie mit der TARE-Taste oder drücken Sie die ZERO-Taste, um den Parameter ohne Bestätigung zu
verlassen.
“F19” – DRUCK DER KOPFZEILEN
Über das Drücken der TARE-Taste kommen Sie zur Konfiguration der bis zu 4 Zeilen möglichen Kopfzeilen für den
Druckbeleg im List1-Format und List2-Format (siehe Parameter F18):
- wählen Sie die zu konfigurierende Zeile mit der M+ Taste;
- drücken Sie die TARE-Taste zur Eingabe oder Änderung: Sie werden zur Eingabe der Kopfzeile über die A-Z Tasten
aufgefordert;
- bestätigen Sie die Eingabe mit der TARE-Taste;
- wiederholen Sie diesen Vorgang für alle gewünschten Kopfzeilen oder verlassen Sie diesen Parameter durch Drücken
der ZERO-Taste.
“F20” – DRUCK DER FUßZEILEN
Über das Drücken der TARE-Taste kommen Sie zur Konfiguration der bis zu 2 Zeilen möglichen Fußzeilen für den
Druckbeleg im List1-Format und List2-Format (siehe Parameter F18):
- wählen Sie die zu konfigurierende Zeile mit der M+ Taste;
- drücken Sie die TARE-Taste zur Eingabe oder Änderung: Sie werden zur Eingabe der Fußzeile über die A-Z Tasten
aufgefordert;
- bestätigen Sie die Eingabe mit der TARE-Taste;
- wiederholen Sie diesen Vorgang für alle gewünschten Kopfzeilen oder verlassen Sie diesen Parameter durch Drücken
der ZERO-Taste.
“F21” – RESET (*)
Dieser Parameter ist nur für den Hersteller.

36
8. DRUCKER
Spezifikationen
Geschwindigkeit: 70 mm/sec.
Auflösung: 8 dot/mm.
384 dots pro Zeile.
Papierbreite: 58mm.
Rollendurchmesser: 50mm.
8.1 DRUCKBELEGE - BEISPIELE
Bei normalen Wägevorgängen sieht beim Drücken der PRINT-Taste das Datenformat folgendermaßen aus:
2011/08/02 13:38
BANANEN
NETTOGEWICHT: 0.335 kg
PREIS: 2.00 €/kg
BETRAG: 0.67 €
Im normalen Wägemodus, wenn das Gewicht summiert wird (siehe Kapitel 6.9), und wenn die Summen aus dem
Speicher wiederhergestellt wurden (siehe Kapitel 6.10), ist das Format von der Einstellung im Parameter F18 abhängig:
“Normal” Format
Akkumulation
2011/08/02 13:38
N. 1
BANANEN
NETTOGEWICHT: 0.335 kg
PREIS: 2.00 €/kg
BETRAG: 0.67 €
Summe
Datum und Uhrzeit (Siehe Kapitel 8.2)
PLU Beschreibung (Siehe Kapitel 6.7)
€= im Parameter F15 eingestellte Währung per /kg oder per /100g (siehe Kapitel 6.5)
Datum und Uhrzeit (Siehe Kapitel 8.2)
Schrittweise summieren
PLU Beschreibung (Siehe Kapitel 6.7)
€= im Parameter F15 eingestellte Währung per /kg oder per /100g (siehe Kapitel 6.5)
2011/08/02 13:38
SUMME
N. 1
BETRAG: 0.67 €
- - - - - - - - - - - - - - - - - - - - - - - -
Datum und Uhrzeit (Siehe Kapitel 8.2)
Schrittweise summieren
€= im Paramter F15 eingestellte Währung.

37
Format “List1”
DINI ARGEO SRL
Kopfzeile 1 (siehe Parameter 19, Kapitel 7)
DINI ARGEO SRL
Kopfzeile 1 (siehe Parameter 1
9, Kapitel 7)
V. DELLA FISICA 20
41042 FIORANO
WWW.DINIARGEO.COM
02/08/2011 13:38
N. NETTO(kg) €/kg €
- - - - - - - - - - - - - - - - - - - - - - #001 BANANEN
0.100 1.00 0.10
#002 KIRSCHEN
1 X 1.00 1.00
- - - - - - - - - - - - - - - - - - - - - - #002 SUMME 1.10
BAR 2.00
RUECKGELD 0.90
VIELEN DANK!
UND EINEN SCHÖNEN TAG!
Format “List2”
Kopfzeile 2 (siehe Parameter 19, Kapitel 7)
Kopfzeile 3 (siehe Parameter 19, Kapitel 7)
Kopfzeile 4 (siehe Parameter 19, Kapitel 7)
Datum und Uhrzeit (Siehe Abschnitt 8.2)
€= im Parameter F15 eingestellte Währung per /kg oder per /100g (siehe Kapitel 6.5)
PLU Beschreibung (siehe Kapitel 6.7)
PLU Beschreibung (siehe Kapitel 6.7)
Fußzeile 1 (siehe Parameter 20, Kapitel 7)
Fußzeile 2 (siehe Parameter 20, Kapitel 7)
V. DELLA FISICA 20
41042 FIORANO
WWW.DINIARGEO.COM
02/08/2011 13:38
N. NETTO(kg) €/kg €
- - - - - - - - - - - - - - - - - - - - - - #001 0.100 1.00 0.10
#002 1 X 1.00 1.00
- - - - - - - - - - - - - - - - - - - - - - #002 SUMME 1.10
BAR 2.00
RUECKGELD 0.90
VIELEN DANK!
UND EINEN SCHÖNEN TAG!
Kopfzeile 2 (siehe Parameter 19, Kapitel 7)
Kopfzeile 3 (siehe Parameter 19, Kapitel 7)
Kopfzeile 4 (siehe Parameter 19, Kapitel 7)
Datum und Uhrzeit (Siehe Abschnitt 8.2)
€= im Parameter F15 eingestellte Währung per /kg oder per /100g (siehe Kapitel 6.5)
Fußzeile 1 (siehe Parameter 20, Kapitel 7)
Fußzeile 2 (siehe Parameter 20, Kapitel 7)
8.2 DATUM UND UHRZEIT EINSTELLEN
Bei dem Modell ASGPP können Datum und Uhrzeit eingestellt werden, deren Ausdruck auf dem Druckbeleg möglich ist.
Die 00-Taste gedrückt halten bis auf dem Gewichts-Display “DATE” und auf dem Preis-Display pro Einheit “MM.DD.YY”
angezeigt wird. Geben Sie über die numerischen Tasten das neue Datum ein und drücken Sie anschließend die
TARE-Taste zur Bestätigung oder die ZERO-Taste, um diesen Vorgang ohne Änderung zu verlassen.
Danach gelangen Sie zur Zeiteinstellung. Auf dem Gewichts-Display wird TIME und auf dem Preis-Display pro Einheit
wird “HH.MM.SS” angezeigt. Geben Sie die neue Uhrzeit über die numerischen Tasten und drücken Sie anschließend
zur Bestätigung die TARE-Taste oder die ZERO Taste, um diesen Vorgang ohne Änderung zu verlassen.

38
9.ANSCHLUSS AN REGISTRIERKASSEN LYNX UND PUMA
Anschlussschema:
Zu verbinden registrierkassen das Instrument, sie müssen setzen Baud Rate auf 9600 (Step “F11” setup) und
Totalisierung auf ECR (Step “F13” setup).
An der registrierkassen müssen Sie wie folgt vor (nur Lynx):

39
10. ZUGRIFF AUF DIE WAAGEN-EINSTELLUNGEN SPERREN (VERSIEGELN)
FEHLERMELDUNGEN
BESCHREIBUNG
LÖSUNG
- - oL - -
Überlast
Entf
ernen Sie das Gewicht von der Waage
Err 4
Nullfindungsfehler
Beim H
ochfahren
der Waage (Einschalten)
oder wenn
die
ZERO
-
Taste
Err 5
Tastaturfehler
Die Tastatur könnte beschädigt sein
.
Err 6
Eingangssignal ist
Bedeutet, dass der A/D
-
Wandler Wert größer ist als der max. Wert
:
Bei der Verwendung der Waage im eichpflichtigen Verkehr, muss die Waage gegen Änderung der meßtechnischen
Parameter gesichert bzw. versiegelt werden.
Zur Sicherung der Waagen-Einstellungen, drücken Sie den eingelassenen Sperrschalter unterhalb der Waage für einen
Moment beim Einschalten (die Nachricht "LEGAL" erscheint kurzfristig); danach verschließen Sie den Sperrschalter und
versiegeln Sie bzw. der Eichbeamte diese Stelle mit der Siegelmarke, wie in untenstehender Abbildung gezeigt..
Um wieder einen Vollzugriff auf die Waagen-Einstellungen zu erhalten, entfernen Sie die Siegelmarke
und drücken Sie den eingelassenen Sperrschalter wiederum beim Einschalten (die Nachricht "HIRES"
erscheint kurzfristig).
Sperrschalter
11. FEHLERMELDUNGEN
größer als 3mV/V
ABS Siegel.
Siegel- oder Eichmarke.
gedrückt wird überschreitet das Gewicht einen Prozentsatz des
Wägebereiches. Entfernen Sie das Übergewicht und wiederholen Sie
den Vorgang
- Entfernen Sie das Übergewicht von der Waage.
- Die Wägezelle oder die Elektronik könnte beschädigt sein.
ANWEISUNGEN ZUM RECYCLING
Die durchgestrichene Mülltonne auf dem Produkt bedeutet, dass Altgeräte separat entsorgt werden
müssen oder bei Kauf eines Neugerätes dem Händler zurückgegeben werden können. Die
entsprechende Zuführung zum Recyclingprozess hilft negative Folgen für die Umwelt und
Gesundheit zu vermeiden und unterstützt die Wiederverwertung der Materialien aus denen das
Gerät besteht. Das widerrechtliche Entsorgen des Produkts durch den Benutzer wird durch
entsprechende gesetzliche Regulierungen geahndet.

40
BIS S.r.l.
Via Trieste, 31
20080 Bubbiano MI – Italia
Tel.: +39 02 90834207
Fax: +39 02 90870542
e-mail: info@BilanceOnLine.it
www.BilanceOnLine.it
KONFORMITÄTSERKLÄRUNG
Dieses Gerät entspricht den Anforderungen und Normen der zuständigen EU
Richtlinien. Die Konformitätserklärung ist auf der web site www.scalehouse.it
GARANTIE
Die Gewährleistung beläuft sich auf zwoelf Monate ab Lieferdatum,
ausgenommen sind Verschleißteile wie: Druckköpfe, Batterien, Räder und
elektrische Motoren. Für dieses Verbrauchsmaterial beträgt die
Gewährleistungsdauer drei Monate. Die Gewährleistung betrifft die eventuellen
Schaden, der von Baumangel oder Produktfehler herkommen und sie deckt die
Kosten der Arbeitsleistung und der ersetzten Bauteilen. Das Produkt muss in der
originellen Verpackung zu Lasten des Käufers an die Verkaufsfirma
zurückgeschickt werden. Falls der Eingriff am Gebrauchsort erwünscht ist, gehen
die Reisekosten des Technikers zu Lasten des Antragsteller. Die Arbeitsleistung
und die eventuelle Bauteile, die ersetzt sind, gehen zu Lasten der Verkaufsfirma.
Die Gewährleistung greift nicht, DIE GEWÄHRLEISTUNG GREIFT NICHT, wenn
die Schäden auf unsachgemäße Behandlung, auf nicht autorisierten Eingriffe, auf
Anschlüsse an andere Geräte oder Entnahme von Kennelementen des Produkt
(z.B. Seriennummer, Schilder) zurückzuführen sind. Ausgeschlossen ist jede
Vergütung von direkten oder indirekten Schäden, die dem Auftraggeber durch
den Ausfall oder Funktionsstörungen der verkauften Geräte oder Anlagen
entstehen, auch falls sie während des Garantiezeitraums auftreten. Schließt die
Gewährleistung auf Wägezellen Schäden aus, die durch Stöße oder Überlast
verursacht curde.
STEMPEL DER KUNDENDIENSTSTELLE
P.IVA e C.F.: 03774900967

41
FRANÇAIS
INDEX
1. INTRODUCTION ............................................................................................................................................................... 43
2. CARACTERISTIQUES TECHNIQUES PRINCIPALES ..................................................................................................... 43
3. INSTALLATION ................................................................................................................................................................. 44
3.1 ALIMENTATION ET MISE EN MARCHE .................................................................................................................... 45
3.2 ALIMENTATION A BATTERIE .................................................................................................................................... 45
4. TOUCHES ET AFFICHEURS DU PANNEAU FRONTAL ................................................................................................. 45
4.1 FONCTION DES TOUCHES ...................................................................................................................................... 45
4.2 FONCTION DES AFFICHEURS ................................................................................................................................. 46
5. DESCRIPTION DES AFFICHEURS .................................................................................................................................. 46
6. OPERATIONS ................................................................................................................................................................... 47
6.1 ZERO AUTOMATIQUE A L’ALLUMAGE ..................................................................................................................... 47
6.2 ZERO BALANCE ........................................................................................................................................................ 47
6.3 FONCTION DE TARE ................................................................................................................................................ 47
6.3.1 RESTRICTION DES FONCTIONS DE TARE .................................................................................................. 47
6.4 MESSAGE DE SURCHARGE .................................................................................................................................... 47
6.5 MODIFICATION DE L'UNITE DE PRIX ...................................................................................................................... 47
6.6 CONFIGURATION DU PRIX ...................................................................................................................................... 47
6.7 MEMOIRES DU NOMBRE DE PLU ........................................................................................................................... 48
6.7.1 ENREGISTREMENT DU PRIX EN MEMOIRE ................................................................................................ 48
6.7.2 EXTRACTION DU PRIX MEMORISE SUR LA TOUCHE A ACCES DIRECT «PLU»..................................... 48
6.8 EFFACEMENT AUTOMATIQUE DU PRIX ................................................................................................................. 48
6.9 IMPRESSION ET TOTALISATION DU MONTANT ..................................................................................................... 48
6.9.1 PREPARATION POUR TOTALISER ET/OU IMPRIMER ................................................................................ 48
6.9.2 IMPRESSION ET TOTALISATION .................................................................................................................. 48
6.9.3 FONCTION D’ACUMULATION DES PIECES ................................................................................................. 48
6.9.4 MODE EN LIBRE-SERVICE ........................................................................................................................... 49
6.9.5 REMARQUE .................................................................................................................................................... 49
6.10 TOTAL ET CALCUL DU RENDU DE LA MONNAIE ................................................................................................. 49
6.11 RETRO ECLAIRAGE ................................................................................................................................................ 49
6.12 ARRET AUTOMATIQUE ........................................................................................................................................... 49
6.13 AFFICHAGE AVEC UNE SENSIBILITE X 10 ........................................................................................................... 49
7. MENU DE SETUP ............................................................................................................................................................. 49
DIAGRAMME DU MENU DU SETUP............................................................................................................................... 51
“F0” - CALIBRATION (*) ................................................................................................................................................... 52
“F1” - NOMBRE DE DIVISIONS (*) .................................................................................................................................. 52

42
“F2” - UNITE DE PRIX PRINCIPALE................................................................................................................................ 52
“F3” – CAPACITE DE LA BALANCE (*) ............................................................................................................................ 52
“F4” - NOMBRE DE DECIMALES DE LA BALANCE (*) ................................................................................................... 52
“F5” - NOMBRE DE DECIMALES DU MONTANT ............................................................................................................ 52
“F6” – AUTO ZERO A L’ALLUMAGE (*) ........................................................................................................................... 52
“F7” - CHAMP DE ZERO MANUEL (*) ............................................................................................................................. 53
“F8” - RESTRICTION DES FONCTIONS DE TARE (*) .................................................................................................... 53
“F9” – POINTS DU CONVERTISSEUR A/D ..................................................................................................................... 53
“F10” - CONFIGURATION DE LA VITESSE DE LECTURE DU CONVERTISSEUR AD.................................................. 53
“F11” - BAUD RATE (VITESSE) ....................................................................................................................................... 53
“F12” - DIVISION MINIMUM DU MONTANT .................................................................................................................... 53
“F13” - TRANSMISSION DU PORT SERIE(*) .................................................................................................................. 53
“F14” - INTRODUCTION DU PRIX ................................................................................................................................... 53
“F15” - LANGUE D’IMPRESSION ET SYMBOLE DE LA DEVISE ................................................................................... 53
“F16” – GRAVITE DE LA ZONE D’UTILISATION (*) ........................................................................................................ 53
“F17” - MODE LIBRE-SERVICE ....................................................................................................................................... 54
“F18” – FORMAT D’IMPRESSION ................................................................................................................................... 54
“F19” – LIGNES D’EN-TETE DES IMPRIMES ................................................................................................................. 54
“F20” - LIGNES DE FIN D’IMPRESSION ......................................................................................................................... 54
“F21” - RESET (*) ............................................................................................................................................................. 54
8. IMPRIMANTE .................................................................................................................................................................... 54
8.1 FORMAT DES DONNEES DE SORTIE ..................................................................................................................... 55
8.2 ETABLIR DATE ET HEURE ....................................................................................................................................... 56
9.RACCORDEMENT AUX CAISSES ENREGISTREUSES LYNX ET PUMA ...................................................................... 57
10. SCELLEMENT DES PARAMETRES DE LA BALANCE ................................................................................................ 58
11. MESSAGES D’ERREUR ................................................................................................................................................. 58
INSTRUCTIONS POUR L’EVACUATION ............................................................................................................................. 58
DECLARATION DE CONFORMITE ...................................................................................................................................... 59
GARANTIE ............................................................................................................................................................................ 59

43
1. INTRODUCTION
Version
Plateau
Capacité kg
Echelon
g
ASGPP1
5 240x370
6/15 2/5
ASGPP30
240x370
15/30
5/10
Ce manuel a été créé pour vous aider à installer et à connaître les possibilités de fonctionnement de la balance série
ASGPP.
MISES EN GARDE
La balance doit être positionnée dans un endroit permettant de la garder en bon état.
Éviter les températures extrêmes. Ne pas exposer l'instrument aux rayons directs du soleil ou près de sources de
chaleur.
Poser ou fixer l'indicateur et la plateforme sur une base non sujette à vibrations. Ne pas installer l'instrument près de
machines créant des vibrations.
Éviter toute source d'alimentation instable. Ne pas utiliser près de sources importantes d'électricité.
Éviter les espaces dont le taux d'humidité est élevé car ils peuvent être à l'origine de la formation de condensation. Éviter
le contact direct avec l’eau. Ne pas éclabousser la balance et ne pas la plonger dans l'eau.
Éviter les déplacements d'air tels que les courants d'air ou les portes ouvertes. Ne pas mettre l'instrument près de
fenêtres ouvertes.
Veiller à ce que la balance soit toujours propre.
Ne pas laisser de produit sur la balance en dehors de son utilisation.
Par ailleurs, pour faciliter la lecture de ce manuel nous avons inventé un nouveau mot pour la langue Française
’’Zéroter et Zérotage’’ qui veut bien sûr dire remise à zéro.
2. CARACTERISTIQUES TECHNIQUES PRINCIPALES
(dimensions en mm)
◆
6 grands afficheurs LCD.
◆
Batterie rechargeable interne.
◆
Unité de prix sélectionnable (au kg ou à l'hectogramme).
◆
Totalisation.
◆
Fonction de calcul du rendu de la monnaie.
◆
Rétro éclairage de l'afficheur.
◆
Imprimante thermique intégrée.
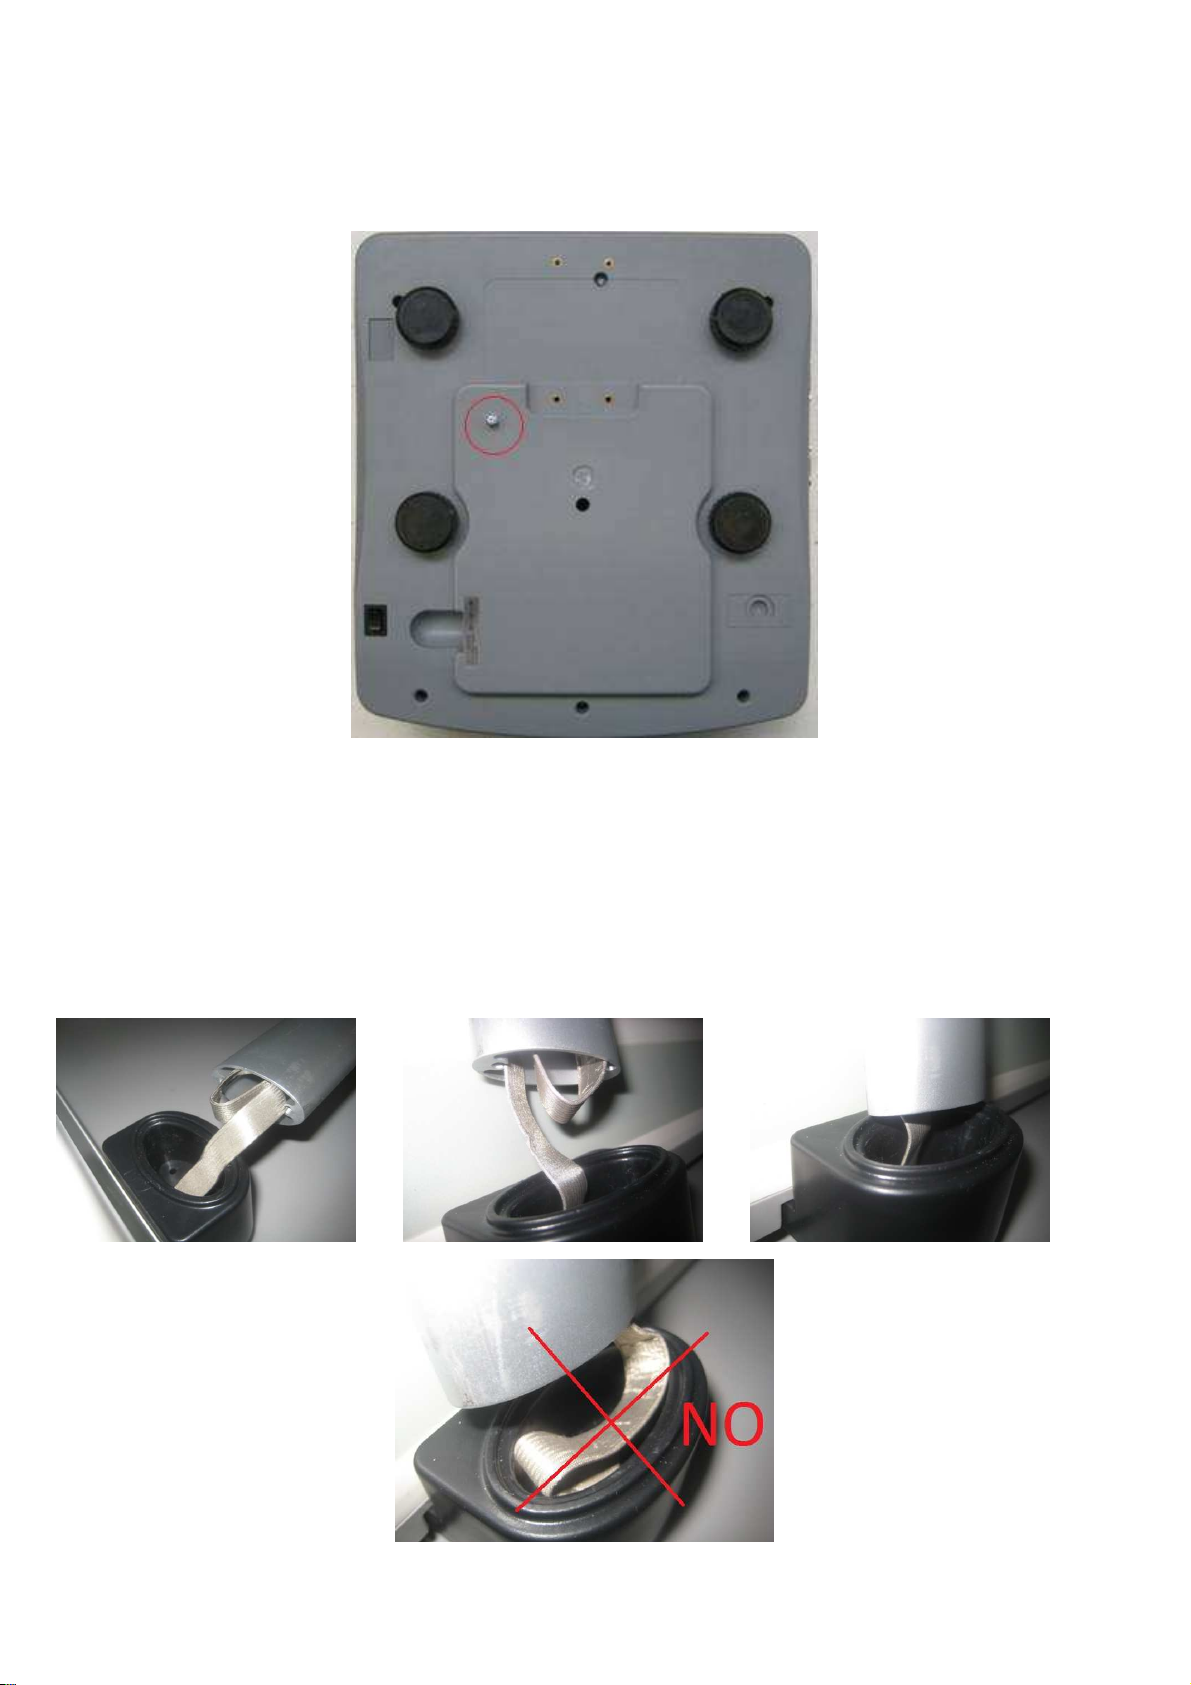
44
3. INSTALLATION
a) Enlever l'emballage.
b) Si la vis de blocage pour le transport - placée sous la balance - est présente (selon le modèle), il est nécessaire de la
dévisser et retirer, comme le montre la figure ci-dessous.
c) Mettre à niveau la balance en tournant les pieds à vis jusqu'à ce que le niveau à bulle positionné sous le plateau soit
au centre. La stabilité de la plateforme est très importante.
TOUS LES ANGLES DOIVENT REPOSER UNIFORMEMENT SUR LA BASE. Veiller à ce que tous les pieds opposent
une résistance à la base et à ce que la plateforme, chargée dans un angle, ne soit pas instable (si un angle n'est pas
posé, le pied est libre et plus facile à tourner).
Pendant l’installation il faut faire attention à la nappe de connexion entre la base et la colonne de la balance : pour éviter
des éventuels endommages du câble il est conseillé de l’installer à l’intérieur de la colonne, comme indiquée dans le
schéma.

45
ZERO
Exécute le zéro balance.
TARE
Exécute la tare (la balance affiche ensuite le poids net).
M+ Totalise le montant stocké en mémoire et imprime.
U Modifie l’unité du prix (au kg ou à l'hectogramme).
PRINT
Effectue une impression simple sans totalisation
, ou
l’impression du total
si
au moins
une
3.1 ALIMENTATION ET MISE EN MARCHE
L’indicateur peut être alimenté par un bloc externe de 240 Vác (standard) ou seulement par la batterie (standard).
REMARQUE: il est conseillé de recharger entièrement la batterie (12 heures) dès la première installation de l'instrument.
POUR ALIMENTER l'instrument sur secteur à 240 Vác, brancher la fiche du bloc CA/CC dans la prise prévue à cet effet
qui se trouve sous la balance et le bloc à votre prise de secteur à 240Vca.
POUR ALLUMER l'instrument, basculer la touche qui se trouve sous la balance, jusqu'à l'allumage et relâcher.
POUR ETEINDRE l'instrument, basculer la touche se trouvant sous la balance, jusqu'à l'extinction et la relâcher.
L’afficheur montre “hi rES” (en cas d’usage interne) ou “LEGAL” (en cas d’usage réglementé).
3.2 ALIMENTATION A BATTERIE
Si on le souhaite, il est possible d'alimenter l’indicateur qu'avec la batterie.
1. Quand la batterie est déchargée, le symbole s'allume automatiquement.
Si la batterie est déchargée, l'afficheur affiche le message “BAT LO” toutes les 10 minutes, et la balance s'éteint
automatiquement après 50 minutes pour protéger la batterie. Recharger immédiatement la batterie avec le bloc de
secteur.
2. L’indicateur de charge “Recharge” devient orange, en cours de charge, et devient vert quand la batterie est
entièrement chargée.
3. Si la batterie est utilisée, elle ne peut pas se recharger entièrement. Si la durée de vie de la batterie est inacceptable,
contacter le revendeur.
4. TOUCHES ET AFFICHEURS DU PANNEAU FRONTAL
4.1 FONCTION DES TOUCHES
accumulation est faite avec la touche M+ (voir le paragraphe «Total et calcul du rendu de la

46
monnaie
»).
FEED
Alimente le papier pour l’imprimante.
“MONNAIE”
Exécute le calcul de rendu de la monnaie et efface la mé
moire.
LOCK
Habilite/déshabilite l'effacement automatique du prix et de la tare.
PLU, 1(A)~28
Permet de stocker le prix en mémoire et de l'en extraire dans un deuxième temps.
C Efface les données mémorisées.
0~9 Permettent d'entrer le prix.
00 Dans le
mode de saisie du prix unitaire à virgule fixe,
cela permet d’entrer 2 décimales “00”.
. Permet d’introduire le point décimal dans le prix quand le point décimal est variable.
Voir le pas F14 dans le paragraphe «Le menu de setup».
INDICATEUR
FONCTION
4.2 FONCTION DES AFFICHEURS
Recharge
Indique que la batterie est en cours de recharge (voir le paragraphe «Alimentation de
la batterie »).
5. DESCRIPTION DES AFFICHEURS
PREMIER AFFICHEUR (kg)
Le premier afficheur visualise le poids présent sur le plateau.
DEUXIEME AFFICHEUR (€/kg €/100g)
Le deuxième afficheur visualise le prix unitaire saisi.
TROISIEME AFFICHEUR (€)
Le troisième afficheur visualise le montant calculé.
FONCTION DES SYMBOLES

47
Les afficheurs LCD présentent des symboles qui donnent une indication sur l'état de fonctionnement de la balance.
SYMBOLE
FONCTION
Le niveau de
la
charge de la batt
erie est bas : voir le paragraphe
«A
limentation a batterie
»
~ Le poids est instable.
NET La valeur affichée est un poids net.
kg Il ind
ique l
’unité
de mesure utilis
é
e (kilogramme).
LOCKED
L'effacement automatique du prix est déshabilitée (voir le paragraphe
«
Effacement automatique du prix»).
€/kg I
l i
ndique l’unité du prix en cours (au kilo).
€/100g
Il i
ndique l’unité du prix en cours (à l'hectogramme).
M+ Le montant total est supérieur à zéro.
Ci-dessous la description de chaque symbole.
0
Le poids lu par le système de pesage est proche du zéro, compris dans l’intervalle – 1/4 ÷ +1/4 de la
division.
La valeur affichée est le rendu de la monnaie.
6. OPERATIONS
6.1 ZERO AUTOMATIQUE A L’ALLUMAGE
L’indicateur est équipé d'une fonction de «zéro automatique à l'allumage». Cela signifie que si à la mise en marche,
l’instrument relève un poids qui est dans le pourcentage configuré par rapport à la capacité (voir le pas F6 dans le
chapitre «Environnement de setup »), le poids est zéroté. Si le poids n’est pas dans cette tolérance, l'écran affiche
le message «Err 4» et, en cas d’un instrument non homologué, affiche dans quelques instants le poids présent ; en
cas d’un instrument homologué, l’écran affiche en continu le message «Err 4».
6.2 ZERO BALANCE
Si aucun objet n'est sur la balance et si l'écran affiche un poids différent de 0, appuyer sur la touche ZERO pour
zéroter (l’icône «ZERO» s'allume). Si le poids est supérieur au pourcentage programmé (voir le pas F7, chapitre
«Menu de setup ») par rapport à la capacité, le zérotage n'a aucune conséquence.
6.3 FONCTION DE TARE
Placer le récipient sur la balance et quand le poids est stable, appuyer sur la touche TARE : le poids est mis en tare
et l’icone « NET » s'allume. Au moment d'enlever la tare, décharger la balance et appuyer de nouveau sur TARE.
6.3.1 RESTRICTION DES FONCTIONS DE TARE
Il est possible de limiter les fonctions de tare, en saisissant « Off » dans le pas F8 dans le menu de setup (voir le
chapitre «Menu de setup»). La TARE SEMI AUTOMATIQUE ne pourra être exécutée que si la tare est égale à 0.
REMARQUE : Si l’instrument est homologué, le pas F8 n’est pas modifiable.
6.4 MESSAGE DE SURCHARGE
Il est recommandé de ne pas dépasser la capacité maximale de la balance. Lorsque l’écran affiche le message
« —OL—» , suivi par un signal acoustique, enlever immédiatement le poids du plateau afin d'éviter d'endommager
le capteur de charge.
6.5 MODIFICATION DE L'UNITE DE PRIX
En appuyant sur la touche U, on modifie l’unité du prix: au kg ou à l'hectogramme; sur l'afficheur, l’indicateur
correspondant s'allumera.
REMARQUE: au moment de son allumage, la balance propose en automatique l'unité de mesure principale
configurée dans le setup (voir le pas F2, chapitre «Menu de setup»)
6.6 CONFIGURATION DU PRIX
La balance permet de configurer le prix du produit, de manière à en déterminer le montant.

48
Quand la balance affiche le poids du produit sur le premier afficheur, entrer le prix au moyen du clavier numérique.
Le prix entré s'affiche sur le deuxième afficheur, le troisième afficheur montre le montant à payer. Pour effacer le prix
entré, appuyer sur la touche C.
6.7 MEMOIRES DU NOMBRE DE PLU
La balance peut mémoriser jusqu’à 105 codes PLU, 5 en accès direct.
6.7.1 ENREGISTREMENT DU PRIX EN MEMOIRE
TOUCHE A ACCES DIRECT DU PLU
Pour lier le prix unitaire à la touche en accès direct, appuyer sur la touche de la mémoire souhaitée (1~28) pendant
3 secondes, après avoir saisi le prix unitaire. On doit insérer le nom du PLU (description de l’article) par les touches
A~Z, confirmer avec la touche TARE le prix unitaire est lié à la touche saisie.
MEMOIRE PLU
Pour sauvegarder le prix unitaire dans la mémoire PLU, appuyer sur la touche PLU pendant 3 secondes, l’écran
affiche « SAVE PoS 00 ». Appuyer sur une touche entre 0 et 9 pour saisir le n° de la place de la mémoire que l’on
veut utiliser entre 0 et 99. Après cette opération, on doit insérer le nom PLU (description de l’article) par les touches
de A~Z, confirmer avec la touche tare, le prix unitaire est mémorisé dans la balance.
6.7.2 EXTRACTION DU PRIX MEMORISE SUR LA TOUCHE A ACCES DIRECT «PLU»
TOUCHE A ACCES DIRECT DU PLU
Si l’on veut utiliser le prix unitaire lié à une touche à accès direct, appuyer sur la touche correspondante de mémoire
voulue (
1~28),
le prix unitaire actuelle est modifiée à la valeur stockée dans la mémoire.
MEMOIRE PLU
Appuyer un court instant sur la touche PLU, les écrans affichent «LoAd PoS 00». Appuyer sur une touche entre
0 et 9 pour sélectionner le n° de la place de mémoire que l’on veut utiliser entre 0 et 99, l’écran affiche le prix
stocké.
6.8 EFFACEMENT AUTOMATIQUE DU PRIX
La balance peut effacer automatiquement le prix entré quand le poids revient à zéro.
Appuyer sur LOCK pour habiliter/déshabiliter la fonction : quand l’icone « LOCK» est allumé sur l'afficheur «TOTAL
PRICE», l'effacement automatique est déshabilité. Quand au contraire, l’icone «LOCK» est éteint, l'effacement
automatique est habilité.
6.9 IMPRESSION ET TOTALISATION DU MONTANT
La balance peut être instaurée pour imprimer manuellement le poids et le montant, et totaliser le montant (voir le
pas F13, le chapitre «Menu de setup»).
6.9.1 PREPARATION POUR TOTALISER ET/OU IMPRIMER
Avant de totaliser, s'assurer que le plateau de la balance est vide, le total à zéro et le poids stable.
6.9.2 IMPRESSION ET TOTALISATION
Mettre le poids sur la balance, attendre que le poids soit stable, configurer le prix, puis appuyer sur la touche
M+ pour totaliser ou la touche PRINT pour imprimer sans totalise, le premier afficheur affiche le message
«total» tandis que le troisième afficheur affiche le montant total, et le poids et le montant sont imprimés.
6.9.3 FONCTION D’ACUMULATION DES PIECES
Il est possible de calculer le montant sur la base du nombre des pièces libres au lieu du poids et puis totaliser:
1) Appuyer sur M+ avec le plateau vide.
2) Enter le nombre des pièces.
3) Appuyer sur M+.
4) Répéter l’opération du point 2 si nécessaire ou appuyer sur ZERO pour sortir.

49
6.9.4 MODE EN LIBRE-SERVICE
La balance peut être configurée pour rechercher automatiquement d’accumuler la quantité après la saisie du PLU (voir le
pas F17, chapitre « Menu de setup »), accumuler et imprimer directement en appuyant sur les touches de PLU (voir le
paragraphe «Extraction du prix mémorisé sur la touche à accès direct «PLU» »
6.9.5 REMARQUE
- La totalisation fonctionne avec un poids minimum de 20d.
- La valeur maximale de montant total cumulable est 999999. Une fois ces limites atteintes, zéroter le total.
- Au moment de l'extinction, les valeurs de totaux sont mises à zéro.
6.10 TOTAL ET CALCUL DU RENDU DE LA MONNAIE
Après les totalisations, on peut
a) Imprimer et mettre à zéro uniquement le montant total en appuyant sur la touche PRINT avec le plateau de la
balance vide,
ou
b) afficher le montant total dans le premier afficheur, tout en appuyant sur la touche de calcul de la monnaie. Puis
dans cet affichage, on peut:
- entrer le montant reçu par le clavier. Le deuxième afficheur visualise la valeur et le troisième montre la valeur du
rendu de monnaie.
- Imprimer et mettre à zéro le montant total, le montant payé et le montant à retourner, en appuyant sur la touche
PRINT, et sortir automatiquement de l’affichage.
- Imprimer le montant total, le montant payé et le montant à retourner en appuyant sur la touche M+ et rester dans
l’affichage.
- Revenir au mode de fonctionnement normal tout en appuyant sur la touche ZERO pour ne pas zéroter la mémoire
ou en appuyant sur la touche TARE pour zéroter la mémoire.
Remarque: il est possible d'utiliser la fonction du calcul de rendu de la monnaie même si aucune totalisation n'a été
faite.
6.11 RETRO ECLAIRAGE
La balance est équipée de trois modes de retro éclairage : on, off et auto.
Appuyer sur la touche LOCK jusqu’à ce que la configuration en cours s'affiche, appuyer sur la touche M+ pour choisir
la configuration souhaitée :
on: retro éclairage toujours allumé.
oFF: retro éclairage toujours éteint.
AU: rétro éclairage allumé seulement quand le poids est différent de 0.
Valider en appuyant sur la touche TARE. La balance revient en mode pesage.
6.12 ARRET AUTOMATIQUE
Appuyer sur la touche de calcul du rendu de la monnaie pendant l'allumage : les écrans affichent «SLEEP ModE
0». Appuyer sur la touche LOCK pour saisir 0/1/5/30 (désactivé / 1 minute de non utilisation / 5 minutes de non
utilisation / 30 minutes de non utilisation. Valider avec TARE (la balance s’éteint).
6.13 AFFICHAGE AVEC UNE SENSIBILITE X 10
On peut utiliser cette fonction comme un test lors de l'étalonnage.
Appuyer sur la touche TARE pendant trois secondes et relâcher : l’afficheur indique la catégorie de poids avec une
division minimale par 10 (cela ajoute une décimale qui clignote).
Après environ 5 secondes, l'afficheur revient au mode normal.
7. MENU DE SETUP
La balance a plusieurs paramètres qui peuvent être instaurés dans le menu du SETUP.
Pour entrer dans le menu du SETUP, à l'allumage appuyer sur la touche TARE pendant le compte à rebours.

50
L'instrument demande la saisie du mot de passe. Le mot de passe par défaut est 0000.
Pour entrer dans le menu:
- Entrer le mot de passe et appuyer sur la touche TARE:
- Le deuxième afficheur affiche le premier paramètre, «F0».
- En appuyant sur la touche M+ les autres paramètres sont saisis.
- En appuyant sur la touche TARE le paramètre peut être configuré.
- Utiliser la touche M+ pour sélectionner une valeur ou configurer la valeur en utilisant les touches numériques.
- Appuyer sur la touche TARE pour valider la valeur ou appuyer sur la touche ZERO pour ne pas modifier le paramètre
ou quitter le menu du SETUP.

51
DIAGRAMME DU MENU DU SETUP
F0 CAL
F1 rES
1 3000,
1 6000,
dUaL rAnGE
SETUP
ENVIRONMENT
F2 Unit
F3 CAPA
F4 Point
F5 Point
F6 init ZEro
F7 rE ZEro 0 … 20
F8 SCSIUE
TARE
F9 A-D
COUNTS
F10 SPEED 7.5, 15, 30, 60
F11 BAUDPin
kiLoS, 100
3, 6, 15, 30
0, 1, 2, 3, 4
0, 1, 2
0 … 20
On, oFF
2400, 4800,
9600, 19200
Dans la description des paramètres:
F12 Min Coin
F13 SEriES
F14 Point
F15 LAnG
F16 GrU
F17 SELF oFF, on
F18 FORMAT
F19 HEADER Text 1...Text 4
F20 FOOTER Text 1...Text 2
F21 rESEt
1, 2, 5, 10
On, oFF
FiXED, FLoAt
En, it, ES,
Fr, DE
9,XXXXX
Normal, List1,
List2
Symbol, Text
XXX
- Les paramètres METRIQUES sont mis en évidence par le symbole (*). Si l’instrument est homologué, les
paramètres ne peuvent pas être modifiés. Voir le chapitre «Scellement des paramètres de la balance ».

52
“F0” - CALIBRATION (*)
Avant propos: L’unité de mesure de l’étalonnage est configurée au kilo (“kg”).
1) Les écrans affichent « CAL F0 ». Appuyer sur TARE pour entrer dans le pas.
2) L’afficheur montre la valeur d’accélération programmée dans le pas F16. Saisir la valeur d’accélération de la zone
d’étalonnage (si différente de la zone d’utilisation) et appuyer sur la touche TARE pour confirmer. On doit modifier
touts les chiffres de l’accélération gravitationnelle. La valeur est programmée aussi dans le pas F16.
3) L'écran affiche «UnLoAd». Décharger la balance et appuyer sur TARE.
4) Les écrans affichent «LoAd X Kilo», où X est le poids étalon à mettre sur la balance. Appuyer plusieurs fois sur
M+ si l'on souhaite modifier le poids d’étalonnage.
5) Mettre le poids sur la balance, attendre la stabilité et appuyer sur TARE.
6) Si l’étalonnage est correct, les écrans affichent un court instant « SPAN PASS », puis « CAL F0 ».
Si la calibration est erronée, les afficheurs visualisent un court instant « SPAN FAIL LOW » (si le poids est faible)
ou « SPAN FAIL HI » (si le poids est trop élevé) puis « CAL F0 ».
SI LA ZONE D’UTILISATION EST DIFFERENTE DE CELLE D'ETALONNAGE, IL FAUT :
1) Effectuer l'étalonnage suivant la description donnée précédemment.
2) Entrer dans le pas F16 et programmer la valeur d’accélération gravitationnelle de la zone d’utilisation.
3) Appuyer sur la touche TARE pour valider.
4) Sauvegarder et sortir du SET-UP (appuyer plusieurs fois sur la touche ZERO).
5) L'erreur de poids engendrée par la différente valeur d'attraction gravitationnelle entre la zone d'étalonnage et la
zone d'utilisation est corrigée automatiquement.
“F1” - NOMBRE DE DIVISIONS (*)
En appuyant sur la touche TARE, on saisi le nombre des divisions de la balance. Appuyer sur la touche M+ pour
sélectionner une valeur parmi celles proposées :
Valeur Divisions
1 3000 3000
1 6000 6000
dUAL rAnGE 3000 + 3000
“F2” - UNITE DE PRIX PRINCIPALE
En appuyant sur la touche TARE, on saisi l’unité de prix principale. Appuyer sur la touche M+ pour sélectionner une unité
parmi celles proposées:
kiLoS kilo
100 100 grammes
“F3” – CAPACITE DE LA BALANCE (*)
En appuyant sur la touche TARE, on saisi la capacité totale de la balance. Appuyer sur la touche M+ pour sélectionner
une capacité parmi celles proposées: 3, 6, 15, 30 kg.
“F4” - NOMBRE DE DECIMALES DE LA BALANCE (*)
En appuyant sur la touche TARE, on saisi le nombre de décimales de la balance. Appuyer sur la touche M+ pour
sélectionner une valeur parmi celles proposées: 0.0 (une décimale), 0.00 (deux décimales), 0.000 (trois décimales),
0.0000 (quatre décimales), 0 (aucune décimale).
“F5” - NOMBRE DE DECIMALES DU MONTANT
En appuyant sur la touche TARE, on saisi le nombre de décimales du montant. Appuyer sur la touche M+ pour
sélectionner une valeur parmi celles proposées: 0.0 (une décimale), 0.00 (deux décimales), 0 (aucune décimale).
“F6” – AUTO ZERO A L’ALLUMAGE (*)
Par l’intermédiaire de ce pas, on configure le pourcentage du poids pour la saisie automatique du zéro brut à l'allumage.
Si à l'allumage, un poids étant dans les limites du pourcentage programmé de la capacité totale est relevé, il est zéroté.
Si le poids n'est pas dans les limites de cette tolérance, après quelques instants, l'écran affiche le poids présent.
Appuyer sur la touche M+ pour sélectionner un pourcentage parmi ceux proposés de 0 à 20.

53
“F7” - CHAMP DE ZERO MANUEL (*)
Par l’intermédiaire de ce pas, on configure le pourcentage du poids pour la saisie manuelle du zéro brut : si, en pesage
normal, en appuyant sur la touche ZERO, un poids est dans les limites du pourcentage programmé de la capacité totale
est relevé, il est zéroté.
Appuyer sur la touche M+ pour sélectionner un pourcentage parmi ceux proposés de 0 à 20.
“F8” - RESTRICTION DES FONCTIONS DE TARE (*)
on tare en succession habilitée
oFF tare en succession déshabilitée
Pour la description du fonctionnement, voir le paragraphe «Restriction des fonctions de tare».
“F9” – POINTS DU CONVERTISSEUR A/D
En appuyant sur la touche TARE, l’instrument affiche les points du convertisseur A/D relatifs au poids sur la balance.
En appuyant sur la touche ZERO, la valeur est mise à zéro.
Appuyer sur la touche TARE pour quitter le pas.
“F10” - CONFIGURATION DE LA VITESSE DE LECTURE DU CONVERTISSEUR AD
En appuyant sur la touche TARE, on configure la vitesse de lecture du convertisseur AD. La valeur configurée
correspond au nombre de lectures par seconde.
Appuyer sur la touche M+ pour saisir un nombre de lectures parmi celles proposées : 7.5, 15, 30, 60.
“F11” - BAUD RATE (VITESSE)
En appuyant sur la touche TARE, on sélectionne le baud rate.
Appuyer sur LOCK pour sélectionner la vitesse: 2400, 4800, 9600, 19200.
“F12” - DIVISION MINIMUM DU MONTANT
En appuyant sur la touche TARE, on saisi la division minimum du montant.
Appuyer sur la touche M+ pour sélectionner une valeur parmi celles proposées : 1, 2, 5, 10.
“F13” - TRANSMISSION DU PORT SERIE(*)
off déshabilitée
on habilitée
“F14” - INTRODUCTION DU PRIX
FLoAt introduction avec point décimal variable
FiXEd introduction avec point décimal fixe
“F15” - LANGUE D’IMPRESSION ET SYMBOLE DE LA DEVISE
En appuyant sur la touche TARE on sélectionne la langue d’impression.
Appuyer sur M+ pour saisir les valeurs: En, It, ES, Fr, DE.
En confirmant avec TARE, on sélectionne le texte ou le symbole de la devise à imprimer.
Appuyer sur M+ pour saisir
- TEXT: Confirmer avec TARE, insérer le texte du «CURRENCY» en 3 caractères et confirmer avec TARE.
- SYMBOL: Confirmer avec TARE. Saisir le code décimal ASCII de la DEVISE avec 3 digits (€=254) et appuyer
TARE.
“F16” – GRAVITE DE LA ZONE D’UTILISATION (*)
On sélectionne la valeur d’accélération gravitationnelle de la ZONE D’ UTILISATION:
Saisie manuelle de la valeur g
les 6 chiffres décimaux de l’accélération gravitationnelle.
Si l’on a saisi une valeur erronée: on montre la valeur décimale minimum (9,75001). La valeur erronée est tous les
nombres décimaux qui ne sont pas compris entre 9,75001 et 9,84999 (inclus).
: on peut saisir manuellement la valeur d’accélération gravitationnelle, on doit modifier

54
“F17” - MODE LIBRE-SERVICE
off déshabilitée
on habilitée
Pour plus de détails, voir le paragraphe «Mode en libre - service ».
“F18” – FORMAT D’IMPRESSION
Appuyer sur la touche M+ pour saisir l’un des possible formats d’impression: Normal, List1, List2.
Pour plus de détails, voir le chapitre «Imprimante».
Valider avec TARE ou appuyer sur ZERO pour quitter sans valider.
“F19” – LIGNES D’EN-TETE DES IMPRIMES
Tout en appuyant sur TARE, on peut configurer jusqu’à 4 lignes qui sont imprimées comme en- tête des imprimés
exécutées par les formats List1 et List2 (voir le pas « F18»):
- Saisir la ligne à configurer en appuyant sur la touche M+.
- Appuyer sur la touche TARE pour entrer. L’instrument demande d’entrer la ligne d’en-tête par les touchés A~Z.
- Valider avec la touche TARE.
- Répéter l’opération pour toutes les lignes souhaitées ou appuyer sur la touche ZERO pour sortir.
“F20” - LIGNES DE FIN D’IMPRESSION
Tout en appuyant sur TARE, on peut configurer jusqu’à 2 lignes qui sont imprimées à la fin de l’impression exécutée par
les formats List1 et List2 (voir le pas « F18»):
- Saisir la ligne à configurer en appuyant sur la touche M+;
- Appuyer sur la touche TARE pour entrer. L’instrument demande d’entrer la ligne d’en-tête par les touchés.
- Valider avec la touche TARE.
- Répéter l’opération pour toutes les lignes souhaitées ou appuyer sur la touche ZERO pour sortir.
“F21” - RESET (*)
A l'usage du fabricant.
8. IMPRIMANTE
Spécifications
Vitesse: 70 mm/sec.
Résolution: 8 dot/mm.
384 points per ligne.
Largeur du papier: 58mm.
Diamètre du rouleau: 50mm.

55
8.1 FORMAT DES DONNEES DE SORTIE
2011/08/02
13:38
Date et heure (
voir le paragraphe
«E
tablir date et heure»).
2011/08/02
13:38
Date et heure (voir le paragraphe «E
DINI ARGEO SRL
Ligne d’en
-
tête 1 (
voir le pas «
F19 » au chapitre
«Menu de setup»
)
Dans les opérations normales de poids, en appuyant sur la touche PRINT le format des données est le suivant:
2011/08/02 13:38
BANANES
POIDS NET: 0.335 kg
PRIX: 2.00 €/kg
MONTANT: 0.67 €
Date et heure (voir le paragraphe «E
Description de PLU (voir le paragraphe «
tablir date et heure»).
Mémoires du nombre de PLU»
)
€= devise configure au pas «F15». /kg= « /kg » ou « /100g » (voir le paragraphe
«
Modification de l'unité de prix
»).
Quand le poids est totalisé (voir le paragraphe «Impression et totalisation du montant»), et quand les totaux sont
rappelés de la mémoire (voir paragraphe «Total et calcul du rendu de la monnaie») le format des données est selon le
format configuré dans le pas «F18»:
Format standard
Accumulation
N. 1
BANANES
POIDS NET: 0.335 kg
PRIX: 2.00 €/kg
MONTANT: 0.67 €
Progressivité de totalisations
Description de PLU (voir le paragraphe «Mémoires du nombre de PLU»)
€= devise configurée au pas «F15». /kg= « /kg » ou « /100g » (voir le paragraphe
« Modification de l'unité de prix»).
Total
tablir date et heure»).
TOTAL
N. 1
MONTANT: 0.67 €
Progressifs des totalisations
€= devise configurée au pas «F15».
- - - - - - - - - - - - - - - - - - - - - - - -
Format «List1»
V. DELLA FISICA 20
41042 FIORANO
WWW.DINIARGEO.COM
02/08/2011 13:38
N. NET(kg) €/kg €
- - - - - - - - - - - - - - - - - - - - - - -
#001 BANANES
0.100 1.00 0.10
#002 CERISES
1 X 1.00 1.00
- - - - - - - - - - - - - - - - - - - - - - #002 TOTAL 1.10
COMPTANT 2.00
MONNAIE 0.90
MERCI BEAUCOUP
ET BONNE JOURNEE
Ligne d’en-tête 2 (voir le pas « F19 » au chapitre «Menu de setup»)
Ligne d’en-tête 3 (voir le pas « F19 » au chapitre «Menu de setup»)
Ligne d’en-tête 4 (voir le pas « F19 » au chapitre «Menu de setup»)
Date et heure (voir le paragraphe «Etablir date et heure»).
€= devise configure au pas «F15». /kg= « /kg » ou « /100g » (voir le paragraphe
« Modification de l'unité de prix»).
Description de PLU (voir le paragraphe «Mémoires du nombre de PLU»)
Description de PLU (voir le paragraphe «Mémoires du nombre de PLU»)
Ligne de pied de page 1 (voir le pas « F20 » au chapitre «Menu de setup»)
Ligne de pied de page 2 (voir le pas « F20 » au chapitre «Menu de setup»)

56
Format «List2»
DINI ARGEO SRL
Ligne d’en
-
tête 1 (voir le pa
s « F19 » au chapitre «Menu de setup»)
V. DELLA FISICA 20
41042 FIORANO
WWW.DINIARGEO.COM
02/08/2011 13:38
N. NET(kg) €/kg €
- - - - - - - - - - - - - - - - - - - - - - #001 0.100 1.00 0.10
#002 1 X 1.00 1.00
- - - - - - - - - - - - - - - - - - - - - - #002 TOTAL 1.10
COMPTANT 2.00
MONNAIE 0.90
MERCI BEAUCOUP
ET BONNE JOURNEE
Ligne d’en-tête 2 (voir le pas « F19 » au chapitre «Menu de setup»)
Ligne d’en-tête 3 (voir le pas « F19 » au chapitre «Menu de setup»)
Ligne d’en-tête 4 (voir le pas « F19 » au chapitre «Menu de setup»)
Date et heure (voir le paragraphe «Etablir date et heure»).
€= devise configurée au pas «F15». /kg= « /kg » ou « /100g » (voir le paragraphe
« Modification de l'unité de prix»).
Ligne de pied de page 1 (voir le pas « F20 » au chapitre «Menu de setup»)
Ligne de pied de page 2 (voir le pas « F20 » au chapitre «Menu de setup»)
8.2 ETABLIR DATE ET HEURE
L’ASGPP peut établir la date et l’heure et après les imprimer.
Appuyer sur la touche 00 jusqu’à ce que l’écran affiche le message « DATE » et l’écran du prix montre “MM.DD.YY”.
Insérer la nouvelle date en utilisant directement les touches numériques et puis appuyer sur la touche TARE pour
confirmer et ZERO pour sortir.
La visu du poids montre “TIME” et la visu du prix montre “HH.MM.SS”. Insérer l’heure en utilisant directement les touches
numériques et puis appuyer sur la touche TARE pour confirmer et ZERO pour sortir.

57
9.RACCORDEMENT AUX CAISSES ENREGISTREUSES LYNX ET PUMA
schéma de câblage:
Pour connecter votre caisse enregistreuse à l'instrument vous devez configurer Baud Rate sur 9600 (step “F11” de Setup)
et totalisation sur ECR (step “F13” de Setup).
Sur la caisse enregistreuse Lynx, vous devez effectuer les opérations suivantes:

58
MESSAGES D’ERREUR
DESCRIPTION
RESOLUTION
- - oL - -
Hors capacité
Enlever le poids de la balance.
Err 4
Erreur de Zé
ro A l’allumage ou lorsqu’on appuie sur
la touche
ZÉRO, le poids sur la
Err 5
Erreur Clavier
Le clavier peut
-
être endommagé
.
Err 6
Signal d'entré plus
La valeur du convertisseur A/D est p
lus grande de la valeur maximum:
10. SCELLEMENT DES PARAMETRES DE LA BALANCE
En usage réglementé, la balance doit être scellée afin d’interdire l’accès aux paramètres météorologiques.
Pour sceller la balance, appuyer sur le commutateur de verrouillage situé à l’arrière de la balance, pendant la mise sous
tension (L’afficheur montre «LEGAL») et recouvrir l’orifice d’accès au commutateur de verrouillage. Un scellement de
papier ou un scellement de plastique peuvent être posés (voir illustration).
Pour pouvoir accéder à nouveau aux paramètres verrouillés de la balance, brisez le
scellement et appuyer sur le commutateur de verrouillage pendant la mise sous
tension (L’afficheur montre “HIRES”).
Commutateur de verrouillage
11. MESSAGES D’ERREUR
grand de 3 mV/V
Scellement de plastique ABS.
Scellement de papier
balance excède le pourcentage programmé dans la capacité.
Enlever le poids en excès et prouver encore.
- Enlever le poids de la balance qui est en excès.
- Le capteur ou l’électronique peuvent être endommagés.
Le symbole de la poubelle sur roues barrée d’une croix signifie que ce produit doit faire l’objet
d’une collecte sélective en fin de vie, ou être rendu au revendeur au moment de son remplacement
avec un produit équivalent. Une bonne collecte sélective contribue à éviter des effets nuisibles à
l’environnement et à la santé et aide le recyclage des matériels. L’élimination abusive de ce produit
par l’utilisateur comporte l’application des sanctions administratives prévues
matière.
INSTRUCTIONS POUR L’EVACUATION
par la législation en la

59
BIS S.r.l.
Via Trieste, 31
20080 Bubbiano MI – Italia
Tel.: +39 02 90834207
Fax: +39 02 90870542
e-mail: info@BilanceOnLine.it
www.BilanceOnLine.it
DECLARATION DE CONFORMITE
Ce dispositif est conforme aux standards et aux normes et règlements européens à
appliquer. La Déclaration de Conformité est disponible à l’adresse Internet
www.scalehouse.it
GARANTIE
Les produits Scale House sont garantis pendant une durée de douze mois à compter de
la date de livraison, exclus les consommables (par exemple têtes d’impression, batteries,
roues et moteurs électriques) pour les quels la durée de la garantie est de trois mois. La
garantie se réfère à des dommages résultant d'un défaut de fabrication ou d'un défaut
du produit et elle comprend la main d'œuvre et le remplacement des pièces
défectueuses. Le produit doit être retourné dans son emballage d'origine avec la
livraison à la charge de l'expéditeur au siège de la société qui a vendu le produit. La
garantie ne s'applique pas aux défauts causés par une mauvaise utilisation et par un
non respect des consignes d'utilisation, phénomène électrique, réparation non autorisée,
relié vers d'autres équipements ou lorsque les éléments d'identification du produit sont
altérés ou retirés (numéro de série, étiquette, etc.). Ne sont pas couvert également
toutes les indemnités pour les dommages, directs ou indirects, causés à l'utilisateur par
la défaillance partielle ou complète des instruments, même pendant la période de
garantie. La présente garantie ne couvre pas les dommages des capteurs de charge dus
à des chocs ou surcharges.
P.IVA e C.F.: 03774900967
TAMPON DU CENTRE D'ASSISTANCE AUTORISE

60
ITALIANO
INDICE
1. INTRODUZIONE ............................................................................................................................................................... 62
2. PRINCIPALI CARATTERISTICHE TECNICHE ................................................................................................................. 62
3. INSTALLAZIONE .............................................................................................................................................................. 63
3.1 ALIMENTAZIONE E ACCENSIONE ........................................................................................................................... 64
3.2 ALIMENTAZIONE A BATTERIA .................................................................................................................................. 64
4. TASTI E INDICATORI DEL PANNELLO FRONTALE ....................................................................................................... 64
4.1 FUNZIONE DEI TASTI ............................................................................................................................................... 64
4.2 FUNZIONE INDICATORI ............................................................................................................................................ 65
5. DESCRIZIONE DEI DISPLAY ........................................................................................................................................... 65
6. OPERAZIONI .................................................................................................................................................................... 66
6.1 AUTOZERO ALL’ACCENSIONE ................................................................................................................................ 66
6.2 ZERO BILANCIA ........................................................................................................................................................ 66
6.3 FUNZIONE DI TARA .................................................................................................................................................. 66
6.3.1 LIMITAZIONE DELLE FUNZIONI DI TARA .................................................................................................... 66
6.4 MESSAGGIO DI OVERLOAD .................................................................................................................................... 66
6.5 CAMBIO DELL’UNITÀ DI PREZZO ............................................................................................................................ 66
6.6 IMPOSTAZIONE DEL PREZZO ................................................................................................................................. 66
6.7 MEMORIE DI PREZZO .............................................................................................................................................. 67
6.7.1 SALVATAGGIO DEL PREZZO IN MEMORIA ................................................................................................. 67
6.7.2 RICHIAMO DEL PREZZO MEMORIZZATO .................................................................................................... 67
6.8 CANCELLAZIONE AUTOMATICA DEL PREZZO ....................................................................................................... 67
6.9 STAMPA E TOTALIZZAZIONE DELL'IMPORTO ........................................................................................................ 67
6.9.1 PREPARAZIONE............................................................................................................................................. 67
6.9.2 STAMPA E TOTALIZZAZIONE ........................................................................................................................ 67
6.9.3 FUNZIONE DI TOTALIZZAZIONE PEZZI ....................................................................................................... 67
6.9.4 MODO SELF-SERVICE ................................................................................................................................... 68
6.9.5 NOTE ............................................................................................................................................................... 68
6.10 TOTALE E CALCOLO DEL RESTO ......................................................................................................................... 68
6.11 RETROILLUMINAZIONE .......................................................................................................................................... 68
6.12 AUTO SPEGNIMENTO ............................................................................................................................................ 68
6.13 VISUALIZZAZIONE CON SENSIBILITA’ PER 10 ..................................................................................................... 68
7. AMBIENTE DI SETUP ...................................................................................................................................................... 69
SCHEMA A BLOCCHI AMBIENTE DI SETUP .................................................................................................................. 70
“F0” - CALIBRAZIONE (*)................................................................................................................................................. 71

61
“F1” - NUMERO DI DIVISIONI (*) ..................................................................................................................................... 71
“F2” - UNITA' DI PREZZO PRINCIPALE .......................................................................................................................... 71
“F3” - PORTATA BILANCIA (*) .......................................................................................................................................... 71
“F4” - NUMERO DI DECIMALI BILANCIA (*) ................................................................................................................... 71
“F5” - NUMERO DI DECIMALI IMPORTO ........................................................................................................................ 71
“F6” - AUTOZERO ALL’ACCENSIONE (*) ........................................................................................................................ 72
“F7” - CAMPO ZERO MANUALE (*) ................................................................................................................................ 72
“F8” - LIMITAZIONE FUNZIONI DI TARA (*) .................................................................................................................... 72
“F9” - PUNTI CONVERTITORE A/D ................................................................................................................................. 72
“F10” - IMPOSTAZIONE VELOCITA DI LETTURA CONVERTITORE ADC ..................................................................... 72
“F11” - BAUD RATE .......................................................................................................................................................... 72
“F12” - DIVISIONE MINIMA IMPORTO ............................................................................................................................ 72
“F13” - STAMPANTE (*) ................................................................................................................................................... 72
“F14” - MODO DI INSERIMENTO PREZZO UNITARIO ................................................................................................... 72
“F15” - LINGUA DI STAMPA E SIMBOLO VALUTA .......................................................................................................... 72
“F16” - ZONA DI GRAVITA’ D’USO (*) .............................................................................................................................. 73
“F17” - MODO SELF-SERVICE ........................................................................................................................................ 73
“F18” - FORMATO DI STAMPA ........................................................................................................................................ 73
“F19” - RIGHE DI INTESTAZIONE STAMPA .................................................................................................................... 73
“F20” - RIGHE DI FINE STAMPA ..................................................................................................................................... 73
“F21” - RESET (*) ............................................................................................................................................................. 73
8. STAMPANTE ..................................................................................................................................................................... 74
8.1 FORMATO DI STAMPA .............................................................................................................................................. 74
8.2 IMPOSTAZIONE DATA E ORA ................................................................................................................................... 75
9.COLLEGAMENTO A REGISTRATORI DI CASSA LYNX E PUMA ................................................................................... 76
10. BLOCCO DELL’ACCESSO ALLE IMPOSTAZIONI DELLA BILANCIA ......................................................................... 77
11. MESSAGGI DI ERRORE ................................................................................................................................................ 77
ISTRUZIONI PER LO SMALTIMENTO ................................................................................................................................. 77
DICHIARAZIONE DI CONFORMITA’ .................................................................................................................................... 78
GARANZIA ........................................................................................................................................................................... 78

62
1. INTRODUZIONE
Modello
Piat
to
Portata kg
Divisione g
ASGP
P15
240x370
6/15 2/5
ASGP
P30
240x370
15/30
5/10
Questo manuale è stato creato per aiutarla nell'installazione e nella conoscenza delle possibilità funzionali della bilancia
serie ASGPP.
AVVERTENZE
La bilancia deve essere situata in un luogo che non diminuisce la sua accuratezza.
Evitare le temperature estreme. Non esporre lo strumento alla luce diretta del sole o vicino a fonti di calore.
Appoggiare o fissare l'indicatore e la piattaforma su una base esente da vibrazioni. Non posizionare vicino a macchinari
vibranti.
Evitare sorgenti di alimentazioni instabili. Non utilizzare vicino a grosse fonti di elettricità.
Evitare zone ad alta umidità che possono causare condensazione. Evitare il contatto diretto con l’acqua. Non spruzzare o
immergere la bilancia nell’acqua.
Evitare movimenti d’aria come correnti d'aria o porte aperte. Non posizionare vicino a finestre aperte.
Mantenere pulita le bilancia.
Non lasciare materiale sulla bilancia quando non è utilizzata.
2. PRINCIPALI CARATTERISTICHE TECNICHE
(dimensioni in mm)
◆
6 grandi display LCD.
◆
Batteria ricaricabile interna.
◆
Unità di prezzo selezionabile (al kg o all’etto).
◆
Totalizzazione.
◆
Funzione di calcolo del resto.
◆
Retroilluminazione del display
◆
Stampante termica integrata

63
3. INSTALLAZIONE
a) Togliere l'imballo.
b) Se presente, dipende dal modello, è necessario svitare e rimuovere la vite di bloccaggio per il trasporto posta sotto la
bilancia, come mostrato nella figura seguente:
c) Livellare la piattaforma agendo sui piedini a vite fino a che la bolla di livello posta sotto al piatto non è al suo centro.
Riveste molta importanza la stabilità della piattaforma.
TUTTI GLI ANGOLI DEVONO APPOGGIARE IN MODO UNIFORME. Controllare con cura che tutti i piedini oppongano
resistenza al suolo e che la piattaforma, caricata in angolo, non sia instabile (se un angolo non appoggia il relativo
piedino è più agevole da girare).
N.B.: in fase di installazione prestare particolare attenzione al flat di collegamento tra la base e la colonna: per evitare un
eventuale danneggiamento del cavo causato dalla compressione tra le due superfici è necessario sistemarlo all’interno
della colonna stessa, come mostrato in figura:

64
ZERO
Esegue lo zero bilancia.
TARE
Esegue la tara (la bilancia in seguito visualizza il peso netto).
M+ Totalizza l’importo in memoria ed es
egue la relativa stampa.
U Cambia l’unità del prezzo (al kg o all’etto).
C Cancella i dati memorizzati.
3.1 ALIMENTAZIONE E ACCENSIONE
L’indicatore può essere alimentato con alimentatore esterno 240 Vac (di serie) oppure solo a batteria (di serie).
NOTA: si consiglia di effettuare la ricarica completa della batteria (12 ore) alla prima installazione dello
strumento.
PER ALIMENTARE lo strumento attraverso la rete 240 Vac, inserire lo spinotto dell'alimentatore AC/DC nella apposita
presa posta sotto la bilancia e l’alimentatore alla vostra presa di rete a 240Vac.
PER ACCENDERE lo strumento premere verso il basso il tasto posto sotto la bilancia, fino all’accensione e rilasciarlo.
PER SPEGNERE lo strumento premere verso l’alto il tasto posto sotto la bilancia, fino allo spegnimento e rilasciarlo.
All’accensione dopo il self-check la bilancia visualizza "hi rES" (in caso di strumento NON omologato) o "LEGAL" (in caso
di strumento omologato).
3.2 ALIMENTAZIONE A BATTERIA
Se si desidera è possibile alimentare l’indicatore solo con la batteria.
1. Quando la batteria è scarica, il simbolo si accende automaticamente.
In caso di batteria scarica, il display mostrerà il messaggio “BAT LO” ogni 10 minuti, e la bilancia si spegnerà
automaticamente dopo 50 minuti per proteggere la batteria. Si prega di ricaricare immediatamente la batteria con
l’alimentatore di rete.
2. L’indicatore di carica “Recharge” diventerà arancione durante la carica, e diventerà verde quando la batteria è
completamente carica.
3. Se la batteria è utilizzata potrebbe non ricaricarsi completamente. Se la durata di vita della batteria risulta
inaccettabile contattare il rivenditore.
4. TASTI E INDICATORI DEL PANNELLO FRONTALE
4.1 FUNZIONE DEI TASTI

65
PRINT
Esegue la stampa semplice senza totalizzare
, oppure la stampa del totale se almeno una
totalizzazione è stata eseguita col tasto M+ (vedere paragrafo 6.10).
FEED
Avanza la carta nella stampante
.
“RESTO”
Esegue il calcolo del resto e cancella la memoria.
LOCK
Abilita/disabilita la cancellazione automatica del prezzo e della tara.
PLU, 1(A)
~28
Permette di memorizzare il prezzo e di richiamarlo
in un secondo momento.
0~9 Permettono di inserire il prezzo
00 Nel modo di inserimento del prezzo unitario con punto decimale fisso permette di inserire “00”.
. Nel modo di inserimento del prezzo unitario con punto decimale flottante, permette di inser
ire il
INDICATORE
FUNZIONE
punto decimale del prezzo. Vedere passo F14, paragrafo 7.
4.2 FUNZIONE INDICATORI
Recharge
Indica che la batteria è in ricarica (vedere paragrafo 3.2).
5. DESCRIZIONE DEI DISPLAY
PRIMO DISPLAY (kg)
Il peso presente sul piatto viene visualizzato in questo display.
SECONDO DISPLAY (€/kg €/100g)
Il prezzo unitario introdotto viene visualizzato in questo display.
TERZO DISPLAY (€)
L'importo corrente viene visualizzato in questo display.
FUNZIONE DEI SIMBOLI

66
I display LCD sono provvisti di simboli che danno indicazione sullo stato di funzionamento dell’indicatore; qui di seguito la
SIMBOLO
FUNZIONE
Il livello di carica della batteria si sta es
aurendo: vedere
paragrafo 3.2
Il peso rilevato dal sistema di pesatura si trova in prossimità dello
zero
, compreso
~ Il peso è instabile.
NET Il valore visualizzato è un peso netto.
kg Indica l’unita d
i misura in uso (chilogrammo).
LOCKED
La cancellazione automatica del prezzo è disabilitata
(vedere
paragrafo 6.8)
€/kg Indica
l’unità del prezzo in uso (al
chilogrammo
).
€/100g
Indica
l’unità del prezzo in uso (all'etto).
M+ L'importo totale è maggiore di zero.
descrizione per ogni simbolo.
0
nell’intervallo – 1/4 ÷ +1/4 della divisione.
Il valore visualizzato è il resto.
6. OPERAZIONI
6.1 AUTOZERO ALL’ACCENSIONE
L’indicatore è dotato di una funzione di “autozero all’accensione”: ciò significa che se all’accensione viene rilevato un
peso rientrante nella percentuale programmata (vedere passo F6, paragrafo 7) rispetto alla portata, esso viene
azzerato; se il peso non rientra in questa tolleranza, il display visualizza il messaggio “Err 4” e con strumento non
omologato dopo qualche istante visualizza il peso presente, con strumento omologato viene visualizzato
continuamente “Err 4” sul display.
6.2 ZERO BILANCIA
Se non ci sono oggetti sulla bilancia e il display mostra un peso diverso da 0, premere il tasto ZERO per azzerare (si
accende l’indicatore “ZERO”). Se il peso è superiore alla percentuale programmata (vedere passo F7, paragrafo 7)
rispetto alla portata, l’azzeramento non avrà effetto.
6.3 FUNZIONE DI TARA
Mettere il contenitore sulla bilancia e, quando il peso è stabile, premere il tasto TARE: il peso viene messo in tara e
si accende l’indicatore “NET”; quando occorre rimuovere la tara, scaricare la bilancia e premere di nuovo TARE.
6.3.1 LIMITAZIONE DELLE FUNZIONI DI TARA
È possibile limitare le funzioni di tara, selezionando "oFF" nel passo F8 dell'ambiente di setup (vedere
paragrafo 7). La TARA SEMIAUTOMATICA potrà essere eseguita solo se la tara è uguale a 0.
NOTA: Con strumento omologato, il passo F8 non è modificabile.
6.4 MESSAGGIO DI OVERLOAD
Si raccomanda di non superare la portata massima della bilancia; quando appare il messaggio
“—OL—“ accompagnato da un segnale sonoro, rimuovere immediatamente il peso per evitare un danno alla cella di
carico.
6.5 CAMBIO DELL’UNITÀ DI PREZZO
Premendo il tasto U si cambia l’unità del prezzo: al kg o all’etto; nel display si accenderà l’indicatore relativo.
NOTA: all'accensione la bilancia propone in automatico l'unità di misura principale impostata nel setup (vedere
passo F2, paragrafo 7).
6.6 IMPOSTAZIONE DEL PREZZO
La bilancia permette di impostare il prezzo del prodotto, in modo da determinarne l’importo.

67
Quando la bilancia mostra il peso del prodotto, introdurre il prezzo tramite la tastiera numerica. Il prezzo inserito
comparirà nel secondo display, quindi il terzo display mostrerà l’importo relativo. Per cancellare il prezzo introdotto
premere il tasto C.
6.7 MEMORIE DI PREZZO
La bilancia può memorizzare fino a 127 unità di prezzo, 28 tramite tasto diretto.
6.7.1 SALVATAGGIO DEL PREZZO IN MEMORIA
PLU CON TASTO DIRETTO
Per memorizzare il prezzo unitario sotto un tasto diretto premere il tasto desiderato (1~28) per circa 3 secondi, dopo
aver inserito il prezzo unitario; viene richiesto l’inserimento del nome del PLU (Article Description) attraverso i tasti
A~Z, confermare con TARE: il prezzo è memorizzato sotto il tasto selezionato.
MEMORIA PLU
Per memorizzare il prezzo unitario in memoria, inserire il prezzo unitario, premere il tasto PLU per circa 3 secondi, i
display visualizzano “SAVE PoS 00”; premere un tasto da 0 a 99 per memorizzare nella posizione desiderata.
Viene richiesto l’inserimento del nome del PLU (Article Description) attraverso i tasti A~Z, confermare con TARE: il
prezzo è memorizzato sotto la memoria selezionata.
6.7.2 RICHIAMO DEL PREZZO MEMORIZZATO
PLU CON TASTO DIRETTO
Per utilizzare il prezzo unitario memorizzato sotto un tasto diretto, premere il corrispondente tasto memoria
desiderato (
MEMORIA PLU
Premere un istante il tasto PLU, i display visualizzano “LoAd PoS 00”; premere un tasto da 0 a 99, il prezzo
memorizzato comparirà nel display.
1~28),
il prezzo unitario in memoria viene attivato.
6.8 CANCELLAZIONE AUTOMATICA DEL PREZZO
La bilancia può cancellare automaticamente il prezzo inserito quando il peso ritorna a zero.
Premere LOCK per abilitare/disabilitare la funzione: quando l’indicatore LOCK sul display “TOTAL PRICE” è acceso,
la cancellazione automatica è disabilitata, quando invece l’indicatore LOCK è spento, la cancellazione automatica è
abilitata.
6.9 STAMPA E TOTALIZZAZIONE DELL'IMPORTO
La bilancia può essere settata per poter manualmente stampare il peso e l’importo su stampante e totalizzare
l'importo (vedere passo F13, paragrafo 7).
6.9.1 PREPARAZIONE
Prima di stampare, assicurarsi che la bilancia sia vuota, il totale sia a zero, ed il peso sia stabile.
6.9.2 STAMPA E TOTALIZZAZIONE
Mettere il peso sulla bilancia, attendere che il peso sia stabile, impostare il prezzo, quindi premere il tasto M+
per totalizzare o PRINT per stampare senza totalizzare: se la bilancia è collegata a una stampante il peso e
importo saranno totalizzati, il primo display mostra il messaggio “total” mentre il terzo display mostra l’importo
totale.
6.9.3 FUNZIONE DI TOTALIZZAZIONE PEZZI
E’ possible calcolare l’importo sulla base di un numero di pezzi libero anziché il peso, e quindi totalizzarlo:
1) premere M+ con bilancia scarica,
2) inserire il numero di pezzi,
3) premere M+,
4) ripetere l’operazione dal punto 2 se necessario o premere ZERO per uscire.

68
6.9.4 MODO SELF-SERVICE
La bilancia può essere configurata per totalizzare automaticamente alla selezione del PLU (vedere step F17,
paragrafo 7), quindi totalizzare e stampare direttamente premendo i tasti PLU (vedere paragrafo 6.7.2).
6.9.5 NOTE
- La stampa funziona con un peso minimo di 20d.
- Il valore massimo di importo totale accumulabile è 999999. Raggiunto questi limiti, occorre azzerare il
totale.
- Allo spegnimento i valori di totali vengono azzerati.
6.10 TOTALE E CALCOLO DEL RESTO
Dopo le totalizzazioni, è possibile:
a) Stampare e azzerare solo l’importo totale, premendo il tasto PRINT con bilancia scarica
oppure
b) visualizzare l’importo totale sul primo display, premendo il tasto di calcolo resto, dopodiché in questa
visualizzazione:
- inserire da tastiera l’importo pagato, che comparirà nel secondo display, e mostrare sul terzo display il valore del
resto;
- stampare e azzerare l’importo totale, l’importo pagato e il resto premendo il tasto PRINT, e uscire
automaticamente dalla visualizzazione;
- soltanto stampare l’importo totale, l’importo pagato e il resto premendo il tasto M+, e rimanere nella
visualizzazione;
- tornare al funzionamento normale premendo il tasto ZERO per non azzerare la memoria o premendo il tasto
TARE per azzerare anche la memoria.
Nota: è possibile utilizzare la funzione di calcolo del resto anche se non è stata fatta una totalizzazione.
6.11 RETROILLUMINAZIONE
La bilancia è dotata di tre modalità di retroilluminazione: on, off e auto.
Premere il tasto LOCK a lungo, apparirà la configurazione corrente; premere il tasto M+ per selezionare la
configurazione desiderata:
on: retroilluminazione sempre accesa.
oFF: retroilluminazione sempre spenta.
AU: retroilluminazione accesa solo quando il peso è diverso da 0.
Confermare con TARE (la bilancia torna in pesatura).
6.12 AUTO SPEGNIMENTO
Premere il tasto di calcolo del resto durante l’accensione: i display visualizzano “SLEEP ModE 0”; premere il
tasto M+ per cambiare le opzioni:
0 (disattivato)
1 (1 minuto di non utilizzo)
5 (5 minuti di non utilizzo)
30 (30 minuti di non utilizzo)
Confermare con TARE (la bilancia si spegne).
6.13 VISUALIZZAZIONE CON SENSIBILITA’ PER 10
E’ possibile utilizzare questa funzione come test in fase di taratura.
Tenere premuto il tasto TARE per tre secondi e rilasciare: a display comparirà il peso con la divisione minima
suddivisa per 10 (viene aggiunto un decimale lampeggiante).
Dopo circa 5 secondi il display tornerà in modalità normale.

69
7. AMBIENTE DI SETUP
La bilancia ha diversi parametri che possono essere settati nell’ambiente di SETUP.
Per entrare nell’ambiente di SETUP all’accensione, premere il tasto TARE durante il conto alla rovescia.
Verrà richiesto l’inserimento della password. La password di default è 0000.
Per entrare nel menù:
- Inserire la password e premere il tasto TARE:
- Il secondo display visualizza il primo parametro, “F0”.
- Premendo il tasto M+ si selezionano gli altri parametri.
- Premendo il tasto TARE è possibile impostare il parametro.
- Utilizzare il tasto M+ per selezionare un valore o impostare il valore usando i tasti numerici.
- Premere il tasto TARE per confermare il valore o premere il tasto ZERO per non modificare il parametro o uscire
dall’ambiente di SETUP.

70
SCHEMA A BLOCCHI AMBIENTE DI SETUP
F0 CAL
F1 rES
1 3000,
1 6000,
dUaL rAnGE
SETUP
ENVIRONMENT
F2 Unit
F3 CAPA
F4 Point
F5 Point
F6 init ZEro
F7 rE ZEro 0 … 20
F8 SCSIUE
TARE
F9 A-D
COUNTS
F10 SPEED 7.5, 15, 30, 60
F11 BAUDPin
kiLoS, 100
3, 6, 15, 30
0, 1, 2, 3, 4
0, 1, 2
0 … 20
On, oFF
2400, 4800,
9600, 19200
F12 Min Coin
F13 SEriES
F14 Point
F15 LAnG
F16 GrU
F17 SELF oFF, on
F18 FORMAT
F19 HEADER Text 1...Text 4
F20 FOOTER Text 1...Text 2
F21 rESEt
1, 2, 5, 10
On, oFF
FiXED, FLoAt
En, it, ES,
Fr, DE
9,XXXXX
Normal, List1,
List2
Symbol, Text
XXX
Nella descrizione dei parametri:
- I parametri METRICI sono evidenziati con il simbolo (*), e, con strumento omologato, sono di sola lettura. Vedere
paragrafo 9.

71
“F0” - CALIBRAZIONE (*)
Premessa: L’unità di misura di calibrazione è fissa al chilogrammo (“kg”).
1) I display visualizzano “CAL F0”: premere TARE per entrare nel passo.
2) Il display mostra il valore di accelerazione impostato nello step F16: inserire il valore di accelerazione gravitazionale
della zona di calibrazione se diversa dalla zona d’uso e premere il tasto TARE per confermare; occorre
modificare tutte le 6 cifre dell’accelerazione gravitazionale. Il valore sarà settato anche nello step F16.
3) Il display visualizza “UnLoAd”: scaricare la bilancia e premere TARE.
4) I display visualizzano “LoAd X KiLoS”, dove X è il peso campione da mettere sulla bilancia; premere diverse volte
M+ se si desidera cambiare il peso di calibrazione.
5) Mettere il peso sulla bilancia, attendere la stabilità e premere TARE.
6) Se la calibrazione è corretta, i display visualizzano per un istante “SPAN PASS”, e poi “CAL F0”.
Se la calibrazione è errata, i display visualizzano per un istante “SPAN FAIL LOW” (se il peso è scarso) oppure
“SPAN FAIL HI” (se il peso è troppo elevato) e poi “CAL F0”.
NEL CASO IN CUI LA ZONA D’USO È DIVERSA DALLA ZONA DI CALIBRAZIONE OCCORRE:
1) Effettuare la calibrazione come descritto in precedenza.
2) Entrare nel passo F16 e impostare il valore di accelerazione gravitazionale della ZONA D’USO.
3) Premere il tasto TARE per confermare.
4) Salvare ed uscire dall’ambiente di SETUP (premere tante volte il tasto ZERO).
5) Automaticamente viene corretto l’errore di peso introdotto da un diverso valore di attrazione gravitazionale tra la zona
di calibrazione e la zona di utilizzo.
“F1” - NUMERO DI DIVISIONI (*)
Premendo il tasto TARE si seleziona il numero di divisioni della bilancia.
Premere il tasto LOCK per selezionare un valore tra quelli proposti:
Valore Divisioni
1 3000 3000
1 6000 6000
dUAL rAnGE 3000 + 3000
“F2” - UNITA' DI PREZZO PRINCIPALE
Premendo il tasto TARE si seleziona unità di prezzo principale.
Premere il tasto M+ per selezionare un unità tra quelle proposte:
kiLoS chilogrammo
100 100 grammi
“F3” - PORTATA BILANCIA (*)
Premendo il tasto TARE si seleziona la portata totale della bilancia.
Premere il tasto M+ per selezionare una portata tra quelle proposte: 3, 6, 15, 30 kg.
“F4” - NUMERO DI DECIMALI BILANCIA (*)
Premendo il tasto TARE si seleziona il numero di decimali della bilancia.
Premere il tasto M+ per selezionare un valore tra quelli proposti: 0.0 (un decimale),0.00 (due decimali), 0.000 (tre
decimali), 0.0000 (quattro decimali), 0 (nessun decimale).
“F5” - NUMERO DI DECIMALI IMPORTO
Premendo il tasto TARE si seleziona il numero di decimali dell'importo.
Premere il tasto M+ per selezionare un valore tra quelli proposti: 0.0 (un decimale),0.00 (due decimali), 0 (nessun
decimale).

72
“F6” - AUTOZERO ALL’ACCENSIONE (*)
Attraverso questo passo si imposta la percentuale di peso per l’acquisizione automatica dello zero lordo all'accensione.
Se all’accensione viene rilevato un peso rientrante nella percentuale programmata della portata totale, esso viene
azzerato; se il peso non rientra in questa tolleranza, il display dopo qualche istante visualizza il peso presente.
Premere il tasto M+ per selezionare una percentuale tra quelle proposte: da 0 a 20.
“F7” - CAMPO ZERO MANUALE (*)
Attraverso questo passo si imposta la percentuale di peso per l’acquisizione manuale dello zero lordo: se, in fase di
normale pesatura, premendo il tasto ZERO, viene rilevato un peso rientrante nella percentuale programmata della
portata totale, esso viene azzerato.
Premere il tasto M+ per selezionare una percentuale tra quelle proposte: da 0 a 20.
“F8” - LIMITAZIONE FUNZIONI DI TARA (*)
on tara in successione abilitata
oFF tara in successione disabilitata
Fare riferimento al paragrafo 6.3.1 per la descrizione del funzionamento
“F9” - PUNTI CONVERTITORE A/D
Premendo il tasto TARE lo strumento visualizza i punti del convertitore A/D relativi al peso sulla bilancia.
Premendo il tasto ZERO si azzera il valore
Premere TARE per uscire dal passo.
“F10” - IMPOSTAZIONE VELOCITA DI LETTURA CONVERTITORE ADC
Premendo il tasto TARE si imposta la velocità di lettura del convertitore ADC; il valore impostato corrisponde al numero
di letture effettuate al secondo.
Premere il tasto M+ per selezionare un numero di letture tra quelle proposte: 7.5, 15, 30, 60.
“F11” - BAUD RATE
Premendo il tasto TARE si seleziona il baud rate.
Premere M+ per selezionare le possibili velocità: 2400, 4800, 9600, 19200.
“F12” - DIVISIONE MINIMA IMPORTO
Premendo il tasto TARE si seleziona la divisione minima dell'importo.
Premere il tasto M+ per selezionare un valore tra quelli proposti: 1, 2, 5, 10.
“F13” - STAMPANTE (*)
off disabilitata
on abilitata
“F14” - MODO DI INSERIMENTO PREZZO UNITARIO
FLoAt inserimento con punto decimale flottante
FiXEd inserimento con punto decimale fisso
“F15” - LINGUA DI STAMPA E SIMBOLO VALUTA
Premendo TARE si seleziona la lingua di stampa.
Premere M+ per selezionare i valori proposti: En, it, ES, Fr, DE.
Confermando con TARE si imposta il testo o il simbolo della valuta da stampare.
Premere M+ per selezionare:
- TEXT: Confermare con TARE, inserire il testo della VALUTA su 3 caratteri e confermare con TARE.
- SYMBOL: Confermare con TARE, Inserire il codice ASCII decimale della VALUTA su 3 cifre (€=254) e premere
TARE.

73
“F16” - ZONA DI GRAVITA’ D’USO (*)
Tramite questo passo si seleziona il valore di accelerazione di gravità d’uso dello strumento:
Inserimento manuale valore di g: lo strumento si predispone per l’inserimento manuale del valore d’accelerazione
gravitazionale; si devono modificare le 6 cifre decimali dell’accelerazione gravitazionale.
Nel caso s’introduca un valore di g errato: è proposto il valore decimale minimo (9,75001); per valore di g errato
s’intende un numero decimale non compreso tra 9,75001 e 9,84999 (inclusi).
“F17” - MODO SELF-SERVICE
off disabilitato
on abilitato
Vedere paragrafo 6.9.4 per dettagli.
“F18” - FORMATO DI STAMPA
Premere il tasto M+ kper selezionare uno dei possibili formati di stampa: Normal, List1, List2.
Vedere paragrafo 8 per dettagli.
Confermare con TARE o premere ZERO per uscire senza confermare.
“F19” - RIGHE DI INTESTAZIONE STAMPA
Premendo TARE si possono configurare fino a 4 righe che saranno stampate come intestazione della stampa eseguita
con formato List1 o List2 selezionato (vedere step F18):
- selezionare la riga da configurare con il tasto M+;
- premere il tasto TARE per accedere: verrà richiesto di inserire la riga di intestazione attraverso i tasti A~Z;
- confermare con il tasto TARE;
- ripetere le operazioni per tutte le righe desiderate o premere il tasto ZERO per uscire.
“F20” - RIGHE DI FINE STAMPA
Premendo TARE si possono configurare fino a 2 righe che saranno stampate alla fine della stampa eseguita con formato
List1 o List2 selezionato (vedere step F18):
- selezionare la riga da configurare con il tasto M+;
- premere il tasto TARE per accedere: verrà richiesto di inserire la riga di intestazione attraverso i tasti A~Z;
- confermare con il tasto TARE;
- ripetere le operazioni per tutte le righe desiderate o premere il tasto ZERO per uscire.
“F21” - RESET (*)
Ad uso del fabbricante.

74
8. STAMPANTE
Caratteristiche
Velocità: 70 mm/sec.
Risoluzione: 8 dot/mm.
384 dots per riga.
Larghezza carta: 58mm.
Diametro rotolo: 50mm.
8.1 FORMATO DI STAMPA
Nelle normali operazioni di pesatura quando si preme il tasto PRINT il formato dei dati è il seguente:
2011/08/02 13:38
BANANE
PESO NETTO: 0.335 kg
PREZZO UNITARIO: 2.00 €/kg
IMPORTO: 0.67 €
Nelle normali operazioni di pesatura quando si esegue l’accumulo del peso (vedere paragrafo 6.9) e quando si richiama il
totale dalla memoria (vedere paragrafo 6.9), il formato dei dati è dipendente dal formato impostato nel passo F18:
Formato “Normal”
Totalizzazione
2011/08/02 13:38
N. 1
BANANE
PESO NETTO: 0.335 kg
PREZZO UNITARIO: 2.00 €/kg
IMPORTO: 0.67 €
Totale
Data e ora (vedere paragrafo 8.2)
Descrizione PLU (vedere paragrafo 6.7)
€= valuta impostata nel passo F15; /kg= “/kg” o “/100g” (vedere paragrafo 6.5)
Data e ora (vedere paragrafo 8.2)
Progressivo di totalizzazione
Descrizione PLU (vedere paragrafo 6.7)
€= valuta impostata nel passo F15; /kg= “/kg” o “/100g” (vedere paragrafo 6.5)
2011/08/02 13:38
TOTALE
N. 1
IMPORTO: 0.67 €
- - - - - - - - - - - - - - - - - - - - - - - -
Data e ora (vedere paragrafo 8.2)
Progressivo di totalizzazione
€= valuta impostata nel passo F15

75
Formato “List1”
DINI ARGEO SRL
Riga di intestazione 1 (vedere passo F19, paragrafo 7)
DINI ARGEO SRL
Riga di intestazione 1 (vedere passo F19, paragrafo 7)
V. DELLA FISICA 20
41042 FIORANO
WWW.DINIARGEO.COM
02/08/2011 13:38
N. NETTO (kg) €/kg €
- - - - - - - - - - - - - - - - - - - - - - #001 BANANE
0.100 1.00 0.10
#002 CILIEGE
1 X 1.00 1.00
- - - - - - - - - - - - - - - - - - - - - - #002 TOTALE 1.10
PAGATO 2.00
RESTO 0.90
ARRIVEDERCI E
GRAZIE
Formato “List2”
Riga di intestazione 2 (vedere passo F19, paragrafo 7)
Riga di intestazione 3 (vedere passo F19, paragrafo 7)
Riga di intestazione 4 (vedere passo F19, paragrafo 7)
Data e ora (vedere paragrafo 8.2)
€= valuta impostata nel passo F15; /kg= “/kg” o “/100g” (vedere paragrafo 6.5)
Descrizione PLU (vedere paragrafo 6.7)
Descrizione PLU (vedere paragrafo 6.7)
Riga di fine stampa 1 (vedere passo F20, paragrafo 7)
Riga di fine stampa 2 (vedere passo F20, paragrafo 7)
V. DELLA FISICA 20
41042 FIORANO
WWW.DINIARGEO.COM
02/08/2011 13:38
N. NETTO(kg) €/kg €
- - - - - - - - - - - - - - - - - - - - - - #001 0.100 1.00 0.10
#002 1 X 1.00 1.00
- - - - - - - - - - - - - - - - - - - - - - #002 TOTALE 1.10
PAGATO 2.00
RESTO 0.90
ARRIVEDERCI E
GRAZIE
Riga di intestazione 2 (vedere passo F19, paragrafo 7)
Riga di intestazione 3 (vedere passo F19, paragrafo 7)
Riga di intestazione 4 (vedere passo F19, paragrafo 7)
Data e ora (vedere paragrafo 8.2)
€= valuta impostata nel passo F15; /kg= “/kg” o “/100g” (vedere paragrafo 6.5)
Riga di fine stampa 1 (vedere passo F20, paragrafo 7)
Riga di fine stampa 2 (vedere passo F20, paragrafo 7)
8.2 IMPOSTAZIONE DATA E ORA
E’ possible impostare la data e ora per stamparla nello scontrino.
Tenere premuto il tasto 00 fino a quando il display del peso mostra “DATE” e il display del prezzo unitario mostra
“MM.DD.YY”. Inserire la nuova data usando I tasti numerici e premere TARE per confermare o ZERO per uscire senza
confermare.
Dopodichè si passa all’impostazione dell’ora, il display del peso mostra “TIME” e il display del prezzo unitario mostra
“HH.MM.SS”. Inserire la nuova ora usando I tasti numerici e premere TARE per confermare o ZERO per uscire senza
confermare

76
9.COLLEGAMENTO A REGISTRATORI DI CASSA LYNX E PUMA
Schema di collegamento:
Per collegare i registratori di cassa allo strumento, sulla bilancia è necessario impostare a 9600 il Baud Rate (Passo
“F11” di Setup) e su ECR la totalizzazione (Passo “F13” di Setup).
Sul registratore di cassa di tipo Lynx è necessario eseguire le seguenti operazioni:

77
10. BLOCCO DELL’ACCESSO ALLE IMPOSTAZIONI DELLA BILANCIA
MESSAGGI DI ERRORE
DESCRIZIONE
SOLUZIONE
- - oL - -
Peso superiore alla
Rimuovere il peso in eccesso dalla bilancia.
Err 4
Errore autozero
All’accensione o quando viene premuto il tasto di
ZERO
, il peso sulla
Err 5
Errore
tastiera
La tastiera potrebbe essere danneggiata.
Err 6
Segnale in ingresso
Indica che il valore del convertitore A/D è superiore al valore mass
imo:
Per le applicazioni per l'utilizzo in rapporto con terzi, la bilancia deve essere sigillata per evitare l’accesso ai parametri
metrologici.
Per sigillare la bilancia, premere l’interruttore di calibrazione sulla parte inferiore della bilancia, durante l’accensione (la
bilancia visualizza “LEGAL”), e coprire il foro di accesso all’interruttore. Si possono utilizzare un sigillo di plastica e di
carta.
Per riottenere l’accesso alle impostazioni bloccate, rompere il sigillo e premere di calibrazione durante
l’accensione (la bilancia visualizza “HIRES”).
Pulsante di calibrazione
Sigillo di plastica ABS.
11. MESSAGGI DI ERRORE
portata
all’accensione /
zero manuale
superiore a 3mV/V
ISTRUZIONI PER LO SMALTIMENTO
Il simbolo del cassonetto barrato riportato sul prodotto, indica che il prodotto alla fine della propria vita
utile deve essere conferito agli idonei centri di raccolta differenziata, oppure riconsegnato al
rivenditore al momento dell’acquisto di un nuovo prodotto equivalente. L’adeguata raccolta
differenziata per l’avvio successivo del prodotto al riciclaggio, contribuisce ad evitare possibili effetti
negativi sull’ambiente e sulla salute e favorisce il riciclo dei materiali. Lo smaltimento abusivo del
prodotto da parte dell’utente comporta l’applicazione delle sanzioni amministrative previste dalla
legge.
Sigillo di carta.
bilancia 4supera la percentuale programmata sulla portata max.
Rimuovere il peso in eccesso e riprovare.
- Rimuovere il peso dalla bilancia se in eccesso.
- La cella di carico o l’elettronica può essere danneggiata.

78
BIS S.r.l.
Via Trieste, 31
20080 Bubbiano MI – Italia
Tel.: +39 02 90834207
Fax: +39 02 90870542
e-mail: info@BilanceOnLine.it
www.BilanceOnLine.it
DICHIARAZIONE DI CONFORMITA’
Il presente dispositivo è conforme agli standard essenziali e alle altre normative
pertinenti dei regolamenti europei applicabili. La Dichiarazione di Conformità è
disponibile all'indirizzo Internet www.scalehouse.it.
GARANZIA
I prodotti Scale House sono assistiti da garanzia per dodici mesi dalla data di
acquisto, con esclusione delle parti classificate come materiale di consumo come
testine di stampa, batterie, ruote e motori elettrici e materiale di consumo. La
garanzia su questo materiale è di tre mesi. Per maggiori informazioni potete
rivolgervi al Centro di Assistenza Autorizzato nel seguito indicato. La garanzia è
riferita al guasto derivante da eventuale difetto di costruzione e copre il costo
della mano d'opera e dei componenti sostituiti. Il prodotto deve essere inviato nel
suo imballo originale con trasporto a carico del mittente, presso la sede della
venditrice. La garanzia non trova applicazione per i guasti derivanti da uso
improprio e inosservanza delle istruzioni di funzionamento, fenomeno elettrico,
tentativo di riparazione non autorizzato, collegamento ad altre apparecchiature o
rimozione degli elementi identificativi del prodotto (numero di serie, etichetta,
etc.). E' escluso qualsiasi indennizzo per danni, diretti o indiretti, provocati
all'utente dal mancato o parziale funzionamento degli strumenti anche se durante
il periodo di garanzia. La garanzia sulle celle di carico esclude i danni da urti e
sovraccarichi.
TIMBRO CENTRO ASSISTENZA AUTORIZZATO
P.IVA e C.F.: 03774900967
 Loading...