

Page 1

VACUUM TUMBLER
OPERATION MANUAL & PARTS LIST
MODEL VTS-41
REMOTE PUMP
MODEL VTS-42
INTERNAL PUMP
The BIRO VTS-41 & VTS-42 VACUUM TUMBLERS are versatile machines used for
vacuum tumbling all types of meats. The BIRO VTS-41 & VTS-42 produce equally
impressive results with beef, pork, poultry and fish.
The units are both easy to clean and maintain as well as sanitary in design and construction. The entire machine is built to give many years of trouble free service while
providing a unique line of marinated products for your customers.
The BIRO VTS-41 & VTS-42 have the following agency approval:
ULc (U.S. & CANADA)
Page 2

TABLE OF CONTENTS
Page
NOTICETOOWNERSANDOPERATORS......................................... 1
SAFETYTIPS............................................................... 2
OPERATION................................................................ 3
TOPROCESSPRODUCT.................................................... 3
OPERATIONOFVTS-41ONLY ............................................... 4
OPERATIONOFVTS-42ONLY ............................................... 5
VTS-41PARTSDIAGRAMS ................................................. 6&7
VTS-42PARTSDIAGRAMS ................................................. 8&9
VACUUM PUMP OPERATING AND MAINTENANCE INSTRUCTIONS . . . . . . . . . . . . . . . . . . . . . 10
INLETFILTEROPERATIONANDSERVICE ........................................11
VTS-41WIRINGDIAGRAM.................................................12&13
VTS-42WIRINGDIAGRAMS....................................................14
GENERALMAINTENANCE.....................................................15
CLEANING.................................................................16
OPERATOR'SSIGNATUREPAGE................................................17
LIMITEDWARRANTY.........................................................18
NOTICE TO OWNERS AND OPERATORS .................................................. 1
SAFETY TIPS .............................................................................. 2
OPERATION .............................................................................. 3
TO PROCESS PRODUCT ................................................................. 3
OPERATION OF VTS-41 ONLY ........................................................... 4
OPERATION OF VTS-42 ONLY ........................................................... 5
INSTRUCTIONS FOR PULLING A VACUUM ................................................ 6
OPERATOR’S NOTES ...................................................................... 7
VTS-41 PARTS DIAGRAMS ............................................................... 8, 9
VTS-42 PARTS DIAGRAMS ............................................................. 10-14
INLET FILTER OPERATION AND SERVICE ............................................ 12, 14
VACUUM PUMP OPERATION AND SERVICE ............................................. 15
VTS-41 WIRING DIAGRAM ............................................................ 16, 17
VTS-42 WIRING DIAGRAMS .............................................................. 18
GENERAL MAINTENANCE ............................................................... 19
CLEANING ............................................................................... 20
OPERATOR’S SIGNATURE PAGE ...........................................................21
LIMITED WARRANTY .....................................................................22
Page 3
BIRO’s products are designed to process food products safely and efficiently. Unless the operator is properly trained and supervised, however, there is the possibility of a serious injury. It is the
responsibility of the owner to assure that this machine is used properly and safely, strictly following
the instructions contained in this Manual and any requirements of local law.
No one should use or service this machine without proper training and supervision. All operators should be thoroughly familiar with the procedures contained in this Manual. Even so BIRO
cannot anticipate every circumstance or environment in which its products will be used. You, the
owner and operator, must remain alert to the hazards posed by the function of this equipment.
No one under eighteen (18) years of age should operate this equipment. If you are uncertain
about a particular task, ask your supervisor.
This Manual contains a number of safe practices in the SAFETY TIP section. Additional warnings are placed throughout the Manual. Warnings related to your personal safety are indicated by:
Warnings related to possible damage are indicated by:
BIRO also has provided warning labels on the equipment. If any warning label or Manual becomes misplaced, damaged, or illegible, please contact your nearest Distributor or BIRO directly
for a replacement.
Remember, however, this Manual or the warning labels do not replace the need to be alert and
to use your common sense when using this equipment.
This Manual applies to Model VTS-41 with Serial Number 41100 and higher; Model VTS-42
with Serial Number 42100 and higher.
1
NOTICE TO OWNERS AND OPERATORS
OR
Page 4

SAFETY TIPS
ROTATING DRUM
TO AVOID SERIOUS PERSONAL INJURY
NEVER Touch This Machine Without Training and Authorization By Your Supervisor.
ALWAYS Read Operation and Service Manual BEFORE Operating, Cleaning or Servicing.
ALWAYS Keep Hands Clear of the Rotating Drum and Other Moving Parts.
NEVER Attempt to Remove the Drum Lid Unless Vacuum Has Been Released and the Drum is
Positioned Vertically with the Lid at the Top.
NEVER Operate Vacuum Pump Unless Properly Connected to Tumbler Drum.
ONLY Operate Vacuum Pump in Recommended Vacuum Range (15-20 Inches of Mercury)
NEVER TO EXCEED 20 INCHES Hg.
ONLY Use a Qualified Electrician to Install According to Local Building Codes: Machine MUST
Be Properly Grounded.
ONLY Install on Level, Non-Skid Surface in a Clean, Well-Lighted Work Area Away From
Children and Visitors.
DO NOT Store or Operate Machine in Meat Cooler.
DO NOT Allow Food Particles, Liquids or Any Other Foreign Material to Enter the Vacuum
Pump or Vacuum Hose.
ALWAYS Turn Off, Unplug From Power Source and Perform Lockout/Tagout Procedure to This
Machine BEFORE Attempting to Unjam or Unclog, Cleaning or Servicing.
NEVER Leave Machine Unattended While Operating.
PROMPTLY REPLACE Any Worn or Illegible Warning and/or Instruction Labels.
USE ONLY BIRO Parts and Accessories Properly Installed.
NEVER Use the Motor Cover Plate for Preparing the Product.
2
Page 5

OPERATION
ROTATING DRUM
TO AVOID SERIOUS PERSONAL INJURY
ONLY Properly Trained Personnel Should Use This Equipment.
ALWAYS Keep Hands Clear of the Rotating Drum and Other Moving Parts.
DO NOT Tamper With, Bypass, Alter, or Modify This Equipment in Any Way From Its Original
Condition.
ALWAYS Turn Off, Unplug From Power Source and Perform Lockout/Tagout Procedure to This
Machine Before Cleaning, Servicing, or When Not In Use.
NEVER Leave Unattended While Operating.
DO NOT Store or Operate Machine in Meat Cooler.
NEVER Operate Without All Warning or Instruction Labels Attached.
NEVER Use the Motor Cover Plate for Preparing the Product.
A. FOOD HANDLING TO PREVENT CONTAMINATION
1. ALWAYS wash hands thoroughly with warm soap and water before and after handling raw fish, poultry or
meats.
2. ALWAYS clean and sanitize all utensils and surfaces that have been in contact with raw products.
3. ALWAYS store cold foods at or below 45 deg. F (7.2 deg. C).
B. TO PROCESS PRODUCT
1. Insert baffles into Stainless Steel drum. Be sure that baffles are fully engaged on mounting buttons.
2. Weigh product to be vacuum tumbled.
3. Refer to your ingredient chart for proper amount of marinade seasoning and water.
4. Place product, marinade and water into tumbler drum.
5. Install gasket on drum lid and place lid on drum.
6. Connect vacuum hose to valve on drum lid. Be sure valve handle is in the open position, parallel with the
valve body.
3
Page 6
OPERATION OF VTS-41 ONLY
7. Plug vacuum pump into a grounded 60HZ: 115 volt, 10 amp power source. Turn vacuum pump to “ON”
while pressing down on center of lid. (Vacuum gauge will start indicating a vacuum is being pulled in the
drum.) If needle in vacuum gauge does not indicate vacuum is being pulled, turn “OFF” vacuum pump and
disconnect vacuum hose from drum lid. Remove drum lid and check that the lid gasket is properly installed
and seated.
8. When vacuum gauge does indicate that a vacuum is being pulled, allow to continue running until gauge
reads between 15 and 20 inches Hg. NEVER EXCEED 20 Hg.
9. Close valve handle on drum lid, Perpendicular to valve body. Turn vacuum pump to “OFF” position and
unplug from power source. Remove vacuum hose from valve. Drum contents are now sealed in a vacuum.
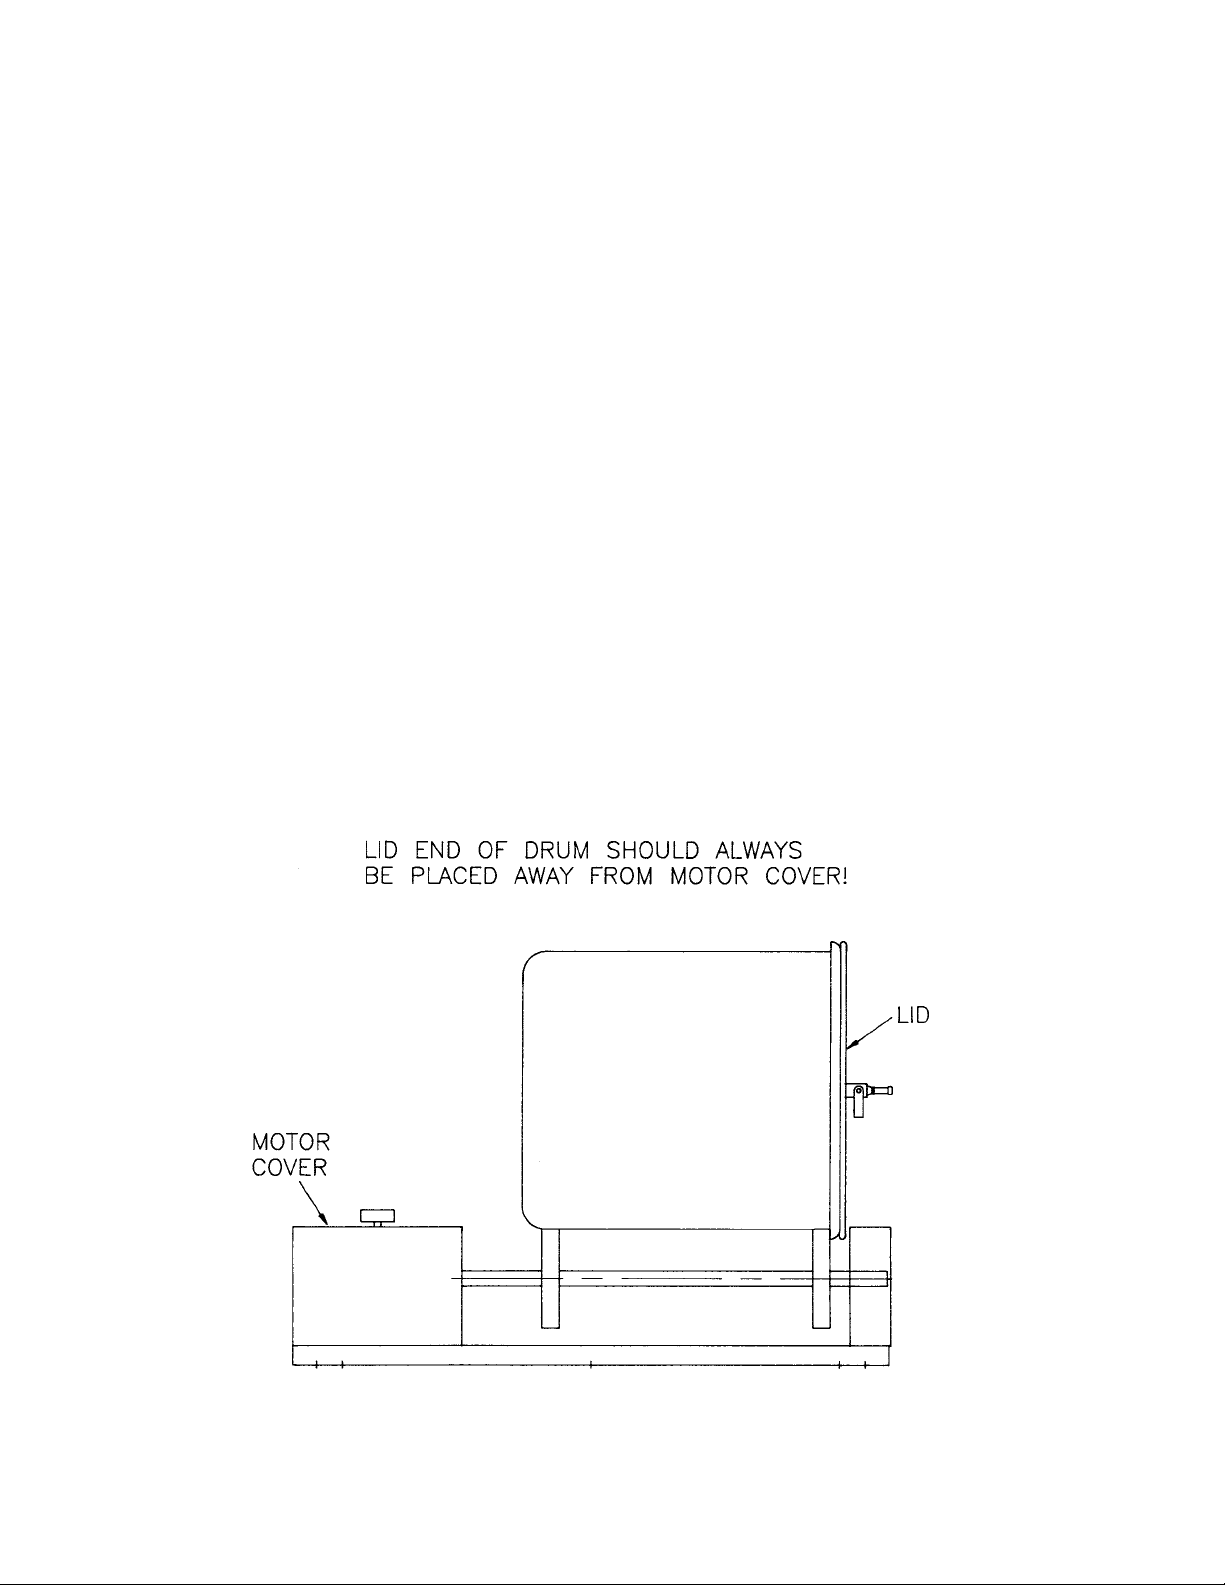
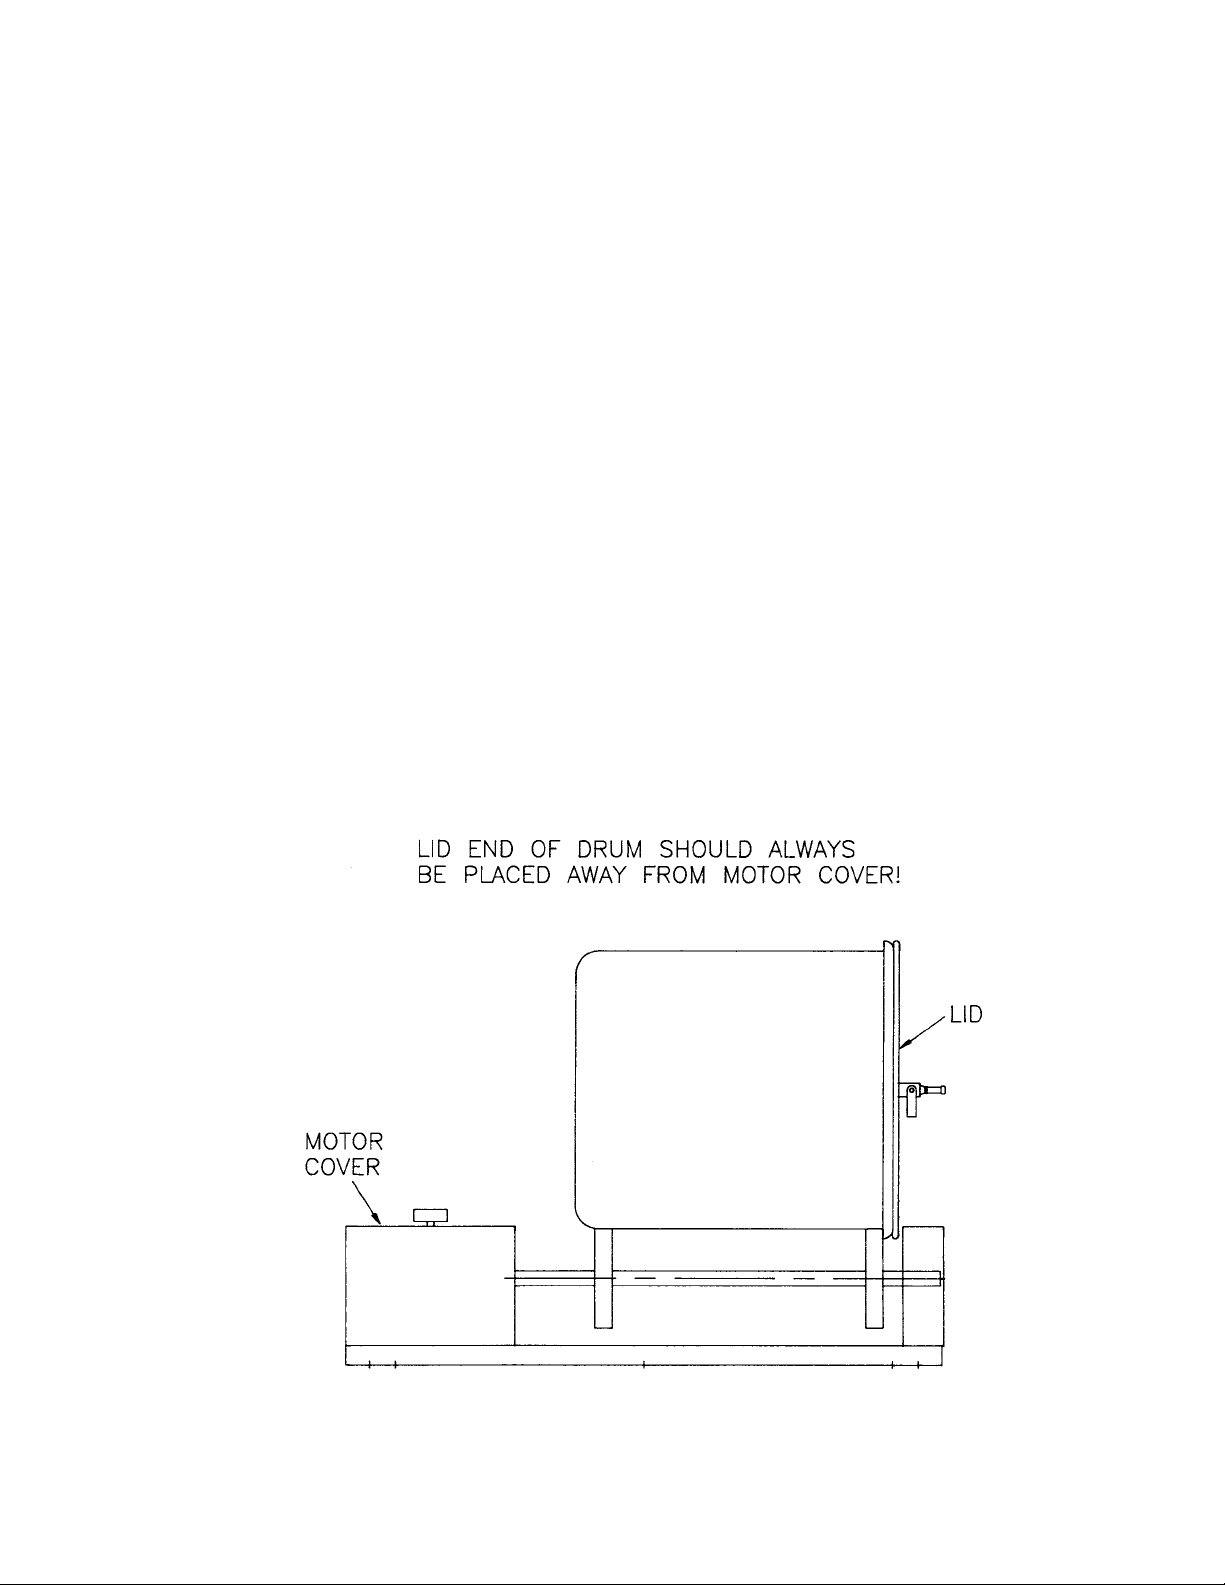
10. Lay drum horizontally on roller with lid end facing away from machine timer controls.
11. Plug tumbler motor into a grounded 60HZ, 115 volt, 10 amp power source.
12. Turn timer control dial to desired time, and turn toggle switch to "ON TIMER" position.
13. When drum stops, turn toggle switch to “OFF” position, unplug tumbler motor from power source.
14. Remove drum and place on table with lid up. Turn valve handle to open position Parallel with valve body to
release vacuum. Remove drum lid.
15. Remove product from drum.
4
Page 7
OPERATION OF VTS-42 ONLY
7. Plug tumbler power cord into a grounded 60HZ: 115 volt, 10 amp OR 50HZ: 220 volt, 5 amp power source.
Turn toggle switch to “VACUUM PUMP” while pressing down on center of lid. (Vacuum gauge will start
indicating a vacuum is being pulled in the drum.) If needle in vacuum gauge does not indicate vacuum is
being pulled, turn toggle to “OFF” and disconnect vacuum hose from drum lid. Remove drum lid and check
that the lid gasket is properly installed and seated.
8. When vacuum gauge does indicate that a vacuum is being pulled, allow to continue running until gauge
reads between 15 and 20 inches Hg. NEVER EXCEED 20 Hg.
9. Close valve handle on drum lid, Perpendicular to valve body. Turn toggle switch to “OFF” position. Remove
vacuum hose from valve. Contents are now sealed in a vacuum.
10. Lay drum horizontally on roller with lid end facing away from machine timer controls.
11. Turn timer control dial to desired time, and turn toggle switch to "ON TIMER" position.
12. When drum stops turn toggle switch to “OFF” position, unplug tumbler motor from power source.
13. Remove drum and place on table with lid up. Turn valve handle to open position Parallel with valve body to
release vacuum. Remove drum lid.
14. Remove product from drum.
5
Page 8

6
Page 9

– OPERATOR’S NOTES –
7
Page 10

VTS-41
IMPORTANT: Always Advise Model & Serial Number When Ordering Parts
6
Part
No. Description
155-1 Guide for 16" high drum
311-1 Rubber foot
HHS010S Hex head screw, 10-32
´
3
8
,SS
HHS035S Hex head screw,
1
4
-20
´
5
8
,SS
HN15S
1
4
-20 hex nut
HN20S Hex nut
5
16
-18 SS
LW10S Lock washer,
1
4
,SS
LW15S Lock washer
5
16
SS
VT402 Motor, HP,
1
25
115-60-1, 17.7RPM. 90:1
VT408 Flange bearing
VT411 Set collar
VT412 Rivet chain before serial no. 41322
VT412-1 Rivet chain after serial no. 41321
VT412ML Master link – spring clip
VT413 Sprocket
VT414-1 Guide for 15" high drum
VT438S Tumbler base plate
VT439S Sprocket & chain box less cover
VT441S Driving shaft
VT442S Driven shaft
Part
No. Description
VT443S Sprocket & chain cover
VT445S-1 Drive wheel, with O-ring
VT448S Label, VTS-41 control panel
VT449S Timer with pushbutton start, 0-50 minute
VT450S Timer socket
VT461S Motor box less cover
VT462S Motor box cover
VT474S Terminal strip, 4 circuit
VT478S Strain relief, 90 deg.
VT492S Timer without pushbutton start, 0-50 minute
VT740S O-ring
VTS7154 Oval handle
VTS7164 Toggle switch w/boot, ON-OFF
VTS7170 Power cord w/120V plug, 8’, 16/3
VTS7179 Toggle switch boot
WS005S Weld stud 8-32´¾, SS
WS012S Weld stud 10-32´½. SS
NOT SHOWN
VT418 Vacuum pump w/toggle, 110-60-1
VT479S Vacuum pump w/toggle, 220-50-1
p ,
VT740S O-ring
VTS7154 Oval handle
VTS7164 Toggle switch w/boot, ON-OFF
VTS7170 Power cord w/120V plug, 8’, 16/3
VTS7179 Toggle switch boot
WS005S Weld stud 8-32´¾, SS
WS012S Weld stud 10-32´½. SS
NOT SHOWN
VT418 Vacuum pump w/toggle, 110-60-1
VT479S Vacuum pump w/toggle, 220-50-1
VT513S Shaft Seal
8
Page 11

VTS-41
IMPORTANT: Always Advise Model & Serial Number When Ordering Parts
7
Part
No. Description
VT418 Vacuum pump w/toggle, 110V-60-1
VT422 Vacuum gauge
VT435 Coupler,
1
4
MPT
VT436 Tee,
14141
4
´´
FPT, brass
VT437 Hose, 5’ with
1
4
MPT crimped ends
VT447S Hex nipple,
1
4
NPT
VT479S Vacuum pump w/toggle, 220V-50-1
VTS7121 Inlet filter
Part
No. Description
VT415S-2 Drum & lid assembly, SS with
guide 155-1
VT425S Baffle only for 15" high drum
VT425S-1 Baffle only for 16" high drum
VT428S-2 Drum with baffles & guide
155-1
VT429S-2 Drum only, without baffles but
with guide 155-1
VT430S-1 Lid assembly with ball valve
VT432S Welded boss SS
VT434S-1 Lid gasket
VT453S Nipple only
VT454S Ball valve only
9
Page 12

VTS-42
IMPORTANT: Always Advise Model & Serial Number When Ordering Parts
8
Part
No. Description
155-1 Guide for 16" high drum
311-1 Rubber foot
HHS010S Hex head screw, 10-32
´
3
8
,SS
HHS035S Hex head screw,
1
4
-20
´
5
8
,SS
HHS049S Hex head screw
5
16
-18´½SS
HN15S
1
4
-20 Hex nut
HN20S Hex nut
5
16
-18 SS
LW10S Lock washer,
1
4
,SS
LW15S Lock washer
5
16
SS
VT402 Motor, HP,
1
25
115-60-1, 17.7RPM. 90:1
VT408 Flange bearing
VT411 Set collar
VT412 Rivet chain before serial no. 42563
VT412-1 Rivet chain after serial no. 42562
VT412ML Master link – spring clip
VT413 Sprocket
VT414-1 Guide for 15" high drum
VT421 Muffler
VT438S Tumbler base plate
VT439S Sprocket & chain box less cover
VT440S Motor & pump box less cover
VT441S Driving shaft
VT442S Driven shaft
VT443S Sprocket & chain cover
VT444S Motor & pump cover
VT445S-1 Drive wheel, with O-ring
VT449S Timer with pushbutton start, 0-50 minute
VT450S Timer socket
Part
No. Description
VT453S Nipple quick release ¼ MPT – brass
VT464S Label, filter
VT467S Label, VTS-42 control panel
VT468S Elbow 45°´¼´¼FPT–SS
VT470S Elbow, 90 deg.,
1
4
FPT, SS
VT474S Terminal strip, 4 circuit
VT476S Toggle switch w/boot, ON-OFF-ON
VT477S Sight window
VT478S Strain relief, 90 deg.
VT481S Lock knob
VT482S Access door
VT487S Coupling
1
4
FPT brass
VT488S Nipple 6"
´
1
4
MPT brass
VT488S-1 Nipple 6½"´¼ MPT – brass
VT491S Ventilation fan
VT492S Timer without pushbutton start, 0 – 50 minute
VT498S Bushing ¼ MPT
´
1
8
FPT – brass
VT740S O-ring
VTS7154 Oval handle
VTS7160 90° street
1
4
MPT
´
1
4
FPT brass
VTS7162 Vacuum pump, 115-60-1
VTS7162-50 Vacuum pump, 220-50-1
VTS7170 Power cord w/120V plug, 8’, 16/3
VTS7179 Toggle switch boot
VTS7209 Spring clip holder
WS005S Weld stud 8-32´¾, SS
WS012S Weld stud 10-32´½. SS
WW15S Washer – SS
VT513S Shaft Seal
10
Page 13

VTS-42
11
Page 14

12
Page 15

13
Page 16

VTS-42
Taking special care that the sight bowl is fully seated and locked.
14
Page 17

15
Page 18

VTS-41
WIRING DIAGRAM
IMPORTANT: Always Advise Model & Serial Number
12
TIMER
CONNECTIONS 2, 7 – COIL
CONNECTIONS (3, 1) (8, 6) N.O. CONTACTS
16
Page 19

VTS-41
WIRING DIAGRAM
FOR VARIABLE SPEED
IMPORTANT: Always Advise Model & Serial Number
13
TIMER
CONNECTIONS 2, 7 – COIL
CONNECTIONS (3, 1) (8, 6) N.O. CONTACTS
17
Page 20

VTS-42
WIRING DIAGRAM
IMPORTANT: Always Advise Model & Serial Number
14
TIMER: INTERVAL MODE – 50 MINUTES
CONNECTIONS 2, 7 – COIL, 24 – 240 VAC
CONNECTIONS (3, 1) (8, 6) N.O. CONTACTS
TIMER: INTERVAL MODE – 50 MINUTES
CONNECTIONS 2, 7 – COIL, 24 – 240 VAC
CONNECTIONS (3, 1) (8, 6) N.O. CONTACTS
18
Page 21

GENERAL MAINTENANCE
ROTATING DRUM
TO AVOID SERIOUS PERSONAL INJURY
ALWAYS Turn Off, Unplug From Power Source and Perform Lockout/Tagout Procedure to This
Machine BEFORE Servicing.
NEVER Touch This Machine Without Training and Authorization By Your Supervisor.
NEVER Bypass, Alter, or Modify This Equipment in Any Way From Its Original Condition.
PROMPTLY REPLACE Any Worn or Illegible Labels.
USE ONLY GENUINE BIRO Parts and Accessories Properly Installed.
A. PUMP FILTER
1. Check filter daily. Filter must be drained before the separated moisture and oil reaches the bottom of the
lower filter element. Drain by unscrewing the black drain plug in bottom of sight bowl.
2. The filter element should be removed and cleaned monthly.
a. Unscrew clear threaded bowl.
b. Unscrew filter element assembly.
c. Clean bowl and filter element. Reassemble or replace filter element. Clean bowl with mild soap and water
only. Do not use detergents, cleansing agents, such as acetone, alcohol, benzene or gasoline, which are
damaging to plastic.
d. Lubricate or replace bowl gasket to assist initial sealing. Use only mineral based oils or grease. Do not
use synthetic oils or silicones.
e. Screw bowl into body of filter. Close black drain plug.
B. VACUUM PUMP
WARNING: THE MOTOR IS THERMALLY PROTECTED AND CAN AUTOMATICALLY RESTART WHEN THE
OVERLOAD RESETS. ALWAYS DISCONNECT FROM POWER SOURCE BEFORE SERVICING. PERSONAL
INJURY COULD BE THE RESULT.
1. Do not at any time lubricate any parts of the vacuum pump with oil, grease or petroleum products or clean
with acids, caustics or chlorinated solvents. Never allow the diaphram to contact any petroleum products.
This can reduce greatly the service life of the vacuum pump.
2. To clean or replace the internal filters and/or rubber gasket. Remove the five screws in the top of the pump.
The filter and gasket are located beneath this top plate. Remove the filters and wash them in solvent and
blow off with air or replace. The gasket may be cleaned with water. Replace the filters in proper position and
replace the gasket. The gasket and top plate will fit in one position only.
3. To replace the diaphram, remove the socket cap screws from the head of the pump. The diaphram is held in
place by two phillips head screws. Remove screws, retainer plate and diaphram. The diaphram will fit in any
position on the connecting rod. Replace the plate and the two phillips head screws. Torque to 30 inch
pounds.
CAUTION: DO NOT RAISE ANY BURRS OR NICKS ON THE HEADS OF THESE SCREWS. THESE
BURRS COULD CAUSE DAMAGE TO THE INLET VALVE.
15
19
Page 22

CLEANING
ROTATING DRUM
TO AVOID SERIOUS PERSONAL INJURY
ALWAYS Turn Off, Unplug From Power Source and Perform Lockout/Tagout Procedure to This
Machine BEFORE Cleaning or Servicing.
ONLY Use Recommended Cleaning Equipment, Materials and Procedures.
NEVER Spray Water or Other Liquid Substances Directly at Motor, Power Switch or any Other
Electrical Components.
ALWAYS Thoroughly Clean Equipment at Least Daily.
DO NOT Use Harsh Chemicals, Scouring Pads or Cleansers. Ordinary Liquid Detergent for Manual Dish or Pot/Pan
Washing Will Not Harm the Machine. Harsh Machine Chemicals Will Cause Brown “Rusty” Stains, as will Chlorine
Bleach and Similar Products if Allowed to Stand in or on the Machine for Any Length of Time.
CLEANING THE BIRO VACUUM TUMBLER:
1. Turn “OFF”, unplug machine from power source,and perform lockout/tagout procedures.
2. The drum, drum lid, baffles in Stainless Steel drum and gasket can be removed and washed in utensil sink.
Be sure to flush the vacuum valve with warm soapy water and rinse with clean water thoroughly. The drum,
drum lid, baffles from Stainless Steel drum and gasket should be sanitized with an appropriate sanitizer
approved by your local Heath Dept. All parts should be air dried before reassembly and storage.
3. The exterior of the tumbler base can be wiped down with the same type soap solution followed by a rinse
water wiping.
4. If food stains are not removed, use a product such as “Bon Ami” or “Soft Scrub”. Be sure to scrub with the
grain of the Stainless Steel with a soft cloth or sponge.
5. Streaks or water spots can usually be removed with a solution of vinegar and water.
16
20
Page 23

OPERATOR'S SIGNATURE PAGE
MY SIGNATURE ATTESTS THAT I HAVE COMPLETELY READ AND UNDERSTAND THIS MANUAL.
I REALIZE THAT THIS MACHINE, IF OPERATED CARELESSLY, CAN CAUSE SERIOUS INJURY TO
MYSELF AND OTHERS.
NAME (PRINT) SIGNATURE
SUPERVISOR’S
INITIALS
DATE
17
21
Page 24

LIMITED WARRANTY
WARRANTY: The BIRO Manufacturing Company warrants that the BIRO Vacuum Tumbler will be
free from defects in material and workmanship under normal use and with recommended service.
BIRO will replace defective parts, which are covered by this limited warranty, provided that the defective parts are authorized for return, shipping charges prepaid, to a designated factory for inspection and/or testing.
DURATION OF WARRANTY: The warranty period for all parts covered by this limited warranty is
one (1) year from inspection/demonstration advised on returned warranty registration card, or
eighteen (18) months from original factory shipping date, whichever occurs first, except as noted
below.
PARTS NOT COVERED BY WARRANTY: The following are not covered by this limited warranty:
VTS7121 vacuum pump inlet filter, VT434S-1 drum lid gasket, and VT454S ball valve on drum lid.
This limited warranty does not apply to machines sold as used, rebuilt, modified, or altered from
the original construction in which the machine was shipped from the factory. Water contaminated
electrical systems and vacuum pump are not covered under this limited warranty. BIRO is not responsible for electrical connection of equipment, adjustments to switch components or any other
electrical requirements, which must be performed only by a certified electrician. BIRO is not responsible for service charges or labor required to replace any part covered by this limited warranty
or for any damages resulting from misuse, abuse, lack of proper or recommended service.
EXCLUSION OF WARRANTIES AND LIMITATION OF REMEDIES: BIRO gives no warranties
other than those expressly stated in this limited warranty. THE IMPLIED WARRANTY OF MERCHANTABILITY, THE IMPLIED WARRANTY OF FITNESS FOR PROCESSING OF FOOD PRODUCTS, AND ALL OTHER IMPLIED WARRANTIES ARE SPECIFICALLY EXCLUDED. BIRO IS NOT
LIABLE FOR CONSEQUENTIAL OR INCIDENTAL DAMAGES, EXPENSES, OR LOSSES. THE
REMEDIES PROVIDED IN THIS BIRO LIMITED WARRANTY ARE PURCHASER’S SOLE AND EXCLUSIVE REMEDIES AGAINST BIRO.
REGISTRATION CARDS: You must sign, date and complete the warranty registration card supplied with each machine. The warranty registration card must be returned to The Biro Manufacturing Company for proper registration. If no warranty registration card is returned to BIRO, the
warranty period will begin from the date the machine was originally shipped from the factory.
HOW TO GET SERVICE:
1. Contact the agency from whom you purchased the machine; or
2. Consult the yellow pages of the phone directory for the nearest authorized dealer; or
3. Contact Biro Mfg. Company for the nearest authorized service entity (250 plus worldwide) in
your area.
THE BIRO MANUFACTURING COMPANY
1114 Main Street
Marblehead, Ohio 43440-2099
Ph. 419-798-4451
Fax 419-798-9106
E-mail: service@birosaw.com
Web: http://www.birosaw.com
18
ITEM NO. VT480S-274
Form No. VTS41/42-274-10-04-4 COMM
ITEM NO. VT480S-274
Form No. VTS41/42-274-7-08-5 PPD
22
 Loading...