

Page 1
Page 2

PREFACE
DSP-880 Series Customer Pole Display
II
Federa l Communicati ons Commiss ion (FCC)
This equipment has been te sted a nd f ound to comply with th e limits fo r a Class A
dig it a l d e vice, p u r s uant to part 15 o f t h e FC C R ul e s . T hese l imi t s are desig ne d to
pro v i de r e a s o na b l e pr ot ectio n aga in st harm f ul i nte rf e ren ce i n a resi denti a l
installation. Thi s equipme nt g ener a tes, us e s a nd can ra d i a t e ra d i o fr e que n cy
energy and, if not installed and used in accordance with the instructions, may
ca us e harm f ul i nt erf e renc e to r a dio c omm u ni ca t ion s. H o w e v e r, there i s n o
guarantee that interference will not occur in a particular installation. If this
equi pme nt does cau se ha rmf ul i nte rfer ence to radio or tele vision reception, which
ca n be d ete rmi ned b y t urni ng t he eq ui pme nt o ff and on, th e u ser i s e ncou rage d t o
try to correct the interference by one or more of the following measures:
• Re o ri ent o r re lo ca t e th e recei v ing a nt enna .
• Increase the separation between the equipment and receiver.
• Connect the equipment into an outlet on a circuit different from that to
which the receiver is connected.
• Consult the dealer or an experienced radio/TV technician for help.
Declaration of C onformity
These devices comply with part 15 of the FCC Rules. Operation is subject to the
following two conditions:
1. These devices may not cause harmful interference.
2. These devices must accept any interference received, including interferenc
e
th
at may cause undesired operation.
WEEE (Waste f rom Electrical and El ec tronic Equip ment)
The WEEE wheeled bin symbol on the product or on its packaging indicates that
the p ro duct m u st n ot b e di s p o sed o f with othe r wast e. It s ho ul d be the u se r ’s
responsibility to dispose of their waste equipment by handing it over to an
approved location for the recycling of waste electrical and electronic equipment.
For more information about where to send your waste equipment for recycling,
plea se co nt act y o u r lo ca l cit y offi ce, yo u r hou sehol d wa ste di sp osal servi ce o r
where you purchased the product.
Page 3

PREFACE
III
DSP-880 Series Customer Pole Display
Disclaimer
The mat e ria l i n t hi s d oc ume nt i s fo r i nf or ma ti on p u rp ose a nd i s s ub je ct t o cha ng e
without prior notice. has made every effort to ensure that this user’s manual is
accurate and complete. However, no liability is assumed for any errors and
omissions that may have occ urred. Nor are any liability assumed for any damage s
resulting from the use of this product and the information contained in this
document. reserves the right to make improvements to this publication from
tim e to ti m e i n t he cont ent s here of wi thout obl i g a t i on of t he m a n u fa c turer t o
noti fy a n y p e r s o n of s uc h re vision or changes.
Copyright
This work is cop yrighted. R e p rod u ct ion or retrans mission of this d o c um e nt a t io n,
in whole or in part, without prior written permission from the manufacture is a
violation of copyright law.
©
2016 T echnology Co., Ltd. All rights reserved.
Tradema rk Recogniti on
Microsoft, Wind o w s a re reg istere d tr ade mar ks of Micr osof t C o rp .
Intel is a registered trademark of Intel International Inc.
Other software or product names used in this manual are the properties of
their respective owners and are acknowledged.
Page 4

PREFACE
DSP-880 Series Customer Pole Display
IV
Important Safety Instructions
Failure to observe these safety instructions may cause bodily injury, or damage
to the product. Read these instructions carefully and keep this user’s manual in
an accessible location for future reference.
The product may cause a fire or
electric shock when it is used
improperly. Observe the above safety measures at all times.
If the product is damaged, immediately turn off the power and
disconnect the power cord. Contact your dealer for assistance.
1. D
o not plug in or unplug the power c ord with we t hand s.
2. Do not plug the product into an AC outlet with the incorrect voltage.
(Be sure to use a voltage that is between AC 100V~240V)
3. Do not plug several products into one multi-outlet.
4. Do not apply pressure to the power cord or place heavy objects on it.
5. Immediately stop using the product if it emits strange noise, odor, or
smoke.
6. Do n ot u se a ero sol spra ye rs c onta ini ng f lam mabl e ga s i nsid e o r ar ound th e
product.
7. Do not allow foreign objects or liquids to enter the product, or serious
damage may result.
8. Do not place the product on an unstable surface. The product may cause a
fire if it is dropped, damaged, or broken.
T
he following instructions will help you to make better use of this product.
1. K
eep the machine away from locations subject to high humidity, dust, or
temperatures that exceed the specification.
2. Clean t he p r oduc t o nl y by usi n g a d ry cloth or a cl oth soake d wit h
det ergent. N ev er us e t hinn e r or ot her vo l a t i le s o lv ent s fo r clea ning.
3. At the end of the day, clean and inspect the exterior of the machine after
the machine i s p o w e red off.
4. Use o nl y sp e cifie d ac ce s s ories.
5. Do not expose the accessories directly to sunlight, high temperatures,
humidity, dust, or gas.
6. Do not place heavy objects on top of the p roduct or lean them against t he
product. These items may fall down and cause injury.
Do not block the air vent of the product as this can cause heat
accumulation inside the box machine and may cause a fire.
Page 5

Page 6

Table Of Contents
CHAPTER 1 INTRODUCTION ............................................... 2
1.1 Unpacking ........................................................................... 2
1.2 Features .............................................................................. 3
1.3 Specification ........................................................................ 4
CHAPTER 2 INTERFACE....................................................... 5
2.1 Connection to Display Panel ................................................... 5
2.2
DSP-880.............................................................................. 5
2.3 DSP-880 USB ..................................................................... 6
2.
4
DSP-880 RS232................................................................... 6
CHAPTER 3 INSTALLATION................................................. 8
3.1 Physical Function .................................................................. 8
3.2 Configuration ..................................................................... 10
3.3 Driver Installation ............................................................... 13
CHAPTER 4 CONFIGURE YOUR DEVICE ............................. 14
4.1 Before starting ................................................................... 14
4.2 Configure System Parameters .............................................. 16
4.3 Define W el co m e Mes sa g e .................................................... 18
4.4 Define Your Own Font ......................................................... 20
CHAPTER 5 SOFTWARE SETTING COMMAND ..................... 22
5.1 Baud Rate Setting Command ............................................... 22
5.2 Parity Check Setting Command ............................................ 22
5.3 USB Class Setting Command ................................................ 22
5.4 Command Type Setting Command ........................................ 23
5.5 International Character Set Setting Command ........................ 23
CHAPTER 6 COMMAND SET ............................................... 24
6.1 ESC/POS Mode Command Set .............................................. 24
6.2 ADM787/788 Mode Command Set ........................................ 26
6.3 EMAX (AEDEX) Mode Command Set ...................................... 27
Page 7

INTRODUCTION
1
DSP-880 Series Customer Pole Display
6.4 UTC Mode Command Set ..................................................... 27
6.5 CD5220 Mode Command Set................................................ 28
6.6 DSP-800 Mode Command Set .............................................. 31
CHAPTER 7 CHARACTER SET............................................... 32
7.1 Character Code (20h-7Eh) ................................................... 32
7.2 Character Code Page (80h-FFh) ............................................ 33
Page 8
INTRODUCTION
DSP-880 Series Customer Pole Display
2
CHAPTER 1 INTRODUCTION
Welcome
Thank you for choosing the DSP-880 Series
Cus tomer Pole Display.
display wi th
with high
The DSP-880 Series is a 20 columns x 2 lines customer Vacuum
Fluorescent Display panel. VFD emits a very bright light contrast.
Based on VFD display method, the DSP-880 Series gives a
better view of message in bright b lue-green display fonts.
1.1 Unpacking
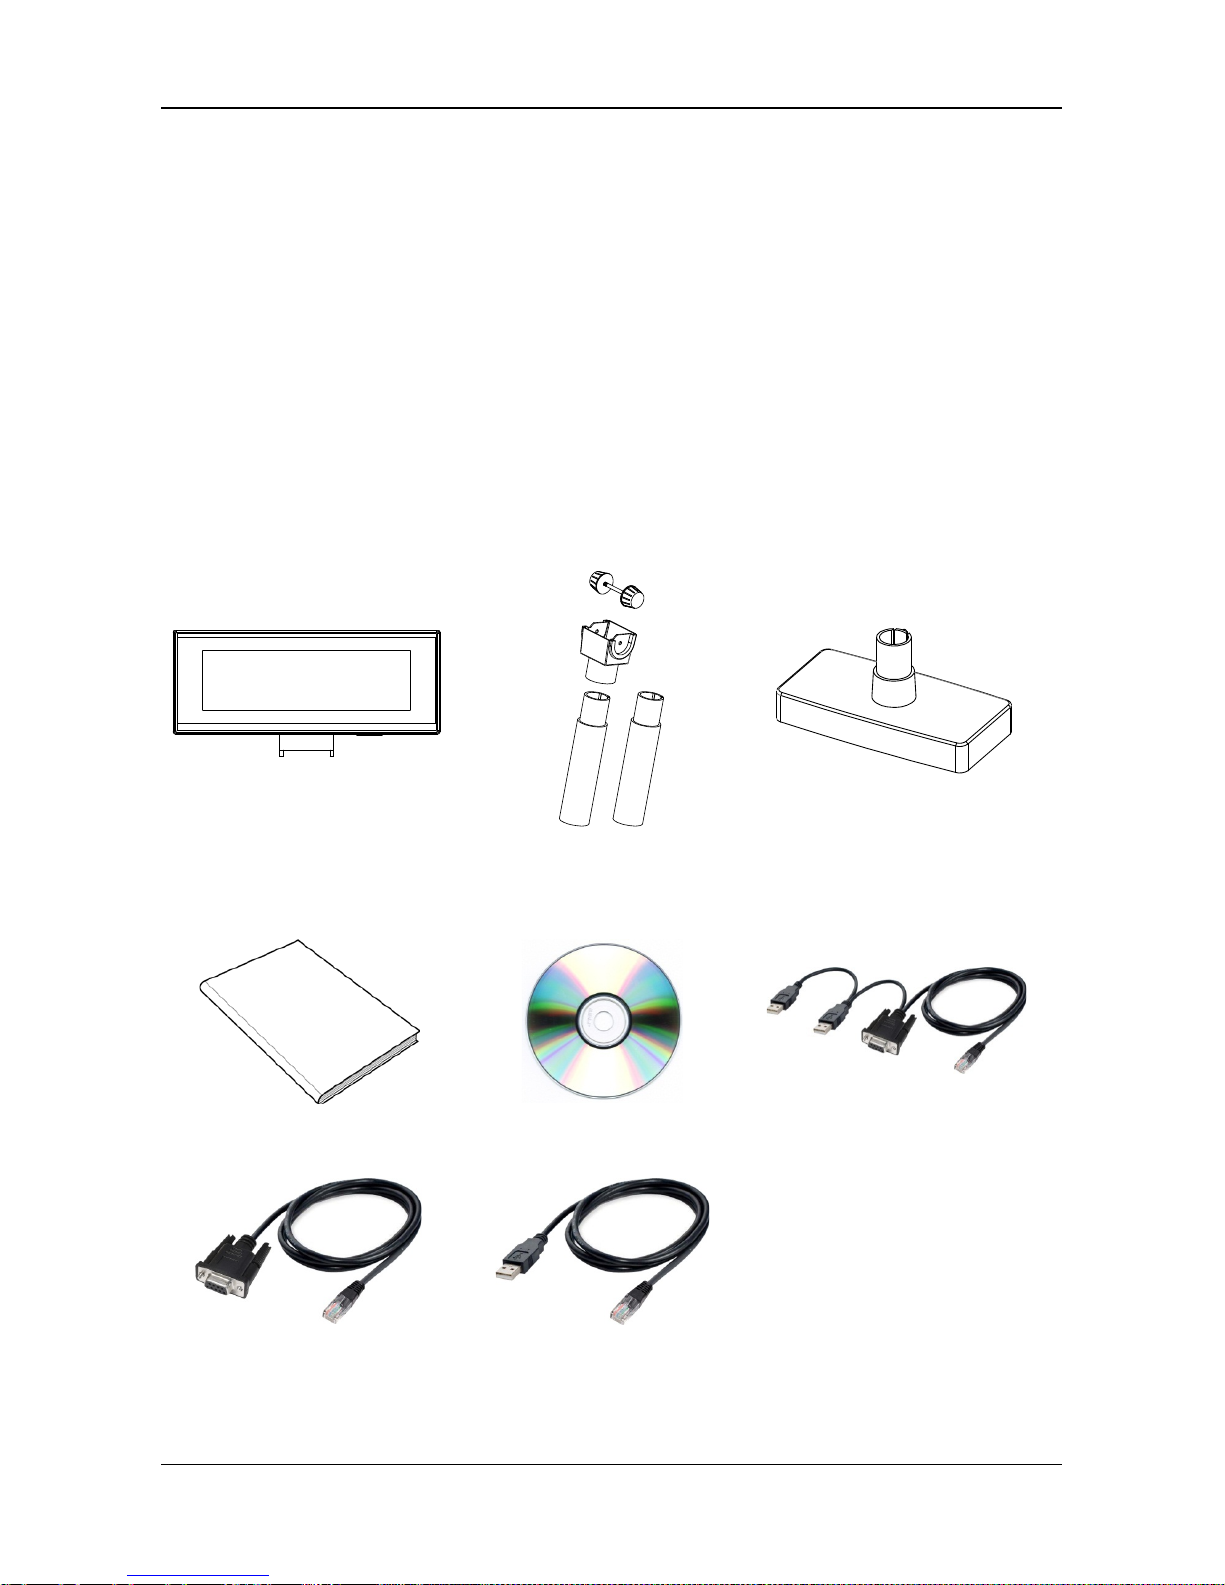
Confirm that all the following items are contained in the carton. If any item is
mis si ng or da ma ge d, co nta ct the de ale r fr om who m y ou pur cha s ed the p rod uct .
DSP-880 Series Customer Pole Display Set:
Display Panel
Pole: 120 mm x 2
Stand Base
Accessory Kit:
Qui
ck R e fer ence G ui d e
Dri v e r C D
(User’s Manua l includ e d )
Dual Interface Cable
(For DSP-880)
RS232 Cable
(For DSP-880)
USB Cable
(For DSP-880)
Page 9

INTRODUCTION
3
DSP-880 Series Customer Pole Display
1.2 Features
1. Vacuum Fluorescent Display
2. Eye-catching bright blue-green display fon
t
3. Unique panel design to vitalize your retail interior.
4. Supports 14 language characters, including those from the USA, France,
Germany, UK, Sweden, Denmark I and II, Italy, Spain, Norway, Greek,
Slavonic, Russian and Portuguese.
5. P r ovide s 6 c omman d mo d es : EPSON ESC/ P OS , A D M7 8 7/7 8 8, U T C/ S , UTC/P,
EMAX (AEDEX), CD5220 and DSP-800.
6. The wide-range of power supplies input to prevent misuse.
7. Low power consumption achieves optimal energy use and reliability.
8. Innovative hinge design for quick panel adjustment.
9. User-program mable for all fonts and customer messages.
10. Hardware Interface:
Standard
F ull sp eed da t a t ran sfer using t he US B 2.0 p r otoc ol .
RS-23
2C Interface with baud rates selectable from 9600 to 115200 bps.
11. Mechanical:
Pro
vides a wide range of rotation and tilt angles.
Selectable pole length for best position installation.
Page 10
INTRODUCTION
DSP-880 Series Customer Pole Display
4
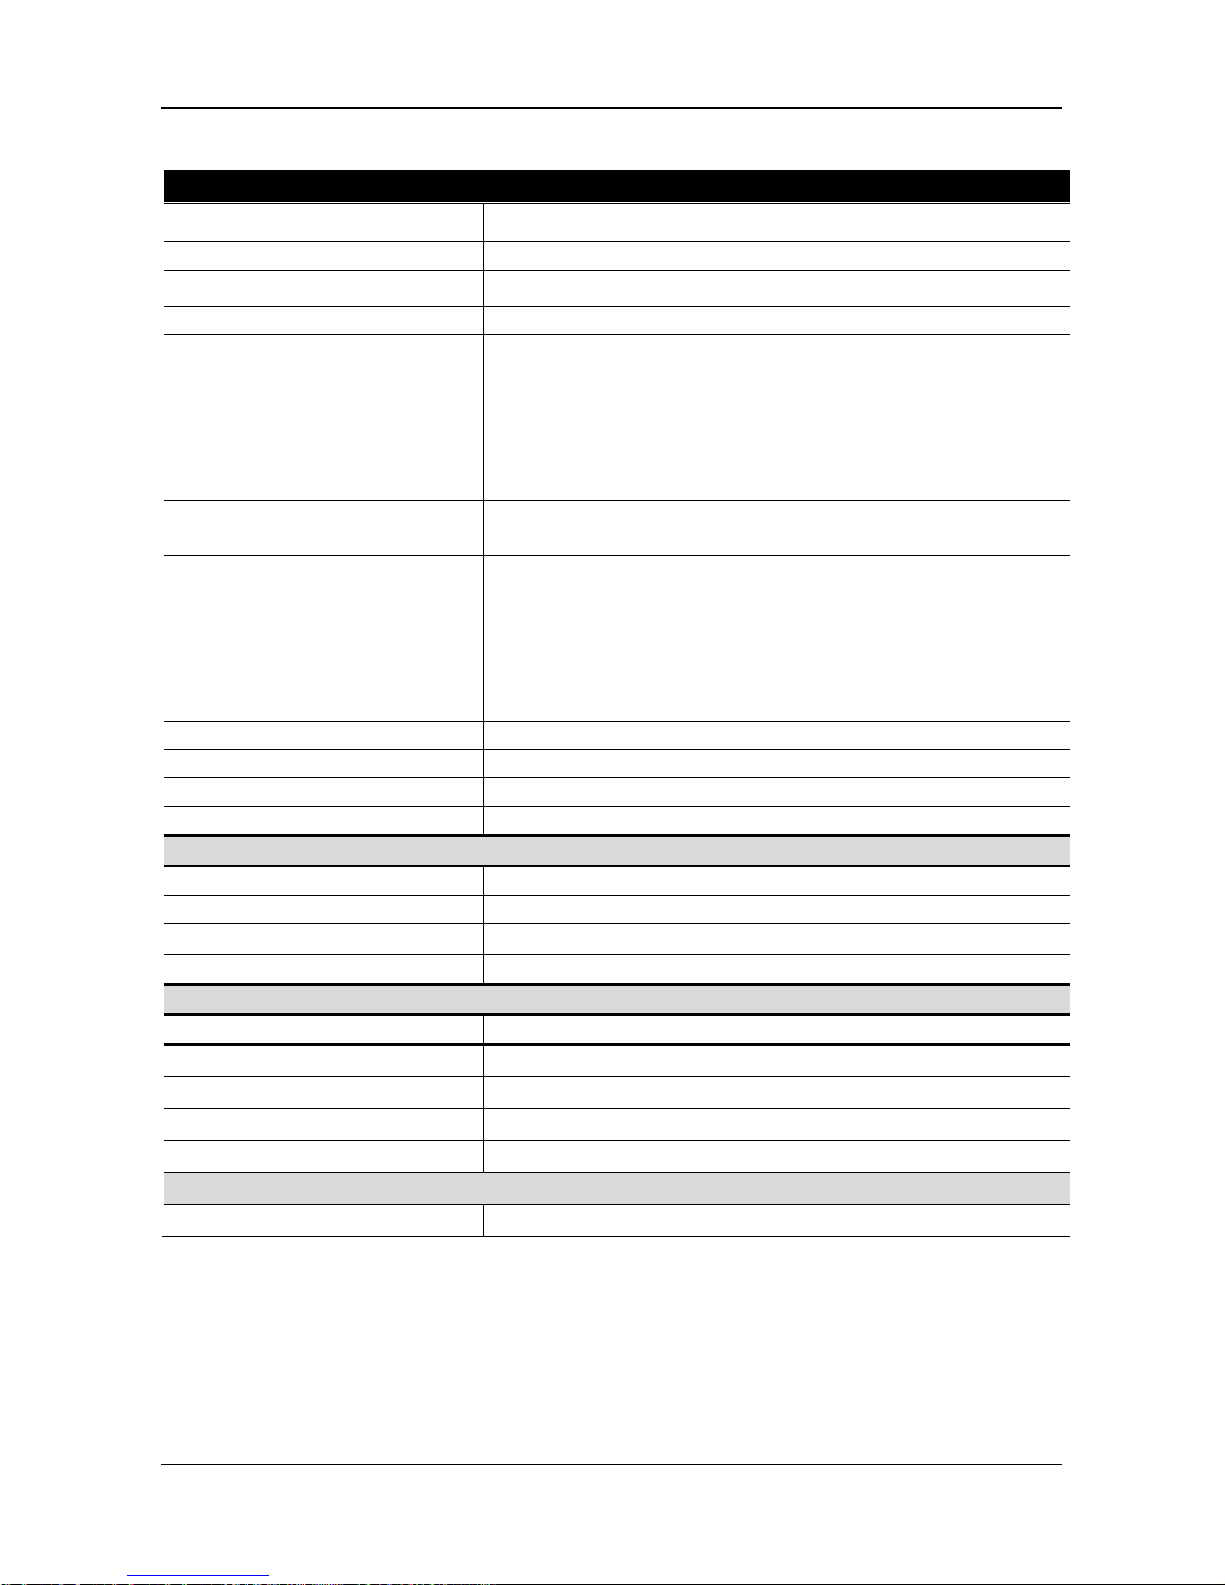
1.3 Specification
Model
DSP-880 Series
Display Method Vacuum Fluorescent Display (VFD)
Num b er of Charact e rs
40 cha r a ct ers ( 2 0 c ol um n s x 2 li ne s)
Display Color
Blue-green
Brightness
700 cd/m2
Font
I. 96 alphanumeric
II. 14 sets of international characters: USA,
France,
Ge rm a ny , U K, Sw ed en, D enm a rk I and
II, I taly, Spain, Norway, Japan (Katakana),
Slavonic, Russian and Portuguese
III. One set of user downloadable characters
Character Size
5x7 D ot M atrix
9.0 3 m m x 5.25 m m
Command Set
1. EPSON ESC/POS
2. ADM787/788
3. EMAX (AEDEX)
4. UTC/S, UTC/P
5. CD5220
6. DSP-800
Interface
Dual Interface (USB+RS232C) / USB / RS232C
Power Supply
DC 5V (via USB or DB9)
Power Consumption
<3W
MTBF
30,000 hrs
Physical Dimension
Head (W x D x H)
225.5 x 50 x 87 mm
Support (H x Ø)
(120 x 35 mm) X 2
Base (W x D x H)
187 x 92 x 27 mm
Weight
N.W. 0.8kg
Environment
EMC & Safety
CE/ FC C Cl a s s A
Operation Temperature
5~45℃
Storage Temperature
-20~70℃
Operation Humidity
15%~80% RH
Storage Humidity
10%~90% RH
Mechanical
Housing Color
Black
Page 11
INTERFACE
5
DSP-880 Series Customer Pole Display
CHAPTER 2 INTERFACE
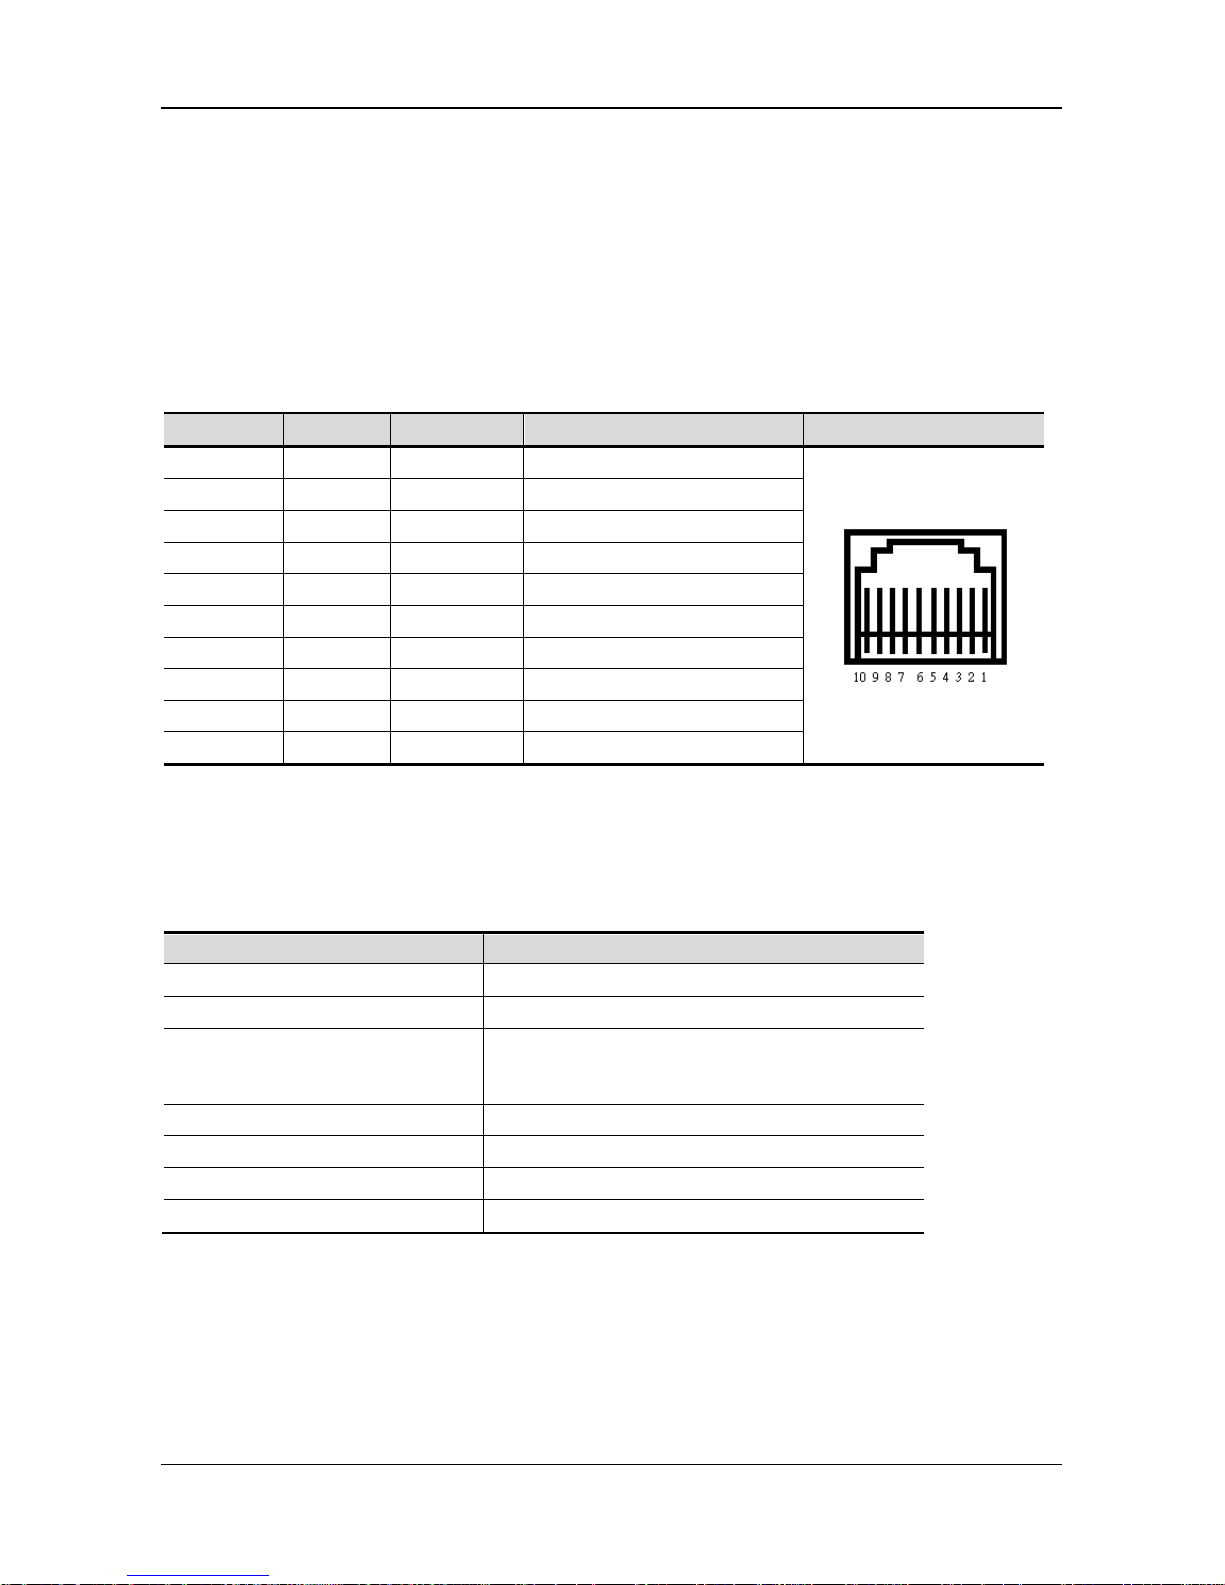
2.1 Connection to Display Panel
All the DSP-880 Series has RJ-45
connector to display end. Connector
Type: 10 Pin Phone Jack Pin
assignment
Pin No.
Signal
I/O
Function
Illustration
1
GND
-
Ground
2
USB
Data -
3
USB
Data +
4
USB
VBUS
5
TXD
Output
Transmit Data
6
DSR
Output
Data Set Ready
7
RXD
Input
Receive Data
8
DTR
Input
Data Terminal Ready
9
VIN
Input
+5V
10
GND
-
Ground
2.2 DSP-880
RS232C Type
Data transmission
Serial
Synchronization
Asynchronous
Handshaking
None
Signal level
MARK = -3 to -15V (logical “1” OFF)
SPACE = +3 to +15V (logical “0” ON)
Baud rate
9600, 19200, 38400, 115200 bps
Parity
None, Even
Bit length (Data word
8 bits
Stop bits
1 bit
USB Type
The DSP-880 Series is compatible to the High-speed USB 2.0 protocol which has
a raw data rate of 12 megabits per second (Mbps).
Page 12

INTERFACE
DSP-880 Series Customer Pole Display
6
2.3 DSP-880 USB
Connector Type: USB 2.0 B Type
Pin assignment
Pin No.
Signal
Illustration
Pin 1
VCC
Type
A
Pin 2
Data –
Pin 3
Data +
Pin 4
GND
2.4 DSP-880 RS232
Connector Type: D-sub 9Pin (Female)
Pin assignment
Pin No.
Signal
I/O
Function
Illustration
2 TXD Output Transmit Data
3
RXD
Input
Receive Data
4, 7 DTR/RTS Output Data Terminal Ready
5
GND
-
Ground
6,8 DSR/CTS Input Data Set Ready
NOTE: PIN9 DC input is necessarily required when DB9 functions as power source.
1 5
6 9
Page 13

Page 14
NSTALLATION
DSP-880 Series Customer Pole Display
8
CHAPTER 3 INSTALLATION
The DSP-880 Series Customer Pole Display is easy to install by following the
instructions in this chapter. No special training or tools are necessary. As
this manual contains required information on the installation and
programming of DSP-880 Series Customer Pole Display, it is recommended
that you read the entire manual carefully prior to initiating installations.
3.1 Physical Function
3.1.2 Assembling
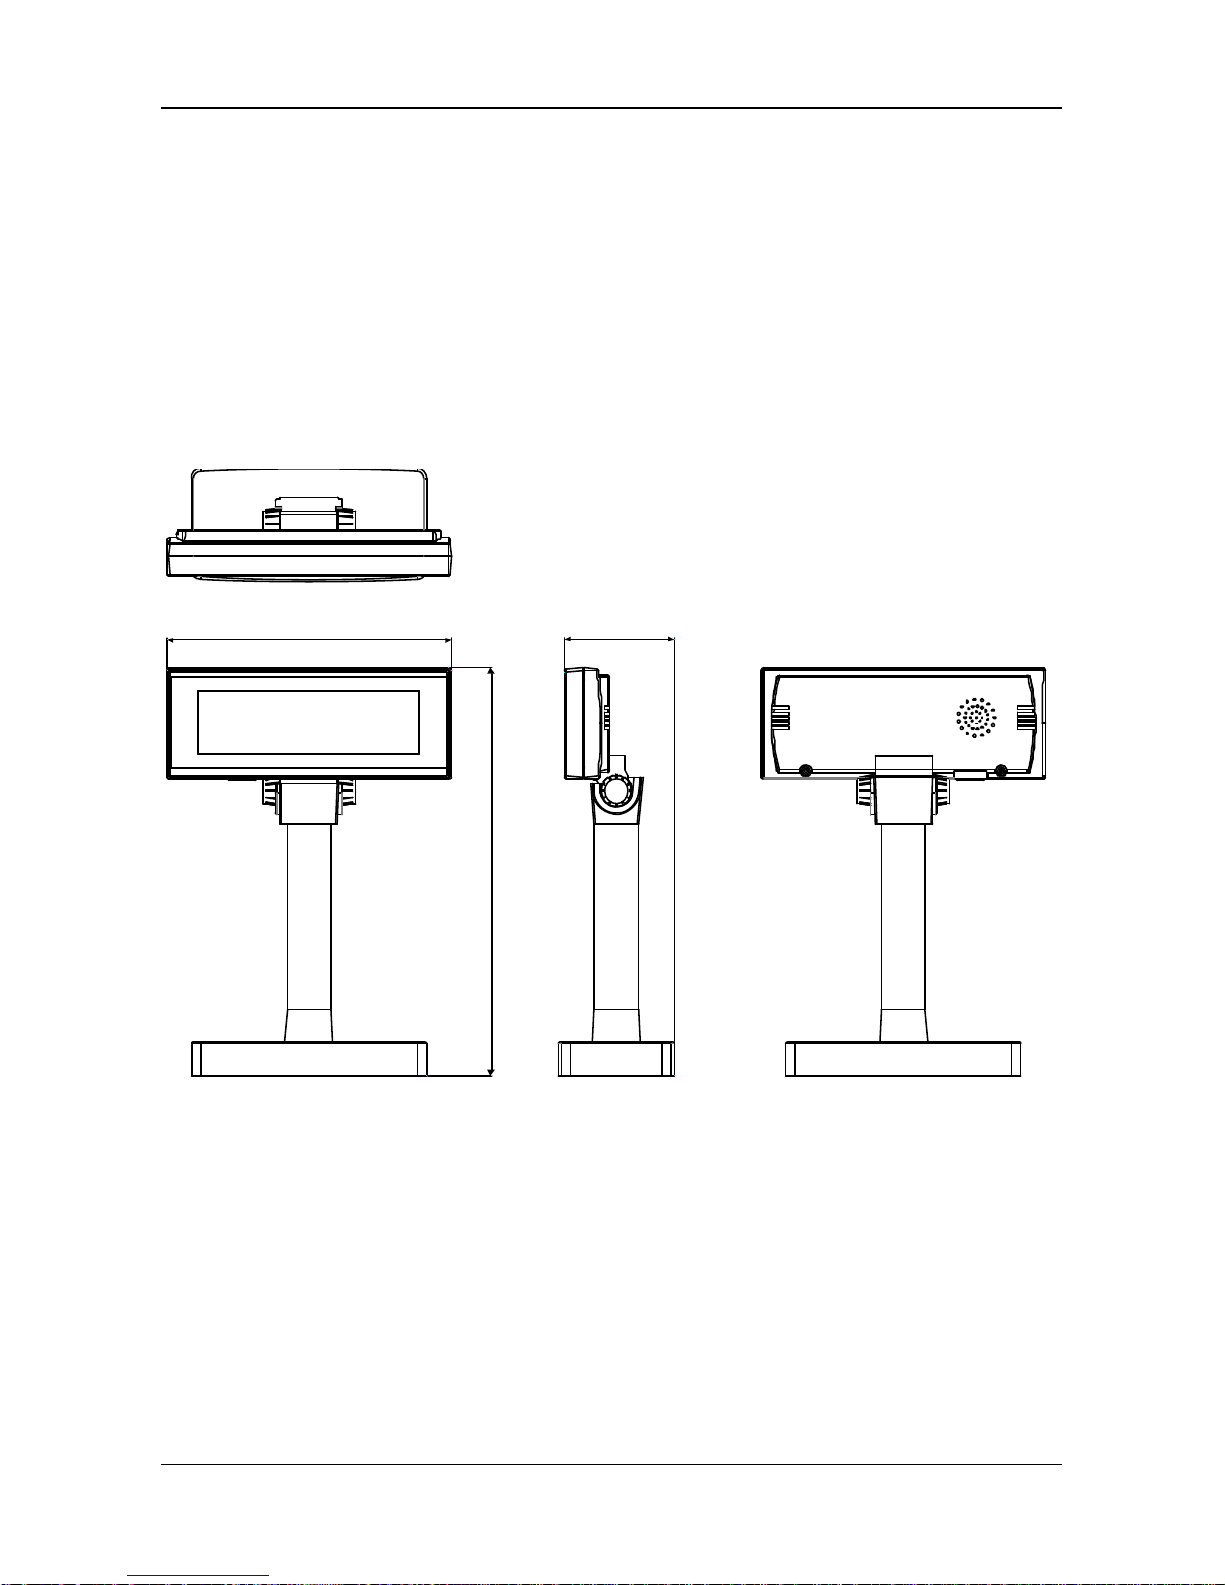
Insert the RJ45 end of the dual interface cable through the base and the pipe then into the
panel and connect to the RJ45 slot. You can extend the pole to the desired height by
attaching the extension pole for different heights:
Low 200 (mm), Mid 323.7 (mm) and Highest 443.7 (mm).
NOTE: Attach the joint of the extension pole or stand base to the Dis play Pan el
unti l it is proper ly loc ked.
225.5
323.7
87.1
Page 15
INSTALLATION
9
DSP-880 Series Customer Pole Display
ATTENTION
(1) Violently rotating the Display Panel may cause
damages of the Display Panel.
(2) Secure the Display Panel properly after attaching the
extension pole to a desired height.
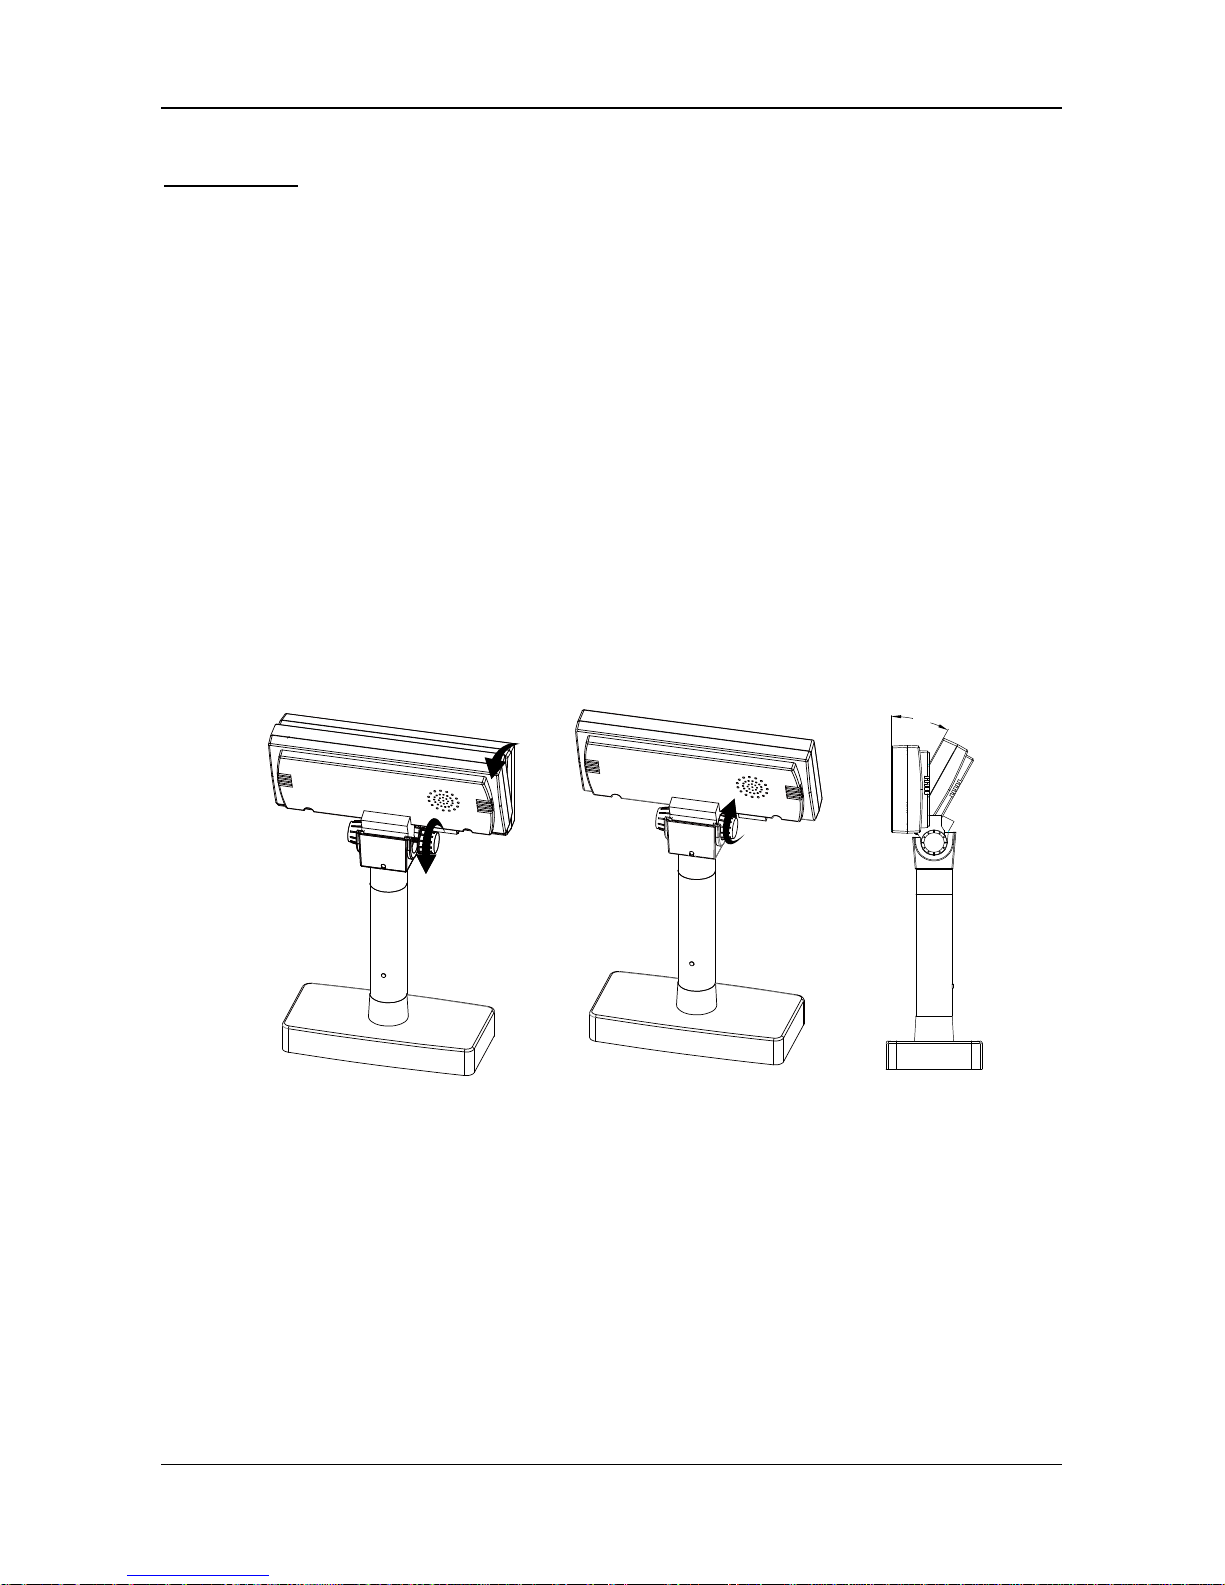
3.1.4 Angling
This product allows 0~28 deg ree tilt a ngle a d just m e nt. The Display Panel can be
easily tilted to the desired pos ition by using a hinge design.
How to Adjust
(1) Locate the hing e sectio n o n t he ba cksid e of Di s p l a y Pan e l.
(2) Pull the tab downward and tilt the panel up or down to the desired position.
28°
Page 16
NSTALLATION
DSP-880 Series Customer Pole Display
10
3.2 Configuration
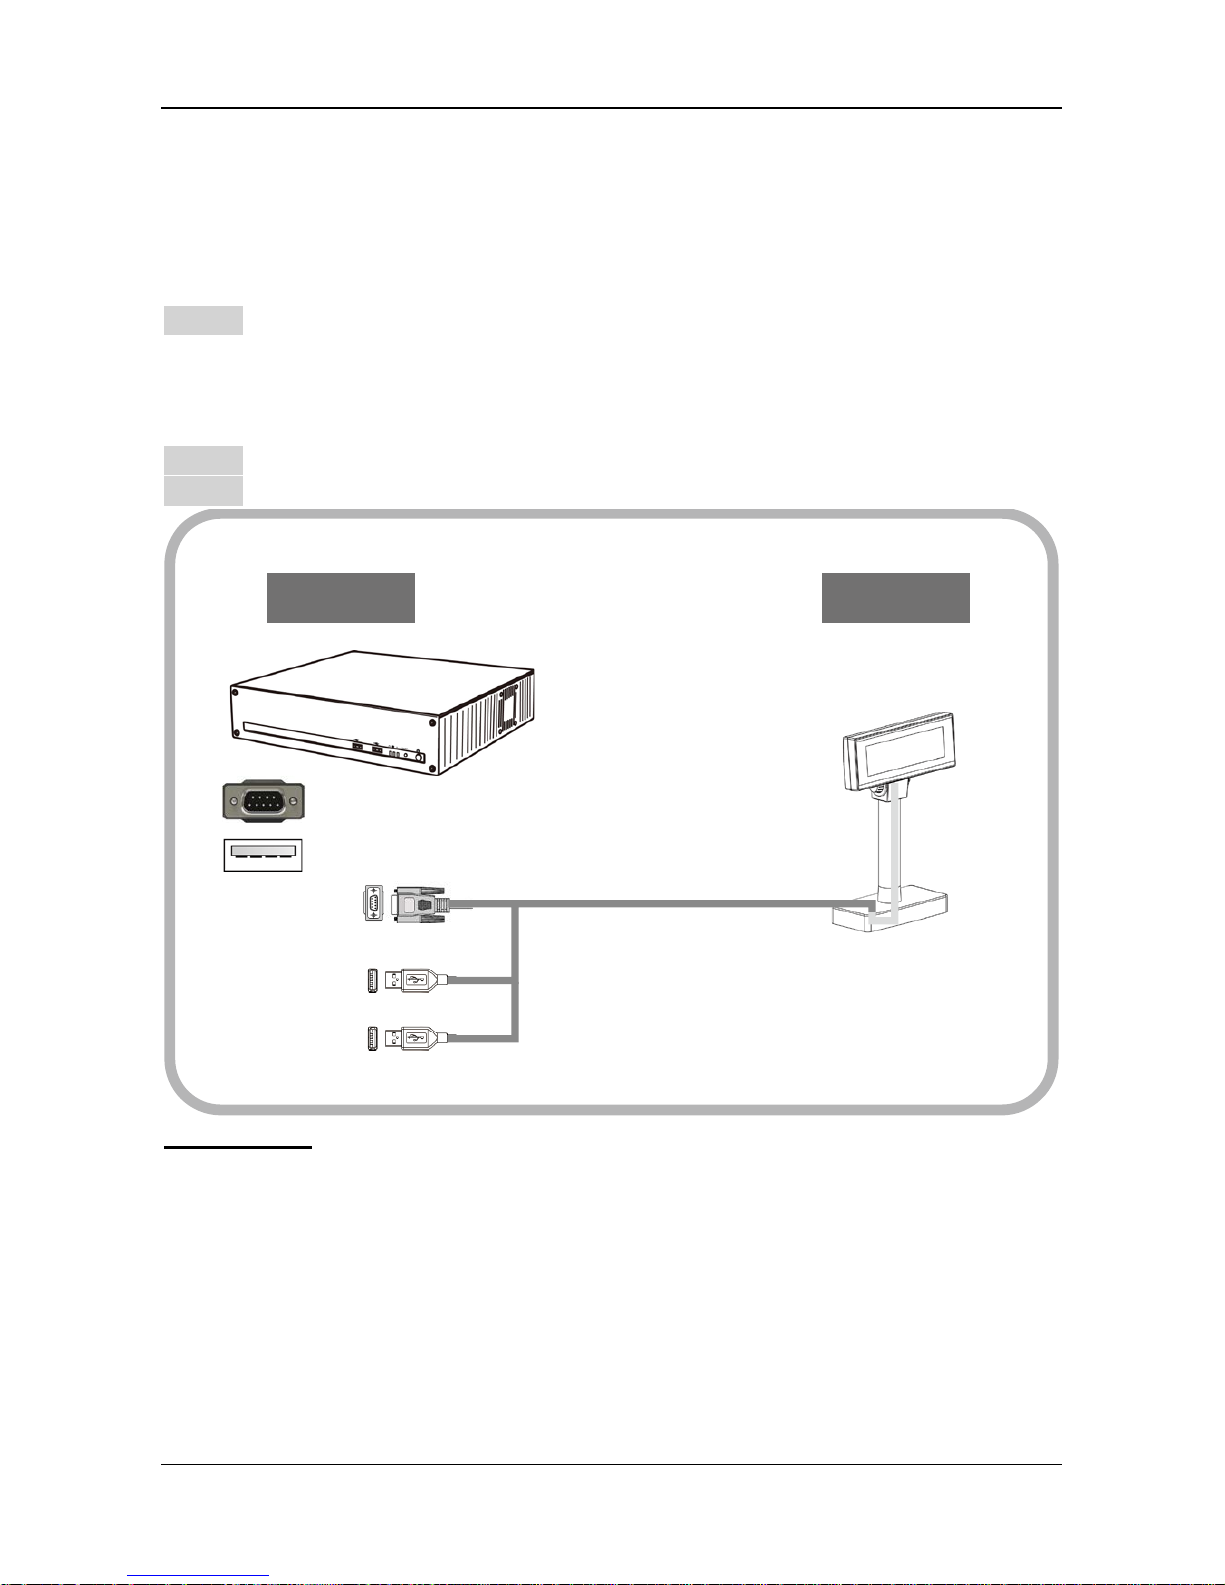
3.2.1 Dual Interface Cable Connection
Step 1 Turn OFF the system power
Before you start the installation, ensure that the host computer and the
DSP-880 Series Customer Pole Display are powered off.
Step 2 Connect all the dual Interface cable
Step 3 Star t t he host PC and swit ch on the di splay .
ATTENTION
With the dual interface cable, the DSP-880 Series is able to
be powered only by the
USB 5V.
DisplayHost/PC
RS232 Male
RS232 DB9
Female
USB A Type
USB 5V
Page 17
INSTALLATION
11
DSP-880 Series Customer Pole Display
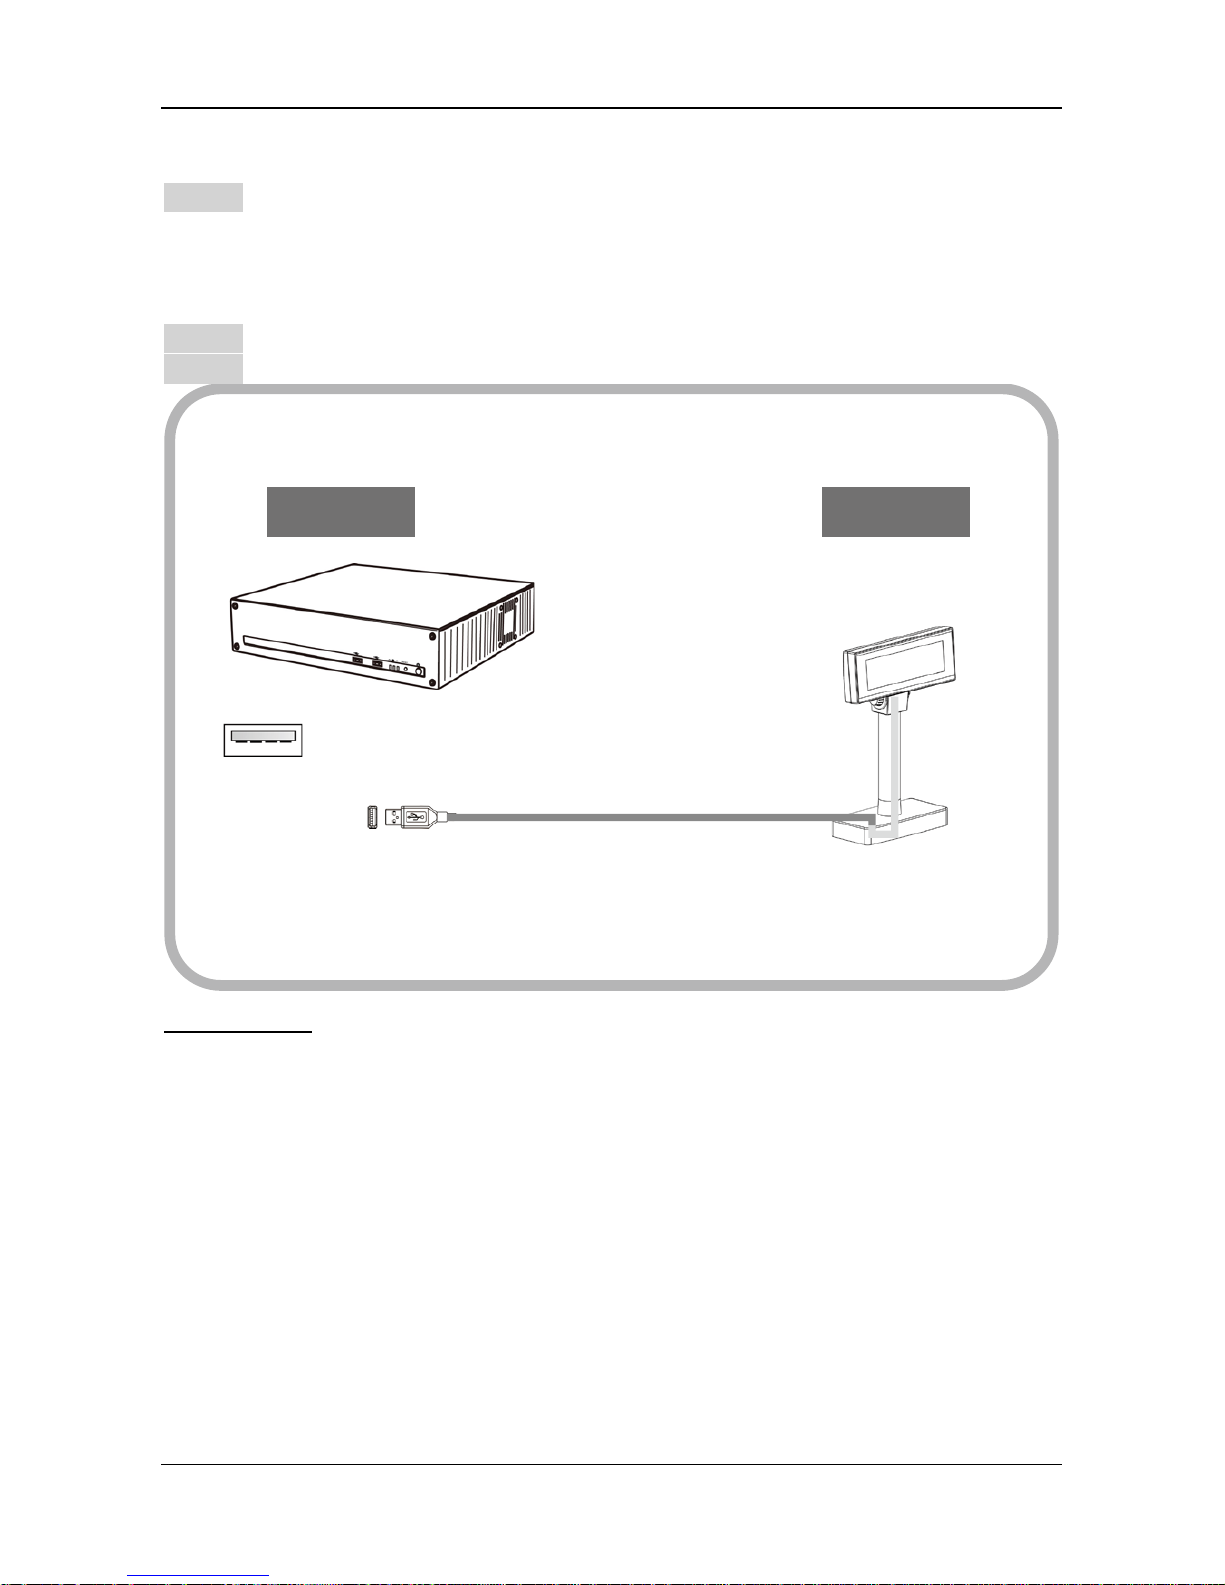
3.2.2 USB Connection
Step 1 Turn OFF the system power
Before you start the installation, ensure that the host computer and the
DSP-880 Series Customer Pole Display are powered off.
Step 2 Connect th e USB ca ble
Step 3 Star t t he host PC and swit ch on the di splay .
ATTENTION
With the dual interface cable, the DSP-880 Series is able to
be powered only by the
USB 5V.
DisplayHost/PC
USB A Type
USB 5V
Page 18
NSTALLATION
DSP-880 Series Customer Pole Display
12
3.2.3 RS232 Connectio n
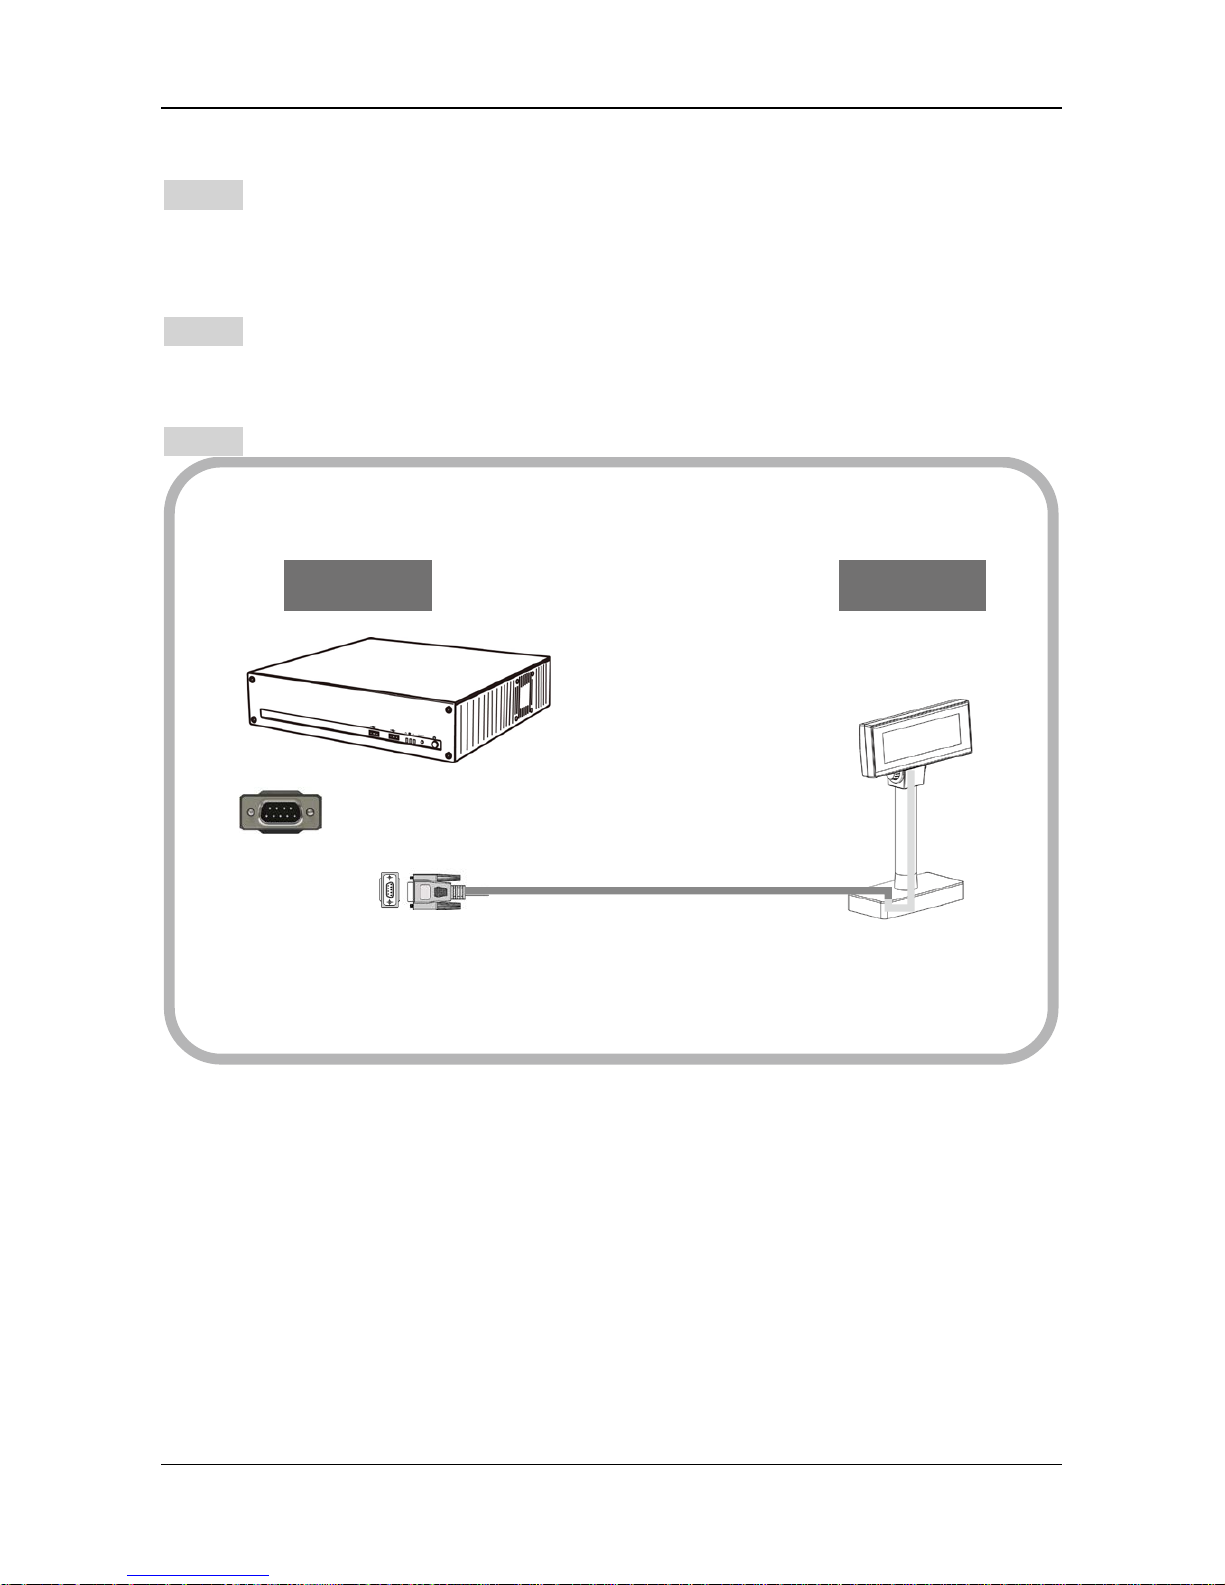
Step 1 Turn OFF the system power
Before you start the installation, ensure that the host computer and the
DSP-880 Series Customer Pole Display are powered off.
Step 2 Connec t t he RS232 cable
Plug t he DB 9 Fe ma l e c on ne ct or of RS 232 ca ble a nd make sure the 9th p in of th e
com p o rt on t he P C is powe red by 5V .
Step 3 Star t t he ho st PC a nd switch on t he d isp l ay .
DisplayHost/PC
RS232 Male
RS232 DB9
Female
Page 19
INSTALLATION
13
DSP-880 Series Customer Pole Display
3.3 Driver Installation
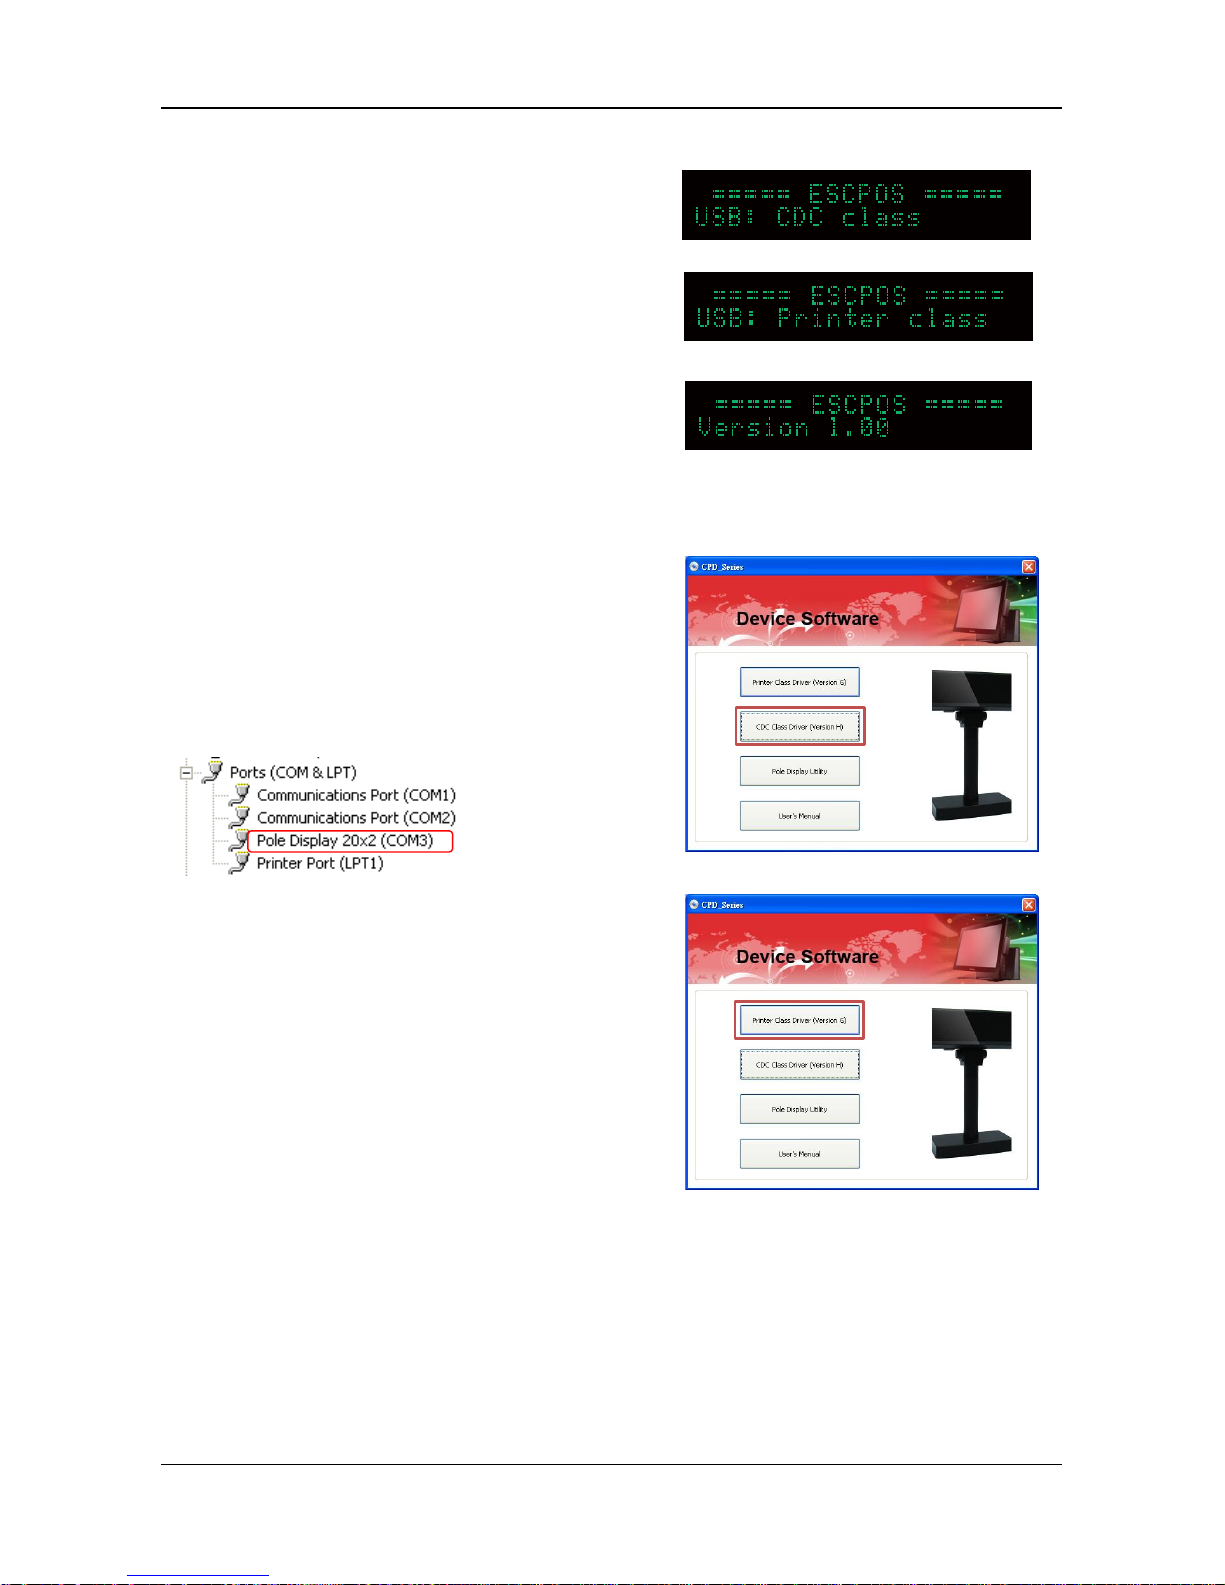
The firmware for the USB port is divided
into CDC class (Virtual COM) and printer
class. To re c ogni ze whi c h f ir mwa r e
version i t is, che ck the starting status of
your customer display as Pic 1a,Pic
1b,Pic1c.
In case y ou r U SB port is i n CDC cl a ss a nd
your application software is connected by
USB p o rt , yo u must inst all the driver:
-Clic k CD C Cl ass a s Pi c 2.
-check the device manager to find the
COM p o rt n umbe r a s be low.
If your A pp l icat io n Softw are ne e d s
to install the printer mode driver:
Click Printer Class as Pic 3 and sel ect:
-Serial/Virtual for COM Connection.
-USB for USB Connection.
Pic 1a
Pic 2
Pic 3
Pic 1b
Pic 1c
Page 20
NSTALLATION
DSP-880 Series Customer Pole Display
14
CHAPTER 4 CO N FIG U RE YO UR DE V ICE
The system parameters of DSP-880 Series can be set by using VFD Utility
software tool. You can find the tool in the companion disk. In addition to
setting system parameters, you can configure welcome message and user font
with the software tool. The system parameters include the following items.
Language Character Set
Command Type
Baud rate
Parity Check
4.1 Before startin g
Before starting the software, please make sure the DSP-880 Series is connected
to your PC and it works. If you use USB interface or device driver, please
install device driver before starting the software. If the connection is OK,
execute the software.
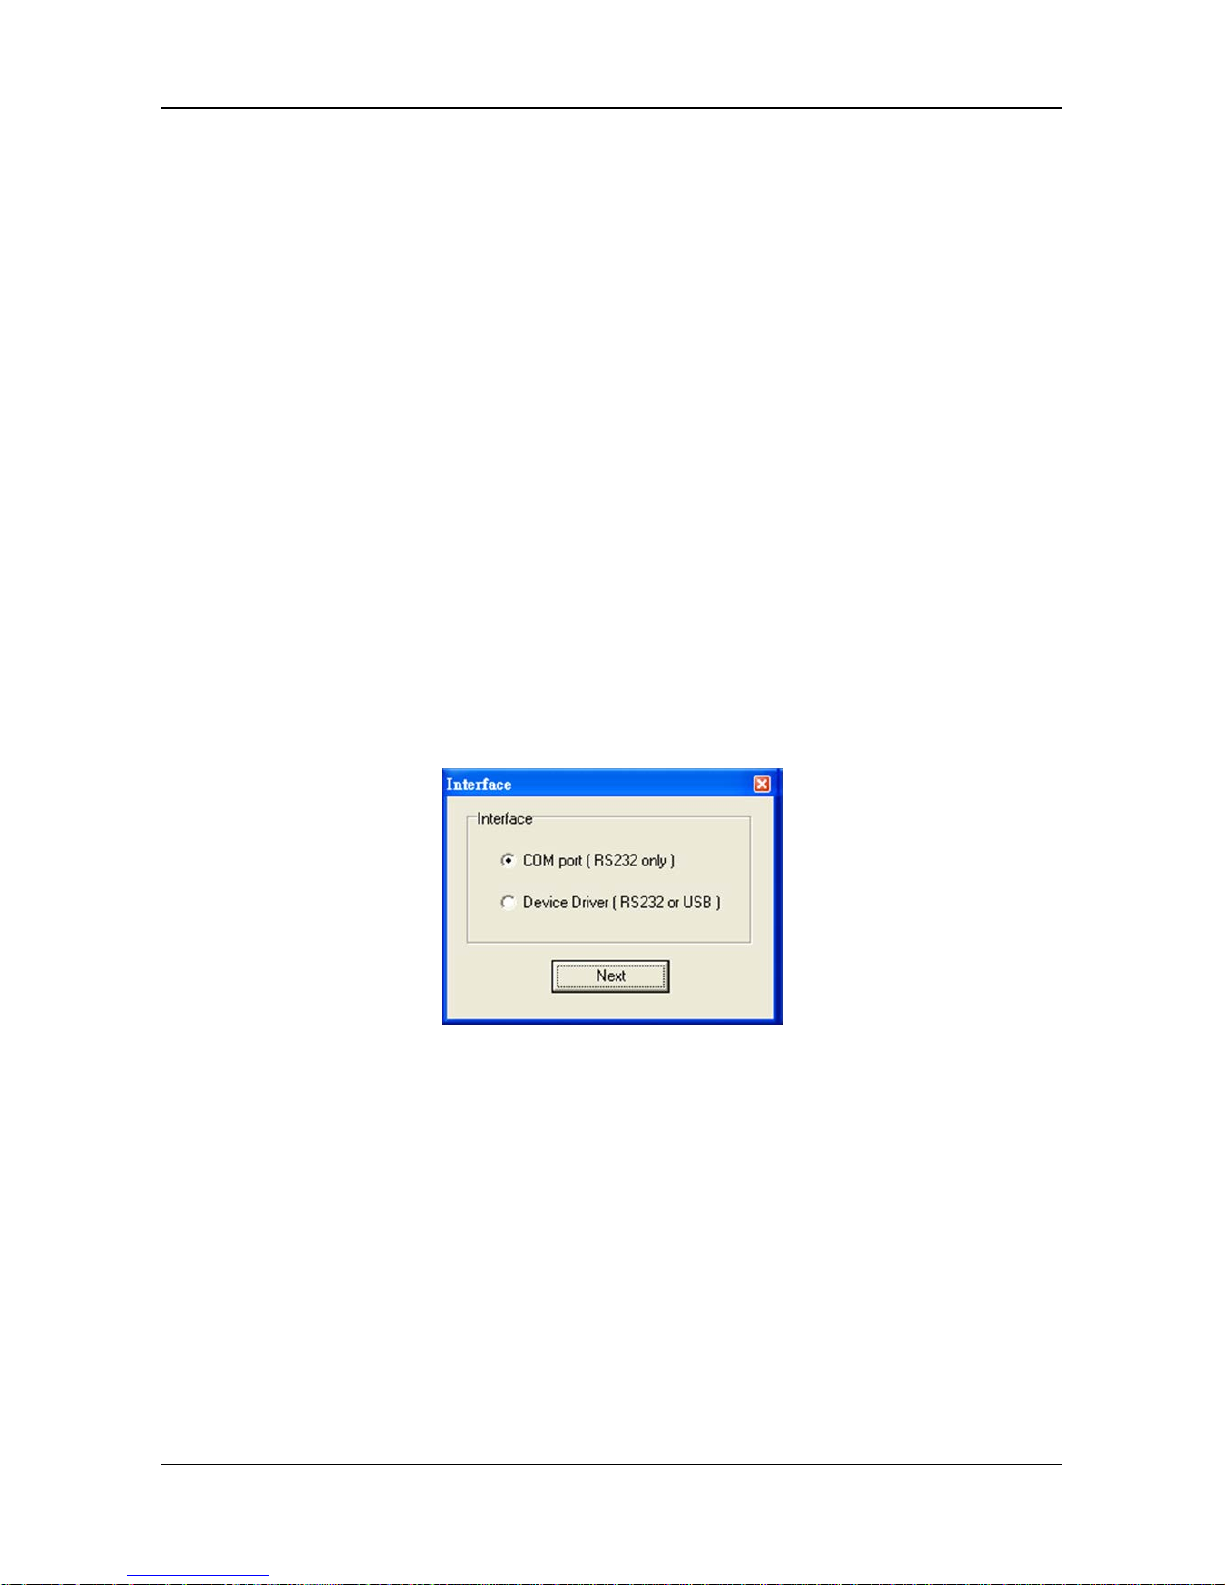
4.1.1 Select a pr op er interface
After starting the software, the following dialog will pop up. Select a proper
interface.
Page 21
INSTALLATION
15
DSP-880 Series Customer Pole Display
4.1.2 RS-23 2 Interface
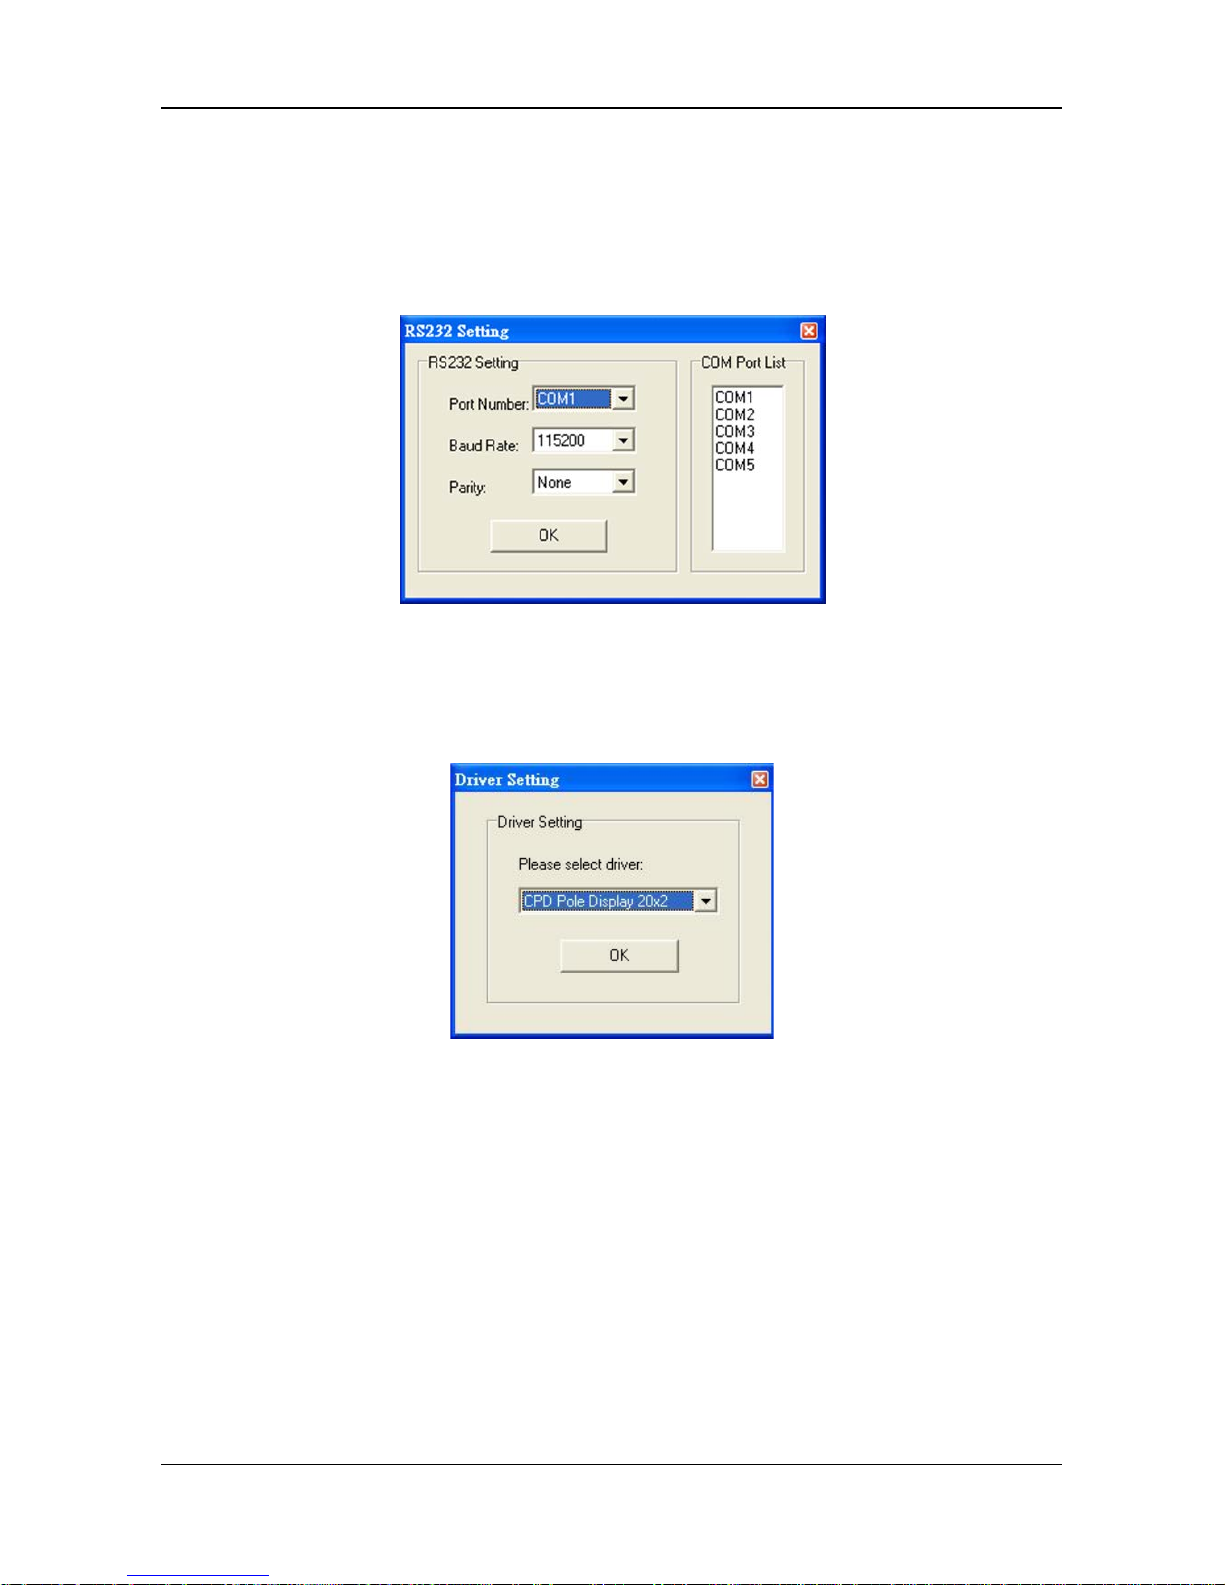
If you select the item COM port (RS232 only), the dial og of RS-232 setting will
show up to configure the RS-232 interface. Please make s ure the paramete r s
that you type here are the same as the settings of your host PC. If the
parameters aren’t the same, the communication between host PC and your
machine will fail.
4.1.3 Selecting Device Driver
Please select your device f rom the p ull-down list on following dialog. If the device
driver is installed, your device shall be shown on the list.
4.1.4 Select Model Name
Before continue, please select a proper model name that matches with your
device’s model. T he model name can be selected on the upper-right corner of the
window. If the model name does not match with your device, the configuration
may not take effect.
Page 22
NSTALLATION
DSP-880 Series Customer Pole Display
16
4.2 Configure System Parameters
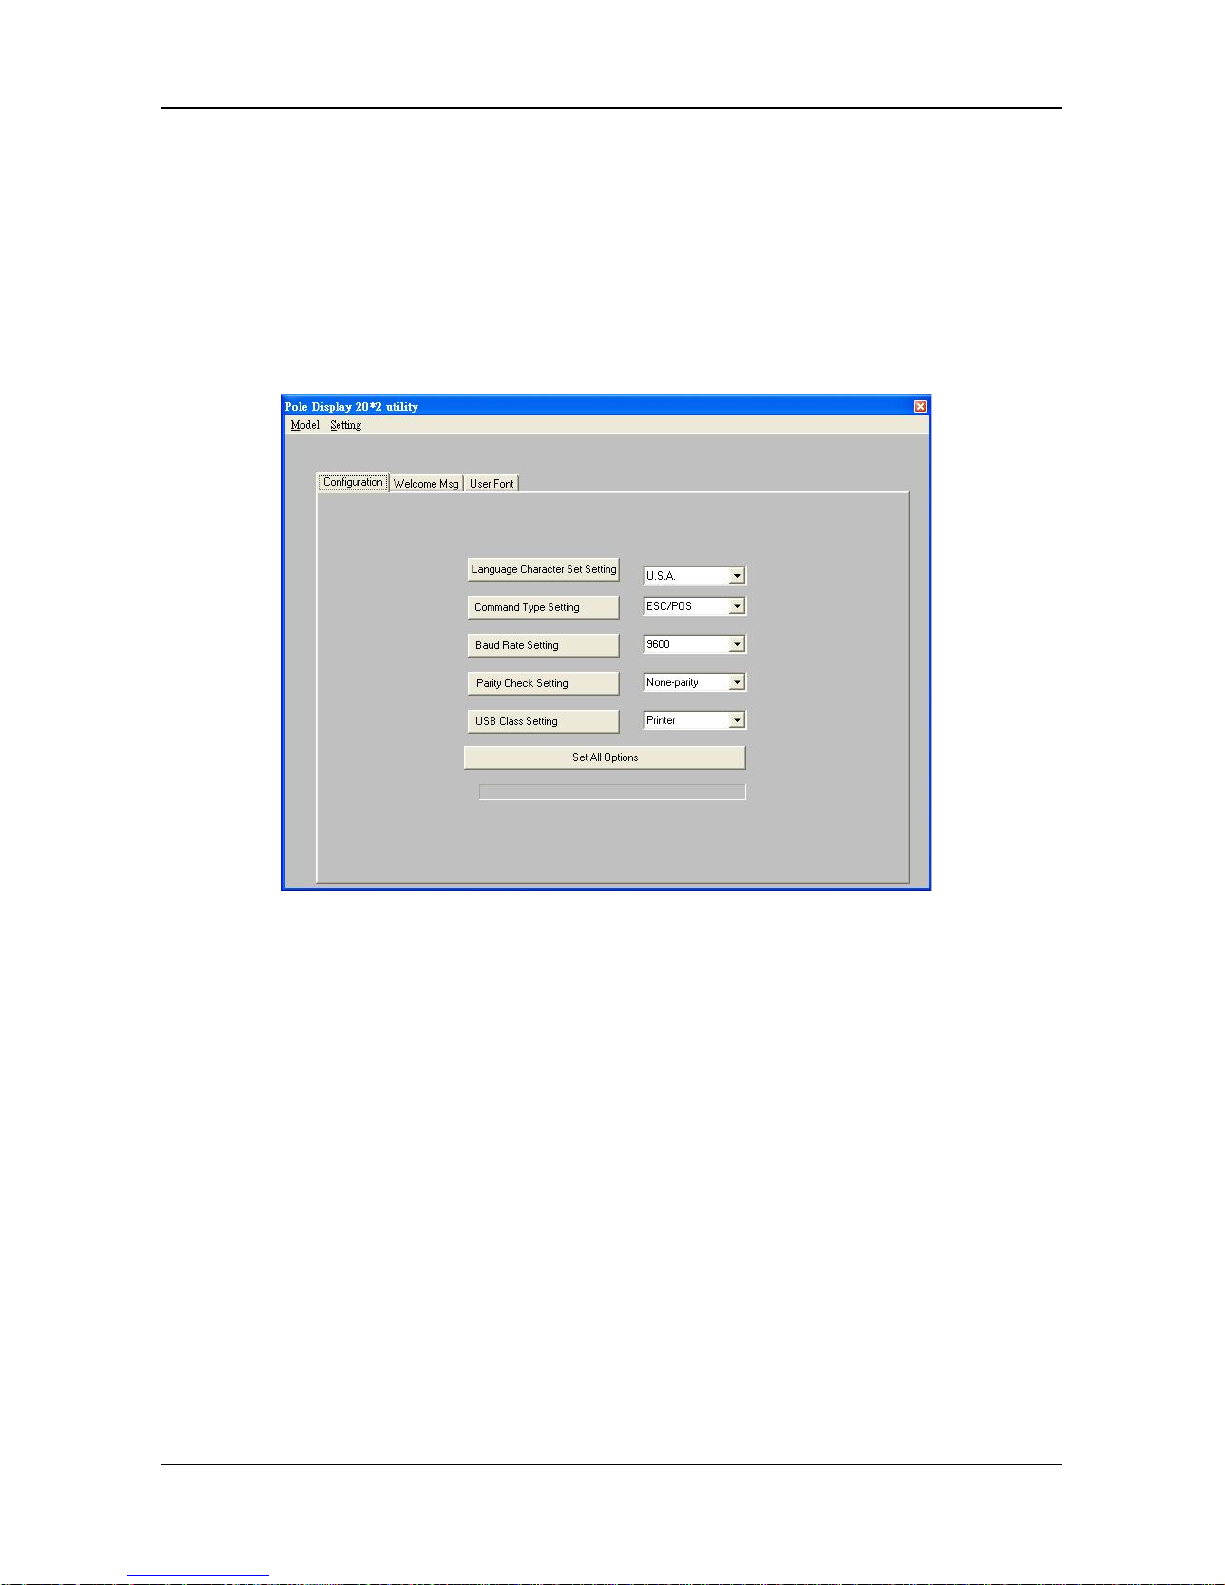
The re a re t hre e pa ge s o n the mai n d ial og. The fi rst one i s t he Con fig urat io n Pa ge.
You can select desired character type, command set and baud rate of RS-232
interface. After all items are set to desired co ndition, pres s SE T but to n to s end al l
the settings to your device. T hese settings will be stored on the non-volatile
memory. Every time when you start the device, these settings will be retrieved
from non-volatile memory.
Page 23
INSTALLATION
17
DSP-880 Series Customer Pole Display
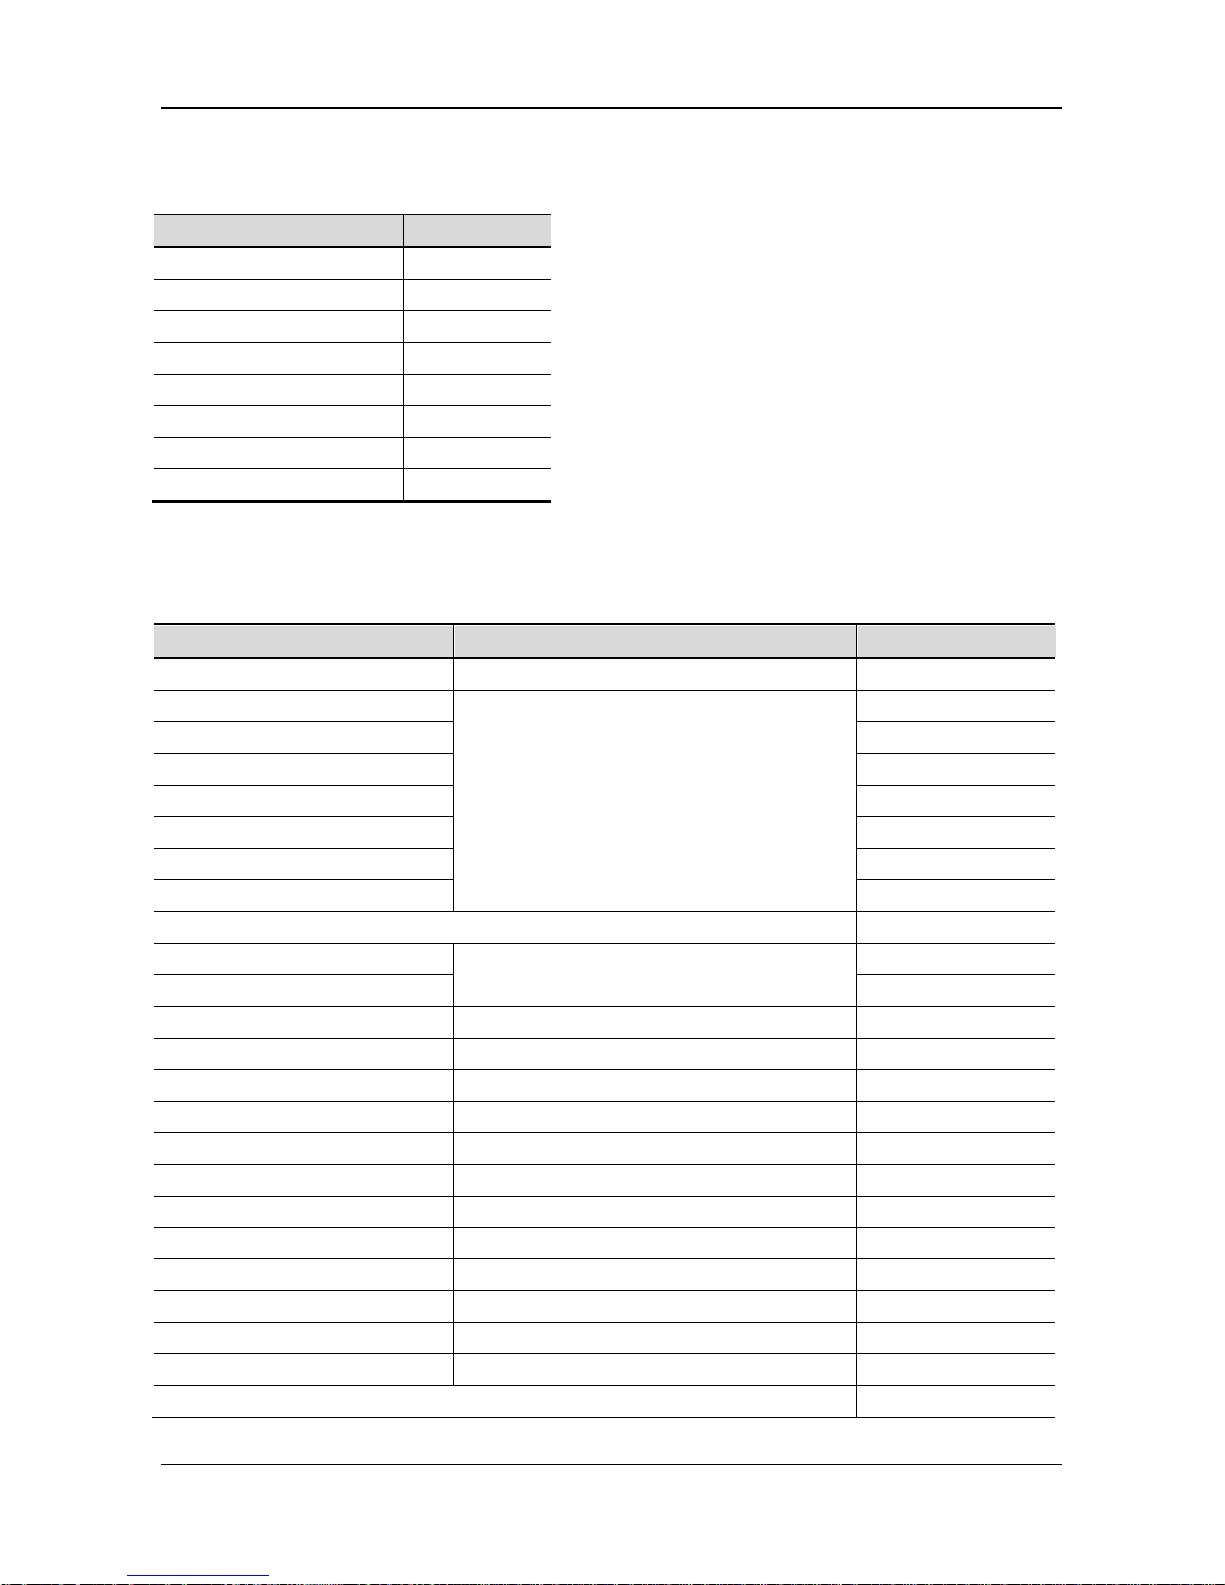
4.2.1 Command Type
The DSP-880 Series supports up to 8 command sets. They are listed on the
following table. Please select one from the pull-down list.
Comma nd Type
Default
EPSON ESC/POS
*
DSP-800
ADM787/788
EMAX(AEDEX)
UTC/S
UTC/P
CD5220
Reserved
4.2.2 Language Character Set Selection
The DSP-880 Series supports the following language character set. Please
refer to following table for character code page.
Characte r Set(20h-7Fh)
Code Table (80H-FFH)
Default
U.S.A
PC-437 (USA, Standard Europe )
*
France
PC-858
Germany
U.K.
Denm ar k I
Sweden
Italy
Spain
Reserved
Norway
PC-858
Denm ar k II
U.S.A
Slavonic
U.S.A Russia
U.S.A
PC-860 (Por tuguese)
U.K.
Greek
U.S.A
PC850
U.S.A
PC852
U.S.A
PC863
U.S.A
PC865
U.S.A
WPC1252
U.S.A
WPC1255
U.S.A
WPC1257
Japan
Katakana
User Font
Page 24
NSTALLATION
DSP-880 Series Customer Pole Display
18
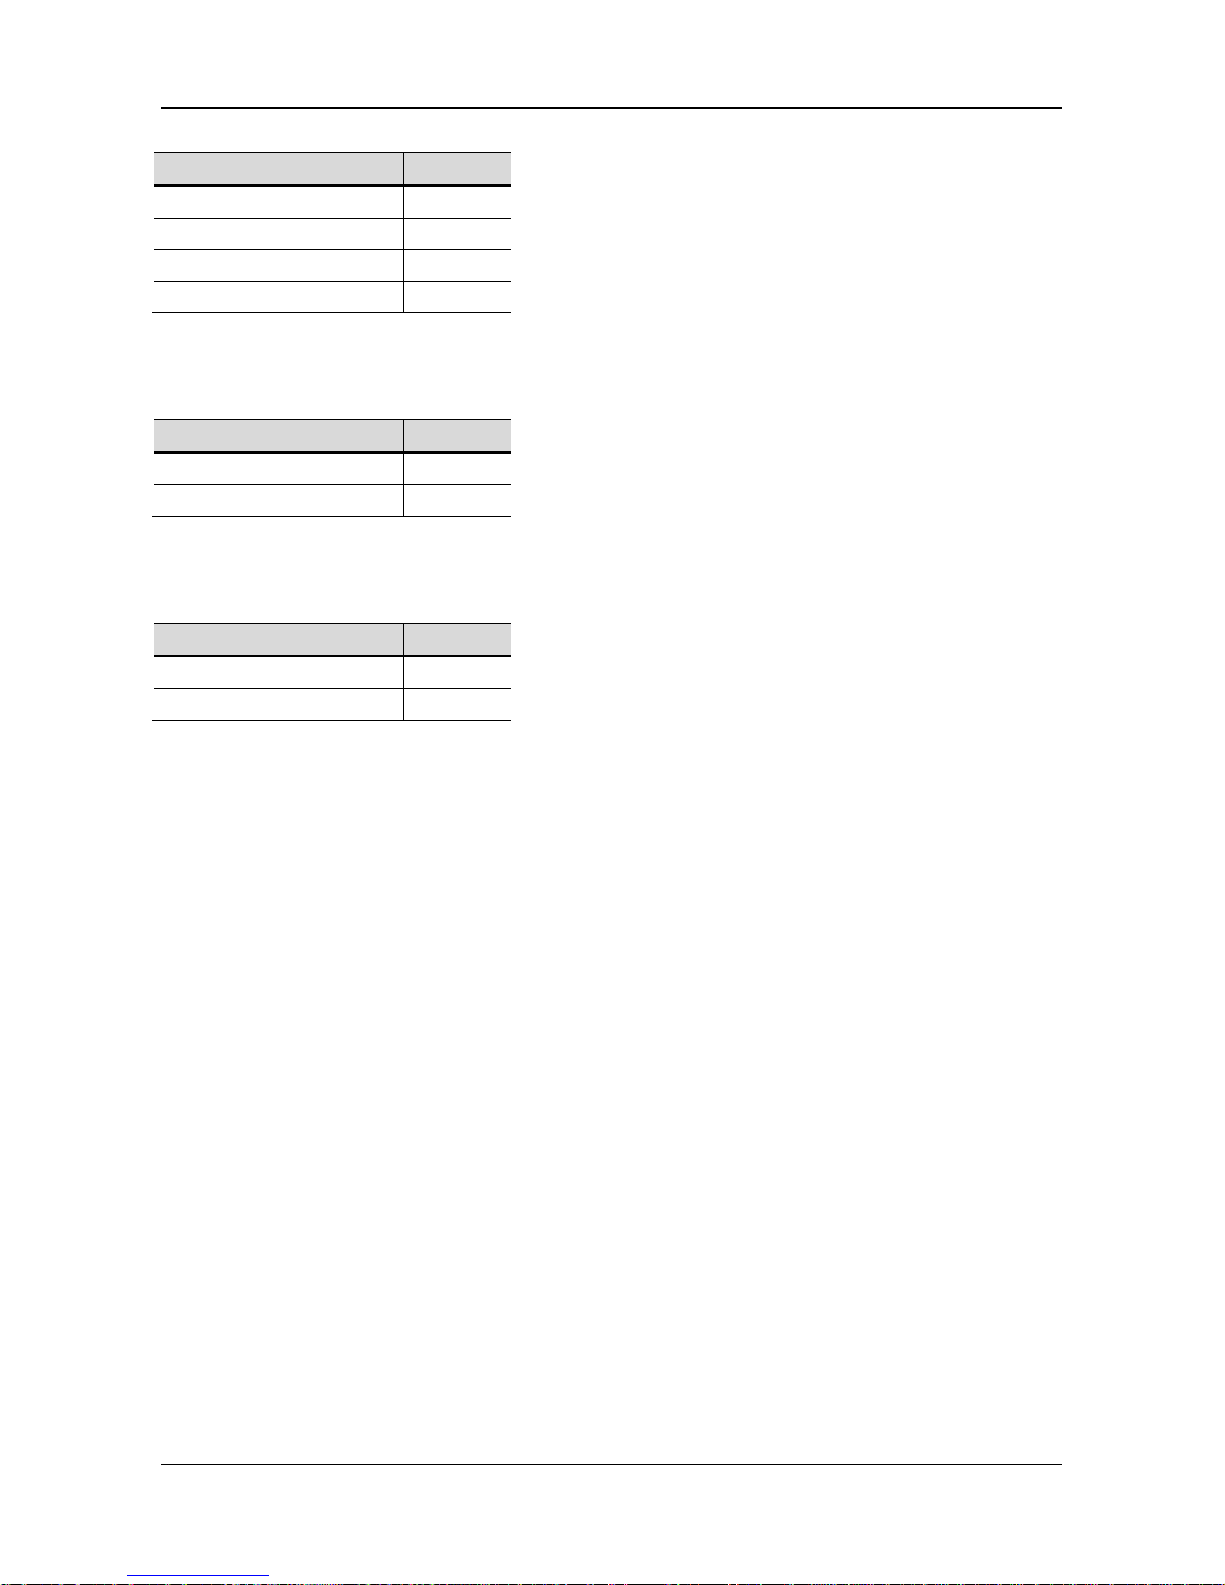
4.2.3 Baud Rate Selection
Baud Rate (bps)
Default
9600
*
19200
38400
115200
4
.2.4 Parity Check Selection
Parity Check
Default
None-parity
*
Even-parity
4.
2.5 USB Class Selection
USB Class
Default
Printer class
*
CDC class
Page 25
INSTALLATION
19
DSP-880 Series Customer Pole Display
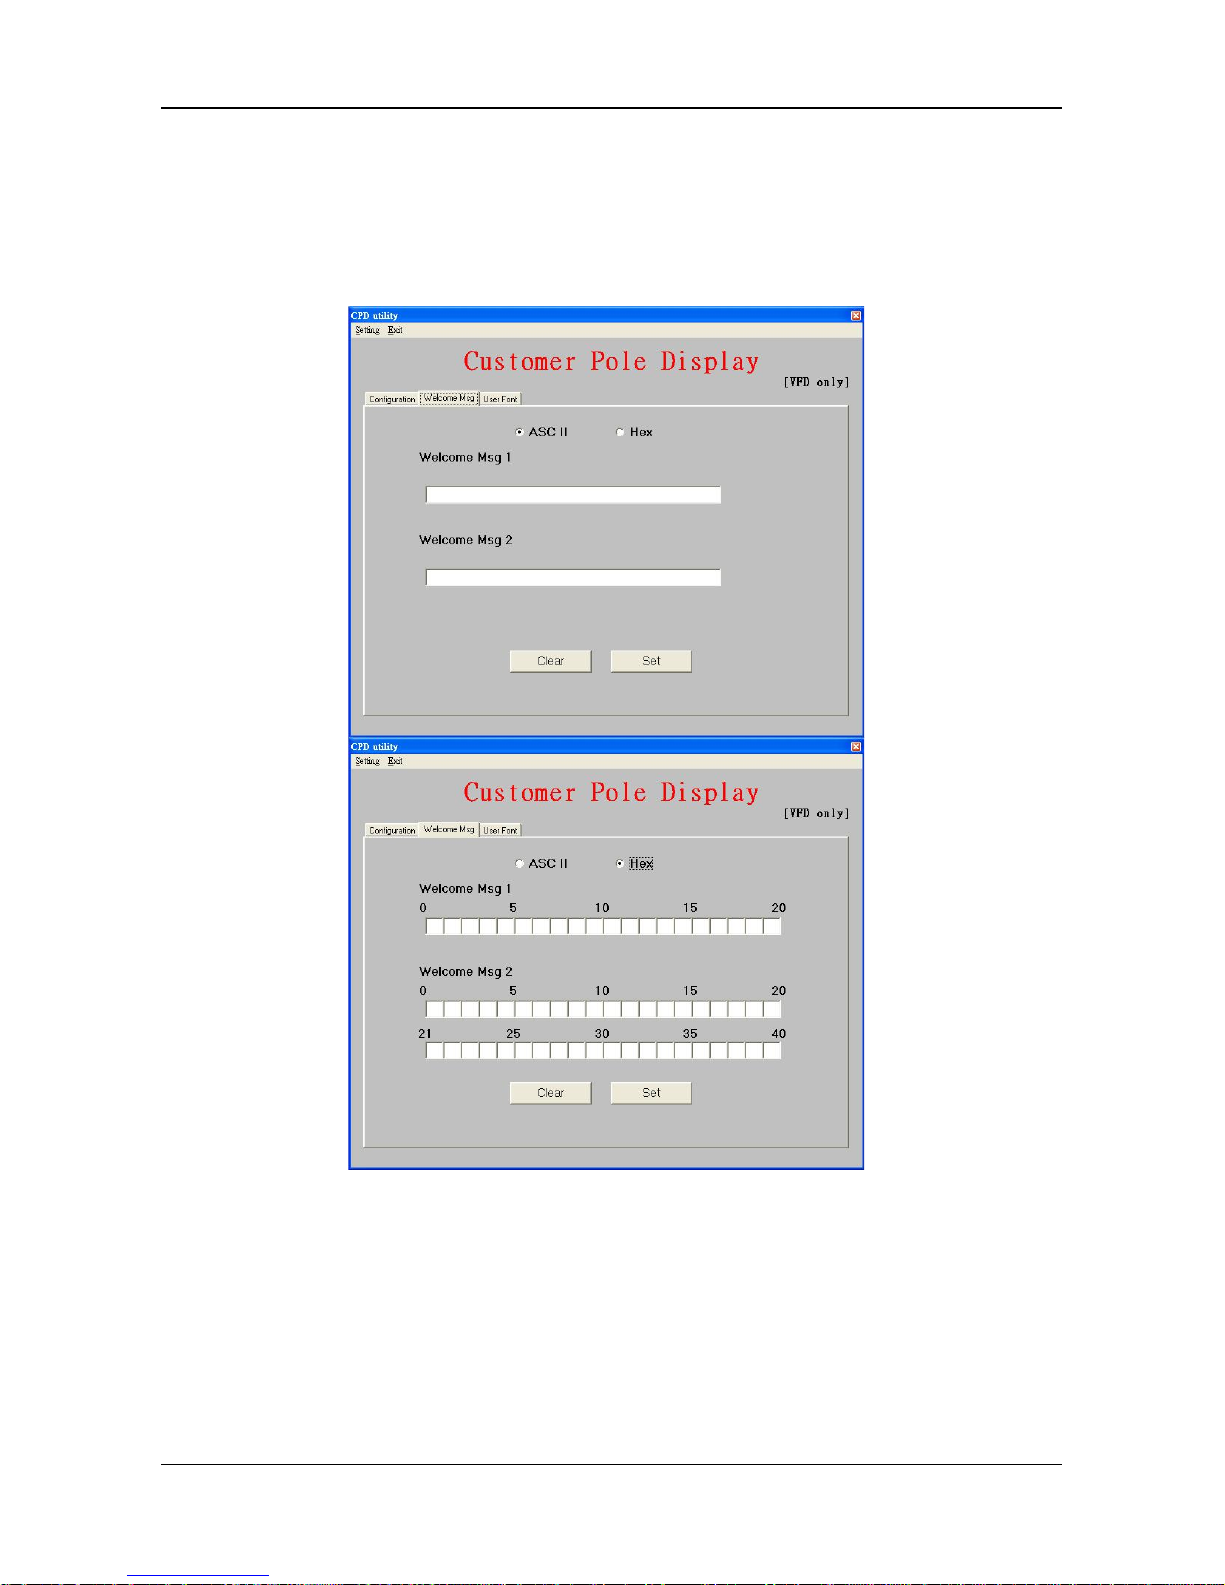
4.3 Defin e Wel co me M es sa ge
You can define your own message in the display. The Msg1 will blink o n upper
line while the Msg2 is displayed on lower line in marquee status.
You can type the character on k eyboard i n A S C I I mo d e o r t ype othe rs i n Hex
mode. Press Set button to send the messages to the machine.
Page 26
NSTALLATION
DSP-880 Series Customer Pole Display
20
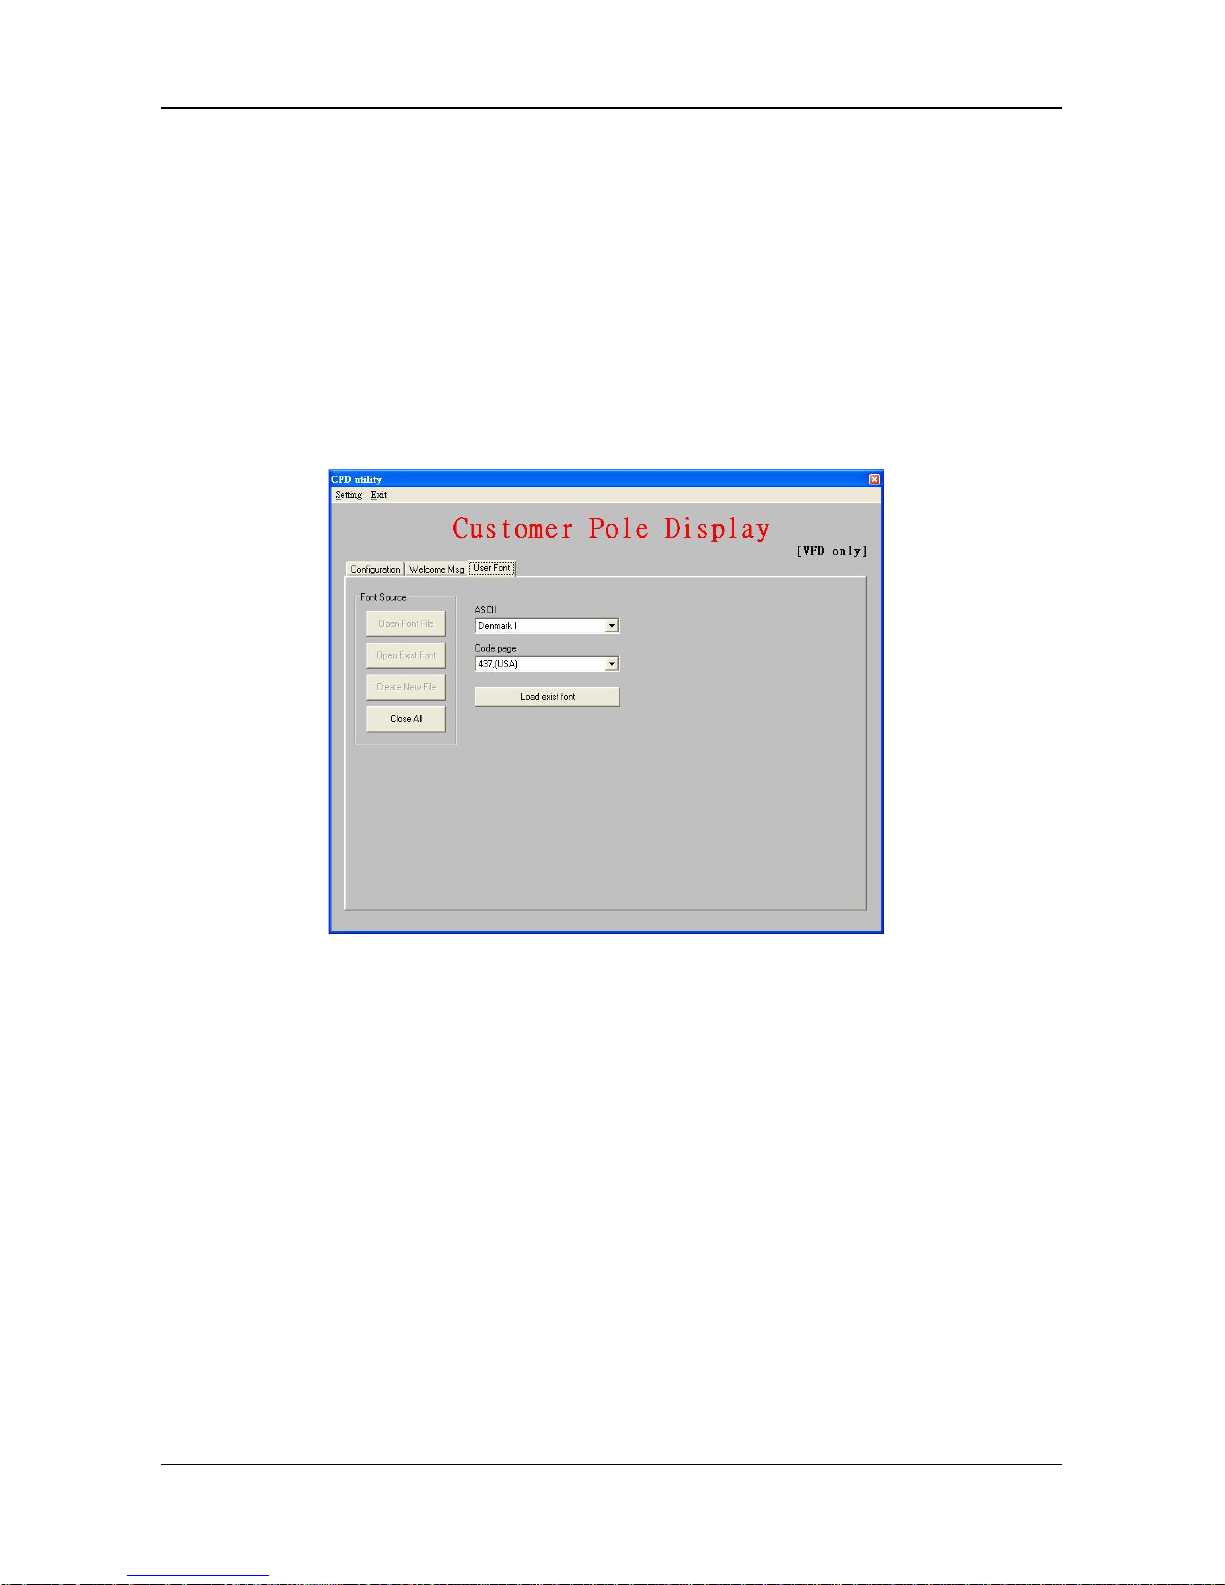
4.4 Define Your Own F ont
You can create your own font and download it with the software tool.
There are three ways to create the font:
4.4.1 From a n Ex isting Font
You can see the following dialog by pressing “Open Exist Font” button.
Please select a font to be your font base and modify it to fit your requirement.
1, T he fi rst pa rt is A SC II c ode whi ch co ntai ns t he cha ract ers code d as 0x20~0x7f.
Wit hin the A SCI I, som e o f cha ract ers ow n dif fere nt de fini ti on i n dif fere nt count ry .
Please refer to the user’s ma nual for the detail s of the code table.
2, T h e s e c o nd p art is 0 x 80~0xff whi c h i s the range tha t c od e pa ge refer t o. You
can se lect a desired code page from the list as a base of your font.
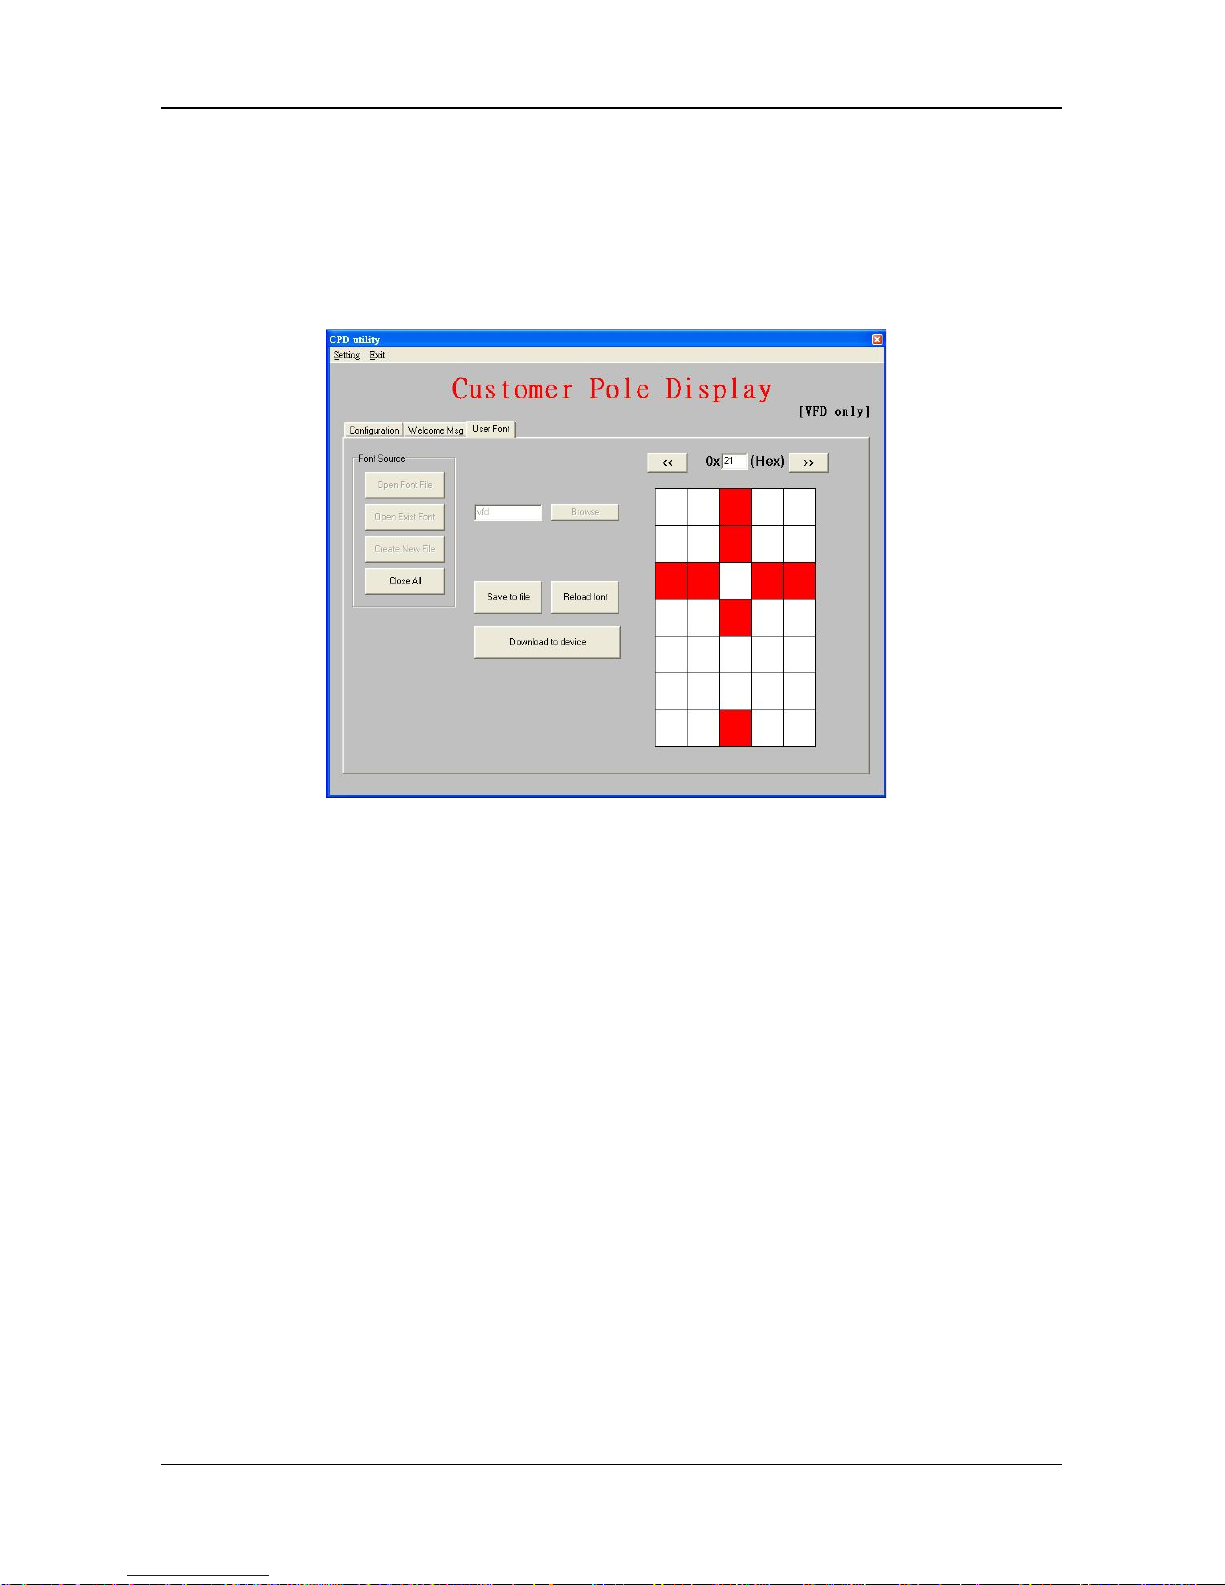
Aft er sel e cti n g t he se ex i sti ng f ont , p res s “L oad Exi st i ng F o nt ” and t he f ont wi ll b e
load ed int o syst em me mory . O nce you f i nis h e d it ing font , y o u c an c h oose e i the r
to save your font to a file by pressing “Save to file” or download your font to
dev ice b y p ress ing “D ownl oad to de vi ce”. If you want to quit cu rre nt mo dif icat io n,
you can press “Reload font” button to load the font again. All your modification
will be lost after reloading font. Press “Reset” button also let you abandon
current modification and restart the whole operation.
Page 27
INSTALLATION
21
DSP-880 Series Customer Pole Display
4.4.2 From Your Font File
You can modify previously edited and saved font file. Press “Open Font File”
button the follo wing dialog wi ll be s hown. Afte r select a file, t h e f o nt co nta i ned i n
that file will be loaded into memory. Then, you can edit font, save font to a file or
download the font to device.
4.4.3 From your scra tc h
If you want to build your font from scratch, press “Create New File” button to
create an empty font. After finishing your edit, you can save font to a file or
download the font to device. It is a difficult job to build font from zero. It is
recommended to build your font from existing font.
Page 28
SOFTWARE SETTING COMMAND
DSP-880 Series Customer Pole Display
22
CHAPTER 5 SOFTWARE SETTING C OMMAND
User can re-set the default configuration by using the following software commands:
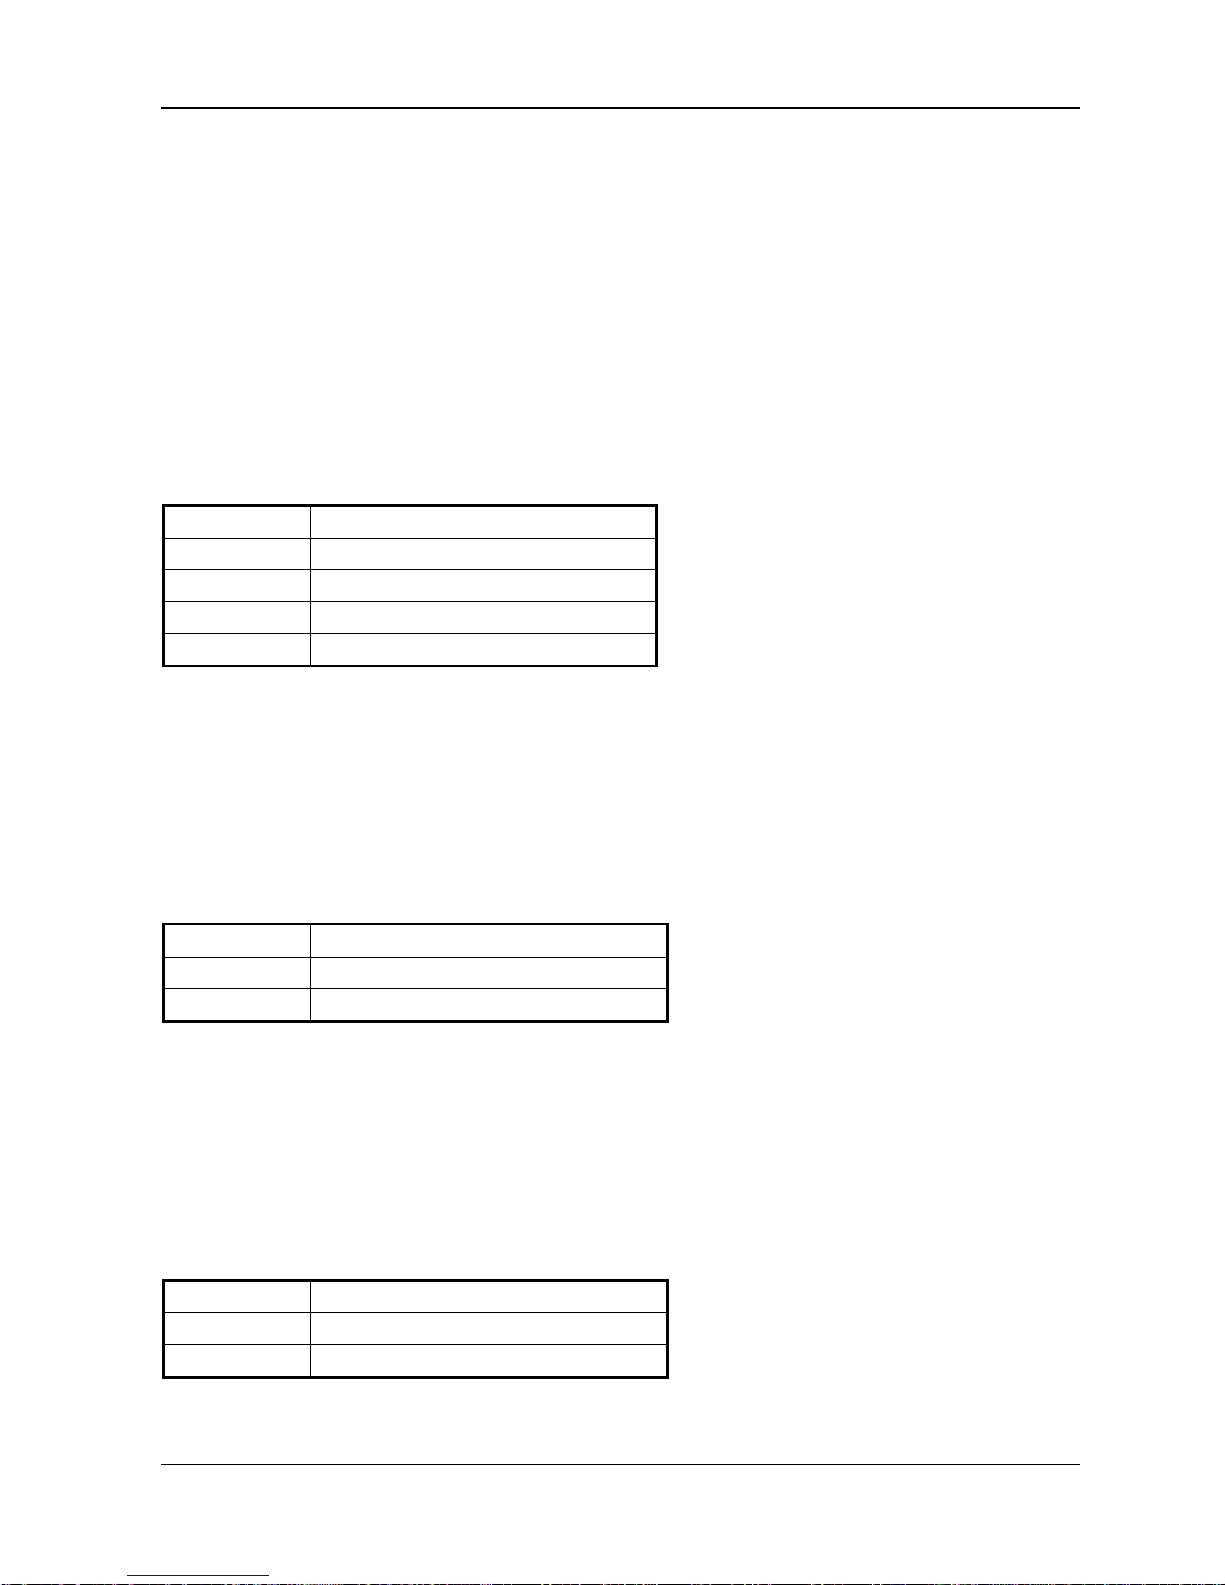
5.1 Baud Rate Setting Command
STX 05 B n ETX Change the baud rate
ASCII Format
STX 05 B n ETX STX 05 E N ETX
De c. Fo rma t
[02][05][66] n [03] [02] [05] [49] [78] [0 3] 49
≦n≦51
He x. Fo rmat
[02h][05h][42h] n [03h][02h][05h][45h][4eh][03h] 31h≦n≦33h
Description
Change the display communication baud rate. The baud
rate setting can be selected from 9600~115200 bps.
N
Baud ra te
30h
115200
31h
38400
32h
19200
33h
9600
5.2 Parity Check Settin g Command
STX 05 P n ETX Change the parity check
ASCII Format
STX 05 P n ETX STX 05 E N ETX
De c. Fo rma t
[02][05][80] n [03] [02] [05] [69] [78] [0 3] n=48,49
He x. Fo rmat
[02h][05h][50h] n [03h][02h][05h][45h][4eh][03h] n=30h,31h
Description
n
Parity check
30h
No ne p arit y
31h
Even parity
5.3 USB Class Setting Command
STX 05 U n ETX Change the USB class
ASCII Format
STX 05 U n ETX STX 05 E N ETX
De c. Fo rma t
[02][05][85] n [03] [02] [05] [69] [78] [0 3] n=48,49
He x. Fo rmat
[02h][05h][55h] n [03h][02h][05h][45h][4eh][03h] n=30h,31h
Description
n
USB class
30h
Pri nt er clas s
31h
CDC cl a ss
Page 29
INSTALLATION
23
DSP-880 Series Customer Pole Display
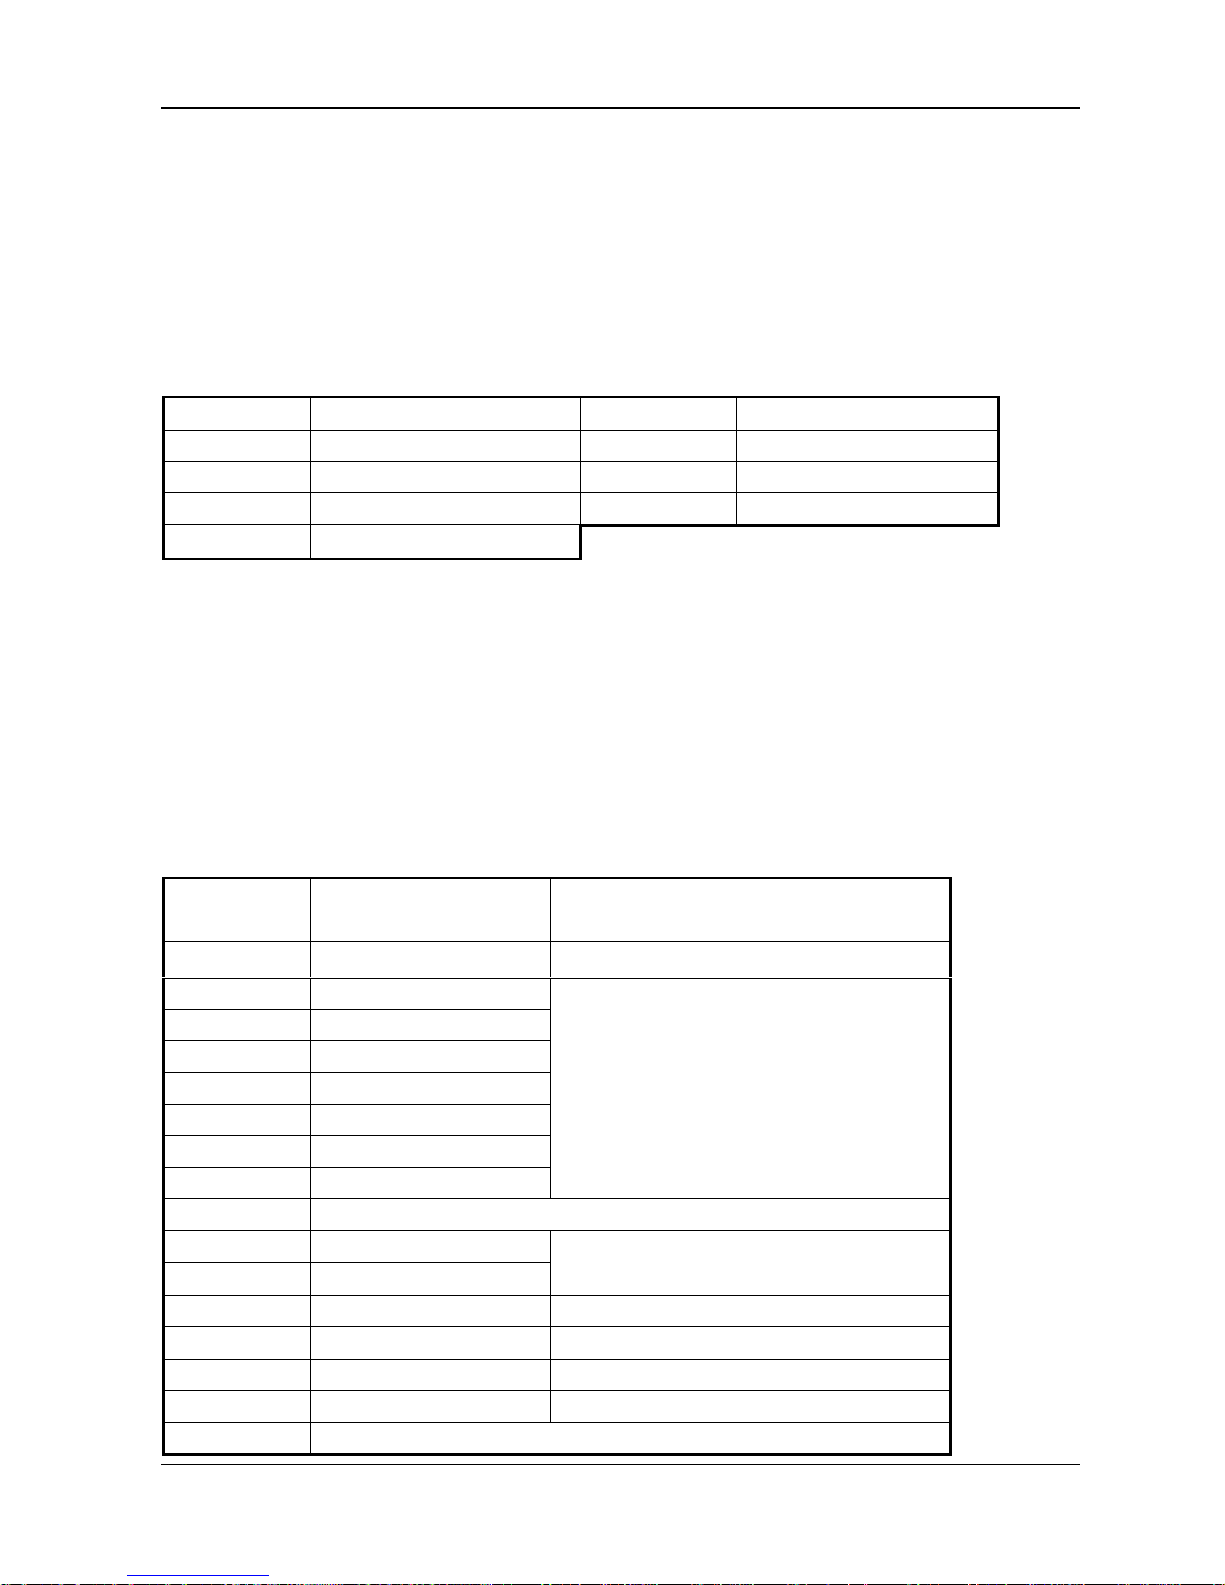
5.4 Comma n d Ty pe Se t ti n g Com ma n d
STX 05 C n ETX Change the command type
ASCII Format
STX 05 C n ETX STX 05 E N ETX
De c. Fo rma t
[02][05][67] n [03] [02] [05] [69] [78] [0 3] n=49,51,55
He x. Fo rmat
[02h][05h][43h] n [03h][02h][05h][45h][4eh][03h]
n=31h,33h,37h
Description Change the command type and initialize the display
n
Command type
n
Co mmand ty pe
31h
ESC/POS
35h
UTC/P
32h
ADM787/788 (option)
36h
UTC/S
33h
DSP-800 (option)
37h
CD5220
34h
EMAX (AEDEX)
5.5
Interna tion al C haracte r Set S etti ng Command
STX 05 S n ETX Change the International character set
ASCII Format
STX 05 S n ETX STX 05 E N ETX
De c. Fo rma t
[02][05][83] n [03] [02] [05] [69] [78] [0 3] 48
≦n≦
63
He x. Fo rmat
[02h][05h][53h] n [03h] [02h][05h][45h][4eh][03h]
30h≦n≦3Fh
Description Change the display International character set
n
Cha racter Set
(20h–7Fh)
Code Tabl e (80H-FFH)
30h
U.S.A.
PC-437 (USA, Standard Europe)
31h
France
PC-858
32h
Germany
33h
U.K.
34h
Denmark I
35h
Sweden
36h
Italy
37h
Spain
38h
Reserved
39h
Norway
PC-858
3Ah
Denmark II
3Bh
U.S.A.
Slavonic
3Ch
U.S.A.
Russia
3Dh
U.S.A.
PC-860 (Portuguese)
3Eh
U.K.
Greek
3Fh
User Font
Page 30
COMMAND SET
DSP-880 Series Customer Pole Display
24
CHAPTER 6 COMMAND SET
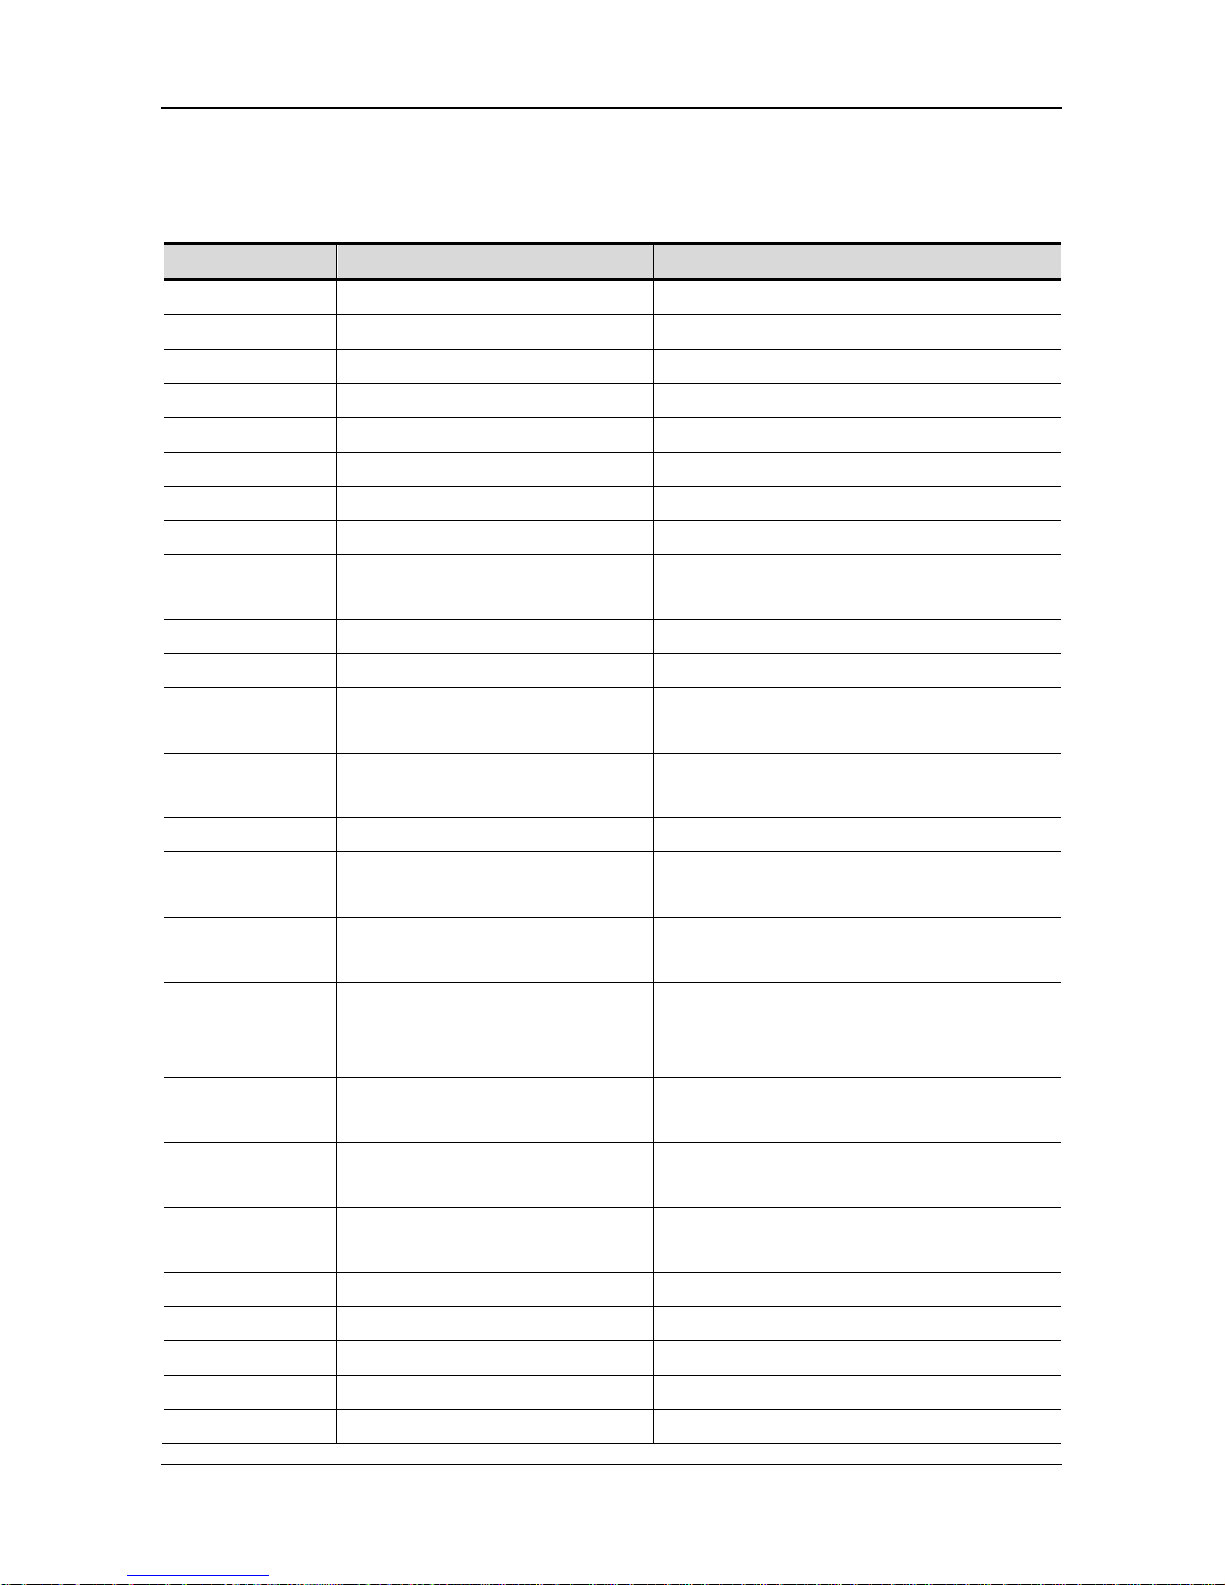
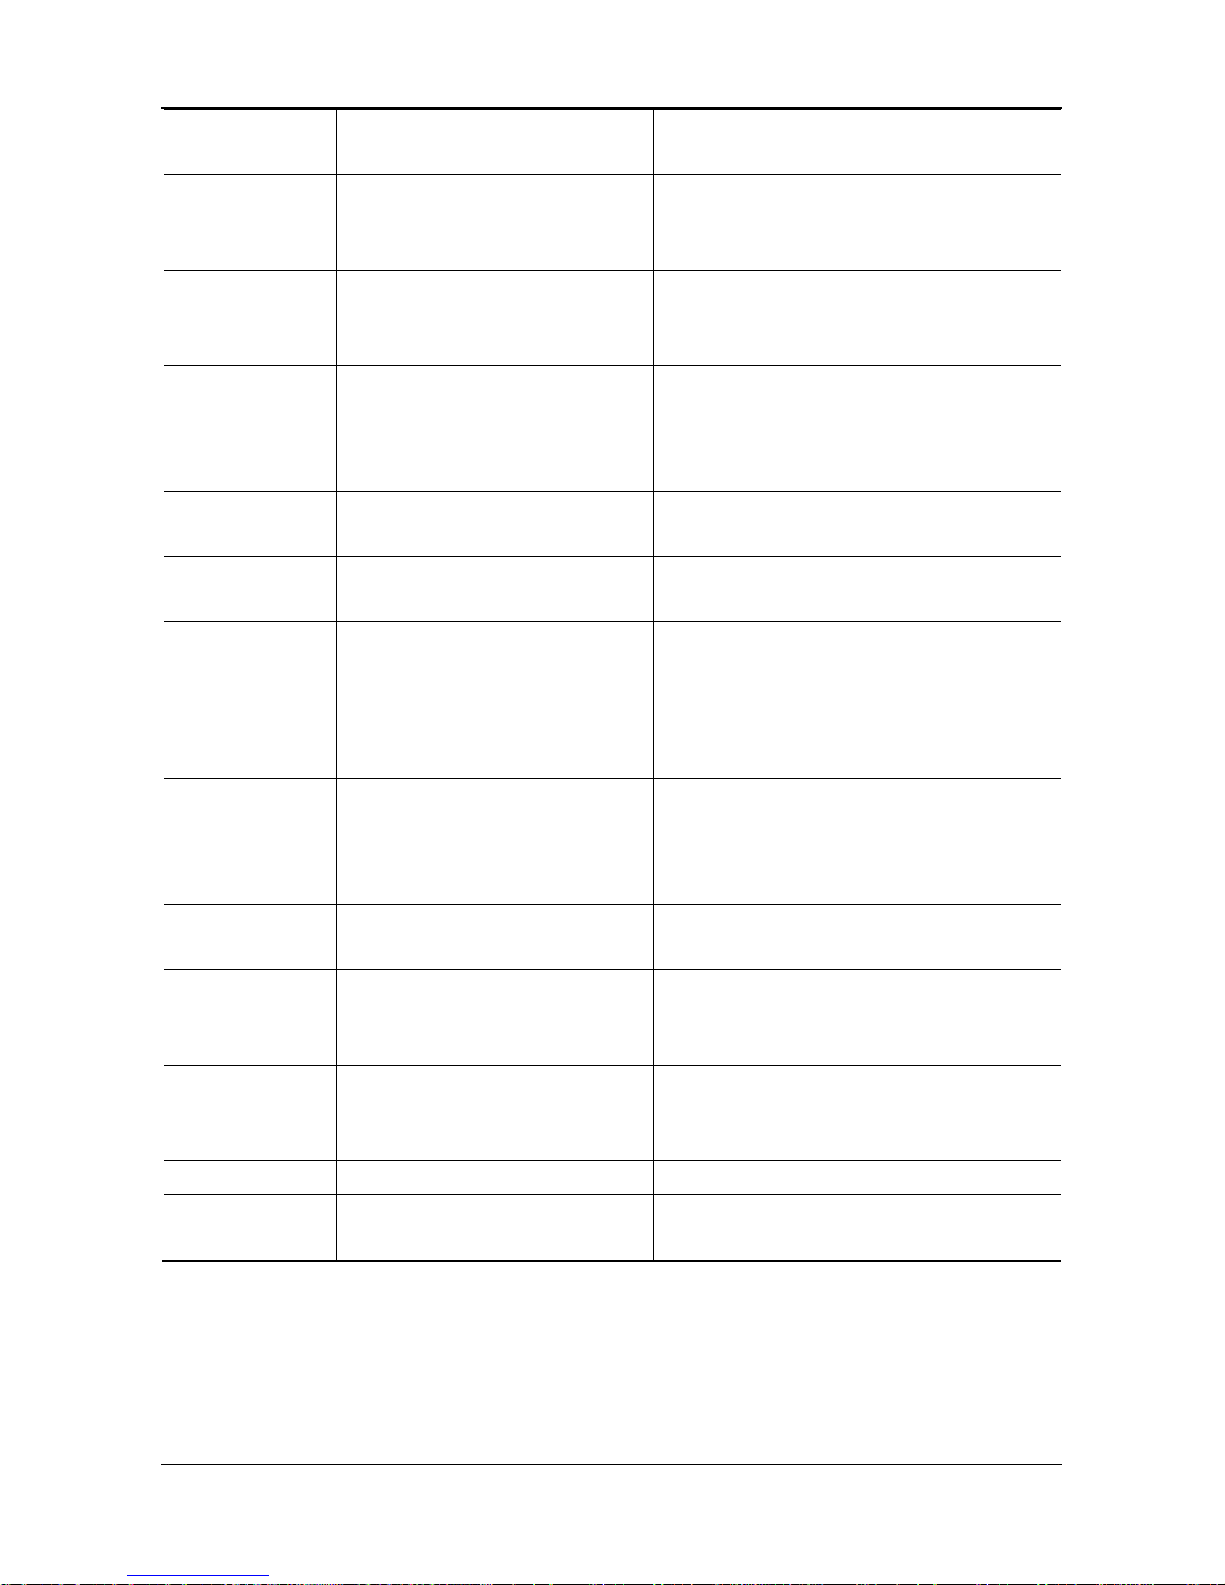
6.1 ESC/POS Mode Command Set
Command
Code (hex)
Function description
HT
09
Move cursor right.
BS 08 Move cursor left.
US LF 1F 0A Move cursor up.
LF
0A
Move cursor dow n.
US CR
1F 0D
Move c ursor to right-most position.
CR
0D
Move cursor to left-most position .
HOM
0B
Move cursor to home position.
US B
1F 42
Move cursor to bottom position.
US $ x y 1F 24 x y
01h≦x≦14h, y=01h, 02h
Move cursor to specified position.
CAN
18
Clear cursor line.
CLR
0C
Clear display screen.
US X n 1F 58 n
01h≦n≦04h (=brightest)
Brig htnes s adjus t m ent .
US E n 1F 45 n
00h≦n≦FFh
Blink display screen.
ESC @ 1B 40 Initialize display.
ESC # n 1B 23 n
30h≦n≦38h
Command type select
ESC R n 1B 52 n
00h≦n≦0Ch
Select international character set.
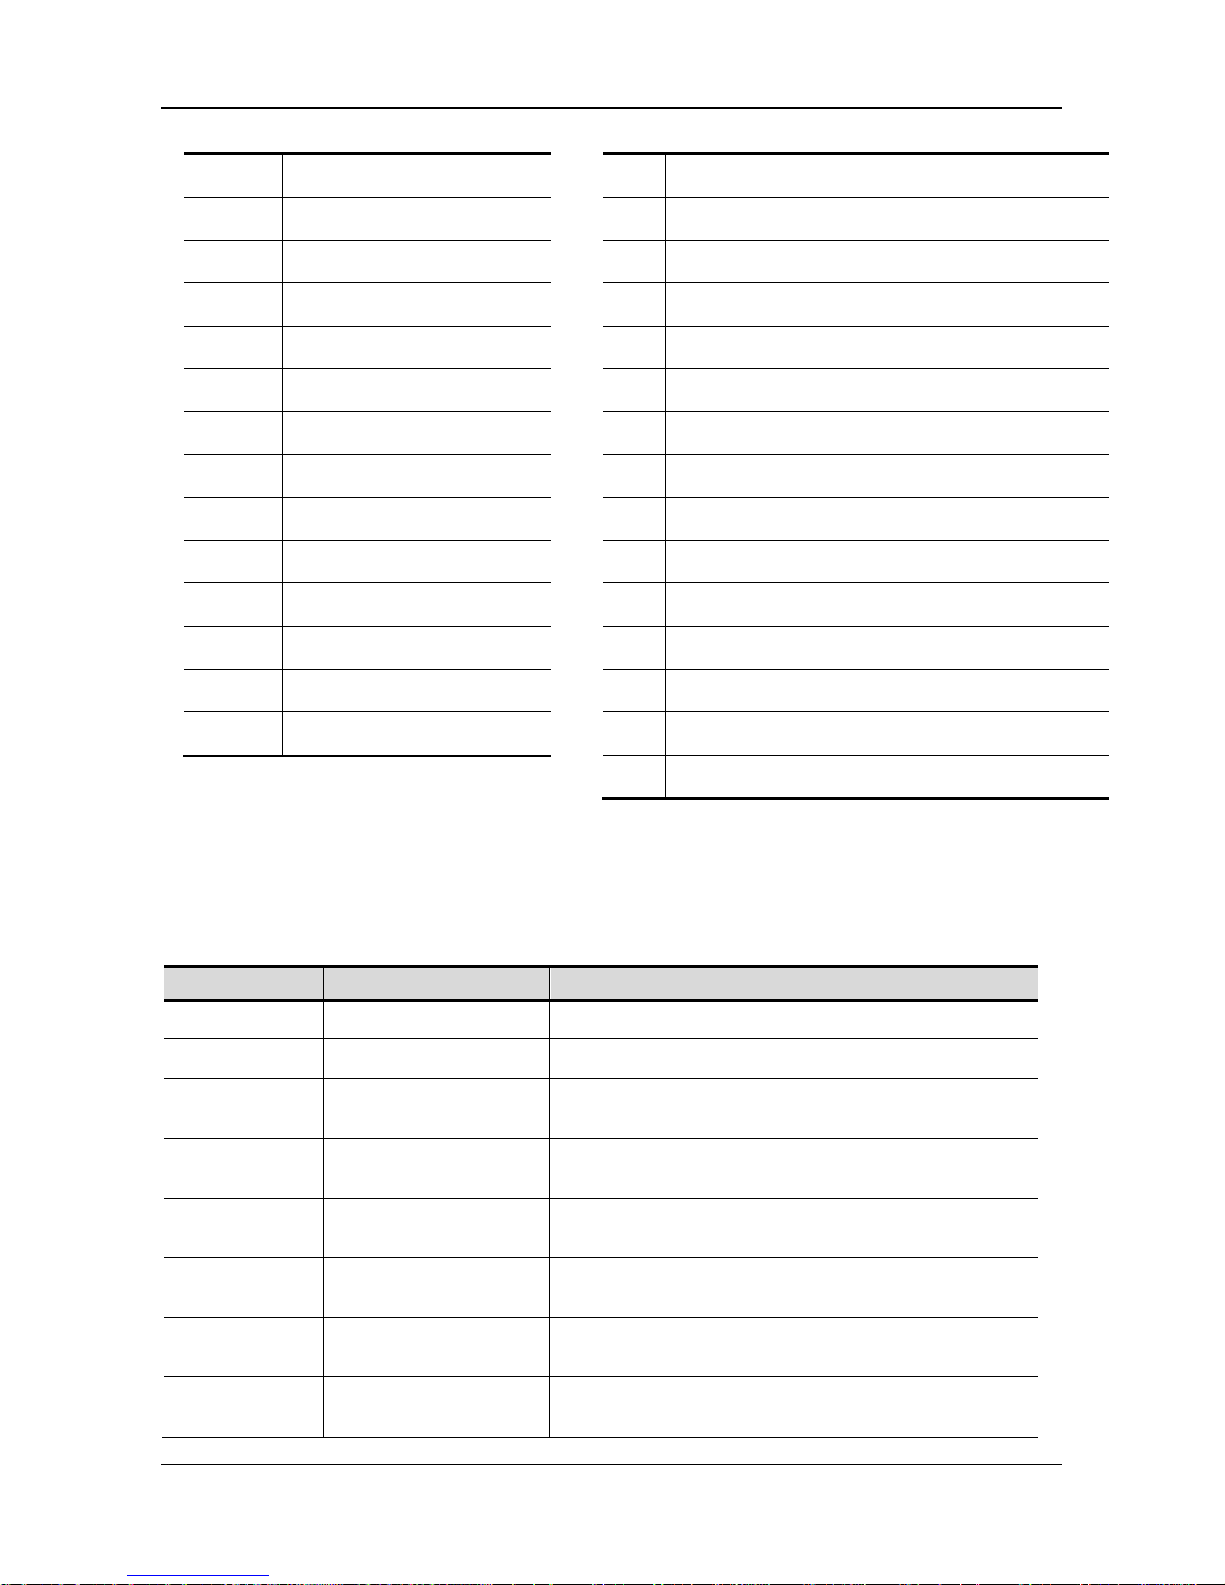
(see Table 5-A)
ESC t n 1B 74 n
n=00h, 01h..07h, 10h,
13h,0Ah~0Dh
Select character code table.
(see Table 5-B)
US r n 1F 72 n
n=00h, 01h
Select/Cancel reverse character.
n=01 select, n=00 cance l
US # n m 1F 23 n m
n=00h, 01h, 01h<m≦14h
Tur n a nn u nciat or on/ of f
n=01 on, n=00 of f
US C n 1F 43 n
n=00h, 01h
Set cursor on/off
n=01 on, n=00 of f
US MD1
1F 01
Specify overwrite mode.
US MD2
1F 02
Specify vertical scroll mode.
US MD3
1F 03
Specify horizontal scroll mod e.
US @
1F 40
Execute self-test.
US . n
1F 2E n
Specify period
Page 31
COMMAND SET
25
DSP-880 Series Customer Pole Display
n=a displayable character
code
US , n 1F 2C n
n=a displayable character
code
Speci fy com ma
US ; n 1F 3B n
n=a displayable character
code
Speci fy semicolon
(period + comma)
ESC & s n m
[a(p1..pa)]x
m-n+1
1B 26 1 n m
[a(p1..pa)]x m-n+1
21h≦n≦m≦FFh; 1≦a≦5
p1..p5=row1...row5
Define download characters.
ESC ? n 1B 3F n
21h≦n≦FFh
Delete download characters.
ESC % n 1B 25 n
n=00h, 01h
Select/cancel download character set.
n=01 select, n=00 cance l
ESC W n s x1
y1 x2 y2
1B 57 n s x1 y1 x2 y2
1≦n≦4, s=00h,01h
01h≦x1≦x2≦14h
01h≦y1≦y2≦02h
Specify/cancel the window range.
s=01 specify, 00 cancel
n=select the window
x= column positi on
y= row position
ESC = n 1B 3D n
n=01h, 02h, 03h
Select peripheral device.
n=01h, select printer
n=02h, select display
n=03h, select printer + display
US : 1F 3A
Set starting/ending position of macro
definition.
US ^ n m 1F 5E n m
00h≦n≦FFh
00h≦m≦FFh
Execute and quit macro.
n=word time
m=show string time
US T h m 1F 54 h m
00h≦h≦17h
00h≦m≦3bh
Display time
US U
1F 55
Display time continuously
US V n 1F 56 n
00h≦n≦01h
Status confirmation by DTR signal
Page 32
COMMAND SET
DSP-880 Series Customer Pole Display
26
n I
nternational Font
00 U.S.A.
01 France
02 Germany
03 U.K.
04 Denmark I
05 Sweden
06 Italy
07 Spain
08 Japan
09 Norway
0A Denmark II
0B Slavonic
0C Russia
Table 5-A Select International font
n C
ode Table (80H-FFH)
00 Page 0, (PC437, USA standard Euro)
01 Page 1, (Green)
02 Page 2, (PC850, Multilingual)
03 Page 3, (PC860, Portuguese)
04 Page 4, (PC863, Canadian-French)
05 Page 5, (PC865, Nordic)
06 Page 6, (Slavonic)
07 Page 7, (Russian)
13h Page 19, (PC858, +Euro symbol)
10h Page 16, (WPC1252)
0A Page 10,(Katakana)
0B Page 11,(PC852)
0C Page 12,(WPC1255)
0D Page 13,(WPC1257)
Table 5-B Select code table
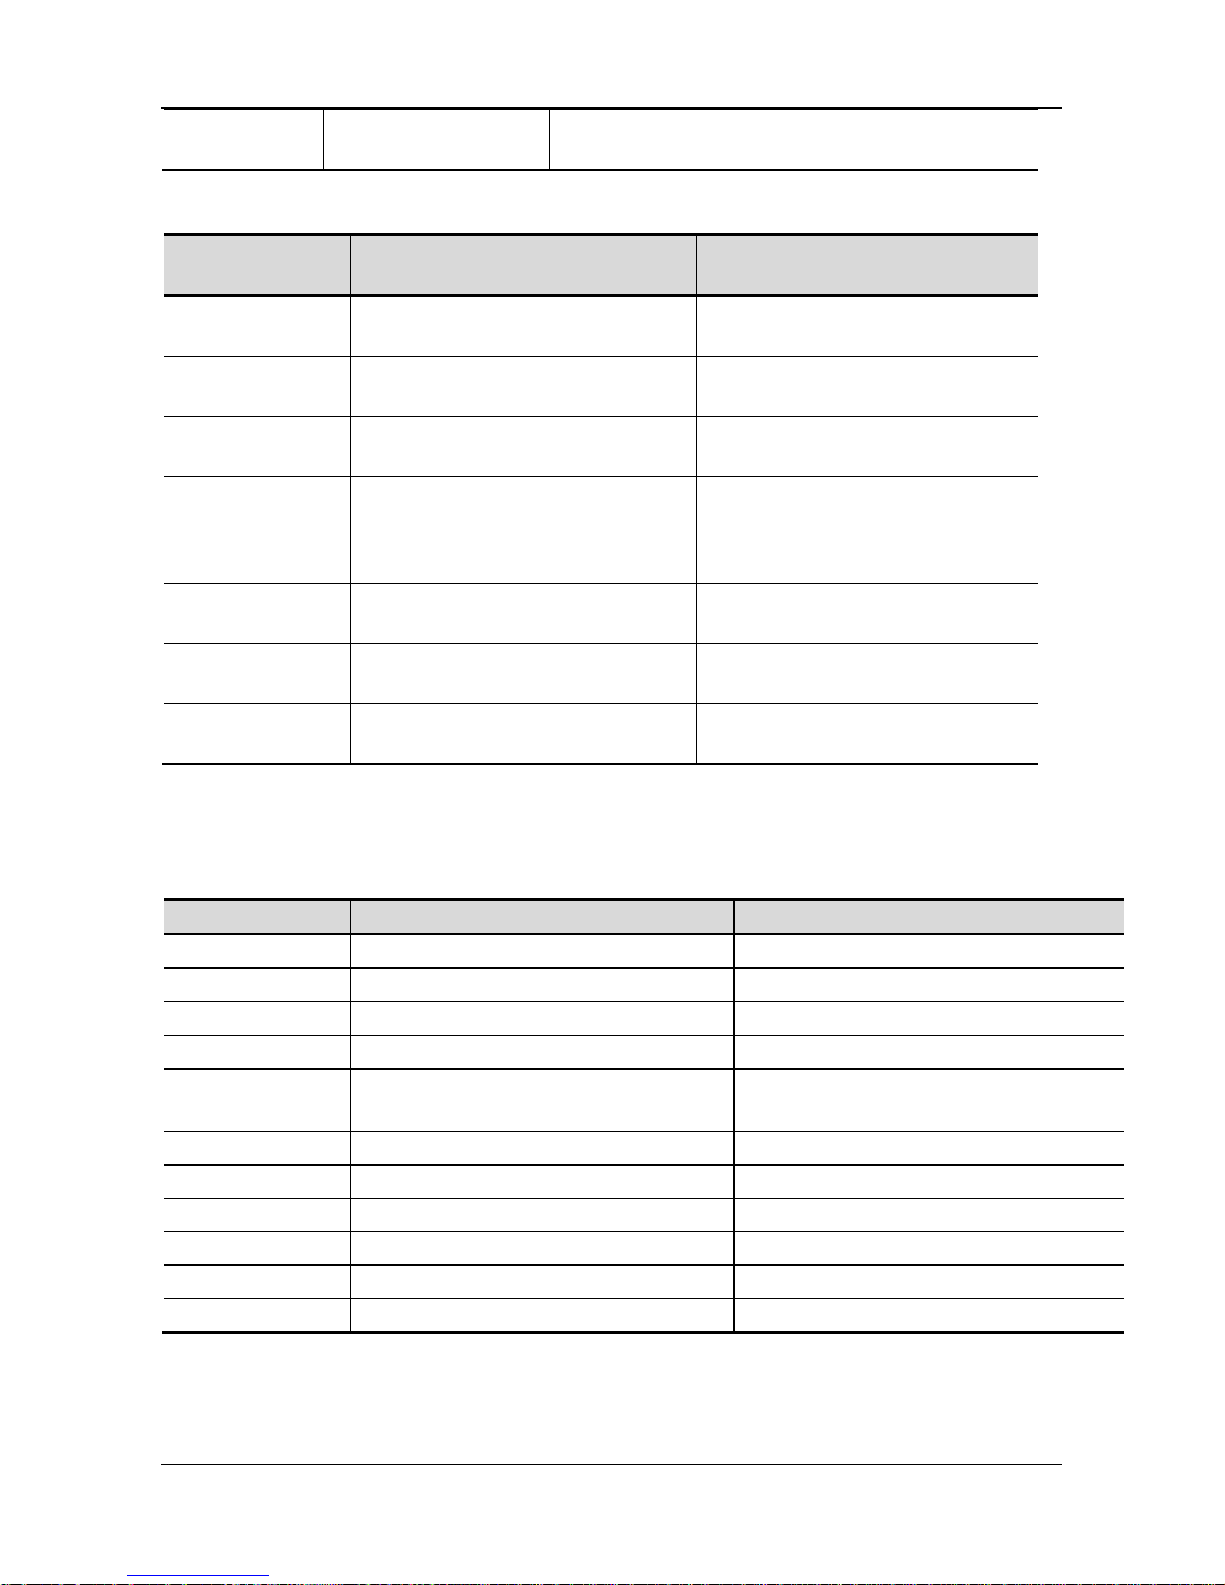
6.2 ADM787/788 Mode Command Set
Command
Code (hex)
Fu nctio n Description
CLR 0C Clear display
CR 0D Ca rriage return
SLE1
0E
Clear filed 1 (upper-left line) and move
cursor to the first position
SLE2
0F
Clear filed 2 (bottom-left line) and move
cursor to the first position
DC0
10 n
31H≦n≦37H
Set the period to the upper line last n
position
DC1
11 n
n=31h, 32h
Set line blinking,
n=31h upper line; n=32h bottom line
DC2
12 n
n=31h, 32h
Clear line bl inking,
n=31h upper line; n=32h bottom line
SF1
1E
Clear field 3 (upper-right line) and move
cursor to the first position
Page 33
COMMAND SET
27
DSP-880 Series Customer Pole Display
SF2
1F
Clear field 4 (bottom-right line) and move
cursor to the first position
6.3 EMAX ( AED EX ) Mod e Co mm an d Set
Command
Code (hex) Function Description
! # 1 … CR
21 23 31 [d1, d2...dn] 0D
1≦n≦20
Upper line display
! # 2 … CR
21 23 32 [d1, d2...dn] 0D
1≦n≦20
Bottom line display
! # 4 … CR
21 23 34 [d1, d2...dn] 0D
1≦n≦40
Upper lin e message scroll
continuously
! # 5 … CR
21 23 3 5 h1 h 2 “:” m 1m 2 0D
“:”=3A
30h≦h1≦32h; 30h≦m1≦35h
30h≦h2, m2≦39h
Display time
h=hour
m=minute
! # 6 … CR
21 23 36 [d1, d2...dn] 0D
1≦n≦64
Upper line message scroll once
pass
! # 8 … CR
21 23 38 n m 0D
20h≦n, m
Cha nge at t ent io n co de
! # 9 … CR
21 23 39 [d1, d2...dn] 0D
1≦n≦40
T wo line display
6.4 UTC Mode Command Set
UTC/S (S TANDA RD)
Command
Code (hex)
Fu nctio n Description
BS
08
Back space
HT
09
Horizontal tab
LF
0A
Line feed
CR
0D
Carriage return
DLE
10 n
00h≦n≦27h
Display cursor position
DC1
11
Over write display mode
DC2
12
Vertical scroll mode
DC3
13
Cursor on
DC4
14
Cursor off
US
1F
Clear display
ESC d
1B 64
Change to UTC enhanced mode
Page 34
COMMAND SET
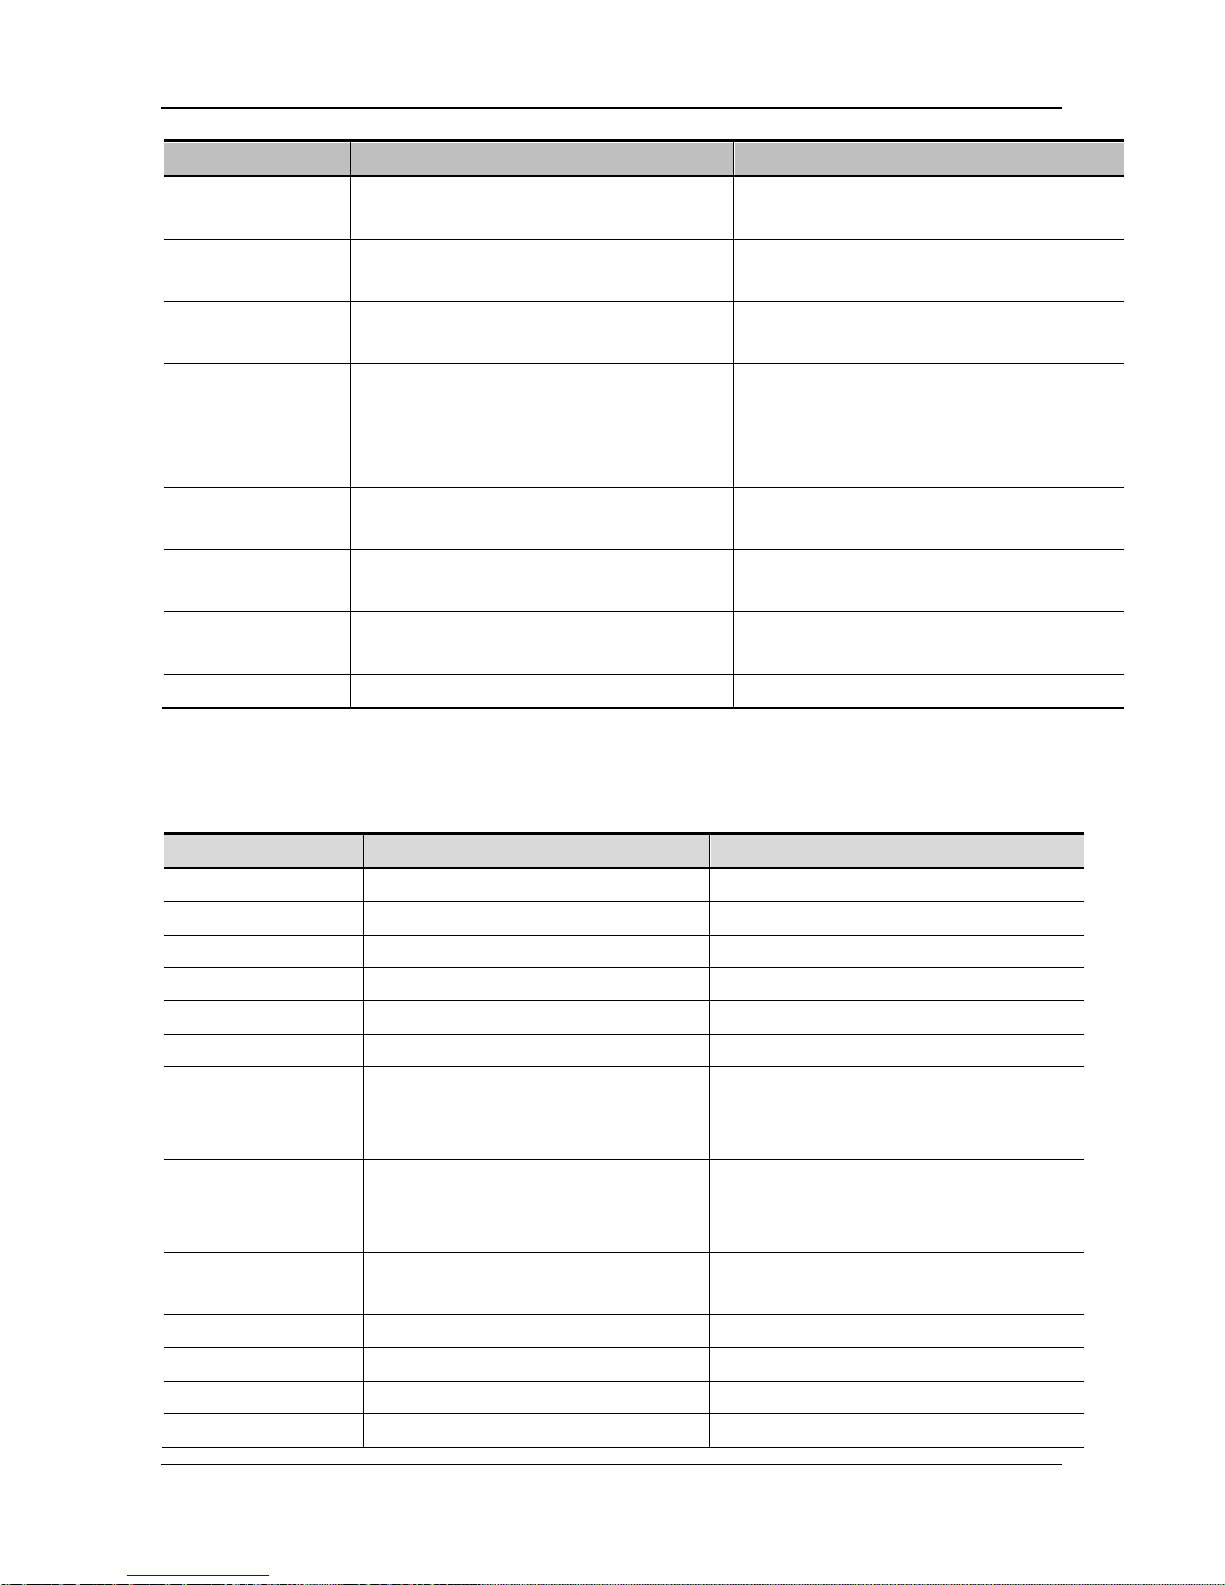
DSP-880 Series Customer Pole Display
28
UTC/P ( ENHANC ED)
Command
Code (hex)
Fu nctio n Description
ESC u A ....CR
1B 75 41 [d1, d2...dn] 0D
1≦n≦20
Upper line display
ESC u B …. CR
1B 75 4 2 [d1, d 2.. .dn] 0D
1≦n≦20
Bottom line display
ESC u D ….CR
1B 75 4 4 [d1, d 2.. .dn] 0D
1≦n≦40
Upper line messa ge scroll
continuously
ESC u E …. C R
1B 75 45 h1h2 “:” m1m2 0D
“:”=3A
30h≦h1≦32h; 30h≦m1≦35h
30h≦h2≦
34h, 30h≦m2≦39h
Display time
hh= hour
mm= minute
ESC u F ….CR
1B 75 4 6 [d1, d 2.. .dn] 0D
1≦n≦40
Uppe r li ne messa ge s cr oll once
pass
ESC u H ….CR
1B 75 48 n m 0D
20h≦n, m
Change attention code
ESC u I …. CR
1B 75 49 [d1, d2...dn] 0D
1≦n≦40
T w o line display
ESC RS ….CR
1B 0F 0D
Change to UTC standard mode
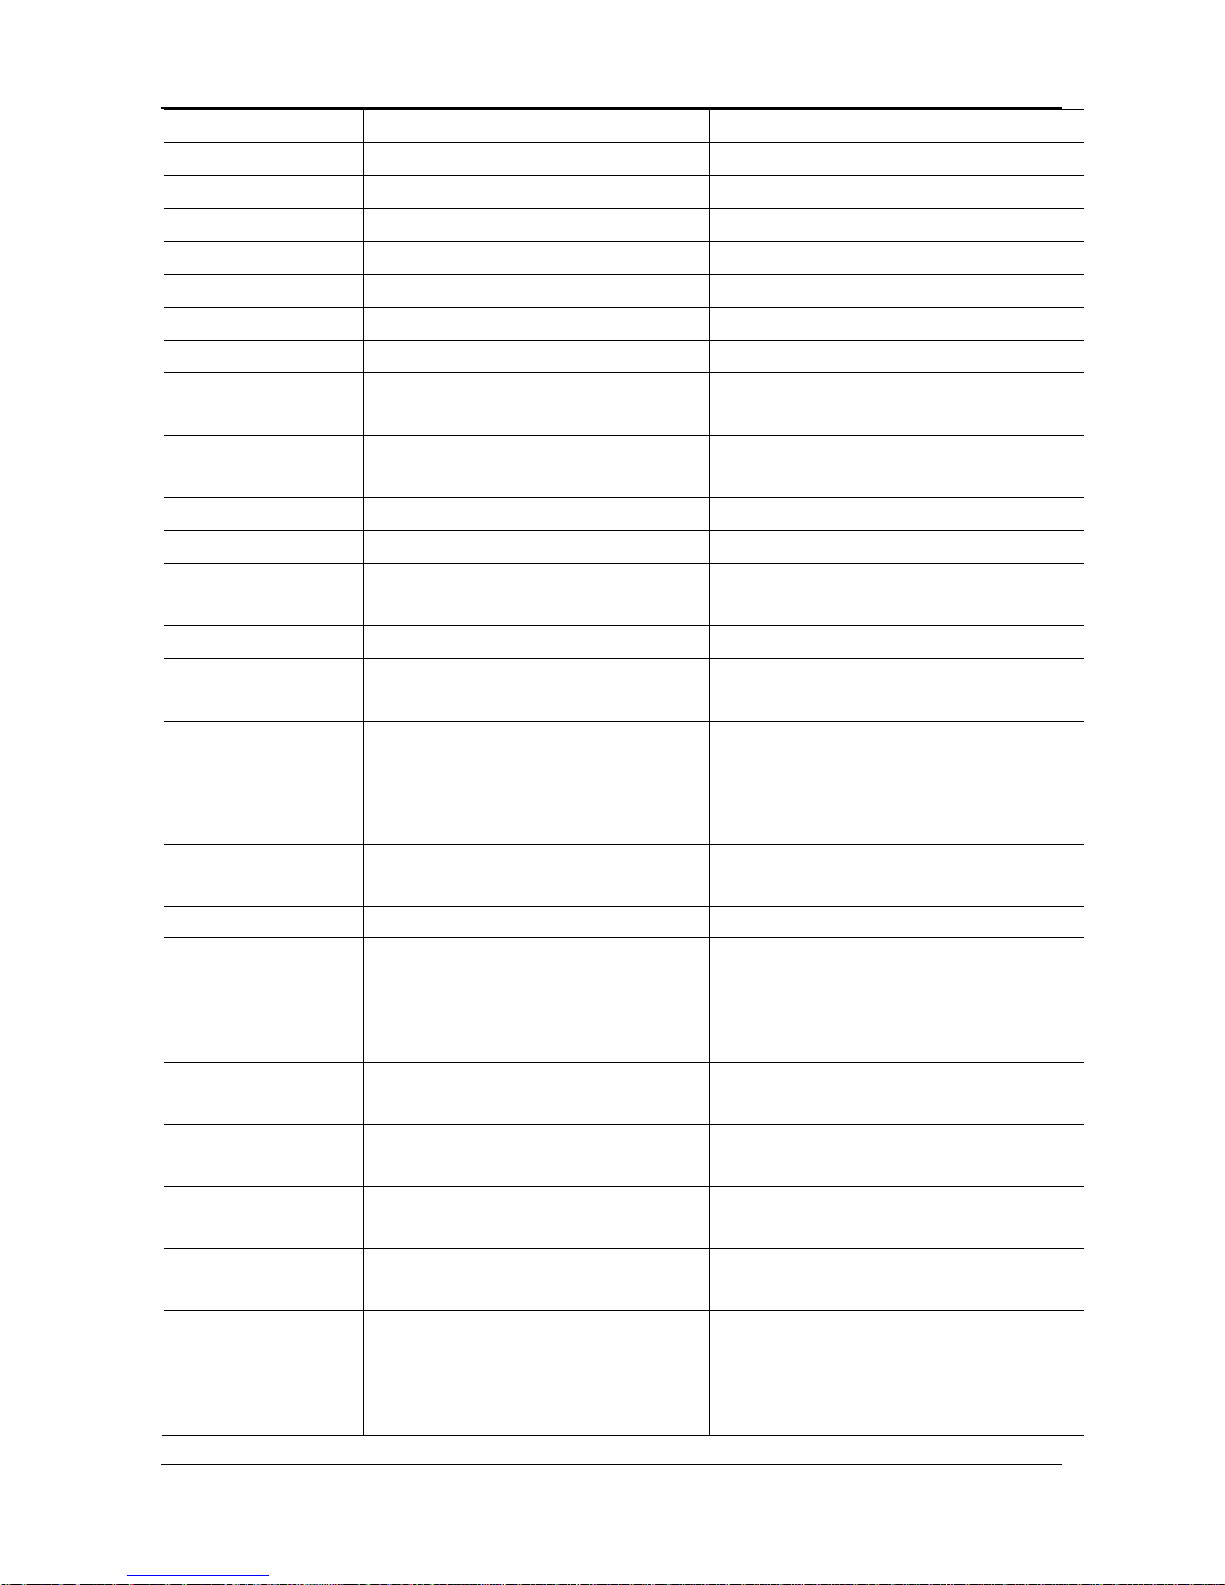
6.5 CD5220 Mod e Co mm and Set
Command
Code (hex)
Func tion des criptio n
ESC DC1
1B 11
Overwrite mode
US SOH
1F 01
Overwrite mode
ESC DC2
1B 12
Vertical scroll mode
US STX
1F 02
Vertical scroll mode
ESC DC3
1B 13
Horizontal scroll mode
US ETX
1F 03
Horizontal scroll mode
ESC QA ....CR
1B 51 4 1 [d1, d 2.. .dn] 0D
1≦n≦20
Set the string display mode,
wri t e string to up per li ne
(see Note 1)
ESC QB ....CR
1B 51 42 [d1, d2…dn] 0D
1≦n≦20
Set the string display mode,
write string to bottom line
(see Note 1)
ESC QD ....CR
1B 51 44 [d1, d2…dn]xm 0D
m≦40
Upper line messa ge scroll
continuously (see Note 2)
ESC [ D
1B 5B 44
Move cursor left
BS
08
Move cursor left
ESC [ C
1B 5B 43
Mov e c u rsor rig ht
HT
09
Mov e c u rsor rig ht
Page 35
COMMAND SET
29
DSP-880 Series Customer Pole Display
ESC [ A
1B 5B 41
Move cursor up
US LF
1F 0A
Move cursor up
ESC [ B
1B 5B 42
Move cursor down
LF
0A
Move cursor down
ESC [ H
1B 5B 48
Move cursor to home position
HOM
0B
Move cursor to home position
ESC [ L
1B 5B 4C
Move cursor to top-left position
CR
0D
Move cursor to top-left position
ESC [ R
1B 5B 52
Move cursor to top-right
position
US CR
1F 0D
Move cursor to top-right
position
ESC [ K
1B 5B 4B
Move cursor to bottom position
US B
1F 42
Move cursor to bottom position
ESC # n
1B 23 n
n=31h~37h
Command type select
US @
1F 40
Exe cute sel f te st
US E n
1F 45 n
n=00h~FFh
Blink display screen
n=00h for no blink
ESC l x y
1B 6C x y
1≦x≦14h
y=01h, 02h
Move cursor to specified
position
x= column position
y= row position
US $ x y
1F 24 x y
01h≦x≦14h; y=01h, 02h
Move cursor to specified
position
ESC @
1B 40
Initialize display
ESC W s x1 x2 y
1B 57 s x1 x2 y
01h≦x1≦x2≦13h
y=01h, 02h, s=00h, 01h
Set/Cancel the window range at
horizontal scroll mode
x= column position
y= row position
CLR
0C
Clear display screen and clear
string mode
CAN
18
Clea r c urs or l ine a nd cle ar s tri ng
mode
ESC * n 1B 2A n
01h≦n≦04h (=brightest)
Brightness adjustment
US X n 1F 58 n
01h≦n≦04h (=brightest)
Brightness adjustment
ESC & s n m
[a(p1..pa)]x
(m-n+1)
1B 26 1 n m
[a (p1..pa)] x (m-n+1)
20h≦n≦m≦ FFh
1≦a≦5 p1...p5=row1...row5
Define dow nload charact e rs
Page 36
COMMAND SET
DSP-880 Series Customer Pole Display
30
ESC ? n
1B 3F
Delete download cha ract ers
ESC % n
1B 25 n
n=00h, 01h
Select/Cancel dow nload
character set
n=01 select, n=00 cancel
ESC _ n
1B 5F n
n=00h, 01h
Set cursor on/off
n=01 cursor on, n=00 cursor off
ESC f n
1B 66 n
Selec t intern at ional fo nt set
(see Note 3)
ESC c n
1B 63 n
Select code (s ee Note 4)
ESC = n
1B 3D n
n=01, 02h, 03h
Select peripheral device
n=01h, select printer
n=02h, select display
n=03h, select printer + display
ESC s 1
1B 73 01
Store the user defined chara cter
into EEPROM.
ESC d 1
1B 64 01
Download the user defined
character from EEPROM.
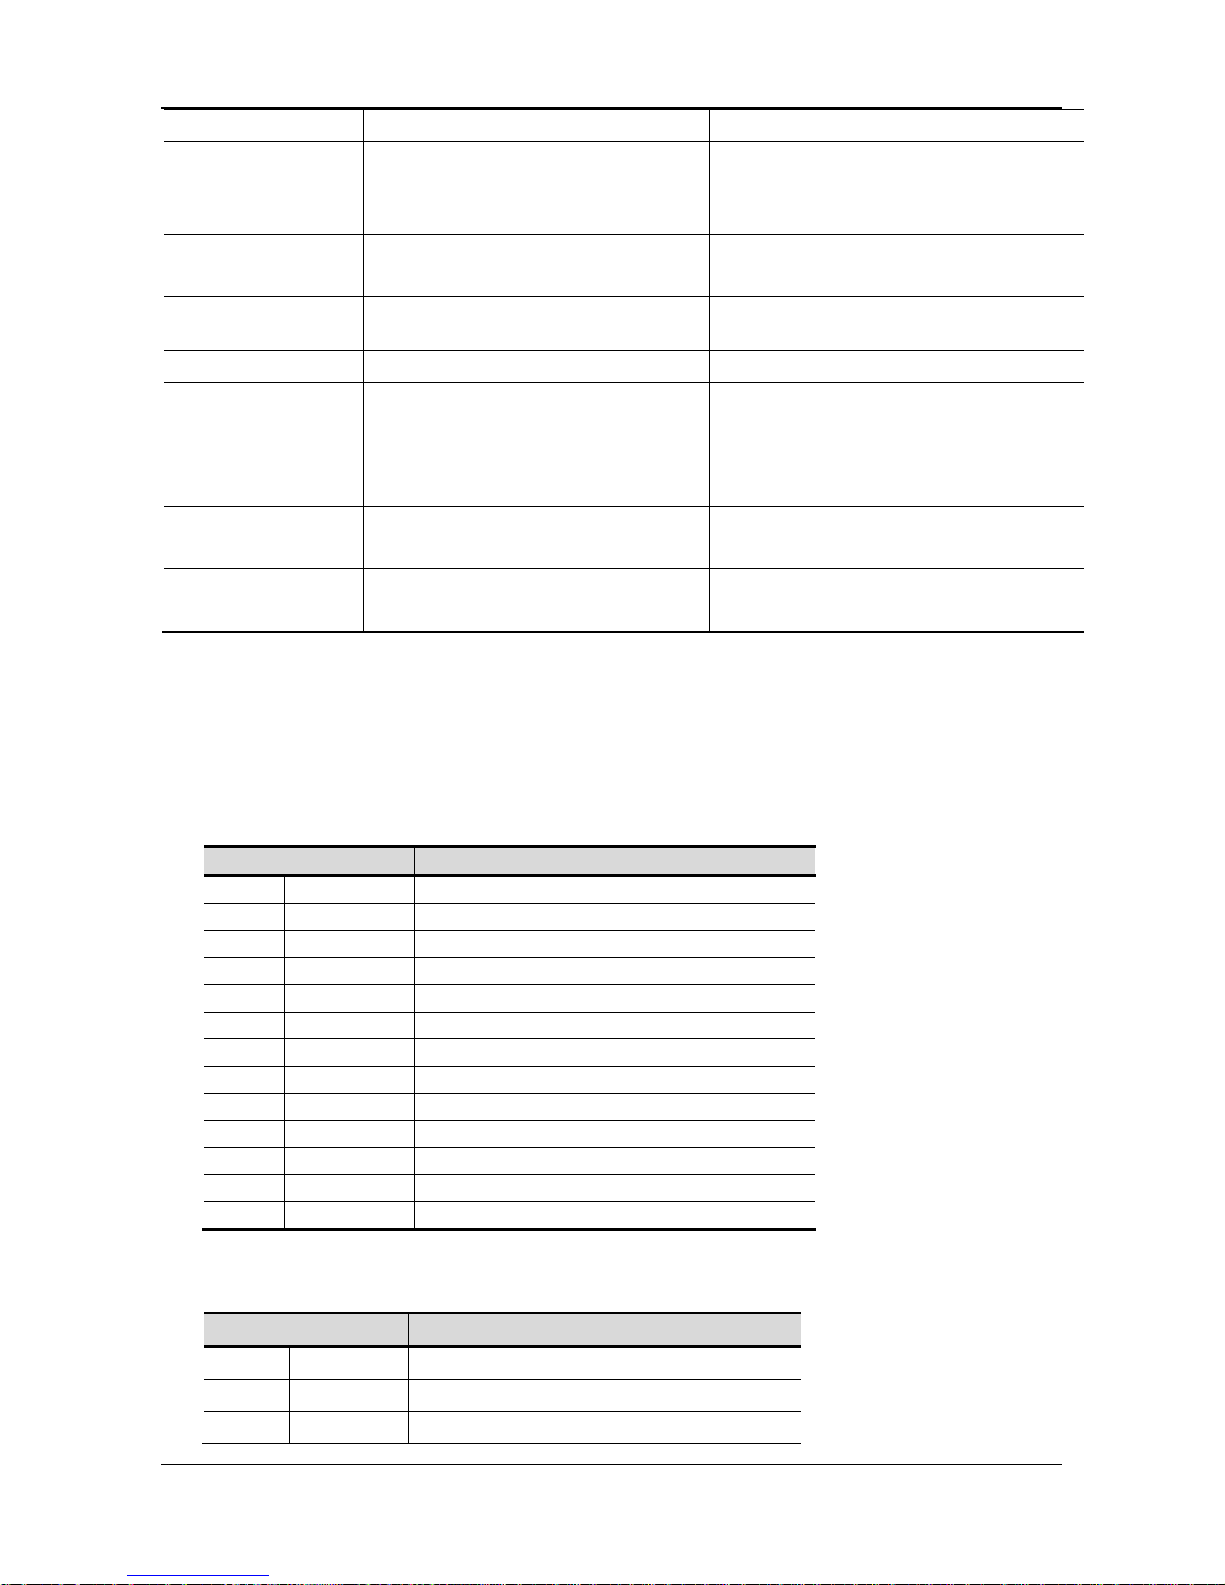
NOTE:
1. While using the comm and “ES C Q A” o r “ ES C Q B ” , o the r c omma n ds c a nn ot be us e d
except for “CLR” or “CAN” to change the operating mode.
2. When us i ng t he co m ma nd “ ES C Q D” , the uppe r l ine me s s ag e wil l scroll c ontin uous l y
unti l a ne w com ma nd is re ceiv ed. I t w i ll t he n cle ar the up pe r line a nd mov e the c urs or
to the upper left end position.
3. The param e t e rs of the in t e r n at iona l font set control command “ESC f n”.
Parameter “n”
Internat i o na l Font Set
‘A’
41h
U.S.A.
‘G’
47h
Germany
’I’
49h
Italy
‘J’
4Ah
Japan
‘U’
55h
U.K.
‘F’
46h
France
‘S’
53h
Spain
‘N’
4Eh
Norway
‘W’
57h
Sweden
‘D’
44h
Denmark I
‘E’
45h
Denmark I I
‘L’
4Ch
Slavonic
‘R’
52h
Russia
4. T
he parameters of the code table control command “ESC c n”.
Parameter “n” Internati o na l Font Set
‘A’
41h
Comp l ian ce w ith ASCII cod e
‘L’
4Ch
Compliance with SLOVONIC code
‘R’
52h
Comp l ian ce w ith RUSSIA c ode
Page 37
COMMAND SET
31
DSP-880 Series Customer Pole Display
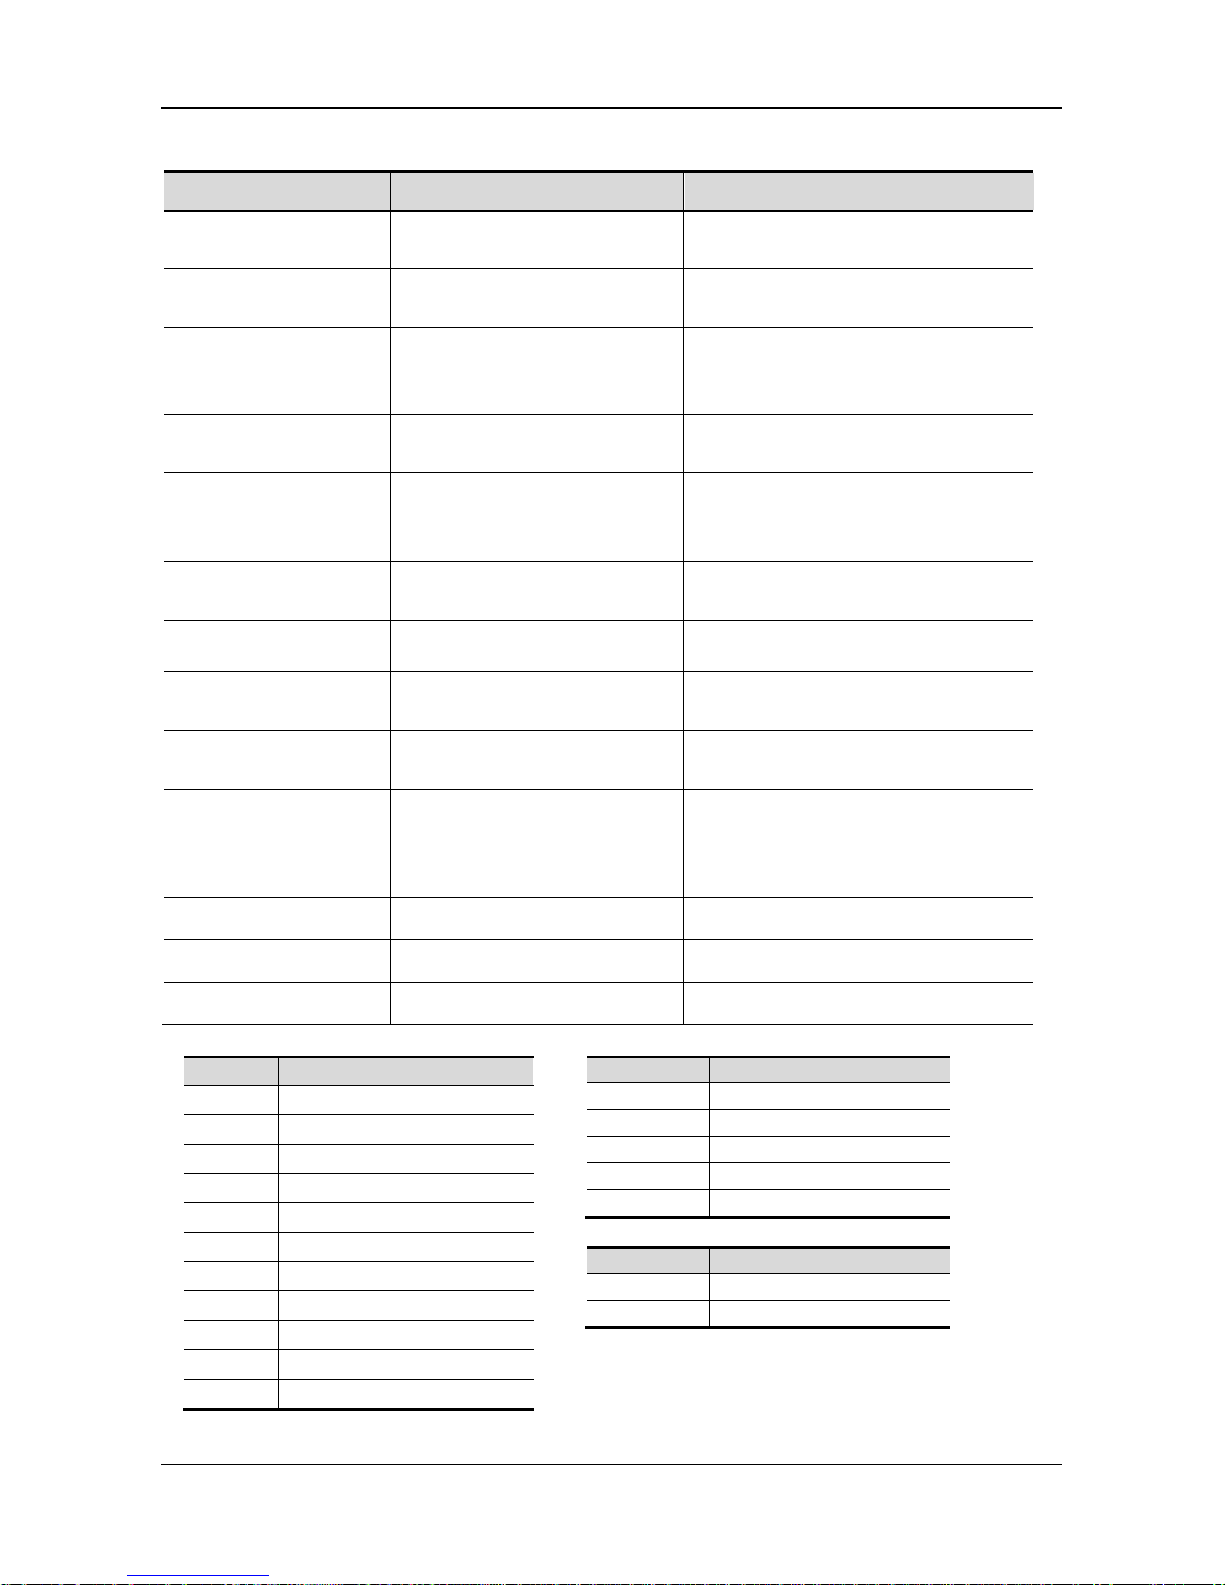
6.6 DSP-800 Mode Command Set
Command Code (hex)
Function Description
EOT SOH I n ETB
04 01 49 n 17
n=00~0Fh or 30~3Fh
Select Inter national character s et
(see Table 5-C)
EOT SOH P n ETB
04 01 50 n 17
31h≦n≦58h
Move cursor t o specified p osition
EOT SOH C n m ETB
04 01 43 n m 17
31h≦n≦m≦58h
Cl ear display rang e from n to m
position and m ove c urs or t o n
position
EOT SOH S n ETB
04 01 53 n 17
31h≦n≦35h
Save the cu rrent view data to n layer
for demo display
EOT SO H D n m ETB
04 01 44 n m 17
31h≦n≦4Fh
31h≦m≦33h
Di splay the saved demo message
(see Table 5-D)
EOT SOH A n ETB
04 01 41 n 17
31h≦n≦34h
Brightness adjustment
EOT SOH F n ETB
04 01 46 n 17
00h≦n≦FFh
Blink displ ay screen
n=00h for no blink
EOT SOH & n [px5]
ETB
04 01 26 n p1…p5 17
20h≦n≦FFh
Define dow nl oad characters
EOT SOH ? n ETB
04 01 3F n 17
20h≦n≦FFh
Delete dow nl oad c haracters
EOT SO H = n ETB
04 01 3D n 17
n=31h, 32h, 33h
Select p eripheral device.
n=31h, select printer
n=32h, select display
n=33h, select printer + display
EOT SO H % ETB 04 01 25 17 Initialize display
EOT SO H @ ETB 04 01 40 17 Execute s elf-test
EOT SO H # n ETB 04 01 23 n 17 Command type select
n
International Font
30h
USA
31h
France
32h
Germany
33h
UK
34h
Denmark I
35h
Sweden
36h
Italy
37h
Spain
38h
Japan
39h
Norway
3Ah
Denmark II
Table 5-C International Font Set
bit 0=1
Layer 1
bit 1=1
Layer 2
bit 2=1
Layer 3
bit 3=1
Layer 4
bit 4=0
Layer 5
m
Show mode
bit 0=1
Show mode 1
bit 1=1
Show mode 2
Table 5-D Layer table for saving data
Page 38
COMMAND SET
DSP-880 Series Customer Pole Display
32
CHAPTER 7 CHARACTER SET
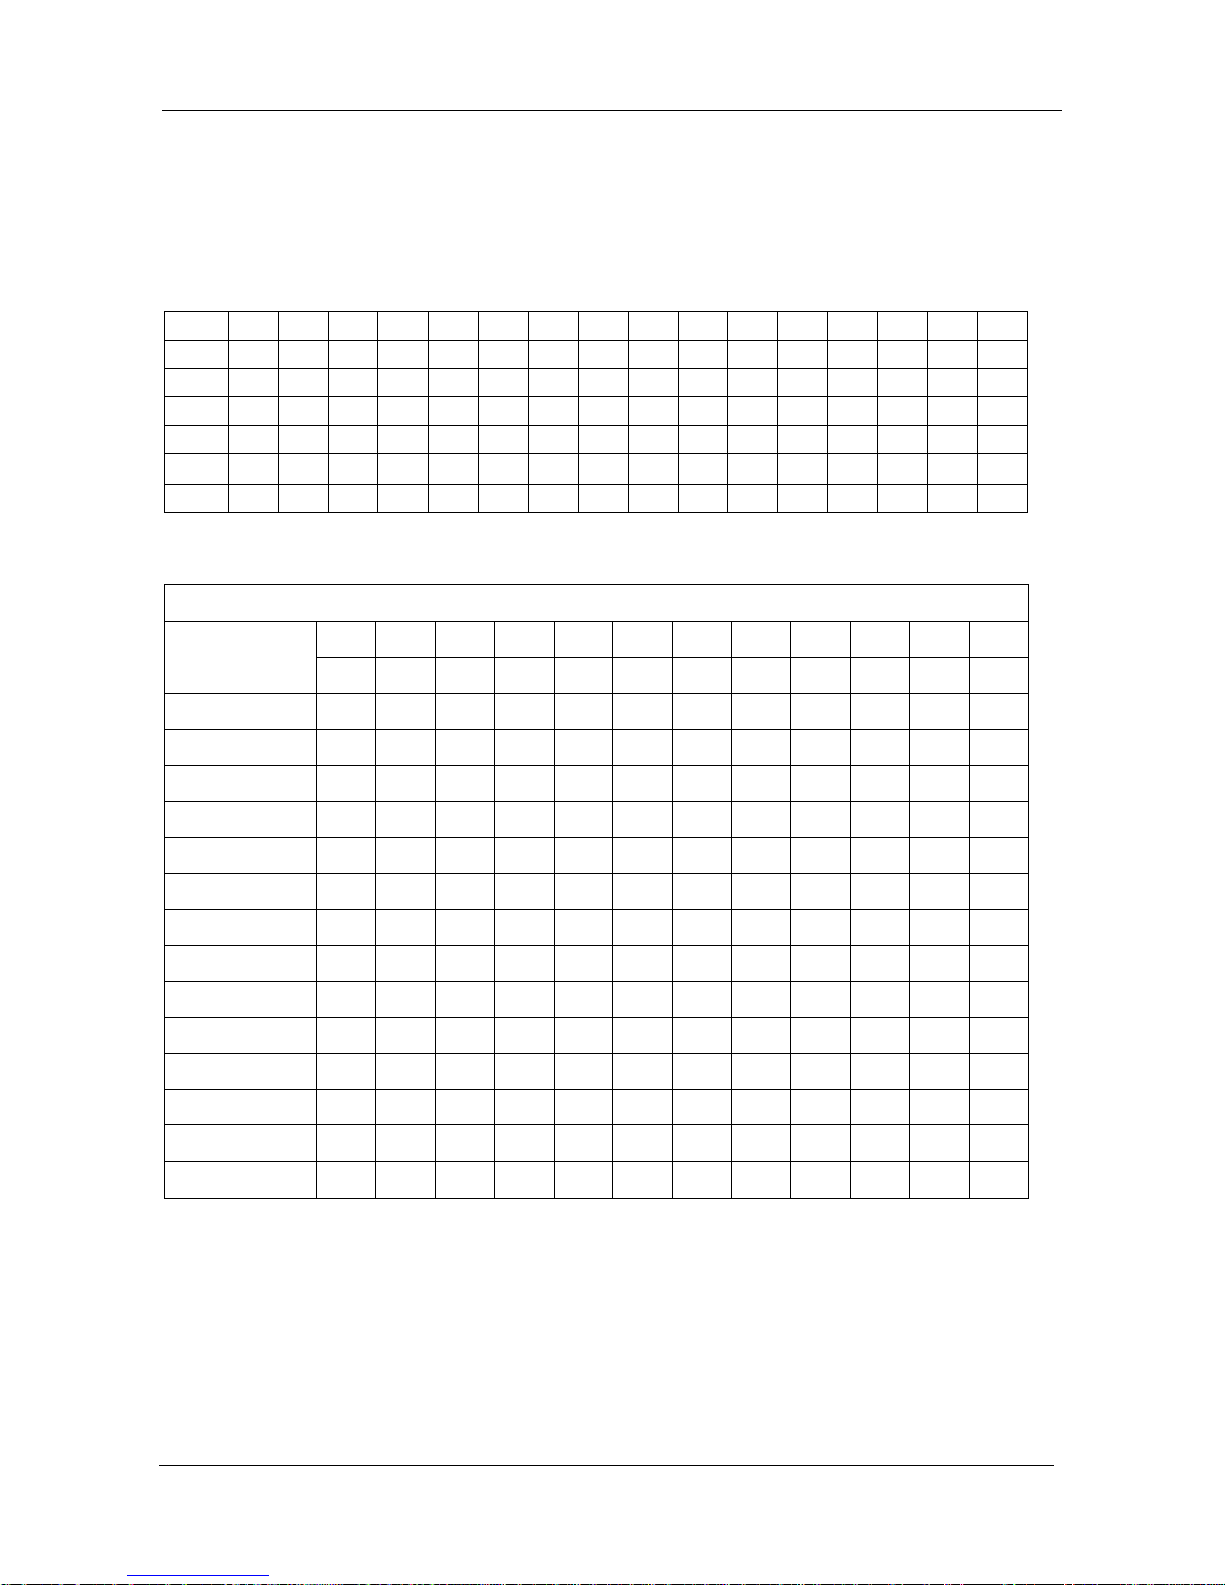
7.1 Character Code (20h-7Eh)
7.1.1 USA Standard Character Set
0 1 2 3 4 5 6 7 8 9 A B C D E
F
20h ! “ # $ % & ‘ ( ) * + , - .
/
30h 0 1 2 3 4 5 6 7 8 9 : ; < = > ?
40h @ A B C D E F G H I J K L M N O
50h P Q R S T U V W X Y Z [ \ ] ^ _
60h ﹑ a b c d e F g h i j k l m n
o
70h p q r s t u V w x y z { | }
~
7.1.2 International Character Set
Charac ter Code Number
Country
Hex 23 24 40 5B
5C 5D 5E 60 7B 7C 7D 7E
Dec 35 36 64 91 92 93 94 96 123 124 125 126
U.S.A # $ @ [ \ ] ^ ` { | } ~
France # $ à ° ç § ^ ` é ù è ¨
Germany # $ §
Ä Ö Ü
^ ` ä ö ü β
U.K £ $ @ [ \ ] ^ ` { | } ~
Denmark I # $ @ Æ Ø
Å
^ ` æ ø å ~
Sweden # ¤
É Ä Ö Å Ü
é ä ö å ü
Italy # $ @ ° \ é ^ ù à ò è ì
Spain Pt $ @ ¡
Ñ
¿ ^ ` ¨ ñ } ~
Japan # $ @ [
¥
] ^ ` { | } ~
Norway # ¤
É
Æ Ø
Å
Ü
é æ ø å ü
Denmark II # $
É
Æ Ø
Å
Ü
é æ ø å ü
Slavonic # $ @ [ \ ] ^ ` { | } ~
Russia # $ @ [ \ ] ^ ` { | } ~
Portuguese # $ @ [ \ ] ^ ` { | } ~
Page 39
COMMAND SET
33
DSP-880 Series Customer Pole Display
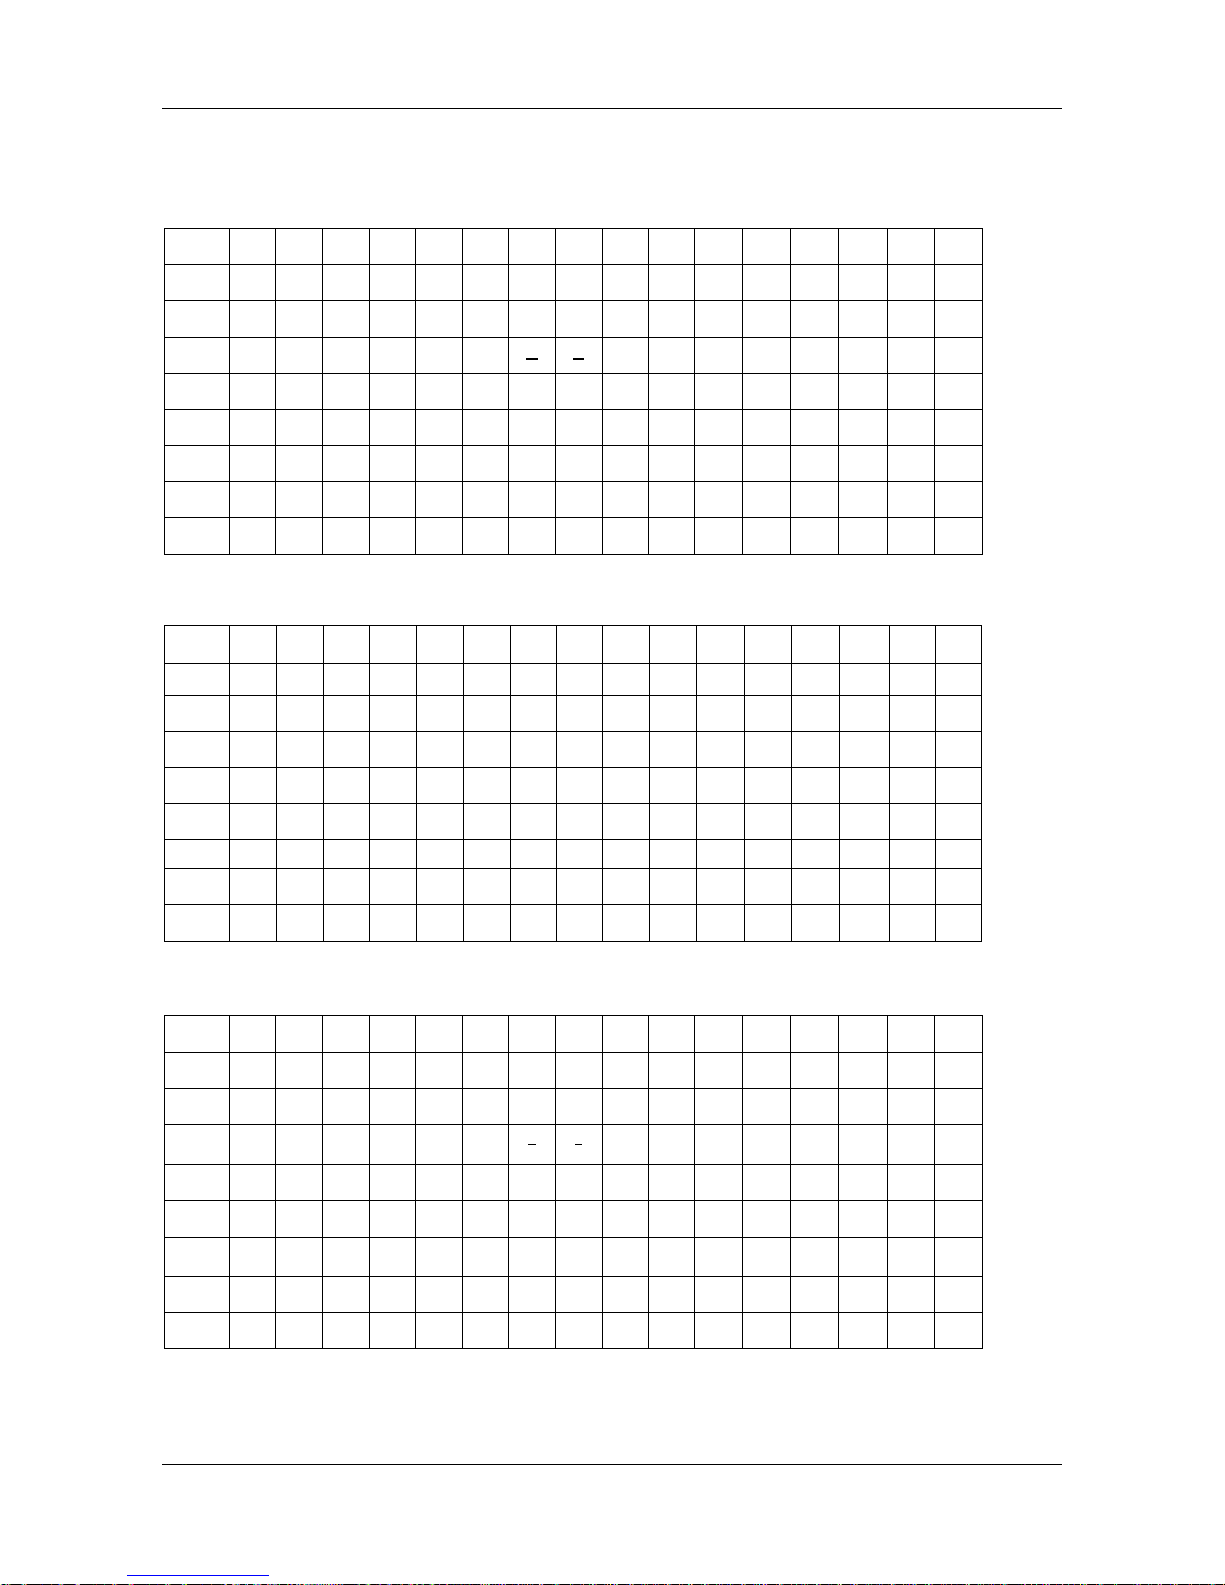
7.2 Character Code Page (80h-FFh)
7.2.1 Page 0 PC437: USA, Standard Europe
00 01 02 03 04 05 06 07 08 09 0A 0B 0C 0D 0E 0F
80H Ç ü é â ä à å ç ê ë è ï î ì Ä Å
90H É æ Æ ô ö ò û ù ÿ Ö Ü ¢ £
¥
Pt ƒ
A0H á í ó ú ñ Ñ
a
o
¿ ⌐ ¬ ½ ¼ ¡ « »
B0H ░ ▒ ▓ │ ┤ ╡ ╢ ╖ ╕ ╣ ║ ╗ ╝ ╜ ╛ ┐
C0H └ ┴ ┬ ├ ─ ┼ ╞ ╟ ╚ ╔ ╩ ╦ ╠ ═ ╬ ╧
D0H ╨ ╤ ╥ ╙ ╘ ╒ ╓ ╫ ╪ ┘ ┌ █ ▄ ▌ ▐ ▀
E0H α ß Γ π Σ σ μ τ Ф θ Ω δ ∞ ø є ∩
F0H ≡ ± ≥ ≤ ⌠ ⌡ ÷ ≈ ° • · √
n
² ■ SP
7.2.2 Greek
00 01 02 03 04 05 06 07 08 09 0A 0B 0C 0D 0E 0F
80H Α Β
Γ Δ
Ε Ζ
Η Θ
Ι Κ
Λ Μ Ν Ξ
Ο
Π
90H
Ρ
Σ Τ
Y Φ Х Ψ Ω
α β
γ
δ
ε ζ η
θ
A0H
ι
κ λ μ ν
ξ
ο π
ρ σ s τ υ φ χ ψ
B0H
C0H
D0H
E0H
ω
F0H £ -
7.2.3 Page 2 PC8 50 : M u ltilingual
00 01 02 03 04 05 06 07 08 09 0A 0B 0C 0D 0E 0F
80H Ç ü é â ä à å ç ê ë è ï î ì Ä Å
90H É æ Æ ô ö ò û ù ÿ Ö Ü ø £ Ø × ƒ
A0H á í ó ú ñ Ñ
a o
¿ ® ¬ ½ ¼ ¡ « »
B0H ░ ▒ ▓ │ ┤ Á Â À © ╣ ║ ╗ ╝ ¢
¥
┐
C0H └ ┴ ┬ ├ ─ ┼ ã Ã ╚ ╔ ╩ ╦ ╠ ═ ╬ ¤
D0H ð Đ Ê Ë È I Í Î Ï ┘ ┌ █ ▄ ▌ ▐ ▀
E0H Ó ß Ô Ò õ Õ μ þ Þ Ú Û Ù ý Ý ¯ ´
F0H ¯ ± = ¾ ¶ § ÷ , ° ¨ ˙
1 3 2
■ SP
Page 40
COMMAND SET
DSP-880 Series Customer Pole Display
34
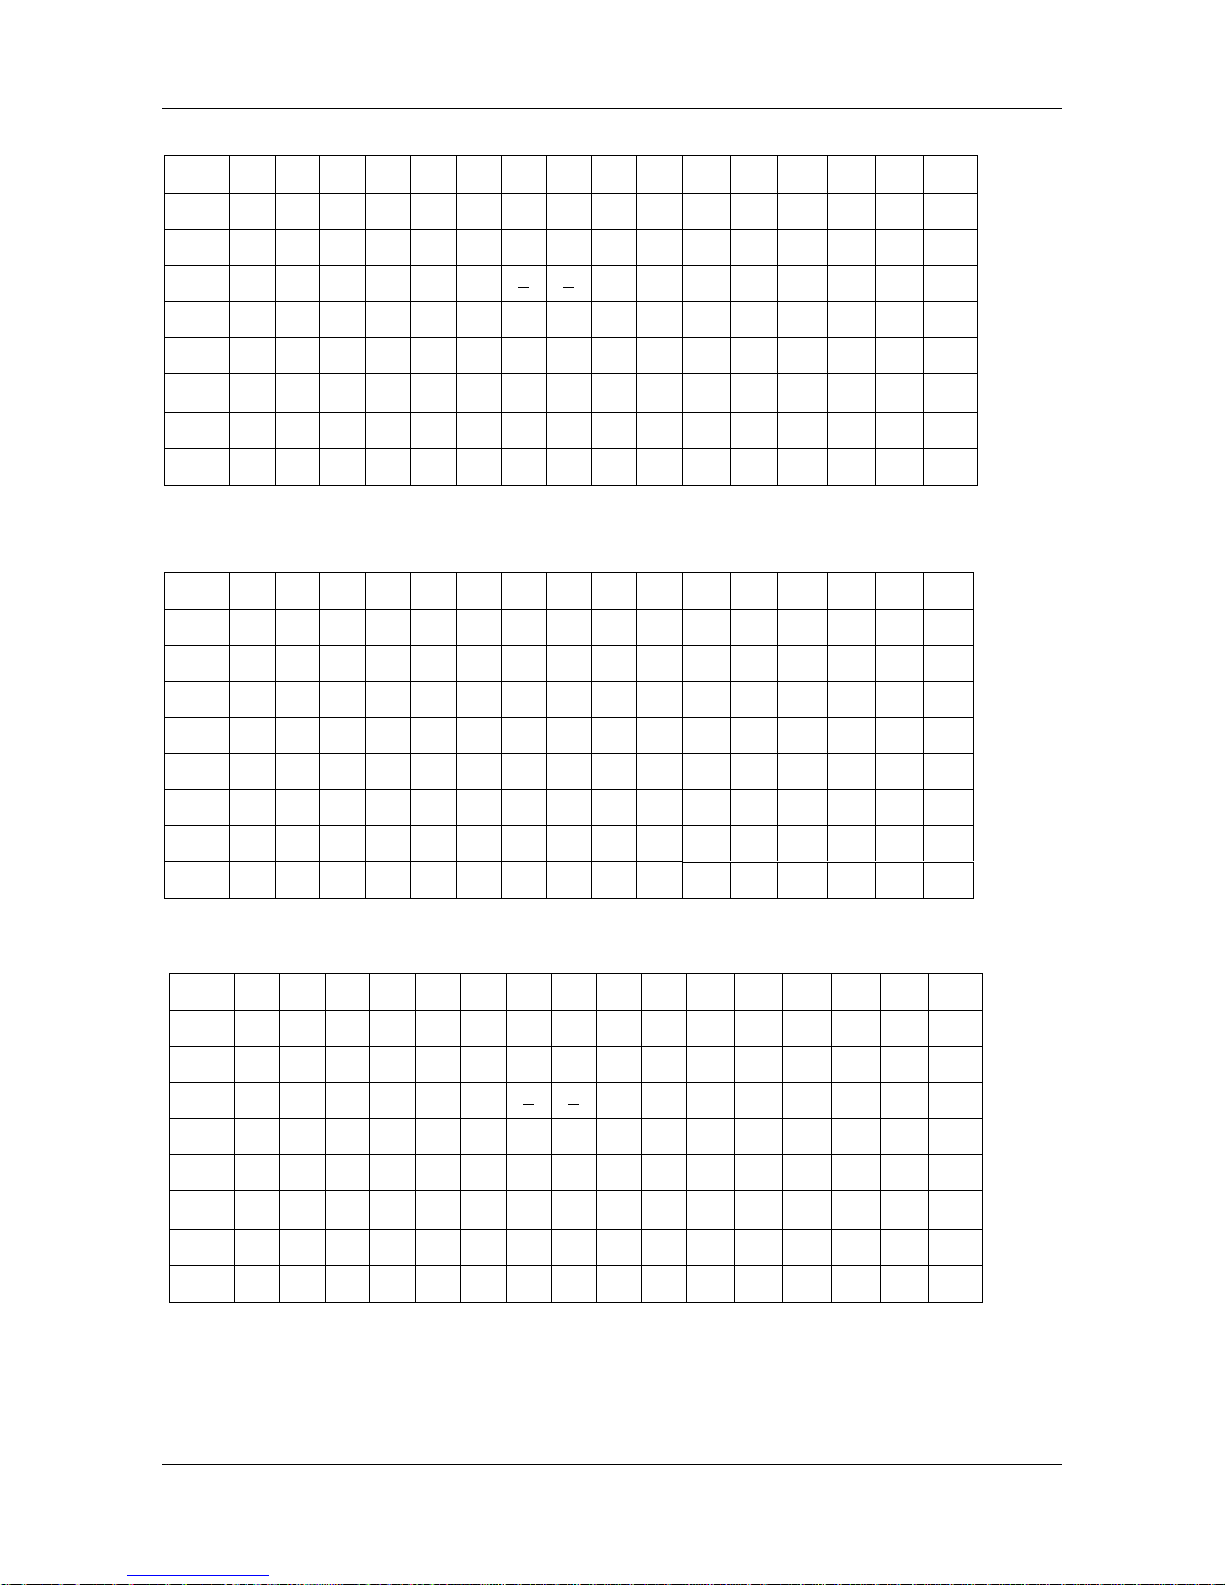
7.2.4 Page 3 PC860: Portuguese
00 01 02 03 04 05 06 07 08 09 0A 0B 0C 0D 0E 0F
80H Ç ü é â ä à Á ç ê Ê è ï Ô ì
Ä
Å
90H
É
À È ô
ö ò
ú
ù ì
Ö
Ü
ø £ ù Pt
ó
A0H á í
ó ú
ñ Ñ
a
o
¿ ⌐ ¬ ½ ¼ ¡ «
»
B0H ░
▒ ▓ │
┤
╡
╢ ╖ ╕
╣ ║ ╗
╝ ╜ ╛
┐
C0H └ ┴ ┬ ├ ─ ┼
╞ ╟ ╚
╔ ╩ ╦ ╠ ═ ╬ ╧
D0H
╨ ╤ ╥ ╙ ╘ ╒ ╓ ╫ ╪
┘
┌
█ ▄
▌ ▐
▀
E0H
α ß Γ π Σ σ µ τ Φ Θ Ω δ ∞ ø ε
∩
F0H
≡ ± ≥ ≤ ⌠ ⌡ ÷ ≈
° • ·
√ ⁿ ²
■
7
.2.5 Page 4 PC86 3: Can adian-French
00 01 02 03 04 05 06 07 08 09 0A 0B 0C 0D 0E 0F
80H
Ç ü é â Â à ¶ ç ê ë è ï î = À §
90H
É È Ê ô Ë Ï û ù
¤
Ô Ü ¢ £ Ù Û ƒ
A0H
¦ í ´ ó ú
¨
³ ¯ Î ⌐ ¬ ½ ¼ ¾ « »
B0H
░ ▒ ▓ │ ┤ ╡ ╢ ╖ ╕ ╣ ║ ╗ ╝ ╜ ╛ ┐
C0H
└ ┴ ┬ ├ ─ ┼ ╞ ╟ ╚ ╔ ╩ ╦ ╠ ═ ╬ ╧
D0H
╨ ╤ ╥ ╙ ╘ ╒ ╓ ╫ ╪ ┘ ┌ █ ▄ ▌ ▐ ▀
E0H
α ß Γ π Σ σ µ τ Φ Θ Ω δ ∞ ø ε
∩
F0H
≡
± ≥ ≤
⌠ ⌡
÷ ≈
° • ·
√ ⁿ ²
■
7.2.6 Page 5 PC865: Nordic
00 01 02 03 04 05 06 07 08 09 0A 0B 0C 0D 0E 0F
80H Ç ü é â ä à å ç ê
Ë
è ï î ì
Ä
Å
90H
É
æ Æ ô ö ò û ù ÿ
Ö
Ü
ø £ Ø Pt
ƒ
A0H á í
ó ú
ñ
Ñ a o
¿ ⌐ ¬ ½ ¼ ¡ «
¤
B0H ░
▒ ▓ │
┤
╡
╢ ╖ ╕
╣ ║
╗ ╝ ╜ ╛
┐
C0H └ ┴ ┬ ├ ─ ┼
╞ ╟ ╚
╔ ╩ ╦ ╠ ═ ╬ ╧
D0H
╨ ╤ ╥ ╙ ╘ ╒ ╓ ╫ ╪
┘
┌
█ ▄
▌ ▐
▀
E0H
α ß Γ π Σ σ µ τ Φ Θ Ω δ ∞ ø ε
∩
F0H
≡ ± ≥ ≤ ⌠ ⌡ ÷ ≈
° • ·
√
n
² ■
Page 41
COMMAND SET
35
DSP-880 Series Customer Pole Display
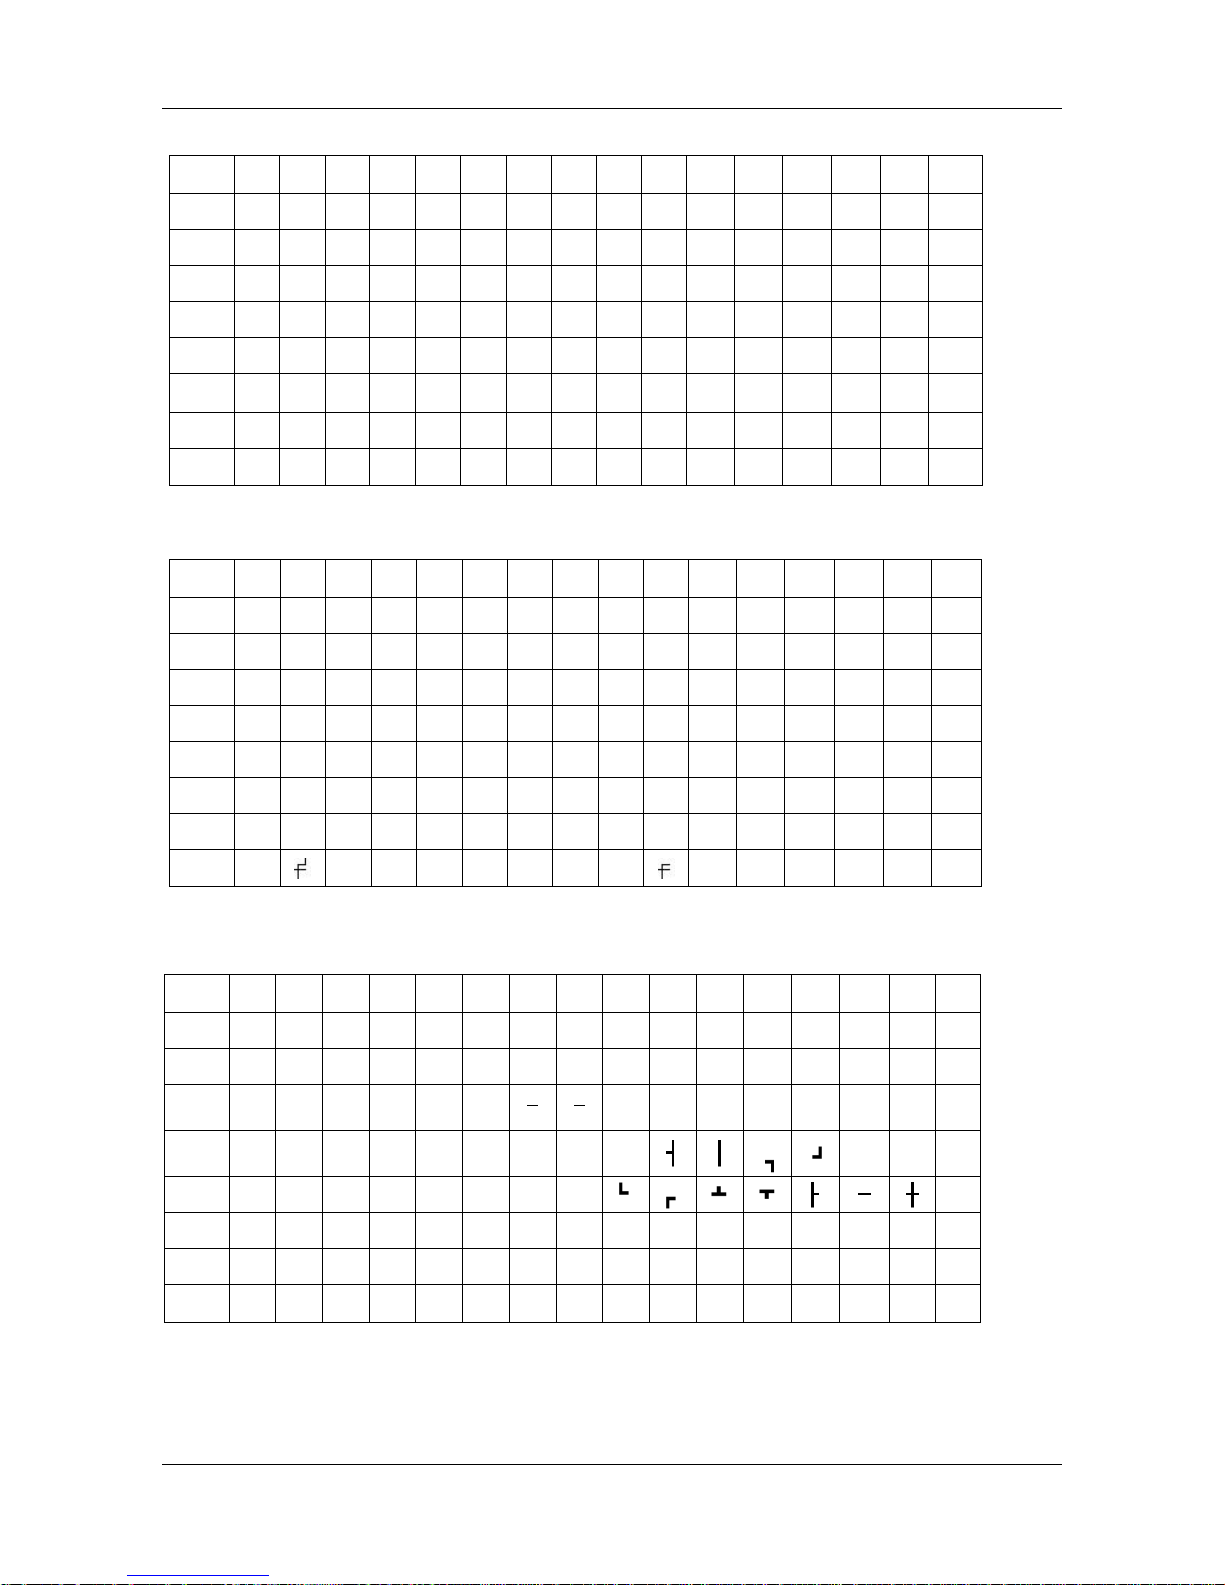
7.2.7 Page 6 Slavonic
00 01 02 03 04 05 06 07 08 09 0A 0B 0C 0D 0E 0F
80H Ç ü é â ä ů ć ç Į ë Õ õ î Ź ä Ć
90H é Ĺ í ô ö Ľ ľ ś ś
Ö
Ü
ť ť Ł х č
A0H á í ó ú ą ą ž ž ę ę ź č ş « »
B0H ░ ▒ ▓ │ ┤ á â ĕ Ş ż ż
C0H ─ ┼ ă ă ═ ¤
D0H đ Đ Ď Ë ď Ň í î ě █ ▄ ţ Ů ▀
E0H Ó ß Ô ń ń ň š š ŕ Ú ŕ Ű ý Ý ţ
F0H -
˝
˛
ˇ ˘ § ÷ ° ¨ ˙ ű ŕ ř ■
7.2.8 Page 7 Russia
00 01 02 03 04 05 06 07 08 09 0A 0B 0C 0D 0E 0F
80H А Б В Г Д Е Ж З и Й К Л М Н О П
90H Р С Т У Ф Х Ц Ч Ш Щ Ъ Ы Ь Э Ю Я
A0H а б в г д е ж з и й к л м н о п
B0H
C0H
D0H
E0H р с т у ф х ц ч ш щ ъ ы ь э ю я
F0H ∂ K H θ ¥ Y h ∂ k H θ
¥
Y
7.2.9 Page 19 PC858: Multilingual + Euro Symbol
00 01 02 03 04 05 06 07 08 09 0A 0B 0C 0D 0E 0F
80H Ç ü é â ä à
å
ç ê
ë
è
ï
î
ì
Ä
Å
90H
É
æ Æ ô ö ò
û
ù
ÿ
Ö
Ü
ø £
Ø
×
ƒ
A0H á í ó ú ñ
Ñ a o
¿
R
¬
½ ¼ ¡ « »
B0H ░ ▒ ▓ │ ┤ Á Â À c ¢
¥
┐
C0H └ ┴ ┬ ├ ─ ┼ ã Ã
¤
D0H ð Đ Ê Ë È € Í Î Ï ┘ ┌ █ ▄ ▀
E0H Ó ß Ô Ò õ Õ μ þ Þ Ú Û Ù ý Ý ¯ ´
F0H ¯ ´
¯
± = ¾ ¶ ÷ ,
°
¨
•
1
3
■
Page 42
COMMAND SET
DSP-880 Series Customer Pole Display
36
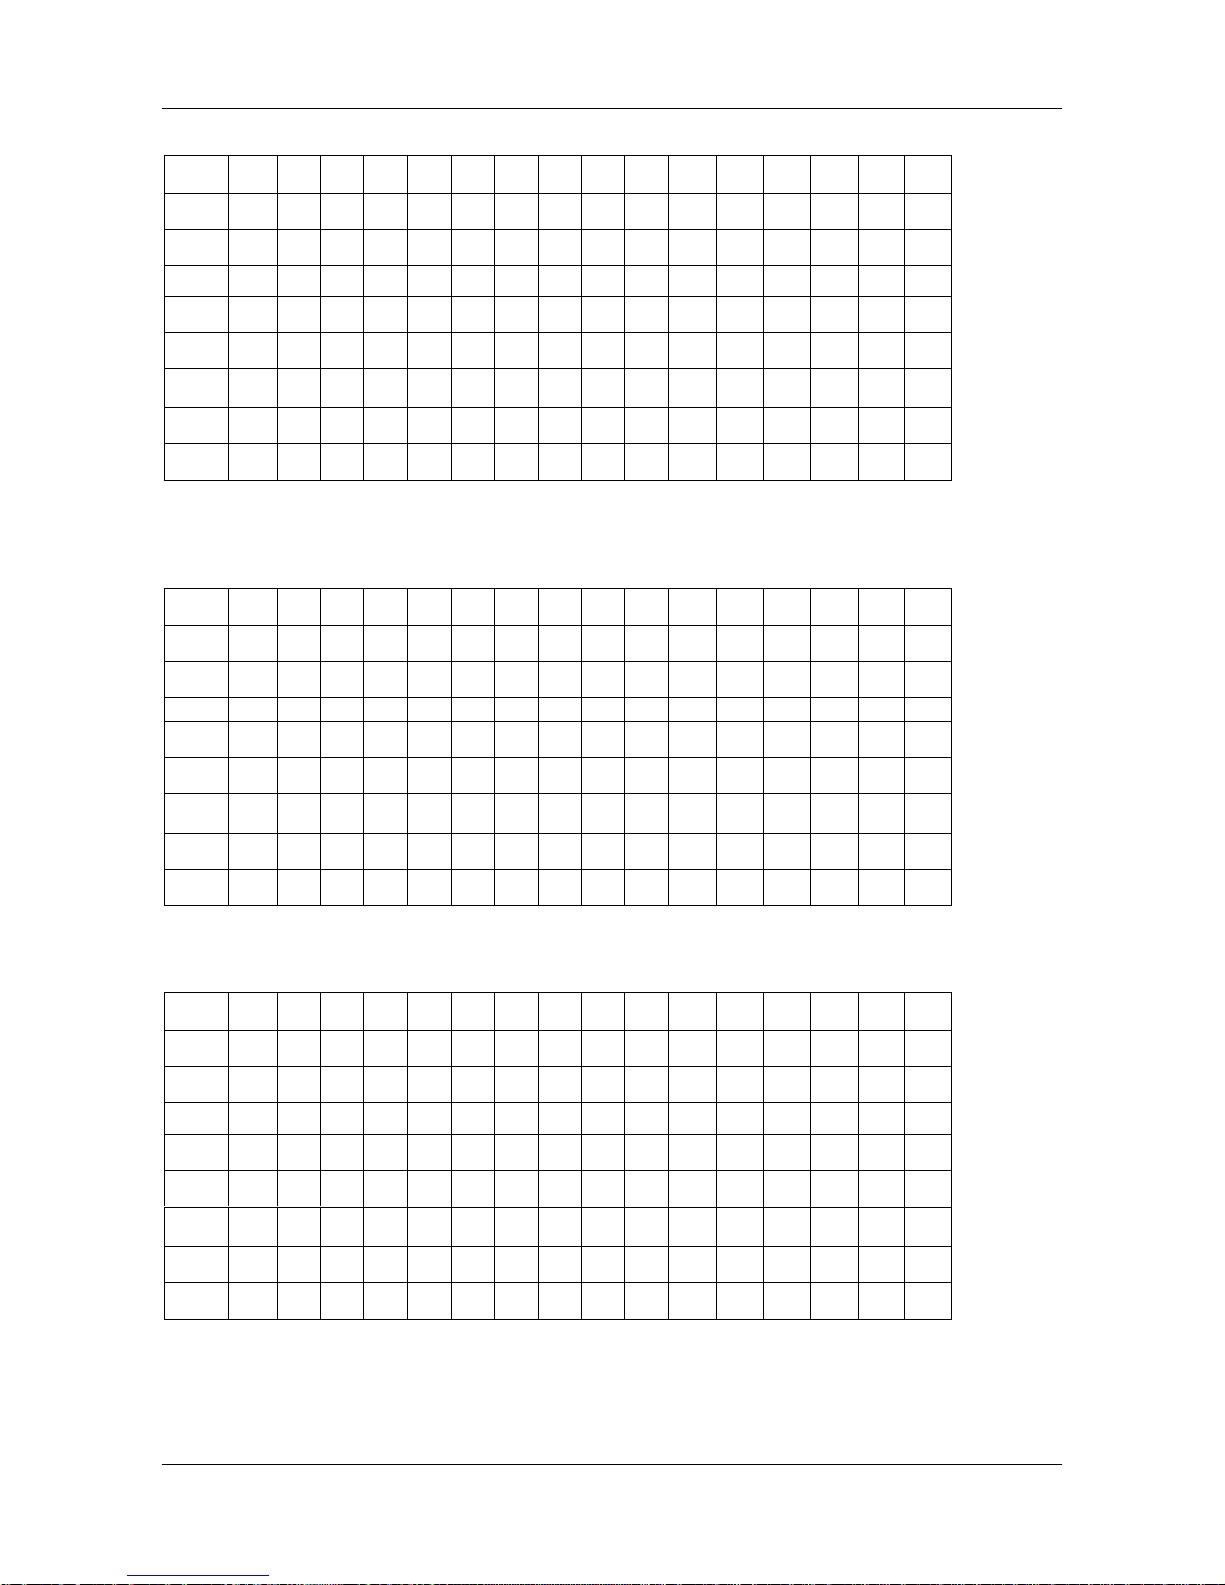
7.2.10 Page 16 WPC1252: West European Latin
00 01 02 03 04 05 06 07 08 09 0A 0B 0C 0D 0E 0F
80H
€ ¨ ‚ ƒ „ … † ‡ ˆ ‰ Š ‹ Œ
Ž
90H
‘ ’ “ ” • – — ˜ ™ š › œ ž Ÿ
A0H
¡ ¢ £ ¤ ¥ ¦ § ¨ © ª « ¬ - ® ¯
B0H
° ± ² ³ ´ µ ¶ · ¸ ¹ º » ¼ ½ ¾ ¿
C0H
À Á Â Ã Ä Å Æ Ç È É Ê Ë Ì Í Î Ï
D0H
Ð Ñ Ò Ó Ô Õ Ö × Ø Ù Ú Û Ü Ý Þ ß
E0H
à á â ã ä å æ ç è é ê ë ì í î
ï
F0H
ð ñ ò ó ô õ ö ÷ ø ù ú û ü ý þ ÿ
7.2.11 Page 10 PC852: Slavonic
00 01 02 03 04 05 06 07 08 09 0A 0B 0C 0D 0E 0F
80H
Ç ü é â ä ů ć ç ł ë Ő ő î Ź Ä Ć
90H
É Ĺ ĺ ô ö Ľ ľ Ś ś Ö Ü Ť ť Ł × č
A0H
á í ó ú Ą ą Ž ž Ę ę ¬ ź Č ş «
»
B0H ░ ▒ ▓ │ ┤
Á Â Ě Ş
╣ ║ ╗ ╝
Ż ż
┐
C0H └ ┴ ┬ ├ ─ ┼
Ă ă
╚ ╔ ╩ ╦ ╠ ═ ╬
¤
D0H
đ Ð Ď Ë ď Ň Í Î ĕ
┘ ┌ █ ▄
Ţ Ů
▀
E0H Ó ß Ô Ń ń ň Š š Ŕ Ú ŕ Ű ý Ý ţ ´
F0H
˝ ˛ ˇ ˘ § ÷ ¸ ° ¨ · ű Ř ř
■
7
.2.12 Page 11 Katakana: Japanese
00 01 02 03 04 05 06 07 08 09 0A 0B 0C 0D 0E 0F
80H ▁ ▂ ▃
▄
▅ ▆ ▇
█
▎ ▍
▌
▋ ▊ ▉
█
┼
90H
┴ ┬ ┤ ├ ‾
━ ∣ ▕
┌ ┐ └
┘
╭ ╮ ╰ ╯
A0H
á
。 「 」 、 ‧ ヲ ァ ィ ゥ ェ ォ ャ ュ ョ ツ
B0H ー ア イ ウ エ オ カ キ ク ケ コ サ シ ス セ ソ
C0H タ チ ツ テ ト ナ ニ ヌ ネ ノ ハ ヒ フ ヘ ホ マ
D0H
ミ ム メ モ ヤ ユ ヨ ラ リ ル レ ロ ワ ン ゛ ゜
E0H
═
ㅑ
╪
ㅕ
◢ ◣ ◥ ◤
♠
♥ ♦ ♣ ● ○ ∕
∖
F0H ╳
円
年 月 日 時 分 秒 〒 市 區 町 村 人
▒
Page 43
COMMAND SET
37
DSP-880 Series Customer Pole Display
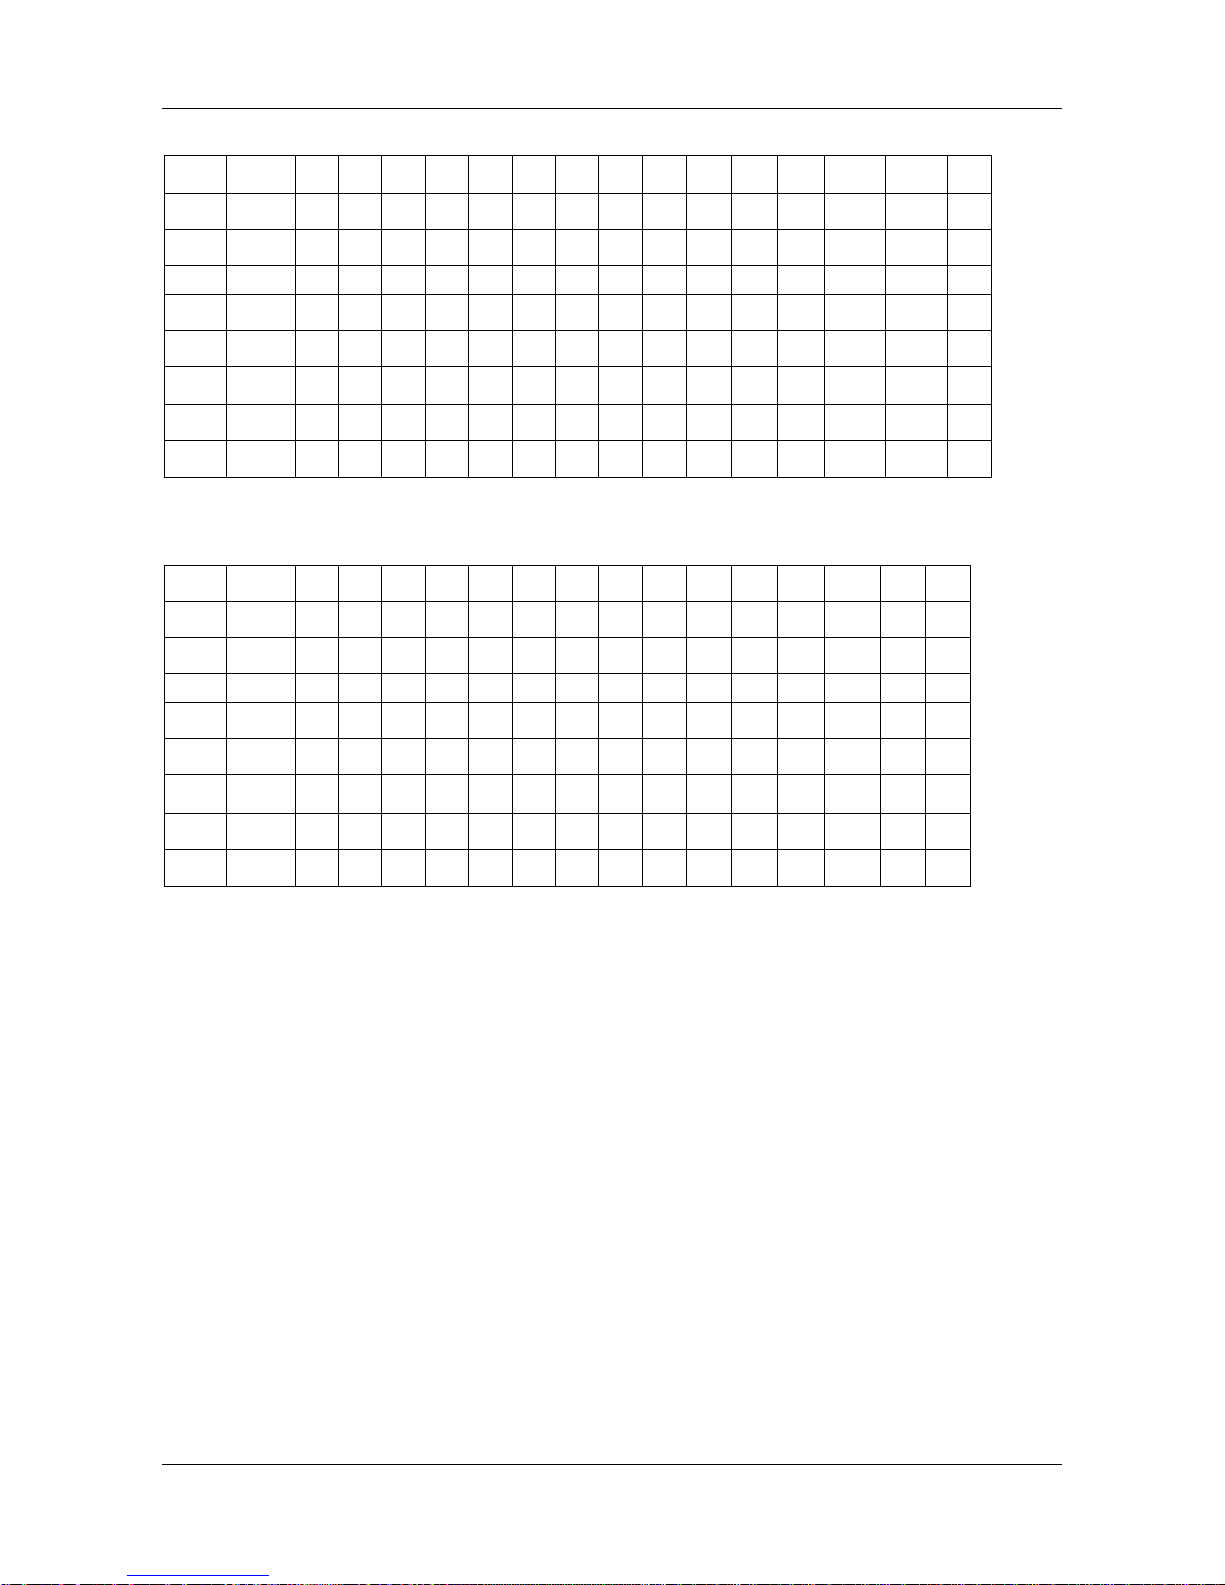
7.2.11 Page 12 WPC1255: Hebrew
00 01 02 03 04 05 06 07 08 09 0A 0B 0C 0D 0E 0F
80H
€
‚ ƒ „ … † ‡ ˆ ‰ ‹
90H
‘ ’ “ ” • – — ˜ ™ ›
A0H
NBSP
¡ ¢ £ ₪ ¥ ¦ § ¨ © × « ¬ SHY
®
¯
B0H
°
± ² ³ ´ µ ¶ · ¸ ¹ ÷ » ¼ ½ ¾
¿
C0H
ְֱֲֳִֵֶַָ
ֹ
ֹ
ֻּֽ־ ֿ
D0H
׀
ׁ◌
ׂ◌ ׃ װ ױ ײ ׳ ״
E0H
א ב ג ד ה ו ז ח ט י ך כ ל ם מ
ן
F0H
נ ס ע ף פ ץ צ ק ר ש ת
LRM
RLM
7
.2.11 Page 13 WPC1257: Baltic
00 01 02 03 04 05 06 07 08 09 0A 0B 0C 0D 0E 0F
80H
€
‚ „ … † ‡ ‰ ‹ ¨ ˇ ¸
90H
‘ ’ “ ” • – — ™ › ¯ ˛
A0H
NBSP
¢ £ ¤ ¦ § Ø © Ŗ « ¬ SHY
®
Æ
B0H
° ± ² ³ ´ µ ¶ · ø ¹ ŗ » ¼ ½ ¾
æ
C0H
Ą Į Ā Ć Ä Å Ę Ē Č É Ź Ė Ģ Ķ Ī
Ļ
D0H
Š Ń Ņ Ó Ō Õ Ö × Ų Ł Ś Ū Ü Ż Ž
ß
E0H
ą į ā ć ä å ę ē č é ź ė ģ ķ ī
ļ
F0H
š ń ņ ó ō õ ö ÷ ų ł ś ū ü ż ž
˙
 Loading...