


BP002
Birch BP002, BP-002BP, BP-002BU, BP-002BR, BP-002BN User Manual
...

BP-002 User's Manual
- i -
Important Safety Instructions
Read all of these instructions carefully and thoroughly and save them for later reference. The
unauthorized operation would lead to malfunction or accident. Manufacturers have no
responsibilities for the problems which are led by misoperations.
1. Follow all warnings and instructions in the manual as well as marked on the product.
2. Don’t touch the thermal print head with your hand at any moment to avoid the thermal head damaged.
3. Be careful the manual cutter when you are installing the paper.
4. Unplug this product from the power outlet before cleaning. Do not use liquid or aerosol cleaners. Use a
damp cloth for cleaning.
5. Please don’t use the printer near water.
6. Do not place this product on an unstable cart, stand or table. The product may fall, causing serious
damage to you or the product.
7. Slots and opening on the cabinet and the back or bottom are provided for ventilation. To ensure reliable
operation of the product and to protect it from overheating, do not block or cover these openings. The
openings should never be blocked by placing the product on a bed, sofa, rug or other similar surface.
This product should not be placed in a built-in installation unless proper ventilation is provided.
8. This product should never be placed near or o ver a radiator or heat origin, and should avoid of direct
sunshine.
9. Do not locate this product w here the cord will be walked on. When the cord or the plug is mangled,
please stop using and get a new one replaced. Make sure the old one is far away from the printer, so it
can avoid someone who does not know the inside story getting damage.
10. Be sure to use the specified power source. Connection to an improper power source may cause fire or
shock.
11. Do not use in locations subject to high humidity or dust levels. Excessive humidity and dust may cause
equipment damage or fire.
12. Never push ob jects of any kind into this product though cabinet slots as they may tou ch dangerous
voltage dots or short out parts.
13. Don’t remove the printe r’s out-cover and rep air the printer. When n eeded, call or t ake it to the
professional.
14. If water or other liquid spills into this equipment, unplug the power cord immediately, and then contact
your dealer or a service center for advice.
15. To ensure safety, please unplug this product prior to leaving it unused for an extended period. The wall
outlet you plan to connect to should be nearby and unobstructed.
16. Unplug this prod uct from the wall out let and refer servicing to qualified service person nel under the
following conditions:
a) When the power cord or plug is damaged or frayed.
b) If liquid has been spilt into the product.
c) If the product has been exposed to rain or water.
d) If the product does not operate normally when the operating instructions are followed.
e) If the product has been dropped or the cabinet has been damaged.
f) If the product exhibits a distinct change in performance, it indicates a need for service.
Warning: In order to ensure the printer life, strictly prohibit printing full line full black
exceeding 2 CM.

BP-002 User's Manual
- ii -
Notice: The contents of this manual are subject to change without notice.
*All the parts of the printer can be recycled. When it is abandoned, we can call it back freely.
Please contact us when you abandon it.

BP-002 User's Manual
- iii -
Table of Contents
Important Safety Instructions.....................................................................................................................i
Chapter 1 Overview
....................................................................................................................................1
1.1 Features..............................................................................................................................................1
1.2 Product Model Description ..................................................................................................................1
1.3 Main Parts of the Printer......................................................................................................................1
Chapter 2 Installing the Printer..................................................................................................................3
2.1 Unpacking & Checking
........................................................................................................................3
2.2 Removing the Protective Materials......................................................................................................3
2.3 Connecting to Your Computer or Other Equipment ............................................................................. 3
2.3.1 Connecting the Cash Drawer Cable .............................................................................................3
2.3.2 Connecting the Parallel Interface Cable ..................................................................................
.....4
2.3.3 Connecting the USB Interface Cable............................................................................................4
2.3.4 Connecting the Serial Interface Cable..........................................................................................5
2.3.5 Connecting the Ethernet Interface Cable......................................................................................5
2.4 Connecting the Power Cord ................................................................................................................6
2.5 Ins
talling the Driver .............................................................................................................................7
2.6 Installing Bluetooth Interface Driver ....................................................................................................9
2.7 Ethernet Settings............................................................................................................................... 11
2.7.1 Connecting Printer.......................................................................................................
...............12
2.7.2 Setting IP Address......................................................................................................................12
2.8 Wi-Fi Setting......................................................................................................................................14
2.8.1 Connect to the Printer, Run the WiFiConfig Software.................................................................15
2.8.2 Set Wi-Fi Parameters.................................................................................................................16
2.8.3 Checking Wi-Fi Parame
ters........................................................................................................17
2.8.4 Recover the Default Setting........................................................................................................18
2.9 Installing Printer Network Driver........................................................................................................18
Chapter 3 Control Panel...........................................................................................................................25
3.1 Control Panel ....................................................................................................................................25
3.1.1 Indicato
r light..............................................................................................................................25
3.1.2 Key .............................................................................................................................................25
3.2 Self-Printing.......................................................................................................................................25
3.3 Hex Dump Printing ............................................................................................................................ 25
3.4 Restoring Factory Printer Settings
....................................................................................................25
3.5 Setting Slip Stitch (UPDATE and BOOT)...........................................................................................26
3.6 Online-aptitude Parameter Setting
s ..................................................................................................26
Chapter 4 Installing Paper........................................................................................................................28
4.1 Paper Installation Ste
ps.....................................................................................................................28
Chapter 5 Specification............................................................................................................................30
5.1 General Specificaion .........................................................................................................................30
5.2 Interface Specifications .....................................................................................................................31

BP-002 User's Manual
- iv -
5.2.1 Cash Drawer Interface................................................................................................................31
5.2.2 Parallel Interface.........................................................................................................................32
5.2.3 USB Interface.............................................................................................................................33
5.2.4 Serial Interface ...........................................................................................................................33
5.2.5 Ethernet Interface.......................................................................................................................34
5.2.6 Power Supply Inlet......................................................................................................................35
Chapter 6 Troubleshooting and Maintenance........................................................................................36
6.1 Maintenance......................................................................................................................................36
6.2 Error Message on the Control Panel .................................................................................................36
Chapter 7 Control Commands.................................................................................................................37
7.1 General .............................................................................................................................................37
7.2 Explanation of Te
rms......................................................................................................................... 37
Appendix Commands List .......................................................................................................................48
BP-002 User's Manual
- 1 -
Chapter 1 Overview
1.1 Features
BP-002 is a low-cost and high-reliability thermal printer facing low-income market. It can be widely
used in the fields of supermarket, POS, catering, electronic instrument and so on.
1.2 Product Model Description
According to different data ports (interfaces), BP-002 series is classified into several different models:
BP-002BP, BP-002BU, BP-002BR, BP-002BN, BP-002BT, BP-002BF, BP-002WP, BP-002WU,
BP-002WR, BP-002WN, BP-002WT, BP-002WF
Configuration of each model:
The products of this series are configured with a cash drawer interface. You can choose one of the
following models when purchasing this printer.
Model Interface Cable Color
BP-002BP Parallel interface Parallel interface cable Black
BP-002BU USB interface + Serial interface USB interface cable Black
BP-002BR USB interface + Serial interface Serial interface cable Black
BP-002BN USB interface + Ethernet interface Ethernet interface cable Black
BP-002BT USB interface + Bluetooth interface USB interface cable Black
BP-002BF USB interface + Wi-Fi interface USB interface cable Black
BP-002WP Parallel interface Parallel interface cable White
BP-002WU USB interface + Serial interface USB interface cable White
BP-002WR USB interface + Serial interface Serial interface cable White
BP-002WN USB interface + Ethernet interface Ethernet interface cable White
BP-002WT USB interface + Bluetooth interface USB interface cable White
BP-002WF USB interface + Wi-Fi interface USB interface cable White
Note: Please contact the local dealer to change the interface with added expense if needed.
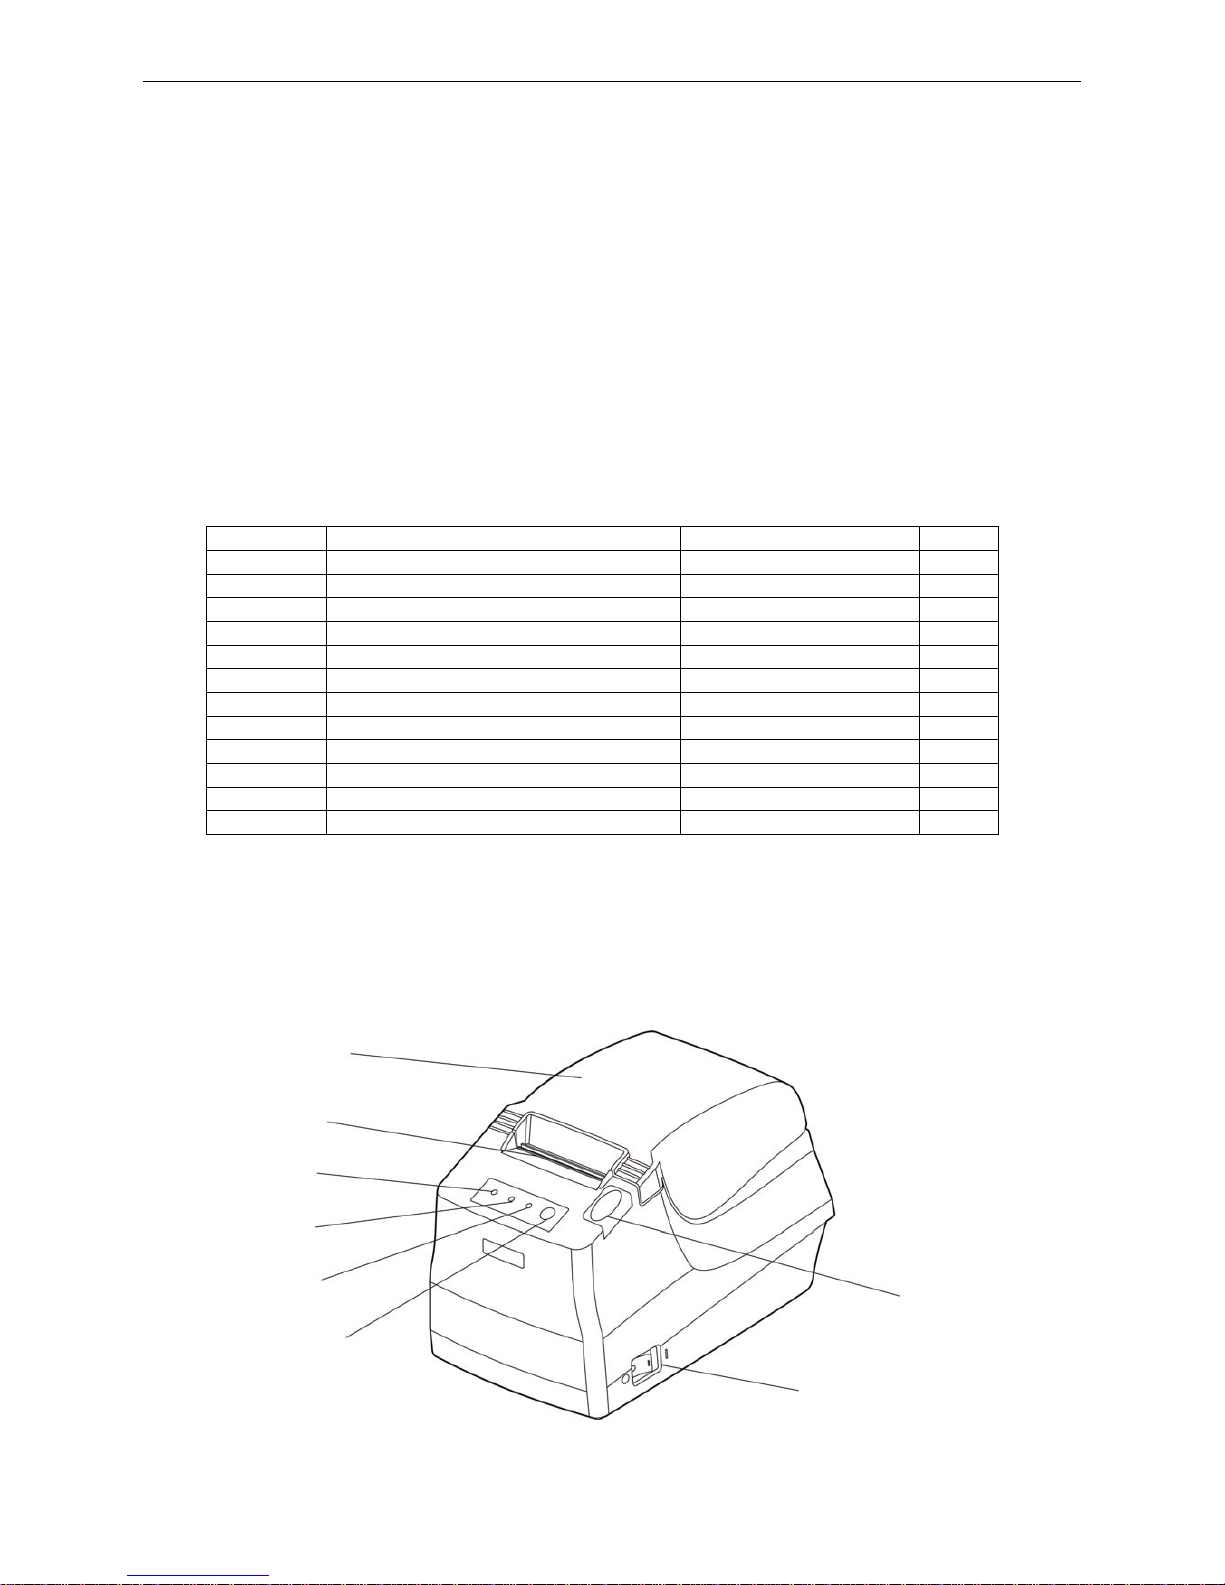
1.3 Main Parts of the Printer
Figure 1-1 Main parts of the printer
Paper out indicator
Cover-opening button
Power switch
Power indicator
Error indicator
FEED key
Manual cutter
Upper cover
BP-002 User's Manual
- 2 -
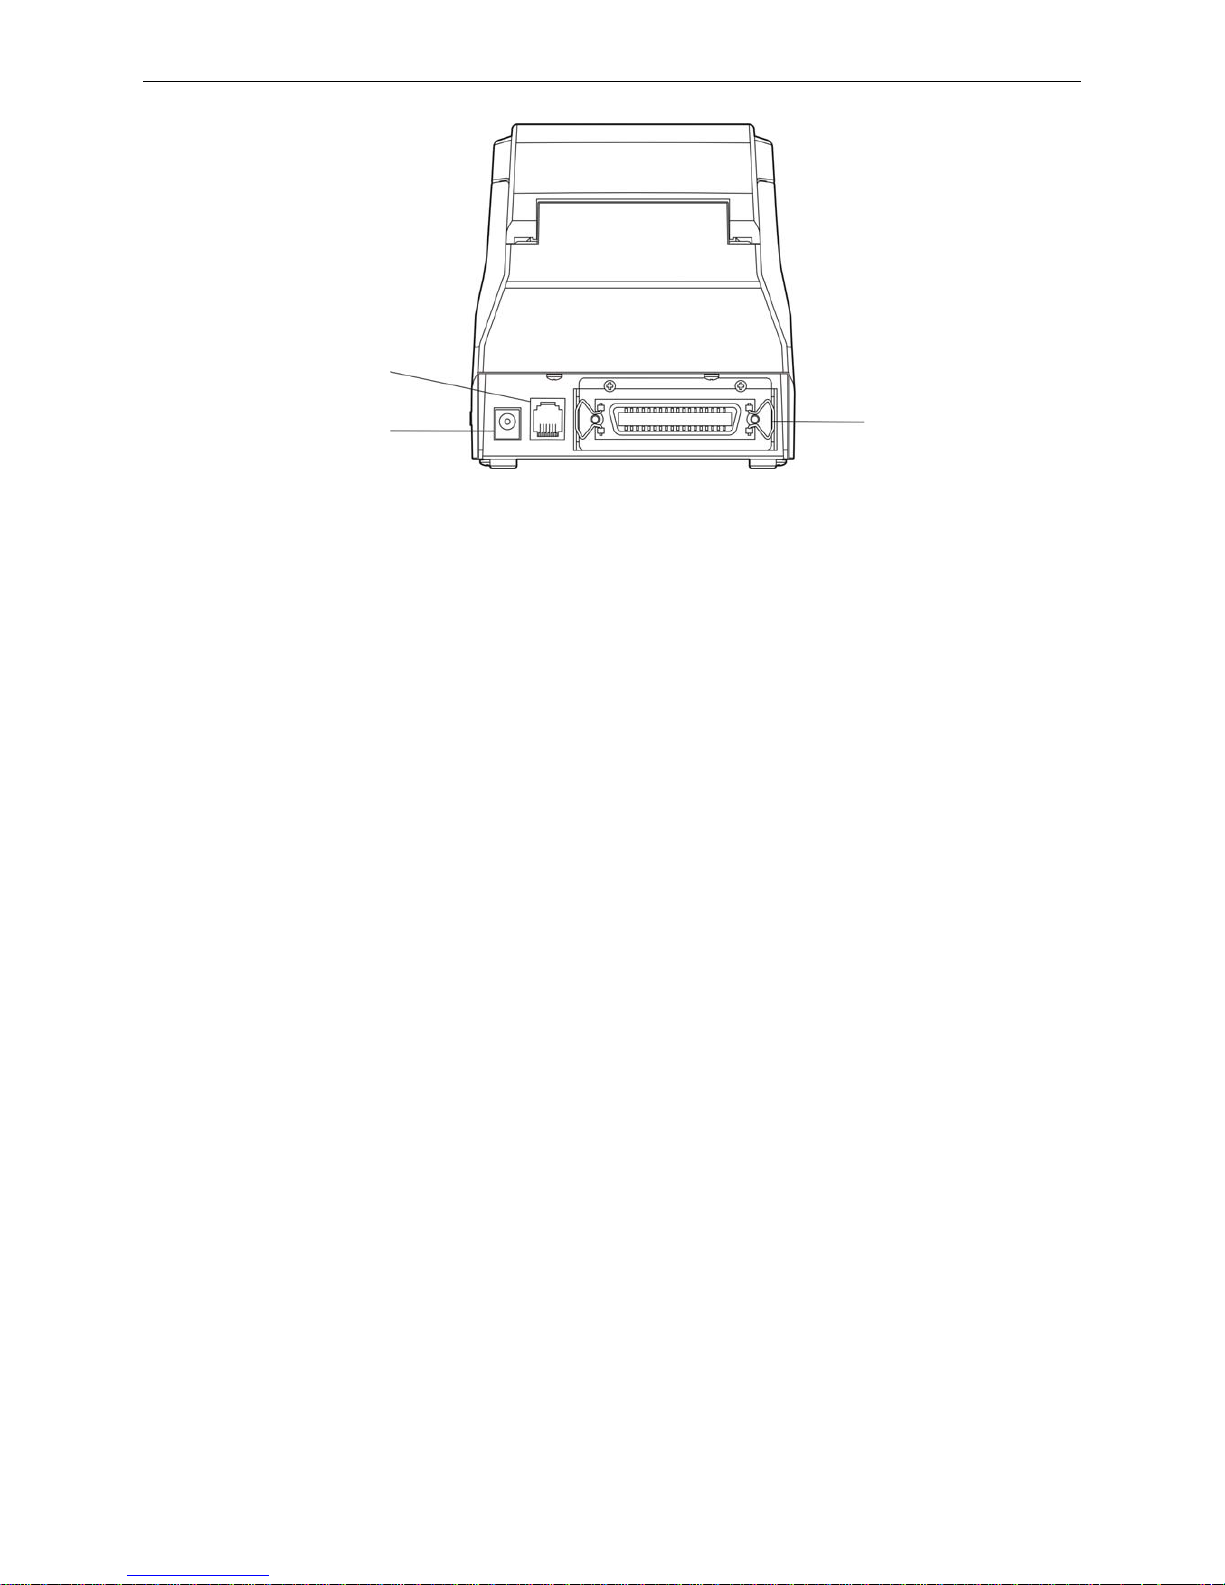
Note: According to the specific interface standards
Figure 1-2 Back interfaces of the printer
Data interface
Cash drawer interface
Power supply inlet
BP-002 User's Manual
- 3 -
Chapter 2 Installing the Printer
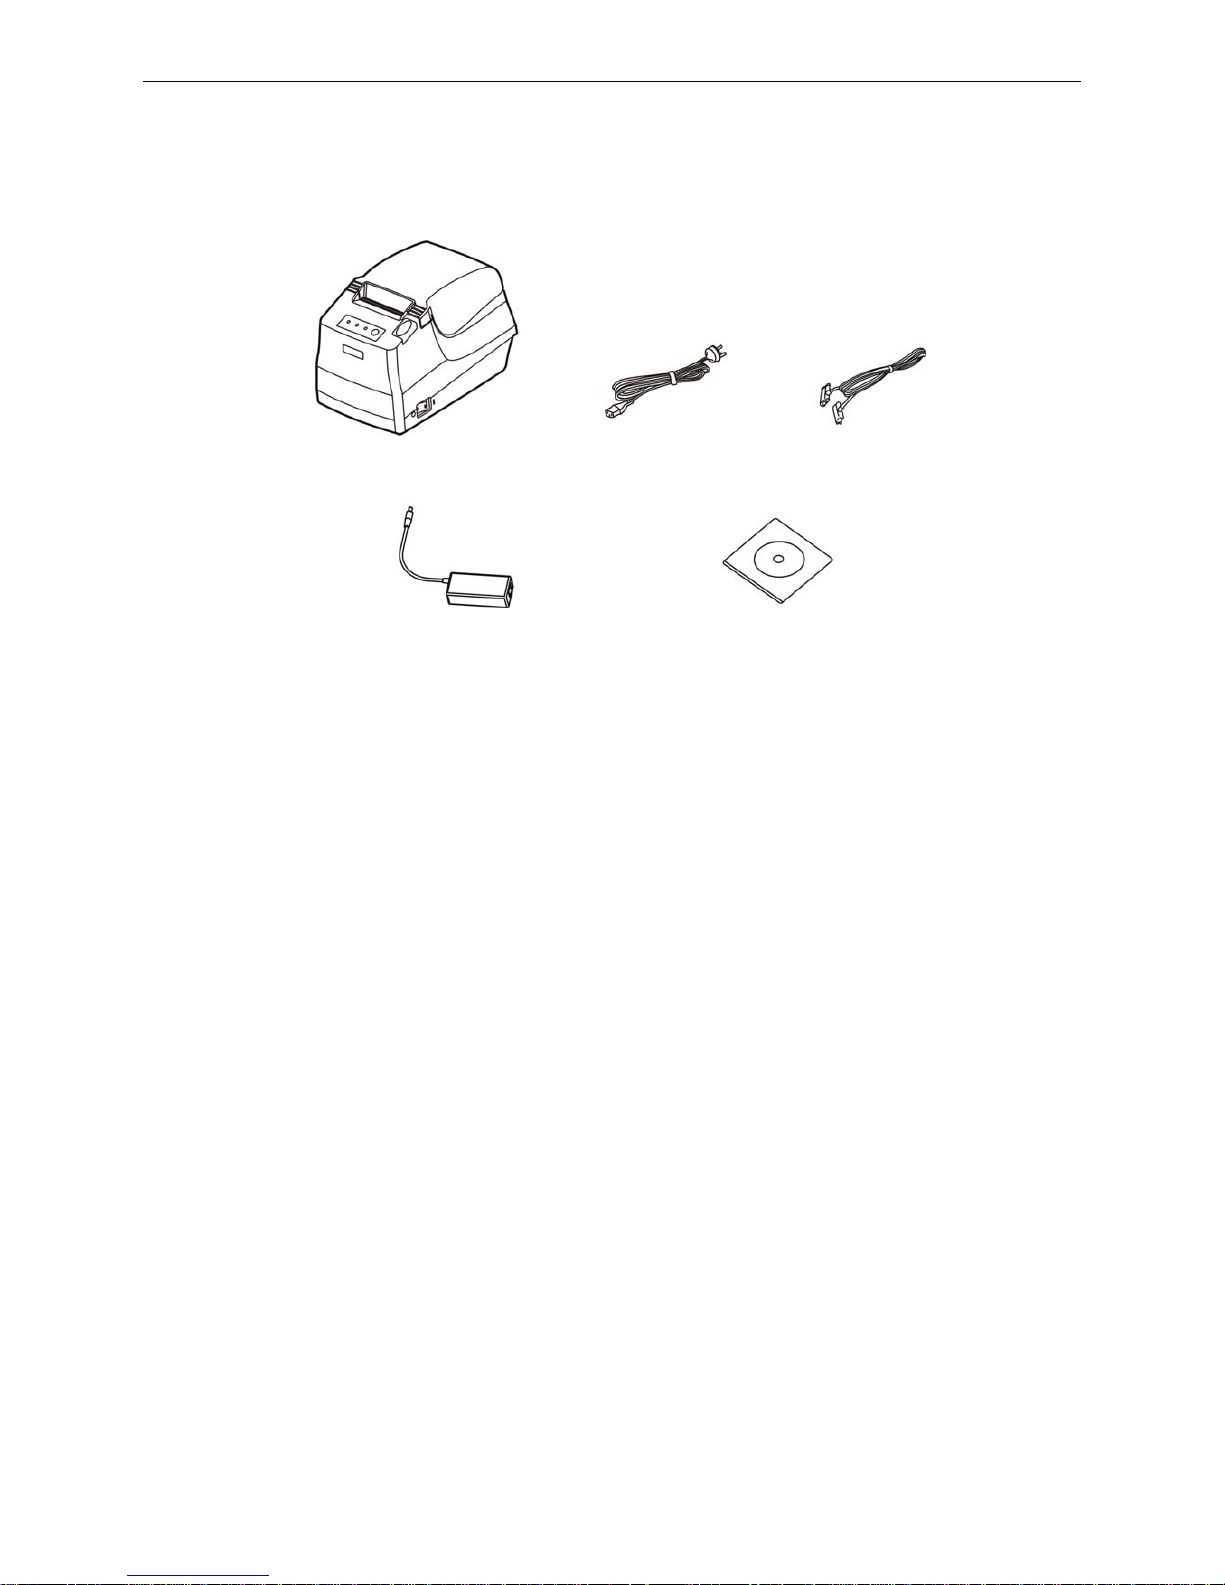
2.1 Unpacking & Checking
Check the following items in the package, if any of these items is missing, please contact your dealer.
2.2 Removing the Protective Materials
1. Open the packing box, take out the printer.
2. Save all the original packing materials so that they can be used when transporting the printer.
2.3 Connecting to Your Computer or Other Equipment
The printer is configured with a cash drawer interface and one data interface (parallel interface, USB +
serial interface, USB + Ethernet interface, USB interface + Bluetooth or USB interface + Wi-Fi).
(According to specific interface standards) Please contact your local dealer to change the interface with
added expense if needed. Connect the printer to your computer as described below.
Note: Before connecting or disconnecting the cash drawer, serial interface or parallel interface
cable, make sure that the power of the printer is turned off. Also make sure the power
cable is disconnected with the AC outlet. Or else it may damage the printer.
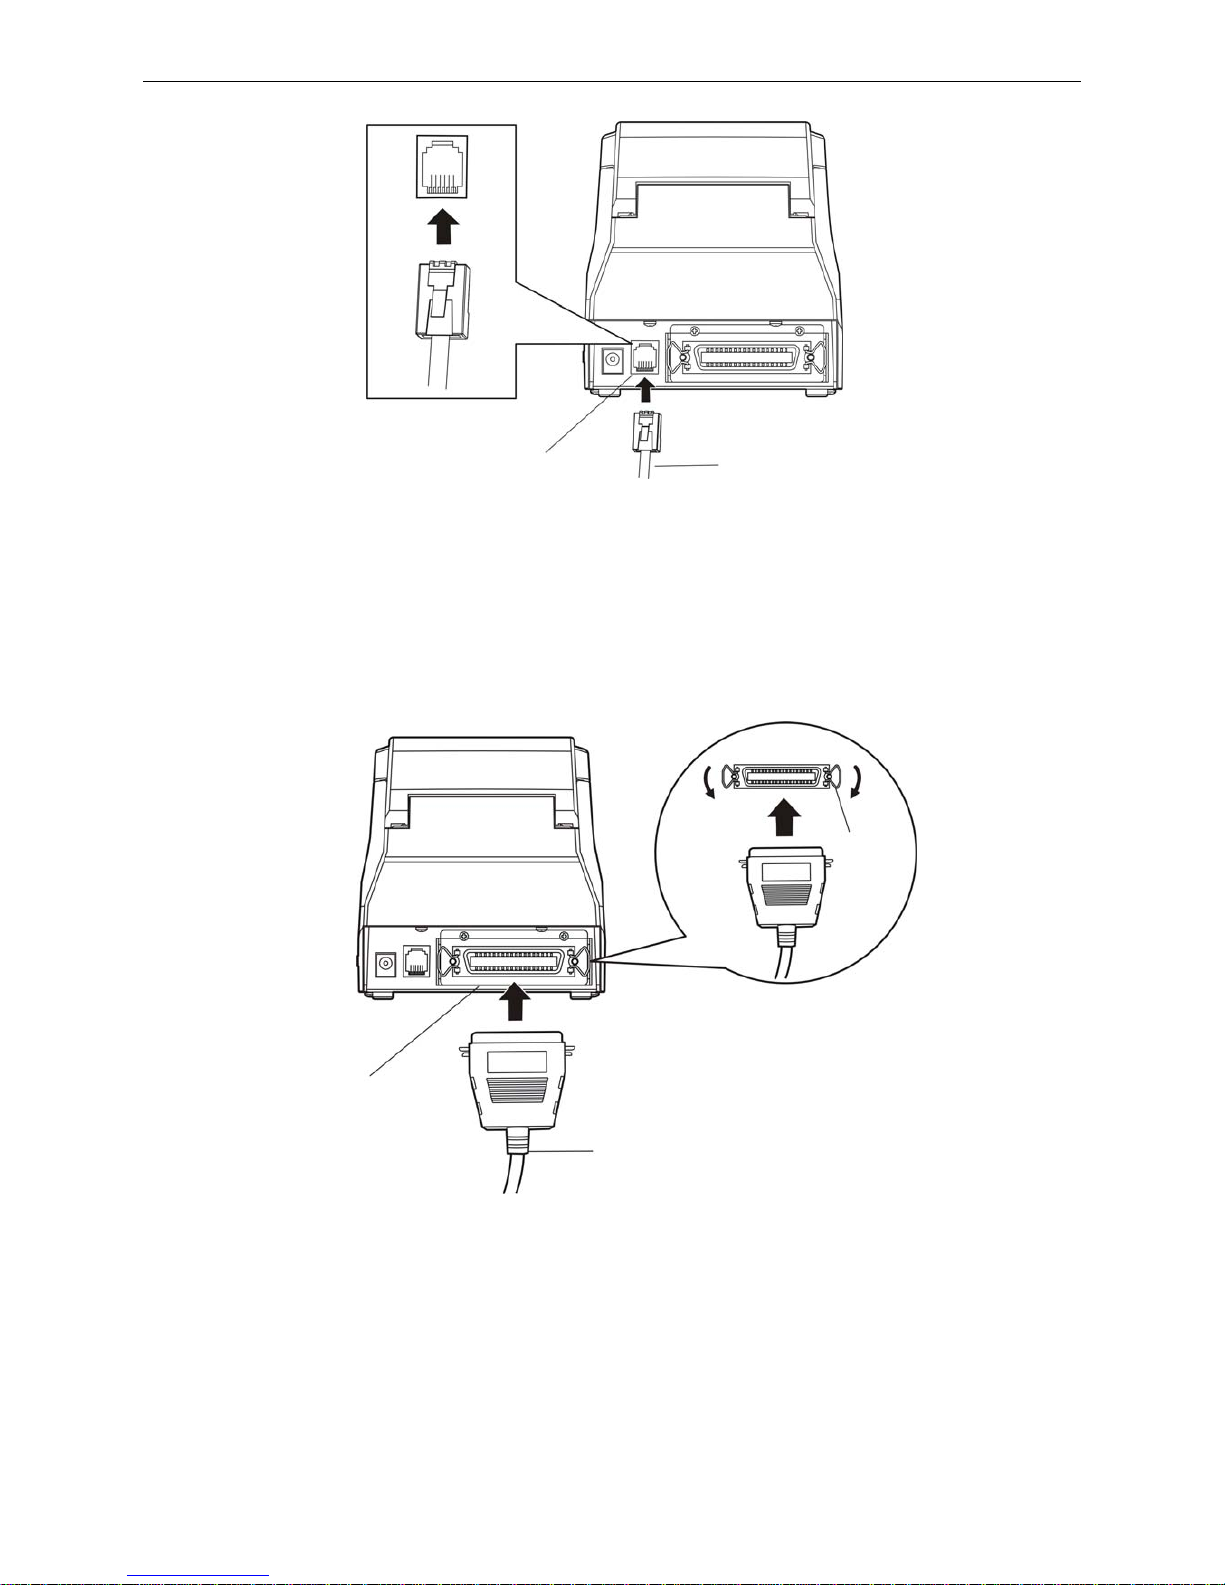
2.3.1 Connecting the Cash Drawer Cable
Turn off the printer and plug the cash drawer cable into the cash drawer interface of the printer and the
other end is connected to cash drawer, as shown in Figure 2-2.
Figure 2-1 Packing List
Printer
A
C Adapter
Power Cord
Driver CD
(Including User's Manual and Driver)
Interface Cable
BP-002 User's Manual
- 4 -
Caution: You must use the appropriate cash drawer, or else our company will not guarantee to
keep the printer in good repair when it is damaged by improper cash drawer.
2.3.2 Connecting the Parallel Interface Cable
1. Make sure the computer and the printer are both turned off, connect the parallel interface cable to
the connector of the printer, and then fasten the wire clips as shown in Figure 2-3.
2. Connect the other end of the cable to the computer. Tighten the connector screws.
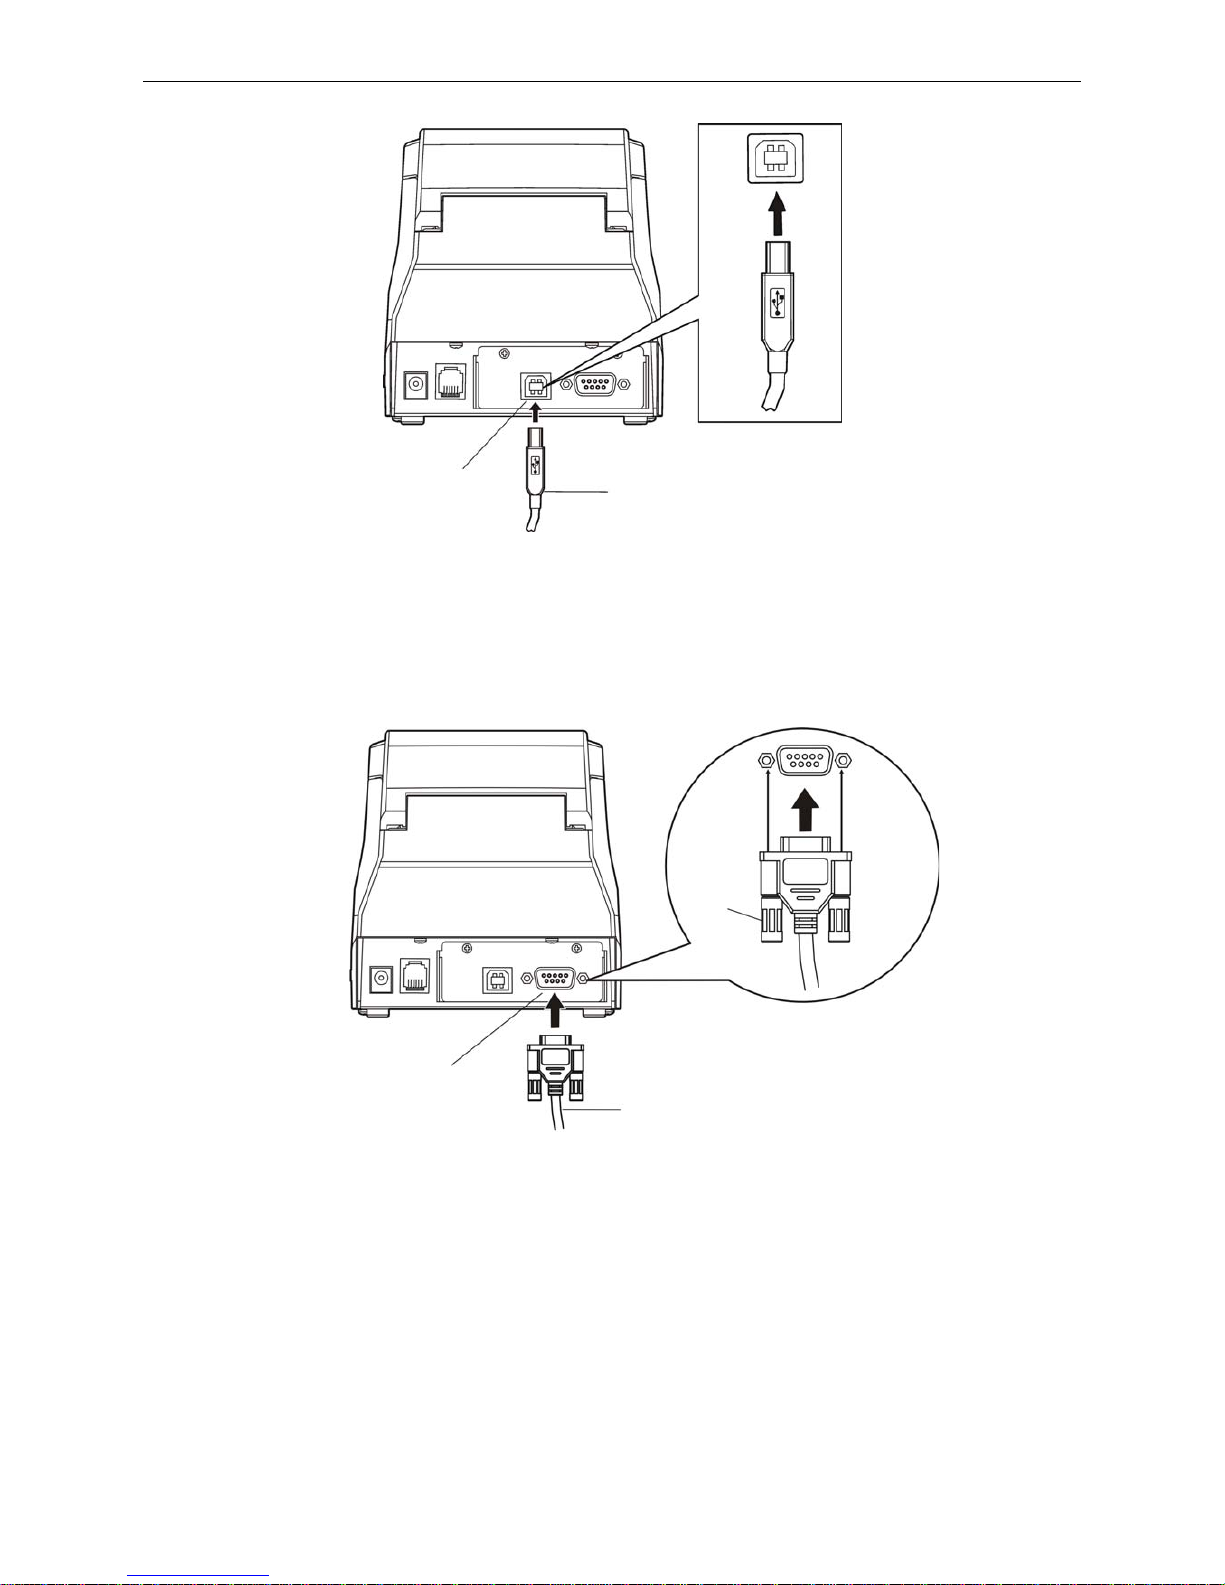
2.3.3 Connecting the USB Interface Cable
1. Plug the USB cable A end (flat shape) into the computer's USB interface.
2. Plug the USB cable B end (square shape) into the printer's USB interface as shown in Figure 2-4.
Note: Please don’t impact the USB interface cable after connecting it.
Figure 2-3 Connecting the parallel interface cable
Figure 2-2 Connecting the cash drawer cable
Cash Drawer Cable
Cash Drawer Interface
Parallel Interface
Parallel Interface Cable
Wire Clips
BP-002 User's Manual
- 5 -
2.3.4 Connecting the Serial Interface Cable
1. Make sure the computer and the printer are both turned off, connect the serial interface cable to the
connector of the printer. Tighten the connector screws as shown in Figure 2-5.
2. Connect the other end of the cable to the computer’s serial interface and tighten the screws.
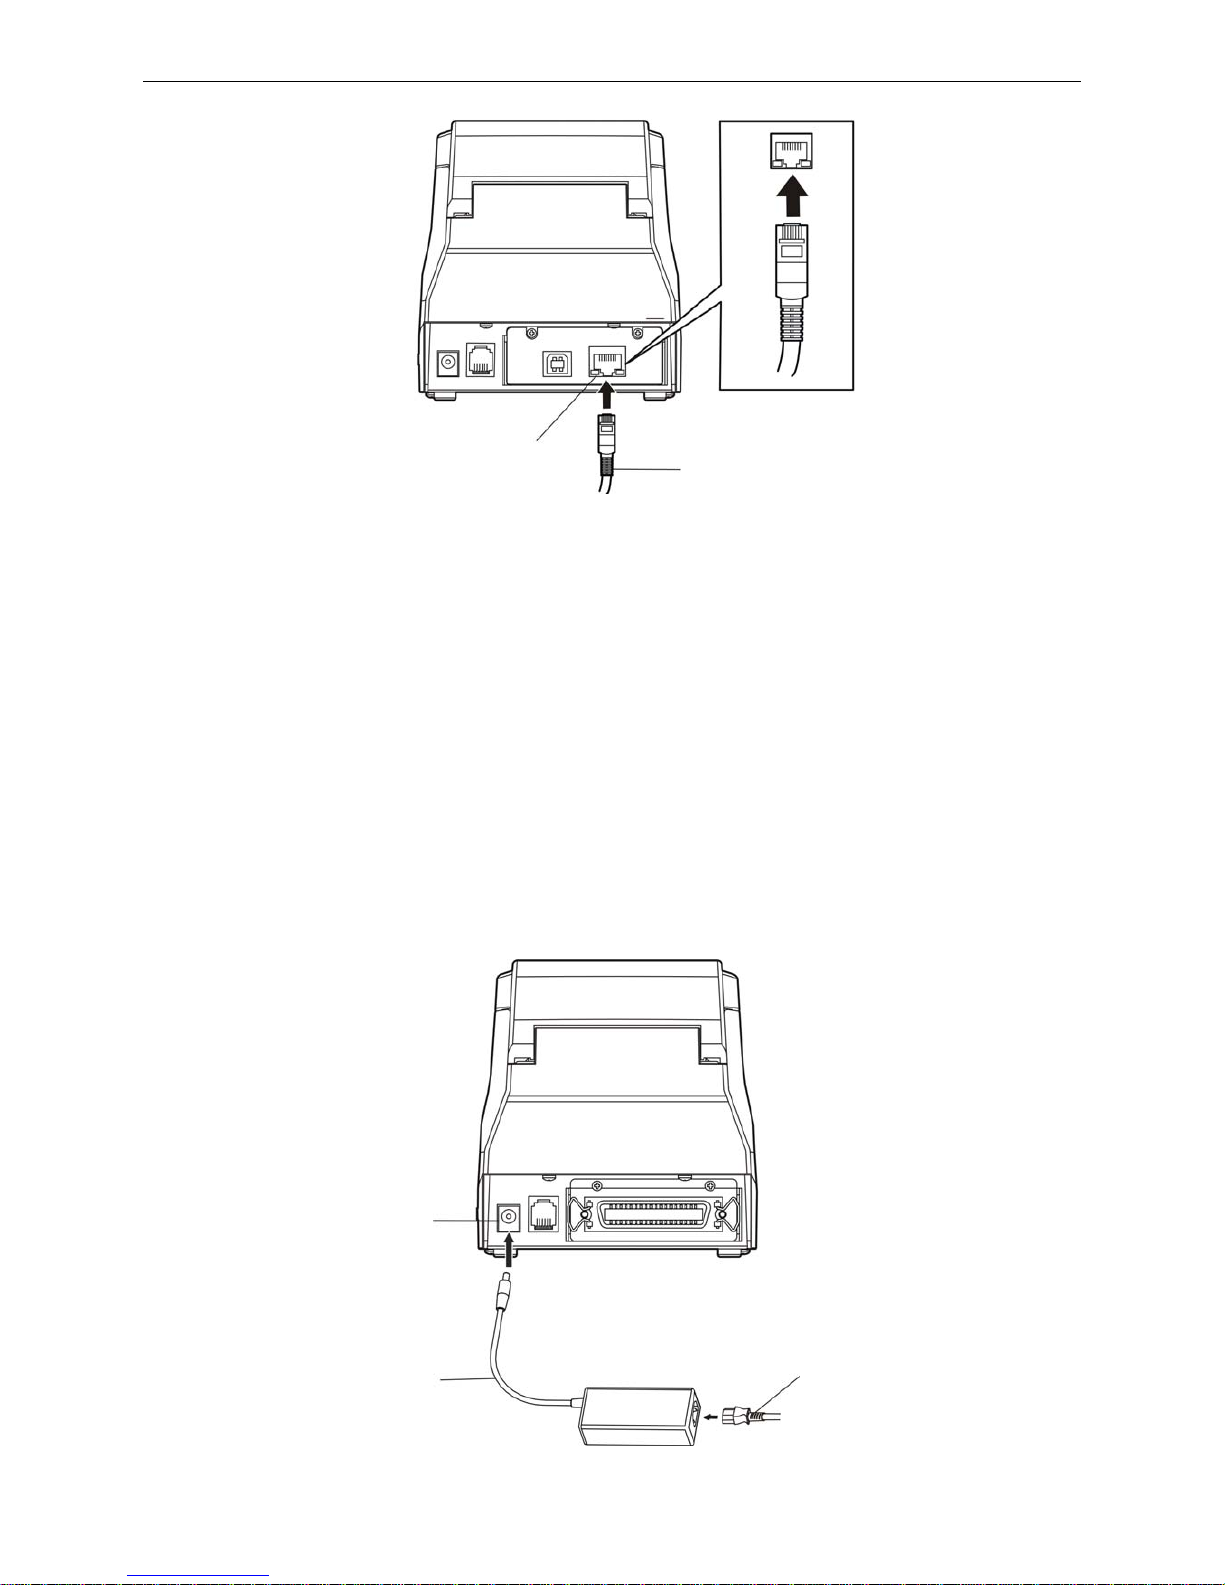
2.3.5 Connecting the Ethernet Interface Cable
Plug the crystal end of the Ethernet interface cable (RJ-45) into the printer's Ethernet interface, plug
the other end into the LAN’s entrance as shown in Figure 2-6.
Figure 2-5 Connecting the serial interface cable
Figure 2-4 Connecting the USB interface cable
Serial Interface
Serial Interface Cable
Screws
US
B Interf
ace
USB Interface Cable
BP-002 User's Manual
- 6 -
Note: Please refer to the user’s manual for the detailed instructions of internet settings.
2.4 Connecting the Power Cord
1. Make sure the printer’s power is turned off. (O mark on the power switch is pressed down)
2. Make sure the voltage of the electrical outlet matches that of the AC adapter.
3. Plug the AC adapter to the printer’s power supply inlet.
4. Plug one end of power cord into the AC adapter, and then plug the other end of power cord into the
grounded electrical outlet.
Note: 1. If the rated voltage doesn’t match the outlet voltage, contact your dealer for
assistance. Do not plug in the power cord.
2. Please use the electrical outlet connecting the ground properly.
3. Please use original AC adapter, or else, our company will not guarantee to keep the
printer in good repair when it is damaged by unauthorized AC adapter.
Figure 2-7 Connecting the AC adapter
Power Supply Inlet
AC Adapter
Power Cord
Figure 2-6 Connecting the Ethernet interface cable
Ethernet Interface Cable
Ethernet Interface

BP-002 User's Manual
- 7 -
2.5 Installing the Driver
You should setup the printer driver in Windows before using the BP-002 printer.
Please use the cable to connect computer with printer, then turn on the computer and the printer, put
the driver CD into the CD-ROM. Install driver by the following ways:
Auto-install way
Double click the file “Setup.exe” in the driver disc, install driver by the following direct.
Note: Auto-install way needs the operating system of Windows 2000 or above.
Hand operated installing way
Note: The hand-operated installing ways of serial interface and parallel interface are the same.
1) The installing steps of parallel interface for Windows 2000/XP/Vista are as follows:
1 Click “Start” → “Settings” → “Select Printers”.
2. Click “Add Printer”, then it pops up a window of “Add Printer Wizard”, click “Next”, then please read
the select guide carefully, such as, select “Local printer” in the “Local or Network Printer” window,
then click “next”.
3. A window of “Select a Printer Port” pops up, select a usable port. Such as, select “LPT1:
(Recommended Printer Port)”, click “Next”.
4. A window of “Install Printer Software" pops up, click “Have Disk...”, click “Next”.
5. A window of “Install From Disk” pops up. Please according to the operating system environment, you
should select the path as follow: CD-ROM → “Driver” → “WIN2000 (XP-Vista-Win7)”, click “Open”,
then click “OK” to return to the window of “Install Printer Software”, select the respective model, click
“Next”.
6. Follow the guide click “Next” gradually till the installation is finished.
2) The installing steps of parallel interface for Windows 7 are as follows:
1. Click “Start” → “Device and Printers”.
2. Click “Add Printer”, then it pops up a window of “Add Printer Wizard”, click “Next”, then please read
the select guide carefully, such as, select “Local printer” in the “Local or Network Printer” window,
then click “next”.
3. A window of “Select a Printer Port” pops up, select a usable port. Such as, select “LPT1:
(Recommended Printer Port)”, click “Next”.
4. A window of “Install Printer Software” pops up, click “Have Disk...”, click “Next”.
5. A window of “Install From Disk” pops up. Please according to the operating system environment,
such as Windows XP operating system, you should select the path as follow: CD-ROM → “Driver”
→“WIN2000 (XP-Vista-Win7)”, click “Open”, then click “OK” to return to the window of “Install Printer
Software”, select the respective model, click “Next”.
6. Follow the guide click “Next” gradually till the installation is finished.
The USB interface installing steps for Windows 2000/XP/Vista/Win7 are as follows:
The following steps are used Windows XP as example. There are slight differences among different
operating systems.
1. Connect the printer to computer with an USB cable and turn on the printer.
2. After the computer find out new hardware and finish searching, pop up a window of “Found New
Hardware Wizard”, choose “Install from a list or specific location (Advanced)”, click “Next”.
3. A window of “Found New Hardware Wizard” — “Please choose your search and installation options”
pops up, choose “Don't search, I will choose the driver to install”, click “Next”.
4. A window of “Add Printer Wizard” pops up, click “Have Disk...”, click “Browse”.
5. A window of “Install From Disk” pops up. Please according to the operating system environment, you

BP-002 User's Manual
- 8 -
should select the path as follow: CD-ROM → “Driver” → “WIN2000 (XP-Vista-Win7)”, click “Open”,
then click “OK” to return to the window of “Add Printer Wizard", select the respective model, click
“Next”.
6. Follow the guide click “Next” gradually till the installation is finished.
The installing steps for Windows 98 are as follows:
(1) The installing steps with a parallel cable or a serial cable:
1. Click “Start” → “Settings” → “Printers”.
2. Click “Add Printer”, then a window of “Add Printer Wizard” pops up, click “Next”, then please read
the select guide carefully, such as, select “Local printer” in the “Local or Network Printer” window,
then click “Next”.
3. A window of “Click the manufacturer and model of your printer” pops up, click “Have Disk...”,
please click “Browse”, select the path as follow: CD-ROM → “Driver” → “WIN98 (WINME)”, then
click “OK”.
4. A window of “Install From Disk” pops up, click "OK, return to a window of “Add Printer”, then click
"Next".
5. A window of “Printer port” pops up, select “Available ports”, such as, select “LPT1: Printer Port”,
click “Next”, and then show the printer’s name. If the system is not installed by other printer driver
process, the printer is treated as default printer by the application process of Window98
environment, click “Next”. Otherwise according to prompt, choose the printer is default: “Yes”, click
“Next”, choose “Yes-(recommended)”, click “Finish”. A window of “Printer test page completed”
pops up, click “Yes”.
6. The printer driver process is installed successfully.
(2) The installing steps with an USB cable:
Note: 1. As the system of Windows 98/ME doesn’t have integrated USB driver control, please
install USB driver before using USB interface printing. Then install USB printer
driver.
2. If it has installed the USB driver, please install the USB printer driver directly as the
following steps.
USB driver installing steps:
1. Connect an USB cable and turn on the printer.
2. After the computer find out new hardware and finish searching, a window of “Add New Hardware
Wizard” pops up, click “Next”.
3. A window of “Add New Hardware Wizard” — “Windows operation” pops up, choose “Search the
best driver for the device (recommended)”, click “Next”.
4. A window of “Search for new drivers” pops up, check “Specify a location”, click “Browse”, select
the path as follows: CD → ROM → “Driver”-“[WIN98 (WINME) \ USBdriver]”, then click “OK”.
5. Return to a window of “Search for new drivers”, click “Next”; a window of “Windows driver file
search for the device” pops up, click “Next”.
6. After the system finishing installing the file automatically, a window of “USB Print Supported” pops
up, click "Finish".
7. The printer USB driver process is installed successfully.
USB printer driver installing steps:
1. Click “Start” → “Settings” → “Printers”.
2. Click “Add Printer”, then a window of “Add Printer Wizard” pops up, click “Next”.
3. A window of “Click the manufacturer and model of your printer” pops up, click “Have Disk...”,
please click
“Browse”, select the path as follow: CD-ROM → “Driver” → “WIN98 (WINME)”, and
then click “OK”.
BP-002 User's Manual
- 9 -
4. A window of “Install From Disk” pops up, click “OK”, return to a window of “Add Printer”, then click
"Next".
5. A window of “Printer port” pops up, select “Available ports”, select “JMUSB”, click "Next", and then
show the printer’s name. If the system is not installed by other printer driver process, the printer is
treated as default printer by the application process of Window98 environment, click “Next”.
Otherwise according to prompt, choose the printer is default: "Yes", click "Next" choose
“Yes-(recommended)”, click “Finish”. A window of “Printer test page completed” pops up, click
“Yes”.
6. The printer driver process is installed successfully.
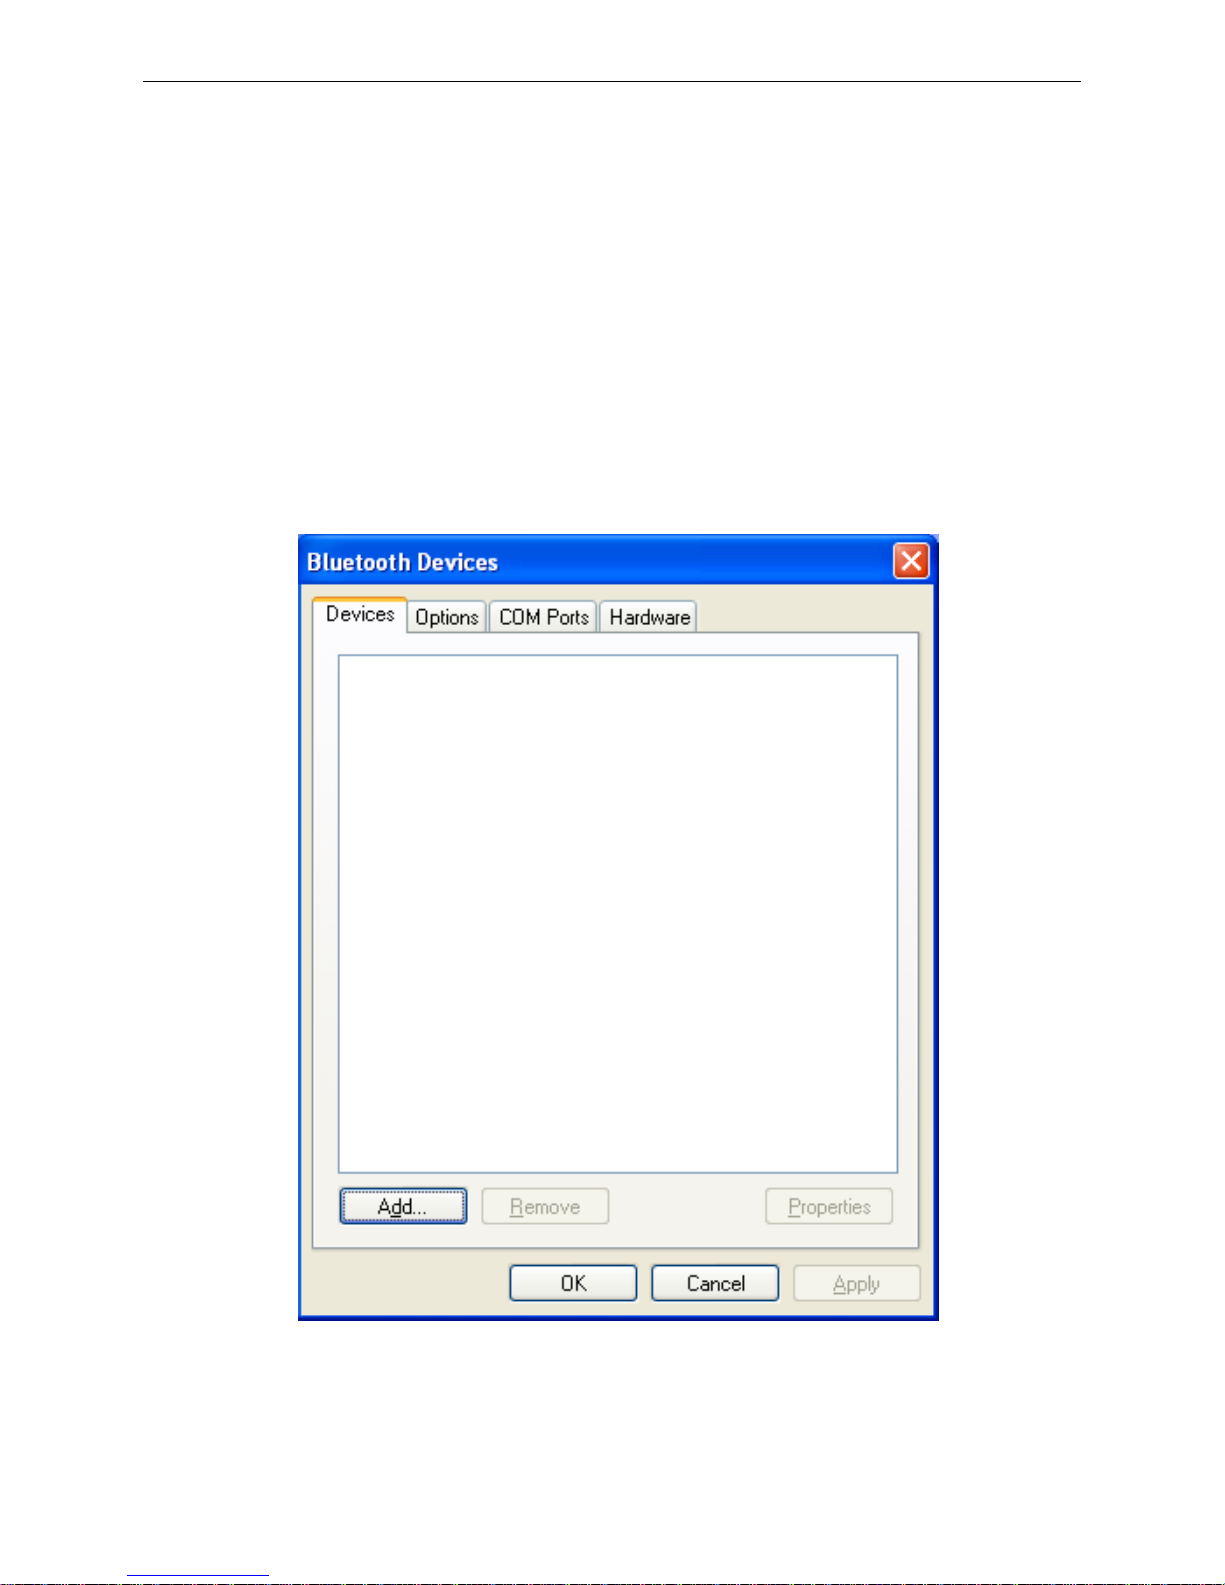
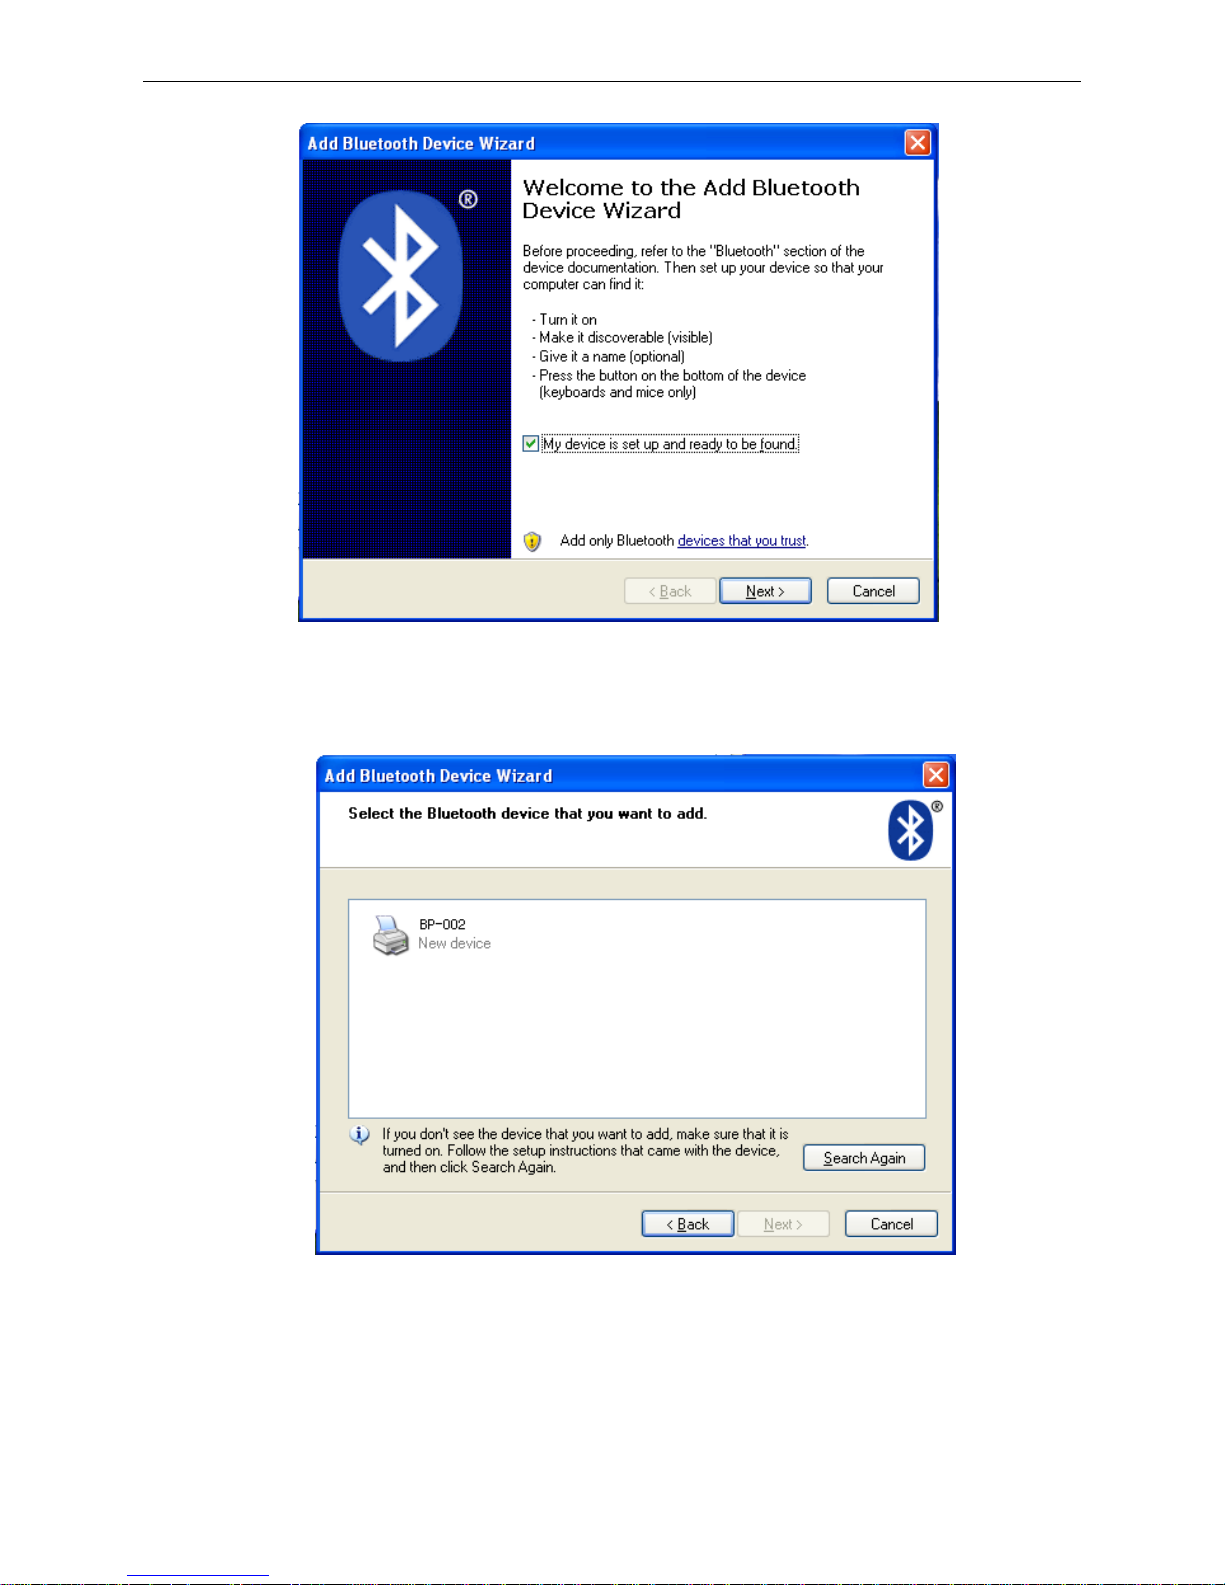
2.6 Installing Bluetooth Interface Driver
Note: Select to install this driver according to the chosen model.
1. Choose the appropriate Bluetooth adapter, the operation system is Window XP or above which with
Bluetooth adapter driver.
2. Turn on the printer, search Bluetooth device in Window XP system, and click “Add”.
3. Tick off the option of “My device is set up and ready to be found.” Click “Next” to continue.
BP-002 User's Manual
- 10 -
4. Select the “BP-002”, and then click “Next”.
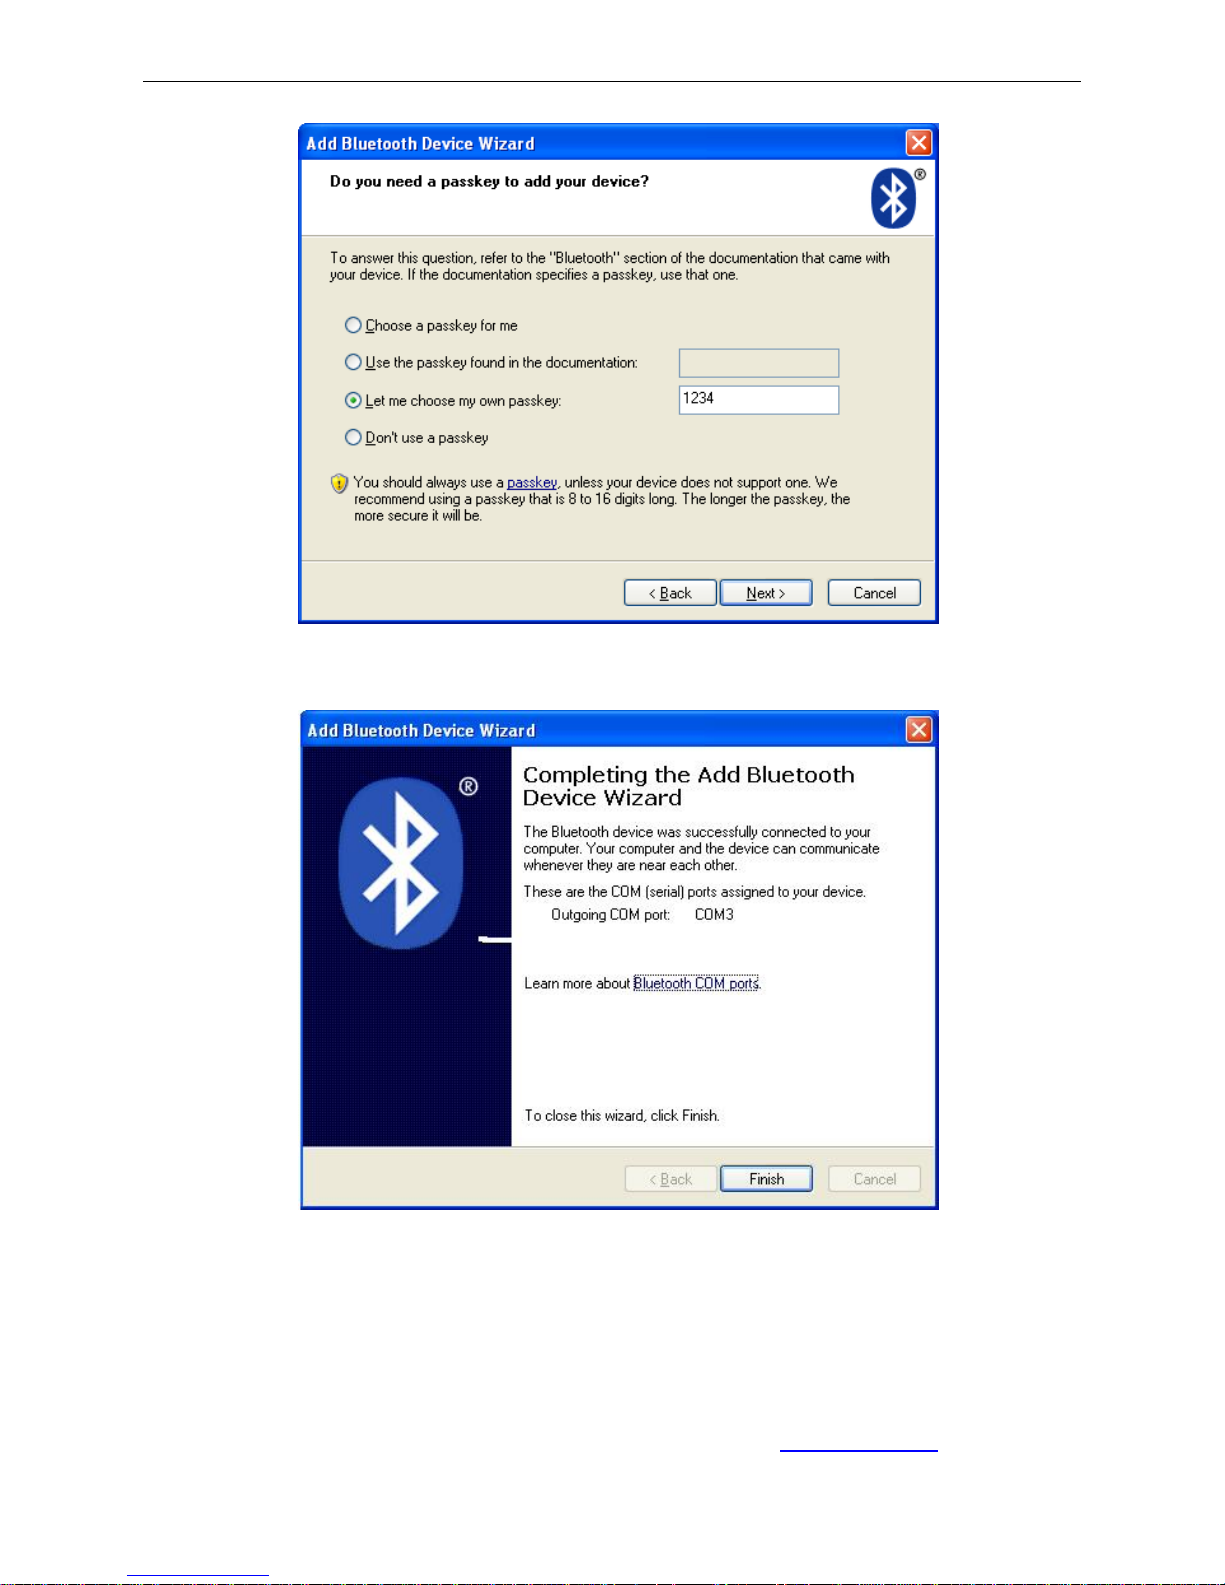
5. Tick off the option of “Let me choose my own passkey” and enter “1234” as shown, then click “Next”.
BP-002 User's Manual
- 11 -
6. Record the Outgoing COM port and click “Finish”, then reboot the computer.
7. Set the printer driver print port as the outgoing port and the installation is finish.
Note: Every Bluetooth device has its own address. Please reinstall it when replacing the
Bluetooth device.
2.7 Ethernet Settings
Please use Birch network setting software NetFinder to set the IP address for Birch Ethernet interface
network printers, which can be found in the CD or downloaded from www.birch.com.tw
.
Caution: The network printing function needs the operation system of Windows2000 or above.
BP-002 User's Manual
- 12 -
2.7.1 Connecting Printer
Power on the printer, connect with the Ethernet cable which has been connected to LAN, and look into
the information of Ethernet LED indicator to ensure the printer has entered into the normal connection.
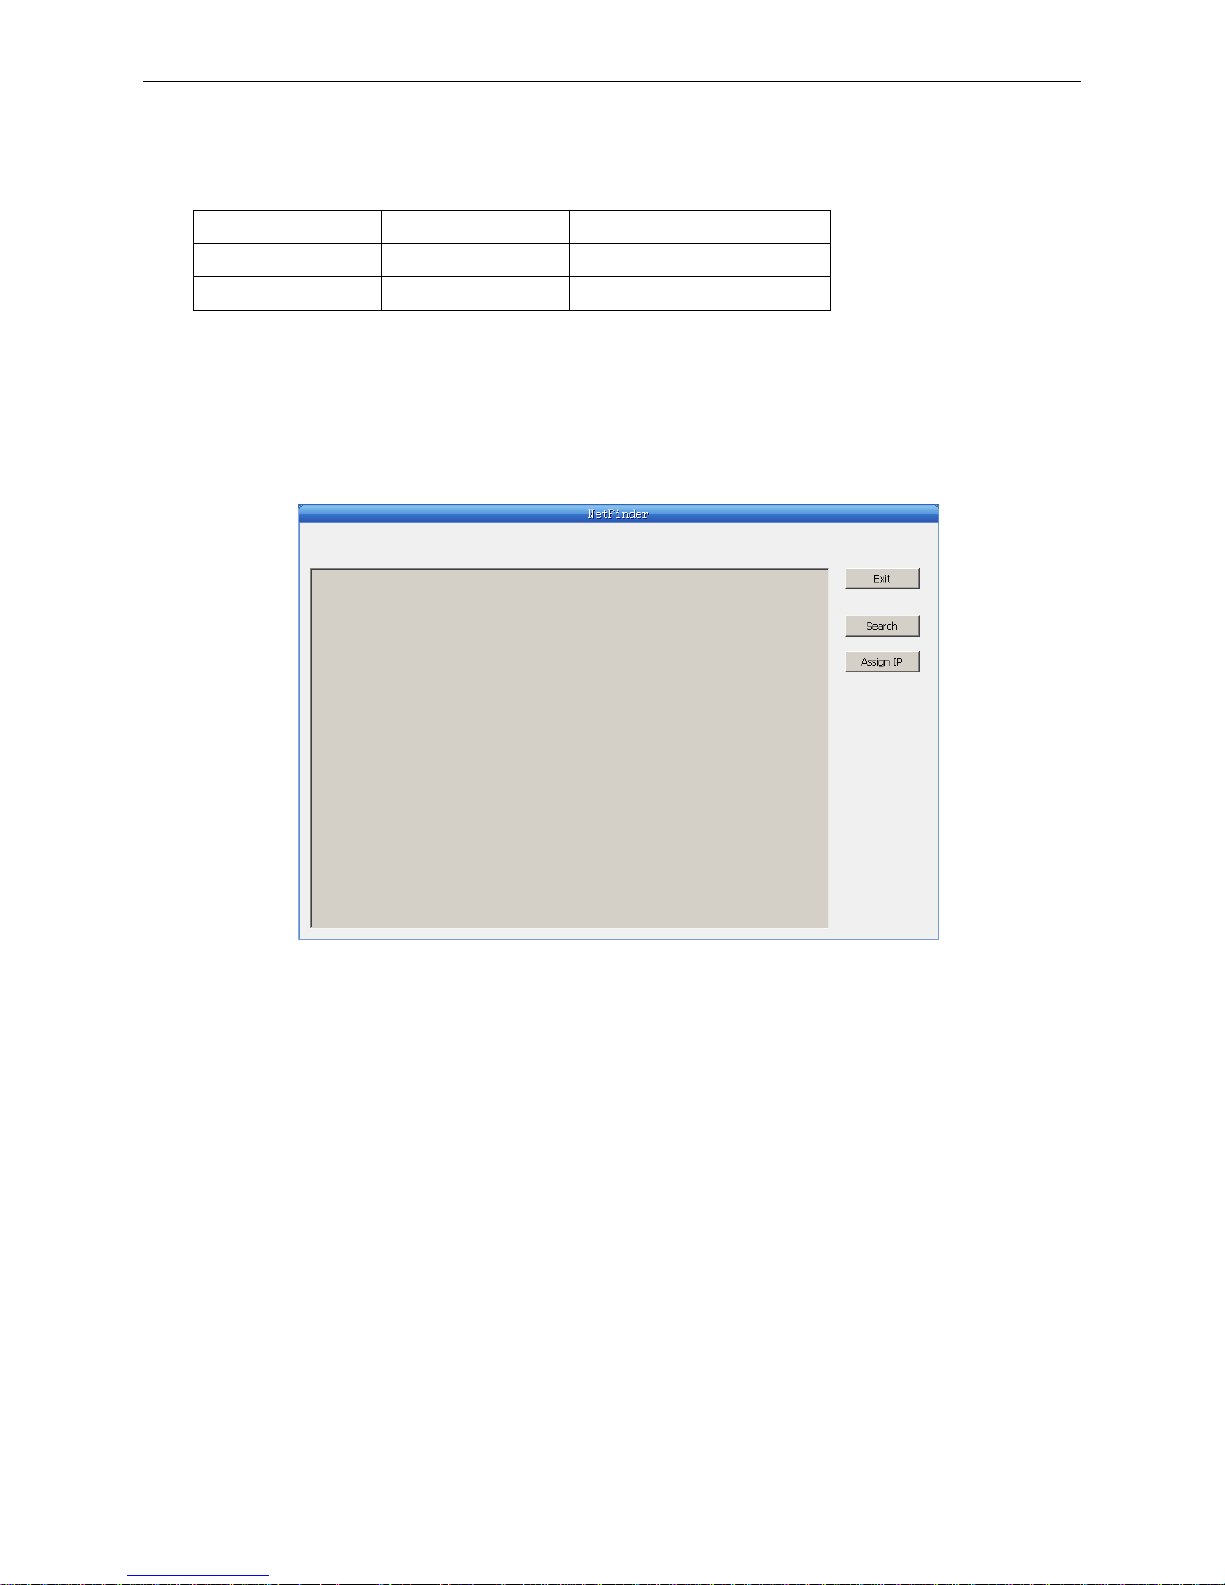
2.7.2 Setting IP Address
1. Run NetFinder Software
Double click NetFinder.exe in the PC which connects the printer in the same LAN. The figure of the
software is shown as follows:
2. Search printer
Click “Search” button in the main interface, the dialog box appearing will begin searching
automatically and show appearance, listing a printer in the main interface if found. The time is
counting down in the progress bar (10s in total) and the search will finish as soon as the time is over.
When going on searching, press “search” button again.
Yello w LED Green LED Description
ON Blink Connecting to network
OFF OFF Not connecting to network
Button description:
Exit — Exit from the software
Search — Search printers in the same LAN
Assign IP — Modify the IP address and other settings for the specified printer.
 Loading...