

Page 1
e PATCH QUICK START GUIDE
Apple Heart Study 1.2
Page 2
ePatch Quick Start Guide | 1
For more information, please visit gobio.com/apple-heart-study
KIT CONTENTS ABOUT THE APPLE HEART STUDY 1.2
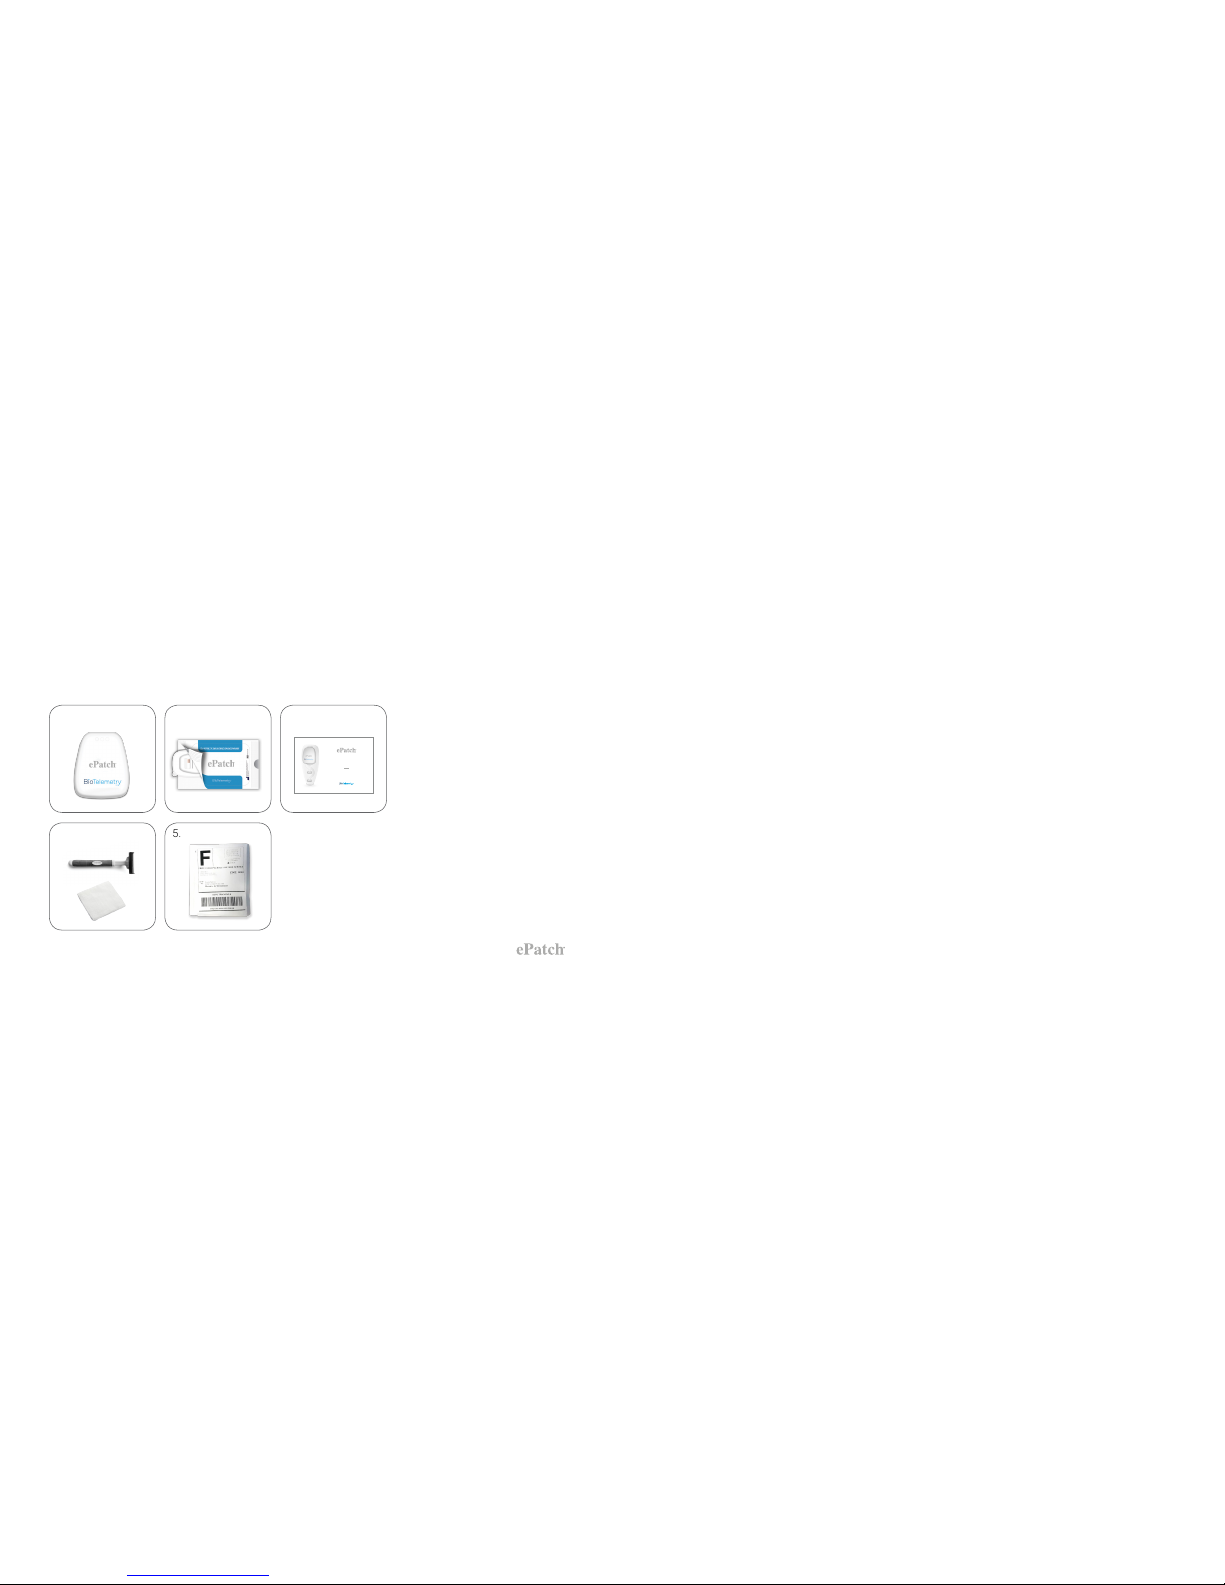
1. Sensor
2. Electrode Patch
3. Quick Start Guide
4. Skin Prep Kit
5. Return Mailer
Apple has created innovative features to look for irregular heart rhythms. Apple is conducting the Apple
Heart Study 1.2 with Stanford Medicine to better understand how people use these features to gain
insights into their health. For more information, please visit med.stanford.edu/appleheartstudy/1.2faq/
or call 800-358-2286.
Please continue to wear your Apple Watch while wearing ePatch. If you have the ECG app on Apple Watch,
please take an ECG twice daily and after any irregular rhythm notications while wearing ePatch.
1. 2.
5.
3.
ePATCH QUICK START GUIDE
Apple Heart Study
4.
Page 3

2 | Apple Heart Study 1.2 ePatch Quick Start Guide | 3
For more information, please visit gobio.com/apple-heart-study
THINGS TO KNOW ABOUT e PATCH
How long should I wear ePatch?
A: Once applied, continue to wear ePatch for a maximum of 7 days.
What if my ePatch begins to fall off, and I have not completed
7 days of monitoring?
A: Your monitoring kit includes a second patch. Refer to page
12 for removal and replacement of the patch and sensor.
What if I have completed 7 days of monitoring, or my second patch
has fallen off?
A: You are all done! Refer to page 15 for instructions
on returning the ePatch sensor.
What if my skin is irritated from the adhesive?
A: Mild itching or irritation under the patch area may occur, but
is usually temporary.
If more signicant itching or irritation develops or persists,
contact customer support at 800-358-2286.
Can I swim, bathe, or shower while wearing ePatch?
A: Do not swim or take baths while wearing ePatch. You can
shower normally.
There is a solid RED light on the sensor. What should I do?
A: You are all done! Refer to page 15 for instructions on returning
the ePatch sensor.
Page 4
4 | Apple Heart Study 1.2 ePatch Quick Start Guide | 5
For more information, please visit gobio.com/apple-heart-study
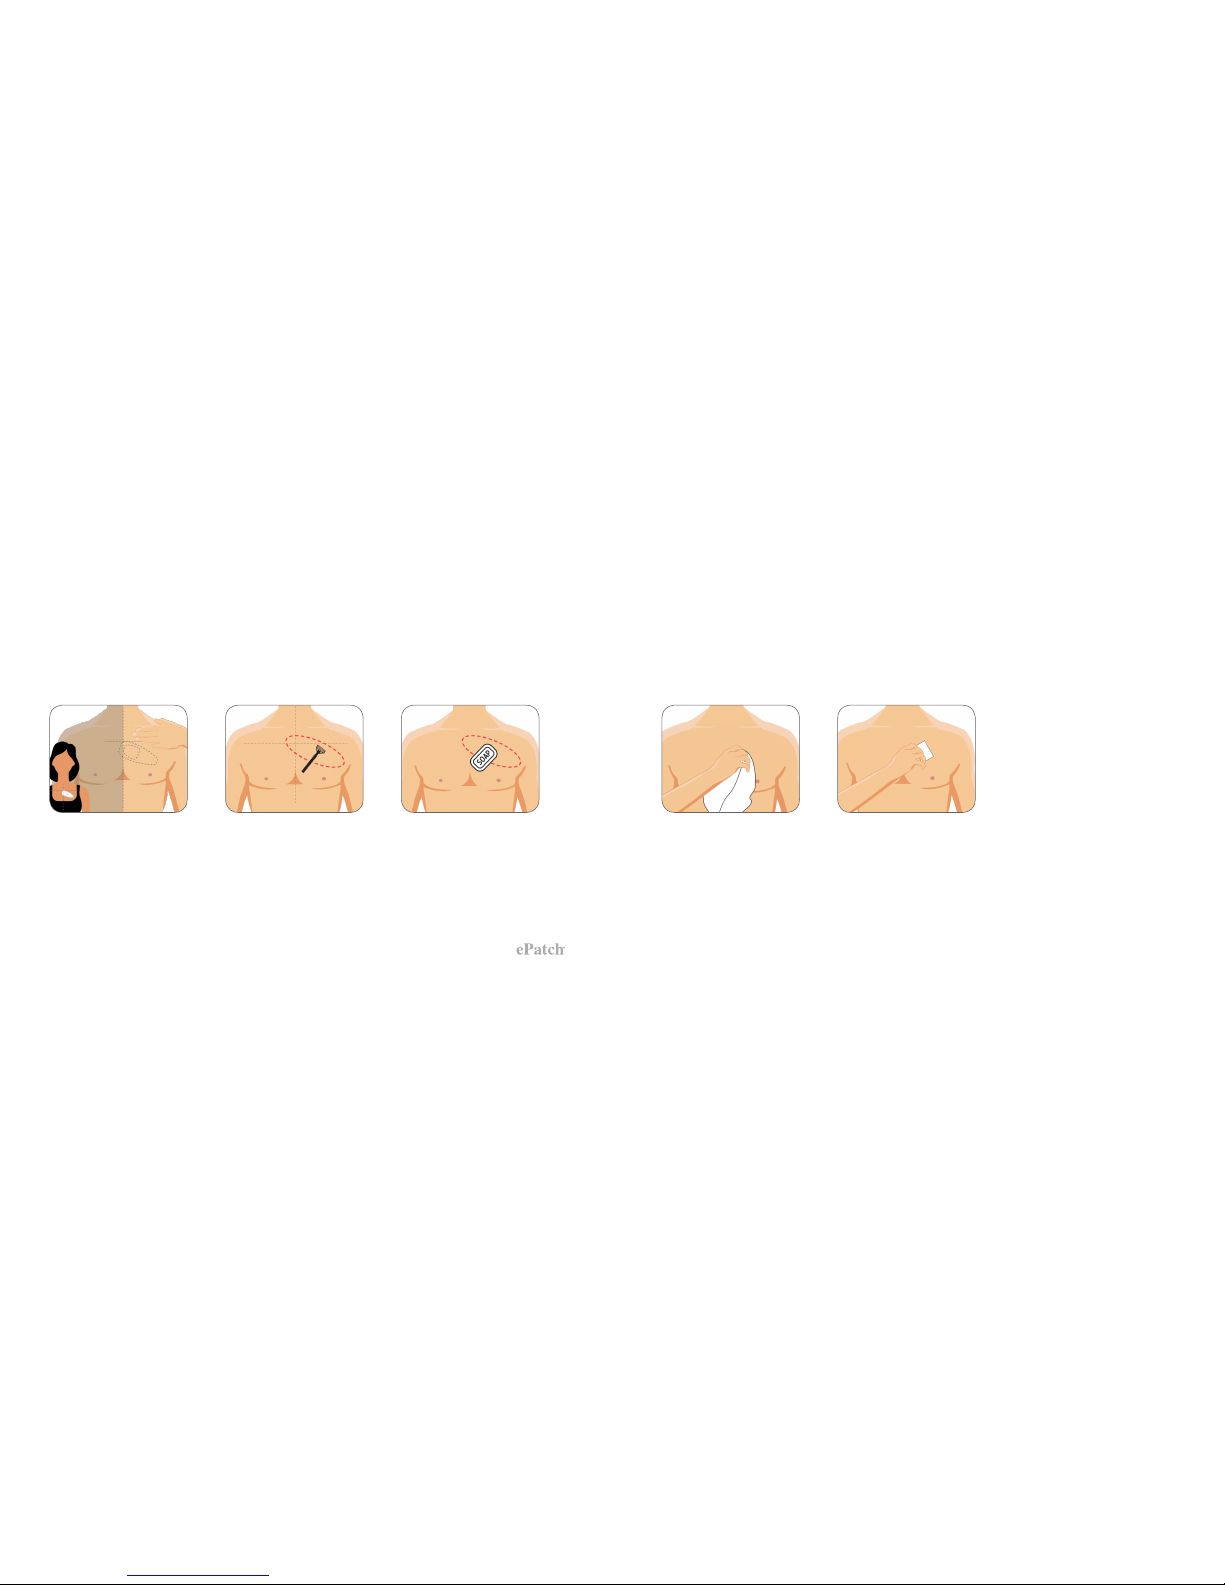
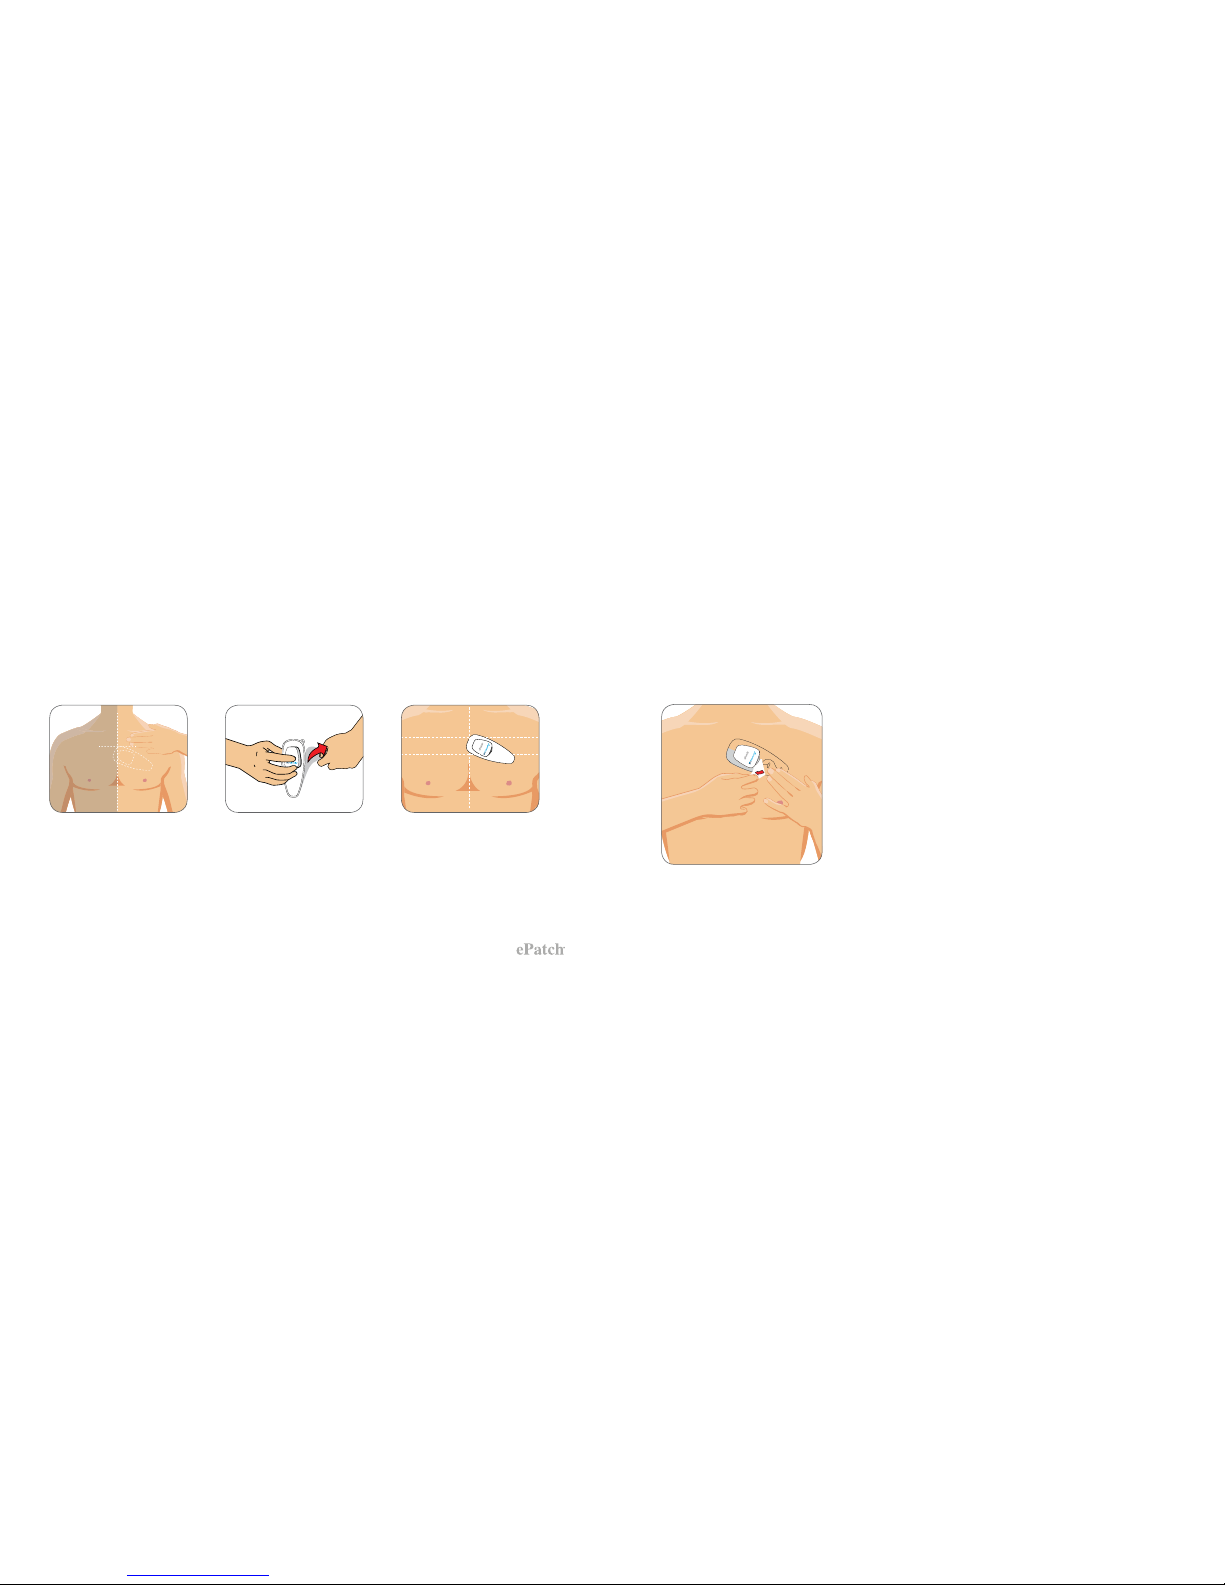
STEP 1: SKIN PREPARATION
1. Patch location.
Determine the area of
your chest that you need
to prepare by referring
to the diagram above.
4. Dry skin.
Dry your skin using a towel.
2. Shave area for ePatch.
If you have hair on your chest,
shave the area where the
patch will be placed. A razor
is provided in the skin prep
kit for this purpose.
5. Scrub skin.
Remove the scrub pad from
the skin prep kit. Scrub the
cleaned area with rm
pressure in a circular motion
for one minute.
3. Clean skin.
Clean the shaved area with
soap and water.
Page 5
6 | Apple Heart Study 1.2 ePatch Quick Start Guide | 7
For more information, please visit gobio.com/apple-heart-study
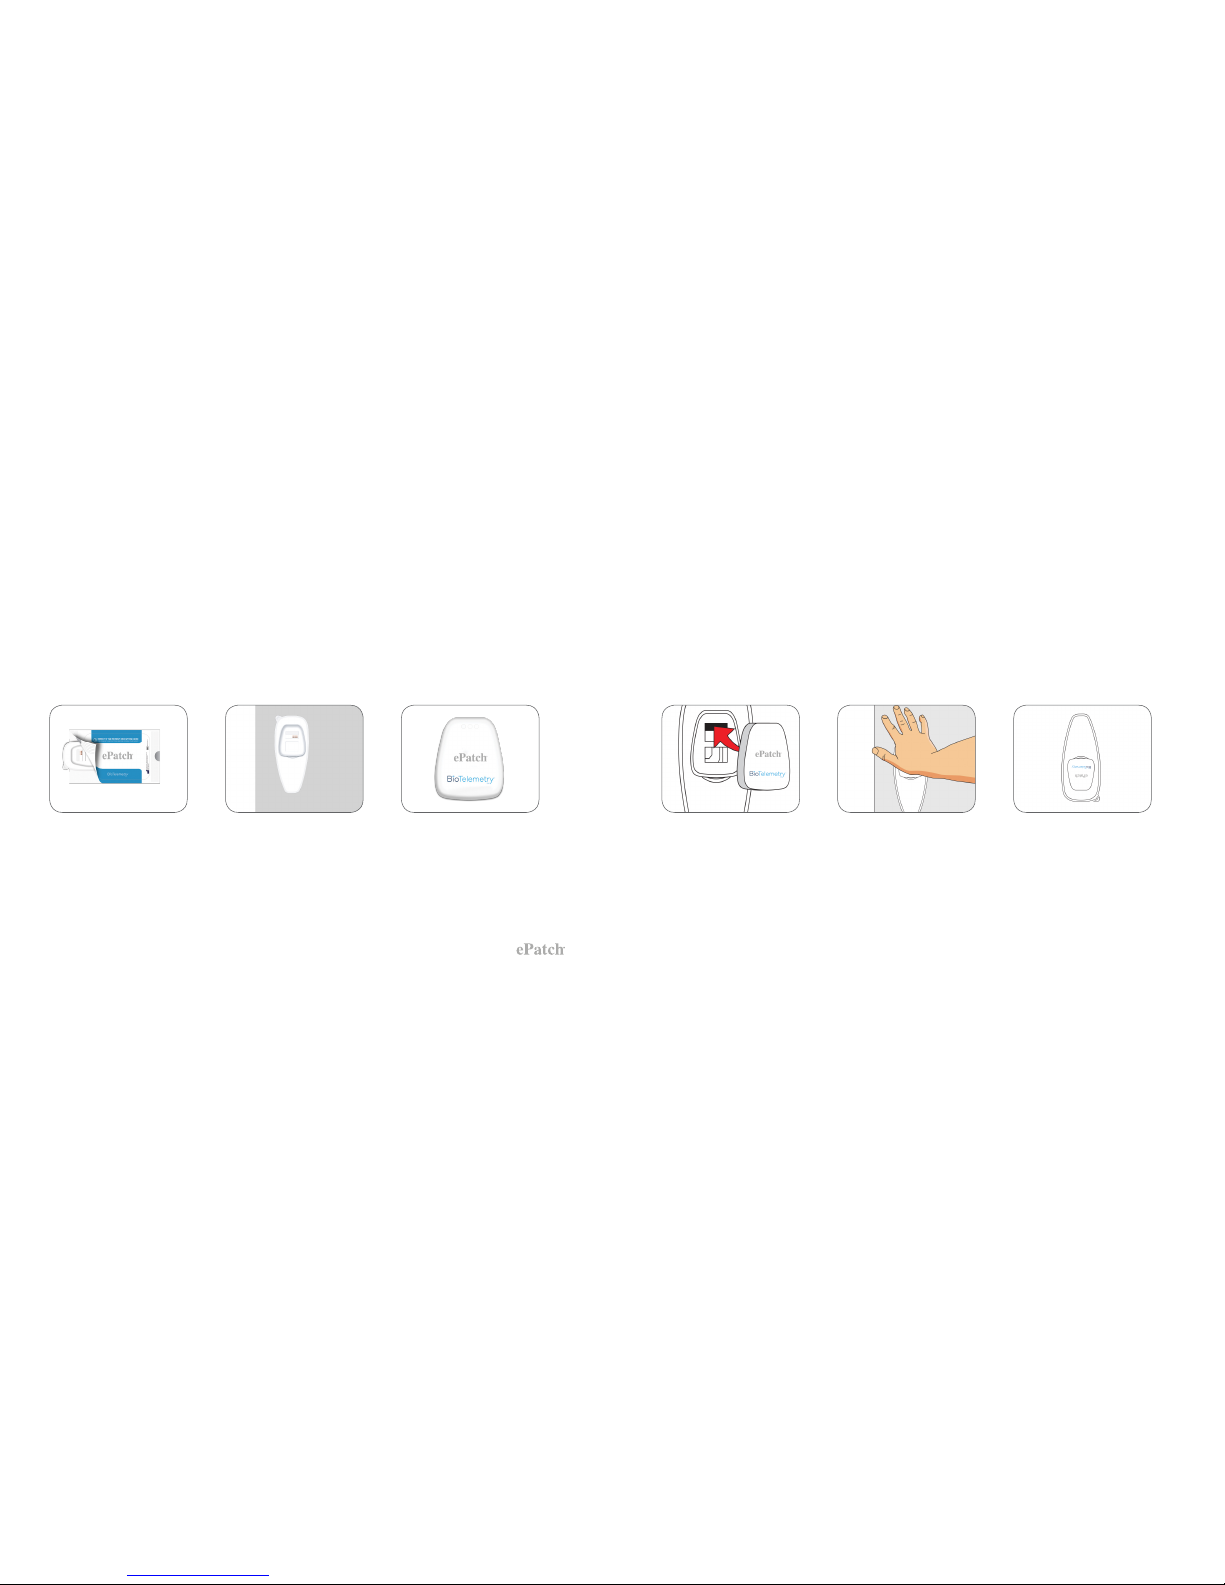
STEP 2: ATTACH THE SENSOR TO THE PATCH
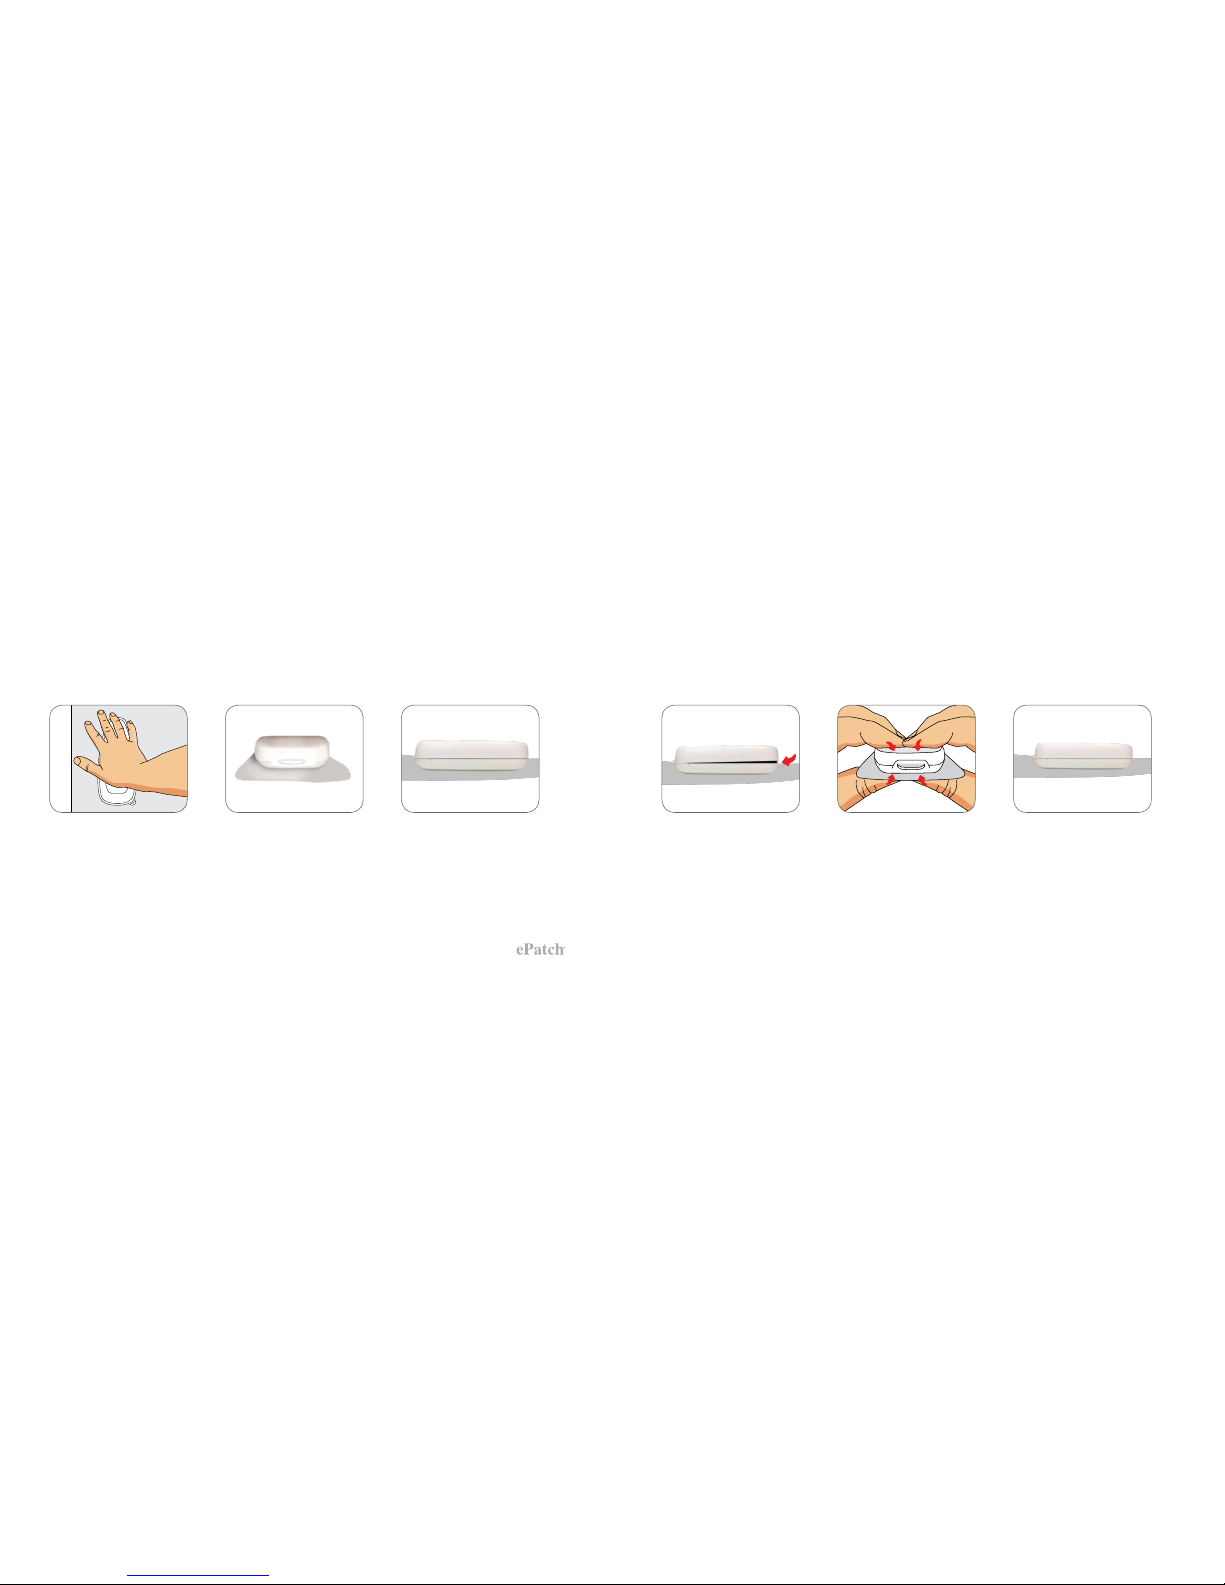
1. Open a pouch.
Tear open one of the pouches
and remove the electrode
patch.
4. Place the sensor into the
patch.
2.Placethepatchonaat,
hard surface.
5. While standing, place the
palm of your hand on top
of the sensor and apply
pressure to snap it into the
patch. You may hear several
clicks while doing this.
6. Rotate the patch 180 degrees.3. Remove the sensor from
the kit.
Page 6
8 | Apple Heart Study 1.2 ePatch Quick Start Guide | 9
For more information, please visit gobio.com/apple-heart-study
10. Incorrect — Gap 11. Apply pressure to any
gaps to seal the sensor
into place.
12. Ensure that the sensor is
sealed and there are no gaps
remaining.
STEP 2: ATTACH THE SENSOR TO THE PATCH (continued)
7. With the patch rotated, again
place the palm of your hand
on top of the sensor and apply
pressure to snap it into the
patch.
8. Inspect all four sides of the
sensor for gaps. The sensor is
attached correctly if there are
no visible gaps.
9. Correct — No Gap
Page 7
10 | Apple Heart Study 1.2 ePatch Quick Start Guide | 11
For more information, please visit gobio.com/apple-heart-study
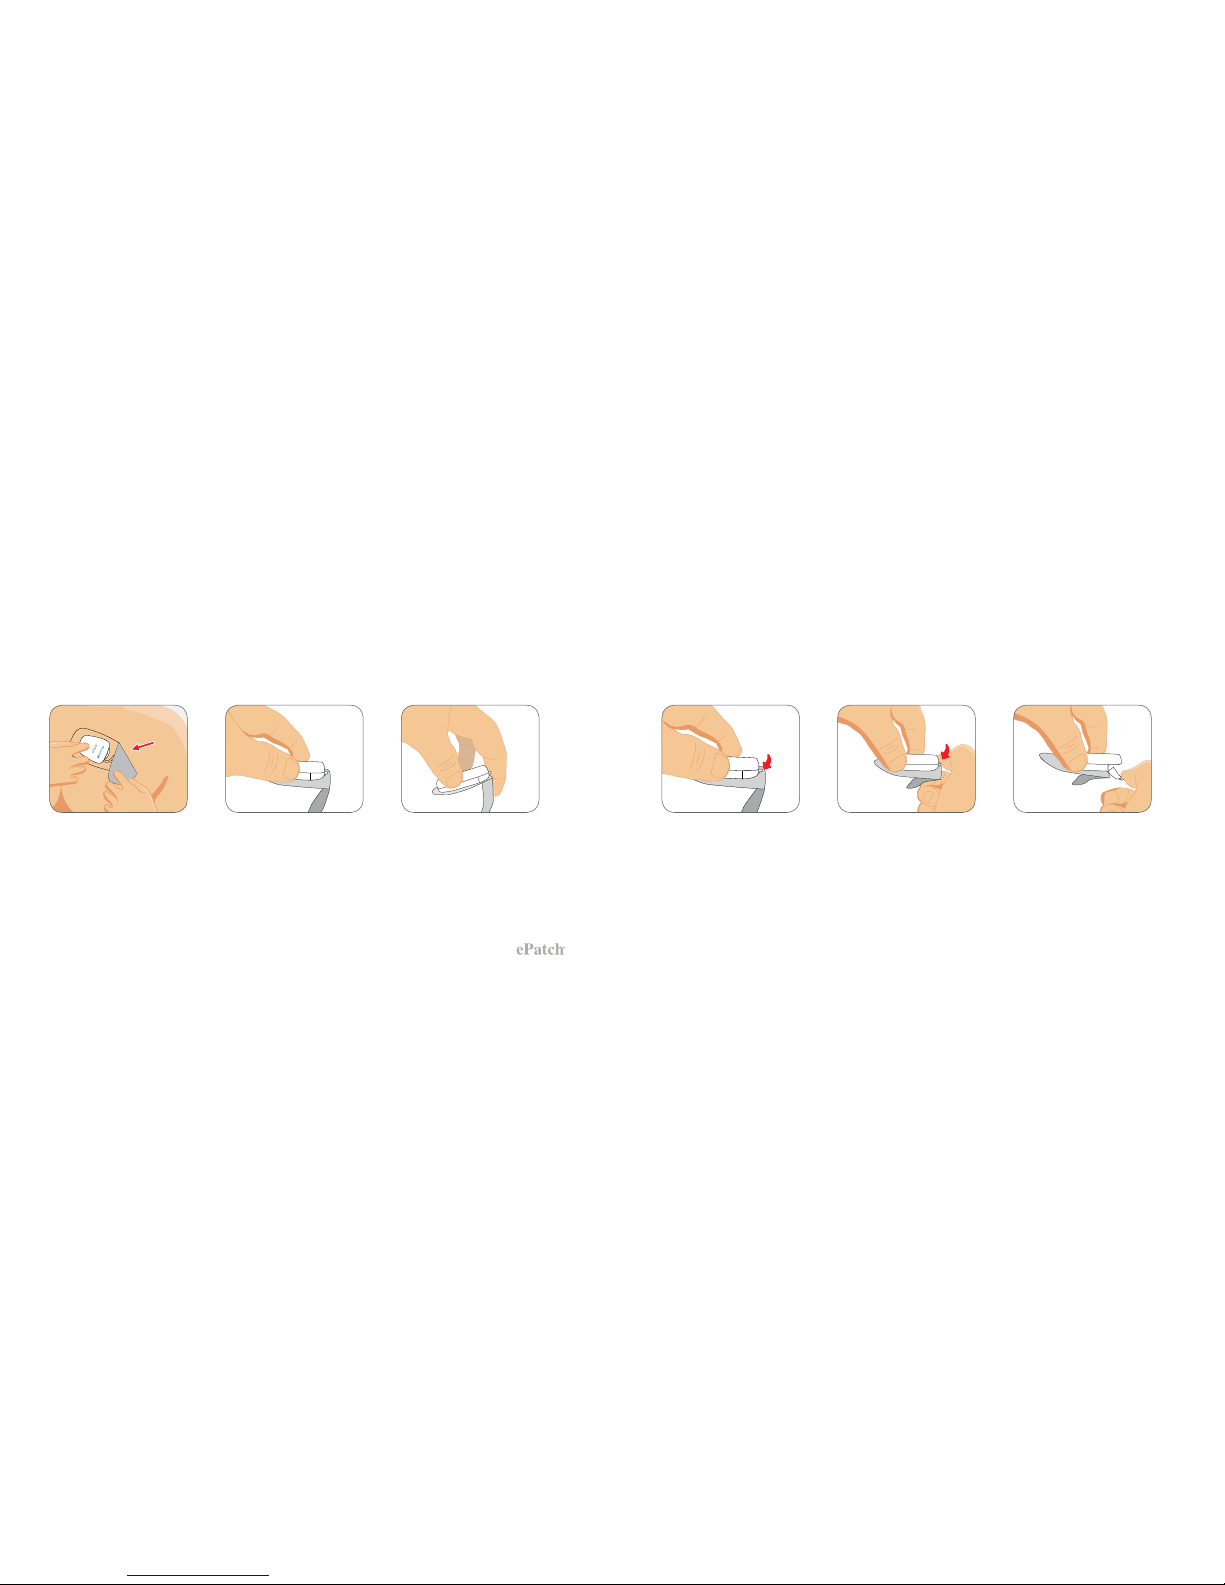
STEP 3: APPLY e PATCH TO YOUR SKIN STEP 4: REMOVE COVER PAPER
1. The top of the patch should
bethreengerwidthsdown
from your collarbone.
2. Pick up the patch with the
attached sensor, peel off
the clear plastic backing.
3. Place the patch on a slight
angle as shown above, with
the wide end of the patch
slightly over the center of
your chest. Press down on
all sides of the patch so it
adheres to your skin.
LEFTRIGHT
Remove the top white paper from the patch.
• Gently peel off the upper liner by starting with the raised tab.
• After the liner is removed, press down rmly on all edges of the
patch and sensor so the patch adheres to your skin.
• Smooth out any wrinkles by pressing down on the patch.
Congratulations, ePatch is ready to start monitoring your heart!
LEFTRIGHT
LEFTRIGHT
Page 8
12 | Apple Heart Study 1.2 ePatch Quick Start Guide | 13
For more information, please visit gobio.com/apple-heart-study
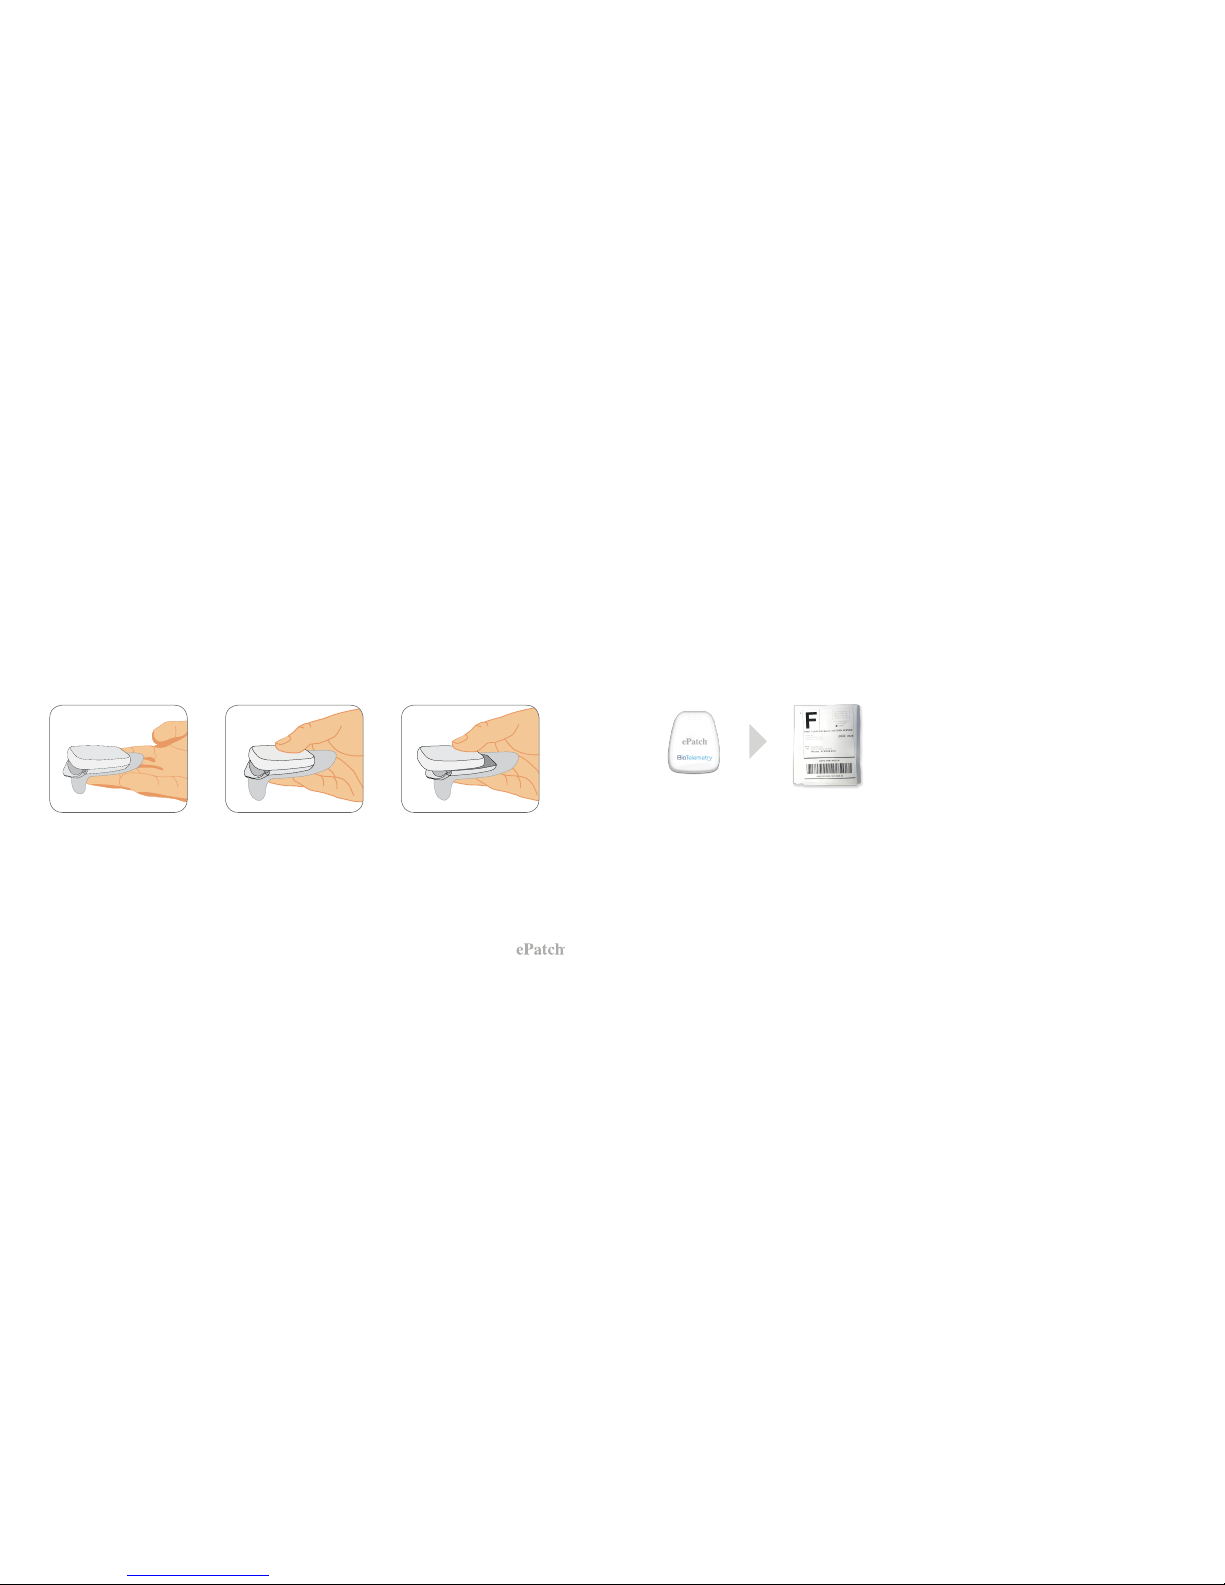
REMOVING THE PATCH
1. Start at one end and pull
the patch material away from
your body. Remove the patch.
2. Hold patch as shown. 3. Fold the clear adhesive
on top of itself to get it out
of way for the next step.
4. Locate the tab. 5. Apply downward pressure
to snap open the tab. This will
require some force.
6. Pull down on the tab.
This will require some force.
TAB
TAB
Page 9
14 | Apple Heart Study 1.2 ePatch Quick Start Guide | 15
For more information, please visit gobio.com/apple-heart-study
REMOVING THE PATCH (continued) RETURNING THE e PATCH SENSOR
7. Place the sensor in your
hand as shown above.
8. Place your thumb on top
of the sensor.
9. Push your thumb forward
to dislodge the sensor from
the patch.
If you are continuing to monitor with a second patch, repeat Steps 2–4. Otherwise, proceed to page 15.
Following the completion of your monitoring
period, please return the ePatch sensor in the
self-addressed, postage-paid envelope supplied.
There is no cost to ship the envelope back to
BioTelemetry. Simply pack the contents into the
envelope provided and place it in your mailbox or
take it to any post ofce location.
SENSOR RETURN MAILER
Page 10

Page 11

© 2018 BioTelemetry, Inc. All rights reserved.
IMPORTANT REMINDER:
This is a diagnostic test, not an emergency response service.
If at any time you experience a symptom you feel is a medical emergency,
you should immediately dial 911 for medical assistance.
 Loading...