

Page 1

Epoch 2
Microplate Spectrophotometer
INSTRUCTIONS FOR USE
BioTek Instruments, Inc.
1771011 Revision A
Page 2

Preface Page 2 of 42
Contents
Installation ............................................................................................................ 12
Getting Started ..................................................................................................... 17
Maintenance ........................................................................................................ 33
Qualification ......................................................
Specifications........................................................................................................ 43
....................................................39
Epoch 2 Instructions for Use 1771011 Revision A BioTek Instruments, Inc.
Page 3

Preface Page 3 of 42
Epoch 2 Instructions for Use 1771011 Revision A BioTek Instruments, Inc.
Preface
Notices
BioTek® Instruments, Inc.
100 Tigan Street
Highland Park, P.O. Box 998
Winooski, Vermont 05404-0998 USA
All Rights Reserved
© 2018, BioTek® Instruments, Incorporated. No part of this publication may be
reproduced, transcribed, or transmitted in any form, or by any means electronic or
mechanical, including photocopying and recording, for any purpose other than the
purchaser’s use without written permission of BioTek Instruments, Inc.
Trademarks
BioTek® is a registered trademark, and Epoch™, Take3™, BioStack™, and Gen5™ are
trademarks of BioTek Instruments, Inc. BioCell™ is a trademark of BioTek Instruments
and is patented under U.S. patent number 5,963,318.
Microsoft®, Windows®, and Excel® are either registered trademarks or trademarks of
Microsoft Corporation in the United States and/or other countries.
All other trademarks are the property of their respective holders.
Restrictions and Liabilities
Information in this document is subject to change and does not represent a
commitment by BioTek Instruments, Inc. Changes made to the information in this
document will be incorporated in new editions of the publication. No responsibility is
assumed by BioTek for the use or reliability of software or equipment that is not
supplied by BioTek or its affiliated dealers.
Page 4

Preface Page 4 of 42
Epoch 2 Instructions for Use 1771011 Revision A BioTek Instruments, Inc.
Contact Information
Global Service and Support
Instrument service and repair is available worldwide
www.biotek.com/service_support
U.S. Headquarters
BioTek® Instruments, Inc.
100 Tigan Street
Highland Park, P.O. Box 998
Winooski, Vermont 05404-0998 USA
www.biotek.com
Customer Service/Sales: 802-655-4740 or customercare@biotek.com
Technical Assistance Center (TAC): 802-655-4740 or tac@biotek.com
European Coordination Center/Authorized European Representative
BioTek® Instruments GmbH
Kocherwaldstrasse 34
D-74177 Bad Friedrichshall
Germany
www.biotek.de
Phone: +49 (0) 7136 9680
Fax: +49 (0) 7136 968 111
Email: info@biotek.de
Instructions for Use Requirements
This document fulfills the basic needs of persons operating this device, according to
the requirements of the In Vitro Diagnostic Directive (98/79/EC) for “Instructions for
Use.” Some of the device's higher-level functions and features, as well as certain
detailed maintenance and qualification routines, are described in the operator’s
manual.
Intended Use Statement
This instrument is intended for IVD use. The performance characteristics of the data
reduction software have not been established with any laboratory diagnostic assay.
Users must evaluate this instrument and PC-based software in conjunction with their
specific assay(s). This evaluation must include the confirmation that performance
characteristics for the specific assay(s) are met.
Page 5
Preface Page 5 of 42
Epoch 2 Instructions for Use 1771011 Revision A BioTek Instruments, Inc.
Quality Control
It is considered good laboratory practice to run laboratory samples according to
instructions and specific recommendations included in the assay package insert for the
test to be conducted. Failure to conduct Quality Control checks could result in
erroneous test data.
Warnings
Operate the instrument on a level, stable surface away from excessive humidity.
Bright sunlight or strong incandescent light can reduce the linear performance
range of the instrument.
Measurement values may be affected by extraneous particles in the microplate
wells. A clean work area is necessary to ensure accurate readings.
When operated in a safe environment according to the instructions in this
document, there are no known hazards associated with the instrument.
However, the operator should be aware of certain situations that could result in
serious injury; these may vary depending on the instrument model. See Hazards
and Precautions.
Hazards
The following hazard warnings are provided to help avoid injury:
Warning! Internal Voltage. Always turn off the power switch and unplug the
power supply before cleaning the outer surface of the instrument.
Warning! Power Rating. The instrument’s power supply or power cord must
be connected to a power receptacle that provides voltage and current within
the specified rating for the system. Use of an incompatible power receptacle
may produce electrical shock and fire hazards.
Warning! Electrical Grounding. Never use a plug adapter to connect primary
power to the external power supply. Use of an adapter disconnects the utility
ground, creating a severe shock hazard. Always connect the power cord
directly to an appropriate receptacle with a functional ground.
Warning! Service. Only qualified technical personnel should perform service
procedures on internal components.
Warning! Accessories. Only accessories that meet the manufacturer's
specifications shall be used with the instrument.
Page 6
Preface Page 6 of 42
Epoch 2 Instructions for Use 1771011 Revision A BioTek Instruments, Inc.
Warning! Lubricants. Do not apply lubricants to the microplate carrier or
carrier track. Lubricant on the carrier mechanism or components in the carrier
compartment will attract dust and other particles, which may obstruct the
carrier path and cause the instrument to produce an error.
Warning! Liquids. Avoid spilling liquids on the instrument; fluid seepage into
internal components creates a potential for shock hazard. If a spill occurs while
a program is running, abort the program and turn off the instrument. Wipe up
all spills immediately. Do not operate the instrument if internal components
have been exposed to fluid. Contact BioTek Technical Assistance Center for
assistance.
Warning! Unspecified Use. Failure to operate the equipment according to the
guidelines and safeguards specified in this manual could result in a hazardous
condition.
Warning! Software Quality Control. The operator must follow the
manufacturer’s assay package insert when modifying software parameters and
establishing reading methods. Failure to conduct quality control checks could
result in erroneous test data.
Warning! Reader Data Reduction Protocol. No limits are applied to the raw
measurement data. All information displayed on the screen, sent to an
attached printer, or exported via computer control must be thoroughly
analyzed by the operator.
Warning! Potential Biohazards. Some assays or specimens may pose a
biohazard. This hazard is noted by the symbol shown here. Adequate safety
precautions should be taken as outlined in the assay’s package insert. Always
wear safety glasses and appropriate protective equipment, such as chemicalresistant rubber gloves and apron.
Precautions
The following precautions are provided to help avoid damage to the instrument:
Caution: Service. The instrument should be serviced by BioTek-authorized
service personnel. Only qualified technical personnel should perform service
procedures on internal components.
Caution: Spare Parts. Only approved spare parts should be used for
maintenance. The use of unapproved spare parts and accessories may result in
a loss of warranty and potentially impair instrument performance or cause
damage to the instrument.
Caution: Environmental Conditions. Do not expose the system to temperature
extremes. For proper operation, the temperature near the instrument should
remain within the range listed in Specifications. Performance may be
adversely affected if temperatures fluctuate above or below this range.
Page 7

Preface Page 7 of 42
Epoch 2 Instructions for Use 1771011 Revision A BioTek Instruments, Inc.
Caution: Sodium Hypochlorite. Do not expose any part of the instrument to
the recommended diluted sodium hypochlorite solution for more than 20
minutes. Prolonged contact may damage the instrument surfaces. Be certain
to rinse and thoroughly wipe all surfaces.
Caution: Power Supply. Use only the power supply shipped with the
instrument. Operate this power supply within the range of line voltages listed
on it.
Caution: Shipping Hardware. The shipping hardware must be removed before
operating the instrument and reinstalled before repackaging the instrument
for shipment.
Caution: Disposal. Dispose of the instrument according to Directive
2012/19/EU, “on waste electrical and electronic equipment (WEEE)” or local
ordinances.
Caution: Warranty. Failure to follow maintenance protocols may void the
warranty. See Maintenance.
Caution: Electromagnetic Environment. Per IEC 61326-2-6 it is the user’s
responsibility to ensure that a compatible electromagnetic environment for
this instrument is provided and maintained in order that the device will
perform as intended.
Caution: Electromagnetic Compatibility. Do not use this device in close
proximity to sources of strong electromagnetic radiation (e.g., unshielded
intentional RF sources), because these may interfere with the proper
operation.
Caution: Touchscreen. Do not use sharp implements to operate the
touchscreen.
Page 8

Preface Page 8 of 42
Epoch 2 Instructions for Use 1771011 Revision A BioTek Instruments, Inc.
CE Mark
Directive 2014/30/EU: Electromagnetic Compatibility
Emissions—Class A
The system has been type-tested by an independent, accredited testing laboratory and
found to meet the requirements of EN 61326-1: Class A for Radiated Emissions and
Line Conducted Emissions.
Verification of compliance was conducted to the limits and methods of EN 55011 –
(CISPR 11) Class A. In a domestic environment it may cause radio interference, in which
case you may need to mitigate the interference.
Immunity
The system has been type-tested by an independent, accredited testing laboratory and
found to meet the requirements of EN 61326-1 and EN 61326-2-6 for Immunity.
Verification of compliance was conducted to the limits and methods of the following:
EN 61000-4-2, Electrostatic Discharge
EN 61000-4-3, Radiated Radio Frequency (RF) Immunity
EN 61000-4-4, Electrical Fast Transient/Burst Immunity
EN 61000-4-5, Surge Immunity
EN 61000-4-6, Conducted RF Disturbance Immunity
EN 61000-4-11, Voltage Dips, Interruptions and Short Variations
Directive 2014/35/EU Low Voltage (Safety)
The system has been type-tested by an independent testing laboratory and was found
to meet the requirements of this Directive. Verification of compliance was conducted
to the limits and methods of the following:
EN 61010-1. "Safety requirement for electrical equipment for measurement, control
and laboratory use. Part 1, General requirements."
EN 61010-2-010. "Particular requirements for laboratory equipment for the heating of
materials."
Directive 2012/19/EU: Waste Electrical and Electronic Equipment
Disposal Notice: Dispose of the instrument according to Directive 2012/19/EU, “on
waste electrical and electronic equipment (WEEE)” or local ordinances.
Page 9

Preface Page 9 of 42
Epoch 2 Instructions for Use 1771011 Revision A BioTek Instruments, Inc.
Electromagnetic Interference and Susceptibility
Canadian Department of Communications Class A: This digital apparatus does not
exceed Class A limits for radio emissions from digital apparatus set out in the Radio
Interference Regulations of the Canada Department of Communications.
User Safety
This device has been type-tested by an independent laboratory and found to meet the
requirements of the following:
• Canadian Standards Association CAN/CSA C22.2 No. 61010-1, “Safety
requirements for electrical equipment for measurement, control and laboratory
use; Part 1: General requirements.”
• EN 61010 Standards, see CE Mark starting on page 8.
Page 10
Preface Page 10 of 42
Epoch 2 Instructions for Use 1771011 Revision A BioTek Instruments, Inc.
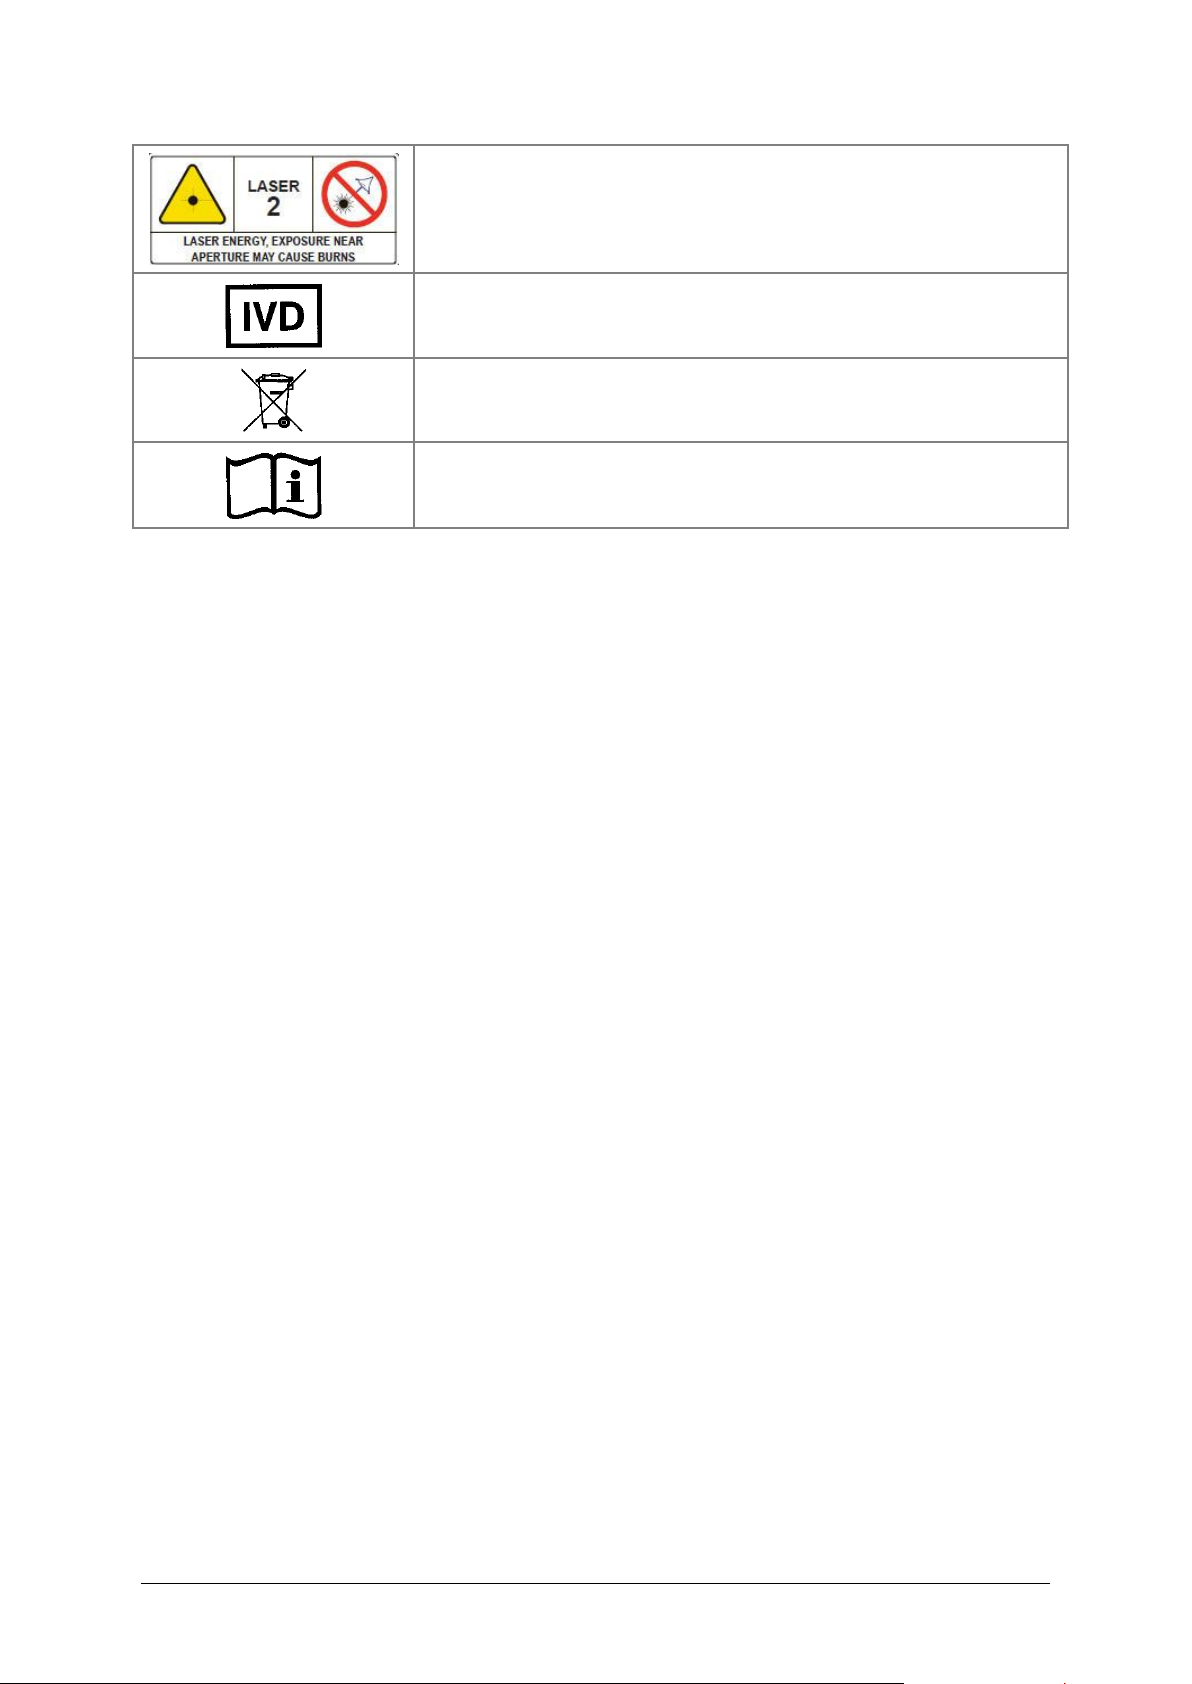
Safety Symbols
Some of these symbols appear on the instrument or accessories:
Alternating current
Both direct and alternating current
Direct current
Earth ground terminal
Protective conductor terminal
On (Supply)
Off (Supply)
Caution (refer to accompanying documents)
Warning, risk of electric shock
Warning, risk of crushing or pinching
Warning, potential biohazards
Warning, hot surface
Laser radiation: Do not stare into beam
Page 11
Preface Page 11 of 42
Epoch 2 Instructions for Use 1771011 Revision A BioTek Instruments, Inc.
Laser energy: Exposure near aperture may cause burns. Do not
stare directly at the laser during operation.
In vitro diagnostic medical device
Separate collection for electrical and electronic equipment
Consult instructions for use
Page 12

Installation Page 12 of 42
Epoch 2 Instructions for Use 1771011 Revision A BioTek Instruments, Inc.
Installation
Models
Model
Touchscreen
Cuvette Port
EPOCH2NS
EPOCH2NSC •
EPOCH2TS •
EPOCH2TSC • •
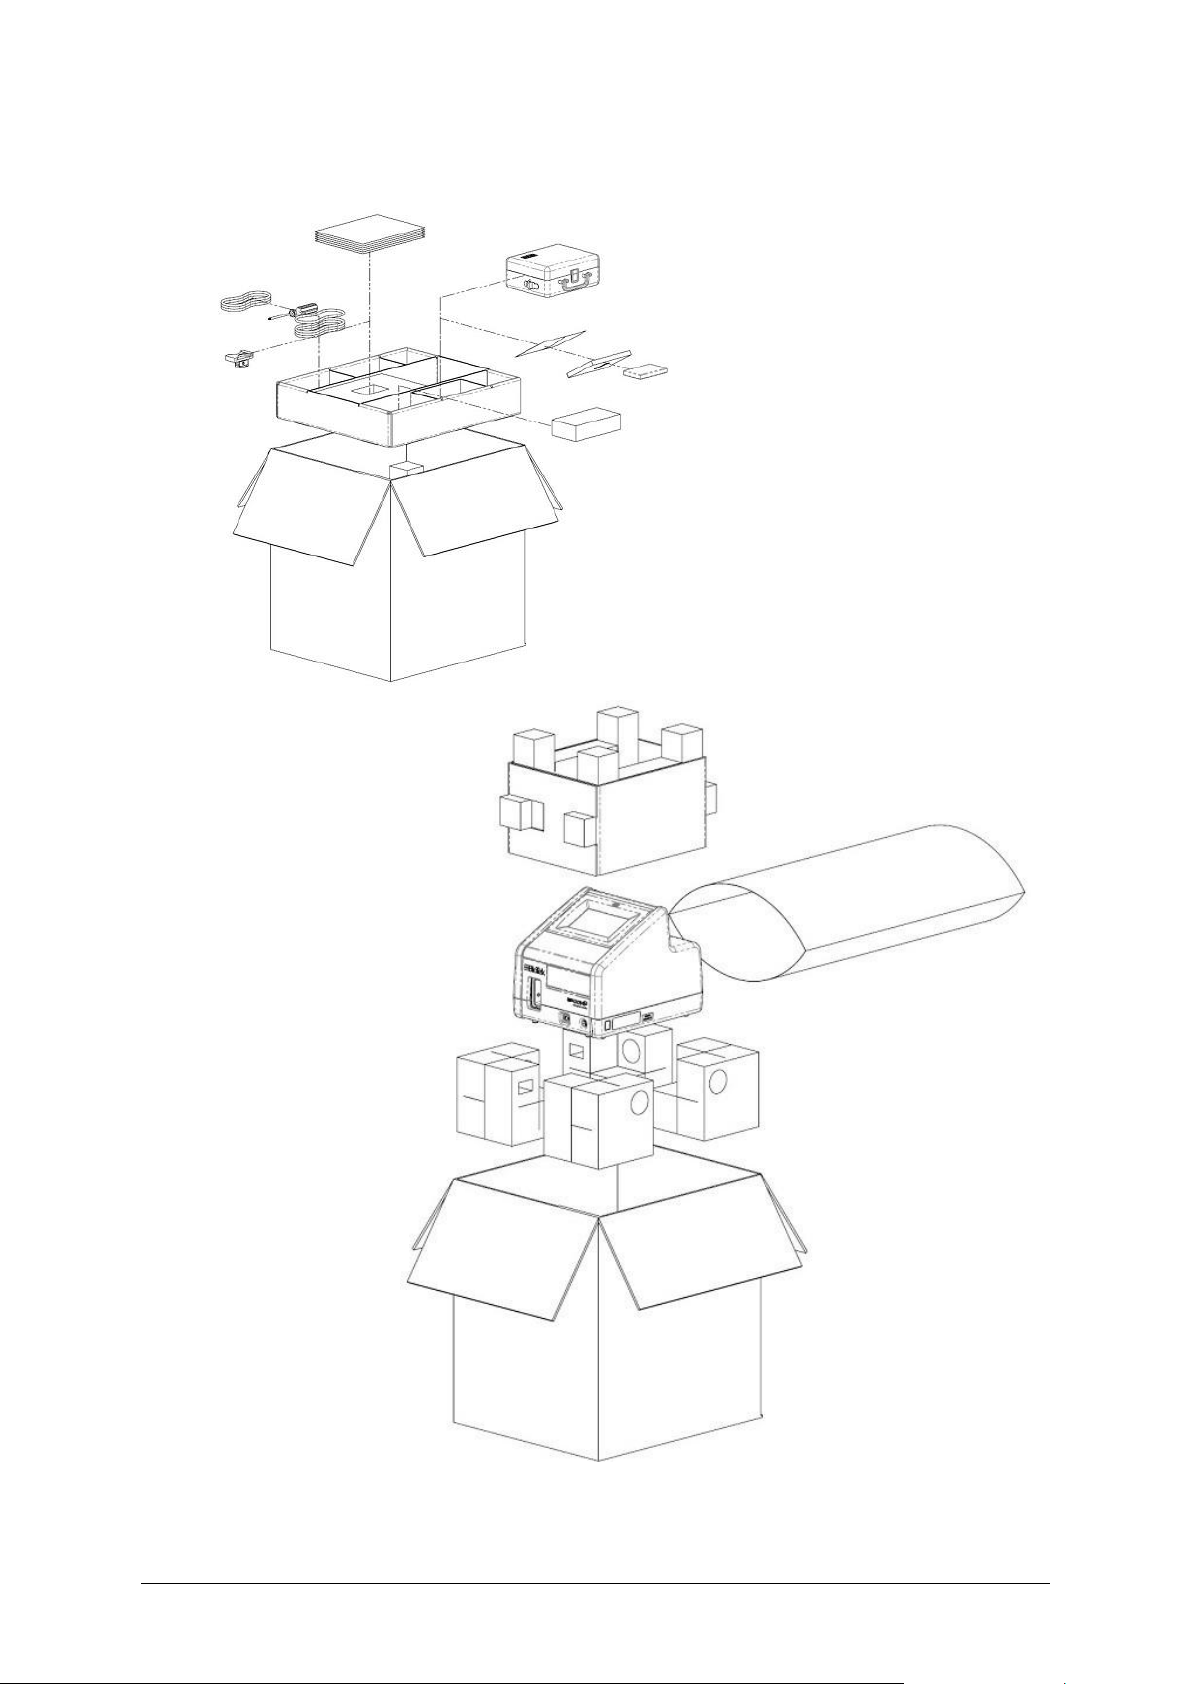
Package Contents
Item
Notes
A specific model of an Epoch 2 instrument
per sales order
All required accessories to power the
instrument
Interface cables, if required
User manual and/or instructions
Optional accessories per sales order,
unless shipped separately
Page 13
Installation Page 13 of 42
Epoch 2 Instructions for Use 1771011 Revision A BioTek Instruments, Inc.
Unpack the Box
Page 14

Installation Page 14 of 42
Epoch 2 Instructions for Use 1771011 Revision A BioTek Instruments, Inc.
Remove the Shipping Hardware
Do not turn on the reader before the shipping hardware is removed!
Select an Appropriate Location
Install the reader on a level, stable surface. For models without a touchscreen, select
an area where temperatures between 18°C and 40°C can be maintained. For models
with a touchscreen, the temperature must be between 18°C and 30°C. The reader is
sensitive to extreme environmental conditions. Avoid excessive humidity, excessive
ambient light, and dust.
(Gen5 control only) Prepare the Host Computer
❖ Follow instructions in the Gen5 Getting Started Guide to install the software.
(Gen5 control only) Connect the Host Computer and Reader
Page 15

Installation Page 15 of 42
Epoch 2 Instructions for Use 1771011 Revision A BioTek Instruments, Inc.
Install the Power Supply
Install the Cuvette Holder
Models with a cuvette port
Page 16

Installation Page 16 of 42
Epoch 2 Instructions for Use 1771011 Revision A BioTek Instruments, Inc.
Turn on the Reader and Run the Power-Up System Test
Allow the reader to settle at room temperature before you turn it on.
(Gen5 control only) Start Gen5 and Test Communication
1. Start Gen5. If prompted to add a reader, click Yes. Otherwise, select System >
Instrument Configuration > Add Reader.
2. Select Epoch 2 and click OK. The reader name and serial number appear. Click on the
reader name and then click Test Communications. The message, “The reader is
communicating!” should appear.
If the communication attempt is not successful: Make sure the reader is turned on and
the USB cable is secure on both ends. Consult the Gen5 Getting Started Guide
(supplied as a PDF on the Gen5 software USB flash drive) for additional
troubleshooting information.
Repackage the Instrument (if needed)
If the reader has been exposed to potentially hazardous material,
decontaminate it to minimize the risk to all who come in contact with the
reader during shipping, handling, and servicing. Decontamination prior to
shipping is required by the U.S Department of Transportation regulations.
See the Maintenance section for instructions.
Remove any labware from the carrier and, if used cuvette, before shipment.
Spilled fluids can contaminate the optics and damage the instrument.
Replace the shipping hardware before repackaging the reader.
Reverse unpacking instructions.
Page 17

Getting Started Page 17 of 42
Epoch 2 Instructions for Use 1771011 Revision A BioTek Instruments, Inc.
Getting Started
External Components
Touchscreen Models
1. USB port for data
output
2. microplate carrier
access door
3. cuvette holder
(if equipped)
4. power on/off
5. carrier in/out,
status LED
6. USB port for printer
7. power inlet
8. USB port for host
computer
(if used)
Page 18

Getting Started Page 18 of 42
Epoch 2 Instructions for Use 1771011 Revision A BioTek Instruments, Inc.
Non-Touchscreen Models
1. microplate carrier
access door
2. cuvette holder
(if equipped)
3. power on/off
4. carrier in/out,
status LED
5. power inlet
6. USB port for host
computer
Page 19

Getting Started Page 19 of 42
Epoch 2 Instructions for Use 1771011 Revision A BioTek Instruments, Inc.
Optional Printer
Refer to the printer's manual for installation and setup instructions.
Using the Touchscreen
Use your fingertip to operate the touchscreen. A sharp stylus or pencil will damage
the surface. You can use a stylus designed for resistive touchscreens.
Main Menu
Up to 60 uniquely named protocols can be saved on the reader at one time, excluding
the predefined Take3 protocols.
Protocols created through the touchscreen are limited to a single read step and, for
Endpoint, Kinetic, and Take3 protocols, up to 12 blank wells. Use Gen5 if your assays
require more complex reading methods or plate layouts.
The left side of the Main Menu lists the five most recently used protocols. The tabbed
sections in the middle contain the protocols created for each protocol type, and the
Take3 plate (if used). To run an existing protocol, tap its name, define the wells to be
read if fewer than the full plate, and tap Start.
Page 20

Getting Started Page 20 of 42
Epoch 2 Instructions for Use 1771011 Revision A BioTek Instruments, Inc.
The right side of the Main Menu provides access to the following features:
• Quick: Define and run an Endpoint read, perform a standalone shake, or
incubate a plate. Quick reads do not support shake or delay actions, and they
read the full plate.
• Protocol: Edit, create (and save), delete, and copy protocols. Through this menu
option, protocols support shake and delay actions.
• Results: Provides access to results for the 12 most recently run protocols. Tap a
protocol name to view its results, and then tap the screen to cycle through the
available data sets (e.g., Raw data, Delta OD, Blanked data).
• Instrument: Run a system test, define date/time settings, enable output to a
printer and/or USB flash drive, configure a Take3 plate, and control
temperature.
Confirm or Set the Time and Date
From the Main Menu, tap Instrument and select the Configuration tab.
• Tap the Time / Time Format and Date / Date Format fields to change the
current settings.
• Set the Decimal Symbol to a period or comma.
• Set the List Separator, used in exported .csv files, to a comma or semicolon.
Page 21

Getting Started Page 21 of 42
Epoch 2 Instructions for Use 1771011 Revision A BioTek Instruments, Inc.
Define Output Formats for Results Data
From the Main Menu, tap Instrument and select the Output tab.
Output Types:
• To print results (Endpoint only), select Print or Save&Print.
• To save results to a USB flash drive, select Save to USB or Save&Print.
Data types:
• Raw: The raw measurement value for each well.
• Delta OD: Applicable when a secondary wavelength is selected in an
absorbance protocol. This is the calculated value for each well of the primary
wavelength measurement minus the secondary wavelength measurement.
• Blanked: The calculated value for each well, after subtracting the average of the
blank well(s).
Save Format options:
• Report: .csv file containing raw data, Delta OD, and/or blanked data, as
available. This file can be opened in Excel or other spreadsheet software.
• Gen5 Input: .txt file containing only raw data. This file can be opened in Gen5
using the Read from File option.
• Prompt: Choose an output format after the plate has been read.
Page 22

Getting Started Page 22 of 42
Epoch 2 Instructions for Use 1771011 Revision A BioTek Instruments, Inc.
Define and Start a Quick Endpoint Read
From the Main Menu, tap Quick.
1. Select the Plate type and define the appropriate settings for your assay.
2. Place the plate on the carrier and tap Start to run the protocol.
3. When the read is finished, the results are displayed and ready for output according to
the settings defined under Instrument > Output.
Define and Start a Standalone Shake
From the Main Menu, tap Quick and select the Shake tab.
1. Set Shake Mode to Linear (side-to-side), Orbital (circle), or Double Orbital (figure 8).
2. Set the Duration, from 1 second to 2 hours 45 minutes.
3. For Orbital shake modes, set the Speed to Slow or Fast.
4. Adjust the Frequency, if needed. The cycles per minute updates as the slider moves.
The measurement in mm indicates the distance the carrier travels during the shake.
5. Place the plate on the carrier and tap Start to shake the plate.
Page 23

Getting Started Page 23 of 42
Epoch 2 Instructions for Use 1771011 Revision A BioTek Instruments, Inc.
Incubate a Plate
From the Main Menu, tap Quick and select the Incubate tab.
1. Check the Active box.
2. Define a Set point from 18°C to 65°C (64.4°F to 149°F). Heating begins immediately.
3. Move the plate carrier in, if it is currently out.
4. When the temperature displayed at the top of the screen reaches the set point, move
the carrier out, insert the plate, and move the carrier back in.
The minimum set point must be ambient room temperature plus 4°C.
Condensation Control™
A temperature Gradient can be applied to reduce the risk of condensation when using
microplate lids. When no gradient (0) is applied, the heaters above and below the
plate operate at the same (setpoint) temperature. This is recommended if the plate
has no lid, or condensation is not a problem when lids are used.
When a gradient (0.1 to 2.0) is applied, the heaters above the plate operate slightly
higher than the set point and the heaters below the plate operate slightly lower than
the set point. The gradient represents the temperature separation between the top
and bottom heaters. This differential should serve to reduce or eliminate
condensation.
In the example below, the Set point is 37°C and the Gradient is 1.0:
Page 24

Getting Started Page 24 of 42
Epoch 2 Instructions for Use 1771011 Revision A BioTek Instruments, Inc.
Some experimentation with the gradient setting may be necessary to achieve optimal
results with your assay.
Create and Save a Protocol
1. From the Main Menu, tap Protocol > Create.
2. Use the onscreen keyboard to enter a name for the protocol, then tap Save. Note that
the protocol name is limited to 18 characters.
3. Set the Read Mode to Endpoint, Kinetic, or Spectral.
4. Define the protocol parameters and then tap Save.
Endpoint Protocols
Plate: Options include standard 6-, 12-, 24-, 48-, 96-, and 384-well plates, Cuvette (if
equipped), and Take3 (if configured).
Primary WL and (optional) Secondary WL: Define the primary and (optional)
secondary wavelength in the range 200 to 999 nm.
Microplates and Take3 only:
Read Speed: Select Normal (optimum performance) or Sweep (optimum speed). See
Specifications to compare the performance and timing specifications.
Page 25

Getting Started Page 25 of 42
Epoch 2 Instructions for Use 1771011 Revision A BioTek Instruments, Inc.
Blanks: Tap to open a plate matrix and select up to 12 Blank wells. For a 384-well
plate, the matrix is displayed in quadrants; tap the 1-2-3-4 box to change the view.
Activity Before Read options:
• Set a delay (up to 2 hours, 45 minutes) before the read.
• Select a shake mode of Linear (side-to-side), Orbital (circle), or Double Orbital
(figure 8). Set a Duration (up to 2 hours 45 minutes) to shake the plate before
the read begins. Adjust the Frequency, if needed. The cycles per minute updates
as the slider moves. The measurement in mm indicates the distance the carrier
travels during the shake.
When finished, tap Save. The protocol name is added to the Main Menu.
If your Endpoint assay requires incubation, activate Temperature Control before reading
the plate. From the Main Menu, select Instrument and tap the Temperature tab.
Kinetic Protocols
Time: Specify the full duration of the kinetic analysis, up to 272:15:00 (hh:mm:ss).
Note: You can stop a protocol while it is running, before the Time expires; results will
be saved.
Interval: Specify the interval (delay) between reads, up to 2:45:00 (hh:mm:ss). The
Interval must be shorter than the Time.
Number of kinetic reads: Calculated automatically, based on the Time and Interval
settings. Cannot exceed 100 reads.
Considerations: The Interval must be long enough to support the protocol parameters
and the number of microplate wells selected for reading. If a shake is specified, its
Duration may result in a longer interval than defined in the protocol. To test the
Page 26

Getting Started Page 26 of 42
Epoch 2 Instructions for Use 1771011 Revision A BioTek Instruments, Inc.
settings, save the protocol and return to the Main Menu. Tap the protocol to run it,
select the wells if not reading the full plate, and tap Start. The Minimum Kinetic Interval
will display if the defined Interval is too short. Run the protocol using the displayed
interval, or return to the protocol and modify its parameters.
Plate: Options include standard 6-, 12-, 24-, 48-, 96-, and 384-well microplates,
Cuvette (if equipped), and Take3 (if configured).
Primary WL: Define a wavelength in the range 200-999 nm. Only one wavelength is
supported through the touchscreen; use Gen5 if your assay has other requirements.
Microplates and Take3 only:
Read Speed: Select Normal (optimum performance) or Sweep (optimum speed). See
Specifications to compare performance and timing specifications.
Blanks: Tap to open a plate matrix and select up to 12 Blank wells. For a 384-well
plate, the matrix is displayed in quadrants; tap the 1-2-3-4 box to change the view.
Options (tap Edit):
If applicable, check Eject the plate when done. If unchecked, the plate will remain in
the chamber after the last kinetic read.
If the assay requires incubation:
1. Check the Active box.
2. Define a Setpoint from 18°C to 65°C. Heating will begin when you start to run
the protocol.
3. Check Turn off when done to turn the incubator off after the last kinetic read is
completed.
The minimum setpoint must be ambient room temperature plus 4°C. See Specifications
for more information on temperature control.
Shake Before Each Read: Select a shake mode of Linear (side-to-side), Orbital (circle),
or Double Orbital (a figure 8). Set a Duration (up to 2 hours 45 minutes) to shake the
plate before each kinetic read or select Continuous to shake the plate whenever it is
not being read. Adjust the Frequency, if needed. The cycles per minute updates as the
slider moves. The measurement in mm indicates the distance the carrier travels during
the shake.
• Continuous shaking typically results in higher ODs and lower CVs.
• To define a kinetic protocol with a shake before the first read only, use Gen5.
When finished, tap Save. The protocol name is added to the Main Menu.
Page 27

Getting Started Page 27 of 42
Epoch 2 Instructions for Use 1771011 Revision A BioTek Instruments, Inc.
Spectral Scan Protocols
Plate: Options include standard 6-, 12-, 24-, 48-, 96-, and 384-well plates, Cuvette (if
equipped), and Take3 (if configured).
Start WL and End WL: Define the start and end wavelengths. The full spectral range is
200 to 999 nm.
Step Size: Define an increment (in nm) for measurement. For example, if the Start WL
is 200 and the Step Size is 10, measurements are taken at 200, 210, 220, and so on
until the End WL is reached.
The number of spectral data points cannot exceed 100.
Microplates and Take3 only:
Calibrate first: Set to Yes (optimum performance) to perform calibration at all of the
specified wavelengths when a plate read is initiated. Set to No (optimum speed) to
perform calibration at only those wavelengths not yet calibrated since the reader was
turned on.
Shake Before Read: Select a shake mode of Linear (side-to-side), Orbital (circle), or
Double Orbital (figure 8). Set a Duration (up to 2 hours 45 minutes) to shake the plate
before spectral scanning begins. Adjust the Frequency, if needed. The cycles per
minute updates as the slider moves. The measurement in mm indicates the distance
the carrier travels during the shake.
When finished, tap Save. The protocol name is added to the Main Menu.
Page 28

Getting Started Page 28 of 42
Epoch 2 Instructions for Use 1771011 Revision A BioTek Instruments, Inc.
Run a Protocol
Kinetic protocols: If a temperature set point is defined in the protocol, you can turn the
incubator on manually by selecting Instrument > Temperature. Otherwise, the
incubator will turn on when you start the protocol. Wait until the set point is reached,
or tap Override to read the plate.
1. From the Main Menu, tap a protocol in the Most Recent list or under one of the
available tabs. The Run Protocol screen displays the defined parameters:
2. To read a partial plate, tap Full Plate and select the well(s) to read. Tap Save.
3. Press the blue lighted button on the front of the reader to eject the plate carrier.
4. Place the microplate on the carrier and tap Start.
When the read is finished, the results are displayed and ready for output according to
the settings defined under Instrument > Output.
The reader saves results for the last 10 Endpoint/Take3 and last 2 Kinetic/Spectral
protocols that were run. The next set of saved results will overwrite the oldest set for
the read mode only with your acknowledgment.
Edit, Delete, or Copy a Protocol
Edit a Protocol
1. In the Main Menu, tap Protocol.
2. Tap the protocol that you want to modify, then tap Edit.
3. Make any desired changes, then tap Save.
Delete a Protocol
1. From the Main Menu, tap Protocol.
Page 29

Getting Started Page 29 of 42
Epoch 2 Instructions for Use 1771011 Revision A BioTek Instruments, Inc.
2. Tap the protocol you want to delete, then tap Delete.
Copy a Protocol
1. In the Main Menu, tap Protocol.
2. Tap the protocol you want to copy, then tap Copy.
3. Enter a name for the new protocol, then tap Save.
4. Make any desired changes, then tap Save.
View or Output Results Stored on the Reader
1. In the Main Menu, tap Results. Results for the last 10 Endpoint/Take3 and last 2
Kinetic/Spectral protocols are listed by read mode/file name. Tap the protocol for
which you want to view or output results. The results are displayed on the
touchscreen.
• Tap the data set name at the top of the screen to view protocol details,
including the start date/time, final status, and protocol parameters.
• Endpoint: Tap the screen to toggle through the available data sets.
• Kinetic/Spectral: Tap a well to view its kinetic curve or spectral scan.
• If a well displays “OVR,” the measurement exceeds (overflow) the maximum
absorbance measurement range: 4.000 OD (normal read speed, or cuvette);
3.000 OD (sweep read speed).
• If a well displays “???,” a result (for example, blank subtraction) could not be
calculated.
2. Tap the green button in the upper-right corner of the display. The results are printed
and/or saved to the USB flash drive, depending on the read mode and defined output
format.
Page 30

Getting Started Page 30 of 42
Epoch 2 Instructions for Use 1771011 Revision A BioTek Instruments, Inc.
Run a Take3 Session
Using the Touchscreen
The Epoch 2 is preprogrammed with seven Take3 protocols, available for use after a
Take3 plate has been defined and aligned on the reader.
The protocols measure at 260, 280, and 320 nm and cannot be edited. For the nucleic
acid protocols, a secondary wavelength of 230 nm can be selected at run time. For all
seven protocols, a spectral scan may also be selected.
Protocol name
Mass Extinction
coefficient
Secondary Ratio WL
(run time option)
Spectral Scan
(run time option)
dsDNA
50
230 nm
240–300 nm
RNA
40
230 nm
240–300 nm
ssDNA
33
230 nm
240–300 nm
1 Abs@1cm =
1 mg/mL
10
-
260–320 nm
BSA
6.7
-
260–320 nm
IgG
13.7
-
260–320 nm
Lysozyme
26.4
-
260–320 nm
Define and Align a Take3 Plate
Ensure that the glass slide is clean before running the alignment procedure.
Refer to the Take3/Take3 Trio User Guide for cleaning instructions.
If you remove or replace the glass slide, perform the Pathlength Calibration
procedure described in the Take3/Take3 Trio User Guide and then run the
alignment procedure described below. Update the Pathlength Values on the
touchscreen with the new values generated through the Pathlength Correction
procedure described in the user guide.
The reader can be configured with only one Take3 plate at a time.
This procedure ensures that the Take3 slide's microspot positions are captured
correctly in the reader's software. Upon completion, the Take3 tab appears on the
Main Menu and contains the preprogrammed Take3 protocols.
1. From the Main Menu, tap Instrument and select the Take3 tab.
Page 31

Getting Started Page 31 of 42
Epoch 2 Instructions for Use 1771011 Revision A BioTek Instruments, Inc.
2. Enter the plate’s Serial Number.
3. Place the plate on the carrier. Tap Required (or Realign) and then Start to perform the
alignment. The process takes several minutes to complete.
4. Change the Blank threshold CV% if the default value does not meet your assay
requirements. This setting compares all replicates of a blank to determine cleanliness
of the microspots (dirty microspots can skew the %CV). Set the value smaller to have a
tighter tolerance on the deviation of cleanliness of the microspots, or set it higher to
relax the tolerance.
5. Tap Edit and enter the pathlength values that either came with the Take3 plate or
were generated through the Pathlength Correction procedure in the Take3 User
Guide.
6. When finished, tap Back and Home to return to the Main Menu.
Run a Take3 Protocol
1. On the Main Menu, tap the Take3 tab and select the protocol to run.
2. Select 1 to 12 wells as Blank and tap Continue.
3. On the Run Protocol screen, select options as applicable:
• Concentration units: Select the unit of measure for the export file.
• Secondary Ratio WL (230 nm): Available for nucleic acid protocols.
Page 32

Getting Started Page 32 of 42
Epoch 2 Instructions for Use 1771011 Revision A BioTek Instruments, Inc.
• Spectral Scan: Perform a spectral scan for the wavelength range displayed (1
nm step size), in addition to the endpoint reads.
.
4. Place the Take3 plate on the carrier and tap Start.
• If the Take3 Blank Masking screen appears and reports that the CV Status is
DIVERGING, the %CV of the blank wells is higher than the Blank threshold CV%
defined for the plate. Invalid blank wells are highlighted in red. Tap a well to
mask (exclude) it from blank average and %CV calculations. When the
remaining unmasked blank wells are valid, the Approve button illuminates. If
the number of valid blank wells is sufficient for the assay, tap Approve,
otherwise select Cancel and address the problem (e.g., clean the slides).
• At least one blank well is required. If all blank wells are masked, the CV Status is
INVALID.
• Each masked blank well will be flagged with an asterisk in the printed and
exported results.
5. When the read is finished, the results are displayed and ready for output according to
the settings under Instrument > Output.
Page 33

Maintenance Page 33 of 42
Epoch 2 Instructions for Use 1771011 Revision A BioTek Instruments, Inc.
Maintenance
Schedule
Task
Frequency
Clean external surfaces
As needed
Inspect/clean touchscreen
As needed
Decontamination
Before shipment or storage
Clean Exposed Surfaces
Materials
• Deionized or distilled water
• Mild detergent
• Clean, lint-free cotton cloths
• Protective gloves
• Lab coat
• Biohazard trash bags
• Safety glasses
• Surgical mask
Procedure
1. Eject the plate carrier and then turn off and unplug the instrument.
2. Moisten a clean cotton cloth with water, or with water and mild detergent. Wring out
the cloth so that liquid does not drip from it. Do not soak the cloth.
3. Wipe the plate carrier, the inside of the plate carrier door, and all exposed surfaces of
the instrument.
4. If the reader is equipped with a cuvette holder, remove the holder and clean its
exposed surfaces.
5. If detergent was used, wipe all surfaces with a cloth moistened, not soaked, with
water.
6. Use a clean, dry, lint-free cloth to dry all wet surfaces.
If liquid is spilled inside the reader, contact BioTek Technical Assistance Center.
Page 34

Maintenance Page 34 of 42
Epoch 2 Instructions for Use 1771011 Revision A BioTek Instruments, Inc.
Clean the Touchscreen
Do not use:
• Strong solvents, such as alcohol, acetone, ammonium chloride, methylene
chloride, and hydrocarbons, which can permanently damage the surface
of the touchscreen.
• Fibrous materials, such as paper towels, which can scratch the
touchscreen. Over time, dirt particles and cleaning agents can get trapped
in the scratches.
Materials
• Dish soap or other mild cleaner
• Deionized or distilled water
• Lint-free disposable towels
• Protective gloves
• Lab coat
• Biohazard trash bags
• Safety glasses
• Surgical mask
Procedure
Do not spray or soak the touchscreen! This will cause damage.
1. Eject the plate carrier and then turn off and unplug the instrument.
2. Moisten a clean lint-free disposable towel with water, or with water and dish soap.
Wring out the towel so that liquid does not drip from it. Do not soak the towel.
3. Wipe the touchscreen gently with the moist towel.
4. If detergent was used, wipe the touchscreen with a towel moistened, not soaked,
with water.
5. Dry the screen gently using another towel.
Page 35

Maintenance Page 35 of 42
Epoch 2 Instructions for Use 1771011 Revision A BioTek Instruments, Inc.
Decontamination
Any laboratory instrument that has been used for research or clinical analysis is
considered a biohazard and requires decontamination prior to handling.
Decontamination minimizes the risk to all who come into contact with the instrument
during shipping, handling, and servicing. Decontamination is required by the U.S.
Department of Transportation regulations.
Persons performing the decontamination process must be familiar with the basic setup
of the instrument.
Turn off and unplug the instrument for the decontamination procedure.
BioTek Instruments, Inc., recommends the use of the following
decontamination solutions and methods based on our knowledge of the
instrument and recommendations of the Centers for Disease Control and
Prevention (CDC). Neither BioTek nor the CDC assumes any liability for the
adequacy of these solutions and methods. Each laboratory must ensure that
decontamination procedures are adequate for the biohazard(s) they handle.
Wear prophylactic gloves when handling contaminated instruments. Gloved
hands should be considered contaminated at all times; keep gloved hands
away from eyes, mouth, and nose. Eating and drinking while decontaminating
instruments is not advised.
Mucous membranes are considered prime entry routes for infectious agents.
Wear eye protection and a surgical mask when there is a possibility of aerosol
contamination. Intact skin is generally considered an effective barrier against
infectious organisms; however, small abrasions and cuts may not always be
visible. Wear protective gloves when performing the decontamination
procedure.
Touchscreen models: Do not spray the sodium hypochlorite solution or
alcohol solution directly on the touchscreen. Avoid fibrous materials that can
scratch the touchscreen surface. Do not use a stronger cleaning solution than
recommended.
Materials
• Sodium hypochlorite (NaClO) or 70% isopropyl alcohol
• Deionized or distilled water
• 125-mL beakers
• Clean, lint-free cotton cloths
• Protective gloves
• Lab coat
Page 36

Maintenance Page 36 of 42
Epoch 2 Instructions for Use 1771011 Revision A BioTek Instruments, Inc.
• Biohazard trash bags
• Safety glasses
• Surgical mask
Procedure
1. Eject the plate carrier and then turn off and unplug the instrument.
2. Prepare an aqueous solution of 0.5% sodium hypochlorite (NaClO). If the effects of
sodium hypochlorite are a concern, 70% isopropyl alcohol may be used.
3. Moisten a clean, lint-free cloth with the cleaning solution. Wring out the cloth so that
liquid does not drip from it. Do not soak the cloth.
4. Wipe the plate carrier and all exposed surfaces of the instrument, including the inside
of the microplate carrier access door and, if equipped, the cuvette holder.
5. If the instrument is equipped with a touchscreen, place the moistened cloth on the
touchscreen and it let rest there for 15 minutes, then remove it.
6. Allow the instrument to dry for 20 minutes for thorough decontamination.
7. Moisten a cloth with deionized or distilled water and wipe all surfaces of the
instrument that have been cleaned with the solution. Do not soak the cloth.
8. Use a clean, dry lint-free cloth to dry all wet surfaces.
9. Discard the used gloves and cloths, using a biohazard trash bag and an approved
biohazard container.
Page 37

Instrument Testing Page 37 of 42
Epoch 2 Instructions for Use 1771011 Revision A BioTek Instruments, Inc.
Instrument Testing
System Test
Each time the Epoch 2 is turned on, it automatically performs a series of tests on the
reader’s motors, lamp, and various subsystems. This test can take a few minutes to
complete. If all tests pass, the microplate carrier is ejected and the green LED on the
power switch remains on. The Main Menu appears on the touchscreen (if equipped).
You can also initiate a system test through the touchscreen or Gen5.
If any test fails, the reader beeps repeatedly and, if equipped, an error message
appears on the touchscreen. If this occurs, either press the carrier eject button, or, if
equipped, tap OK on the touchscreen to stop the beeping. If necessary, start another
system test to try to retrieve an error code from the reader.
Absorbance Test Plates
Gen5 software is required for this test.
Absorbance Test Plate Part Number 7260522 uses NIST-traceable neutral density
filters to confirm absorbance specifications in the visible range (400–800 nm). This test
plate also contains precision-machined holes to verify mechanical alignment.
Absorbance Test Plate Part Number 7260551 uses NIST-traceable neutral density
filters to test performance at 340 nm.
Define the Absorbance Test Plate Parameters
Before the Absorbance Plate Test can be performed, the wavelength settings and the
calibration data for each wavelength selected must be initially entered into Gen5. Use
the data sheet included with the Absorbance Test Plate for the following:
• Select System > Diagnostics > Test Plates > Add/Modify Plates, then click Add.
Click Help for guidance when setting the wavelengths and entering the OD and
peak wavelength values.
Run the Absorbance Plate Test
1. From the Gen5 main screen, click System > Diagnostics > Test Plates > Run. If
prompted, select the desired Test Plate and click OK.
2. When the Absorbance Test Plate Options dialog appears, select Perform Peak
Wavelength Test, if it is not already selected.
3. Highlight the wavelength(s) to be included in this test.
4. (Optional) Enter a comment.
Page 38

Instrument Testing Page 38 of 42
Epoch 2 Instructions for Use 1771011 Revision A BioTek Instruments, Inc.
5. Click Start Test.
6. Place the Absorbance Test Plate on the microplate carrier, with well A1 in the
proper location.
7. Click OK to run the test.
8. When the test is complete, the results report appears. Scroll through the report;
every result should show “PASS.”
Page 39

Specifications Page 39 of 42
Epoch 2 Instructions for Use 1771011 Revision A BioTek Instruments, Inc.
Specifications
General Specifications
Microplates
The Epoch 2 accommodates standard 6-, 12-, 24-, 48-, 96-, and 384-well microplates with 128 x 86
mm geometry and the Take3 Micro-Volume Plate. If using Gen5, the Take3 Trio Micro-Volume plate
and BioCell are also supported.
Maximum plate height: 20.32 mm
Hardware and Environmental
Weight:
Fully configured weight ~11.3 kg
Dimensions:
Touchscreen models: 31.8 cm x 32.4 cm x 39.4 cm
Non-touchscreen models: 21.6 cm x 32.4 cm x 39.4 cm
Operational Temperature
Range:
Touchscreen models: 18°C to 30°C
Non-touchscreen models: 18°C to 40°C
Humidity:
10% to 85% relative humidity (non-condensing)
Power Consumption:
Powered from an external 120W (minimum), 24VDC power supply
compatible with 100-240 volts AC @50-60Hz.
Temperature Control
Range:
Maximum incubation temperature 65°C. Minimum setpoint must be
ambient room temperature plus 4°C. For incubation setpoints > 60°C,
ambient room temperature must be at least 22°C.
Uniformity:
+/- 0.5°C at 37°C, tested with Innovative Instruments, Inc. temperature
test plate.
Page 40

Specifications Page 40 of 42
Epoch 2 Instructions for Use 1771011 Revision A BioTek Instruments, Inc.
Absorbance Specifications
For the performance specifications described in this section, the gain on the optics test
should be < 8.
Unless indicated otherwise, the specifications in the table below apply to both
microplate and cuvette.
Wavelength Selection System:
Monochromator
Detectors:
2 photodiodes (measurement & reference) each for the
plate channel and the cuvette channel
Wavelength Range:
200–999 nm
Bandpass:
< 5 nm (microplate & cuvette)
Measurement Range:
0.000–4.000 OD (microplate normal mode, cuvette)
0.000–3.000 OD (microplate sweep mode)
Resolution:
0.001 OD (touchscreen control only)
0.0001 OD (Gen5 control only)
Increment:
1 nm
Wavelength Accuracy:
± 2 nm
Wavelength Precision
0.2 nm (standard deviation)
Accuracy
Tested with certified neutral density glass
96-well plate
normal read speed
delay after plate movement = 100 ms
0.000 to 2.000 OD: ±1.0% ±0.010 OD
2.000 to 2.500 OD: ±3.0% ±0.010 OD
384-well plate
normal read speed
delay after plate movement = 100 ms
0.000 to 1.500 OD: ±2.0% ±0.010 OD
1.500 to 2.000 OD: ±5.0% ±0.010 OD
96- and 384-well plate
sweep read speed
0.000 to 1.000 OD: ±1.0% ±0.010 OD
Page 41

Specifications Page 41 of 42
Epoch 2 Instructions for Use 1771011 Revision A BioTek Instruments, Inc.
Linearity
By liquid dilution, 200 µL volume in 96-well plate, 80 µL volume in 384-well plate
96-well plate
normal read speed
delay after plate movement = 100 ms
0.000 to 2.000 OD: ±1.0% ±0.010 OD
2.000 to 2.500 OD: ±3.0% ±0.010 OD
384-well plate
normal read speed
delay after plate movement = 100 ms
0.000 to 1.500 OD: ±2.0% ±0.010 OD
1.500 to 2.000 OD: ±5.0% ±0.010 OD
96- and 384-well plate
sweep read speed
0.000 to 1.000 OD: ±1.0% ±0.010 OD
Repeatability (Standard Deviation [STD])
Tested with certified neutral density glass, measured by one standard deviation
(8 measurements/data point)
96-well plate
normal read speed
delay after plate movement = 100 ms
0.000 to 2.000 OD: ±1.0% ±0.005 OD
2.000 to 2.500 OD: ±3.0% ±0.005 OD
384-well plate
normal read speed
delay after plate movement = 100 ms
0.000 to 1.500 OD: ±1.0% ±0.005 OD
1.500 to 2.000 OD: ±3.0% ±0.005 OD
96- and 384-well plate
sweep read speed
0.000 to 1.000 OD: ±2.0% ±0.010 OD
Assay Validation
Using a Take3 plate
260 nm dsDNA detection limit: < 5 ng/μL
Cuvette
Absorbance performance of measurements made via cuvette shall satisfy the
requirements given above for accuracy, linearity. and repeatability in a 96 well-plate,
normal read speed, 100 ms delay after movement.
Page 42

Specifications Page 42 of 42
Epoch 2 Instructions for Use 1771011 Revision A BioTek Instruments, Inc.
Reading Speeds
Endpoint
Start of plate motion to stop of plate motion
96 well
450 nm
[sec] MAX
Delay Time
[msec]
Normal Mode
74
100
Normal Mode, Min Delay Time
64
0
Sweep
35
0 (at end of row)
384 well
Normal Mode
192
100
Normal Mode, Min Delay Time
154
0
Sweep
42
0 (at end of row)
Kinetic
A1 to A1
96 well
450 nm
[sec] MAX
Delay Time
[msec]
Normal Mode
50
100
Normal Mode, Min Delay Time
40
0
Sweep
8
0 (at end of row)
384 well
Normal Mode
170
100
Normal Mode, Min Delay Time
131
0
Sweep
14
0 (at end of row)
 Loading...