

Page 1
BIOSWING
350 iQ E | 360 iQ E
Bedienungsanleitung
Instruction manual
Mode d‘emploi
Page 2
deutsch | 04 – 13
english | 14 – 23
français | 24 – 33
HAIDER BIOSWING GmbH
Dechantseeser Str. 4
D - 95704 Pullenreuth
Tel. +49 (0)92 34- 99 22 - 0
Fax +49 (0)92 34 - 99 2266
www.bioswing.de
[email protected]
Page 3
Wir beglückwünschen Sie zu Ihrem neuen
HAIDER BIOSWING!
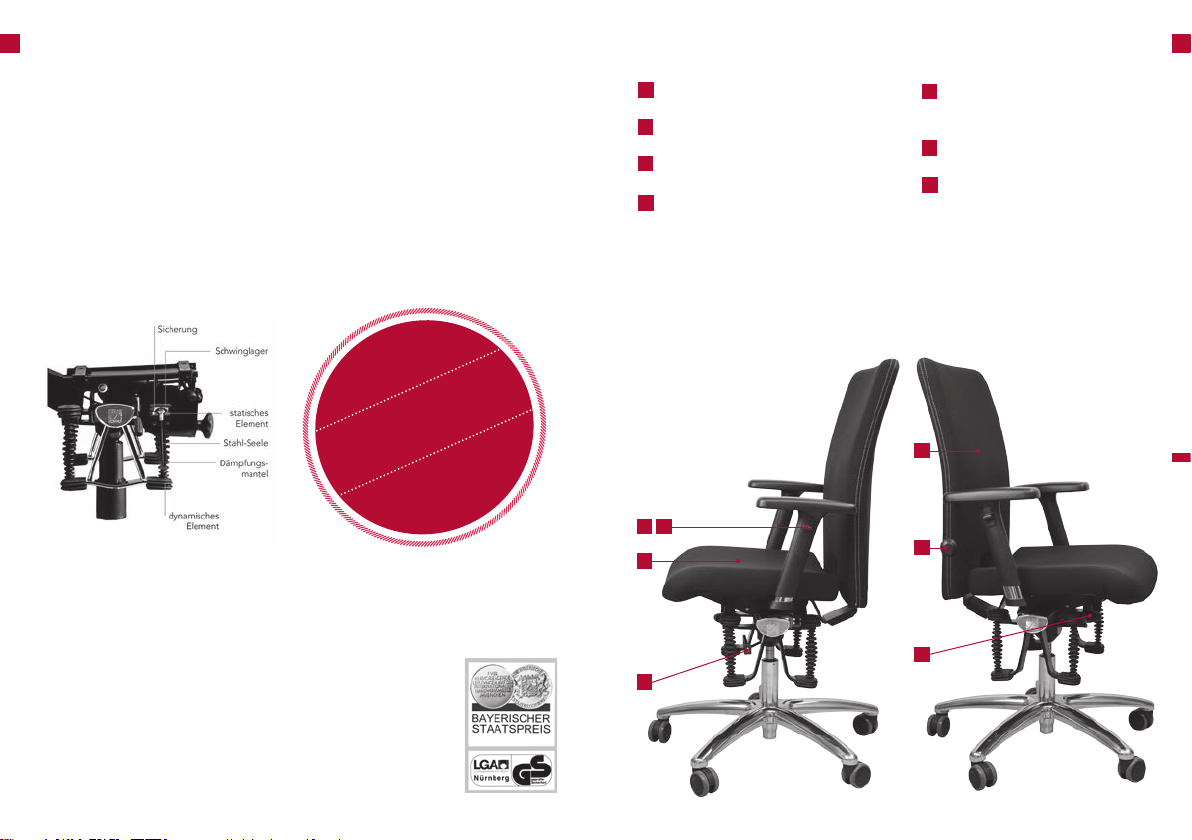
HAIDER BIOSWING Sitzsysteme verfügen über eine weltweit einzigartige
Technologie: ein nach allen Seiten bewegliches, kontrolliert gedämpftes Sitzwerk, das die Energie des Körpers dynamisch reflektiert.
Ihr Gehirn antwortet hierauf mit ständigen Mikroimpulsen an Ihre Haltungs
muskulatur. Körper und Geist gelangen in ein aktives Gleichgewicht. HAIDER
BIOSWING Sitzsysteme steigern maßgeblich Konzentrationsfähigkeit, Wohlbefinden und Leistungsvermögen.
Das HAIDER BIOSWING Sitzwerk
Übersicht der Bedienelemente
1
Sitzhöhe
2
Beckenbalance
3
-
Armlehne Höhenverstellbar
4
Armlehne Multifunktional
Rückenlehnenhöhenver-
5
stellung
Lumbalstütze
6
EcoMatic
7
(Rückenlehnenneigung)
(Einstellmöglichkeiten je nach gewählter Ausstattung bzw. Typ!)
11
1. Platz
im BGIA-Report
„Ergonomische Untersuchung
besonderer Büroarbeitsstühle“
Herausgeber der Studie: DGUV
(Deutsche Gesetzliche
Unfallversicherung)
Um alle Einstellungsmöglichkeiten* optimal nutzen zu können, lesen Sie bitte
die nachfolgende Bedienungsanleitung.
Wir wünschen Ihnen Überlegenheit im Sitzen auf Ihrem neuen HAIDER
BIOSWING.
Ihr Team von HAIDER BIOSWING
* Einstellungsmöglichkeiten je nach gewählter Ausstattung!
deutsch | 4 deutsch | 5
3 4
2
1
5
6
7
Page 4
Sitzhöhe
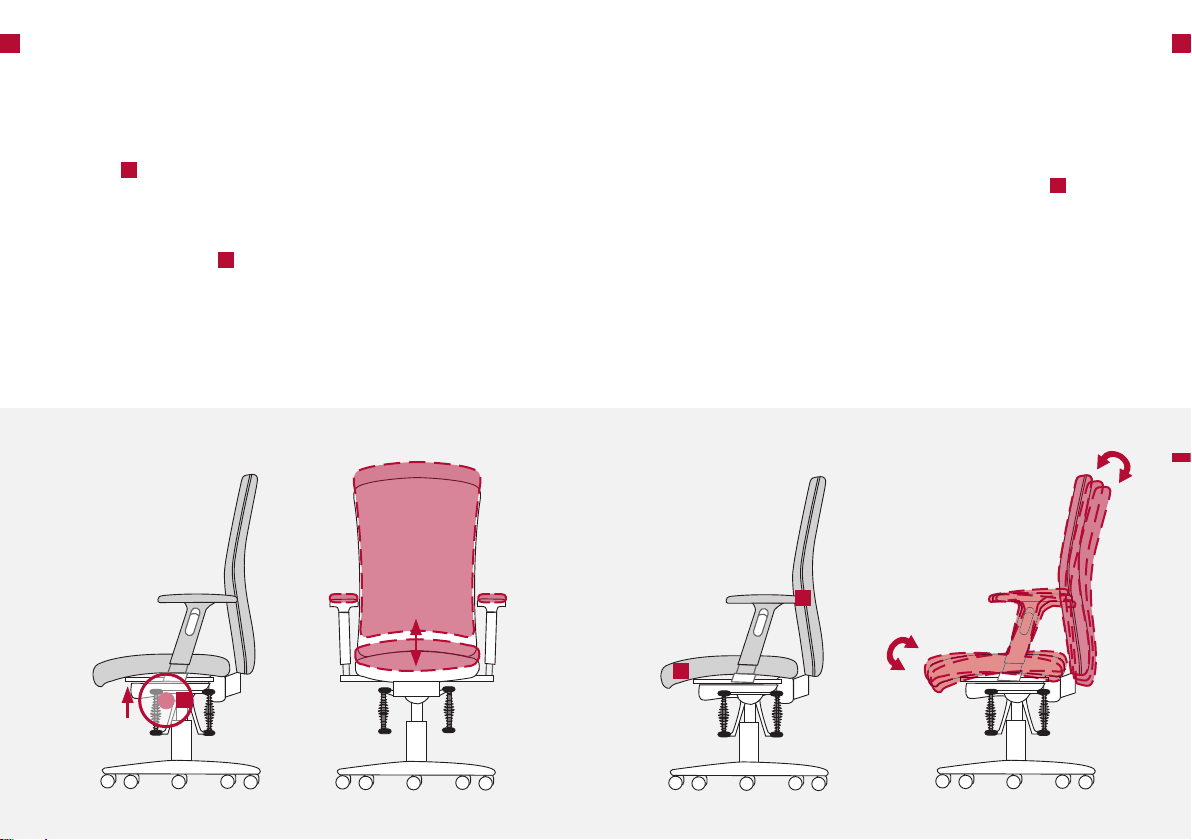
Stellen Sie die Höhe der Sitzoberfläche auf Höhe der Kniekehle. Ober- und
Unterschenkel bilden einen rechten bis leicht geöffneten Winkel. Die Füße
stehen ganzflächig auf dem Boden – ohne Druck auf die Oberschenkel.
Sitzfläche niedriger
Bediengriff im Sitzen nach oben ziehen und in gewünschter Position los
lassen. Beachten Sie bitte beim Absenken der Sitzfläche die Klemmgefahr
im Fußbereich zwischen Fußkreuz und Sitzwerk.
Sitzfläche höher
Sitz entlasten, Bediengriff nach oben ziehen und in gewünschter Position
loslassen.
1
1
Beckenbalance
21
Die Beckenbalance ermöglicht Ihnen eine harmonische Anpassung der Sitzfläche an unterschiedliche Sitzhaltungen. Das motiviert zum aktiven Sitzen
mit offenem Sitzwinkel und fördert damit zusätzlich die Stabilisierung Ihrer
Rückenmuskeln.
-
Beckenbalance mit Permanentkontakt
Synchron zu Ihrer Sitzhaltung folgt die Sitz- und Rückenfläche automatisch
2
Ihren Bewegungen. Körpergewicht einfach nach vorne oder hinten verlagern
und die Sitzfläche neigt sich entsprechend. Es ist keine gesonderte Bedienung erforderlich.
2
2
1
deutsch | 6 deutsch | 7
Page 5
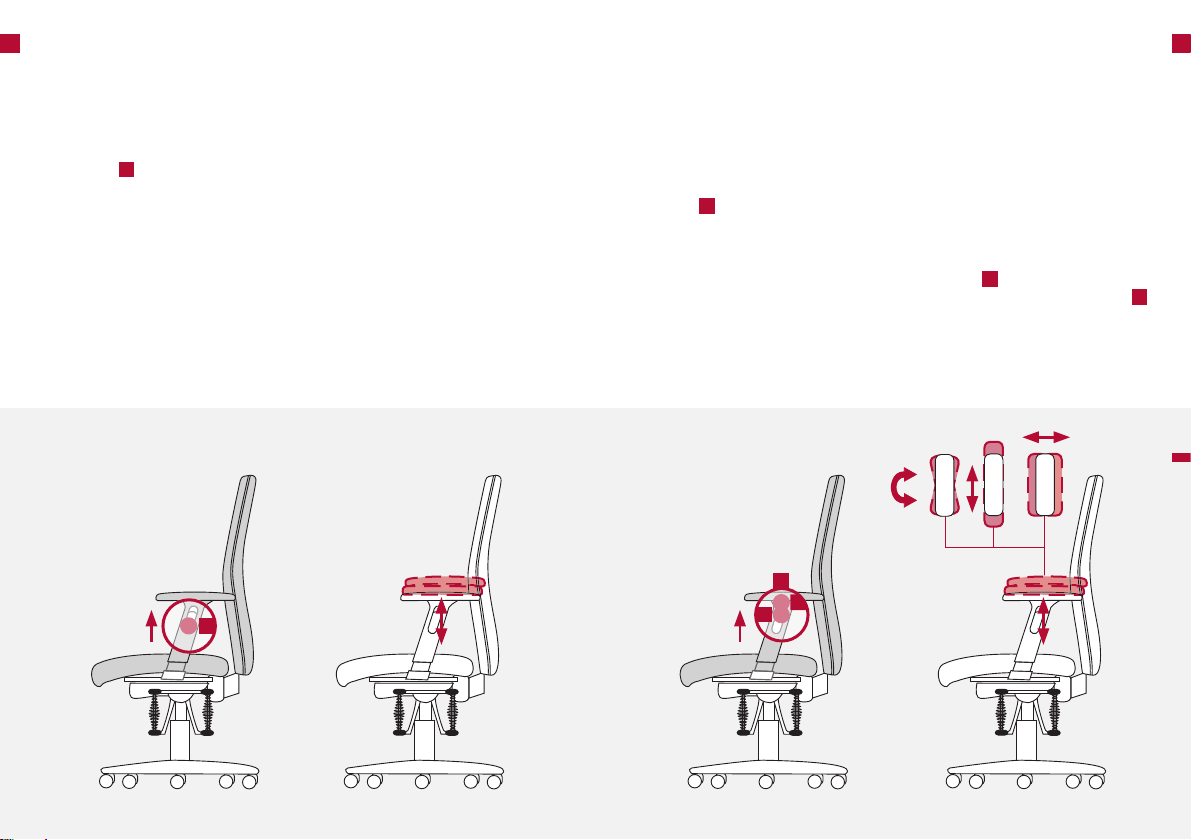
Armlehne Höhenverstellbar (1F)
Zur Entlastung der Schulter- und Nackenmuskulatur können die Armlehnen
in der Höhe eingestellt werden. Justieren Sie die Höhe so, dass Sie keine
Anspannung in der Schulter spüren.
Armlehne auf Höhe einstellen
Bediengriff nach oben ziehen, gleichzeitig Auflagen auf gewünschte Höhe
bringen und anschließend Zugtaste loslassen.
(Armlehnen lassen sich durch die Langlochführung am Träger in der Breite regulieren. Schrauben
an der Unterseite des Sitzpolsters lösen, Breite durch Ziehen der Armlehne nach außen oder innen
bestimmen und anschließend Schrauben wieder fest anziehen.)
3
3
Armlehne Multifunktional (4F)
Zur Entlastung der Schulter- und Nackenmuskulatur können die Armlehnen
in der Höhe eingestellt werden. Justieren Sie die Höhe so, daß Sie keine An
spannung in der Schulter spüren. Zusätzlich können die Armlehnenauflagen
auf die jeweiligen Oberkörperproportionen in Breite und Tiefe angepasst,
sowie hinsichtlich der Unterarmstellung gedreht werden.
Armlehne auf Höhe einstellen
Zugtaste nach oben ziehen, gleichzeitig Auflagen auf gewünschte Höhe
bringen und anschließend Zugtaste loslassen.
Armlehnenauflage auf Breite und Tiefe einstellen oder drehen
Durch spürbaren Rastwiderstand die Armauflagen nach links/rechts oder
nach vorne/hinten schieben. Durch vorheriges drücken der Bedientaste
unterhalb der Armlauflage kann die Drehung verstellt werden.
(Armlehnen lassen sich durch die Langlochführung am Träger in der Breite regulieren. Schrauben
an der Unterseite des Sitzpolsters lösen, Breite durch Ziehen der Armlehne nach aussen oder innen
bestimmen und anschließend Schrauben wieder fest anziehen.)
4a
4b
4b
4c
4a
4c
43
-
deutsch | 8 deutsch | 9
Page 6
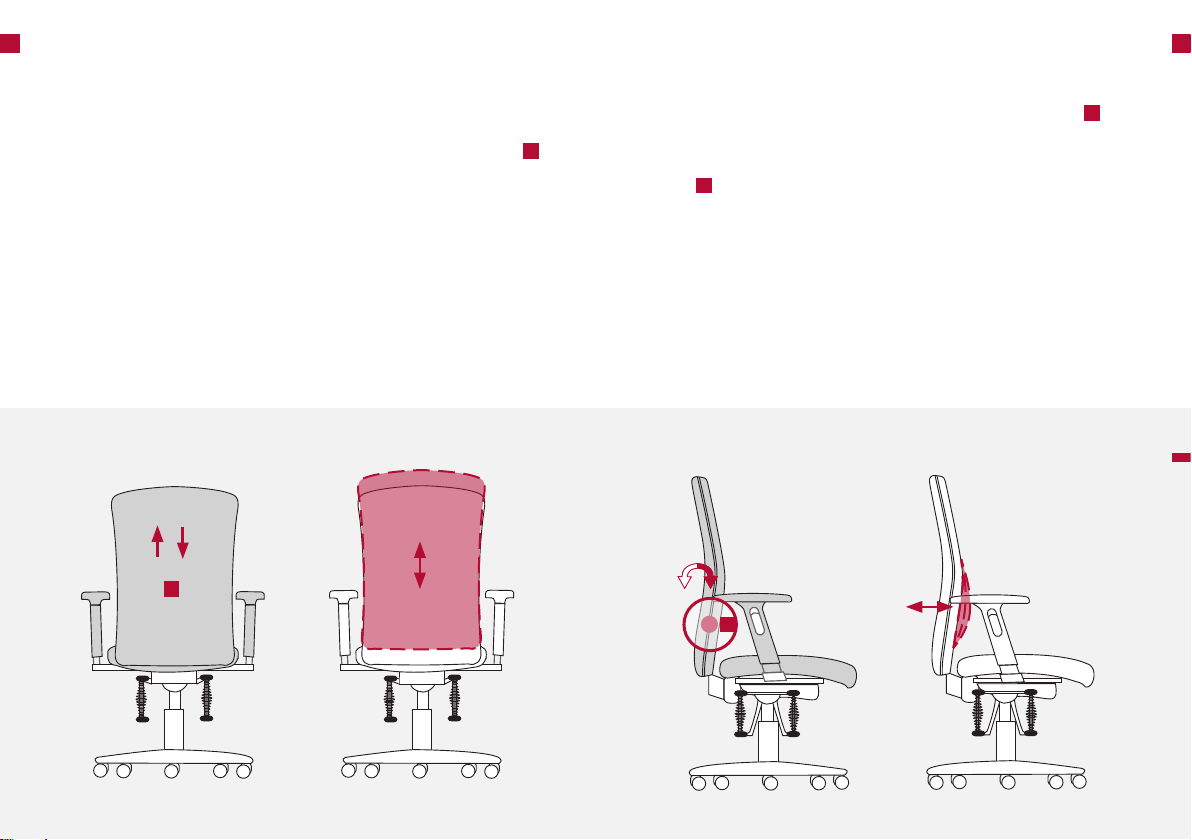
Rückenlehnenhöhenverstellung
Die Höhe der Rückenlehne können Sie an die persönlichen Wirbelsäulenmaße individuell anpassen.
Rückenlehne auf Höhe einstellen
Im Sitzen mit beiden Händen nach hinten greifen und Rückenlehne in
unterster Stellung durch Schieben nach oben auf gewünschte Höhe bringen.
Bitte beachten Sie, daß die Rückenlehne nur in oberster Position wieder nach
unten gebracht werden kann.
5
5
Lumbalstütze
Durch die individuell einstellbare Lumbalstütze können Sie eine stufenlose
Anpassung der Wölbung im Bereich der Lendenlordose vornehmen. Die
Wölbung stellen Sie sich durch Anpassung der Rückenlehnenhöhe in etwa
auf Gürtelhöhe, damit Ihre Lendenwirbelsäule optimal gestützt wird.
Lumbalstütze an Rückenkontur anpassen
Drehrad an der Rückenlehne nach vorne drehen verstärkt die Wölbung.
6
Drehen nach hinten bewirkt eine Abschwächung der Wölbung.
5
65
6
deutsch | 10 deutsch | 11
Page 7
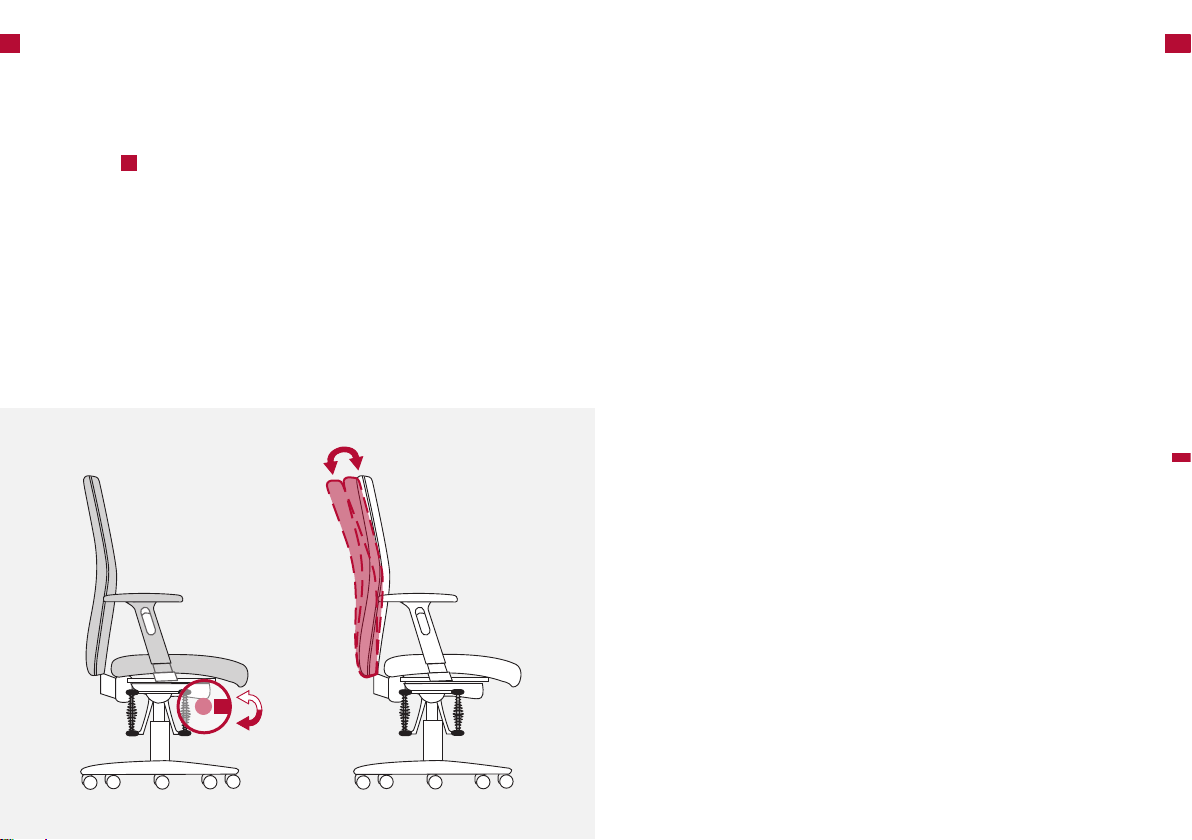
EcoMatic (Rückenlehnenneigung)
7
Die EcoMatic hat eine elastische Rückenlehnenanbindung. Sobald Sie sich
zurücklehnen, folgt die Rückenlehne Ihren Bewegungen und neigt sich je
nach Körpergewicht 5 - 10 Grad nach hinten.
Rückenlehnenneigung individuell einstellen
Bediengriff nach rechts drehen und die Rückenlehne kann bis zu 29 Grad
7
nach hinten gestellt werden. Nach links drehen und die Rückenlehne neigt
sich wieder nach vorne.
Besondere Hinweise
Den Bürodrehstuhl bestimmungsgemäß nur zum Sitzen verwenden. Niemals
auf den Stuhl steigen!
Gasfeder
Austausch und Arbeiten im Bereich der Gasfeder zur Höhenverstellung dür
fen nur durch eingewiesenes Fachpersonal getätigt werden. Gasdruckfeder
nicht erhitzen oder gewaltsam öffnen.
Rollen
Zu Ihrer Sicherheit ist der Bürodrehstuhl seriell mit selbstbremsenden Rol
len ausgestattet, um bei unbelasteten Zustand ein Verschieben zu erschweren.
Achten Sie bei einem Wechsel des Bodenbelags auf die richtige Wahl der
Rollen.
Für den Einsatz auf weichen Böden (z.B. Teppich) sollte der Stuhl mit harten
Rollen ausgestattet sein. Die harten Rollen sind einfarbig.
Für den Einsatz auf harten Böden (z.B. Parkett, Fliesen, Linolium) sollte der
Stuhl mit weichen Rollen ausgestattet sein. Die weichen Rollen sind zweifar
big, d.h. die Lauffläche hat eine andere Farbe.
Wartung und Pflege
Ihr Bürodrehstuhl ist bei normalem Gebrauch wartungsfrei. Lack/Kunststoff
und Metalloberflächen mit einer weichen Handbürste oder Tuch und Fein
waschmitteln, Seifen oder Fett lösenden Spülmitteln reinigen. Je nach Einsatz ist eine regelmäßige Reinigung/Pflege des Polsterbezuges empfehlenswert. Stoffbezüge/Microfaser sind durch Absaugen oder mit handelsüblichen
Trockenschaum zu reinigen. Lederbezüge halten Sie durch handelsübliche
Lederpflegemittel für viele Jahre geschmeidig (Sonneneinstrahlung). Flecken sind möglichst sofort zu behandeln. Führen Sie jedoch an einer nicht
sichtbaren Stelle einen Test durch. Durch eine punktuelle Reinigung kann ein
farblicher Unterschied zum unbehandelten Polsterbezug sichtbar werden.
-
-
-
-
7
deutsch | 12 deutsch | 13
Page 8
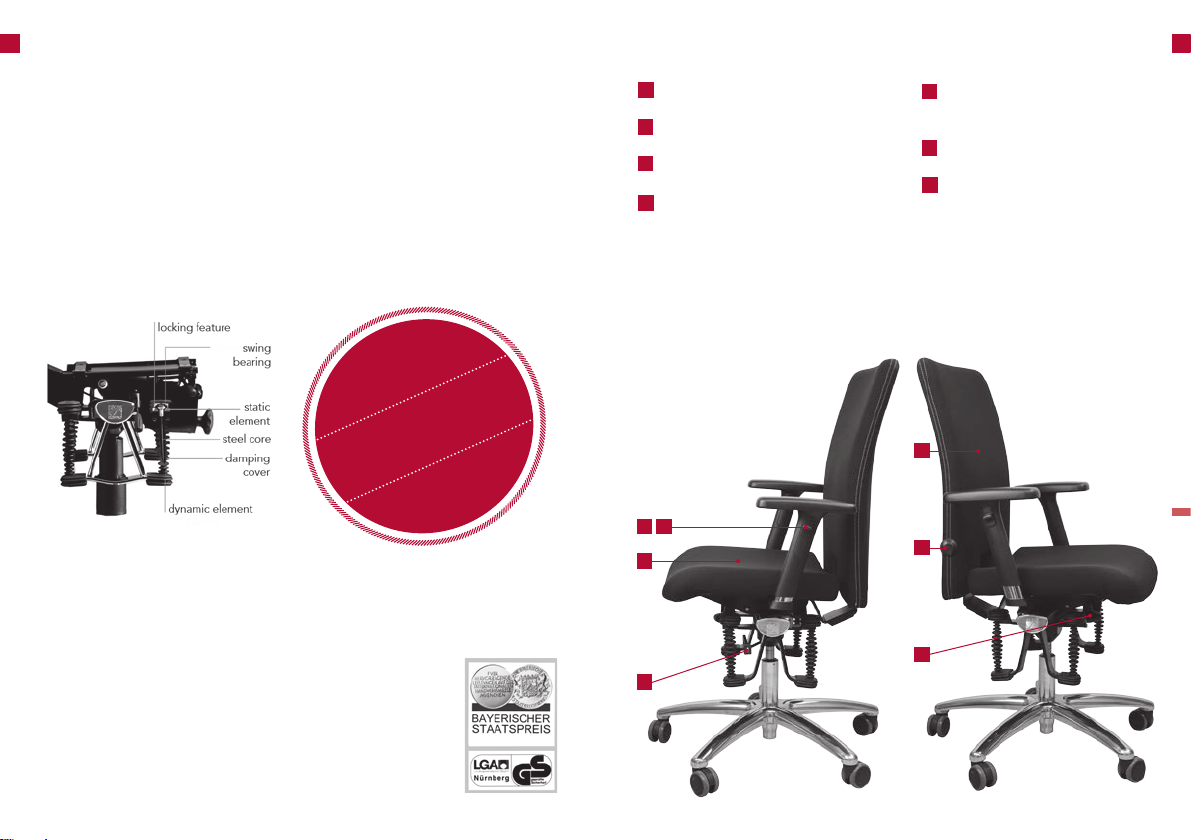
Congratulations on your new HAIDER BIOSWING!
Summary of Operating Elements
HAIDER BIOSWING seating systems come with a unique technology: A multifunctional seat, which can be moved in multiple directions and is dampened
in a controlled manner, dynamically reflecting the body`s energy.
Your brain responds to this by sending constant impulses to your postural
muscles. The body and mind achieve active balance. HAIDER BIOSWING
seating systems significantly increase concentration, well-being, and performance.
The HAIDER BIOSWING Multifunctional Seat.
1st
of the BGIA-Report
„Ergonomic study of
special office chairs“
Editor of the study:
DGUV (German Social
Accident Insurance)
Please read the following instructions in order to be able to use all availa
ble settings .
We wish you great pleasure as soon as you take place in the new HAIDER
BIOSWING experience.
Your HAIDER BIOSWING Team
1
Seat height
Adjustment of backrest
5
height
2
Device for pelvis balance
3
Arm, height adjustable
4
Arm, multifunctional
3 4
2
Lumbar support
6
EcoMatic
7
(backrest tilt)
(Instructions included for each model!)
11
5
6
-
7
1
* Customized settings for each individual`s needs!
english | 14 english | 15
Page 9
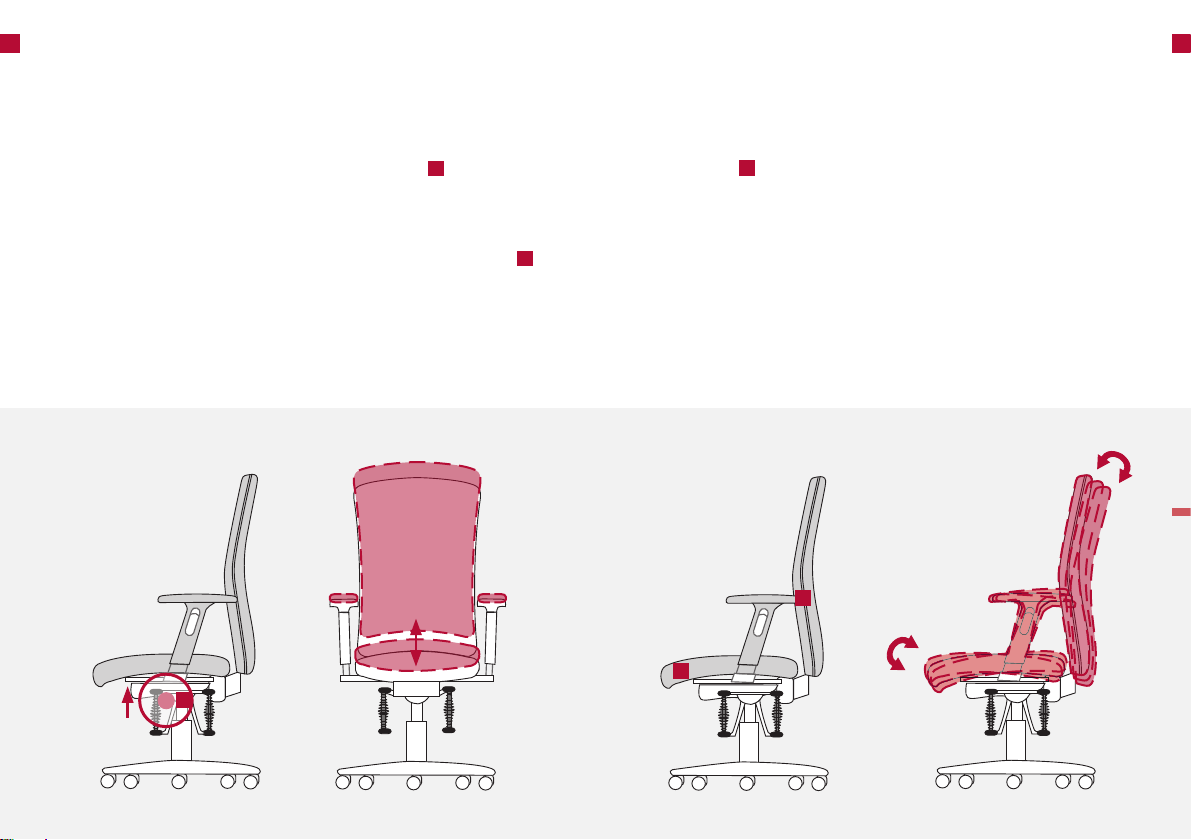
Seat Height
Adjust the height of the seat surface according to the height to the hollow
parts of your knees. Your upper and lower leg form a right to slightly open
angle. Your feet are flat on the floor – without pressure on the upper thighs.
Device for Pelvis Balance
The device for pelvis balance allows you a harmonic adjustment of the seat
surface to different positions. This motivates you to sit actively with an open
angle, thereby promoting the stabilization of your back muscles.
21
Lowering the Seat
While sitting on the chair, pull the operating element upward and re-
1
lease it at the desired position. Please pay attention to the risk of getting
trapped in the foot section.
Raising the Seat
Lightening the load on the seat, pull the operating element upward
1
and release it at the desired position.
1
Device for Pelvis Balance with Permanent-Contact Mechanism
Seat and back
2
automatically follow your movements. Simply shift your
weight to the front or to the back and the seat surface tilts correspondingly.
Further operation is not necessary.
2
2
english | 16 english | 17
Page 10
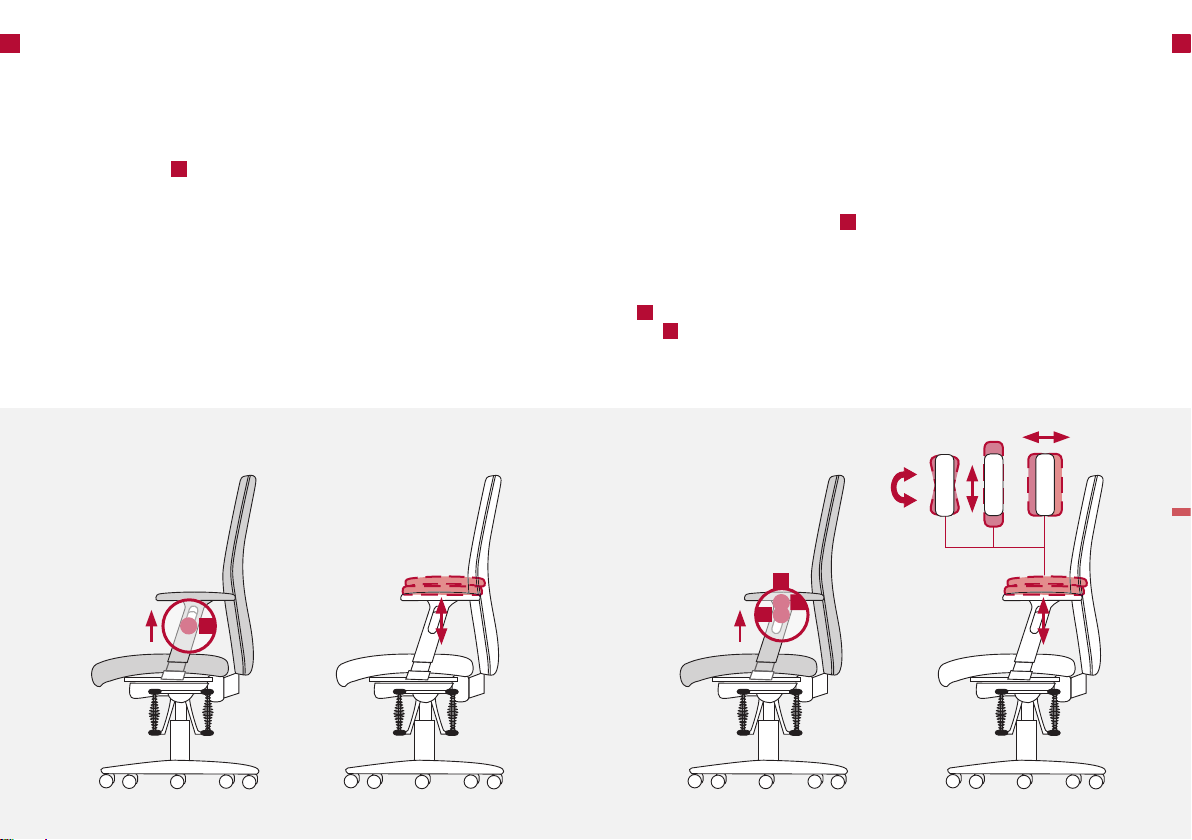
Arm, Height adjustable (1F)
To relieve the strain on shoulders and neck, the arms can be adjusted in
height. Adapt the height so that you do not feel any tension in the shoulder area.
Adjustment of Arm in Height
Pull the operating element upward. At the same time, adjust the arms
at the desired height and then release the cord-pull switch.
(Arms allow adjustment to the width by using the elongated guide with position holes at the beam
holding the arms up. Loosen the screws at the bottom of the seat cushion. Adjust the width by
pulling the arms outward or inward and then tighten the screws firmly.)
3
3
Multifunctional Armrest (4F)
The arm rests may be adjusted in height, in order to relief the shoulder and
neck musculature. Please adjust the height that way, so that you don’t feel
any tightness in the shoulder. Additionally you may align the supports of the
arm rests in width and profundity in accordance with the particular proportions of the upper part of the body, and rotate them in respect to the position of the forearm.
To adjust the height of the armrest
Please, pull upwards the key
the desired height and subsequently loosen the key.
To adjust the width and profundity, or rotate the support of the armrest
You may push by a noticeable locking resistance the supports of the armrest
4b
to the left/right or ahead/rear. By a previous pushing of the operation
key below the support, may be adjusted the rotation of the support.
4c
(The armrests may be adjusted in width by a long hole guiding in the bearing. Loosen the screwson
the lower part of the seat upholstery, establish the width by pulling or pushing the armrest outwards
or inwardly and subsequently tighten the screws again.)
4b
4a
4a
, and simultaneously adjust the supports at
4c
43
english | 18 english | 19
Page 11
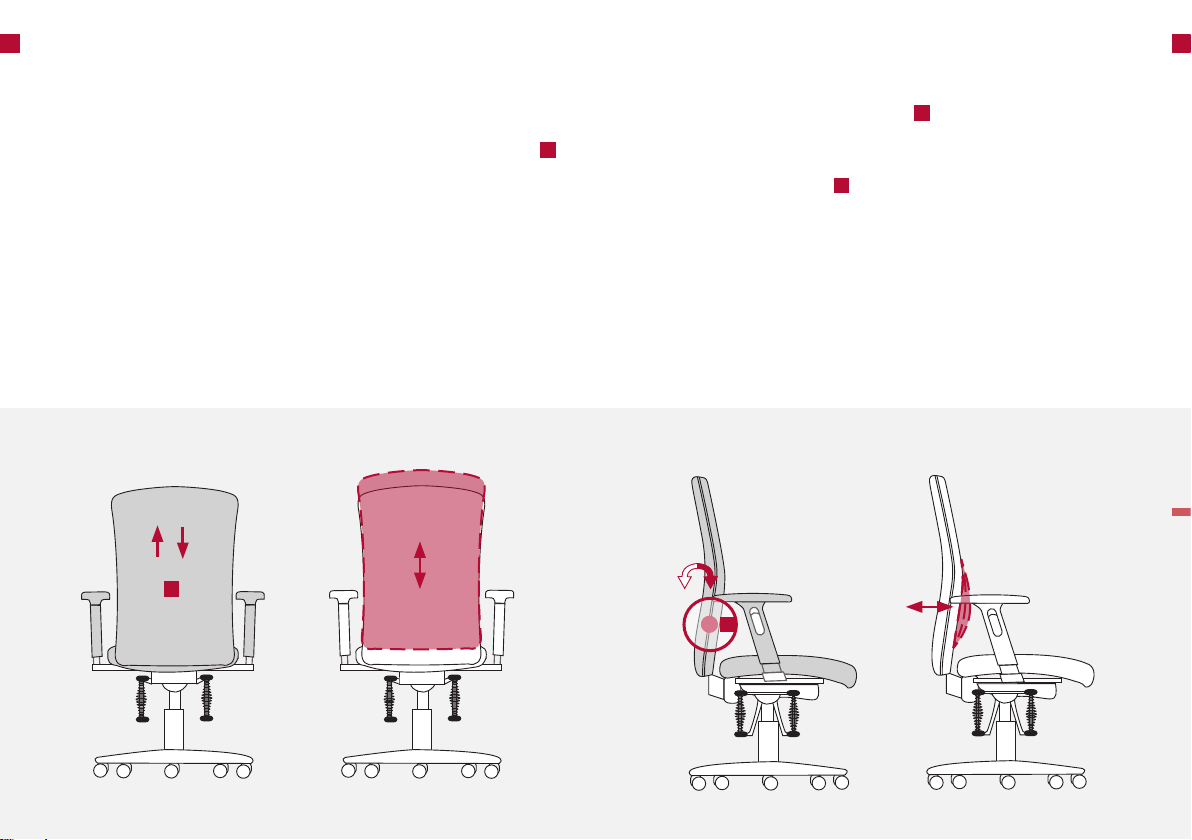
Adjustment of Backrest Height
The backrest height can be individually adjusted to the shape of your spinal column.
Adjustment of Backrest Height
While sitting, reach backward with both hands and adjust the backrest
to the desired height by pushing it upward from the lowest point. Please note
that the backrest can be lowered only from the highest position.
5
5
Lumbar Support
With the adjustable lumbar support mechanism, you can adapt the curvature
in the area of the lumbar lordosis. Adjust the seat curvature approximately
at belt height by adjusting the backrest
timal support.
Adjustment of Lumbar Support to Shape of Back
Operating the rotary control at the backrest forward increases the curva
6
ture of the spine. Operating backward reduces the curvature of the spine.
5
so that your spine receives op-
65
-
6
english | 20 english | 21
Page 12
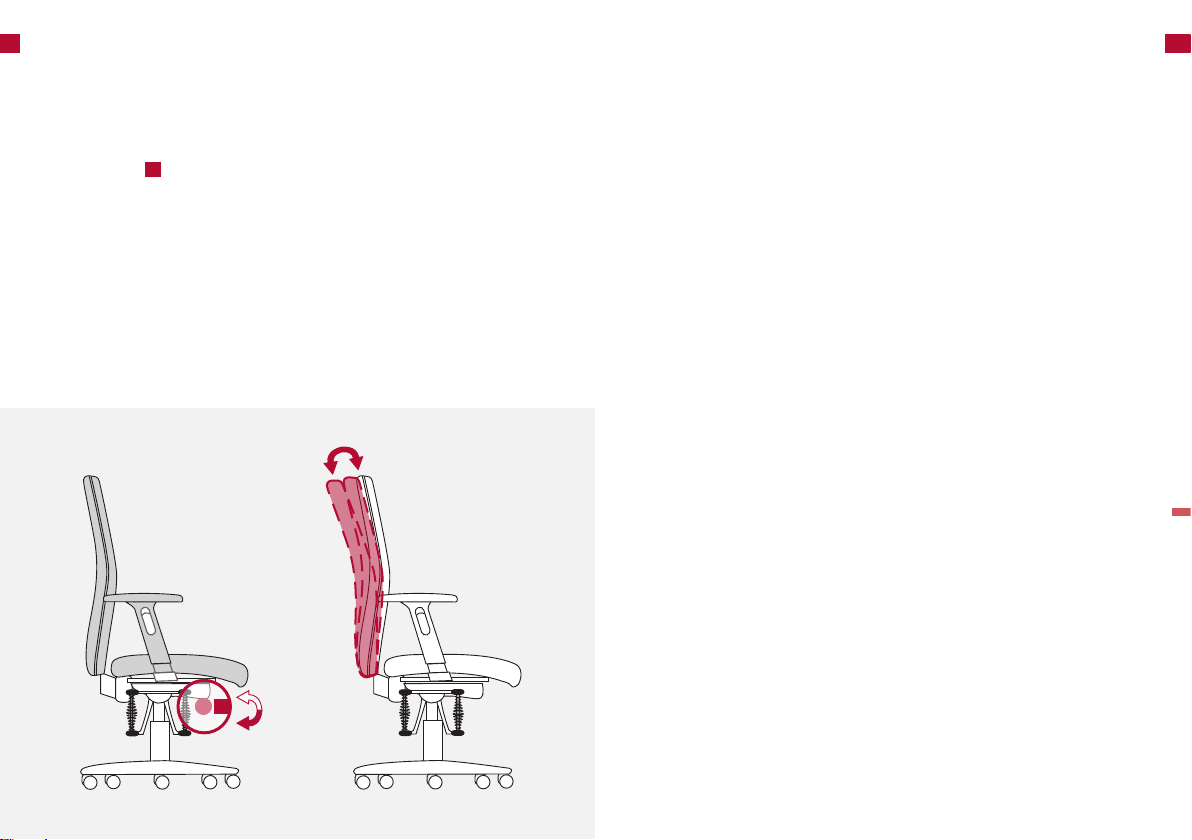
EcoMatic (backrest tilt)
7
Special Notes
The EcoMatic has got an elastic backrest junction. As soon as you lean back,
the backrest follows your motions and drifts back between 5 and 10 degrees
depending on your body weight.
Backrest tilt to adjust individually
Turn the handle to the right; the backrest can be put back up to 29 degrees.
7
Turn the handle to the left to adjust the backlift forwards.
Use the office swivel chair only – as intended – to sit on it. Never stand on
the chair.
Gas Spring
In order to adjust the height, only specialist staff is allowed to make changes
and perform work in the area of the gas spring. Do not heat or open the
pneumatic spring with force.
Castors
For your safety, the office swivel chair is equipped in series with self-braking
castors in order to impede the movement of an empty chair.
Pay attention to the correct choice of castors according to the floor cover
ing.
If the chair is used on a soft floor (e.g. carpet), it should be equipped with
hard castors. Hard castors are single-colored.
If the chair is used on a hard floor (e.g. parquet, linoleum, tiles), it should be
equipped with soft castors. Soft castors are two-colored, which means that
the tread has a different color.
Maintenance and Care
If the office swivel chair is used as intended, it is maintenance-free. Clean
paint/plastic and metal surfaces with a soft hand brush or cloth with mild
detergent, soap, or grease-dissolving liquid. According to how much the
chair is used, a regular cleaning of the upholstery cover is recommended.
The fabric/micro-fiber cover can be made dirt free by vacuum-cleaning it or
with the help of standard dry foam. Leather coverings can be kept smooth
for years by using standard leather-care products (solar radiation). Stains
should be treated immediately. Check the effect of cleaning products first
at a place that is not visible. Otherwise, select cleaning-agents can cause
color discrepancies when compared to the untreated areas.
-
7
english | 22 english | 23
Page 13
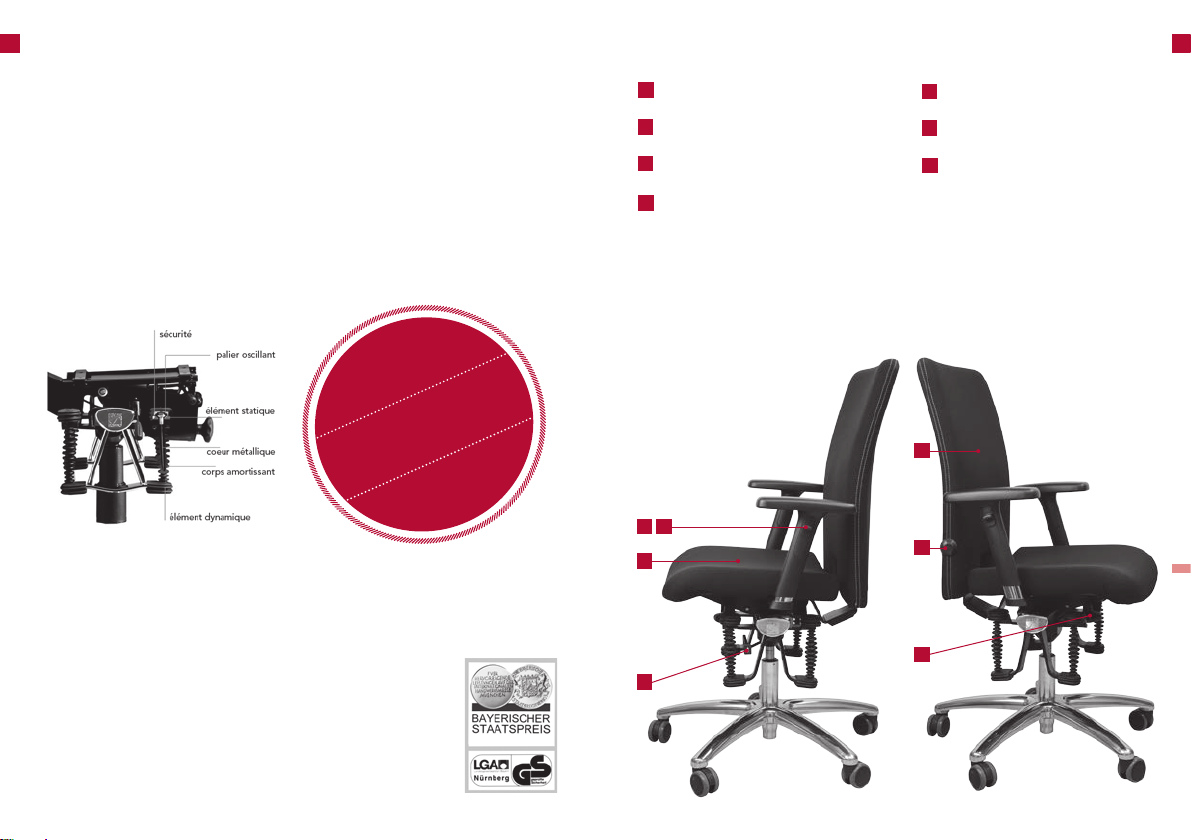
Nous vous félicitons de votre nouvel achat de HAIDER
BIOSWING!
Les systèmes d’assise de HAIDER BIOSWING possèdent une technologie
unique au monde: ils permettent un mouvement amorti et contrôlé dans
toutes les directions (360°) de l’assise, ce mouvement est le reflet de l’énergie dynamique du corps.
Votre cerveau réagit au mouvement du corps par l’envoi de micro pulsions
aux muscles de posture. Le corps et l’esprit se trouvent ainsi dans un équi
libre actif. Les systèmes d’assise de HAIDER BIOSWING stimulent progressivement votre bien-être, votre concentration et vos performances.
Le système d’assise HAIDER BIOSWING.
ELU N° 1
Afin de vous permettre d’optimaliser toutes les options de réglage*,
nous vous conseillons de consulter en détail ce mode d’emploi.
Étude du marché BGIA
«Analyse des sièges de
bureau ergonomiques»
Éditeur:
L’Assurance légale
allemande (DGUV)
Répertoire des réglages
1
Hauteur de l‘assise
2
Balance Bassin
3
Hauteur des accoudoirs
4
-
Accoudoir multifonctionnel
3 4
2
Hauteur du dossier
5
6
Support lombaire
7
EcoMatic
(inclinaison du dossier)
(Options de réglage selon votre choix fait
lors de la commande!)
5
6
Nous vous souhaitons, lorsque vous êtes assis sur votre nouveau
HAIDER BIOSWING, de superbes moments de bien-être.
Votre équipe BIOSWING
*Options de réglage selon votre choix fait lors de la commande!
français | 24 français | 25
7
1
Page 14
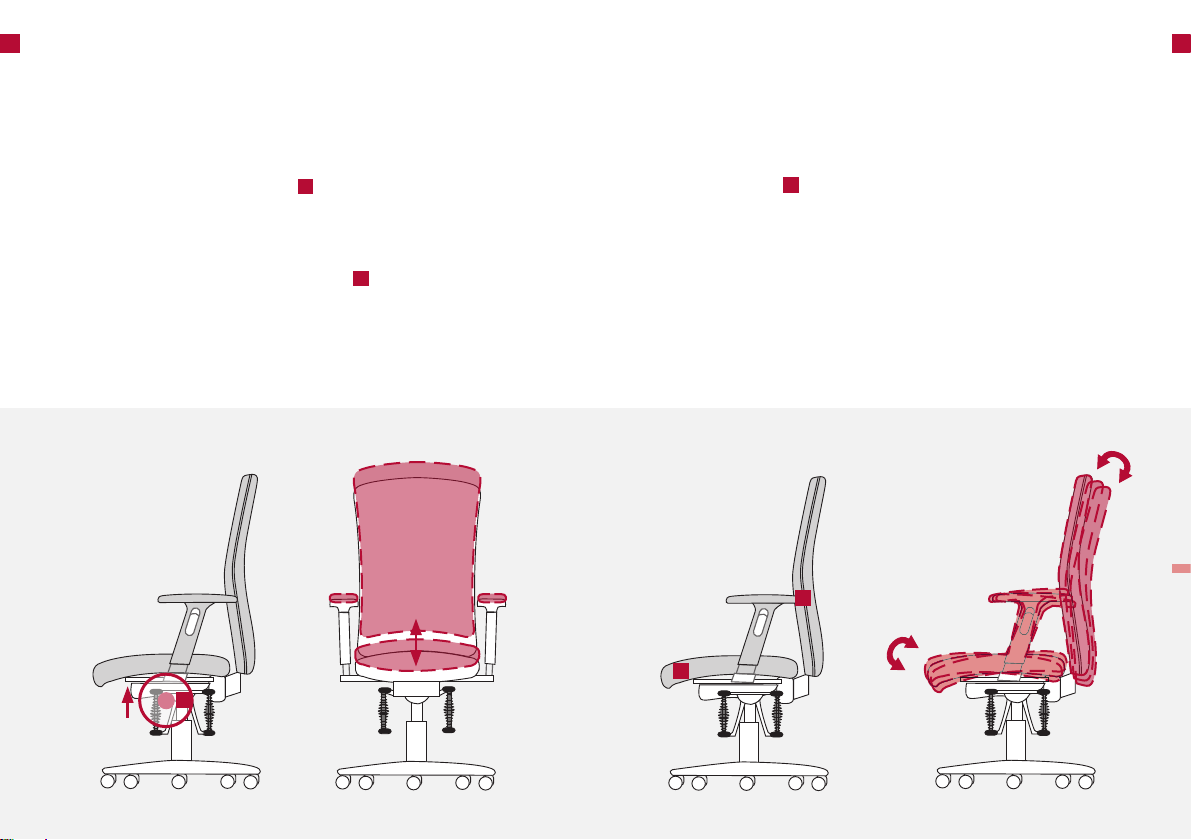
Hauteur de l’assise
Positionner la hauteur du dessus de l’assise à la hauteur du creux poplité.
Votre cuisse et l’intérieur de votre jambe doivent former un angle droit de
90°, ou légèrement plus ouvert selon votre préférence. Les pieds doivent être
positionnés à plat par rapport au sol sans provoquer de pression sur la cuisse.
Balance Bassin
Le système Balance Bassin (Corps Synchrone) permet d’adapter harmonieusement l’assise selon les différentes positions du corps. Ce système incite
la personne à s’asseoir activement: angle ouvert entre les cuisses et le dos.
Cette posture aide à stabiliser les muscles du dos.
21
Baisser l’assise
Quand vous êtes assis, tirer le levier
1
vers le haut et ajuster à la hauteur
souhaitée. Faites attention à ne pas coincer vos pieds entre les bras de
l’étoile du piétement et le dessous de l’assise lors du réglage!
Relever l’assise
Libérer l’assise de tout poids. Tirer le levier
1
vers le haut et lâcher à la
hauteur souhaitée.
1
Balance Bassin avec contact permanent
2
Le dossier et l’assise
du siège suivent automatiquement les mouvements
du corps d’une façon «corps-synchrone». L’inclinaison de l’assise suit automatiquement les déplacements du point de gravité du corps, quand celui-ci
se déplace vers le devant ou l’arrière. Il n’y a pas de réglage, cette option
fonctionne automatiquement.
2
2
français | 26 français | 27
Page 15
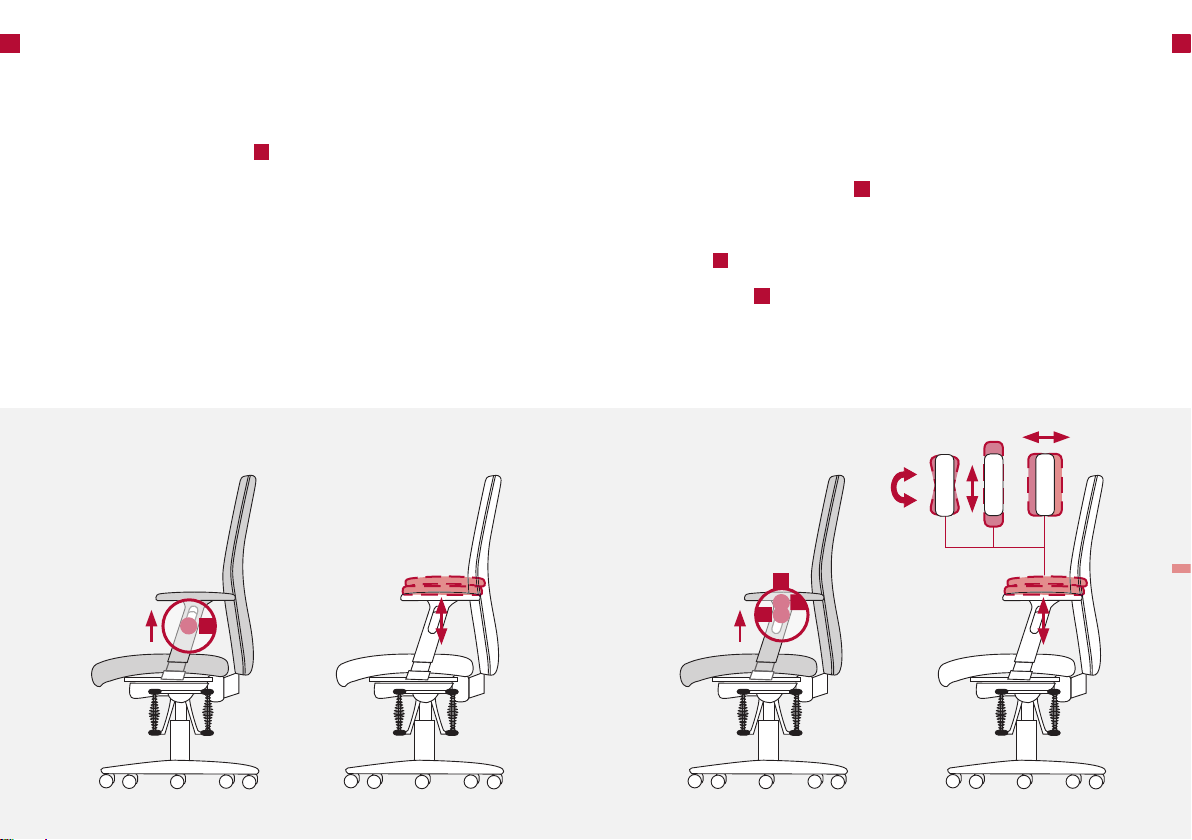
Hauteur des accoudoirs (1F)
Pour soulager les muscles de l’épaule et de la nuque les accoudoirs peuvent
être ajustés en hauteur. Il est nécessaire d’éviter toute tension dans l’épaule.
Adapter l’accoudoir en hauteur
Tirer vers le haut l’interrupteur , simultanément ajuster les accoudoirs et
puis relâcher l’interrupteur.
(Les accoudoirs dans leur totalité peuvent être ajustés en largeur. Dévisser suffisamment les vis en
dessous de l’assise. Pousser ou tirer la barre pour modifier la position d’origine vers l’intérieur ou
l’extérieur. Pour terminer l’opération bien serrer les vis à nouveau.)
3
3
Hauteur des accoudoirs (4F)
Pour soulager les muscles de l’épaule et de la nuque les accoudoirs peuvent
être ajustés en hauteur. Il est très important d’éviter toute tension dans les
épaules. Vous pouvez également adapter la position de la manchette en
largeur, profondeur et orientation selon votre posture.
Adapter l’accoudoir en hauteur
Tirer vers le haut l’interrupteur
puis relâcher l’interrupteur.
Ajuster la manchette en largeur, profondeur et orientation
Débloquer la résistance de la manchette pour ajuster à droite ou à gauche,
4b
vers le devant ou l’arrière, vers l’intérieur ou l’extérieur. Excercer une pression
sur l’interrupteur en dessous de la manchette pour changer l’orientation.
(Les accoudoirs dans leur totalité peuvent être ajustés en largeur. Dévisser suffisamment les vis en
dessous de l’assise. Pousser ou tirer la barre pour modifier la position d’origine vers l’intérieur ou
l’extérieur. Pour terminer l’opération bien serrer les vis à nouveau.)
4c
4b
4c
4a
4a
, simultanément ajuster les accoudoirs et
43
français | 28 français | 29
Page 16
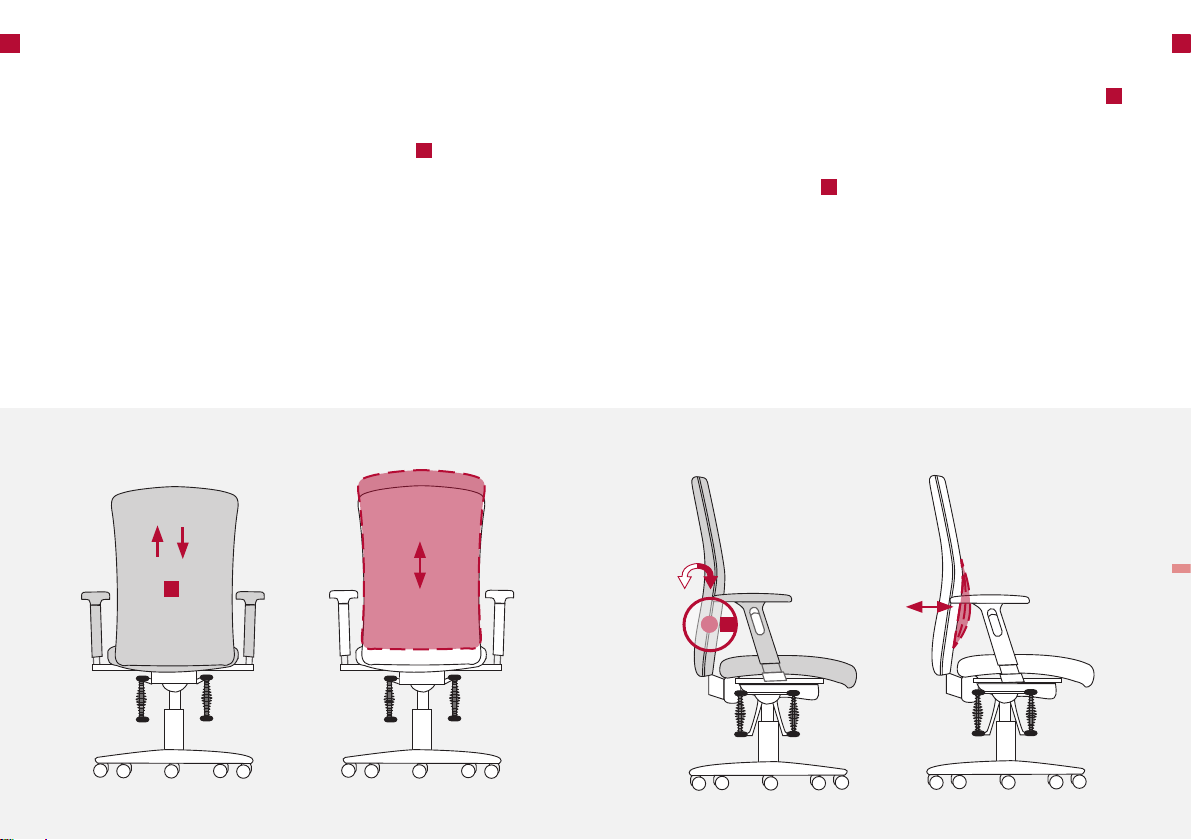
Hauteur du dossier
Support lombaire
65
Vous pouvez adapter la hauteur du dossier à la taille de votre colonne vertébrale et à votre posture personnelle.
Adaptation du dossier en hauteur
5
Lorsque vous êtes assis saisir avec vos mains le dossier
du siège. Hausser
le dossier étape par étape vers le haut, sachant que la dernière étape vous
permettra de faire glisser le dossier à sa position la plus basse. Recommencer
l’opération pour trouver la position qui vous conviendra le mieux.
5
Ce siège permet de régler parfaitement le support lombaire. Pour cela il
faut avant tout positionner l’élément intégré à l’intérieur du dossier à la
5
bonne hauteur par rapport à votre colonne vertébrale: généralement à la
hauteur de la ceinture.
Adapter le support lombaire à la colonne vertébrale
Tourner le bouton rotatif qui se trouve sur le coté du dossier vers le
6
devant pour favoriser la courbure. Tourner dans l’autre sens pour diminuer
la courbure.
6
français | 30 français | 31
Page 17
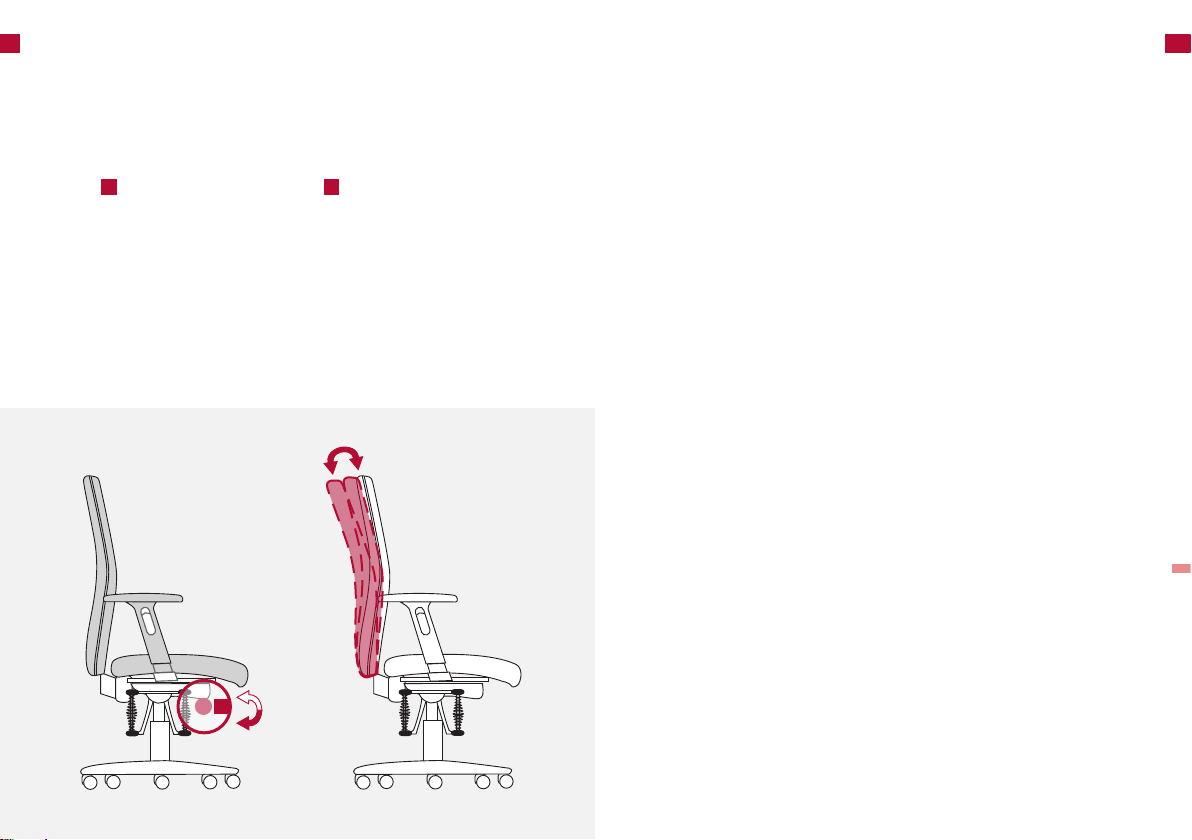
EcoMatic (Inclinaison du dossier)
7
L’EcoMatic possède un dossier flexible. Aussitôt que vous vous reposez
contre le dossier, ce dernier suivra les mouvements du dos et s’inclinera, selon la force exercée, de 5 à 10 degrés vers l’arrière.
Réglage individuel de l’inclinaison
Pour incliner le dossier à l’arrière jusqu’à 29 degrés, il suffit de tourner la
manette à droite. Tourner la manette vers la gauche et le dossier se
77
repositionne en avant.
Conseils spécifiques
Utiliser ce siège uniquement pour s’asseoir! Pour votre sécurité, ne jamais
se mettre debout sur ce siège!
Vérin à gaz
Le changement du lift à gaz et tous travaux se rapportant à cet élément,
ne peuvent être effectués que par des professionnels certifiés et qualifiés
dans ce domaine. Ne jamais chauffer le vérin à gaz ni l’ouvrir de force!
Roulettes
Ce siège est équipé de roulettes «non chargées freinées» Prêter suffisam
ment d’attention au choix des roulettes lors d’un éventuel échange soit
des roulettes, soit du sol. Sur un sol doux (type moquette) ce siège devra
être équipé de roulettes dures (ce type de roulettes est mono-teinté). Sur
un sol dur (type parquet, lino, vinyl…) ce siège devra être équipé de rou
lettes à semelle douce (ce type de roulettes est bi-teinté)
L’entretien et les soins
Lors d’une utilisation normale, ce siège ne demande pas d’entretien. Les éléments métalliques, laqués et plastifiés sont à entretenir avec un balai à main,
chiffon et savon doux. Selon l’utilisation, les revêtements demandent un entretien adapté. Parfois un passage de l’aspirateur est suffisant. Dans le commerce vous trouvez également des produits pour effectuer un nettoyage à
sec. Les cuirs peuvent être entretenus grâce à un entretien régulier avec des
produits spécifiques cuir. Nous vous conseillons de traiter les tâches sans
tarder. N’oubliez pas d’effectuer un test en pulvérisant votre produit sur un
endroit peu visible avant de l’utiliser sur la surface du siège: un nettoyage
ponctuel peut provoquer une décoloration involontaire.
-
-
7
français | 32 français | 33
Page 18

Quality Passport
Certificat de Qualité
This certificate guarantees regular and thorough quality inspections.
HAIDER BIOSWING GmbH guarantees perfect quality and full functionality of its products.
The warranty lasts five years
involved in 8 hours use per day with a maximum weight load of 110kg.
The warranty is valid from date of delivery/distribution of the product to
our contracting partner.
(If you use the product continuously, contact us to request information about the
time of the warranty and the warranty restrictions; the regulations can also be found
on www.bioswing.de.)
This product has been carefully mounted and inspected by our employees.
_________________________
Signature
In case of a complaint, please tell us the following serial number.
Serial number:
Your contracting partner:
in consideration of normal wear and tear
Nous certifions que ce siège est soumis à un contrôle qualité continu
pendant les différentes étapes de sa production y compris un contrôle de
qualité final poussé. La société HAIDER BIOSWING GmbH garanti un chef
d’oeuvre de l’ergonomie doté d’un fonctionnement parfait.
Nous offrons une garantie de 5 ans
La garantie entre en vigueur le jour où le produit quitte l’usine de production. La garantie de base porte sur 5 ans, hors usure normale dans le
temps et lors d’une utilisation normale de 8 heures par jour sans dépasser
la charge maximale de 110 kg.
(La garantie lors d’une utilisation poussée ou dans des conditions spécifiques, les restrictions et les exclusions par rapport à cette garantie générale sont à consulter sur notre
site (www.bioswing.fr) ou disponible sur simple demande auprès de l’usine.)
Chaque produit a été minutieusement crée, assemblé et testé pièce par
pièce par nos collaborateurs à l’usine. Votre siège a été fabriqué par…
_________________________
signature
Nous vous invitons lors d’une éventuelle remarque concernant ce produit,
à nous communiquer son numéro de fabrication unique:
(N° de fabrication unique) Série 350iQ E, 360iQ E
Votre revendeur:
Page 19

Qualitäts-Pass
Dieses Zertifikat garantiert ständige Qualitäts- und sorgfältige Endkontrolle.
Die HAIDER BIOSWING GmbH übernimmt hiermit die Garantie für eine
einwandfreie Beschaffenheit und Funktionsfähigkeit des Produktes.
Die Garantie beträgt 5 Jahre unter Berücksichtigung einer täglich 8-stündigen Nutzungsdauer bei einer maximalen Gewichtsbelastung von 110 kg.
Beginn der Garantiezeit ist der Tag der Übergabe/Auslieferung an unseren Vertragspartner.
(Garantie-Zeit im Schicht- und Dauereinsatz sowie Garantie-Leistung, -Einschränkung
und -Ausschlüsse können Sie bei uns anfordern oder auf www.bioswing.de einsehen.)
Dieses Produkt wurde von unseren Mitarbeitern sorgfältig montiert und
geprüft.
_________________________
Unterschrift
Bei eventueller Beanstandung des Produktes bitten wir Sie uns die nachfolgende Seriennummer mitzuteilen.
Seriennummer:
Ihr Vertragspartner:
k03491-00
 Loading...