


2
Contents
1. About this edition of user instructions ....................................................................... 2
2. Safety precautions ................................................................................................... 3
3. General information .................................................................................................. 5
4. Getting started .......................................................................................................... 6
5. Operation ................................................................................................................. 8
6. Specifications ......................................................................................................... 11
7. Ordering information .............................................................................................. 12
8. Care and maintenance ........................................................................................... 13
9. Warranty ................................................................................................................. 14
10. EU Declaration of conformity .................................................................................. 15
1. About this edition of user instructions
The current edition of the user instructions applies to the following models and ver-
sions of laboratory centrifuges:
LMC-3000 ............................................................................. versions V.6AD, V.6AE
LMC-4200R ......................................................................................... version V.4AD

3
2. Safety precautions
The following symbols mean:
Caution! Make sure you have fully read and understood the present Manual
before using the equipment. Please pay special attention to sections
marked by this symbol.
GENERAL SAFETY
The protection provided can be ineffective if the operation of the appliance does not
comply with the manufacturer's requirements.
Save the unit from shocks and falling.
After transportation or storage and before connecting it to the electric circuit, keep the
unit under room temperature for 2-3 hrs.
Store and transport the unit in a horizontal position (see package label) at ambient
temperatures between -20°C and +60°C and maximum relative humidity of 80%.
According to EN 61010-2-20, people and hazardous materials must not be within a
300 mm area around the device during the centrifuge operation.
Use only original parts and accessories, provided by manufacturer for this product.
Before using any cleaning or decontamination methods except those recommended
by the manufacturer, check with the manufacturer that the proposed method will not
damage the equipment.
Do not make modifications in design of the unit.
ELECTRICAL SAFETY
Connect only to the mains with voltage corresponding to that on the serial number
label.
Do not plug the unit into an ungrounded power socket, and do not use an ungrounded
extension lead.
Ensure that the power plug is easily accessible during use.
Disconnect the unit from the mains before moving.
If liquid penetrates into the unit, disconnect it from the mains and have it checked by
a repair and maintenance technician.
Do not operate the unit in premises where condensation can form. Operating condi-
tions of the unit are defined in the Specifications section.

4
DURING OPERATION
Do not centrifuge flammable or chemically active substances. If such liquids are
spilled on the rotor or rotor chamber, the centrifuge must be cleaned with a moist
cloth and a mild soap solution.
Do not use rotors with visible signs of corrosion, wear or mechanical damage.
Do not use the rotor without fixation nut (see figure below). Fixation procedure is
described in 4.4.
Do not fill in the tubes after they have been inserted in the rotor.
Do not use glass tubes or tubes unsuitable for centrifugation.
Select the correct type of rotor. Some rotors have limited maximum speed (see figure
below). Selection procedure is described in 5.4.3.
Do not leave the operating unit unattended.
Do not operate the unit in environments with aggressive or explosive chemical mix-
tures. Please contact manufacturer for possible operation of the unit in specific atmospheres.
Do not operate the unit if it is faulty or has been installed incorrectly.
Do not use outside laboratory rooms.
Do not place a load exceeding the maximum load value mentioned in the Specifica-
tions section of this manual.
BIOLOGICAL SAFETY
According to EN 61010-2-20, a centrifuge without a lid gasket is not considered a
biologically safe system and therefore cannot be used for centrifuging hazardous materials contaminated with toxic, radioactive or pathogenic microorganisms.
The user is responsible to carry out appropriate decontamination if hazardous mate-
rial spills on or penetrates into the equipment.
Rotor label

5
3. General information
LMC-3000 and LMC-4200R are modern desktop laboratory centrifuges designed for
convenient sedimentation, centrifugation and collection of necessary samples. They provides operation with tubes, blood collection systems, gel cards, microtest and ELISA plates.
Our centrifuges are designed for safe work (metal protecting housing), easy maintenance and wide application range in medical, biochemical, chemical, industrial and other
type of laboratories.
LMC-4200R Refrigerated Laboratory Centrifuge provides temperature control during
centrifugation. Temperature control of the so-called “cold-shelf” is a gold standard for enzy-
mologists, cell biologists, medical laboratory specialists and different discipline professionals
because it ensures conditions necessary for reproducibility of sample preparation stage and
reliable testing results connected with temperature sensitive components (metabolites, enzymes, hormonal factors, cytokines, chemical compounds etc.) and material itself (blood
components, CSF and other thermolabile materials). Temperature control absence at this
stage causes unpredictable results.
FEATURES:
User-friendly centrifugation parameter input and simultaneous display of the set and
actual parameter values.
Safe assay performance: metal protective housing and metal lid, automatic imbal-
ance switch-off, lid lock during the centrifuge operation provide safe operation at all
speeds.
Rotor imbalance automatic diagnostics (emergency stop, imbalance indication).
Low noise level (not more than 65 dBA).
Wide choice of accessory rotors and adapters.
Rotor mode selection.
Different modes of acceleration and deceleration, including deceleration mode with
switched off forced braking.
Possibility to set the speed both in revolutions per minute and by relative centrifugal
force.
Temperature control (model LMC-4200R)
After non-stop centrifugation for 1.5 hours, temperature in the working chamber of
the LMC-3000 model can rise, but not by more than 15°C higher than ambient. In case of
centrifugation of thermally sensitive samples, we recommend using LMC-4200R model, laboratory centrifuge with cooling function.

6
4. Getting started
4.1. Unpacking. Remove packing materials carefully and retain them for future shipment
or storage of the unit. Examine the unit carefully for any damage incurred during
transit. The warranty does not cover in-transit damage. Warranty covers only the units
transported in the original package.
Caution! Due to the high weight of the LMC-4200R unit, its unpacking and in-
stalling must be carried out by two persons.
4.2. Complete set. Package contents:
4.2.1. Standard set:
- Laboratory centrifuge ....................................................................................... 1 pce.
- Power cable .................................................................................................... 1 pce.
- Spare fuse (inside fuse holder) ....................................................................... 1 pce.
- Wrench for rotor fixation .................................................................................. 1 pcs.
- Emergency opening tool (for LMC-4200R)........................................................ 1 pce
- Operating manual, declaration of conformity .................................................. 1 copy
4.2.2. Optional accessories:
- R-6 rotor .................................................................................................... on request
- R-6P rotor .................................................................................................. on request
- R-12/10 rotor ............................................................................................. on request
- R-24/10 rotor (only for LMC-4200R) ......................................................... on request
- R-12/15 rotor ............................................................................................. on request
- R-2 rotor .................................................................................................... on request
- R-24GC rotor for gel cards ........................................................................ on request
- Adapter sets: BN-13/75, BN-13/100 and BN-16/100 (for R-12/10 and R24/10),
AP-96 and AP-384 (for R-2) ...................................................................... on request
- RR-U rotor support stand .......................................................................... on request
R-6 R-6P R-12/10 R-24/10
R-12/15 R-2 R-24GC Adapters
4.3. Setup.
- Place the unit upon even horizontal stable non-flammable surface 30 cm away from
any flammable materials, and clear 20 cm around the device on all sides for ventila-
tion.
- Remove the protective film from the display.

7
- Connect the power cable to the socket on the rear side of the unit, and position it
with easy access to the power switch and plug.
- According to EN 61010-2-20, people and hazardous materials must not be within a
300 mm area around the device during the centrifuge operation.
- (LMC-4200R) Be sure to cork the drain hose (fig. 2/1) on the left side of the unit
with a stopper to prevent the rising of chamber temperature.
4.4. Rotor replacement.
- Check the power cable for any signs of damage. Connect the power cable to a
properly grounded mains socket. Set the power switch on the unit to position I (on).
Press the ▲ Open key (fig. 4/9 or 5/11) and lift the lid by hand.
Caution! Check the rotor and adapters for any signs of wear or corrosion and
replace if necessary.
- Hold the rotor with one hand and, using the supplied wrench for rotor replacement
(13 mm), turn the fixation nut (fig. 1/1) counter clockwise to release the rotor.
- Replace the rotor and secure the new rotor carefully by turning the fixation nut
tightly.
Caution! Do not hold the rotor by rings or adapters mounting when mounting
and fixing it. Hold the rotor as shown on figure 1 (✔).
Caution! Since some plastic tubes and microtest plates can be damaged at
higher speeds, maximum speed is limited for some rotors. Before
centrifugation, select the type of installed rotor on the display, see
5.4.3.
- If the unit will not be used, close the lid carefully and smoothly until a clicking sound
is heard. Set the power switch on the side to position O (off). Disconnect the power
cable from electric circuit.
Figure 1. Rotor fixation
Figure 2. LMC-4200R, left side Figure 3. LMC4200R, right side

8
5. Operation
Recommendations during operation
Use even numbers of tubes arranged symmetrically (one opposite another) when
loading to give the unit even balance during operation. The opposite tubes must be
filled up equally.
Centrifuge rotors must not be filled over the volume specified by the manufacturer.
Do not fill in the tubes after they have been inserted in the rotor.
Do not use glass tubes or tubes unsuitable for centrifugation.
Rotor must always be fixed securely. Stop the operation immediately by pressing and
holding the RUN/STOP ►/■ key for more than 2 seconds if any unusual noise occurs
during acceleration, which can be due to improper rotor fixation.
Since some plastic tubes and microtest plates can be damaged at higher speeds,
maximum speed is limited for some rotors. Before centrifugation, select the type of
installed rotor on the display, see 5.4.3.
Figure 4. LMC-3000 control panel
Figure 5. LMC-4200R control panel
5.1. Check the power cable for any signs of damage. Connect the power cable to a
properly grounded mains socket. Set the power switch on the side to position I (on).
Caution! In model LMC-4200R, cooling system requires some time for start-
up. After powering up, wait for about 4 minutes before centrifugation.
5.2. The centrifuge turns on. The following readouts appear on the display:
- Acceleration and deceleration modes (fig. 4/2 or 5/2);
- Rotor selection (fig. 4/1 or 5/1);
- Set rotor speed in RPM or RCF
1
(fig. 4/6 or 5/6);
- Set chamber temperature, in degrees Celsius (only LMC-4200R, fig. 5/7);
- Status icons of rotor, ■ stopped or ► running (fig. 4/1 or 5/1, first symbol);
- Status icons of lid, closed or open (fig. 4/1 or 5/1, second symbol);
- Set time of centrifugation, in minutes and seconds (fig. 4/4 or 5/4);
- Actual rotor speed, in RPM or RCF (fig. 4/6 or 5/6);
- Actual chamber temperature, in degrees Celsius (only LMC-4200R, fig. 5/8).
1
Revolutions per minute and Relative Centrifugal Force
9
5.3. Press the ▲ Open key (fig. 4/9 or 5/11) and lift the lid by hand. Check the rotor and
buckets for any signs of wear or corrosion and replace if necessary. Insert EVEN
number of tubes/microtest plates in rotor one opposite another. The loading in the
opposite tubes must be equal.
Warning! Check the rotor fixation every 10 days. Tighten the fixation nut if nec-
essary, see figure 1.
5.4. Setting parameters. Use the SELECT ◄ and ► keys (fig. 4/7 or 5/10) to choose a
parameter and the – and + keys (fig. 4/8 or 5/9) to modify it. Selected parameter will
be blinking. Program automatically saves any changes made after no keys are
pressed for 2 seconds.
5.4.1. Acceleration modes (fig. 4/2 or 5/2, first letter). Three modes of acceleration are avail-
able, slow (shortened to S), normal (N) and fast (F).
5.4.2. Deceleration modes (fig. 4/2 or 5/2, second letter). Four modes of deceleration are
available, free brake (0), slow (S), normal (N) and fast (F).
Note. Acceleration and deceleration speed values can be found in the
Specifications section. This information can also be found on the lid
of the unit.
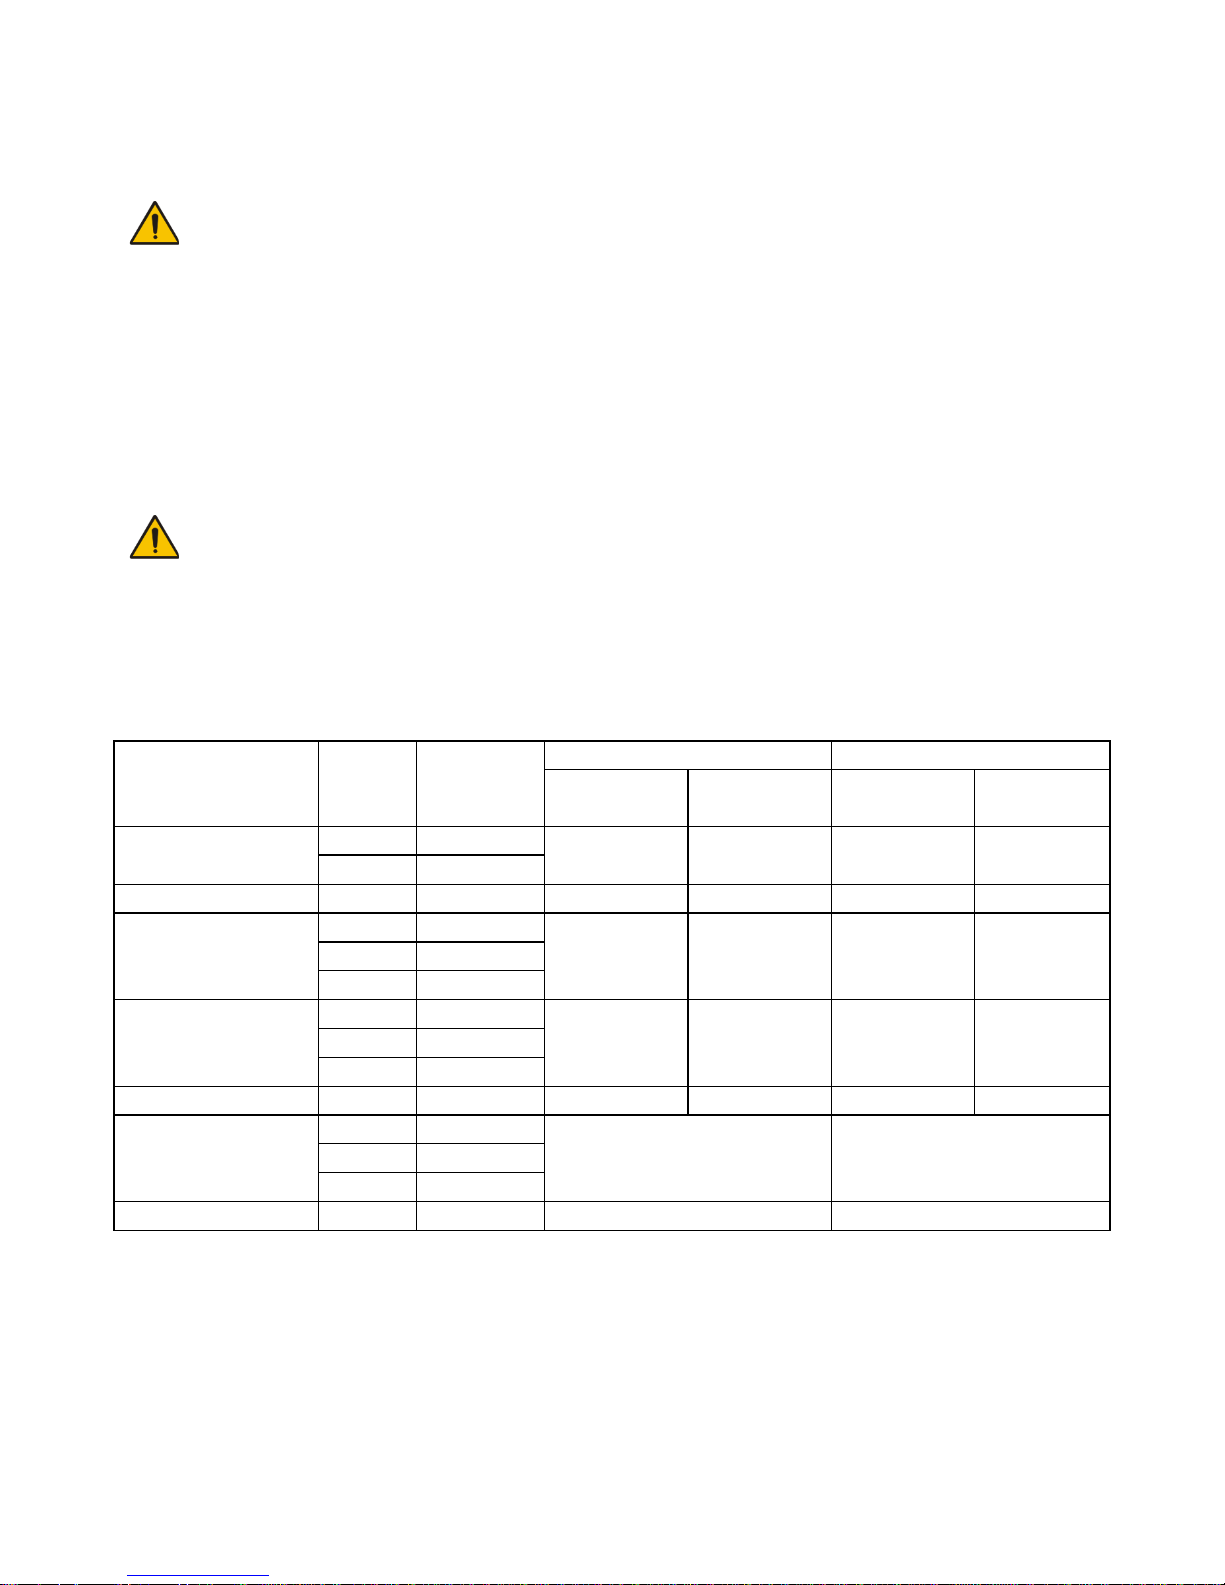
5.4.3. Installed rotor (fig. 4/3 or 5/3). Select the rotor that is currently installed in the centri-
fuge. Combinations of rotors, adapters and their maximum allowed speed is listed
below in the Table 1.
Table 1.
Code on display
(fig. 4/3 or 5/3)
Rotor
Adapter
Maximum speed, RPM
Maximum RCF, g
LMC-3000
LMC-4200R
LMC-3000
LMC-
4200R
R6
R-6
-
3000
4200
1610
3160
R-6P - R12/15
R-12/15
-
3000
4200
1610
3160
R24/10
R-24/10
-
N/A
4000
N/A
2860
R-24/10
BN-16/100
R-24/10
BN-13/100
R12/10
R-12/10
-
3000
4200
1610
3160
R-12/10
BN-16/100
R-12/10
BN-13/100
BN13/75
R-12/10
BN-13/75
3000
4200
1360
2660
R2
R-2
-
2000
560
R-2
AP-96
R-2
AP-384
R24GC
R-24GC - 1500
280
5.4.4. Rotation parameters (fig. 4/5 or 5/5). Rotor speed can be set in RPM and in RCF,
denoted after numeric value by r and g, accordingly. Values convert after changing
units. RCF depends on selected rotor or adapters, as shown in Table 1.
5.4.5. Chamber temperature (fig. 5/7, only for LMC-4200R). Select the chamber tempera-
ture, step 1 °C. Cooling starts independently from centrifugation.

10
Warning! Chamber surface may become very cold. Avoid touching the surface.
5.4.6. Time setting (fig. 4/4 or 5/4). Select duration of centrifugation in minutes, step 1 mi-
nute.
5.5. Close the lid carefully and smoothly until a clicking sound is heard. Icon appears on
the display (fig. 4/1 or 5/1).
Note. If the icon did not appear on the display, program does not start the
centrifugation. Try to open and close the lid again.
5.6. Press the RUN/STOP ►/■ key (fig. 4/10 or 5/12) to start centrifugation. Icon ► (fig.
4/1 or 5/1) and actual speed (fig. 4/6 or 5/6) are shown in the lower line of the display.
The timer (fig. 4/4 or 5/4) starts the countdown after set speed is achieved.
Note. If the rotor imbalance occurs causing vibration the centrifuge stops
automatically (IMBALANCE indication appears on the display). In this
case, open the lid after the rotor has stopped and remedy the cause
of imbalance.
5.7. Centrifugation is stopped automatically after the set time elapses. A sound signal is
emitted after full stop of the rotor. Press the RUN/STOP ►/■ key to stop the signal.
5.8. If necessary, centrifugation can be stopped before the set time elapses. Press the
RUN/STOP ►/■ key. Rotor stops according to set deceleration mode.
Note. For emergency, to apply fast braking regardless of set deceleration
mode, press and hold RUN/STOP ►/■ key for more than 2 seconds.
5.9. Press the ▲ Open key and open the lid by lifting it upwards with your hand. It is
possible to unlock and open the lid only when the rotor is stopped. Display shows
icon.
5.10. (For LMC-4200R) Wipe clean the chamber from ice and condensation, see 8.3.3 for
additional information.
5.11. At the end of operation, set the Power switch in position O (OFF) on the rear panel
of the unit. Disconnect the power cord from the mains.
Note. The electrical lid lock allows opening the lid only when the unit is con-
nected to the mains and is turned on. Do not force the lid to open
when the unit is switched off!
5.12. Lid emergency opening.
5.12.1. Disconnect the power cord from the mains. Ensure that the rotor has stopped.
5.12.2. LMC-3000. Slide the unit to the front of the bench to access the emergency opening
slot on the underside of the unit (located in the front side). Avoid tilting the unit as this
may cause spilling of the materials from the containers inside the unit. Insert a small
screwdriver (or similar tool with diameter up to 3 mm) into the emergency opening
slot in front of the dot on the label “Open” at a depth of 10-15 mm. Move the lever to
the arrow direction until a click is heard and open the unlocked lid..
5.12.3. LMC-4200R. Insert the emergency opening tool into the slot on the right side of the
unit, above the power switch (fig. 3/1). Push until a click is heard and open the un-
locked lid.

11
6. Specifications
The unit is designed for operation in cold rooms and closed laboratory rooms at am-
bient temperature from +4°C to +40°C in a non-condensing atmosphere and maximum rel-
ative humidity 80% for temperatures up to 31°C decreasing linearly to 50% relative humidity
at 40°C.
Biosan is committed to a continuous programme of improvement and reserves the
right to alter design and specifications of the equipment without additional notice.
LMC-3000
LMC-4200R
Speed setting
range
In RPM
100 – 3000 RPM
100 – 4200 RPM
In RCF1
10 – 1610 g
10 – 3160 g
Speed increment
100 RPM or 10 g
Timer setting
1 – 90 min
Timer increment
1 min
Acceleration,
RPM/s
Slow mode
50
50
Normal mode
75
75
Fast mode2
135
150
Deceleration,
RPM/s
Brakes off2
30
30
Slow mode 8 8
Normal mode
45
50
Fast mode2
135
150
Temperature setting range
-
-10 °C … +25 °C
Stable temperature
maintenance range
-
25 °C below ambient …
+25 °C
Temperature setting resolution
-
1 °C
Rotor imbalance automatic diag-
nostics
Emergency stop, display indication “IMBALANCE”
Rotation direction
Counterclockwise
Display
2x16 characters, LCD
2x24 characters, LCD
Noise level
≤ 60 dBA
≤ 65 dBA
Chamber diameter
340 mm
360 mm
Dimensions
495x420x235 mm
635x580x335 mm
Power consumption
110 W (V.6AD);
120 W (V.6AE)
990 W
Operational voltage
230 V, 50/60 Hz (V.6AD);
120 V, 50/60 Hz (V.6AE)
230 V, 50/60 Hz
Weight3
11.8 kg
56 kg
1
Relative Centrifugal Force
2
Depending on the load
3
Accurate within ±10%

12
7. Ordering information
7.1. Models and versions available:
Model
Version
Description
Catalogue number
LMC-3000
V.6AD
230 V, 50/60 Hz
BS-010208-AAA
V.6AE
120 V, 50/60 Hz
LMC-4200R
V.4AD
230 V, 50 Hz
BS-010212-AAA
7.2. To inquire about or order the optional accessories or the replacement parts, contact
Biosan or your local Biosan representative.
7.2.1. Optional accessories. Rotors and rotor holder.
Model
Description
Maximum speed1 / RCF2
Catalogue num-
ber
LMC-3000
LMC-4200R
R-6
For 6 conical centrifuge tubes of 50 ml,
with aluminium tube holders,
ØxH: 40x103 mm
3000 RPM /
1610g
4200 RPM /
3160g
BS-010208-DK
R-6P
For 6 conical centrifuge tubes of 50 ml,
with plastic tube holders,
ØxH: 40x103 mm
3000 RPM /
1610g
4200 RPM /
3160g
BS-010208-XK
R-12/15
For 12 conical centrifuge tubes
of 15 ml, ØxH: 17x120 mm
3000 RPM /
1610g
4200 RPM /
3160g
BS-010208-EK
R-12/10
For 12 round-bottom centrifuge tubes
of 10-15 ml, ØxH: 16x90 mm
3000 RPM /
1610g
4200 RPM /
3160g
BS-010208-BK
R-24/10
For 24 round-bottom centrifuge tubes
of 10-15 ml, ØxH: 16x90 mm
N/A
4000 RPM /
2860g
BS-010212-JK
R-2
For 2 standard 96-well microplates,
LxWxH
max
128x85.6x45 mm
2000 RPM /
560g
2000 RPM /
560g
BS-010208-AK
R-24GC
For 24 of 8-column gel cards for blood
group serology testing, LxW 53x74 mm
1500 RPM /
280g
1500 RPM /
280g
BS-010208-VK
RR-U
Rack for rotors
BS-010208-UK
7.2.1.1 Centrifuge tube and microplate manufacturers: Corning, Falcon, Greiner Bio-one,
Nunc, Sarstedt.
7.2.1.2 Gel card manufacturers: Grifols, Diamed.
7.2.2. Optional accessories. Rotor adapter sets.
Model
For rotor
Description
Max. RCF2
Catalogue
number
BN-13/75
R-12/10
Adapters for 2-5 ml vacutainers
(ØxH: 13x75 mm)
1360g
BS-010208-
PK
BN-13/100
R-12/10
Adapters for 4-8 ml vacutainers
(ØxH: 13x100 mm)
1610g
BS-010208-
QK
R-24/10
3160g
BN-16/100
R-12/10
Adapters for 8-9 ml vacutainers
(ØxH: 16x100 mm)
1610g
BS-010208-
RK
R-24/10
3160g
AP-96
R-2
Adapters for unskirted or semi-skirted 96well microplates (LxWxH
max
: 128x85.6x45
mm)
560g
BS-010219-
DK
AP-384
R-2
Adapters for 384-well microplates
(LxWxH
max
: 128x85.6x45 mm)
560g
BS-010219-
EK
1
Accurate within ±5%
2
Relative Centrifugal Force

13
7.2.3. Replacement parts. Rotor adapter sets.
Model
For rotor
Description
Max. RCF1
Catalogue
number
BN-11/30
R-6P
Adapters for 6 of 50 ml centrifuge tubes
(ØxH: 40x103 mm)
1610g
BS-010208-ZK
BN-17/120
R-12/15
Adapters for 12 of 15 ml centrifuge tubes
(ØxH: 17x120 mm)
1610g
BS-010208-TK
BN-16/90
R-12/10
Adapters for 12 of 10-15 ml centrifuge tubes
(ØxH: 16x90 mm)
1610g
BS-010208-SK
R-24/10
3160g
8. Care and maintenance
8.1. If the unit requires maintenance, disconnect the unit from the mains and contact Bio-
san or your local Biosan representative.
8.2. All maintenance and repair operations must be performed only by qualified and spe-
cially trained personnel.
8.3. Cleaning and desinfection.
8.3.1. Standard ethanol (75%) or other cleaning agents recommended for cleaning of labor-
atory equipment can be used for cleaning and decontamination of the unit.
8.3.2. Disinfect the unit after operation by cleaning the parts inside the centrifuge chamber.
The rotor and other accessories are autoclavable (120°С, 20 min).
8.3.3. (For LMC-4200R) Wipe away any ice and condensation in the working chamber after
operation. For the ease of cleaning, chamber is equipped with a drain hole with tube
(fig. 2/1).
8.3.4. (For LMC-4200R) Clean the condenser of the unit at least once per year. Disconnect
from electric circuit. Unscrew 4 screws and remove the grate on the rear panel of the
unit, then vacuum the condenser. Replace the grate and screws.
8.4. Fuse replacement. Disconnect the power cable from the mains. Disconnect the
power cable from the socket on the rear of the unit. Open the fuse holder, located
near the socket. Check and replace with a correct fuse if necessary, see table below:
Model & version
Fuse2
LMC-3000 V.6AD, 230 V, 50/60 Hz
M 1 A
LMC-3000 V.6AE, 120 V, 60 Hz
M 2 A
LMC-4200R V.4AD, 230 V, 50/60 Hz
M 6.3 A
Figure 6. Fuse holder
1
Relative Centrifugal Force
2
Fuse type M - time lag Medium

14
9. Warranty
9.1. The Manufacturer guarantees the compliance of the unit with the requirements of
Specifications, provided the Customer follows the operation, storage and transporta-
tion instructions.
9.2. The warranted service life of the unit from the date of its delivery to the Customer is
24 months, excluding optional accessories mentioned in the section Ordering infor-
mation. For extended warranty, see 9.5.
9.3. Warranty covers only the units transported in the original package.
9.4. If any manufacturing defects are discovered by the Customer, an unsatisfactory
equipment report shall be compiled, certified and sent to the local distributor address.
To obtain the claim form, visit Technical support page on our website at link below.
9.5. Extended warranty.
For LMC-4200R, the Premium class model, one year of extended warranty is availa-
ble free of charge after registration, during 6 months from the date of sale. Online
registration form can be found in section Warranty registration on our website at the
link below.
For LMC-3000, the Basic Plus class model, extended warranty is a paid service.
Contact your local Biosan representative or our service department through the Tech-
nical support section on our website at the link below.
9.6. Description of the classes of our products is available in the Product class descrip-
tion section on our website at the link below.
Technical support
Registration
Product class description
biosan.lv/en/support
biosan.lv/register-en
biosan.lv/classes-en
9.7. The following information will be required in the event that warranty or post-warranty
service comes necessary. Complete the table below and retain for your records.
Model
LMC-3000 & LMC-4200R, Laboratory centrifuges
Serial number
Date of sale

15
10. EU Declaration of conformity
Unit type Mini-centrifuge, laboratory centrifuges
Models Microspin 12, LMC-3000, LMC-4200R
Serial number 14 digits styled XXXXXXYYMMZZZZ, where XXXXXX is
model code, YY and MM – year and month of production,
ZZZZ – unit number.
Manufacturer SIA BIOSAN
Latvia, LV-1067, Riga, Ratsupites str. 7/2
Applicable Directives EMC Directive 2014/30/EU
LVD Directive 2014/35/EU
RoHS2 2011/65/EU
WEEE 2012/19/EU
Applicable Standards LVS EN 61326-1: 2013
Electrical equipment for measurement, control and
laboratory use. EMC requirements. General requirements.
LVS EN 61010-1: 2011
Safety requirements for electrical equipment for
measurement, control, and laboratory use. General
requirements.
LVS EN 61010-2-020: 2006
Particular requirements for laboratory centrifuges.
We declare that this product conforms to the requirements of the above Directives
____________________ ____________________
Signature Signature
Svetlana Bankovska Aleksandr Shevchik
Managing director Engineer of R&D
____________________ ____________________
Date Date

Biosan SIA
Ratsupites 7, build.2, Riga, LV-1067, Latvia
Phone: +371 67426137 Fax: +371 67428101
http://www.biosan.lv
Edition 4.-6.02 – December of 2018
 Loading...