

Page 1
InSTRuCTIOn
manual
blOOD pRESSuRE mOnITOR
with BP Advisor™ Technology
Wrist
Page 2

Table of Contents
1. Introduction
1.1 Features
1.2 Important Information
1.2A Safety Information
2. About Blood Pressure
2.1 Normal Blood Pressure Values
2.2 Common Blood Pressure Questions and Answers
2.3 What is mean arterial pressure (MAP)?
3. Getting Started
3.1 About the BD401
3.2 About the LCD Screen
3.3 Inserting the Batteries
3.4 Discontinuing a Measurement
4. Using the Device
4.1 Setting Date, Time, Language And Measurement Units
4.2 Obtaining Accurate Measurements
4.2A Before Measuring
4.2B Fitting the Wrist
4.2C Choose Your Measurement Position
4.3 Measuring Your Blood Pressure
4.4 Recalling Measurements Stored In Memory
4.5 Deleting A Measurement Record From Memory
4.6 Discontinue A Measurement
4.7 Voice Playback Of Blood Pressure Measurement
5. Troubleshooting
6. Care and Maintenance
7. Lifetime Guarantee
8. Reference to Standards
9. Technical Specifications
10. Contacts for Support
Talking Wrist Blood Pressure Monitor
Instruction Manual
Page 3

1. Introduction
Thank you for purchasing the BIOS Diagnostics™ Talking Wrist Blood Pressure Monitor.
Designed for convenience and easy operation, this device provides you with voice
directions on how to take blood pressure correctly. It also announces your blood pressure
reading, and lets you know how your systolic and diastolic numbers rate according to the
World Health Organization (WHO) guidelines.
1.1 Features
• Voice prompt on how to take blood pressure correctly
• Announces and displays:
- Systolic and diastolic pressure, and how they compare to WHO guidelines
- Pulse rate
- Mean arterial pressure
• Memory recalls 2 users, 60 measurements each
• Volume adjustment
Readings taken by the blood pressure monitor are equivalent to those obtained by a
trained observer using the cuff and stethoscope method. Clinical performance were
successfully done against ANSI/AAMI SP10 and international protocol, and The B.H.S.
which has rated this product “recommended for clinical and home use”, this is the highest
grading available for blood pressure monitors. Please refer to BHS website http://www.
bhsoc.org/bp_monitors/automatic_wrist.stm.
Before using the BD401, please read this instruction manual carefully and keep it in safe
place.
1.2 Important Information
Refer to the following sections to learn about important safety instructions and how to
take care of the BIOS Diagnostics
™
Talking Wrist Blood Pressure Monitor.
1.2A Safety Information
• Self measurement means control, not diagnosis or treatment. Your values must always
be discussed with your doctor or a physician who is familiar with your family history.
• If you are undergoing medical treatment and receiving medication, consult your doctor
to determine the most appropriate time to measure your blood pressure. Never alter the
dosages of any medication without direction from your doctor.
• The pulse display is not suitable for checking the frequency of heart pacemakers.
• If you have been diagnosed with a severe arrhythmia or irregular heartbeat, vascular
constriction, liver disorders, or diabetes, have a cardiac pacemaker, or are pregnant,
measurements made with this instrument should only be evaluated after consultation
with your doctor.
2
Page 4

• Morning Hypertension ( > 135 / 85 mm Hg): Recently, several studies have identified
elevated cardiovascular risks (heart failure, stroke, angina) associated with “morning
hypertension”. There is a typical rise in blood pressure during the physiological
changes from sleep to arising for the day.
• This device is intended for adult use only.
2. About Blood Pressure
Your blood pressure is an important parameter that can be used to monitor your health.
This device enables you to monitor your blood pressure regularly and maintain a record of
your blood pressure measurements. You can then use this record to assist your physician
in diagnosing and maintaining a healthy blood pressure level. Your blood pressure level is
determined in the circulatory center of your brain. Your nervous system allows your body
to adapt or alter blood pressure in response to different situations. Your body alters your
pulse or heart rate and the width of blood vessels through changes in muscles in the walls
of blood vessels.
Your blood pressure reading is highest when your heart pumps or ejects blood. This stage
is called your systolic blood pressure.
Your blood pressure is lowest when the heart rests (in-between beats). This is called your
diastolic blood pressure.
• Your blood pressure depends on several factors, such as age, gender, weight, and
physical condition It also depends on the environment and your state of mind at the
time of measurement. In general, your blood pressure is lower when you are asleep
and higher when you are active. Your blood pressure may be higher when recorded
at a hospital or a clinic and may be lower when measured in the relaxing comfort of
your home. Due to these variations, we recommend that you record your blood pressure
regularly at home as well as at your doctor’s clinic.
• Try to record your blood pressure regularly at the same time of the day and under the
same conditions. This will help your physician detect any extreme variations in your
blood pressure and thus treat you accordingly. The ideal time to measure your blood
pressure is in the morning just after you wake up before breakfast and any physical
activity, and in the absence of the urge to urinate. If this is not possible, try to take the
measurements later in the morning, before you start any physical activity. Relax for a
few minutes before you record your blood pressure.
• It is critical to maintain blood pressure values within a “normal” range in order to
prevent cardiovascular diseases. Increased blood pressure values (various forms of
hypertension) have associated long and medium term health risks. These risks concern
the arterial blood vessels of your body, which are endangered due to constriction
caused by deposits in the vessel walls (arteriosclerosis). A deficient supply of blood to
3
Page 5

important organs (heart, brain, muscles) can be the result. Furthermore, with long-term
increased blood pressure values, the heart will become structurally damaged.
• There are many different causes of the appearance of high blood pressure. We
differentiate between common primary (essential) hypertension, and secondary
hypertension. The latter group can be ascribed to specific organic malfunctions. Please
consult your doctor for information about the possible origins of your own increased
blood pressure values.
2.1 Normal Blood Pressure Values
Blood pressure is too high when, at rest, the diastolic pressure is above 90 mmHg or the
systolic blood pressure is over 140 mmHg.
If you obtain readings in this range, consult your doctor immediately. High blood pressure
values over time can damage blood vessels, vital organs such as the kidney, and your
heart.
Should the systolic blood pressure values lie between 140 mmHg and 160 mmHg or the
diastolic blood pressure values lie between 90 mmHg and 95 mmHg, consult your doctor.
Regular self-checks will be necessary.
With blood pressure values that are too low (i.e., systolic values under 105 mmHg or
diastolic values under 60 mmHg), consult with your doctor.
Even with normal blood pressure values, a regular self-check with your blood pressure
monitor is recommended. This way you can detect possible changes in your values early
and react appropriately.
Refer to the following table for classifying blood pressure values (units: mmHg) according
to the World Health Organization (WHO):
Category Systolic Blood Pressure Diastolic Blood Pressure
Optimal < 120 < 80
Normal < 130 < 85
High Normal 130 - 139 85 - 89
Hypertension
• Stage 1: Mild
• Stage 2: Moderate
• Stage 3: Severe
140 - 159
160 - 179
> 180
90 - 99
100 - 109
> 110
Isolated Systolic Hypertension > 140 < 90
4
Page 6
Further information
If your values are mostly “normal” under resting conditions but exceptionally high under
conditions of physical or psychological stress, it is possible that you are suffering from socalled ”labile hypertension”. In any case, please discuss the values with your doctor.
Correctly measured diastolic blood-pressure values above 120mmHg require immediate
medical treatment.
2.2 Common Blood Pressure Questions and Answers
a) Why is my blood pressure reading always different?
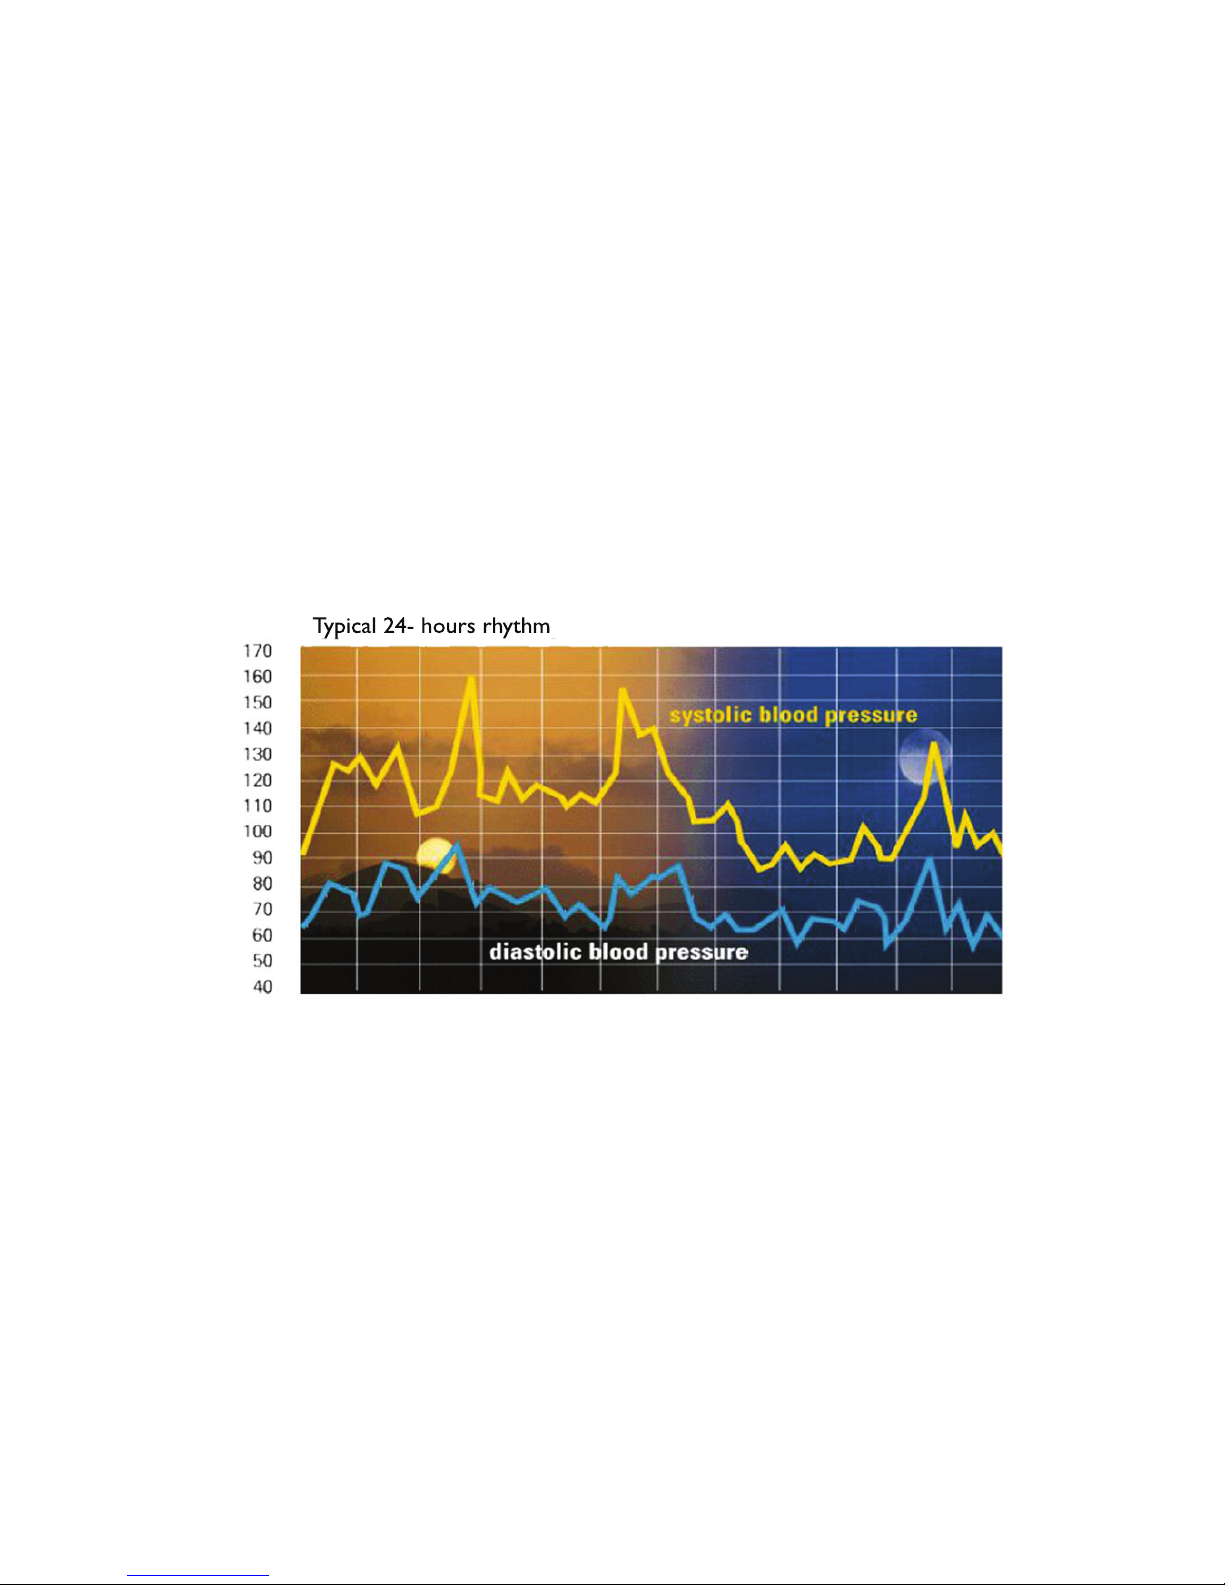
Your blood pressure changes constantly. It is quite normal for blood pressure to fluctuate
significantly (50 mmHg to 60 mmHg) throughout the day. Blood pressure is normally lowest
at night, but increases during waking hours when the stress and activities of everyday
life are highest.
mmHg
AM Time PM
Your blood pressure also increases and decreases under the following circumstances
Blood pressure is higher than normal:
• when you are excited, nervous, or tense
• while taking a bath
• during and after exercise or strenuous physical activity
• when it is cold
• within one hour after meals
• after drinking tea, coffee, or other caffeinated drinks
• after smoking tobacco
• when your bladder is full
5
Page 7

Blood pressure is lower than normal:
• after consuming alcohol
• after taking a bath
b) Why is the doctor’s reading different from the reading taken at home?
Your blood pressure can vary due to the environment (temperature, nervous condition).
When measuring blood pressure at the doctor’s office, it is possible for blood pressure
to increase due to anxiety and tension.
c) Why should I monitor blood pressure at home?
One or two readings will not provide a true indication of your normal blood pressure. It
is important to take regular, daily measurements and to keep records over a period of
time. This information can be used to assist your physician in diagnosing and
preventing potential health problems.
2.3 What is mean arterial pressure (MAP)?
The mean arterial pressure (MAP) is the average pressure that forces blood through the
arteries. It is not the average of the systolic and diastolic blood pressure; rather, MAP
corresponds to a state of balance between the compressive and expansive forces acting
on the arterial wall when there is no distension outward or inward. MAP is an excellent
way to evaluate the stress on the walls of your blood vessels, and can be used to evaluate
excessive load on the cardiovascular system. Show your MAP history to your doctor to
provide additional information that may help him or her understand your situation.
6
Page 8
3.0 Getting Started
3.1 About the BD401
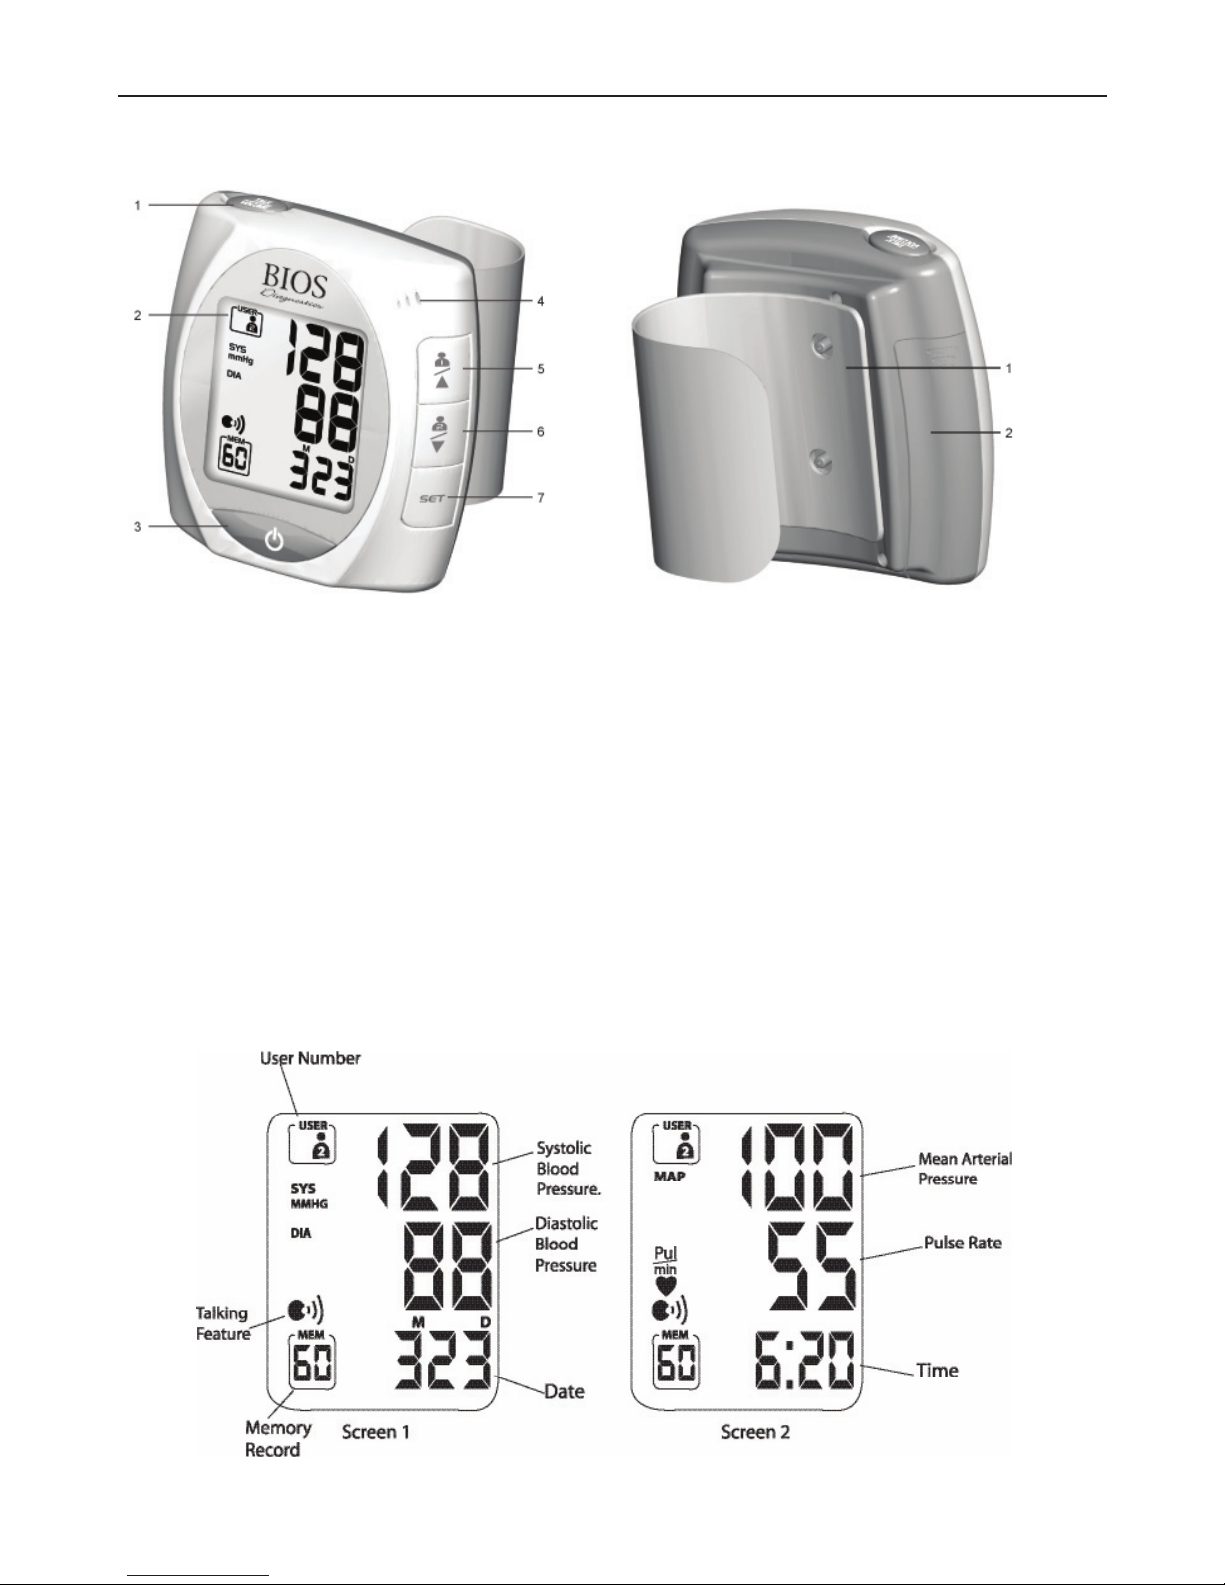
1. TALK / VOLUME BUTTON
2. LCD
3. ON / OFF BUTTON
4. SPEAKER
5. USER 1 / UP ARROW BUTTON
6. USER 2 / DOWN ARROW BUTTON
7. SET button
3.2 About the LCD Screen
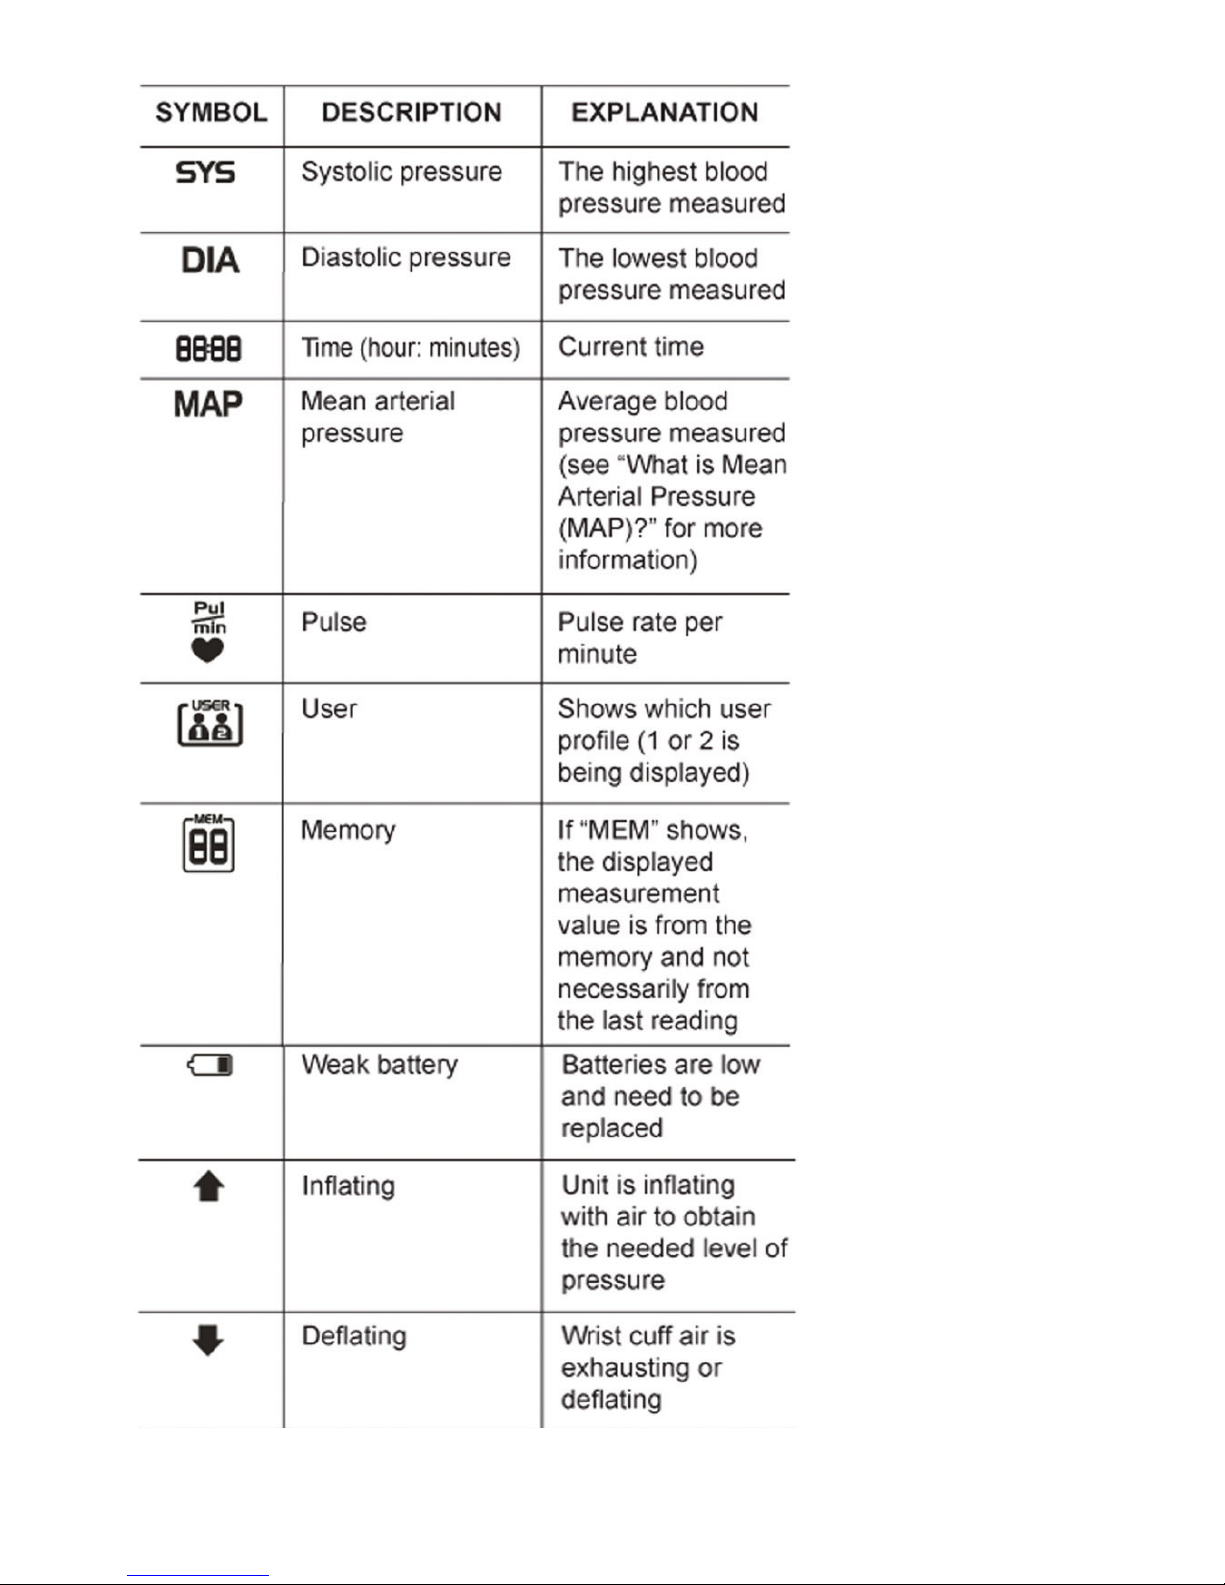
The LCD screen displays the systolic and diastolic blood pressure measurements along
with your heart rate. It also displays previously recorded measurements and the date and
time, when the appropriate button is pressed.
7
1. WRIST CUFF
2. BATTERY COMPARTMENT
Page 9
8
Page 10
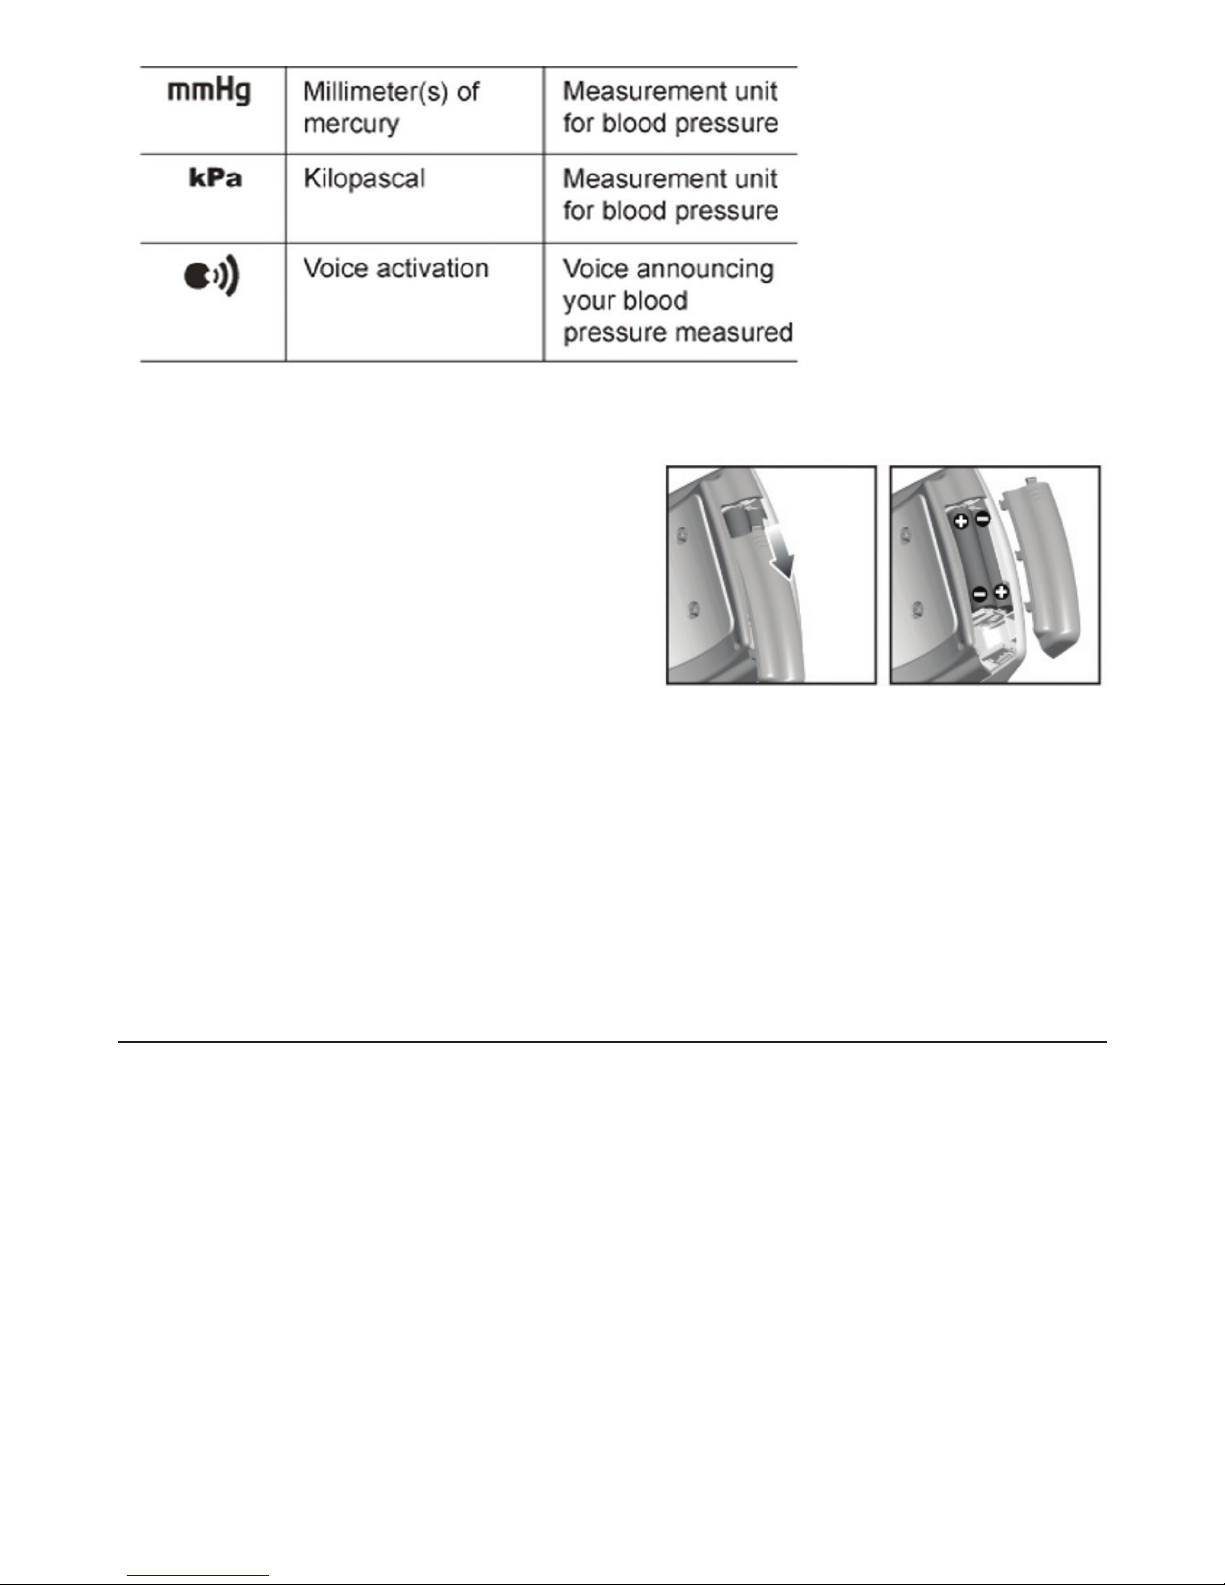
3.3 Inserting The Batteries
Follow these steps to insert the two “AAA” batteries in the device.
1. Open the battery compartment cover in the
direction shown.
2. Insert the two “AAA” batteries with the
correct polarity as indicated.
3. Replace the battery compartment cover.
NOTE: Replace the batteries whenever the weak battery mark shows, the
display is dim, or the display does not illuminate when the power is on. Replace
all the batteries at the same time - it is dangerous to mix old and new batteries.
Contact your local waste disposal authority for instructions on how to dispose of used
batteries. Used batteries can be harmful to the environment, and should not be thrown out
with household trash.
4. Using The Device
This section describes how to get the maximum benefit from your BD401 blood pressure
monitor. Follow the instructions carefully to get an accurate measurement of your blood
pressure and pulse rate.
9
Page 11
4.1 Setting Date, Time, Language And Measurement Units
It is important to set the clock before using your blood pressure monitor, so that the
correct time stamp can be assigned to each record that is stored in the memory.
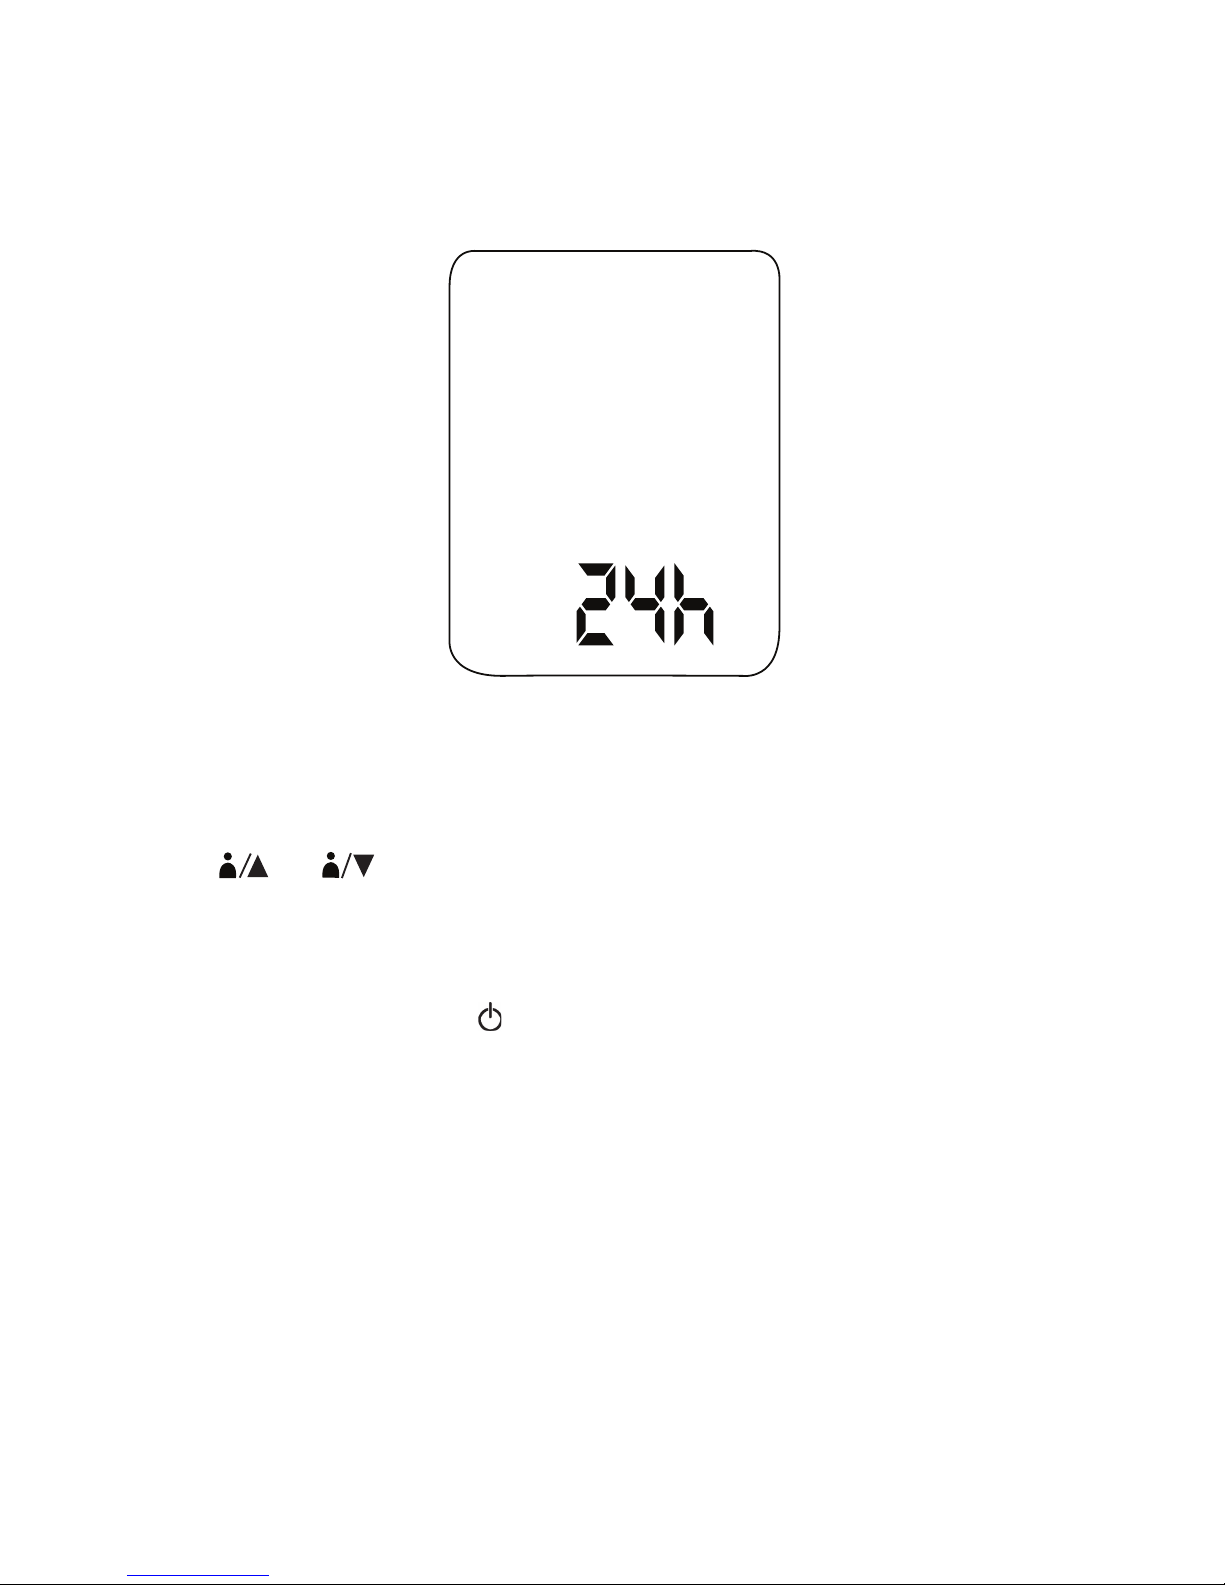
1. When the unit is off, press and hold SET for 2 seconds to enter the setting mode.
2. The setting order is as follows: 12/24 hour format, hour, minute, year, month/day or
day/month format, month, date, and measurement unit (kPa or mmHg), language
(English or French).
3. Press
1
2
or
2
to increase / decrease a value or change the setting.
4. Press SET to accept the change and switch to the next setting.
5. When you are finished, press
to exit the setup menu.
10
Page 12
4.2 Obtaining Accurate Measurements
Your blood pressure can vary based on numerous factors, physiological conditions,
and your surroundings. Follow these guidelines to obtain accurate and error-free
measurements of your blood pressure and pulse rate.
4.2A Before Measuring
• Avoid eating, smoking as well as all forms of exertion directly before the measurement.
All these factors influence the measurement result. Relax by sitting in an armchair in a
quiet atmosphere for about 5 minutes before the measurement
• Always take measurements on the same wrist (normally left) and in the same posture.
Do not switch between right and left arms while recording your blood pressure as there
may be a difference of up to 10mmHg pressure between the two wrist.
• Attempt to carry out the measurements regularly at the same time of day, since blood
pressure changes during the course of the day. The ideal time to measure your blood
pressure is in the morning after you wake up, before breakfast and physical activity, and
in the absence of the urge to urinate.
• Rest for 5 minutes sitting quietly and release all the tension in your body especially
the arm muscles before beginning with the measurement. Remain calm and quiet when
the measurement is in process. Do not speak or move your arm (as well as other body)
muscles during the process.
• With repeated measurements, blood accumulates in the arm, which can lead to false
results. Consecutive blood pressure measurements should be repeated after at least
a 15 second pause or after the arm has been held up in order to allow the accumulated
blood to flow away.
• Do not lean backward or bend your wrist inward while taking a measurement.
4.2B Fitting the wrist
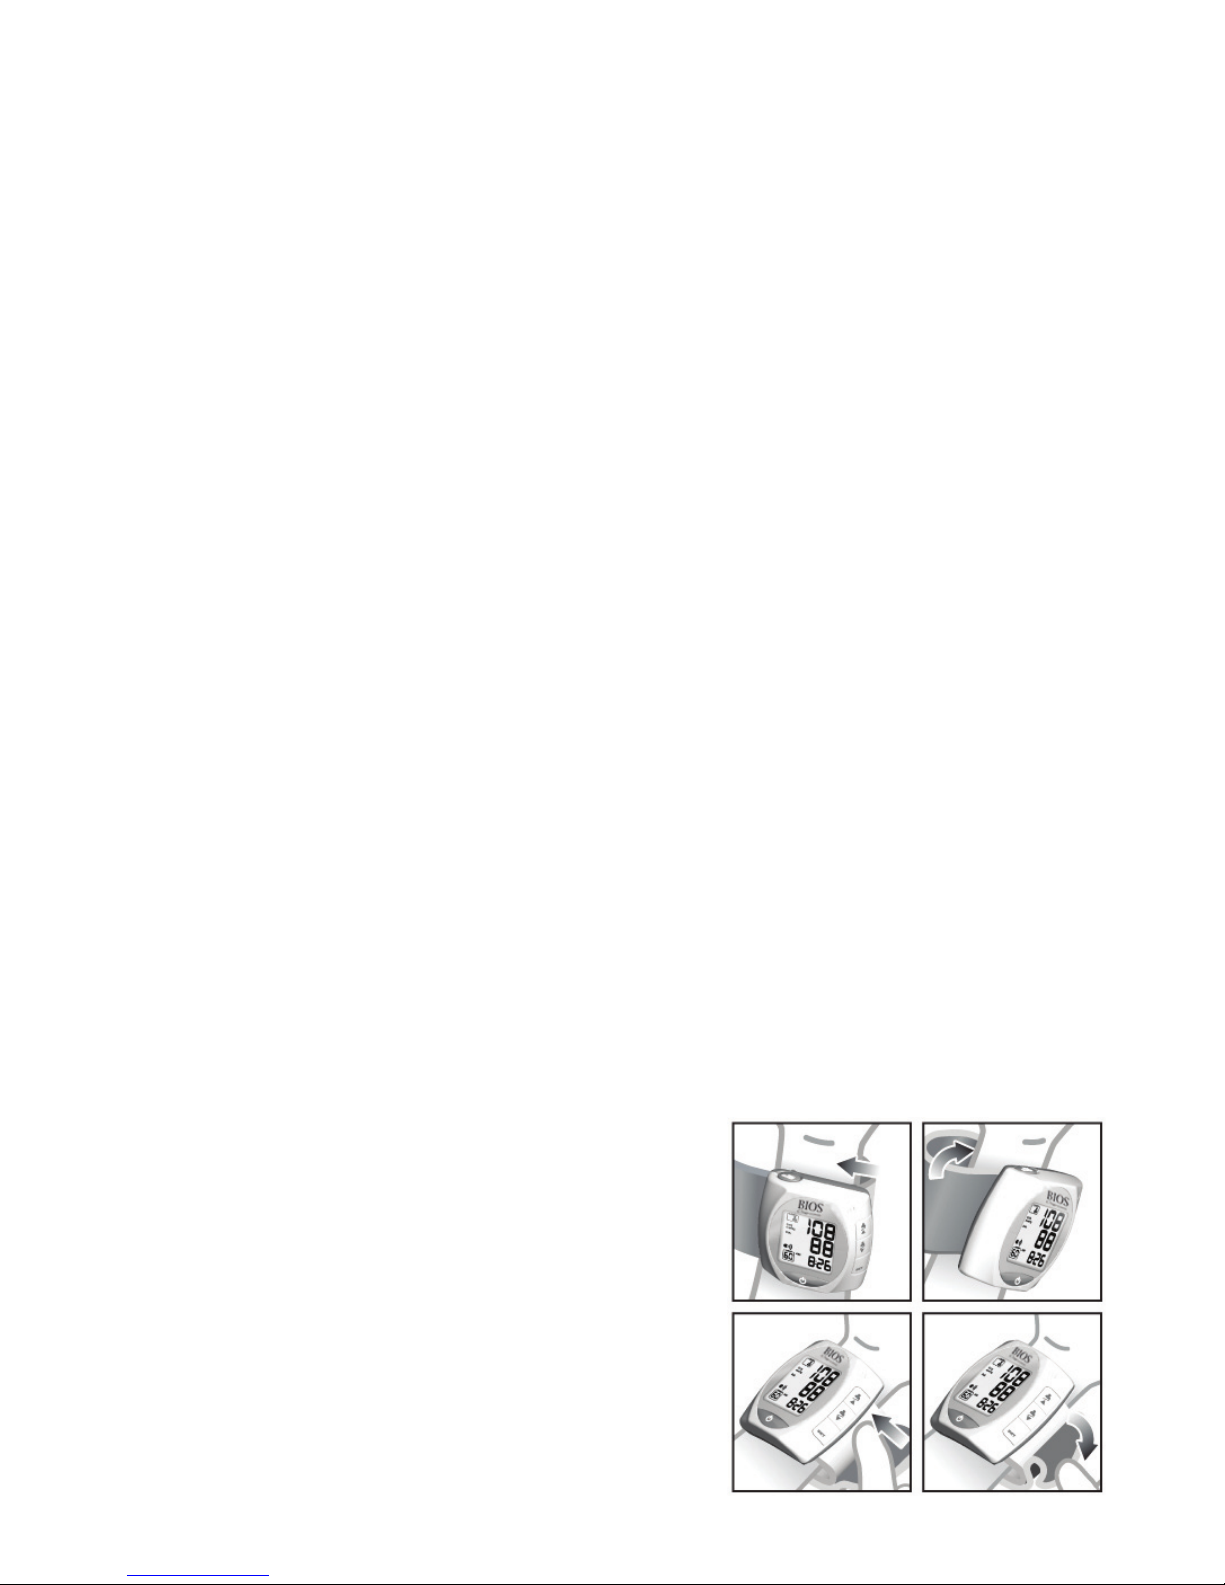
a) Remove all accessories (watch, bracelet, etc.) from
your left wrist. If your physician has diagnosed you
with poor circulation in your left arm, use your right
wrist.
b) Roll or push up your sleeve to expose the skin.
c) Apply the cuff to your left wrist with your palm
facing up and the LCD display facing you.
11
Page 13
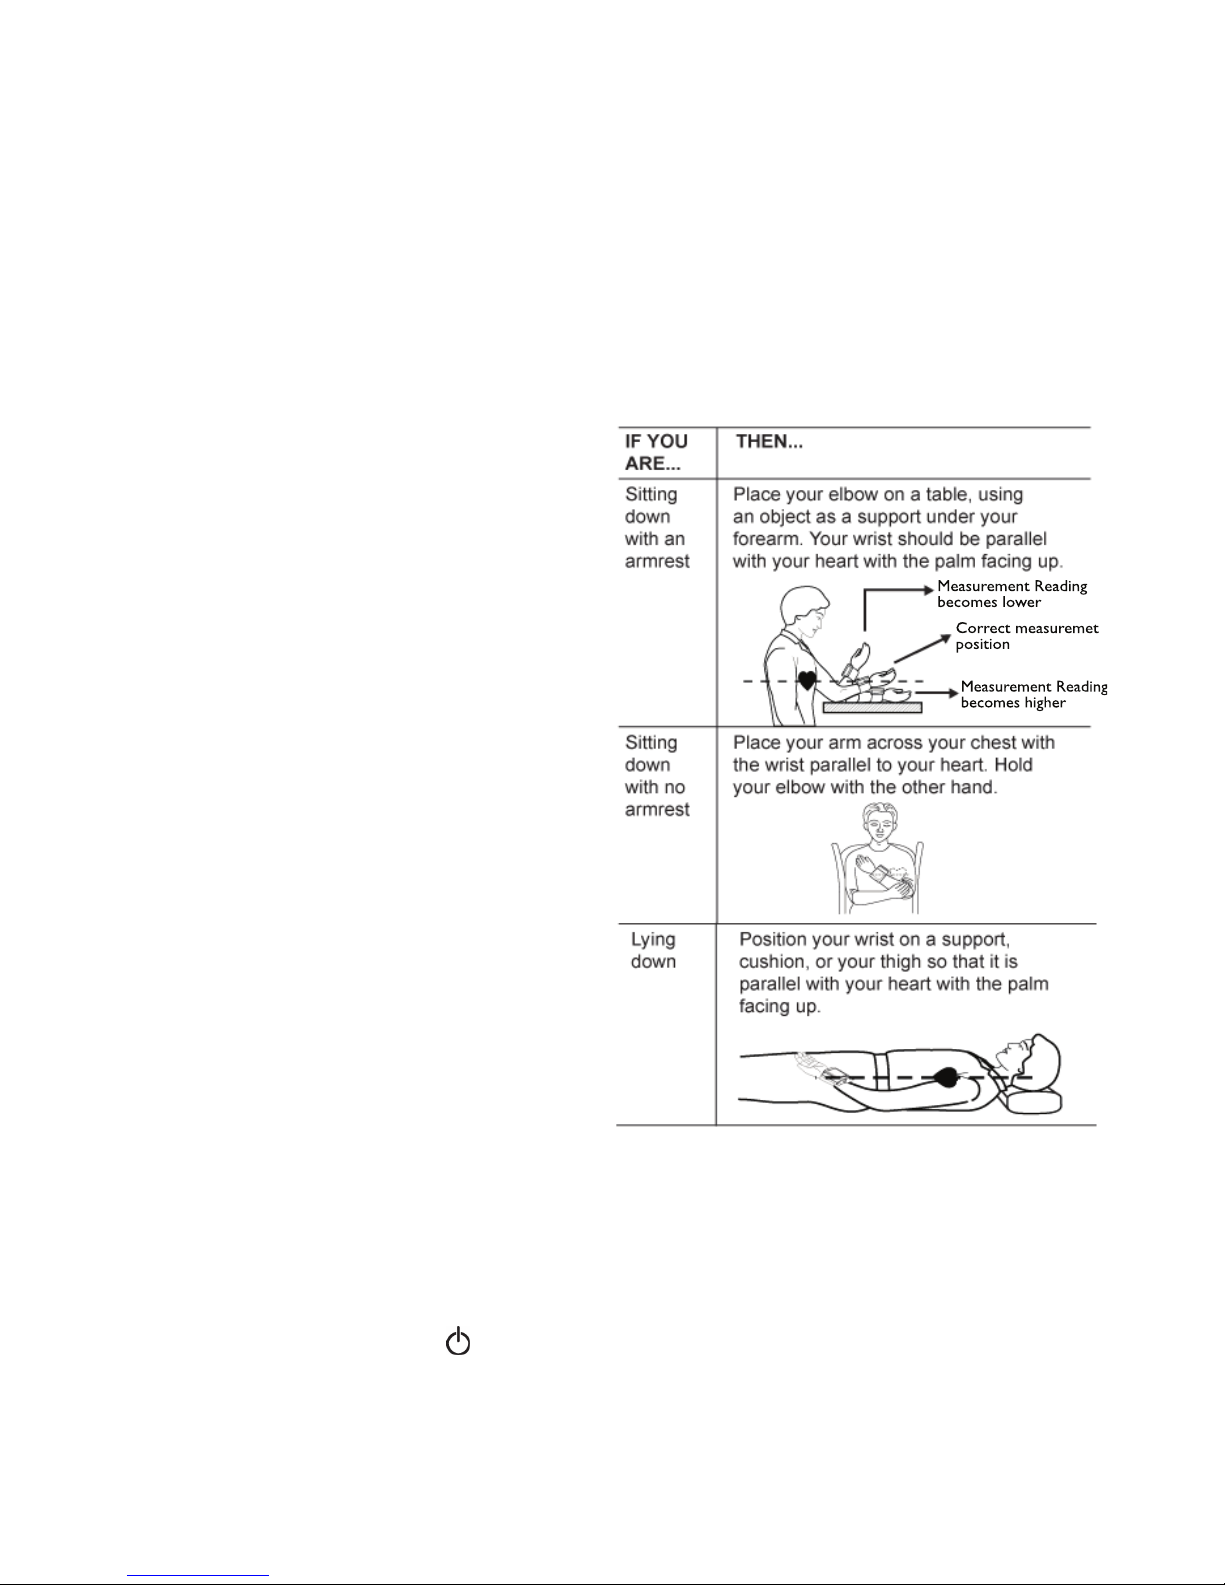
d) Position the edge of the cuff about 0.4 inches (1cm)
from the bottom of your palm.
e) Fasten the wrist cuff around your wrist, leaving no extra room
between the cuff and your skin. If the cuff is too loose, the
measurement will not be accurate.
NOTE: Graphics may not exactly match product
4.2C Choose your measurement position
1. Choose the position from which you wish
to measure - sitting or lying down.
2. Position your body so that your wrist is
parallel with your heart, using the chart
and illustrations below as a guide.
4.3 Measuring Your Blood Pressure
After following the guidelines described in the previous section and placing the cuff around
your wrist, you are now ready to measure your blood pressure. Follow these steps to record
your measurement.
1. Relax your hand and press
to turn on the unit. A voice message will remind you to
relax and remain still press again. The unit will then begin to inflate the wrist cuff. Once
the pressure reaches 180 mmHg, it will slowly deflate until the measurement results
show on the LCD.
12
Page 14
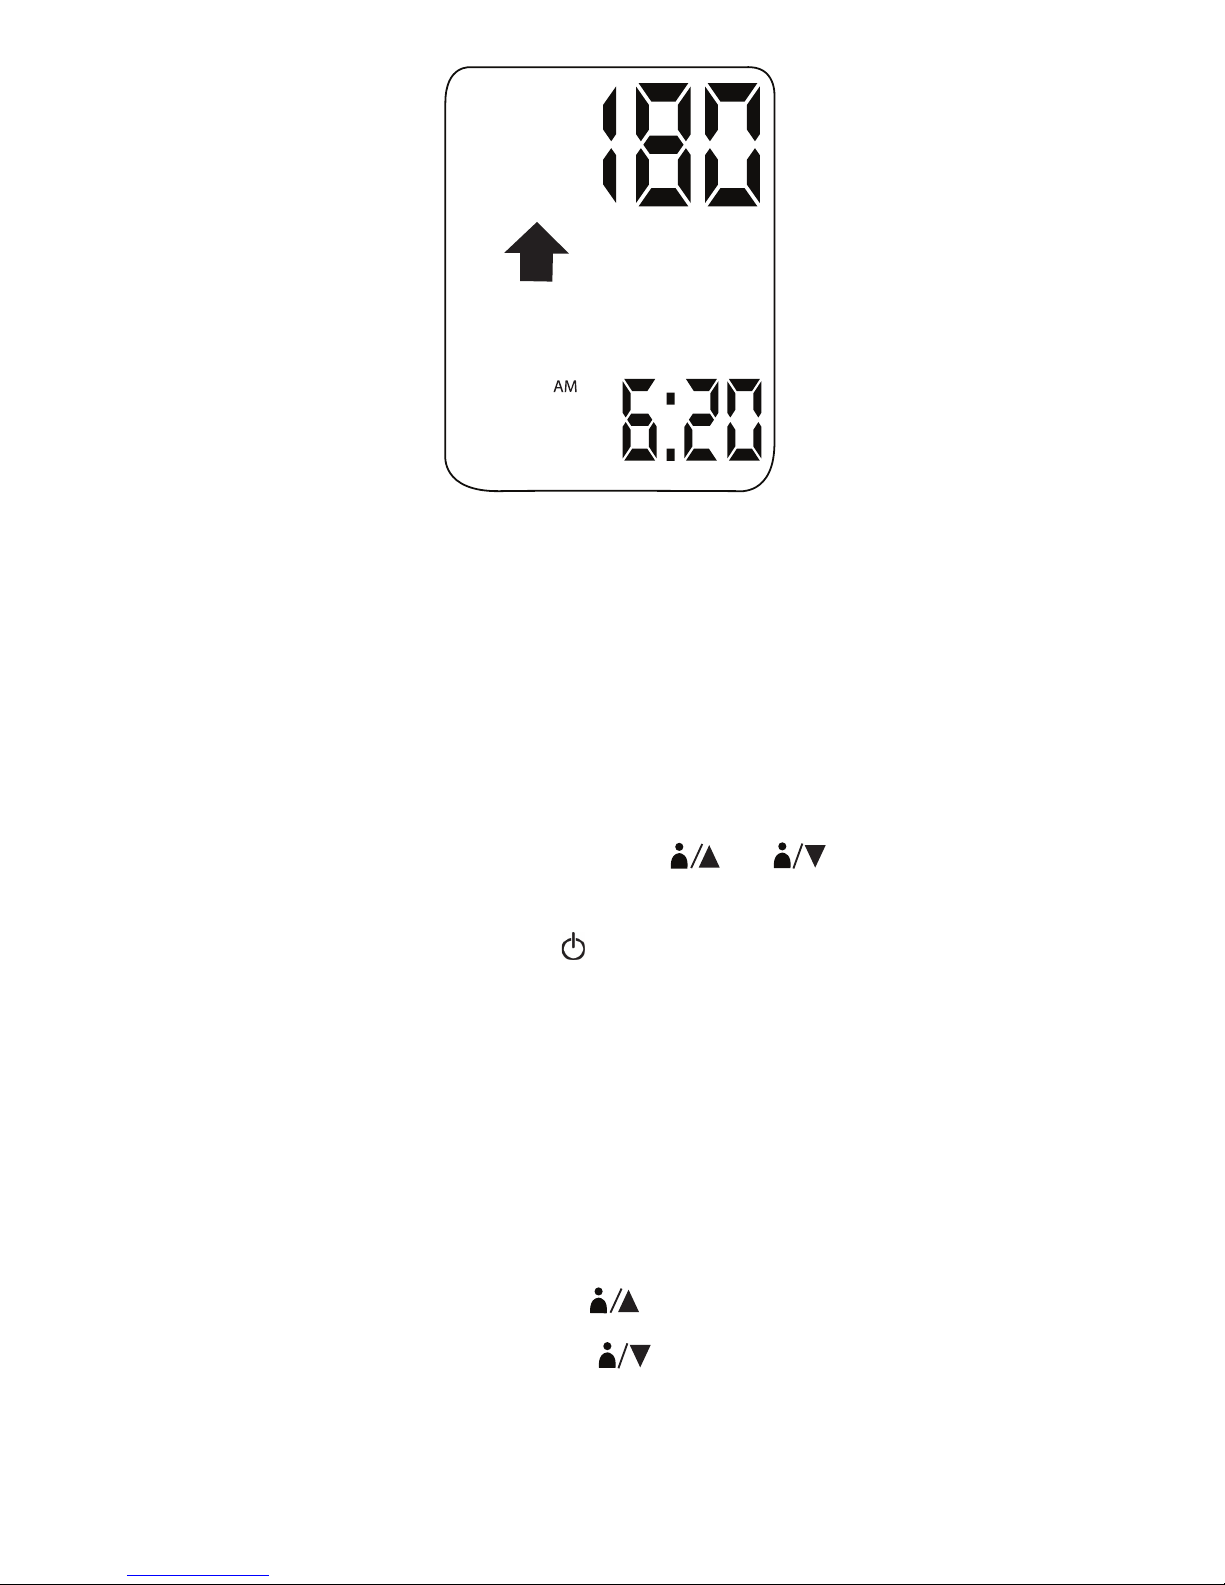
NOTE: This unit can intelligently adjust the cuff pressure and inflate to a higher
pressure level (>180 mmHg) when needed.
2. Your systolic and diastolic pressure readings will flash on the LCD, followed by MAP
and pulse per minute readings every 2 seconds. At the same time, your measurement
results and the blood pressure classification will also be announced.
3. To repeat the announcement, simply press TALK / VOLUME.
4. If you want to save the record to memory, press
1
2
or
2
and the results will be
saved to User 1’s or User 2’s memory accordingly.
5. Switch off the device by pressing the
button to preserve the batteries. If no button is
pressed for 1 minute, the instrument switches the display off.The measurement is
stored as the first (MEM 1) entry in the user record you selected; the last entry (MEM
60) is dropped, and all the entries in between move up 1 digit (e.g. 58 becomes 59, and
so on).
4.4 Recalling Measurements Stored In Memory
To view a history of User 1’s records, press
1
2
.
To view a history of User 2’s records, press
2
.
The screen will alternate between displaying systolic pressure, diastolic pressure, and
MAP/Pulse rate for that record.
13
Page 15
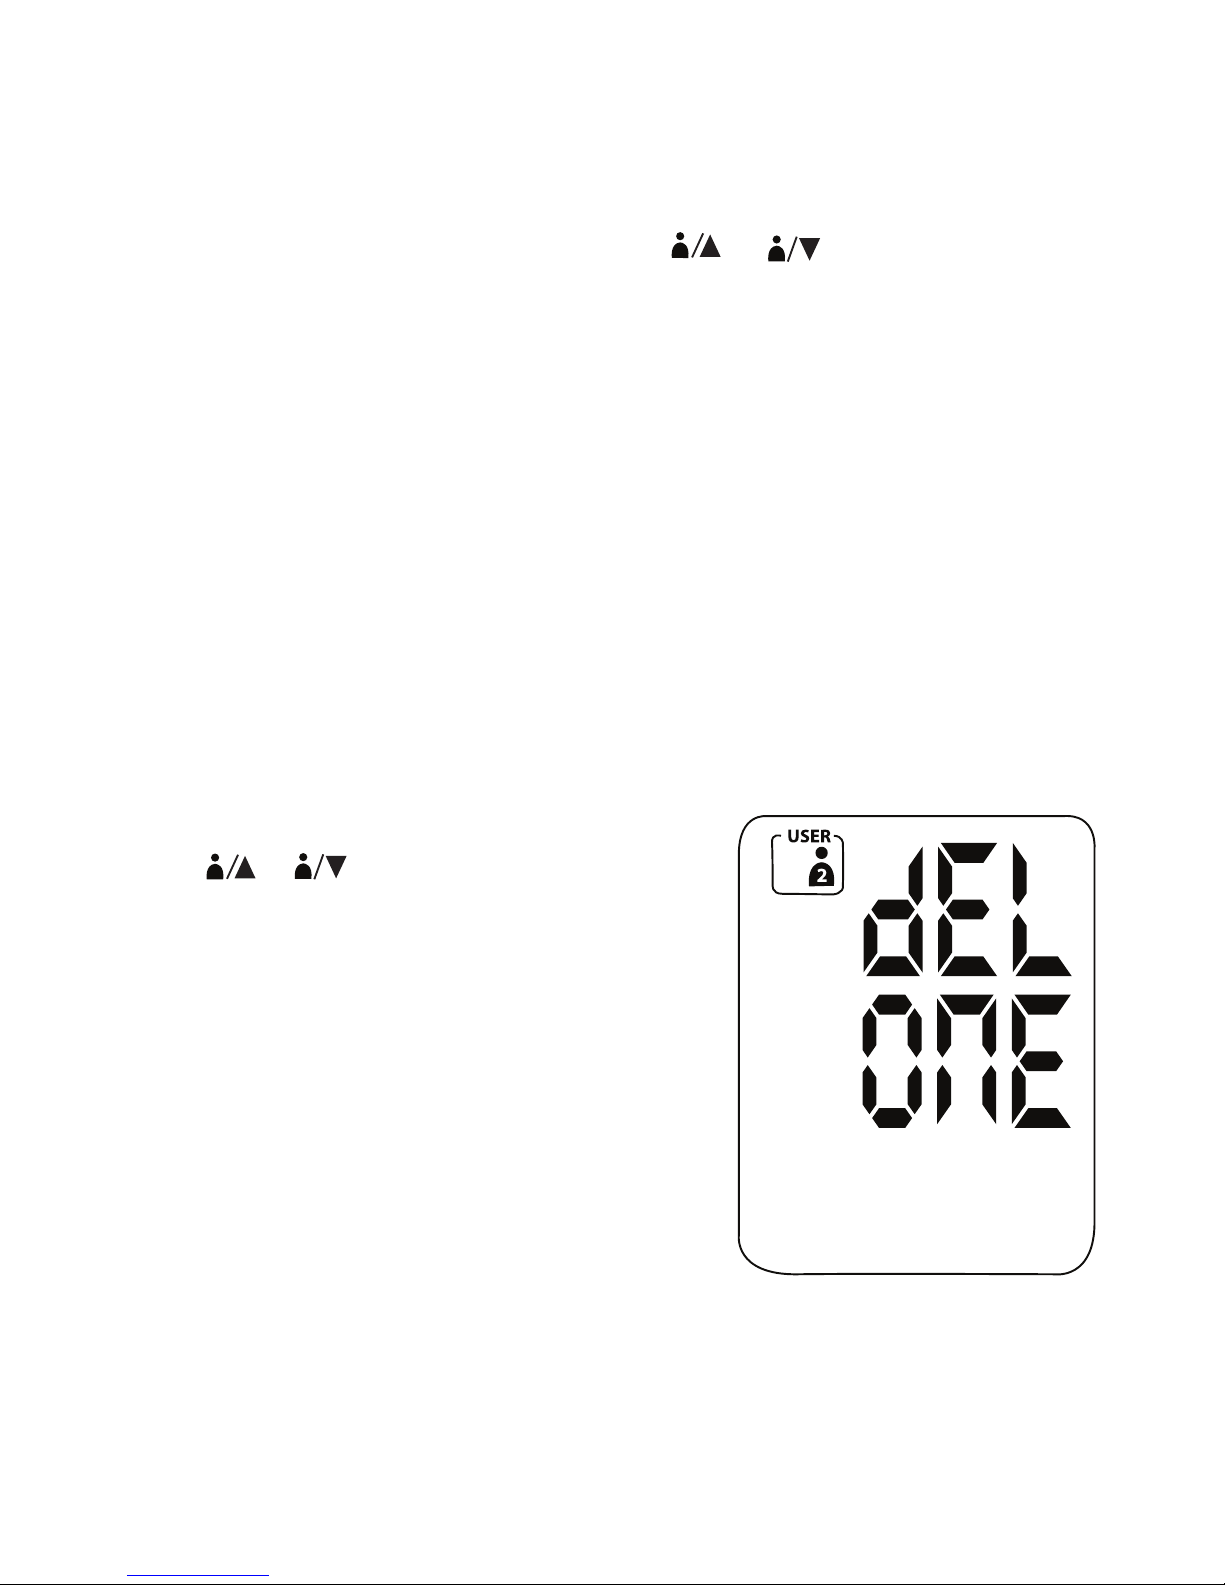
NOTE:
• The most recent record (1) is shown first. Each new measurement is assigned
to the first (1) record. All other records are pushed back one digit (e.g., 2
becomes 3, and so on), and the last record (60) is dropped from the list.
• Press the corresponding user button again (
1
2
or
2
) to see additional
records.
• Press and hold the corresponding user button to auto-advance to additional
records.
• The date and time of measurement are shown with each record.
• Memory records will be kept even when the batteries become exhausted and
are replaced.
4.5 Deleting A Measurement Record From Memory
You have the option of deleting your latest measurement record or entire measurement
history. This is useful if measurements have not been accurately recorded and need to be
recorded again.
DELETING THE LATEST RECORD
1. Press
1
2
or
2
to recall the latest measurement
record for User 1 or User 2.
2. Press and hold SET until the LCD shows
“dEL ONE”.
14
Page 16
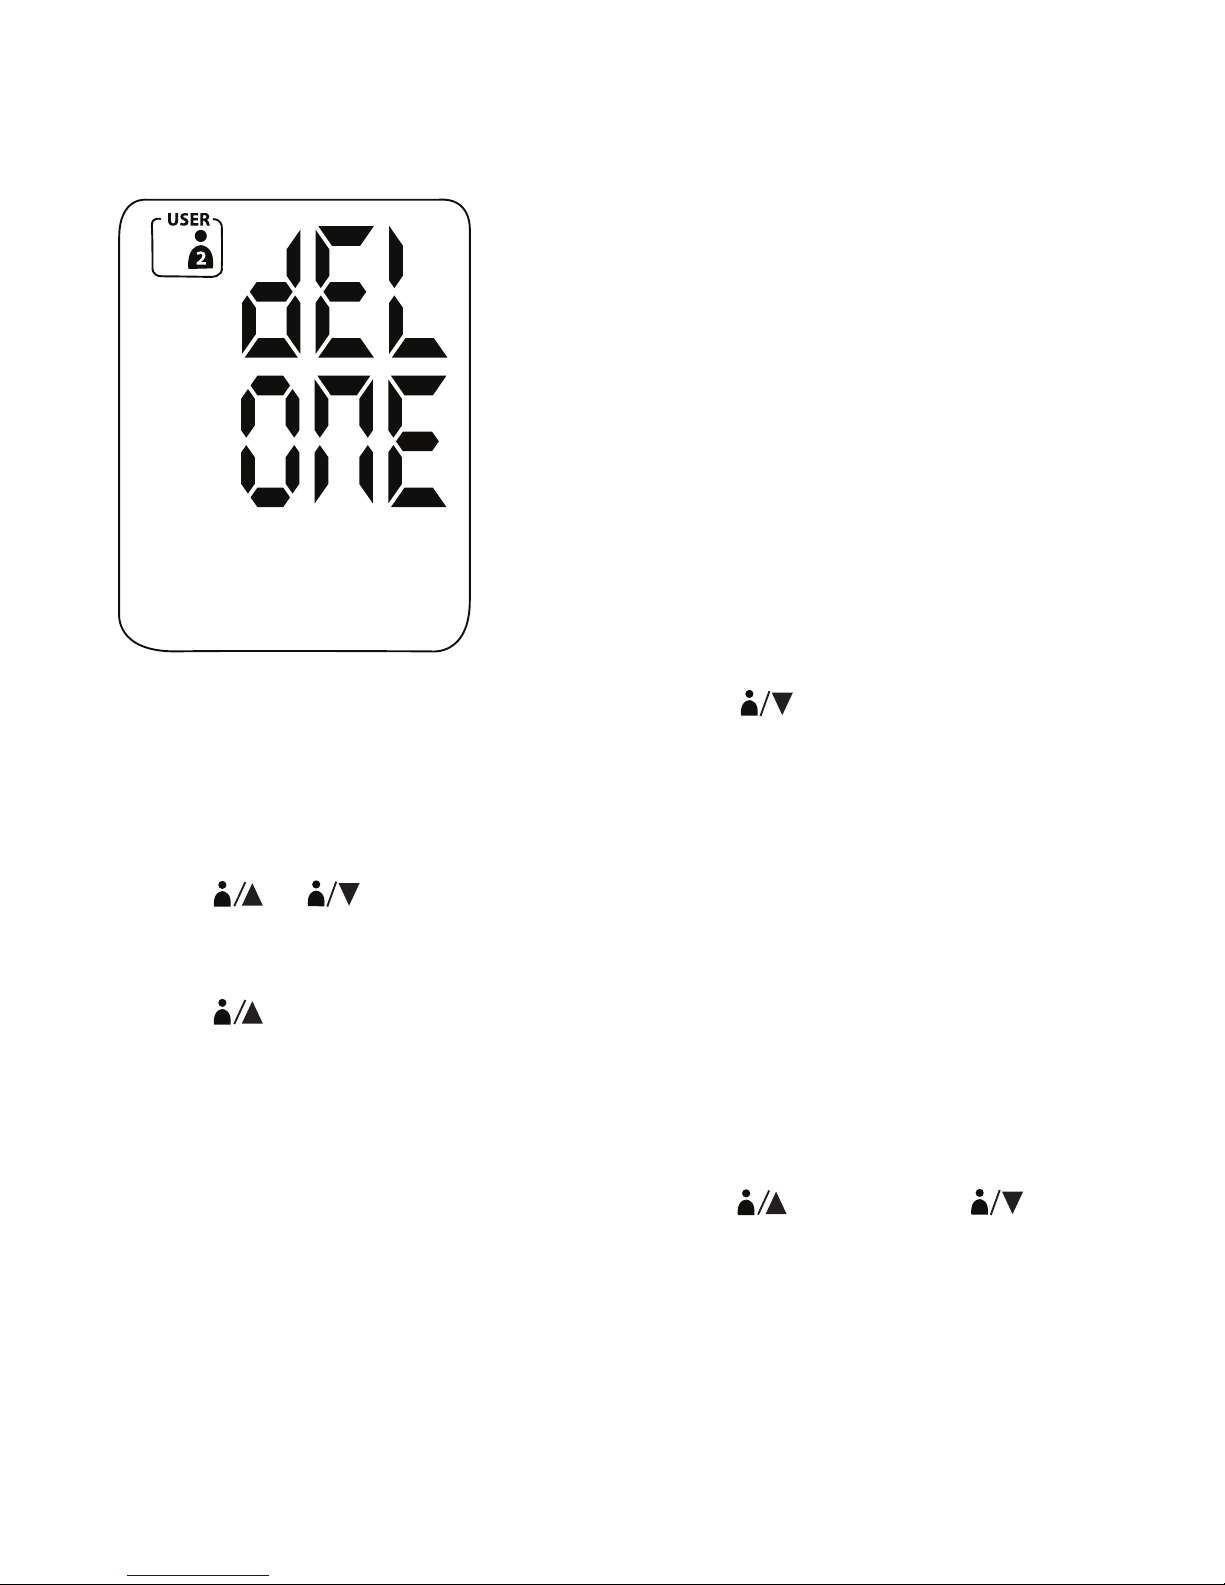
3. Press and hold SET for 2 seconds to delete the latest recorded measurement for User
1 or User 2. After you have confirmed deleting the latest record, the screen shows
“dEL ONE”.
4. If you decide to abort the delete action instead, press
2
to go back to the main
screen.
DELETING ALL RECORDS
1. Press
1
2
or
2
to recall the latest measurement record for User 1 or User 2.
2. Press and hold SET until the LCD shows “dEL ONE”.
3. Press
1
2
to show the option of deleting your entire measurement history; the LCD
displays “DEL ALL”.
4. Press and hold SET for 2 seconds to delete all measurement records. After you have
confirmed deleting all records, the screen shows “dEL ONE”.
5. If you decide to abort the delete action instead, press
1
2
once OR press
2
twice
to go back to the main screen.
15
Page 17
4.6 Discontinue A Measurement
If it is necessary to interrupt a blood pressure measurement for any reason (e.g. the
patient feels unwell), the ON/OFF button can be pressed at any time. The device then
immediately lowers the cuff pressure automatically.
4.7 Voice Playback Of Blood Pressure Measurement
The features voice playback during and after blood pressure measurement results, as well
as general instructions to help you prepare for taking measurements. When the unit has
finished taking your measurement, your blood pressure readings, pulse and blood pressure
classification are announced. If you want to repeat the announcement, simply press
TALK / VOLUME. Anytime you recall a measurement record from memory, it will also be
announced. Press TALK /VOLUME if you need to repeat the playback of any record.
VOLUME CONTROL
To adjust the volume level:
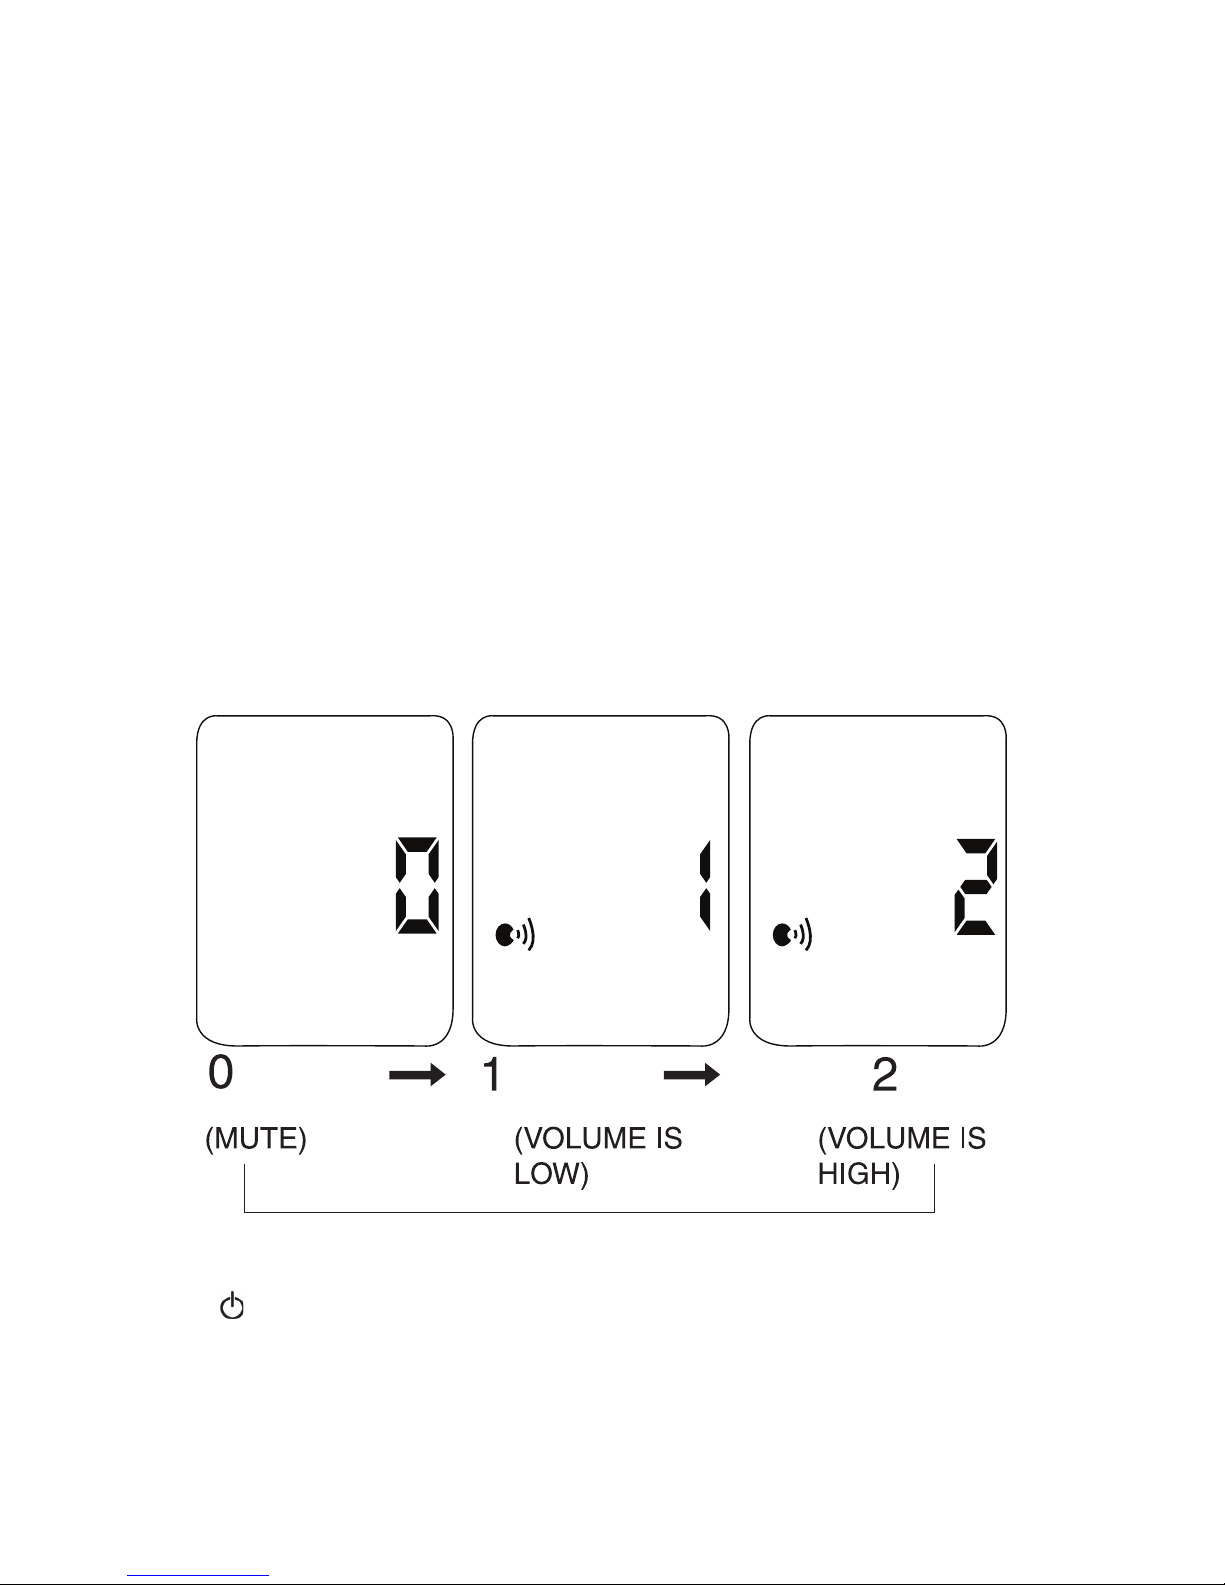
1. Press and hold TALK / VOLUME until volume level flashes on the LCD.
2. Press TALK / VOLUME to adjust volume level.
3. Press when you have finished adjusting the volume.
NOTE: When volume level 0 is selected, the unit is on mute and you will not hear
any voice messages announced.
16
Page 18

5. Troubleshooting
This section includes a list of error messages and frequently asked questions for problems
you may encounter with your blood pressure monitor. If the product is not operating as you
think it should, check this list before arranging for servicing.
Problem Symptom Check This Remedy
No
power
Display is dim or will
not light up
Batteries are
exhausted
Replace with new
batteries
Low
batteries
shows on the
display
Batteries are low Replace with new
batteries
Error
message
Err shows on the
display.
A measurement
error occurred
Relax for a moment
and then measure
again
Err 1, 2, or 3 shows on
the display
The wrist cuff is
not secure
Refasten the cuff and
then measure again
Err 4 shows on the
display
The monitor
detected
motion while
measuring
Movement can affect
the measurement.
Relax for a moment
and then measure
again
Err 5 shows on the
display
Pressure is over
37.3kPa (280
mmHg)
Relax for a moment
and then measure
again
17
Page 19

Err 6 shows on the
display
Deflation period
was too long
Movement can affect
the measurement.
Relax for a moment
and then measure
again
EExx shows on the
display
A calibration error
occurred
Retake the
measurement.If the
problem persists,
contact the retailer or
our customer service
department for further
assistance. Refer to
the warranty for contact information and
return instructions
Settings
are wrong
Date and time are
incorrect
The clock was not
set or reset after
installing new batteries
Reset the clock
Measurement unit
(kPa or mmHg)
are incorrect
The measurement
unit was not set or
reset after installing new batteries
Reset the
measurement unit
No user
memory
Cannot find a record The memory was
not saved after
taking a
measurement
Retake the
measurement.
Press
1
2
or
2
to
save the corresponding user’s memory
The record was
stored to the wrong
user memory
Press
1
2
to view
User 1’s record.
Press
2
to view
User 2’s record
18
Page 20
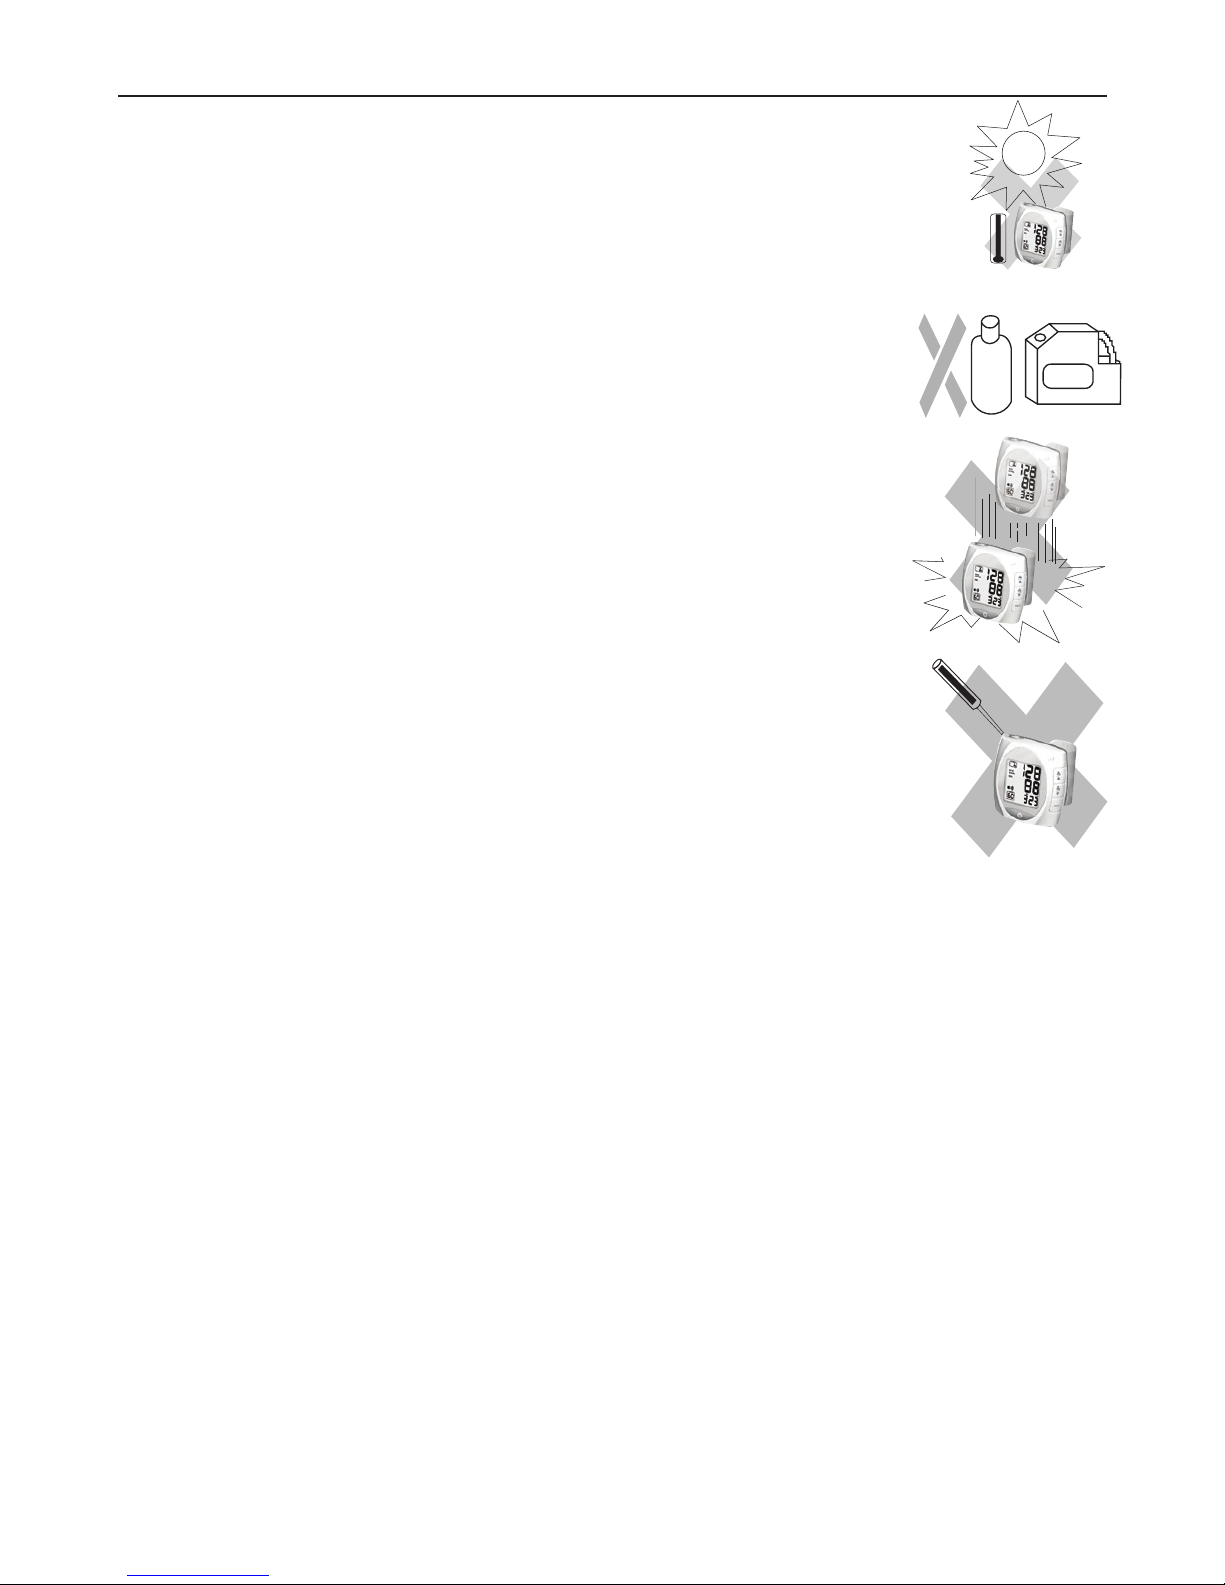
6. Care And Maintenance
a) Do not expose the device to either extreme temperatures, high
humidity, dust or direct sunlight. If the unit has been stored at very
low or freezing temperature, allow to reach room temperature
before using it.
b) Clean the device with a soft, dry cloth. Do not use gas, thinners
or similar solvents. Spots on the cuff and unit can be removed
carefully with a slightly moistened cloth and soapsuds.
c) Do not drop or bang the monitor or treat it roughly in any way.
Prevent sudden jerks and shocks. Avoid strong vibrations.
d) Never open the monitor. This invalidates the manufacturer’s
warranty.
e) Batteries and electronic instruments must be disposed of in
accordance with the locally applicable regulations, not with
domestic waste.
f) Take care while handling the batteries in the device. Incorrect usage may casue battery
fluid leakage. To prevent such accidents, refer to the following instructions:
- Insert batteries with the correct polarity.
- Turn off power after use. Remove and store the batteries if you are not planning to
use the device for an extended period of time.
- Do not mix different types, brands, or size of batteries. This may cause damage to
the product.
- Do not mix old and new batteries.
- Remove batteries and dispose of them according to the proper regulations in your
area.
- Do not disassemble batteries or expose them to heat or fire
- Do not short-circuit the batteries.
- Do not use rechargeable batteries.
19
Page 21

7. Lifetime Guarantee
BIOS Diagnostics
™
blood pressure monitors have a lifetime warranty to be free of
manufacturing defects for the life of the original owner. This warranty does not include
the inflation system including the cuff and inflation bladder. The cuff is warranted for two
years. The warranty does not cover damage from misuse or tampering.
If you have questions regarding the operation of your monitor call the BIOS
Diagnostics
™
Blood Pressure Hotline:
1-866-536-2289
Should repair be necessary, return the unit with all component pieces. Enclose proof of
purchase and $5.00 for return shipping and insurance. Ship the unit prepaid and insured
(at owners option) to:
Thermor Ltd.
Repair Department
16975 Leslie Street
Newmarket, ON L3Y 9A1
www.biosexactly.com
Please include your name, return address, phone number, and email address. Thermor will
repair or replace (at Thermor’s option) free of charge any parts necessary to correct the
defect in material or workmanship.
Please allow 10 days for repair and return shipping.
20
Page 22

8. Reference To Standards
Device standard: Device corresponds to the requirements
of the standard for non-invasive blood
pressure monitors:
AAMI/ANSI SP10
IEC 60601-1
IEC 60601-1-2
EN1060-1
EN1060-3
EN1060-4
Electromagnetic compatibility: Device fulfills the stipulations of the
International standard IEC 60601-1-2
Readings taken by the blood pressure monitor are equivalent to those obtained by a
trained observer using the cuff and stethoscope auscultation method. Clinical performance
were successfully done against ANSI/AAMI SP10 and international protocol, and the
B.H.S has rated this product “recommended for clinical and home use”,this is the highest
grading available for blood pressure monitors. please refer to BHS website http://www.
bhsoc.org/bp_monitors/automatic_wrist.stm.
21
Page 23

9. Technical Specifications
Weight: 6.3 oz (180g) without batteries
Size Height x Width x Depth: 3.5”(H) x 3.4”(W) x 1.2”(D)
(90 x 86 x 30.8 mm)
Storage Temperature: 4°F to 140°F (-20°C to 60°C)
Humidity: 10% to 83% relative humidity
Operation Temperature: 50°F to 104°F (10°C to 40°C)
Display: LCD Display (Liquid Crystal Display)
Measuring method: Oscillometric / noninvasive
Measuring range:
SYS/ DIA Pressure: 30 to 300 mmHg
(4.0 to 40.0 kPa)
Pulse: 40 to 200 pulse/min
Accuracy:
Pressure: +/- 3 mmHg (+/- 0.4 kPa)
Pulse: +/- 5%
Memory: Maximum 60 records per user
Maximum number of users: 2
Cuff circumference: 5.3 to 7.7 inches (13.5 to 19.5 cm)
Power:
Power source: 3V DC, 2 LR03 / AAA / UM4-size
1.5V batteries
Power save: Auto power off after 1 minute of
non-activity
9. Contacts for Support
Thermor Ltd.
16975 Leslie Street
Newmarket, ON L3Y 9A1
www.biosexactly.com
Toll Free Help Line: 1-866-536-2289
Email: [email protected]
Made in China
 Loading...