

Page 1
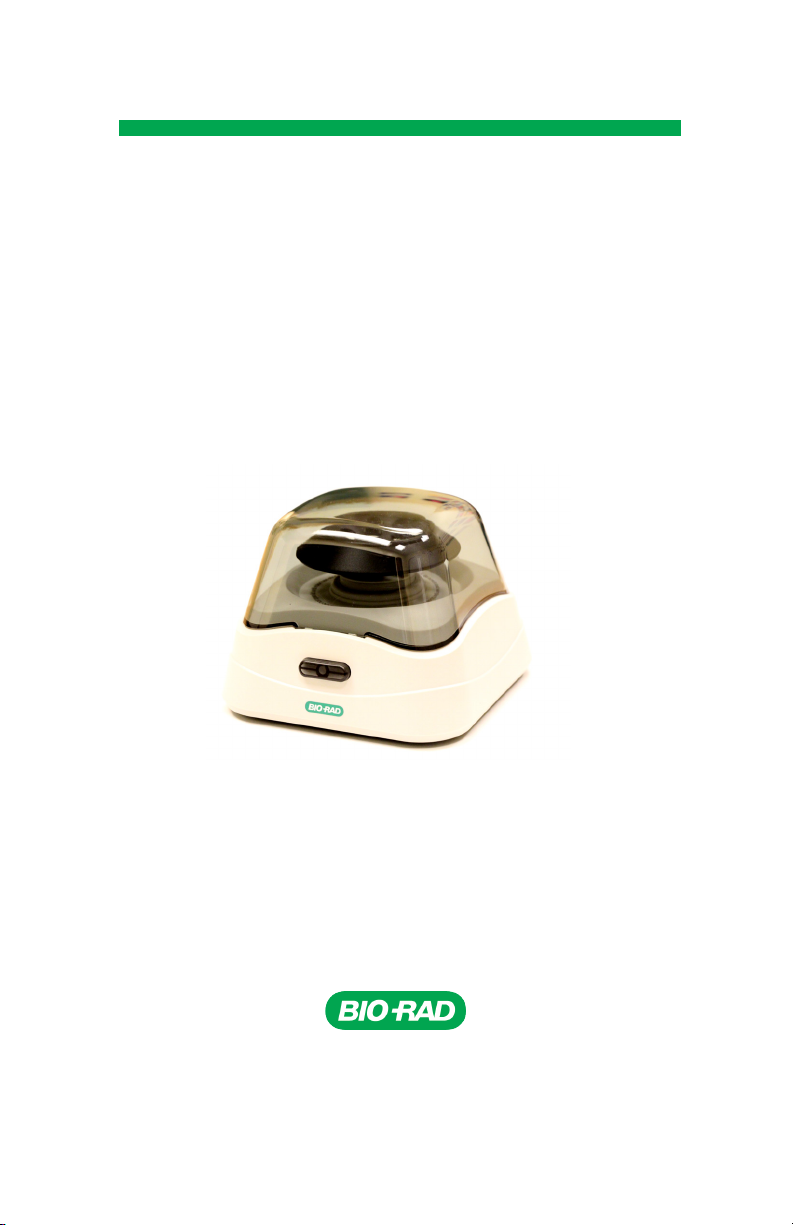
Mini Centrifuge
Instruction Manual
Catalog # 12011919
12011919ED U
Page 2

Bio-Rad Technical Support
The Bio-Rad Technical Support in the U.S. is open Monday through Friday,
5:00 AM to 5:00 PM, Pacic time.
Phone: 1-800-4BIORAD (1-800-424-6723), option 2 (U.S.)
1-800-268-0213 (Canada)
Email: [email protected] (U.S./Canada only)
For technical assistance outside the U.S. and Canada, contact your local
technical support ofce or click the Contact Us link at www.bio-rad.com.
Legal Notices
Bio-Rad reserves the right to modify its products and services at any time.
This instruction manual is subject to change without notice.
Although prepared to ensure accuracy, Bio-Rad assumes no liability for
errors, or for any damages resulting from the application or use of this
information.
Safety Warnings
Warning! symbol in this manual warns you about potential sources
of injury or harm, including risk of electrical shock.
WEEE Disposal Requirements
The Mini Centrifuge contains electrical or electronic materials.
It should not be disposed of as unsorted waste and must be collected
separately, according to European Union Directive 2012/19/EU on
waste and electronic equipment — WEEE Directive.
Before disposal, contact your local Bio-Rad representative for country
specic instructions.
Page 3

Table of Contents
1. Specications and Environmental Conditions ....... 2
2. General Information .............................................. 2
3. Safety Precautions ............................................... 2
4. Installation ............................................................ 3
5. Operation ............................................................. 3
6. Equipment Maintenance ...................................... 4
7. Rotors .................................................................. 4
8. Cleaning ............................................................... 4
9. Service ................................................................. 4
10. Limited Warranty ................................................. 5
1 | Mini Centrifuge
Page 4

1. Specications and Environmental Conditions
Dimensions 5.9 x 5.9 x 4.6 in/15 x 15 x 11.6 cm
Weight 2.65 lb/1.2 kg
Electrical AC 100 — 240 V, 50/60 Hz 0.35 A
Unit input 24 VDC 1A
Maximum speed/RCF 6,000 RPM/2,000 x g
Indoor use only
Altitude up to 2,000 m
Temperature 5 to 40°C
Maximum relative humidity 80% for temperature up to 30°C decreasing linearly
Pollution degree 2
to 50% relative humidity at 40°C
2. General Information
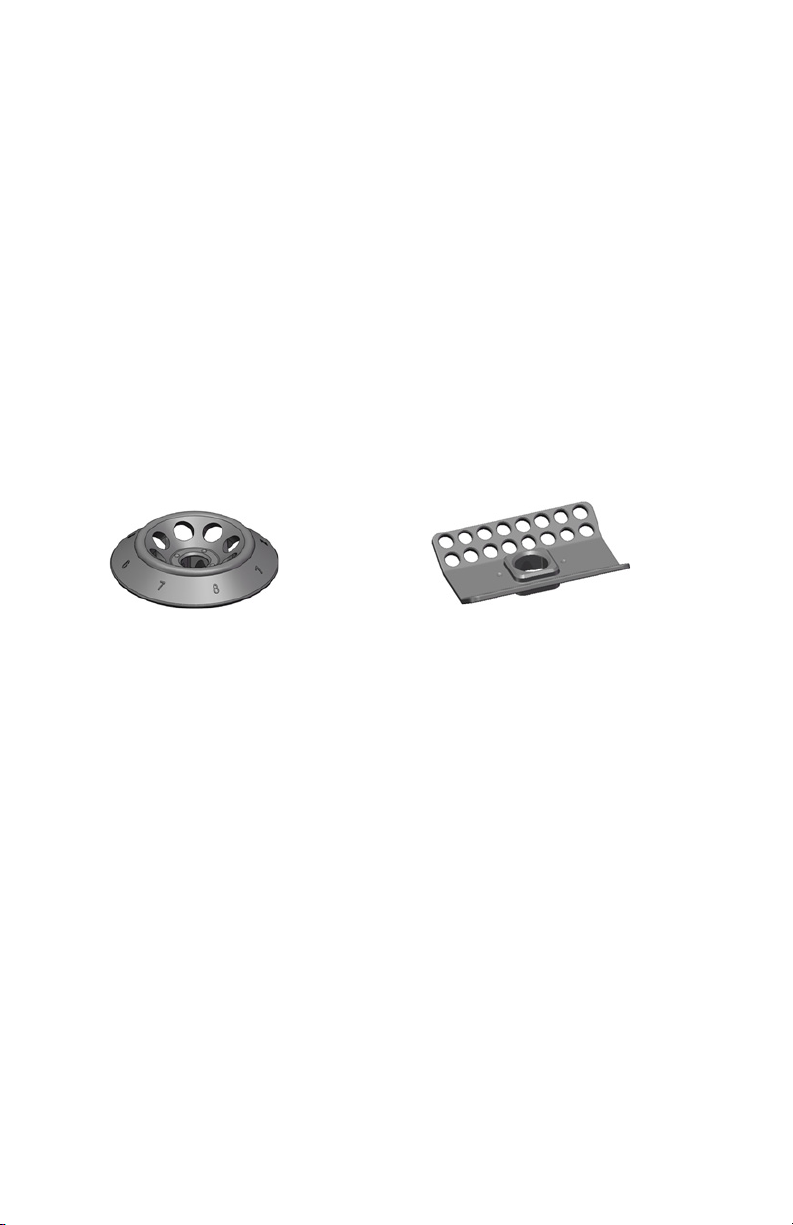
The Bio-Rad Mini Centrifuge is supplied with two rotors, one for micro tubes and one for PCR
strip tubes. The eight place rotor is designed to centrifuge up to eight individual 1.5/2.0 ml
plastic micro centrifuge tubes. It will also accept 0.5/0.6 ml, 0.4/0.25 ml and 0.2 ml tubes
with the adapters supplied with the unit. The PCR strip tube rotor is designed to centrifuge
four 8 x 0.2 ml tube strips. It will also accept up to 32 individual 0.2 ml tubes. Both rotors
are designed for applications requiring relatively low g-forces, such as microltration, cell
separation, and quick spin-downs from the walls of tubes.
A full line of microcentrifuges and PCR tubes are available from Bio-Rad. Visit bio-rad.com,
call 1-800-4BIORAD, or speak with your sales representative.
If the centrifuge is used in a manner not specied herein, the protection provided by the
centrifuge may be impaired.
3. Safety Precautions
NEVER use the centrifuge in any manner not specied in these instructions.
NEVER operate the centrifuge without a rotor properly attached to the shaft.
NEVER ll tubes while they are in the rotor. Liquid spillage may harm unit.
NEVER put hands in the rotor area unless the rotor is completely stopped.
NEVER move the centrifuge while the rotor is spinning.
NEVER use solvents or ammables near this or other electrical equipment.
NEVER centrifuge ammable, explosive or corrosive materials.
NEVER centrifuge hazardous materials outside of a hood or proper containment facility.
NEVER try to continue operating the centrifuge if the centrifuge stops working prematurely.
Stop the centrifuge immediately by turning off the main power switch on the back side of
the centrifuge. Wait one minute before turning on the main power switch to operate the
centrifuge again.
NEVER attempt to repair or remove the outer case of the Mini Centrifuge or other
accessories. If you open this instrument, you put yourself at risk for harm to body or
equipment from electrical shock.
ALWAYS load the rotor symmetrically. Counterbalance each tube with another tube. No
individual tube should weight more than 3.0 g.
ALWAYS locate the centrifuge within easy access to an electrical outlet.
ALWAYS use only plastic micro centrifuge tubes designed to withstand centrifugal forces of
at least 2,000 x g.
2 | Mini Centrifuge
Page 5
4. Installation
1. Make sure to always install the centrifuge on stable at surfaces only.
2. Place the centrifuge near the electrical outlet.
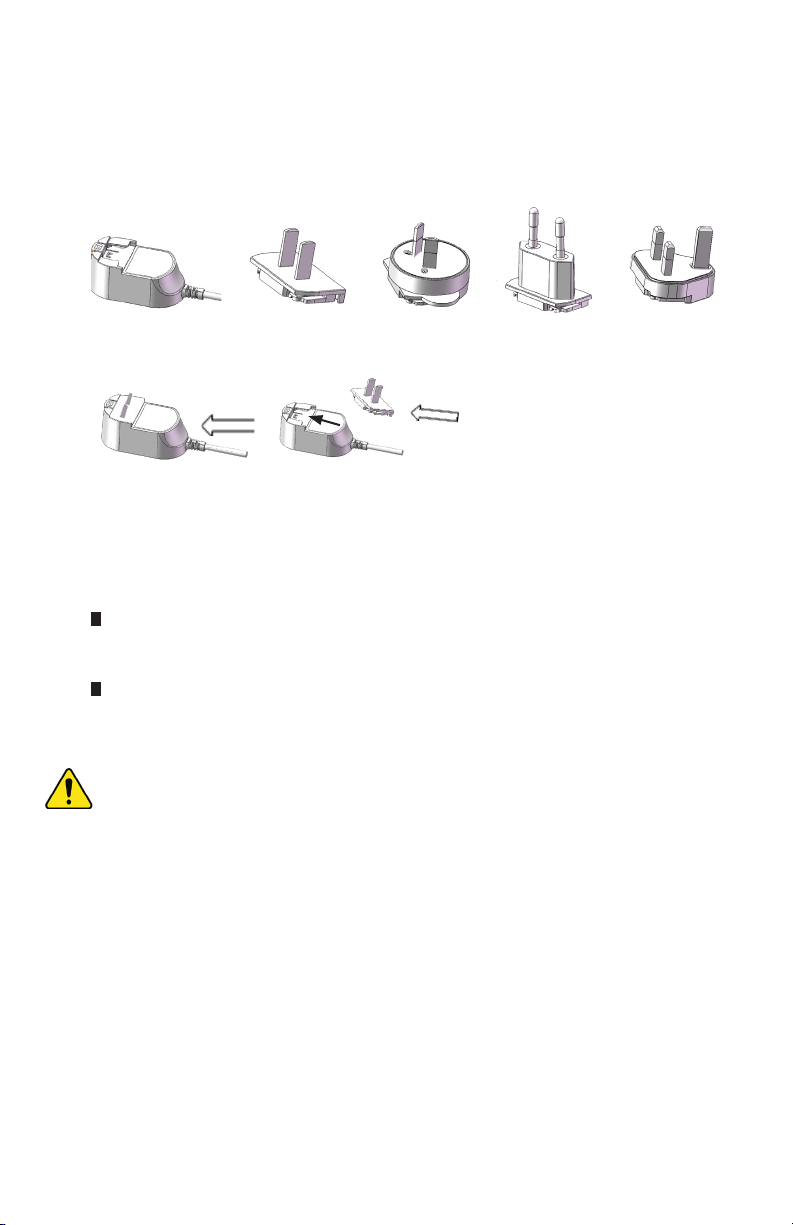
3. Select the appropriate regional plug and push the plug rmly into the
adapter body.
Adapter body U.S./Canada Australia European Union United Kingdom
Push the plug into its position rmly!
5. Operation
Before operating the centrifuge, be sure that the power switch on the back of the unit is in the
“on” position. To begin a run, close the lid of the centrifuge. No other controls are required.
Fast stop
Press down and release the tab on the front of the lid. This will release the
lid lock, allowing the lid to open and the rotor to come to a braked stop.
Gradual stop
Put the power switch in the “off” position. This will cut the power to the
motor, and the rotor to come to a gradual stop.
CAUTION: Do not attempt to open the lid or remove samples until the unit has come
to a complete stop. Once the rotor has come to a full stop, the lid can be manually lifted
to the full open position and samples may be removed from the rotor.
Safe operation of the centrifuge requires that the rotor be loaded in a balanced
fashion. Failure to load the rotor properly presents a hazardous condition
and may damage the centrifuge. Individual tubes, strip tubes, and/or adapters
must always be loaded symmetrically to ensure proper balance. Never run the centrifuge
with only one tube or one strip tube in place.
Mini Centrifuge | 3
Page 6
6. Equipment Maintenance
The centrifuge should be cleaned periodically. Ensure that the unit is not plugged in. Use a
damp cloth and a mild, noncorrosive detergent (pH < 8). Do not immerse the centrifuge in
liquid or pour liquids over it. Excessive amounts of liquid should be avoided. Liquid should
not come into contact with the motor. After cleaning, ensure all parts are dried thoroughly
before attempting to operate the unit.
Should a spill of infectious materials occur within the rotor or rotor chamber, the unit should
be disinfected. This should be performed by qualied personnel with proper protective
equipment.
7. Rotors
The centrifuge is supplied with two interchangeable quick-release rotors. No tools are
required to exchange the rotors or attach them to the motor shaft. The rotors can be easily
exchanged with one hand by way of the quick release system. Remove the rotors i by
placing your thumb on top of the motor shaft and lifting up with two ngers under the rotor.
Place the other rotor into position on the motor shaft and snap in.
8 place tube rotor 4 place strip rotor
8. Cleaning
Before using any cleaning or decontamination methods except those recommended herein,
check with technical support (1-800-4-BIORAD) that the proposed method will not damage
the equipment. To clean the centrifuge, use a damp cloth and a mild, noncorrosive detergent
(pH < 8). After cleaning, ensure all parts are dried thoroughly before attempting to operate the
unit. Do not immerse the centrifuge in liquid or pour liquids over it.
9. Service
Should you have a question about the operation of the Mini Centrifuge or if service is required,
contact Bio-Rad technical support at 1-800-4-BIORAD. Do not send in a unit for service
without rst calling to obtain a repair authorization number. Should the unit require return for
service, it should be properly packed to avoid damage. Any damage resulting from improper
packaging shall be the responsibility of the user.
4 | Mini Centrifuge
Page 7

10. Limited Warranty
Bio-Rad Laboratories (Bio-Rad) warrants that this product will be free from defects
in material and workmanship for a period of one (1) year from date of purchase. This
warranty is valid only if the product is used for its intended purpose and within the
guidelines specied in the supplied instruction manual.
Should this product require service, contact Bio-Rad Technical Support at
1-800-4-BIORAD to receive a return authorization number and shipping instructions.
Products received without proper authorization will be returned. All items returned for
service should be sent postage prepaid in the original packaging or other suitable carton,
and padded to avoid damage. Bio-Rad will not be responsible for damage incurred by
improper packaging.
This warranty does not cover damage caused by accident, neglect, misuse, improper
service, natural forces, or other causes not arising from defects in original material or
workmanship. This warranty does not cover motor brushes, fuses, light bulbs, batteries, or
damage to paint or nish. Claims for transit damage should be led with the transportation
carrier.
ALL WARRANTIES INCLUDING THE IMPLIED WARRANTY OF MERCHANTABILITY AND
FITNESS FOR A PARTICULAR PURPOSE ARE LIMITED IN DURATION TO 12 MONTHS
FROM THE ORIGINAL DATE OF PURCHASE.
BIO-RAD’S SOLE OBLIGATION UNDER THIS WARRANTY IS LIMITED TO THE REPAIR
OR REPLACEMENT, AT BIO-RAD’S DISCRETION, OF A DEFECTIVE PRODUCT. BIORAD IS NOT LIABLE FOR INCIDENTAL OR CONSEQUENTIAL DAMAGE, COMMERCIAL
LOSS, OR ANY OTHER DAMAGES RESULTING FROM THE USE OF THIS PRODUCT.
Some states do not allow limitation on the length of implied warranties or the exclusion or
limitation of incidental or consequential damages. This warranty gives you specic legal
rights. You may have other rights which vary from state to state.
No individual may accept for, or on behalf of, Bio-Rad any other obligation of liability, or
extend the period of this warranty.
For your reference, make a note of the model and serial number, date of purchase, and
supplier here.
Model No._____________________ Serial No.________________________________
Date Purchased ____________________________________________________________
Supplier __________________________________________________________________
Mini Centrifuge | 5
Page 8

BIO-RAD is a trademark of Bio-Rad Laboratories, Inc. in certain jurisdictions. All trademarks used
herein are the property of their respective owners.
Bio-Rad
Laboratories, Inc.
Life Science
Group
10000120898 Ver A US/EG
Web site bio-rad.com USA 1 80 0 424 6723 Australia 61 2 9914 2800 Austria 43 01 877 89019
Belgium 32 03 710 53 00 Brazil 55 11 3065 7550 Canada 1 905 364 3 435 China 86 21 6169 8500
Czech Republic 36 01 459 6192 Denmark 4 5 04 452 10 00 Finland 35 08 980 422 00
France 33 01 479 593 00 Germa ny 49 089 3188 4393 H ong Kong 852 2789 33 00 Hungary 36 01 459 6190
India 91 124 4029300
Korea 82 2 3473 4460 Mex ico 52 555 488 7670 The Netherlands 31 0 318 540 666 New Zealand 64 9 415 228 0
Norwa y 47 0 233 841 30 Poland 36 01 459 6191 Portugal 351 21 4727 717 Russia 7 495 721 14 04
Singapore 65 6415 3188 South Africa 36 01 459 6193 Spain 34 091 4 9 06 580 Swed en 46 08 555 127 00
Switzerland 41 0617 17 9555 Taiwan 886 2 2578 7189 Thailand 66 2 651 8311
United Arab Emirates 971 4 8187300 Un ited Kingdom 44 01923 47 1301
Israel 972 03 963 6050
Italy 39 02 494866 00 Japan 81 3 6361 7000
Sig 0119
 Loading...