

Page 1

Your
Complete
Guide to
Biopod
Version 1.0This manual was printed January 2018, please check biopod.com for the latest updates.
Page 2

Page 3

IMPORTANT
Please follow step-by-step instructions thoroughly to prevent
voiding your warranty. See Biopod warranty information
on page 114-115.
YOUR BIOPOD’S ADAPTER
Your Biopod adapter is located UNDERNEATH
your Biopod unit (in the base). When unboxing your
Biopod, gently remove any packaging or tape
holding the adapter in place.
WHAT YOUR BIOPOD’S LIGHTS INDICATE
Orange light: Power | Green Light: Registration Status of your Biopod |
3 main light combinations you will see at the back of your Biopod:
1. Orange ON / Green Blinking/ Blue Blinking: Biopod is ON and going through booting
cycle if just plugged in, or reset cycle if reset button pressed. BIOPOD WiFi is NOT visible.
2. Orange ON / Green ON/ Blue OFF: Biopod is ON, registered but not connected.
BIOPOD WiFi is visible. 3. Orange ON / Green ON/ Blue ON: Biopod is ON,
Blue Light: Connection status of your Biopod
registered and connected. BIOPOD WiFi is NOT visible.
Page 4
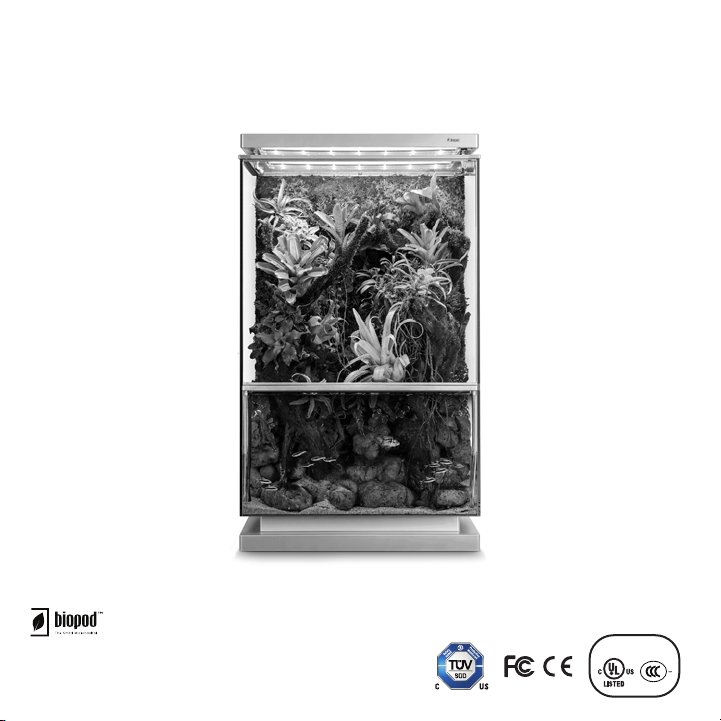
Congratulations on your new Biopod!
COPYRIGHT 2017 BIOPOD SYSTEMS INC - All Rights Reserved
PATENTS PENDING - Designed by Biopod in Canada
Made in China
CLASS 2 POWER SUPPLY
ALIMENTATION DE CLASSE 2:
2
Page 5
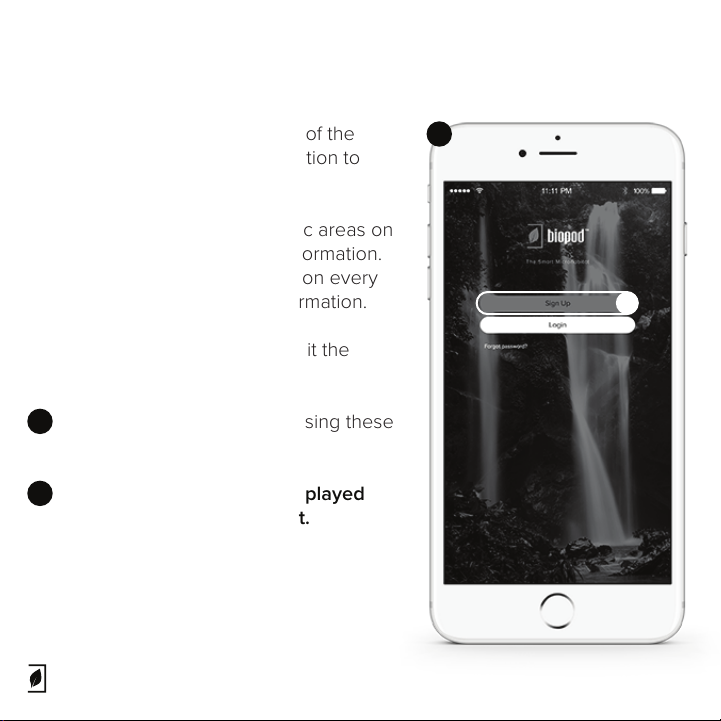
Before we begin
Here’s a legend showing some of the
important elements to pay attention to
within this guide.
A. These letters indicate specific areas on
screens providing additional information.
These letters will start from “A” on every
page containing additional information.
In this case “A” is indicating to hit the
Sign Up button.
1
Multiple images are shown using these
numbers.
!
Important messages are displayed
using an “!” icon & bold text.
1
A
3
Page 6
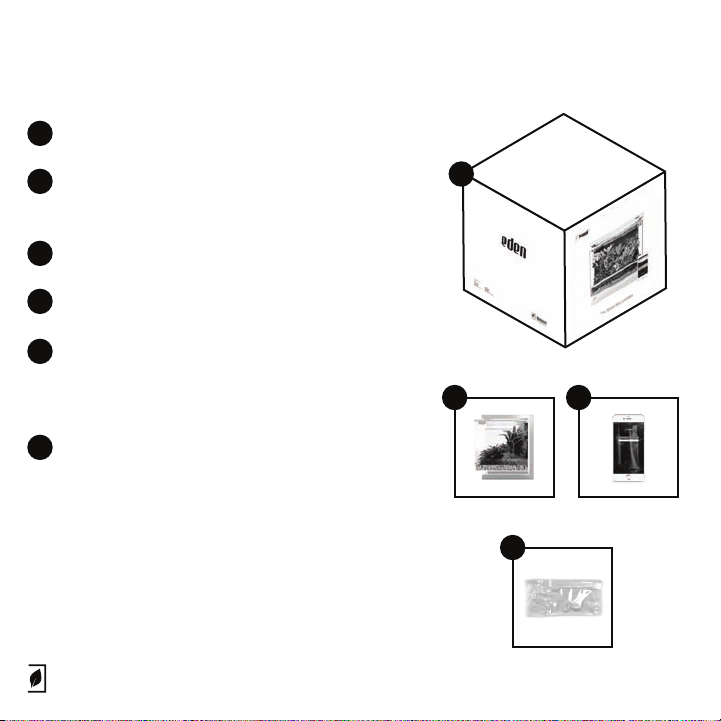
1
Your new Biopod
What you should have in front of you
2
“Your Complete Guide to Biopod”
(this manual)
3
Your Smartphone or Tablet
4
Lubricant for reservoir fitting
If you’re missing any of the above,
!
please contact our Customer Support
Ninjas at [email protected].
If you’re located in Canada or the
!
United States of America, your
Biopod Plant Pack is included with
your purchase. Plant Packs arrive 2-4
days after activating your Biopod
unit. For more information on Plant
Packs, see 78.
1
2 3
4
4
Page 7
Some Tips, Tricks & Rules
Never access the area underneath your
Biopod unit unless instructed to do so by
an ocial Biopod Customer Support
Ninja.
Accessing your Biopod’s components or
underneath your unit without proper
instructions from an Authorized Biopod
Representative will void your warranty.
Adding accessories that are not Biopod
approved (i.e. heat lamps etc.) will also
void your warranty.
Follow instructions in this booklet and you
should be set and good to go!
!
In certain instances we ask that some
components are touched/opened and
then closed o via YouTube etc.
For example: Priming your irrigation
pump; this will not void your warranty.
Customer Support Ninjas
5
Page 8

IMPORTANT
PLEASE PRIME YOUR IRRIGATION PUMP BEFORE
BEGINNING WITH THE STEPS IN THIS GUIDE.
biopod.com/support/irrigationpump
6
Page 9

STEP 1: Initial Registration & Setup
a) Download the Biopod app
Available for both Android & iOS
b) Create an account using the Biopod app
c) Place Biopod in Position
Choose a sturdy spot where you would like your Biopod. This should be in an area that
isn’t too hot, too cold or near a vent. *Biopods may be heavy, especially after scaping
and adding water to your unit and to the reservoir.
d) Unpack Biopod and plug it in. It will start its boot cycle. A steady green
light on the back of the Biopod means you’re good to go!
All indicator lights (including the green light), as well as the plug are located in the back of
the unit.
e) Establish Network Connection
WiFi connectivity instructions are available on page 8, on our website and on our YouTube
channel. Android: biopod.com/androidsetup iOS: biopod.com/iossetup
*iOS devices require a few extra steps in our Setup Wizard.
7
Page 10
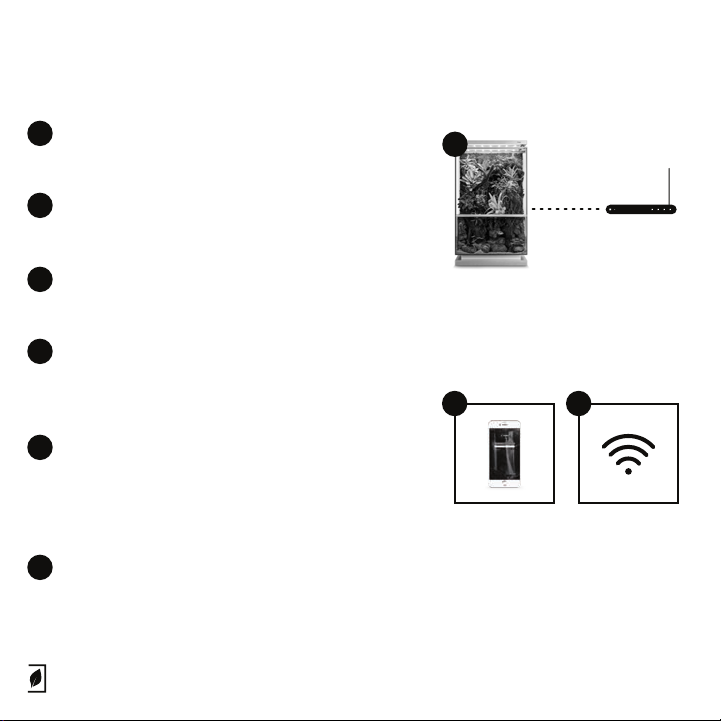
Please follow these tips & tricks
1
Ensure your unit is no further than 10
meters away from your router.
1
2
Ensure your unit is up to date always
(firmware update), see page 41 & 58.
Your WiFi frequency must be 2.4 GHz
3
(2.4 GHz with WPA/WPA2 encryption).
Biopod is currently not supported by
!
a 5 GHz network (WEP encryption is
not supported).
Some routers may be incompatible or
!
cause performance issues with the
connection from your phone to your
unit and vice versa.
Please note that your operating
!
system’s minimum requirements are:
iOS: 9 | Android: 4.4 Kit-Kat
10 meters
maximum
2 3
8
Page 11
STEP 1: Continued
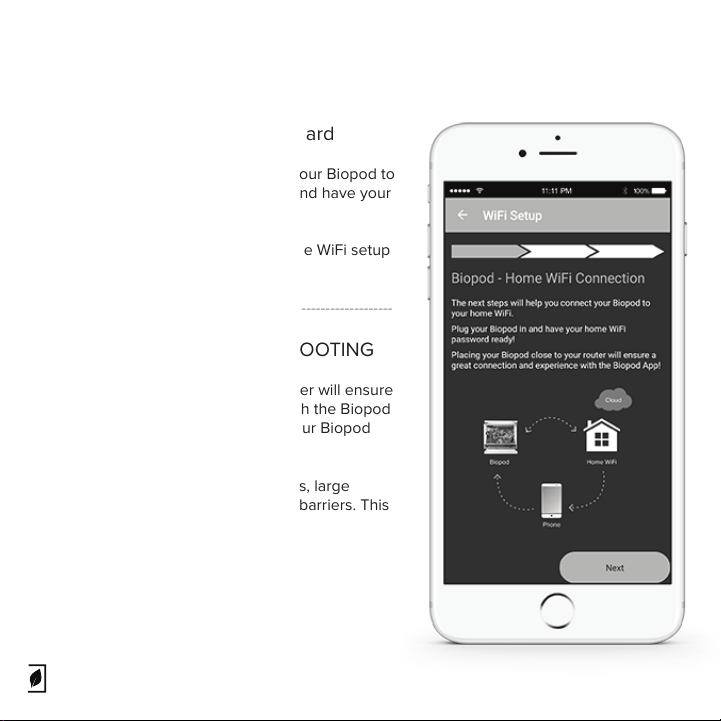
Welcome to the WiFi Setup Wizard
The next steps will help you connect your Biopod to
your home WiFi. Plug your Biopod in and have your
home WiFi password ready!
Hit Next when you’re ready to begin the WiFi setup
process.
---------------------------------------------------------------------------
TIPS & TRICKS + TROUBLE SHOOTING
Placing your Biopod close to your router will ensure
a great connection and experience with the Biopod
app. We recommend that you place your Biopod
within 10 meters of your router.
Please note that walls, furniture, beams, large
appliances etc. can create WiFi signal barriers. This
can result in a slower connection.
9
Page 12
STEP 1: Continued
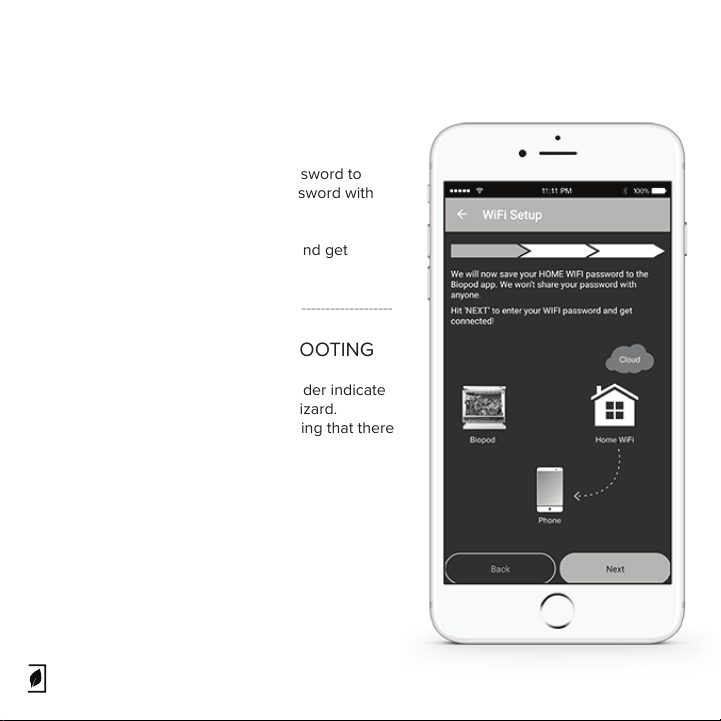
WiFi Setup Wizard Continued
We will now save your HOME WiFi password to
your Biopod. We won’t share your password with
anyone.
Hit Next to enter your WiFi password and get
connected!
---------------------------------------------------------------------------
TIPS & TRICKS + TROUBLE SHOOTING
The green/white arrows below the header indicate
your progress within the WiFi Setup Wizard.
Currently the first arrow is green meaning that there
are a few more steps to go!
10
Page 13

STEP 1: Continued
WiFi Setup Wizard Continued
In this screen we are detecting nearby
1
WiFi connections.
In this screen you see which HOME WiFi connection
2
your app has detected. Below you have two options
- you can either enter your HOME WiFi password by
selecting the green button, or you can select the
second button allowing you to choose another WiFi
connection.
Once you’re happy with your WiFi connection,
hit the Enter WiFi Password button.
You will see this screen pop-up. Enter your password
3
twice. The second time you will be confirming/verifying your password.
---------------------------------------------------------------------------
TIPS & TRICKS + TROUBLE SHOOTING
Ensure your Biopod is within 10 meters distance of your
router and that your smartphone is as close to the
Biopod as possible for a faster WiFi connection process.
1
32
11
Page 14
STEP 1: Continued
WiFi Setup Wizard Continued
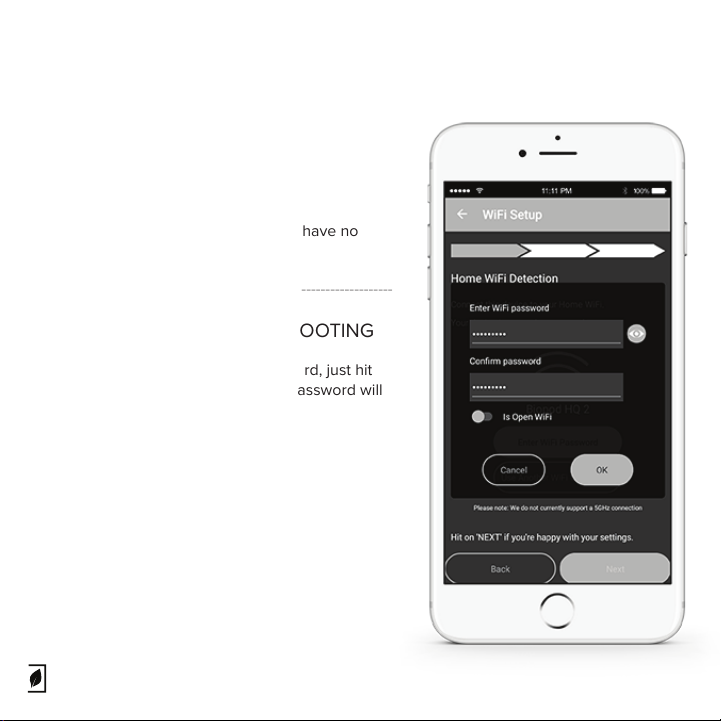
Once you’ve entered and confirmed
your password, hit OK.
If your password matched, you should have no
issues. Go ahead and hit Next.
---------------------------------------------------------------------------
TIPS & TRICKS + TROUBLE SHOOTING
If it’s easier for you to see your password, just hit
the little eye icon. This ensures your password will
be the same on the first try!
12
Page 15
STEP 1: Continued
WiFi Setup Wizard Continued
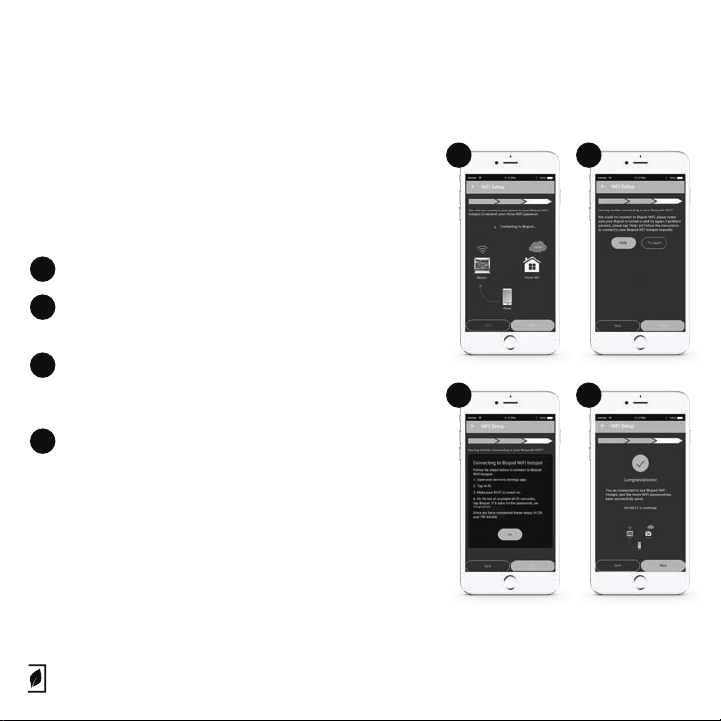
We will now connect your phone to a hotspot signal that
is emitted by your Biopod. This unique WiFi hotspot will
have a name configuration, similar to
“BIOPOD_12345678” (These numbers will be your
Biopod‘s serial number).
Connecting to your Biopod’s WiFi hotspot.
1
2
You will see this screen if there was an issue
connecting to your Biopod’s WiFi hotspot.
Follow the steps on the screen in order to trouble-
3
shoot any issues you may have encountered
during your Biopod’s WiFi Hotspot connection.
4
If you do not have any issues connecting you will
see a “CONGRATULATIONS” screen, with message
similar to the sample here (right).
1
2
43
13
Page 16
STEP 1: Continued
WiFi Setup Wizard Continued
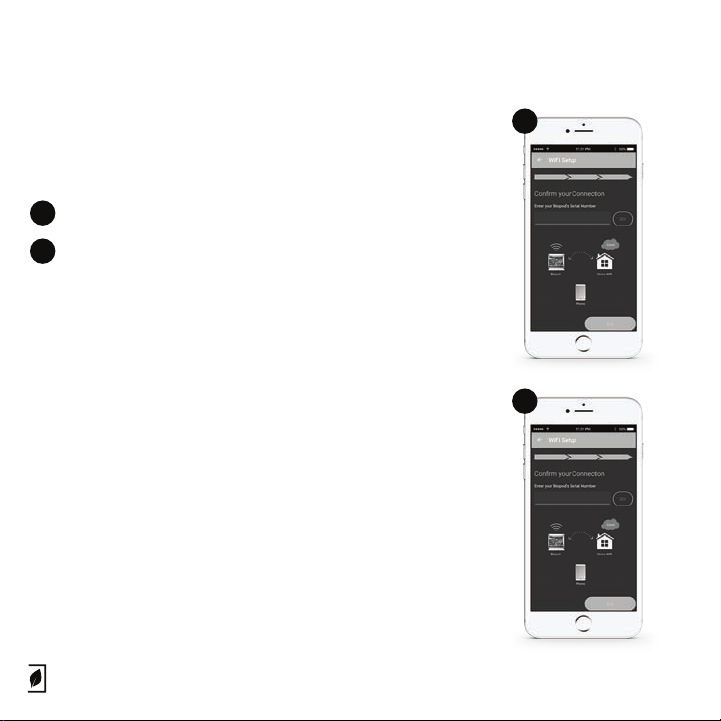
Congratulations! Your WiFi is now setup, we just have
to confirm your connection. Follow the steps below:
Enter your serial number.
1
Once you enter your serial number, hit GO!
2
---------------------------------------------------------------------------
TIPS & TRICKS + TROUBLE SHOOTING
Your Biopod’s serial number is a unique 12-digit number
that can be found ON THE BACK of this manual. This
number can also be found on the back of your Biopod,
located on a white sticker. Please note your serial
number can contain both numbers and letters, and must
be entered into the app EXACTLY as shown on your
manual.
Example: 1234567801NA
1
2
1234567801NA
14
Page 17
STEP 1: Continued
WiFi Setup Wizard Continued
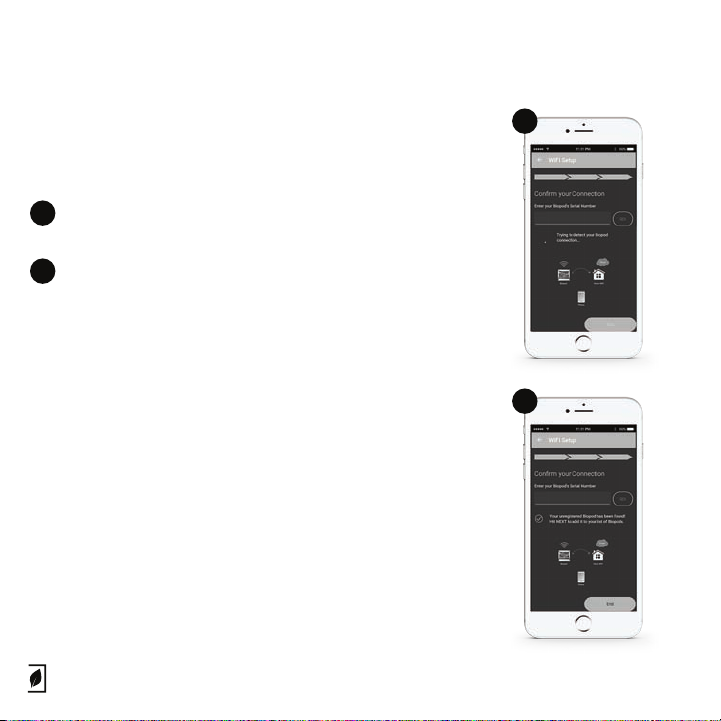
We are now confirming your connection & Biopod
serial number.
You will see a loading circle indicating that we are
1
trying to detect your Biopod connection.
You should see a check mark indicating we have
2
found your unregistered Biopod.
You have now completed the WiFi setup process!
Hit End to add it to your list of Biopods.
---------------------------------------------------------------------------
TIPS & TRICKS + TROUBLE SHOOTING
If you are having trouble confirming your Biopod serial
number, ensure you have entered in the correct number.
Biopod serial numbers can contain numbers and letters,
it’s important to include the letters as well. Enter your
serial number EXACTLY as displayed on the back of
your unit or at the back of this manual (letters may be
case sensitive).
1
1234567890NA
2
1234567890NA
15
Page 18
STEP 1: Continued
WiFi Setup Wizard Continued
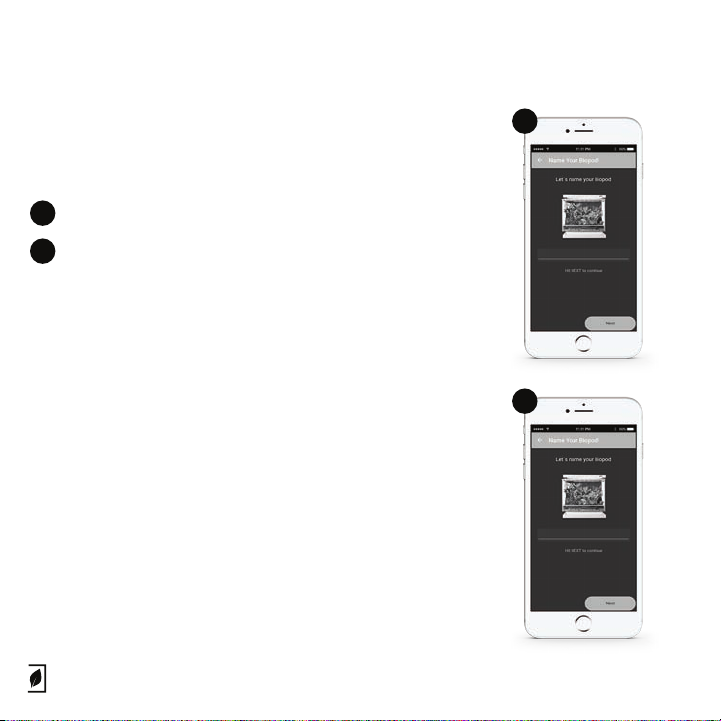
This step is fun and easy! Simply name your Biopod
with any name you desire.
You will see a screen with a field option.
1
Type in a name for your Biopod! In this image it’s
2
showing a sample with the name “Lisa’s Biopod”.
Hit Next to continue
---------------------------------------------------------------------------
TIPS & TRICKS + TROUBLE SHOOTING
You can always go back and rename your Biopod if
you wish. If you would like to rename your Biopod at any
time, head to the MAIN MENU, click on ‘Biopod Info’ and
simply click on the current name to change it. Once
you’re happy with your decision, hit ‘Save’.
1
2
Lisa’s Biopod
16
Page 19
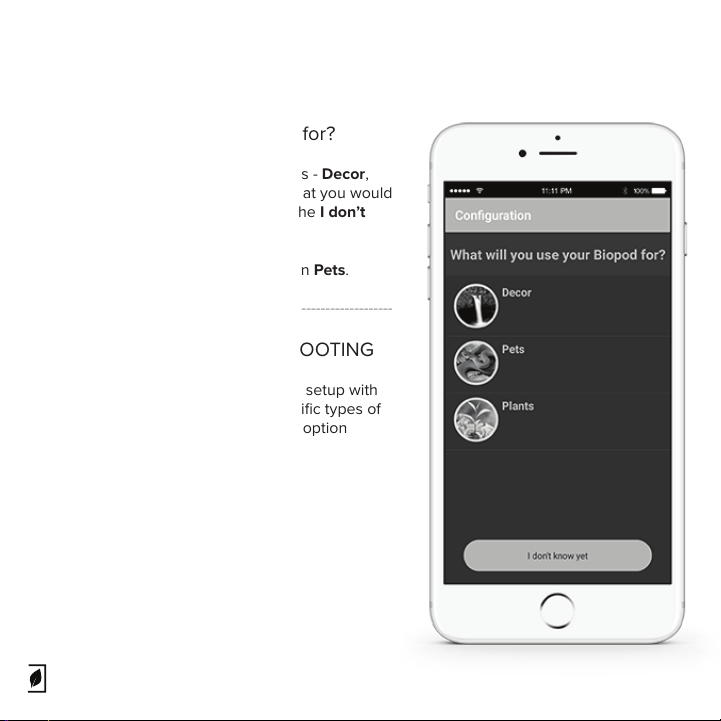
STEP 1: Continued
What will you use your Biopod for?
In this screen you will see three options - Decor,
Pets and Plants. If you’re unsure of what you would
like to use your Biopod for, simply hit the I don’t
know yet button.
In this demo we will be using the option Pets.
---------------------------------------------------------------------------
TIPS & TRICKS + TROUBLE SHOOTING
Select Decor for your typical rainforest setup with
no pets. If you would like to grow specific types of
plants, herbs or vegetables, select the option
Plants.
17
Page 20
STEP 1: Continued
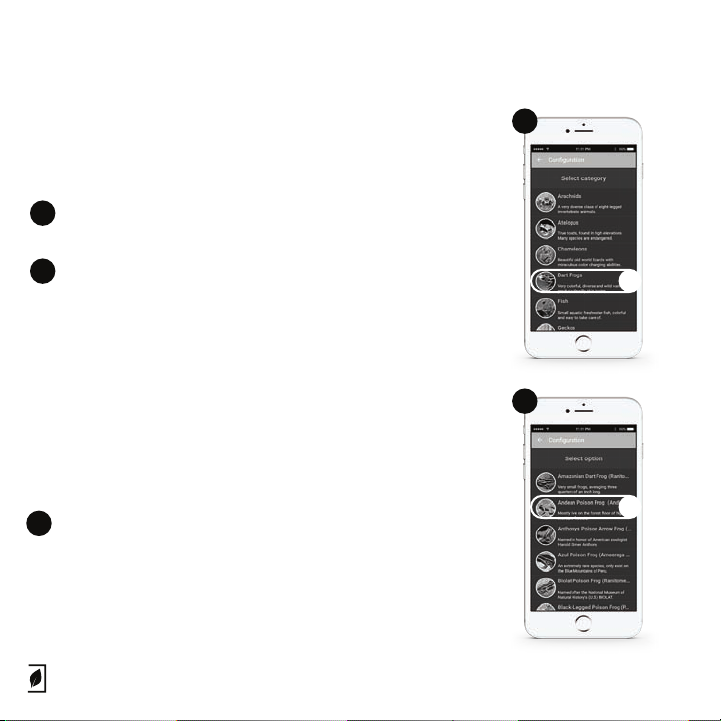
Making Your Selection
In these screens you will be asked to select your
animal/species, plants or decor.
Select a category. For the purpose of this demo
1
we are going to select Dart Frogs.
In this screen you’ll be asked to select an option.
2
In this case it would be a specific type of dart frog.
---------------------------------------------------------------------------
TIPS & TRICKS + TROUBLE SHOOTING
You can always change your selection by going into
your Biopod’s settings. To get into your Biopod’s
settings, simply click the MAIN MENU, click BIOPOD
INFO, then click CHANGE CONFIGURATION to change
your preferences/environment.
Before scaping your Biopod, we recommend you
!
review the components of the Biopod on page 43
to 53 for additional information. Please also ensure
that your heat sensor is not touching the heating
cables, as this will cause inaccurate sensor
readings.
1
A
2
B
18
Page 21
STEP 1: Continued
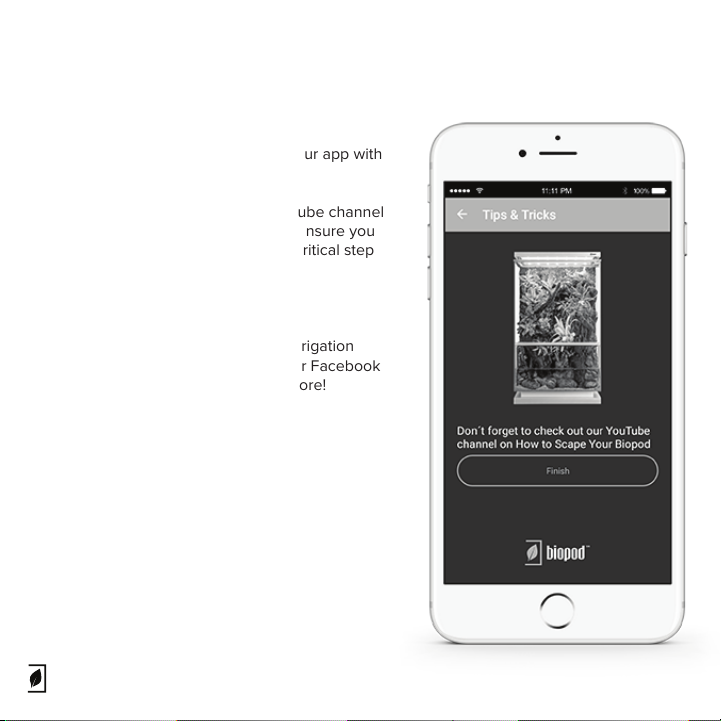
Tips & Tricks
You have now completed setting up your app with
your Biopod!
Important: Before heading to our YouTube channel
on how to scape your Biopod, please ensure you
prime your irrigation pump. This is a critical step
before scaping your Biopod.
Head to biopod.com/irrigationpump
After you have primed your Biopod’s irrigation
pump, head to our YouTube channel, or Facebook
page for scape videos, tutorials and more!
youtube.com/biopod
19
Page 22

STEP 2: Gather Items Needed for Scaping
a) Biopod (already purchased)
b) Your Plants and/or Biopod Plant Packs
Please Refer to Page 78 for additional Plant Pack info.
c) Gravel/Desired Substrate
This can be purchased at a local pet store or garden center.
d) Decor (Wood/Rocks/Etc.)
This can be purchased at a local pet store, specialty store or online. *Aquarium Setup
(
aqua & aqua II) should have compatible aquatic soil/substrate and wood. It must be
suitable for an aquatic environment.
e) Water Conditioner if using tap water
If using filtered dechlorinated water, you will NOT need a water conditioner.
f) 2 Buckets: One for New Water, One for Used Water
These can be purchased at your local hardware/supply store.
20
Page 23
STEP 2: Continued
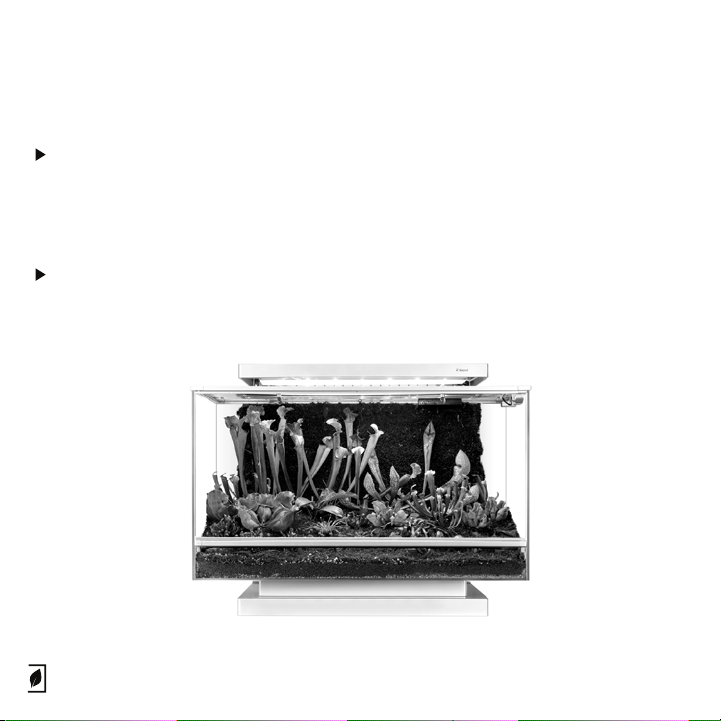
g) Siphon Hose for Water Changes
You will need to replace/change the water when first setting up your Biopod due to the
materials being fresh. Water changes will also be done to ensure the safety of your plants
and animals (preventing stagnation, bacteria growth, murky water...etc). Can be purchased
at local hardware store. *Aquarium Setup Only.
h) Beneficial bacteria/Nitrifying bacteria (if housing fish)
Can be purchased at local pet store. This allows proper nutrient cycling.
21
Page 24

STEP 3: Prep Your Items for Scaping/Planting
a) Rinse gravel until water is clean (removing all dust particles)
This ensures a clean and balanced Biopod. This also helps with aquatic Biopod setups,
ensuring a pristine environment for your fish. Use a strainer as this makes washing
gravel easier and faster.
b) Unpack your plant roots VERY gently and hydrate the roots
To hydrate the roots, spray gently with water. Do not leave unpacked overnight as plants
could wilt and become unusable.
c) Unpacking moss
Unpack and unravel your moss and let it air out (letting it sit out in the open). If your moss
has arrived dry, then it needs to be gently hydrated with water when you are ready to
scape. When you are ready to scape, gently spray the moss from the top (the green
portion) with some water. Please do not over-hydrate the moss, just hydrate it slightly
(misting for 10 seconds should be sucient). Wait 5 minutes after re-hydrating your
moss to let it soak up water, before beginning the scaping process.
d) Scape your Biopod!
Head on to our Facebook/YouTube page to watch a scaping video in order to get your
system setup properly. *This step is important.
22
Page 25
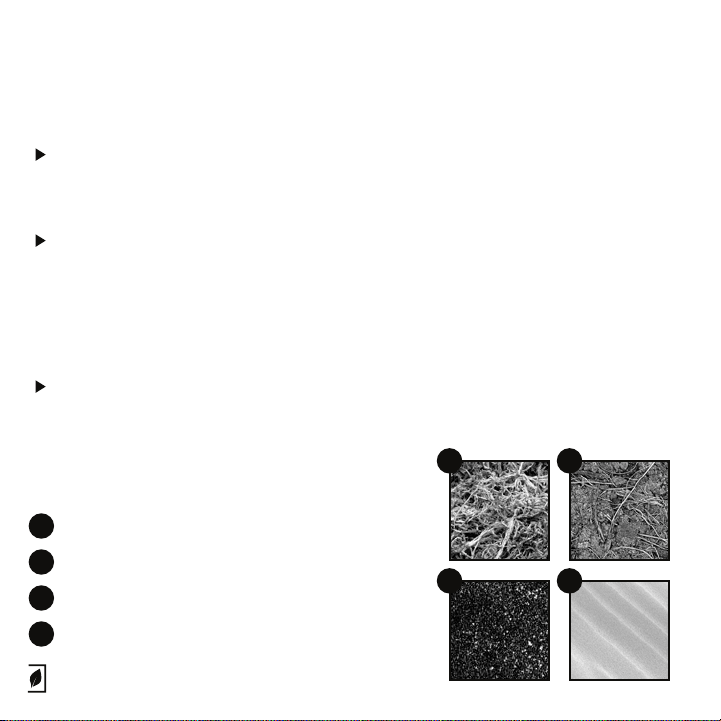
STEP 4: Prepare Biopod
a) Recommended Rinse
Rinse your biopod with warm water and wipe with a soft cloth. *NEVER USE HARSH
CHEMICALS TO CLEAN BIOPOD.
b) Hydrate Sphagnum Moss and plant it/fill it into the Living Wall
Break up your sphagnum moss into small pieces with your hands and soak it in a bucket
of water for 15 minutes before filling in the living wall. To see what the living wall looks like,
refer to Page 52. When the sphagnum moss is hydrated, start inserting small clumps of
sphagnum moss into the living wall. To see an example of filling in the living wall, watch
our instructional scaping videos at www.youtube.com/Biopod
c) Place Substrate
Coconut Husk is recommended for planting plants in terrestrial models, for Aquatic models
we recommend using sphagnum moss. Your substrate must be placed on top of the false
bottoms, be sure to rinse your substrate and squeeze out the water before using it. ONLY
USE SOIL FOR EDIBLE PLANTS.
Types of substrate for your Biopod
1
Sphagnum Moss
2
Coconut Coir/Husk
3
Aqua Soil
4
Sand or Desert-Type Substrate
1
3
2
4
23
Page 26
STEP 4: Continued
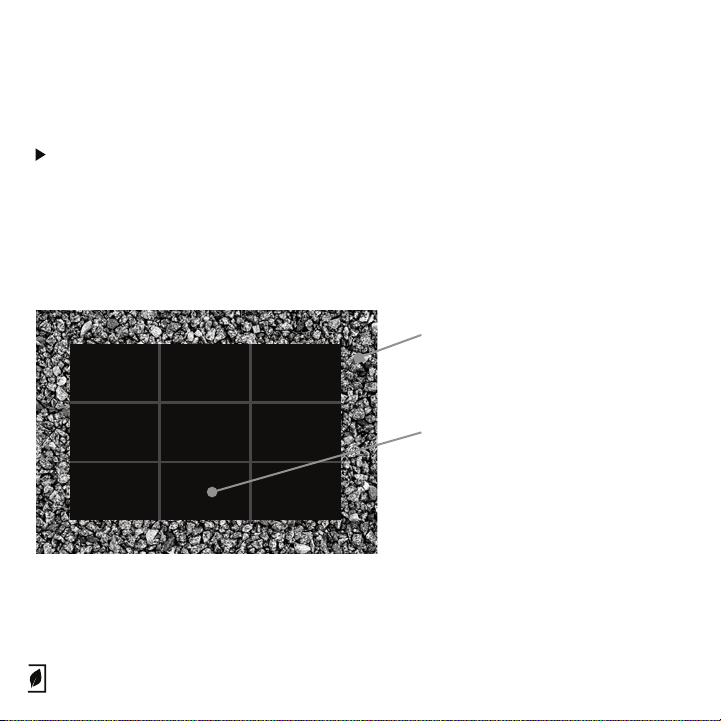
d) Place Gravel
Can be purchased at a local store. Must be washed multiple times before placing into
Biopod. Should be placed around false bottoms up to the silver ventilation. Refer to
diagram below or visit our YouTube channel for additional information. Gently use a butter
knife to tuck gravel under the clear tubes along the sides of the Biopod.
*THIS DIAGRAM & SETUP APPLIES TO TERRESTRIAL MODELS ONLY.
Placing gravel in your Biopod
Gravel (should overlap false
bottoms slightly to cover up edges).
Gravel should NOT go under false
bottoms.
False Bottoms
*You can use hydro-balls to help reduce the amount of gravel as well as help with aeration.
**You can still use gravel for the base layer in Aquatic models. The Aqua II model does not
come with false bottoms.
Coconut Husk or Sphagnum moss
should be placed on top of false
bottoms for planting.
24
Page 27

STEP 4: Continued
e) Place Decor Items
Placing your wood and decor rocks before you begin your scape helps you envision your
outcome. Once you like where your wood and rocks are placed you can start planting.
*To make planting easier, remove decor items temporarily.
f) Plant Up the Living Wall
You will need to use clips to secure plant roots and moss to the Living Wall. If you need
additional instructions, we have scaping/instructional videos on our Facebook page and
YouTube channel.
g) Start Planting
If you have removed your decor items, add them back in and start planting! Dig a small
hole (in substrate where your plant roots would go. Place plant roots into hole and cover
up with substrate (Coconut Husk or Sphagnum).
h) Add Finishing Touches
Once your Biopod is planted up, add moss on top of the substrate to set the scene. Add air
plants if you wish. Check out our scaping videos for more information on setting up and
planting your Biopod!
i) Spray Your Plants
Once everything is planted, gently spray your plants with filtered dechlorinated water.
This allows the plants to settle into their new home.
*If you are using tap water, ensure that you’re also using a water conditioner. Without
the water conditioner, tap water will create a lot of residue within your Biopod.
25
Page 28

STEP 4: Continued
j) Add Water to Tank
If you have a terrestrial scape (eden, terra..etc), please add 2-3 inches of water
(filtered/dechlorinated). You can see the water level on the side glass or the back of the
Biopod. You will want to add water (filtered dechlorinated) up to the ventilation. This allows
the Living Wall to work eciently with minimal maintenance. If using our aquatic models,
ensure to also fill up to the ventilation strip. *Add conditioner to the water if using tap
water.
k) Add Water to Reservoir
This should also be filtered dechlorinated water. *DO NOT add animals yet
IMPORTANT
Before placing animals or running your Biopod, please ensure that your RIGHT misting
nozzle is facing AWAY from the glass and sensor. If your nozzle is facing the sensor,
gently turn it to face the Living Wall. Direct water contact with the sensor could
damage sensory feedback.
26
Page 29
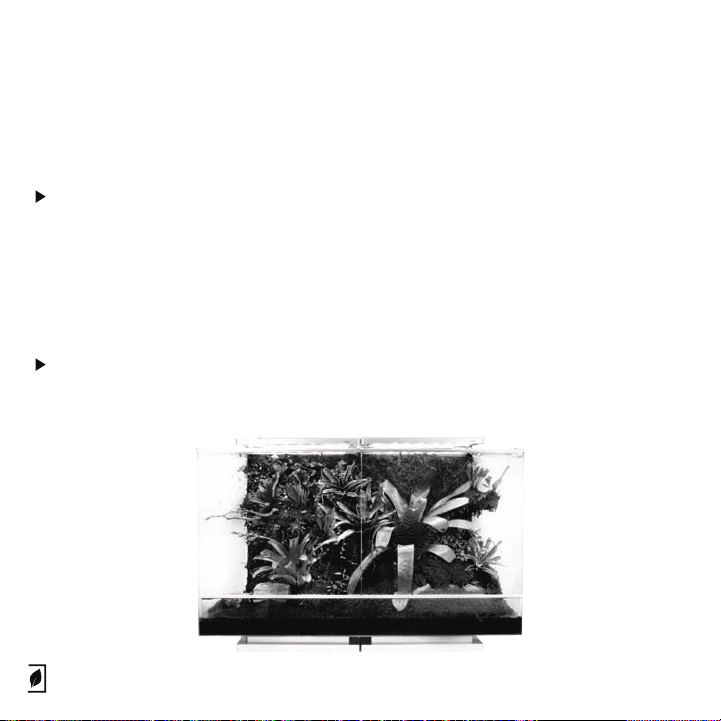
STEP 5: Stabilize
a) Let sit for 2 Days
b) Replace 50% of water in Aquatic models/Aquatic setups
Use siphon hose to replace 50% of water. If using tap water, don’t forget to add the
conditioner. Filtered dechlorinated water is what we use at Biopod and is highly
recommended over tap water. For a video on how to siphon water from your Biopod,
visit our YouTube channel.
c) Let Sit for 1 Day
d) Replace 50% of Water
Follow instructions above in STEP 6 (b)
27
Page 30

IMPORTANT: AQUATIC SETUP ONLY
a) Introducing Water
After your Biopod is scaped/planted, add *water into your Biopod.
b) Day 1: Let sit for 1 day, change 50% water
c) Day 2: Let sit 1 more day, change 50% water
d) Day 3: Introducing Fish
Introduce 1-2 small freshwater fish, feed very small amounts (sparingly) - Add nitrifying
bacteria. This can speed up the establishment of good bacteria in your tank. Bacteria
can be purchased at local pet store.
e) Day 4: Do 15% water change
f) Day 5 & 6: Wait
g) Day 7: Test Water
Test water for ammonia/nitrite levels, if levels are too high, then use ammonia
removing products from your local pet store.
Whenever you need to top o the tank, do a 15% water change, then top o the tank
up to the ventilation strip. Once the tank is established, nutrients will be recycled and
your fish will do very well. Every once in a while it is still a good idea to test for
ammonia/nitrite.
28
Page 31
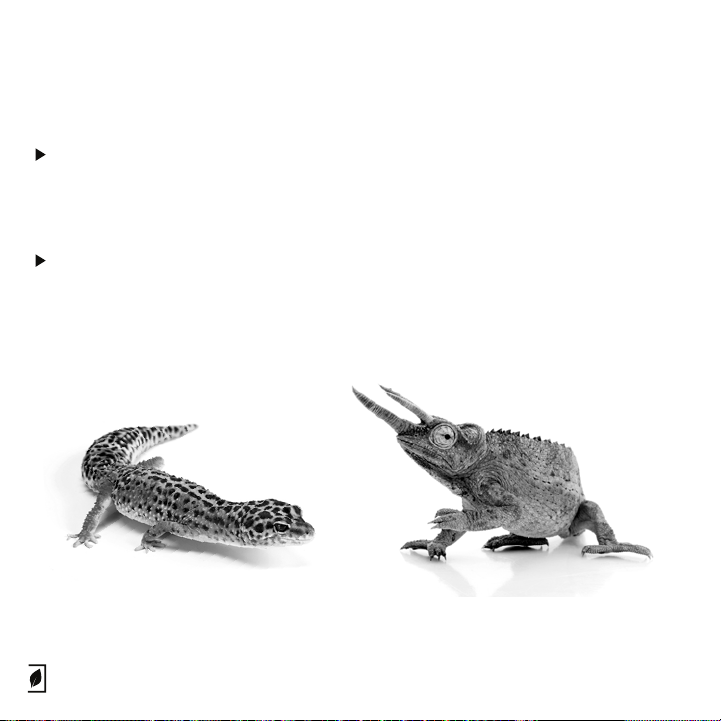
STEP 6: Add Your Animal(s)
a) Introducing your pet to Biopod
Ensure that you speak with a knowledgeable professional or representative at your local
pet store with regard to introducing your pet into a new environment (example: not all fish
should be introduced at once).
b) Don’t forget to feed your pet!
Purchase food at your local pet store or specialty shop. While Biopod is low maintenance,
we do not have the capability to feed your pets...yet.
Please research species before putting multiple types of species together in one unit.
29
Page 32
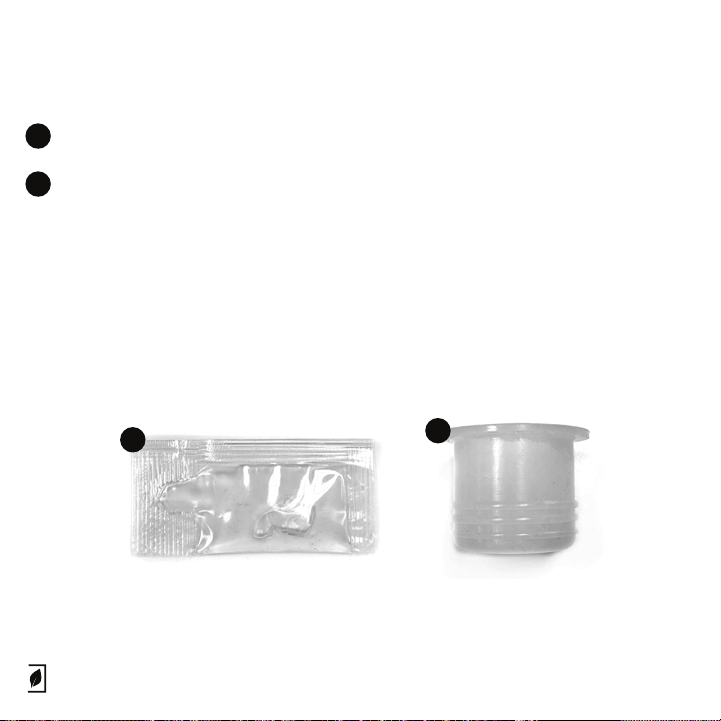
Using the Reservoir Fitting Lubricant
Lubricant: The lubricant comes in a small clear packet.
1
Reservoir Fitting/Stopper: The fitting/stopper is attached to the bottom of
2
the reservoir on the left hand side.
The Lubricant is recommended to ease the insertion of the rubber stopper
for your Biopod’s reservoir. Please apply the lubricant around the outside
surface of the reservoir stopper.
2
1
2
30
Page 33
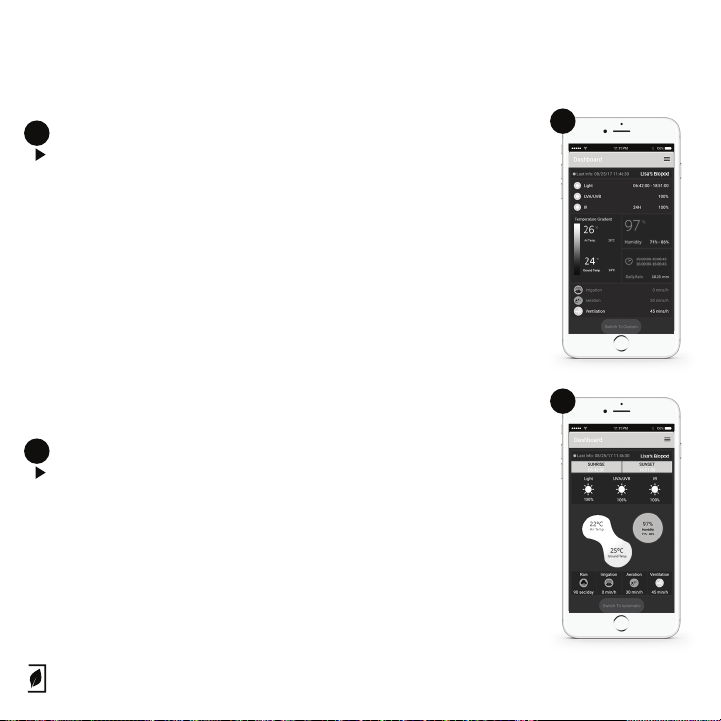
How does the Biopod App work?
1
Automatic Mode
With Biopod’s Automatic Mode, your Biopod creates the optimal
conditions for your plants and/or animals. Our automatic settings
have been developed through extensive research by our team of
Biologists. Each setting is unique, dynamic and uses real climate
data from natural habitats where each species is found.
This mode is recommended for those who want to establish the
best environment for their Biopod and its inhabitants. This setting
is highly recommended for novice users who aren’t familiar with
plant or animal care.
Our Automatic Mode makes it easy, stress-free and ensures that
your Biopod will take care of itself. Sit back, relax and watch your
Biopod flourish and grow!
2
Custom Mode
Custom mode allows you to freely adjust all parameters: air
temperature, ground/substrate temperature, humidity, rainfall,
UV lighting, Infrared (IR) lighting and photoperiod (sunrise/sunset). It also allows you to set custom timed cycles for all of
Biopod’s components (irrigation, aeration and ventilation).
Custom mode has been developed for hobbyists, advanced
users, Biologists and for those experienced with plant and
animal care.
Setting custom values for the aeration & ventilation: the Biopod may override these
settings at times to help your Biopod reach the temperature and humidity selected.
1
2
31
Page 34
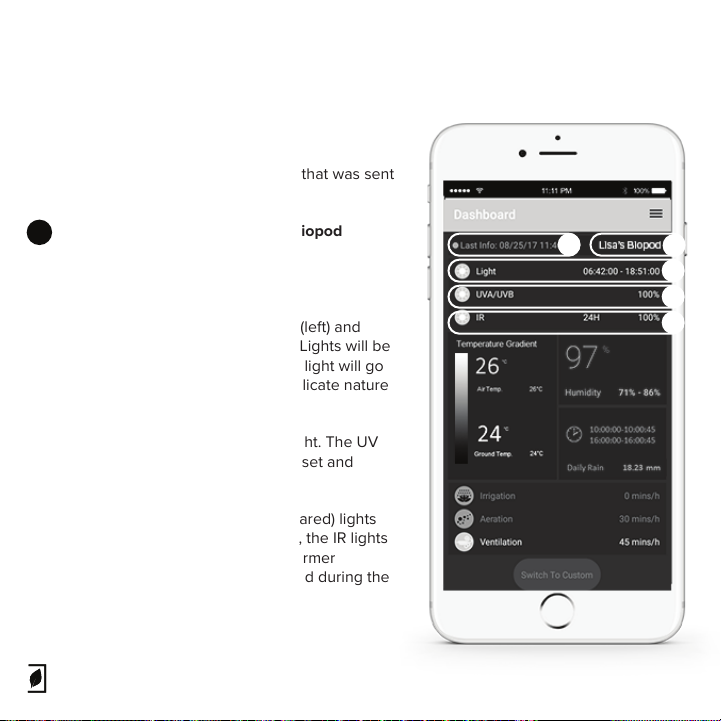
How does the Biopod App work?
Automatic Mode
A. This shows you the last information that was sent
via your Biopod to the Biopod App.
You can change the time in your Biopod
!
options.
B. Name you chose for your Biopod!
C. These two times define the sunrise (left) and
sunset (right). During the day, the LED Lights will be
ON. When sunset or sunrise occur, the light will go
through a 15 min. dimming cycle to replicate nature
as much as possible.
D. This shows the power of your UV light. The UV
light follows the LED light cycle for sunset and
sunrise.
E. Displaying the power of your IR (infrared) lights
and when they’re turned ON. Typically, the IR lights
are used during the night to keep a warmer
environment, however they can be used during the
day as well.
A
B
C
D
E
32
Page 35
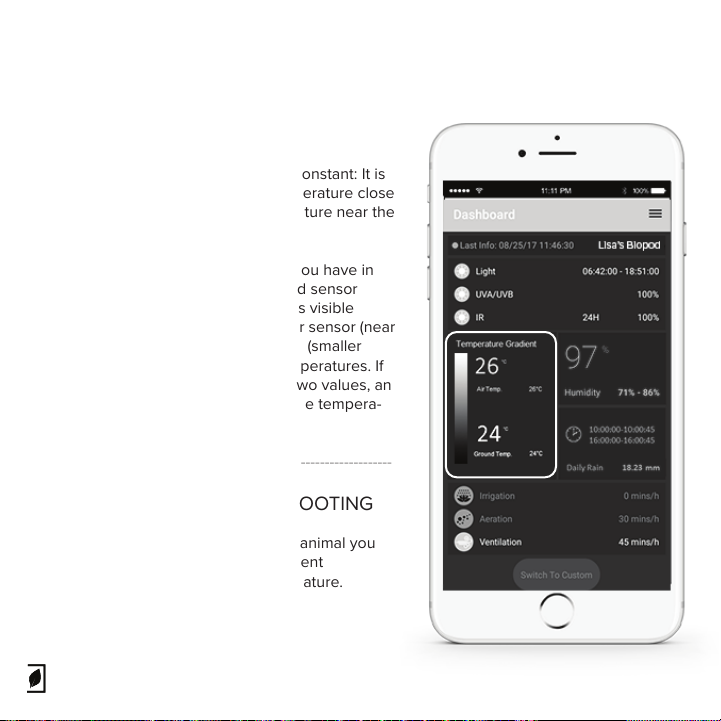
How does the Biopod App work?
Automatic Mode Continued
Temperature inside the Biopod is not constant: It is
a gradient, going from the lowest temperature close
to the substrate to the highest temperature near the
lights.
This shows the temperature gradient you have in
your Biopod, measured by your ground sensor
(black cable with a silver tip, not always visible
depending on your model) and your air sensor (near
the camera). You can see the expected (smaller
letters) and current (bigger letters) temperatures. If
there is a dierence between theses two values, an
icon (arrow) will appear showing that the tempera-
ture is being adjusted.
---------------------------------------------------------------------------
TIPS & TRICKS + TROUBLE SHOOTING
This gradient is very important for any animal you
will have, as it will be able to find dierent
temperature spots, like it would do in nature.
33
Page 36
How does the Biopod App work?
Automatic Mode Continued
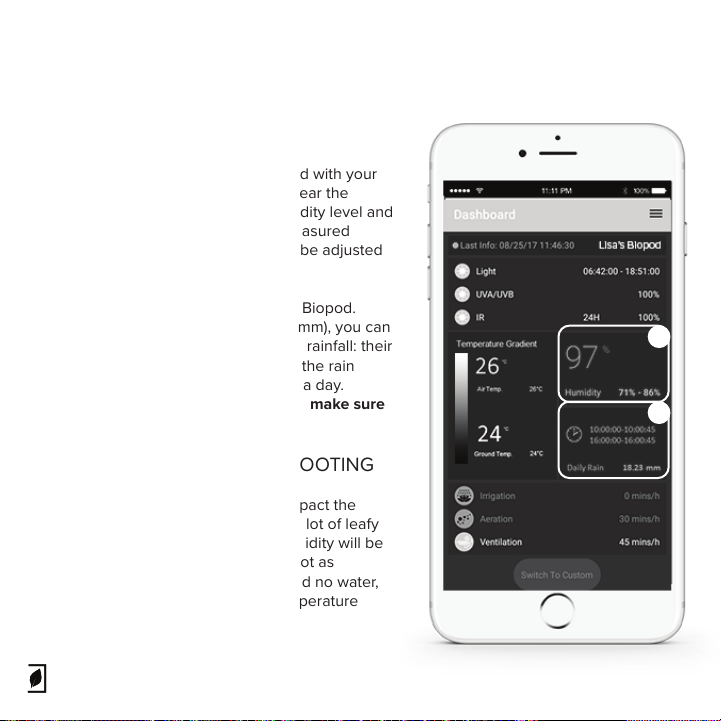
A. This displays the humidity, measured with your
air sensor on the side of the Biopod (near the
camera). You can see the current humidity level and
the expected humidity range. If the measured
humidity is not within this range, It will be adjusted
using aeration and ventilation.
B. This displays the rain cycles in your Biopod.
You can see the daily rainfall value (in mm), you can
also see the set times of your Biopod’s rainfall: their
starting and ending times. If activated, the rain
events occur between once and twice a day.
*It helps you monitor your reservoir to make sure
it is always full for proper rain cycle.
TIPS & TRICKS + TROUBLE SHOOTING
The way your Biopod is scaped will impact the
temperature and humidity. If you add a lot of leafy
plants, water and lots of moss, the humidity will be
higher and the temperature gradient not as
substantial. If you have a few plants and no water,
the humidity will be lower and the temperature
gradient stronger.
A
B
34
Page 37
How does the Biopod App work?
Automatic Mode Continued
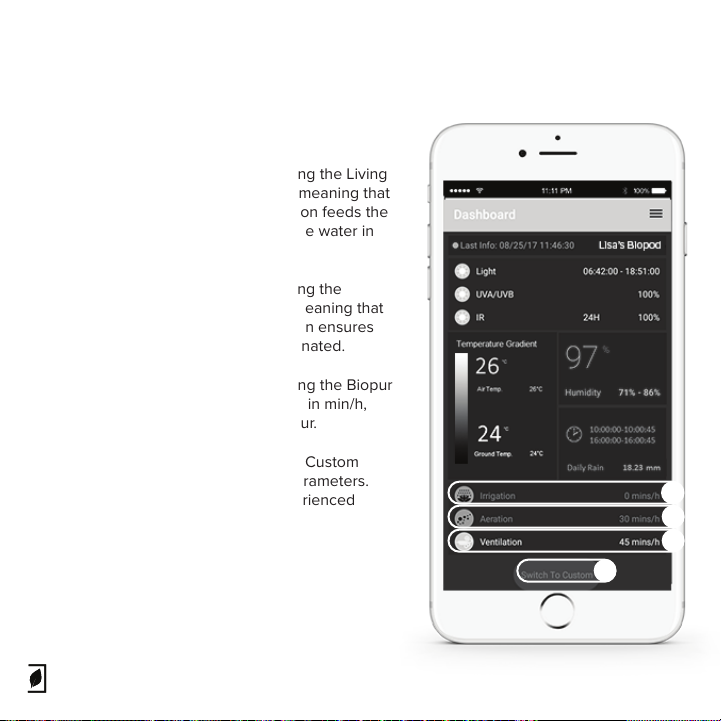
A. This displays information on how long the Living
Wall is irrigated. The value is in min/h, meaning that
this cycle starts every hour. The irrigation feeds the
plants in the living wall while filtering the water in
the most natural way possible.
B. This displays information on how long the
aeration is ON. The value is in min/h, meaning that
this cycle starts every hour. The aeration ensures
that your substrate/water is well oxygenated.
C. This displays information on how long the Biopur
Air Injection system is ON. The value is in min/h,
meaning that this cycle starts every hour.
D. This button permits you to switch to Custom
Mode, where you can modify all the parameters.
We recommend Custom Mode to experienced
users.
A
B
C
D
35
Page 38
How does the Biopod App work?
Custom Mode
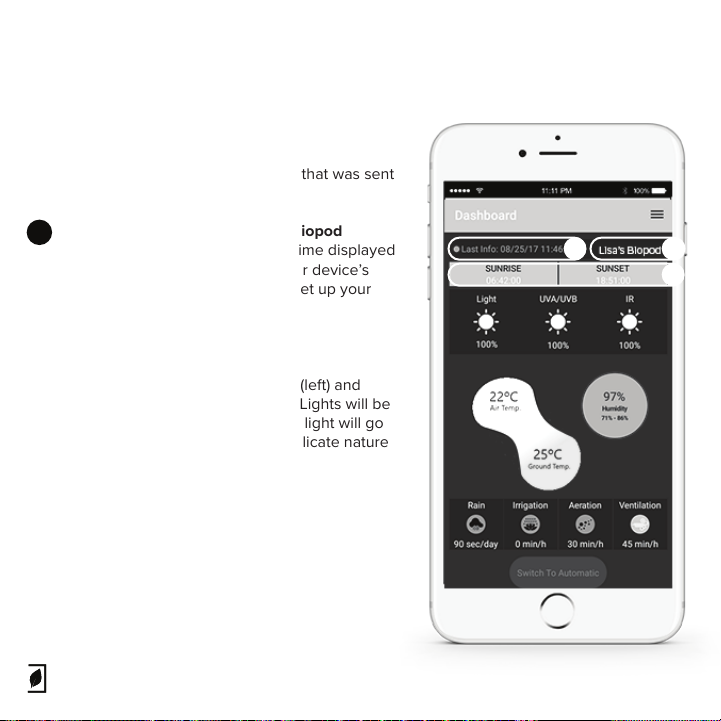
A. This shows you the last information that was sent
from the cloud to your Biopod unit.
You can change the time in your Biopod
!
options. Please also note that the time displayed
in the Biopod app is not always your device’s
time (this will depend on how you set up your
Biopod).
B. Name you chose for your Biopod!
C. These two times define the sunrise (left) and
sunset (right). During the day, the LED Lights will be
ON. When sunset or sunrise occur, the light will go
through a 15 min. dimming cycle to replicate nature
as much as possible.
A
B
C
36
Page 39
How does the Biopod App work?
Custom Mode Continued
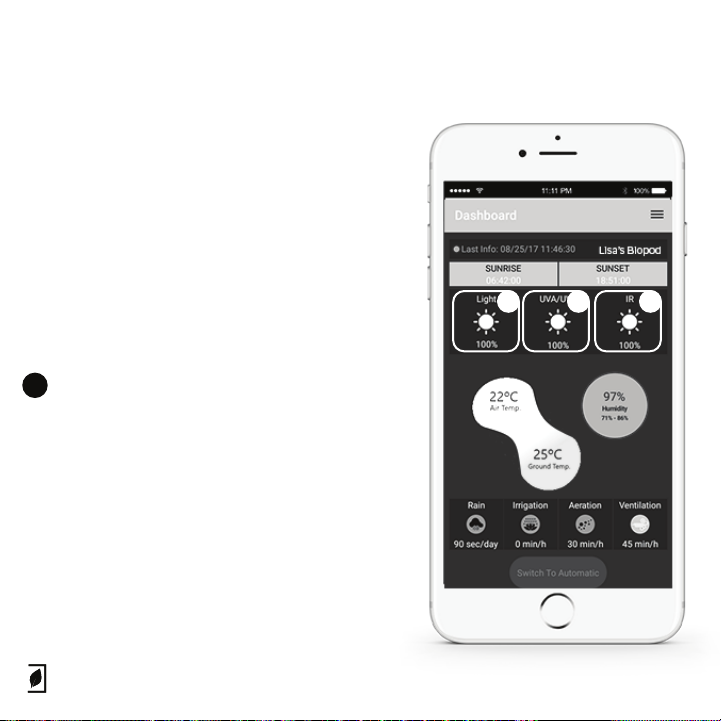
A. This allows you to adjust the brightness of the
LED light panels.
B. This displays the power of the UV light. Custom
mode allows you to choose the percentage
(0% to 100%).
C. This displays the power of the IR (infrared) light.
You can choose the percentage from 0% to 100%.
Please note, any percentage under 30% is
!
barely visible to the naked eye.
CBA
37
Page 40
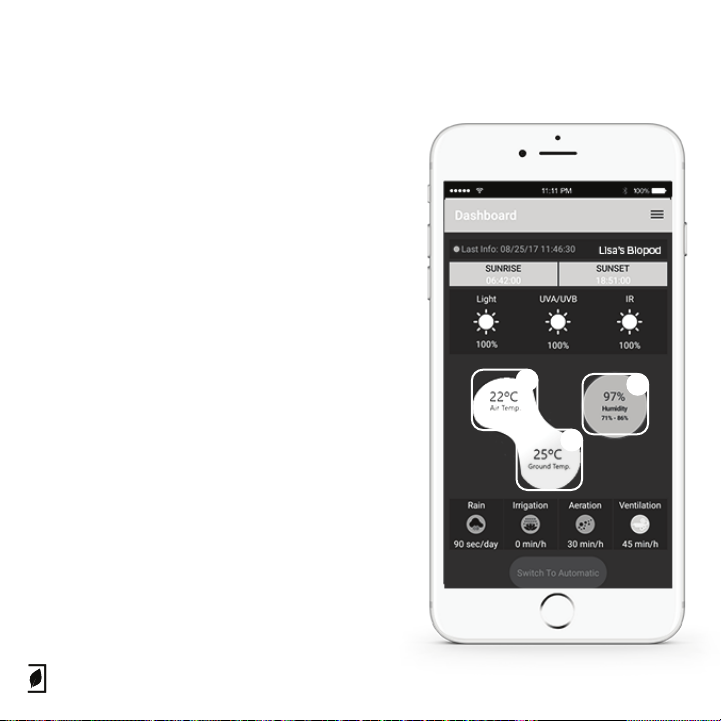
How does the Biopod App work?
Custom Mode Continued
A. & B. These boxes are related to the temperature
gradient in the Biopod. You can choose the
minimum and maximum temperature inside the
Biopod.
As the substrate and air are tied together in a
microclimat, both minimum and maximum temperatures can only be changed within 3 degrees of each
others to make sure the environment in your
Biopod is still close to nature's balance.
C. This box is related to the humidity level in your
Biopod. The humidity inside the Biopod is always a
gradient, and the big number in this box shows the
high point of the gradient. For example, if the
gradient humidity is between 80% - 95%, this box
will show 95%. The other two numbers below
represent the optimal humidity range.
Note that the actual values (for both humidity and
air temp.) won’t be lower than ambient (within
your home and the location of your actual Biopod
unit) values.
A
B
C
38
Page 41
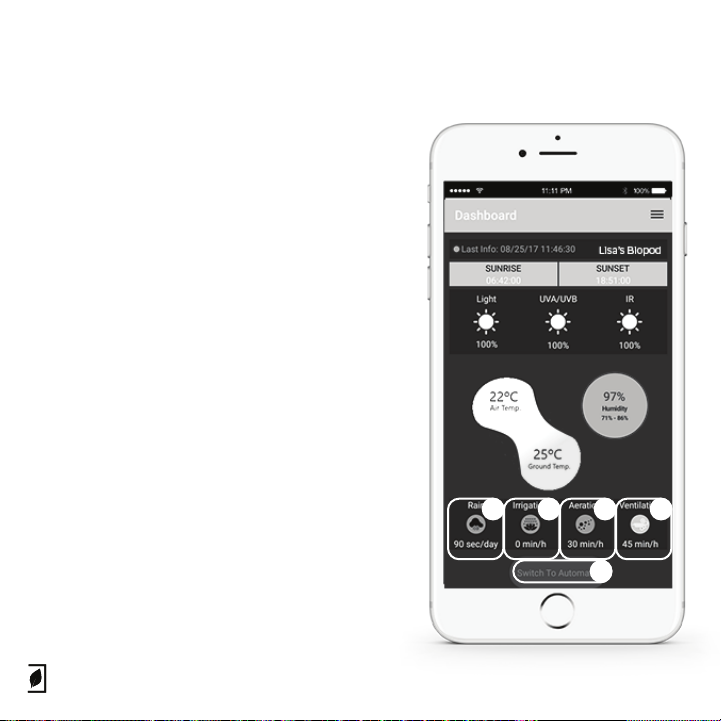
How does the Biopod App work?
Custom Mode Continued
A. This is related to the rain cycles. You can select the
cycle length (between 0 and 60 sec.) for two dierent
cycles. You can also decide when those cycles
should start.
B. The irrigation of the living wall can be set from 0
min/hour (turned o) to 60 min/hour (continuous
non-stop irrigation). Make sure you primed your
irrigation pump before using it! Note that non-stop
irrigation of the living wall may cause algae or mold
growth.
C. The aeration of your substrate/water can be set
from 0 min/hour (turned o) to 60 min/hour
(continuous non-stop aeration). The water aeration is
extremely important if you have fish.
D. The ventilation of your Biopod can be set from 0
min/hour (turned o) to 60 min/hour (continuous
non-stop ventilation).
E. This permits you to switch to Auto Mode, back to
the annual plan you picked for your animal/plants.
C
BA D
E
39
Page 42
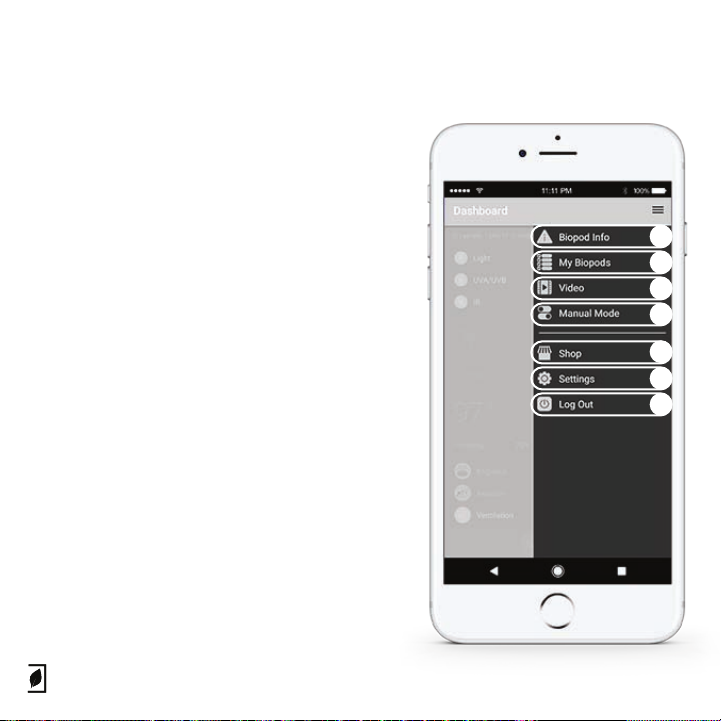
How does the Biopod App work?
Menu Options > Main Dashboard
A. This option gives you information on your
Biopod. Your Biopod’s internal clock time, name, the
model you have, the city it’s located in. You can
change any of the above settings (see page 42).
B. This shows all of the Biopod units connected to
your account. Multiple Biopods can be connected
to one account.
C. The video option allows you to connect to your
Biopod’s camera.
D. Manual mode is used for retail purposes. This
feature is not available to users.
E. The Biopod shop allows you to purchase plant
packs. *Biopods cannot currently be purchased
using this feature.
F. In the settings section, you are able to view
General settings, Setting up your WiFi, Wireless
diagnostics, Remove Biopod and Update Biopod.
This menu can be viewed on page 41.
F. Log Out allows the user to log out of the app.
A
B
C
D
E
F
G
40
Page 43
How does the Biopod App work?
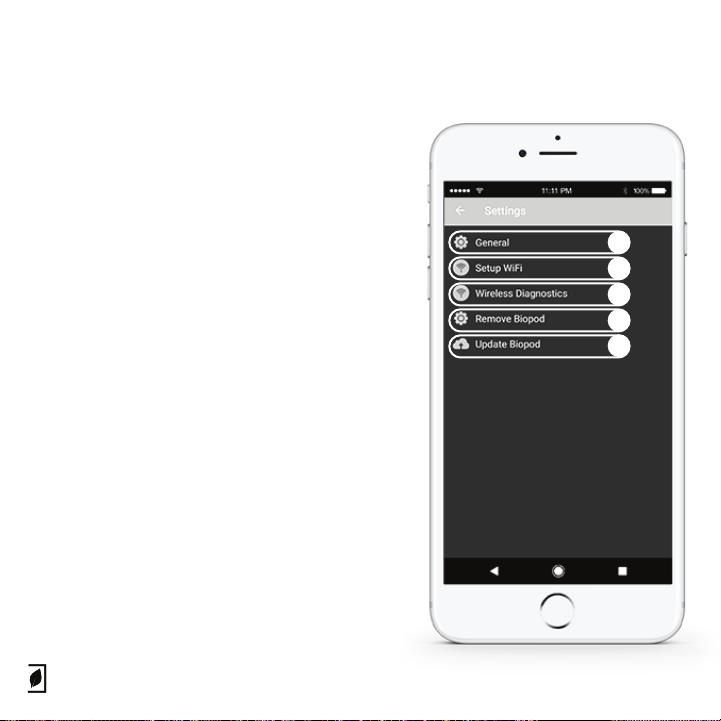
Menu Options > Settings
A. This feature allows you to see the general
settings of your Biopod app.
B. This feature opens up the WiFi Setup Wizard
which allows you to switch your Home WiFi
connection.
C. Wireless Diagnostics will show your WiFi to
Biopod compatibility (strength of connection, Bit
Rate and Channel).
D. This allows you to remove a Biopod from your
account.
E. This feature allows you to check for updates as
well as to update your Biopod’s firmware.
A
B
C
D
E
41
Page 44
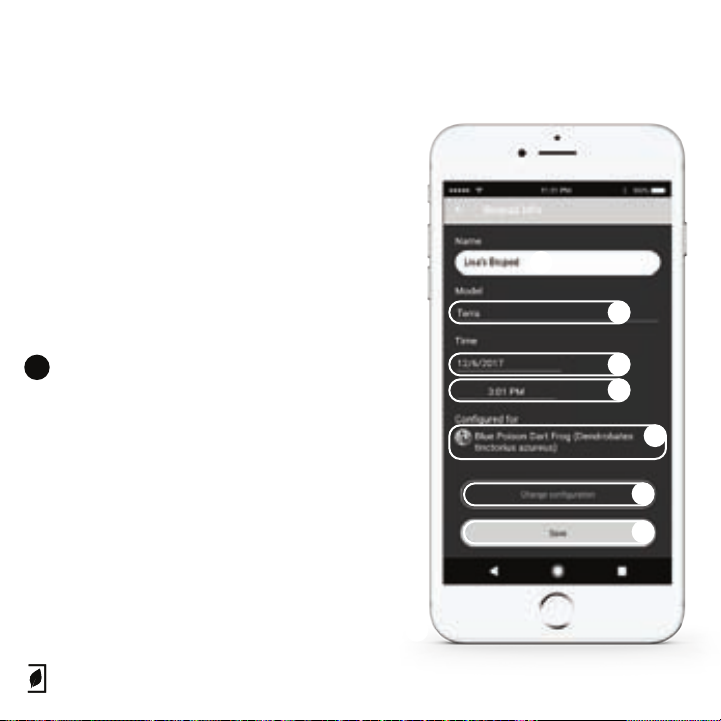
How does the Biopod App work?
Menu Options > Biopod Info
A. Your Biopod’s name.
B. The model you currently have connected.
C. Allows you to change the date your Biopod was
connected.
D. This allows you to change the time. This is
beneficial for sunrise and sunset purposes.
We strongly recommend to keep your Biopod
!
time synced with your local time to ease your
interaction with your Biopod.
E. This displays what your Biopod is currently
configured for (pet, plant, decor).
F. You can change the configuration for your Biopod
using this button (pet, plant, decor).
G. Don’t forget to save your changes!
H. If you scroll down on this screen (right), you will
see your latest firmware version.
A
B
C
D
E
F
G
H
42
Page 45
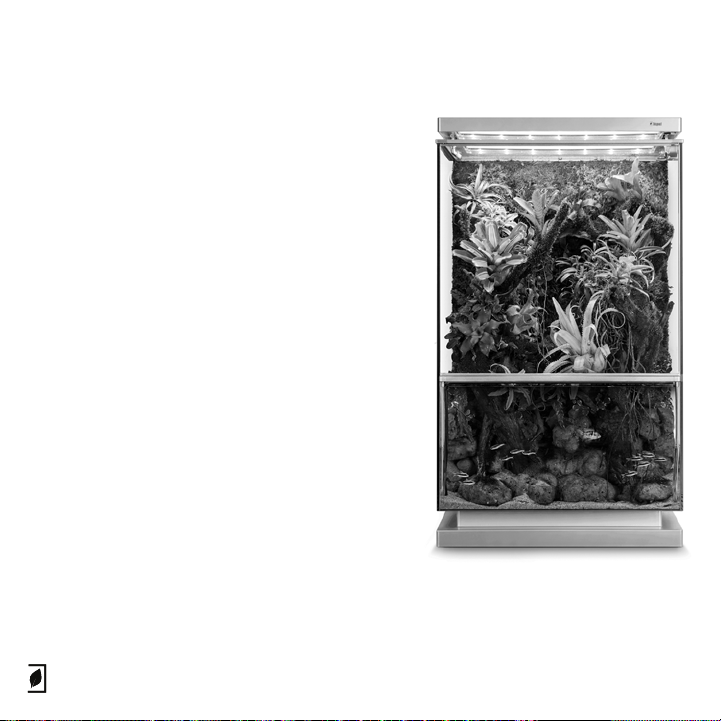
Biopod Components & Features
How does the biopod work?
Your Biopod is a Smart Microhabitat that follows in
real time instructions from the cloud.
The instructions (for example air temperature,
sunrise and sunset time, water temperature etc…)
are created to reproduce a specific natural
environment. If you choose to be in a rainforest, the
air and water temperature, the daylight duration
and other parameters will be adjusted in a dierent
way than if you choose to be in a Desert.
43
Page 46

Biopod Components & Features
How does the biopod work?
Three types of components are in your Biopod to control
your environment:
The Workers: they are heating, cooling, humidifying,
dehumidifying the Biopod.
The Reporters: they are taking measurements
(temperature, humidity…) and report it to the
manager.
The Manager: it is the motherboard of your Biopod.
The Manager continuously sends instructions to the
workers about the settings for the environment you
chose. The Manager gets these instructions from the
Cloud (an online database). The Reporters send their
measurements to the manager that will compare them
to the settings and communicate with the workers if
they are not meeting the target.
Please note, the cooling of your Biopod is done
!
naturally through the fresh air intake (ventilation).
44
Page 47

Biopod Components & Features
How does the biopod work?
Example of controlled environment:
For example, one of the settings could be water
temperature of 24˚C (stored in the Cloud).
The motherboard (the manager) sends these instructions to
the water heating system (the worker) that starts to get
warmer and warmer. The water sensor (the reporter),
measures a temperature of 22˚C and sends that
information to the motherboard.
The measured value is not matching the requirement
(24˚C), the motherboard sends new instructions to make
sure the water heating system keeps going. Once the
water sensor (reporter) gives a value of 24˚C or higher, the
motherboard will immediately order the water heating
system to shut o.
45
Page 48
Biopod Components & Features
What’s a Cloud?
The Biopod cloud is a virtual filing cabinet for your
Biopod’s data. This ensures the proper
functionality of your unit, allowing continuous
interaction and supervision of it wherever you are.
Why the Cloud?
Three reasons why we use the cloud:
Storage: this allows Biopod to use much
smaller, more ecient hardware (such as the
motherboard).
Inconsistencies: we are able to identify
inconsistencies almost instantly.
Improving: we are always improving your
experience with Biopod via feedback from the
cloud.
Please note, the cloud does not sync your
!
personal data to the Biopod motherboard.
Personal information is only used for
Customer Support purposes.
46
Page 49
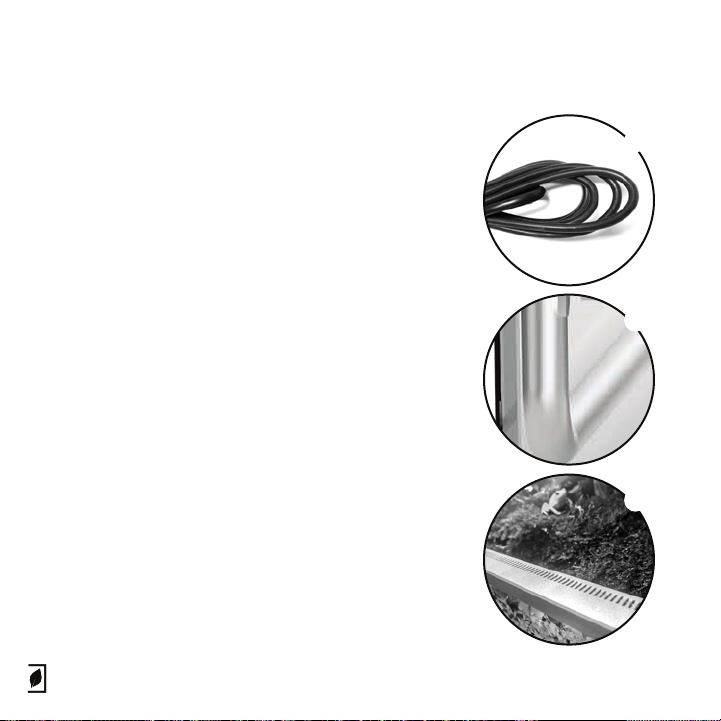
Biopod Components & Features
Details about the components
(the workers)
A. Substrate/water heating
The substrate/water heating is controlled by the blue
cable (under the false bottoms) and will warm up
depending on the instruction. The cable winds across
the Biopod to distribute the heat in the tank, whether it
is placed in water or in soil.
B. Air heating/cooling
The air is warmed up by the combination of a heating
cable (black cable attached under the ventilation) and a
ventilation system. Ventilation tubes on both sides of the
tank provide a fresh air intake. The air is guided to an
aluminum grating built across the tank, and sent
upwards along the glass door. The heating cable is
located underneath the grating and warms up the air as
it passes by. The air is cooled by turning o the heating
cable and letting fresh air in.
C. Ventilation
The ventilation (front of your Biopod unit) allows air
movement in the Biopod, and keeps the front glass
clean and pristine.
A
B
C
47
Page 50

Biopod Components & Features
Details about the components
(the workers)
A. Substrate/water aeration
The aeration system provides oxygenation in the water
and substrate; prevents stagnation and growth of
anaerobic bacteria. The airstone is located at the
bottom of your unit. If you have a terrestrial model, it is
located below the false bottom.
B. Irrigation
The irrigation system is feeding the living wall that will
contain moss and plants. The living wall circulates
water, acts as a biofilter with the plants roots and
prevents water stagnation. The irrigation input contains
a filter system and is protected either by a false bottom
(Eden, Terra), or by another part of the living wall (aqua,
aqua II). The irrigation output is connected to the bottom
of the living wall and shoots water upwards. Water
spreads left and right at the top of the living wall and
gently drips down along the wall into the tank.
C. Rain
Rainfall is created by the misting nozzles located on the
Topglass of the Biopod. The maximum rainfall is set to a
total of one minute per day to prevent flooding and
excessive humidity.
A
B
C
48
Page 51
Biopod Components & Features
Details about the components
(the workers)
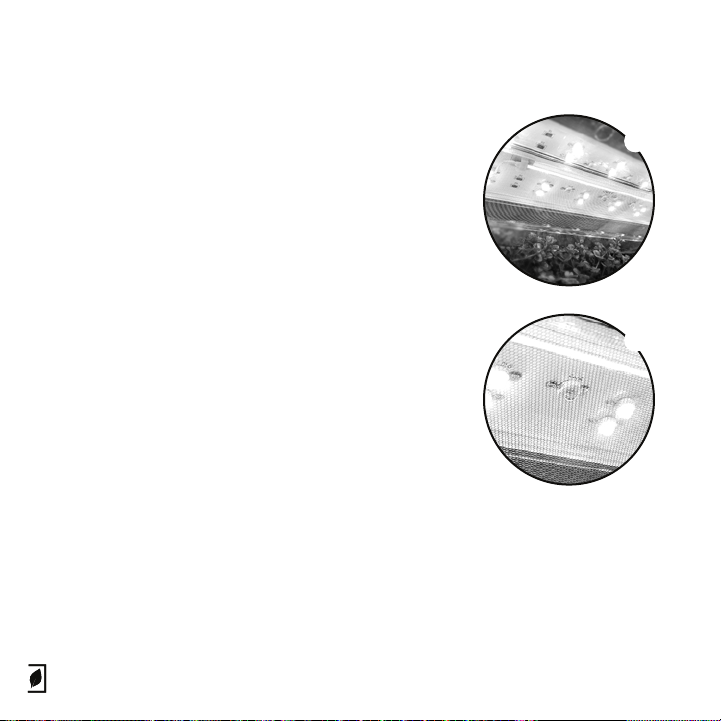
A. Sunlight
Sunlight is created by a combination of LED lighting, UV
and IR Lighting to be as close as possible to the natural
light. A day/ night cycle allows to provide just the right
amount of lighting depending on the environment and
the season. The sunrise and sunset are reproduced by
having a 15-minute dimming cycle at the beginning and
end of each days. The mesh located on the Topglass
allows UV light to penetrate the tank, while keeping
your unit pristine as well as enclosed for the safety of
your plants/animals.
B. IR (infrared) heating system
The IR (infrared) light source provides an extra source of
heat, this is especially beneficial for animals that need
extra heat at night.
A
B
49
Page 52
Biopod Components & Features
Details about the components
(The reporters)
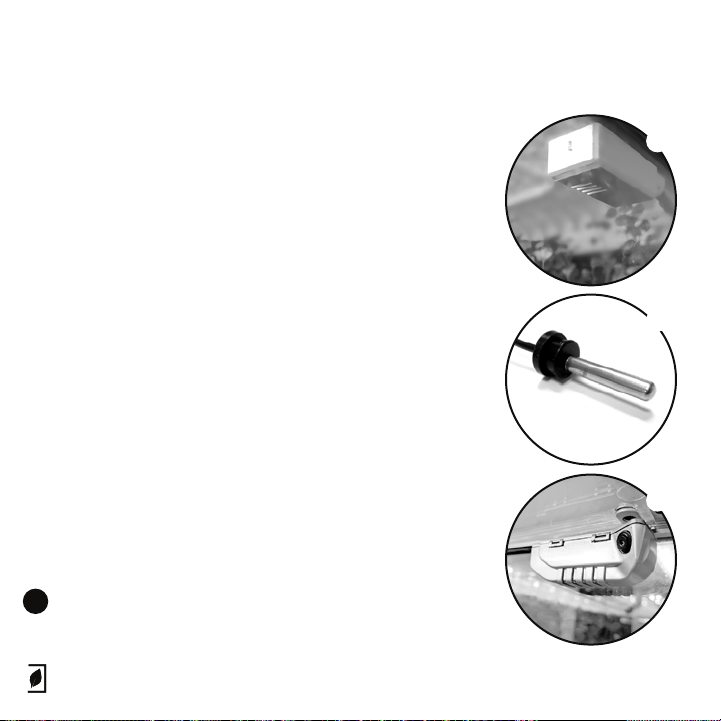
A. Air sensor
The air sensor measures the temperature and the humidity of
the Biopod. As it is located at the top of the tank and hot air
rises, the sensor picks up on the highest value of the air
temperature gradient in the tank. The humidity inside the
Biopod is also a gradient, and this sensor picks up on the
highest value of the humidity gradient inside the Biopod.
The data from the air sensor are sent back to the cloud for
feedback.
B. NTC or Substrate heating sensor
The NTC sensor measures the temperature of your substrate
(If terrestrial) or water (if aquatic). It also sends data to the
cloud for feedback.
C. Camera
The camera enables you to see the interior of your Biopod.
The Biopod camera’s resolution is 720p HD; depending on the
strength of your WiFi connection/performance (as well as
router), this may appear in lower resolution.
Please make sure that the NTC sensor is not placed right
!
against the substrate heating cable (blue cable) as it will
give an inaccurate measurement.
A
B
C
50
Page 53
Biopod Components & Features
Other important features
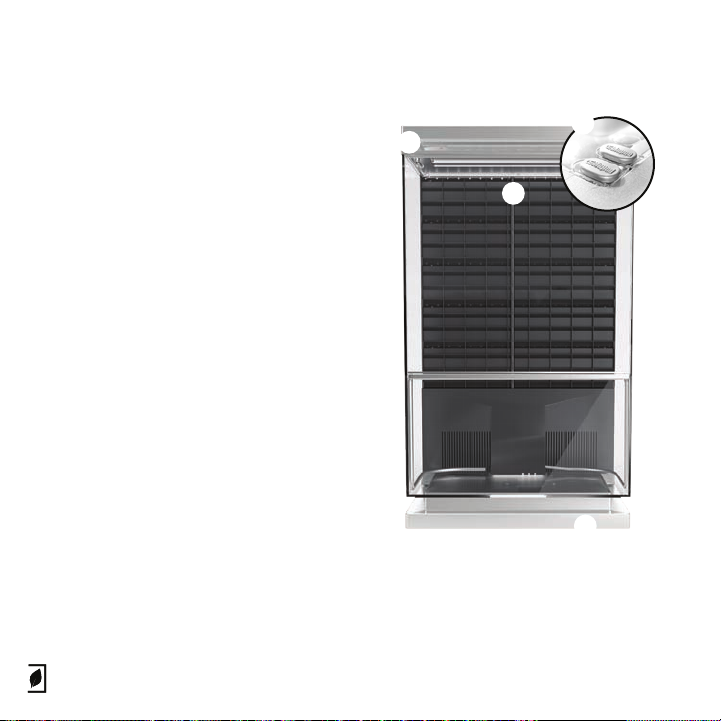
A. Base: contains the motherboard
and pumps.
B. Backwall (behind the glass tank):
Support the canopy and reservoir as
well as allows for cable routing from
the base to the top.
C. Canopy: holds Light unit and
misting tubes.
D. Lock: Allows to close the tank door.
C
D
B
A
51
Page 54
Biopod Components & Features
Identifying Components
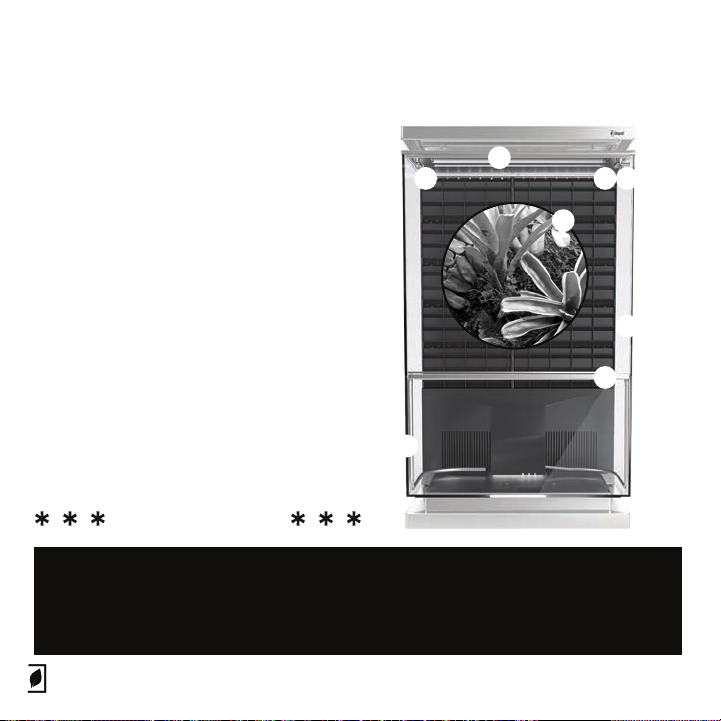
A. LED Light panel (LED, UV, IR)
A
D
CB
B. Air Temperature/Humidity sensor
C. Camera
D. Misting Nozzles
E. Living Wall
F. Door (opens left)
G. Ventilation
H. Tubes
H
E
G
IMPORTANT
Before placing animals or running your Biopod, please ensure that your RIGHT misting
nozzle is facing AWAY from the glass and sensor. If your nozzle is facing the sensor,
gently turn it to face the Living Wall. Direct water contact with the sensor could
damage sensory feedback.
F
52
Page 55
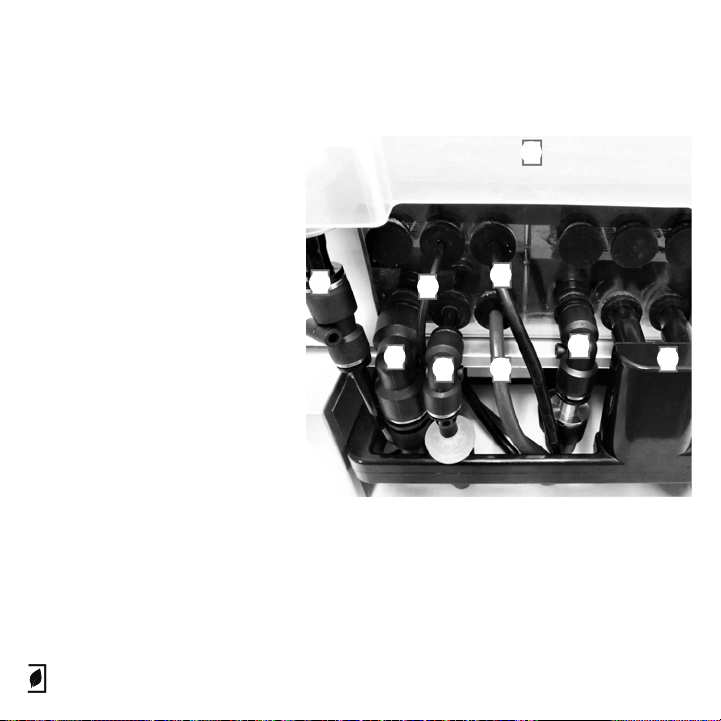
Biopod Components & Features
Back of the Biopod:
Pumps and Pipes
A. Misting pump input, from
external water reservoir (See point
"I" on the image to the right.
B. Irrigation pump input (from filter
inside the tank)
C. Substrate sensor
D. Aeration pump output (to
airstone)
E. Ventilation heating cable (black
colored)
F. Substrate heating cable (blue
colored)
G. Irrigation pump output (to
Living Wall)
H. Ventilation output
I. Reservoir
I
D F
E
G
H
53
A
C
B
Page 56
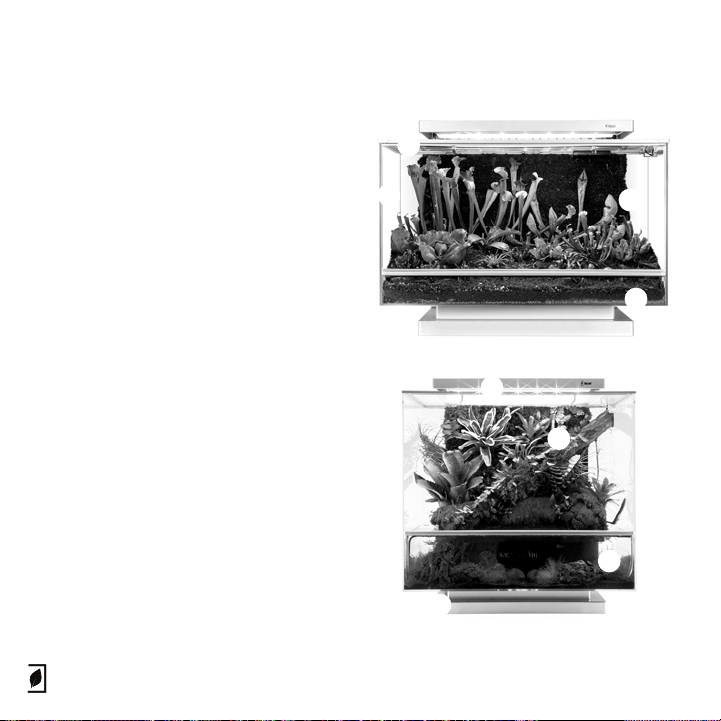
Biopod Maintenance
Areas of maintenance
A. Topglass (Top cover)
B. Side glass
C. Front glass
D. Replacing the light panel/UV light
E. Filling up the reservoir (back of Biopod)
F. Trimming plants
G. Water changes
H. App/Firmware updates
*I. Fertilizing Plants
DO NOT FERTILIZE PLANTS IF YOU ALSO
HAVE ANIMALS IN YOUR BIOPOD.
A
B
D
E
H
F
C
*I
G
54
Page 57
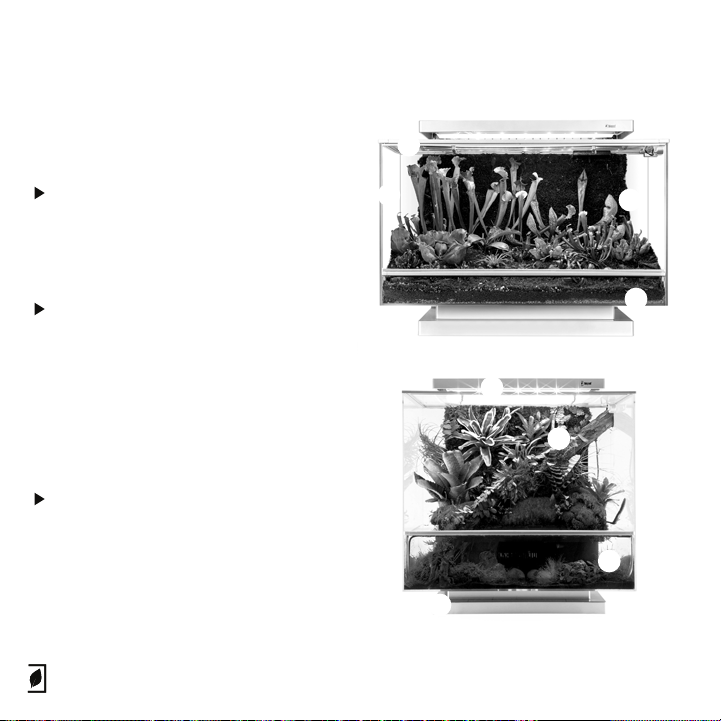
Biopod Maintenance
Performing maintenance
A. Topglass (Top cover)
Gently clean with water and a
microfiber cloth. Do not use paper
towel as this could scratch the surface.
Do not use harsh chemicals.
B. Side glass
Spray with water, use a razor blade or
razor scraper to clean o the water
stains. BE GENTLE, don’t scratch the
glass. Once the water stains have
been removed, the most eective
method to dry your glass would be
coee filters. You’ll want to do both the
inside and the outside of your Biopod.
C. Front glass
Please follow the steps above in “B.
Side glass”.
A
B
D
E
H
F
C
*I
G
55
Page 58
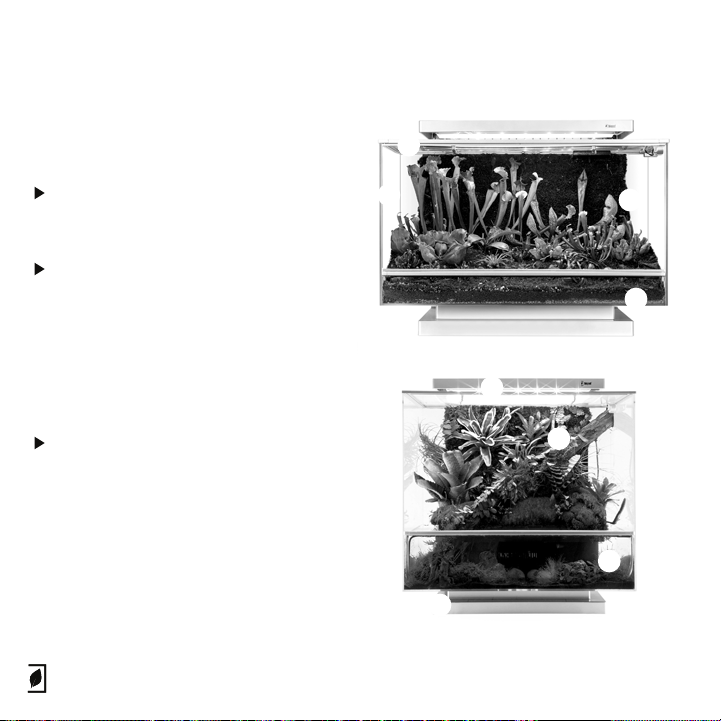
Biopod Maintenance
Performing maintenance
D. Replacing the UV light
Details on how to replace your UV light
will be provided when the light is ordered.
E. Filling up the reservoir (back of Biopod)
Simply remove the reservoir from the
fitting by pulling up gently. Fill up with
dechlorinated water or RO water. If you're
using tap water, ensure that you use a
water conditioner; this will keep your
glass cleaner for longer periods of time
and will reduce maintenance.
F. Trimming plants
Although most tropical plants provided in
Biopod plant packs grow quite slowly,
some occasionally need trimming.
Trimming your plants will also help keep
the front glass clean and pristine. Simply
trim your plants with scissors.
A
B
D
E
H
F
C
*I
G
56
Page 59
Biopod Maintenance
Performing maintenance
A
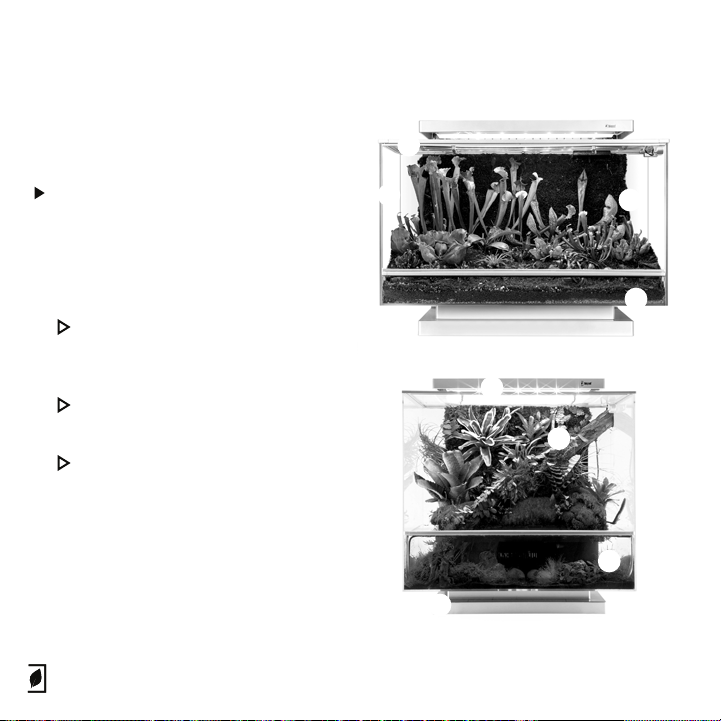
G. Water changes
Siphoning the water out from the front of
B
your unit with a hose/tube will be a lot
quicker than from the back of your unit.
To change the water in your unit you will
need a bucket, siphon hose and some
pressure in the hose.
Fill your hose/tube with water and hold
both ends with the tips of your fingers
to create pressure.
Put one end of the tube in your Biopod
D
and the other end in the bucket.
E
F
Once you have both ends in place, let
go of the end leading to the bucket
and the pressure should siphon water
out. Stick the end your finger is
covering into your unit and start
If you have fish you will want to leave
about 50% of water in the unit.
Visit our YouTube channel for helpful tutorials on water changes.
IMPORTANT: Be careful when doing water changes (don’t lost any fish!), Biopod is not responsible for
fish harmed during water changes.
H
C
*I
G
57
Page 60
Biopod Maintenance
Performing maintenance
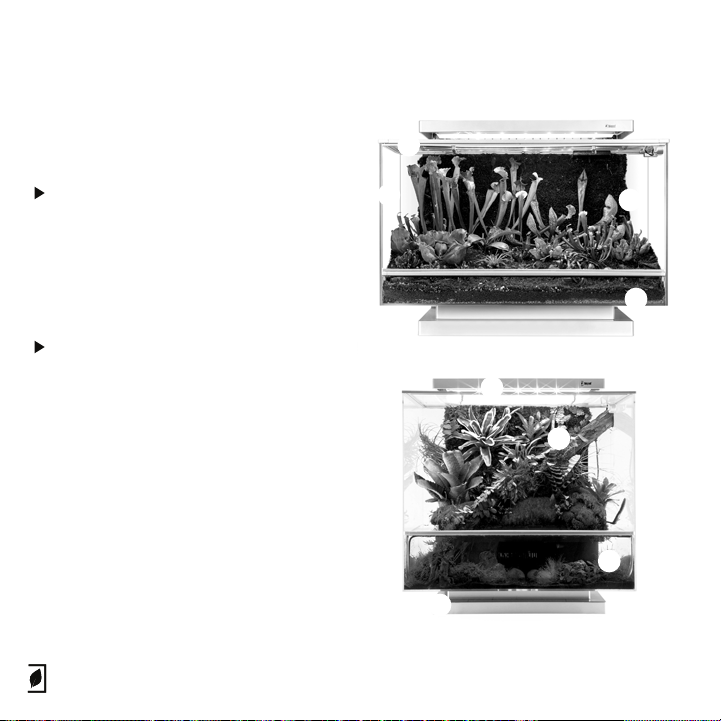
H. App/Firmware updates
Our “Biopod Firmware Update Guide” is
available on our website. To learn more
on updating your app or firmware, visit
our YouTube channel for videos or head
to www.biopod.com/support/technical-guides
*I. Fertilizing Plants
Fertilizer can be purchased at your local
store. Ensure to find a fertilizer that is
specific to your plant/environment. Follow
instructions on packaging.
Fertilizer is not needed when animals are
present due to their waste acting as a
natural fertilizer.
A
B
D
E
H
F
C
*I
G
58
Page 61

Troubleshooting
In order for our technical support team to provide you the best support
possible, you will be asked the following questions:
1. What is your name?
2. What is the best number to contact you?
3. What is your Biopod’s serial number?
4. Where did you purchase your Biopod?
5. Is your Biopod connected right now?
6. Do you have the latest version of the app? (if you are not sure you can uninstall the app
and install the latest version from the app store to make sure. Please note WiFi setup
instructions are available on our website: biopod.com/support/technical-guides/ )
7. Do you have the latest version of the Biopod firmware? (detailed instructions are available
on our website: biopod.com/support/technical-guides/ )
8. How far away is your Biopod from your WiFi router?
9. What type of device are you using? (Make, Model, Type i.e. Samsung Galaxy S8
Smartphone)
Once we receive the above information someone will get back to you as soon as possible.
59
Page 62
Troubleshooting
Camera
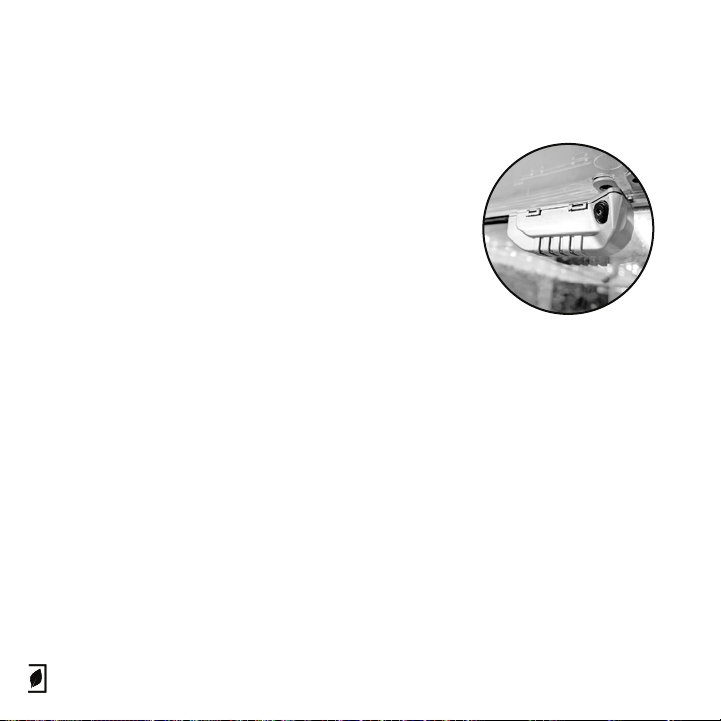
Here are a few troubleshooting steps to try to resolve
your camera issue:
1. Unplug your Biopod from the wall, wait 10 seconds,
plug your Biopod back in, and try again.
2. Check the physical connection of your camera as it
may be disconnected. To do this you can open the
camera housing, make sure the camera cable is fully
connected). If the camera was disconnected, once
replaced, close the app, unplug the Biopod from the
wall, wait 10 seconds, plug the Biopod back in and try
again.
If you're still having issues, please contact our
Customer Support Ninjas at [email protected]
Please note, we do not record footage from your
camera and will not access your camera without
your permission.
Visit the following YouTube video for camera repair
instructions: https://youtu.be/NtEszhBuypI
60
Page 63
Troubleshooting
Humidity/Air Temperature Sensor
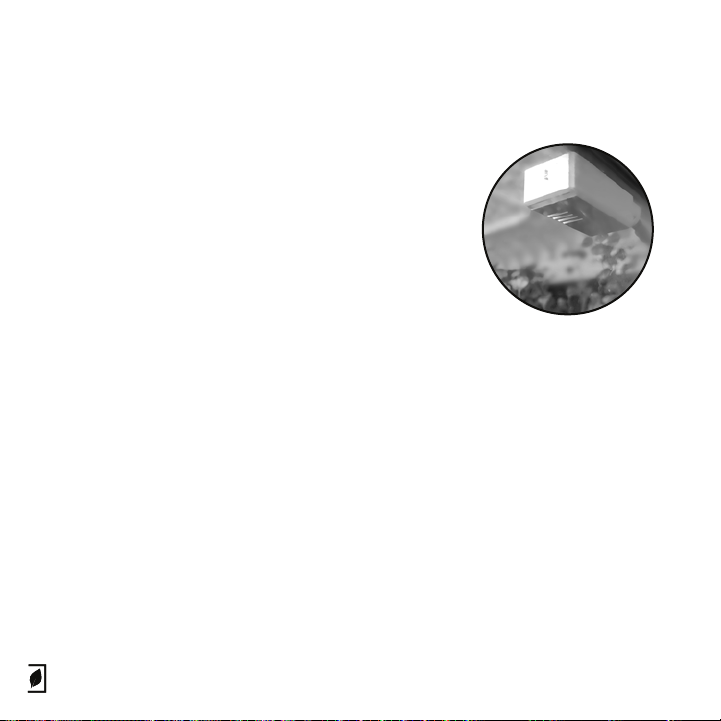
Here are a few troubleshooting steps to try to resolve
your sensor issue. Humidity/Temperature
fluctuations/incorrect readings can be caused by
the following:
1. Connectivity Issue: Your Biopod may have lost
connection with your WiFi, please ensure your WiFi is
working and that your Biopod is connected.
2. App Changes: If you have recently changed
modes from auto to custom or vice versa and your
changes did not take eect, please try resetting the
Biopod by unplugging the power plug from the wall,
waiting 10 seconds, and plugging the power back into
the wall. This may solve any issues you're having
concerning mode switches not being saved.
3. Scape/Environment: The temperature/humidity
may be showing the correct value, however the
scape of the Biopod may be creating an excessive
amount of humidity/heat or coolness (the coolness
may be caused by excess evaporation from the
scape) Please refer to our notices page on our
website regarding the temperature/humidity gradient
inside your Biopod. For more details please visit
biopod.com/support/notices
61
Page 64
Troubleshooting
Humidity/Air Temperature Sensor Continued
4. Wet Sensor: Make sure the right misting nozzle is
not spraying into the sensor. If the sensor is wet, gently
dry the sensor with a hair dryer for 1 or 2 minutes,
making sure it is not too hot, and keep the dryer about
5cms away from the sensor to avoid overheating it.
Then, reset the Biopod by unplugging the power plug
from the wall, waiting 10 seconds, plugging it back in
and check values again after a few minutes.
5. If you have another thermometer to put in the
Biopod it can help verify what the real temperature is.
Note that you need to put the thermometer close to the
sensor to make sure you measure at the same location.
If the value is similar, then it is a scape issue: the way
your Biopod is scaped can create an unbalance in the
Biopod. Please send us a picture of your scape and we
will help you with this. If the value is dierent, then the
sensor is possibly defective and may need to be
replaced.
6. Once you have gone through the above steps,
please let us know your findings so we can troubleshoot further by emailing us at [email protected].
62
Page 65

Troubleshooting
WiFi Connection
Here are a few troubleshooting steps to try to resolve your
WiFi connection issue:
1. Is your Mobile Data OFF while you are trying to connect your
Biopod?
2. Are you within 10 metres of your router?
3. Are you using a 2.4gHz WiFi signal?
4. What is the color of your Biopod's status lights? These lights
can be seen in the black box at the back of the bottom (near
the bottom). Can you see a Biopod WiFi in the WiFi settings of
your phone? (It should look something like
BIOPOD_12345678).
5. Have you tried to restart your Biopod and reconnecting it?
Access the back of the Biopod near the bottom, and find the
small reset button near the power plug. Hold this reset button
for 8 seconds and wait for the Biopod to reset and broadcast
the "BIOPOD_12345678" WiFi. Now access the app, go into
settings and tap "Setup WiFi". Go through the steps to
re-connect your Biopod to your WiFi. If you get stuck or you
see an error, please make a note of it and contact us at
[email protected] for further assistance.
63
Page 66
Troubleshooting
WiFi Connection Continued
6. If you're connection issue is occurring during the
WiFi Setup process (screen: “Trouble connecting to
Biopod WiFi?”, make sure that your app is connecting
to the "BIOPOD_12345678" WiFi, if it is not. Then you
must manually go into your WiFi settings and connect it
yourself. If it asks for a password, the password is
always "biopod123".
7. If you cannot find Biopod WiFi, unplug the Biopod,
wait 10 seconds, plug it back in and try again. If still not
there, reset the biopod again using the reset button,
then unplug, plug back in again.
8. If you have an issue during the registration step
(‘’cannot connect to server’’, ‘’connection wasn’t
detected’’…), make sure your device is connected to
your home WiFi. Ensure the Biopod is close enough to
your router (3 meters) and try again. If it is still not
working, go into your App settings and empty your
cache. We have a videos available for this on our
YouTube channel, youtube.com/biopod
A. Note: It sometimes takes a couple of minutes once
you connect and registered your Biopod to see the
blue dot on the dashboard.
A
64
Page 67

Troubleshooting
WiFi Connection Continued
9. If still not working please send us the following:
a. Your information on the Router for your
home/shop WiFi
b. A picture of the sticker on the router if available
c. WiFi properties found on a laptop WiFi settings
and any info you know such as: Security type WPA2
or WPA? WiFi 2.4 or 5GHz, Fiber Optics?
10. Try to unplug/replug the router, reset the Biopod
and try again to connect to WiFi.
11. If the Biopod was never able to connect, try to
connect with a phone mobile hotspot instead of
home/shop WiFi.
12. If the Biopod was previously connected once and is
not connecting anymore:
a. Make sure that the Biopod is close enough to the
router (less than 10m from the router).
b. Unplug the Biopod from the wall, wait 10 seconds,
plug it back in and try again.
65
Page 68

Troubleshooting
WiFi Connection Continued
If you’ve followed all of the steps and still have trouble
connecting your Biopod to your WiFi – the WiFi
connectivity issues may be due to the following
reasons:
Frequency of your local WiFi: Currently Biopod only
supports a 2.4 GHz frequency WiFi. This is because the
2.4 GHz band is more reliable and farther reaching than
a 5 GHz WiFi frequency. Please check your router
configuration to determine whether your WiFi frequency is set to 2.4 or 5 GHz. As all routers are dierent,
please refer to your router setup guide or your Internet
Service Provider (ISP) on how to configure your router
WiFi for a 2.4 GHz frequency.
WiFi Security Encryption: Your router’s security key
may be setup to be a WEP or WPA security type. We
recommend using WPA2 or WPA-2PSK as these are the
latest and most secure encryption protocols available.
Please refer to your router setup guide or your Internet
Service Provider (ISP) on how to configure your router
for a WPA2 or WPA2-PSK security encryption key.
66
Page 69

Troubleshooting
WiFi Connection Continued
Firewall/Blocked Ports/Other settings: All routers are
dierent, and some come with unique security features.
If your router is old, if it was configured by a technician
or your ISP, or if it is a special type of router: it may
have been set up with some unconventional security
features preventing Biopod from connecting to the
WiFi. Please refer to your router setup guide or your
Internet Service Provider (ISP) on how to configure your
router for a WPA2 or WPA2-PSK security encryption
key.
Please note we also have a detailed WiFi Troubleshooting Guide available on our website at:
biopod.com/wifi-troubleshooting-guide
Once you have gone through the above steps, if you
are still having trouble, please contact
[email protected] with details of your findings and we
will troubleshoot further for you.
67
Page 70
Troubleshooting
Custom Mode Not Responding
Here are a few troubleshooting steps to try to
resolve your Settings issue:
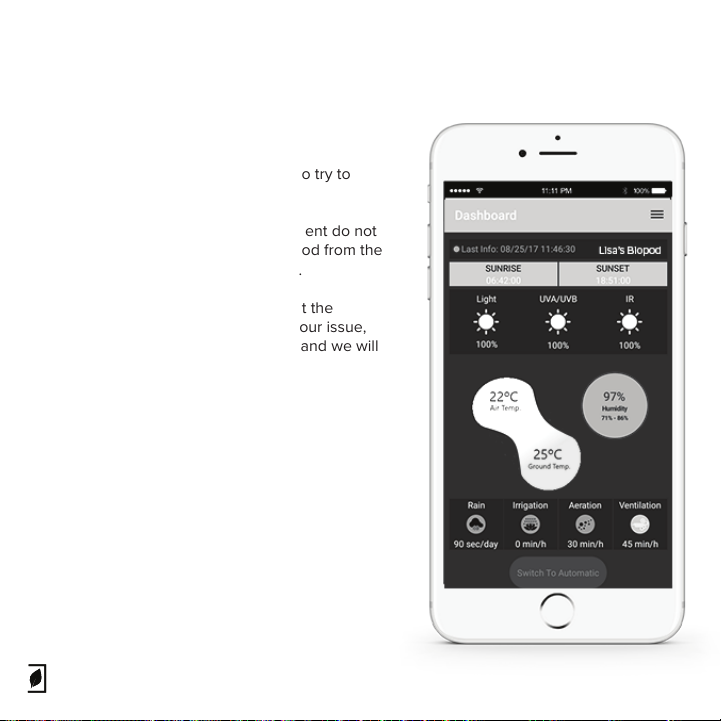
If the changes you are trying to implement do not
appear to be working, unplug the Biopod from the
wall, wait 10 seconds and plug back in.
This should help the Biopod implement the
new settings. If this does not resolve your issue,
please let us know ([email protected]) and we will
troubleshoot further for you.
68
Page 71
Troubleshooting
Loud Noise
If you hear a loud noise when first plugging in
your Biopod, the irrigation pump may need to be
primed (YouTube link: https://youtu.be/YmfpQhPKDAA)
It sometimes takes 2 attempts at priming to make
it work and you need to let the water flow for at
least 6s and see a steady flow. The water level
will need to be high enough in the tank for the
pump to operate properly.
You can make sure the water level is covering the
pump by looking at the back of the Biopod where
you will see the pump connections/stoppers.
Make sure the intake for the pump is fully covered
by water (usually 2 or 3 inches of water depending on the model of your Biopod and how you
have it scaped).
If the reservoir at the back of the Biopod is empty,
or not fully inserted into the stopper, this can also
cause a noise when the misting pumps try to run.
Please let us know if the above steps do not
resolve your issue and we will troubleshoot
further.
Please send us a video to help us assess the situation for you ([email protected]).
69
Page 72
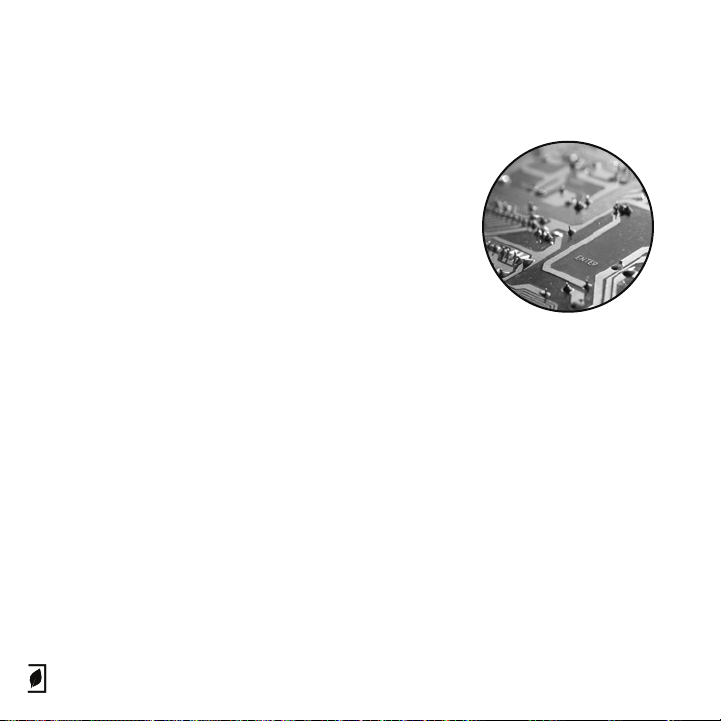
Troubleshooting
Motherboard (PCB)
1. If the Biopod won’t work at all, check to see if
the green light is on at the box part of the
adapter. The light can sometimes be dicult to
see if light is shining on it. If there is no green
light on the adapter let us know and we will send
you a replacement adapter.
2. If your adapter has a green light, but the box at
the back of your Biopod shows no lights, your
Biopod LED's lights are o, and is not receiving
power. Your Biopod may have experienced some
kind of failure. Please contact us at hey@biopod
so we can guide you through some diagnostic
steps.
3. If your Biopod doesn’t re-boot properly or
your connection is lost: try resetting using the
reset button on the back of the Biopod. To do this,
press and hold the button at the back of the
Biopod for 8 seconds. Please make sure the
button is fully pressed, you should feel a slight
click when you push it in. Once the light stop
flashing, unplug the Biopod, wait 10 seconds, plug
back in, then check to see if Biopod WiFi is
showing on your list of WiFi options on your
device. You will have to re-do the WiFi setup.
70
Page 73
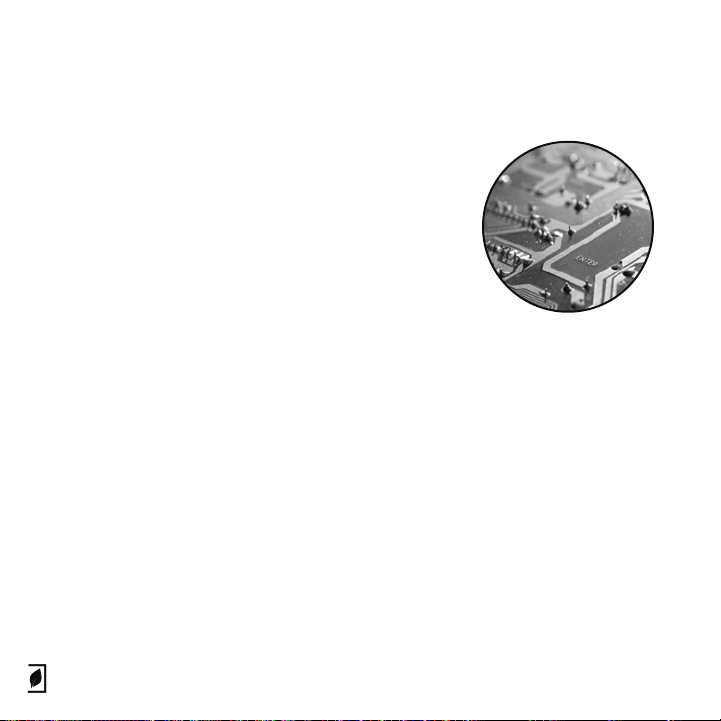
Troubleshooting
Motherboard (PCB) Continued
4. Follow the instructions on page 8 for your WiFi
setup.
5. If these steps did not resolve your issue, due to
the complex nature of diagnosing Motherboard
(PCB) issues, please contact us at
[email protected] for further assistance
71
Page 74
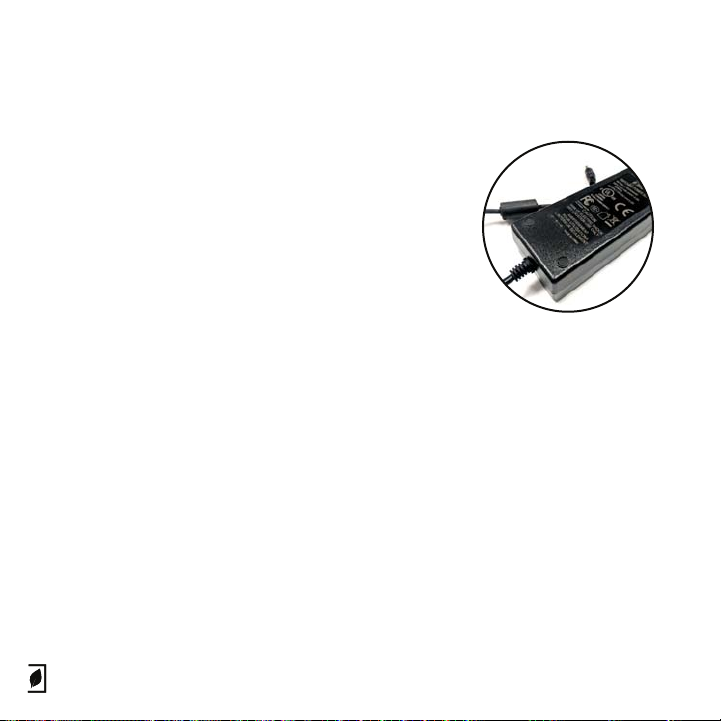
Troubleshooting
Power Adapter
Here are a few troubleshooting steps to try to
resolve your power adapter issue:
Check the power adapter to see if the green light
is on. Check the back of the Biopod to see if the
LED lights are on. Try unplugging the Biopod, wait
10 seconds, plug back in and see of the lights
come on. If there is no green light on the power
adapter after unplugging/plugging back in the
Biopod, please let us know and we will send you a
new power adapter as quickly as possible.
Please note: The little green light on the adapter
can sometimes be dicult to see if there is a
light shining on it.
Email us at [email protected] if you think you need
a new power adapter.
72
Page 75
Troubleshooting
UV Light
If you have any issues with your UV light (whether
the light is flickering or not turning on), follow the
instructions below:
1. Make sure the UV power in your app settings is
on and at more than 30% (the light is not visible
bellow that value).
2. If the settings are correct and the UV light is not
on, unplug your Biopod from the wall.
A
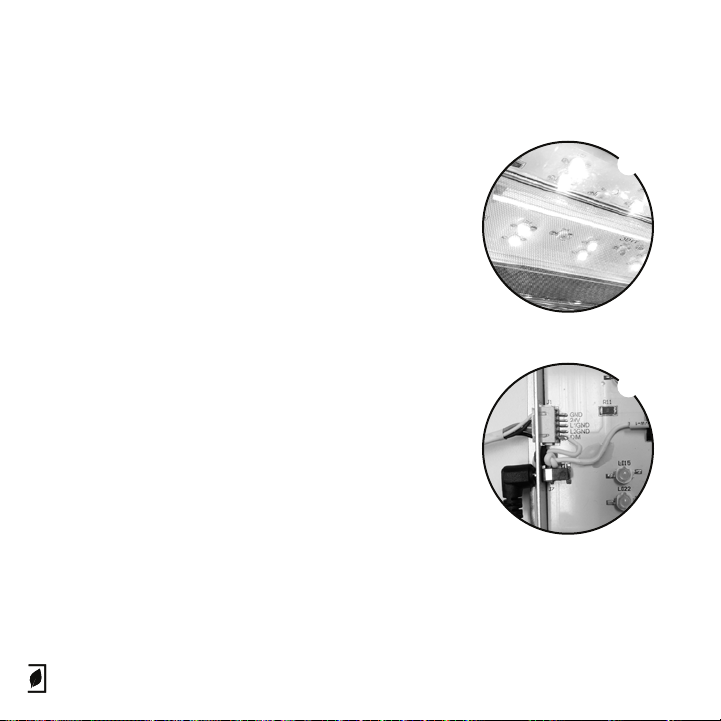
3. Unplug the two light connectors (refer to
picture ‘B’): the white one and the black one, both
on the sides of the light unit. Leave them
unplugged for 1 min. and plug them back in.
4. Plug your Biopod back in and wait for the
booting cycle to complete.
If the issue remains, please contact
[email protected]
B
73
Page 76
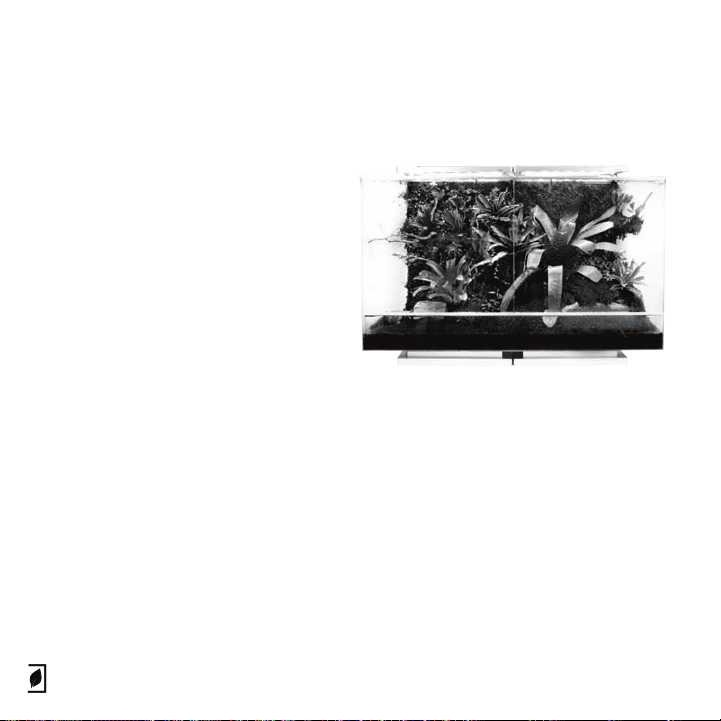
Grand WiFi Setup
Before we begin
Your Grand is composed of two units,
each containing a base and a
motherboard. To setup your Grand, you
will have to setup each side of your unit
individually.
Setting up your Grand involves a few
additional steps from any of our other
models.
Please note: If you setup your grand with
2 dierent temperature/environments,
this will cause inaccurate readings and
will not be sucient for your
plants/animals.
What does this mean?
This means you cannot scape half desert
and half rainforest and have it work
accordingly with those two environments
at this time.
74
Page 77
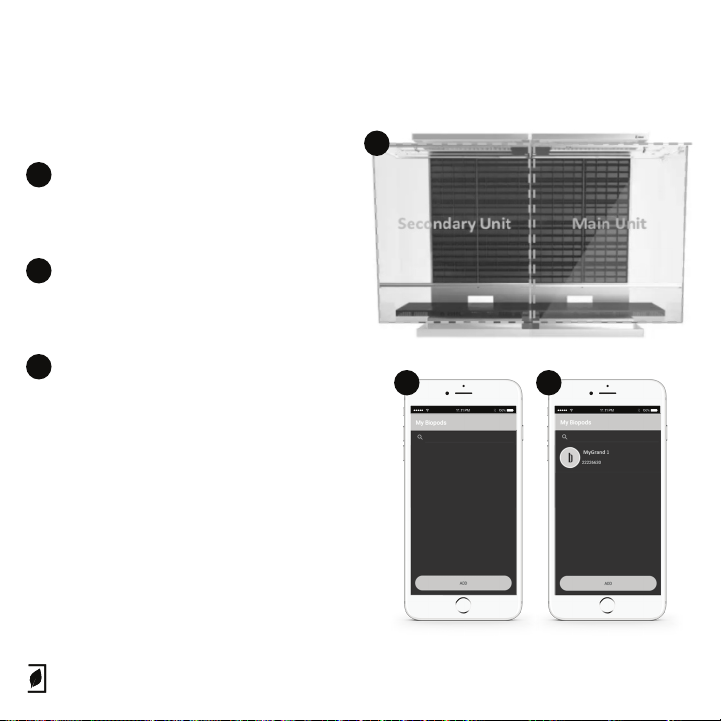
Grand WiFi Setup
Let’s Begin the Setup
Once the APP installed and your
1
account created, turn on the main unit
(on the right side when facing the
Grand).
Click on ADD in the APP main screen
2
and follow the instructions. Make sure
you have the main unit serial number,
as it will be required during the process.
Once your main unit is setup and
3
connected to your APP, turn on the
secondary unit and click on ADD to
connect it to the APP.
Both of your units are now connected.
1
2
3
75
Page 78
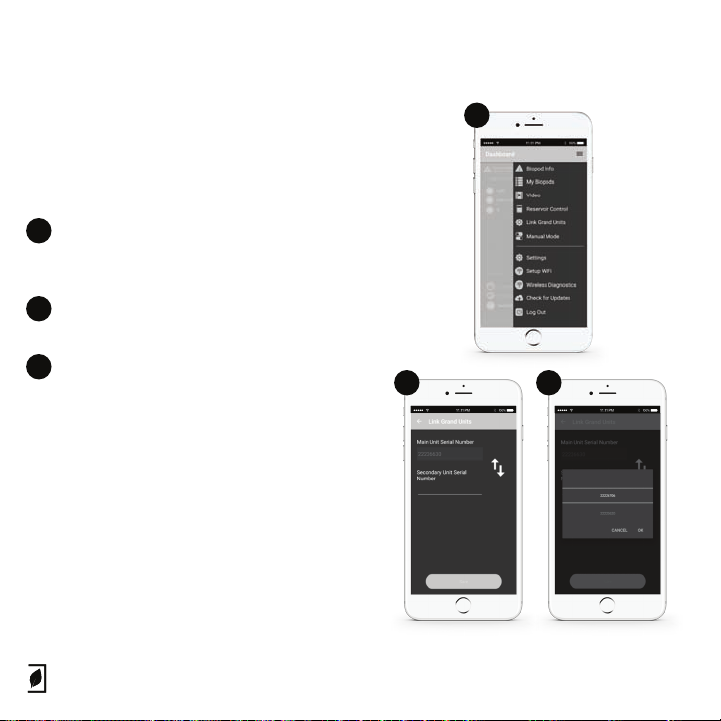
Grand WiFi Setup
Setup Continued
The next step will enable you to link both
units to create a single environment.
To link them, go to your main unit
1
dashboard’s option tab, click on ‘’Link
Grand Units’’
Select the secondary unit serial number
2
in the list.
Enter in your Secondary Unit Serial
3
Number
Congratulations! You successfully linked
your Grand units.
1
2
3
76
Page 79
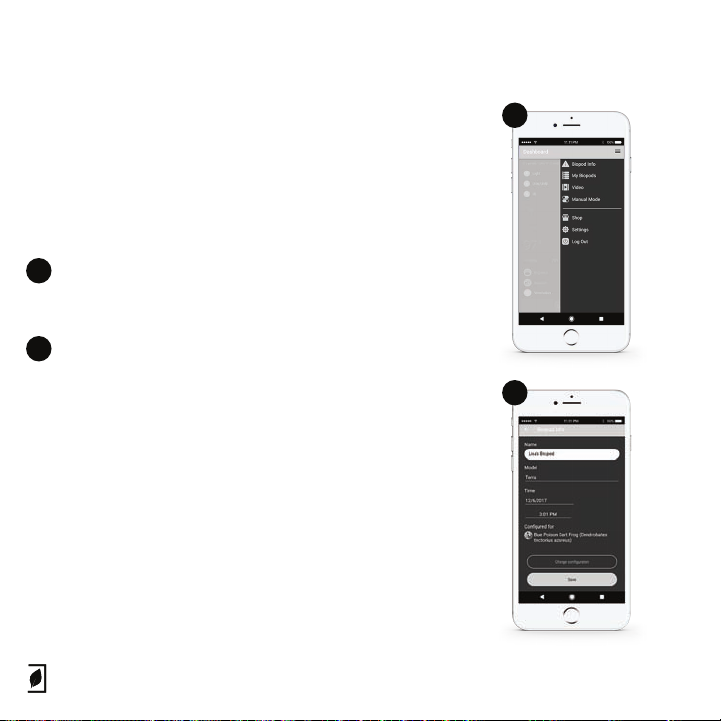
Grand WiFi Setup
Setup Continued
5. The last step is to manually synchronize them by
making sure both have the same annual plan and time.
To change these two parameters, follow the steps
below:
Ensure you have the MAIN UNIT selected. Go to
1
your options (main menu), and click on ‘’Biopod
Info’’.
Ensure that you have the annual plan or configura-
2
tion settings that you want.
Once you are happy with your configuration settings
for your MAIN UNIT of the grand. Please head to the
main menu, click on ‘My Biopods’, switch to the
SECONDARY UNIT and ensure that the information
here matches your MAIN UNIT.
Going forward, you will be working with the settings on
your MAIN UNIT only. Your SECONDARY UNIT simply
follows any changes/adjustments you make on your
MAIN UNIT. This applies in both auto and custom
modes.
1
2
77
Page 80
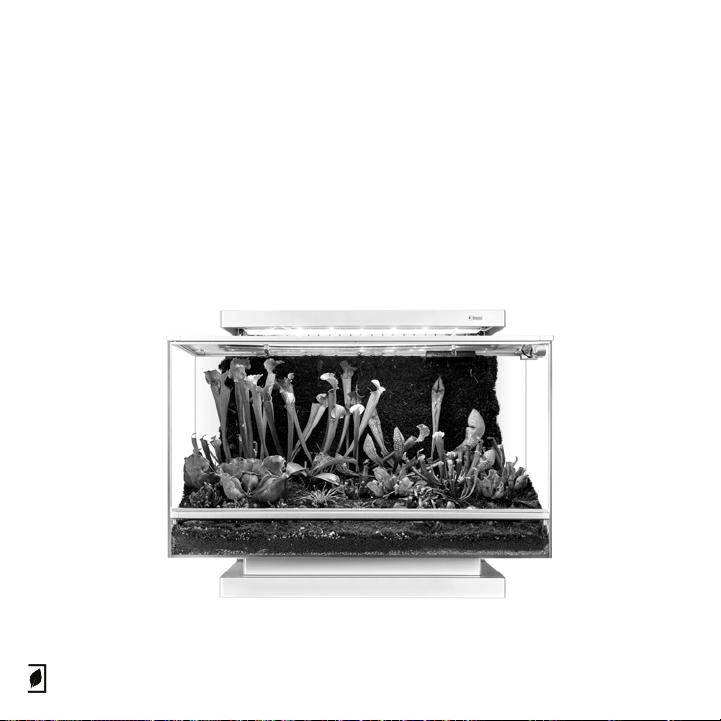
Biopod Plant Packs
Biopod Plant Packs are only available in Canada and the United States.
If you are outside of these countries, please consult with your local pet or
plant shop for more details on the appropriate plants to use in your
Biopod.
78
Page 81

&tĂƌŶŝŶŐ
dŚŝƐĚĞǀŝĐĞĐŽŵƉůŝĞƐǁŝƚŚWĂƌƚϭϱŽĨƚŚĞ&ZƵůĞƐKƉĞƌĂƚŝŽŶŝƐƐƵďũĞĐƚƚŽƚŚĞĨŽůůŽǁŝŶŐƚǁŽ
ĐŽŶĚŝƚŝŽŶƐ
;ϭͿƚŚŝƐĚĞǀŝĐĞŵĂLJŶŽƚĐĂƵƐĞŚĂƌŵĨƵůŝŶƚĞƌĨĞƌĞŶĐĞĂŶĚ
;ϮͿƚŚŝƐĚĞǀŝĐĞŵƵƐƚĂĐĐĞƉƚĂŶLJŝŶƚĞƌĨĞƌĞŶĐĞƌĞĐĞŝǀĞĚŝŶĐůƵĚŝŶŐŝŶƚĞƌĨĞƌĞŶĐĞƚŚĂƚŵĂLJĐĂƵƐĞ
ƵŶĚĞƐŝƌĞĚŽƉĞƌĂƚŝŽŶŚĂŶŐĞƐ Žƌ ŵŽĚŝĨŝĐĂƚŝŽŶƐ ŶŽƚ ĞdžƉƌĞƐƐůLJĂƉƉƌŽǀĞĚďLJƚŚĞƉĂƌƚLJƌĞƐƉŽŶƐŝďůĞ
ĨŽƌĐŽŵƉůŝĂŶĐĞĐŽƵůĚǀŽŝĚƚŚĞƵƐĞƌƐĂƵƚŚŽƌŝƚLJƚŽŽƉĞƌĂƚĞƚŚĞĞƋƵŝƉŵĞŶƚ
EŽƚĞϭdŚŝƐĞƋƵŝƉŵĞŶƚŚĂƐďĞĞŶƚĞƐƚĞĚĂŶĚĨŽƵŶĚƚŽĐŽŵƉůLJǁŝƚŚƚŚĞůŝŵŝƚƐĨŽƌĂůĂƐƐĚŝŐŝƚĂů
ĚĞǀŝĐĞ ƉƵƌƐƵĂŶƚ ƚŽ ƉĂƌƚ ϭϱ ŽĨ ƚŚĞ & ZƵůĞƐ dŚĞƐĞ ůŝŵŝƚƐ ĂƌĞ ĚĞƐŝŐŶĞĚ ƚŽ ƉƌŽǀŝĚĞ ƌĞĂƐŽŶĂďůĞ
ƉƌŽƚĞĐƚŝŽŶ ĂŐĂŝŶƐƚ ŚĂƌŵĨƵů ŝŶƚĞƌĨĞƌĞŶĐĞŝŶ Ă ƌĞƐŝĚĞŶƚŝĂů ŝŶƐƚĂůůĂƚŝŽŶ dŚŝƐ ĞƋƵŝƉŵĞŶƚ ŐĞŶĞƌĂƚĞƐ
ƵƐĞƐĂŶĚĐĂŶƌĂĚŝĂƚĞƌĂĚŝŽĨƌĞƋƵĞŶĐLJĞŶĞƌŐLJĂŶĚŝĨŶŽƚŝŶƐƚĂůůĞĚĂŶĚƵƐĞĚŝŶĂĐĐŽƌĚĂŶĐĞǁŝƚŚƚŚĞ
ŝŶƐƚƌƵĐƚŝŽŶƐ ŵĂLJ ĐĂƵƐĞ ŚĂƌŵĨƵů ŝŶƚĞƌĨĞƌĞŶĐĞ ƚŽ ƌĂĚŝŽ ĐŽŵŵƵŶŝĐĂƚŝŽŶƐ ,ŽǁĞǀĞƌ ƚŚĞƌĞ ŝƐ ŶŽ
ŐƵĂƌĂŶƚĞĞ ƚŚĂƚ ŝŶƚĞƌĨĞƌĞŶĐĞ ǁŝůů ŶŽƚ ŽĐĐƵƌ ŝŶ Ă ƉĂƌƚŝĐƵůĂƌ ŝŶƐƚĂůůĂƚŝŽŶ /Ĩ ƚŚŝƐ ĞƋƵŝƉŵĞŶƚ ĚŽĞƐ
ĐĂƵƐĞŚĂƌŵĨƵůŝŶƚĞƌĨĞƌĞŶĐĞƚŽƌĂĚŝŽŽƌƚĞůĞǀŝƐŝŽŶƌĞĐĞƉƚŝŽŶǁŚŝĐŚĐĂŶďĞĚĞƚĞƌŵŝŶĞĚďLJƚƵƌŶŝŶŐ
ƚŚĞ ĞƋƵŝƉŵĞŶƚ ŽĨĨ ĂŶĚ ŽŶ ƚŚĞ ƵƐĞƌ ŝƐ ĞŶĐŽƵƌĂŐĞĚƚŽƚƌLJ ƚŽ ĐŽƌƌĞĐƚ ƚŚĞ ŝŶƚĞƌĨĞƌĞŶĐĞ ďLJŽŶĞ Žƌ
ŵŽƌĞŽĨƚŚĞĨŽůůŽǁŝŶŐŵĞĂƐƵƌĞƐ
ͶZĞŽƌŝĞŶƚŽƌƌĞůŽĐĂƚĞƚŚĞƌĞĐĞŝǀŝŶŐĂŶƚĞŶŶĂ
Ͷ/ŶĐƌĞĂƐĞƚŚĞƐĞƉĂƌĂƚŝŽŶďĞƚǁĞĞŶƚŚĞĞƋƵŝƉŵĞŶƚĂŶĚƌĞĐĞŝǀĞƌ
ͶŽŶŶĞĐƚƚŚĞĞƋƵŝƉŵĞŶƚŝŶƚŽĂŶŽƵƚůĞƚŽŶĂĐŝƌĐƵŝƚĚŝĨĨĞƌĞŶƚĨƌŽŵƚŚĂƚƚŽǁŚŝĐŚƚŚĞƌĞĐĞŝǀĞƌŝƐ
ĐŽŶŶĞĐƚĞĚ
ͶŽŶƐƵůƚƚŚĞĚĞĂůĞƌŽƌĂŶĞdžƉĞƌŝĞŶĐĞĚƌĂĚŝŽdsƚĞĐŚŶŝĐŝĂŶĨŽƌŚĞůƉ
EŽƚĞϮϭŚĂŶŐĞƐŽƌ ŵŽĚŝĨŝĐĂƚŝŽŶƐƚŽƚŚŝƐƵŶŝƚŶŽƚĞdžƉƌĞƐƐůLJĂƉƉƌŽǀĞĚďLJƚŚĞƉĂƌƚLJƌĞƐƉŽŶƐŝďůĞ
ĨŽƌĐŽŵƉůŝĂŶĐĞĐŽƵůĚǀŽŝĚƚŚĞƵƐĞƌƐĂƵƚŚŽƌŝƚLJƚŽŽƉĞƌĂƚĞƚŚĞĞƋƵŝƉŵĞŶƚ
ϮdŚĞŵŝŶŝŵƵŵƐĞƉĂƌĂƚŝŽŶŐĞŶĞƌĂůůLJďĞƵƐĞĚŝƐĂƚůĞĂƐƚϮϬĐŵ
 Loading...