

Page 1
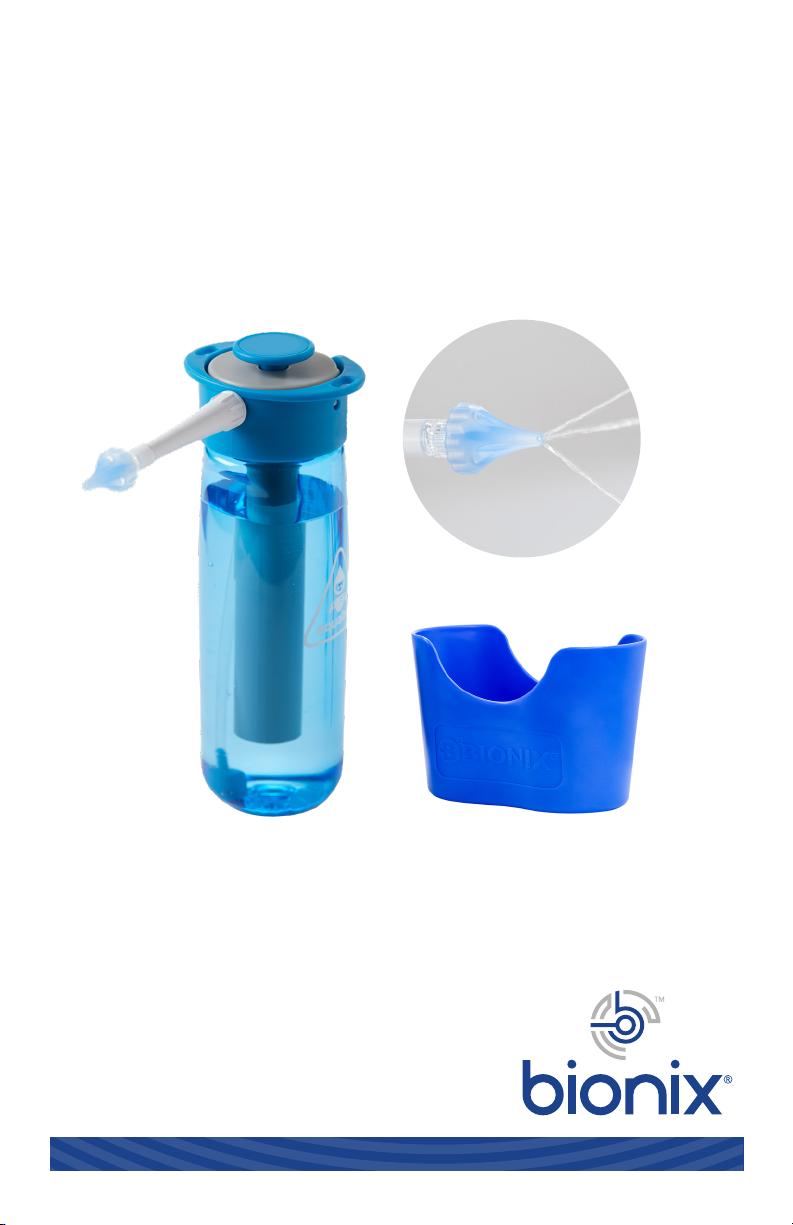
OtoClear® Powered by Aquabot
®
Ear Irrigation Kit
INSTRUCTIONS FOR USE
PRODUCT OFFERING
#7270 - OtoClear/Aquabot, 20 tips, 1 Ear Basin
#7275 - OtoClear/Aquabot, 5 tips, 1 Ear Basin
INNOVATIVE SOLUTIONS FOR EVERYDAY PROBLEMS
Page 2

CONTENTS
Thank you for purchasing OtoClear®,
powered by Aquabot
OtoClear®, powered by Aquabot® provides a simple, yet effective, solution to patient safety, patient discomfort, and compacted cerumen removal. The key to this
system is the OtoClear ear irrigation tips that are attached to the end of the wand.
OtoClear ear irrigation tips direct water to the ear canal wall at 30 degree angles
avoiding directly impacting the tympanic membrane.
This manual is designed to explain the proper assembly instructions for the
entirety of the kit, including bottle assembly, cleaning, and tip placement.
Note: Any other use for the product outside of the intended use stated herein,
Bionix shall not be held liable.
®
Getting Started ......................... 3
Aquabot Parts ID ...................... 4
Aquabot Warnings/Modes ...... 5
OtoClear®, powered by
Aquabot® Use Instructions ..... 6
Aquabot Maintenance .............. 8
High Level Disinfection ............ 9
Aquabot Troubleshooting......... 10
Getting Started:
Unpacking and Verifying Contents:
Before continuing, inspect the package for any damage during shipping.
If you find any damage notify your local distributor.
Next, check to ensure that your OtoClear®, powered by Aquabot® is complete.
Contents include:
• Aquabot® Bottle
• Adapter wand
• Either 20 OtoClear Tips or 5 OtoClear Tips
• Ear basin
If any item is missing please contact your distributor.
Intended Use
OtoClear®, powered by Aquabot® is intended to be used for Ear Irrigation by a
medical professional.
Before you begin:
Exam the ear canal and tympanic membrane with an otoscope noting the type
and location of any cerumen. Hard or impacted wax may require a cerumenolytic
agent.
WARNING: DO NOT perform irrigation if the tympanic
membrane is perforated or if tympanostomy tubes are pres-
ent. Discontinue irrigation immediately if bleeding, irritation,
or other trauma to the ear canal or tympanic membrane.
3
Page 3
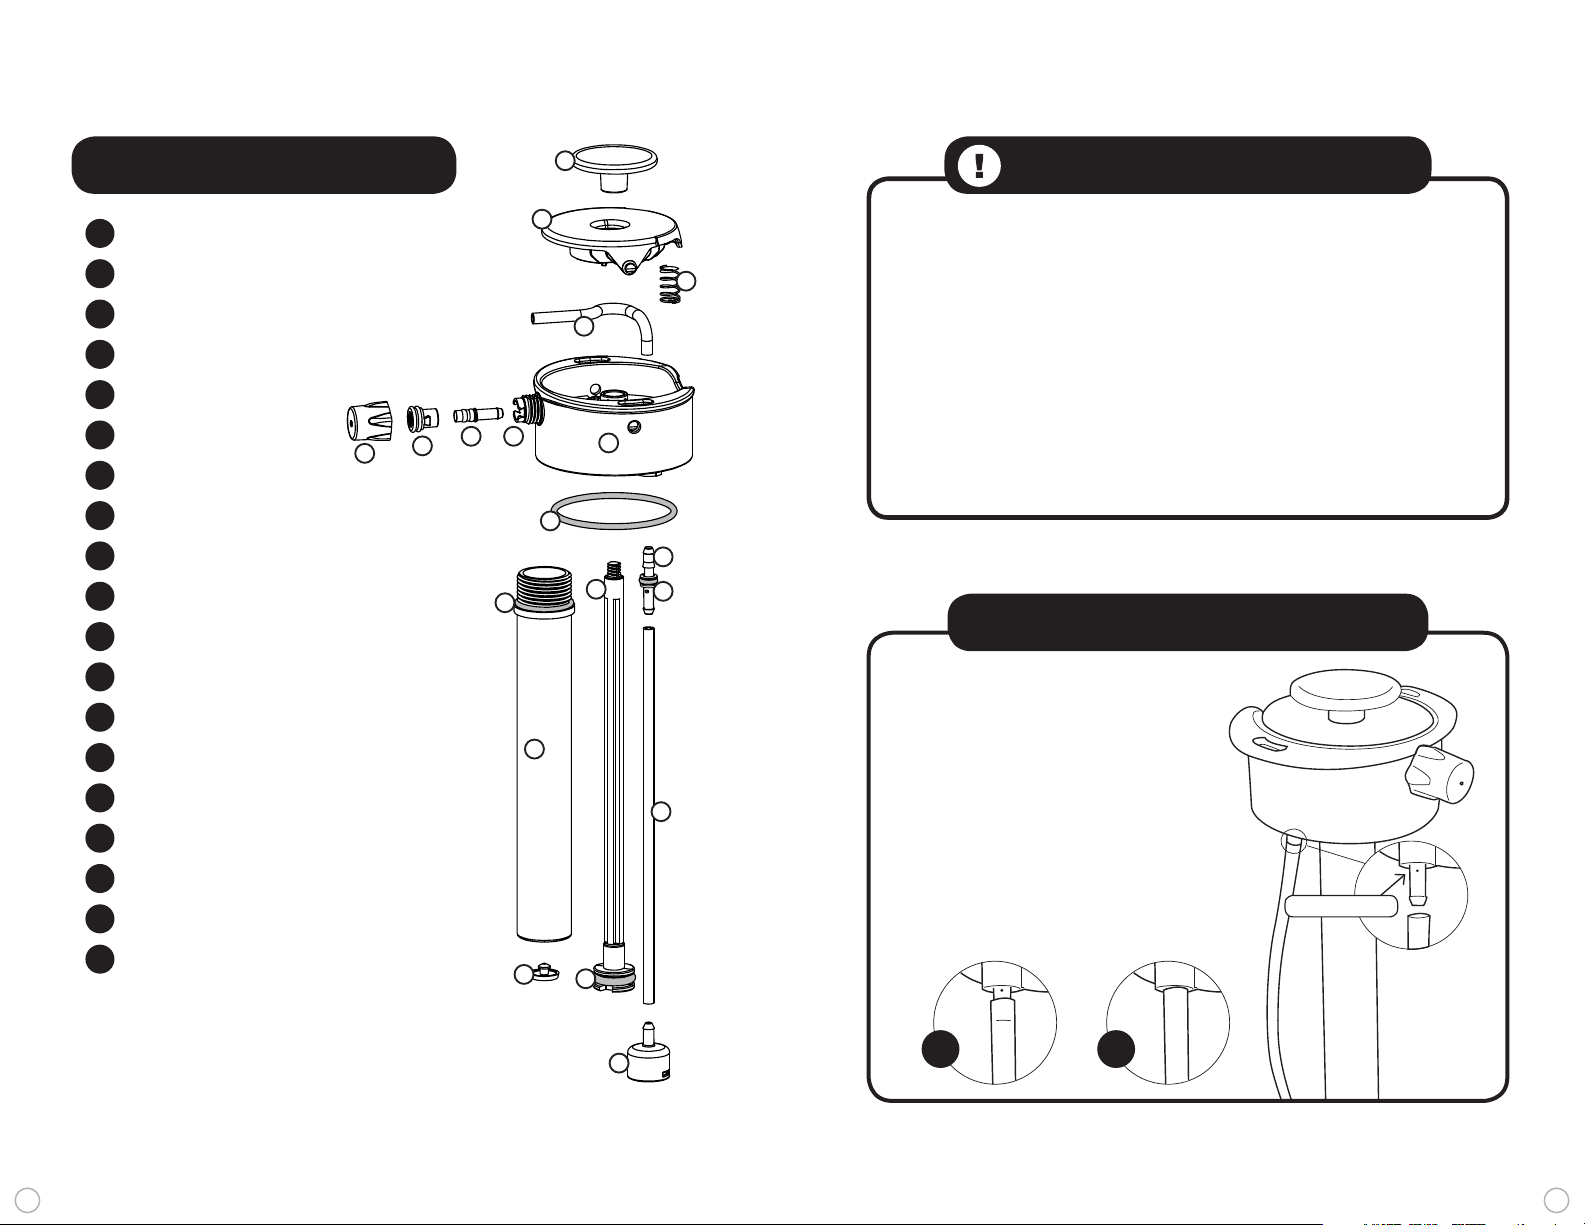
Aquabot® PARTS ID
1
Aquabot® WARNINGS
1
Pump Handle
2
Trigger
3
Spring
4
Pinch Tube
5
Lid
6
Lid Nozzle
7
Nozzle Adapter
8
Soft Nozzle
9
Nozzle Cap
10
Lid O-ring
11
Draw Tube Adapter
12
Draw Tube O-ring
13
Piston Rod
14
Pump Barrel O-ring
15
Pump Barrel
16
Draw Tube
17
Umbrella Valve
18
Piston O-ring
19
Weighted Screen
2
• Do not over-pressurize the unit.
• Do not use liquids with temperatures above
3
120oF / 49oC.
• CHOKING HAZARD Unit contains small parts.
4
Not suitable for children under 3 years.
• Only use lid with Aquabot bases.
• Do not use lid on any metal or glass bases.
7
8
9
6
5
FAILURE TO READ AND FOLLOW THE ABOVE
WARNINGS AND OPERATING INSTRUCTIONS
COULD LEAD TO SERIOUS BODILY INJURY.
10
11
14
13
12
Aquabot® SPRAY MODES
Aquabot has two operating
15
16
17
18
modes called Stealth and Pulse.
Stealth is ideal for drinking, misting
and conserving pressure. Pulse is
ideal for cleaning and conserving
water.
a. Expose adapter hole to use
in Pulse mode.
b. Cover adapter hole to use
in Stealth mode.
adapter hole
19
a
b
54
Page 4
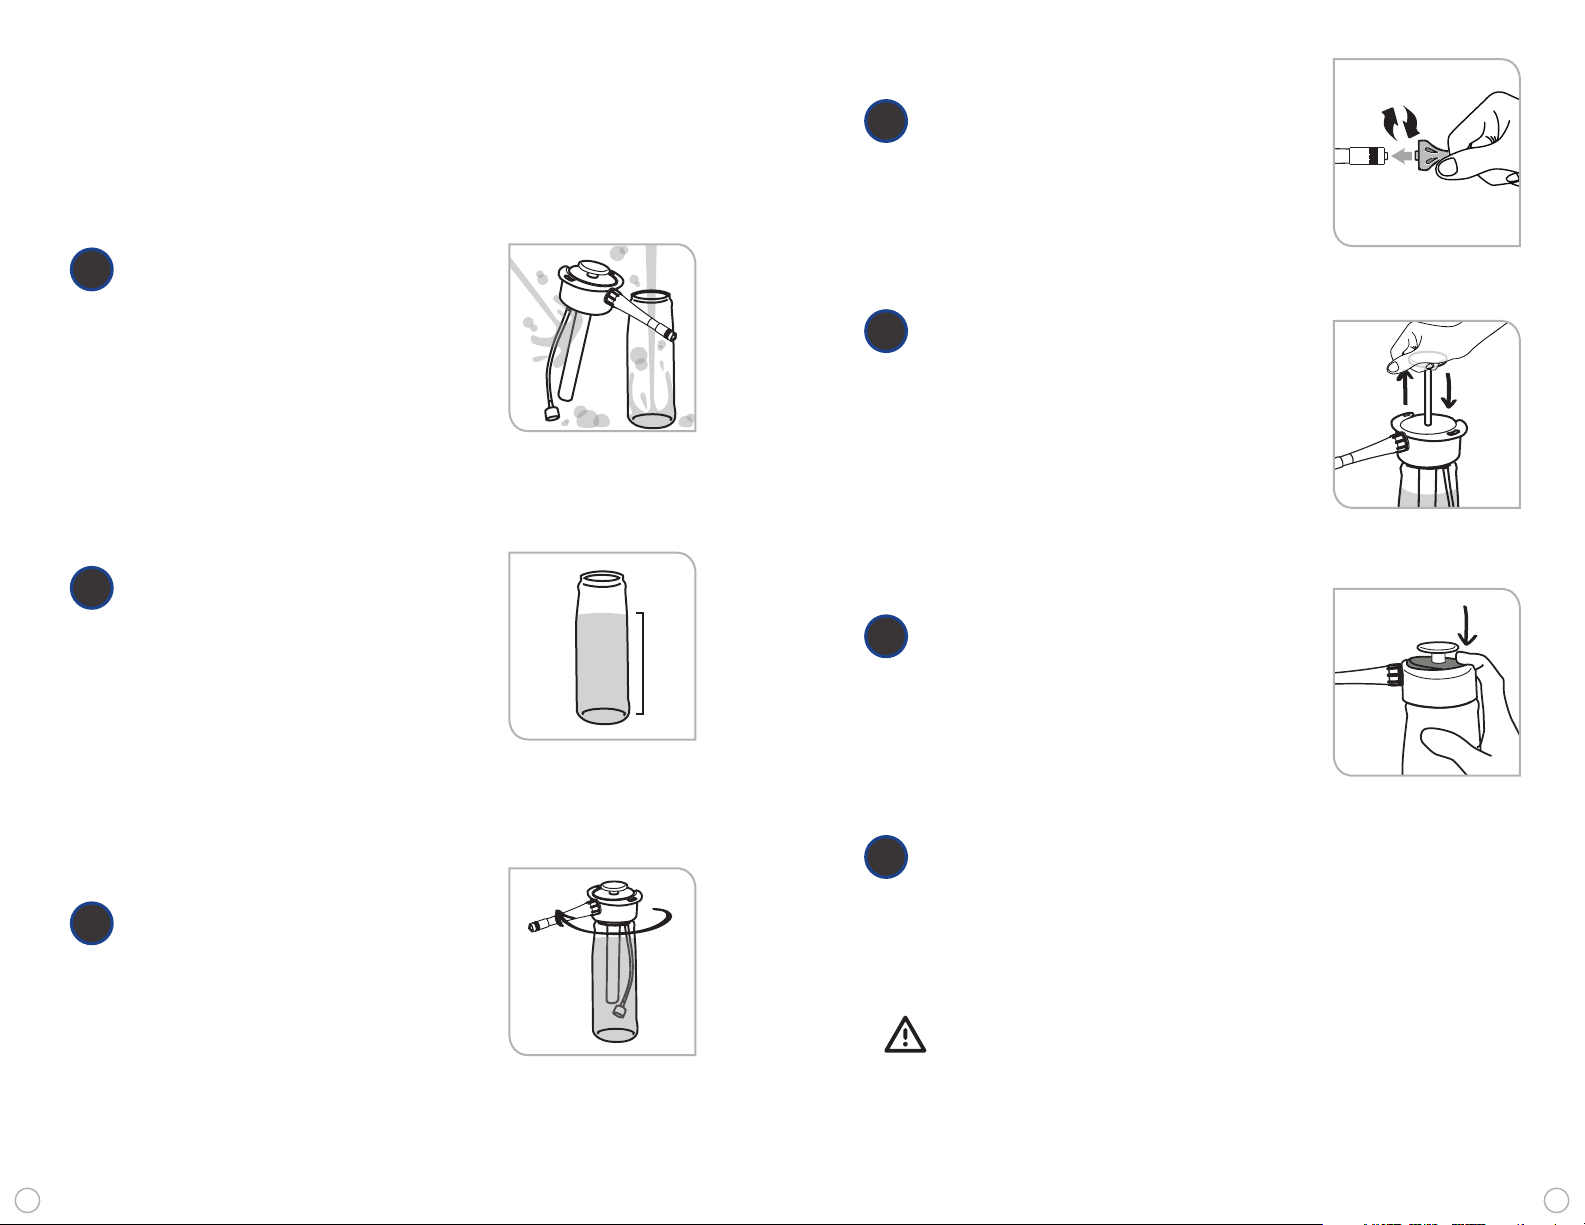
OtoClear®, powered by Aquabot
USE INSTRUCTIONS:
Clean by filling base half full
1
with soapy water, twist on the
lid, shake to clean and then
spray soapy water through
the unit. Repeat with fresh
water.
Fill base to 32 oz. mark on
2
1000mL bottle and 19 oz.
on 650mL bottle.
1
®
Grasp the OtoClear Tip and
4
twist onto the luer lock fitting
of the adapter until it stops.
Pump no more than 6 times.
5
This will pressurize the unit to
approximately 35 psi. Take note
of the force required on the last
pump and use this as a guide
for when to stop pumping on
future charges so that you do
not over-pressurize the unit.
To release water, firmly press
6
the colored circle on the back
of the trigger.
Attach Aquabot to top of
3
bottle and close firmly by
rotating clockwise.
The safest method to depressurize the unit is to
7
hold it upside down, while keeping the weighted
screen above the water line. Then press the
trigger to spray out compressed air.
WARNING: Failure to remove the OtoClear Tip
runs the risk of cross contamination between patients.
The tip is designed to be a single-use product.
76
Page 5
Aquabot® MAINTENANCE
• Clean with soap and water as needed.
The base is dishwasher safe for top rack only.
The lid is NOT dishwasher safe.
• Do not put the unit in the freezer.
• Store out of direct sunlight.
• Do not store pressurized for more than 36 hours.
• Spray air through the unit to dry out the silicone
tube before storing for long periods.
• It’s a good idea to lock the trigger in the ON
position when storing for long periods to keep
the Pinch Tube from kinking.
• Spare parts are available on lunatecgear.com.
• Instructional videos are available on product
pages at lunatecgear.com.
• For help, contact us at [email protected]
High Level Disinfection of OtoClear®,
powered by Aquabot®:
It is recommended to high level disinfect OtoClear®, powered by Aquabot®
after any use where there was contact with blood, infectious material, or
non-intact skin.
01. Use one of the following high level disinfecting (HLD) solutions that are
compatible with OtoClear®, powered by Aquabot®:
• Ortho-Phthalaldehyde Solution (0.55% maximum)
• Accelerated Hydrogen Peroxide Solution (2% maximum)
• Glutaraldehyde Solution (3.0% maximum)
02. Prepare the HLD solution per the manufacturer’s instructions.
03. Remove the spray head from the bottle.
04. Ensure all water has been drained from the bottle and the spray head.
05. Fill OtoClear®, powered by Aquabot® with the HLD solution and reattach the
spray head.
06. Pump OtoClear®, powered by Aquabot® until HLD solution discharges.
07. Remove the spray head and completely fill the bottle with HLD solution.
08. Reattach the spray head.
09. Allow the HLD solution to soak in OtoClear®, powered by Aquabot® per the
HLD manufacturer’s instructions for use.
10. After the manufacturer’s recommended soak, remove the spray head from the
bottle and empty the HLD solution from the bottle.
11. Thoroughly rinse the outer surfaces of the bottle and spray head with water.
12. Fill the bottle with clean rinse water and reattach the spray head.
13. Pump until half of the bottle is discharged.
14. Repeat steps 11 – 13 until the bottle has been rinsed three times.
15. Remove the spray head from the bottle.
16. Drain all water from the bottle.
17. Pump the spray head until all water is discharged.
18. Dry the outer surfaces of the bottle and spray head and leave them separated
to allow complete drying.
19. To high level disinfect the ear basin, repeat steps 1 & 2 and follow the
manufacturer’s instructions.
98
Page 6
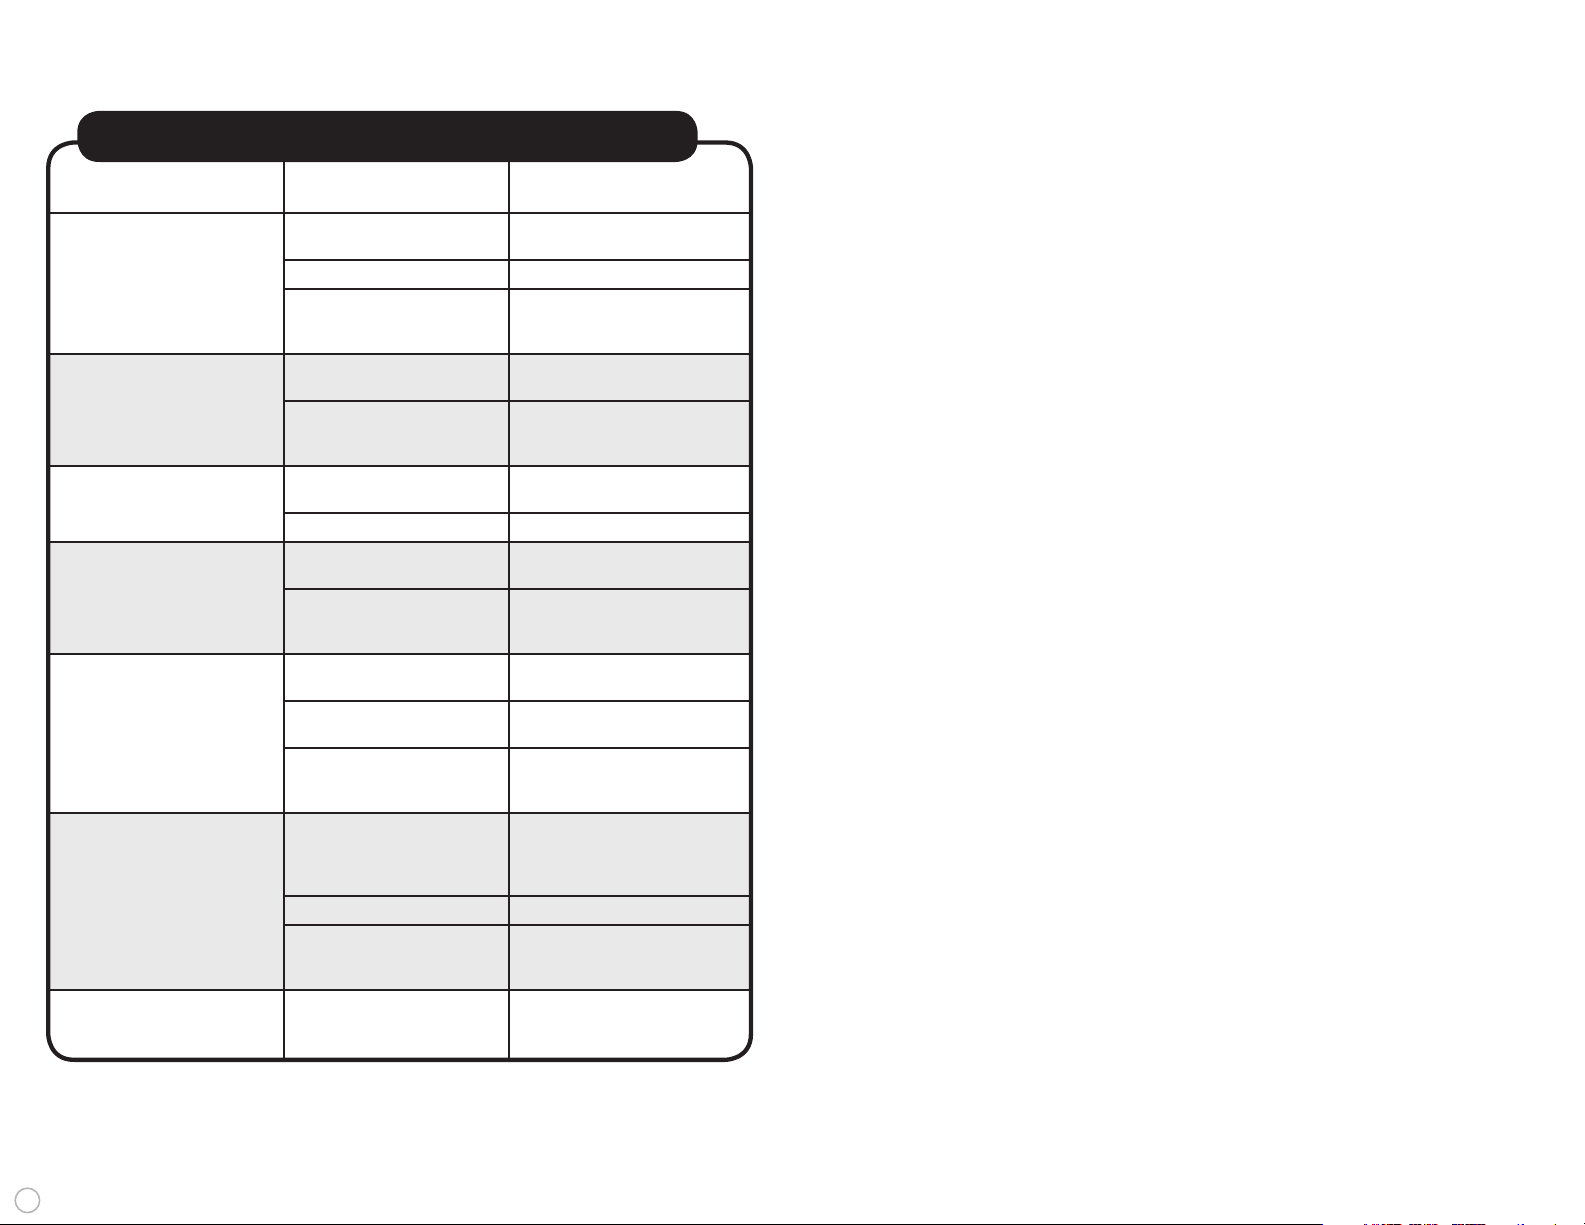
Aquabot® TROUBLESHOOTING CHART
PROBLEM REASON SOLUTION
Replacement parts available
at lunatecgear.com
Email
or call 858.653.0401
Remove trigger and unkink
Pinch Tube
Email
or call 858.653.0401
Replacement parts available
at lunatecgear.com
Replacement parts available
at lunatecgear.com
Email
or call 858.653.0401
Replacement parts available
at lunatecgear.com
Replacement parts available
at lunatecgear.com
Email
or call 858.653.0401
Try sanding 0.5mm off the
open side of the Nozzle C ap.
If that doesn’t work ,
order a new Nozzle Cap.
Email
or call 858.653.0401
Unit does not build
or hold pressure
Builds pressure but
does not spray
Water is getting inside of
pump barrel
Water is leaking from
under trigger
Water is leaking from
under trigger
Mist is not fine
Lid O-ring is missing
Pump Barrel is too loose Tighten Pump Barrel
Something else
Pinch Tube is kinked
Something else
Umbrella Valve is not
sealing
Pump Barrel is too loose Tighten Pump Barrel
Pinch Tube is damag ed
Something else
Soft Nozzle is missing
Wear and tear on
Soft Nozzle
Something else
Wear and tear
Operating mode is in Pulse Switch to Stealth mode
Something else
10
Spray is too noisy Operating mode is in Pulse Switch to Stealth mode
 Loading...