

Page 1
INSTRUCTION BOOK
TM
TM
TM
Po o l: 7 .3 p H OK
Se t: 7 . 3 pH ¯
TM
AUTO /
OFF
PROGRAM /
SET
DOWN
UP
Pleas e read before you call us for advice.
Simple, Effective pH Control System
Page 2

TABLE OF CONTENTS
Page
INTRODUCTION . . . . . . . . . . . . . . . . . . . . . . . . . . . . . . . . . . . . . . . . . . . . . . . . . . 3
pH BOSS ILLUSTRATION . . . . . . . . . . . . . . . . . . . . . . . . . . . . . . . . . . . . . . . . . . . . 4
SAFETY INSTRUCTIONS. . . . . . . . . . . . . . . . . . . . . . . . . . . . . . . . . . . . . . . . . . . . . 5
ACID SAFETY . . . . . . . . . . . . . . . . . . . . . . . . . . . . . . . . . . . . . . . . . . . . . . . . . . . . . . . . . . . . . . . . . . . . 5
pH BOSS INSTALLATION . . . . . . . . . . . . . . . . . . . . . . . . . . . . . . . . . . . . . . . . . . . . 6
TEE PIECE INSTALLATION. . . . . . . . . . . . . . . . . . . . . . . . . . . . . . . . . . . . . . . . . . . . . . . . . . . . . . . . . . . 6
CONTROL BOX INSTALLATION . . . . . . . . . . . . . . . . . . . . . . . . . . . . . . . . . . . . . . . . . . . . . . . . . . . . . . . 7
ACID PUMP HOSE INSTALLATION . . . . . . . . . . . . . . . . . . . . . . . . . . . . . . . . . . . . . . . . . . . . . . . . . . . . 7
TEE PIECE HOSE INSTALLATION . . . . . . . . . . . . . . . . . . . . . . . . . . . . . . . . . . . . . . . . . . . . . . . . . . . . . . 8
DRUM WEIGHT HOSE INSTALLATION . . . . . . . . . . . . . . . . . . . . . . . . . . . . . . . . . . . . . . . . . . . . . . . . . 8
pH PROBE INSTALLATION . . . . . . . . . . . . . . . . . . . . . . . . . . . . . . . . . . . . . . . . . . . . . . . . . . . . . . . . . . 8
PROGRAMMING YOUR pH BOSS . . . . . . . . . . . . . . . . . . . . . . . . . . . . . . . . . . . . . 9
AUTO / OFF KEY. . . . . . . . . . . . . . . . . . . . . . . . . . . . . . . . . . . . . . . . . . . . . . . . . . . . . . . . . . . . . . . . . . 9
DOSE SETTING. . . . . . . . . . . . . . . . . . . . . . . . . . . . . . . . . . . . . . . . . . . . . . . . . . . . . . . . . . . . . . . . . . . 9
MANUAL DOSE . . . . . . . . . . . . . . . . . . . . . . . . . . . . . . . . . . . . . . . . . . . . . . . . . . . . . . . . . . . . . . . . . . 9
CHANGING THE pH SET POINT . . . . . . . . . . . . . . . . . . . . . . . . . . . . . . . . . . . . . . . . . . . . . . . . . . . . . 10
ALARM FUNCTION . . . . . . . . . . . . . . . . . . . . . . . . . . . . . . . . . . . . . . . . . . . . . . . . . . . . . . . . . . . . . . 10
MAINTENANCE . . . . . . . . . . . . . . . . . . . . . . . . . . . . . . . . . . . . . . . . . . . . . . . . . . 11
pH PROBE CALIBRATION . . . . . . . . . . . . . . . . . . . . . . . . . . . . . . . . . . . . . . . . . . . . . . . . . . . . . . . . . . 11
PUMP SQUEEZE TUBE LUBRICATION. . . . . . . . . . . . . . . . . . . . . . . . . . . . . . . . . . . . . . . . . . . . . . . . . 12
PUMP SQUEEZE TUBE REPLACEMENT . . . . . . . . . . . . . . . . . . . . . . . . . . . . . . . . . . . . . . . . . . . . . . . 12
TROUBLESHOOTING . . . . . . . . . . . . . . . . . . . . . . . . . . . . . . . . . . . . . . . . . . . . . . 13
BIONISER CONTACT INFORMATION . . . . . . . . . . . . . . . . . . . . . . . . . . . . . . . . . . 14
2
INSTRUCTION BOOK CONTENTS
Page 3

INTRODUCTION
PLEASE TAKE THE TIME TO READ THESE INSTRUCTIONS CAREFULLY AND NOTE HOW THEY
APPLY TO YOUR PARTICULAR POOL AND EQUIPMENT.
IMPORTANT : ALWAYS USE DILUTED ACID. SEE SAFETY & WARRANTY SECTION.
pH level is one of the most important pool balance Take note of the few “do’s and don’ts” and you will
parameters for any type of pool. Whether the pool have a simple and trouble free start up.
is ionised, ozone, salt water chlorinated (including
salt chlorinators that use alternative salts such as
magnesium and potassium), liquid chlorine etc, the
pH must be maintained at the correct level for
optimum water quality and algae control.
The pH BOSS takes the hassle out of controlling pH,
by doing the job for you. Whenever the pool
filtration pump is running, the pH BOSS will add
small, frequent doses of diluted hydrochloric acid
to ensure correct pH at all times.
This not only saves you time, but it also takes the
guesswork out of colour matching with pH tests
and reduces chemical usage. In particular, the small
doses will not reduce total alkalinity as quickly as
adding a larger amount of undiluted acid every
week or two. If you use a pool care service you can reduce the
So the pH BOSS saves you time, frustration AND
money !
Before installing the pH BOSS, the pool water reservoir and you do no pool care whatsoever.
should be correctly balanced, particularly total
alkalinity. The pH BOSS can be safely used on brand
new pools, including those pools which have high
acid demand for the first few weeks, months and
years of operation.
Bioniser Pty Ltd is committed to creating a more
healthy environment… the pH BOSS is one integral
component of our ongoing journey in this
direction.
Other components to advance ourselves along the
path back to a toxic free world include the original
Bioniser Bio-effective ionic pool and spa purifer,
and also the Eco-Oxidizer chemical free pool
oxidiser.
Now for the first time pools are able to stay healthy
and clear without any toxic substances polluting
your swimming environment or your lifestyle. You
are removed from all but the most simple tasks
required for pool care.
time they visit… they are now almost redundant.
Let them visit once a month and sweep the pool,
check the skimmer and add some acid to the pH
This is the Bioniser “Ultimate Solution” to Pool
Care…
and your commitment to help us all return to a toxic
free Planet for your children to enjoy.
www.bioniser.com.au . . . . . . The original bio-effective pool sanitising system.
www.phboss.com . . . . . . . . . Simple, effective pH Control System.
www.starclear.com . . . . . . . . High quality, energy efficient pool lighting.
INTRODUCTION
3
TM
Page 4
Po ol : 7 .3 pH OK
S et : 7 .3 pH ¯
AUTO /
PROGRAM /
OFF
DOWN
SET
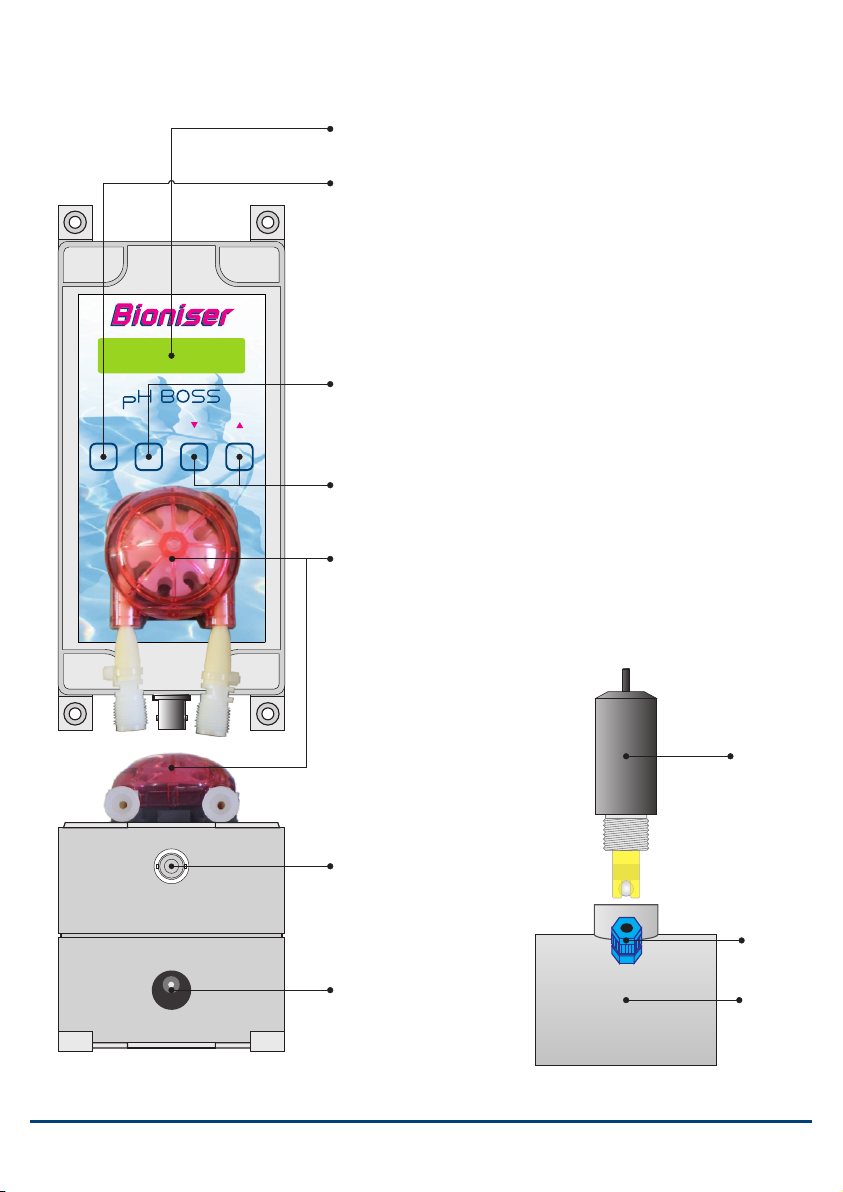
pH BOSS ILLUSTRATION
DISPLAY
16 x 2 Line alphanumeric LCD with LED backlight.
AUTO / OFF
Press to select:
Auto ................Normal automatic pH control
OFF 24 Hrs .......Unit will not add acid for 24 hours, for example if
some buffer was added to the pool.
TM
TM
UP
OFF ..................Unit will not add any acid automatically.
Press this button to cancel without saving changes when adjusting
settings in the programming menus.
PROGRAM / SET
Press to scroll through the five user setting menus.
Press to save changes when adjusting settings.
UP & DOWN SETTING ADJUSTMENT
Press to makes changes to user settings.
PERISTALTIC DOSING PUMP
Precision, high quality dosing pump. 150mL/min flow rate while
running.
4
INSTRUCTION BOOK
BNC pH PROBE SOCKET
Connect pH Probe by
pushing on, then
clockwise 1/4 turn to
lock into place.
DC POWER SOCKET
Use only genuine
power adaptor
supplied by Bioniser to
avoid damage to your
pH BOSS.
pH PROBE
One Way
Valve
Tee Piece
Tee Piece, pH Probe
and one way valve
pH BOSS ILLUSTRATION
Page 5
SAFETY INSTRUCTIONS - READ
1. WARNING - always use diluted acid at 1 part acid
to 4 or more parts water with pH BOSS.
2. ALWAYS add acid to a larger volume of water.
NEVER add water to acid.
3. ALWAYS wear safety glasses and gloves.
4. ALWAYS dilute acid in a well ventilated area,
IMPORTANT : CAUTION :
It is important to follow basic safety precautions Your warranty could become invalid should you fail
when installing and using this electrical equipment, to observe the following :
including the following :
1. Ensure you read and follow all instructions. 1. The pH BOSS must be installed and operated as
2. WARNING - ALWAYS USE DILUTED ACID AT A
RATIO OF NOT LESS THAN 4 PARTS WATER TO 1 2. Damage due to using undiluted or insufficiently
PART ACID. diluted acid is not covered by warranty.
3. WARNING - Do not allow children to use this 3. Turn off the power to the pH BOSS before
product unless they are closely supervised at all replacing the peristaltic dosing pump squeeze
times. This is to prevent accidental injury. tube.
4. Keep all cables and tubes visible and do not bury 4. The life of the unit will be extended (as with most
them. Also, position them so that they do not get other pool equipment) if it is placed indoors or in
damaged by lawn mowers, hedge trimmers and an enclosed structure. This is recommended as
other equipment. sunlight can damage the Liquid Crystal Display on
5. WARNING - To prevent electrical shock, acid
spillage or incorrect dosing, replace damaged
cords or tubes immediately. 5. Always power the pH BOSS from a genuine
6. Read these instructions and keep the instruction
manual in a safe place.
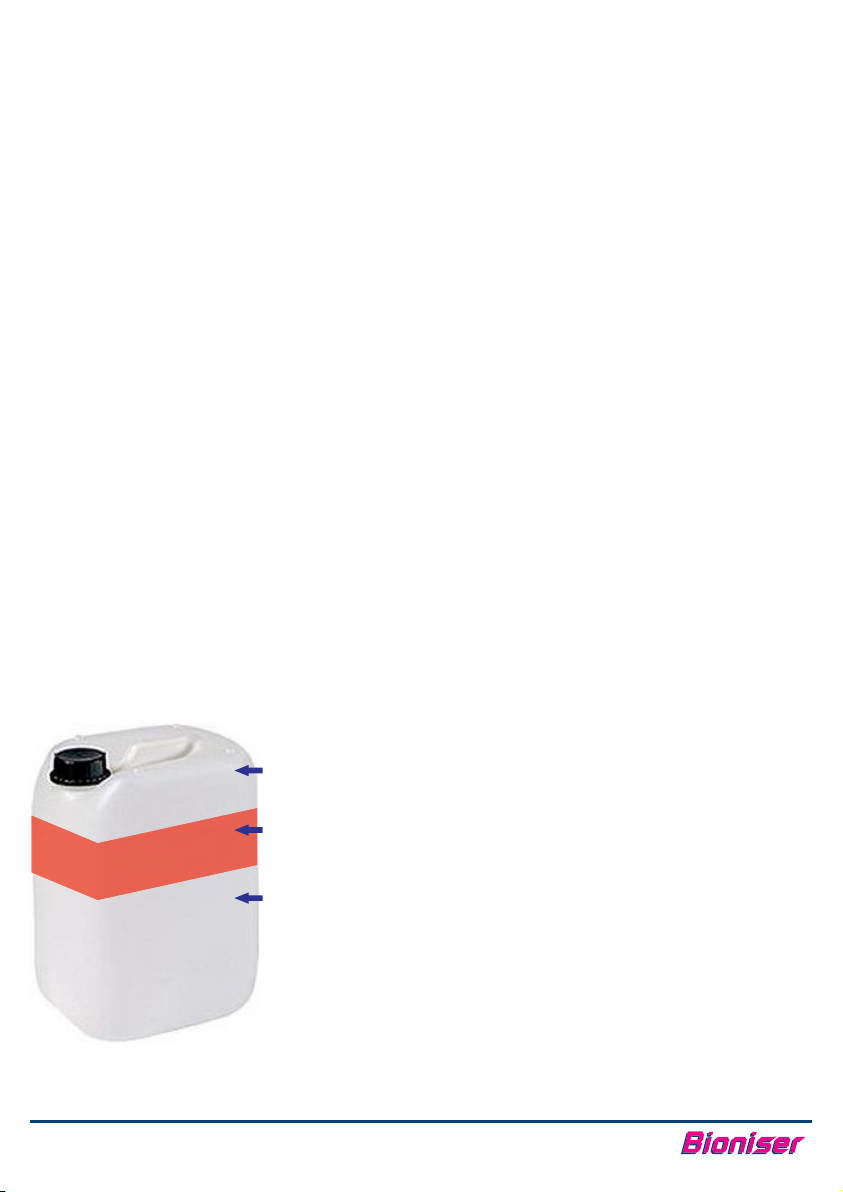
ACID SAFETY
PLEASE FOLLOW THESE IMPORTANT ACID SAFETY INSTRUCTIONS.
ALWAYS ADD THE ACID TO WATER ALREADY IN THE DRUM. NEVER ADD WATER TO ACID.
3. Top off the drum
with more water.
2. Add 4 Litres only of
Hydrochloric Acid.
1. e.g. Add water to a
20 Litre acid drum
to approx 1/2 full.
In case of a larger
drum, add 1 part
acid to 4 parts
water to be mixed
as above
SAFETY INSTRUCTIONS
specified.
the face of the control unit. The LCD is covered
within the warranty on a pro-rata basis.
Bioniser power adaptor. An incorrect adaptor
could damage the pH BOSS and will void your
warranty.
1. WARNING - always use diluted acid at 1 part acid
to 4 or more parts water with pH BOSS.
2. ALWAYS add acid to a larger volume of water.
NEVER add water to acid.
3. ALWAYS wear safety glasses and gloves.
4. ALWAYS dilute acid in a well ventilated area,
preferably outdoors.
5. ALWAYS have a source of fresh water nearby,
such as a hose, so you can wash down accidental
spillages.
6. In case of acid spillage onto clothing, eyes, skin,
concrete etc, wash down with large amounts of
fresh water immediately. SEEK MEDICAL ADVICE
IF NECESSARY.
5
TM
Page 6
pH BOSS INSTALLATION
READ THE DO’S AND DON’TS AND TAKE THE TIME TO INSTALL CORRECTLY.
The pH BOSS can be installed onto a new pool or an tee BEFORE the Salt Chlorinator cell. The acid
existing pool with minimal pool preparation. Ensure will help to keep the expensive Chlorinator
that the pool is correctly balanced, in particular the cells clean.
Total Alkalinity. If a liquid Chlorine injection system is fitted,
1. Installing your pH BOSS takes around 30 minutes.
NOTE: Turn off all valves prior to fitting the T-piece injector becoming clogged with calcium.
(avoid leaks), and turn them back on again before
switching pool pump back on.
2. Alternatively engage a competent person to do
the job.
3. If installing it yourself you will need :
!
PVC pressure glue and primer.
!
A fine tooth saw.
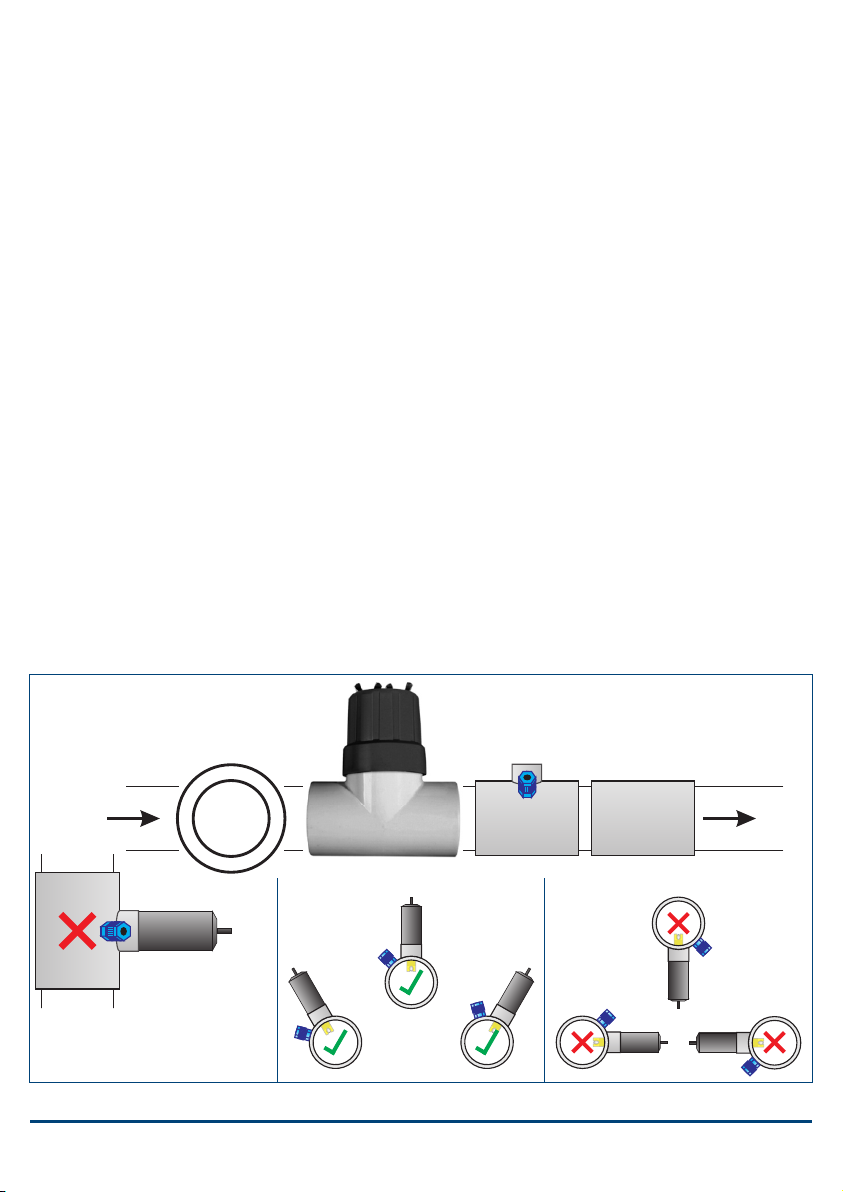
4. The Probe/Injection Tee must be fitted on the
pipe that sends water back to the pool after it has
been filtered (the “Return Line”).
!
If a Bioniser is installed, fit the pH BOSS tee
AFTER the Bioniser Tee.
!
If a Salt Chlorinator is installed, fit the pH BOSS
!
install the tee BEFORE the Chlorine injection
point. The acid will help prevent the Chlorine
TEE PIECE INSTALLATION
1. Cut out a 7cm section of pipe sufficient for the
Tee piece that holds the pH sensor and one way
valve.
NOTE: The section that is cut out of the pipe
should be about 60mm shorter than the Tee
piece.
2. If the Tee piece diameter is larger than the pipe
then use the 50mm to 40mm reducing bushes
provided by glueing them in place in the Tee
piece before fitting. The pipe should now fit
snugly into the Tee piece.
3. The Tee piece should be installed so that the pH
Probe is within 30 of vertical.
O
Bioniser Tee
(If fitted)
WATER IN POOL
DO NOT MOUNT ON
VERTICAL SECTION OF PIPE,
WHICH MAKES THE PROBE
HORIZONTAL.
FILTER
Correctly Installed Tee Incorrectly Installed Tee
pH BOSS Tee Salt Chlorinator
Cell
(if fitted)
6
INSTRUCTION BOOK
pH BOSS INSTALLAT I O N
Page 7
CONTROL BOX INSTALLATION
1. Choose a position that will allow you to see the
pH BOSS Display easily. Fix the control box in
position using screws at each corner of the box.
NOTE: Make sure that the pH BOSS is positioned
near enough to a power outlet and to the T-piece
and acid drum to allow the power connecting
and sensor cables to reach without straining.
2. Make sure that the unit is undercover and that
the Display is not in direct sunlight as it is not
covered by warranty if it is damaged by sunlight.
3. Plug the power adaptor into a suitable power
outlet. The pH BOSS should only be powered on
when the pool pump is running. This can be done
in 2 ways :
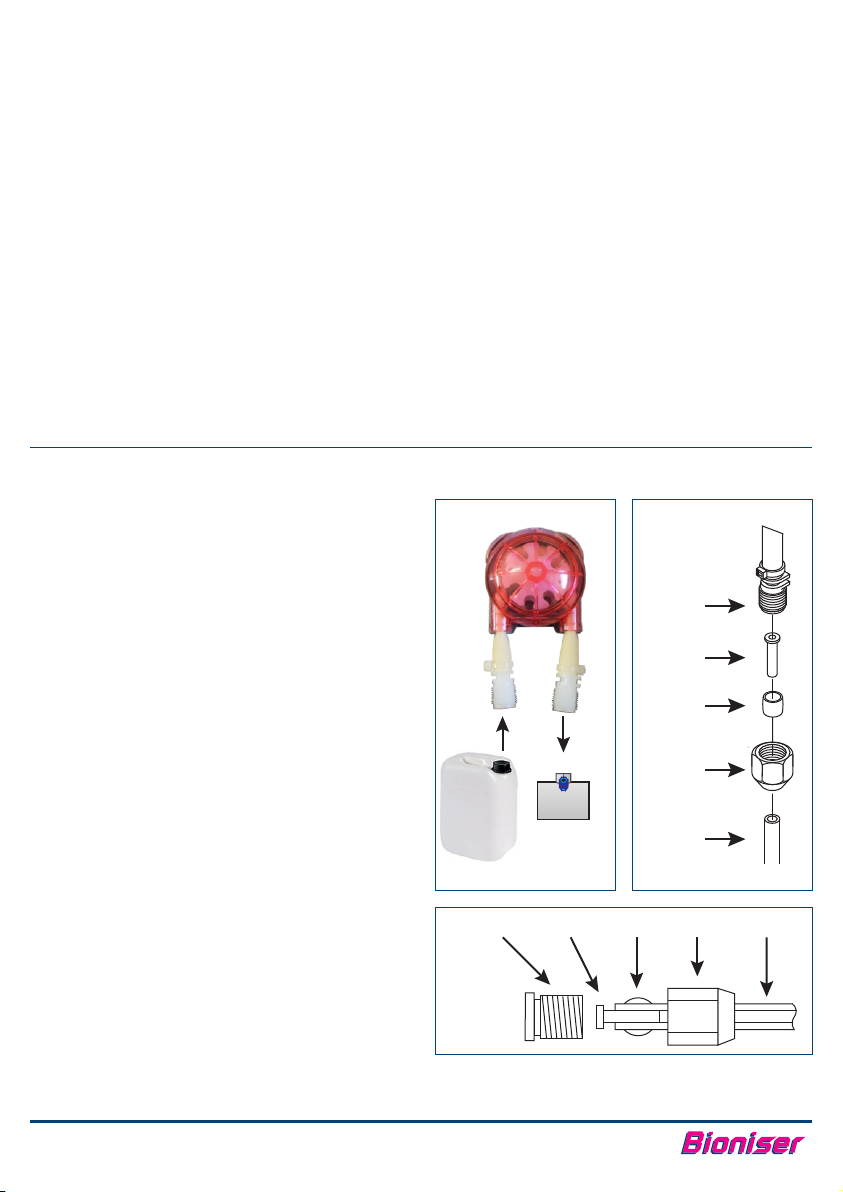
ACID PUMP HOSE INSTALLATION
The flexible inlet and outlet hoses are pre-fitted to
the pH B OSS for your conveni ence. Thes e
instructions are included in case you need to change
the hoses in the future, which is part of normal wear
and tear. The tubes will need to be replaced every
two to three years, depending on pool size.
1. If the pH BOSS has been used before, remove the
drum weight from the acid drum and place into a
container of at least 1 litre of water.
Use the Manual Dose function (see page 9) to
pump 1 litre of water. This will flush the acid out
of the pump and hoses.
2. Disconnect the power from the pH BOSS.
3. Use a NEW sleeve kit. Re-using the old sleeve kit
may result in corrosive diluted acid leakage.
4. Cut the hose as required, as straight as possible.
5. Slip the Nut over the hose.
6. Slip the Sleeve onto the hose.
7. Push the Insert into the hose.
8. Push the hose and sleeve into the Tube Fitting.
9. Tighten the Nut firmly by hand. DO NOT OVERTIGHTEN.
pH BOSS INSTALLAT I O N
1) If you are using a Bioniser or other system,
with a pool pump power outlet, plug the
power adaptor into the outlet provided. Use
a double adaptor if necessary.
2) Use a separate timer switch, which has been
tuned to the same times as the timer
controlling the pool pump.
5. Connect the low voltage plug to the pH BOSS DC
Power Socket (see DC Power Socket diagram,
Page 4). Use only a genuine Bioniser power
adaptor. An incorrect adaptor could damage
your pH BOSS and void your warranty.
DO NOT SWITCH THE POWER ON UNTIL
INSTALLATION HAS BEEN COMPLETED.
Tube
Fitting
Insert
Sleeve
Suction from
acid drum
Delivery to
pipe
Nut
Hose
Tube Fitting Insert Sleeve Nut Hose
7
TM
Page 8
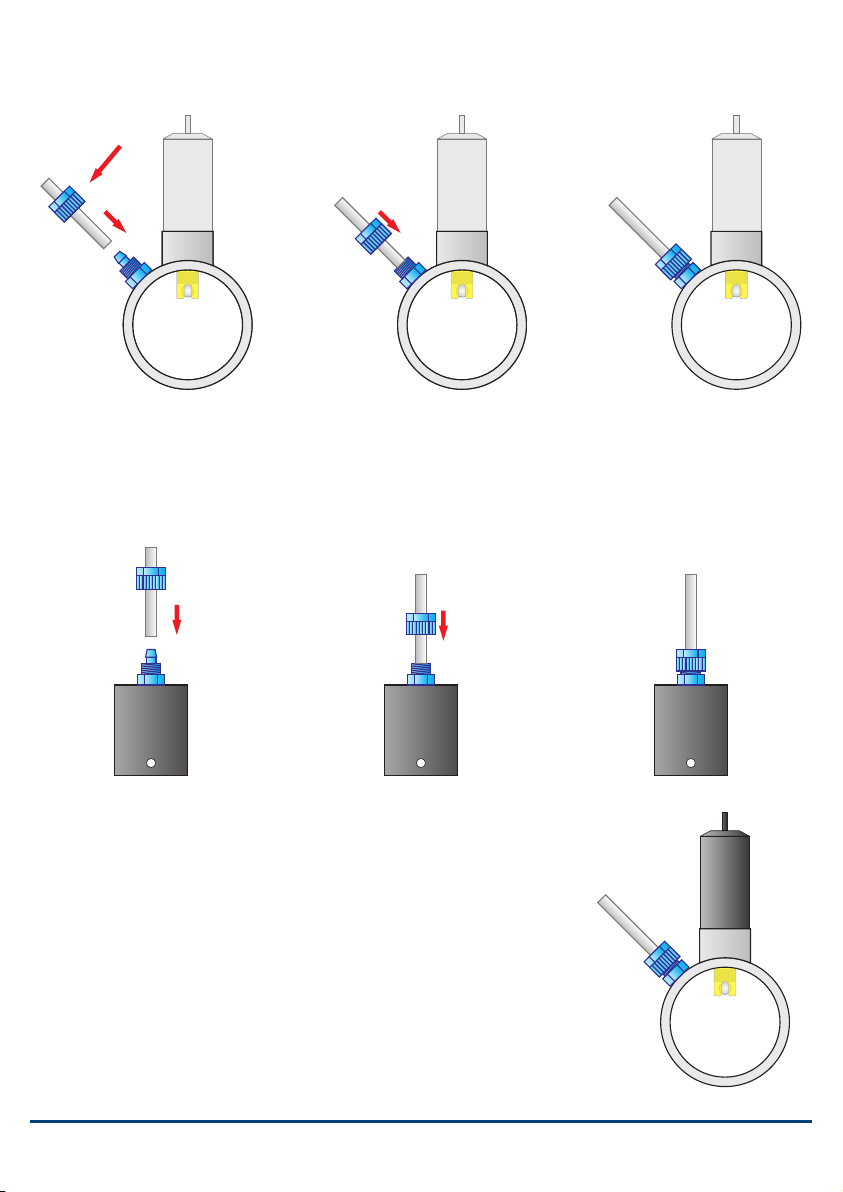
TEE PIECE HOSE INSTALLATION
1. Remove the nut from the one way valve fitting on
the Tee piece.
2. Slip the Nut over the hose.
DRUM WEIGHT HOSE INSTALLATION
1. Remove the lid from the acid drum that you will
use.
2. Drill a 6.5mm or 1/4 inch hole into the top of the
drum lid.
3. Push the hose firmly onto the tube fitting.
4. Tighten the nut over the hose. Tighten firmly
with fingers. DO NOT USE A TOOL.
3. Push the end of the drum weight hose through
the drum lid.
4. Fit the hose onto the drum weight tube fitting in
the same way as described in the Tee Piece Hose
Installation section above and illustration below.
pH PROBE INSTALLATION
1. Fit Teflon tape onto the thread of the pH Probe. Carefully remove the
protective cap from the tip of the probe.
2. Screw the pH Probe into the Tee piece thread. Tighten firmly by hand. A tool
may be used for another ½ to 1 turn, if the fitting is leaking when the pump
is running. DO NOT OVER-TIGHTEN.
3. After the pH Probe is installed in the Tee piece, connect plug on the pH
Probe cable into the probe socket on the pH BOSS. Push the plug into place
and 1/4 turn clockwise to lock it into place. See the pH Probe socket
diagram, Page 4.
AFTER ALL HOSE FITTINGS ARE COMPLETED, AND THE PROBE IS FITTED, TEST
THE SYSTEM WITH FRESH WATER, USING THE MANUAL DOSE FUNCTION
8
(PAGE 9). CHECK CAREFULLY FOR ANY LEAKS AND CORRECT AS NEEDED.
INSTRUCTION BOOK
pH BOSS INSTALLAT I O N
Page 9
PROGRAMMING YOUR pH BOSS
!
Press the PROGRAM / SET button to move through each of the five user settings.
!
If no key has been pressed for 30 seconds, the unit will return to the normal readout display. Any changes
will not be saved.
!
Use the Up and Down keys to change settings.
!
When changing a setting, press PROGRAM / SET after the desired setting is programmed to save the
changes and return to the normal readout display.
!
To quit any screen without saving changes, press AUTO / OFF to cancel.
AUTO / OFF KEY
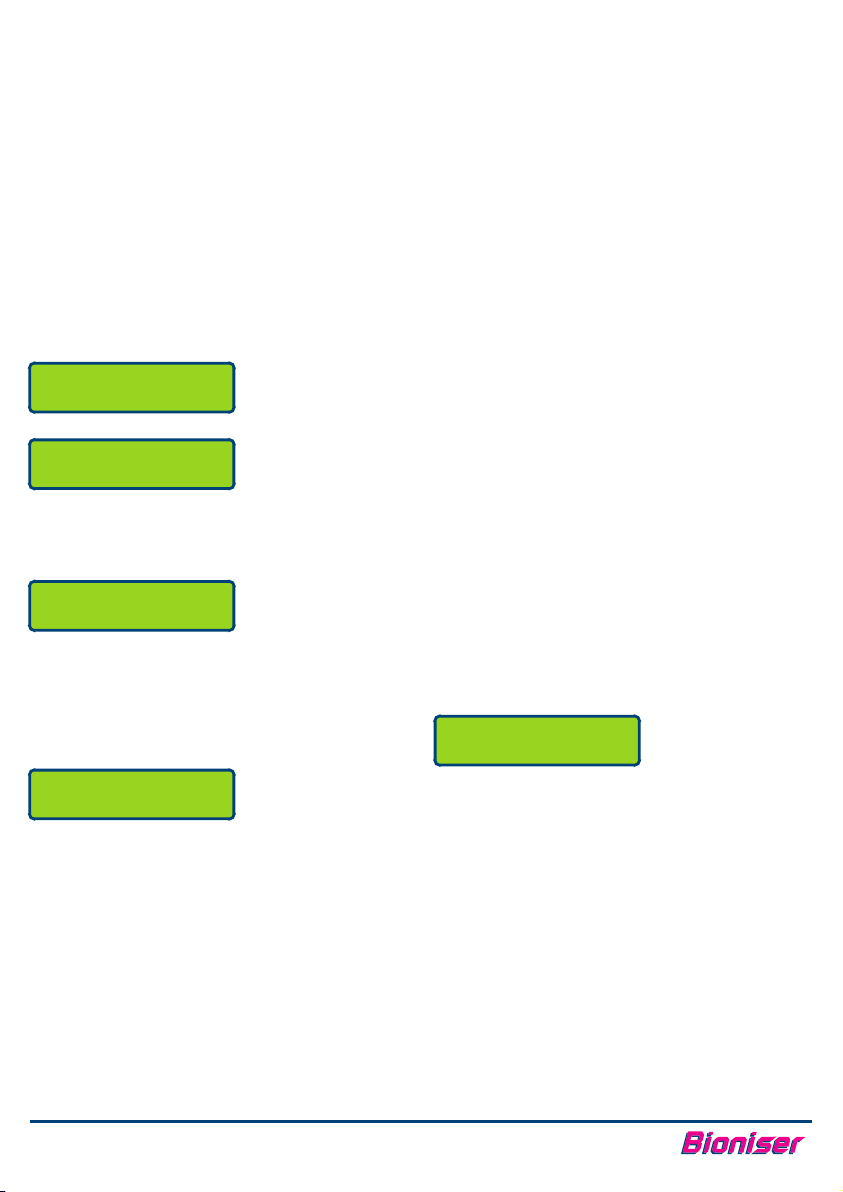
Press to alternatively select Auto, Off and 24 Hrs Off :
Aci d Pum p i s now
in A U TO mo de
Aci d Pum p i s now
OFF f or 24 H ours
Aci d Pum p i s now
OFF
The AUTO / OFF key is also the “Cancel” key in
programming screens, to exit without saving
changes.
AUTO: Unit will dose
a c i d w hen p H is
outside the set point.
OFF 24 Hrs: Unit will
not dose any acid for
24 hrs (for example,
choose this function
when some buffer is
added to the pool).
OFF: Unit will not dose
any acid again until
this setting is changed.
DOSE SETTING
Dos e Set t ing : 1
!
Use the and ¯ buttons to enter setting 1 to 5.
!
Press PROGRAM / SET save the new setting.
Alternatively, press AUTO / OFF to cancel without
saving.
The dose setting is used to set the acid pump
addition and waiting times, and are related to how
quickly the pool turns over the water. This is related
to both pool size, and pump/pipe setup.
This setting will move
between 1 and 5.
In general, a smaller pool would use a lower Dose
Setting than a large pool. However other factors can
affect this, such as pool turnover time.
As a guide, use the following setting as a STARTING
point when the unit is first installed :
1....Up to 75,000 L
2....75,000 to 150,000 L
3....150,000 to 250,000 L
4....250,000 to 500,000 L
5....>500,000 L
If the pH BOSS does not keep up with acid demand,
and the Alarm sounds, increase the dose setting by
one step and check in 2 days.
If the alarm is tripped due to low pH, reduce the dose
setting by one step and check in 2 days.
MANUAL DOSE
MAN UAL D O SE: 0 L
Use this function to add a measured dose of 1:4
diluted acid.
!
Use the and ¯ buttons to enter 1 to 5 Litres.
!
Press PROGRAM / SET to start pumping.
Please note that the litres are the total litres of liquid
being pumped, and does not take into account the
dilution ratio of the acid. Take care when using this
function, that you do not overdose the pool with
acid.
Remember that 1 Litre equals 200 mL of acid when
the acid is diluted 1 part acid to 4 parts water.
This will change from 0
to 5 Litres.
PROGRAMMING YOUR pH B OSS
9
TM
Page 10

CHANGING THE pH SET POINT
Use PROGRAM / SET to select Set Point.
Set P oin t
Set p H: 7. 3 ¯
!
Use the Use the and ¯ buttons to enter a new Set
Point value.
!
Press PROGRAM / SET to save.
Alternatively, press AUTO / OFF to quit without
saving changes.
Please note that the pH BOSS factory preset default
Set Point is pH7.3. This is most likely to be the best
setting for your pool, so changing the Set Point is only
recommended for experienced users.
ALARM FUNCTION
When the Alarm is set to ON, the pH BOSS will sound
the beeper and disable the acid pump when the pH is
above or below the set point for more than 4 hours.
When the Alarm is set to OFF, the alarm will never be
triggered, regardless of the pH reading. Only
advanced users should set the alarm to OFF, and only
temporarily while the cause of the alarm beeping is
being rectified.
Use PROGRAM / SET to select Alarm.
Ala rm
On ¯
!
Use the Use the and ¯ buttons to select On or
Off.
!
Press PROGRAM / SET to save.
!
Press AUTO / OFF to quit without saving changes.
When the alarm has been triggered, the pH BOSS will
sound the beeper and also display the following
message :
Ala rm
Res et - Au t o/O ff
THE ACID PUMP WILL BE DISABLED AND THE pH
BOSS WILL NOT PUMP MORE DILUTED ACID UNTIL
THE ALARM HAS BEEN RESET.
You must press AUTO / OFF to reset the alarm and
return to normal operation.
The reason for the alarm being triggered should be
found and rectified too. It could be due to any of the
following :
Problem
Fix
Problem
Fix
Problem
Fix
Problem
Fix
Problem
Fix
...Acid drum is empty.
.............Make up a new drum of diluted acid.
Dilution ratio should be at least 4 parts
water to 1 part acid.
...Dose Setting is too low or too high.
.............See page 9 for information on how to
change the Dose Setting.
...pH Reading is incorrect
.............Re-calibrate the pH Probe. See page 11.
...pH Probe is broken or faulty.
.............If re-calibration is not possible, then
replace the pH Probe. See page 8.
A replacement pH Probe can be ordered
by telephone or online at
www.phboss.com or
www.bioniser.com.au
...Pump is not pumping acid correctly.
.............Check all tube and hose fittings for
leakage. Re-fit or replace as necessary.
Check squeeze tube inside pump for
leakage and replace if necessary. See
page 12.
A replacement Squeeze Tube can be
ordered by telephone or online at
www.phboss.com or
www.bioniser.com.au
10
INSTRUCTION BOOK
PROGRAMMING YOUR pH B OSS
Page 11
MAINTENANCE
Calibration Procedure
!
Wait for 10 seconds to allow displayed Pool pH
reading to stabilise.
!
Use the and ¯ buttons to enter pH value of the
pH buffer, or the recorded pool pH value.
!
Press PROGRAM / SET to calibrate. The pH BOSS
will return to the normal display readout (similar
to the example below).
Alternatively, press AUTO / OFF to quit without re-
calibrating.
!
!
If you just performed a calibration in pH Buffer, re-
Add one pH7 Buffer sachet to
fit the pH Probe into the Tee piece.
250mL of distilled or deionised
water. Mix thoroughly.
!
Switch the pool pump off.
!
Unscrew the pH Probe from the
Tee piece and clean it. See page
13.
!
Place the tip of the pH Probe into
the buffer, so that the it is
After c ompleting t he prior procedure, us e
PROGRAM / SET to select pH Calibration.
A LITTLE PREVENTATIVE MAINTENANCE WILL HELP YOU GET THE MOST FROM YOUR pH BOSS
pH PROBE CALIBRATION
Approximately every 6 months, the pH Probe should
be calibrated to ensure that the readout is correct.
Calibration is simply the process of placing the pH
Probe into a solution of known pH, and adjusting the
readout to that value.
Calibration frequency is dependent on how many
hours per day the pH Probe has water rushing past it.
The pH BOSS measures the operating hours each day,
and will display a calibration reminder message
when calibration is due.
Calibration can either be in a pH Buffer solution or an
inline calibration with the pH Probe still in the Tee
piece.
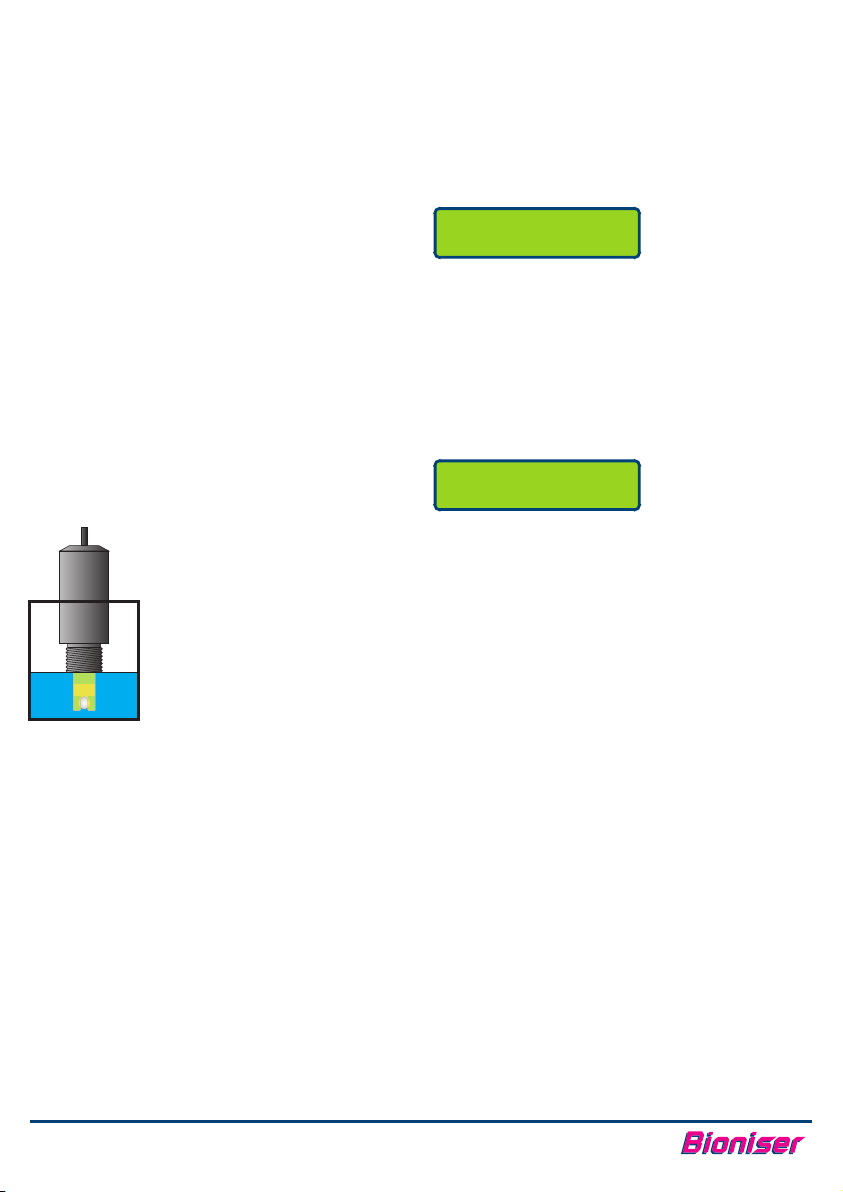
Preparing for pH Buffer Calibration
Inline Calibration
! Ensure that no chemicals such as acid, buffer,
chlorine, stabiliser etc have been added to the
pool for 24 hours before attempting inline
calibration.
Hint: Set the pH BOSS to “OFF 24 Hrs” mode (page
8) the day before calibrating.
! Measure the pH of the pool with a good quality,
calibrated pH meter. A standard pool pH test kit is
not accurate enough for calibration.
! Record the measured pH value.
MAINTENANCE
!
Add one pH7 Buffer sachet to
250mL of distilled or deionised
water. Mix thoroughly.
!
Switch the pool pump off.
!
Unscrew the pH Probe from the
Tee piece and clean it. See page
13.
!
Place the tip of the pH Probe into
the buffer, so that the it is
immersed at least to the thread.
Calibration Procedure
After c ompleting t he prior procedure, us e
PROGRAM / SET to select pH Calibration.
Cal ibr a te Bu ffer
Poo l pH: 7 . 3 ¯
!
Wait for 10 seconds to allow displayed Pool pH
reading to stabilise.
!
Use the and ¯ buttons to enter pH value of the
pH buffer, or the recorded pool pH value.
!
Press PROGRAM / SET to calibrate. The pH BOSS
will return to the normal display readout (similar
to the example below).
Alternatively, press AUTO / OFF to quit without recalibrating.
Poo l: 7. 3 p H OK
Set : 7.3 p H ¯
!
If you just performed a calibration in pH Buffer, refit the pH Probe into the Tee piece.
11
TM
Page 12
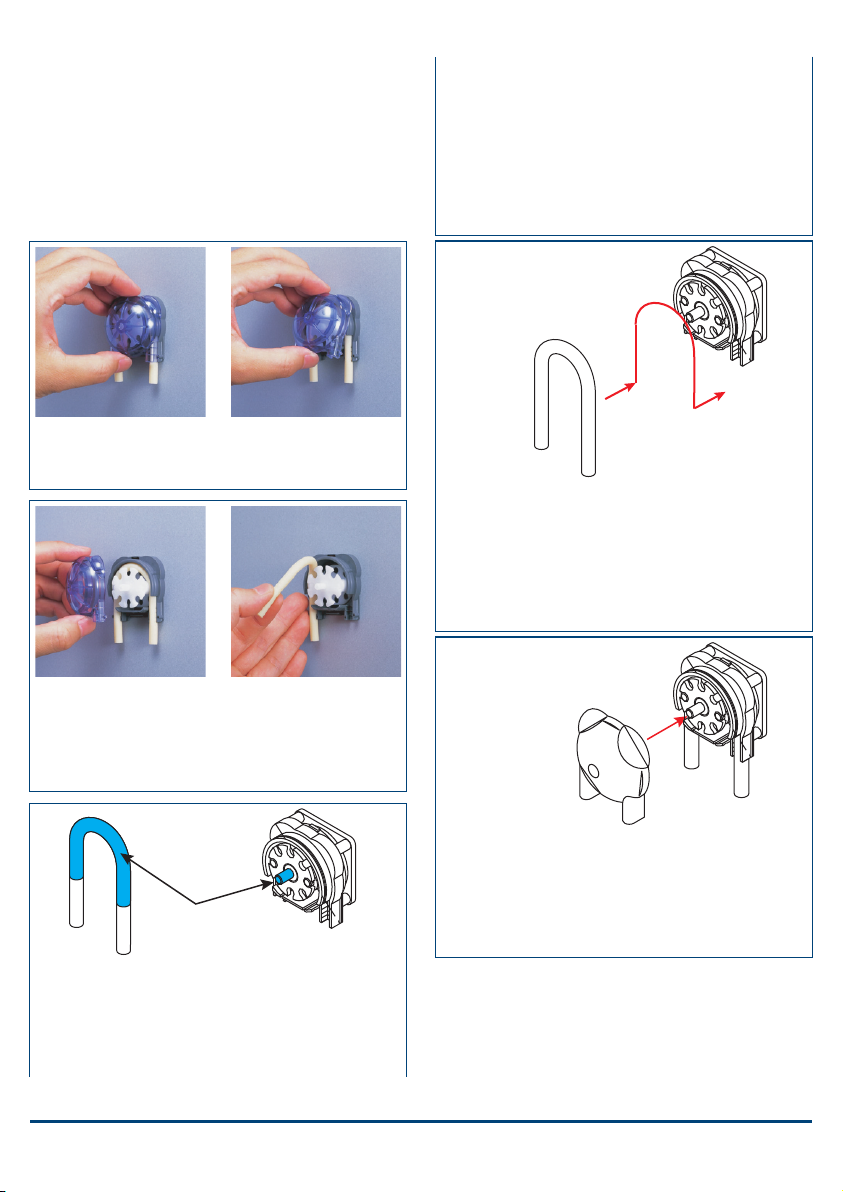
PUMP SQUEEZE TUBE LUBRICATION
The peristaltic pump squeeze tube should be
lubricated periodically as per the following
procedure. The pH BOSS will display a lubrication
reminder message when lubrication is due.
You do not need to remove the inlet and outlet hoses
to lubricate the pump squeeze tube.
Hol d t he to p a nd Lift up the pump cover
bottom of the pump from the bottom side.
cover.
DO NOT over-lubricate, as this will attract dirt and
grit, which will cause premature wear of the
squeeze tube and rollers.
WARNING : Use only silicon grease. Petroleum gel
and other oil-based lubricants may cause the
squeeze tube to break down, resulting in corrosive
diluted acid spillage.
Pull out the pump rotor a little, and place the
squeeze tube between the pump body and the two
rollers.
Push the squeeze tube and rotor into the pump
body. Ensure that the inlet and outlet are seated in
the guides on each side of the pump body.
Pu ll o ff t he pump Remove the Squeeze
cover. tube. The pump rotor
may come out too, but
can easily be pushed
back into place.
Apply Silicon
grease here.
Apply a THIN SMEAR of Silicon grease to the
squeeze tube and pump rotor shaft as shown
above.
12
INSTRUCTION BOOK
Re-fit the pump cover until it clips into place. There
should be no gaps anywhere between the pump
body and cover.
Ensure that the squeeze tube is not pinched on
either side, after the cover is replaced.
PUMP SQUEEZE TUBE REPLACEMENT
If the peristaltic pump squeeze tube breaks or loses
its flexibility for pumping, it needs to be replaced.
Remove the old tube and fit a new tube as per the
lubrication procedure on this page. A replacement
Squeeze Tube can be ordered by telephone or online
at www.phboss.com or www.bioniser.com.au.
MAINTENANCE
Page 13

TROUBLESHOOTING
CHECK THIS SECTION BEFORE CALLING OR SENDING YOUR pH BOSS FOR SERVICE.
Symptom Possible Causes and Remedies
Inaccurate pH readings
pH reading cannot be
calibrated
pH reads around pH7
without changing
pH reads around pH4 to 5
without changing
Unit does not power up
Unit is not adding acid
when dosing pump is
operating
Alarm sounds due to pH
being too low
pH Probe is dirty.
!
Disconnect probe BNC connector from the pH BOSS, then unscrew probe
from the pipe.
!
CAREFULLY unscrew the bulb protector. Take care as the bulb is made of thin
glass.
!
Wipe the bulb with a soft tissue soaked with methylated spirits.
!
Soak the tip of the probe in diluted Hydrochloric acid (for example, from your
pH BOSS diluted acid drum).
!
Rinse the pH Probe thoroughly in clean water.
!
Screw probe back into pipe and re-connect probe BNC connector.
pH Probe needs to be re-calibrated.
!
Clean pH Probe as per procedure above.
!
Re-calibrate pH Probe as per details on page 10.
pH Probe is dirty.
!
Follow the pH Probe cleaning procedure above.
pH Probe is faulty.
!
Replace pH Probe. Please contact your distributor or Bioniser.
Short circuit in pH Probe BNC Plug or Socket
!
Disconnect pH Probe plug from socket. Dry out with a hair dryer or allow to air
dry. Reconnect and re-check.
!
If problem persists, return pH probe to have connector replaced, or replace
the pH probe. Please contact your distributor or Bioniser.
Glass bulb or internal stem of pH Probe is cracked.
!
Replace pH Probe. Please contact your distributor or Bioniser.
Faulty AC/DC power adaptor
!
Replace power adaptor. Please contact your distributor or Bioniser.
!
Faulty pH BOSS main unit. Return to Bioniser for repair.
!
Check that the pH BOSS diluted acid drum is not empty.
!
Check that all suction and output hoses are fitted correctly, with no leakage.
!
Check that squeeze tube inside pump is not leaking.
WARNING : IF ANY DILUTED ACID HAS LEAKED OUT OF HOSES, WASH DOWN
THE AREA WITH FRESH WATER IMMEDIATELY. TAKE THE LID OFF THE PUMP,
REMOVE SQUEEZE TUBE AND WASH OUT WITH FRESH WATER IF SQUEEZE
TUBE WAS LEAKING.
Dose Setting is set too high
!
Reduce the Dose Setting by one level and check in 2 days.
IF YOU NEED TO RETURN YOUR pH BOSS FOR SERVICE OR REPAIRS AT ANY TIME, PLEASE USE THE MANUAL
DOSE FUNCTION (PAGE 10) TO DOSE 1 LITRE OF FRESH WATER THROUGH THE SYSTEM BEFORE SENDING
BACK. THIS WILL STOP DILUTED ACID LEAKING FROM THE PUMP DURING TRANSPORT (WHICH WOULD
DAMAGE YOUR UNIT OR THE PACKAGING, POSSIBLY VOIDING WARRANTY), AND IS ALSO A SAFETY HAZARD
FOR OUR TECHNICIANS.
13
TROUBLESHOOTING
TM
Page 14

BIONISER CONTACT INFORMATION
BIONISER SALES & SERVICE
63 Mary St.
Noosaville
QLD 4566
Australia
Phone ..............1800 10 62 74
International....+61 7 5473 0900
Fax ...................+61 7 5473 0009
Postal Address:
PO Box 1117
Noosaville BC
QLD 4566
Australia.
Web ........www.bioniser.com
www.phboss.com
14
INSTRUCTION BOOK
Vers ion 1.2, 11-Jul- 2011
CONTA C T I N F O R MATION
 Loading...