

Page 1
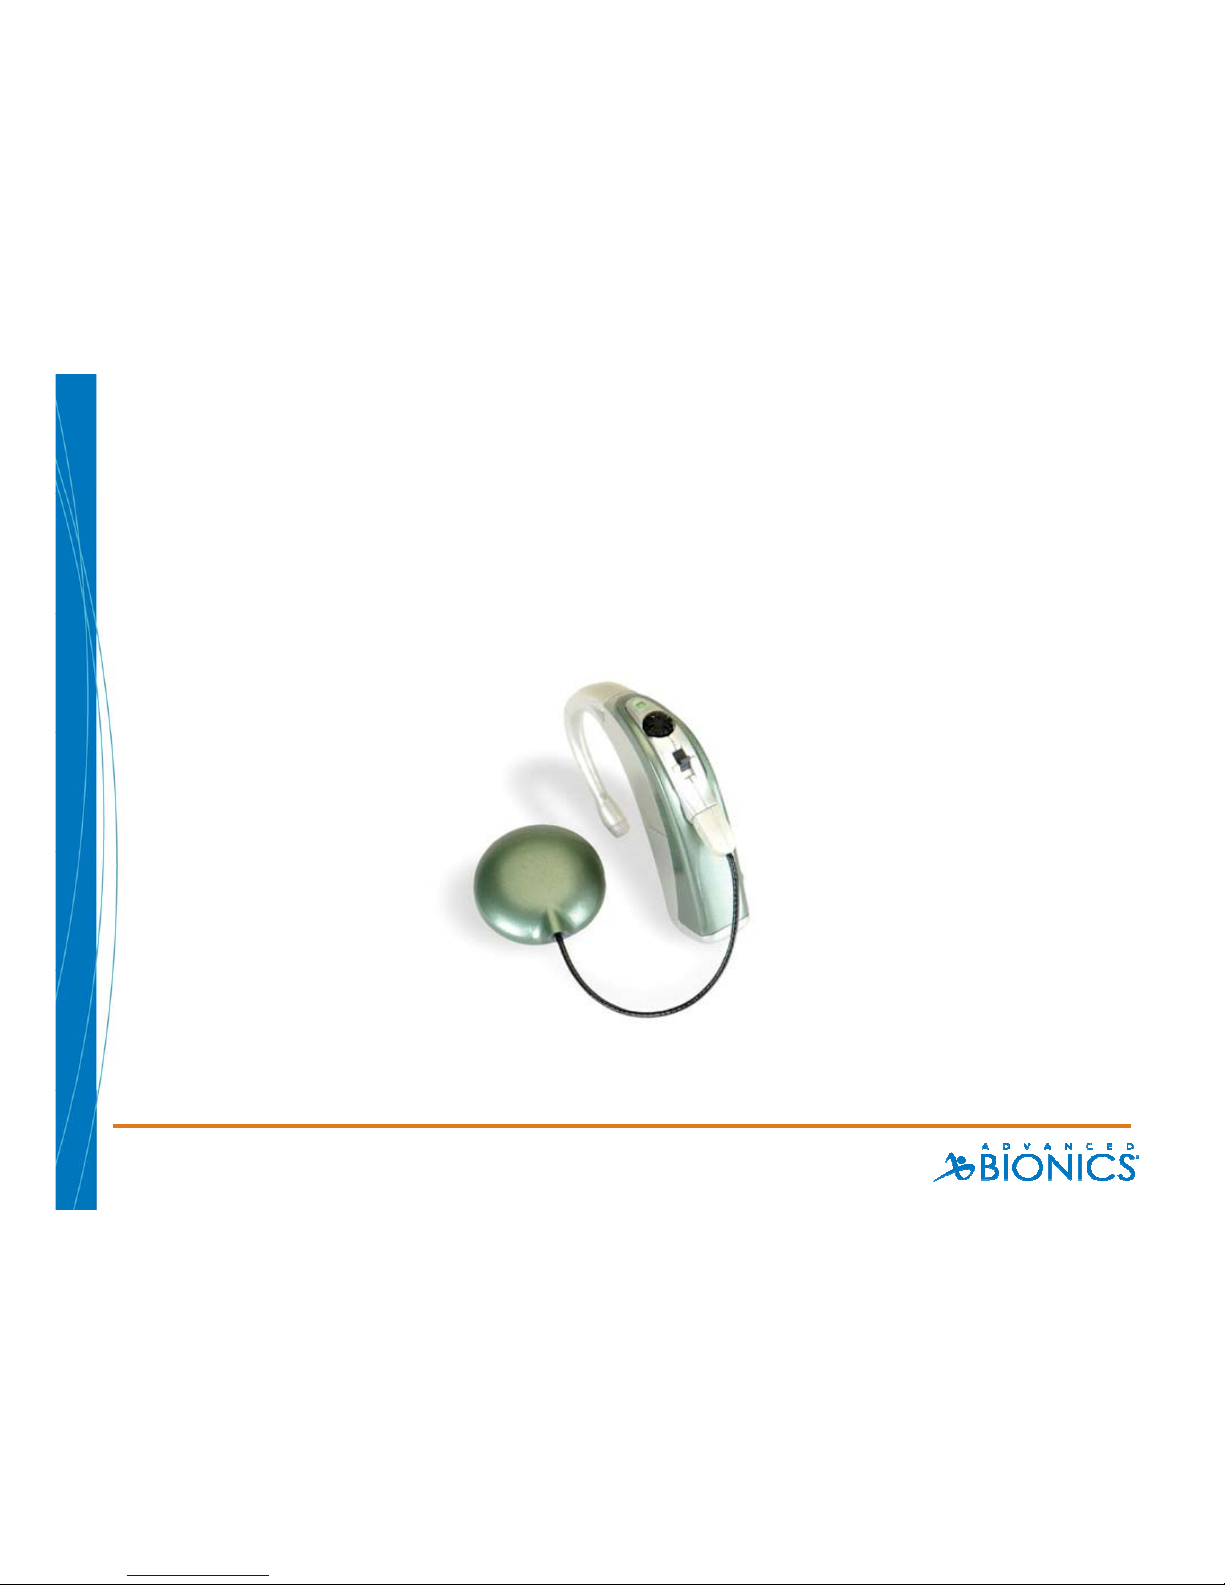
Welcome to the Harmony™ Interactive
Troubleshooting Guide
Press the button to begin
Page 2

Harmony™ Interactive Troubleshooting Guide
These guides have been created to systematically lead you
through active troubleshooting with the Harmony
™
Sound
Processor.
To use these guides simply review the choices and make
your selection by clicking on the accompanying box.
The menu bar at the bottom of each page will provide you
with a way to return to your last selection should you get
lost or return you to the main menu.
As a reminder, you can also call Advanced Bionics On-Call
Support at 877-829-0026, Monday – Friday, 5 AM – 5
PM Pacific Time
Press the Start button to begin
Page 3
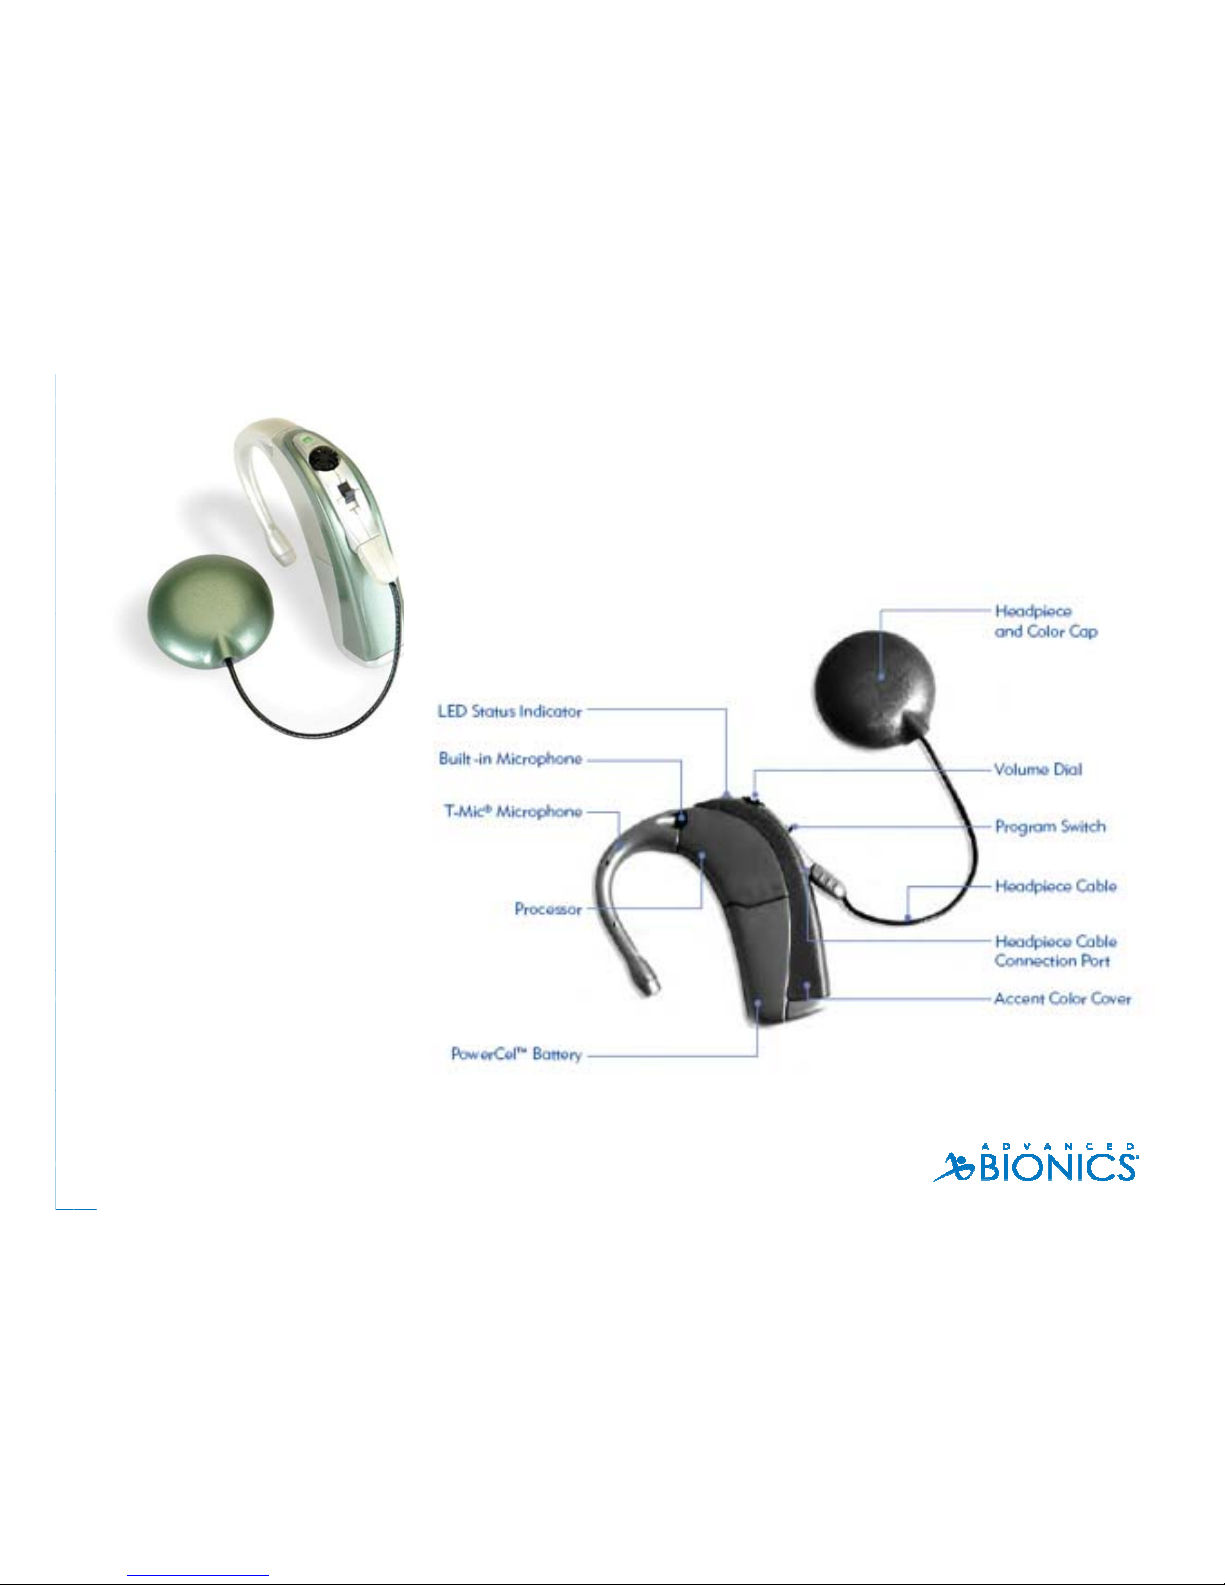
Harmony™ Sound Processor
We encourage you to review the processor components before proceeding.
Next
Page 4
Choose from the item below that best
Choose from the item below that best
describes your situation:
describes your situation:
I want to learn how to perform a task
I need help with troubleshooting a problem
Back
Page 5
How do I………
• Check the device each day?
• Connect to an FM system?
Back
Main Menu
Page 6

How to Verify the Child’s Device is Working
1. Is the PowerCel in place and fully charged?
• Sliding the PowerCel on the Processor module will turn the device on
• You should see 3-4 quick Orange blinks verifying the PowerCel is fully
charged
2. Is the Headpiece cable plugged into the processor module?
• Check to see the cable is not twisted or frayed
3. Is the Earhook properly positioned?
• To Attach: Align the Earhook flush with the Harmony and push to snap
in place. Gently pull back to confirm that the Earhook is secure.
• To Remove: Turn the Earhook slightly more than ¼ turn in either
direction until it comes off.
Back
Next
Main Menu
Page 7

How to Verify the Child’s Device is Working
4. Is the Program Selector in the desired position?
• The Harmony can store up to 3 programs (P1, P2, P3). The Program
Switch has three positions to represent each program. P1 is at the
bottom, P2 is in the middle and P3 is at the top.
5. Is the Volume Control in the 12 o’ Clock position?
6. Is the Processor in a comfortable position behind the ear?
• An Earmold, Huggie or Toupee Tape can be used to help secure the
processor on the child’s ear.
Back
Next
Main Menu
Page 8

How to Verify the Child’s Device is Working
7. Is the Headpiece positioned over the Implant (internal device)?
• You should feel the magnetic attraction
• You should also see the LED flash GREEN in response to loud sounds
8. Perform a Behavioral Listening Check
• Use the Ling Six Sound Check to verify that the child is able to detect all
aspects of speech.
• I am unsure how to perform this task, tell me more…
Back
Next
Main Menu
Page 9
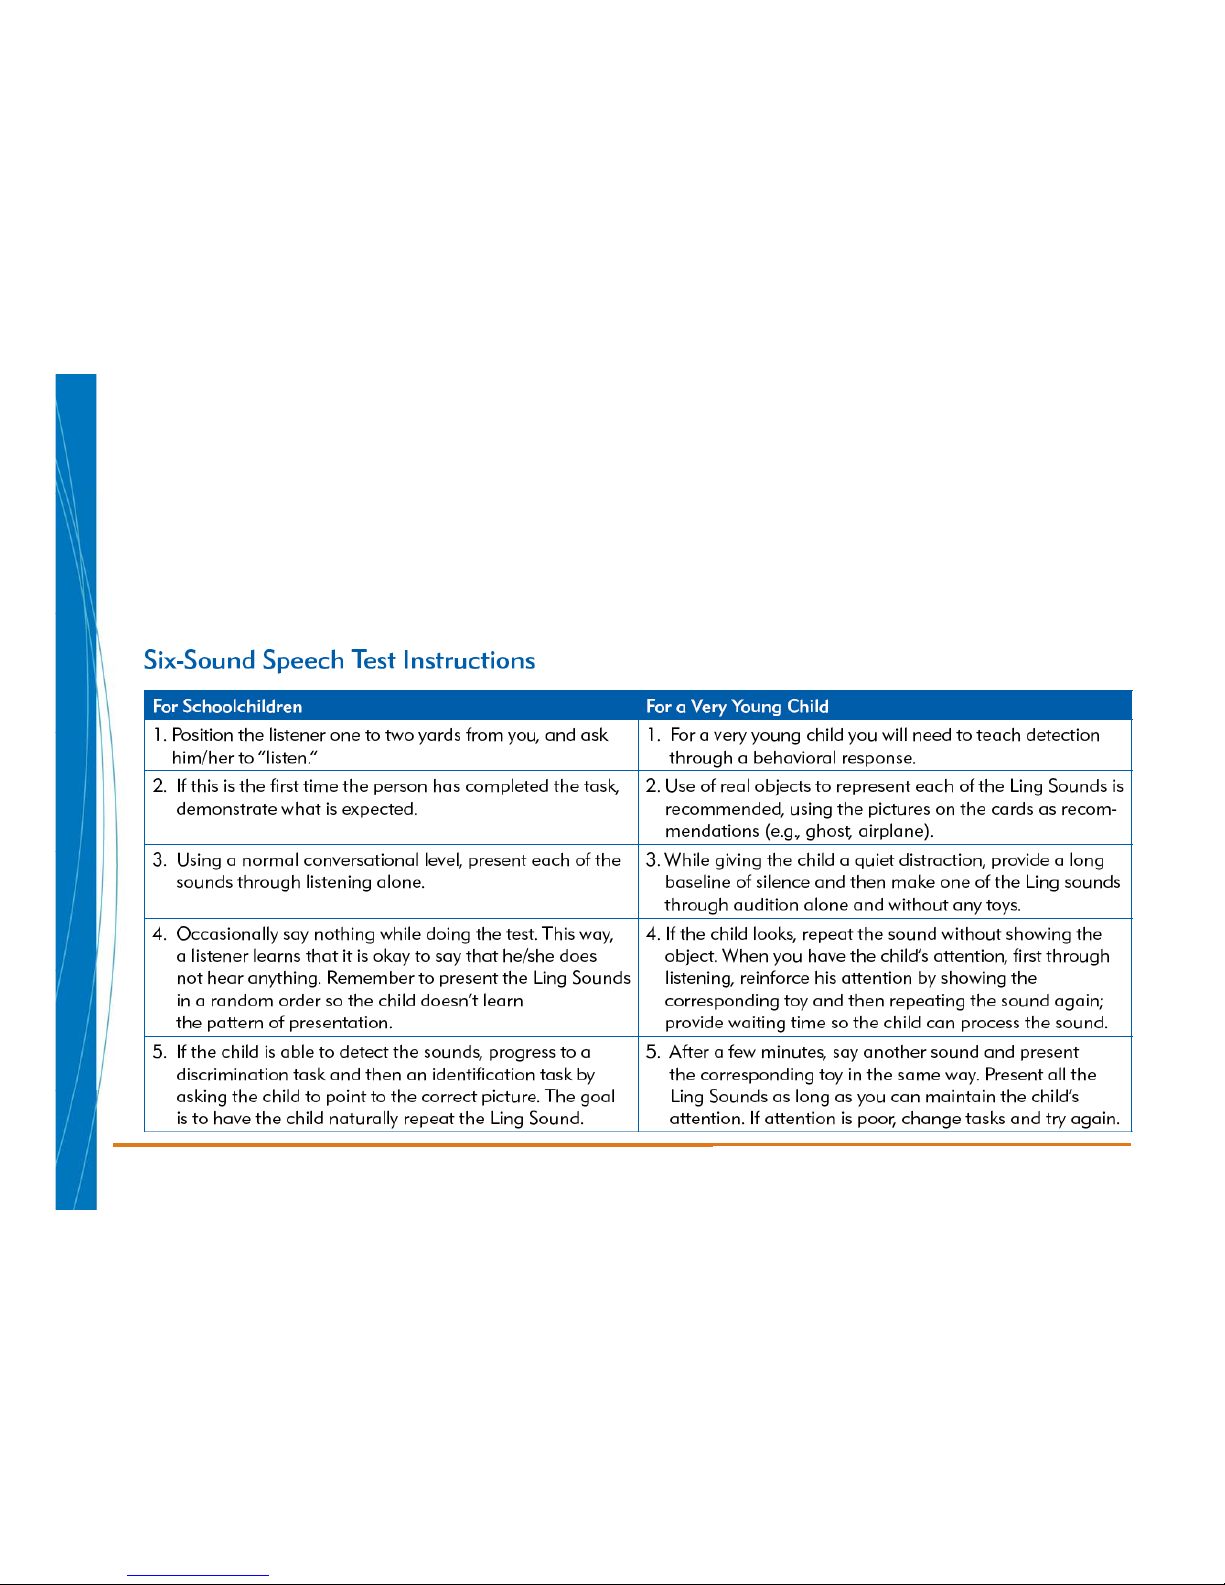
Performing a Behavioral Listening Check
• Using the Ling Six Sounds (ah, ee, oo, sh, s and mm) you can
determine a cochlear implant’s effectiveness by verifying that the
child is able to detect all aspects of speech as the six sounds
encompass the frequency range of all phonemes.
Back
Main Menu
Page 10
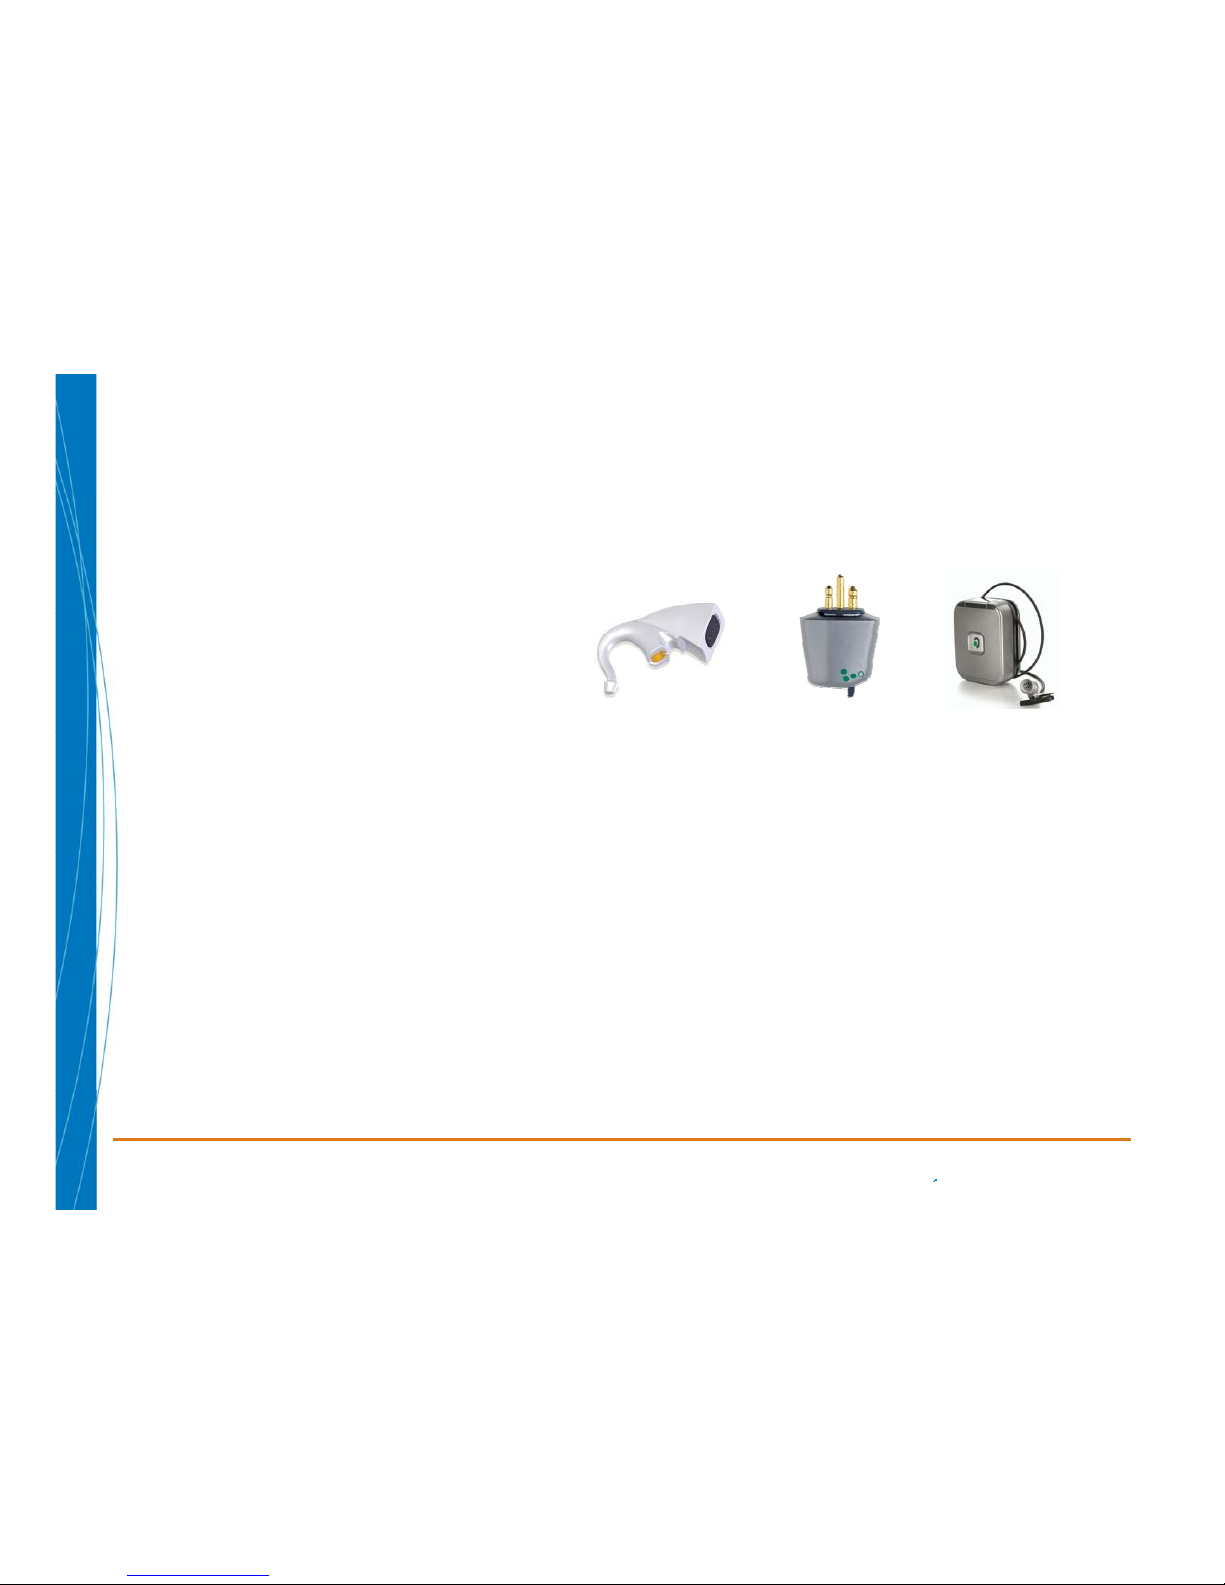
Connecting to an FM System
1. Ensure that you have the appropriate equipment.
• iConnect Earhook
• MLxS
• Transmitter
2. Ensure that the FM system is functioning appropriately
by listening to the FM system through an amplified
speaker or walkman-style earphones.
3. Make sure all components are turned off
4. Attach the iConnect Adapter Earhook and MLxS
module to the Harmony
Back
Next
Main Menu
Page 11

Connecting to an FM System
5. Insert a size 10 zinc air battery into the iConnect
6. Turn down the volume on the Harmony Processor
7. Turn on the FM transmitter, MLxS, and slide the
PowerCel onto the Harmony
8. Make sure the following settings are in place:
• 1 dot setting on the MLxS
• 50/50 mixing ratio on the Harmony Program
• Transmitter microphone in omni-directional mode
Back
Next
Main Menu
Page 12
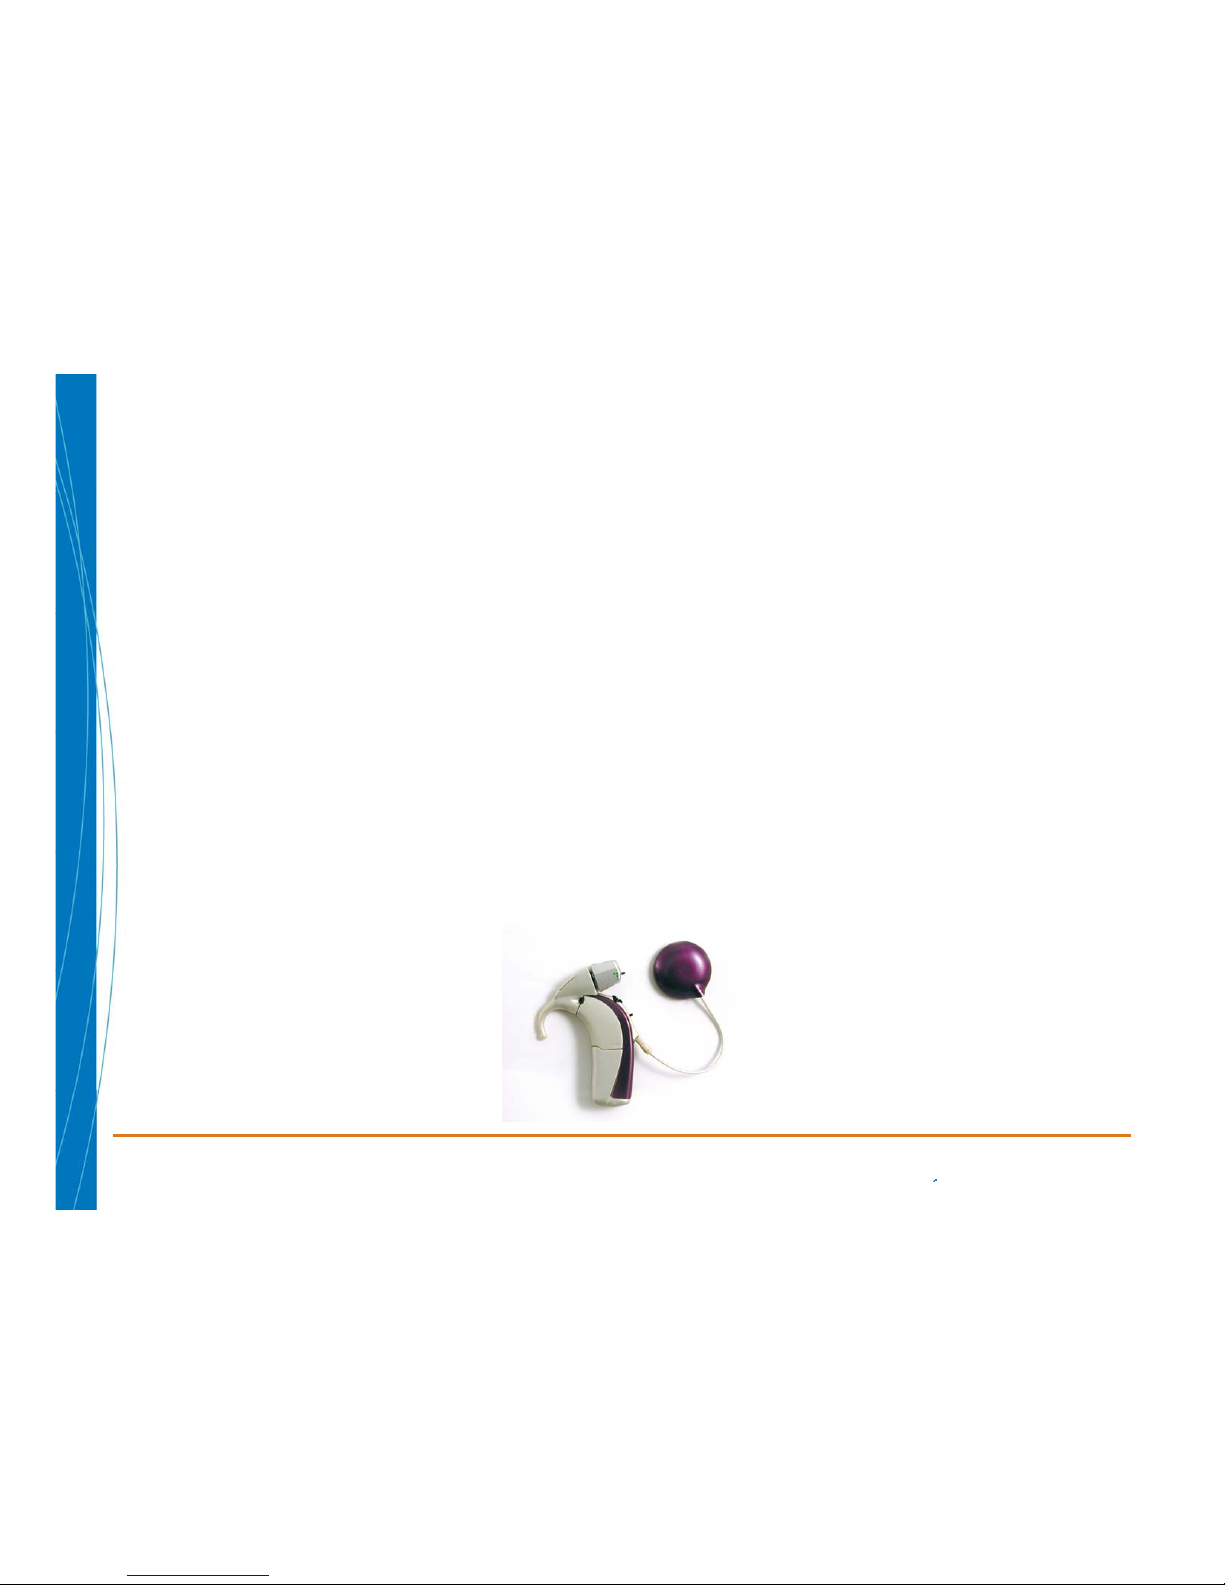
Connecting to an FM System
9. Gradually turn up the volume on the Harmony
Processor
10.Assess performance:
• In quiet using an auditory only task
• Verify FM benefit by determining performance in noise –
CI+FM
• Perform daily functional checks and monitor
performance
Back
Next
Main Menu
Page 13

I need help troubleshooting the following:
• Child is NOT responding to Sound
• The Light (LED) on the Processor is Flashing
• Sound appears to be Intermittent
• Headpiece will not stay on
• Child’s voice sounds muffled or different
Back
Main Menu
Page 14

Child is NOT responding to sound—
*Note you have verified no response with a behavioral listening check.
1. Verify the Sound Processor is ON
• Remember that sliding on the PowerCel turns the
processor on
2. Check your connections including PowerCel, Earhook
and Headpiece-Cable
• Make sure they are secure
3. Verify that the Volume Dial is in the 12 o’ clock position
Back
Next
Main Menu
Page 15

Child is NOT responding to sound—
*Note you have verified no response with a behavioral listening check.
4. Is the Headpiece positioned over the implant site?
• Busy children can knock it off and may not be able to put
it back in place.
5. Is your PowerCel charged and inserted properly?
• The LED will flash 3-4 quick Orange flashes letting you
know it is fully charged.
6. Are you using the appropriate program?
• You may need to check with the parent or audiologist for
this information.
Back
Next
Main Menu
Page 16

Child is NOT responding to sound—
*Note you have verified no response with a behavioral listening check.
7. Check the Microphone/System Status using the LED
• I would like to learn more about LED functionality
8. Replace the Headpiece/Cable
• You should keep spare equipment on hand
• To order equipment contact us now
9. Clean the contact on both your PowerCel and
Harmony Processor
• Learn how
Back
Next
Main Menu
Page 17
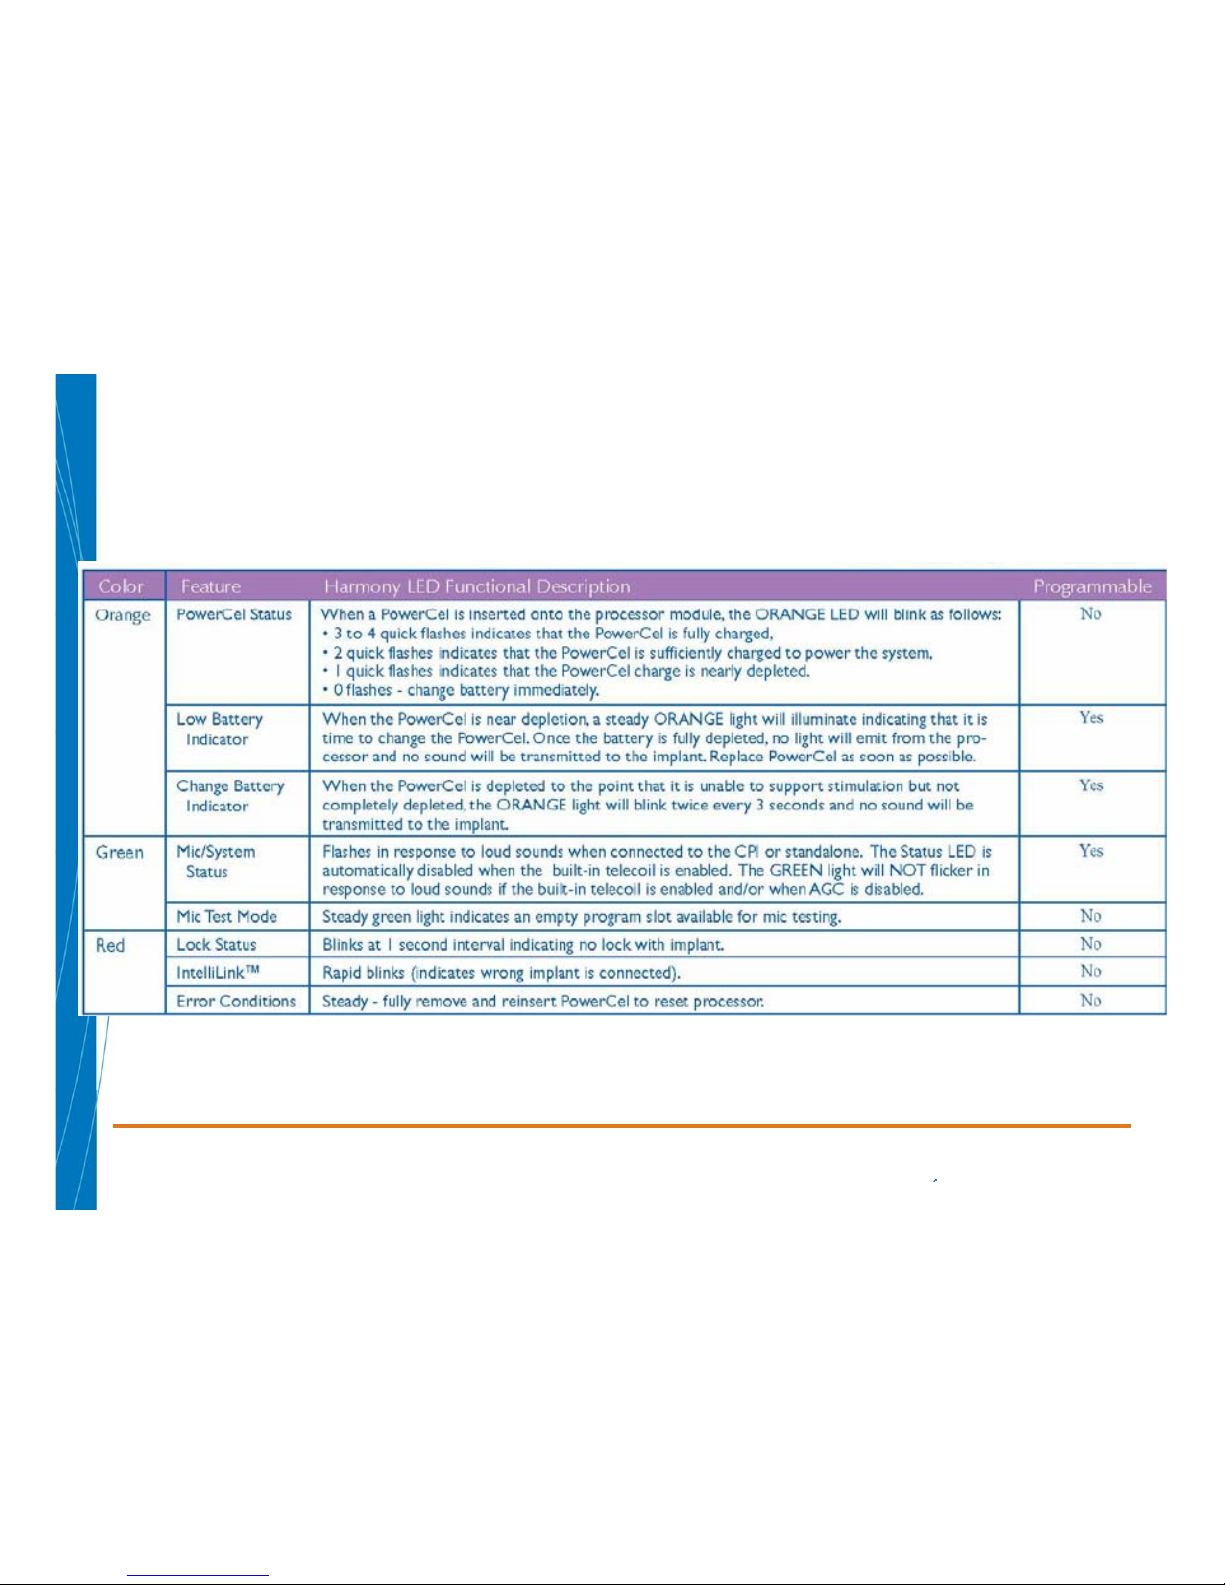
Harmony LED Functionality Chart
Main Menu
Back
Next
Page 18

Child is NOT responding to sound—
*Note you have verified no response with a behavioral listening check.
10.Remove any materials that may be covering the
microphone (i.e. Scarf, Hat, Headband)
11.Perform a test of the built in microphone using an
empty program slot
• Learn how
12.Try another audio input source
• Such as an Auxiliary Microphone or your Direct Connect
Earhook interfaced with an audio device (i.e., CD/MP3
player).
• Learn how
Back
Next
Main Menu
Page 19

Child is NOT responding to sound—
*Note you have verified no response with a behavioral listening check.
13.Check for visible damage on the processor
14.Contact the audiologist for further troubleshooting
• Contact us now!
Back
Main Menu
Page 20

The Light (LED) on the Processor is Flashing….
1. What is the color of the flashing light?
• Orange (Battery)
• Green (Microphone)
• Red (Communication Error)
Back
Main Menu
Page 21

Orange LED can mean the following:
1. PowerCel Status
• 3 to 4 quick flashes indicates the PowerCel is fully charged.
• 2 quick flashes indicates the PowerCel is sufficiently charged to
power the system.
• 1 quick flash indicates the PowerCel is nearly depleted
• 0 change the PowerCel immediately
2. Low Battery Indicator
• Steady Orange Light will emit when the PowerCel is near
depletion
3. Change Battery Indicator
• When the PowerCel is depleted to the point that it is unable to
support stimulation but not completely depleted, the orange light
will blink twice every 3 seconds and no sound will be transmitted
Back
Next
Main Menu
Page 22

Green LED can mean the following…
1. Microphone System Status
• A green light will flash in response to loud sounds
2. Microphone Test Mode
• A steady green light indicates an empty program slot is
available for microphone testing
Back
Next
Main Menu
Page 23

Red LED can mean the following…
1. Lock Status
• Blinks at 1 second intervals indicating no lock with the
implant
2. Intellink™
• Rapid blinks indicating wrong implant is connected
3. Error Conditions
• Steady light indicates a processor error
• Remove the PowerCel and re-insert it to reset the
processor
Back
Next
Main Menu
Page 24

Sound is intermittent:
1. Verify the Sound Processor is ON
• Remember that sliding on the PowerCel turns the
processor on
2. Check your connections including PowerCel, Earhook
and Headpiece-Cable
• Make sure they are secure
3. Verify that the Volume Dial is in the 12 o’ clock position
Back
Next
Main Menu
Page 25

4. Is the Headpiece positioned over the implant site?
• Busy children can knock it off and may not be able to put
it back in place.
5. Is your PowerCel charged and inserted properly?
• The LED will flash 3-4 quick Orange flashes letting you
know it is fully charged.
6. Are you using the appropriate program?
• You may need to check with the parent or audiologist for
this information.
Back
Next
Sound is intermittent—
Main Menu
Page 26

7. Check the Microphone/System Status using the LED
• I would like to learn more about LED functionality
8. Replace the Headpiece/Cable
• You should keep spare equipment on hand
• To order equipment contact us now
9. Clean the contact on both your PowerCel and
Harmony Processor
• Learn how
Back
Next
Sound is intermittent—
Main Menu
Page 27
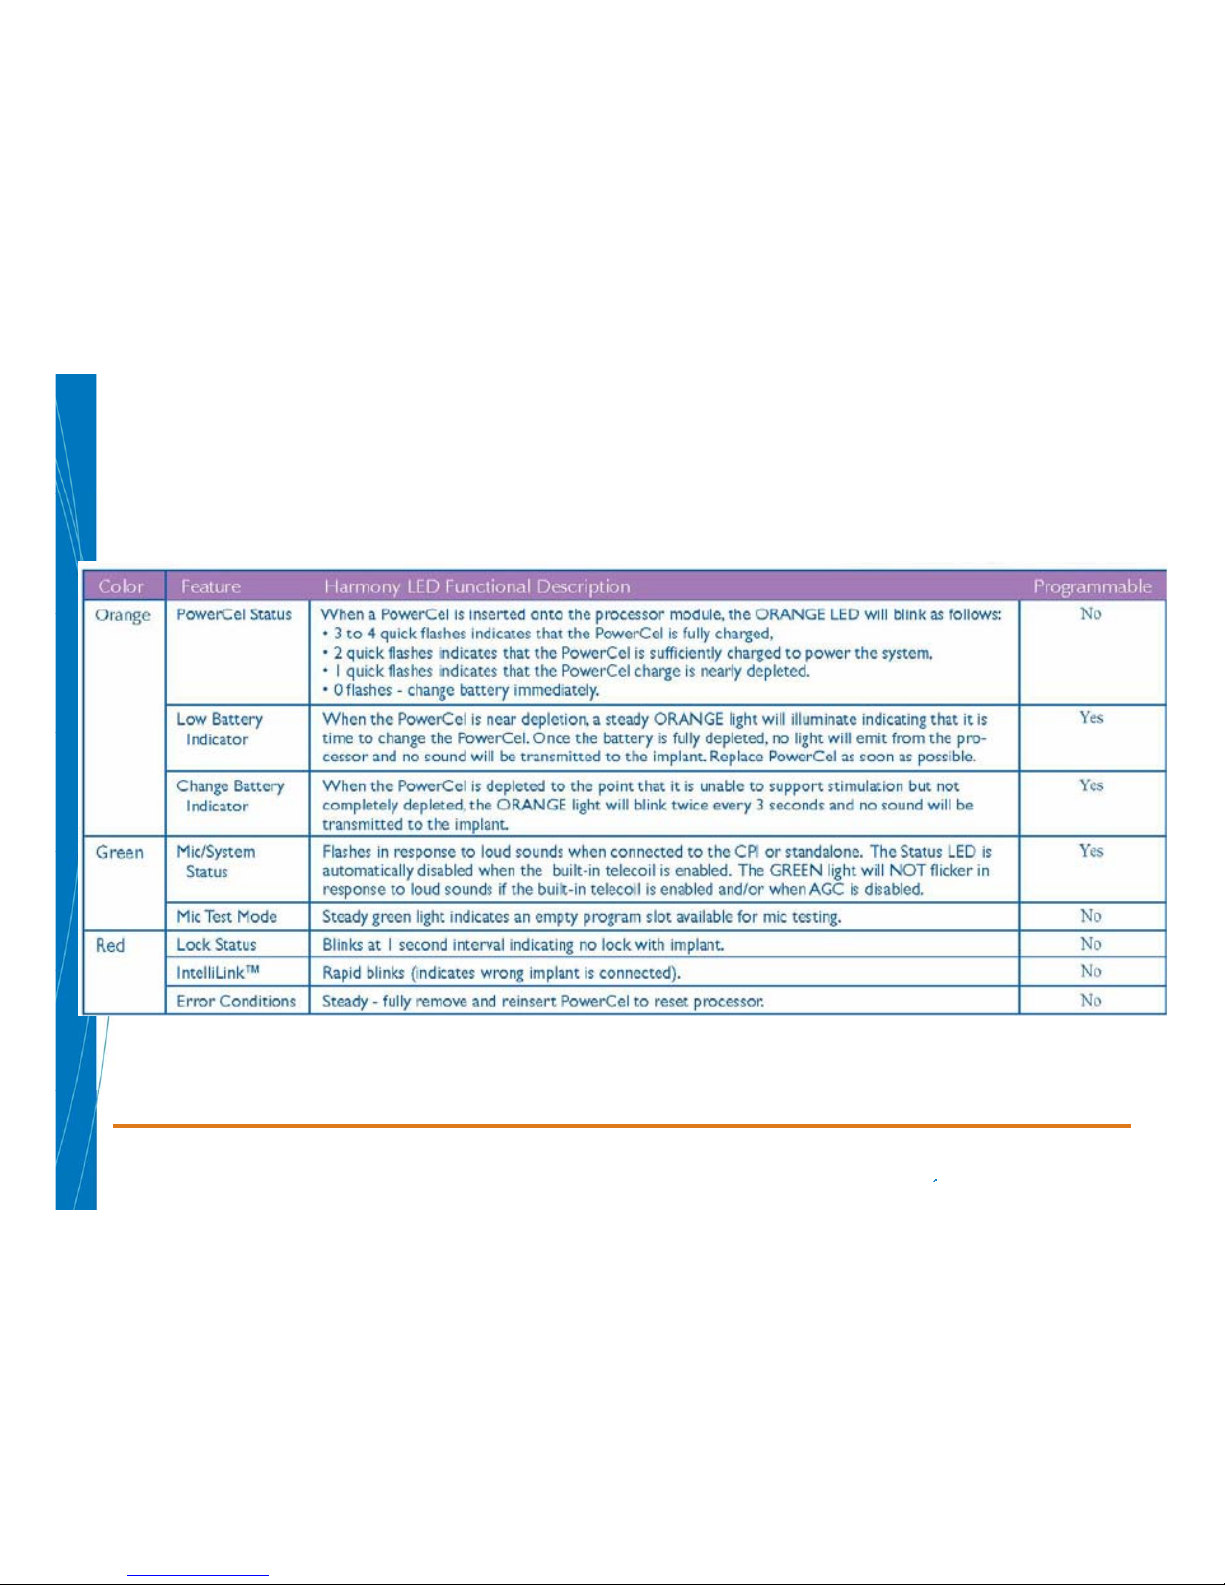
Harmony LED Functionality Chart
Main Menu
Back
Next
Page 28

10.Remove any materials that may be covering the
microphone (i.e. Scarf, Hat, Headband)
11.Perform a test of the built in microphone using an
empty program slot
• Learn how
12.Try another audio input source
• Such as an Auxiliary Microphone or your Direct Connect
Earhook interfaced with an audio device (i.e., CD/MP3
player).
• Learn how
Back
Next
Sound is intermittent—
Main Menu
Page 29

13.Check for visible damage on the processor
14.Contact the audiologist for further troubleshooting
Back
Sound is intermittent—
Main Menu
Page 30

Headpiece will not stay on…..
1. CAUTION: adding too many magnets to the headpiece
may cause physical discomfort and can potentially damage
the skin around the implant site
2. How long has it been since surgery? Swelling is common
for 1-2 months following surgery.
3. If significant time had elapsed, you may try the following:
• Use of an earmold, huggie or toupee tape will help keep
the headpiece on as it will assist with the weight of the
processor so it does not pull the headpiece off.
• Other suggestions:
• Temporarily shave hair around the implant site
• Apply pressure to the headpiece with a headband,
baseball cap, etc.
• Refer to audiologist for further troubleshooting
Back
Next
Main Menu
Page 31

Child’s voice sounds muffled or distorted
1. Is the processor turned on?
2. Are the connections secure?
3. Is the Volume Control in the 12 o’ Clock position?
4. Verify the LED status
• Learn how
5. Perform a behavioral listening check
• Learn how
6. Perform test of the built-in Microphone
• Learn how
7. Refer back to “Sound is Intermittent” section for
additional steps
• Go now
Back
Next
Main Menu
Page 32
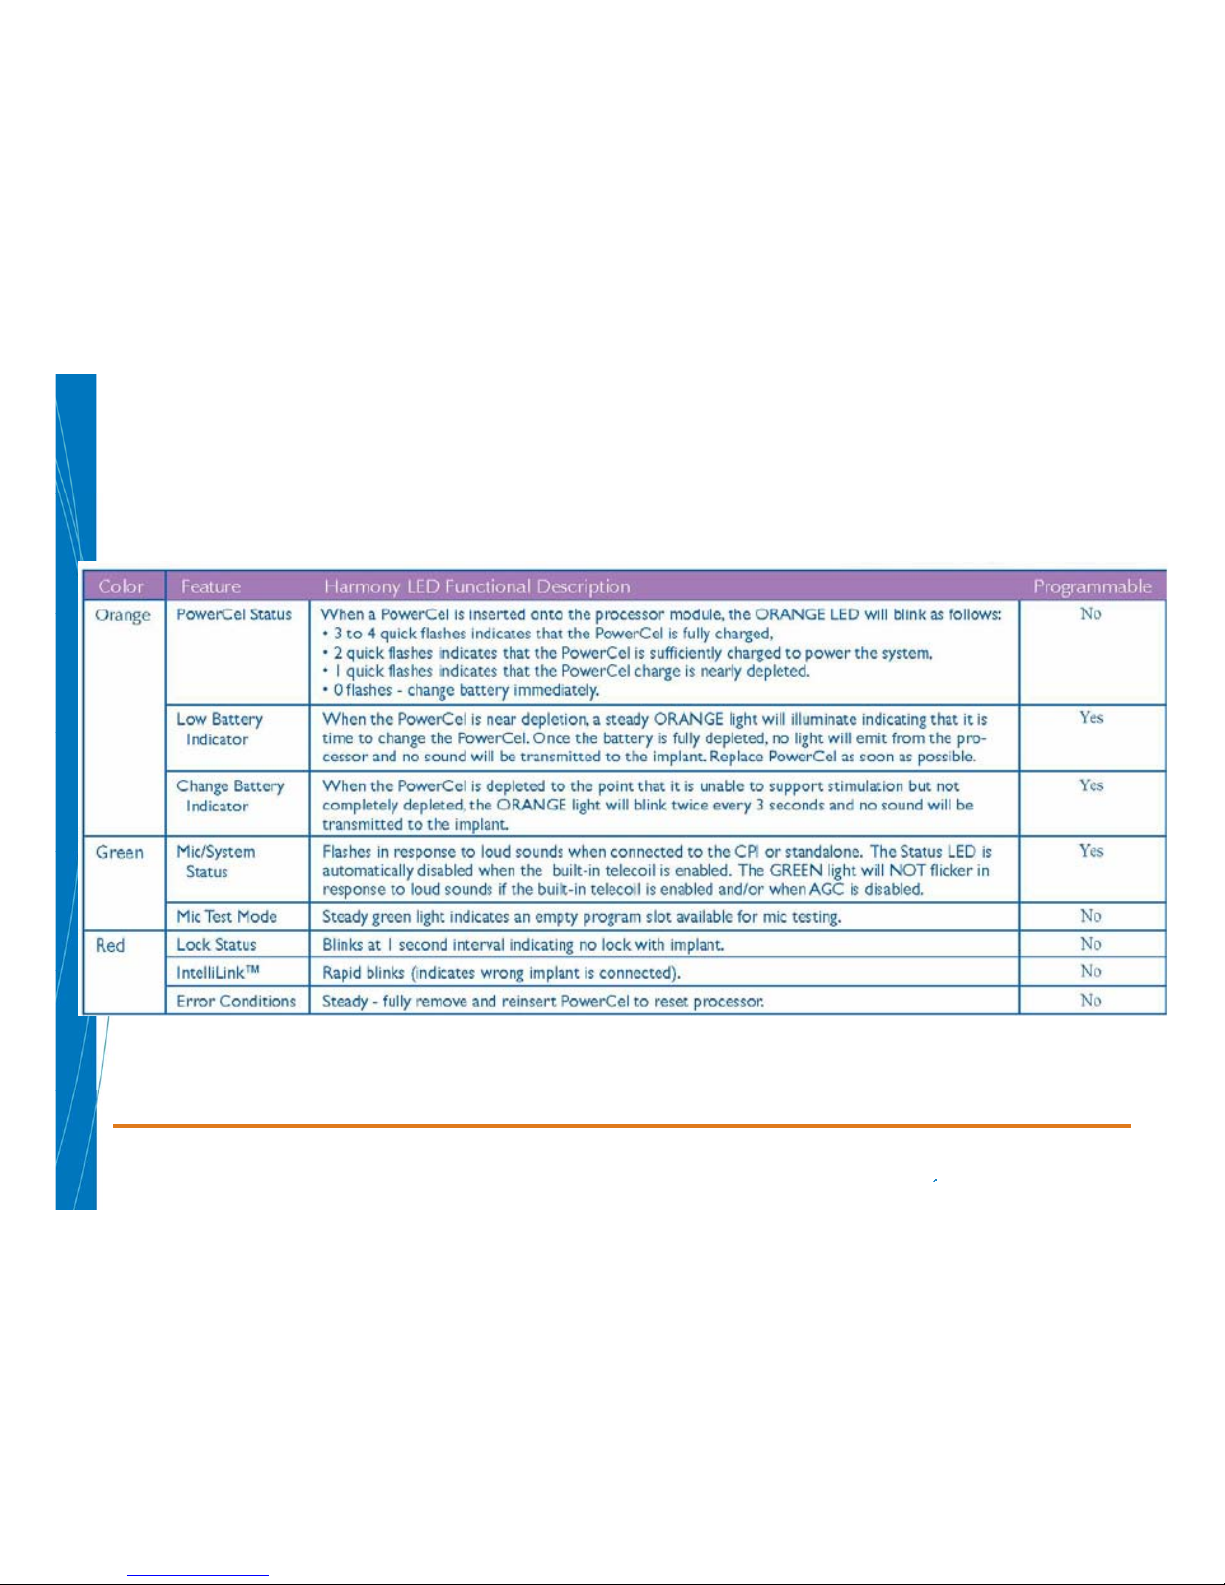
Harmony LED Functionality Chart
Main Menu
Back
Next
Page 33
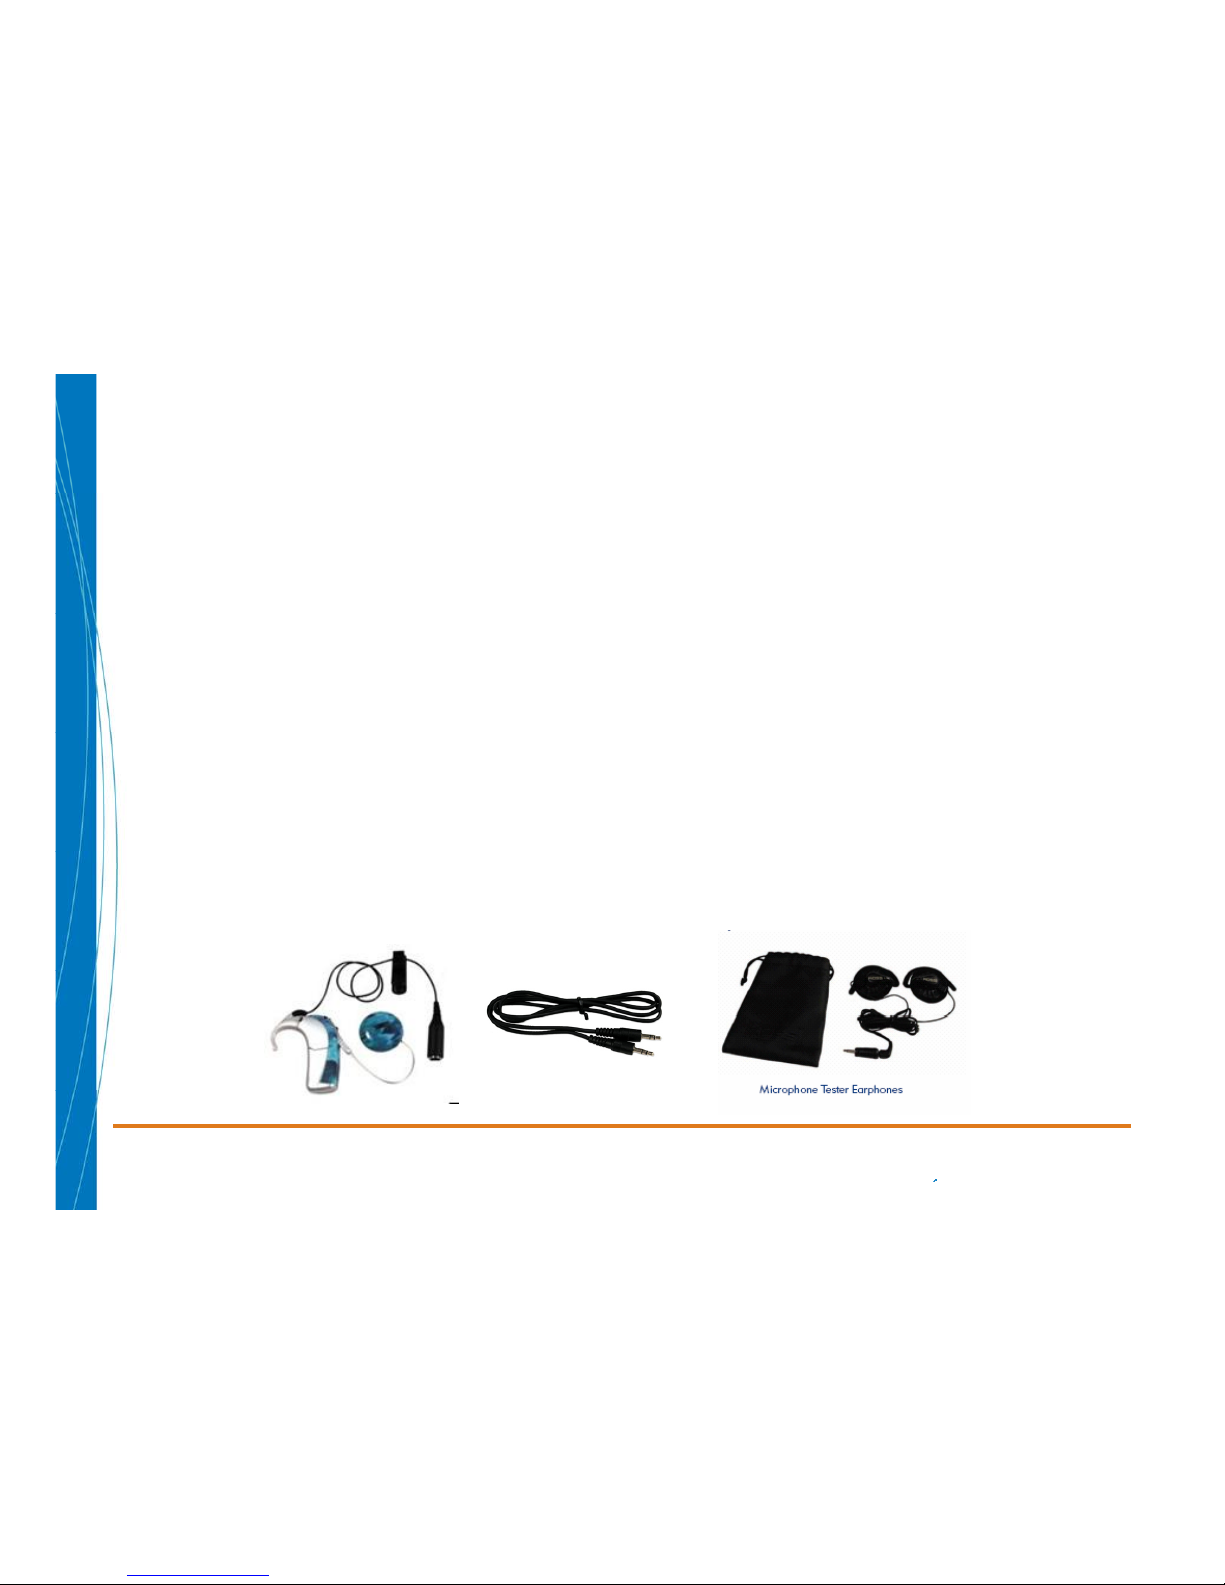
Performing a test of the built-in Microphone
1. Note: To assess the microphone, you will need to have
an empty program slot on the processor. You will also
need a Direct Connect system and an Audio Interface
Cable
2. Using the Mic Tester Headphones supplied by
Advanced Bionics attach to the Direct Connect
3. Set the program switch to an empty program slot (solid
green light/LED should emit)
4. Connect a charged PowerCel
5. Speak in a normal voice and monitor output
Back
Next
Main Menu
Page 34
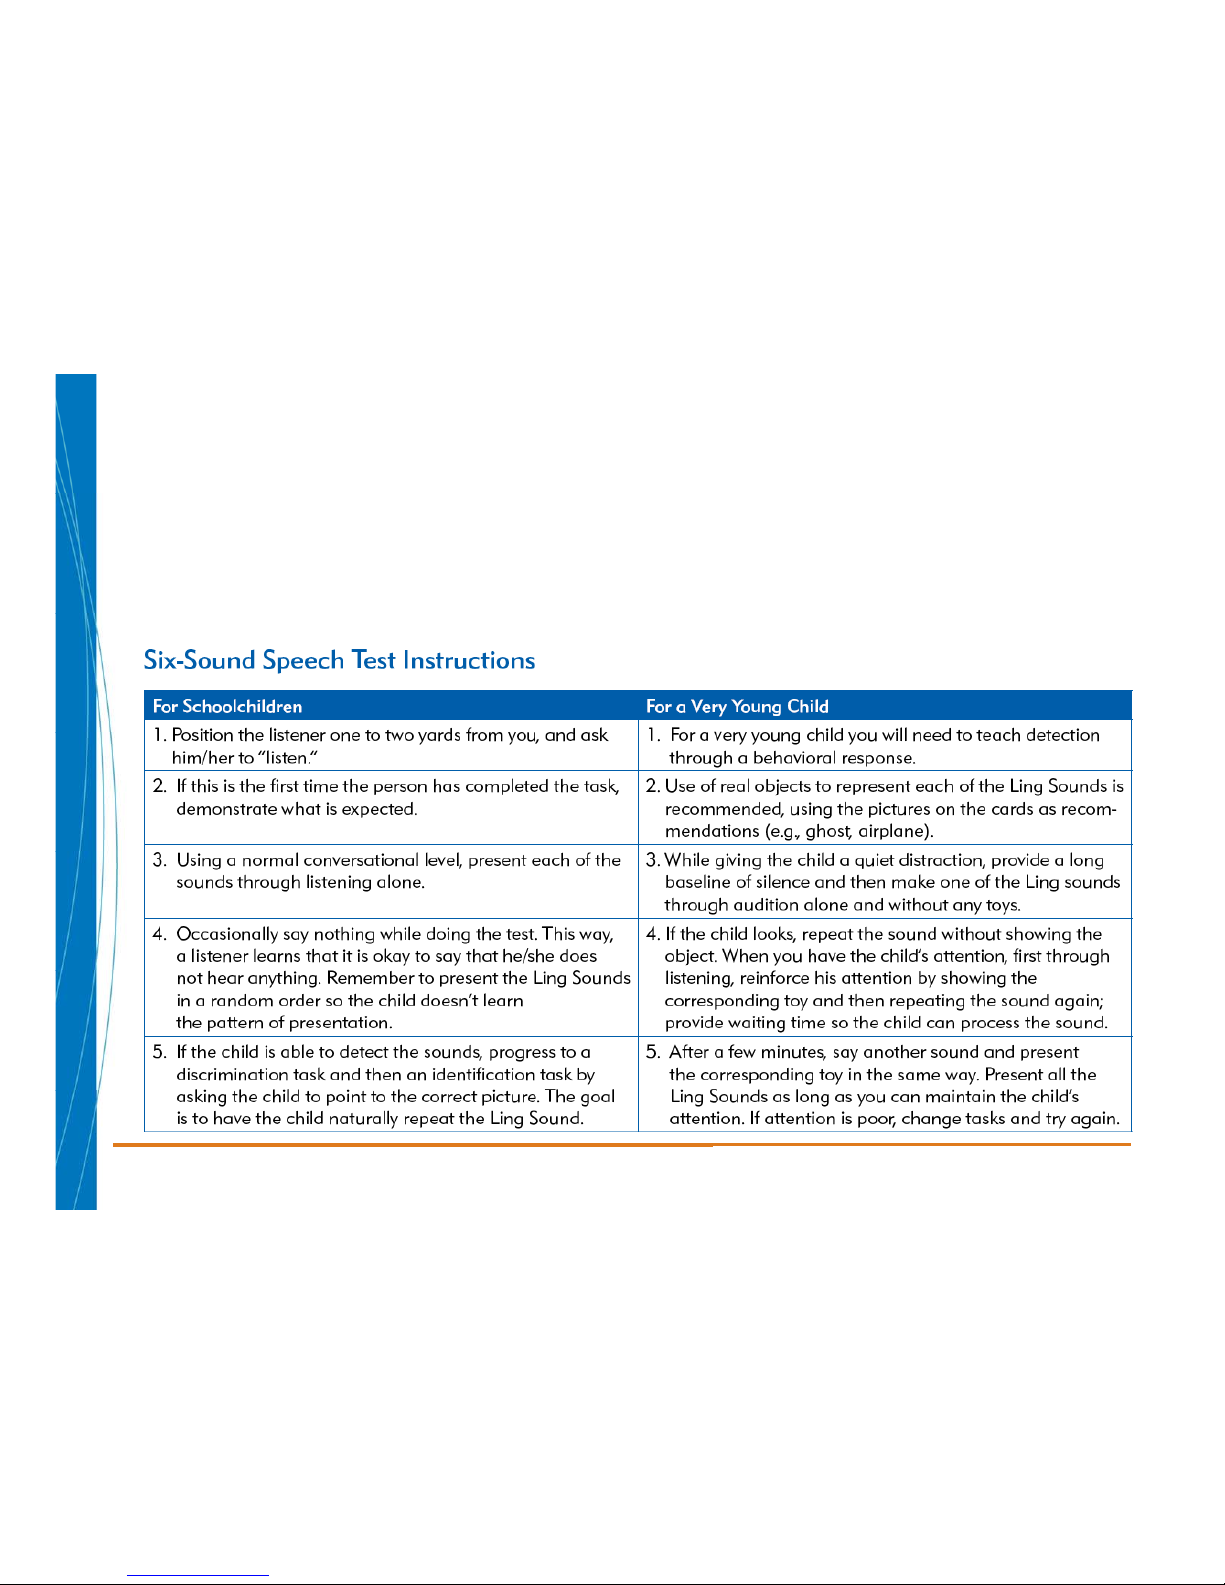
Performing a Behavioral Listening Check
• Using the Ling Six Sounds (ah, ee, oo, sh, s and mm) you can
determine a cochlear implant’s effectiveness by verifying that the
child is able to detect all aspects of speech as the six sounds
encompass the frequency range of all phonemes.
Back
Main Menu
Page 35
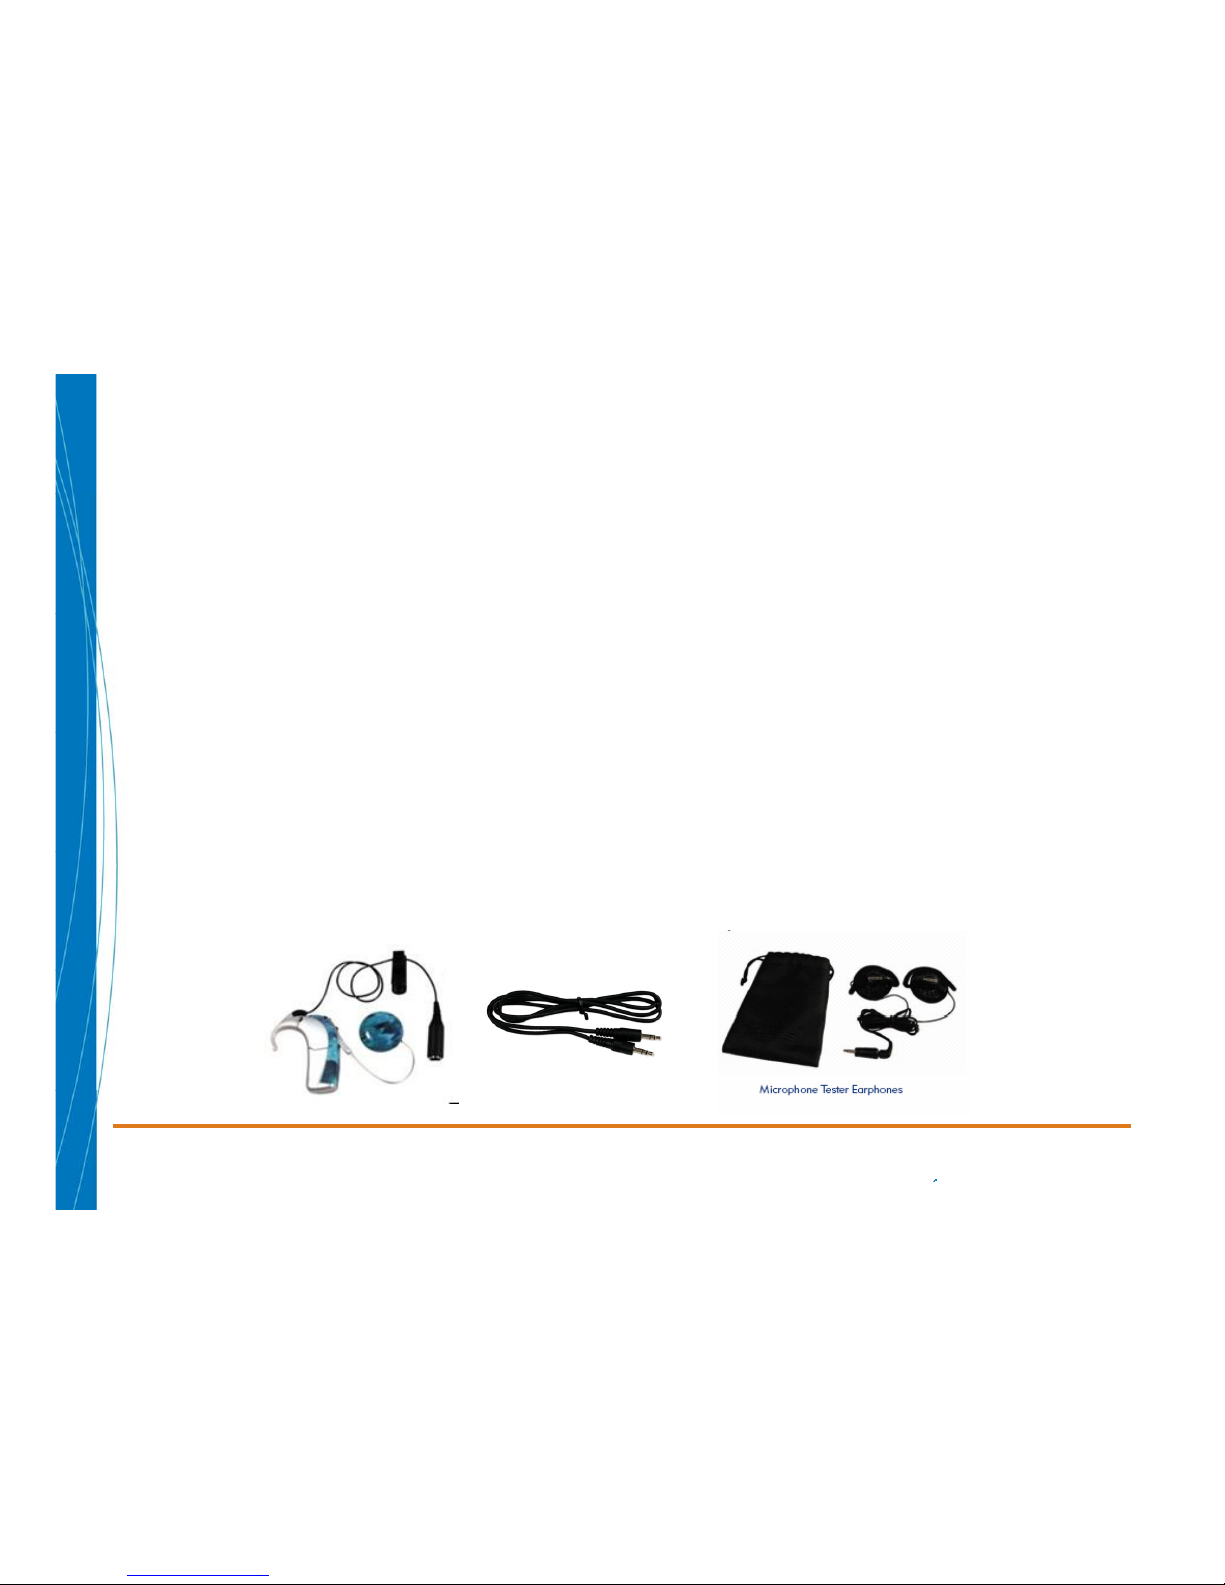
Performing a test of the built-in Microphone
1. Note: To assess the microphone, you will need to have
an empty program slot on the processor. You will also
need a Direct Connect system and an Audio Interface
Cable
2. Using the Mic Tester Headphones supplied by
Advanced Bionics attach to the Direct Connect
3. Set the program switch to an empty program slot (solid
green light/LED should emit)
4. Connect a charged PowerCel
5. Speak in a normal voice and monitor output
Back
Next
Main Menu
Page 36
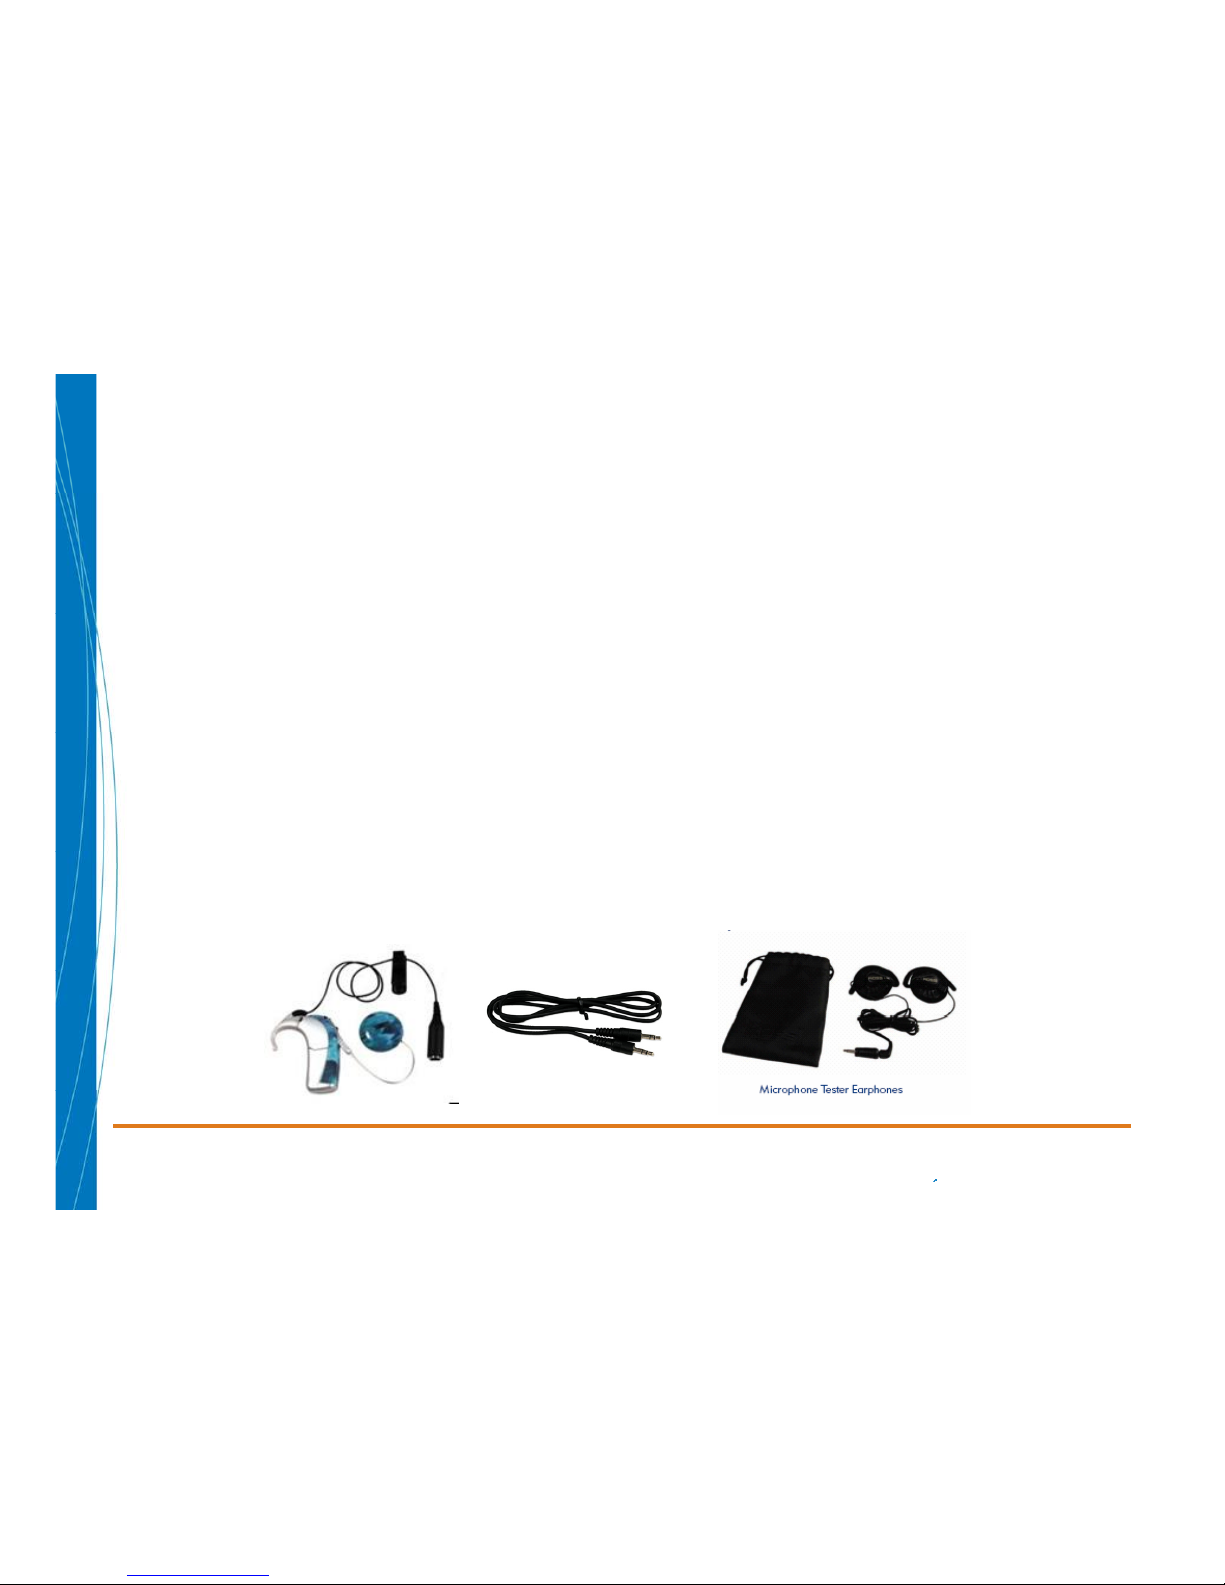
Performing a test of the built-in Microphone
1. Note: To assess the microphone, you will need to have
an empty program slot on the processor. You will also
need a Direct Connect system and an Audio Interface
Cable
2. Using the Mic Tester Headphones supplied by
Advanced Bionics attach to the Direct Connect
3. Set the program switch to an empty program slot (solid
green light/LED should emit)
4. Connect a charged PowerCel
5. Speak in a normal voice and monitor output
Back
Next
Main Menu
Page 37
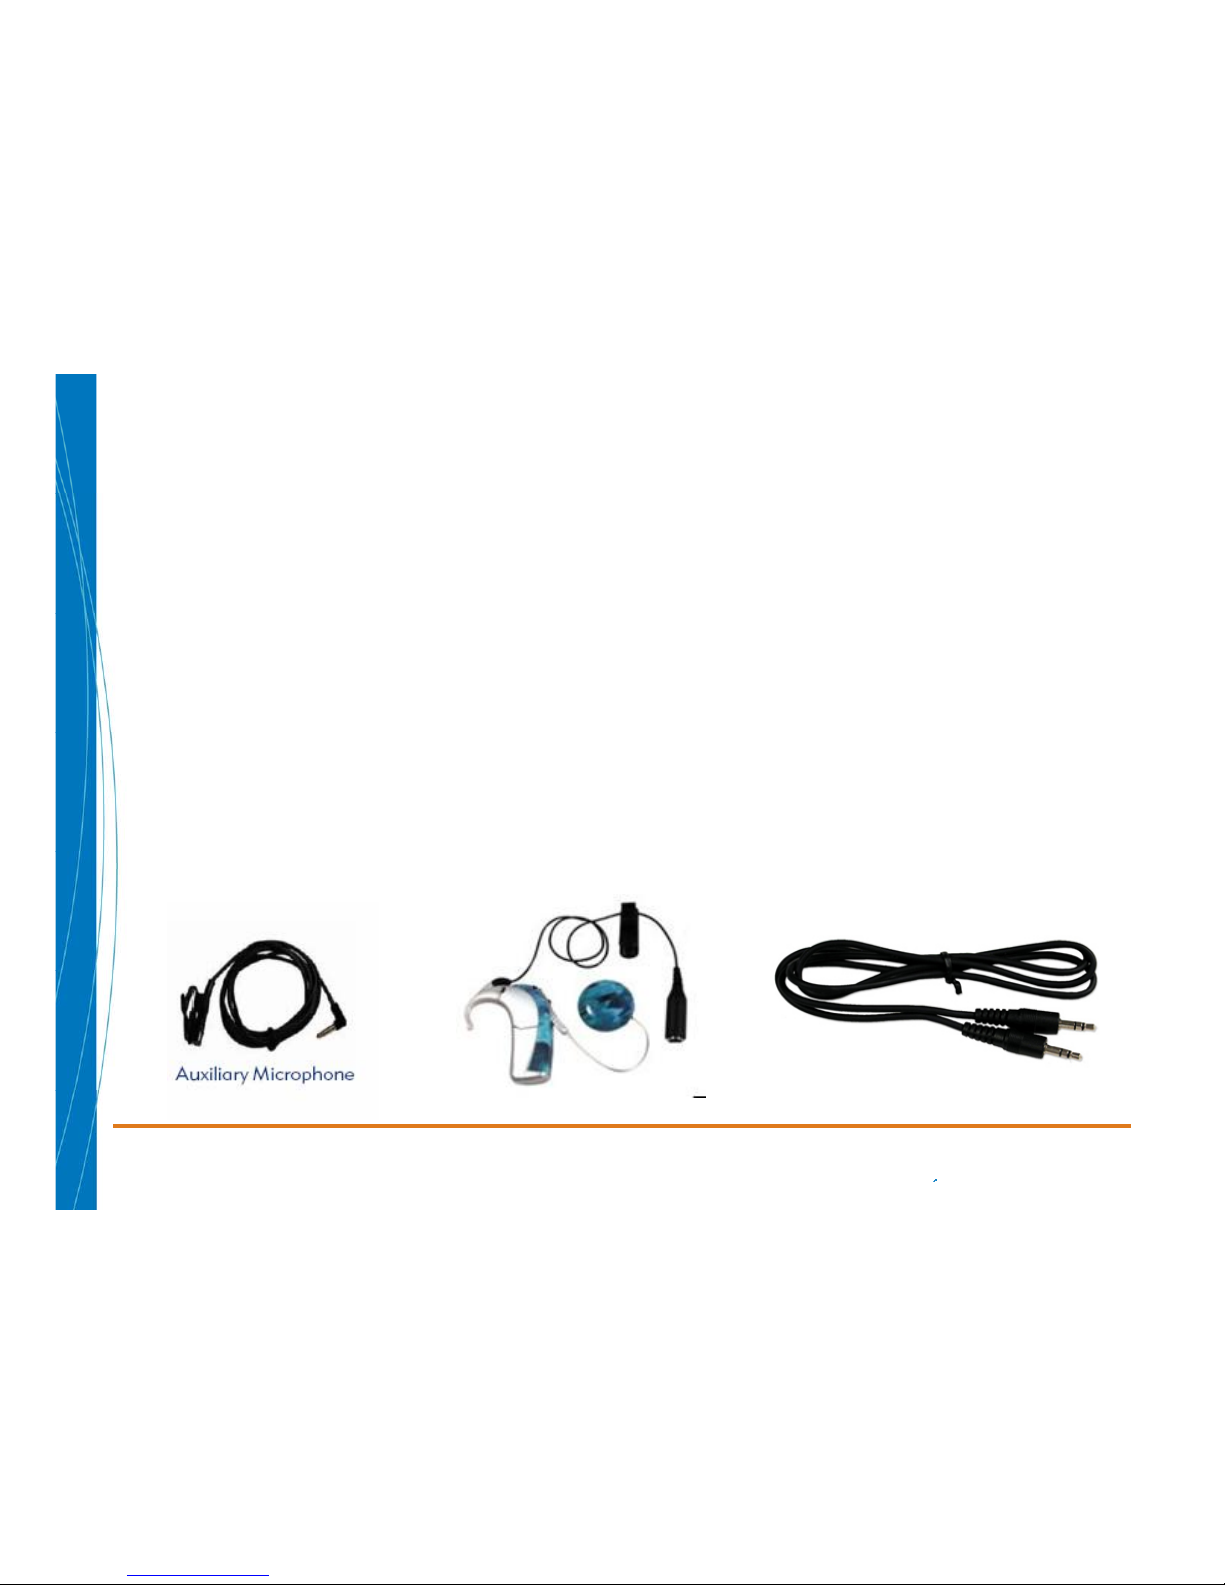
How to Try another Audio Input Source
1. By connecting the direct connect system, audio
interface cable and either an auxiliary microphone or
portable listening device you can verify if the child can
receive sound through another sound source.
2. Should the child receive sound with another audio
source this verifies that the processor microphone is
not functioning.
3. Contact the family and/or managing audiologist for
further assistance.
Back
Next
Main Menu
Page 38
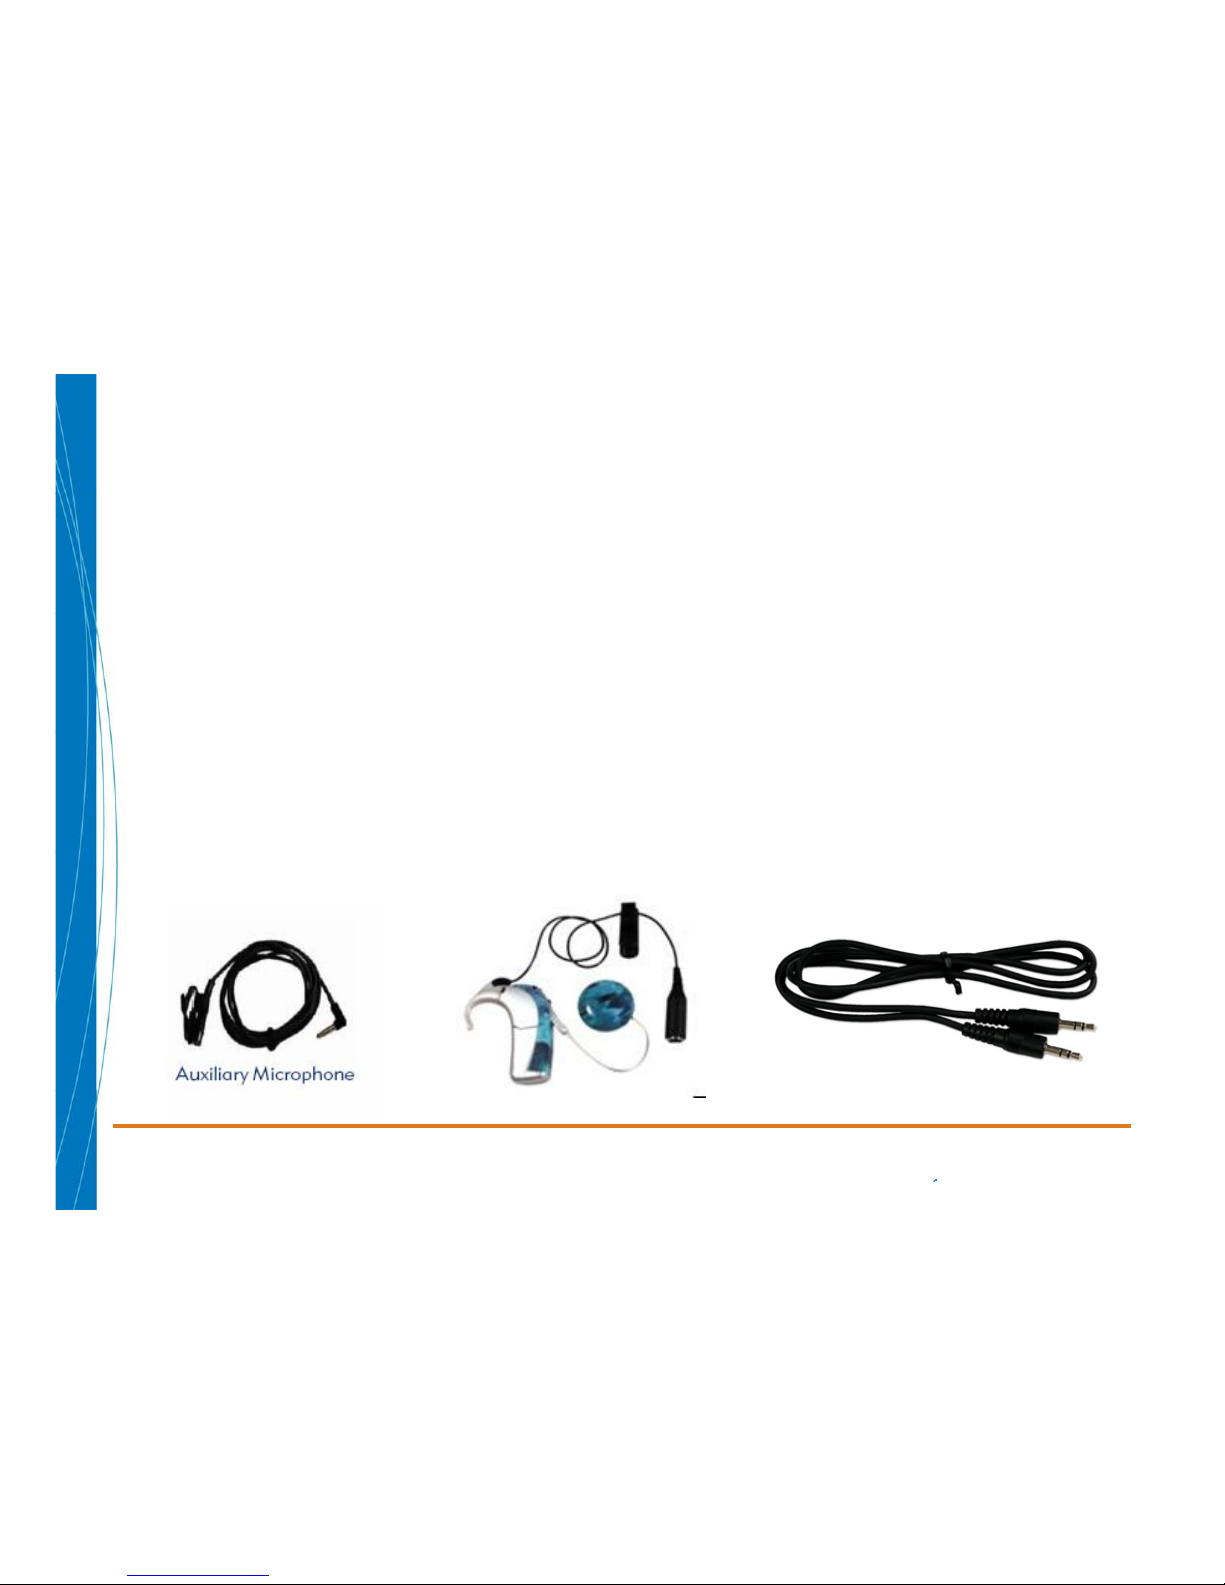
How to Try another Audio Input Source
1. By connecting the direct connect system, audio
interface cable and either an auxiliary microphone or
portable listening device you can verify if the child can
receive sound through another sound source.
2. Should the child receive sound with another audio
source this verifies that the processor microphone is
not functioning.
3. Contact the family and/or managing audiologist for
further assistance.
Back
Next
Main Menu
Page 39

Cleaning the Processor and PowerCel Contacts
1. To prevent intermittent operation of the Processor, contacts
on both the PowerCel and Processor should be kept free
from dirt, dust, perspiration or moisture.
2. Clean the contacts with a soft bristle brush (a hearing aid
brush is best) at least once a month.
Main Menu
Back
Next
Page 40

Cleaning the Processor and PowerCel Contacts
1. To prevent intermittent operation of the Processor, contacts
on both the PowerCel and Processor should be kept free
from dirt, dust, perspiration or moisture.
2. Clean the contacts with a soft bristle brush (a hearing aid
brush is best) at least once a month.
Main Menu
Back
Next
Page 41
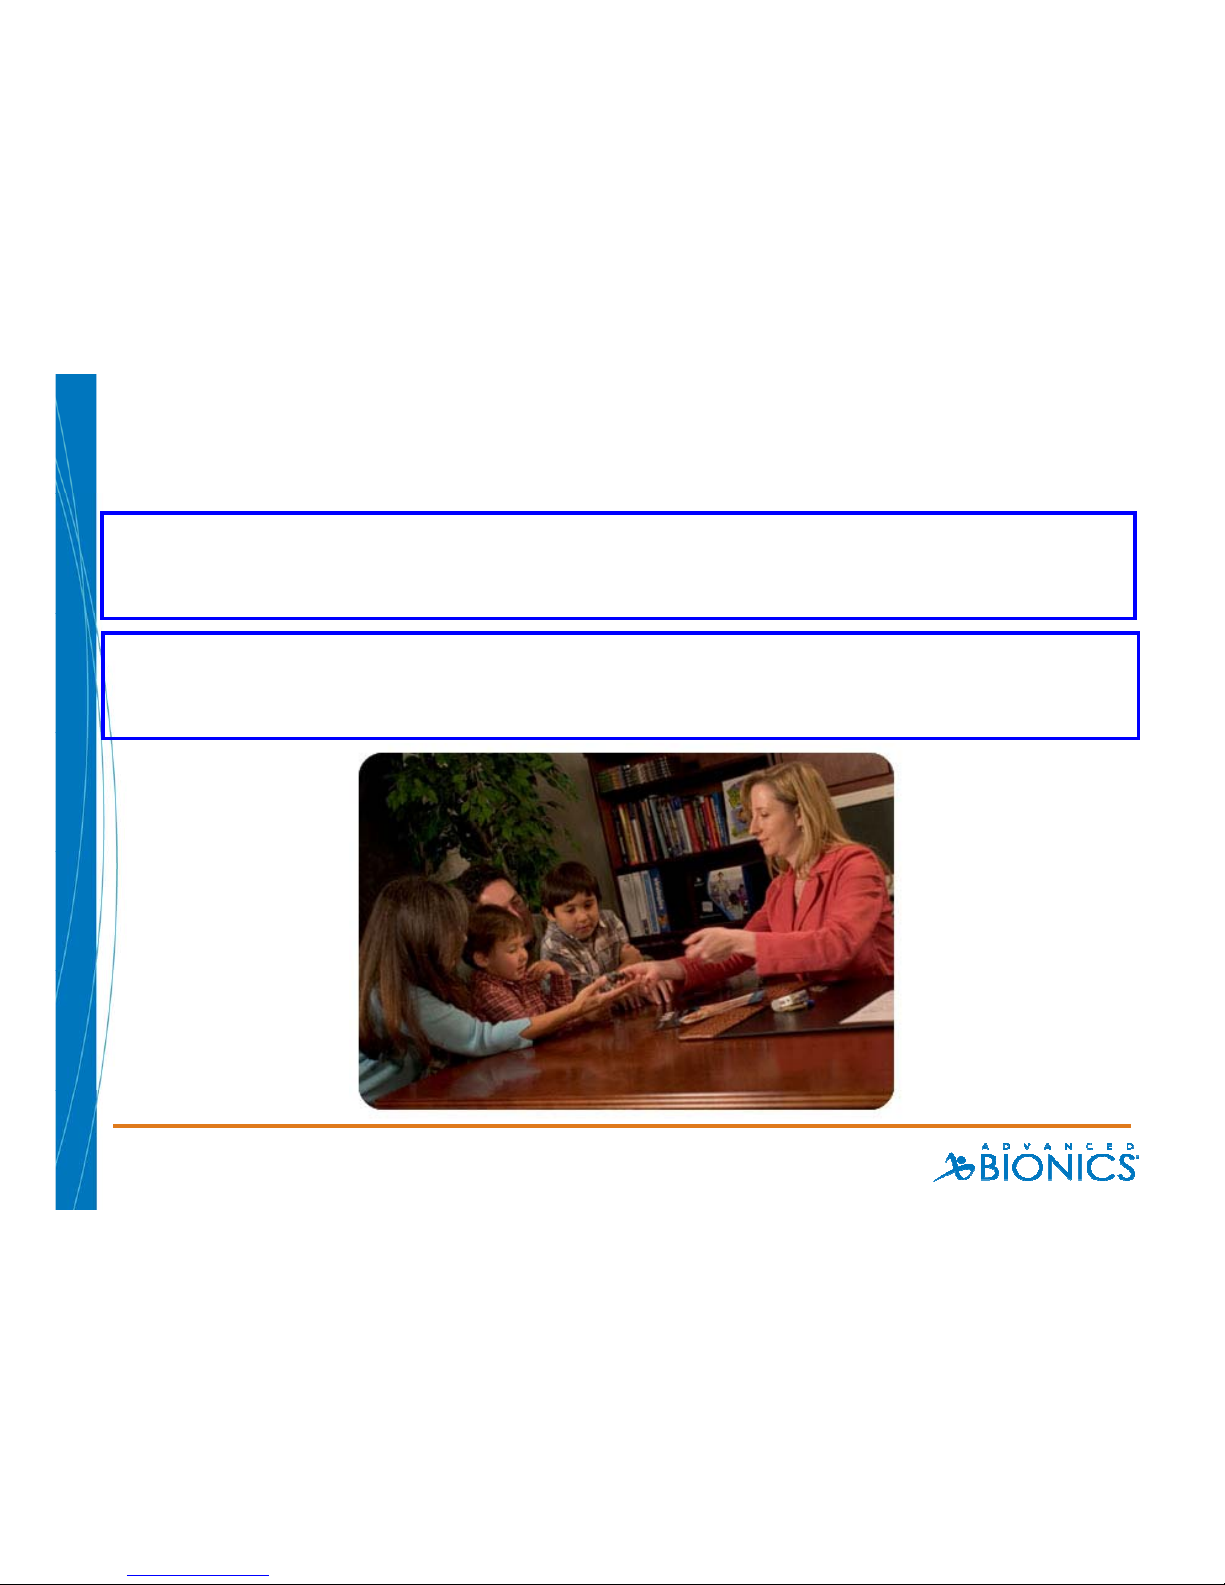
1. Speak to an Audiologist to ask further questions
2. Learn more on-line about the Harmony Processor
I need more information……
Main Menu
Page 42

Speak to an Audiologist
Please call us for further assistance:
• Hours of Operation: 5 AM to 5 PM PST
(877) 829-0026 US and Canada
(800) 678-3575 TTY
(661) 362-1400 ext. 2101
Main Menu
Next
Back
Page 43

Speak to an Audiologist
Please call us for further assistance:
• Hours of Operation: 5 AM to 5 PM PST
(877) 829-0026 US and Canada
(800) 678-3575 TTY
(661) 362-1400 ext. 2101
Main Menu
Next
Back
Page 44

Speak to an Audiologist
Please call us for further assistance:
• Hours of Operation: 5 AM to 5 PM PST
(877) 829-0026 US and Canada
(800) 678-3575 TTY
(661) 362-1400 ext. 2101
Main Menu
Next
Back
Page 45

Speak to an Audiologist
Please call us for further assistance:
• Hours of Operation: 5 AM to 5 PM PST
(877) 829-0026 US and Canada
(800) 678-3575 TTY
(661) 362-1400 ext. 2101
Main Menu
Next
Back
 Loading...