

Page 1
NESS®, NESS L300®, NESS L300® Plus, Intelli-Gait®, Intelli-Sense Gait Sensor™, Bioness, the Bioness Logo® and LiveOn®
are trademarks of Bioness Inc in the United States or other countries. | www.bioness.com/Landing.php?reset
Manufactured by Bioness Neuromodulation Ltd.
A Bioness Inc Company
19 Ha’Haroshet Street
PO Box 2500
Industrial Zone
Ra’Anana 43654, Israel
Worldwide Corporate Office
Bioness Inc
25103 Rye Canyon Loop
Valencia, CA 91355 USA
Telephone: 800-211-9136
Email: [email protected]
Website: www.bioness.com
Rx Only (US Only)
612-00313-001 Rev. B
European Authorized Representative
NESS Europe B.V.
Stationsweg 41
3331 LR Zwijndrecht, The Netherlands
Telephone: +31.78.625.6088
Email: [email protected]
Website: www.bioness.com /Landing.php?reset
Mp612-00313-001_RevB.indd 1 7/18/2011 4:13:54 PM
Page 2
User’s Guide
Mp612-00313-001_RevB.indd 2 7/18/2011 4:13:54 PM
Page 3
I
User’s Guide
Rx Only (US Only)
Mp612-00313-001_RevB.indd 1 7/18/2011 4:13:56 PM
Page 4
II
User's Guide
User’s Guide Copyright
© 2011, Bioness Inc
All Rights Reserved
No part of this publication may be reproduced, transmitted, transcribed, stored in a retrieval system, or
translated into any language or any computer language, in any form or by any third party, without the prior
written permission of Bioness Inc.
Trademarks
NESS
®
, NESS L300®, NESS L300® Plus, Intelli-Gait®, Intelli-Sense Gait Sensor™, Bioness, the Bioness Logo®
and LiveOn
®
are trademarks of Bioness Inc in the United States or other countries. | www.bioness.com/Landing.
php?reset | Rx Only (US Only).
Patents Pending
Aspects of this device are covered by several patents and patent applications, including US Pat 7,899,556.
Disclaimer
Bioness Inc and its affiliates shall not be liable for any injury or damage suffered by any person, either directly or
indirectly, as a result of the unauthorized use or repair of Bioness Inc products. Bioness Inc does not accept any
responsibility for any damage caused to its products, either directly or indirectly, as a result of use and/or repair
by unauthorized personnel.
Environmental Policy
Service personnel are advised that when changing any part of the NESS L300 Plus System,
care should be taken to dispose of those parts in the correct manner; where applicable, parts
should be recycled.
For more detailed information regarding these recommended procedures, please
contact Bioness
Inc.
Bioness Inc is committed to continuously seeking and implementing the best possible
manufacturing procedures and servicing routines.
Worldwide Corporate Office
Bioness Inc
25103 Rye Canyon Loop
Valencia, CA 91355 USA
Telephone: 800-211-9136
Email: [email protected]
Website: www.bioness.com
Manufactured by
Bioness Neuromodulation Ltd.
A Bioness Inc Company
19 Ha’Haroshet Street
PO Box 2500
Industrial Zone
Ra’Anana 43654, Israel
European Authorized Representative
NESS Europe B.V.
Stationsweg 41
3331 LR Zwijndrecht, The Netherlands
Telephone: +31.78.625.6088
Email: [email protected]
Website: www.bioness.com /Landing.php?reset
Conformity Certification
Mp612-00313-001_RevB.indd 2 7/18/2011 4:13:57 PM
Page 5

III
Contents
List of Symbols ................................................................................................. VII
Chapter 1: Introduction ........................................................................ 1
Chapter 2: Device Description and Safety Information .................... 3
Device Description ............................................................................................ 3
Indications for Use ............................................................................................ 4
Contraindications .............................................................................................. 4
Warnings .......................................................................................................... 5
Precautions ....................................................................................................... 5
Adverse Reactions ........................................................................................... 9
Skin Care Guidelines ........................................................................................ 9
Chapter 3: Environmental Conditions that Affect Use ...................... 11
Radio Frequency (RF) Communication Information ......................................... 11
Travel and Airport Security ............................................................................... 12
Electromagnetic Emissions .............................................................................. 13
Warnings ..................................................................................................... 13
Chapter 4: NESS L300 Plus System Kits ............................................ 15
NESS L300 Plus System Kit ............................................................................. 15
System Components .................................................................................. 15
Accessories ................................................................................................ 15
NESS L300 Plus System Upgrade Kit .............................................................. 18
System Components .................................................................................. 18
Accessories ................................................................................................ 18
Chapter 5: NESS L300 Plus System ................................................... 19
L300 Functional Stimulation (FS) Cuff ............................................................. 19
Locator ........................................................................................................ 20
Cradle ......................................................................................................... 20
Mp612-00313-001_RevB.indd 3 7/18/2011 4:13:58 PM
Page 6
IV
User's Guide
Strap ........................................................................................................... 20
L300 Electrodes and Electrode Bases ....................................................... 20
L300 RF Stim Unit ...................................................................................... 21
Thigh FS Cuff .................................................................................................. 23
Panels ......................................................................................................... 24
Elongation Bar ............................................................................................ 24
Locator ........................................................................................................ 24
Cradle ......................................................................................................... 24
Thigh Cloth Electrodes ............................................................................... 25
Thigh RF Stim Unit ..................................................................................... 26
Intelli-Sense Gait Sensor .................................................................................. 28
L300 Plus Control Unit ...................................................................................... 30
Operating Modes ........................................................................................ 32
Standby Mode ....................................................................................... 32
Gait Mode ............................................................................................. 32
Training Mode ....................................................................................... 32
Digital Display and Indicator Lights ............................................................ 33
Audio Indicators .......................................................................................... 38
Chapter 6: L300 Plus Accessories ...................................................... 39
L300 Electrodes and Bases .............................................................................. 39
Large Cloth Electrode ................................................................................. 40
L300 Hydrogel Electrodes and Bases ........................................................ 43
L300 Cloth Electrodes and Bases .............................................................. 47
Thigh Cloth Electrodes ..................................................................................... 51
Thigh Electrode Marking Ring .......................................................................... 55
Cloth Electrode Mesh Bag ................................................................................ 56
Thigh Elongation Bar Lock ............................................................................... 57
Mp612-00313-001_RevB.indd 4 7/18/2011 4:13:58 PM
Page 7

V
Control Unit Wrist Strap, Neck Strap, and Belt Pouch ...................................... 58
System Charger Set ......................................................................................... 59
Replacement Battery, Gait Sensor ................................................................... 60
Gait Sensor Pads ............................................................................................. 61
Shoe Spacers ................................................................................................... 62
Chapter 7: Setting Up the NESS L300 Plus System .......................... 63
Preparing the Skin ............................................................................................ 63
Checking the Components ............................................................................... 63
Putting on the L300 FS Cuff ............................................................................. 64
Testing the Position of the L300 FS Cuff .................................................... 68
Putting on the Thigh FS Cuff ............................................................................ 69
Testing the Position of the Thigh FS Cuff ................................................... 71
Placing the Intelli-Sense Gait Sensor in the Shoe ............................................ 72
Transferring the Intelli-Sense Gait Sensor to Another Shoe ....................... 76
Using Multiple Intelli-Sense Gait Sensors .................................................. 76
Chapter 8: Operating the NESS L300 Plus System ........................... 77
Turning On/Off the NESS L300 Plus System ................................................... 77
Testing the Position of the FS Cuffs ................................................................. 78
L300 FS Cuff............................................................................................... 78
Thigh FS Cuff.............................................................................................. 78
Selecting an Operating Mode ........................................................................... 79
Selecting Gait Mode ................................................................................... 79
Selecting Training Mode ............................................................................. 79
Returning to Standby Mode ........................................................................ 80
Adjusting Stimulation Intensity .......................................................................... 81
L300 FS Cuff............................................................................................... 81
Mp612-00313-001_RevB.indd 5 7/18/2011 4:13:58 PM
Page 8

VI
User's Guide
Adjustment Guidelines ................................................................................ 82
Thigh FS Cuff.............................................................................................. 83
Turning on Audio Feedback During Stimulation ............................................... 84
L300 FS Cuff............................................................................................... 84
Thigh FS Cuff.............................................................................................. 85
Muting/Un-Muting the L300 Plus Control Unit .................................................. 86
Turning Off Audio/Visual Alerts ......................................................................... 87
L300 FS Cuff............................................................................................... 87
Thigh FS Cuff.............................................................................................. 87
Chapter 9: Maintenance and Cleaning ............................................... 89
Daily Maintenance ............................................................................................ 89
Charging the Batteries ...................................................................................... 90
Battery Replacement ........................................................................................ 95
Bases ................................................................................................................ 100
L300 FS Cuff Strap ........................................................................................... 103
Thigh Silicone Panels ....................................................................................... 104
Removing the L300 and Thigh RF Stim Units .................................................. 107
Cleaning the L300 Plus Components ............................................................... 108
Disinfecting the L300 Plus Components ........................................................... 109
Chapter 10: Electronic Registration ................................................... 111
Chapter 11: Troubleshooting ............................................................... 117
Chapter 12: Technical Specifications ................................................. 125
Chapter 13: Appendix - EMI Tables ..................................................... 135
Mp612-00313-001_RevB.indd 6 7/18/2011 4:13:58 PM
Page 9
VII
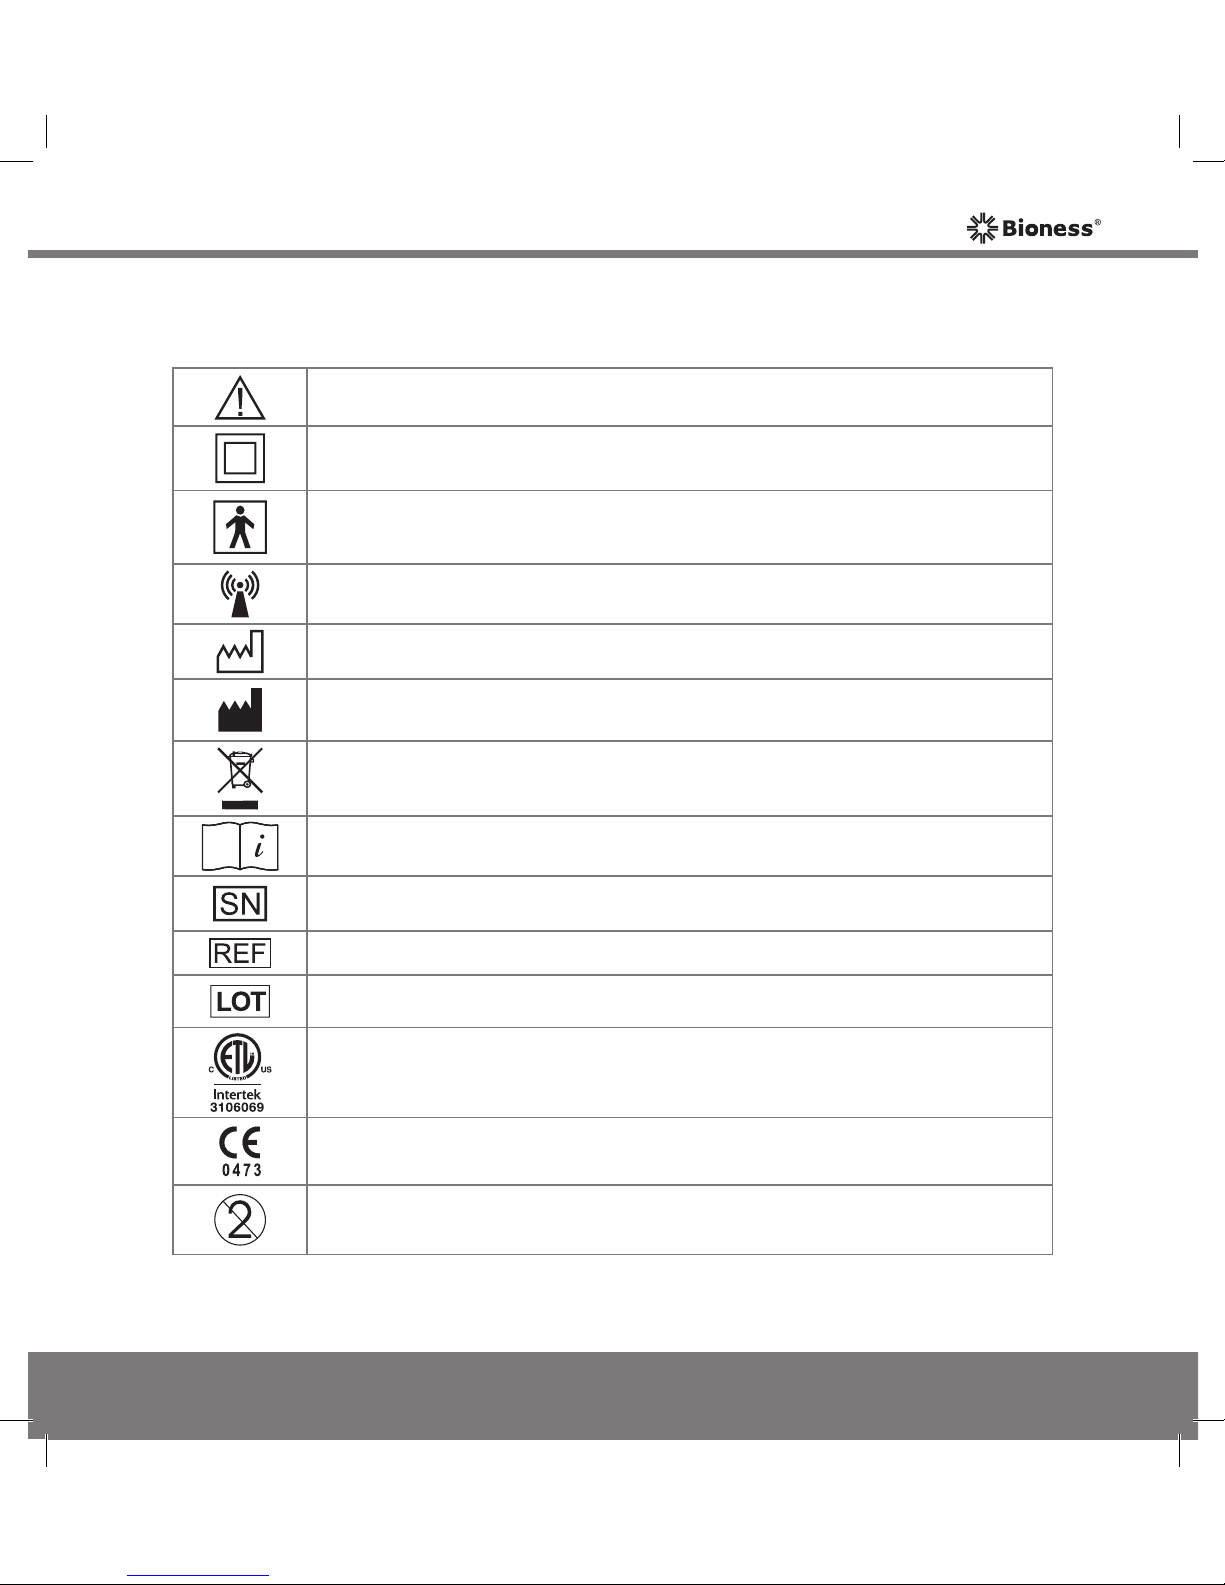
List of Symbols
Caution or Warning
Double Insulated (Equivalent to Class II of IEC 536)
Type BF Applied Part(s)
Non-Ionizing Radiation
Date of Manufacture
Manufacturer
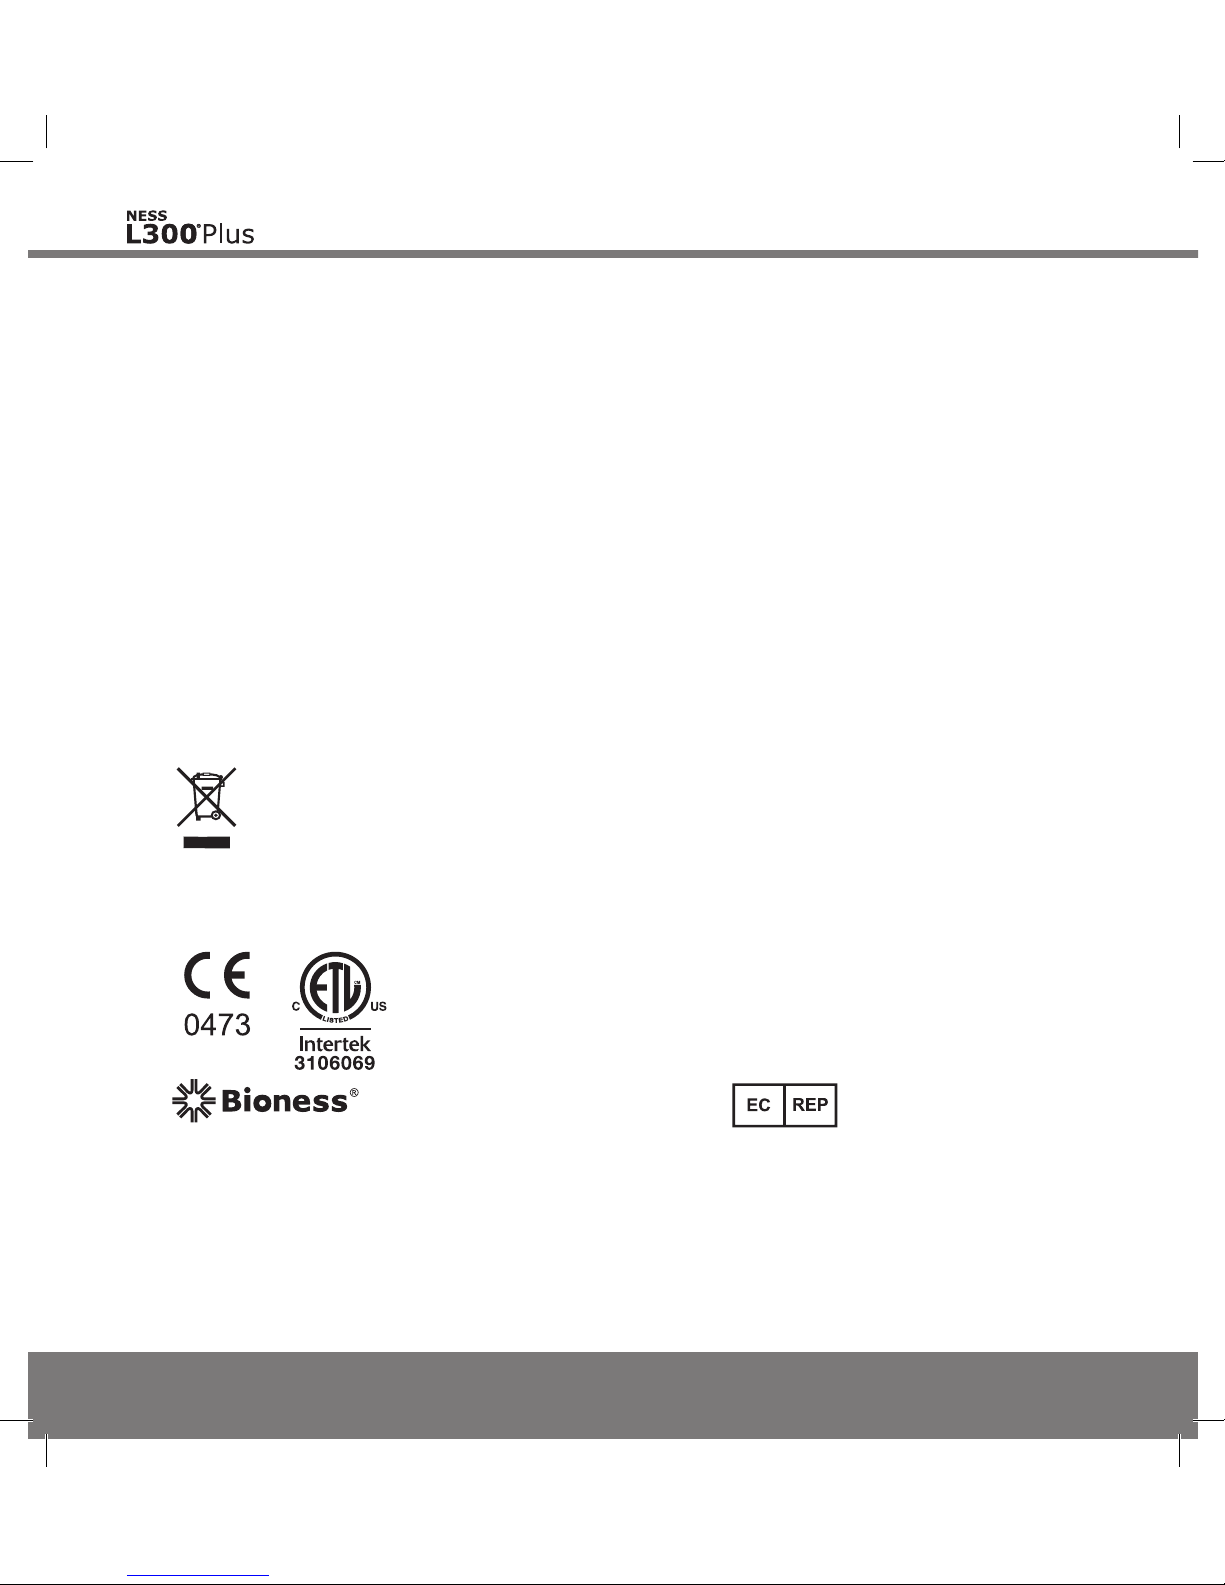
This Product Must not be Disposed of with Other Household Waste
Consult Instructions for Use
Serial Number
Re-Order Number
Lot Number
Complies with United States and Canadian Product Safety Standards
Complies with the European Union Medical Device Directive
Single Patient Use
Mp612-00313-001_RevB.indd 7 7/18/2011 4:14:01 PM
Page 10
VIII
User's Guide
Mp612-00313-001_RevB.indd 8 7/18/2011 4:14:02 PM
Page 11
1
Chapter 1 - Introduction
1
Introduction
Central nervous system (CNS) injuries and diseases often cause a gait disorder
called foot drop. People who have foot drop are unable to raise their foot while
walking. They often drag their foot, resulting in instability and increased effort
during gait. Many people with CNS injuries/diseases also suffer from thigh
muscle weakness. Weak thigh muscles can cause considerable difficulties
with flexing or extending the knee during ambulation.
The NESS L300 Plus System is intended to provide ankle dorsiflexion and knee
flexion or extension in individuals with foot drop and thigh muscle weakness
following an upper motor neuron injury or disease.
This NESS L300 Plus User’s Guide describes:
• Important safety information about the NESS L300 Plus System.
• The components of the NESS L300 Plus System.
• How to set up, operate, and maintain the NESS L300 Plus System.
• Troubleshooting information.
Be sure to review this guide with your clinician before using the NESS L300
Plus System.
If you have clinical or technical questions, consult your clinician or your local
distributor, or visit the Bioness website: www.bioness.com /Landing.php?reset.
CAUTION: Do not put on or operate the NESS L300 Plus System
before being properly fitted and trained by a certified clinician.
Mp612-00313-001_RevB.indd 1 7/18/2011 4:14:02 PM
Page 12
2
User's Guide
Mp612-00313-001_RevB.indd 2 7/18/2011 4:14:02 PM
Page 13
3
Chapter 2 - Device Description and Safety Information
2
Device Description and Safety
Information
Device Description
The NESS L300 Plus System consists of four main components:
• L300 Functional Stimulation (FS) Cuff with L300 Radio Frequency
(RF) Stim Unit—used to stimulate the nerves that control the muscles
of the lower leg.
• Thigh FS Cuff with Thigh RF Stim Unit—used to stimulate the nerves
that control the muscles of the thigh.
• Intelli-Sense Gait Sensor—used to sense and wirelessly transmit heel
events in the affected leg.
• L300 Plus Control Unit—used to wirelessly control and monitor the
NESS L300 Plus System.
These components communicate wirelessly to provide synchronized ankle
dorsiflexion and knee flexion or extension.
Mp612-00313-001_RevB.indd 3 7/18/2011 4:14:02 PM
Page 14
4
User's Guide
Indications for Use
The NESS L300 Plus System is intended to provide ankle dorsiflexion and knee
flexion or extension in individuals with foot drop and thigh muscle weakness
following an upper motor neuron injury or disease.
During gait, the NESS L300 Plus System electrically stimulates muscles in the
affected leg to provide dorsiflexion of the foot and knee flexion or extension;
thus, it may improve the individual’s gait.
The NESS L300 Plus System may also:
• Facilitate muscle re-education.
• Prevent or retard disuse atrophy.
• Maintain or increase joint range of motion.
• Increase local blood flow.
Contraindications
• Patients with a demand-type cardiac pacemaker, defibrillator, or any
electrical or metallic implant should not use the NESS L300 Plus System.
• The NESS L300 Plus System should not be used on a leg where a
cancerous lesion is present or suspected.
•
The NESS L300 Plus System should not be used on a leg with a regional
disorder, such as a fracture or dislocation, which could be adversely
affected by motion from the stimulation.
Mp612-00313-001_RevB.indd 4 7/18/2011 4:14:02 PM
Page 15

5
Chapter 2 - Device Description and Safety Information
Warnings
• The long-term effects of chronic electrical stimulation are unknown.
• The L300 and Thigh FS Cuffs should not be worn over swollen, infected,
or inflamed areas or skin eruptions, such as phlebitis, thrombophlebitis,
and varicose veins.
• Simultaneous connection of the NESS L300 Plus System to the patient
and high-frequency surgical equipment may result in skin burns where
the stimulator electrodes touch and damage to the L300 and Thigh RF
Stim Units.
•
The NESS L300 Plus System should only be configured by an authorized
clinician.
Precautions
•
Inflammation in the region of the L300 and Thigh FS Cuffs may be aggravated
by motion, muscle activity, or pressure from the FS Cuffs. Stop using the
NESS L300 Plus System until any inflammation is gone.
• Use caution if you have a suspected or diagnosed heart problem.
• Use caution if you have suspected or diagnosed epilepsy.
• Use the L300 and Thigh FS Cuffs with caution:
• If you have a tendency to bleed heavily following acute trauma
or fracture.
• Following recent surgical procedures when muscle contraction
may disrupt the healing process.
• Over areas of the skin that lack normal sensation.
Mp612-00313-001_RevB.indd 5 7/18/2011 4:14:03 PM
Page 16
6
User's Guide
•
Obtain physician clearance prior to use if you have an alteration in normal
arterial or venous flow in the region of the L300 and/or Thigh FS Cuffs
because of local insufficiency (insufficient blood flow), occlusion (a blood
flow blockage), arteriovenous fistula for the purpose of hemodialysis (an
abnormal connection between an artery and vein), or a primary disorder
of the vasculature (a disease of the blood vessels: arteries, veins, and
lymphatics).
• Obtain physician clearance before stimulating an area with a structural
deformity.
• The safe use of the NESS L300 Plus System during pregnancy has not
been established.
• Keep the NESS L300 Plus System out of the reach of children.
•
The L300 and Thigh FS Cuffs are to be worn only on the leg of the patient
for whom they have been fitted. They should not be worn by anyone else
or on any other part of the body.
• Skin problems where the L300 and Thigh FS Cuffs are worn may be
aggravated by the NESS L300 Plus System.
• Some patients may experience a skin irritation, an allergic reaction, or
hypersensitivity to the electrical stimulation or the electrical conductive
medium. In some cases, irritation may be avoided by having your clinician
change the stimulation parameters, type of electrodes used, or electrode
placement.
•
After removing the L300 and Thigh FS Cuffs, it is normal for the areas under
the electrodes to be red and indented. The redness should disappear in
approximately one hour. Persistent redness, lesions, or blisters are signs
of irritation. Stop using the NESS L300 Plus System until any irritation
is gone.
Mp612-00313-001_RevB.indd 6 7/18/2011 4:14:03 PM
Page 17

7
Chapter 2 - Device Description and Safety Information
• Do not use the NESS L300 Plus System without electrodes.
• Use only electrodes supplied by Bioness Inc.
• Change the electrodes at least every two weeks.
• Only the treating clinician should determine electrode placement and
stimulation settings.
• Turn off the NESS L300 Plus System before removing, replacing, and
wetting the electrodes.
• Turn off the NESS L300 Plus System before putting on the L300 and
Thigh FS Cuffs. Do not turn on the NESS L300 Plus System until the FS
Cuffs are fastened in place.
•
Turn off the NESS L300 Plus System before driving, operating machinery,
or performing any activity in which involuntary muscle contractions could
injure you.
•
Turn off the NESS L300 Plus System when at a refueling place. Do not use
the NESS L300 Plus System near flammable fuel, fumes, or chemicals.
• Stop using the NESS L300 Plus System and consult your clinician if
stimulation does not start at the correct time during gait.
• Protect all electronic components from contact with water, such as from
sinks, bathtubs, shower stalls, rain, snow, etc.
•
Do not leave the NESS L300 Plus System stored where temperatures may
exceed the acceptable environmental range: -25°C to +55°C. Temperature
extremes can damage the components.
• The NESS L300 Plus System needs special precautions regarding
electromagnetic compatibility (EMC) and needs to be installed and put
into service according to the EMC information provided in this manual.
See Chapter 3 and the Appendix.
Mp612-00313-001_RevB.indd 7 7/18/2011 4:14:03 PM
Page 18
8
User's Guide
• Do not attempt to repair your NESS L300 Plus System. Changes or
modifications to the NESS L300 Plus System components not expressly
approved by Bioness Inc could void the user’s authority to operate the
equipment.
Contact your local distributor if you experience a clinical or technical
problem not covered in this guide.
CAUTION: The Intelli-Sense Gait Sensor has not been validated
for use by individuals weighing more than 136 kilograms.
CAUTION: Do not use the Intelli-Sense Gait Sensor with a
rigid insole, such as a custom rigid orthosis or an ankle foot
orthosis.
Mp612-00313-001_RevB.indd 8 7/18/2011 4:14:03 PM
Page 19

9
Chapter 2 - Device Description and Safety Information
Adverse Reactions
In the unlikely event that any of the following occurs, stop using your
NESS L300 Plus System immediately and consult your physician:
• Signs of significant irritation or pressure sores where the L300 and/or
Thigh FS Cuffs contact the skin.
• A significant increase in muscle spasticity.
• A feeling of heart-related stress during stimulation.
• Swelling of the leg, knee, ankle, or foot.
• Any other unanticipated reaction.
Skin irritations and burns have been reported with the use of powered muscle
stimulators.
Skin Care Guidelines
In the absence of proper skin care, extended use of electrical stimulation
may cause skin irritation or a skin reaction to the NESS L300 Plus System
electrodes or the L300 and/or Thigh FS Cuffs.
To promote healthy skin with long-term use of the NESS L300 Plus
System, it is important to follow a daily skin-care routine:
• Clean the skin where the electrodes touch with a wet washcloth. If any
oils or lotions are on the skin, then clean with soap and water. Rinse well.
• Always check the skin for redness or a rash when putting on and taking
off the L300 and Thigh FS Cuffs.
• Wet the cloth electrodes before use and after every three to four hours
of use.
Mp612-00313-001_RevB.indd 9 7/18/2011 4:14:03 PM
Page 20
10
User's Guide
• Replace the electrodes at least every two weeks, even if they appear to
be in good condition.
• Store the L300 hydrogel electrodes with the protective plastic covers
attached. Do not allow the hydrogel electrodes to dry.
• Store the cloth electrodes where they can air dry.
•
Excess body hair where the L300 hydrogel electrodes adhere may reduce
electrode contact with the skin. If necessary, remove excess body hair
with an electric shaver or scissors. Do not use a razor. A razor can irritate
the skin.
•
When positioning the L300 and Thigh FS Cuffs, make sure the electrodes
uniformly contact the skin.
• Ventilate the skin by removing the L300 and Thigh FS Cuffs for at least
15 minutes every 3 to 4 hours.
If skin irritation or a skin reaction occurs, stop using your NESS L300 Plus
System immediately. Contact your clinician or dermatologist, and your local
distributor. Resume use only when the skin is completely healed. Then follow
a skin conditioning protocol per the recommendation of your health-care
specialist.
If you have any questions or concerns, please call your local distributor
or visit the Bioness website at www.bioness.com/Landing.php?reset.
Mp612-00313-001_RevB.indd 10 7/18/2011 4:14:04 PM
Page 21
11
Chapter 3 - Environmental Conditions that Affect Use
3
Environmental Conditions that Affect
Use
Radio Frequency (RF) Communication Information
Several components of the NESS L300 Plus System communicate via radio
communication and have been tested and found to comply with the limits
for a Class B digital device, pursuant to Part 15 (RF Devices) of the FCC
(Federal Communications Commission) Rules. These limits are designed to
provide reasonable protection against harmful interference in a residential
installation. This equipment generates, uses, and can radiate RF energy
and, if not installed and used in accordance with the instructions, may cause
harmful interference to radio communications. However, there is no guarantee
that interference will not occur in a particular installation. If this equipment
does cause harmful interference to radio or television reception, which can
be determined by turning the equipment off and on, the user is encouraged
to try to correct the interference by one or more of the following measures:
• Reorient or relocate the receiving antenna.
• Increase the separation between the equipment and receiver.
•
Consult the dealer or an experienced radio/TV technician for assistance.
The antenna for each transmitter must not be co-located or operating in
conjunction with any other antenna or transmitter.
Portable and mobile RF communications equipment can affect the NESS
L300 Plus System.
Mp612-00313-001_RevB.indd 11 7/18/2011 4:14:04 PM
Page 22
12
User's Guide
Conformity Certification
The NESS L300 Plus System complies with Part 15 of the FCC rules. Operation
is subject to the following two conditions:
1. This device may not cause harmful interference.
2.
This device must accept any interference received, including interference
that may cause undesired operation.
This equipment complies with FCC RF radiation exposure limits set forth for
an uncontrolled environment.
Travel and Airport Security
The NESS L300 Plus system charger is compatible with Australian, U.K.,
European Union, and U.S. voltages: 110/220 V, 50/60 Hz.
Turn off your NESS L300 Plus System before going through airport security.
Wear loose clothing so that you can easily show the security person your
NESS L300 Plus System. The NESS L300 Plus System will likely set off the
security alarm. Be prepared to remove the NESS L300 Plus System so that
security can scan it, or ask for the system to be scanned if you do not want
to remove it. You may want to carry a copy of your NESS L300 Plus System
prescription. A prescription can be useful when passing through customs as
well.
To request a copy of your prescription, call your local distributor or visit
the Bioness website at www.bioness.com/Landing.php?reset. A Bioness
representative can fax or mail you a copy.
Note: The NESS L300 Plus System contains radio transmitters. The Federal
Aviation Administration rules require that all radio-transmitting devices be
turned off during flight.
Mp612-00313-001_RevB.indd 12 7/18/2011 4:14:04 PM
Page 23

13
Chapter 3 - Environmental Conditions that Affect Use
Electromagnetic Emissions
The NESS L300 Plus System needs special precautions regarding
electromagnetic compatibility (EMC). The system needs to be installed and
put into service according to the EMC information provided in this manual.
See Appendix.
The NESS L300 Plus System was tested and certified to use the following:
• DC power supply as provided by Bioness Inc, manufactured by FRIWO,
Part No. FW7555M/05.
•
W cable (3-way splitter) as provided by Bioness Inc, Model No. L3P-5A10.
Manufactured by Tamuz Electronics Ltd.
Warnings
•
Do not use the NESS L300 Plus System within three feet of shortwave or
microwave therapy equipment. Such equipment may produce instability
in the output of the L300 and Thigh RF Stim Units.
• Remove the NESS L300 Plus System before undergoing any diagnostic
or therapeutic medical procedure such as x-ray examination, ultrasound,
Magnetic Resonance Imaging (MRI), etc.
•
The NESS L300 Plus System should not be used adjacent to or stacked with
other equipment. If adjacent or stacked use is necessary, the equipment or
system should be observed to verify normal operation in the configuration
in which it will be used.
•
The use of accessories, transducers, and cables other than those specified,
with the exception of transducers and cables sold by the manufacturer of
the NESS L300 Plus System as replacement parts for internal components,
may result in increased emissions or decreased immunity of the NESS
L300 Plus System.
Mp612-00313-001_RevB.indd 13 7/18/2011 4:14:04 PM
Page 24
14
User's Guide
•
The use of the accessory, transducer, or cable with equipment and systems
other than those specified may result in increased emissions or decreased
immunity of the NESS L300 Plus System.
•
The NESS L300 Plus System may be interfered with by other equipment,
even if that other equipment complies with CISPR (International Special
Committee on Radio Interference, International Electrotechnical Commission)
emission requirements.
Mp612-00313-001_RevB.indd 14 7/18/2011 4:14:05 PM
Page 25
15
Chapter 4 - NESS L300 Plus System Kits
4
NESS L300 Plus System Kits
NESS L300 Plus System Kit
System Components
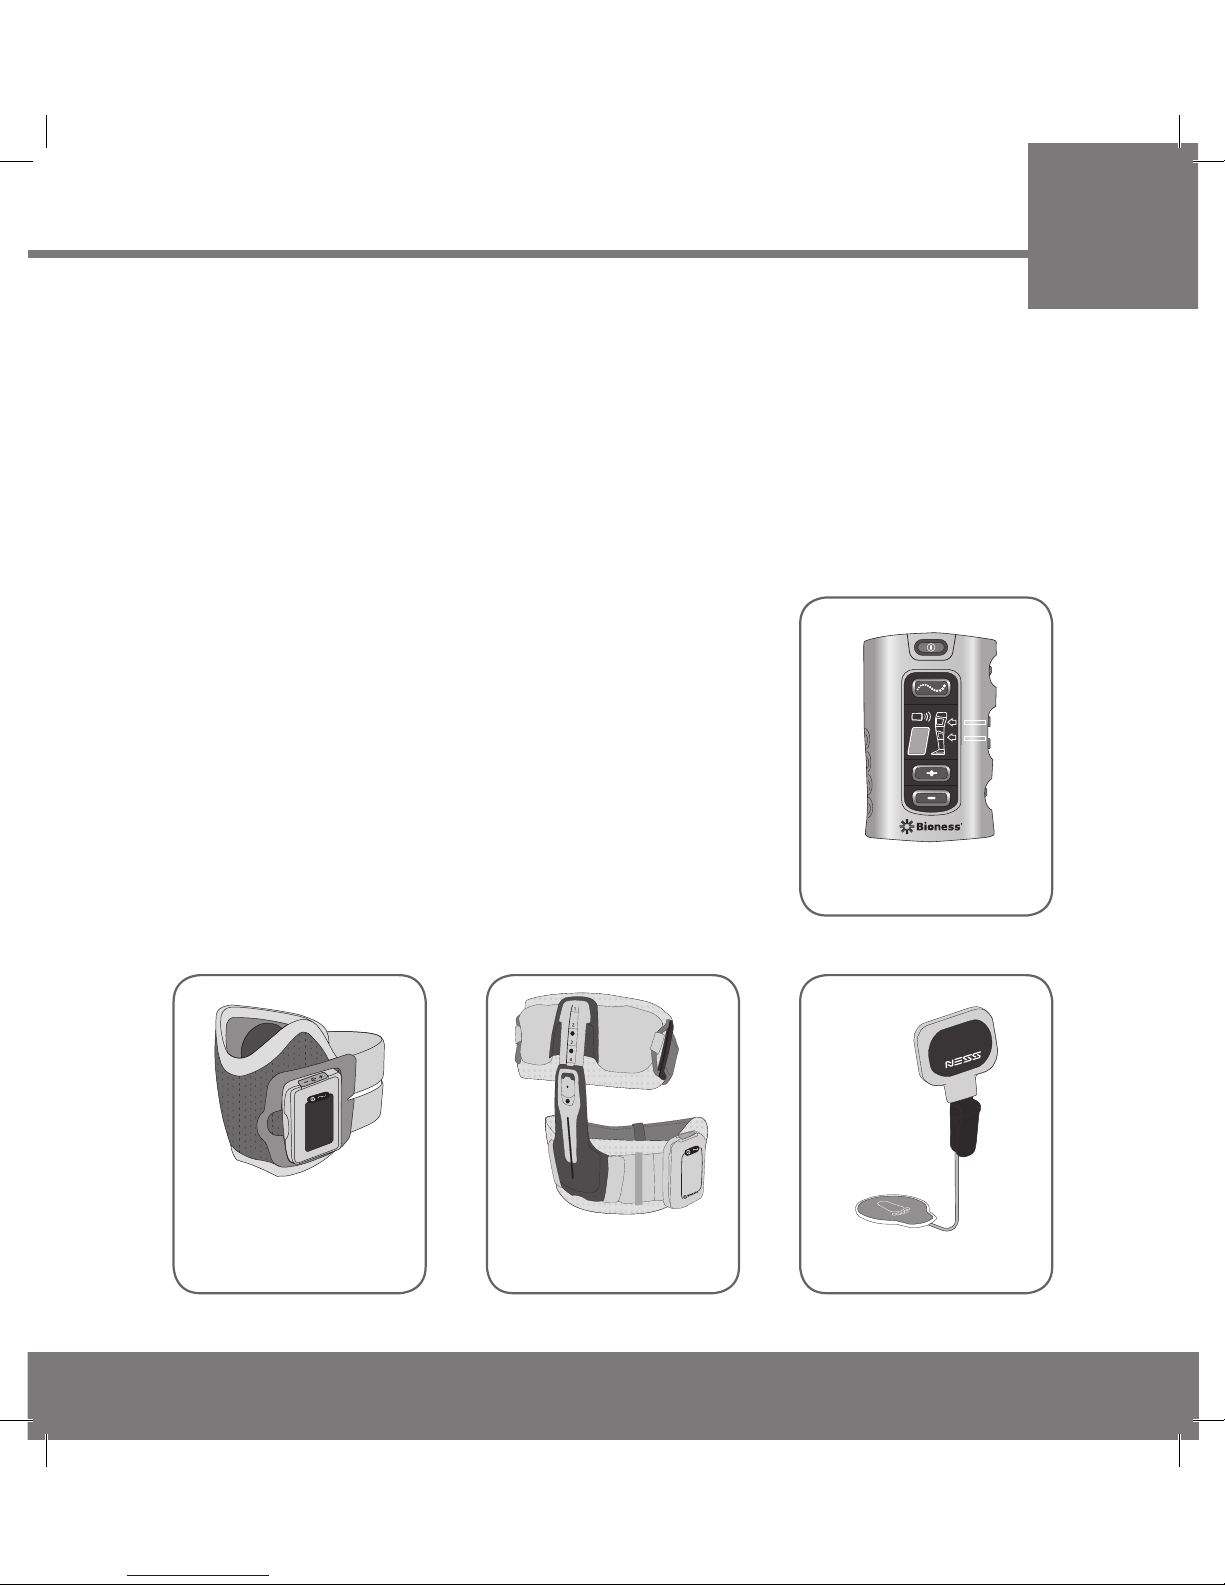
• L300 Plus Control Unit
• L300 FS Cuff and RF Stim Unit
• Thigh FS Cuff and RF Stim Unit
• Intelli-Sense Gait Sensor
Accessories
• System Charger Set
• Control Unit Neck Strap
• Control Unit Wrist Strap
• Control Unit Belt Pouch
L300 Plus Control Unit
L300 FS Cuff and
RF Stim Unit
Thigh FS Cuff and
RF Stim Unit
Intelli-Sense Gait Sensor
Mp612-00313-001_RevB.indd 15 7/18/2011 4:14:07 PM
Page 26
16
User's Guide
• Replacement Battery, Gait Sensor
• Gait Sensor Pads
• Shoe Spacers
• Thigh Elongation Bar Locks
• Thigh Electrode Marking Rings
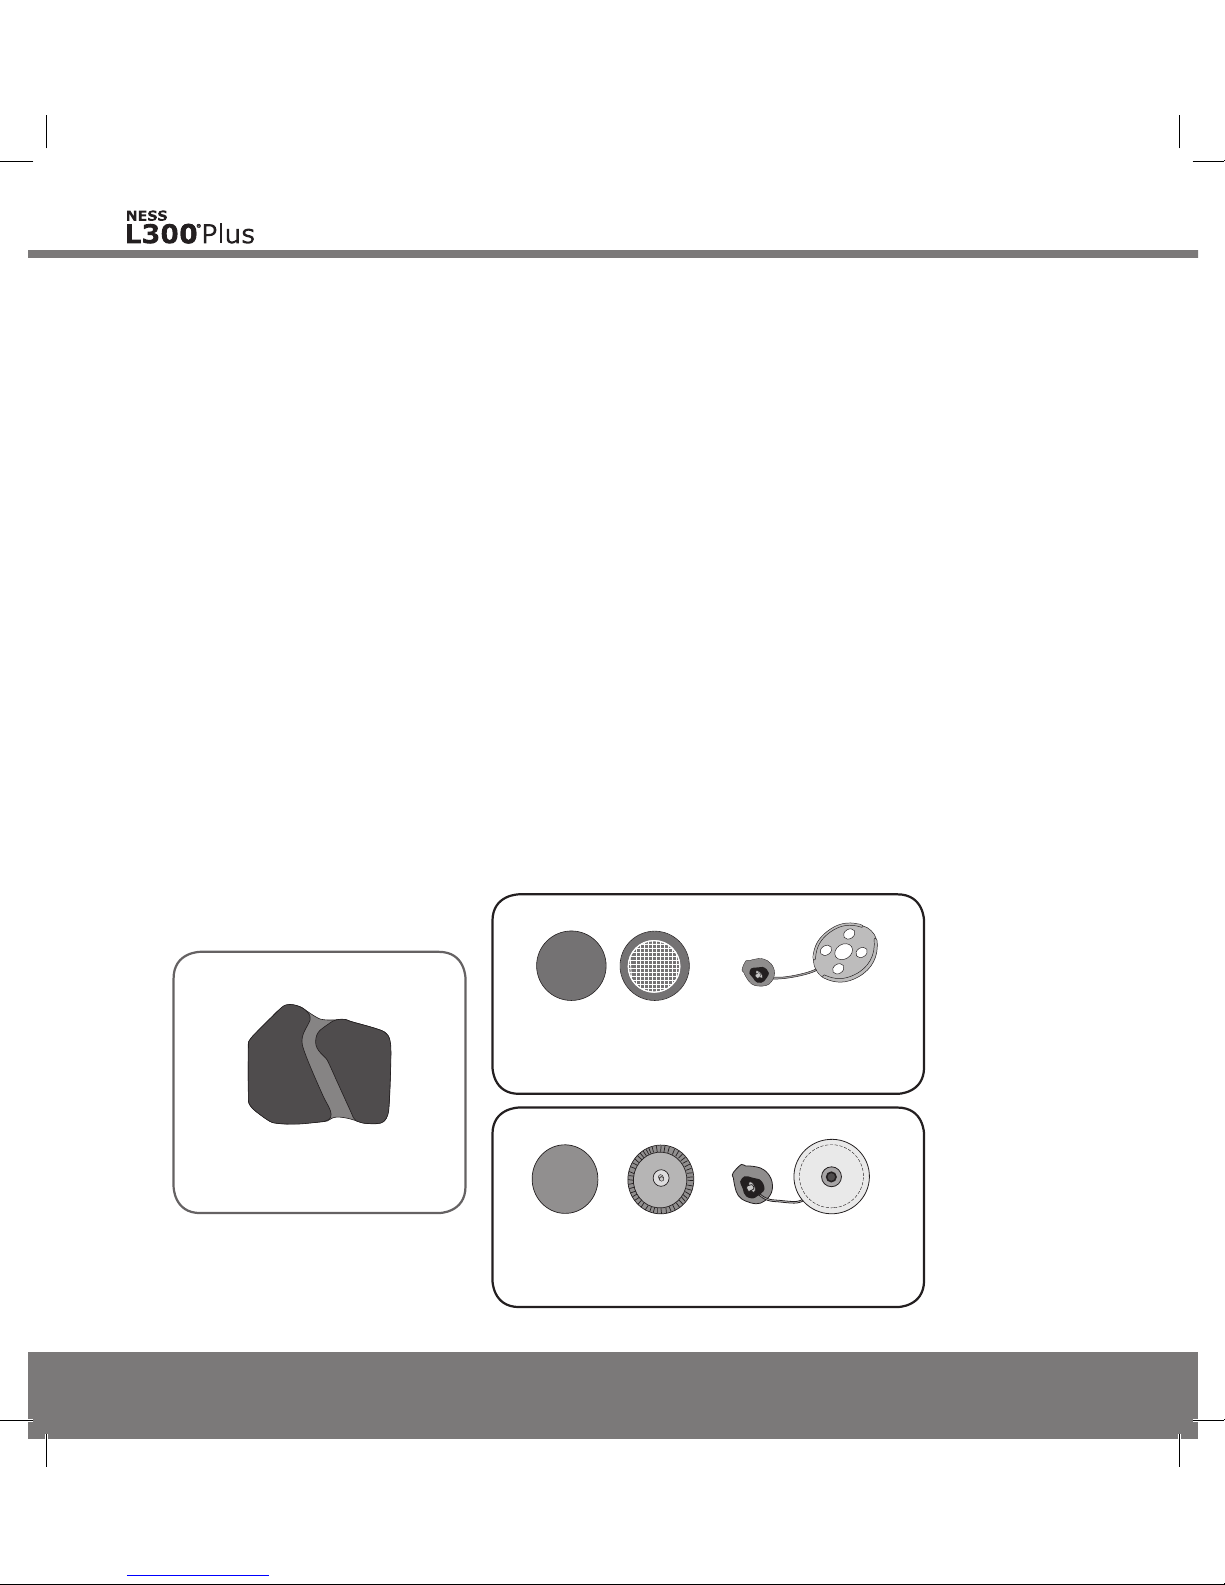
• Large Cloth Electrode*
• L300 Hydrogel Electrodes and Bases*
• L300 Cloth Electrodes and Bases*
• Thigh Cloth Electrodes
• Cloth Electrode Mesh Bag
• Carrying Case
• L300 Plus User’s Guide
• User’s Reference Card
*One L300 electrode type included, as determined by your clinician.
L300 Hydrogel
Electrode
L300 Cloth
Electrode
L300 Hydrogel
Electrode Base
L300 Cloth
Electrode Base
L300 Large Cloth Electrode
Mp612-00313-001_RevB.indd 16 7/18/2011 4:14:08 PM
Page 27
17
Chapter 4 - NESS L300 Plus System Kits
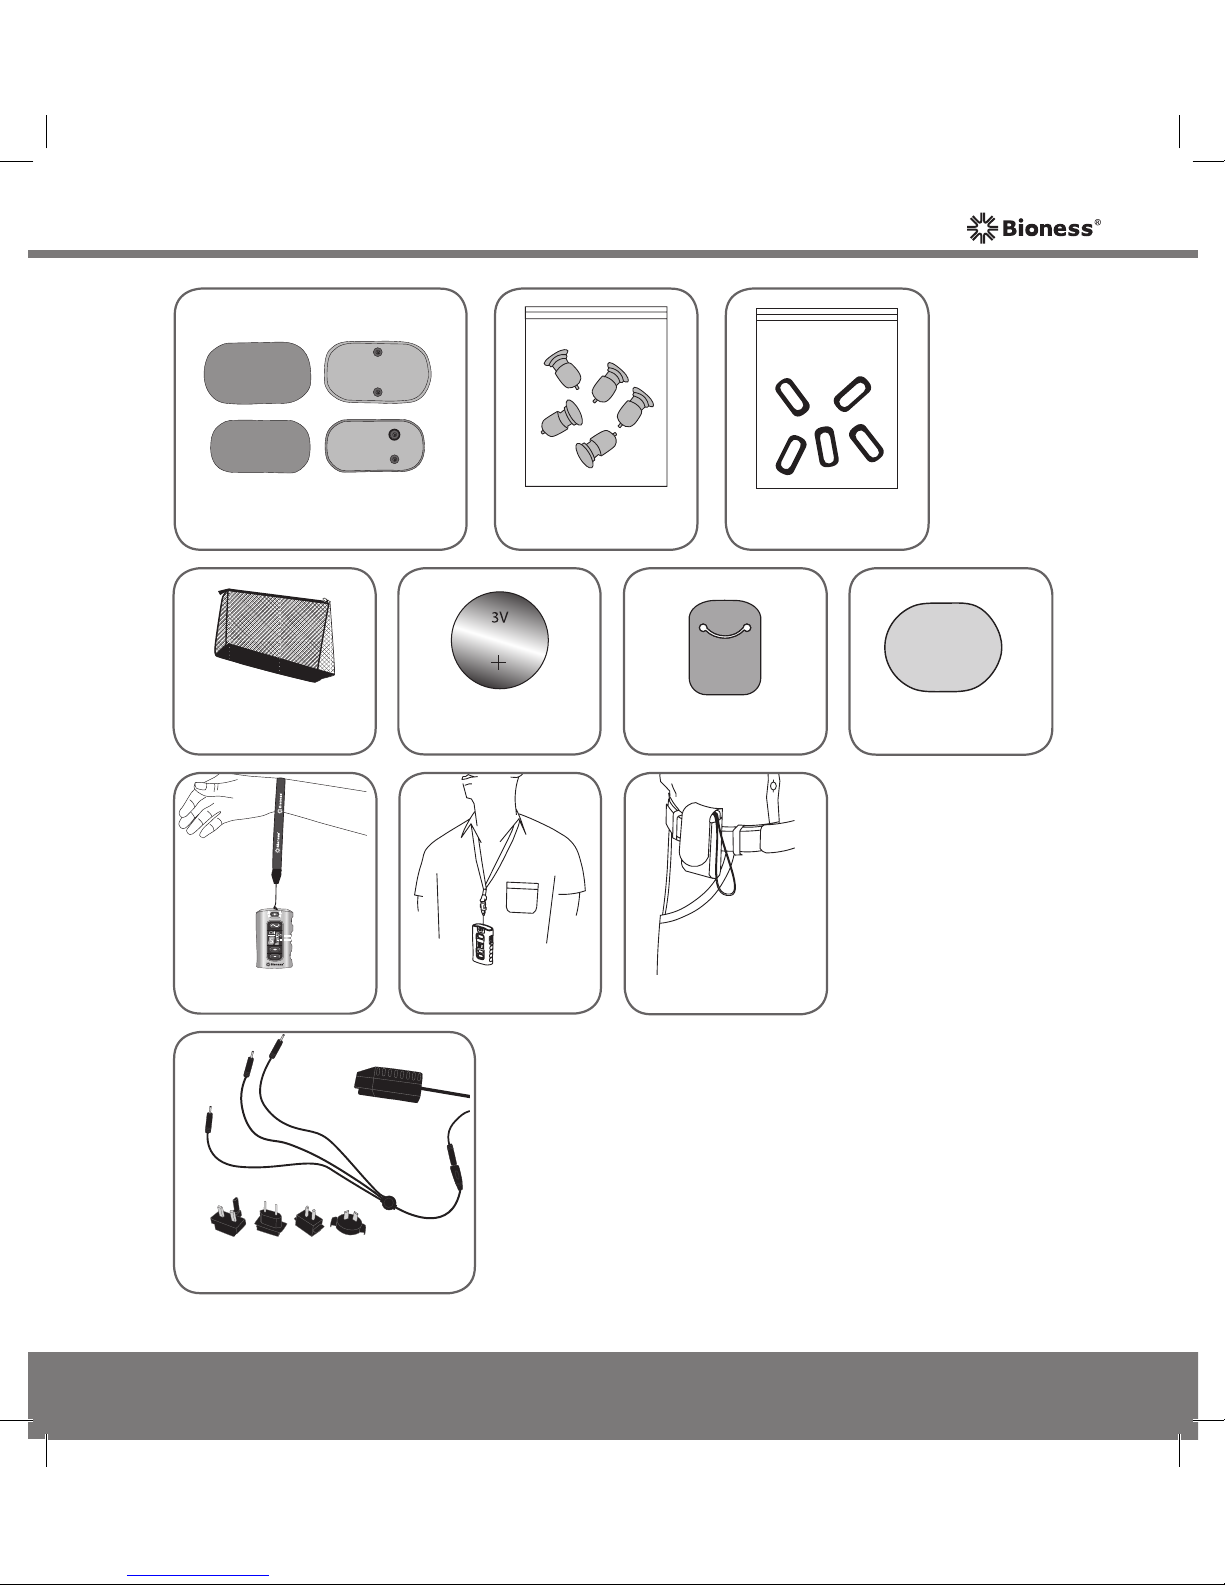
Control Unit Wrist Strap
Control Unit Belt Pouch
Control Unit Neck Strap
System Charger Set
Replacement Battery,
Gait Sensor
Gait Sensor Pad
Shoe Spacer
Cloth Electrode
Mesh Bag
Thigh Elongation Bar
Locks
Thigh Electrode
Marking Rings
Thigh Cloth Electrodes
Mp612-00313-001_RevB.indd 17 7/18/2011 4:14:12 PM
Page 28
18
User's Guide
NESS L300 Plus System Upgrade Kit
The NESS L300 Plus System Upgrade Kit is for individuals who have a NESS
L300 Foot Drop System.
System Components
• L300 Plus Control Unit
• Thigh FS Cuff and RF Stim Unit
Accessories
• System Charger Set
• Thigh Elongation Bar Locks
• Thigh Electrode Marking Rings
• Thigh Cloth Electrodes
• Carrying Case
• Control Unit Neck Strap
• Control Unit Wrist Strap
• Control Unit Belt Pouch
• Cloth Electrode Mesh Bag
• L300 Plus User’s Guide
• User's Reference Card
IMPORTANT! Bring your NESS L300 Foot Drop System to your L300 Plus
fitting session.
Mp612-00313-001_RevB.indd 18 7/18/2011 4:14:12 PM
Page 29
19
Chapter 5 - NESS L300 Plus System
5
NESS L300 Plus System
L300 Functional Stimulation (FS) Cuff
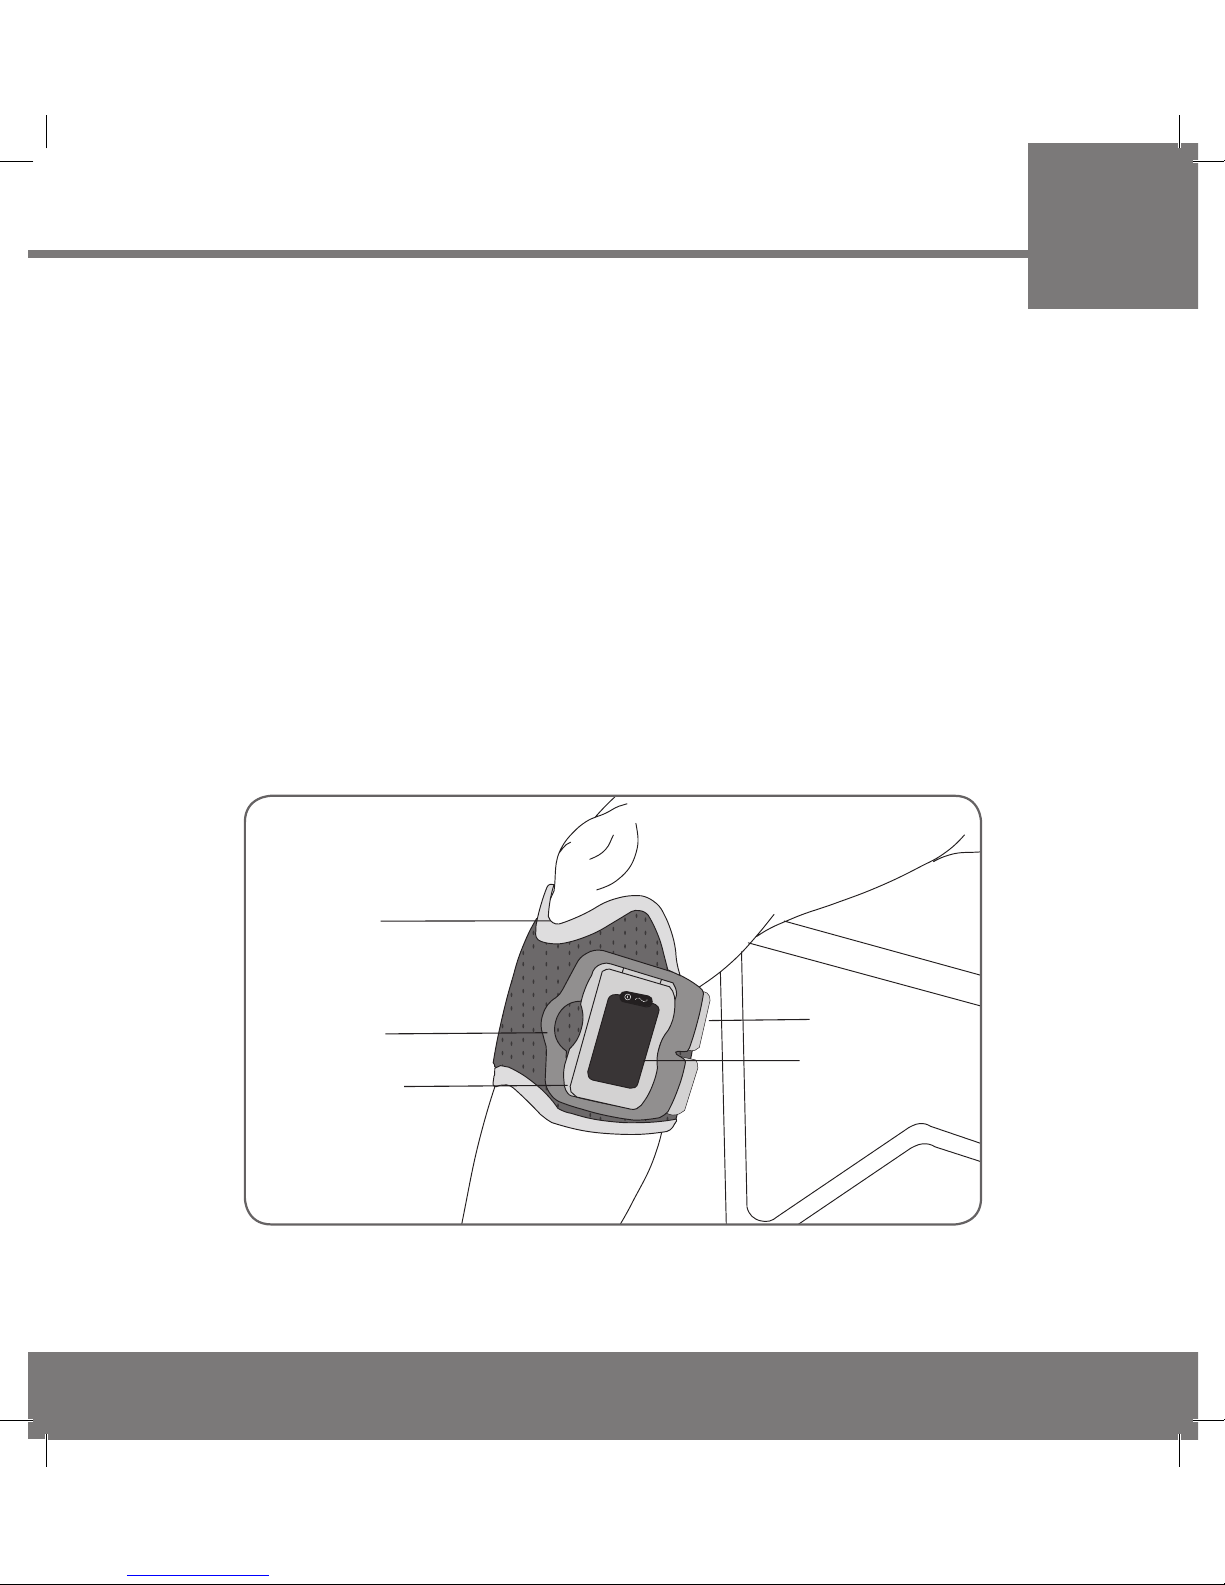
The L300 FS Cuff fits on the affected leg below the knee. See Figure 5-1. The
L300 FS Cuff is designed to facilitate dorsiflexion of the foot. It is lightweight,
easy to put on with one hand, and can be worn under loose clothing.
The L300 FS Cuff features a radio frequency (RF) stimulation unit that
communicates wirelessly with the L300 Plus Control Unit and Intelli-Sense
Gait Sensor.
Figure 5-1: L300 FS Cuff.
Locator
Strap
Handle
Cradle
L300 RF
Stim Unit
Strap
Mp612-00313-001_RevB.indd 19 7/18/2011 4:14:13 PM
Page 30
20
User's Guide
Locator
The locator fits under the kneecap of the affected leg. The locator is used
to accurately place the L300 FS Cuff on the leg, and to ensure repeatable
electrode contact.
Cradle
The cradle holds the L300 RF Stim Unit. The L300 RF Stim Unit snaps in
and out of the cradle.
Note: The L300 RF Stim Unit should only be removed for maintenance and
when cleaning the L300 FS Cuff.
Strap
The L300 FS Cuff strap is adjustable and has a flexible handle, which fits
over the cradle to fasten.
L300 Electrodes and Electrode Bases
The following electrodes may be used with the L300 FS Cuff:
• Large Cloth Electrode, L300 systems.
• L300 Hydrogel Electrodes and Hydrogel Electrode Bases.
• L300 Cloth Electrodes and Cloth Electrode Bases.
The electrodes attach to the inside of the L300 FS Cuff. Your clinician will
determine the type of electrodes most appropriate for you and then fit the
electrodes to your L300 FS Cuff.
CAUTION: Do not wear the L300 FS Cuff without electrodes.
Mp612-00313-001_RevB.indd 20 7/18/2011 4:14:13 PM
Page 31
21
Chapter 5 - NESS L300 Plus System
L300 RF Stim Unit
The L300 RF Stim Unit generates the electrical stimulation used to dorsiflex
the foot. It responds to wireless signals from the L300 Plus Control Unit and
the Intelli-Sense Gait Sensor to turn stimulation on/off.
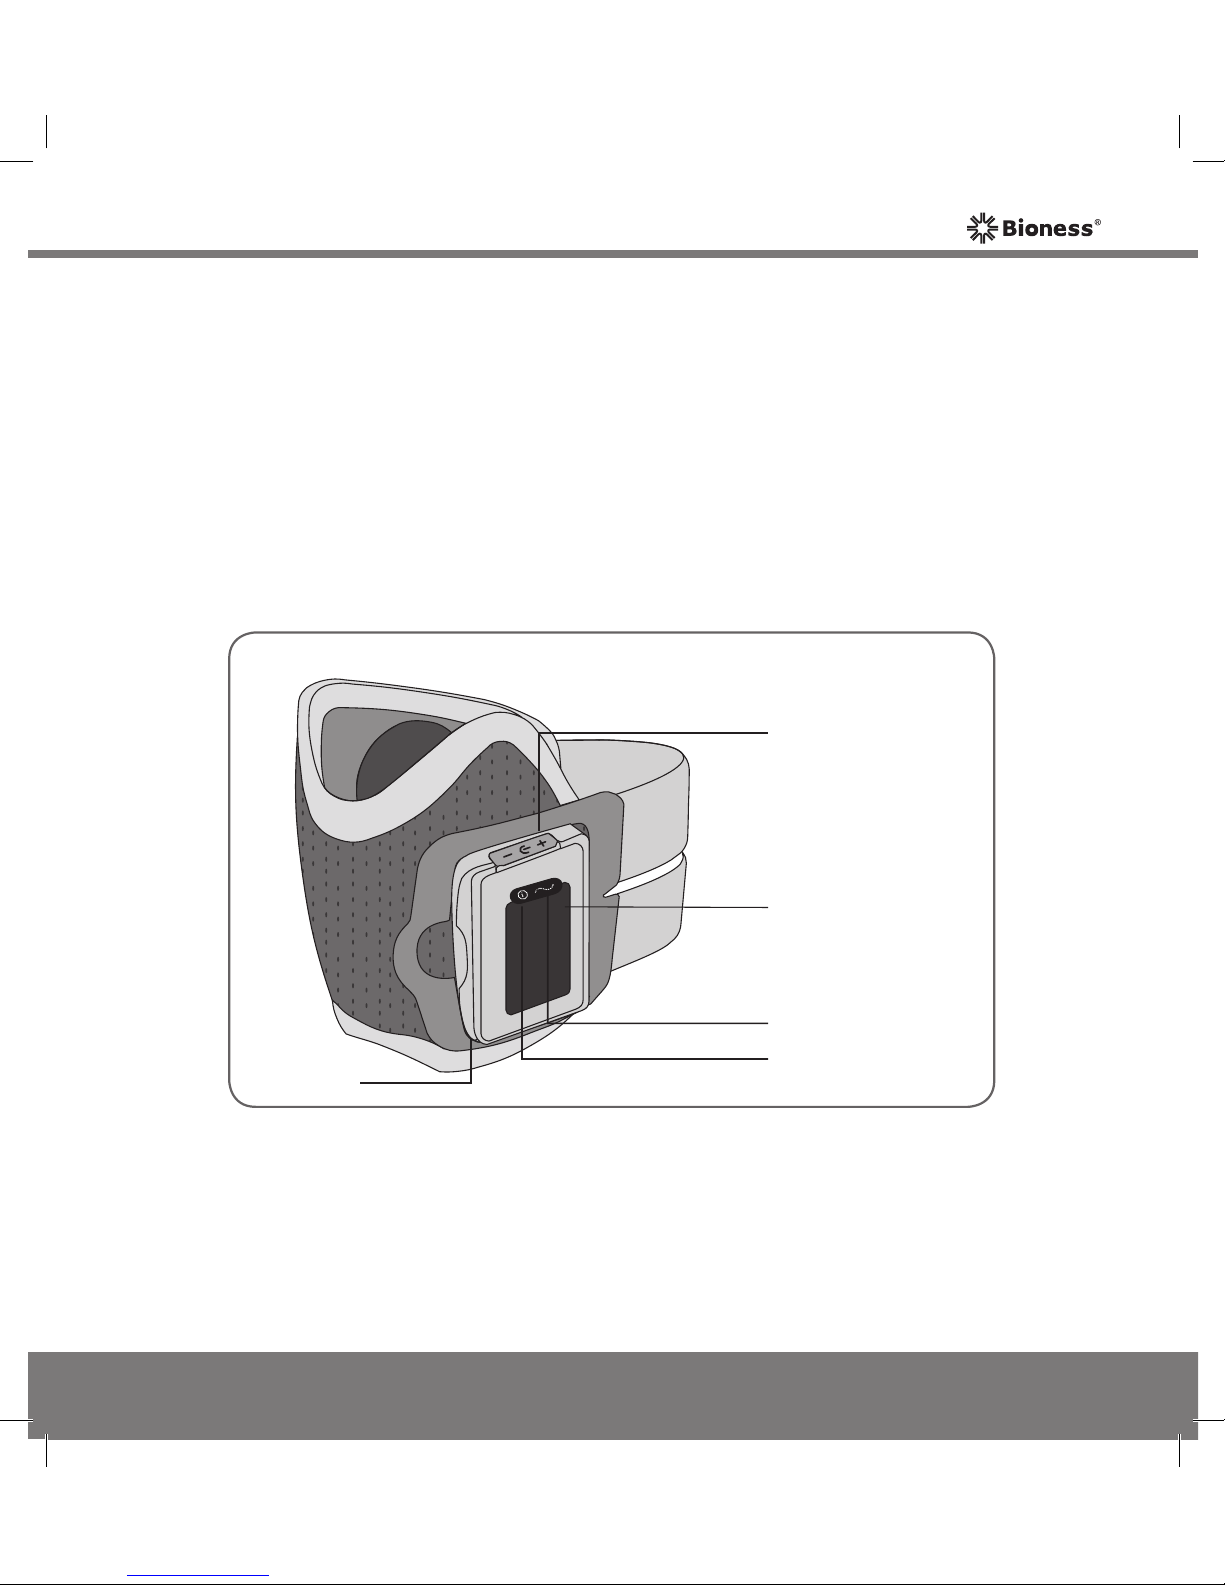
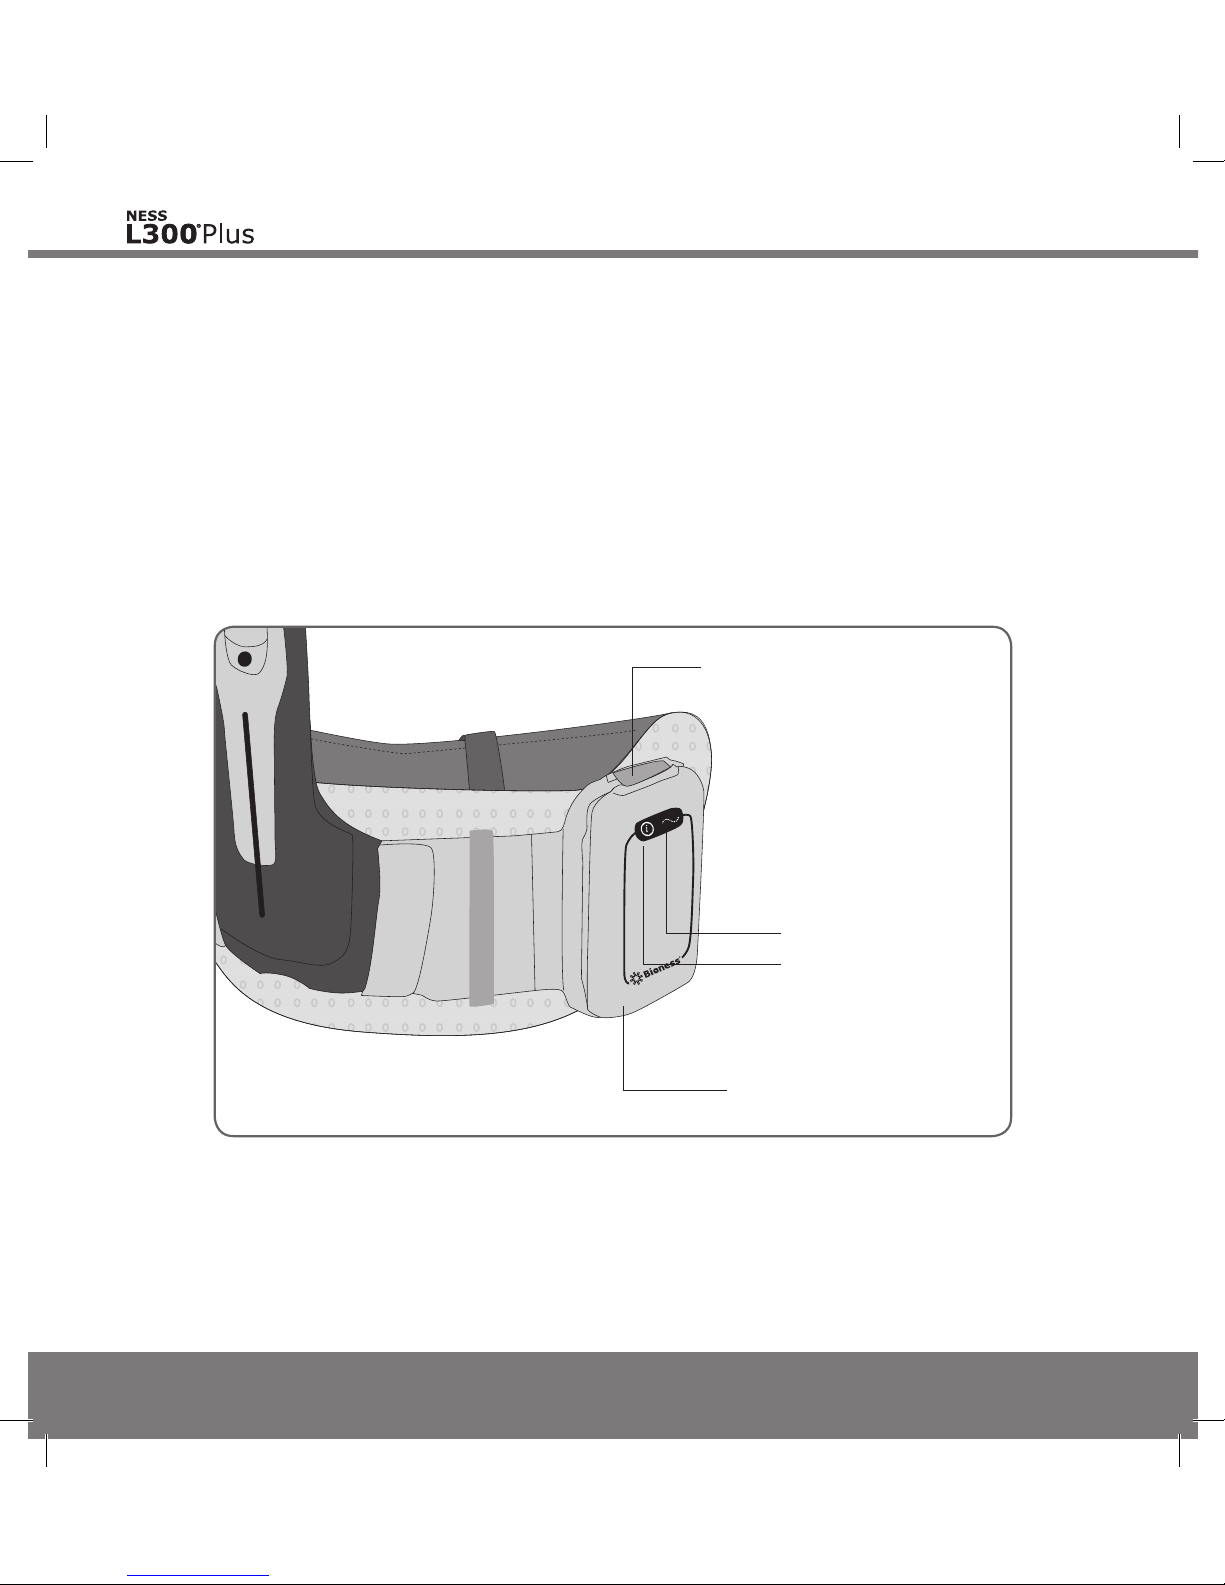
The L300 RF Stim Unit includes a status light, a stimulation light, and a
rechargeable battery. The battery charging port is located at the top of the
L300 RF Stim Unit, under the flexible cover. See Figure 5-2.
Figure 5-2: L300 RF Stim Unit.
Charging
Port under
Flexible
Cover
Cradle
Status Light
Stimulation Light
L300 RF
Stim Unit
Mp612-00313-001_RevB.indd 21 7/18/2011 4:14:13 PM
Page 32
22
User's Guide
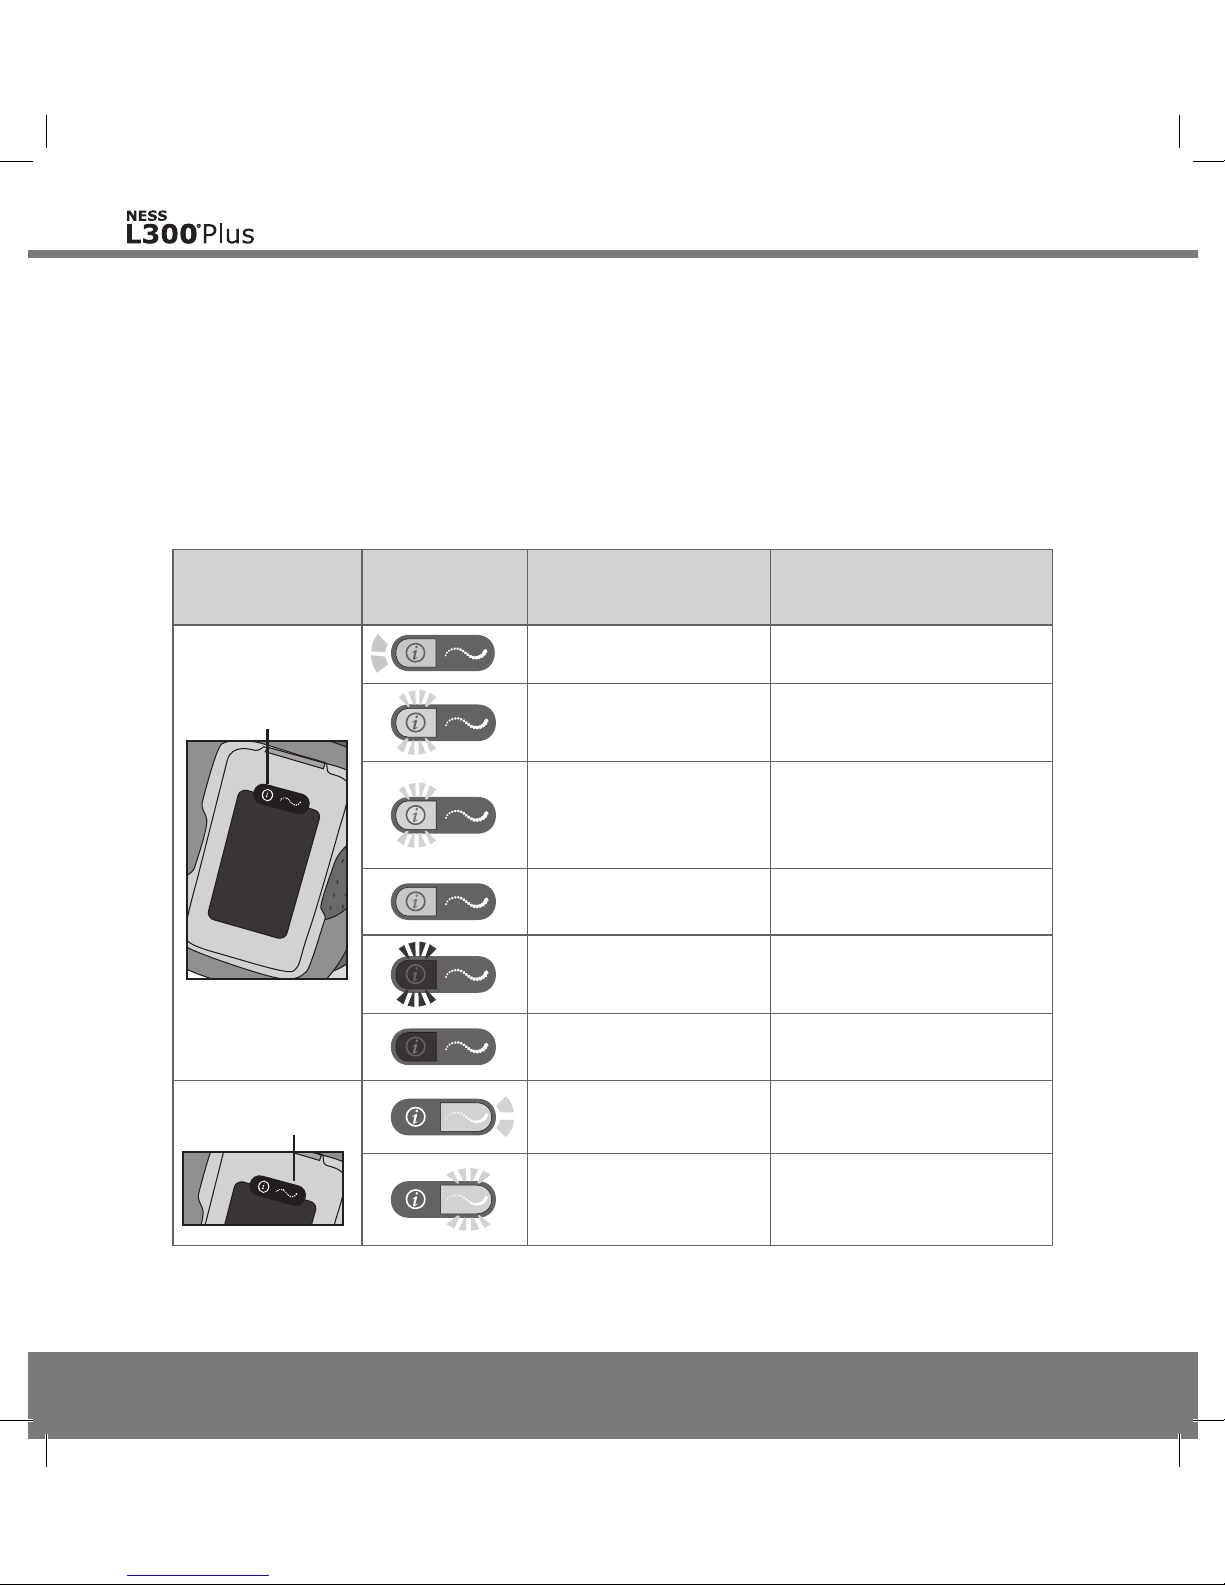
The L300 RF Stim Unit emits visual and/or audio alerts when:
• Stimulation is on.
• RF communication with the L300 RF Stim Unit fails.
• The L300 RF Stim Unit battery charge level is low.
• The L300 RF Stim Unit battery is charging.
• The L300 RF Stim Unit malfunctions. See Table 5-1.
L300
RF Stim Unit
Display Description Definition
Status Light
FLASHES GREEN System is On
FLASHES YELLOW Low Battery
ALTERNATELY
FLASHES YELLOW
and GREEN
Battery Charging
SOLID GREEN Battery Fully Charged
FLASHES RED RF Communication Failure
SOLID RED Malfunction
Stimulation
Light
FLASHES YELLOW
SLOWLY
Stimulation is Off
FLASHES YELLOW
RAPIDLY
Stimulation is On
Table 5-1: L300 RF Stim Unit displays.
Mp612-00313-001_RevB.indd 22 7/18/2011 4:14:15 PM
Page 33
23
Chapter 5 - NESS L300 Plus System
Thigh FS Cuff
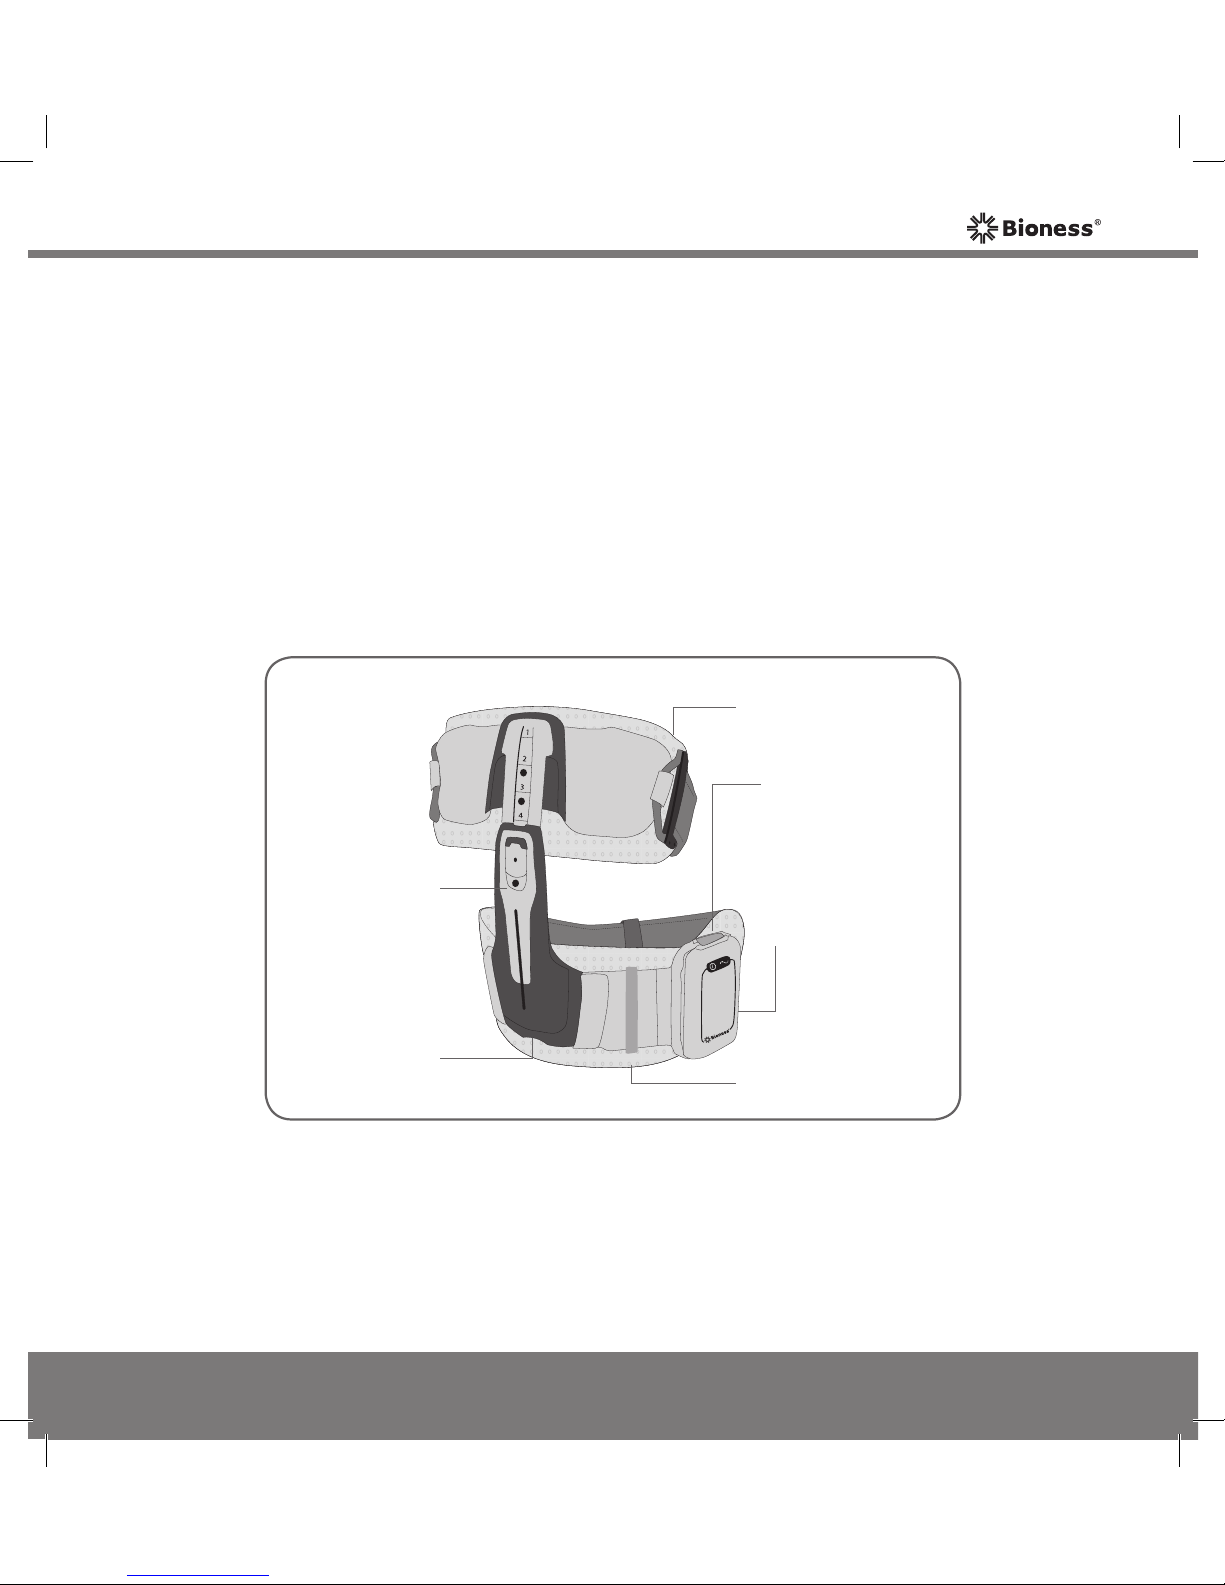
The Thigh FS Cuff is a lightweight, low-profile orthosis designed to assist
with knee flexion or extension. See Figure 5-3. The Thigh FS Cuff fits above
the affected knee, centered on the back or front of the thigh.
The Thigh FS Cuff features an RF stimulation unit that communicates wirelessly
with the L300 Plus Control Unit and Intelli-Sense Gait Sensor.
Figure 5-3: Thigh FS Cuff.
Cradle
Locator
Elongation
Bar
Thigh RF Stim
Unit
Top Panel
Bottom Panel
Mp612-00313-001_RevB.indd 23 7/18/2011 4:14:16 PM
Page 34
24
User's Guide
Panels
The Thigh FS Cuff features two panels. The top panel fits higher on the thigh.
The bottom panel fits lower on the thigh. The bottom panel has a cradle for
the Thigh RF Stim Unit.
Elongation Bar
The elongation bar connects the top and bottom Thigh FS Cuff panels. Your
clinician will adjust the elongation bar and lock it.
Locator
The Thigh FS Cuff locator should rest on the center of the thigh, three finger
widths from the knee of the affected leg. The locator is used to accurately
place the Thigh FS Cuff on the leg, and to ensure repeatable electrode contact.
Cradle
The cradle holds the Thigh RF Stim Unit. The Thigh RF Stim Unit snaps in
and out of the cradle.
Note: The Thigh RF Stim Unit should only be removed for maintenance and
when cleaning the Thigh FS Cuff.
Mp612-00313-001_RevB.indd 24 7/18/2011 4:14:16 PM
Page 35
25
Chapter 5 - NESS L300 Plus System
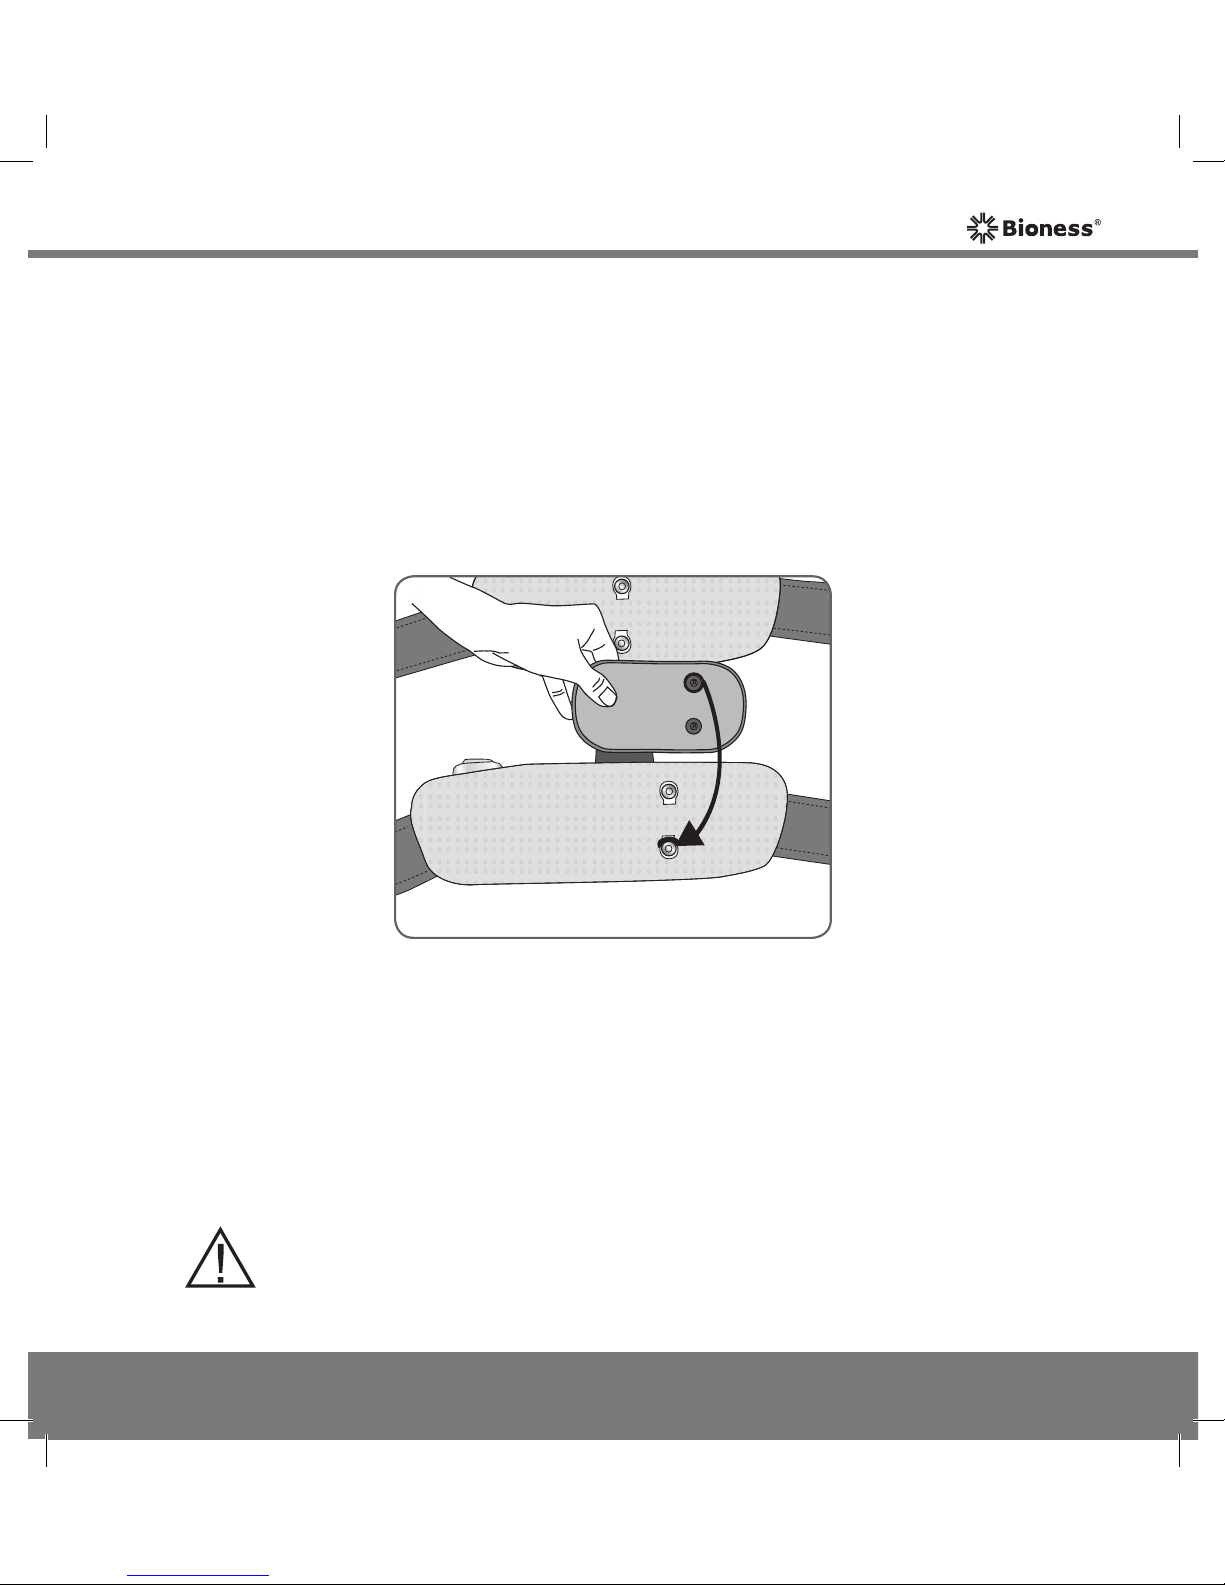
Figure 5-4: Snapping the small Thigh cloth electrode to the bottom panel.
CAUTION: Do not wear the Thigh FS Cuff without the cloth
electrodes.
Thigh Cloth Electrodes
The Thigh FS Cuff uses two cloth electrodes to provide electrical stimulation.
The large Thigh cloth electrode snaps to the Thigh FS Cuff top panel. The
small Thigh cloth electrode snaps to the Thigh FS Cuff bottom panel. See
Figure 5-4.
Mp612-00313-001_RevB.indd 25 7/18/2011 4:14:18 PM
Page 36
26
User's Guide
Thigh RF Stim Unit
The Thigh RF Stim Unit generates the electrical stimulation used to flex or
extend the knee. It responds to wireless signals from the L300 Plus Control
Unit and the Intelli-Sense Gait Sensor to turn stimulation on/off.
The Thigh RF Stim Unit includes a status light, a stimulation light, and a
rechargeable battery. See Figure 5-5. The battery charging port is located
at the top of the Thigh RF Stim Unit, under the flexible cover.
Figure 5-5: Thigh RF Stim Unit.
Charging Port Under
Flexible Cover
Thigh RF Stim Unit
Stimulation Light
Status Light
Mp612-00313-001_RevB.indd 26 7/18/2011 4:14:18 PM
Page 37
27
Chapter 5 - NESS L300 Plus System
Thigh
RF Stim Unit
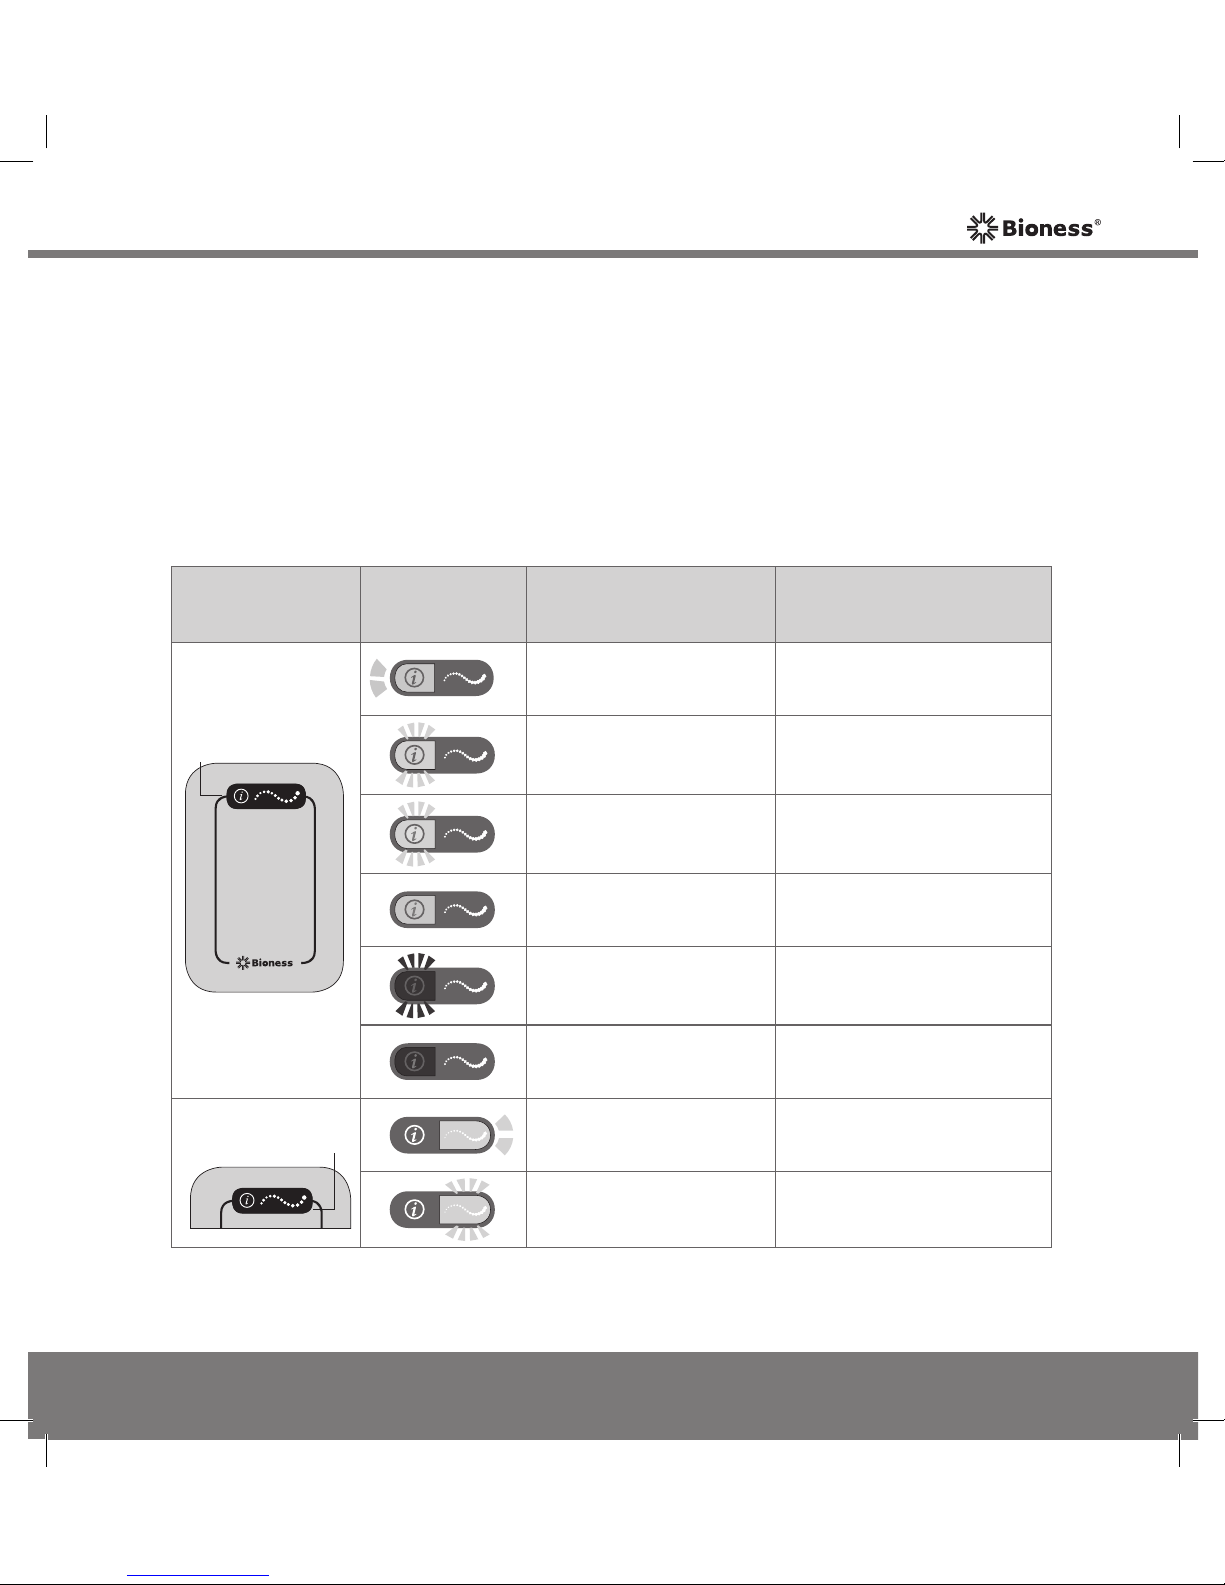
Display Description Definition
Status Light
FLASHES GREEN System is On
FLASHES YELLOW Low Battery
ALTERNATELY
FLASHES YELLOW
and GREEN
Battery Charging
SOLID GREEN Battery Fully Charged
FLASHES RED
RF Communication
Failure
SOLID RED Malfunction
Stimulation
Light
FLASHES YELLOW
SLOWLY
Stimulation is Off
FLASHES YELLOW
RAPIDLY
Stimulation is On
Table 5-2: Thigh RF Stim Unit displays.
The Thigh RF Stim Unit emits visual and/or audio alerts when:
• Stimulation is on.
• RF communication with the Thigh RF Stim Unit fails.
• The Thigh RF Stim Unit battery charge level is low.
• The Thigh RF Stim Unit battery is charging.
• The Thigh RF Stim Unit malfunctions. See Table 5-2.
Mp612-00313-001_RevB.indd 27 7/18/2011 4:14:19 PM
Page 38
28
User's Guide
Intelli-Sense Gait Sensor
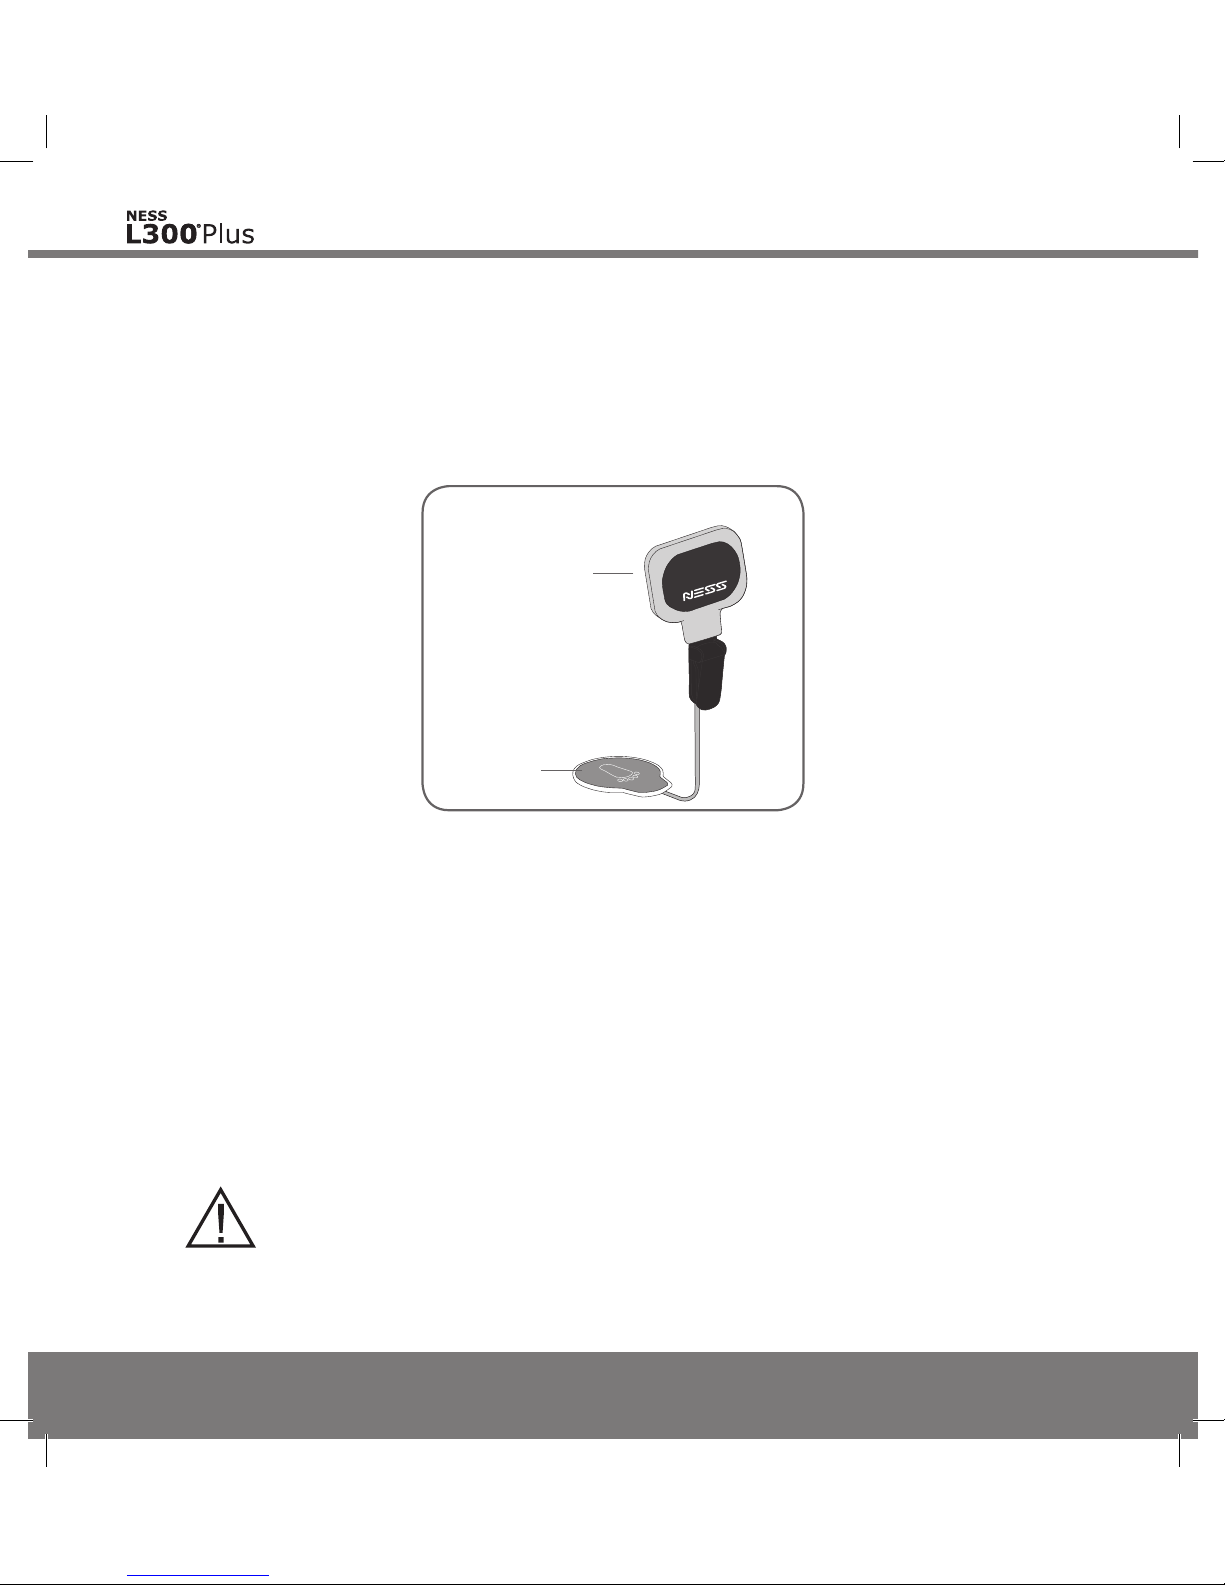
The Intelli-Sense Gait Sensor features a pressure sensor and a transmitter.
See Figure 5-6.
Figure 5-6: Intelli-Sense Gait Sensor.
Transmitter
Pressure
Sensor
The pressure sensor:
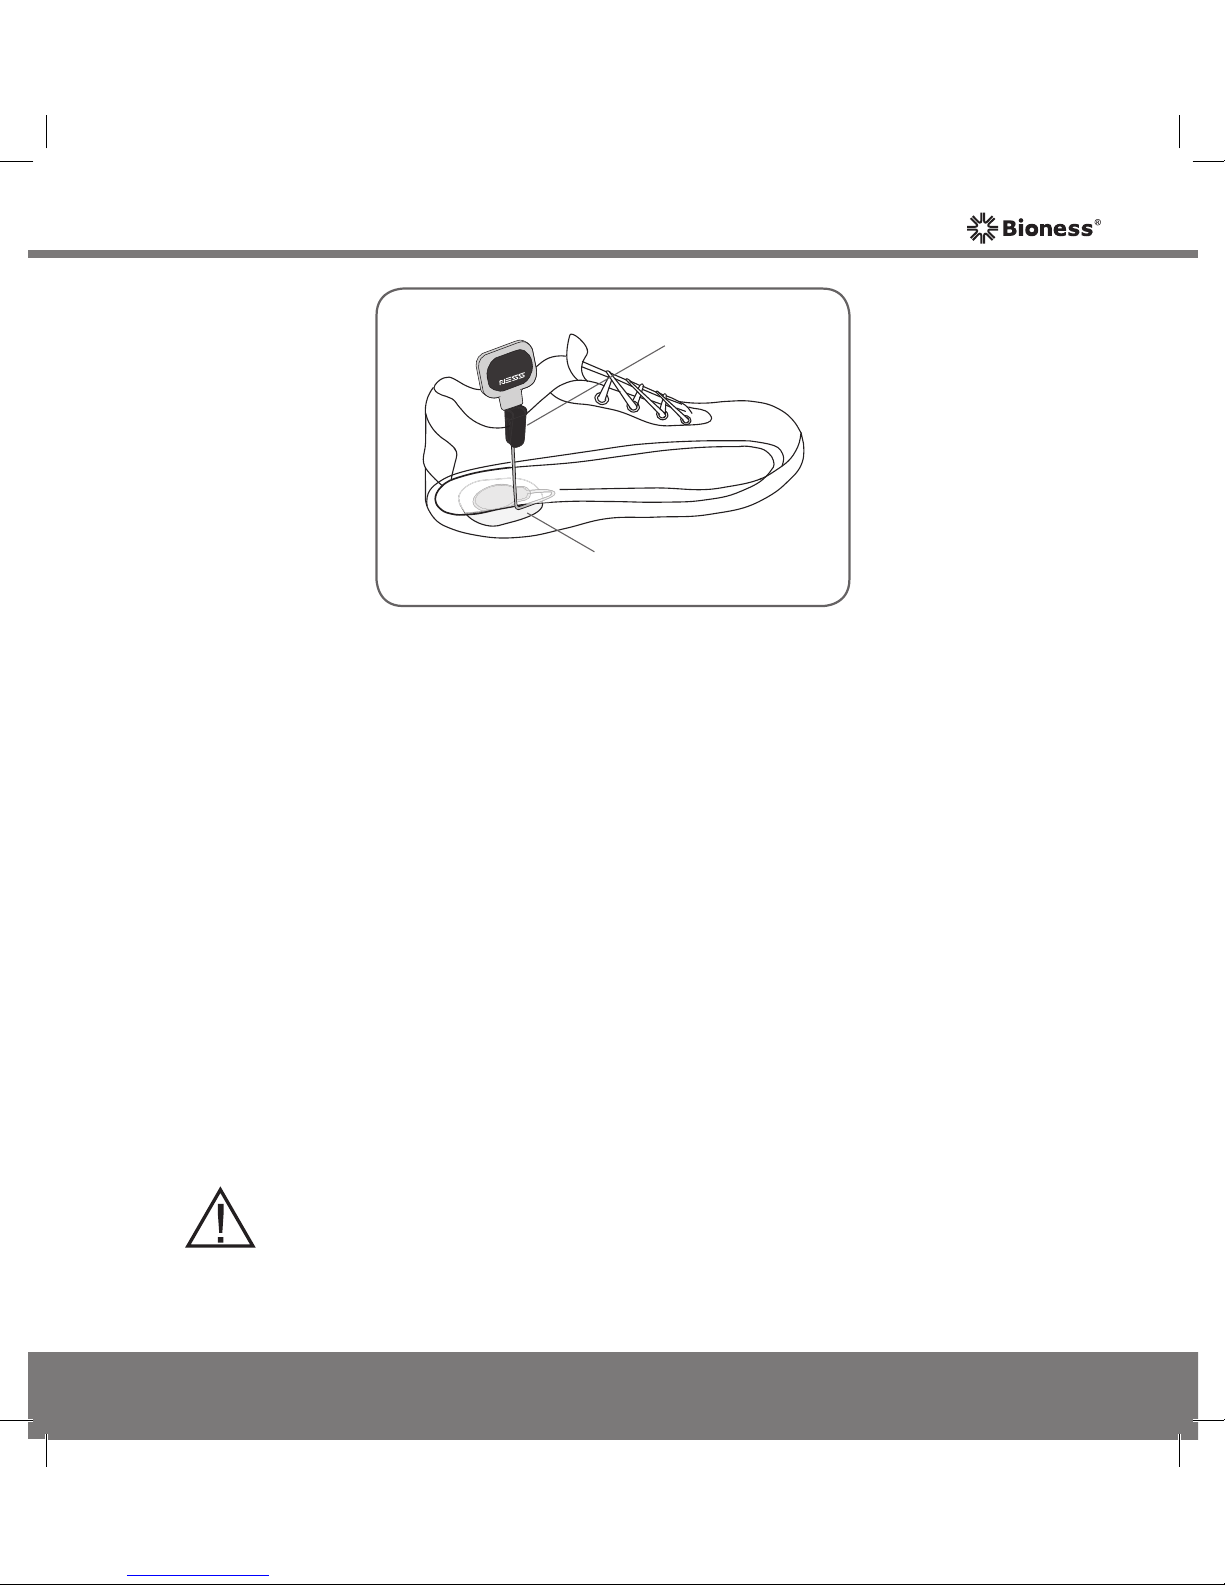
• Fits under the insole of the shoe of the affected leg, attached to a gait
sensor pad. See Figure 5-7.
• Detects when the foot is in the air and on the ground.
CAUTION: Do not use the Intelli-Sense Gait Sensor with a
rigid insole, such as a custom rigid orthosis or an ankle foot
orthosis.
Mp612-00313-001_RevB.indd 28 7/18/2011 4:14:19 PM
Page 39
29
Chapter 5 - NESS L300 Plus System
Clamp
Gait Sensor Pad
Figure 5-7: Intelli-Sense Gait Sensor in a left shoe.
The transmitter:
• Is worn clamped to the inner rim of the shoe. See Figure 5-7.
• Communicates wirelessly with the L300 and Thigh RF Stim Units.
The Intelli-Sense Gait Sensor can be transferred to a different shoe, or additional
Intelli-Sense Gait Sensors may be purchased for different shoes. You do not
need to detach the Intelli-Sense Gait Sensor between uses.
The Intelli-Sense Gait Sensor is powered by a small non-rechargeable battery.
The battery may need to be replaced after approximately six months of use.
CAUTION: The Intelli-Sense Gait Sensor has not been validated
for use by individuals weighing more than 136 kilograms.
Mp612-00313-001_RevB.indd 29 7/18/2011 4:14:19 PM
Page 40
30
User's Guide
L300 Plus Control Unit
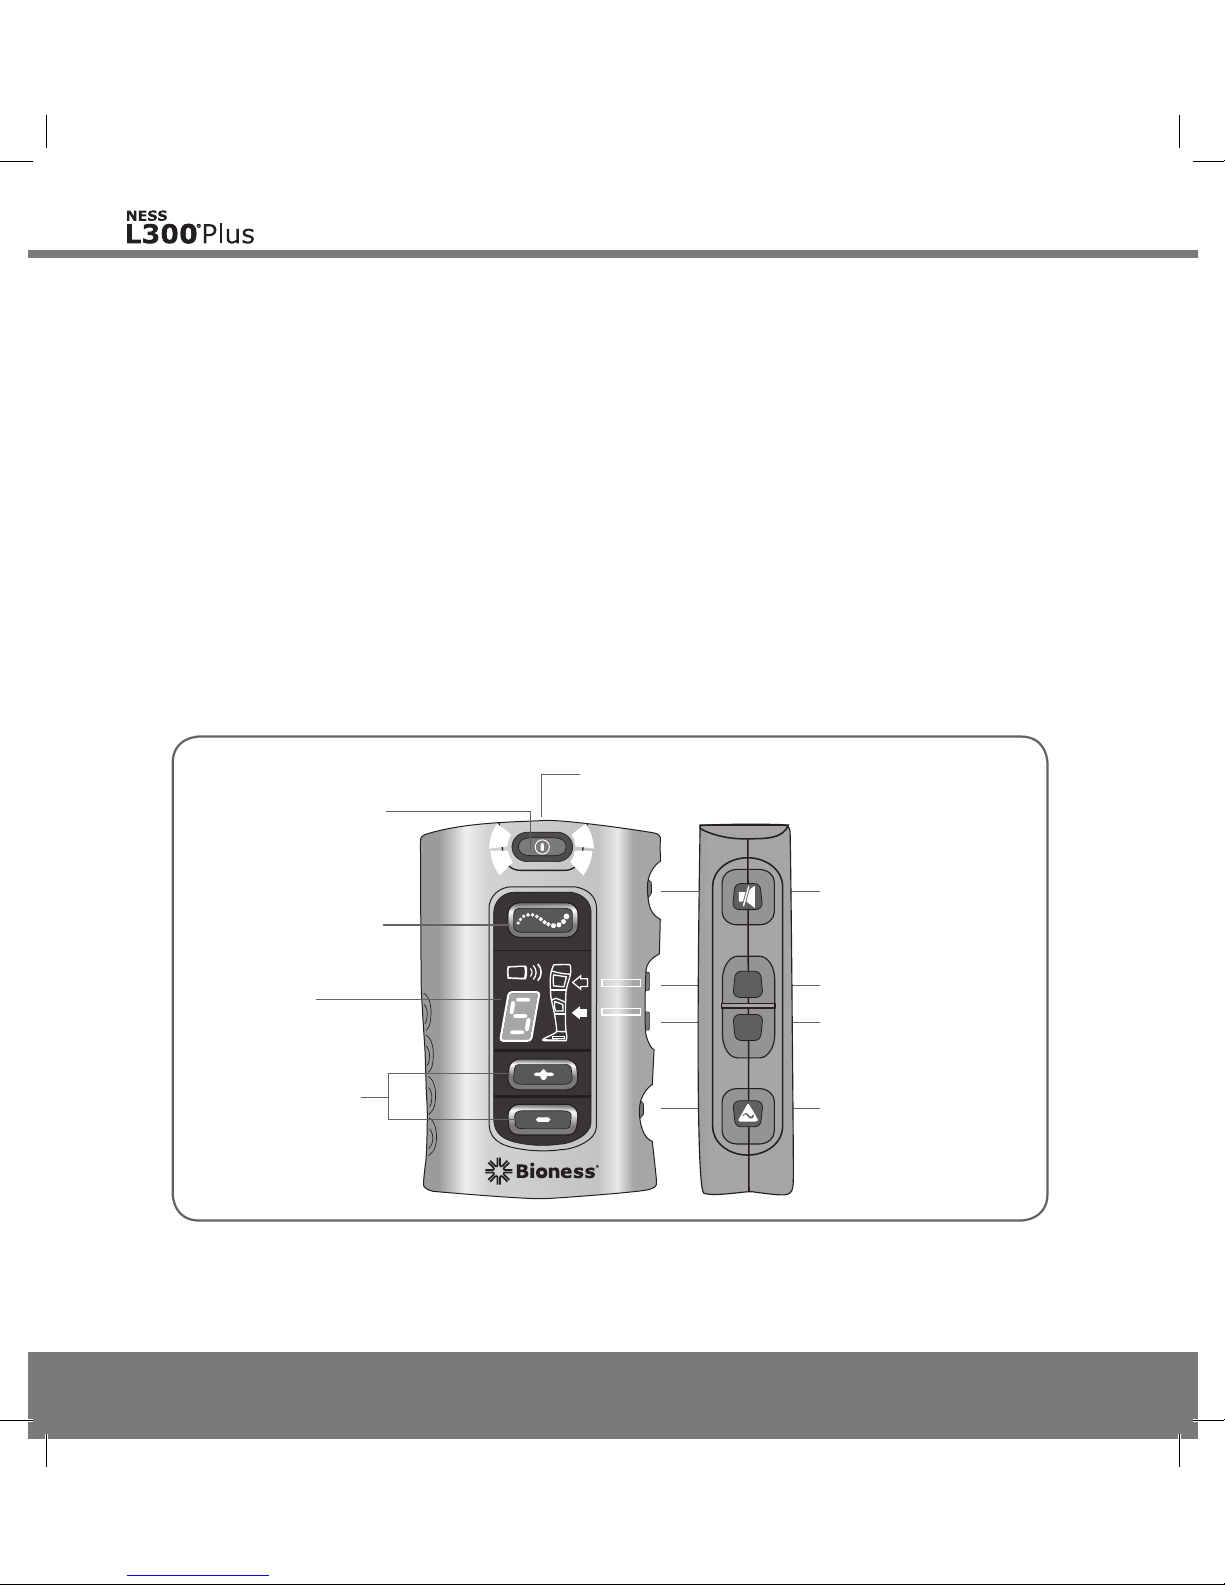
The L300 Plus Control Unit is used to:
• Turn on/off the NESS L300 Plus System.
• Test stimulation in the FS Cuffs.
• Select an operating mode (gait, training, or standby).
• Fine-tune stimulation intensity.
• Mute/un-mute system audio alerts.
• Turn off visual alerts.
• Turn on/off audio feedback during stimulation.
• Monitor system status. See Figure 5-8 and Table 5-3.
Figure 5-8: L300 Plus Control Unit operating buttons and digital display.
Mute Button
L300 RF Stim
Unit Selection
Button
Stimulation
Test Button
On/Off Button
Loop Hole for Wrist and Neck Straps
Mode Button
Intensity
Adjustment
(Plus/Minus)
Buttons
Digital
Display
Thigh RF Stim
Unit Selection
Button
Mp612-00313-001_RevB.indd 30 7/18/2011 4:14:20 PM
Page 41
31
Chapter 5 - NESS L300 Plus System
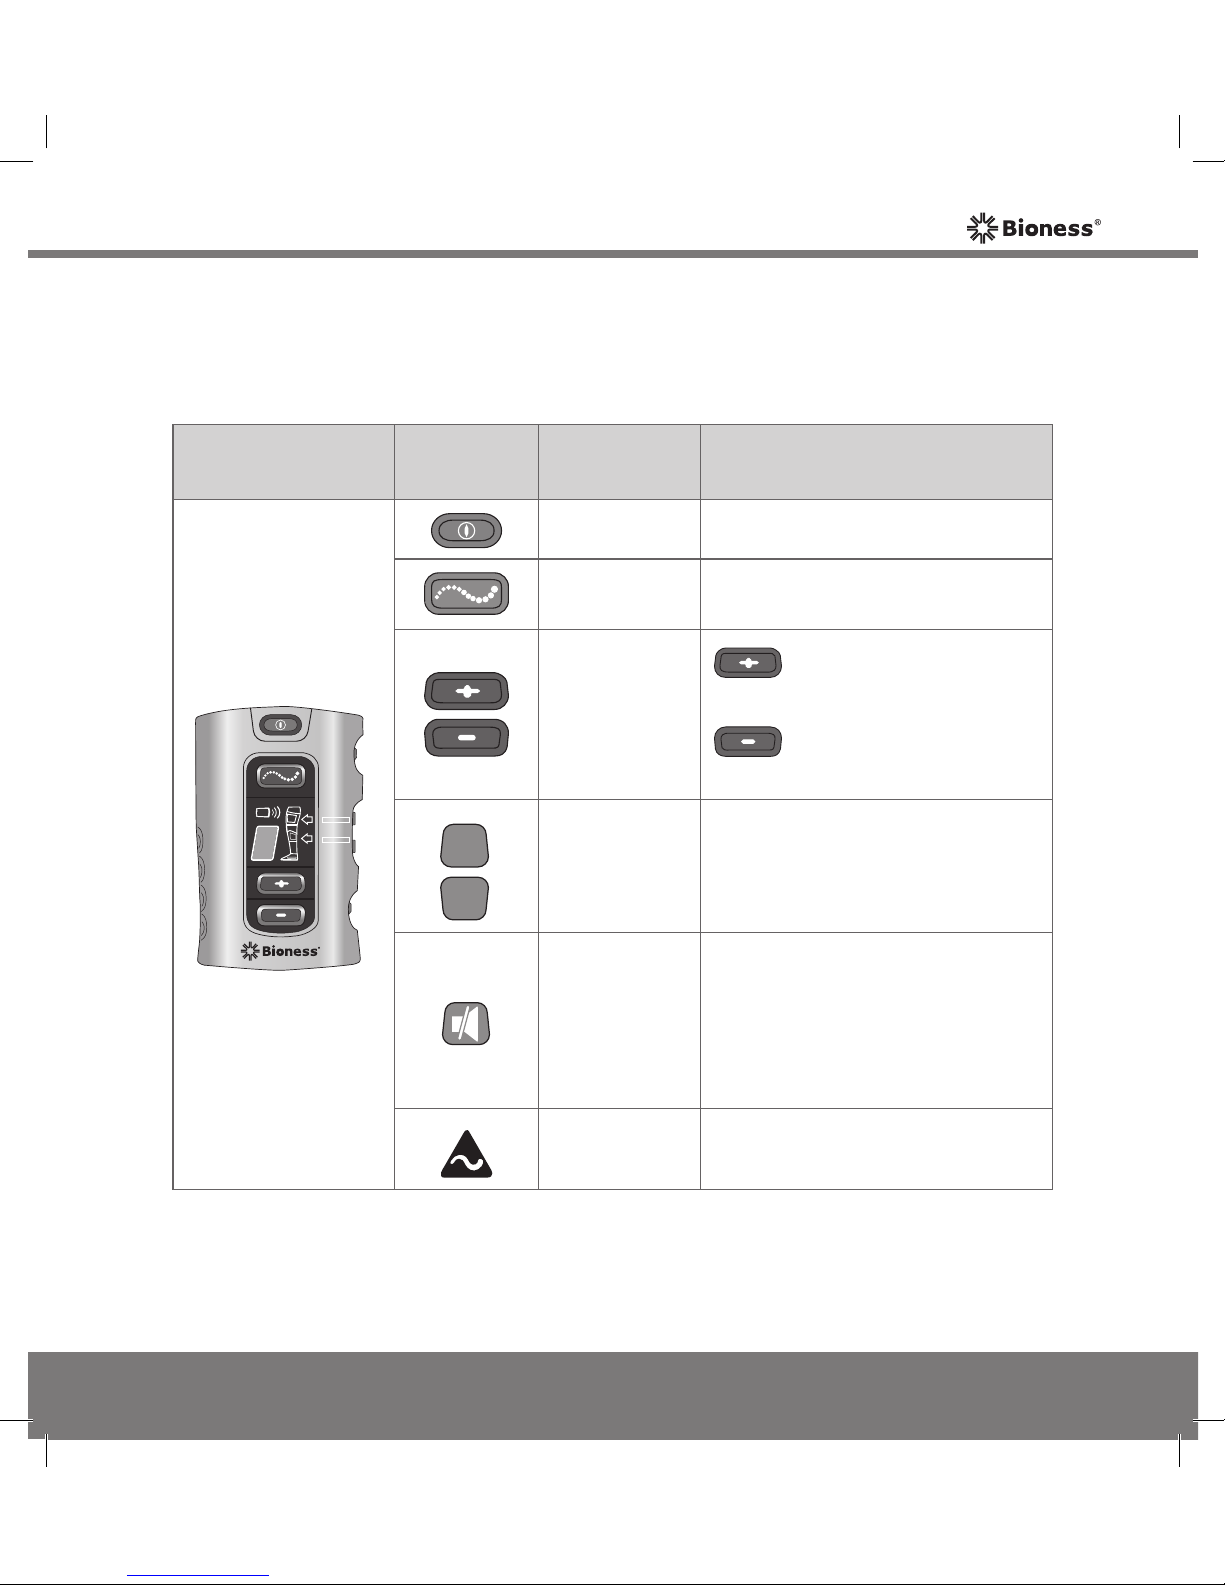
The L300 Plus Control Unit communicates wirelessly with the L300 and Thigh
RF Stim Units. It is powered by a single rechargeable AAA NiMH battery, and
is small enough to wear on a neck strap or in a belt pouch.
L300 Plus
Control Unit
Operating
Button
Description Function
On/Off Turns On/Off the System
Mode
Selects Standby, Gait, or
Training Mode
Intensity
Adjustment
(Plus/Minus)
Increases Stimulation
Intensity
Decreases Stimulation
Intensity
RF Stim Unit
Selection
Top: Selects the Thigh RF Stim
Unit.
Bottom: Selects the L300 RF
Stim Unit
Mute
Mutes/Un-Mutes the Control
Unit Audio Alerts; Turns Off the
Visual and Audio Indicators in
the Selected RF Stim Unit;
Turns On/Off Audio Feedback
During Stimulation
Stimulation
Test
Tests Stimulation for the
Selected RF Stim Unit
Table 5-3: L300 Plus Control Unit operating buttons.
Mp612-00313-001_RevB.indd 31 7/18/2011 4:14:22 PM
Page 42
32
User's Guide
Operating Modes
The L300 Plus System has three operating modes: standby, gait, and training.
Standby Mode
In standby mode, the NESS L300 Plus System is on and waiting for commands.
Stimulation is off.
Gait Mode
Gait mode is used when walking. In gait mode, the Intelli-Sense Gait Sensor
signals the L300 and Thigh RF Stim Units when the heel leaves the ground
and when the heel contacts the ground. Stimulation in the L300 and Thigh
RF Stim Units respond as programmed by the clinician.
Training Mode
Training mode is used to train the muscles when not walking (for example,
sitting or lying down). Training mode works independently of the Intelli-Sense
Gait Sensor. Stimulation is delivered in cycles pre-set by the clinician.
Training mode is designed to:
• Facilitate muscle re-education.
• Prevent or retard disuse atrophy of the lower leg and thigh muscles.
• Maintain or improve range of motion of the ankle and knee joints.
• Improve local blood circulation.
Mp612-00313-001_RevB.indd 32 7/18/2011 4:14:22 PM
Page 43
33
Chapter 5 - NESS L300 Plus System
Intelli-Sense Gait Sensor
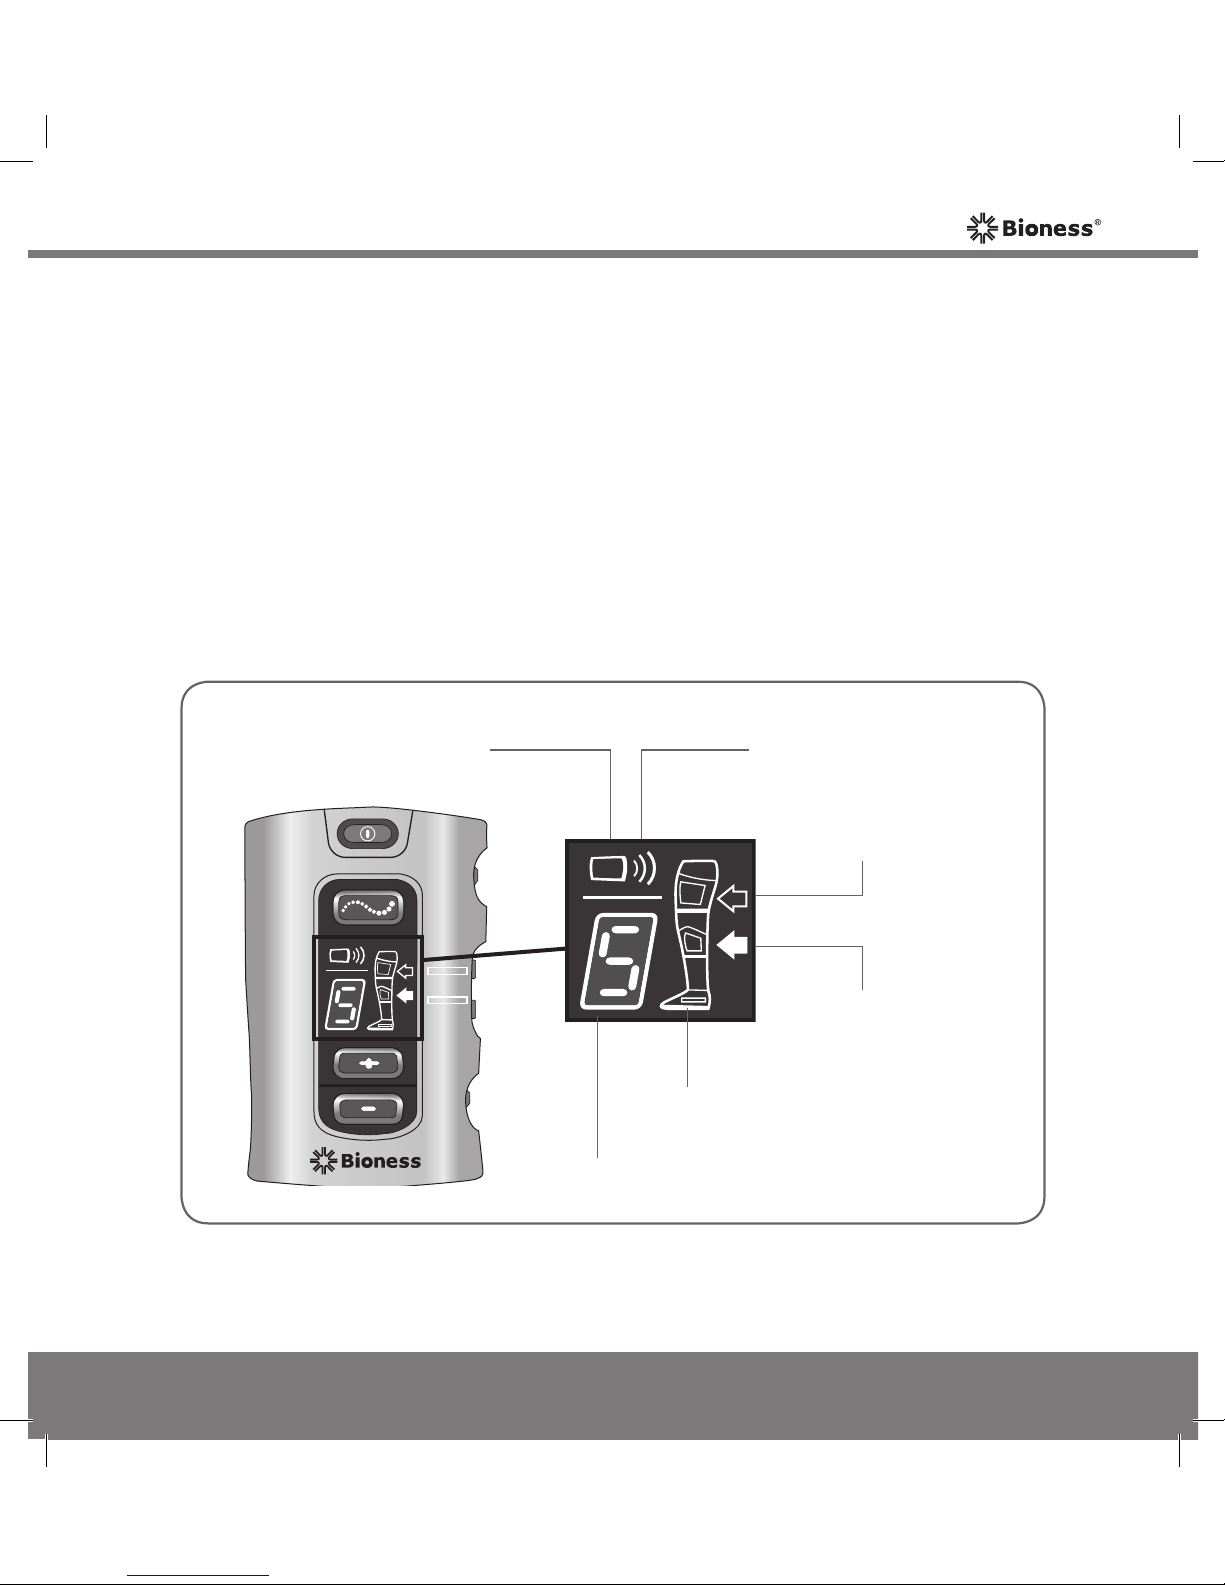
Indicator
Digital Display
L300 RF Stim Unit
Indicator/Selection
Arrow
L300 Plus Control Unit
Indicator
Thigh RF Stim Unit
Indicator/Selection
Arrow
RF Communication
Indicator
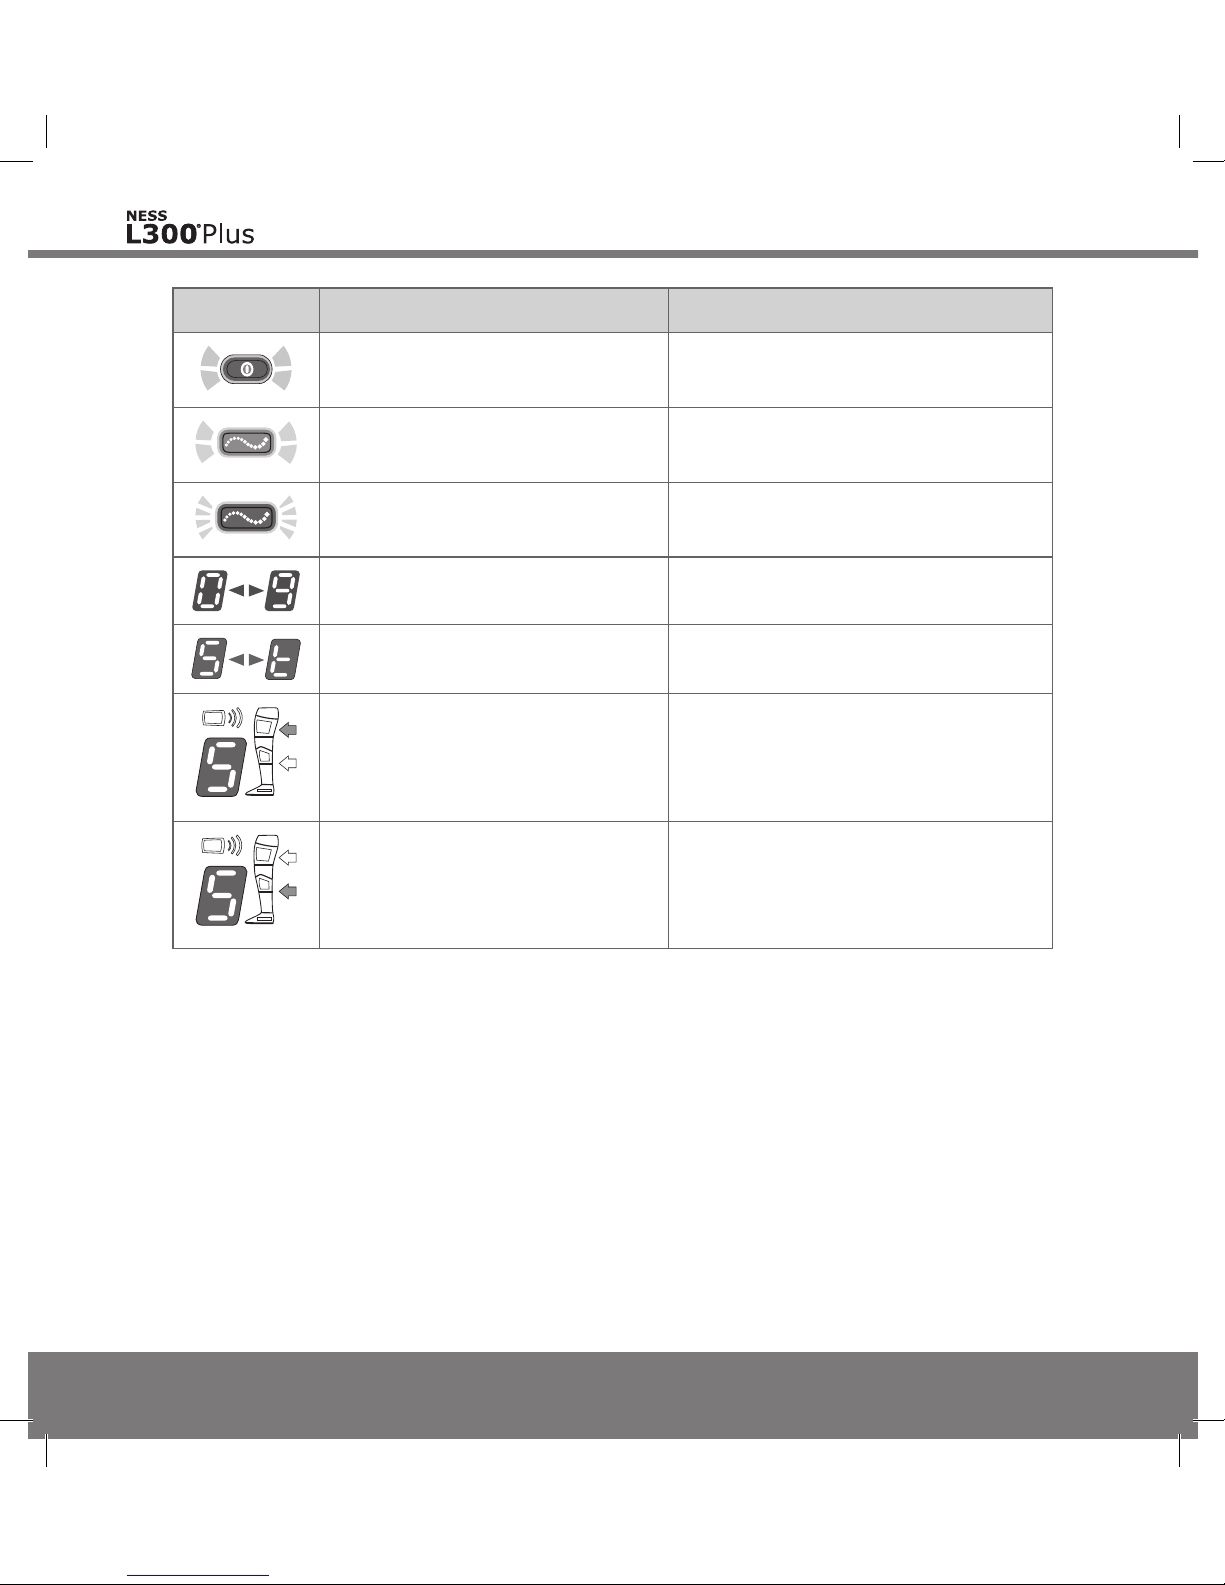
Figure 5-9: L300 Plus Control Unit digital display and indicators.
Digital Display and Indicator Lights
The L300 Plus Control Unit digital display and indicator lights indicate:
• Stimulation intensity level.
• Operating mode.
• Battery charge status.
• Electronic registration status.
• RF Stim Unit selected.
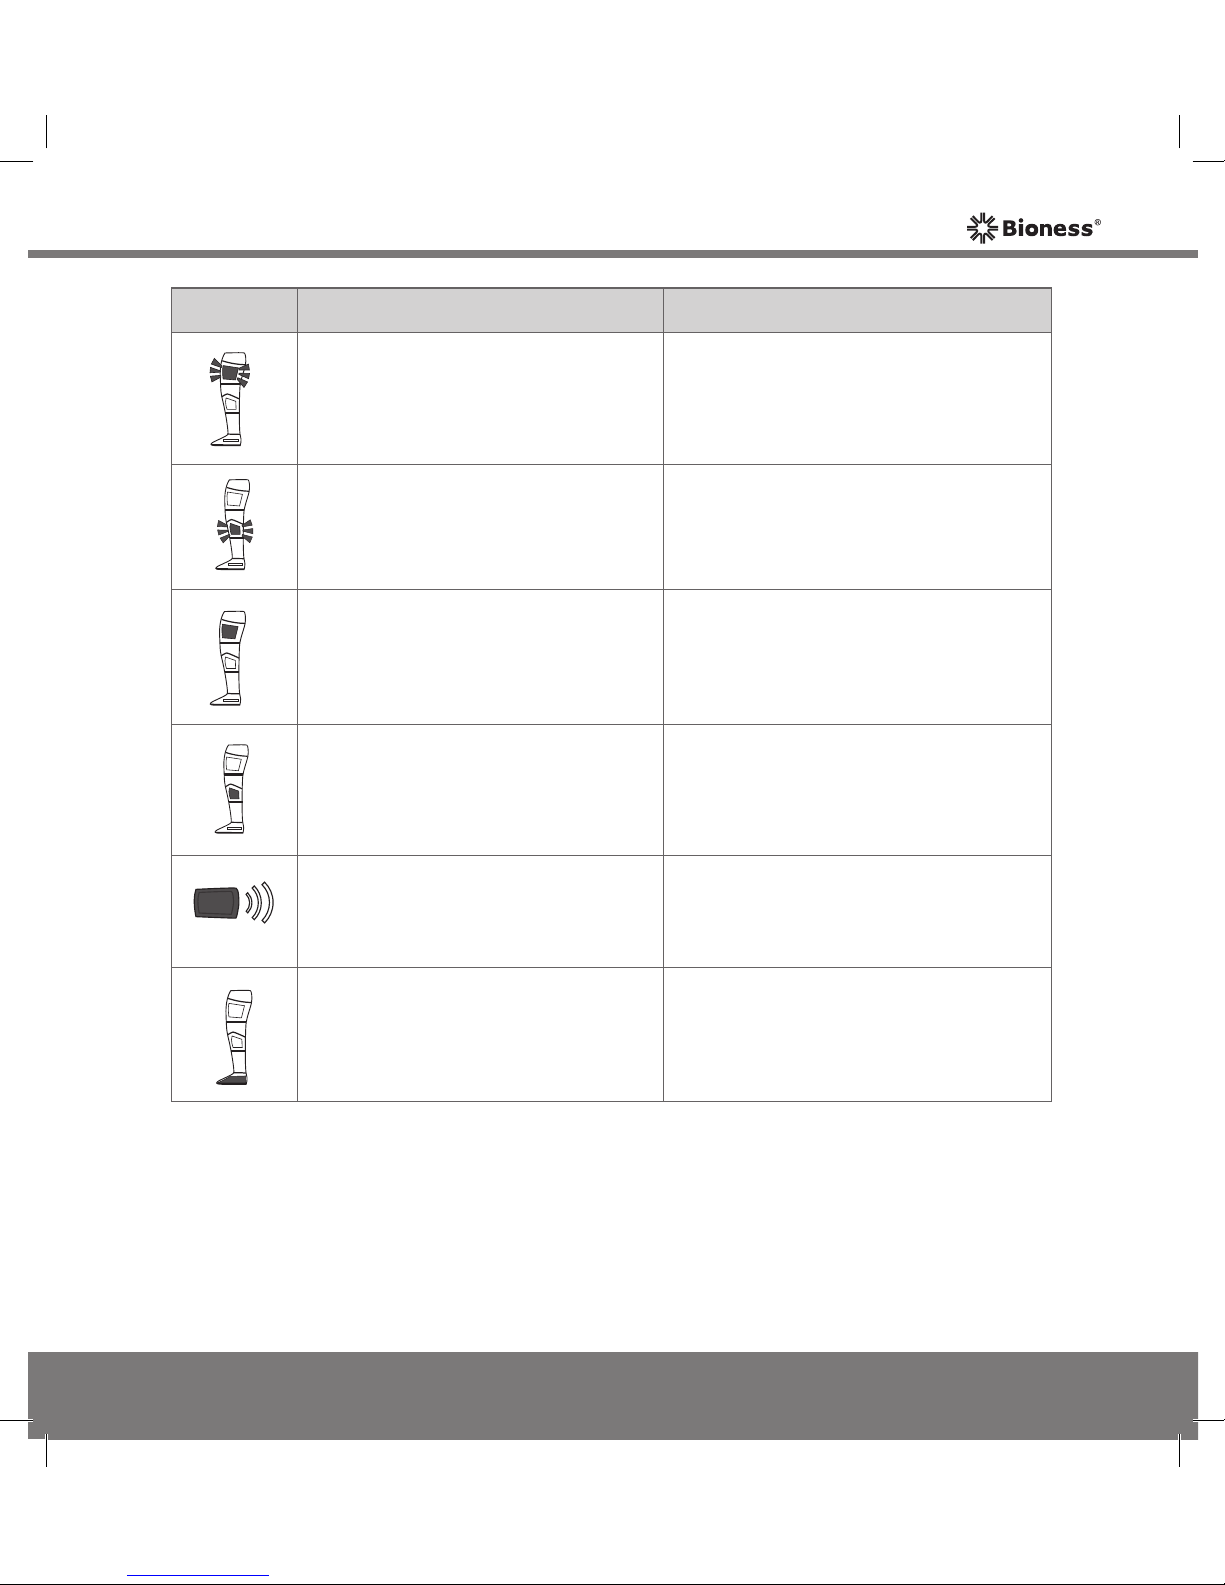
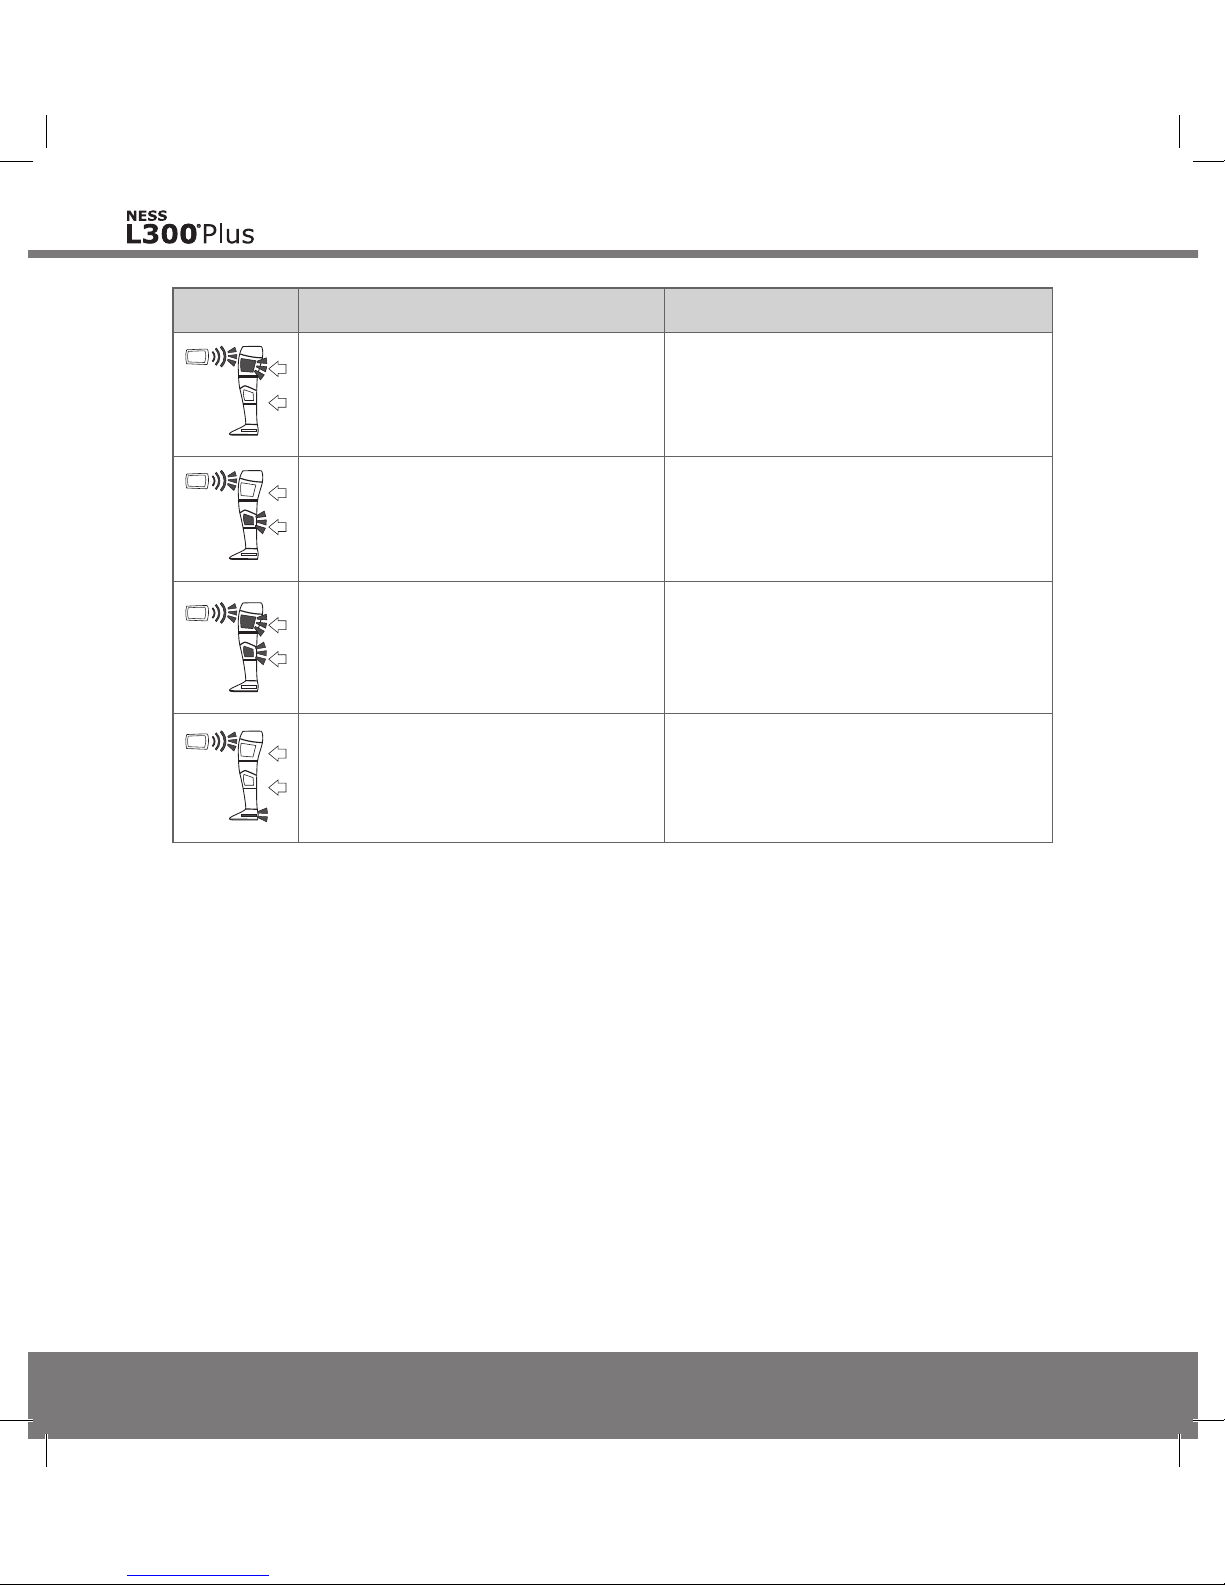
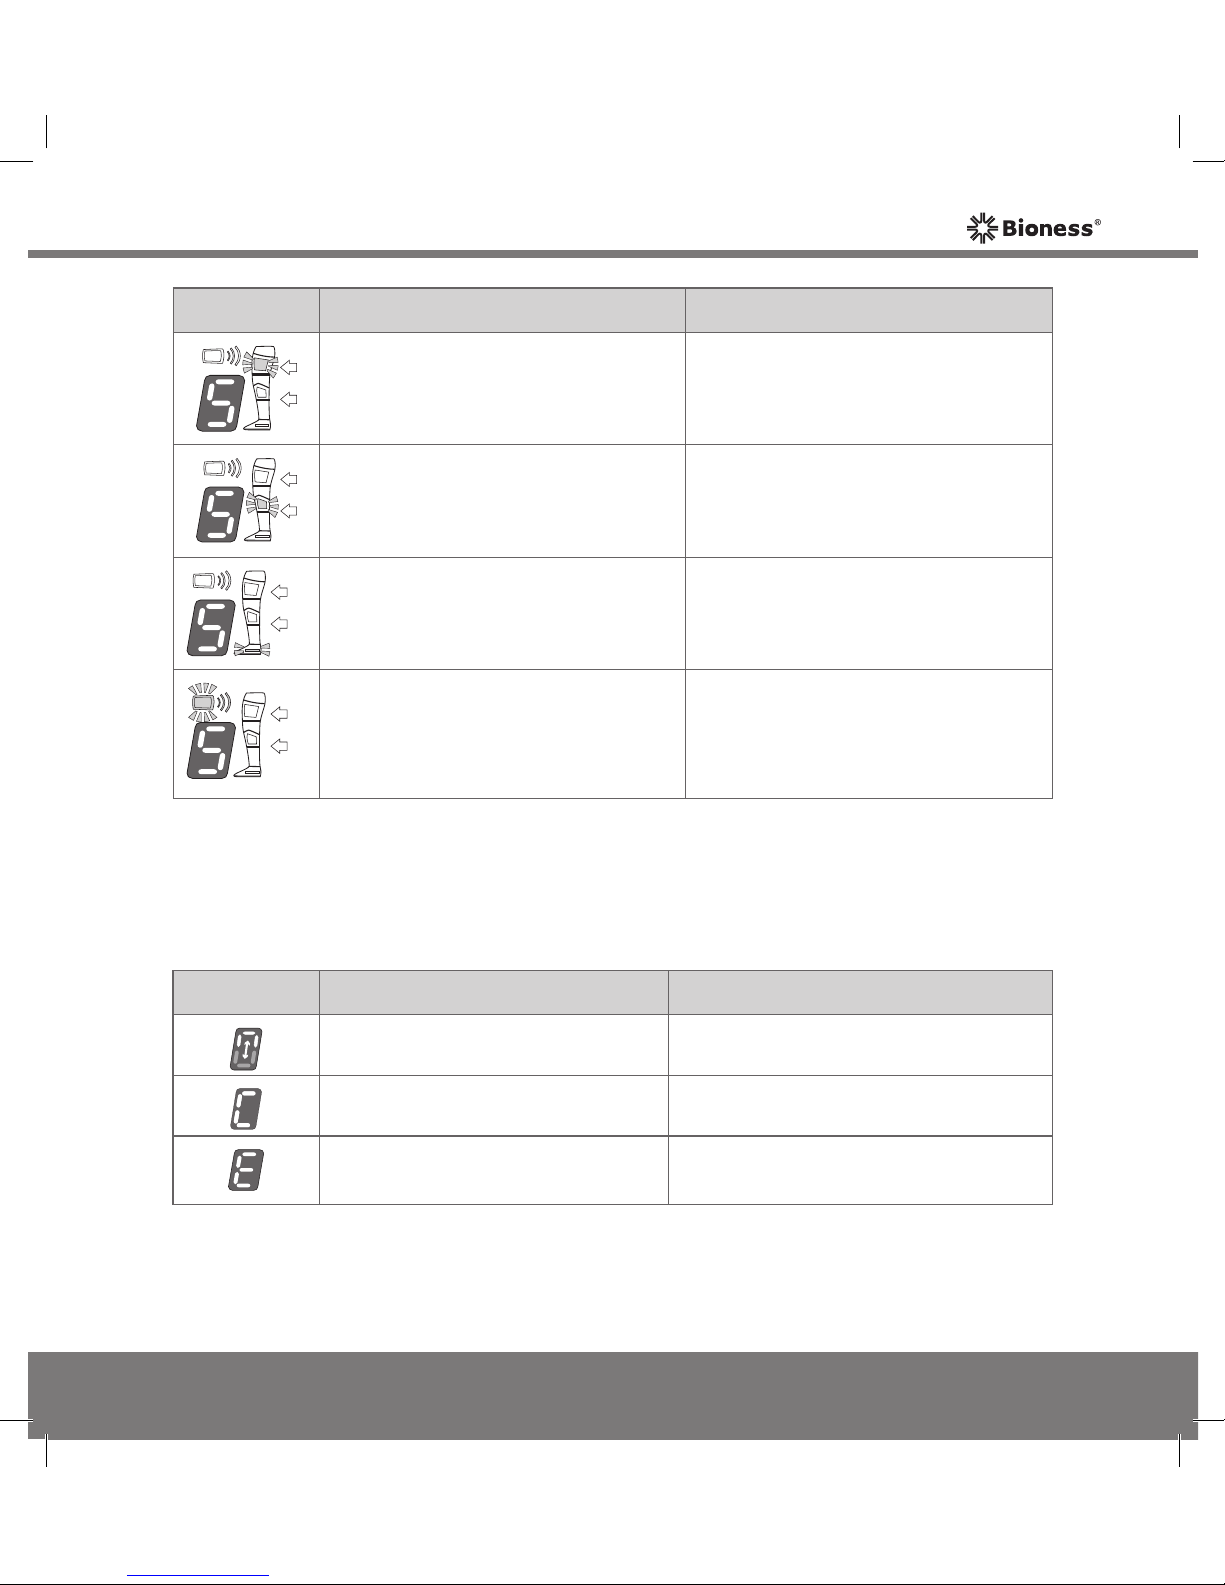
• Error messages. See Figure 5-9 and Tables 5-4 through 5-9.
Mp612-00313-001_RevB.indd 33 7/18/2011 4:14:22 PM
Page 44
34
User's Guide
Display Description Definition
On/Off Button FLASHES
GREEN
System is On
Mode Button FLASHES
YELLOW SLOWLY
Stimulation is Off
Mode Button FLASHES
YELLOW RAPIDLY
Stimulation is On
Displays 0–9 Stimulation Intensity Level
Intensity Level and Letter “t”
Alternate
Training Mode is On
GREEN Arrow by Thigh RF Stim
Unit
Thigh RF Stim Unit Selected
GREEN Arrow by L300 RF Stim
Unit
L300 RF Stim Unit Selected
Table 5-4: L300 Plus Control Unit operating displays.
Mp612-00313-001_RevB.indd 34 7/18/2011 4:14:24 PM
Page 45
35
Chapter 5 - NESS L300 Plus System
Display Description Definition
Thigh RF Stim Unit Indicator
FLASHES RED
Faulty Electrode Contact in Thigh
FS Cuff
L300 RF Stim Unit Indicator
FLASHES RED
Faulty Electrode Contact in L300 FS
Cuff
Thigh RF Stim Unit Indicator is
SOLID RED
Thigh RF Stim Unit Software or
Hardware Malfunction
L300 RF Stim Unit Indicator is
SOLID RED
L300 RF Stim Unit Software or
Hardware Malfunction
L300 Plus Control Unit Indicator is
SOLID RED
L300 Plus Control Unit Software or
Hardware Malfunction
Gait Sensor Indicator is SOLID
RED
Intelli-Sense Gait Sensor Software
or Hardware Malfunction
Table 5-5: L300 Plus Control Unit component error displays.
Mp612-00313-001_RevB.indd 35 7/18/2011 4:14:25 PM
Page 46
36
User's Guide
Display Description Definition
Thigh RF Stim Unit Indicator and
RF Communication Indicator
ALTERNATELY FLASH RED
RF Communication Failure, Thigh
RF Stim Unit
L300 RF Stim Unit Indicator and
RF Communication Indicator
ALTERNATELY FLASH RED
RF Communication Failure, L300
RF Stim Unit
Thigh RF Stim Unit, L300 RF Stim
Unit, and RF Communication
Indicators ALTERNATELY FLASH
RED
RF Communication Failure, L300
and Thigh RF Stim Units
Intelli-Sense Gait Sensor Indicator
and RF Communication Indicator
ALTERNATELY FLASH RED
RF Communication Failure, IntelliSense Gait Sensor
Table 5-6: L300 Plus Control Unit RF communication errors.
Note: The L300 Plus Control Unit, L300 RF Stim Unit, and Thigh RF Stim
Unit must be within RF communication range to communicate wirelessly. The
communication range is approximately 10 feet (3 m). If RF communication
fails, the RF communication indicator on the L300 Plus Control Unit will
FLASH RED.
Mp612-00313-001_RevB.indd 36 7/18/2011 4:14:26 PM
Page 47
37
Chapter 5 - NESS L300 Plus System
Display Description Definition
Thigh RF Stim Unit Indicator
FLASHES YELLOW
Thigh RF Stim Unit Low Battery
L300 RF Stim Unit Indicator
FLASHES YELLOW
L300 RF Stim Unit Low Battery
Intelli-Sense Gait Sensor Indicator
FLASHES YELLOW
Intelli-Sense Gait Sensor Low
Battery
L300 Plus Control Unit Indicator
FLASHES YELLOW
L300 Plus Control Unit Low
Battery
Display Description Definition
ALTERNATING GREEN Arches Registration in Process
Letter "C" Registration Complete
Letter "E" Registration Error
Table 5-8: L300 Plus Control Unit electronic registration displays.
Table 5-7: L300 Plus Control Unit low battery displays.
Mp612-00313-001_RevB.indd 37 7/18/2011 4:14:27 PM
Page 48
38
User's Guide
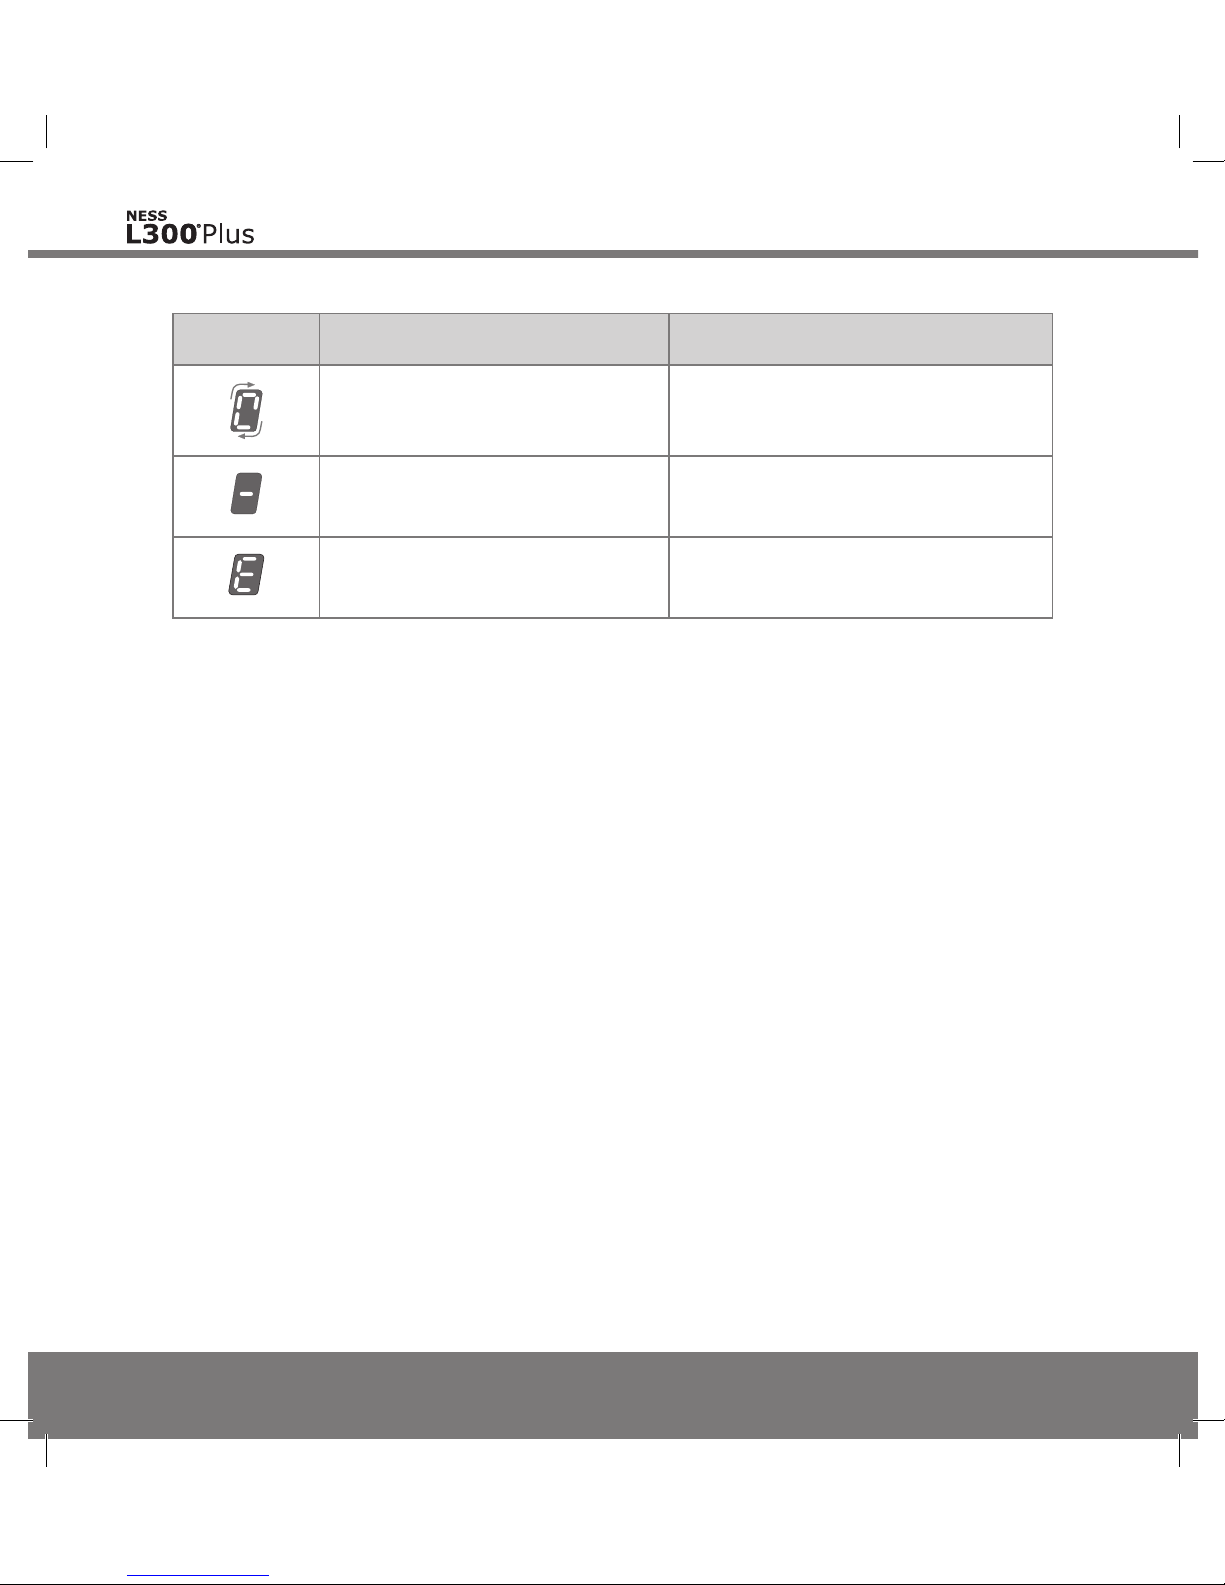
Display Description Definition
ROTATING GREEN Circle L300 Plus Control Unit Charging
Horizontal GREEN Line
L300 Plus Control Unit Fully
Charged
Letter "E" FLASHES while
Charging
Charging Error
Table 5-9: L300 Plus Control Unit charging displays and definitions.
Audio Indicators
The L300 Plus Control Unit beeps to indicate:
• The NESS L300 Plus System is on.
• A button was pressed.
• Low battery.
• An error.
Mp612-00313-001_RevB.indd 38 7/18/2011 4:14:27 PM
Page 49
39
Chapter 6 - L300 Plus Accessories
6
L300 Plus Accessories
L300 Electrodes and Bases
The L300 electrodes deliver the electrical stimulation used to dorsiflex the foot.
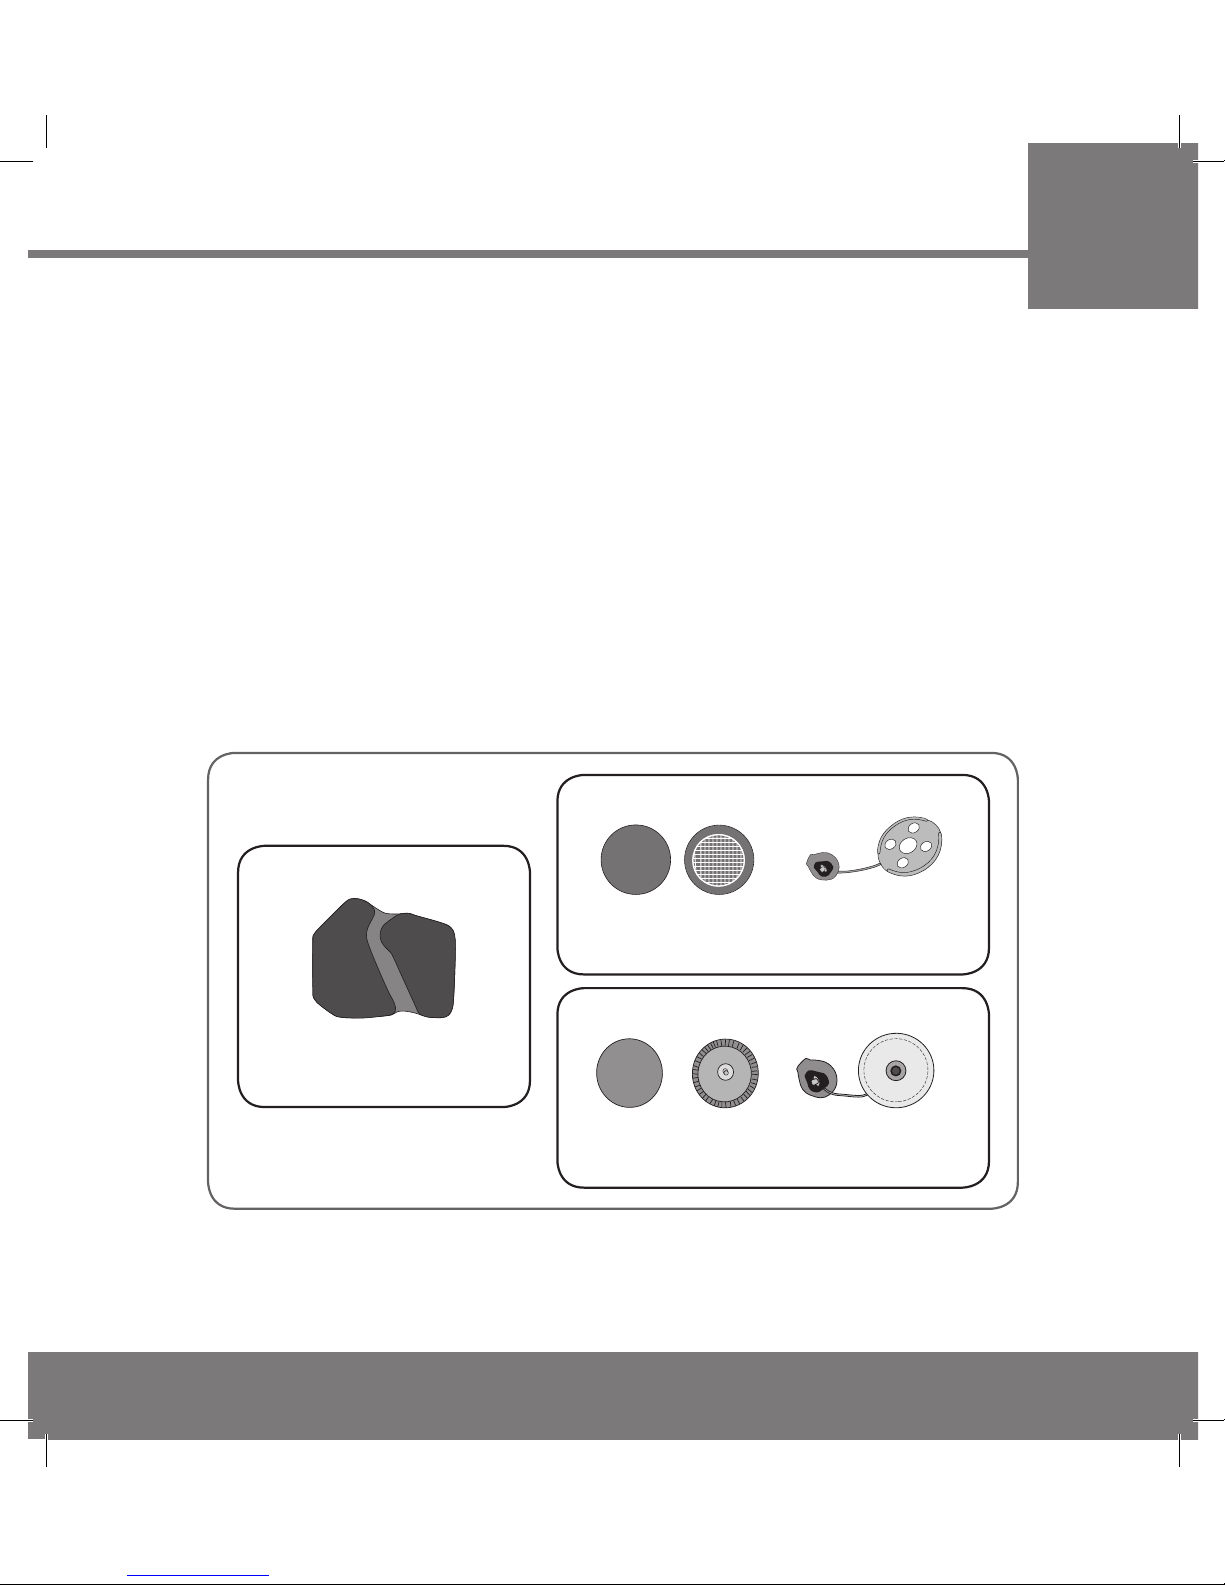
Three types of electrodes may be used:
• L300 Large Cloth Electrode.
• L300 Hydrogel Electrodes with Hydrogel Electrode Bases.
• L300 Cloth Electrodes with Cloth Electrode Bases. See Figure 6-1.
Figure 6-1: L300 electrodes and bases.
L300 Hydrogel
Electrode
L300 Cloth
Electrode
L300 Hydrogel
Electrode Base
L300 Cloth
Electrode Base
L300 Large Cloth Electrode
Mp612-00313-001_RevB.indd 39 7/18/2011 4:14:28 PM
Page 50
40
User's Guide
Large Cloth Electrode
The L300 FS Cuff uses one large cloth electrode. The large cloth electrode
snaps to the L300 FS Cuff plug holes. No electrode base is required.
Wet the large cloth electrode before use. After every three to four hours of use,
remove and rewet the large cloth electrode. If the L300 FS Cuff is removed
for more than one hour, wet the large cloth electrode again before use.
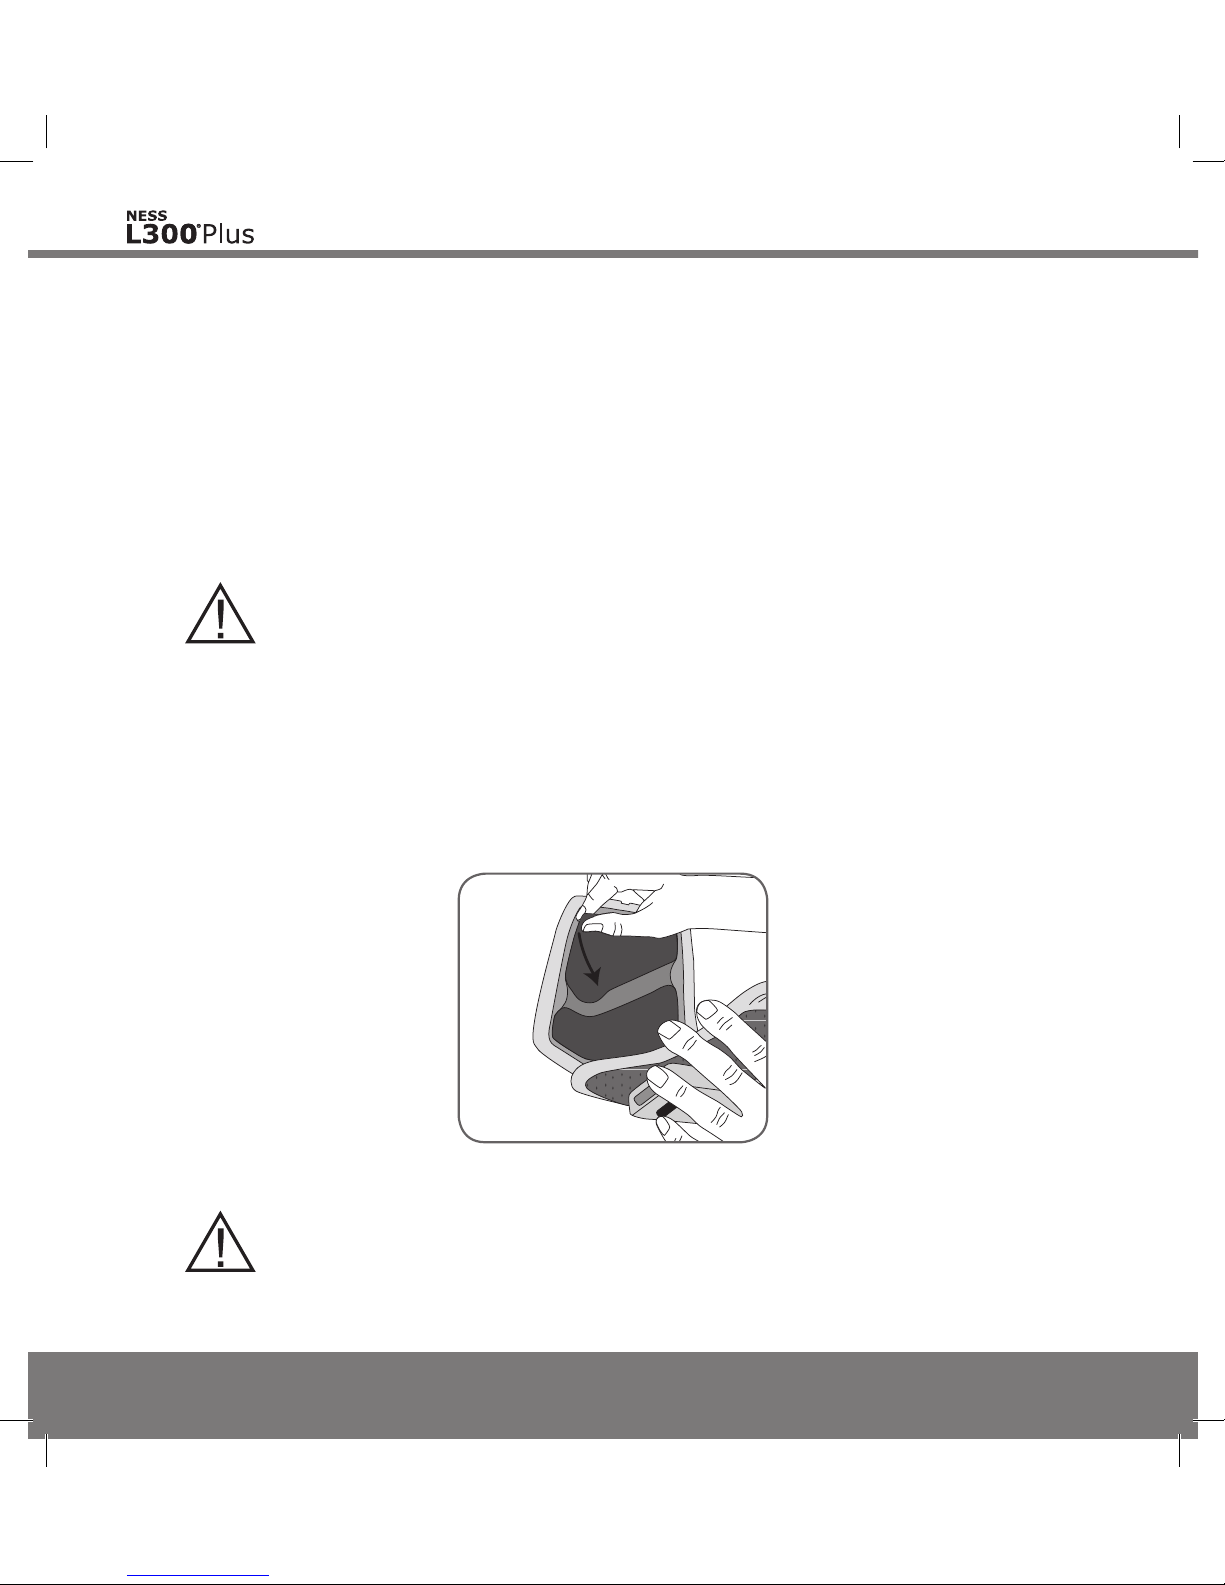
Figure 6-2: Removing the large cloth electrode.
CAUTION: Do not fold or twist the large cloth electrode.
CAUTION: Replace the large cloth electrode every two weeks.
To rewet/replace the large cloth electrode:
1. Turn off the L300 Plus System, and remove the L300 FS Cuff.
2. Gently remove the large cloth electrode from the L300 FS Cuff. See
Figure 6-2.
Mp612-00313-001_RevB.indd 40 7/18/2011 4:14:28 PM
Page 51
41
Chapter 6 - L300 Plus Accessories
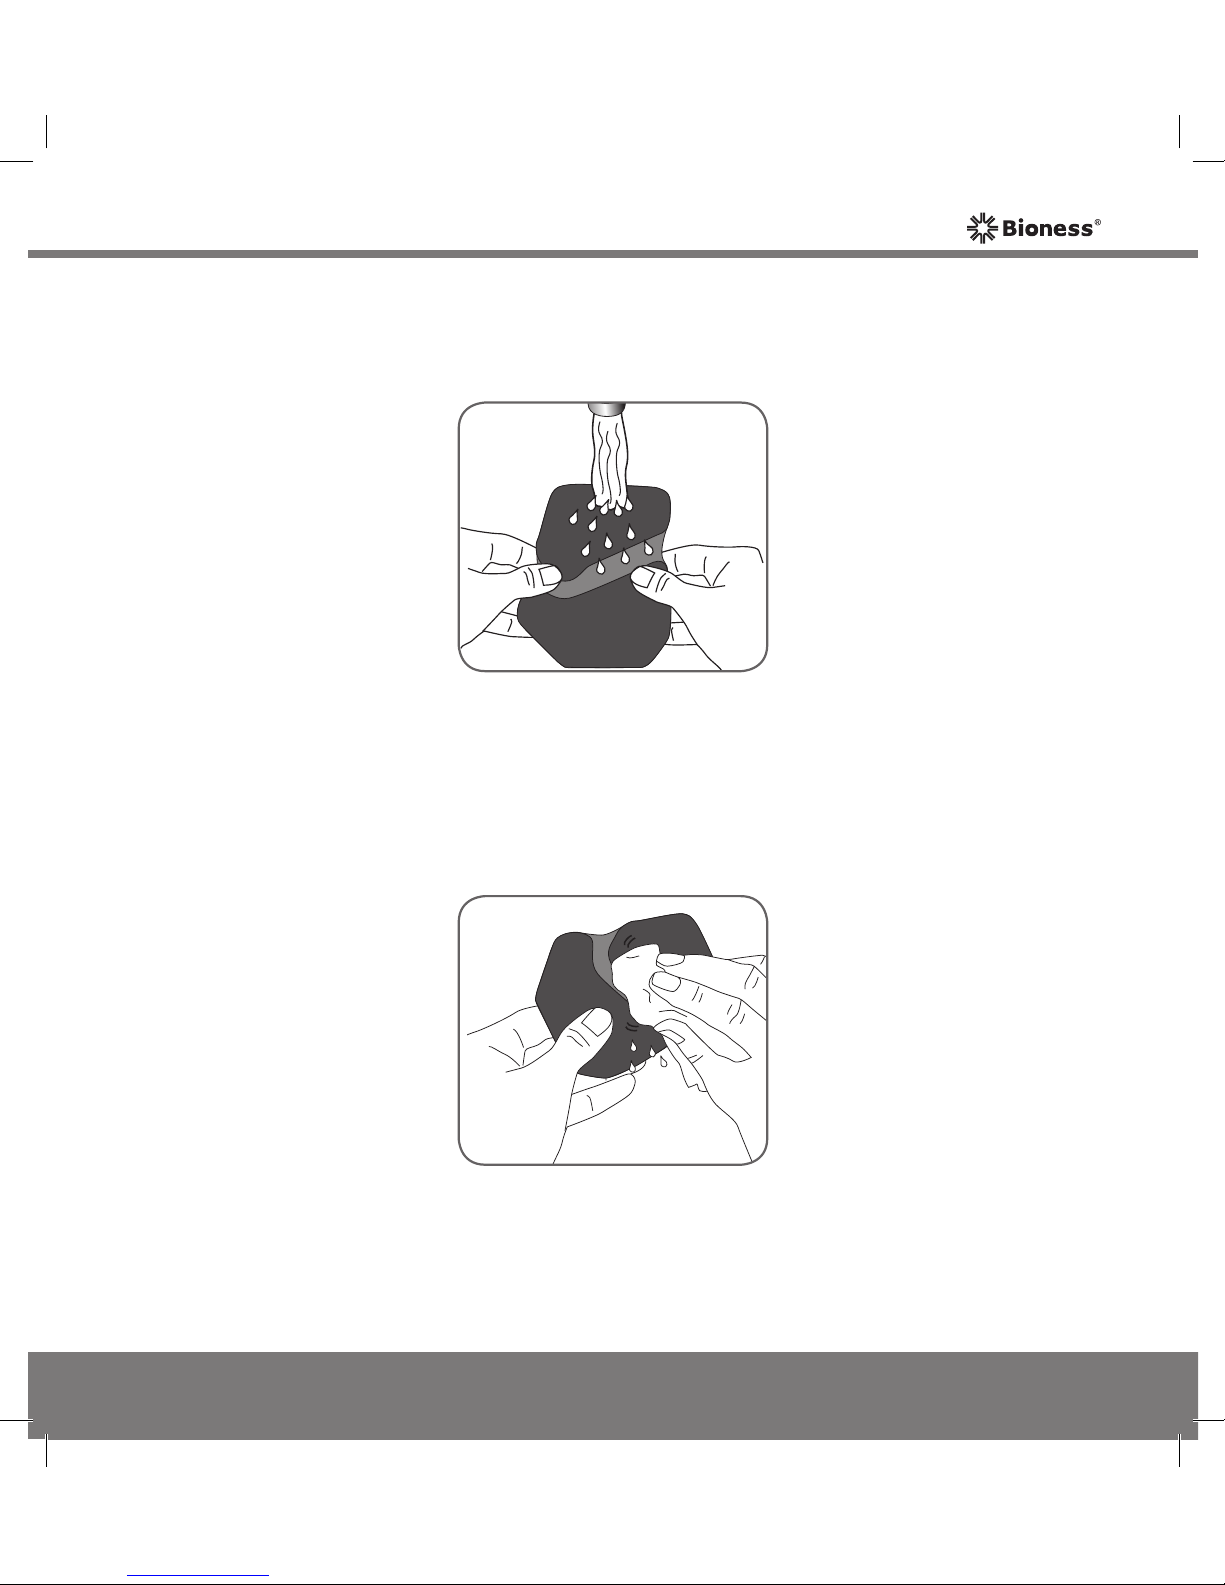
3. Wet the entire large cloth electrode with water. See Figure 6-3.
Figure 6-3: Wetting the large cloth electrode.
Figure 6-4: Blotting the large cloth electrode.
4. Remove excess water from the large cloth electrode. See Figure 6-4.
Mp612-00313-001_RevB.indd 41 7/18/2011 4:14:29 PM
Page 52

42
User's Guide
5. Align the orange and blue snaps on the large cloth electrode with the
orange and blue plug holes on the L300 FS Cuff. See Figure 6-5.
Figure 6-5: Aligning the large cloth electrode.
6. Press firmly to snap the large cloth electrode into the L300 FS Cuff. See
Figure 6-6.
Figure 6-6: Snapping the large cloth electrode.
Mp612-00313-001_RevB.indd 42 7/18/2011 4:14:29 PM
Page 53
43
Chapter 6 - L300 Plus Accessories
L300 Hydrogel Electrodes and Bases
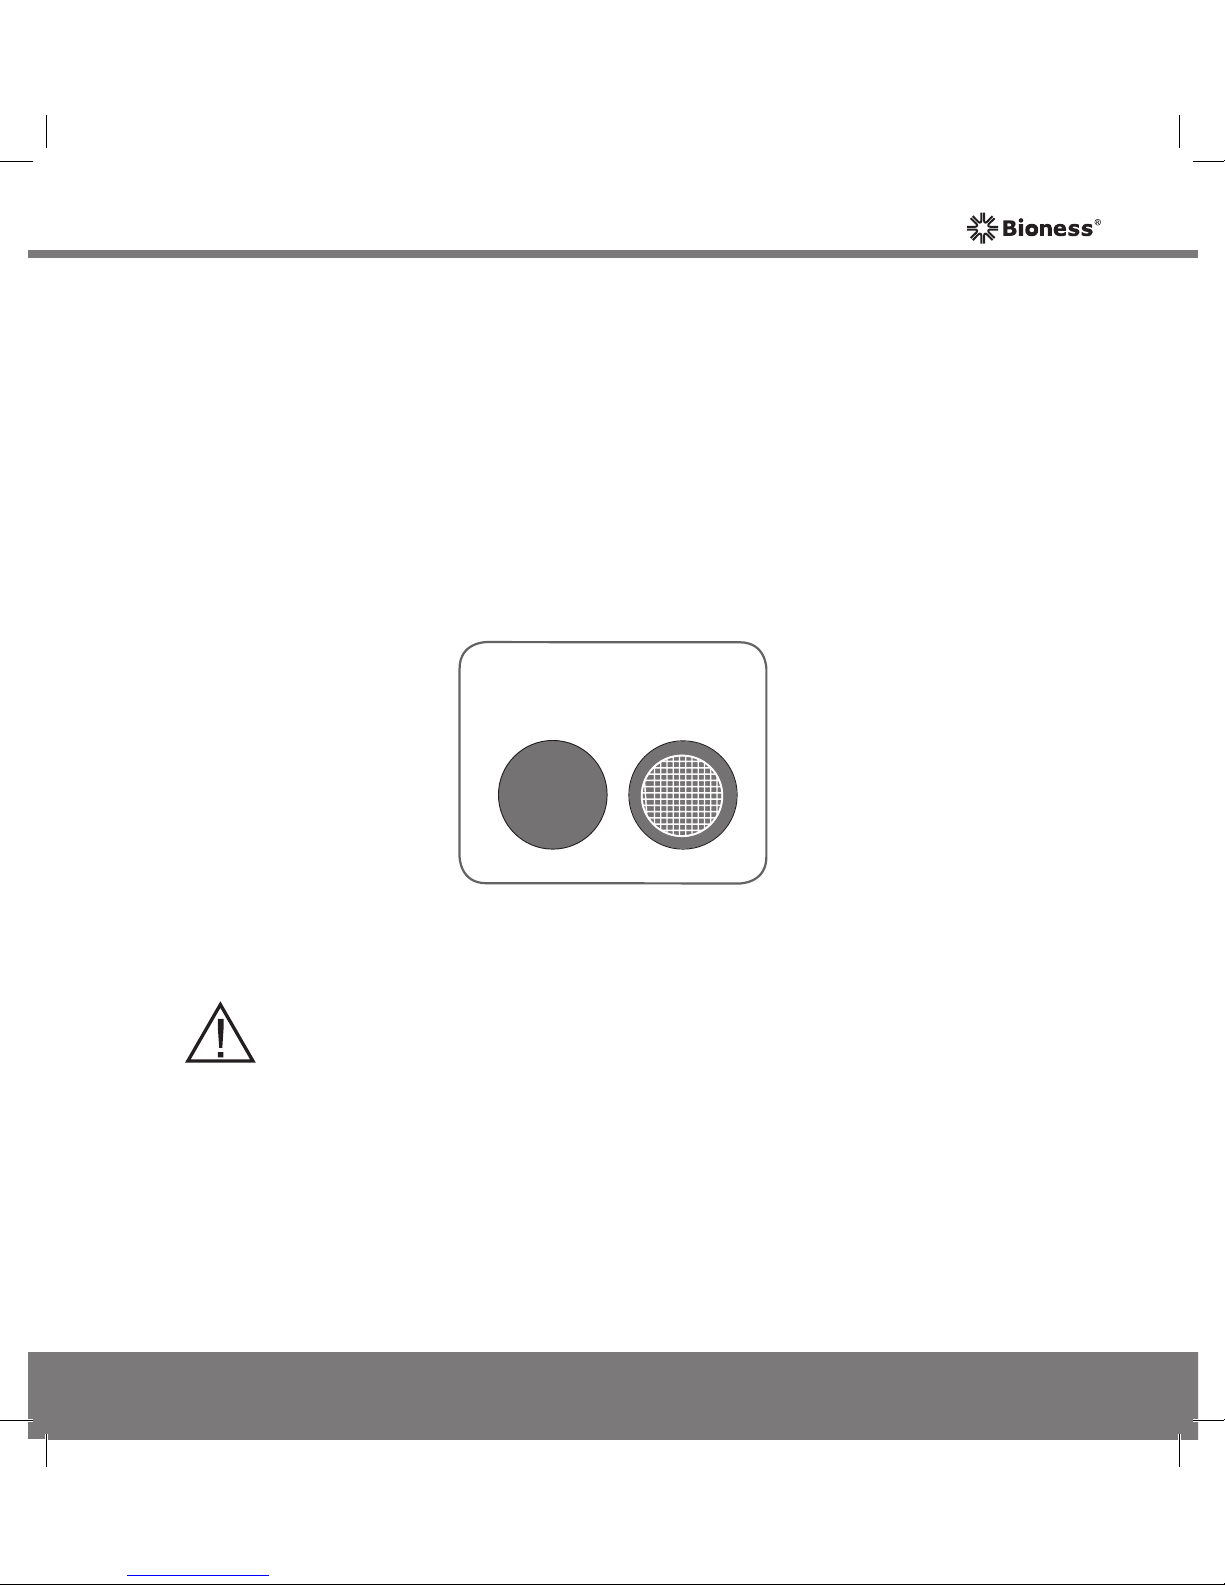
The L300 FS Cuff uses two L300 hydrogel electrodes and two L300 hydrogel
electrode bases. Your clinician will determine the best position for the L300
hydrogel electrode bases. Do not move the bases.
The L300 hydrogel electrodes adhere to the hydrogel electrode bases. The
grid side of the hydrogel electrode faces the hydrogel electrode base. See
Figure 6-7.
Figure 6-7: L300 hydrogel electrode, front and back.
Faces
Base
Faces
Skin
CAUTION: Replace the electrodes every two weeks.
Mp612-00313-001_RevB.indd 43 7/18/2011 4:14:29 PM
Page 54
44
User's Guide
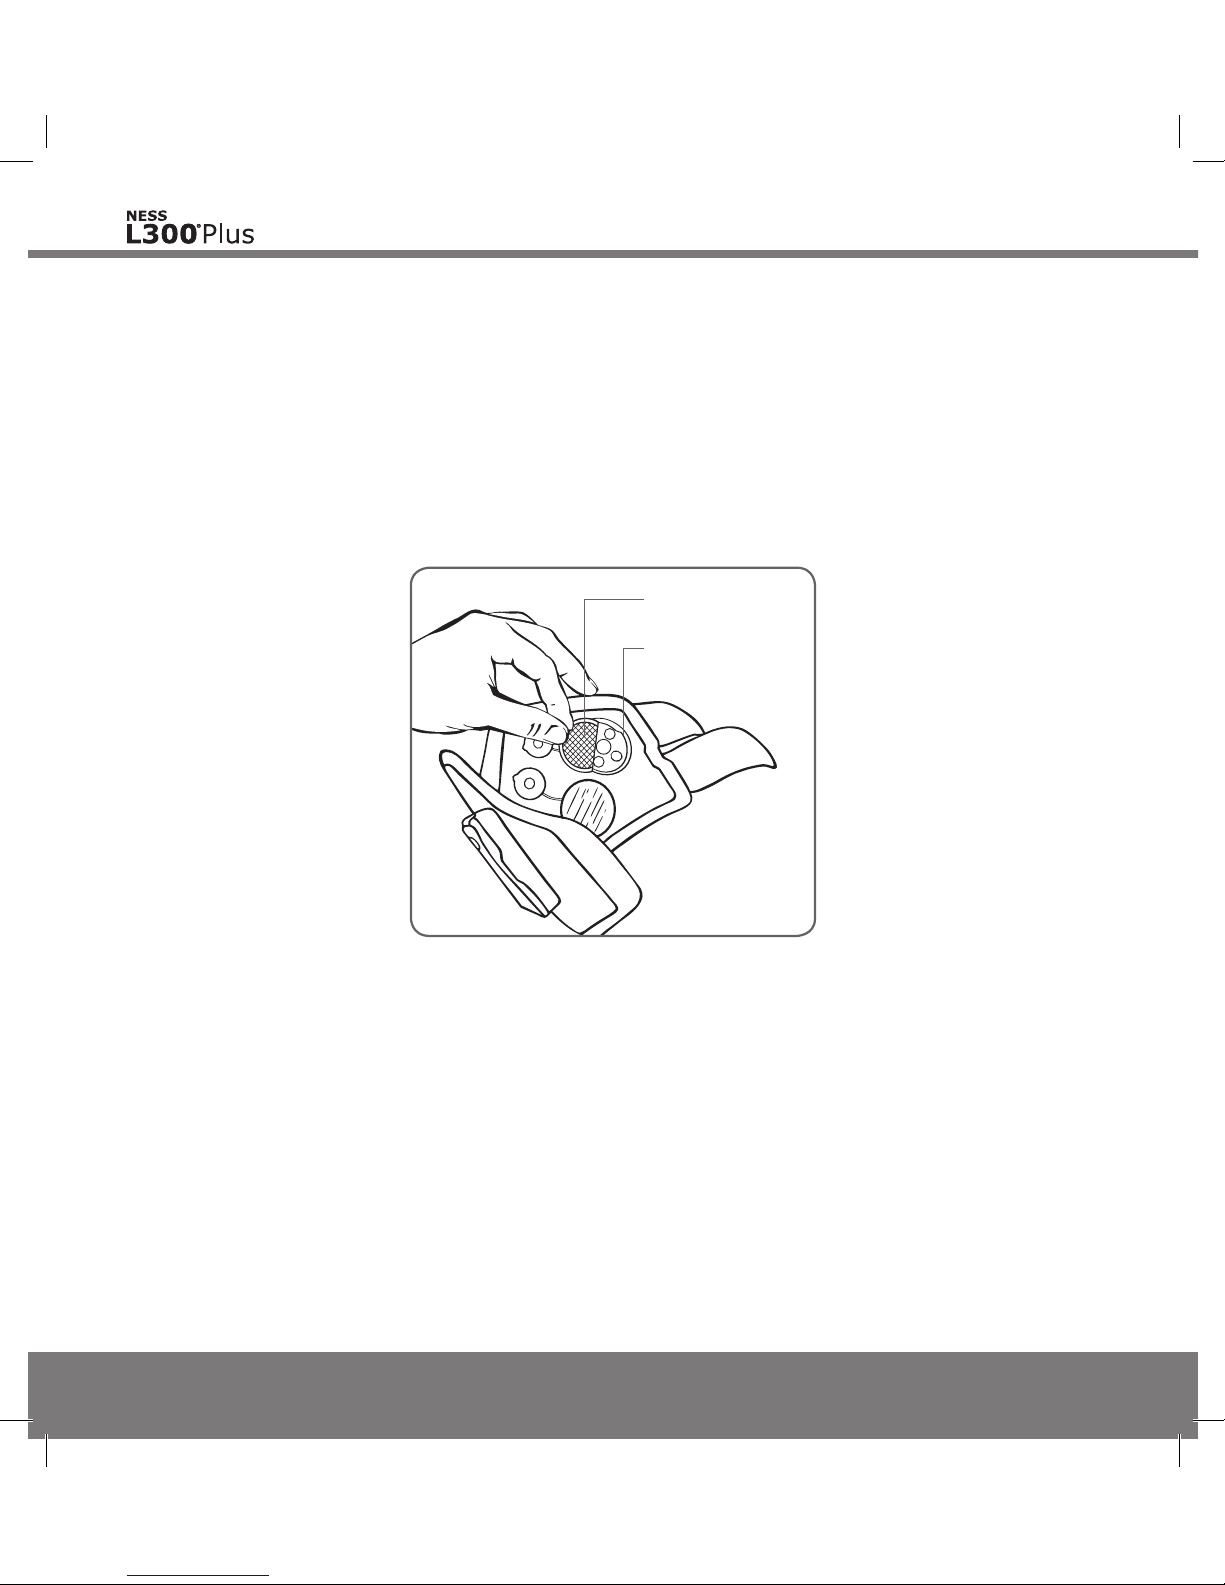
Figure 6-8: Removing the used L300 hydrogel electrodes.
To replace the L300 hydrogel electrodes:
1. Turn off the L300 Plus System and remove the L300 FS Cuff.
2. Gently pull the L300 hydrogel electrodes from the bases. Be careful not
to detach the bases from the L300 FS Cuff. See Figure 6-8.
Hydrogel
Electrode
Hydrogel
Electrode Base
3. If necessary, clean the bases with a damp cloth. Do not use a chemicalbased cleaning substance.
Mp612-00313-001_RevB.indd 44 7/18/2011 4:14:29 PM
Page 55
45
Chapter 6 - L300 Plus Accessories
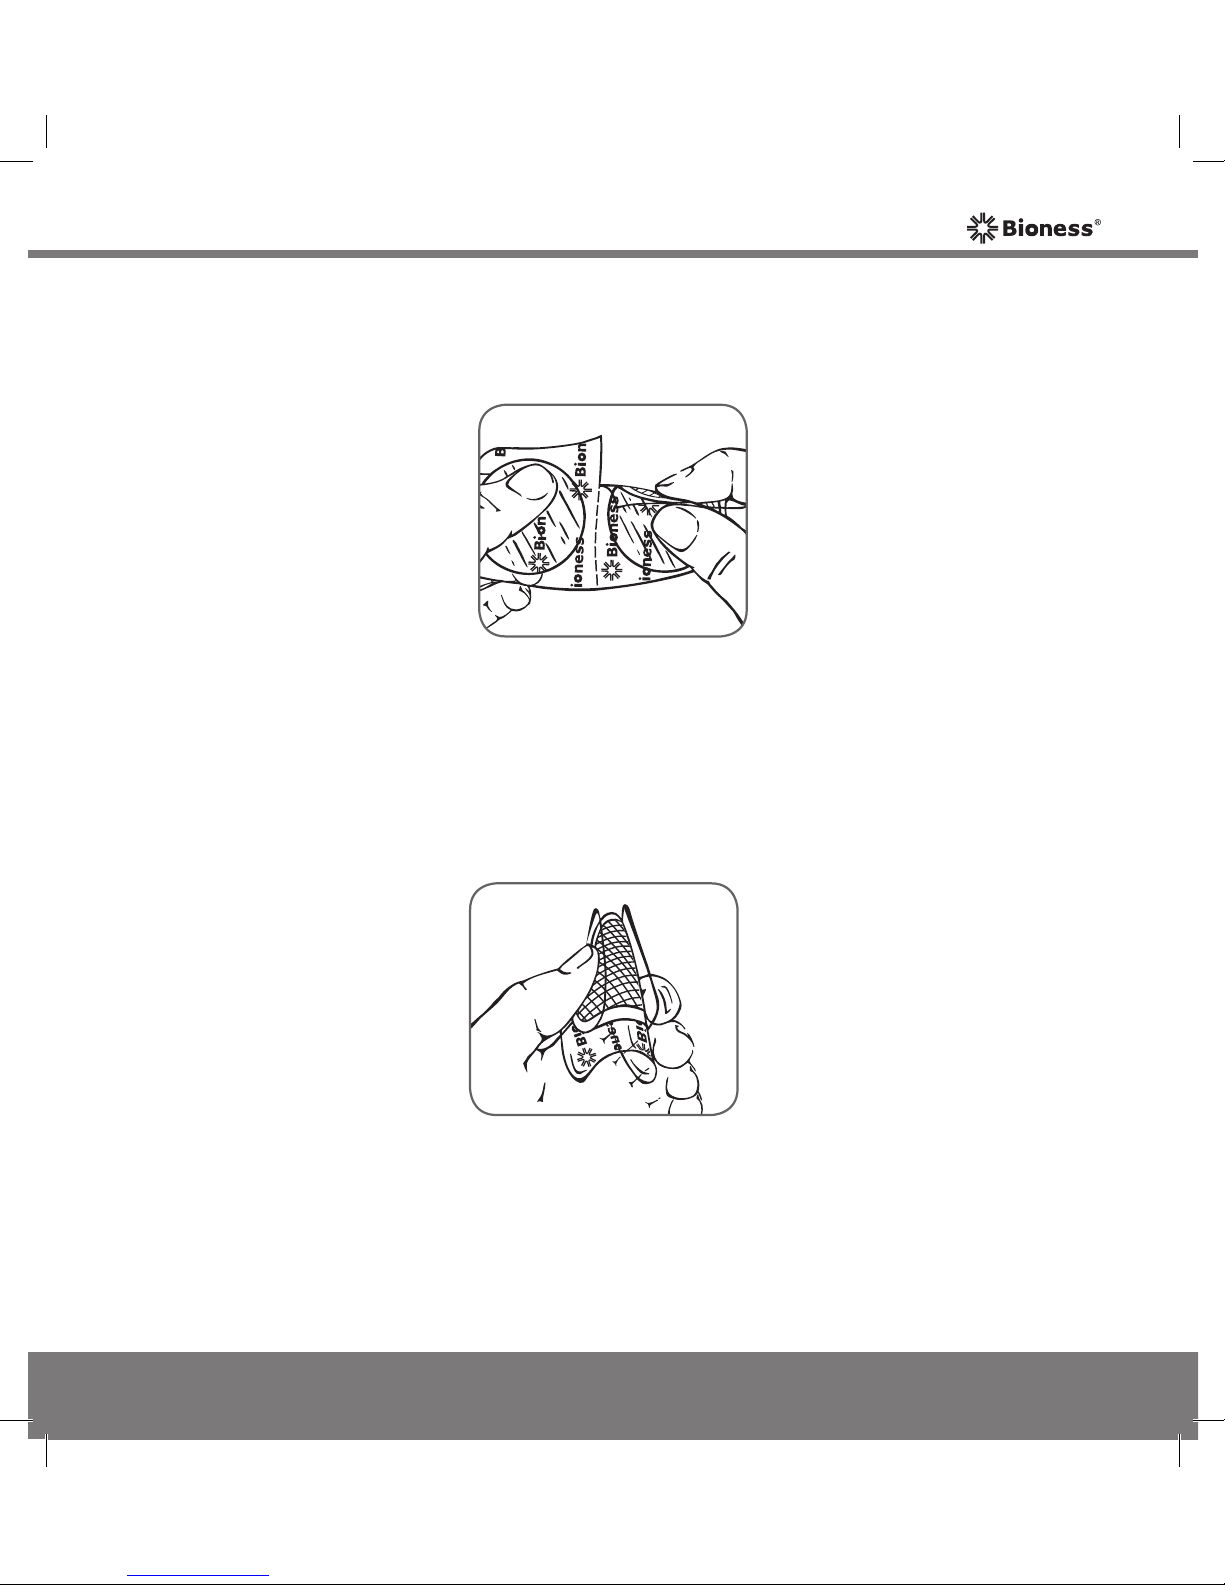
4. Separate the new L300 hydrogel electrodes along the perforation. See
Figure 6-9.
Figure 6-9: Separating the new L300 hydrogel electrodes.
Figure 6-10: Splitting the two-piece covers on the L300 hydrogel electrodes.
5. Split the two-piece covers on each L300 hydrogel electrode and discard
them. See Figure 6-10.
Mp612-00313-001_RevB.indd 45 7/18/2011 4:14:30 PM
Page 56
46
User's Guide
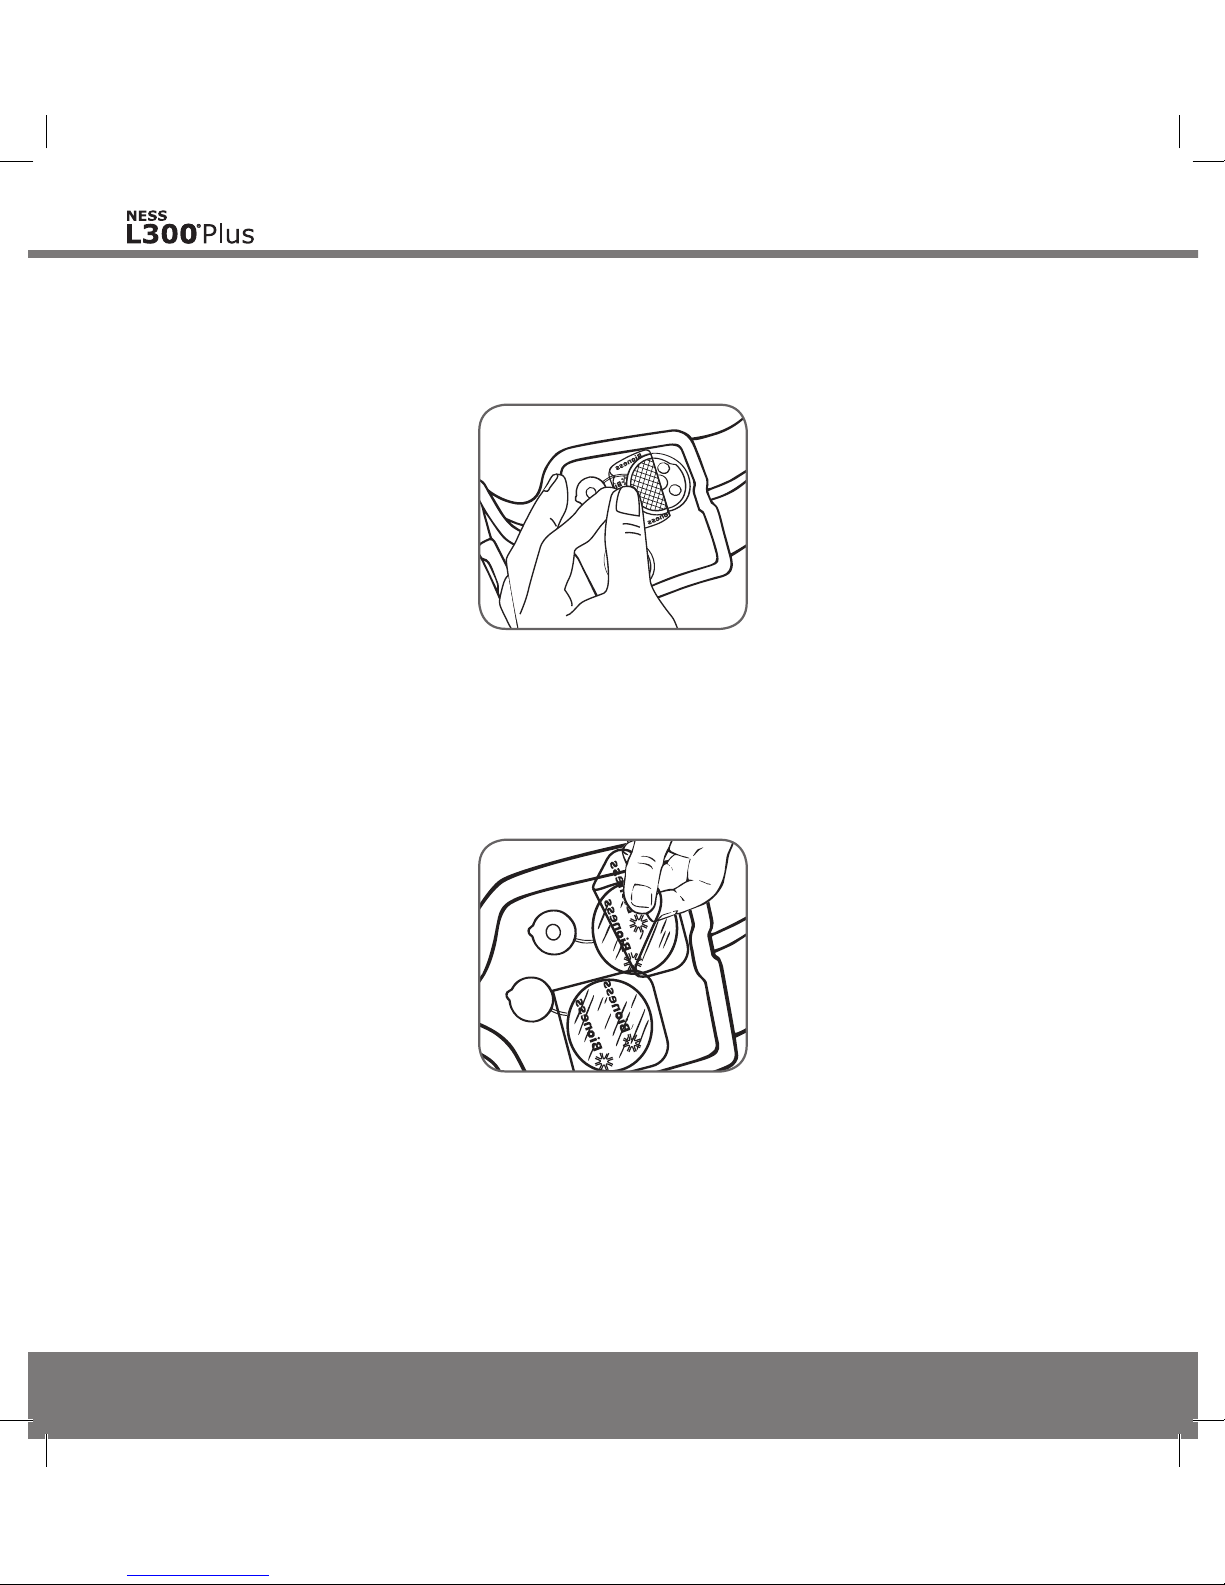
Figure 6-11: Adhering the L300 hydrogel electrodes to the bases.
Figure 6-12: Removing the covers from the L300 hydrogel electrodes.
Note: Save the covers. Always reapply the covers between uses.
Note: If the electrode gel dries, rehydrate it with one to two drops of water.
6.
Adhere the grid side of the L300 hydrogel electrodes to the L300 hydrogel
electrode bases, and then press firmly. See Figure 6-11.
7. Remove the covers from the L300 hydrogel electrodes. See Figure 6-12.
Mp612-00313-001_RevB.indd 46 7/18/2011 4:14:30 PM
Page 57
47
Chapter 6 - L300 Plus Accessories
L300 Cloth Electrodes and Bases
The L300 cloth electrodes are for people who opt to use them instead of the
L300 hydrogel electrodes. They are also for people who have sensitivities to
hydrogel electrodes or other known sensitivities (for example, allergy or skin
sensitivity to tape/adhesive).
The L300 FS Cuff uses two L300 cloth electrodes and two L300 cloth electrode
bases. Your clinician will determine the best position for the L300 cloth electrode
bases. Do not move the bases.
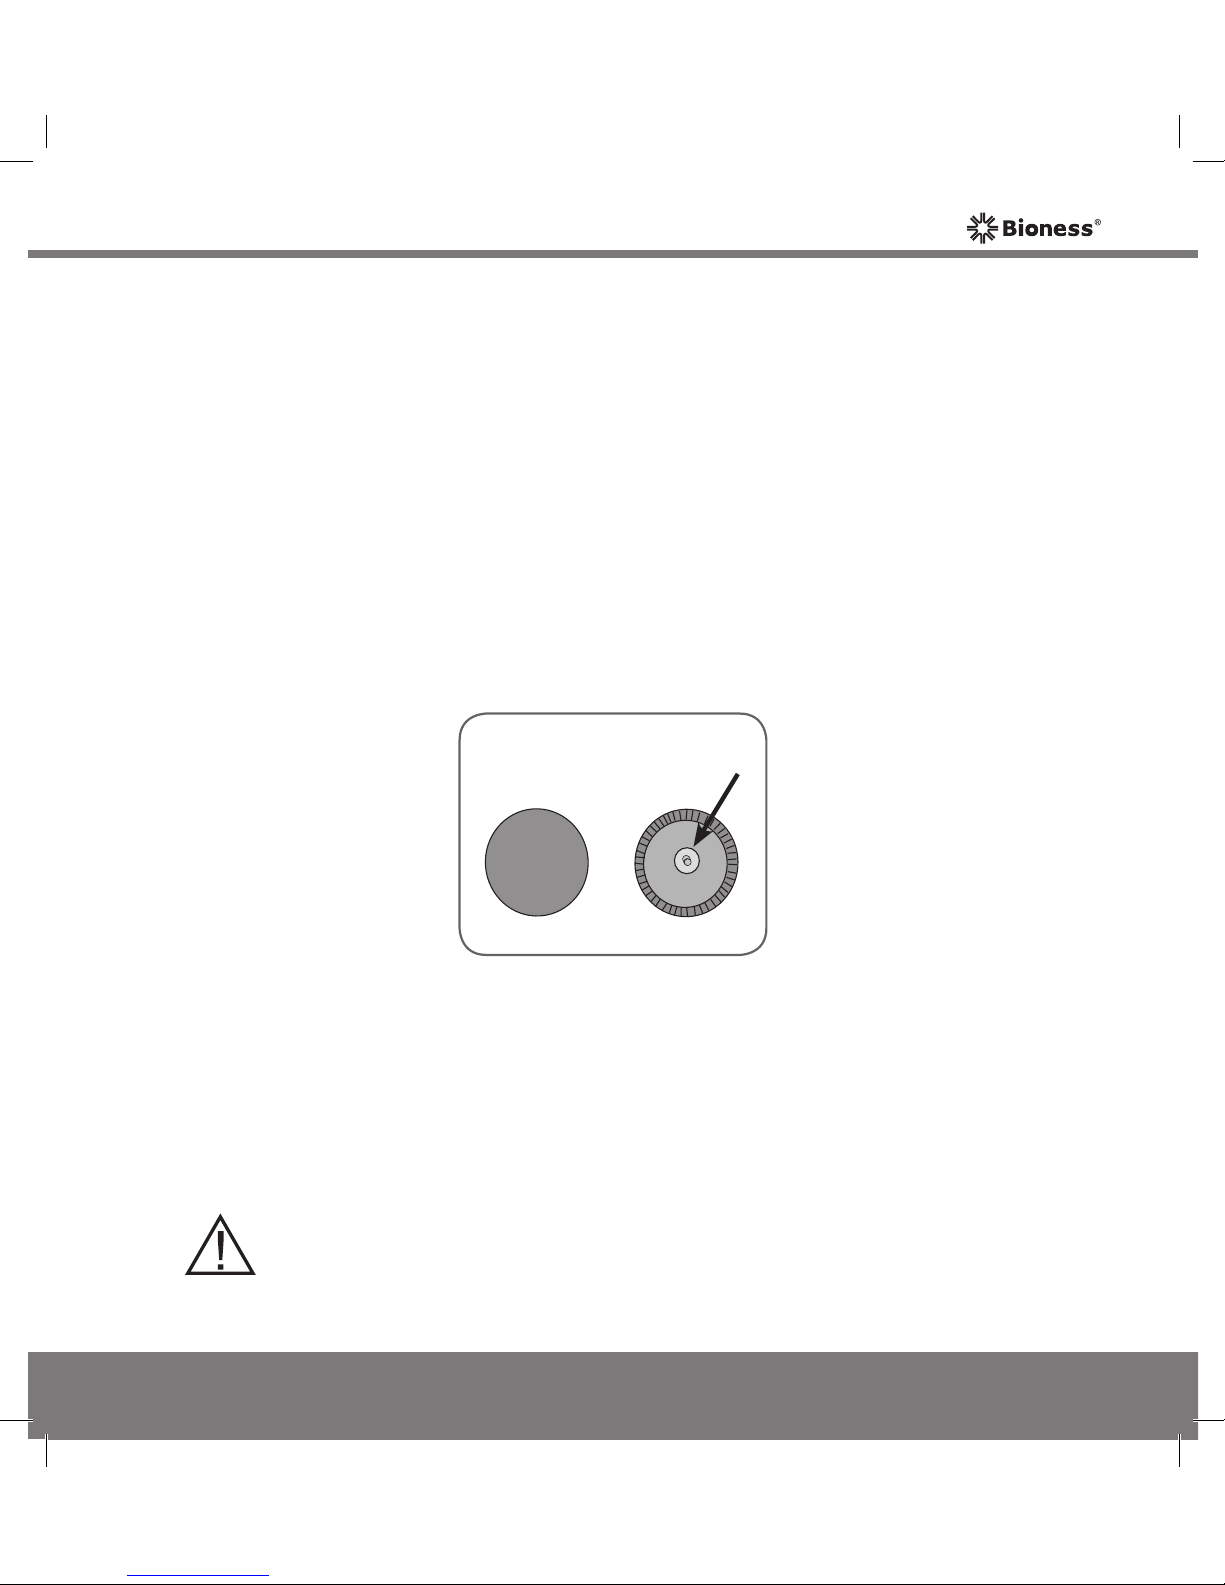
The cloth electrodes snap to the cloth electrode bases. See Figure 6-13.
Figure 6-13: L300 cloth electrode, front (left) and back (right).
CAUTION: Replace the electrodes every two weeks.
Wet the L300 cloth electrodes before use. Then remove and rewet the cloth
electrodes after every three to four hours of use. If the L300 FS Cuff is
removed for more than one hour, wet the cloth electrodes again before use.
Snaps to
Base
Faces
Skin
Mp612-00313-001_RevB.indd 47 7/18/2011 4:14:31 PM
Page 58
48
User's Guide
To rewet/replace the L300 cloth electrodes:
1. Turn off the L300 Plus System and remove the L300 FS Cuff.
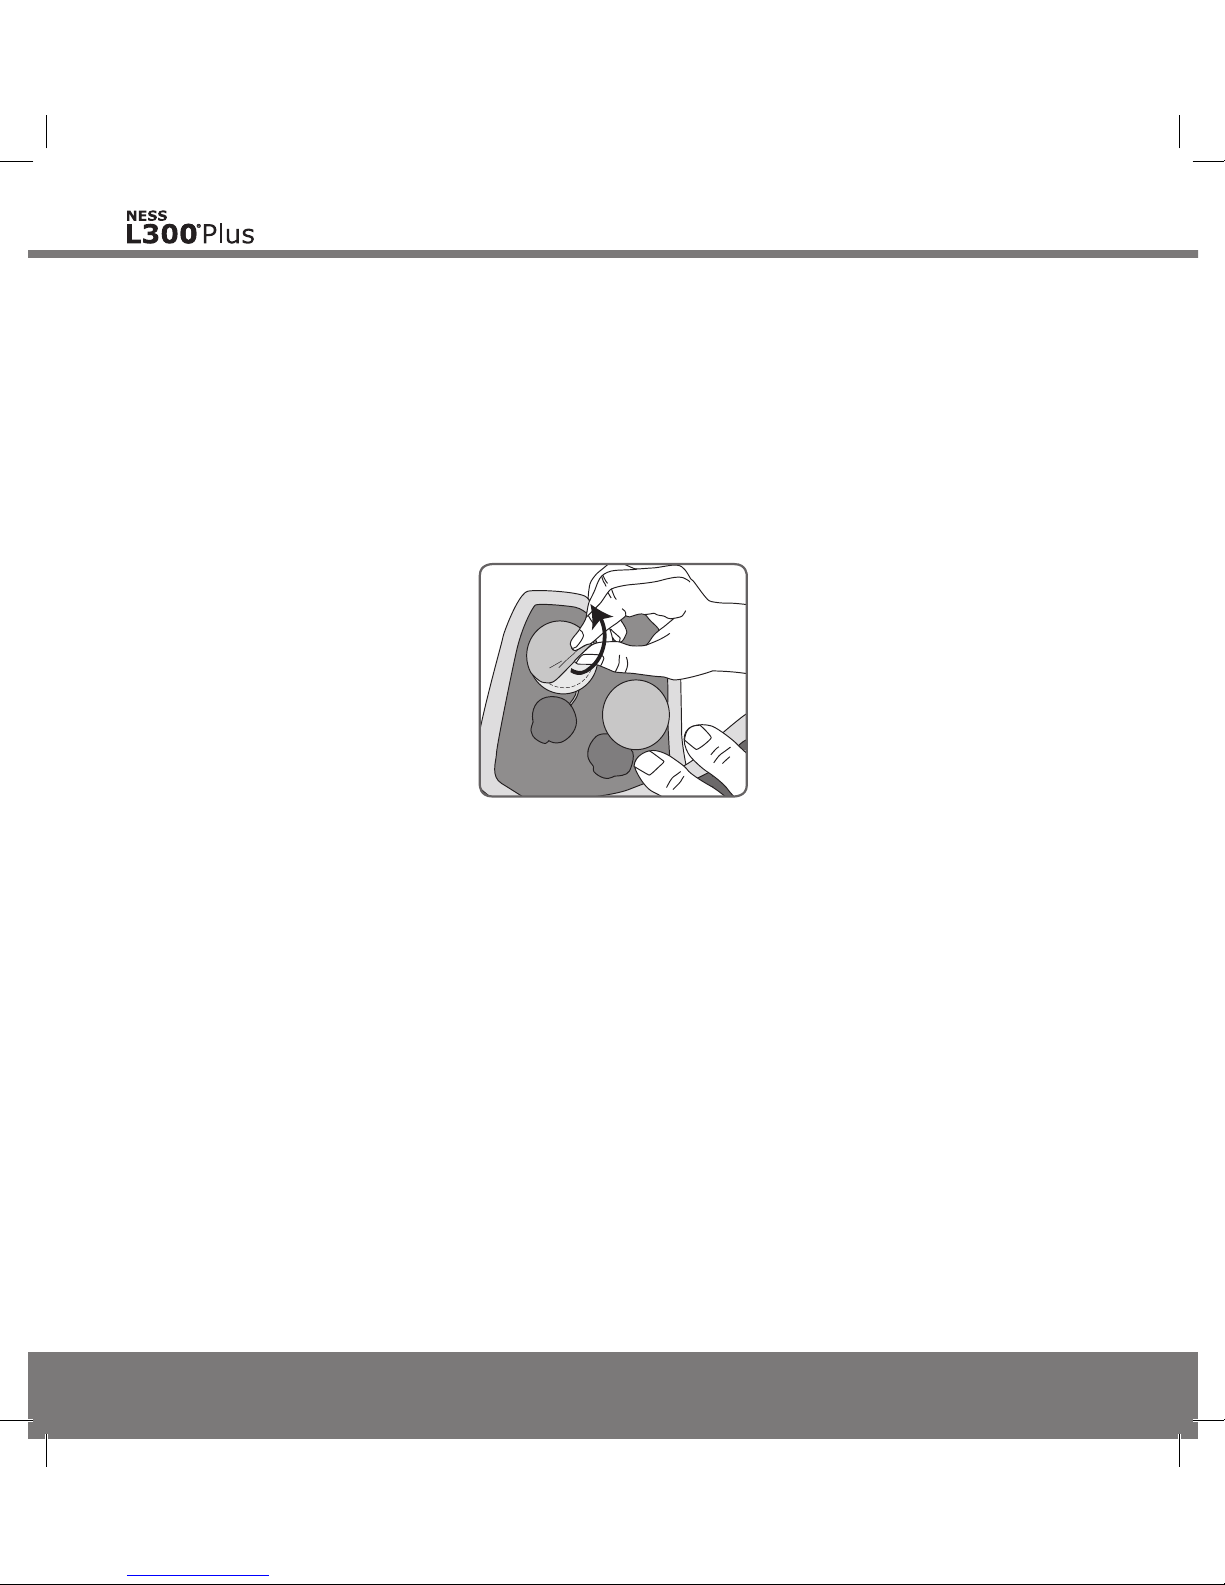
2. Gently pull the L300 cloth electrodes from the bases. Be careful not to
detach the bases from the L300 FS Cuff. See Figure 6-14.
Figure 6-14: Removing the L300 cloth electrodes.
3. If necessary, clean the L300 cloth electrode bases with a damp cloth. Do
not use a chemical-based cleaning substance.
Mp612-00313-001_RevB.indd 48 7/18/2011 4:14:31 PM
Page 59
49
Chapter 6 - L300 Plus Accessories
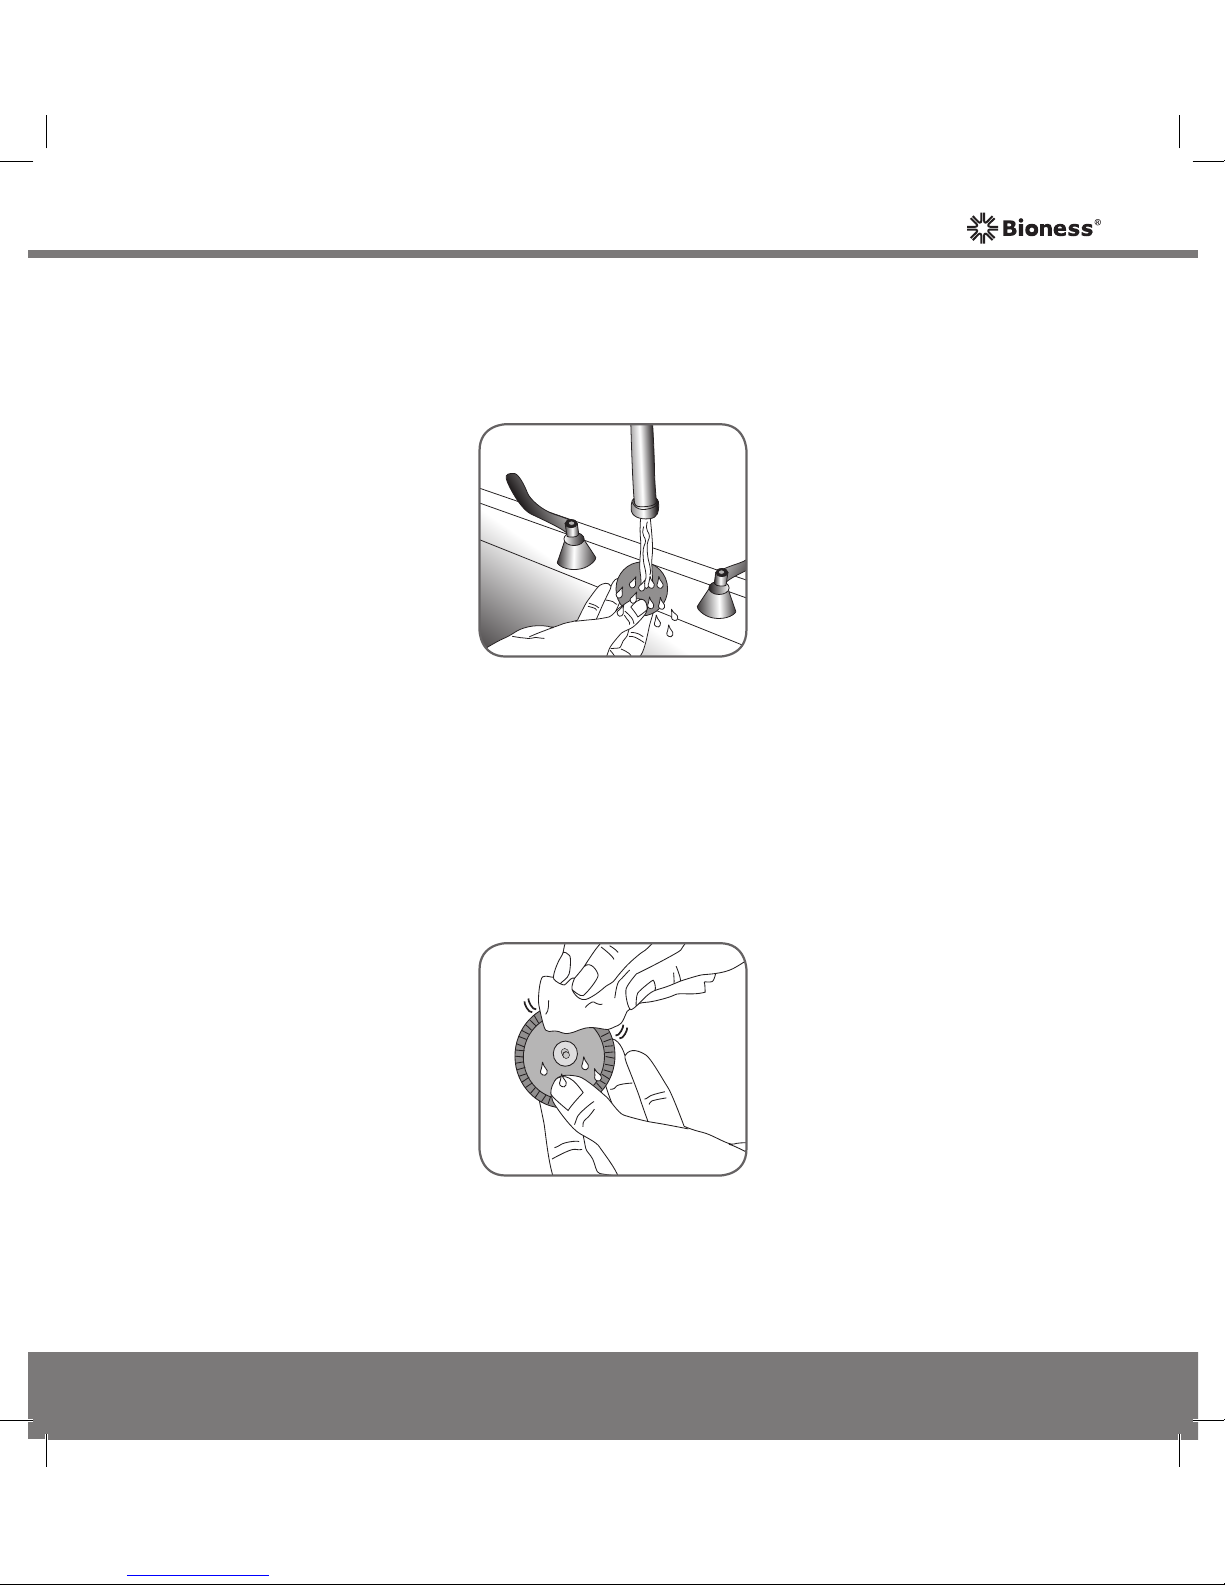
4. Wet the L300 cloth electrodes with water until they are saturated. See
Figure 6-15.
Figure 6-15: Wetting the L300 cloth electrodes.
5. With a soft cloth, gently wipe or blot excess water from the snap side of
the cloth electrodes. See Figure 6-16.
Figure 6-16: Blotting the snap side of the L300 cloth electrodes.
Mp612-00313-001_RevB.indd 49 7/18/2011 4:14:31 PM
Page 60
50
User's Guide
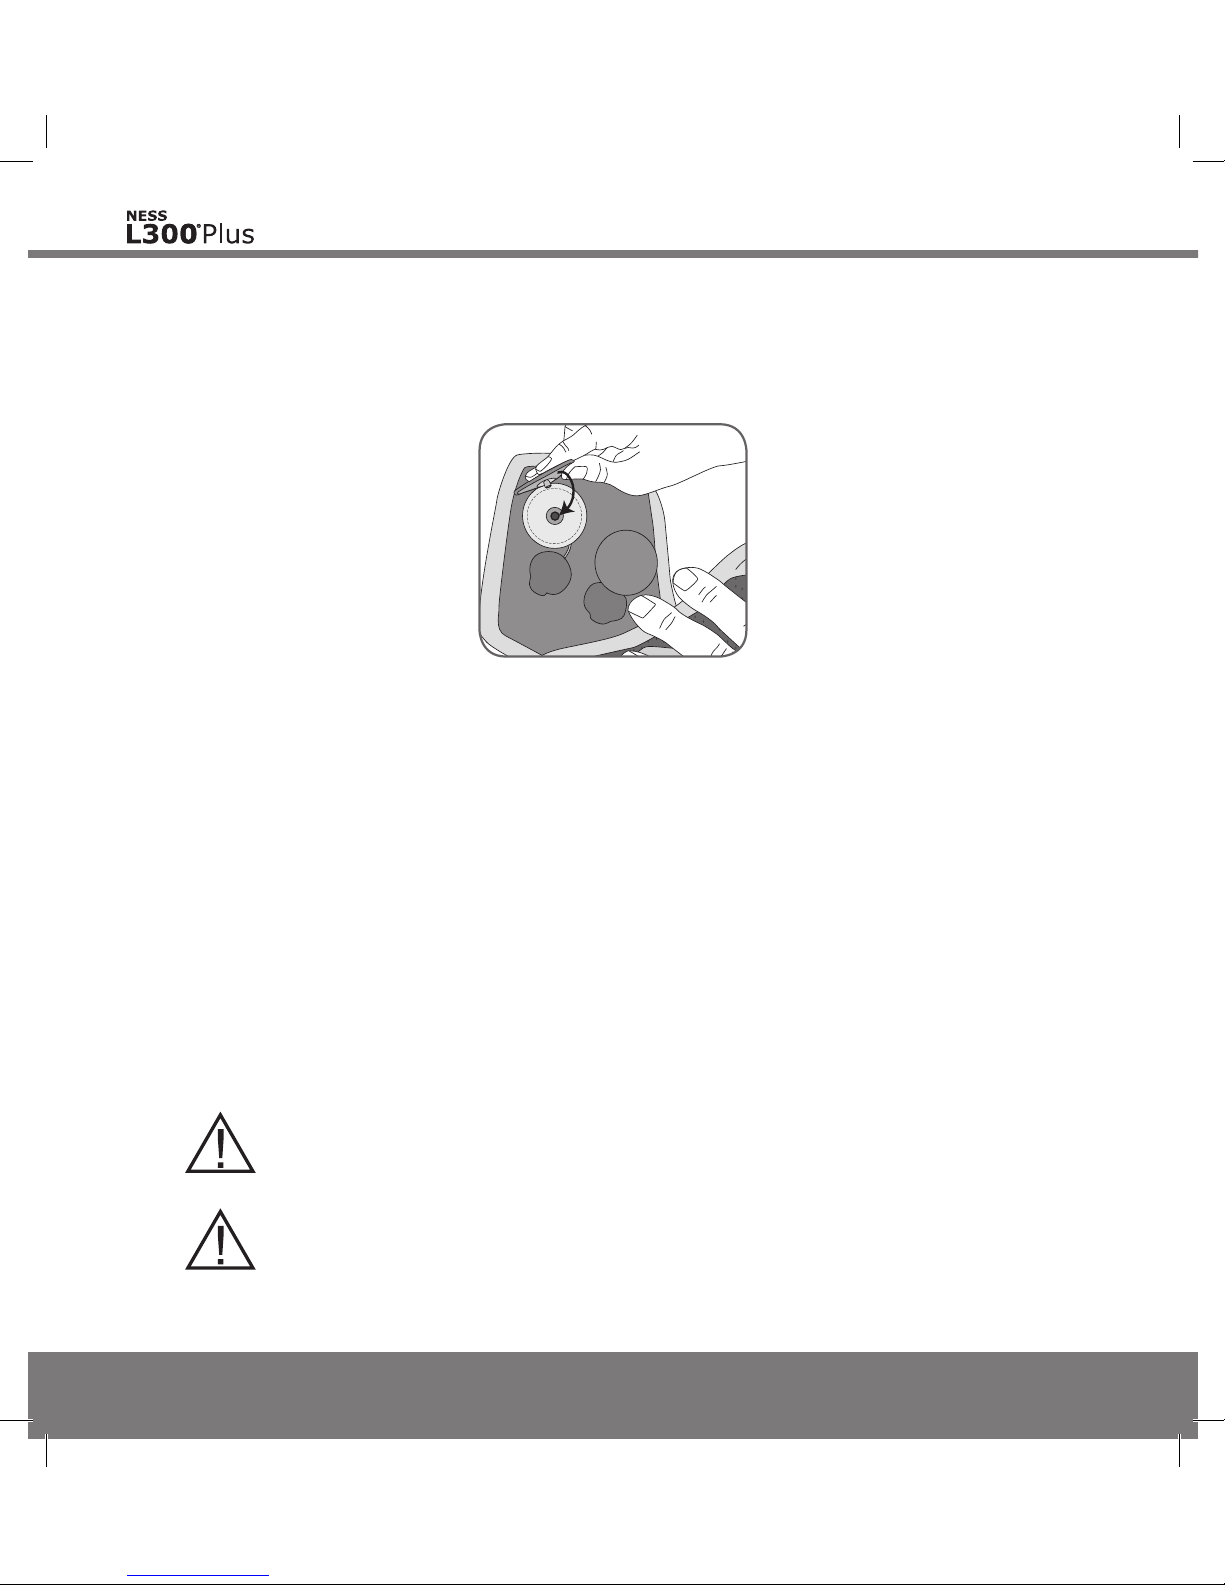
Figure 6-17: Snapping the L300 cloth electrodes to the cloth electrode bases.
6. Snap the L300 cloth electrodes to the L300 cloth electrode bases. See
Figure 6-17.
Note: If the L300 cloth electrodes dry out, your response to the stimulation
may change. If you need to adjust stimulation intensity more often than usual,
try rewetting the cloth electrodes.
CAUTION: Only use electrodes provided by Bioness Inc.
CAUTION: Store cloth electrodes where they can air dry.
Mp612-00313-001_RevB.indd 50 7/18/2011 4:14:32 PM
Page 61
51
Chapter 6 - L300 Plus Accessories
CAUTION: The electrodes are for single patient use.
CAUTION: Wet the cloth electrodes before use, and remove
and rewet them after every three to four hours of use.
Thigh Cloth Electrodes
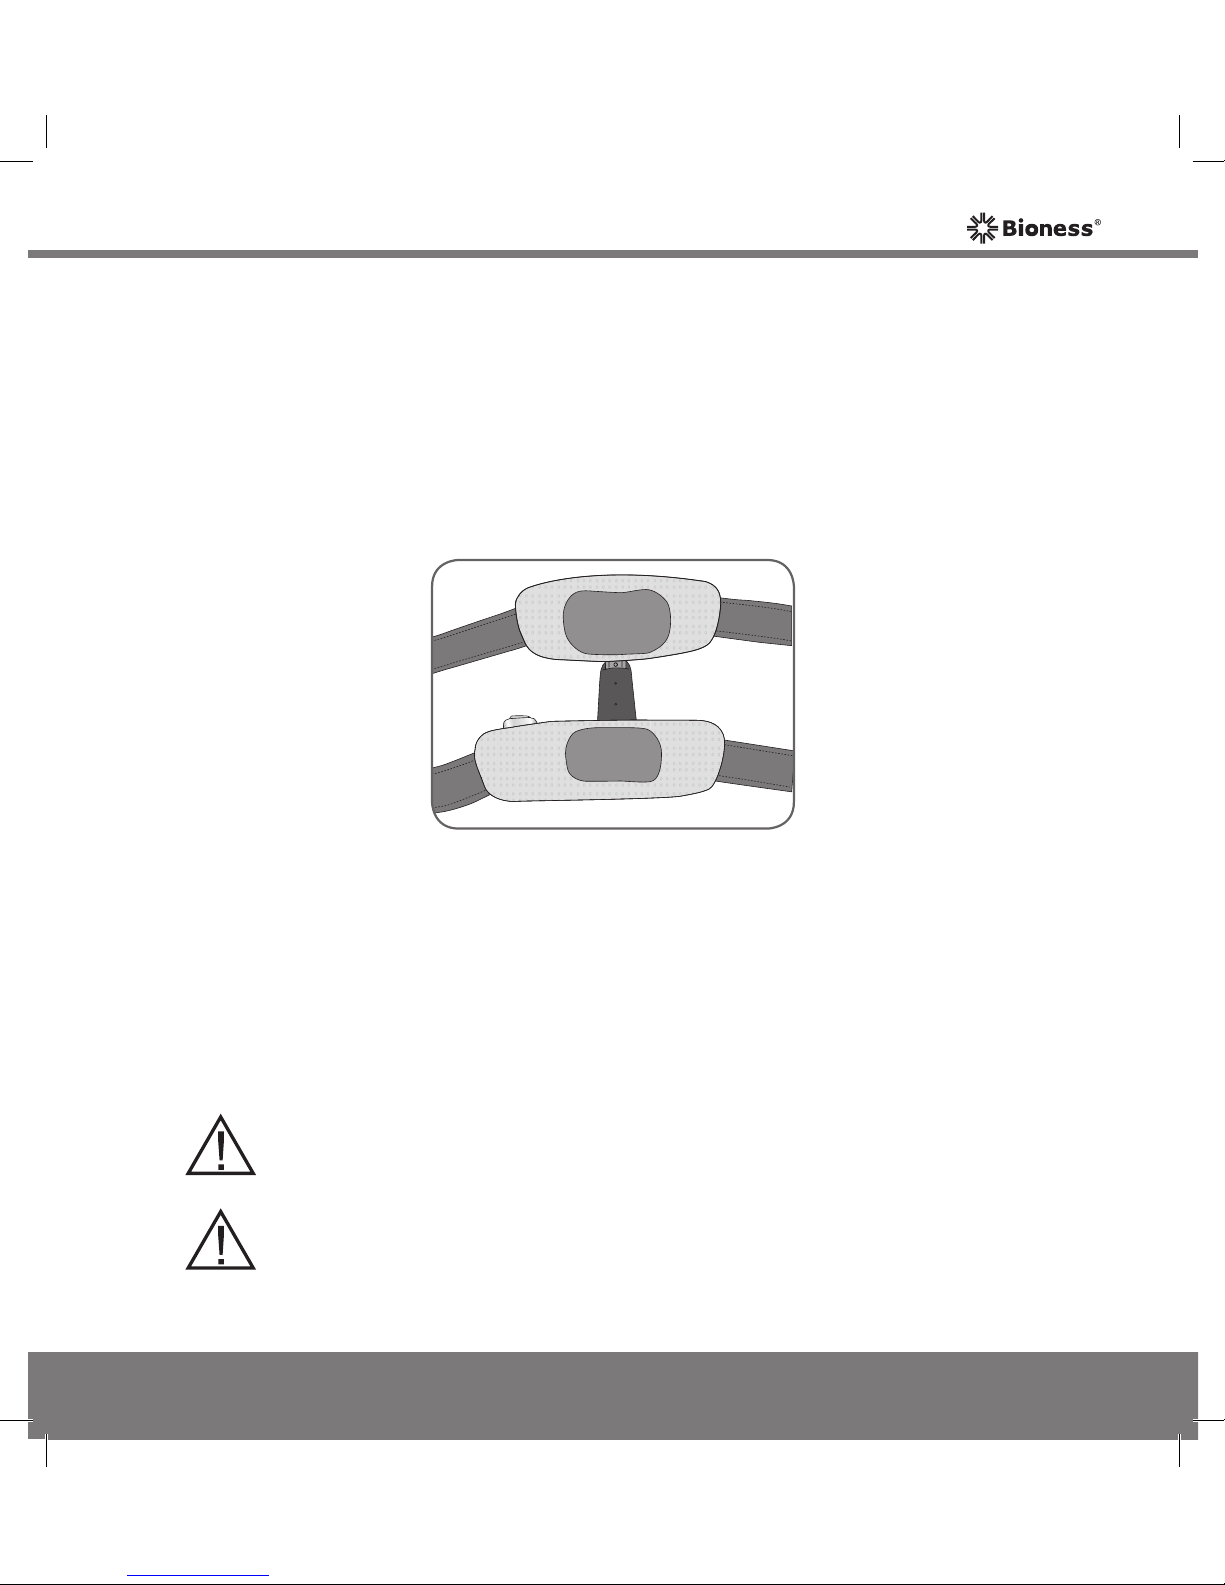
The Thigh cloth electrodes deliver stimulation to the muscles in the upper
leg. The Thigh FS Cuff uses two Thigh cloth electrodes. The large Thigh
cloth electrode snaps to the Thigh FS Cuff top panel. The small Thigh cloth
electrode snaps to the Thigh FS Cuff bottom panel. See Figure 6-18.
Figure 6-18: Thigh cloth electrodes on the Thigh FS Cuff.
Mp612-00313-001_RevB.indd 51 7/18/2011 4:14:32 PM
Page 62
52
User's Guide
Marking Ring
Marking
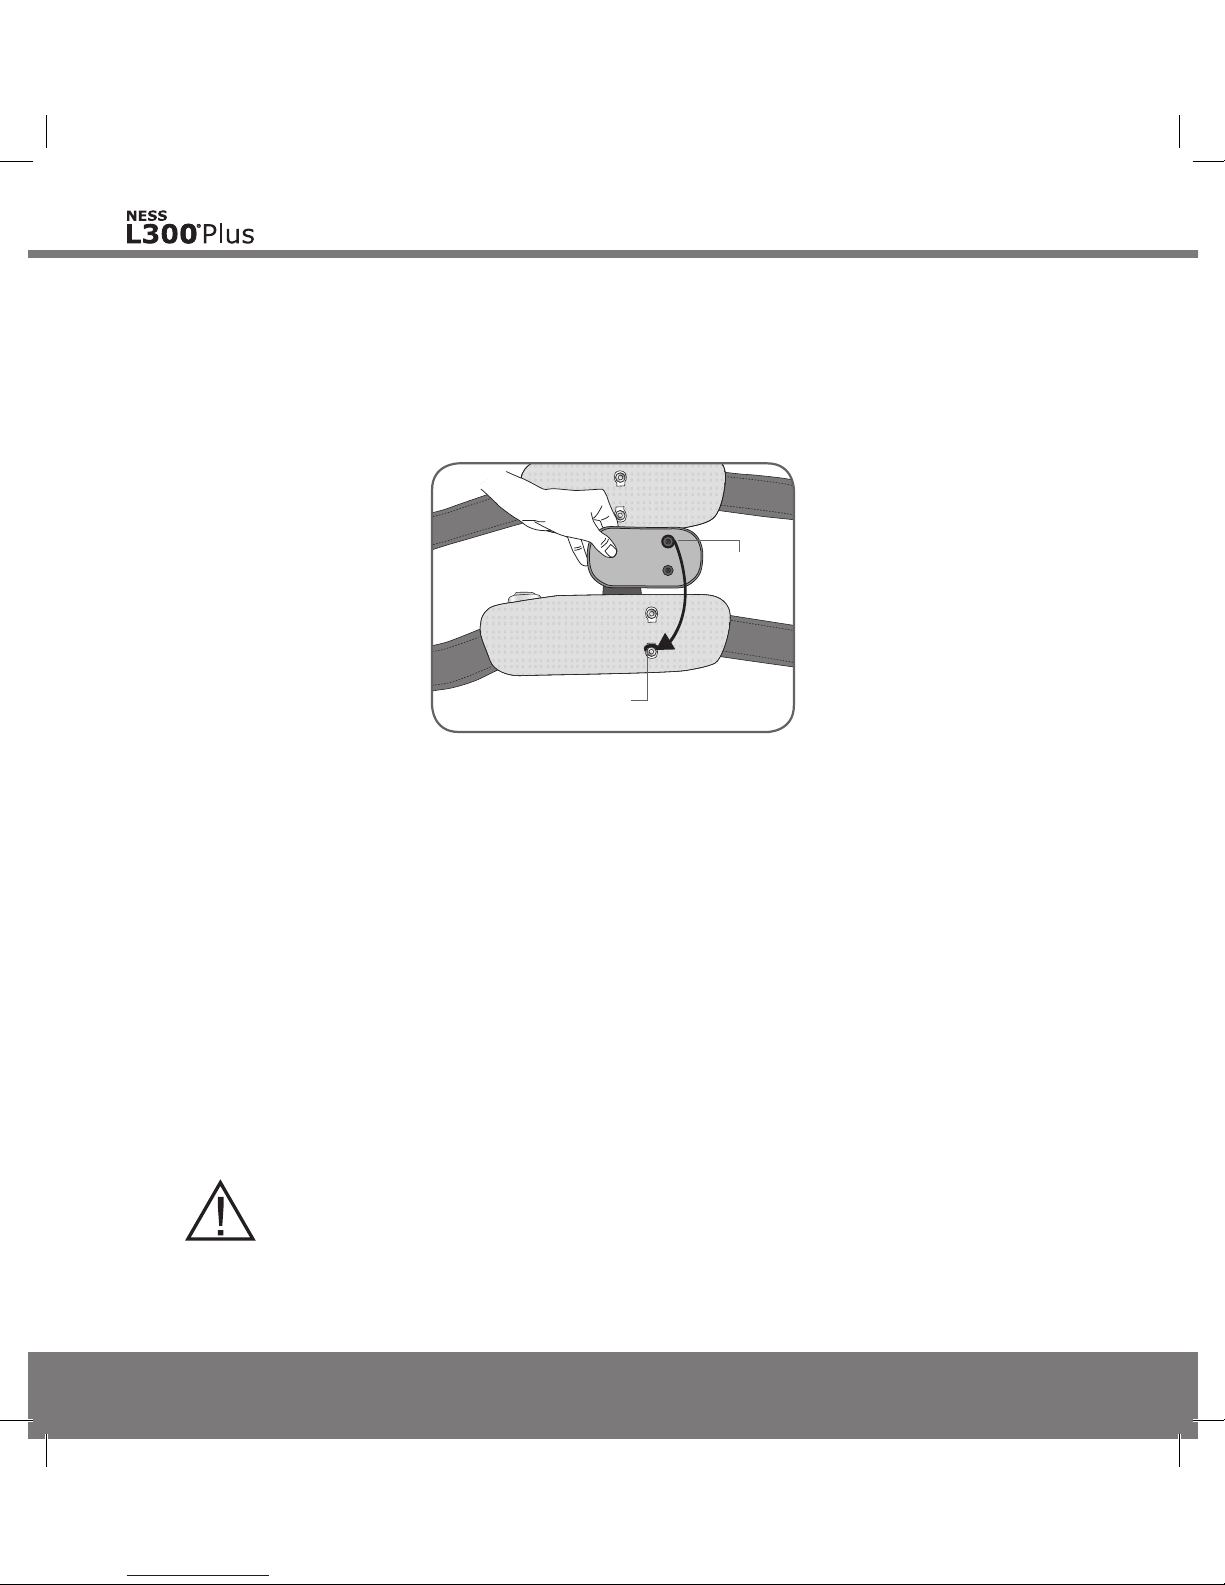
The small Thigh cloth electrode has a marking around one of the snaps. Align
the marking with the electrode marking ring on the Thigh FS Cuff bottom
panel. See Figure 6-19.
Figure 6-19: Aligning the small Thigh cloth electrode.
Wet the Thigh cloth electrodes before use. After every three to four hours
of use, remove and rewet the Thigh cloth electrodes. If the Thigh FS Cuff is
removed for more than one hour, wet the cloth electrodes again before use.
Note: If the Thigh cloth electrodes dry out, your response to the stimulation
may change. If you need to adjust stimulation intensity more often than usual,
try re-wetting the cloth electrodes.
Store the Thigh cloth electrodes where they can air dry.
CAUTION: Replace the electrodes every two weeks.
Mp612-00313-001_RevB.indd 52 7/18/2011 4:14:33 PM
Page 63
53
Chapter 6 - L300 Plus Accessories
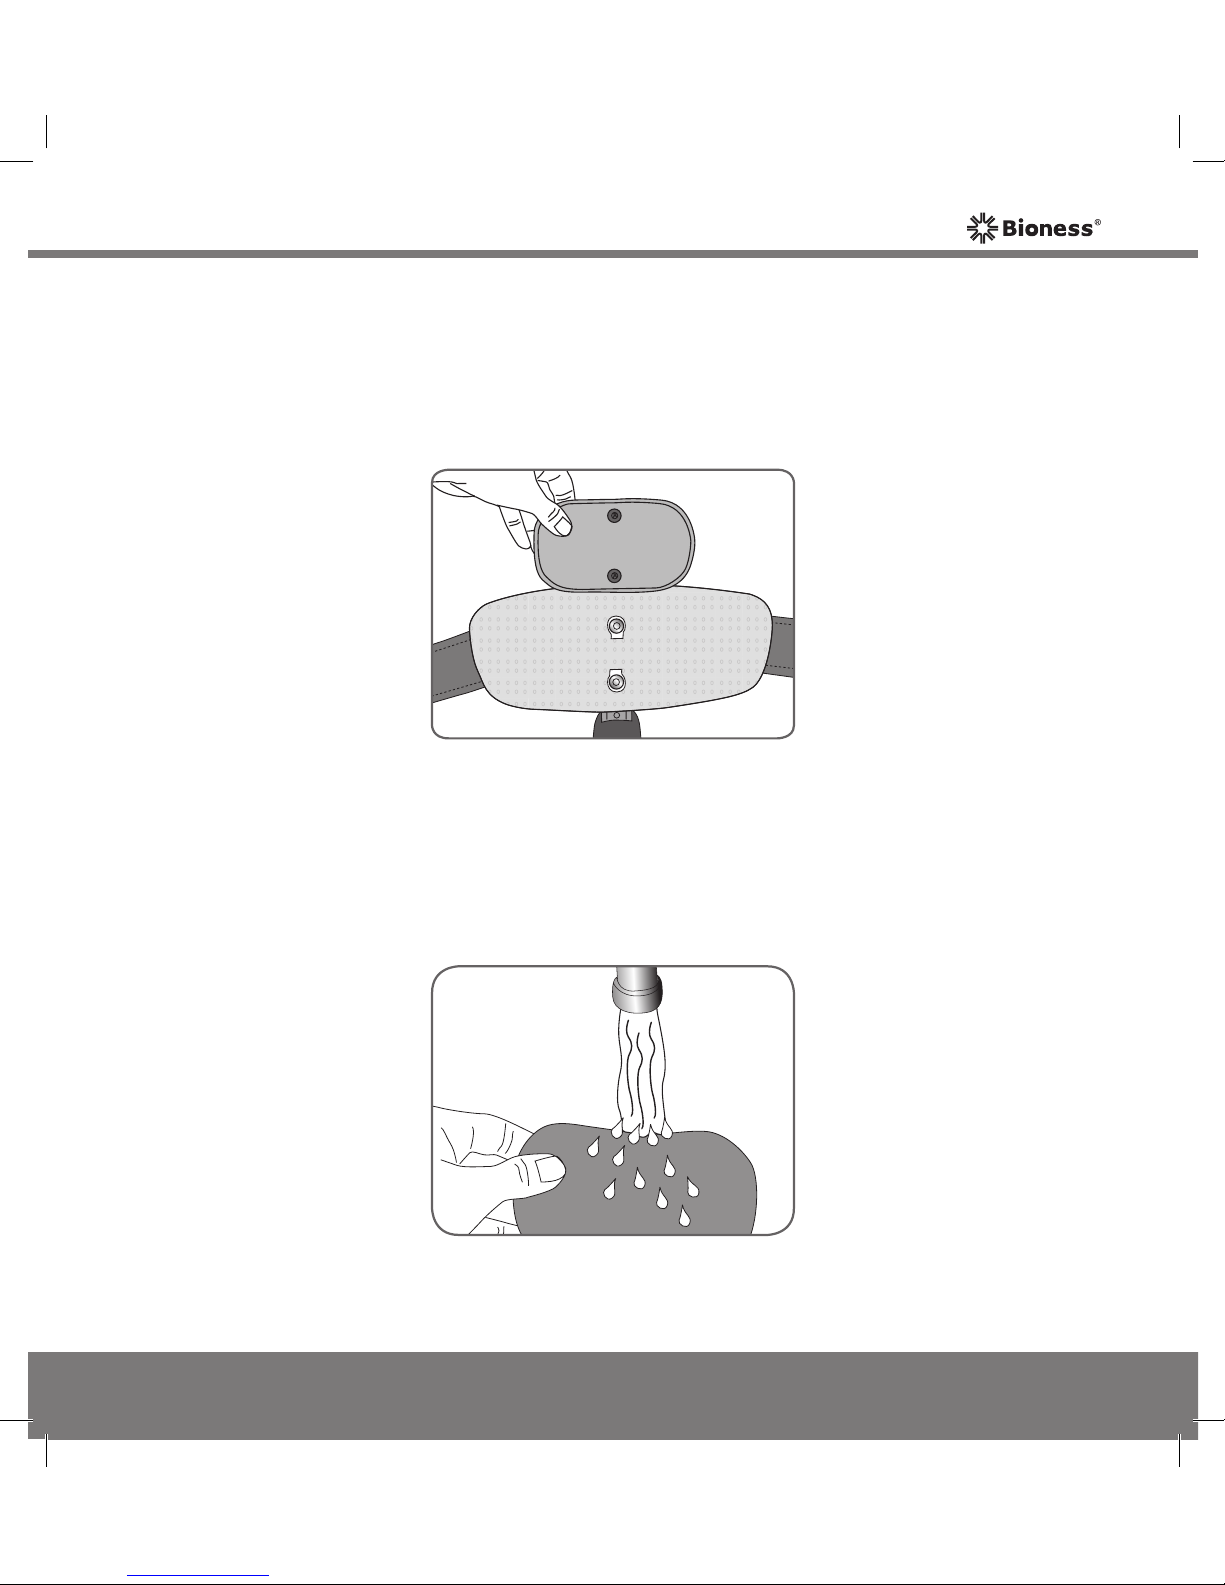
To rewet/replace the Thigh cloth electrodes:
1. Turn off the L300 Plus System and remove the Thigh FS Cuff.
2. Gently unsnap the Thigh cloth electrodes. See Figure 6-20.
Figure 6-20: Unsnapping the Thigh cloth electrodes.
3. Wet the Thigh cloth electrodes with water until they are saturated. See
Figure 6-21.
Figure 6-21: Wetting the Thigh cloth electrodes.
Mp612-00313-001_RevB.indd 53 7/18/2011 4:14:34 PM
Page 64
54
User's Guide
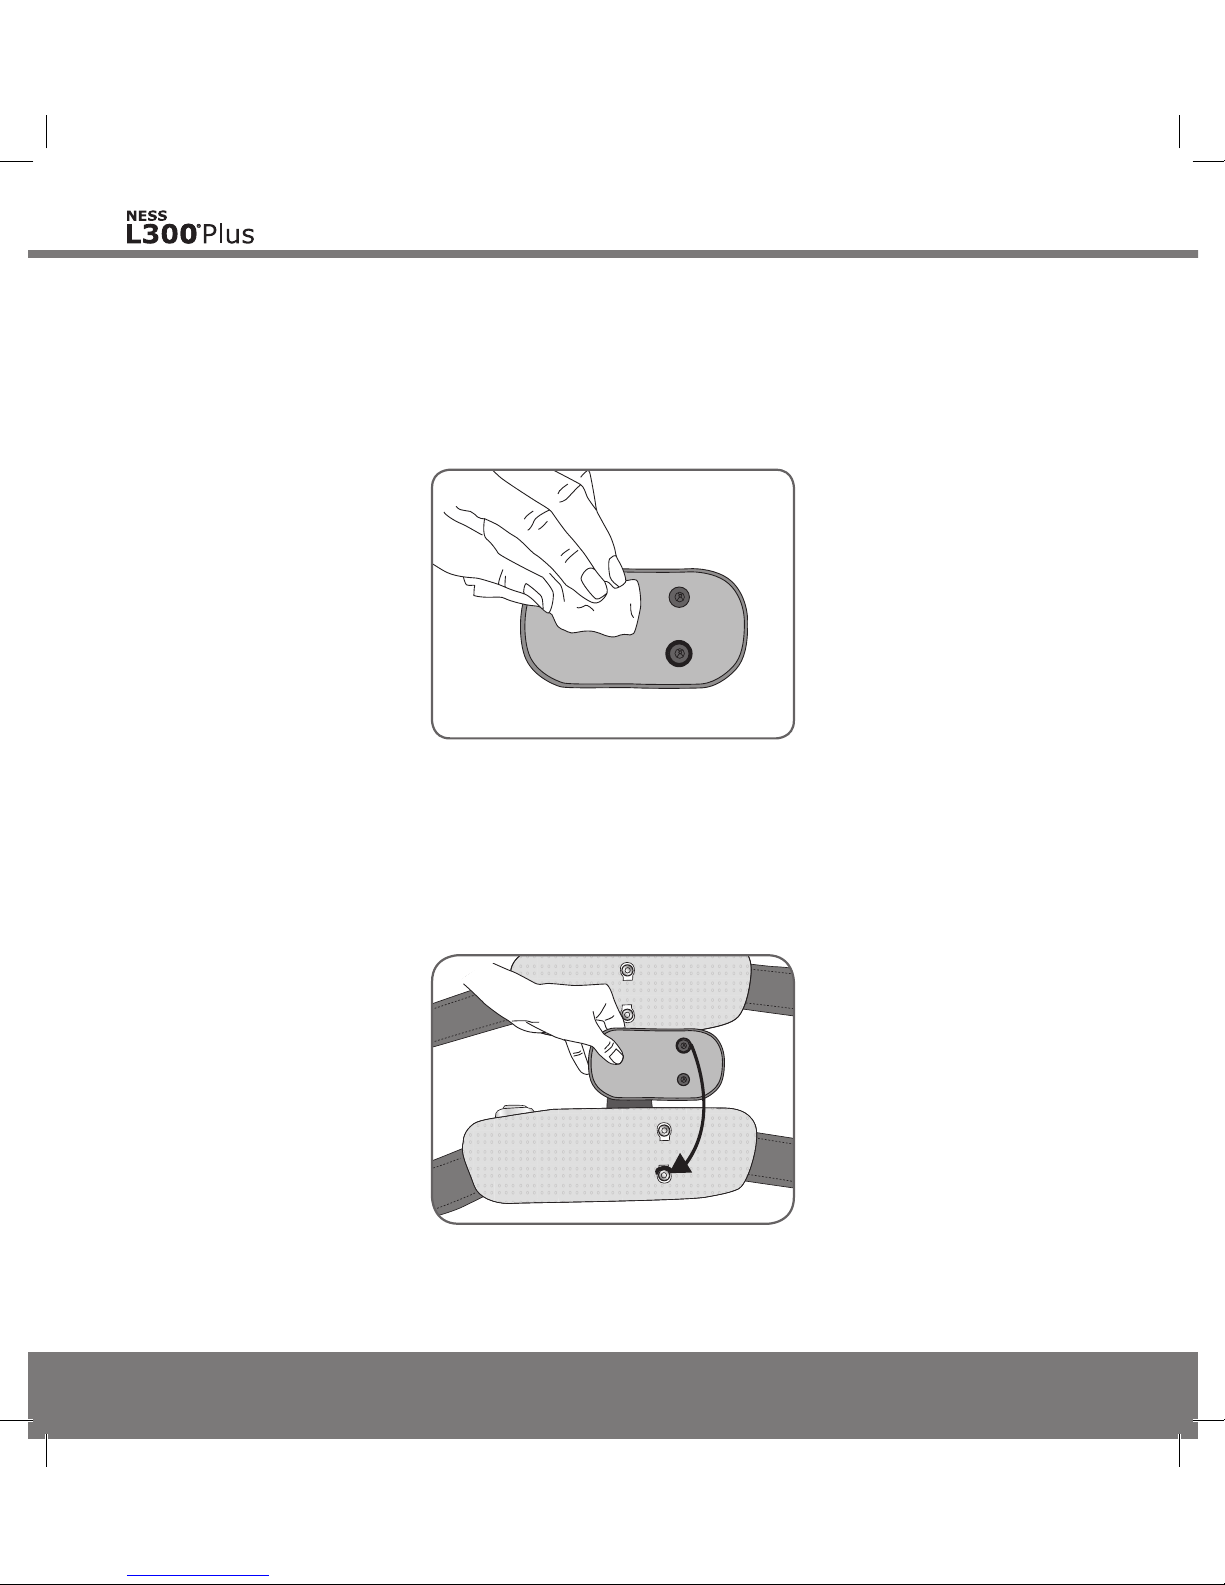
Figure 6-22: Blotting the snap side of the Thigh cloth electrodes.
4. Gently squeeze the Thigh cloth electrodes together.
5. Blot excess water from the snap side of the Thigh cloth electrodes. See
Figure 6-22.
Figure 6-23: Snapping the Thigh cloth electrodes to the Thigh FS Cuff.
6. Snap the Thigh cloth electrodes to the Thigh FS Cuff. See Figure 6-23.
Mp612-00313-001_RevB.indd 54 7/18/2011 4:14:35 PM
Page 65
55
Chapter 6 - L300 Plus Accessories
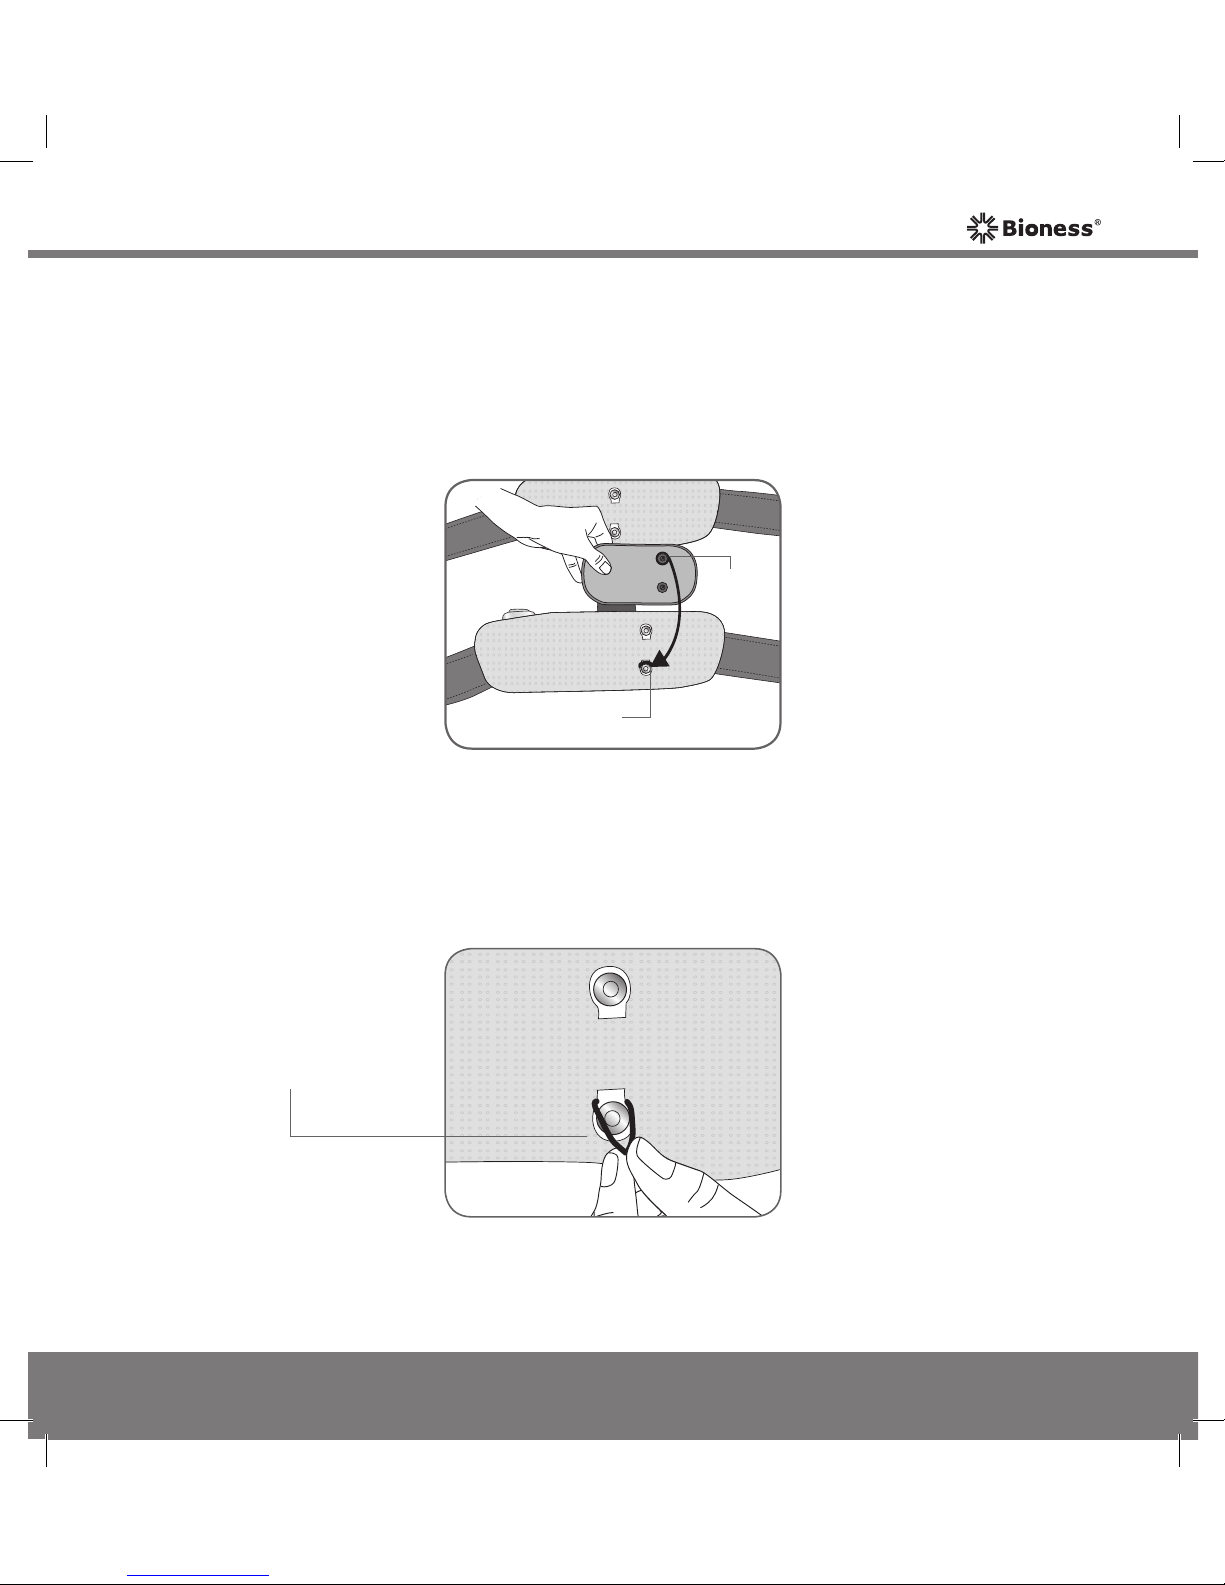
Thigh Electrode Marking Ring
The Thigh electrode marking ring marks the orientation of the small Thigh
cloth electrode on the bottom panel of the Thigh FS Cuff. Align the marking
on the small Thigh cloth electrode with the marking ring. See Figure 6-24.
Figure 6-25: Replacing the Thigh electrode marking ring.
Thigh Electrode
Marking Ring
Attach replacement Thigh electrode marking rings to the same snap. See
Figure 6-25.
Marking Ring
Marking
Figure 6-24: Aligning the small Thigh cloth electrode.
Mp612-00313-001_RevB.indd 55 7/18/2011 4:14:36 PM
Page 66
56
User's Guide
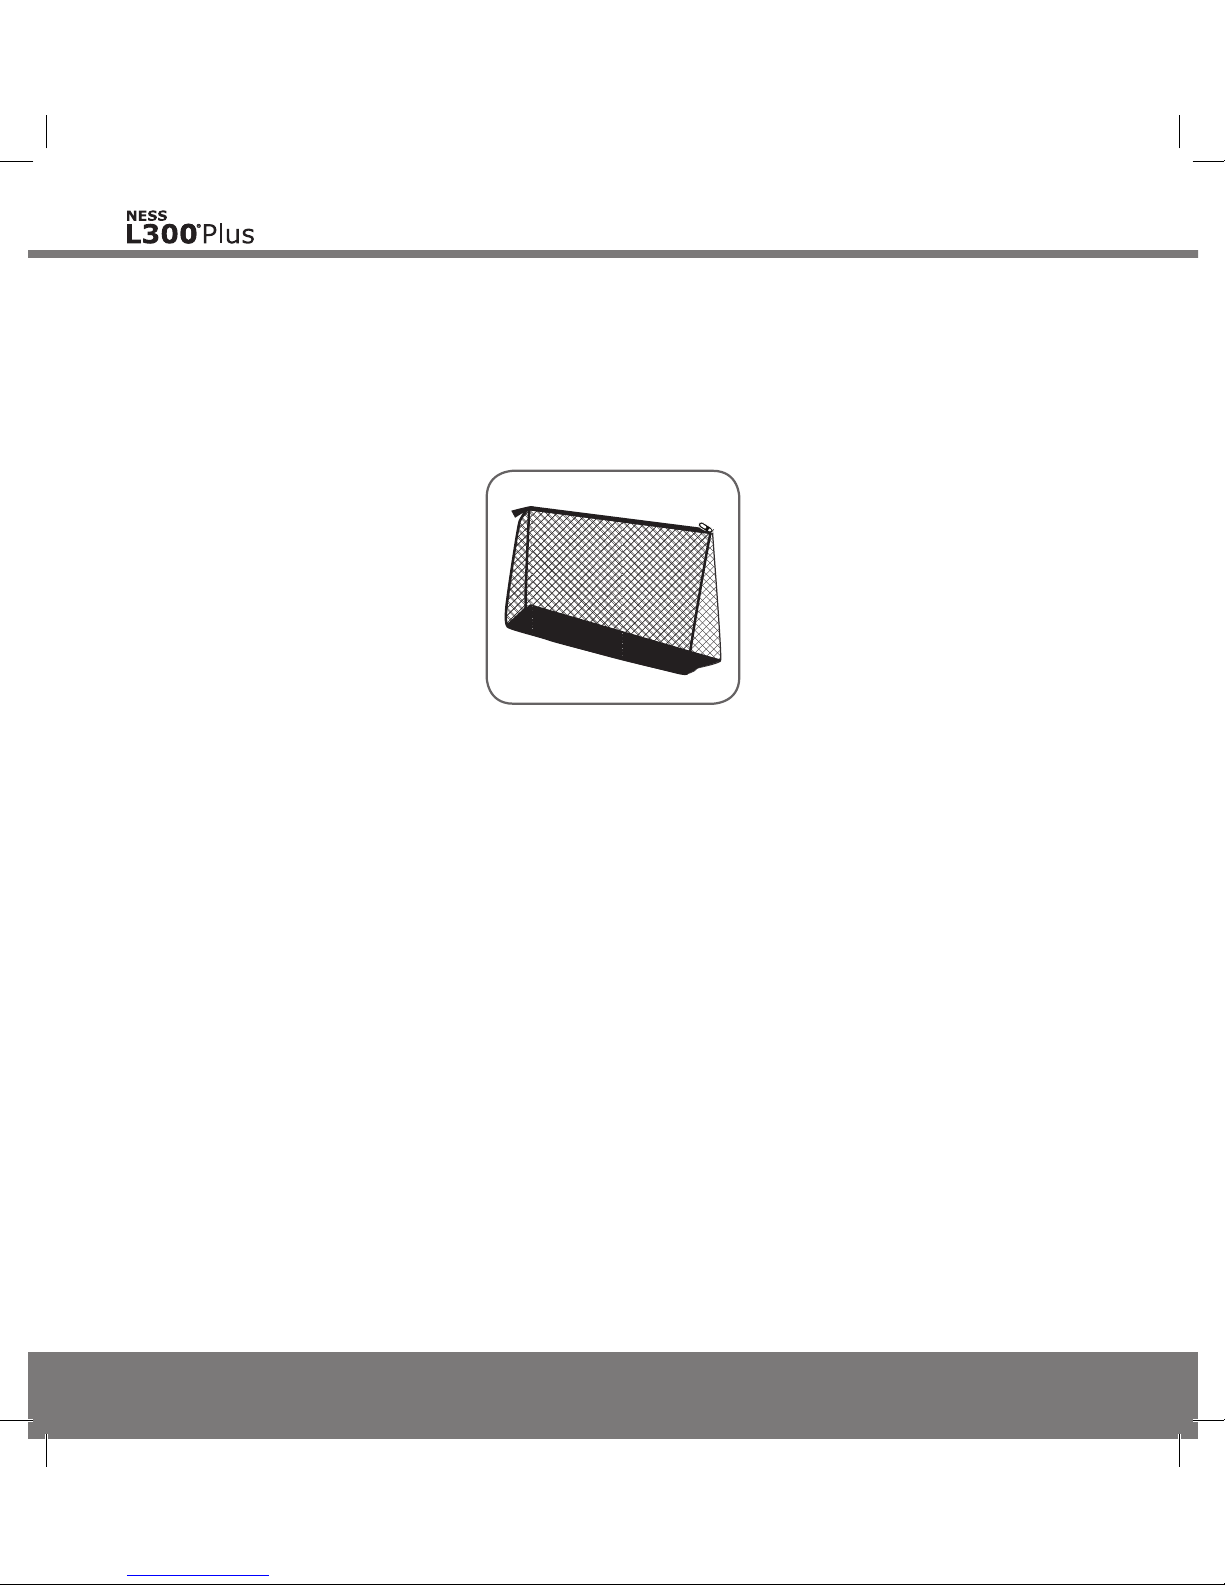
Figure 6-26: Cloth electrode mesh bag.
Cloth Electrode Mesh Bag
The cloth electrode mesh bag is for storing the L300 and Thigh cloth electrodes.
See Figure 6-26.
Mp612-00313-001_RevB.indd 56 7/18/2011 4:14:37 PM
Page 67
57
Chapter 6 - L300 Plus Accessories
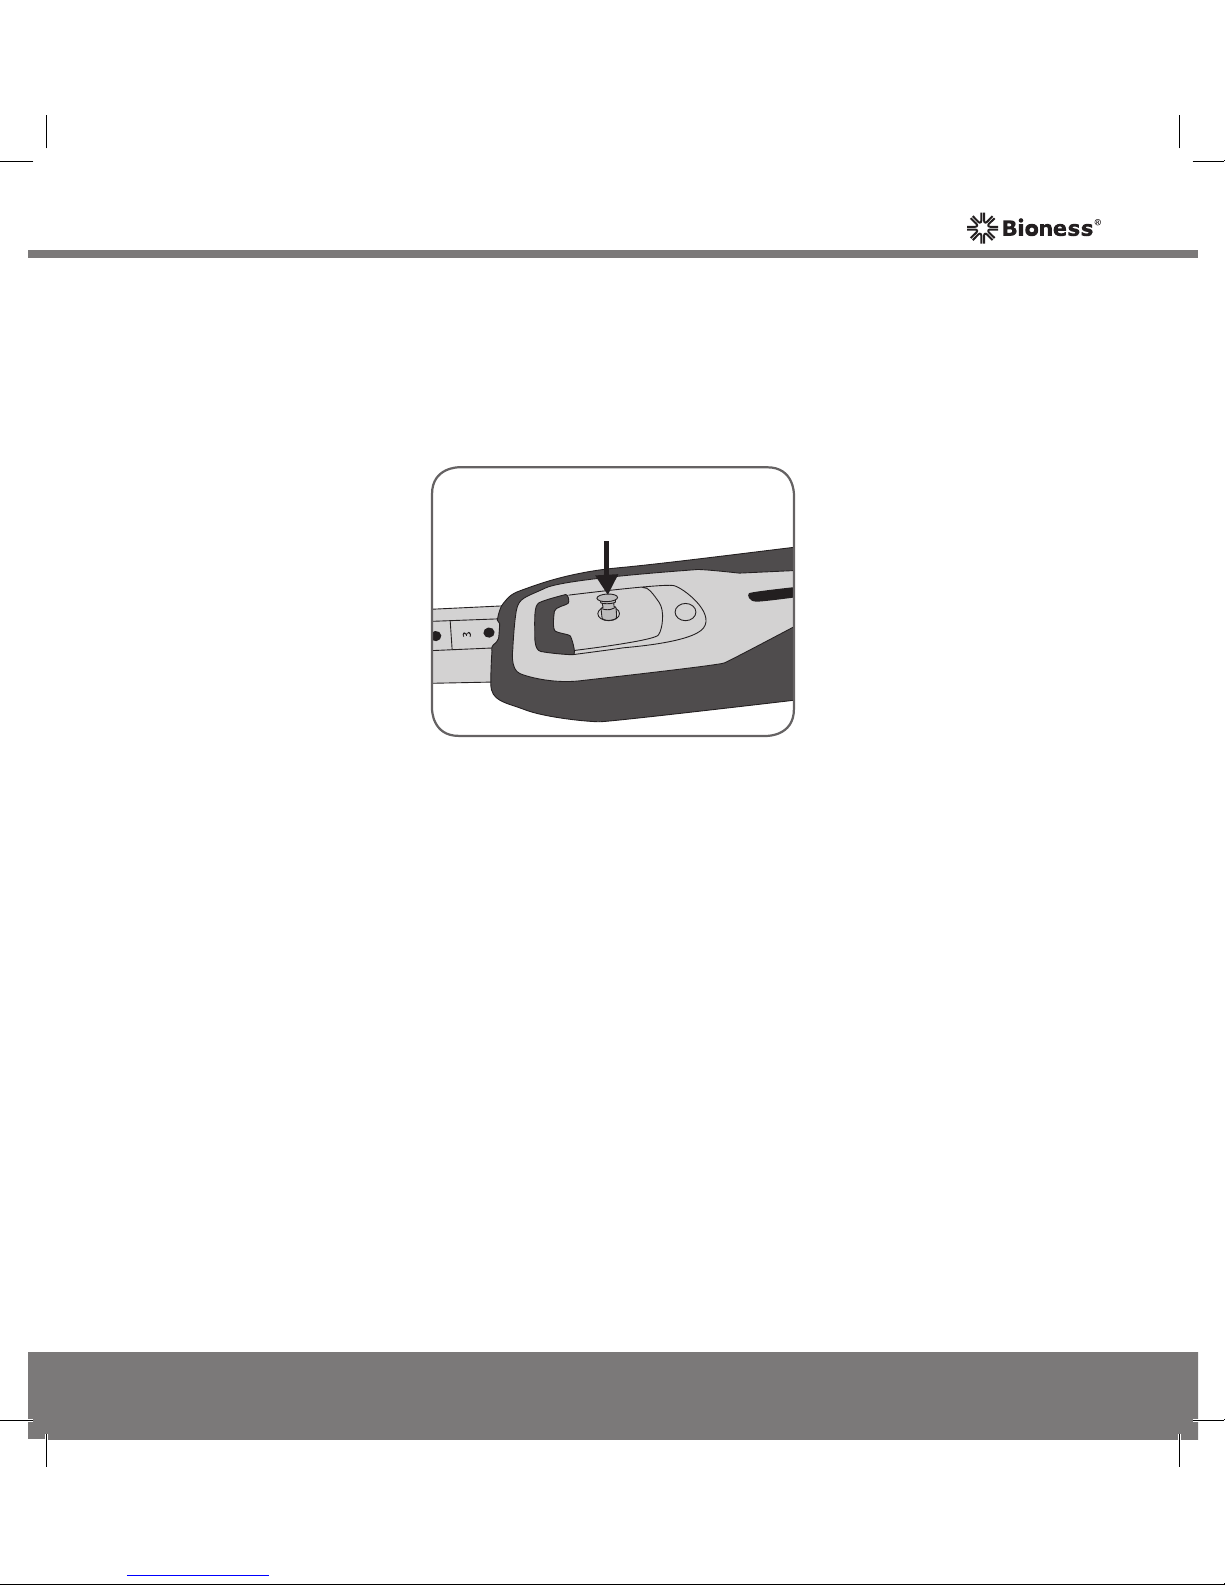
Thigh Elongation Bar Lock
The Thigh elongation bar lock prevents the elongation bar from sliding. See
Figure 6-27.
Figure 6-27: Thigh elongation bar lock.
Thigh Elongation Bar Lock
Do not attempt to remove the Thigh elongation bar lock or to adjust the
elongation bar. Contact your clinician if you think the elongation bar needs
adjustment.
Mp612-00313-001_RevB.indd 57 7/18/2011 4:14:37 PM
Page 68
58
User's Guide
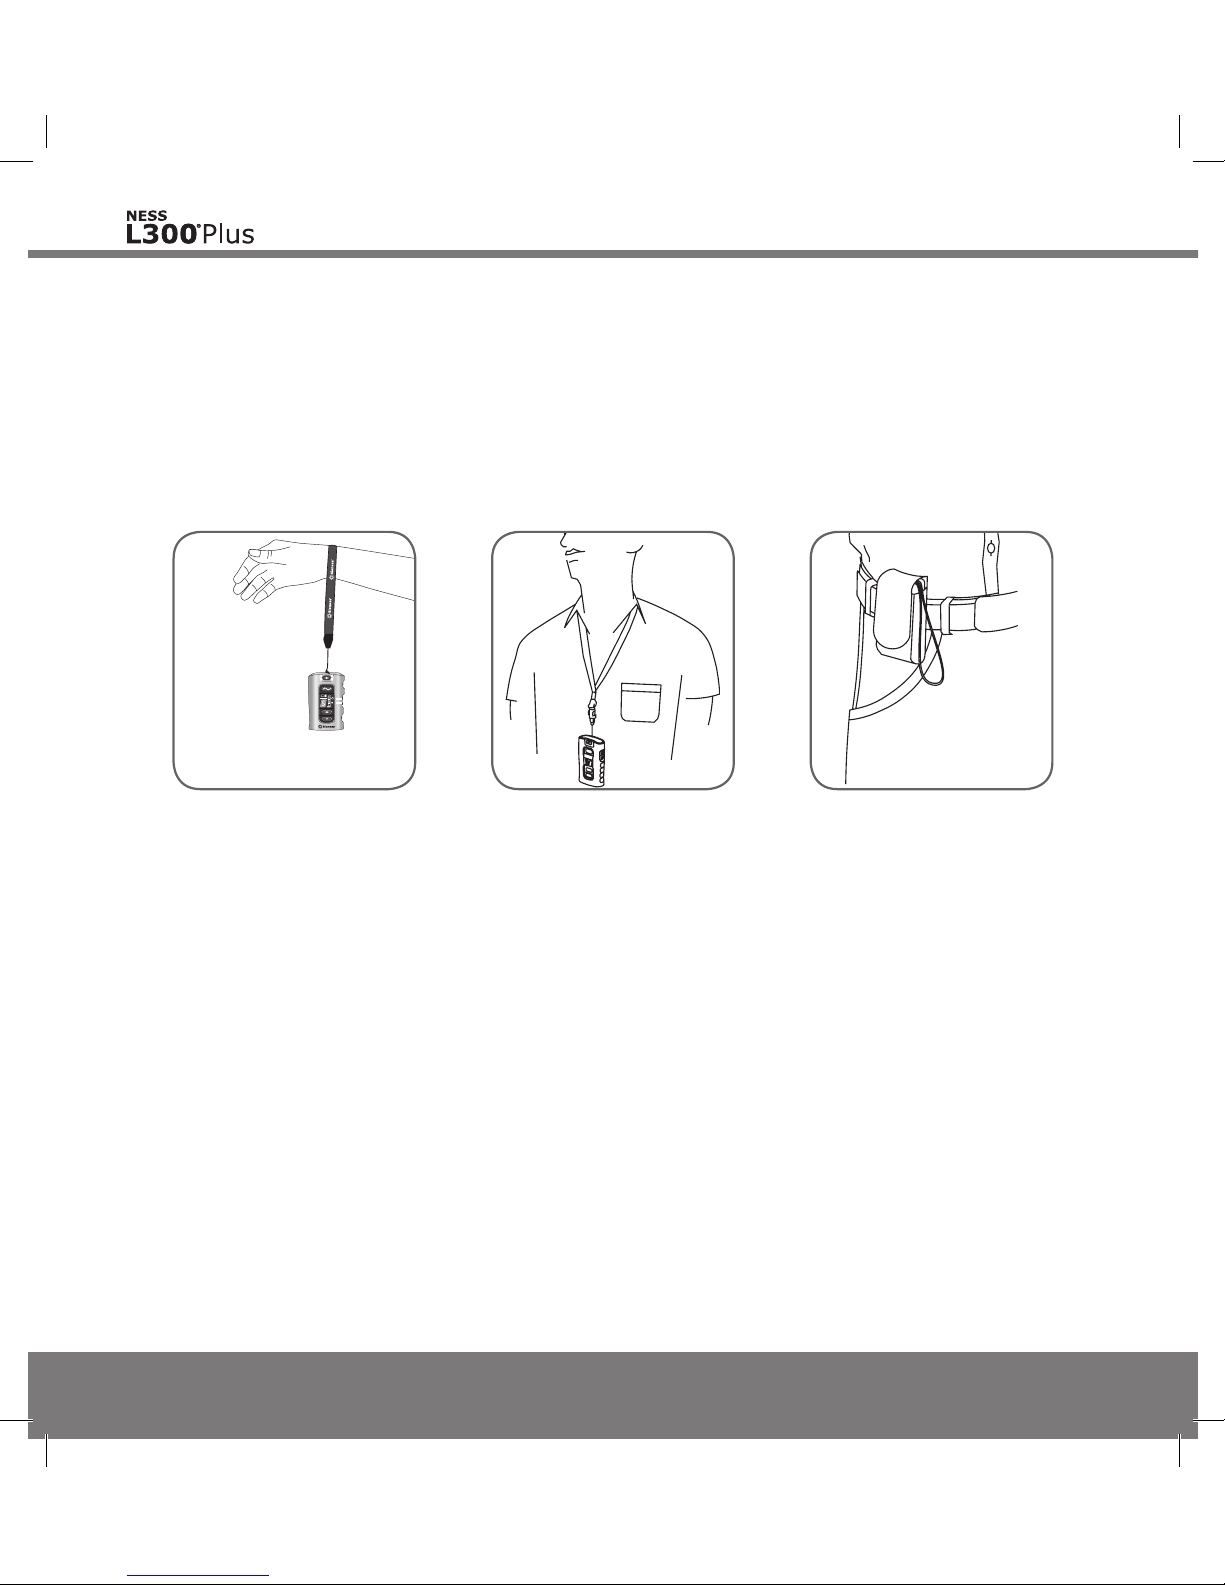
Control Unit Wrist Strap, Neck Strap, and Belt
Pouch
The L300 Plus control unit wrist strap, neck strap, and belt pouch are for
carrying the L300 Plus Control Unit. The wrist and neck straps loop through
the top of the L300 Plus Control Unit. See Figure 6-28.
Wrist Strap Belt PouchNeck Strap
Figure 6-28: L300 Plus Control Unit accessories.
Mp612-00313-001_RevB.indd 58 7/18/2011 4:14:37 PM
Page 69
59
Chapter 6 - L300 Plus Accessories
System Charger Set
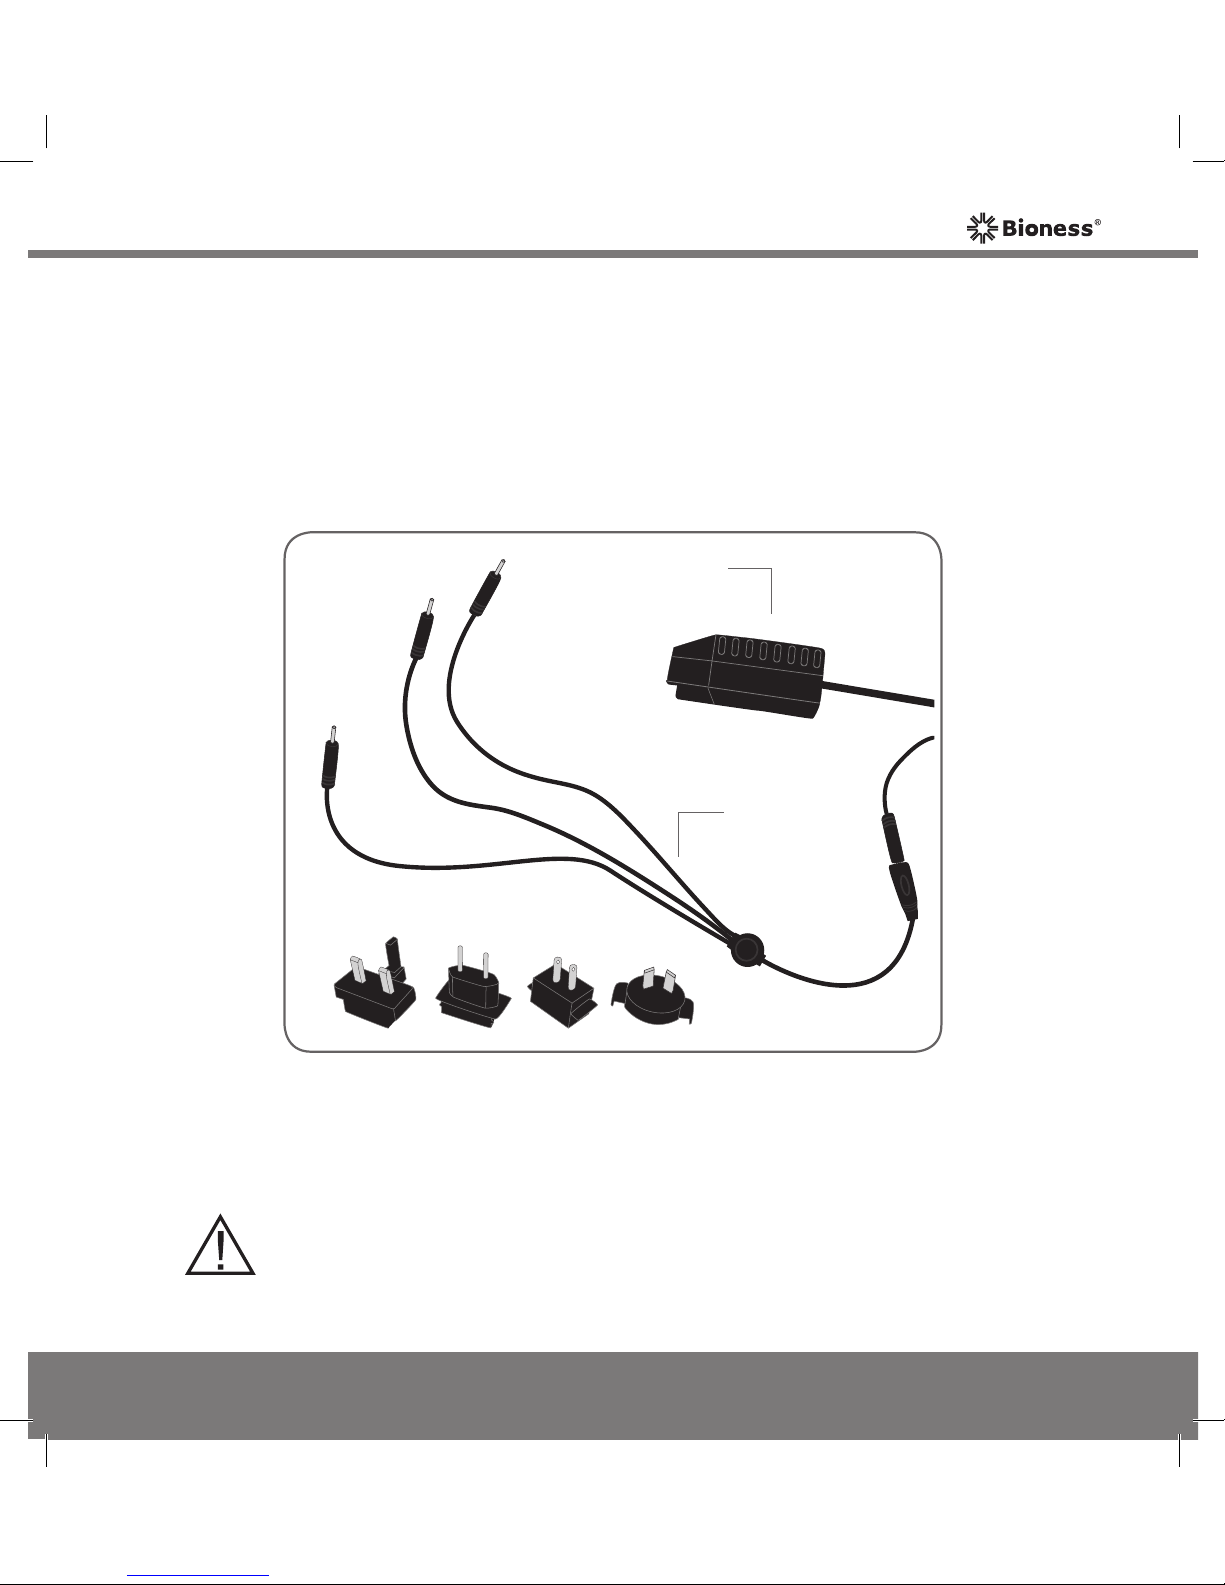
The system charger set is for charging the L300 RF Stim Unit, Thigh RF Stim
Unit, and L300 Plus Control Unit simultaneously. The system charger set
includes a W cable, a charger, and four interchangeable blades for Australia,
European Union, U.K., and U.S. voltages. See Figure 6-29.
Figure 6-29: System charger set.
Charger
W Cable
Interchangeable Blades
WARNING: Use only the charger included in your NESS L300
Plus System Kit or NESS L300 Plus System Upgrade Kit. Use
of any other charger could damage the system.
Mp612-00313-001_RevB.indd 59 7/18/2011 4:14:37 PM
Page 70
60
User's Guide
Replacement Battery, Gait Sensor
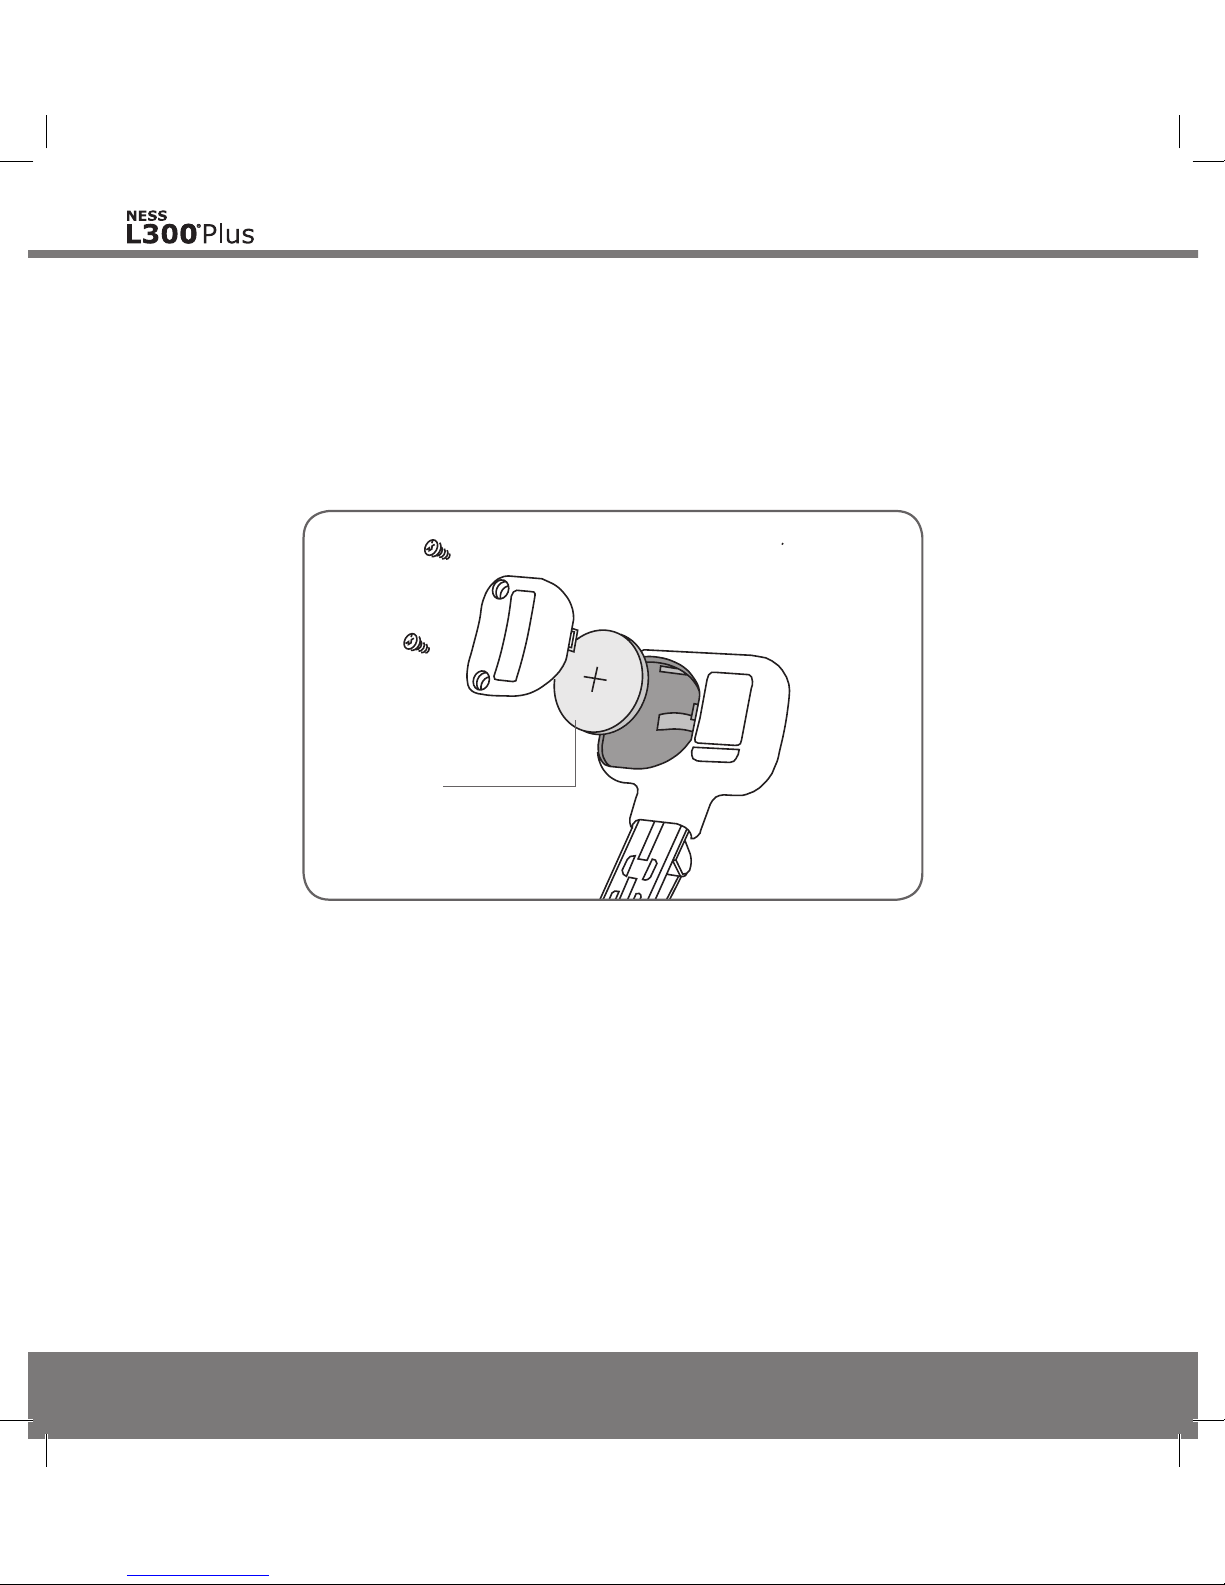
The Intelli-Sense Gait Sensor battery may need to be replaced approximately
every six months. See Figure 6-30. Battery replacement instructions can be
found in the maintenance chapter of this guide.
Intelli-Sense
Gait Sensor
Battery
Figure 6-30: The Intelli-Sense Gait Sensor battery.
Mp612-00313-001_RevB.indd 60 7/18/2011 4:14:38 PM
Page 71
61
Chapter 6 - L300 Plus Accessories
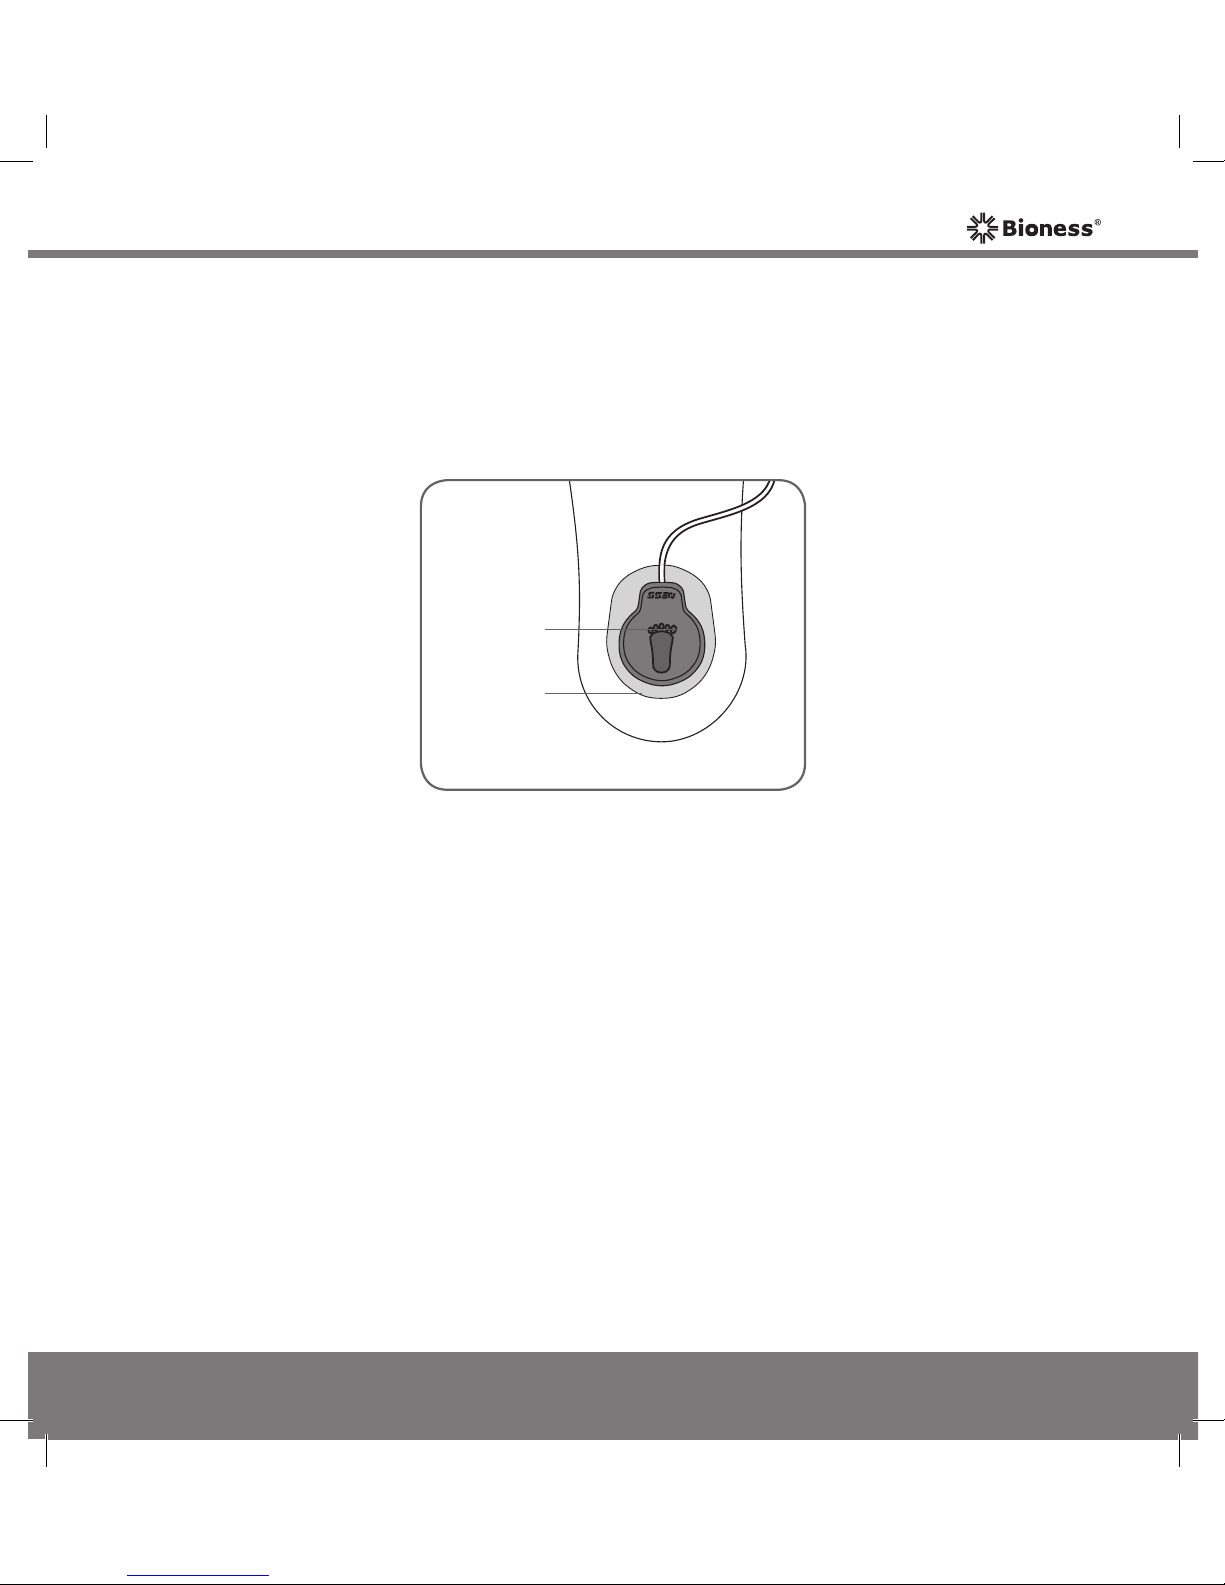
Figure 6-31: Placement of the gait sensor pad in the heel of a shoe.
Gait Sensor Pads
The gait sensor pad stabilizes the Intelli-Sense Gait Sensor pressure sensor
in the shoe. See Figure 6-31.
Pressure
Sensor
Gait
Sensor
Pad
One gait sensor pad is placed under the insole of the shoe of the affected
leg. The pressure sensor is then placed on top of the gait sensor pad, and
pressed down. (The adhesive side of the gait sensor pad faces down.) Finally,
the insole of the shoe is lowered to cover both the pressure sensor and the
gait sensor pad.
The location of the gait sensor pad is initially determined by your clinician.
Mp612-00313-001_RevB.indd 61 7/18/2011 4:14:38 PM
Page 72
62
User's Guide
Shoe Spacers
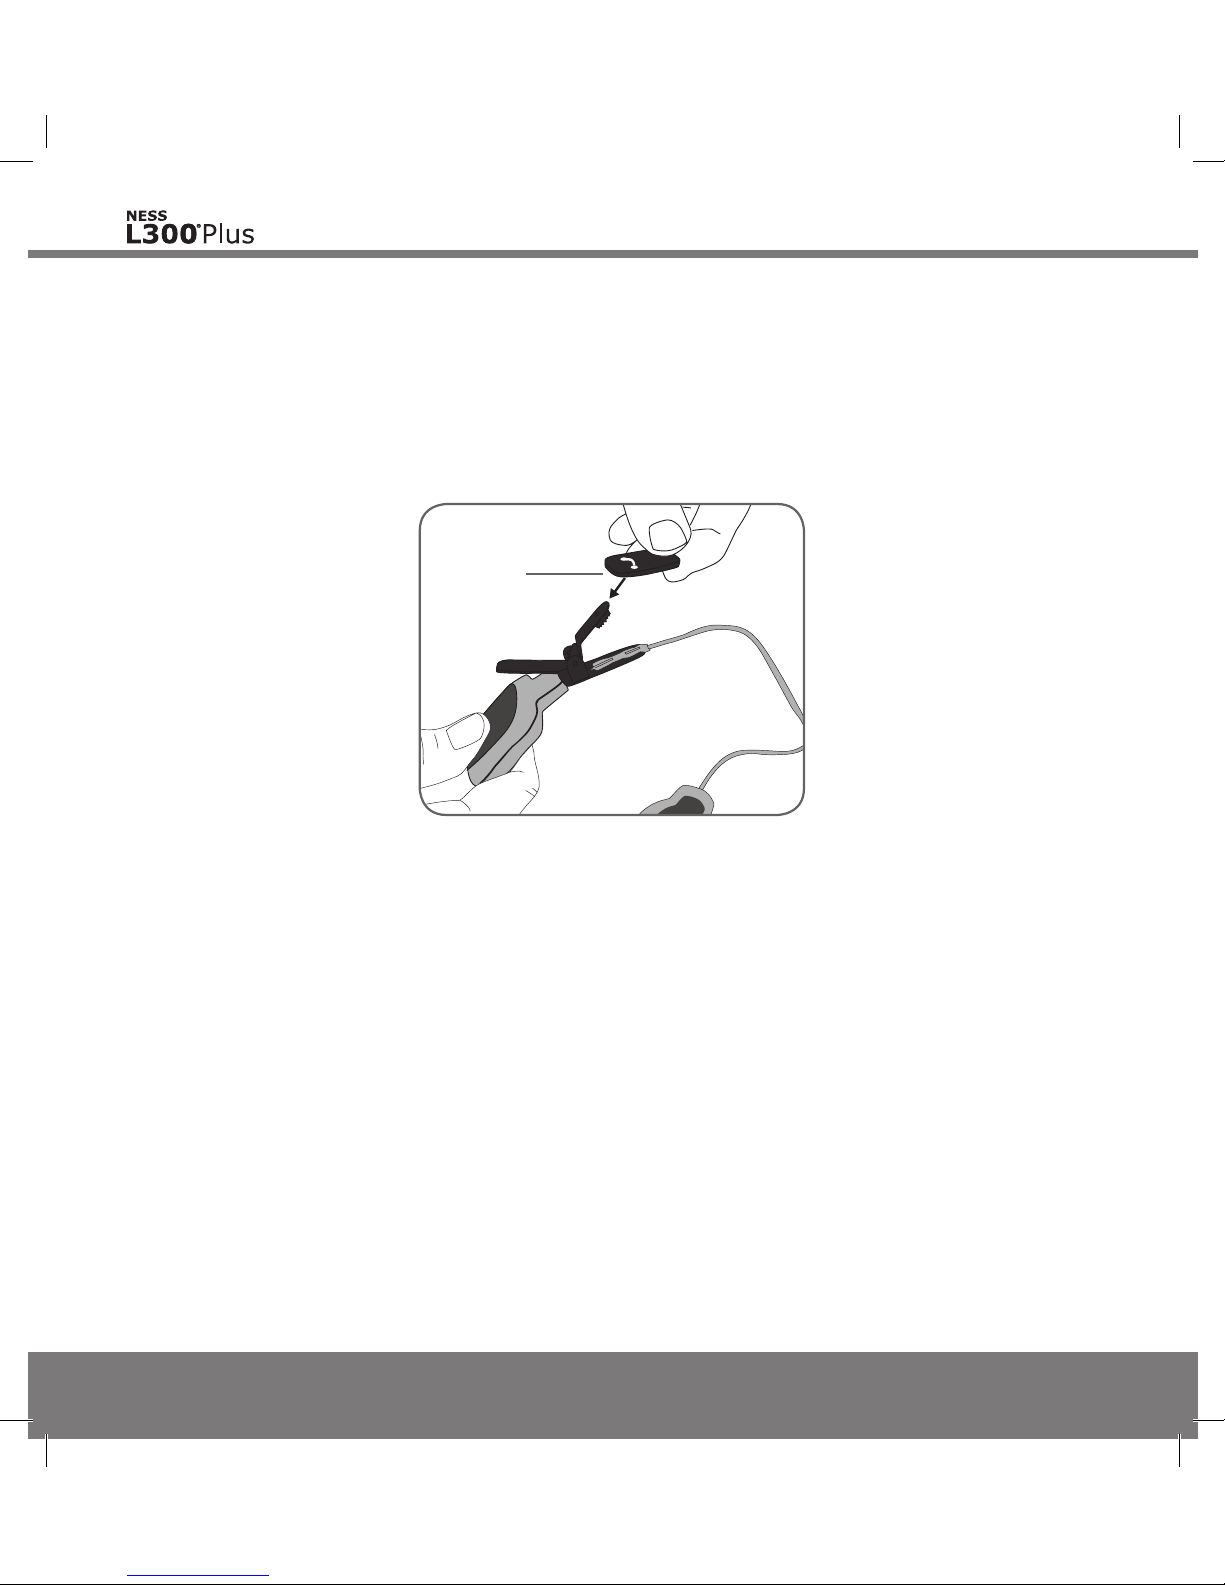
The shoe spacer is placed on the inner clamp of the Intelli-Sense Gait Sensor.
See Figure 6-32.
Figure 6-32: Attaching the shoe spacer to the Intelli-Sense Gait Sensor.
Shoe
Spacer
The shoe spacer:
• Stabilizes the Intelli-Sense Gait Sensor on the rim of the shoe.
• Protects the rim of the shoe from the clamp.
Mp612-00313-001_RevB.indd 62 7/18/2011 4:14:38 PM
Page 73
63
Chapter 7 - Setting Up the NESS L300 Plus System
7
Setting Up the NESS L300 Plus System
Preparing the Skin
Before you put on the L300 and Thigh FS Cuffs, prepare your skin where
the electrodes will touch.
To prepare your skin:
1.
Clean the skin where the electrodes will touch with a wet washcloth. If any
lotions are on the skin, clean the skin with soap and water. Rinse well.
2.
If necessary, trim excess body hair from the area using an electric shaver
or scissors. Do not use a razor. A razor can irritate the skin.
3.
Check the skin for signs of irritation. If any irritation is present, stop using the
NESS L300 Plus System. Contact your clinician and your local distributor
or visit the Bioness website at www.bioness.com/Landing.php?reset. Wait
for complete healing before using the NESS L300 Plus System.
Checking the Components
Check all components and accessories for signs of wear or damage. If any
component is damaged, contact your local distributor. If the electrodes are
old, replace them.
Mp612-00313-001_RevB.indd 63 7/18/2011 4:14:38 PM
Page 74
64
User's Guide
Putting on the L300 FS Cuff
To put on the L300 FS Cuff:
1. Remove and wet the L300 cloth electrode(s), if appropriate.
2. Remove the covers on the hydrogel electrodes, if appropriate.
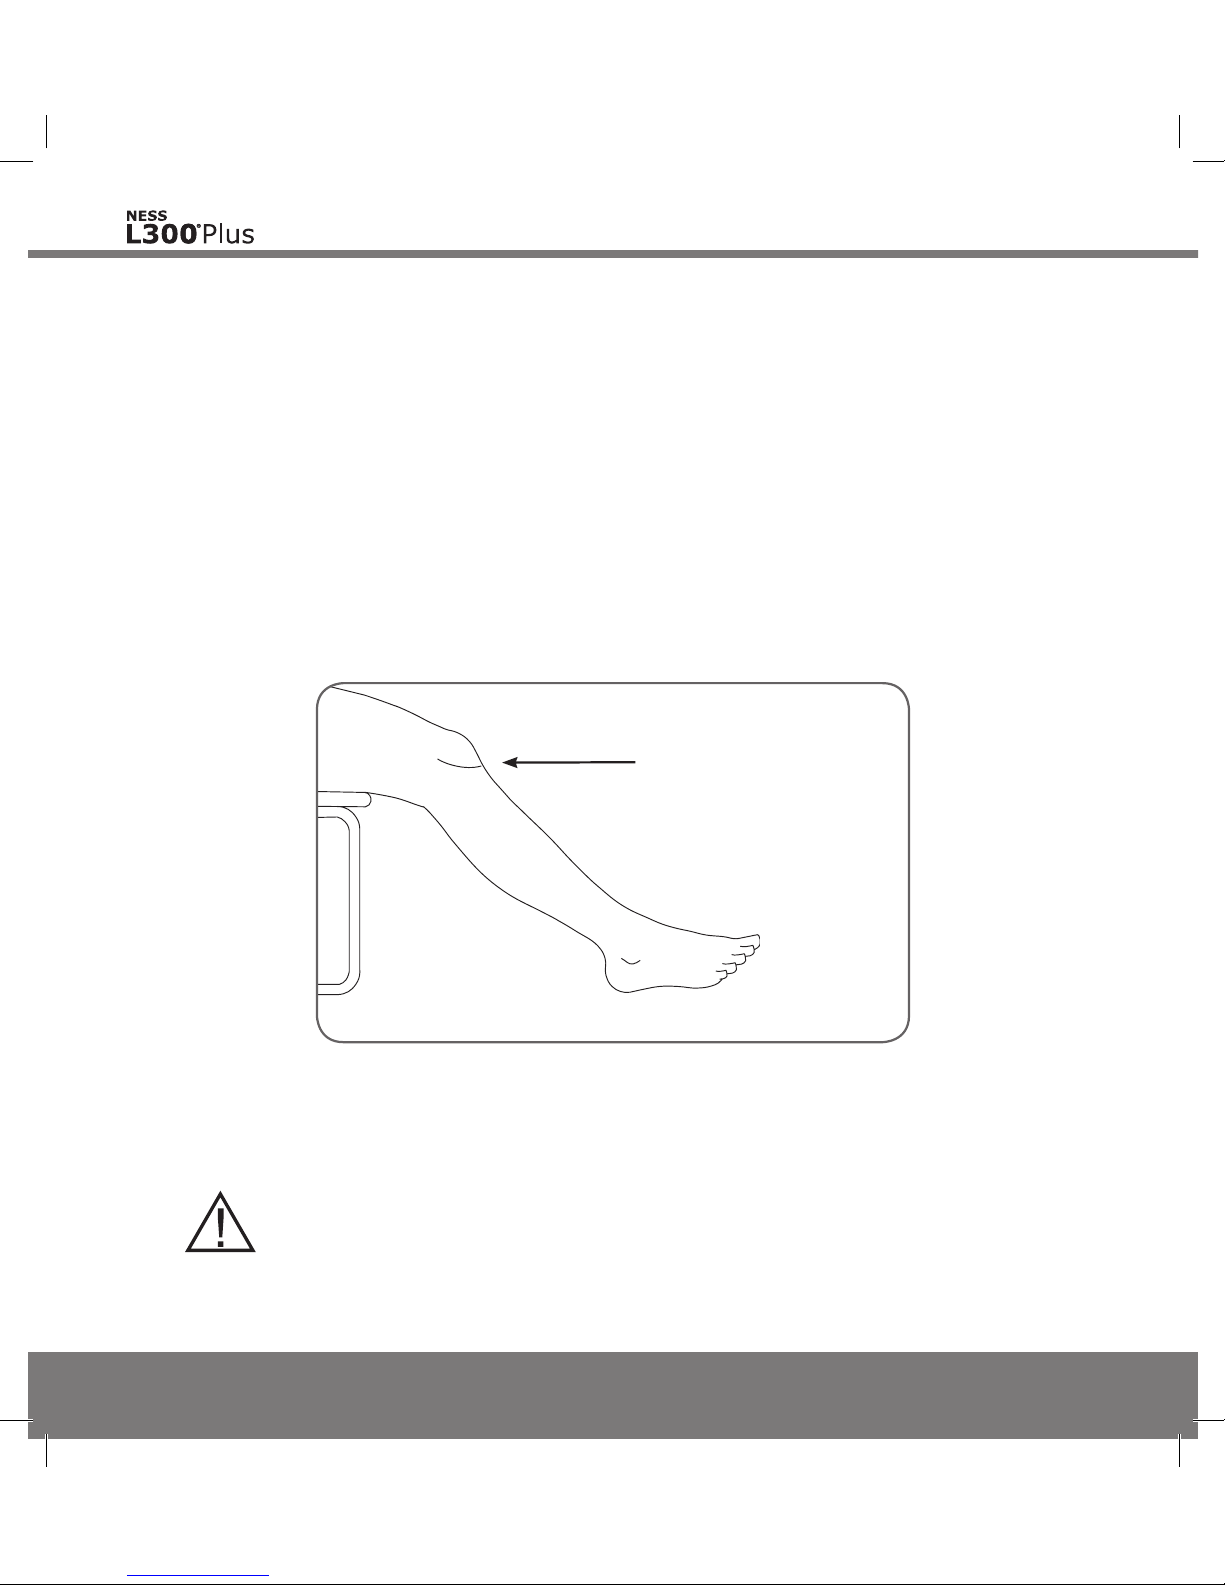
3. While seated, slightly straighten your leg. The outline of your kneecap
should be clearly defined. Place your foot on a footrest, if necessary. See
Figure 7-1
Figure 7-1: Recommended knee angle for putting on the L300 FS Cuff.
Outline of Kneecap
Clearly Defined
CAUTION: Turn off stimulation before putting on or taking off
the L300 FS Cuff.
Mp612-00313-001_RevB.indd 64 7/18/2011 4:14:39 PM
Page 75
65
Chapter 7 - Setting Up the NESS L300 Plus System
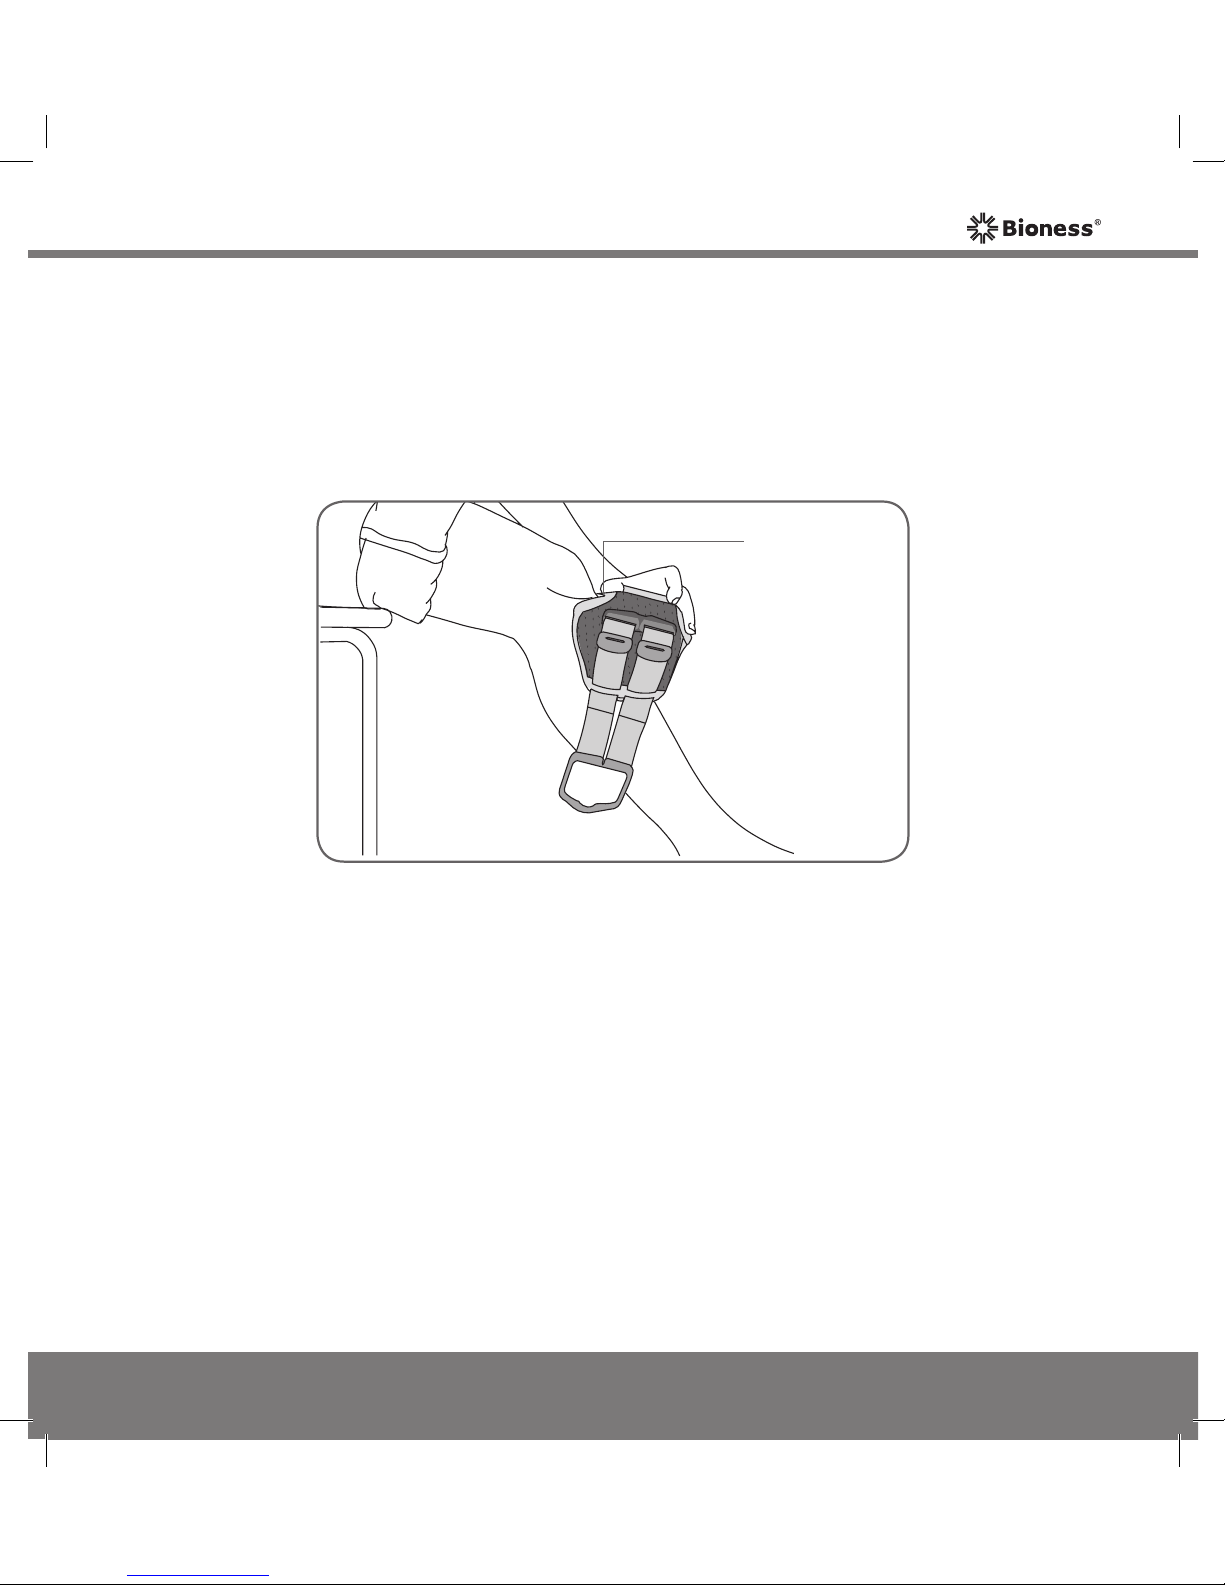
4. Grasp the front of the L300 FS Cuff by the cradle. Then tilt the bottom of
the L300 FS Cuff up.
5. Slide the locator up your leg until it rests snugly and comfortably below
your kneecap. See Figure 7-2.
Figure 7-2: Aligning the L300 FS Cuff locator below the kneecap.
Locator
Mp612-00313-001_RevB.indd 65 7/18/2011 4:14:39 PM
Page 76
66
User's Guide
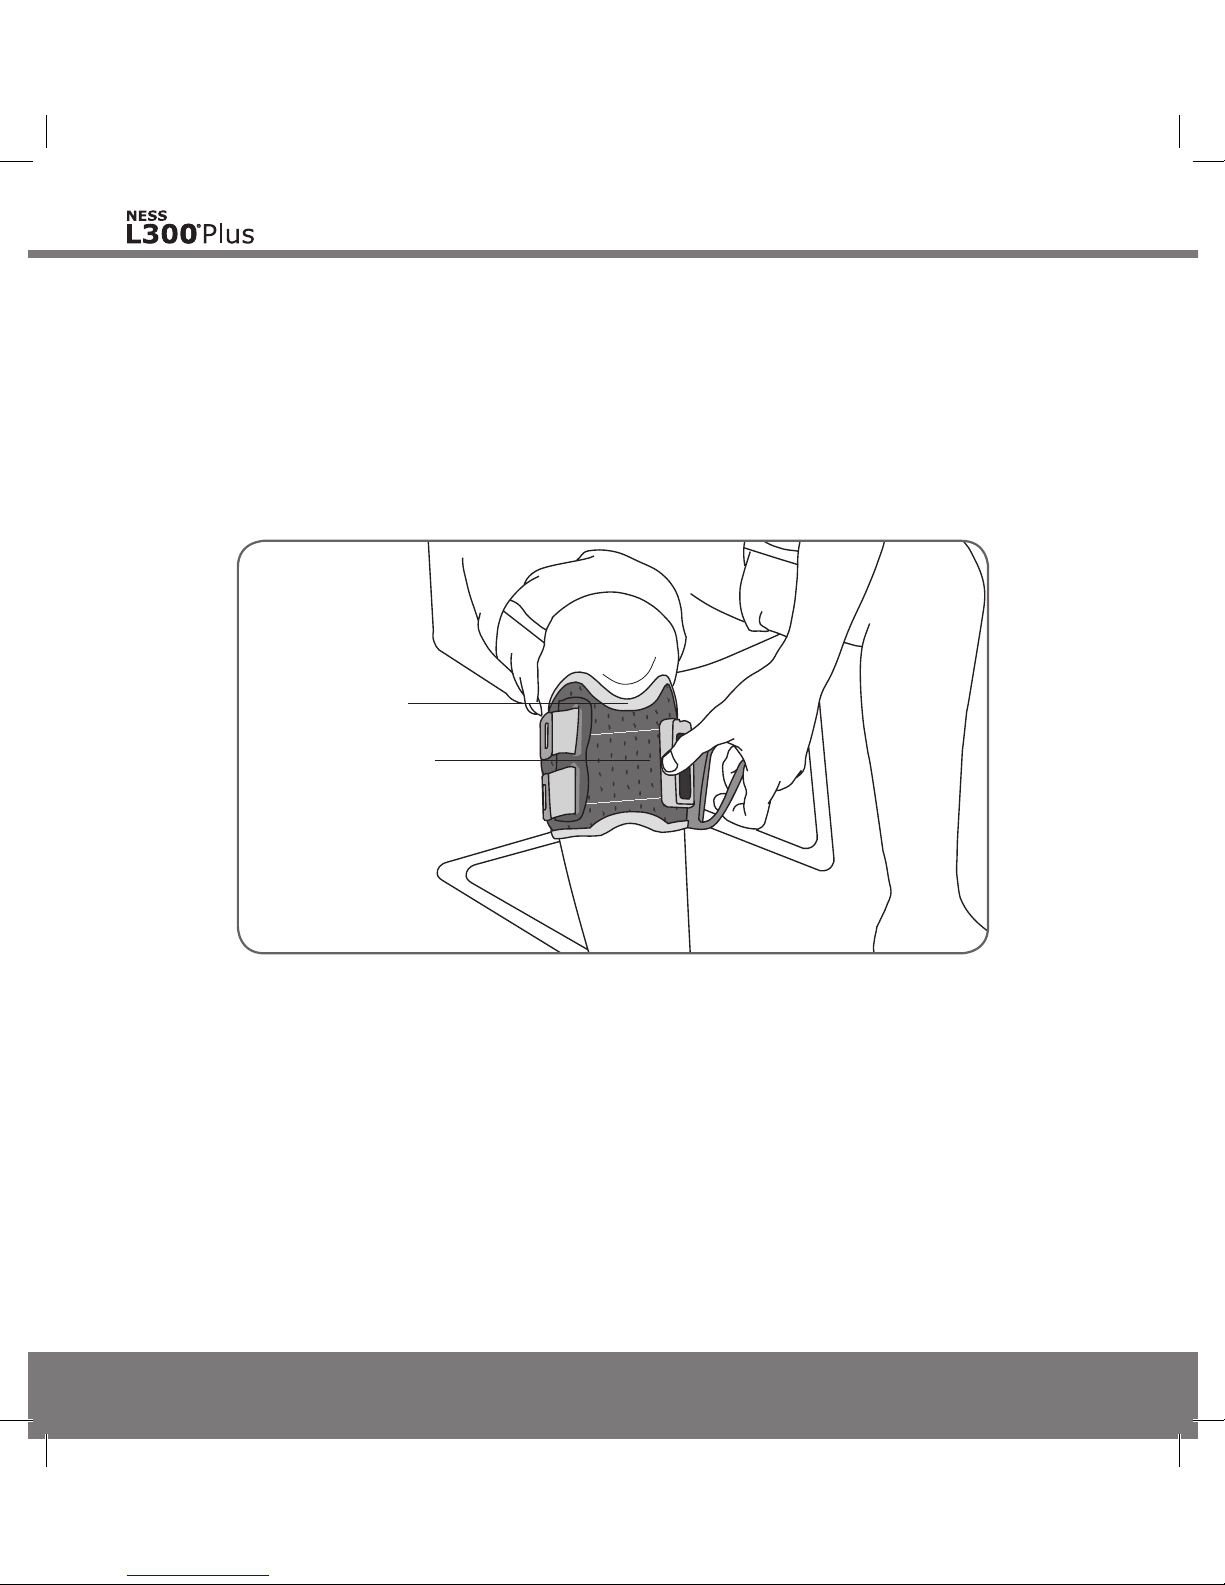
Figure 7-3: Fastening the L300 FS Cuff strap.
Locator Below
the Kneecap
Thumb on the
Cradle and
Fingers on the
Strap Handle
6. While holding the locator in place, lower the L300 FS Cuff until it rests
flush against your leg. The L300 FS Cuff should gently grip your leg.
7. Grasp the handle of the L300 FS Cuff strap.
8. With your thumb on the cradle, fasten the L300 FS Cuff strap handle
around the cradle. See Figure 7-3.
Mp612-00313-001_RevB.indd 66 7/18/2011 4:14:39 PM
Page 77

67
Chapter 7 - Setting Up the NESS L300 Plus System
Figure 7-4: The L300 FS Cuff correctly positioned on the right leg.
Locator Below the
Kneecap
Strap Handle
Around the Cradle
L300 RF Stim Unit
9. Make sure the L300 FS Cuff is correctly positioned. The locator should
rest below the kneecap. The RF Stim Unit should face the inside of the
leg. See Figure 7-4.
Mp612-00313-001_RevB.indd 67 7/18/2011 4:14:39 PM
Page 78
68
User's Guide
Testing the Position of the L300 FS Cuff
To test the position of the L300 FS Cuff:
1. Place the L300 Plus Control Unit in standby mode.
2.
Press the L300 RF Stim Unit selection button. The arrow next to the L300
RF Stim Unit indicator will light GREEN to confirm the selection.
3. Press and hold the
stimulation test button. The L300 RF Stim Unit will
stimulate until the stimulation test button is released.
If the L300 FS Cuff is not positioned correctly:
1. Turn off the L300 Plus System.
2. Unhook the L300 FS Cuff strap handle from the cradle.
3. Slowly lift the L300 FS Cuff away from the skin.
4. If appropriate, gently peel the L300 hydrogel electrodes from the skin.
Then make sure the L300 hydrogel electrodes are adhered correctly to
the bases.
5. Repeat the steps for putting on the L300 FS Cuff.
6. Retest the position of the L300 FS Cuff.
CAUTION: Remove the L300 FS Cuff from the skin every 3 to
4 hours for 15 minutes to allow the skin to breathe.
Mp612-00313-001_RevB.indd 68 7/18/2011 4:14:40 PM
Page 79
69
Chapter 7 - Setting Up the NESS L300 Plus System
Putting on the Thigh FS Cuff
To put on the Thigh FS Cuff:
1. Remove and wet the Thigh cloth electrodes.
2. Sit in a stable position on the edge of a chair.
3.
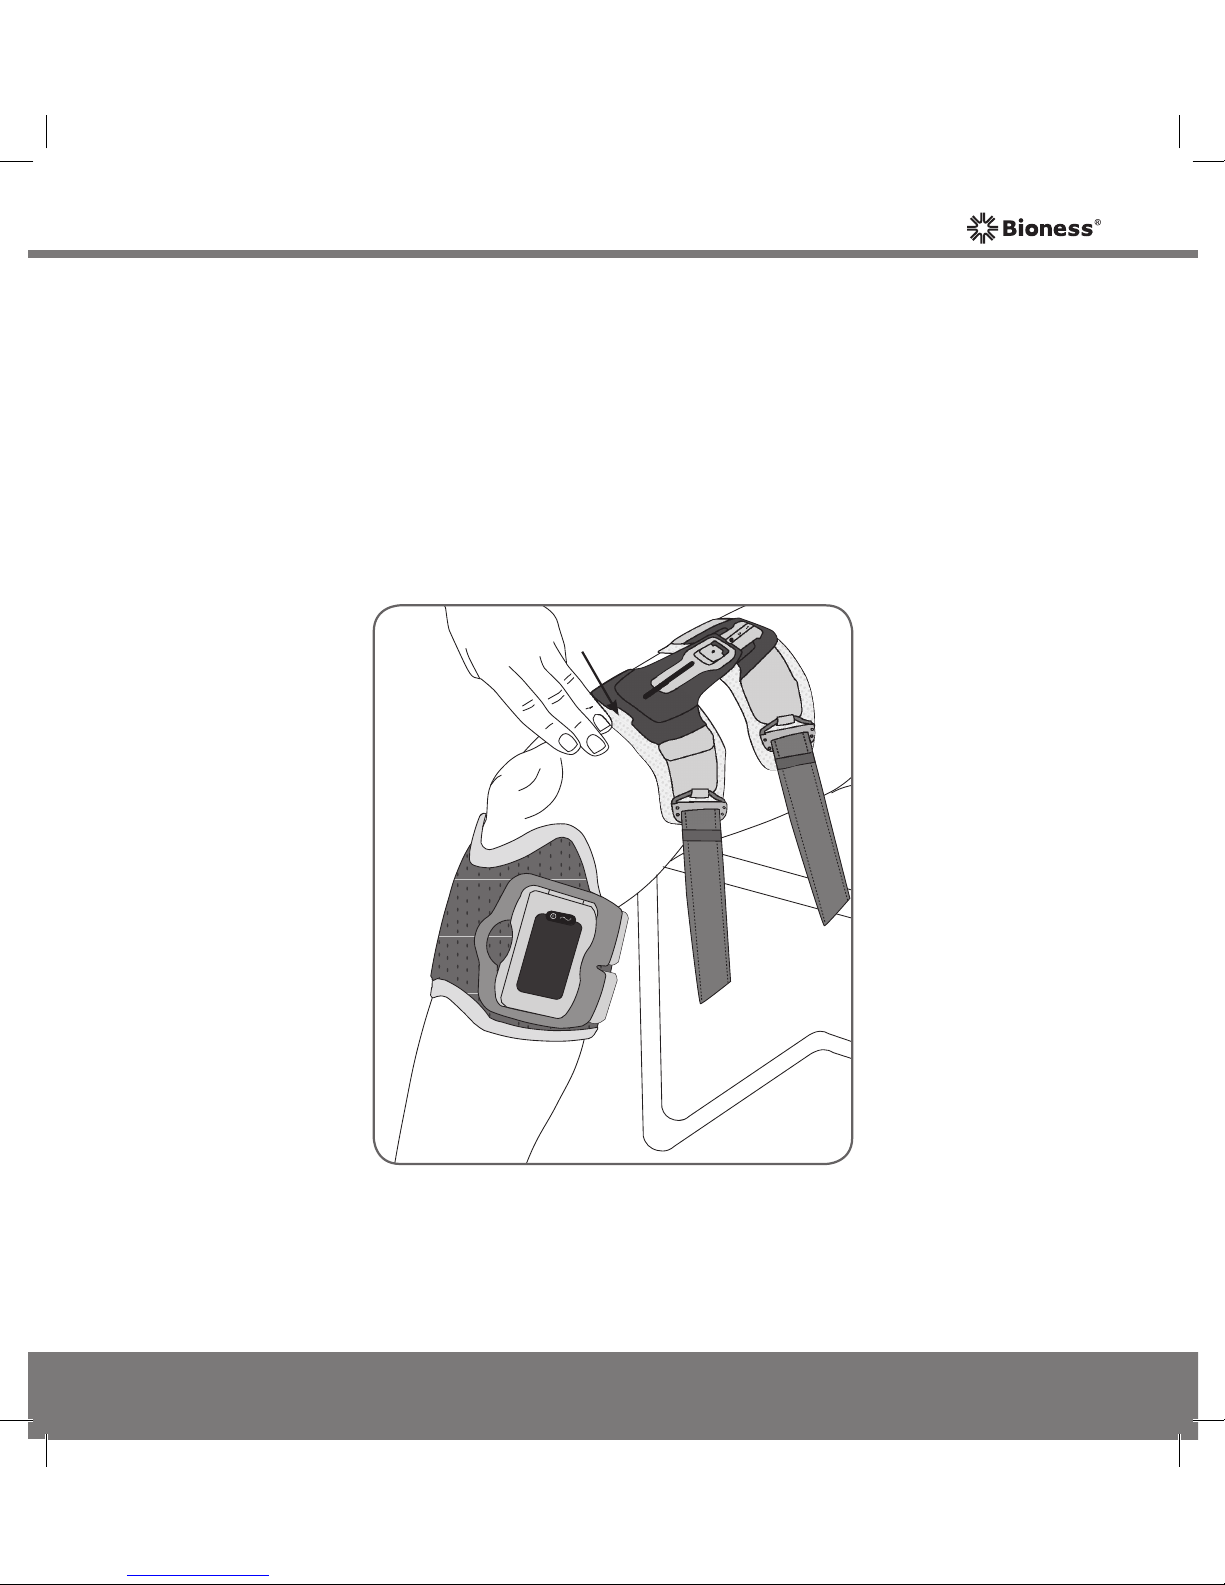
Place the Thigh FS Cuff locator on the midline of the thigh, approximately
three finger widths from the knee. See Figure 7-5.
Locator
Figure 7-5: Thigh FS Cuff locator correctly positioned on the quadriceps.
Mp612-00313-001_RevB.indd 69 7/18/2011 4:14:40 PM
Page 80
70
User's Guide
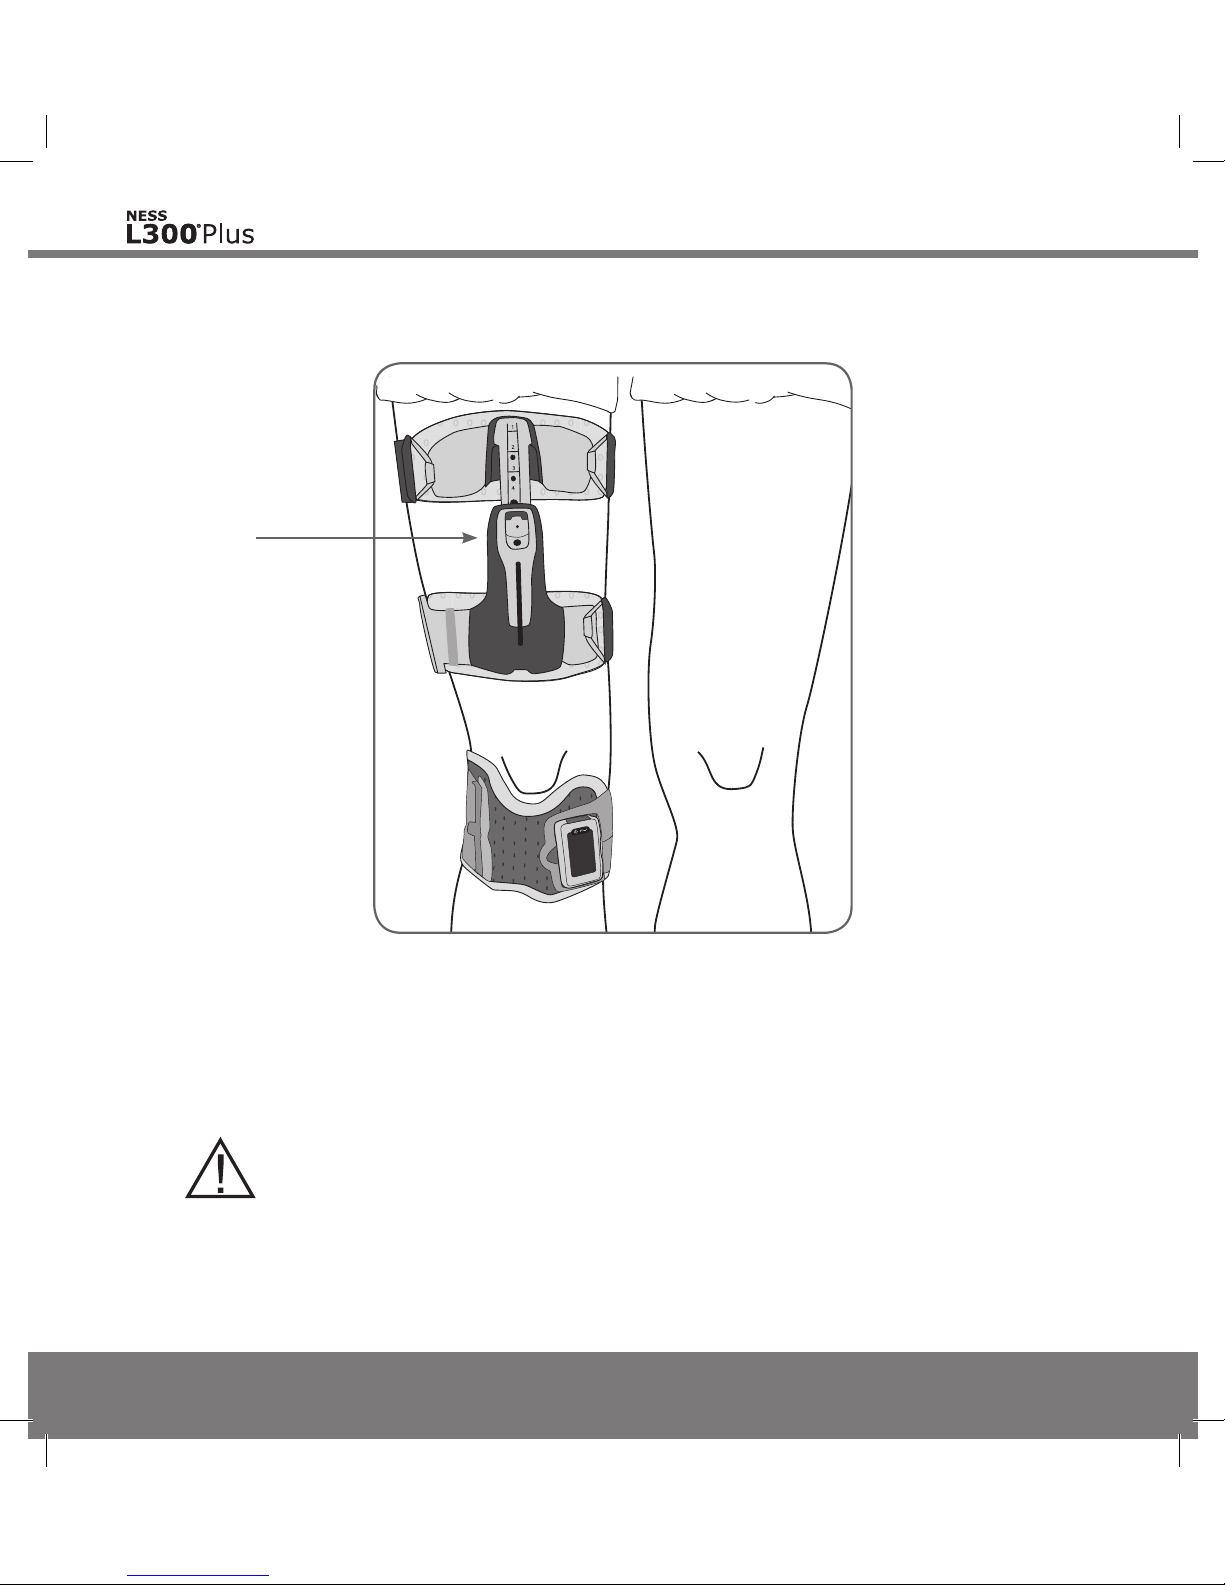
Figure 7-6: Thigh FS Cuff correctly positioned on the quadriceps.
4. Center the elongation bar on the midline of the thigh. See Figure 7-6.
Elongation
Bar
CAUTION: Turn off stimulation before putting on or taking off
the Thigh FS Cuff.
5. Fasten the straps.
Mp612-00313-001_RevB.indd 70 7/18/2011 4:14:41 PM
Page 81
71
Chapter 7 - Setting Up the NESS L300 Plus System
Testing the Position of the Thigh FS Cuff
To test the position of the Thigh FS Cuff:
1. Place the L300 Plus Control Unit in standby mode.
2. Press the Thigh RF Stim Unit selection button. The arrow next to the
Thigh RF Stim Unit indicator will light GREEN to confirm the selection.
3.
Press and hold the stimulation test button. The Thigh RF Stim Unit will
stimulate until the stimulation test button is released.
If the Thigh FS Cuff is not positioned correctly:
1. Turn off the L300 Plus System.
2. Loosen the Thigh FS Cuff.
3. Slowly lift the Thigh FS Cuff from the skin.
4. Make sure the Thigh cloth electrodes are wet and attached correctly.
5. Repeat the steps for putting on the Thigh FS Cuff.
6. Retest the position of the Thigh FS Cuff.
Note: Do not rotate (slide) the Thigh FS Cuff on the leg while it is fastened.
Rotating the Thigh FS Cuff while it is fastened could loosen or damage the
Thigh cloth electrodes.
CAUTION: Remove the Thigh FS Cuff from the skin every 3 to
4 hours for 15 minutes to allow the skin to breathe.
Mp612-00313-001_RevB.indd 71 7/18/2011 4:14:41 PM
Page 82
72
User's Guide
Placing the Intelli-Sense Gait Sensor in the Shoe
The Intelli-Sense Gait Sensor is used when walking in gait mode. Make sure
it is placed in your shoe before selecting gait mode.
To position the pressure sensor:
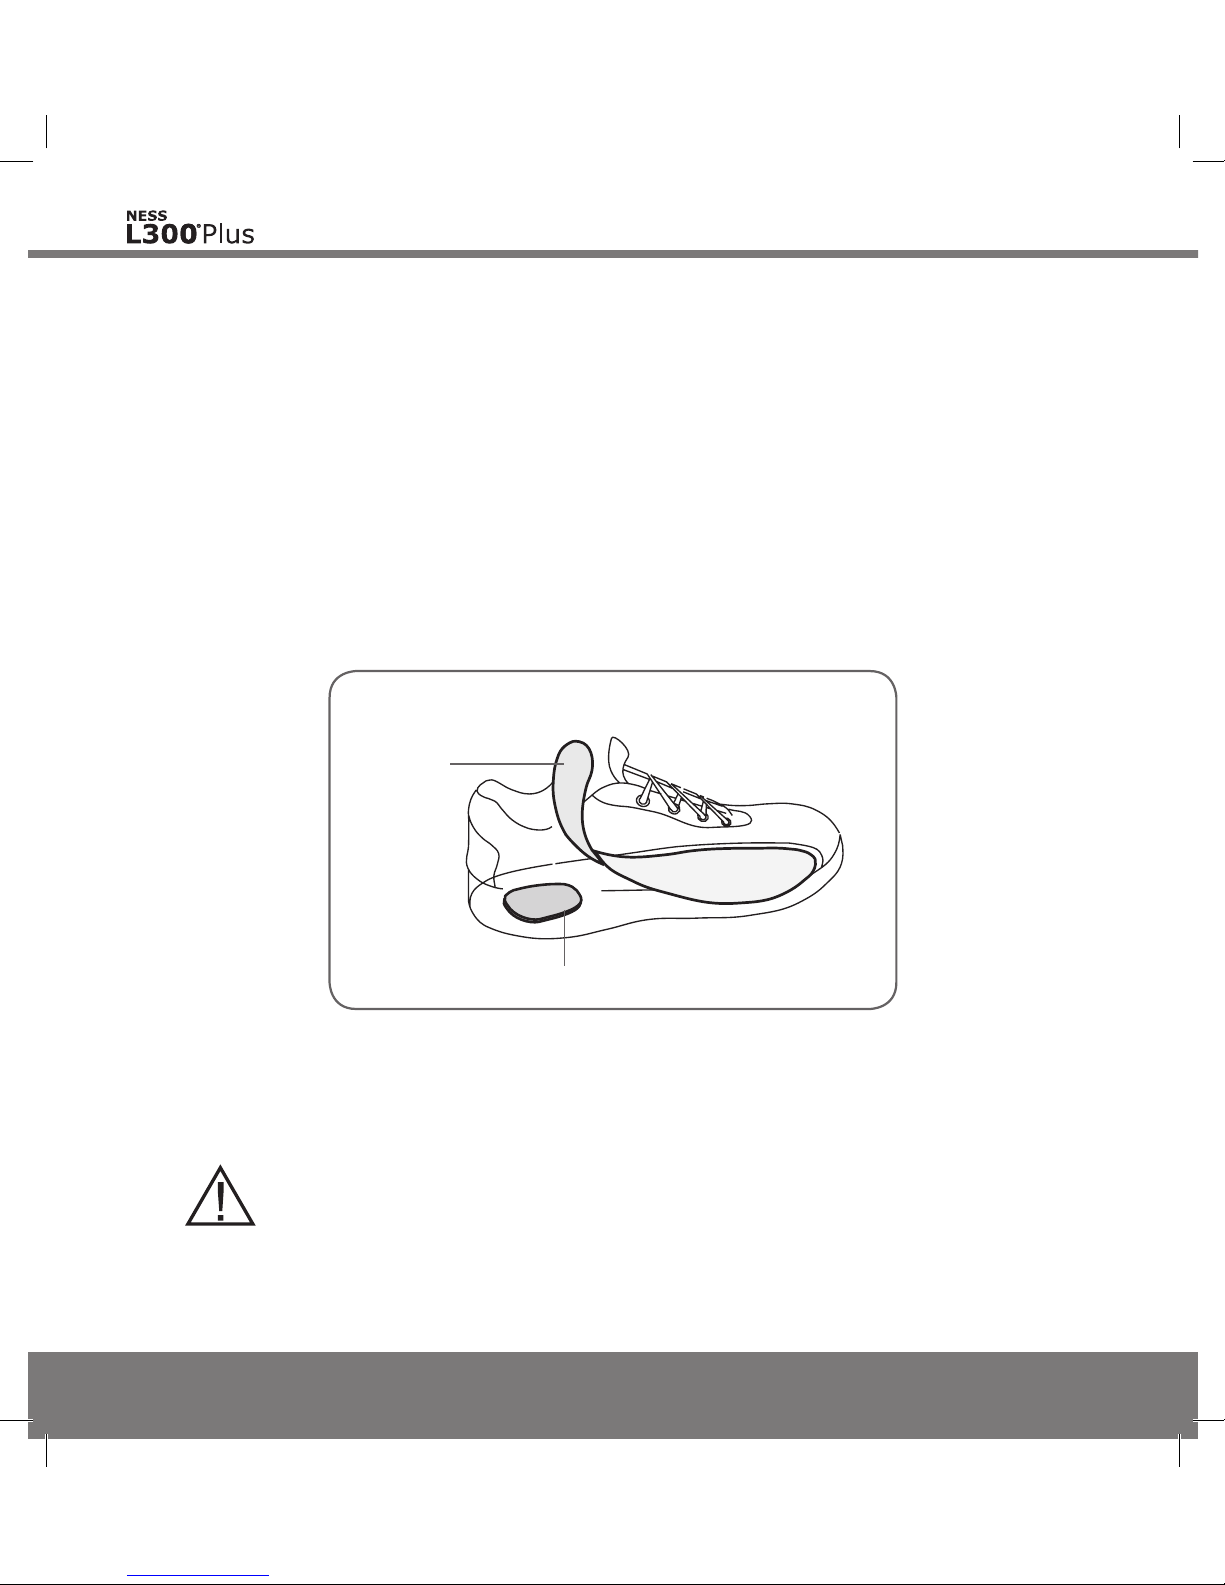
1. Lift the insole of the shoe, and attach a gait sensor pad under the insole,
at the heel of the shoe. Make sure the gait sensor pad is in the same
location as initially fitted by your clinician. See Figure 7-7.
Figure 7-7: Lifting the insole and attaching a gait sensor pad.
Shoe
Insole
Gait Sensor Pad
CAUTION: Do not use the Intelli-Sense Gait Sensor with a
rigid insole, such as a custom rigid orthosis or an ankle foot
orthosis.
Mp612-00313-001_RevB.indd 72 7/18/2011 4:14:41 PM
Page 83
73
Chapter 7 - Setting Up the NESS L300 Plus System
Note: If your shoe does not have a detachable insole, place the pressure
sensor on top of the insole. Then, place a generic (one layer versus two)
insole over it. Generic insoles can be purchased from drugstores, shoe stores,
or Bioness. Contact your local distributor.
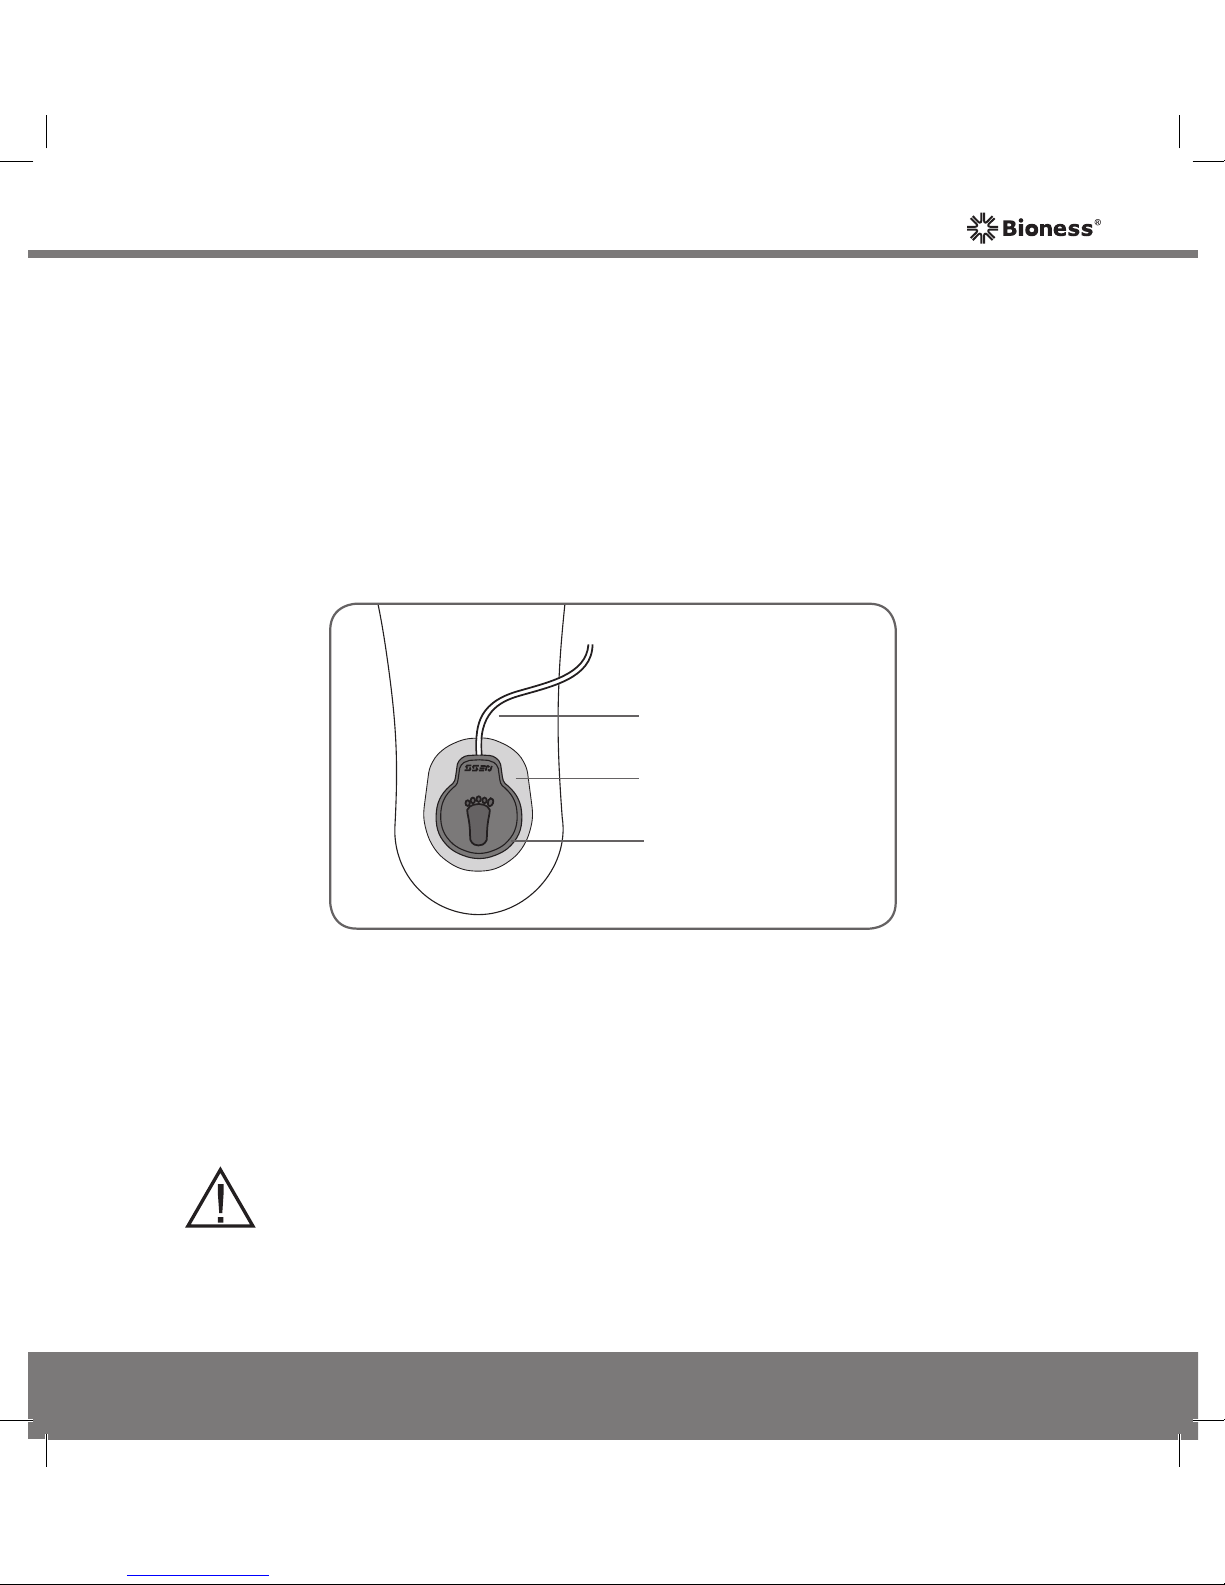
2. Point the wire of the pressure sensor toward the toe of the shoe. Then
press the pressure sensor to the gait sensor pad. See Figure 7-8.
CAUTION: The Intelli-Sense Gait Sensor has not been validated
for use by individuals weighing more than 136 kilograms.
Foot Image on
Pressure Sensor
Gait Sensor Pad
Wire
Figure 7-8: Positioning the pressure sensor in the heel of the shoe
Note: Refer to the foot image on the pressure sensor for correct orientation.
Mp612-00313-001_RevB.indd 73 7/18/2011 4:14:41 PM
Page 84
74
User's Guide
To position the transmitter:
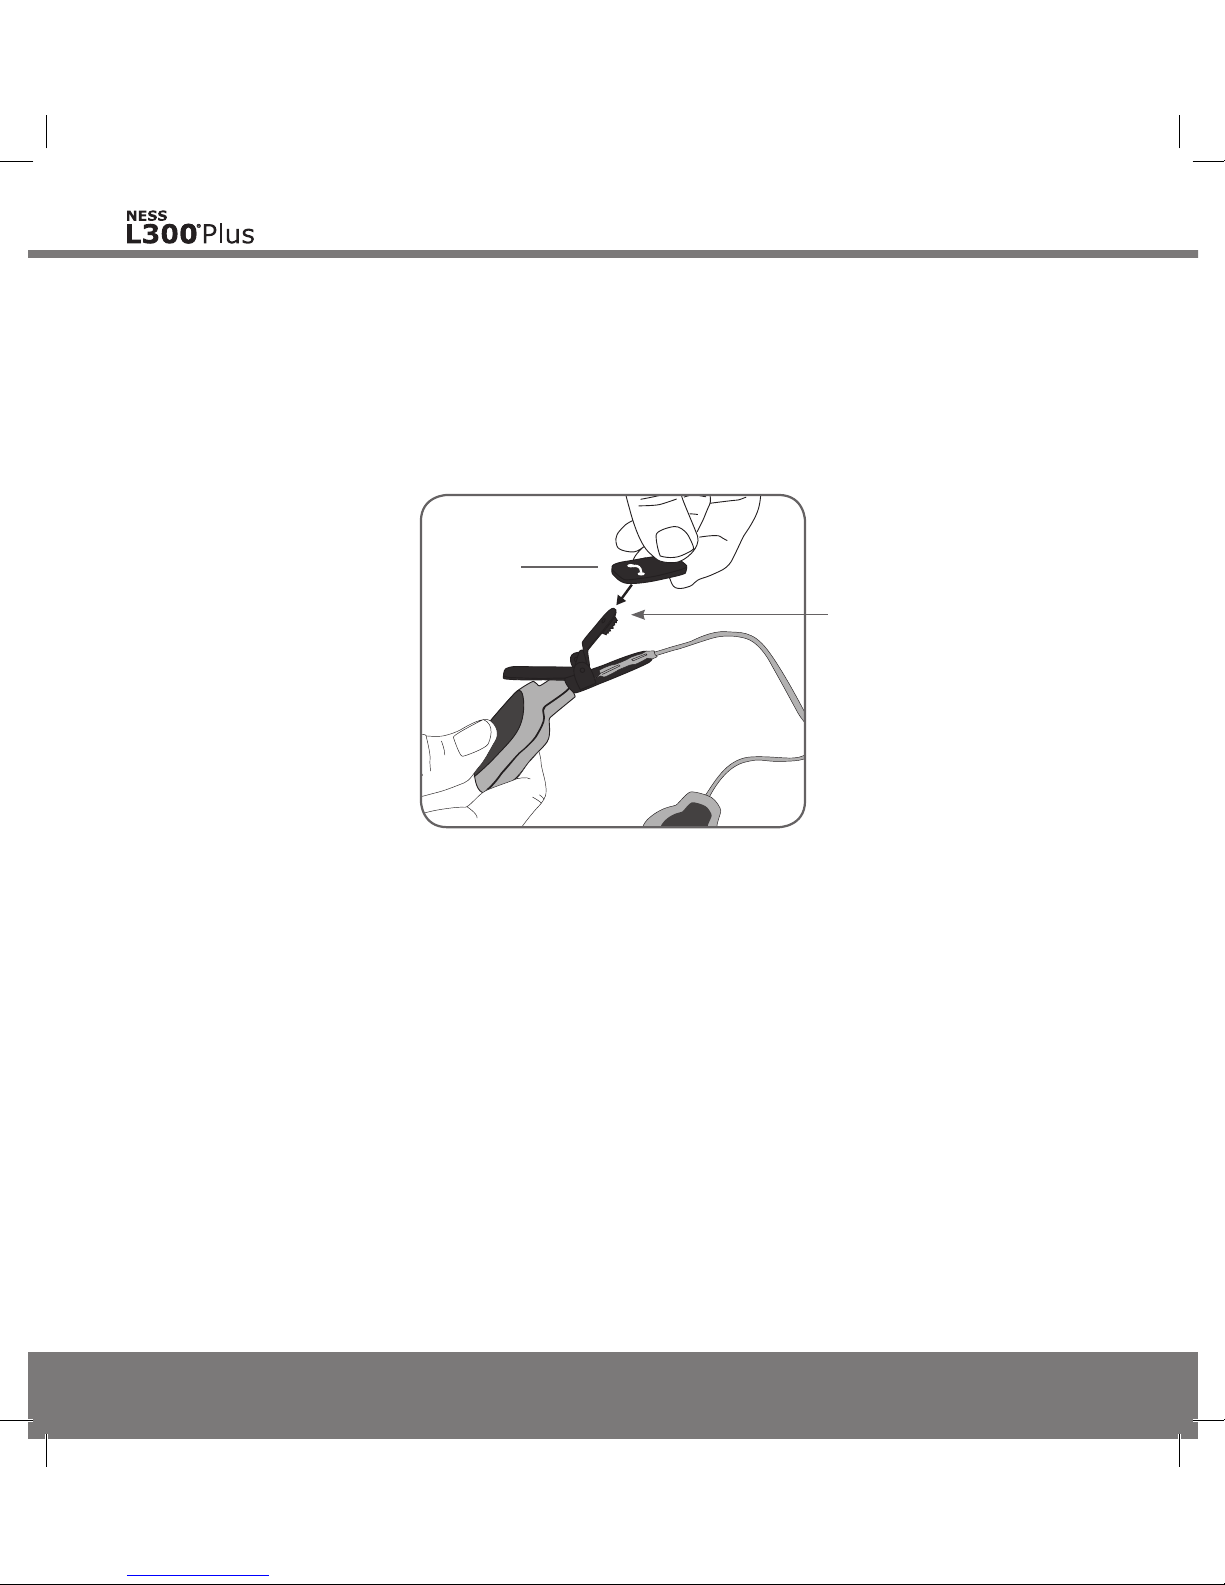
1. Cover the inner clamp of the Intelli-Sense Gait Sensor with the shoe
spacer. See Figure 7-9.
Figure 7-9: Attaching the shoe spacer.
Shoe
Spacer
Inner Clamp
Mp612-00313-001_RevB.indd 74 7/18/2011 4:14:41 PM
Page 85

75
Chapter 7 - Setting Up the NESS L300 Plus System
Figure 7-10: Clamping the transmitter to the inner rim of the shoe.
Pressure Sensor
Transmitter
Clamp
Attaches to
the Inner Rim
of the Shoe
NESS Logo Faces Away
From the Ankle
Left Shoe
2. Clamp the transmitter to the inner rim of the shoe. The NESS logo on the
transmitter should face away from the ankle. See Figure 7-10.
Left Shoe
Figure 7-11: Intelli-Sense Gait Sensor correctly positioned.
3.
Lower the insole. Tuck any excess wire under the insole. See Figure 7-11.
Mp612-00313-001_RevB.indd 75 7/18/2011 4:14:42 PM
Page 86
76
User's Guide
Transferring the Intelli-Sense Gait Sensor to Another Shoe
To transfer the Intelli-Sense Gait Sensor to another shoe:
1. Turn off the NESS L300 Plus System.
2. Remove the Intelli-Sense Gait Sensor from the shoe.
3. Select another shoe.
4. Follow the steps for placing the Intelli-Sense Gait Sensor in the shoe. Be
sure to place the gait sensor pad in the same location as determined by
your clinician.
Using Multiple Intelli-Sense Gait Sensors
If you have more than one Intelli-Sense Gait Sensor, you can place each one
in a different shoe, and then switch shoes.
Note: Be sure to register any new Intelli-Sense Gait Sensor to your L300
Plus System. See Chapter 10.
To switch shoes using multiple Intelli-Sense Gait Sensors:
1. Turn off the NESS L300 Plus System.
2. Switch shoes.
3. Turn on the NESS L300 Plus System.
Mp612-00313-001_RevB.indd 76 7/18/2011 4:14:42 PM
Page 87
77
Chapter 8 - Operating the NESS L300 Plus System
8
Operating the NESS L300 Plus System
The NESS L300 Plus System is designed to operate as a complete system.
The L300 and Thigh FS Cuffs both must be on and the system components
close to each other to communicate wirelessly.
Turning On/Off the NESS L300 Plus System
To turn on the NESS L300 Plus System, press the on/off button on the
L300 Plus Control Unit once. The system will start in standby mode. All display
indicators will light up for a few seconds while the system performs a selftest. The on/off button will FLASH GREEN to indicate the system is on.
To turn off the L300 Plus System, press the on/off button once.
Mp612-00313-001_RevB.indd 77 7/18/2011 4:14:42 PM
Page 88
78
User's Guide
Testing the Position of the FS Cuffs
The stimulation test button is used to test the position of the FS Cuffs. Only
one FS Cuff can be tested at a time.
L300 FS Cuff
To test the position of the L300 FS Cuff:
1. Place the L300 Plus Control Unit in standby mode.
2.
Press the L300 RF Stim Unit selection button. The arrow next to the L300
RF Stim Unit indicator will light GREEN to confirm the selection.
3. Press and hold the
stimulation test button. The L300 RF Stim Unit will
stimulate until the stimulation test button is released.
Thigh FS Cuff
To test the position of the Thigh FS Cuff:
1. Press the Thigh RF Stim Unit selection button. The arrow next to the
Thigh RF Stim Unit indicator will light GREEN to confirm the selection.
2.
Press and hold the stimulation test button. The Thigh RF Stim Unit will
stimulate until the stimulation test button is released.
Mp612-00313-001_RevB.indd 78 7/18/2011 4:14:42 PM
Page 89
79
Chapter 8 - Operating the NESS L300 Plus System
Selecting an Operating Mode
Selecting Gait Mode
To select gait mode:
1. Turn on the L300 Plus System.
2. Press the
mode button briefly.
The L300 Plus Control Unit will beep and the mode button will FLASH
YELLOW SLOWLY (stimulation is off). When stimulation is on, the
mode button will FLASH YELLOW RAPIDLY.
Selecting Training Mode
To select training mode:
1. Turn on the L300 Plus System.
2. Press and hold the
mode button.
The L300 Plus Control Unit will beep, the
mode button will FLASH
YELLOW SLOWLY, and
(“t” for training) will alternate with the intensity
level in the digital display.
When stimulation is on, the mode button will FLASH YELLOW RAPIDLY .
Mp612-00313-001_RevB.indd 79 7/18/2011 4:14:42 PM
Page 90
80
User's Guide
Returning to Standby Mode
To return to standby mode from gait or training mode:
• Press the flashing mode button briefly.
The L300 Plus Control Unit will beep, and the mode button will stop
flashing.
Mp612-00313-001_RevB.indd 80 7/18/2011 4:14:42 PM
Page 91
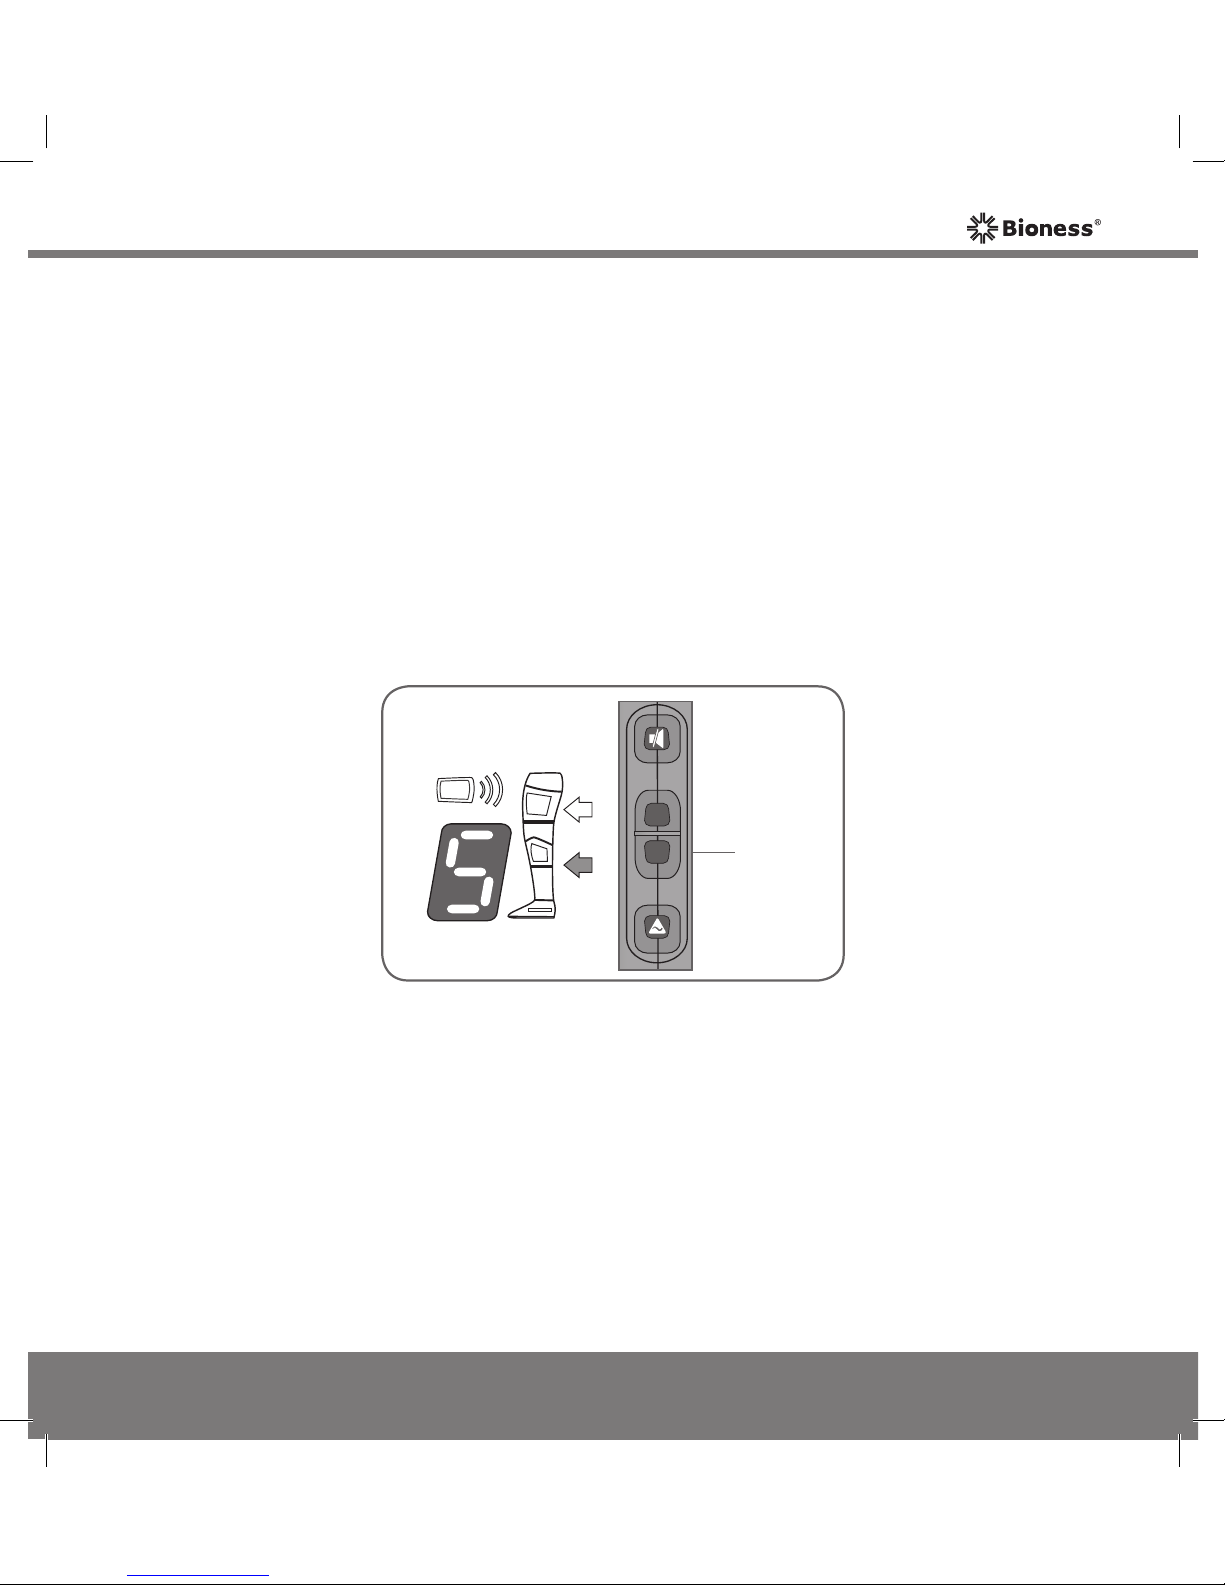
81
Chapter 8 - Operating the NESS L300 Plus System
Adjusting Stimulation Intensity
When the L300 Plus Control Unit is turned on, the stimulation intensity level
will be “5."
L300 FS Cuff
To adjust stimulation intensity for the L300 FS Cuff:
1. Press the L300 RF Stim Unit selection button. The arrow next to the
L300 RF Stim Unit indicator will light GREEN to confirm the selection.
See Figure 8-1.
Figure 8-1: L300 RF Stim Unit selection.
L300 RF
Stim Unit
Selection
Button
Mp612-00313-001_RevB.indd 81 7/18/2011 4:14:43 PM
Page 92
82
User's Guide
2. Press the plus or minus intensity adjustment button on the
L300 Plus Control Unit to change the intensity level.
The L300 Plus Control Unit will beep with each change in level. The new
level will show in the digital display.
Note: An intensity level of “0” equals no stimulation.
Note: When the system is turned on, the default stimulation intensity level
is restored.
Adjustment Guidelines
If your foot slightly drags or catches on the floor while walking, increase the
stimulation intensity in the L300 FS Cuff to lift the foot higher.
If your foot rises too high while walking or if stimulation is unpleasant, decrease
the stimulation intensity in the L300 FS Cuff. Be sure your foot does not drag
or catch on the floor after decreasing the intensity level.
Consult your clinician if you have questions.
Mp612-00313-001_RevB.indd 82 7/18/2011 4:14:43 PM
Page 93
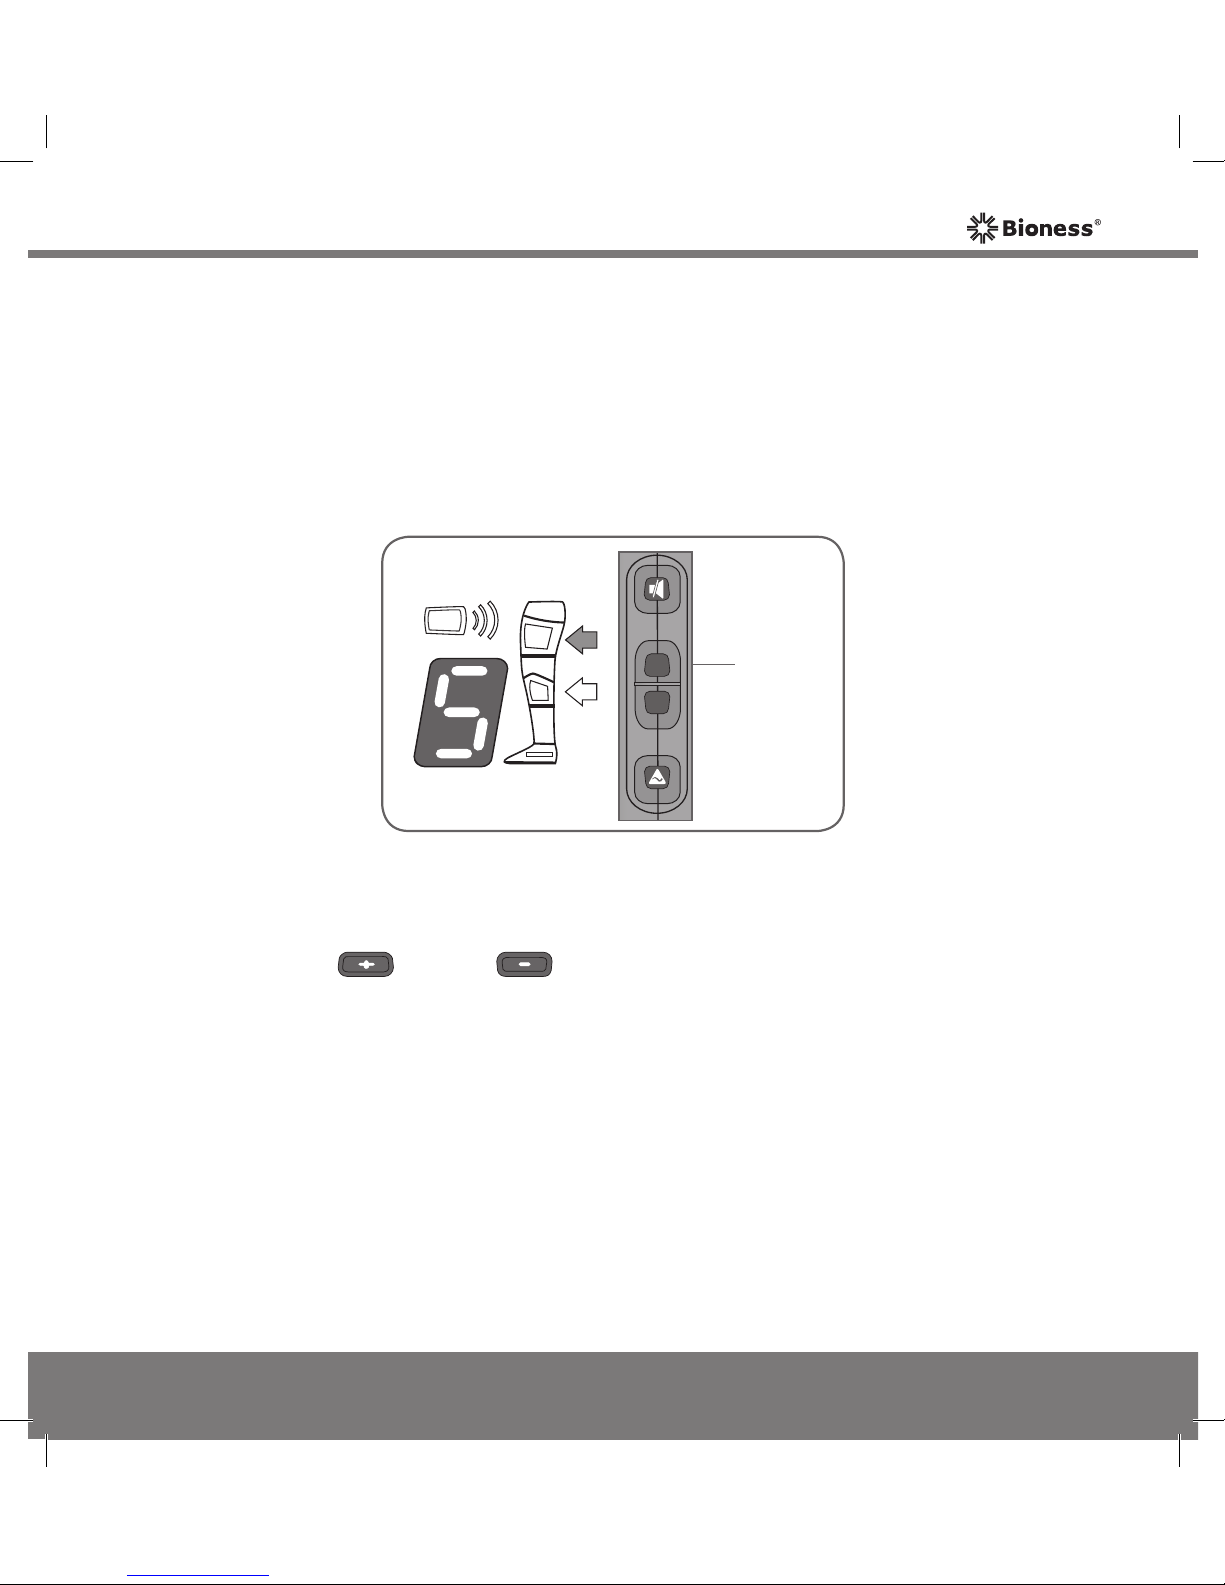
83
Chapter 8 - Operating the NESS L300 Plus System
Thigh FS Cuff
To adjust stimulation intensity for the Thigh FS Cuff:
1. Press the Thigh RF Stim Unit selection button. The arrow next to the
Thigh RF Stim Unit indicator will light GREEN to confirm the selection.
See Figure 8-2.
Figure 8-2: Thigh RF Stim Unit selection.
2. Press the plus or minus intensity adjustment button on the
L300 Plus Control Unit to change the intensity level.
The L300 Plus Control Unit will beep with each change in level. The new
level will show in the digital display.
Note: An intensity level of “0” equals no stimulation.
Note: When the system is turned on, the default stimulation intensity level
is restored.
Thigh RF
Stim Unit
Selection
Button
Mp612-00313-001_RevB.indd 83 7/18/2011 4:14:43 PM
Page 94

84
User's Guide
Turning on Audio Feedback During Stimulation
The mute button is used to turn on audio feedback when stimulation is on.
Audio feedback can be turned on for one FS Cuff or both.
L300 FS Cuff
To turn on audio feedback during stimulation:
1. Place the L300 Plus Control Unit in standby mode.
2. Press and hold the L300 RF Stim Unit selection button.
3. While holding the L300 RF Stim Unit selection button, press and hold the
mute button for three seconds.
The L300 Plus Control Unit will emit an audio alert when stimulation is on.
To turn off audio feedback during stimulation:
• Press the mute button or the on/off button.
Mp612-00313-001_RevB.indd 84 7/18/2011 4:14:43 PM
Page 95
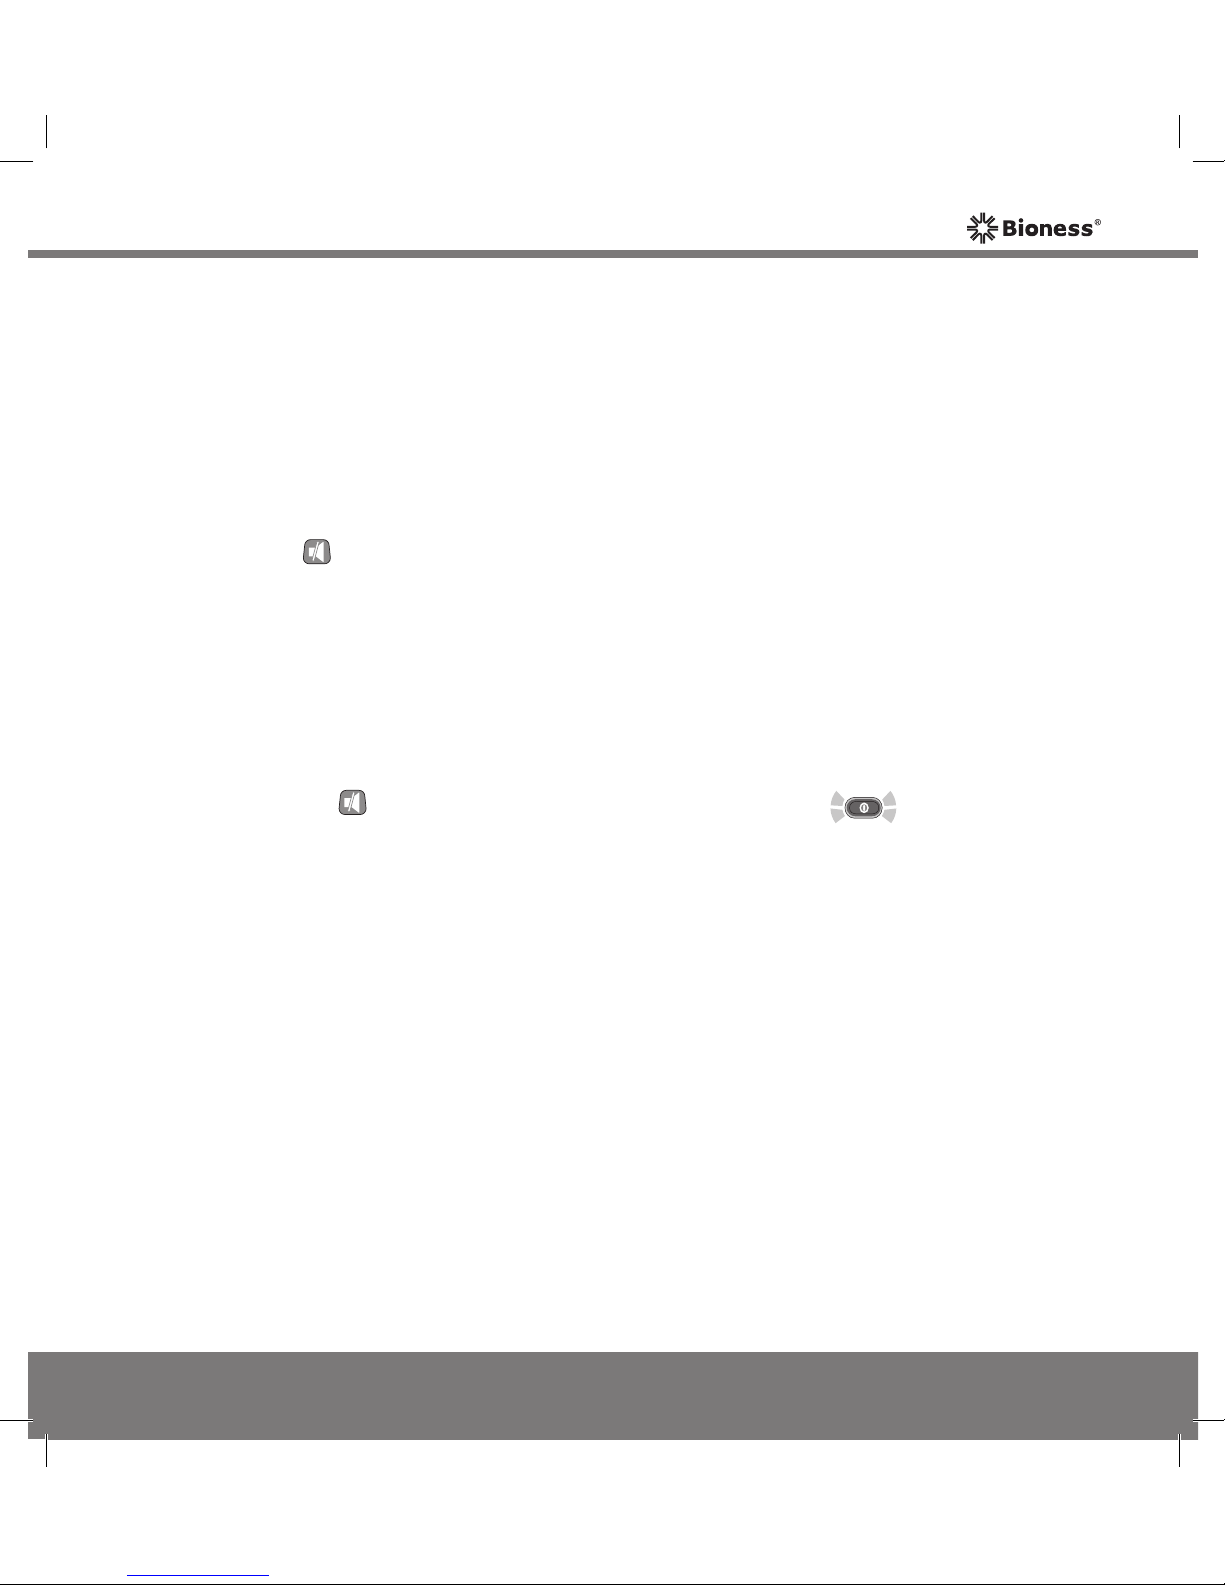
85
Chapter 8 - Operating the NESS L300 Plus System
Thigh FS Cuff
To turn on audio feedback during stimulation:
1. Place the L300 Plus Control Unit in standby mode.
2. Press and hold the Thigh RF Stim Unit selection button.
3.
While holding the Thigh RF Stim Unit selection button, press and hold
the mute button for three seconds.
The L300 Plus Control Unit will emit an audio alert when stimulation is on.
To turn off audio feedback during stimulation:
•
Press the mute button or the FLASHING GREEN on/off button.
Mp612-00313-001_RevB.indd 85 7/18/2011 4:14:43 PM
Page 96
86
User's Guide
Muting/Un-Muting the L300 Plus Control Unit
To mute/un-mute the L300 Plus Control Unit:
• Press the mute button briefly.
Note: When the system is turned on, the default volume setting is restored.
Mp612-00313-001_RevB.indd 86 7/18/2011 4:14:43 PM
Page 97
87
Chapter 8 - Operating the NESS L300 Plus System
Turning Off Audio/Visual Alerts
The NESS L300 Plus System is designed to be worn as a complete system
in gait mode, with both the L300 FS Cuff and the Thigh FS Cuff on. In training
mode, the L300 FS Cuff and the Thigh FS Cuff can be worn individually.
When only one FS Cuff is worn, the NESS L300 Plus System will emit a
faulty electrode contact alert for the other FS Cuff. It will also emit an RF
communication error alert for the other RF Stim Unit, if it is out of range.
These alerts can be temporarily turned off.
L300 FS Cuff
To temporarily turn off the alerts:
1. Place the L300 Plus Control Unit in standby mode.
2. Press and release the L300 RF Stim Unit selection button.
3. Press and hold the
mute button for three seconds.
Thigh FS Cuff
To temporarily turn off the alerts:
1. Place the L300 Plus Control Unit in standby mode.
2. Press and release the Thigh RF Stim Unit selection button.
3. Press and hold the
mute button for three seconds.
Note: When the system is turned on, the default settings are restored.
Mp612-00313-001_RevB.indd 87 7/18/2011 4:14:43 PM
Page 98
88
User's Guide
Mp612-00313-001_RevB.indd 88 7/18/2011 4:14:43 PM
Page 99
89
Chapter 9 - Maintenance and Cleaning
9
Maintenance and Cleaning
Daily Maintenance
When the NESS L300 Plus System is not in use:
1. If appropriate, reapply the covers to the hydrogel electrodes. Do not let
the hydrogel dry out.
2. Store the cloth electrodes where they can air dry.
3. Allow the FS Cuffs to air dry.
4. Check each component for wear or damage.
5.
Replace any components or electrodes that appear old, worn, or damaged.
6. Fully charge the L300 Plus Control Unit, Thigh RF Stim Unit, and L300
RF Stim Unit batteries.
Mp612-00313-001_RevB.indd 89 7/18/2011 4:14:44 PM
Page 100
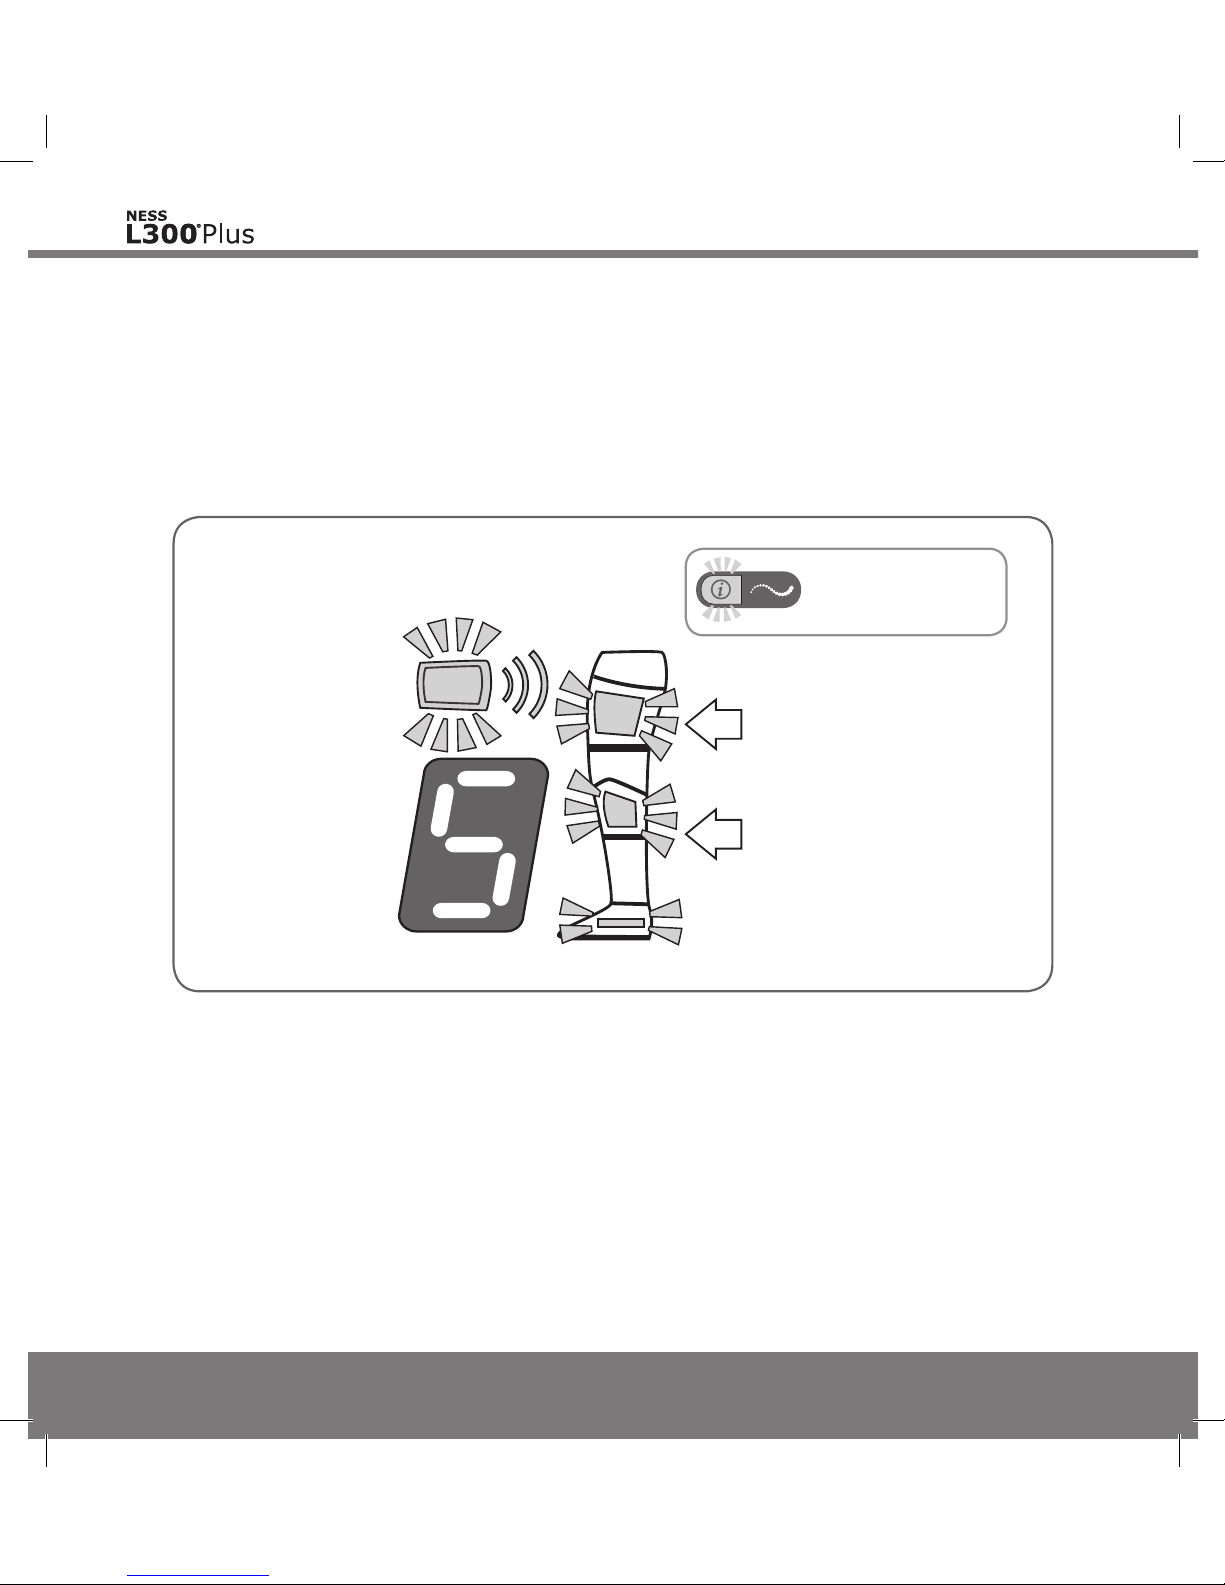
90
User's Guide
Charging the Batteries
When a NESS L300 Plus System component has a low battery, the L300
Plus Control Unit will beep and the component indicator light will FLASH
YELLOW. See Figure 9-1.
Low Battery,
Thigh RF
Stim Unit
Low Battery,
L300 RF Stim
Unit
Low Battery,
Gait Sensor
Low Battery,
L300 Plus
Control Unit
Low Battery, RF
Stim Unit
Figure 9-1: Low battery FLASHING YELLOW indicators.
When an RF Stim Unit battery charge level is low, the RF Stim Unit status
light will also FLASH YELLOW. See inset in Figure 9-1.
When the Intelli-Sense Gait Sensor battery charge level is low, the L300
Plus Control Unit low-battery audio alert will become more persistent as the
battery weakens.
Mp612-00313-001_RevB.indd 90 7/18/2011 4:14:44 PM
 Loading...