

Page 1
Veriprox
Operations Manual
Td1136_rev0700 © 1999 Biometric Identification, Inc.
Page 2

Notices
Biometric ID strives to comply with the most stringent standards, however at the
time this document went to press, the following approvals were still pending for
the Veriprox.
FCC
UL
CLU
CE
Disclaimer
The instructions in this document have been carefully checked for accuracy and are
presumed to be reliable. BiometricID, Inc. and its writers assume no responsibility for
inaccuracies and reserve the right to modify and revise this document without notice.
It is always our goal at BiometricID, Inc. to supply accurate and reliable documentation. If
you discover a discrepancy in this document, please e-mail your comments to
[email protected], or contact Biometric ID Technical Support at the telephone
number listed below.
No part of this publication may be placed in a retrieval system, transmitted, or
reproduced in any way, including, but not limited to, photograph, photocopy, computer
disk or other record, without prior agreement and written permission from:
Pending Approval
Pending Listing
Pending Listing
Pending Approval
Biometric Identification Inc.
5000 Van Nuys Blvd., Suite 300
Sherman Oaks, CA 91403
Phone (818).501.3908
Fax (818).461.0843
http://www.biometricid.com
© 1999 Biometric Identification, Inc. All rights reserved.
Page 1 © 1999 Biometric Identification, Inc.
Page 3

Trademark Disclosures
BiometricID has made every effort to provide disclosures when using trademarks owned
by other companies. Trademarked designations appear throughout this publication. The
publisher states that it is using the designations only for editorial purposes, and to the
benefit of the trademark owner with no intent to infringe upon that trademark. The
following trademarks are found in this manual:
• Microsoft™, and Windows 95™, Windows 98™, and Windows NT™ are
trademarks of the Microsoft Corporation.
• Veriprox ® is a registered trademark of Biometric Identification, Inc.
• HID™ is a trademark of the HID Corporation.
• Motorola™ Indala™ are trademarks of the Motorola Corporation.
Page 2 © 1999 Biometric Identification, Inc.
Page 4

Biometric ID Warranty Policy
Biometric Identification, Inc. (Biometric ID) warrants its products to be free from
defects caused by faulty materials or poor workmanship for a period of one year from
date of shipment from Biometric ID. Biometric ID makes no warranty that its products are
fit for the use or purpose to which they may be put by the buyer, whether or not such use
or purpose has been disclosed to Biometric ID in specifications or drawings previously or
subsequently provided, or whether or not Biometric ID's products are specifically
designed and/or manufactur ed for buy er 's use or purpose.
Biometric ID's liability is limited to replacing, repairing or issuing credit, at its option, for
any products that are returned by the original purchaser during the warranty period.
Biometric ID's liability on any claim for loss or damage arising out of the sale, resale or
use of any of its products shall in no event exceed the selling p rice of the products. The
buyer is responsible for making any claims for shipment damage (evident or concealed)
with the carrier. Biometric ID must be notified within 30 days of shipment of incorrect
materials.
This warranty is voided if any component, subsystem, or element of the product(s) has
been subject to electrical or physical abuse, tampering (such as opening a sealed
housing or removal of a product serial number tag), or improper operation as determined
by Biometric ID. This warranty is also voided for failure to comply with Biometric ID's
return procedures as given in the Biometric ID Technical Support Guide. Any service
provided by unauthorized personnel voids the warranty.
Biometric ID offers three (3) options to our customers that have a problem with one of
our products.
1) Warranty Service if the unit is covered under either the factory one-year warranty
period or any extended warranty the buyer may have purchased.
2) Fee-based Service if the unit is not covered under a warranty.
3) Return for credit if less than 30 days from the original date of shipment.
Service can be provided by Biometric ID, the manufacturer.
Service can be provided by Authorized Service Representatives – contact Biometric ID
or visit our WWW site (http://www.BiometricID.com) for a service representative near
you. No service can be performed without first notifying Biometric ID.
Service can be provided by Authorized Repair Center – contact Biometric ID or visit our
WWW site (http://www.BiometricID.com) for a repair center near you. No service can be
performed without first notifying Biometric ID.
Any service provided by unauthorized personnel voids the warranty. No product may be
returned, whether in warranty or out-of-warranty, without first obtaining approval from
Biometric ID. No credit will be given nor repairs made for products returned without such
approval as described in the Returned Merchandise Authorization procedure as given in
the Biometric ID Technical Support Guide. Products must be returned, prepaid, to a
Biometric ID service center (no C.O.D. or Collect Freight shipments will be accepted).
The status of any product returned later than 30 days after the issuance of a return
Page 3 © 1999 Biometric Identification, Inc.
Page 5

authorization will be subject to review. After Biometric ID's examination, warranty or outof-warranty status will be determined. If, upon Biometric ID's examination, a warranted
defect exists, the product(s) will be repaired at no charge and shipped, prepaid, back to
the buyer. If the buyer desires an airfreight or other expedited return, the product(s) will
be shipped collect, charged to the buyer’s account with airfreight carrier, or charged to
the buyer’s account with Biometric ID. Warranty repairs do not extend the warranty
period. Repair work is warranted for 90 days from the date of shipment. Replacement
components are warranted for one year from the date of shipment. Returned product(s),
whether warranty or out-of-warranty, d iagnosed as "No Problem Found" will be subje c t
to a $150 handling charge and will be returned as is, at the buyer's expense.
Privacy Statement
Biometric Identification’s unique approach to fingerprint recognition provides the
maximum in user privacy protection. Instead of storing a graphic representation of the
user’s finger (i.e., a picture), the Veriprox stores a template which is a highly processed
mathematical model of the ridge pattern. This means that no direct personal data about
the user is stored by the system.
Page 4 © 1999 Biometric Identification, Inc.
Page 6

Table of Contents
Notices ............................................................................................................................................................1
FCC..................................................................................................................................................................................1
UL ....................................................................................................................................................................................1
CLU..................................................................................................................................................................................1
CE....................................................................................................................................................................................1
Disclaimer........................................................................................................................................................1
Trademark Disclosures ....................................................................................................................................2
Biometric ID Warranty Polic y...........................................................................................................................3
Privacy Statement............................................................................................................................................4
Introduction.........................................................................................................................................9
About the Veriprox.........................................................................................................................................10
Veriprox – Physical Layout ............................................................................................................................11
Concepts of Operations...................................................................................................................13
The Veriprox..................................................................................................................................................13
The Proximity Card..........................................................................................................................................1
User Cards.....................................................................................................................................................................14
Command Cards............................................................................................................................................................14
Basic System Administration.........................................................................................................................15
Enrollment......................................................................................................................................................................15
Templates......................................................................................................................................................................15
Multiple Readers............................................................................................................................................................ 16
Backing-Up Templates .................................................................................................................................................. 16
Lights.............................................................................................................................................................17
Veriprox Administrative Software ...................................................................................................18
Concepts of Operation...................................................................................................................................18
Transmit ID ....................................................................................................................................................................18
Ports...............................................................................................................................................................................19
Serial Port Settings And Baud Rates.........................................................................................19
Installing the Software....................................................................................................................................20
Setting up the ID File .....................................................................................................................................21
ID File Format................................................................................................................................................................21
Communication Settings file ..........................................................................................................................22
Setting up a Network.....................................................................................................................................23
Icons, Commands and Drop Downs...............................................................................................................25
Template Manager ............................................................................................................................27
Edit Templates...............................................................................................................................................28
Enroll Templates............................................................................................................................................29
Delete Templ a tes...........................................................................................................................................30
Page 5 © 1999 Biometric Identification, Inc.
Page 7

Transfer Te mp lates........................................................................................................................................32
Download to PC.............................................................................................................................................................32
Upload from PC .............................................................................................................................................................34
Transfer from Unit to Unit .............................................................................................................................................. 35
Command Cards...............................................................................................................................36
Administering Command Cards.....................................................................................................................36
Creating Command Cards.............................................................................................................................................36
Reviewing Command Cards..........................................................................................................................................36
Removing Command Cards ..........................................................................................................................................37
Using Command Cards..................................................................................................................................37
Enroll Command Card...................................................................................................................................................37
Delete Command Card..................................................................................................................................................38
Communication Settings..................................................................................................................39
Veriprox Parameters.........................................................................................................................40
Network Identification Number.......................................................................................................................41
Global Security Threshold..............................................................................................................................42
Setting the Security Threshold.......................................................................................................................................42
Wiegand OUT................................................................................................................................................43
Failure Code ..................................................................................................................................................................43
Site Code.......................................................................................................................................................................43
Host Port and Aux Port Baud Rates...............................................................................................................44
Host Port Protocol..........................................................................................................................................44
Broadcast..........................................................................................................................................45
Net Status..........................................................................................................................................46
Getting Service and Support ...........................................................................................................47
Technical Support..........................................................................................................................................47
Customer Service and Sales Support............................................................................................................47
World Wide Web Site.....................................................................................................................................47
Appendix A – Quality and Content..................................................................................................48
Section A.1 - Basic Biometric Concepts......................................................................................................... 48
Biometric Definitions..................................................................................................................48
Scanning an Image........................................................................................................................................................48
Storing User Templates on the Veriprox ....................................................................................................................... 49
Section A.2 - Proper Finger Placement..........................................................................................................50
Common mistakes.........................................................................................................................................................50
Image quality..................................................................................................................................................................50
Image consistency.........................................................................................................................................................51
Section A.3 - Using Content and Quality during Enrollments .........................................................................52
False Acceptance and False Rejection ......................................................................................................................... 52
Quality............................................................................................................................................................................53
Content ..........................................................................................................................................................................54
Content and Quality Summary.......................................................................................................................................55
Recommended Enrollment Process..............................................................................................................................55
Page 6 © 1999 Biometric Identification, Inc.
Page 8

Page 7 © 1999 Biometric Identification, Inc.
Page 9

Notes
Page 8 © 1999 Biometric Identification, Inc.
Page 10

Introduction
BiometricID, the leader in fingerprint identification and verification systems, presents the
Veriprox Fingerprint Verification System. Technology by BiometricID has been applied in
various unique applications including Access Security, Time and Attendance, Political
Polling, Computer Logon, and other applications where an individual must be clearly
identified as being solely responsible for specific actions.
BiometricID was founded in 1996 with a mission to provide fingerprint recognition
technology with the highest degree of accuracy at a reasonable cost while still being
easy to use. BiometricID has successfully migrated technology once found only in
government or military applications, toward private industry and small businesses around
the globe.
It has been known for years that each person has unique fingerprints. Using fingerprints
as a means of identification ensures a unique id entifier for each tracked user, and
protects users from the vulnerabilities associated with lost keys or identification cards.
After installing BiometricID’s product in your application, your company will be able to
accurately identify, track, and automatically act according to each individual’s
identification and permi ssi ons.
I NTRODUCTION
Page 9 © 1999 Biometric Identification, Inc.
Page 11

About the Veriprox
BiometricID’s Veriprox combines patented fingerprint verification technology with an
industry-standard proximity card reader in a mullion-mountable case. This ensures
greater security for the card issuer and the card user. Requiring that the fingerprint of the
person seeking entry matches the identity of the cardholder eliminates access via lost or
stolen proximity cards. Suitable for both standalone and network use, the system works
with existing 26-bit proximity card infrastructures.
The unit operates in conjunction with administration software hosted on a PC. Once
installed users simply present their identification cards when entering the secure area
and then touch a fingertip to the recessed area on top of the unit. The system validates
their fingerprint against a previously enrolled template stored in flash memory.
The Veriprox system provides security features that can minimize fraud and can tolerate
changes to the user’s finger like scarring or swelling. The Veriprox returns accurate pass
and fail decisions in 99.99% of all cases.
Each Veriprox unit stores thousands of fingerprint templates, in a non-volatile memory.
Response time is less than five seconds for fingerprint enrollment and less than
1.5 seconds for fingerprint verification. The system is compact, versatile, and configured
to allow standalone, PC-connected, and multiple-unit operation.
I NTRODUCTION
Page 10 © 1999 Biometric Identification, Inc.
Page 12
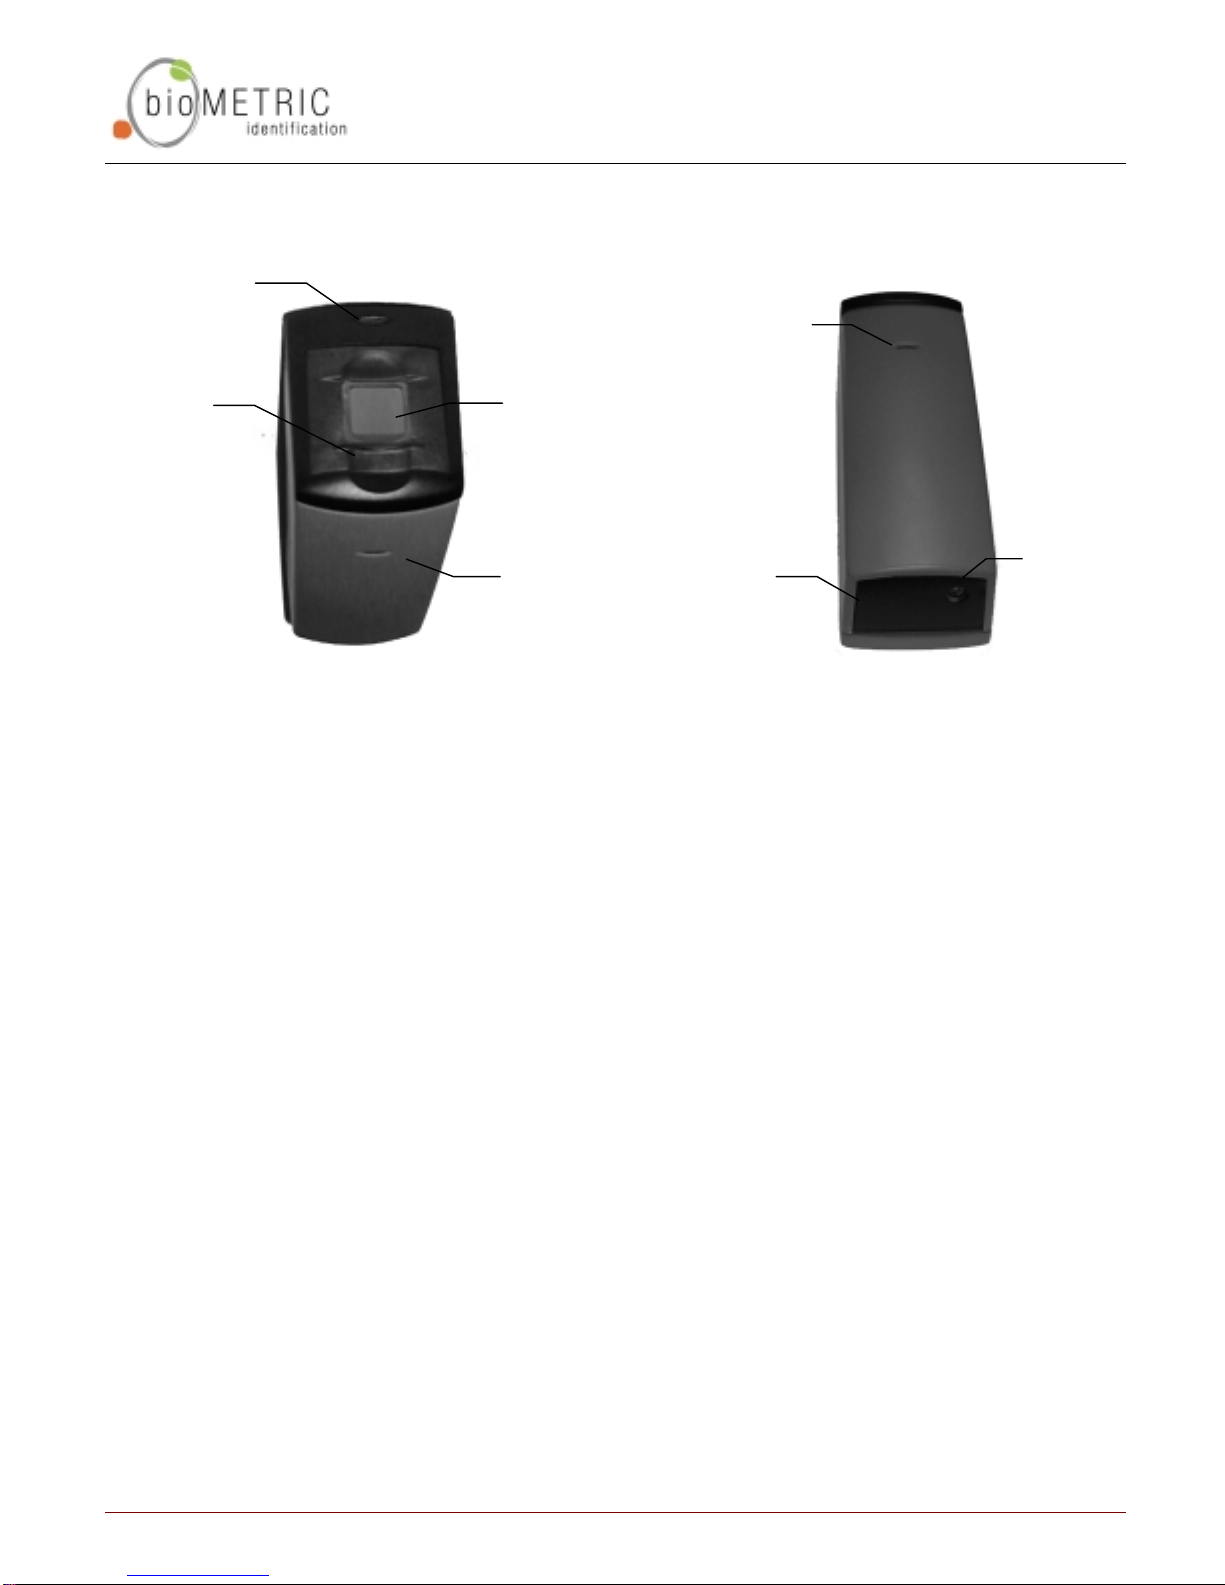
Veriprox – Physical Layout
r
(
)
Top LED
I NTRODUCTION
Power On
Light
Ridge
Lock
Sensor
Front LED
(power on)
Bottom
Aux Port
Cove
closed
Figure 1: Top View Figure 2: Bottom View
Locking
Screw
Page 11 © 1999 Biometric Identification, Inc.
Page 13
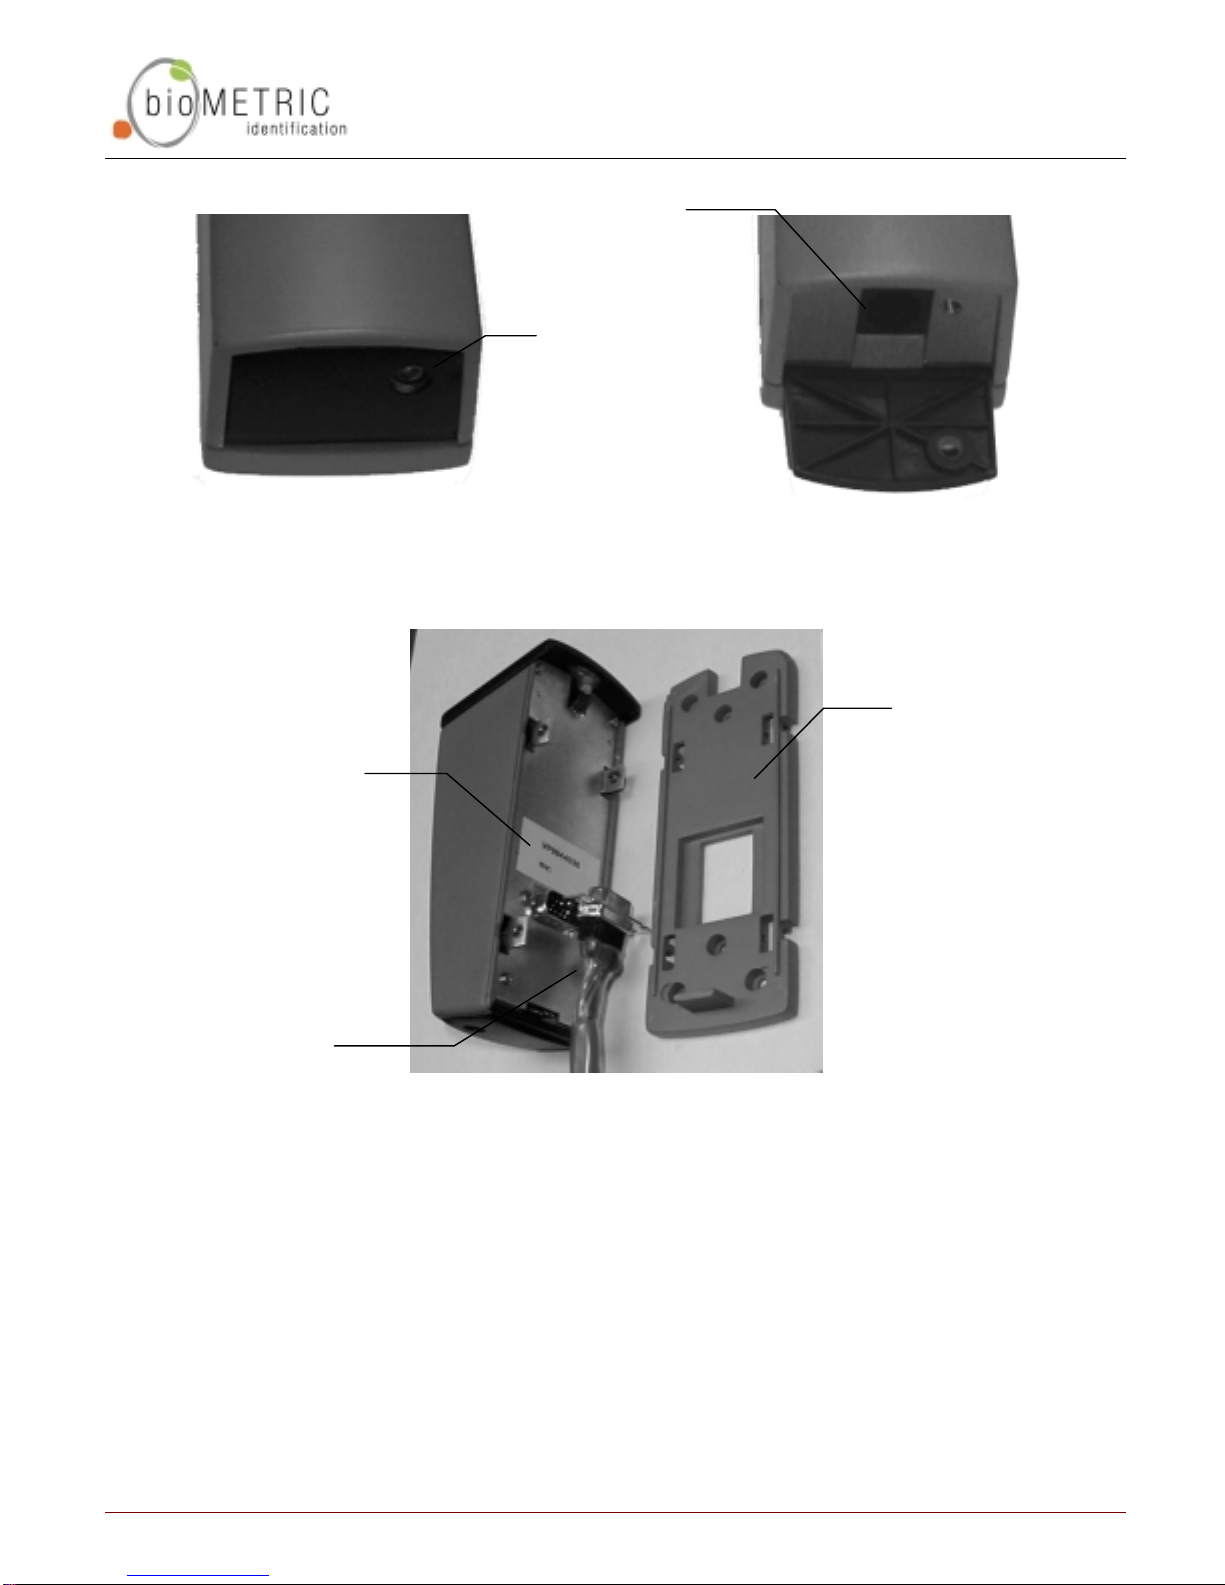
RJ-11
Auxiliary
Port
Locking
Screw
Figure 3: Bottom Panel – closed Figure 4: Bottom Panel – open
Mounting
Plate
Part and Serial
Number Tag
Pigtail
Connector
Figure 5: Veriprox Unit and Mounting Plate
For additional information on installing and connecting your Veriprox unit,
please refer to the Veriprox Installation Manual.
Page 12 © 1999 Biometric Identification, Inc.
Page 14

Concepts of Operations
The Veriprox
The Veriprox integrates an industry-standard proximity card reader with
BiometricID’s MV1100 fingerprint verification technology. A user waves the
proximity card near the front of the Veriprox. The LED on the top of the reader will
glow amber; indicating the user should place their finger on the sensor on the top
of the reader. The ID number is read from the proximity card while the fingerprint
is scanned. The amber light will turn off, signaling the finger can be removed. The
scanned image is compared with the data that is stored under the ID number in
the memory of the Veriprox. If the verificatio n is positive, the top LED will glow
green and the unit will emit an audible beep. If the authentication fails, the LED
will glow red and no beep will be generated. When authentication is successful a
Wiegand string that contains the site code and ID number read from the proximity
card is sent out for use by a standard door controller. Optionally, the Veriprox can
be configured to send out a pre-determined “failure” ID whenever an unsuccessful
verification occurs. An additional option allows the site code to be replaced with
another number.
C ONCEPTS OF O PERATIONS
The Veriprox has several communication options. It is equipped with both a Host
port and an auxiliary port. The Host port may be configured to operated in RS-232
mode or RS-485 mode. The auxiliary port is always set to RS-232. The Host port
connections are made through the wiring pigtail on the back of the reader. The
auxiliary port is accessed from an RJ-11 jack that is hidden under a door on the
bottom of the Veriprox. This door is held shut with a security screw.
The Veriprox can be used as a stand-alone reader or multiple units can be
configured on an RS-485 network. The manner in which you choose to install the
Veriprox will determine which commun ications settings are most convenient for
your configuration. Certain administrative functions are common to any
installation. You must have a way to “enroll” users into the system, that is, you
must be able to associate their fingerprint data with a specific proximity card ID
number. You must have a way to distribute this user information to all other
readers in your installation. The Veriprox Administrative Software is provided for
this purpose.
Page 13 © 1999 Biometric Identification, Inc.
Page 15

C ONCEPTS OF O PERATIONS
The Proximity Card
There are three types of proximity cards split into two basic categories:
• User Cards
• Enroll Command Cards
• Delete Command Cards
Site Number
Designator
n-01234
Card Number
Veriprox Card
Figure 6: Veriprox Card
User Cards
The Veriprox can be programmed to use a given card ID number as a standard
“user card”. The majority of your cards will be of this type.
Command Cards
Command Cards can be created to add and remove users from a Veriprox reader
without using the PC based Administrative Software. These can be useful for
creating and removing temporary visitor’s badges or administering the system
when your PC is down or unavailable. There are two types of Command Cards
associated with the Veriprox:
• Enroll Command Cards
• Delete Command Cards
Note: The command cards must be created using the Administration Software.
Once a card has been designated as one of the three types, it will remain that
type unless it is deleted and re-enrolled (see Edit Templates on page 28 ).
Page 14 © 1999 Biometric Identification, Inc.
Page 16
Basic System Administration
Enrollment
New users are entered into the system through the process of “enrollment”. This
procedure scans the users fingerprint and produces a fingerprint template, a
collection of data that is stored in memory on the Veriprox. This includes:
• User Name
• User Finger Identifier
• Template Security Threshold
• Template ID
• Template Index Number
• A mathematical model of the fingerprint ridge pattern
Templates
Every template on a Veriprox unit is unique. Each time a fingerprint is enrolled a
new template is generated using the number from the proximity card as the
Template ID number. The system automatically increments and assigns an index
value to each template.
C ONCEPTS OF O PERATIONS
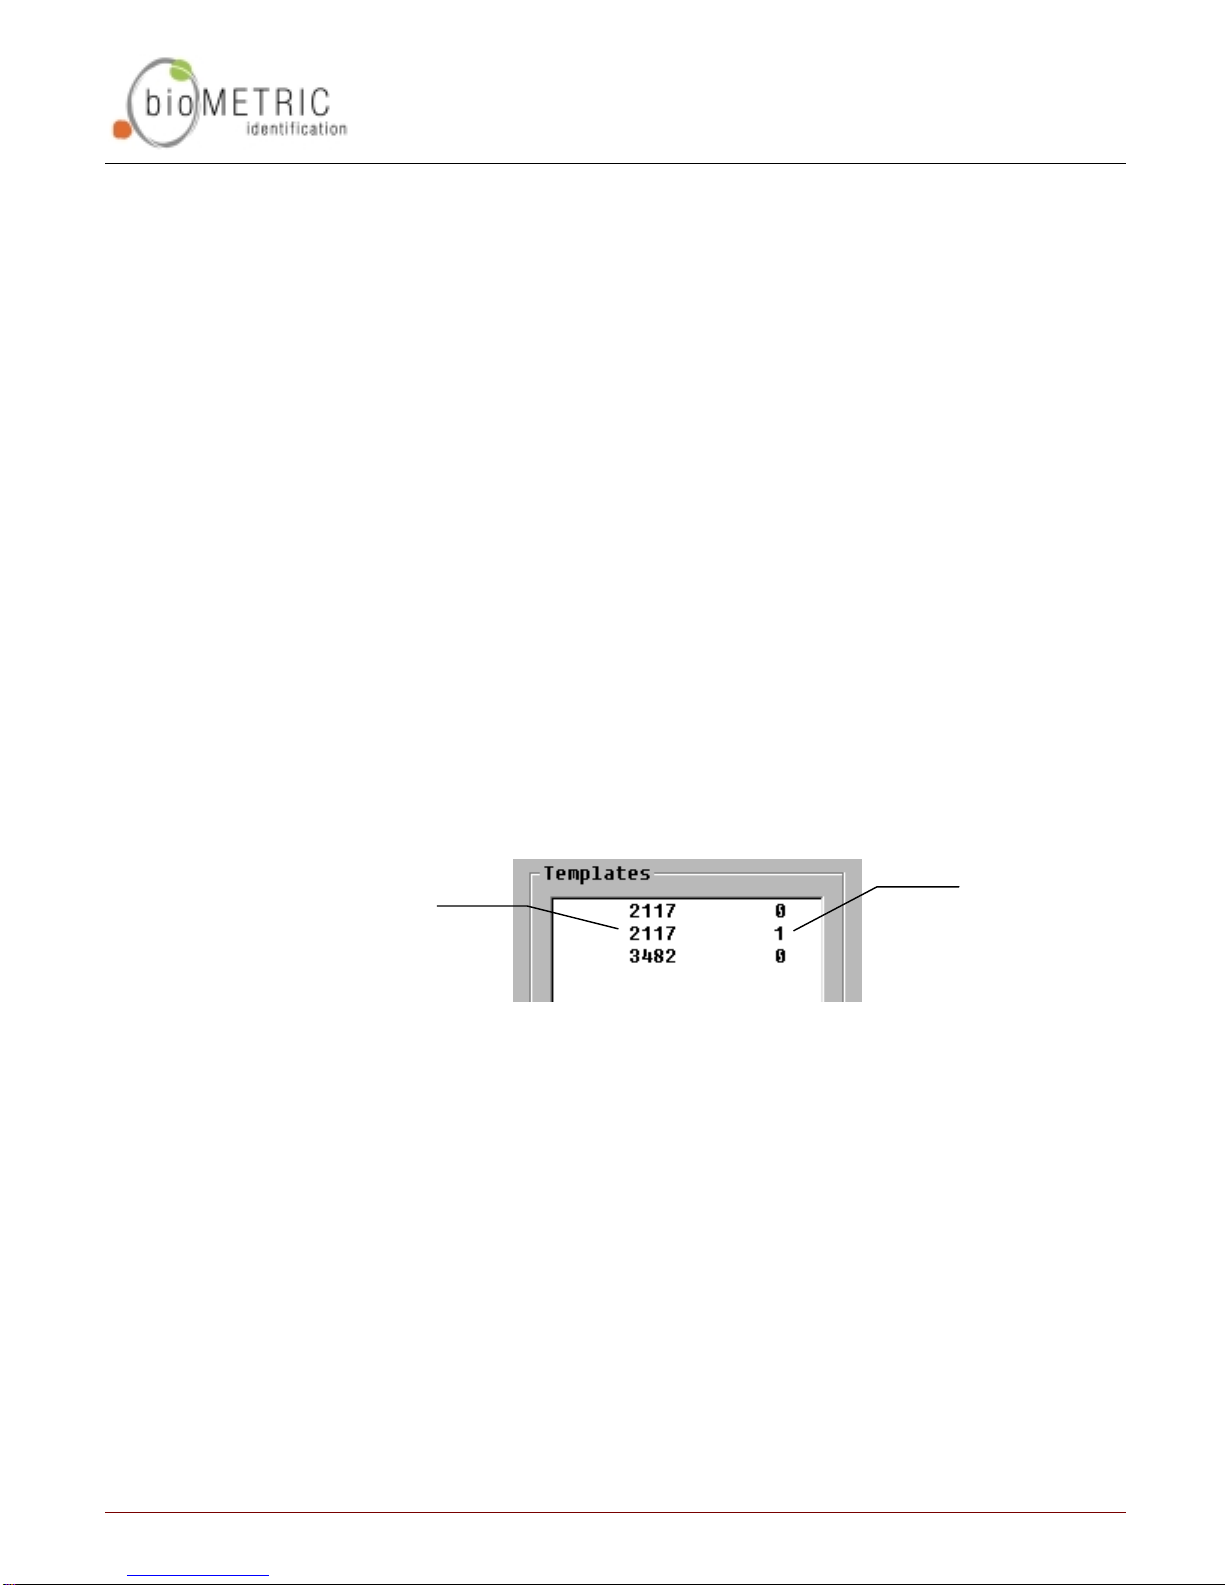
Template ID
Number
Template
Index
Number
Figure 7: Template ID Numbers
1. The ID number of the card to which the template is being assigned.
2. The index number of the template; this is assigned automatically by the
software. Index numbers differentiate between fingerprints assigned to
the same Template ID number (i.e., card number).
Please see Appendix A – Quality and Content on page 48 for a technical
description of what constitutes a good enrollment. A quality enrollment will ensure
peak performance from the Veriprox fingerprint recognition alg or ithm.
Page 15 © 1999 Biometric Identification, Inc.
Page 17
C ONCEPTS OF O PERATIONS
Multiple Readers
If your installation includes multiple Veriprox readers that are used by a common
population of users, you will need to distribute the fingerprint template of each
user to all the Veriprox readers.
Note: It is recommended that you designate one
Veriprox as the “administration reader” and enroll
all new users on this unit.
After a new user is enrolled on the administration unit, the template can be
copied to the other readers. If the units are networked, you can broadcast the
new template to the other readers over the RS- 485 lines using the
Administrative Software. If the readers are not interconnected, a laptop can be
used to download the templates from the ad mini str ati o n reader and then
uploaded to each reader through its Aux Port.
Backing-Up Templates
Templates can be “backed-up” by downloading them to a PC. On the PC,
template files are of the type “.tem”. The name of the file is derived from the
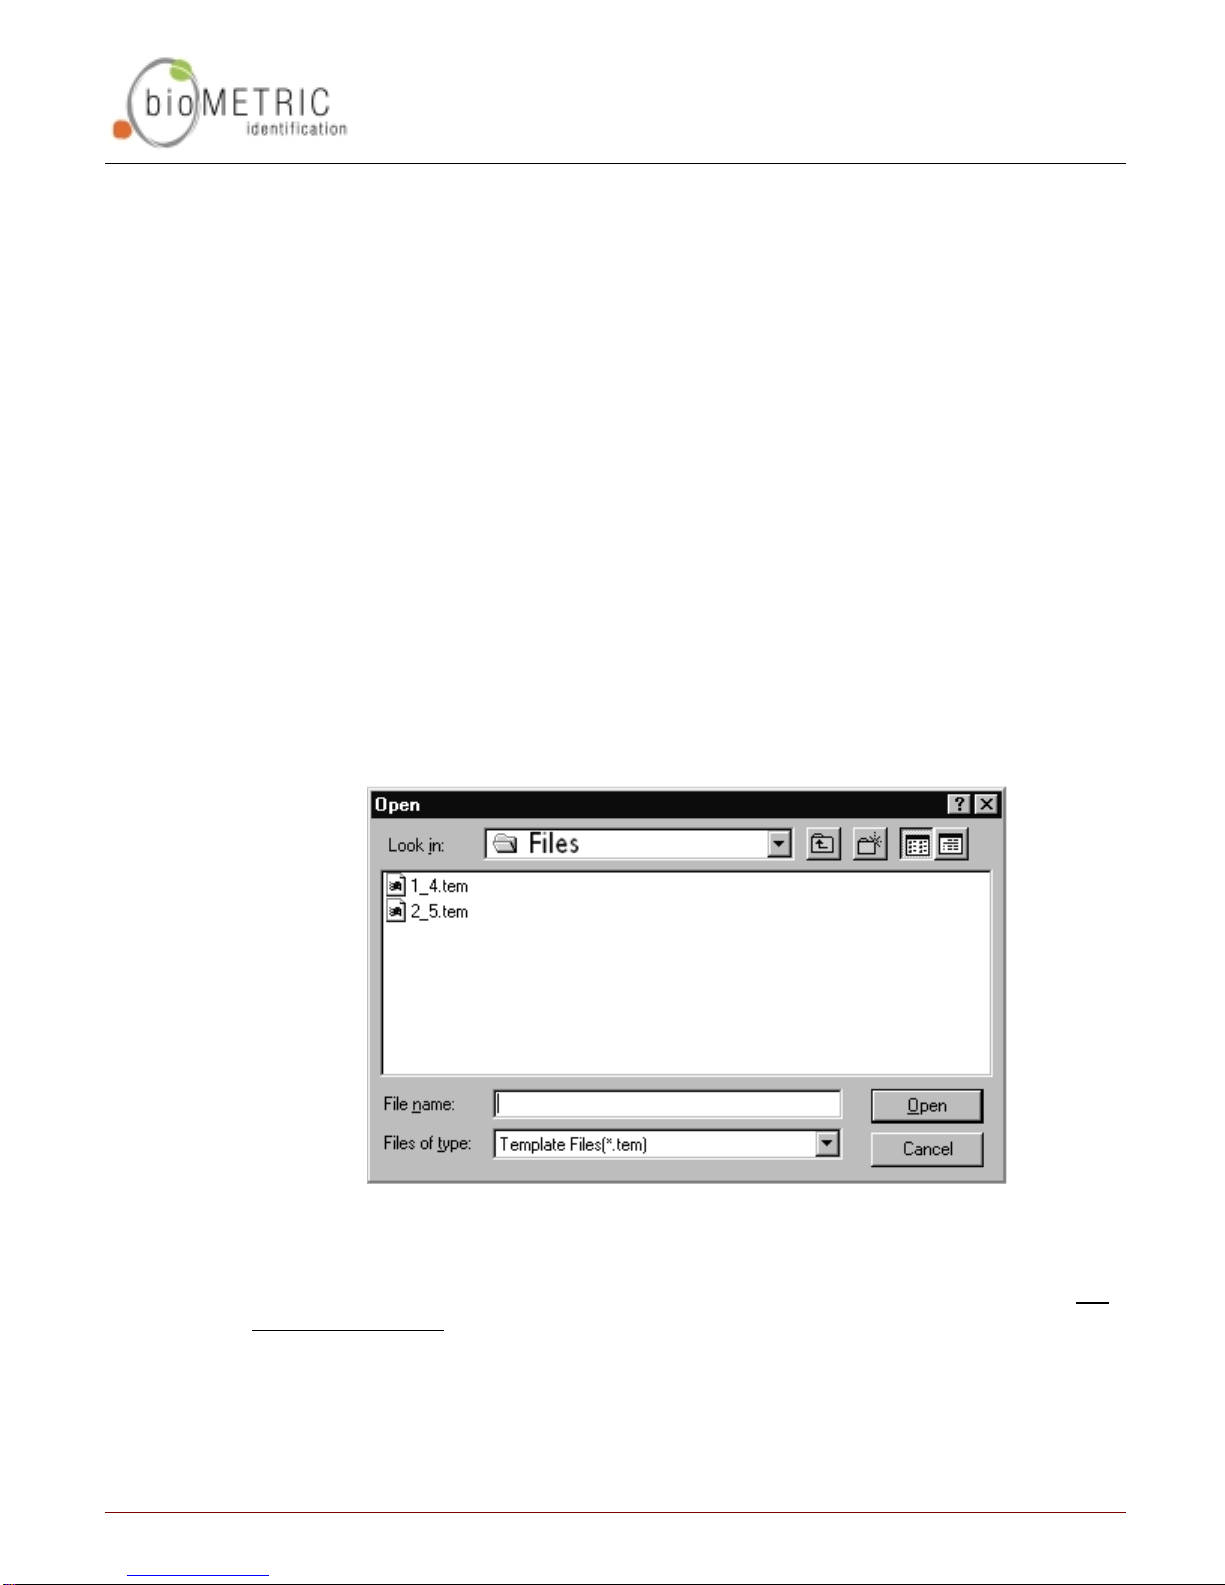
Template ID Number and the Template Index Number. For example, the first file
(1_4.tem) in Figure 8 below is of Template 1 4.
Please note that when the template is uploaded from the PC to a Veriprox reader,
the Template ID Number and Index Number is taken from data within the file, not
from the file name. Therefore, even if you change the name of the file on your PC,
the Template ID and index will remain the same.
Figure 8: Template files on the PC
Page 16 © 1999 Biometric Identification, Inc.
Page 18
Lights
C ONCEPTS OF O PERATIONS
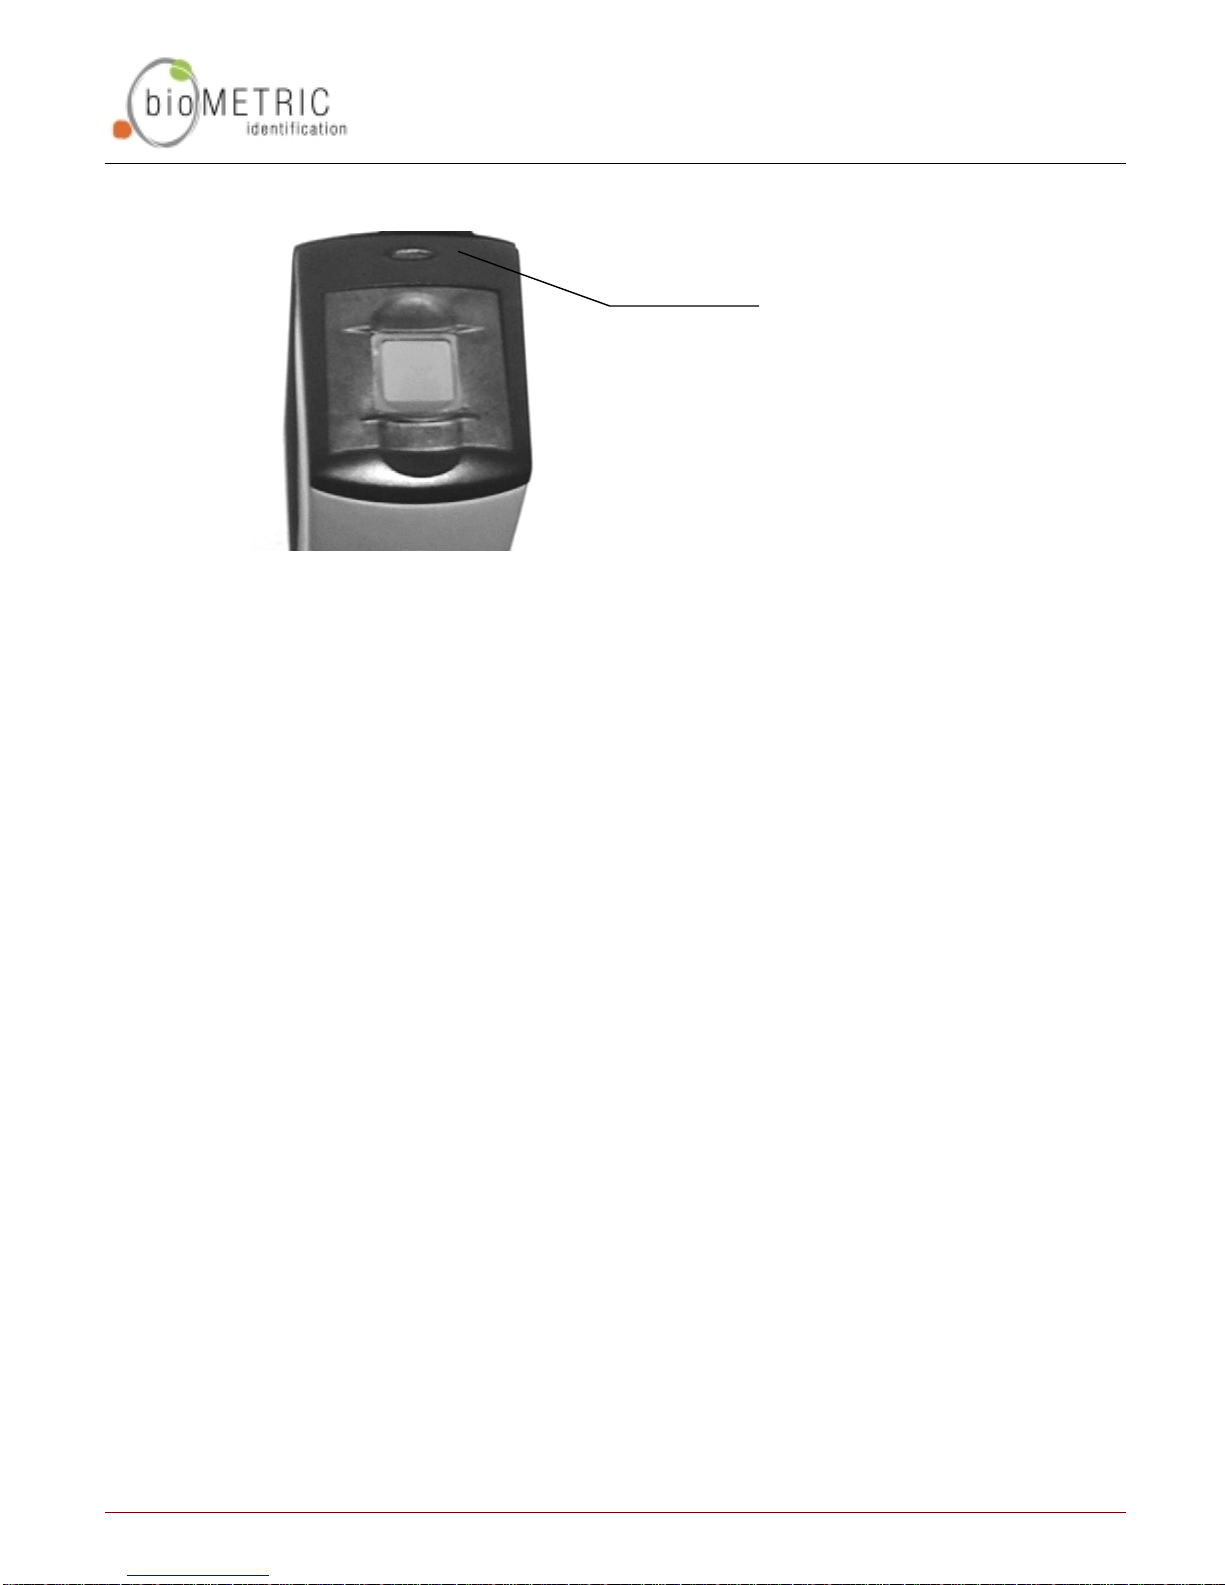
The LED on top of the unit
can illuminate in different
colors and patterns.
Figure 9: Top LED
Steady Amber the Veriprox is requesting that a finger be placed on the sensor.
This may be for verification or for enroll m ent. The user may
remove the finger when the light goes out.
Blinking Amber the Veriprox is requesting a proximity card be waved for
enrollment into the reader. The blinking amber light is seen
when an Enroll Command Card is used to add a new user to the
reader.
Steady Green the Veriprox is indicating the successful completion of one of
the following operations:
• Verification
• Enrollment
• Deletion
A steady green light is accompanied by an audible beep.
Steady Red the Veriprox is indicating the current operation has failed.
Blinking Red the Veriprox is requesting a proximity card be waved. The card
ID number will be deleted from the reader. The blinking red light
is seen when a Delete Command Card is used to remove an
existing ID from the reader.
Page 17 © 1999 Biometric Identification, Inc.
Page 19

V ERIPROX A DMINISTRATIVE S OFTWARE
V eriprox A dministrative Software
The administrative software that comes with the Veriprox unit is designed to run on Windows
NT™ 4.0 or Windows 98™ (Note: it is possible to run the software on Windows 95™, however,
this is not recommended).
Use the Veriprox Administrative software to perform the following functions:
• Enroll new users and assign them a proximity card ID.
• Distribute the user templates from the administration reader to other Veriprox readers in
the installation.
• Create “command cards”; proximity cards with the privilege to enroll or delete other user
cards.
• Adjust the parameters (baud rate, security level, port configuration) of individual
Veriprox units, or of all readers connected on an RS-485 network.
• Select specific readers in a networked environment and view and/or edit the templates
on those readers.
Concepts of Operation
Transmit ID
On the tool bar of the Administration Software, there is a drop-down list titled
Transmit ID (see Figure 10 below). The ID number that appears in the field is the
Veriprox reader with which the software currently is communicating. For this
reason, each Veriprox reader must be assigned a Network ID, even if your
installation consists of a single Veriprox (the default setting is 0).
A special transmit ID number, “-1”, is assigned as a broadcast ID. All Veriprox
units will respond to this broadcast ID. For functions labeled “broadcast” the
software uses the broadcast ID and all readers on the network will process these
commands.
If the transmit ID is set to a number that is not assigned to any Veriprox unit, the
software will report that there is no communication.
Figure 10: Transmit ID Drop-down
If two units on the network have the same ID assigned, there also will be
communication problems, because both units would respond to commands sent
Page 18 © 1999 Biometric Identification, Inc.
Page 20

V ERIPROX A DMINISTRATIVE S OFTWARE
to that ID. This causes the information packets to “collide” and become jumbled,
resulting in communication losses.
It is important that commands that are broadcast to all readers do not ask for a
confirmation reply because all units would respond at the same time jumbling
communications.
Ports
The Veriprox “talks to the Administrative Software using either the Host or
Auxiliary (Aux) port. The Host port may be configured to use RS-232 or RS-485
protocol. The Host port is connected through the pigtail-wiring bundle at the back
of the unit. Different wires are used for RS-485 versus RS-232. The Aux port is
accessed using the RJ11 jack at the bottom of the Veriprox. Please refer to the
Veriprox Installation Manual (included on this CD) for details.
Serial Port Settings and Baud Rates
Once you have connected the PC to the Veriprox reader(s), you have to identify
which ports on the PC are talking with which readers.
As usual, the serial ports on the host PC are designated as COM1, COM2, etc.
You may connect up to 31 Veriprox readers to each COM line (using RS-485).
You must provide the Administration Software with the information as to which
Network ID has been assigned to which COM line.
This information is stored in an initialization file that is read by the software on
application startup. The file is labeled “UnitIDs.dat” and is located at the following
path:
<Install Dir>\UnitIDs.dat
where <Install Dir> indicates the directory where the Veriprox Administrative
Software was installed). The default installation path is:
C:\Program Files\BioID\Veriprox
Please refer to the Setting up the ID File section on page 21 for details.
In addition the baud rate may be set on each Veriprox reader. It is essential that
the baud rate used by the PC match the baud rate setting on the reader and that
all readers on the network are set to the same baud rate.
The following settings are the factory defaults. Your Veriprox should arrive with
these settings in place:
Network ID: 0
Host Port baud rate: 9600 baud
Aux Port baud rate: 9600 baud
Host Port protocol: RS 485
Page 19 © 1999 Biometric Identification, Inc.
Page 21

Installing the Software
To install the software, run the setup.exe file on the Veriprox Admin CD. You may
accept the default path or choose an alternate directory in which to install the
software. The default path is:
Like most Windows based installations, you will step through a number of
windows (approximately 5) that will request basic installation information, such as,
file name and directory location. It is recommended that you use the default
settings for these, however, you can change them.
Once the installation is complete, a short-cut icon for the
Administration Software will appear on your desktop.
V ERIPROX A DMINISTRATIVE S OFTWARE
C:\Program Files\BioID\Veriprox
Page 20 © 1999 Biometric Identification, Inc.
Page 22

Setting up the ID File
Once you have installed the software on your PC, you will need to set up a
communications port ID file. The software will use the information in this file to
communicate with the Veriprox reader(s) connected to the Host Port.
You can create and edit the file using the “Notebook” program provided with
Microsoft Windows.
Access the file, UnitIDs.dat located in the Install Directory . The default path is:
C:\Program Files\BioID\Veriprox\UnitIDs.dat
ID File Format
The file format is as follows:
Line 1: Name the comm port on the PC
Line 2: List the IDs for all units on this port. Separate each ID by a space.
Line 3: Type a % to end the comm port.
Example:
V ERIPROX A DMINISTRATIVE S OFTWARE
COM#: 1
UnitIDs: 0 1 2 3 4 5 6 7 8 9 10 11 12 13 14 15 16 17 18 19 20 21 22 23 24
25 26 27 28 29 30
%
COM#: 2
UnitIDs: 31 32 33
%
Notice how the line for the Unit IDs for Comm 1 wraps; the software will
continue to read the line until the %. A space should appear after each
colon (:) and between each reader ID number.
Once you have completed editing the file, save it under the same name
and to the same location.
Note: It is essential that this file be located in the
same directory as the Veriprox Administration
software.
The default UnitIDs.dat file looks like this:
COM#: 1
UnitIDs: 0
%
Thus the software will initialize expecting to find only one reader on the
host port with an assigned ID number of “0”. There will be no
communication problems if there are other readers on the network unless
those readers are also set to ID “0”.
Page 21 © 1999 Biometric Identification, Inc.
Page 23
V ERIPROX A DMINISTRATIVE S OFTWARE
Communication Settings file
There is a second initialization file that is used by the Administrative Software.
This is the CommParameters.cfg file. The program automatically writes this file
when it is closed. The next time the program is opened, this file is read and the
communication parameters are set to match their state when the program was
last shut down.
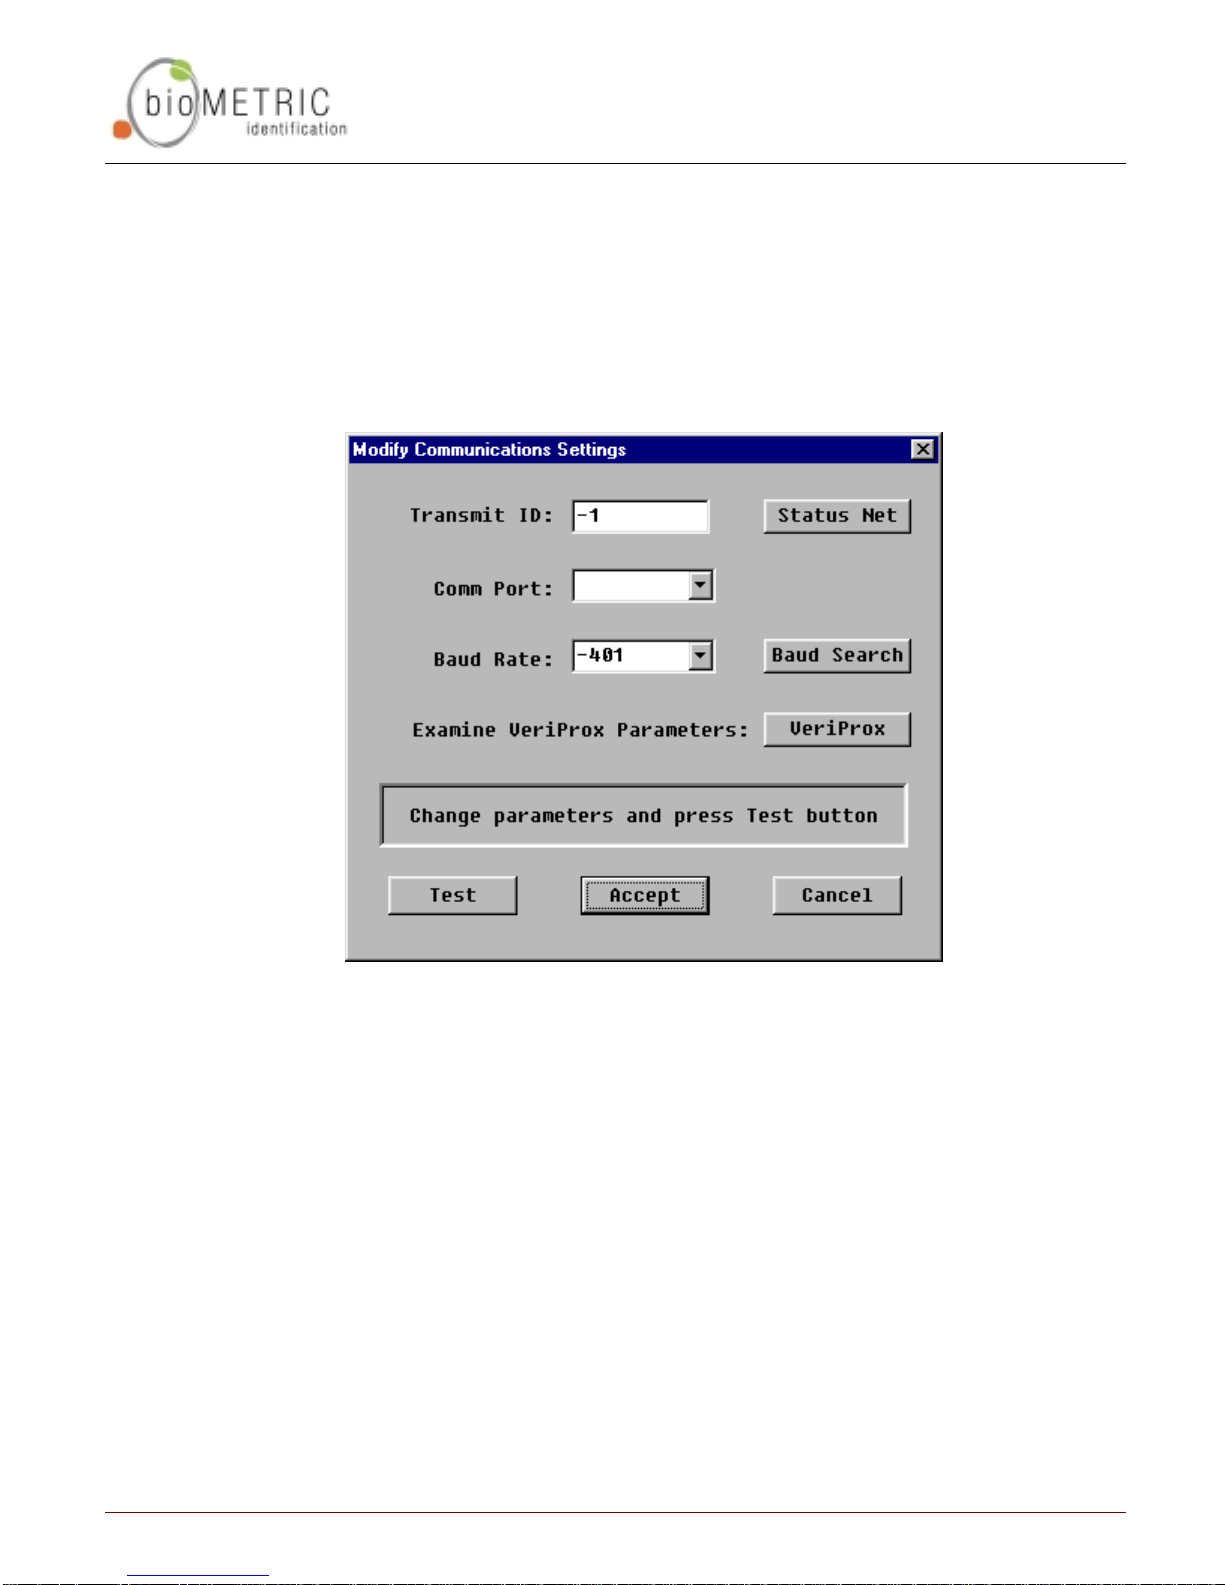
The first time you run the Veriprox Administrative software this file does not exist.
You will see the following dialog appea r. Fill out the desired parameters.
Page 22 © 1999 Biometric Identification, Inc.
Page 24

Setting up a Network
As described above, when setting up a network you will need to assign unique ID
numbers to each Veriprox and confirm the communication settings. The easiest
way to do this is to cycle through each reader, setting the parameters by plugging
into the Aux port. When using the Aux port you can set the transmit ID to –1
(broadcast). Since you are plugged into only one reader, you are assured that no
other Veriprox units will be responding to your commands. If the ID on the
Veriprox has been changed from its default you can still be confident it will
respond to the Broadcast ID. After you set the parameters for each Veriprox
through the Aux Port you can connect them to your 485 network. To review, the
recommended steps are:
1 Supply power to the proper wires in the pigtail on the back of the
Veriprox (Consult the Installation Manual for a wiring diagram).
When power is applied, the unit will beep, the front LED will glow
green, and the top LED will blink amber, then turn off.
2 Plug into the Aux Port using the RJ-11 jack on the bottom of the unit
and connect the cable to one of the serial ports on your PC
V ERIPROX A DMINISTRATIVE S OFTWARE
3 Access the Communication Settings window by clicking on the icon
or using the menu.
5 Click the Modify button.
Set the Transmit ID to –1. Set the Comm Port setting to match the
designation for the port you are using on the PC (e.g. COM1, COM2)
6 Set the baud rate setting to 9600 baud (the factory default).
7 Press the test button.
8 If necessary, use the Baud Search button to have the software test
different baud rate settings and report which baud setting works. (For
this function to succeed a valid transmit ID and valid COMM port must
be set.
9 Click the Accept button to change the settings.
10 You can now set Network ID on the reader. Click the Veriprox button
on the Modify Communications Settings dialog.
11
Type the desired ID number in the Assign Veriprox Network ID field.
Press the “Set” button to make the change. Note this will change the
ID in flash on the reader. It will not modify the transmit ID that is being
used by the PC. The lower right corner of this dialog box shows the
current communication settings. Since you are using the broadcast ID
(-1) and only connected to one Veriprox (over the AUX port) you will
continue to communicate without problems.
Page 23 © 1999 Biometric Identification, Inc.
Page 25

12
V ERIPROX A DMINISTRATIVE S OFTWARE
Select the appropriate baud rate from the Host Port Baud Rate drop
down list (9600 is recommended). Keep in mind that you are currently
talking over the AUX port, but you are changing the Host Port settings
that will be used when you connect to the Veriprox through the Host
Port wires on the back of the unit.
13
Set the Host Port Protocol to RS-485 if you will be using a networked
environment. Alternatively you may choose RS 232 if you will not be
networking the Veriprox. Remember that the RS 232 and RS485
connections are made through different wires on the pigtail. (Consult
the installation manual.)
Make sure that the Network IDs in the UnitIDs.dat file match those assigned to the
readers. If not, update accordingly.
Page 24 © 1999 Biometric Identification, Inc.
Page 26
V ERIPROX A DMINISTRATIVE S OFTWARE
Icons, Commands and Drop Downs
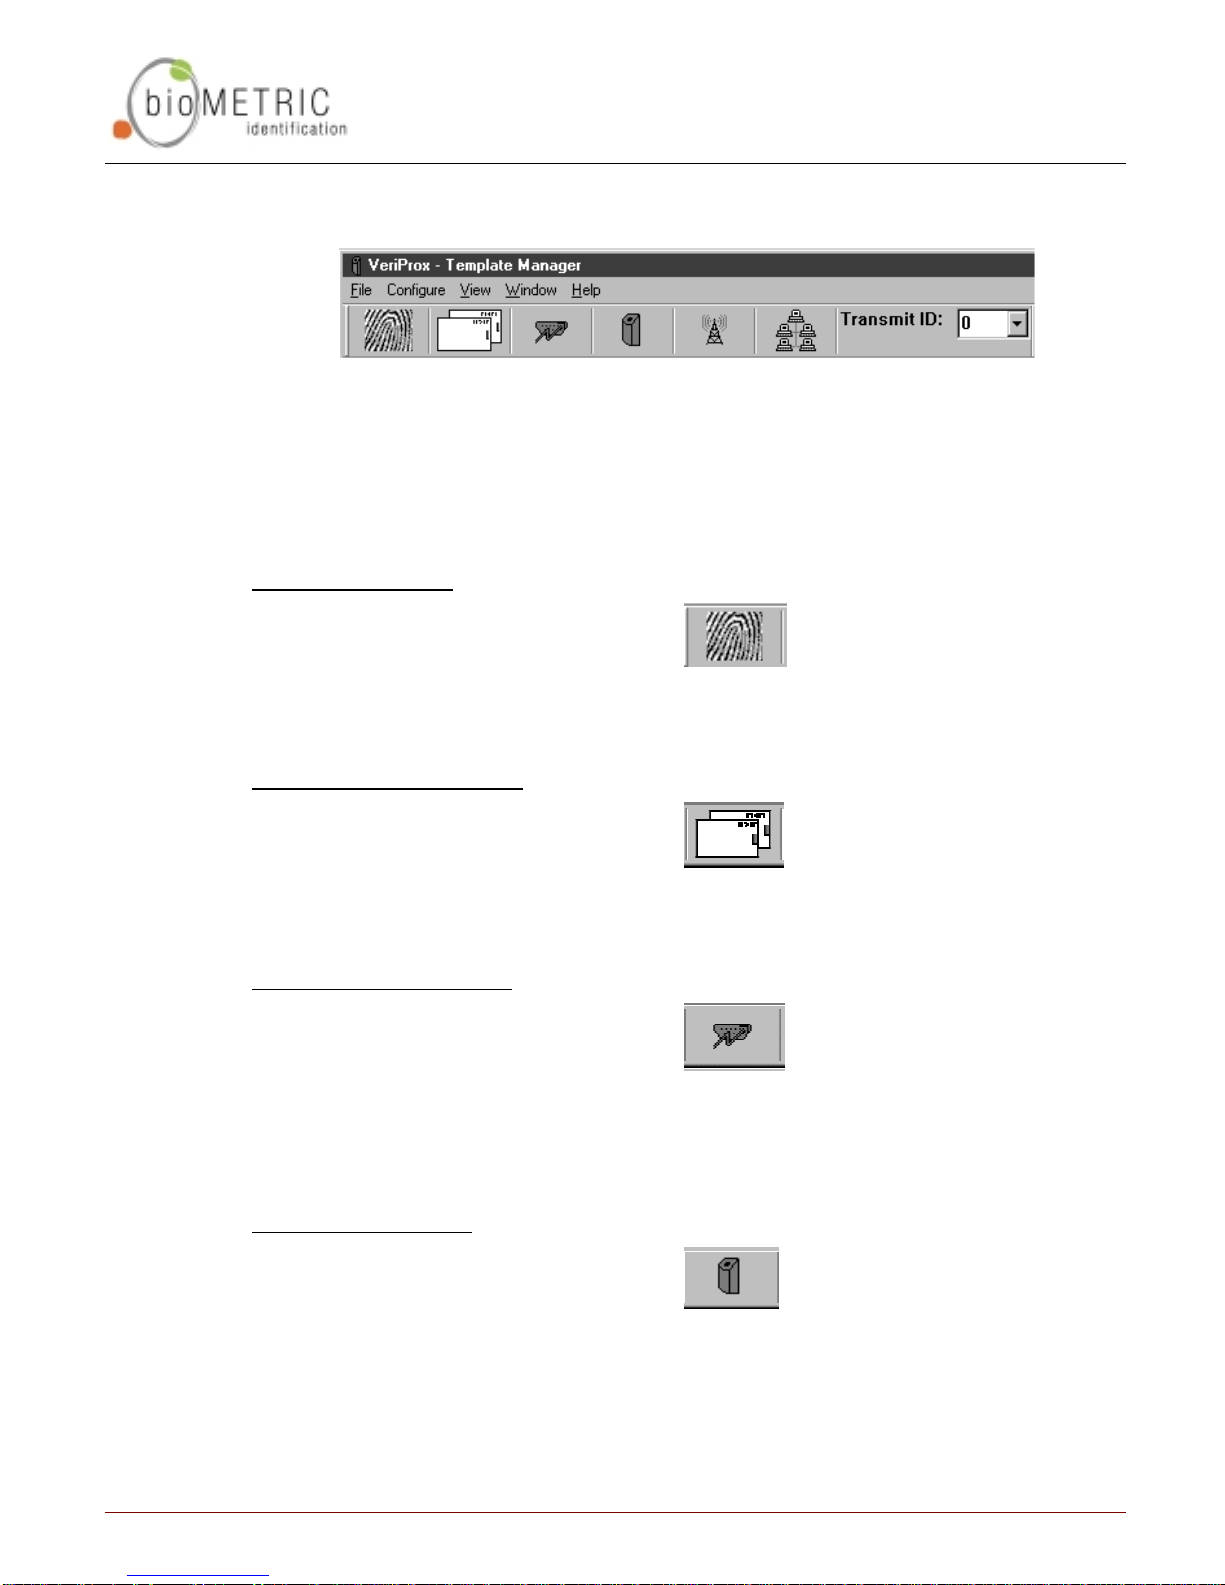
Figure 11: Veriprox Toolbar
Once you have the software installed and running, you will be able to access the
features mentioned above either through the icons and drop down box on the
toolbar or through the command menus.
Template Manager (page 27)
Icon
Command Path File > Template Manager
Command Card Manager (page 36)
Icon
Command Path File > Command Card Manager
Communication Settings (page 39)
Icon
Command Path Configure > Communication Settings
Veriprox Parameters (page 40)
Icon
Command Path Configure > Veriprox Parameters
Page 25 © 1999 Biometric Identification, Inc.
Page 27
V ERIPROX A DMINISTRATIVE S OFTWARE
Broadcast (page 45)
Icon
Command Path File > Broadcast Parameters
Network Status (page 46)
Icon
Command Path File > Network Status
Transmit ID
Drop Down
The Transmit ID number refers to the IDs given to individual Veriprox units.
Whichever number appears in the box is the unit with which the software is
communicating. If you have networked more than one Veriprox unit, you can use
the Transmit ID drop down box to access a specific unit by its ID number.
The ID numbers show in the drop down list come from the “UnitIDs.dat” file
described in the ID File Format section.
Page 26 © 1999 Biometric Identification, Inc.
Page 28
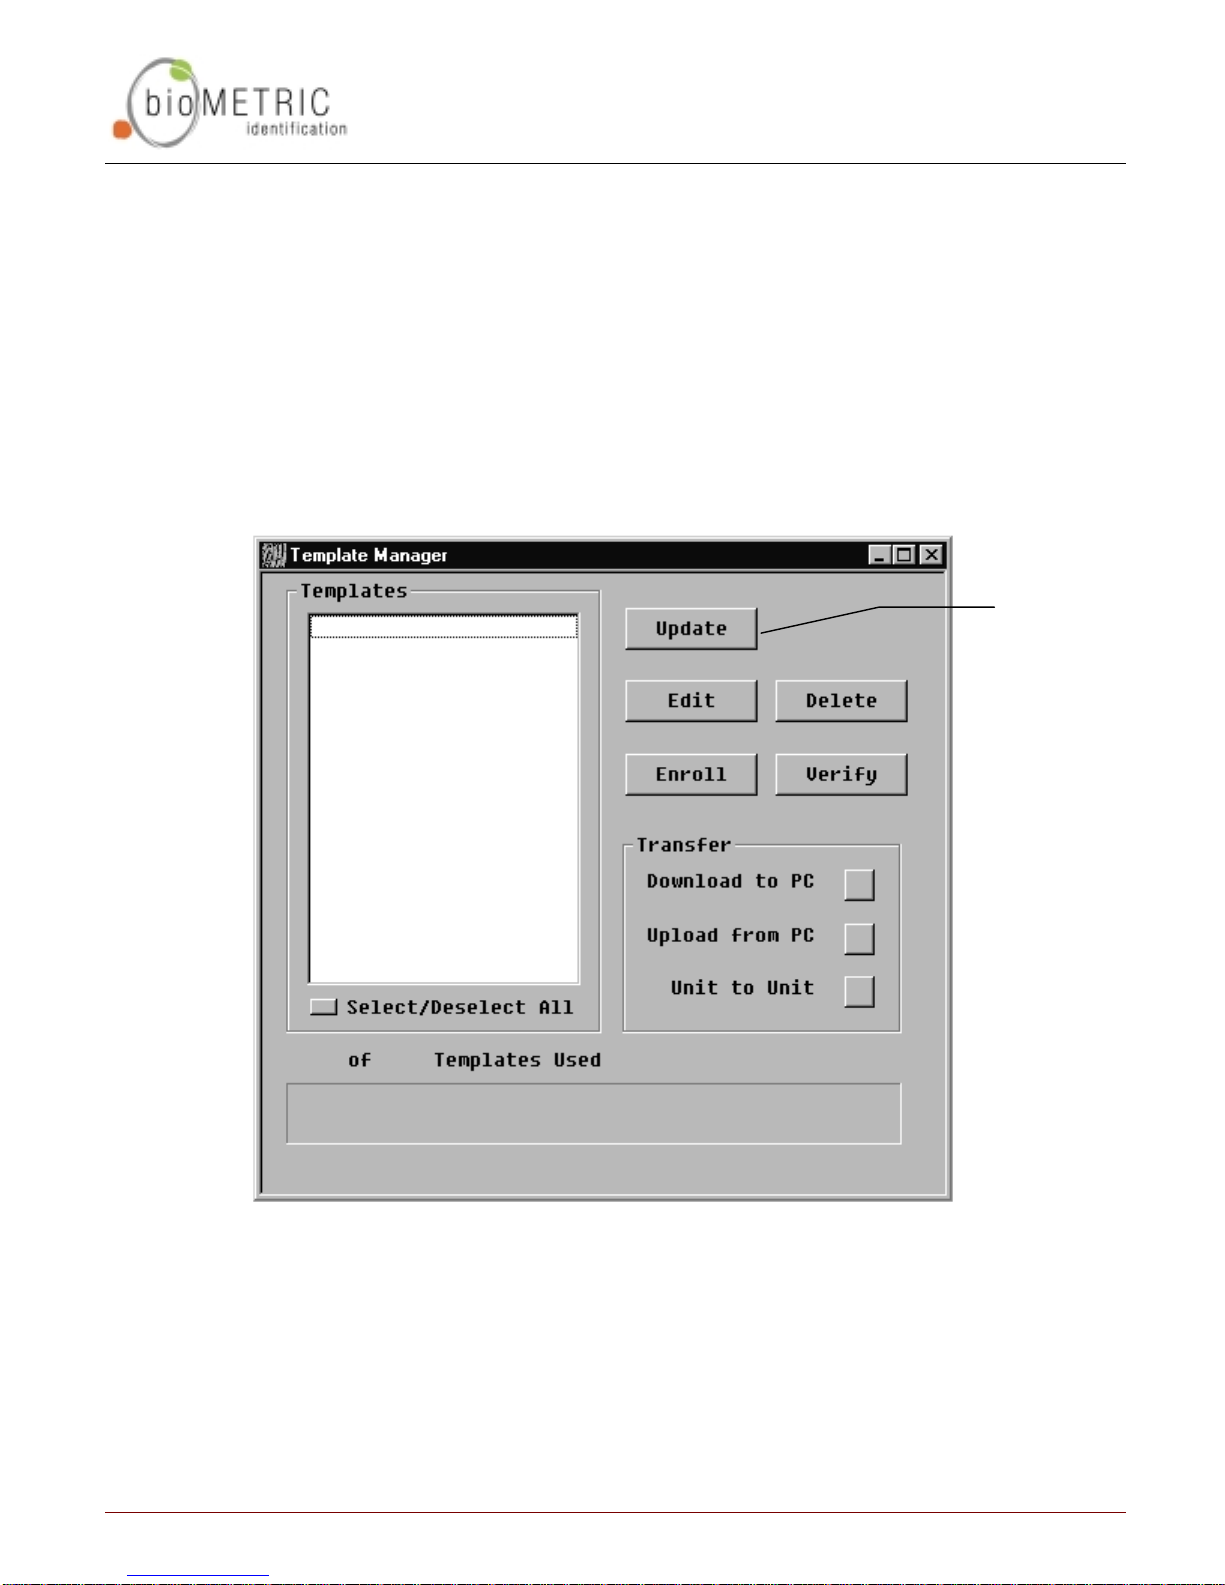
Template Manager
The Template Manager allows you to:
• Edit Templates
• Enroll Templates
• Delete Templates
• Verify Templates
• Transfer templates to and from a PC or from one Veriprox unit to another Veriprox
unit
T EMPLATE M ANAGER
Click this
button to
update the
window.
Figure 12: Template Manager
Page 27 © 1999 Biometric Identification, Inc.
Page 29
Edit Templates
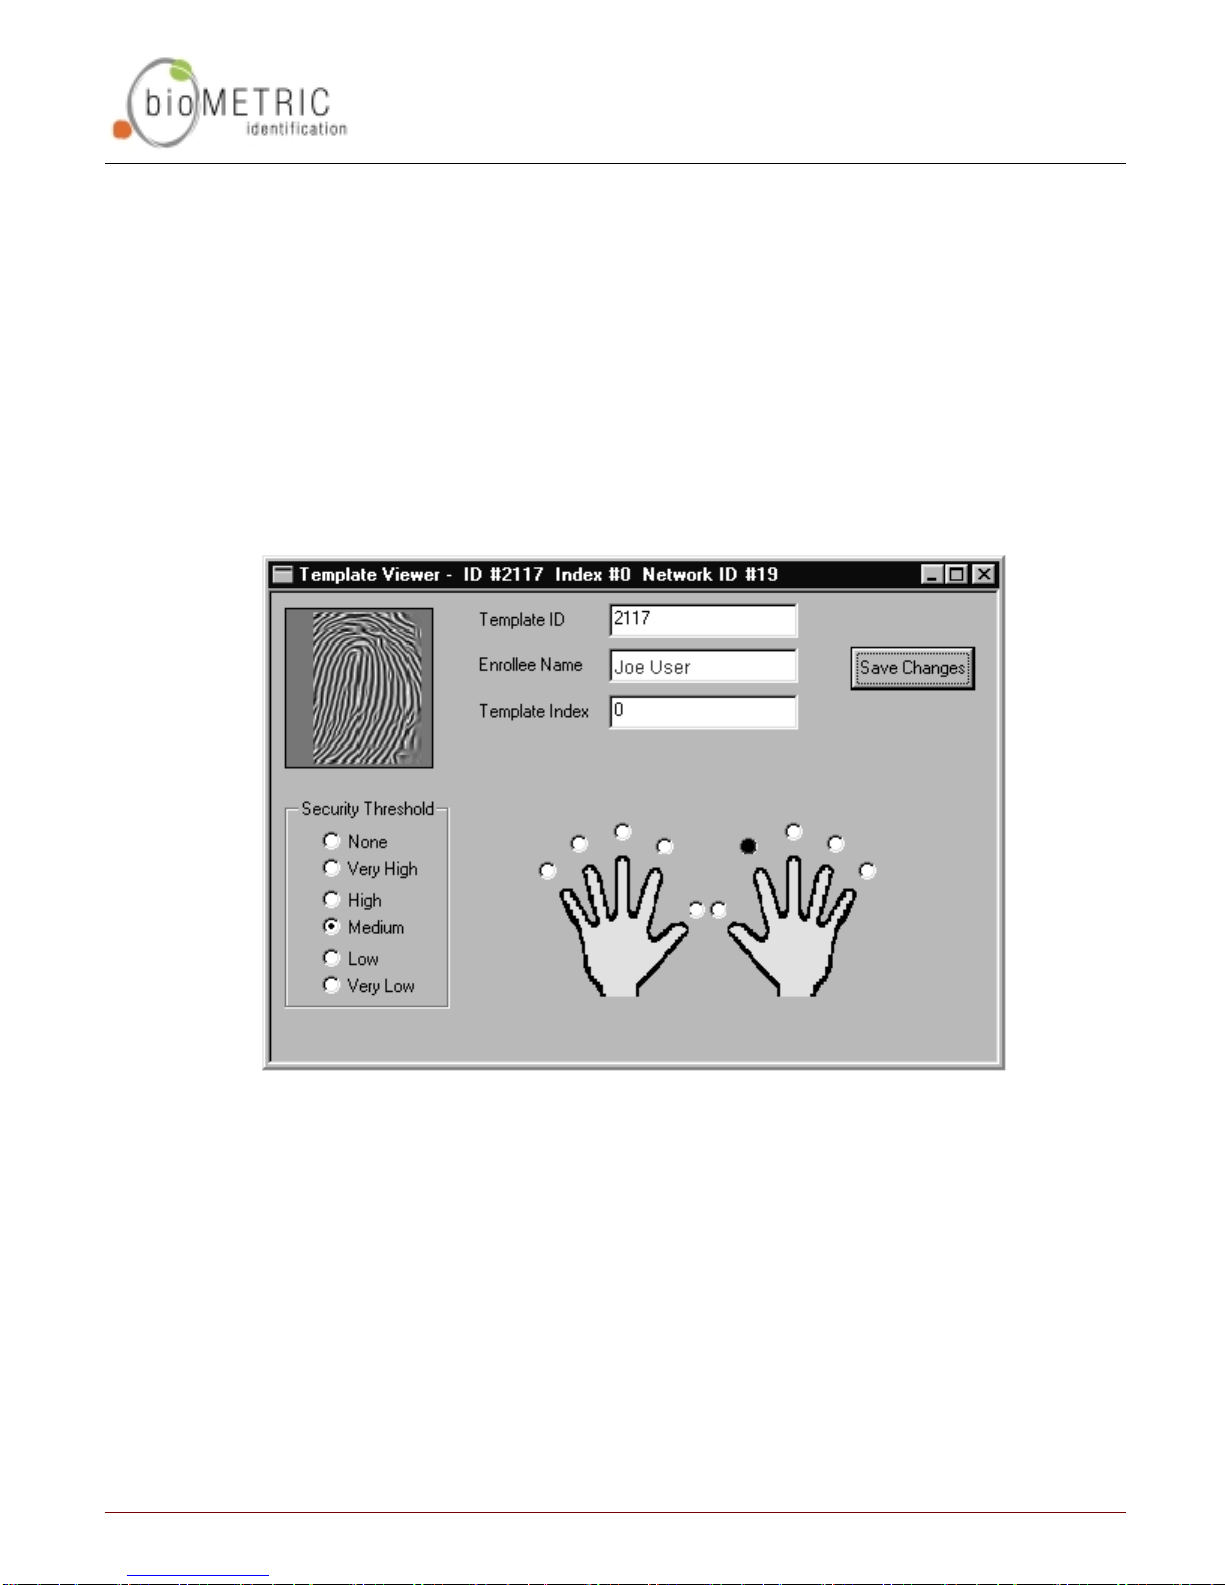
To edit a template, select the appropriate ID number(s) in the Templates window
and click the Edit button. Alternatively, you make double-click on the ID number in
the window and an Edit box will open.
Note: While you can use the Shift and Ctrl keys to select multiple
A window like the one below will open.
T EMPLATE M ANAGER
templates, realize that a separate window will open for each
template you select.
Figure 13: Template Viewer
From here you can view and edit the attributes of the template such as the
Employee Name and Security Threshold. You must press the “Save Changes
button to make your edits permanent.
Page 28 © 1999 Biometric Identification, Inc.
Page 30
Enroll Templates
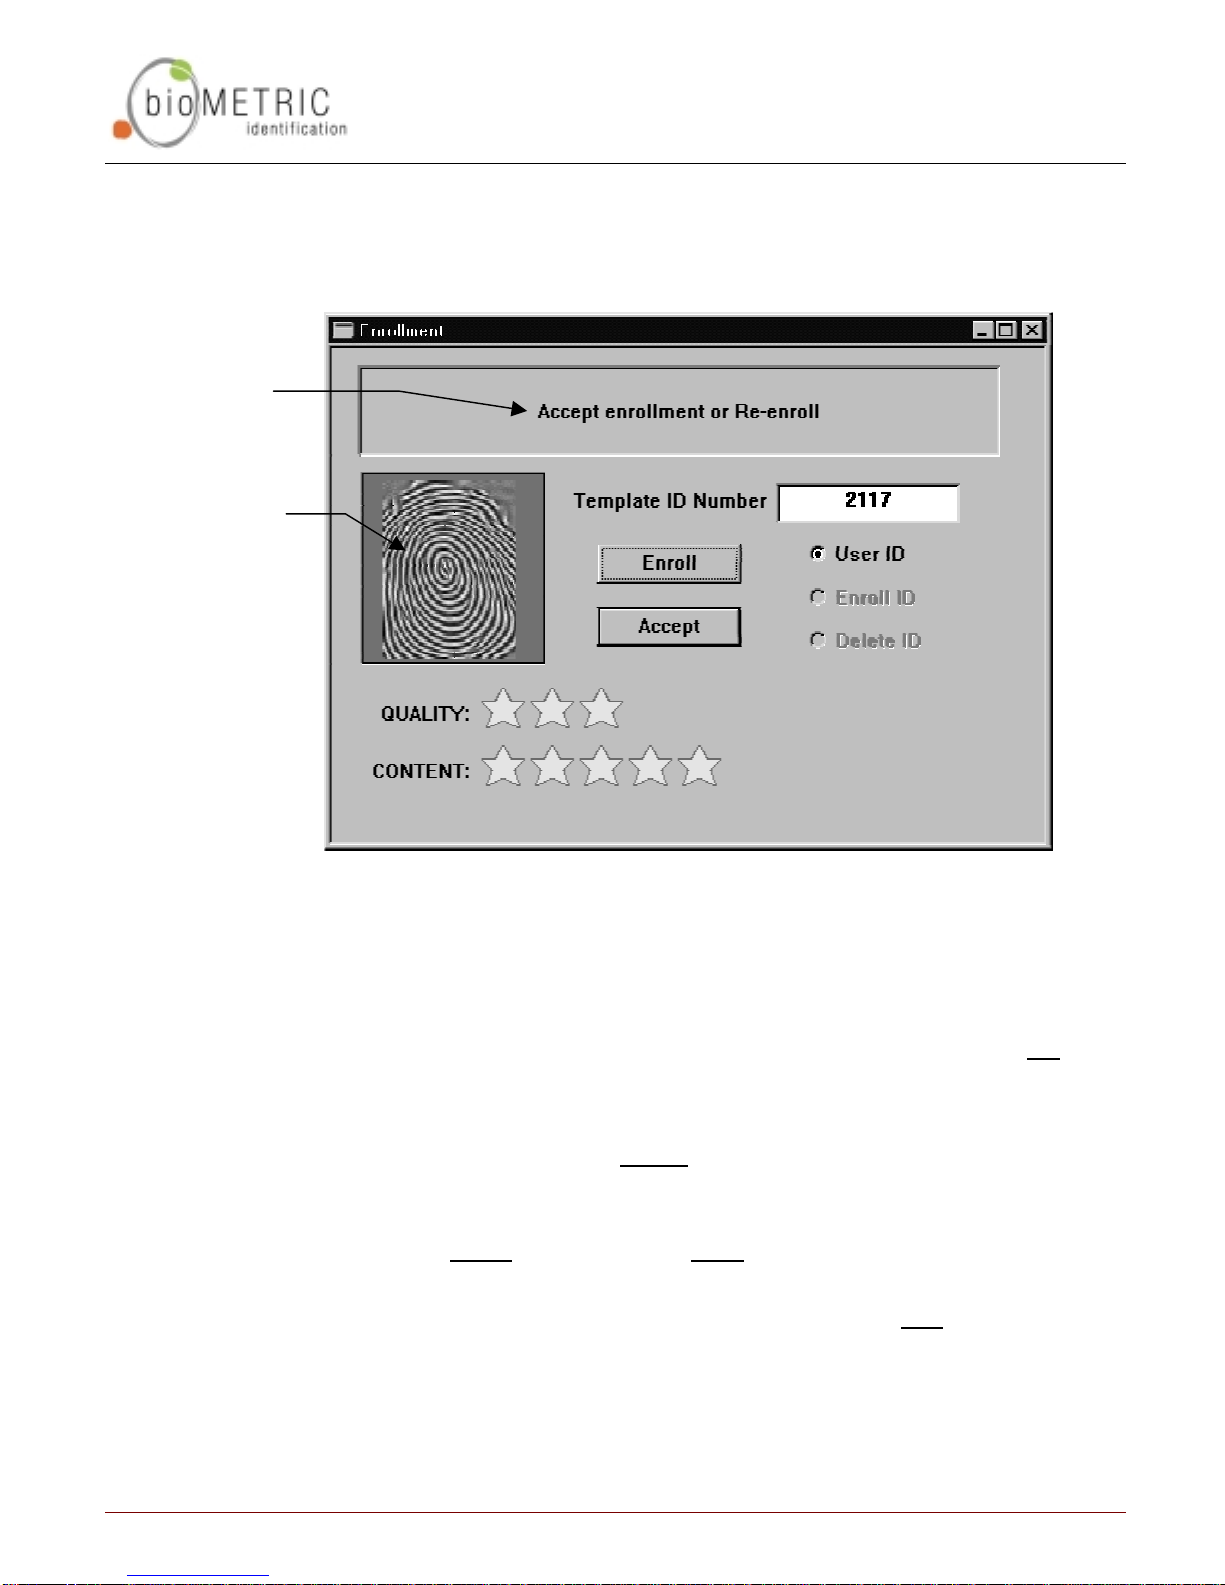
When you select the Enroll button on the Template Manager window, the
following window will appear:
Info and
directions will
A visualization
of the
fingerprint
template will
appear here
T EMPLATE M ANAGER
Figure 14: Enrollment Screen
Note: It is recommended that you enroll all templates from this window so you
can make use of the Quality and Content ratings provided.
The process to enroll a new template is as follows:
1
In the Template ID Number field, type the proximity card ID number. Do not
include a site code designation.
2 Click the Enroll button.
The light on the Veriprox will glo w amber requesting the enrollee to pla ce a
finger on the sensor. Nestle the ridgelock into the first joint line on the finger.
The finger may be removed when the amber light goes out.
3 The light will glow green and the unit will beep
fingerprint has been captured.
If a finger is not placed within ten seconds, the light will glow red and the unit
will time out. Similarly the light will glow red if the unit was unable to image the
fingerprint. (See the appendix for a discussion of proper enrollment).
once to acknowledge that the
Page 29 © 1999 Biometric Identification, Inc.
Page 31

T EMPLATE M ANAGER
4
On the Enrollment screen, the Quantity and Content fields each will display
from one to five stars indicating how well the print was read. In addition, a
sample of the print will appear in the left center of the screen.
A rating of at least three stars in each field is recommended.
5 If you are satisfied with the read, and this is the first time the card is being
enrolled, click either User ID, Enroll ID, or Delete ID depending on the type of
card you are enrolling.
Note: remember that if the card number already has been
designated as one of the three types, then any subsequent
templates assigned to the card must be of the same type.
If you wish to re-read the fingerprint, repeat steps 3 through 5 above.
6 Press the Accept button and the template will be enrolled.
At this point, the Edit Template window will open (see page 28). Complete the
Username field and identify the finger that was scanned.
Note: if you have more than one unit networked together, it is recommended that
you broadcast the new enrollment to the other units at this time.
Delete Templates
Use this option to delete one or more templates from a single unit (if you are in a
networked environment, see the
Page 30 © 1999 Biometric Identification, Inc.
Page 32

T EMPLATE M ANAGER
Broadcast section on page 45).
Select the appropriate ID number(s) in the Templates window and click the Delete
button (recall that you can use the Shift and Ctrl keys to select multiple
templates).
Note: You WILL NOT receive a warning when you delete
templates so confirm that you have selected the correct ones
the first time.
Page 31 © 1999 Biometric Identification, Inc.
Page 33
Transfer Templates
There are three primary ways you can transfer templates:
• Download from the Veriprox unit to the PC
• Upload from the PC to the Veriprox unit
• Transfer from unit to unit
In each of these cases, you can transfer from one to all templates.
Download to PC
T EMPLATE M ANAGER
1 In the Template Manager window, select the template(s) you wish to transfer.
2 Click the Download to PC button.
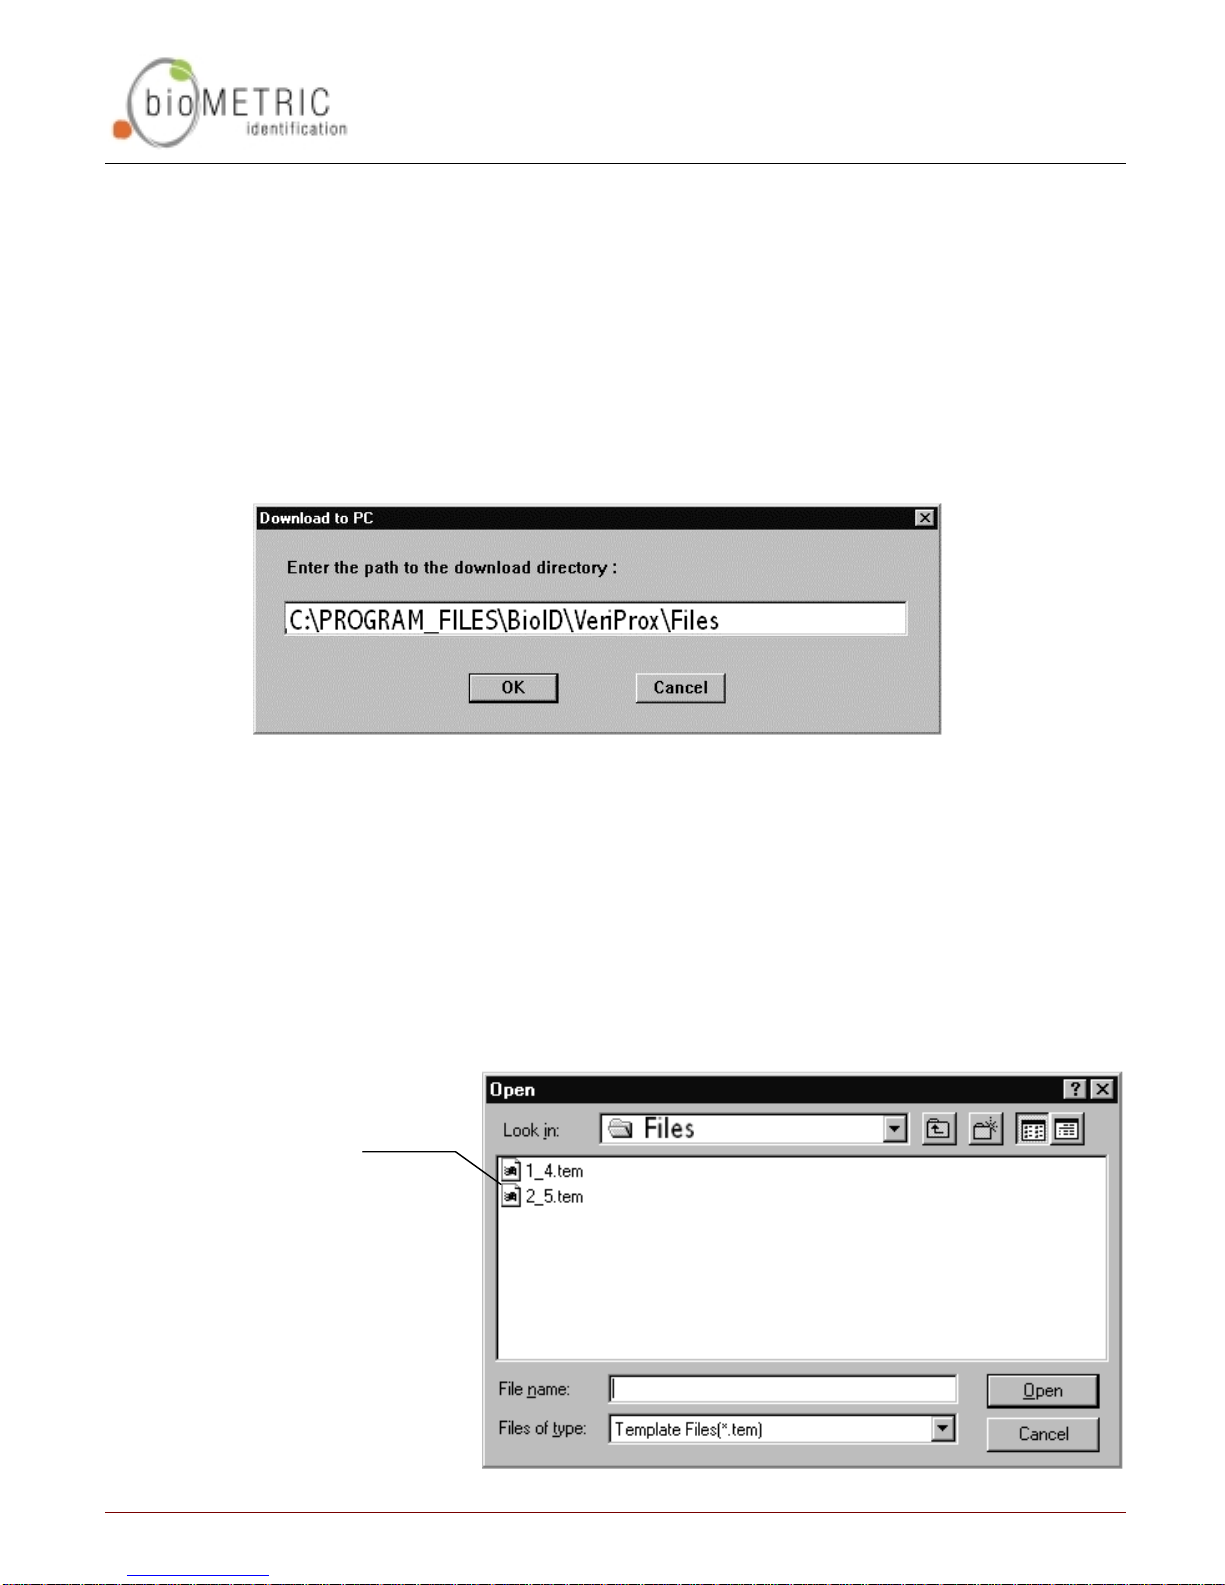
3 When the screen in Figure 15 appears, confirm the download path and
directory; make any applicable changes.
4 Click the OK button.
When completed the files will be loaded in the designated directory on your PC.
File names are derived
from the Template ID # and
the Template Index #:
e.g., this is Template 2 5
Figure 15: Download Template(s ) to PC
Page 32 © 1999 Biometric Identification, Inc.
Page 34

T EMPLATE M ANAGER
Note: if you are in a networked environment, you only need to download from
one unit since the template will be the same on all units.
Page 33 © 1999 Biometric Identification, Inc.
Page 35
T EMPLATE M ANAGER
Upload from PC
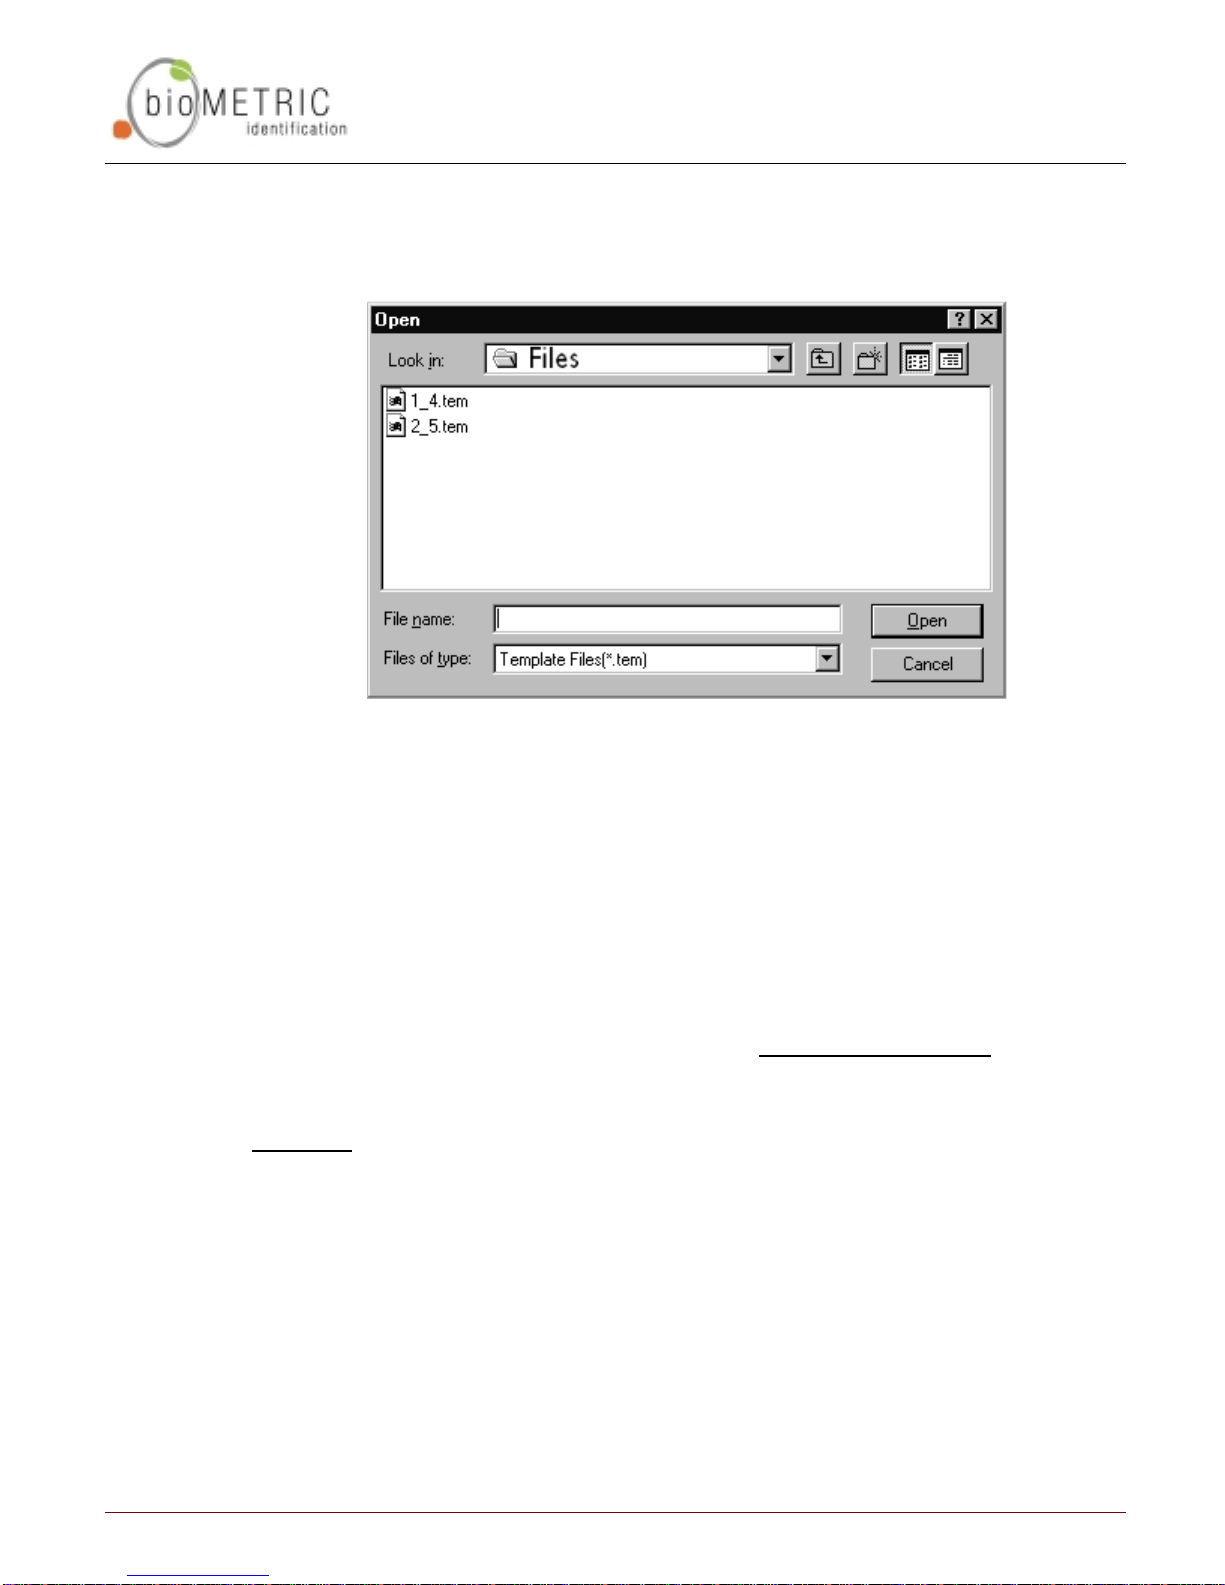
You can transfer templates from your PC to any Veriprox unit. When you click the
Upload from PC button, a window like the one below will open:
Figure 16: Transfer between PC and Veriprox
1 Click the Upload from PC button.
2 Use the window to browse for the correct directory.
3 Select the appropriate template(s).
4 Click the Open button.
Please note that when the template is uploaded, the Template ID Number and
Index Number is taken from data within the file, not from the file name. Therefore,
even if you change the name of the file on your PC, the Template number will
remain the same.
Networks: if you have more than one Veriprox unit networked together, use the
above to load the template(s) on one unit, then follow the steps in the next section
(Transfer from Unit to Unit) to upload to the other units on the network.
Page 34 © 1999 Biometric Identification, Inc.
Page 36
Transfer from Unit to Unit
Use this option when you are in a networked environment.
T EMPLATE M ANAGER
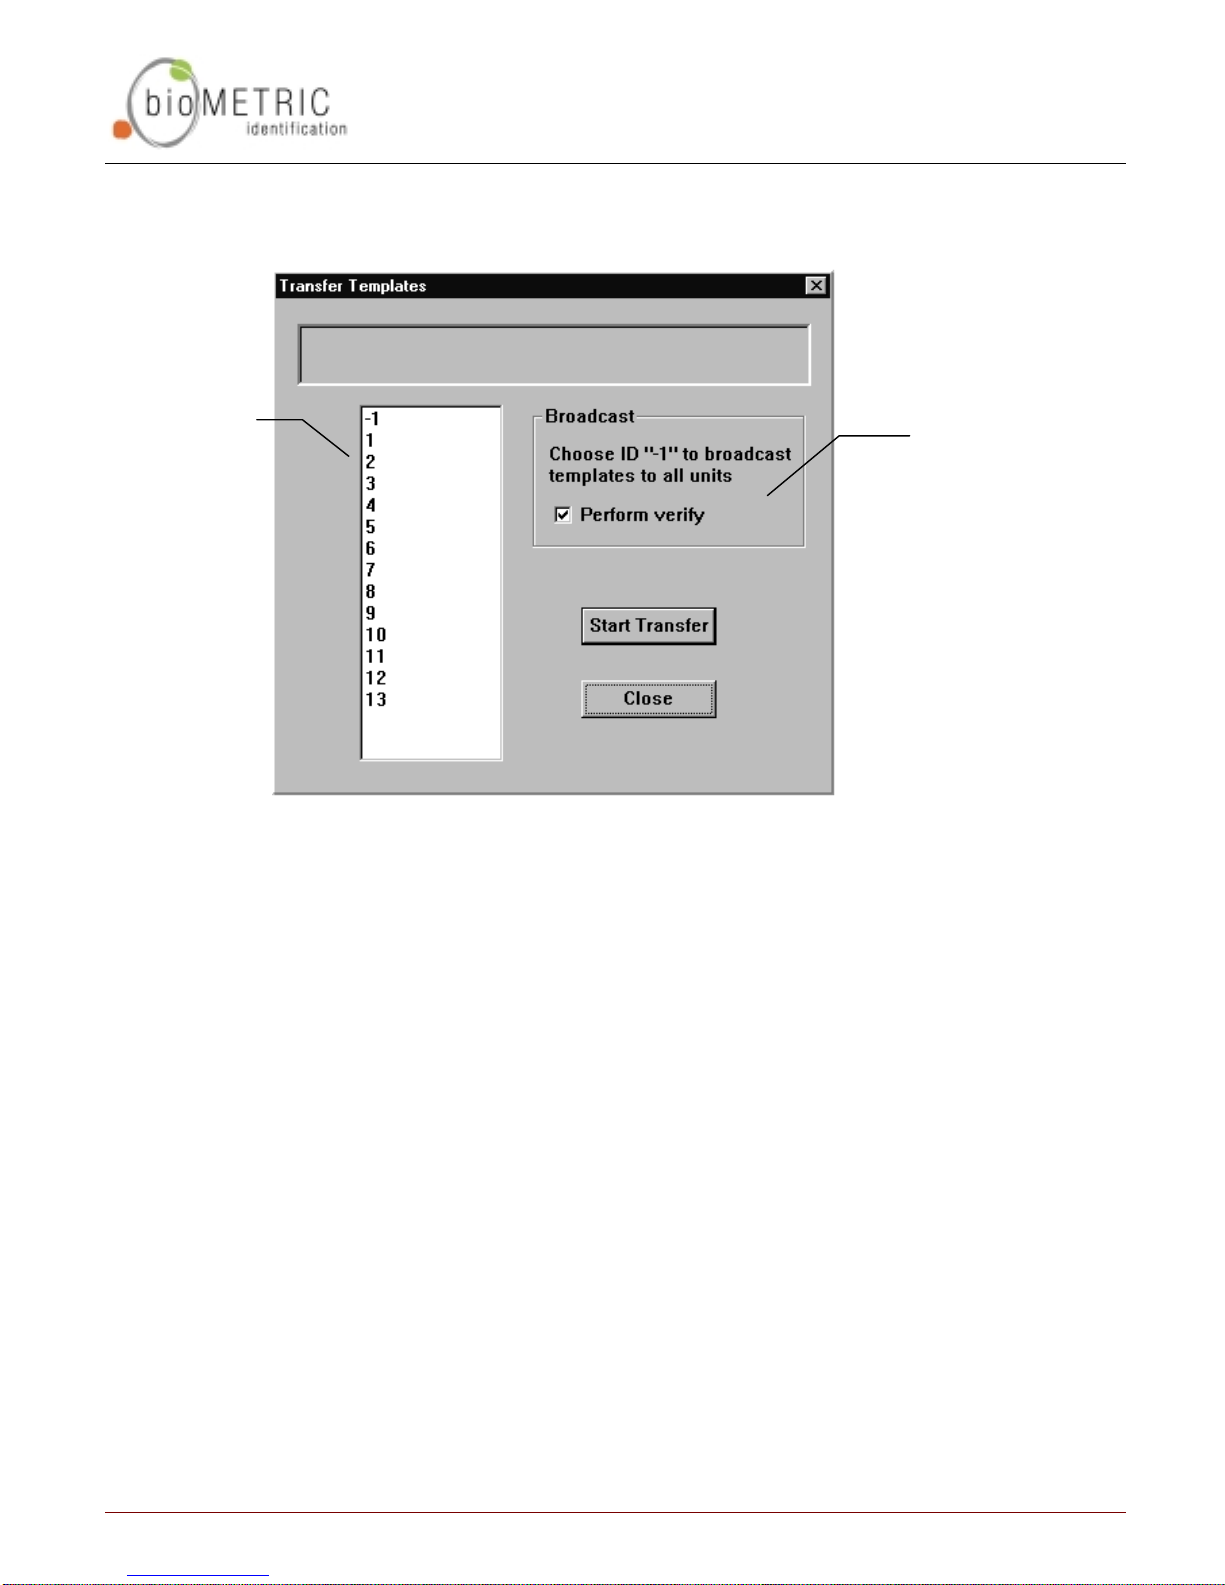
These are the
Network IDs for
the units.
1 In the Template Manager window, select the template(s) you wish to transfer.
2 Click the Unit to Unit button.
3 When the screen in Figure 1 7 appears, high light the ID of the Veriprox to
The software will
verify the
transfers when
you broadcast to
all the readers
when this box is
checked
Figure 17: Transfer Templates for Unit to Unit
To transfer templates between units,
which you wish to transfer the templates. Select –1 if you wish to broadcast
the templates to all units on the network.
If you broadcast to all units (i.e., select –1), you can have the software verify
that the individual steps are complete before moving on, however, this may
increase the amount of time needed to complete the transfers. It is
recommended that the Verify box remain selected. If some one is accessing
one of the readers with a proximity card, that action takes priority over
template transfers. The verify option will ensure the template is resent if the
reader was busy on the first attempt.
Page 35 © 1999 Biometric Identification, Inc.
Page 37
Command Cards
Command Cards allow administrators to add and remove user IDs directly from
the Veriprox unit without having to access the software. These can be useful for
creating and removing temporary visitor’s badges or administering the system
when your PC is down or unavailable.
Administering Command Cards
Creating Command Cards
To create command cards, use the Template Manager (see Enroll Templates on
page 29).
Reviewing Command Cards
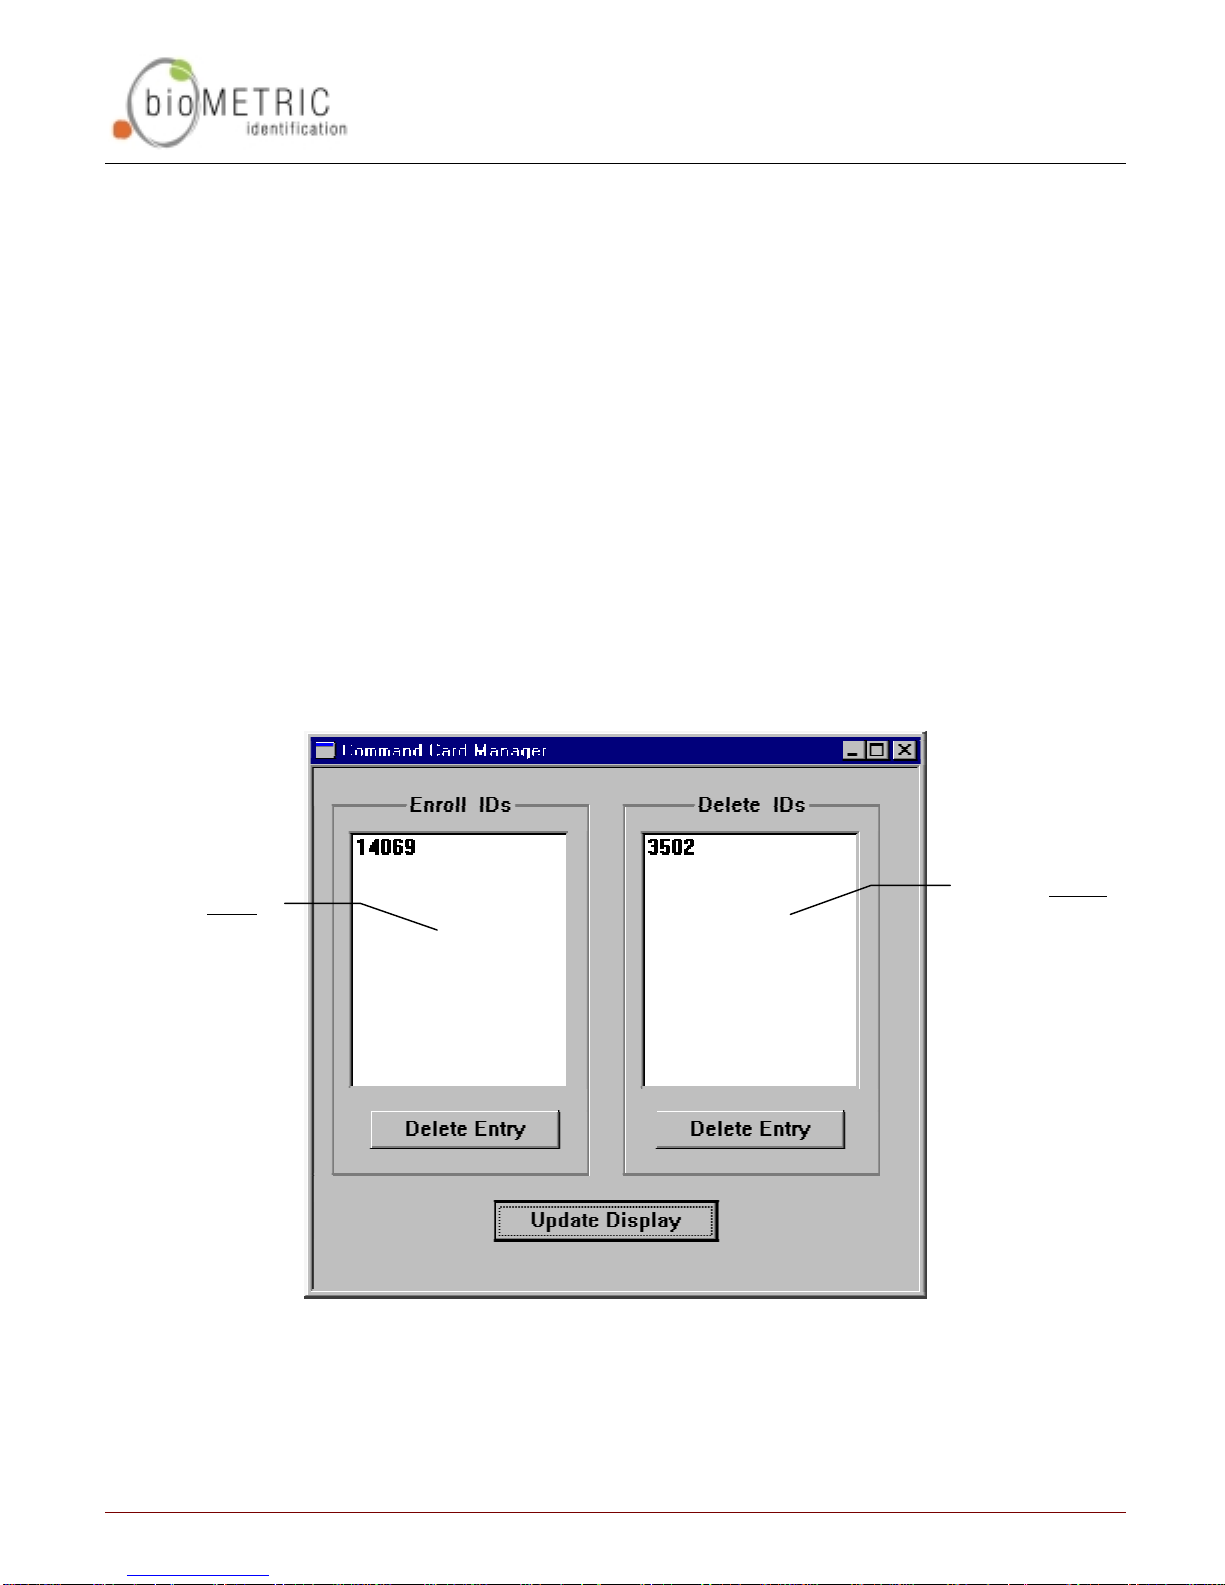
By clicking the Command Card icon on the toolbar or selecting the option from the
menu, the window below will appear. You will notice that the cards are listed by
their Template ID numbers; all indices for each te mpl a te ar e impl i ed.
C OMMAND C ARDS
Lists all Enroll
Command
Cards
Lists all Delete
Command
Cards
Figure 18: Command Card Manager
Page 36 © 1999 Biometric Identification, Inc.
Page 38

Removing Command Cards
To remove a command card, highlight the ID number in either the Enroll IDs or
the Delete IDs window and click the Delete Entry button directly beneath the
window. This will delete the template for all associa t ed indices.
Note: You will not receive a warning when you click the button, therefore, make
sure that you have selected the correct ID.
Using Command Cards
Once you have created Enroll and Delete Command Cards, they can be used as
follows:
Enroll Command Card
To enroll a user:
1 Wave the Enroll Command Card near the front of the Veriprox unit.
The light will glow amber directing the Administrator to place h is/her
finger on the unit.
2 If the Administrator is authorized to use the Command Card, the light
will glow green and the unit will beep. Continue with the next step.
If not, the light will glow red. Return to Step 1 or stop.
3 The light will flash yellow, indicating the system is ready to enroll the
new card. Wave the user card to be enrolled. The light will stop
flashing.
The light will glow amber directing the User to place his/her fin ge r on
the unit.
4 If the print is accepted, the light will glow green and the unit will beep
indicating that the card has been enrolled.
Page 37 © 1999 Biometric Identification, Inc.
Page 39

Delete Command Card
To delete a user:
1 Wave the Delete Command Card near the front of the Veriprox unit.
The light will glow amber directing the Administrator to place h is/her
finger on the unit.
2 If the Administrator is authorized to use the Command Card, the light
will glow green and the unit will beep. Continue with the next step.
If not, the light will glow red. Return to Step 1 or stop.
3 The light will flash red, indicating the system is ready to delete the card.
Wave the user card to be deleted.
4 The light will glow green and the unit will beep indicating that the card
has been deleted.
Page 38 © 1999 Biometric Identification, Inc.
Page 40
C OMMUNICATION S ETTINGS
Communication Settings
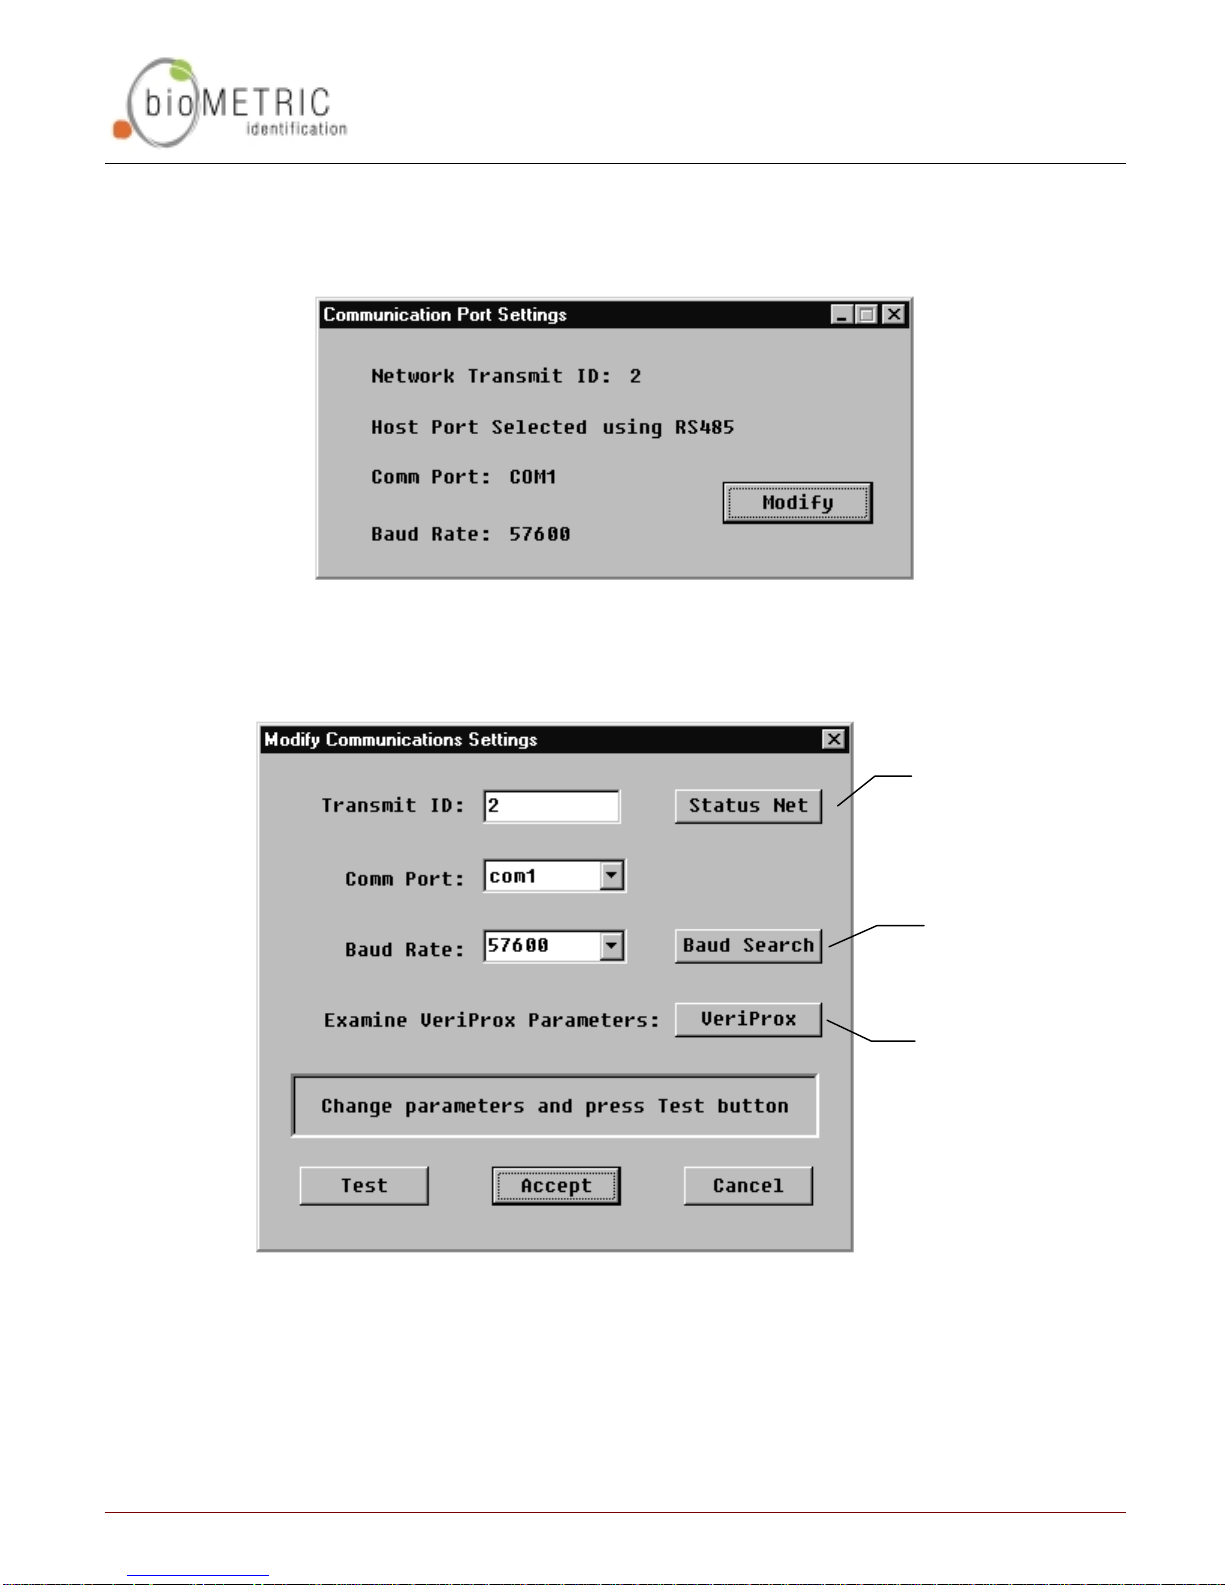
From the Communication Settings dialog, you can modify the Transmit ID, the PC Comm Port,
and the Communication Baud rate.
Figure 19: Communication Port Settings
Click the Modify button to change the displayed settings.
Figure 20: Modify Communications Settings
Same as the Net
Status button on
the Toolbar
Click if you’re
uncertain of
the baud rate
Same as the
Veriprox
Parameters button
on the Toolbar
Note: Change only one setting at a time and be sure to test the change
before clicking the Accept button.
Page 39 © 1999 Biometric Identification, Inc.
Page 41
V ERIPROX P ARAMETERS
Veriprox Parameters
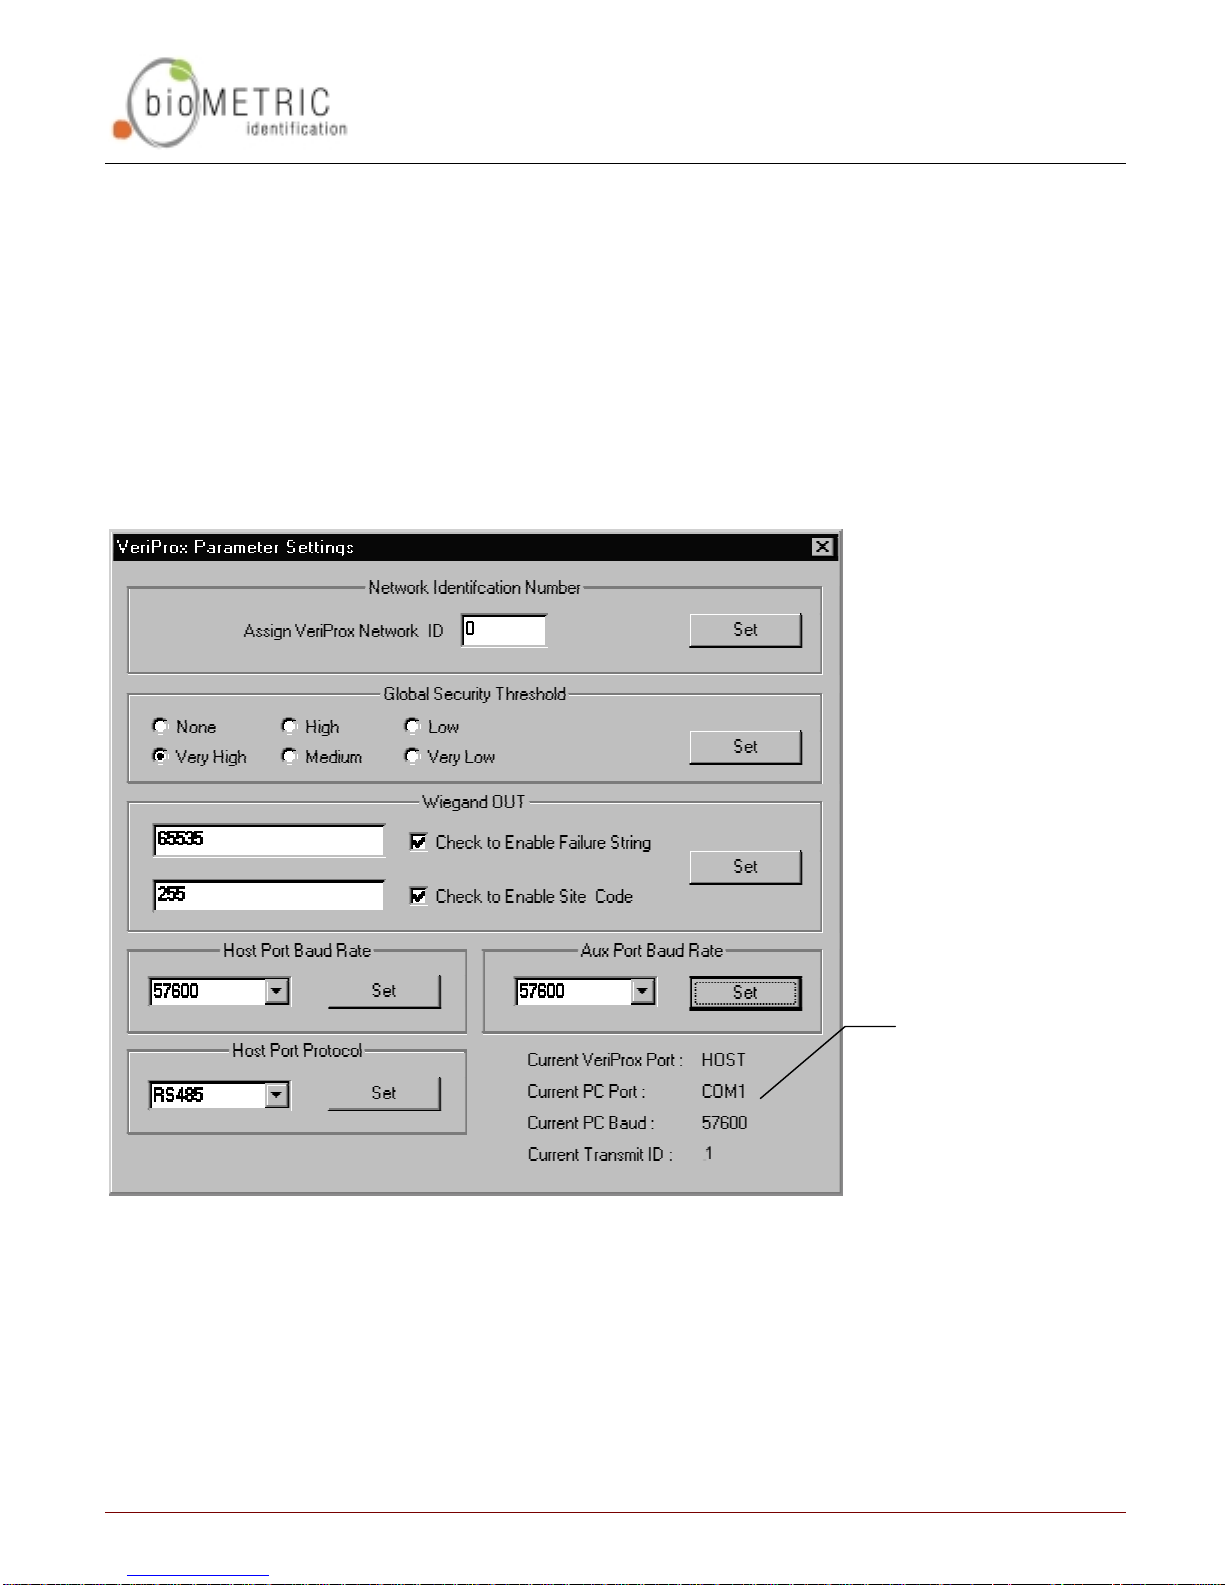
The Veriprox Parameter Settings window aids the Administrator in the following:
• Assigning a Network Identification Number to a Veriprox unit
• Setting a Global Security Threshold for a Veriprox unit
• Enabling/Disabling Wiegand Out Failure and Site codes
• Modify the Host and Aux Port baud rates
• Change the Host Protocol
• View the current statuses and settings of the various ports
Note: Use caution when changing settings to ensure that you don’t lose
communication with the unit(s).
Current statuses
and settings
Figure 21: Veriprox Parameter Settings
Page 40 © 1999 Biometric Identification, Inc.
Page 42

Network Identification Number
In a networked environment, this allows you to assign a unique number to each
Veriprox unit on the network (the default setting from the factory is “0”).
Setting the Number
1
2 Click the Set button.
If the transmit ID being used by the PC is set to a different ID, you will lose
communication with the unit. To re-establish, contact:
1 Close the Veriprox Parameter Settings window.
In the Assign Veriprox Network ID field, type the new Network ID
number.
V ERIPROX P ARAMETERS
2
Select the new ID number in the Transmit ID drop down list on the
toolbar.
3 Reopen the Veriprox Parameter Settings window.
The information in the lower right corner will reflect the new ID
number.
You will not loose communications when modifying the network ID parameter on
the Veriprox if you use the broadcast transmit ID ,-1 when you are communicating
over the auxiliary port. (You would not want to attempt to assign a new net work
ID by broadcasting this command over a 485 network, as this would program all
the readers on the network to the same ID.)
Page 41 © 1999 Biometric Identification, Inc.
Page 43

Global Security Threshold
There are two types of security settings: the local security level associated with
the individual template; and, the global security level associated with the
individual Veriprox unit. You may recall that the system will authorize using the
lower of the two. See the appendix for a discussion of security settings and
algorithm performance.
Example: If the template is set for Very High, and the unit is set
for Medium, the authorization will be performed at the
Medium setting.
Because of Veriprox’s high accuracy rate which practically negat es the possibility
of a false read, the above affords the unit a high rate of true authorization.
Setting the Security Threshold
Select the threshold level:
• None
• Very High
V ERIPROX P ARAMETERS
• High
• Medium
• Low
• Very Low
Click the Set button.
Page 42 © 1999 Biometric Identification, Inc.
Page 44

Wiegand OUT
This section allows you to send coded messages to your Wiegand device (where
applicable).
Failure Code
When you check the Check to Enable Failure String box, whatever code you type
into the Failure Code field will be sent to the Wiegand device when a failed
authorization occurs.
The string is numeric and ranges from 0 to 65535.
If the box is unchecked then, no string will be sent when a verification fails.
Site Code
When you check the Check to Enable Site Code box, whatever code you type in
the Site Code field will override the site code on all cards used on the unit.
The string is numeric and ranges from 0 to 255.
V ERIPROX P ARAMETERS
If the box is unchecked the site code read from the proximity card will be passed
through in the Wiegand out string.
Page 43 © 1999 Biometric Identification, Inc.
Page 45

V ERIPROX P ARAMETERS
Host Port and Aux Port Baud Rates
You can change the baud rates of both the Host and Aux ports to match your PC
and/or other networked devices.
In order to maintain communication, if you change the baud rate on the port you
are using, the PC’s baud rate automatically will update.
1 In the appropriate section (Host Port or Aux Port), select the appropriate
baud rate from the drop down list.
2 Click the Set button.
If the display in the lower right corner does not update, close and re-open the
window.
Host Port Protocol
The usual protocol settings are as follows:
RS-232 stand alone devices
RS-485 networked devices
1 In the Host Port Protocol section, select the appropriate protocol from the
drop down list.
2 Click the Set button.
If the display in the lower right corner does not update, close and re-open the
window.
Note: If you change this while talking over the Host Port, you will lose
communication with the unit(s).
Page 44 © 1999 Biometric Identification, Inc.
Page 46
Broadcast
The PC baud rate
will update
automatically.
B ROADCAST
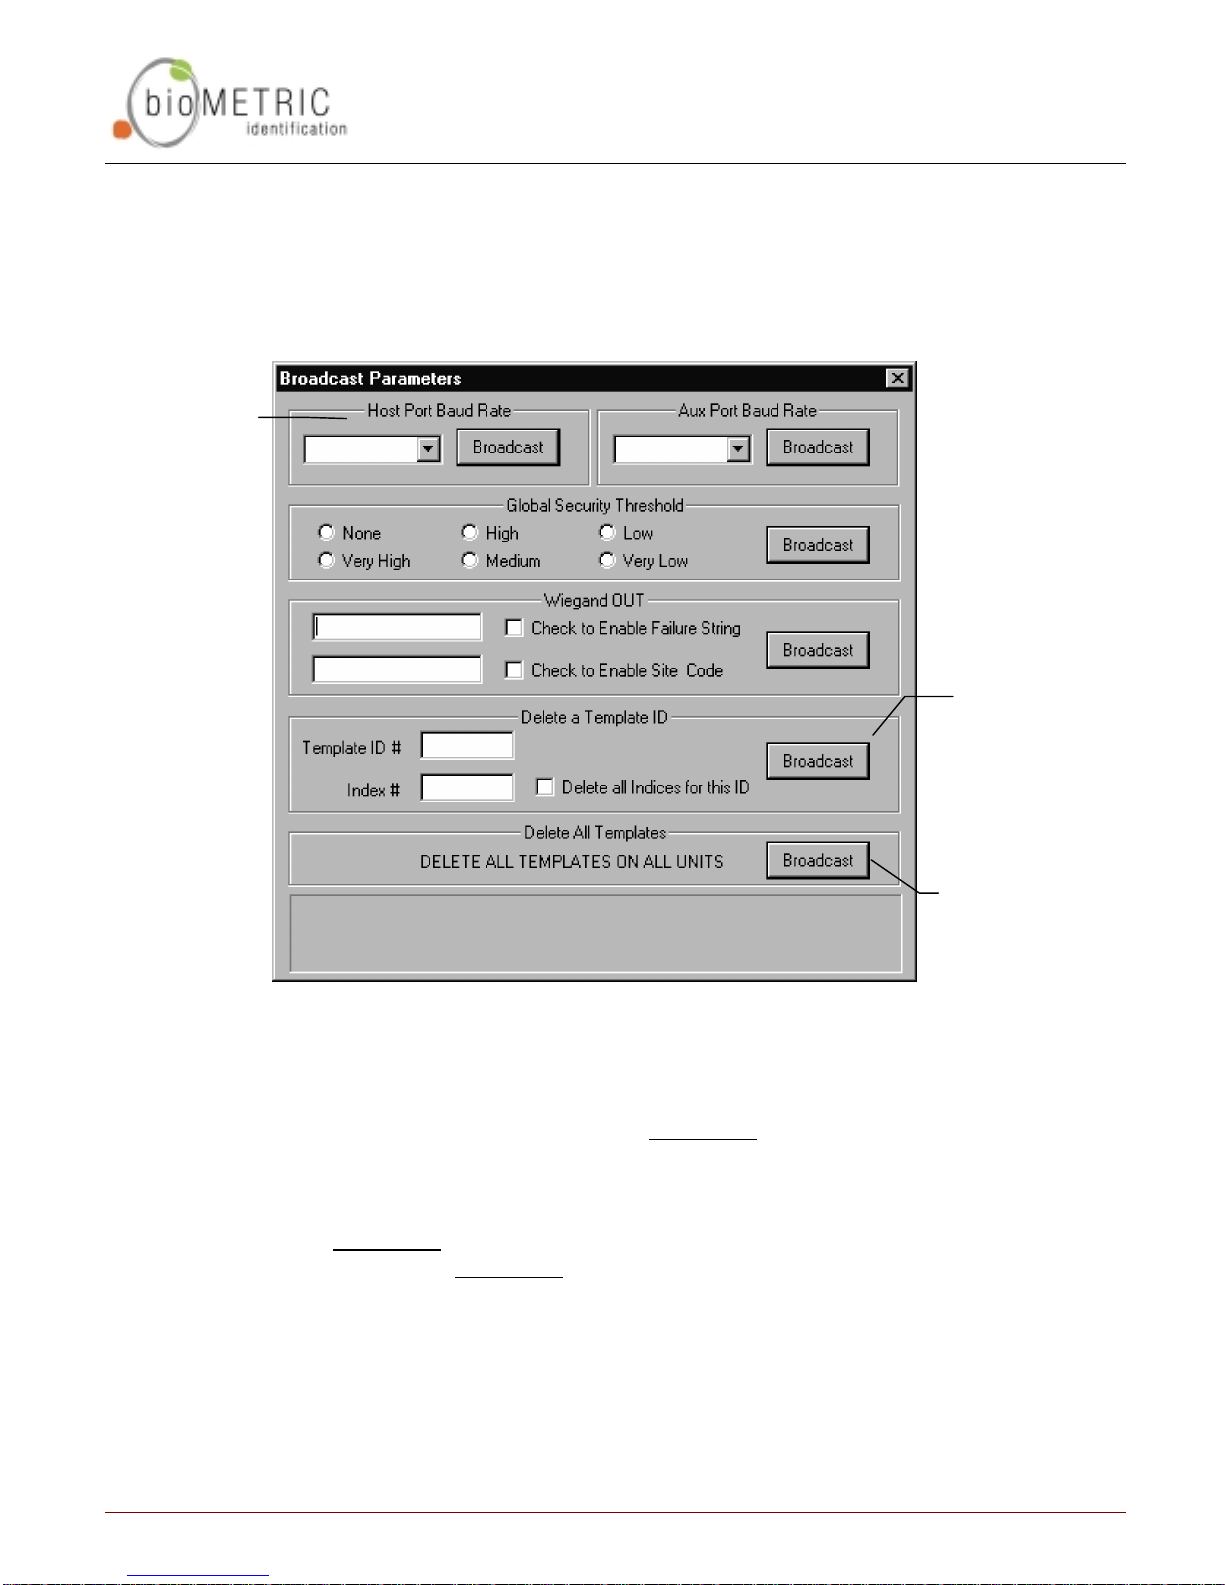
The Broadcast window allows you to modify settings on all units in a networked
environment at the same time. Under most circumstances, you will use this
window when communicating over the Host Port (recall that the Aux Port primarily
is for communicating with a single unit). You will note that the window is similar to
the Veriprox Parameters window.
Enter the ID#,
then either:
1 enter the
Index#, or
2 check the Delete
all… box
Warning:
This will delete
ALL templates!
Figure 22: Broadcast Parameters Window
Note: As with the Veriprox Parameter Settings window, change one
setting at a time and click the Broadcast button after each change.
For example: if you wish to change the Security Threshold and the
Wiegand Out string: 1) change the threshold; 2) click the
Broadcast button in the security section; 3) change the string; and,
4) click the Broadcast button in that section.
Page 45 © 1999 Biometric Identification, Inc.
Page 47
Net Status
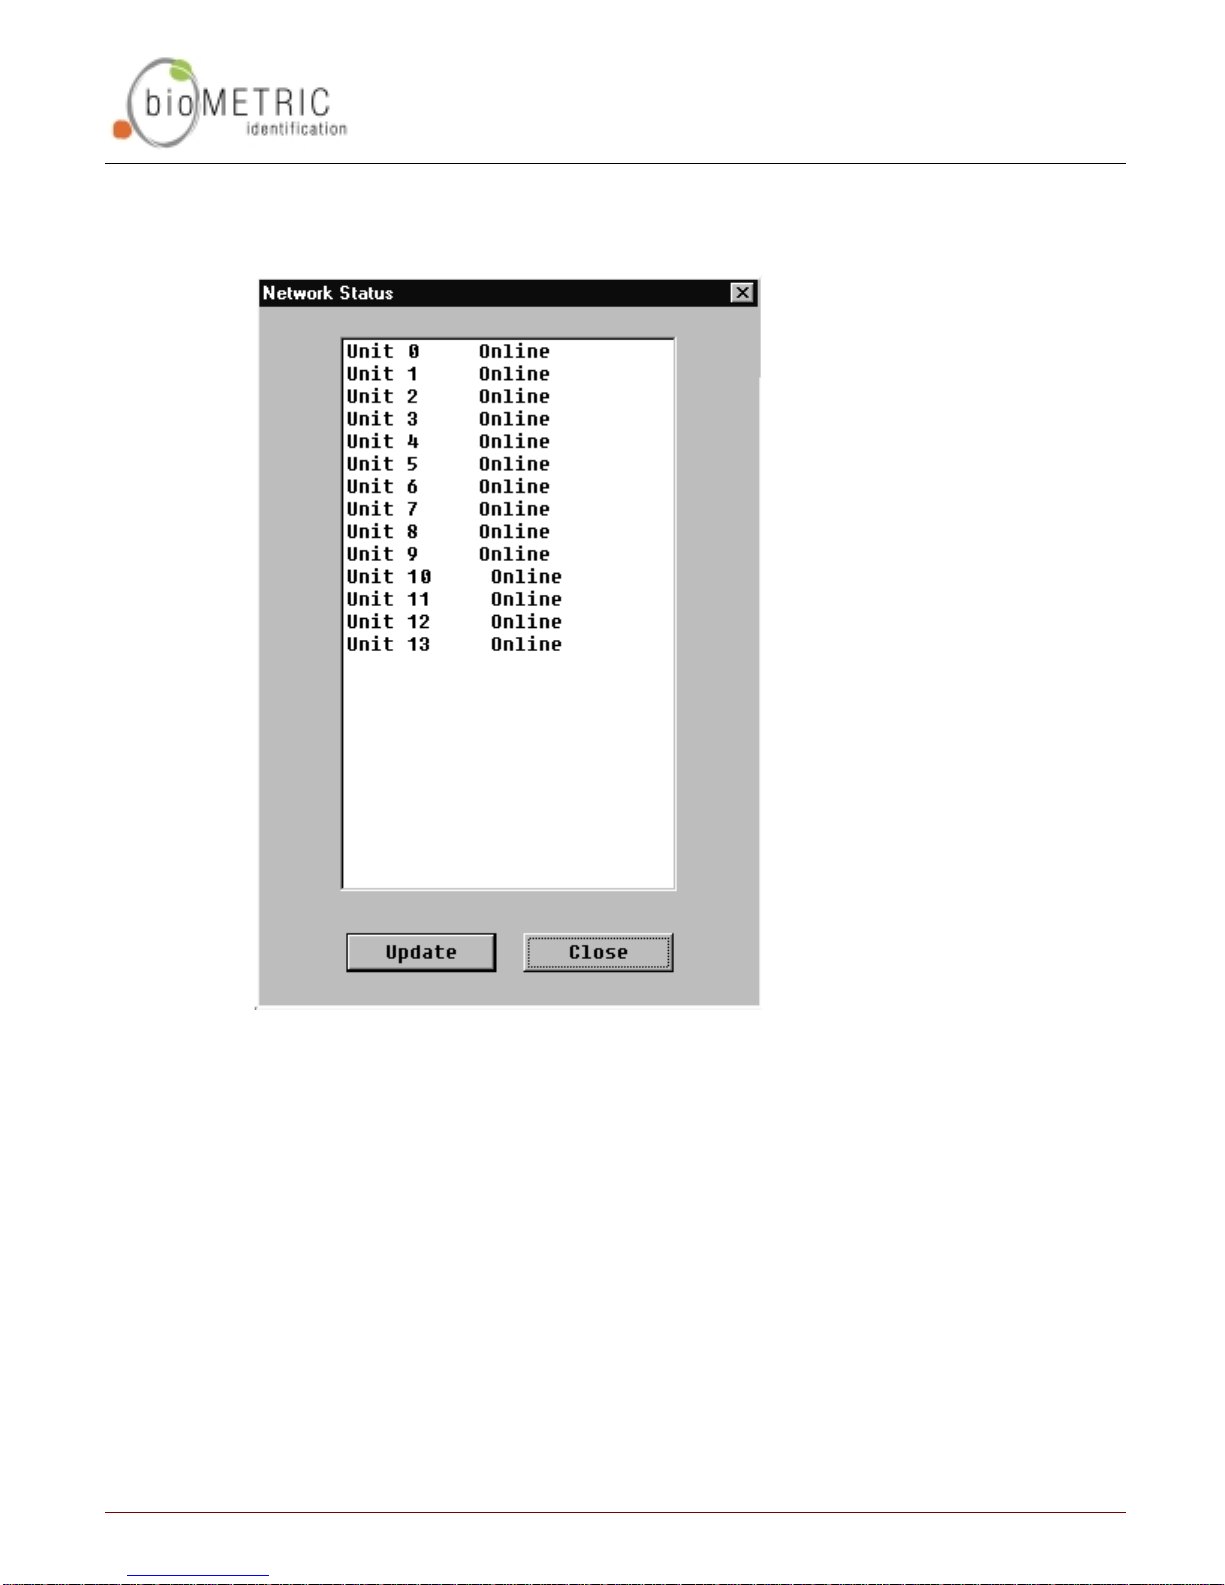
The Net Status window displays the condition of all units networked.
N ET S TATUS
Figure 23: Net Status Window
There are three possible conditions:
1. Online
2. No Response
3. Busy
Page 46 © 1999 Biometric Identification, Inc.
Page 48

Getting Service and Support
BiometricID, Inc. is available to provide information and assistance. Contact
BiometricID using methods discussed below.
Before calling, copy down the following version information about your unit:
• Software
• DLL
• Algorithm
• Kernel
• PIC
This can be found in the Help menu under About Veriprox.
Technical Support
For assistance with technical matters, contact the Technical Support
Department by sending e-mail to [email protected]. To speak
directly with a technician, call (818) 501-3908.
G ETTING S ERVICE AND S UPPORT
Customer Service and Sales Support
BiometricID is here to assist you with your questions. Contact our
Customer Service and Sales support departments by calling (818) 501-
3908.
World Wide Web Site
See our World Wide Web site for breaking information, and other services. The
address is www.biometricid.com.
Page 47 © 1999 Biometric Identification, Inc.
Page 49

A PPENDIX A – Q UALITY AND C ONTENT
Appendix A – Quality and Content
Section A.1 - Basic Biometric Concepts
Biometric Definitions
Enrollment is the operation of scanning a fingerprint, determining the
quality of the fingerprint scan, and storing a good template with associated
data within the memory of the Veriprox.
Verification is the operation of presenting the user ID, either by waving a
proximity card or typing the ID into the Verify dialog box, requesting the
user to place their finger on the Veriprox, scanning the finger, comparing
the current scan against stored fingerprint templates for that user, and
then notification of a successful validation or a failure.
Fingerprint Template is the term used to describe the data stored on the
Veriprox that mathematically represents the ridge pattern of an enrolled
fingerprint. This data is not the raw image of the fingerprint, but the result
of processing a raw image through our unique algorithmic process,
preparing the data for later comparisons, and compressing the data for
maximum storage. An image of the uncompressed template data does
resemble the raw image, but whereas a raw image is 90K bytes, the
compressed template is only 348 bytes.
Fingerprint Core is the term used to describe distinguishing print
characteristics usually found in the area of the print where the topography
shows the tightest curvature. Although the entire fingerprint has significant
data, the “core” is the most data-intensive area and therefore very
important.
Scanning an Image
When the Veriprox properly reads a fingerprint, it looks for image quality and
fingerprint content. When a raw image is collected from the sensor, the Veriprox
searches for the fingerprint core.
Page 48 © 1999 Biometric Identification, Inc.
Page 50

A PPENDIX A – Q UALITY AND C ONTENT
Content scores are based upon the amount of non-ambiguous data in the region
of the core. The higher the content, the greater the degree of useful information.
See Section B.3 for a thorough discussion of content
Quality scores are based on how well the ridge pattern is defined within the
image. For best image quality, be sure that the sensor window is clear of dirt,
residue, or other material that can block the Veriprox’s view of the fingerprint.
See Section B.3 for a thorough discussion on quality.
Once the image is scanned, the Veriprox then creates and stores the resulting
fingerprint template.
Storing User Templates on the Veriprox
The Veriprox recognizes users by matching current images to stored templates of
previously enrolled fingerprints. Along with the fingerprint, the Veriprox requires a
proximity card with a unique user ID number.
The Veriprox allows associating multiple fingerprints with a single proximity
card. Each instance of a template with a specific Id has a unique index (up to 256
indices possible (0-255)). This allows a user to have a single proximity card, but
be able to enroll multiple fingers. During VERIFICATION, a user waves their card
at the Veriprox reader and places their finger on the sensor. The Veriprox then will
scan the current fingerprint and compare it against all enrolled templates for that
specific card. If there are multiple templates enrolled under one card, then the
Veriprox will check templates in the numerical order based on their index.
Example: On Card # 123, a person ENROLLs both their left and right index
fingers. The next time that user goes to verify, they wave Card #
123 and place a finger on the sensor. The Veriprox scans the
current finger and compares it against the first template (the right
index finger, Template ID 123 0). If a match is found, the
VERIFICATION is PASSED and the operation ends. If a match is
not found, the Veriprox will check the second print (the left index
finger, Template ID 123 1). If a match is found, the
VERIFICATION is PASSED and the operation ends. If the match
is not found and since all templates have been compared, the
VERIFICATION is FAILED.
NOTE: The initial finger scan takes ~0.5 seconds and each comparison
takes ~0.5 seconds. So if the first template results in a successful
verification, the total time is ~1.0 seconds. Successful verification
on the second templates requires ~1.5 seconds, and so on.
Page 49 © 1999 Biometric Identification, Inc.
Page 51

A PPENDIX A – Q UALITY AND C ONTENT
Section A.2 - Proper Finger Placement
The basics for successful operation of the Veriprox are simple but important. System
performance improves dramatically with consistent finger placement. It is important to
make sure that the position of the finger allows the Veriprox to record the unique features
of the print. Here are the steps to follow for trouble-free fingerprint recognition.
• BII has designed the Ridge-Lock to create “simple user instruction” and
“consistent” finger position. With the fingertip raised, position the finger so that
the Ridge-Lock rests comfortably within the first indentation of the finger. Next,
lower the finger onto the sensor and apply moderate pressure.
Common mistakes
Correct finger placement is a significant component for reliable fingerprint imaging.
The following list some common mistakes to avoid.
• Sliding the fingertip into place instead of lowering it onto the sensor will cause
distortion of the fingerprint and will degrade image quality. Keep the fingertip
raised while locating the Ridge-Lock, then lower the fingertip.
• Rotating the finger into position also will cause distortion of the fingerprint,
subsequently making verification less reliable.
• Positioning the finger to one side and leaving a portion of the sensor exposed will
degrade image quality.
• Placing the finger at an angle to the finger guide is another common mistake.
Rotation of the fingertip will not provide a reliable image of the fingerprint.
Image quality
Dry skin is another factor that can contribute to an unreliable image of a fingerprint. A
normal amount of moisture on the skin makes the ridges and valleys of the fingerprint
stand out to the sensor. Too little moisture makes the image “noisy” and will “cause
Veriprox to reject the image during processing. Lightly moisturizing the finger will
enhance the contrast of the print and provide more reliable verification. The
increased sensitivity of the silicon sensor is dramatically reducing problems in this
area.
Page 50 © 1999 Biometric Identification, Inc.
Page 52

A PPENDIX A – Q UALITY AND C ONTENT
Image consistency
Once a user’s fingerprint template has been enrolled, the best performance in the
candidate matching process depends on consistency. Obviously, the user must use
the same finger for ID verification as was used to form the original template. It also is
important to position the finger correctly for each verification, as was done when the
template was enrolled, so the Veriprox “sees” approximately the same information
each time.
Page 51 © 1999 Biometric Identification, Inc.
Page 53

A PPENDIX A – Q UALITY AND C ONTENT
Section A.3 - Using Content and Quality during Enrollments
As described in section A.1, Quality and Content scores are returned in the enrollment
process. These scores give an indication of the performance of the template enrolled. To a
large degree, the verification algorithm compensates for deficiencies in image quality and
loss of information content. Nonetheless, knowledge of these parameters and what they
mean helps ensure optimal performance of the Veriprox.
False Acceptance and False Rejection
In order to understand the effects of poor image quality and poor information content
it is necessary to understand how to measure performance. Performance of the
Veriprox is presented in terms of False Rejection and False Acceptance.
False Rejection indicates that the Veriprox incorrectly rejected a fingerprint
that corresponds to the person’s template. False Rejections rarely occur
and primarily result from the inability to get a good image of the finger.
False Acceptance indicates that the Veriprox accepted a fingerprint that
does not correspond to the template it was compared against. False
Acceptances also are rare and primarily result when a fingerprint template
is characterized by low information in the enrolled print.
The algorithm on the Veriprox has been tuned so that the false acceptance and false
rejection rates are equal at the medium security level (level 3), delivering the industry
leading accuracy. This is known as the Equal Error Rate. Increasing the security
(e.g., changing the security level from 3 to 1) will decrease the chance for false
acceptance at the expense of increased false rejection. Reducing the security (e.g.,
changing the security level from 3 to 5) will decrease the chance of a false rejection
at the expense of false acceptance. The table below indicates the expected error
rates at the different security levels.
Security Level False Rejection Rate False Acceptance Rate
Very Low (5) 1 / 10,000 1 / 100
Low (4) 1 / 5000 1 / 200
Medium (3) 1 / 1000 1 / 1000
High (2) 1 / 200 1 / 5000
Very High (1) 1 / 100 1 / 20,000
Page 52 © 1999 Biometric Identification, Inc.
Page 54

A PPENDIX A – Q UALITY AND C ONTENT
Quality
The quality score is based on how well the ridge pattern is defined within the
fingerprint image that was enrolled. In other words, quality measures how clearly
the Veriprox imaged the fingerprint. Poor quality enrollments can result in an
elevated rate of false rejection making it difficult for the user to verify reliably.
The score is given in stars () and ranges from zero to five stars, with five being
the best quality (rarely obtained) and zero being the worst. Quality scores of three
stars and higher perform well with the BII verification algorithm. In this range, the
algorithm readily compensates for differences in fingerprint quality. It statistically
is still true that the larger the quality score the better the performance of an
enrollment.
As a general rule of thumb, quality scores less than three stars require
intervention on the part of the enroller or ad mini str ative software. Sources of low
scores include dry fingers and dirty sensors.
Very Low Very High
If the quality score falls below three stars, BII recommends the following options:
• Ensure that the sensor and finger are clean.
• If the finger and sensor are clean and a dry finger is suspected, try re-enrolling
one more time, leaving the finger on the sensor for several seconds prior to
enrollment. Frequently finger moisture accumulates over time to provide a
good image.
• Fingerprint quality can vary among individual fingers for the same person. Try
enrolling an alternate finger to see if the score improves.
• Alter the security level for that particular template by decreasing the threshold
a minimum of 1 level (e.g., change the value from medium [3] to low [4]). This
will offset the false rejection for that template by making it easier to match. If
use of that template indicates that raising the threshold one level still produces
false rejections, try setting the value to its lowest security (level 5).
Warning: Decreasing a template’s security may increase the risk of a
false acceptance for that template.
A thorough enrollment procedure will ensure streamlined and reliable verification
for users. It is recommended that all four options be performed in the order listed
above to maximize the performance of the device.
Page 53 © 1999 Biometric Identification, Inc.
Page 55

A PPENDIX A – Q UALITY AND C ONTENT
Content
The Content score is based upon the amount of usable information the Veriprox
sees in the fingerprint. Templates that are characterized by low content scores
may result in elevated rates of false acceptance.
Again, the score is given in stars () and ranges from zero to five stars, with five
being the most content and zero being the least. Content scores of three stars
and higher perform well with the BII Algorithm. In this range the algorithm has
enough information to distinguish between different fingerprints with a high level
of accuracy. Templates with content scores above two stars do not vary in terms
of the error rate s.
Content scores less than three stars require intervention on the part of the enroller
or administrative software. Sources of poor content include improper finger
positioning and extremely bland fingerprints.
Very High Low Content
If the content score falls below three stars, BII recommends the following options:
• Try re-enrolling the same finger if finge r po sitioning seems to be the issue
(see section A.2). Ensure that the user can comfortably place the finger on
the sensor while maintaining the core region in the image.
• Fingerprint content can vary among individual fingers for the same person.
Try enrolling an alternate finger to see if the score improves.
• Alter the security level for that particular template by increasing the
threshold a minimum of 1 level (e.g ., change the v alue fro m medium [3] to
high [2]). This will offset the false acceptance for that template by making it
more difficult to match. If use of that template indicates that raising the
threshold one level still produces false rejections, try setting the value to its
highest security (level 1).
Warning: Increasing a template’s security may increase the risk of a false
rejection for that template.
Page 54 © 1999 Biometric Identification, Inc.
Page 56

A PPENDIX A – Q UALITY AND C ONTENT
A thorough enrollment procedure will ensure streamlined and reliable verification
for users. It is recommended that all three options be performed in the order listed
above to maximize the performance of the device.
Content and Quality Summary
Table 1: Quality and Content Minimum Thresholds
Score Poor Range Normal Range
Quality Less than three stars Three or more stars
Content Less than three stars Three or more stars
Table 2: Veriprox Administrative application map of score versus category
Score Quality/Content
Category
Very poor
Poor
Fair
High
Very high
Recommended Enrollment Process
• Have the user pick one of the following fingers for enrollment: Left Index,
Left Middle, Right Index, or Right Middle.
• Enroll the chosen finger and note the quality and content results.
• If either is below the minimum threshold, follow the directions outlined in the
previous section.
• If both are above their minimum thresholds, either accept the created
template, or attempt another finger trying to achieve the best quality
possible.
• If multiple fingers are attempted and only one finger is required, choose the
template where both quality and content are above the threshold, and which
the quality is m aximized.
Page 55 © 1999 Biometric Identification, Inc.
Page 57

A PPENDIX A – Q UALITY AND C ONTENT
Biometric Identification Inc.
5000 Van Nuys Blvd., Suite 300
Sherman Oaks, CA 91403
Phone 818.501.3908
Fax 818.461.0843
World Wide Web Site: www.BiometricID.com
Page 56 © 1999 Biometric Identification, Inc.
 Loading...