

Page 1

1 | P a g e
601 HANDHELD READER
USER MANUAL
Page 2

2 | P a g e
Page 3

3 | P a g e
Thank you for purchasing the Biomark 601 Handheld
Reader. This is a functional, durable and water resistant
reader. It has many options for configurations making it
very versatile.
The reader provides outstanding performance when
coupled with Biomark PIT tags that make it ideal for most
mark-recapture applications.
For technical support please call us:
+1 2082750011
Or email:
www.biomark.com
Page 4

4 | P a g e
601 HANDHELD READER
USER MANUAL
Contents:
Product description & reader features 5-6
List of supplied equipment 7
Care & maintenance 7
Battery installation 8
Battery Charging 9
Getting started and reading tags 10-11
Powering the reader off 20
Configuring the reader: 12
Display set-up 13
Reader settings 14
Time & date 16
Stored ID codes 17
RS232 settings 18
ID code format 18
Reader info 20
Downloading stored tag memory 21
Connecting to BioTerm software 22
Reader technical specification 23
Warranty information 25
Regulatory notices 26
Page 5
5 | P a g e
1. Product Description
The Biomark 601 Handheld reader (Reader) is a dual frequency,
134.2 kHz and 125 kHz radio frequency identification (RFID) tag
reader intended for use with animal tags. The Reader has been
designed specifically for use in fish and wildlife research
applications. The 601 is well suited to handheld field use.
1.2 The Reader features:
Water resistant housing
Shockproof per IEC 68-2-27
Memory for storage of 1,600 tag codes
High-performance ISO 11784/11785 HDX/FDX-B 134.2 kHz
and 125 kHz detecting antenna
Time/Date stamp on each read
Hand strap
Rechargeable NiMH (4) AA battery capable, or (4) AA, or
AC power capable
RS232 communication cable
Page 6

6 | P a g e
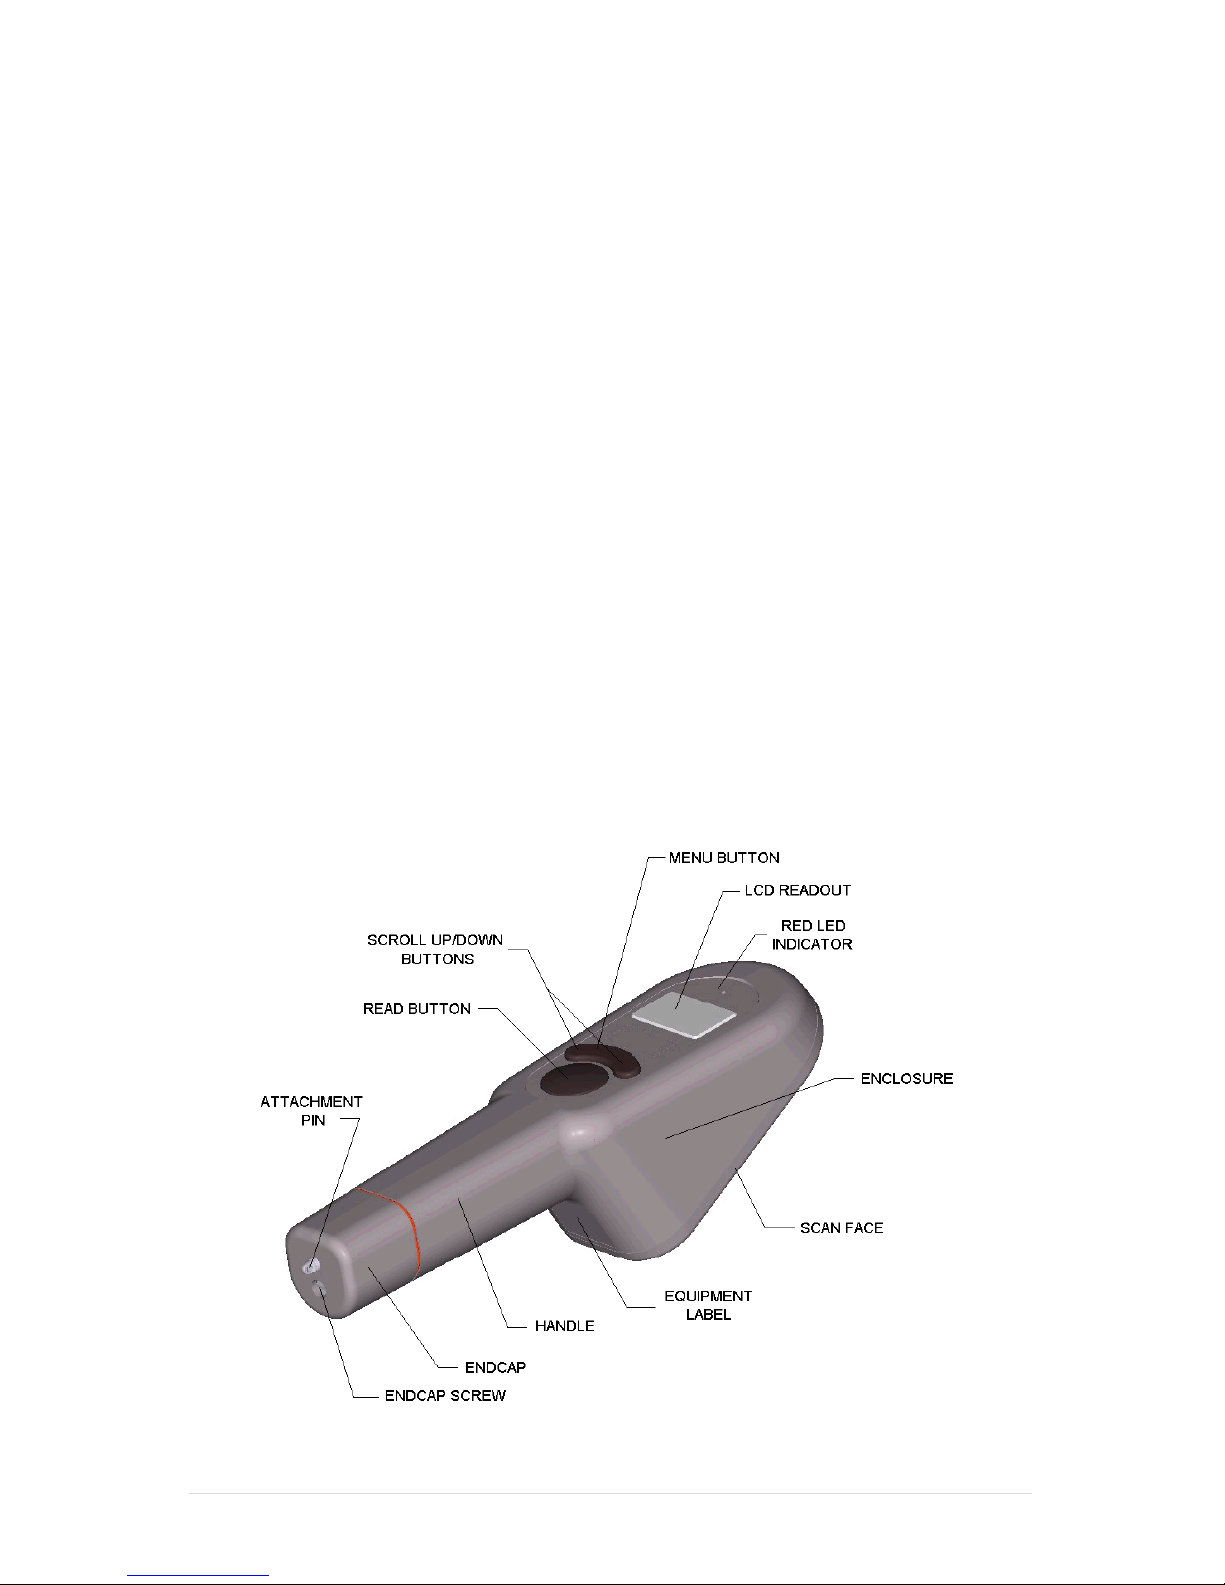
Feature/Item
Description of Use
READ Button
Turns Reader ON from OFF state
Activates transponder reading from ON state
Selects certain option alternatives in Options Menu
MENU Button
Activates Options Menu / Selects Options Menu
Category
SCROLL UP/DOWN
Buttons
Navigates Options Menu
(Press both buttons simultaneously to turn off unit)
2x8 Character LCD
Displays transponder ID Code information, Reader
status, and Options Menu selections
Red LED Indicator
Lights when valid transponder ID Codes are
detected (optionally lights with Options Menu
selections)
Scan Face
Reader surface planar with scanning coil.
Transponder coil axis should be perpendicular to
Reader scan face for maximum reading distance
Handle
Ambidextrous gripping surface
End Cap
User removable component for accessing battery
compartment
End Cap Screw
Retains End-cap in place
Attachment Pin
and Ring
Used to attach wrist strap, belt hook, etc.
Data/Power Cable
Connects Reader to PC and battery charger (not
shown)
Battery
Compartment
Accepts 4 AA alkaline or 4 AA rechargeable
batteries (not shown)
Data/Power
Connectors
Data/Power Cable End-cap connectors interface
(not shown)
Equipment Label
Provides model, serial number, and agency
certification notices
Page 7

7 | P a g e
1.3 Supplied Equipment:
Biomark 601 Handheld reader, (the Reader)
Power Charger
Fish-Shaped FDX-B RFID Key-chain Test Tag
(4) AA Alkaline batteries
(4) AA NiMH batteries
RS232 Cable for PC Connection
USB to RS232 adaptor
User Manual
Please ensure you have received all of the above equipment
upon receipt of your new Reader.
1.4 Care and Maintenance
While the Biomark 601 Handheld reader has been designed to be
as rugged and durable as possible, please observe the following
points to ensure your Reader provides many years of trouble free
service:
If using batteries, ensure that they are installed correctly.
The gasket around the endcap should be free of twists and
sit flush in groove to best protect against moisture and dust.
Always tighten the endcap screw until the endcap is snug
on the Reader. Do not over tighten as this can create
gaps in which moisture and dust can enter the Reader.
If the Reader has become wet, allow time for the exterior
to dry before removing the endcap or storing.
If the Reader is exposed to salt water, gently wipe the
Reader clean with a damp cloth and allow to dry before
storage.
NOTE: We recommend installing the new AA disposable batteries
or fully charging the included NiMH rechargeable batteries before
using your reader (see page 7).
Page 8
8 | P a g e
2. Reader Setup
The Biomark 601 Handheld reader is shipped with the wrist strap
and endcap installed. In order to prepare the Reader for use, (4)
AA batteries (either alkaline or the included NiMH rechargeable)
must be installed. The rechargeable batteries are shipped in a
discharged state, and must be fully charged prior to reader use.
Alternatively, the Reader can be powered using the AC power
supply and AC Power/ Communication cable endcap.
NOTE: Biomark recommends removing the batteries, wiping down
the reader, and storing the Reader in a dry place.
2.1 Battery Installation
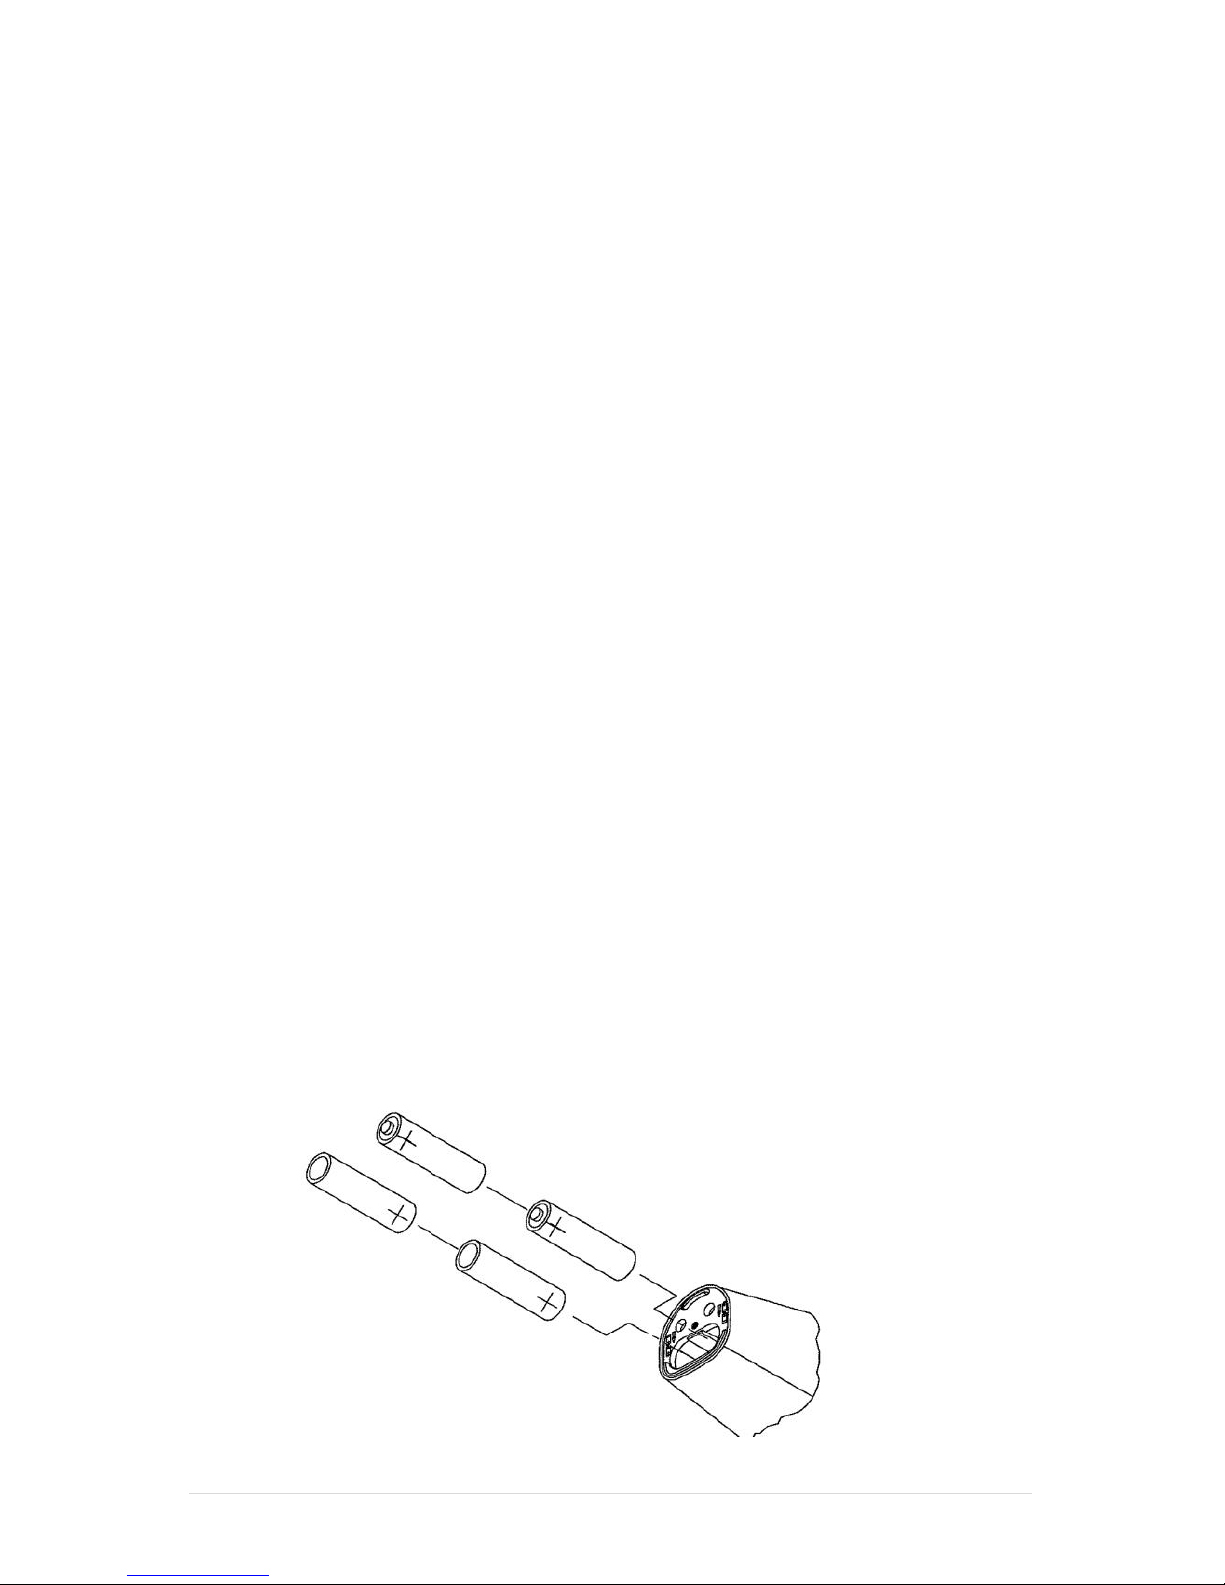
Unscrew the endcap screw by turning it counter-clockwise.
Remove the endcap by pulling it away from the Readers handle.
Install alkaline or rechargeable batteries, observing the polarity
orientation icons located beneath the battery channel. Replace
endcap on the handle end ensuring the gasket is sitting flush on
the endcap, guiding the connector plugs into their respective
receptacles (if the endcap is equipped), and tighten the endcap
screw by turning it clockwise. Do not overtighten screw as this can
create gaps that can allow moisture and dust into the reader.
NOTE: The Reader will not operate unless the batteries are installed
correctly. Incorrect installation of the batteries will not damage
the reader.
Page 9

9 | P a g e
2.2 Charging the NiMH Batteries
If rechargeable batteries have been installed in the Reader,
remove the endcap and attach the AC Power/Communication
cable endcap (this endcap can act as a trickle charger for the
rechargeable NiMH batteries, communication cable to a PC, or
connection to an AC power source). Plug the AC output plug into
the mating receptacle on the AC Power/Communication cable
and then plug the AC power supply into an outlet.
The provided NiMH rechargeable batteries will take 12 to 16 hours
to fully charge from a completely discharged state. The trickle
charger may be left connected to the Reader continuously when
the Reader is being used with the AC Power/Communication
cable endcap. Overcharging of the rechargeable batteries will
not occur.
NOTE: Do not use the AC power supply while alkaline batteries are
in use. Never attempt to charge alkaline batteries, and do not
combine alkaline and rechargeable batteries, or combine
different rechargeable battery types. Serious damage will result
and the warranty will become void.
Page 10

10 | P a g e
2.3 Powering the Reader with AC Power
To power the Reader continuously using AC power, attach the AC
Power/Communication cable endcap to the Reader, plug the AC
power supply into the AC output plug on the AC
Power/Communication cable, and then plug the AC power
supply into an outlet. It is very important that any alkaline batteries
are REMOVED before using the Reader with AC power.
3. Getting Started
3.1 Turning the Reader On
After installing the batteries or connecting to AC power, the
Biomark 601 Handheld reader is ready for operation.
To power on the Reader, press the READ button for at least 1
second. The Reader will indicate a successful power up by
emitting a tone, a momentary flashing of the Red LED indicator,
black boxes appearing briefly on the LCD screen, and finally
displaying ‘READER READY’ on the LCD screen. If you have the
‘LAST TAG’ option enabled, instead of saying ‘READER READY’ the
LCD will display the last tag code detected.
NOTE: If the batteries exhibit a low charge level at power up or
when the ‘READ’ button is subsequently pressed for scanning a
tag, the LCD screen will display ‘LOW BATTERY’, and the reader
may automatically turn off.
Page 11

11 | P a g e
3.2 Reading Tags
Once the Reader has been powered on, pressing the ‘READ’
button will put the reader in scan mode. The reader will remain in
scan mode until it times out (determined by user in the ‘READER
SETTINGS’) or successfully detects a tag. The tag code will be
displayed on the LCD screen as well as automatically saved to the
Reader’s memory.
A tag read multiple times in a row will elicit a double beep
notification and are only stored in the Reader memory once. Only
when another tag is read can the initial tag be read and its tag ID
stored to the memory again.
Prior to use, Biomark recommends that the reader be checked
with a test tag (provided with the Reader). This will ensure that the
unit is working properly prior to field use.
Successful tag detection depends on many factors. Three major
factors are listed below to help ensure the best results when
attempting to detect tags.
Tag Orientation – Maximum read distance is attained when a tag
is perpendicular to the face of the antenna (best orientation).
Minimum distance will be achieved when the tag is parallel to the
face of the antenna (worst orientation).
Electrical Noise Interference – Detection range can be affected
by electromagnetic interference, such as but not limited to:
overhead lights, computer monitors, and overhead power lines.
Large amounts of ferrous material, such as a metal piping, rebar in
concrete, or a metal desk will also negatively affect detection
distances.
Tag Quality – It is important to note that not all tags are created
equal. Biomark sells the highest performing tags for the fish and
wildlife research community available. Biomark cannot guarantee
the performance of other manufacturer’s tags, however the
Biomark 601 Handheld reader should detect all ISO 11784/11785
tags even if from another distributer.
Page 12

12 | P a g e
3.3 Powering the Reader Off
Once usage of the Reader is complete, it may be powered off by
leaving it idle for a set amount of time (as defined by the user in
the Reader Settings) or by pressing both the up and down arrows
simultaneously.
NOTE: Any data stored in the Readers memory will remain in the
memory until manually deleted, either using the reader or a PC.
This memory is maintained by a separate internal battery and will
not be affected by the removal of the AA batteries or AC power.
4. Configuring the Biomark 601 Handheld Reader
The Biomark 601 Handheld reader has many useful options to help
meet researcher’s needs. To begin configuring the Reader, it is
important to familiarize yourself with accessing and manipulating
the Readers menu.
To access the menu, press the ‘MENU’ button located in
the center of the Reader face.
Use the ‘SCROLL UP/DOWN’ buttons to navigate each
option category.
Press the ‘READ’ button to select the desired setting.
Reader Options
Each available option is detailed in the following list.
Page 13

13 | P a g e
4.1 Display set-up
This submenu lists all options that will affect what is displayed on
the LCD screen.
#FORMAT – Options are ‘HEX’ (Hexadecimal) or ‘DEC’
(Decimal). Determines what tag format is displayed once
a successful detection occurs. Hexadecimal format
includes letters A through F as well as numbers 0 through 9.
Decimal format uses only numbers. Any 125 kHz FDX-A tags
detected will only be displayed in their 10 digit
Hexadecimal code even if the Reader is set to ‘DEC’. The
default for this setting is ‘DEC’.
NOTE: It is possible for the Reader to display in one format
and download in another. Please ensure that the same
format type is selected in the ‘ID CODE FORMAT’ submenu.
LEAD 0’S – Options are ‘YES’ or ‘NO’. Allows the user to
choose whether or not to display any zeros preceding
other non-zero characters in a tag ID. For example, 982
000000012345 will display if this option is enabled; if
disabled the same ID would display as 982 12345. If the
tag ID starts with a non-zero character, such as 982
100000012345, either setting will result in the same display.
The default for this setting is ‘YES’.
LAST TAG – Options are ‘ON’ or ‘OFF’. If enabled the
Reader will display the last tag detected upon powering
up. If disabled, the reader will not display the last tag read
upon powering up and will instead display ‘READER
READY’. The default for this setting is ‘ON’.
CTY CODE – Options are ‘ALPHA’ or ‘NUMERIC‘. This option
makes the first 3 digits appear as either the ISO 3166
number sequence or alpha sequence, but has no effect
on tags coded with manufacturer numbers such as 900,
982, or 985. The default for this setting is ‘ALPHA’.
F/H/A – Options are ‘YES’ or ‘NO’. If enabled the Reader
will denote the frequency of any tag detected. When a
134.2 kHz Full Duplex B tag is detected, a highlighted F will
show behind the 3rd character of the tag ID (ex.
Page 14

14 | P a g e
982F100023456789). When a 134.2 kHz Half Duplex tag is
detected, a highlighted H will show behind the 3rd
character of the tag ID (ex. 982H100023456789). When a
125 kHz Full Duplex A tag is detected, FDXA will show up at
the beginning of the tag ID (ex. FDXA43253764404). The
default for this setting is ‘NO’.
4.2 Reader settings
This submenu allows the user to configure the hardware.
BEEPMODE – Options are ‘EVERY READ’ or ‘FIRST READ’. This
setting determines how often the Reader will make a beep
sound when tags are detected. If ‘EVERY READ’ is selected
the Reader will beep every time a tag successfully
scanned. If ‘FIRST READ’ is selected the Reader will beep
only on the first successful tag detection for any individual
tag should that tag be scanned twice or more in a row.
The default for this setting is ‘EVERY READ’.
NOTE: The ‘FIRST READ’ function acts as a unique mode
setting. If a tag is scanned while enabled it cannot be
scanned again until another unique tag is scanned first.
Once this second tag is scanned the original tag can be
rescanned again.
AUTOREAD – Options are ‘ON’ or ‘Off’. If enabled, this
setting will power up the Reader in read mode. It will
remain in read mode until a tag is detected or it times out
(depending on the selected read time), in which it will then
go to idle mode and display the ready message or the last
tag (depending on what setting is selected). If disabled,
the Reader will power up in idle mode, displaying the last
tag or ready message (depending on what setting is
selected). The default for this setting is ‘OFF’.
NOTE: Disabling this option can help conserve power if it is
found that the Reader is draining battery life quickly.
WRLSSYNC – Options are ‘ON’ or ‘OFF’. If enabled, this
setting ensures the reader will not interfere with a nearby
Page 15

15 | P a g e
fixed reader/antenna system. This option is designed
mainly to eliminate interference for HDX (half-duplex)
systems. The default for this setting is ‘OFF’.
TIME ON - Options are from 20 seconds to 4 minutes. This
setting allows the user to select the shut down time for the
reader. Selecting ‘TIMEROFF’ will allow the user to run the
reader continuously without the unit turning off. The
default for this setting is 0:30 min.
NOTE: If ‘TIMEROFF’ is selected, the user must manually
power the Reader down.
READTIME – Options are from 1 to 9 seconds. This setting
allows the user to set the amount of time the Reader will
search for a tag once the ‘READ’ button is pressed. The
‘READ’ button can be held down for a continuous read.
If a tag is detected before the read time expires, or when
being held continuously, the reader will revert to the idle
mode and the ‘READ’ button will need to be pressed again
to search for another tag.
NOTE: If ‘AUTOREAD’ is enabled, the Reader will start up in
read mode and stay in read mode for the read time
duration selected.
Page 16

16 | P a g e
4.3 Time & Date
This submenu allows the user to configure local settings and
format.
DATE FMT – Options are DD MM YY, MM DD YY, YY MM DD
where D stands for day, M for month, and Y for year. This
setting allows the user to set the date format that will
appear on the time and date stamp when downloading
tags if the ‘TIMEDATE’ option is enabled in the ‘ID-CODE
FORMAT submenu. The default for this setting is DD MM YY.
DATE SEP – Options are ‘/ SLASH’, ‘. DOT’, and ‘- HYPHEN’.
This setting allows the user to set the separator used in the
date stamp (ex. 12/14/82, 5.16.84, 10-13-14).
NOTE: Some tagging programs require a specific date
separator in order to successfully download the time
stamp.
DATE – This setting displays the current date and date
separator that has been selected. The date can be
changed in this screen by using the ‘READ’ button to cycle
through the displayed values and the ‘SCROLL UP’ and
‘SCROLL DOWN’ buttons to adjust those values.
TIME FMT – Options are ‘12 HOUR’ or ’24 HOUR’. This setting
switches the time format between the standard 12 hour
time format(AM/PM) and the 24 hour or Military time
format.
TIME – This setting displays the current time that has been
selected. The time can be changed in this screen by using
the ‘READ’ button to cycle through the displayed values
and the ‘SCROLL UP’ and ‘SCROLL DOWN’ buttons to
adjust those values.
Page 17

17 | P a g e
4.4 Stored ID-codes
This submenu allows the user to access the Readers memory and
scroll through current tags stored in the memory, download stored
tag information, or delete the Readers memory.
XXXX IDs STORED – Displays the current number of tags
stored in the Readers memory.
Downloading Tags: Pushing the ‘READ’ button while on this
screen will display the message ‘SEND ALL <READ>’. If the
‘READ’ button is pushed a second time the Reader will
transmit its stored data. When it has finished transmitting a
message saying ‘DOWNLOAD COMPLETE’ will display.
Deleting Tags: Pushing either ‘SCROLL UP’ or ‘SCROLL
DOWN’ button will bring up the message ‘DELETE YES *NO’.
Pushing the ‘READ’ button will move the * (star) between
the ‘YES’ and ‘NO’. Pressing the ‘SCROLL UP’ or ‘SCROLL
DOWN’ button while the ‘YES’ is selected will erase all
stored tag information.
NOTE: The Delete Tag option will not be available if there
are no tags stored in the memory.
Scroll through current tags stored in the memory and
downloading individual tag ID’s: Pushing either ‘SCROLL
UP’ or ‘SCROLL DOWN’ button will bring up the message
‘DELETE YES *NO’. Pressing the ‘SCROLL UP’ or ‘SCROLL
DOWN’ button while the ‘NO’ is selected will allow the user
to scroll through all stored tag ID’s. Pressing the ‘READ’
button while a tag ID is displayed will download that
specific tag ID. The message ‘ID-CODE SENT’ will display to
indicate a successful transmission.
Page 18

18 | P a g e
4.5 RS232 Settings
This submenu allows the user to configure the communication
settings in order to connect to a computer. In most instances,
these setting will never need to be adjusted.
BITRATE – Options are ‘300’, ‘1200’, ‘2400’, ‘4800’, ‘9600’,
‘19200’, ‘38400’, and ‘57600’. Sets the serial port bit rate.
The default for this setting is 9600.
DATABITS – Options are ‘7 BITS’ or ‘8 BITS’. Sets the data bits
per character. The default for this setting is ‘8 BITS’.
PARITY – Options are ‘NONE’, ‘EVEN’, and ‘ODD’. Sets
parity mode. The default for this setting is ‘NONE’.
FLOWCTRL – Options are ‘OFF’ and ‘ON’. Sets flow control.
The default for this setting is ‘OFF’.
4.6 ID-code format
This submenu lists all options that will affect how the information will
be presented when downloaded to a computer.
#FORMAT – Options are ‘HEX’ (Hexadecimal) or ‘DEC’
(Decimal). Determines what tag format is displayed once
a successful detection occurs. Hexadecimal format
includes letters A through F as well as numbers 0 through 9.
Decimal format uses only numbers. Any 125 kHz FDX-A tags
detected will only be displayed in their 10 digit
Hexadecimal code even if the Reader is set to ‘DEC’. The
default for this setting is ‘DEC’.
NOTE: It is possible for the Reader to display in one format
and download in another. Please ensure that the same
format type is selected in the ‘DISPLAY SETUP’ submenu.
CTY CODE – Options are ‘ALPHA’ or ‘NUMERIC‘. This option
makes the first 3 digits appear as either the ISO 3166
number sequence or alpha sequence, but has no effect
on tags coded with manufacturer numbers such as 900,
982, or 985. The default for this setting is ‘ALPHA’.
Page 19

19 | P a g e
LEAD 0’S – Options are ‘YES’ or ‘NO’. Allows the user to
choose whether or not to display any zeros preceding
other non-zero characters in a tag ID. For example, 982
000000012345 will display if this option is enabled; if
disabled the same ID would display as 982 12345. If the
tag ID starts with a non-zero character, such as 982
100000012345, either setting will result in the same display.
The default for this setting is ‘YES’.
DUPLICTS – Options are ‘YES’ or ‘NO’. This setting will
determine if duplicate tag ID’s will be transmitted while
downloading tag information. If enabled, every tag
detection stored in the Readers memory will be
transmitted. If disabled, only unique tag ID information will
be transmitted. If duplicate tag ID’s exist in the memory,
the Reader will always transmit the first instance that it
appears. The default for this setting is ‘YES’.
TIMEDATE – Options are ‘ON’ or ‘OFF’. This setting will
determine if the time and date stamp associated with
every tag detection is transmitted when the memory is
downloaded. If enabled, downloaded tags will have a
time and date stamp associated with them. If disabled,
downloaded tags will not have a time and date stamp
associated with them. The default for this setting is ‘ON’.
NOTE: If the ‘TIMEDATE’ stamp is disabled, the reader will still
record a time and date for the tag detection in its own
memory. If enabled, the same tag ID’s will display a time
and date.
RSRV FLD – Options are ‘ON’ or ‘OFF’. This setting
suppresses ISO Reserved field. The default for this setting is
‘OFF’.
DB FLAG – Options are ‘ON’ or ‘OFF’. Suppresses ISO Data
Bit flag. The default for this setting is ‘OFF’.
C/M CODE – Options are ‘ON’ or ‘OFF’. This setting will
either display or hide the country/manufacturer code from
the beginning of a tag ID when downloaded. If enabled,
the country/manufacturer code will display with the tag ID
(ex. 989 or 3DD). If disabled, the country/manufacturer
Page 20

20 | P a g e
code will not be included with the tag ID. The default for
this setting is ‘ON’.
DILIMITR – Options are ‘SPACE’, ‘NONE’, ‘.’, ‘TAB’, ‘;’, or ‘,’.
This setting sets the character that is displayed between
the data fields (tag ID, date and time) when tag
information is downloaded. The default is ‘.’.
NOTE: Some PC programs require the delimiter format to
be a specific character.
1st CHAR – Options are ‘NONE’, ‘#’, ‘L’, ‘X’, ‘G’. This setting
will add the selected character to the beginning of a tag
ID field when downloaded. The default for this setting is
‘NONE’.
TAG-TYPE – Options are ‘NONE’, ‘ALLFLEX’, ‘TI-RFID’. This
setting sets character fields. The default for this setting is
‘NONE’.
4.7 Reader Info
This submenu displays the Readers current software and hardware
versions. The software version is listed following the ‘SW’. The
Hardware version is listed following the ‘HW’.
Page 21

21 | P a g e
5.0 Downloading Stored Tag Information
The Biomark 601 Handheld is an RS-232 serial device and no
specific drivers or programs necessary to access the memory from
a PC.
To successfully access stored data for any program, first attach the
AC Power/Communication cable and ensure that the RS-232
settings match the following: 9600 baud rate, 8 data bits, no parity,
and flow control none.
Note: It is important to note that the latest PC’s rarely come
equipped with a 9-pin serial ports. If your computer does not have
a 9-pin serial port, a USB to serial adapter has been included with
the Reader. It is important to install the drivers for this adapter
before use.
If you are using the Biomark Tag Manager program to access your
memory, please refer to the Biomark Tag Manager User manual for
instructions on how to create a successful connection.
Page 22

22 | P a g e
5.1 Connecting to the Biomark BioTerm Software
BioTerm is a terminal program that Biomark has developed to
replace the aging Hyper-Terminal program. It can be
downloaded at no cost at www.biomark.com.
After successfully installing the BioTerm program and preparing the
Reader with the previous mentioned RS-232 settings you are ready
to begin. Plug the AC Power/Communication cable into the PC,
using the serial connection or USB to serial adaptor provided.
Power on the Reader and select the appropriate COM Port from
the drop down menu next to ‘Serial Port’. Most computers have
only one COM Port, which usually defaults to COM1.
NOTE: If you do not see the correct port listed, choose the
‘REFRESH’ button to the right of the menu. If the correct port still
does not appear, there is a problem with your connection.
Once you have the COM Port selected, select the 9600 in the drop
down to the right. Select whether or not you want to use the Text
Capture function, and then select ‘OPEN’. The traffic box below
should turn white (a message will appear if a connection is not
established). Typing a capital ‘G’ into the traffic box will begin
downloading tag ID’s. Once connected, you can also use the
Readers internal settings to download data. To do this, follow the
directions listed under 4.4 ‘STORED ID-CODES’.
Page 23

23 | P a g e
BIOMARK 601 READER TECHNICAL SPECIFICATIONS
RFID Compatibility:
ISO 11784 & 11785 HDX and FDX-B and Fecava
FDX-A
Form Factor:
Portable Handheld Santoprene Enclosure
User Interface:
Single “On/Press to Read” Activation Button
Menu & Scroll Up/Down Option Select Buttons
16 character (2x8) LCD display
Audible Beeper and Red LED “Read” Indicators
ID Code Display
Format
Decimal or Hexadecimal
Clock/Calendar
ddmmyy and hh:mm:ss (12 or 24 hour format)
Memory:
1600 ID codes (including Mfr Code and
date/time)
Battery Power:
4 AA Alkaline battery cells, or
4 AA NiCad or NiMH rechargeable battery cells
Electromagnetic
Compatibility (EMC)
Certifications
FCC Part 15 Class A
CISPR 22 (EN55022), and EN50082-1
ETSI 300 330-1
Industry Canada RSS-210
PHYSICAL/ENVIRONMENTAL
Dimensions:
275 mm L x 68 mm W x 83 mm H
Weight:
Approx 0.35 kg. with alkaline battery installed
Enclosure Material:
Monsanto Santoprene ®
Color:
Medium Gray (Pantone 423C)
Operate
Temperature
+5ºC to +40ºC (IEC68.2.1/.2)
Storage
Temperature
-10ºC to +55ºC (IEC68.2.1/.2)
Page 24

24 | P a g e
Humidity:
0 to 95% (IEC68.2.56)
Altitude:
-100 to +3,000 meters
Mechanical Shock:
Per IEC 68-2-27
Vibration:
Per IEC 68-2-6
Hermeticity:
IP-68 to 1 meter immersion per IEC 529
Buoyancy:
Approximately ½ the weight of water it
displaces
Chemical
Resistance:
Resistant to petroleum based solvents & fluids,
biological and organic fluids, aqueous solutions,
and mild acid/alkaline solutions
RELIABILITY
MTBF:
50,000 hours
MTTR:
0.5 hours
Expected Life:
5 years, minimum
PERFORMANCE
Read Distances:
HPT8 3.5-5 inches
HPT9 3-5 inches
HPT12 5-7 inches
HPT22 7-11 inches
FDX-A 5-8.5 inches
Reading Orientation:
0º to 30º with less than 10% range decrease
Read Error Rate:
Less than 1 in 106
Read
Cycles/Battery:
5,000 - Alkaline (disposable) (based on 2
second read intervals
2,500 - NiCad (rechargeable)
5,000 – NiMH (rechargeable)
Page 25

25 | P a g e
Biomark Inc. Warranty Statement
Biomark Inc. warrants that each Part or Equipment is free from defects
in materials and workmanship. The warranty period for a Parts and
Equipment is 12-months from your date of purchase. A valid proof of
purchase may be required. If you do not have a valid proof of
purchase, the warranty period will be measured from the date of sale
from Biomark Inc. or its Distributor. If, during the warranty period, the
Part or Equipment is not in good working order, Biomark Inc. will, at its
option, repair or replace it at no additional charge. After replacement
or repair the original part or equipment will be the originating term of
the warranty. The warranty does not extend to cover the repaired or
replaced part or equipment. Biomark, Inc. is predominantly a reseller
of parts and equipment. All parts that are manufactured by someone
other than Biomark, Inc. are subject to the Manufactures warranty.
Extent of Warranty
The warranty does not cover the repair or exchange of a Part or
Equipment resulting from misuse, accident, modification, unsuitable
physical or operating environment, improper maintenance, or failure
caused by a product for which Biomark Inc. is not responsible. The
warranty is voided by removal or alteration of Parts or Equipment
identification labels.
Warranty Service
Warranty service may be obtained from Biomark Inc., headquartered
in Boise, Idaho, by receiving a Return Material Authorization number
during the warranty period. You may be required to present proof of
purchase or other similar proof of warranty entitlement. You are
responsible for any associated transportation charges, duties and
insurance between you and the Biomark Inc. facility. Biomark, Inc. will
ship repaired or replacement parts and equipment Duty Prepaid
(DDP) and will pay for standard return shipment.
Warranty Service for Installed Parts and Equipment
Biomark warrantees’ parts and equipment of installed systems for one
year from date of delivery to the customer. When a warranty issue on
equipment or parts arises within the Biomark warranty (12 months), the
customer can request a quote for repair of equipment on site or
the customer can return the parts or equipment to Biomark, Inc.
facility through the “Warranty Service” statement above.
Page 26

26 | P a g e
Regulatory Notices
FCC ID: NQY-930043
Note: This equipment has been tested and found to comply with the
limits for a Class B digital device pursuant to Part 15 of the FCC Rules.
These limits are designed to provide reasonable protection against
harmful interference when the equipment is operated in a residential
installation. This equipment generates, uses, and can radiate radio
frequency energy, and if not installed and used in accordance with
the instruction manual, may cause harmful interference to radio
communications. However, there is no guarantee that interference will
not occur in a particular installation. If this equipment does cause
harmful interference to radio or television reception, which can be
determined by turning the equipment off and on, the user is
encouraged to try to correct the interference by one of the following
measures:
Reorient or relocate the receiving antenna.
Increase the separation between the equipment and the
receiver.
Connect the equipment into an outlet on a circuit different
from that to which the receiver is connected.
Consult the dealer or an experienced radio/TV technician for
help.
THE MANUFACTURER IS NOT RESPONSIBLE FOR ANY RADIO OR TV
INTERFERENCE CAUSED BY UNAUTHORIZED MODIFICATIONS TO THIS
EQUIPMENT. SUCH MODIFICATIONS COULD VOID THE USER'S
AUTHORITY TO OPERATE THE EQUIPMENT.
This device has been tested and meets the Electromagnetic
Compatibility (EMC) requirements of EMC Directive 2004/108/EC and
R&TTE Directive 99/5/EC.
Use of this device is protected under patent no. US 7,528,725 B2.
RBRC™ Battery Recycling Program
This product uses nickel-cadmium (ni-cad) rechargeable and
recyclable batteries. When the batteries no longer hold a charge,
they should be removed and recycled. They must NOT be
incinerated or composted. In some venues, it is illegal to place
depleted batteries in municipal solid waste
Note: The 230 VAC/50 Hz Battery Charging unit is equipped with
electrical fuses for safety. If it becomes necessary to replace these
fuses, use identical type T500 / 230 VAC / 5 x 20 mm compliant fuses
only.
Page 27

27 | P a g e
NOTES:
 Loading...