

Page 1

Artisan Technology Group is your source for quality
new and certied-used/pre-owned equipment
• FAST SHIPPING AND
DELIVERY
• TENS OF THOUSANDS OF
IN-STOCK ITEMS
• EQUIPMENT DEMOS
• HUNDREDS OF
MANUFACTURERS
SUPPORTED
• LEASING/MONTHLY
RENTALS
• ITAR CERTIFIED
SECURE ASSET SOLUTIONS
SERVICE CENTER REPAIRS
Experienced engineers and technicians on staff
at our full-service, in-house repair center
Instra
Remotely inspect equipment before purchasing with
our interactive website at www.instraview.com
Contact us: (888) 88-SOURCE | [email protected] | www.artisantg.com
SM
REMOTE INSPECTION
View
WE BUY USED EQUIPMENT
Sell your excess, underutilized, and idle used equipment
We also offer credit for buy-backs and trade-ins
www.artisantg.com/WeBuyEquipment
LOOKING FOR MORE INFORMATION?
Visit us on the web at www.artisantg.com for more
information on price quotations, drivers, technical
specications, manuals, and documentation
Page 2
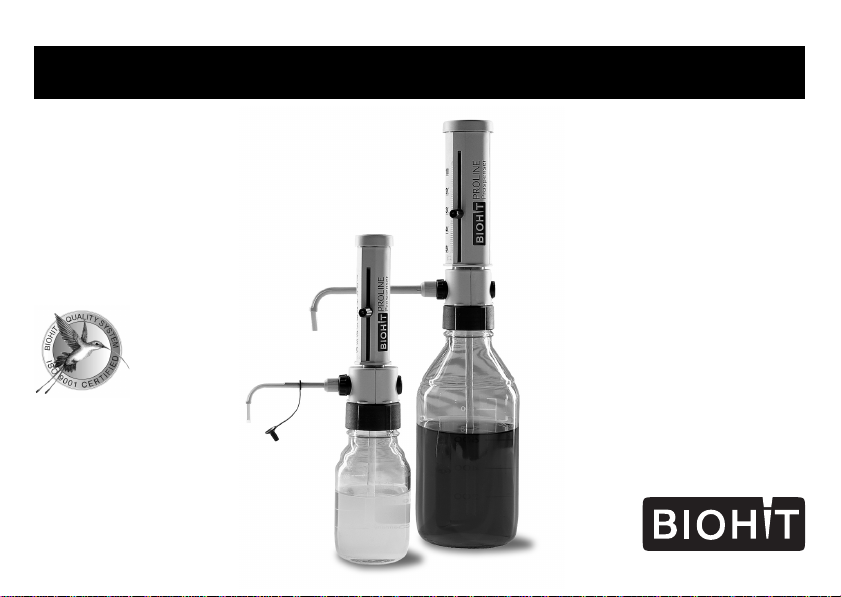
BIOHIT PROLINE® Prospenser
Gebrauchsanleitung
Bitte vor Gebrauch sorgfältig lesen
und alle Bedienungs- und
Sicherheitshinweise befolgen!
Operating Manual
Please read carefully before use,
and follow all operating and safety
instructions!
BIOHIT OYJ
Laippatie 1
FIN-00880 Helsinki
Finland
Tel.: +358-9-773 861
Fax: +358-9-773 86 200
Internet: www.biohit.com
Artisan Technology Group - Quality Instrumentation ... Guaranteed | (888) 88-SOURCE | www.artisantg.com
Page 3

– 2 –
Contents
Safety Instructions 4
Components 6
Application and Design 7
Materials 7
Operating Exclusions 8
Operating Limitations 8
Preparing for use 10
Connecting the discharge tube 11
Connecting the fi lling tube 12
Mounting instrument on bottle 13
Priming the instrument 14
Dispensing 16
Setting the volume 16
Serial dispensing with fl exible
discharge tube (optional) 18
Connecting drying tube (optional) 20
Cleaning 21
Cleaning/replacing the fi lling valve 24
Cleaning/replacing the discharge valve 25
Autoclaving 26
Preparation prior to the fi rst autoclaving 26
Artisan Technology Group - Quality Instrumentation ... Guaranteed | (888) 88-SOURCE | www.artisantg.com
Inhalt
Page
Sicherheitsbestimmungen 4
Einzelteile 6
Funktion 7
Materialien 7
Einsatzausschlüsse 8
Einsatzbeschränkungen 8
Gerät zum Einsatz vorbereiten 10
Dosierkanüle montieren 11
Ansaugrohr montieren 12
Gerät auf Flasche schrauben 13
Gerät entlüften 14
Dosieren 16
Volumen einstellen 16
Seriendosierung mit
fl exiblem Dosierschlauch (optional) 18
Trockenrohr montieren (optional) 20
Reinigung 21
Ansaugventil reinigen/austauschen 24
Ausstoßventil reinigen/austauschen 25
Autoklavieren 26
Vorbereitung vor dem ersten Autoklavieren 26
Seite
Page 4

Checking the Volume 28
Trouble Shooting 30
Technical Data / Ordering Data 34
Accessories and Spare Parts 35
Return for Repair 38
Warranty 39
Dispenser selection chart 40
Volumen kontrollieren 28
Störung – was tun? 32
Technische Daten / Bestelldaten 34
Zubehör und Ersatzteile 35
Zur Reparatur einsenden 38
Mängelhaftung 39
Leitfaden zur Geräteauswahl 42
Artisan Technology Group - Quality Instrumentation ... Guaranteed | (888) 88-SOURCE | www.artisantg.com
– 3 –
Page 5

Read carefully before use!
Safety Instructions
– 4 –
Vor Benutzung sorgfältig lesen!
Sicherheitsbestimmungen
This instrument may be involved with hazardous
materials, operations, and equipment.
This ma nu al does not purport to address all of the
safety problems associated with its use. It is the
responsibility of whomever uses this instrument
to consult and establish appropriate safety and
health practices and determine the applicability of
regulatory limitations prior to use.
1. Follow the general instructions for hazard
prevention and safety regulations, e.g., wear
protective clothing, eye protection and gloves.
2. Observe the reagent manufacturer’s information.
3. Every user must be acquainted with this Operating
Manual before operation.
4. Use the instrument only for dispensing liquids, with
strict regard to the defi ned Operating Exclusions
and Limitations (➤ pages 8-9).
If in doubt, contact the manufacturer or supplier.
5. When dispensing fl ammable media, make
provisions to avoid electrostatic charging, e.g.,
do not dispense into plastic vessels; do not wipe
instruments with a dry cloth.
Artisan Technology Group - Quality Instrumentation ... Guaranteed | (888) 88-SOURCE | www.artisantg.com
Dieses Gerät kann in Kombination mit gefährlichen
Materialien, Arbeitsvorgängen und Ap pa ra tu ren
verwendet werden. Die Gebrauchsanleitung kann
jedoch nicht alle Si cher heits pro ble me aufzeigen,
die hierbei eventuell auftreten. Es liegt in der
Verant wor tung des Anwenders, die Einhaltung der
Sicherheits- und Gesundheitsvorschriften sicherzu stel len und die entsprechenden Einschränkungen
vor Gebrauch festzulegen.
1. Allgemeine Gefahrenhinweise und Sicherheits-
vorschriften befolgen, z. B. Schutz klei dung,
Augenschutz und Schutzhandschuhe tragen.
2. Angaben der Reagenzienhersteller beachten.
3. Jeder Benutzer muss diese Gebrauchsanleitung vor
Be nut zung des Geräts gelesen haben und beachten.
4. Gerät nur zum Dosieren von Flüssigkeiten und nur
im Rahmen der defi nierten Ein satz aus schlüs se
und -beschränkungen einsetzen (➤ Seite 8-9).
Bei Zweifel un be dingt an den Hersteller oder
Händler wenden.
5. Beim Dosieren brennbarer Medien Vorkehrungen zur
Vermeidung elektrostatischer Aufl adung treffen,
z. B. nicht in Kunststoffgefäße dosieren und Geräte
nicht mit einem trockenen Tuch abreiben.
Page 6

6. When dispensing, the discharge tube must always
point away from the user or any other person.
Avoid splashes. Only dispense into suitable vessels.
7. Never carry the mounted instrument by the cylinder
sleeve or the valve block. Breakage or loosening
of the cylinder may lead to personal injury from
chemicals.
8. Never press down the piston when the closure cap
is pushed on.
9. Never remove the discharge tube while the cylinder
is fi lled.
10. Never use force on the instrument.
11. Use smooth gentle movements to operate the
piston upwards and downwards.
12. Use only original manufacturer’s accessories and
spare parts. Don't carry out technical modifi cations.
13. Before use check the instrument for visual
damages. In case of trouble (e.g., piston diffi cult
to move, sticking valves or leakage), immediately
stop dispensing. Clean the instrument according
to the cleaning instructions before any further use
of the instrument (➤ pages 21-24) or contact the
manufacturer.
6. Beim Dosieren Dosierkanüle nie auf den Anwender
oder andere Per so nen richten. Spritzer vermeiden.
Nur in geeignete Gefäße dosieren.
7. Aufgesetztes Gerät nie an Zylinderhülse oder Ventilblock tragen. Bruch oder Ablösen des Zylinders
kann zu Verletzungen durch Chemikalien führen.
8. Kolben nie niederdrücken, solange Verschlusskappe
aufgesetzt ist.
9. Dosierkanüle nie bei gefülltem Zylinder abschrauben.
10. Nie Gewalt an wen den.
11. Kolben beim Dosieren stets sanft hochziehen
und sanft niederdrücken.
12. Nur Original-Zubehör und Original-Ersatzteile
verwenden. Keine technischen Ver än de run gen
vornehmen.
13. Vor Verwendung stets den ordnungsgemäßen
Zustand des Gerätes prüfen. Bei Stö run gen (z. B.
schwer gän gi gem Kolben, verklebten Ventilen oder
undichten Stellen) sofort aufhören zu dosieren
und vor jeder weiteren Benutzung des Geräts
Rei ni gungs hin wei se befolgen (➤ Seite 21-24).
Ggf. an den Hersteller wenden.
Artisan Technology Group - Quality Instrumentation ... Guaranteed | (888) 88-SOURCE | www.artisantg.com
– 5 –
Page 7
– 6 –
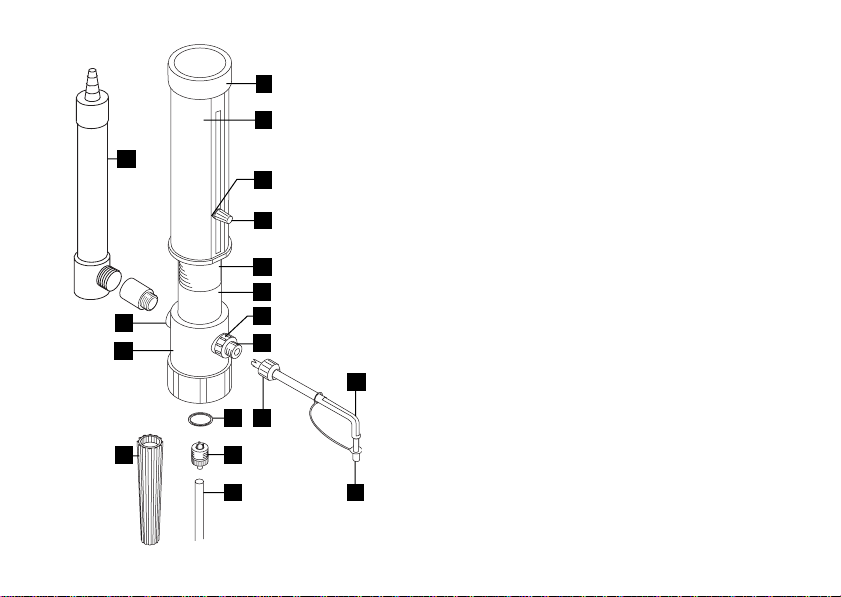
Components
A
B
Q
C
D
O
N
L
M
P
Artisan Technology Group - Quality Instrumentation ... Guaranteed | (888) 88-SOURCE | www.artisantg.com
E
F
G
I
R
K
HJ
A piston seat
B cylinder sleeve
C pointer
D volume adjustment knob
E valve locking ring
F* discharge valve
G* discharge tube
H* closure cap
I locking nut
J* fi lling tube
K* fi lling valve
L air vent cap
M valve block
N* glass cylinder
O* piston
P mounting tool
Q drying tube (optional)
R seal
* Parts in contact with the media
Einzelteile
A Kolbenlager
B Zylinderhülse
C Zeiger
D Arretiermutter
E Verdrehsicherung
F* Ausstoßventil
G* Dosierkanüle
H* Verschlusskappe
I Überwurfmutter
J* Ansaugrohr
K* Ansaugventil
L Blindstopfen
M Ventilblock
N* Glaszylinder
O* Kolben
P Montageschlüssel
Q Trockenrohr (optional)
R Dichtring
* medienberührte Teile
Page 8

Application and Design
This instrument is designed for dispensing liquids,
observing the following limits:
– 15 to 40 °C of instrument and reagent
– vapor pressure up to 500 mbar
– density up to 2.2 g/cm
– kinematic viscosity up to 500 mm²/s
(dynamic viscosity [mPas] =
kinematic viscosity [mm²/s] x density [g/cm³])
3
Funktion
Das Gerät dient zum Dosieren von Flüssigkeiten unter
Beachtung folgender Grenzen:
– 15 - 40 °C von Gerät und Reagenz
– Dampfdruck bis 500 mbar
– Dichte bis 2,2 g/cm³
– kinematische Viskosität bis 500 mm²/s
(Dynamische Viskosität [mPas] =
kinematische Viskosität [mm²/s] x Dichte [g/cm³])
Materials
When the instrument is correctly used, the dispensed
liquid comes into contact with only the following
chemically resistant materials: Borosilicate glass,
Al2O3, ETFE, PFA, FEP, PTFE, platinum-iridium;
PP (closure cap).
Artisan Technology Group - Quality Instrumentation ... Guaranteed | (888) 88-SOURCE | www.artisantg.com
Materialien
Bei richtiger Handhabung des Geräts kommt die
dosierte Flüssigkeit nur mit folgenden chemisch
resistenten Materialien in Kontakt: Borosilikatglas,
Al2O3, ETFE, PFA, FEP, PTFE, Platin-Iridium;
PP (Verschlusskappe).
– 7 –
Page 9

Operating Exclusions
– 8 –
Einsatzausschlüsse
Never use this instrument for
– liquids attacking ETFE, FEP, PFA, PTFE or
Al
(e.g., dissolved sodium azide)
2O3
– liquids attacking borosilicate glass (e.g.,
hydrofl uoric acid)
– liquids which are decomposed catalytically by
platinum-iridium (e.g., H
2O2
)
– fuming acids
– trifl uoroacetic acid
– tetrahydrofuran
– explosive liquids (e.g., carbon disulphide)
– suspensions (e.g., of charcoal) as solid particles
may clog or damage the instrument.
Das Gerät niemals einsetzen für:
– Flüssigkeiten, die ETFE, FEP, PFA, PTFE oder
Al
angreifen (z. B. gelöstes Natriumazid)
2O3
– Flüssigkeiten, die Borosilikatglas angreifen
(z. B. Fluorwasserstoffsäure)
– Flüssigkeiten, die sich an Platin-Iridium katalytisch
zersetzen (z. B. H2O2)
– rauchende Säuren
– Trifl uoressigsäure
– Tetrahydrofuran
– explosive Flüssigkeiten (z. B. Schwefelkohlenstoff)
– Suspensionen, da feste Teilchen das Gerät
verstopfen oder beschädigen können
(z. B. Aktivkohlelösung).
Operating Limitations
Concentrated hydrochloric acid and concentrated
nitric acid, chlorinated and fl uorinated hydrocarbons,
or chemical combinations which form deposits may
make the piston diffi cult to move or may cause jamming
(e.g., concentrated saline solutions, highly crystallizing
solutions or highly concentrated alkaline solutions).
Einsatzbeschränkungen
Konzentrierte Salzsäure und konzentrierte Salpetersäure, chlorierte und fl uorierte Kohlenwasserstoffe,
oder Verbindungen, die Ablagerungen bilden, können
zu schwergängigem oder festsitzendem Kolben führen
(z. B. konzentrierte Salzlösungen, stark kristallisierende
Lösungen oder stark konzentrierte Laugen).
Artisan Technology Group - Quality Instrumentation ... Guaranteed | (888) 88-SOURCE | www.artisantg.com
Page 10

Warning!
If there is a sign of a potential malfunction (e.g.,
piston diffi cult to move) never use force. Immediately stop dispensing and follow cleaning instructions
(see p. 21) or contact the manufacturer.
Warnung!
Sollten sich Störungen des Gerätes ankündigen
(z. B. schwergängiger Kolben) niemals Gewalt
anwenden. Sofort aufhören zu dosieren und
Reinigung durchführen (s. S. 21). Ggf. an den
Hersteller wenden.
Note:
Compatibility of the instrument for this special
application (e. g., trace material analysis) must be
checked by the user or contact the manufacturer.
Artisan Technology Group - Quality Instrumentation ... Guaranteed | (888) 88-SOURCE | www.artisantg.com
Hinweis:
Der Einsatz des Gerätes für den vorgesehenen
Anwendungsfall (z. B. Spurenanalyse) ist vom
Anwender sorgfältig zu prüfen. Ggf. an den
Hersteller wenden.
– 9 –
Page 11
Preparing instrument for use
– 10 –
Gerät zum Einsatz vorbereiten
Attention!
The adapters supplied with the instrument are made
of polypropylene (PP), and can only be applied for
media which do not attack PP (➤ page 35, ETFEadapters).
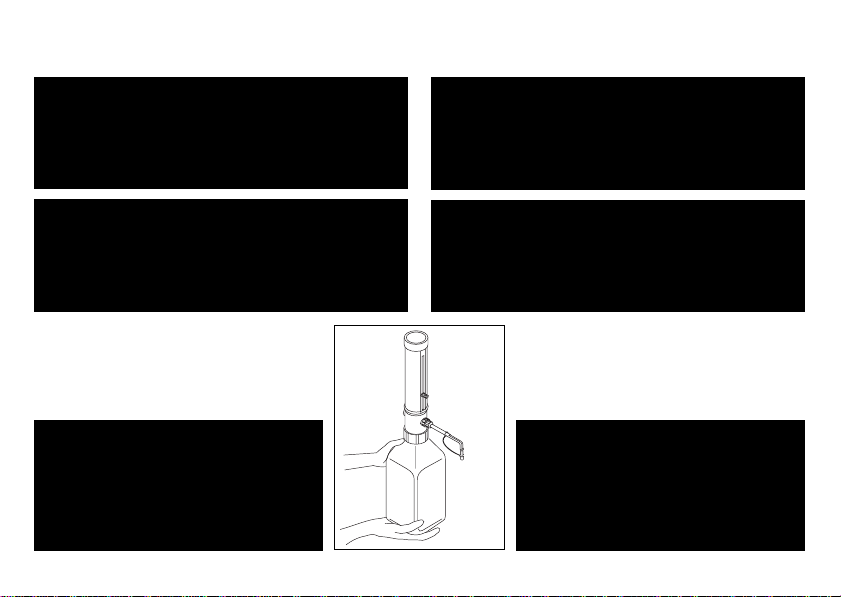
Warning!
Wear protective clothing, eye protection and gloves.
Follow all Safety Instructions and observe the
Operating Exclusions and Limitations (see pages
8, 9).
Warning!
Always wear protective gloves when
touching the instrument and the bottle,
especially when using dangerous
liquides. Carry the mounted instrument
only as shown in fi gure.
Artisan Technology Group - Quality Instrumentation ... Guaranteed | (888) 88-SOURCE | www.artisantg.com
Achtung!
Die im Lieferumfang enthaltenen Adapter sind
aus Polypropylen (PP) und dürfen nur für Me di en
eingesetzt werden, die PP nicht angreifen
(➤ Seite 35, ETFE-Adapter).
Warnung!
Schutzkleidung, Augenschutz und Schutzhandschuhe
tragen. Alle Sicherheitsbestimmungen, sowie
Einsatzausschlüsse und -beschränkungen beachten
(s. Seite 8, 9).
Warnung!
Gerät und Flasche nur mit Schutzhandschuhen anfassen, insbesondere wenn
gefährliche Medien eingesetzt werden.
Montiertes Gerät stets so tragen, wie
in der Abb. gezeigt.
Page 12
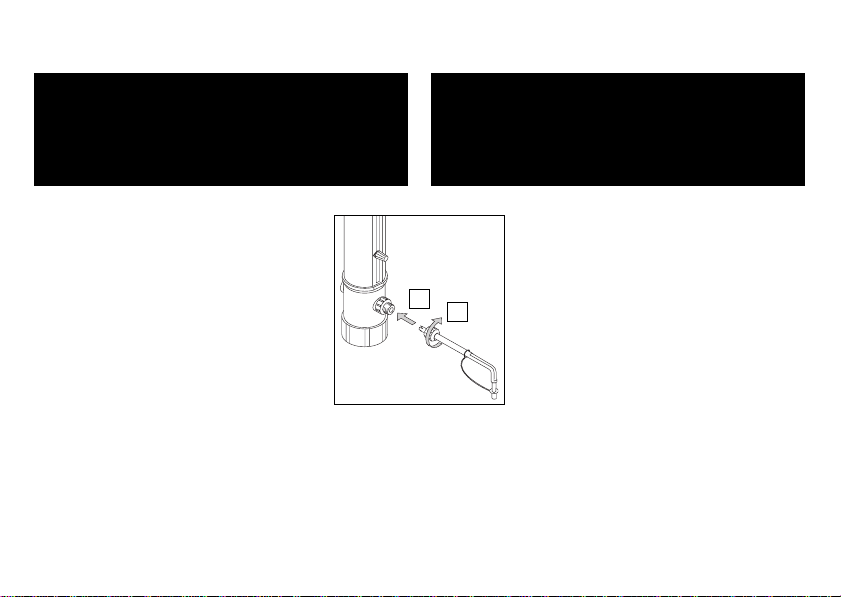
Connecting the discharge tube
Dosierkanüle montieren
Warning!
Only the slotted-type discharge tube supplied
with the instrument allows correct operation.
Do not use any other type of discharge tube.
Never use damaged or deformed discharge tubes.
1. Push the discharge tube as far as
possible into the discharge valve.
2. Firmly fi nger-tighten the locking nut.
Check the discharge tube for a tight fi t.
Artisan Technology Group - Quality Instrumentation ... Guaranteed | (888) 88-SOURCE | www.artisantg.com
Warnung!
Die einwandfreie Funktion ist nur in Verbindung mit
der mitgelieferten geschlitzten Dosierkanüle gewährleistet. Keine andere Dosierkanüle verwenden. Nie
beschädigte oder deformierte Dosierkanüle verwenden.
1. Dosierkanüle bis zum Anschlag
aufschieben.
2. Überwurfmutter von Hand gut fest-
1.
– 11 –
2.
drehen. Festen Sitz der Dosierkanüle
prüfen.
Page 13
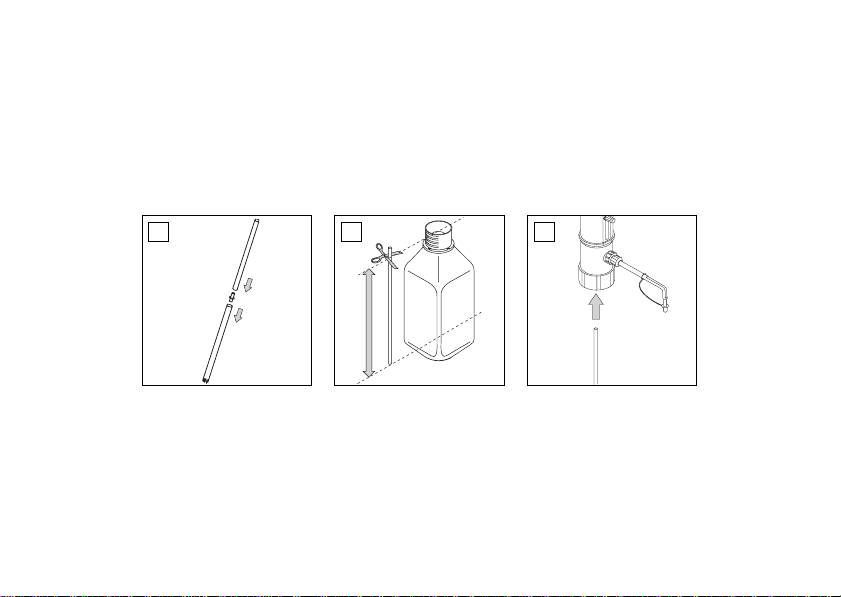
Connecting the fi lling tube
1. For instruments 0-25 ml and 0-50 ml, fi lling tube
can be connected.
2. Cut off fi lling tube diagonal.
3. Push the fi lling tube into the valve block as far as
possible – with the diagonal end down.
– 12 –
Ansaugrohr montieren
1. Für Geräte 0-25 ml und 0-50 ml kann das Ansaugrohr aus 2 Einzelteilen zusammengefügt werden.
2. Ansaugrohr schräg abschneiden.
3. Ansaugrohr bis zum Anschlag aufschieben, schräg
abgeschnittenes Ende nach unten.
1.
Artisan Technology Group - Quality Instrumentation ... Guaranteed | (888) 88-SOURCE | www.artisantg.com
2.
3.
Page 14

Mounting instrument on bottle
The instrument can be screwed directly onto a GL 45
screwthread. For other bottles, use the accompanying
adapters. Adapters are also available as accessories
(see page 35).
Gerät auf Flasche schrauben
Auf Flaschen mit Gewinde GL 45 kann das Gerät direkt
geschraubt werden. Für andere Flaschen beiliegende
Adapter verwenden. Zusätzlich sind Adapter als Zubehör erhältlich (siehe S. 35).
Attention!
The adapters supplied with the instrument are made
of polypropylene (PP), and can only be applied for
media which do not attack PP (see page 35, ETFEadapters).
Artisan Technology Group - Quality Instrumentation ... Guaranteed | (888) 88-SOURCE | www.artisantg.com
Achtung!
Die im Lieferumfang enthaltenen Adapter sind
aus Polypropylen (PP) und dürfen nur für Medien
eingesetzt werden, die PP nicht angreifen (siehe
Seite 35, ETFE-Adapter).
– 13 –
Page 15
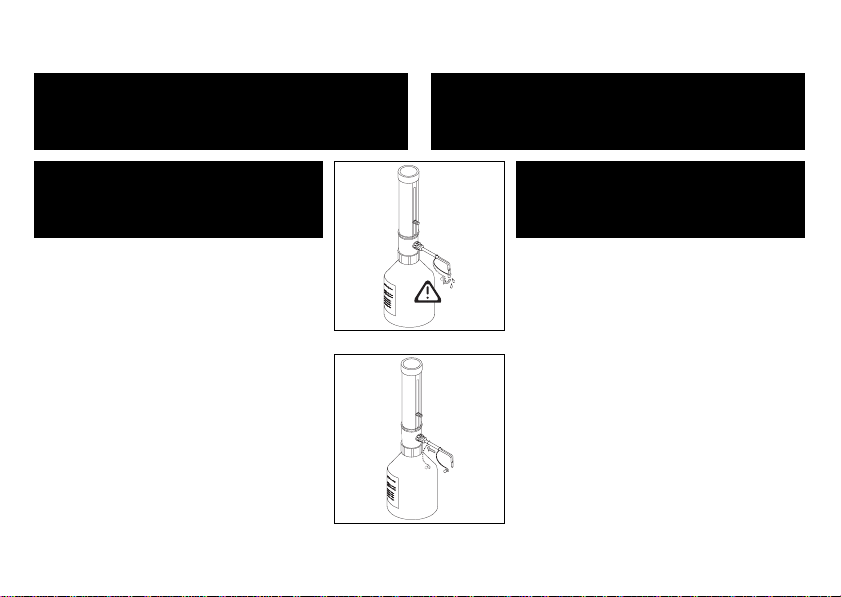
Priming the instrument
– 14 –
Gerät entlüften
Attention!
For small bottles use a bottle stand to prevent
tipping over.
Warning!
Reagent may drip off the discharge
tube and closure cap.
– Hold the discharge tube and carefully
remove the closure cap.
– Slide the closure cap backwards on the
tube support, away from the discharge
tube opening.
Artisan Technology Group - Quality Instrumentation ... Guaranteed | (888) 88-SOURCE | www.artisantg.com
Achtung!
Für kleine Flaschen eine Flaschenhalterung verwenden, um Kippen zu vermeiden.
Achtung!
Aus Dosierkanüle und Verschlusskappe
kann Reagenz heraustropfen.
– Dosierkanüle festhalten, und Verschluss-
kappe vorsichtig abziehen.
– Verschlusskappe von der Kanülenöffnung
weg nach hinten schieben.
Page 16
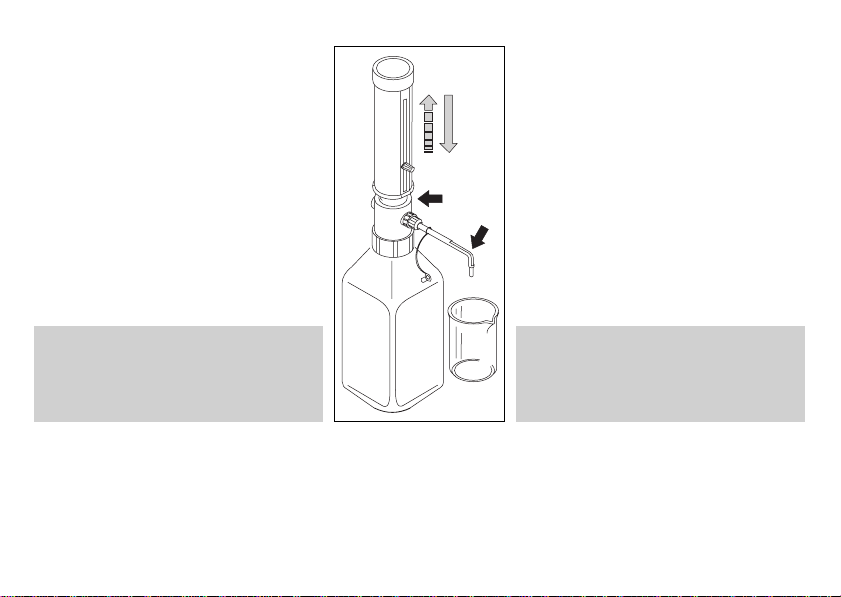
1. To avoid splashes when priming hold
discharge tube on inner wall of a
suitable recipient.
2. Gently pull the piston up (1 to 2 cm),
then press it down rapidly.
3. Repeat this procedure until most of the
air bubbles in the glass cylinder and
discharge tube have been removed.
Pay particular attention to critical areas
where bubbles may lodge (see black
arrows).
1. Um Spritzer beim Entlüften zu
vermeiden, die Öffnung der
Dosierkanüle an die Innenwand eines
geeigneten Auffanggefäßes halten.
2. Den Kolben 1-2 cm sanft hochziehen
und schnell niederdrücken.
3. Vorgang solange wiederholen, bis in
Glaszylinder und Dosierkanüle keine
größeren Luftblasen mehr zu sehen
sind. Auf kritische Stellen achten
(siehe schwarze Pfeile).
Note:
Before using the instrument for the
fi rst time, ensure it is rinsed carefully or
discard fi rst few samples dispensed.
Artisan Technology Group - Quality Instrumentation ... Guaranteed | (888) 88-SOURCE | www.artisantg.com
– 15 –
Hinweis:
Vor dem ersten Gebrauch das Gerät
gründlich spülen oder die ersten
Do sie run gen verwerfen.
Page 17
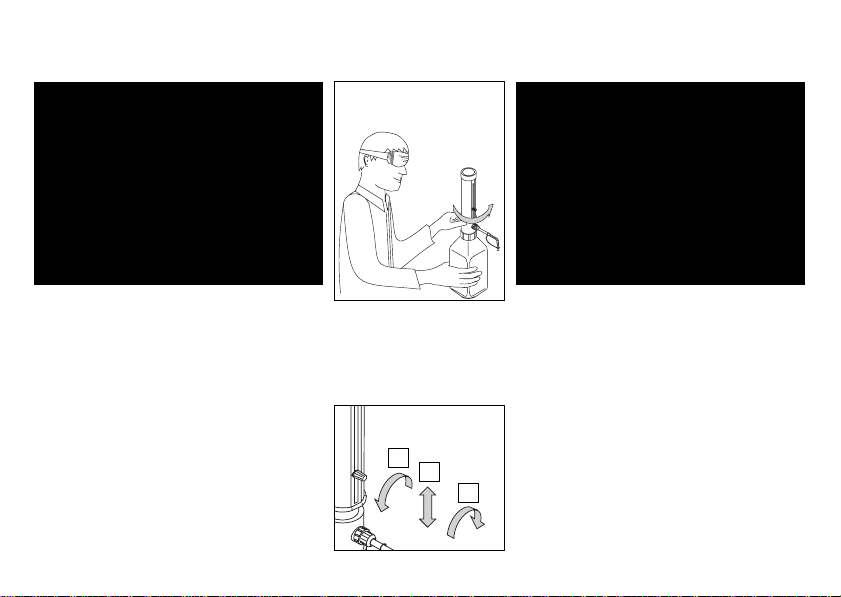
Dispensing
– 16 –
Dosieren
Warning!
Follow all Safety Instructions (see
page 4, 5) and observe the Operating
Exclusions and Limitations (see pages
8, 9). The discharge tube must always
point away from the user or any other
person. Never press down the piston
when the closure cap is pushed on.
Reagent may drip off the discharge
tube and closure cap.
Setting the volume
1.
2.
3.
Artisan Technology Group - Quality Instrumentation ... Guaranteed | (888) 88-SOURCE | www.artisantg.com
Warnung!
Sicherheitsbestimmungen (s. S. 4, 5)
befolgen sowie Einsatzausschlüsse und
-beschränkungen beachten (s. S. 8, 9).
Dosierkanüle muß vom Anwender und
von anderen Personen stets abgewandt
sein. Kolben nie niederdrücken, solange
die Verschlusskappe aufgesteckt ist.
Aus Dosierkanüle und Verschlusskappe
kann Reagenz heraustropfen.
Volumen einstellen
Page 18
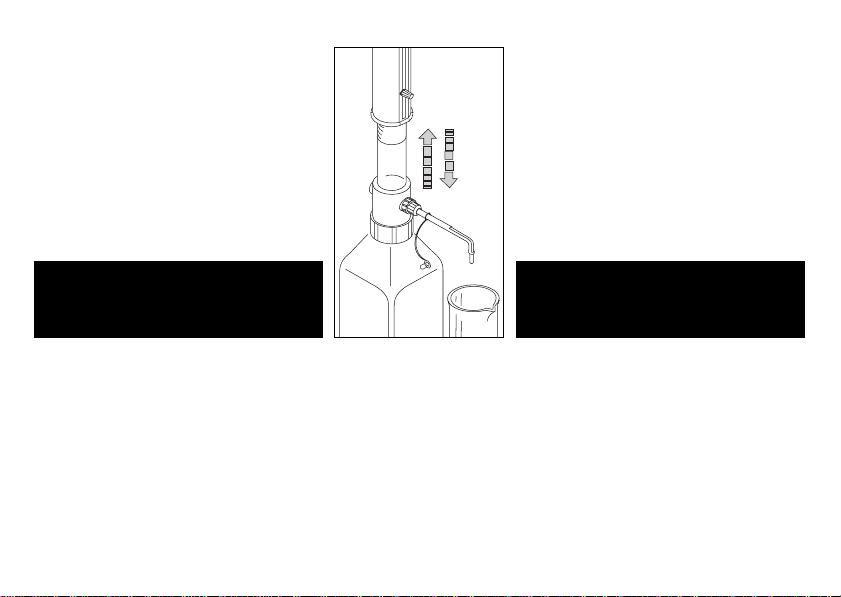
– Hold an appropriate collecting vessel
under the discharge tube opening.
– Pull the piston up slowly and evenly to
the upper stop to draw reagent into the
glass cylinder.
– Push the piston down gently and evenly
to dispens the reagent into the vessel.
– Geeignetes Auffanggefäß unter die
Öffnung der Dosierkanüle halten.
– Kolben langsam und gleichmäßig bis zum
Anschlag hochziehen. Das Reagenz wird
in den Glaszylinder gezogen.
– Kolben langsam und gleichmäßig nieder-
drücken. Das Reagenz wird in das Gefäß
dosiert.
Attention!
After use, always leave the piston in the
down position.
Artisan Technology Group - Quality Instrumentation ... Guaranteed | (888) 88-SOURCE | www.artisantg.com
– 17 –
Achtung!
Nach Gebrauch Kolben stets niedergedrückt lassen.
Page 19

Serial dispensing with fl exible discharge tube
(optional)
– 18 –
Seriendosierung mit fl exiblem Dosierschlauch
(optional)
Attention!
Each time you are going to use the tubing, examine
it carefully for any damages. To dispense aggressive
liquids, e.g. concentrated acids and lyes, you should
take safety measures in addition to the normal
precautions of wearing protective clothing, eye
protection and protective gloves. We recommend
that you use a protective screen.
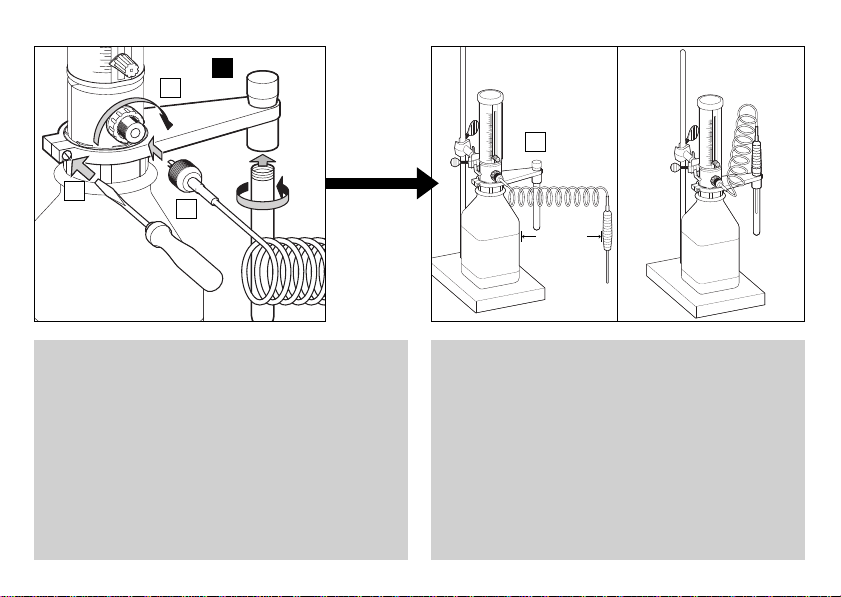
When using the fl exible discharge tube, the bottle
must be supported using a bottle stand to help
prevent the bottle from accidentally tipping over.
To help avoid reagent splashing from the tube, allways grip the tube fi rmly by the handle and replace
in the holder after use.
Operating Exclusions:
The fl exible discharge tube is compatible with all
liquids suitable for the dispenser.
Artisan Technology Group - Quality Instrumentation ... Guaranteed | (888) 88-SOURCE | www.artisantg.com
Achtung!
Vor dem Einsatz Schlauch stets auf evtl. Beschädigungen (Knickstellen und dgl.) prüfen. Sollen
agressive Flüssigkeiten, wie z. B. konzentrierte
Säuren und Laugen dosiert werden, empfehlen wir
zusätzlich zu den üblichen Sicherheitsvorkehrungen
(wie z. B. das Tragen von Schutzkleidung, Augenschutz und Schutzhandschuhen) ein Schutzschild
zu verwenden.
Bei Verwendung des fl exiblen Dosierschlauchs,
Flaschenhalterung verwenden, um Kippen der
Reagenzfl asche zu vermeiden. Um Verspritzen von
Reagenz aus der Kanülenöffnung zu vermeiden,
Dosierschlauch stets festhalten und nach Gebrauch
in die dafür vorgesehene Halterung stecken.
Einsatzausschlüsse:
Der fl exible Dosierschlauch ist für alle Flüssigkeiten
einsetzbar, die für den Dispenser geeignet sind.
Page 20
!
2.
4.
3.
1.
800 mm
Note:
The coil of the tubing can be stretched to a maximum length of 800 mm. The entire coil must lie in
regular loops and must not be twisted.
When working with the fl exible discharge tube,
the accuracy and coeffi cient of variation indicated in
the Operating Manual are only obtained for volumes
≥ 2 ml and by smooth and steady operation, gently
approaching the upper and lower stops.
Rinse the tube carefully! Do not dismantle!
Hinweis:
Die maximale Dehnungslänge der Schlauchwendel
beträgt 800 mm. Die Schlauchwendel soll ordentlich
in Schlaufen liegen und darf nicht verdreht sein. Die
in der Gebrauchsanleitung angegebenen Werte für
Rich tig keit und Variationskoeffi zient werden in Verbindung mit dem Dosierschlauch nur dann erreicht,
wenn Volumina ≥ 2 ml dispensiert und oberer und
unterer Anschlag sanft und ruckfrei angefahren
werden. Zum Reinigen den Schlauch spülen.
Nicht zerlegen!
Artisan Technology Group - Quality Instrumentation ... Guaranteed | (888) 88-SOURCE | www.artisantg.com
– 19 –
Page 21
Connecting drying tube (optional)
– 20 –
Trockenrohr montieren (optional)
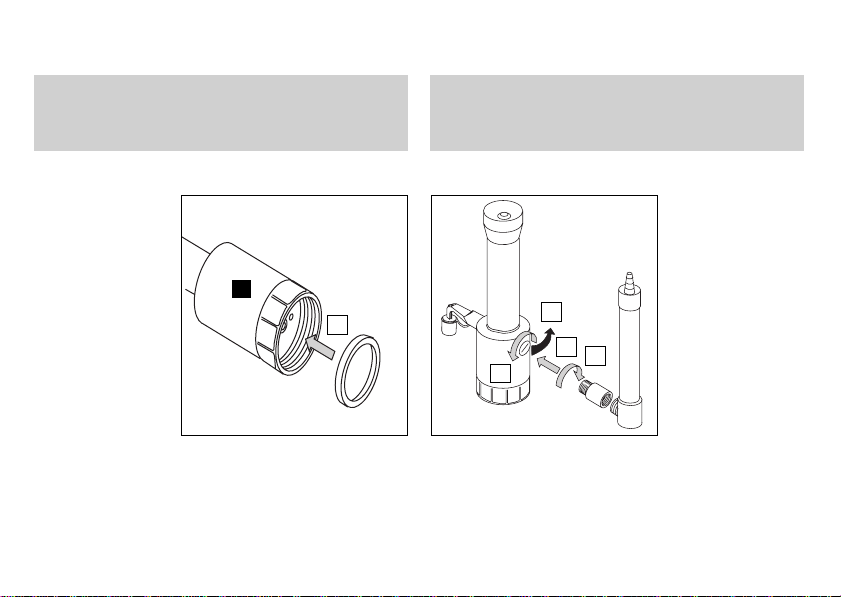
Note:
The screwthreads of the bottle and/or the threaded
adapter should be sealed with PTFE tape.
M
1.
Artisan Technology Group - Quality Instrumentation ... Guaranteed | (888) 88-SOURCE | www.artisantg.com
Hinweis:
Gewinde des Trockenrohrs, der Flasche und/oder
des Gewindeadapters mit PTFE-Band dichten.
3.
4.
2.
5.
Page 22

Cleaning
The instrument must be cleaned in the following
situations to assure correct operation:
– if the piston becomes diffi cult to move
– after dispensing liquids which form deposits
– before changing the reagent
– prior to long term storage
– should liquid have accumulated in the
closure cap
– prior to sterilization
– before replacing the valves
Reinigung
Damit eine einwandfreie Funktion gewährleistet ist,
muss das Gerät in folgenden Fällen gereinigt werden:
– wenn der Kolben schwergängig wird
– nach Dosieren von Flüssigkeiten, die Ablagerungen
bilden
– vor Reagenzwechsel
– vor längerer Lagerung
– wenn sich Flüssigkeit in der Verschlusskappe
angesammelt hat
– vor dem Autoklavieren
– vor Ventilaustausch
Warning!
Follow all Safety Instructions (see pages 4, 5). The
glass cylinder, valves, fi lling and discharge tubes
contain reagent. Point the valves and tube openings
away from your body. Wear protective clothing, eye
protection and appropriate hand protection.
Note:
Never change the pistons of the instruments!
Artisan Technology Group - Quality Instrumentation ... Guaranteed | (888) 88-SOURCE | www.artisantg.com
Warnung!
Alle Sicherheitsbestimmungen befolgen (s. S. 4, 5).
Glaszylinder, Ventile, Ansaugrohr und Dosierkanüle
sind mit Reagenz gefüllt. Öffnungen von Ansaugrohr, Dosierkanüle und Ventilen niemals auf den
Körper richten. Schutzkleidung, Augenschutz und
ausreichenden Handschutz tragen.
Hinweis:
Die Kolben der Geräte dürfen nicht vertauscht
werden!
– 21 –
Page 23
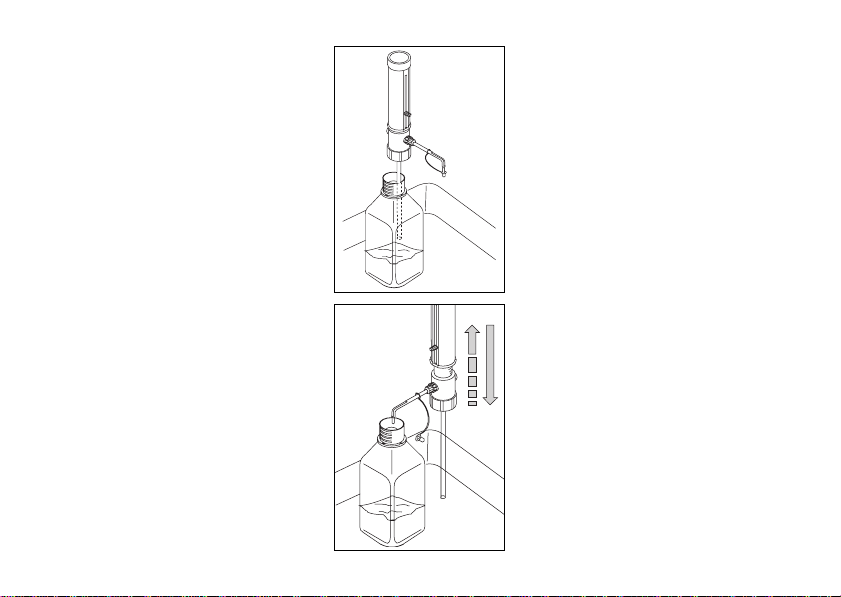
1. Push on the closure cap.
2. Empty and unscrew the instrument
from the bottle and lift the instrument
so that the fi lling tube is out of the
liquid but still in the bottle.
3. Carefully tap the fi lling tube against
the bottle from the inside so that the
reagent runs back into the bottle.
– 22 –
1. Verschlusskappe aufstecken.
2. Gerät entleeren und von der Flasche
abschrauben und so weit abheben,
bis sich das Ansaugrohr nicht mehr
im Reagenz, aber noch in der Flasche
befi ndet.
3. Ansaugrohr vorsichtig innen gegen die
Flasche klopfen, damit das Reagenz
herausläuft.
4. Remove the closure cap, and dispense
the remaining reagent into the bottle
by repeated piston operation.
5. Mount the instrument onto another
bottle fi lled with an appropriate cleaning solution.
6. Flush the instrument.
7. Empty the bottle, fl ush it and fi ll it
with water. Repeat step 6 and 7.
8. Empty the instrument.
Artisan Technology Group - Quality Instrumentation ... Guaranteed | (888) 88-SOURCE | www.artisantg.com
4. Verschlusskappe abziehen, restliches
Reagenz durch wiederholtes Dosieren
in die Flasche zurück dosieren.
5. Gerät auf andere Flasche, gefüllt mit
geeignetem Reinigungsmittel, aufschrauben.
6. Gerät spülen.
7. Flasche entleeren, spülen und mit
Wasser füllen. Vorgang 6 und 7
wiederholen.
8. Gerät entleeren.
Page 24
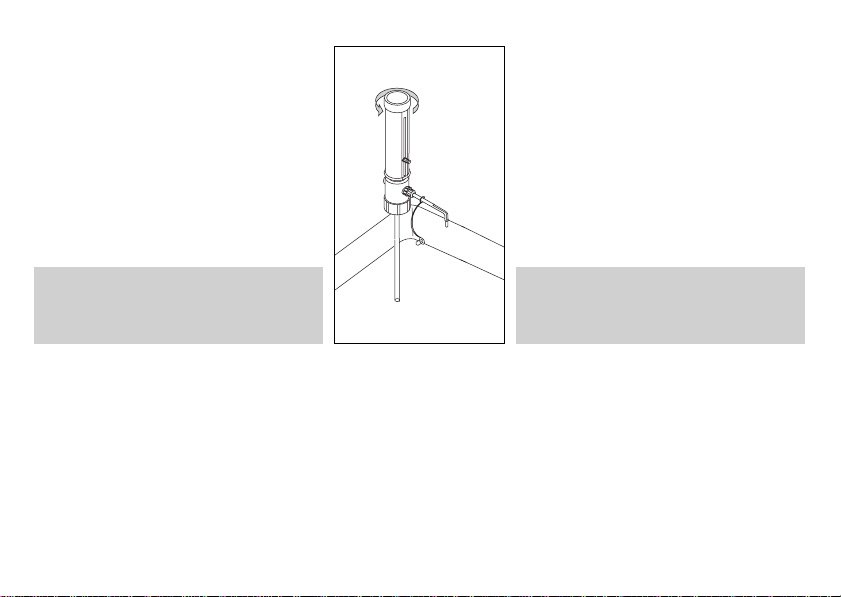
9. Unscrew the piston seat (A).
10. Carefully pull the piston (O) out of the
glass cylinder (N) by pulling on the
piston seat only.
11. Carefully remove deposits at the edge
of the glass cylinder with a screw
driver. Clean piston and cylinder with
a bottle-brush.
12. Carefully reassemble the instrument
in the reverse order. Flush instrument
with distilled water.
9. Kolbenlager (A) abschrauben.
10. Kolben (O) vorsichtig am Kolbenlager
aus dem Glaszylinder (N) herausziehen.
11. Ablagerungen am Rand des Dosierzylinders mit Schraubendreher vorsichtig entfernen. Kolben und Zylinder
mit Flaschenbürste reinigen.
12. Gerät in umgekehrter Reihenfolge
vorsichtig montieren. Gerät mit aqua
dest. spülen.
Note:
Insert the piston straight into the
cylinder, not at an angle.
Artisan Technology Group - Quality Instrumentation ... Guaranteed | (888) 88-SOURCE | www.artisantg.com
– 23 –
Hinweis:
Kolben ohne Verkanten senkrecht in
den Glaszylinder einführen.
Page 25
– 24 –
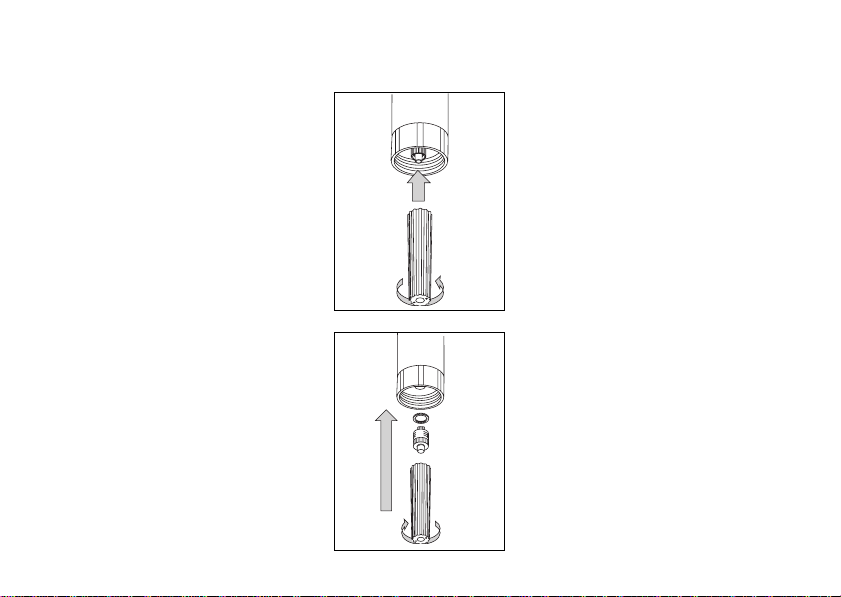
Cleaning/replacing
the fi lling valve
1. Follow all cleaning instructions
(see pages 21-23).
2. Remove the fi lling tube.
3. Unscrew the fi lling valve using the
mounting tool. Remove the valve with its
sealing washer. Make sure the sealing
washer does not remain in the valve
block.
4. Rinse the fi lling valve in the cleaning
solution, and clean with soft brush.
Should valve ball stick, push into fi lling
opening of valve with pointed instrument
(e.g., disposable pipette tip), and
release valve ball.
5. Screw the cleaned/new fi lling valve
together with its sealing washer into the
valve block and tighten it fi rmly using
the mounting tool.
Artisan Technology Group - Quality Instrumentation ... Guaranteed | (888) 88-SOURCE | www.artisantg.com
Ansaugventil reinigen/
austauschen
1. Reinigung durchführen
(s. S. 21-23).
2. Ansaugrohr abziehen.
3. Ansaugventil mit Montageschlüssel
herausschrauben, und Ventil zusammen mit dem Dichtring entfernen.
Sicherstellen, daß der Dichtring nicht
im Ventilblock zurückbleibt.
4. Ansaugventil in Reinigungslösung
spülen und mit weicher Bürste säubern.
Falls Ventilkugel festsitzt, mit spitzem
Gegenstand (z. B. Einmal-Pipettenspitze) in die Ansaugöffnung des Ventils
stoßen und Ventilkugel lösen.
5. Gereinigtes bzw. neues Ansaugventil
mit Dichtring einschrauben und mit
Montageschlüssel fest anziehen.
Page 26
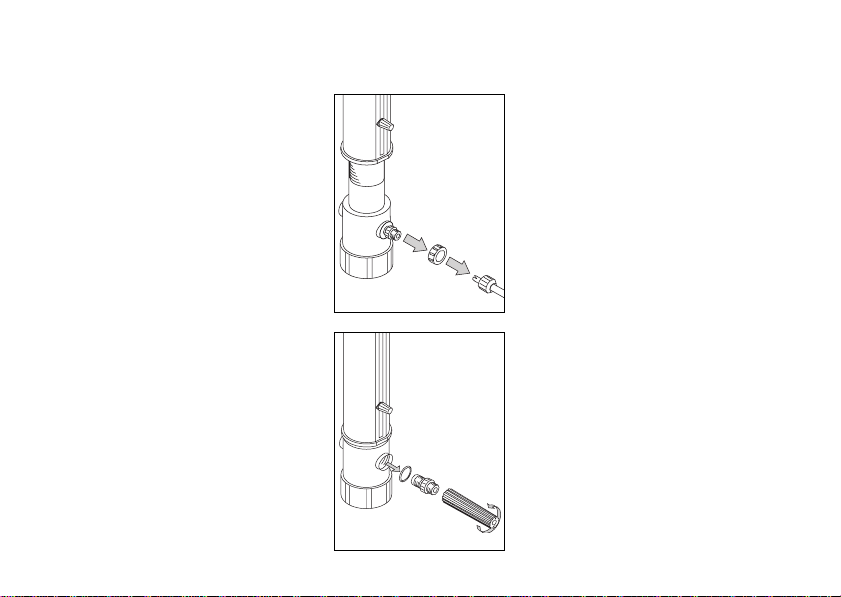
Cleaning/replacing
the discharge valve
1. Follow all cleaning instructions
(see pages 17-19).
2. Unscrew the discharge tube.
3. Remove valve locking ring.
4. Unscrew the discharge valve using the
mounting tool. Remove the valve with
its sealing washer. Make sure the
sealing washer does not remain in
the valve block.
5. Rinse the discharge valve in the cleaning solution, and clean with soft brush.
Should valve ball stick, push into fi lling
opening of valve with pointed instrument
(e.g., disposable pipette tip), and release
valve ball.
6. Screw the cleaned/new discharge valve
together with its sealing washer into the
valve block and tighten it fi rmly using
the mounting tool.
7. Slide on the valve locking ring making
sure the two prongs properly align with
the notches.
Ausstoßventil
reinigen/austauschen
1. Reinigung durchführen
(siehe S. 17-19).
2. Dosierkanüle abschrauben.
3. Verdrehsicherung abziehen.
4. Ausstoßventil mit Montageschlüssel
herausschrauben, und Ventil zusammen
mit dem Dichtring entfernen. Sicherstellen, dass der Dichtring nicht im
Ventilblock zurückbleibt.
5. Ausstoßventil in Reinigungslösung spülen und mit weicher Bürste säubern.
Falls Ventilkugel festsitzt, mit spitzem
Gegenstand (z. B. Einmal-Pipettenspitze) in die Ansaugöffnung des Ventils
stoßen und Ventilkugel lösen.
6. Gereinigtes bzw. neues Ausstoßventil
mit Dichtring einschrauben und mit
Montageschlüssel fest anziehen.
7. Verdrehsicherung aufschieben. Dabei
sicherstellen, dass die beiden Nasen
exakt in die Einbuchtungen greifen.
Artisan Technology Group - Quality Instrumentation ... Guaranteed | (888) 88-SOURCE | www.artisantg.com
– 25 –
Page 27
Autoclaving
This instrument withstands steam sterilization at
121 °C, 2 bar absolute (15 psi) for 20 minutes in
accordance with widely used guidelines. It is the user’s
responsibility to ensure effective autoclaving.
– 26 –
Autoklavieren
Das Gerät ist autoklavierbar (121 °C) bei 2 bar,
Einwirkzeit nach DIN te = 20 min. Die Wirksamkeit
des Autoklavierens ist vom Anwender jeweils selbst
zu prüfen.
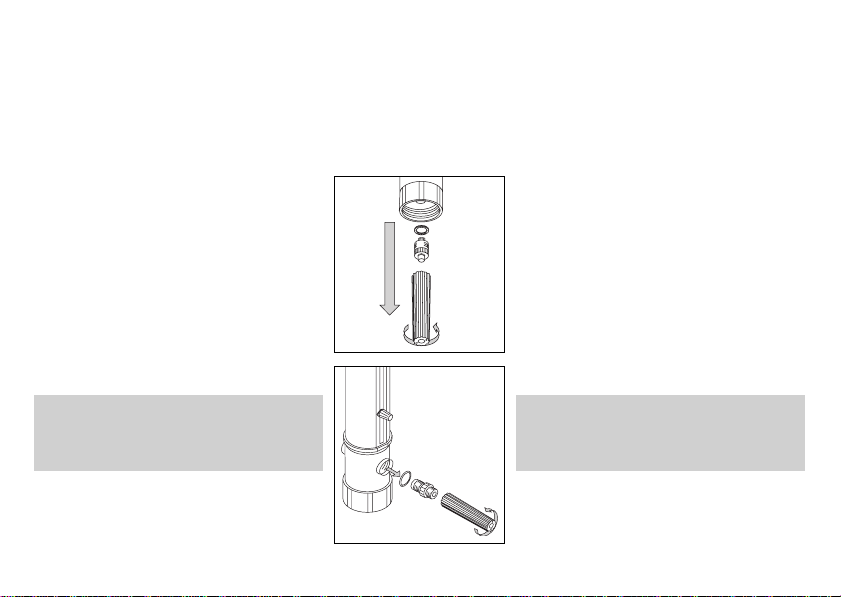
Preparation prior
to the fi rst autoclaving
– Unscrew fi lling valve (K) and discharge
valve (F).
– Replace built-in PTFE-rings (R) with the
supplied elastic O-rings made of FKM.
– Screw in the fi lling valve (K) and
discharge valve (F) and tighten them
fi rmly using the mounting tool.
Note:
Observe the reduced chemical
resistance of FKM!
Artisan Technology Group - Quality Instrumentation ... Guaranteed | (888) 88-SOURCE | www.artisantg.com
Vorbereitung vor dem ersten
Autoklavieren
– Ansaugventil (K) und Ausstoßventil (F)
herausschrauben.
– Eingebaute PTFE-Ringe (R) durch
mitgelieferte elastische O-Ringe aus
FKM ersetzen.
– Ansaugventil (K) und Ausstoßventil (F)
einschrauben und mit Montageschlüssel
fest anziehen.
Hinweis:
Eingeschränkte Chemikalienbeständigkeit von FKM beachten!
Page 28

1. Clean the instrument before sterilization
(see pages 21-23).
2. Remove the discharge tube (G) with removed
closure cap (H), fi lling tube (J), and drying tube (Q),
and put all parts on a towel. Avoid contact with
hot metal surfaces.
3. Lay the instrument with piston in down position
on the towel.
4. Autoclave all parts.
1. Reinigung durchführen (siehe S. 21-23).
2. Dosierkanüle (G) mit abgezogener Verschlusskappe
(H), Ansaugrohr (J) sowie Trockenrohr (Q)
abnehmen und Teile auf ein Tuch legen.
Kontakt mit heißen Metallfl ächen vermeiden.
3. Gerät mit niedergedrücktem Kolben auf das Tuch
legen.
4. Alle Teile autoklavieren.
Note:
Allow to cool down in the closed autoclave to avoid
deformation through too rapid cooling. After every
autoclaving, inspect all parts for deformities or
damage. If necessary, replace them. Do not reassemble the instrument until it has cooled down
to room temperature (cooling time approx. 2 hours).
Note:
Mounting tool can be steam sterilized at 121 °C.
Artisan Technology Group - Quality Instrumentation ... Guaranteed | (888) 88-SOURCE | www.artisantg.com
Hinweis:
Im geschlossenen Autoklaven abkühlen lassen,
um Verformungen durch zu schnelles Abkühlen zu
vermeiden. Nach jedem Autoklavieren alle Teile auf
Verformung oder Beschädigung überprüfen, ggf.
ersetzen. Gerät erst dann wieder zusammenbauen,
wenn es Raumtemperatur erreicht hat (Abkühlzeit
ca. 2 Stunden).
Hinweis:
Bei Bedarf kann auch der Montageschlüssel autoklaviert werden (121 °C).
– 27 –
Page 29

– 28 –
Checking the Volume
The accuracy and coeffi cient of variation of the
instrument are determined gravimetrically as follows:
– Set to the nominal volume.
– Dispense distilled H
– Weigh the dispensed quantity on an analytical
balance.
– Calculate the dispensed volume taking the
temperature into account.
– Perform at least 10 dispensing and weighing
operations.
– Calculate the accuracy (A%) and the coeffi cient
of variation (CV%) by means of the formular used
in statistical quality control. The proceeding is
described e.g., in DIN EN ISO 8655-6. Observe the
operating manual of the balance manufacturer and
O.
2
Volumen kontrollieren
Richtigkeit und Variationskoeffi zient des Geräts werden
gravimetrisch wie folgt ermittelt:
– Nennvolumen einstellen.
– H
O dest. dosieren.
2
– Dosierte Menge mit einer Analysenwaage wiegen.
– Dosiertes Volumen errechnen. Dabei die Temperatur
berücksichtigen.
– Mindestens 10 Dosierungen und Wägungen
durchführen.
– Richtigkeit (R%) und Variationskoeffi zient (VK%)
nach den Formeln der statistischen Qualitätskontrolle berechnen. Das Prüfverfahren ist z. B.
in DIN EN ISO 8655-6 beschrieben. Beachten Sie
die Gebrauchsanleitung des Waagenherstellers und
entsprechende Normen.
the corresponding standards.
Artisan Technology Group - Quality Instrumentation ... Guaranteed | (888) 88-SOURCE | www.artisantg.com
Page 30

Calculations (for the nominal volume)
Mean value x_ =
∑ x
n n = number of weighings
xi = results of weighings
i
Mean volume V_ = x_ · Z
Z = correction factor
(e. g. 1.0029 µl/mg at 20 °C, 1013 hPa)
Berechnung (für Nennvolumen)
Mittelwert x_ =
∑ x
n n = Anzahl der Wägungen
xi = Wäge-Ergebnisse
i
Mittleres Volumen V_ = x_ · Z
Z = Korrekturfaktor
(z. B. 1,0029 µl/mg bei 20 °C, 1013 hPa)
Accuracy
V_ - V
0
A% =
· 100 V0 = nominal volume
V
0
Standard deviation Coeffi cient of variation
s = Z ·
√
∑ (x1 - x_)
n - 1
2
CV% =
100 s
_
V
Artisan Technology Group - Quality Instrumentation ... Guaranteed | (888) 88-SOURCE | www.artisantg.com
Richtigkeit
V_ - V
R% =
V
Standardabweichung
s = Z ·
√
– 29 –
0
· 100 V0 = Nennvolumen
0
Variationskoeffi zient
2
VK% =
100 s
∑ (x1 - x_)
n - 1
_
V
Page 31

– 30 –
Trouble Shooting
Problem Possible cause Corrective action
Piston diffi cult to move - Formation of crystals, dirty - Stop dispensing immediately. Loose
Filling not possible - Volume adjusted to minimum setting
- Sticking fi lling valve - Clean the fi lling valve. If necessary
Instrument does not
dispense liquid
Air bubbles in the instrument - Reagent with high vapor pressure
Artisan Technology Group - Quality Instrumentation ... Guaranteed | (888) 88-SOURCE | www.artisantg.com
- Discharge tube closure cap
pushed on
- Discharge tube not fi rmly
connected or damaged
has been drawn in too quickly
- Seal not inserted, knurled locking
nuts not fi rmly connected
piston by circular motion, but do
not disassemble. Follow all cleaning
instructions (➤ p. 21-23).
- Set to required volume (➤ page 16).
replace the valve with sealing washer
(➤ page 24).
- Remove closure cap.
- Push on the closure cap. Hold the
piston in place, and push the original
manufacturer‘s discharge tube on
fi rmly (➤ page 11). Replace a de-
formed or damaged discharge tube
(➤ Accessories and Spare Parts).
- Slowly draw in reagent.
- Double check that seal (R) is in
place, and that the knurled locking
nuts at the discharge tube are fi rmly
seated and fi nger tight.
Page 32

- Air not expelled from the instrument - Priming the instrument (➤ page 14)
- Filling tube not fi rmly connected or
damaged
- Valves dirty, not fi rmly installed or
damaged
Dispensed volume is too low - Discharge tube not fi rmly connected
or damaged
- Filling tube not fi rmly connected or
damaged
- Valves not fi rmly installed or
damaged
- Sticking fi lling valve - Clean or replace discharge tube,
- Push the fi lling tube on fi rmly. If
necessary cut off approx. 1 cm
of tube at the upper end and reconnect it or replace fi lling tube.
- Cleaning procedure (➤ page 21-23).
Tighten the valves using the mounting tool. If necessary, replace the
valves and sealing washers.
- Push the original manufacturer‘s
tube on fi rmly (➤ page 11).
- Cleaning procedure (➤ page 21-
23). Push the fi lling tube on fi rmly.
If this does not suffi ce, cut off
approx. 1 cm of tube at the upper
end and re-connect it or replace
fi lling tube (➤ page 12).
- Clean the instrument (➤ page 21-
23). Tighten the valves using the
mounting tool, if necessary replace
the valves and sealing washers
(➤ page 24)
if necessary.
Artisan Technology Group - Quality Instrumentation ... Guaranteed | (888) 88-SOURCE | www.artisantg.com
– 31 –
Page 33

– 32 –
Störung – was tun ?
Störung Mögliche Ursachen Was tun?
Kolben schwergängig - Kristallablagerungen,
Verunreinigungen
Ansaugen nicht möglich - Volumeneinstellung am unteren
Anschlag
- Ansaugventil verklebt - Ansaugventil reinigen. Ggf. Ventil mit
Dosieren nicht möglich - Verschlusskappe aufgesteckt - Verschlusskappe abziehen.
- Dosierkanüle locker oder
beschädigt
Luftblasen werden angesaugt - Reagenz mit zu hohem Dampf-
druck zu schnell aufgezogen
- Dichtung nicht eingelegt,
Verschraubungen locker
Artisan Technology Group - Quality Instrumentation ... Guaranteed | (888) 88-SOURCE | www.artisantg.com
- Sofort aufhören zu dosieren. Kolben
durch Drehbewegungen lösen, jedoch
nicht demontieren. Reinigung durchführen (➤ S. 21-23).
- Gewünschtes Volumen einstellen
(➤ S. 16).
Dichtring ersetzen (➤ S. 24).
- Verschlusskappe aufstecken. Kolben
in seiner Position halten, und OriginalDosierkanüle richtig montieren
(➤ S. 11).
Deformierte oder beschlädigte
Dosierkanüle ersetzen (➤ Zubehör
und Ersatzteile.
- Reagenz langsam aufziehen.
- Überprüfen ob Dichtung (R) eingelegt ist und die Verschraubung der
Dosierkanüle bestmöglich von Hand
anziehen.
Page 34

- Gerät nicht entlüftet
- Ansaugrohr locker oder
beschädigt
- Ventile verschmutzt, locker oder
beschädigt
- Gerät entlüften (➤ S. 14).
- Ansaugrohr fest einschieben. Ggf.
ca. 1 cm abschneiden bzw. ersetzen.
- Reinigung durchführen (➤ S. 21-23).
Ventile mit Montageschlüssel festziehen, ggf. Ventile mit jeweiligem
Dichtring ersetzen (➤
S. 24, 25).
Dosiertes Volumen zu niedrig - Dosierkanüle locker oder
Artisan Technology Group - Quality Instrumentation ... Guaranteed | (888) 88-SOURCE | www.artisantg.com
beschädigt
- Ansaugrohr locker oder
beschädigt
- Ventile locker oder beschädigt
- Ansaugventil verklebt - Dosierkanüle reinigen, ggf. ersetzen.
– 33 –
- Original-Dosierkanüle richtig montieren
(➤ S. 11).
- Reinigung durchführen (➤ S. 21-23).
Ansaugrohr fest einschieben. Genügt
das nicht, ca. 1 cm am oberen Rohrende abschneiden, bzw. Ansaugrohr
ersetzen (➤ S. 12).
- Reinigung durchführen (➤
Ventile mit Montageschlüssel festziehen, ggf. Ventile mit jeweiligem
Dichtring ersetzen (➤ S. 24).
S.
21-23).
Page 35
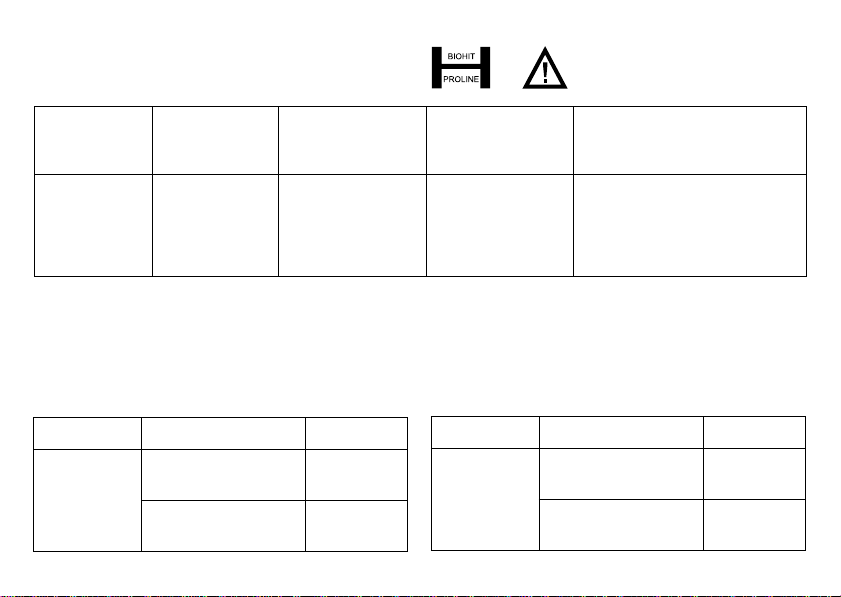
Technical Data / Technische Daten
Ordering Data / Bestelldaten
– 34 –
20 °C
EX
Volume
Volumen
ml
Graduation
Graduierung
ml
A*
R*
%
<
+
–
–
<
+
–
–
µl
CV*
VK*
%
<
–
<
–
Cat. No.
Best.-Nr.
µl
0.5 - 5 0.1 0.5 25 0.1 5 7230 45
1 - 10 0.2 0.5 50 0.1 10 7230 46
2.5 - 25 0.5 0.5 125 0.1 25 7230 47
5 - 50 1.0 0.5 250 0.1 50 7230 48
* Error limits (A = Accuracy, CV = Coeffi cient of variation) relative to
the nominal capacity (maximum volume) indicated on the instrument,
obtained at equal temperature (20 °C) of instrument, ambience and
dist. water, and with smooth operation.
Items supplied:
operating manual, 1 discharge tube, 1 mounting tool,
1 fi lling tube and adapters of PP of the following sizes:
Nominal vol.
0.5 - 5 GL 25, GL 28, GL 32,
1-10
Adapter, PP Filling tube
250 mm
GL 38, S40
2.5 - 25 GL 32, GL 38, S 40 500** mm
5-50
** 2 x 250 mm + Adapter
Artisan Technology Group - Quality Instrumentation ... Guaranteed | (888) 88-SOURCE | www.artisantg.com
* Fehlergrenzen (R = Richtigkeit, VK = Variationskoeffi zient) bezogen auf
das auf dem Gerät aufgedruckte Nennvolumen (= max. Volumen) bei
gleicher Temperatur (20 °C) von Gerät, Umgebung und aqua dest. sowie
gleichmäßiger, ruckfreier Handhabung.
Lieferumfang:
Gebrauchsanleitung, 1 Dosierkanüle, 1 Montageschlüssel
sowie 1 Ansaugrohr und PP-Adapter folgender Größe:
Nennvolumen
0,5 - 5 GL 25, GL 28, GL 32,
1-10
Adapter, PP Ansaugrohr
250 mm
GL 38, S40
2,5 - 25 GL 32, GL 38, S 40 500** mm
5-50
** 2 x 250 mm + Adapter
Page 36

Accessories and Spare Parts Zubehör und Ersatzteile
Adapter, Pack of 1.
Outer thread/
Bottle thread
Polypropylene
Cat. No.
ETFE
Cat. No.
GL
32/22 7215 34 –
32/25 7215 35 7215 42
32/28 7215 36 7215 43
32/30 7215 37 7215 44
45/32 7215 41 7215 47
45/38 7215 38 7215 45
45/S 40 7215 40 7215 46*
* PTFE
Outer thread/
size
Polypropylene
Cat. No.
GL 32/NS 19/26 7215 48
GL 32/NS 24/29 7215 49
GL 32/NS 29/32 7215 50
Artisan Technology Group - Quality Instrumentation ... Guaranteed | (888) 88-SOURCE | www.artisantg.com
Adapter, Verpackungseinheit, 1 Stück.
Außen-Gewinde/
Flaschengewinde
Polypropylen
Best.-Nr.
GL
32/22 7215 34 –
32/25 7215 35 7215 42
32/28 7215 36 7215 43
32/30 7215 37 7215 44
45/32 7215 41 7215 47
45/38 7215 38 7215 45
45/S 40 7215 40 7215 46*
Außengewinde/
Schliffgröße
Polypropylen
Best.-Nr.
GL 32/NS 19/26 7215 48
GL 32/NS 24/29 7215 49
GL 32/NS 29/32 7215 50
– 35 –
ETFE
Best.-Nr.
* PTFE
Page 37

Discharge tube
FEP, complete with tube support, locking nut,
and closure cap. Pack of 2.
for nominal volume/size/length Cat. No.
5, 10 ml bent, 80 mm 7215 53
25, 50 ml bent, 120 mm 7215 54
25, 50 ml
25, 50 ml bent, 200 mm
bent, 120 mm
drawn to fi ne tip
7215 55
7215 56
– 36 –
Dosierkanülen
FEP, komplett mit Kanülenhalterung, Überwurfmutter
und Verschlusskappe. Verpackungseinheit 2 Stück.
für Nennvolumen/Größe/Länge Best.-Nr.
5, 10 ml gebogen, 80 mm 7215 53
25, 50 ml gebogen, 120 mm 7215 54
25, 50 ml
25, 50 ml gebogen, 200 mm 7215 56
gebogen, 120 mm
Spitze ausgezogen
7215 55
Filling tubes
with adapter to connect 2 fi lling tubes,
FEP. Pack of 2.
Length x outer diam., mm Cat. No.
250 x 6.9 7215 59
335 x 6.9 7215 60
390 x 6.9 7215 61
Flexible discharge tube
PTFE, coiled, length 800 mm, with safety handel.
Pack of 1.
Nominal volume, ml Cat. No.
5, 10 7216 33
25, 50 7216 34
Artisan Technology Group - Quality Instrumentation ... Guaranteed | (888) 88-SOURCE | www.artisantg.com
Ansaugrohre
mit Adapter zum verbinden von 2 Ansaugrohren,
FEP. Verpackungseinheit 2 Stück.
Länge x A-Ø, mm Best.-Nr.
250 x 6.9 7215 59
335 x 6.9 7215 60
390 x 6.9 7215 61
Flexibler Dosierschlauch
PTFE, gewendelt, 800 mm lang, mit Handgriff.
Verpackungseinheit 1 Stück.
Nennvolumen, ml Best.-Nr.
5, 10 7216 33
25, 50 7216 34
Page 38

For all following items:
Pack of 1.
Für folgende Teile:
Verpackungseinheit 1 Stück.
Drying tube Cat. No. 7215 67
Valve locking ring
for discharge tube
Nominal volume 5-10 ml
Nominal volume 25-50 ml
Filling valve with
sealing washer
Nominal volume 5-10 ml
Nominal volume 25-50 ml
Discharge valve with
sealing washer
Nominal volume 5-10 ml
Nominal volume 25-50 ml
Seals for fi lling valve and
discharge valve, pack of 6.
PTFE
FKM (Fluoro elastomer),
only for sterile applications
Mounting tool Cat. No. 7215 79
Airvent cap Cat. No. 7215 78
Artisan Technology Group - Quality Instrumentation ... Guaranteed | (888) 88-SOURCE | www.artisantg.com
Cat. No. 7215 70
Cat. No. 7215 71
Cat. No. 7215 72
Cat. No. 7215 73
Cat. No. 7215 74
Cat. No. 7215 75
Cat. No. 7215 84
Cat. No. 7215 83
Trockenrohr Best.-Nr. 7215 67
Verdrehsicherung
für Ausstoßventil
Nennvolumen 5-10 ml
Nennvolumen 25-50 ml
Ansaugventil
mit Dichtring
Nennvolumen 5-10 ml
Nennvolumen 25-50 ml
Ausstoßventil
mit Dichtring
Nennvolumen 5-10 ml
Nennvolumen 25-50 ml
Dichtung für Ansaug- und
Ausstoßventil, Verp.-Einh. 6.
PTFE
FKM (Fluor-Kautschuk),
nur für Sterilanwendungen
Montageschlüssel Best.-Nr. 7215 79
Blindstopfen Best.-Nr. 7215 78
– 37 –
Best.-Nr. 7215 70
Best.-Nr. 7215 71
Best.-Nr. 7215 72
Best.-Nr. 7215 73
Best.-Nr. 7215 74
Best.-Nr. 7215 75
Best.-Nr. 7215 84
Best.-Nr. 7215 83
Page 39

Return for Repair
– 38 –
Zur Reparatur einsenden
Attention:
For safety reasons only clean/decontaminated
instruments can be checked/repaired.
– Therefore: Clean and decontaminate the instrument
carefully.
– Complete the “Declaration on the Absence of Health
Hazards” and send the instrument to your local Biohit
representative and describe
– the nature of the problem
– the liquids dispensed.
Return shipment has to be effected at the risk and cost
of the sender.
Artisan Technology Group - Quality Instrumentation ... Guaranteed | (888) 88-SOURCE | www.artisantg.com
Achtung:
Aus Sicherheitsgründen können nur saubere/
dekontaminierte Geräte geprüft/repariert werden.
– Daher: Gerät gründlich reinigen/dekontaminieren!
– „Erklärung zur gesundheitlichen Unbedenklichkeit“
ausfüllen und gemeinsam mit dem Gerät an einen
Biohit-Fachhändler in Ihrer Nähe senden unter
Angaben von:
– Art der Störung
– dosiertem Medium.
Der Rücktransport geschieht auf Gefahr und Kosten
des Einsenders.
Page 40

Warranty
As provided by law, any and all warranties are null
and void if the product has been misused, modifi ed
or repaired by unauthorized personnel, if the defects
are caused by negligence (instruction manual,
maintenance) or by normal wear and tear. Use
only original manufacturer’s accessory/spare parts.
For conditions and extent of warranty refer to our
General Conditions of Sale.
Mängelhaftung
Abnutzung infolge des Gebrauchs sowie Defekte oder
Schäden, die auf unsachgemäßer Behandlung, Modifi kation oder nichtautorisierte Reparatur, Nachlässigkeit
(Nichtbeachtung der Gebrauchs anleitung, mangelnde
Wartung) oder auf Einbau fremder Zubehör- bzw.
Ersatzteile beruhen, sind nach dem Gesetz keine
Sachmängel.
Beachten Sie zur Verjährung und zum Umfang von
Mängelansprüchen unsere aktuellen Allgemeinen
Geschäftsbedingungen.
Subject to technical modifi cation without notice. Errors
excepted.
Artisan Technology Group - Quality Instrumentation ... Guaranteed | (888) 88-SOURCE | www.artisantg.com
Technische Änderungen, Irrtum und Druckfehler
vorbehalten.
– 39 –
Page 41
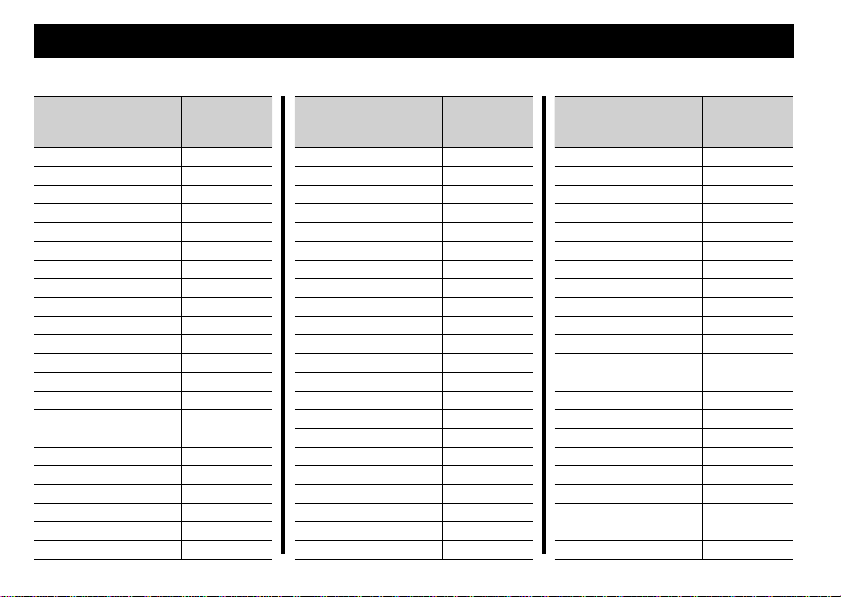
Dispenser selection chart
Reagent BIOHIT
Acetaldehyde +
Acetic acid (glacial), 100% +
Acetic acid, 96% +
Acetone +
Acetonitrile +
Acetylacetone +
Acrylic acid +
Acrylonitrile +
Adipic acid +
Allyl alcohol +
Aluminium chloride +
Amino acids +
Ammonium chloride +
Ammonium fluoride +
Ammonium hydroxide, 30%
(Ammonia)
Ammonium sulfate +
n-Amyl acetate +
Amyl alcohol (Pentanol) +
Aniline +
Barium chloride +
Benzaldehyde +
PROLINE®
Prospenser
+
Artisan Technology Group - Quality Instrumentation ... Guaranteed | (888) 88-SOURCE | www.artisantg.com
Reagent BIOHIT
Chlorobenzene +
Chlorobutane +
Chromic acid, 50% +
Chromosulfuric acid +
Copper sulfate +
Cumene (Isopropyl benzene) +
Cyclohexanone +
Decane +
1-Decanol +
Dibenzylether +
Dichlorobenzene +
Diethanolamine +
Diethylamine +
1.2 Diethylbenzene +
Diethylene glycol +
Dimethyl sulfoxide (DMSO) +
Dimethylaniline +
Dimethylformamide (DMF) +
Diphenyl ether +
Ethanol +
Ethanolamine +
Ethyl acetate +
PROLINE®
Prospenser
– 40 –
Reagent BIOHIT
Monochloroacetic acid +
Nitric acid, 30% +
Nitrobenzene +
Oleic acid +
Oxalic acid +
Perchloric acid +
Petroleum +
Phenol +
Phenylethanol +
Phenylhydrazine +
Phosphoric acid, 85% +
Phosphoric acid, 85% +
Sulphuric acid, 98%, 1:1
Piperidine +
Potassium chloride +
Potassium dichromate +
Potassium hydroxide +
Potassium permanganate +
Propionic acid +
Propylene glycol
(Propanediol)
Pyridine +
PROLINE®
Prospenser
+
+
Page 42

Benzene (Benzol) +
Benzoyl chloride +
Benzyl alcohol +
Benzylamine +
Benzylchloride +
Boric acid, 10% +
Bromobenzene +
Bromonaphthalene +
Butanediol +
1-Butanol +
n-Butyl acetate +
Butyl methyl ether +
Butylamine +
Butyric acid +
Calcium carbonate +
Calcium chloride +
Calcium hydroxide +
Calcium hypochlorite +
Chloro naphthalene +
Chloroacetalaldehyde, 45% +
Chloroacetic acid +
Chloroacetone +
Ethyl methyl ketone +
Formaldehyde, 40% +
Formamide +
Glycerol +
Glycol (Ethylene glycol) +
Glycolic acid, 50% +
Hexanoic acid +
Hexanol +
Hydriodic acid +
Hydrochloric acid, 20% +
Isoamyl alcohol +
Isobutanol (Isobutyl alcohol) +
Isopropanol (2-Propanol) +
Isopropyl ether +
Lactic acid +
Methanol +
Methoxybenzene +
Methyl benzoate +
Methyl butyl ether +
Methyl formate +
Methyl propyl ketone +
Mineral oil (Engine oil) +
The BIOHIT PROLINE® Prospenser is not designed for
use with Hydrofl uoric acid (HF). Consults the "Operating
Exclusions" and "Operating Limitations" sections of the
Operating Manual (see pages 9, 10).
Artisan Technology Group - Quality Instrumentation ... Guaranteed | (888) 88-SOURCE | www.artisantg.com
– 41 –
Pyruvic acid +
Salicyl acid +
Salicylaldehyde +
Scintilation fluid +
Silver acetate +
Silver nitrate +
Sodium acetate +
Sodium chloride +
Sodium dichromate +
Sodium fluoride +
Sodium hydroxide, 30% +
Sodium hypochlorite +
Sulfuric acid, 98% +
Tartaric acid +
Tetramethylammonium
hydroxide
Triethanolamine +
Triethylene glycol +
Urea +
Zinc chloride, 10% +
Zinc sulfate, 10% +
The above recommendations reflect testing
completed prior to publication. Always follow
instructions in the operating manual of the instrument as well as the reagent manufacturer's
specifications. In addition to these chemicals, a
variety of organic and inorganic saline solutions
(e.g., biological buffers), biological detergents
and media for cell culture can be dispensed.
Should you require information on chemicals not
listed, please feel free to contact BIOHIT.
Status as of: 0906/1
+
Page 43
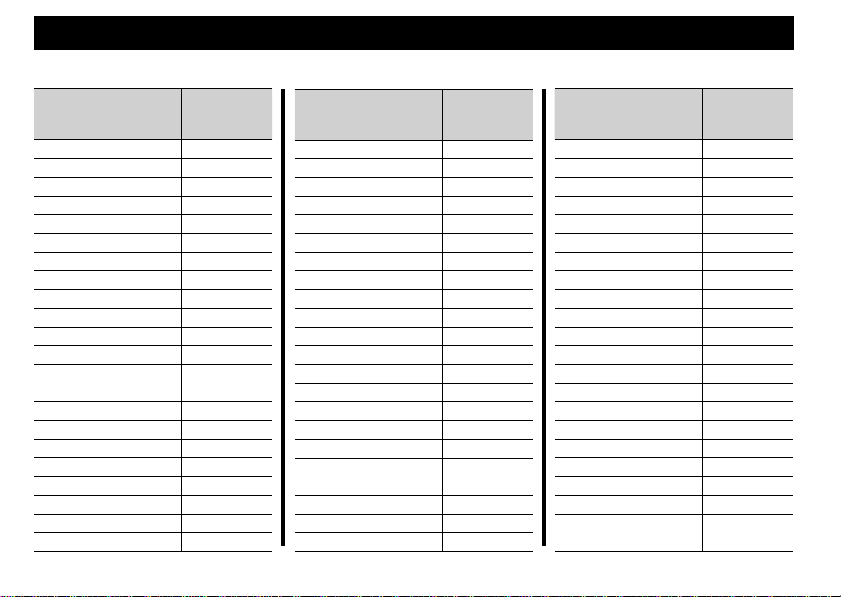
Leitfaden zur Geräteauswahl
Medium BIOHIT
Acetaldehyd +
Aceton +
Acetonitril +
Acetylaceton +
Acrylnitril +
Acrylsäure +
Adipinsäure +
Allylalkohol +
Aluminiumchlorid +
Aminosäuren +
Ammoniumchlorid +
Ammoniumfluorid +
Ammoniumhydroxid, 30%
(Ammoniak)
Ammoniumsulfat +
n-Amylacetat +
Amylalkohol (Pentanol) +
Anilin +
Bariumchlorid +
Benzaldehyd +
Benzoesäuremethylester +
Benzol +
PROLINE®
Prospenser
+
Artisan Technology Group - Quality Instrumentation ... Guaranteed | (888) 88-SOURCE | www.artisantg.com
Medium BIOHIT
Chlornaphtalin +
Chromsäure, 50% +
Chromschwefelsäure +
Cumol (Isopropylbenzol) +
Cyclohexanon +
Decan +
1-Decanol +
Dibenzylether +
Dichlorbenzol +
Diethanolamin +
Diethylamin +
1,2 Diethylbenzol +
Diethylenglykol +
Dimethylanilin +
Dimethylformamid (DMF) +
Dimethylsulfoxid (DMSO) +
Diphenylether +
Essigsäure, 100%
(= Eisessig)
Essigsäure, 96% +
Ethanol +
Ethanolamin +
PROLINE®
Prospenser
– 42 –
+
Medium BIOHIT
Methylformiat +
Methylpropylketon +
Milchsäure +
Mineralöl (Motoröl) +
Monochloressigsäure +
Natriumacetat +
Natriumchlorid +
Natriumdichromat +
Natriumfluorid +
Natriumhypochlorit +
Natronlauge, 30% +
Nitrobenzol +
Ölsäure +
Oxalsäure +
Perchlorsäure +
Petroleum +
Phenol +
Phenylethanol +
Phenylhydrazin +
Phosphorsäure, 85% +
Phosphorsäure, 85% +
Schwefelsäure, 98%, 1:1
PROLINE®
Prospenser
+
Page 44

Benzoylchlorid +
Benzylalkohol +
Benzylamin +
Benzylchlorid +
Borsäure, 10% +
Brenztraubensäure +
Brombenzol +
Bromnaphthalin +
Butandiol +
1-Butanol +
Buttersäure +
n-Butylacetat +
Butylamin +
Butylmethylether +
Calciumcarbonat +
Calciumchlorid +
Calciumhydroxid +
Calciumhypochlorit +
Chloracetaldehyd, 45% +
Chloraceton +
Chlorbenzol +
Chlorbutan +
Chloressigsäure +
Der BIOHIT PROLINE® Prospenser ist nicht zum Dosieren
von Flusssäure (HF) geeignet. "Einsatzausschlüsse" und
"Einsatzbeschränkungen" beachten (siehe Seite 9, 10).
Artisan Technology Group - Quality Instrumentation ... Guaranteed | (888) 88-SOURCE | www.artisantg.com
Ethylacetat +
Ethylmethylketon +
Formaldehyd, 40% +
Formamid +
Glykol (Ethylenglykol) +
Glykolsäure, 50% +
Glyzerin +
Harnstoff +
Hexanol +
Hexansäure +
Iodwasserstoffsäure +
Isoamylalkohol +
Isobutanol (Isobutylalkohol) +
Isopropanol (2-Propanol) +
Isopropylether +
Kaliumchlorid +
Kaliumdichromat +
Kaliumhydroxid +
Kaliumpermanganat +
Kupfersulfat +
Methanol +
Methoxybenzol +
Methylbutylether +
– 43 –
Piperidin +
Propionsäure +
Propylenglykol (Propandiol) +
Pyridin +
Salicylaldehyd +
Salicylsäure +
Salpetersäure, 30% +
Salzsäure, 20% +
Schwefelsäure, 98% +
Silberacetat +
Silbernitrat +
Szintillations-Cocktail +
Tetramethylammoiumhydroxid
Triethanolamin +
Triethylenglycol +
Weinsäure +
Zinkchlorid, 10% +
Zinksulfat, 10% +
Diese Tabelle ist sorgfältig geprüft und basiert
auf dem derzeitigen Kenntnisstand. Stets die
Gebrauchsanweisung des Gerätes sowie die
Angaben der Reagenzienhersteller beachten.
Zusätzlich zu den oben aufgeführten Chemikalien können eine Vielzahl organischer oder
anorganischer Salzlösungen (z. B. biologische
Puffer), biologische Detergenzien sowie Medien für die Zellkultur dosiert werden. Sollten
Sie Aussagen zu Chemikalien benötigen, die
nicht in der Liste genannt sind, können Sie
sich gerne an BIOHIT wenden.
Stand: 0906/1
+
Page 45

Artisan Technology Group is your source for quality
new and certied-used/pre-owned equipment
• FAST SHIPPING AND
DELIVERY
• TENS OF THOUSANDS OF
IN-STOCK ITEMS
• EQUIPMENT DEMOS
• HUNDREDS OF
MANUFACTURERS
SUPPORTED
• LEASING/MONTHLY
RENTALS
• ITAR CERTIFIED
SECURE ASSET SOLUTIONS
SERVICE CENTER REPAIRS
Experienced engineers and technicians on staff
at our full-service, in-house repair center
Instra
Remotely inspect equipment before purchasing with
our interactive website at www.instraview.com
Contact us: (888) 88-SOURCE | [email protected] | www.artisantg.com
SM
REMOTE INSPECTION
View
WE BUY USED EQUIPMENT
Sell your excess, underutilized, and idle used equipment
We also offer credit for buy-backs and trade-ins
www.artisantg.com/WeBuyEquipment
LOOKING FOR MORE INFORMATION?
Visit us on the web at www.artisantg.com for more
information on price quotations, drivers, technical
specications, manuals, and documentation
 Loading...