


950-440
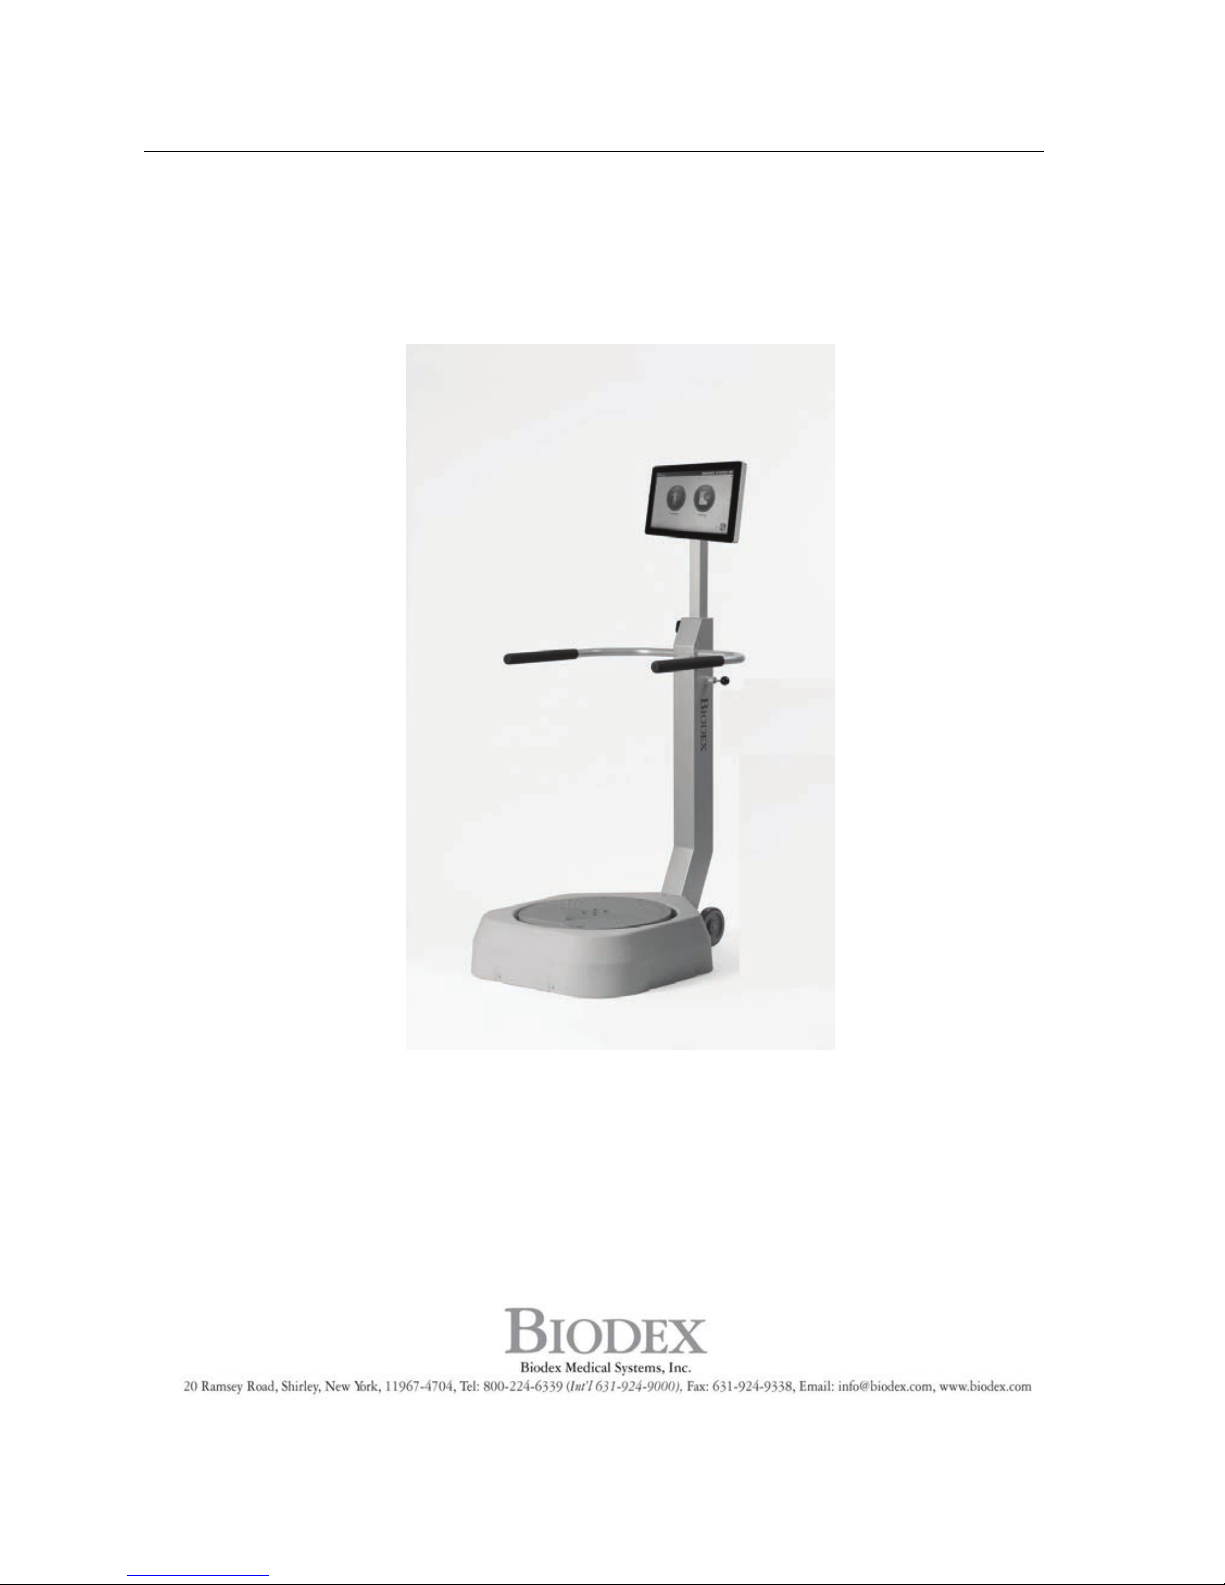
BALANCE SYSTEM SD (with v4.X software)
OPERATION/SERVICE MANUAL
950-440
950-441
950-444
FN: 17-100 Rev B 5/17
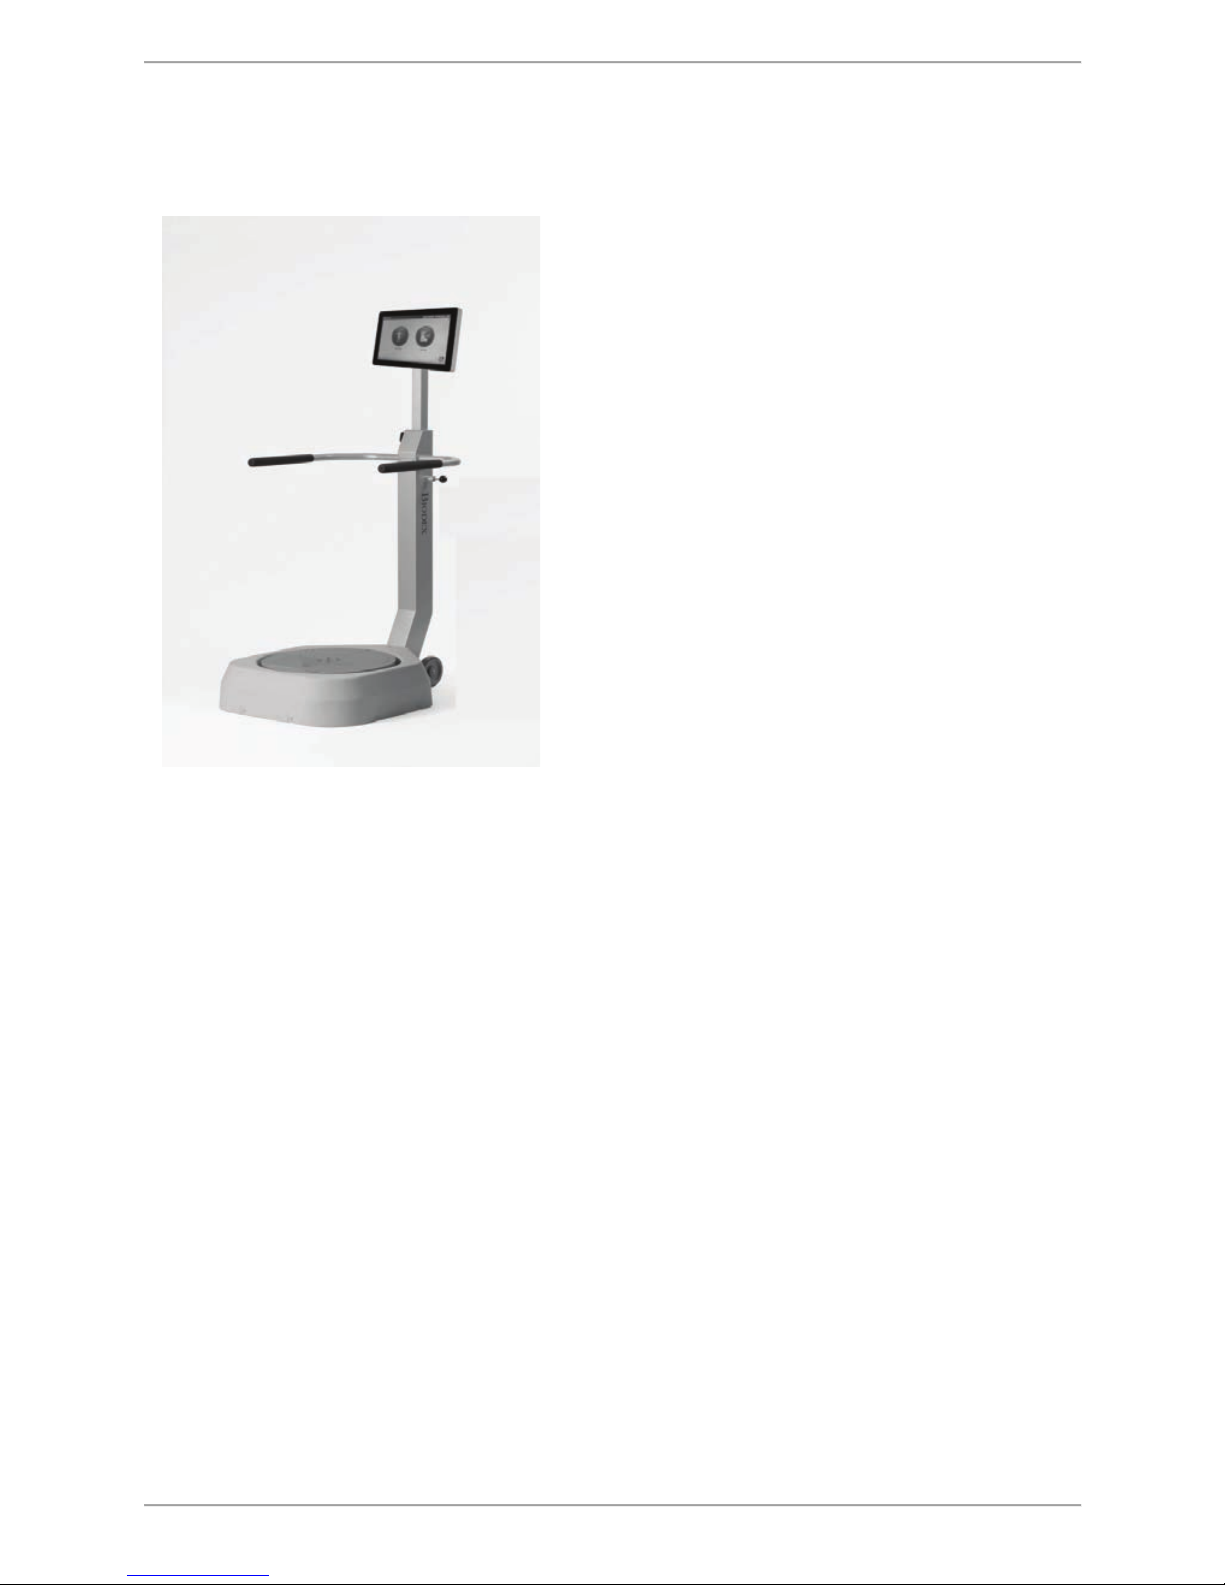
BALANCE SYSTEM SD (with v4.X software)
This manual covers installation and operation procedures for the following products:
950-440 System, Balance SD, 115 VAC
950-441 System, Balance SD, 230 VAC
950-444 System, Balance SD, 100 VAC
2 Biodex Medical Systems, Inc. © 2017

Table of Contents
Definition of Symbols ................................................................................................................ 6!
Product Certifications and Classifications .................................................................................. 7!
Before Proceeding ..................................................................................................................... 8!
Important Safety Information .................................................................................................... 8!
Biodex Warranty ...................................................................................................................... 10!
1.! Introduction ...................................................................................................................... 13!
2.! Assembly and Installation .................................................................................................. 14!
Printer Installation ....................................................................................................... 14!
Parts and Adjustments ................................................................................................. 14!
Power-up ..................................................................................................................... 15!
Power-down ................................................................................................................. 15!
Connecting Components ............................................................................................. 16!
3.! Clinical Considerations ...................................................................................................... 18!
General Clinical Considerations ................................................................................... 18!
4.! Applications of Body Weight Support Devices .................................................................... 19!
The Biodex NxStep Unweighing System ........................................................................ 19!
The Biodex FreeStep SAS ............................................................................................. 20!
5.! Getting Started .................................................................................................................. 21!
Patient Setup Information Screen ................................................................................. 22!
Patient Setup Information Screen Parameters ............................................................... 23!
The Select Patient Screen ............................................................................................. 24!
Patient Setup Screen with optional Parameters ............................................................. 25!
The Additional Information Screen ............................................................................... 26!
The Diagnostic Information Screen .............................................................................. 27!
The G-Code Calculator Options Screen ......................................................................... 27!
6.! Training Modes ................................................................................................................. 28!
Percent Weight Bearing Training .................................................................................. 28!
Weight Shift Training ................................................................................................... 31!
Motor Control Training ................................................................................................ 35!
Maze Control Training ................................................................................................. 37!
Random Control Training ............................................................................................. 39!
7.! Testing Modes ................................................................................................................... 42!
Sensory Integration Tests ............................................................................................ 43!
Clinical Test of Sensory Integration and Balance – CTSIB or m-CTSIB (Modified CTSIB) .. 44!
BESS Test ..................................................................................................................... 48!
Balance System SD (with v4.X software) 3

Limits of Stability (LOS) Test ........................................................................................ 50!
Postural Stability Test .................................................................................................. 53!
Motor Control Test ...................................................................................................... 56!
Bilateral Comparison Test ............................................................................................ 59!
Fall Risk Test ............................................................................................................... 62!
8.! System Utilities .................................................................................................................. 65!
Reports ........................................................................................................................ 65!
View Test Results and Print Report ............................................................................... 66!
View and Print Progress Report .................................................................................... 75!
Configuration .............................................................................................................. 79!
System Configuration .................................................................................................. 79!
Balance System SD Configuration ................................................................................. 81!
Create, Save, and Recall Custom Protocols ................................................................... 84!
Create, Save, and Recall Custom Sensory Tests ............................................................ 86!
Deleting Patient Files ................................................................................................... 90!
Printing and Editing Stored Results .............................................................................. 91!
Exporting Patient Data ................................................................................................. 92!
Importing Patient Data ................................................................................................. 93!
System Maintenance .................................................................................................... 94!
Restore from USB ......................................................................................................... 96!
9.! Software Updates .............................................................................................................. 98!
10.!Clinical Codes and Normative Data .................................................................................... 99!
ICD-10 (ICD-10-CM) ..................................................................................................... 99!
G-Codes ..................................................................................................................... 100!
Sample Reports with G-Code – Percent Weight Bearing Training ................................. 104!
Sample Reports with G-Code – CTSIB/m-CTSIB Test .................................................... 105!
Normative Data .......................................................................................................... 109!
Fall Risk Test Normative Data .................................................................................... 110!
11.!System Specifications ...................................................................................................... 113!
12.!Maintenance .................................................................................................................... 114!
Cleaning Instructions ................................................................................................. 114!
General Maintenance Procedures ............................................................................... 114!
13.!Electromagnetic Compatibility ......................................................................................... 115!
Conformance to Standards ........................................................................................ 115!
Accompanying EMC Documents ................................................................................. 115!
List of Cable Accessories ........................................................................................... 115!
Declaration of Conformity .......................................................................................... 116!
Recommended Separation Distances .......................................................................... 118!
4 Biodex Medical Systems, Inc. © 2017

Operating Temperature ............................................................................................. 118!
14.!Parts and Assembly Illustrations ...................................................................................... 119!
Appendix A: Data Definitions and Interpretation ................................................................... 125!
Appendix B: Interpretation of Reports ................................................................................... 128!
Appendix C: CSV file export (Balance SD and BioSway) .......................................................... 134!
Appendix D: Log Transformation .......................................................................................... 154!
Balance System SD (with v4.X software) 5
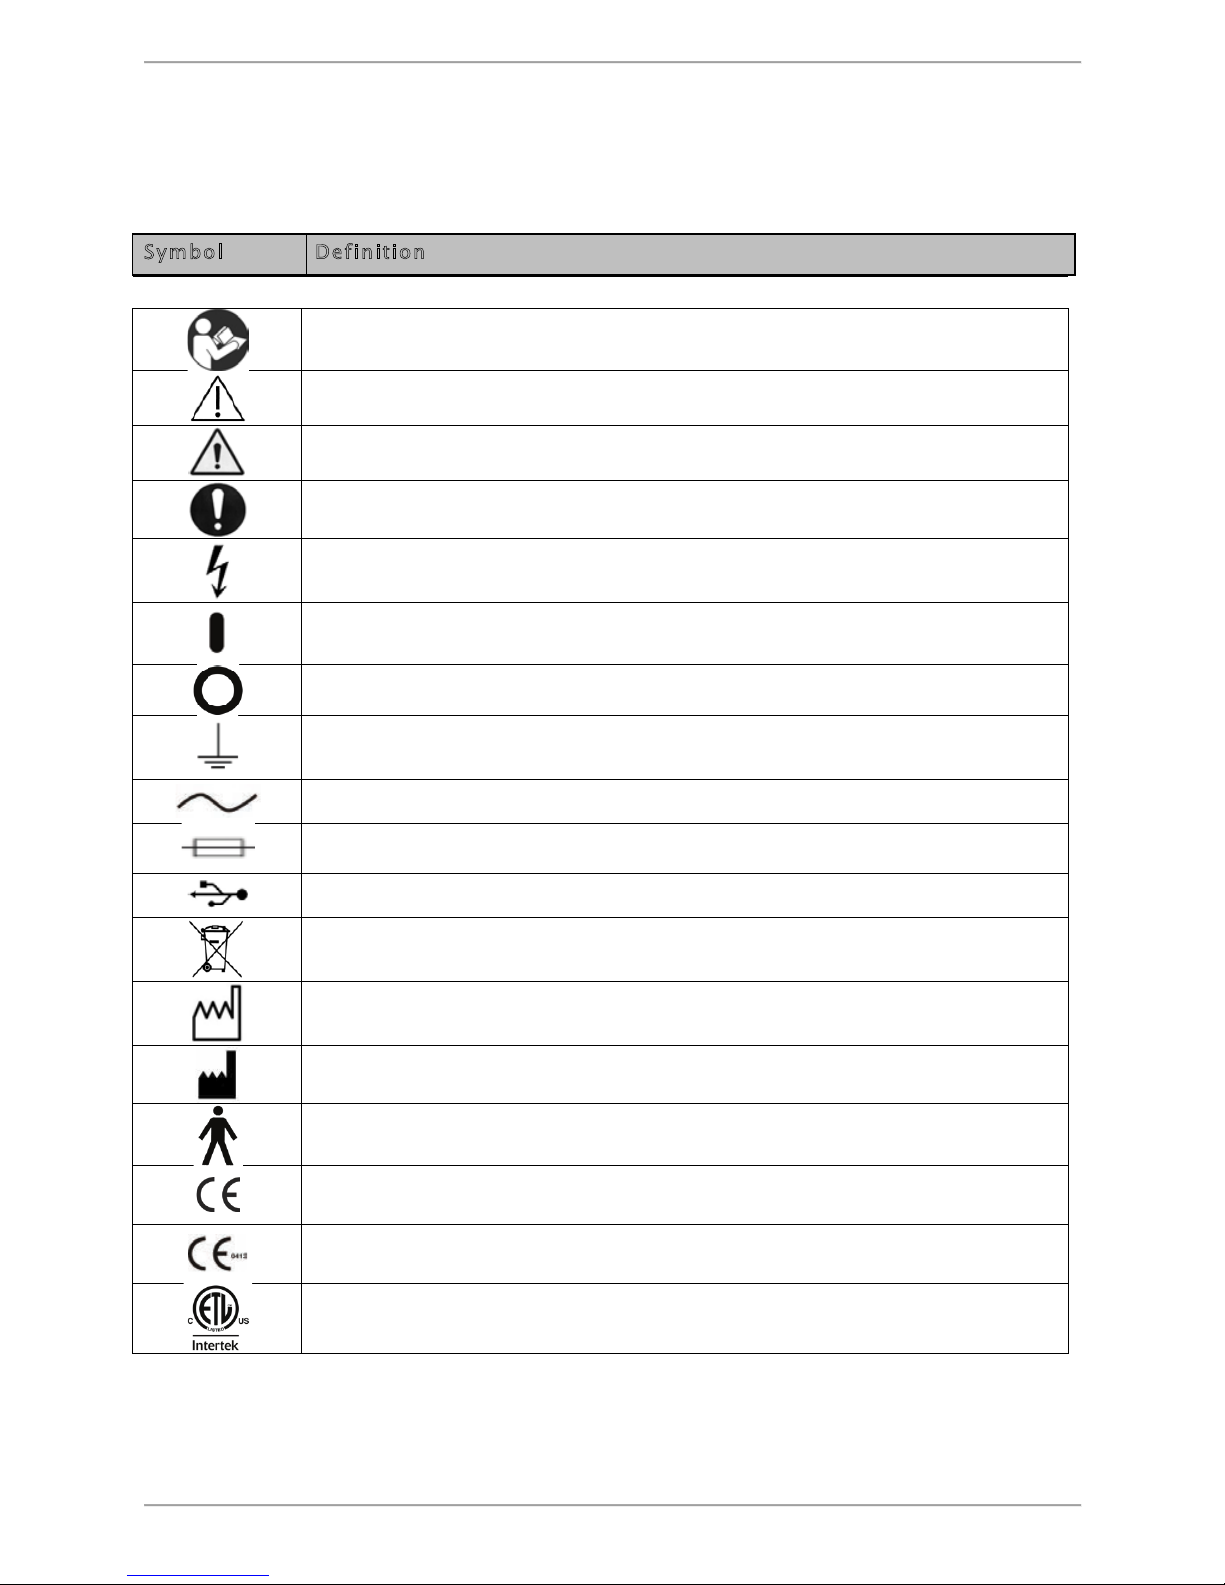
Definition of Symbols
The following symbols and their associated definitions are used and implied throughout this
manual.
Sym bol Def ini t ion
Carefully read these instructions prior to use
Caution
General Warning
General Mandatory Action
Dangerous Voltage
“On” Power
“Off” Power
Earth (ground)
Alternating Current
Fuse
USB Connector/Cable
Waste in Electrical Equipment
Date of Manufacture
Manufactured By
Type B Applied Part
CE Mark
CE Mark for products with EC Certificate
Certified for Safety by ETL Intertek
6 Biodex Medical Systems, Inc. © 2017
Product Certifications and Classifications
The Balance System SD has received the following certifications, and falls within the
following classifications:
! ETL Listed Electrical Equipment, Laboratory Use; Part 1, General Requirements for Safety
conforms to UL 60601-1, CAN/CSA C22.2 No: 601-1-M90, IEC 60601-1, IEC 60601-1-4 and
IEC 60601-1-2 and CE Marked.
! FDA Class II Equipment.
! EC Certificate: EC # 4132458.
NOTE: Circuit diagrams for this product are provided in the Schematics section at the
back of this manual.
! Type B Applied Part.
! Electromagnetic Compatibility: This equipment complies with the Medical Equipment ICC
60601-2 EMC Standard.
Authorized European Community Representative:
Emergo Europe
Prinsessegracht 20
2514 AP, The Hague
The Netherlands
Balance System SD (with v4.X software) 7

Before Proceeding
NOTE: The warnings, cautions and instructions provided in this manual must be
read, followed and kept available for consultation at all times. Observing the
information, instructions, and procedures presented throughout this manual is
essential for using this product both properly and safely.
SPECIFIC CAUTIONS
● Allow only qualified, trained personnel to operate or service this product.
● If the equipment is used in a manner other than specified in this operation
manual, the protection provided by the equipment may be impaired and
results could be compromised.
● Never leave patient unattended.
EN GARDE SPÉCIFIQUES
● Permettez au personnel seulement autorisé, entraîné de faire marcher ou
assurer l'entretien de ce produit.
● Si l'équipement est utilisé dans une manière autre qu'indiqué dans ce
manuel d'opération, la protection fournie par l'équipement peut être
diminuée et les résultats pourraient être compromis.
● Ne quittent Jamais le patient sans surveillance.
CAUTION: Unauthorized modifications to this product are not permitted and will
void the manufacturer’s warranty. Unauthorized modification of the product may
result in a hazard to the user and/or patient. Do not modify this equipment
without authorization from the manufacturer.
ATTENTION: Les modifications faites sans autorisation à ce produit ne sont pas
permises et va faire le vide la garantie du fabricant. La modification faite sans
autorisation du produit peut s'ensuivre dans un hasard à l'utilisateur et-ou le
patient. Ne modifiez pas cet équipement sans autorisation du fabricant.
CAUTION: Federal Law restricts this device to sale by, or on the order of a
medical practitioner. When prescribed for therapeutic purpose, a physician
should clearly define the parameters of use (i.e., total work, maximum heart
rate, etc.) to reduce the risk of patient injury.
ATTENTION: La Loi Fédérale restreint cet artifice à la vente par, ou sur
l'ordre d'un praticien médical. Quand prescrit pour le but thérapeutique, un
docteur devrait clairement définir les paramètres d'utilisation (c'est-à-dire,
travail total, taux maximum du cœur, etc.) pour réduire le risque de
blessure patiente.
Follow the assembly and installation instructions document.
Before using this device, read the entire operation manual carefully. Failure
to read the manual may result in user error or inaccurate data. Be sure to
save all provided documents for future reference.
Important Safety Information
8 Biodex Medical Systems, Inc. © 2017
Make certain to understand all warning and caution labels as explained in
the Before Proceeding section of this manual.
This product should be used only as specified in the operation manual.
The Balance System SD is designed for use in a patient environment.
See Chapter 10 for Balance System SD specifications.
For product specifications, refer to the Table of Contents.
This medical electrical equipment requires special precautions regarding
EMC and must be installed and placed into service according to EMC
information provided in this manual. Electromagnetic compliance definition
is provided in the Chapter 13.
Reference Cleaning and Maintenance instructions in Chapter 12.
CAUTION: Operation for: 115-230 VAC, 50/60 Hz.
ATTENTION: Opération pour 115-230 VAC, 50/60 Hz.
WARNING: Only use approved power supplies.
AVERTISSEMENT: N'utiliser que les alimentations homologuées
CAUTION: To avoid risk of electric shock, this equipment must only be
connected to supply mains with protective earth.
ATTENTION: Pour éviter le risque de choc électrique, cet équipement doit
uniquement être connecté à un approvisionnement conduites avec la terre
protectrice.
CAUTION: The plug is considered the method of disconnecting the product
from main power. Do not place the product in a position where the plug is
not easily accessible.
ATTENTION: Le bouchon est considérée comme la méthode de déconnexion
du produit d'alimentation. Ne placez pas le produit dans une position où le
bouchon n'est pas facilement accessible.
Balance System SD (with v4.X software) 9

CAUTION: The product is intended to remain in one location during
operation. The product is provided with wheels for relocation, and should
be used when performing this operation. One person can move the product.
ATTENTION: Le produit est voulu rester dans un emplacement pendant
l'opération. Le produit est fourni avec les roues pour la relocalisation, et
devrait être utilisé en exécutant cette opération. Une personne peut
déplacer le produit.
Biodex Warranty
Instrumentation
A. This equipment and its accessories are warranted by BIODEX MEDICAL SYSTEMS,
INC., against defects in materials and workmanship for a period of two years (2
years for parts, 1 year for labor) from the date of shipment from BIODEX MEDICAL
SYSTEMS, INC. During the warranty period, BIODEX MEDICAL SYSTEMS, INC. will in its
sole discretion, repair, recalibrate or replace the equipment found to have such
defect, at no charge to the customer.
EXCEPT AS STATED ABOVE, THERE ARE NO WARRANTIES, EXPRESSED OR IMPLIED,
INCLUDING WITHOUT LIMITATION WARRANTIES OR MERCHANTABILITY OR FITNESS FOR
USE. BIODEX DOES NOT ASSUME LIABILITY FOR INCIDENTAL, CONSEQUENTIAL OR
INDIRECT DAMAGES INCLUDING LOSS OF USE, SALES, PROFITS OR BUSINESS
INTERRUPTION.
B. This warranty does not apply if the product, as determined by BIODEX MEDICAL
SYSTEMS, INC., is defective due to abuse, misuse, modification or service performed
by other than a BIODEX MEDICAL SYSTEMS, INC. authorized repair and calibration
facility. Misuse and abuse include, but are not limited to, subjecting limits and
allowing the equipment to become contaminated by radioactive materials.
C. In order to obtain warranty repair service, the equipment or system component
must be returned freight pre-paid to one of our facilities. The Return Materials
Authorization number (R.M.A. #) should be included, along with a statement of the
problem. Equipment or system component will be returned transportation prepaid.
Calibration
A. Instruments are warranted to be within their specified accuracy at the time of
shipment. If a question arises and BIODEX MEDICAL SYSTEMS, INC. determines that the
initial calibration is in error, the instrument will be recalibrated at no charge.
B. Mechanical products are warranted to meet written specifications and tolerances at
the time of shipment.
C. The return policy is as stated in paragraph 1.C.
10 Biodex Medical Systems, Inc. © 2017

Warranty is Non Transferable.
Non-Warranty Service
A. Repairs and/or replacements not covered by this warranty may be performed by
BIODEX MEDICAL SYSTEMS, INC. at a factory authorized service location. Estimates of
repair charges may be requested, however, a charge for estimate preparation may
apply if the repair is later not authorized by the customer.
B. The cost of transportation into and out of the service location will be the responsibility
of the customer.
Service Procedure
A. If a service problem exists, take the following action:
1. Check to see that the problem occurs more than once.
2. Refer to the instruction manual and operations procedure.
3. Refer to the instruction manual Troubleshooting Guide.
B. If a service problem still exists:
1. Call BIODEX MEDICAL SYSTEMS, INC., Service Department at (800) 224-6339.
2. Keep yourself and the phone next to the equipment.
3. Service will ask for a brief description of the problem. We will ask specific questions
about the malfunction that occurred. This diagnostic process may take a few
minutes; therefore, call us when you can set aside an uninterrupted block of time.
4. After taking the information, we will advise on the action we will take.
5. Sometimes service personnel must consult with engineering and it may take time to
get back to you. Be sure to let the service representative know your schedule in
order for a call back to be made at a convenient time.
6. The return call may be from a person other than the one to whom you first reported
the problem.
7. After analyzing the problem, we will decide if the unit can be repaired on site, or
replacement parts will be sent.
8. If the unit must be returned, Biodex will provide a return materials authorization
number (R.M.A. #.) Pack the table in the carton that it was originally shipped in. It is
the customer's responsibility for any damage that occurs during shipping.
9. Non-warranty/non-service contract charges for repair are as follows:
a. Materials.
+
b. Time.
+
c. Travel Zone.
Balance System SD (with v4.X software) 11

Contact information
Manufactured by:
Biodex Medical Systems, Inc.
20 Ramsey Road, Shirley, New York, 11967-4704
Tel: 800-224-6339 (Int’l 631-924-9000)
Fax: 631-924-8355
email: supportservices@biodex.com
www.biodex.com
12 Biodex Medical Systems, Inc. © 2017

1. Introduction
Intended Use
Featuring seven test protocols, six training modes and intuitive touch-screen operation, the
Balance System SD allows testing and training in both static and dynamic formats. Extremely
versatile, it is the only system that provides a balance assessment tool for concussion
management plus closed-chain, weight-bearing assessment, and training for lower extremity
patients.
Indications for Use
Using this unique device, clinicians can assess neuromuscular control by quantifying the
ability to maintain dynamic bilateral and unilateral postural stability on a static or unstable
surface.
Use any of seven test protocols including Limits of Stability, Postural Stability and Clinical Test
of Sensory Integration of Balance (CTSIB). The Balance System SD serves as a valuable training
device to enhance kinesthetic abilities that may provide some degree of compensation for
impaired proprioceptive reflex mechanisms following injury.
An easy-to-follow touch-screen format makes the system simple to learn and operate, leading
the user step-by-step through testing protocols and training modes. All test results and training
sessions are documented on easy to read 8.5" x 11" reports that can be placed into a patient’s
file. Comparisons to normative data can be made for population-specific tests.
Balance System SD (with v4.X software) 13
2. Assembly and Installation
The Balance System SD is shipped in a single carton. Except for the printer, which the user
must install as explained below, the entire system is factory assembled and ready to operate.
Printer Installation
1. Refer to the supplied printer manual to unpack the printer and ensure that it has not been
damaged by shipping.
2. Position the printer on the Biodex-provided printer stand.
3. Locate the printer power cable. Plug the small end into the power receptacle on the back of
the printer.
4. Insert the AC plug end of the printer power cable first into the Biodex-provided power
adapter, and insert the adapter plug into the power cable receptacle on the back, lower
base of the Balance System. Do not connect any other equipment to this receptacle.
5. Locate the Biodex-provided USB cable that will be pre-installed in one of the USB ports on
the Balance System display. Connect the other end of the cable to the port at the back of
the printer.
6. Ensure both cables are positioned such that they will not interfere with the patient or get
caught in the Balance System platform or handles.
7. Refer to the printer manual for directions on installing ink cartridges and paper.
8. With power ON to the Balance System, press the <Power ON> switch on the printer. Refer to
the printer manual for additional printer information.
Figure 2.1. Connect the power cable and USB cable to the rear of the printer.
Parts and Adjustments
Mechanical adjustments to the Biodex Balance System are straightforward and
uncomplicated. In fact, there are only three adjustments that need be addressed to
14 Biodex Medical Systems, Inc. © 2017
accommodate any patient: Support Handle Position, Display Height, and Display Tilt. All other
1
2
test and exercise functions are software controlled.
To Adjust the Support Handle:
1. To position the Support Handle for patient use, hold the Support Handle while pulling out
on the Support Handle Release Pin. Rotate the handle to the desired position. Release the
pin to lock the Support Handle in place.
2. To release the Support Handle ensuring that it cannot be used by the patient, hold the
handle while pulling out on the Support Handle Release Pin. Fully lower the handle and
release the pin.
To Adjust the Display Height:
1. Loosen the Display Height Locking Knob.
2. Pull up or push down on the display until the desired height is achieved.
3. Tighten the locking knob to secure the display in the desired position.
NOTE: Position the display enabling the patient to look straight at it. This will help ensure
good posture during the test or exercise session.
To Adjust the Display Tilt:
Tilt the Display as required by patient or testing/exercise protocol.
Power-up
When the unit is plugged in, the display will automatically power up.
Power-down
In order to prevent the device’s database from becoming corrupted, it is essential that the
correct power-down sequence is performed. Always turn off the display, by touching the X in
the upper right corner of the home screen, followed by Shut Down.
Figure 2.2. Power-down sequence.
Balance System SD (with v4.X software) 15
Note: If the display is shut down, but not unplugged, it can be turned back on by pressing the
Ne débranchez pas l 'appareil avant de mettre l' écran hors tension!
Figure 2.4 Do not unplug the device before powering down the
rocker button on the bottom of the display.
Figure 2.3. Use the rocker button on bottom of the monitor to power the device back on.
Once the display has finished its shut down sequence, power may be removed from the system.
CAUTION: Do not unplug the device before powering down the display!
ATTENTION:
Connecting Components
In addition to the printer that is shipped with the Balance System SD, other printers may also be
used with the device. Most Windows 7 printers should be compatible with the Balance System
16 Biodex Medical Systems, Inc. © 2017
display.

display, but the drivers for various printers may need to be installed. For help with this, please
call Biodex Customer Support at 631-924-9000, Option 3. Similarly, any Windows 7 keyboard or
mouse will also automatically connect using one of the USB connections.
It is possible to connect the device to a printer wirelessly. Please call Customer Support for
instructions.
An external monitor can also be connected via the VGA port on the bottom of the display. Once
the external monitor’s cable is connected, the <Mirror to External Monitor> button in System
Utilities must be selected. (This button is accessed by the following navigation steps from the
Home screen: Utilities > Configuration > System Configuration > Screen Configuration.)
Balance System SD (with v4.X software) 17

3. Clinical Considerations
Prior to allowing any patient to use this device, make certain to read and comprehend this
entire manual. Ensure that you are completely familiar with all aspects of adjustment, training
and testing, as well as patient history. Be sure to adhere to the following clinical guidelines at
all times when using this system.
NOTE: Never allow a patient to use the Balance System while unsupervised.
General Clinical Considerations
All users should have a verbal understanding of the Balance System prior to stepping on the
device.
To ensure patient safety, begin each session with the balance platform in the ‘locked’ or static
position.
NOTE: The Balance System automatically places the platform in the locked position when the
unit is turned ON, or after a time period of three minutes when the system is not in use.
Adjust support rail and biofeedback display for patient comfort and safety.
When dealing with post-operative patients, ensure they possess adequate muscular control to
stabilize the joint prior to placing them on the foot platform. Inadequate muscular control could
lead to increased joint translation.
When patients are working with their eyes closed, ensure that a clinician is ready to assist in
case of loss of balance.
Since the entire lower extremity is required to work to maintain good balance, ensure that
supporting structures above and below the joint are adequately strengthened prior to beginning
rehabilitation on this device.
For optimal operation, ensure the patient is standing in the center of the platform.
Patients should progress from ‘hands-on’ to ‘hands-off’ the support handle. This will ensure
that new or unstable patients have an adequate understanding of the Balance System and will
help protect the patient against sudden or unexpected movement of the platform.
Position the display enabling the patient to look straight at it. This will help ensure good
posture during the test or exercise session.
There is a patient learning curve that must be considered when testing with this device. Clinical
research suggests three trials be performed prior to testing. For dynamic balance testing, the
default settings are preselected with three trials per side. This should assist with the patient’s
familiarization with the device and result in better data averaging.
18 Biodex Medical Systems, Inc. © 2017

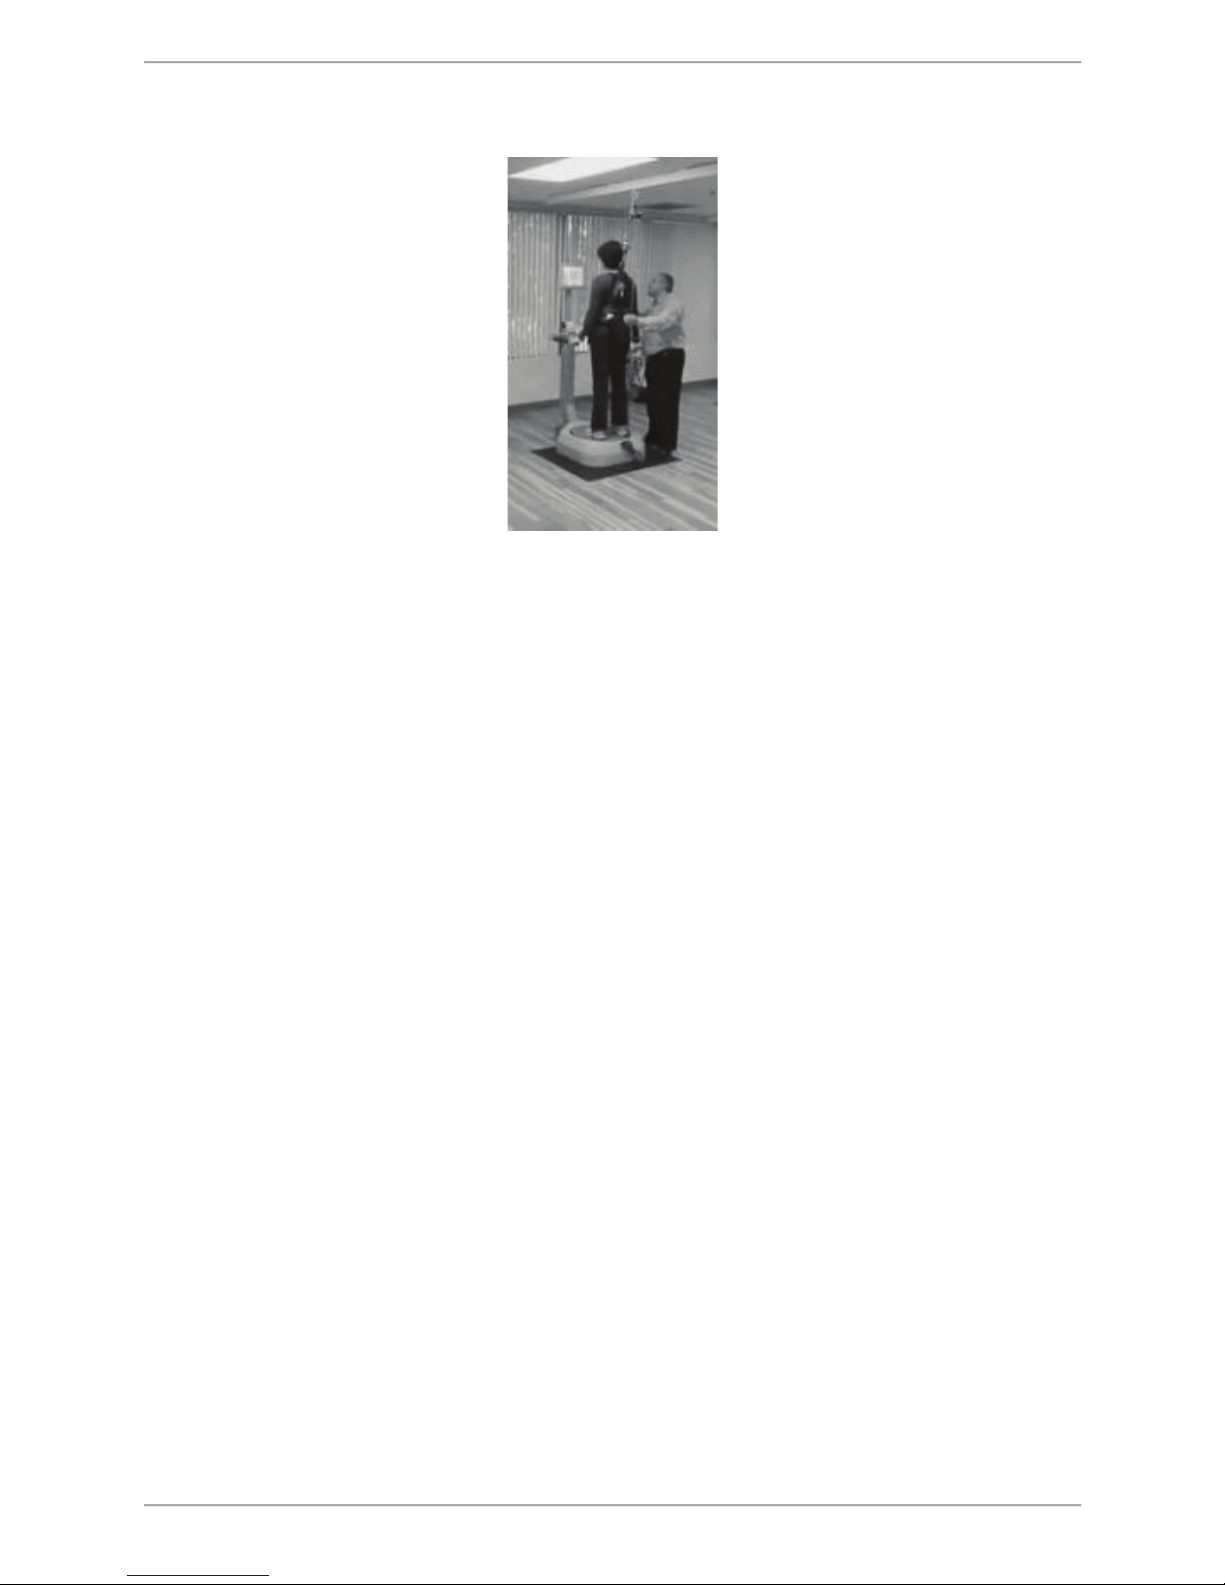
4. Applications of Body Weight Support
Devices
The Biodex NxStep Unweighing System
Figure 4.1. The NxStep ready for use with the Biodex Balance System SD.
The Biodex NxStep Unweighing System is ideal for use with the Biodex Balance System SD.
The loss of the ability to ambulate can be one of the most debilitating aspects of many
neurological and musculoskeletal disorders. Any of the three main components of locomotion –
posture, balance and coordination – can be affected by a variety of neurological or
musculoskeletal pathologies resulting in the disruption of an individual’s ability to walk
normally.
Partial Weight Bearing (PWB) gait therapy has shown great promise in helping a wide variety of
impaired patients as they relearn the walking function. It is an appropriate modality to use
whenever gait therapy is prescribed for patients who lack the upper and/or lower body strength
to support themselves during assisted ambulation. In addition to aiding gait pattern
regeneration, partial weight bearing therapy allows patients to enhance their endurance,
balance and posture.
Balance System SD (with v4.X software) 19
The Biodex FreeStep SAS
Figure 4.2. The Biodex FreeStep SAS
The Biodex FreeStep SAS is also ideal for use with the
Biodex FreeStep SAS is an overhead track and harness system that provides a safe ambulation
environment for both therapist and patient. Without the fear of falling, patients can focus more
fully on their tasks of gait and balance. Likewise, therapists can focus on assisting, rather than
supporting. Worn like a vest around the upper torso, the Balance Support Harness provides
patients with security and safety from falling. The versatile harness is supportive, comfortable
and easy to put on and off.
Biodex FreeStep SAS can be custom configured to any facility, complementing the existing
equipment floor plan. Install as a simple loop for continuous ambulation over stairs or through
parallel bars, or add side branches for equipment-specific stations to include treadmill exercise
or balance training.
Biodex Balance System SD.
20 Biodex Medical Systems, Inc. © 2017
5. Getting Started
The Biodex Balance System software program is easy to master. Follow the screen prompts as
they lead from step-by-step through testing and training protocols or software utility options.
Touch the desired screen icons to make a selection. Option choices progress logically based on
the selections made.
If the unit is plugged in, there will be power to the display. The screen saver can be set to go
dark after a time-out period. The screen saver is not enabled as a default setting, but this can
be adjusted in the System Utilities. When the screen is dark and the unit is plugged in, touch
the screen to activate it.
The following screen icons and buttons are consistent whenever they appear throughout the
entire Balance System SD program:
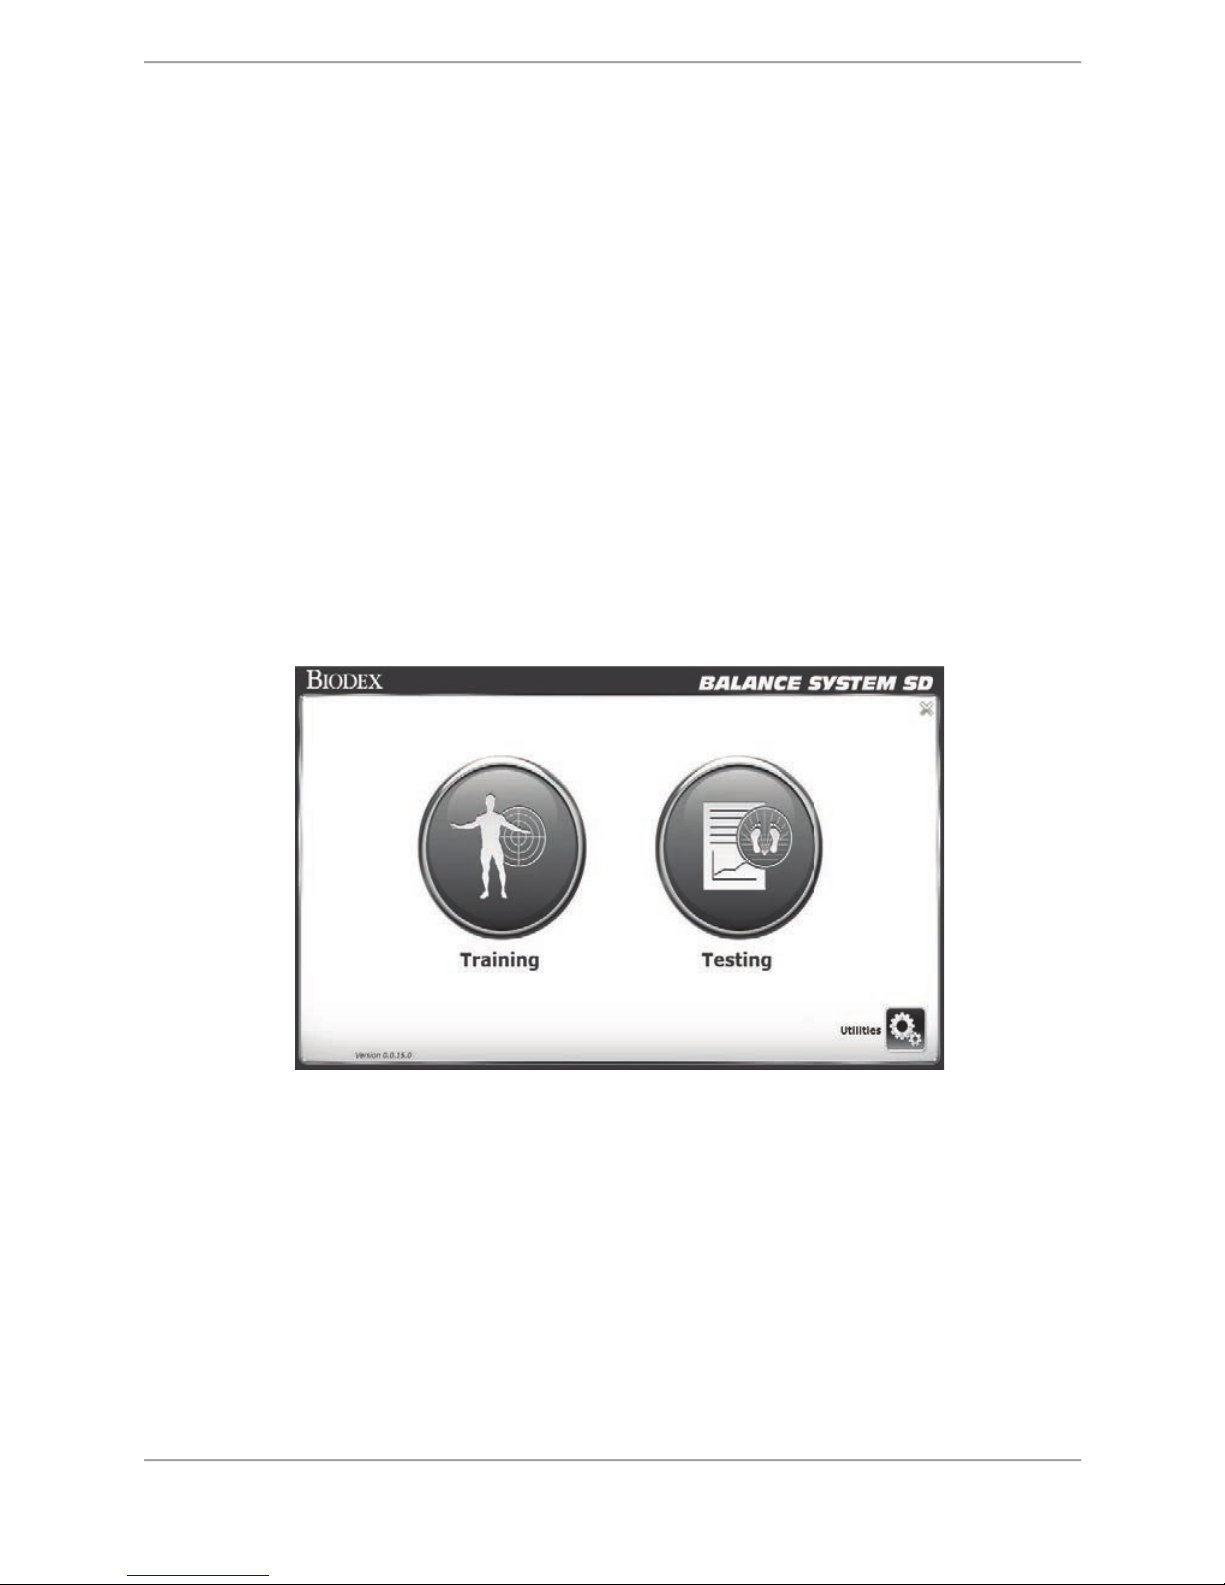
• <HOME>: Touch this icon to return to the Main Menu.
• <NEXT>: Touch this key to advance to the next screen.
• <BACK>: Touch this key to return to the previous screen.
• <OK>: Touch this key to confirm selections or entries; advances to the next screen.
Figure 5.1. The Balance System Main Menu.
NOTE: When accessing the System Utilities, the user will be prompted to enter the default
access ID code, which is 159.
Figure 5.1represents the Main Menu/Home screen for the Balance System. Both Training and
Testing have the Patient Setup screen in common. Touching either button from the Main Menu
will display the Patient Setup screen. A session of Training or Testing can be performed by
entering/selecting patient information from the existing patient list or without entering any
information other than Patient Height. In the latter case, the application will require the user to
enter the test result along with the patient information after the session is completed.
It is important that the user understands how the patient information is set up in the Balance
System before proceeding to either the Testing or the Training sections.
Balance System SD (with v4.X software) 21
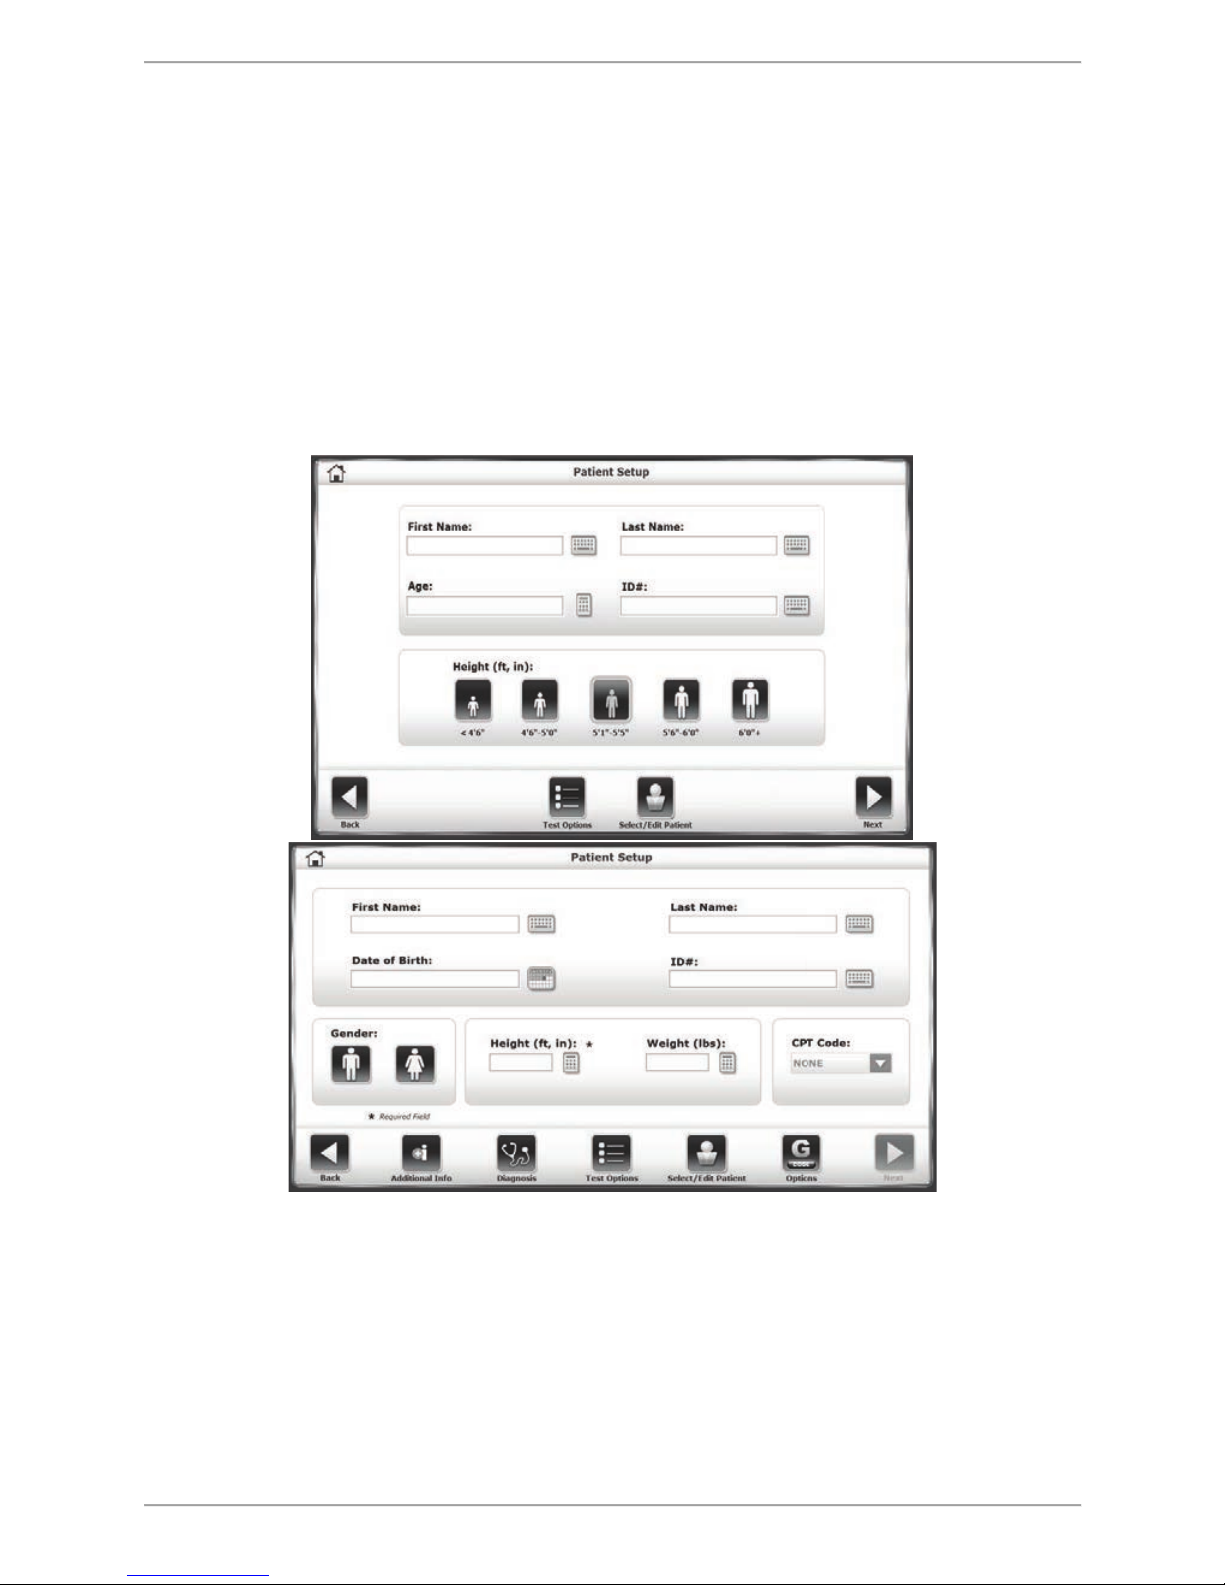
Patient Setup Information Screen
The Patient Setup information screen will precede all training and testing mode interfaces.
Touch the appropriate icon to begin entering information. A pop-up keypad or keyboard is used
to enter some parameters such as name and age. Once the desired information is
entered/selected, touch <Next> to advance to the Training mode screen. Other adjustments can
be made using the icons along the bottom of the screen. The presence of some of these icons
is set in the System Utilities section.
The default setting for the Balance System SD will be the simpler, quicker Patient Setup screen
illustrated in Figure 5.2a. The steps for configuring the more advanced Patient Setup screen
(Fig. 5.2b) is detailed in the System Utilities section of this manual.
Figure 5.2a and b The Patient Setup information screen.
22 Biodex Medical Systems, Inc. © 2017

Patient Setup Information Screen Parameters
NOTE: The parameter for Height is a mandatory field and must be completed before balance
training can begin.
● First and Last Name: Optional, touch the pop-up keyboards to enter the first and last
name. Touch <OK> to continue.
● ID#: Optional or required, depending on Configuration settings. Touch the pop-up
<Keypads> to enter an identification number. Touch <OK> to continue.
● Gender: Optional, touch the appropriate icon to choose <Male> or <Female>.
● Height: Required, this setting is used to calculate Center of Gravity (COG) in all training
and testing protocols operating with the platform in its fixed position (static mode).
Touch the appropriate <Height> icon to select the desired range. This value can be a
manual number entry; see Fig 5.2b. The manual height entry option can be set within
the Configuration option in System Utilities.
● Weight: Optional, for new patients, a weight can be entered in pounds or kilograms
depending upon the Configuration settings.
NOTE: If a patient has been selected using the Select a Patient function, the application will
display the existing height and weight as was previously recorded. If height or weight has
changed, the numbers can be adjusted and new test results will feature the updated
information. Once a test is performed, there is no way to edit the height or weight recorded for
that test result. Patient height and weight can be changed at any time from the Patient
Management screen in System Utilities. The new numbers will be used for any subsequent tests.
● Age / Date of Birth: Range is from 10 to 120 years old. Touch the <Age> keypad and
use the pop-up keypad to change the value. This value can be derived from a Date of
Birth entry; see Fig 5.2b. The Age/DOB option can be set within the Configuration option
in System Utilities. Touch <OK> to continue.
● Test Options: The Test Options screen will vary with each Training or Testing mode.
These settings will be described in more detail in later sections of this document.
● Select/Edit Patient (Fig. 5.3): Touch <Select Patient> to designate an existing patient
within the device’s records for a new training session.
Balance System SD (with v4.X software) 23
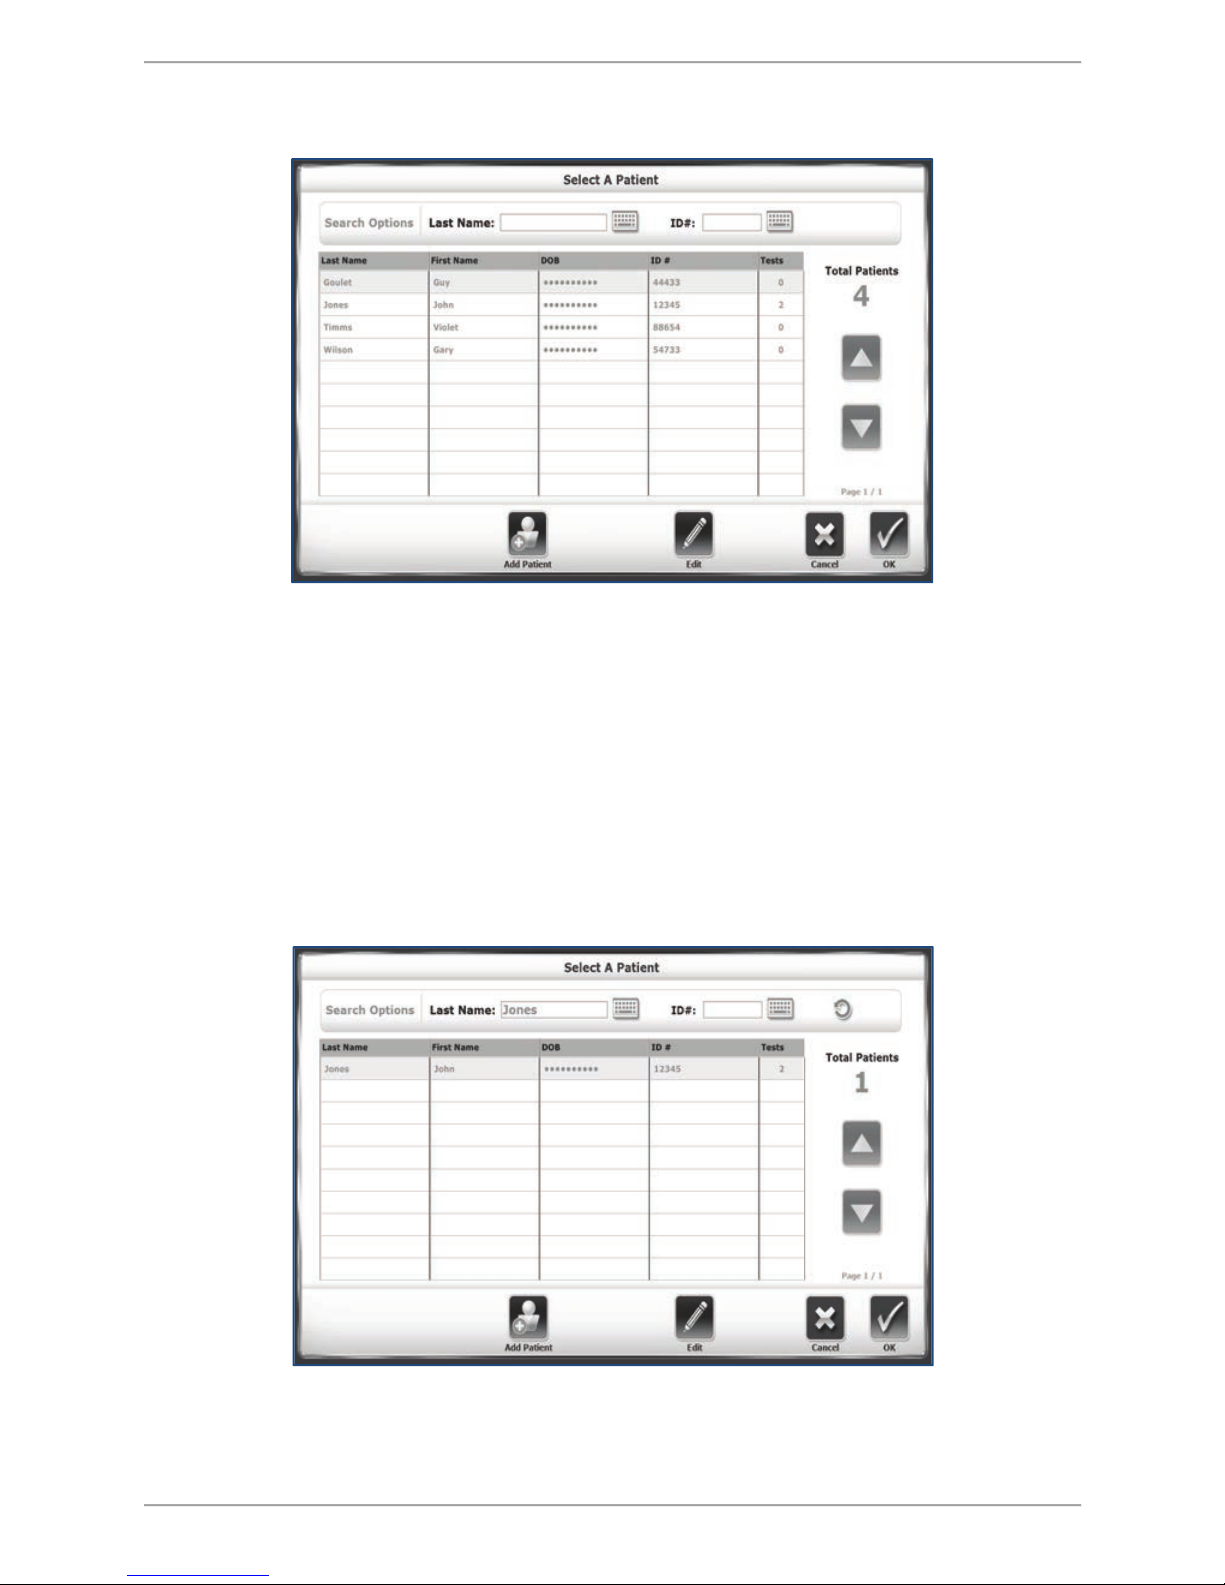
The Select Patient Screen
Figure 5.3. The Select/Edit Patient screen.
In previous versions of the software, a patient with existing data on the device could only be retested by either: a) typing in his or her name exactly at it is spelled on an existing record, or b)
finding the patient within the set of records in the Patient Management section of System
Utilities. Now, with the Select Patient option, users can quickly find an existing patient and get
them started on a new training session.
There are two ways to identify specific existing patients from this screen. At the top of the
screen, the user can search for a patient’s last name or identification number. Select one of the
fields and type in either a patient last name or an ID number. Select <OK> to see a listing of
search results. To return to the list of all patients, select the circular refresh arrow icon at the
top, right of the screen.
Figure 5.4. The Select/Edit Patient screen illustrating search results. To reset listing of all patients,
24 Biodex Medical Systems, Inc. © 2017
select the circular refresh arrow in the upper right corner.
If the number of patient records on the device is relatively small, it may be easier to scroll
through the records with the or arrows. (The arrows will not scroll through individual
records, but rather pages of records—ten per page.)
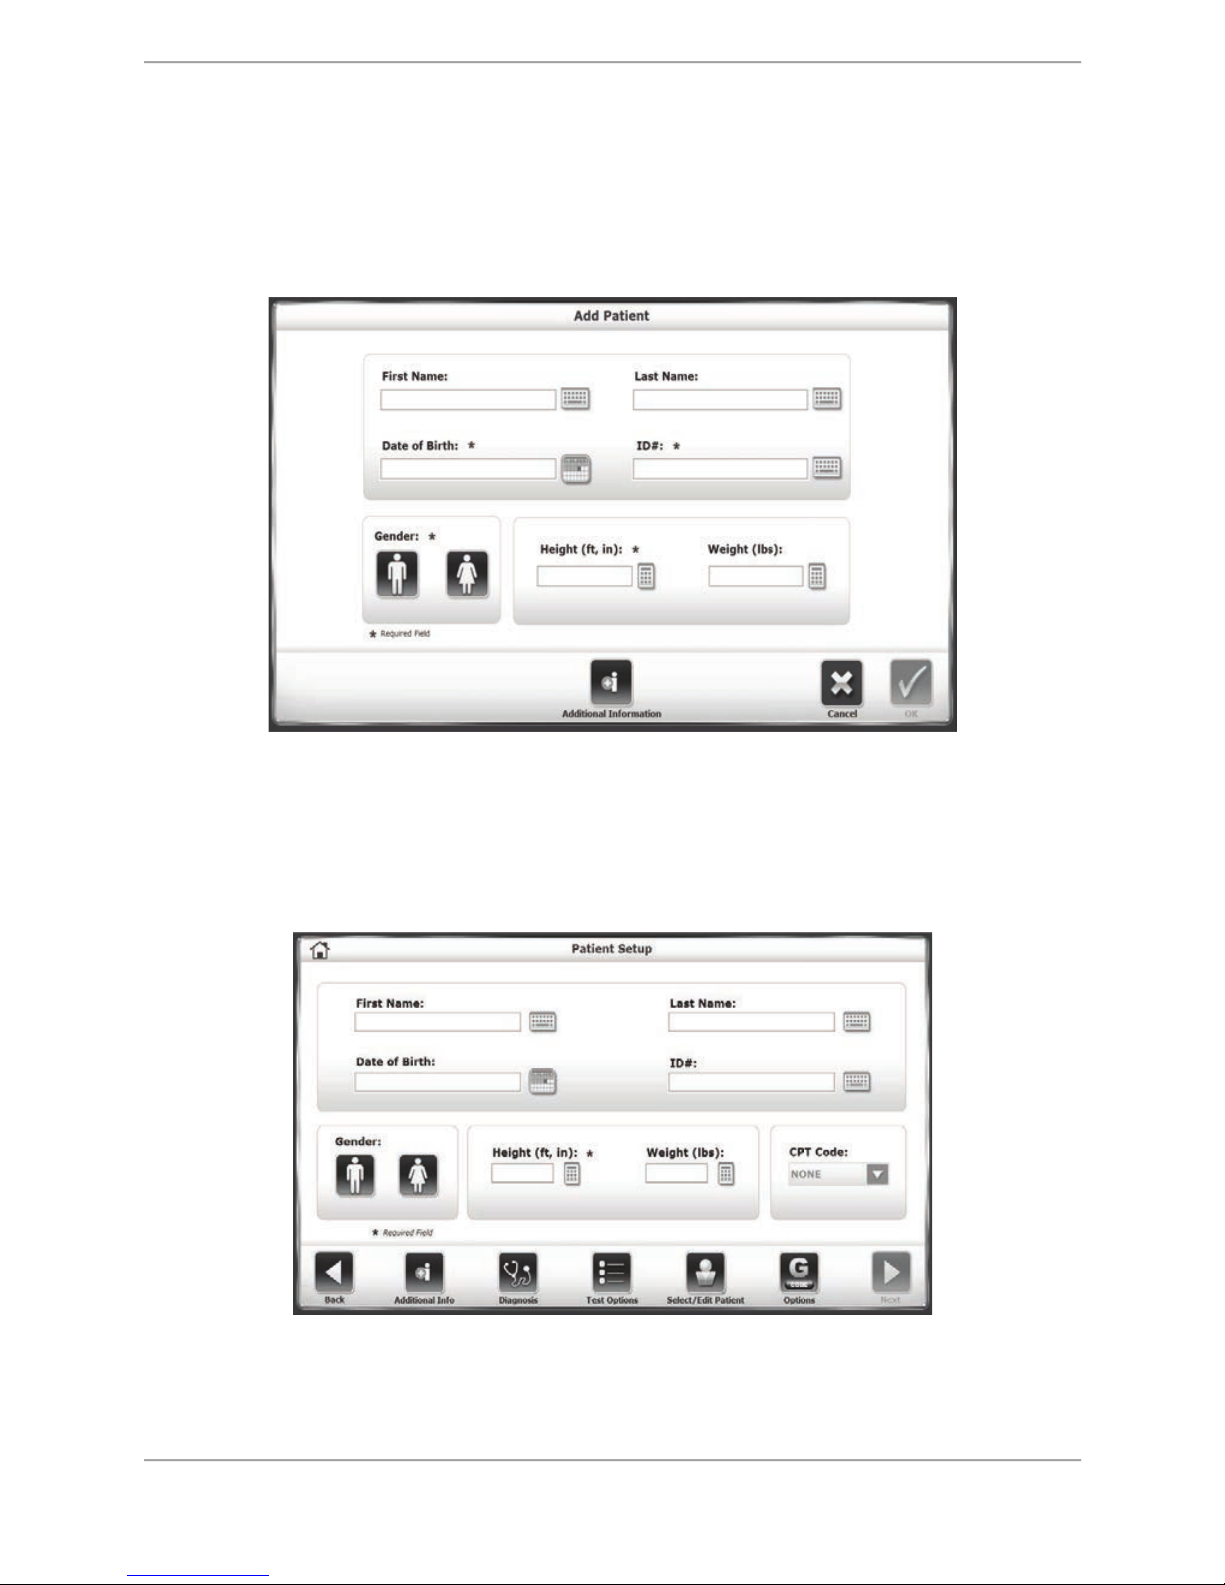
Patient records can be edited on this screen, or a new patient can be added. Many of the same
information fields that are in the Patient Setup screen will need to be entered.
Figure 5.5. The Add Patient screen.
Patient Setup Screen with optional Parameters
The following parameters are only visible when they are activated within the Balance System SD
Configuration settings (i.e., in System Utilities). If they are turned on, additional buttons are
displayed; otherwise they will not be visible at Patient Setup screen.
Figure 5.6. Patient Setup Screen
! Additional Info (Figure 5.7): Touch <Additional Info> to enter information regarding the
patient’s health status and the facility where treatment is taking place.
Balance System SD (with v4.X software) 25
! Diagnosis (Figure 5.8): Touch <Diagnosis> to enter diagnostic information for the patient,
including an ICD code.
! CPT Code: (Figure 5.6): Touch the <CPT Code> drop-down menu to assign a particular CPT
(Current Procedural Terminology) code to the patient.
! G-Code Options (Figure 5.9): Touch <G-Code> to apply certain G-Code settings to this
particular patient.
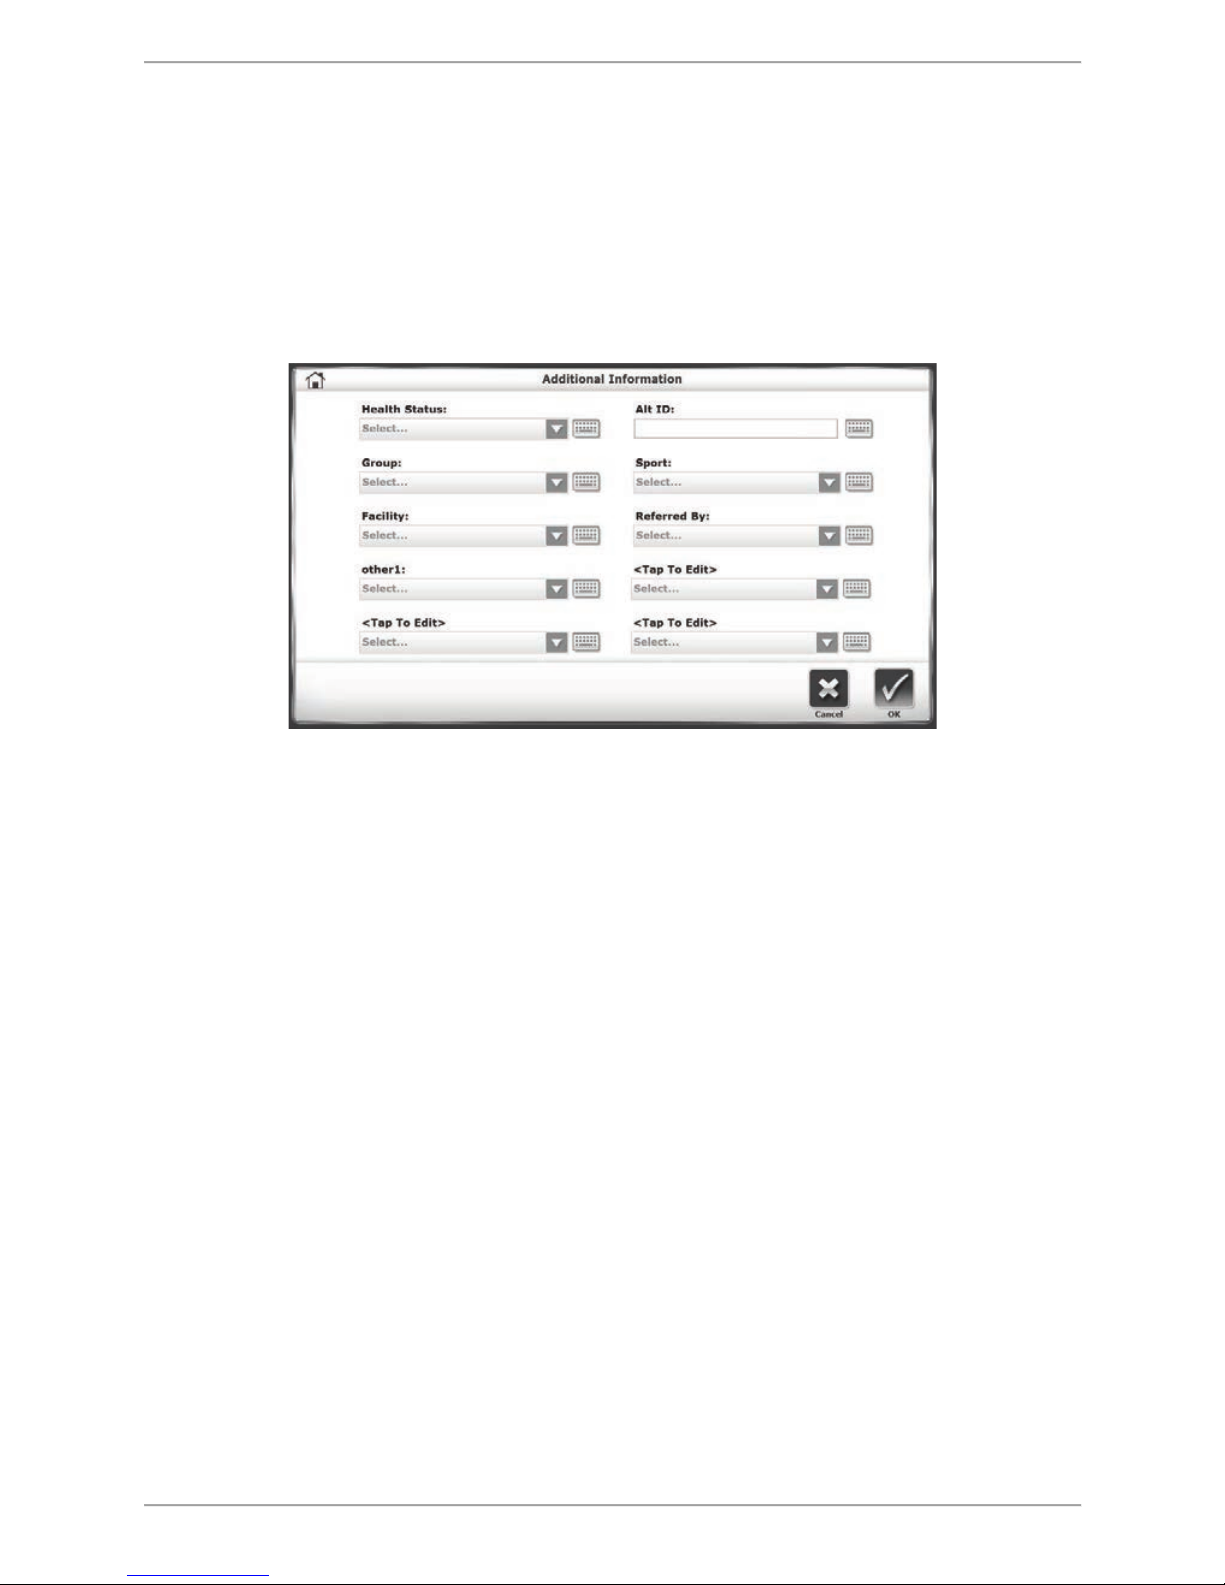
The Additional Information Screen
Figure 5.7. The Additional Information screen.
Entering Additional Information data is optional. The Additional Information screen contains a
series of drop-down menus and editable fields in which users can enter various types of
information about the patient. In each menu, users can enter a new value or item into the dropdown list. Entering Additional Information data is optional.
The screen contains the following fields: Health Status, Alt(ernative) ID, Group, Sport, Facility,
Referred By, and four custom categories (referred to as <Tap to Edit> that can be defined by the
user. Custom categories are named by touching the field and entering a name using the keypad
or selecting a name from the drop-down menu (e.g., other1as illustrated in Figure 5.7).
26 Biodex Medical Systems, Inc. © 2017
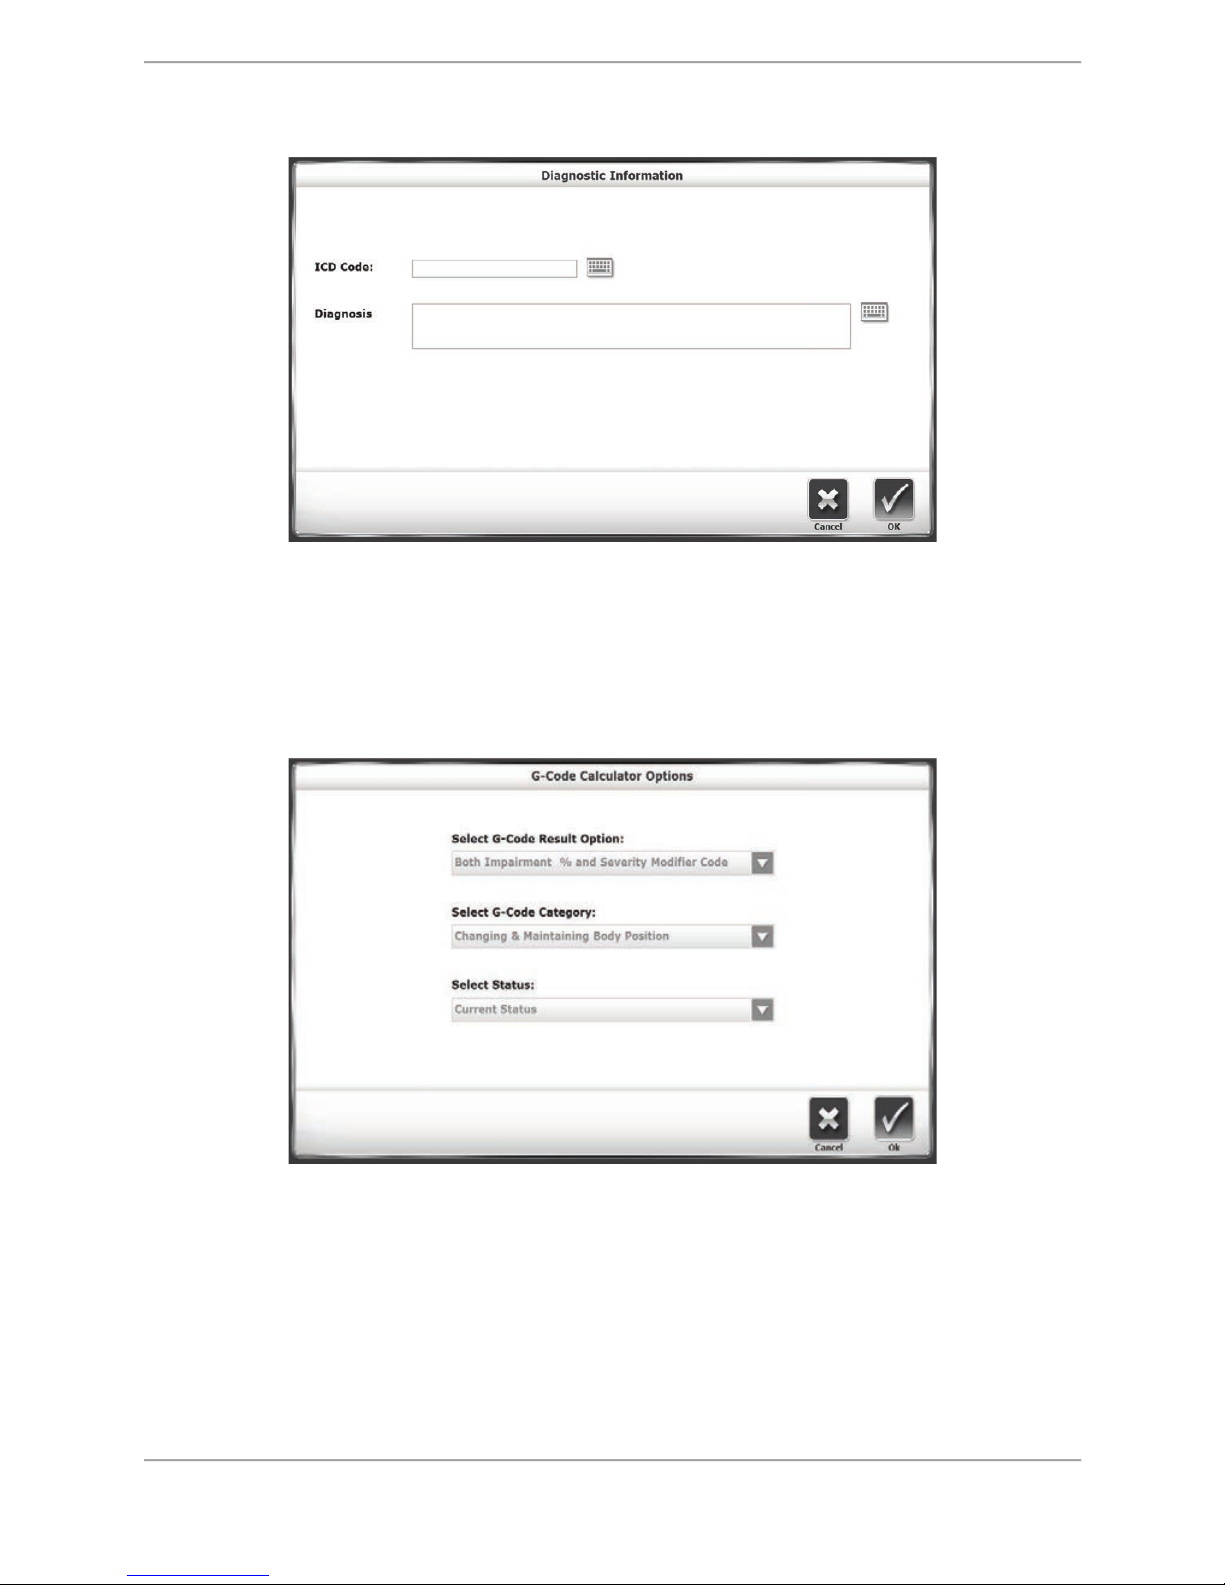
The Diagnostic Information Screen
Figure 5.8. The Diagnostic Information screen.
On the Diagnostic Information screen, users can manually enter an ICD code in one field, and
more specific text in the larger field. Note that this screen does not necessarily have to feature
an ICD Code field; this can be activated or deactivated in System Utilities.
The G-Code Calculator Options Screen
Figure 5.9. The G-Code Calculator Options screen.
The G-Code Calculator Options screen contains three drop-down menus that will apply various
types of G-Code data to the patient’s tests. The G-Code result options and categories are
discussed in depth in a later section of this document. After making any selections to the
menus on this screen, note that the G-Code icon on the Patient Setup screen will change from
red to green. How the G-Code function is used is detailed in the Training and Testing sections.
Balance System SD (with v4.X software) 27
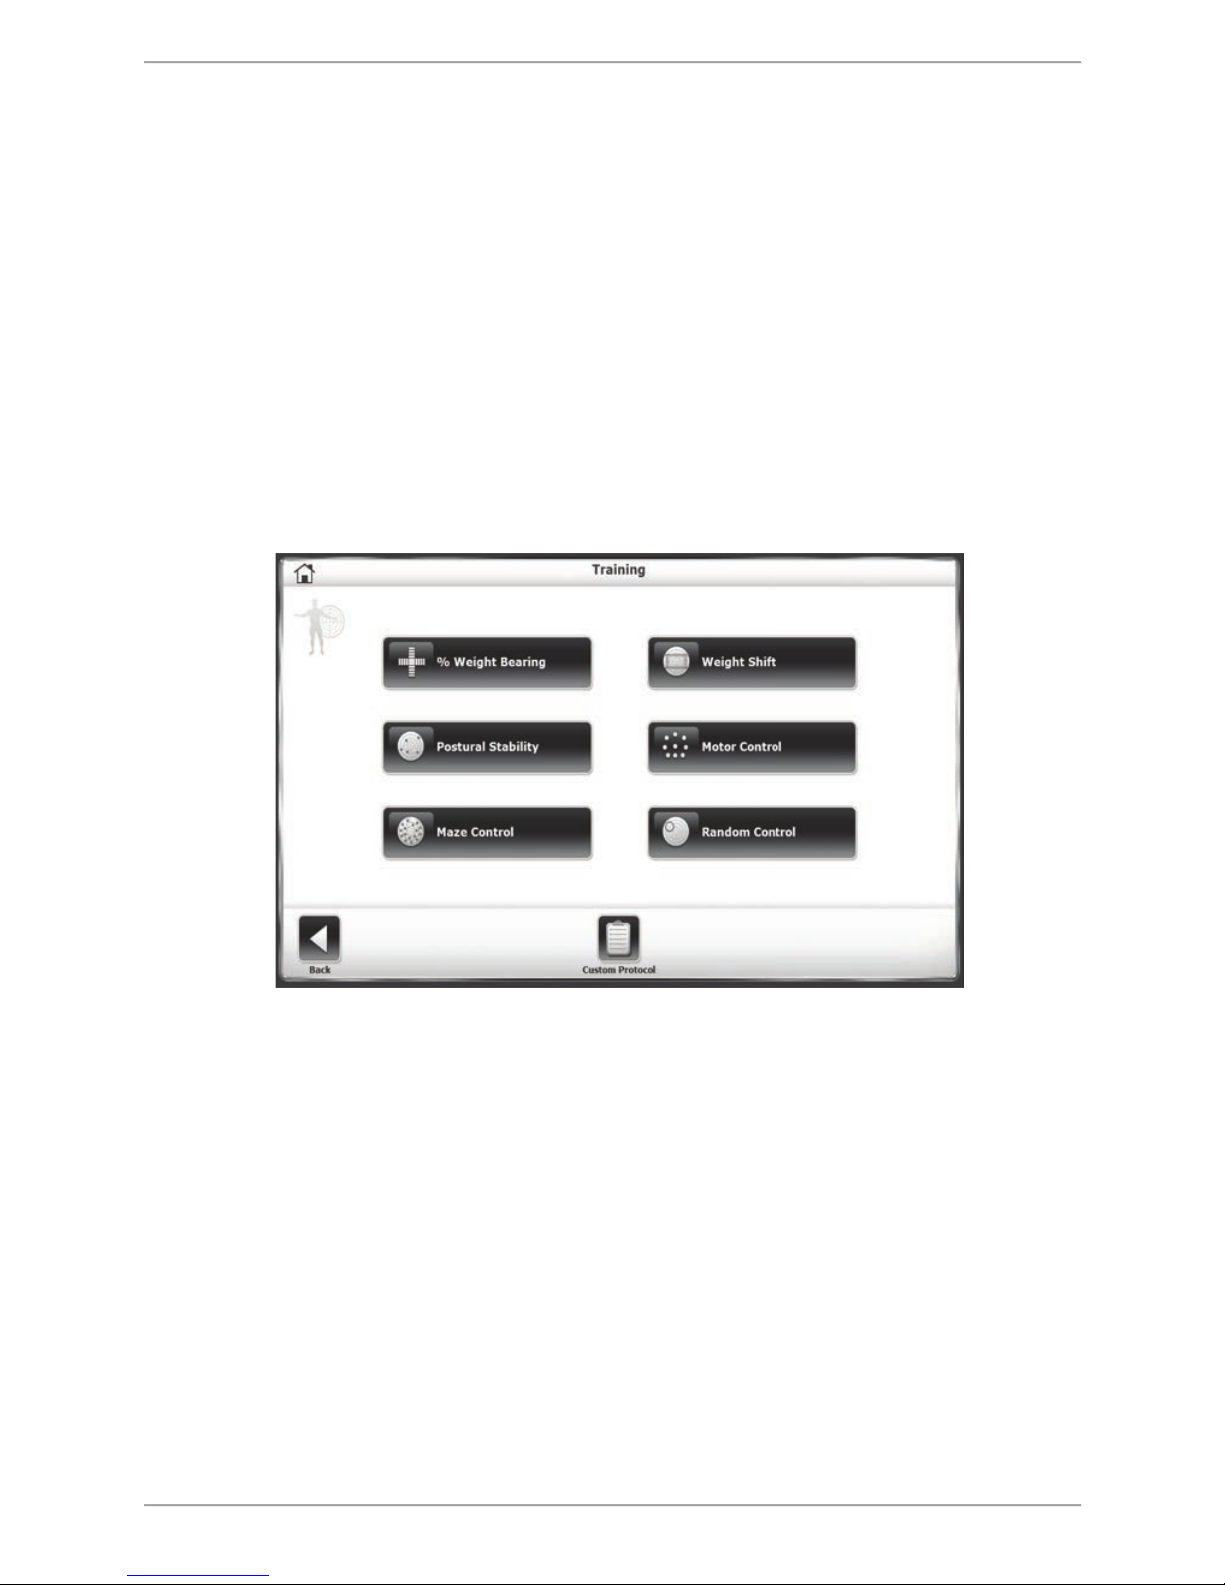
6. Training Modes
The training modes provide a simple means of setting up training or exercise sessions. Six
interactive, game-like training modes are provided. These modes allow for fast patient setups
and the ability to change stability level from very unstable to static during the actual training
session. All six training modes can be customized to provide specific rehab goals.
Patients direct the cursor movement on screen by shifting their weight from foot-to-foot or
leaning in a particular direction.
Training mode formats include: Percent Weight Bearing, Weight Shift, Postural Stability, Motor
Control, Maze Control, and Random Control.
There is an option for selecting a customized protocol. The steps for customizing a protocol are
listed in the System Utilities section of this document.
Figure 6.1. The Training Modes Main Menu Screen.
Percent Weight Bearing Training
Percent Weight-Bearing Training provides real-time feedback of the percentage of weightbearing on a patient’s foot, ankle, knee, hip, body side, and such. In this mode, targets can be
set that encourage patients to focus on weight-bearing goals in anterior, posterior, medial, and
lateral movements. Therapists and patients should find weight-bearing training to be an
effective mode for communicating what, where, and how a patient’s body weight is located.
Movement feedback can be limited to Medial Lateral, Anterior Posterior, or combined.
28 Biodex Medical Systems, Inc. © 2017
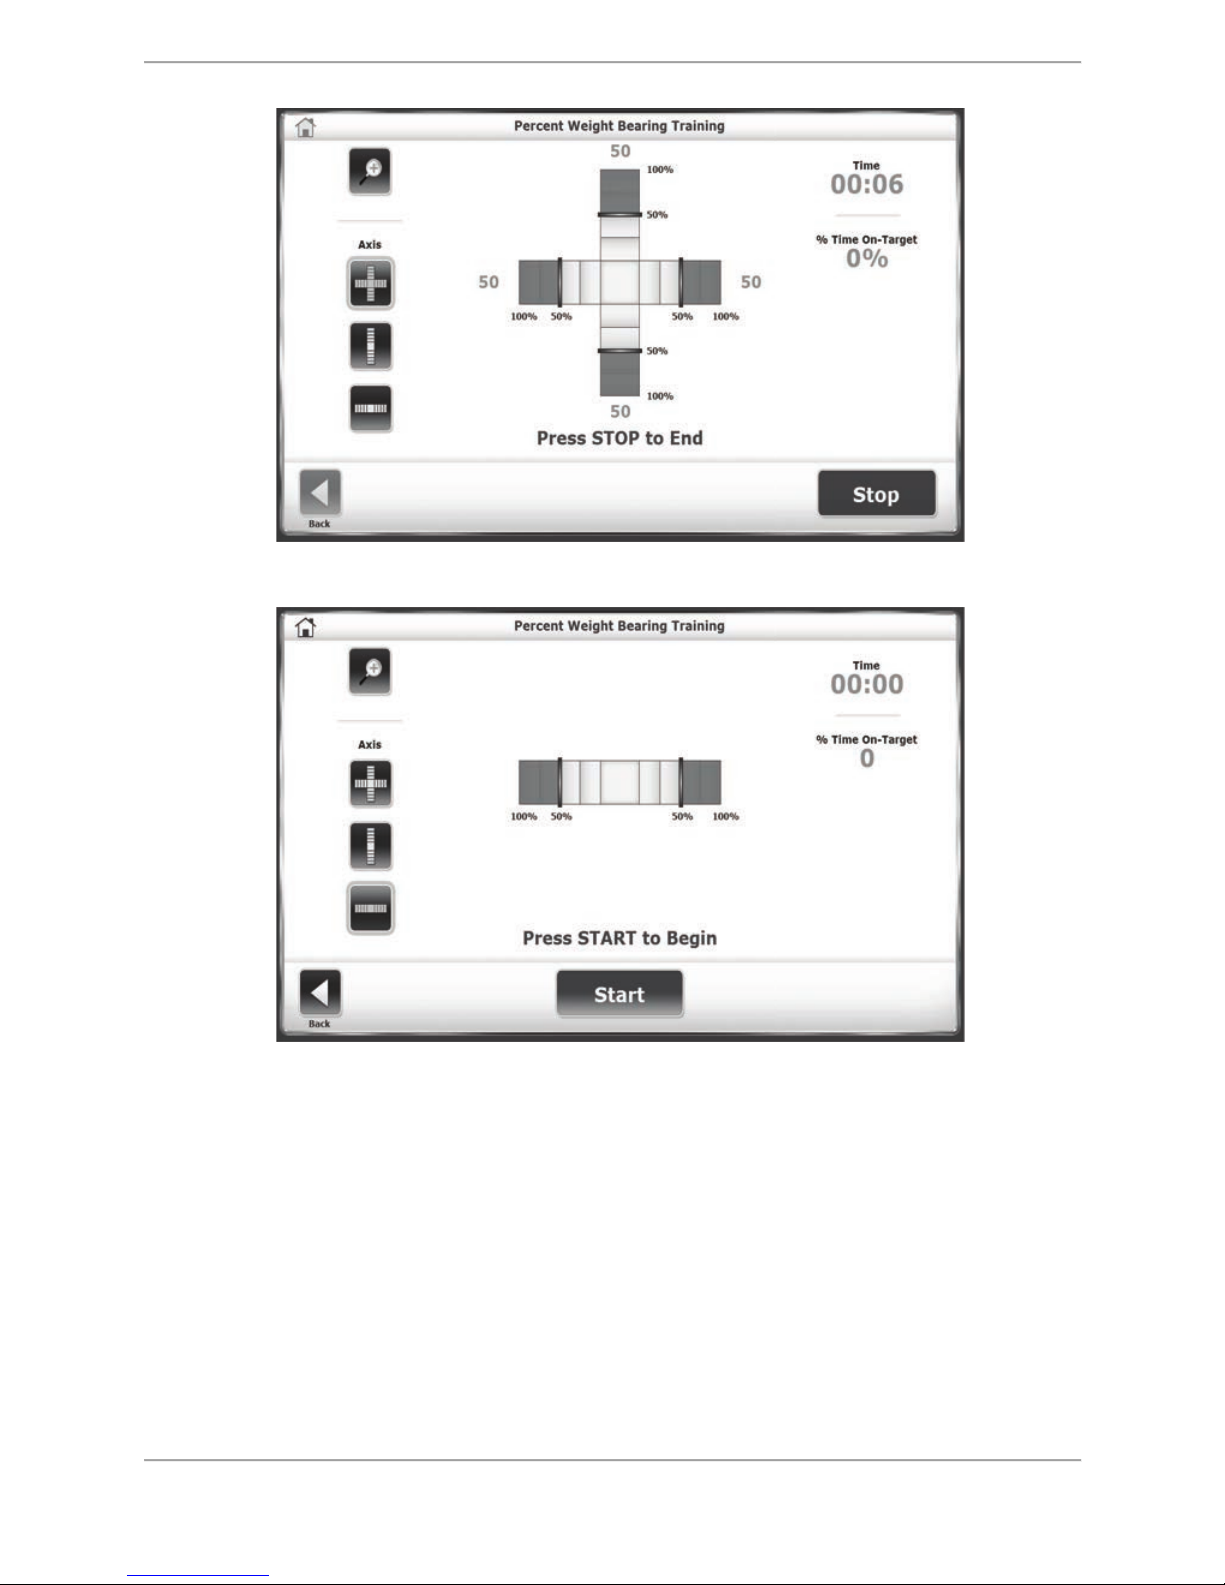
Figure 6.2. The Percent Weight Bearing Training screen.
Figure 6.3. If desired, the exercise orientation can be set to medial/lateral only.
To Access the Percent Weight Bearing Training Mode:
NOTE: Percent Weight Bearing training mode is used with the platform in static mode only.
1. Position the support handles and the display height and tilt for patient comfort.
2. At the Main Menu, touch <Training>.
3. Touch <% Weight Bearing>. The Patient Setup Information screen is displayed. If this is a
new patient and the training session is to be saved after its completion, the patient’s name
and height must be entered. If the training session does not need to be saved, designate a
height value, which is correlated to the software’s scoring algorithm based on the calculated
Center of Gravity.
Balance System SD (with v4.X software) 29
4. Touch <Test Options> to advance to the Percent Weight Bearing Training Options screen if
Height Default:
Foot Angle:
Heel Position:
< 53”
10/10
F7/F15
53 – 59”
10/10
E7/E15
59 – 65”and 65 – 73”
10/10
D67/D16
73” +
10/10
C5/C17
desired. Here, the total time for the exercise can be set, the Scoring range can be set, and
the Display Tracing, Display Cursor, and Scoring Tone can be turned on or off.
5. Use the <"> or <#> keys to set the total time in ten-second increments. During the
routine, the system will count down from the time setting selected. If no time is set, the
timer will count up from 00:00 to a maximum of 12:00 minutes.
6. Use the <"> or <#> keys to set the scoring forgiveness range, which is used to make it
easier or harder for patients to perform the weight shifting tasks they will be asked to
perform. Values from 3% to 15% can be set.
7. Touch <OK> to confirm the selections or <Cancel> to return to the Patient Setup Information
screen without making changes. Touch <NEXT> to advance to the Position Patient screen.
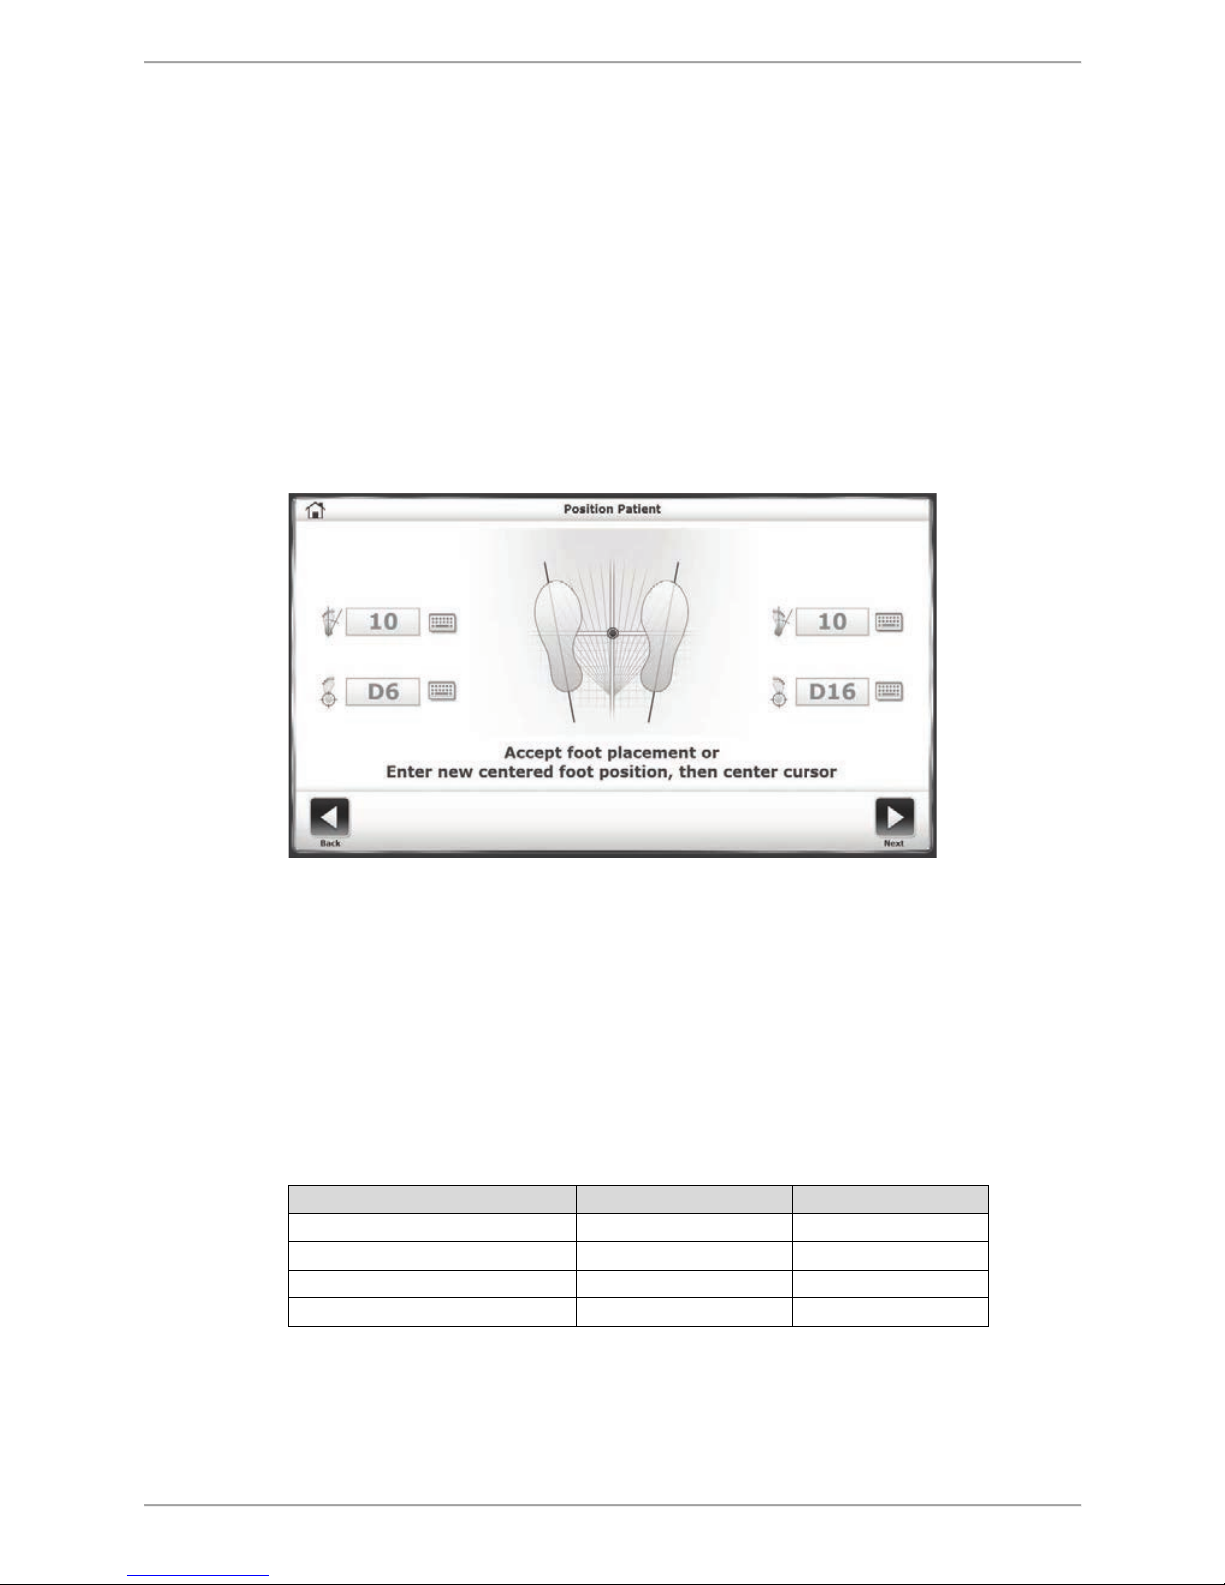
Figure 6.4. Position Patient Screen
8. The dot on the Position Patient screen represents the patient’s Center of Gravity. Have the
patient stand in a natural stance, slightly adjusting foot placement until the dot is on or
close to the center axis. Using the four keypads, enter the patient’s left foot, left heel, right
foot and right heel positions using the midline of the foot and the platform grid as
reference points. As a reference, use the table below for foot positioning based on patient
height*:
Table 6.1 Patient Foot Placement
9. Touch <Next> to advance to the Percent Weight Bearing Training screen (see Figure 6.5).
10. On the Percent Weight Bearing Training screen, touch one of the three <Axis> icons to
select an exercise orientation.
30 Biodex Medical Systems, Inc. © 2017
 Loading...