

Page 1
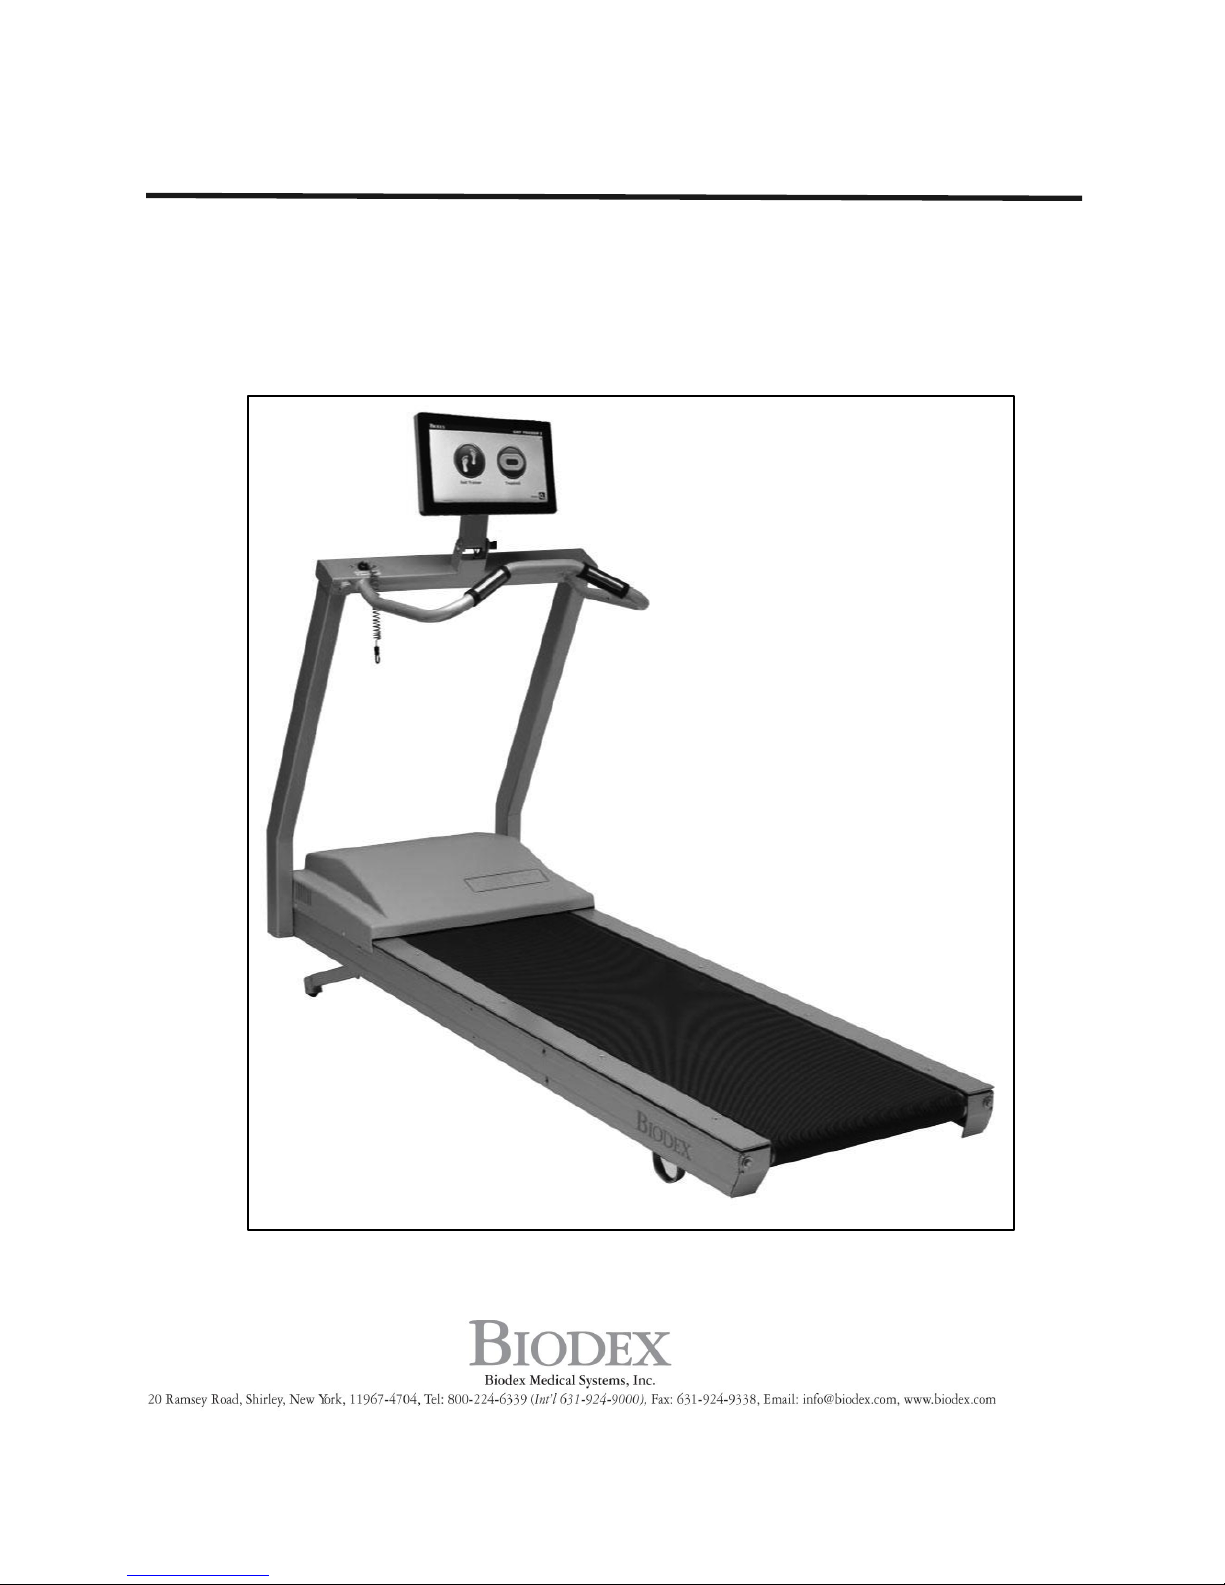
GAIT TRAINER 3 (v3.X software)
APPLICATION/OPERATION MANUAL
950-400
950-401
950-402
950-403
950-404
950-405
950-406
950-407
950-408
950-413
950-414
FN: 17-024 Rev B 5/17
Page 2
2 Biodex Medical Systems, Inc. © 2017
Gait Trainer 3 (v3.X software)
This manual covers operation procedures for the following products:
950-400 Gait Trainer 3, 115 VAC
950-401 Gait Trainer 3, 230 VAC
950-404 Gait Trainer 3, 100 VAC
950-402 Gait Trainer 3, 115 VAC, with Extended Handrails
950-403 Gait Trainer 3, 230 VAC, with Extended Handrails
950-405 Gait Trainer 3, 100 VAC, with Extended Handrails
950-406 Gait Trainer 3, 115 VAC, with Geriatric/Pediatric Handrails
950-407 Gait Trainer 3, 230 VAC, with Geriatric/Pediatric Handrails
950-408 Gait Trainer 3, 100 VAC, with Geriatric/Pediatric Handrails
950-413 Gait Trainer 3, 115 VAC, with Music Therapy Option
950-414 Music Therapy Kit
Page 3

GAIT TRAINER 3 (v3.X SOFTWARE) 3
Table of Contents
Definition of Symbols ................................................................................................................ 6!
Before Proceeding ..................................................................................................................... 7!
Important Safety Information ..................................................................................................... 8!
Biodex Warranty ...................................................................................................................... 10!
1.! Introduction ....................................................................................................................... 12!
Intended Use ................................................................................................................ 12!
Indications for Use ....................................................................................................... 12!
Assembly and Installation ............................................................................................ 12!
Power-down ................................................................................................................. 14!
Initial Setup and Activation ........................................................................................... 15!
Printer Installation ........................................................................................................ 15!
Connecting Components .............................................................................................. 17!
Accessing Additional Ports and Connections ................................................................ 17!
2.! Gait Trainer Mode .............................................................................................................. 18!
Gait Trainer Mode ........................................................................................................ 18!
The Gait Trainer Patient Setup Screen ........................................................................... 18!
Gait Training Patient Setup Screen Parameters .............................................................. 20!
Additional Gait Training Patient Setup Screen Parameters ............................................. 21!
The Additional Information Screen ............................................................................... 21!
The Diagnostic Information Screen ............................................................................... 22!
The Biofeedback Options Screen .................................................................................. 22!
The Select Patient Screen .............................................................................................. 23!
The G-Code Calculator Options Screen ......................................................................... 25!
Footfalls/Histogram Screen .......................................................................................... 25!
Footfalls/Histogram Screen Parameters ........................................................................ 27!
3.! Normative Data .................................................................................................................. 29!
4.! Test Results ....................................................................................................................... 30!
Test Results Parameters ............................................................................................... 30!
Test Results Screen Functions ...................................................................................... 31!
Gait Trainer Progress Report ........................................................................................ 32!
5.! G-Codes ............................................................................................................................. 36!
Introduction to G-Codes and Modifiers ......................................................................... 36!
Associating G-Code Data .............................................................................................. 37!
Test Results Data ......................................................................................................... 41!
Page 4

4 Biodex Medical Systems, Inc. © 2017
6.! Treadmill Operation ........................................................................................................... 47!
Quick Start Operation ................................................................................................... 47!
Quick Start Track / Numeric Display Parameters ........................................................... 48!
Manual Treadmill Operation ......................................................................................... 49!
Manual Operation Procedure ........................................................................................ 49!
Manual Mode Exercise Track and Numeric Display Parameters ..................................... 50!
7.! Treadmill Profiles ............................................................................................................... 52!
Selecting a Pre-Defined Exercise Profile ........................................................................ 52!
Profile Mode Exercise Track and Numeric Display Parameters ....................................... 54!
Designing a Custom Exercise Profile ............................................................................ 54!
8.! Gait Trainer Utilities ........................................................................................................... 56!
Reports ........................................................................................................................ 56!
Configuration ............................................................................................................... 57!
System Configuration ................................................................................................... 57!
System Configuration Screen Parameters ...................................................................... 58!
Gait Trainer Configuration ............................................................................................ 60!
Patient Management ..................................................................................................... 62!
Adding Patient Files ..................................................................................................... 64!
Editing Patient Files ...................................................................................................... 64!
Deleting Patient Files .................................................................................................... 65!
Importing Patient Data ................................................................................................. 65!
Exporting Multiple Patient Data Sets ............................................................................. 66!
Working With Individual Patient Records ....................................................................... 67!
Printing Stored Results ................................................................................................. 68!
System Maintenance ..................................................................................................... 69!
Backup to USB .............................................................................................................. 70!
Restore from USB ......................................................................................................... 70!
Database Cleanup ........................................................................................................ 72!
Advanced System Maintenance ..................................................................................... 72!
Advanced System Maintenance Screen Settings ............................................................ 73!
Software Updates ......................................................................................................... 76!
9.! Music Therapy ................................................................................................................... 77!
Music Compositions ..................................................................................................... 86!
Copyright Notice of Music Compositions ...................................................................... 86!
10.!Maintenance ...................................................................................................................... 88!
Daily Maintenance ........................................................................................................ 90!
Quarterly Maintenance ................................................................................................. 90!
Annually or Every 1,000 Hours Reverse Exact-Track Bed ............................................... 91!
Page 5

GAIT TRAINER 3 (v3.X SOFTWARE) 5
Replace Treadbelt ........................................................................................................ 91!
Maintenance Procedures Belt/Deck Lubrication ............................................................ 91!
Treadbelt Adjustment .................................................................................................. 92!
Treadbelt Alignment .................................................................................................... 94!
11.!Troubleshooting ................................................................................................................ 95!
Symptom ..................................................................................................................... 95!
12.!Electromagnetic Compatibility ............................................................................................ 96!
Conformance to Standards ........................................................................................... 96!
Accompanying EMC Documents ................................................................................... 96!
List of Cable Accessories .............................................................................................. 96!
Declaration of Conformity ............................................................................................ 97!
Recommended Separation Distances .......................................................................... 100!
Operating Temperature .............................................................................................. 100!
13.!Specifications .................................................................................................................. 101!
14.!References and Bibliography ............................................................................................ 102!
References: ................................................................................................................ 102!
15.!Parts and Assembly Illustrations ...................................................................................... 104!
Appendix A: CSV File Export .................................................................................................. 109!
Appendix B: Use of Music Therapy and the Biodex Gait Trainer .............................................. 114!
Page 6
6 Biodex Medical Systems, Inc. © 2017
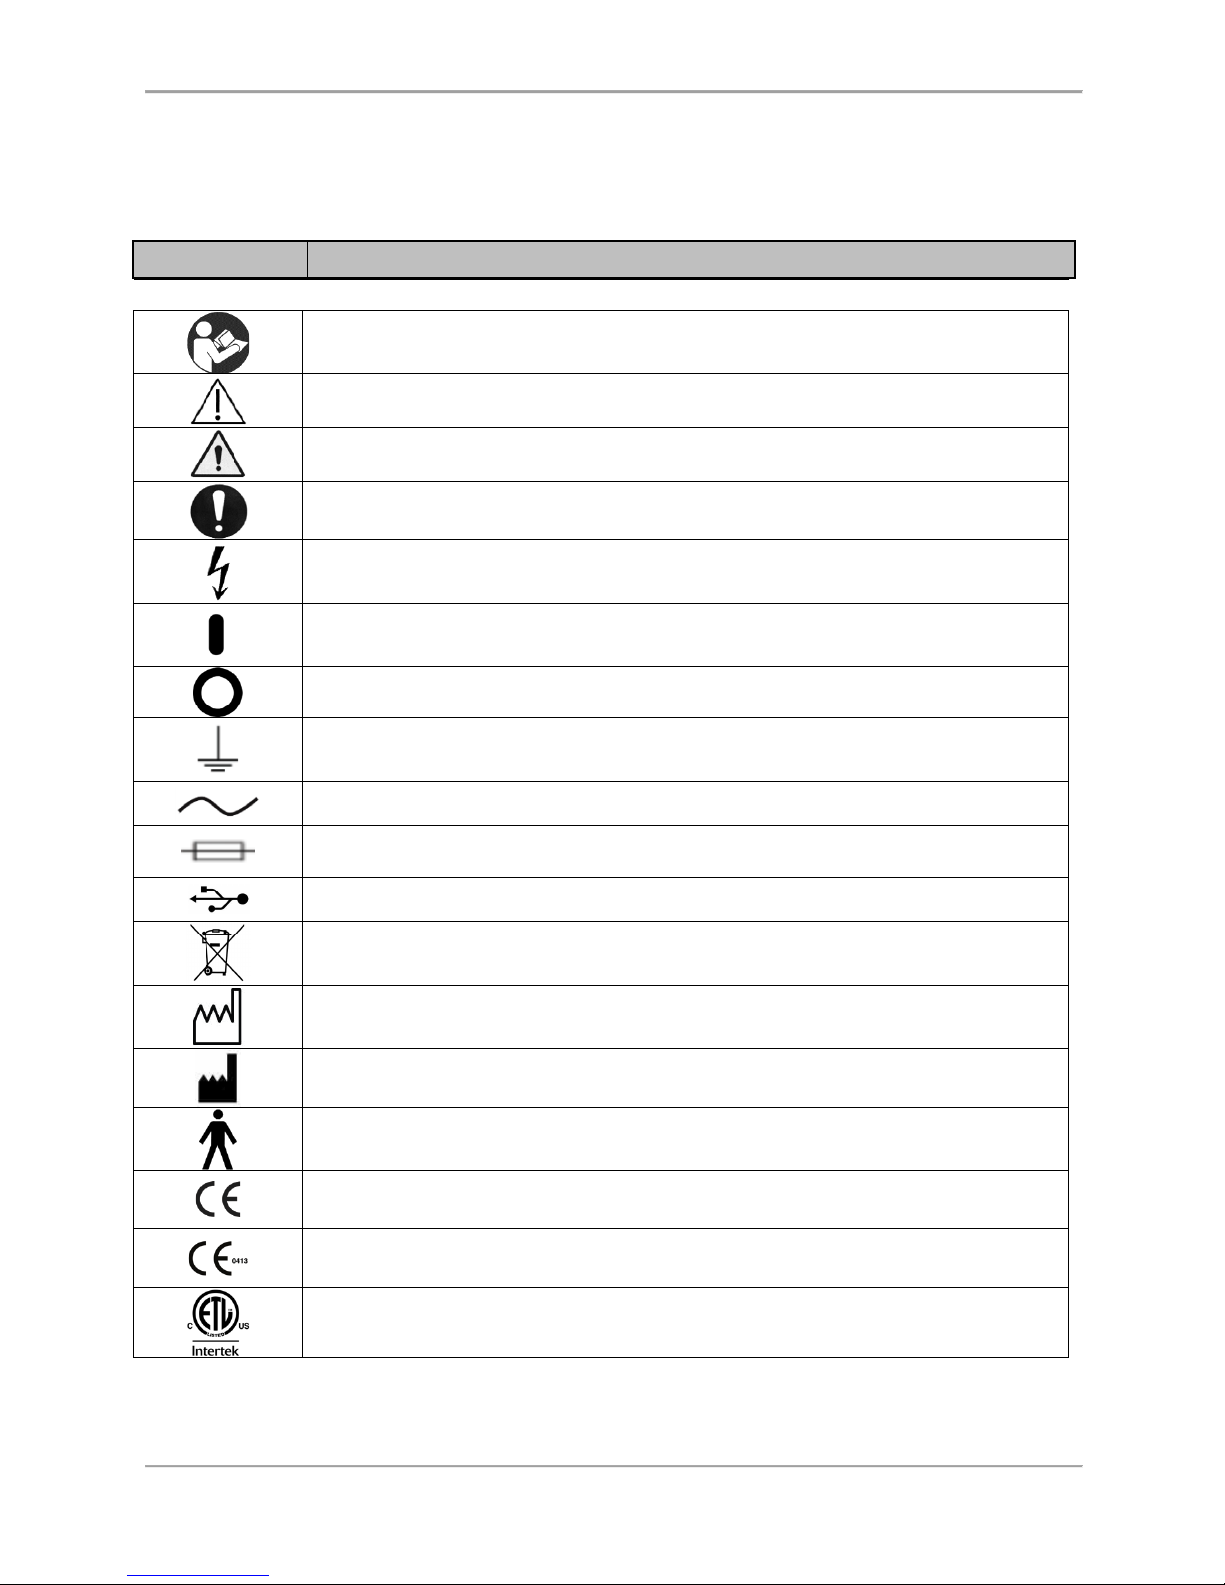
Definition of Symbols
The following symbols and their associated definitions are used and implied throughout this
manual.
Symbol Definition
Carefully read these instructions prior to use
Caution
General Warning
General Mandatory Action
Dangerous Voltage
“On” Power
“Off” Power
Earth (ground)
Alternating Current
Fuse
USB Connector/Cable
Waste in Electrical Equipment
Date of Manufacture
Manufactured By
Type B Applied Part
CE Mark
CE Mark for products with EC Certificate
Certified for Safety by ETL Intertek
Page 7
GAIT TRAINER 3 (v3.X SOFTWARE) 7
Before Proceeding
NOTE: The warnings, cautions and instructions provided in this manual must be
read, followed and kept available for consultation at all times. Observing the
information, instructions, and procedures presented throughout this manual is
essential for using this product both properly and safely.
SPECIFIC CAUTIONS
● Allow only qualified, trained personnel to operate or service this product.
● If the equipment is used in a manner other than specified in this operation
manual, the protection provided by the equipment may be impaired and
results could be compromised.
● Never leave patient unattended.
EN GARDE SPÉCIFIQUES
● Permettez au personnel seulement autorisé, entraîné de faire marcher ou
assurer l'entretien de ce produit.
● Si l'équipement est utilisé dans une manière autre qu'indiqué dans ce
manuel d'opération, la protection fournie par l'équipement peut être
diminuée et les résultats pourraient être compromis.
● Ne quittent Jamais le patient sans surveillance.
CAUTION: Unauthorized modifications to this product are not permitted and will
void the manufacturer’s warranty. Unauthorized modification of the product may
result in a hazard to the user and/or patient. Do not modify this equipment
without authorization from the manufacturer.
ATTENTION: Les modifications faites sans autorisation à ce produit ne sont pas
permises et va faire le vide la garantie du fabricant. La modification faite sans
autorisation du produit peut s'ensuivre dans un hasard à l'utilisateur et-ou le
patient. Ne modifiez pas cet équipement sans autorisation du fabricant.
Training
This operation manual includes assembly and operating instructions. Operating/assembly
questions can be directed to the service department during business hours.
Page 8
8 Biodex Medical Systems, Inc. © 2017
Important Safety Information
CAUTION: Federal Law restricts this device to sale by or on the order of a
physician, or other licensed professional.
ATTENTION: La Loi Fédérale restreint cet artifice à la vente par ou sur l'ordre
d'un docteur, ou d'autre professionnel agréé.
Follow the unpacking and assembly instructions document.
Before using this equipment, read the entire operation manual carefully.
Failure to read the manual may result in user error or injury. Be sure to save
all provided documents for future reference.
Make certain to understand all warning and caution labels as explained in the
Before Proceeding section of this manual.
This product should be used only as specified in the operation manual.
For product specifications, refer to the Table of Contents.
This medical electrical equipment requires special precautions regarding EMC
and must be assembled and placed into service according to EMC information
provided in this manual. For electromagnetic compliance definition, refer to
the Table of Contents.
Reference Cleaning and Maintenance instructions in Table of Contents.
CAUTION: Operation for 950-400: 115 VAC; 950-401: 230 VAC; 950-404: 100
VAC.
ATTENTION: Opération pour 950-400: 115 VAC; 950-401: 230 VAC; 950-404:
100 VAC.
WARNING: Only use approved power supplies.
AVERTISSEMENT: N'utiliser que les alimentations homologuées
Page 9
GAIT TRAINER 3 (v3.X SOFTWARE) 9
CAUTION: To avoid risk of electric shock, this equipment must only be
connected to supply mains with protective earth.
ATTENTION: Pour éviter le risque de choc électrique, cet équipement doit
uniquement être connecté à un approvisionnement conduites avec la terre
protectrice.
CAUTION: The plug is considered the method of disconnecting the product
from main power. Do not place the product in a position where the plug is not
easily accessible.
ATTENTION: Le bouchon est considérée comme la méthode de déconnexion du
produit d'alimentation. Ne placez pas le produit dans une position où le
bouchon n'est pas facilement accessible.
CAUTION: This product is intended to remain in one location during operation.
It is provided with wheels for relocation that should be used when moving.
ATTENTION: Ce produit est destiné à rester à un endroit pendant le
fonctionnement. Il est muni de roues pour la réinstallation qui devraient être
utilisés lors du déplacement.
Page 10

10 Biodex Medical Systems, Inc. © 2017
Biodex Warranty
1. Product Warranty
A. This equipment and its accessories are warranted by BIODEX MEDICAL SYSTEMS, INC.
against defects in materials for a period of two years and workmanship for a period of
one year from the date of shipment from BIODEX MEDICAL SYSTEMS, INC. During the
warranty period, BIODEX MEDICAL SYSTEMS, INC. will in its sole discretion, repair, send
replacement parts, or replace the equipment found to have such defects at no charge to
the customer.
EXCEPT AS STATED ABOVE, THERE ARE NO WARRANTIES, EXPRESSED OR IMPLIED,
INCLUDING WITHOUT LIMITATION WARRANTIES OR MERCHANTABILITY OR FITNESS FOR
USE. BIODEX DOES NOT ASSUME LIABILITY FOR INCIDENTAL, CONSEQUENTIAL, OR
INDIRECT DAMAGES INCLUDING LOSS OF USE, SALES, PROFITS, OR BUSINESS
INTERRUPTION.
B. This warranty does not apply if the product, as determined by BIODEX MEDICAL
SYSTEMS, INC., is defective due to abuse, misuse, modification, or service performed by
other than a BIODEX MEDICAL SYSTEMS, INC. authorized repair representative. Misuse
and abuse include, but are not limited to, subjecting limits, and allowing the equipment
to become contaminated by fluid materials.
C. In order to obtain warranty repair service and to expedite repair process, please contact
BIODEX MEDICAL SYSTEMS, INC. Support Services Dept. at 800-224-6339, and select
product support as prompted.
Warranty is non-transferable.
Non-Warranty Service
A. Repairs and/or replacements not covered by this warranty may be performed by
BIODEX MEDICAL SYSTEMS, INC. authorized service representatives.
Service Procedure
A. If you think you have a service problem, take the following action:
1. Check to see that the problem occurs more than once.
2. Refer to the instruction manual and operations procedure.
B. If you still think you have a service problem:
1. Call BIODEX MEDICAL SYSTEMS, INC., Service Department at (800) 224-6339 and
select product service as prompted.
2. Keep yourself and the phone next to the equipment.
3. Service will ask for a brief description of the problem. We will ask specific questions
about the malfunction that occurred. This diagnostic process may take a few
minutes; therefore, call us when you can set aside an uninterrupted block of time.
4. After taking the information, we will advise on the action we will take.
Page 11
GAIT TRAINER 3 (v3.X SOFTWARE) 11
5. Sometimes service personnel must consult with engineering and it may take time to
get back to you. Be sure to let the service representative know your schedule so
that we can call at a convenient time.
6. The return call may be from a person other than the one to whom you first reported
the problem.
7. After analyzing the problem, we will decide if the unit can be repaired on site, or
replacement parts will be sent.
8. If the unit must be returned, Biodex will provide a return materials authorization
number (R.M.A. #.) Pack the unit in the carton that it was originally shipped in. It is
the customer's responsibility for any damage that occurs during shipping.
9. Non-warranty/non-service contract charges for repair are as follows:
a. Materials
+
b. Time
+
c. Travel Zone
Contact information
Manufactured by:
Biodex Medical Systems, Inc.
20 Ramsey Road, Shirley, New York, 11967-4704
Tel: 800-224-6339 (Int’l 631-924-9000)
Fax: 631-924-8355
email: [email protected]
www.biodex.com
Page 12

12 Biodex Medical Systems, Inc. © 2017
1. Introduction
Intended Use
Designed specifically for rehabilitation and retraining of gait for patients with neurologic and
orthopedic gait dysfunctions, the Biodex Gait Trainer provides both the audio and visual
feedback needed to progress patients quickly and safely to normal ambulation.
The Gait Trainer is easy to use. The clinician need only select the patient’s age and height for
the treadmill to automatically calculate the exact speed needed to achieve desired step cycle.
The rhythmic movement and the audio feedback provide patients with added stimulus for
retraining of neural pathways to improve gait pattern.
The Gait Trainer promotes correct stride length for early phase patients. By starting out slowly
(with the zero starting speed and small, one-step cycle speed increments), it is possible to
manually position the patient’s lower extremities in the desired patterns for gait thus
reinforcing the proper techniques early in the rehabilitation process. As the patient progresses,
correct stride length is coupled to the correct step cycle. When belt speed is increased, the
patient must either take longer or more strides to stay on target. Normative data allows
clinicians to compare patient progress to baseline norms.
Indications for Use
Of course, the Gait Trainer can also be used for many other rehabilitation treadmill
applications. In the treadmill mode, its unparalleled speed control, durability, incline and
decline in both forward and reverse directions, digital feedback, low profile, and choice of
handrail configurations make it the ideal choice for virtually any patient young or old.
The Biodex Gait Trainer comes with a printer that is easy to install and resides on the printer
stand.
Assembly and Installation
The display monitor receives power from the larger Gait Trainer device. Therefore, the Gait
Trainer must be plugged into a wall outlet or surge suppressor and powered on by the ON/OFF
switch at the front base of the unit.
The Gait Trainer deck is instrumented with a strain gage at each of the four corners. It is
important that the Gait Trainer be level for optimal footfall detection. When not level, the user
may see messages concerning Leveling or Offset Calibration. Depending on the situation,
instructional screens will be displayed leading the user through any required process.
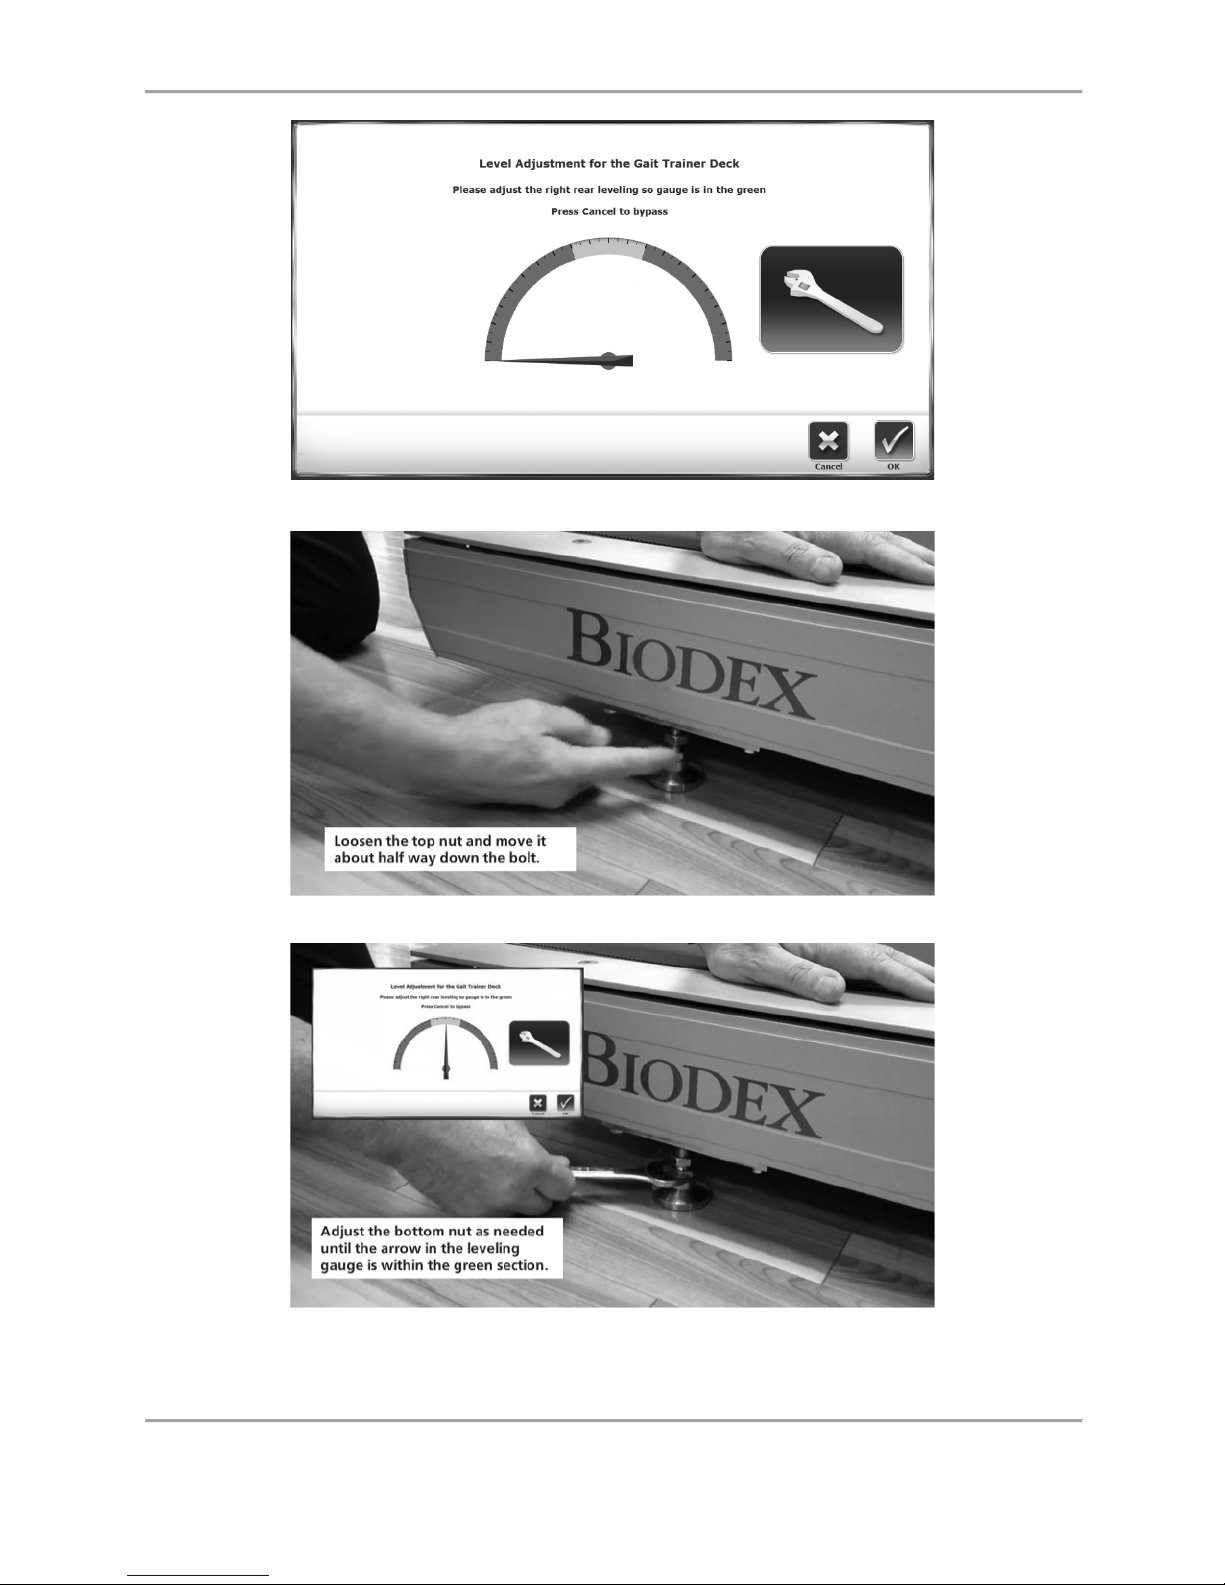
When first installed, or if the Gait Trainer is moved, the leveling foot may require an
adjustment. This will require a ¾” wrench. Adjust the rear leveling foot by turning it with the
wrench until the on-screen gage turns green. Please note that there is a jam nut that should be
loosened first, and re-tightened after leveling the foot. Press <OK>.
Page 13
GAIT TRAINER 3 (v3.X SOFTWARE) 13
Figure 1.1. Leveling Foot Requires an Adjustment.
Figure 1.2. Loosen the Top Nut
Figure 1.3. Adjust the Bottom Nut
Page 14
14 Biodex Medical Systems, Inc. © 2017
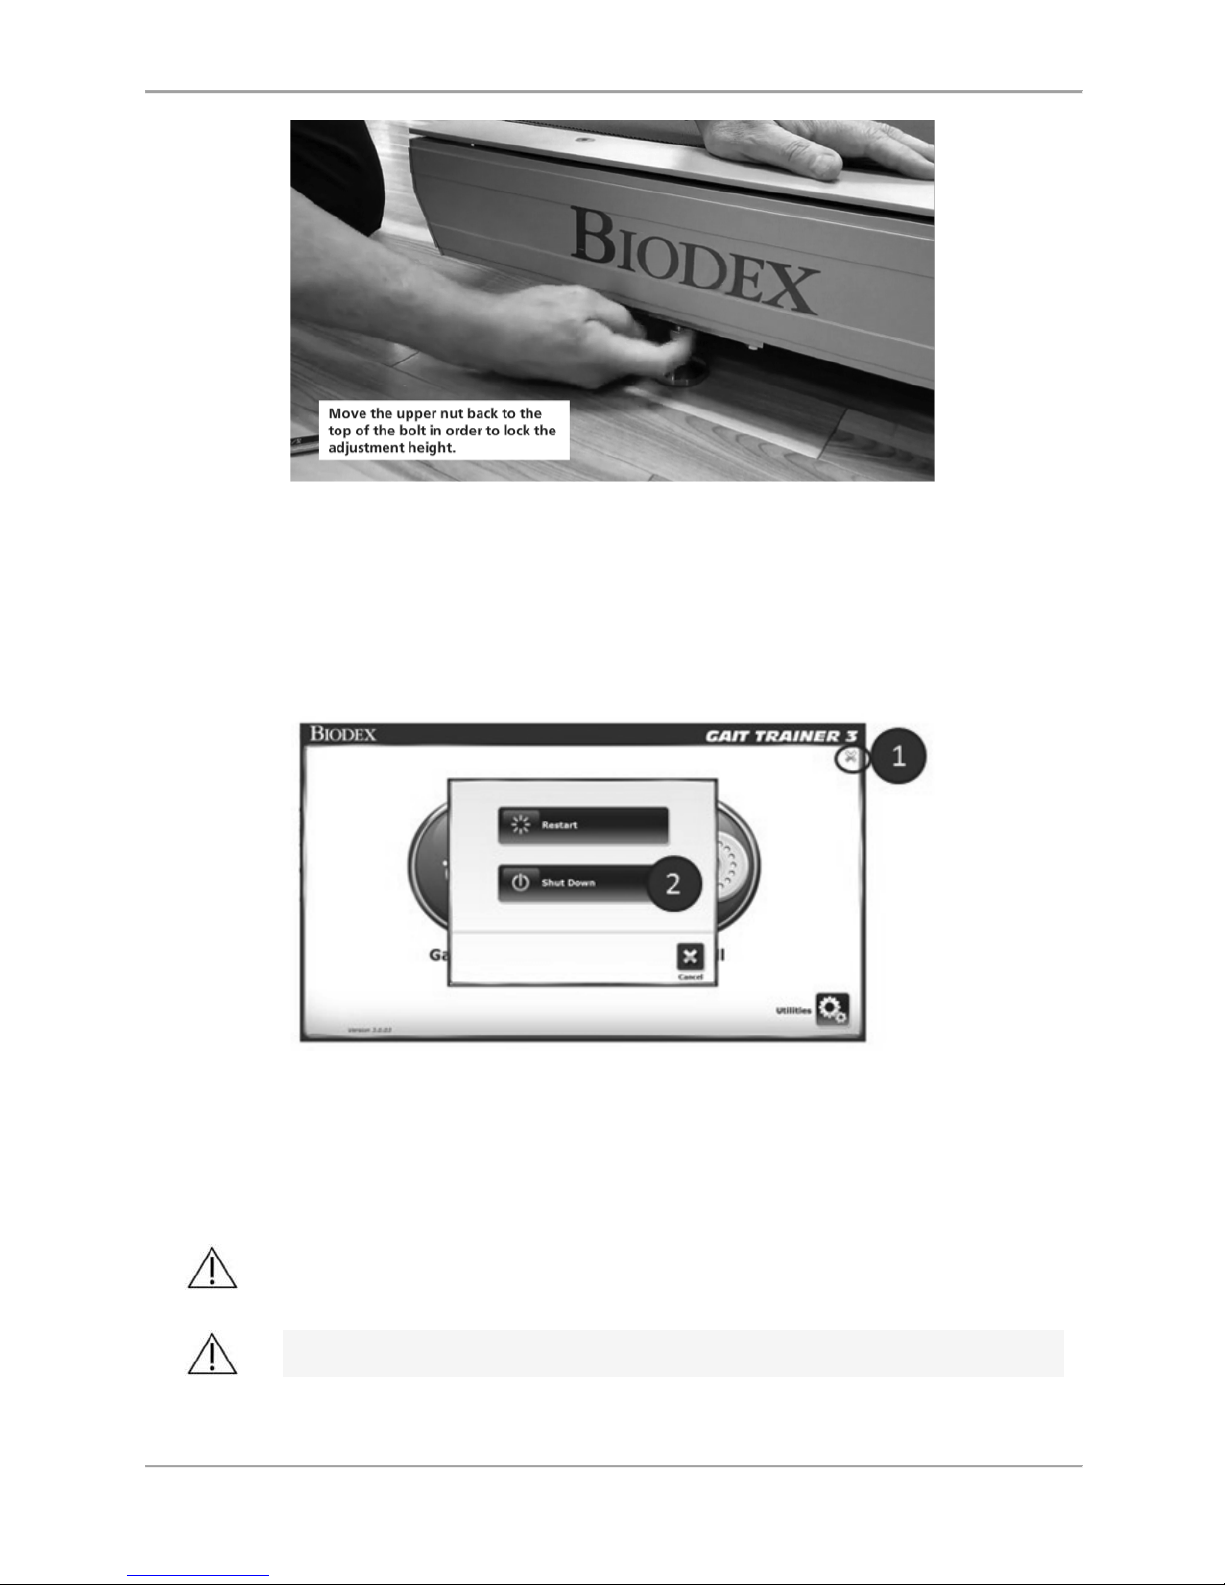
Figure 1.4. Adjusting the height of the Gait Trainer
Power-down
In order to prevent the device’s database from becoming corrupted, it is essential that the
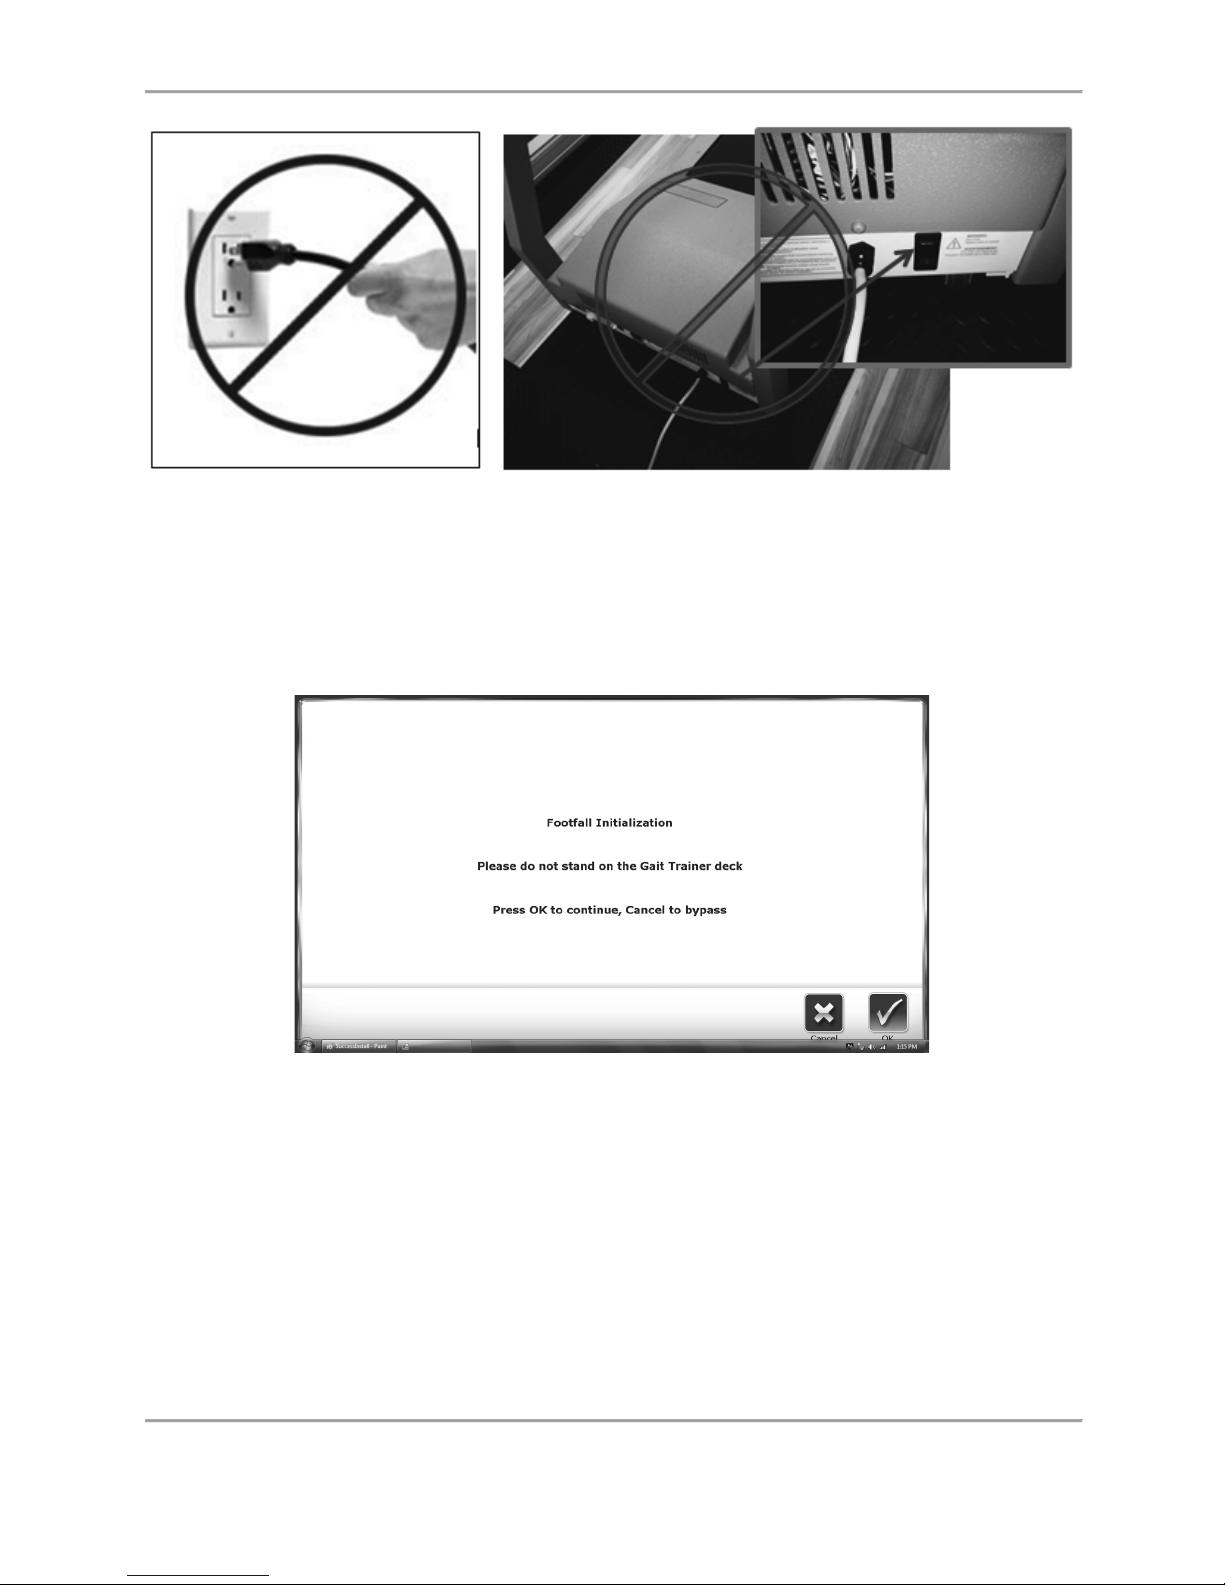
correct power-down sequence is performed. Always turn off the display, by touching the “X” in
the upper right corner of the home screen, followed by “Shut Down”.
Figure 1.5. Power-down sequence.
Once the display has finished its shut down sequence, power may be removed from the
treadmill using the main ON/OFF switch located on the front of the base where the power line
cord enters the treadmill.
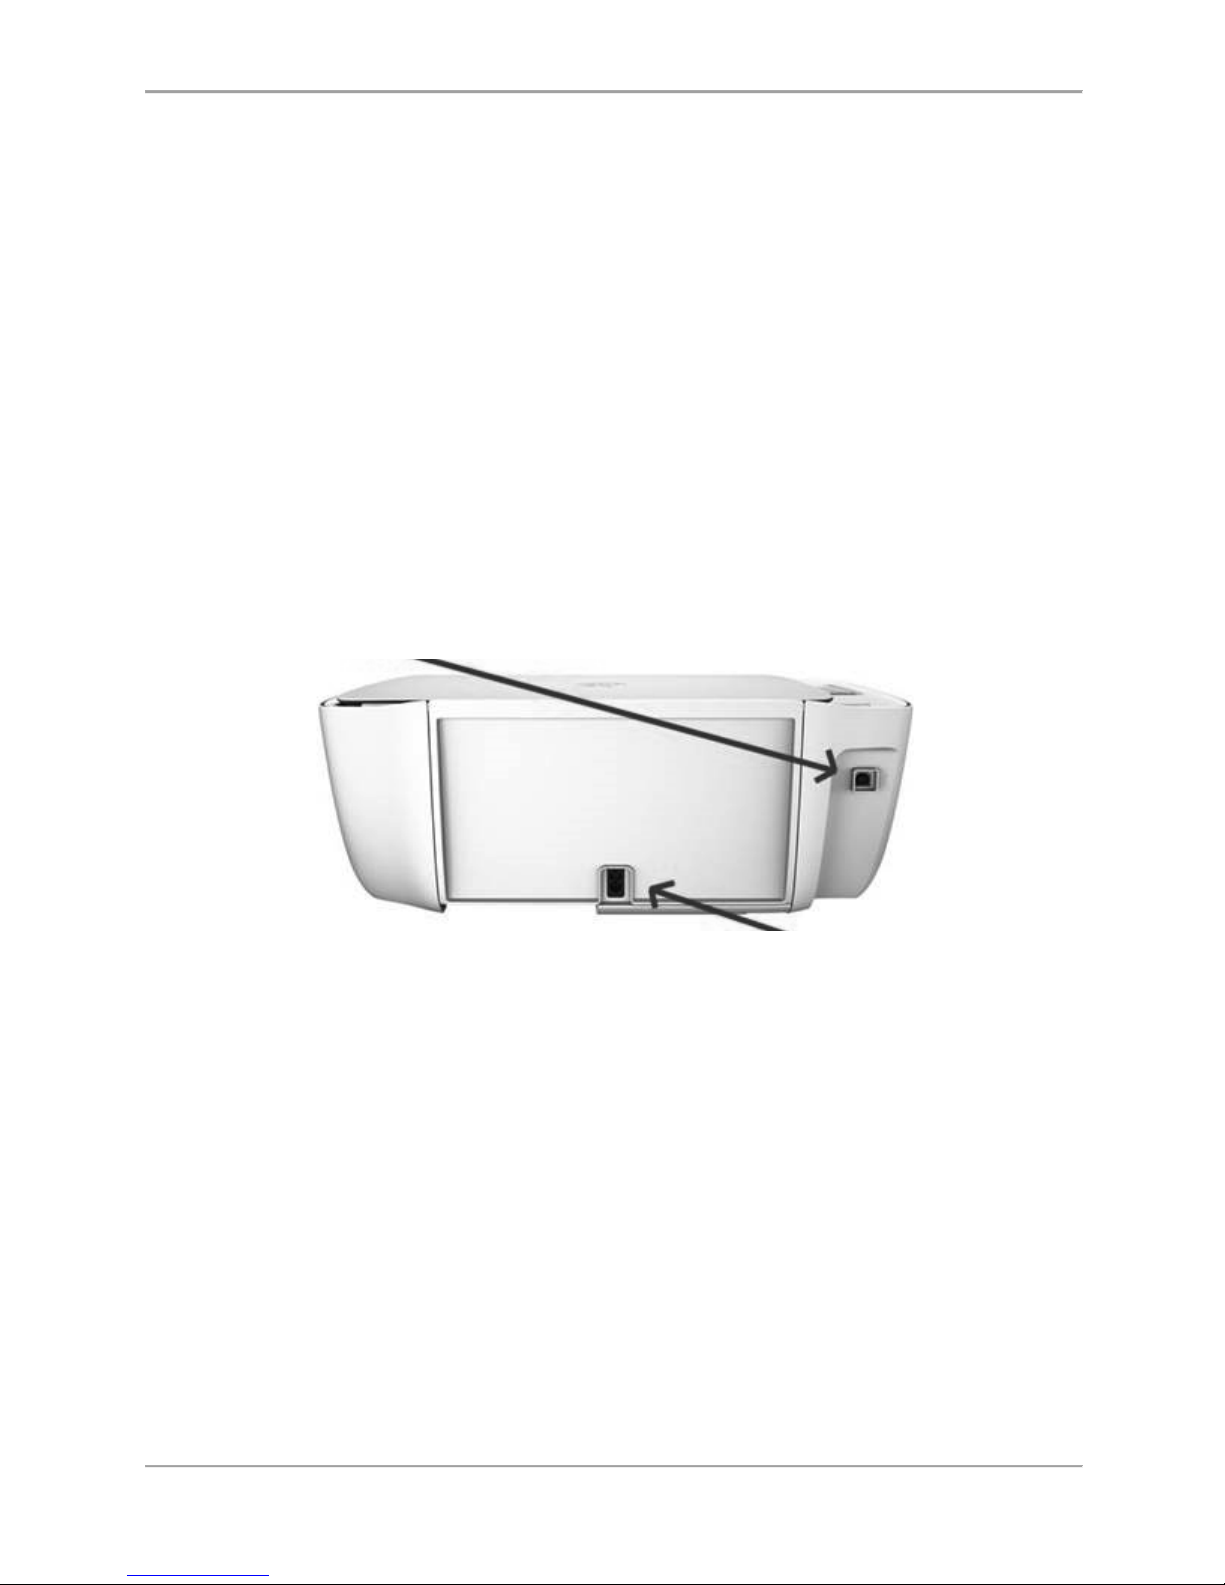
CAUTION: Do not unplug the device or turn off the ON/OFF front base switch
before powering down the display!
ATTENTION: Ne débranchez pas l 'appareil ou n'éteignez pas le commutateur
de la base avant avant d' éteindre l 'écran!
Page 15
GAIT TRAINER 3 (v3.X SOFTWARE) 15
Figure 1.6. Do not unplug the device or turn off the controller tray circuit breaker
front base switch before powering down the display.
Initial Setup and Activation
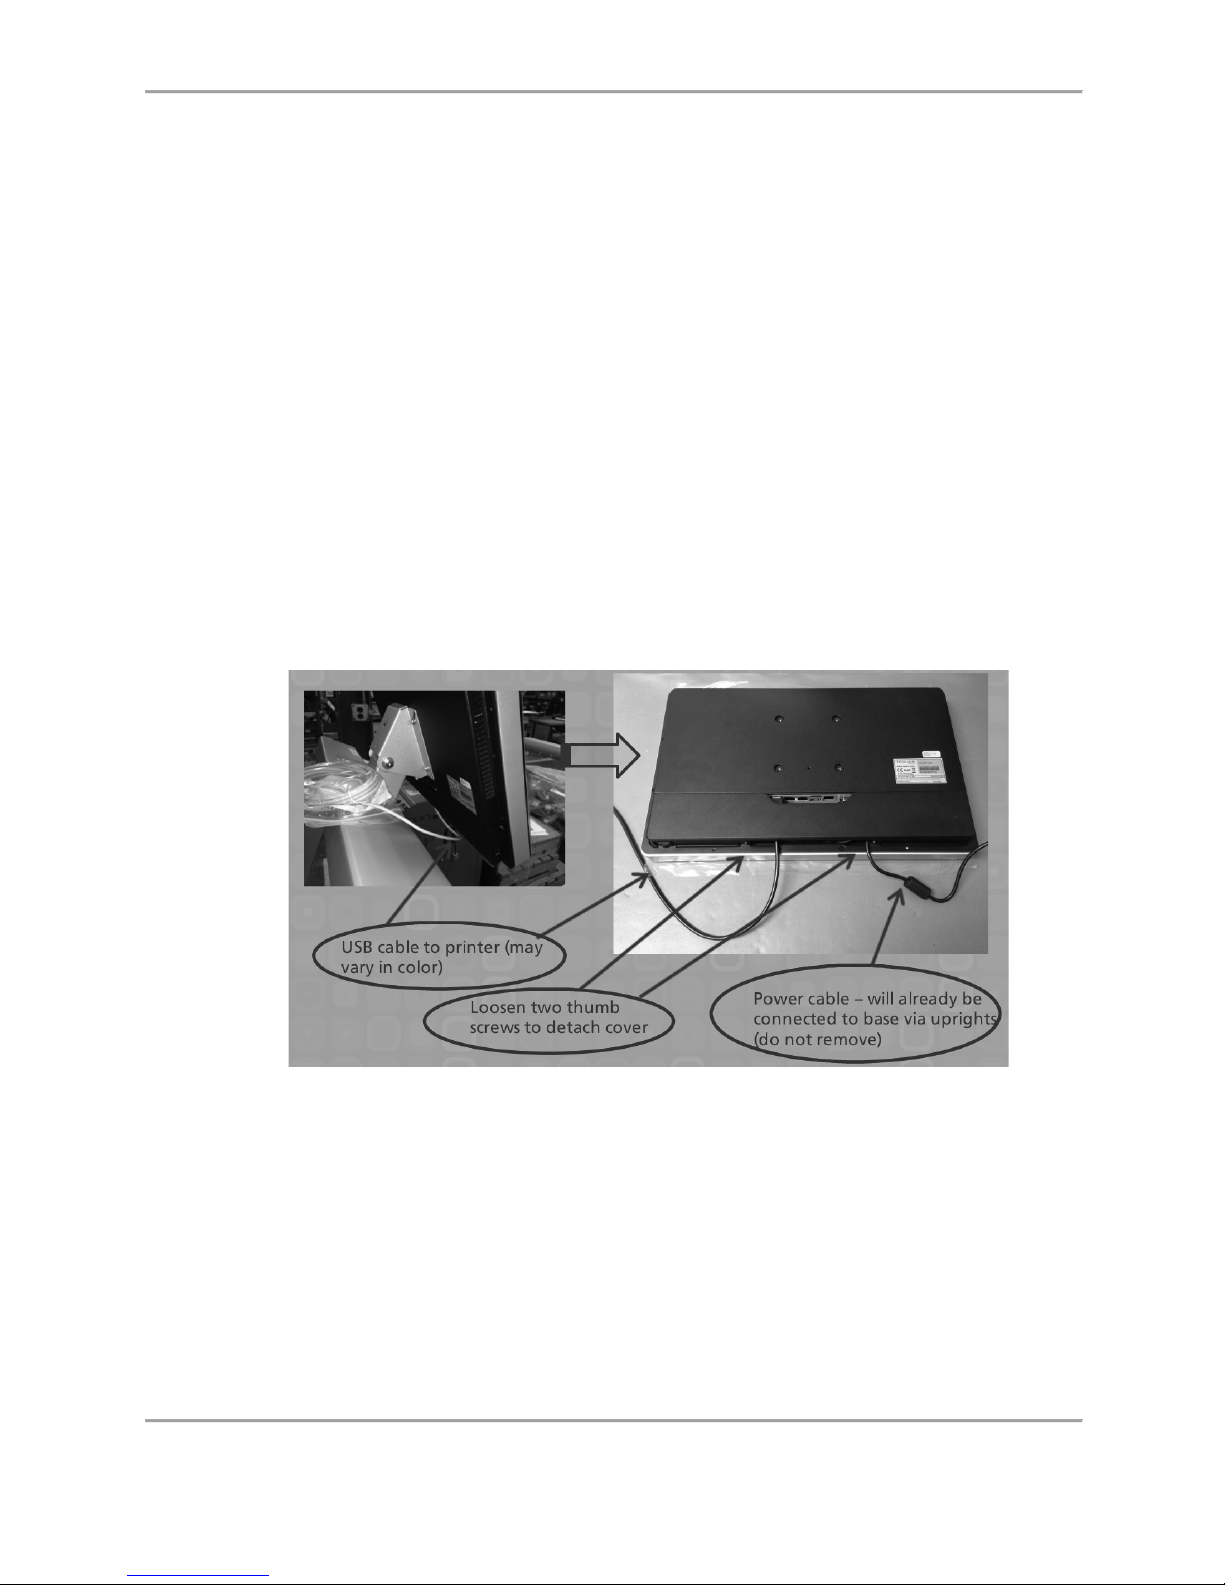
When the system is first powered on, the following screen is displayed if someone is standing
on the treadmill deck:
Figure 1.7. Footfall Initialization Screen
Note: It is important to not be standing on the treadmill deck when OK is selected to perform
the footfall initialization. The footfall initialization calibrates the treadmill sensors to patient
footfalls. Standing on the treadmill deck while the initialization is in process, will result in
inaccurate footfall readings.
Printer Installation
1. Refer to the supplied printer manual to unpack the printer and ensure that it has not been
damaged by shipping.
2. Position the printer on the Biodex-provided printer stand.
Page 16
16 Biodex Medical Systems, Inc. © 2017
3. Locate the printer power cable. Plug the small end into the power receptacle on the back of
the printer.
4. Insert the AC plug end of the printer power cable first into the Biodex-provided power
adapter, and then insert the adapter plug into the power cable receptacle on the back, lower
base of the Gait Trainer 3. Do not connect any other equipment to this receptacle.
5. Locate the Biodex-provided 15ft USB cable that will be pre-installed in one of the USB ports
on the Gait Trainer 3 display. Connect the other end of the cable to the port at the back of
the printer.
6. Ensure both cables are positioned such that they will not interfere with the patient or get
caught in the Gait Trainer 3 platform or handles.
7. Refer to the printer manual for directions on installing ink cartridges and paper.
8. With power ON to the Gait Trainer 3, press the <Power ON> switch on the printer. Refer to
the printer manual for additional printer information.
Figure 1.8. Connect the power cable and USB cable to the rear of the printer.
USB connection – The Gait Trainer 3 display will be shipped with a
USB cable plugged into one of the display’s USB ports. Plug the other
end into the data port on the back of the printer.
Power connection – Plug the smaller end of the printer power cable in
here. Plug the AC end of the cable into the power cable adapter.
Lastly, plug the adapter into the receptacle on the base of the Gait
Trainer 3.
Page 17
GAIT TRAINER 3 (v3.X SOFTWARE) 17
Connecting Components
In addition to the printer that is shipped with the Gait Trainer, other printers may be used with
the device. Most Windows 7 printers are compatible with the Gait Trainer display, but the
drivers for many of those printers may need to be installed. For help with this, please call
Biodex Customer Support at 631-924-9000, Option 3. Similarly, any Windows 7 keyboard or
mouse will automatically connect using one of the USB connections.
It is possible to connect the device to a printer wirelessly. Please call Customer Support for
instructions.
An external monitor can also be connected via the VGA port on the bottom of the display. Once
the external monitor’s cable is connected, the <Mirror to External Monitor> button in System
Utilities must be selected. (This button is accessed by the following navigation steps from the
Home screen: Utilities > Configuration > System Configuration > Screen Configuration.)
Accessing Additional Ports and Connections
The Gait Trainer provides the user with the ability to access additional ports and connections
from the back, bottom side of the monitor. These connections can be used to attach an
additional printer, external monitor, or other component. In the example below, the monitor
has been removed from the device column for demonstration purposes.
To access these ports and connections, the back of the monitor can be temporarily removed as
detailed in Figure 1.9.
Figure 1.9. Accessing Additional Ports and Connections
Page 18
18 Biodex Medical Systems, Inc. © 2017
2. Gait Trainer Mode
The Biodex Gait Trainer can be used for gait training applications or as a rehabilitation
treadmill. The following section describes use in the Gait Trainer Mode. The rehabilitation
treadmill operation is described later in this manual.
Gait Trainer Mode
The Gait Training Mode is useful for the rehabilitation and retraining of gait for patients with
neurological and orthopedic gait dysfunctions. It provides both audio and visual feedback for
the patient. The rhythmic movement of the treadbelt, along with the audio and visual
biofeedback, provides the necessary stimulus for retraining neural pathways thus improving
gait pattern.
NOTE: It is recommended that the Biodex NxStep Unweighing System be used in conjunction
with the Gait Trainer to provide a safe environment for the patient and clinician, and also to
allow for proper patient positioning for weight distribution and coordination of balance.
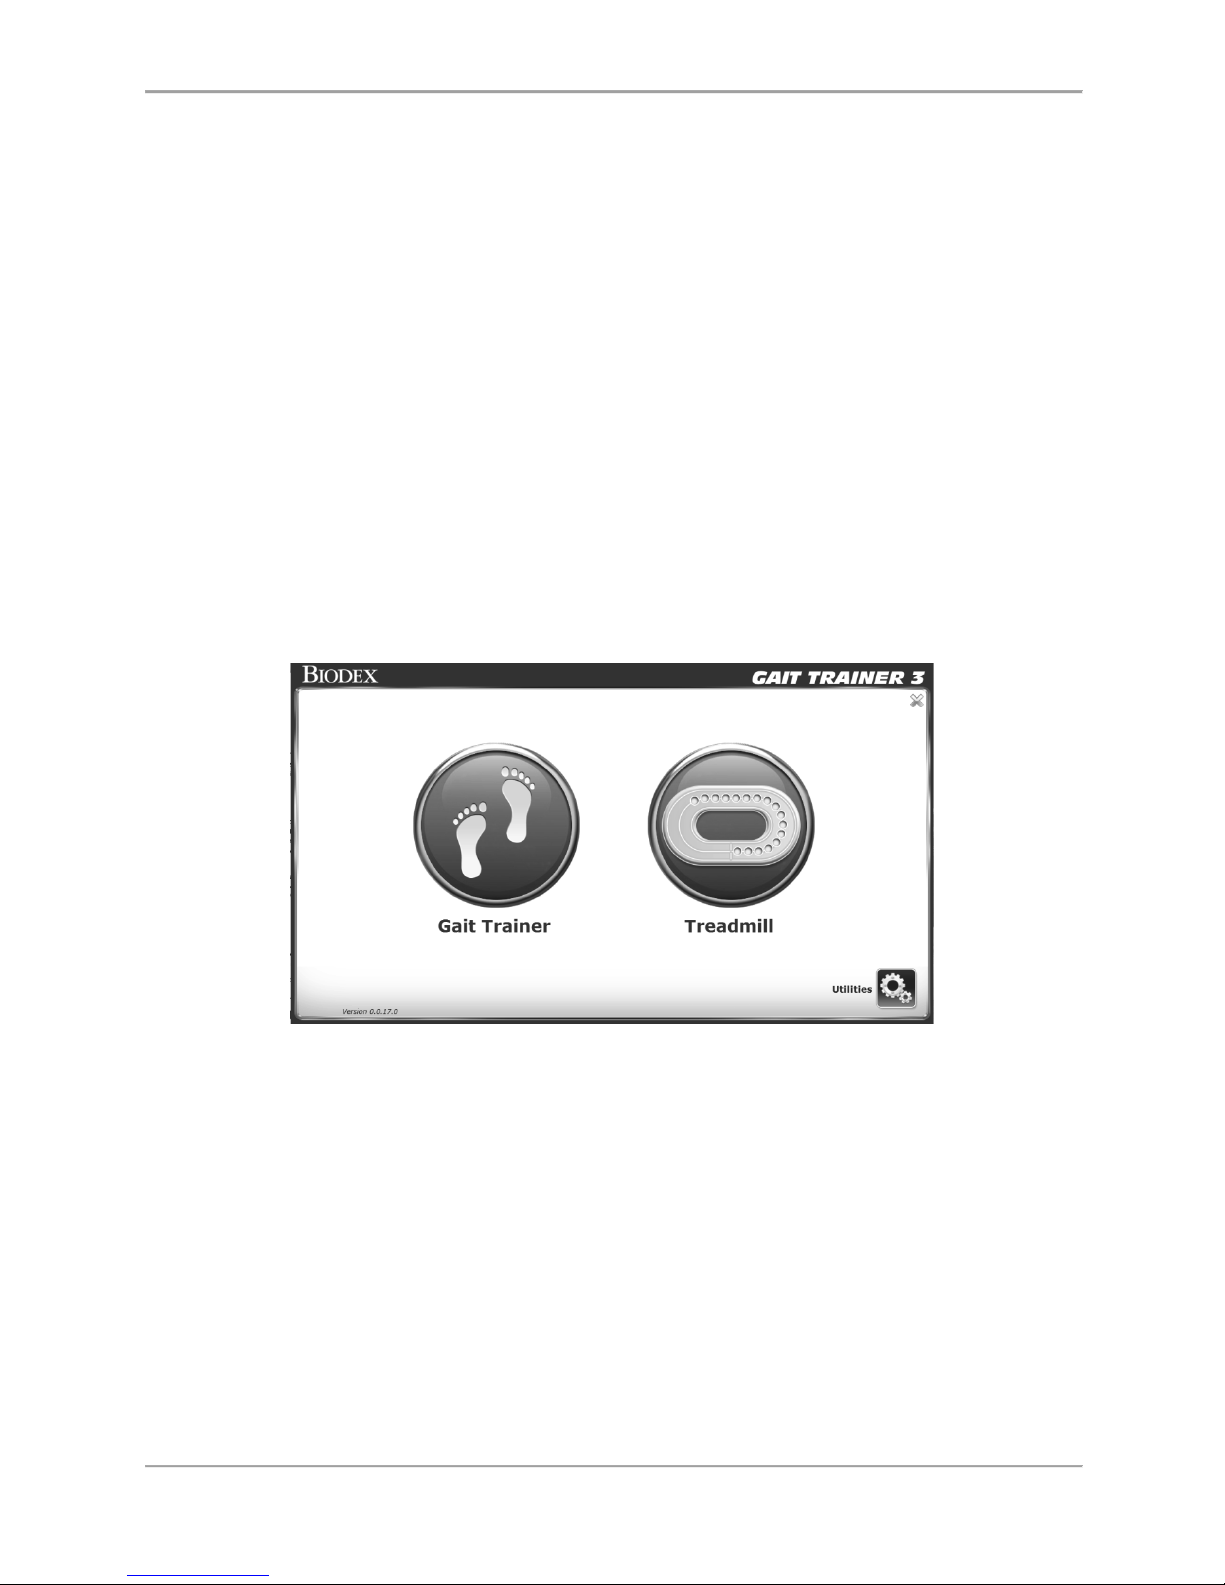
The Opening Menu displays three icons: Gait Trainer, Treadmill, and Utilities. Touch <Gait
Trainer> to advance to the Patient Setup screen. This screen allows entry of patient information
and parameters used for gait training.
Figure 2.1. The Gait Trainer Opening Menu.
NOTE: Please be aware that entering patient information into the system for the first time will
require some effort. This information is very important if reports are to be run for statistical
purposes. After the initial set up, information for existing patients is very quickly retrieved
making the session set up faster and easier.
The Gait Trainer Patient Setup Screen
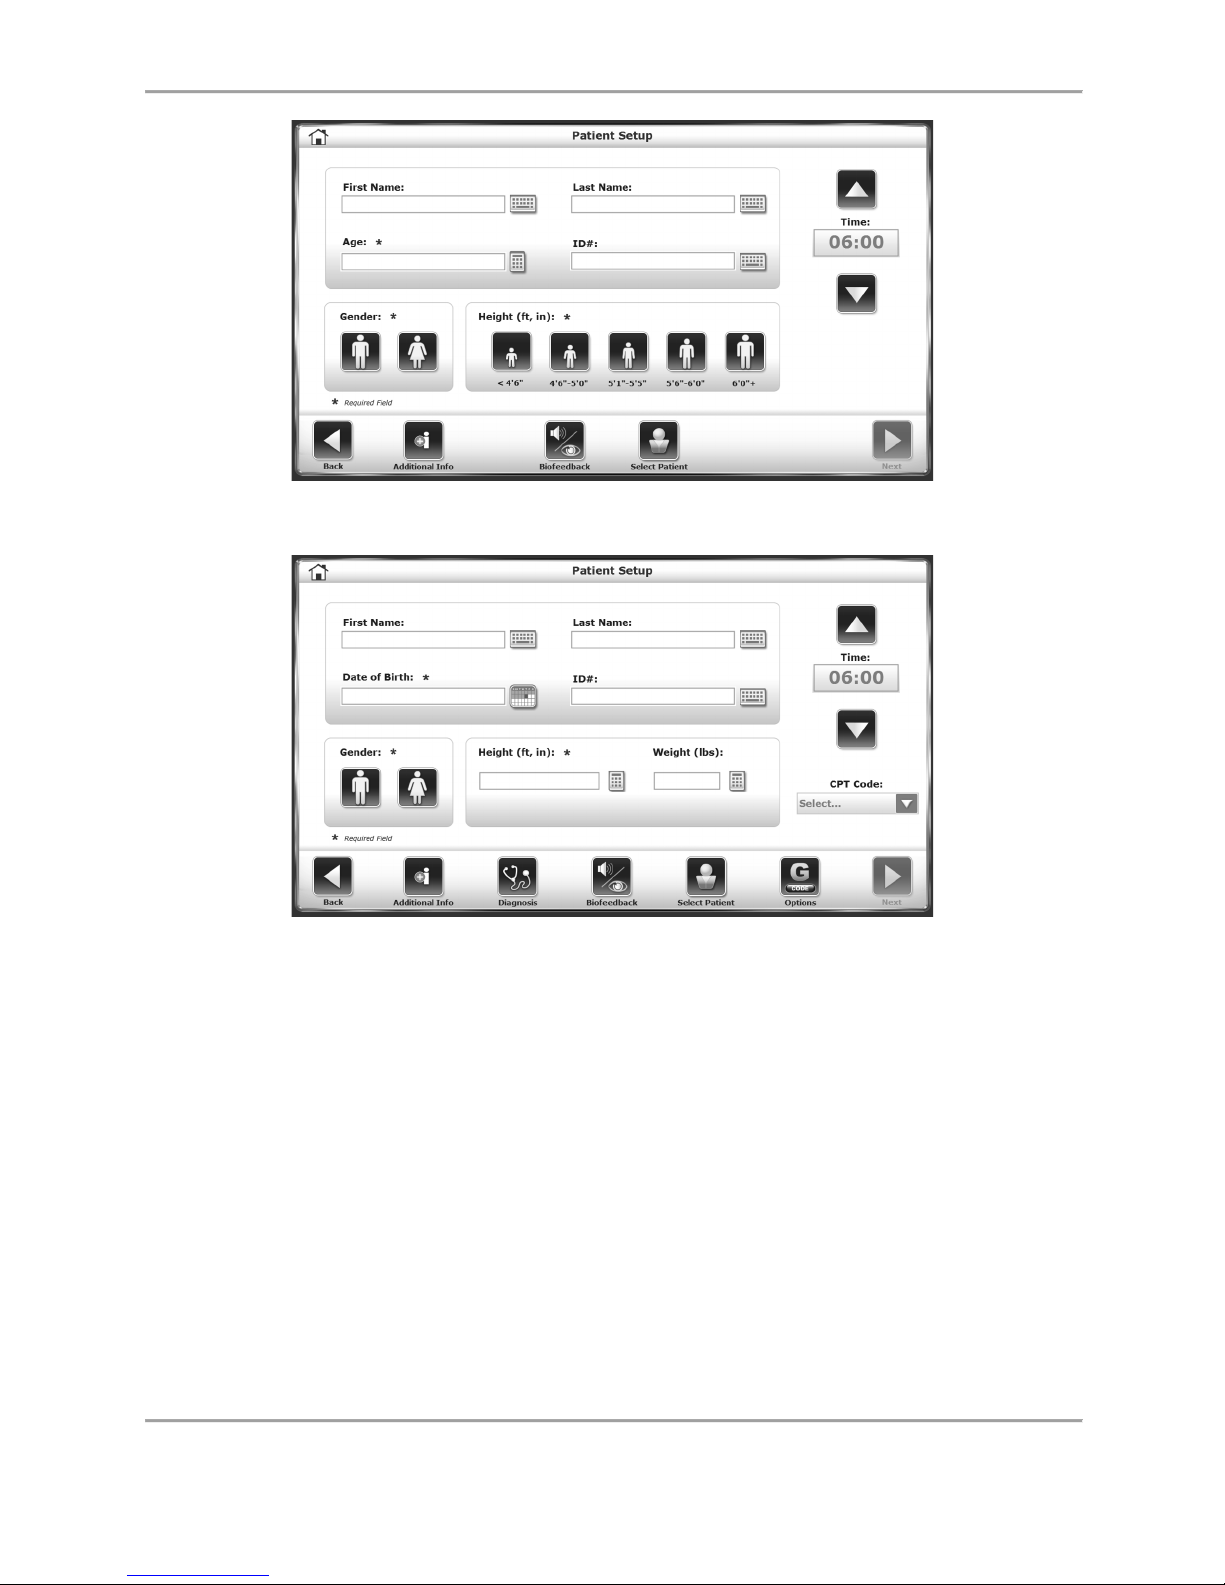
At the Patient Setup screen, touch the appropriate icon to begin entering information. A popup keypad is used to enter some parameters such as Name and Age. Once the desired
information is entered/selected, touch <Next> to advance to the Footfalls/Histogram screen.
Other adjustments can be made using the icons along the bottom of the screen. The presence
of some of these icons is set in the system Utilities section.
Page 19
GAIT TRAINER 3 (v3.X SOFTWARE) 19
Figure 2.2. The Gait Trainer Patient Setup screen.
Figure 2.3 The Gait Trainer Patient Setup screen. The presence of certain icons
(e.g., the Diagnosis and G-Code icons) are set within system Utilities.
Similarly, the different ways to input height, weight, and age information
can also be configured in system Utilities.
A brief explanation of each parameter and function on the Gait Training Patient Setup screen
follows.
NOTE: For all screens, <Next> advances to the next screen and <Back> returns the user to the
previous screen. The <Home> icon at the top, left corner returns the user to the Gait Trainer
Opening Menu screen.
Page 20

20 Biodex Medical Systems, Inc. © 2017
Gait Training Patient Setup Screen Parameters
NOTE: The three parameters for Gender, Height, and Age are mandatory fields and must be
completed before gait training can begin.
● First and Last Name: Optional, touch the pop-up <Keypads> to enter the first and last
name. Touch <OK> to continue.
● ID#: Optional or required depending on Configuration settings. Touch the pop-up
<Keypads> to enter an identification number. Touch <OK> to continue.
● Gender: Touch the appropriate icon to choose <Male> or <Female>.
● Height: This setting is used to determine step length. Touch the appropriate <Height>
icon to select the desired range. This value can also be a manual number entry (see
Figure 2.3). The manual height entry option can be set within the Configuration option
in system Utilities.
● Weight: For new patients, a weight can be entered here in pounds. Entering weight data
is optional.
NOTE: If a patient has been selected using the Select a Patient function, the application will
display the existing height and weight as was previously recorded. If height or weight has
changed, the numbers can be adjusted and new test results will feature the updated
information. Once a test is performed, there is no way to edit the height or weight recorded for
that test result. Patient height and weight can also be changed at any time from the Patient
Management screen in system Utilities. The new numbers will be used for any subsequent tests.
● Age / Date of Birth: Range is from 10 to 120 years old. Touch the <Age> keypad and
use the pop-up keypad to change the value. This value can also be derived from a Date
of Birth entry (see Figure 2.3). The Age/DOB option can be set within the Configuration
option in system Utilities. Touch <OK> to continue.
● Gait Training Time: Default value is 6:00 minutes. Use the <▲> and <▼> icons to
change the value.
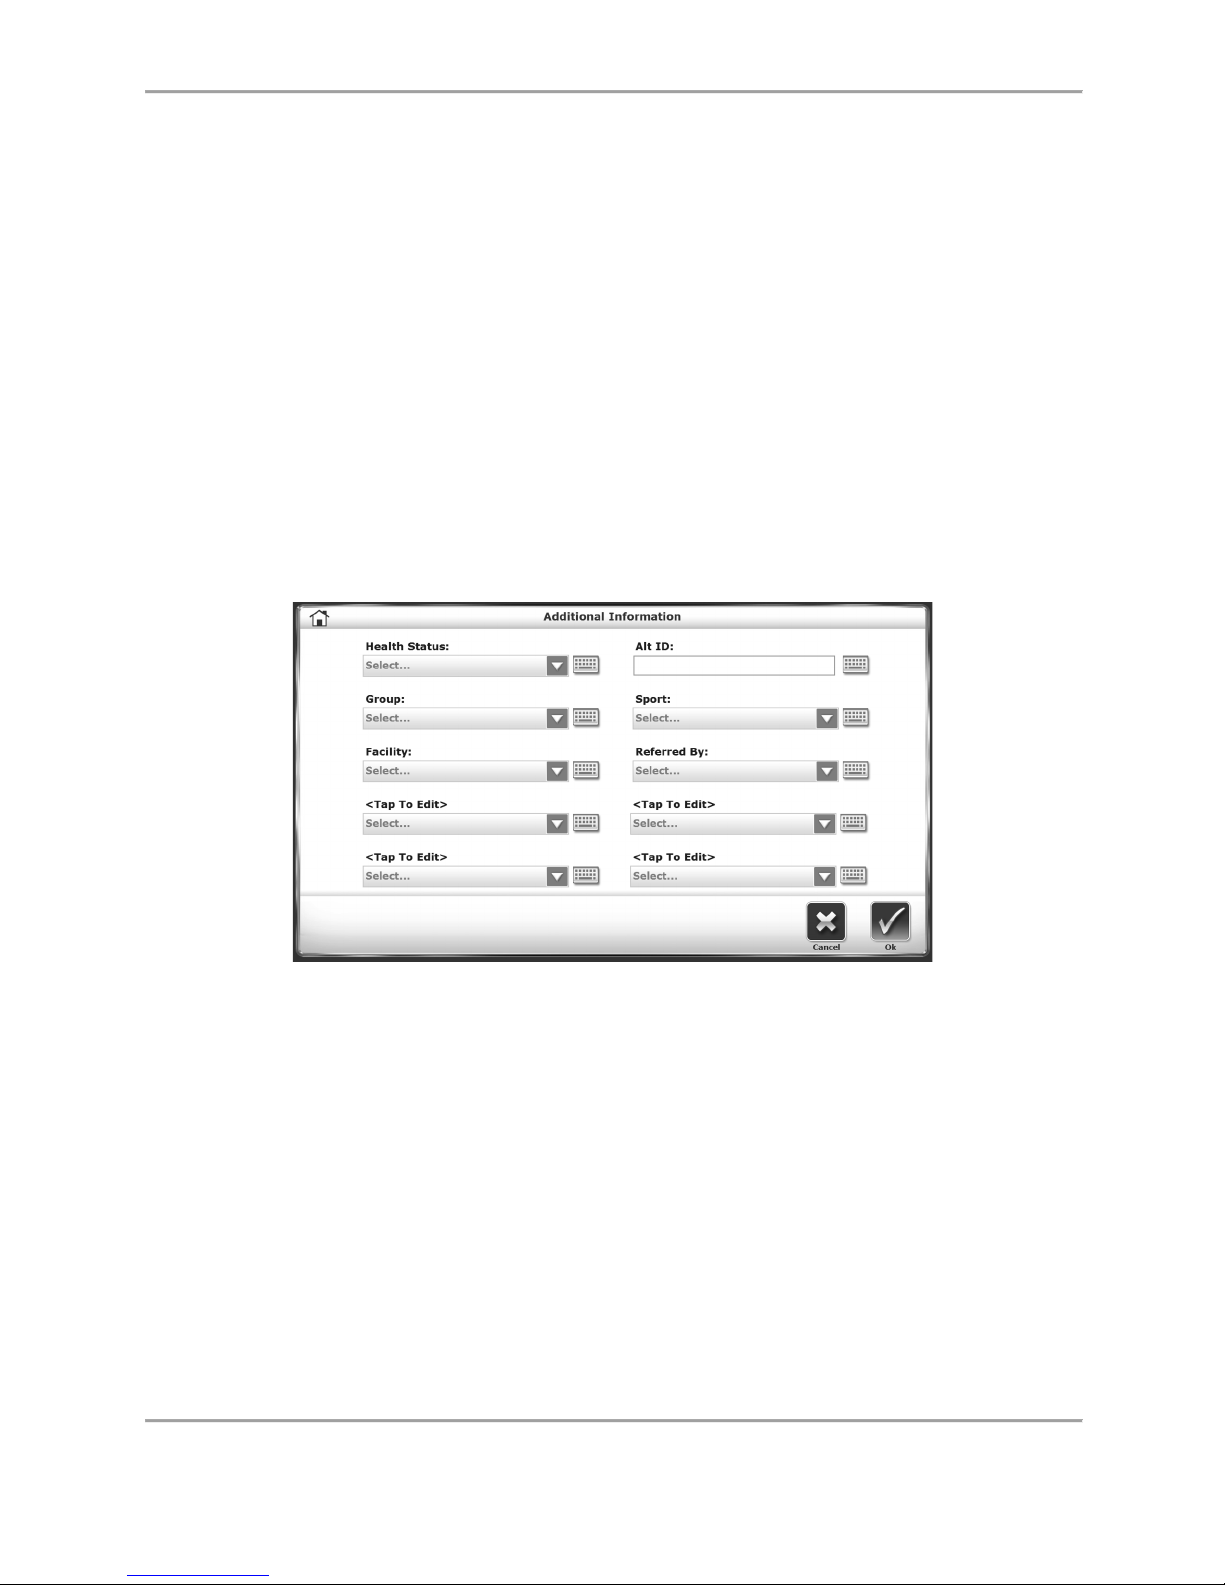
● Additional Info (Figure 2.4): Touch <Additional Info> to enter information regarding the
patient’s health status and the facility where treatment is taking place. In addition to
the predefined categories, the bottom four drop-down menus can be customized to
define new categories and associated selection lists. Entering Additional Information
data is optional.
● Biofeedback Options (Figure 2.6): Touch <Biofeedback> to adjust biofeedback options
on the audio/visual Biofeedback Options screen.
● Select Patient (Figure 2.7): Touch <Select Patient> to designate an existing patient
within the device’s records for a new training session.
Page 21
GAIT TRAINER 3 (v3.X SOFTWARE) 21
Additional Gait Training Patient Setup Screen Parameters
NOTE: The following parameters are only visible when they are activated within the Gait
Trainer Configuration settings (i.e., in system Utilities.)
● G-Code Options (Figure 2.10.): Touch <G-Code> to apply certain G-Code settings to this
particular patient.
● Diagnosis (Figure 2.5): Touch <Diagnosis> to enter diagnostic information for the
patient, including an ICD code.
● CPT Code (Figure 2.3): Touch the <CPT Code> drop-down menu to assign a particular
CPT (Current Procedural Terminology) code to the patient.
The Additional Information Screen
Figure 2.4 The Additional Information screen.
The Additional Information screen contains a series of drop-down menus and editable fields in
which users can enter various types of information about the patient. In each menu, users can
enter a new value or item into the drop-down list.
Page 22
22 Biodex Medical Systems, Inc. © 2017
The Diagnostic Information Screen
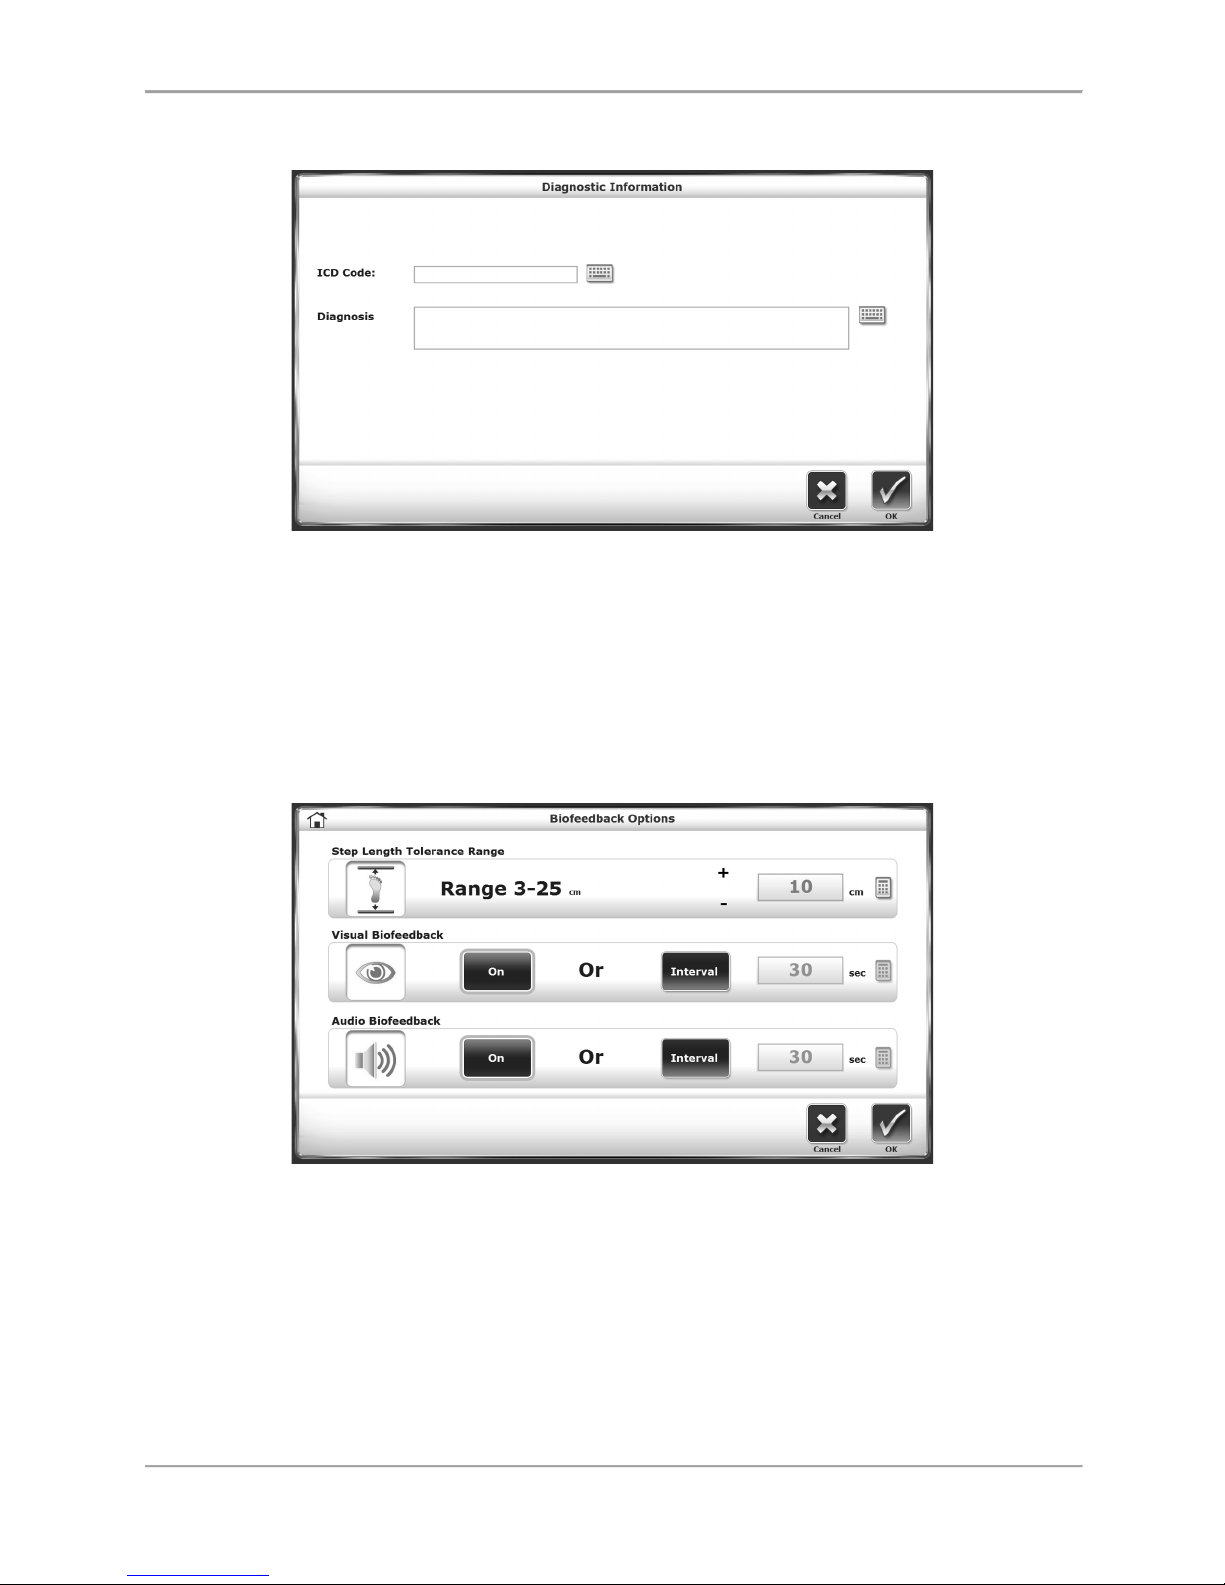
Figure 2.5. The Diagnostic Information screen.
On the Diagnostic Information screen, users can manually enter an ICD code in one field and
more specific text in the other larger field. Note that this screen does not necessarily have to
feature an ICD Code field; this can be activated or deactivated in system Utilities.
The Biofeedback Options Screen
Figure 2.6. The audio/visual Biofeedback Options screen.
The Biofeedback screen is accessed from the Gait Training User Information screen by touching
the <Biofeedback> icon. At this screen, biofeedback parameters can be entered or set. A brief
explanation of each parameter and function follows.
Audio/visual biofeedback screen parameters and functions:
Page 23
GAIT TRAINER 3 (v3.X SOFTWARE) 23
● Set Step Length Tolerance Range: Touch <Set Range> and use the pop-up keypad to
increase or decrease the distance between the target lines the patient must achieve in
the steps they take.
● Set Visual Biofeedback ON/OFF Interval Time: Touch <ON>, <OFF>, or <Interval> and
enter the desired feedback time intervals via the pop-up keyboard.
● Set Audio Biofeedback ON/OFF Interval Time: Touch <ON>, <OFF>, or <Interval> and
enter the desired feedback time via the pop-up keyboard. The audio tone is not a
metronome tempo. The audio tone is timed to be in sync with the appearance of the
target box. Tone is also based on the last footfall. A tone can be heard without a
footfall. After a while, due to the rhythmic nature of walking, the tone falls into a
seemingly real-time tempo.
Once the desired parameters have been set/entered on the A/V screen, touch <OK> to return to
the Patient Setup screen.
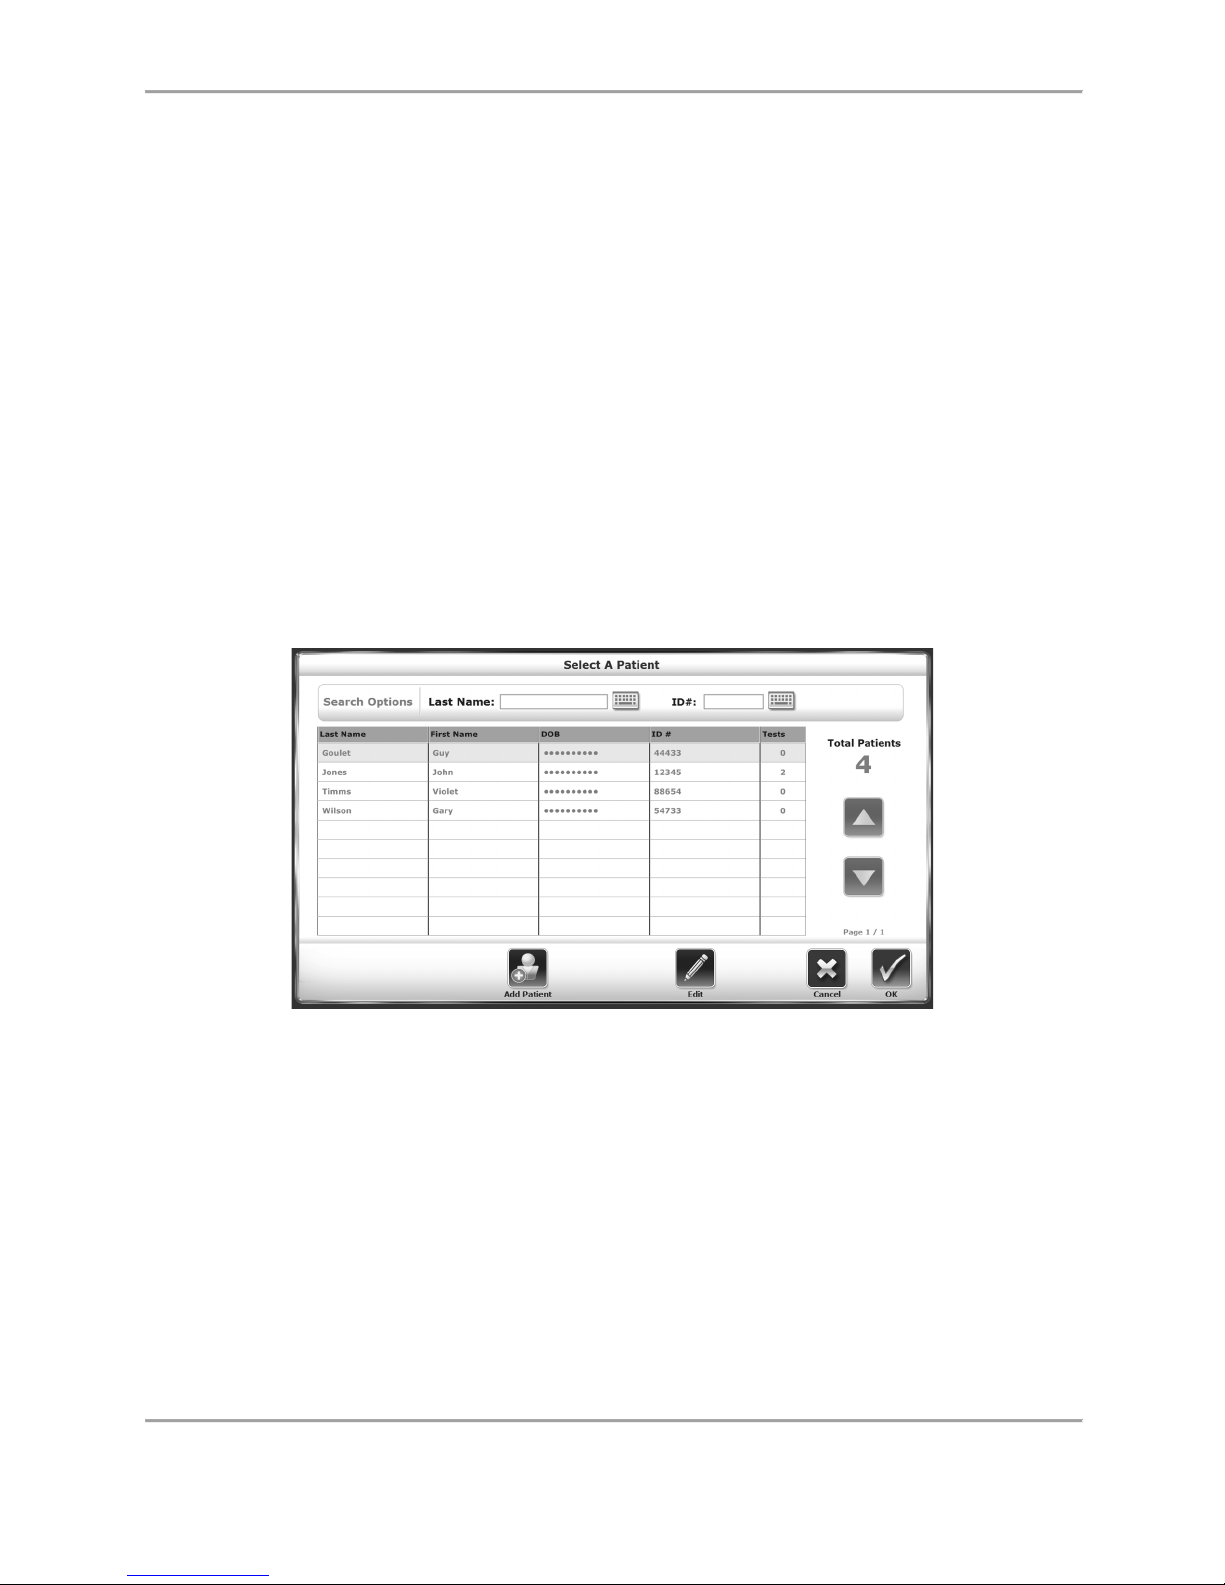
The Select Patient Screen
Figure 2.7. The Select/Edit Patient screen.
In previous versions of the Gait Trainer software, a patient with existing data on the device
could only be re-tested by either: a) typing in the patient’s name exactly as it is spelled on an
existing record, or b) finding the patient within the set of records in the Patient Management
section of system Utilities. Now, with the Select Patient option, users can quickly find an
existing patient and started on a new gait training session.
There are two ways to identify specific existing patients from this screen. At the top there are
search options for a patient’s last name or an identification number that has been assigned to
the patient. Select one of these fields and enter either a patient last name or the ID number.
Select <OK> to display a listing of search results. To return to the list of all patients, select the
circular refresh arrow icon at the top right of the screen:
Page 24
24 Biodex Medical Systems, Inc. © 2017
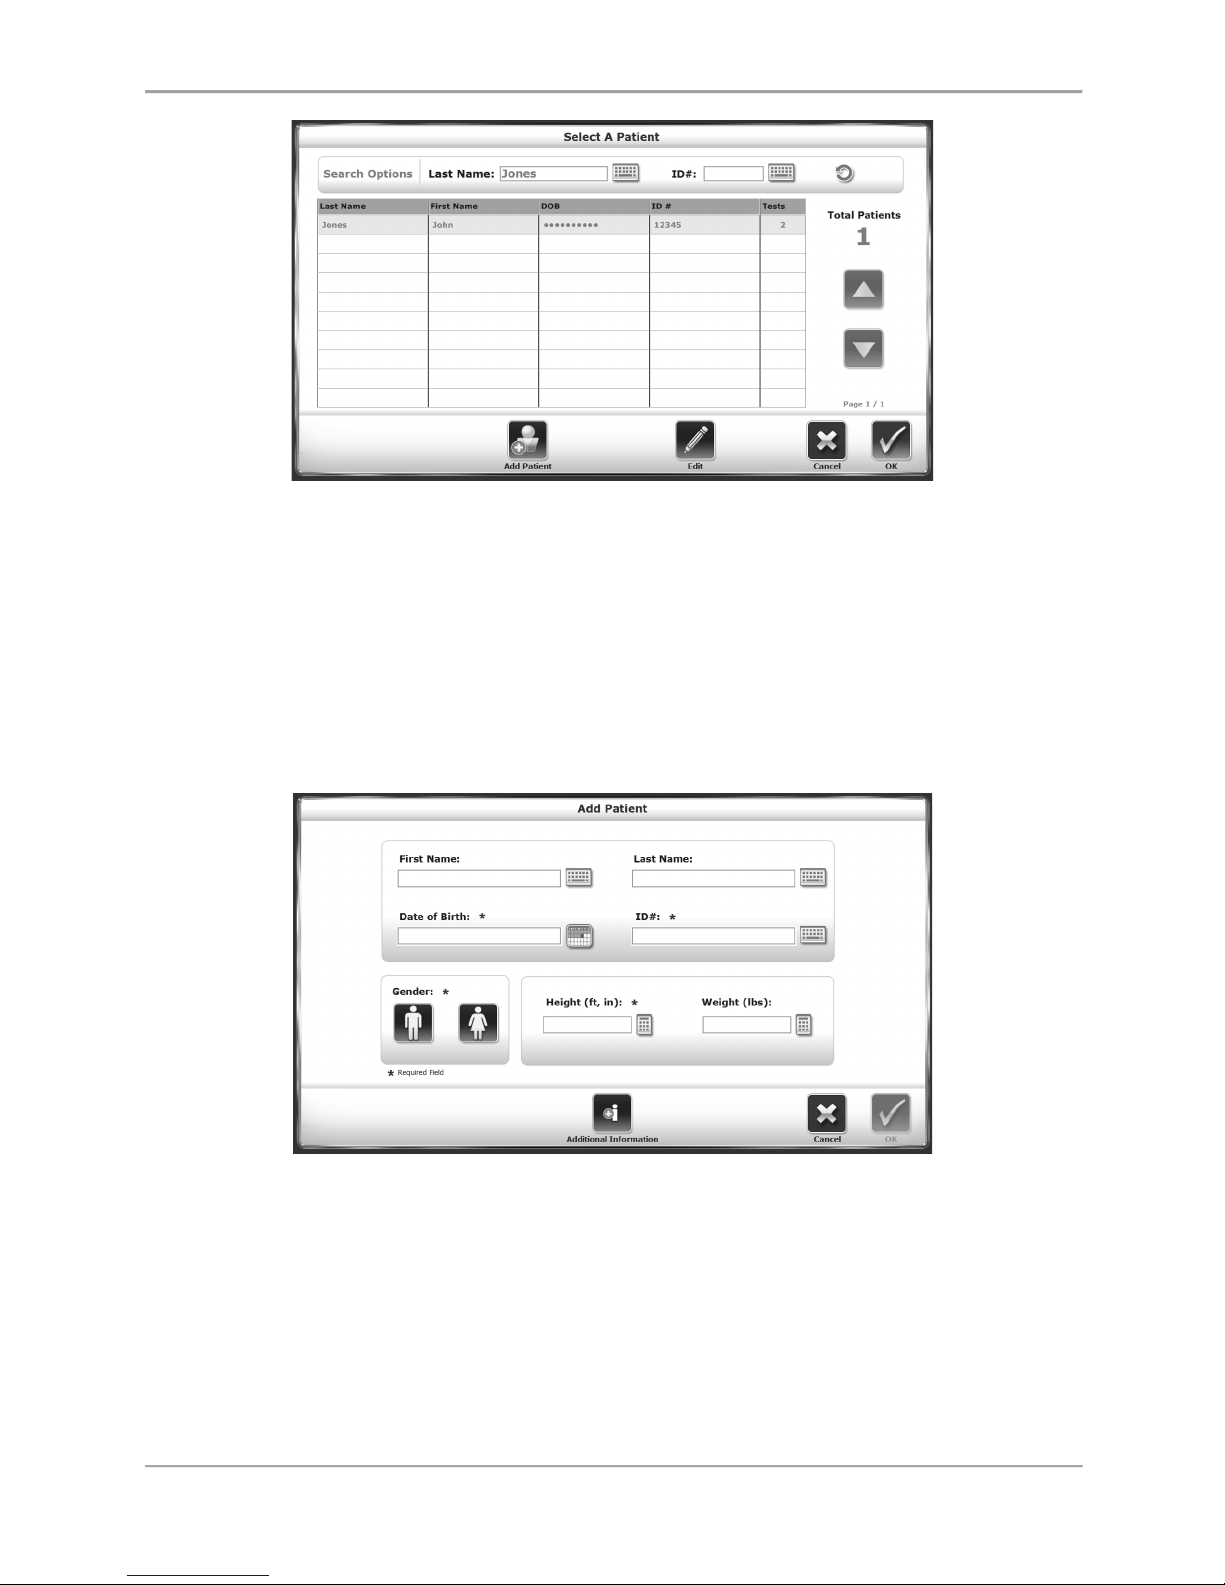
Figure 2.8. The Select/Edit Patient screen, showing search results. To reset listing of
all patients, select the circular refresh arrow in the upper right corner.
If the number of patient records on the device is relatively small, it may be easier to scroll
through the records with the <▲> and <▼> arrows. (The arrows will not scroll through
individual records, but rather pages of records — ten per page.)
Patient records can be edited on this screen, or a new patient can be added. Many of the same
information fields that are in the Patient Setup screen will need to be entered.
Figure 2.9. The Add Patient screen.
Page 25
GAIT TRAINER 3 (v3.X SOFTWARE) 25
The G-Code Calculator Options Screen
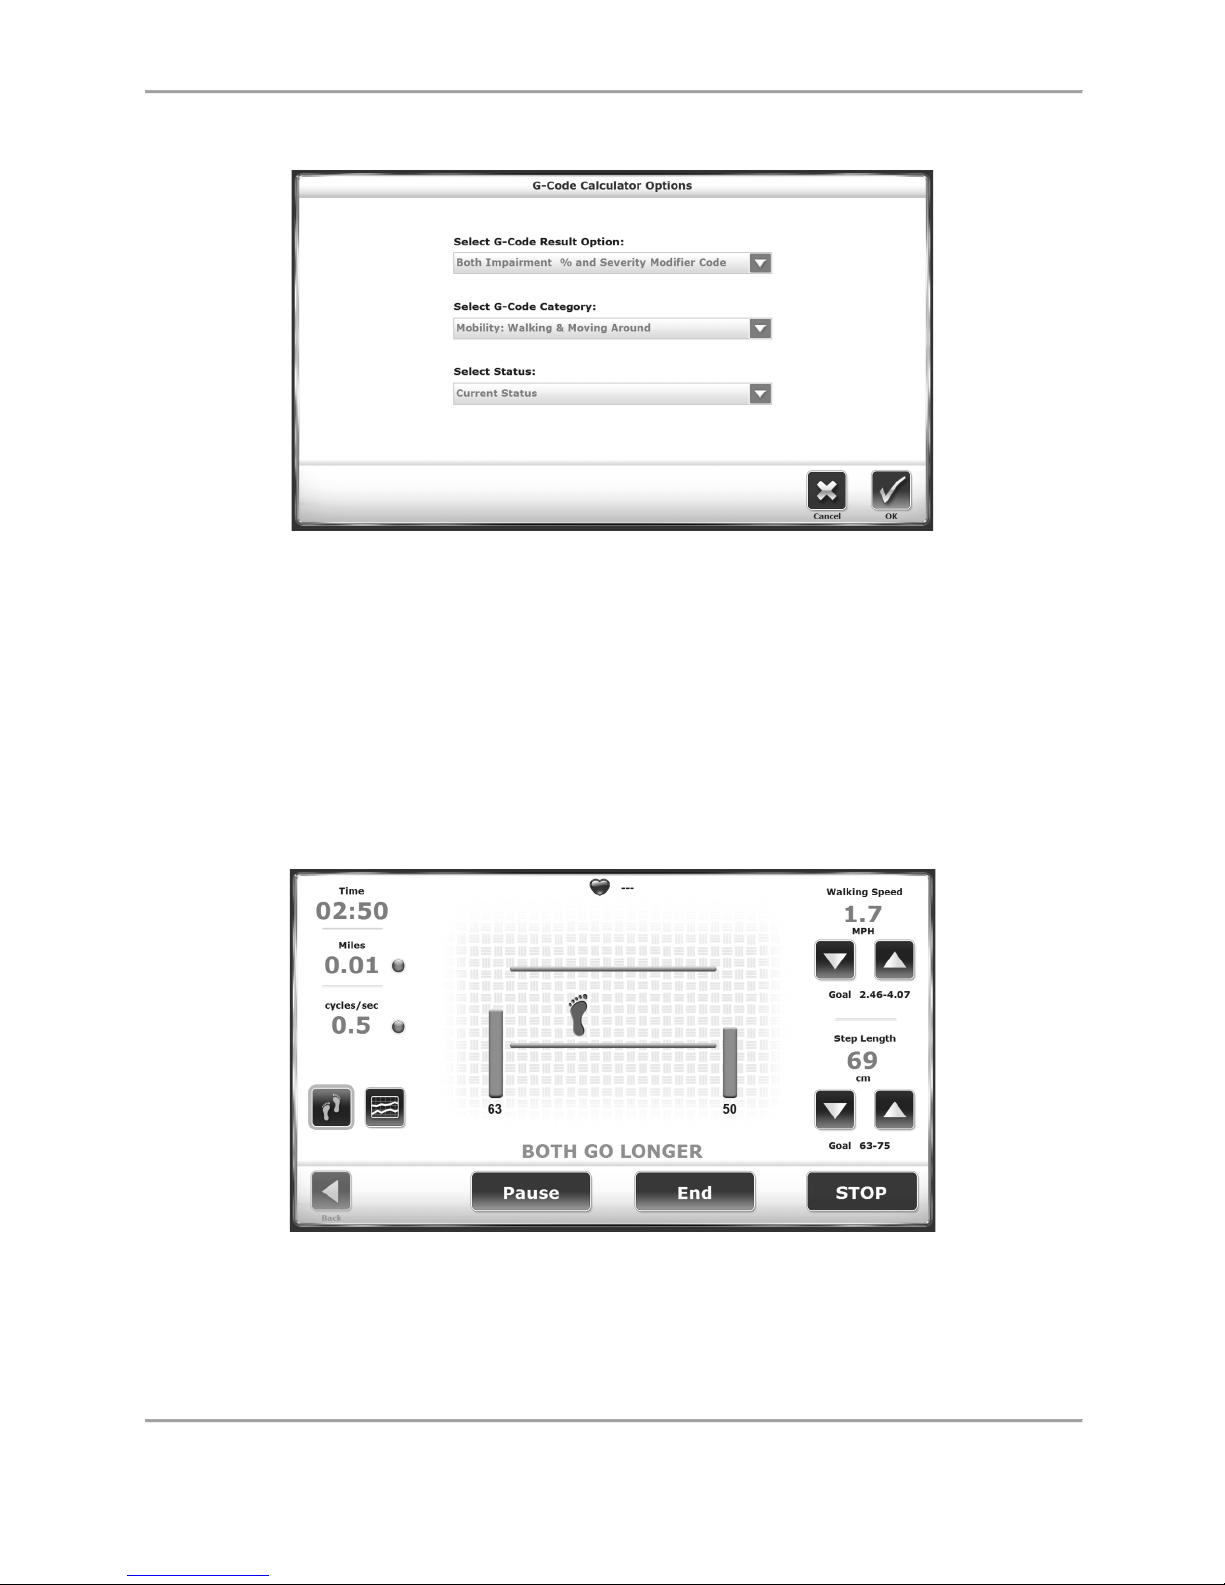
Figure 2.10. The G-Code Calculator Options screen.
The G-Code Calculator Options screen contains three drop-down menus that will apply various
types of G-Code data to the patient’s tests. The G-Code result options and categories are
discussed in depth in a later section of this document.
After making any selections to the menus on this screen, note that the G-Code icon on the
Patient Setup screen will change from red to green.
Footfalls/Histogram Screen
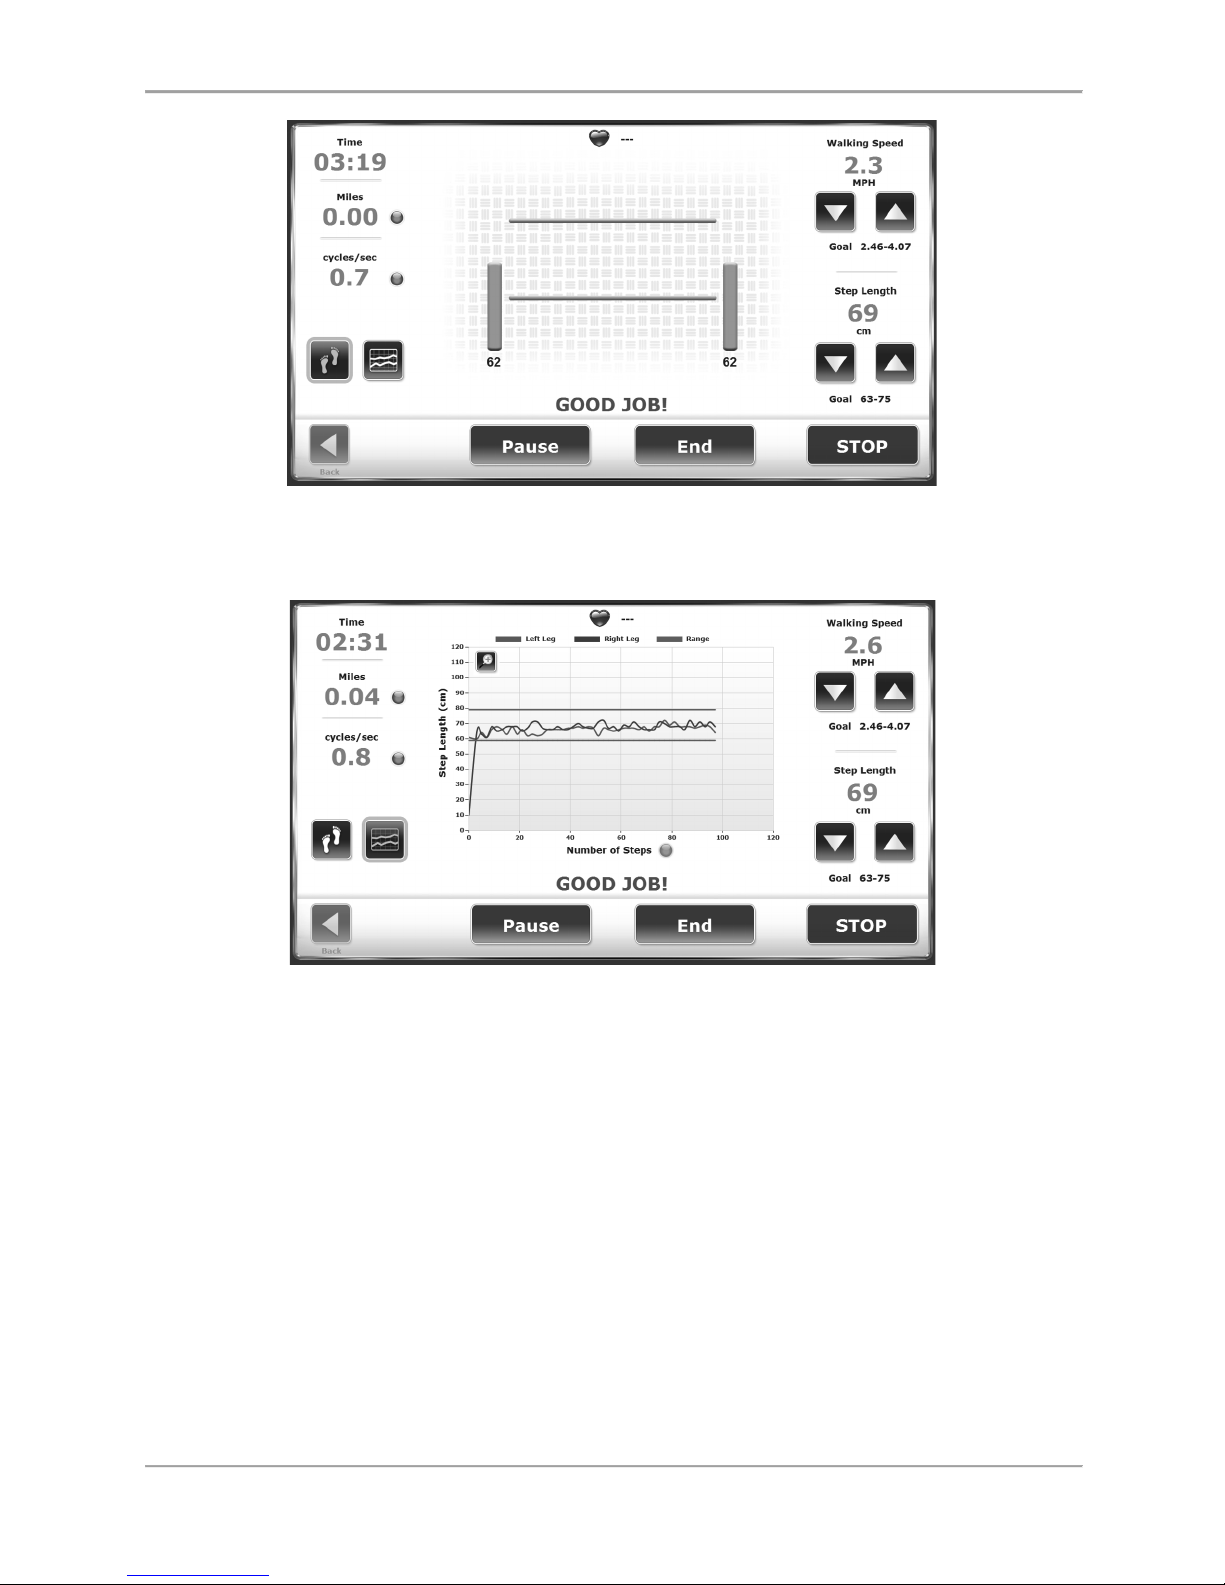
Figure 2.11. If the Patient’s Steps are outside of the Target Step-Length Range, One or
Two Vertical Orange Bars are Displayed.
Page 26
26 Biodex Medical Systems, Inc. © 2017
Figure 2.12. If the Patient is Achieving the Desired Step-Length Target, Two Vertical
Green Bars are Displayed along with a “Good Job!” Message.
Figure 2.13. Patients Also Receive Feedback on Step-Length Targets in the Histogram
View.
In the Footfalls screen, the blue foot marks the user's last foot placement while the space
between the two green lines is a target for the next foot placement. The user can toggle by
pressing the blue dots to display speed as cycles/sec, MPH, or meters/sec. The numbers in the
left and right corners of the Footfalls display illustrate the real time average of the patient’s last
five steps. (In Figure 2.12, it is 62 for both the left and the right legs.) There is also a reading
for step length.
In the Histogram view, the Y axis represents Step Length and can be displayed in scales of 0-60
cm, 0-80 cm, 0-100 cm, or 0-120 cm. The X axis can be TIME, DISTANCE, or STEPS.
To change the axis label, touch the axis label (in Figure 2.13 the words Number of Steps) to
toggle between selections.
Page 27

GAIT TRAINER 3 (v3.X SOFTWARE) 27
Footfalls/Histogram Screen Parameters
Touch <Next> at the Patient Setup screen to advance to the Footfalls/Histogram screen. At this
screen, users can view patient progress via either a footfall or histogram display. Touch the
appropriate icon at the bottom of the left to toggle between display formats. With either
display, the following parameters can be adjusted at any time as follows:
● Walking Speed (mph): Located at the top right of the screen. Use the associated <▲>
and <▼> icons to set this goal to match the desired cycles per second.
Note: The walking (gait) speed can be increased in two ways: Increase the step
frequency (step cycle) or increase the step length.
Walking speed is displayed in MPH or KMH. The default value depends upon how the
Gait Trainer is set up (English or Metric). Most people can relate better to MPH or KMH
than cycles per second. To determine what the cycles/second are, toggle the speed on
the left. When step length is increased or decreased, the green lines will move up or
down. The patient’s goal is to place their foot between the lines. The numeric bars
show the real time average of the last five step lengths for the respective side. Two
vertical green bars are displayed if the patient is stepping within the lines (Figure 2.12),
and change to orange when the footfall is too short (Figure 2.11).
Clinical tip: Increase the step length to challenge the patient to take longer steps.
NOTE: For visual and audio biofeedback, the treadbelt speed must be greater than 0.3
mph (0.48 kmh).
A step cycle is a successive heel strike for the same foot (i.e., right step, left step, right
step). Set the treadbelt speed based on how many complete successive heel strikes
occur within a second. 0.1 cycles per second is very slow; 3 cycles is fast. A normal
walking step cycle approximates 1 cycle per second.
The cycle/sec speed and step length settings regulate the treadbelt speed. If the
treadbelt speed is below 0.3 mph (.48 kmh), a message will display noting that the
treadbelt is moving too slowly for biofeedback.
● Time: Located at the top left of the screen, counts down from the timing set at the
Patient Setup screen.
● Step Length: A range equaling [Leg length (cm) x .69] to [Leg length (cm) x .86]. Step
Target is placed within this range plus or minus the entered standard deviation.
Located at the bottom right of the screen. Use the associated <▲> and <▼> icons on
the right side of the screen to increase or decrease goal value.
Note: A Step Target is a theoretical footfall area based on calculated step length. When
the step target distance is increased, the treadbelt moves faster because steps need to
become longer. If target distance is decreased, treadbelt speed decreases because steps
need to become shorter.
● Distance: Located at the left of the screen, touch the blue dot <o> to toggle units of
measure between miles, meters, and kilometers.
● Speed (Treadbelt Speed): Located at the left of the screen, touch the blue dot, to toggle
units of measure between KMH, MPH, and meters/second.
Page 28

28 Biodex Medical Systems, Inc. © 2017
● Heart Rate: Heart rate monitoring is accomplished by having the patient hold onto both
heart rate handgrips on the front handrail. The heart rate value will be displayed at the
top of the screen when the handgrips are held.
● Histogram or Footfall: Located at the bottom left of the screen, touch the desired icon to
toggle between these two choices.
Footfalls
When the patient’s actual footfalls are detected, they are displayed with respect to the step
length lines. When the patient falls within the set step length tolerance as set in biofeedback
option, the footfalls are synchronized with the target and the message GOOD JOB will show in
the display. Should they fall outside of the step length tolerance, the display will tell the patient
what footfall is outside of the range by displaying a prompt to go longer or shorter on the
respected foot or feet (Figure 2.11).
NOTE: Because footfalls are projected based on the patient’s last step the screen is always one
step behind. This should not be apparent once the patient falls into a rhythmic walking
pattern. If a step does not go in front of the opposite step, the target box will not appear.
Histogram
The Histogram displays footfalls as a two-pixel wide dot. The X-axis shows distance traveled
and the Y-axis shows the deviation, where 1 pixel is equal to 1cm of deviation. If the patient
goes beyond the Standard Deviation (SD), the histogram will deviate from straight path.
NOTE: On the histogram graph, the upper and lower horizontal green lines are the target step
length area, plus or minus the step length tolerance. The Step Length Tolerance Range can be
adjusted in the Biofeedback Options screen (from the Patient Setup screen).
Page 29
GAIT TRAINER 3 (v3.X SOFTWARE) 29
3. Normative Data
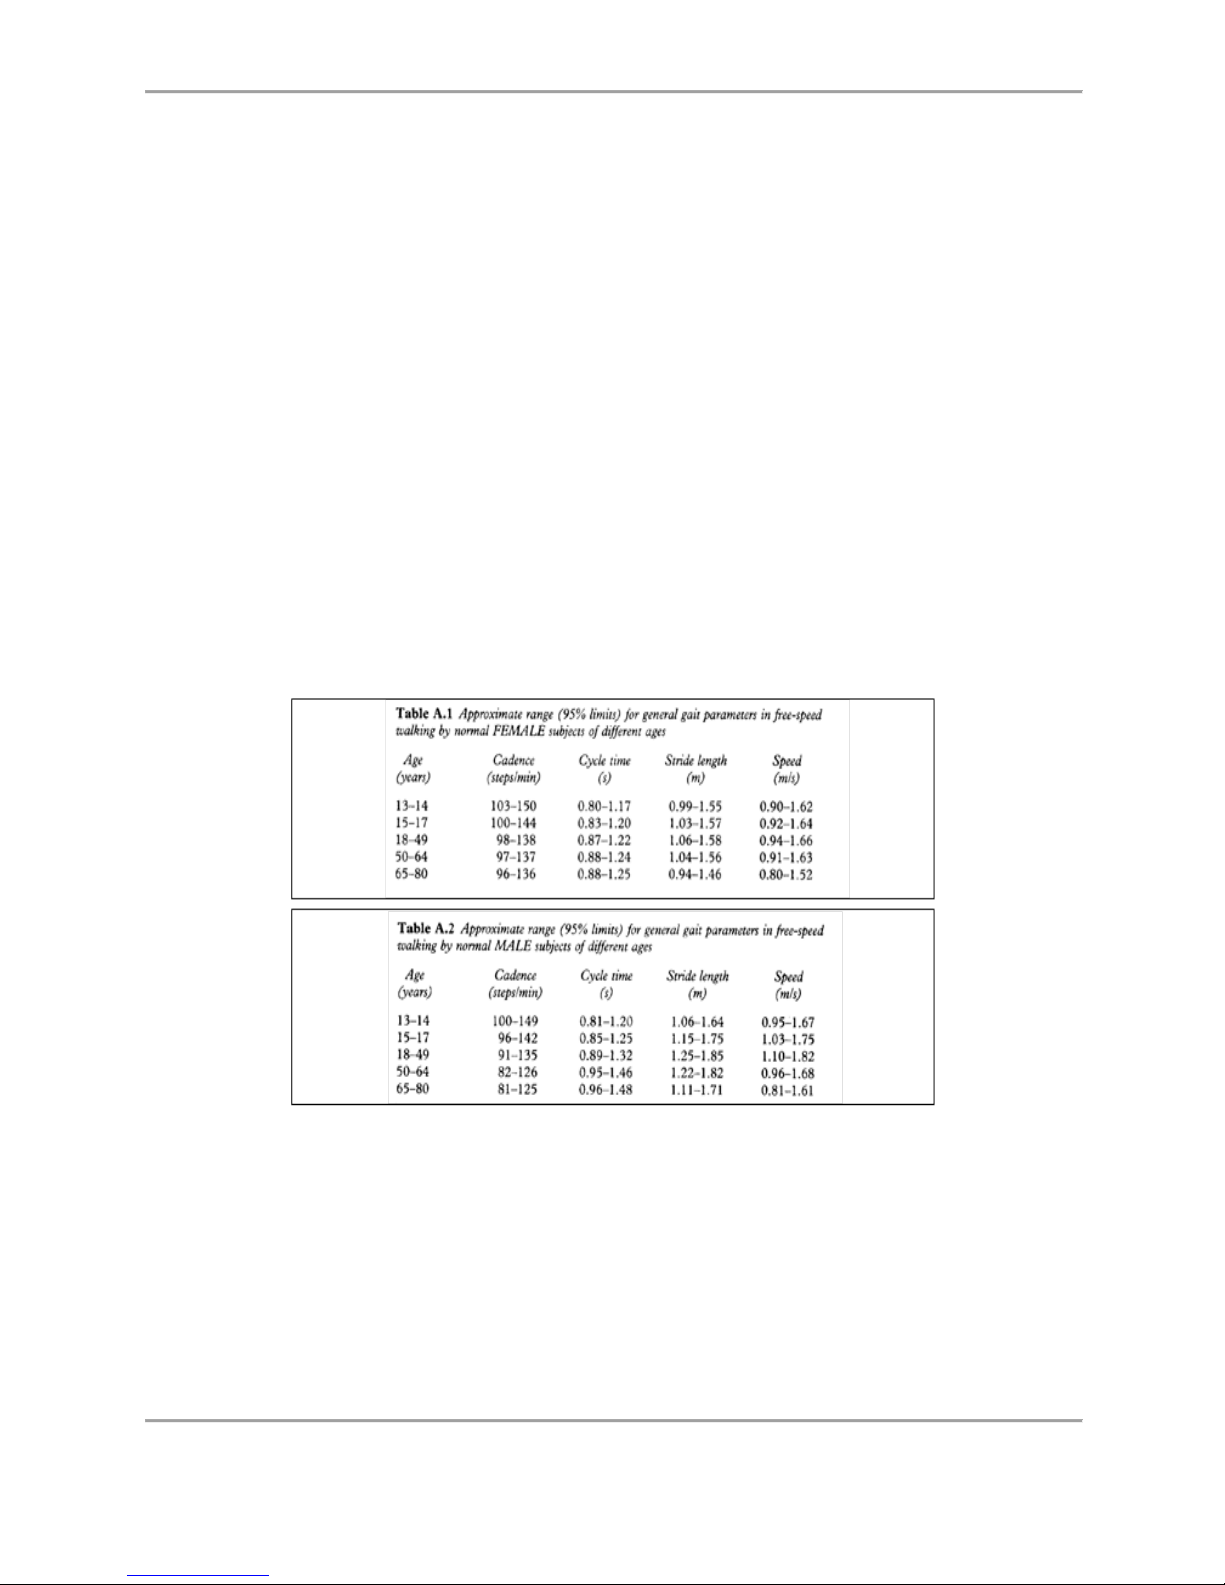
The normative data charts provided in this manual can be used to develop rehabilitation
programs and discharge criteria for patients. The normative values are based on age and
gender; therefore, comparisons can be easily made.
NOTE: Clarification of Normative Data for the Gait Trainer: The normative data and goals
presented in the Biodex Gait Trainer are derived from the reference tables in Gait Analysis, An
Introduction, 2nd. Edition, Michael W. Whittle, 1997, pgs. 218 - 219.
The cycle time in Whittle’s research is measured in seconds, whereas the Gait Trainer uses
cycles/second. Therefore, data is presented as the inverse function of the cycle time:
Cycles per second = Cycles-1
Whittle also presents normative data for stride length. The Gait Trainer uses step length. A
stride equals two steps; therefore, these tables represent stride length divided by two.
Table 3.1. Stride Length Tables
Page 30
30 Biodex Medical Systems, Inc. © 2017
4. Test Results
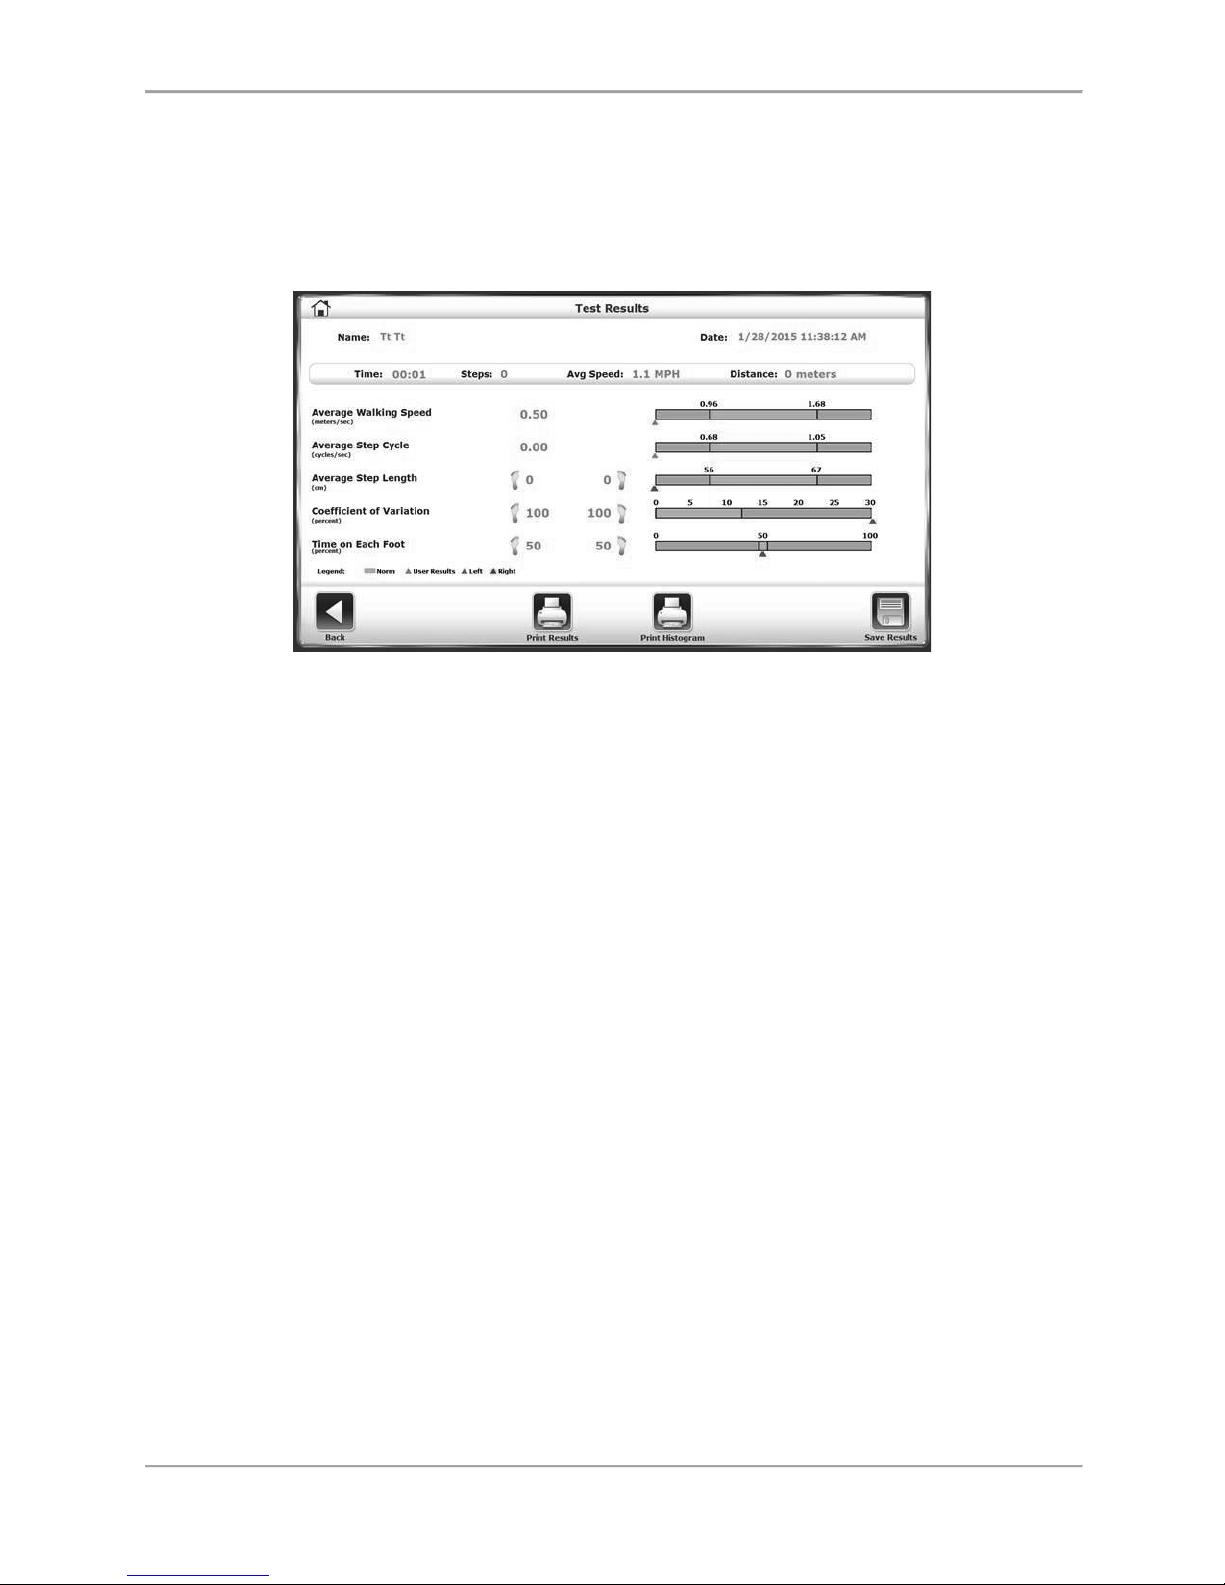
Exercise results can be reviewed on the Test Results screen. This screen appears after touching
<Results> on the Gait Training screen.
Figure 4.1. The Test Results screen. Note the Test Results functions available at the
bottom of the screen.
Test Results Parameters
Time: This displays the total elapsed time from the start of the exercise session until either the
end of the session or when the <STOP> icon is pushed.
Steps: Total Steps during the exercise session.
Average Speed: Average speed of the treadbelt during exercise session.
Distance: This is the total distance traveled by the treadbelt, which is in essence the distance
traveled by the patient.
Average Walking Speed: Normative values have been established and are dependent on age and
sex. The norms are expressed next to the real time value.
Average Step Cycle: This is calculated by taking an average for the step cycles during the
exercise.
Average Step Length: This number is calculated by taking an average for all of the step lengths.
Coefficient of Variation: This is calculated as the amount of variation occurring between
footfalls.
Time on Each Foot: This is the actual time spent on the mentioned limb. The time spent on
each limb should be equally distributed between right and left. Should they be different, the
patient is spending more time on one leg than the other.
Page 31
GAIT TRAINER 3 (v3.X SOFTWARE) 31
Test Results Screen Functions
From the Test Results screen the user can perform the following functions:
Back: Return to the Footfalls/Histogram screen by touching <Back>. All current exercise data
will be lost if <OK> to proceed is touched. To cancel and return to the Test Results screen,
touch <Cancel>.
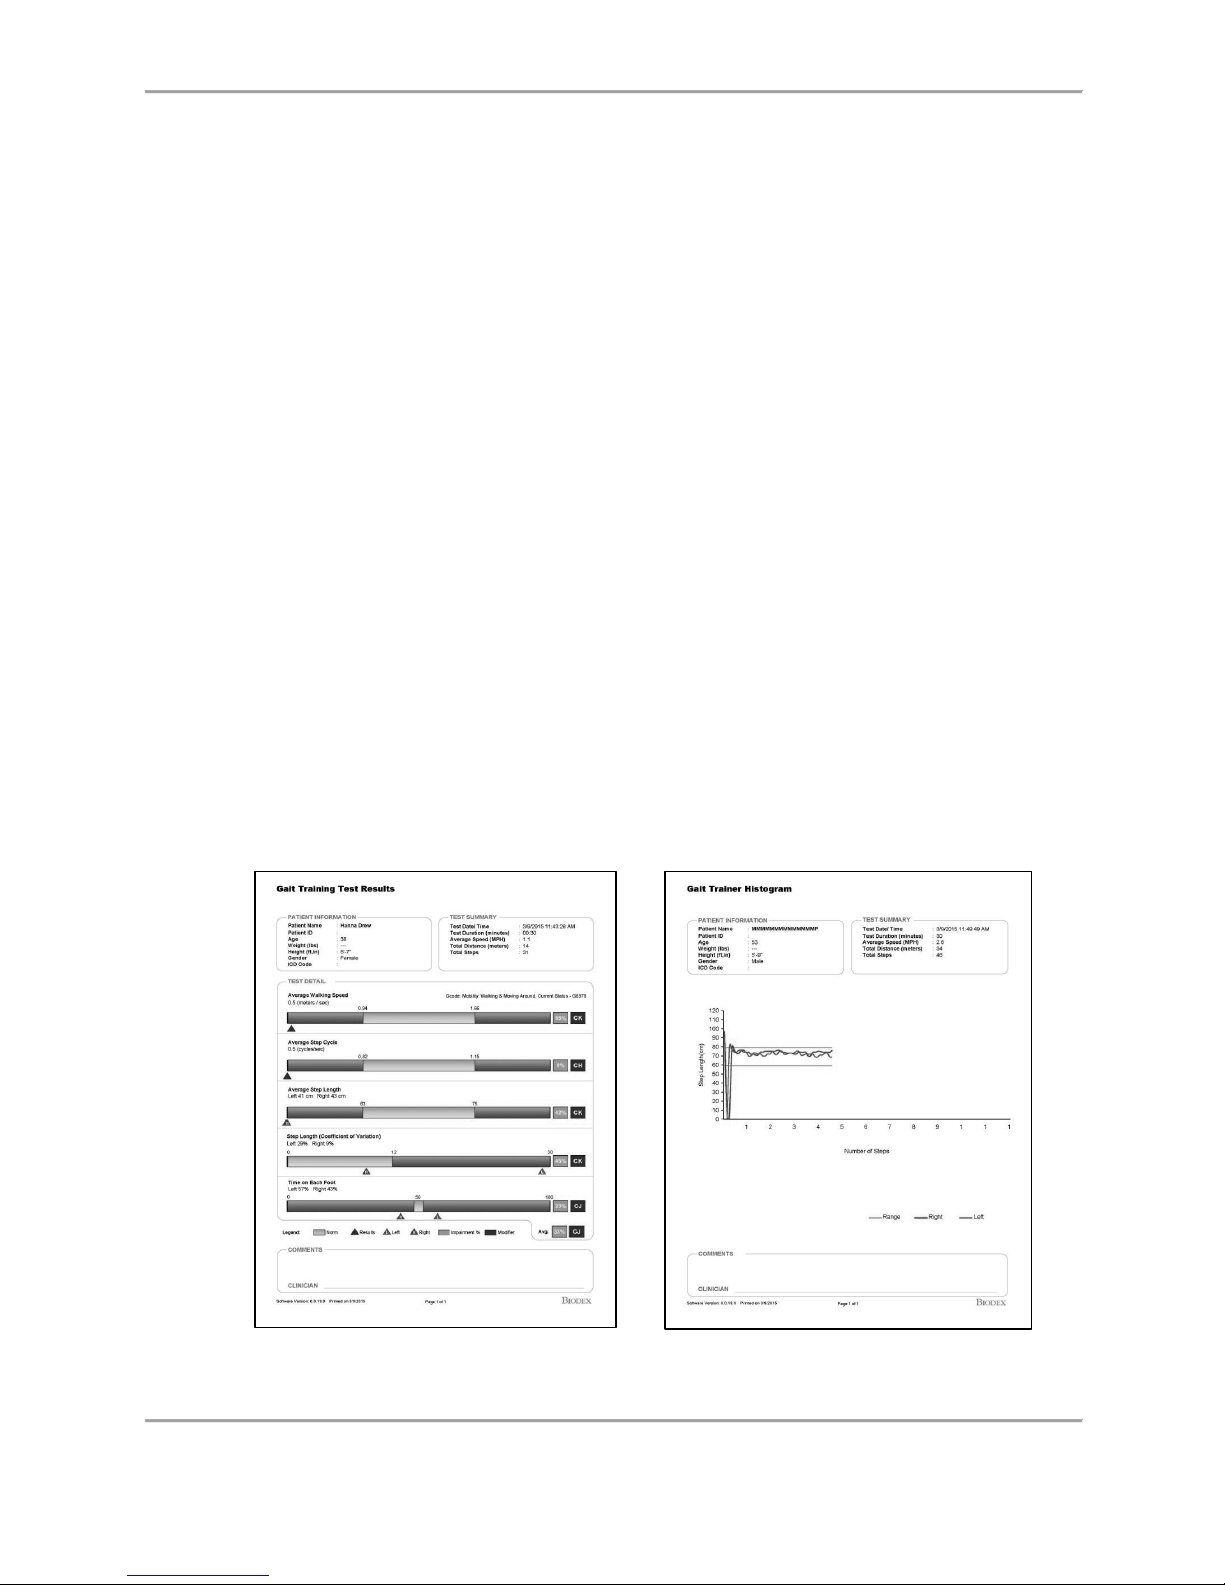
Print Results: Touch <Print Results> to print out a Gait Training Exercise Summary.
Progress Report: Touch <Progress Report> to compare results over time. For more details,
refer to the section on progress report. This icon will only be visible if there is more than one
exercise session (test) to compare.
Print Histogram: Touch <Histogram> to print a histogram for this exercise session.
Save Results: This option allows the user to save exercise results for later reporting or export as
follows:
1. At the Test Results screen, touch the <Save Results> icon to save the results of the
latest gait training session.
NOTE: If no patient name has been entered, the system will prompt that the “The
Patient Name is Undefined”. Enter the Patient Name to Save the Data. Touching <OK>
will display the Add a New Patient screen where the patient’s name and other data is
entered. Touch <OK> again to save the results.
If the user tries to continue without entering a patient name, a prompt will appear
stating that all exercise results data will be lost. Press <OK> to return to the Patient
Setup screen, or <Cancel> to return to the Patient Name is Undefined screen.
2. If the patient name has already been entered, touch <OK> on the Test Results screen to
save the results for later reporting or export.
Figure 4.2 and Figure 4.3. Gait Trainer printouts include a Gait Training Test Results
and Gait Trainer Histogram.
Page 32
32 Biodex Medical Systems, Inc. © 2017
Gait Trainer Progress Report
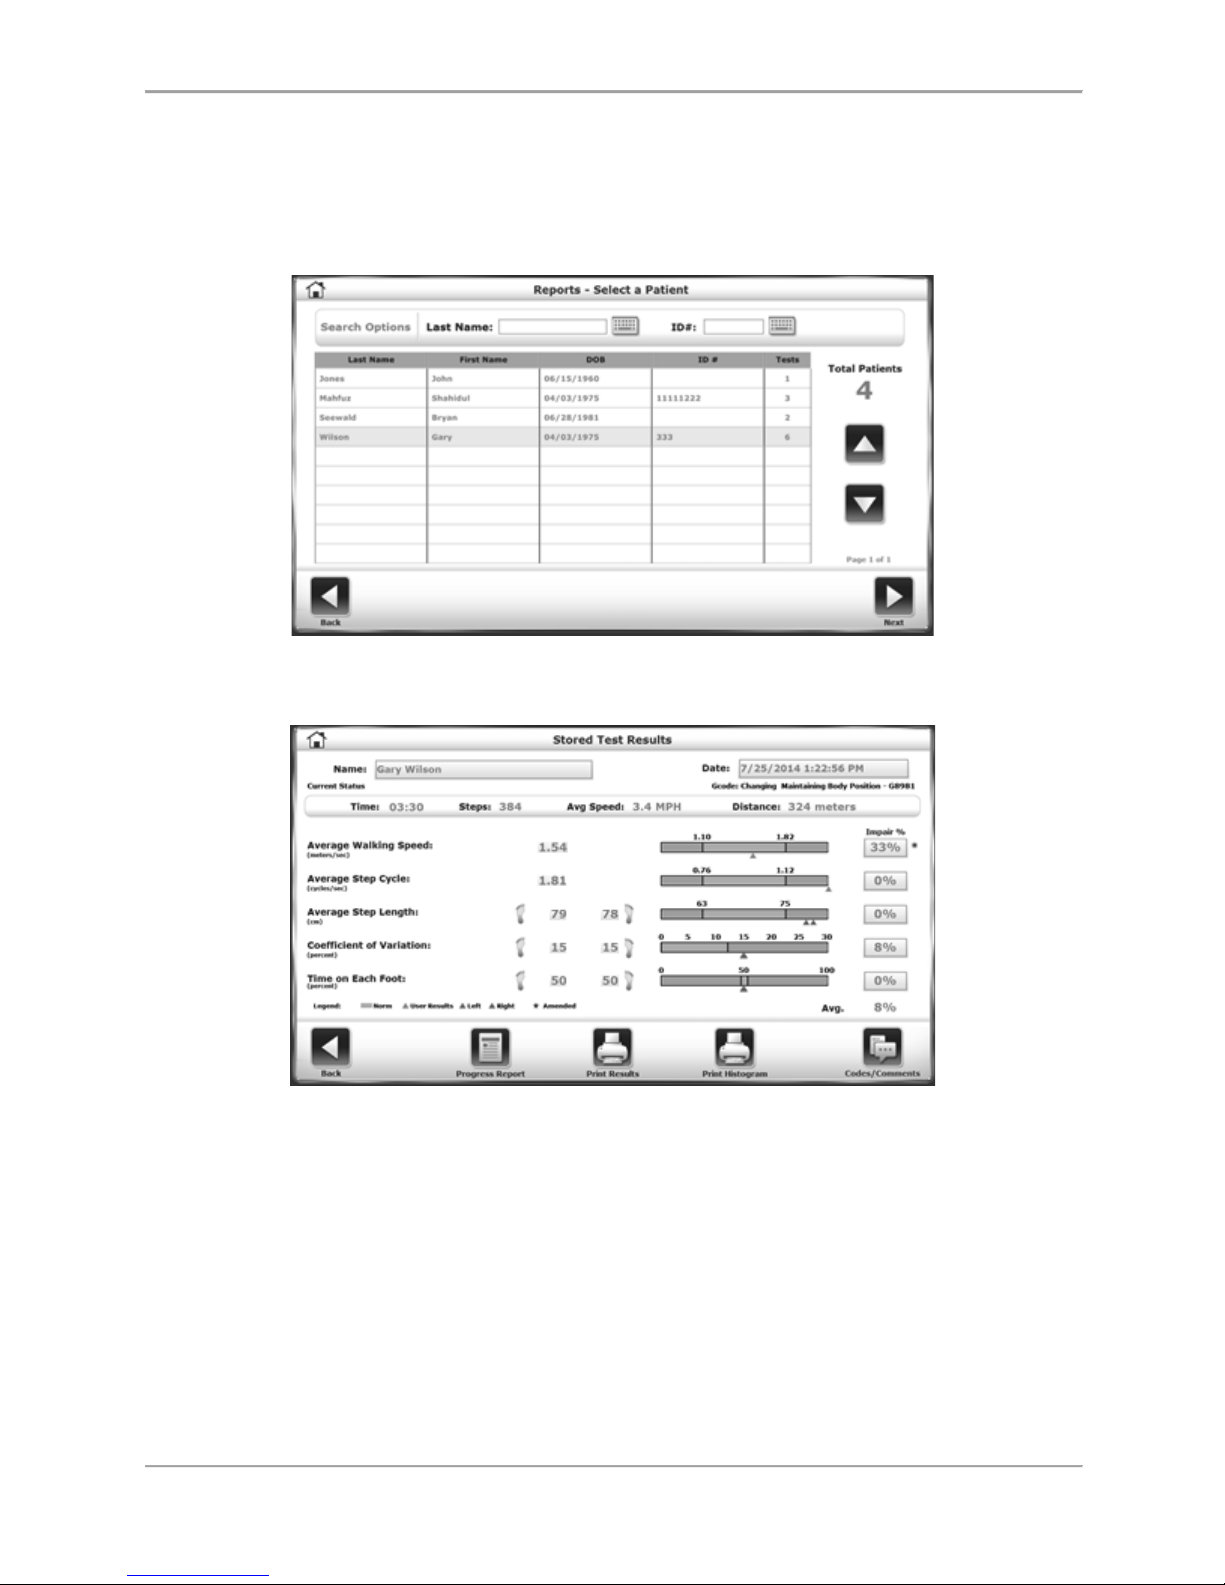
A progress report is perfect for showing need, progress, and outcome. Progress reports for
specific parameters are available when a patient has multiple exercise reports.
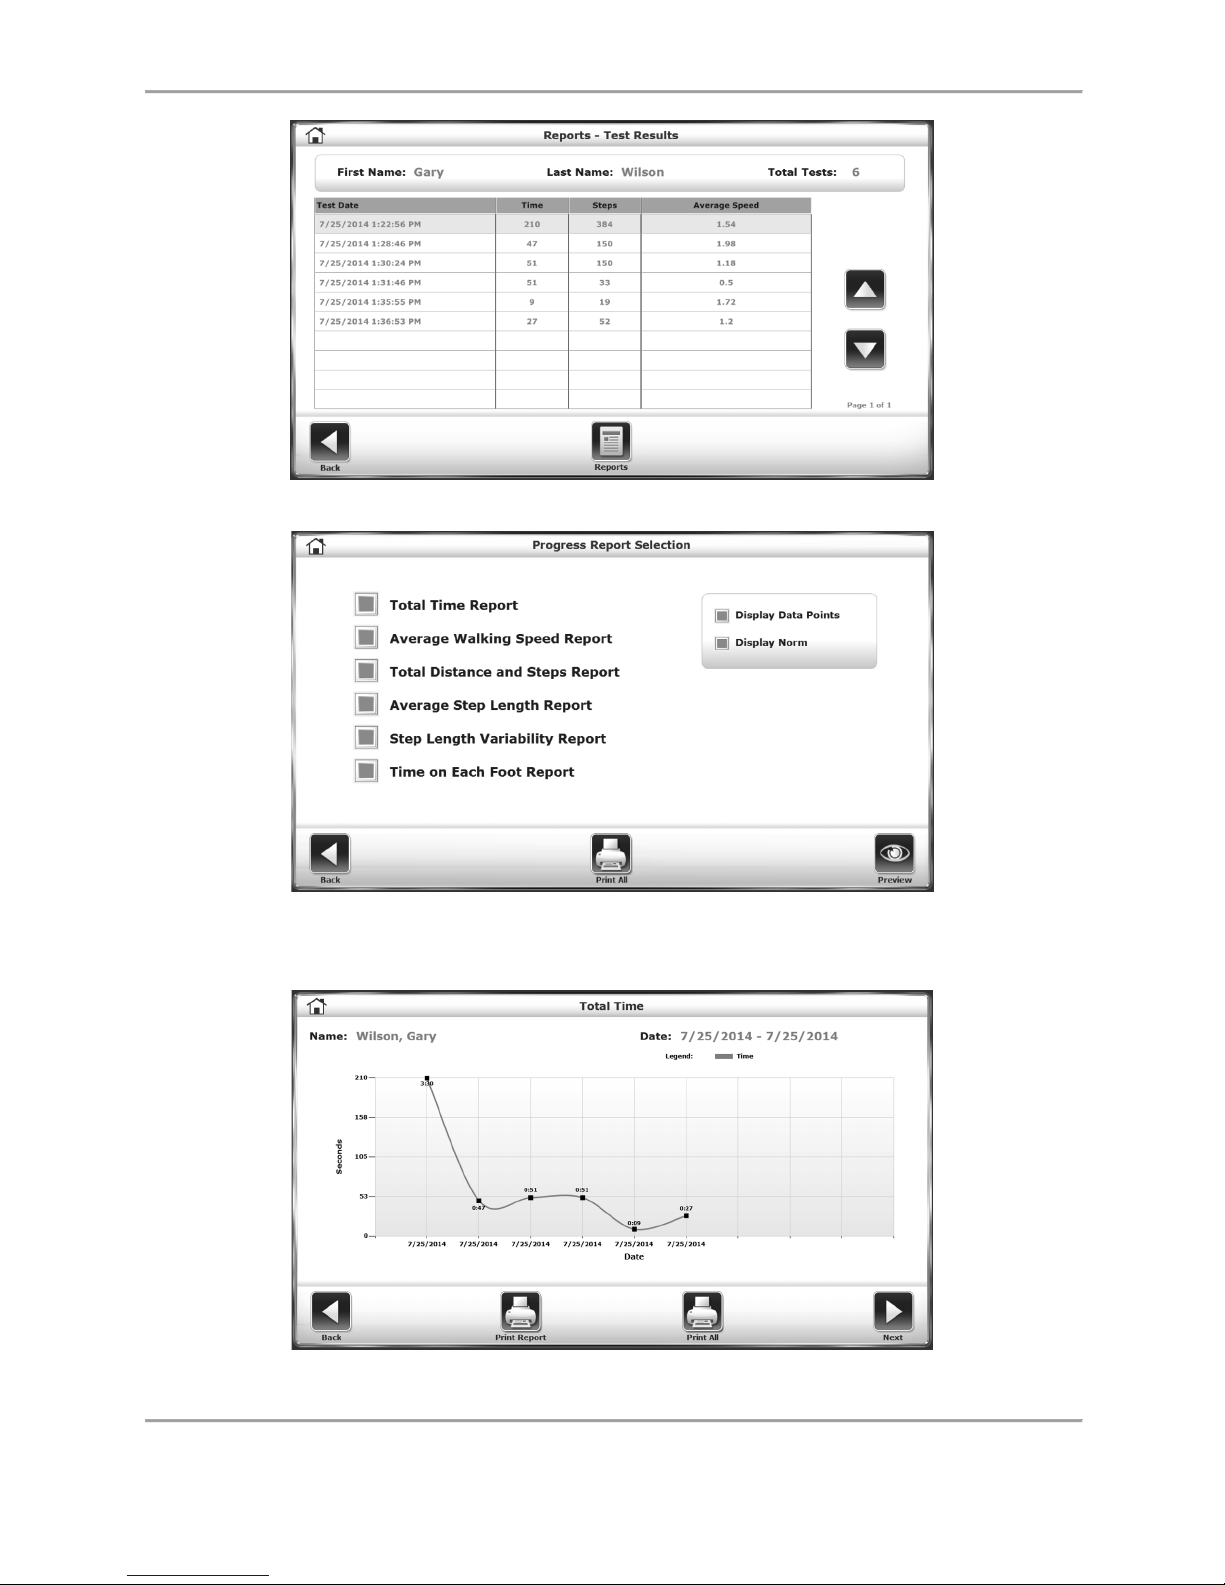
Figure 4.4. Select any of the patient records by touching a row.
Figure 4.5. The Stored Test Results Screen
Page 33
GAIT TRAINER 3 (v3.X SOFTWARE) 33
Figure 4.6. Select Progress Report, and Reports on the following screen.
Figure 4.7. Touch the progress parameters that you are interested in viewing and/or
printing. Green boxes indicate selected parameters. Also, choose to have
data points on the report and/or Normative data ranges.
Figure 4.8. Progress report showing total time in seconds for each exercise session.
Page 34
34 Biodex Medical Systems, Inc. © 2017
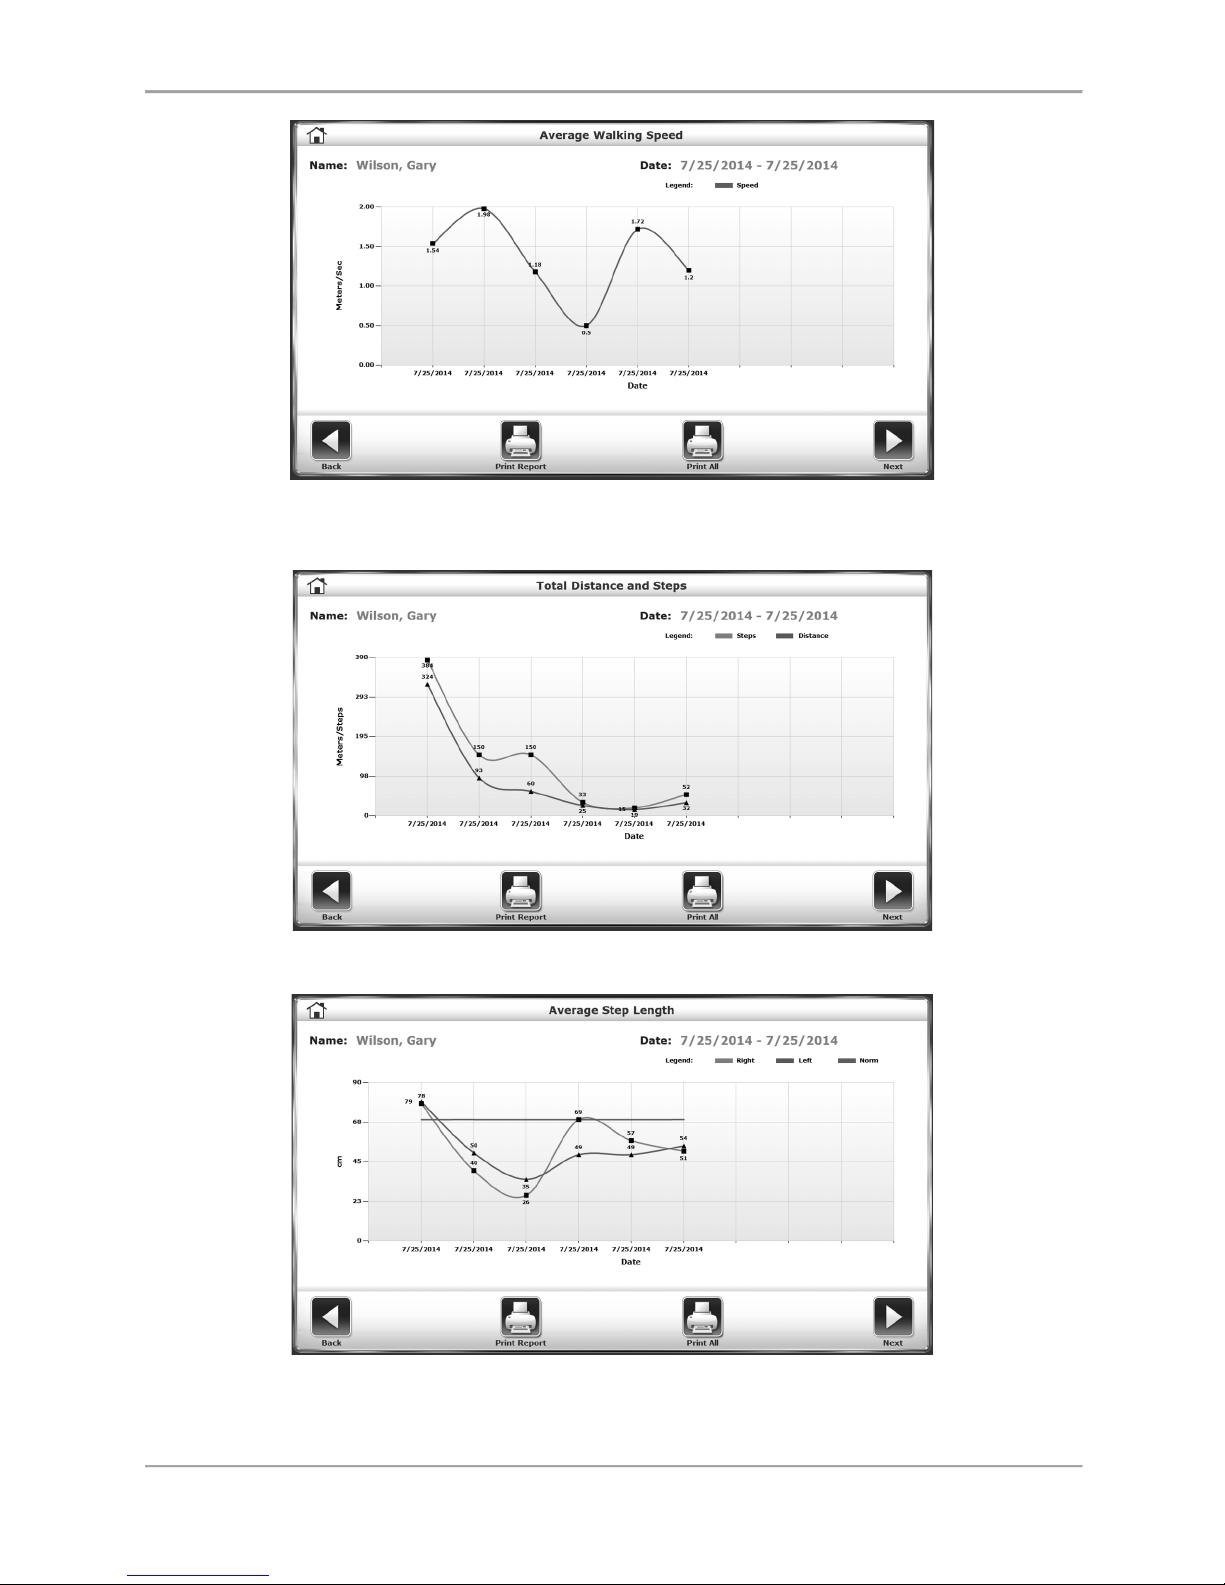
Figure 4.9. Progress report showing increase or decrease in average walking speed
over the six sessions.
Figure 4.10 Progress report showing increase or decrease in total distance covered
and steps taken.
Figure 4.11. Progress report showing increase or decrease in average step length.
Page 35
GAIT TRAINER 3 (v3.X SOFTWARE) 35
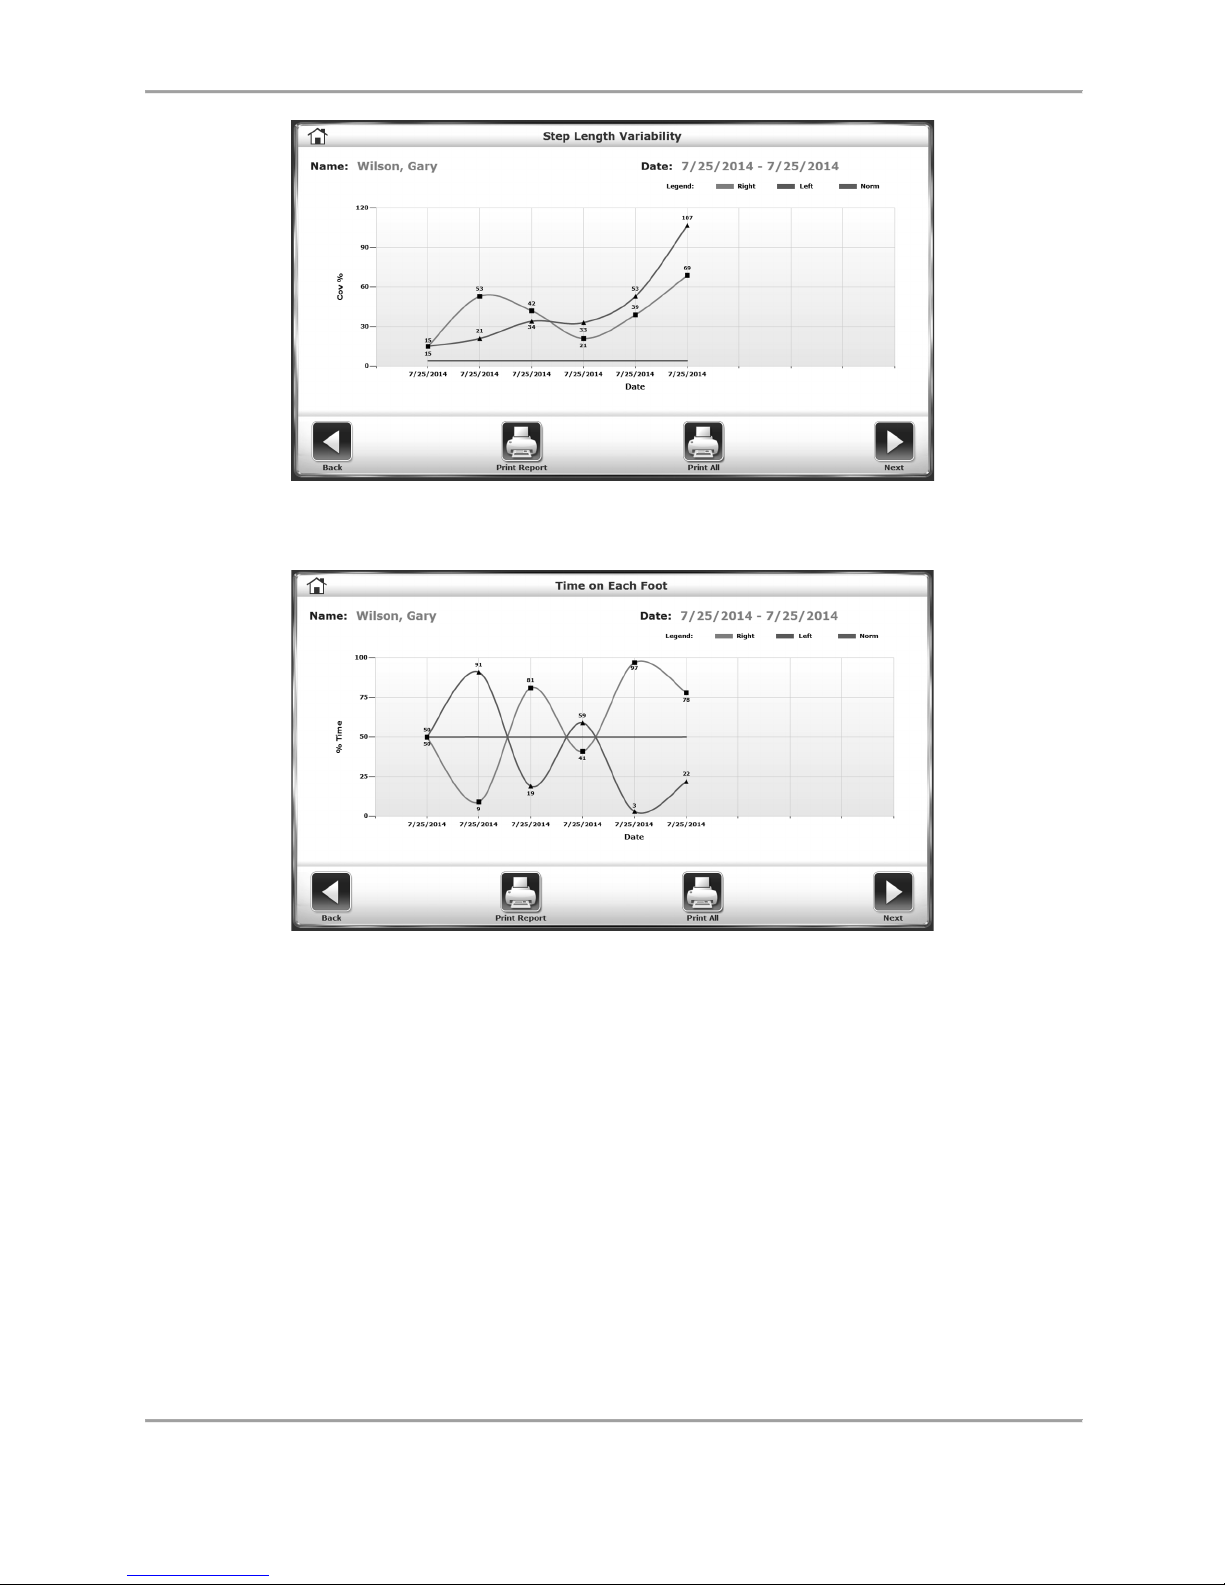
Figure 4.12. In this case, the progress report shows an increased step length variability
over the sessions.
Figure 4.13. Progress report showing the percentage of time spent on each foot.
Page 36
36 Biodex Medical Systems, Inc. © 2017
5. G-Codes
Introduction to G-Codes and Modifiers
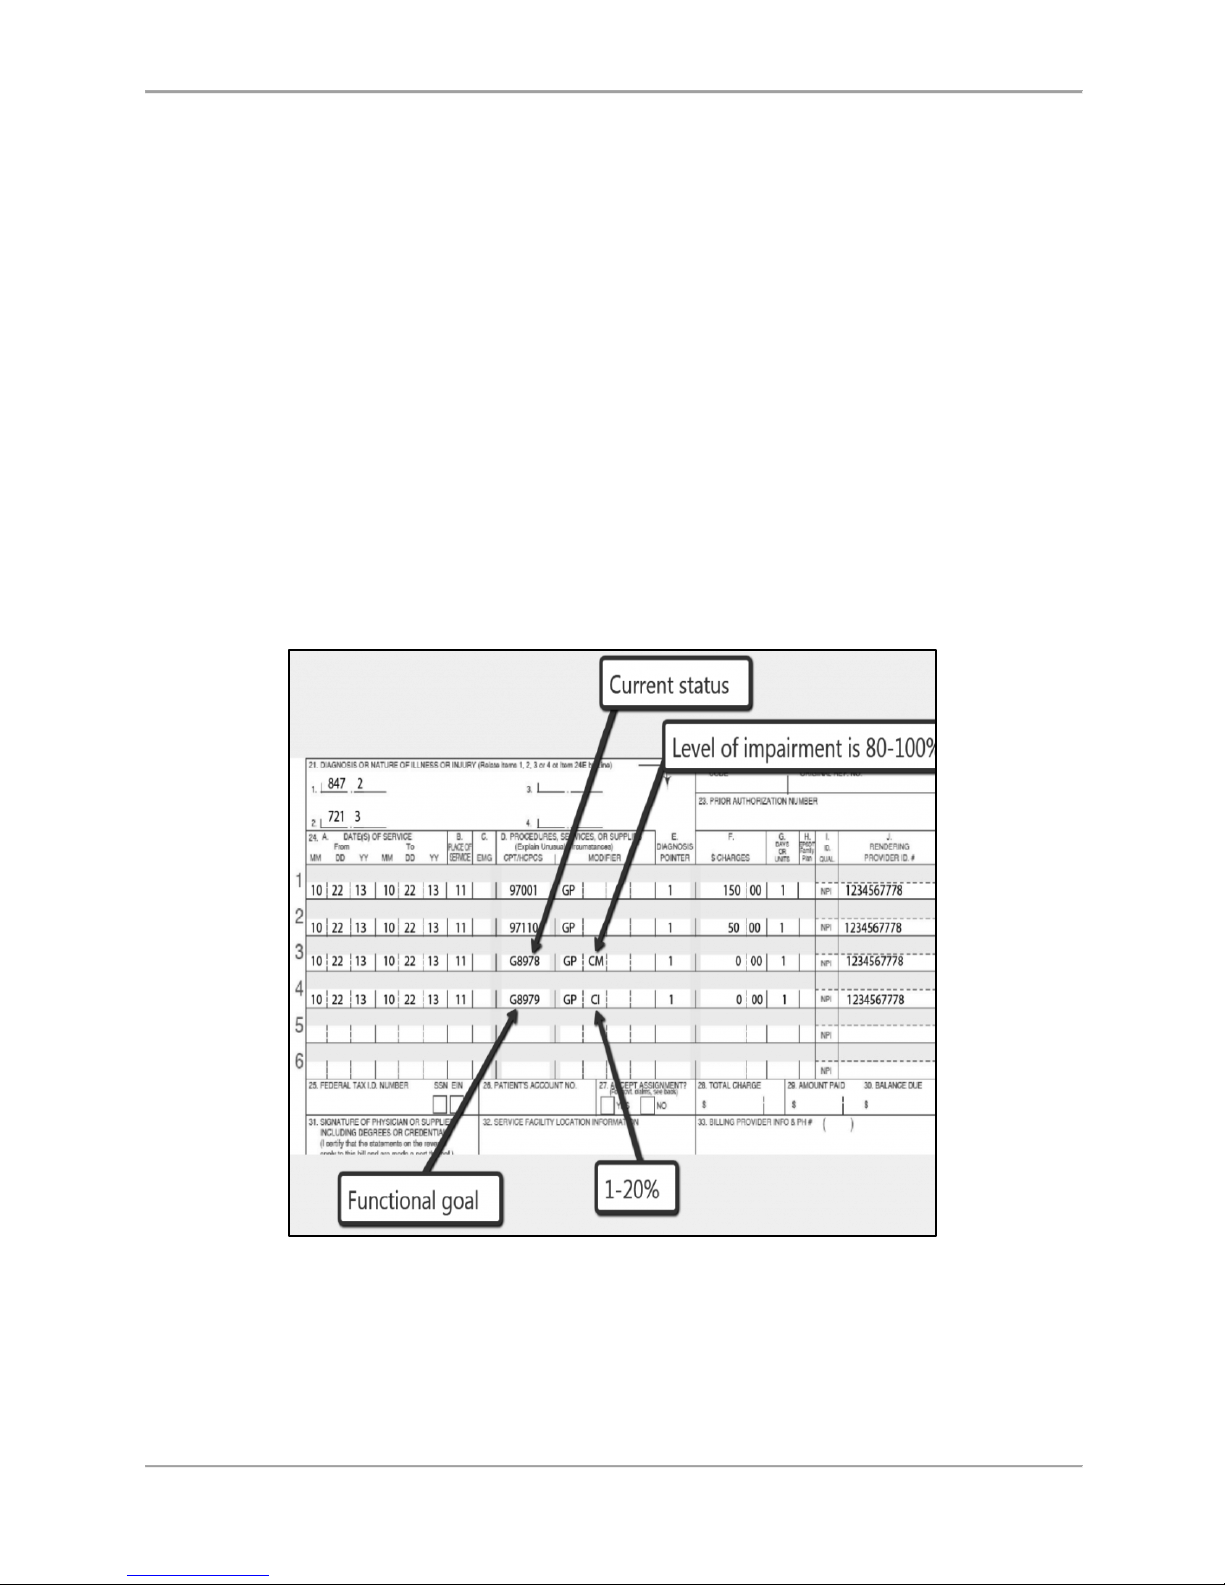
G-codes are a method of recording and tracking a patient’s functional limitation at the outset of
therapy, during the course of therapy, and at the time of discharge.
The codes are now required by Medicare for outpatient therapy services billed under Medicare
Part B in order to collect data on beneficiaries’ functional outcomes from therapy services
provided. Claims that do not include the required functional data will be returned for resubmission.
Functional tests will be used to report a functional limitation category (G-code) and a
percentage of impairment (Severity Code Modifier).
Severity Code Modifiers are a series of impairment level ranges made up of approximately 20
percentage points each.
The G-codes will be used by those who provide outpatient therapy services. These include
physical therapists, occupational therapists, speech-language pathologists, physicians,
physician assistants, nurse practitioners, and clinical nurse specialists.
Figure 5.1. Sample Claim Form with G-code and Impairment Modifier
Page 37
GAIT TRAINER 3 (v3.X SOFTWARE) 37
Associating G-Code Data
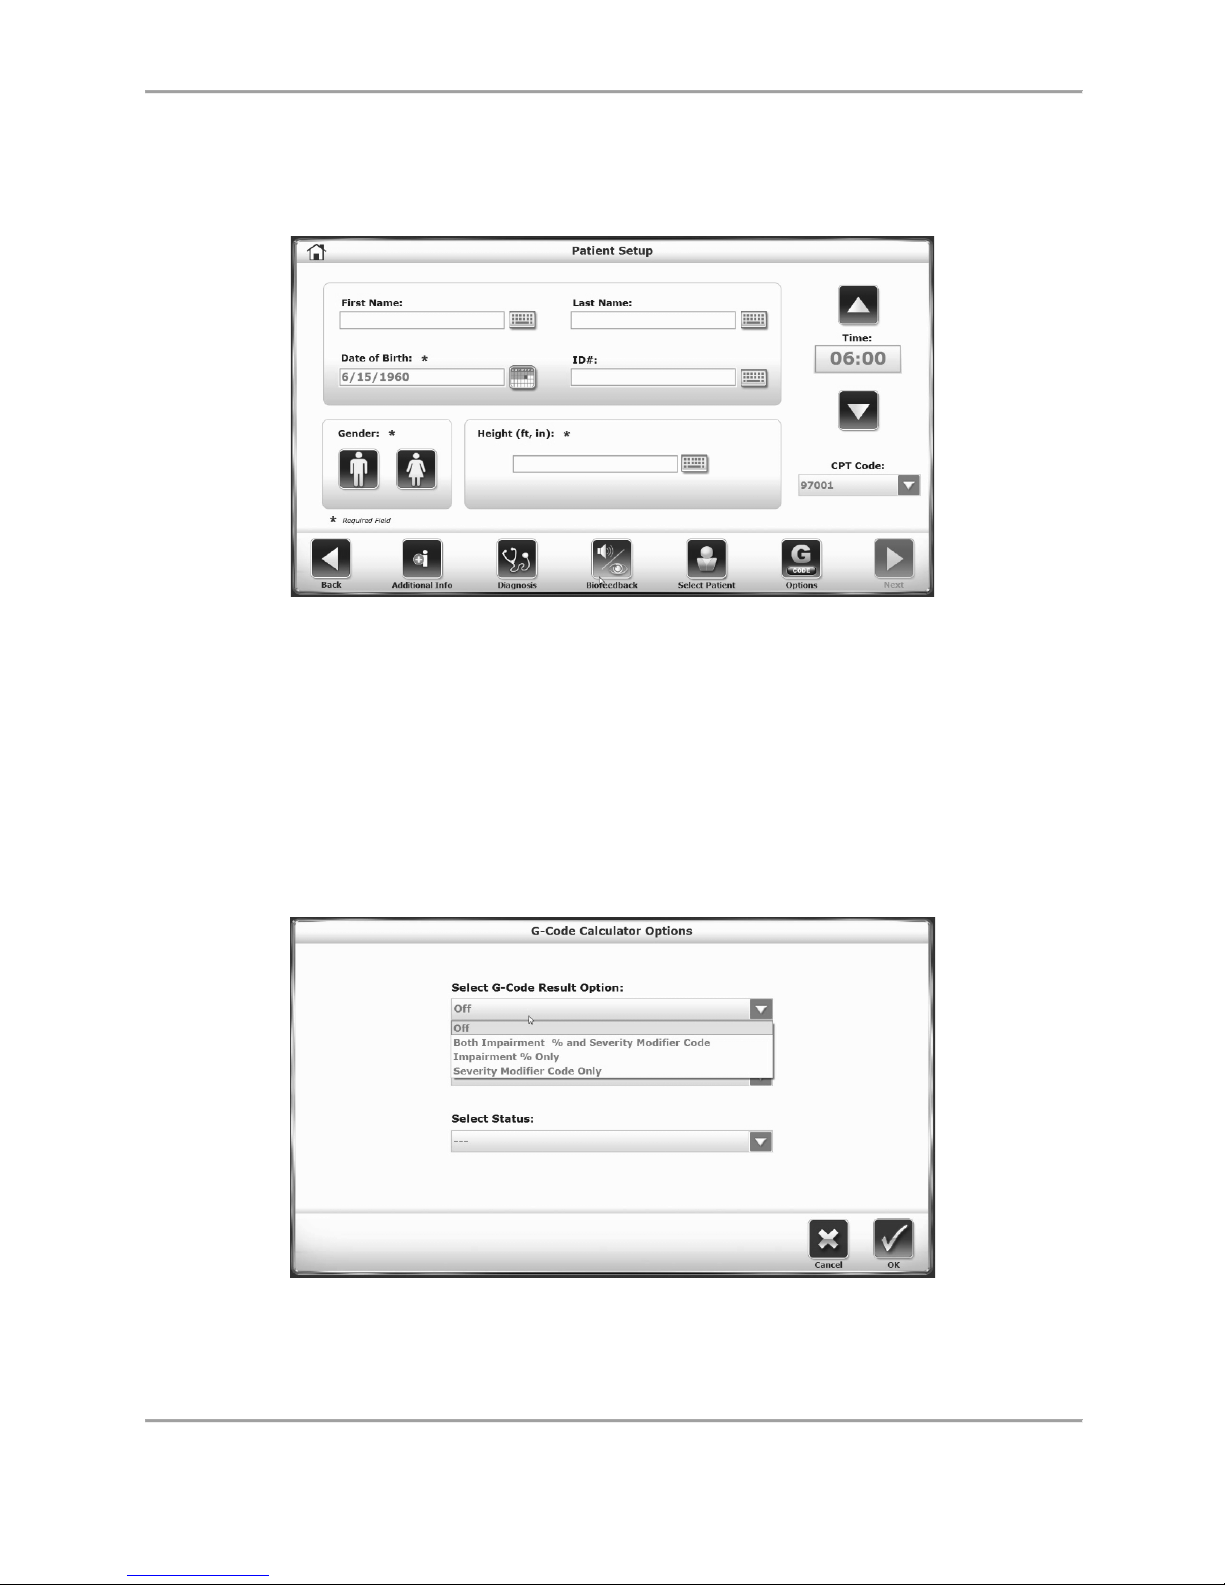
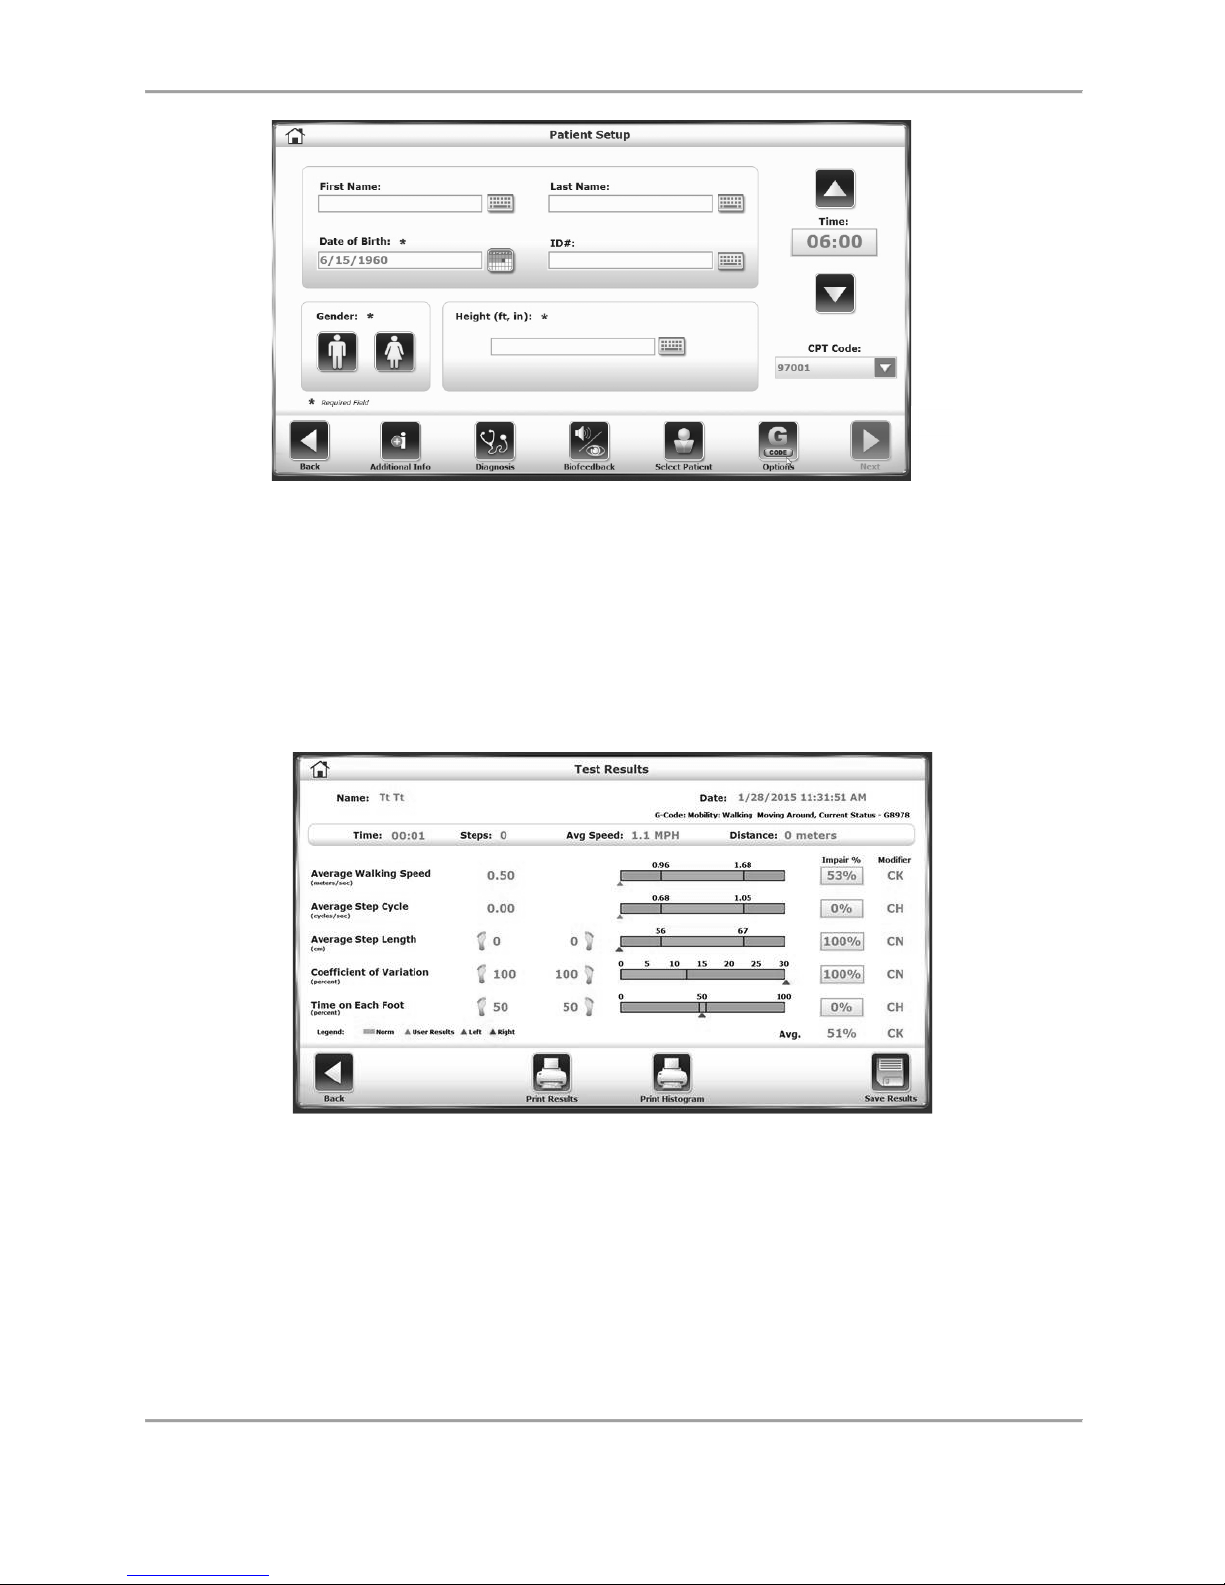
The G-code screen is accessed from the Patient Setup screen in the Gait Trainer interface.
Touch the <G-code> icon to access this screen.
Figure 5.2. Patient Setup screen in the Gait Trainer interface. Using the G-code icon,
a user can access the drop-down menus needed for associating G-code
data.
At this screen, the G-code data can be associated with the patient by making selections in the
drop-down menus.
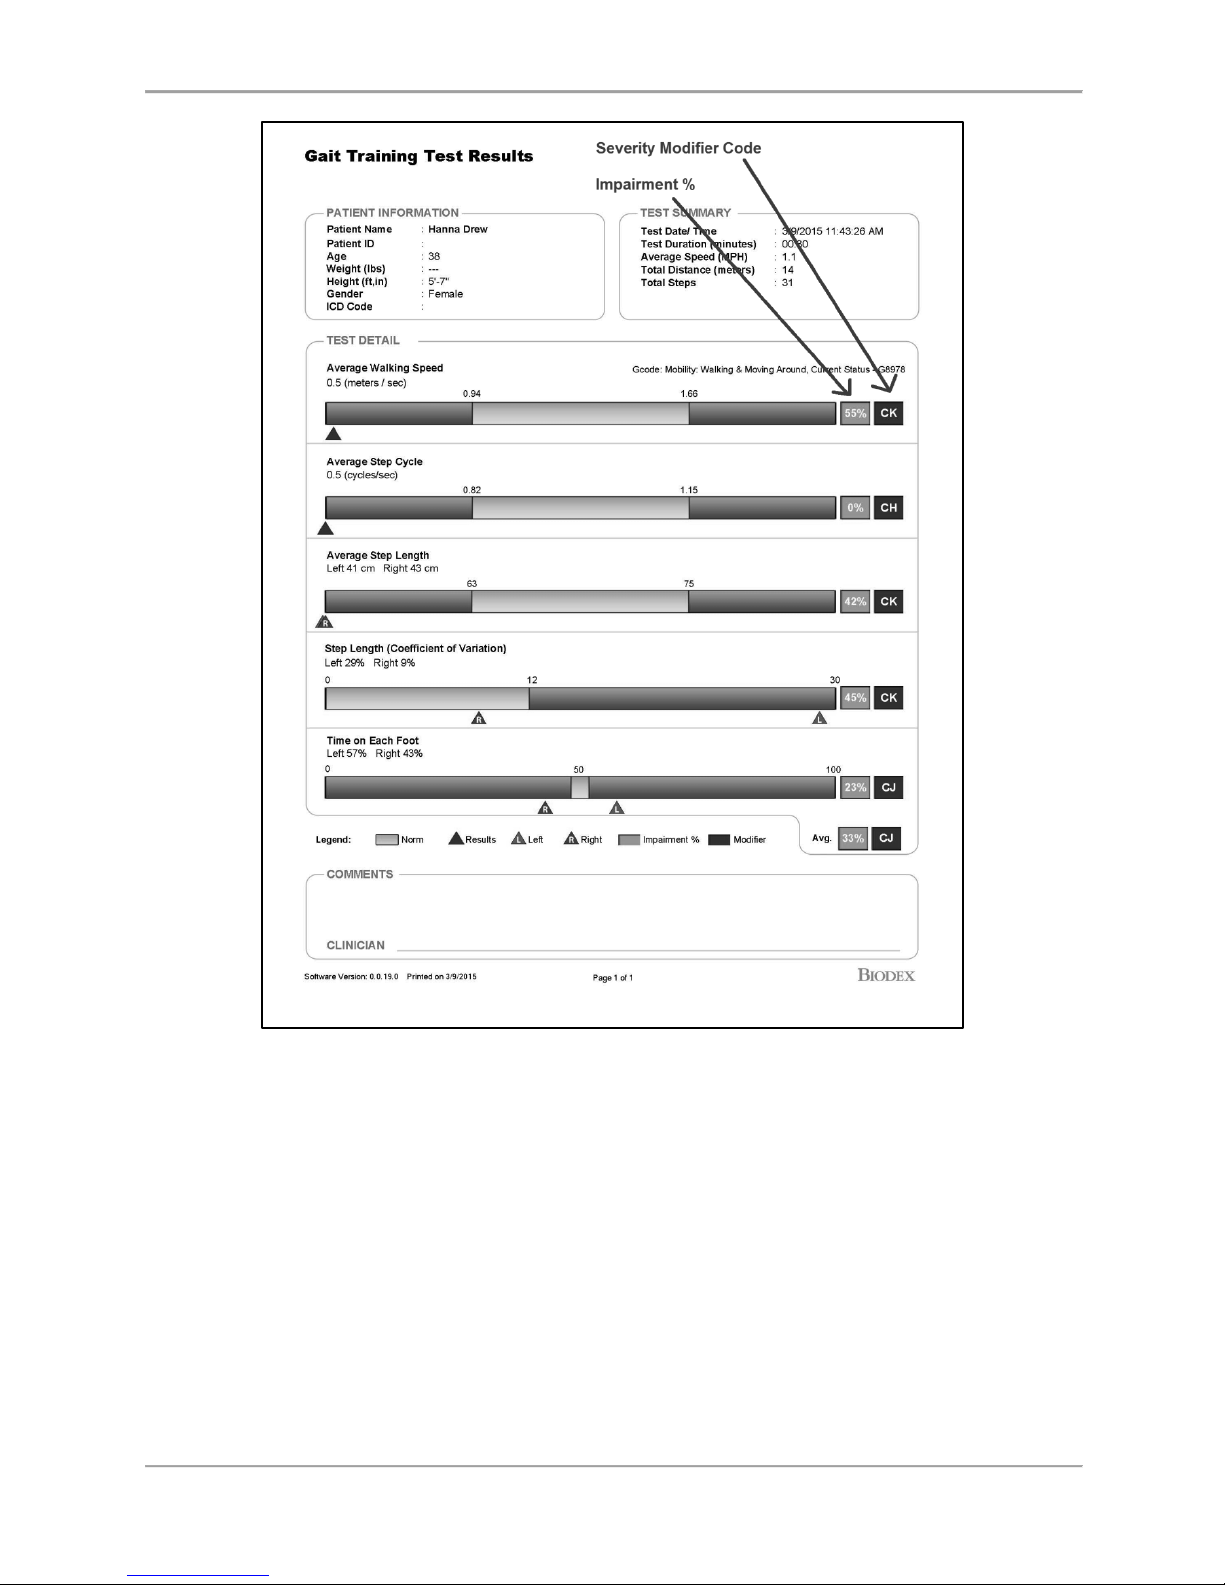
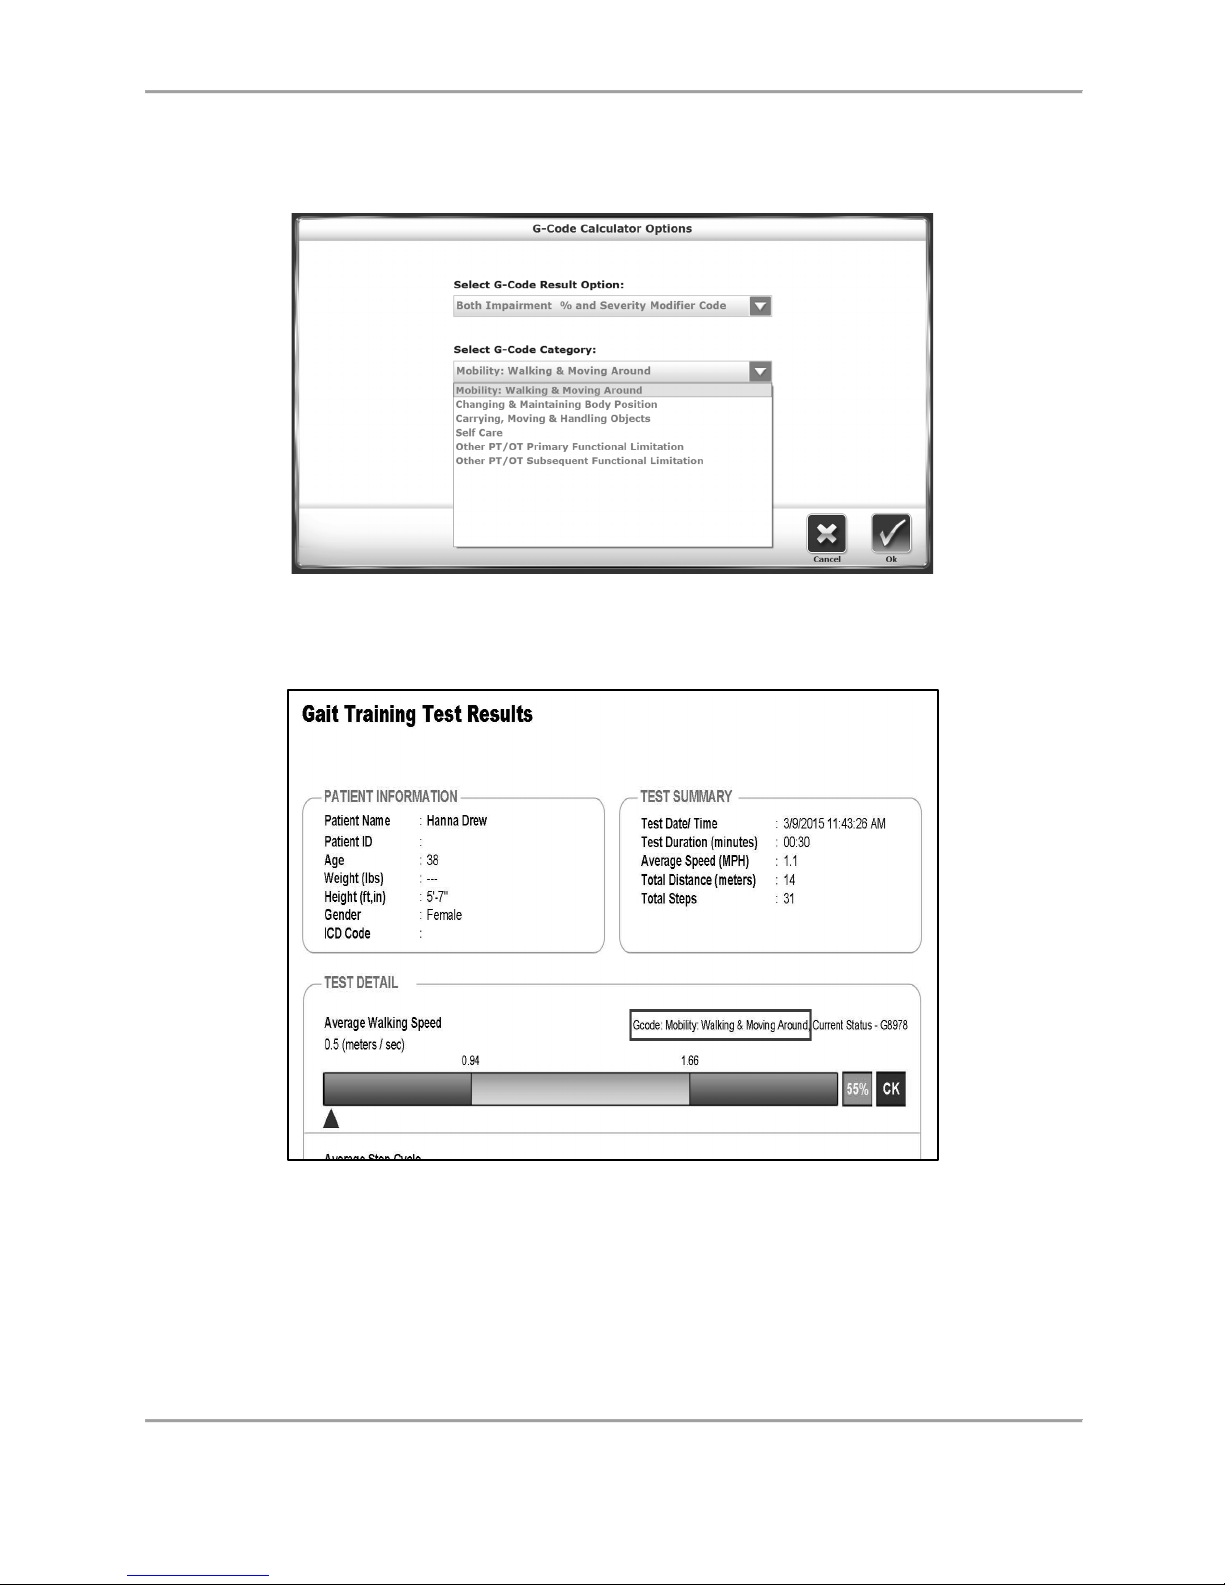
The top drop-down menu allows the user to select a G-code Result Option. This means that the
Exercise Summary Report will feature the Impairment %, the Severity Modifier Code, or both. If
the drop-down menu is set to Off, the Exercise Summary Report will show neither column and
the G-code icon on the Patient Setup screen will have a red (as opposed to green) dot on it.
Figure 5.3. G-code Calculator Options screen in the Gait Trainer interface. The first
drop-down menu allows the user to customize the G-code data that will
appear on the Gait Training Test Results.
Page 38
38 Biodex Medical Systems, Inc. © 2017
Figure 5.4. A sample of the Test Results after ‘Both Impairment % and Severity
Modifier Code’ has been selected.
Page 39
GAIT TRAINER 3 (v3.X SOFTWARE) 39
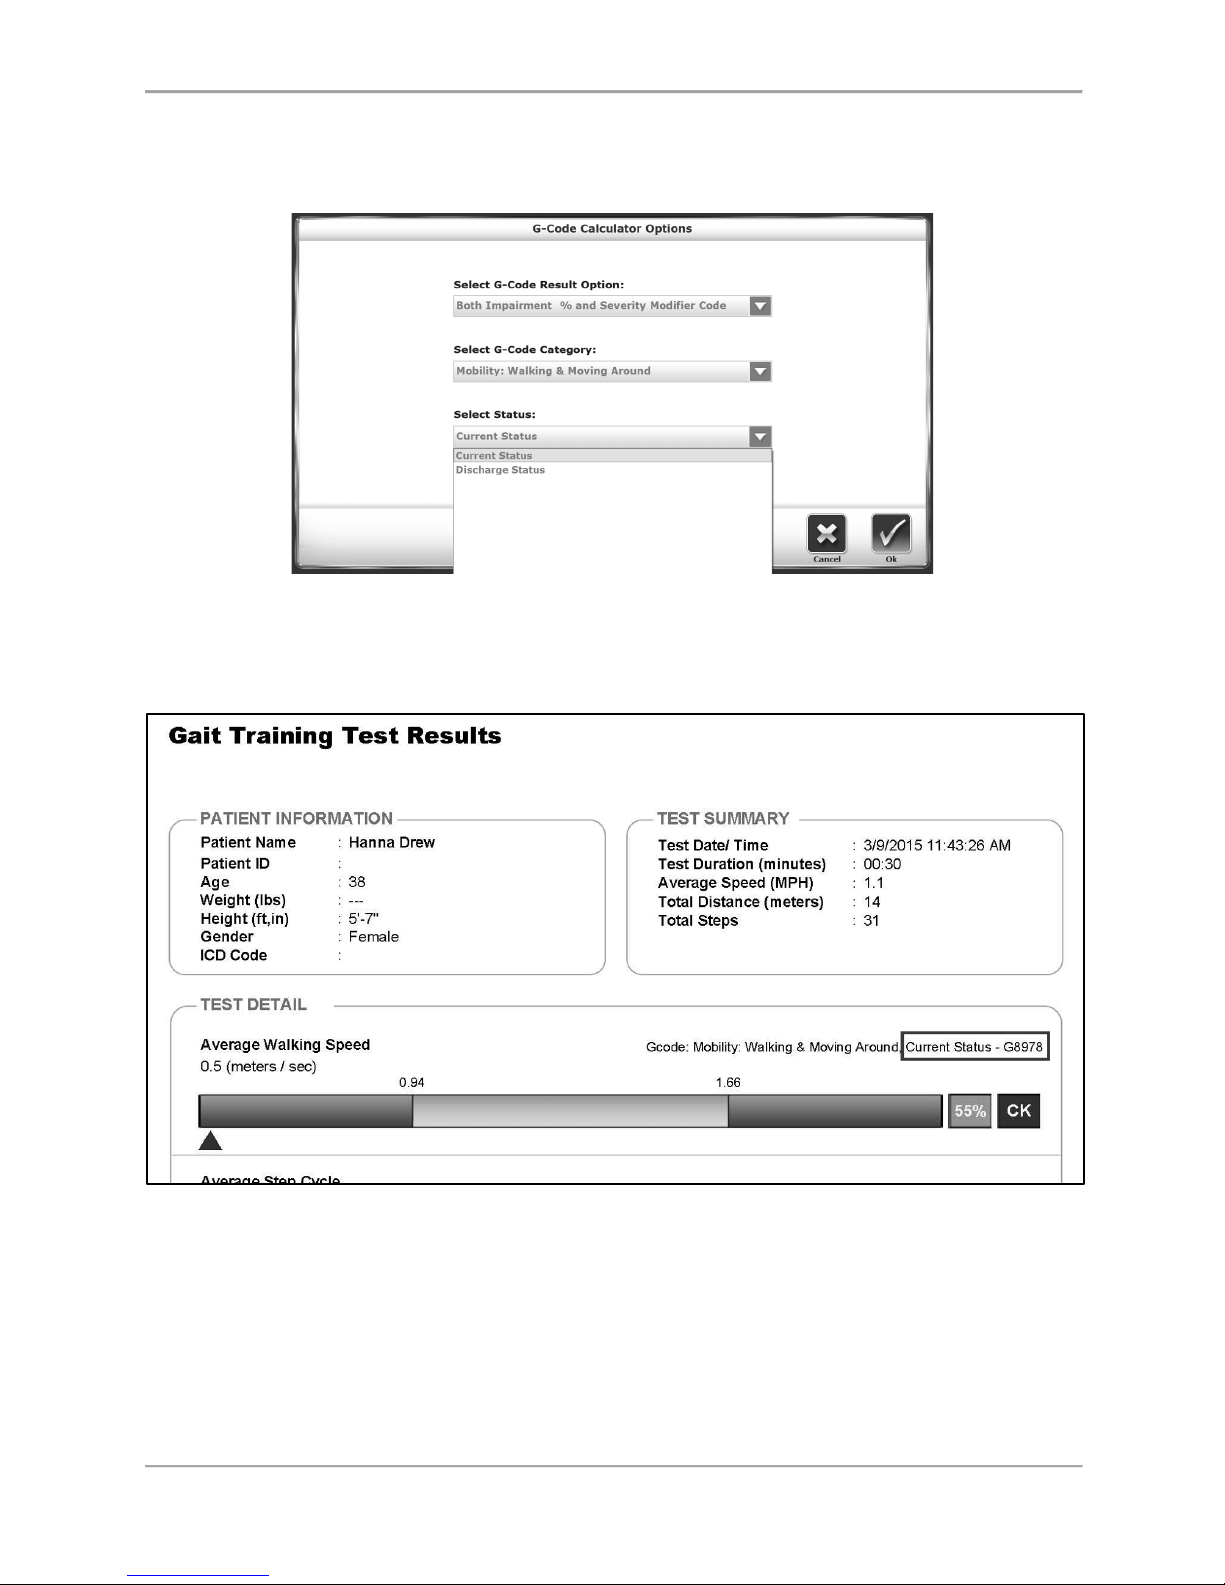
The G-code category drop-down menu features a list of commonly used rehabilitation
categories. The category most likely to be associated with the Gait Trainer is the Mobility:
Walking and Moving Around selection.
Figure 5.5. The second drop-down menu on the G-code Calculator Options screen in
the Gait Trainer interface allows the user to choose a G-code category.
Figure 5.6. A sample of the Test Results showing the G-code category that has been
selected.
Page 40
40 Biodex Medical Systems, Inc. © 2017
The Status drop-down menu relates to the patient’s treatment timeline. If this is the patient’s
first treatment or one in a series of treatments, the status should be set equal to Current
Status. If it is the last treatment, the Discharge Status should be selected.
Figure 5.7. The third drop-down menu on the G-code Calculator Options screen in
the Gait Trainer interface allows the user to select the status of the
beneficiary.
Figure 5.8. A sample of the Test Results showing the status that has been selected.
Press <Back> to return to the Patient Setup screen. Note that the dot on the G-code icon is
green, as opposed to red.
Page 41
GAIT TRAINER 3 (v3.X SOFTWARE) 41
Figure 5.9. The Patient Setup screen after G-code data has been associated.
Test Results Data
Exercise report data can be reviewed from the Test Results screen only after touching <End> to
end the exercise session and touching <Results>.
The Test Results screen can also be accessed by selecting the individual record from the
Reports section in system Utilities.
Figure 5.10. Sample Test Results screen.
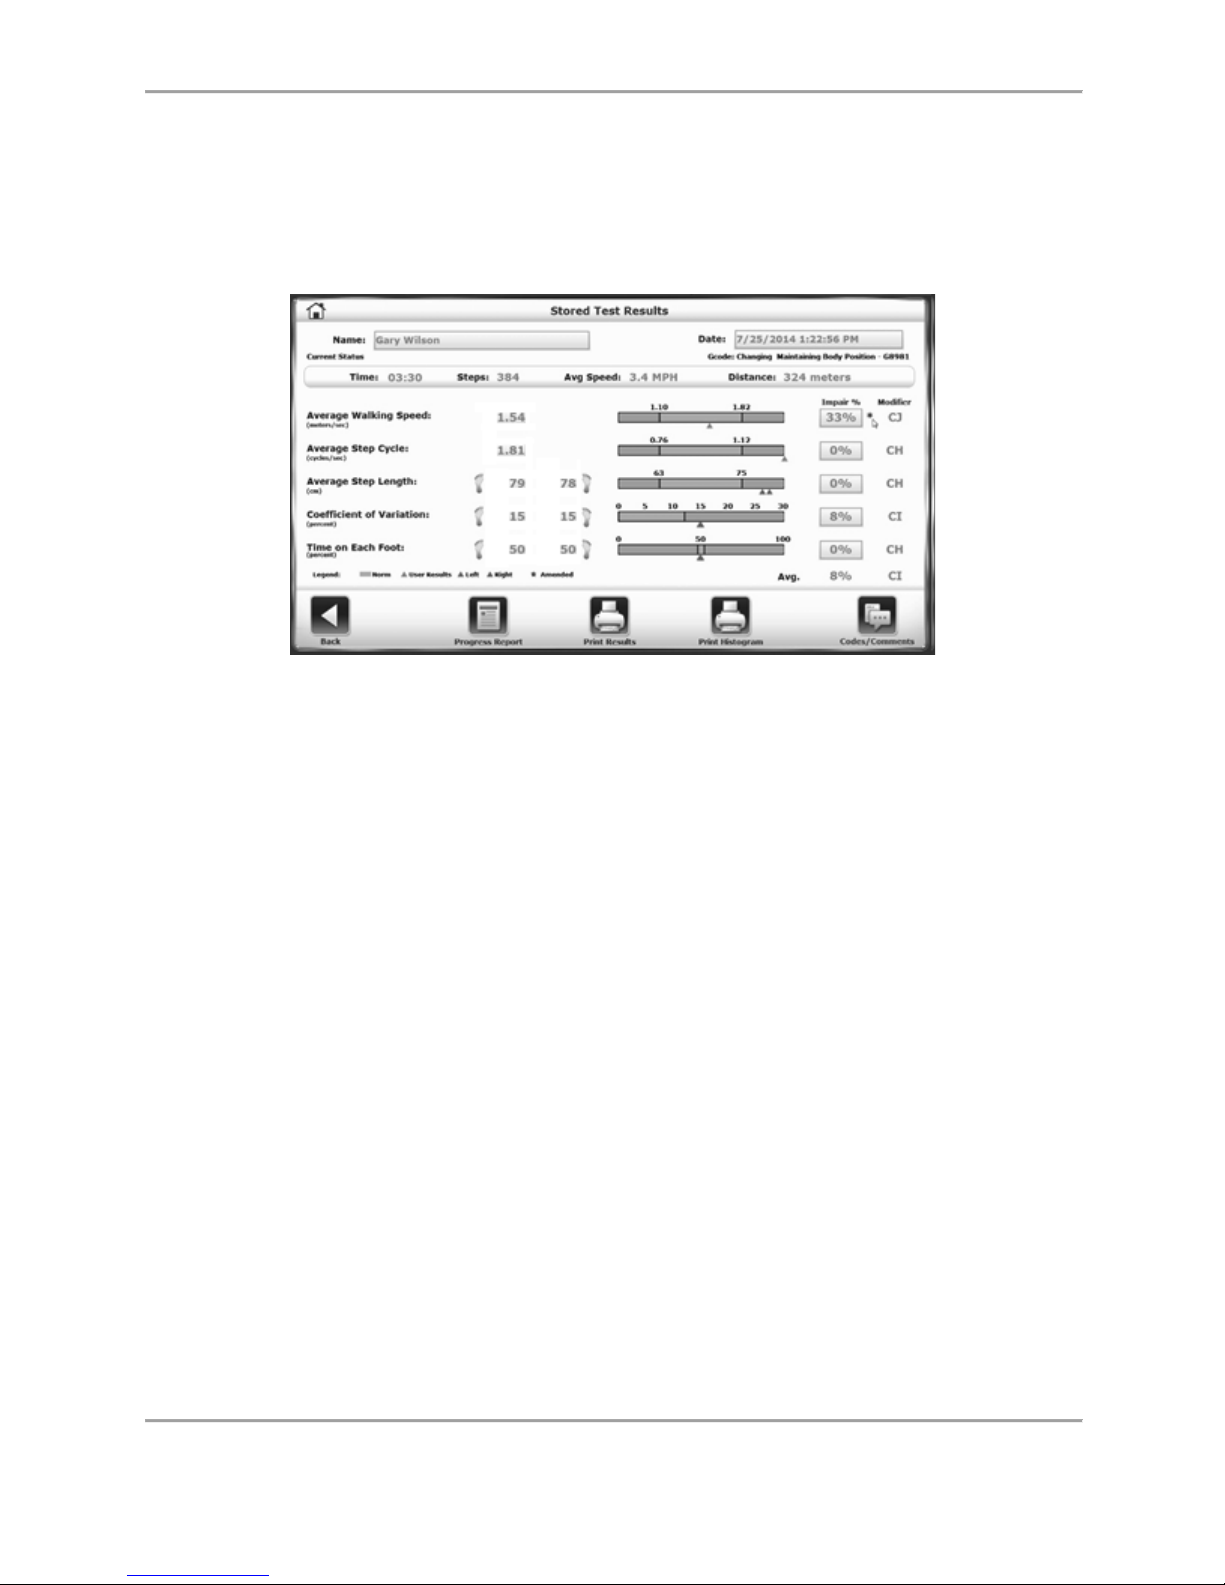
Near the top of the screen, the user can see that the G-code category has been specified as
Mobility: Walking and Moving Around. The G8978 code is derived from making a “Current
Status” selection. Both of these selections are made in the Gait Training Patient Setup screen.
The two columns at the right of the screen pertain to G-code data. The Impair Percentage
numbers refer to what degree the patient could be considered impaired, with 100% meaning
the patient is completely impaired and unable to do the associated task without help.
Page 42
42 Biodex Medical Systems, Inc. © 2017
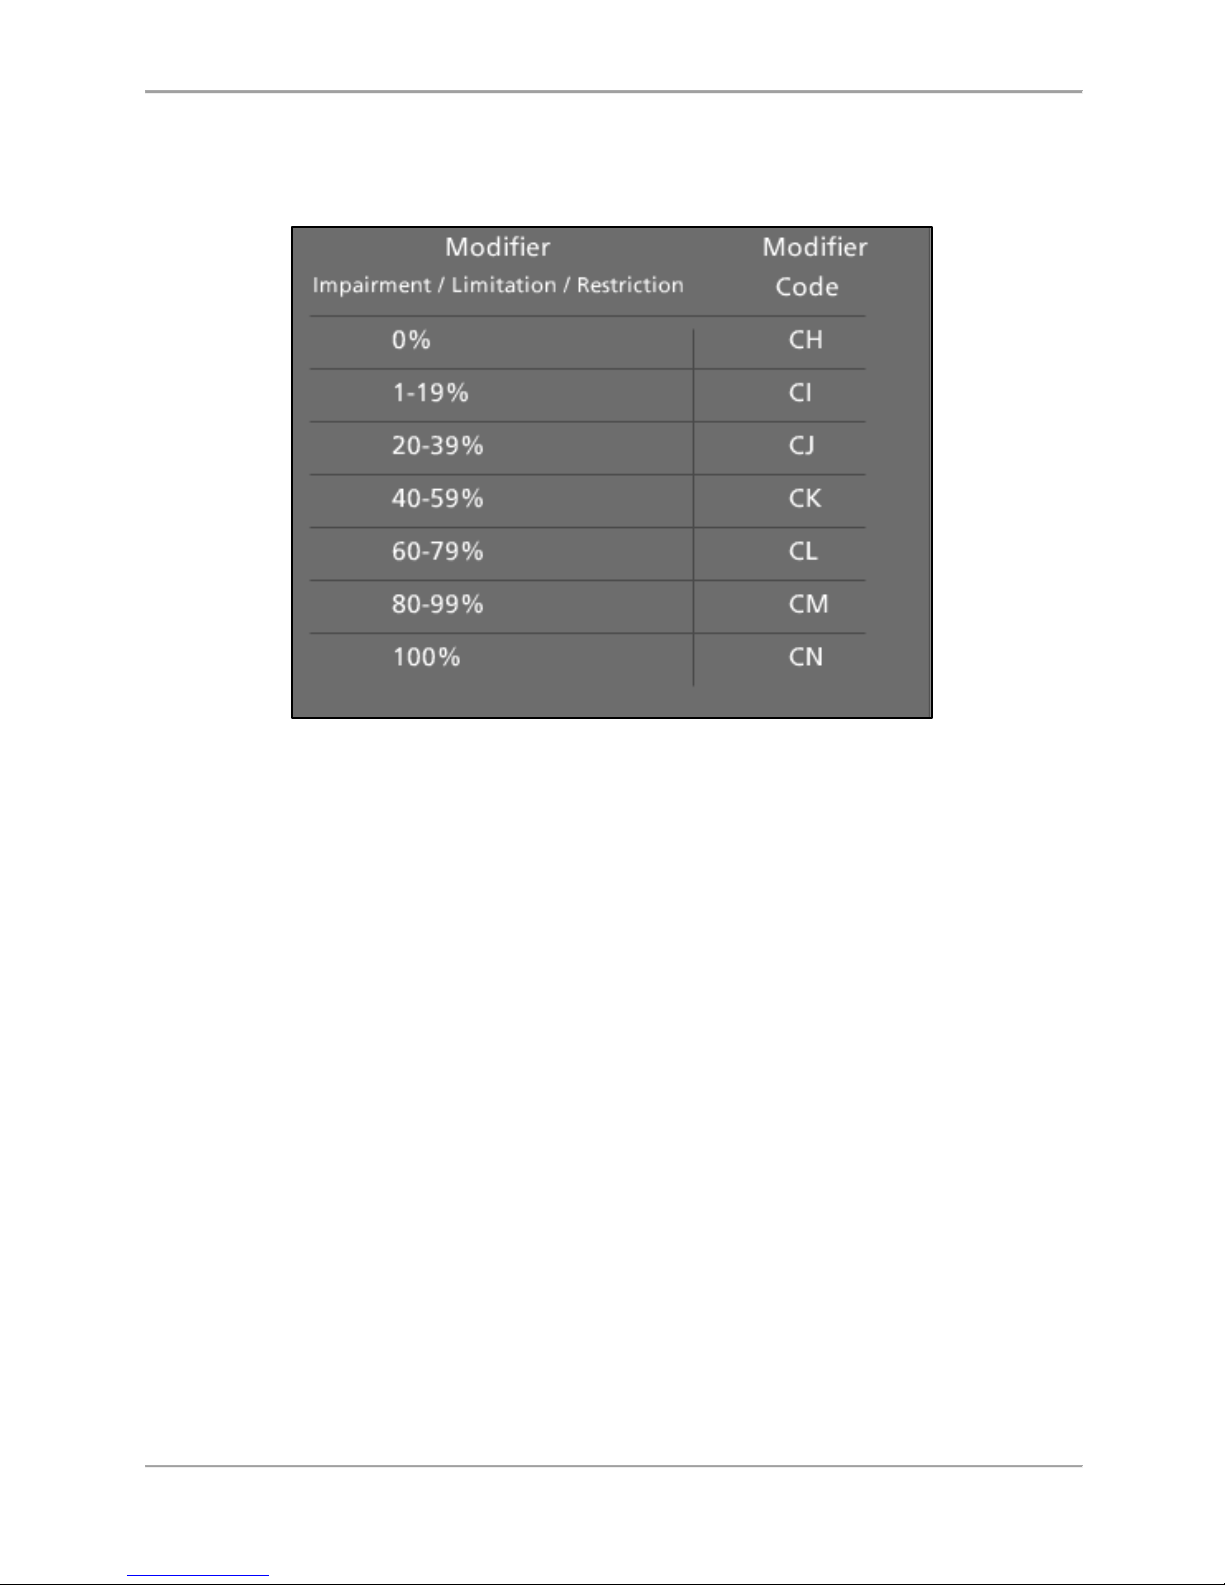
The Severity Code Modifiers are a series of impairment level ranges made up of about 20
percentage points each, where for example, “CI” would represent a status of 1-19% impairment.
Figure 5.11. The scale of 7 modifiers is intended to denote the patient's degree of
impairment/limitation/restriction.
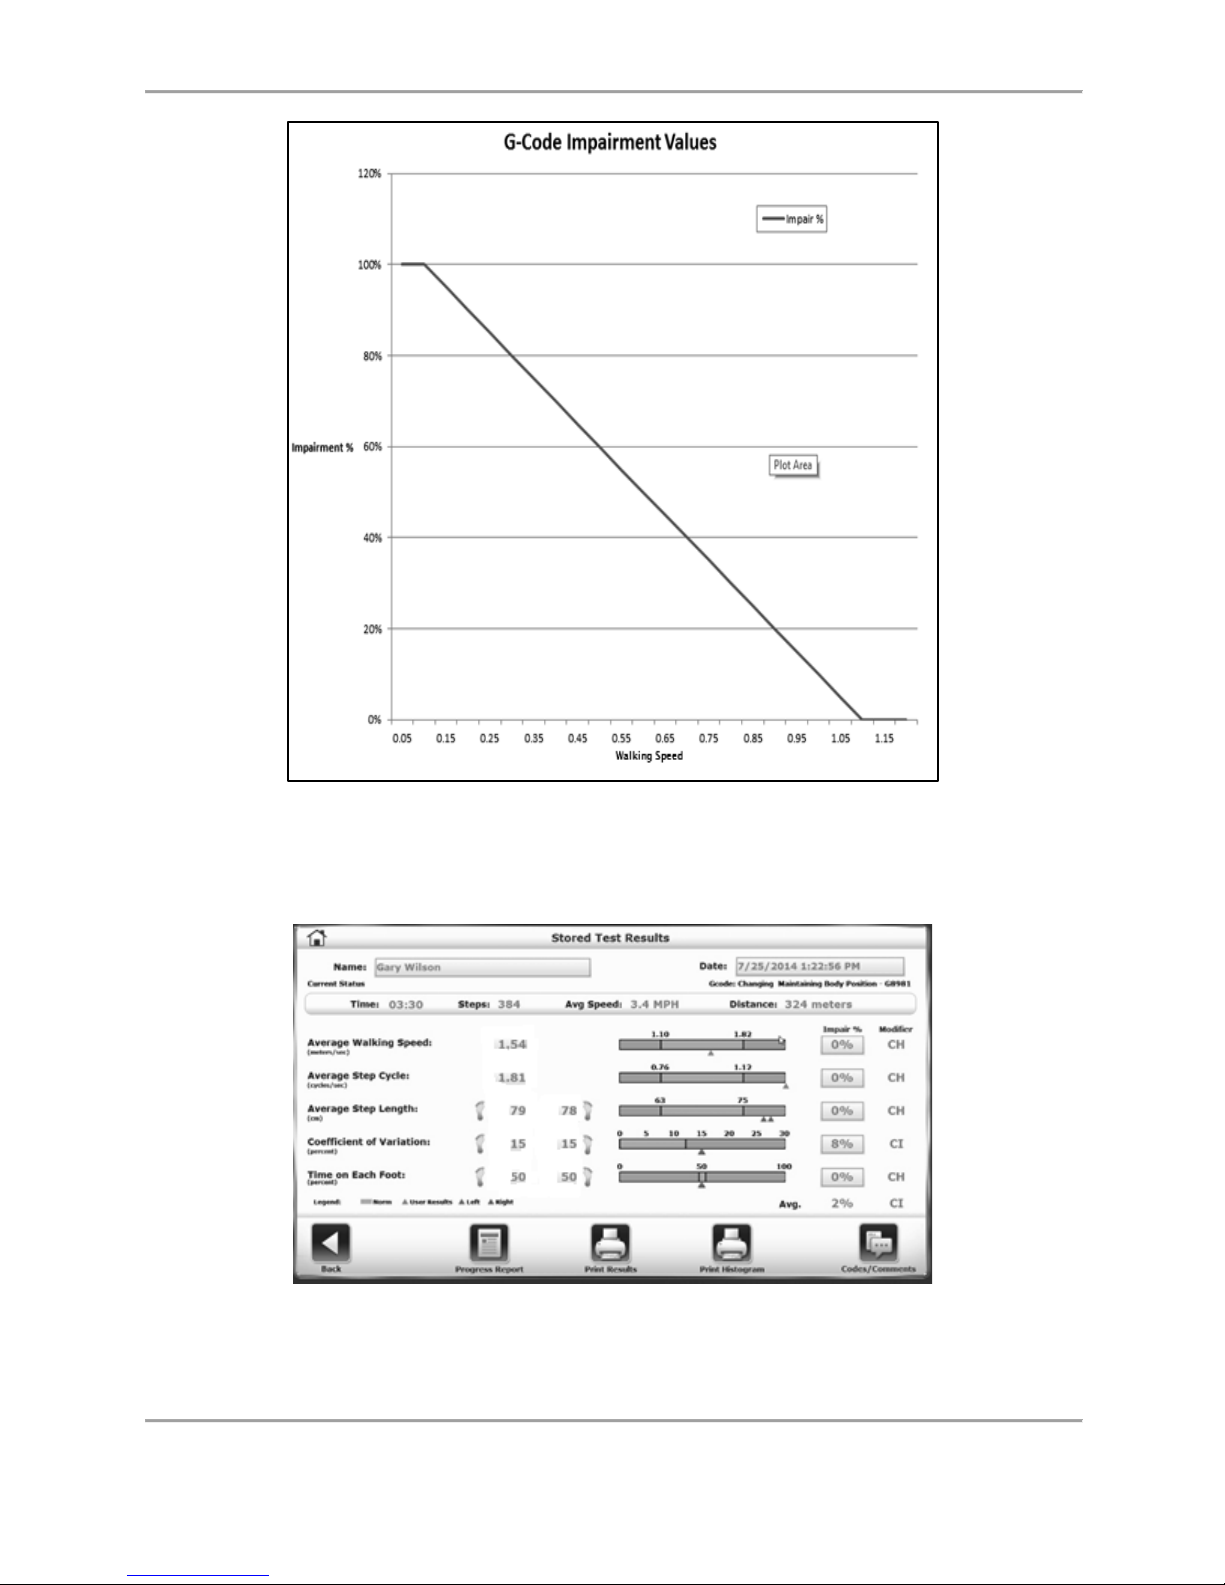
For further reference, review the chart below to see how the Gait Trainer software calculates
Impairment Percentage. In measuring a patient’s average walking speed, the software assigns
an Impairment Percentage “score” based on the patient’s average walking speed during a
particular session. If an average speed 0.1 MPH, but less than 1.1, cannot be obtained, the
patient is considered to be 100% impaired. If the average walking speed is 1.1 MPH or greater,
the patient is considered to be 0% impaired.
Note: In this example, a “normal” range of 1.1 to 1.82 MPH is calculated from the age, gender,
and height data entered on the Patient Setup screen.
Page 43
GAIT TRAINER 3 (v3.X SOFTWARE) 43
Figure 5.12. Sample graph showing how the Gait Trainer software calculates
Impairment Percentage.
From the Stored Test Results screen, the therapist may also choose to alter the Impairment
Percentage numbers manually. To do so, touch the number to be changed.
Figure 5.13. The Impairment Percentage numbers can be manually changed from this
screen.
Page 44
44 Biodex Medical Systems, Inc. © 2017
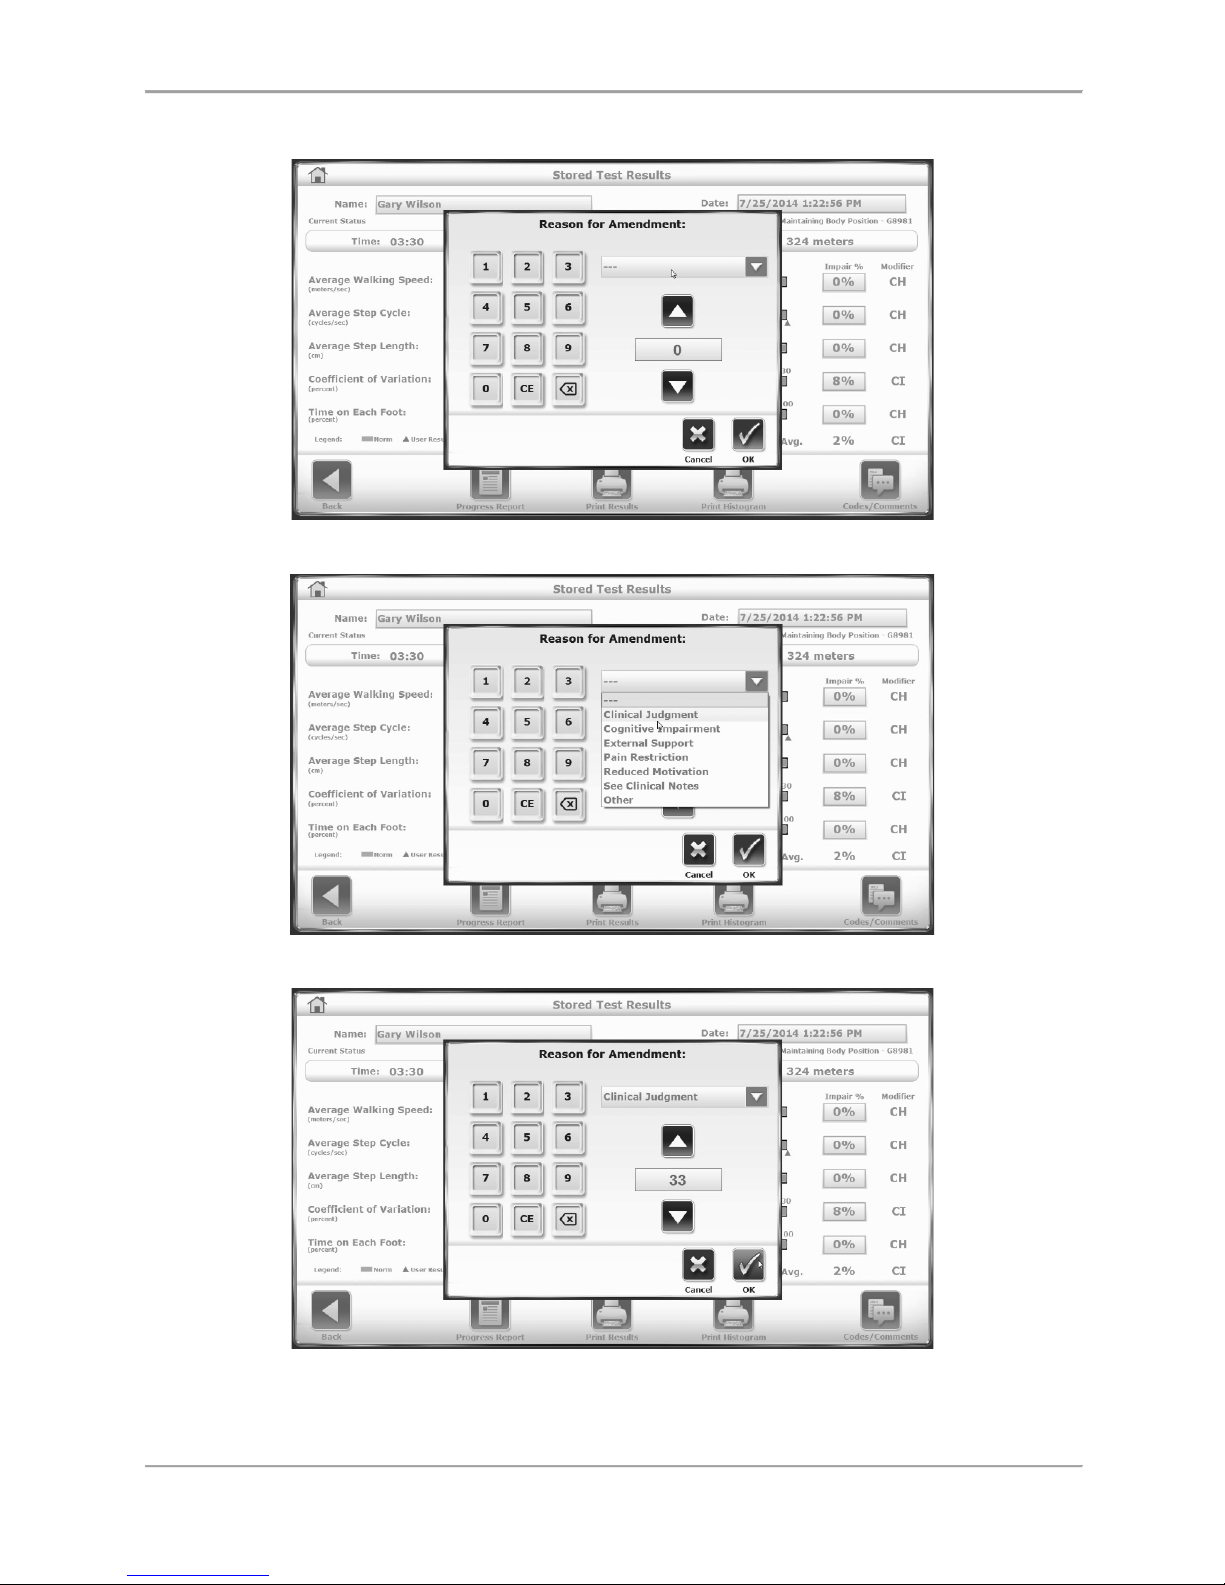
On the Reason for Amendment screen, select a reason for the change in the drop-down menu.
Figure 5.14. Reason for Amendment screens
Page 45
GAIT TRAINER 3 (v3.X SOFTWARE) 45
Enter an updated number with the keypad.
Two things can be observed when the Stored Test Results screen is redisplayed: First, a red
asterisk has appeared next to the updated number marking it as being amended. Also, since
the impairment level change was a significant one — from 0 to 33 — the Severity Modifier Code
has changed from CH to CJ.
Figure 5.15. The change in impairment percentage is now noted by an asterisk.
Sample G Code Categories
For reference, some other G-code categories and associated codes are listed below. All of these
selections are available on the Gait Trainer software.
Mobility: Walking & Moving Around
G8978 Mobility current status
G8979 Mobility goal status
G8980 Mobility D/C status
Changing & Maintaining Body Position
G8981 Body position current status
G8982 Body position goal status
G8983 Body position D/C status
Carrying, Moving and Handling Objects
G8984 Carry current status
G8985 Carry goal status
G8986 Carry D/C status
Page 46

46 Biodex Medical Systems, Inc. © 2017
Self-Care
G8987 Self-care current status
G8988 Self-care goal status
G8989 Self-care D/C status
Other PT/OT Primary (not covered in above category)
G8990 Other PT/OT current status
G8991 Other PT/OT goal status
G8992 Other PT/OT D/C status
Other PT/OT Subsequent (not covered in above category)
G8993 Sub PT/OT current status
G8994 Sub PT/OT goal status
G8995 Sub PT/OT D/C status
Page 47
GAIT TRAINER 3 (v3.X SOFTWARE) 47
6. Treadmill Operation
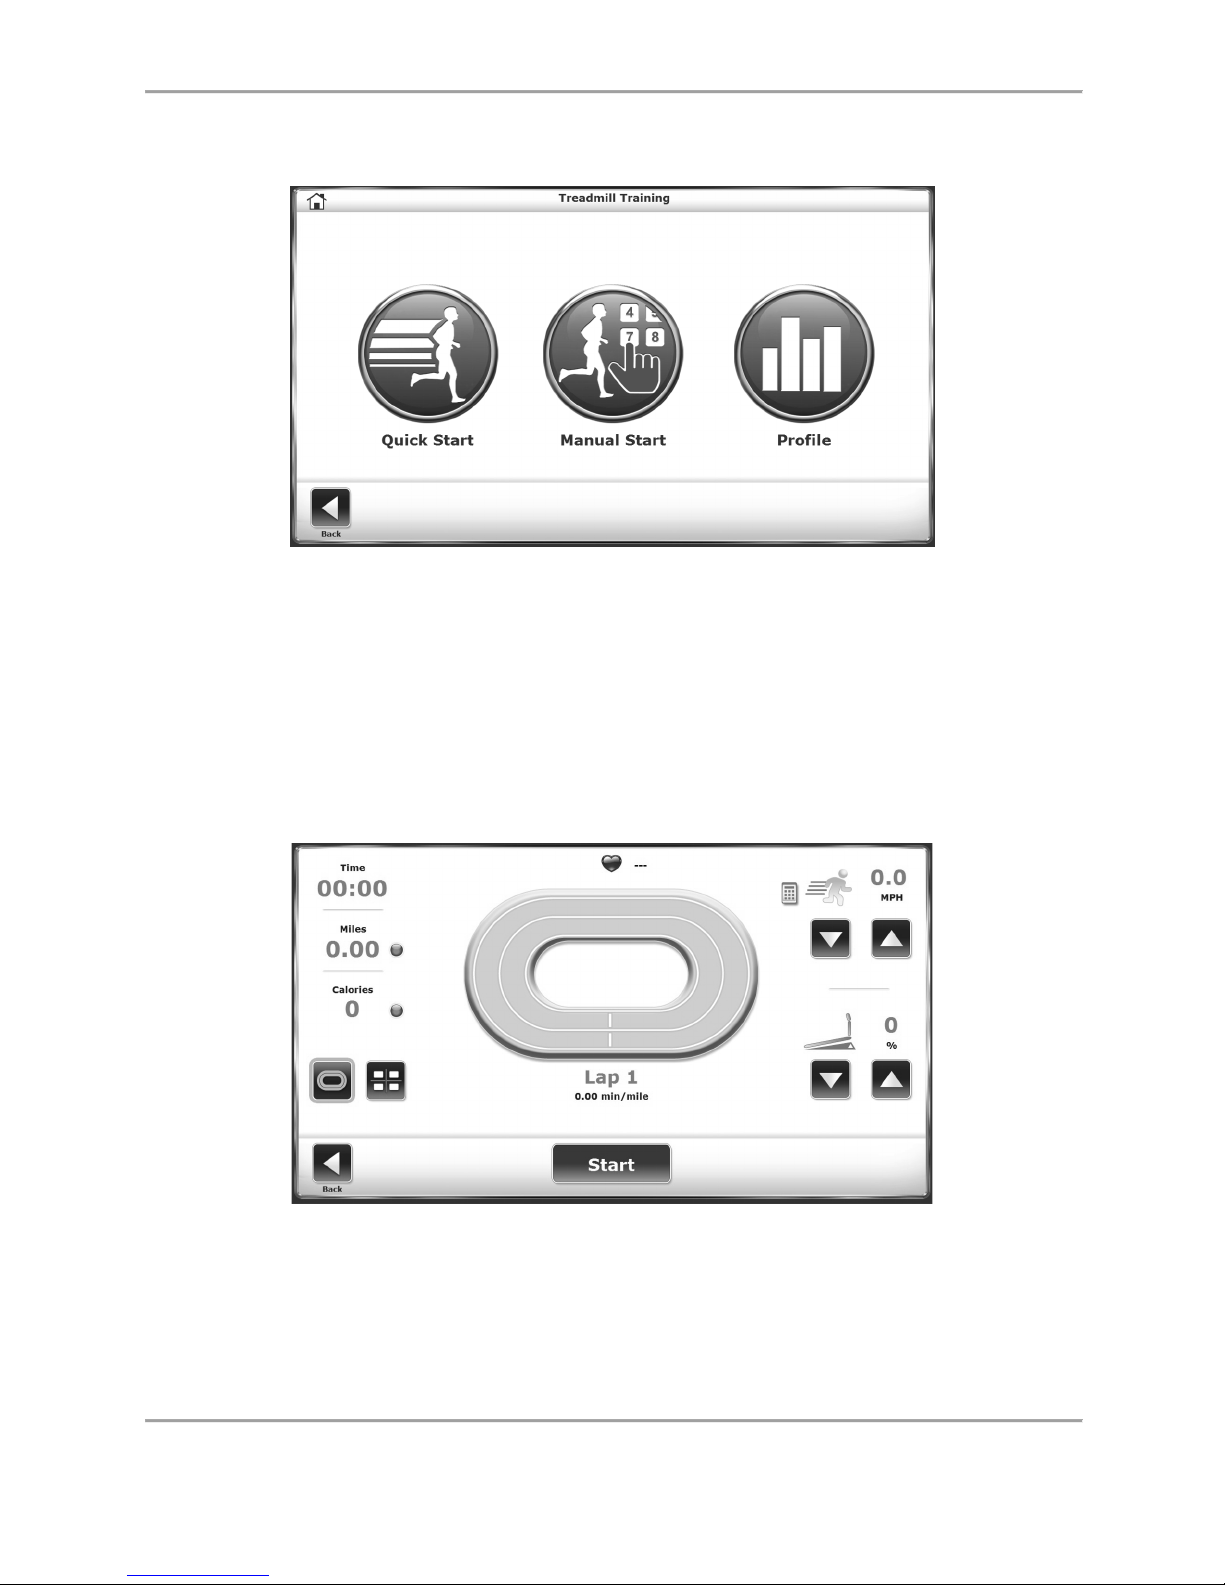
Figure 6.1. The Quick Start feature allows the user to begin the exercise session with
minimal input.
Quick Start Operation
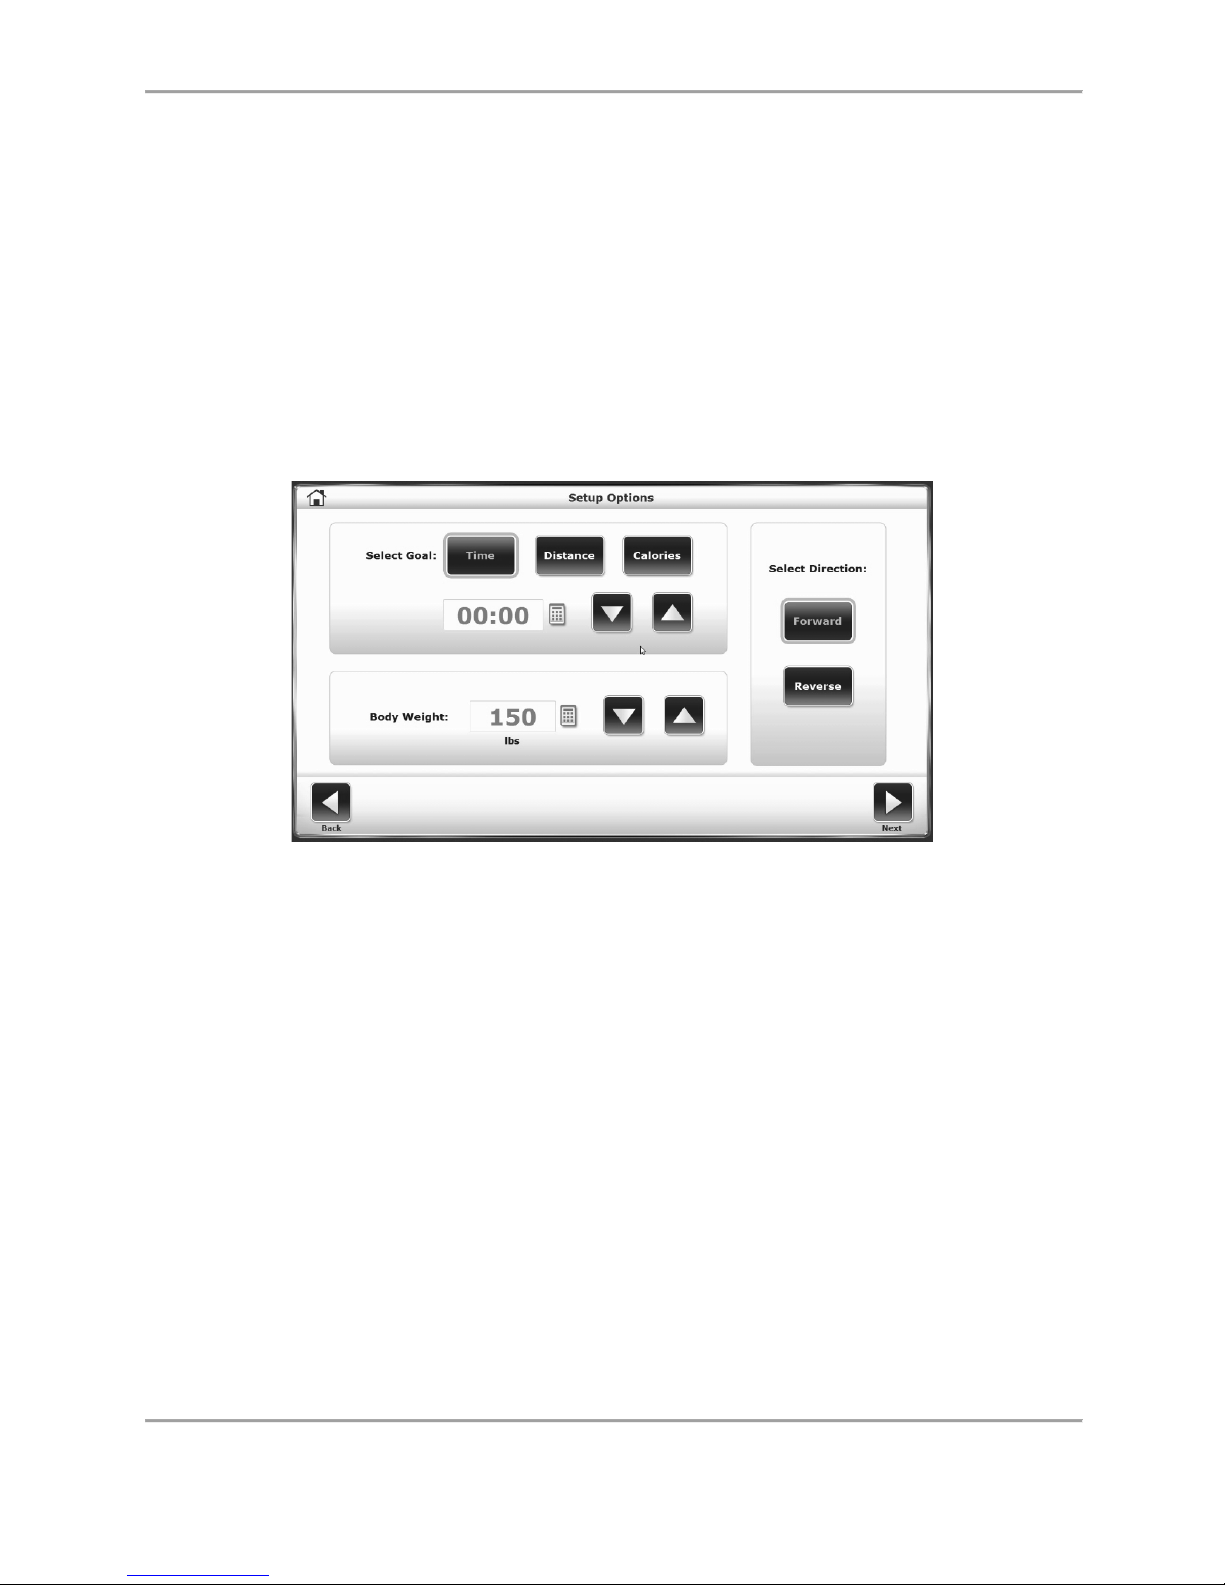
Although the Gait Trainer offers advanced programming capability, it also features a "Quick
Start" function that allows the user to immediately begin exercise on the system with 1/4-mile
scaled track views.
Figure 6.2. Quick Start track view.
Page 48

48 Biodex Medical Systems, Inc. © 2017
Quick Start operation is simple. With the system turned ON, position the user on the treadbelt
and proceed as follows:
1. Touch <Treadmill> on the Opening Menu. The Treadmill Opening Menu is displayed.
Touch <Quick Start>.
2. Press <Start> on the display to activate the treadbelt. The treadbelt will ramp up to .01
mph.
3. Touch the <▲> and <▼> arrows on the screen to adjust the Speed and the Elevation as
desired.
4. Touch the display icons at the bottom left of the screen to toggle between the Quick
Start Exercise Track display and a Numeric display.
5. Touch <Pause> to pause the exercise session at any time. Touch <Resume> to resume
the exercise session.
6. Touch <End> to end the exercise session at any time.
Quick Start Track / Numeric Display Parameters
Users can choose from a Quick Start Exercise Track or Numeric display during Quick Start
exercise sessions. The following parameters are displayed for both choices.
NOTE: To toggle between displayed parameters (i.e., to change measurement units for calories,
pace, or distance), touch the blue dot next to each parameter heading.
Time: Cumulative time in minutes/seconds from the point at which the treadbelt begins to
move in either direction.
Distance: The distance covered in miles or KM from the beginning to the end of the current
exercise session.
Calories: Toggle between:
● Calories: Total calories burned by the user during the current exercise session. This
value is displayed in real-time.
● Calories/Hr: Total calories burned in one hour if exercise continues at the current rate.
This parameter is dependent upon a default weight of 150 pounds.
● METs: This value reflects the resting rate of oxygen consumption with one MET equal to
the oxygen consumption of a seated individual at rest. Thus, a seated individual in a
resting state is consuming one MET. A seated individual exercising at a rate of two
METs is consuming twice the oxygen of a seated resting individual. A person exercising
at 10 METs is consuming ten times the oxygen of a seated resting individual. To
compute the METs of a person actively exercising on the Gait Trainer, the system uses
standard calculations based on American College of Sports Medicine Guidelines for
Testing and Exercise. The METs value is always displayed in real/time for current speed.
Lap Count/Pace: The amount of time it will take the user to move one mile or KM at the current
treadbelt speed. Toggle between miles or kilometers by clicking on the number below the Lap
text.
Page 49
GAIT TRAINER 3 (v3.X SOFTWARE) 49
Heart Rate: Displayed at the top of the screen, this is the real-time heart rate of the user during
the exercise session measured using the contact handgrips.
Quick Setting Option for Speed Value: Clinicians and users have the option of bringing the
treadbelt to a designated speed without having to press the <▲> button multiple times. To use
this option, select the keypad located to the left of the Speed setting in the upper right corner
(see Figure 6.2). The keypad will appear on the screen for ten seconds. If a Speed Limit has
been enabled, the speed limit — in MPH or KMH — will appear at the top of the screen. Users
will not be able to select a number value that is higher than the speed limit. (For more
information on the Speed Limit setting, refer to the System Configuration section of this
document.) To set a speed, touch a number button. The window will close and the treadbelt
will start “ramping up” to that speed.
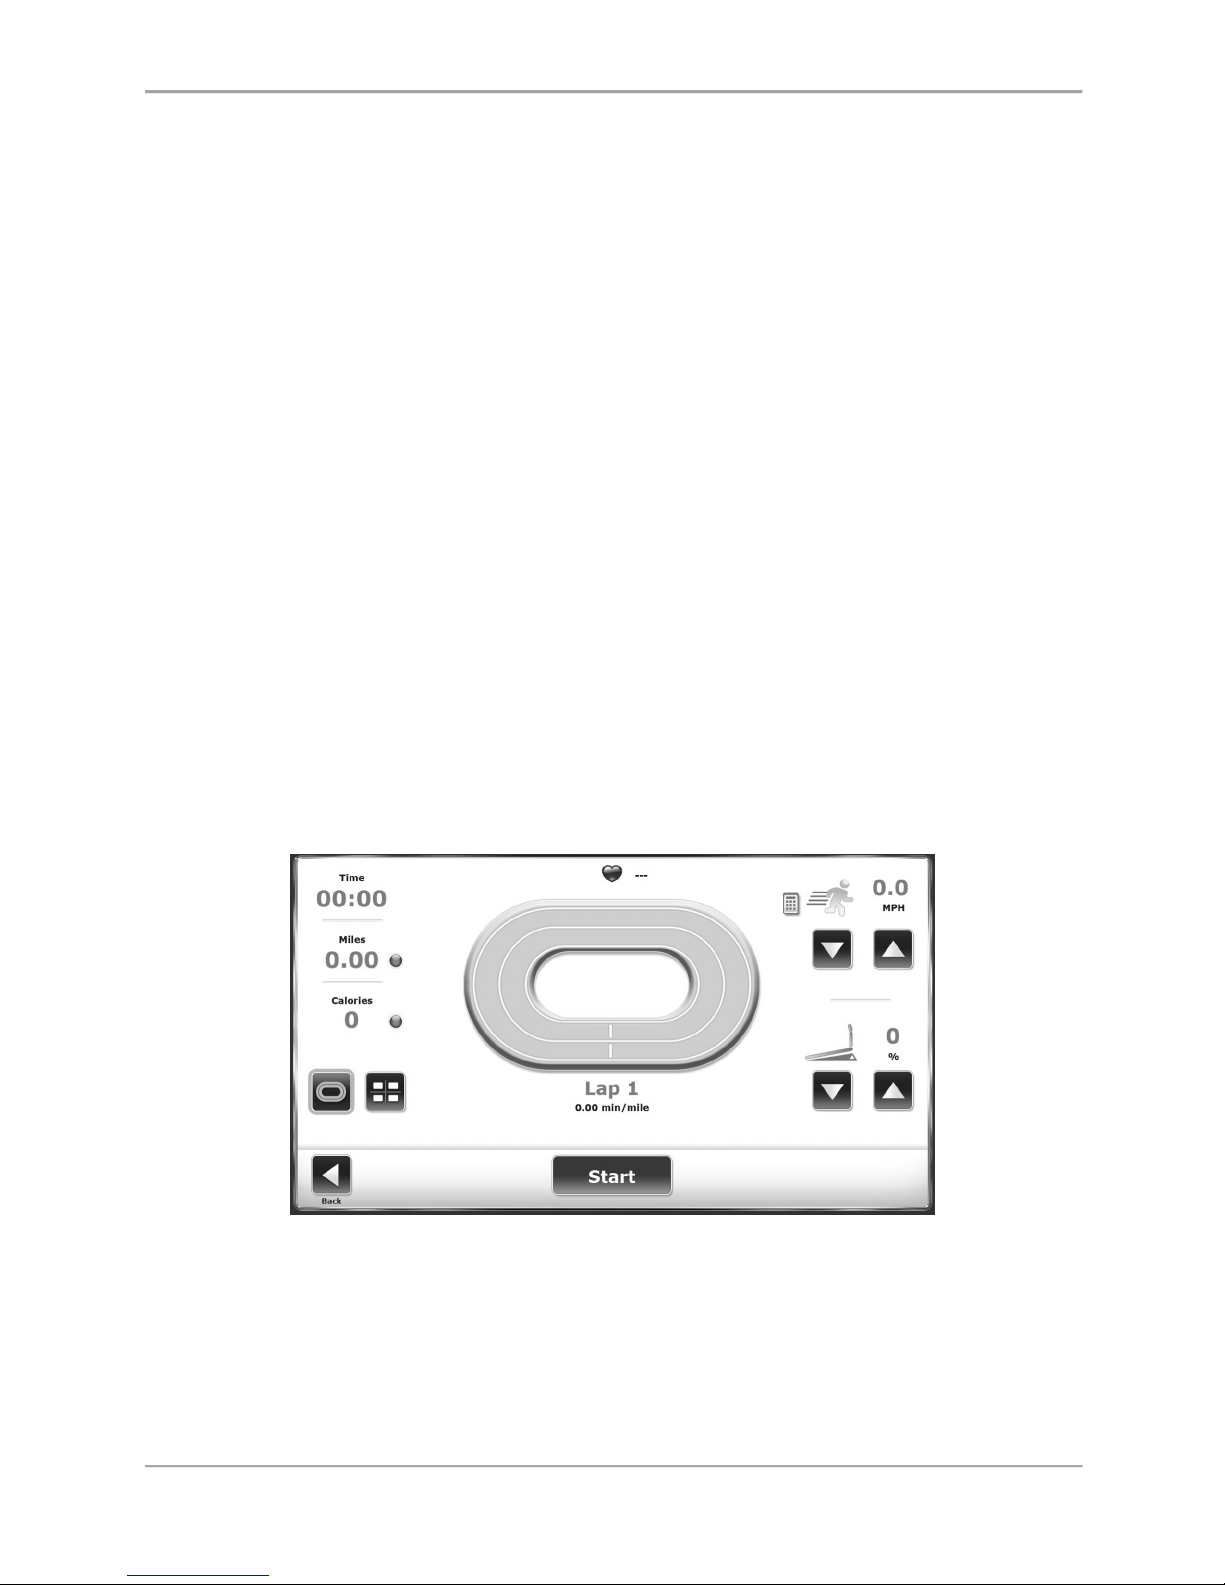
Figure 6.3. The Manual Start Setup Options screen allows entry of patient-specific
information and parameters.
Manual Treadmill Operation
Manual treadmill operation is easy. Like the Quick Start function, Manual Start allows the user
to begin exercising quickly. Rather than using default settings, however, this mode of
operation prompts the clinician to enter the patient’s body weight, select the treadbelt
direction, and enter values for Time, Distance, and Calories. During the exercise, the user can
choose between Exercise Track or Numeric displays.
Manual Operation Procedure
NOTE: For all screens, <Next> advances to the next screen, <Back> returns the user to the
previous screen.
1. At the treadmill Opening Menu select <Manual Start>. The Setup Options screen is
displayed.
Page 50
50 Biodex Medical Systems, Inc. © 2017
2. At the Setup Options screen, touch the appropriate icons to enter information and select
treadbelt direction. In addition to the <▲> and <▼> arrows, a pop-up keypad can be
used to enter values for Distance, Calories, and Body Weight. Once the desired
information is entered/selected, touch <Next> to advance to the Exercise Track display.
3. Touch the Display icons at the lower left of the screen to toggle between the Exercise
Track display and a Numeric display.
4. With the Exercise Track or Numeric Display on the screen, touch the yellow dot next to
any heading or icon to change the value. To toggle between value settings (i.e., miles /
KM), touch the displayed parameter.
5. When all parameters are entered/selected, press <Start> on the display to activate the
tread-treadbelt and begin the exercise session. The treadbelt will ramp up to .1 mph.
6. Use the <▲> and <▼> arrows on the Exercise Track or Numeric Display to adjust the
speed setting to the desired value. Both speed and elevation can be adjusted at any
time during the exercise session.
7. Touch <Pause> to pause the exercise session at any time. Press <Resume> to resume
the exercise session.
8. Touch <End> to end the exercise session at any time.
Manual Mode Exercise Track and Numeric Display Parameters
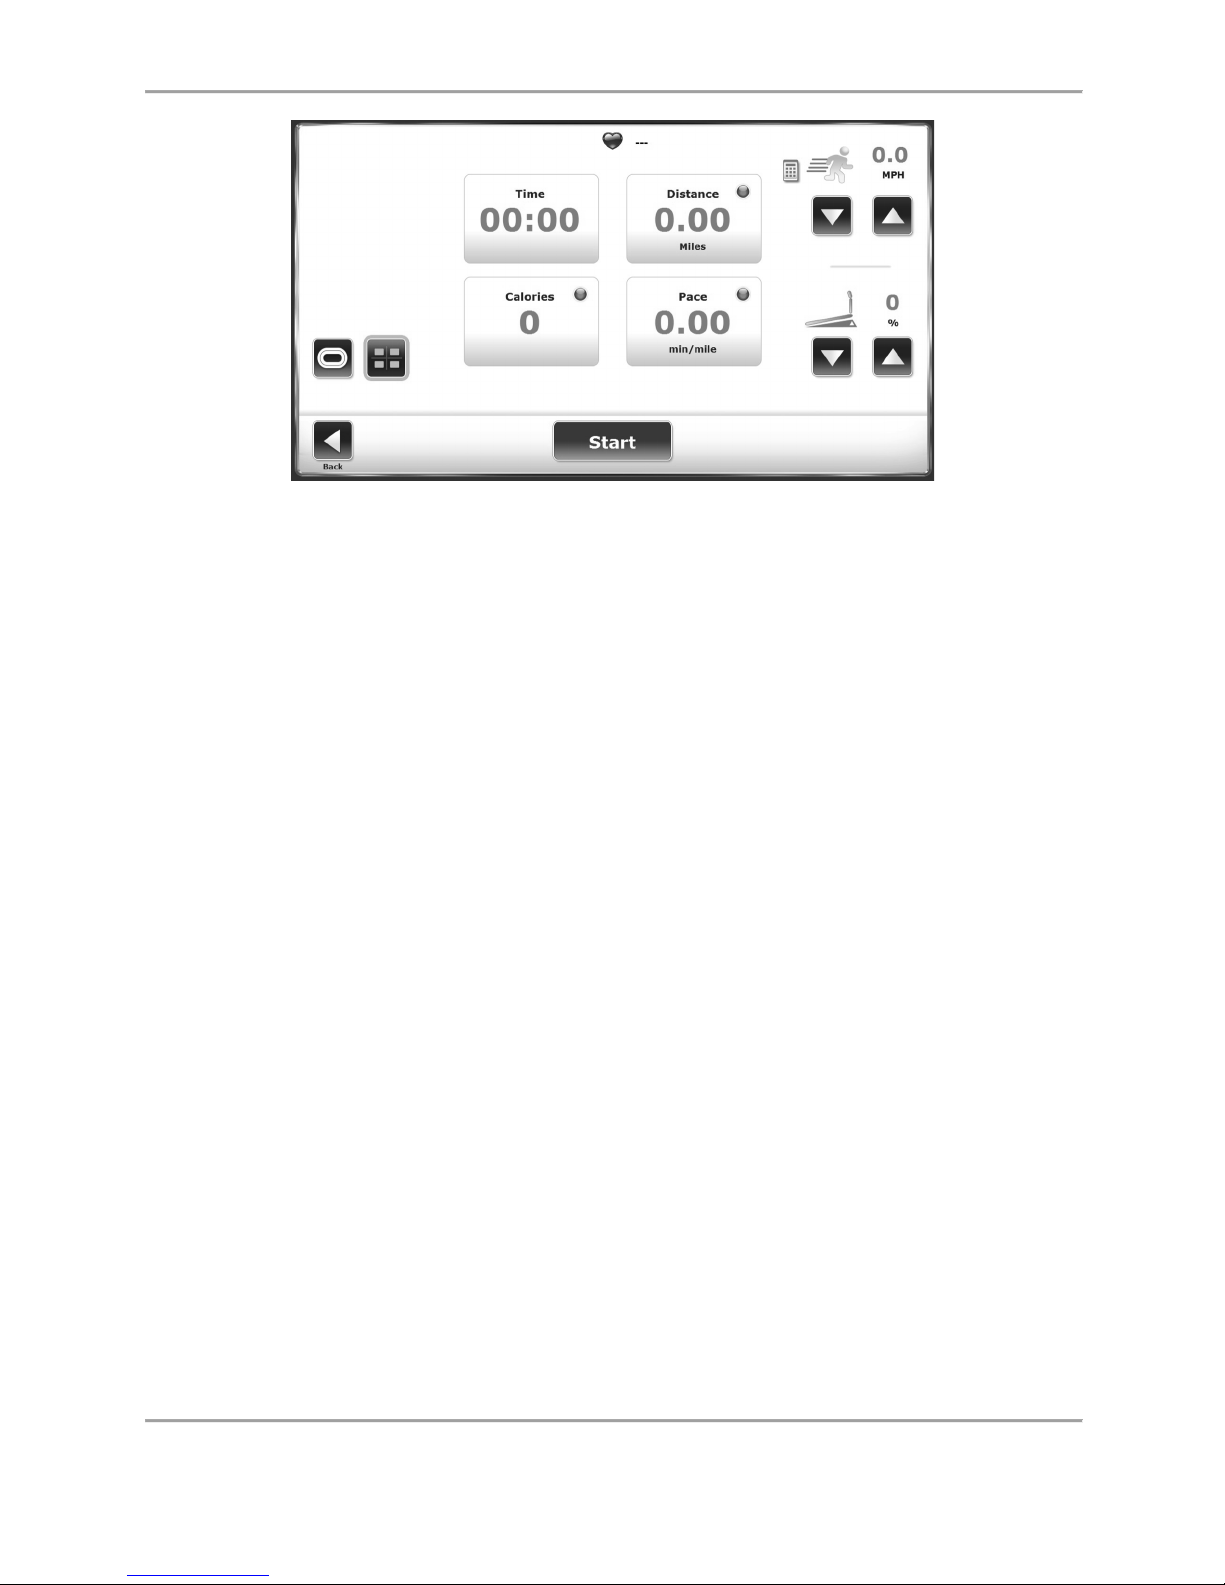
The same parameters are displayed on both the Exercise Track and Numeric displays. A brief
explanation of these parameters can be found in the previous (Quick Start) section.
Figure 6.4. The Exercise Track display.
Page 51
GAIT TRAINER 3 (v3.X SOFTWARE) 51
Figure 6.5. The Numeric display.
Page 52

52 Biodex Medical Systems, Inc. © 2017
7. Treadmill Profiles
The Biodex Gait Trainer treadmill mode features five pre-loaded exercise profiles and the ability
to create and select up to 12 custom exercise profiles. These programs allow the clinician to
select pre-determined exercise format routines. Exercise profiles are divided into as many as
ten segments each. Users can select any of the pre-defined exercise profiles, review or edit any
exercise profile, or delete an existing exercise profile.
The pre-defined exercise profiles include:
● Anaerobic
● Aerobic
● Pyramiding
● Surge
● Random
Selecting a Pre-Defined Exercise Profile
To select a pre-defined exercise profile:
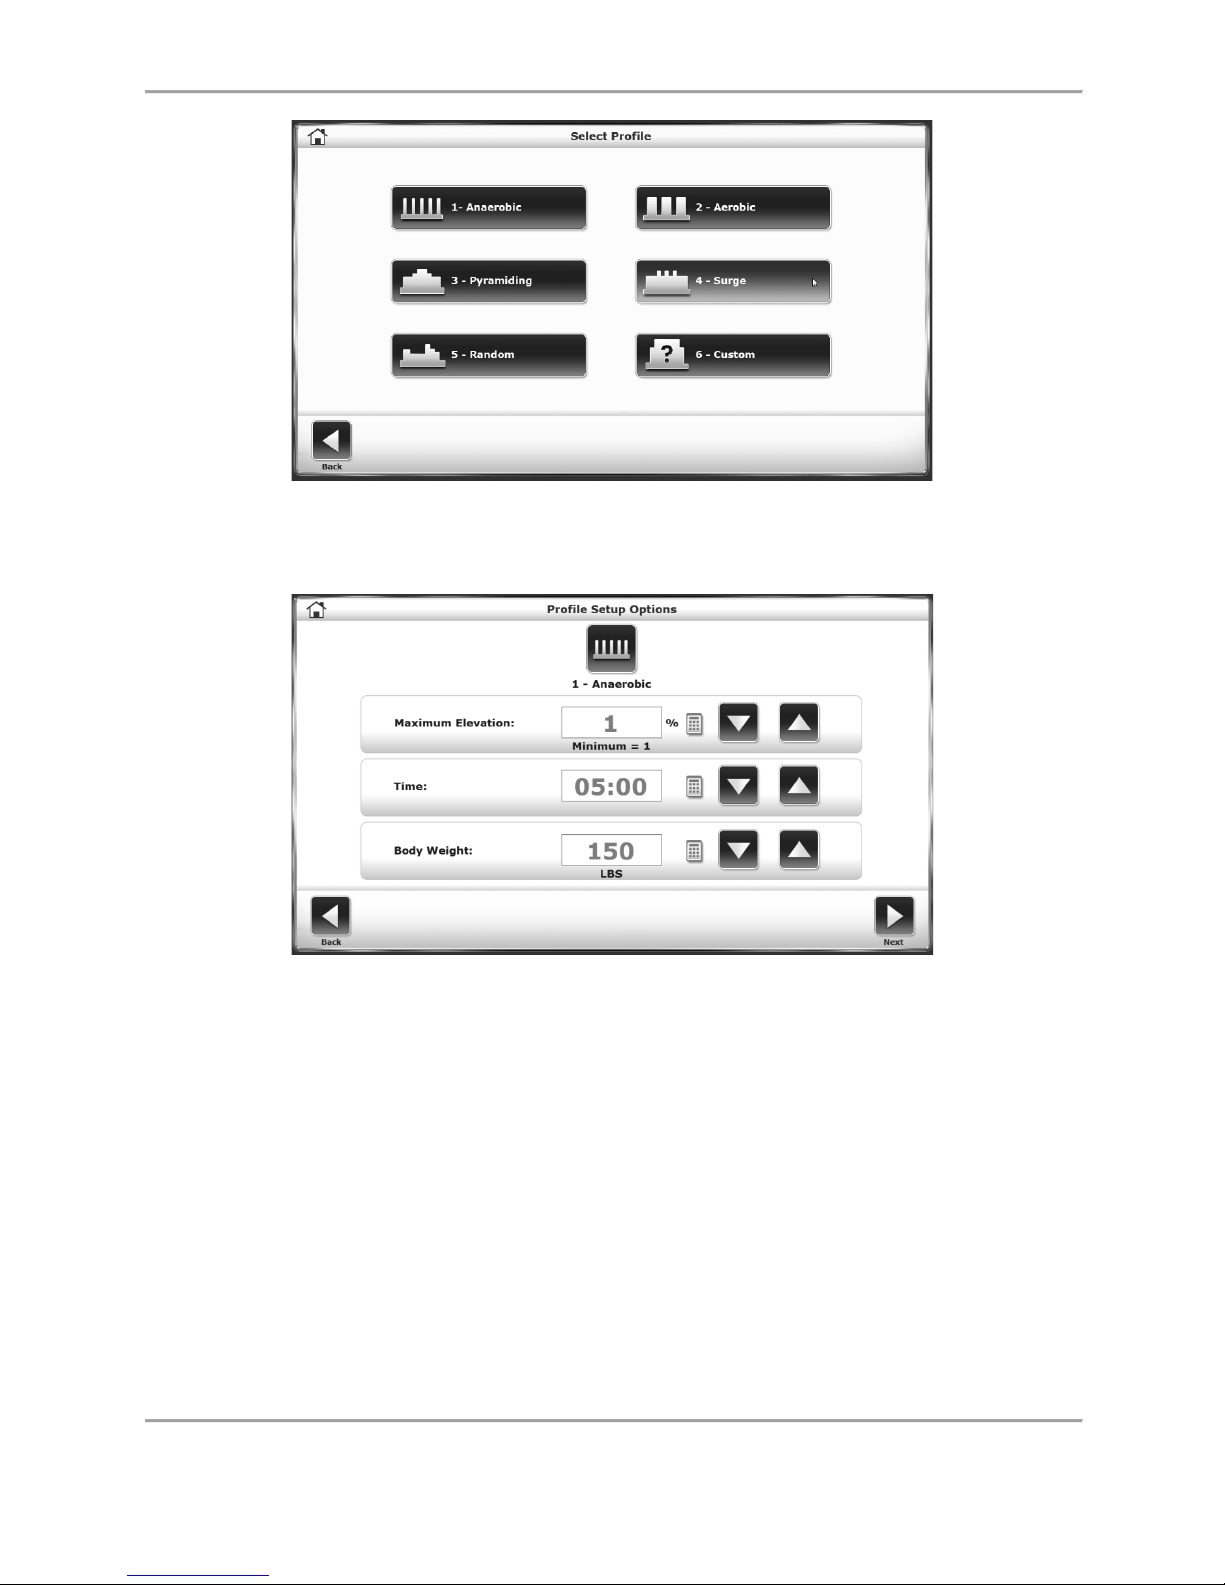
1. At the treadmill Opening Menu, touch <Profile>. The Select Profile screen is displayed.
2. Touch to select the desired pre-defined exercise profile. The Profile Setup Options
screen is displayed.
3. At the Profile Setup Options screen, enter the Time duration, user’s Body Weight, and
the Maximum Elevation for the exercise profile. Touch <Next> to advance to the Profile
Exercise screen.
4. At the Profile Exercise screen, push <Start> on the display to activate the treadbelt and
begin the exercise session. The treadbelt will automatically ramp up to the speed
required by the first segment of the desired protocol. The treadmill will also
automatically rise or lower to the required elevation.
5. The treadmill will automatically beep to signal the end of each profile segment and
proceed to match the required speed and elevation for the next segment. If necessary,
the <▲> and <▼> arrows on the Exercise Track or Numeric Display can be used to
adjust the speed and elevation setting at any time.
6. Touch <Pause> to pause the exercise session at any time. Press <Resume> to resume
the exercise session.
7. Touch <End> to end the exercise session at any time.
Page 53
GAIT TRAINER 3 (v3.X SOFTWARE) 53
Figure 7.1. The Select Profile screen allows the user to choose from five pre-defined
profiles.
Figure 7.2. At the Profile Setup Options screen, users can enter values for time, body
weight and maximum elevation.
Page 54
54 Biodex Medical Systems, Inc. © 2017
Profile Mode Exercise Track and Numeric Display Parameters
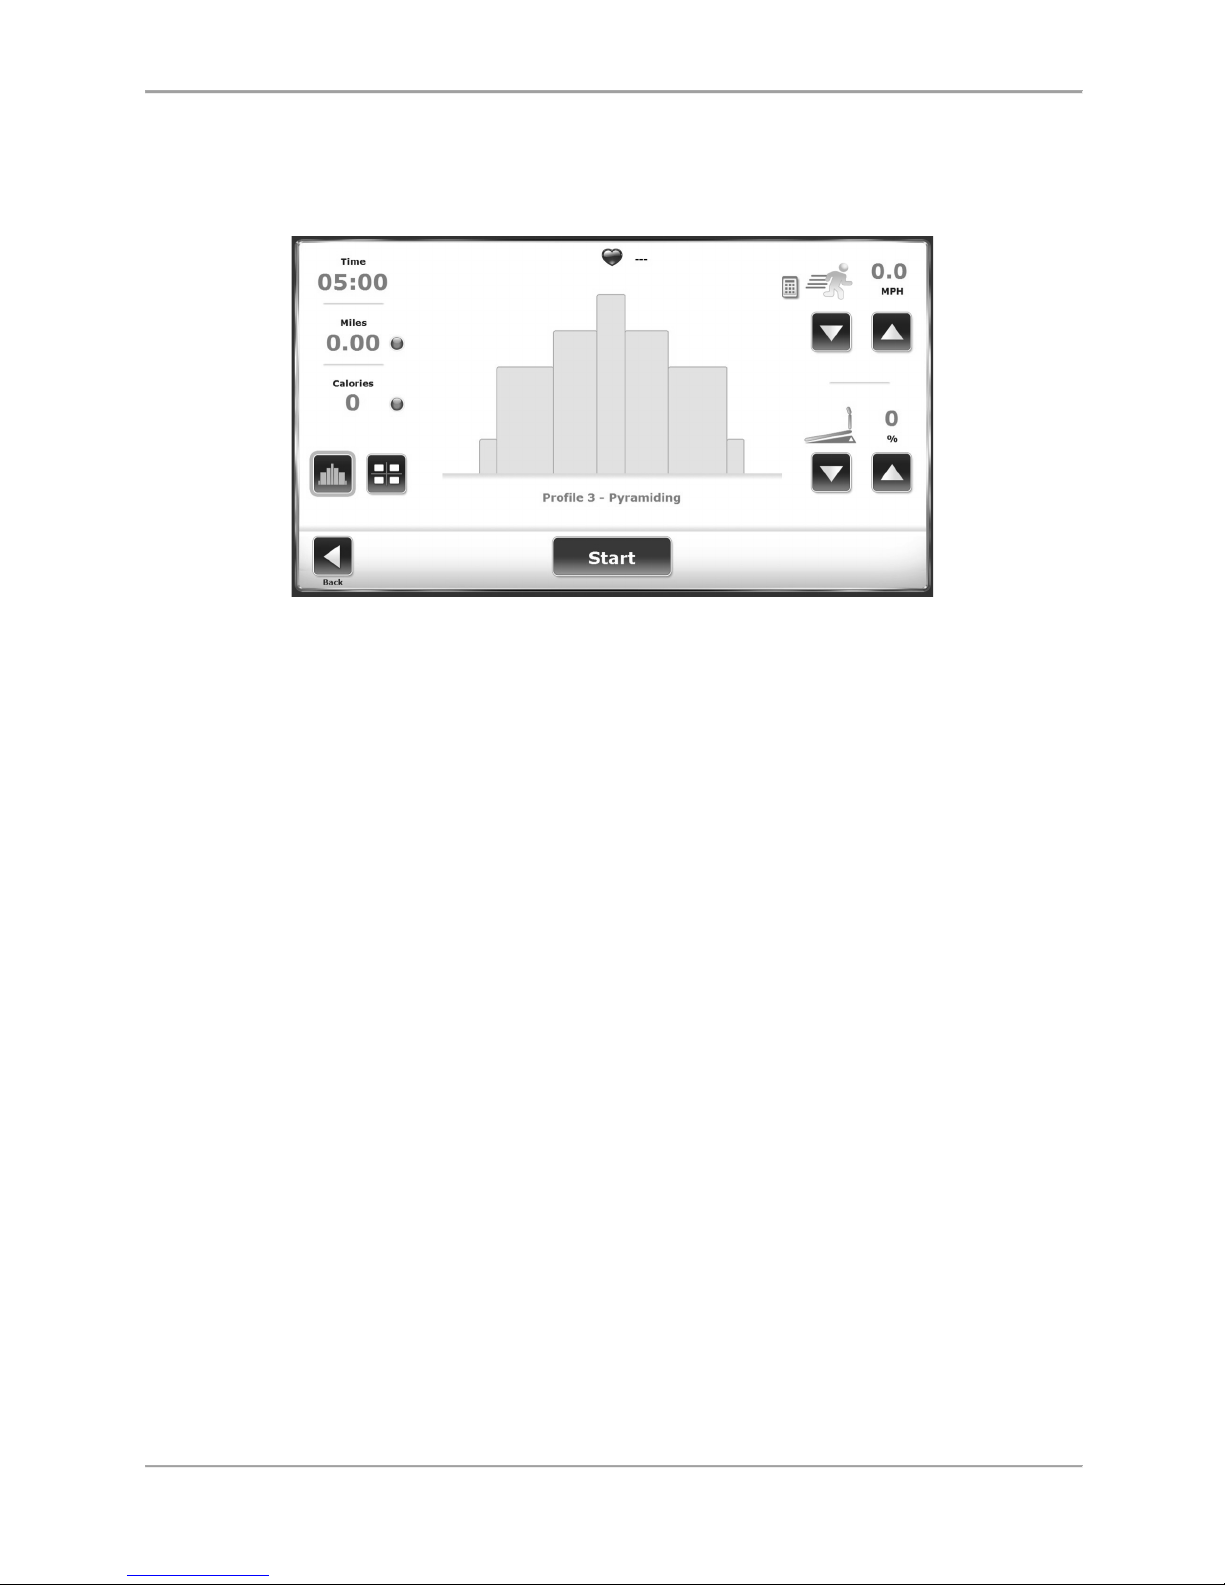
The same parameters are displayed on both the Exercise Track and Numeric displays. A brief
explanation of these parameters can be found in the Quick Start section.
Figure 7.3. Ready to begin an exercise session with Profile 3, Pyramiding, selected.
Designing a Custom Exercise Profile
To design a custom exercise profile:
1. At the treadmill Opening Menu, touch <Profile>. The Select Profile Menu is displayed.
2. Touch option six, <Custom>. The Custom Profiles screen is displayed.
3. Touch the <Empty> (1-12) icon of the profile to be designed. Touch <Edit Profile> at the
bottom of the screen. The Editing Profile screen is displayed.
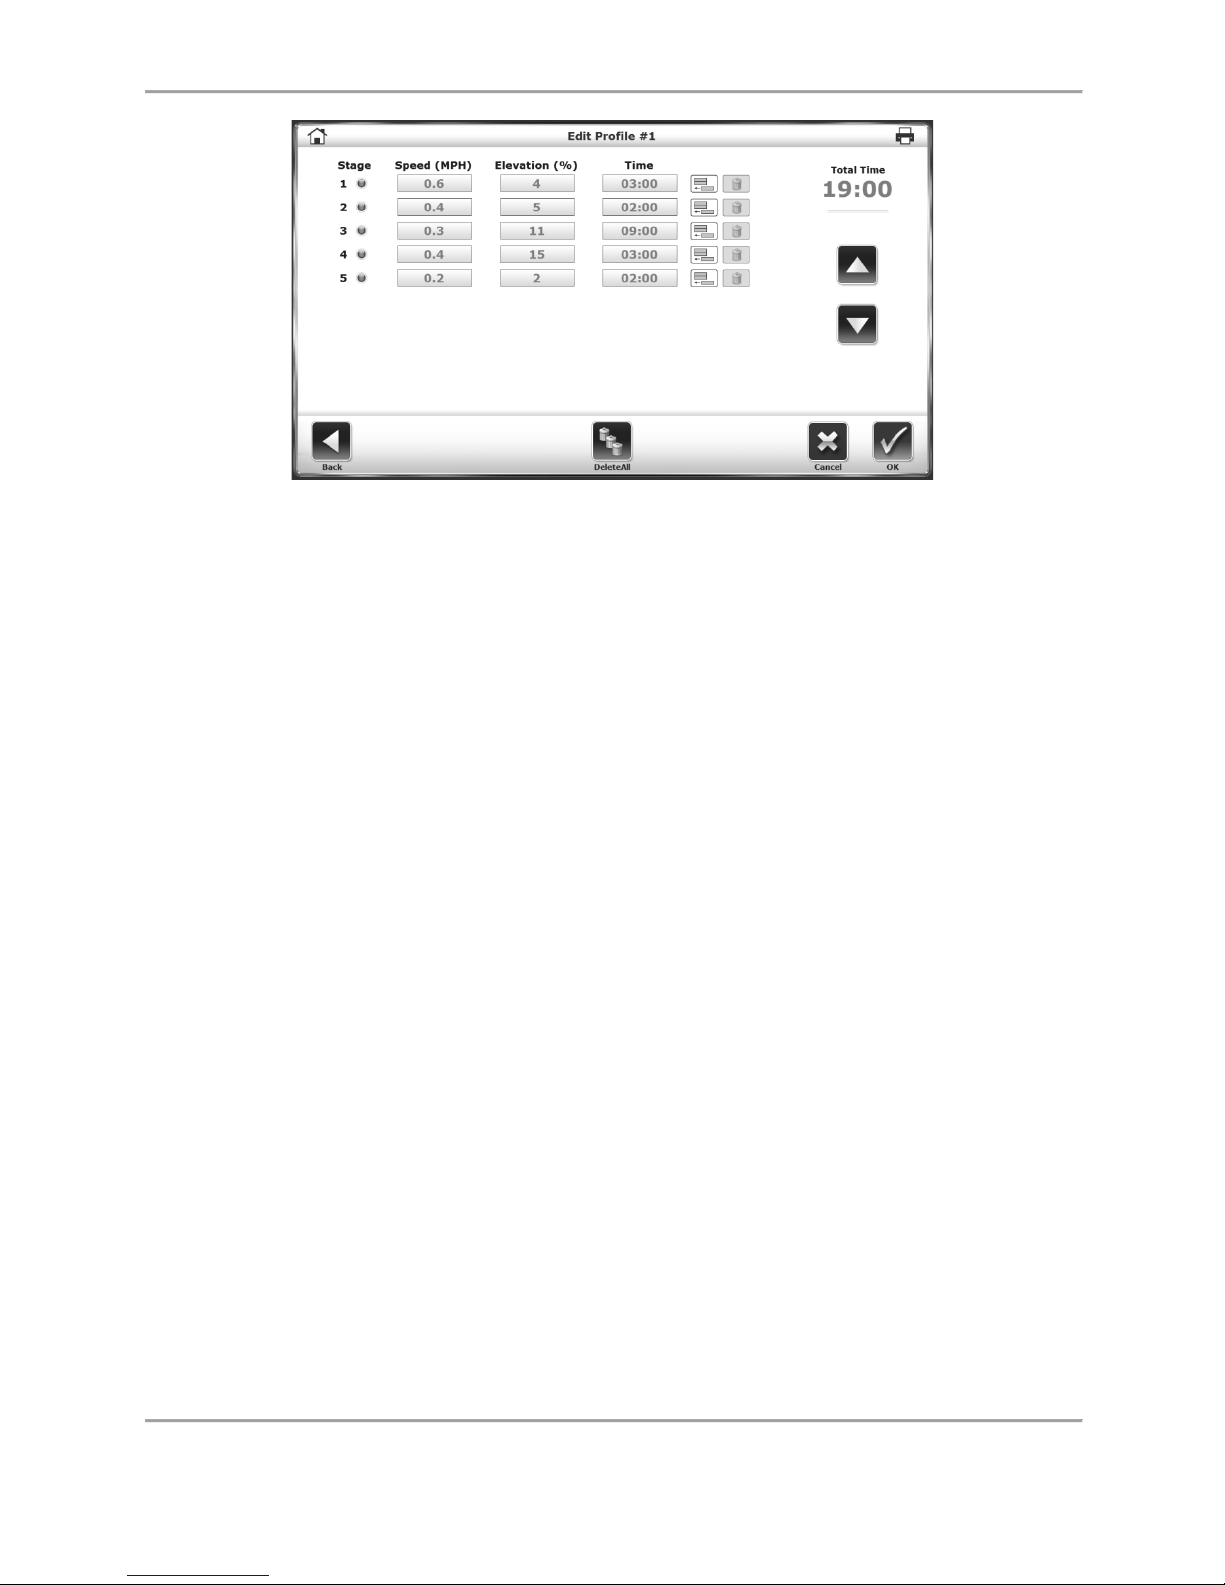
4. Each exercise profile can be divided into as many as ten separate stages. Enter the
speed, elevation, and time duration for each stage. To add stages, touch the “add row
below” icon to the right of the Time field. If it is necessary to clear a stage, touch the
recycling can on that row. If it is necessary to clear all of the stages, touch <Delete All>.
Touch <OK> to return to the Custom Profile menu.
5. At this point, the user can select any of the custom profiles designed. The Custom
Profile Setup Options screen is displayed. Proceed as if using a pre-defined profile.
Page 55
GAIT TRAINER 3 (v3.X SOFTWARE) 55
Figure 7.4. At the Editing Profile screen, clinicians enter values for speed, elevation
and time for each of up to ten stages for any profile.
Page 56
56 Biodex Medical Systems, Inc. © 2017
8. Gait Trainer Utilities
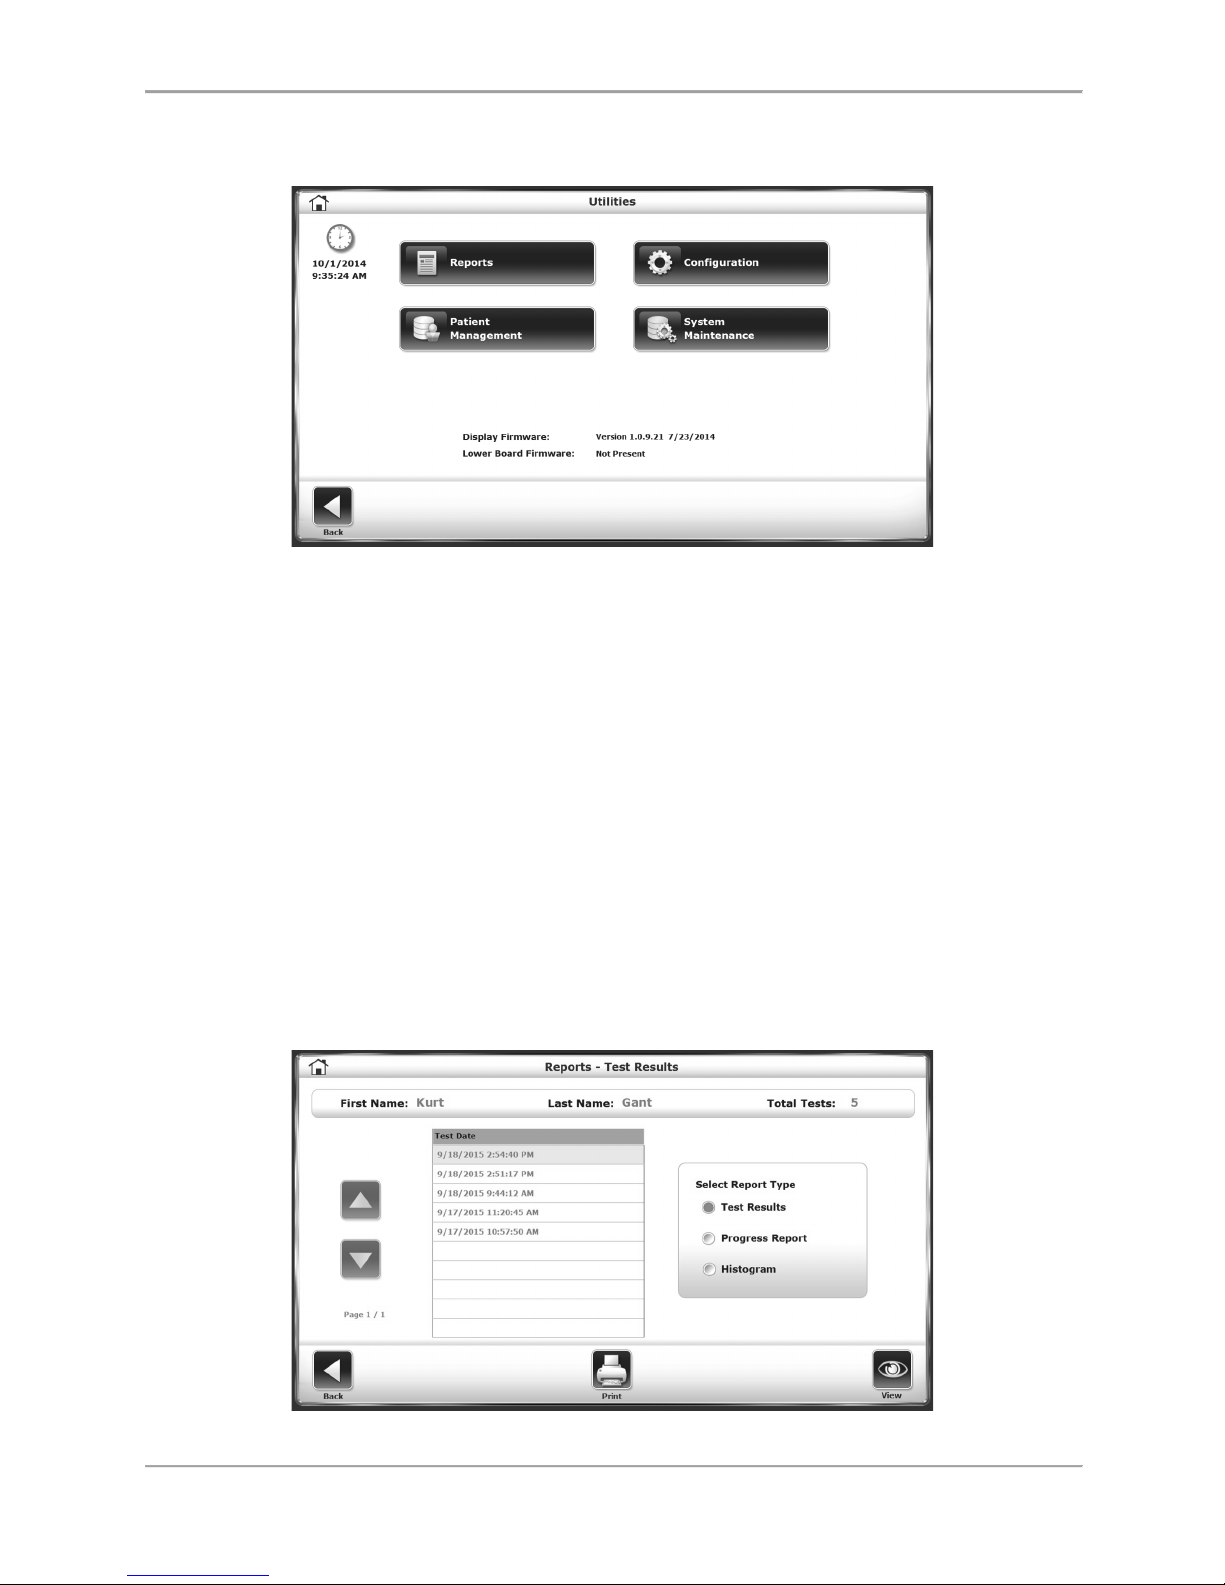
Figure 8.1. The Utilities Menu allows access to the Reports, Configuration, Patient
Management, and System Maintenance screens. The Advanced System
Maintenance screen, not displayed, is also accessed through the Utilities
menu.
To access the Utilities menu, touch <Utilities> on the Main screen. The Utilities Menu allows
users to access the Configuration, Patient Management, Reports, System Maintenance, and
Advanced System Maintenance (not displayed) screens.
NOTE: The Advanced System Maintenance is an icon that is normally hidden; instructions on
accessing it will be discussed later in this section.
The Utilities menu also displays technical information about the Gait Trainer firmware version.
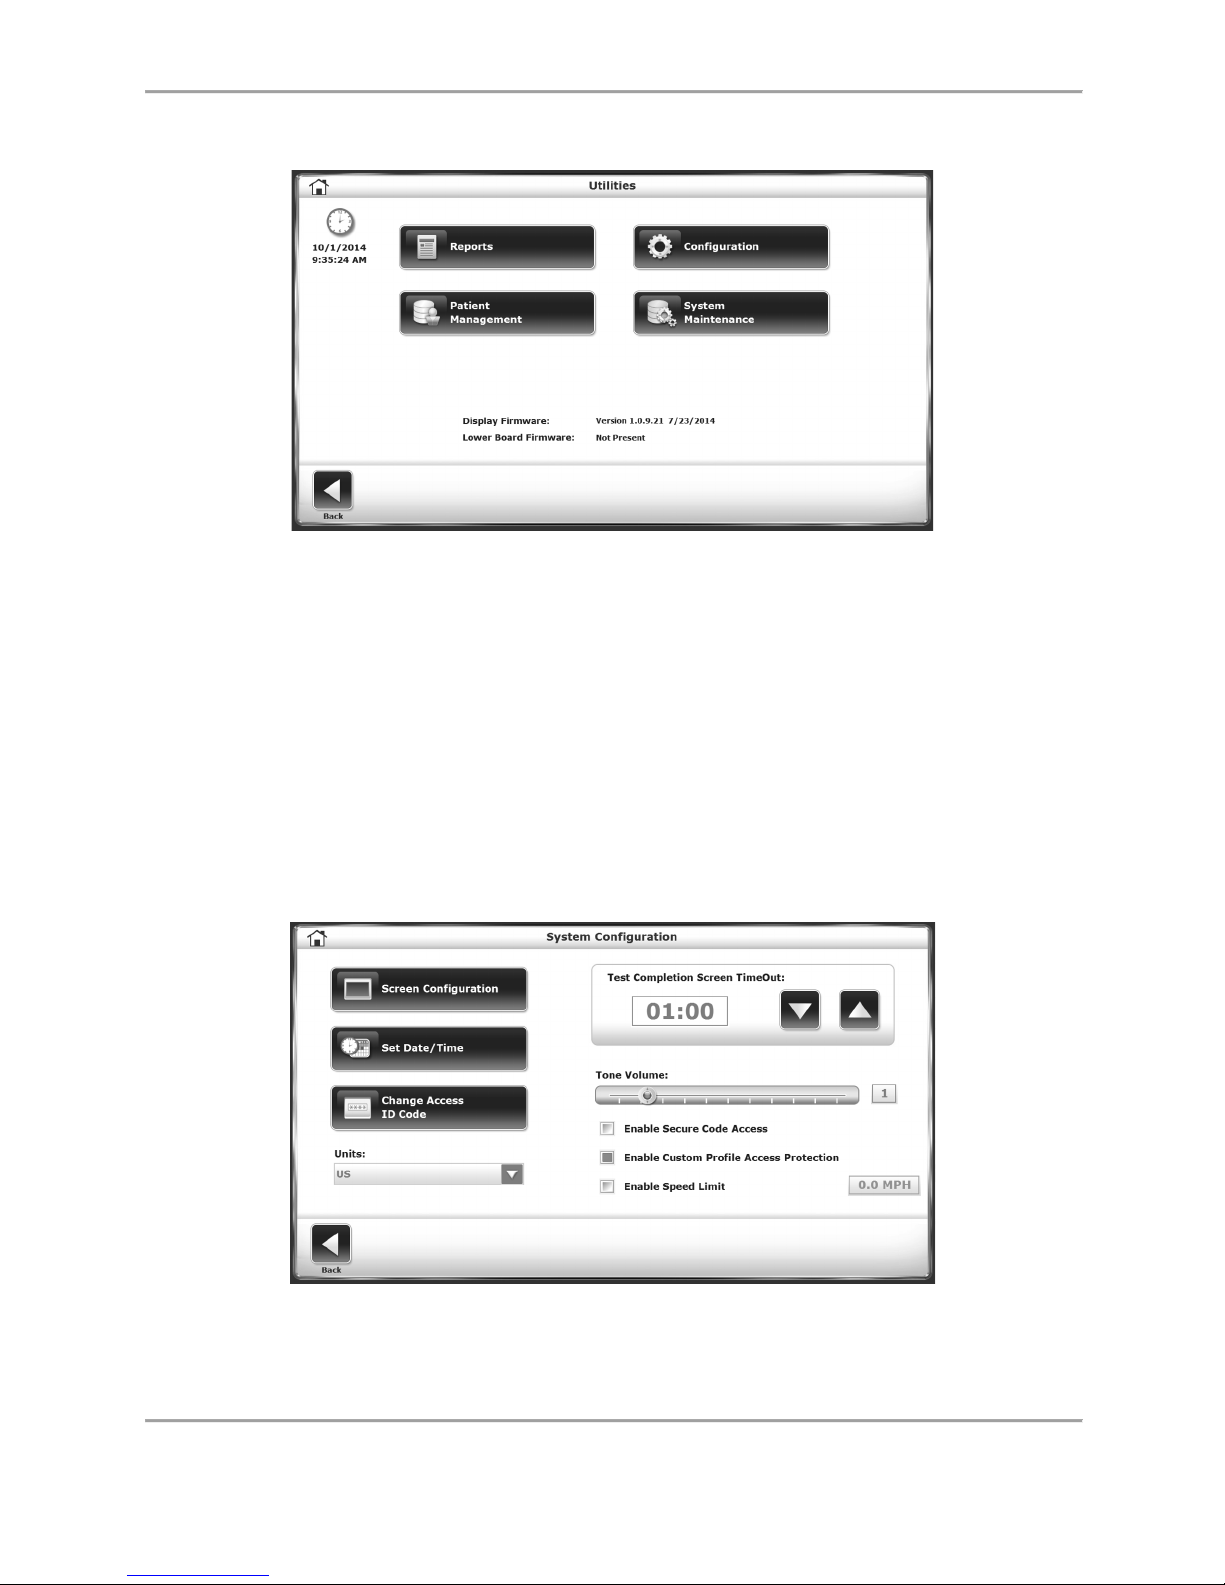
Reports
The Reports function is another way to navigate to the Test Results screens detailed in the
Patient Management section, the main difference being that you cannot edit Codes/Comments
or G-Code data in Reports section screens.
Figure 8.2. Reports – Test Results screen.
Page 57
GAIT TRAINER 3 (v3.X SOFTWARE) 57
Configuration
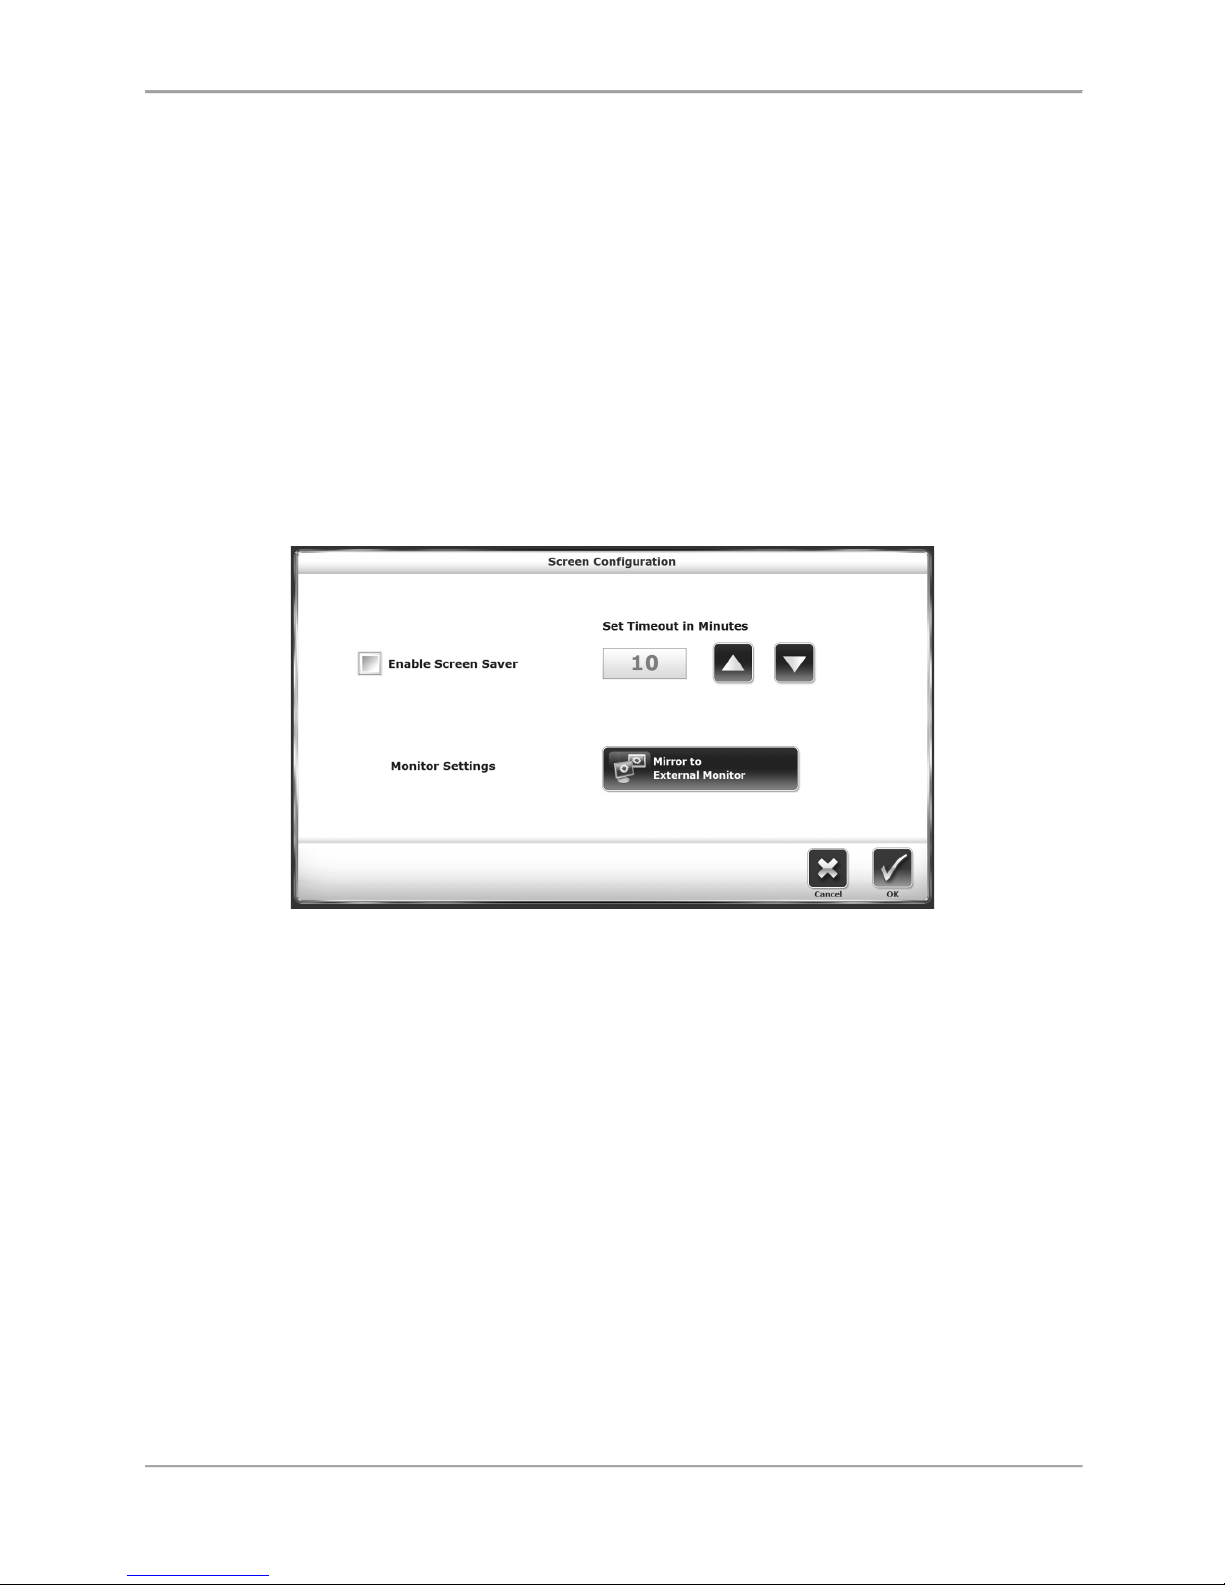
Figure 8.3. Configuration – Utilities Screen
To advance to the Configuration screen from the Utilities Menu, touch <Configuration>. There
will be a submenu featuring two icons; one for System Configuration and one for Gait Trainer
Configuration. For either option, the user must enter 159 at the “Access ID Code” prompt and
touch <OK>.
System Configuration
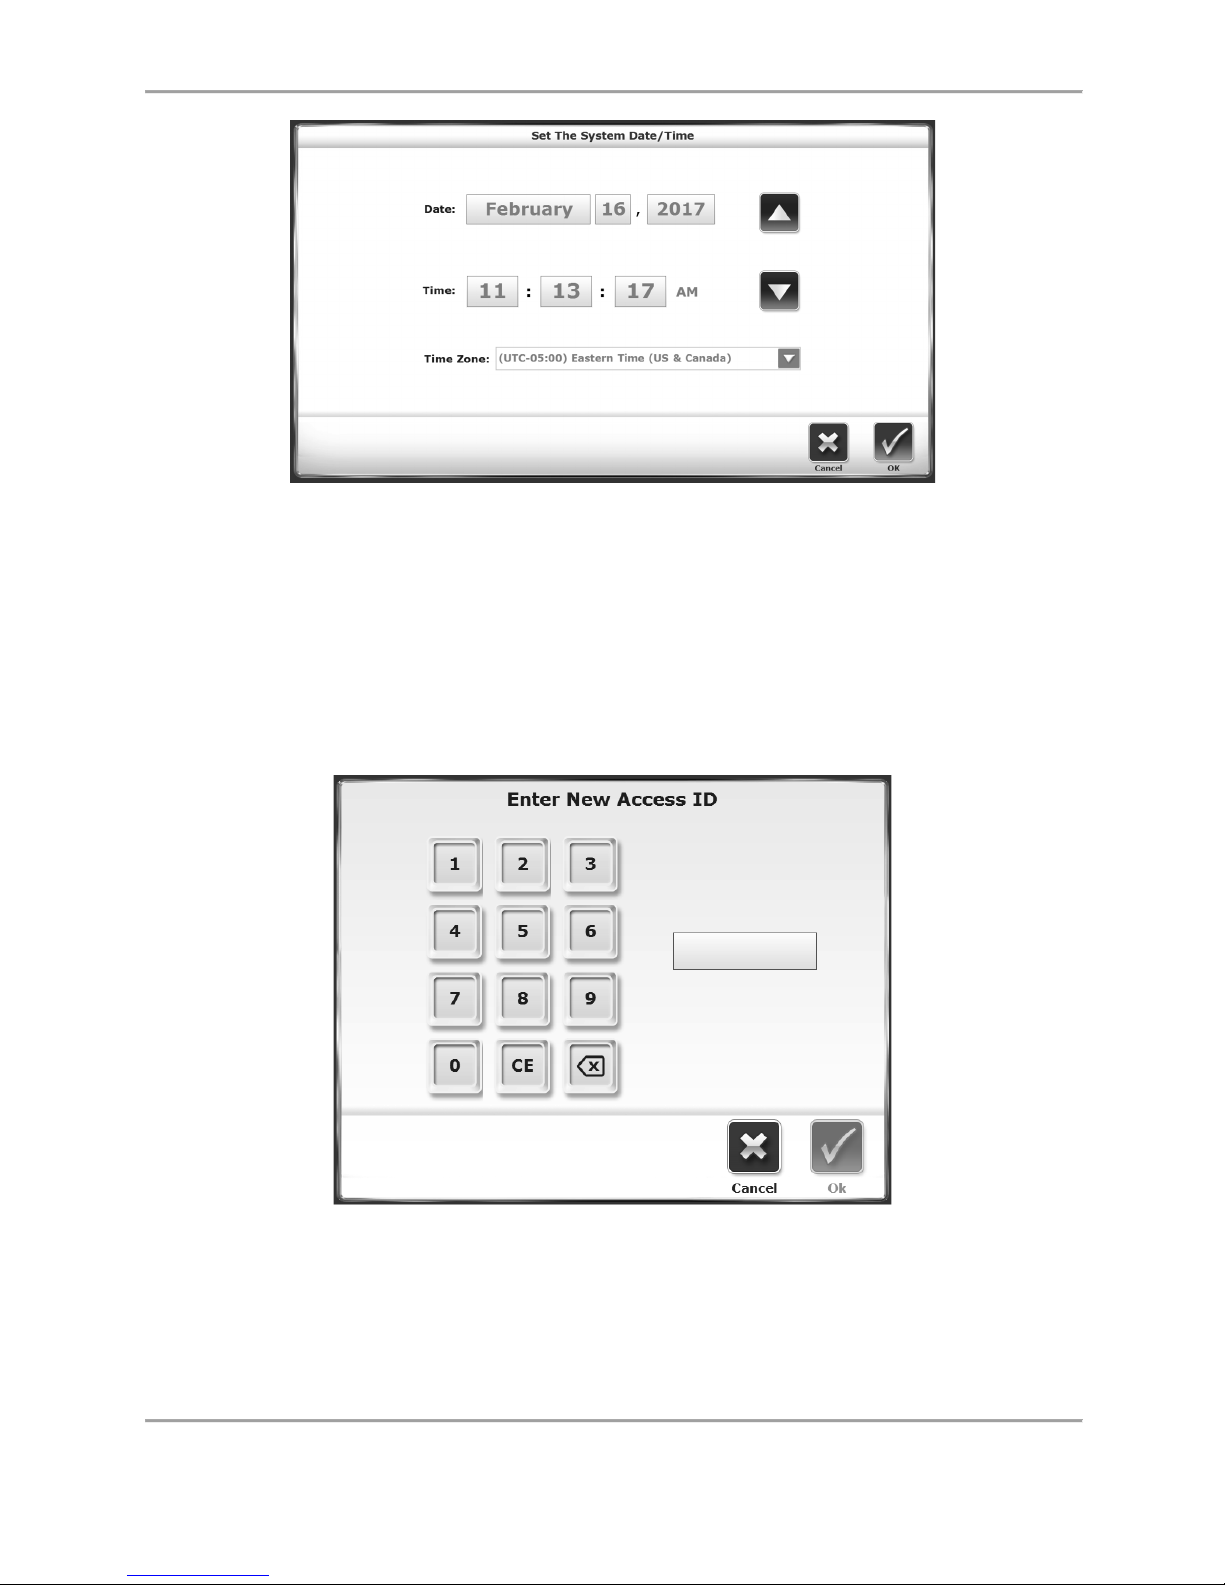
The System Configuration screen allows the user to choose between various display options
and to set specific parameters for a variety of treadmill functions.
Following is a description of Configuration screen options. Once all parameters and values are
set, touch <Back> to exit and return to the Utilities Menu. Touch <Back> a second time to
return to the Main Menu.
Figure 8.4. System Configuration Screen.
Page 58
58 Biodex Medical Systems, Inc. © 2017
System Configuration Screen Parameters
Test Completion Screen TimeOut: This setting determines how long the Test Results screen will
be displayed before the screen saver activates following completion of the exercise session.
The default is “OFF” but the range can be adjusted from 0:15 seconds to 60:00 minutes. Touch
the <▲> and <▼> icons to increase or decrease the value.
Screen Configuration: The Screen Saver setting determines how long the display screen remains
ON when the system is no longer in use. Once the selected time expires, the screen fades to
black even if the Gait Trainer remains ON. To enable the Screen Saver function, touch the radio
box next to <Enable Screen Saver> causing it to turn green. Use the <▲> and <▼> icons to
increase or decrease the value displayed in 1 minute increments. The “time out” range is from
00:00 to 50:00. To enable a mirror image of the display on an external monitor, touch <Mirror
to External Monitor> (An external monitor must already be connected to the VGA port on the
bottom of the display.) Touch <OK> to confirm the changes and return to the Configuration
screen. Touch <Cancel> to return to the Configuration screen without making any changes.
Figure 8.5. Screen Configuration Screen
Set Date/Time: Touch <Set Date/Time> to change the system time, date, or time zone. Touch
the button to highlight the value to change and use the <▲> and <▼> icons to increase or
decrease the value as desired. To change the Time Zone, touch the drop-down menu once and
scroll through the list to make a selection. Touch <OK> to save the changes and return to the
Configuration screen.
Page 59
GAIT TRAINER 3 (v3.X SOFTWARE) 59
Figure 8.6. Set the System Date/Time Screen
Tone Volume: Touch any section of the horizontal bar to select a new tone volume setting.
Selecting low numbers along the bar will result in lower volume while selecting high numbers
makes the louder. Tone volume settings range from 0 to 10.
Change Access ID Code: Users can change the default Access Code (159) used to access secure
settings in the device software. To change the access ID code, select a new Access ID Code by
pressing this button and entering the value using the <▲ > and <▼> arrows or the numeric
buttons on the key pad. Press <OK> to save the New Access ID Code and return to the System
Configuration screen.
Figure 8.7. Enter New Access ID Screen
Units: (see Figure 8.4.) Treadbelt speed can be measured in either US (MPH) or metric (KMH)
units. Touch this menu to toggle between the two.
Enable Secure Code Access: Having this function enabled will require users to input an Access ID
Code before changing certain settings on the device. The default Access ID Code is 159.
Page 60
60 Biodex Medical Systems, Inc. © 2017
Enable Custom Profile Access Protection: Having this function enabled will require users to input
an Access ID Code when they attempt to alter a customized profile that has been created in the
Custom Profiles section of the Treadmill mode.
Enable Speed Limit: The software for the Gait Trainer 3 includes an additional safety setting to
limit treadbelt movement to a predetermined speed during Treadmill Training activities.
Clinicians can determine what speed limit would be most appropriate for the type of patients in
their facilities. To enable the Speed Limit functionality, touch the box once to turn it green. To
change the default Speed Limit from 5 MPH, touch the enabled “5 MPH” window once; a keypad
is displayed for altering the speed limit. Speed limits can be set in either MPH or KMH by
toggling the “Units” function in the bottom left portion of the screen. The device will be
shipped with the Speed Limit functionality disabled.
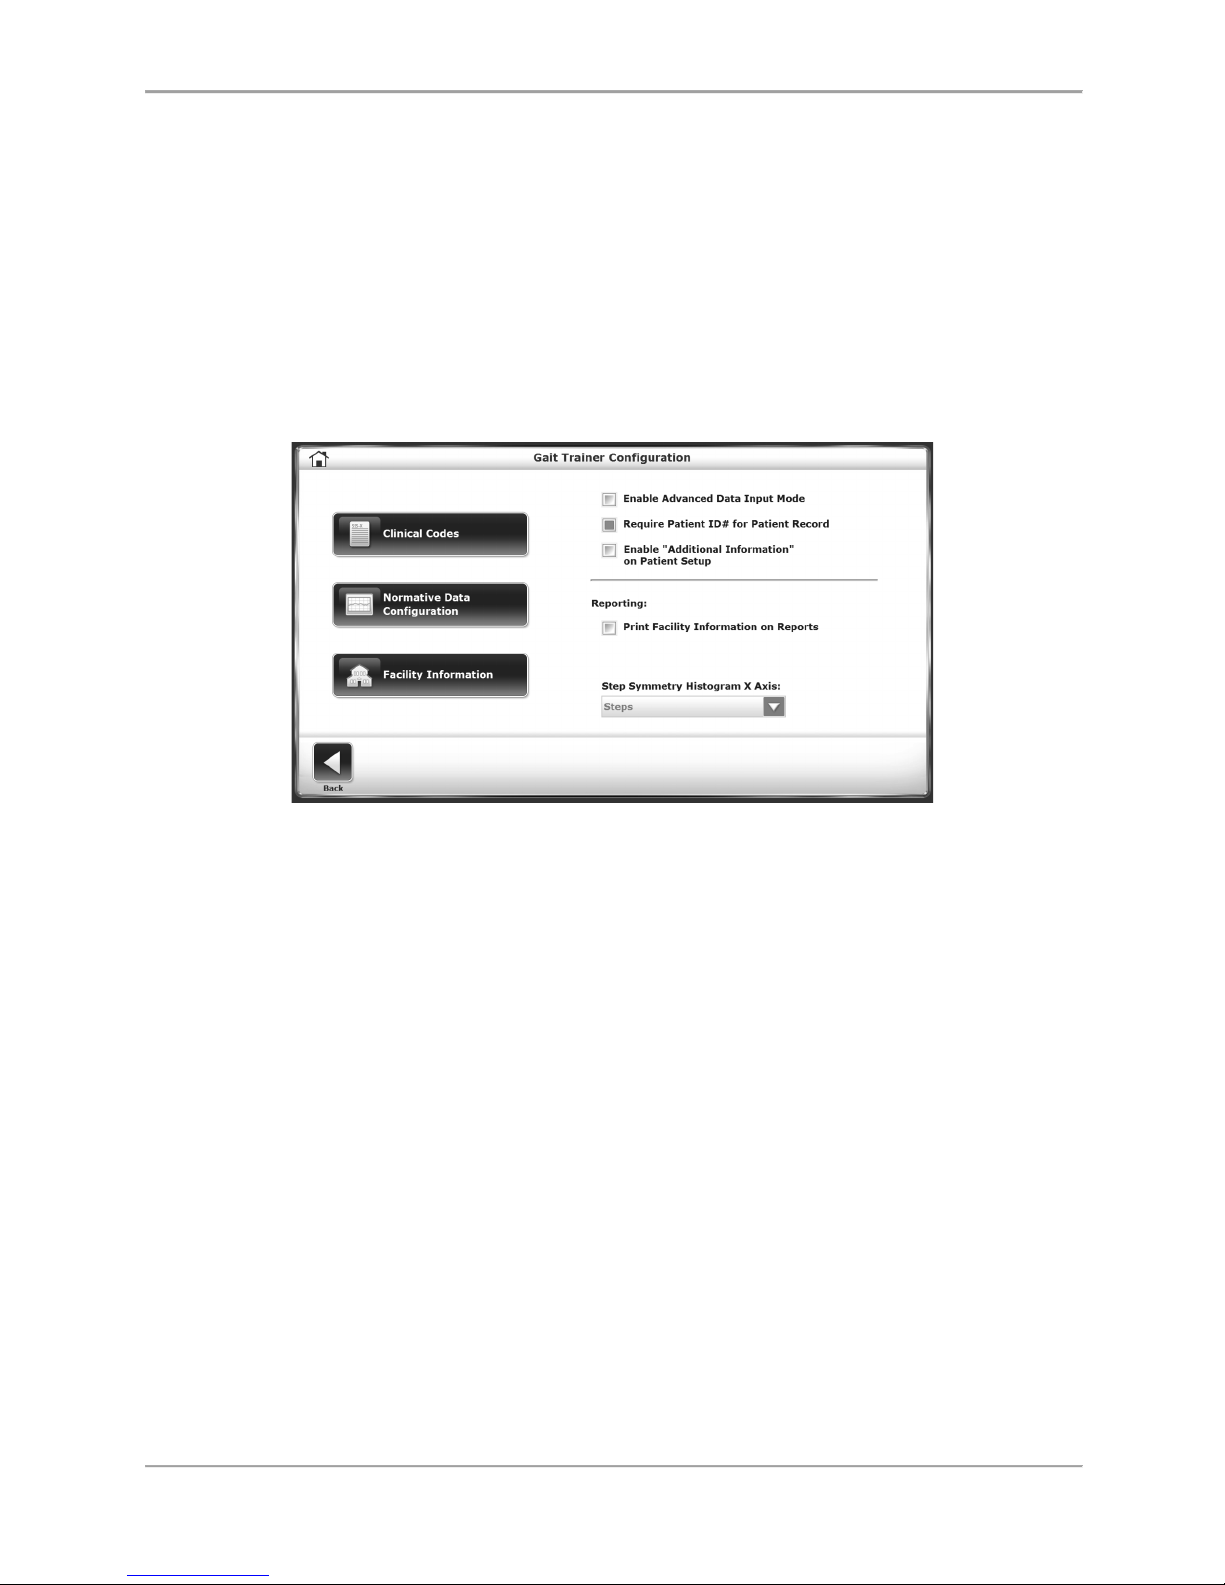
Figure 8.8. Gait Trainer Configuration Screen.
Gait Trainer Configuration
The Gait Trainer Configuration screen allows the user to further configure the Gait Trainer user
settings (e.g., Clinical Codes and Normative Data).
Descriptions of the Gait Trainer Configuration screen options are detailed below. Once all
parameters and values are set, touch <Back> to exit and return to the Configuration submenu.
Touch <Back> a second time to return to the main Utilities menu.
Gait Trainer Configuration Screen Parameters
Clinical Codes: The Clinical Codes screen allows the user to activate the CPT Codes, G-Codes,
and Diagnostic/ICD Codes options on the Patient Set up screen. To enable one or more codes,
touch the boxes to turn them green. A default CPT Code can be set by selecting one of the
rows and touching <Add>.
Page 61
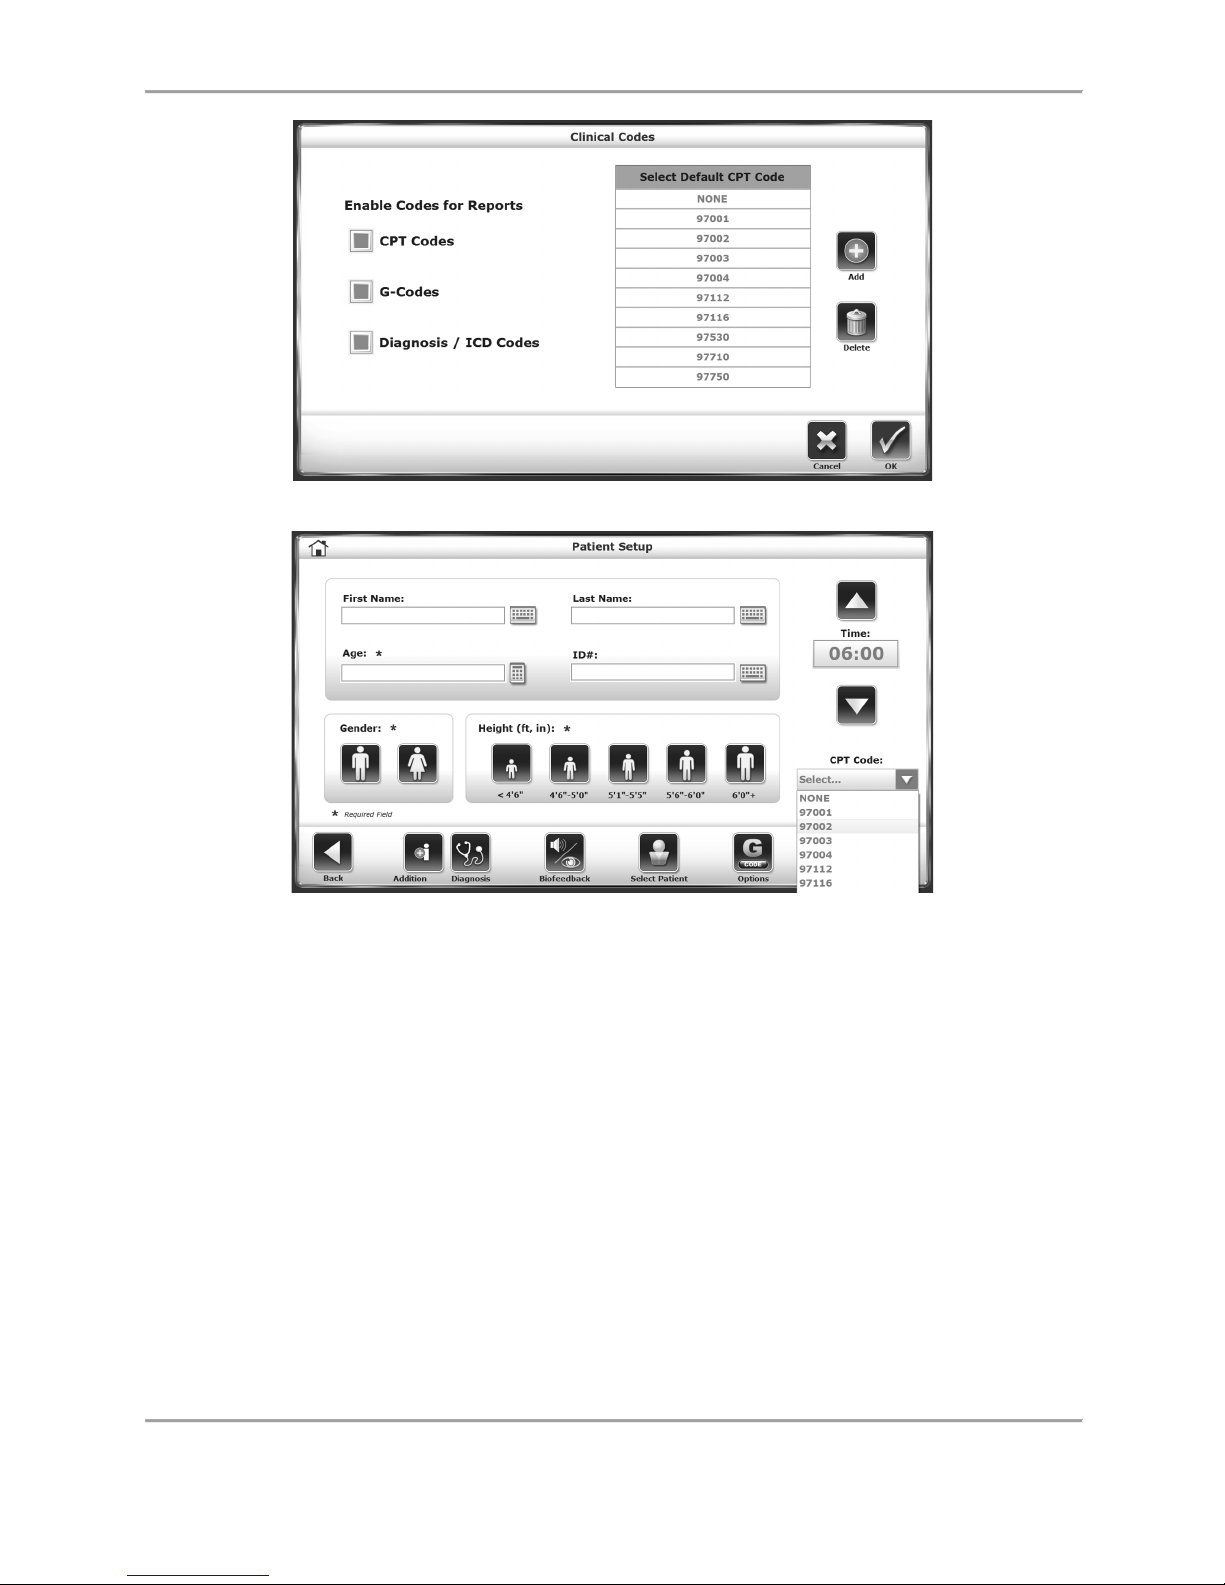
GAIT TRAINER 3 (v3.X SOFTWARE) 61
Figure 8.9. Clinical Codes Screen.
Figure 8.10. Patient Setup screen with Clinical Codes (CPT) option activated.
Normative Data Configuration: Normative data can be specified to each facility’s needs. Select
a particular row of demographic information and touch the pencil icon beside the row to edit
the norms for performance in the settings at the bottom of the screen. Selecting the <Restore
Defaults> icon returns the normative data back to the factory setting.
Page 62
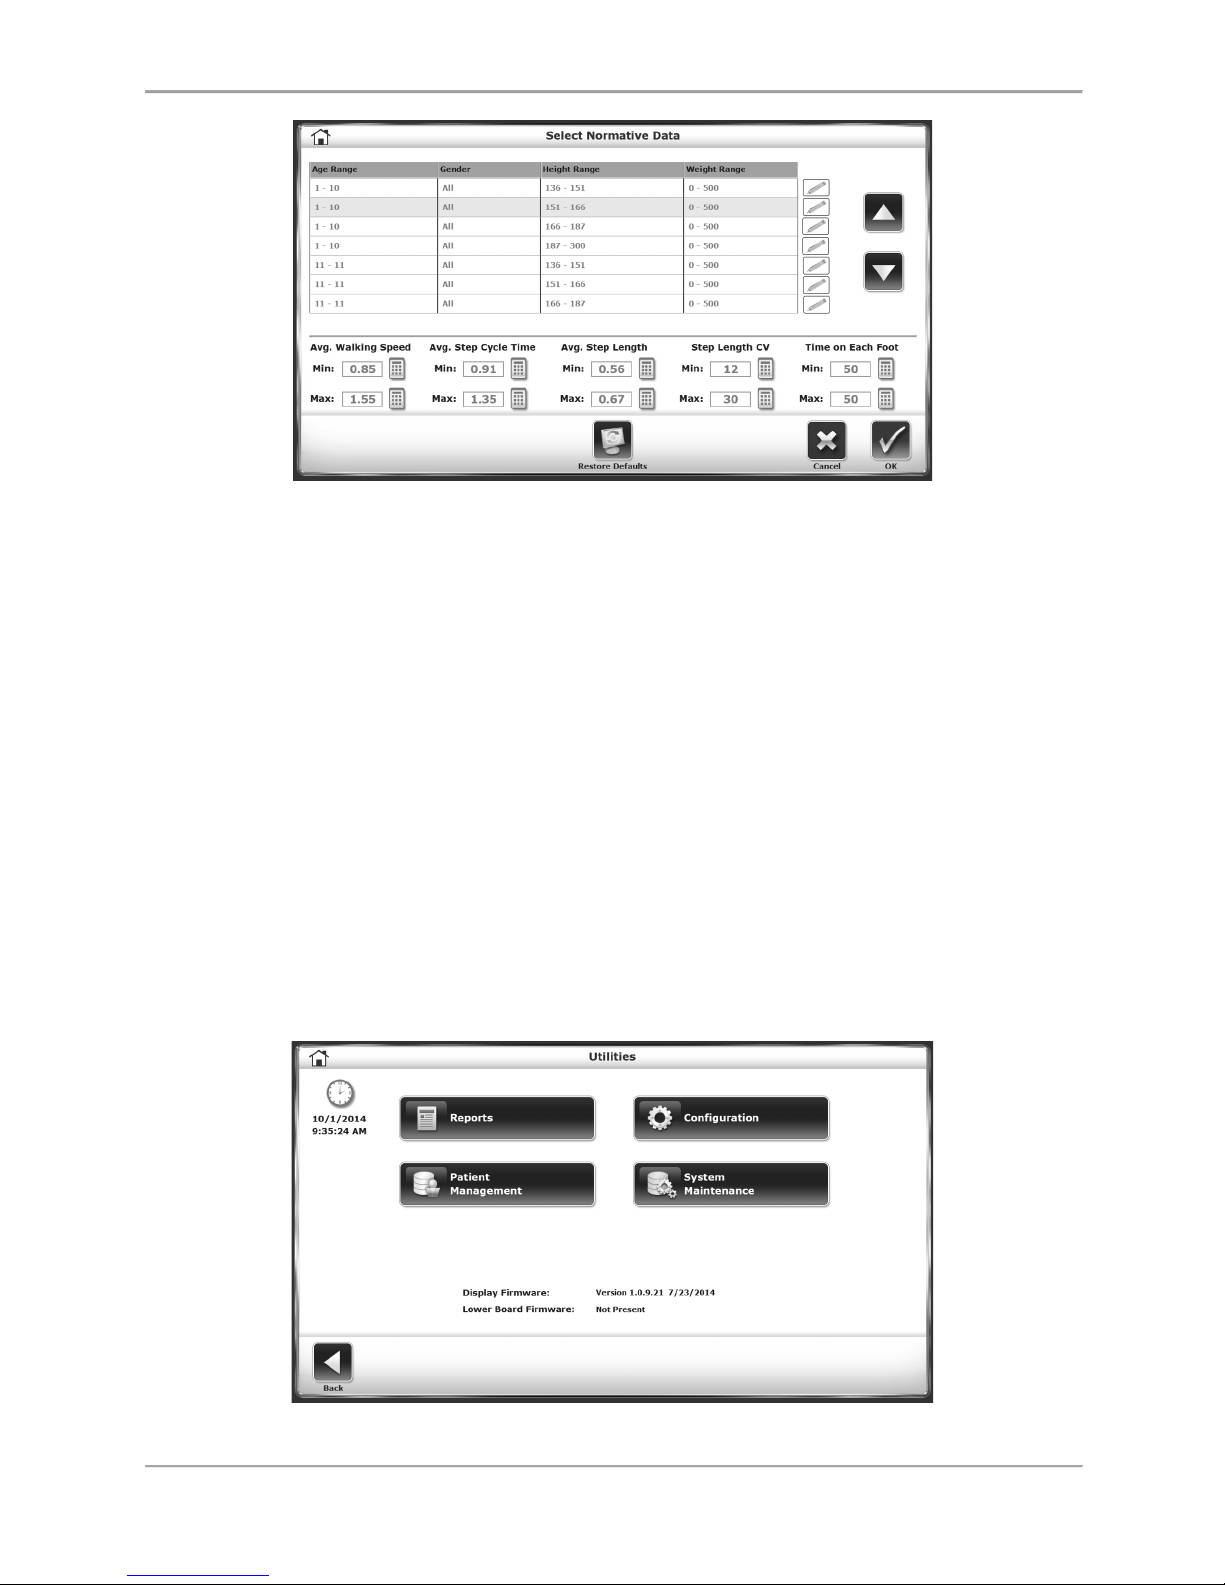
62 Biodex Medical Systems, Inc. © 2017
Figure 8.11. Select Normative Data screen.
Facility Information: Use this screen to enter the facility’s name, which can be featured on
printed reports.
Enable Advanced Data Input Mode: Touch this checkbox to input a patient’s exact date of birth
and height numbers in the Gait Training Patient Setup Screen (as opposed to simply designating
an age number and height range).
Require Patient ID# for Patient Record: Touch this checkbox to require that users input a
specific Patient ID# for each new patient that performs gait training sessions.
Enable “Additional Information” on Patient Setup: Touch this checkbox to enable the Additional
Info icon at the bottom of the Gait Training Patient Setup screen.
Print Facility Information on Reports: Touching this checkbox allows the user to input
information about the facility that will be displayed on printed reports.
Step Symmetry Histogram X Axis: This setting allows the X axis for the Reports/Test Results
histograms to be units of time, steps, or distance.
Patient Management
Figure 8.12. Utilities Menu
Page 63
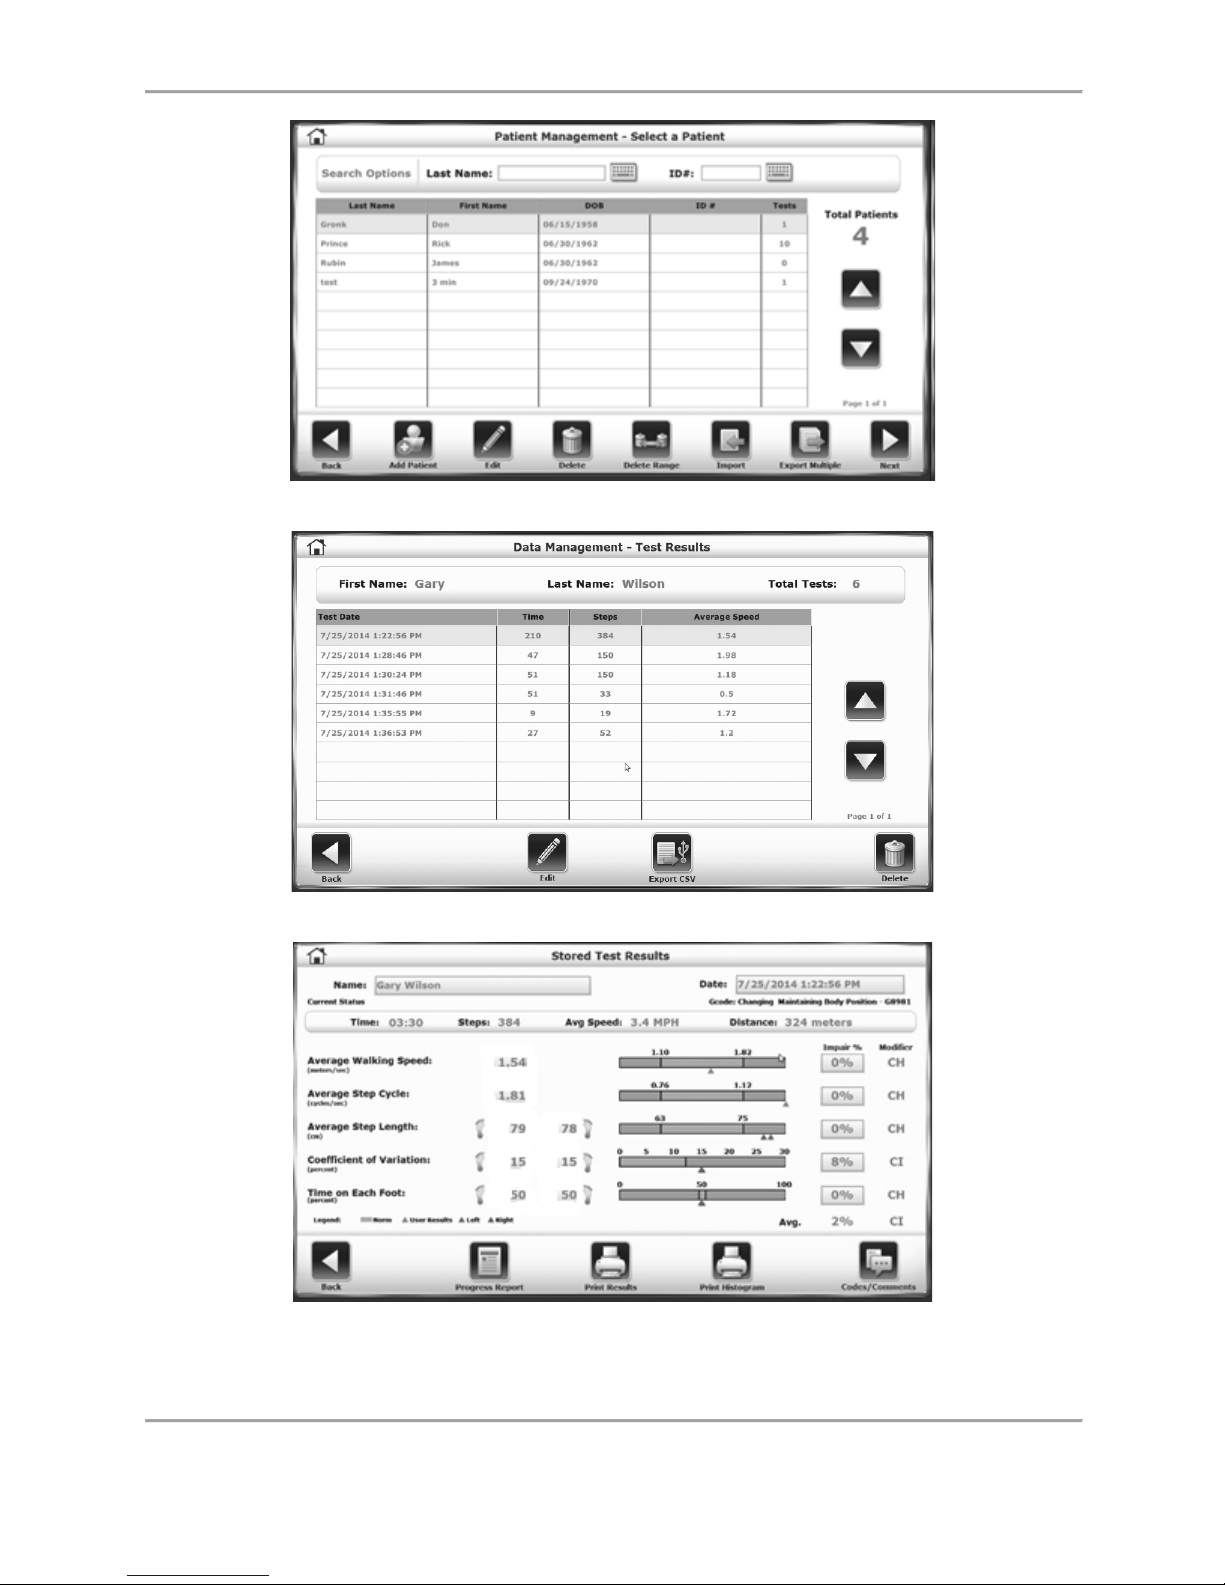
GAIT TRAINER 3 (v3.X SOFTWARE) 63
Figure 8.13. The Patient Management – Select a Patient screen.
Figure 8.14. The Patient Management – Test Results screen.
Figure 8.15. The Stored Test Results screen.
Page 64

64 Biodex Medical Systems, Inc. © 2017
To advance to the Patient Management screen from the Utilities Menu, touch <Patient
Management>. Enter 159 at the “Access ID Code” prompt and touch <OK>. The Patient
Management screen is displayed.
To view an individual’s records or an individual’s test results, select the row listing the patient
to be viewed from the main Patient Management screen (Figure 8.13), and select <Next>. From
the Data Management – Test Results screen (Figure 8.14), select <Edit>. This displays the
Stored Test Results screen (Figure 8.15).
Patient Management functions include the ability to add or edit an individual patient file, delete
a file, delete single or multiple patient files, and import or export patient data. A description of
each feature follows.
Adding Patient Files
To Add a Patient File:
1. From the Patient Management – Select a Patient screen, touch <Add Patient>.
2. On the resulting screen, there will be several fields to populate. Depending on how the
system is configured, either the First and Last Name fields will be required or the Patient
ID number field will be mandatory.
3. The user may also select to enter data on the Additional Information screen. On this
screen, just to mention two options, the user can add details about the facility where the
patient is being treated or create customized drop-down menus.
4. After inputting the new patient information, touch <OK>. The new file will be saved and
the system will return to the Patient Management – Select a Patient screen.
To make the Patient ID# a required field when adding new patients:
1. From the Main system Utilities screen, touch <Configuration>.
2. On the next screen, touch <Gait Trainer Configuration>.
3. Check the box for “Require Patient ID# for Patient Record”.
4. When the system returns to the Add Patient screen (from the Patient Management –
Select a Patient screen) the First and Last Name fields are no longer required, but the
Patient ID# field is required.
Editing Patient Files
To Edit a Patient File:
1. From the Patient Management – Select a Patient screen, touch a patient row, and touch
<Edit>.
2. On the resulting screen, the fields that were present when the patient file was created
are displayed. Depending on how the system is configured, either the First and Last
Name fields will be required or the Patient ID number field will be mandatory. If the
Patient file was created when one of these fields was not required, a value must be
entered in the now-required field in order to save any other changes (Refer to the
previous section for instructions on changing this setting).
Page 65
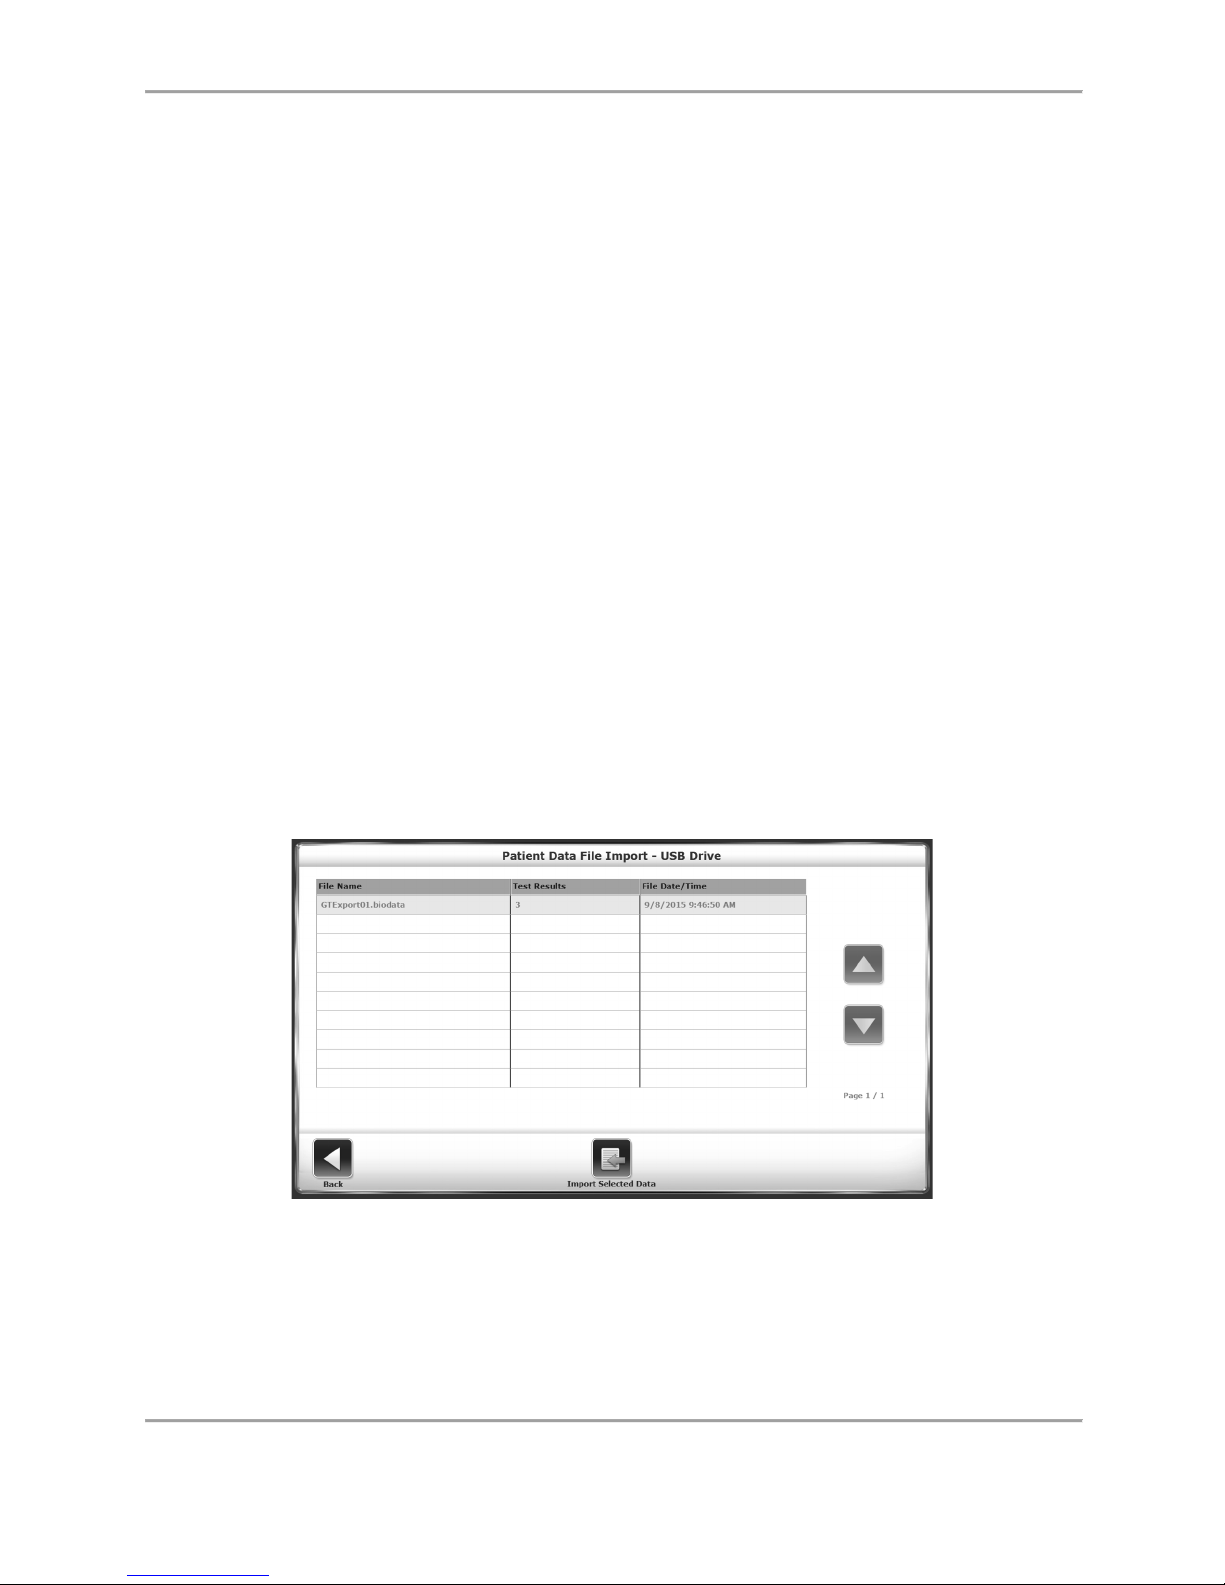
GAIT TRAINER 3 (v3.X SOFTWARE) 65
3. The user may also edit the data in the Additional Information screen. On this screen,
the user can add details regarding the facility where the patient is being treated or
create customized drop-down menus to name two options.
4. After editing the patient information, touch <OK>. The file is saved with the changes
and the system returns to the Patient Management – Select a Patient screen.
Deleting Patient Files
To Delete a Single Patient File:
1. Touch to highlight the patient file to delete.
2. Touch <Delete> to delete the selected patient file. The system will display a prompt to
ensure the selected file is to be deleted.
3. Touch <OK> to delete all test results associated with the patient. The system returns to
the Patient Management screen.
To Delete An Entire Range of Patient Files:
1. Touch the <Delete Range> icon. On the next screen, the user can select a range of
patient records to delete: All records, records from a certain date to present time,
records Prior To a certain date, or all records between certain dates (From/To). The
system will display a prompt to ensure all the selected files are to be deleted. Touch
<OK> to delete the selected files and return to the Patient Management screen.
Importing Patient Data
The Import Patient Data function allows patient data from a stored test to be imported in a
binary (.biodata) file format.
Figure 8.16. Select a File Name from the Patient Data File Import Screen
Page 66
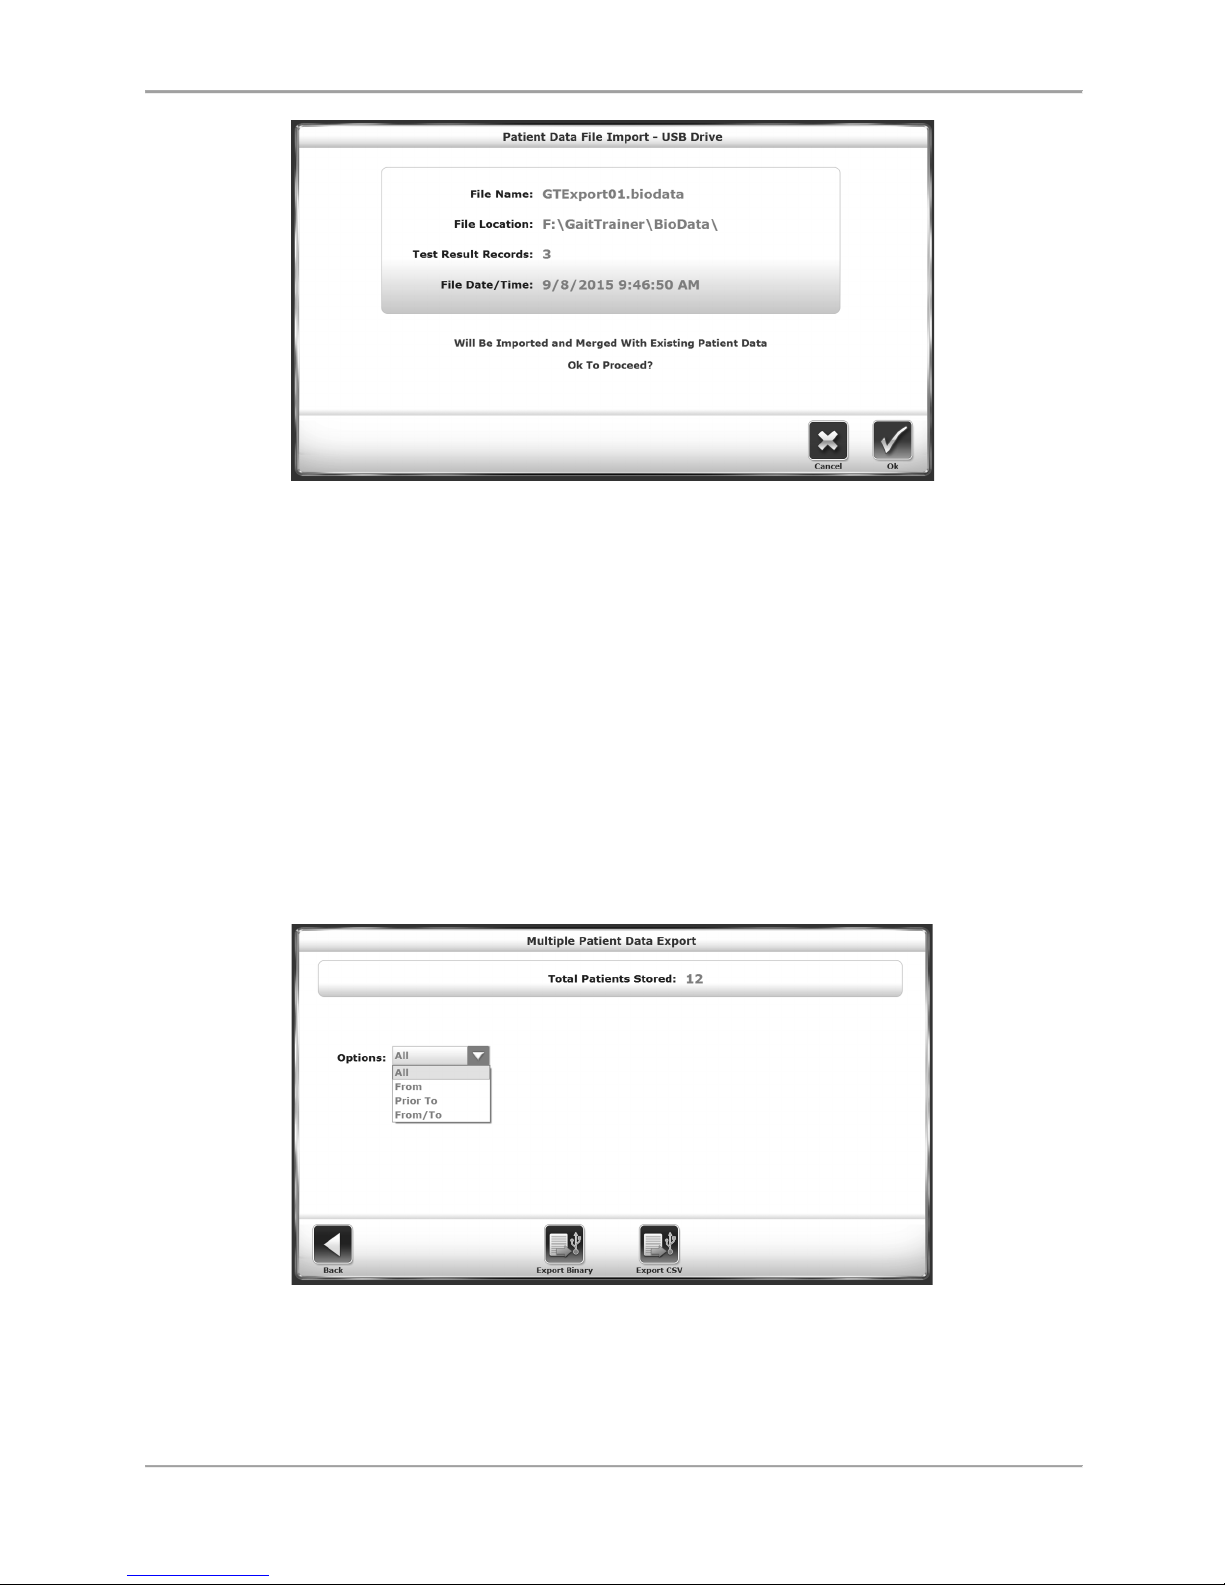
66 Biodex Medical Systems, Inc. © 2017
Figure 8.17. The Patient Data File Import Screen.
To Import a Patient Data Set:
1. From the Patient Management – Select a Patient screen, touch <Import>.
2. The system displays the contents of a biodata folder from an attached flash drive.
Select a data set to import by touching a particular row.
3. Touch <Import Selected Data>.
4. A confirmation screen is displayed prompting the user whether or not to proceed.
Touch <OK> to update the system’s data set with the patients and their associated test
results in the imported data.
Exporting Multiple Patient Data Sets
The Export Multiple function allows patient data from stored tests to be exported in either a
binary (.biodata) file format or a CSV format.
Figure 8.18. The Multiple Patient Data Export screen.
Page 67
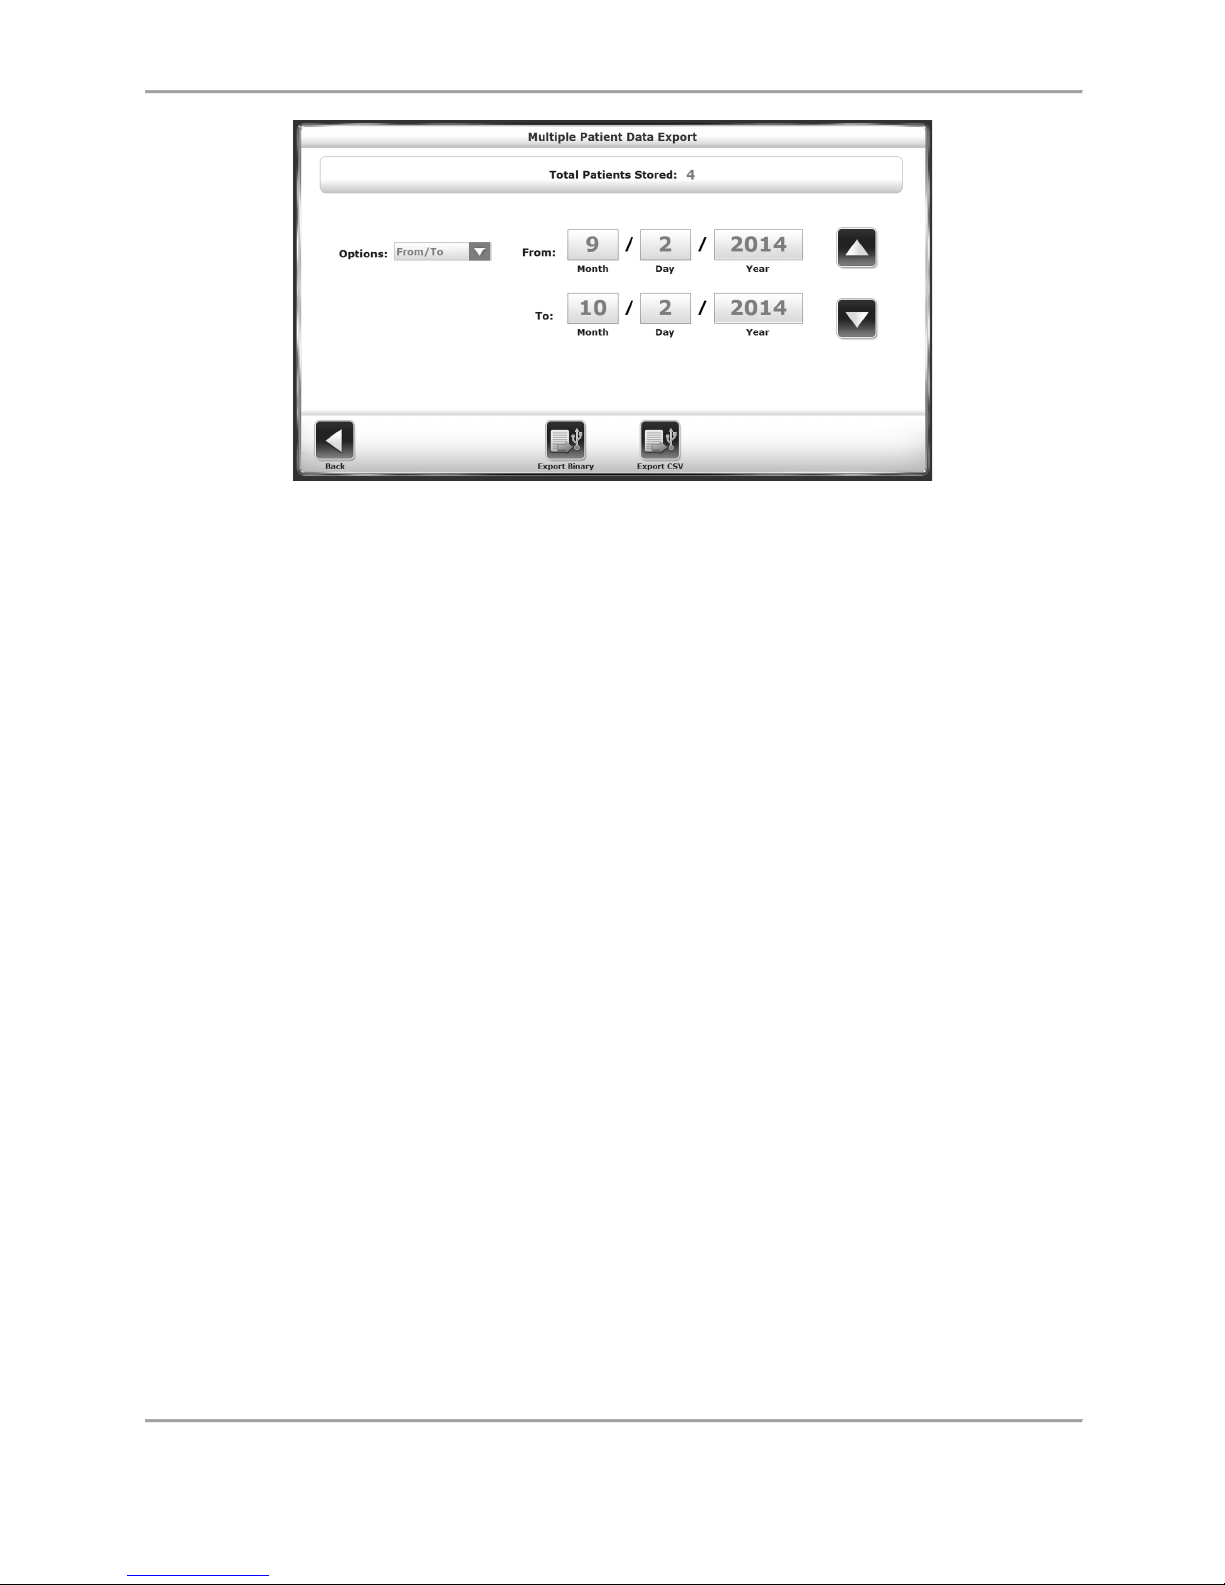
GAIT TRAINER 3 (v3.X SOFTWARE) 67
Figure 8.19. The Multiple Patient Data Export screen.
1. From the Patient Management – Select a Patient screen, touch <Export Multiple>.
2. On the next screen, the user has the option to select what range of patient records to
export: All records, records from a certain date to present time, records prior to a
certain date, or all records between certain dates (From/To).
3. Touch either the <Export Binary> button or the <Export CSV> icon. A confirmation
screen is displayed prompting the user whether or not to proceed.
4. Touch the <Export Binary> or the <Export CSV> button again to complete the export
process. The selected files are exported to the attached flash drive in the designated
format.
5. Touch <Back> to return to the Patient Management – Select a Patient screen.
Working With Individual Patient Records
To export an individual patient data file:
1. From the Patient Management – Select a Patient screen.
2. Select a patient row, and touch <Next>.
3. On the following Data Management – Test Results screen, touch <Export CSV>. The CSV
file will be saved to an automatically generated folder titled “BioCSV” (refer to Appendix
A for details regarding how to perform a CSV file export).
Note: The user has the option to export patient data either to a Binary file or a CSV file, which
can be stored locally on a hard drive.
Page 68
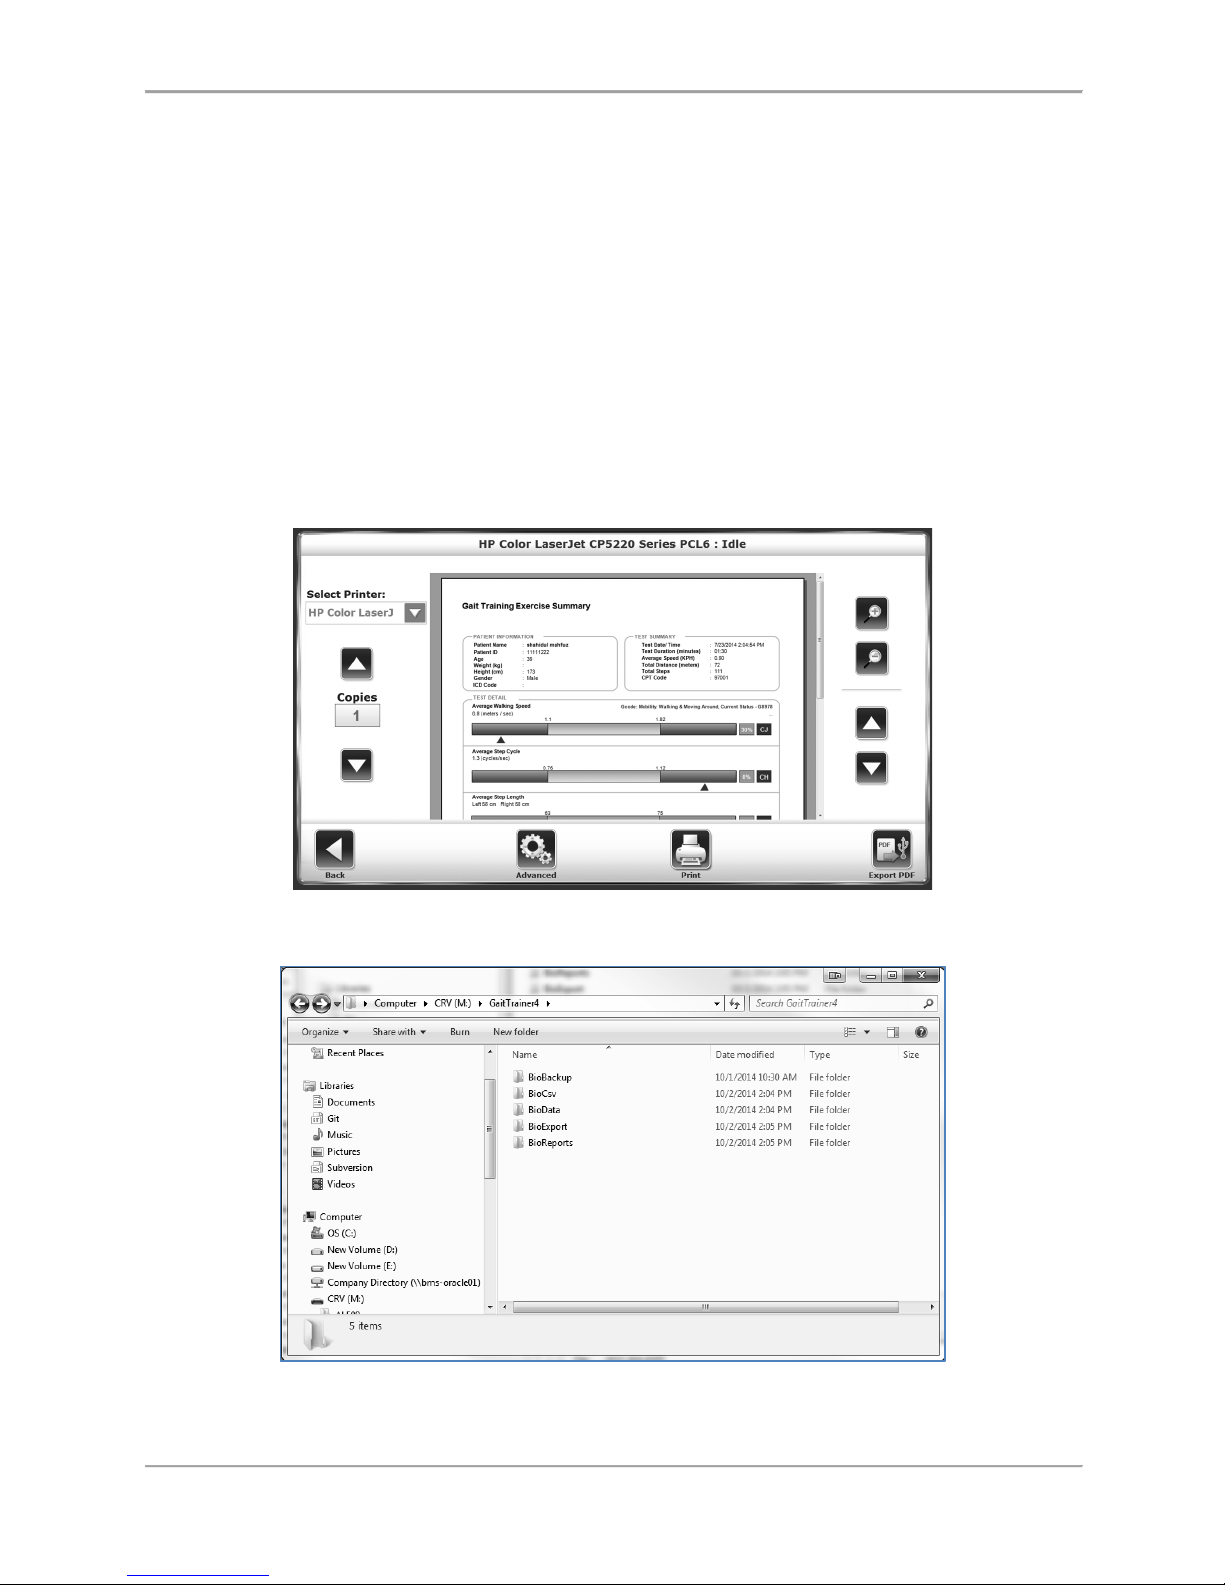
68 Biodex Medical Systems, Inc. © 2017
Printing Stored Results
To Print a Stored Test Result or Histogram:
• Touch <Next> at the Patient Management – Select a Patient screen.
• At the Data Management – Test Results screen, touch <Edit>.
• Touch <Print Results> to print out the patient file, or touch <Print Histogram> to print
out a patient histogram.
• At the Print screen, the user has the option to send the record to a connected printer or
to export the document to a PDF on a USB flash drive without printing it.
Note: When <Export PDF> is selected, the PDF will be exported to an automatically
generated folder titled “BioReports” on an inserted USB flash drive.
• After printing, the system returns to the Stored Test Result screen.
Figure 8.20. Print Results screen.
Figure 8.21. The hard drive saving location for the <Export PDF> function.
Page 69
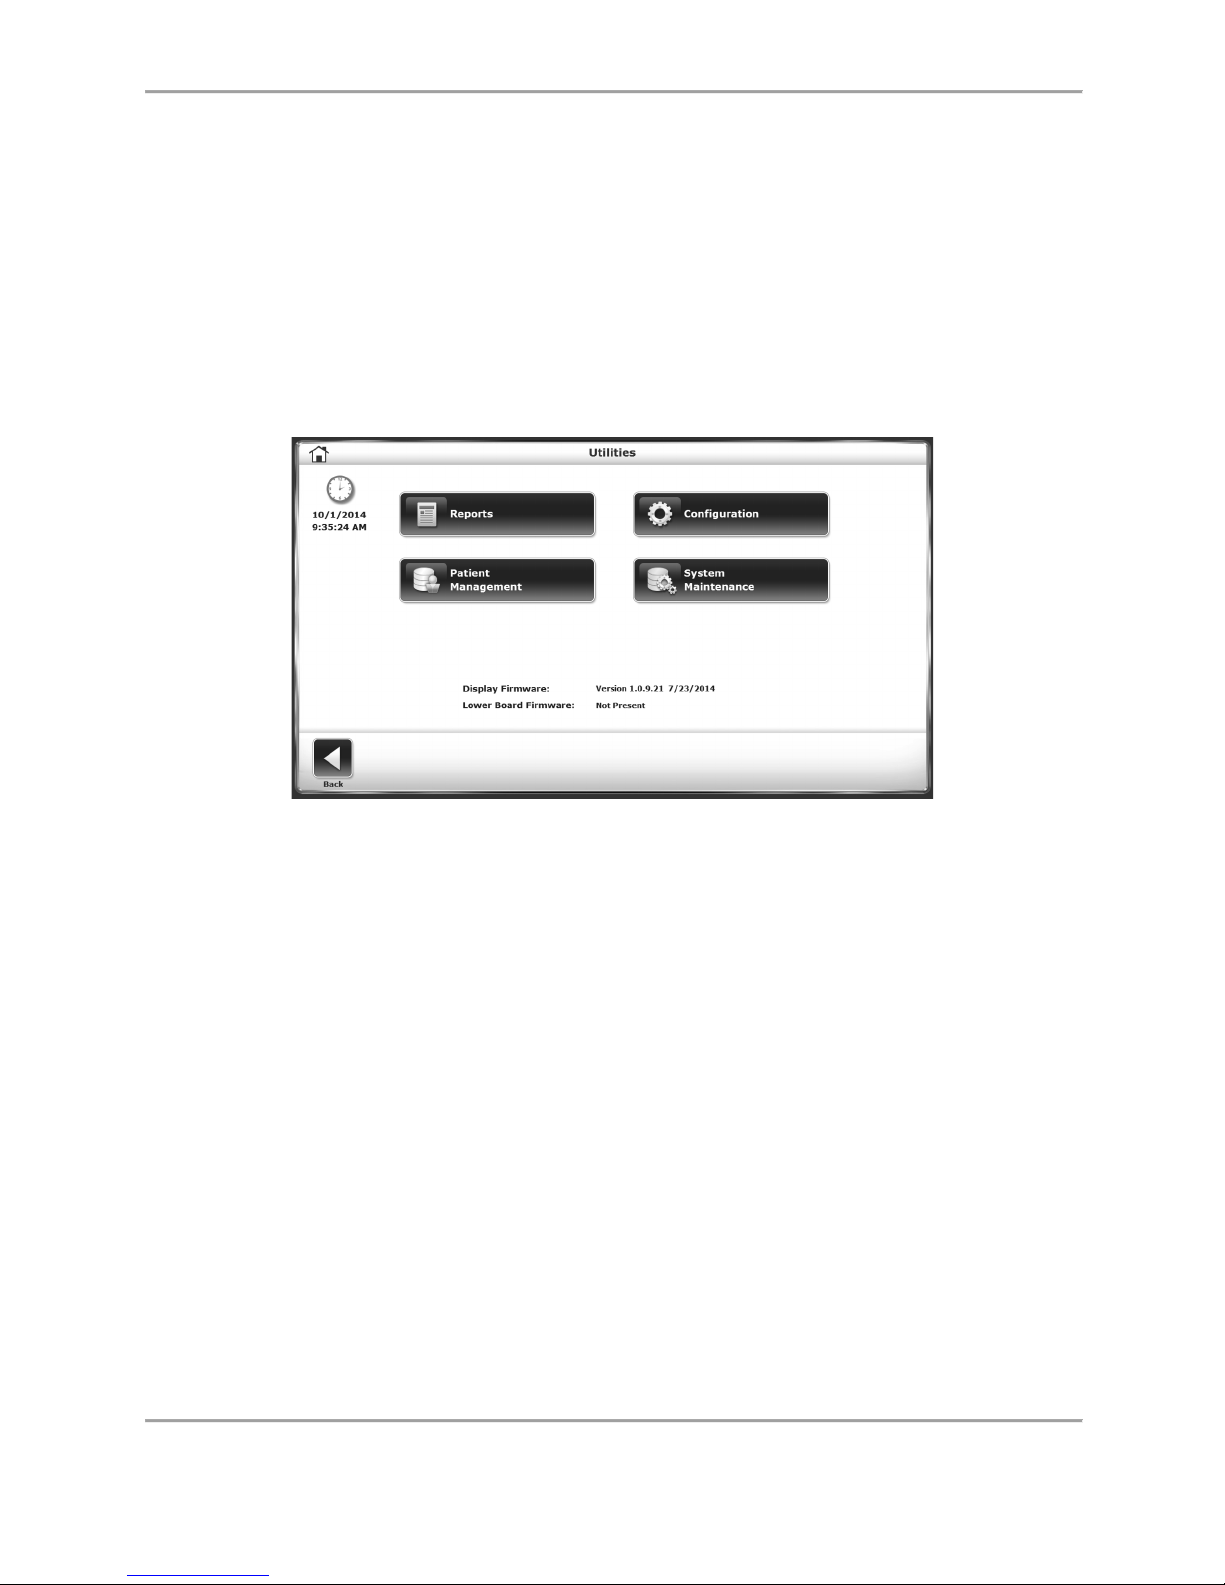
GAIT TRAINER 3 (v3.X SOFTWARE) 69
Figure 8.21 illustrates that the BioReports folder is just one of several subfolders that are
automatically generated in the main GaitTrainer4 directory, which is automatically generated by
the system. Here is a list of the subfolders, along with the types of files they contain:
● BioBackup: The backup of system settings with database.
● BioCsv: Both individual CSV file and multi data CSV file.
● BioData: The patient test results as Binary file.
● BioExport: The event log file.
● BioReports: The reports in PDF format.
System Maintenance
Figure 8.22. Utilities main screen.
The System Maintenance main menu contains icons for the three configurations related to
database maintenance:
1. Backup to USB.
2. Restore from USB.
3. Database Cleanup.
Page 70
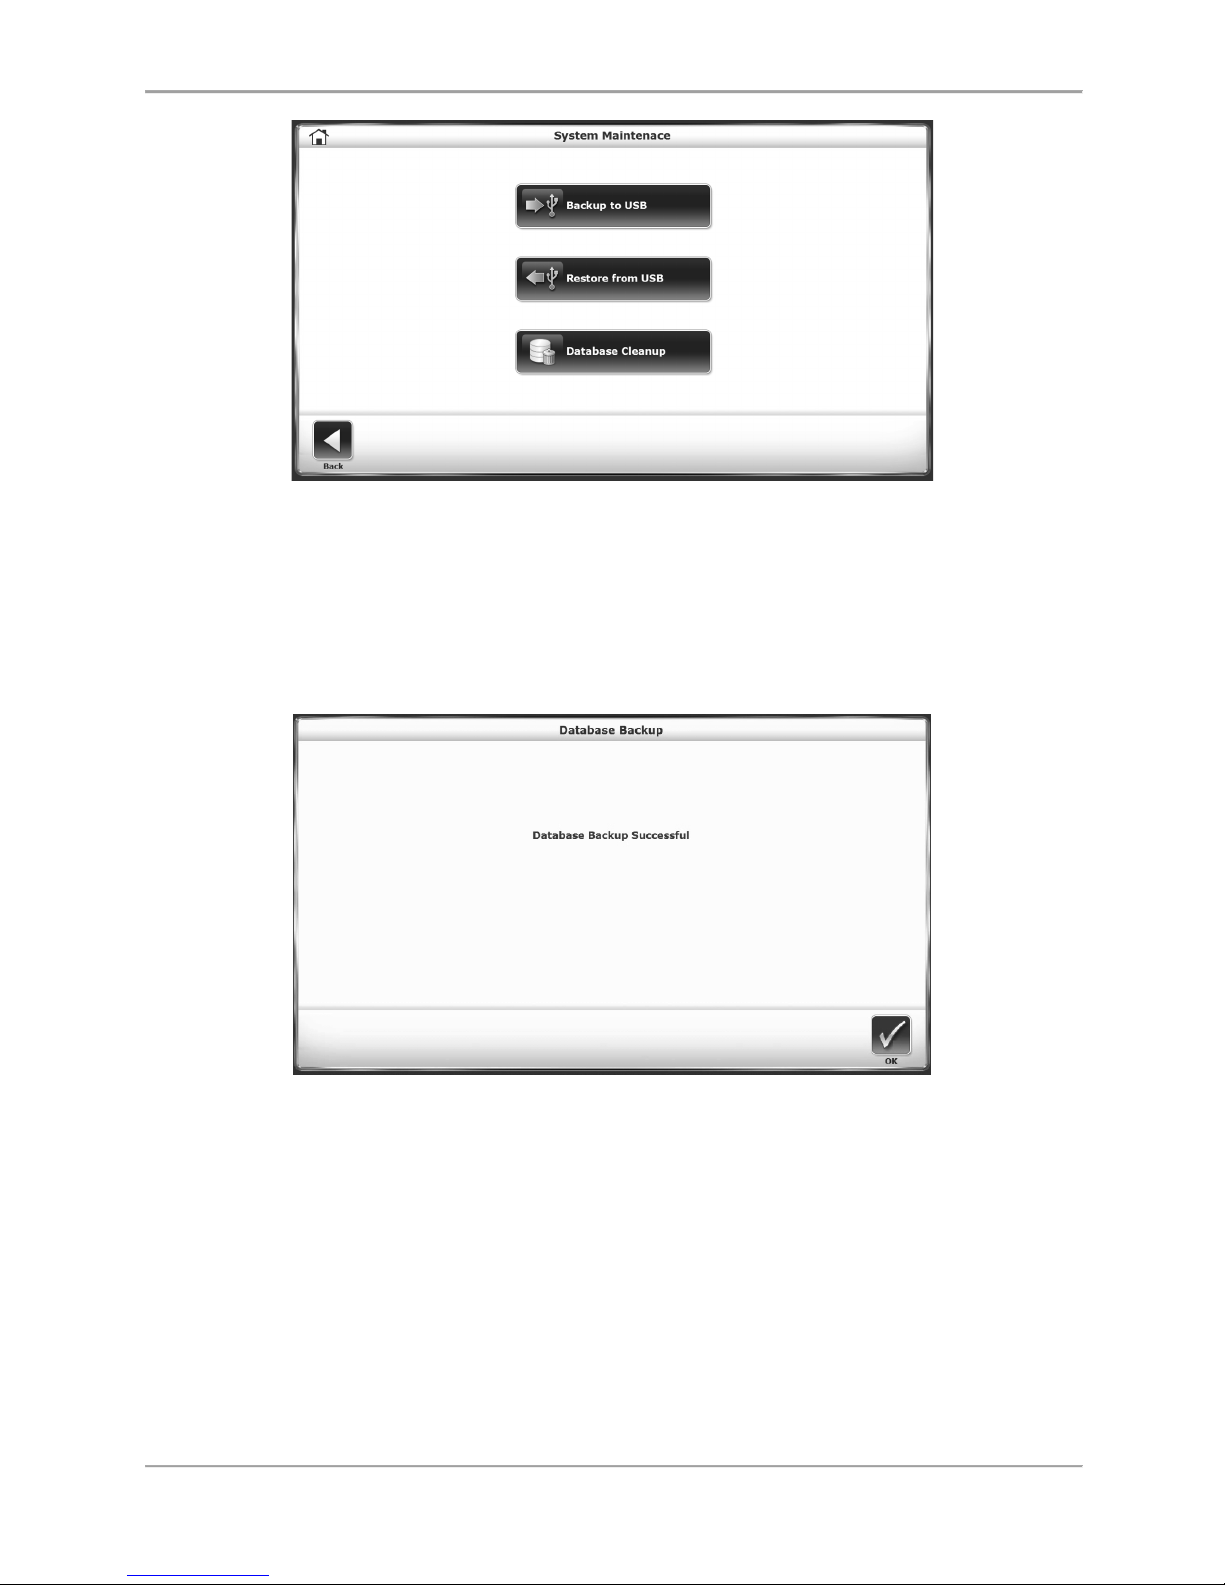
70 Biodex Medical Systems, Inc. © 2017
Figure 8.23. System Maintenance Main Screen.
Backup to USB
The Backup to USB function creates a backup database of current patient records on a
removable USB flash drive. After a flash drive is inserted into one of the device’s USB ports,
selecting the <Backup to USB> icon will generate the following screen:
Figure 8.24. Backup to USB Screen.
Restore from USB
The Restore from USB function allows users to restore a previously backed up database to be
the Gait Trainer’s current data set. The restoration will be from a removable flash drive that
was used in the Backup to USB function.
Selecting the <Restore from USB> icon displays the following screen:
Page 71
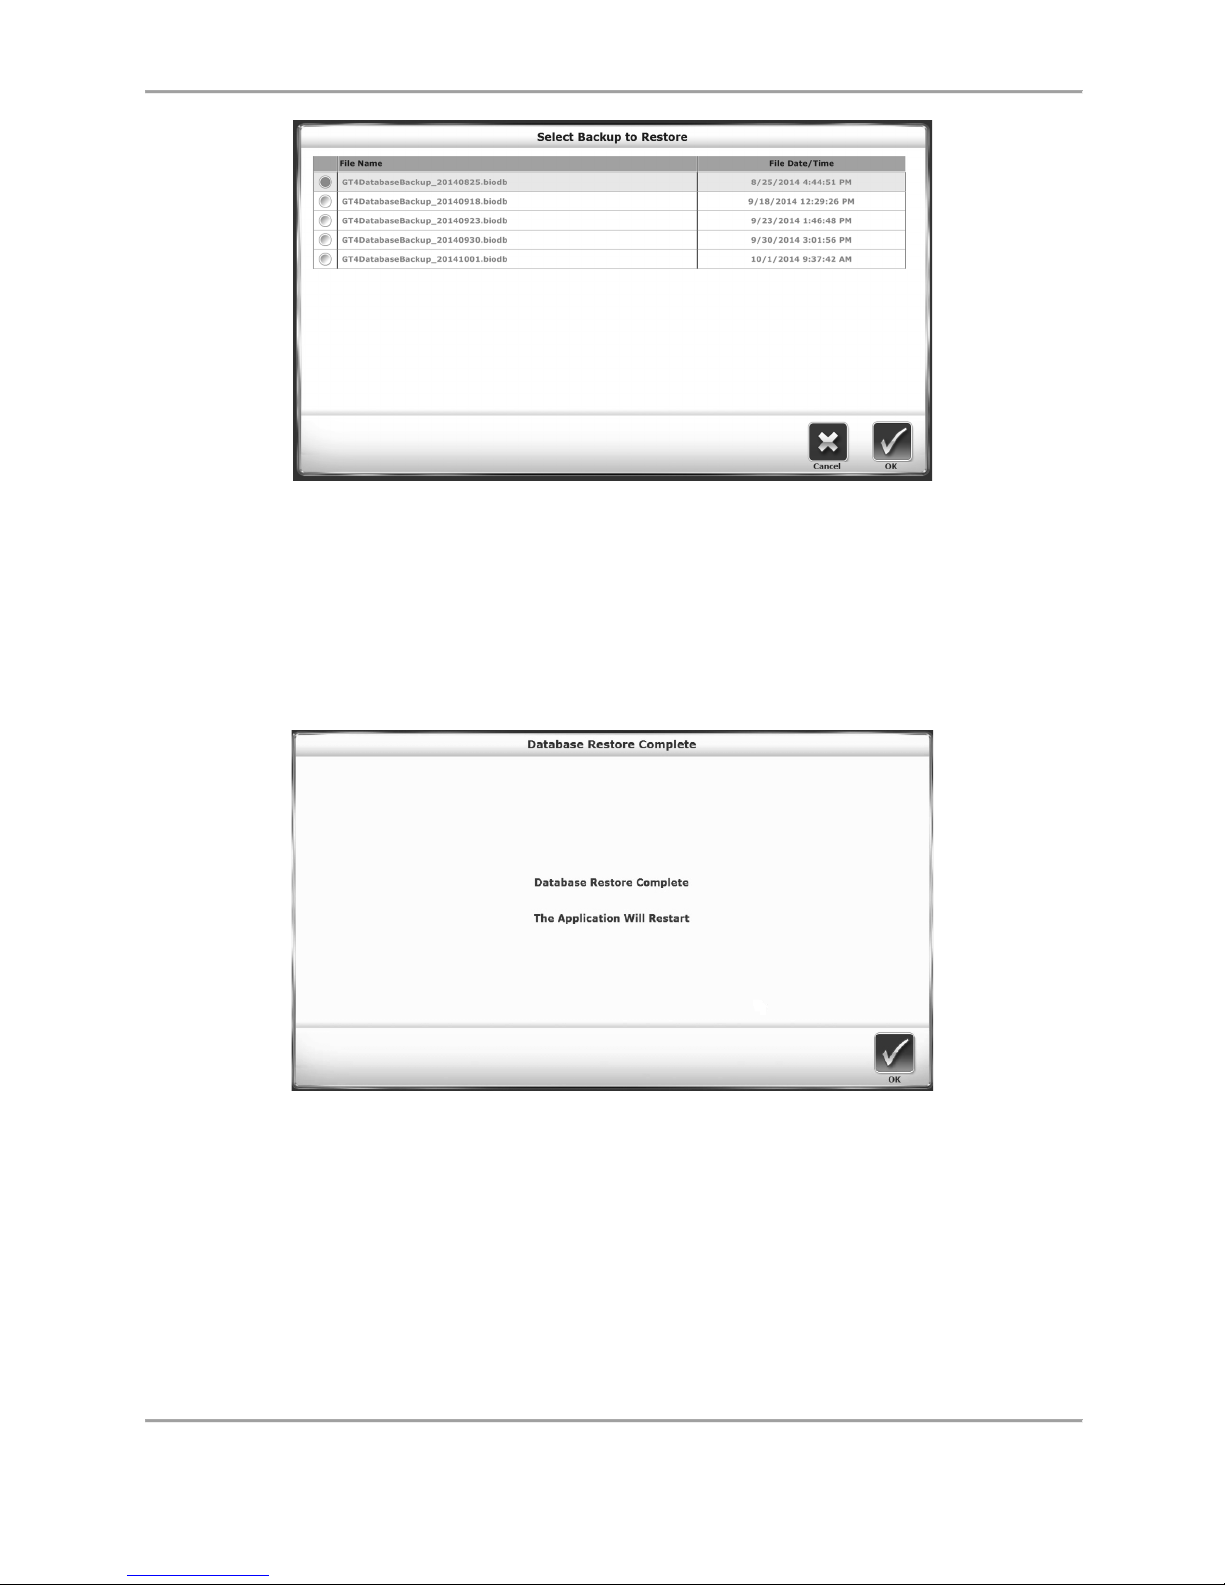
GAIT TRAINER 3 (v3.X SOFTWARE) 71
Figure 8.25. Restore from USB Screen.
The Select Backup to Restore screen displays a list of backed up databases that have been
created. The most recently backed up database will be the top row of the list. Select the
database to restore as the Gait Trainer’s current data set, and select the <OK> icon. The
Database Restore Complete screen is displayed as illustrated below:
Figure 8.26. Restore from USB Confirmation Screen.
Depending on the size of the database, it can take some time to reach the Database Restore
Complete screen. The Gait Trainer application will restart once <OK> is touched.
The Backup operation makes a backup of the entire system — not just the database. All system
selections and settings will be backed up and the Restore operation will restore all of these
settings in addition to the patient data. This includes the backup and restoration of the facility
name. Also, for added safety/security, all backup data is encrypted.
Page 72
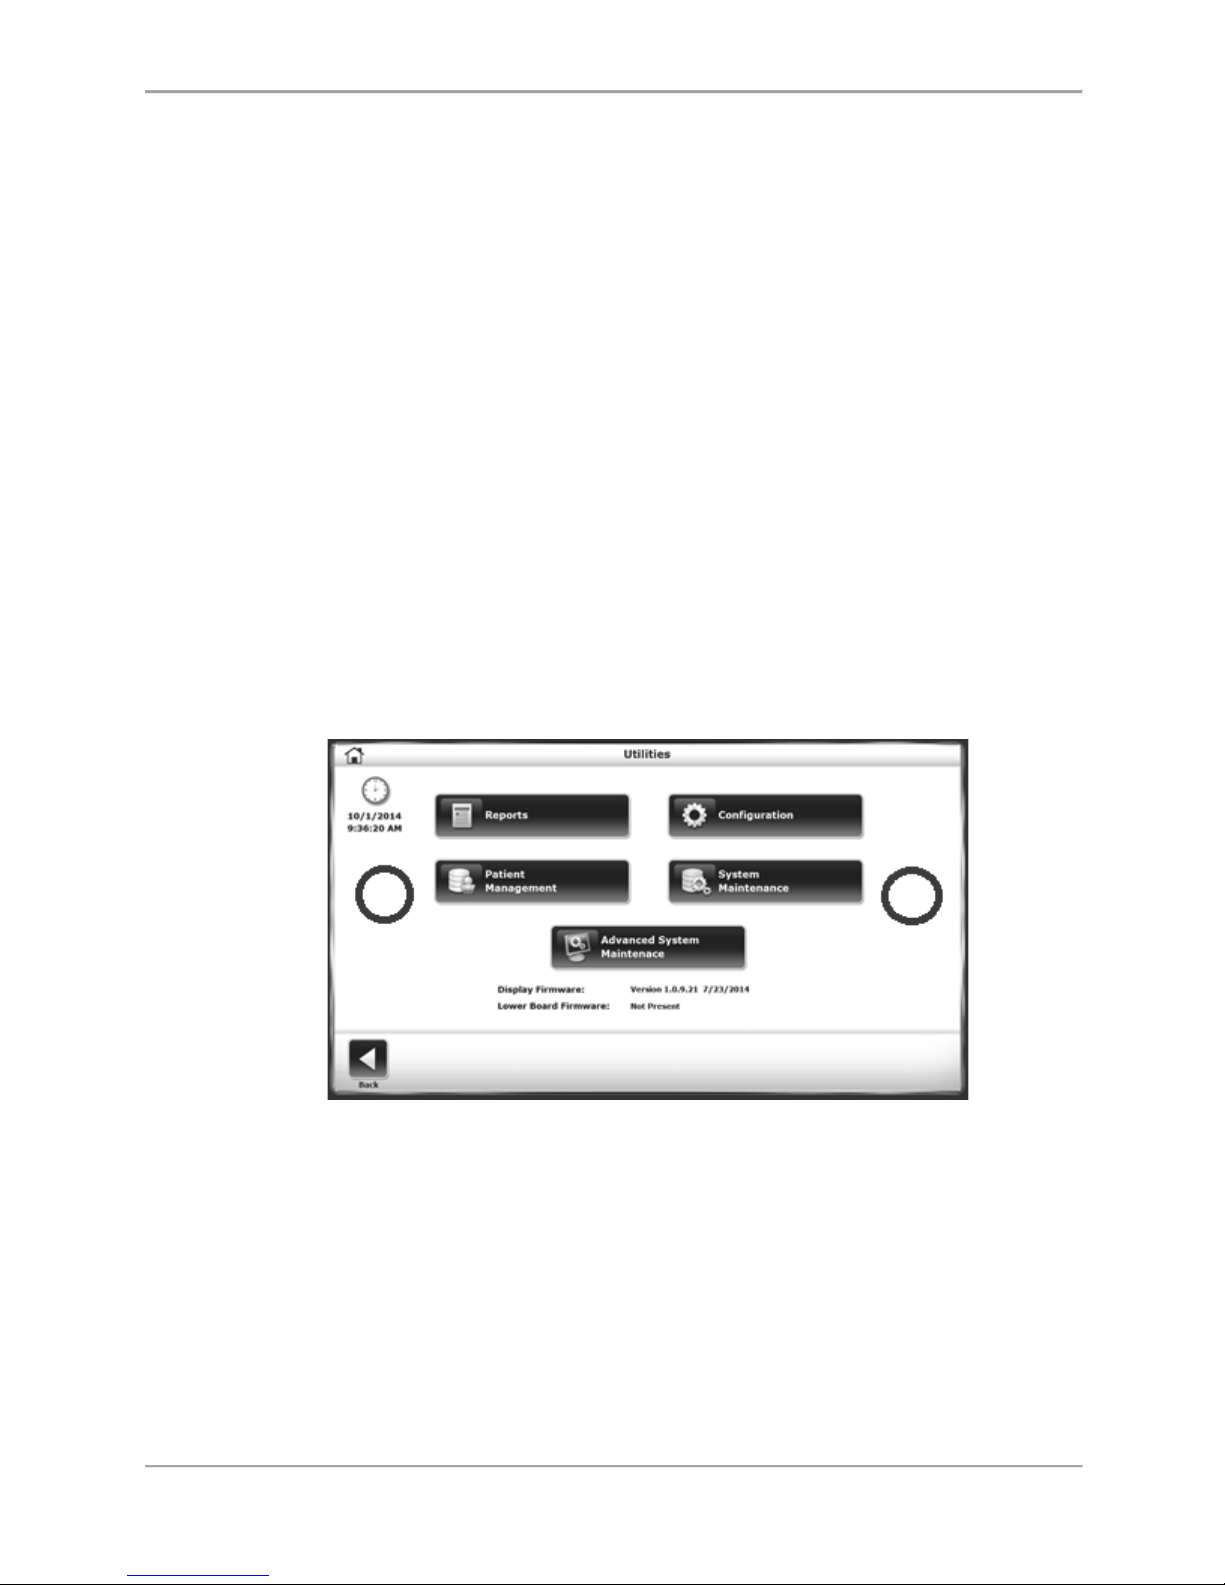
72 Biodex Medical Systems, Inc. © 2017
Database Cleanup
Database Cleanup is an administrative maintenance function that reduces the system’s overall
file size.
Selecting the <Database Cleanup> button displays a confirmation screen prompting the user
whether or not to proceed with the clean up or cancel the action.
Advanced System Maintenance
The Advanced System Maintenance screen is hidden from normal view. This screen, when
active, allows the user to make adjustments such as selecting a language preference,
performing speed and elevation calibration, and performing strain gauge calibration.
To access the System Maintenance screen:
1. Touch <Utilities>.
NOTE: The next step requires pressing the hidden keypads in the right and left corners of
the displays touch screen.
2. To access the <System Maintenance> prompt on the display:
a. Touch the right side of the Utilities screen (refer to the red circle in Figure 8.27).
b. Touch the left side (as indicated by the red circle in Figure 8.27).
c. Touch the right side a second time.
Figure 8.27. Unmarked touch areas for Access to the Advanced System Maintenance
Screen.
3. Touch <Advanced System Maintenance>. The Advanced System Maintenance screen is
displayed.
Page 73
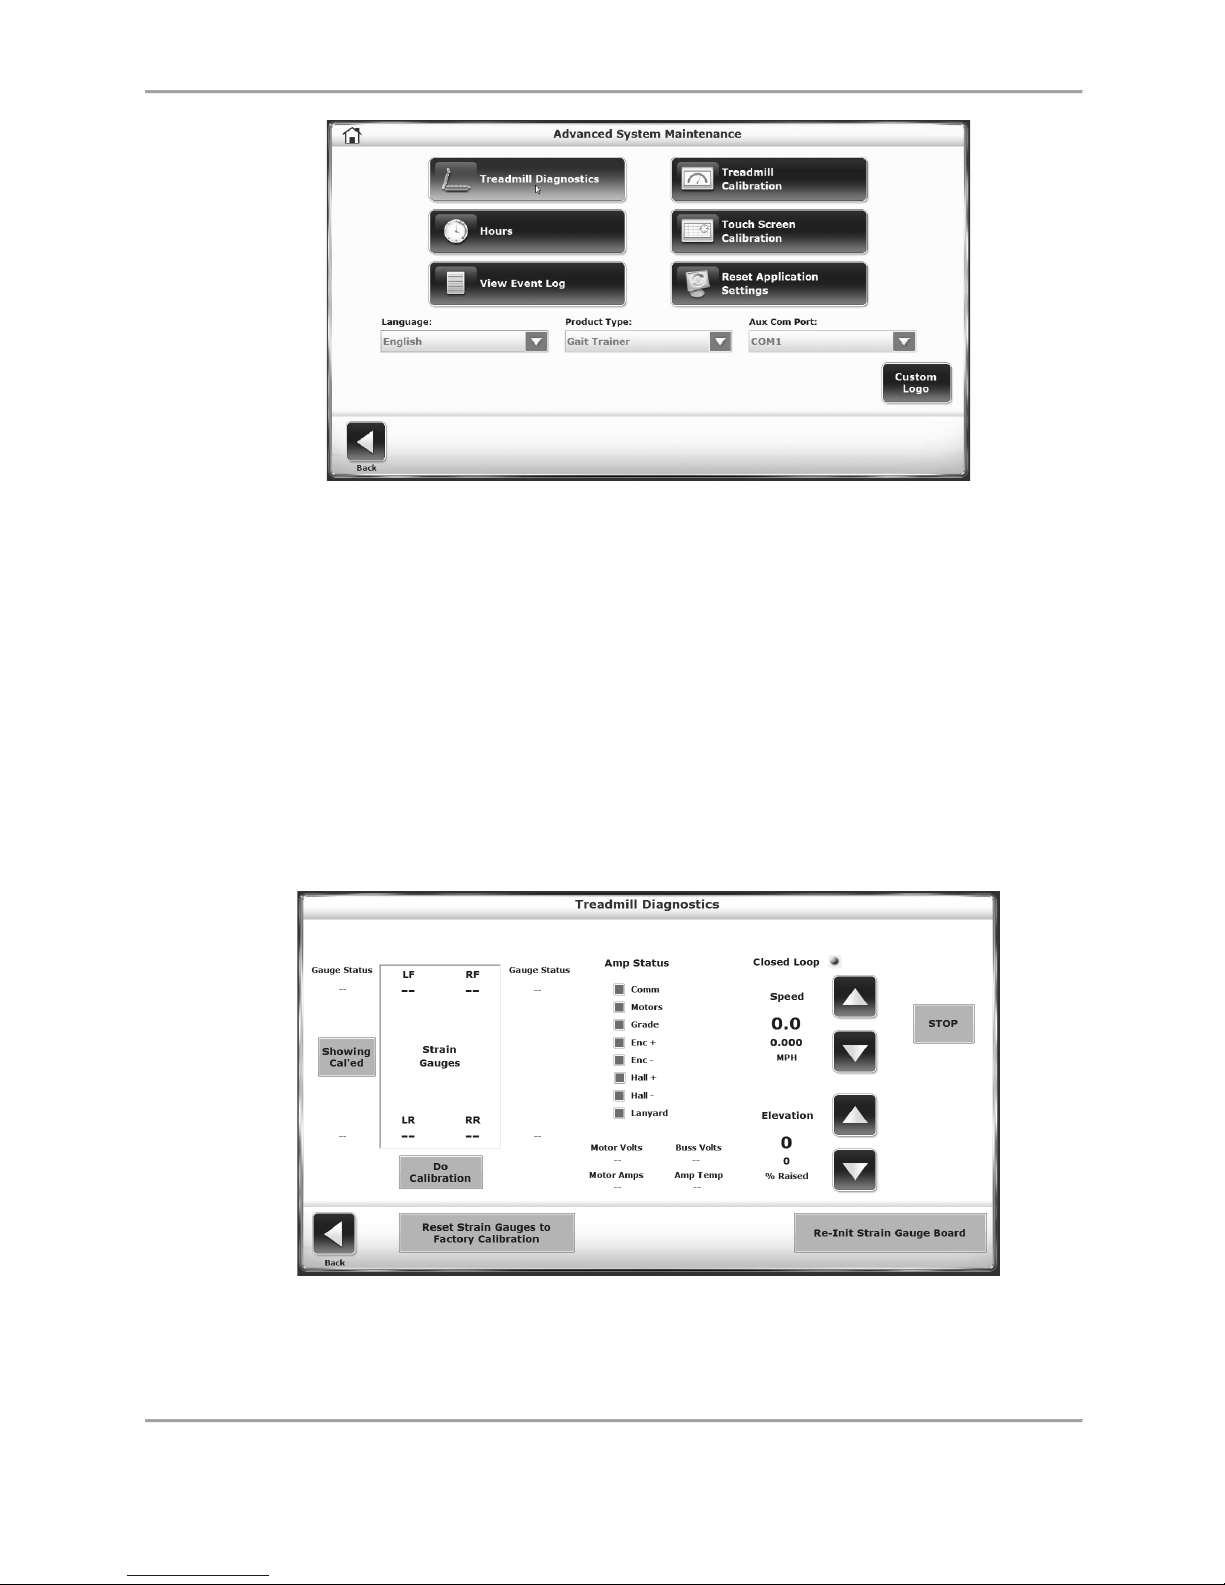
GAIT TRAINER 3 (v3.X SOFTWARE) 73
Figure 8.28. Advanced System Maintenance Screen.
Advanced System Maintenance Screen Settings
Treadmill Diagnostics: The Treadmill Diagnostics screen allows the user to conduct some
diagnostic tests with regards to treadmill performance. The strain gauges can be reset to the
factory calibration and the strain gauge board can be re-initialized.
● Touch < > for the elevation until the elevation motor stops. The reported elevation counts
must be between 12 and 15. If they not, loosen the nut on the elevation pot and adjust the
pot for a count between 12 and 15.
● Touch < > until the treadmill is fully elevated. The counts must be between 121 and 125.
Figure 8.29. Treadmill Diagnostics Screen.
Page 74
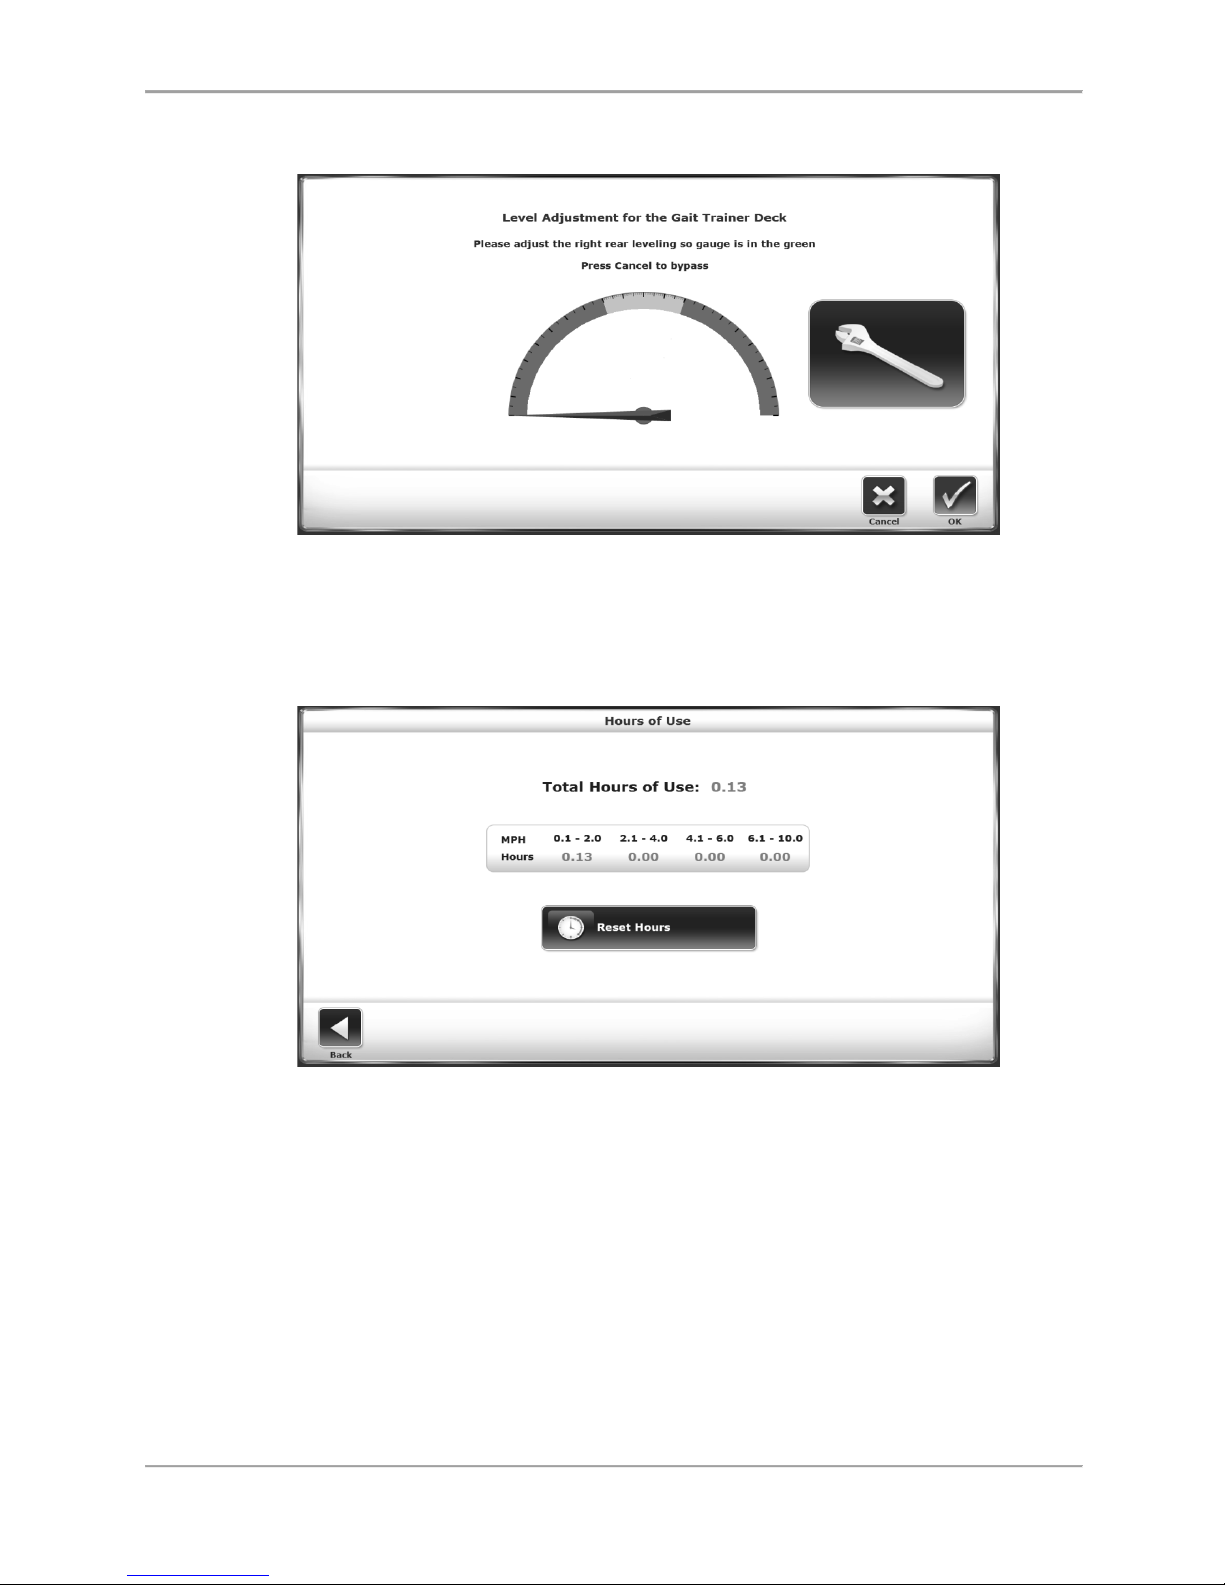
74 Biodex Medical Systems, Inc. © 2017
Treadmill Calibration: Use this gauge when manually adjusting leveling.
Figure 8.30. Treadmill Calibration Screen.
Hours: The Hours of Use screen provides a breakdown of device usage along with the option to
reset the hour count.
Figure 8.31. Hours Screen.
View Event Log: The Event Log screen contains information on device events with options to
filter by date ranges. The screen can be used to delete the log content or export it to a USB
flash drive.
Page 75
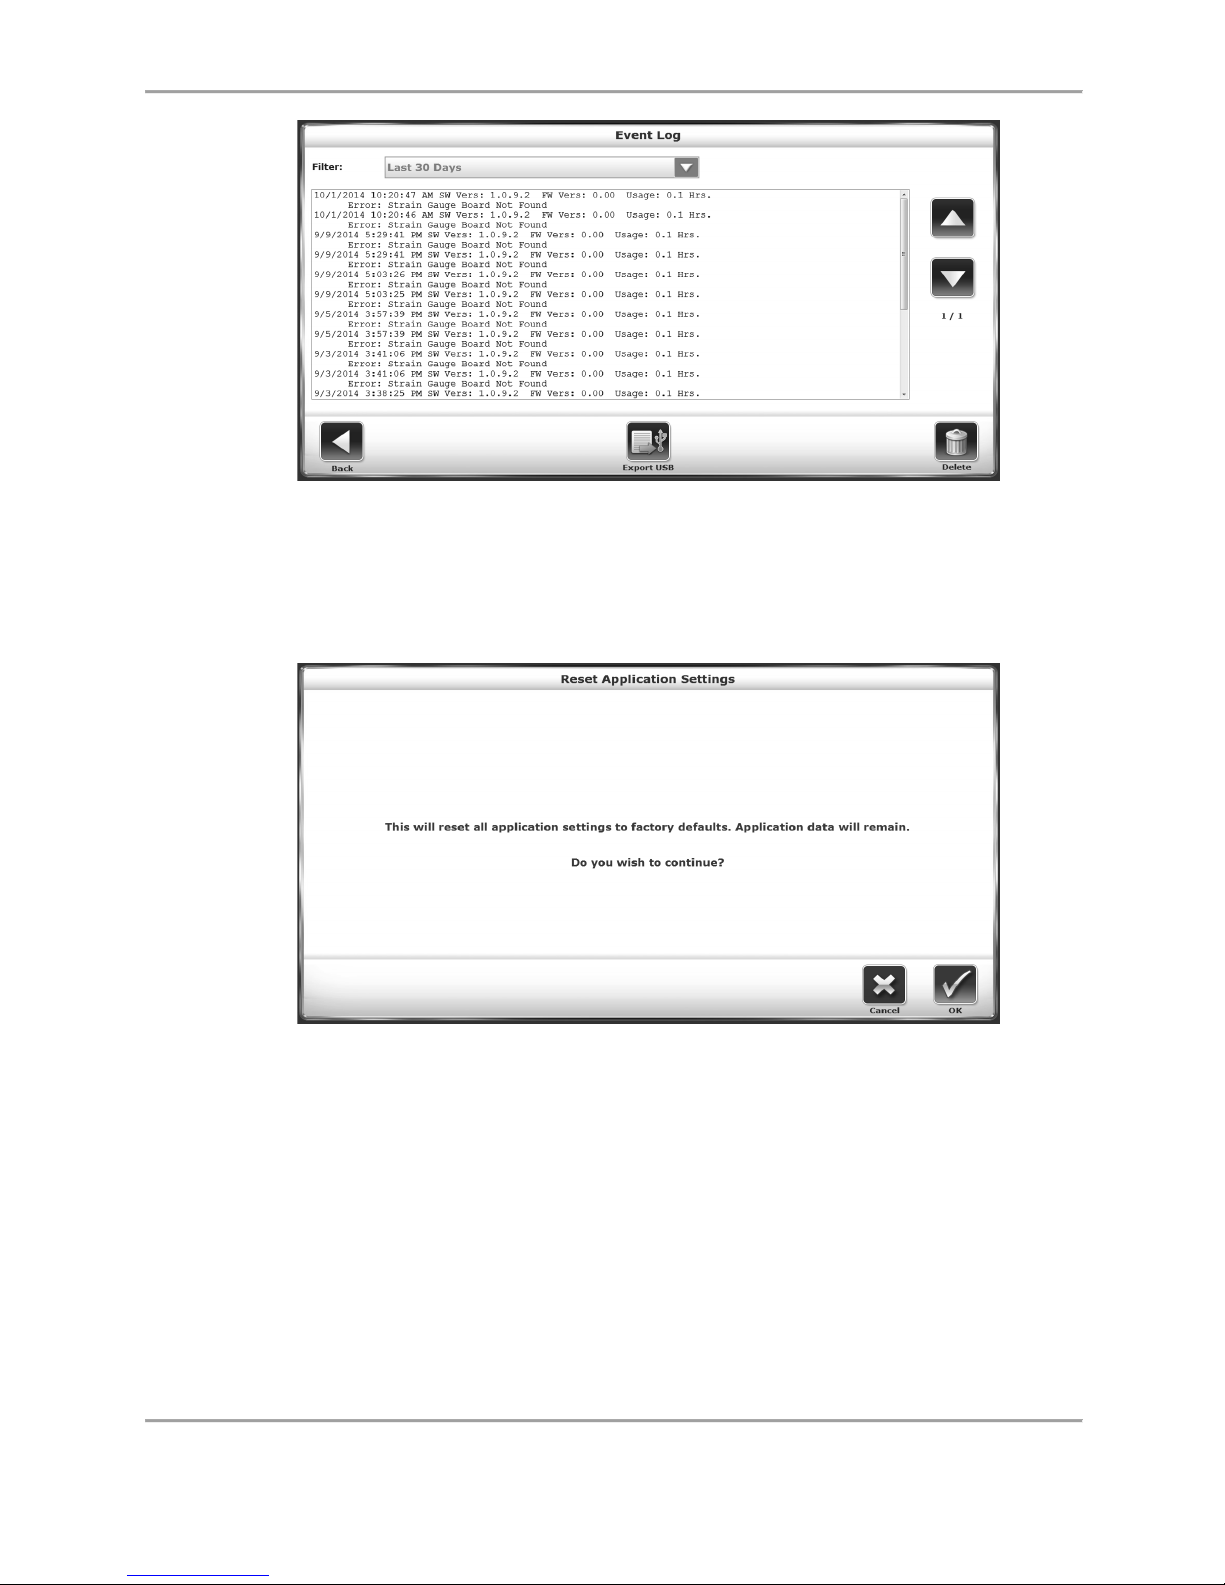
GAIT TRAINER 3 (v3.X SOFTWARE) 75
Figure 8.32. Event Log Screen.
Reset Application Settings: Use this function to return all application settings to factory
defaults. Patient data will not be deleted a reset is performed.
Figure 8.33. Reset Application Settings Screen.
Language: Use this function to set a language preference for the system.
Product Type: The product type can be designated as either Gait Trainer or RTM 600. Keep the
Product Type selection set to “Gait Trainer.”
Aux Com Port: The auxiliary port, which allows the device to transmit or receive data, can be set
as COM1 or COM3.
Custom Logo: Use this function to upload an image from a USB flash drive to be used as
branding on the device.
Page 76
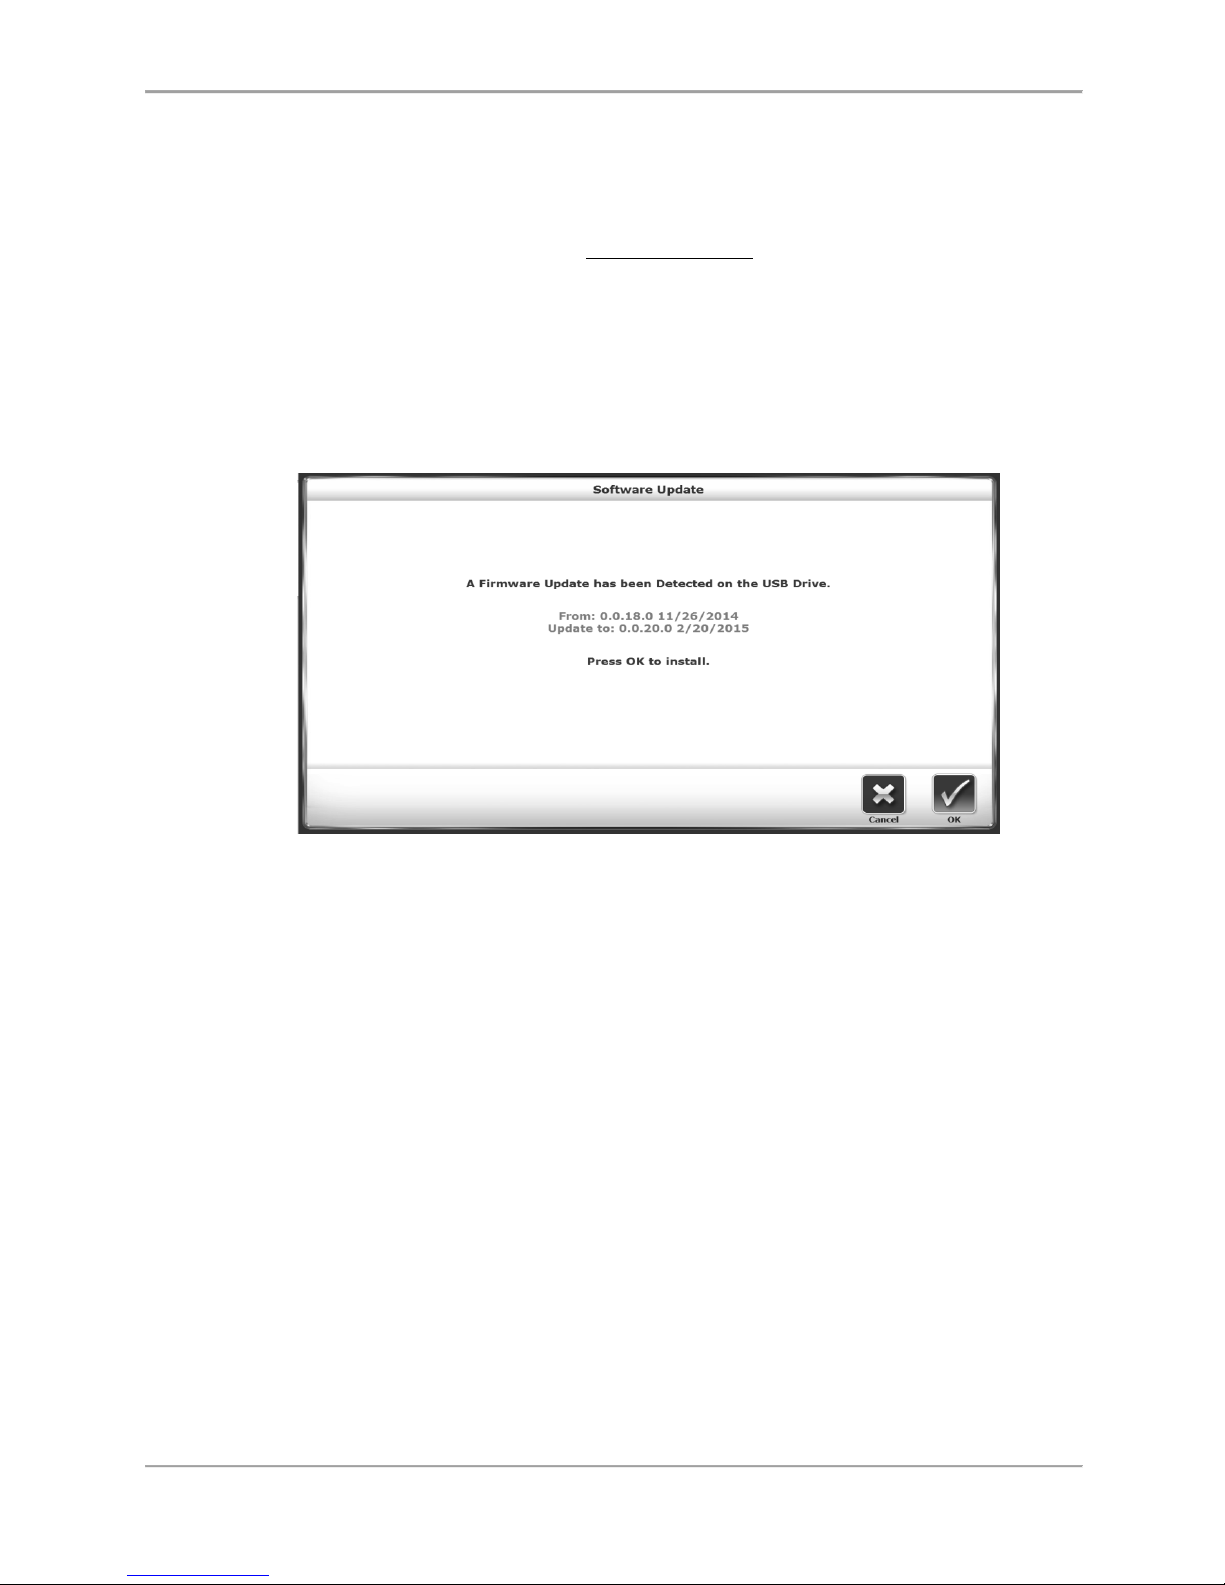
76 Biodex Medical Systems, Inc. © 2017
Software Updates
From time to time, it may be necessary to update the device’s software. The steps for updating
the software are as follows:
1. Download the updated software from www.biodex.com to a portable thumb drive. Be
sure to save the file in the root directory of the drive.
2. While the device monitor is displaying the main screen (with the <Gait Trainer> and
<Treadmill> icons), plug the thumb drive into one of the USB ports. The Software
Update screen (Figure 8.34) is displayed.
3. Follow the directions on the screen to complete the update.
Figure 8.34. Software Update Screen.
Page 77
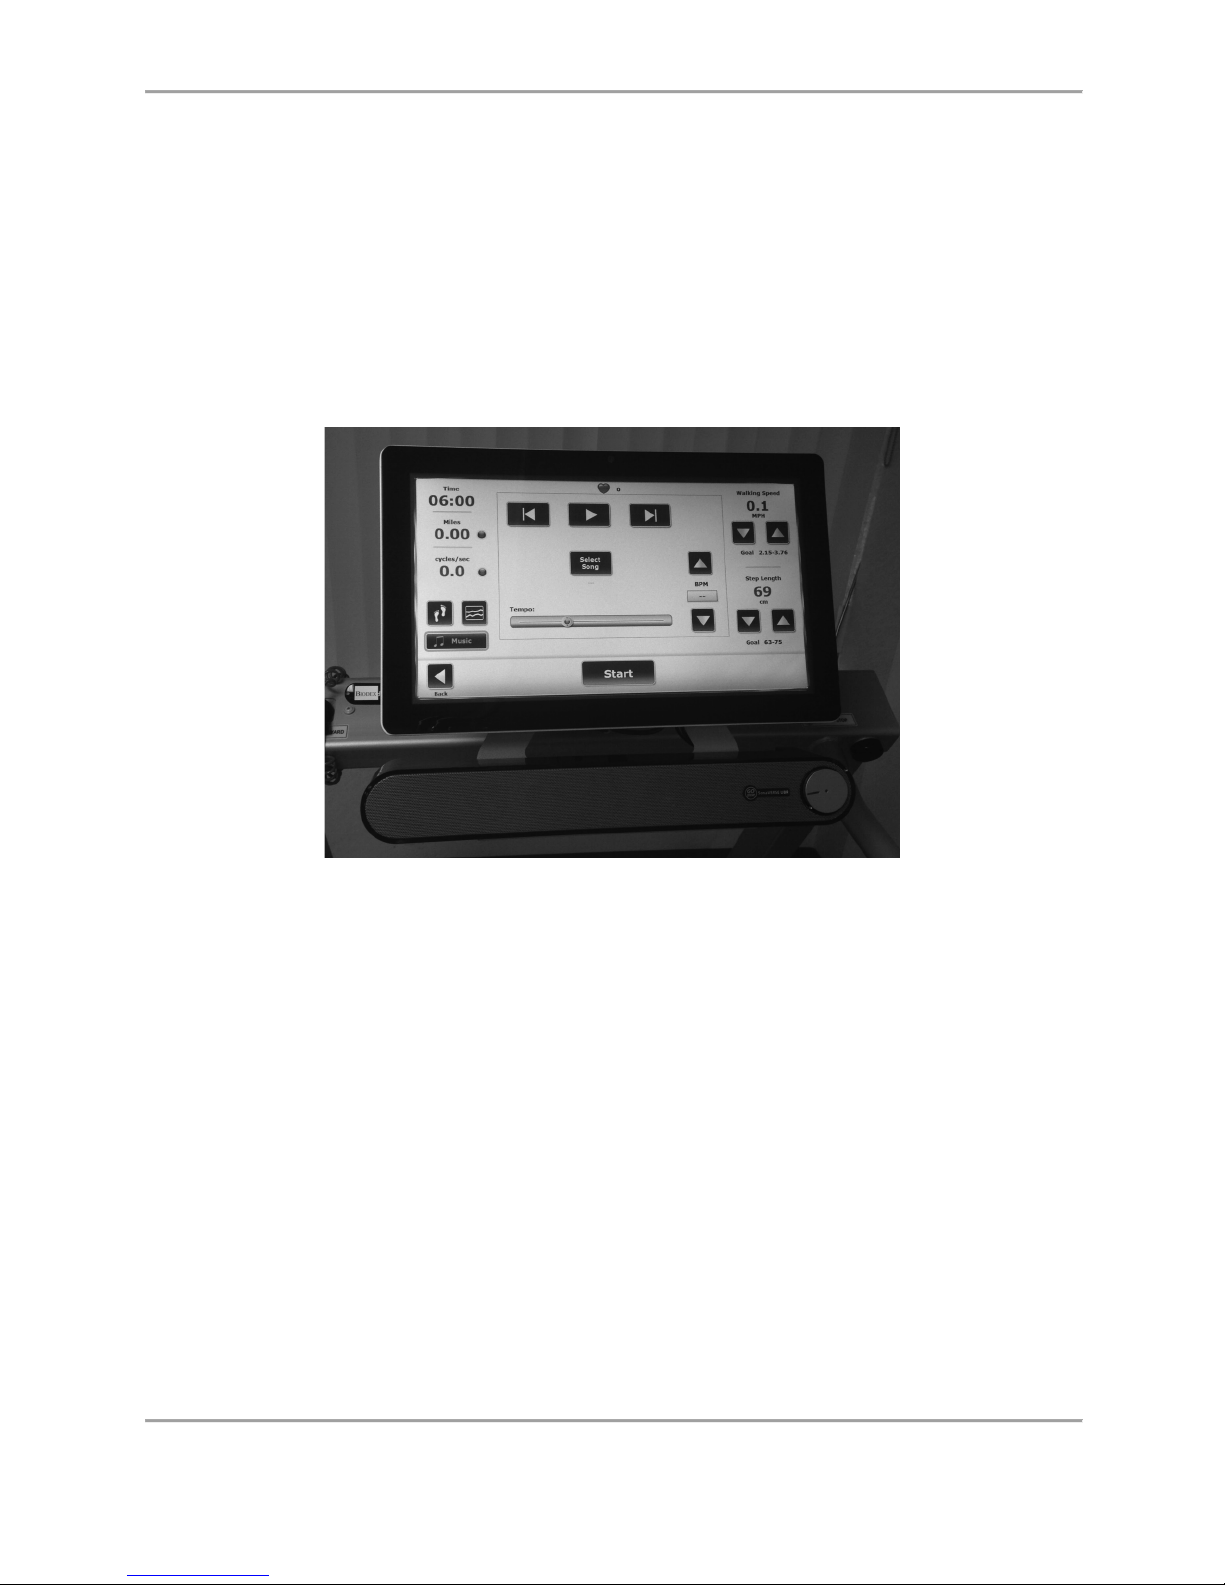
GAIT TRAINER 3 (v3.X SOFTWARE) 77
9. Music Therapy
The Biodex Gait Trainer 3 with version 3.X software can be configured with an optional Music
Therapy component (see Appendix B for a treatise on the use of music therapy in relation to the
Biodex Gait Trainer). The Music Therapy option includes a specially designed bracket to hold
the provided sound bar and a USB drive that activates the music player software and the music
therapy music files. If the Gait Trainer 3 was ordered from the factory with the Music Therapy
option, the sound bar will already be installed on the display.
NOTE: The sound bar on the actual gait trainer may be a different model than those displayed
in the manual.
Figure 9.1. Gait Trainer Display with Music Therapy Sound Bar Installed.
If the Music Therapy option was purchased at a later date, the sound bar can easily be installed.
Simply unscrew the lower two screws on the display mount, slide the sound bar bracket in
between the display and the display mount, and re-apply and tighten the screws.
NOTE: The back plate is made from cast aluminum. Please be careful when tightening the
screws as overt force could strip the threads.
Page 78
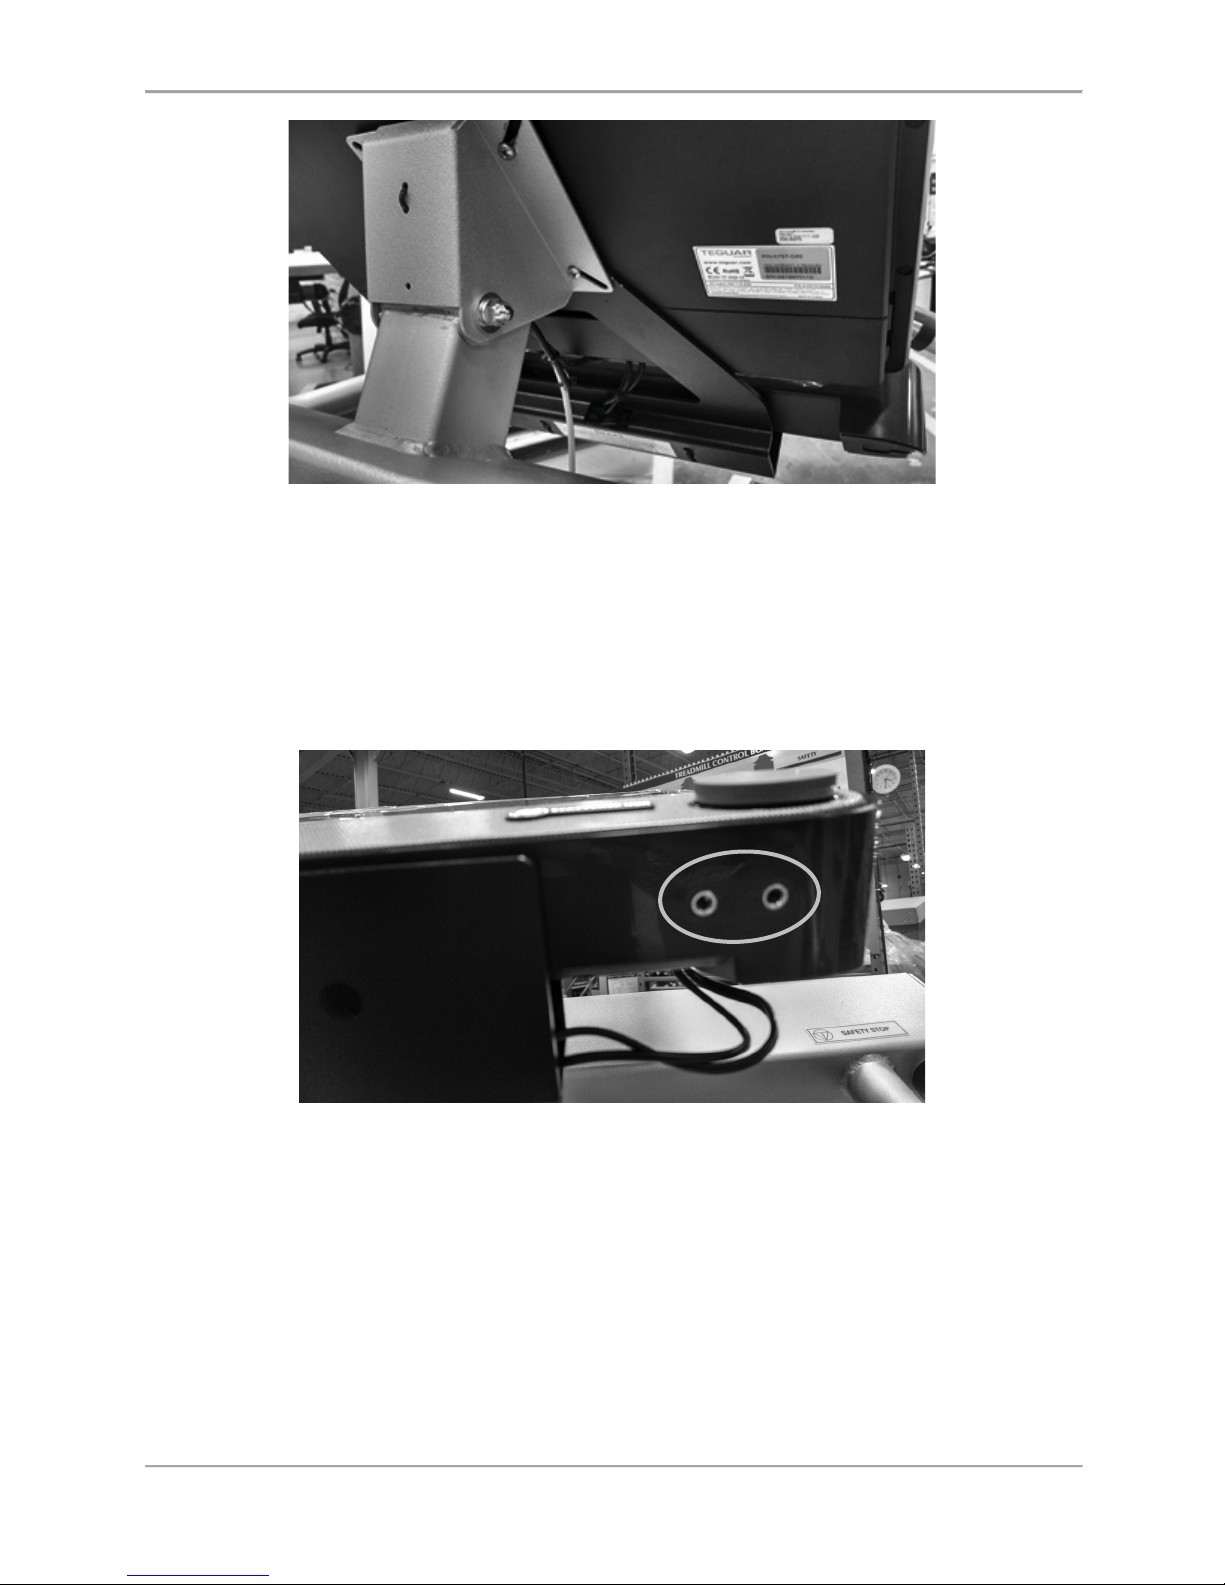
78 Biodex Medical Systems, Inc. © 2017
Figure 9.2. The sound bar mounting bracket is slid in behind the Gait Trainer display
bracket and fastened with the two screws from the Gait Trainer display
bracket.
The sound bar has two cables: one for power and one for sound (see Figure 9.4). Both plug
into the display directly above it. The sound bar also has standard jacks for headphones and a
microphone (see Figure 9.3).
Figure 9.3. The sound bar’s headphone and microphone jacks (circled).
Page 79
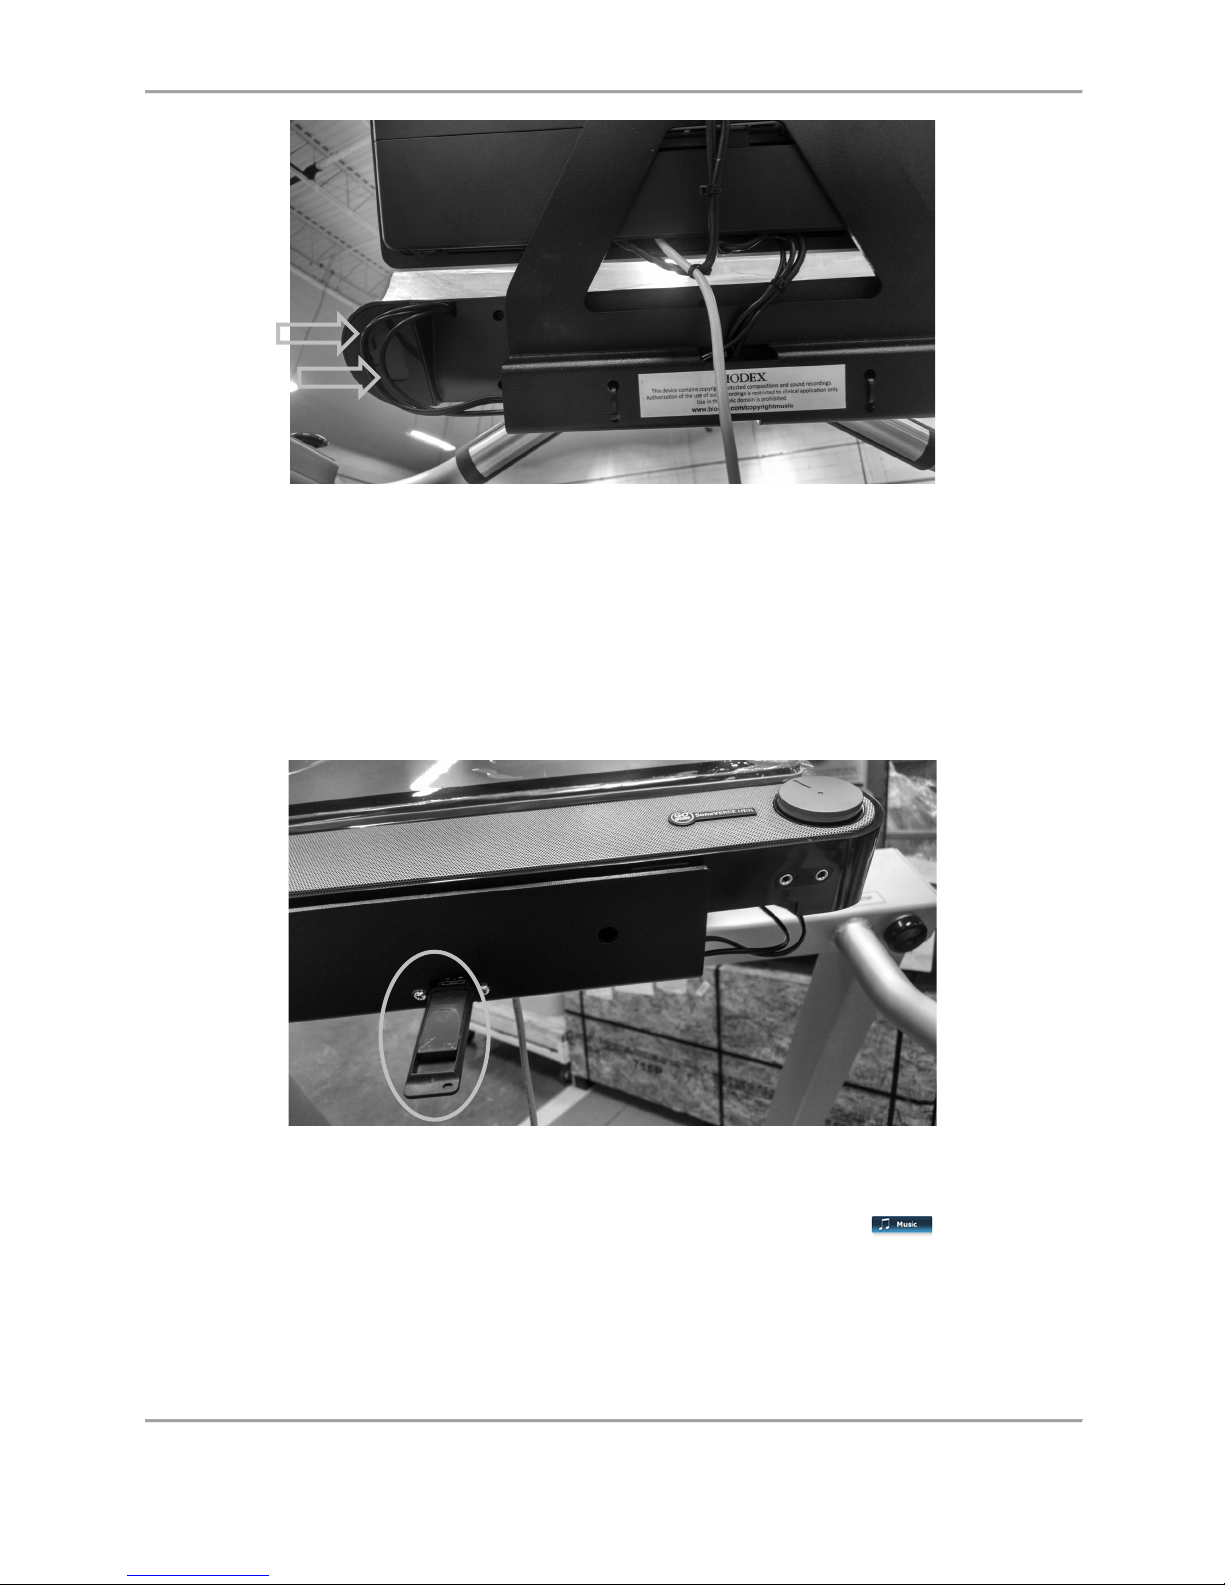
GAIT TRAINER 3 (v3.X SOFTWARE) 79
Figure 9.4. The sound bar’s power and sound cables (arrows).
The Music Therapy component will not be activated until the flash drive is inserted into one of
the USB ports on either the side or the bottom of the display. (The location of USB ports may
vary depending on the display model.) The software will activate automatically once the flash
drive is inserted. If the Gait Trainer was ordered with the Music Therapy option, the flash drive
is included in the packaging along with the manual, safety lanyard, etc.
Figure 9.5. USB Port on the Side of the Display with Flash Drive Inserted.
When the Music Therapy software is activated, the music therapy button ( ) will be
visible on the left hand side of the Gait Trainer mode screen.
Page 80
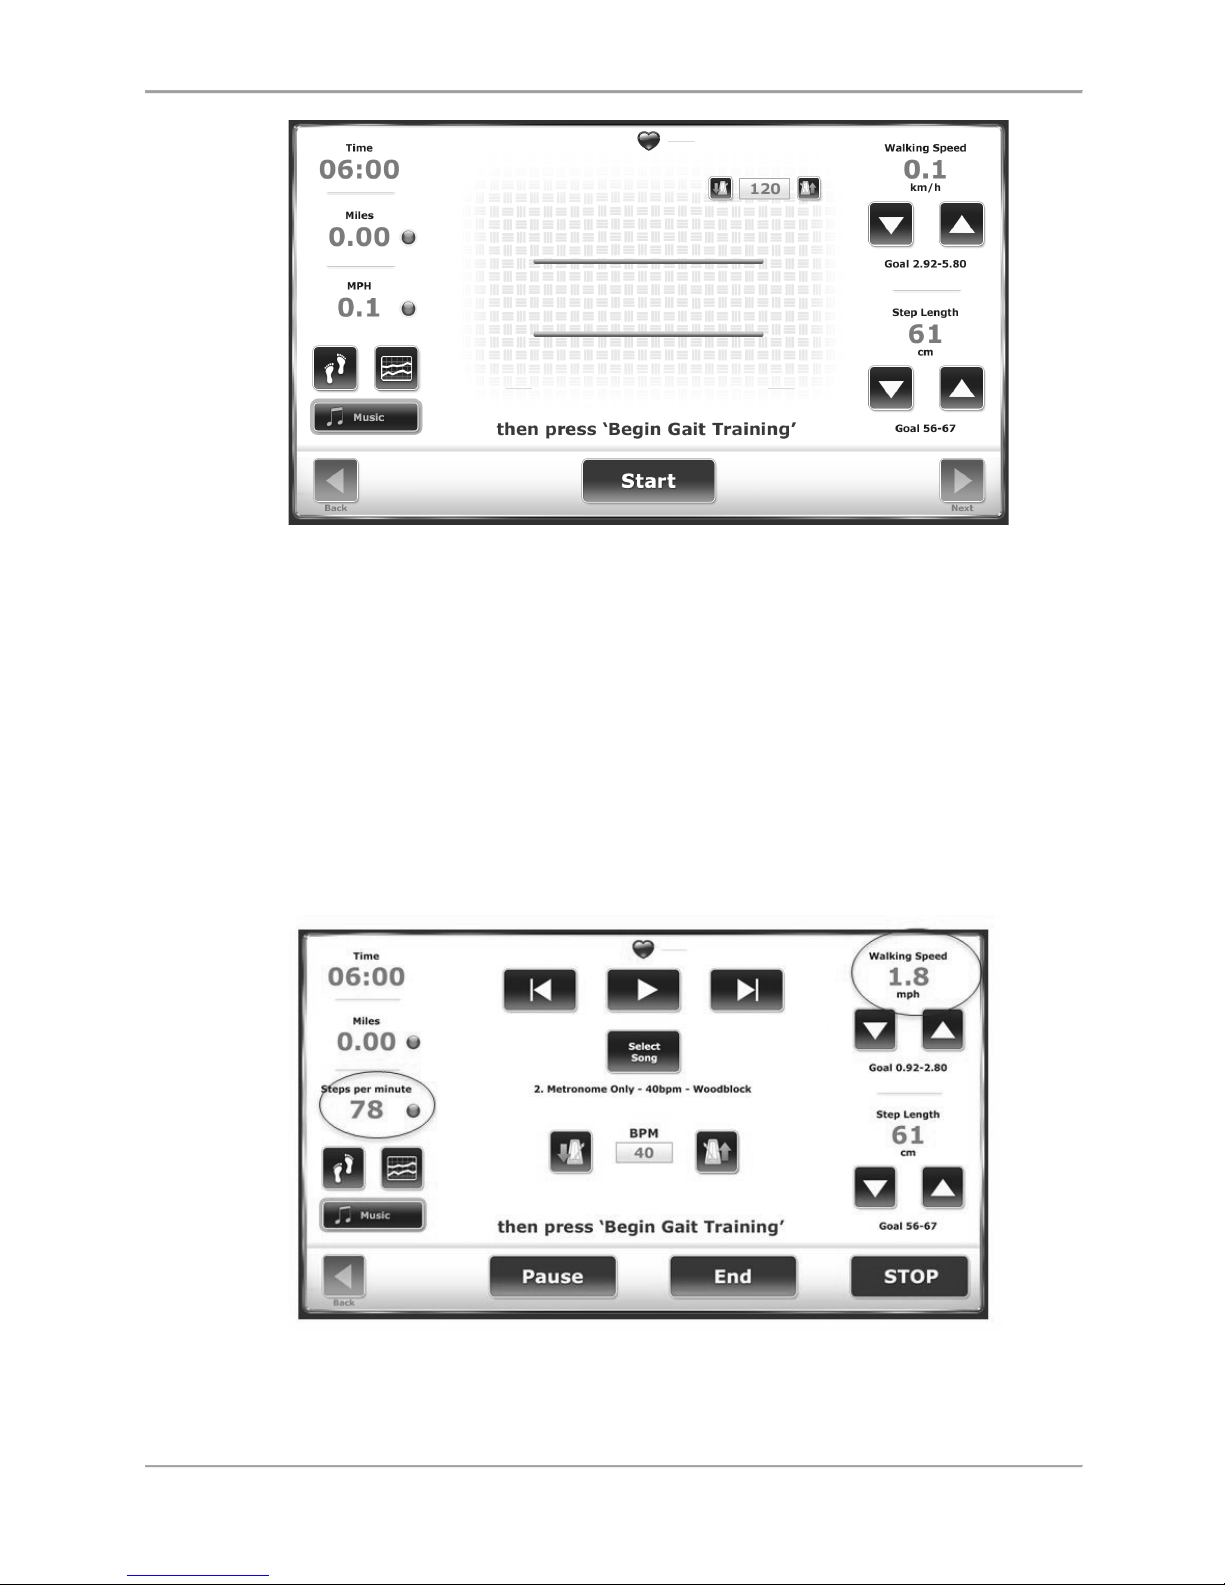
80 Biodex Medical Systems, Inc. © 2017
Figure 9.6. The Music Therapy software package activation will be marked by the
“Music” button in the lower left corner.
During an initial assessment, a Music Therapist assesses the patient's gait with either an overground session (10 meter walk test) or if they have the Biodex Gait Trainer, with a standard Gait
Trainer mode session—no music.
The Music Therapist, using the toggle button on the left side of the screen, converts the
patient's walking pace from the walk test speed measurement (usually MPH) to steps per
minute. This is how the therapist/clinician will "fit the music" to a prescribed song tempo (beats
per minute or BPM) from the music library to optimize the patient's gait pattern.
The therapist touches the <Music> button located below the <Footfalls> and <Histograms>
buttons. On the following screen, the Music Library is accessed by touching <Select Song>.
Figure 9.7. Setting the Toggle to Steps per Minute
Page 81
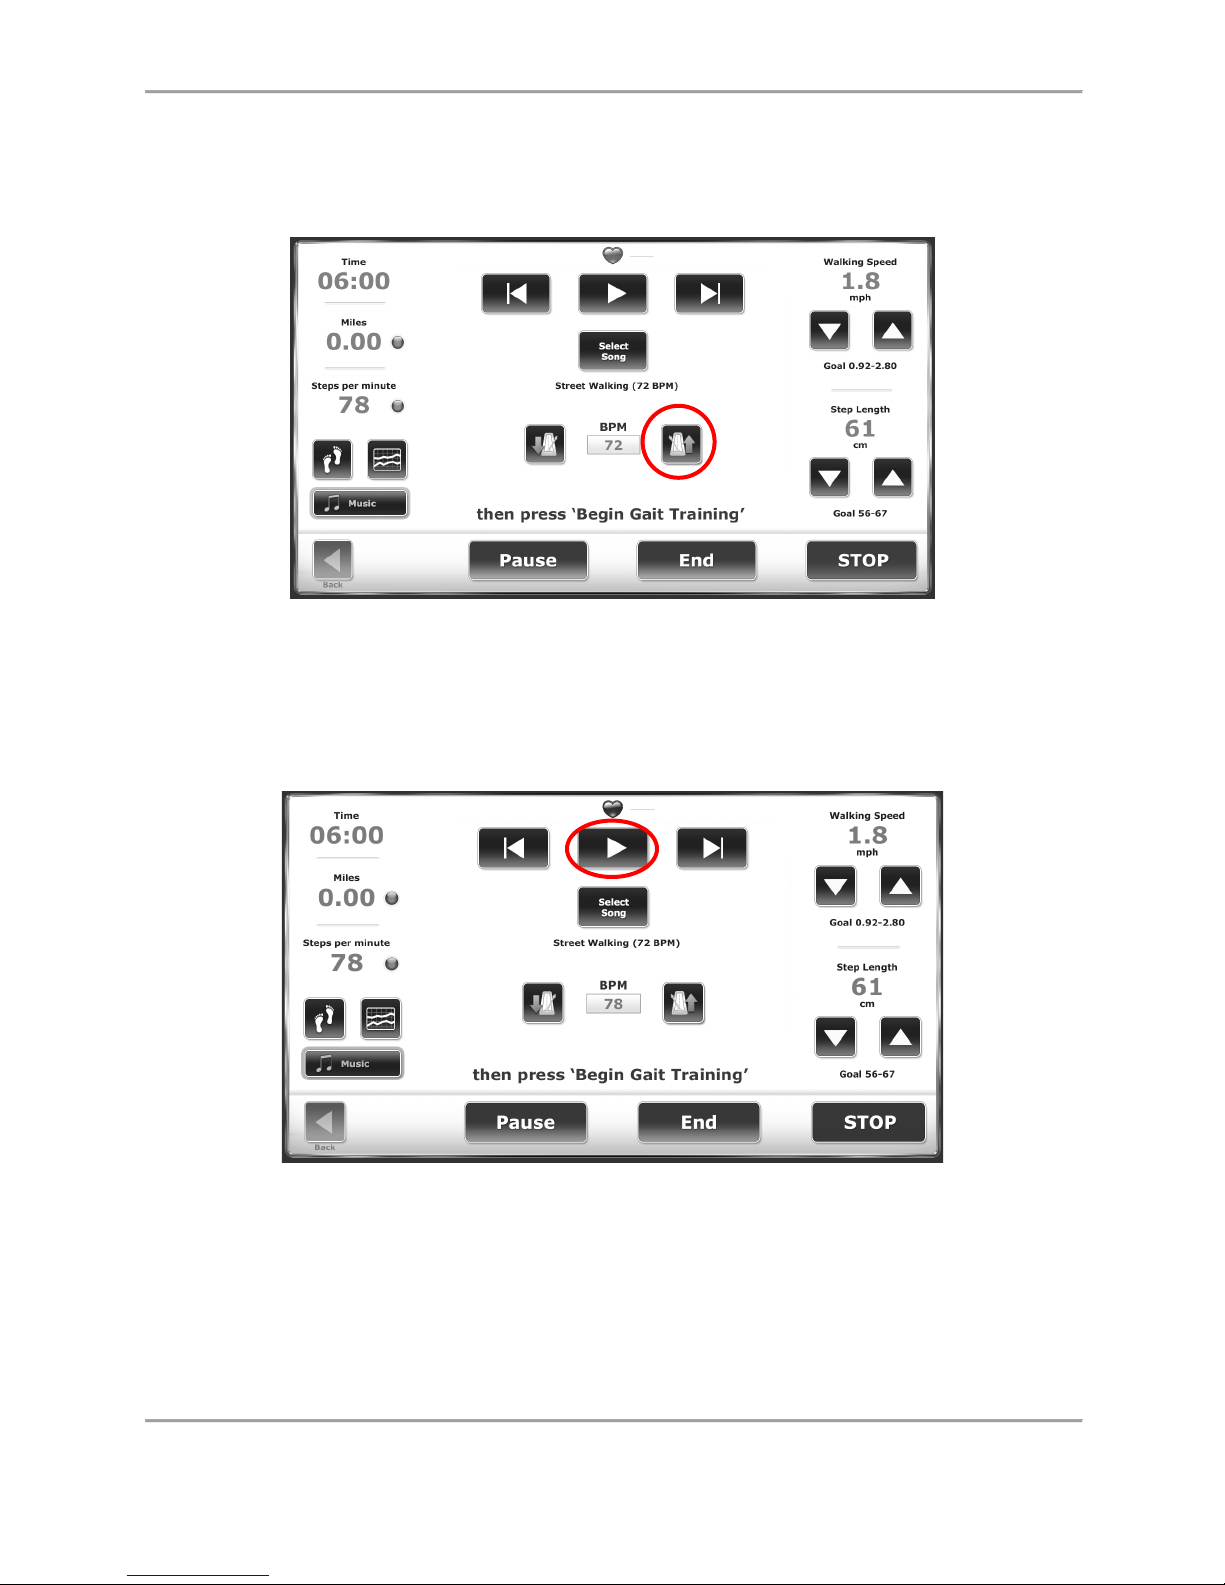
GAIT TRAINER 3 (v3.X SOFTWARE) 81
In this example, the 72 BPM version of the song “Street Walking” is selected.
Figure 9.8. Setting the Beats per Minute (BPM)
To match the BPM of the song with the steps per minute reading on the left, touch the “up”
<Metronome> button until the BPM reads “78”.
Figure 9.9. Pressing the Play Button.
The therapist presses the <Play> button to start the music for the patient to begin gait training.
Page 82
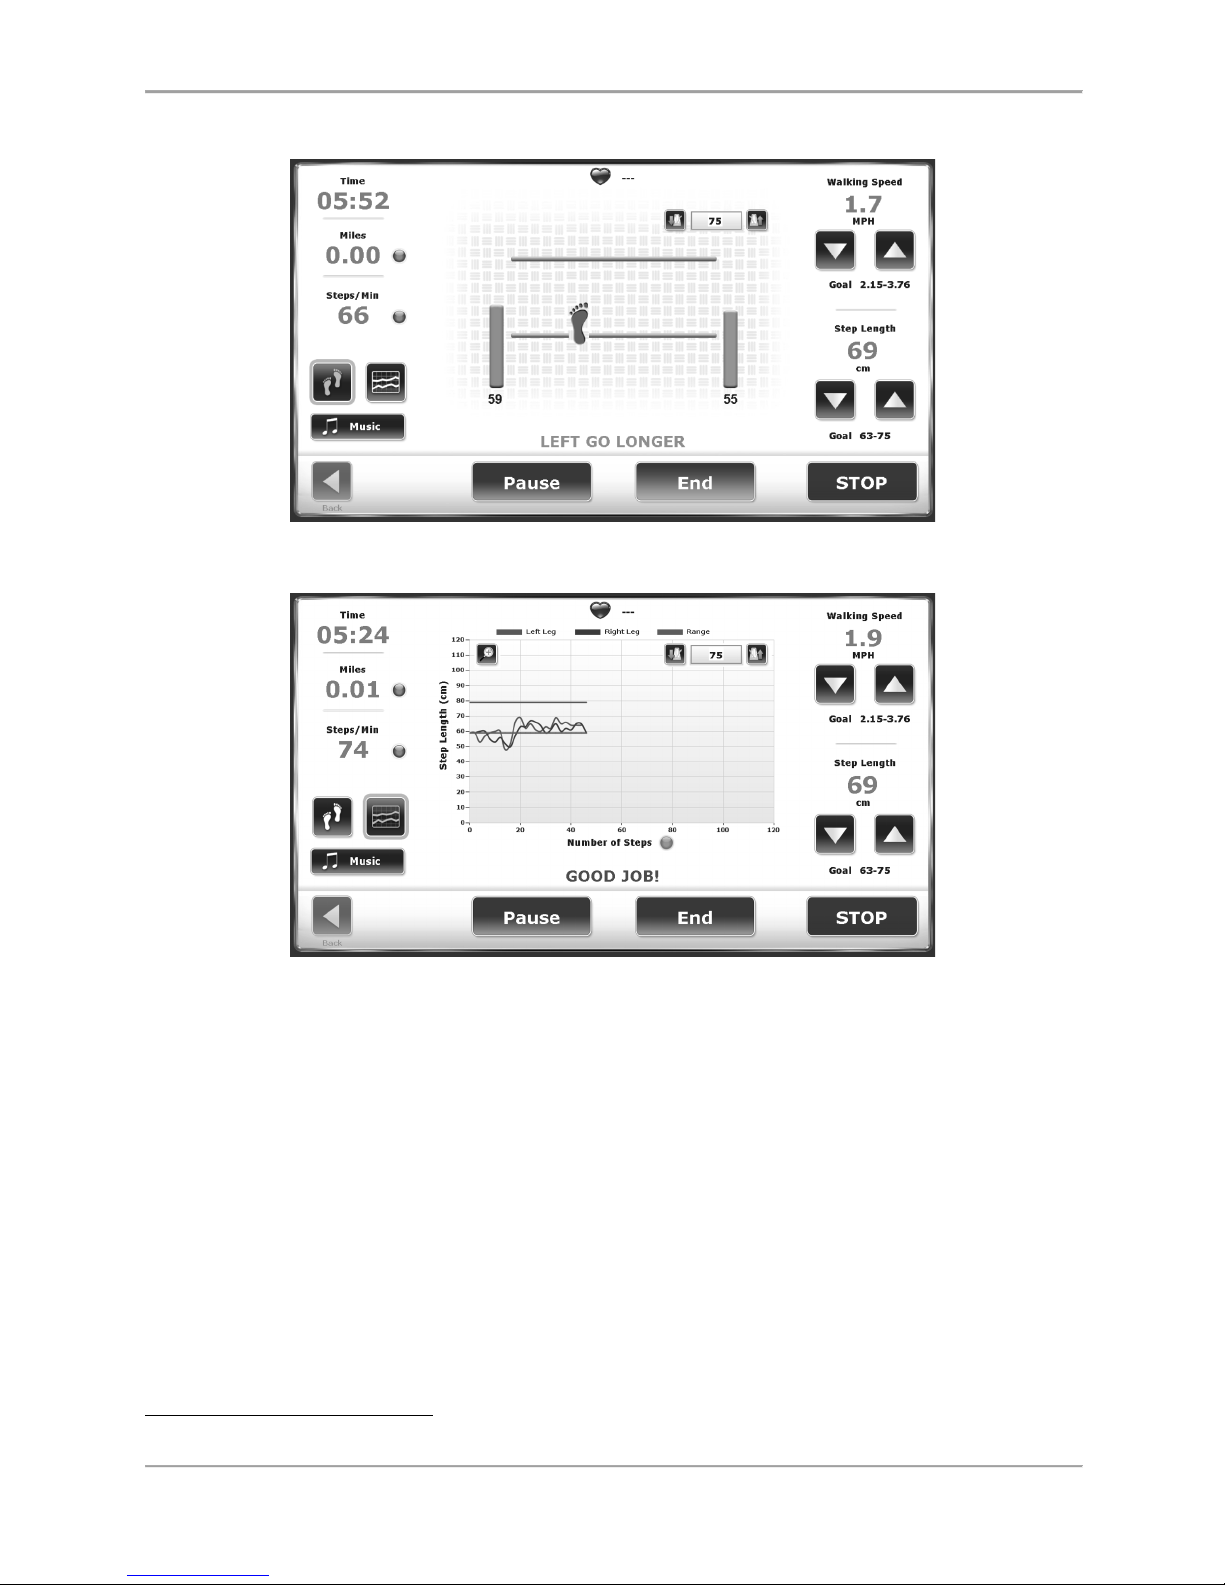
82 Biodex Medical Systems, Inc. © 2017
Below are two sample biofeedback screens from a gait training session with music therapy:
Figure 9.10. When Music Therapy is installed, the tempo can be adjusted to optimize
the gait pattern
Figure 9.11. Histograms are displayed for Music Therapy including the music tempo
Each song in the Music Library has an identifiable BPM. During therapy, the tempo is typically
increased in increments of 10% but clinicians may adjust belt speed and music at any time to
better fit the patient’s need and therapy targets (i.e., getting the patient out of a shuffling gait
into a long stride). Compositions such as “Animals Everywhere” (70/80/90bpm) offer a bass line
at half tempo for the clinician to cue slowed, long strides without having to adjust the tempo.
As a result, the therapist must only make slight belt speed (walking cadence) adjustments until
the patient relaxes into a more open gait pattern according to Patterned Sensory Enhancement
(PSE)1 strategies.
Note: Patterned Sensory Enhancement (PSE) is a technique that uses the rhythmic, melodic,
harmonic and dynamic-acoustical elements of music to provide temporal, spatial, and force
cues for movements that reflect functional exercises and activities of daily living. PSE is broader
1
Refer to the fourth entry in the References section.
Page 83

GAIT TRAINER 3 (v3.X SOFTWARE) 83
in application than Rhythmic Auditory Stimulation (RAS), because it is (a) applied to movements
that are not rhythmical by nature (e.g., most arm and hand movements, functional movement
sequences such as dressing or sit-to-stand transfers) and (b) it provides more than just
temporal cues. PSE uses musical patterns to assemble single, discrete motions (e.g., arm and
hand movements during reaching and grasping), into functional movement patterns and
sequences. PSE cues movements temporally, spatially, and dynamically during training
exercises.
The patient walks (i.e., gait trains) using the music therapy informed compositions to achieve
"entrainment"; the repetition of the gait training aids in the reconditioning of neural pathways
(“neuroplasticity”). The Histogram screen is the preferred biofeedback as it illustrates when
entrainment occurs; in other words, when the footfalls (steps) register within the step targets
for a steady period of time.
When the gait training session with music therapy is complete, a report documents the song
title, starting bpm, and the percent change of the song tempo in addition to showing all the
important gait parameter measures of: gait speed, step length, step length variability, and
such.
Page 84
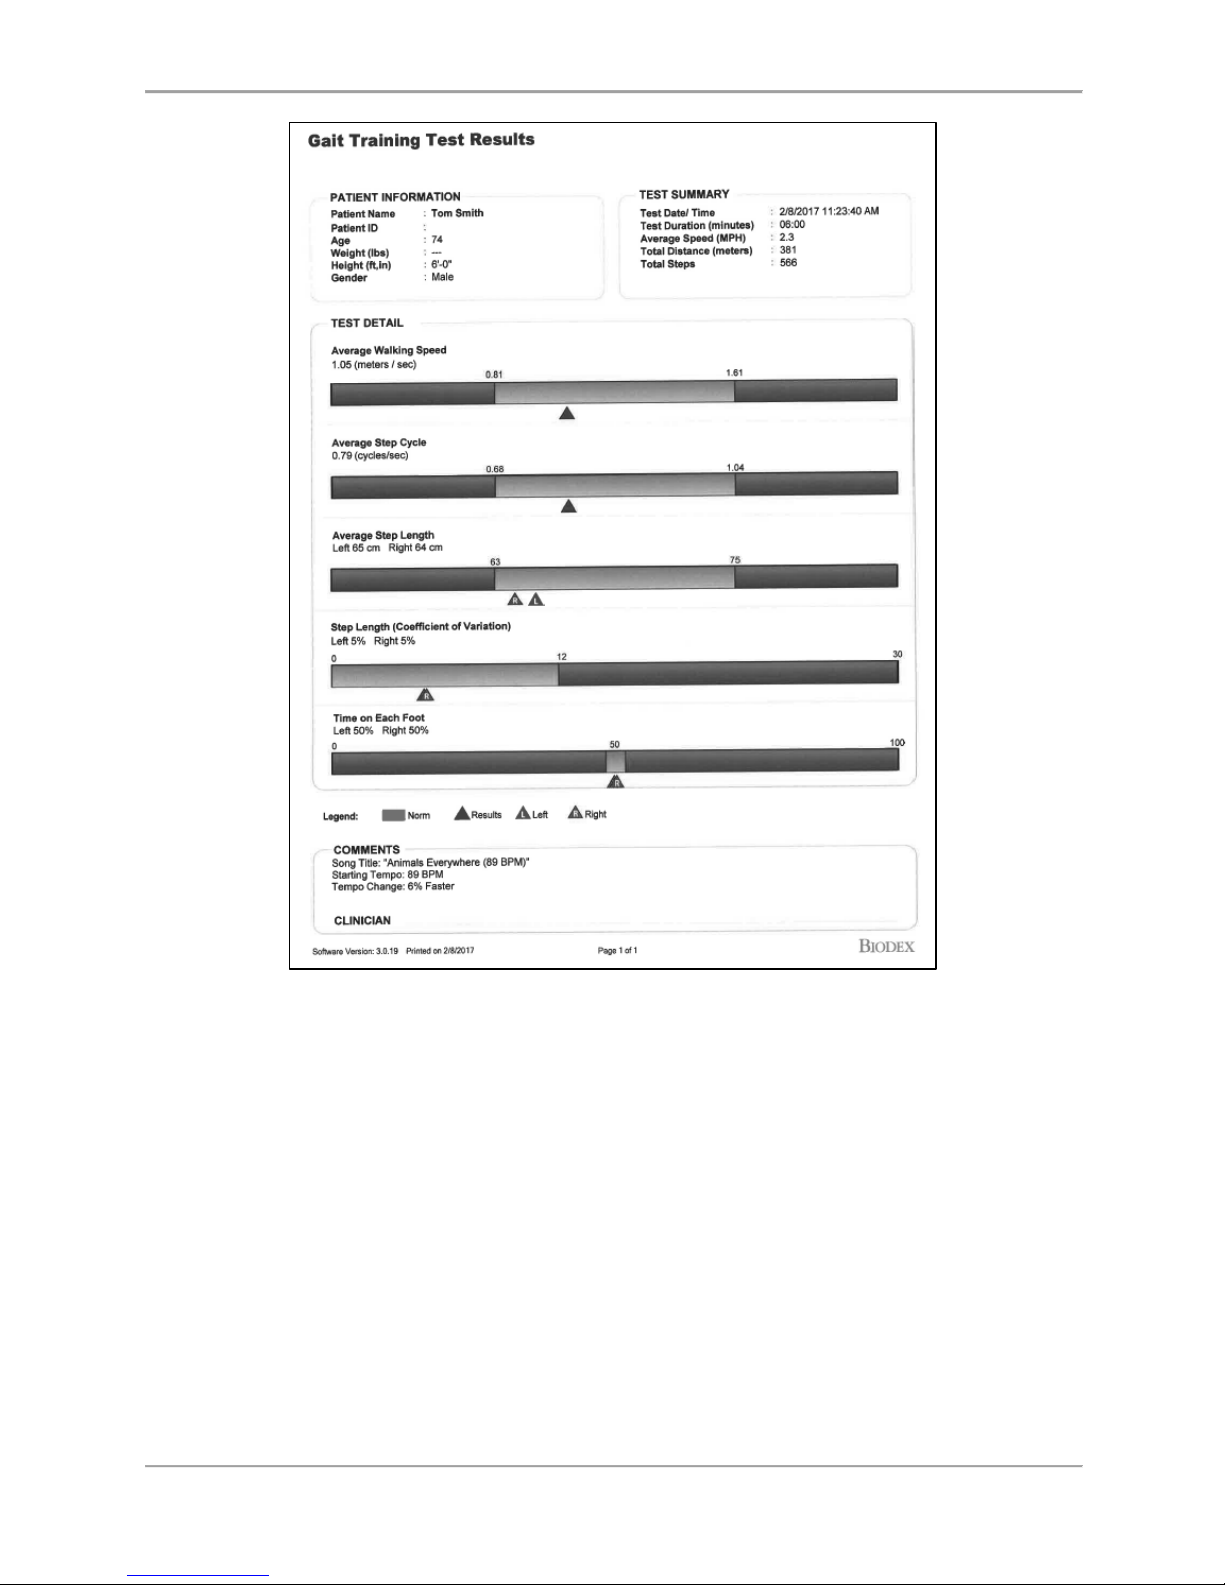
84 Biodex Medical Systems, Inc. © 2017
Figure 9.12. Gait Training Test Results
The patient is often sent home with prescribed music therapy songs to play on an mp3
compatible device. In this way, the music therapy treatment can be continued outside of the
session. On returning to the clinic, the patient can work with the therapist to modify/monitor
the music therapy exercises.
On the Music Therapy screen when <Select Song> is touched, the contents (audio files) of the
currently inserted flash drive are displayed. If the Biodex flash drive is inserted, a library of
songs composed specifically for music therapy will be displayed. A different flash drive can be
inserted (although not at the same time) and the software will display any audio files that are in
the flash drive’s root directory. If music therapists intend to play songs that they have
composed in addition to the Biodex provided files, the therapists are advised to save their
compositions to the Biodex flash drive via their own computers. Their compositions will be
displayed along with the others songs included in the Biodex library.
If the user uploads songs to a flash drive and inserts the drive into one of the USB ports on the
display, the system will identify them and make them available for music therapy. However, the
Page 85
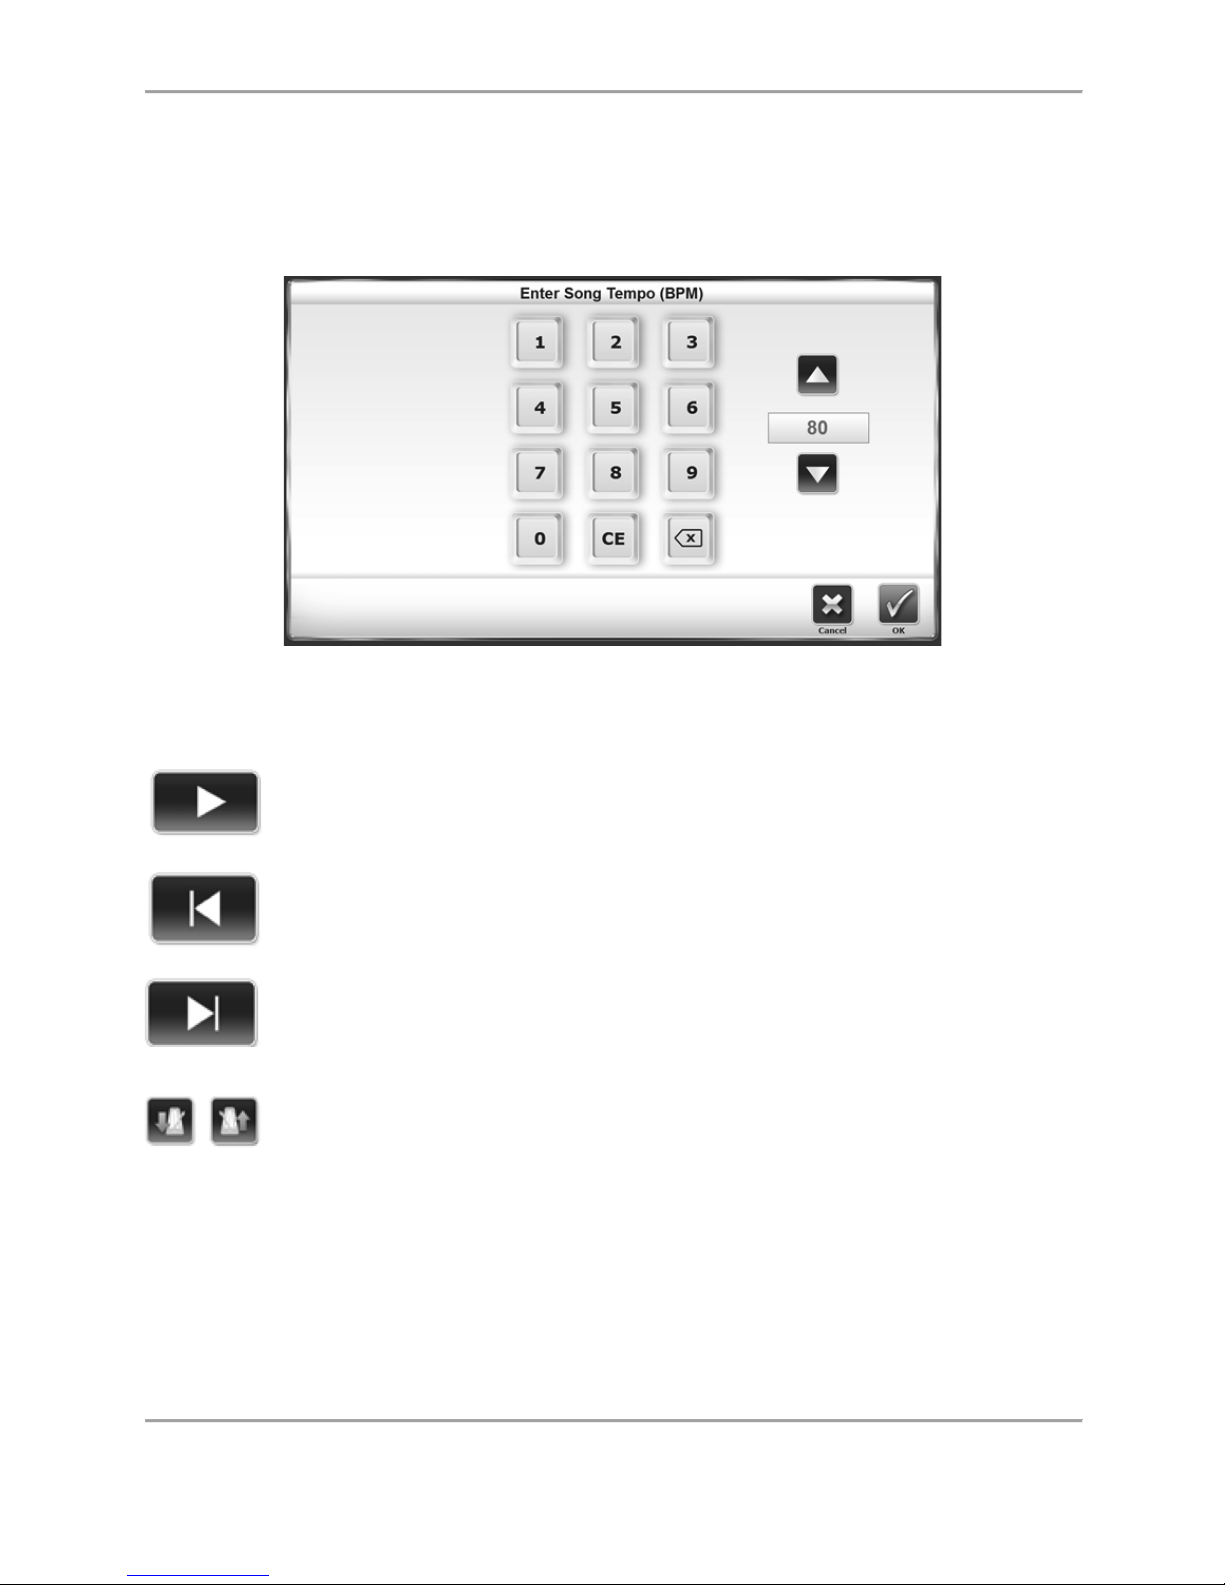
GAIT TRAINER 3 (v3.X SOFTWARE) 85
baseline tempo will be unknown and will need to be entered for tempo control to work
correctly.
For each song with no tempo identified, enter the tempo (in this case 80 BPM [Beats Per
Minute]) and touch <OK>.
Figure 9.13. Entering a song’s tempo (BPM).
The Controls work as follows:
Play: Starts the song and, if already playing, will pause the music.
Previous Song: Navigates to the previous song on the flash drive or if the
current song has played for five seconds, it will restart the current song at its
default tempo.
Next Song: Navigates to the next song on the flash drive.
Tempo Adjustment: On the top of the screen, the two buttons with
metronomes are used to adjust the tempo from any Gait Training view not just
the music player interface. The buttons are, from left to right, tempo down and
tempo up.
Note: The next and previous buttons will only load songs with defined tempos. Songs that have
not had their tempo set will be ignored when using those two buttons.
The system will remember the tempo that was entered for any previously selected song and will
not ask for it to be entered again when retrieved from the library.
Page 86

86 Biodex Medical Systems, Inc. © 2017
A more comprehensive clinical guideline for music therapy protocols will be available to help
guide a music therapy program. Visit www.biodex.com or email [email protected] for more
information.
The music therapy component of the Gait Trainer 3 should only be utilized by a
credentialed music therapist.
Music Compositions
The following songs will be included with the Music Therapy option:
Metronome: This series of compositions will include the following selections:
• Metronome Only – E Click (20BPM).mp3
• Metronome Only – E Click (40BPM).mp3
• Metronome Only – E Click (60BPM).mp3
• Metronome Only – E Click (80BPM).mp3
• Metronome Only – E Click (100BPM).mp3
• Metronome Only – E Click (120BPM).mp3
• Metronome Only – Woodblock (20BPM).mp3
• Metronome Only – Woodblock (40BPM).mp3
• Metronome Only – Woodblock (60BPM).mp3
• Metronome Only – Woodblock (80BPM).mp3
• Metronome Only – Woodblock (100BPM).mp3
• Metronome Only – Woodblock (120BPM).mp3
Genre Compositions with Metronome: The following compositions are included:
• 50’s 1 – (120BPM)
• 50’s 2 – (80BPM)
• 70’s – (116BPM)
Music Therapy Informed: The following compositions are included:
• Animals Everywhere (45BOM)
• Animals Everywhere (57BOM)
• Animals Everywhere (72BOM)
• Animals Everywhere (89BOM)
• Animals Everywhere (108BOM)
• Street Walking (72BPM)
• Street Walking (90BPM)
• Silvery Moon Medley (90BPM)
• Silvery Moon Medley (100BPM)
• Silvery Moon Medley (110BPM)
• Silvery Moon Medley (121BPM)
Copyright Notice of Music Compositions
Music Therapy Compositions provided with Biodex Medical Systems, Inc. products are protected
under U.S. Copyright laws. Use of these compositions is restricted to clinical application only.
Use in any public domain is strictly prohibited.
“Silvery Moon Medley” is a music therapy arrangement.
Copyright © 2016 The Center for Music Therapy, Inc.
Page 87

GAIT TRAINER 3 (v3.X SOFTWARE) 87
Phonorecord ℗ 2016 The Center for Music Therapy, Inc.
Note: “Silvery Moon Medley” is a Music Therapy arrangement from three compositions:
1. "By The Light of the Silvery Moon" © 1909; original music by Gus Edwards.
2. "Shine On Harvest Moon" © 1908; lyrics by Jack Norworth, music by Nora Bayes-Norworth,
copyright Jerome H. Remick of New York and Detroit.
3. "On Moonlight Bay" © 1912; lyrics by Edward Madden, music by Percy Wenrich.
“Street Walking’’ is an original Music Therapy composition.
Copyright © 2015 The Center for Music Therapy, Inc.
Phonorecord ℗ 2015 The Center for Music Therapy, Inc.
“Animals Everywhere” is an original Music Therapy composition.
Copyright © 2015 The Center for Music Therapy, Inc.
Phonorecord ℗ 2015 The Center for Music Therapy, Inc.
Page 88
88 Biodex Medical Systems, Inc. © 2017
10. Maintenance
The Biodex Gait Trainer 3 should provide trouble-free operation as long as the following
maintenance procedures are performed. To verify hours of operation, touch <Utilities> and
touch the right-left-right sequence on the main system Utilities screen to activate the
<Advanced System Maintenance> button (refer to Figure 10.2). From there, touch the <Hours
of Use> button, where hours of use will be indicated, both in total and in MPH categories (see
Figure 10.3). Be sure to adhere to the hours of usage guidelines in Table 10.1.
NOTE: Without proper maintenance, excessive wear to drive components will occur. To assure
trouble-free operation, scheduled maintenance must be performed. Failure to adhere to the
scheduled maintenance instructions below will void the warranty.
WARNING: Only qualified persons should perform maintenance and repair on
this device. This is a motorized device with many moving assemblies.
Precaution is necessary.
AVERTISSEMENT: Seulement les personnes qualifiées devraient exécuter
l'entretien et la répa-ration sur ce dispositif. C'est un dispositif motorisé avec
beaucoup d'assemblées mobiles. La pré-caution est nécessaire.
Page 89
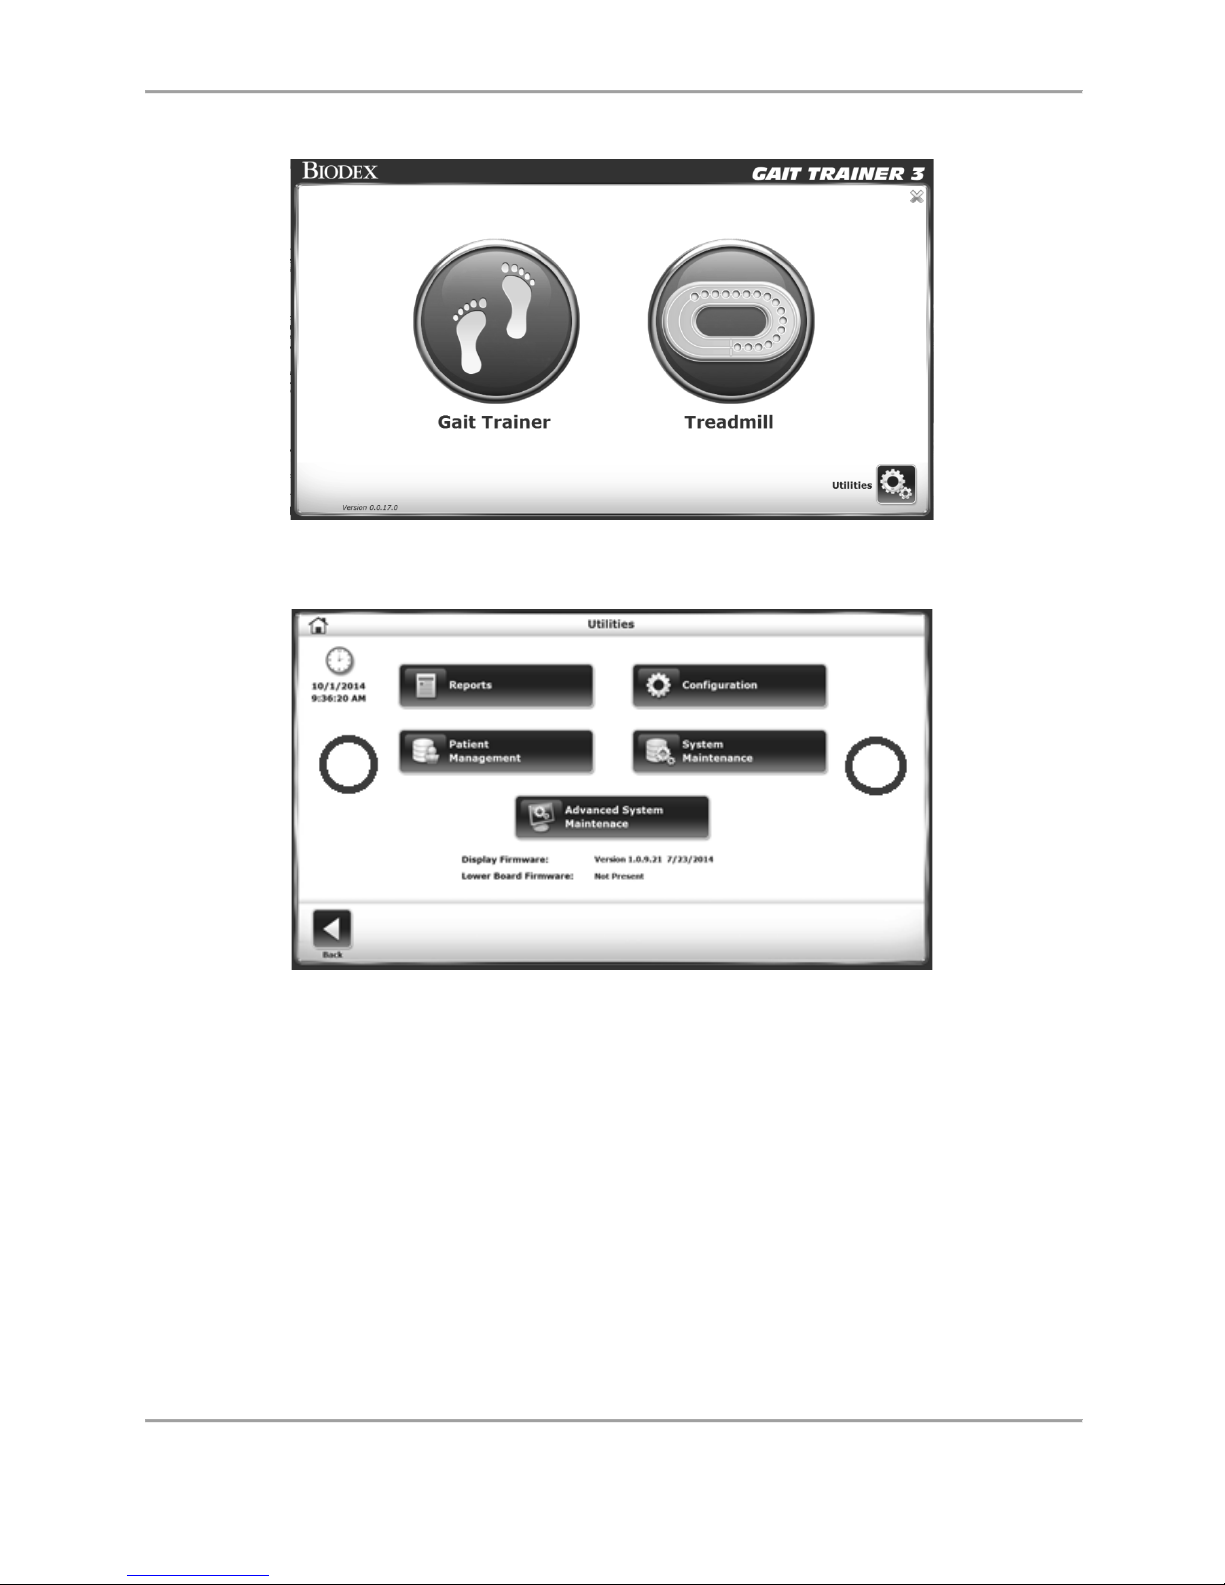
GAIT TRAINER 3 (v3.X SOFTWARE) 89
Figure 10.1. Main Screen
Figure 10.2. Main Menu, followed by right-left-right touches to activate Advanced
System Maintenance button.
Page 90
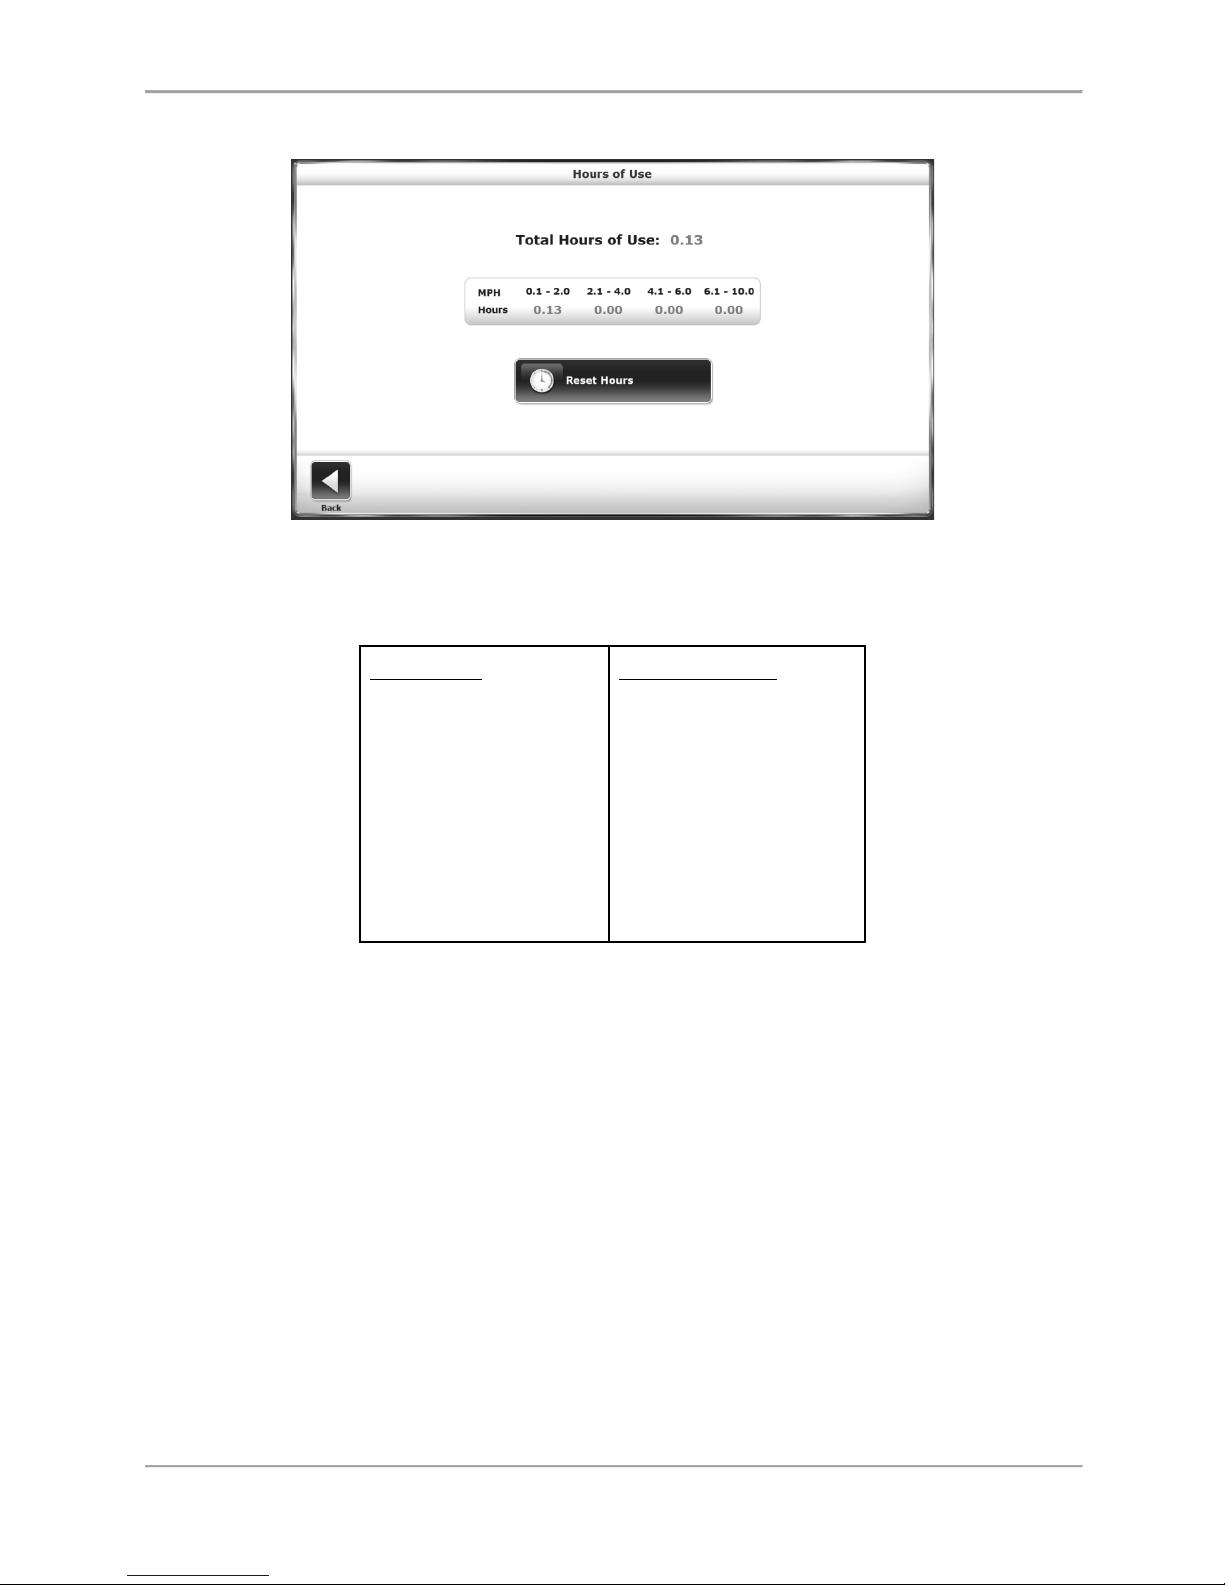
90 Biodex Medical Systems, Inc. © 2017
Figure 10.3. Hours of Use screen.
Table 10.1. Hours of Usage Guidelines
Instruction
Lubricate Deck
Reverse Deck
Belt Replacement
Clean Motor and Amp
Front Roller Cleaning
Hours of Usage
75
1,000
1,000
750
375
Daily Maintenance
As required, clean all exterior surfaces, excluding the display with a light application of
disinfectant and wipe dry with paper towels.
NOTE: DO NOT use solutions containing ammonia.
Hardware computer components should be wiped clean as needed using a soft rag dampened
with alcohol.
Quarterly Maintenance
Lubricate the treadbelt and slider deck. The Biodex Lubricant Kit is designed to reduce friction
between the treadbelt and the slider deck. It is required for all institutional treadmills. Proper
Page 91

GAIT TRAINER 3 (v3.X SOFTWARE) 91
and timely application of the lubricant will prevent premature failures due to excessive wear
and load. Items affected by inadequate lubrication are the treadbelt, slider deck, motor, and
motor controller.
Annually or Every 1,000 Hours Reverse Exact-Track Bed
Reverse the Exact-Track bed. The Gait Trainer 3 bed is double-sided, allowing it to be reversed
and used over. Once both sides have been used, the bed must be replaced.
Replace Treadbelt
Inspect Treadbelt for cracks or tears. If none are found, continue to use. If any cracks or tears
are apparent, replace the treadbelt.
Maintenance Procedures Belt/Deck Lubrication
1. Using the large syringe provided, squirt one-half tube of the lubricant underneath the
center of the treadbelt (see Figure 10.4).
2. Walk ten steps on the Gait Trainer 3 at a speed of 1.0 mph. This will moisten an 8-inch
track underneath the center of the entire treadbelt.
3. Allow the Gait Trainer 3 to dry for approximately ten minutes.
NOTE: Use only the Biodex lubricant kit with the Gait Trainer 3. Most standard greases, waxes
and silicon sprays will build up on the rollers causing belt slippage and affecting tracking.
To re-order lubricant kit, use Biodex part # 945-276. Each container provides 12 applications.
Page 92
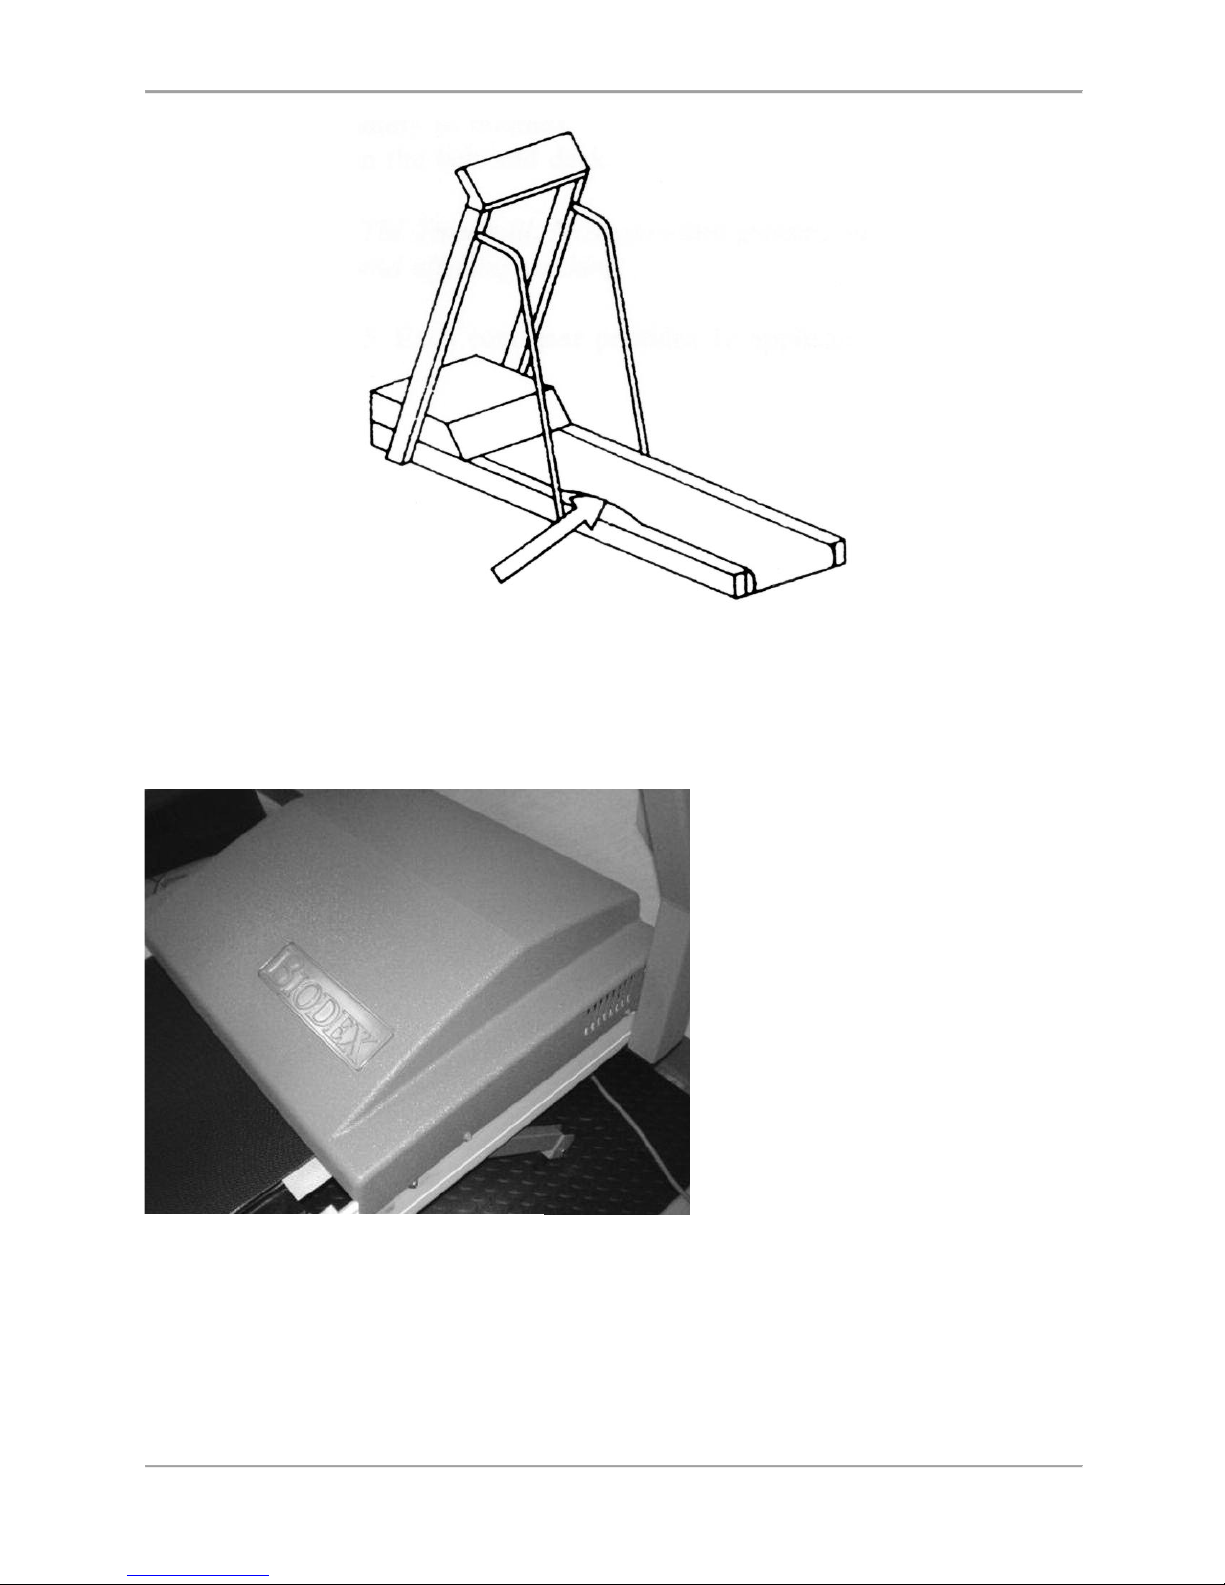
92 Biodex Medical Systems, Inc. © 2017
Figure 10.4. Squirt one-half tube of lubricant between the belt and deck.
Treadbelt Adjustment
1. Remove the 6 Phillips head screws
from the cover. Lift the cover off
the treadmill.
Figure 10.5. Treadmill Cover
Page 93
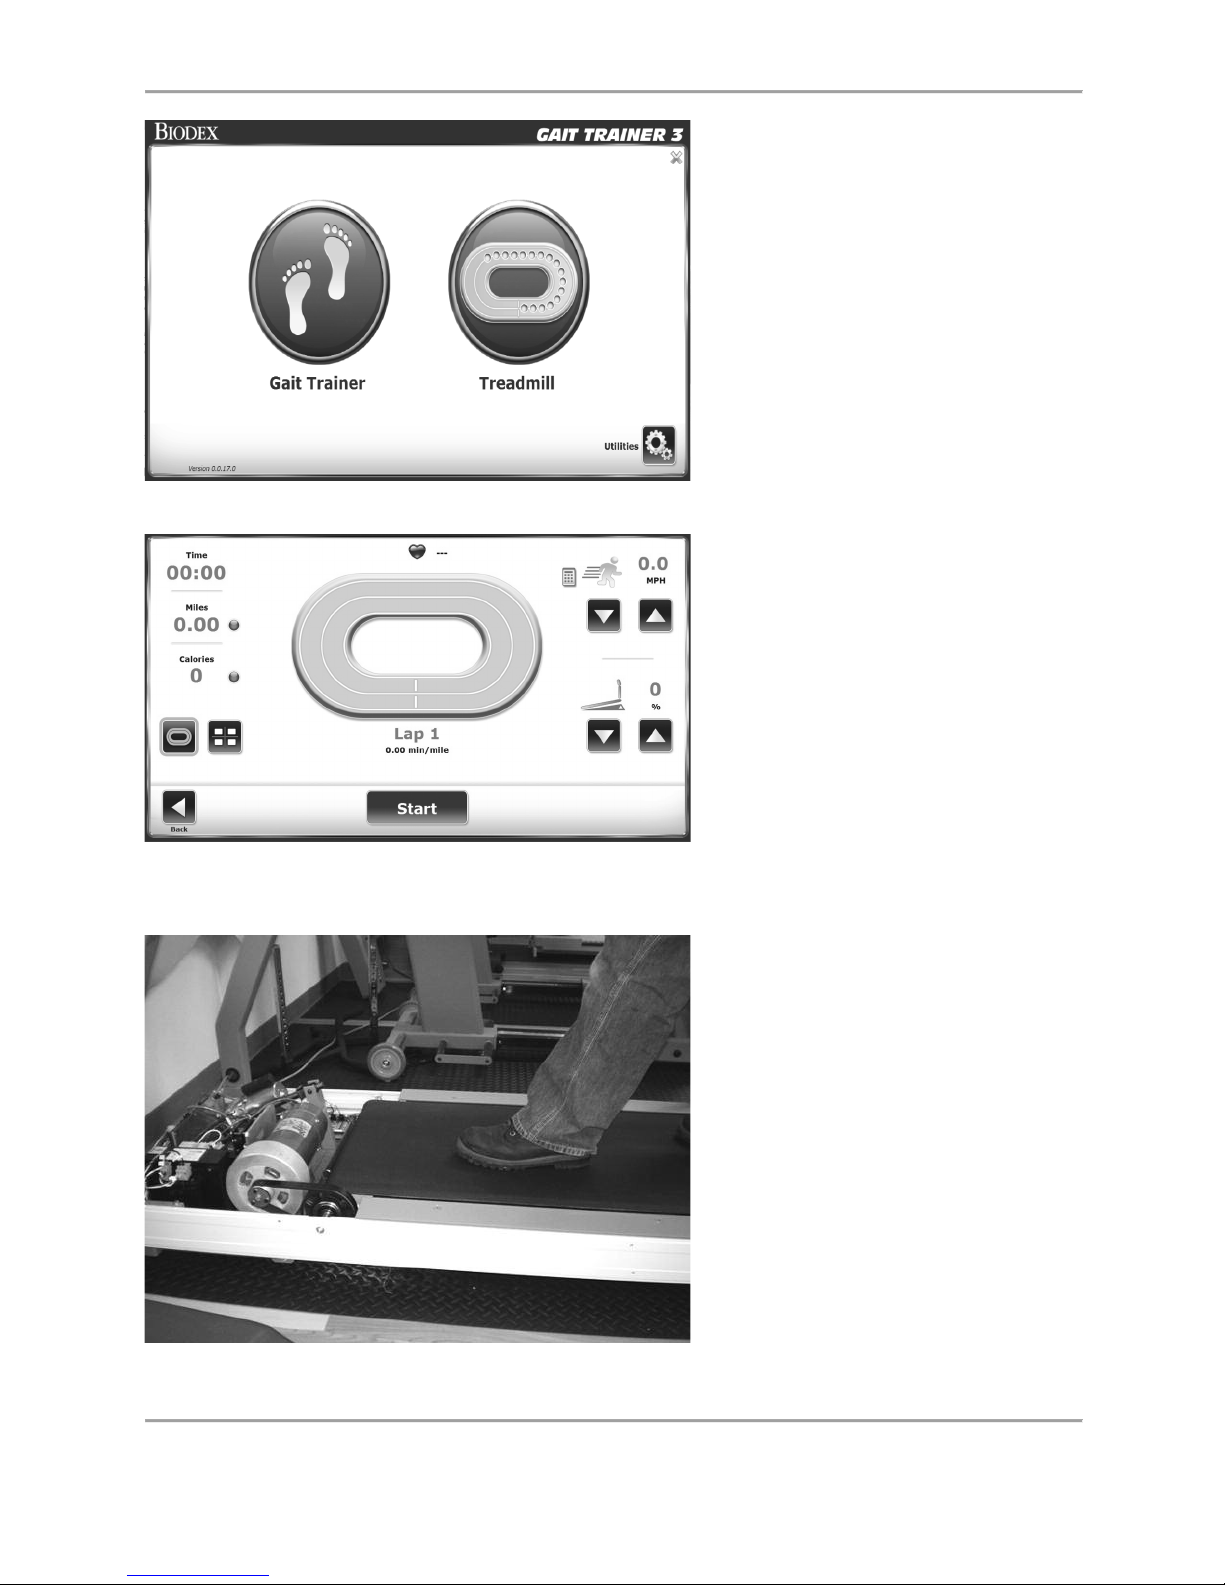
GAIT TRAINER 3 (v3.X SOFTWARE) 93
2. Access the Quick Start
Treadmill function and
adjust the speed to 1.0
MPH.
3. Walk on the treadmill at 1.0 MPH and
stop the treadbelt with a foot.
Front roller should slip under the
treadbelt .
Figure 10.7. Treadmill shown without cover. Note
the location of front roller.
Figure 10.6. Quick Start Treadmill Screen
Page 94
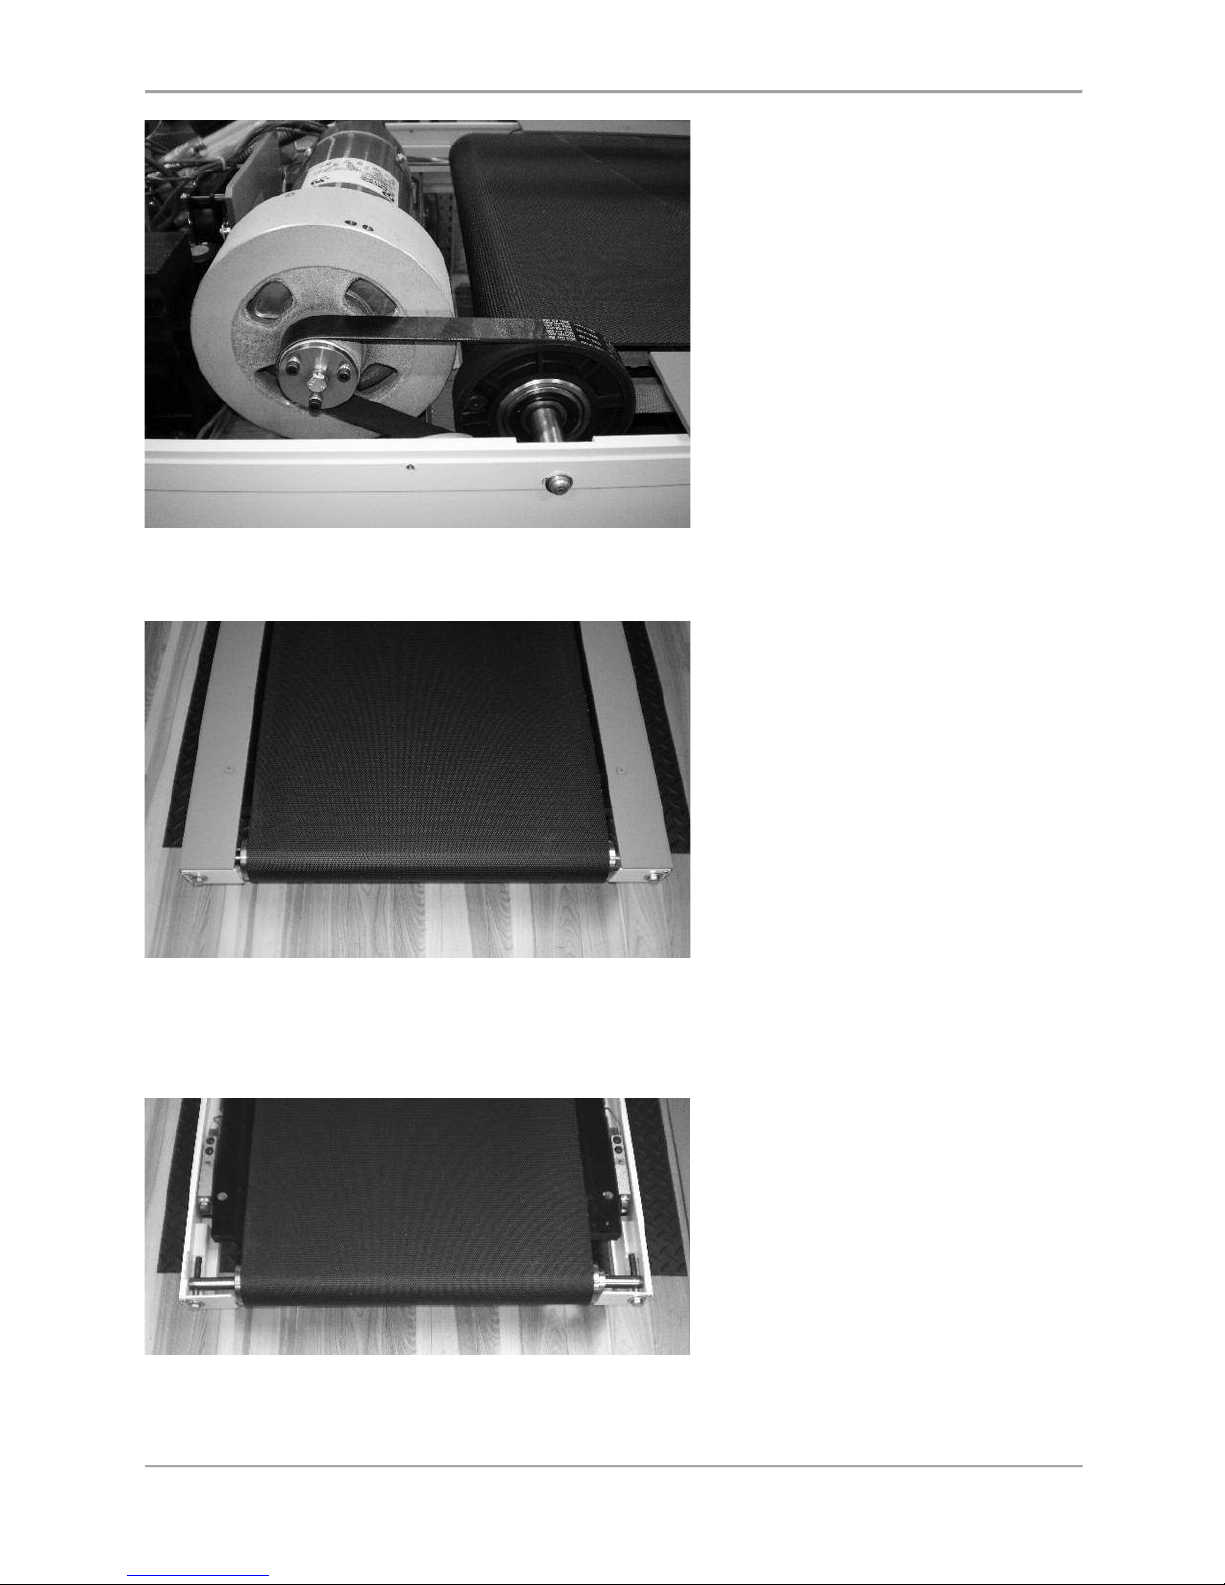
94 Biodex Medical Systems, Inc. © 2017
Treadbelt Alignment
4. Front roller
5. Adjust the two belt tensioning bolts
evenly at the back of the treadmill
so that the front roller slows down,
but continues to turn when you
stop the treadbelt with your foot.
6. Adjust the two hex bolts so that the
distance between the end of the roller
and the edges of the belt are equal on
both sides.
7. Turn the right hex bolt half turn
clockwise to move the belt toward the
left side of the roller.
8. Turn the left hex bolt half turn
clockwise to move the belt toward the
right side of the roller.
Figure 10.8. Close up of motor, showing front roller.
Figure 10.9. Back of Treadmill shown for tensioning bolt location.
Figure 10.10. Hex bolts shown to adjust belt left or right.
Page 95
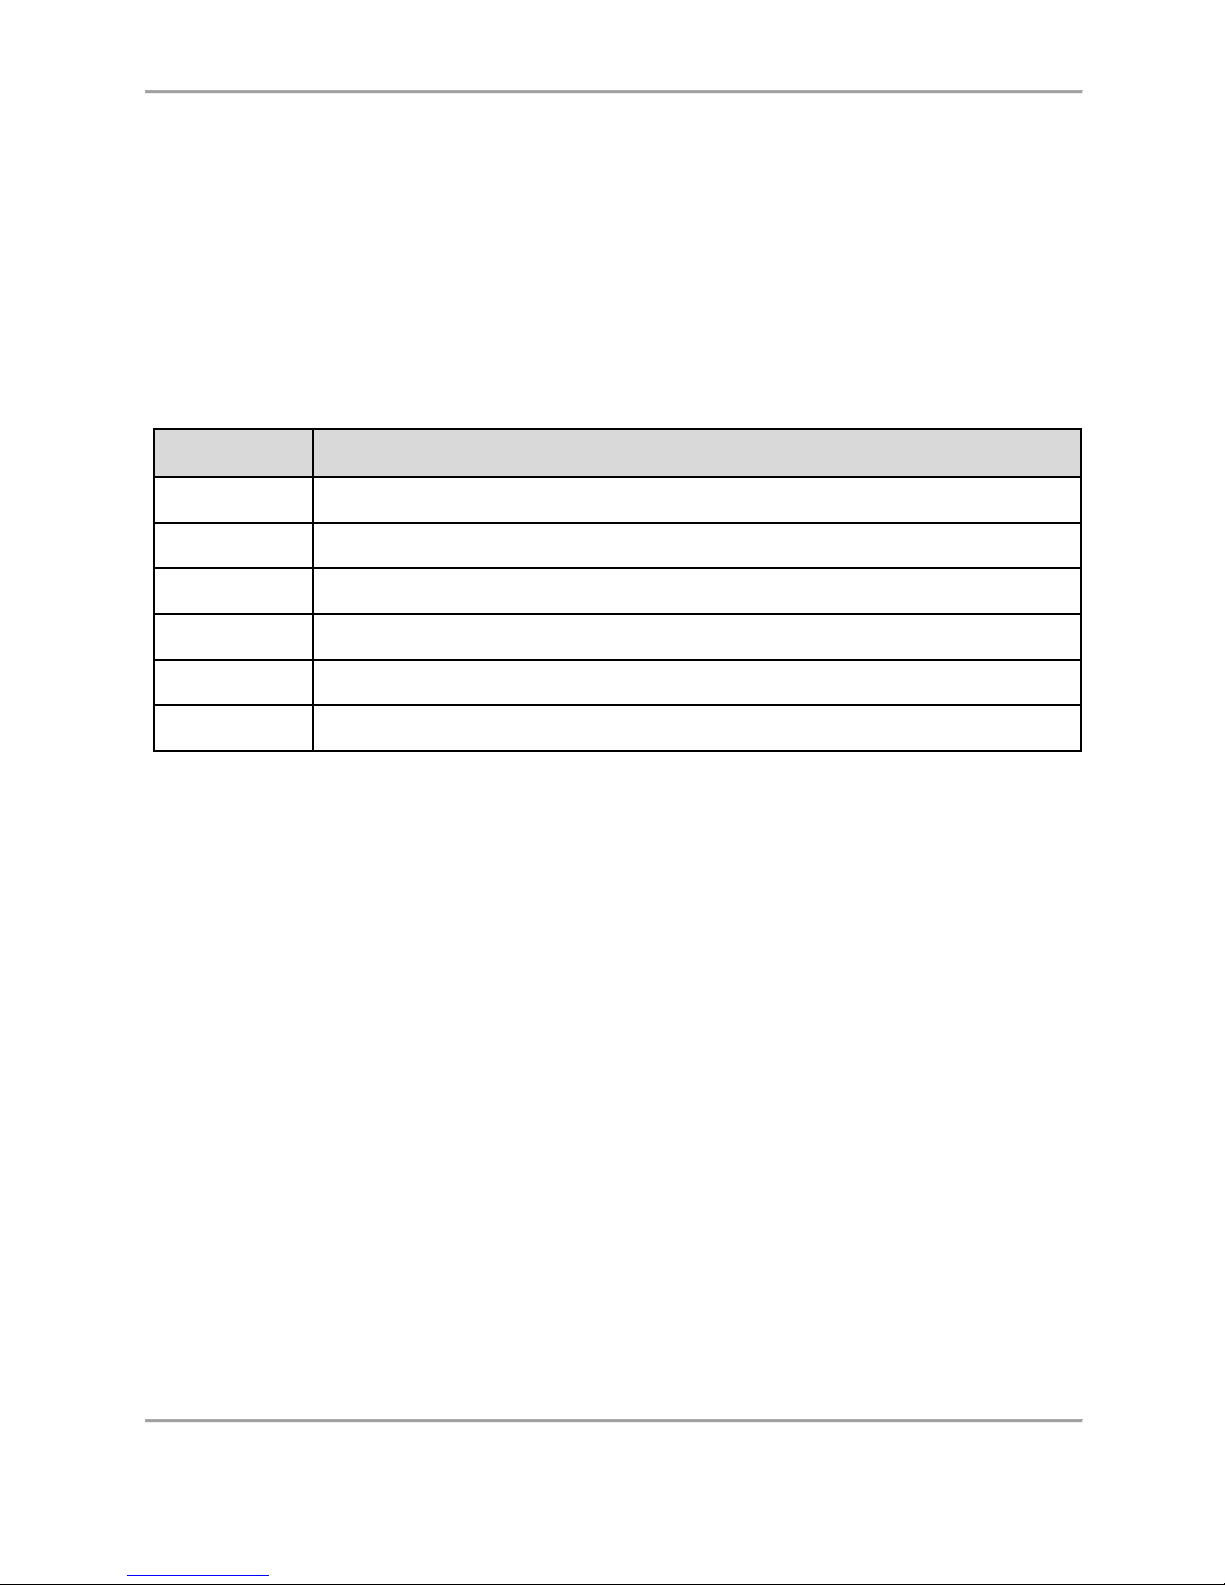
GAIT TRAINER 3 (v3.X SOFTWARE) 95
Table 11.1. Diagnostic Error Codes Table
11. Troubleshooting
Symptom
Gait Trainer 3 is turned ON and speed control is inoperable (belt not moving).
Check for faults on display. The following diagnostic error codes apply:
Code
Description
128
Communication between upper/lower board inop
64
Safety Lanyard Removed
32
Control fault (no amplifier)
16
Grade Error
8
Motor Tach Output Exceeds Selected Speed
4
Motor Tach Output is Below Selected Speed
NOTE: The above faults indicate an issue with the treadmill. For fault 64-Safety Lanyard
Removed, verify lanyard is still attached in its proper location. For all other faults, please
contact Biodex Support Services department at 1-800-224-6339 and provide the fault code.
Someone will provide instructions on how to proceed.
Page 96
96 Biodex Medical Systems, Inc. © 2017
Table 12.2. Cable Accessories Table
12. Electromagnetic Compatibility
Conformance to Standards
This equipment conforms to the following safety standards:
Table 12.1. Safety Standards Conformance Table
Standard
Edition and/or Date
IEC60601-1-2
First edition, 2007
Accompanying EMC Documents
This medical electrical equipment needs special precautions regarding EMC and needs to be
installed and put into service according to the EMC information provided in this manual.
● Portable and mobile RF communications equipment can affect medical electrical
equipment.
● Use of accessories, transducers, and cables other than those specified, with the
exception of accessories, transducers, and cables sold by the manufacturer of this
equipment, as replacement parts for internal and external components, may result in
increased emissions or decreased immunity of the equipment.
● The Gait Trainer 3 should not be used adjacent to or stacked with other equipment. If
the Gait Trainer 3 is used while positioned adjacent to other equipment, it should be
observed to verify normal operation in the configuration in which it will be used.
List of Cable Accessories
The table below includes all accessory cables supplied with the Gait Trainer 3 for which the
manufacturer of this equipment claims compliance to EN 60601-1-2 when used with the Gait
Trainer 3.
Cable Description
Part Number
Cable Length
USB Printer Cable
Biodex # C12086
15ft
Page 97
GAIT TRAINER 3 (v3.X SOFTWARE) 97
Table 12.3. Emission Test Table
Declaration of Conformity
Manufacturer’s Declaration Electromagnetic Emissions
The Gait Trainer 3 is intended for use in the electromagnetic environment specified below.
The customer or the user of the Gait Trainer 3 must ensure that it is used in such an
environment.
Emission Test
Compliance
Electromagnetic Environment
RF emissions CISPR 11
Group 1
The Gait Trainer 3 generates RF energy only for
its internal functions. Therefore, its RF
emission is very low and is not likely to cause
any interference in nearby electronic
equipment.
RF emissions CISPR 11
Class A
The Gait Trainer 3 is suitable for use in all
establishments other than domestic and those
directly connected to the public low-voltage
power supply network supplying buildings used
for domestic purposes.
Harmonic distortion
EN 61000-3-2
Class A
Voltage fluctuations and
flicker EN 61000-3-3
Complies
Manufacturer’s Declaration Electromagnetic Immunity
The Gait Trainer 3 is intended for use in the electromagnetic environment specified below.
The customer or the user of the Gait Trainer 3 must ensure that it is used in such an
environment.
Page 98

98 Biodex Medical Systems, Inc. © 2017
Table 12.4. Immunity Test Table
Immunity
Test
IEC 60601-1-2
Test Level
IEC 60601-1-2
Compliance
Level
Electromagnetic
Environment -Guidance
Electrostatic
discharge (ESD)
IEC 61000-4-2
± 6 kV contact
± 8 kV air Test level
Contact ± 6 kV
Air ± 8 kV
Floor should be wood,
concrete or ceramic tiles.
If floor is covered with
synthetic material, the relative
humidity should be at least
30%.
Electrical fast
transients/
burst
IEC 61000-4-4
± 2 kV for power
lines
± 1 kV for
input/output lines
Power ± 2 kV
Signal ± 1 kV
Mains power quality should be
that of a typical commercial or
hospital environment.
Surge
IEC 61000-4-5
± 1 kV differential
mode
± 2 kV common
mode
± 1 kV diff. mode
± 2 kV com. mode
Mains power quality should be
that of a typical commercial or
hospital environment.
Voltage dips,
short
interruptions
and voltage
variations on
power supply
input lines
IEC 61000-4-11
< 5% UT (> 95% of
dip in UT for 1/2
cycle)
40% UT (60% of dip
in UT) for 5 cycle
70% UT (30% of dip
in UT) for 25 cycle
< 5% UT (> 95% of
dip in UT) for 5 sec
< 5% UT (> 95% of
dip in UT) for 1/2
cycle
40% UT (60% of dip
in UT) for 5 cycle
70% UT (30% of dip
in UT) for 25 cycle
< 5% UT (> 95% of
dip in UT) for 5 sec
Mains power quality should be
that of a typical commercial or
hospital environment. If a
better mains power quality is
required, it is recommended
that the Gait Trainer 3 is
powered from an
uninterruptible power supply.
Power
frequency
(50/60 Hz)
magnetic field
IEC 61000-4-8
3 A/m
3 A/m
If image distortion occurs, it
may be necessary to position
the Gait Trainer 3 display
further from sources of power
frequency magnetic fields or to
install magnetic shielding. The
power frequency magnetic
field should be measured in
the intended installation
location to assure that it is
sufficiently low.
Conducted RF
IEC 61000-4-6
3 Vrms,
150 KHz to 80 MHz
3 Vrms,
150 KHz to 80 MHz
Conducted RF
IEC 61000-4-6
3 Vrms,
150 KHz to 80 MHz
3 Vrms,
150 KHz to 80 MHz
Portable and mobile RF
communications equipment
should be used no closer to
any part of the Gait Trainer 3,
including cables, than the
recommended separation
distance calculated from the
equation applicable to the
Page 99
GAIT TRAINER 3 (v3.X SOFTWARE) 99
Immunity
Test
IEC 60601-1-2
Test Level
IEC 60601-1-2
Compliance
Level
Electromagnetic
Environment -Guidance
frequency of the transmitter.
Recommended separation
distance:
d = 1.2√ P 150 KHz to 80 MHz
d = 1.2√ P 80 MHz to 800 MHz
d = 2.3√ P 800 MHz to 2.5 GHz
Where P is the maximum
output power rating of the
transmitter in watt (W)
according to the transmitter
manufacturer, and is the
recommended separation
distance in meters (m). Field
strengths from fixed RF
transmitters, as determined by
an electromagnetic site survey,
should be less than the
compliance level in each
frequency range. b
Interference may occur in the
vicinity of equipment marked
with the following symbol:
NOTE 1: UT is the a.c. mains voltage prior to application of the test level.
NOTE 2: At 80 MHz and 800 MHz, the higher frequency range applies.
NOTE 3: These guidelines may not apply in all situations. Electromagnetic propagation is
affected by absorption and reflections from structures, objects and people.
Field strength from mixed transmitters, such as base stations for radio telephones and land
mobile radios, amateur radio, AM or FM broadcast, and TV broadcast cannot be predicted
theoretically with accuracy. To assess the electromagnetic environment due to fixed RF
transmitters, an electromagnetic site survey should be considered. If the measured field
strength in the location in which the Gait Trainer 3 is used exceeds the applicable RF
compliance levels above, the Gait Trainer 3 should be observed to verify normal operation. If
abnormal performance is observed, additional measures may be necessary, such as reorienting
or relocating the Gait Trainer 3. Over the frequency range 150 KHz to 80 MHz, field strengths
should be less than 3 V/m.
Page 100
100 Biodex Medical Systems, Inc. © 2017
Table 12.5 Separation Distance Table
Recommended Separation Distances
Recommended separation distances between portable and mobile RF communications
equipment and the Gait trainer 3 are detailed in the following table.
The Gait Trainer 3 is intended for use in the electromagnetic environment in which radiated RF
disturbance are controlled. The customer or the user of the Gait Trainer 3 can help prevent
electromagnetic interference by maintaining a minimum distance between portable and mobile
RF communication equipment (transmitters) and the Gait Trainer 3 as recommended below,
according to the maximum output power of the communication equipment.
Rated Maximum
Output Power of
Transmitter [W]
Separation Distance According to Frequency of Transmitter [m]
150 kHz to 80 MHz
80 MHz to 800 MHz
800 MHz to 2.5 GHz
d = 1.2√ P
d = 1.2√ P
d = 2.3√ P
0.01
0.12
0.12
0.23
0.1
0.38
0.38
0.73
1
1.2
1.2
2.3
10
3.8
3.8
7.3
100
12
12
23
For transmitters rated at a maximum output power not listed above, the recommended
separation distance (d) in meters (m) can be estimated using the equation applicable to the
frequency of the transmitter, where P is the maximum output power rating of the transmitter in
watts (W) according to the transmitter manufacturer.
NOTE 1: At 80 MHz and 800 MHz, the separation distance for the higher frequency range
applies.
NOTE 2: These guidelines may not apply in all situations. Electromagnetic propagation is
affected by absorption and reflection from structures, objects and people.
Operating Temperature
Do not expose the equipment to a temperature change of more than 5° F (3° C) per hour. Limits
of low and high operating temperature ranges are 59° to 86° F (15° C to 30° C).
 Loading...