

biodex 950-214, 950-220, 950-215, 950-245, BIOSTEP Installation & Operation Manual [en, fr]
...Page 1
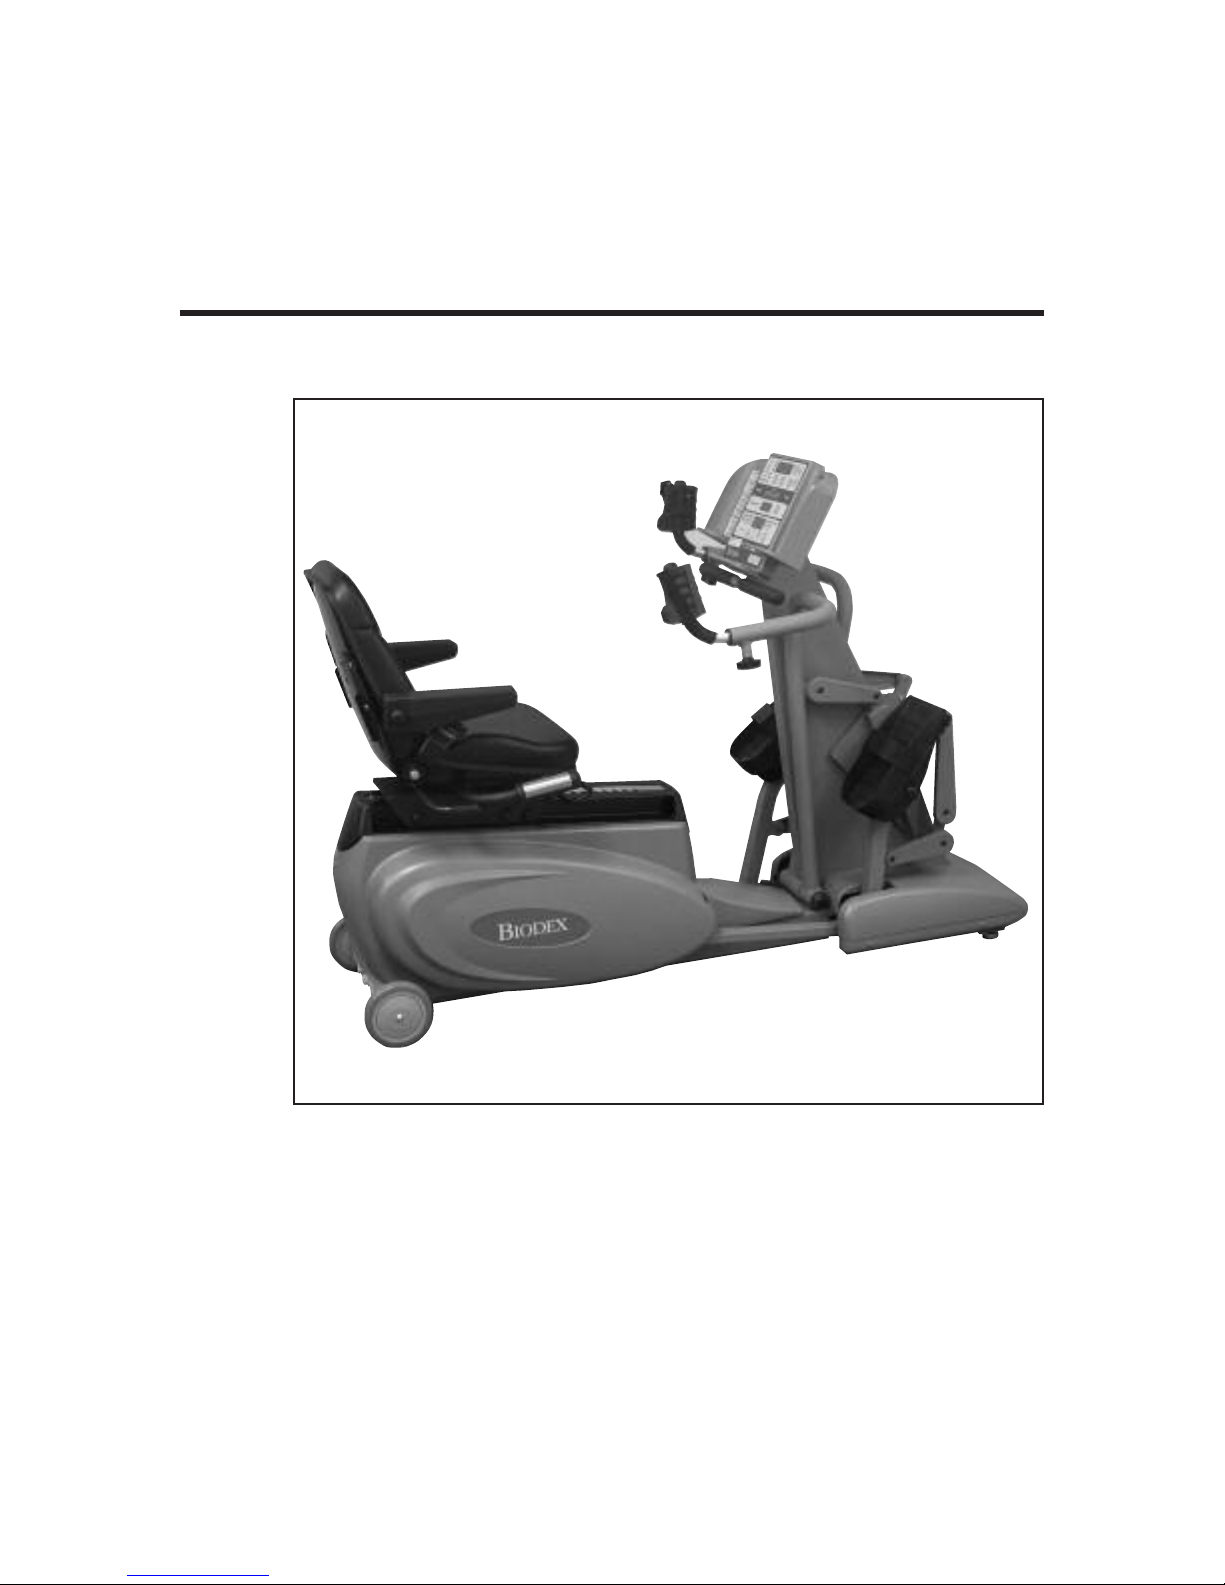
BIOSTEP™AND
™
BIOSTEP
CLINICAL PRO
SEMI-RECUMBENT ELLIPTICAL
INSTALLATION/OPERATION MANUAL
950-214
950-215
950-220
950-245
20 Ramsay Road, Shirley,NewYork,11967-4704,Tel: 800-224-6339 (Int’l 631-924-9000), Fax: 631-924-9338, Email: [email protected], www.biodex.com
FN: 08-082 3/08
BIODEX
Biodex Medical Systems, Inc.
Page 2

BIOSTEP™AND BIOSTEP™CLINICAL PRO
SEMI-RECUMBENT ELLIPTICAL
This manual covers installation and operation procedures
for the following BioStep™Semi-Recumbent Elliptical products:
™
#950-214 BioStep
, Clinical Pro, Japanese
#950-215 BioStep™, 115 VAC
#950-220 BioStep™, Clinical Pro, 115 VAC
#950-245 Stabilization Kit (Optional)
NOTE: All or some of the following symbols, cautions, warnings and notes may apply to your BioStep
and correspond to this operation manual:
Symbol Meaning
Attention, consult accompanying documents.
Symbol signification: Attention, se référer à la notice.
Warning: Injuries to health may result from incorrect or excessive training.
Attention, incorrect ou extrême entrainement peut aboutir des lesíons au santé.
NOTE: Circuit diagrams for this product are available upon request.
Page 3

TABLE OF CONTENTS
1. INTRODUCTION..................................................................................................................................4
2. IMPORTANT SAFETY INSTRUCTIONS ........................................................................................5
3. PARTS AND ADJUSTMENTS............................................................................................................7
4. QUICK-START OPERATION ............................................................................................................9
5. BASIC OPERATION ..........................................................................................................................10
• Quick-Start Operation
• Standard Operation
6. DISPLAY PARAMETERS ..................................................................................................................12
7. SELECTING THE RESISTANCE MODE........................................................................................13
• Constant Resistance Control (Aerobic Exercise)
• Isokinetic Speed Control (Strength Exercise)
8. SELECTING AND CUSTOMIZING EXERCISE PROFILES......................................................15
• Constant Resistance Profile Examples
• Constant Resistance Profile Defined
• Isokinetic Profiles Defined
9. HEART RATE MONITORING ........................................................................................................22
• Heart Rate Monitoring
• Heart Rate Chart
10. ADDITIONAL CONSIDERATIONS ............................................................................................24
• What is a MET?
• Biodex Ergometers Support METs and Aid Exercise Prescription for
both Cardiopulmonary Rehabilitation and Exercise Fitness
• The Relationship of Calories Burned to Oxygen Consumption and METs
11. MAINTENANCE & CLEANING....................................................................................................29
12. SPECIFICATIONS ............................................................................................................................30
13. ELECTROMAGNETIC COMPATIBILITY ..................................................................................31
14. OPTIONAL ........................................................................................................................................32
• Stabilization Kit (950-245)
15. DIAGNOSTICS..................................................................................................................................34
16. REPLACEMENT ................................................................................................................................47
— 3— TABLE OF CONTENTS
Page 4

1.INTRODUCTION
Designed for versatility and durability, the Biodex BioStep and BioStep Clinical Pro meet the
demands of orthopedic, cardiopulmonary, sports medicine, wellness and general conditioning
programs. Featuring a work range of 10 to 600 WATTs, plus self-powered, self-charging capability, the BioStep accommodates a wide variety of people and can be used virtually anywhere.
Software-driven for accurate reporting of real-time data, the BioStep features Constant
Resistance Control while the BioStep Clinical Pro features both Isokinetic Speed Control and
Constant Resistance Control. Because the internal battery is automatically recharged when work
rates reach or exceed 30 WATTs and 50 RPM, both BioStep models can be used in the gym or at
the clinic – without cumbersome power cords. An AC adapter is provided for use at work rates
below 30 WATTs and 50 RPMs. Large wheels make the units easy to move.
Ergonomically designed and simple to operate, both BioSteps feature a step-through design for
easy access. The contoured seat with lumbar support and an indexed track allows extensive
front-to-back adjustment to ensure comfort, safety and biomechanically correct positioning. Both
BioStep models accommodate users from 4'4" to 6'6" and weighing up to 500 pounds.
The easy-to-read, programmable LED display provides immediate user biofeedback for
increased motivation and compliance. It maintains all settings and LED displays for 60 seconds
after the workout is finished. Users can choose from quick-start operation that gets first-timers
right into their exercise routine, or from five pre-programmed exercise profiles for each mode of
operation. All profiles can be modified with the panel controls to provide a multitude of exercise
programs to suit any individual’s need. Heart Rate monitoring is provided through contact
handgrips and Polar telemetry.
The Biodex BioSteps are available in two configurations: Standard and Clinical Pro. A
stabilization kit including foot straps, a trunk stabilization belt, flip-up/flip-down seat arm rests,
and EZ-Grip Handgrips for the adjustable arms is available for both models.
NOTE: Throughout this manual the name BioStep is used to denote both the BioStep and BioStep
Clinical Pro. For functions that differ between the two models, the specific model name is used.
NOTE: In a study designed to examine the test-retest reliability and concurrent criterion validity of VO
max on the BioStep in community-dwelling older adults, results provided preliminary evidence of reliable
and valid estimates of oxygen consumption by the BioStep when compared with the criterion standard of
direct VO
Reference: Mendelsohn, M.E., Connelly, D.M., Overend, J.J., Petrella, R.J.:Reliability and validity of
responses to submaximal all-extremity semi-recumbent exercise in older adults. Journal of Aging and
Physical Activity, 2007, 15, 184-194.
measurement in the sample.
2max
2
INTRODUCTION — 4—
Page 5

2.IMPORTANT SAFETY INSTRUCTIONS
The Biodex BioStep and BioStep Clinical Pro have been designed and tested to safely provide
superior function, results and years of use. Still, it is vital that you follow these important safety
instructions at all times when using this device.
1. Read all instructions in this manual before using this device.
2. Use this device only for its intended use as described in this manual.
3. Except as instructed for use of the device, keep hands and feet away from all moving parts.
4. Do not use add-on's with this device, other than those recommended by Biodex Medical
Systems, Inc.
5. Keep the electrical cord away from heated surfaces and out of all travel lanes.
6. Keep small children away from the pedals and arm cranks while the device is in use.
Unsupervised children should never be allowed near this device.
7. This device must be level and stable on the floor before being used. See Chapter 3, Parts and
Adjustments, for leveling instructions.
8. Establish a minimum of at least two feet of free space along the sides of unit to ensure unencumbered operation, easy access, and prevent possible injuries to non-users standing or walking nearby. Establish at least six inches of free space at the front and rear ends of the unit.
9. This device is designed for commercial use and will meet the demands of orthopedic,
cardiopulmonary, sports wellness and general conditioning programs.
10. The surface under the BioStep should be stable and level.
11. Do not use this device outdoors while plugged in. Since the self-powered battery operation
is low voltage, both the BioStep and BioStep Clinical Pro can be used outdoors only with
self-powered battery operation.
CAUTION: For important additional safety considerations, see Chapter 10, Additional Considerations.
GROUNDING INSTRUCTIONS
This product must be grounded. In the unlikely event that it may malfunction or breakdown,
grounding provides a path of least resistance for electric current to reduce the risk of electric
shock. This product is equipped with a cord having an equipment-grounding conductor and a
grounding plug. The plug must be plugged into an appropriate outlet that is properly installed
and grounded in accordance with local codes and ordinances.
DANGER: Improper connection of the equipment-grounding conductor can result in a risk of electric
shock. Check with a qualified electrician or Biodex Customer Service if you are in doubt as to whether
the product is properly grounded. Do not attempt to modify the plug provided with the product. If the
plug will not fit into the outlet, have a proper outlet installed by a qualified electrician.
If the BioStep is operated using the battery and no wall current, it is operating at low voltage (6Volt Battery) and does not require grounding.
— 5— IMPORTANT SAFETY INSTRUCTIONS
Page 6

2. DIRECTIVES IMPORTANTES SUR LA SÉCURITÉ
DIRECTIVES IMPORTANTES SUR LA SÉCURITÉ
Les appareils BioStep et BioStep Clinical Pro de Biodex ont été conçus et testés pour assurer en
toute sécurité un fonctionnement et des résultats supérieurs ainsi que des années d’utilisation.
Toutefois, il est crucial de porter en tout temps une attention particulière aux directives importantes qui suivent sur la sécurité, lorsqu’on utilise cet appareil.
1. Lire toutes les directives dans le présent manuel avant d’utiliser cet appareil.
2. N’utiliser l’appareil que pour son usage prévu comme décrit dans le manuel.
3. Sauf indication précise pour l’utilisation de l’appareil, garder les mains et les pieds éloignés
des pièces en mouvement.
4. Ne pas utiliser d’accessoires avec cet appareil, à part ceux qui sont recommandés par Biodex
Medical Systems, Inc.
5. Garder le cordon électrique éloigné de toute surface chauffée et de toute voie de circulation.
6. Éloigner les petits enfants des pédales et manivelles lorsque l’appareil est en cours d’utilisation. Il ne faut jamais laisser les enfants sans surveillance s’approcher de l’appareil.
7. Cet appareil doit être de niveau et stable sur le plancher avant son utilisation. On trouvera
des directives de mise au niveau au chapitre 3 – Pièces et réglages.
8. Établir une zone libre d’au moins 90 cm (3 pi) le long des côtés de l’appareil pour lui assurer
un fonctionnement sans gêne, en faciliter l’accès et prévenir des blessures possibles aux nonutilisateurs se tenant ou marchant à proximité. Établir une zone libre d’au moins 15 cm
(6 po) aux extrémités avant et arrière de l’appareil.
9. Cet appareil est conçu pour utilisation commerciale. Il répond aux exigences des programmes orthopédiques, cardiopulmonaires, de mise en forme sportive et de conditionnement général.
10. La surface sous les appareils BioStep doit être stable et de niveau.
11. Ne pas utiliser l’appareil branché à l’extérieur. Le fonctionnement avec piles étant à basse
tension, on peut utiliser les appareils BioStep et BioStep Clinical Pro à l’extérieur en mode
de fonctionnement avec piles seulement.
ATTENTION – On trouvera des considérations supplémentaires importantes sur la sécurité au
chapitre 10 – Considérations Supplémentaires.
DIRECTIVES DE MISE À LA TERRE
Ce produit doit être mis à la terre. Dans l’éventualité peu probable où il subisse une panne ou
une défaillance, la mise à la terre fournit une voie de moindre résistance pour le courant électrique, réduisant ainsi le risque de choc électrique. Ce produit est équipé d’un cordon ayant un
conducteur de protection et une fiche de mise à la terre. On doit brancher la fiche dans une prise
appropriée installée et mise à la terre en conformité avec les codes et règlements en vigueur.
DANGER – Le mauvais branchement du conducteur de protection peut entraîner un risque de
choc électrique. Consulter un électricien qualifié ou le service après-vente Biodex en cas de doute
sur la mise à la terre appropriée du produit. Il est déconseillé d’essayer de modifier la fiche fournie
avec le produit. Si la fiche n’entre pas dans la prise, faire installer une prise appropriée par un
électricien qualifié.
Lorsque l’appareil BioStep fonctionne au moyen de la pile et sans courant de secteur, il fonctionne à basse tension (pile de 6 V) et ne nécessite pas de mise à la terre.
IMPORTANT SAFETY INSTRUCTIONS — 6—
Page 7
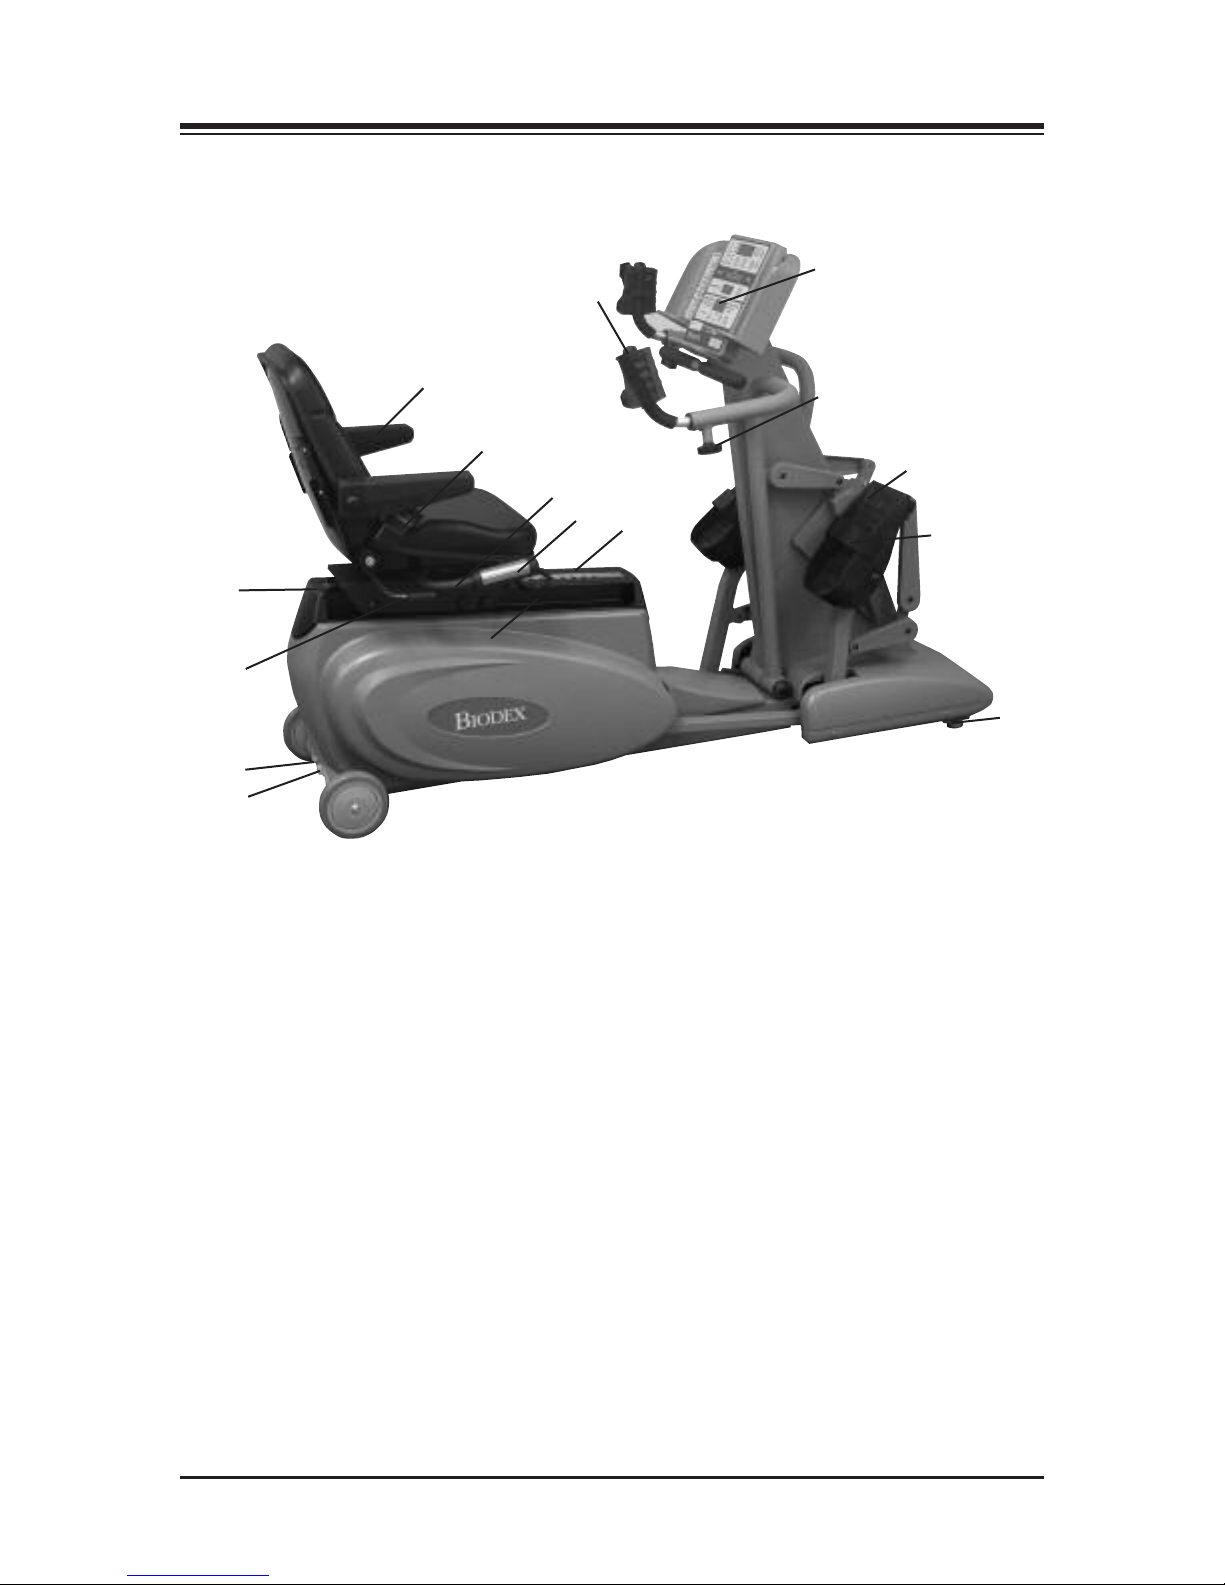
3. PARTS AND ADJUSTMENTS
(Refer to Figure 1.)
16
1
15
14
5
11
4
6
3
12
8
9
Figure 1: Parts and adjustment mechanisms.
The BioStep and BioStep Clinical Pro includes the following parts and adjustment mechanisms:
2
7
13
10
1. Display panel
2. Adjustable arms
3. Seat front-to-back release handle
4. Seat front-to-back scale
5. Fixed support handles
6. Rear seat stop
7. Footplate
8. RS-232 Jack
9. Battery recharge jack/AC adapter
10. Leveling guides
11. Heart rate contact handgrips
12. Seat Rotation Handle
Optional Stabilization Kit (Installed by customer):
13. Foot Straps
14. Trunk Belt
15. Arm Rests
16. EZ-Grip™ Handgrips (removable)
— 7— PARTS AND ADJUSTMENTS
Page 8

4. QUICK-START OPERATION
The Biodex BioStep is easy to adjust for user comfort. The seat can be moved forward or back
and the arms adjust, too. The following section explains how to adjust your BioStep for optimum user comfort and positioning.
Seat Front-to-Back Adjustment: The seat can be moved forward or back over a range of 15" to
match user comfort requirements. Proper seat front-to-back positioning will allow the user to
exercise comfortably. Proper seat positioning allows the leg to extend just short of full extension,
provided the patient has no range of motion limitations. In others words, the user should not
lock the knee.
To adjust the seat front-to-back position:
• Pull up on the Seat Front-to-Back Release Handle. While holding the handle up, slide the seat
either forward or back to the desired position. To lock the seat in position, release the handle
and make sure it engages in the appropriate hole. To ensure reproducible positioning, note the
seat position as per the Seat Front-to-Back Position Scale, located on the seat slide track.
Rotating Seat: To aid the user in getting on and off the BioStep, the rotational seat can be turned
left or right.
To rotate the seat:
• Lift on the Seat Rotation Handle, located under the rear of the seat, to release the seat. You
may now swivel the seat left or right until it engages in either position.
• With the seat locked in the desired position, instruct the user to sit down. Pull up on the Seat
Rotation Handle and rotate the seat until it engages in the forward locked position.
Adjustable Arms: Make this a total body cross-trainer.
To adjust the arm handles:
• Loosen the arm handle locking knobs, slide the arms out to the desired length, then tighten
the arm handle locking knobs to secure.
Leveling Guides: Located underneath the front hood of the unit, the leveling guides can be
used to adjust the BioStep to sit level on the floor - even if the floor is slightly uneven. To adjust,
use a 9/16" open-end wrench to raise or lower each guide as appropriate. The BioStep must be
level and stable before being used.
Battery Recharge Jack/AC Adapter (Refer to Figure 1, Insert): The Battery Recharge Jack/AC
Adapter is used to recharge the BioStep and BioStep Clinical Pro batteries, or for use at work
rates below 30 WATTs and 50 RPMs.
NOTE: It is recommended that you plug in the adapter overnight to keep the BioStep battery charged to
full capacity.
The Battery Recharge Jack/AC Adapter must be installed correctly before using, as follows. The
AC adapter is supplied.
1. Plug the AC adapter cord into the BioStep Battery Recharge Jack/AC Adapter, located at the
rear base of the BioStep. Slip the cord under the cord holder directly to the right of the jack.
2. Plug the AC adapter into a wall socket to charge the BioStep battery or to use the BioStep at
work rates below 30 WATTs and 50 RPMs.
PARTS AND ADJUSTMENTS — 8—
Page 9

4. QUICK-START OPERATION
Although the BioStep offers advanced programming capability, it also features a “Quick-Start”
function that allows the user to immediately begin exercise with factory preset default values
serving for the programmable system parameters.
Quick-Start operation is simple. Seat the user, adjust the seat forward and back position and foot
pedal straps as necessary, and proceed as described below:
1. Press <Power On> to power-up. After a brief self-test (which includes display of the current
software version,) the system beeps to signify that it is ready to begin collecting data.
2. Grasp the BioStep adjustable arms and begin to exercise.
3. Use the <+> and <-> adjust effort level buttons to adjust resistance level.
NOTE: The Effort Levels are not wattage settings. They are a series of torque settings with
no given value.
4. To stop the system at any time, simply stop exercising. All parameters will continue to display
for one minute before the system shuts off. If you want to turn the system off and automatically reset the display, press <Power ON > again.
NOTE: The BioStep provides Constant Resistance Control exercise mode. The BioStep Clinical Pro also
offers Constant Resistance Control exercise mode, but defaults to Isokinetic Mode. A green LED on the
display activates to show the selected mode on the Clinical Pro. To change modes, on the BioStep Clinical
Pro, press <Select Exercise> (#4 on display).
NOTE: To provide heart rate monitoring, the subject must hold onto both heart rate contact handgrips or
use the telemetry chest strap.
NOTE: For the first 24 hours of operation, the BioStep should be used with the AC Adapter.
— 9— QUICK-START OPERATION
Page 10
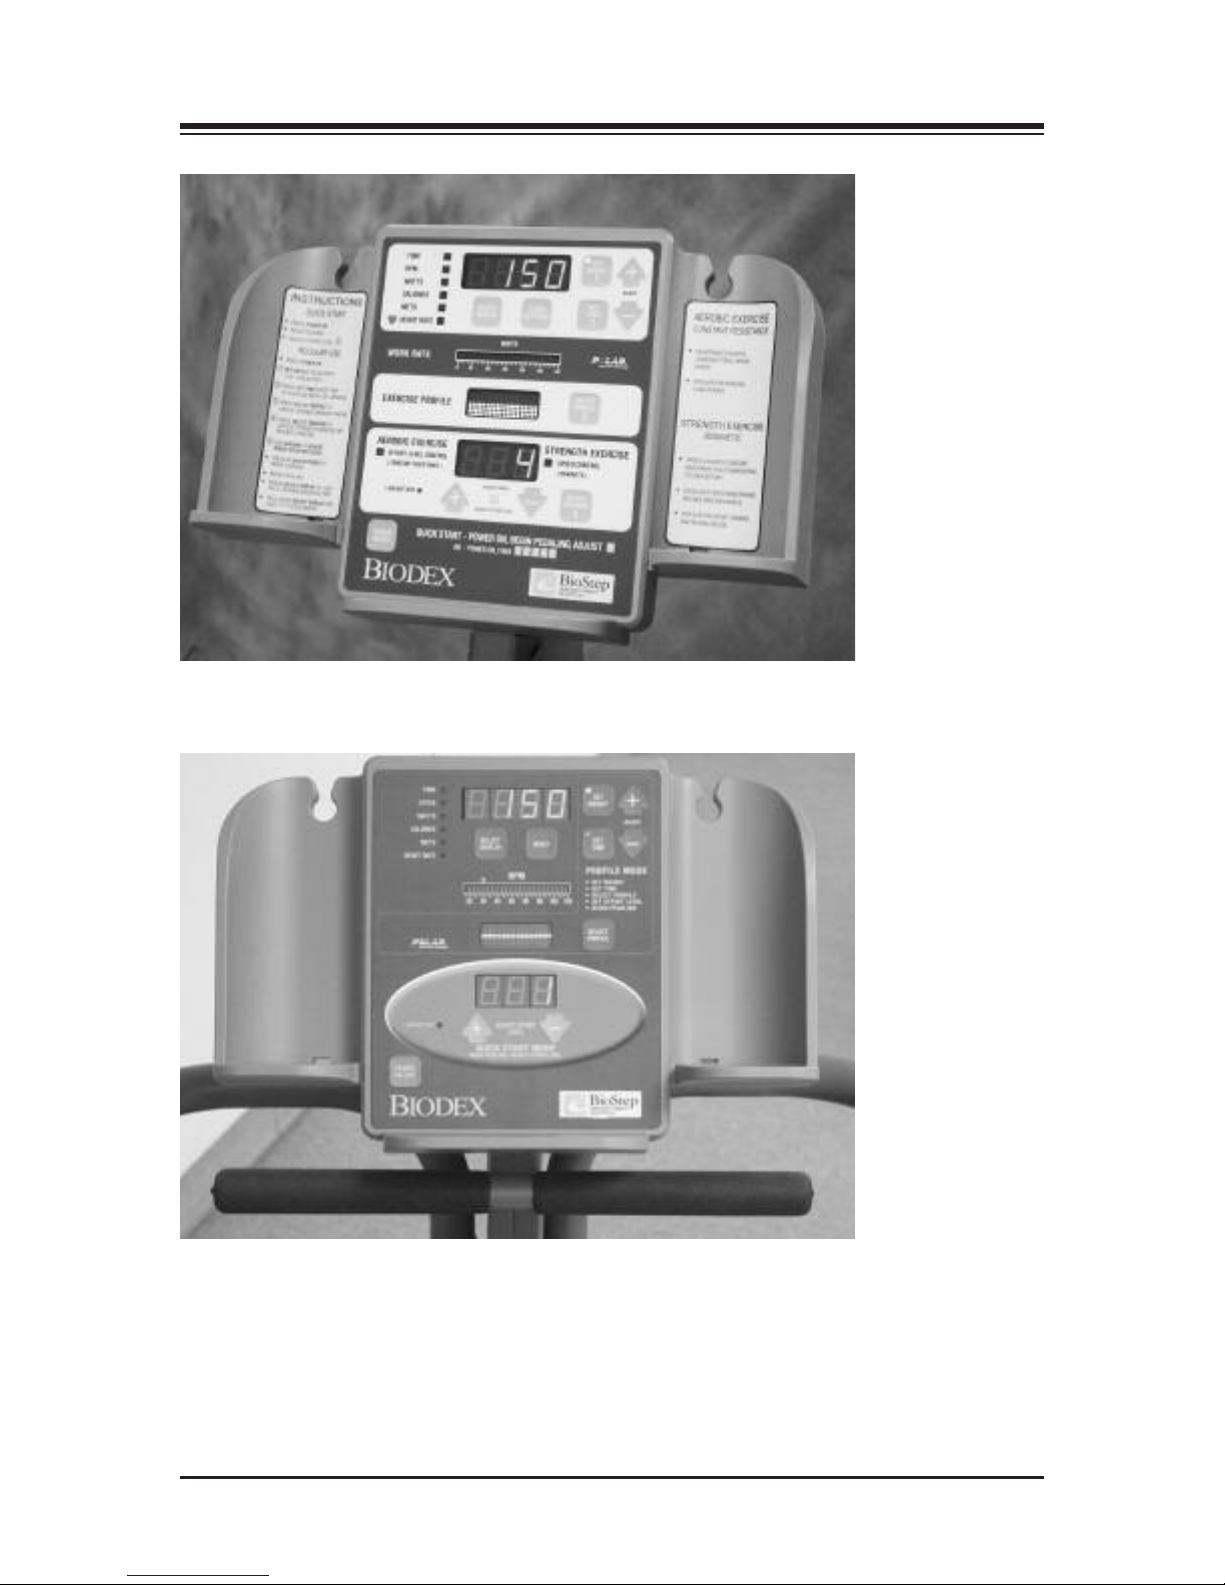
5. BASIC OPERATION
Figure 2. The BioStep Clinical Pro Display Panel.
Figure 3. The BioStep Display Panel.
(Refer to Figures 2 and 3.)
Quick-Start mode is perfect for acquainting subjects with the BioStep. It gets the user up and
exercising in about five seconds. More experienced users, however, will likely prefer the ability
to personalize their exercise or rehabilitation routine as described below.
BASIC OPERATION — 10 —
Page 11

6. DISPLAY PARAMETERS
With the system turned ON, seat the user, adjust the seat forward and back position and foot
pedal straps as necessary, and proceed as follows:
NOTE: Steps one through five, below, correspond to the numbered keys on the display.
1. Set The Patient Weight: Press <Set Weight> and then use the <+> or <-> arrow keys to adjust
the value to the desired setting (for more accurate metabolic calculation).
2. Set the Exercise Duration Time: Press <Set Time> and then use the <+> or <-> arrow keys to
adjust the value to the desired setting.
NOTE: Time counts down if you set the exercise duration. Time counts up if you do not set this value.
3. Select the Desired Profile: By pressing <Select Profile>, you can scroll through the available
profiles. When you see the profile desired, proceed to step 4.
4. Select the Exercise Mode (BioStep Clinical Pro only): Press <Select Exercise> to toggle between
Isokinetic (strength exercise/speed control) and Aerobic Exercise (constant / Resistance control).
5. Adjust Isokinetic Speed or Constant Resistance Effort Level: Use the <+> or <-> arrows to
adjust the Isokinetic Speed or Constant Resistance level to the desired level.
NOTE: To make changes to programmed parameters, press <Clear Settings>. This will set all
parameters back to default values. You can then begin again at step one, above.
NOTE: The Resistance Effort Levels are not wattage settings. They are a series of 30 torque settings
with no given value.
6. Grasp the BioStep adjustable arms and begin to exercise.
NOTE: The BioStep begins collecting data as soon as the subject begins to step. Once data collection
begins, the system scrolls through the settings at the top left side of the display panel. To lock on to a
specific setting, i.e., calories, press <Select Display> until you advance to the setting you wish to be
displayed. To return to a scrolling display format, press and hold <Select Display> for two full seconds.
The BioStep displays Time, Steps, WATTS, Calories, METS and Heart Rate. Work rate is displayed in
RPM (Revolutions Per Minute). The BioStep Clinical Pro displays Time, RPMs. WATTS, Calories,
METS and Heart Rate. Work rate is displayed in WATTS.
NOTE: The BioStep provides Constant Resistance Control exercise mode. The BioStep Clinical Pro also
offers Constant Resistance Control exercise mode, but defaults to Isokinetic Mode. A green LED on the
display activates to show the selected mode on the Clinical Pro. To change modes, press <Select Exercise>
(4) at the bottom of the display.
NOTE: To provide heart rate monitoring, the subject must hold onto both heart rate contact handgrips or
use the telemetry chest strap.
NOTE: For the first 24 hours of operation, the BioStep should be used with the AC Adapter.
— 11 — BASIC OPERATION
Page 12

6. DISPLAY PARAMETERS
The top window of the display panel offers readouts for common parameters of exercise and
training interest. For the Biostep, these parameters include Time, WATTs, Calories, METs and
Heart Rate with work rate shown in RPMs. For the BioStep Clinical Pro, display parameters
include Time, RPM, WATTs, Calories, METs and Heart Rate with work rate shown in WATTs. As
you exercise, the system displays values for each parameter in the display window. A green
indicator light denotes the parameter currently being displayed.
A low-battery LED is located at the bottom left of the display. This indicator illuminates if the
battery needs to be recharged. To recharge the battery, simply plug the input jack of the recharging pack into the receptacle at the front of the cycle base or exercise at higher work rates and
speeds above 50 RPM. Plug the opposite end of the recharging pack into a wall socket. The system will recharge even while turned OFF.
NOTE: The BioStep has a Time-Out function based on the system clock. If left on without being used for
more than 60 seconds, the BioStep automatically turns OFF and all data is lost. For this reason, it is
important to check all accumulated data immediately following any exercise session.
NOTE: An explanation of METs, and the relationship of calories burned to oxygen consumption and
METs, is provided in Chapter 10, Additional Considerations.
NOTE: To toggle OFF the “beep” that sounds as parameters scroll during exercise:
1. While pressing <Power ON/OFF> to power up the BioStep, press and hold down the <M> and
<Select Display> button until “bPr” appears in the top window. (Do not pedal at this point.)
2. Press <–Adjust> twice so that OFF appears in the top window.
3. Press <Select Display> twice so that 150 appears in the top window (you should hear a beep).
4. Press <Power ON/OFF> to turn the power OFF.
5. Press <Power ON/OFF to turn the power back ON. The beep should now be disabled
during exercise mode.
DISPLAY PARAMETERS — 12 —
Page 13

7. SELECTING THE RESISTANCE MODE (Clinical Pro Only)
The BioStep Clinical Pro provides two modes of operation: Constant Resistance Control and
Isokinetic Speed Control. Either mode is selected using the <Select Exercise> key. The BioStep
Clinical Pro defaults to Constant Resistance Control. Pressing the <Select Exercise> key will let
you toggle between the two choices. A LED illuminates next to the current selection. The
Constant Resistance Level or Isokinetic Speed selected are displayed in the exercise window at
the bottom of the display. Resistance level and WATTs are also displayed in the resistance level
display bar.
NOTE: Although the resistance level display bar shows up to 300 WATTs, the LED display will show up
to 600 WATTs.
NOTE: Work rates of 30 to 600 WATTs can be achieved without using the AC adapter when above 30
WATTs and 50 RPM. Using the AC adapter will allow users to achieve work rates as low as 50 WATTs at
25 RPM.
CONSTANT RESISTANCE CONTROL (AEROBIC EXERCISE)
• Excellent for heart rate and pulmonary rehab
• Popular for general aerobic conditioning
Constant Resistance Control is ideal for cardiovascular and general aerobic exercise. In this
mode, subjects can pedal as fast or as slow as they wish. Using Constant Resistance Control, no
matter how fast or slow the subject exercises the resistance stays the same.
When Constant Resistance Control is selected, resistance level is displayed in the Resistance
Level Display Window and Resistance Level Display Bar. A selection of 30 resistance levels provides a wide range of work-rate choices. Weak, de-conditioned, or post-operative patients, for
example, can exercise at work rates as low as 10 WATTs. Stronger subjects ranging up to highly
conditioned athletes can demand as much as 600 WATTs.
ISOKINETIC SPEED CONTROL (STRENGTH EXERCISE)
• Speed is always constant and resistance is accommodating
• Pedal hard, work rate increases. Pedal easy, work rate decreases
• Excellent for strengthening and building endurance
• Popular for sport training and physical rehabilitation
Isokinetic Speed Control provides accommodating resistance throughout the subject’s entire
stepping range of motion for the duration of the exercise period. Resistance continuously matches resistance, accommodating to variations in the subject’s force output due to weakness or pain
at specific points in the range of motion, and to fatigue over the course of the cycling period.
With a selection of speeds ranging from 50 to 120 deg/sec, Isokinetic Speed Control can be used
to maximize strength gains while minimizing the potential for injury. The default Isokinetic
speed setting is 60 RPM.
As subjects exercise with Isokinetic Speed Control, they will quickly notice that you can go only
so fast. Once the selected speed is reached, increasing resistance results in increased stepping
resistance - try as they might, subjects can’t exercise any faster. On the other hand, if resistance
is lessened, the exercise resistance will decrease. This reflects the basic premise of Isokinetic
exercise: fixed speed with totally accommodating, variable resistance.
— 13 — SELECTING THE RESISTANCE MODE
Page 14

8. SELECTING AND CUSTOMIZING EXERCISE PRO
Just what is “totally accommodating, variable resistance?” Simply put, this means that at any
point in the range of motion (in this case, the stepping revolution) the resistance encountered by
the user will exactly match the force exerted. In other words, the harder one pushes on the
pedal, the greater the resistance. Maximum speed never changes and there is little or no resistance provided until the preset speed is achieved.
Because the BioStep Clinical Pro provides totally accommodating Isokinetic resistance for each
and every stepping revolution, fluctuations in force output are instantaneously accommodated.
Since the amount of resistance the musculoskeletal system must overcome can never exceed that
which it can produce at any point in the range of motion, the Isokinetic mode ensures extremely
safe and comfortable exercise for rehabilitation users.
FILES
SELECTING THE RESISTANCE MODE — 14 —
Page 15

8. SELECTING AND CUSTOMIZING EXERCISE PRO
The BioStep and BioStep Clinical Pro features five pre-programmed exercise protocols. These
can be used in conjunction with over 30 resistance levels for Constant Resistance Control or 20
speed settings for Isokinetic Speed Control applications (Clinical Pro only).
Each pre-programmed exercise protocol can be used as is, or can be customized by changing the
weight, time, speed or resistance level values. Modifying the <Set Time> value changes the total
time and the duration of each interval. Changing the Set Speed or Resistance Level increases or
decreases each interval. The minimum time for each profile is six minutes.
During the exercise, actual patient Resistance in WATTs is displayed on the Resistance Level Bar
Graph. The selected program resistance level or speed is displayed in the Exercise Window.
The Resistance Level Bar Graph provides both clinician and user with immediate, real-time
biofeedback, which helps make it easy for the user to stay within personal protocol guidelines
and for the clinician to be aware of the user’s level of resistance.
NOTE: Resistance may be changed while exercising. If changed, the new resistance becomes the basis for
subsequent levels.
FILES
The following sections define each exercise protocol and its potential applications.
NOTE: For all profiles of less than 10 minutes duration, the warm-up is one minute and the cool down is two
minutes. For profiles greater than 10 minutes duration, the warm-up and cool down are two minutes each.
CONSTANT RESISTANCE PROFILE EXAMPLES
All segments of the Constant Profiles are based on the work rate entered for the peak resistance
level work rate when you set Adjust Resistance Level. For example, if you enter “5” as the Peak
Resistance Level, the Constant Resistance (Manual Mode) profile will remain at “5” for the duration of the exercise session.
Minimum time for all profiles = 6 minutes.
Examples
With a Peak Resistance Level of “5”, a Constant Resistance (Manual Mode) Profile will appear
like the following example:
Peak Resistance Level: 5
Begin at 5
End at 5
— 15 — SELECTING & CUSTOMIZING EXERCISE PROFILES
Page 16

CONTENTS
With a Peak Effort Level of "20" (200 WATTS), a Constant Power Aerobic Interval Training
Profile will appear like the following example. (Refer to next page for profile definition):
Peak Effort Level: 20 (200 WATTS)
Warm Up at level 9 (20 x 45%)
Initial Low = 13 (20 x 65%)
First High = 20 (peak resistance)
Second Low = 13 (20 x 65%)
Second High = 20 (peak resistance)
Third Low = 13 (20 x 65%)
Third High = 20 (peak resistance)
Cool Down = 9 (20 x 45%)
*All values for Constant Power are rounded to the nearest unit of 10.
20
13
9
13
Constant Resistance (Manual Mode)
20
13
20
9
Resistance level is consistent for the duration of this profile. The user selects the peak resistance
level and simply begins to pedal.
• Appropriate for general aerobic endurance
• Exercise at lower work rates for longer period of time if de-conditioned or weight loss
is the goal
• Minimum setting: 1
SELECTING & CUSTOMIZING EXERCISE PROFILES — 16 —
Page 17
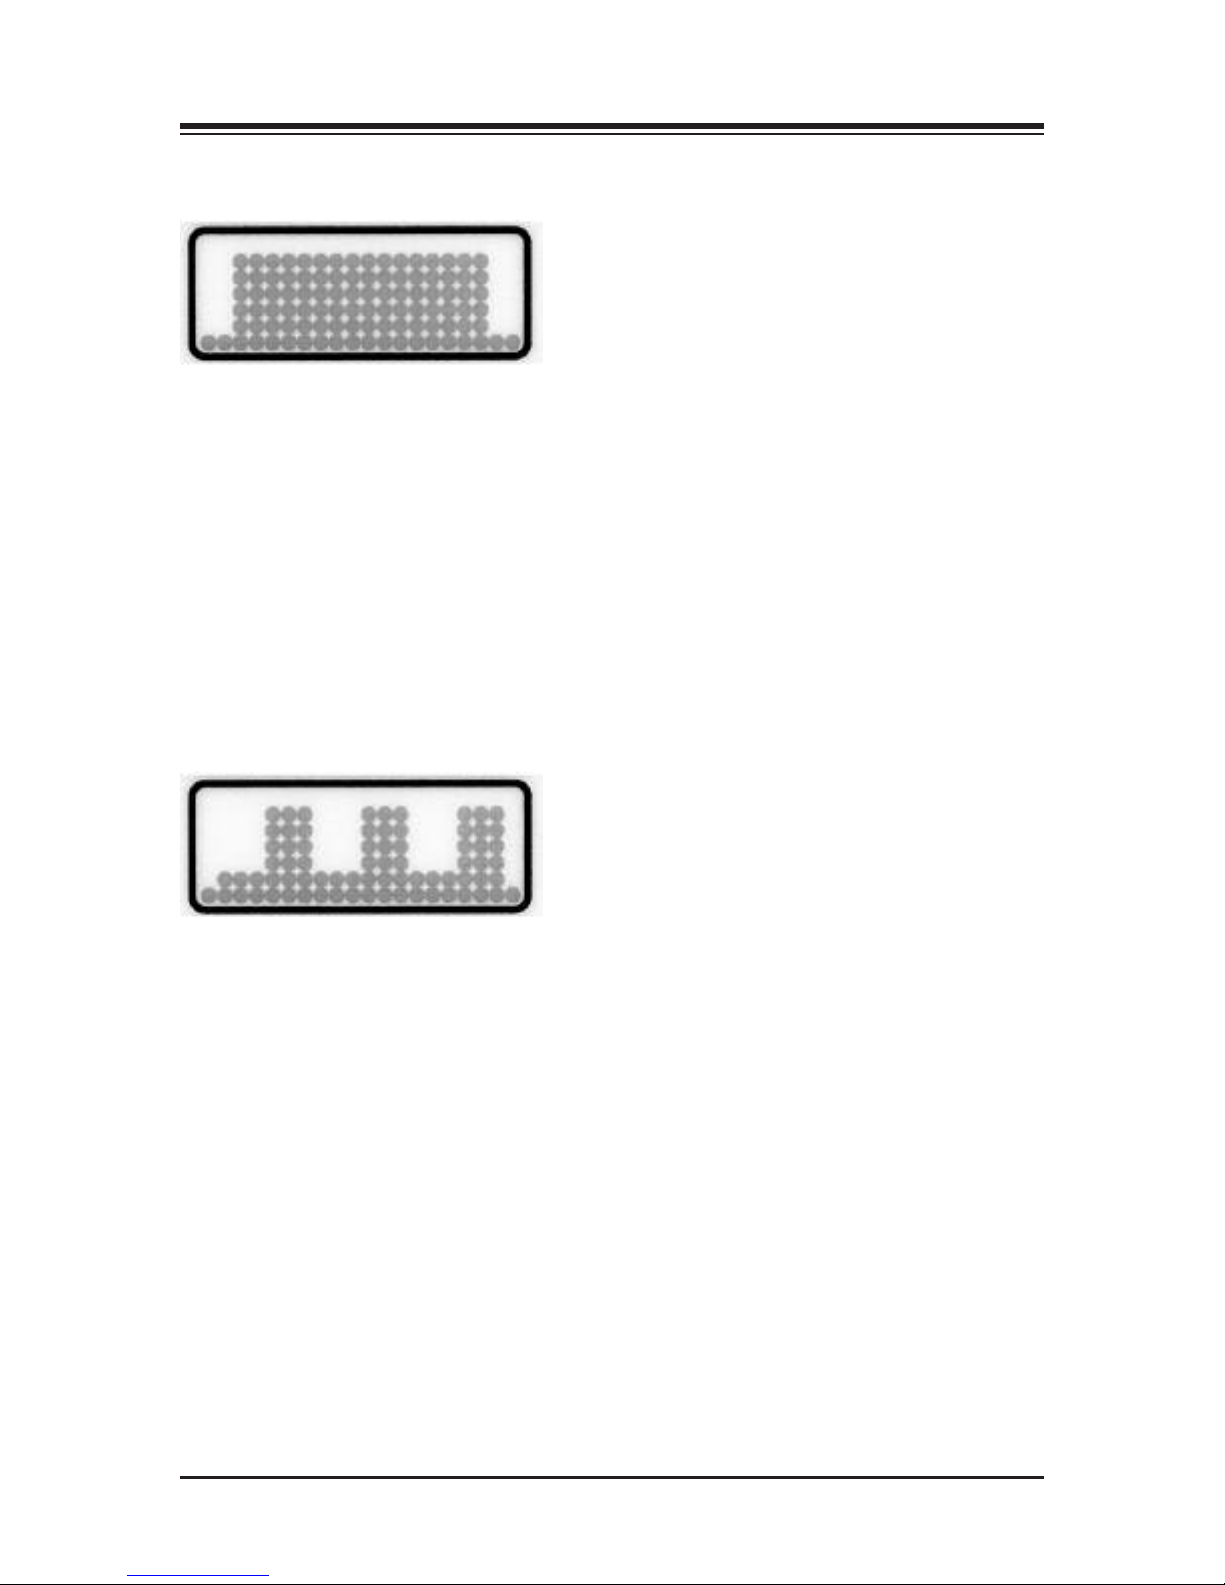
CONTENTS
Constant Resistance Level with Warm-Up and Cool Down
The starting segment (1, warm-up) and ending segment (3, cool down) are set at 25% of selected
peak resistance level or the minimum resistance for the first three segments produced in the
resistance bar, whichever is greater. The middle segment (2, work) is set at the peak resistance
level selected by the user.
• Includes a warm-up and cool down period
• Appropriate for general aerobic endurance
• Exercise at lower work rates for longer period of time if de-conditioned or weight loss
is the goal
• Minimum peak effort level: 2
• Minimum initial warm-up: 1
Aerobic Interval Training
The starting segment (1, warm-up) and ending segment (8, cool down) are set at 45% of selected
peak resistance level or the minimum resistance for the first three segments produced in the
resistance bar, whichever is greater (1,8). Low level segments, (2,4,6) are set at 65% of selected
peak resistance. High level segments, (3,5,7) are the selected peak resistance level.
• Warm-up followed by three intervals of high resistance, then low resistance
• Low intervals are 65% of high resistance level
• For improving aerobic capability or if extremity circulation problems are experienced
• Exercise at upper end of target zone to a moderate level of fatigue at each interval
• Minimum peak effort level: 5
— 17 — SELECTING & CUSTOMIZING EXERCISE PROFILES
Page 18
CONTENTS
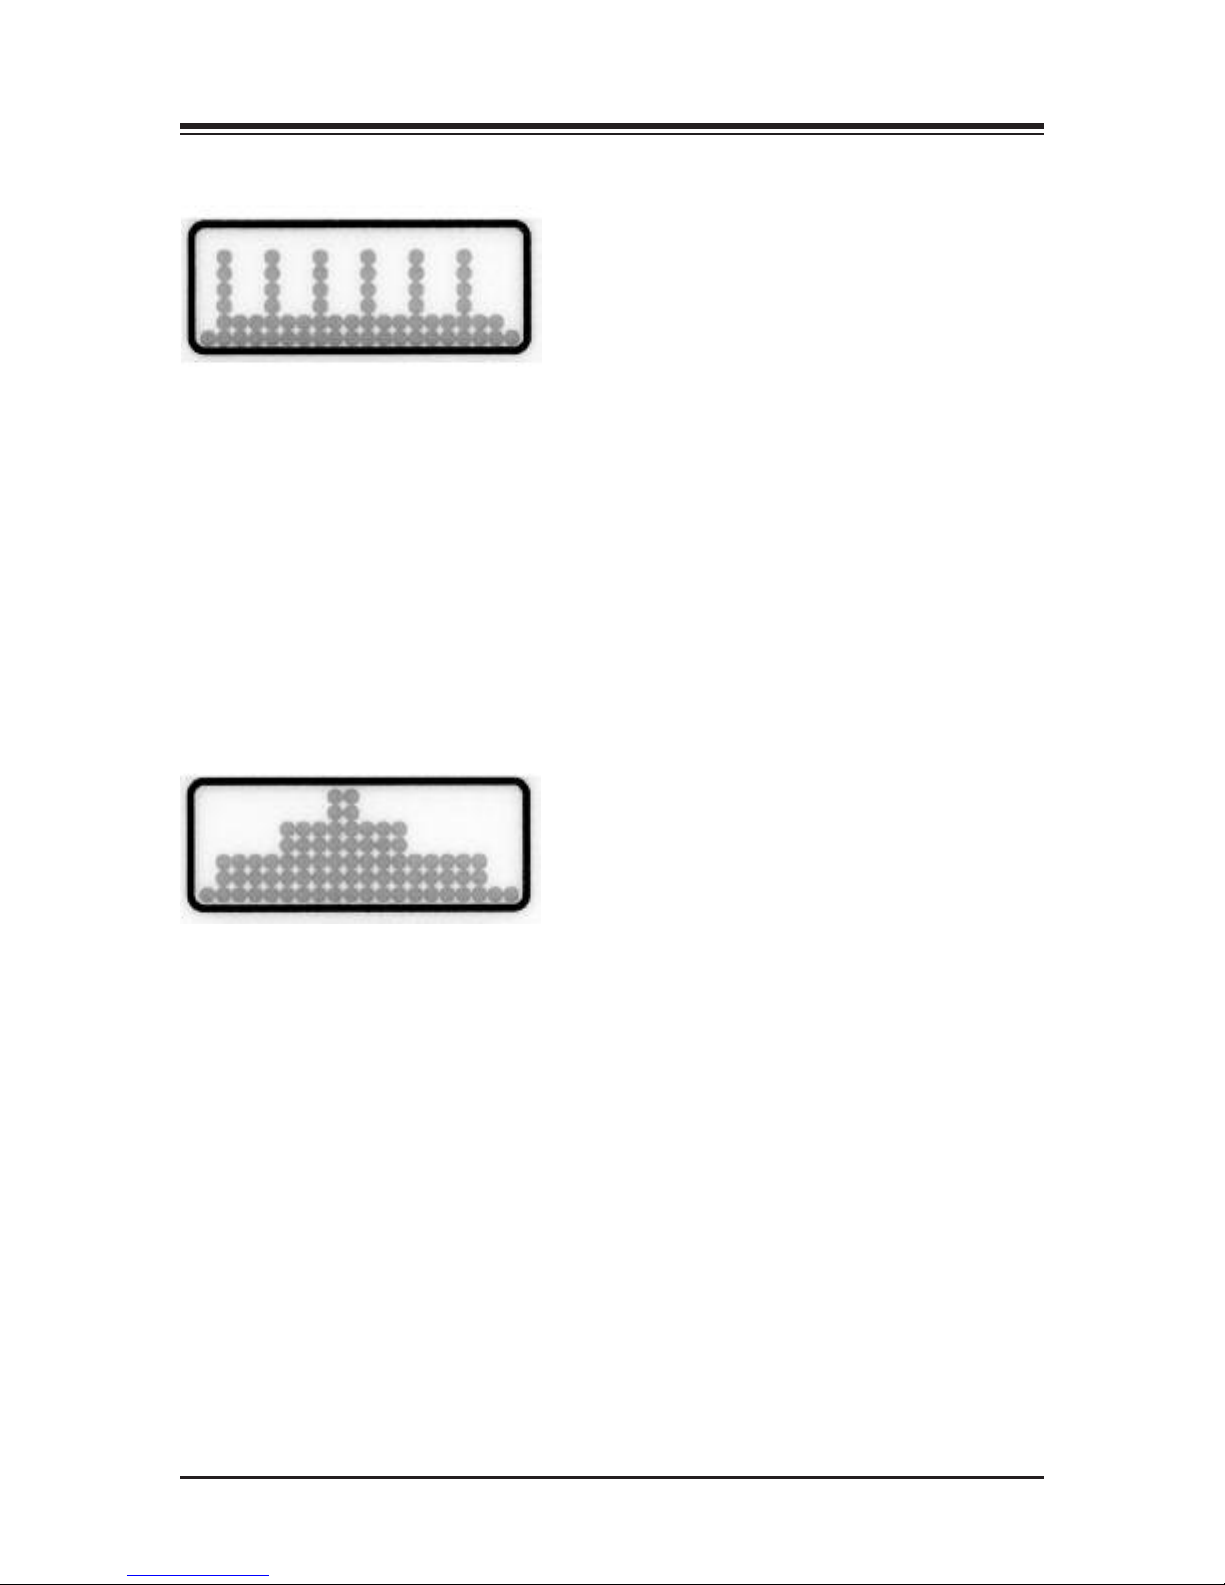
Anaerobic Interval Training
The starting segment (1, warm-up) and ending segment (14, cool down) are set at 45% of selected peak resistance level or the minimum resistance for the first three segments produced in the
resistance bar, whichever is greater. Low level segments, (3,5,7,9,11,13) are set at 65% of selected
peak resistance. High level segments, (2,4,6,8,10,12) are the selected peak resistance level.
• Warm-up followed by six short intervals of high-level resistance
• Low intervals are 65% of high resistance
• For improving strength and endurance – mimics sport conditions of short,
intense resistance followed by longer recovery periods
• Minimum peak effort level: 5
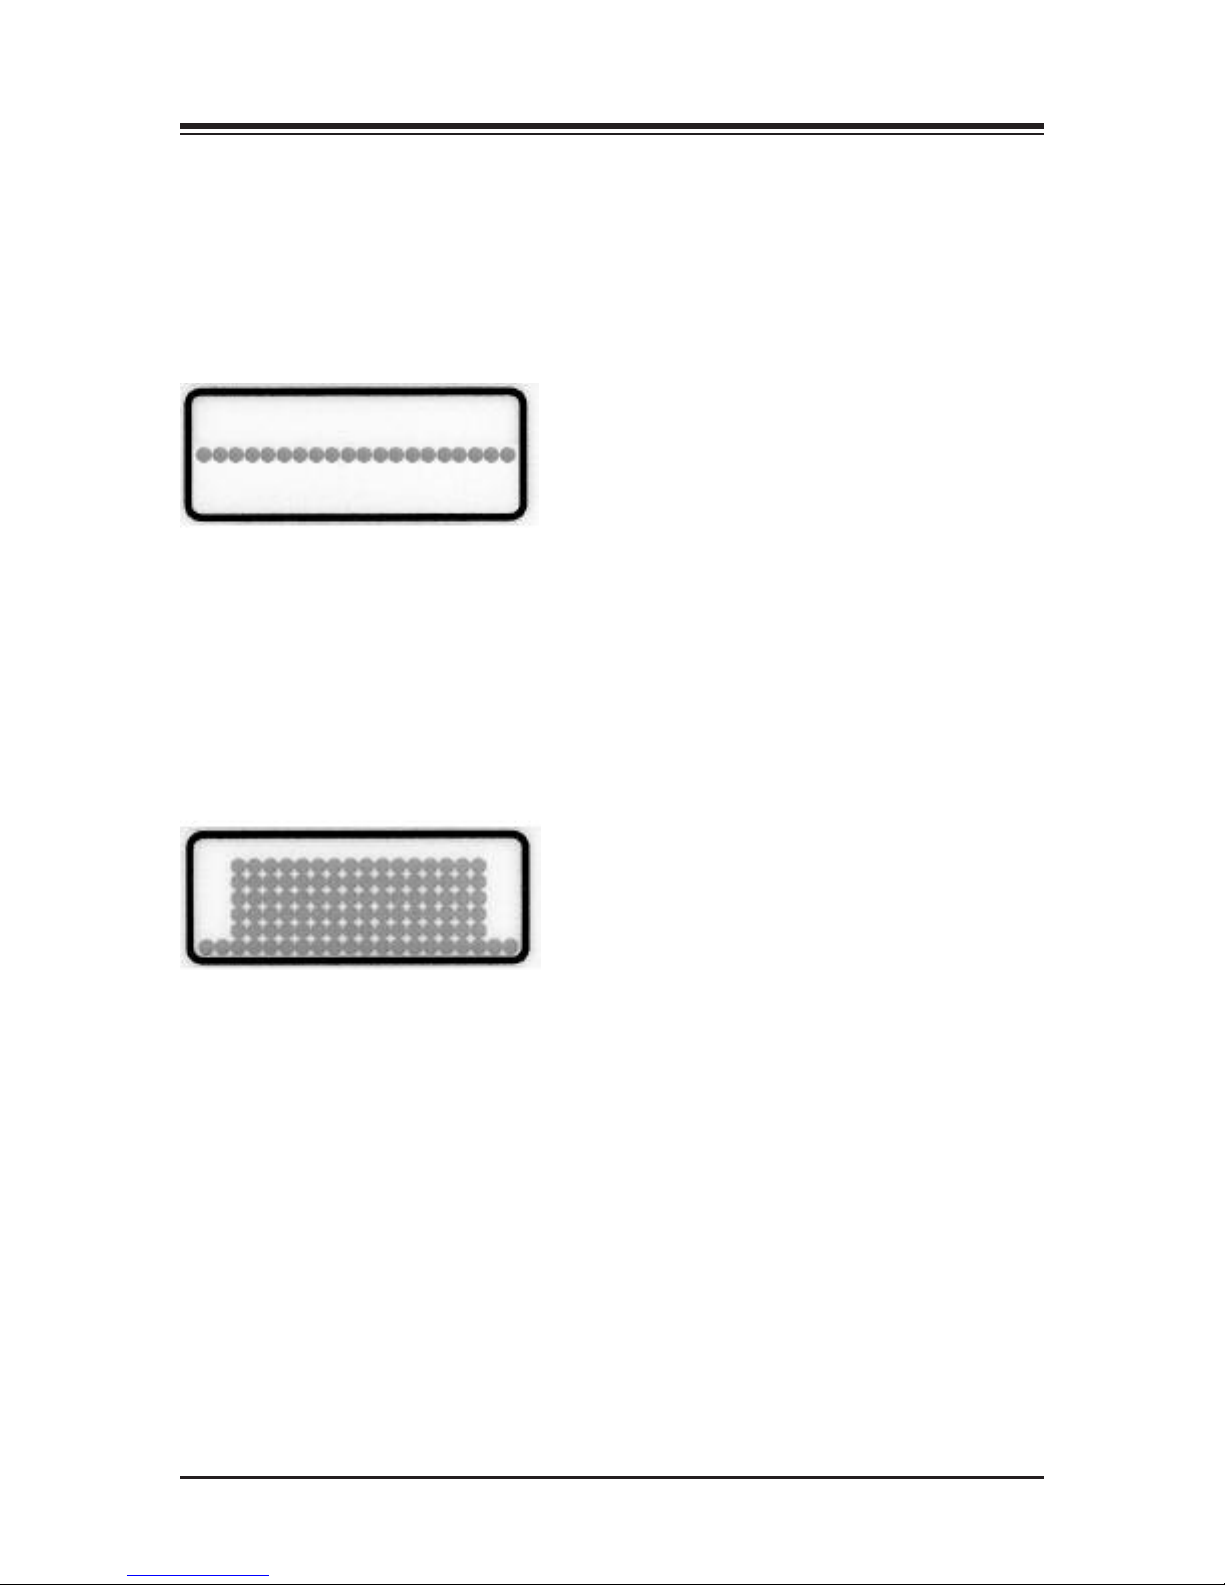
Pyramid
The starting segment (1, warm-up) and ending segment (7, cool down) are set at 45% of selected
peak resistance level or the minimum resistance for the first three segments produced in the
resistance bar, whichever is greater. Segments 2 and 6 are set at 75% of selected peak resistance
level while segments three and five are set at 85% of selected peak resistance level.
• Warm-up followed by three increasingly difficult intervals, then two less difficult intervals
• Peak resistance is the set resistance
• Less difficult intervals are 85% and 75% of peak resistance
• Use for general conditioning of both aerobic and anaerobic systems
• Minimum peak effort level: 5
SELECTING & CUSTOMIZING EXERCISE PROFILES — 18 —
Page 19
CONTENTS
ISOKINETIC PROFILES DEFINED (Clinical Pro Only)
Minimum time is six minutes for all profiles, target resistance level LED will flash during time
duration for that segment. All segments following warm up are based on the actual work rate
performed in the immediate previous segment.
Constant Resistance (Manual Mode)
Speed is consistent for the duration of this profile. The user selects the speed and simply begins
to pedal. Resistance level is how hard the patient pushes against the pedal.
• Appropriate for general aerobic endurance
• Exercise at lower work rates for longer period of time if de-conditioned or weight loss
is the goal
Constant Level with Warm up and Cool Down
The starting segment (1, warm-up) is however hard the patient chooses to work. The middle
segment (2, work) target value equals 100% more than the average actual work rate performed
in the warm-up segment (rounded to the nearest 10 WATTs). Target resistance level flashes in
the resistance bar during the time duration for the work segment. The cool down segment
equals 50% less than work performed in the work segment.
• Includes a warm-up and cool down period
• Appropriate for general aerobic endurance
• Exercise at lower work rates for longer period of time if de-conditioned or weight loss
is the goal
— 19 — SELECTING & CUSTOMIZING EXERCISE PROFILES
Page 20
9. SRC OPTIONS
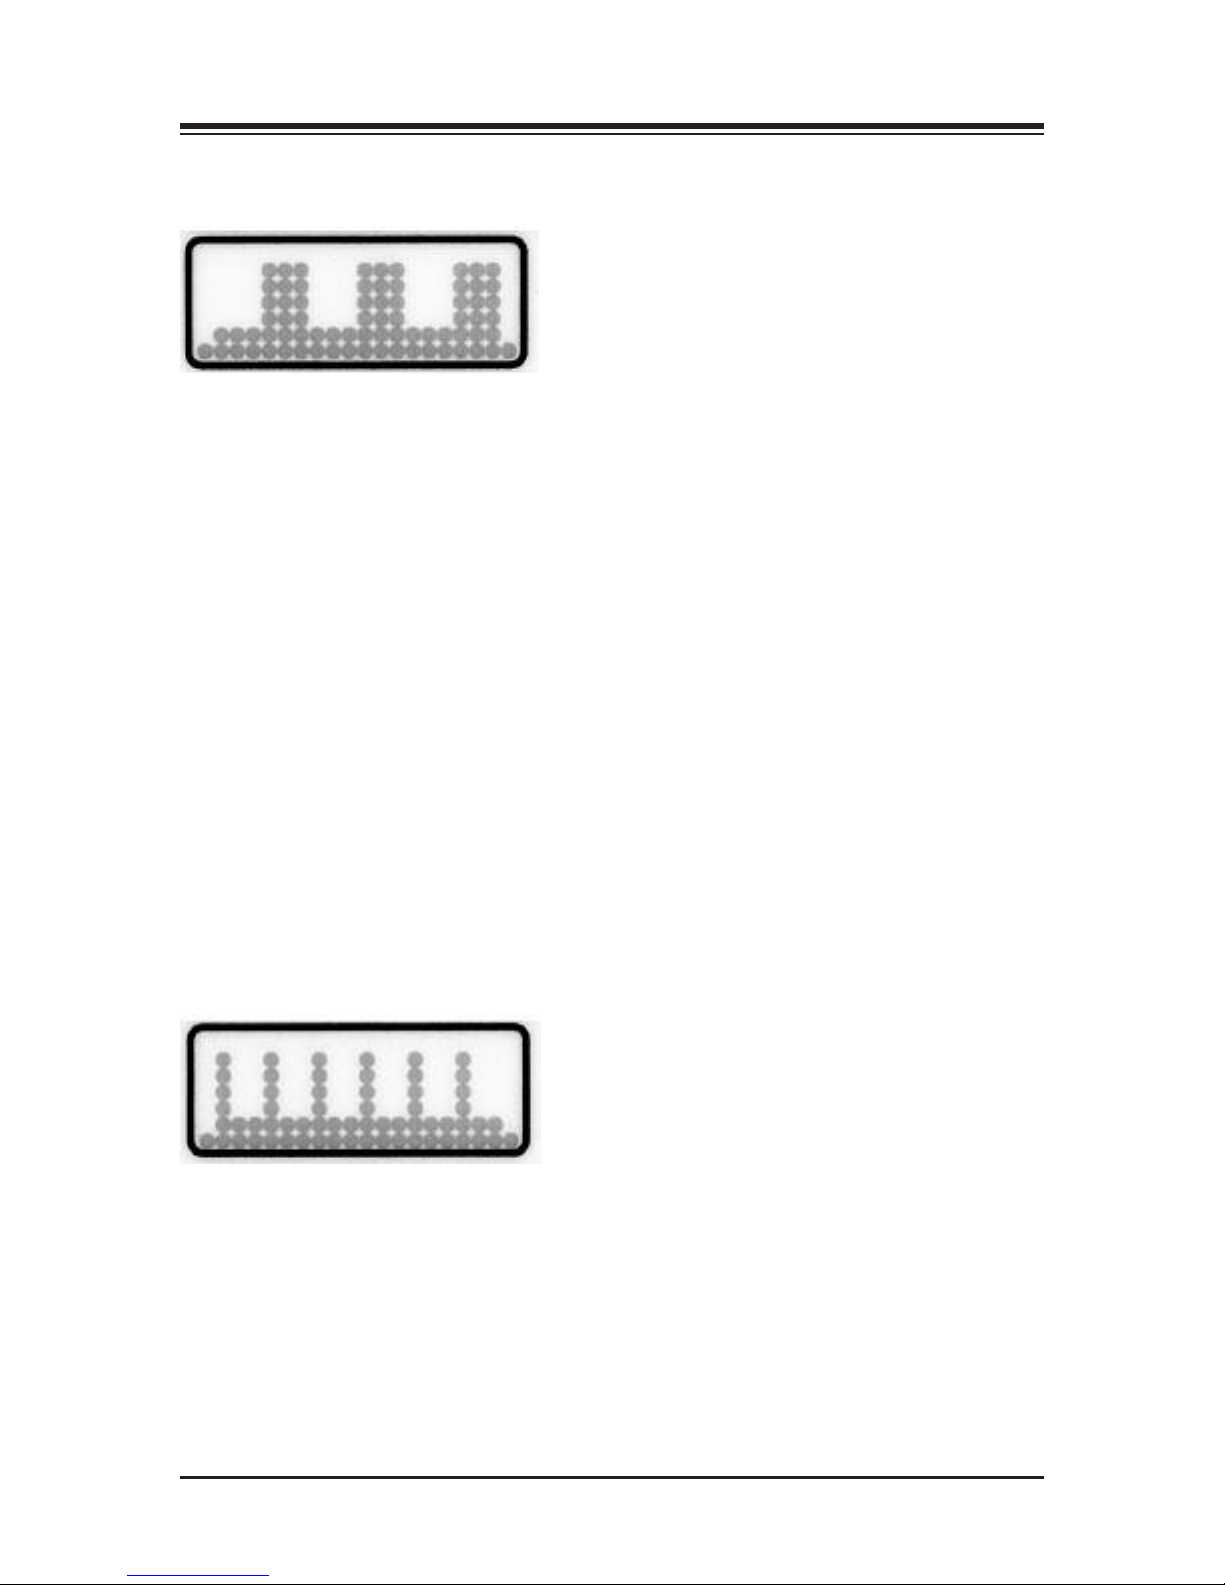
Aerobic Interval Training
1. The starting segment (1, warm-up) is however hard the patient chooses to work.
2. Initial Low level equals 25% more than the average actual work rate performed in the
warm-up segment.
3. First High level equals 100% more than the average actual work rate performed in the initial
low level.
4. Second Low level: Equals 50% less then the average actual work rate performed in the First
High Level work segment.
5. Second High Level work segment equals 100% more than the average actual work rate performed in the Second Low Level.
6. Third Low equals 50% less then the average actual work rate performed in the Second High
Level work segment.
7. Third High Level equals 100% more than the average actual work rate performed in the
Third Low level.
8. Cool Down equals 25% less than the average actually work rate performed in the Third Low
level.
• Warm-up followed by three intervals of high resistance, then low resistance
• For improving aerobic capability or if extremity circulation problems are experienced
• Exercise at upper end of target zone to a moderate level of fatigue at each interval
Anaerobic Interval Training
1. The starting segment (1, warm-up) is however hard the patient chooses to work.
2. First High level equals 300% more than the average actual work rate performed in the initial
segment.
3. First Low level equals 75% less than the average actual work rate performed at the First
High Level.
4. Second High Level equals 300% more than the average actual work rate performed in the
First Low Level.
5. Second Low Level equals 75% less than the average actual work rate performed at the
Second High Level.
SELECTING & CUSTOMIZING EXERCISE PROFILES — 20 —
Page 21
9. HEART RATE MONITORING
6. Third High Level equals 300% more than the average actually work rate performed in the
Second Low level.
7. Third Low Level equals 75% less than the average actual work rate performed at the Third
High Level.
8. Fourth High Level equals 300% more than the average actually work rate performed in the
Third Low level.
9. Fourth Low Level equals 75% less than the average actual work rate performed at the
Fourth High Level.
10. Fifth High Level equals 300% more than the average actually work rate performed in the
Fourth Low level.
11. Fifth Low Level equals 75% less than the average actual work rate performed at the Fifth
High Level.
12. Sixth High Level equals 300% more than the average actual work rate performed in the Fifth
Low level.
13. Sixth Low Level equals 75% less than the average actual work rate performed at the Sixth
High Level.
14. Cool down equals 25% less than the average work rate performed in the Sixth Low Level.
• Warm-up followed by six short intervals of high-level resistance
• Low intervals are 25% of high resistance. High resistance needs to be greater than 40 WATTS
for the target LED to flash in low level.
• For improving strength and endurance – mimics sport conditions of short,
intense resistance followed by longer recovery periods
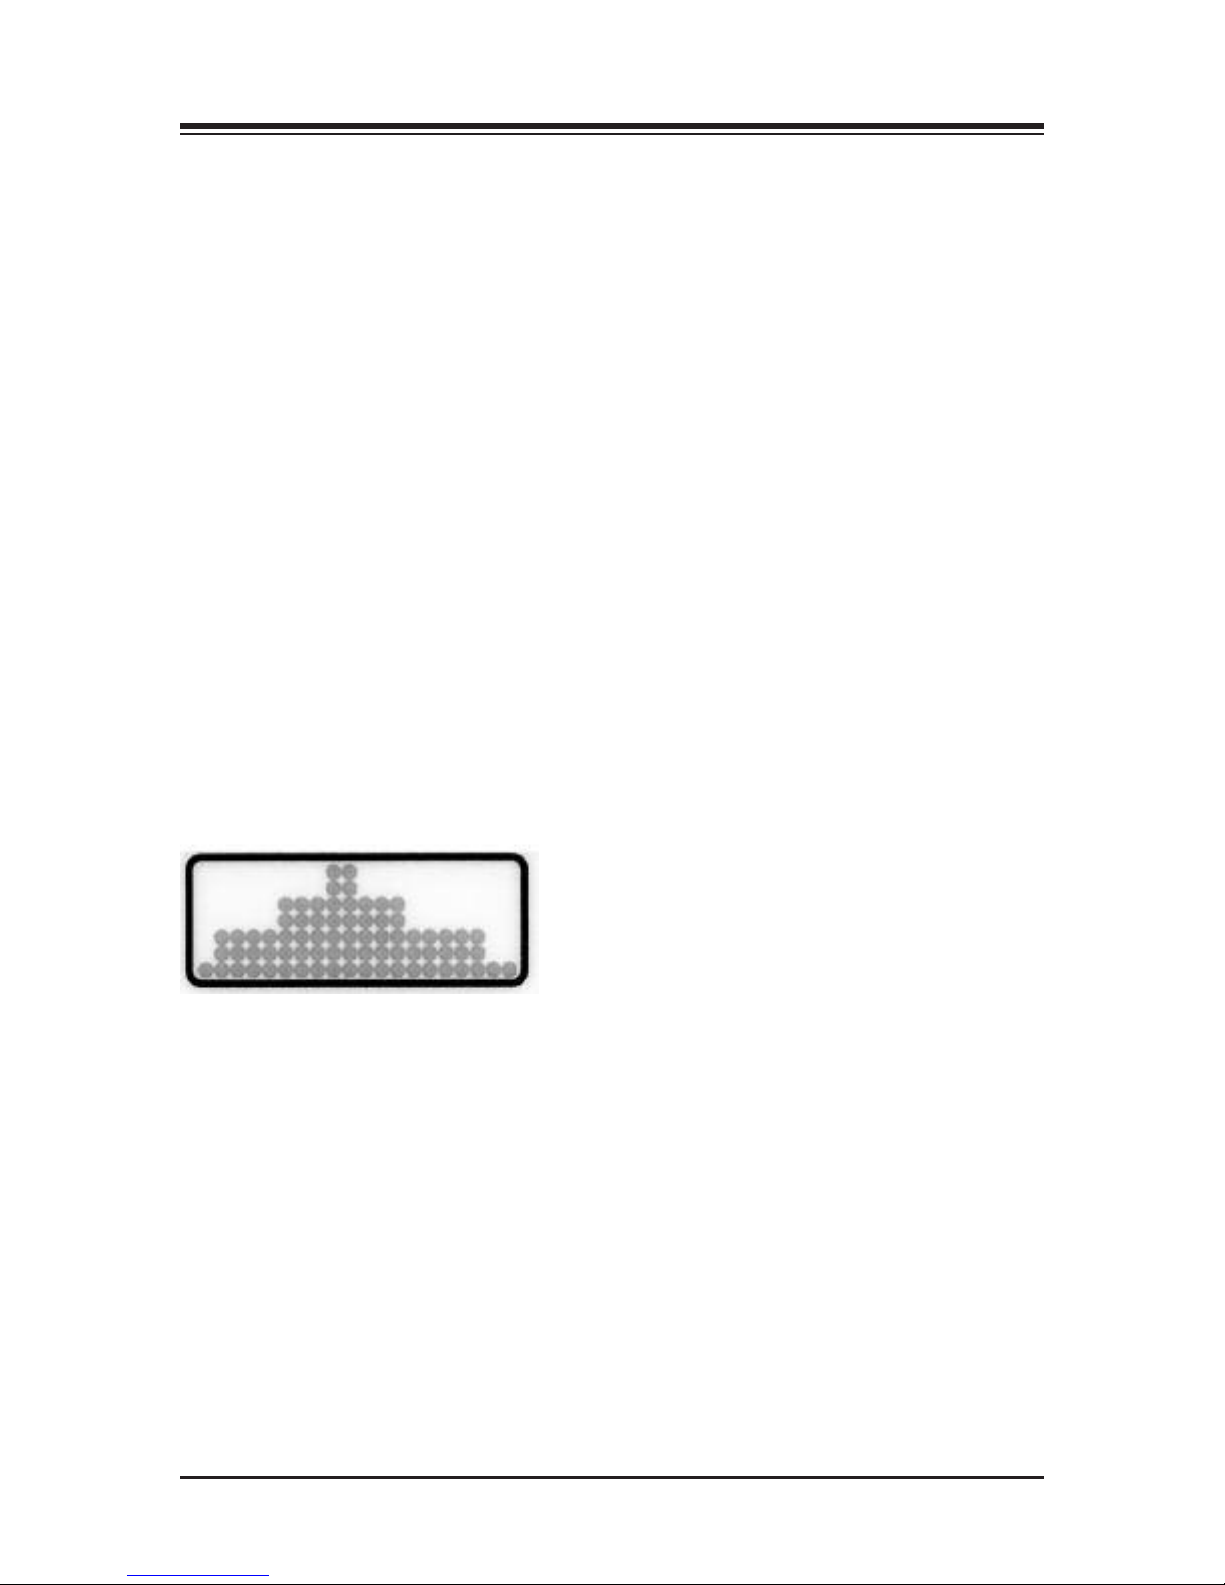
Pyramid
1. The starting segment (1, warm-up) is however hard the patient chooses to work.
2. First Level equals 65% more than the average actual work rate performed in the initial
warm up segment.
3. Second Level equals 20% more than the average actual work rate performed in the First
Level.
4. Peak level equals 15% more than the average actual work rate performed in the Second Level.
5. First Level Descending equals 15% less than the average work performed at the Peak Level.
6. Second Level Descending equals 35% less than the average work performed at the Peak.
7. Cool Down equals 25% less than the average work performed in the Second Descending
Level.
• Warm-up followed by three increasingly difficult intervals, then two less difficult intervals
• Peak resistance is the set resistance
• Less difficult intervals are 85% and 65% of peak resistance
• Use for general conditioning of both aerobic and anaerobic systems
— 21 — SELECTING & CUSTOMIZING EXERCISE PROFILES
Page 22

9. HEART RATE MONITORING
HEART RATE MONITORING
The BioStep’s Heart Rate Monitoring feature allows clinicians to monitor user heart rate during
exercise sessions. This can be done using the heart rate contact handgrips, or by attaching the
wireless Polar heart rate monitor belt directly to the patient.
Heart Rate Contact Handgrips
To use the heart rate contact handgrips for heart rate monitoring, the patient needs only to grasp
both BioStep heart rate contact handgrips while exercising. The heart rate will be displayed in
real-time value in the upper display window. When the heart rate is being displayed, the heart
rate LED will be illuminated.
Wireless Heart Rate Chest Strap
The wireless Heart Rate Chest Strap is attached directly to the patient. When used, it sends heart
rate related information directly to the display panel.
To attach the Heart Rate Chest Strap directly to the patient:
1. Have the patient lift shirt and secure the Heart Rate Chest Strap around the chest so that it is
in direct contact with the skin just below the breast. (The strap should be dampened with a
conducting gel, sponge or wet cloth to ensure maximum conductivity.)
2. Position the patient on the BioStep and check that the heart rate information is being provid-
ed in the top window of the display panel.
HEART RATE CHART
As illustrated by the following chart, medical authorities have determined target heart rate
ranges for optimum cardiovascular benefit. While the chart may be used as a guide or starting
point, concessions must be made based on individual user needs.
CAUTION: As a general guideline, use the following equation in
estimating Maximum Heart Rate for a heart rate healthy user:
Maximum Heart Rate = 220 - user age in years
Example: A heart rate healthy 30 year-old would use a Max. H/R of 190 beats per minute.
ATTENTION: On ne do it jamais se servir de la pulsation cardiaque qui se rapproche de la limite
maximum de sécurité de la personne. Servez-vous de l’équation suivante comme guide pour estimer
la pulsation cardiaque maximum sécuritaire pour une personne en santé.
Pulsation cardiaque maximum = 220 - l’âge de la personne
Example: Une personne de 30 ans en santé et sane probléme cardiaque devrait s’en tenir à une pulsation cardiaque maximum de 190 par minute.
HEART RATE MONITORING — 22 —
Page 23

10. ADDITIONAL CONSIDERATIONS
NOTE: If the heart rate is not displayed, or appears to be incorrect, adjust the Heart Rate Chest Strap for
improved conductivity, or have the patient reposition both hands on the heart rate handle bar. (You may
want to take the user’s pulse rate manually and compare it against the displayed heart rate to confirm
accuracy. Eldery patients may need to use hand cream or water to improve signal strength.)
The following chart depicts standard Target Heart Rate ranges for optimum cardiovascular
benefit. While this chart may be used as a guide for heart rate-healthy users, clinicians must be
sure to set the Target Heart Rate based on individual patient protocol.
CAUTION: When prescribed for therapeutic purposes, a physician should clearly define the parameters of use (i.e., total work, maximum heart rate, etc.) to reduce the risk of patient injury.
ATTENTION: Quand l’appareil est untilisé en thérapue, le médecin responsable do it définir les
paramétres spécifiques en patient pour limiter tout rique et nnotamment le travail total et la
fréquence cardiaque.
Age Estimated Maximal 85% 70%
Attainable Heart Rate Level Level
20 200 170 140
25 195 166 136
30 190 162 133
35 185 157 129
40 180 153 126
45 175 149 122
50 170 145 119
55 165 140 115
60 160 136 112
65 155 132 108
— 23 — HEART RATE MONITORING
Page 24

10. ADDITIONAL CONSIDERATIONS
CAUTION: As with any other piece of user-interactive exercise equipment, certain considerations
must be ensured before anyone is allowed to exercise on the Biodex BioStep. Following is a brief
summary of some points to consider.
1. All users should have medical clearance prior to undertaking any rigorous exercise program. This is
especially necessary for any user with a past history of heart rate problems or known risk factors
including: family history of cardiovascular disease, elevated blood pressure, hyperlipidemia, diabetes,
obesity, sedentary lifestyle and smoking.
2. Start each user at a safe exercise level. Do not allow users to overexert themselves on the BioStep.
Symptoms of overexertion may include, but are not limited to: pain or discomfort, shortness of breath
or difficulty in breathing.
3. Prior to starting any exercise session, ensure that the user is comfortably seated. Be sure to adjust the
seat front-to-back and adjustment arm length as necessary. Mechanical adjustments are described in
detail in the Mechanical Adjustments section of this manual.
4. Warm-up and warm-down periods are necessary to avoid suddenly taxing the heart and circulation
system, and to help prevent injury to the muscles or joints. Sufficient warm-up and warm-down periods have also been shown to reduce muscle soreness following exercise. Be sure to allow for a minimum
of three to five minutes of gradually increasing exercise intensity prior to starting the actual exercise
session and a similar amount of time of decreasing exercise intensity following each session.
WHAT IS A MET?
The acronym MET stands for "metabolic equivalents"
METs are a unit of measurement that estimate the amount of physical demand placed on a person’s cardiopulmonary system. METs are often used in prescribing exercise for patients involved
in cardiopulmonary rehabilitation.
The MET level at which one exercises, is directly proportional to the amount of oxygen being
consumed, the amount of power (WATTs) accomplished, and the amount of calories burned
while exercising.
1 MET is equal to the amount of oxygen the body consumes at rest (lying down). The amount of
oxygen one consumes at rest is estimated to be approximately 3.5 ml of oxygen for each kilogram of body weight every minute or 3.5 ml/kg/min.
Each increase in energy expenditure of 3.5 ml/kg/min. is increasing one’s energy expenditure
by 1 MET.
MET charts have been developed by researchers to estimate the MET levels of domestic and
recreational activities. These estimations are generalizations as to how many times an individual
needs to elevate their metabolic rate (METs) to accomplish such activities.
The American College of Sports Medicine has published formulas to estimate the oxygen cost of
exercising at various work loads on treadmills, lower body cycles, upper body cycles, stepping,
and outdoor walking and running. MET levels can be determined by simply dividing oxygen
consumption in ml/kg/min. by 3.5.
ADDITIONAL CONSIDERATIONS — 24 —
Page 25
CONTENTS
BIODEX ERGOMETERS SUPPORT METs AND AID EXERCISE PRESCRIPTION FOR
BOTH CARDIOPULMONARY AND MEDICAL FITNESS
A cardiac stress test typically reports the max MET level achieved by the patient and/or the
MET level achieved at the point the test turned positive (often demonstrating schemic changes
in the heart muscle and/or inappropriate arrhythmias). Cardiologists often ask therapists to
keep a patient below a certain MET level based on this information from the cardiac stress test.
The Cardiologist will report, for example, “schemic changes at 10 METs/Heart Rate 128.
Exercise at or below 9 METs”.
Different types of cardiovascular exercise machines require the user to work at different work
loads (WATTs) to ensure a consistent elevation of an individual’s metabolic rate and the corresponding appropriate heart rate. Cranking an upper body cycle at 100 WATTs will, for example,
have a very different effect on one’s metabolic rate and heart rate when compared to stepping a
lower body cycle at 100 WATTs. It is up to the clinician to set the appropriate workloads on each
ergometer, or speed and elevation on the treadmill, to achieve the appropriate MET level.
THE RELATIONSHIP OF CALORIES BURNED TO OXYGEN CONSUMPTION AND METs
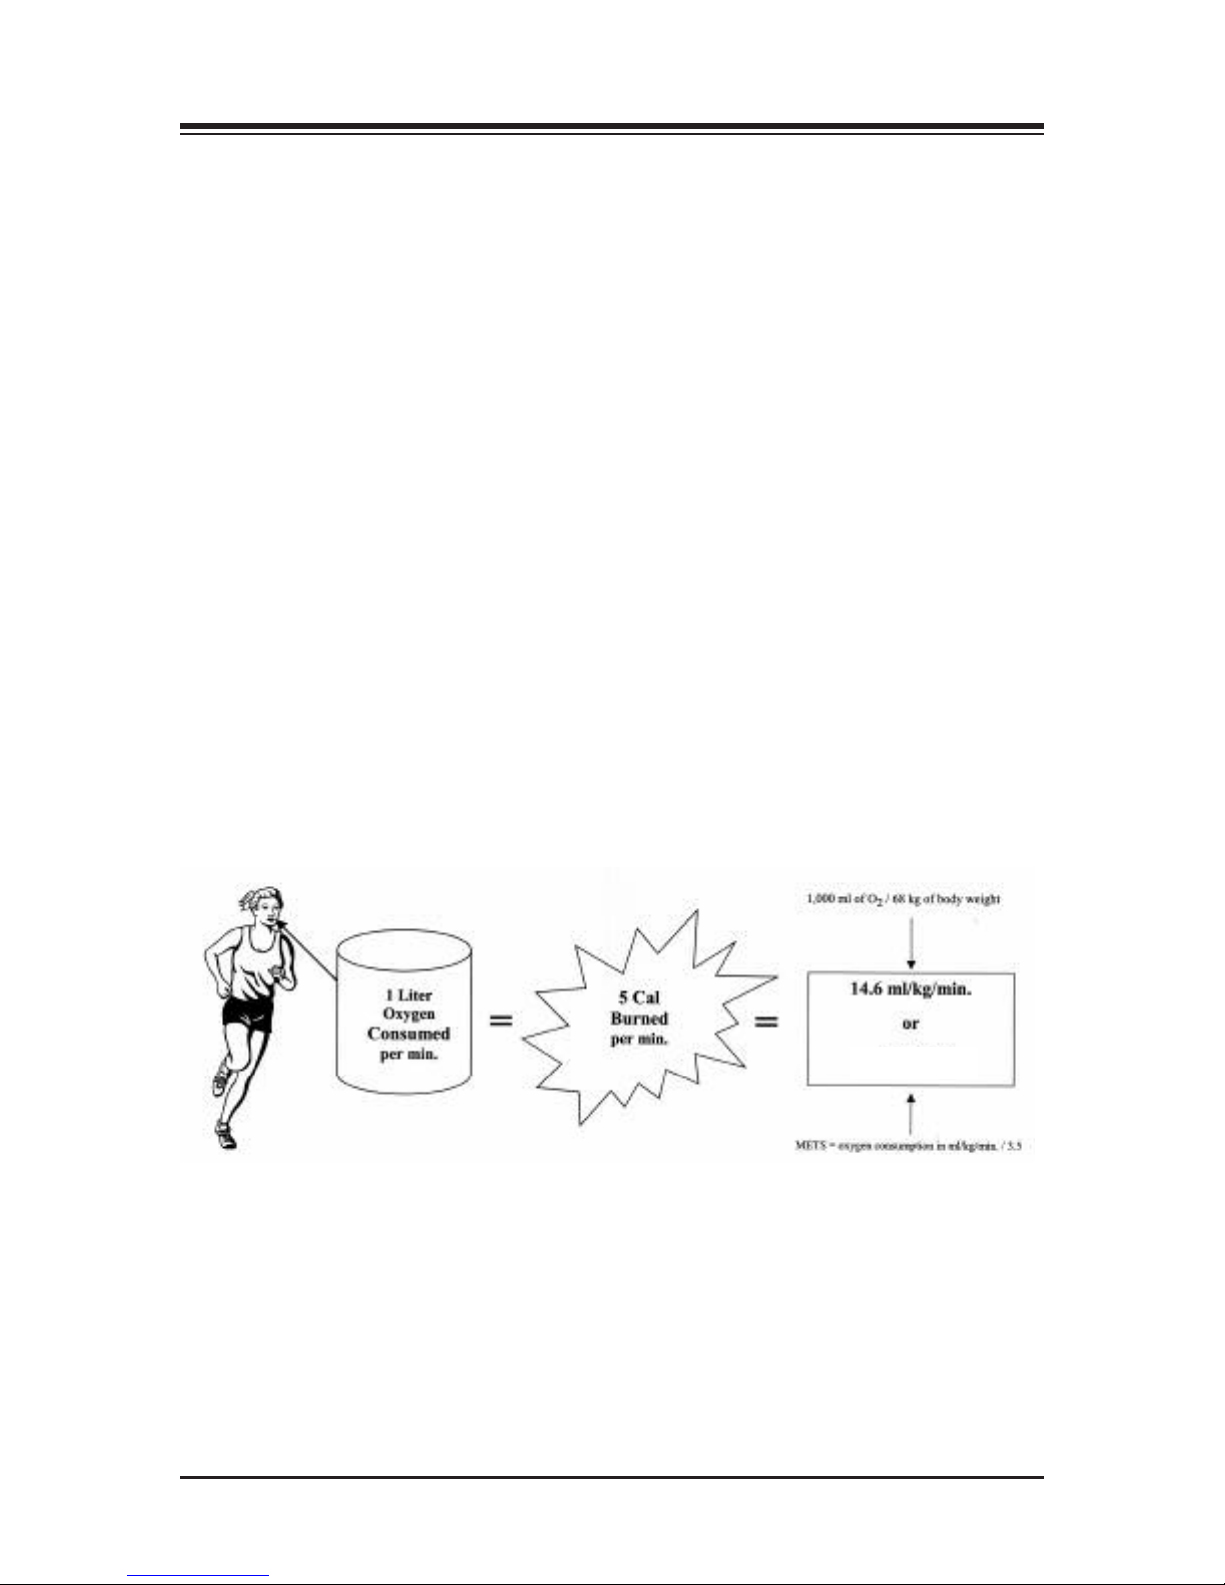
For every liter of oxygen consumed by the body during exercise, the body burns approximately
5 calories. The example below shows a 150 lb (68 kg) individual exercising at a level requiring
an oxygen consumption of 1 liter (1,000 ml) of oxygen each min., which would require that they
burn 5 calories each min. to supply the appropriate amount of energy for the exercise. This same
individual would be burning 14.6 milliliters of oxygen for each kilogram of body weight per
min. (1,000 ml of oxygen / 68 kg of body weight). Since one MET = (oxygen consumption in
ml/kg/min.) / (3.5), this individual would be exercising at 4 METs. They would need to elevate
their resting metabolism approximately 4 times to achieve this sustain this rate of exercise.
NOTE: In a study designed to examine the test-retest reliability and concurrent criterion validity of
VO
on the BioStep in community-dwelling older adults, results provided preliminary evidence of
2max
reliable and valid estimates of oxygen consumption by the BioStep when compared with the criterion
standard of direct VO
measurement in the sample.
2max
Reference: Mendelsohn, M.E., Connelly, D.M., Overend, J.J., Petrella, R.J.:Reliability and validity of
responses to submaximal all-extremity semi-recumbent exercise in older adults. Journal of Aging and
Physical Activity, 2007, 15, 184-194.
4 METs
— 25 — ADDITIONAL CONSIDERATIONS
Page 26

CONTENTS
NOTA – Comme pour tout autre équipement d’exercice interactif avec l’usager, on doit s’assurer du
respect de certaines considérations avant de permettre à quiconque de s’exercer sur l’appareil
BioStep de Biodex. Voici un bref aperçu de certains points dont il faut tenir compte.
1. Tous les utilisateurs doivent recevoir une permission médicale avant d’entreprendre tout programme
d’exercices rigoureux. Cela est particulièrement nécessaire dans le cas de tout utilisateur ayant un historique de difficultés du rythme cardiaque ou de facteurs de risques connus, y compris : un historique
familial de maladie cardio-vasculaire, l’hypertension artérielle, l’hyperlipidémie, le diabète, l’obésité, un
mode de vie sédentaire et le tabagisme.
2. Au début, faire évoluer chaque utilisateur à un niveau sécuritaire d’exercice. Ne pas permettre aux
utilisateurs de se surmener sur l’appareil BioStep. Les symptômes du surmenage peuvent comprendre,
sans s’y limiter : la douleur ou le malaise, la respiration courte ou la difficulté à respirer.
3. Au début de toute séance d’exercice, s’assurer que l’utilisateur est assis confortablement. Veiller à
régler la position d’avance et de recul du siège, ainsi que la longueur du bras de réglage, selon le
besoin. On trouvera la description détaillée des réglages mécaniques au chapitre Réglages mécaniques
du présent manuel.
4. Des périodes d’échauffement et de récupération sont nécessaires pour éviter de surcharger subitement le
cœur et le système circulatoire et pour aider à prévenir les lésions aux muscles et aux articulations. Il a
été démontré que des périodes suffisantes d’échauffement et de récupération réduisent les douleurs
musculaires après l’exercice. Veiller à prévoir au minimum entre trois et cinq minutes d’exercices dont
l’intensité augmente graduellement avant le début de la séance d’exercice proprement dite, ainsi qu’une
période semblable d’exercices dont l’intensité va en diminuant après chaque séance.
ADDITIONAL CONSIDERATIONS — 26 —
Page 27

CONTENTS
QU’EST-CE QU’UN MET?
L’acronyme MET signifie « équivalent métabolique ».
Le MET sert d’unité de mesure pour estimer l’ Resistance demandé au système cardiopulmonaire d’une personne. On utilise souvent les MET pour prescrire des exercices à des patients
en cours de réadaptation cardiopulmonaire.
Le taux métabolique (en MET) auquel on effectue un exercice est directement proportionnel à la
quantité d’oxygène consommée, à la puissance développée (en WATTs) et aux calories brûlées
durant l’exercice.
Le MET correspond à la quantité d’oxygène que l’organisme consomme au repos (sujet couché).
On estime cette quantité à environ 3,5 millilitres d’oxygène par kilogramme de poids corporel
par minute, soit 3,5 ml/kg/min.
Chaque augmentation de 3,5 ml/kg/min de la dépense énergétique augmente la vitesse de
métabolisme de 1 MET.
Les chercheurs ont mis au point des tableaux où ils estiment le nombre de MET pour des activités domestiques et récréatives. Ces estimations sont des généralisations sur le nombre de fois
qu’une personne doit augmenter son taux métabolique (le nombre de MET qu’elle doit développer) pour effectuer ces activités.
L’American College of Sports Medicine publie des formules permettant de faire l’estimation de
la dépense en oxygène de l’exercice, sous diverses charges de travail, sur tapis roulant, sur
cycles pour membres inférieurs et pour membres supérieurs, de la montée-descente sur
escabeau, ainsi que de la marche et de la course à l’extérieur. On calcule le taux métabolique en
MET en divisant simplement la consommation d’oxygène (en ml/kg/min) par 3,5.
LES ERGOMÈTRES BIODEX FACILITENT LE CALCUL DES MET ET LES PRESCRIPTIONS D’EXERCICE POUR CARDIOPULMONAIRE ET MISE EN FORME SOUS
SURVEILLANCE MÉDICALE.
L’épreuve d’ Resistance cardiaque indique normalement le nombre maximal de MET atteint par
le patient, ou le nombre de MET au point où l’épreuve passe au positif (souvent avec manifestation de changements ischémiques dans le muscle cardiaque ou d’arythmies inappropriées). Les
cardiologues demandent souvent aux thérapeutes de maintenir le patient au-dessous d’un certain nombre de MET sur la foi de cette information, glanée de l’épreuve d’ Resistance cardiaque.
Dans son rapport, le cardiologue fait état, par exemple de « modifications ischémiques à 10
MET/fréquence cardiaque 128. Exercice à vitesse de métabolisme égale ou inférieure à 9 MET. »
Les différents types de machines d’exercice cardiovasculaire demandent à l’utilisateur des
charges de travail (en WATTs) différentes pour assurer une augmentation uniforme de la vitesse
de son métabolisme, ainsi que la fréquence cardiaque correspondante appropriée. Activer les
manivelles d’un cycle pour membres supérieurs à 100 WATTs, ou pédaler un cycle pour membres inférieurs à 100 WATTs, sont des activités qui ont de effets très différents sur la vitesse de
métabolisme et la fréquence cardiaque du sujet. C’est au clinicien qu’il revient de fixer les
charges de travail qui conviennent sur chaque ergomètre, ou la vitesse et l’élévation du tapis
roulant, afin d’atteindre le taux métabolique en MET approprié.
— 27 — ADDITIONAL CONSIDERATIONS
Page 28
11. MAINTENANCE
RAPPORT ENTRE CALORIES BRÛLÉES, CONSOMMATION D’OXYGÈNE ET MET
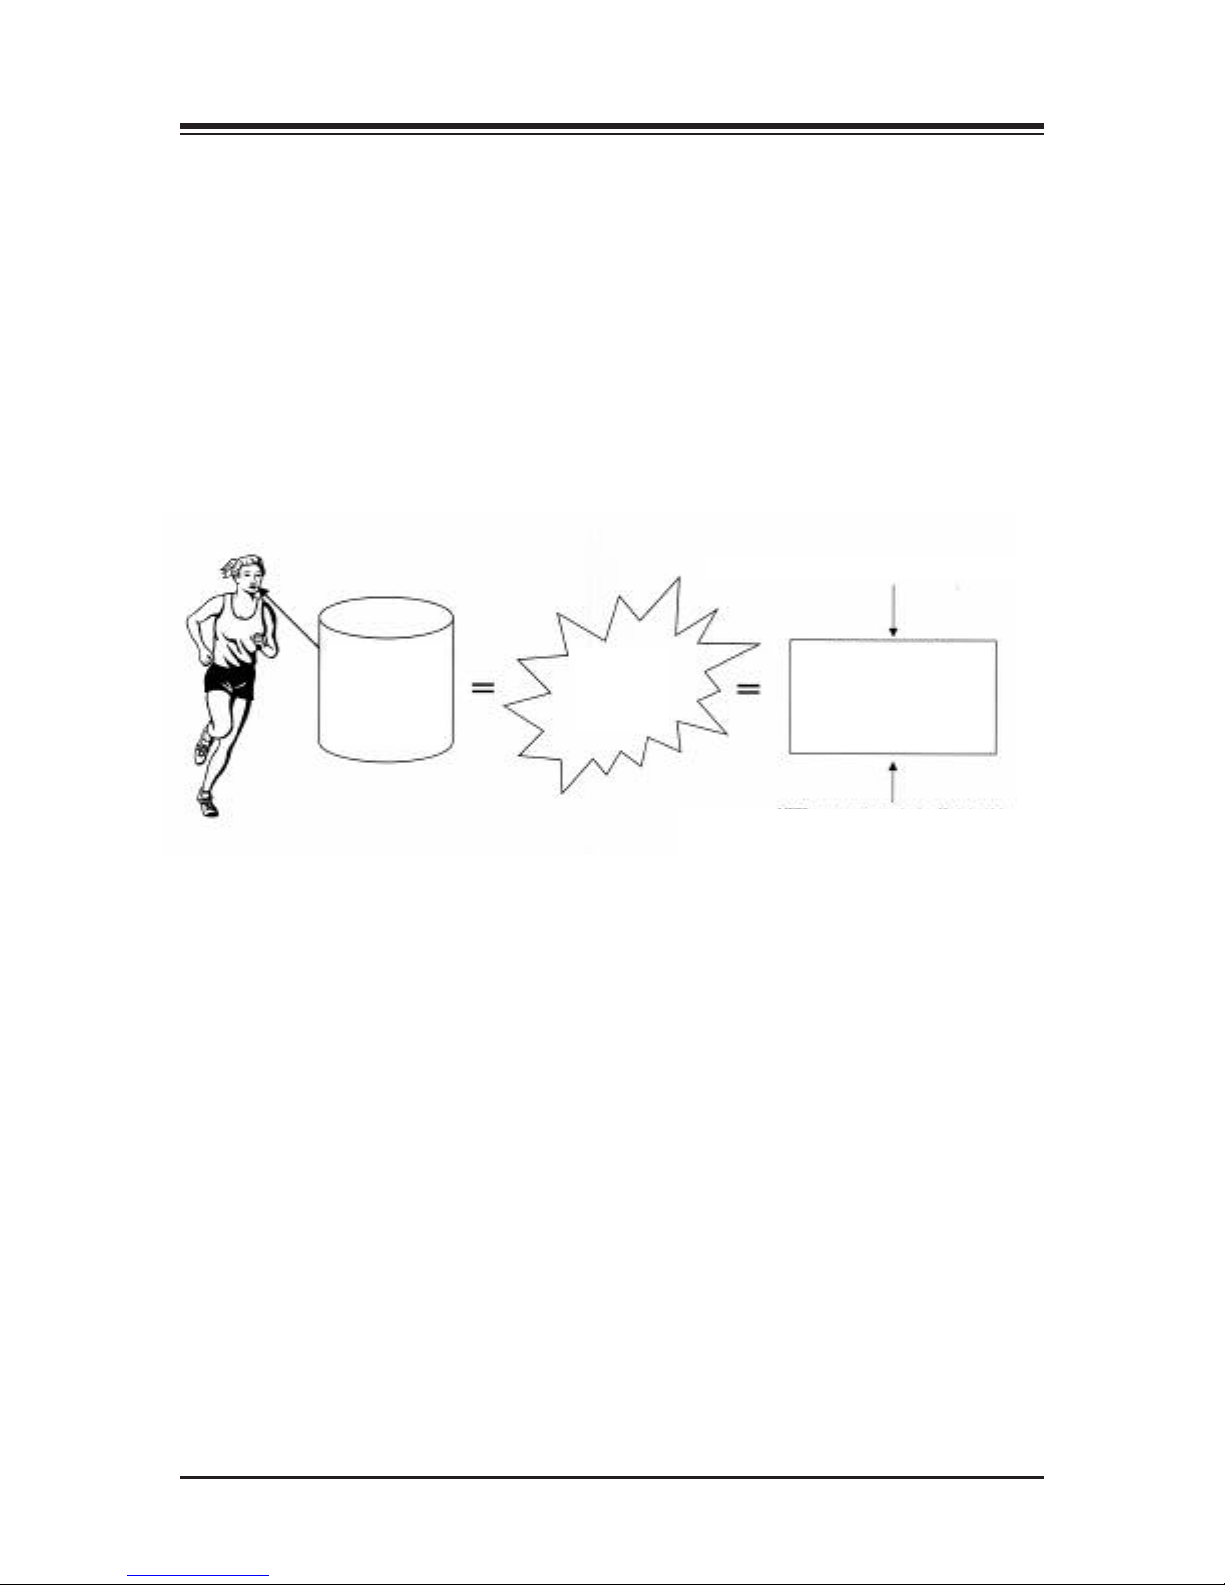
Pour chaque litre d’oxygène consommé par l’organisme durant l’exercice, ce dernier brûle environ 5 calories. L’exemple ci-dessous illustre une personne de 68 kg (150 lb) s’exerçant à un
niveau qui demande une consommation de 1 litre (1 000 ml) d’oxygène chaque minute. Pour ce
faire, elle doit brûler 5 calories chaque minutes afin de fournir la quantité d’énergie appropriée à
l’exercice. Cette même personne brûle 14,6 millilitres d’oxygène pour chaque kilogramme de son
poids corporel par minute (1 000 ml d’oxygène / 68 kg de poids corporel). Étant donné que un
MET = (consommation d’oxygène en ml/kg/min) / (3,5), cette personne s’exerce à un taux de 4
MET. Elle doit augmenter son métabolisme au repos environ 4 fois pour atteindre et maintenir
ce taux d’exercice.
1,000 ml d’O2 / 68kg de poids corporel
1 litre
d’oxygène
consommé
par min
5 cal
brulées
par min
14,6 ml/kg/min
ou
4 MET
Nombre de MET = consommation d’oxygène en ml/kg/min/3,5
ADDTIONAL CONSIDERATIONS — 28 —
Page 29

11. MAINTENANCE & CLEANING
The BioStep has been designed to provide many years of dependable use. To help ensure this
product performs to the maximum specifications, and to increase the life of the product, please
note the following general cleaning instructions and maintenance procedures.
1. As required, clean all exterior surfaces, upholstery and restraining straps. Specialized vinyl
cleaners or protectants are recommended for upholstery and cushions. Otherwise, use a solution of warm water and mild detergent.
2. As needed, wipe the display using a soft rag dampened with alcohol.
3. Lubricate the linkage bearings with lithium grease or oil as needed. Periodic lubrication of the
bearings will prevent them from becoming noisy. Lubricate the linkage bearings once a year
or every six months for heavy usage.
SUGGESTED METHODS FOR LUBRICATING LINKAGE BEARINGS
1. With the BioStep resting on its side, apply oil or grease to the outer race of the spherical bearings. Allow the BioStep to set for several minutes while the oil wicks to the opposite side. Lay
the BioStep on the opposite side and repeat. Return the BioStep to its upright position.
2. Axially rotate the linkage in question to expose the maximum amount of ball bearings and
race. Place the extension tube from the spray can of lithium grease between the linkage components and spray lightly. Repeat this for all 12 spherical bearings. Move the linkages in both
directions to ensure the grease wicks to the steel ball of the bearing.
3. Remove the set screws from within the lubrication port located on the ends of the cast links.
Insert the extension tube from the spray can of lithium grease into the port. While holding a
rag over the grease port to prevent spray back, spray lubrication into the bearings. The set
screws do not need to be replaced.
— 29 — MAINTENANCE & CLEANING
Page 30
12. SPECIFICATIONS
0
TYPE BEQUIPMENT
Dimensions: 65" l x 28" w x 47.25" h (165 x 71 x 121 cm)
Resistance:
BioStep: Constant resistance with 30 effort levels
BioStep Clinical Pro: Constant resistance and Isokinetic
Work Rate Range: 10 watts - 600 watts (25 -120 rpm)
Heart Rate Monitoring: Polar®Telemetry (chest strap) and contact handgrip
Readouts:
BioStep: Time, RPM, watts, calories, METs, heart rate and total steps
BioStep Clinical Pro: Time, RPM, watts, calories, METs and heart rate
Communication: RS-232 port, CSAFE protocol for data export
(data collection software available)
User Capacity: 500 lb (227 kg)
Weight: 254 lb (115 kg)
Power: Self-Powered; no external power requirement at user work rates over 30 watts and
50 rpms; 115 VAC adapter (230 VAC available) is provided to power system and charge
battery during applications below 30 watts and 50 rpms; battery automatically recharges at
work rates above 30 watts and 50 rpms. AC Adapter included.
Certifications: ETL listed to UL1647 and CAN/CSA C22.2 No.68-92, EN957-1,
EN957-5. CE conformity to low voltage and EMC directives
Warranty: Two-years parts; one-year labor
950-215 BioStep®, 115 VAC
950-220 BioStep®Clinical Pro,115 VAC
FSS Contract# GS-03F-0017T
Export models available.
Patent Pending
Optional
950-245 Stabilization Package
Includes: Movable armrests, trunk belt,
foot straps and EZ-Grip™handgrips
950-164 Software, Data Collection
SPECIFICATIONS — 30 —
Page 31

13. ELECTROMAGNETIC COMPATIBILITY
Standard Test Method Range Limits Result
IEC 61000-3-2 Harmonics 100 Hz to 2KHz Class A THD = 251.94%
IEC 61000-3-3 Flicker observation time (TP) 10 min --
IEC 61000-4-2 Electrostatic Discharge Contact: 4 & 6Kv pos/neg 1pps for 10 sec no degradation complied
IEC 61000-4-3 Radiated Immunity 80 MHz to 1000 MHz / 3v/m Horiz & no degradation complied
IEC 61000-4-4 Electrical Fast Transient/ PWR Input leads .5, 1, & 2 Kv / pos & no degradation complied
Burst, Power Leads neg / 5KHz Rep Rate of performance
IEC 61000-4-6 Conducted Immunity, 150 KHz to 80 MHz /3Vrms no degradation complied
Power Leads of performance
IEC 61000-4-8 Magnetic Immunity 3A/M RMS @ 50/60 Hz no degradation complied
IEC 61000-4-11 Voltage Dips and Interrupts Int Pause % no degradation complied
max voltage change (dmax) 4% 0.00 %
max Rel steady state voltage change (dc) 3% 0.00 %
duration of d(t)>3%(t) .2 sec 0.00 sec
short term flicker Sev (PST) 1.00 0.00
long term flicker Sev (PLT) .65 0.00
Air: 2, 4, & 8Kv pos/neg 1pps for 10 sec of performance
Vertical @ 2M of performance
1000 MHz to 2500 MHz / 3v/m Horiz &
Vertical @ 1M
of performance
Duration between reduction of performance
Int 20msec pause 10 sec >95% no degradation complied
of performance
Int 100msec pause 10 sec 60% no degradation complied
of performance
Int 500msec pause 10 sec 30% no degradation complied
of performance
Int 5000msec pause 10 sec >95% no degradation complied
of performance
CISPR 11 Conducted Emissions 150 KHz - 500 KHz / 5 MHz - 30 MHz, 79/73 dbuV QP complied
CISPR 11 Radiated Emissions 30 MHz – 230 MHz / 230MHz - 1GHz, 40/47 dbuVm @ complied
IEC 61000-4-5 Surge Immunity, 1 Kv, differential 1ppm, pos/neg no degradation complied
Power Leads of performance
Class A, Group 1 66/60 dbuV AV
Class A, Group 1 10 m
— 31 — ELECTROMAGNETIC COMPATIBILITY
Page 32
14. OPTIONAL
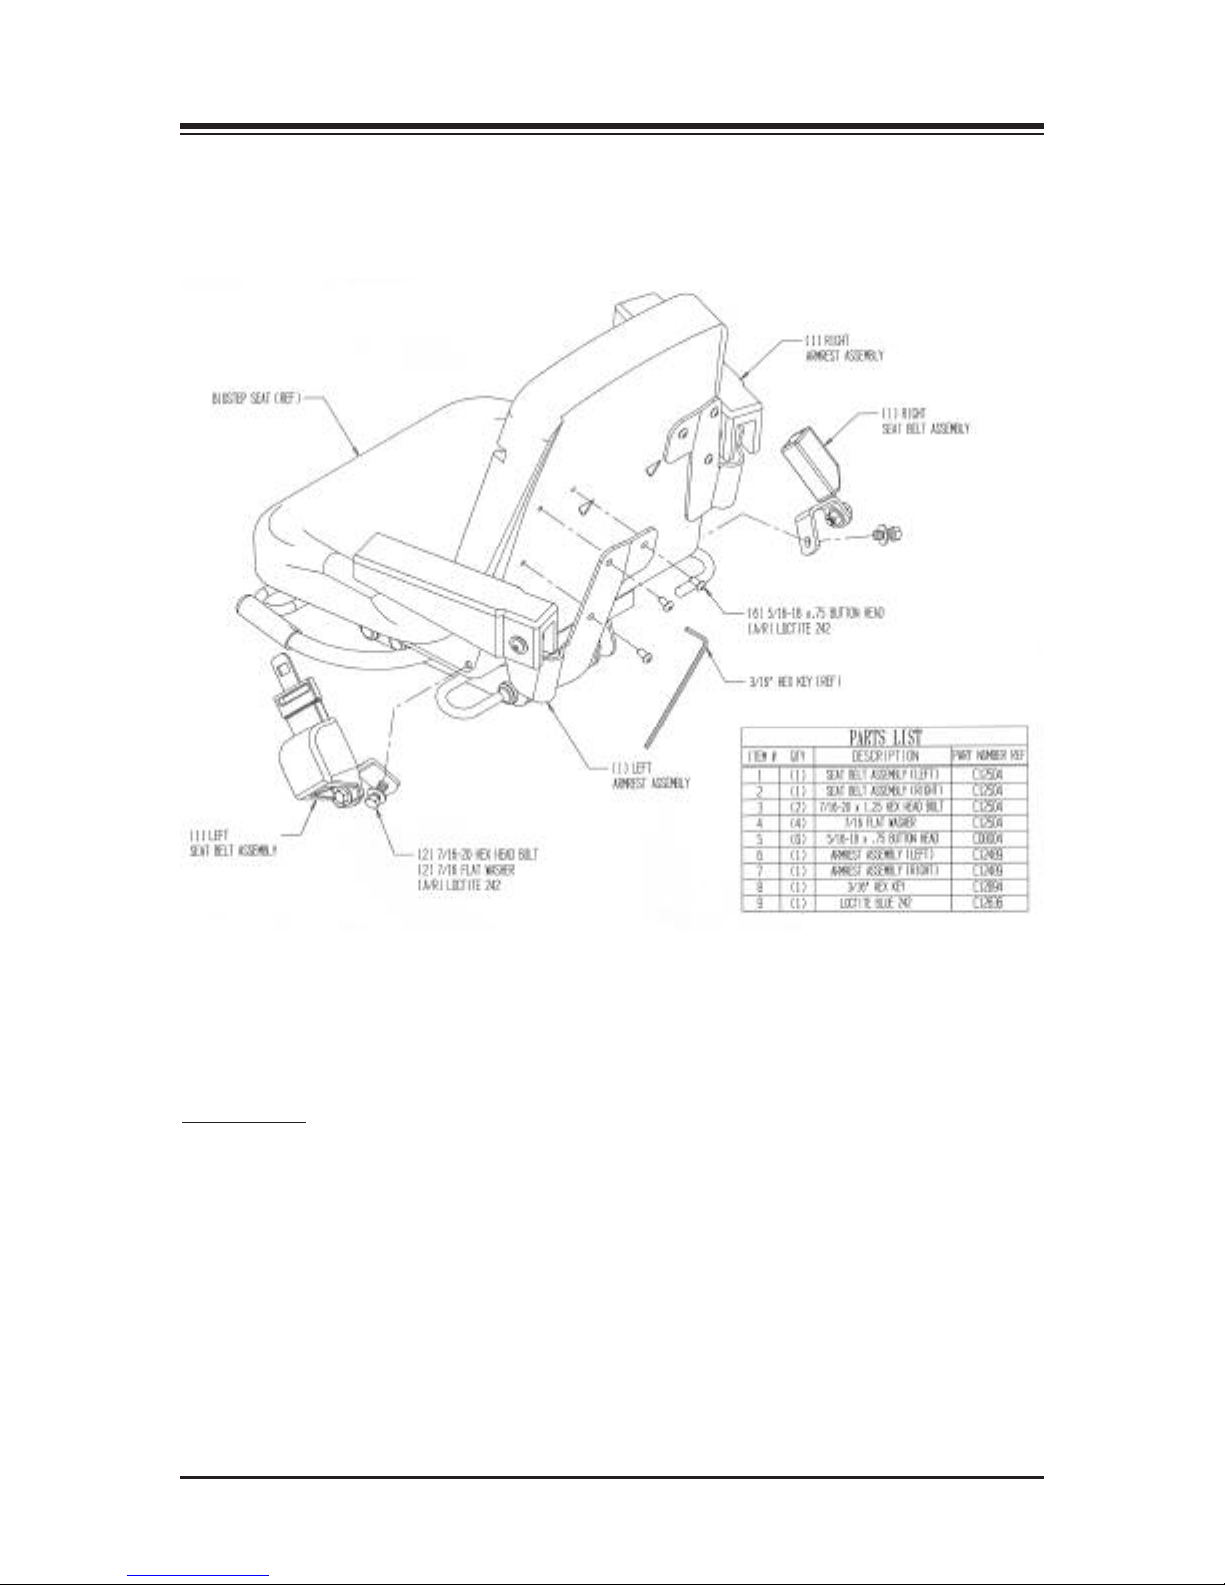
The optional Stabilization Kit (950-245) provides flip-up/flip-down arm rests, a seat belt and
buckle, and a pair of foot straps to help stabilize patients on both the BioStep and BioStep
Clinical Pro Semi-Recumbent Elliptical. All components of the kit are easy to install.
Figure 4: Installing the optional Stabilization Kit.
INSTALLING THE OPTIONAL ARM RESTS
(Refer to Figure 4.)
Tools Required:
Allen Key (supplied)
The optional Arm Rests are designed so they can be lifted up and out of the patient’s way when
not needed. For each of the two arm rests, simply align the three pre-drilled holes on the back of
the folding arm rest support plate with the three pre-drilled holes in the seat back. Use the
screws and Allen key supplied to tightly secure each arm rest plate to the seat back.
OPTIONAL — 32 —
Page 33

INSTALLING THE OPTIONAL SEAT BELT AND BUCKLE
(Refer to Figure 4.)
Tools Required:
5/8” Wrench
To install the optional seat belt and buckle, coat one of the two 7/16-20 hex head bolts supplied
with Loctite 242. Align the pre-drilled hole in the seat belt assembly with the hole on the patient
left side of the seat base and then secure the belt assembly to the seat using the washer and bolt.
The buckle assembly is secured in the same manner on the patient right side of the seat.
INSTALLING THE OPTIONAL EZ-GRIP HANDGRIPS
(Refer to Figure 4.)
The optional EZ-Grip Handgrips come with a left and a right, they are not interchangeable.
When properly installed, the flat side of the grip will face to the inside of the BioStep with the
widest part of the handgrip on the bottom and pointing toward the patient.
To install each handgrip, lift up on the plastic tab and pull the two halves in opposite directions
to open. Position the handgrip with the wide end at the bottom and pointing toward the patient,
then squeeze the two halves toward each other until they lock together.
INSTALLING THE OPTIONAL FOOT STRAPS
To install the optional foot straps, slide the hook side of the strap up through the innermost foot
strap slot and fasten the strap to itself. Take the remaining end of the strap and feed it down
through the remaining foot strap slot and around the outside of the foot plate before fastening
the Velcro to itself.
— 33 — OPTIONAL
Page 34

15. DIAGNOSTICS
There are two hidden key presses that will allow for either configuration, setup or
hardware debug.
Configuration Mode
To enter the configuration setup mode, power the unit ON while holding the select profile
button down during power on LED test. Use the +/- adjust buttons to toggle through the
selections. The selections for configuration setup are as follows:
ENGL/EURO Description
1 UBC/ BIO UBC or BioStep
CPRO or STD For Clinical Pro BioStep with both
HRS Constant Torque and Isokinetic resistance or
Standard BioStep with constant torque only.
Diagnostic Mode
(For 950-214 and 950-220. See NOTE at end of this section for 950-215.)
To enter the debug mode, power the unit ON holding the select exercise button down during
power on LED test. Use the select exercise button to cycle through the selections.
The selections for hardware debug mode are as follows:
Description
1. Load PWM / Speed display Ramps PWM value from 0-255 (0-100%) displayed in upper
display window (use <L> to increase resistance)..
2. Batt Displays battery voltage in lower window
NOTE: The <Select Exericse> button is hidden but functional on model 950-215. To activate, press down
on the display 2-3/4” below the <Select Profile> button while holding down <M>.
DIAGNOSTICS — 34 —
Page 35
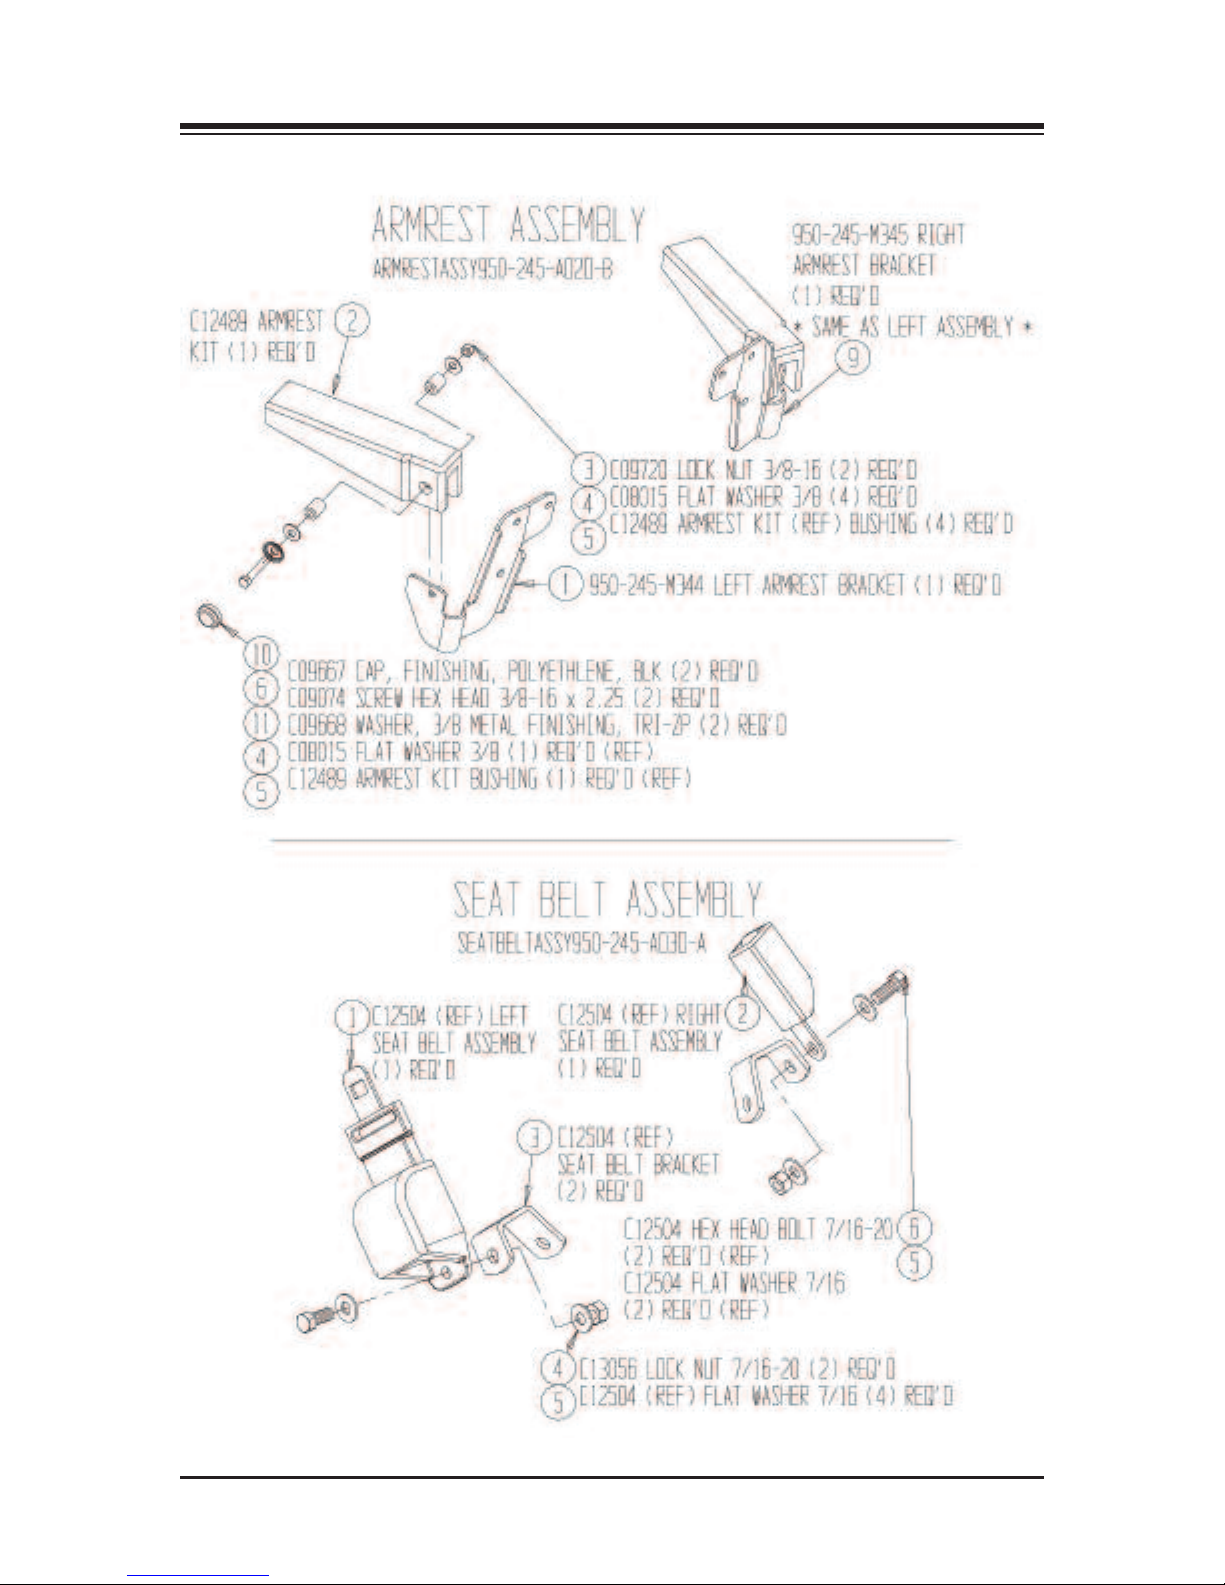
16. REPLACEMENT
— 35 — REPLACEMENT
Page 36
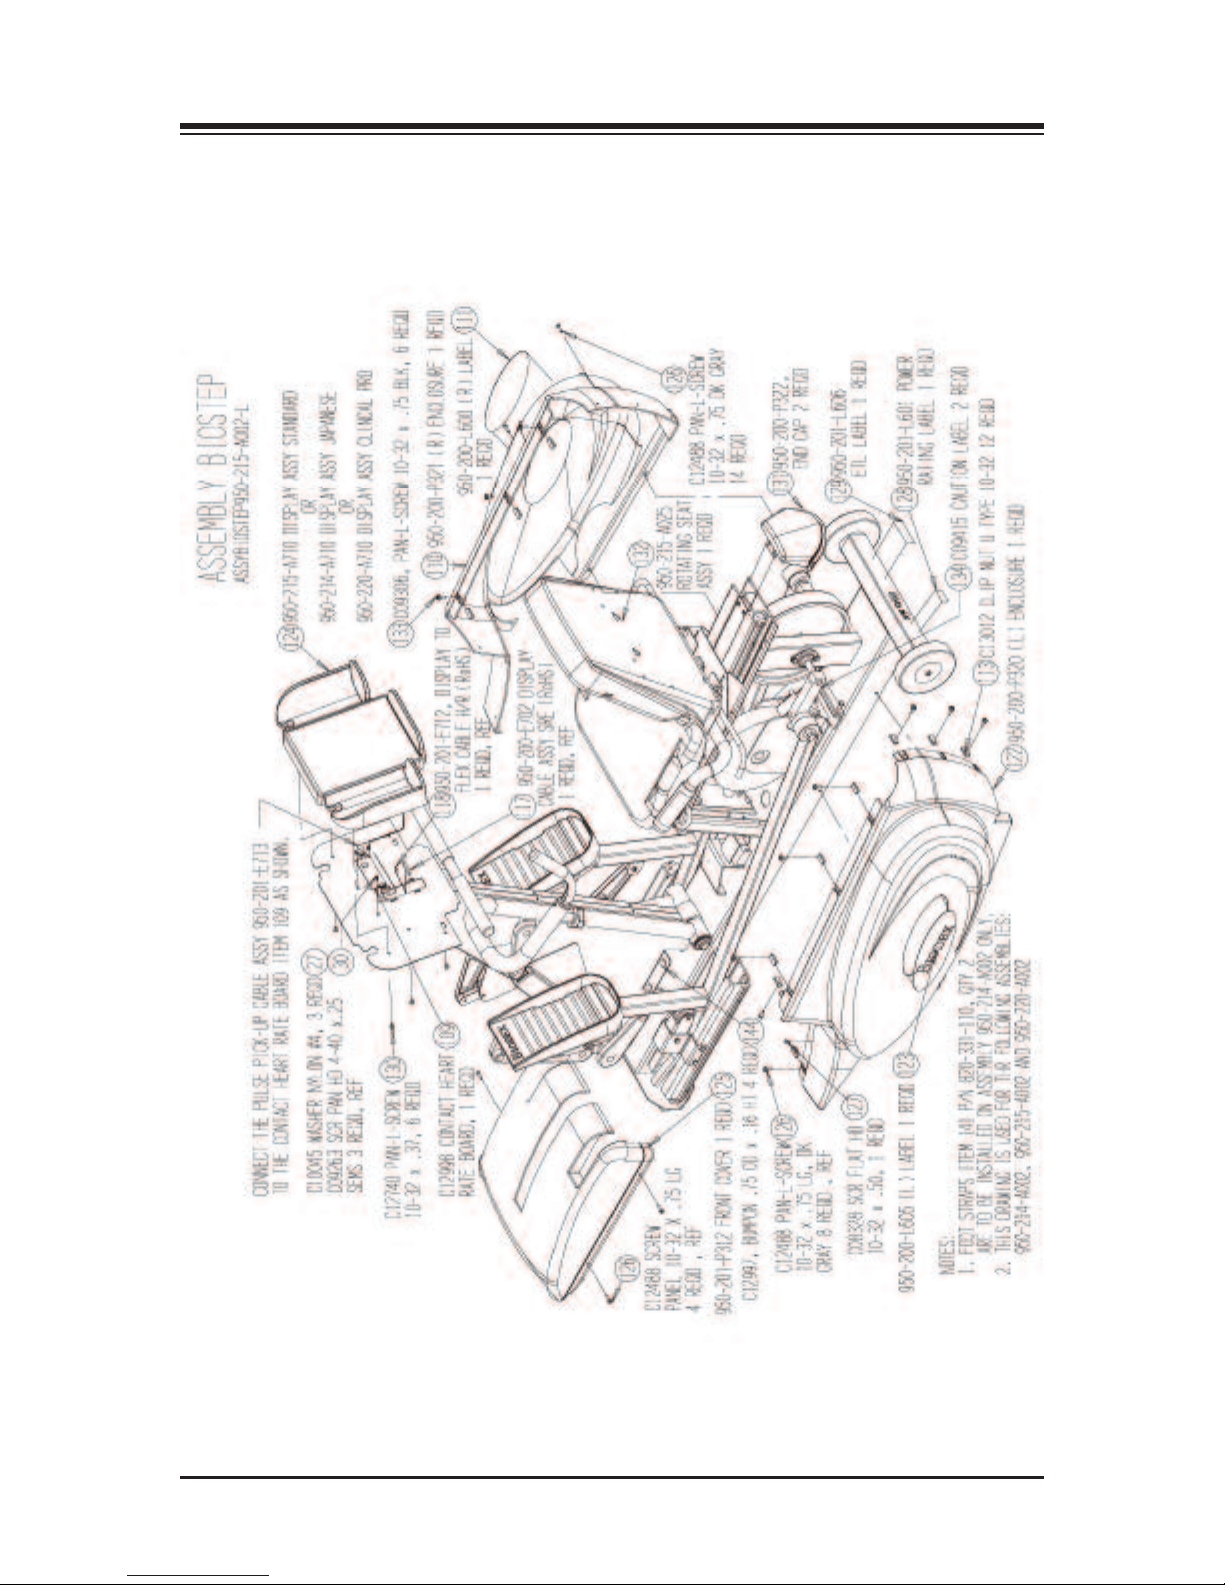
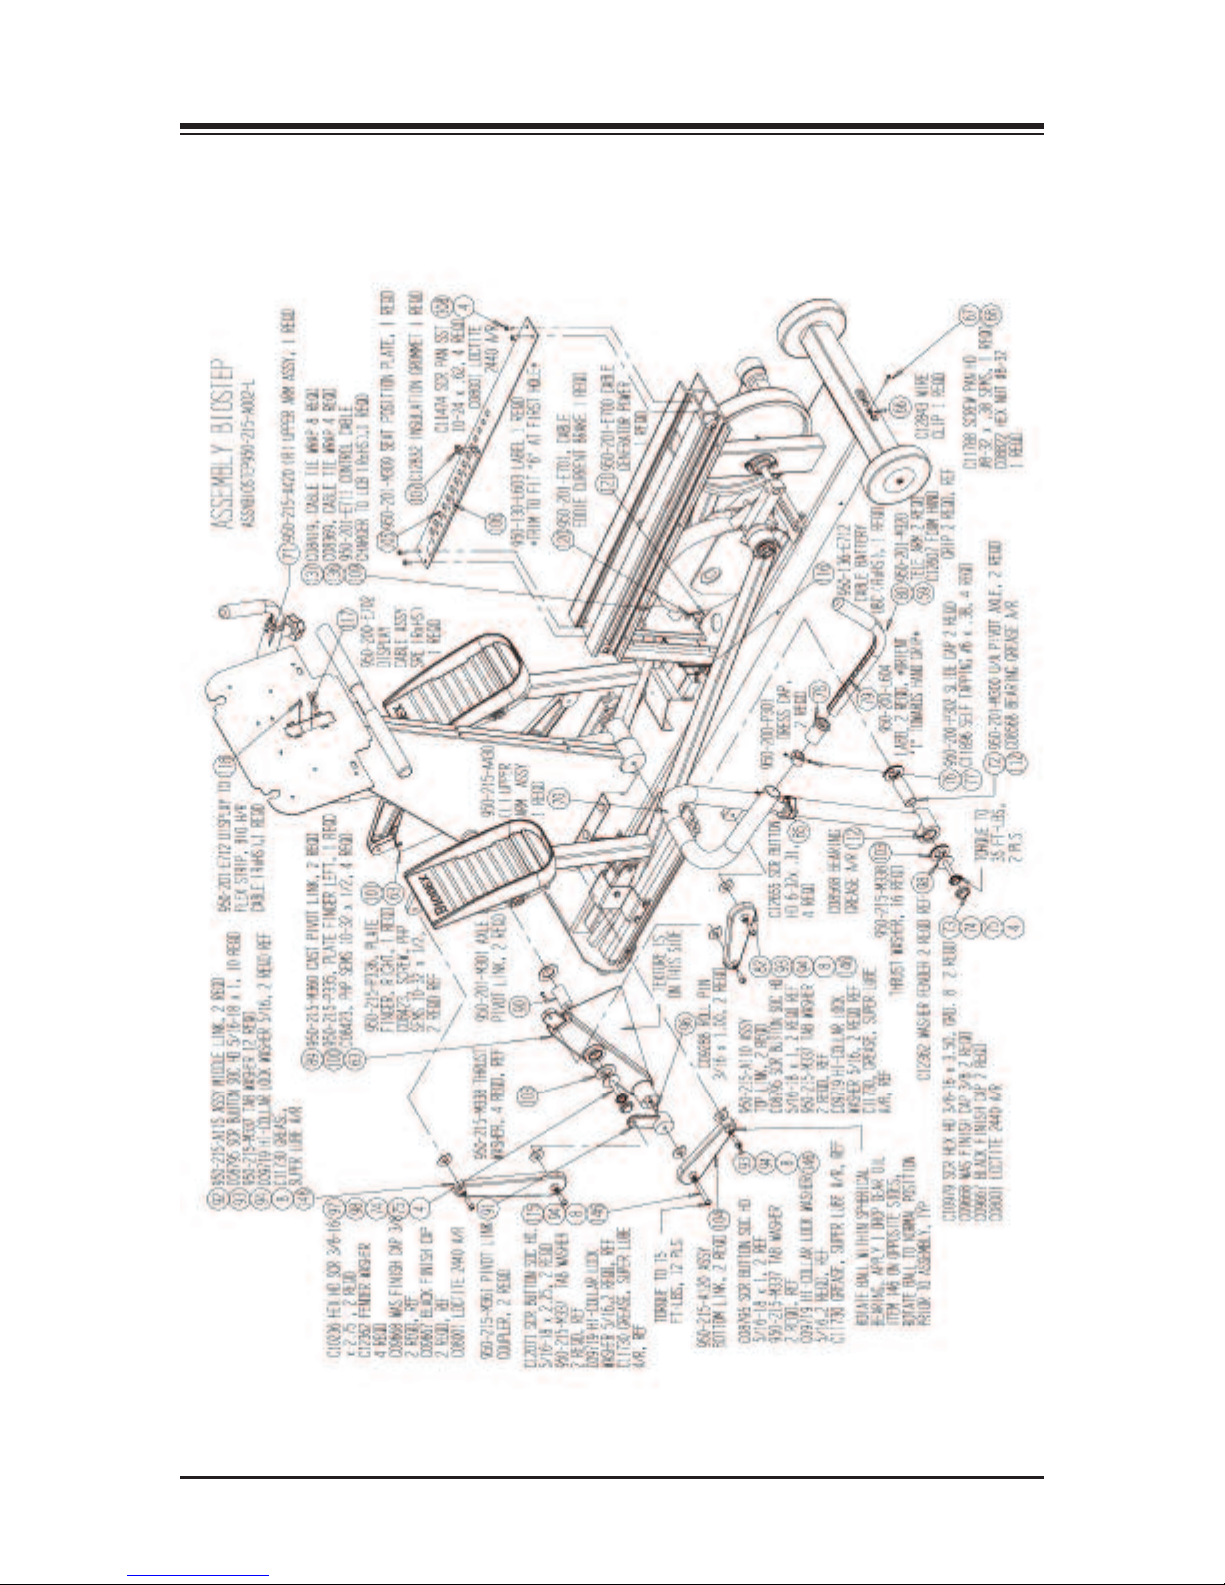
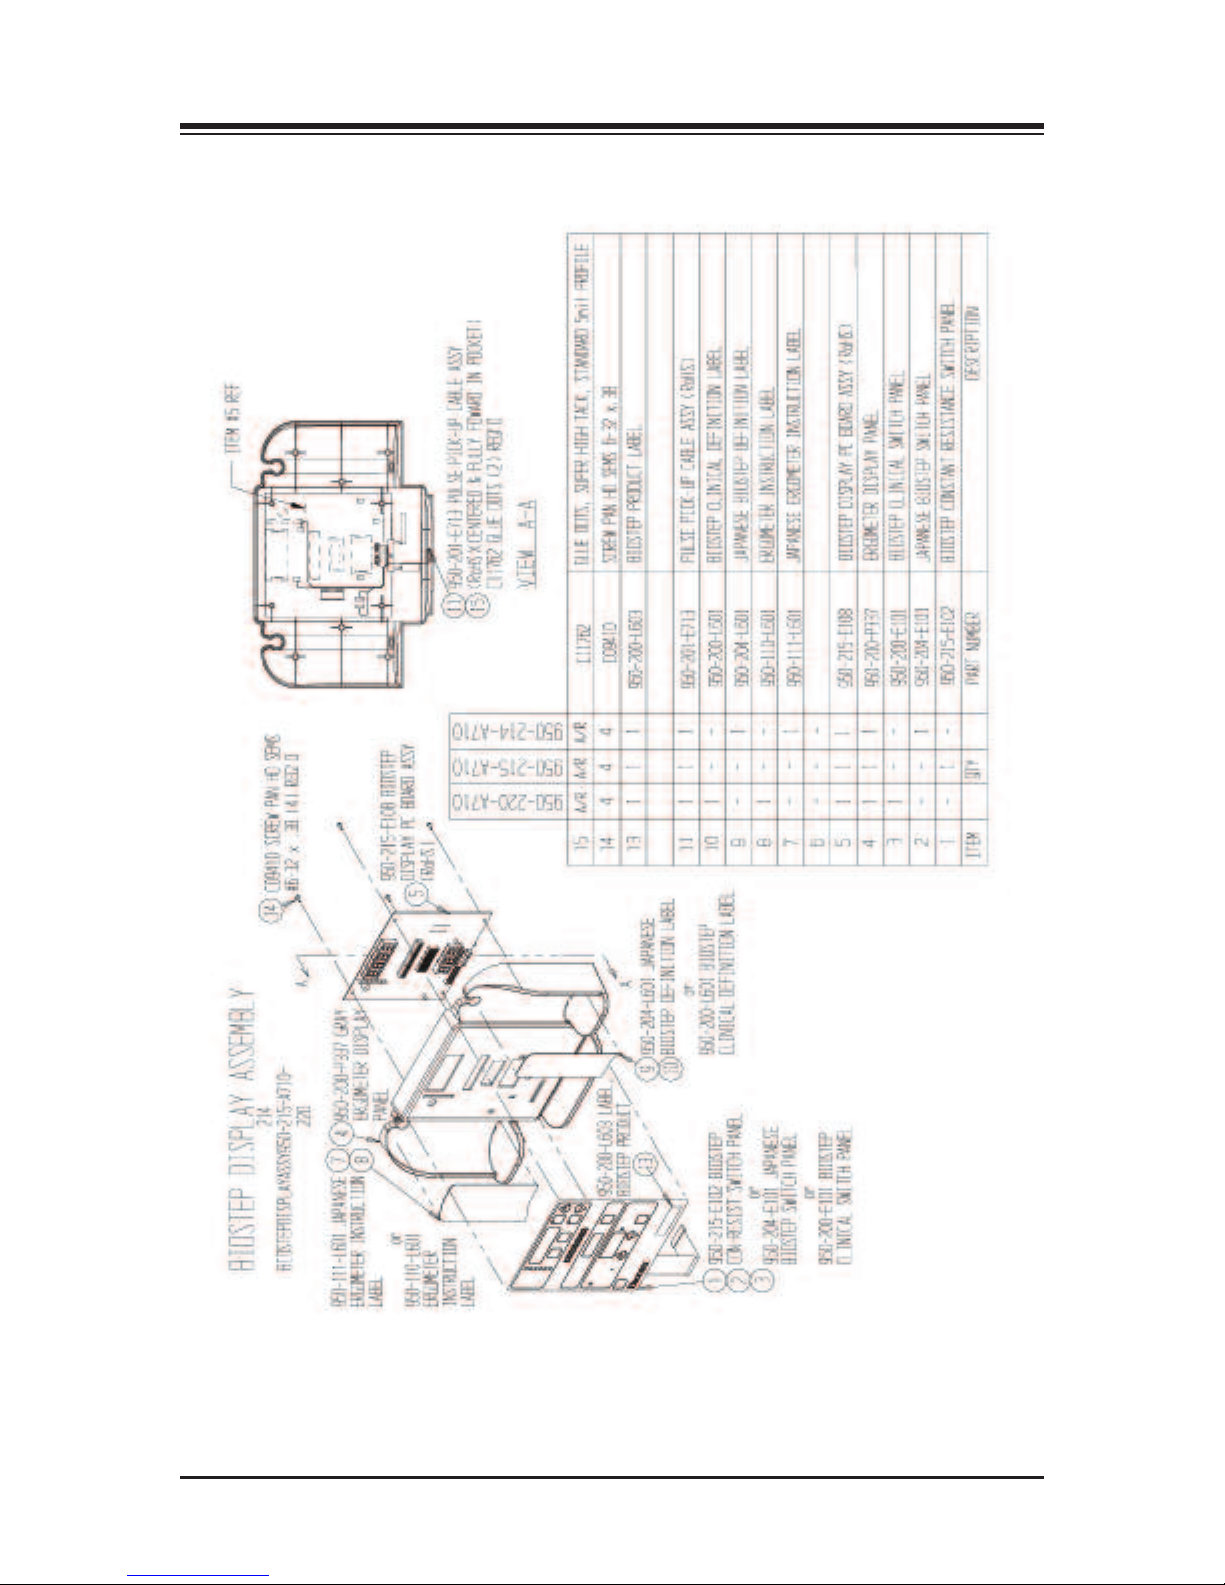
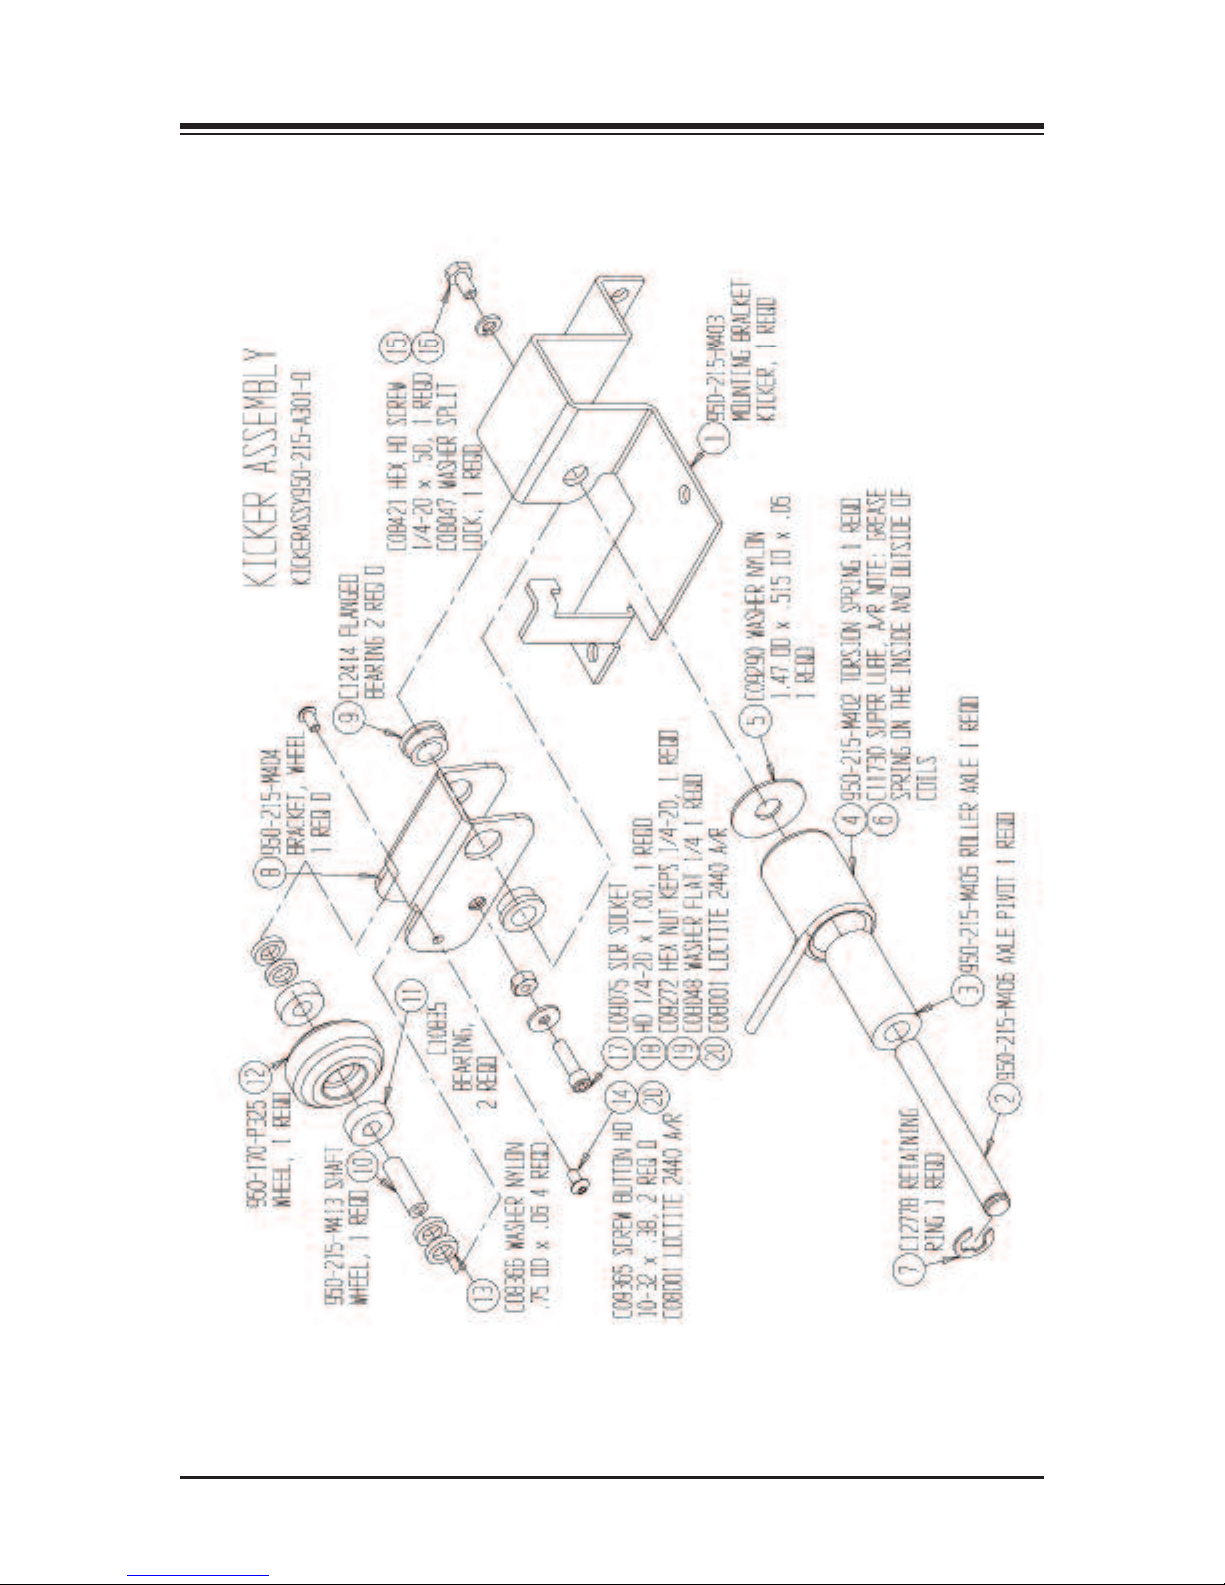
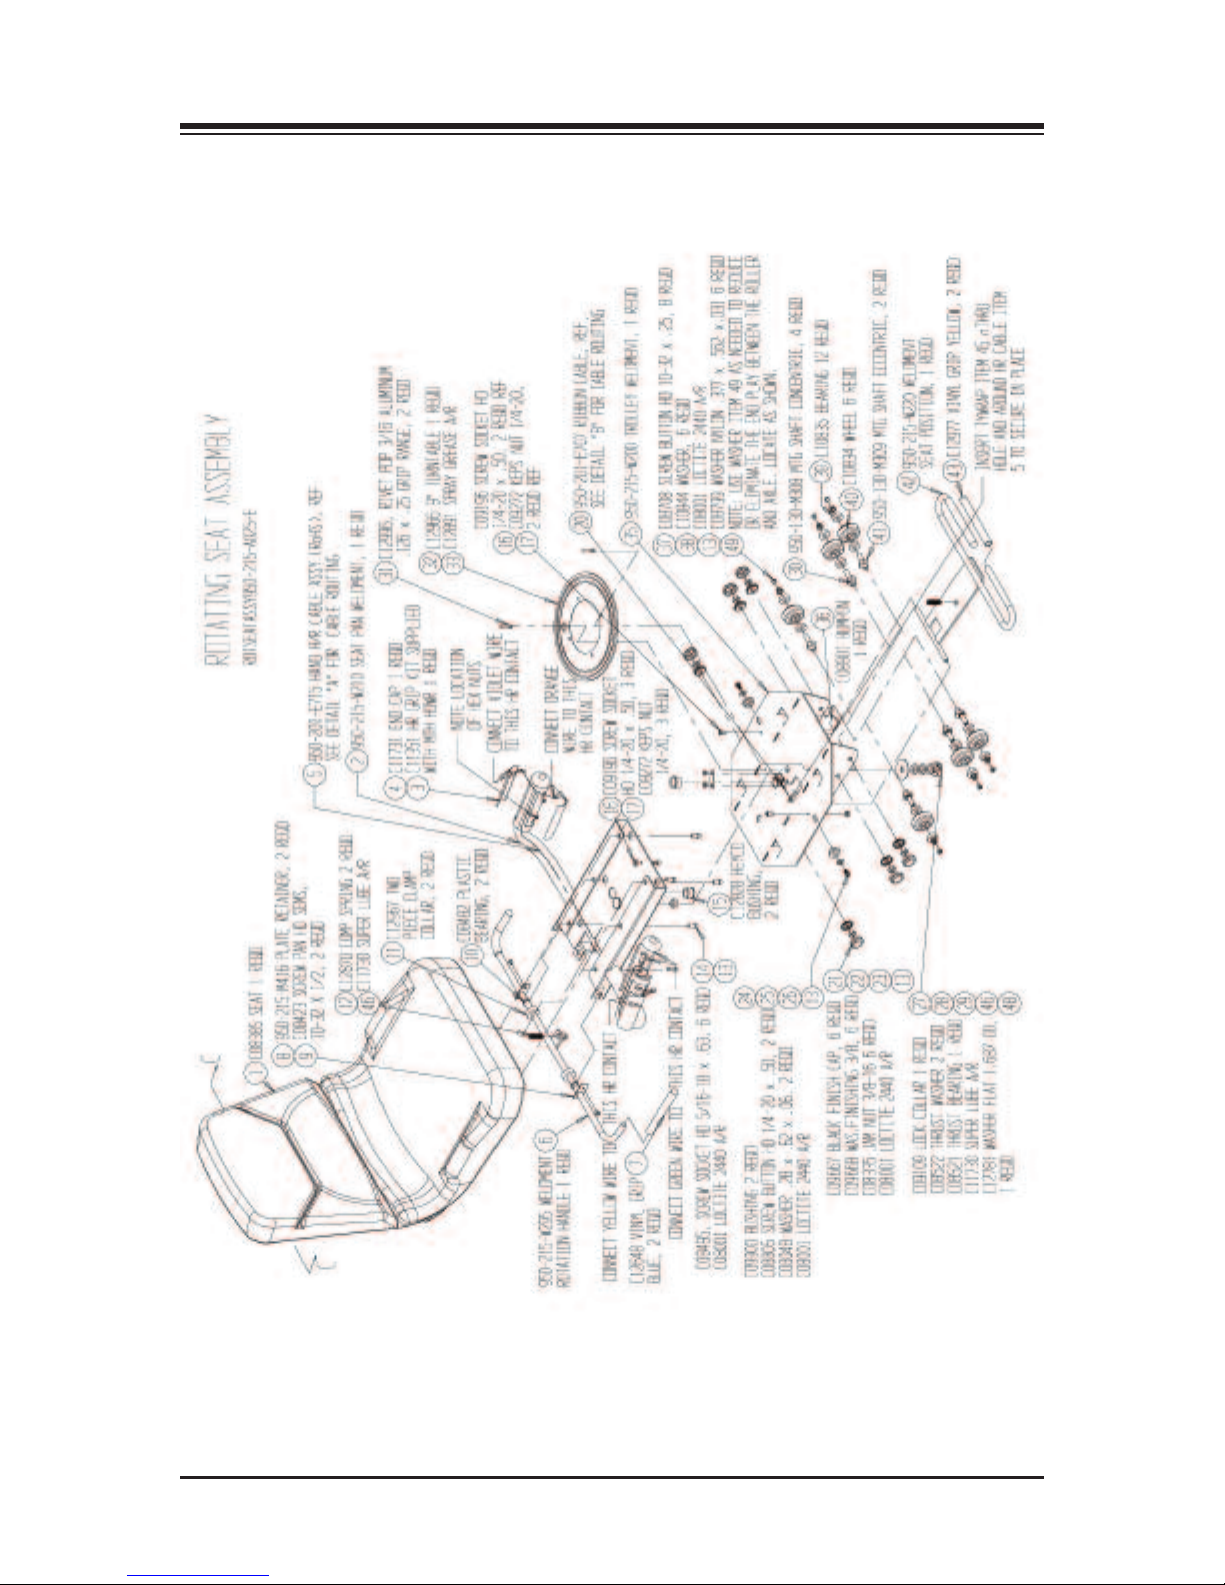
14. REPLACEMENT PARTS
REPLACEMENT — 36 —
Page 37
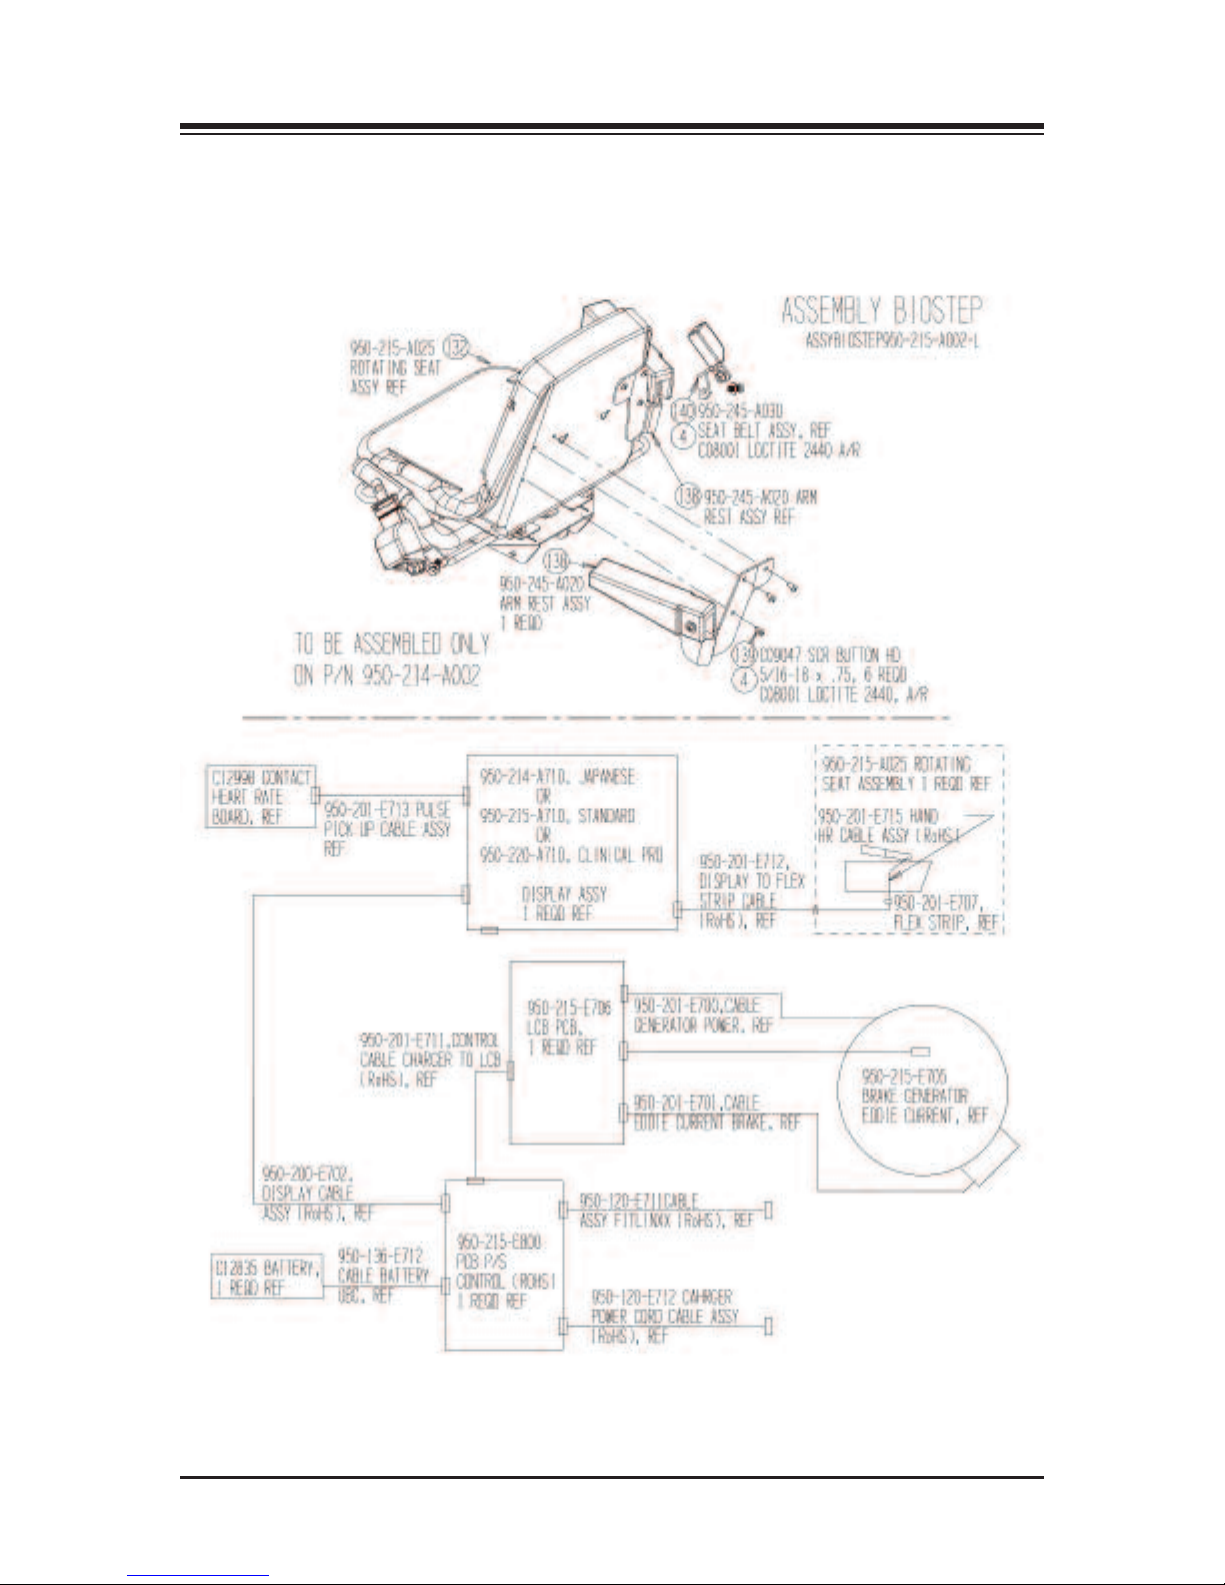
14. REPLACEMENT PARTS
— 37 — REPLACEMENT
Page 38
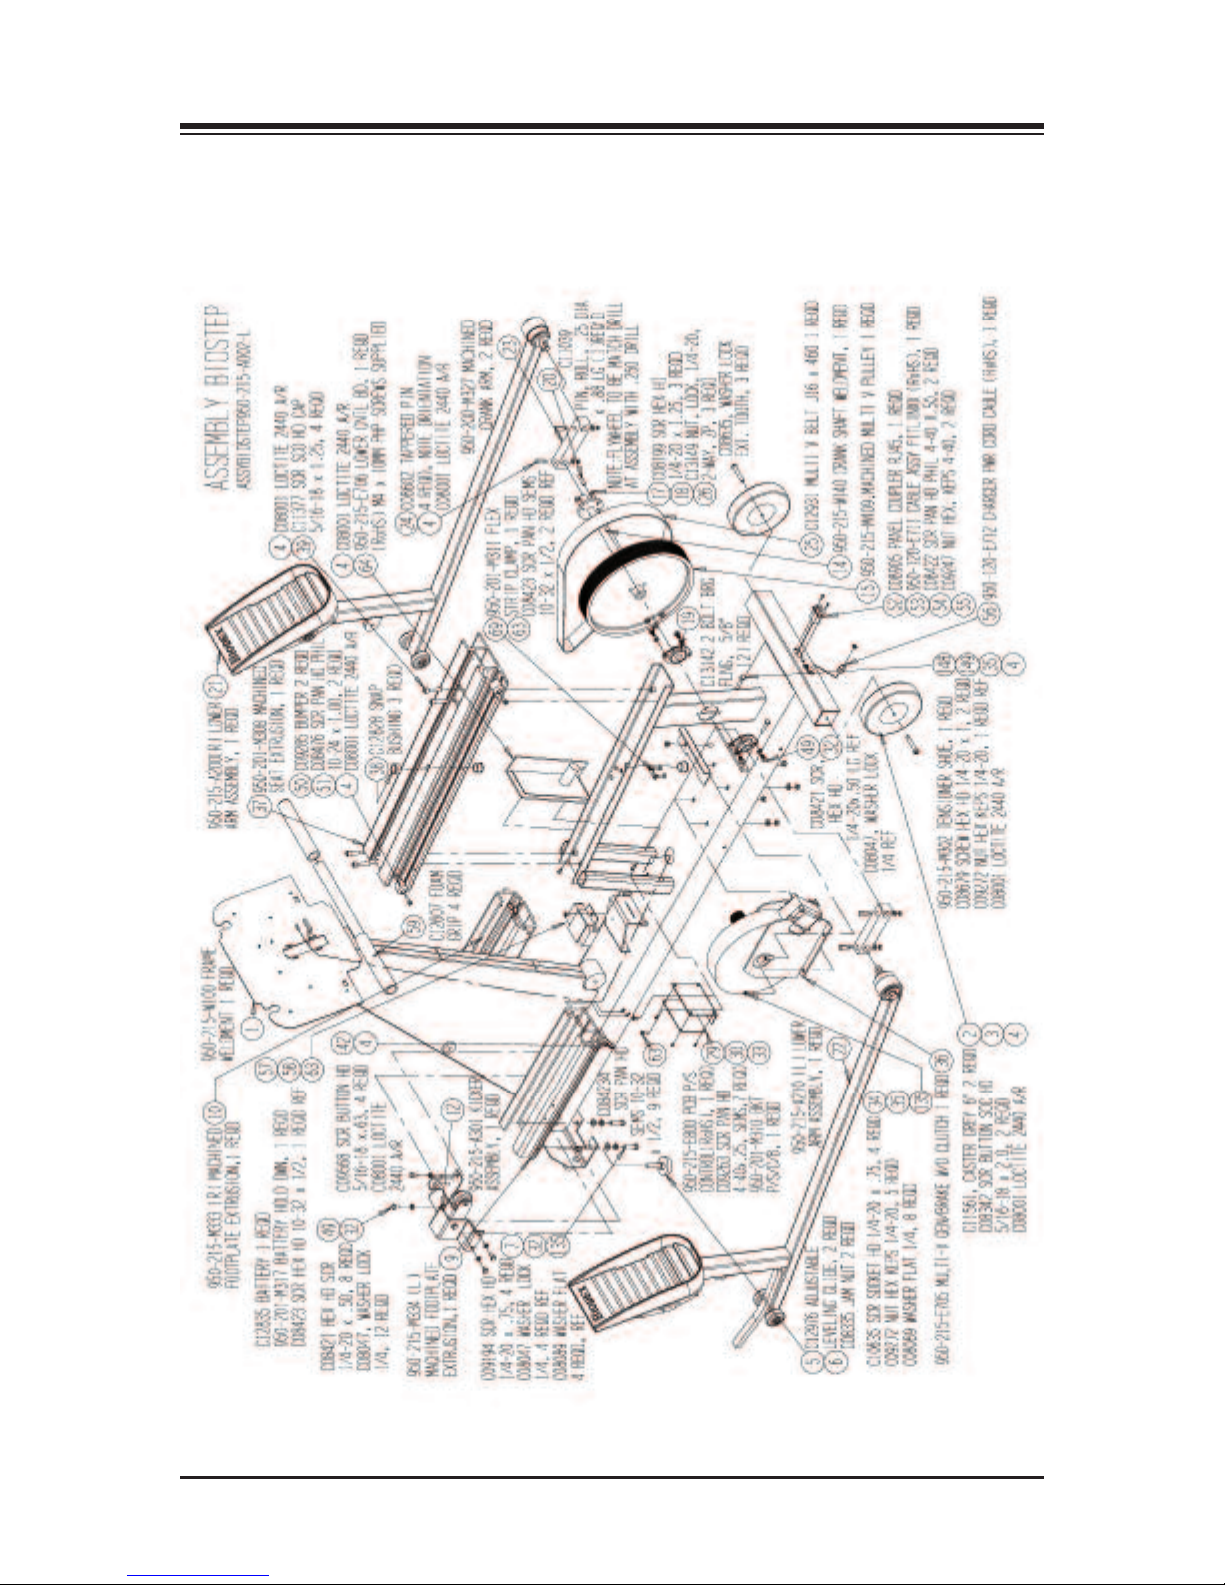
CONTENTS
REPLACEMENT — 38 —
Page 39
CONTENTS
— 39 — REPLACEMENT
Page 40
CONTENTS
REPLACEMENT — 40 —
Page 41
CONTENTS
— 41 — REPLACEMENT
Page 42
CONTENTS
REPLACEMENT — 42 —
Page 43
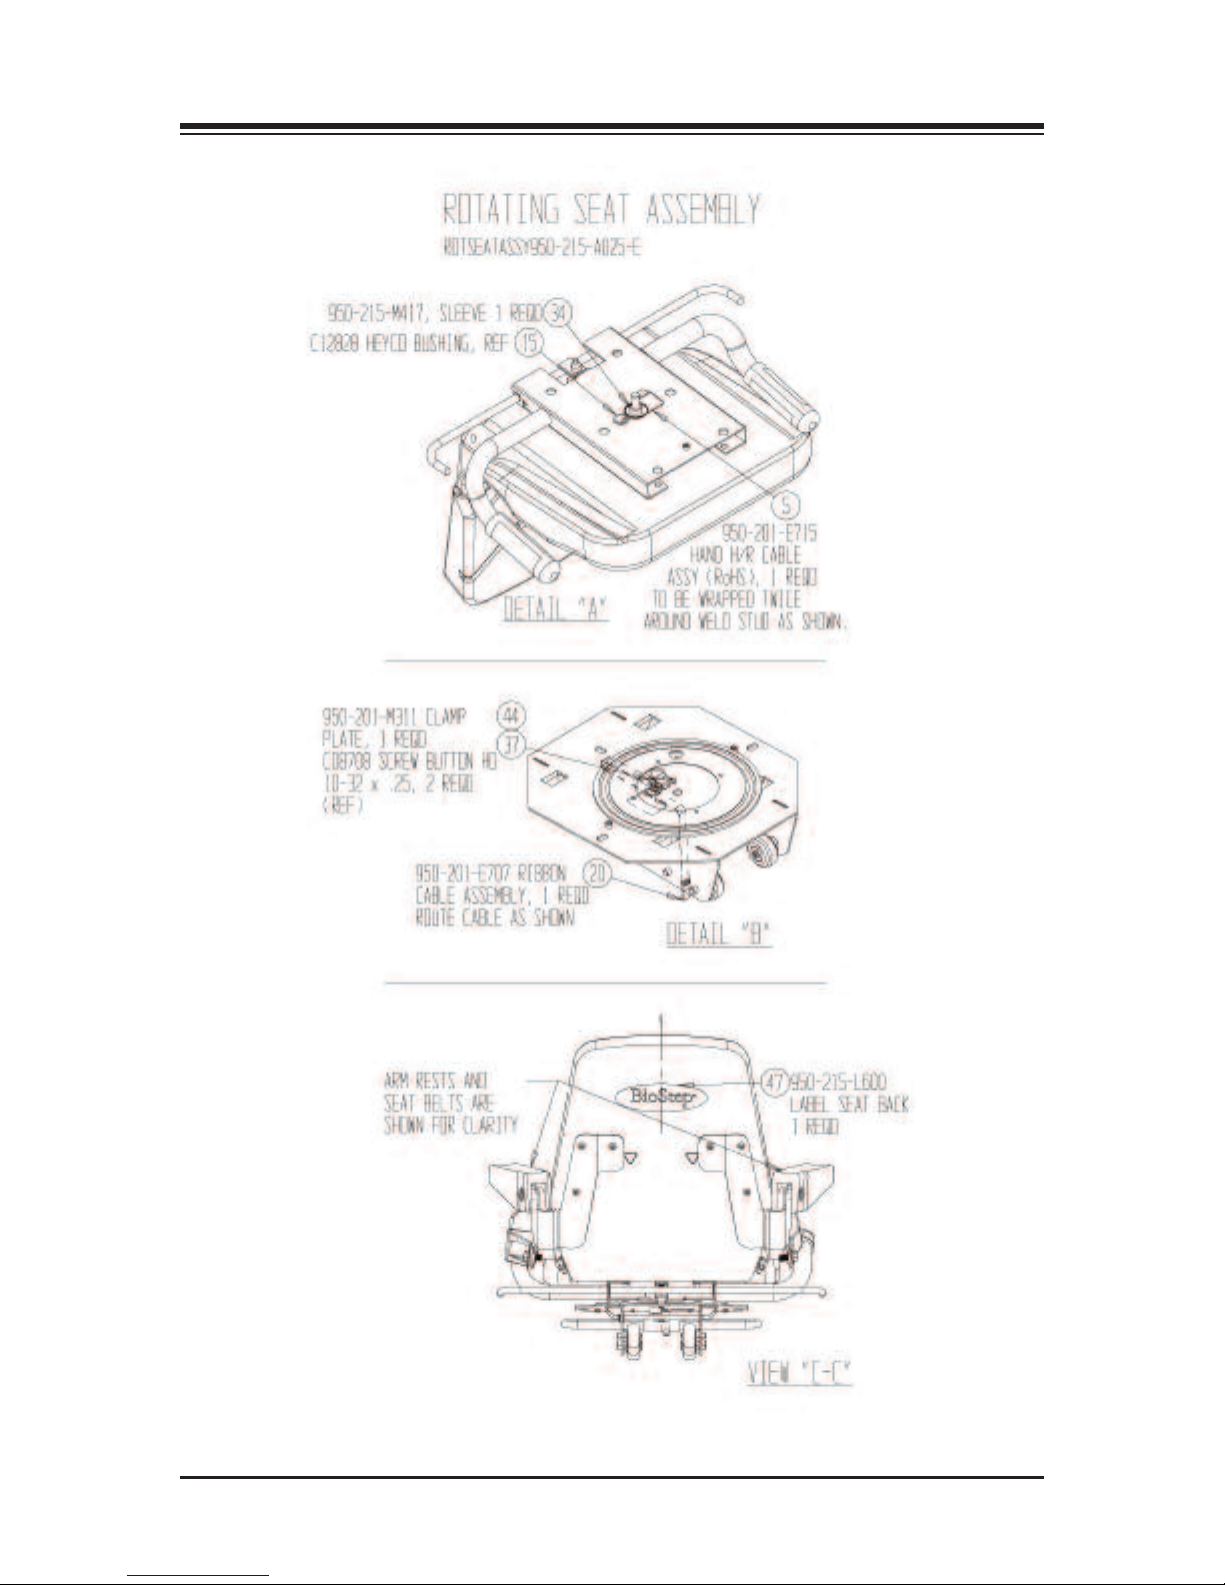
— 43 — REPLACEMENT
Page 44
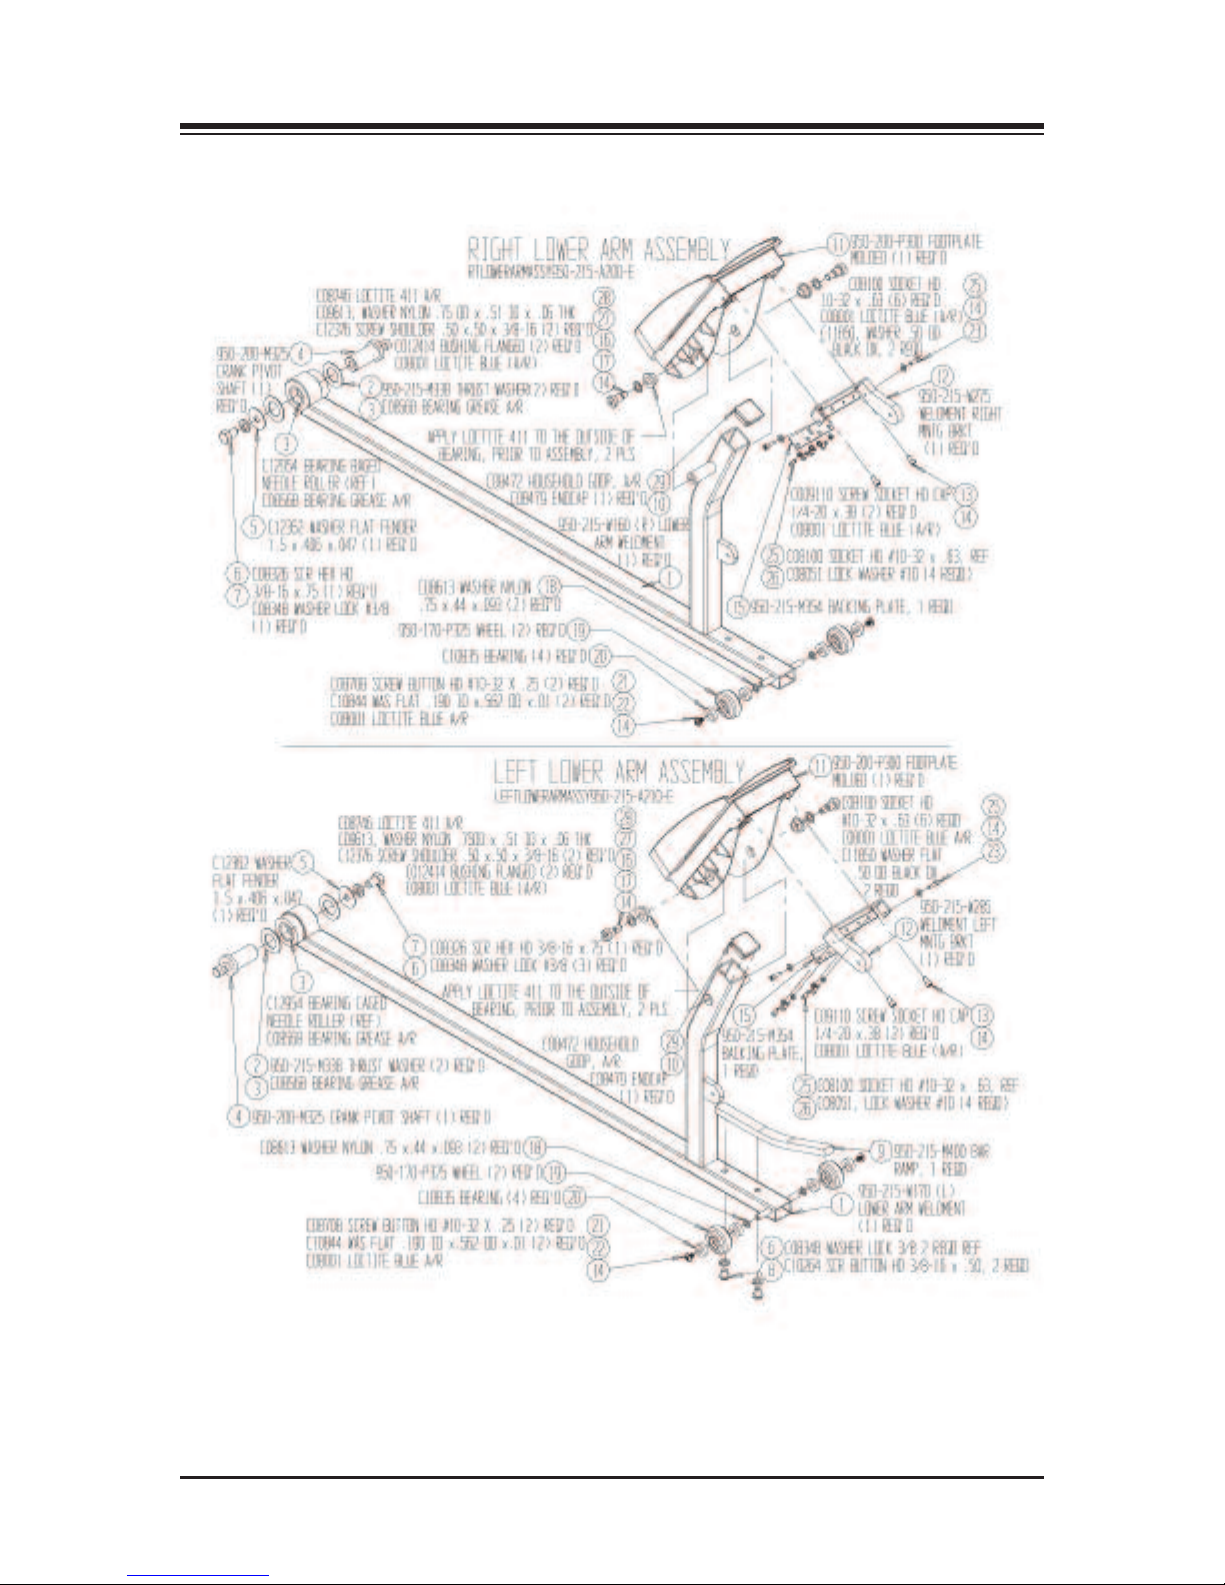
NOTES
REPLACEMENT — 44 —
Page 45

NOTES
— 45 — REPLACEMENT
Page 46
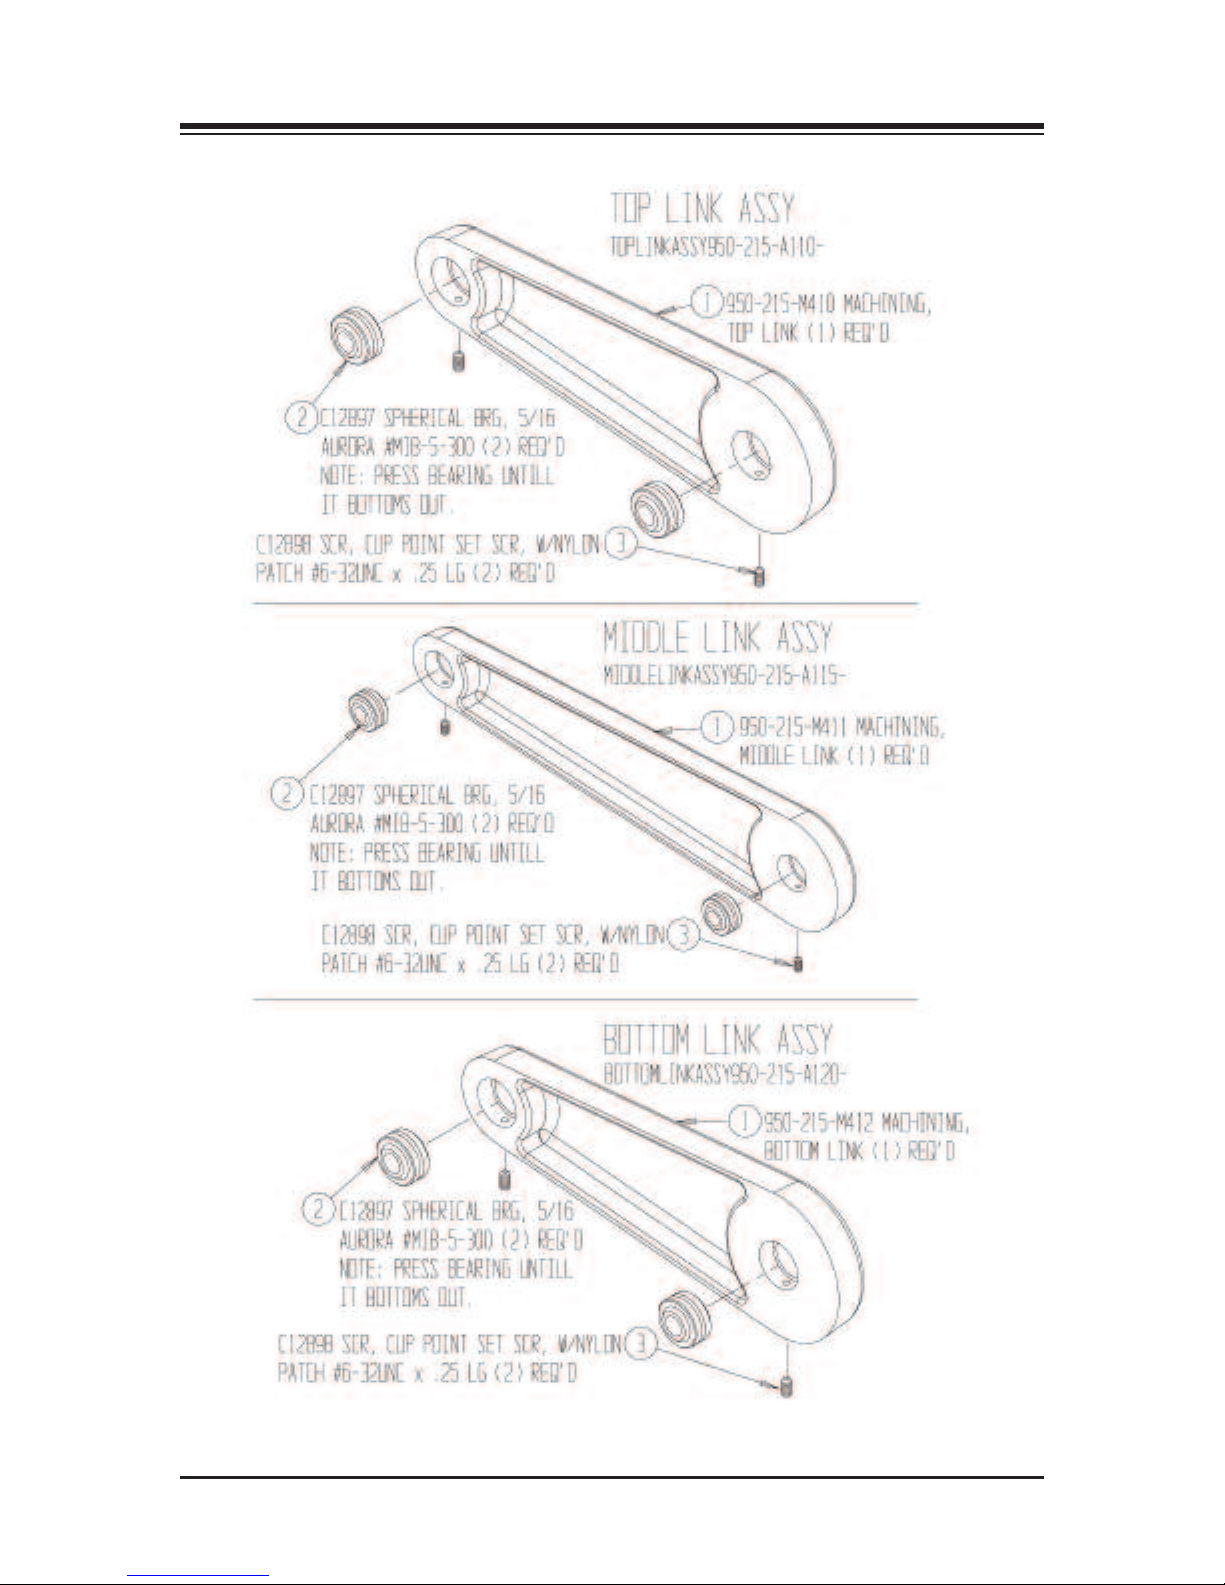
CONTENTS
REPLACEMENT — 46 —
Page 47

NOTES
— 47 — NOTES
Page 48

20 Ramsay Road, Shirley,New York, 11967-4704, Tel: 800-224-6339 (Int’l 631-924-9000), Fax: 631-924-9338, Email: [email protected], www.biodex.com
Certified Quality Management System
BIODEX
Biodex Medical Systems, Inc.
 Loading...