

BIOCLEAR Blaster BC-B5000, Blaster BC-B5010, Blaster BC-B5030, Blaster BC-B5040, Blaster BC-B5020 Instruction Manual

Air Polisher
BC-B5000 / BC-B5010 / BC-B5020 / BC-B5030 / BC-B5040
INSTRUCTION MANUAL

Thank you for purchasing the air polisher “ The BLASTER”.
For optimum performance of your polisher, read this instruction manual carefully and thoroughly before use.
Mishandling of this instrument may cause mechanical trouble and accidents during treatment.
Keep this instruction manual for future reference.
Specifi cations in this manual may be changed for improvement and modifi cation without prior notice.
* The BLASTER is indicated as “polisher” in this instruction manual.
* MULTIfl ex® is a registered trademark of Kaltenbach & Voigt GmbH & Co. Kg, Germany.
Roto Quick® is a registered trademark of W&H Dentalwerk Bürmoos GmbH, Austria.
Sirona® is a registered trademark of Sirona Dental Systems GmbH, Germany.
Unifi x® is a registered trademark of Bien-Air Dental S.A., Switzerland.
Mach® and Phatelus® are registered trademarks of NAKANISHI INC., Japan.

CONTENTS
1. PREFACE ------------------------------------------------------------------------------------------------------------------------------------ 1
2. CAUTIONS FOR USE --------------------------------------------------------------------------------------------------------------------- 2
3. INTENDED USE -------------------------------------------------------- --------------------------------------------------------------------- 4
4. CHARACTERISTICS ----------------------------------------------------------------------------------------------------------------------- 4
5. DELIVERY PACKAGE -------------------------------------------------------------------------------------------------------------------- 5
6. PRODUCT COMPONENTS -------------------------------------------------------- ----------------------------------------------------- 6
7. HOW TO USE ------------------------------------------------------------------------------------------------------------------------------ 7
7.1 Before use ---------------------------------------------------------------------------------------------------------------------------- 7
7.2 Air pressure setting (at fi rst use) ----------------------------------------------------------------------------------------------- 8
7.3 Attaching head -------------------------------------------------------------------------------------------------------------------10
7.4 Attaching powder cap --------------------------------------------------------------------------------------------------------11
7.5 Connecting to dental unit ----------------------------------------------------------------------------------------------------13
7.6 Water removal in channels (idle run) -------------------------------------------------------------------------------------15
7.7 Powder fi lling -----------------------------------------------------------------------------------------------------------------------16
7.8 Confi rming correct operation and water volume --------------------------------------------------------------------19
7.9 Treatment ---------------------------------------------------------------------------------------------------------------------------20
7.10 Other remarks on use ---------------------------------------------------------------------------------------------------------24
8. MAINTENANCE AND CHECKS ------------------------------------------------------------------------------------------------------26
8.1 Regular maintenance and checks ----------------------------------------------------------------------------------------26
8.2 Cleaning at troubles in air and powder spray -------------------------------------------------------------------------29
9. CLEANING AND STERILIZATION ----------------------------------------------------------------------------------------------------31
9.1 Cleaning and disinfection ----------------------------------------------------------------------------------------------------31
9.2 Sterilization --------------------------------------------------------------------------------------------------------------------------31
9.3 Storage -------------------------------------------------------------------------------------------------------------------------------32
10. REPLACEMENT OF CONSUMABLE PARTS, DISPOSAL ----------------------------------------------------------------------34
10.1 Replacement of head --------------------------------------------------------------------------------------------------------34
10.2 Replacement of head o-ring -----------------------------------------------------------------------------------------------34
10.3 Replacement of powder cap ---------------------------------------------------------------------------------------------34
10.4 Replacement of powder seal ----------------------------------------------------------------------------------------------35
10.5 Disposal ----------------------------------------------------------------------------------------------------------------------------35
11. TROUBLE SHOOTING ------------------------------------------------------------------------------------------------------------------36
12. SPECIFICATIONS -----------------------------------------------------------------------------------------------------------------------38
13. COMPONENT PARTS------------------------------------------------------------------------------------------------------------------39

1. PREFACE
The defi nitions in this instruction manual of the words preceded by the symbol are as follows. To avoid dangers, observe the
instructions preceded by these words.
: This indicates not specifi c general attentions, cautions and dangers.
CONTRAINDICATION AND RESTRICTION
This indicates exemptions from responsibilities such as improper use and excess of design limit.
The drawings and illustrations in this instruction manual is BC-B5000 unless otherwise specifi ed.
: This indicates potential direct dangers that may cause serious injuries, death, property damages such as total loss
DANGER
CAUTION
ATTENTION
of the instrument or fi re disaster.
: This indicates potential indirect dangers that may cause serious injuries, death, property damages such as total
loss of the instrument or fi re disaster.
: This indicates potential dangers that may cause light to middle injuries, property damages such as partial loss of
the instrument or loss of computer data.
:
1

2. CAUTIONS FOR USE
CONTRAINDICATION AND RESTRICTION
1. Non-eligible patients
1) Never use this product on patients
- - on a low salt diet (due to hypertension, hypernatremia, edema, pregnancy toxemia, etc.),
- - having a serious ulcer in digestive organs,
- - having a renal dysfunction,
- - having cardiac dysfunction,
- - having asthma or chronic pulmonary disease,
- - having electrolyte abnormality due to hypochloric alkalosis.
2) Avoid using this product on patients below, other than those stated in above 1):
- - having an intraoral injury or disease,
- - having a hyperemia, infl ammation or bleeding in the intraoral cavity,
- - easily get oral mucosa infl ammation or bleeding,
- - having allergies,
- - wearing contact lenses.
3) Depending on the patient’s physical condition, allergy symptoms or stomatitis may occur. In such a case, stop using this
product.
2. Usage
1) This product must be used only by qualifi ed dental professionals and only for dental treatment.
2) Never dismantle or modify this product.
3) In case of trouble, do not attempt to repair. Return to dealer for repair.
4) In case of deterioration or malfunction, do not use this product.
5) Do not use this product when in an unmaintained condition.
6) To operate this instrument correctly and safely, keep the instruction manual.
7) Use sodium hydrogen carbonate powder for dental prophylaxis only. Other powder (for example, alumina powder) will cause
a decrease in cleaning effi ciency, powder clogging, or damage to the polisher.
2

CONTRAINDICATION AND RESTRICTION
8) Do not reuse the powder.
9) The powder must be fi lled into the powder cap. Filling into the chamber unit may cause a premature wear of the screw
threads and insuffi cient sealing and powder scattering.
10) Never spray into the subgingival, root canal, or extraction socket. It can cause accidental symptoms such as emphysemas.
11) Never spray directly into the intraoral soft tissues (gingiva, mucosa). It can cause accidental symptoms such as surface
damages.
12) This product must not be repaired by the user in case of malfunction. Contact your dealer for repair.
3

3. INTENDED USE
This product is intended to remove dental plaque, stain, and discoloration from tooth surface etc. by dental professionals during
dental treatment.
4. CHARACTERISTICS
1) The compact handpiece form allows easy movement between dental units and takes up little space for storage.
2) The quick-disconnect system permits easy replacement with turbines and immediate use. No need for cumbersome installation
and allows easy integration into your treatment system.
3) The contra-angled head rotates 360 degrees, allowing excellent access to all areas.
4) The detachable head allows easy maintenance in case of powder clogging.
5) Driven by compressed air and water from the dental unit, polisher neither effects other medical devices and is not effected by
electromagnetic waves.
4
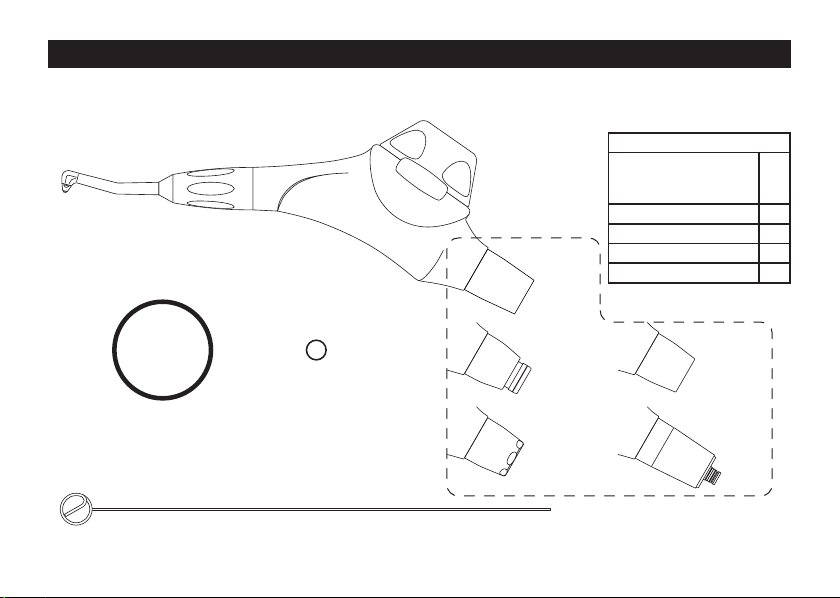
5. DELIVERY PACKAGE
The components and accessories below are included in the delivery kit. When you fi rst open the package, confi rm all components
are included in the package. If something is missing, contact your dealer immediately.
No powder is included in the delivery package.
Contents
The BLASTER
BC-B5000/B5010/
B5020/B5030/B5040
Cleaning wire 1
Head o-ring (spare) 1
The BLASTER
BC-B5000
Powder seal (spare) Head o-ring (spare)
Powder seal (spare) 1
Instruction manual 1
BC-B5020 BC-B5010
BC-B5040 BC-B5030
1
Cleaning wire
5

6. PRODUCT COMPONENTS
Powder cap
Chamber unit coupling
Head o-ring
Nozzle
6
Head coupling
Grip
Head
Powder pipe
Chamber unit
Powder stirring cap
Powder chamber
Powder seal
Joint
Triangle symbol
Mounting position mark

7. HOW TO USE
7.1 Before use
CAUTION
Do not impact this product (dropping, for example). If the polisher gets an impact, stop using and ask your dealer for inspection
and repair of the main body and the powder cap together. If the main body and/or powder cap has got a crack (including a
small crack invisible to the naked eye) through an impact, the main body may break and cause accidents.
ATTENTION
1) Use this product for the prescribed purpose according to the specifi ed usage only.
2) When using other products which are compatible (such as peripheral devices and instruments) to this product, observe
instructions for use of such devices or instruments.
1) Opening the package
When unpacking the package fi rst time, confi rm all contents in “5. DELIVERY PACKAGE” are included in the package.
2) Confi rmation of defect
Confi rm polisher has no defect or damage such as cracks.
3) Sterilization (before fi rst use and when a sterilization is required)
1) This product is not sterilized in the delivery condition. Clean with alcohol and sterilize in an autoclave before fi rst use.
2) Do not lubricate this product. Lubricant will be mixed into the compressed air and cause powder clogging.
Clean with alcohol and sterilize in an autoclave according to instructions in “9. CLEANING AND
STERILIZATION”.
ATTENTION
7

4) Checking your air compressor
To supply polisher with clean and dry air, drain air fi lter of the compressor in your dental offi ce. Do not supply compressed air
containing moisture. For drainage and regular maintenance of your compressor, please refer to your air compressor’s instruction
manual. Confi rm the compressor is maintained according to its instructions for use.
7.2 Air pressure setting (at fi rst use)
1) Preparation of polisher
(a) If polisher is connected to a turbine hose, disconnect it from the turbine hose.
(b) Attach the head and powder cap to the chamber unit according to “7.3 Attaching head” and “7.4 Attaching powder cap”.
not fi ll the powder yet.
2) Connection
(a) Connect your coupling (separately sold) to your turbine hose. Confi rm secure connection.
(b) Connect a pressure gauge to your coupling on your turbine hose until you hear a locking sound. Confi rm the gauge is fi rmly
attached. (If you don’t have a pressure gauge, consult with your dental dealer.)
(c) Connect polisher to the coupling of the pressure gauge until you hear a locking sound. Confi rm the gauge is fi rmly seated.
8
Do

3) Air pressure setting
(a) Turn off the water supply of your dental unit. Direct polisher
to your cuspidor and depress your foot control to activate the
dental unit.
(b) Adjust the air pressure of the unit until the gauge shows 0.25
to 0.4 MPa (about 2.5 to 4.1kgf/cm
(c) Detach the pressure gauge and polisher after pressure
adjustment.
2
).
Air pressure
0.25 to 0.4 MPa
CAUTION
1) When connecting your coupling to this product, confi rm secure connection after hearing a locking sound. Make sure the
head and powder cap are fi rmly screwed in. A failure to attach correctly may cause injury due to instrument becoming
disconnected or powder being scattered.
2) Never pull the handpiece out of your coupling while polisher is in operation. This may cause injury due to disconnection of
the polisher. (For BC-B5000 or BC-B5020)
3) Never release your coupling from the handpiece while polisher is in operation. This may cause injury due to disconnection
of the polisher. (For BC-B5010, BC-B5030 or BC-B5040)
4) The head and powder cap must not be detached during operation. This may cause injuries due to instrument becoming
disconnected, or powder scattering.
5) The air pressure at the coupling must be set within 0.25 to 0.4 MPa (about 2.5 to 4.1kgf/cm
damage tooth surface and cause patient pain. It may also cause trouble during use such as injuries due to instrument damage,
or powder scattering.
2
). Excess air pressure will
9

7.3 Attaching head
1) Polisher must be disconnected from a turbine
hose of dental unit when attaching and
detaching the head. If it is connected,
disconnect from the turbine hose fi rst.
2) Confi rm the o-ring of the head is not
damaged.
3) If water, oil, or powder adheres to head or
inside the chamber unit’s coupling, wipe off
with a cotton swab or dry cloth.
4) Align the head to the thread of the chamber
unit’s coupling, turn the head in the direction
of the arrow in the illustration until it stops.
Confi rm secure attachment.
10
Remove water,
oil, and powder.
Confirm the o-ring of the head
is not damaged.

7.4 Attaching powder cap
* Water due to sterilization must be expelled
by an idle run beforehand. Do not fi ll the
powder yet.
1) The powder cap must be attached or detached when
polisher is not connected to a turbine hose. If
connected, detach from the turbine hose.
2) If water, oil, or powder adheres to inside chamber unit,
powder cap, or powder seal, wipe off with a dry cloth.
3) Confi rm the powder seal (blue) is fully engaged in the
groove of chamber unit shown in the illustration.
4) Turn the powder cap in the direction of the arrow in
the illustration until it stops. Confi rm the powder cap is
fi rmly attached and the triangle symbol on the powder
cap lies within the range of the mounting position mark.
In case the triangle symbol lies outside of the mounting
position mark, replace your powder seal with new one
according to “10.4 Replacement of powder seal”.
Groove
Enlarged sectional view
Powder seal
Remove water, oil,
and powder.
Mounting position mark
Triangle symbol
11

CAUTION
1) Powder cap and powder seal must be attached fi rmly. An unstable attachment will cause the powder cap to undo during use
and may cause injuries or powder scattering.
2) Make sure the powder stirring cap is attached. Improper attachment will lower the cleaning effi ciency.
3) Remove powder remaining in/on the screw threads of the main body, powder cap, and sealing surface of the powder seal.
If the powder adheres fi rmly and is hard to remove, clean the remaining powder according to the instructions in “8.1 3)
Cleaning and disinfection”. As the remaining powder may cause premature wear of the threads and insuffi cient sealing
which may cause powder scattering.
4) Before each use, check if the screw threads of the main body and powder cap have any damage such as wear, crack,
deformation, etc. If the main body or powder cap has a damage, do not use and ask your dealer for repair together.
5) If the triangle symbol on the powder cap lies outside of the mounting position mark while the polisher is in use, this may
cause trouble like crack, damage or premature wear of the threads of the main body and powder cap.
ATTENTION
Remove water, oil, or powder remaining in/on the head, coupling of chamber unit, powder chamber, and powder cap.
Otherwise, the powder will get damp and cause clogging.
12

7.5 Connecting to dental unit
1) Cleaning of coupling
(a) Confi rm no water or oil remains in the coupling on your turbine hose. Remove with a dry cloth if remains.
* When a handpiece (air turbine, air scaler, etc.) is detached, water and oil remain at the joint.
Remove the water and oil without fail.
(b) Confi rm no water or oil remains in the joint of polisher. Remove with a cotton swab if remains.
Remove water and oil.
ATTENTION
Remove water or oil remaining inside of the coupling on your turbine hose and joint of the chamber unit. Otherwise, the
powder will become damp and cause clogging.
Remove water
and oil.
13

2) Connecting a coupling
(a) Connect a coupling (separately sold)
compatible with your polisher to your turbine
hose. Confi rm the coupling is fi rmly seated.
3) Connecting to turbine hose
(a) Insert your coupling on your turbine hose
into the joint of polisher until you hear a
locking sound. Confi rm the handpiece is
fi rmly seated.
(b) If your coupling has a light source, turn off
the illumination switch of your dental unit.
Coupling Turbine hose
CAUTION
When connecting your coupling to this product, confi rm secure connection after hearing a locking sound. Make sure the head
and powder cap are fi rmly screwed in. A failure to attach correctly may cause injury due to instrument becoming disconnected
or powder being scattered.
ATTENTION
To avoid shortening the life of the light source (light bulb) of your coupling, turn off the illumination of your dental unit when
using this product.
14

7.6 Water removal in channels (idle run)
1) Confi rm no powder remains within the powder chamber.
2) Direct the nozzle to your cuspidor. Depress your foot
control without water supply from the dental unit. Run
for 1 minute to remove water remaining in the channels
of polisher.
Stop water supply.
Idle run for 1 min.
ATTENTION
Run polisher for 1 minute without powder before use. If water remains inside of the main body, powder will become damp and
cause clogging.
15

7.7 Powder fi lling
1) Remove polisher from the turbine hose before refi lling
with powder.
2) Detach the powder cap by turning in the direction of the
arrow in the illustration above.
3) Confi rm the powder stirring cap is attached in place.
4) If water, oil, or powder remains inside of powder chamber
or powder cap, remove it with a dry cloth.
5) Fill sodium hydrogen carbonate powder not exceeding 15g
into the powder cap.
* The powder must be placed into the powder
cap. Take care not to spill the powder over the
thread of the powder cap. If the powder is spilt
over the thread, wipe it off with a dry cloth.
Filling too much powder will make the powder
adhere to the powder seal and cause
premature wear of the powder seal or
incomplete sealing.
6) Hold the chamber unit downward and the powder cap
upward as shown in the illustration. Turn the powder cap
in the direction of the arrow until it stops.
16
Remove water, oil, and powder.
Fill the powder into
the powder cap.
Confirm the powder
stirring cap is
attached in place.

7) Confi rm the powder cap is fi rmly attached within the
Mounting position mark
range of the mounting position mark. If the triangle
symbol on the powder cap lies outside of the mounting
position mark, replace your powder seal with a new one
according to “10.4 Replacement of powder seal”.
Triangle symbol
CONTRAINDICATION AND RESTRICTION
1) Use sodium hydrogen carbonate powder for dental prophylaxis only. Other powder (for example, alumina powder) will cause
a decrease in cleaning effi ciency, powder clogging, or damage to the polisher.
2) Do not reuse the powder.
3) The powder must be fi lled into the powder cap. Filling into the chamber unit may cause a premature wear of the screw
threads and insuffi cient sealing and powder scattering.
17

CAUTION
1) Confi rm the powder cap is attached fi rmly. An unstable attachment will cause the powder cap to undo during use and may
cause injuries or powder scattering.
2) Make sure the powder stirring cap is attached. Improper attachment will lower the cleaning effi ciency.
3) Remove powder remaining in/on the screw threads of the main body, powder cap, and sealing surface of the powder seal.
If the powder adheres fi rmly and is hard to remove, clean the remaining powder according to the instructions in “8.1 3)
Cleaning and disinfection”. As the remaining powder may cause premature wear of the threads and insuffi cient sealing
which may cause powder scattering.
4) Before each use, check if the screw threads of the main body and powder cap have any damage such as wear, crack,
deformation, etc. If the main body or powder cap has a damage, do not use and ask your dealer for repair together.
5) If the triangle symbol on the powder cap lies outside of the mounting position mark while the polisher is in use, this may
cause trouble like crack, damage or premature wear of the threads of the main body and powder cap.
ATTENTION
1) Remove water, oil, or powder remaining in/on the head, coupling of chamber unit, powder chamber, and powder cap.
Otherwise, the powder will get damp and cause clogging.
2) Do not overfi ll with powder.
3) Do not shake polisher after fi lling the powder. The powder may leak from the nozzle.
4) Always use dry compressed air and dry powder. Use of air and powder containing moisture or oil will cause powder
clogging.
18

7.8 Confi rming correct operation and water volume
1) Insert your coupling on your turbine hose into the joint of
polisher until you hear a locking sound. Confi rm the
handpiece is fi rmly seated.
2) Direct the nozzle to your cuspidor.
3) Depress the foot control of your dental unit one or two
times for about one second and confi rm if:
- - air, water, and powder are sprayed,
- - water supply is suffi cient,
- - no leak of air, water, and powder from polisher.
4) If you have trouble, refer to “11. TROUBLE
SHOOTING”.
For water supply adjustment, use the water volume control
of your dental unit.
Spray for about 1 sec.
1 or 2 times.
CAUTION
1) When connecting your coupling to this product, confi rm secure connection after hearing a locking sound. Make sure the
head and powder cap are fi rmly screwed in. A failure to attach correctly may cause injury due to instrument becoming
disconnected or powder being scattered.
2) Confi rm no damage, no cracks, no breakage or no major corrosion is present on the product and it is safe to use.
ATTENTION
A lot of powder might be sprayed immediately after fi lling powder. Before using on a patient, spray into your cuspidor for one
second one or two times to confi rm operation.
19

7.9 Treatment
1) Patient, operator, and assistant protection
(a) Operator and assistant must be wear protective eyewear and anti-dust mask.
(b) Protect the patient’s face (other than oral cavity) with towels or protective eyewear.
* If the patient wears contact lenses, the patient must remove them before treatment.
(c) When spraying into an area around soft tissues such as gingiva, protect it with cotton in advance.
CAUTION
1) When using, the operator and assistant(s) must wear protective eyewear and anti-dust masks full-time. If the powder gets
into your eyes, wash your eyes with water and consult an eye doctor.
2) During a treatment with polisher, protect the patient with towels or protective eyewear so that the powder does not enter
mucous membranes (eyes, nose, tracheae) other than intraoral.
20

2) Spraying
Make your vacuum suction system ready to remove scattered powder. Direct the nozzle to tooth surface and depress your foot
control to start spraying.
* The prevention ability of tooth against discoloration is decreased after cleaning. Instruct the patient
not to smoke or have foods or beverages with strong coloring effect such as tea and coffee for two
or three hours after treatment.
○ When using for the fi rst time, grasp the spraying area and cleaning effect with an extracted tooth or tarnished coin.
○ Keep distance of 2 to 5 mm from the tooth surface.
○ Spray from gingival margin to occlusal surface. Suction the spray with your vacuum suction system and avoid soft tissues.
2 to 5 mm
○ When cleaning a large area, spray while moving the nozzle minutely.
○ The powder may be sprayed for a few seconds after releasing your foot control due to the residual pressure within the powder
chamber. Collect the powder with your vacuum suction to avoid damaging soft tissues.
○ Have the patient wash out his/her mouth as needed or after treatment.
21

CONTRAINDICATION AND RESTRICTION
1. Non-eligible patients
1) Never use this product on patients
- - on a low salt diet (due to hypertension, hypernatremia, edema, pregnancy toxemia, etc.),
- - having a serious ulcer in digestive organs,
- - having a renal dysfunction,
- - having cardiac dysfunction,
- - having asthma or chronic pulmonary disease,
- - having electrolyte abnormality due to hypochloric alkalosis.
2) Avoid using this product on patients below, other than those stated in above 1):
- - having an intraoral injury or disease,
- - having a hyperemia, infl ammation or bleeding in the intraoral cavity,
- - easily get oral mucosa infl ammation or bleeding,
- - having allergies,
- - wearing contact lenses.
3) Depending on the patient’s physical condition, allergy symptoms or stomatitis may occur. In such a case, stop using this
product.
2. Usage
1) Never spray into the subgingival, root canal, or extraction socket. It can cause accidental symptoms such as emphysemas.
2) Never spray directly into the intraoral soft tissues (gingiva, mucosa). It can cause accidental symptoms such as surface
damages.
CAUTION
1) Confi rm secure attachment of the head and powder cap before every treatment. Loosening of the head or powder cap
during use may cause injury due to instrument becoming loose or powder being scattered.
2) Avoid prolonged continuous use. Have the patient wash out his/her mouth enough as needed.
3) Do not put this product close to heat. It will cause damage on the body and malfunction, and may cause injury or powder
scattering during use.
22

CAUTION
4) To avoid infection, wear suitable protective wears such as mask, gloves and eyewear when using.
ATTENTION
1) Always use with suffi cient water. If the water is insuffi cient, the powder will scatter and the cleaning effi ciency will decrease.
2) Do not spray directly to restorations such as crowns. It may scratch restorations.
3) Collect the sprayed powder with your vacuum suction system while using.
4) The powder may be sprayed for a few seconds after releasing your foot control due to the residual pressure in the powder
chamber. Collect the powder with your vacuum suction system to avoid damaging soft tissues.
5) Take care so that the patient does not swallow too much powder.
6) The tooth cuticle is removed during the cleaning procedure and the prevention ability of tooth against discoloration is
decreased. The tooth cuticle will be re-created by protein contained in saliva.
To avoid discoloration, instruct the patient not to smoke or have foods or beverages with strong coloring effect such as tea
and coffee for two or three hours after treatment.
3) Turning the head
Rotate the head by turning the grip. The head rotates 360 degrees.
360-rotation
CAUTION
The head must be rotated by holding and turning the grip, not the head. Otherwise the head will loosen and this may cause
injuries or powder scattering during use.
23

7.10 Other remarks on use
1) Disconnecting from the turbine hose
(a) Detach the handpiece according to the instruction manual
of your coupling.
* When reconnecting, clean the coupling on your turbine hose
and inside of chamber unit’s joint in advance referring to
“7.5 1) Cleaning of coupling”.
2) Detaching head
(a) The head must be attached or detached when polisher is not
connected to a turbine hose. If polisher is connected to a
turbine hose, disconnect it from the turbine hose.
(b) Turn the head in the direction of the arrow in the illustration
and detach.
(c) When reattaching, clean the head and inside of chamber
unit’s coupling in advance referring to “7.3 Attaching head”.
3) Detaching powder cap
(a) The powder cap must be attached or detached when polisher
is not connected to a turbine hose. If polisher is connected
to a turbine hose, disconnect it from the turbine hose.
(b) Hold polisher keeping the powder cap downward. Turn the
powder cap in the direction of the arrow in the illustration
to detach. Detach the powder cap above your cuspidor, as
the powder in the powder chamber may scatter when the
powder cap is released.
(c) Discard the leftover powder in the powder cap.
(d) When refi lling the powder and reattaching the powder cap,
clean the inside of powder chamber and powder cap
referring to “7.7 Powder fi lling”.
24
Powder cap
downward and
unfix. Discard the
leftover powder.

ATTENTION
The leftover powder must be discarded after treatment. When the powder gets damp, it will cause clogging.
25

8. MAINTENANCE AND CHECKS
8.1 Regular maintenance and checks
* Perform maintenance and checks as follows before sterilization and after clinic hours without fail.
ATTENTION
To use safely, check and maintain this product daily after clinic hours according to the instructions in “8. MAINTENANCE
AND CHECKS”.
1) Powder disposal
Detach the powder cap referring to “7.10 3) Detaching powder cap”. Taking care of powder scattering, discard the leftover
powder.
ATTENTION
The leftover powder must be discarded after treatment. When the powder gets damp, it will cause clogging.
2) Removal of remaining powder within polisher
(a) Attach the emptied powder cap to the chamber unit.
(b) Connect polisher to the coupling on your turbine hose.
(c) Direct the nozzle to your cuspidor. Depress your foot
control without water supply from the dental unit. Run for
1 minute to remove the powder remaining within the
channels of polisher.
(d) Disconnect polisher from your coupling.
26
Stop water supply.
Idle run for 1 min.

3) Cleaning and disinfection
(a) Remove the head and powder cap from the chamber unit.
(b) Scrub the chamber unit, head and powder cap in every part using a tooth brush thoroughly under warm running water at
< 38°C (100.4°F).
(c) Rinse thoroughly and confi rm no debris or blood remain.
(d) Remove remaining water by blowing air with a three-way syringe.
(e) Wipe the chamber unit, head and powder cap in every part with disinfectant alcohol.
ATTENTION
1) Do not use ultrasonic cleaners to clean this product. This will cause malfunction or damage.
2) Remove powder remaining inside and on the surface of polisher before every sterilization and after each treatment. The
powder is easy to adhere and remain in the powder chamber and thread, powder seal and thread of the powder cap. Clean
these parts in particular carefully. If the powder gets damp, it will cause clogging and powder adherence.
4) Water draining
(a) Attach the powder cap and head to the emptied chamber
unit.
(b) Direct the nozzle to your cuspidor. Blow air into the joint
of chamber unit with a three-way syringe to drain the
water channels.
Blow air.
27

ATTENTION
1) Drain polisher before every sterilization and once a day after clinic hours.
2) Do not lubricate this product. Lubricant will be mixed into the compressed air and cause powder clogging.
5) Checking your air compressor
Check your air compressor referring to “7.1 4) Checking your air compressor”.
28

8.2 Cleaning at troubles in air and powder spray
In case of trouble in air and powder spray, clean each part of polisher. Cleaning must be done when polisher is disconnected
from the coupling on your turbine hose.
1) Powder stirring cap cleaning (if the center hole
of the stirring cap is clogged with powder)
(a) Remove powder adhered on the center hole of the
Center hole of powder stirring cap
powder stirring cap with a cotton swab or dry cloth.
(b) Clean the center hole with the attached cleaning wire to
remove the powder blocking the center hole.
(The cleaning wire does not pass through the
center hole.)
2) Head cleaning
(a) Remove the head from the chamber unit.
(b) Insert the cleaning wire into the spraying orifi ce of the
Blow air
nozzle and center hole of the coupling. Remove powder
remaining within the channels using the cleaning wire.
(c) Blow air into the spraying orifi ce of the nozzle with a
three-way syringe to remove powder remaining inside.
(d) If water, oil, or powder remains in the head, remove with
a cotton swab or dry cloth.
Cleaning wire
29

3) Chamber unit cleaning
(a) Detach the head and powder cap from the chamber unit.
(b) Loosen the powder stirring cap from the powder pipe by
turning in the direction of the arrow in the illustration
and detach it.
(c) Insert the cleaning wire into the powder pipe and remove
powder remaining in the pipe.
(d) Blow air into the powder pipe of the nozzle with a
three-way syringe to remove powder remaining inside.
(e) If powder remains inside coupling of the chamber unit,
remove with a cotton swab or dry cloth.
(f) If water, oil, or powder remains inside chamber unit or in
the powder cap, remove with a cotton swab or dry cloth.
(g) Attach the powder stirring cap to the powder pipe by
turning in the direction of the arrow in the illustration.
30
Blow air
Remove water, oil, and powder.

9. CLEANING AND STERILIZATION
9.1 Cleaning and disinfection
Clean polisher according to “8.1 Regular maintenance and checks 1) to 4)” before sterilization.
CAUTION
To avoid infection, wear suitable protective wears such as mask, gloves and eyewear when using.
9.2 Sterilization
1) Sterilizability
Polisher (head, chamber unit, and powder cap) and cleaning wire are
sterilizable in autoclave.
2) Sterilization (Sterilization must be done after every patient.)
(a) Remove the head and powder cap from the chamber unit. Confi rm no
powder remains in the powder chamber.
(b) Put the chamber unit (with head and powder cap detached) into a
sterilization bag and seal it.
(c) Place each component sealed in the sterilization bag on a sterilization
tray to avoid direct contact with sterilizer’s inner chamber surface, and
put into the autoclave.
The maximum sterilization temperature is 135°C (275°F). Sterilize at
134°C (273°F) for 3 minutes. Follow your local regulation for
sterilization.
Sterilizable in autoclave
31

CAUTION
1) Sterilization must be done after every patient in order to prevent direct and cross infection.
2) To avoid infection, wear suitable protective wears such as mask, gloves and eyewear.
ATTENTION
1) To avoid trouble and damage on the product, follow the instructions in “9. CLEANING AND STERILIZATION” when
sterilizing.
2) Polisher is autoclavable up to 135°C (275°F). Sterilize at 134°C (273°F) for 3 minutes. Follow your local regulations for
sterilization.
3) Do not sterilize with powder remaining in the powder chamber.
4) Do not sterilize polisher with instruments on which some medicine or chemical agent remains.
5) Do not immerse polisher in disinfectant liquids.
6) Do not use alkaline disinfectant and oxidized water (hard acid water or super acid water) for disinfection.
7) Dry heat sterilizers generate high heat that exceeds the maximum sterilization temperature of polisher. Do not use in order
to avoid mechanical trouble or damage to polisher.
8) Depending on the conditions of your sterilizer or sterilizing methods, this product may discolor.
9) The chamber unit is made from a synthetic material and may rarely get minute scratches due to autoclave sterilization.
Receiving maintenance after 250 autoclave cycles or once every two years is recommended to confi rm the product safety.
3) After sterilization
When the sterilization cycle is fi nished, take out sterilized polisher from the autoclave. Cool naturally.
9.3 Storage
After sterilization, confi rm no condensation remains and store. The powder is sensitive to heat and humidity. Store in a place of
low temperature and moisture.
32

ATTENTION
1) For storing of this product, follow the instructions in “9.3 Storage”.
2) The chamber unit and head must be dried completely before storage. If water remains, discoloration, rust, or powder
clogging will occur.
3) Store and take care of polisher properly to keep it out of reach of persons other than dental professionals.
4) Do not store polisher in a place where it may be exposed to water.
5) Keep polisher in a place where it is not affected by barometric pressure, temperature, humidity, ventilation, strong sunshine,
dust, salt or sulfurous air.
6) Keep polisher in places without vibration or shock.
7) Do not store polisher in a place where chemical agents are kept or some gas exists.
33

10. REPLACEMENT OF CONSUMABLE PARTS, DISPOSAL
* For disposal of used consumables, see “10.5 Disposal”
10.1 Replacement of head
The nozzle of the head will wear out with use. A broadened
spraying orifi ce will cause decrease in cleaning effi ciency and
diffi culty in pinpoint spraying. When the spraying orifi ce
has become larger like shown in the illustration, the work
effi ciency will be recovered by replacement of the head
(separately available). Attach the head properly according to
“7.3 Attaching head” when replacing.
* The entire head must be replaced, not only the nozzle.
10.2 Replacement of head o-ring
In case the o-ring at the coupling of the head is damaged or
worn or, air, water, or powder leaks from the joint, replace
the used o-ring with the provided head o-ring (spare). Attach
the o-ring properly in place. Do not damage the surface of
the o-ring when replacing.
10.3 Replacement of powder cap
The transparency of the powder cap will lower with use and may result in decreased visibility inside the powder cap. In case
you cannot see powder in the powder chamber, replace the powder cap (separately available). Attach the powder cap properly
according to the instructions in “7.4 Attaching powder cap” when replacing it.
34
Nozzle
Head
Leak
Head o-ring (spare)

10.4 Replacement of powder seal
In case the powder seal attached into the thread of the powder chamber is damaged or worn or, air or powder leaks between the
powder cap and powder seal, replace the used powder seal with the provided powder seal (spare). Follow the procedure below:
If powder or something remains in the groove of the powder chamber, in which the powder seal is attached (see the illustration
below), remove it with air from a three-way syringe. Clean the groove and attach the powder seal properly so that the powder seal
fully seats in the groove (see the illustration below). Do not damage the surface of the powder seal when replacing.
Powder seal
Groove
Leak
Powder seal (spare)
Engage powder
seal fully in
the groove of
chamber unit.
Enlarged
sectional view
CAUTION
When replacing o-rings and powder seal, be careful about the correct mounting location and direction. Incorrect mounting may
cause injuries due to disconnection of the head or powder cap, powder scattering, leakage of air, water, or powder during use.
10.5 Disposal
Dispose of this product according to your local rules and regulations.
35

11. TROUBLE SHOOTING
If this product does not operate as stated in this manual, check your problem according to the list below. If your trouble is not
corrected, or if your trouble is not listed below, contact your dealer.
CONTRAINDICATION AND RESTRICTION
This product must not be repaired by the user. In case of malfunction, contact your dealer for repair.
Symptoms Possible causes Countermeasures
1) No powder spray. Low
cleaning effi ciency.
2) No water. * Water supply system of your dental unit is shut
36
* The center hole of the powder stirring cap is
clogged with powder.
* Powder clogging within the channels.
* The powder stirring cap is not attached properly.
* No air supply.
* Low air pressure at the coupling.
* The control system of the dental unit does not
work.
off.
* Water does not reach turbine hose.
* Water channels of polisher is clogged.
* O-ring(s) on your coupling is/are damaged.
* Clean the powder stirring cap according to “8.2
1) Powder stirring cap cleaning”.
* Clean the head and chamber unit according to
“8.2 2) Head cleaning” and “8.2 3) Chamber
unit cleaning”.
* Attach the powder stirring cap properly
according to “8.2 3) Chamber unit cleaning”.
* Set coupling pressure between 0.25 and 0.4 MPa.
* Set coupling pressure between 0.25 and 0.4 MPa.
* Check the control system using other handpiece
or three-way syringe.
* Activate the water supply system of your dental
unit.
* Check the water supply system of your dental
unit.
* Ask your dealer for repair.
* Replace the o-ring(s) on your coupling
(separately sold).

Symptoms Possible causes Countermeasures
3) Leak (air, water, and
powder) from powder
chamber coupling.
4) Air and/or powder
leak from near of the
powder chamber.
5) Water leak from
around the coupling
on the turbine hose.
6) Polisher cannot be
connected to your
coupling.
* The head is not fi rmly attached.
* The o-ring in the head is worn or damaged.
* The powder cap is not fi rmly attached.
* The powder seal is not properly attached in the
powder chamber.
* The powder seal is worn or damaged.
* Powder adheres to the sealing surface (of the
powder seal and/or powder cap).
* O-ring(s) on your coupling is/are damaged. (For
BC-B5000, BC-B5010, BC-B5020 or BC-B5030)
* O-ring(s) on your joint is/are damaged. (For
BC-B5040)
* Polisher is not compatible with your coupling.
* The light cover at the front of the coupling is
loose (if you use coupling with light).
* Attach the head fi rmly according to “7.3
Attaching head”.
* Replace with the attached head o-ring according
to “10.2 Replacement of head o-ring”.
* Attach the powder cap fi rmly according to “7.4
Attaching powder cap”.
* Attach the powder seal properly according to
“10.4 Replacement of powder seal”.
* Replace with the attached new powder seal
according to “10.4 Replacement of powder
seal”.
* Fill the powder into the powder cap properly
according to “7.7 Powder fi lling”.
* Replace the o-ring(s) on your coupling
(separately sold).
* Replace the o-ring(s) on the joint (separately
sold).
* Use polisher compatible with your coupling
according to “7.5 Connecting to dental unit”.
* Turn the light cover at the front of the coupling
to fi x securely.
37

12. SPECIFICATIONS
Product name
Model
Connection
Powder consumption
volume
Coupling air pressure
Air consumption volume
Water fl ow volume
Length
Weight (without powder)
38
ITEMS SPECIFICATIONS
BC-B5000 BC-B5010 BC-B5020 BC-B5030 BC-B5040
Multifl ex®
201mm (7.9inch) 200mm (7.9inch) 196mm (7.7inch) 196mm (7.7inch) 208mm (8.2inch)
142g (5.0oz.) 136g (4.8oz.) 137g (4.8oz.) 133g (4.7oz.) 144g (5.1oz.)
coupling
The BLASTER
Roto Quick®
coupling
4g/min (at coupling air pressure 0.4MPa)
0.25 to 0.4MPa (36 to 58psi, 2.5 to 4.0bar, 2.5 to 4.1kgf/cm
10L/min (at coupling air pressure 0.4MPa)
40ml/min (at coolant water pressure 0.2MPa)
Sirona®
Quick coupling
Unifi x® coupling
Mach®/Phatelus®
coupling
2
)

13. COMPONENT PARTS
REF 5011112
Head o-ring
REF 3162031
Head
Chamber unit
REF 3170251
Cleaning wire
BC-B5040 only
REF 3162871
Joint o-ring set
REF 3162851
Joint cover
REF 3162121
Powder cap
REF 3162861
O-ring set for powder pipe
REF 5012022
4-hole seal
REF 5012012
2-hole seal
REF 3162222
Powder stirring cap
REF 5013034
Powder seal
39

Distributor:
Bioclear
For technical support, repair or service contact:
Vector R & D Inc.
2810 69th Ave. West, University Place, WA 98466, U.S.A.
TOLL FREE: +1-877-88DRILL (+1-877-883-7455), www.vectorusa.net
Manufacturer:
MICRON Corporation
2-17-7, Ikegami, Ota-ku, Tokyo, 146-0082, Japan
Tel: +81-3-3755-0396, Fax: +81-3-5747-5396
7000079-3-160415
Made in Japan
 Loading...