

Page 1
Bloeddrukmeter
Volautomatisch Bovenarm
Modelnummer: BX300
HANDLEIDING
Version Number:1.0
Page 2
NL
NL
EN
Dutch....................................................................1--19
English................................................................20--44
CONTENTS
1.Inleiding en beoogd gebruik...............................................................
2.Belangrijke informatie over bloeddruk en het meten ervan................
3.Componenten van uw Bloeddrukmeter.............................................
4.Uw monitor voor de eerste keer gebruiken........................................
5.Meetsprocedure.................................................................................
6.Verzorging en Onderhoud..................................................................
7.Garantie/service.................................................................................
8.Certificaten.........................................................................................
9.Technische specificaties....................................................................
EN
2
5
6
8
10
17
18
18
18
Page 3
NL
NL
EN
1. Inleiding en beoogd gebruik
Het maakt betrouwbare meting van de bovendruk (systolische
bloeddruk), onderdruk (diastolische bloeddruk) en de polsslag via de
oscillometrische methode.
Lees voor gebruik deze gebruiksaanwijzing zorgvuldig door en bewaar ze
op een veilige plaats.
1.1 Onthoud...
• Alleen een gezondheidsdeskundige is bevoegd om bloeddrukmetingen
te interpreteren.
• Dit toestel is NIET bedoeld om regelmatige medische controles te
vervangen.
• Bloeddrukmetingen die met dit apparaat zijn verkregen, moeten
worden geverifieerd voordat u medicijnen voorschrijft of aanpast die
worden gebruikt om hypertensie (hoge bloeddruk) onder controle te
houden. In geen geval mag U de dosering van de door uw arts
voorgeschreven geneesmiddelen wijzigen.
• Deze monitor is uitsluitend bedoeld voor gebruik door volwassenen.
Raadpleeg een arts alvorens dit instrument bij een kind te gebruiken.
• In geval van onregelmatige hartslag, mogen metingen die met dit
instrument genomen worden alleen worden geëvalueerd na overleg met
een arts.
• Host producten, inclusief accessoires, moeten worden behandeld in
overeenstemming met de plaatselijke voorschriften na het bereiken van
de levenscyclus.
1.2 Waarschuwingen en voorzorgsmaatregelen
Waarschuwing: Het gebruik van andere accessoires dan die gespecificeerd of
geleverd zijn door de fabrikant van dit apparatuur kunnen de elektromagnetische
straling verhogen of verlagen wat elektromagnetische immuniteit met
bedrijfsstoringen tot gevolg kunnen hebben.
Waarschuwing: Het apparaat kan niet de gespecificeerde meetnauwkeurigheid
leveren indien het gebruikt of opgeslagen wordt in temperatuur- of vochtigheidsomstandigheden buiten de grenswaarden vermeld in het hoofdstuk ‘Technische
Specificaties’.
Waarschuwing: De aparte netstroomadapter die bedoeld is om de USB-inter-
face van de bloeddrukmeter aan te sluiten, is niet geëvalueerd volgens de IEC
60601-1. De veiligheid van het product moet opnieuw worden beoordeeld
wanneer het wordt gevoed door een aparte netstroomadapter.
Waarschuwing: De gebruiker dient vóór gebruik te controleren of het apparaat
veilig functioneert en dat het in goede staat verkeert.
Waarschuwing: Het apparaat is niet geschikt voor gebruik in de aanwezigheid
van ontvlambare verdovingsmengsels met lucht of met zuurstof of lachgas.
Waarschuwing: De patiënt is een aangewezen gebruiker, d.w.z. dat de
controlefunctie van bloeddruk en polsslag veilig door de patiënt kunnen worden
gebruikt en dat de schoonmaak routine en het vervangen van de batterijen kan
worden uitgevoerd door de patiënt.
Waarschuwing: Dit apparaat kan niet samen met HF- chirurgische apparatuur
worden gebruikt.
Waarschuwing: Gebruik van stroomadapter
1.Adapter: input 100-240V, 50/60hz output DC 5V 1A
2. Zorg voor een comfortabele verbinding tussen apparaat en adaptar.
3.Gevoelig voor water, hoge temperatuur, vocht, direct zonlicht en bijtende
gasomgeving. Gebruik dit product niet in de bovengenoemde omgeving.
Waarschuwing: Te frequente metingen kunnen de PATIËNT schade toebrengen
doordat de bloedstroom wordt gestoord.
Waarschuwing: Plaats de manchet niet over een wonddeel.
Waarschuwing: Door gelijktijdig gebruik van ME-apparatuur op hetzelfde
ledemaat komt de manchet onder druk en kan hierdoor tijdelijk functieverlies
veroorzaken.
Let op: Om elke mogelijkheid van accidentele wurging te vermijden, moet u dit
apparaat uit de buurt van kinderen houden en de slang niet om uw nek wikkelen.
Let op: Om beschadiging van het apparaat te voorkomen, dient u dit apparaat
uit de buurt van kinderen en huisdieren te houden.
EN
Page 4
NL
Let op: Het standaardmateriaal dat voor de blaas en de slangen wordt gebruikt,
EN
is latexvrij.
Let op: Zelfmeting betekent controle, geen diagnose of behandeling.
Ongebruikelijke waarden moeten altijd met een arts worden besproken. In
geen geval mag u de dosering wijzigen van medicijnen die door een arts zijn
voorgeschreven.
Let op: De puls monitor is niet geschikt voor het controleren van de frequentie
van hartpacemakers!
Let op: In geval van onregelmatige hartslag, mogen metingen die met dit
instrument genomen worden alleen worden geëvalueerd na overleg met een
arts.
Opmerking: Het apparaat kan niet de gespecificeerde meetnauwkeurigheid
leveren indien het gebruikt of opgeslagen wordt in temperatuur- of vochtigheidsomstandigheden buiten de grenswaarden vermeld in het hoofdstuk
‘Technische Specificaties’.
Opmerking: De manchet wordt behandeld als een onderdeel van het toestel.
De gebruiker moet contact de fabrikant voor hulp, indien nodig, bij het
opzetten, gebruiken of onderhoud van het apparaat.
Opmerking: Dit apparaat bevat gevoelige elektronische onderdelen. Vermijd
sterke elektrische of elektromagnetische velden in de directe omgeving van het
apparaat (bijv. mobiele telefoons, magnetronovens) tijdens het gebruik. Deze
kunnen leiden tot onregelmatige resultaten.
Opmerking: Probeer dit apparaat niet zelf te repareren of te onderhouden.
Mocht zich een defect optreden, neem dan contact op met de plaatselijke
distributeur of fabrikant.
2.Belangrijke informatie over bloeddruk en de
meting ervan
Bloeddruk
De kracht waarmee het hart bloed in de vaten pompt, wordt de bloeddruk
genoemd. De kracht waarmee dit gebeurt, kan per persoon verschillen. Het is
ook mogelijk dat je bloeddruk niet altijd hetzelfde is, dit kan verschillende
oorzaken hebben. Normaal gesproken is de bloeddruk op peil, dat wil zeggen
dat je hele lichaam voldoende bloed krijgt. Als je bloeddruk wordt gemeten,
dan wordt dit gedaan aan de hand van een tweetal waarden. Zowel de
bovendruk als de onderdruk wordt dan gemeten.
Bovendruk en onderdruk
De bovendruk is de kracht of druk waarmee het hart bloed in je vaten pompt.
Dit wordt ook wel de samentrekkingsfase van het hart genoemd. De
onderdruk is de druk op het moment van ontspanning van het hart. Het hart
zal zich dan weer met bloed vullen. Hier wordt dan ook een waarde aan
gekoppeld. Een waarde van de bovendruk van een gezond persoon ligt
normaal gesproken tussen de 100 en 140 mm HG. De onderdruk meestal
tussen de 60 en 80 mm HG.
Normale bloeddruk
De ideale bloeddruk voor een volwassene met een goede gezondheid is
120/80. Hierbij is 120 de bovendruk en 80 de onderdruk. Normaliter moet de
bovendruk liggen tussen de 100 en de 140. De onderdruk moet liggen tussen
de 60 en de 80.
NL
EN
Page 5
NL
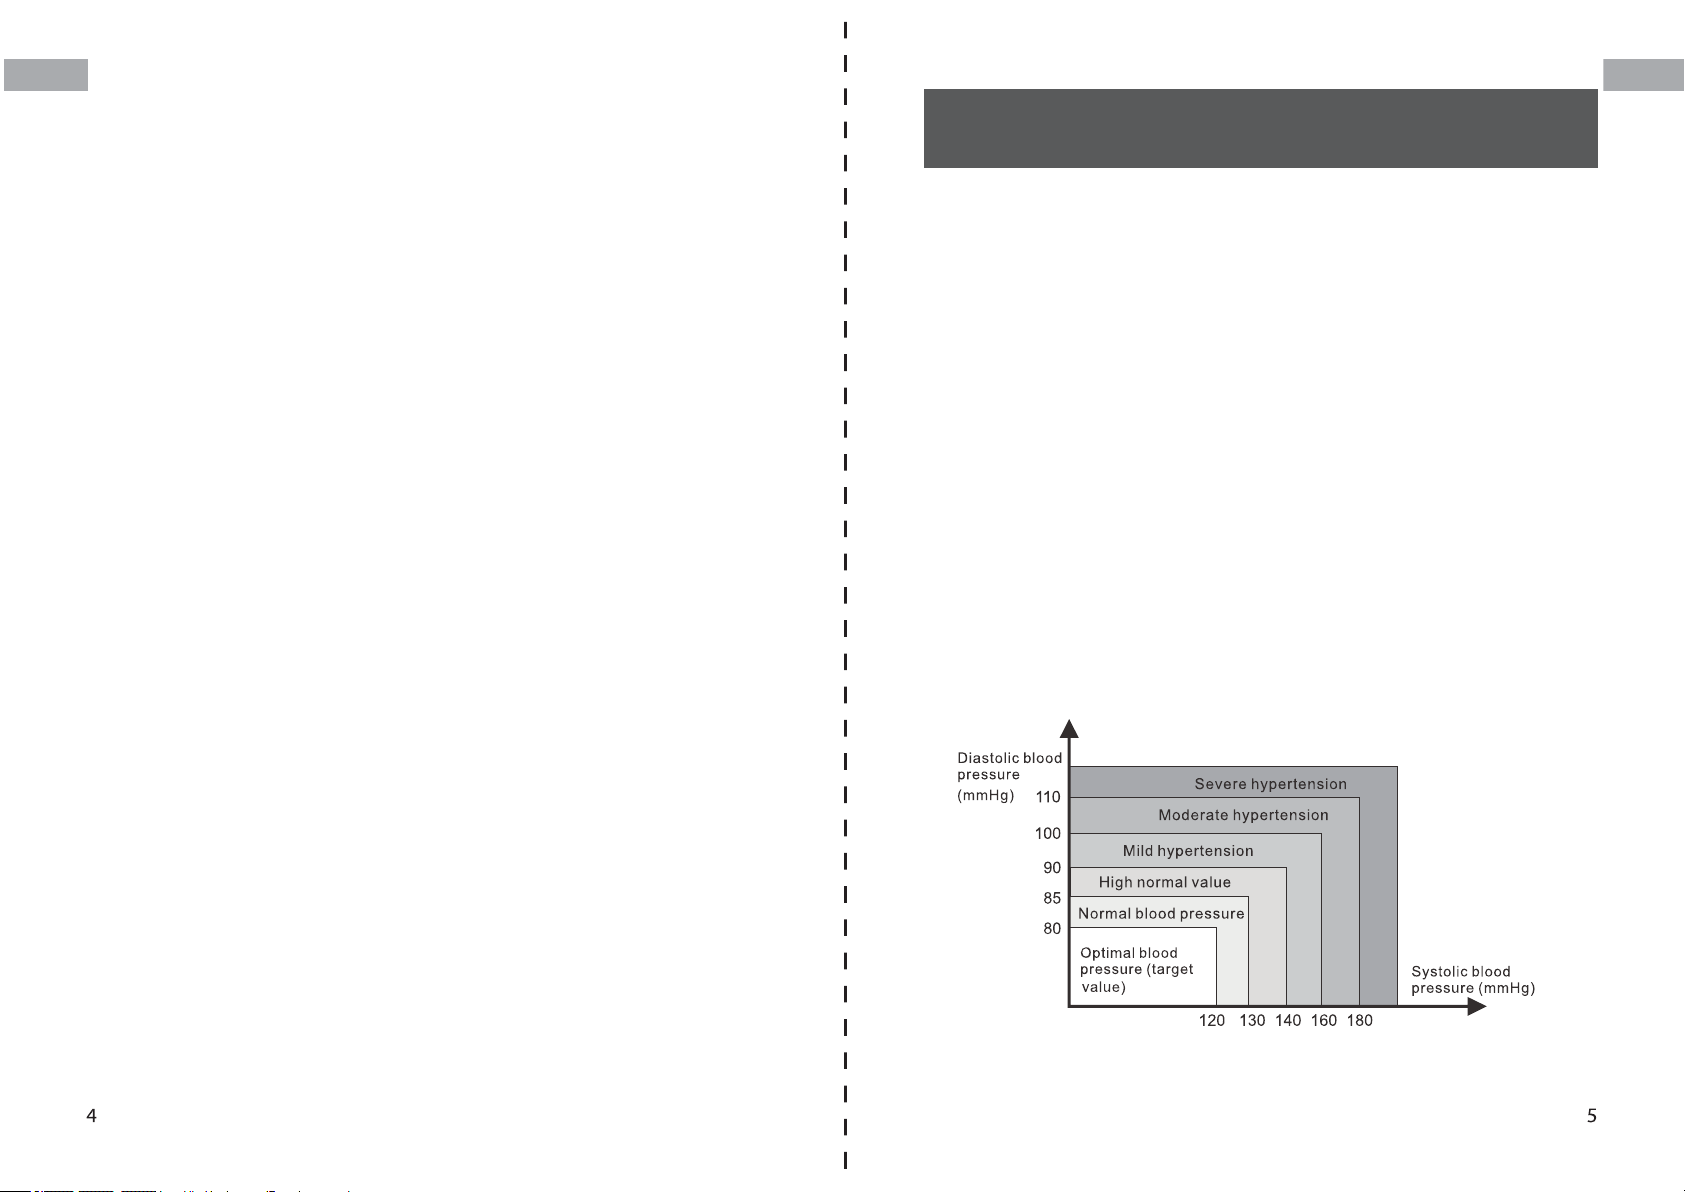
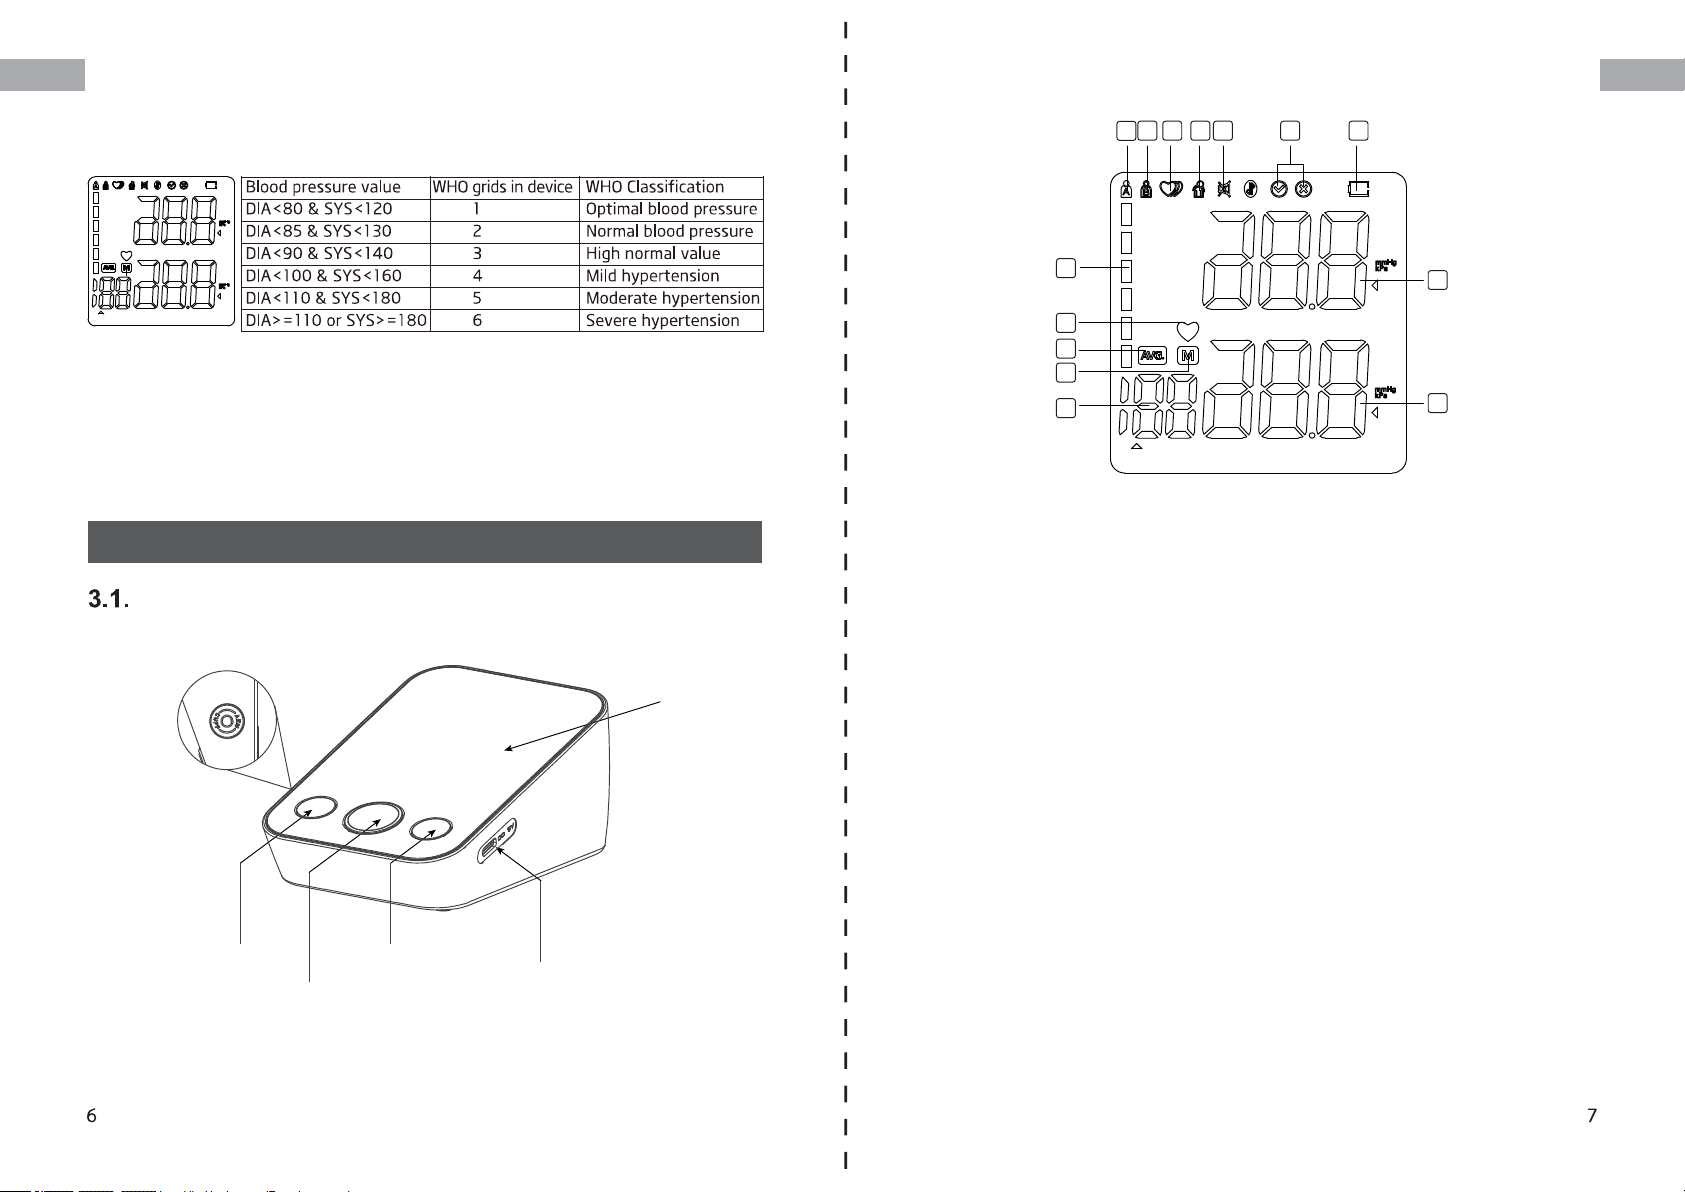
Er zijn zes klassen in het display van het apparaat. Zie afbeelding-01-01.
EN
De verschillende roosters vertegenwoordigen verschillende intervalschalen
van de WHO.
SYS
2 3 4 5 6 7
1
NL
EN
DIA
PULES
/min
Afbeelding-01-01
3. Onderdelen van uw bloeddrukmeter
Meetunits
Cuff Connector
Port
LED display
8
SYS
14
9
10
11
12
PULES
/min
DIA
13
Afbeelding-03
3.2 Symbolen op de LED display
1. Gebruiker A 2. Gebruiker B
3. Symbool voor onregelmatige hartslag 4. Bewegingsfout symbool
5. Mute symbool 6. Manchet zelf controle functie
7. Batterij bijna leeg symbool 8. WHO-functie symbool
9. Hartslagsymbool (knippert tijdens de meting)
10.Gemiddelde waarde symbool 11. Geheugensymbool
12. Impulsweergave 13.Onderdruk (diastolische bloeddruk)
14. Bovendruk (systolische bloeddruk)
3.3 Kenmerken van model BX300
SET button
START/STOP button
Memory button
Afbeelding-02
AC Adapter port
1. Sprekende functie 2. Dubbele gebruikers: 2 x 120 sets geheugen
3. Manchet zelf-controle functie 4. Controle op onregelmatige hartslag
5. Gemiddelde waarde functie 6. Lege batterij display
7. WHO-functie 8. Automatische uitschakeling
9. Ondersteuning voor externe stroomadapter 10. Volume aanpassing
11. Manchet opberger 12. Led display
13. Acryl lens
Page 6
NL
EN
4. De Bloeddrukmeter voor de eerste keer
4.2.Systeem Instellingen
NL
EN
gebruiken
4.1 Activeren van de aanwezige batterijen
Installatie van de batterijen
Gebruik alleen 1,5 V "AA" alkalinebatterijen in dit apparaat.
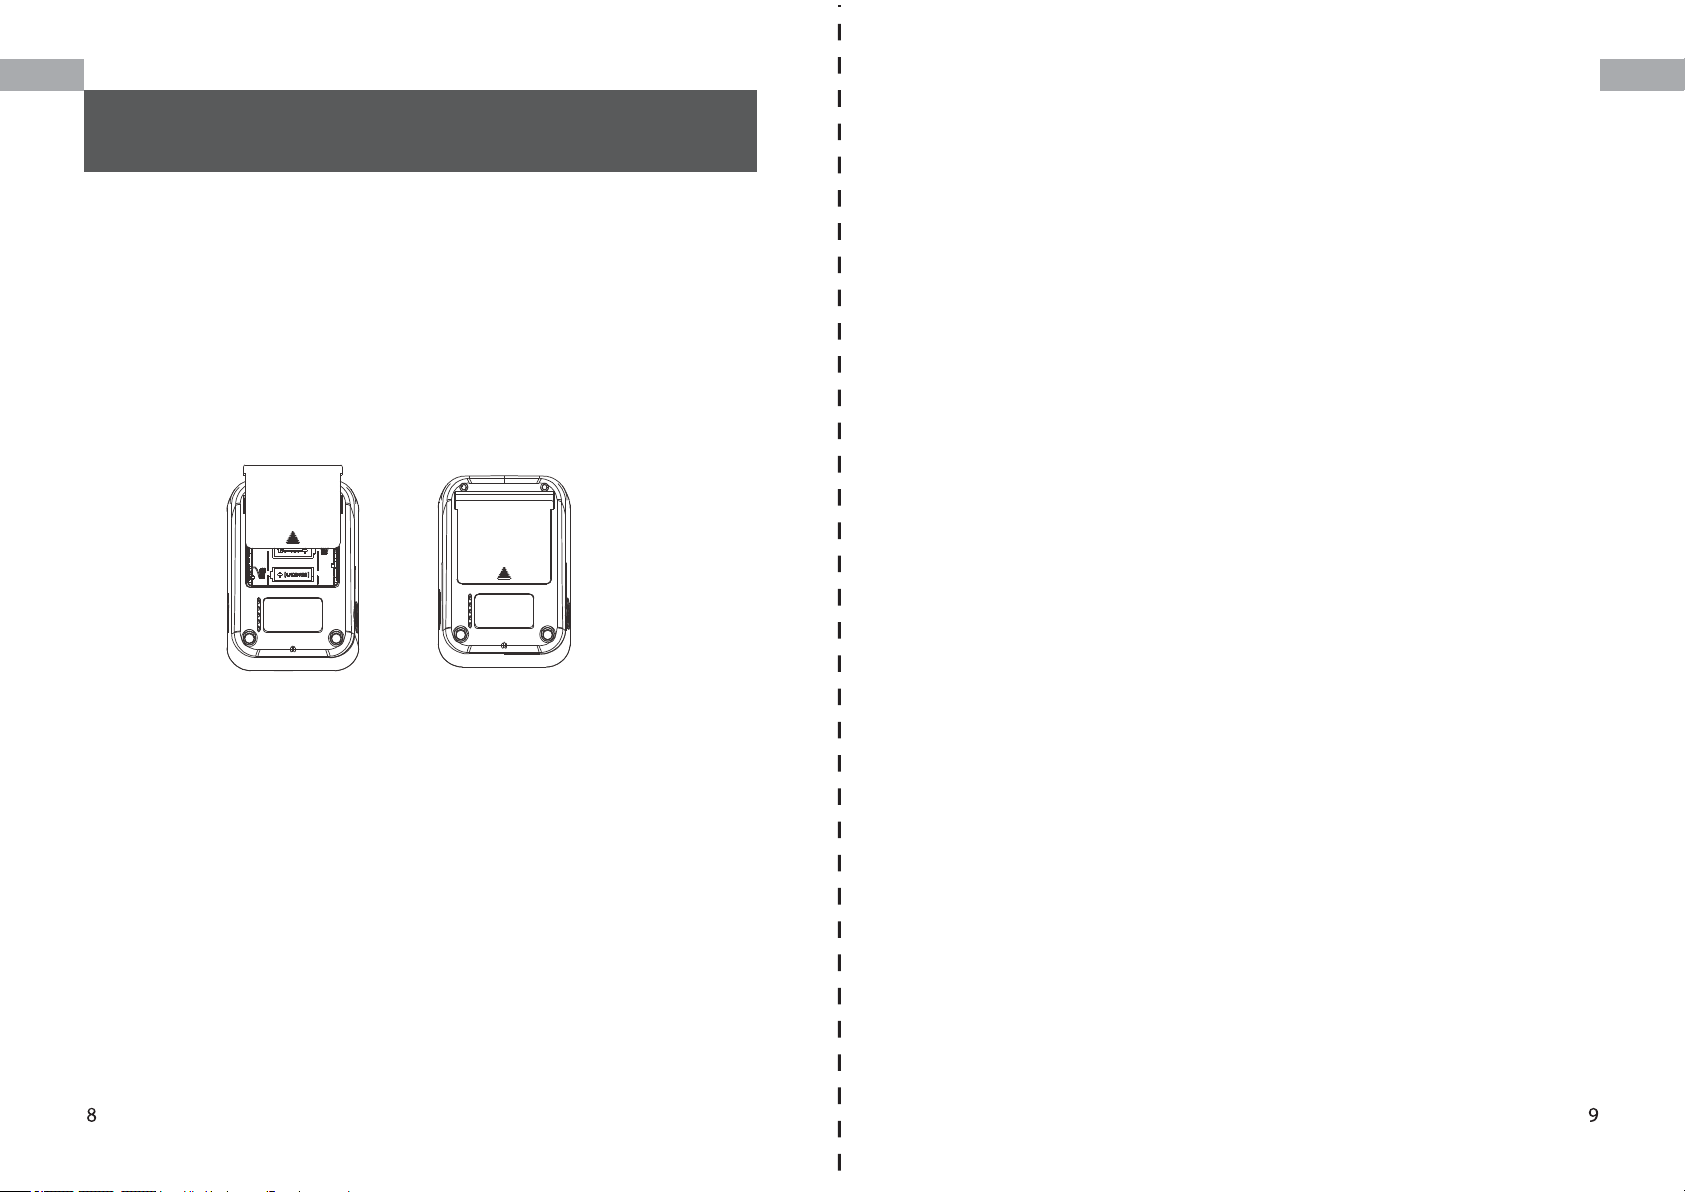
1.Druk op het haakje aan de onderkant van het batterijklepje en haal het
klepje eraf in de richting van de pijl (Afbeelding-04).
2.Plaats 3 "AA" formaat batterijen en zorg ervoor dat de + (positief) en (negatief) polariteiten overeenkomen met de polariteiten van het batterijcompartiment, sluit vervolgens het batterijdeksel. Zorg ervoor dat het batterijdeksel goed op zijn plaats zit.
Afbeelding-04
Indicator voor lege batterij
1. Wanneer de batterij-indicator op het scherm verschijnt, schakelt u de
monitor uit en verwijder alle batterijen. Vervang door 3 nieuwe batterijen.
Long-life alkaline batterijen worden aanbevolen.
2.Om schade aan het toestel te voorkomen, door lekkende batterijvloeistof,
dient u de batterij eruit te halen als het toestel lange tijd niet wordt gebruikt (in
het algemeen langer dan 3 maanden).
Als er batterijvloeistof in uw ogen komt, onmiddellijk spoelen met veel zuiver
water. Neem onmiddellijk contact op met een arts.
3. Gooi het apparaat, de onderdelen en optionele accessoires weg volgens
de plaatselijke voorschriften. Onwettige verwijdering kan milieuvervuiling
veroorzaken.
Nadat u de batterijen hebt geplaatst of de monitor op de stroom hebt
aangesloten, moet u de SET knop gedurende 3seconden indrukken en dan
kunt u beginnen met instellen.
A. Instellen van de gebruiker
Druk op de MEM-knop om gebruiker A of gebruiker B te kiezen. Wanneer
gebruiker A (/B) op het scherm verschijnt, druk dan op de MEM-knop om over
te schakelen naar gebruiker B (/A). Druk op de SET-knop om te bevestigen.
B. Volume Instellen:
Wanneer op de display ‘SP’ knippert, druk dan op de MEM knop om volume
1, volume 2, volume 3 te kiezen of het geluid UIT te zetten. Druk op de SET
knop om te bevestigen.
C. Meetgegevens Wissen:
Wanneer u de geheugengegevens controleert, druk dan lang op de MEM-knop
om de meetgegevens te wissen.
Opmerking:
U kunt niet alle meetgegevens van de monitoropslag in keer wissen. De
batterijen uitnemen zal niet leiden tot het wissen van de meetgegevens.
Page 7
NL
NL
EN
5. Metingsprocedure
5.1. Vóór de meting:
• Vermijd eten en roken, evenals alle vormen van inspanning direct vóór de
meting. Deze factoren beïnvloeden het meetresultaat. Neem de tijd om te
ontspannen door ongeveer tien minuten in een fauteuil te zitten in een rustige
omgeving voordat u een meting verricht.
Verwijder elk kledingstuk dat nauw aansluit op uw bovenarm.
•
• Meet altijd aan dezelfde arm (normaal links).
5.2. Aanbrengen/passen van de manchet
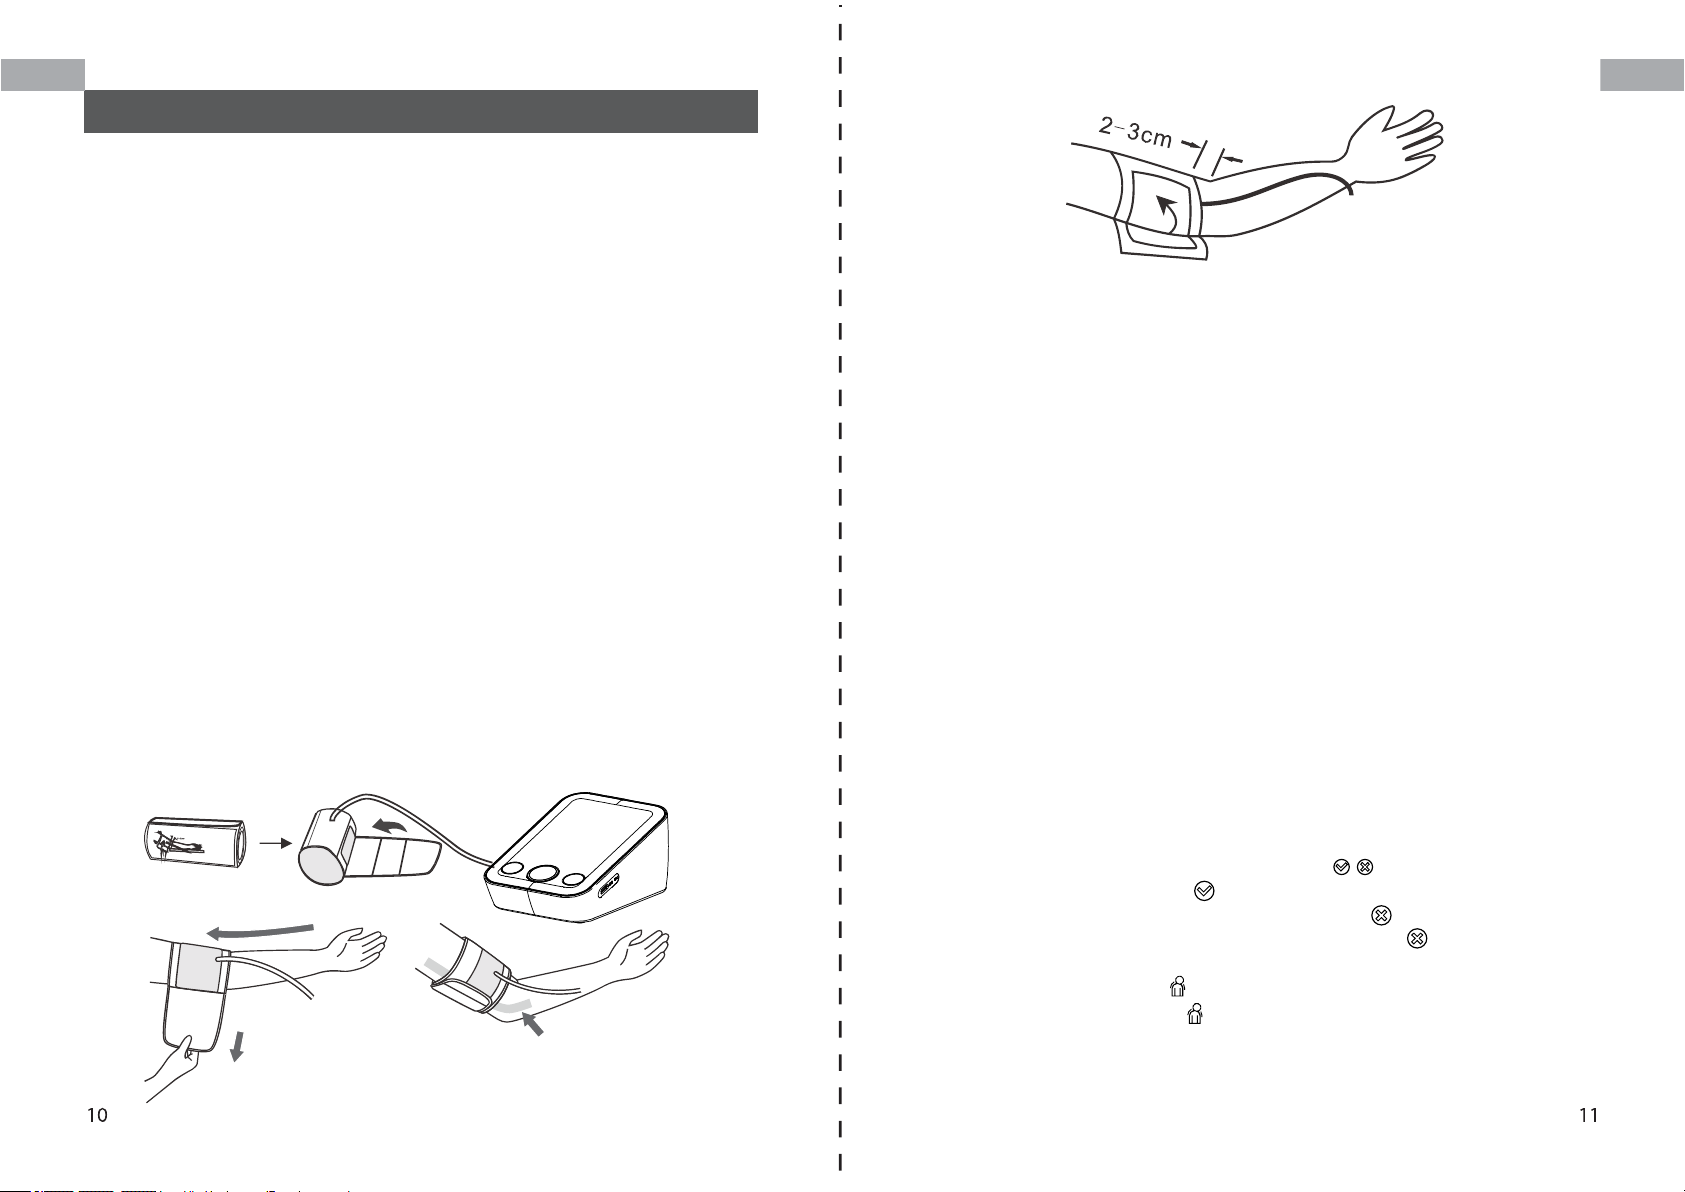
Zie foto-05
a) Wikkel de manchet om uw linker bovenarm. De rubberen slang moet aan
de binnenkant van uw arm zitten en naar beneden doorlopen tot uw hand.
Zorg ervoor dat de manchet ongeveer 2 tot 3 cm boven de elleboog ligt.
Belangrijk!
De op de rand van de manchet (slagadermarkering) moet over de slagader
liggen die langs de binnenzijde van de arm loopt.
b) Om de manchet vast te maken, wikkelt u hem om uw arm en drukt u de
haak en lussluiting samen.
c) Er moet weinig vrije ruimte zijn tussen uw arm en de manchet. Er moeten
2 vingers tussen uw arm en de manchet passen. Manchetten die niet goed
passen, leiden tot verkeerde meetwaarden. Meet uw armomtrek als u niet
zeker weet of de manchet goed past.
d) Leg uw arm op een tafel (palm naar boven) zodat de manchet zich op
dezelfde hoogte bevindt als uw hart. Zorg ervoor dat de slang niet geknikt is.
EN
Afbeelding-05
5.3. Meetprocedure
Zie foto-06
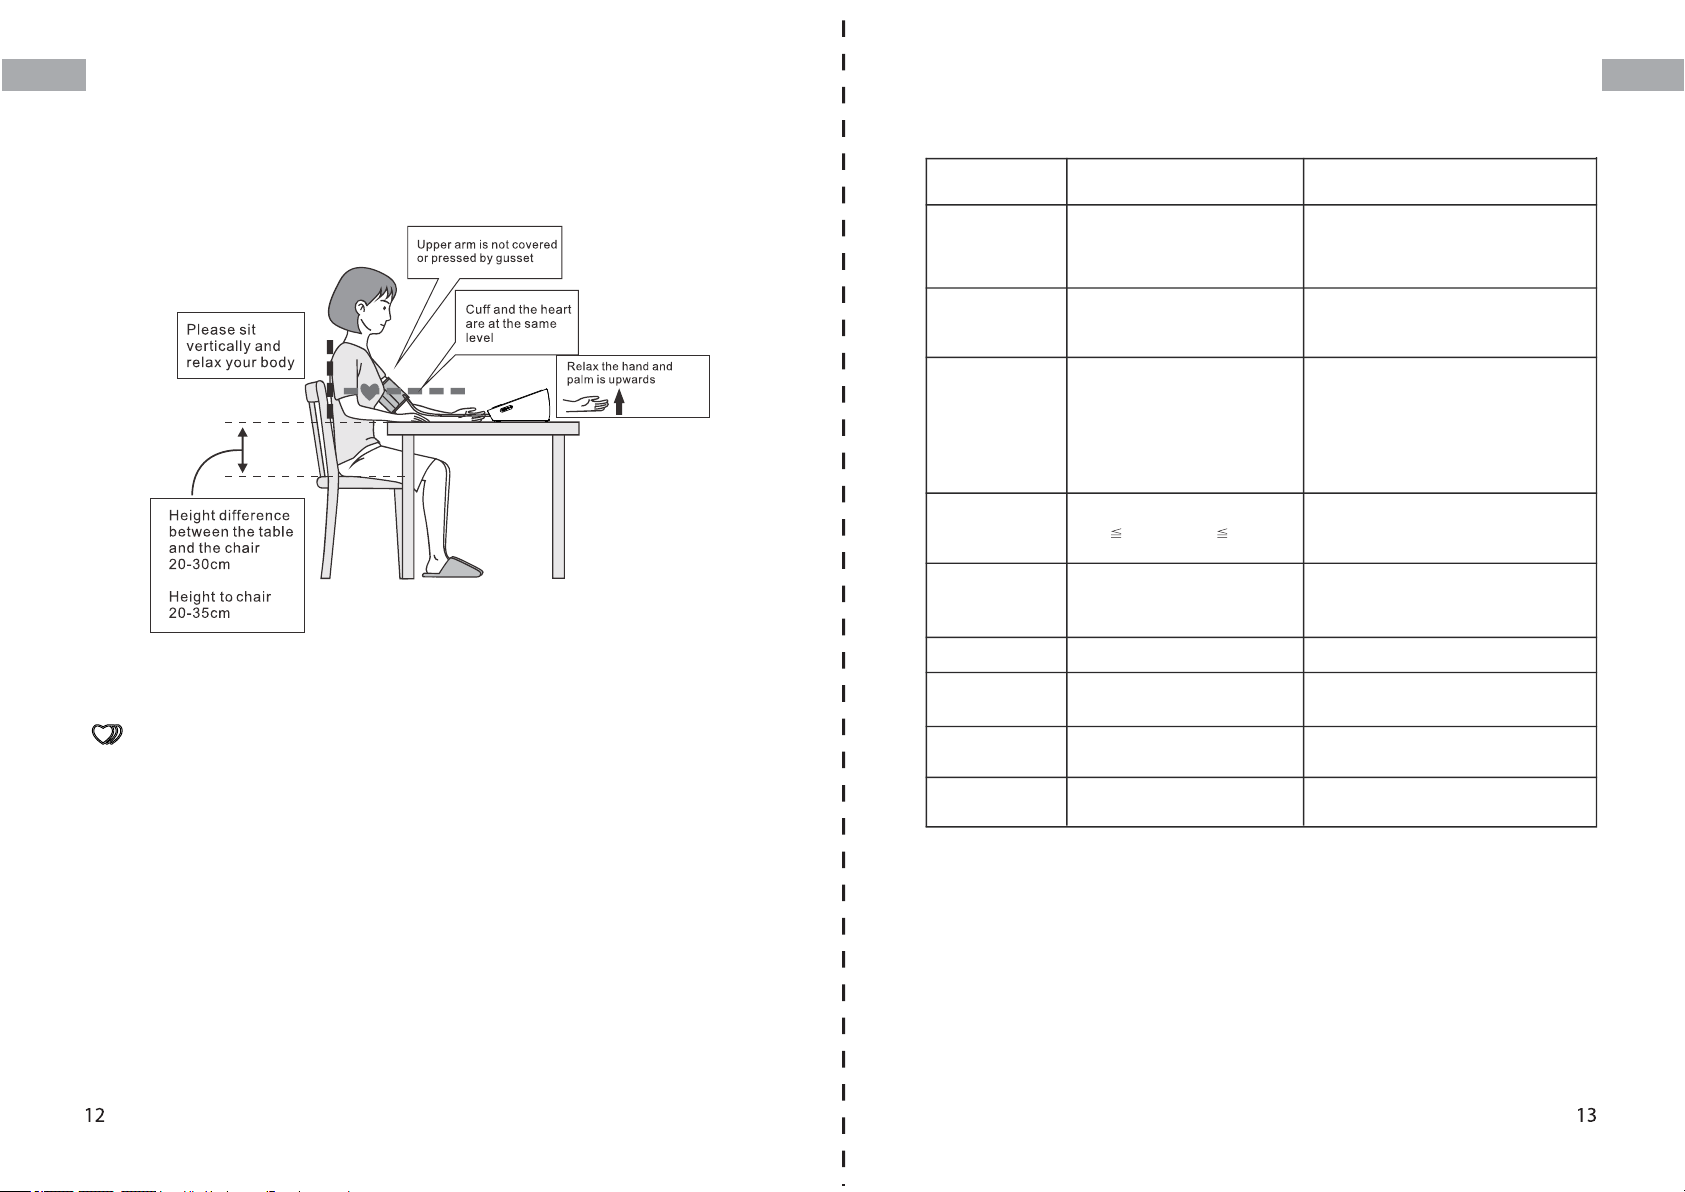
1. Ga comfortabel in een stoel zitten met uw voeten plat op de vloer.
2. Selecteer uw gebruikers-ID (A of B).
3. Strek uw arm naar voren op het bureau en blijf ontspannen, zorg ervoor
dat de handpalm naar boven is gedraaid. Zorg ervoor dat de arm in de juiste
positie ligt, om lichaamsbeweging te vermijden. Blijf stil zitten en praat of
beweeg niet tijdens de meting. Nadat de manchet op de juiste manier op de
arm is geplaatst en aangesloten is op de bloeddrukmeter, kan de meting
beginnen:
a) Druk op de START/STOP-knop. De pomp begint de manchet op te
blazen. Op het scherm wordt de toenemende manchetdruk continu
weergegeven.
b) Nadat automatisch een bepaalde druk is bereikt, stopt de pomp en daalt
de druk langzaam. De manchetdruk wordt weergegeven tijdens de meting.
c) Wanneer het apparaat uw polsslag heeft gedetecteerd, begint het
hartsymbool op het display te knipperen.
d) Wanneer de meting is beëindigd, worden de gemeten bovendruk,
onderdruk en de polsslag weergegeven.
e) De meetresultaten worden weergegeven totdat u het apparaat
uitschakelt. Als er 60 seconden geen toets wordt ingedrukt, schakelt het
apparaat automatisch uit.
f) Symbool voor zelfcontrole van de manchet ( )
Het symbool manchet correct( ) wordt weergegeven als de positie van de
manchet correct is, anders wordt het foutsymbool( ) weergegeven.
Controleer de manchet nogmaals als het foutsymbool( ) wordt weergegeven.
g) Bewegingsfoutsymbool ( )
Het symbool Bewegingsfout ( ) wordt weergegeven als u uw lichaam
beweegt tijdens de meting. Verwijder de manchet en wacht 2-3 minuten.
Breng de manchet opnieuw aan en voer een nieuwe meting uit.
Page 8
NL
Let op:
EN
positie van de patiënt:
1) Comfortabel zittend 2) Benen niet gekruist
3) Voeten plat op de vloer 4) Rug en arm ondersteund
5) Midden van het CUFF ter hoogte van de rechterboezem van het hart
5.5. Foutindicaties
De volgende symbolen verschijnen op de display bij abnormale metingen
Symbool
Geen beeldscherm
/Geen stroom
Er 1
Er 2
Aanleiding Correctie
Batterijen zijn leeg of incorrect
geplaatst
Sensor abnormaal
De monitor kon de polsslag niet
detecteren of kon de
bloeddrukgegevens niet
berekenen
Vervang de batterijen door nieuwe.
Controleer of de batterijen correct zijn
geplaatst.
Controleer of de pomp werkt. Als hij werkt,
dan is het probleem een abnormale
sensor. Stuur het naar de plaatselijke
distributeur.
Controleer of de luchtafgifte te traag is of
niet. Als het te langzaam gaat, controleer
dan of er stof zit in de slangplug van de
manchet en de manchetpoort in het
apparaat. Zo ja, maak het schoon en start
de meting opnieuw. Zo nee, stuur het
apparaat dan terug naar de plaatselijke
distributeur.
NL
EN
Afbeelding-06
5.4. Onregelmatige hartslagsymbool
Dit symbool geeft aan dat er bepaalde onregelmatigheden in de puls zijn
geconstateerd tijdens de meting. In dit geval kan het resultaat afwijken van
uw normale bloeddruk en dient u de meting te herhalen. Indien dit symbool
vaak verschijnt, dient u uw arts te raadplegen.
Dit instrument is een oscillometrische bloeddrukmeter die ook de
polsfrequentie tijdens de meting analyseert. Als zich tijdens de meting
onregelmatigheden in de polsslag voordoen, wordt het symbool voor
onregelmatige hartslag ook hier weergegeven na de meting. Als het symbool
vaker verschijnt (bijv. meerdere keren per week bij dagelijks uitgevoerde
metingen) of als het plotseling vaker dan normaal verschijnt, raden wij de
patiënt aan medisch advies in te winnen. Het instrument is geen vervanging
voor een onderzoek, maar dient om onregelmatigheden van de polsslag in
een vroeg stadium op te sporen.
Er 3
Er 4
Er 5
Er 6
Er 7
Er 8
Het meetresultaat is abnormaal
(SYS
35mmHg,DIA 23mmHg)
Te losse manchet of luchtlekkage
(kan niet binnen 15s opblazen tot
30mmHg)
De luchtbuis is geplooid.
De sensor registreert grote
fluctuaties in de bloeddruk.
De druk die de sensor
detecteert is over de limiet
De begrenzing is onjuist of het
apparaat is niet begrensd
Occasioneel – voor de meting nogmaals uit/
Altijd - stuur het naar de plaatselijke
distributeur
Bind de manchet goed vast en zorg ervoor
dat de lucht goed in het apparaat zit.
Corrigeer het en voer de meting opnieuw uit.
Hou je stil en beweeg niet
Stuur het toestel naar de plaatselijke
distribiteur
Stuur het toestel naar de plaatselijke
distribiteur
Page 9
NL
Problemen oplossen
EN
Probleem
Geen druk
Err en stopt
met werken
Manchetlek
Let op: Contacteer de plaatselijke distributeur als je niet zeker bent, demonteer het toestel
niet zelf.
Check
De plug steekt er niet goed in.
De plug is kapot of lekt
Je arm beweegt bij het meten
Je praat bij het meten
De manchet is te los vastgemaakt
De manchet is stuk
Oorzaak en oplossing
Steek stevig in de manchet aansluitpoort
Vervang met een nieuwe manchet
Hou het lichaam rustig
Hou je stil, zodat je lichaam in rust is
Wikkel de manchet goed vast
Vervang met een nieuwe manchet
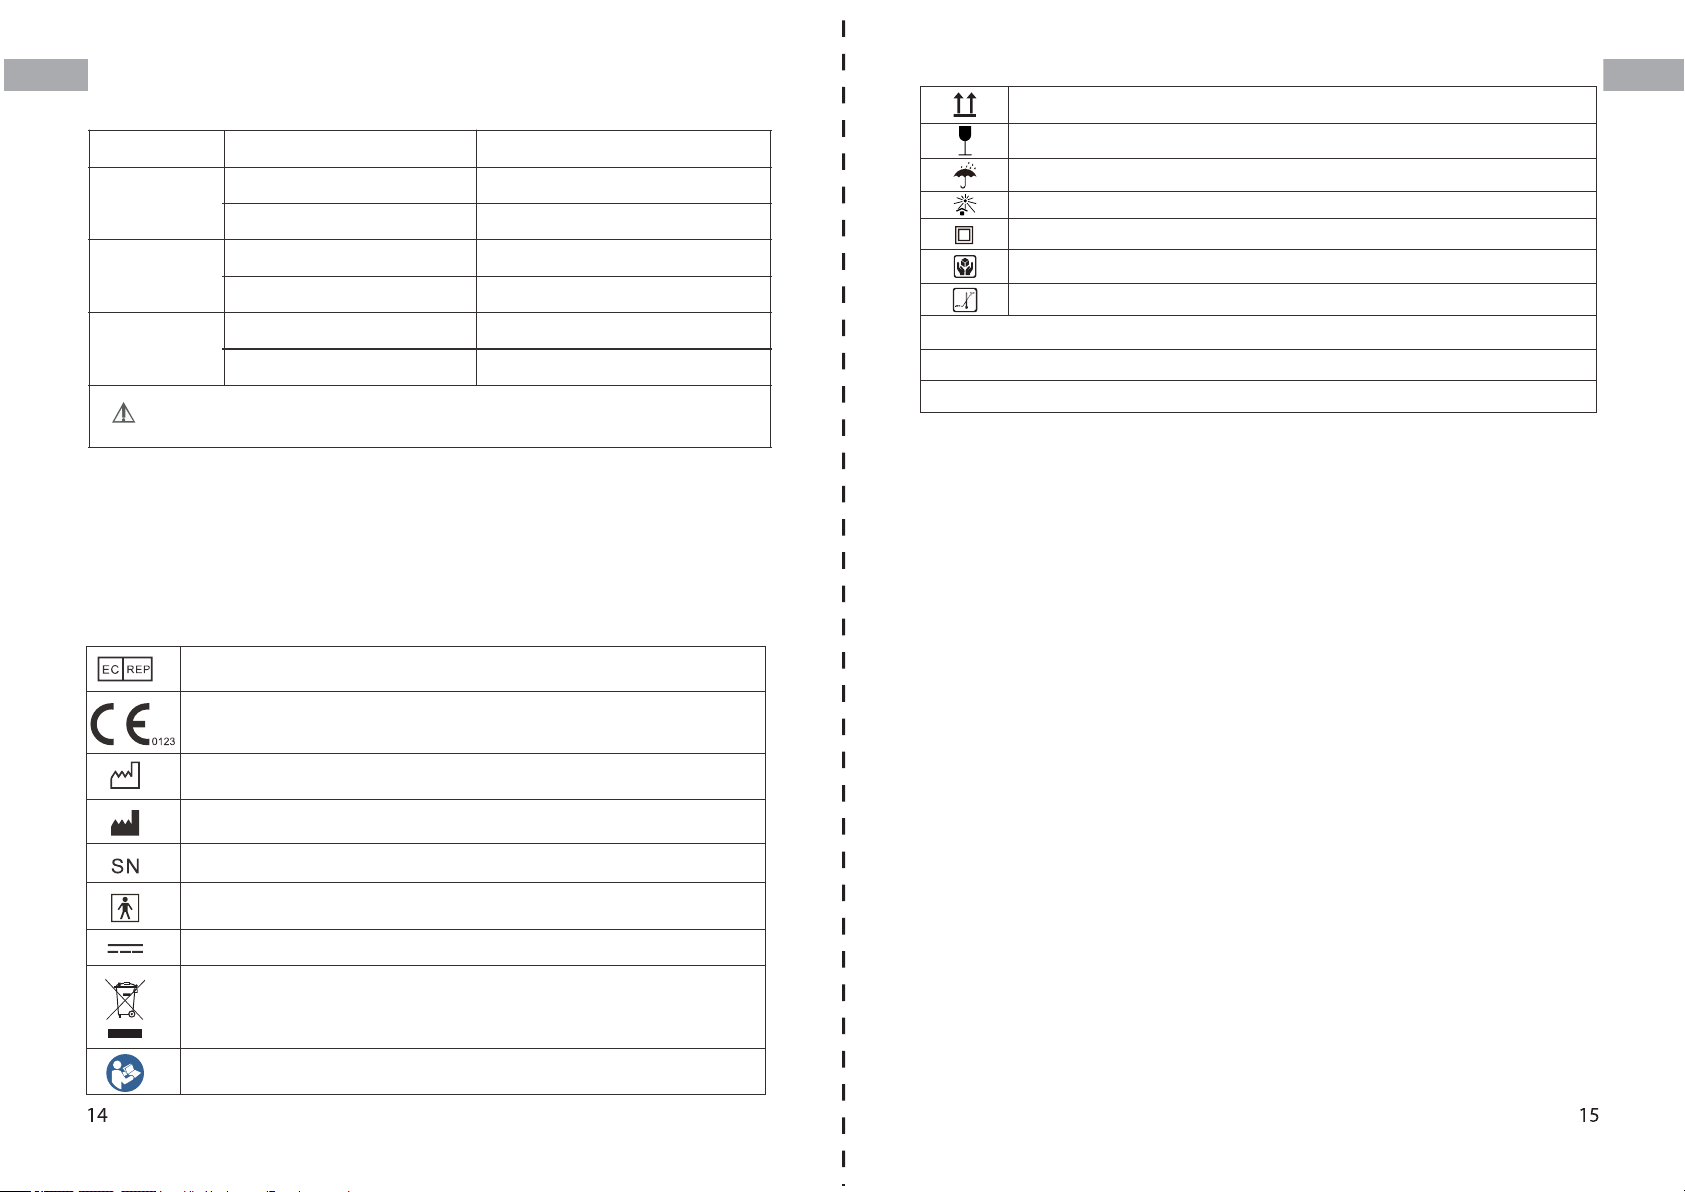
Put up
Fragile
Afraid of the rain
Fear of the sun
Class ll equipment
Handle gently
Temperature range
No Sterilize requirement
Not category AP / APG equipment
Mode of operation: continuous
5.6. Geheugenstatus
NL
EN
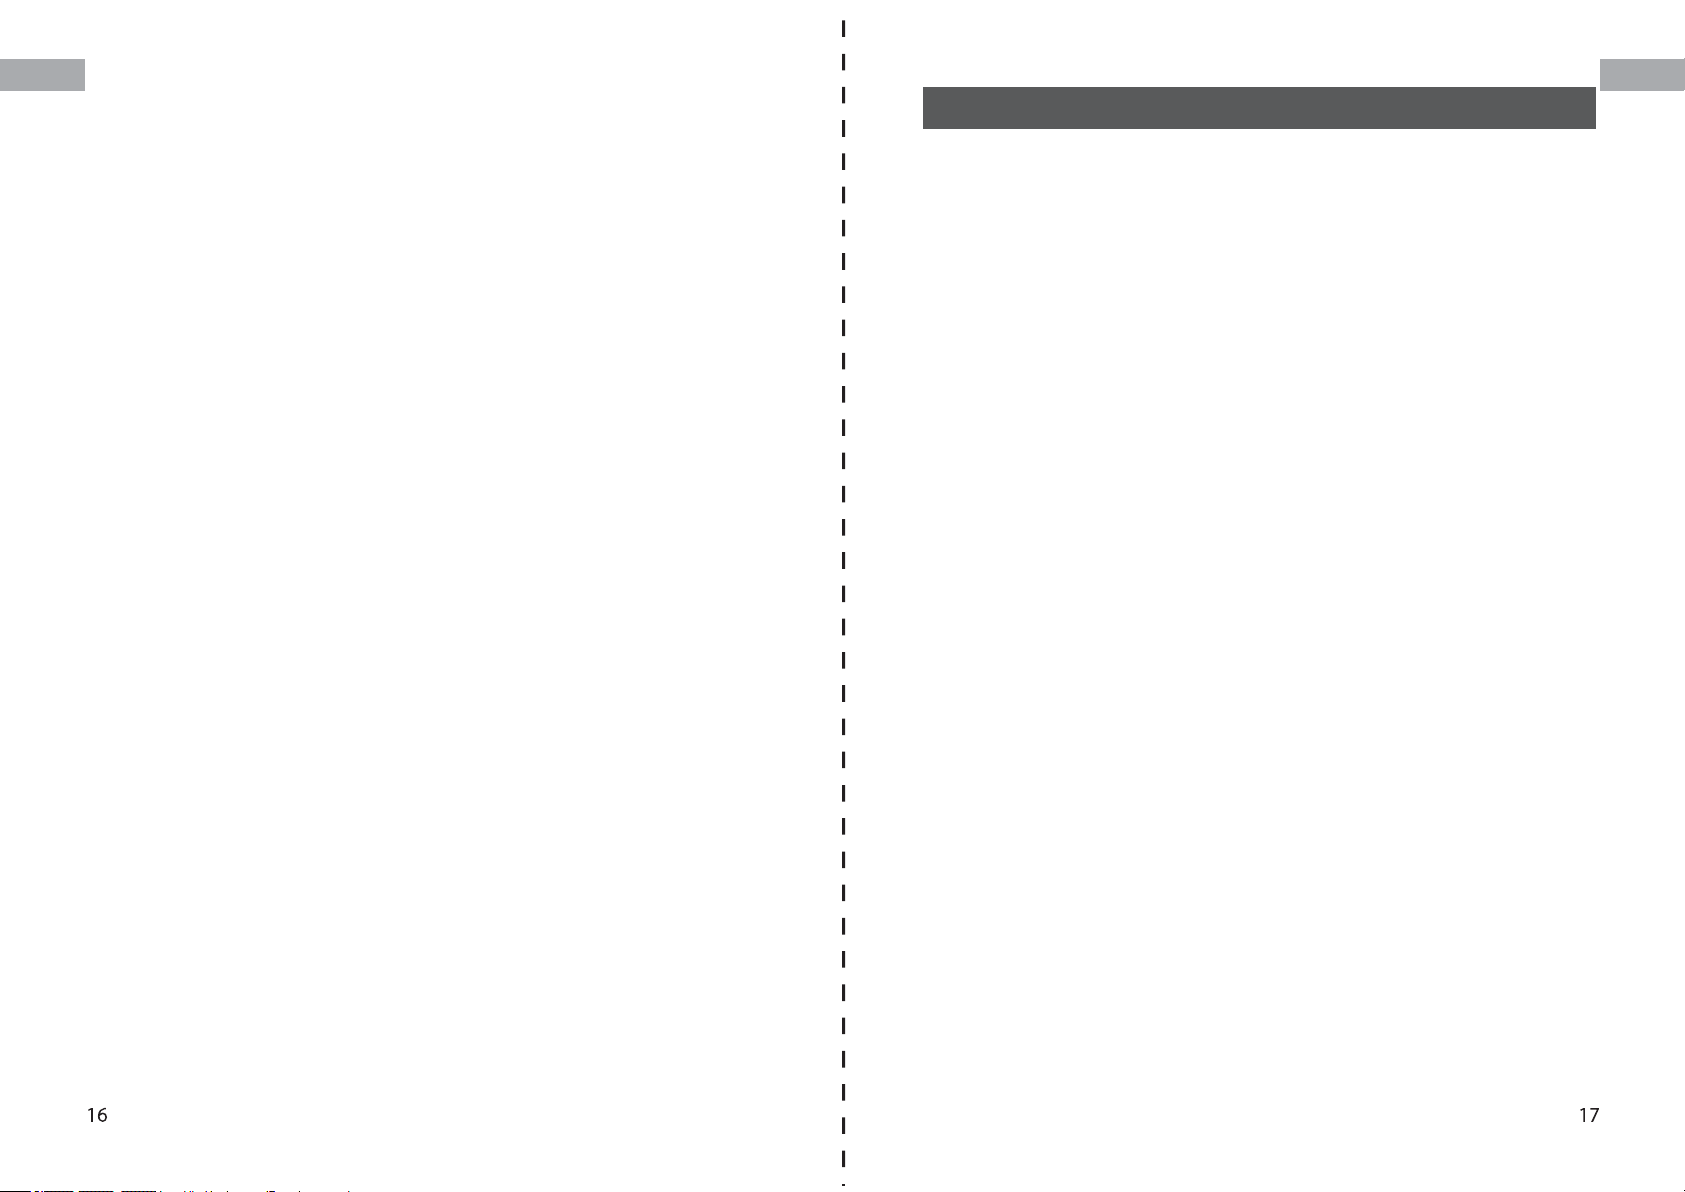
Symbolen
De volgende symbolen kunnen voorkomen in deze handleiding, op de
Digitale bloeddrukmeter BX300, of op de accessoires ervan. Sommige van
de symbolen staan voor standaarden en nalevingen in verband met de
Digitale bloeddrukmeter BX300 en het gebruik ervan.
Authorized Representative in the European Community
CE Mark: conforms to essential requirements of the Medical
Device Directive 93/42/EEC.
Date of manufacture.
Manufacturer
Specifies serial number
Type BF applied part
Direct current
DISPOSAL: Do not dispose this product as unsorted municipal
waste. Collection of such waste separately for special treatment
is necessary.
Follow instructions for use
Elk toestel slaat 120 sets metingen op per gebruiker, in totaal 240 sets
(Gebruiker A en B).
De opgeslagen waarden bekijken
Druk op de Geheugentoets terwijl het toestel uit staat. Het display toont eerst
de resultaten van gebruiker "A", dan toont het display het gemiddelde van
alle metingen die in het toestel zijn opgeslagen voor deze gebruiker.
Let op: Dat u de metingen voor de juiste gebruiker bekijkt.
Door nogmaals op de geheugentoets te drukken, worden de vorige waarde
weergegeven. Hou de memory-knop ingedrukt om naar de gewenste
opgeslagen meting te scrollen.
5.7. Stopzetting van een meting
Als het nodig is om een bloeddrukmeting om welke reden dan ook te
onderbreken (bijv. als de patiënt zich onwel voelt), dan kan de
Start/Stop-knop op elk gewenst moment worden ingedrukt. Het apparaat
verlaagt dan onmiddellijk automatisch de manchetdruk.
Page 10
NL
5.8. Gebruik van de AC-adapter
EN
U kunt deze monitor ook gebruiken met een AC-adapter (wisselstroomadapter; uitgang 5V DC1A met Type C aansluiting). Gebruik alleen de
goedgekeurde AC-adapter om beschadiging van het apparaat te voorkomen.
a) Zorg ervoor dat de AC-adapter en de kabel niet beschadigd zijn.
b) Steek de adapterkabel in de AC adapter poort aan de rechterzijde van de
bloeddrukmeter.
c) Steek de adapter in het stopcontact. Wanneer de wisselstroomadapter is
aangesloten, wordt er geen batterijstroom verbruikt.
Let op: Er wordt geen stroom afgenomen van de batterijen terwijl de
AC-adapter op de monitor is aangesloten. Als de elektrische stroom wordt
onderbroken, (bijv. door per ongeluk de AC-adapter uit het stopcontact te
halen) moet de monitor worden gereset door de stekker uit het stopcontact te
halen en de AC-adapter opnieuw aan te sluiten.
6.Beheer en onderhoud
Was de handen na elke tijdmeting. Als een apparaat door verschillende
patiënten wordt gebruikt, was dan de handen voor en na elk gebruik.
a) Stel het apparaat niet bloot aan extreme temperaturen, vochtigheid, stof
of direct zonlicht.
b) De manchet bevat een gevoelige luchtdichte luchtbel. Behandel deze
manchet voorzichtig en vermijd elke vorm van belasting door draaiing of
buiging.
c) Reinig het apparaat met een zachte, droge doek. Gebruik geen gas,
verdunners of soortgelijke oplosmiddelen. Vlekken op de manchet kunnen
voorzichtig worden verwijderd met een vochtige doek en zeepsop. De
manchet met blaas mag niet worden gewassen in een afwasmachine,
wasmachine of ondergedompeld in water.
d) Behandel de slang voorzichtig. Trek er niet aan. Zorg ervoor dat de
slang niet knikt en houd het uit de buurt van scherpe randen.
e) Laat de monitor niet vallen en behandel hem op geen enkele manier
ruw. Vermijd sterke trillingen.
f) Open de monitor nooit! Hierdoor vervalt de garantie van de fabrikant.
g) Batterijen en elektronische instrumenten moeten worden weggegooid
volgens de plaatselijk geldende voorschriften, niet bij het huisvuil.
NL
EN
6.1. Nauwkeurigheidstest
Gevoelige meettoestellen moeten van tijd tot tijd op nauwkeurigheid
worden gecontroleerd. Wij raden een periodieke controle van uw toestel
door een erkende verdeler om de 1 jaar aan. Gelieve u te wenden tot de
plaatselijke verdeler of de fabrikant.
Page 11
NL
EN
7. Garantie/Service
Uw bloeddrukmeter heeft een garantie van 1 jaar tegen fabrieksfouten. Dit
uitsluitend voor de oorspronkelijke koper, tellend vanaf de datum van
aankoop. De garantie is niet van toepassing op schade veroorzaakt door
onjuist gebruik, ongelukken, professioneel gebruik, het niet opvolgen van de
gebruiksaanwijzing of wijzigingen die door derden aan het instrument zijn
aangebracht. De garantie geldt alleen voor het hoofdtoestel en de
bijbehorende manchet. Alle andere accessoires vallen niet onder de garantie.
Er bevinden zich binnenin geen onderdelen die door de gebruiker kunnen
worden gerepareerd. Batterijen of schade door oude batterijen wordt niet
gedekt onder de garantie.
8. Certificaten
Device standard:
This device is manufactured to meet the European blood pressure monitors:
EN1060-3 / IEC 80601-2-30 / ISO81060-1 / IEC60601-1-11 / IEC60601-1
Electromagnetic compatibility:
Device fulfills the stipulations of the International standard
IEC60601-1-2
Atmosferische drukbereik: 70kPa~106kPa
Meetmethode: Oscillometric
Druksensor: Weerstand biedend
Meetbereik: DIA: 40-195mmHg; SYS: 60-255mmHg
Polsslag: 40 tot 170 per minuut
Bereik van de manchetdruk: <300mmHg
Geheugen: Slaat automatisch de laatste 120 metingen op voor 2 gebruikers
(totaal 240)
Meetresolutie: 1 mmHg
Nauwkeurigheid: Druk binnen ± 3 mmHg / polsslag ± 5 % van de meting
Voedingsbron: a) 3*AA batterijen, 1,5 V
AC adapter INPUT: 100-240VAC 50/60HZ OUTPUT5V DC 1A
Toebehoren: Breed scala stijve manchet 8.7 "- 15.7" (22 - 40 cm)
Automatisch uitschakelen : 60 seconden
Gebruikers: Volwassen
Verwachte levensduur van het apparaat en de accessoires: 5 jaar
Technische wijzigingen voorbehouden!
NL
EN
9. Technische Specificaties
Model: BX300(C04)
Gewicht: 189g (Batterijen en AC adapter niet inbegrepen)
Vertoning: 62.5*63.5mm2.46 "x2.5 "LED Digitaal Vertoning
Afmetingen: 126 (W) x 85 (L) x 57 (H) mm4.96"(W)x3.35"(L)x2.24"(H)
Toebehoren: 1× Hoofdapparaat, 1× manchet, 1×Gebruikershandleiding,
Gebruiksomstandigheden: Temperatuur: 5°C tot 40°C; Vochtigheid: 15% tot
93% RH;
Opslag en het Verschepen Omstandigheden: Temperatuur: -25°C tot +70°C;
Page 12
NL
NL
EN
Dutch....................................................................1--19
English................................................................20--44
CONTENTS
1.Introduction and Intended Use..........................................................
2.Important Information on Blood Pressure and its Measurement.......
3. Components of Your Blood Pressure Monitor..................................
4. Using Your Monitor for the First Time..............................................
5.Measurement Procedure..................................................................
6.Care and Maintenance.....................................................................
7. Warranty/service..............................................................................
8. Certifications....................................................................................
9. Technical Specifications..................................................................
EN
22
25
26
28
30
37
38
38
38
10. EMC Declaration...........................................................................
39
Page 13
NL
NL
EN
1.Introduction and Intended Use
It enables reliable measurement of systolic and diastolic blood pressure
as well as pulse through the oscillometric method.
Before using, please read this instruction manual carefully and then
keep it in a safe place.
1.1 Remember…
• Only a health-care professional is qualified to interpret blood pressure
measurements.
• This device is NOT intended to replace regular medical checkups.
• Blood pressure readings obtained by this device should be verified
before prescribing or making adjustments to any medications used to
control hypertension. Under no circumstances should YOU alter the
dosages of any drugs prescribed by your physician.
• This monitor is intended for use by adults only. Consult with a physician
before using this instrument on a child.
•In cases of irregular heartbeat , measurements made with this
instrument should only be evaluated after consultation with a physician.
• Host products, including accessories, shall be processed in accordance
with local regulations after reaching the life cycle.
1.2 Warnings and Precautions
Warning:
Warning:
Warning:
Warning:
Warning:
Warning:
Warning:
Warning:
Warning:
Warning:
Warning:
Caution:
The use of other accessories other than those specified or
provided by the equipment manufacturer may cause
electromagnetic radiation to increase or decrease electromagnetic immunity resulting in operational failure
This system may fail to yield specified measurement accuracy if
operated or stored in temperature or humidity conditions outside
the limits stated in the specifications section of this manual.
The separate ac adapter which is intended to connect USB
interface of Blood Pressure Monitor has not been evaluated
according to IEC 60601-1. The safety of the product shall be
reappraised when it power supply by a separate ac adapter.
The user must check that the equipment functions safely and
see that it is in proper working condition before being used.
The device is not suitable for use in the presence of flammable
anesthetic mixtures with air or with oxygen or nitrous oxide.
The patient is an intended operator, the functions of monitoring
blood pressure and pulse rate can be safely used by patient. The
routine clean and changing batteries can be performed by the
patient.
This device can not be used together with hf surgical equipment.
Use of power adapters
1.Adapter: input 100-240V, 50/60hz output DC 5V 1A
2.Do not to position the device to make it difficult to operate the
disconnection device while using adaptor.
3.Do not be prone to water leakage, high temperature, moisture,
direct sunlight and more or more corrosive gas environment. And
Do not use this product in the above environment.
Too frequent measurements can cause injury to the PATIENT due
to blood flow interference.
Don’t place the cuff over wound part.
Pressurization of the CUFF can temporarily cause loss of function
of simultaneously used monitoring ME EQUIPMENT on the same
limb.
To avoid any possibility of accidental strangulation, keep this unit
away from children and do not drape tubing around your neck.
EN
Page 14
NL
EN
Caution:
Caution:
Attention:
Attention:
Attention:
Note:
Note:
To avoid damaging the device, keep this unit away from children
and pets.
The standard material used for the bladder and tubing is latex-free.
Self-measurement means control, not diagnosis or treatment.
Unusual values must always be discussed with a physician. Under
no circumstances should you alter the dosages of any drugs
prescribed by your physician.
The pulse display is not suitable for checking the frequency of
heart pacemakers!
In cases of irregular heartbeat, measurements made with this
instrument should only be evaluated after consultation with a
physician.
To obtain the greatest accuracy from your blood pressure
instrument, it is recommended that the instrument be used within
the specified temperature and the relative humidity, please see
the Technical Specifications.
The cuff is treated as the applied part.The user should contact
the manufacturer for assistance, if needed, in setting up, using
or maintaining the device.
2.Important Information on Blood Pressure
and its Measurement
2.1. How does high or low blood pressure arise?
Your level of blood pressure is determined in the circulatory center of the brain
and adjusts to a variety of situations through feedback from the nervous
system. To adjust blood pressure, the strength and speed of the heart (Pulse),
as well as the width of circulatory blood vessels is altered.Blood vessel width
is controlled by fine muscles in the blood vessel walls.
Your level of arterial blood pressure changes periodically during heart activity:
During the “blood ejection” (Systole) the value is highest (systolic blood
pressure value). At the end of the heart’s “rest period” (Diastole) pressure is
lowest (diastolic blood pressure value).
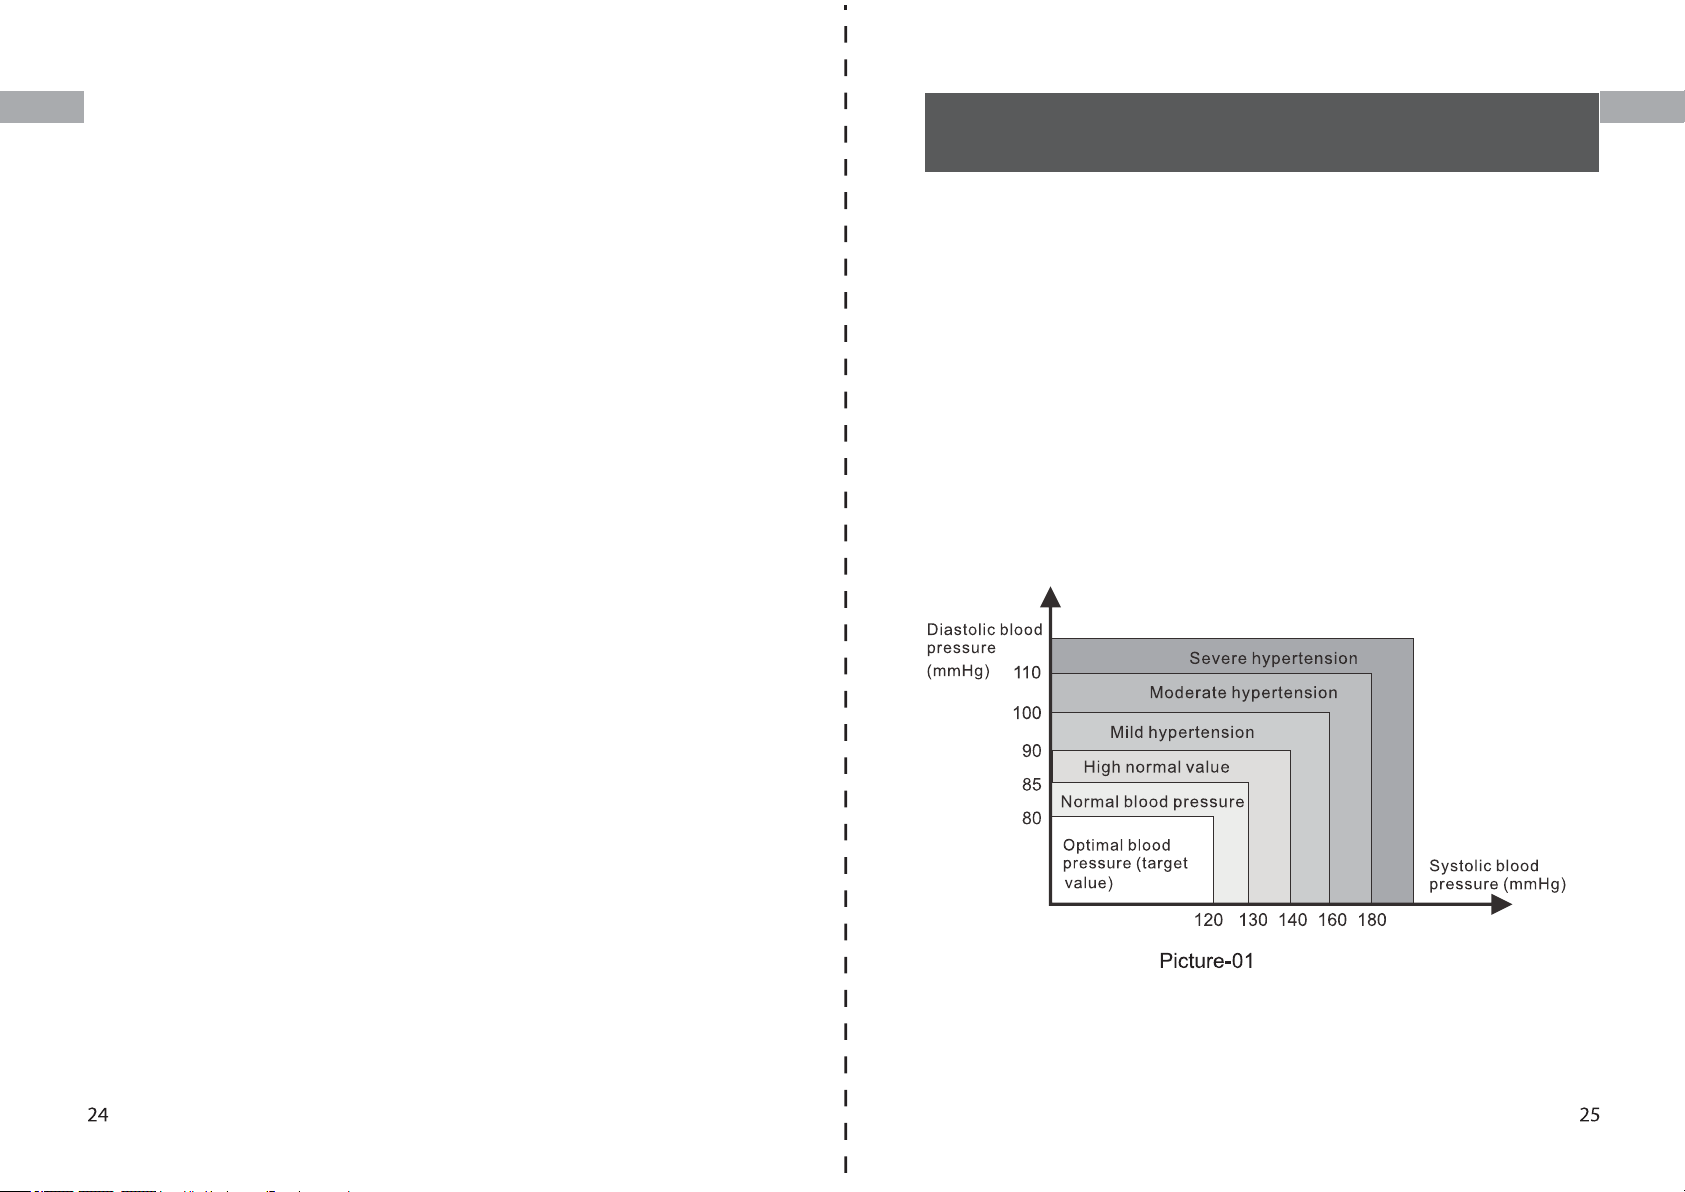
2.2. Which values are normal?
Please refer to the diagram below(Picture-01)
NL
EN
Note:
Note:
This device contains sensitive electronic components. Avoid
strong electrical or electromagnetic fields in the direct vicinity of
the device (e.g. mobile telephones, microwave ovens) during use.
These can lead to erratic results.
Do not attempt to service or repair this device yourself. Should a
malfunction occur, refer to local distributor or the manufacturer.
Page 15
NL
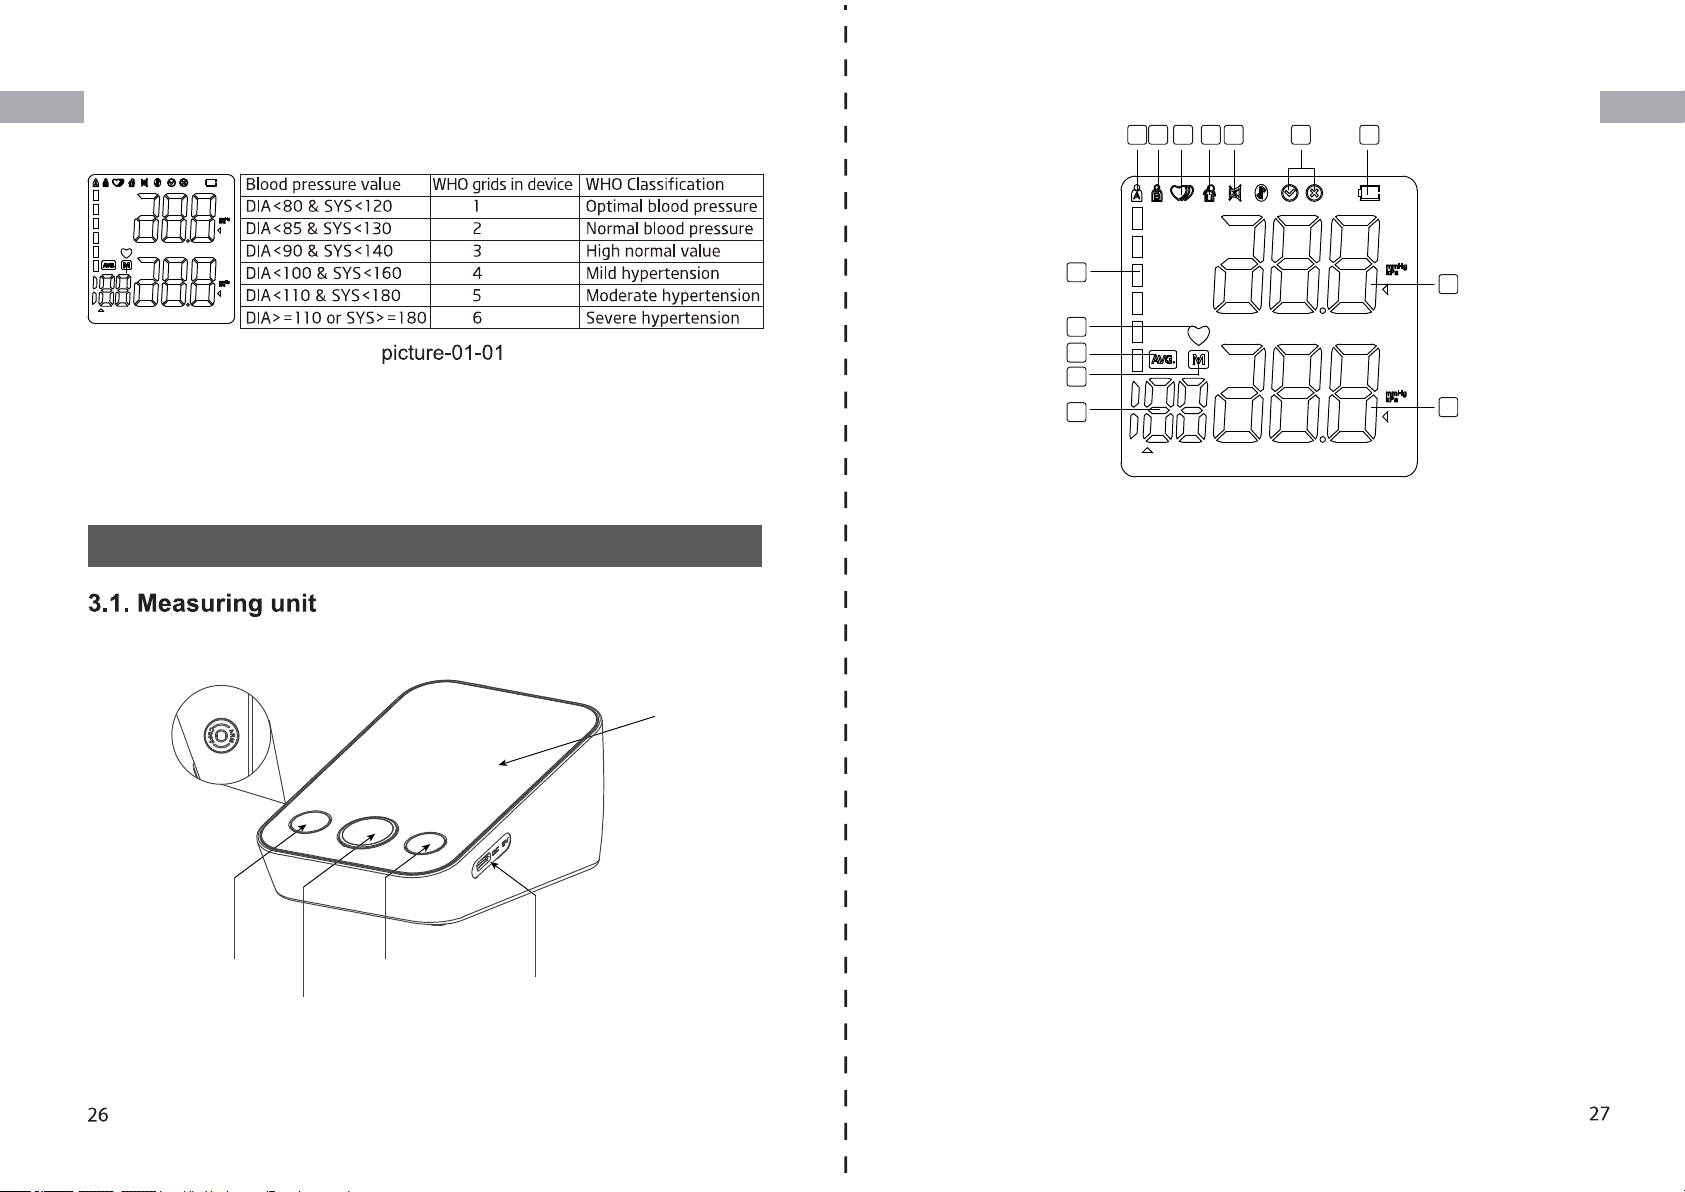
There are six grids in the display of device. Please refer to the picture-01-01.
EN
Different grids represent different interval scales of WHO.
SYS
NL
EN
1 2 3 4 5 6 7
DIA
PULES
/min
3. Components of your blood pressure monitor
LED display
Cuff Connector
Port
8
9
10
11
12
PULES
/min
Picture-03
3.2 The symbols on the LED display
1.User A
3.Irregular heartbeat symbol
5.Mute symbol
7.Low battery symbol
9.Heartbeat symbol (Flashes during measurement)
10.Average value symbol
12.Pulse symbol
14.Systolic blood pressure
2.User B
4.Movement error symbol
6.Cuff self-detecting function
8.WHO function symbol
11.Memory symbol
13.Diastolic blood pressure
3.3 Features of Model BX300
SYS
14
DIA
13
SET button
START/STOP button
Memory button
Picture-02
AC Adapter port
1.Talking function
3.Cuff self-checking function
5. Average value function
7. WHO function
9. External power adapter support
11. Cuff storage
13. Acrylic lens
2. Double users: 2 x 120 sets memory
4. Irregular heartbeat checking
6. Low battery display
8. Auto power-off
10.Volume adjustment
12.Led display
Page 16
NL
EN
4. Using your Monitor for the First Time
4.2. System Settings
NL
EN
4.1 Activating the pre-installed batteries
Battery Installation
Use only 1.5V “AA” alkaline batteries with this device.
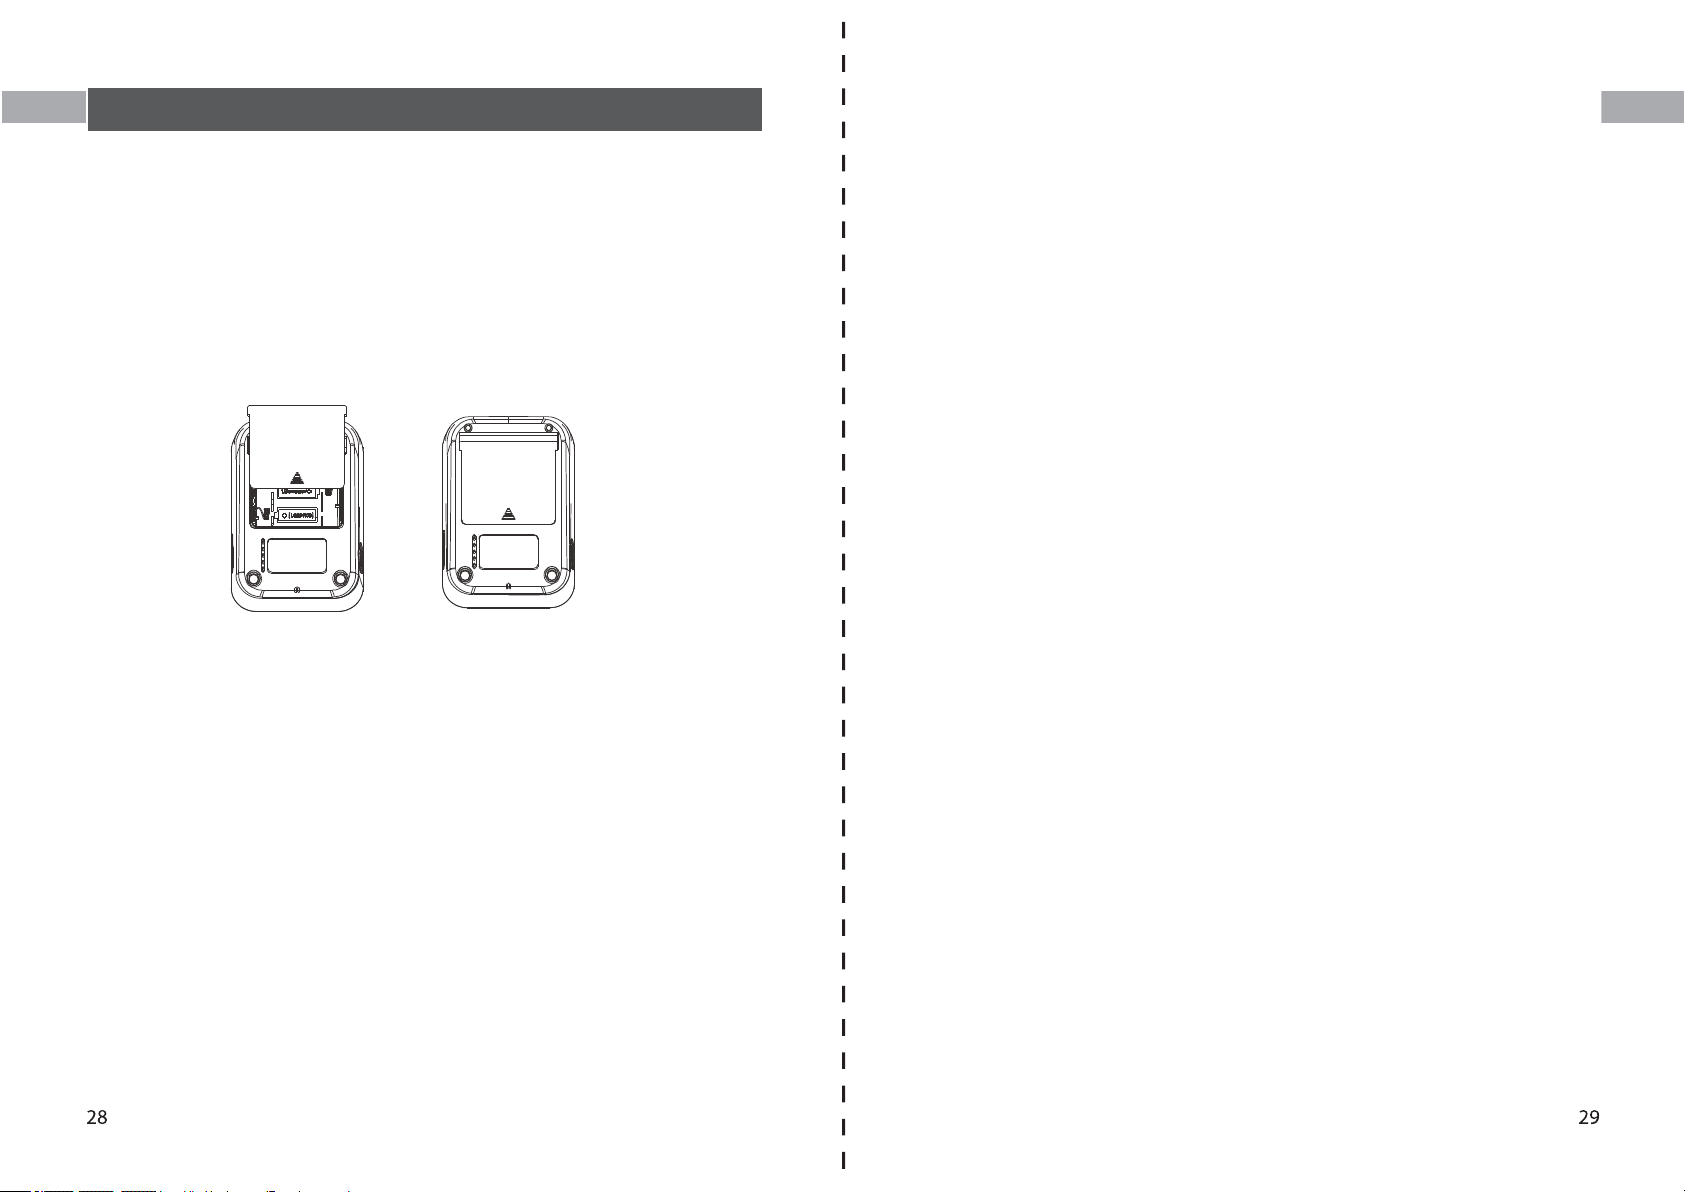
1. Press the hook on the bottom of the battery cover and lift the cover off in
the direction of the arrow (Picture-04).
2. Install 3 “AA” size batteries and make sure the + (positive) and - (negative)
polarities match the polarities of the battery compartment, then close the
battery cover.Make sure that the battery cover is securely in position.
Picture-04
Battery replacement
Low Battery Indicator
1.When the Low Battery Indicator appears on the display, turn the monitor off
and remove all the batteries. Replace with 3 new batteries at the same time.
Long-life alkaline batteries are recommended.
2.To prevent the damage of monitor from leaked battery fluid, please take out
of battery if the monitor unused in a long time(generally more than 3 months).
If battery fluid get in your eyes, immediately rinse with plenty of clean water.
Contact a physician immediately.
3. Dispose of the device, components and optional accessories according to
applicable local regulations. Unlawful disposal may cause environmental
pollution.
After you load the battery or connect power for the monitor,long press the
SET button for more than 3s, and then you can start to set.
Setting the User:
Press the MEM button to select User A or User B. When display A (/B) on the
screen, press the MEM button to switch to user B (/A). Press the SET button
to confirm.
Setting Volume:
When display with SP is flashing, press MEM button to switch volume 1,
volume 2, volume 3 or OFF. Press SET button to confirm.
Record Delete:
When you checking the memory data, long press MEM button to delete
existing user measurement data.
Note:
You can’t delete all measurement record from the monitor storage at one
time, if you decide to delete the all record, please keep the record in another
way, in case you need it some days later. Take the battery out won’t lead to a
record missing.
Page 17
NL
NL
EN
5. Measurement Procedure
5.1. Before measurement:
• Avoid eating and smoking as well as all forms of exertion directly before
measurement. These factors influence the measurement result. Find time to
relax by sitting in an armchair in a quiet atmosphere for about ten minutes
before taking a measurement.
• Remove any garment that fits closely to your upper arm.
• Always measure on the same arm (normally left).
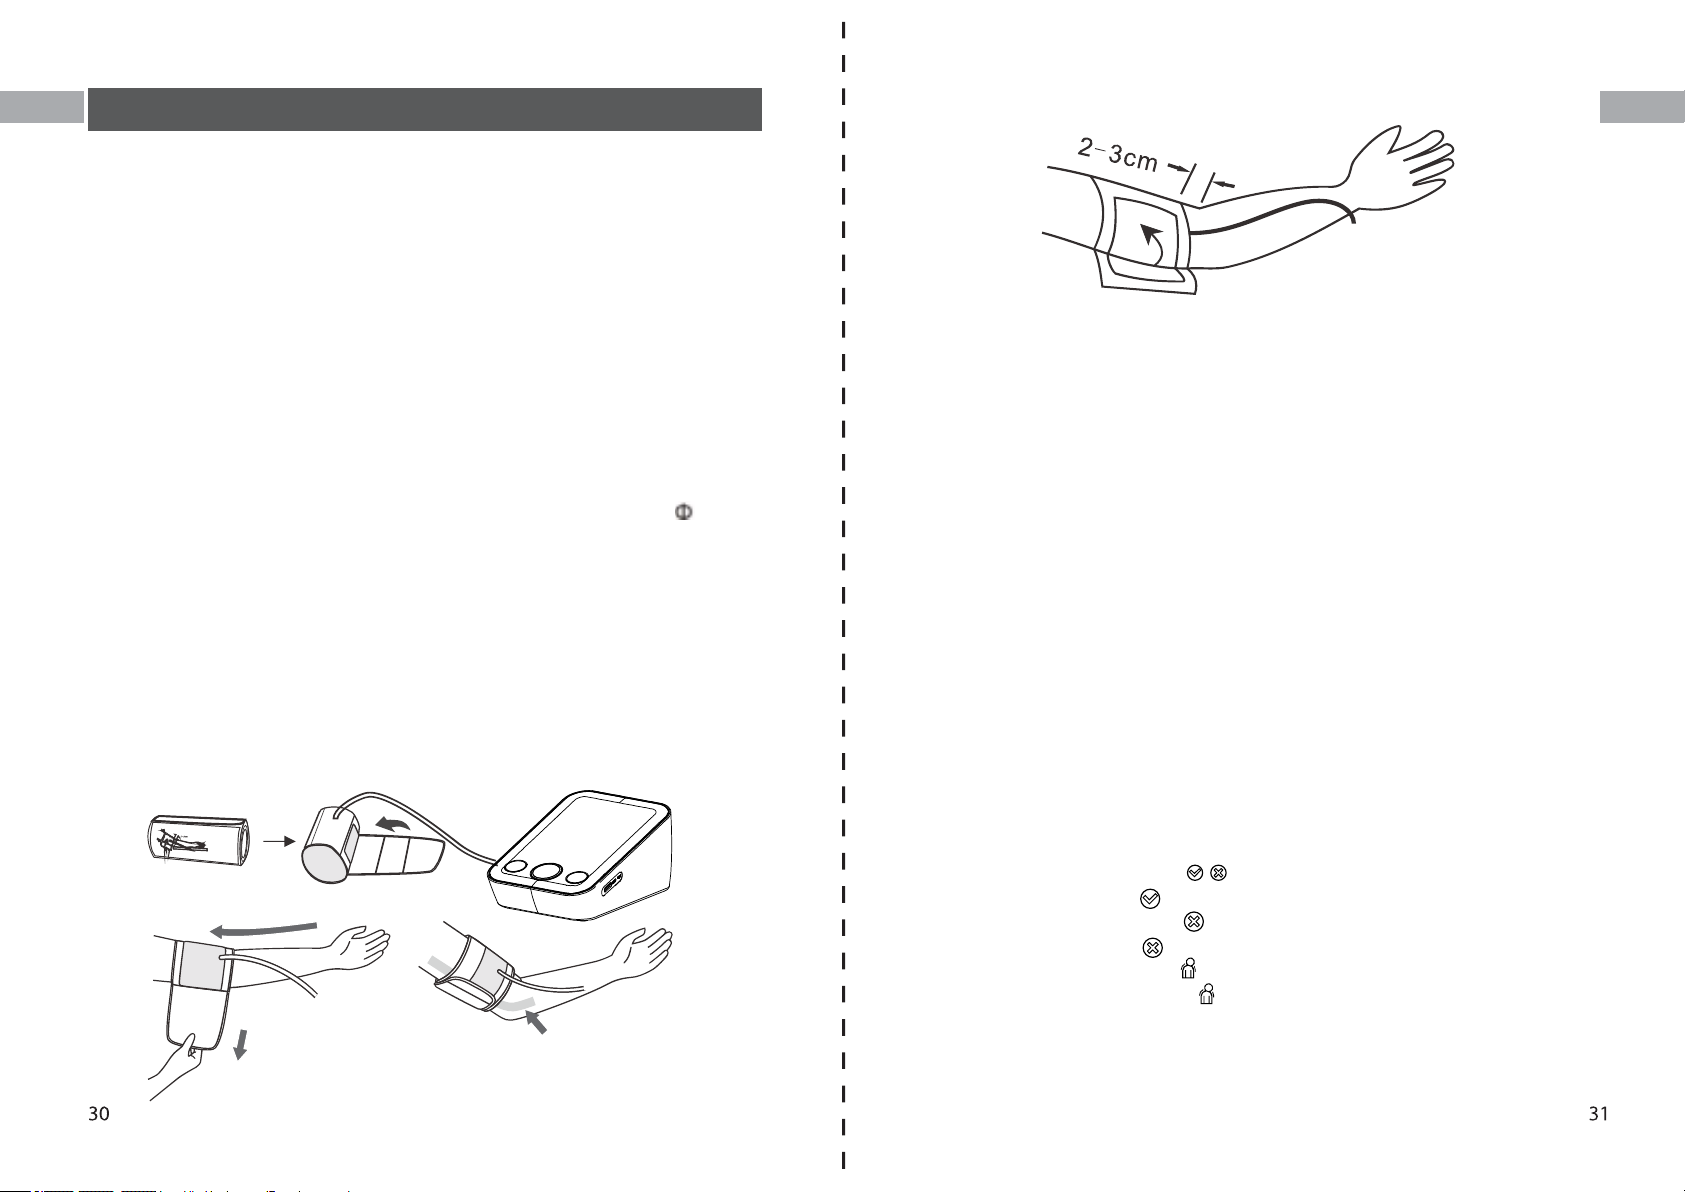
5.2. Fitting the Cuff
Please refer to picture-05
a) Wrap the cuff around your upper left arm. The rubber tube should be on
the inside of your arm extending downward to your hand. Make certain the
cuff lies approximately 2 to 3 cm above the elbow. Important! The on the
edge of the cuff (Artery Mark) must lie over the artery which runs down the
inner side of the arm.
b) To secure the cuff, wrap it around your arm and press the hook and loop
closure together.
c) There should be little free space between your arm and the cuff. You
should be able to fit 2 fingers between your arm and the cuff. Cuffs that don’t
fit properly result in false measurement values. Measure your arm
circumference if you are not sure of proper fit.
d) Lay your arm on a table (palm upward) so the cuff is at the same height as
your heart. Make sure the tube is not kinked.
EN
Picture-05
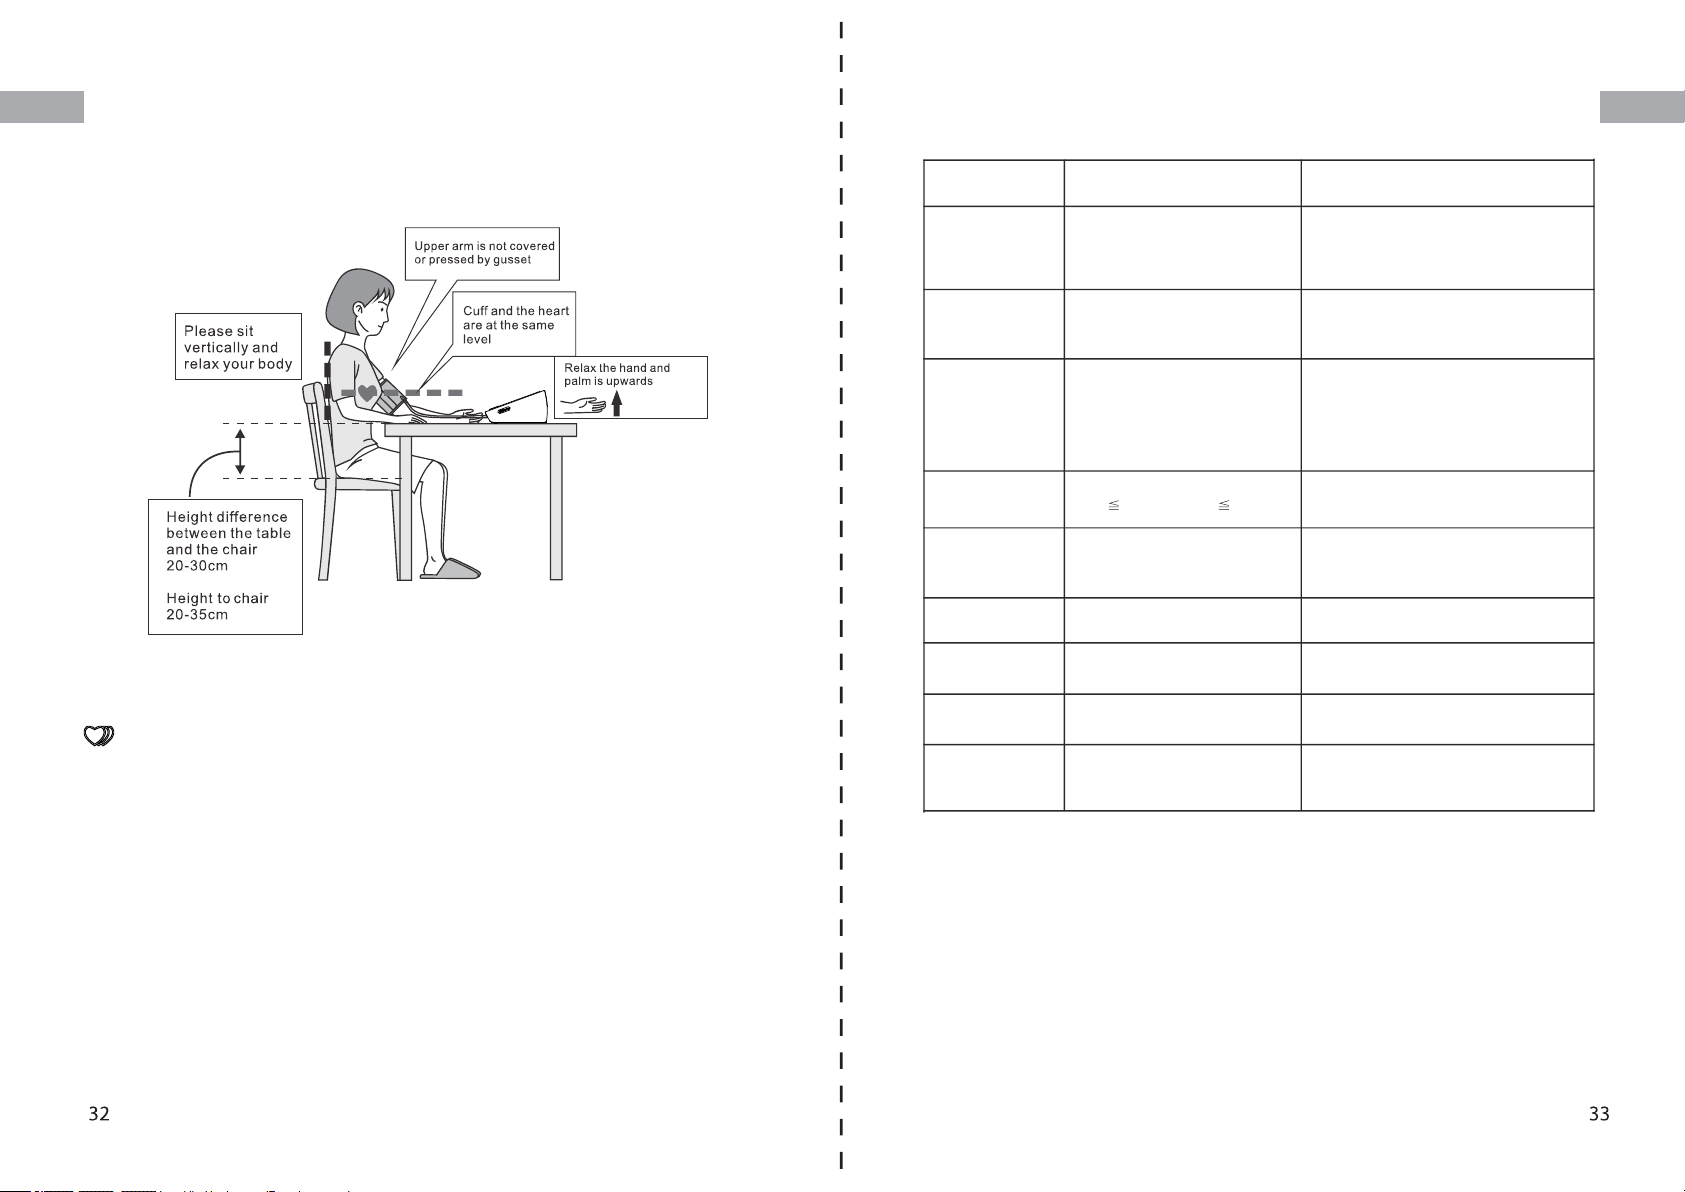
5.3. Measure Procedure
Refer to picture-06
1. Sit comfortably in a chair with your feet flat on the floor.
2. Select your User ID (A or B).
3. Stretch your arm forward on the desk and keep relaxing, make sure the
palm of hand is upturned. Make sure arm is in correct position, to avoid body
movement. Sit still and do not talk or move during the measurement.
After the cuff has been appropriately positioned on the arm and connected
to the blood pressure monitor, the measurement can begin:
a) Press the START/STOP button. The pump begins to inflate the cuff. In the
display, the increasing cuff pressure is continually displayed.
b) After automatically reaching an individual pressure, the pump stops and
the pressure slowly falls. The cuff pressure is displayed during the
measurement.
c) When the device has detected your pulse, the heart symbol in the display
begins to blink.
d) When the measurement has been concluded, the measured systolic and
diastolic blood pressure values, as well as the pulse will be displayed.
e) The measurement results are displayed until you switch the device off. If
no button is pressed for 60 seconds, the device switches off automatically.
f) Cuff self-checking symbol ( )
The cuff correct symbol( ) will be displayed if the cuff position is correct,
otherwise the wrong symbol( ) will be displayed. Please check again the
cuff if the wrong symbol( ) is displayed.
g) Movement error symbol ( )
The Movement Error Symbol ( ) is displayed if you move your body during
the measurement. Please remove the cuff, and wait 2-3 minutes. Reapply the
cuff and take another measurement.
Page 18
NL
NOTE:
EN
Patient Position:
1) Comfortably seated 2) Legs uncrossed
3) Feet flat on the floor 4) Back and arm supported
5) Middle of the CUFF at the level of the right atrium of the heart
5.5. Error Indicates
The following symbol will appear on the display when measuring abnormal
SYMBOL
No display
appears
Er 1
Er 2
CAUSE CORRECTION
Weak battery or improper
placement
Sensor abnormal
Monitor could not detect pulse
wave or cannot calculate the
blood pressure data
Replace both batteries with new ones.
Check the battery installation for proper
placement of the battery polarities.
Check if the pump is working or not. If it
is working, then the problem is sensor
abnormal. Please send it to the local
distributor.
Check if the air releasing is too slow or not.
If it is too slow, please check if there is any
dust in the tube plug of the cuff and the cuff
port in the device. If yes, please clean and
start the measurement again. If no, please
send the device back to the local distributor.
NL
EN
Picture-06
5.4. Irregular Heartbeat Detector
This symbol - indicates that certain pulse irregularities were detected
during the measurement.
In this case, the result may deviate from your normal basal blood pressure –
repeat the measurement.
Information for the physician on frequent appearance of the Irregular
Heartbeat Symbol.
This instrument is an oscillometric blood pressure monitor device that also
analyzes pulse frequency during measurement. The instrument is clinically
tested.
If pulse irregularities occur during measurement, the irregular heartbeat
symbol is displayed after the measurement. If the symbol appears more
frequently (e.g. several times per week on measurements performed daily) or
if it suddenly appears more often than usual, we recommend the patient to
seek medical advice. The instrument does not replace a cardiac examination,
but serves to detect pulse irregularities at an early stage.
Er 3
Er 4
Er 5
Er 6
Er 7
Er 8
Measurement result is abnormal
(SYS
35mmHg, DIA 23mmHg)
Too loose cuff or air leakage
(Cannot inflate to 30mmHg within
15s)
The air tube is crimped
The sensor is sensing great
fluctuation in the pressure
The pressure that the sensor
sensing is over the limit
The demarcation is incorrect or the
device has not been demarcated
Occasionally-measure for one more time/
Always - send it to local distributor
Tie the cuff correctly and make sure the air
plug is properly inserted in the unit
Correct it and make the measurement again
Please keep quiet and don’t move
Please send back to the local distributor
Please send back to the local distributor
Page 19
NL
EN
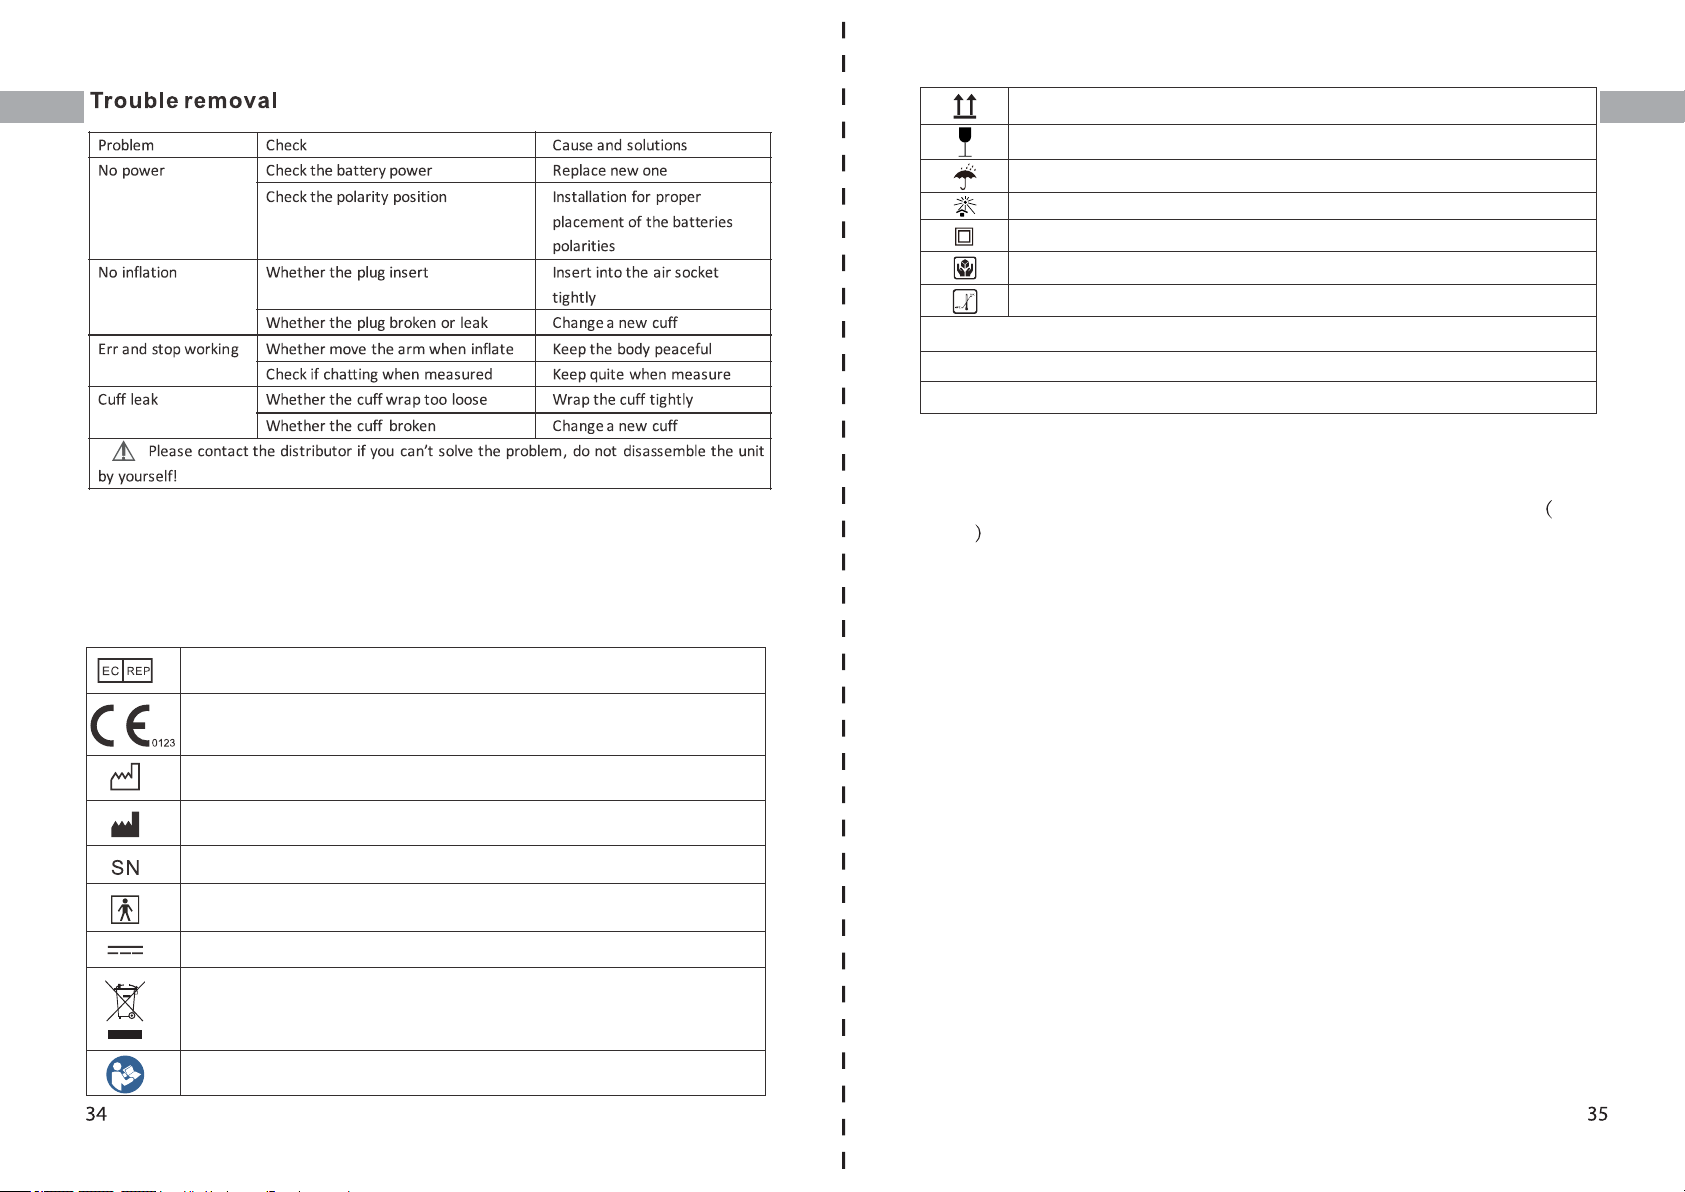
Put up
Fragile
Afraid of the rain
Fear of the sun
Class ll equipment
Handle gently
Temperature range
No Sterilize requirement
Not category AP / APG equipment
Mode of operation: continuous
5.6. Memory
NL
EN
SYMBOL DESCRIPTIONS
The following symbols may appear in this manual, on the Digital Blood
Pressure Monitor BX300, or on it's accessories. Some of the symbols
represent standards and compliances associated with the Digital Blood
Pressure Monitor BX300 and its use.
Authorized Representative in the European Community
CE Mark: conforms to essential requirements of the Medical
Device Directive 93/42/EEC.
Date of manufacture.
Manufacturer
Specifies serial number
Type BF applied part
Direct current
DISPOSAL: Do not dispose this product as unsorted municipal
waste. Collection of such waste separately for special treatment
is necessary.
Follow instructions for use
Each unit stores 120 sets measurements for 2 users, totally 240 sets User A
and B
.
Viewing the stored values
With the unit off, press the Memory button. The display first shows "A", then
shows an average of all measurements stored in the unit. Please note:
Measurements for each user are averaged and stored separately. Be certain
that you are viewing the measurements for the correct user. Pressing the
Memory button again displays the previous value. To view a particular stored
memory, press and hold the Memory button to scroll to that stored reading.
5.7. Discontinuing a Measurement
If it is necessary to interrupt a blood pressure measurement for any reason
(e.g the patient feels unwell), the Start/Stop button can be pressed at any
time. The device then immediately lowers the cuff pressure automatically.
Page 20
NL
5.8. Using the AC Adapter
EN
You may also operate this monitor using the AC adapter (output 5V DC1A
with Type-C connector).
Use only the approved AC adapter to avoid damaging the unit.
a) Ensure that the AC adapter and cable are not damaged.
b) Plug the adapter cable into the AC adapter port on the right side of the
blood pressure monitor.
c) Plug the adapter into your electrical outlet. When the AC adapter is
connected, no battery current is consumed.
Note: No power is taken from the batteries while the AC adapter is connected
to the monitor. If electrical power is interrupted,(e.g., by accidental removal of
the AC adapter from the outlet) the monitor must be reset by removing the
plug from the socket and reinserting the AC adapter connection.
6.Care and Maintenance
Wash hands after each time measurement.
If one device is used by different patients, wash hands before and after
each use.
a) Do not expose the device to either extreme temperatures, humidity,
dust or direct sunlight.
b) The cuff contains a sensitive air-tight bubble. Handle this cuff carefully
and avoid all types of stress through twisting or buckling.
c) Clean the device with a soft, dry cloth. Do not use gas, thinners or
similar solvents. Spots on the cuff can be removed carefully with a damp
cloth and soapsuds. The cuff with bladder must not be washed in a
dishwasher, clothes washer, or submerged in water.
d) Handle the tube carefully. Do not pull on it. Do not allow the tubing to
kink and keep it away from sharp edges.
e) Do not drop the monitor or treat it roughly in any way. Avoid strong
vibrations.
f) Never open the monitor! This invalidates the manufacturer’s warranty.
g) Batteries and electronic instruments must be disposed of in accordance
with the locally applicable regulations, not with domestic waste.
NL
EN
6.1. Accuracy test
Sensitive measuring devices must be checked for accuracy from time to
time. We recommend a periodical inspection of your unit by an authorized
dealer every 1 year. Please turn to local distributor or the manufacturer.
Page 21
NL
EN
7. Warranty/Service
Your blood pressure monitor is guaranteed for 1 year against manufacturers’
defects for the original purchaser only, from date of purchase. The warranty
does not apply to damage caused by improper handling, accidents,
professional use, not following the operating instructions or alterations made
to the instrument by third parties.
Warranty only applies to the main device and its cuff. All other accessories
are not covered by warranty.
There are no user serviceable parts inside. Batteries or damage from old
batteries is not covered by the warranty.
8. Certifications
Measuring method: Oscillometric
Pressure sensor: Resistive
Measuring range: DIA: 40-195mmHg; SYS: 60-255mmHg
Pulse: 40 to 170 per minute
Cuff pressure display range:<300mmHg
Memory: Automatically stores the last 120 measurements for 2 users (total
240)
Measuring resolution: 1 mmHg
Accuracy: Pressure within ± 3 mmHg / pulse ± 5 % of the reading
Power source: a) 3*AA batteries, 1.5 V
b) AC adapter INPUT
Accessories: Wide range rigid cuff 8.7” – 15.7” (22 - 40 cm)
Automatically power off : 60 seconds
Users: Adult
Expected service life of the device and accessories: 5 years
Technical alterations reserved!
100-240VAC 50/60HZ OUTPUT 5V DC 1A
NL
EN
Device standard:
This device is manufactured to meet the European blood pressure monitors:
EN1060-3 / IEC 80601-2-30 / ISO81060-1 / IEC60601-1-11 / IEC60601-1
Electromagnetic compatibility:
Device fulfills the stipulations of the International standard
IEC60601-1-2
9. Technical Specifications
Model: BX300(C04)
Weight: 189g (Batteries and AC adapter are not included)
Display: 62.5*63.5mm
Size: 126 (W) x 85 (L) x 57 (H) mm
Accessories: 1×Main Device, 1×Cuff, 1×Users manual,
Operating Conditions: Temperature: 5
Storage And Shipping Conditions:Temperature: -25
93% RH;
Atmospheric pressure range 70kPa~106kPa
2.46"x2.5" LED Digital Display
4.96"(W)x3.35"(L)x2.24"(H)
to 40 ;Humidity : 15% to 93% RH;
to +70
10. EMC Declaration
1) *This product needs special precautions regarding EMC and needs to be
installed and put into service according to the EMC information provided, and
this unit can be affected by portable and mobile RF communications
equipment.
2) * Do not use a mobile phone or other devices that emit electromagnetic
fields, near the unit. This may result in incorrect operation of the unit.
3) * Caution: This unit has been thoroughly tested and inspected to assure
proper performance and operation!
4) * Caution: this machine should not be used adjacent to or stacked with
other equipment and that if adjacent or stacked use is necessary, this
machine should be observed to verify normal operation in the configuration in
which it will be used
Page 22
NL
EN
The device is intended for use in the electromagnetic environment specified below. The customer or
Guidance and manufacture’s declaration – electromagnetic immunity
the user of device should assure that it is used in such an environment.
Immunity test
Electrostatic
discharge (ESD)
IEC 61000-4-2
Electrical fast
transient/burst
IEC 61000-4-4
Surge
IEC 61000-4-5
Voltage dips, short
interruptions and
voltage variations
on power supply
input lines
IEC 61000-4-11
Power frequency
(50Hz/60Hz)
magnetic field IEC
61000-4-8
IEC 60601 test level
±8 kV contact
±2 kV, ±4 kV, ±8
kV, ±15 kV air
±2 kV for power
supply lines
±1 kV for input/output
lines
± 1 kV line(s) to
line(s)
± 2 kV line(s) to earth
T; 0.5 cycle
0 % U
at 0°,45°,90°, 135°,
180°, 225°, 270°,
315°
0 % UT ; 1 cycle
70 % UT; 25/30
cycle
0% UT; 250/300
cycle
30 A/m
50/60Hz
Compliance level
±8 kV contact
±2 kV, ±4 kV, ±8
kV, ±15 kV air
Not applicable
Not applicable
Not applicable Mains power quality should be
30 A/m
50/60Hz
Electromagnetic environment guidance
Floors should be wood, concrete or
ceramic tile. If floor are covered with
synthetic material, the relative
humidity should be at least 30%.
Mains power quality should be that
of a typical commercial or hospital
environment.
Mains power quality should be that
of a typical commercial or hospital
environment.
that of a typical commercial or
hospital environment. If the user
of the device requires continued
operation during power mains
interruptions, it is recommended
that the device be powered from
an uninterruptible power supply
or a battery.
Power frequency magnetic
fields should be at levels
characteristic of a typical
location in a typical commercial
or hospital environment.
NOTE UT is the a.c. mains voltage prior to application of the test level.
Guidance and manufacture’s declaration – electromagnetic immunity
The device is intended for use in the electromagnetic environment specified below. The customer or
the user of the device should assure that it is used in such an environment.
Immunity test
Conducted RF
IEC 61000-4-6
Radiated RF
IEC 61000-4-3
NOTE 1 At 80 MHz and 800 MHz, the higher frequency range applies.
NOTE 2 These guidelines may not apply in all situations. Electromagnetic propagation is affected by
absorption and reflection from structures, objects and people.
A
Field strengths from fixed transmitters, such as base stations for radio (cellular/cordless) telephones and land
mobile radios, amateur radio, AM and FM radio broadcast and TV broadcast cannot be predicted theoretically
with accuracy. To assess the electromagnetic environment due to fixed RF transmitters, an electromagnetic
site survey should be considered. If the measured field strength in the location in which the device is used
exceeds the applicable RF compliance level above, the device should be observed to verify normal operation.
If abnormal performance is observed, additional measures may be necessary, such as re-orienting or
relocating the device.
IEC 60601 test level
3 Vrms
150 kHz to 80 MHz
3 V RMS outside the
ISM band, 6 V RMS
in the ISM and
amateur bands
80% AM at 1kHz
10 V/m
80 MHz to 2.7 GHz
80% AM at 1kHz
Compliance
level
Not
applicable
10 V/m
80 MHz to
2.7 GHz
80% AM at
1kHz
Electromagnetic environment - guidance
Portable and mobile RF communications equipment
should be used no closer to any part of the device,
including cables, than the recommended separation
distance calculated from the equation applicable to the
frequency of the transmitter.
Recommended separation distance
80MHz to 800MHz
800MHzto 2.7GHz
Where, P is the maximum output power rating of the
transmitter in watts (W) according to the transmitter
manufacturer and d is the recommended separation
distance.
Field strengths from fixed RF transmitters, as determined
by an electromagnetic site survey, should be less than
the compliance level in each frequency range.
Interference may occur in the vicinity of equipment
marked with the following symbol:
NL
EN
Over the frequency range 150 kHz to 80 MHz, field strengths should be less than 3 V/m.
B
Page 23
NL
NL
EN
Guidance and manufacture’s declaration – electromagnetic emission
The device is intended for use in the electromagnetic environment specified below. The customer of the
user of the device should assure that it is used in such an environment.
Emission test
RF emissions
CISPR 11
RF emission
CISPR 11
Harmonic emissions
IEC 61000-3-2
Voltage fluctuations/
flicker emissions
IEC 61000-3-3
Compliance Electromagnetic environment – guidance
The device use RF energy only for its internal function.
Group 1
Therefore, its RF emissions are very low and are not likely to
cause any interference in nearby electronic equipment.
Class B
The device is suitable for use in all establishments, including
Not applicable
domestic establishments other than domestic and those directly
connected to the public low-voltage power supply network that
supplies buildings used for domestic purposes.
Not applicable
Recommended separation distances between
portable and mobile RF communications equipment and the device
The device is intended for use in an electromagnetic environment in which radiated RF disturbances are
controlled. The customer or the user of the device can help prevent electromagnetic interference by
maintaining a minimum distance between portable and mobile RF communications equipment
(transmitters) and the device as recommended below, according to the maximum output power of the
communications equipment.
Rated maximum output
Separation distance according to frequency of transmitter (m)
power of transmitter
(W)
150 KHz to 80 MHz 80 MHz to 800 MHz 800 MHz to 2.7 GHz
Guidance and manufacturer’s declaration - electromagnetic immunity
The device is intended for use in the electromagnetic environment specified below. The customer or the
user of the device, should assure that it is used in such an environment.
Test
frequency
(MHz)
385
450
710
745
780
810
870
930
1720
1845
1970
2450 2400-2570
5240
5500
5785
a)
Band
(MHz)
380-390 TETRA 400 Pulse Modulation
430-470 GMRS 460,
704-787
800-960
1700-1990
5100-5800
a)
Service Modulation
18 Hz
c)
FRS 460
LTE Band 13,
17
GSM 800/900,
TETRA 800,
iDEN 820,
CDMA 850,
LTE Band 5
GSM 1800;
CDMA 1900;
GSM 1900;
DECT;
LTE Band 1,3
4,25;UMTS
Bluetooth,
WLAN
802.11 b/g/n,
RFID 2450,
LTE Band 7
WLAN 802.11
a/n
FM
±5 kHz deviation
1 kHz sine
Pulse
Modulation
217 Hz
Pulse
Modulation
18 Hz
Pulse
Modulation
217 Hz
Pulse
Modulation
217 Hz
Pulse
Modulation
217 Hz
a)
b)
b)
b)
b)
b)
Maximum
power
(w)
b)
1.8 0.3 27
2
0.2
2 0.3 28
2 0.3 28
2 0.3 28
0.2 0.3 9
Distance
(m)
IMMUNITY
TEST LEVEL
(V/m)
0.3 28
0.3 9
EN
For transmitters rated at a maximum output power not listed above, the recommended separation
distance d in metres (m) can be estimated using the equation applicable to the frequency of the
transmitter, where P is the maximum output power rating of the transmitter in watts (W) according to the
transmitter manufacturer.
NOTE 1 At 80 MHz and 800 MHz, the separation distance for the higher frequency range applies.
NOTE 2 These guidelines may not apply in all situations. Electromagnetic propagation is affected by
absorption and reflection from structures, objects and people.
NOTE If necessary to achieve the IMMUNITY TEST LEVEL, the distance between the transmitting
antenna and the ME EQUIPMENT or ME SYSTEM may be reduced to 1 m. The 1 m test distance is
permitted by IEC 61000-4-3.
a ) For some services, only the uplink frequencies are included.
b ) The carrier shall be modulated using a 50% duty cycle square wave signal.
c ) As an alternative to FM modulation. 50% pulse modulation at 18 Hz may be used because while it
does not represent actual modulation, it would be worst case.
The MANUFACTURER should consider reducing the minimum separation distance, based on RISK
MANAGEMENT, and using higher IMMUNITY TEST LEVELS that are appropriate for the reduced
minimum separation distance. Minimum separation distances for higher IMMUNITY TEST LEVELS
shall be
calculated using the following equation:
Where P is the maximum power in W, d is the minimum separation distance in m, and E is the
IMMUNITY
TEST LEVEL in V/m.
 Loading...