

Page 1

X3200
User’s Guide
Installation and Configuration
Copyright © 2001 BinTec Communicat ions AG, all rights re served.
Version 1.0
Document #71000Q
September 2001
X3200 User’s Guide 1
Page 2

Purpose This manual expl ains t he ins tal lation and init ial c onfig urati on of X32 00 with soft-
ware release 5.5. 1. For up-to-the-minute information and instructions concern ing the latest software release, you should always read our release notes,
especially when carrying out a software update to a later release level. The l atest release notes can always be found at www.bintec.net.
Liability While every effort has been made to ensure the accuracy of all information in
this manual, BinTec Communications AG cannot assume liability to any party
for any loss or damage caused by errors or omissions or by statements of any
kind in this document and is only liable within the scope of i ts terms of sale and
delivery.
The informa tion in this manual is subje ct to change without noti ce. Additiona l information, including changes and release notes for X3200, can be found at
www.bintec.net.
As an ISDN multiprotocol router, X3200 sets up ISDN connections in accordance with t he system config uration. To prevent unint entional charges accu mulating, the operation of the product should be carefully monitored. BinTec
Communications AG accepts no liability for loss of data, unintentional connection costs and damages resulti ng from unsupervised operation of the product.
Trademarks BinTec and the BinTec logo are registered trademarks of BinTec Communica-
tions AG.
Other pr oduct names and t rademark s ment ioned ar e us ually the prop erty of the
respect ive companies and manuf acturers.
Copyright All rights are reserved. No part of this publication may be reproduced or trans-
mitted in any form or by any means – graphic, electronic, or mechanical – including photocopying, recording in any medium, taping, or storage in
information retrieval systems, without the prior written permission of BinTec
Communications AG. Adaptation and especially translation of the document is
inadmiss ible without the prior consent of BinTec Communications AG.
Guidelines and
standards
X3200 complies with the fol lowi ng guidelines and standards:
■ R&TTE Directive 1999/5/EC
■ CE marking for all EU countries
For further information, see "Declaration of Conformity" at www.bintec.net.
2 BinTec Communications AG
Page 3

How to reach
BinTec Communications AG
Südwestpark 94
D-90449 Nürnberg
Germany
BinTec Communicat ions France
6/8 Avenue de la Grande Lande
F-33174 Gradig nan
France
Telephone: +49 911 96 73 0
Fax: +49 911 688 07 25
Inter n e t: www.bintec.net
Telephone: +33 5 57 35 63 00
Fax : +3 3 5 56 89 14 05
Inter n e t: www.bintec.fr
X3200 User’s Guide 3
Page 4

4 BinTec Communications AG
Page 5

Inhaltsverzeichnis
Inhaltsverzeichnis
Inhaltsverzeichni s 5
1 Welcome! 11
1.1 What Do You Need X3200 For? 13
1.2 Sco pe of Su pply 17
1.3 BinTec ISDN Companion CD 18
1.4 BinTec Documentation 20
1.5 System Requirements 21
1.6 Guarantee Terms 22
1.7 About this Manual 24
1.7.1 Contents 24
1.7.2 Meaning of Symbols Used 25
2 General Safety Precautions 29
3 Getting Started 31
3.1 Setting Up and Connecting 32
3.2 In Advance of Configuration 35
3.2.1 Gathering Information 35
3.2.2 What to Do in Your Windows Network 38
3.3 Installing BRICKware Under Windows 41
3.4 Solution Scenarios 43
3.4.1 Configuring Hi gh-Speed Internet Access 43
3.4.2 Using Communications Applications 45
3.4.3 Connecting a Branch O ffice to Head Office 46
3.4.4 Providing Access to Head Office for Field
Service Staff without Router Access (Dial-In) 47
3.5 Conf iguring X3 200 Under Windows 48
X3200 User’s Guide 5
Page 6

Inhaltsverzeichnis
3.5.1 Configuring the Basic Router Configuration 51
3.5.2 Internet Access with X3200 55
3.5.3 Connecting X3200 to a Corporate Network 58
3.5.4 Completing the Configuration 60
3.6 Remote CAPI Interface on the PC 63
3.6.1 Installi ng the Remote CAPI Client on all Other PCs 63
3.6.2 Configuring Remot e CAPI 63
3.7 Configuring a PC 65
3.7.1 Configuring IP Address, Gateway and DNS on the PC 65
3.7.2 Finding PCs on your Partner’s Network 67
3.8 Configuring Fax and Answering Machine with RVS-COM Lite 70
3.8.1 Installing RVS-COM Lite 70
3.8.2 Configuring RVS-COM Lite 73
3.9 Testing your Configuration 77
3.9.1 Testing your Internet Access 77
3.9.2 Sending and Receiving E-Mails 77
3.9.3 Sending a Fax 77
3.9.4 Receiving a Fax 79
4 Conne cti n g X320 0 81
4.1 Connection Methods 82
4.1.1 Connecting Over the Ser ial Interface 83
4.1.2 Connecting Over a LAN 85
4.1.3 Connection Over ISDN 86
4.2 Logging In 87
4.3 Configuration options 89
4.3.1 Methods of Configuration 89
4.3.2 Operation and Menu Architecture of the Setup Tool 90
5 Basic Configuration with the Setup Tool 101
6 BinTec Communications AG
Page 7

Inhaltsverzeichnis
5.1 Basic Router Settings 103
5.1.1 Entering Licenses 104
5.1.2 Entering System Data 105
5.1.3 Configuring the LAN Interface 108
5.1.4 Configuring the WAN Interface 112
5.1.5 Configuring the High-Speed Internet Interface 121
5.1.6 Configuring X3200 as DHCP Server 122
5.1.7 Setting Filters 124
5.2 X3200 and the WAN 129
5.2.1 Configuring WA N Part ners 131
5.2.2 Internet Access with X3200 155
5.2.3 Dialing into Corporate Network 163
5.3 Saving the Configuration File 172
6 Advanced Configuration 173
6.1 General WAN Settings 174
6.1.1 Dynamic IP Address Server 174
6.1.2 CAPI User Concept 176
6.1.3 General PPP Settings 180
6.1.4 X.31 TEI 182
6.2 Settings Specific to WAN Partners 183
6.2.1 Delay after Connection Failure 183
6.2.2 Channel Bundling - Basi c Configuration for Dialup Connections 184
6.2.3 Channel Bundling – Bandwi dth on Demand (BOD) – Advanced Configurat ion for
PPP Connections 186
6.2.4 Always On/Dynamic ISDN (AO/DI) 192
6.2.5 BOD for IP-Based Applications 201
6.2.6 Layer 1 Protocol (ISDN B-Channel) 206
6.2.7 IP Transit Networ k 208
6.2.8 Transfer of DNS and WINS IP Addresses to WAN Part ner 210
6.2.9 Routing Information Protocol (RI P ) 213
X3200 User’s Guide 7
Page 8

Inhaltsverzeichnis
6.2.10 Compression 216
6.2.11 Proxy ARP (Address Resolution Protocol) 218
6.2.12 Keepalive Monitor ing 220
6.3 Basic IP settings 225
6.3.1 System Time 225
6.3.2 Name Resolution in X3200 with DNS Proxy 229
6.3.3 Port Numbers 246
6.3.4 BOOTP Relay Agent 247
6.4 IPX Settings 250
6.4.1 General Settings 250
6.4.2 Configuring the LAN Interface 252
6.4.3 Configuring WAN Partn ers 253
6.5 Extra License Function s 256
6.5.1 Virtual Private Network (VPN) and Encryption 256
6.5.2 IPSec (Internet Protocol Security) 256
7 Security Mechanisms 259
7.1 Activit y Mo nitoring 260
7.1.1 Syslog Messages 260
7.1.2 Monitoring Functions in the Setup Tool 265
7.1.3 Credits Based Accounting System 268
7.1.4 HTTP Status Page 271
7.1.5 Activity Monito r 274
7.2 Access Security 277
7.2.1 Logging In 277
7.2.2 Checking the Calli ng Party Number 278
7.2.3 Authentication of PPP Connections with PAP, CHAP or MS-CHAP 279
7.2.4 Callback 279
7.2.5 Closed User Group 281
7.2.6 Access to Remote CAPI 281
7.2.7 NAT (Network Address Translation) 282
8 BinTec Communications AG
Page 9

Inhaltsverzeichnis
7.2.8 Filters (Access Lists) 286
7.2.9 Local Filter s 299
7.2.10 Back Route Verifi cation 302
7.2.11 TAF Agent 303
7.2.12 Extended IP Routing (XIPR) 303
7.3 Line Tapping Security 305
7.3.1 Encryption 305
7.3.2 VPN (with extra license) 308
7.3.3 IPSec (with extra license) 308
7.4 Special Features 309
7.4.1 Startup Procedure 309
7.4.2 Auto Logout 309
7.4.3 Prevention of Denial-of-Service Attacks 309
7.5 Checklist 311
8 Configuration Managem ent 313
8.1 Administration of Configuration Files 314
8.2 Resetting X3200 to the Ex Works State 321
8.3 Updating Software 322
9 Troubleshooting 325
9.1 Aids t o Troubleshooting 326
9.1.1 Local SNMP Shell Commands 326
9.1.2 External Aids 327
9.2 Typical Errors 328
9.2.1 System Errors 328
9.2.2 ISDN Connections 329
9.2.3 IPX Routing 332
10 Technical Data 335
X3200 User’s Guide 9
Page 10

Inhaltsverzeichnis
10.1 General Product Features 336
10.2 Front Pa nel LEDs 339
10.3 Rear Panel Connections 342
10.4 Pin Assignment 3 43
10.5 BOOT Sequence 346
11 Important Commands 349
11.1 SNMP Shell Commands 350
11.2 BRICKtools for Unix Commands 357
12 General Safety Precautions in 15 Different Languages 359
Glossary 395
Index 413
10 BinTec Communications AG
Page 11
1
1 Welcome!
Congratulati ons on choosing to buy a router from BinTec Commun ications AG.
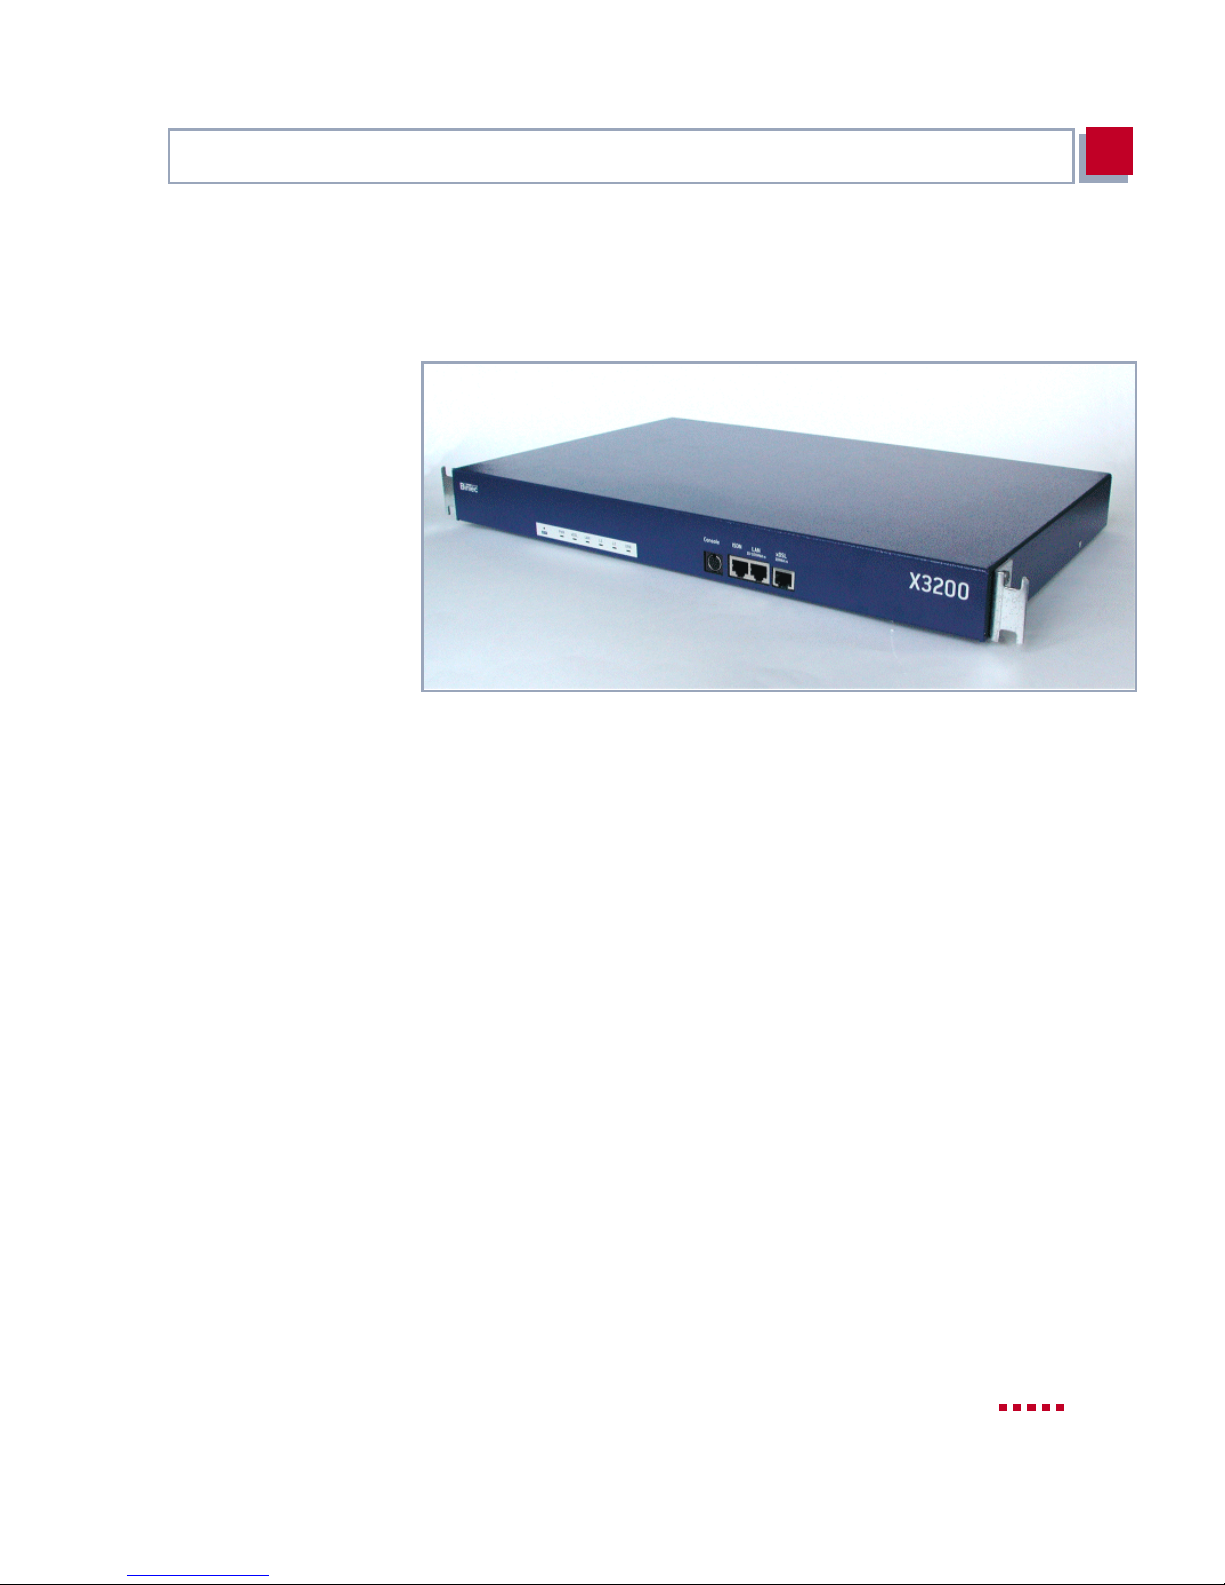
Figure 1-1: X3200
BinTec Communications’ X3200 is a fully equipped and versatile xDSL Router
for professi onal use. It has been developed mainly for high sp eed internet co nnections using xDSL or cable technology. Moreover, you can configure the
ISDN interface as a backup solution for your high speed connection: if it fails,
you will still be connnected to the Internet or other remote networks. Furthermore, X3200 support s leased l ines without the need of addition al licen ses or up-
grades.
By acquiring additional licenses, you can set up secure networking environments either through the use of Virtual Private Networks (VPN) or through IPSec. Thus, communication over the internet will be as secure as over leased
lines. Since ex tensive fir ewall mechani sms have been imp lemented int o X3200,
it meets the hi gh sec urity re qui rements f or bra nch off ic es or fiel d st aff loggi ng in
to your company network. You can, therefore, easily integrate branch offices
into the security concept of your entire enterprise.
X3200, of course, ensures the flow of all kinds of information, since it supports
fax and other network applications like eMail, Home Banking or File Transfer.
The equipment X3200 comes with is not limited to mere routing functionality: In
addition to sec urit y, BinTe c lays emphas is on easy ma intenan ce and cost management. Quality tool s facili tate conf igura tion and enabl e remote mainte nance .
X3200 User’s Guide 11
Page 12
1
Welcome!
RVS-COM Lite, the comm unication sof tware include d with your X3200, rounds
off the comple te communication package.
Where do we go from here?
What your X3200 gives
you...
Getting X3200 up and
running...
And on top of all that… you will find extensive explanations in chapter 5, page 101, which show all the
If you have already
configured BinTec
routers. ..
You will find out what X3200 means for you and exactly what X3200 can do on
the followi ng pages.
...is described in chapter 3, page 31. There we show you how to st art up X3 200
within a f ew m inutes from a Windows PC with the help of a confi guration ass istant and how to inst all other useful online assistants . At the end of the chapter,
you will be in a posi tion to sur f the In ternet , send or recei ve e-mai ls or fa xes and
set up a connection to a partner network, for example, to access data at your
corporate headquarters.
possible configurations in detail. Even if you do not have a Windows PC, you
will find fast ways to configure your X3200.
...or you are familiar with configuration and you want to get started right away,
all you reall y need to know is the preset user name and password.
User name Password
admin bintec
Remember, however, to change the password immedi ately when you log in to
your X3200 for the fi rst time. All BinTec routers are supplied wit h the same
password, which me ans they are not protected against unautho ri zed access
until you change the password. How to change the passwords is described in
"Changing the password", page 95.
Otherwise... ... BinTec Communicat ions AG wishes you lots of fun with your new product.
Pick-up Service However , should you have any probl ems with your X3 200 hardwar e at any time,
BinTec Communications AG offers you free replacement of your defective
equipment for a per iod of one year. Further in formation on this can be found in
chapter 1.6, page 22.
12 BinTec Communications AG
Page 13
What Do You Need X3200 For?
1.1 What Do You Need X3200 For?
Router of your
Internet Service
Provider
xDSL
1
Internet
BIANCA/BRICK-XM
Network of your
Internet Service
Provider
Your Local Area Network
Why a router such as
X3200?
X3200
ISDN
BIANCA/BRICK-XM
Router of your
Companys
Head Office
Network of your
Companys
Head Office
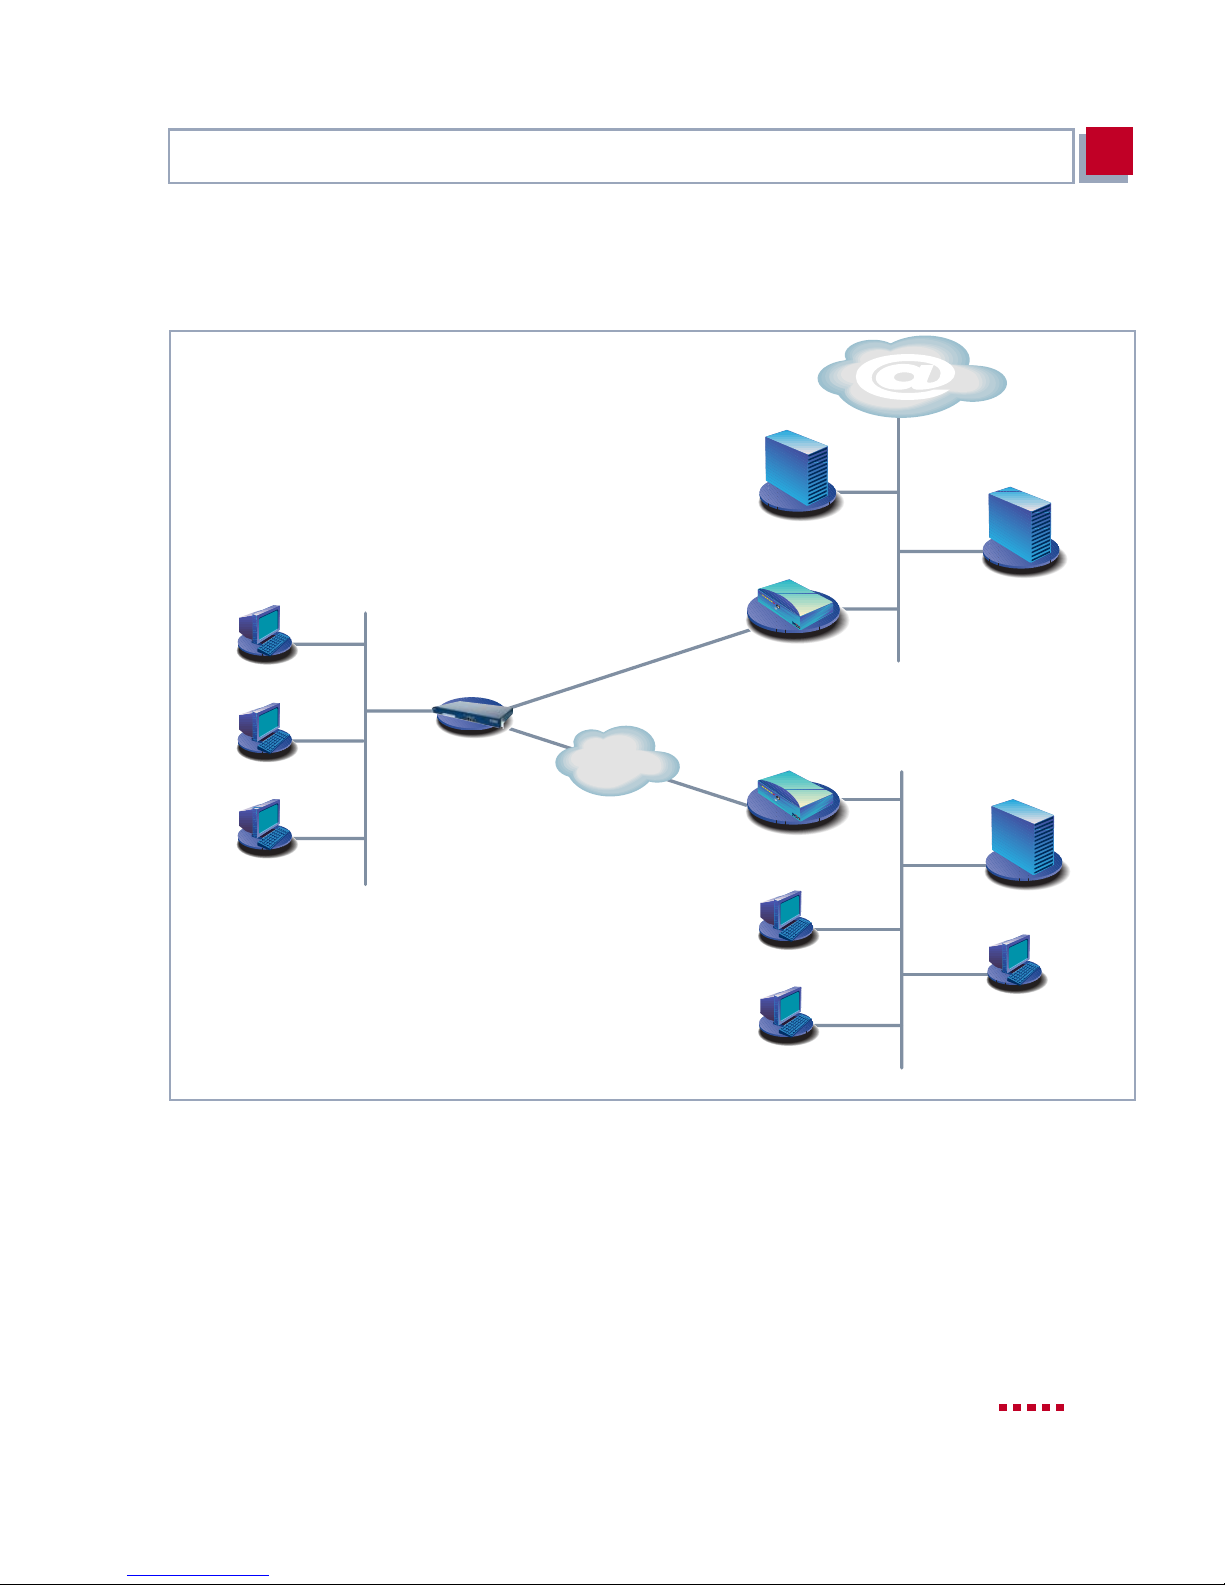
Figure 1-2: Basic scenario
Routers are used to interconnect networks and to exchange information between the networks. For example, you can c onnect t o the networ k of your Inter net Service Provi der via yo ur route r as shown above and us e the us ual Interne t
services, such as the World Wide Web (WWW) or e-mail. By connecting to an-
other partner network, e.g. your company’s head office, from your home or
branch office, you can co nvenient ly acce ss any i nformat i on you may need from
X3200 User’s Guide 13
Page 14

1
Welcome!
the headquarters, even if this is hundreds of kilometers away. The size of your
own local network – whether it consists of several computers or just one workstation – is irrelevant.
As shown in the pre vious i llu strat ion, y our X3200 is the essenti al comp onent fo r
connecting t he net works: i t is your li nk to the out side world. Ever y router serves
as a link between the individual local networks. Within each LAN, the router is
connected to the network like a nor mal com puter . It s task i s to t ransm it inf or mation as necessary from its own network to an external network (e.g. to the network of your Int ernet Service Provider or your head of fi ce) and to find the most
suitable routes for transmission. Conv ersely, it recei ves informati on and routes
it to its own network.
What can X3200 do that ISDN cards can’t? Your X3200 can do considerably
more:
One router for
everyone
Communication
applications
If you have a local network with several computers, you only need one single
router to allow all computers in the network access to the Internet or the head
office. The lower ex pendit ure on equ ip ment and ad mini strat ion f or sev eral c omputers in the network means substantial savings. When using ISDN cards, every workplace would have to be equipped sep arately.
If you config ure high-spee d Internet ac cess with X3200, al l t he use rs i n the l ocal
network profit from shorter Internet access times. The bandwidth of up to
768 kbps used from the I nternet Se rvice Prov ider to the cus tomer (d ownstream)
and 128 kbps in the o pposit e di rect ion ( upstre am) a llows cons iderab ly f aster Internet applications than with conventional ISDN, as data transfer downstream,
for example, is up to twelve times faster.
For communicat ions appl icat ions on your PC, such as answe ring machi ne, fax,
file t ran sfer and Eurofi le t ransfe r, the same p rinci pl e appl ies as f or acc ess to the
Internet. All LAN users can use these services via BinTec’s own Remote CAPI
interface while accessing a single ISDN connection over X3200. The only requirement is that all users have su itable app lication so ftware ins talled to sup port
the CAPI interface. This standard interface is, however, used by most communications applications. X3200 is supplied as standard with suitable software
(RVS-COM Lite). This software covers the spectrum of common communications applications.
14 BinTec Communications AG
Page 15

What Do You Need X3200 For?
1
Automatic diali ng and
disconnection
Security X3200 also has a lot to of fer with regard to security. Y our router offers you inte-
A significant advantage of your X3200 is also its means of obtaining access to
networks. Once configured, your router decides independently if and how it is
to set up a connection to the Internet Service Provider. If you enter an external
WWW address in your browser, for example, your X3200 determines that the
requested address lies outside your own LAN and establishes a connection to
your Internet Service Provider and the Internet automatically. To save costs,
X3200 disconnects the connection after a predefined time (short hold) if no
more information is exchanged.
The same principle is applied for conveniently accessing data at another loca-
tion, e.g. your company headquarters. While running Windows, for example,
you can even connect a network drive to a computer at your head office. You
then simply click the icon for this link in Windows Explorer and can surf in the
directorie s and data of the remote comput er just as if you were using your own
hard disk. X3200 takes care of setting up and clearing the connection .
grated firewall mechanisms and provides extensive, low-cost features to meet
all the requireme nts for access security. It protects your network against unauthorized external access. This is made possible by X3200’s SAFERNET func-
tions such as NAT, encryption, filters and monitoring.
Configuration and
administration
A number of options a re available for confi guring X3200. Most of the configura-
tion methods are independent of your comput er’s operating system.
The simplest m ethod u sing W indows i s the Confi gurati on Wiz ard. This configuration assistant guides you through the configuration step by step and helps
you to make the most important settings on your router. X3200 is read y f o r op-
eration in only a few minutes. Using the Configuration Wizard, you can con-
figure high-speed access to the Internet quickly and easily as soon as your
provider makes your xDSL connection avai lable.
X3200 can also be configured and administrated remotely. As soon as your
router is connected to the ISDN – even in its ex works state, configuration settings can be ca rried out from a distant location (e.g. by t he administrator a t your
head office). This means you can leave the configuration of the system to be
carried out by someone at HQ.
X3200 User’s Guide 15
Page 16

1
Welcome!
In summary X3200 has the following main advanta ges:
■ A connection to the I nternet or another partner networ k allows everyone i n
your LAN to use the usual Internet services (e.g. e-mail, WWW, file transfer) and to access data at other locat ions.
■ High-speed access to the Internet, so that all users in the LAN no longer
have to wait so long when accessing the Internet.
■ Use of communications applications in the LAN (e.g. fax, answering ma-
chine) via a common ISDN conn ection.
■ Simple configuration for you and remote administration by an administrator
at head office.
■ Independence from the operating system of your PC.
On top of all that, you need not do without security, convenience and economy.
16 BinTec Communications AG
Page 17

Scope of Supply
1
1.2 Scope of Supply
X3200 is suppli ed with the following part s:
■ Cable sets:
– LAN cable (RJ45, red) for LAN connecti on to hub
– Adapter cable (reversed) together with red LAN cabl e for LAN connec -
tion direct ly t o PC
– ISDN cable (RJ45, black) for I SDN connection
– Serial cable (gray)
– Power cable
■ BinTec Compani on CD
■ Documentation:
– User’s Guide
– Quick Install Guide
– Release Notes, if requ ired
■ Additional material:
– License card with license information
X3200 User’s Guide 17
Page 18

1
Welcome!
1.3 BinTec ISDN Companion CD
You will f ind a ll t he p rograms you need for the i ns tall ation , conf igurat ion a nd ad ministration of X3200 on your BinTec Companion CD.
BRICKware
■ The Configuration Wizard leads you step by step through the basic con-
figuration of X3200.
■ The Acti vity Mon ito r enables you to monitor the utilization of X3200 at a
glance.
■ You gain access to X3200 v ia the seria l interface using the provided short-
cuts Device at COM 1 or Device at COM2.
■ Remote CAPI Client
The Remote CAPI Client allows you to use communications applications
based on the standard CAPI interface (e.g. RVS-COM Lite).
■ Token Authentication Firewall (T AF) pr ogram
This software package is required if you are using the Security Dynamics
security system.
■ The Configuration Manager allows you to configure and administrate all
BinTec routers in the network via a graphic interface. Here you can view
and edit SNMP tables and vari ables.
■ DIME Tools are for monitoring and administration of your X320 0.
More detailed descriptions of all software programs can be found in our online
manual BRI CKware for Windows.
RVS-COM Lite In addition to BRICKware, your BinTec Companion CD contains the RVS-COM
Lite communications program that allows you to use all the usual communications applicatio ns on your PC, e.g. answering machin e, fax or file transfer. How
to do this is explained in chapter 3.8, page 70.
Please note: The license for RVS-COM Lite is a single user license. You can
purchase additional licenses from your dealer.
18 BinTec Communications AG
Page 19

BinTec ISDN Companion CD
What else? The Companion CD also contains a range of other useful directories in which
you can find the following, for example:
■ The documentation in electronic form (see chapter 1.4, page 20)
■ A copy of the router software (in its unconfigured ex works state), if appli-
■ UNIX Tools (admini stration)
■ Adobe’s Acr obat Reader
■ MIB tables
1
cable
X3200 User’s Guide 19
Page 20

1
Welcome!
1.4 BinTec Documentation
The following documenattion is available:
■ User’s Guide (pr inted/PDF file)
This manual.
■ Leaflet with a Quick Install Guide for initial configuration of X3200 (PDF
and printed).
■ Reference manuals (English, PDF/HTML).
– Software Reference (PDF)
Online refer ence with more detailed information about t he functions de scribed here; reference for extra functions only available with a separate license (e .g. VPN); reference for operation of the SNMP shel l.
– MIB Reference
HTML document with short descriptions about all SNMP tables and
variables for X3200.
■ BRICKware for Windows (English, PDF)
User’s guide for Wind ows uti lity programs (BRICKware)
■ Release Notes (Englis h, PDF and/or printed)
Up-to-the-minute information and instructions concerning the latest software release, description of all changes undertaken since the previous release.
In the Release Notes Logic, you will find i nstructions to hel p you upgrade
the BOOTmonitor and/or firmware logic.
■ UK information (English, PDF)
Instructio ns for the operation of Bi nTec routers in Great Britain.
You have received the documentation together with your X3200. The User’s
Guide you have received in print; in addition, you can find the complete documentation in elect ronic form (P DF, HTML) on the BinTec Companion CD. More over, the latest versions of all documents can be downloaded from
www.bintec.net.
20 BinTec Communications AG
Page 21

System Requirements
1.5 System Requirements
X3200 can be configured from all conventional platforms. X3200 is a stand-
alone device that is independent of the PC or operating system to which it is
connected. The router communicates with the PC over a LAN interface (10/
100 Mbps) or a serial connection. Your router can therefore be used in many
different operating system environments, such as DOS, Windows, UNIX, AS/
400, Macintosh or Novell.
For a Windows PC If you use a Windows PC to configure X3200, you need a terminal program for
the serial connection, e.g. HyperTerminal. Make sure that HyperTerminal is
also installed on the PC during the Windows instal lation.
Note th a t HyperTerminal is not incl uded in the standard installation of
Windows 98 and Windows ME.
1
Configuration Wizard If you want to use the Configuration Wizard, however, you will require the fol-
lowing:
■ PC with serial interface (V.24)
■ Windows 95, Windows 98, Windows NT 4.0 or Windows 2000
■ Insta ll ed network card (10 Mbps and/or 100 Mbps Ethernet )
■ Insta ll ed M icrosoft TCP/IP prot ocol
Before we start with the configuration, we will explain how you determine
whether the req uired s etti ngs h ave been m ade on yo ur PC or, i f necess ary ,
how you make these sett ings yourself.
■ High color monitor (more than 256 colors) for correct display of graphics
Remote CAPI CAPI support for communication applications and Unified Messaging is avail-
able for the following systems:
■ Windows 95, Windows98, Windows 2000 or Windows NT 4.0
■ Novell Netware 3.1x, 4.0x and 5.x
X3200 User’s Guide 21
Page 22

1
Welcome!
1.6 Guarantee Terms
X3200 comes with a war rant y of 24 months from the date of purchase.
Extend the gua rant ee period for your X3200 to 6 years free of charge!
How?
Simply register as BinTec X3200 custom er o nl ine at www.bintec.net within 14
days of the date of purchase.
In recognition of your efforts, we will extend your guarantee from 2 to 6 years
and give you a small present.
Guarantee 1. BinTec hereby guarantees this equipmen t against failure due to faulty ma-
terial and workman ship for a per iod of 24 months from the date of ini tial purchase. Should defects attributabl e to faulty material or workmanship occur
in the equipment during the gua rantee period, BinTec will repai r the equipment in accordance with the following conditions at no charge for labor or
material or (at the discretion of BinTec) replace the equipment itself or its
damaged parts. Exchanged equipment or parts shall become the property
of BinTec. Exchange equipment or spare parts shall be cove red for the remaining part of the original guarantee period, subject to a minimum guarantee period of 6 (six) months from the date of repair or exchange.
2. Work shall only be carried out under guarantee if the original bill or sales
check (showing date of purchase, product type and name of dealer) and a
description of the fault are submi tted togeth er with the defect ive equipment.
3. Before making a claim under guarantee, make sure you save a backup
copy of your con fi guration. BinTec is not liable in the event of loss of these
data.
Before you return the equipment for repair via your dealer, please remove
all parts, functions, equipment, changes and ad ditional equipment not covered by the guarantee. BinTec is not liable in the event of damage or loss
of these parts or devices . BinTec i s not liable for changes , deleti ons or othe r
modifications to the configuration of the equipment. The equipment will be
returned to you wit h a curr ent software version in an unconfigured state.
4. The following item s are excluded from this guarantee:
(1) Regular mainten ance and repair or replacem ent of parts due to normal
22 BinTec Communications AG
Page 23

Guarantee Terms
1
wear and tear.
(2) Expendable it em s supplied with this equipm ent.
(3) Removal of signs of use.
(4) Damage or loss of conf iguration data.
(5) Damage caused by (a) force majeure or reasons beyond the control of
BinTec; (b) incor rec t use, e special ly u se of the equipmen t for p urposes ot her than the int ended purpose or use not complying wi th the BinTec oper ating and maintenance manual; (c) incorrect use or maintenance of the
equipment; (d) connection of the equipment to unsuitable power sources;
(e) physical damage to housing; (f) repair attempts by third parties not authorized by BinTec; (g) use of equipment with accessories, equipment or
additional equipment from manufa cturers not autho ri zed by BinTec.
5. If BinTec can prove that no c ase exi sts fo r a clai m und er the gu arantee , the
costs of troubl eshooting and other r elated services shall be charged to the
customer.
6. This guarantee becomes invalid if the type or serial number of the equipment has been changed, deleted, removed or made unreadable.
Pick-up Service Apart from the guarantee provided, BinTec Communications AG offers you a
Pick-up Service for your X3200: If problems occur in the equipment hardware
within a period of one year, you can replace your X3200 free of charge. Your
defective equipment is usually collected from you on the next working day and
a replacement delivered at the same time.
To make it easier for you to use our Pick-up Ser vice, you will fin d a form for this
service enclosed with your equipment and at our World Wide Web site at
www.bintec.net.
X3200 User’s Guide 23
Page 24
1
Welcome!
1.7 About this Ma nual
1.7.1 Contents
This manual i s structured as fo llows:
Chapter Contents
1: "Welcome!" General introduction, scope of supply, guaran-
tee terms, inf ormation about this m anual.
2: "General Safety Precautions"
3: "Getting Started" Instructi ons on taking X3200 into operati on in a
4: "Connecting X3200" A basis for workin g wit h the Setup Tool.
5: "Basic Configu rat ion
with the Setup Tool"
6: "Advanced Configura-
tion"
7: "Security Mechanisms" How to configure secu ri ty mechanisms usi ng
8: "Configuration Management"
9: "Troubleshooting" Important ti ps on fault clearance.
10: "Technical Data" X3200 technical data.
General safety precautions.
few minutes using the Configuration Wizard
and how to install and configure other useful
software.
How to get X3200 working with the Setup Tool
(alternat ive to Configuration Wizard).
How to carry out more advanced settings with
the Setup Tool.
SAFERNET, e.g.
How to administ rate co nfigur at ion fil es an d how
to perform software updates.
➤➤ NAT or ➤➤ CLID.
11: "Important Commands"
24 BinTec Communications AG
A brief overvi ew of the most important commands of the SNMP shell and BRICKtools for
Unix.
Page 25
About this Manual
1
Chapter Contents
12: "General Safety Precautions in 15 Dif fer ent
Languages"
Table 1-1: List of chapters
General safety precaution s in var ious national
languages .
1.7.2 Meaning of Symbols Used
To help you locate and i nterpr et inf ormati on easil y, thi s manua l uses the following visual aids:
Symbol Meaning
Points out useful and relevant tips and tricks.
Predicts potential pitfalls and explains how to
avoid them.
Brings to your at tention general and important
points.
Explains additional background information.
X3200 User’s Guide 25
Page 26
1
Welcome!
Symbol Meaning
Brings your att ention to important safety precautions. Levels of danger are in accordance
with ANSI:
■ Caution (indicates possible danger that, if
unheeded, could cause material damage)
■ Warning (indicates possible danger that, if
unheeded, could cause bodily harm)
■ Danger (indi cates dang er t hat, if unh eeded,
could lead to serious bodily harm or death)
Table 1-2: List of visual aids
26 BinTec Communications AG
Page 27
About this Manual
1
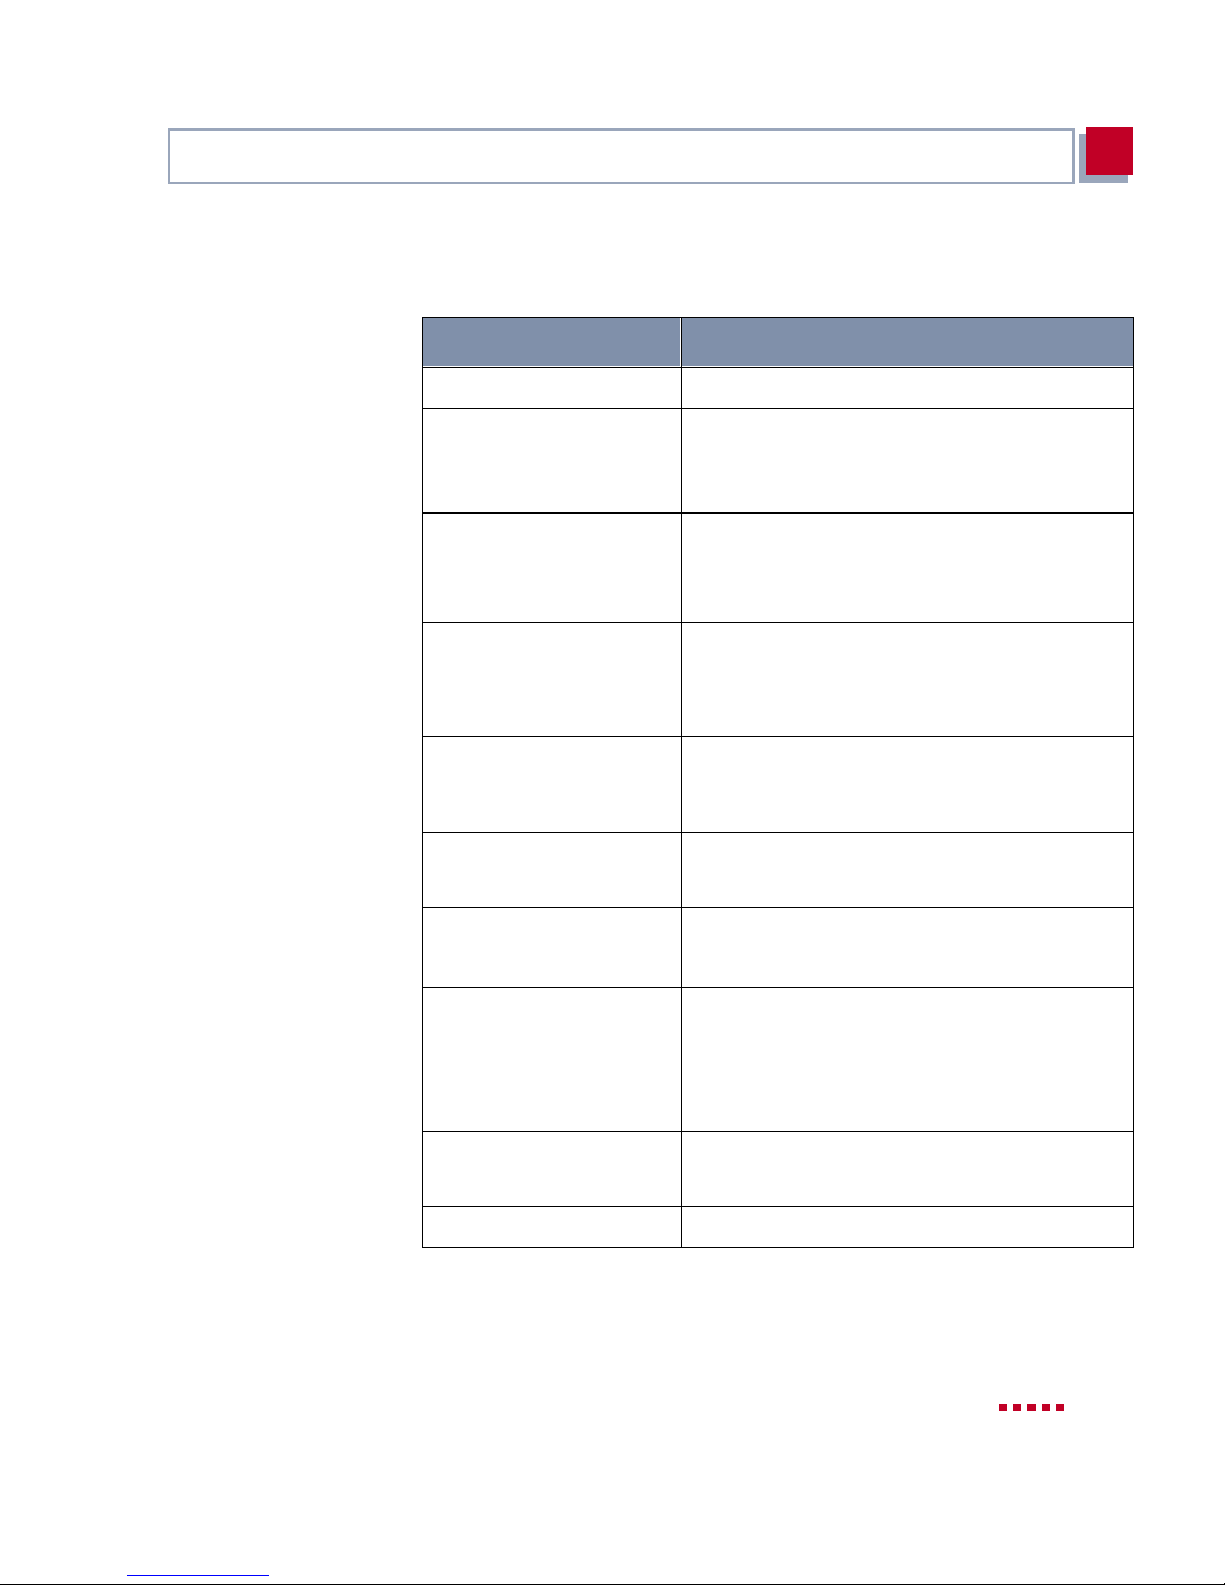
To help yo u find and interpret the information in this manual, the following typographical elements are used:
Typographical element Meaning
➤ Here you are requested to do something.
■
–
–
M
ENU
➧
S
UBMENU
Menu➧ Submenu
Non-proportional
(Courier), e.g.
ping 192.168.1.254
Lists including two level s.
Indicates menus and submenus in the Setup
Tool.
Indicates menus and submenus in Windows.
■ Indicates commands (e.g. in the SNMP
shell) that you must enter as shown.
■ Display in the Setup Tool.
<IP address> Indicates inputs in which you enter a value for
the term shown in the br ackets. Do not enter
the pointed brackets.
bold, italics, e. g.
BigBoss
bold, e.g.
➤➤ MIB
bold, e.g.
biboAdmLoginTable,
Indicates example terms.
Indicates terms you can find in the glos sary (for
online texts, click the doubl e arrow).
■ Indicates fields in the Setup Tool and MIB
tables and variables.
Windows Start menu
italics, e.g.
none
Online: blue Indicates links.
Table 1-3: Typographical elements
■ Indicates keys, key combinations and Win-
dows terms.
Indicates values that can be entered or set in
the Setup Tool or MIB var iables.
X3200 User’s Guide 27
Page 28

1
Welcome!
28 BinTec Communications AG
Page 29

2
2 General Safety Precautions
General Safety Precautions in English
The following sections contain safety precautions you are strongly advised to
heed when working with your equipment.
Transport and storage
Installation and
operation
■ Only transpor t and store X3200 i n it s original p ackaging or use o ther appr o-
priate packaging to protect against knocking and shak ing.
■ Read the information on the ambient conditions (see Technical Data) be-
fore installing and operating X3200. Place the equipment on a firm flat
base.
■ Condensation may occur externally or internally if the equipment is moved
from a colder room to a warmer room. When moving the equipment under
such condition s, a llow ampl e time fo r the equi pment to reach roo m temper ature and to dry out compl etely befo re operating. Obser ve the ambient co nditions under Technical Data.
■ Make sure th e nominal vo ltage on the l abel o f the mains unit is t he sa me as
the local power source.
■ Make sure you follow the correct cabling sequence, as described in the
manual. Firstly, connect the LAN, ISDN and serial cables, then connect to
the mains, and finally, turn on your X3200.
■ Make doubly sure the cablin g is correct – especiall y the ISDN and LAN ca-
bles – before you turn on X3200. X3200’s ISDN connection must not be
connected t o the Ethernet connect ion of your PC or hub, and X320 0’s LAN
connection should not be connected to the ISDN connection.
■ Use only the cables supplied. If you use ot her cables, BinTec Communic a-
tions AG cann ot accept l iabilit y for any d amage occurri ng or for any adverse
effects on operat ion.
■ Arrange the cables so that they are not in the way and cannot be tripped
over or damaged.
■ Do not connec t, disconnect or touch the data lines during lightning storms.
X3200 User’s Guide 29
Page 30

General Safety Prec autions
2
Operation according to
the regulations
Cleaning and repair
■ X3200 is intended for use in offices. As an ISDN multiprotocol router,
X3200 establishes WAN connections depending on the system configura-
tion. To avoid extra charges, you should carefully monit or the product.
■ X3200 meets the relevant safety standards for information technology
equipment for use in offices.
■ Operation of the system according to IEC 950/EN 60950 is only guaran-
teed when the top of the housing is fitted (cooling, fire protection, RFI suppression).
■ Ambient temperature should not exceed 50 °C. Avoid exposure to direct
sunlight.
■ Make sure no foreign obj ects (e. g. paper clips) or liq uids get into the equ ip-
ment (risk of electric shock, short-circuit). Make sure the equipment is sufficiently cooled.
■ In an emergency (e.g. damage d housing or operating elem ent, entry of liq-
uid or foreign bod ies), immediat ely disconnect the power supply and not if y
customer service.
■ The equipment should only be opened by trained personnel. Only service
centers authorized by BinTec should carry out any repairs to the equipment. Your dealer will tell you where the service centers are situated. Unauthorized opening and improper repairs can result in serious danger for
the user (e.g. electr ic shock). Unauthorize d opening of the equipment invalidates the terms of the guarantee and exempts BinTec Communications
AG from any liability.
■ Never use water to clean this equipment. Water spillage can result in seri-
ous danger for the user (e.g. electric shock) and cause considerable damage to the equipment.
■ Never use sc ouring or abr asi ve al kali ne c leani ng agent s o n thi s equi pment.
30 BinTec Communications AG
Page 31

3
3 Getting Started
This chapter wi ll he lp you t o co nfigur e the mos t im portan t and com mon a pplic ations for your local ne twor k or your sing le-us er syste m as qui ckly as po ssi ble. A
configuration assistant, the Configur ati on Wizard, helps to make the configu-
ration as easy as possible. With its help, you can configure X3200 in a ma tter
of minutes.
At the end of this chapter you will be able to:
■ Reach X3200 in the LAN
■ Surf the Internet
■ Sending and r eceiving faxes
■ If necessary, establish a connection to a remote network (LAN-LAN con-
nection, e.g. to your head offi ce) to access cor porate data from the co mfort
of your home office.
In order to set up these app li cations, you must first carry out the following:
■ X3200 set-up and connections (chapter 3.1, page 32)
■ Make a number of preparations (chapter 3.2, page 35)
■ Insta ll Windows software:
–Install BRICKware for Windows (chapter 3.3, page 41)
– Configure X3200 with the Configuration Wizard (chapter 3.5, page 48)
– Configure the Remote CAPI interface (chapter 3.6, page 63)
■ Make possible additional settings on your PC (chapter 3.7, page 65)
■ Install and configure RVS-COM Lite (chapter 3.8, page 70)
We will explain how to test t he configuration at the end of this chapter.
After finishing the basic configuration, you can optimize your configuration as
described in chapt er 6, page 173.
If you would like to know how to carry out the basic configuration without the
Configurati on Wizard (e.g. if you are not using a Windows operating system),
read chapter 5, page 101.
X3200 User’s Guide 31
Page 32
Getting Started
3
3.1 Setting Up and Connecting
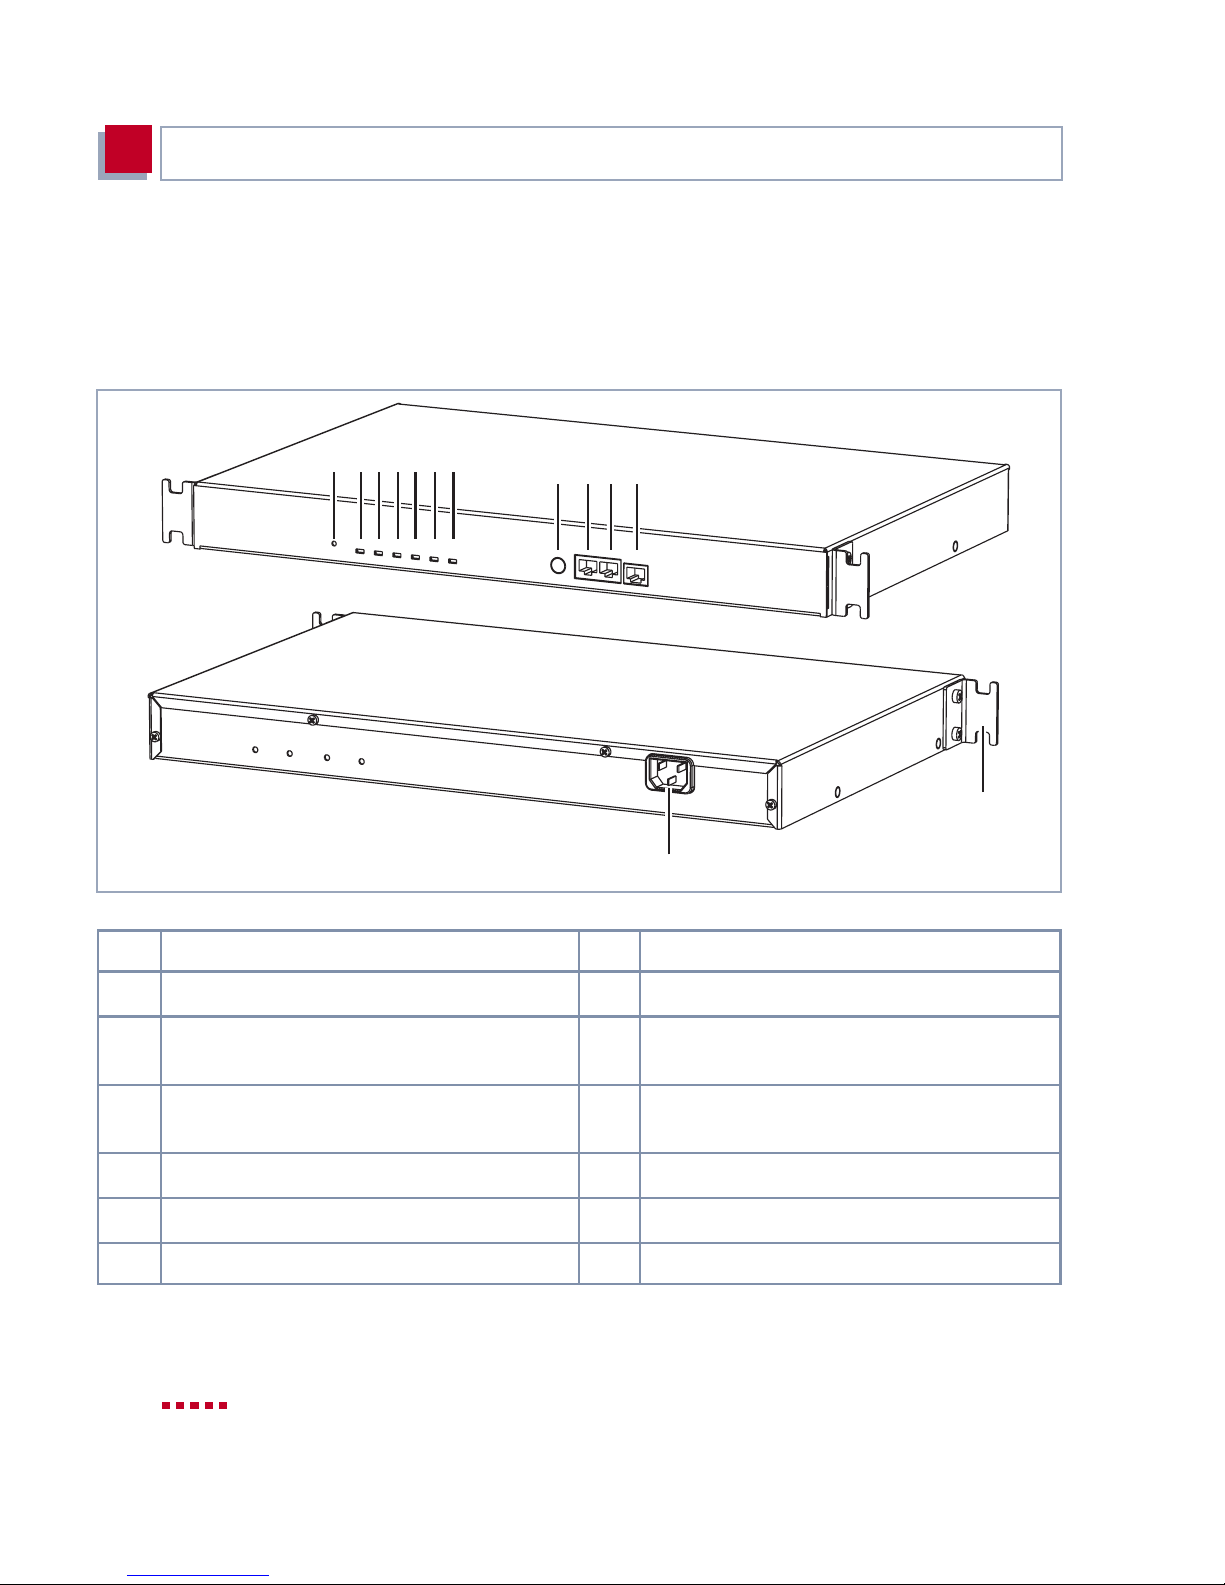
X3200 has been design ed to be mounted in a 19" rack, and all ports are fo und
at the front of the router.
1234567
8 9 10 11
12
1 Reset button 8 Serial interface
2 Power LED 9 ISDN S
0
port
3 xDSL LED 10 LAN interface
(10/100 Base-T Ethernet )
13
4 LAN LED 11 High-speed Internet interface
5S
5S
-1 LED 12 Power connection
0
-2 LED 13 Mount ing bracket
0
7Error LED
Figure 3-1 : X3200 front and re ar view
32 BinTec Communications AG
(10 Base-T Ethernet)
Page 33
Setting Up and Connecting
3
Alternatively, you can connect X3200 to the network card of your PC or, if you
belong to a small network, to a hub. You only need to make sure you use the
right cables.
Connect X3200 to the ISDN over the ISDN connection (4). It makes no difference to X3200 whether you use an ISDN socket, an
PABX. If, however, you want to use functions specific to a PABX, connect
X3200 to the PABX. This enables you to disable extensions, for example, so
that these never reach X3200 at all. Or you can check the charges for the extensions yo u assign to X3200.
Caution!
Incorrect cabling of ISDN or LAN interfaces can cause your router to malfunction!
➤➤ NTBA adaptor or a
➤ Only connect the LAN interface of X3200 to the LAN interface of your PC/
hub and the ISDN interface of X3200 to the ISDN connection.
Make the connections in the following or der:
➤ Place X3200 on a fir m level surface or mount it i n a 19" ra ck.
➤ Connect the serial port of your PC (COM1 or COM2) to t he serial interf ace
of your router (8, cf. figure 3-1, page 32). Use only the serial cable (gray)
supplied with the equipment.
You can connect X3200 to your hub (LAN) or to the network card of your PC
(single-user system).
To connect X3200 to your LAN, you need the red LAN cable supplied with the
equipment.
➤ Connect the LAN interface (marked red) of X3200 (10) t o your LAN.
The speed of your LAN (10 Mbps or 100 Mbps) is detected automatically
(auto sensing).
X3200 User’s Guide 33
Page 34
Getting Started
3
If you do not want to connect X3200 to a LAN, but directly to the network card
of your PC (single-user sy stem), you need the adaptor cable as well as the red
LAN cable.
➤ Connect X3200’s LAN int erface to your PC. Thi s is done by connecting the
red LAN cable to the LAN interface of X3200, which is marked red (10).
Plug the adaptor cable into the red cable. Connect the adaptor cable to the
network card of your PC.
➤ Connect the ISDN interface of the rout er (9) t o your ISDN con nect ion usi ng
the black ISDN cable (RJ45) supplied.
➤ Connect the Interne t interface (marked xDSL) of the router to t he 10 Base-
T interface of the
If you use the ➤➤ xDSL connection of a provider oth er than Deutsche Telekom AG, ask the pro vider about any special features of your ADSL connec ti on
that need to be taken into account.
➤➤ DSL modem.
If you receive a speci al cable from your provider for connecting the modem,
please use only this cable. If you need to extend this cable, use a standard
Ethernet cable.
➤ Connect X3200’s mains connection to the power supply with the power ca-
ble supplied.
X3200 performs a selftest. If all cables are correctly connected, the error
LED goes out at the end of the selftest and the power LED (operating display) lights u p.
34 BinTec Communications AG
Page 35
In Advance of Configura tion
3
3.2 In Advance of Configuration
3.2.1 Gathering Information
Before you start your configuration, you should have information available for
the following purposes:
■ Basic rou ter configuration with licensing (obligatory)
■ Internet access (optional)
■ Connecting to a corporate netwo rk (optional)
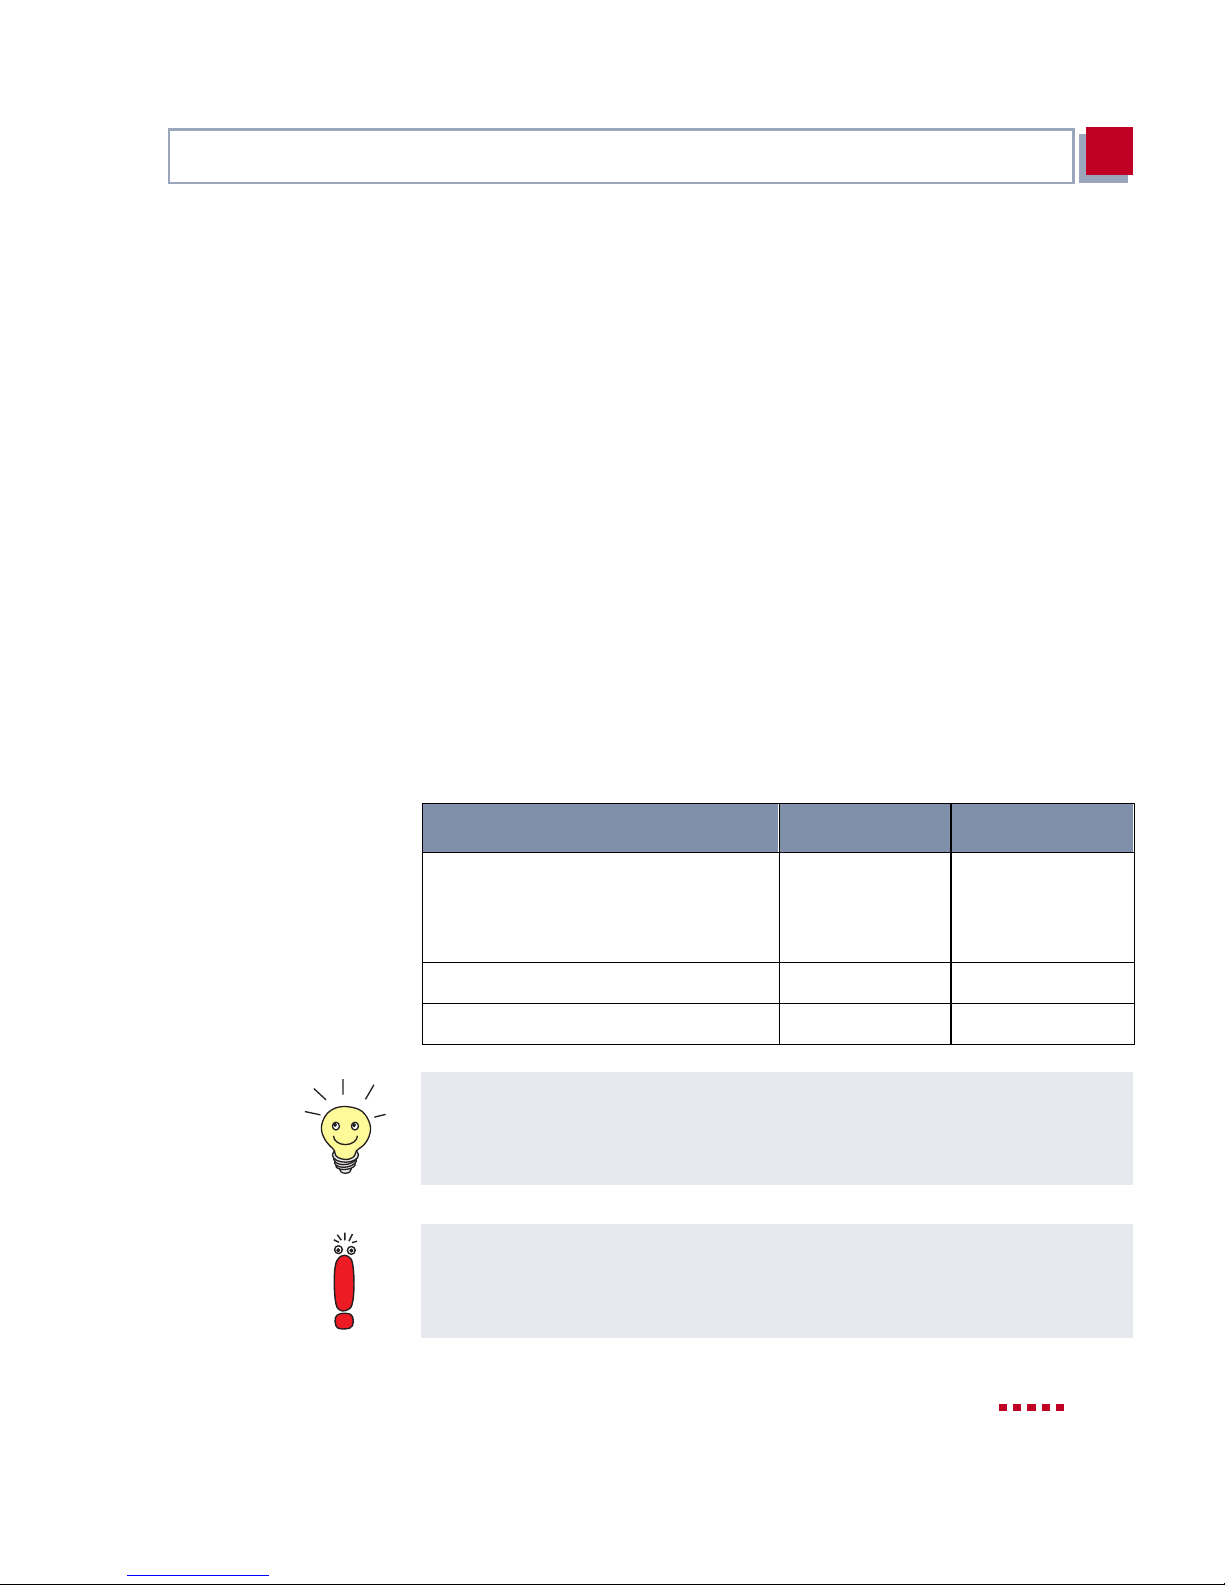
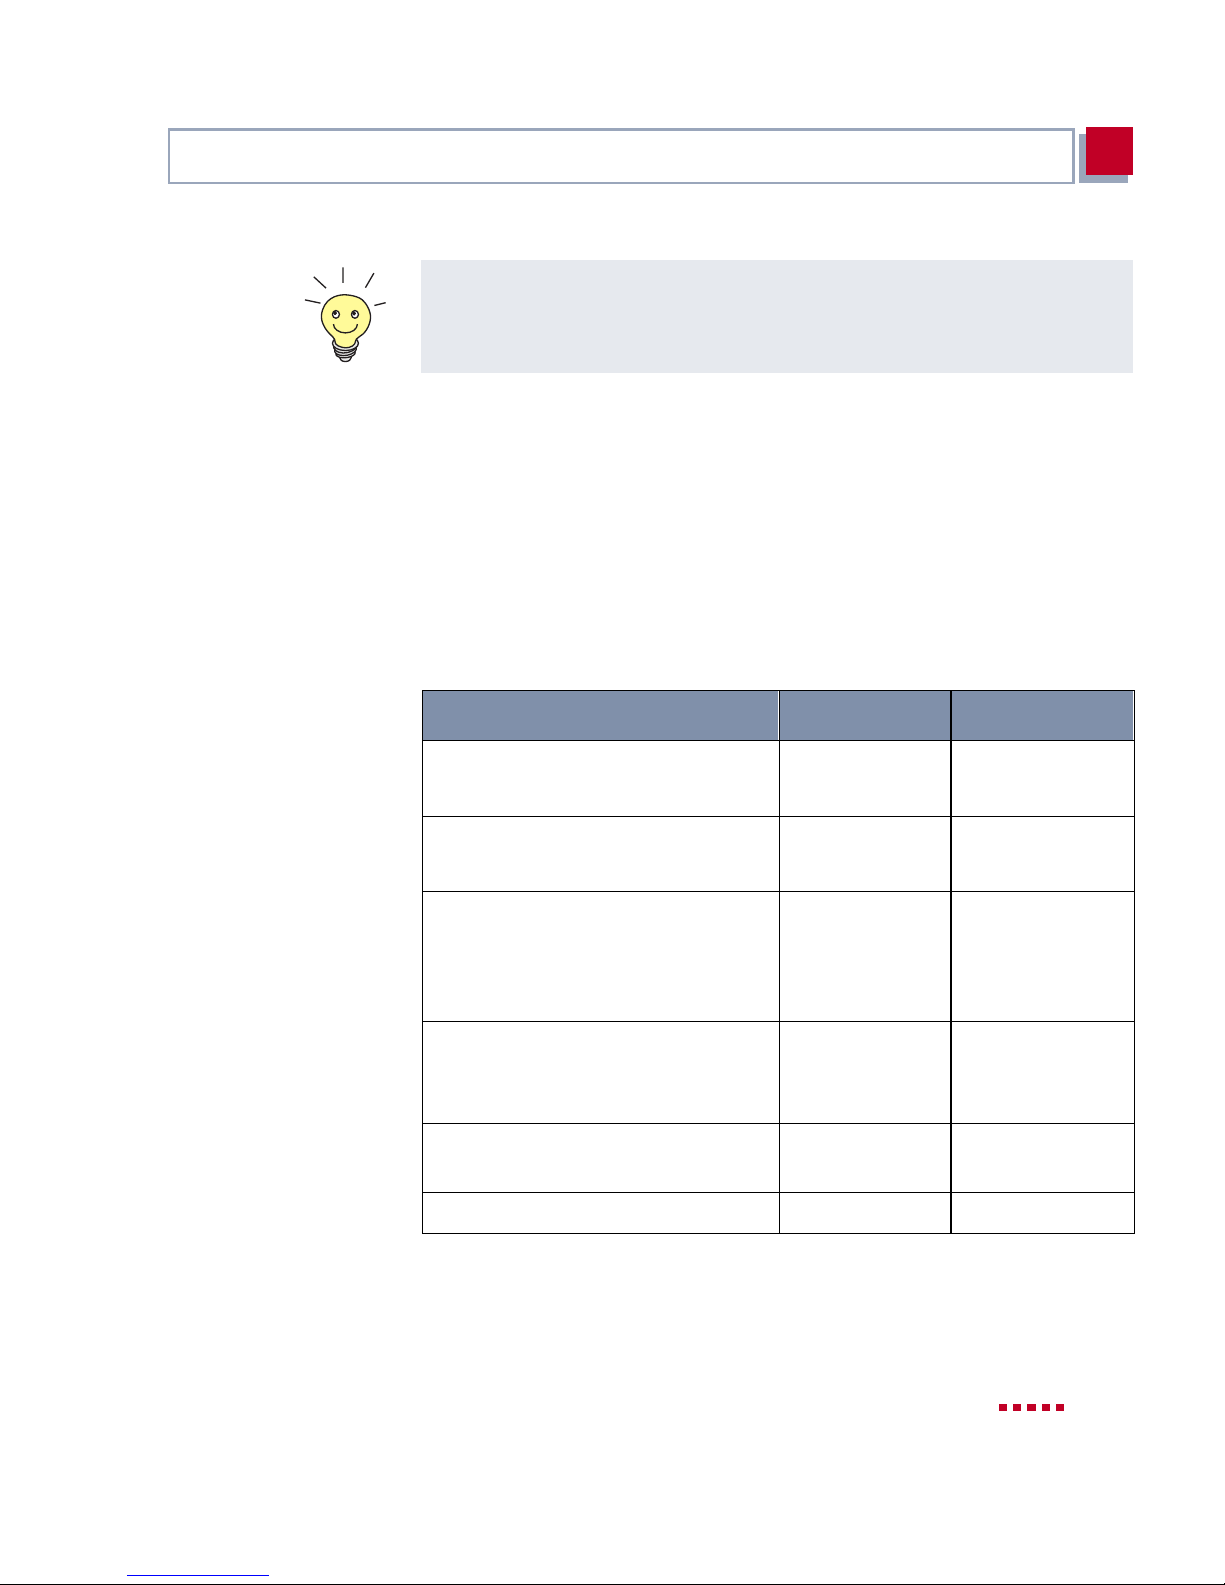
In the foll owing table, we have inclu ded exampl es of possi ble values for the nec essary access data. You should supplement the table with your personal data
under the heading "Your value". Then you can refer to the values later when
needed.
Basic router
configura tion
For the basic configuration of your X3200, you need information about your
ISDN connection and network environment:
Access data Example Your value
ISDN extensions
You received the ISDN extensions
with your ISDN connect ion.
X3200 IP address
X3200 Netmask
For a point-to-mult ip oint conne ction , it is suffici ent to ent er the fina l digits of the
ISDN extensions that differ for eac h num ber. If you have the foll owing exten-
sions (
to consider
A descrip tion of the setti ngs r equire d f or conne ct ing X3200 t o an NTBA ada pto r
is given below. If you are connecting to a PABX, note t he special charact eristics of your connection and refer to your PABX documentation if necessary.
➤➤ MSNs), for example:
10, 11
and 12.
967310, 967311
967310
967311
967312
192.168.1.254
255.255.255.0
and
967312
, you only need
X3200 User’s Guide 35
Page 36
Getting Started
3
If you are not in a network or do not know how to assign IP addresses and netmasks in a new network, then simply use our example values. Otherwise, ask
your system administrator.
License card All you now need for the basic confi guration is yo ur l icense card, whic h you re-
ceived together with your X3200. On the card you will find a serial number,
mask and key, whic h you wil l need to activate cert ain features of your X3200.
Internet access If you want to access the Internet, you will need an Internet Service Provider
(ISP). The ter ms of the re quired access data may var y sli ghtly from provider to
provider. Basically, however, the kind of information required to dial in and establish y our personal Intern et access r emains the sa me. The f ollowing table list s
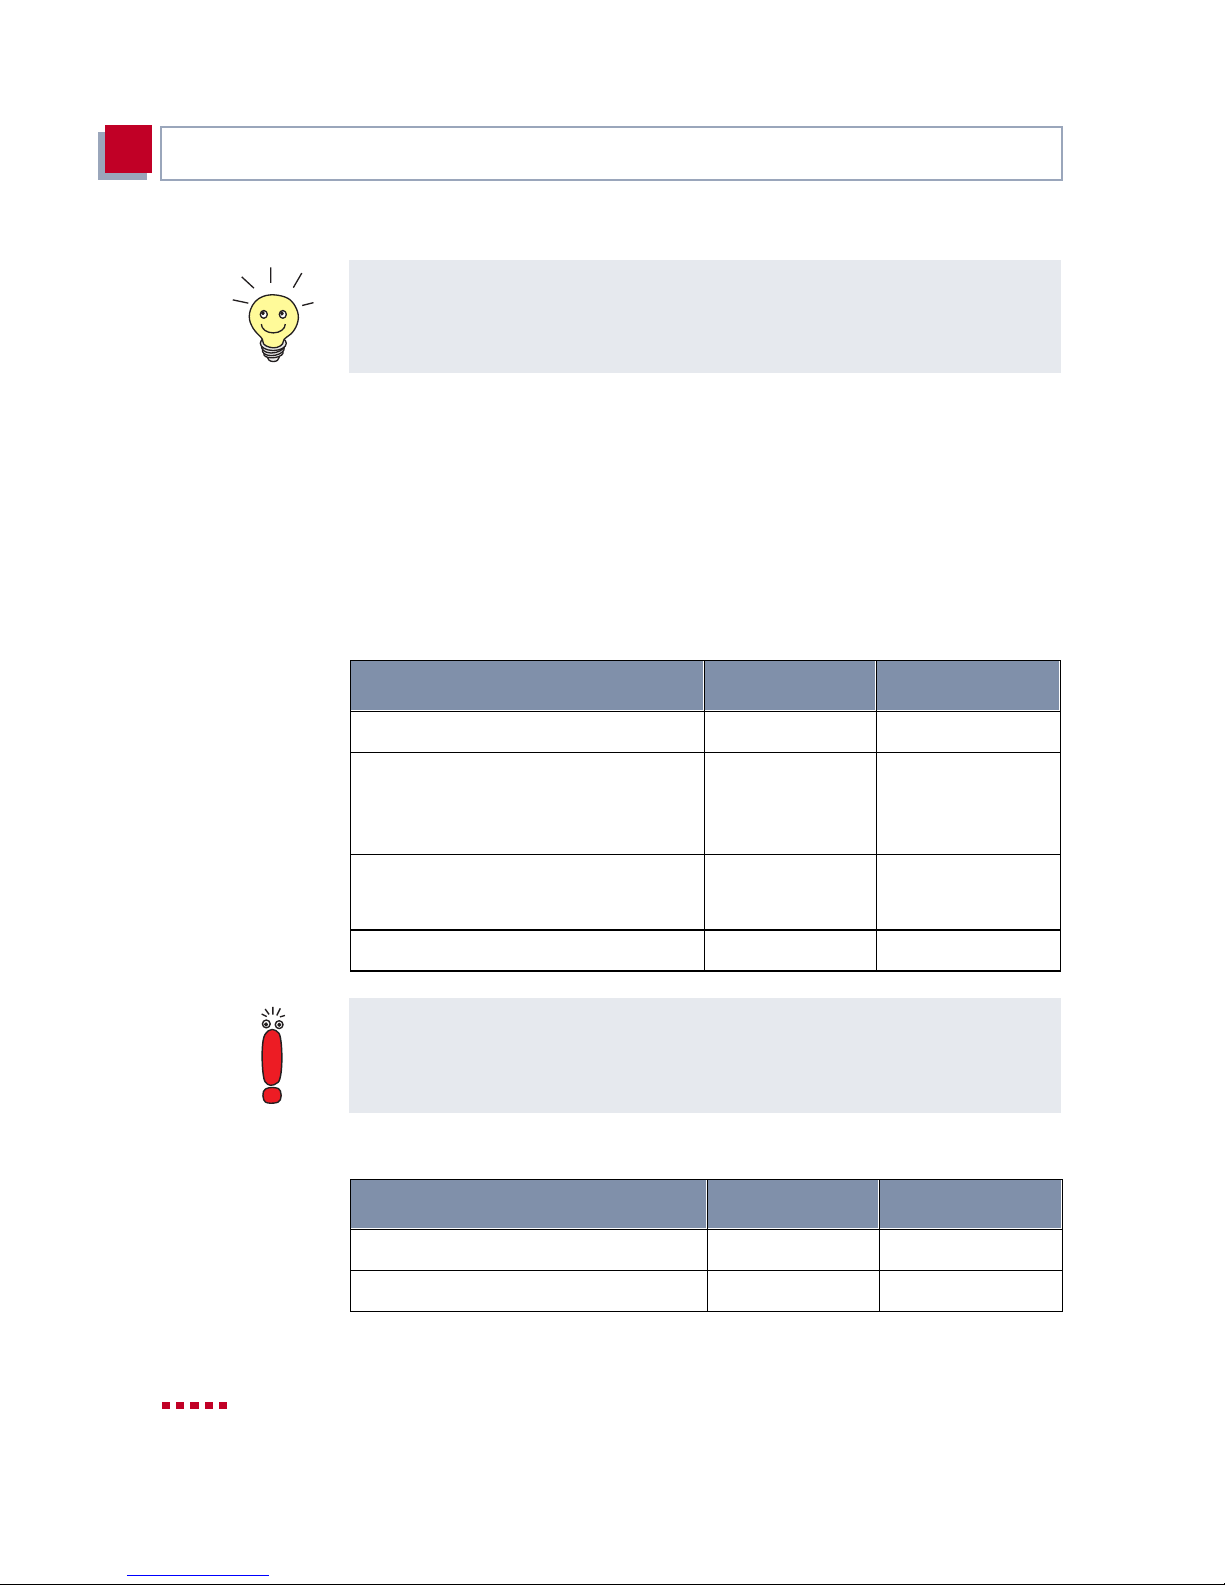
the access dat a that your X3200 also needs for a connection to the Internet:
1
Access data Example Your value
Provider name
Dial-in number
GoInternet
1234567
The ISDN extension you use to dial
in to your Internet Service Provider.
User account
MyName
Your user name
Password
TopSecret
When X3200 is connected to a PABX system for which a "0" prefix is necessary for external line access, this "0" must be considered when entering the
access number.
Some providers such as T-Online require additional information:
Access data Example Your value
T-Online number
Joint user account (other user code)
081512345678
0001
36 BinTec Communications AG
Page 37
In Advance of Configura tion
3
Some ISPs also offer the option of accessing the Internet without logging in
first ("Int ernet by call"). This means you can check immedi ately whether your
Internet access works with X3200, even if you want to apply to another ISP for
your personal access data later on.
Corporate network
connection
To connect to a WAN partner (e. g. head of fice) , you wil l need some inf ormati on
about the rem ote ter minal that i s to t ake your cal l. Likewi se, the remote t er minal
must have information about you. These data must be agreed between both
ends of the connection.
X3200 and t he router at y our HQ check t he incomin g dat a befo re ever y c onnec -
tion to see if they should take the call from the partner. To protect the network
against unauthorized access, the call is accepted only after correct au thentication. This authentication is based on a common password and two codes that
you and your partner use for the connection.
Access data Example Your value
Partner’s name
Code of head office
Dial-in number
Extension of head off ice’s router
Local name
Your own code. Your partner (at
head office) must enter this na me as
a partner name on his router.
BigBoss
0911987654321
LittleIndian
Password
Common password for this connec-
tion
Network address(es) of your head
office
Netmask(s) of your head office
Secret
10.1.1.0
255.255.25 5.0
X3200 User’s Guide 37
Page 38
Getting Started
3
How to use other securi ty mechanisms, e. g. authenticat ion by means of the cal ling number (CLID) or concealing your own network t o the outside (NAT), is explained in chapter 7, page 259.
When X3200 is connec ted to a PABX system for which a "0" prefi x is necessary for external line access, this "0" must be considered when entering the
access number.
You only need the network address and netmask of th e WAN par tner (head
office) if you configure Internet access in addition to a LAN-LAN connection. If
you are not configuring Inter net access, X3200 will be configured so that all
data not destined for your own local network will be forwarded au tomatically to
the WAN partner (default route).
Windows 95/98
3.2.2 What to Do in Your Windows Network
You have now gather ed all the information X3200 needs to know.
To make s ure everything works corr ectly, you also need to check whether your
PC is suitabl y confi gured in the networ k. If not, you wi ll need to make s ome settings.
In order that the PCs in your network can exchange data, the TCP/IP protocol
must be install ed. You should theref ore ensure that this protocol is installed on
your PC before beginning configuration.
Checkin g th e TC P /IP Protocol
To check if the TCP/IP protocol is already installed or to install it now, proceed
as follow s :
➤ Click the Windows Start button and then Setti ngs
➤ Double click Network.
➤ Look for TCP/IP in the list of net work components.
➧
Control Panel.
38 BinTec Communications AG
Page 39

In Advance of Configura tion
3
➤ If you can’t find the entry, install the TCP/IP protocol as explained below.
Windows NT
➤ Click the Windows Start button and then Settings
➤ Double click Networ k.
➤ Select the Prot ocols ta b and l oo k for TCP/I P Pr otocol in the l ist of network
components.
➤ If you can’t find the entry, install the TCP/IP protocol as explained below.
Windows 2000
➤ Click the Windows Start button and then Settings
Connections.
➤ Double click LAN Connection.
➤ Click the General tab and then Properties. Look for Internet Protocol
(TCP /IP) in the list of net work components.
➤ If you can’t find the entry, install the TCP/IP protocol as explained below.
Insta llin g t he TC P / IP Pr otocol
Windows 95/98 ➤ Click Add in the Network dial og box.
➤ Select Protocol in the list of networ k com ponents and click Add.
➤ Select M icrosoft as manufacturer and TCP/IP as network protocol and
click OK.
➧
Control Panel.
➧
Network and DCN
Windows NT
➤ If you are in an existing network, you may have to make other settings at
this point. Ask your system administrator.
➤ If you are setting up a new network, click OK.
➤ Follow the on-screen instructions and restart your PC when you have fin-
ished.
➤ Repeat the instal lation for all the PCs in your network.
➤ Click the Protocols tab in the Network dialog box. Click Add.
➤ Select TCP/IP protocol from the list of network pr otocols. Click OK.
➤ If setting up a new network, click Yes to answer the question.
➤ In an existing network, ask your system administrator.
X3200 User’s Guide 39
Page 40

Getting Started
3
➤ Follow the on-screen instructions and restart your PC when you have fin-
ished.
Windows 2000
Finally
➤ Click the Windows Start button and then Settings
Connections.
➧
Network and DCN
➤ Double click LAN Connection.
➤ Click the General tab and then Properties.
➤ Select the General tab and click Install.
➤ Select Protocol in the list of networ k com ponents and click Add.
➤ Select Internet Protocol (TCP/IP) as network protocol and click OK.
➤ If you are in an existing network, you may have to make other settings at
this point. Ask your system administrator.
➤ If you are setting up a new network, click OK and Close.
➤ Follow the on-screen instructions and restart your PC when you have fin-
ished.
➤ Repeat the installati on for all PCs on th e network where you want to use the
LAN-LAN connection, Internet access or communications programs over
X3200.
40 BinTec Communications AG
Page 41

Installing BRICKware Under Windows
3.3 Installing BRICKware Under Windows
➤ Close all Windows programs on your PC.
➤ Place your BinTec Compani on CD in the CD-ROM drive of your PC.
The start window appear s automaticall y aft er a short time.
➤ If the Start window does not open automatically, click your CD-ROM drive
in Windows Explorer and double-click setup.exe. (Or click Settings
Control Panel. First cli ck Software and then Install. Follow the ins truc-
tions on the screen.)
➤ Select the desir ed language in the Star t window or leave the def ault sett ing.
➤ Select BRICKware.
The configuration assistant is activated.
If the version of BRICKware saved on your PC is older th an version 5.2.1, you
will be asked to deinstall this so that you can install the current version of
BRICKware.
After version 5.2.1, you can carry out an update on your BRICKware.
If you alre ady have the cur re nt ver sion of BRI CKware install ed on your PC, you
can select from various installation possibilities during a new installation.
3
➧
Deinstalling If you are requested to deinstall BRICKware, follow the instructions on the
screen to remove the program from your PC. The win.ini file is saved on your
PC before deinstallation.
A window informs you as soon as BRICKware is deinstalled and you can now
install the software again.
New installati on Proceed as follows t o inst all BRICKware:
➤ Click Next.
➤ Enter the directory in whi ch BRICKware is to be instal led or accept the de-
fault direct ory.
➤ Click Next.
➤ Select your router type, i.e. the group
X1000, X1200, X3200 or X4000
➤ Click Next.
X3200 User’s Guide 41
.
Page 42

Getting Started
3
➤ Select the software com ponents you wish t o i nstal l. You ca n acce pt the de -
fault select ion or make another selection. Be car eful not to cancel the marking of the Configuration Wizard if you want to use the Configuration
Wizard for basic configuration of X3200.
➤ Click Next.
A list of the component s selected for the inst allation appea rs.
➤ To install these components, click Next.
The files are copied. A window appears after a short time telling you that
the installation of BRICKware is completed.
Update After BRICKware versi on 5.2.1 , you do not need to deins tall if you have an old -
Current BRICKware
already available
➤ If you want to configure X3200 again, leave the default setting
device configuration
The Configurati on Wizard starts.
er version of t he software on your PC, but can carry out an update.
and click Finish.
Continue
➤ Follow the instructio ns on the screen.
The existing BRICKware files on your PC are replaced with the new files.
A window appears after a shor t time telling you t hat the BRICKware update
is completed. Click Finish to end the update operation.
If a curren t version of BRICKware is alrea dy saved on your PC, you can cha nge
the existing installation, restore a defective part of the program or remove
BRICKware from your PC during a new installation.
➤ Follow the instructio ns on the screen.
The files are copied or removed from your PC. A window appears after a
short time tel ling yo u that th e maintena nce operat io ns are compl eted. Cl ick
Finish to end the maintenance operation.
42 BinTec Communications AG
Page 43
Solution Scenarios
3
3.4 Solution Scenarios
This section cont ains s ome co nfigur atio n exa mples t o exp lain some of t he mos t
frequently asked questions about configuration.
You only need to run throu gh the Configuration Wizard once, even if you
want to combine several suggested conf igurations.
3.4.1 Configuring High-Speed Internet Access
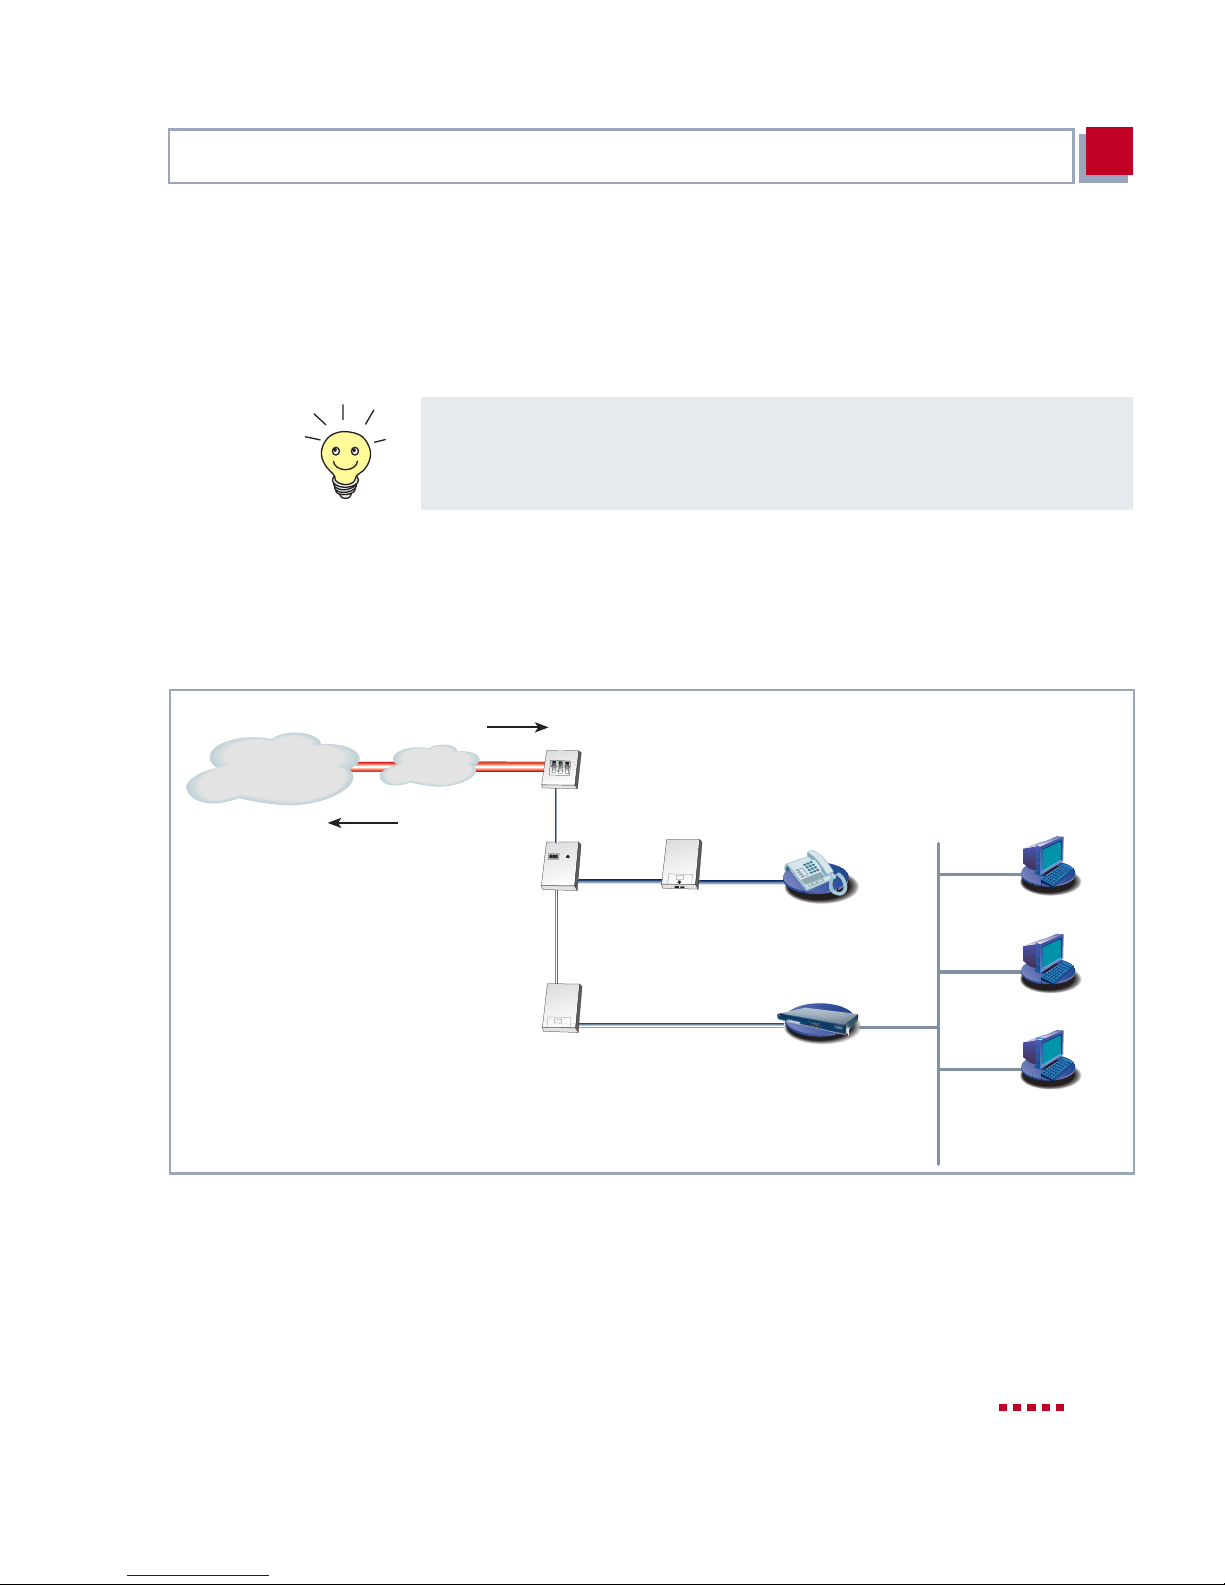
Before you can use high -speed I nt ernet ac cess, y ou nee d an xDS L connect ion ,
e.g. from Deutsche Telekom AG.
Customer
T-ISDN
T-ISDN dsl
ADSL
ADSL splitter
(BBAE)
ADSL modem
(NTBBA)
Figure 3-2: T-IS DN dsl connection
NTBA
ISDN telephone
192.168.1.1
192.168.1.2
X3200
192.168.1.254
192.168.1.3
You can quickly and easily configure high-speed Int ernet access for X3200 under Windows using the Configuration Wizard.
X3200 User’s Guide 43
Page 44

Getting Started
3
Proceed as described in chapter 3, page 31. Follow the instructions on the
screen. and note the following:
■ Select the confi guration items (see chapter 3.5, page 48):
– Basic Router Configuration, for making the basic router settings
(chapter 3.5.1, page 51).
– Internet Connection, for configuring your Internet access
(chapter 3.5.2, page 55).
■ For the Inter net co nnecti on, sele ct t he ISP
or if applicable another provide r and hi s high-speed access.
T-Online
and the network
T-DSL
■ Complete the configuration as described in chapt er 3.5. 4, page 60.
■ If you want to access the Internet from several PCs, proceed as described
in chapter 3.7, page 65.
■ Finally test your configuration (see chapter 3.9, page 77).
If you would like to use the Setup Tool for configuring the high-speed access,
refer to t he T-DSL confi guration example for the I nternet Ser vice Provi der T-Online (see chapter 5.2.2, page 155). Please also note the configuration example
for an ADSL connection of the ISP Telekom Austria (see chapter 5.2.2,
page 155).
44 BinTec Communications AG
Page 45
Solution Scenarios
3
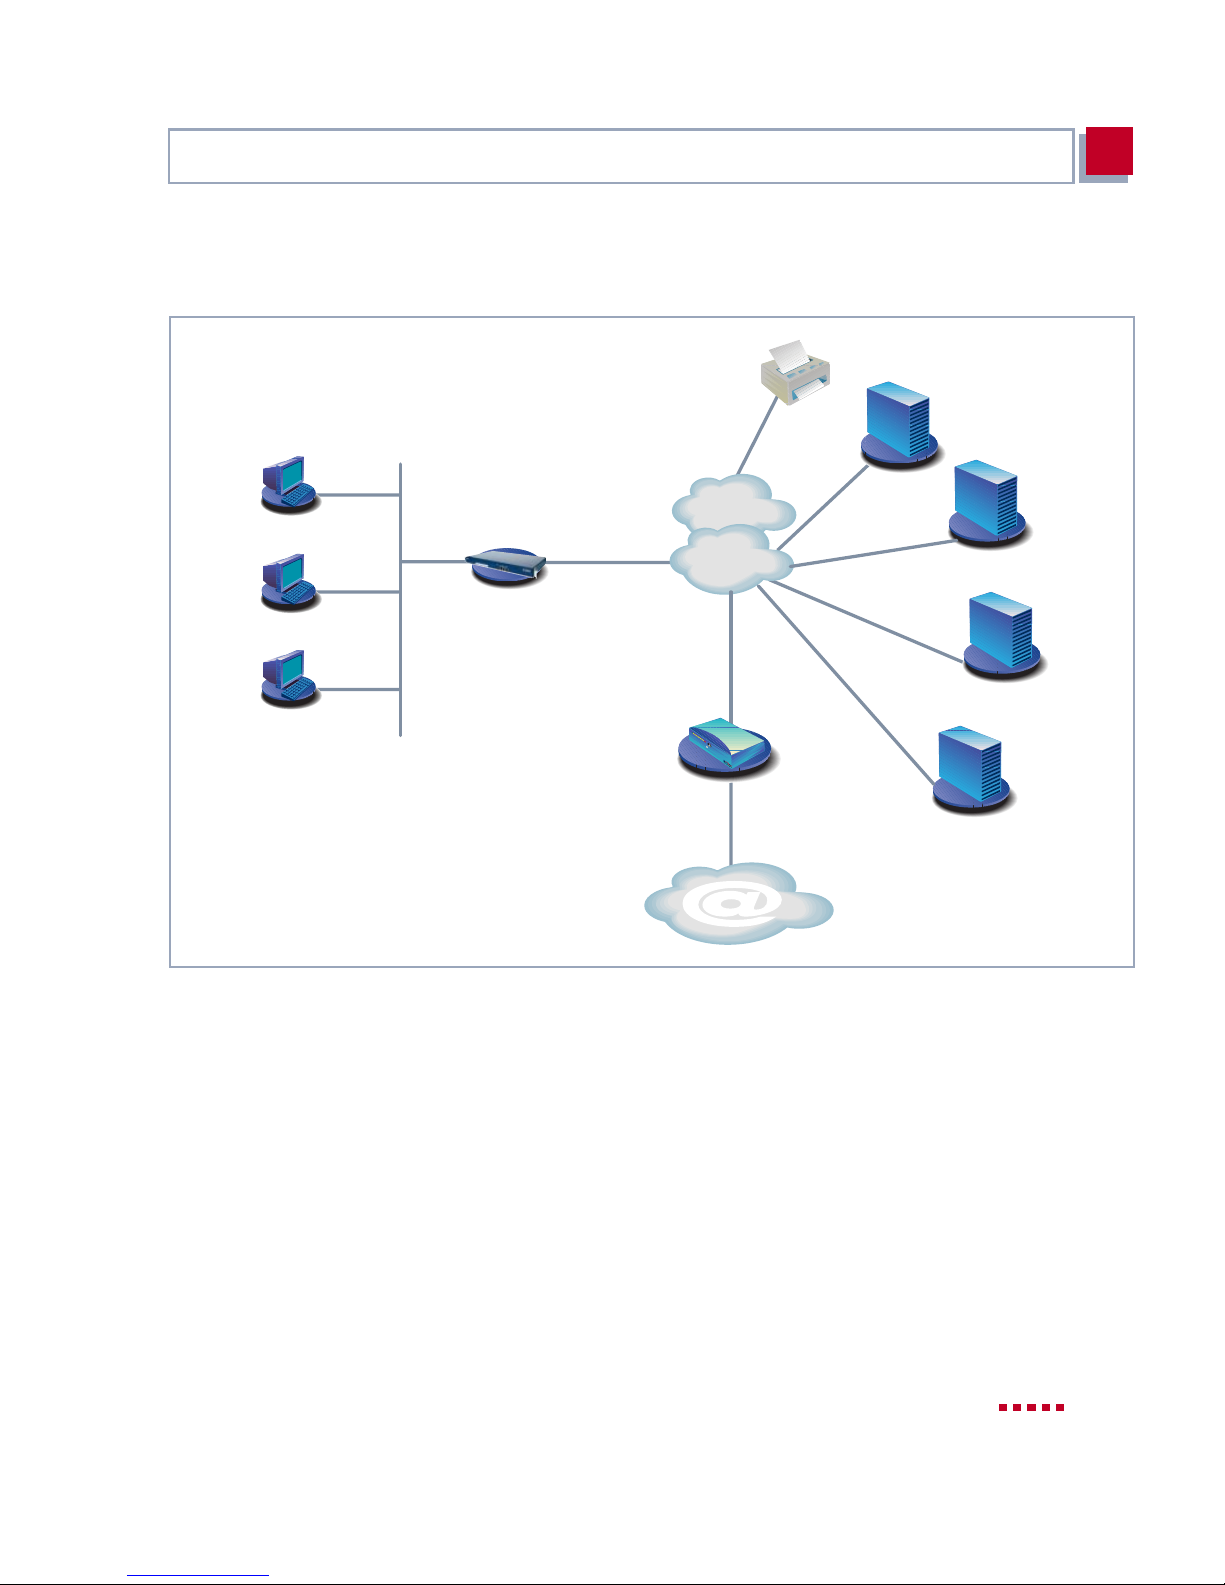
3.4.2 Using Communications Applications
FAX
X3200
Your Local Area Network
Figure 3-3: X3200 with communications application s
Use the Configuration Wizard under Windows to use communications appli-
cations (e.g. fax and answering machine) from several PCs.
Router of your
Internet Provider
analog
ISDN
BIANCA/BRICK-XM
Internet
Mailbox
FTP server
FAX server
Datex-J server
Proceed as descr ibed in chapt er3.2, pag e 35 onwards. Follow the instructions
on the screen. and note the following:
■ Select the configuration items (see chapter3.5, page 48):
– Basic Router Configuration, for making the basic router settings
(chapter 3.5.1, page 51).
■ Complete the configuration as described in chapter 3.5.4, page 60.
X3200 User’s Guide 45
Page 46
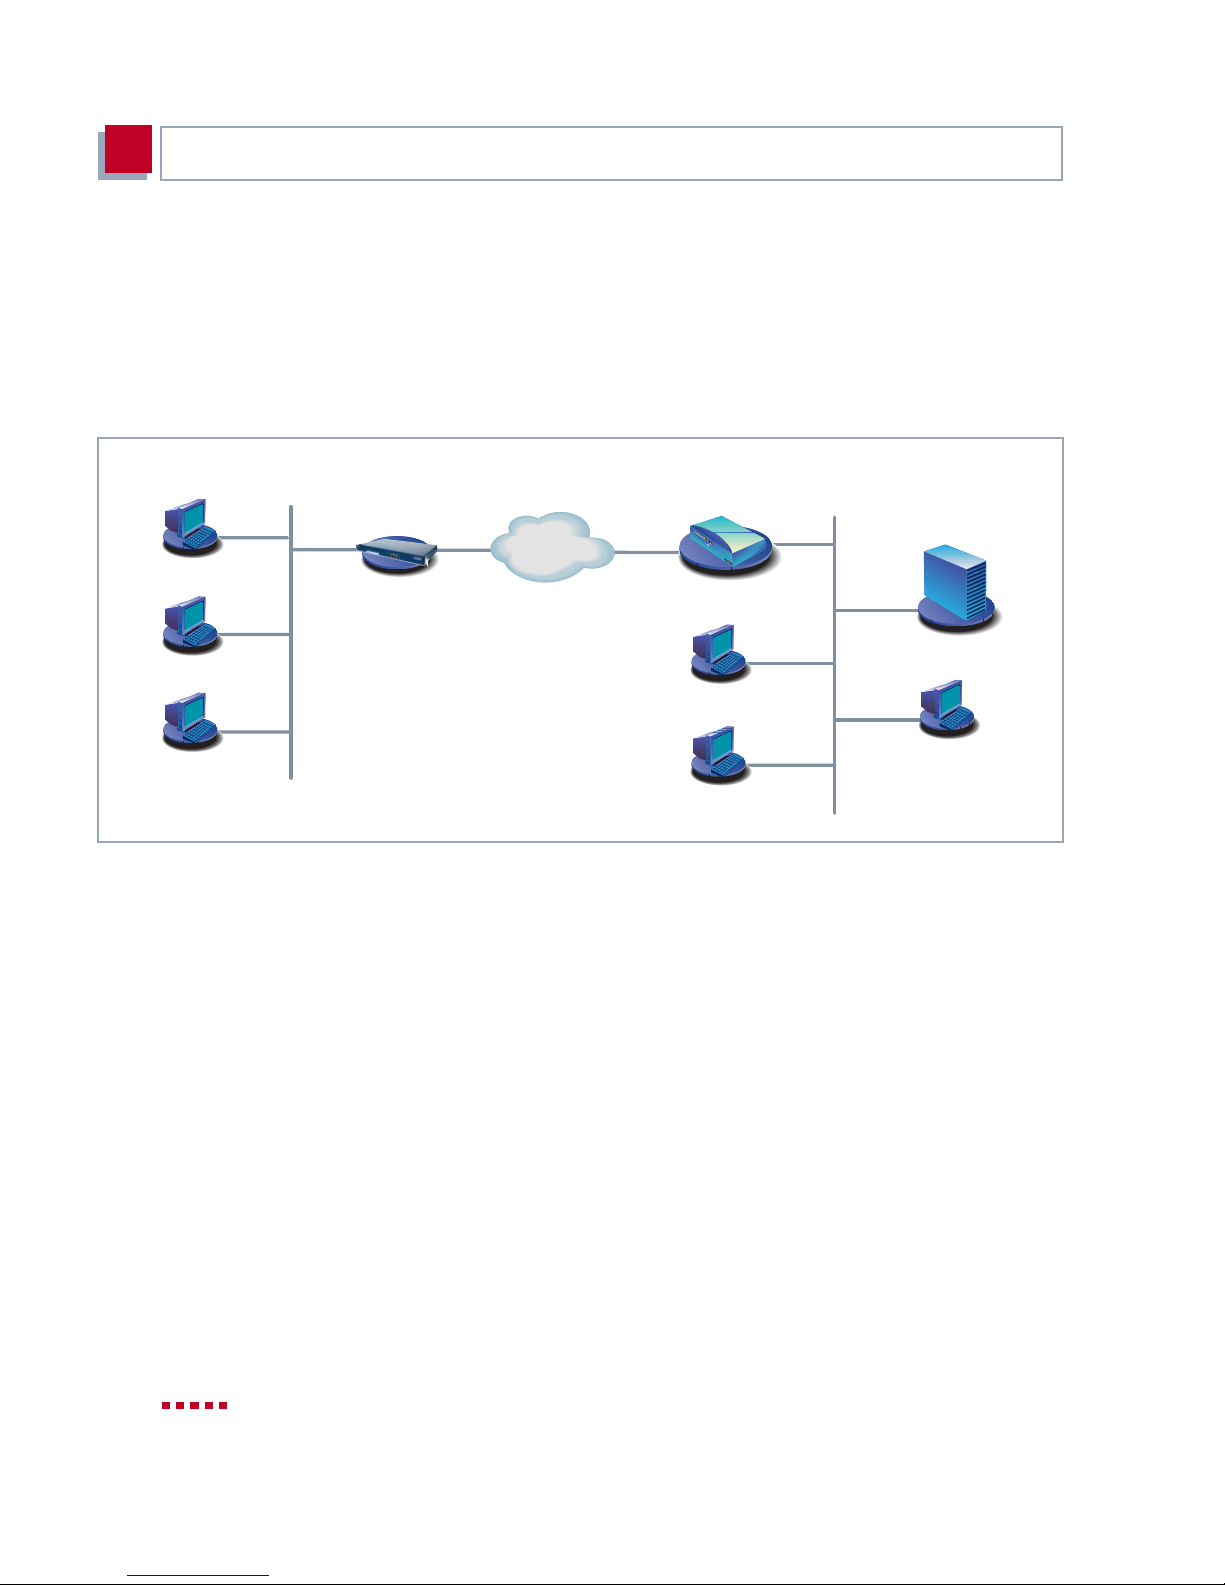
Getting Started
3
■ Configure the Remote CAPI inte rf ace (see chap ter 3.6, page 63).
■ Configure FAX and answer ing machine, if requi red (chapt er 3.8, pa ge70).
3.4.3 Connecting a Branch Office to Head Office
Router of your
Companys
Head Office
X3200
Your Local Area Network
Figure 3-4 : X3200 in your branch office
You can quickly and easily connect branch offices or home offices to the head
office using the Configuration Wizard under Windows. The employees in the
branch office or home office can then access data at the head office as if they
were in the head off ice.
Proceed as described in chapter 3, page 31. Follow the instructions on the
screen. and note the following:
■ Select the confi guration items (see chapter 3.5, page 48):
ISDN
BIANCA/BRICK-XM
Network of your
Companys
Head Office
– Basic Router Configuration, for making the basic router settings
(chapter 3.5.1, page 51).
– Connection to a Corporat e Network, e.g. for connect ing to a head of -
fice (chapter 3.5.3, page 58).
■ Complete the configuration as described in chapt er 3.5. 4, page 60.
■ Make additional settings on your PCs (chapter 3.7, page65).
46 BinTec Communications AG
Page 47
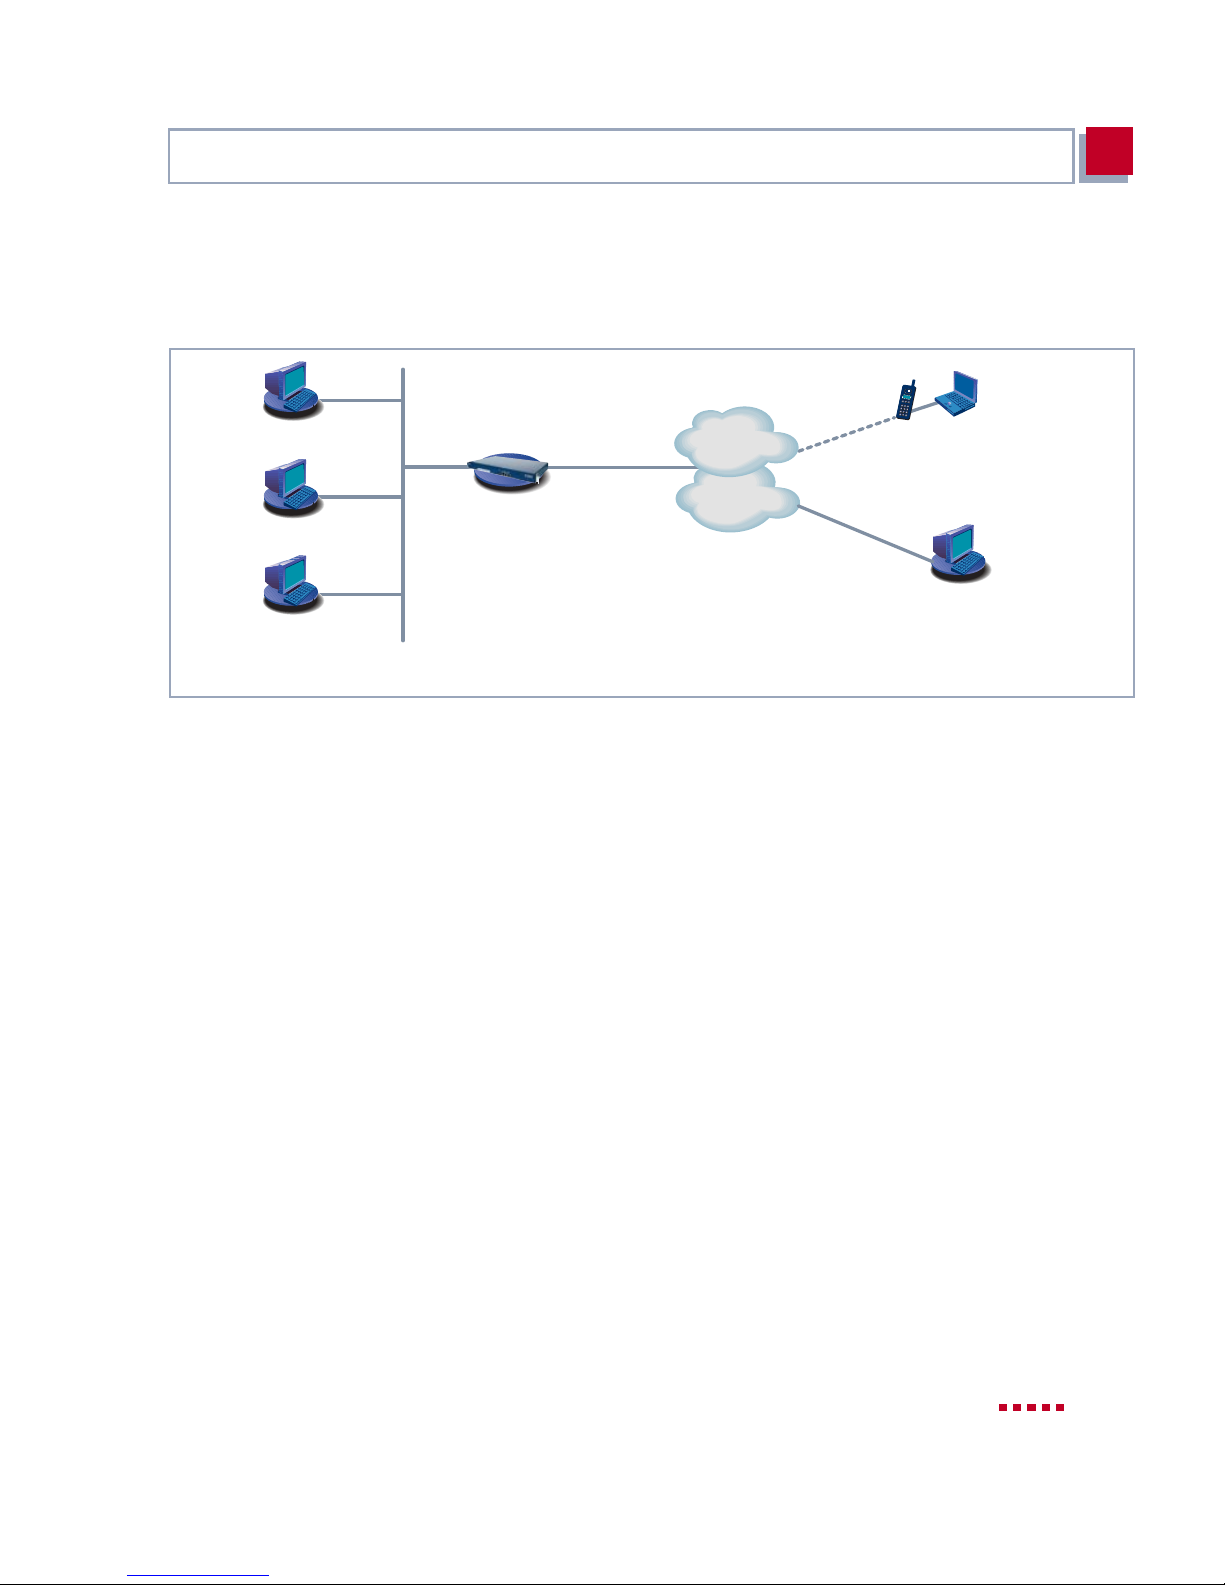
Solution Scenarios
3
3.4.4 Providing Access to Head Office for Field
Service Staff without Router Access (Dial-In)
X3200
Your Local Area Network
Figure 3-5: X3200 in head office
To provide field service or home office staff with access to data at their head
office (dial-i n), you need the Setup Tool for configuring you r X3200.
A PC in a home office can access the corporate network via an ISDN connection using
Field service staff can dial in to the head offi ce via lapto p and mobile phone ov er
the GSM.
First you must carry out the basic configuration of the router. You can use the
Configuration Wizard (cf. chapter 3.5.1, page 51) or the Setup Tool (see
chapter 5, page 101) for this purpose .
GSM
ISDN
➤➤ dial-up networ king.
Mobile Phone and Laptop
Single workstation
with ISDN card
Next you must conf igur e the pers on who wants t o acc ess data at head office as
a WAN partner. The exact configuration is explained using an example in
chapter 5.2.3, page 163.
X3200 User’s Guide 47
Page 48
Getting Started
3
3.5 Configuring X3200 Under Windows
You started the Configuration Wizard in chapter 3.3, page 41, which you can
now use to configure X3200. X3200 must first be ready for operation.
The following configuration options are available:
■ Basic router configuration
■ Internet access
■ Corporate network connection
An extensive online Help Assistant is available if you have any questions during configuration. To activate our context-sensitive online Help Assistant:
➤ Press F1 or cli ck Help.
If you have already used the Configuration Wizard to create a configuration,
the Wizard can adopt the pres et values. At the end of the configuration , the Wizard transfers the new configu ration fil e to the router and al so saves it t o your PC.
You can also sav e the original configurat ion file of X3200 at the end of t he configuration on the router (under old_cfg), as long as you have not forgotten the
password.
If you are operati ng X3200 on a point-to-point connectio n, an ent ry must be
made in Setup To ol in ad diti on to t he sett ings unde r Wi zard. I n
S0
➧
I
NCOMING CALL ANSWERING
bers to
cally as this is not the default setting. See also chapter 5.1.4, page 112.
left to right (D D I)
. The Wizard does not make these settings automati-
, set the mode for the comparison of num-
CM-1BRI, ISDN
48 BinTec Communications AG
Page 49
Configuring X3 200 Under Windows
3
Starting the
Configuration Wizard
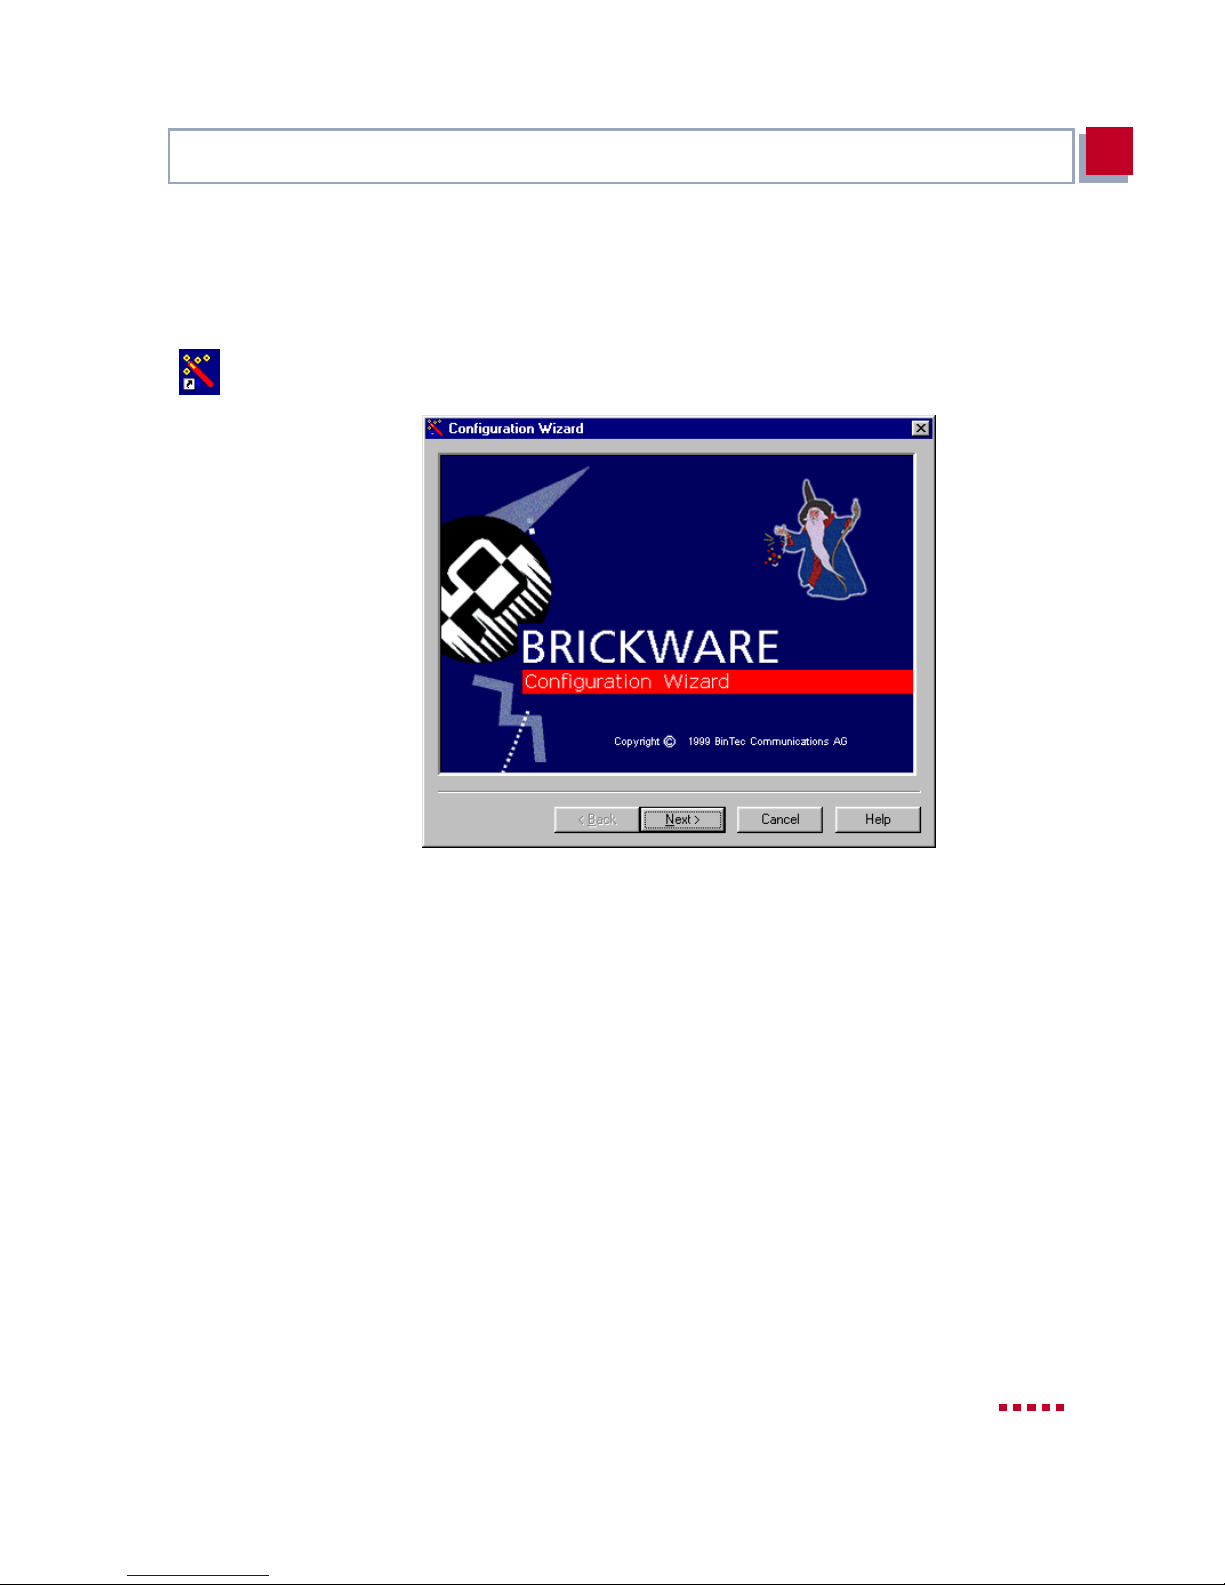
If the Conf iguration Wizard has not yet been started, proceed as follows:
➤ Select the Windows Start menu and click Program
Configuration Wizard.
The start window of the Configuration Wizard opens:
➧
BRICKware
➧
Setting the
configurati on mo de
Figure 3-6: Configurati on Wiza r d start window
➤ Click Next.
In the following window, choose between Quick and Expert Mode.
➤ If you are not very familiar with networking technologies, choose Quick.
The following is an explanation of how to confi gure using the Quick Mode.
➤ If you are already familiar with networking technologies and the configura-
tion of routers, you could choose Expert.
In this mode, you could:
– configure your router as a DHCP server.
– configure different users for communi cations applications
– assign different ISDN extensions to diff erent services (e.g. fax)
– define different filters
X3200 User’s Guide 49
Page 50
Getting Started
3
Configurati on wit h the Quick Mode is sufficient in many cases. You can use
Expert Mode to optimize an X3200 configuration you have created in Quick
Mode.
However, if you first use Expert Mode and then Quick Mode, the complete configuratio n will be over wri tten and the previous configuration in Exper t Mode will
be lost.
➤ Click Next.
A message appears sayi ng the router will reboo t fo r a seri al connection.
Making a serial
connectio n
Selecting
configuration opt ions
➤ Click Next.
The Configuration Wizard establishes a connection to X3200. After that
the router is restar ted and t he type of rout er identif ied : in yo ur case, X3200.
If the Configuration W izard ca nnot establi sh a connectio n or an error message
appears:
➤ Make sure X3200 is correc tly connected.
➤ Check to see if a terminal program (e.g. HyperTerminal) or another pro-
gram is running and occupying the serial interface. If yes, close the program.
➤ Check if X3200 ´s bau d rat e ha s c hanged. The ex works s etti ng is 9600 bps.
If you have chan ged the baud ra te, set it to 960 0 bps again or use the Con-
figuration Wizard in Expert Mo de .
➤ If the Configuration Wizard could not boot X3200, switch X3200 off and
then on again. Wait unt il the LEDs stop blinking.
➤ Click Next.
➤ Click OK and then Next.
➤ Select one or more of the following options:
– Basic Router Configuration, for making the basic router settings
(chapter 3.5.1, page 51).
– Internet Connection, for configuring your Internet access
(chapter 3.5.2, page 55). You can configure the Internet access either
as high-speed access vi a ADSL or, if you wish, as conventi onal access
via ISDN.
50 BinTec Communications AG
Page 51
Configuring X3 200 Under Windows
– Connection to a Corporate Network, e.g. for connect ing to a head of -
The basic router set tings will have to be made in eve ry case.
➤ Click Next.
A list of the selected configuration options is displayed.
➤ Click Next.
3.5.1 Configuring the Basic Router Configuration
3
fice (chapter 3.5.3, page 58).
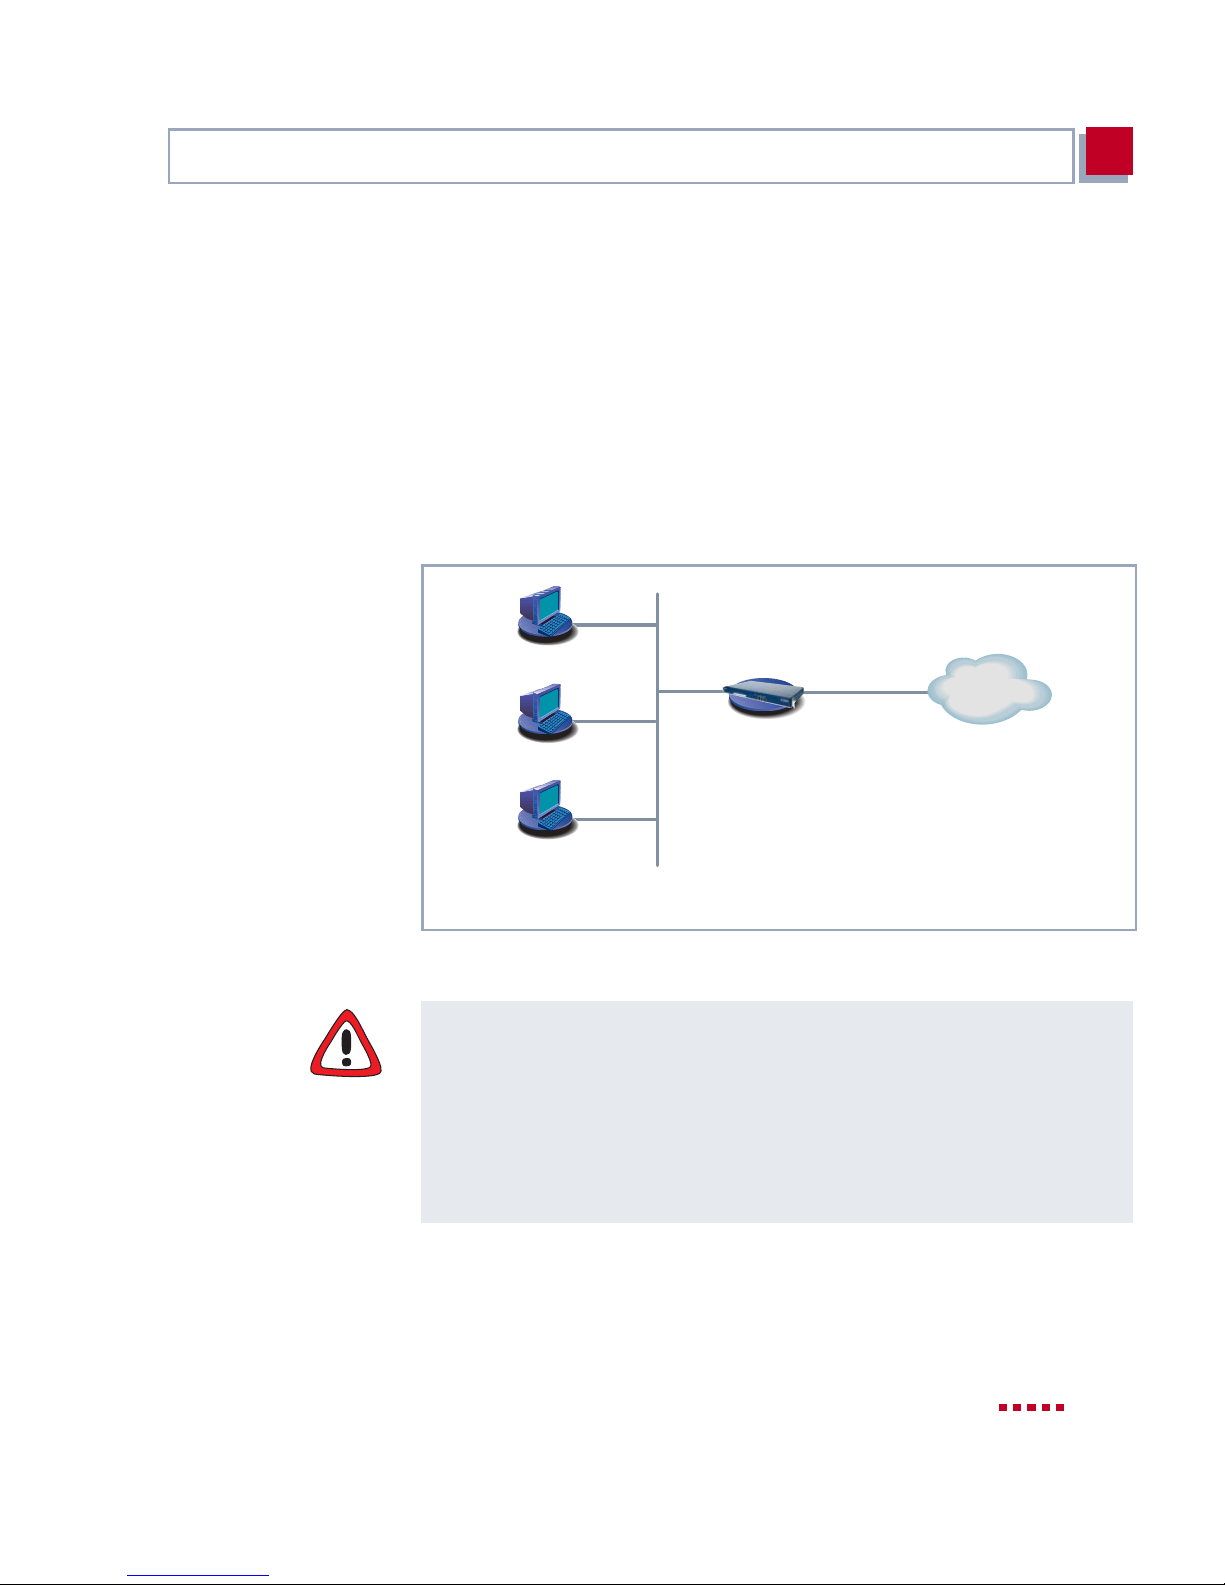
192.168.1.1
192.168.1.2
192.168.1.3
Your Local Area Network
Figure 3-7: X3200 basic co nfigura tio n
192.168.1.254
X3200
(10, 11, 12
ISDN
Caution!
All BinTec routers are shipped with the same user names and passwords. As
long as the passwor d re mains unchan ged, they are not prot ected aga ins t unauthorized use. How to cha nge the passwords is descri bed in "Changing the pas s-
word", page 95.
➤ You must therefore change your system password when requested to do
so.
X3200 User’s Guide 51
Page 52
Getting Started
3
➤ First enter your licens e data, which can be found on you r license car d. Click
Next.
The Conf iguration Wizard checks the settings of the PC on which it star t-
ed and derives suggested values for the confi guration.
The Configuration Wizard provides different configuration options, according
to how your PC is configured.
Unconfigured network
An already configured
network
➤ If your PC is still unconfigured, does not have an IP address and is config-
ured as a DHCP client, the Wizard will ask you if X3200 should be config-
ured as a DHCP server and if you wish to retain the sugg ested settings.
➤ Click Next.
Your X3200 receives the IP address
signs all PCs in the network an IP address beginning with
If you are familiar with networking technologies and do not want to configure a
DHCP server or you want to configure the settings for a DHCP server and IP
addresses your self, proceed as foll ows:
192.168.1.254
and automatically as-
192.168.1.1
.
➤ Deactivate the field Use this Configuration.
➤ Now enter X3200´s IP address and the corresponding netmask,
192.168.1.254
e.g.
and
255.255.255.0
. Click Next.
➤ State whether you want to configure X3200 as a DHCP server. If you do,
enter the IP address range for your PCs and define the number of IP addresses to be assigned by X3200.
After configuration, remember to assign your PCs fixed IP addresses if no
DHCP server is configured (cf. chapter 3.7.1, page 65).
➤ If your PC has a fixed IP address, the Wizard asks you in the Router I P Ad-
dress window for X3200’s IP address in the LAN and the corresponding
netmask. Enter the val ues, e.g.
192.168.1.254
and
255.255.2 55.0
.
➤ Click Next.
➤ Enter a new password for your access authorization.
➤ Click Next.
All system passwo rds are provided with this new password.
52 BinTec Communications AG
Page 53
Configuring X3 200 Under Windows
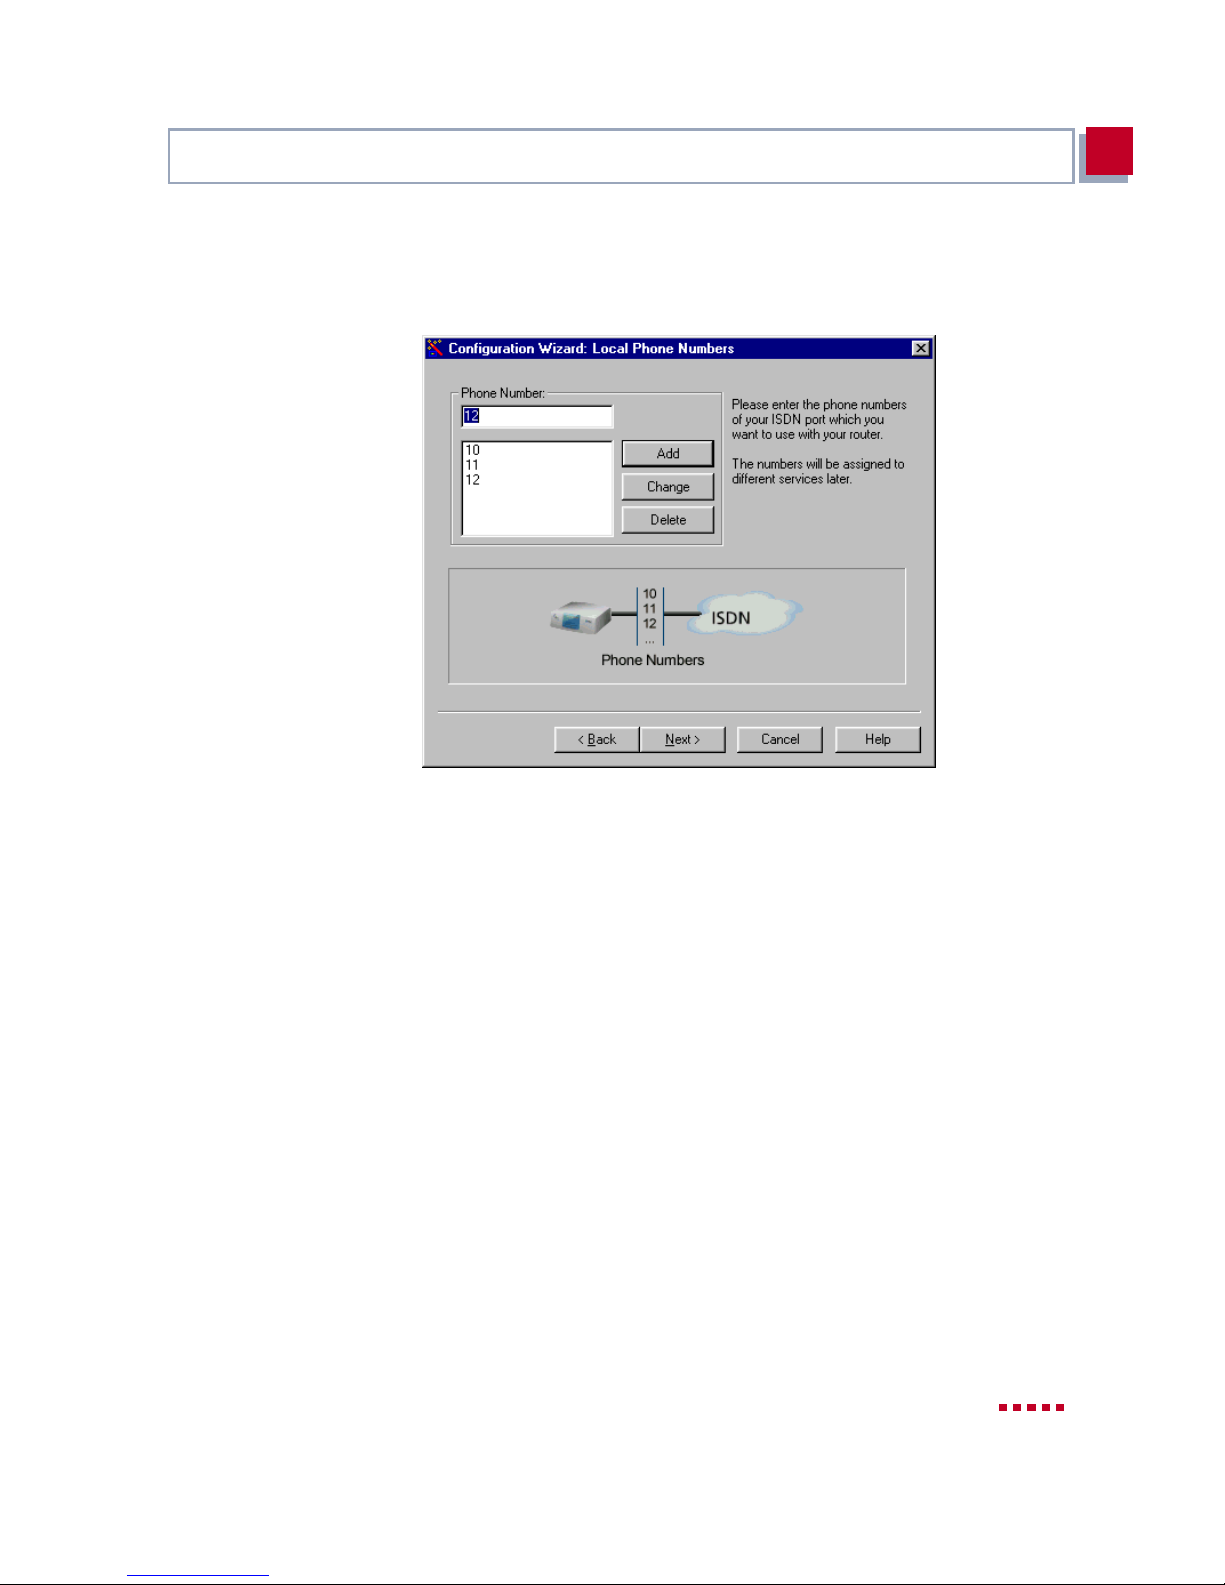
➤ Enter the extensions of your ISDN port that you want to use with X3200:
Enter an extensio n in the Ext ensions fi eld and c lick Add. Repeat the entr y
for all other extensions (cf. figure 3-8, page 53).
3
Figure 3-8: Enter ing ext ensions in the Configuration Wizard
➤ Click Next.
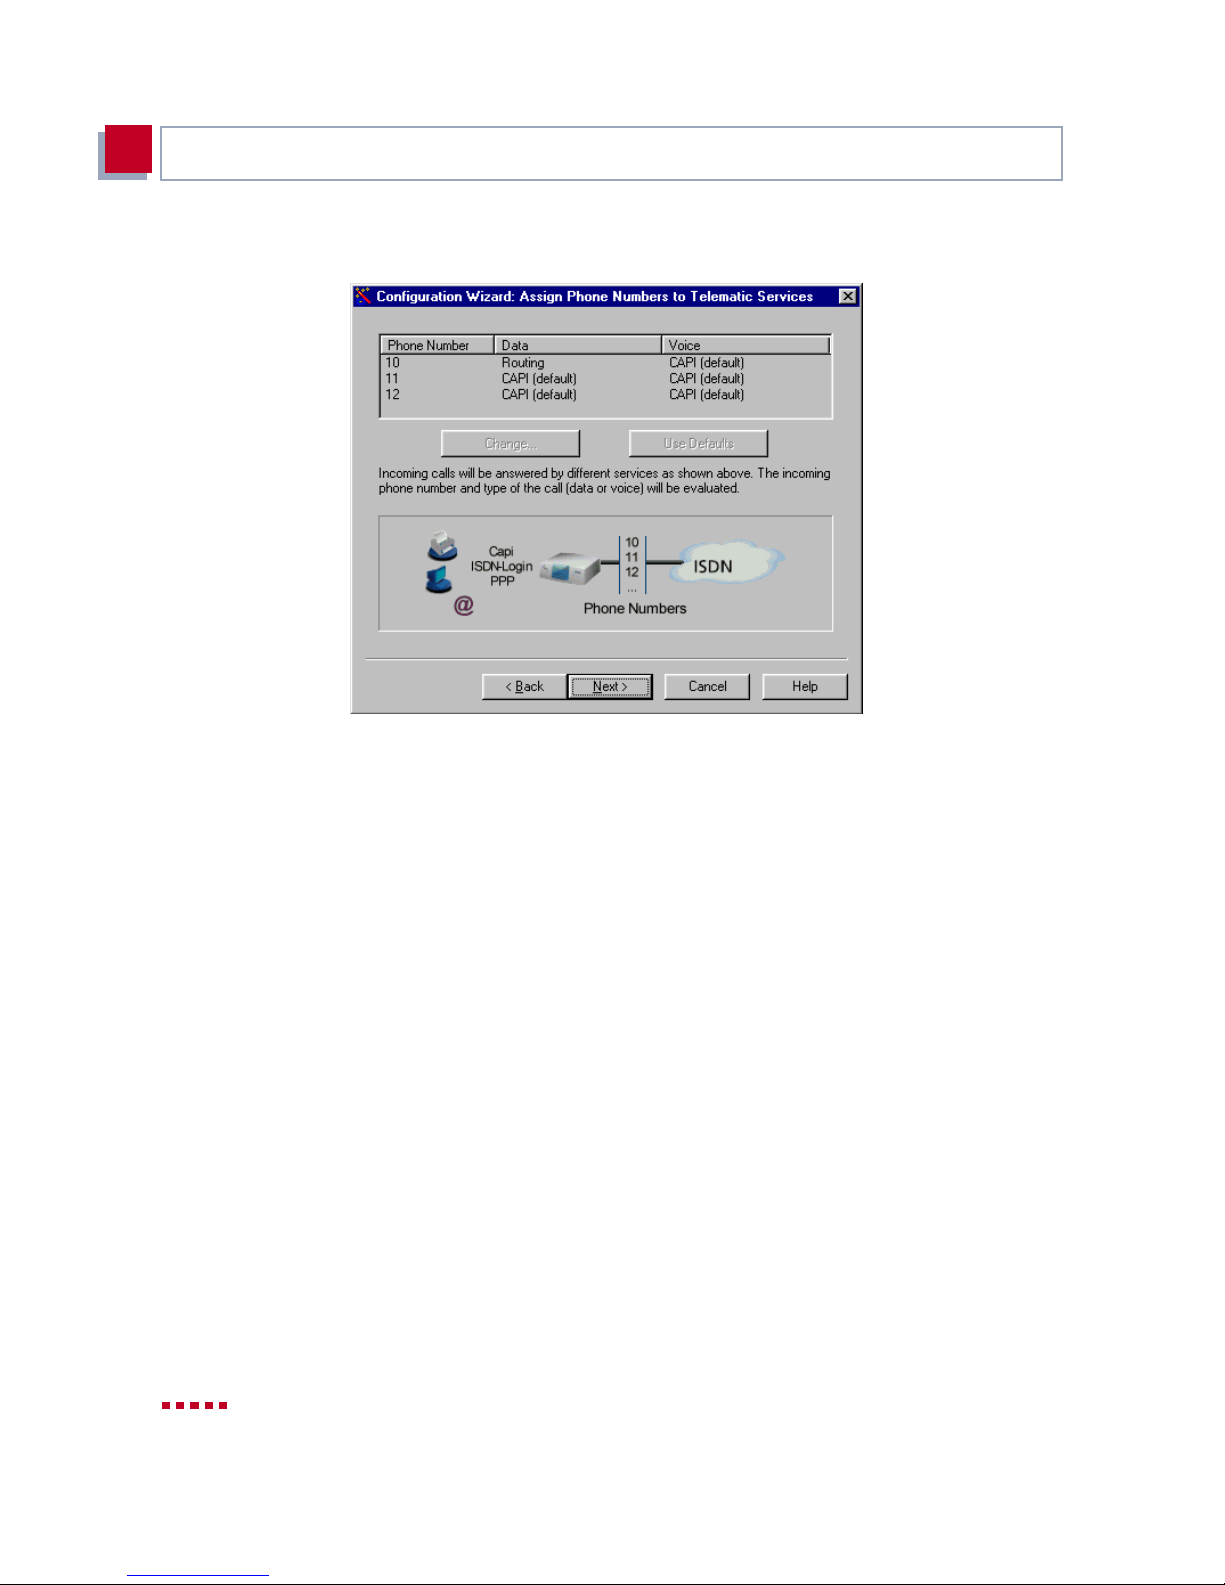
The Wizard aut om ati cally assi gns the extensio ns to certain s ervices (more
on service s and users in ch apt er 4.3, page 88). This allocation can o nly be
changed in Expert Mode (cf. figure 3-9, page 54).
X3200 User’s Guide 53
Page 54
Getting Started
3
The following window opens:
Config urat ion in Exp ert
Mode
Figure 3-9: Allocation of extensions in the Configuration Wizard
➤ Click Next.
The basic configuration is now complete. A summary of the configuration data
appears.
You can also do the followi ng in Expert Mode:
■ Change the system data , e. g. contact, name and loc ati on of X3200.
■ Specify the IP address of a DNS.
■ Configure your router as a DHCP server.
■ Receive the system ti me from a source other than ISDN.
■ Enable ISDN login.
■ Define different system passwords.
■ Assign communicat ions applications to different users and extensions.
■ Set different filters (NetBIOS, CAPI and TAPI clients).
■ Monitor activities (Activity Monitor).
■ Log system messag es.
54 BinTec Communications AG
Page 55
Configuring X3 200 Under Windows
■ Monitor the utilization of X3200.
■ State the time when charging information is to be obtained from ISDN.
■ Configure u ser accounts for t elecom municat ions app licat i ons (CAPI a nd/or
TAPI).
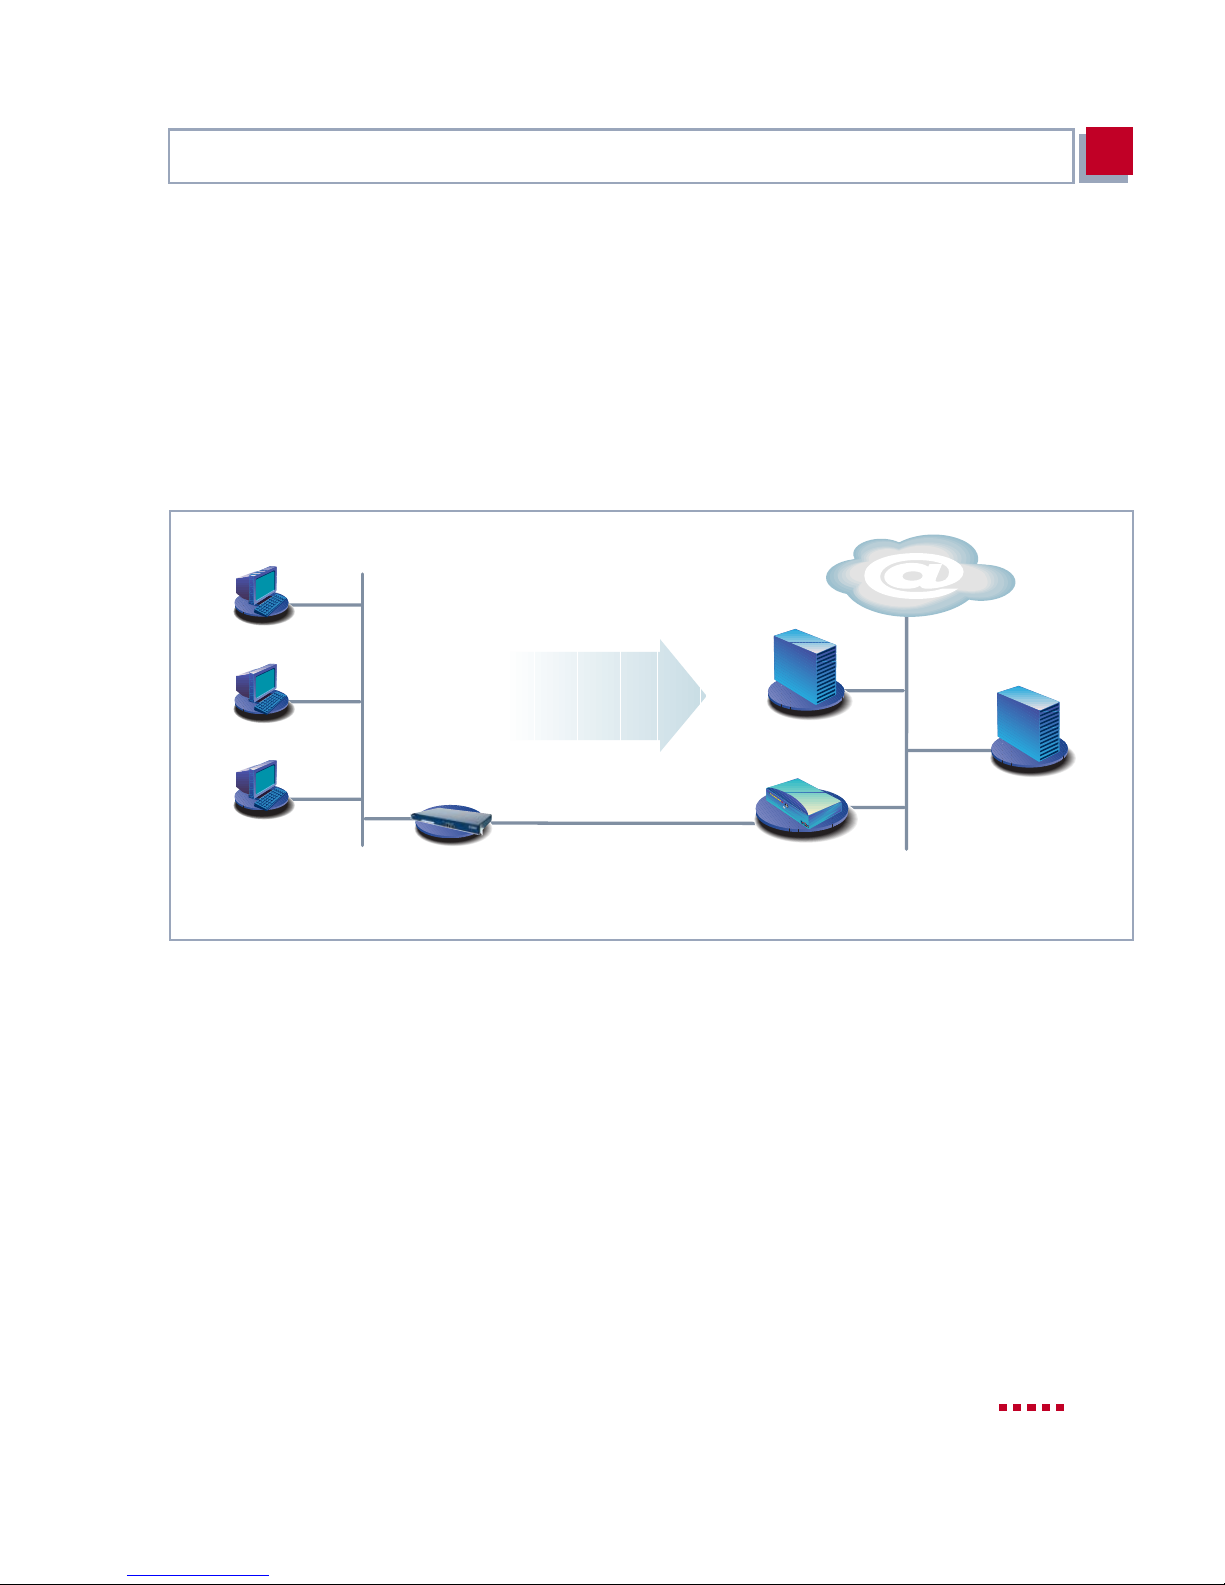
3.5.2 Internet Access with X3200
3
Internet
( 1234567
GoInternet
MyName
TopSecret
Your Local
Area Network
BIANCA/BRICK-XM
xDSL
X3200
Figure 3-10: X3200 and yo ur Int er n et Service Pro v ide r
Router of your
Internet Service
Provider
Network of your
Internet Service
Provider
➤ Click Next.
A message window appears.
➤ Click Next after readi ng the information in the window.
X3200 User’s Guide 55
Page 56

Getting Started
3
➤ First define your Internet Service Provider. If you cannot find your Internet
Service Provider in t he list, select
Other Internet Service Provider
.
High-speed Inter net
access
Internet test access
(Internet by call)
High-spe ed connections are now offered by a number of ISPs.
If you use the ➤➤ ADSL connection of a provider other than Deutsche
Telekom AG, ask about any special features of your ADSL connection that
need to be taken into account.
Proceed as follows to use the T-Online hi gh-speed access :
➤ Select
T-Online
as Internet Service Provider.
➤ Click Next.
➤ Select
T-DSL
as connection to the Internet Service Provider.
➤ Click Next.
➤ Enter the user account (e.g.
081512345678
), the joint user account (e.g.
123456789012
), the T-Online number (e.g.
0001
) and the password.
➤ Click Next.
The configurati on of your high-speed Internet access is now com plete.
If you would li ke to test your I nternet acc ess with X3200 i mmediately, you do not
need pers onal acc ess data f rom a n Inte rnet Ser vice Prov ider, but ca n co nfigur e
a so-called "Internet-by-call" access.
➤ Select a provider that offe rs access without fir st logging in. The text on the
right of the selected provider gives you information about this.
➤ Click Next.
➤ Enter the access number of the Internet Service Provider, e.g.
use the preset number.
➤ Click Next.
➤ Enter your user name and the associated password, e.g.
TopSecret
➤ Click Next.
The configurati on of your Internet connection is compl ete.
56 BinTec Communications AG
1234567
MyName
.
or
and
Page 57

Configuring X3 200 Under Windows
3
Conventional Internet
access
Configurati on in Ex pert
Mod e
To configure a conventional Internet acces s, proceed exactl y as for an Int ernet
test access. In this case, you can set up a connection to any Internet Service
Provider from whic h you have previously r eceived access data.
If you want to configure a conventional Internet access via the Internet Service
Provider T-Onli ne, proceed as follows:
➤ Select
T-Online
as Internet Service Prov ider.
➤ Click Next.
➤ Select
cess number of the Internet Servic e Provider, e.g.
set number.
ISDN
as connection to the Internet Service Provider. Enter the ac-
1234567
or use the pre-
➤ Click Next.
➤ Enter the user account (e.g.
081512345678
), the joint user account (e.g.
123456789012
), the T-Online number (e.g.
0001
) and the password.
➤ Click Next.
The configuration of your Internet access is complete.
A summary of the configuration data appears at the end of each configuration.
You can also do the follo wing in Expert Mode:
■ Keep a record of IP connection data.
■ Enable data com pression.
■ More accurately define connection clearance (dynamic and static short
hold).
■ Activate channel bundling. (this option cannot be selected for all Internet
Service Providers).
X3200 User’s Guide 57
Page 58
Getting Started
3
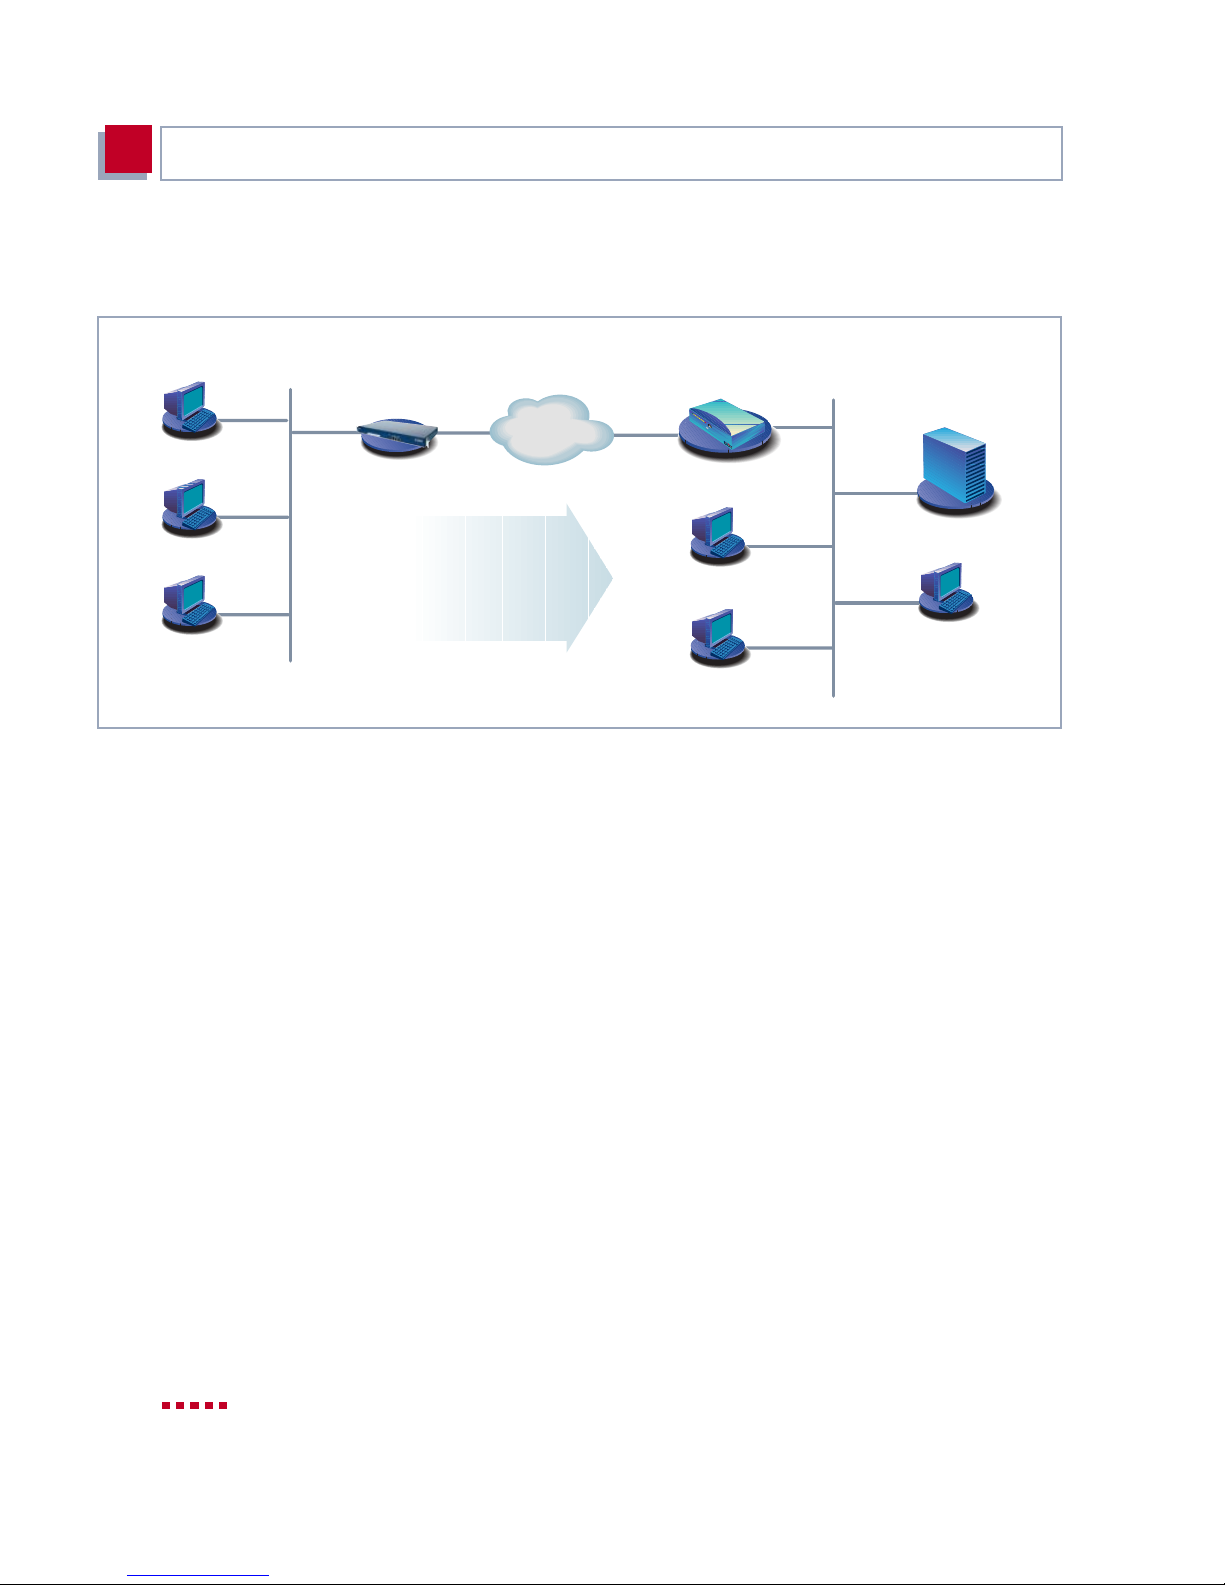
3.5.3 Connecting X3200 to a Corporate Network
Router of your
Companys
Head Office
X3200
Your Local Area Network
Figure 3-1 1: X3200 and your he ad offic e
➤ Click Next.
➤ Click Next after reading the information in the window.
➤ Click Next after reading the information in the window.
➤ First enter the name of your WAN partner (e.g. your head office) and the
ISDN
( 1234567
10.1.1.0
255.255.255.0
BigBoss
LittleIndian
Secret
BIANCA/BRICK-XM
Network of your
Companys
Head Office
A message window appears.
Another message window may appear.
corresponding access number e.g.
The name of your WAN partner must be the same name as your partner
uses as a local name. Your partner must accept calls to the given access
number with the routing service.
BigBoss
and
0911987654321
.
➤ Click Next.
➤ Enter your local name and the common password, e.g.
Secret
Your local name must be the same name as you r partner uses f or you as a
WAN partner.
➤ Click Next.
58 BinTec Communications AG
LittleIndian
.
and
Page 59
Configuring X3 200 Under Windows
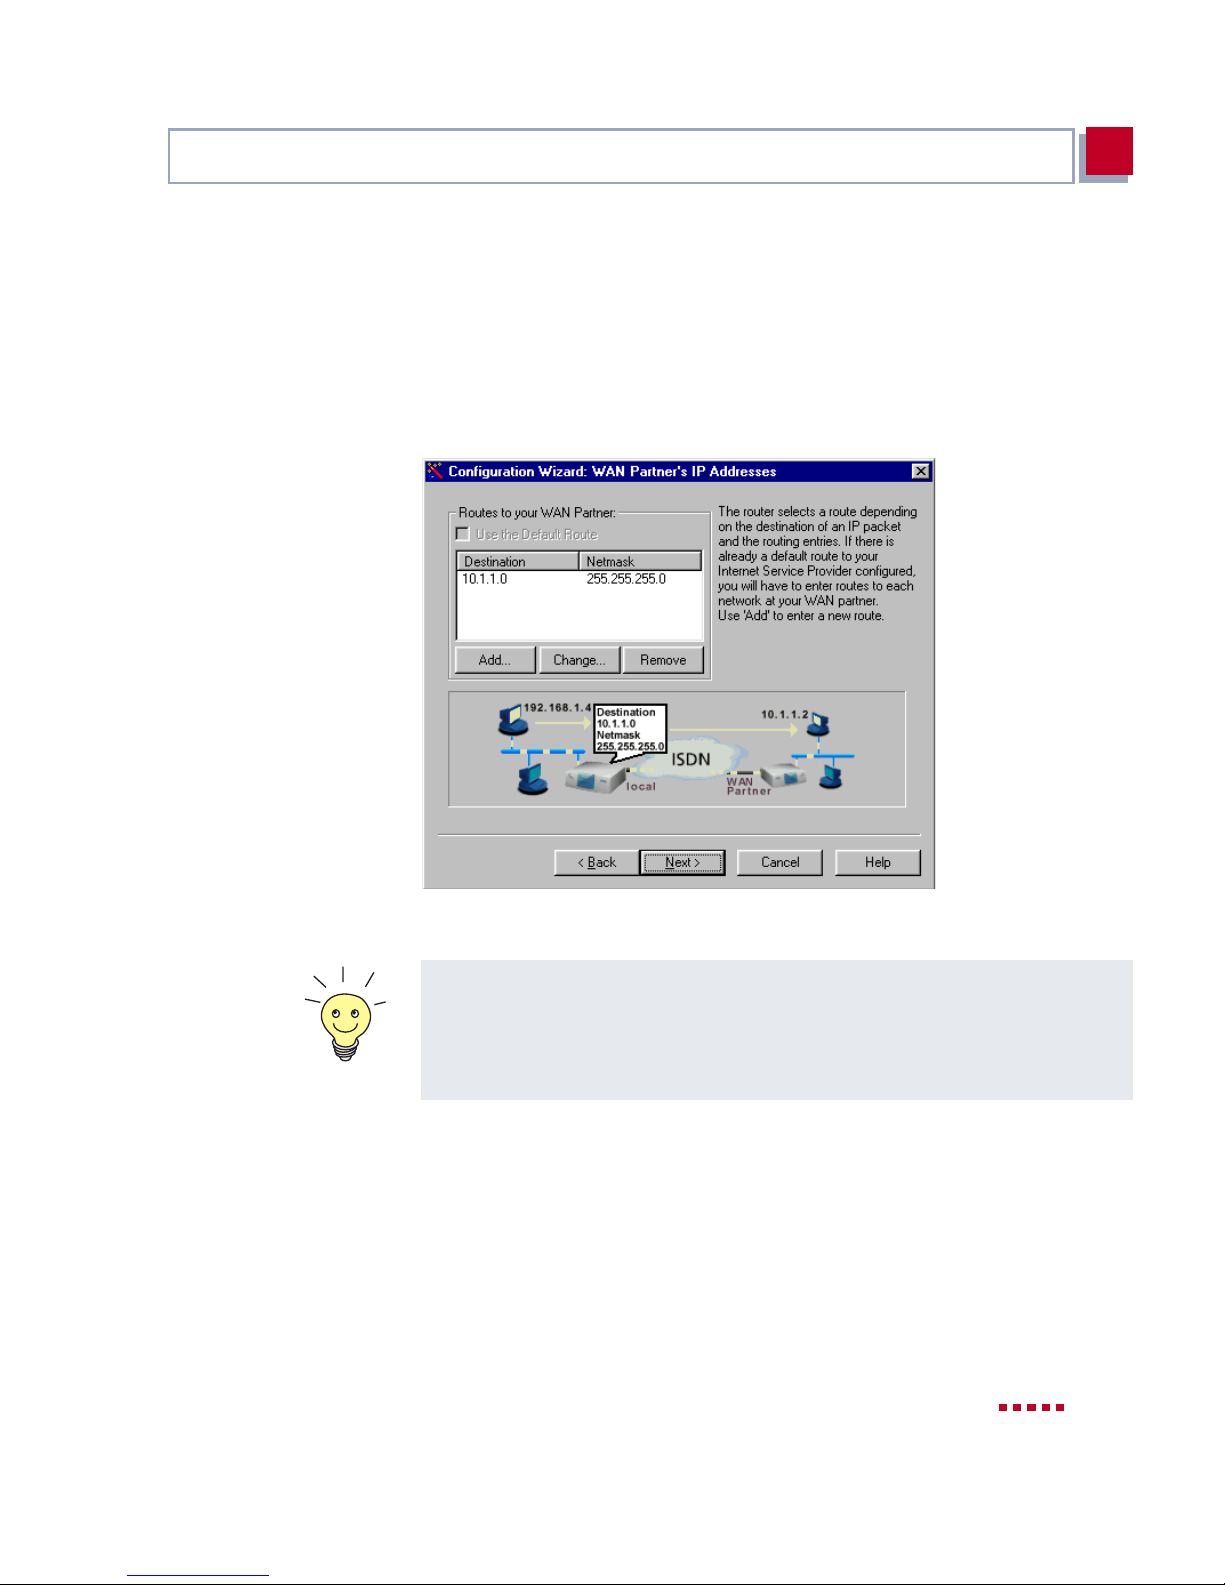
➤ Add a route to your head office:
If you have not configured Intern et access, choose Use Default Route.
If you have configured Internet access, then enter the route yourself: Click
Add. Enter the IP address or network address and the netmask, e.g.
10.1.1.0
necting you to your WAN partner (e.g. head office) (cf. figure 3-12,
page 59).
and
255.255.255.0
3
. By setting the route, you def ine the path con-
Figure 3-12: Defining the route to the WAN partner in the Configuration Wizard
Each route determines the path to a network or subnet of your WAN partner. A
route is clear ly defined by IP address/network addres s and netmask.
Instead of the network ad dre ss, you ca n choos e and enter any IP address from
your partner’s network. The Configuration Wizard determines the net work
address automatically using the corresponding netmask.
➤ Click OK.
➤ If the network of your head office comprises several single networks (sub-
nets) and you want acce ss to each of these subnets , you must en ter a route
for each one of them (cf. figure 4-3, page99).
➤ Click Next.
X3200 User’s Guide 59
Page 60

Getting Started
3
The confi guration of your WAN partner is complete. A sum ma ry of the configuration data appears.
Config urat ion in Exp ert
Mode
You can also do the followi ng in Expert Mode:
■ Configure an automatic callback function, so that only one of the two part-
ners takes the telephone charges.
■ Check the number of the call er: Calling Line Id enti fication (CLID).
■ Keep a record of IP connection data.
■ Activate Back Route Verify t o prevent the import of manipulated data pack-
ets.
■ Define data compression, encryption and channel bundli ng.
■ More accurately define connection clearance (dynamic and static short
hold).
3.5.4 Completing the Configuration
➤ Click Next.
➤ Select Save the former configuration on the router to save an existing
configurati on of X3200 before overwriting.
➤ Click Finish to complete conf iguration.
The Wizard l ogs in to X320 0. An existing conf igurati on is saved on the router as old_cfg. The new configu ration i s transferre d to X3 200 and also sav ed
on your PC under the name brick.cfg in the BRICK directory. A message
appears after a while saying that the configuration is com pleted.
60 BinTec Communications AG
Page 61

Configuring X3 200 Under Windows
If an error message appears saying that the Configuration Wizard could not
log in to the router because the password has been changed, proceed as f ollows:
➤ If you know the password of the existing configuration, enter the password
and click OK.
The Wizard tries to log in to X3200.
➤ If you do not know the password, cli ck Unknown and then OK.
X3200 is reset to the ex wor ks state and all the previous configura ti ons are
lost.
The Configuration Wizard always saves your newly created configuration on
the PC, even if errors occur durin g transmission to t he router.
Further setti ngs can be made to the configu ration file saved on your PC using
the Wizard.
➤ Click OK.
If you have configured X3200 as a DHCP server and your PCs as DHCP
clients (the usual case), X3200 will now assign the PCs their IP addresses.
This happens automa tically under Windows NT or Windows 2000 (pro gram
IPCONFIG), but you must confirm the assignment under Windows 95/98
(program WINIPCFG).
3
➤ Click Yes to start WINIPCFG. Click Renew and then OK.
A message window opens asking if you want to configure the CAPI client.
➤ Click Yes.
X3200 User’s Guide 61
Page 62
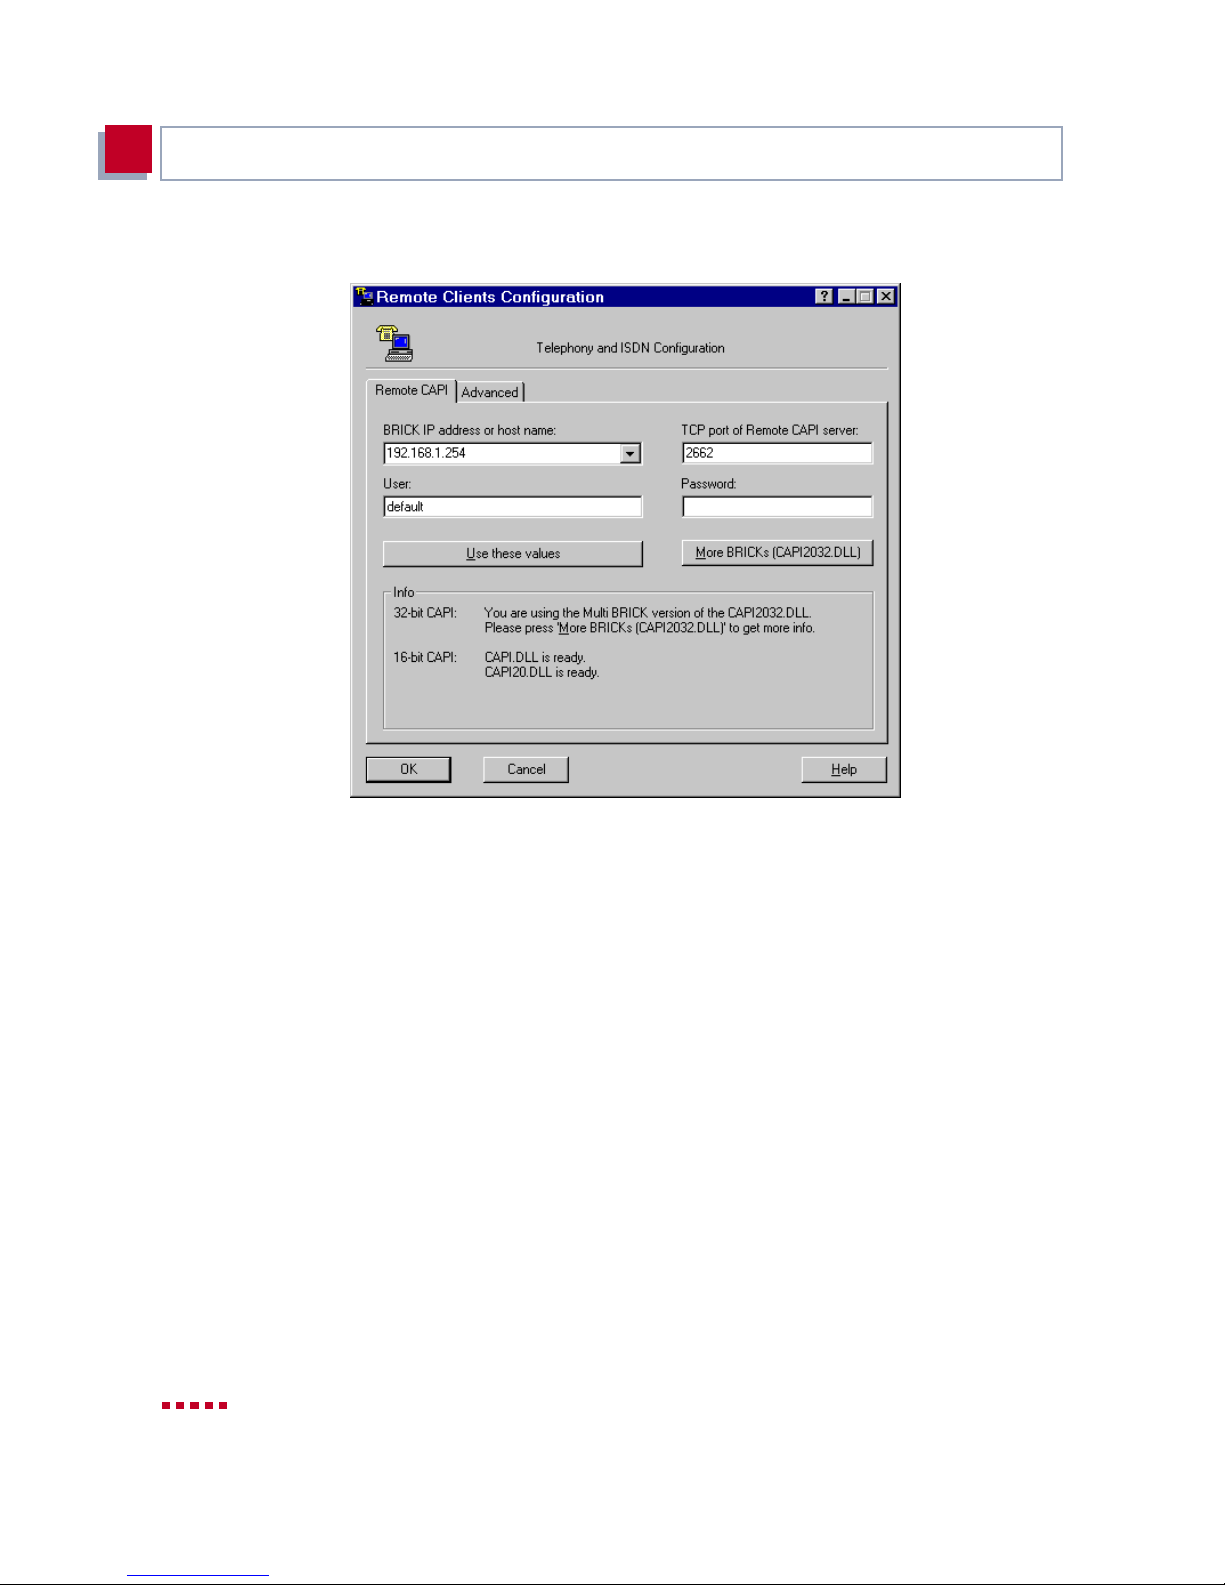
Getting Started
3
The Remote Clients Configuration window opens:
Figure 3-13: Remote CAPI confi guration
62 BinTec Communications AG
Page 63

Remote CAPI Interface on the PC
3.6 Remote CAPI Interface on the PC
Enter X3200 as CAPI server in the ➤➤ Remote CAPI configuration program.
The CAPI server of X3200 permits t he fol lowing:
■ Operation of communica tions applic ations on ev ery PC in t he networ k (e.g .
fax services with RVS-COM Lite)
■ Simultaneous ISDN access via communications applications from several
PCs
To enable CAPI applications on all PCs in the network, you must configure the
Remote CAPI in te r fa c e fo r a ll PC s.
You have already installed BRICKware on the first PC and have opened the
configuration window for Remote CAPI confi guration (cf. figure 3-13, page 62).
You can shortly proceed with chapter 3.6.2, page 63. You must first install the
CAPI configuration program and configure the Remote CAPI interface for all
other PCs in the network, as described in chapter 3.6.1, page 63 and
chapter 3.6.2, page 63.
3
3.6.1 Installing the Remote CAPI Client on all Other
PCs
➤ If not yet done, install BRICKware as described in chapter 3.3, page 41. If
no administration tasks are to be executed from a PC, switch off the Administration Tools.
➤ Follow the instructions on the scre en.
➤ Click OK.
The Remote CAPI configuration wind ow appears (cf. figure 3-13, page 62).
3.6.2 Configuring Remote CAPI
Proceed as follows (s ee figure 3-13, page 62):
➤ Enter X3200’s IP address, e.g.
192.168.1.254
X3200 User’s Guide 63
in the Remote CAPI tab.
Page 64
Getting Started
3
➤ If you have use d Quick Mode i n t he Configur ation Wi zard , ret ain t he en try
default in the User fiel d.
➤ If you have configur ed several users in the Expert Mo de of the Confi gura-
tion Wizard, enter your user name a nd password. The ri ghts you have set
for these users during configuration are therefore valid on the current PC.
➤ Click Use these values.
The "Remote CAPI is ready" message appears after a shor t tim e.
➤ If no error message appears, click OK.
If an error message appears after cl icking Use these values, make sure that:
■ X3200’s IP address is correct
■ You have entered the license data correctly
■ You have entered a valid user name and the correc t password
■ The right port number 2662 has been entered
■ Your PC has been configured as a DHCP client and ha s been assigne d an
IP address (see c hapter 4.4, page 92)
➤ Repeat the Remote CAPI installation on all PCs in the network on which
you want to enable communications appli cations (e.g. fax) .
You can find a more detail ed description of the Remote CAPI configurati on in
BRICKware for Windows. A descri ptio n of the Multi brick CAPI for Windows NT
is also incl uded there, which allows you to define several BinTec routers in the
network as CAPI servers.
64 BinTec Communications AG
Page 65

Configuring a PC
3
3.7 Configuring a PC
To ensure t hat y our net work and i ts ex ter nal c onnec tion work pr operl y, you may
have to change some additional settings on your PCs:
■ If you have not conf igured X3200 as a DCHP ser ver and the PCs have not
yet been given any IP addresses, you will have to do the following (as per
chapter 3.7.1, page 65):
– define the IP addresses now
– show the PCs "the way out" (gateway, DNS)
If you have used the Configuration Wizard’s default settings and have
configured your PCs as DHCP clients, you can disregard chapter 3.7.1,
page 65. In this case, X3200 automatical ly suppli es the necessary infor ma-
tion.
■ If you have configured a conne ction to a cor porate netwo rk, you will ce rtain-
ly want to reach PCs from the partner LAN (e.g. head offic e) vi a Windows.
To do this, you must proceed as described in chapter 3.7.2, page 67.
Windows 95/98
3.7.1 Configuring IP Address, Gateway and DNS on
the PC
If you have not configured X3200 as a DHCP server and your PCs do not yet
have any IP addre sses, you must now assign IP add resses t o all PCs. You must
also tell the PCs how co nnections, e. g to the Int ernet, are to be made. Proceed
as follows:
➤ Click the Windows Start button and then Settings
➤ Double click Networ k.
➤ Click TCP/IP
➧
Properties.
➤ Enter a unique IP address for your PC and the netmask in the IP Address
tab, e.g.
192.168.1.1
➤ Enter X3200’s IP address, e.g.
Add.
and
255.255.255 .0.
192.168.1.254,
X3200 User’s Guide 65
➧
Control Panel.
in the Gateway tab. Click
Page 66

Getting Started
3
➤ If you do not have your own DNS, enter X3200’s IP address in the DNS
Configuration tab under DNS Server Search Order, e.g .
192.168.1.254
.
Windows NT
Windows 2000
➤ Click the Windows Start button and then Setti ngs
➧
Control Panel.
➤ Double click Network.
➤ Select the Protocols tab. Click TCP/IP Pro tocol
➧
Properties.
➤ Click Specify IP Address in the IP Address tab and set the IP address,
netmask and default gateway, e.g.
192.168.1.1
. Enter the IP address of X3200 as default gateway .
192.168.1.254, 255.255.255.0
and
➤ Click Add in the DNS tab under DNS Server Search Order and enter
X3200’s IP add ress, e.g.
192.168.1.254
➤ Click the Windows Start button and then Settings
Connections .
.
➧
Network and DCN
➤ Double click LAN Connection.
➤ Click the General tab and then Properties.
➤ Select the Internet Protocol (TCP/IP) in the General tab. Click Proper-
ties.
➤ Activate t he Use next IP address option in th e Genera l tab . Specif y the IP
address, netmask and standard gateway, e.g.
255.255.255.0
gateway.
and
192.168.1.1
. Enter the IP address of X3200 as defaul t
192.168.1.254
,
➤ If you do not have your own DNS, enter the IP address of X3200 as DNS
address. Activate the Use next DNS server addresses option.
➤ Enter the address, e.g.
➤ Close the open windows with OK and Close.
And finally,
➤ Confirm all entries and restart your PC.
➤ Repeat the installati on for all the PCs in your network.
66 BinTec Communications AG
192.168.1.254
and click OK.
Page 67

Configuring a PC
3
3.7.2 Finding PCs on your Partner’s Network
You have now set everything on your X3200 to connect to your partner’s net-
work. Let us suppose, for example, that you now want to establish contact between your PC and the Windows
There are a few things you should know first. Every PC in your LAN or in your
partner’s network requires a unique address, the IP address. In addition to the
use of IP addresses, an alter nativ e means of addressi ng PCs that devel oped in
the past was by computer or host names (e.g.
used especially in Windows networks. PCs, however, only understand IP addresses an d not na mes. Thus, it i s ne cess ary f or the names to be tran sl ated ( resolved) into their cor responding IP addresses (cf. chapter 4.5, page 95). Typica l
examples of such name resolution are DNS or WINS servers. As you normally
do not want to set up your own server in a sm all networ k, there i s an alternative
way of resolving the name
In the LMHOSTS file, IP addresses are arranged with their computer names in
tabular form. If, for example, you are looking for
partner’s network (e.g. head office), your PC checks the LMHOSTS file for the
corresponding IP address and in this way is able to find the PC. Alternatively,
you can use DNS Proxy (see chapter 6.3.2, page 229).
BossPC
BossPC
in your partner’s network.
BossPC
into an IP address: the LMHOSTS fil e.
BossPC
). Computer names are
, a PC located in your
Caution!
The following configuration can lead to increased connections and thus higher
telephone bills. The conditions t hat lead to connections being set up are largely
dependent on the respective network configuration. If you connect a network
drive, for exam ple, you must expect regul ar requests to increase the number of
connectio ns m ade.
➤ To avoid unintentional cha rges, it is essential that you monitor your X3200.
Use the Credits Based Accounting System for this purpose (see
chapter 7.1.3, page 268).
X3200 User’s Guide 67
Page 68

Getting Started
3
You can only use the foll owing process if you have not configured extensive
NetBIOS filteri ng with the Configuration Wizard. Otherwi se certain Windows
functions cannot be used, e.g. network drive connections.
If you require acc ess to the partner network for several PCs in your net work,
you must save the assignm ent of IP address to name on each of these PCs.
You should also ensure that:
■ you and your WAN partner are in the same domain or work group.
■ you recei ve the nec essary permiss io n from the WAN par tner to ac cess PCs
in your partner’s network. If in doubt, ask your system administrator.
You can also register completel y with the Win dows NT domain of a partner net work. To test such a configu ration, BinTec provides a test access for your use.
How to configure this access is describ ed at www.bintec.net.
You can tell your PC the IP address of the
text file: This method is time-consuming and laborious, as you must make the
necessar y entries for every PC in your LAN. We recommend using DNS Proxy
instead (see cha pter 6.3.2, page 229).
To edit the LMHOSTS text file:
➤ Click the Windows Start button and then Find
BossPC
by editing the LMHOSTS
➧
Files and Folders.. ..
➤ Type in lmhosts.*.
➤ Click Find now .
➤ Open the file found with a text editor.
➤ Type in the IP address of the PC in the partner network, followed by a tab
or space, followed by the name of the PC, e.g. 10.1.1. 1 BossP C. Save
and close the file under the name lmhosts.
➤ Repeat the same procedure for each PC in the partner network that you
want to reach over Windows.
➤ Click the Windows Start button and then Find
➤ Type in the name of the PC, e.g.
The name of the PC appears after a moment.
BossPC
➧
Computer....
, and click Find now.
68 BinTec Communications AG
Page 69

Configuring a PC
3
Creating a shortcut on
the desktop
Connecting a network
drive
➤ To avoid having to look for the
right-click the PC icon and click
You are then asked if you want the shortcut to be placed on the desktop.
BossPC
Create Shortcut.
every time you restart your PC,
➤ Click Yes.
Now you can connect to the
Another pos sible method of setting up a network drive connection is as fol lows:
BossPC
on your pa rtner ’s ne twork at any t ime .
➤ Open Windows Explorer, click Tools, then Map network drive.
➤ Specify the drive and enter the path, e.g.
\\BossPC
.
➤ Click Reconnect at logon.
➤ Click OK.
X3200 User’s Guide 69
Page 70

Getting Started
3
3.8 Configuring Fax and Answering
Machine with RVS-COM Lite
After you have configured your PC and X3200, inst all RVS-COM Lite. You can
obtain the necessary license key by registering your router at www.bintec.net.
RVS-COM Lite offers you facilities for the following:
■ Sending and receivi ng faxes
■ Configuring an answer ing machine
■ Configuring file transfer and Eurofile transfer services
In the foll owing sections, we describe how to teach yo ur PC and X3200 how to
fax with RVS-COM Li te (ve rsion 1 .63) and how to set up an an swering machine
facility.
You have received just one single-user license for RVS-COM Lite wi th X3200.
If you want to install RVS-COM Lite on several PCs, please contact RVS Dat-
entechnik GmbH. You can obtain the address from RVS-COM Lite’s online
help.
3.8.1 Installing RVS-COM Lite
➤ Place your BinTec Companion CD in the CD-ROM drive of your PC.
The start window appears automatically after a short time.
➤ If the Start window does not open automatically, click your CD-ROM drive
in Windows Explorer and double-click setup.exe.
➤ Click RVS-COM Lite in the start window.
The setup program starts.
➤ Enter your RVS-COM license number, which you have received upon reg-
istration.
➤ Click Install.
The start window opens.
70 BinTec Communications AG
Page 71
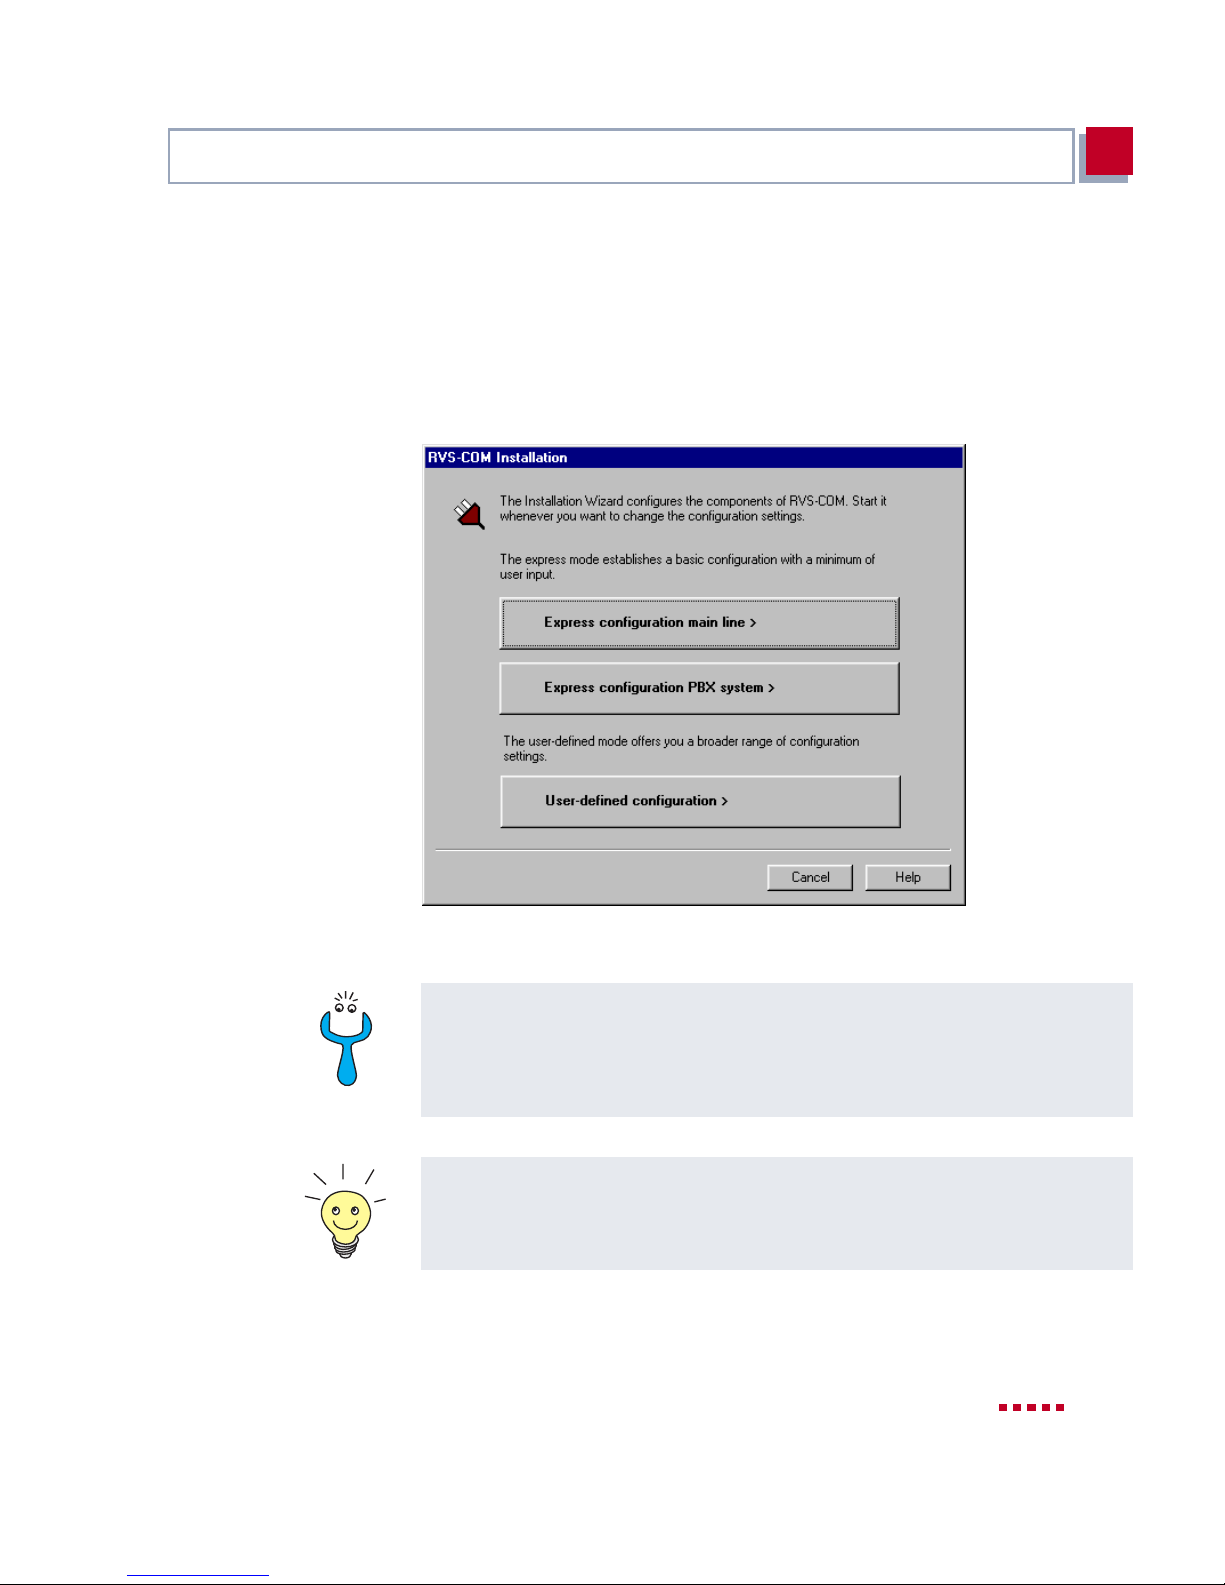
Configuring Fax and Answering Machine with RVS-COM Lite
➤ Confirm the following two windows and enter the directory in which RVS-
COM Lite should be installed. Click Next.
The files are copied. After a moment a window appears saying the setup
program is fini shed.
➤ Click Finish.
The start window of the configuration assistant appears:
3
Figure 3-14: Start window of the RVS-COM Lite configuration assistant
Should an error message appear saying no CAPI interface has been installed:
➤ Make sure X3200 is connected to your ISDN connection.
➤ Make sure your Remote CAPI configuration is configured as described in
chapter 3.6.2, page 63.
To manage faxes with a Windows e-m ail system instead of wi th the RVS inbox
or to install RVS I SDN modems (also f or
figurati on mo de User-Defined Configuration.
➤➤ dial-up network), select the con-
X3200 User’s Guide 71
Page 72
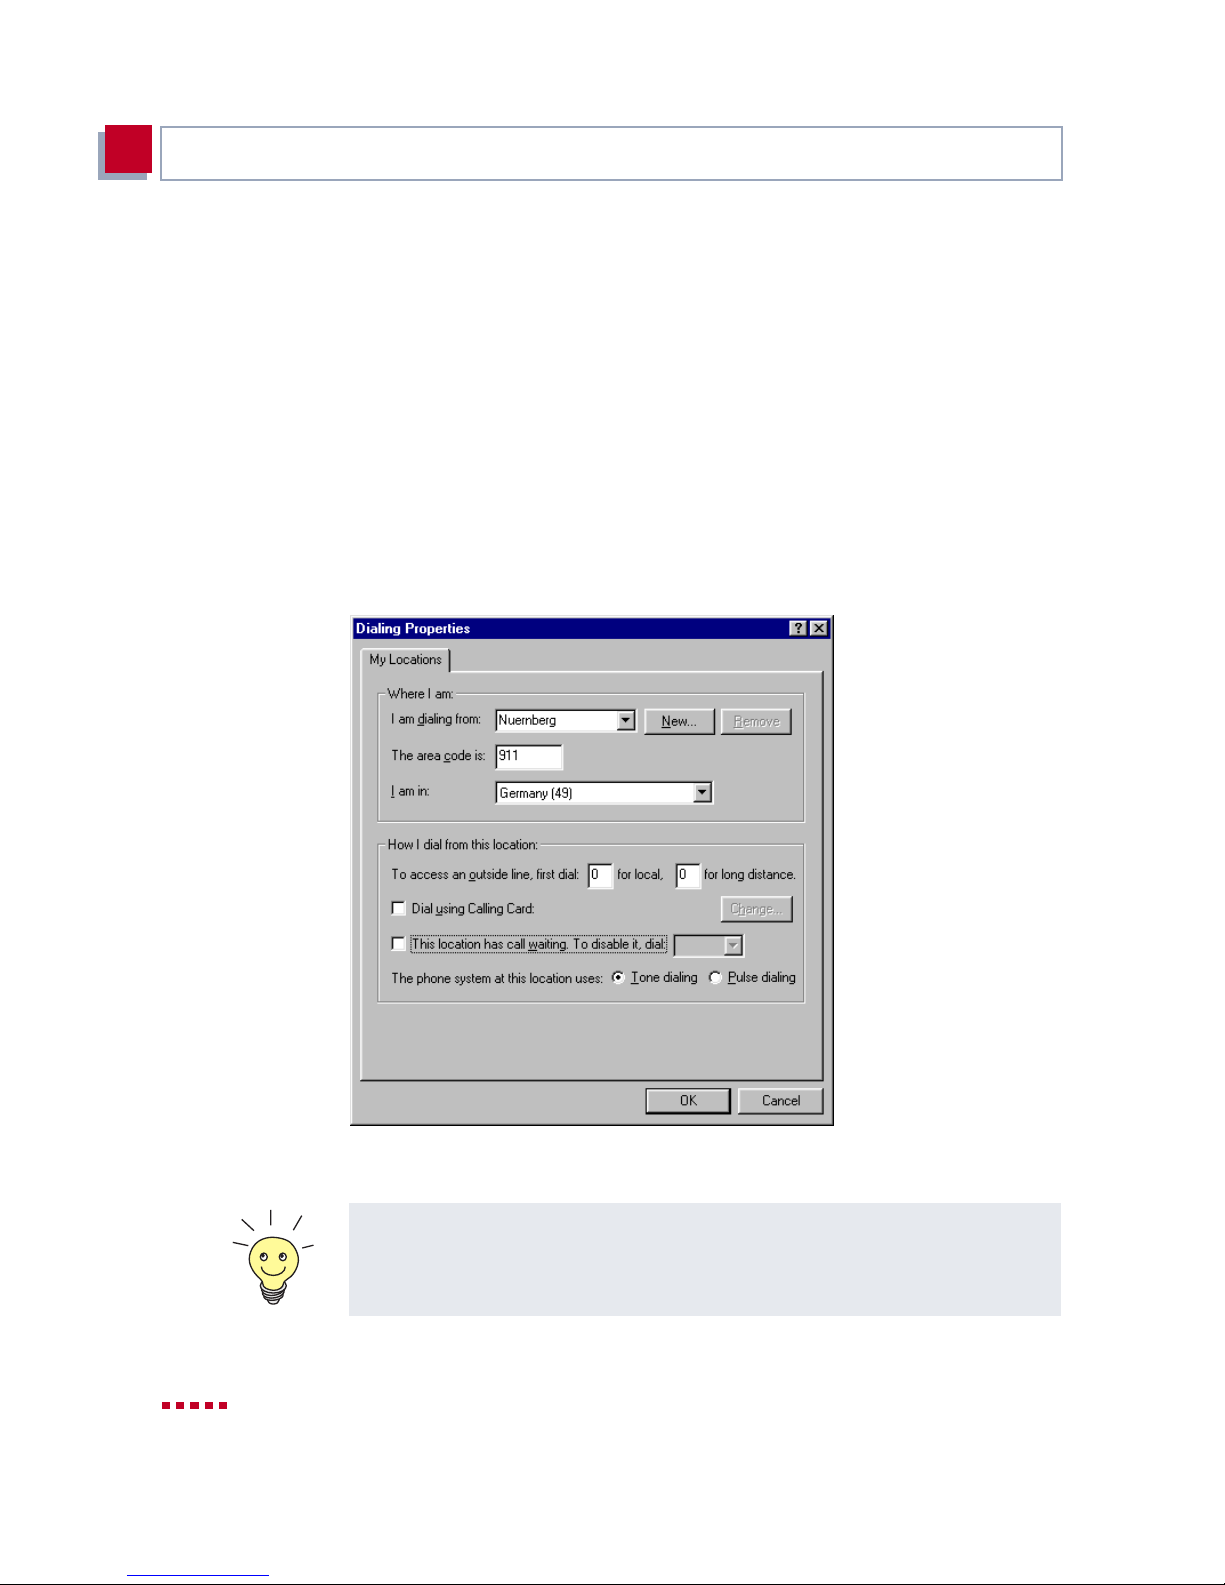
Getting Started
3
➤ If X3200 is connected to a main line (e.g. NTBA adaptor), click Express
configuration main line.
➤ If X3200 is connected to a PABX, click Express configuration PBX sys-
tem.
➤ Click Next.
A message appears saying you have configured RVS-COM for operation
with an ISDN adaptor with a CAPI interface .
➤ Click Next.
➤ If a message ap pears s ayi ng you shou ld chan ge t he dial ing pr operti es ( e.g.
area code, exchange number), confirm the message to set your dialing
properties correctly. Adjust the settings (cf. figure 3-15, page 72).
o
Figure 3-1 5: Dialing properties
The area code must be entered without the "0" prefix.
You only need the exchange num ber if you are operating X3200 with a PABX.
Normally, t he ex change numbe rs for l ocal a nd l ong-di stance call s ar e the same
(see figure 3-15, page 72).
72 BinTec Communications AG
Page 73

Configuring Fax and Answering Machine with RVS-COM Lite
➤ When you have adjusted the settings , cl ick Apply and then OK.
➤ If you selected Express configuration main line, enter the extension of
your ISDN conne ction in the next wi ndow. Sel ect one of t he ext ensi ons you
have already entered with the Configuration Wizard and assigned to the
CAPI service. You can only enter one extension with the configuration assistant, but you can add more later.
➤ If you s elect ed Ex press conf igurat i on PBX, enter in the next two windows
the exte nsion and ISDN phon e n umbers (poi nt-t o-mult ipoin t) a nd extensi on
number and prefix of the extension (point-to-point).
If you are operati ng X3200 on a point -to-point connection, an entry mus t be
made in Setup T ool in a dditi on to t he sett ings und er Wi zard. I n
➧
I
S0
bers to
cally as this is not the default setting. See also chapter 5.1.4, page 112.
NCOMING CALL ANSWERING
left to right (DDI)
. The Wizard does not make these settings automati-
➤ Click Next.
3
CM-1BRI, ISDN
, set the mode for the comparison of num-
➤ Click Next in the followi ng windows and finally Finish.
The configurati on with the configuration assistant is now complete.
3.8.2 Configuring RVS-COM Lite
In the following s ection, t he numbers y ou have also set for the CAPI serv ice with
the Wizard have to be allocated to different communications applications (fax,
answering machine) . The foll owing diag ram illustr ates which nu mber in our co nfiguration example is to be used for a certain facility.
X3200 User’s Guide 73
Page 74
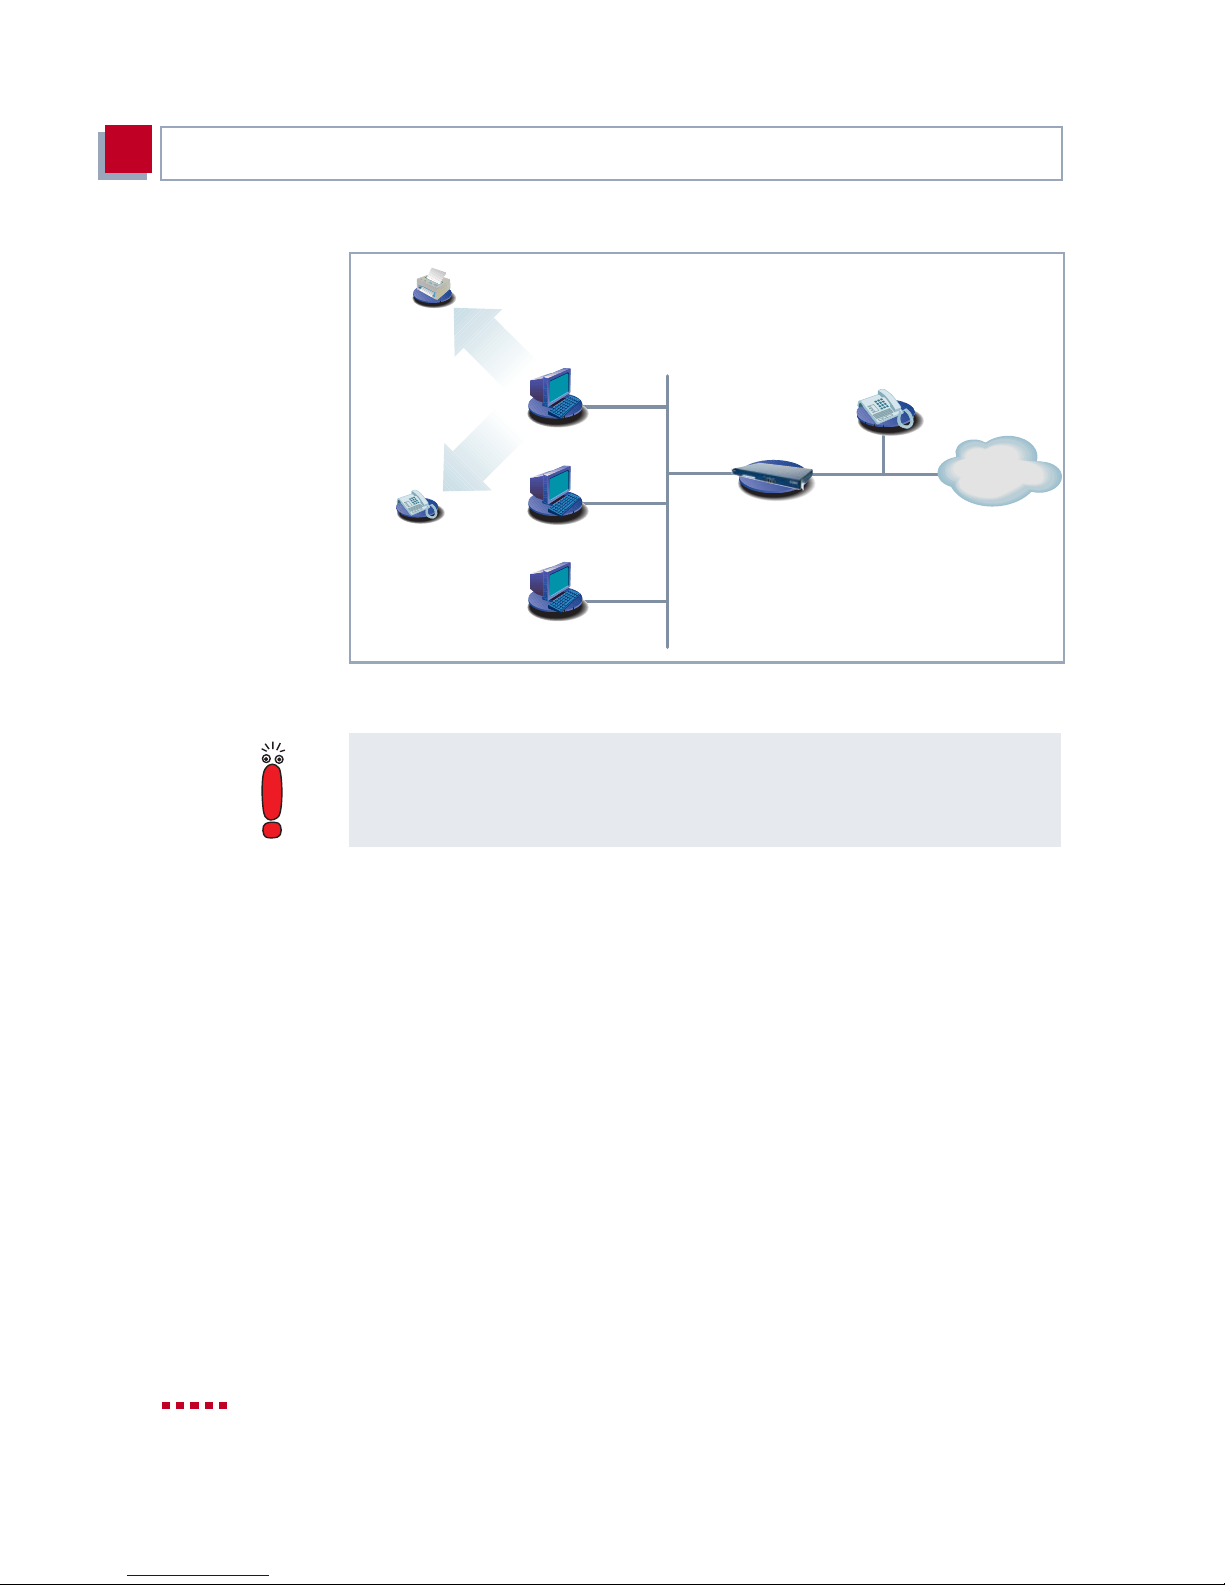
Getting Started
3
Fax
(10
(11
(11
ISDN
X3200
Answering
machine
LAN
Figure 3-16: Scenario: 1 telephone, 1 PC with fax and answering machine
This scenario assumes that a telepho ne responds to one of the numbers you
11
have entered with the Wizard (
➤ Select the Start button in the Windows menu and click Program
➧
COM Lite
CommCenter.
in example).
➧
RVS-
➤ Click Add in the Phone Numbers tab to enter more phone number s. Ente r
the numbers that you have already used for router configuration with the
Wizard (cf. figure 3-17, page 75).
74 BinTec Communications AG
Page 75
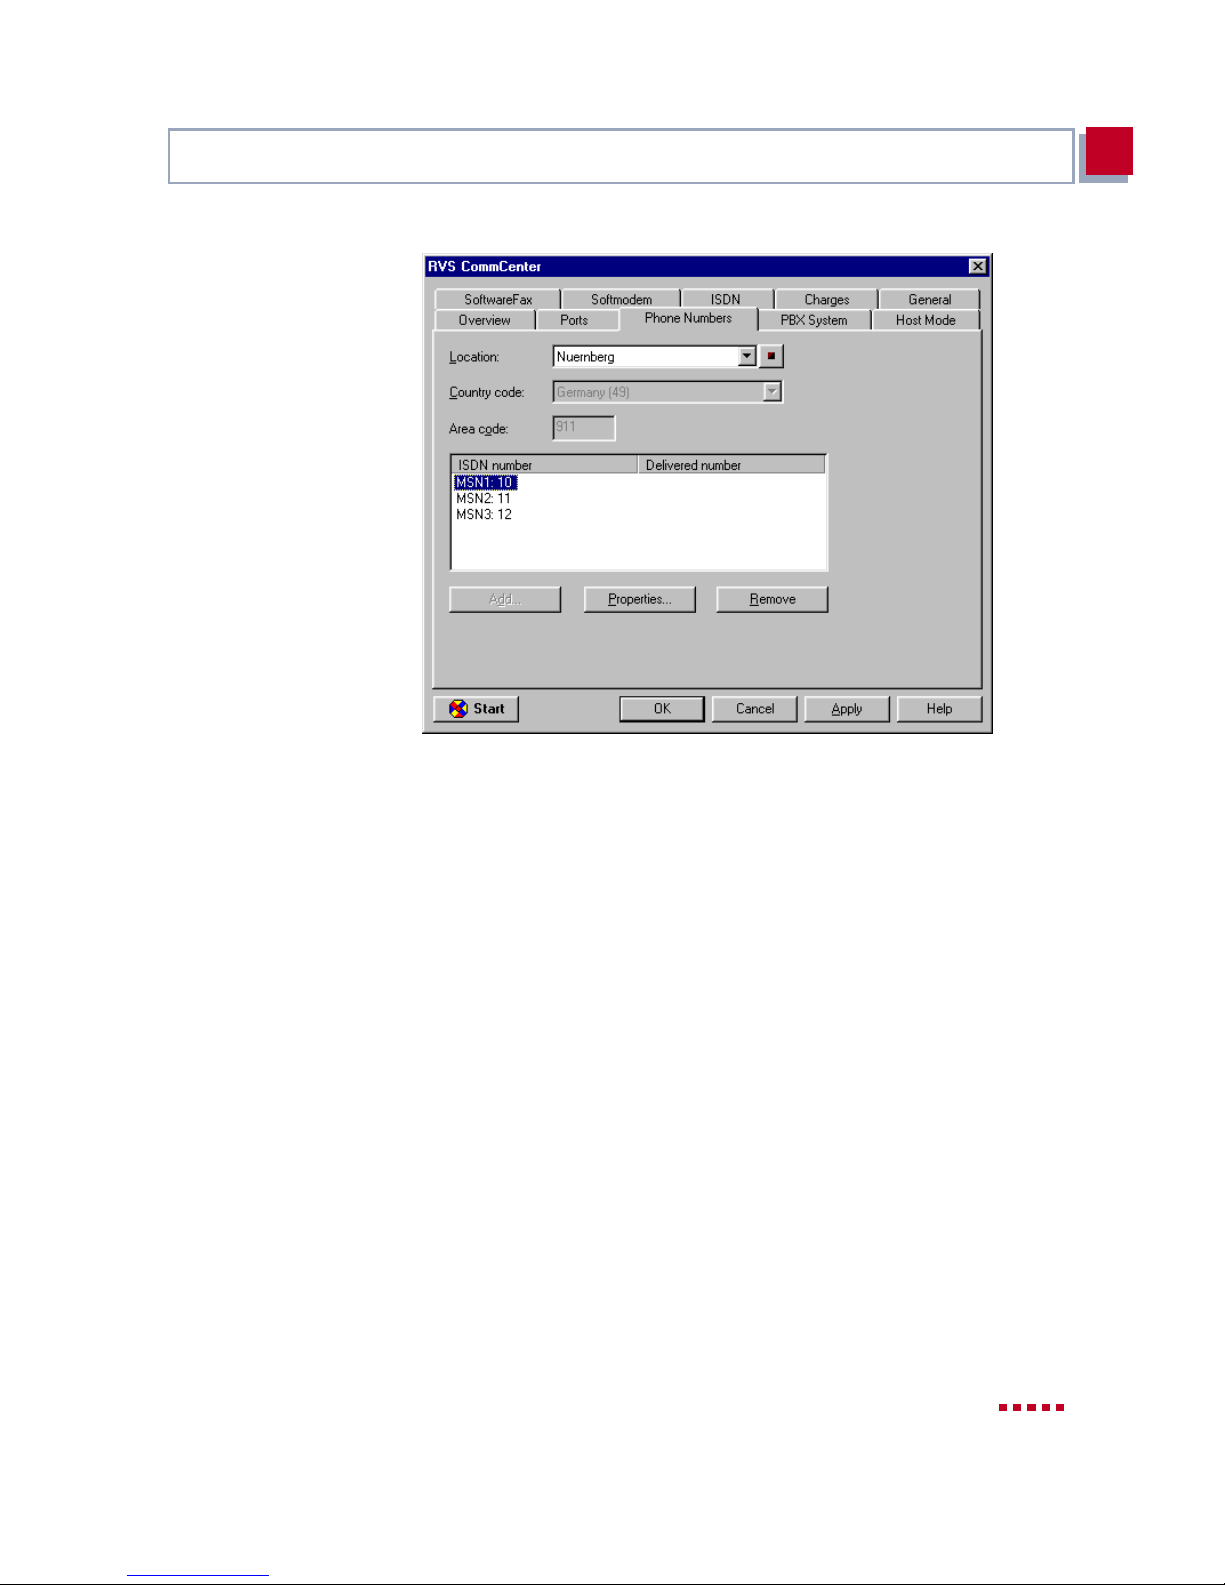
Configuring Fax and Answering Machine with RVS-COM Lite
3
Figure 3-17: Phone number configuration in RVS-COM Lite
➤ Click Apply af ter yo u have en tered all the nu mbers. Make su re that the op-
tions Use software fax for sendi ng fax and Use software fa x for re ceiving fax are active in the Software fa x tab.
X3200 User’s Guide 75
Page 76
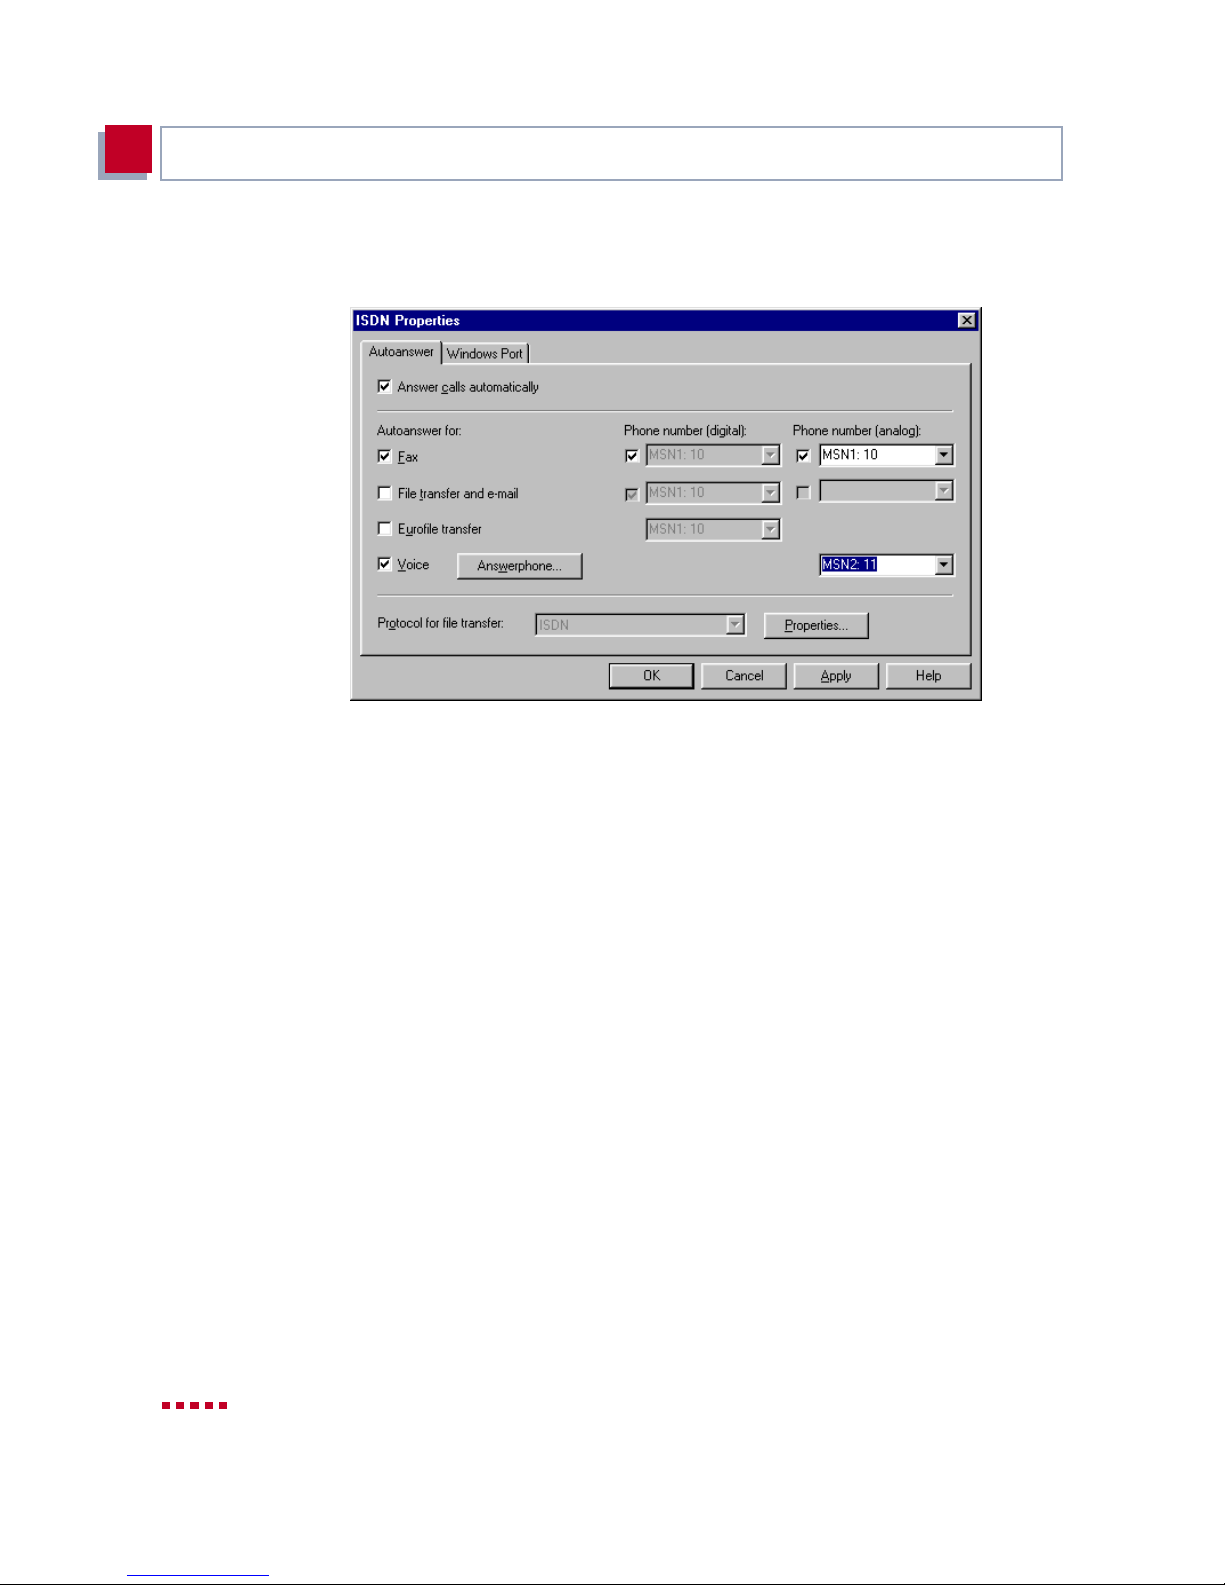
Getting Started
3
➤ Click Properties in the Ports t ab to alloc ate the numbers to the various ser-
vices (cf. figur e 3-18, page 76).
Figure 3-1 8: Allocat ion of p hone numbers to services in RVS-COM Lite
➤ Allocate the first phone number to the fax service, the second number to
voice (answering machine). Use different phone numbers.
➤ To adjust the answering se rvi ce facility, click An swerphone and, if neces-
sary, chan ge the recor ded message and the n umber of r ings befo re th e c all
is taken.
➤ Click OK.
➤ Click Apply and fi nally OK.
The following mes sage appears i n the list of connections : "ISDN: wait ing for
call." RVS CommCenter is ready to take calls and faxes.
76 BinTec Communications AG
Page 77

Testing your Configuration
3
3.9 Testi ng your Co nfiguration
Your configurat ion is now complete, so let’s make sure everyt hing works!
3.9.1 Testing your Internet Access
➤ Configure your browser if you have not done so already. If you have re-
ceived the IP address of a proxy server from your Internet provider, you can
enter this address. Make sure you configure a connection over your local
network.
➤ Try contacting us by typing www.bintec.net in your browser.
The home page of BinTec Communicati ons AG appears.
3.9.2 Sending and Receiving E-Mails
➤ Open an account in the e-mail program if you have not already done so.
You should hav e received the servers fo r i ncoming and ou tgoing mail f rom
your Internet provider. Make sure you configur e a connection over your local netw or k.
➤ Just send an e-mail to a good friend or – if you like – send one to BinTec!
Use the following e-mail address for this:
[email protected] - enter test mail as reference.
You will receive an immediate reply from us to reassure you that the mail
arrived successfully.
3.9.3 Sending a Fax
Send a friend a t est fax or s end it to yours elf by using y our o wn new fax nu mber
as the recipient’s number.
First make sure that several attempts are made to send each fax if it cannot be
sent at the first attempt.
➤ Select the Start button in the Windows menu and click Program
➧
COM Lite
CommCenter.
➧
RVS-
X3200 User’s Guide 77
Page 78

Getting Started
3
➤ Click Start and then Inbox.
You receive a list of the faxes received and sent.
➤ Click Fax
Set the number of attempts you want to make to send a fax and the time
interval betwe en each attempt in the Schedul e tab.
➤ Enter the number of attempts, e.g.
➤ Enter the waiting time between attempts, e.g.
➧
Fax Settings.
3
.
5
minutes.
➤ Click OK.
➤ Close the Inbox and RVS CommCenter.
Create the desir ed fax and then send it.
➤ Select the Windows Start button and then click Program
➧
Lite
The window RVS Fax: Recipient s appears.
➤ Type in the extension, e.g.
Create new fax.
967310
, and the name of the recipient.
➧
RVS-COM
➤ Click Next.
➤ Enter a reference and selec t the cover sheet Normal.
➤ Click Next.
➤ Type in a short message, e.g.
Test Fax
.
➤ Click Next.
➤ If you want, you can attach a file for sen ding with the fax.
➤ Click Next and finally Send to send your fax.
The RVS Mail Spoo ler appears and informs you about the status of th e fax
being sent.
If you have sent a fax to yourself, you should receive it right away (cf.
chapter 3.9.4, page 79). This is the best way to check your fax application
is working properly.
78 BinTec Communications AG
Page 79

Testing your Configuration
3
You can send a fax from any program (e.g. Word).
➤ Write your fax message (e.g. in Word).
➤ Print the document by using the RVS FAX printer driver from RVS-COM
Lite. This is done in the File menu by clicking Print and setting the printer
driver to RVS Fax.
➤ Confirm the print job.
The window RVS Fax: Recipients you used a shor t ti me ago appears.
3.9.4 Receiving a Fax
As the fax solution with X3200 and RVS-COM Lite is a softfax solution, the fax
software m ust always be started if you want to recei ve faxes. RVS-COM Lite is
created autom ati cally in the Windows task bar during installation of RVS-COM
Lite. The appli cati on is alway s ready to re ceive as l ong as you do not te rminat e
RVS-COM Lite.
All incoming and outgoing faxes (including mailing errors) are displayed in the
RVS-COM inbox, as are voice messages you r eceive over your RVS-CO M answerphone.
➤ Select the Windows Start button and then click Program
➧
Lite
Inbox.
➧
RVS-COM
X3200 User’s Guide 79
Page 80
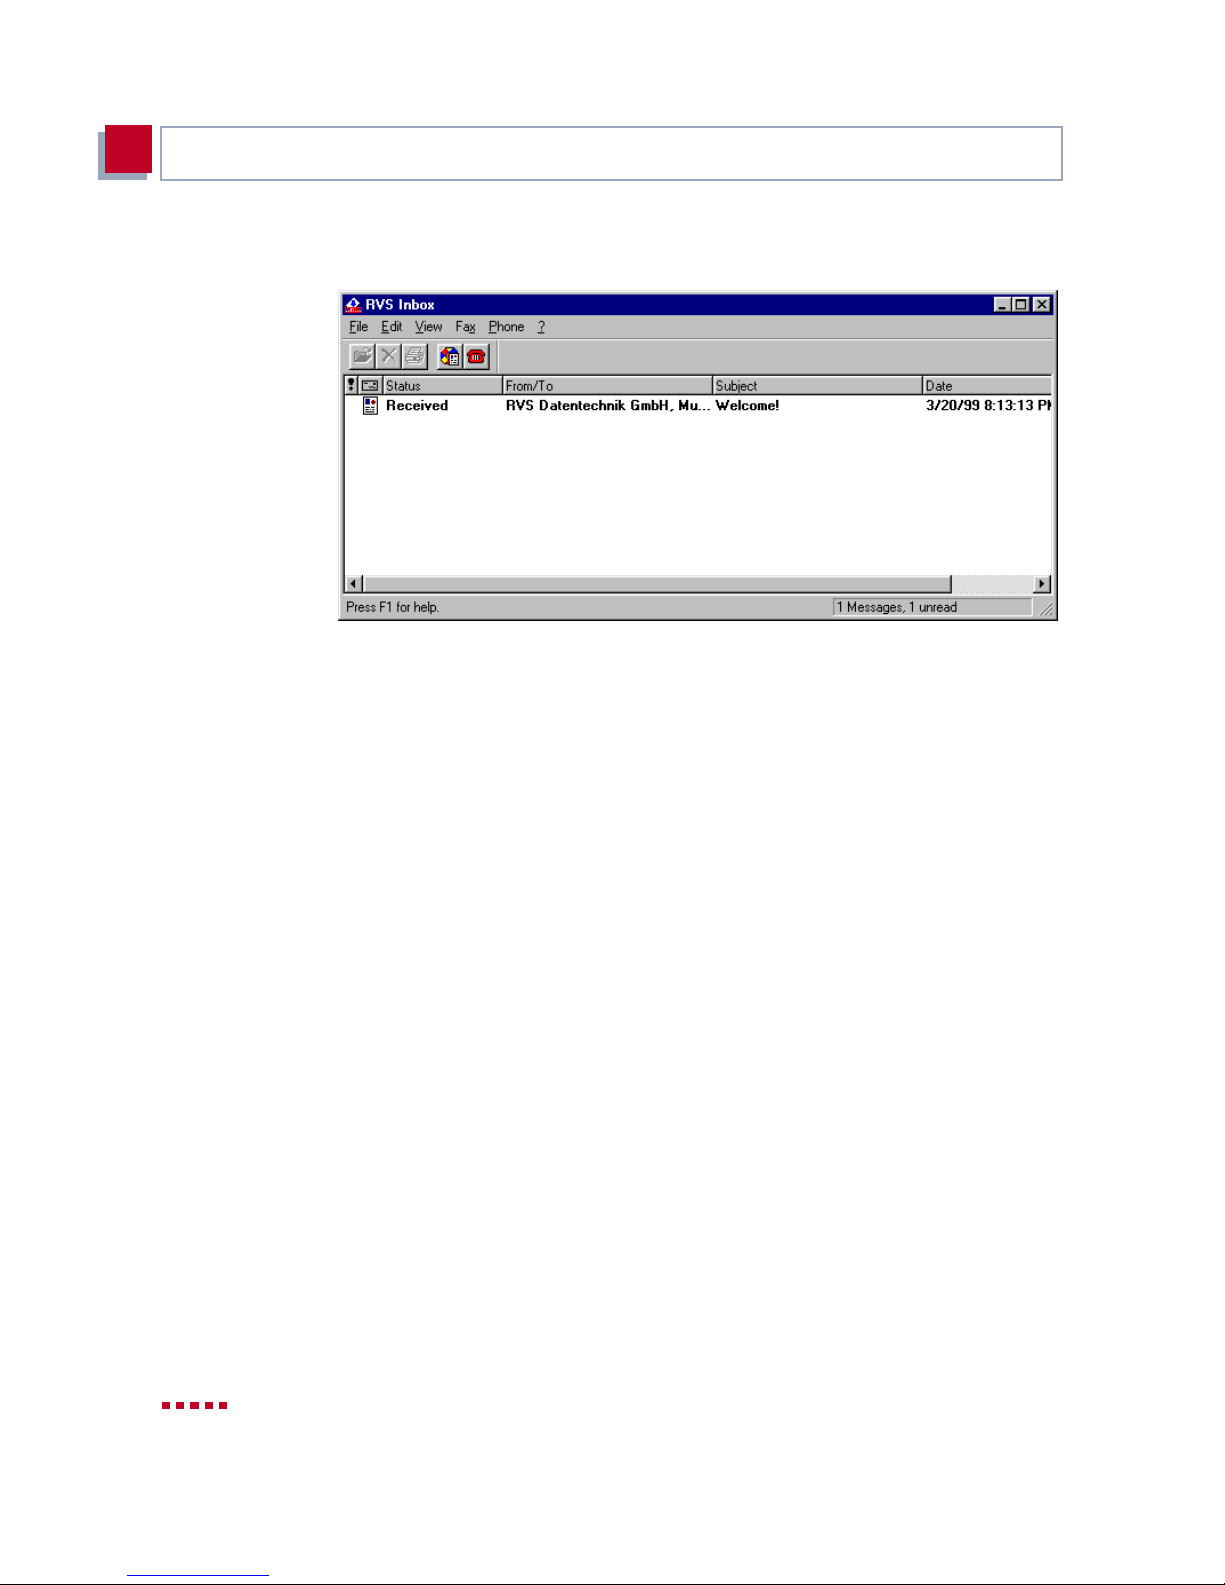
Getting Started
3
All faxes and voice messages rec eived are listed in the inbox.
Figure 3-19: RVS inbox
➤ Double-click the fax entry to open your received fax messages (including
the test messages created by RVS-COM). The RVS Fax Viewer open s.
If you have sent yoursel f a fax, you should find i t in the inbox.
80 BinTec Communications AG
Page 81

4
4 Connecting X3200
This chapter i nclude s ex planati ons abou t the d if feren t acces s and confi gurati on
meth ods .
You will learn the followi ng:
■ How to access X3200
■ How to log in
■ What methods of configuration are available
■ How the ➤➤ Setup Tool is structure d
X3200 User’s Guide 81
Page 82
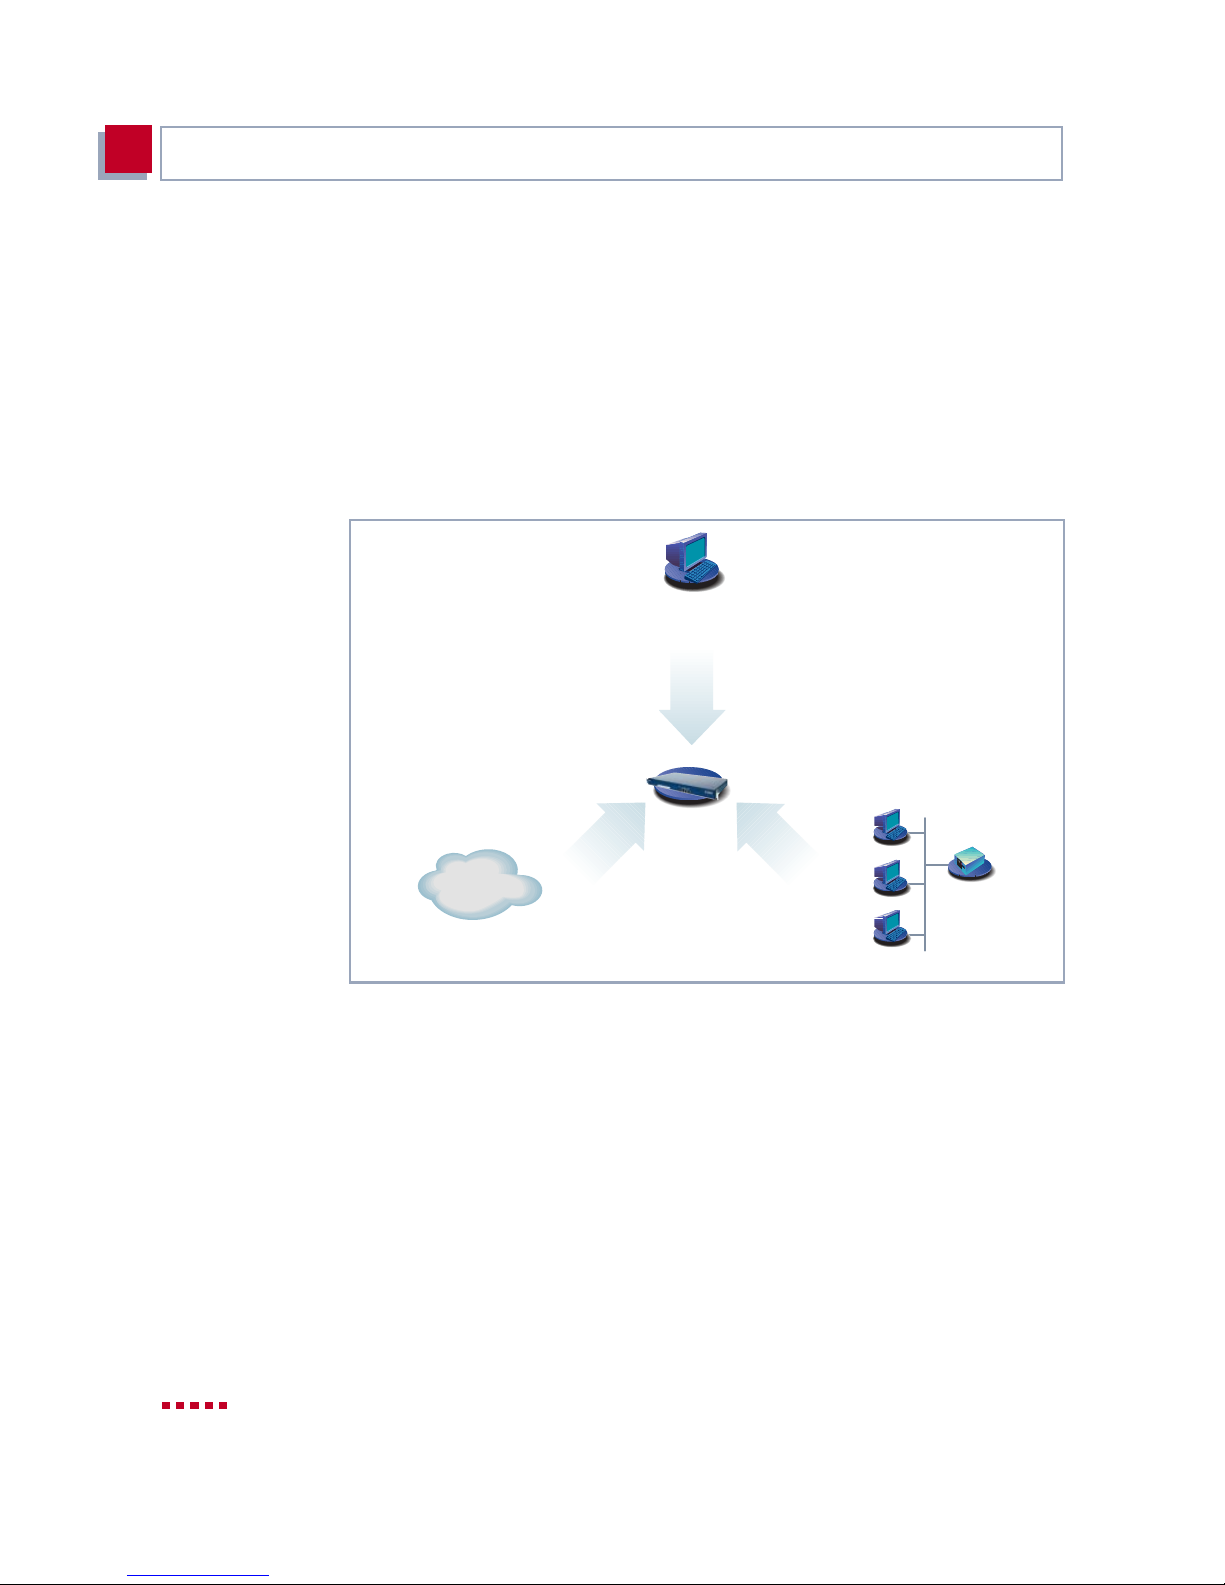
Connecting X3200
4
4.1 Connection Methods
Before you can configure your ➤➤ router, you must connect it. There are
three ways to do this:
■ Over the serial in ter face
■ Ove r your ➤➤ LAN
■ Over an ➤➤ ISDN connection
Serial
Connection
ISDN
Figure 4-1: Possib le connections to X3200
The various connection methods are presented below, so that you can choose
the best method for your needs.
If you use the
Windows, you connect to X3200 over the LAN. If you use the Configuration
Wizard, you connect to X3200 over the serial interface.
82 BinTec Communications AG
➤➤ Configuration Manager (BRICKware for Windows) under
isdnlogin
X3200
LAN
Page 83

Connection Methods
4.1.1 Connecting Over the Serial Interface
Initial configu r at io n A serial interface connection is the most appropriate method if you are config-
uring your X3200 fo r the first time. To connec t X3200 to your PC over the serial
port, proceed as expl ained in chapter 3.1, page 32.
Windows If you use a Windows PC, you need a terminal program for the serial connec-
tion, e.g. HyperTerminal.
Make sure that HyperTerminal is also inst alled on the PC during the Windows
installation.
Note th a t HyperTerminal is not included in the standard installation of
Windows 98 and Windows ME.
If you use Hype rTerminal under Windows 2000 or Windows ME, it is possible
that the cursor keys for navigation in the Setup Tool do not work. In this case,
use the tabulator key or Ctrl+P for moving forwards and Ctrl+N for navigation
backwards.
4
To do
➤ Click the Windows Start button and then
Device at COM1 (or Device at COM2 if you use the COM2 port of your
PC) to start HyperTerminal.
Programs
➧
BRICKware
➤ Press Return (at least once) after the Hyper Terminal window opens.
A window with the login pr ompt appears . You are now i n the SNMP shell of
X3200.
➤ Continue with chapter 4.2, page 87.
➧
X3200 User’s Guide 83
Page 84

Connecting X3200
4
If the login prompt does not appear after pressing Return several times, the
connection to X3200 has not been set up successf ully. Check the set tings of
COM1 or COM2:
➤ Click File
➧
Properties.
➤ Click Configure.... in the Connect To tab.
The following set tings are necessar y:
– Bits per second: 9600
– Data bits: 8
– Parity: none
– Stop bits: 1
– Flow control: none
➤ Enter the values and cli ck OK.
➤ Set in the Settings tab:
– Emulation: VT100
➤ Click OK.
The changes to the terminal program settings do not take effect until you disconnect the conn ection to X3200 and then make the connection again.
You can also use any other termina l pro gram that can be set to 9600 bps, 8N1
(8 data bits, no parity, 1 stop bit), software handshake (none) and VT100 emulation.
Unix If you are using a Unix PC, you equally need a terminal program such as cu (un-
der S ystem V), tip (under BSD) or minicom (under Linux). The settings for
these program s are the same as listed above.
84 BinTec Communications AG
Page 85

Connection Methods
To do ➤ Connect X3200 to your LAN as explained in chapter 3.1, page 32.
4
4.1.2 Connecting Over a LAN
You can reach X3200 from the LAN over the ➤➤ telnet service. Telne t is normally available on every PC. To be able to reach yo ur router over the LAN, it
must already have an
case and X3200 has therefo re not yet been configured, you have two option s:
■ If you are working with Windows, you can assign X3200 an IP address be-
fore you start telnet. To do this, you will need the assistant,
Tools. If you have not yet install ed DIME Tool s with BRICKware for Win -
dows, proceed as explai ned in chapter 3.3, page 41.
■ If you are not working with W indows, use an alternative con nection method
for initial configuration (over the serial interface or ISDN).
➤➤ IP address and ➤➤ netmask. If this is not the
➤➤ DIME
Assigning IP
addresses
To assign your X3200 an IP address (if necessary) with the DIME Tools pro-
gram, proceed as foll ows:
➤ Click the Windows Start button and then
DIME Tools.
➤ If the ➤➤ Boo tP server is not started as standard, you must start it.
A
➤➤ BootP server window will appear after a short time if X3200 is still
unconfigured.
➤ Enter the name and IP address of your X3200 in the window u nder BRICK
Parameter (if you are unsure, refer to chapter 3.2, page 35).
➤ Click OK.
➤ Close DIME Tools.
Running telnet Now establish a connection to X3200 with telnet:
Windows
➤ Click the Windows Start button and then Run....
➤ Type telnet <IP address of X3200>.
➤ Click OK.
A window with the login pr ompt appears . You are now i n the SNMP shell of
X3200. Continue with chapter 4.2, page 87.
P
ROGRAMS
➧
BRICK
WARE
➧
X3200 User’s Guide 85
Page 86

Connecting X3200
4
Unix ➤ Type telnet <IP address of X3200> into a terminal.
A window with the login pro mpt appears . You are now in the SNMP shell of
X3200. Continue with chapter 4.2, page 87.
Configuration Manager The
➤➤ Configurati on Manager also c onnects to X3200 over the LAN. Com-
munication bet ween the PC and X3200 uses the SNMP protocol.
4.1.3 Connection Over ISDN
Remote configurat ion Access over ➤➤ ISDN wi th ➤➤ ISDN Login is par ticular ly useful if X3200 is
situated at a different location and you want to config ure or administrate it from
a distance. Thi s is als o possibl e even if X3200 has not been i niti ally configu red,
i.e. is st ill in the ex works st ate. For t his purpose, you must have anothe r already
configured Bin Tec rout er at your dispo sal (i n LAN 1) and y ou must know t he ex tension of your (new) router (i n LAN 2). This makes it possible, for example, for
the administrator at a head office to configure the router of an employee in a
home office which is hundreds of kilometers away. The X3200 in the home office merely has to be connected to the ISDN outlet and turned on.
Access over ISDN costs money. If X3200, router and PC ar e in the same LAN,
it is cheaper to access X3200 over the LAN or the serial interface.
➤ Connect X3200 to the IS DN as ex plained in chapter3.1, page 32.
To reach X3200 over ISDN login, proceed as follows:
➤ Log in on your BinTec router (in LAN 1) in the usual way.
➤ Enter isdnlogin <extension of your X3200> in the SNMP shell.
The login prompt will appear in the window. You are now i n the SNM P shell
of X3200. Continue with chapter 4.2, page 87.
86 BinTec Communications AG
Page 87
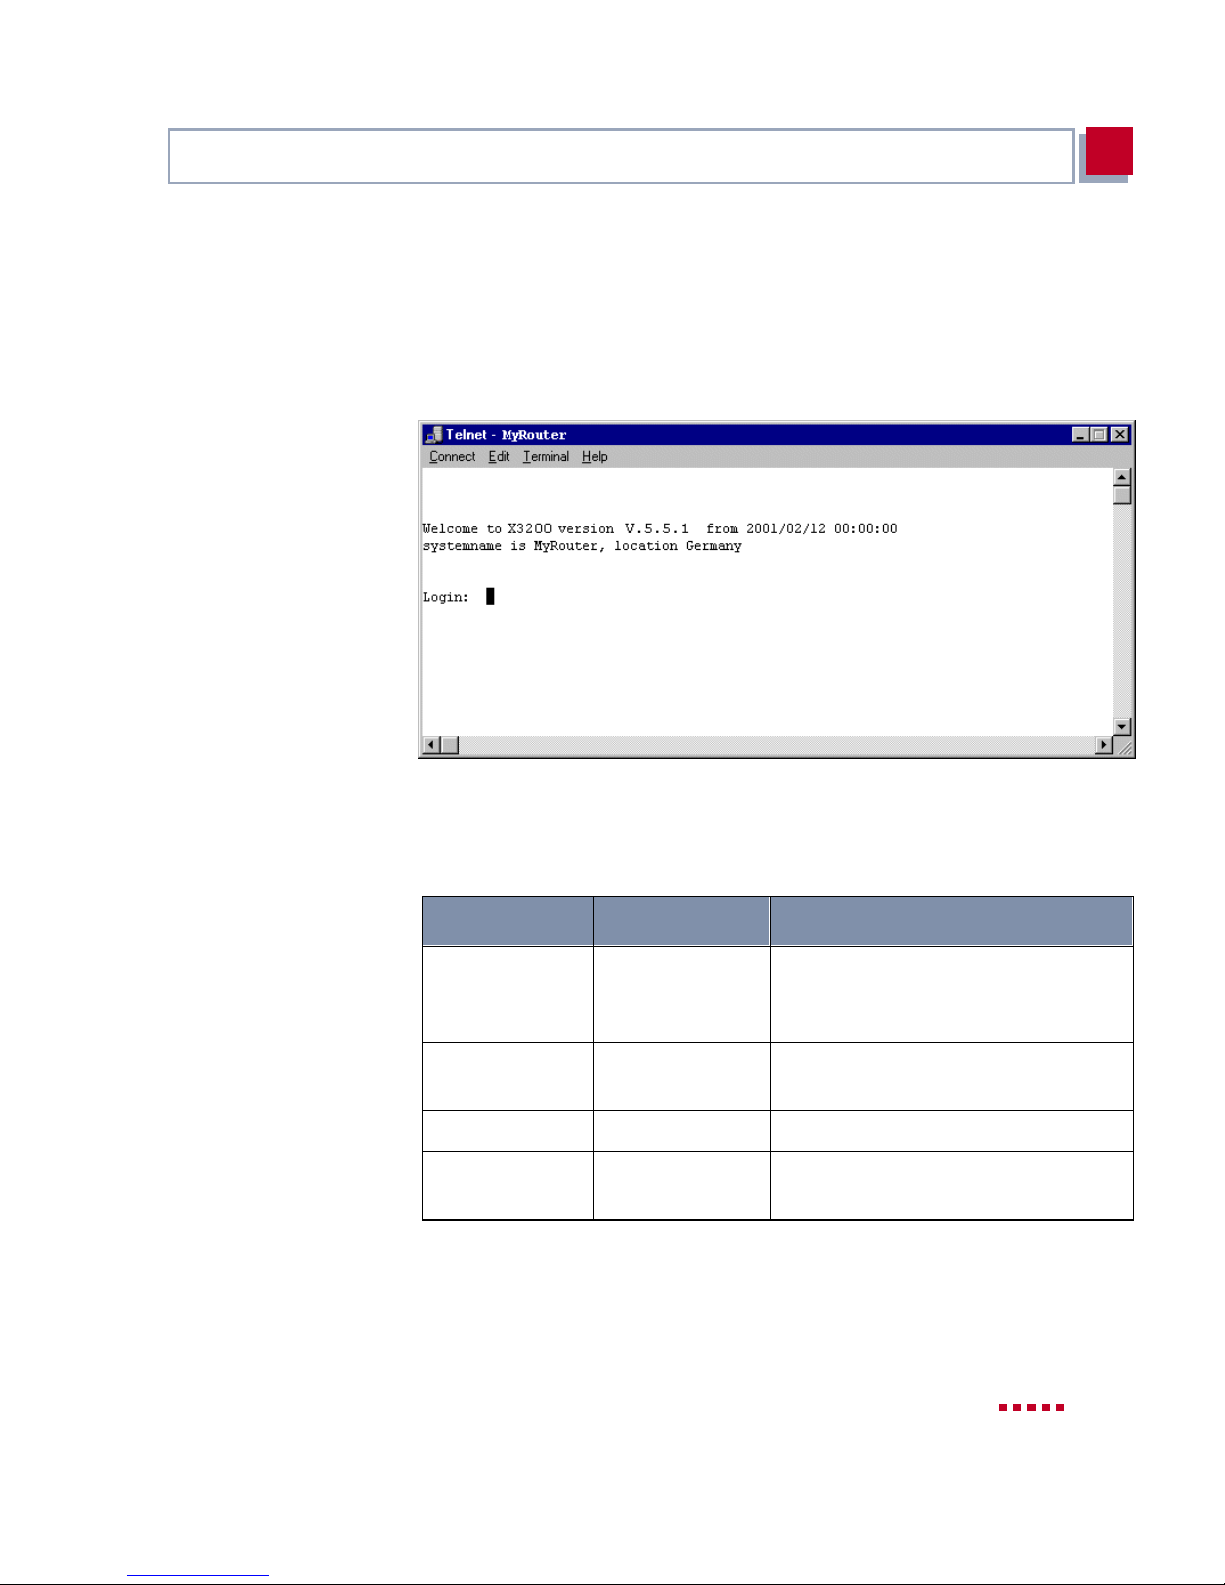
Logging In
4
4.2 Logging In
Regardless of how you access X3200, the ➤➤ SNMP shell of X3200 with the
login prompt always appears first. (Exceptions to this rule are the Configura ti-
on Wizard and Con fi guration Manager under Windows.)
Figure 4-2: Login prompt
In order to log in, you need to know the user name and p assword. In i ts ex works
state, X3200 is provid ed with the following use r names and passwords:
User name Password Permission
admin bintec Read and change system variables,
save configurations, use the Setup
Tool.
write public Read system variables (changes are
lost wh en X3200 is turned off).
read public Read system variables.
http bintec Call up HTTP status page of X3200,
read system variables, no login.
Table 4-1: User names and passwords in ex works state
As you can see, it is only possi ble to chang e and save con figur ation s when you
log in with the user name admin.
X3200 User’s Guide 87
Page 88
Connecting X3200
4
Access information (user names and passwords) can also only be changed if
you log in with the use r name admin. For security reasons, passwords are not
normally shown on the Setup Tool screen in plain language, but only as asterisks. The user names app ear in plain language. The security concept of X3200
enables you to read all the other configuration settings with the user name
read, but not the access information. It is therefore impossible to log in with
read, read the password of the admin user and subsequently log in with ad-
min and make changes to the configuration.
This is how you log in:
➤ Type in your user name (e.g.
➤ Type in your password (e.g.
Your router then i ssues an i npu t prompt, e. g. X1200:>. The login was successful.
admin
bintec
) and press Return.
) and press Return.
Caution!
To prevent unauthorized access to X3200, you should change the passwords
right away, in case you did not do this during the bas ic configuration with the
Configuration Wizard.
➤ Change the passwords as described in chapter 5.1.2, page 105.
Closing the SNMP she ll To leave the SNMP shell after completing the configuration, enter exit and
press Return.
88 BinTec Communications AG
Page 89

Configuration options
4
4.3 Configurati on options
Before you set to wo rk with the configurati on, you must sel ect a method. For this
reason, we wou ld first li ke to give you an overvie w of the different confi guration
methods and a n int rod uction to u sin g the Setup To ol. This manu al expl ains how
to configure X3200 by means of the Setup Tool.
4.3.1 Methods of Configuration
Methods of confi guring X3200:
■ Configuration Wizard
■ Setup Tool
■ ➤➤ SNMP shell commands
■ Configuration Manager
■ Other SNMP managers
Configuration Wizard You have already learnt about configuration with the Configuration Wizard in
chapter 3.5, page 48. It is us eful for q uic k, i niti al co nfigur atio n of X3200 and can
be used if you have a Windows PC. This usually covers most standard configurations. If, however, you require further settings, you can use the other aforementioned options. You could first configure X3200 with the Configuration
Wizard and s ubsequently extend or change thi s initial configuration with one of
the other tools. In many cases, the Configuration Wizard alone will be suffi-
cient!
Setup Tool The Setup Tool is a menu-dr iv en tool for th e confi gurati on and adm inis tration of
X3200. Conf iguration with th e Setup Tool is much easier and clearer than co n-
figuration with SNMP commands, alt hough not all settings can be m ade with the
Setup Tool. Besides the assistance of the Configuration Wizard, this manual
only explains how to confi gure with the Setup Tool. The Setup Tool is independent of the operating syst em on your PC. If a config urati on step i s only possi ble
in isolated cases with the help of an SNMP command, the procedure for this is
also explained.
X3200 User’s Guide 89
Page 90

Connecting X3200
4
SNMP ➤➤ SNMP ( Simple Network Management Protocol) is a ➤➤ protocol that
defines how yo u can acces s the confi guration s ettings. Al l config uration se ttings
are stored in the
tables and MIB variables. You can acc ess these directly via the SNMP shell.
➤➤ MIB (Management Information Base) in the form of MIB
Configuration Manager
and other SNMP
managers
Main menu
The Confi gurati on Manager is provide d by Bin Tec Communi catio ns AG as an
SNMP manager for Windows PCs. You can use the Configuration Manager
with its interface based on Microsoft Explo rer to access all MIB tables and variables of X3200 (see chapter 4.8, page 103). You can also use other SNMP
managers, such as SNM, HP Open View or Transview, to access and modify
the MIB tables and variables. As more detailed knowledge of the st ructure and
interrelations of X3200 is necessary, this method is suitable for more experi-
enced users. Handling MIB tables and MIB variables is explained in the Soft-
ware Reference and MIB Reference.
4.3.2 Operation and Menu Architecture of the Setup
Tool
You can call up the Setup Tool once you have logged in to X3200:
➤ Type setup after the input promp t and press Return.
The main menu of the Setup Tool appears.
X3200 Setup Tool BinTec Communications AG
MyRouter
Licenses System
LAN: CM-100BT, Fast Ethernet
WAN: CM-1BRI, ISDN S0
xDSL: CM-BNC/TP, Ethernet
WAN Partner
IP IPX PPP ISDN CAPI
Configuration Management
Monitoring and Debugging
Exit
Press <Ctrl-n>, <Ctrl-p> to scroll through menu items, <Return> to
enter
90 BinTec Communications AG
Page 91
Configuration options
Menu layout Every Setup Tool menu consists of three par ts:
4
The appearance of the main menu of the Setup Tool diff ers according to
whether or not the license data have alrea dy been entered. The illustration
shows the main menu wit h the dat a already entered for a standard license.
To use the Setup Too l, you m ust log in with the user name admin! If you don’t
know the corresponding password, you cannot open the Setup Tool (see
chapter 4.2, page 87).
The Setup Tool is easy to use. and you will soon find your way around. Nevertheless, you sho ul d first f amili ariz e yoursel f wit h the fac ili ties o ffere d by the Set up Tool.
Menu Line
Configuration Window
Help Line
X3200 Setup Tool BinTec Communications AG
MyRouter
Licenses System
LAN: CM-100BT, Fast Ethernet
WAN: CM-1BRI, ISDN S0
xDSL: CM-BNC/TP, Ethernet
WAN Partner
IP IPX PPP CREDITS CAPI
Configuration Management
Monitoring and Debugging
Exit
Press <Crtl-n>,<Ctrl-p> to scroll through menu items,<Return> to enter
Figure 4-3: Setup Tool menu layout
The menu line contains a navi gati on aid to show you wher e you curre ntly ar e in
the Setup Tool menu system. The system name of X3200 is also displayed.
This is especially helpful if you are using several BinTec routers with different
system names.
X3200 User’s Guide 91
Page 92
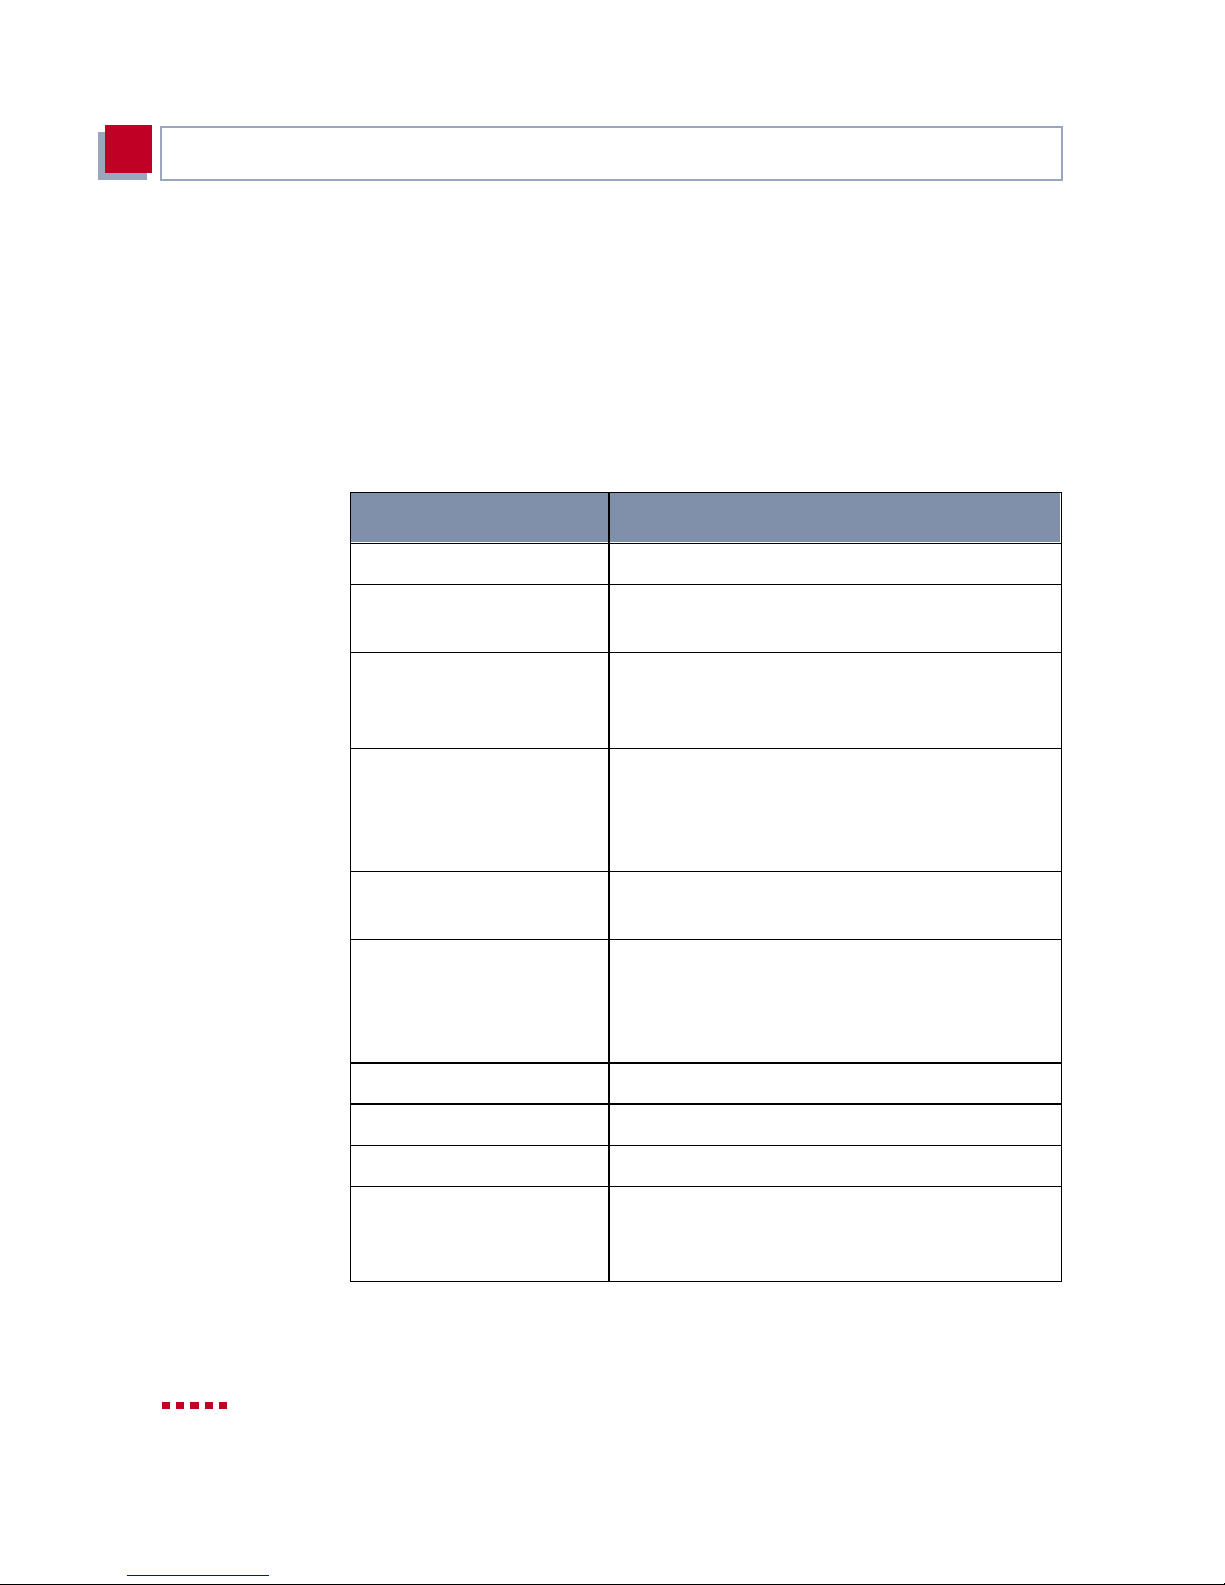
Connecting X3200
4
The configurat ion wind ow is where the ac tual ent ries ar e made and the respec tive settings displayed. The field in which the cursor is currently located is also
marked.
The help line at the bottom of the window tel ls you how to move around or how
to change entries in the menu curren tl y being displayed.
Menu navigation You can use the following keys or key combinations to navigate the various
menus in the Setup Tool:
Key combination Meaning
Tabulator To move to the next item in a menu.
Return To open a submenu or acti vate a menu com-
mand (e.g. SAVE).
up or down To move forwards or backwards between menu
fields (functions with VT 100 emulation when
using a terminal program).
left or right To scroll backwards or forwards in the same
field to reveal a list of possi ble entries (f unctions with VT 100 emulation when using a terminal program).
Esc Esc Esc twice in succession: To return to the previ-
ous menu. Cancels any changes made.
Space To toggle the delet e fl ag for list entri es that are
to be deleted. The ta gged entries are marke d
with D. Pressing Space again removes the tag
marking.
Ctrl - l To redraw the screen.
Ctrl - n To move to the next item in a menu.
Ctrl - p To move to the previous item i n a menu.
Ctrl - f To scroll forward a page in a long list. An "="
sign at the bottom right indicates the end of the
list or a "∨" indicates more to come.
92 BinTec Communications AG
Page 93
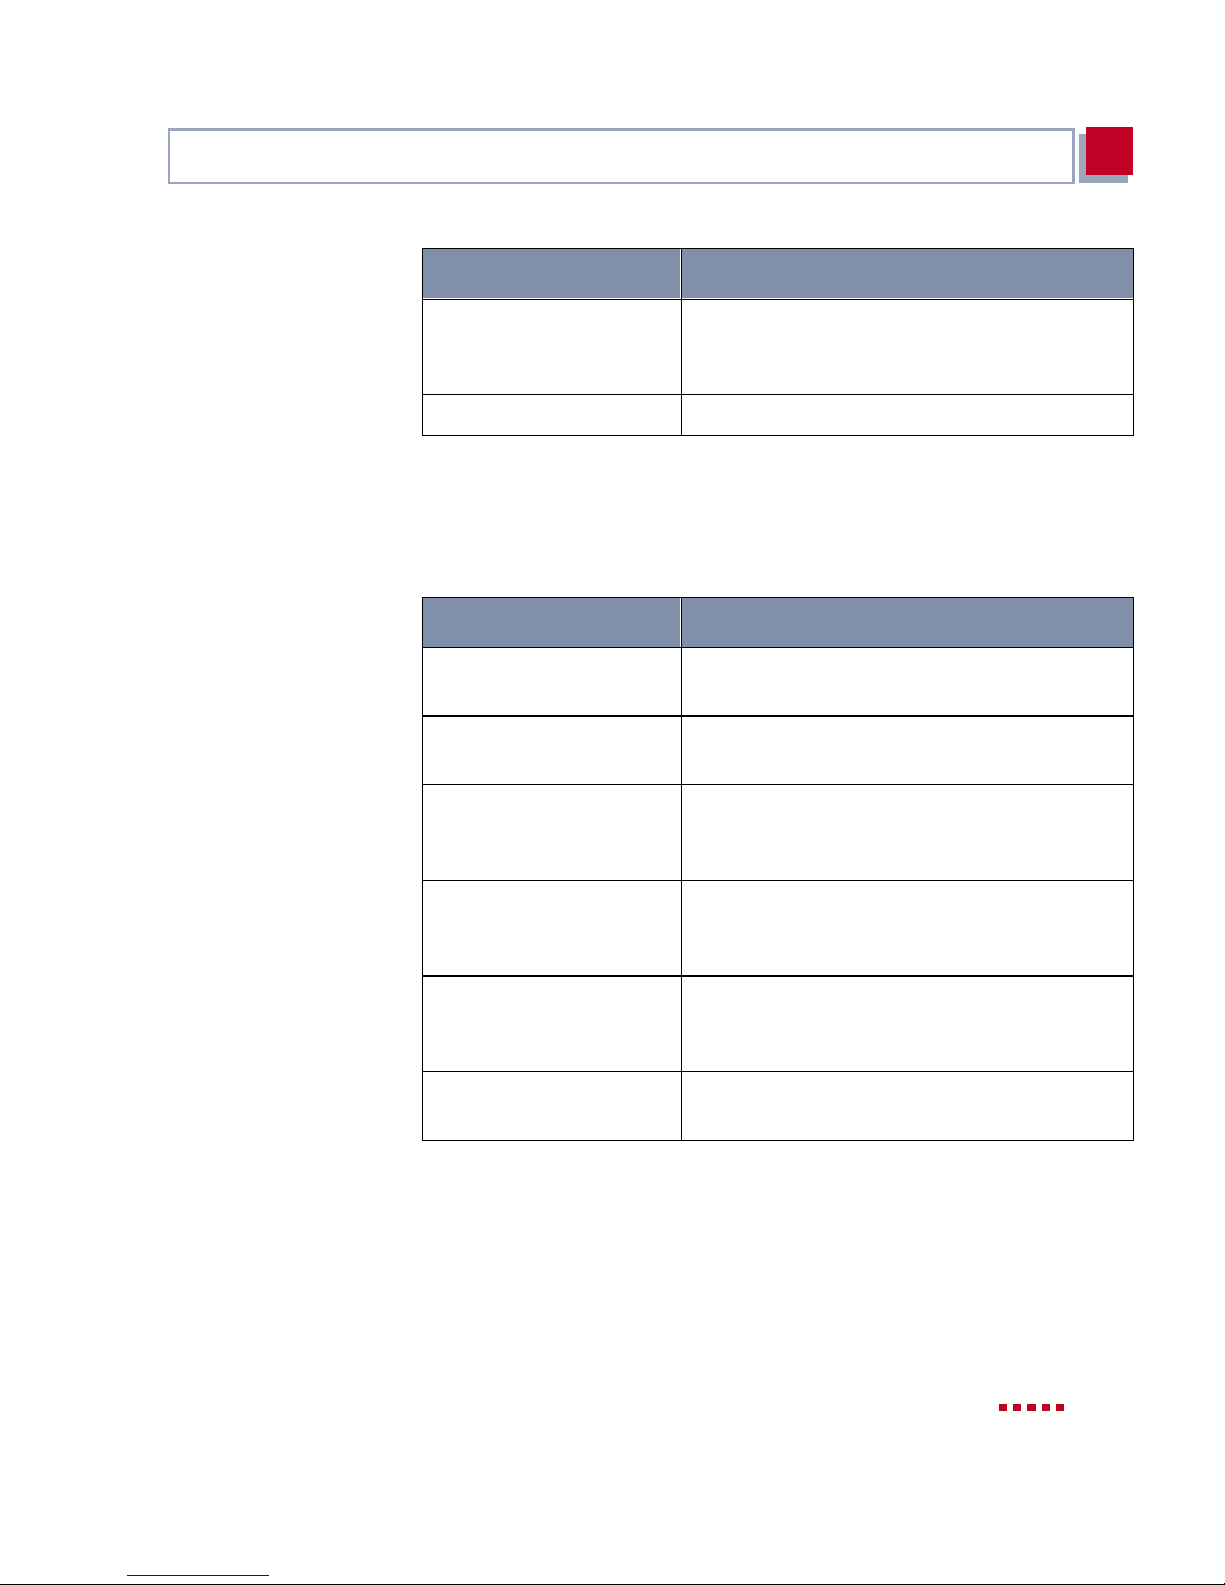
Configuration options
Key combination Meaning
Ctrl - b To scroll back a page in a long list. An "=" sign
at the top ri ght indicat es the start of the list or a
"∧" indicates more to come .
Ctrl - c Leave the Setup Tool without saving.
Table 4-2: Navigation in the Setup Tool
Menu commands When you start moving around in the Setup Tool, you will notice that some
menus have sp eci al c omma nd opti ons , suc h a s DEL ETE, SAVE and CANCEL.
The meaning of the respective commands is expl ained below:
Menu Command Meaning
ADD To create or add an item to a list. A submenu
appears for entering the desi red settings.
4
CANCEL To discard all changes made in the current
menu.
DELETE To delete all entries tagged wi th the Space bar
for deleti on from a list. These cha nges become
effective immediately.
OK To confirm the changes in the current me nu.
These changes do not become effective until
SAVE is pressed in the next me nu.
SAVE All variables set in the curren t menu and all its
submenus are saved to memory. These
changes become effective immed iat ely.
EXIT To leave the curre nt menu and return to the
previous menu. Any entries made are lost.
Table 4-3: Buttons in the Setup Tool
X3200 User’s Guide 93
Page 94
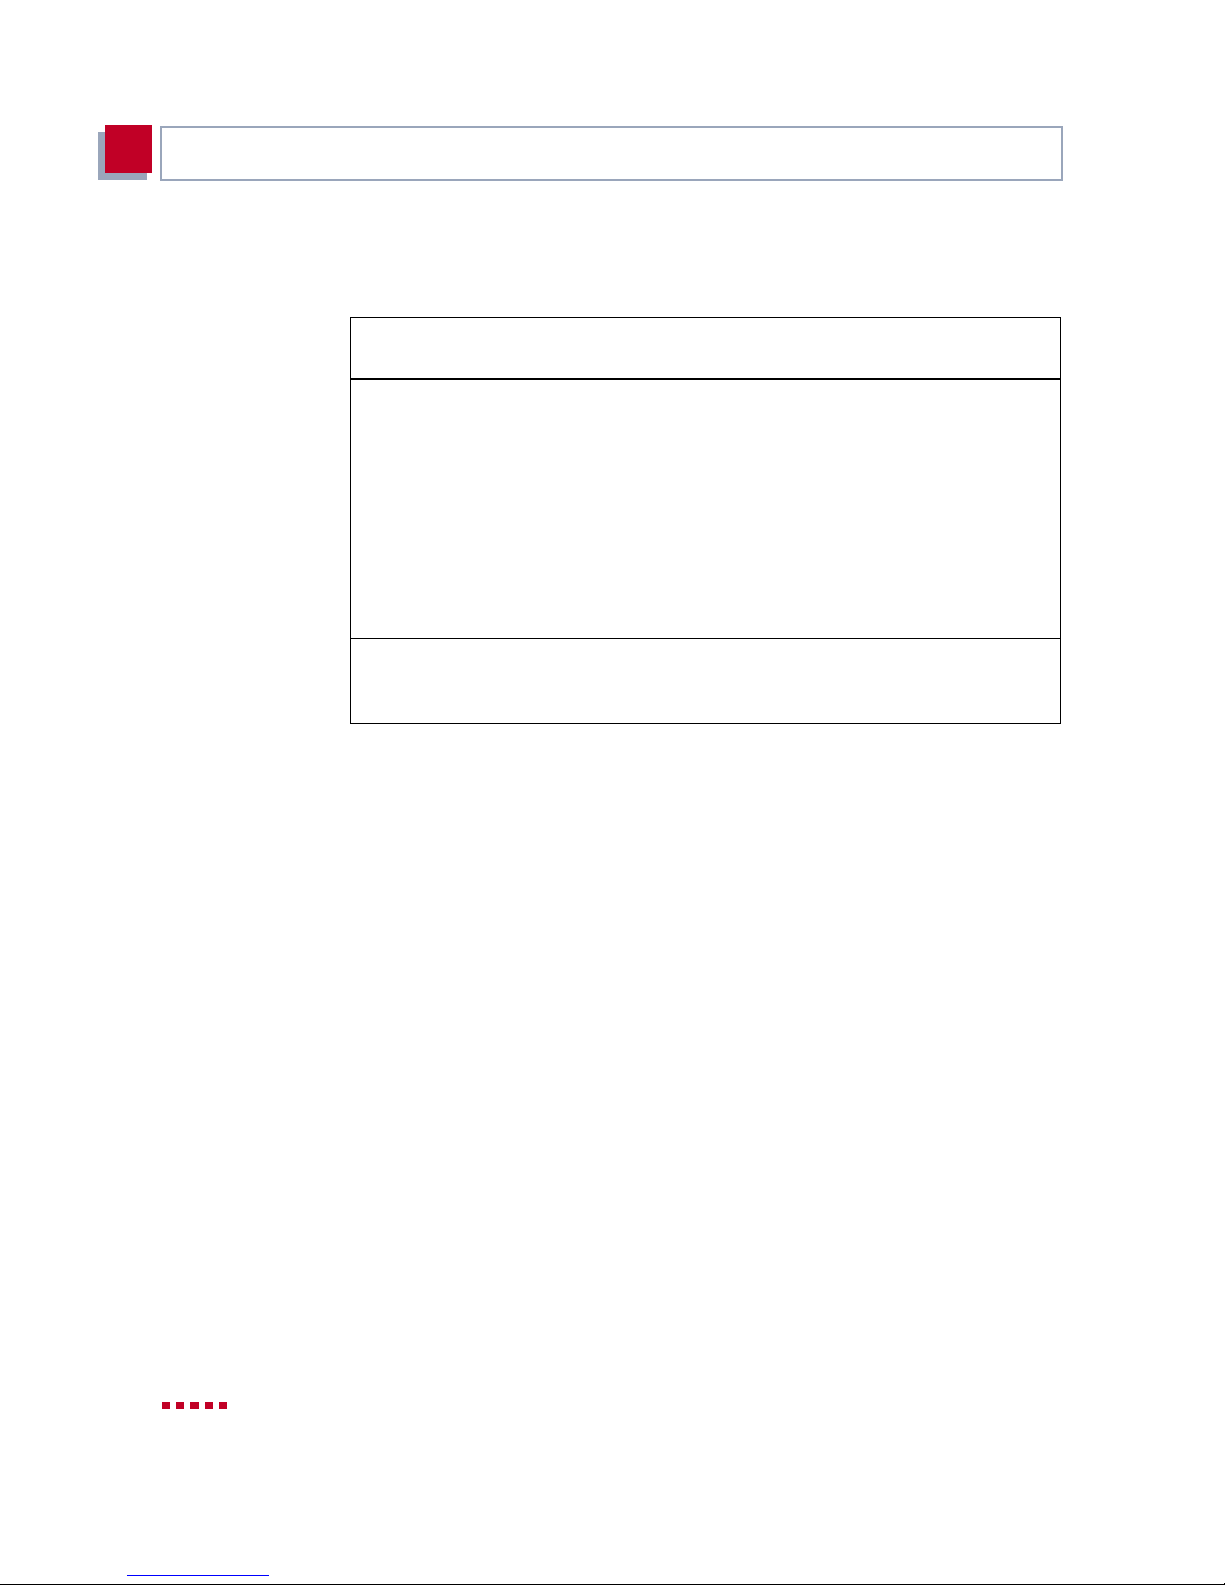
Connecting X3200
4
List search function Some Setup Tool menus contain lists of items, e.g. the
which lis ts al l
X3200 Setup Tool BinTec Communications AG
[WAN]: WAN Partners MyRouter
Current WAN Partner Configuration
Partnername Protocol State
BigBoss ppp dormant
T_ONLINE ppp dormant |
Partner1 ppp dormant |
Partner2 ppp dormant |
PROVIDER ppp dormant =
ADD DELETE EXIT
Press <Ctrl-n>, <Ctrl-p> to scroll, <Space> tag/untag DELETE, <Retur n>
to edit
Search: p
➤➤ WAN partners currently conf igured.
These lists are in alphabetical order according to the contents of the first field.
An incremental search function is provided, which is very useful for searching
for an item in lo ng lis ts .
WAN P
ARTNER
∧
menu,
Proceed as follows:
➤ Enter the first letter of the item you are looking for, with the cursor located
on an item in the list. Entries can be made in upper or lower case.
➤ As long as the search is act ive, you can enter mor e charact er s to refine t he
search.
➤ The Backspace or Delete key can be used to edit the search string.
The cursor automatically jumps to the first match it finds in the list.
The characters entered for the search are displayed in the help line at the bottom of the menu.
Do not ente r invisi ble cha rac ters, such as Tabu lator or Space, as they st op t he
search and could lead to a function being executed.
94 BinTec Communications AG
Page 95
Configuration options
4
If the search does not work, make sure that the cursor is located in a list field.
The search cannot run if the cursor is located in a command fiel d, e.g. ADD or
DELETE.
Example:
Changing the
password
In the
search resul ts:
Table 4-4: Search results
The procedure de scrib ed below fo r changi ng the pass word ap plies to all X 3200
passwords: the access passwords for the user names admin, read and
write, the HTTP password, the PPP password and the provi der password.
Any character may be used for entering a password. Passwords are only displayed as asterisks, even during password changes. The number of asterisks
is the same as the number of characters in the password.
To start the X3200 Setup Tool in a mode in which the passwor ds are display ed
in plain languag e and can be changed once by editing, you must enter the
command setup -p. This option only exists if you have logged in on X3200
under the user name admin.
WAN P
Entry Cursor moves to entry
p or P Partner1
pr, Pr, pR, PR PROVIDER
p a r t n e r 2 Partner1, on entering 2 to Partner2
ARTNER
menu shown above, the entries provide the following
To change a password, proceed as follows:
In the password field, the Backspace key always del etes the complete entry
and not just one character.
X3200 User’s Guide 95
Page 96

Connecting X3200
4
➤ Select the password field and enter the new password.
The field changes to the change mode and the message Change
Password appears in the help line.
➤ Now press Return, Tabulator or a Cursor key to confirm.
The field changes to the confirm mode and Confirm Password is dis-
played in the help line.
➤ Enter the password again and con firm wi th Ret urn, Tabulator or a Cursor
key.
If you have entered the repeat password correctly, the password is
changed. The new passwor d is saved on leaving the menu with the SAVE
button. If you leave the menu by pressing CANCEL or Esc Esc, the pass-
word change is not saved.
If the two pas swords y ou entered wer e not th e same, th e fi eld i s res et to t he
old password an d Password doesn’t match Try again. is displayed
in the help line.
Convention To ensu re you al ways know whi ch S etup Tool menu we a re tal king abo ut in t his
manual or how you get there, we have devised the following convention (the
starting point is always the main menu):
M
ENU
➧
S
UBMENU
Examples:
➧
S
UBMENU
■ "Go to the submenu Routing fr om the menu IP" is represented as follows:
IP
➧
R
Go to
OUTING
.
■ "Go to the submenu Advanc ed Settings f rom th e submenu WAN Numbers.
To do this you must press ADD in the menu WAN Partner and submenu
WAN Numbers." This is shown thus:
Go to
S
ETTINGS
WAN P
.
ARTNER
➧
ADD
➧
WAN N
UMBERS
➧
ADD
➧
A
DVANCED
■ "Go to the submenu WAN Numbers of an entered WAN partner to change
an existing entry. Mark t he rel evan t WAN part ner i n the menu WAN Par tne r
and press Return." This i s shown thus:
Go to
WAN P
ARTNER
➧
E
DIT
➧
WAN N
UMBERS
.
96 BinTec Communications AG
Page 97
Configuration options
Menu Architecture The menu architecture of t he Setup Tool looks like thi s:
4
Licences
External Activity Monitor
Ext. System Logging
Keepalive Monitoring
Password Settings
LAN:
CM-100BT, Fast Ethern.
Advanced Settings
WAN:
DSL:
CM-1BRI, ISDN S0
Incoming Call Answering
Advanced Settings
CM-BNC/TP, Ethernet
Advanced Settings
System
Time and Date
WAN Partner
PPP
Advanced Settings
Ext. Interface Settings
WAN Numbers
Advanced Settings
IP
Advanced Settings
IPX
IP
Routing
Static Settings
Network Address Transl.
Access Lists
Bandw. on Dem. (BOD)
IP add. pool WAN (PPP)
IP a. pool LAN (DHCP)
SNMP
DNS
Loc. Serv. Access Contr.
IPX
PPP
VPN
PPP
IP
Advanced Settings
IPX
Credits
ISDN Credits
xDSL Credits
PPPoE Credits
CAPI
User
IPSec
Config. Management
Monitoring a. Debugging
ISDN Monitor
ISDN Credits
xDSL Credits
PPPoE Credits
Interfaces
Messages
TCP/IP
Figure 4-4: Setup Tool menu architecture
All menus of the Setup Tool available to X3200 are illustrated in figure 4-4,
page 97. Not all functions are available on all rout ers (e.g. VPN). To use them,
an extra li cense is necessary, which you can acquire from BinT ec Communications AG. When y ou acti vate t he ne cessary lice nse, X3200 det ects t his and dis -
X3200 User’s Guide 97
Page 98
Connecting X3200
4
plays the corresponding menus (for entering license, see chapter 5.1.1,
page 104).
Summary To help you f ind your way arou nd during configu ration, the menus are bri efly ex-
plained below. A more detailed description of th e individual configuration steps
necessary for the required settings is given in the following chapters.
Menu Function
L
ICENSES
This menu is for entering the license infor m ation printed on the li cense card
supplied with the equipment. This menu is also used for activating extra
licenses.
S
YSTEM
In this menu, you ent er the basic system settings of X3200, e.g. s ystem name
and passwords.
CM-100BT, F
NET
AST ETHER
CM-1BRI, ISDN S0
CM-BNC/TP, E
WAN P
ARTNER
THERNET
-
This menu is for configuring the ➤➤ LAN interface of X3200. Here you enter data such as the IP address and netmask of X3200.
This menu is for configur ing the ➤➤ WAN interface of X3200. Here you en-
ter data such as the type of ISDN connection to which X3200 is connect ed.
The submenu
NTERFACE
➧
I
NCOMING CALL ANSWERING
is for assign-
WAN I
ing the available ISDN extensions to the desired services (e.g. PPP routing,
➤➤ CAPI, ➤➤ ISDN Login).
This is X3200’s high-speed Internet interface.
Here you define all your WAN par tners, e.g. your ➤➤ Int ern et Ser vice Pro-
➤➤ ISP) . All the WAN partners entered are displayed in a list tha t i n-
vider (
cludes the name of partner, protocol used and current status of each.
98 BinTec Communications AG
Page 99

Configuration options
Menu Function
4
IP
Here you enter the settings for the ➤➤ IP protocol. This menu consists of
several submenus:
IP
➧
R
OUTING
your partners (e.g. default routes, network routes), which ensure that your
X3200 sends all the
IP
➧
STATIC SETTINGS
name of X3200, the IP addresses of additional
Name Server) and system time specifications.
IP
➧
N
ETWORK ADDRESS TRANSLATION
partners for which you want to use the Network Address Translation function
➤➤ NAT).
(
IP
➧
A
CCESS LISTS
or to the differen t hosts in t he connected net works. You can th us prevent your
X3200 from establishing unintended connections to t he ISDN.
IP➧ IP A
that X3200 as a dynamic IP addr ess server can assi gn to WAN partners, who
can then dial in.
includes X3200’s IP routing table. Here you enter routes to
➤➤ data packets to the correct addresses.
is for entering important settings, e.g. the domain
➤➤ servers (e.g. Doma in
is for configu ring the inter faces to the
is for defi ning ➤➤ filters to al low or de ny ac cess fr om
DDRESS POOL
WAN (PPP)
is for setting up a pool of IP addresses
IPX
IP
➧
IP A
DDRESS POOL
LAN (DHCP)
is for configuring X3200 as a
➤➤ DHCP server. As a DHCP server, X3200 assigns the IP addresses to
the hosts in the LAN dynamically.
IP➧SNMP
IP
➧
IP
➧
connection partners.
IP
➧
UDP and TCP services in X3200.
Here you make the entries for the IPX protocol. ➤➤ IPX is use d es p e c ia lly
in Novell networks.
is for changing the basic ➤➤ SNMP settings.
DNS
is for defining the procedure for name re solution in X3200.
T
OKENAUTHENTICATIONFIREWALL
L
OCAL SERVICES ACCESS CONTROL
is for personal authentication of IP
is for control ling access t o the local
X3200 User’s Guide 99
Page 100
Connecting X3200
4
Menu Function
PPP
VPN
CREDITS
CAPI
IPS
EC
Includes general ly vali d ➤➤ PPP settings, e.g. authenticat ion protocol, that
do not just ref er to partic ular WAN par tners. The rout er can use thes e settings
to perform an authentication procedure for incoming calls if the calling line
number cannot be identified (e.g. because the call is made from an analog
line that does not transfer the calling line number).
Here the necessary settings for Virtual Private Networking (VPN) are made.
This menu only appears if you have entered the relevant valid license. The
license can be purchased as an option. You will find more detailed explanations and instructions on configuration in the Softwa re R eference.
Here you administrate the Credits Based Accounting System of X3200.
Includes the setting s for BinTec’s ➤➤ CAPI user concept. You can use this
to assign user names and passwords to users of X3200’s CAPI appl ications.
This makes sure that only authorized users can receive incoming calls and
make outgoing calls via CAPI.
This menu is for making the necessary settings for Inter net Protocol Security
(IPSec). This menu only appears if you have entered the relevant valid licens e. The licen se can be purc hased as a n option. You will find mor e detailed explanat ions and in struct ions on conf igura tion in the IPSec Referenc e
Manual, which is supplied together with the license, or in the Software Ref-
erence.
C
ONFIGURATION MANAGE
MENT
M
ONITORING AND DEBUG
GING
E
XIT
-
Here you can administrat e X3200’s conf igura tion fil es. You can save t hem e ither locally on X3200 or on your PC, for exam ple.
-
Contains submenus that enable you to locate problems in your network and
moni to r ac tivitie s in X3200.
Quit the Setup Tool with Exit.
You can save the configura tion file to the flash memory with Exit
boot configuration and exit; this file is loaded after X3200 is restarted.
If you select Exit
time X3200 is started.
Table 4-5: Setup Tool menus
100 BinTec Communications AG
➧
Save as
➧
Exit without saving, all the changes will be lo st the next
 Loading...