

Page 1

USER MANUAL
SYSTEM PHONE
BINTEC CS300
Page 2

Reprinting of this document - including excerpts - is permitted only with the permission
of the publisher and with precise designation of sources.
Page 3

Contents
1 Introduction . . . . . . . . . . . . . . . . . . . . . . . 1
2 Description . . . . . . . . . . . . . . . . . . . . . . . 1
2.1 Safety instructions. . . . . . . . . . . . . . . . . . . . . . . . . . . 1
2.2 Contents of package . . . . . . . . . . . . . . . . . . . . . . . . . 2
2.3 Cleaning and maintenance . . . . . . . . . . . . . . . . . . . . . . 2
2.4 Placing the telephone . . . . . . . . . . . . . . . . . . . . . . . . . 2
2.5 User interface of your system telephone . . . . . . . . . . . . . . . 3
2.6 Display, Buttons, LEDs, Pictographs and signals . . . . . . . . . . . 4
3 Installation of the telephone . . . . . . . . . . . . . . 9
3.1 Connection of the handset connecting cord . . . . . . . . . . . . . 9
3.2 Connection of the ISDN connecting cord. . . . . . . . . . . . . . . 9
3.3 Changing the label panel . . . . . . . . . . . . . . . . . . . . . . 10
3.4 Keyboard extension elmeg T300. . . . . . . . . . . . . . . . . . . 10
4 Settings . . . . . . . . . . . . . . . . . . . . . . . . 13
4.1 Telephone numbers (MSN or extension number) . . . . . . . . . . 13
4.2 Volume settings . . . . . . . . . . . . . . . . . . . . . . . . . . . 16
4.3 Call forwarding (call rerouting) . . . . . . . . . . . . . . . . . . . . 20
4.4 Call waiting . . . . . . . . . . . . . . . . . . . . . . . . . . . . . . 22
4.5 Setting appointment dates . . . . . . . . . . . . . . . . . . . . . . 23
4.6 Call Filter . . . . . . . . . . . . . . . . . . . . . . . . . . . . . . . 24
4.7 Setting the date and time . . . . . . . . . . . . . . . . . . . . . . 26
4.8 Setting the User Interface . . . . . . . . . . . . . . . . . . . . . . 27
4.9 Direct dialing . . . . . . . . . . . . . . . . . . . . . . . . . . . . . 29
4.10 Displays of the telephone . . . . . . . . . . . . . . . . . . . . . . 31
4.11 Call control . . . . . . . . . . . . . . . . . . . . . . . . . . . . . . 36
4.12 Protecting the configuration by a PIN (password). . . . . . . . . . 39
4.13 Call charges . . . . . . . . . . . . . . . . . . . . . . . . . . . . . 40
4.14 Setting the default park code . . . . . . . . . . . . . . . . . . . . 42
4.15 Emergency operation . . . . . . . . . . . . . . . . . . . . . . . . 43
4.16 Emergency operation at a point-to-point connection . . . . . . . . 45
4.17 Programming the phone directory . . . . . . . . . . . . . . . . . . 45
4.18 Programming VIP numbers . . . . . . . . . . . . . . . . . . . . . 48
4.19 Programming direct dialing numbers . . . . . . . . . . . . . . . . 49
4.20 Programming the elmeg T300 keyboard extension . . . . . . . . . 54
4.21 Additional Information in the Display. . . . . . . . . . . . . . . . . 55
Page 4

5 Settings for a PABX System . . . . . . . . . . . . . 57
5.1 Number length . . . . . . . . . . . . . . . . . . . . . . . . . . . . 57
5.2 Automatic access of exchange line . . . . . . . . . . . . . . . . . 57
5.3 Line access digit (LAD) . . . . . . . . . . . . . . . . . . . . . . . . 58
5.4 Setting the PABX system type . . . . . . . . . . . . . . . . . . . . 58
5.5 Function buttons . . . . . . . . . . . . . . . . . . . . . . . . . . . 59
6 Operation . . . . . . . . . . . . . . . . . . . . . . . 65
6.1 Starting a call . . . . . . . . . . . . . . . . . . . . . . . . . . . . 65
6.2 Accepting a call . . . . . . . . . . . . . . . . . . . . . . . . . . . 67
6.3 »Station guarding« . . . . . . . . . . . . . . . . . . . . . . . . . . 67
6.4 Call rerouting / Call deflection . . . . . . . . . . . . . . . . . . . . 68
6.5 Redialing . . . . . . . . . . . . . . . . . . . . . . . . . . . . . . . 68
6.6 Caller and memo list. . . . . . . . . . . . . . . . . . . . . . . . . 71
6.7 Mute, Open Listening and Hands-Free Calling . . . . . . . . . . . 74
6.8 Light Telephone Headset (Headset) . . . . . . . . . . . . . . . . . 75
6.9 Message and Intercom. . . . . . . . . . . . . . . . . . . . . . . . 76
6.10 Call waiting, Enquiry call, Broker`s call and three-party conference . 77
6.11 Call transfer(switching) . . . . . . . . . . . . . . . . . . . . . . . . 79
6.12 Parking . . . . . . . . . . . . . . . . . . . . . . . . . . . . . . . . 79
6.13 Call-Back on busy(CCBS) . . . . . . . . . . . . . . . . . . . . . . 80
6.14 Malicious call identification (MCID). . . . . . . . . . . . . . . . . . 80
6.15 Keypad and Tone Frequency Dialing (DTMF dialing) . . . . . . . . 81
6.16 Viewing and deleting call charges . . . . . . . . . . . . . . . . . 82
6.17 CTI with TAPI. . . . . . . . . . . . . . . . . . . . . . . . . . . . . 84
7 Service Functions . . . . . . . . . . . . . . . . . . . 85
7.1 Read firmwareversion of the telephone . . . . . . . . . . . . . . . 85
7.2 Country-specific Settings . . . . . . . . . . . . . . . . . . . . . . 85
7.3 Programs of the WIN-Tools CD-ROM . . . . . . . . . . . . . . . . 86
7.4 Downloading a new firmware . . . . . . . . . . . . . . . . . . . . 86
7.5 Telephone BIOS . . . . . . . . . . . . . . . . . . . . . . . . . . . 87
7.6 RESET - Resetting to default state. . . . . . . . . . . . . . . . . . 88
7.7 Connection of the telephone to the PC . . . . . . . . . . . . . . . 89
8 Index .......................91
Page 5

1 Introduction
BinTec CS 300 system telephones are manufactured exclusively for BinTec by elmeg,
the leading manufacturer of ISDN telephones and PABX systems.Not all features de
scribed in the User’s Manual are currently available with your XCENTRIC.Latest imple
mentation data is available for you at:
http://www.bintec.de/XCENTRIC/de/loesungen/index.html
2 Description
These operating instructions describe the functions for the Bin Tec CS300 ISDN
telephone.
You can connect the ISDN telephone at the Euro-ISDN point-to-point connection
(DSS1 protocol)provided by your network service provider, orat the internal ISDN con
nection (point-to-point connection DSS1 protocol) in a PABX system. The ISDN tele
phone is linked tothe ISDNnetwork via an ISDNjack (Westernor RJ45). After being connected to the ISDN network, your ISDN telephone is immediately ready for operation
and can fully utilize its configured performance features.
Up toeight (8) ISDN terminal devices canbe connected and managed at anetwork termination of a network service provider. Of these eight (8) available lines, one supply line
(max. 4 W) is available for ISDN telephones without their own internal power supply. A
link can be set up simultaneously for two (2) ISDN terminaldevices at each baseaccess
terminal (2 B channels, 1 D channel).
An internal ISDN connection fora PABX system is comparable to an ISDN baseaccess
terminal (point-to-point connection) of a network service provider. Up to eight (8) ISDN
terminal devices can be connected and managed ateach internalISDN connection. The
power available atthis internal ISDN connection determines how manyterminal devices
can besupplied with power by the PABX system.Refer to the operating instructions for
your PABX,or contact the PABX manufacturer for more details about this.A link can be
set up simultaneously for two (2) ISDN terminal devices at each internal ISDN connec
tion.
-
-
Description
-
-
-
The CS300 ISDN telephone provides certain system features when connected to an
XCentric. The internal connection (S0 bus) on this PABX system interfaces with the
CS300 ISDN telephone. Please refer also to the User’s Manual for your XCentric.
2.1 Safety instructions
Unauthorized opening of thesystem telephoneand improperrepairs may
q
result in riskof injury for the user.
1
Page 6

Do not expose the insideof the system telephone to any liquids. This can
q
result in electric shock. If you expose the inside of the telephoneto liquids
the telephone canbe destroyed.
You should notconnect or disconnect any linesduring thunderstorms.
q
To prevent mutualinterference, do not install your system telephone in the
q
immediate vicinity of electronic devices such as stereo equipment, elec
Description
tric office equipmentor microwave units.
Avoid installing your PABX near sources of excessive heat, e.g. radiators
q
or in roomswith excessive humidity.
The ambient temperature must not be below 0° and should not exceed
40°C.
2.2 Contents of package
BinTec CS300 ISDN-telephone
q
handset with handsetconnecting cord
q
ISDN connecting cord(approx. 3m)
q
RS232 connecting cableRJ12 / D-SUB 9-pin (approx.3m)
q
operating instruction
q
Label for directdialing/function keys
q
WIN-Tools CD-ROM with:detailed operating instruction;
q
configuration manager, telephone directory manager and download
manager;
TAPI driver
Adobe Acrobat filefor the printing of individuallabels
-
2.3 Cleaning and maintenance
The ISDN systemtelephone hasbeen manufactured for normal,everyday use. When re
quired, clean the ISDN system telephone with a slightly moistened cloth, or with an
anti-static cloth. Never use a solvent to clean the phone! Never use a dry cloth. Electro
static charges could damage the electronics in the system. It is essential that no liquids
penetrate into theinside of the ISDN system telephone, asthis could destroy the phone.
2.4 Placing the telephone
Please note thatthe plasticfeet of your ISDNsystem telephone may leave marks on sen
sitive surfaces, suchas furniture. The manufacturer of theISDN systemtelephone is not
liable for any such damage. Therefore, use appropriate non-skidding pads under the
phone.
2
-
-
-
Page 7
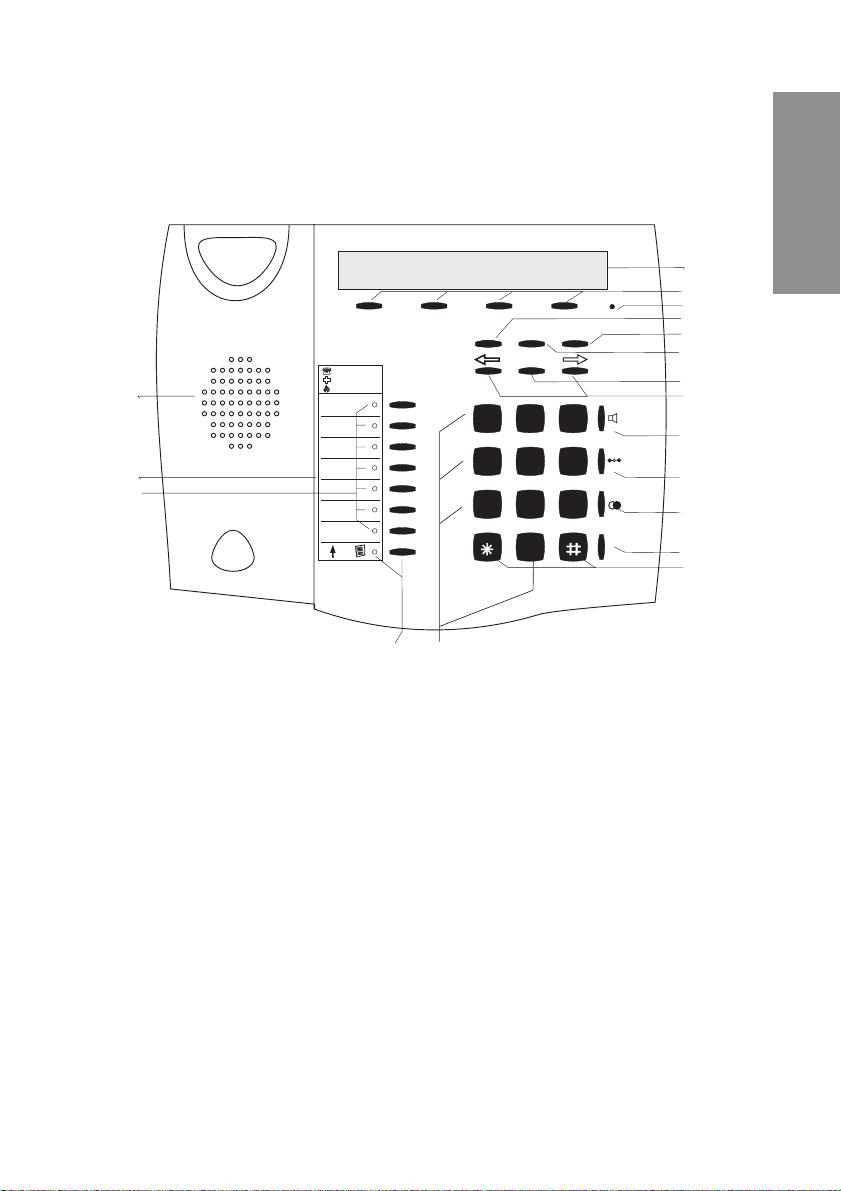
2.5 User interface of your system telephone
1
2
3
1 Speaker
2 Label panel for VIP keys and
function keys
3 7 direct dialing/ function keys
with LED
4 Shift button with LED
5 Display
6 4 softkeys
7 Microphone
8 Function key
9 C-button
01.04.00\10:34\\\\\\\\\}
tbook vip quiet
ESC
C
OK
2
3
ABC
DEF
6
5
JKL
MNO
8
9
TUV
WXYZ
4
GHI
7
PQRS
F
1
1
0
4
18
10 Escape
11 Acknowledgement
12 Arrow buttons »left« / »right«
13 Open listening/ hands-free
14 Disconnect
15 Redial
16 Enquiry
17 Asterix button / number symbol
18 Dial / VIP buttons
Description
5
6
7
8
9
10
11
12
13
14
15
R
16
17
Fig. 1: User interface of your telephone
3
Page 8
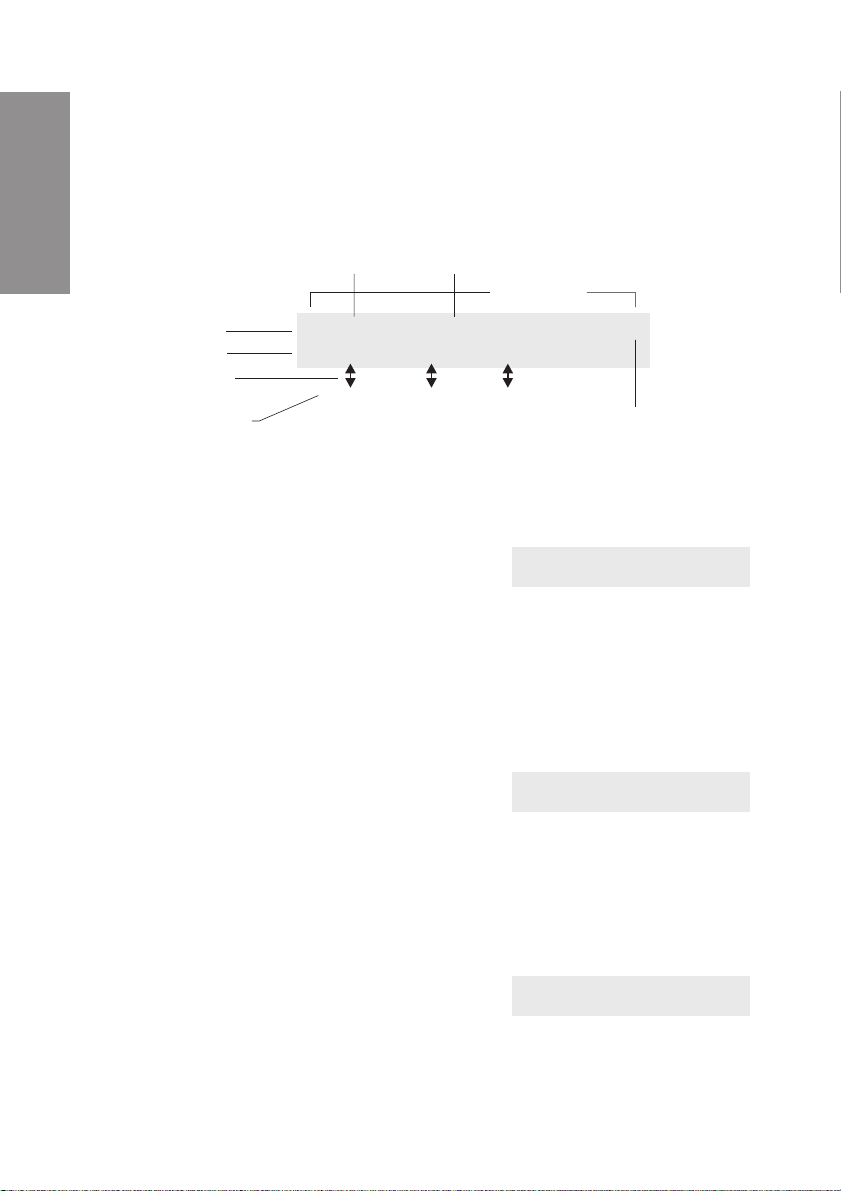
2.6 Display, Buttons, LEDs, Pictographs and signals
2.6.1 Display
Description
Time
24 chars
Arrow: further menu items
accessible with arrow buttons
1st line
2nd line
Text assignment
to softkey
4 softkeys
Fig. 2: Display of your telephone
01.04.00\10:34\\\\\\\\\}
tbook\ vip \\quiet
SSSS
Date
After you connect the system to the ISDN connection,
the date andtime are shown on the topline of the display. The date and time are imported automatically
from the PABX system, or from the ISDN network
when you have successfully made a call. Terms are
displayed in capital and small letters on the first line.
The functions of the softkeys are displayed in capital
or small letters (depending on your settings) in the
second line.
The textdisplayed for a function on line 2 is always lo
cated above the corresponding softkey. When you
press the softkey, the next level is displayed.
2.6.2 Buttons
F Function button: This key opens the pro
gramming menu. If you are already lo
cated in a menu and then press the key,
either menu-specificfunctions are shown,
or you are moved back one programming
step.
ˆ01.04.00 10:34 }
ˆtbook vip quiet
-
ˆ Functions
ˆaudib adjust prog config
SSSS
-
ˆ Functions
ˆaudib adjust prog config
-
4
Page 9

E Escape button: Pressing the Esc button
during programming returns the tele
phone to its idle status.
ˆ Functions
ˆaudib adjust prog config
-
O OK key:Pressing this button stores a settingin the telephone. You then hear
the acknowledgement signal.
C C-button: Press this button to move back one menu stepin the menu. Ifyou
are currently in the input mode, this button can be used to delete individual
characters.
<> Arrow buttons: The arrows »{« and »}«in
the right corner on the top line of the dis
play indicate that you can call up further
functions on the second line using the ar
row buttons.
Special feature for changing existing entries
You have various options available to you for changing existing entries (e.g. names or
numbers).
Example 1:
You wish to change an existing number / MSN (see page 14), as the telephone is to be
used at a different ISDN connection.
t When you use the pushbutton set to enter
the first digit of the new number the exist
ing number is deleted completely.
ˆ01.04.00 10:34 }
ˆ vip quiet
-
ˆ01.04.00 10:34 {}
-
ˆunpark rate
ˆ program dial number
ˆMSN1>123456
-
ˆ program dial number
ˆMSN1>9_
Description
t Enter the other digits of the new number. ˆ program dial number
ˆMSN1>987654_
Example 2:
You wish to change parts of a name in a telephone directory listing (see page 46), be
cause the name has changed (e.g. after a wedding).
<>
C
Using the arrow keys, first select the let
ters of the entry that are to be changed (in
this example: the surname »
delete this name using the C button.
MILLER«) and
5
-
ˆChange tbook data input
ˆname>TINA_MILLER
ˆChange tbook data input
ˆname>TINA _
-
Page 10

t Now enter the new letters for the new
name (in the example the surname
»
PETERS«).
Description
2.6.3 Entering letters and numbers
The following buttons areconfigured forthe entryof letters andnumbers (e.g.telephone
directory, VIP-memory).
ˆChange tbook data input
ˆname>TINA PETERS_
Button
1
2
3
4
5
6
7
8
9
0
1. press 2. press 3. press 4. press 5. press 6. press
1
ABC2Ä
DEF3
GHI 4
JKL5
MNO6 Ö
PQRS7ß
TUV8Ü
WX Y Z 9
(space) . , - 0 /
*
#
*
#
6
Page 11

2.6.4 LEDs
To the left of each direct dialing and function key (total of 7) is located the associated
LED. These LEDs can be used toindicate certain functions. The shift keyLED flashes to
indicate new callersin the caller list, or remains litwhen the shift key is pressed (active).
The LED lightsup.
•
///////////////////////////////////////////
The LED flashes.
•
////////////____////////////____///////////
The LED flickers.
•
//__//__//__//__//__//__//__//__//__//__//_
1. second 1. second 1. second 1. second
2.6.5 Call signalling
Call signalling is effected using the ringing tone that has been set for the dialed number
(MSN) in each telephone. Ifyou are usingthe telephone at the internal ISDN connection
of an XCentric, internal calls are signalled using a special ringing melody. This ringing
tone has priorityover the ringing tone set for thedialed number (MSN) in the telephone.
Description
2.6.6 Pictographs
The pictographs (symbols) describedin thefollowing havebeen usedin theseoperating
instructions to illustrate some procedures for setting and using the telephone.
b Liftupthe handset, activatehandsfree calling, orstartinitializing selec
tion.
a Hang up thehandset and end handsfree calling.
The telephone isidle.
l A call issignaled.
The ringing tonemelody sounds.
g You areconducting acall.
7
-
Page 12

d A three-party conference call is initiated.
q You hear the positiveor negative acknowledgement signal.
t Select the number,code, character or text.
Description
0...9
,#
*
2.6.7 Listen to acknowledgement signals
Depending on your settings, the input you make at your phone will be confirmed by an
acknowledgement signal (see page 18).
Before you begin making settings, you should listen to these two acknowledgement
signals of your telephone.
Positive acknowledgement signal
The positive acknowledgement signal indicates that your input has been accepted and
stored by the telephone.
a
Negative acknowledgement signal
Pressthe appropriate button on thepushbutton set.
SS
quiet nein
q
You will hear the negative acknowledgement signal when your input has not been ac
cepted by the telephone, or when invalid input has been made.
a
If no call is parked you hear the negative acknowledgement signal.
>SO
unpark
q
8
-
Page 13
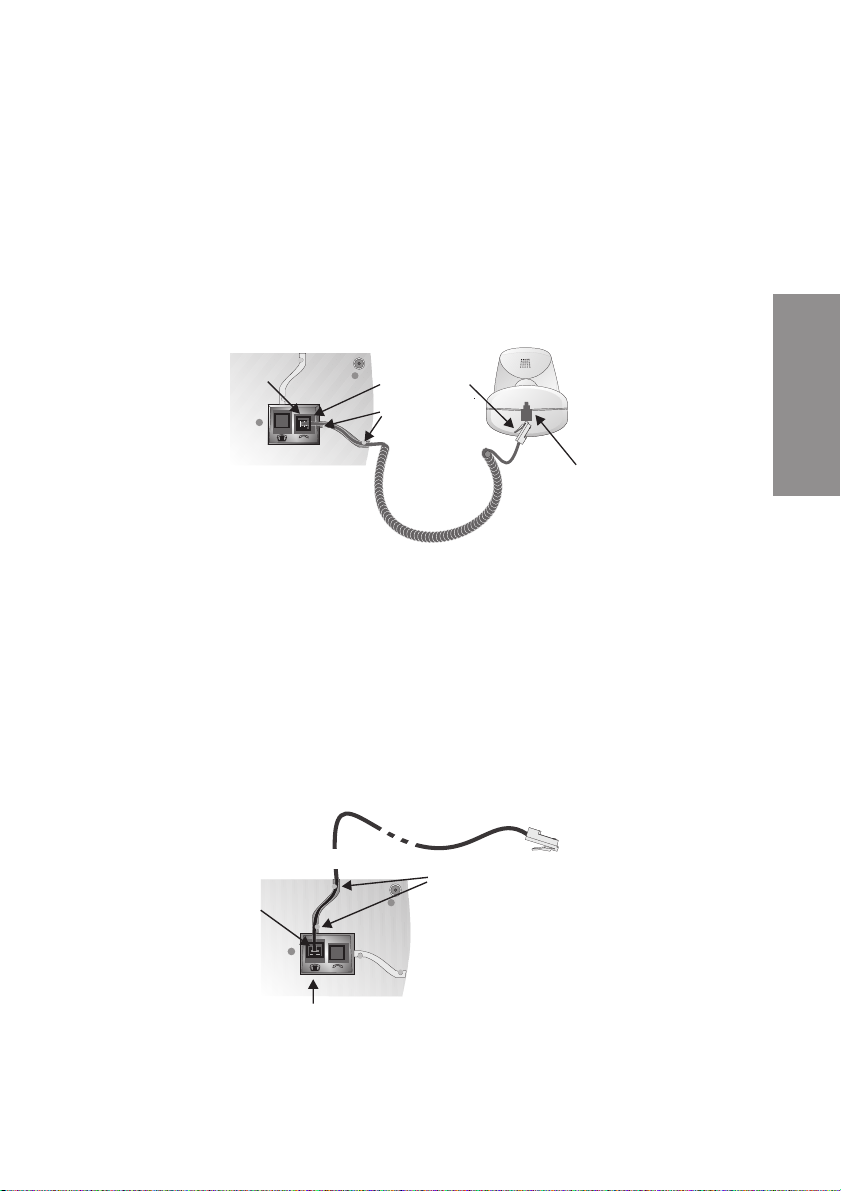
3 Installation of the telephone
3.1 Connection of the handset connecting cord
Connect the handset cord asshown inFigure 3. Lay the handset cord in the cord groove
and lock it below the two cord retainers.
ISDN telephone seen from the bottom
Jack for connecting
the handset
Handset connector
Cord holder
Handset
Handset jack
Fig. 3: Connection of the handset connecting cord
3.2 Connection of the ISDN connecting cord
Connect the ISDNcord as shown in Figure4. Then lay the ISDNcord in the cord groove
and lock it below the two cord retainers. Ensure that the longer ISDN connector is
plugged into the ISDN jack and the shorter ISDN connector into the ISDN jack on the
telephone.
ISDN connectorr
(long)
Telephone seen from the bottom
ISDN connector
(short)
Cord holder
Installation
Jack for ISDN connecting cord
Fig. 4: Connection of the ISDN connecting cord
9
Page 14
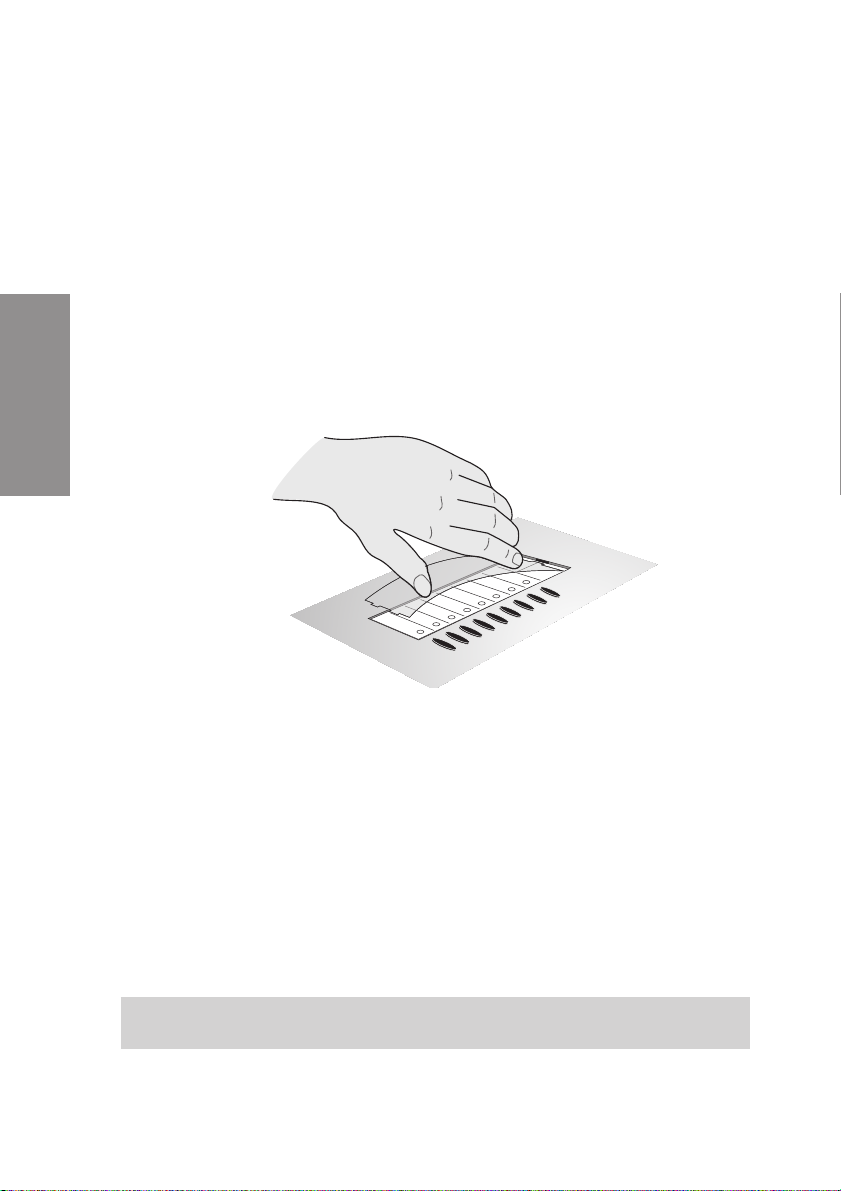
3.3 Changing the label panel
The label panels for the direct dialand function keys are included ona sheet enclosed in
the operating instructions.Cut outthe label you wish to use and ensure thatall theholes
for the LEDs have been punched out completely. Where required, remove any remain
ing material from the holes.
To change the label panel, (see figure 5) press the flexible cover together between your
index finger and thumb and lift it out. The label panel can now be changed.
You can edit the label panel with the PC.The CD ROM supplied with the system contains
an Adobe Acrobat file (BinTec_CS300.pdf) with templates.
Move the mousepointer tothe first field (behind the symbol) »(«). You canthen use the
PC keyboardto make input into this field. You can jump from field to fieldusing the TAB
key and fill them in as required. After this you can print out a selected label panel, cut it
out and place it in the space provided for labels on your telephone.
Installation
-
Fig. 5: Changing the label panel
3.4 Keyboard extension elmeg T300
Your telephoneis equipped with 7 direct dialing buttons which can beassigned various
functions on two levels. You have the option of connecting an elmeg keyboard exten
sion to your telephone.Ask your specialized dealer or distributor for this accessory.This
key extension modulehas 24buttons whichcan be used on two levels as function ordi
rect dialing buttons.
The elmegkeyboard extension module T300 is available as an accessory part.Ask
your specialized dealer or distributor.
10
-
-
Page 15
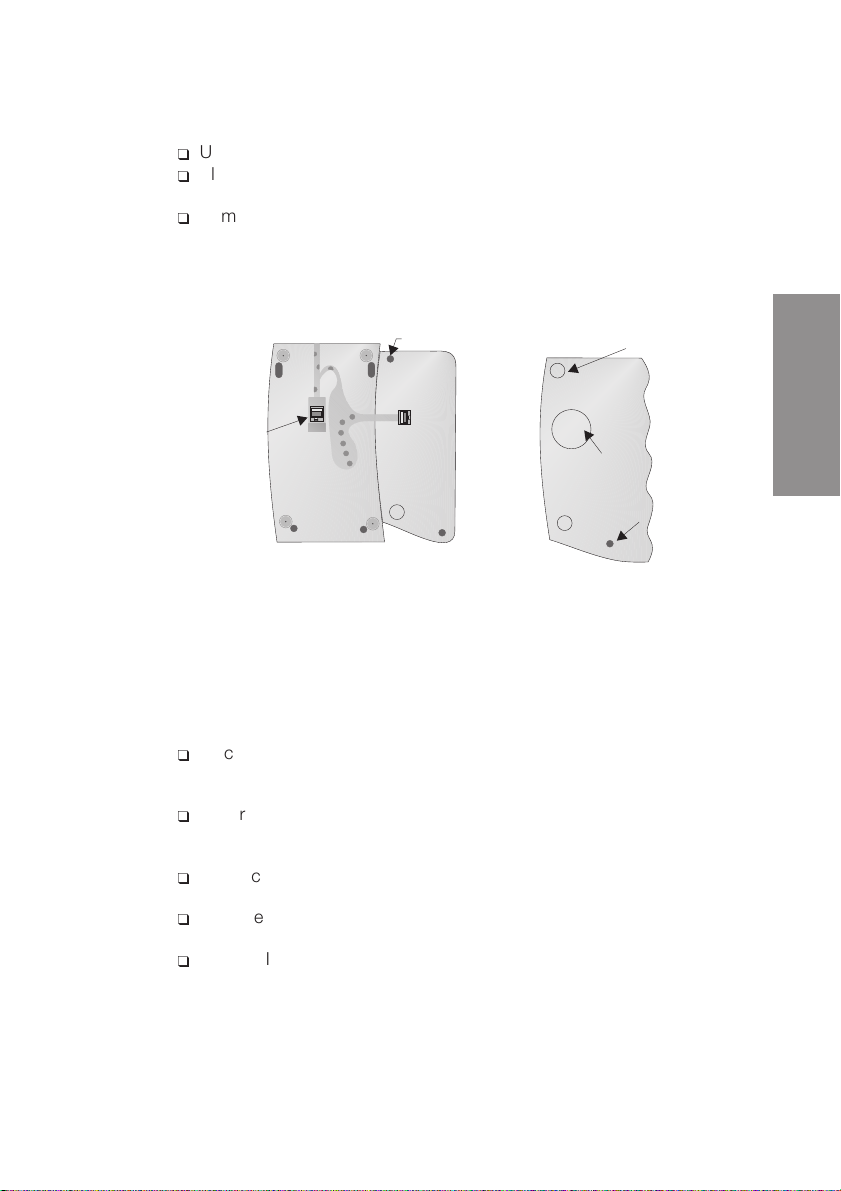
3.4.1 Connection of the elmeg keyboard extension
Unplug the ISDNconnector (long) for the telephonefrom the ISDN jack.
q
Place the phone face-down on a soft surface so that you can read the
q
nameplate on thebottom of the phone fromthe front.
Remove the screwto the left of the nameplate, the rubber supportand the
q
plastic cover inthe top left corner ofthe phone (see Figure 6).
Fastening
Jack for connecting
the telephone
Keyboard extension,
seen from the bottom
Fig. 6: Prepare the connection of the keyboard extension
Place the key extension modulewith itsfront side next to the phone on the
q
left so that the expandable catches fit in the retainer for the rubber sup
ports.
Securing the keyextension moduleto thephone. Todo this,screw in and
q
tighten one screw to the left of the nameplate and theother one in theex
pandable catch.
Connect the connecting cabledelivered withthe key extension module as
q
shown in Figure7 . After this, placethe cable in the cableduct.
Turn the phone over with the key extension module attached so that you
q
are looking atthe front of the phone.
Plug the ISDNconnector of your phone intothe ISDN jack.
q
Rubber foot
Installation
Cover
Fastening screw
Telephone seen from the
bottom
-
-
After initialization of your telephone the phone and the key extension module are imme
diately ready for operation.
11
-
Page 16
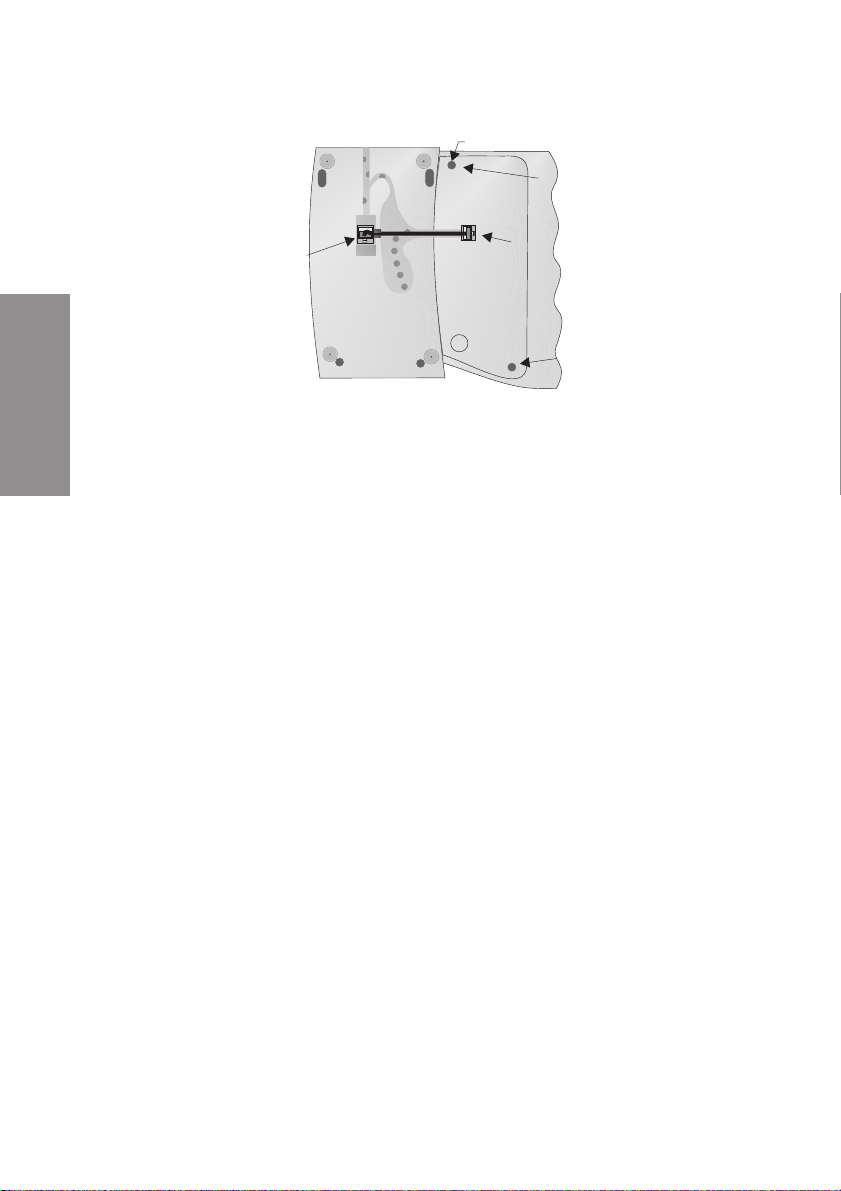
Fastening
Fastening screw
Jack for connecting
the telephone
Keyboard extension,
seen from the bottom
Jack for connecting
the keyboard extension
Fastening screw
Telephone seen from
the bottom
Installation
Fig. 7: Connection of the elmeg keyboard extension
3.4.2 Changing the label panel
A sheet containing the labels for the direct dial/function keys of the key extension module isincluded with the key extension module. Cut out the label you wish to use and ensure that all the holes for theLEDs have been punched out completely. Where required,
remove any remaining material from the holes.
To change the label panel, press the flexible cover together between your index finger
and thumb and lift it out. The label panel can now be changed.
12
Page 17

4 Settings
4.1 Telephone numbers (MSN or extension number)
Up to 10 MSNs (extension numbers) can be configured on your telephone. When you
enter an MSN or extension number in your ISDN system telephone you are essentially
defining thatyour ISDN system telephoneis called using thisMSN or extension number
when a call is made. If you enter more than one MSN (extension number) in your ISDN
system telephone, your phone will ring each time one of these MSNs (extension num
bers) is called.
If you are using your telephone on the external ISDN port of your service provider, pro
gram your telephone with the MSNs or extension numbers allocated to you by the net
work service provider. Usually your network service provider will provide you with 3
MSNs (extension numbers). You can apply for further MSNs (extension numbers) from
your network service provider.
When you operate your telephoneon the internal ISDN connection of a PABX youmust
enter the internal instead of the external number of your telephone at the PABX. Please
observe the instructions in the XCentric manual.
You can define and set a name, a specific melody and its volumefor each MSN or extension number that you enter. If, for example, you assign the name »priv.«to a number,
»
priv.« will appear in the display instead of »msn-1« when that phone is called.
When you call a subscriber,you canselect a certainnumber (MSN) thatis transmittedto
the subscriber (e.g. for separate charges). If you do not select any number, the number
(MSN) that has been entered first in the phone (MSN-1) is used.
How to configure an MSN (extension number) isdescribed inthe following example
with MSN1.
-
-
-
Settings
4.1.1 Entering MSNs
Begin as follows:
a
t Enter the number (max.26 digits).
FSS<>SS
config msn msn-1 tnumb
ˆ program dial number
In the example here: »
123456«.
ˆMSN-1>123456
O Confirm your entry by pressing OK. ˆ MSN-1 program }
ˆtnumb sound volume x-fer
13
Page 18

4.1.2 Changing MSNs
Begin as follows:
a
C Delete the existing telephone number by
t Enter the new number.
FSSSS
config msn msn-1 tnumb
ˆ program dial number
pressing the C button.
In this example: »
99887766«.
ˆMSN-1>123456
ˆ program dial number
ˆMSN-1>99887766_
O Confirm your entry by pressing OK. ˆ MSN-1 program }
ˆtnumb sound volume x-fer
4.1.3 Setting the melody for an MSN
Begin as follows:
Settings
a
<> Use the arrow buttons to set the desired
FSSSS
config msn msn-1 sound
ˆ Select melody {}
melody. The bar in the display indicates
the current status.
ˆMSN-1 -¼--------
O Confirm your entry by pressing OK. ˆ MSN-1 program }
ˆtnumb sound volume x-fer
4.1.4 Setting the volume of the melody for an MSN
Begin as follows:
a
FSSSS
config msn msn-1 volume
14
Page 19

<> Use the arrow buttons to set the volume.
The bar inthe display indicates the current
status.
ˆSelect volume {}
ˆMSN-1 - ¼¼---- +
O Confirm your entry by pressing OK. ˆ MSN-1 program }
ˆtnumb sound volume x-fer
4.1.5 Default setting of a number for forwarding of calls
If you do not wish to accept a call, you can forward this call directly to a different phone
number (see page 68).
If you frequentlyforward callsto the same number, you can usethis numberas a default
setting in your phone. If you then wish to forward a call, the default number will be pre
sented first for you to use.
The default setting for such a number is made separately for each number (MSN) entered in the telephone.
Begin as follows:
a
t Enter the number. To delete an existing
FSSSS
config msn msn-1 x-fer
ˆ Call forward. number
number press the C button.
In the example: »
0123«.
ˆMSN-1>0123_
O Confirm your entry by pressing OK. ˆ MSN-1 program }
ˆtnumb sound volume x-fer
-
Settings
4.1.6 Assigning a name to the MSN
You can assign your own names (max. 5 places) to the MSNs.
On each ofthe buttons on the pushbutton set thereare three or four letters of the alpha
bet. You canadvance through the letters bypressing the appropriate button repeatedly
(see page 6). The letters are shown in the display one after the other as you press the
button. If there are two consecutive letters on the same button of the pushbutton set,
press the rightarrow button after entering the first letterand then enter the next letter.
15
-
Page 20

Begin as follows:
a
C Delete the existing name of the MSN by
t Enter the name.
FSSS> S
config msn msn-1 msn_name
ˆ Own MSN designation
pressing the C button.
In the example: »
priv.«.
ˆMSN-1>MSN-1
ˆ Own MSN designation
ˆMSN-1>priv.
O Confirm your entry by pressing OK. ˆ MSN-1 program {
ˆmsn_name rate
After entering a name for an MSN the softkey designations in the menu »msn-1« ...
»
msn10« change to the corresponding name. In the example »msn-1« changes to
»
priv.«.
4.2 Volume settings
Settings
4.2.1 Speaker volume setting
Permanent speaker volume setting
Begin as follows:
a
<> Use the arrow buttons to set the volume.
FSS
audib louds
The bar inthe display indicates the current
status.
ˆ Loudspeaker loudness {}
ˆ - ¼¼---- +
O Confirm your entry by pressing OK. ˆ Volume, etc. }
ˆlouds wait beep handset
16
Page 21

Temporary volume setting
g You are conducting a call. The loud
speaker is set to open listening.
F Press the F button.
Press the E button in orderto return to thenormal display duringan ongoing call. Ifyou
confirm your entry by pressing the
set value is overwritten by the newly set one.
Use the arrow buttons toset the volumeof
the speaker. The bar in the display indi
cates the current status.
O button instead of the E button, the permanently
ˆ| 0123456 00.51 }
-
ˆdispl silent
ˆ Loudspeaker loudness {}
ˆ - ©©©©©©- +
-
4.2.2 Setting the call waiting signal
If the function call waiting (see page 22) is enabled onyour telephoneyou can set the volume of the call waiting signal .You can also select whether awaiting call is signaled only
once, or several times.
Begin as follows:
a
FSS
audib wait
Settings
S Press the softkey below»repeat«. ˆ Call wait. tone
ˆrepeat volume
If you want the waiting call to be signalled
only once, press the softkey below »
To have a waiting call signalled several
times, press the softkey below »
ok«.
ˆ Repeat call wt. tone?
ˆNo ok
no«.
S Press the softkey below »volume«. ˆ Call wait. tone
ˆrepeat volume
<> Use the arrow buttons toset the volumeof
the call waiting signal. The bar in the dis
play indicates the current status.
17
ˆCall wait. tone vol. {}
ˆ - ©©©--- +
-
Page 22

O Confirm your entry by pressing OK. ˆ Call wait. tone
ˆrepeat volume
4.2.3 Setting the acknowledgement signals
With your ISDN systemtelephone youcan select whether the acknowledgement signals
are always active,never active or only active when an incorrectentry is made. In the initial
state, the acknowledgement signals are always active.
Begin as follows:
a
FSS
audib beep
S Press the softkey below the desired func-
tion:
»
no«: Acknowledgement signal never
active.
»
error«: Acknowledgement signal when
entry incorrect.
»
Settings
4.2.4 Setting the volume of the handset
Permanent handset volume setting
Begin as follows:
a
ok«: Acknowledgement signal always
active.
FSS
audib handset
Use the arrow buttons to set the volume.
The bar inthe display indicates the current
status.
Acknowledge signal activ
ˆ no error ok
ˆ Volume, etc. }
ˆlouds wait beep handset
ˆ Handset loudness {}
ˆ - ©©-- +
O Confirm your entry by pressing OK. ˆ Volume, etc. }
ˆlouds wait beep handset
18
Page 23

Temporary volume setting
g You are conducting a call. ˆ0123456 00.51 }
ˆdispl silent
F Press the F button.
Use the arrow buttons toset the volumeof
the handset. The bar in the display indi
cates the current status.
Press the E button in orderto return to thenormal display duringan ongoing call. Ifyou
confirm your entry by pressing the
set value is overwritten by the newly set one.
4.2.5 Setting the volume of the volume of the »Station guarding«
tone
You havevarious options of settingyour telephone to »Station guarding« (see page 67).
You can set your telephone to signal incoming calls by abrief acoustic signal while»Station guarding« is active. The volume of that idle tone is adjustable.
Begin as follows:
a
FS>S
audib quiet
O button instead of the E button, the permanently
ˆ Handset loudness {
ˆ - ©©©© +
-
Settings
Use the arrow buttons to set the idle tone
volume. The bar in the display indicates
the current status.
ˆ Idle tone volume {}
ˆ - ©©©--- +
O Confirm your entry by pressing OK. ˆ Volume, etc. {}
ˆmessage quiet
19
Page 24

4.3 Call forwarding (call rerouting)
With thistelephone you can bereached, even if youare not in thevicinity of your phone.
This is made possible by automatic forwarding of calls to any other number.
Call rerouting can be configured separately for any of the entered numbers (MSNs). To
utilize the call rerouting function you must have already configured at least one phone
number.
The following settings are possible for all MSNs or extension numbers.
»
delayed« Call forwarding delayed
»
busy« Call forwarding onbusy:
»
fixed« Permanent call forwarding
Settings
The following example describes how to set up MSN 1 for permanent call forwarding.
All calls for the number for which delayed call forwarding has been
configuredare signaled fora definedtimeat the exchange office or in
the PABX and are then forwardedwhen this period expires.
The calls for a defined number are forwarded only when the tele
phone is busy.
(For example: There are already two (2) connections made, or one
connection has beenmade and call waitingis not permitted.)
All calls for a number forwhich “fixed” call forwarding has beenconfiguredarererouted.Your telephone willnot ring, whenthis numberis
called.
-
4.3.1 Activating call forwarding
Begin as follows:
a
FSSSS
adjust forward fixed msn-1
t Enter the number to which the calls are to
be forwarded.
In this example: »
0123456789«.
20
ˆCall forwarding direct
ˆMSN-1>0123456789_
Page 25

O Confirm your entry by pressing OK.
Call forwarding has been registered. The
three dots at theright lowercorner flash al
ternately.
Call forwarding has been configured. You
see this display for about 10 seconds.
ˆCall forwarding direct
ˆMSN1>0123456789 ...
-
ˆMSN-1
ˆ Direct call forwarding!
ˆcall forwarding
ˆ off delayed busy fixed
4.3.2 Viewing current call forwarding
When the telephone is idle, a »C« on the top line indicates that call forwarding has been
activated.
Begin as follows:
a
>S
info
In the example here, MSN1 is forwarded
directly to number 0123456789.
4.3.3 Deactivating call forwarding
Begin as follows:
a
FSSSS
adjust forward off msn1
Call forwarding is deactivated. The three
dots at the right lower corner flash alter
nately.
Call forwarding isdeactivated. You seethis
display for about 10 seconds.
ˆCall forwarding direct{}
ˆ(1}0123456789) info
ˆCall forwarding quit?
ˆMSN-1 ...
-
ˆMSN-1
ˆ Call forwarding quit!
ˆcall forwarding
ˆ off delayed busy fixed
Settings
21
Page 26

4.3.4 Special features for the Swiss version
In its initial state,the CS300telephone isconfigured foruse atthe internalISDN connec
tion with the XCentric. If you wish to use the telephone at the other connection theproto
col for call rerouting (»
Use at a point-to-multipoint connection (NTBA)
a
Use with an XCentric
a
Keypad« or »ETSI«) must be switched as follows.
FS> S>S S
config service swissvar keypad
FS> S>S S
config service swissvar etsi
4.4 Call waiting
If, during an ongoing call, a second call comes in for you, the second call is signaled
when “Call waiting on” is set. When “Call waiting off” is set, the caller only hears a busy
Settings
signal.
A waiting call is indicated by a brief acoustic signal in the handset and also displayed.
You can set the volumeof thecall waiting signaland selectwhether a waitingcall isto be
signaled only one time, or several times (see page 17).
-
-
When »Station guarding« is set, the call is indicated as described on page . If you have
configured “Hands-free calling” for an active connection, waiting calls will only be sig
naled optically in the display.
Begin as follows:
a
S Press the softkey below »no« to inhibit the
FSS
adjust wait
call waiting function. Use the softkey
below »
function.
ok« to enable the call waiting
22
ˆ Call waiting enable?
ˆNo ok
ˆ Settings }
ˆforward wait date
-
Page 27

4.5 Setting appointment dates
With your system phone you can set three different appointments which can be acti
vated once, or daily.
The following settings are possible for every day:
»
off« The set appointmentis not signaled.
»
daily« Theset appointment is signaled daily.
»
once« The set appointmentis signaled once.
Begin as follows:
a
<> Select the desired date with the arrow but-
S You can now select the type of acoustic
After pressing the softkey below »off«, you can set the next appointment. If you press
the softkey below »
appointment.
FSS
adjust date
tons. The currently set alarm type for this
date is displayed on the right.
Confirm your choice by pressing OK.
signal for the appointment.
daily«or»once«, you can set the time and the date of the
ˆ Select appointment {}
ˆ1: 09:30 30.03.00 off
ˆAlarm for appointment 1?
ˆ off daily once
-
Settings
t
O
t
O
Enter the time of the appointment.
In this example: »
Confirm your entry by pressing OK.
Enter the date of the appointment.
In this example:»
Confirm your choice by pressing OK.
You then see thenew settings forappoint
ment 1. An exclamation mark (!) in front of
the appointment in the display indicates
that this appointment is activated.
1300«.
020400«.
23
ˆ Set appointment 1
ˆTime>13:00
ˆ Set appointment 1
ˆDate>02.04.00
-
ˆ Select appointment {}
ˆ1:!13:00 02.04.00 once
Page 28

Once the dateand timeof the set appointment are reached, an acoustic (withfixed mel
ody and volume) and optical signal is issued.
If youpress the E button once, this signalis interrupted and then continued a shorttime
later as a reminder. To terminate signaling of an appointment press the
twice. Signalling of the appointment can also occur during a call, or when you have set
the function “Do not disturb”.
When your system phone is idle, the symbol »
appointment has been configured.
D«in the display indicates that an active
4.6 Call Filter
This telephone also offers you the option of automatically refusing calls. If this has been
activated, the call is not signaled but isstored with a special flag (»
caller hears the busy signal.
Up to 5(1...5) prefixes, complete telephone numbersor partial numbers can beentered
in the call filter. These numbers can consist of up to 26 digits. When you enter »
you can include callswhich do not transmit the number (caller ID) in the call filter. Youcan
then specifically refuse or accept these calls.
If the ISDN system telephoneis disconnected from the ISDN network, e.g. by parkinga
call (see page79), allof the entries that you havemade in the call filter are thencanceled.
If the call filter is active the display shows a »
Settings
4.6.1 Configuring filter numbers
You can reconfigure a prefix, a number or a partial number, or you can use an existing
number from the phone directory, speed dialing or direct dialing memory as the filter
number.
V« in its upper row.
i«) in the caller list. The
-
E button
****«
The following examples describe how to set up an inhibit filter.
If you want to set up ormodify existing filters, go through the steps described for fil
ter 1.
Setting up a new number as filter number
Begin as follows:
a
FS>SS<>O
adjust filter new
Select filter num
ber (1...5)
S Press the softkey below »new«. ˆEnter filter no.1
ˆtbook vip direct new
24
-
-
Page 29

t Enter the prefix,telephone number or par
tial number that is to be filtered.
In this example: »
05171«.
ˆ Filter number create
-
ˆ>05171_
O Confirm your entry by pressing OK. ˆSelect filter number {}
ˆ1:05171
Using an existing number as the filter number
Begin as follows:
a
S Press the softkey below »tbook«,»vip«or
O
<>
O
FS>SS<>O
adjust filter new
»
direct«.
In this example: Softkey below »
Use the arrow buttons to select the desired short dialing destination.
In this example: VIP-Ziel »
Confirm your choice by pressing OK.
Now you have the possibility to change or
add information to the dial number.
Confirm the number by pressing OK.
vip«.
V5«.
Select filter num
ber (1...5)
ˆEnter filter no.1
ˆtbook vip direct new
ˆ Subscr. from VIP {}
ˆV5:BEATRICE
ˆ Filter number create
ˆ>0123456789_
ˆSelect filter number {}
ˆV1:BEATRICE
-
Settings
4.6.2 Setting the call filter
There are various options available for filtering the call:
»no« All calls signaled.
»
reject« Calls whose number concurs with the filter numbers that you have
stored (complete numbers or partial numbers) are not signaled. All
other calls aresignaled.
25
Page 30

»permit« Only those callswhose numberconcurs withthe filternumbers that
»
complete« No callsaresignaled.
Begin as follows:
youhavestored(completenumbers or partialnumbers)aresignaled.
All other callsare not signaled.
a
>
<
S Select the setting forthe call filter by press-
FS>S S
adjust filter incoming
You see the possible call filter settings.
Press the right arrow button to viewthe fil
ter feature »
Press the left arrow button to return to the
initial call filter settings.
ing the corresponding softkeys.
complete«.
ˆFilter incoming calls? }
ˆ no reject permit
-
ˆFilter incoming calls?{
ˆ complete
ˆFilter incoming calls? }
ˆ no reject permit
Settings
ˆcall filter
ˆincoming new
4.7 Setting the date and time
The system telephone automatically takes the time and date from the PABX system, or
from the external ISDN network. Nevertheless, you have the possibility to configure the
date and time manually.
Begin as follows:
t
O
a
FS>S
adjust time
Enter the time.
In this example: »
Confirm your entry by pressing OK.
1034«.
ˆ Set time
ˆtime>10:34_
26
Page 31

t
O
Enter the date.
In this example: »
Confirm your entry by pressing OK.
010400«.
ˆ Set time
ˆDate>01.04.00
ˆ Settings {}
ˆfilter tncall time use
4.8 Setting the User Interface
4.8.1 Setting the softkey display
You canconfigure the settings forthe softkeys in the lower row of the display. With your
ISDN system telephone you can select whether you wish to have the letters for the
softkeys shown in lower and upper, or only in upper case in the display.
Begin as follows:
a
S Press the softkey below »no« to have the
FS>S S
adjust use softkeys
ˆ Softkey-Name large?
letters for the softkeys shown in lower
case. Press the softkey below »
have the letters for the softkeys shown in
upper case.
In this example: Letters for softkeys in
upper case.
ok«to
ˆNo ok
ˆ Use variant }
ˆSOFTKEYS HEADSET
4.8.2 Setting Light Telephone Headset(Headset)
You also have the option of connecting a headset to your telephone. Ask your dealer
which headset models can be used with this system.
The following paragraph describesthe setting ofthe headset.You find moreinformation
about howto use the headset on page 75of this manual. For information about mount
ing the headset, please refer to the operating manual of the headset.
Settings
-
27
Page 32

Begin as follows:
a
S Press the softkey below »ok« to configure
FS>SS
adjust use headset
ˆ Use headset?
a headset or press the softkey below »
to deactivate a set headset.
ˆNo ok
no«
ˆ Use variant }
ˆsoftkeys headset
4.8.3 Dialing with handset in its cradle
You can dial the number of a subscriber without lifting the handset from the cradle (e.g.
hands free calling). Here you can select whether the built-in microphone is to be activated immediately, or only after the »
microphone is switched off during dialing, the softkey below »
even if the connection has already been set up.
Begin as follows:
Settings
a
FS>S >S
adjust use silent
speak« softkey has been pressed. If the
speak« must be pressed,
S Press the softkey below »speak«to
activate the microphone during dialing. If
you would like to deactivate the
microphone during dialing press the
softkey below »
silent«.
ˆ With hands-free?
ˆspeak silent
ˆ Use variant {
ˆ silent list
4.8.4 Adjusting the LED of the caller list
The LED to the left of the shift button is used to indicate new calls in the caller list. You
can set whether this LEDis to flashfor newcalls in thecaller list, orwhether new callsare
to be signalled in the display only via the softkey »
28
list« .
Page 33

Begin as follows:
a
S If the LED is to flash for new calls in the
FS>S>S
adjust use list
ˆ Caller list LED?
caller list, press the softkeybelow »
not have newcalls inthe callerlist signaled
by flashing LEDs, press the softkey below
»
OFF«.
on«. To
ˆ on off
ˆ Use variant {
ˆ silent list
4.9 Direct dialing
You can alsoconfigure adirect callfor thetelephone sothat whenany buttonis pressed
(except for the
rect call function is active only one connection can be set up to the set number. If you
wish to establish a connection to a different number you must first deactivate the direct
call function.
The PIN for the call filter (seepage 38) is alsoused simultaneously to safeguard the activated direct call function in the telephone.The direct call functioncan then only bedeactivated after entering this PIN.If thePIN is set to »
and can bypass this step by pressing the
The following functions are possible when the direct call function is active:
E button and the F button) a definedphone number is dialed. Ifthe di-
0000« (initial state), you neednot enterit
O button.
Settings
Automatic dialing of the set number by lifting the handset or by pressing
q
any button (exceptfor the
Accepting calls, providedthese are not suppressed bythe call filter.
q
Dates that havebeen set previously.
q
Further functions (e.g.: function keys, TAPI functions or headset function) are not
possible when direct dialing is activated.
E button andthe F button).
4.9.1 Adjusting numbers for direct dialing
Begin as follows:
a
FS>S
adjust dircall
29
Page 34

S To set the number for direct dialing press
the softkey below »
tnumb«.
ˆ Activate direct call?
ˆ no tnumb ok
t
O
Enter the telephone number.
In this example: »
Confirm your entry by pressing OK.
098765«.
4.9.2 Activate direct dialing
Begin as follows:
a
FS>S
adjust dircall
S Press the softkey below »ok« to activate
direct dialing.
Direct dialing is now activated.In the lower
Settings
4.9.3 Deactivate direct dialing
row of the display you see the direct dialing number.
ˆDir. call-in number
ˆDirCall>098765_
ˆ Activate direct call?
ˆ no tnumb ok
ˆ Activate direct call?
ˆ no tnumb ok
ˆDirect cal>10_
ˆ098765
F The display returns to idle with the direct
call-in feature enabled.
Press the button F.
t
Enter the set PIN and confirm your entry
by pressing OK.
O
S Press the softkey below »ok« to deactivate
direct dialing.
30
ˆ10:34 Direct cal
ˆ098765
ˆ Input PIN please
ˆ>0000_
ˆ End direct-call?
ˆ no tnumb ok
ˆ01.04.00 10:34 }
ˆtbook vip quiet
Page 35
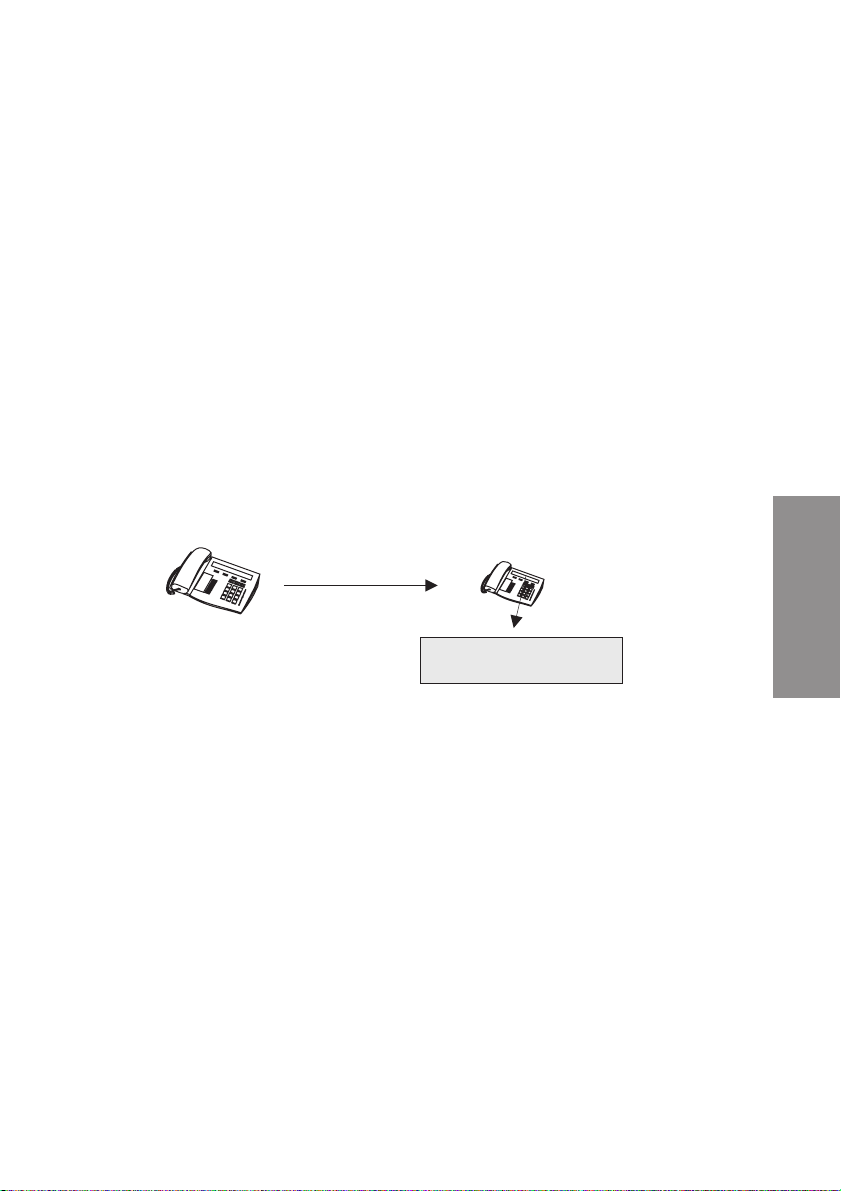
4.10 Displays of the telephone
4.10.1 Display the call number
The four (4) options for call switchingare described in the following. Notall of the perfor
mance features described here are implemented in the ISDN standard connection or in
the PABX. Contact your service provider to determine how or if you must apply sepa
rately for the individual performance features for your ISDN connection.
CLIP - Calling Line Identification Presentation
This feature permitsthe number of the caller to bedisplayed at the party being called.
CLIR - Calling Line Identification Restriction
This feature allows the caller to restrict (suppress) the display of his/her number at the
party being called.
A
(Telephone number: 1234567)
B
(Telephone number : 7654321)
Call from A to B
1234567
Display at B shows telephone number of A
Fig. 8: Display the number for the called party (CLIP/CLIR)
-
-
Settings
COLP - Connected Line Identification Presentation
This feature allows the phone number of the party being called to be displayed at the
caller’s phone. For example, it the party being called has configured call rerouting to a
third party, the caller can have the final numberdisplayed at his/her phone using this fea
ture.
COLR - Connected Line Identification Restriction
This feature restricts (suppresses) the display of the number of the party being called at
the caller’sphone. For example, if the party being called has configured call rerouting to
a third partythe final party (third party) canprevent his/her number from being displayed
at the caller’s phone using this feature.
31
-
Page 36
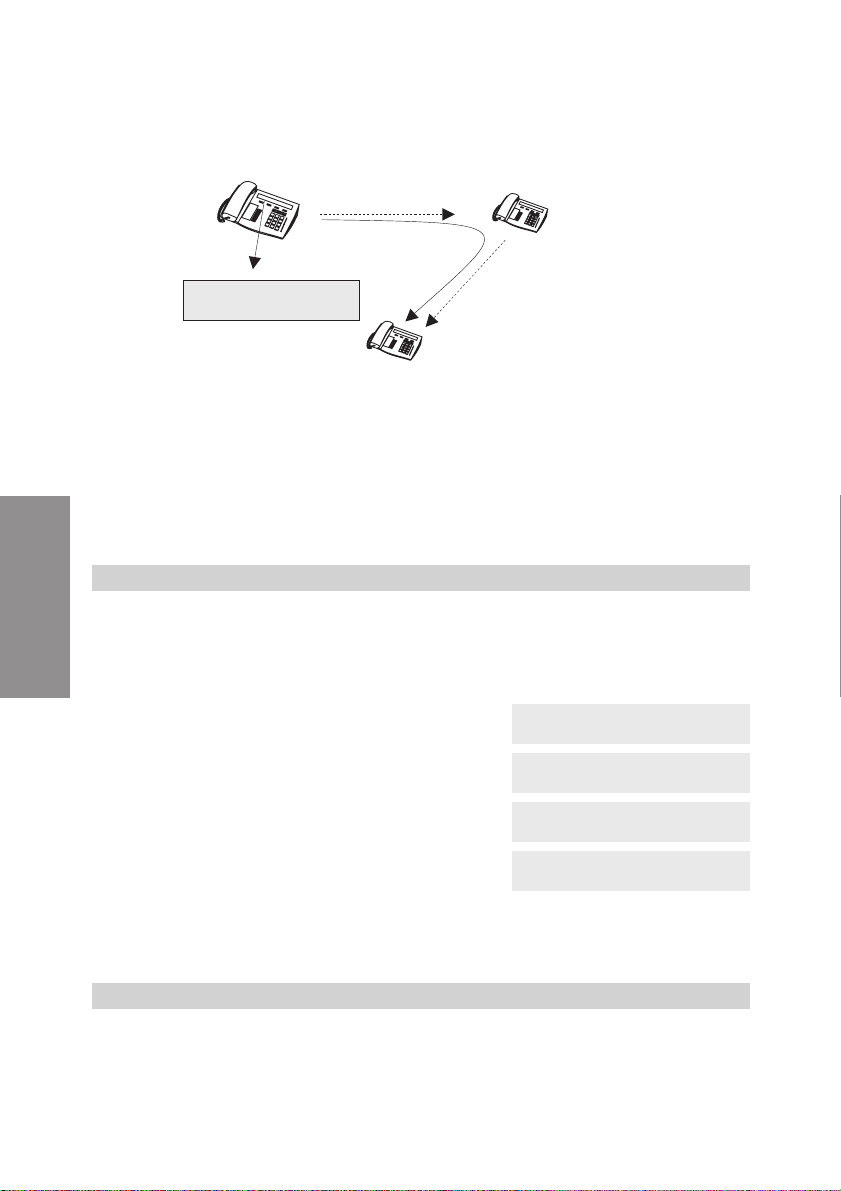
A
(Telephone number: 1234567)
Call from A to B
B
(Telephone number: 7654321)
7654321
Display at A does not show number
of C, but only the telephone number
that was dialed
Call rerouting from
B to C
C has Caller-ID (number transmission)
disabled
C
(Telephone number: 987654)
Fig. 9: Display of number at caller (COLP/COLR)
Display the number for the called party (CLIP/CLIR)
Begin as follows:
Settings
a
FSSS S
config display msn outgoing
S Press the softkey below »no« or »ok«. ˆ Called subscriber numb?
ˆNo ok
Display (approx. 5seconds) after pressing
the softkey below »
no«.
Display (approx. 5seconds) after pressing
the softkey below »
ok«.
ˆCalled subscriber get
ˆno dial number!
ˆCalled subscriber get
ˆ dial number!
ˆCall-Number transfer
ˆoutgoing incoming
Display of number at caller (COLP/COLR)
Begin as follows:
a
FSSS S
config display msn incoming
32
Page 37

S Press the softkey below»no« or »ok«. ˆCalling subscriber numb?
ˆ no ok
Display (approx. 5seconds) after pressing
the softkey below »
no«.
Display (approx. 5seconds) after pressing
the softkey below »
ok«.
4.10.2 Display during call
The following displays are possible during a call:
Call display for phone number (»
Call display for phone number (»0123456«)
and time (»
19:22«).
Call display for phone number (»0123456«)
and duration (»
02.19«) of entire call.
Call display for phone number (»0123456«)
and charges (»
0,36«).
Call display for date (»01.04.00«) and
19:22«).
time(»
0123456«). ˆ0123456 }
ˆCalling subscriber get
ˆno dial number!
ˆCalling subscriber get
ˆ dial number!
ˆCall-Number transfer
ˆoutgoing incoming
ˆdispl silent
ˆ0123456 19:22 }
ˆdispl silent
ˆ0123456 02.19 }
ˆdispl silent
ˆ0123456 0,36 }
ˆdispl silent
ˆ01.04.00 19:22 }
ˆdispl silent
Settings
Correct charge display is shown only if you have applied at your network service
provider for transmission of charges during calls.
View during a call
The displays during calls described in the following depend on your individual set
tings and can therefore be different for each connection.
33
-
Page 38

g
S
During a call the display shows in the up
per row the phone number (»
and the duration of the entire call
(»
02.19«).
Press the softkey below »
0123456«)
displ«.
ˆ0123456 02.19 }
-
ˆdispl silent
You see the date (»01.04.00«) and time
(»
S
S
S
Settings
10:34«).
Press the softkey below »
You see the charges (»0,36 GBP«)and the
duration of the call (»
Press the softkey below »
If you are the final destination for call rerouting you will see the number that is being rerouted (»
transmitted.
Press the softkey below »
You see the normal display again during a
connection.
098765«), provided it is
displ«.
02.55«).
displ«.
displ«.
a After finishing the call you see for about 5
seconds the following display.
Setting call display
Begin as follows:
ˆ01.04.00 10:34 {}
ˆdispl
ˆ0,36 GBP 02.55 {}
ˆdispl
ˆU{098765 {}
ˆdispl
ˆ0123456 03.33 }
ˆdispl silent
ˆ0123456
ˆduration 03.45
a
FSS S S
config display conversation norm
> You will see twosetting options for call dis
play. Press the right arrow button to have
other options displayed.
S Press the corresponding softkey for the
desired call display.
34
-
ˆ Normal display? }
ˆtnumb+charge tnumb+time
ˆ Normal display? {
ˆnumber data+time
Page 39

The softkey »duration« is available only
after pressing the softkey below
»
tnumb+charge«. Otherwise, this softkey
is no longer displayed.
Displaying the conversation time
ˆ Conversation display
ˆ duration norm
After setting thecall display to »
Begin as follows:
a
FSS S S
S Press the softkey below »always«,
»
never« or »for_charge«.
tnumb+charge« you canset the display for call duration.
config display conversation duration
ˆConversation time displa
ˆalways never for_charge
S »always« The charges are not displayed during a call. You
see the duration of the call.
S »never« Accrued charges are displayed. The duration of a
call is not displayed.
S »for_charge« Accrued charges are displayed, otherwise the
duration of the call is displayed. If the charges are
not displayed, theduration of the call is displayed.
ˆ Conversation display
ˆ duration norm
4.10.3 Setting the language of the display
Settings
You can selectthe languageof your display. The display texts canbe displayed in differ
ent languages.
Begin as follows:
a
FSS> S
config display language
35
-
Page 40

<> Press the arrow buttons to view the avail
able languages.
ˆ Which language? }
-
ˆdeutsch english
S Press the softkey below the desired lan
guage. The display switches to the
changed language immediately.
-
ˆ Display-Monitoring {
ˆlanguage
4.11 Call control
You can configure a control for outgoing calls in your phone.
If you have configured the call control a »
The settings for call control are PIN-protected (password) and can only be made and
accessed in the following manner.
Begin as follows:
a
FS>S
config inhibit
V« is shown on the top line of the display.
Settings
t Enter the PIN.
In the initial state:»
0000«).
ˆ Input PIN please
ˆ> _
O Confirm your entry by pressing OK. ˆConfig. inhibit filter }
ˆpin list outgoing
If the PIN is initiallyset to »0000«(initial state), youneed notenter it againand can bypass
this step by pressing the
O button.
4.11.1 Setting call control
The inhibit and enable listsfor the telephoneboth encompassseven (1...7) entries.Each
entry for a prefix, a number or a partial number can contain up to 26 digits.
Global inhibit
»
complete« You can set your phone toinhibit all outgoing calls, except for those
telephone numbers inthe enabled list..Forexample, iftheprefix 051
is enabled, all telephone numbers which begin with 051 can be
called.
36
Page 41

Selective inhibit
»list« Thecall controldistinguishes betweenthe entries in the enablelist and
Deactivate call control
»
no« The softkey »no« deactivates a configuredcall control.
Begin as follows:
a
S To deactivate a configured call control,
those inthe inhibit list. You can release inhibited entries using the en
able list. Ifan entry inthe enable listlonger that anentry in theinhibit list
that entry can be dialed. (Example: Inhibited number 01234 and en
abled number 012345;Calls beginning with 01234 can not be dialed,
only those beginningwith 012345.)
FS>S
config inhibit
press the softkey below »
If you would like to activate call control,
press the softkey below »
»
list«.
no«.
complete«or
t
Enter PIN
ˆ Inhib. outgoing calls?
ˆno complete list
ˆConfig. inhibit filter }
ˆpin list outgoing
OS
outgoing
-
-
Settings
4.11.2 Enter the inhibited and enabled telephone numbers
Configuring and changing of inhibited number 1 of the call filter is described in the
following examples.
Proceed as described for Inhibited number 1 to configure or change other inhib
ited/enabled numbers.
Begin as follows:
a
FS>S
config inhibit
t Enter the prefix,telephone number or par
tial number that is to be inhibited.
In this example: »
05171«.
37
t
Enter PIN
O S <> O
list
-
ˆ Inhib./Enable tel. no.
ˆInhib-1>05171_
Select entry
-
Page 42

O Confirm your entry by pressing OK. ˆInhib./Enable tel. no.{}
ˆInhib-1>05171
Editing inhibited and enabled telephone numbers
Begin as follows:
a
FS>S
config inhibit
C Delete the existing telephone number by
pressing the C button.
t Enter the prefix,telephone number or par
tial number that is to be inhibited.
In this example: »
»
0049«.
05171« change in
t
Enter PIN
O S <> O
list
ˆ Inhib./Enable tel. no.
ˆInhib-1>05171_
ˆ Inhib./Enable tel. no.
-
°Inhib-1>0049_
Select entry
O Confirm your entry by pressing OK. ˆInhib./Enable tel. no.{}
ˆInhib-1>0049
Settings
4.11.3 Changing the PIN
In this menu you are able to configure your individual PIN (0000...9999).
Begin as follows:
t
O
a
FS>S
config inhibit
Enter the new PIN.
In this example: »
Confirm your entry by pressing OK.
1234«.
t
Enter PIN
ˆ Change PIN
ˆ>1234_
OS
pin
ˆConfig. inhibit filter }
ˆpin list outgoing
Note: The PIN is also reset after executing the service reset for restoring the initial
state (0000).
38
Page 43

4.12 Protecting the configuration by a PIN (password)
The call filter PIN can also be used to protect the configuration of the telephone and for
deleting the charges. After accessing configuration (
before clearing the charges, the PIN must first be entered.
The setting for access using a PIN is made using a security code:
F button and S »config«) and
protection
code: »
0«
protection
code: »
1«
Begin as follows:
a
t Enter the digit for the protection code.
Access to the configuration menu is not restricted. The PIN must only
be entered whenaccessing the menufor call control(see page 36).
Access to the configuration menu and clearing of the charge rate
memory are PIN-protected. After pressing the F button and the
softkey below »
enter your PIN.
FS>S
config inhibit
In this example: »
config« , andprior to clearing the charges, you must
t
Enter PIN
1«.
O> S
ˆ Inhibit menu access
ˆSec. code>1_
menu
O Confirm your entry by pressing OK. ˆConfig. inhibit filter{
menu
Please write downthe enteredPIN. Ifyou forgetyour PIN, you will not be able to ac
cess any of the PIN-protected settings.
Accessing the configuration menu via the PIN
Settings
-
In these operating instructions, access to configuration is always described without the
use of a PIN (Setting: »
(Setting: »
Begin as follows:
Prot.Code>1«), this menu is then accessed as described here.
a
FS
Prot. code>0«). If you set PIN protection for configuration
config
t
Enter PIN
39
O
Configuration of the requested perfor
mance features possible in the configura
tion menu.
-
-
Page 44

4.13 Call charges
You must apply for this feature at your network service provider. Transmission of the
current chargescan, depending on the service youapplied for, be displayed either dur
ing or after the call.
Please note that only charge billing by the network service provider is binding.
There are several standardized procedures for transmitting call charge rates. Usually the
same procedure is employed at one connectionthat is recognized andstored automati
cally for future use by the telephone.
The exchange office transmits rate units which are converted into
q
charges by the telephone using the specified charge rate factor. The dis
play of your telephone then shows the current charges with the currency
denotation that youhave configured.
The exchangeoffice sends you currency values consisting ofthe amount
q
of thecharges and the currency denotation. Theseare then displayed directly in thedisplay of your ISDN systemtelephone.
The currency denotation transmitted from the exchangemust not necessarily be thesame one that is setin the initial state ofyour telephone.
4.13.1 Setting the Currency and Charge Factor (Charge rate factor)
Settings
The setting ofthe chargefactor can have a maximum of 5digits. To enter a comma, use
the
* key.
Begin as follows:
-
-
-
a
C The initially set charge factoris displayed :
t Enter the new charge factor.
FS>SS
config rate charge
ˆ Amount for units
»
0,12«.
Delete the existingvalue by pressing the C
button.
In this example: »
0,25«.
ˆ>0,12
ˆ Amount for units
ˆ>0,25_
O Confirm your entry by pressing OK. ˆ Charges
ˆcharge delete currency
40
Page 45

4.13.2 Resetting the charge display
In the event that the phone receives charge information that is not stored, »wrong
charge type
When the charges that are stored in the phone are deleted, recognition and saving are
reactivated automatically.
Begin as follows:
« then appears in the display.
a
S Press thesoftkey below »No«, to reset the
FS>SS
config rate delete
ˆ Reset charge type?
type of charge information. If you want to
delete the charge information, press the
softkey below »
ok«.
ˆNo ok
ˆ Charges
ˆcharge delete currency
4.13.3 Setting the currency
The entry for the nameof a currency can have a maximum of 6digits. You can advance
through the letters by pressing the appropriate button repeatedly (see page 6). The letters are shown in the display one after the other as you press the button.
Begin as follows:
a
C You see the defaultcurrency type setting.
FS>S S
config rate currency
ˆ Currency name
Delete theexisting entry by pressingthe C
button.
ˆ>GBP
Settings
t Enter the new currency.
In this example: »
EURO«.
ˆ Currency name
ˆ>EURO_
O Confirm your entry by pressing OK. ˆ Charges
ˆcharge delete currency
41
Page 46

4.13.4 Chargesaccount for each Number (MSN)
You can set up a charge account for each number (MSN) that has been entered in the
telephone. An amount in the configured currency that is available for making calls will
then be allocated to this account for the defined number (MSN). Once this amount has
been exhausted, onlycalls withcosts, in additionto free-of-charge calls, can be directed
to theenabled numbers of the call control(see Page 36). Calls with costscan not be di
rected to othernumbers. Ifthe amount in the charge account isexceeded duringan on
going call, this call can nevertheless be completed.
When the amountfor the account is increased, or when theaccrued charges are cleared
(see Page 82) calls with costs can again be made.
Attention: Not all service providers transfer charge rate information. If you make
calls using a service provider which does not transmit charge information, the
charge account is ineffectual.
Configuring a charge account
Configuring of acharge account for a phone number (MSN)is described in the following
using MSN1 as the example.
Begin as follows:
-
-
a
Settings
t
O
If you enter the amount available for making calls as »0«, the charge account is not
activated.
FSSS>S
config msn msn-1 rate
Enter the amount that is available for this
number for making calls.
In this example: »EURO
Confirm your entry with OK.
20«.
ˆDial inhib. by charge
ˆLimit/EURO>20_
ˆ MSN-1 program {}
ˆmsn_name rate
4.14 Setting the default park code
A parkingcode of 55 is set in the initial state. You canchange the default parkcode to a
single- or double-digit code.
42
Page 47

Begin as follows:
a
t Enter the new park code.
FS>>S
config parkc
The initially set park code is displayed:
»
55«.
In this example: »
22«.
ˆ Standard call-parking
ˆCall-Parking>55_
ˆ Standard call-parking
ˆCall-Parking>22_
O Confirm your entry by pressing ok. ˆ Configuration {
ˆservice parkc
4.15 Emergency operation
When using the CS300 at a pabx, you must connect the telephone directly to the line
acces, in case the 230 V~ power supply fails. This is possible with a pabx designed for
emergency operation or by including a UPS adapter.
A proposal for the XCentric can be found at:
http://www.bintec.de/XCENTRIC/de/loesungen/index.html
The emergency operation mode enables you to use your telephone with limited performance features only.All incoming calls are signaledat this phone (ringing tone volume is
not adjustable).
In addition to making normal calls, the following functions are also available:
Settings
Display duration ofcall and charges
q
Mute
q
Terminate call
q
4.15.1 Setting emergency operation at a point-to-multipoint
connection
To be able to use the CS300 in emergency mode, the emergency mode feature must
first be configured in your telephone.When you have several ISDN telephones con
nected to theS0-bus, please be sure to configure onlyone for emergency operation.
For this, please removethe labelfrom thetelephone (see page10). Usinga suitabletool,
as shown infigure 10 pressthe spring down until it catches.The ISDN system telephone
is now set for emergency operation. To deactivate the emergency operation function,
press the springlightly towards the front using a suitabletool until the spring is released.
43
-
Page 48

To deactivate, press spring
in this direction
spring
Fig. 10: Setting emergency operation at a point-to-multipoint connection
4.15.2 Making calls during emergency operation at a
point-to-multipoint connection
Loss of power supply for the network ter-
ˆ EMERGENCY SERVICE
mination, or for the PABX. You see this
display after a few seconds.
Settings
b Lift up the handset of your ISDN system
telephone and dial the numberyou wish to
call.
If the 230V~ power supply is restored during an ongoing call, allnormal, configured
functions are available again only after you hang up the handset.
If the 230V~ power supply is restored when the handset is in its cradle, the “Emer
gency service” message in the display is replaced by the normal display when you
lift up the handset or when a call is made.
The MSN allocated to you by the network service provider as the first MSN (MSN1) is
transmitted to theexternal subscriber.Charge billing is effected for this. Allexisting con
nections will beinterrupted at a power supply failure andalso when the power returns.
ˆDial please
ˆ
-
-
44
Page 49

4.16 Emergency operation at a point-to-point connec
tion
Begin as follows:
-
a
S Press the softkey below »ok«, to enable
FSS> S
config pabx connection
ˆEmergency service PABX?
your telephone for emergency operation
at a pabx connection or press »
activate emergency service.
no«, to de
ˆ no ok
-
ˆ PABX {
ˆtype-id connection
4.17 Programming the phone directory
You can store up to 250 names (20 characters max.) and telephone numbers (26 digits
max.). To selecta name,you canpage throughthe directoryusing thearrow buttons,or
enter the specific first letter(s) of the name using the pushbutton set.
If thename of the caller is tobe shown in the display instead of the caller’s number,
this number must be entered in the telephone directory with that name (including
prefix and, when used with a PABX the line access digit).
Display of the caller name is only made when the transmitted number corresponds
to the number stored in the phone directory.
Settings
If the telephone is disconnected from the ISDN network and then reconnected, or if the
data forthe telephone directory are transferred to the system telephone via the PC pro
gram, the directory must be reorganized internally. This process takes place automati
cally and may require a few minutes. During this time, the telephone directory of your
telephone is not available for use.
4.17.1 Directory entries
Each button of the pushbutton set is labelled with three or four letters of the alphabet.
You can advancethrough theletters bypressing the appropriate button repeatedly (see
page 6). Theletters are shown in the displayone after the other as youpress the button.
If there are two consecutive letters on the same button ofthe pushbutton set, press the
45
-
-
Page 50

right arrow button afterentering thefirst letter and thenenter thenext letter. You canalso
change the position where the letters are entered usingthe arrow buttons (e.g. for enter
ing a space).
Begin as follows:
-
a
t
O
t
O
Settings
4.17.2 Editing entries in the directory
Begin as follows:
a
t
FSSS
prog tbook new
Enter the name.
In this example: »
Confirm your entry by pressing OK.
Enter the telephone number.
In this example: »
Confirm you entry by pressing OK.
If you wish to make further entries proceed
as described above.
J.DEAN«.
0987654321«.
FSSS
prog tbook list
Enter the first letter of the directory entry
and/ or search it with the arrow buttons.
<>
ˆ Input telephone book
ˆname>J.DEAN
ˆ Input telephone book
ˆtnumb>0987654321
ˆTel. drctry
° delete list new
ˆ Make initial select.
ˆname>M
O Confirm your entry by pressing ok.
C Delete the existing characters by pressing
the C button.
t
O
Enter the new letters.
In this example: »
Confirm your entry by pressing OK.
J.DEANNOY«.
46
ˆChange tbook data input
ˆname>J.DEAN
ˆChange tbook data input
ˆname>J.DEANNOY
Page 51

C Delete the existing telephone number by
pressing the C button.
ˆChange tbook data input
ˆtnumb>0987654321_
t
O
Enter the new number.
In this example: »
Bestätigen Sie die Eingabe mit OK.
To edit further entries proceed as de
scribed above.
0123456789«.
ˆChange tbook data input
ˆtnumb>0123456789_
ˆname>J.DEANNOY
-
ˆT:0123456789
4.17.3 Deleting entries from the directory
Begin as follows:
a
FS S S
prog tbook delete
To delete further entries proceed as described above.
t
Enter first letter. Select entry
ˆTel. drctry
ˆ delete list new
and /
or
<> O
4.17.4 Reorganizing the directory
When you delete an entry from the directory it will no longer appear in the display, but it
does, however, continue to take up storage space. It may then not be possible to have
the complete 250 entries in the directory. A prompt then appears in the display asking
you to reorganize the directory. Reorganization of the directory removes all of the de
leted entries from thememory, makingstorage space previously used bydeleted entries
available again.
Settings
-
You wish to make an entry in the directory
and the text shown at the right appears in
the display for around 10 seconds.
ˆ Reorganization before
ˆ tbook modification
S Press the softkey below »reorganize«. ˆTel. drctry
° reorganize
The telephone returns to idle. ˆ01.04.00 10:34 }
47
°tbook vip quiet
Page 52

4.17.5 Configuringspecial ringing tone (VIP ringing tone) for
directory entries
You can configure a special ringing tone for a caller whose number is entered in the di
rectory. Thisspecial ringing tone will then have priority over the ringing tone assigned to
the selected MSN.
Begin as follows:
<>
O
<>
O
Settings
a
FS > S <>
adjust tncall
Press thearrow buttons to selectthe ring
ing tone melody..
Confirm your selectionby pressingthe ac
knowledgement button.
Press the arrow buttons to select the volume.
Confirm your selectionby pressingthe acknowledgement button.
An active special ringing tone is displayed
as a digit.
In this example: »
6«.
or
Select entry Select entry
ˆname>J.DEANNOY {}
-
ˆMelody: -------¼---- 6
-
ˆname>J.DEANNOY {}
ˆCall signal - ¼¼¼--- +
ˆSet specl. tone call {}
ˆname>J.DEANNOY 6
t
4.18 Programming VIP numbers
-
O
You can program VIP numbers for each of the ten buttons 1 ... 0 including a name
(20 characters max.) and a telephone number ( 26 digits max.).
4.18.1 Programming VIP entries
The followingexample describes how to program a VIP entry for destination »V5«. If you
wish to program further entries, proceed as described for »
Begin as follows:
a F
SSS<>O
prog vip new
48
V5«.
Select VIP
destination
Page 53

t
O
Enter the name of the VIP entry »V5«.
In this example: »
Confirm your entry by pressing OK.
BEATRICE«.
ˆ Program VIP name
ˆV5:BEATRICE_
t
O
Enter the telephone number.
In this example: »
Bestätigen Sie die Eingabe mit OK.
0123456789«.
4.18.2 Editing VIP entries
Begin as follows:
a
C
t
O
FSSS<>O
prog vip list
Delete theexisting entry by pressingthe C
button and enter the new name for this VIP
entry.
In this example, the name is left unchanged.
Confirm your entry by pressing OK.
C Delete the existing telephone number by
pressing the C button.
t
O
Enter the new number.
In this example: »
Confirm you entry by pressing OK.
0987654321«.
ˆ Program VIP number
ˆV5>0123456789_
ˆReprogram VIP {}
ˆV5:BEATRICE
Select VIP
destination
ˆ Program VIP name
ˆV5:BEATRICE
ˆ Program VIP number
ˆV5>0123456789
ˆ Program VIP number
ˆV5>0987654321_
ˆ Select VIP {}
ˆV5:BEATRICE
Settings
4.19 Programming direct dialing numbers
Direct dialingis initiated using thedirect dialing keys Z.Each of the 7keys can be pro
grammed with two direct dialing numbers. Using the Shift button you can switch be
tween the two levels for direct dialing. Pressing the shift button is indicated by »
the top line in the display.
You can also program other typical systemfunctions for the direct dialing buttonsin ad
dition to the ones described here (see page 59).
49
[a]«on
-
-
-
Page 54

4.19.1 Programming dtmf or keypad sequences
The followingexample describes how toprogram the direct dialing button 5. If you wish
to configure further buttons proceed as described for Button 5.
Begin as follows:
a
t Enter the telephone number or the dtmf/
If youwish to program atone frequency or keypadsequence press the Shiftbutton and
set the desired entry mode in the display before you input the digits.
(No character) Telephonenumber
»
T« DTMF sequence (Tone frequency dialing, see page 81)
»
K« Keypad sequence (Keypadfunction; see page 81)
FSSS<>O
prog direct new
keypad sequence ( 26 digits max.).
In this example: Telephone number
»
0123456«.
Select direct
dial button
ˆ Program keys
ˆ5_> 0123456_
Settings
O Confirm your entry by pressing OK. ˆProg. new direct dial {}
ˆ5_: 0123456
Editing direct dialing numbers
Begin as follows:
a
FSSS<>O
prog direct list
C Delete theexisting entry by pressing the C
button.
t Enter the telephone number or the dtmf/
keypad sequence.
In this example: »
721«.
50
Select direct
dial button
ˆ Program keys
ˆ5_> 0123456_
ˆ Prog. new keypad key
ˆ5_>K721_
Page 55

O Confirm your entry by pressing OK. ˆ Select direct dial {}
ˆ5_:K 721
4.19.2 Programming function keys
You can program the following functions for the direct dialing buttons of your phone:
MSN assignment
You canconduct an internal or external call suchthat a defined phone number (MSN) is
transmitted to the party you are calling from your phone. This number must have been
entered previously in your telephone. MSN assignment via a programmed function key
is possible only for numbers MSN-1 to MSN-9. It is not possible to configure an MSN as
signment for MSN-10 using the function keys.
-
LED functions:
Carrier / Provider prefix
You can configure a button such that, in addition to an explicit MSN assignment, you
can also store a carrier code atthis button. A buttonthat has been configured inthis way
can also be combined with a number from the phone directory, or the VIP or direct dial
memory during call preparation.
LED functions:
Callfilter
If you haveconfigured the call filter for your telephone (see page 24),e.g. for ignoring cer
tain numbers, you can also configure a button for activating/deactivating the call filter.
Changing between the filter modes (reject, accept or complete) can not be performed
using this programmed button. If you havenot yet made any settings in the call filter you
can call up the call filter menu by pressing this button.
LED functions:
Connection has beenset up via this button:
•
The LED lightsup.
Connection has beenset up via this button:
•
The LED lightsup.
Call filter active:
•
The LED lightsup.
Call filter off:
•
The LED isnot lit.
Settings
-
51
Page 56

Callrerouting
You can configure a button such that call rerouting (see page 20) is set up for certain
numbers (MSNs). When this button is then pressed call rerouting is either activated or
deactivated. Configuring of call rerouting using programmable buttons is only possible
for numbers 1to 9(MSN1...MSN9) of the telephone. To utilize thecall rerouting function
you must have already configured at least one phone number.
LED functions:
Directcall
Direct calling from the telephone (see page 29) can beconfigured via programmed func
tion keys. The direct call numbermust be stored in thetelephone before direct callingvia
a functionkey can be configured. Deactivation of direct calls is carried out as described
in the section »Direct call« (see page 29).
LED functions:
Call rerouting on:
•
The LED lightsup.
Call rerouting off:
•
The LED isnot lit.
Direct call on:
•
The LED lightsup.
Direct call off:
•
The LED isnot lit.
Settings
Programming function keys
The following example describeshow to programthe functionkey 2a. Ifyou wishto pro
gram other buttons, or edit an already programmed button, proceed as described for
Button 2a.
Begin as follows:
-
-
a
<>
O
FSSS<>O
prog direct function
Use the arrow keys to select the desired
function.
In this example: »
Confirm your choice by pressing OK.
call forwarding«.
52
Select direct
dial button
ˆFunction for key 2a?{}
ˆcall forwarding
Page 57

t Enter the index of the telephone number
(MSN) that is to be forwarded.
In this example: Telephone number with
index »
3«.
ˆ2a / call forwarding
ˆnumber>3_
t Indicate the type of call rerouting.
»1« - permanent
»2« - delayed
»3« - on busy
In this example: »
2«.
t Enter the number to which the calls are to
be forwarded.
In this example: »
O Confirm your entry by pressing the OK
button.
You will thensee the button programming.
In this example: Call rerouting “delayed”
for number (MSN) 3 to the final number
123456.
function Displays further entries
MSN assignment
Carrier/Provider prefix
123456«.
msn-assignment
msn-assignment
ˆ2a / call forwarding
ˆnumber>32_
ˆ2a / call forwarding
ˆnumber>32123456
ˆProg. new direct dial {}
ˆ2a:F MSN3,delaye}123456
Index of numbers (MSN 1...9)
that are to be transmitted
Index of the numbers (MSN
1...9) and code of the desired
provider
(e.g. 01033)
Settings
call filter
call forwarding
dir. call-in
call filter
call forwarding
dir. call-in
53
Index of numbers (MSN 1...9)
that are to be rerouted, type
of rerouting (1...3) and final
destination of call rerouting
Page 58

4.20 Programming the elmeg T300 keyboard extension
If you are using your telephone with the elmeg T300 keyboard extension module (see
page 10), youcan also conduct two-level programming for a further 24 buttons.You can
program numbers (DTMF or keypad sequences (see page 50) and functions (see page
51) for these buttons.When youare usingthe BinTec CS300together withan XCentric,
you can program the typical system features described from page 59 on.
You canget to the second level on the keyboard extension module bypressing the
Shift button on your phone.
Begin as follows:
a
Z Press any one of the buttons on the key-
Settings
S Press the softkey below »function«, if
Programming a telephone number, a dtmf sequence or a keypad sequence
t Enter the telephone number or the dtmf/
FSS
prog direct
board extension. To program the second
level for abutton, press the desired button
two times, or first press the Shift button,
followed by the desired button on thekeyboard extension module.
you want to program a function. If you
want to program a telephone number, a
dtmf sequence or a keypad sequence,
press the softkey below »
keypad sequence.
In this example: »
0123456789«.
new«.
ˆ Program keys
ˆ function list new
ˆ Prog. key 13a
ˆFunction New
ˆ Program keys
ˆ13a> 0123456789
O Confirm your entry by pressing OK. ˆ Prog. key 13a
ˆFunction New
The number of the button and the pro
grammed number then alternate in the
display.
-
ˆ 0123456789
ˆFunction New
54
Page 59
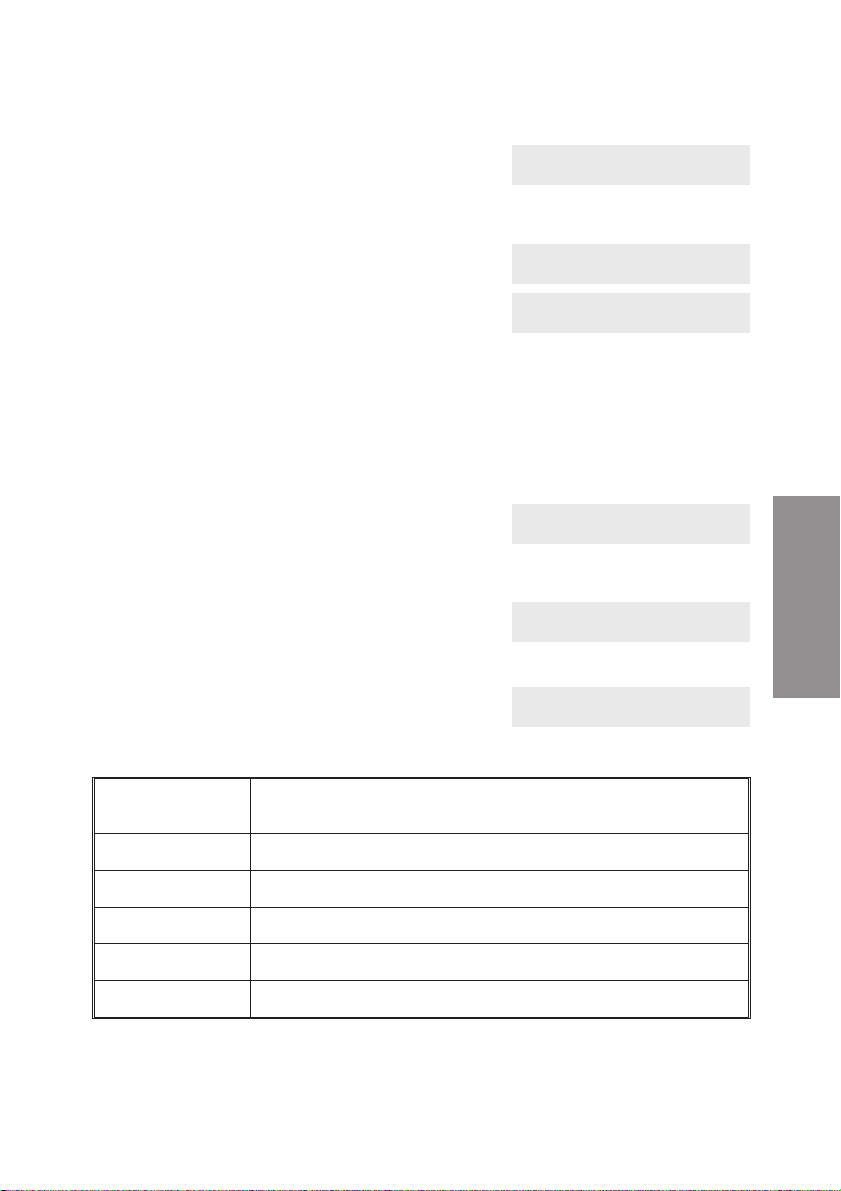
Programming functions
<> Use the arrow keys to select the desired
function.
In this example: »
call filter«.
ˆ Prog. key 13a
ˆcall filter
O Confirm your entry by pressing OK. ˆ Prog. key 13a
ˆFunction New
The number of the button and the pro
grammed function then alternate in the
display.
4.21 Additional Information in the Display
When thetelephone is in the idle state, additional information about functions/performance features that have been configured
are shown on the top line of the display. In
this example: »
DVqC«.
>S To obtain further information about set
functions pressthe right arrow button and
then the softkey below »
If several functions have been set, press
the arrow button or the softkey below
»
info«, to view the various settings.
info«.
ˆF call filter
-
ˆFunction New
ˆ01.04.00 10:34 DVqC }
°tbook vip quiet
ˆ01.04.00 10:34 DVqC {}
ˆunpark charges info
ˆCall forwarding direct{}
ˆ(1}0123456789) info
Settings
Displays Configured function
»
D« Active date set
V« Dial control, call filter or configuration protection active
»
q« Function »Station guarding« (only brief signal) active
»
Q« Function »Station guarding« (complete) active
»
»C« call forwarding active
55
Page 60

Settings
56
Page 61

5 Settings for a PABX System
5.1 Number length
The length of internal numbers is the maximum length (digits) for numbers that are as
signed to different internal subscribers within your PABX system. The telephone uses
the number of digits of a number (number length) you have entered to differentiate be
tween internal and external callers.
In the default state, this length is set to 4 digits.
Begin as follows:
a
t
O
FSS S
config pabx number
Enter the internal number length of your
pabx (0...9).
In the example here: »
Confirm your entry by pressing OK.
2«.
ˆPABX number length
ˆ>2_
ˆ PABX }
ˆnumber ln.access extern
5.2 Automatic access of exchange line
You have the option of setting your system telephone for automatic access to an exchange (outside) line. When placing a call from the telephone directory, speed dialing or
destination speed dialingmemory, donot dial the exchange code. When calls are made
the number of the subscriber is likewise shown without the exchange prefix.
Please note that you can set automatic line access either in the PABX system or in
your system telephone.
-
-
Settings
Begin as follows:
a
FSS S
config pabx ln.access
S Press the softkey below »ok« to configure
line access or »
cess.
no«, to deactivate line ac
57
ˆAutom. line access?
ˆ No ok
-
ˆ PABX }
ˆnumber ln.access extern
Page 62

5.3 Line access digit (LAD)
You need thisfeature when your telephone is connected to a PABX. The lineaccess digit
(LAD) is the code that you must dial to call an external number. The line access digit is
placed automaticallyin front of the number of the caller in the caller list for external calls.
The stored number can then be calleddirectly from the caller list (seepage 71). You can
find the LAD for your PABX in the PABX manual .
Begin as follows:
a
t
O
FSSS
config pabx extern
Enter the externalline accesscode ofyour
pabx (max. 4 digits).
In the example here: »
Confirm your entry by pressing OK.
*80«.
ˆInput external line
ˆExtern>*80
ˆ External line!
5.4 Setting the PABX system type
If you operateyour system telephone with a PABX youmust set the type of PABX you are
Settings
using in thephone. This setting is required, assome PABX systems transmit the lineaccess digit onincoming calls, meaning that the line access digitmust not be entered in the
phone.
Type »
0«: ThePABXsystemdoesnot transmit theline access digiton incoming
Type »
1«: The PABX system transmits a line accessdigit on incoming calls.No
If you are using the BinTec CS300 on the internal ISDN connection of the XCentric,
please enter type »
Begin as follows:
calls. The lineaccess digit must beentered in thephone.
line access digitshould be entered in the phone.
1«.
a
t Enter the type of PABX.
FSS>S
config pabx type-id
ˆ PABX-type-number
In the example here: »
1«.
ˆ>1_
O Confirm your entry by pressing OK. ˆ PABX {
ˆtype-id connection
58
Page 63

5.5 Function buttons
The existing directdial buttons(see page49) ofyour phone can also be programmed as
function keys forfacilitating use of typical system functions withyour XCentric system.
Not all features listed below arecurrently supported bythe function keys.The scope
of features iscontinuously enhanced.Up to date information on the currentsoftware
version can be found at:
http://www.bintec.de/XCENTRIC/de/loesungen/index.html
Attention:
All of the LED functions described here are only available
•
for functions configured for the first level of the direct dial
buttons.
Line keys, connection keys, team keys andthe boss/ sec
•
retary functions cannot be configured for the secondlevel
of the directdial buttons.
The following applies to the LED functions of configured
•
function keys inthe second level of thedirect dial buttons:
The current LED status of second level function keys is
displayed by pressingthe Shiftkey. Whenthe function key
is then pressed theLED status isdisplayed. Afteraround 3
seconds the “normal” LED status is displayed again for
first level functionkeys.
5.5.1 Line keys
A B channel for an ISDN connection is configured for a line key. When this key is
pressed, hands-free callingis activatedautomatically andthe correspondingISDN con
nection is accessed. You will hear the external dial tone.
LED Function
External Connection:
•
The LED lightsup.
Incoming call:
•
The LED flickers.
No B-channel available:
•
The LED blinks.
-
Settings
-
59
Page 64

5.5.2 Connection keys
You can configure dialing to an internal party using a connection key. When the corre
sponding key is pressed the hands-free function is activated and the number entered for
the listed internal subscriber is dialed.
If a call is signaled at alisted, internal subscriber youcan accept this call by pressing the
connection key.
LED Function
Connection:
•
The LED assignedto the internal number lightsup.
Call:
•
The LED flickers.
No B-channel available:
•
The LED blinks.
5.5.3 Team keys
A team keyis a normal line key to which theinternal number for a team is assigned.When
the corresponding key is pressed hands-free calling is activated and the listed team
called.
If a callfor the listed team is signaled youcan accept the call by pressing theteam key.
Settings
LED Function
Call:
•
The LED assignedto the team flickers.
Connection:
•
The LED goesout so that other team calls canbe signaled
when they comein.
-
5.5.4 Team function log-in/ log-out
If you are entered asa subscriber in the call switching modes of one or more teamsyou
can configure a key so as to control the call signaling of your telephone. When you are
logged in, team calls will be signaled at your telephone. No team calls are signaled at
your phone if you are not logged in.
LED Function
Logged in: TheLED lights up.
•
Logged out: TheLED is not lit.
•
60
Page 65

5.5.5 Day-/ Night modes
You can configurea keyso that you can switch between the call switchingmodes ofthe
PABX (Day/Night modes) when that key is pressed. There are three(3) different options
for this function:
Day/Night all: All features which make a distinction between Day/Night call modes for
call distribution (AVA, Teams, TFE) are all commonly switched over.
Day/Night Team:When a team number is entered here,only the call mode for this team
is switched over. If you donot enter ateam number, the callmode is switched overfor all
teams.
LED Function
Day call mode:The LED is not lit.
•
Night call mode:The LED lights up.
•
5.5.6 Message
The message function allowsyou toestablish a connection to a different telephone, orto
a team to which several phones are assigned, without this connection having to be actively accepted. The connection is set up as soon as at least one telephone has accepted the messageand theLED ofthe message button is activated. The message can
be ended by pressingthe messagebutton again, or bypressing thespeaker button. The
associated LED is deactivated when the message is terminated.
Messages are accepted automaticallyby thephones being called by activatingthe open
listening function when:
the phone isidle.
•
the message inhibitfilter is activated.
•
the »Station guarding«function is not activated.
•
When a messagecomes in, the number of the partysending the message appears in the
display of the phone being called. The message is preceded by a brief acoustic signal
over the speaker.The message can be terminated at anytime by pressing the ESC key.
5.5.7 Message on/off
Settings
If the function »Station guarding« is activated at your phone, you will not be able to re
ceive any messages. You can also explicitly inhibit or enable receiving of messages us
ing a corresponding function key.
LED Function
Message possible: TheLED lights up.
•
Message inhibited: TheLED is not lit.
•
61
-
-
Page 66

5.5.8 Intchselercom
The intercom function allowsyou toestablish aconnection to adifferent telephonewith
out this connection having to be actively accepted. When this phone accepts the inter
com call the connection is set up and the LED for the intercom button is activated. The
intercom connection can be endedby pressing the intercom button again, or by press
ing the speakerbutton. Theassociated LEDis deactivatedwhen the intercom call is ter
minated.
In contrast to the message function, intercom calls can only be made to one phone.
Intercom calls are accepted automatically at the phone being called by activating the
hands-free calling function when:
the phone isidle.
•
the intercom callinhibit filter is not activated.
•
the »Station guarding«function is not activated.
•
The number of the caller appears in the display of the party being called for intercom
calls. Intercom calls are preceded by a brief acoustic signal over the speaker. Intercom
calls can be terminated by pressing the speaker button. An intercomcall is transformed
into a normal call if you lift the handset during an intercom call.
During an intercom call, you will hear a special tone every 15 seconds.
5.5.9 Intercom on/off
Settings
If the function »Station guarding« is activated at your phone, you will not be able to receive any intercom calls. You can also explicitly inhibit or enable receiving of intercom
calls using a corresponding function key.
-
-
-
-
LED Function
Intercom calls possible:The LED lights up.
•
Intercom calls inhibited:The LED is not lit.
•
5.5.10 Boss secretary function
This function enablesthe interactionbetween thephones of the secretary and the boss.
Here, a specialline key with the number of the boss’ phone is assignedto the secretary’s
phone, and one with the number of the secretary’s phone assignedto the boss’ phone.
These special line keys allow the features “Boss’s phone” and “Secretary’s phone” to be
stored in both phones.
If a connection is set up from the boss’ phone to the secretary’s office via the corre
sponding line key, this call is signaled in the display of the secretary’s phone by »
conn
«. If a connection is set up from the secretary’s phone to the boss’ office via the
corresponding line key, this call is signaled in the display of the boss’ phone by
»
office«.
The display »
boss conn«or»office« alternates at 2 second intervals with the normal
62
boss
-
Page 67

display of the number or name of the caller.
If your phone has beenconfigured as a “Boss” phone, a further function isadded to the
feature »Station guarding«. Once you have activated »Station guarding«, all calls for the
first number (MSN-1) at the boss’ phone are forwarded immediately to the secretary’s
phone. These callsare thenonly signaledoptically at the boss’ phone and both optically
and acoustically at the secretary’s phone.
Several “boss” phones can be configured for each secretary’s phone.
5.5.11 Programming a Function Key
Configuring a functionkey isdescribed in the following using key 1as anexample. If you
wish to configure furtherkeys, or changea keythat has alreadybeen programmed,pro
ceed as described here for key 1.
If you wish toprogram a key of the key extension module, proceed as described on page
54.
Begin as follows:
-
a
<>
O
t Please select an ISDN connectionfor con
FSS S<>O
prog direct function
Use the arrow keys to select the desired
function.
In this example: »
Confirm your selection by pressing OK.
figuring theline access.Enter the two-digit
slot number and the two-digit unit num
ber. Example:
Slot 3, Unit 0 = 0300
Slot 3, Unit 1 = 0301.
li ne key«.
Select direct
dial button
ˆFunction for key 1_?{}
ˆline key
-
ˆ1_ / line key
ˆnumber>0301_
-
O Confirm your entry by pressing OK. ˆ Prog. new function {}
ˆ1_:F line key-1/1
Settings
63
Page 68

function Display Other input
Line keys
Connection keys
Team-Tasten
Day/Night call mode(all)
Day/ Night call mode
(Team)
Team function
Log in/ out
Message
Settings
Message on/off
Intercom
line key
connection key
connection key
day/night all
day/night team
team on/off
message
message on/ off
intercom
Please refer to the description
on page 63.
Number of subscriber
Number of team subscriber
Team number or no entry for all
teams
Team number or no entry for all
teams
Internal numberwhen message
is to beput through to a specific
subscriber/team
Internal number when intercom
call is to be made to a specific
subscriber
Intercom on/off
Boss/ Sec. function
intercom on/off
boss connect.
or
office
64
Number of secretary’s office
R>or
number of the boss
Page 69

6 Operation
6.1 Starting a call
6.1.1 Dial number - no correction possible
btg
Dial number
6.1.2 Dial number - correction possible
atbg
Dial number
To change thenumber or to correct a wrong entry, select the wrongfigure with the arrow
buttons and press
If you wish to conduct the call using the handset, just lift it up after dialing the number.
Any time during a call you can switch back and forth between hands-free calling,
speaker function and use of the handset.
After you have dialed the number you can also press the speaker button to have the
number dialed and to use hands-free calling.
If a call can not be put through, (e.g. number is inhibited via the calling filter, or the ac
count for the number/MSN is empty), this message will appear in the display »
inhibited
«.
C to delete it.
number
-
6.1.3 Other options for dialing without lifting the handset
The option of dialing without lifting the handset and of correctingor adding toa number
also exists during dialing:
from the redialingmemory (see page 68).
q
from the caller/memolist (see page 71).
q
from the telephonedirectory (see page 45).
q
from the VIPmemory (see page 48).
q
from the directdialing memory (see page 49).
q
If you are using one of these options, you can make further entries prior to initiating
the call. Youcan define which number (MSN), if any, is to be transmitted to the party
being called.
65
Operation
Page 70

Dialing from the telephone directory
a
Dialing from the speed dialing memory
a
Dialing from the direct dialing memory
a
S
tbook
S<>
vip
Z
Press the di
rect dialing
key
t
Enter first let
ter.
Select VIP
destination
-
bg
-
and / or
or
<>
Select
entry
bg
tbg
Select VIP
destination
6.1.4 Initiating a call using a set number (MSN)
You can conduct an internal or external call such that a defined number (MSN) is transferred from yourtelephone tothe party you are calling. This number must havebeen entered previously in your telephone. When you call, either number that is transmitted is
shown in the second line of the display (»
assigned to this number (MSN). You can initiate dialing using the set number (MSN) as
explained in the following, oryou can use a programmed function key for this (see page
51).
msn1...msn10«) or the name that you have
at
Operation
Dial number
OFSS
msn
msn1
...
msn10
bg
6.1.5 No number transmission
During an external or internal call, you can prevent the number from being transmitted
(displayed) to theparty youhave called.You canset thisfunction specificallyfor the next
call, or permanently (see page 31).
at
Dial number
OFS
secret
66
bg
Page 71

6.2 Accepting a call
In its initial state the telephone will accept all calls, regardless of the service or the se
lected MSN. If two calls are signaled simultaneously the first one is accepted when you
lift the handset. Thesecond callis then no longer signaled or indicatedin thedisplay. The
second caller will then hear the busy signal.
The telephonenumber of the caller is shownon the first line in your display. The second
line shows the MSN on the right (»
which this particular telephone number is entered.
msn1«…»msn10«), or the name of the MSN under
albg
No number transmission
When a call issignaled, youcan decide before accepting the call whetheryour numberis
to be transmitted to the caller. If your phone is the final destination of call rerouting you
can use thisprocedure toprevent the caller fromseeing the final destination phone number (i.e. yours).
You can set this function specifically for the next call, or permanently (see page 31).
al
>S
6.3 »Station guarding«
secret
bg
-
You have the option of setting your ISDN system telephone to“Station guarding”. In the
idle state an »
guarding« is activated.
»
no« The function »Station guarding«is deactivated.
»
complete« Callsare signaled optically only (»R«shown in the display).
»
ok« Calls are signaled first bya brief acoustic signal andthen only optically
a
r«or»R« in the upper line of the display shows that the function »Station
displayed (»
r«).
SS
quiet no/complete/ok
67
Operation
Page 72

6.4 Call rerouting / Call deflection
If you are unable, or do not wish to accept a call, you have the option of rejecting or for
warding this call. To do this, press the softkey below»
the busy signal.
Press the softkey below »
Rejecting a call
al
Call Deflection (Call Deflection)
al
x-fer« to forward the call to a different subscriber.
S
reject
>S
x-fer
reject«. The calling party hears
t
Dial number
O
6.5 Redialing
The previously dialed telephone number is stored in the redial memory.
If the connection between the ISDN system telephone and the ISDN network is in
terrupted, the redial memory is deleted.
-
-
ab
Operation
6.5.1 Expanded redialing
In the expanded redialing function the 20 previous calls, connections and dialed tele
phone numbersare stored. You can view these bypressing the
buttons and subsequently have them redialed automatically.
a
WWO
W
Select entry
g
W button or the arrow
bg
68
-
Page 73

The last dialed number is displayed. At the end of thesecond line the statusof this entry
is indicated by the letters displayed there.
»
v« connection
»
A« Call-Box
»
|« Calls configured forautomatic redialing.
no entry Youplaced acall to somebody but didnot reachhim/her,or his/herline
was busy.
6.5.2 Delete telephone number from expanded redialing or save as
a memo
a
Press the softkey below »delete?«, delete the displayed entry immediately. Press the
softkey below»
ten to thescratchpad the entry is deleted. The nexttelephone number is then displayed.
For an entry in the scratchpad, the softkey »
display.
WWFS
Select entry
memo?« towrite the entry asa memo to thescratchpad. After being writ-
delete? memo?
list« is shown in the second line of the
or
S
6.5.3 Importing numbers from expanded redialing into the
telephone directory
You can import a number that is present in the list for expanded redialing into the tele
phone directory of your phone (see page 45).
Begin as follows:
a
WWF
Select entry
S Press the softkey below »tbook«. ˆ 5/001122334455
ˆtbook delete? memo? auto
-
Operation
t
O
Enter the name.
In this example: »
Confirm your entry by pressing OK.
TONY«.
69
ˆ Input telephone book
ˆName>TONY_
Page 74

In the redialing function the name displays
instead of the number.
ˆ 5/TONY
ˆtbook delete? memo? auto
6.5.4 Automatic redialing
If you placed a call to a subscriber whose number is busy or who does not answer, you
can then activate automatic redialing which will call that same subscriber again after
about 10 seconds.
btg
Dial number
After around 10 seconds the hands-free calling function of your phone is activated and
the number is dialed automatically.
This is repeated for up to around 2 minutes.
Up to 20 call attempts are made if the subscriber can still not be reached.
If you hear thebusy signal youcan cancel automatic redialing bypressing theredial
button.
Suspending automatic redialing
You can suspendautomatic redialingthat you have started any time using the appropri
ate procedure and place a normal call.To suspendautomatic redialing, press the button
Subscriber
busy or does
not answer
W
or
S
autodial
a
L during automatic redialing.
After the call automatic redialing starts again.
Operation
Deactivating automatic redialing
You can deactivateautomatic redialing at any time. There areno further call attempts.
To deactivate automatic redialing during automatic dialing press
If you like to deactivate automatic redialing in the idle stateof the phone, proceedas fol
lows:
E.
-
-
a
WFSS
auto ok
70
Page 75

6.6 Caller and memo list
The phone has a combined caller and memo list. A maximum of 20 entries are stored.
Entries in the caller or memo list are indicated by the softkey »
the display. Youalways havethe most current entries in the list.The mostrecent entry is
displayed first.
If the number in this entry is identical to a number in the telephone directory the name is
displayed insteadof the number. You can also view the time and the date ofan entry as
well information (if applicable) about it. If you lift up the handset of your phone while you
are viewing an entry in the list, that caller is then called automatically. Single entries can
be selected for deletion.
list« in the lower row of
If the ISDN system telephone is disconnected from the ISDN network all of the en
tries in the list are canceled.
Caller list
Calls that you do not accept, or that you specifically refuse, are stored in the caller list.
Entries in the caller list are indicated by the flashing LED of the Shift button.
A maximum of 20 calls are stored. Further calls will then overwrite the oldest entries.
When a callis made with a subscriber from the caller list (you callor you are called)the entry is automatically deleted and transferred into the redial memory.
Scratchpad memo
You can storea telephone number under a scratchpad memo.You can not input letters
or any other special characters. A maximum of 10 entries can be stored. When a call is
made with a subscriber from the scratchpad list (you call or you are called) the entry is
automatically deleted and transferred into the redial memory.
You can entera memoduring acall orin theidle state.The following entries in the list are
possible.
Manual entry.
q
Telephone number fromshort dialing memory.
q
Telephone number fromdirectory.
q
Telephone number fromdirect dialing memory.
q
Telephone number fromredial memory.
q
-
Operation
6.6.1 Viewing memos in the list
a The telephone is idle. The softkey»list«
in the lower row of the display indicates
that a memo or an entry is present in the
list.
71
ˆ01.04.00 10:34 }
ˆtbook vip quiet list
Page 76

S Press the softkey below »list«. ˆ01.04.00 10:34 }
ˆtbook vip quiet list
The most current entryis shownin thedis
play.
In the upper row of the display you see the type of entry: (»Call-Box«or»Memo«) thedate
(for the firsttwo days »
telephone number (and the name, if applicable) and the state of the entry.
»
*« New call
»
n« Memo
»
a« Call-Box
»
i« rejected/ ignored call (see page24)
When youview the caller/memo listagain, entries that youhave already viewed but
not deletedare no longer marked by »
a«.
by »
today«or»yesterday«) and thetime. In the lower row you seethe
*« inthe bottom line of the display, but rather
ˆCall-Box today 07:55 {}
-
ˆ 1:JOHNSON,E. *
You can view other entriesusing the arrow
buttons.
F If youwish to view more information about
the entry, press the F button.
S You have the option to delete the entry or
view more. Press the softkey below
»
info«.
S On the top line of the display you can see
Operation
for which previously entered numbers
(MSNs) the entry was made.
S The number of calls is now displayed on
the bottom line of the display (in thisexam
ple:»
2«).
Press the softkey below »
viewing the information.
info« to stop
S If you want to delete the entry, press the
softkey below »
delete?«.
ˆMemo yesterday 15:42 {}
ˆ3:112233445566
ˆCall 29.03.00 08:04 {}
ˆ5:PETERS,J.
ˆ 5/PETERS,J. a
ˆtbook delete? info
ˆFOR MSN-5
ˆ info
ˆ5:PETERS,J. {}
ˆ ( 2 A) info
-
ˆ 5/PETERS,J. a
ˆtbook delete? info
72
Page 77

6.6.2 Select from the caller or memolist
a
S<>
list
Select entry
b
or
L
g
6.6.3 Deleting an entry from the caller or memo list
a
S<>F S
list
Select entry
delete?
6.6.4 Importing numbers from the caller/memo list into the
telephone directory
You can import a number listed in the caller/memo list into the telephone directory of
your phone (see page 45).
Begin as follows:
a
S<>F
list
Select entry
S Press the softkey below »tbook«. ˆ 3/001122334455
ˆdelete tbook? memo? auto
t
O
Enter the name.
In this example: »
Confirm your entry by pressing OK.
The memo or caller list then displays the
name instead of the number.
TONY«.
ˆ Input telephone book
ˆName>TONY_
ˆ 3/TONY
ˆtbook delete? memo? auto
6.6.5 Add entry to memo
The following example describes how a memo entry is made from the VIP memory. To
enter a memofrom thetelephone directory,or fromthe direct dialing memory, press the
corresponding softkey (»
memory is done by pressing the
press the softkey below »
tbook«or»direct«). Entering a memo from the redialing
W key. If you want to enter the new memo manually,
new«.
73
Operation
Page 78

Begin as follows:
a
Ct You now have the option to change or ex
>SS<>O
Select
memo vip
tend the telephone number. If you want to
delete the figures, press the C button
short dialing
destination
-
ˆ Memo number create
ˆ>0123456_
O Confirm your entry by pressing OK. ˆ Enter memo
ˆtbook vip direct new
6.7 Mute, Open Listening and Hands-Free Calling
Mute
The mute function allowsyou toswitch offthe handsetmicrophone duringa normalcall,
or the telephone microphone during hands free calling. The party you are calling will then
no longerbe able to hear the conversation youconduct with persons in the room (room
enquiry). However, you will continue to be able to hear the party on the phone.
g
SS
silent
Room enquiry
speak
g
Please note thatthe units or charge counter continues torun when »Mute« is activated.
Operation
Open listening
The “Open listening” function can be activated when there are other persons in theroom
who wish to also participate in the call. You continue to talk into the handset while this
function is active. You can adjust thevolume of the speakerduring the call as described
on page 17.
Please informthe party you arecalling that open listeningis activated. »
open listening is activated.
g
LL
Begin open
listening
End open lis
tening
g
-
74
|« indicatesthat
Page 79

When you hangup thehandset while openlistening isactive, both open listeningand the
call itself are terminated.
Hands Free Calling
The handset remainsin its cradle during hands free calling. The built-in microphone and
the speaker are activated. Any actions are carried out using the open listening button
only. You can switch back to normal “handset”calls at any time duringhands free calling
by merely lifting up the handset. You can also switch from normal “handset” calling to
hands free calling when you hang up the handset after pressing the open listening but
ton. During hands free calling acoustic signals (e.g. call waiting signal) are not transmit
ted.
Please inform the party you are calling that openlistening is active. »
|« shows that hands
free calling is activated.
-
-
a
L
Begin hands
free calling
t
Dial number
L
End hands
free calling
6.8 Light Telephone Headset (Headset)
You can connecta headset to your telephone and setit up as described on page 27.
Activate/deactivate headsets
The handset remains in its cradle when “headsets” are being used.
a
L
activate head
set
Switching between “Headsets” and open listening
If, during an ongoing call, you wish to switch over to open listening, press the Shift but
ton.
tg
Dial number
Call via head
L
-
set
Deactivate
headset
a
Operation
-
g
Call via head
set
ZL
Shift
key
Activate
open listen
-
-
ing
g
Call via headset and
open listening
ZL
Shift
Deactivate open
key
listening
75
g
Call via head
set
-
L
Deactivate
headset
a
Page 80

Hands Free Calling
You can also initiate a call with hands-free calling activated without having to use head
sets. If you deactivatethe hands-free callingfunction duringan ongoing callit cannot be
reactivated during this same call. The only alternative, in this case, is the speaker func
tion.
a
ZL
Activate
Shift
hands free
key
calling
tg
Dial number
Call via hands
free calling
L
Deactivate
hands free
calling
or
ZL
Shift
Terminate
key
call
6.9 Message and Intercom
The functions »Message« (see page 61) and »Intercom« (see Page 62) are typical system features that are available when using the BinTec CS300 at an XCentric. You can
initiate the messageor theintercom functionvia afunction key that has been configured
accordingly (see page 59) or using the procedures described in the following.
Message
Begin as follows:
a
FS> S
audib message
-
-
Operation
t Enter the telephonenumber, for which the
message is to be given, or select an entry
from the telephone directory
g The connection is set up as soon as at
least one telephone has taken the mes
sage.
To end the message, press the
L key.
76
ˆ| Message to 22
ˆtbook
ˆ| 22 Msg. }
ˆdispl silent
-
Page 81

Intercom
Begin as follows:
a
t Enter the telephonenumber, for which the
g The connection is set up when the tele
FS>> S
audib intercom
ˆ| Speak with 22
intercom functionis to be activated, or se
lect an entryfrom the telephone directory.
phone has accepted the intercom func
tion.
To end the intercom function, press the
ˆtbook
-
ˆ| 22 interc. }
-
ˆdispl silent
-
L key.
6.10 Call waiting, Enquiry call, Broker`s call and
three-party conference
Call waiting
If; during an ongoing call, a second call comes in for you, the second call is signaled
when “Call waiting on” is set (see page 22).
The “Call waiting” functionis notpossible whenalready morethan one connectionis es
tablished at your telephone.
g
call waiting
S
accept
or
R
g
call with subscriber 2;
Subscriber 1 is put on hold
-
Operation
Enquiry call
You havethe option of establishing up to three (3) other connections during an ongoing
call using theenquiry callfunction. Youcan alsouse theMSN assignment key, a line key
or a connection key to initiate an enquiry connection.
g
Call with sub
scriber
-
Subscriber 1
is put on hold
R
tg
Dial number
Call with sub
scriber 2
77
-
Page 82

If you wish to set up further connections, proceed as described above.
An active connection can be terminated by pressing
T.You can return to the call that
was previously put on hold.If thereare no other calls on hold, a new connection canthen
be set up.
Broker`s call
If you havemore than one connection active at your system telephone (call waitingor en
quiry call) (max. of four connections), you can talk to these parties alternately. For this,
there are up to four (4) softkeys available, depending on the number of connections on
hold.
g
Call with sub
scriber
>S
-
conn1
...
conn4
g
Call with sub
scriber
>S
-
conn1
...
conn4
g
Call with sub
scriber
>S
-
If you have configuredconnection and linekeys youcan also carryout Broker’scalls between different callers using these keys.
Additional information about the corresponding connections is displayed when you
press the shift key and the softkeys below»conn1«, »conn2«, »conn3« or »conn4«.
To terminatean active connection, press
T. Youare then returned to the call thatwas
previously put on hold.
Three-party conference
If you have an active connection and a connection on hold at your system telephone,
you can initiate a conference call with these two parties. All three parties can speak to
one another.
Conference calls are not possible with more than two (2) connections at your phone.
Operation
g
Call with sub
scriber 1
>S
-
conn2
g
Call with sub
scriber 2
S
-
conf
d
Conference with sub
scriber 1 and 2
-
conn1
...
conn4
etc.
etc.
-
...
...
To end thethree-party conference, press the softkey below »back_to_«. You are recon
nected with thesubscriber of the last previous active connection.The other subscriber is
then put on hold.
78
-
Page 83

6.11 Call transfer (switching)
When a call is transferred, the active subscriber and the subscriber for the connection
previously put on hold are always connected with one another.
You can initiate an enquiry call yourself (e.g. in order to announce the call) and can then
transfer the call.
g
Call with sub
scriber 1
Please note that this performance feature (ECT - ExplicitCall Transfer) must be sup
ported by the PABX system when transferring two (2) external calls, or, when you
use your phone directly on the NTBA, by your network service provider.
Subscriber 1
is put on hold
R
tg
Dial number
Call with sub
scriber 2
-
S
x-fer
6.12 Parking
You can only use this feature if it is supported by your network provider or by your
PABX.
The parking function allows you to interrupt a call for up to three (3) minutes. You can
then unplug the plug-in connector for your ISDN system telephone from the ISDN jack
and plug it in in a different room. You can continue with the previous call after
»unparking« it. Or you can »unpark« the call at a different phone and continue your call
there. A “parking code” (0....99)is usedto ensure thatyou are returnedto the propercall
when two calls are parked. A parking code of 55 is setin the initial state. If theISDN sys
tem telephone is disconnected from the ISDN network, all scratchpad notes, the caller
list, a call back on busy, all entries in the call filter and the telephone number of the
“parked” subscriber are canceled.
-
-
Operation
If you park two calls on an ISDN bus this bus is then disabled for further calls.
“Unparking” is possible only on the bus on which the call was also parked.
Parking is only possible when only one connection is currently active with your ISDN
system telephone.
Parking
g
Ongoing call
>S
park
t
Enter park
code
79
O
a
Page 84

Unparking
a
>S
unpark
t
Enter
park code
O
bg
Ongoing
call
6.13 Call-Back on busy (CCBS)
You can only use this feature if it is supported by your network provider or by your
PABX.
Using the function “automatic call-back on busy” you can reach a party whose line is
busy as soon as he/shehangs up thehandset at theend of his/her call.You are thenno
tified by theexchange office that the party for whichCCBS has been configured can now
be reached. As soon as you accept this information, the selected party is called automatically.
This feature must be applied for at your network service provider. You can configure
three call-backs at a time.The call-backis deleted aftera time perioddefined bythe network service provider (approx. 45 minutes).
btg
Dial number
If the ISDN system telephoneis disconnected from the ISDN network, e.g. by parkinga
call (see page 79), a requested call-back on busy is canceled.
Subscriber
busy
S
clbckbusy
a
-
Operation
6.14 Malicious call identification (MCID)
You can only use this feature if it is supported by your network provider or by your
PABX.
If you receive aprank ormalicious call,you canarrange forthe numberof the caller to be
saved at the exchange office.
To enable thisfeature (Malicious call identification), it must firstbe applied for at your net
work service provider.
You can use this feature in 2 situations.
80
-
Page 85

Malicious call identification during ongoing call
g
Call with sub
scriber
You want to identify a caller.
-
>S
mcid
The telephone number can then be estab
lished in the exchange office.
-
After the caller has hung up the handset
g
Call with sub
scriber
You wish to determine the caller, but he/she
has already hung up the handset.
-
S
mcid
The telephone number can then be es
tablished in the exchange office.
-
Identification of the caller is effected in the exchange office and the number stored
there with informationon the number of the caller, thedate and the time of the call.
6.15 Keypad and Tone Frequency Dialing (DTMF dialing)
Keypad and DTMF sequences can also be stored at direct dialing keys (see page
50), which can then be used during a call.
Keypad
Using the Keypad function you can manage service or performance features in the
PABX system or in the network of the service provider byentering character strings and
digit sequences via the keypad. Ask your network service provider about this and con
sult the manual for your PABX to determine whether “Keypad” is supported..
-
Operation
g
>S
keypad
t
Input of character
strings and digit se
quences
-
ToneFrequency Dialing (DTMF dialing)
Using tone frequency dialing, you can transmit multifrequency signals (DTMF signals)
during an ongoing call in order, forexample, to poll your answering machineor for using
mail systems. Ifcall waiting is active for an ongoing connection,tone frequencysuffix di
aling can not be utilized.
81
-
Page 86

g
>S
dtmf
strings and digit se
t
Input of character
quences
-
In the initialstate of your system telephonetone frequency suffix dialing ispossible with
out pressing the corresponding softkey. Pressing theright arrow key is used asa check
function here todetermine whether tone frequency dialing or keypadsequences can be
entered. If the softkey »
immediately possible. If the softkey »
suffix dialing is only possible after pressing this softkey.
keypad« is shown on the display, tone frequency suffix dialing is
dtmf« is shown on the display, tone frequency
6.16 Viewing and deleting call charges
Please note the instruction about Viewing the call charges on page 40. If you have im
plemented PIN protection of your phone’s configuration (see page 39), clearing of the
charge rate accountsis alsoPIN protected.After pressing the softkey below »
you then need to enter the PIN.
View/Delete charges of the individual MSNs
Begin as follows:
a
Operation
>S>S
rate
You can view the sum of the charges ac
crued.
In this example for MSN -6.
msn1
...
msn10
-
ˆMSN-6: 4,72 GBP {}
ˆmsn-5 msn-6 msn-7 msn-8
-
-
delete?«
S If you wish to view the charges for other
MSNs, press the corresponding softkey.
or
< If you wish to delete the charges accrued
for an MSN, press the left arrow button.
In this example: for MSN-3.
82
ˆMSN-3: 12,36 GBP {}
ˆmsn-1 msn-2 msn-3 msn-4
ˆMSN-3: 12,36 GBP }
ˆsingle delete? sum
Page 87

S Press the softkey below »delete?«. ˆMSN-3: 12,36 GBP }
ˆsingle delete? sum
> Press the right arrow button to view the
charges for other MSNs. Proceed as de
scribed for MSN-3 if you wish to delete
these charges.
Viewing/deleting the charges for the last call or the sum of the charges
Begin as follows:
a
>S
rate
The charges for the call previously conducted are displayed.
S If you wishto viewthe sumof allof the cur-
rently accrued charges press softkey below »
sum«.
If you wish to delete the charges for an individual call or for all calls, press the
softkey »
the softkey below »
single«or»sum« and then press
delete?«.
ˆMSN-3 0,00 GBP }
ˆsingle delete? sum
-
ˆLast conn. 1,44 GBP }
ˆsingle delete? sum
ˆTotal: 118,44 GBP }
ˆsingle delete? sum
ˆTotal: 118,44 GBP }
ˆsingle delete? sum
ˆTotal: 0,00 GBP }
ˆsingle delete? sum
If the sum of all the accrued charges is deleted, all MSN charge rate accounts are
deleted simultaneously.
83
Operation
Page 88

6.17 CTI with TAPI
The abbreviation CTI stands for Computer Telephony Integration, while TAPI is Tele
phony ApplicationProgramming Interface. This denotes the standard interface for Win
dows telephony applications from Microsoft.
This enables you to make and control telephone calls directly from TAPI-compatible
Windows applications.Data for incoming calls are displayed as well.
For further information please refer to:
http://www.bintec.de/XCENTRIC/de/loesungen/index.html
-
-
Operation
84
Page 89

7 Service Functions
7.1 Read firmwareversion of the telephone
You can have the version and the model of your phone (CS300) displayed so that you
can determine, for example, which firmware version is available in your phone.
Begin as follows:
a
> The display shows the firmware version of
FS>> S S
config service version
ˆSoftware-Identificatio{}
your telephone. In this example:
»
V1.00a«.
Press the right arrowbutton toview further
data.
ˆBinTec CS300 V1.00
C Press the C button to exit the menu. ˆ Service-Functions }
ˆversion software data
7.2 Country-specific Settings
Country-specific ISDN protocols must be set additionally in some countries. Check as
described in the following whether you need to set a country-specific ISDN protocol for
the country in which the telephone is to be used.
Begin as follows:
a
FS>> S>S
config service country
<>
S
Press the softkey below the desired country. To reset the protocolto the telephone’s ini
tial state, press the softkey below »
immediately.
Press the arrow button to view the avail
able country-specific ISDN protocols.
default«. The ISDN protocol is changed
85
-
Which Country (Prot.)? }
ˆdeutsch default
ˆ Service-Functions }
ˆcountry mfa
-
Service Functions
Page 90

7.3 Programs of the WIN-Tools CD-ROM
Programs for data exchange between the PC and the telephone and for loading new
firmware are included on the CD ROM provided with your telephone. These programs
can be configured under Windows 95, 98, 2000 and Windows NT4. To install
WIN-Tools place theCD ROM in the appropriate drivein your PC and follow the installa
tion instructions on the screen.
WIN-Tools contains the following programs:
Configuration Manager
q
(Setting and configurationof your telephone)
Phone Directory Manager
q
(Create and editof entries in the phonedirectory)
Download Manager
q
(Loading of newfirmware for the telephone)
Operation and use of the individual programs are not described in these operating
instructions. Should you have any questions or problems while you are using the
programs, you can also referto the PC Help function of the various applicationsfor
assistance. The WIN-Tools CD-ROM programs are equipped with a comprehensive online Help function.
Connect the RS232(V.24) port ofyour PCwith the RS232(V.24) port of your telephone in
accordance with the manufacturer’s instructions (see Figure 11 on Page 89). Ensure
that you use thecorrect RS232(V.24) porton your PC.The configurationprograms supplied with the system support the ports COM1 ... COM10.
Transfer of configuration and phone directory data to the telephone can only be carried
out via the RS232(V.24) port.
-
On completion of data exchange, the telephone undergoes an internal reorganiza
tion (of phone directory data for example). This process takes place automatically
and may require afew minutes. Duringthis time,certain telephone functionswill not
be available for use (e.g. phone directory).
7.4 Downloading a new firmware
You can download the firmware in two different ways:
Download via theserail port (see section 7.4.1).
q
Quick download via the ISDN connection (direct dial-in). For further infor
q
mation please referto:
http:/www.bintec.de/XCENTRIC/de/loesungen/index.html
All of the data in your telephone may be deleted.
Prior to downloading, save all of your telephone data (configuration, phone direc
Service Functions
tory) to your PC. You can re-import this data back into your telephone on comple
tion of the download.
-
-
-
-
86
Page 91

7.4.1 Downloading a new new firmware via the RS232 interface
You can loadthe newest firmware versions into your telephone via thePC and using the
WIN-Tools CD ROM supplied with the system.
Load the newfirmware into your PC (e.g.from the Internet).
q
Start the WIN-Toolsdownload program.
q
In the field »Type of connection« set the appropriate COM port (COM1 ...
q
COM10) for theRS232(V.24) interface.
If you wish to load the newest firmware into several telephones simulta
q
neously via the available RS232(V.24) ports, enter the number of tele
phones and setthe appropriate COM port foreach telephone.
Open the menu »File« - »Open« and select the directory in which the new
q
firmware has beenstored.
In the field »Status«click »StartDownload« tobegin downloadingthe new
q
firmware.
Attention: Do not press any keys (unless prompted to do so) or plug in or unplug any
connectors while data transfer is in progress. If the connecting line is interrupted
during a download, restart thedownload programand proceed asdescribed previously.
Once the new firmware has been loaded completely the telephone per-
q
forms a RESET and is then available for use again. Now, you can re-import the data (e.g. configuration, phone directory) that you saved previously back intoyour telephone.
-
-
7.5 Telephone BIOS
This telephoneis equipped with a BIOS (basicfunctions) in English. The BIOS functions
also remain available even if the firmwareof the telephone does not operate properly, or
if new firmwarewas notloaded completely(e.g. ifthe PC crashed while loading the firm
ware).
The following functions are available in the telephone’s BIOS:
All phone calls are signaled. No number (MSN) has been entered in the
q
telephone.
Dialing ofoutgoing calls is possible after lifting the handset (no call prepa
q
ration, no openlistening or hands-free calling).
Loading new firmwarevia the RS232(V.24) port.
q
Downloading new firmware via the RS232 port
To load new firmware in the BIOS of your telephone via the RS232(V.24) port, proceed
as described on page 87 of these operating instructions.
87
-
-
Service Functions
Page 92

7.6 RESET - Resetting to default state
You can reset the telephone to its initial state using the procedure described in the fol
lowing. All of the data that you have entered previously will be deleted.
If you have connected the elmeg T300 key extension module to your phone all of the
data for the module will also be deleted when this procedure is executed.
Begin as follows:
a
S Press the softkey below »ok«, to restore
FS>> S S
config service data
ˆ Sure to delete all?
the phone to its initial state. If you do not
wish to have the data deleted press the
softkey below »
The telephone is returned to its initial state.
All data are deleted.
no«.
ˆNo ok
ˆ01.04.00 10:34 }
ˆ vip quiet
-
Service Functions
88
Page 93
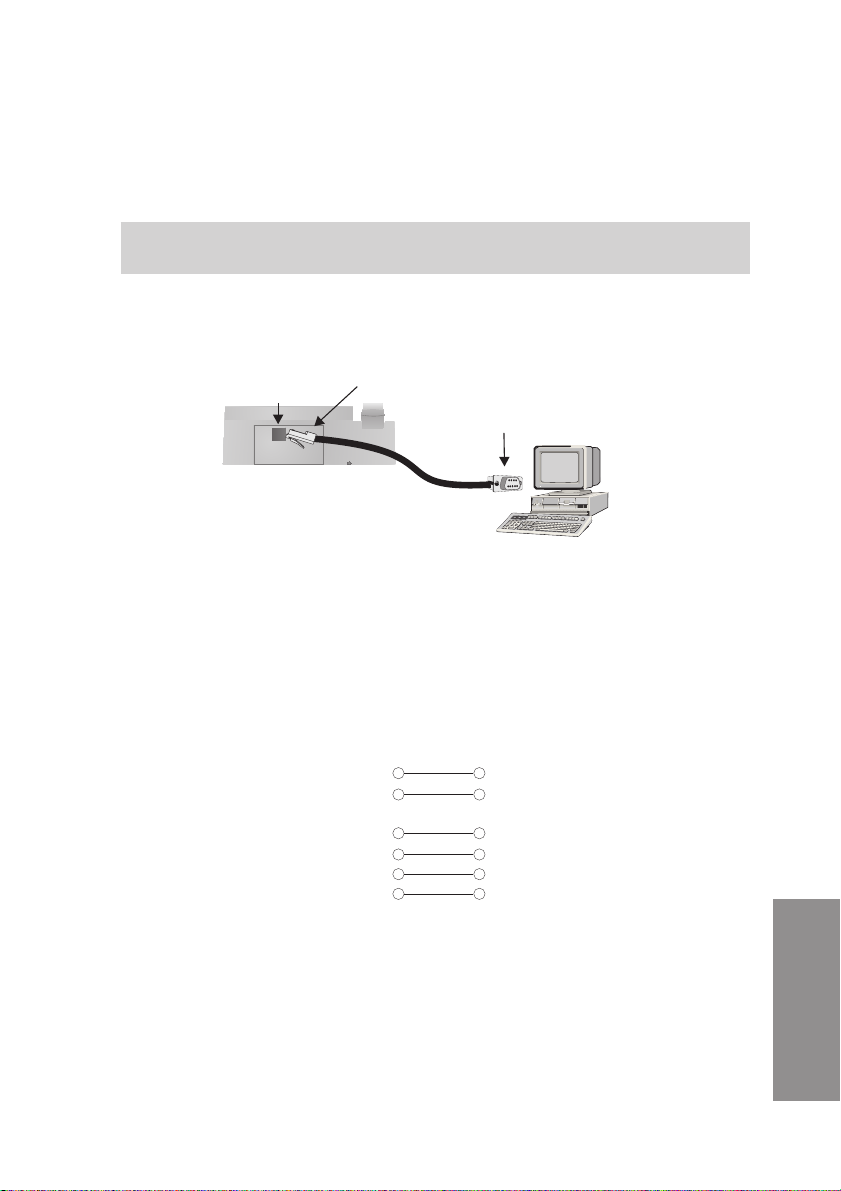
7.7 Connection of the telephone to the PC
Connect the cable RS232(V.24)as shownin figure11. Plugthe RJ12connector intothe
RJ12 jackon the back ofthe telephone and the9-pin D-SUB connector ontothe corre
sponding connecting jack of your PC.
Only usethe RS232(V.24) cable deliveredwith the system, asthis is not astandard
serial cable.
-
Jack(RJ12) for connecting
the RS232(V.24) cable
Telephone seen from
the back
Fig. 11: Connecting of the telephone to the PC
RS232(V.24) cable
RS232(V.24) connector
(RJ12)
1
2
3
RS 232(V.24) connector
(9 poles)
4
5
6
7
8
9
RS232(V.24) connector
(D-SUB 9 poles)
3
4
RJ12 connector
6
(6-poles)
1
2
5
Fig. 12: RS232 (V.24) cable
Service Functions
89
Page 94

Service Functions
90
Page 95

8 Index
A
Accepting a call . . . . . . . . . . 67
call waiting . . . . . . . . . . . 77
no number transmission
(COLR) . . . . . . . . . . . . . 67
Acknowledgement signals. . . . . . 8
setting . . . . . . . . . . . . . 18
Automatic access of
exchange line . . . . . . . . . . . 57
Automatic redialing. . . . . . . . . 70
deactivate . . . . . . . . . . . 70
B
Boss-secretary function . . . . . . 62
Broker's call . . . . . . . . . . . . 78
Buttons . . . . . . . . . . . . . . . 4
C
Call
park . . . . . . . . . . . . . . 79
transfer/switching . . . . . . . 79
using a set number (MSN) . . . 66
Call control. . . . . . . . . . . . . 36
configuring inhibited and enabled
telephone numbers. . . . . . . 37
editing inhibited and enabled
numbers . . . . . . . . . . . . 38
setting . . . . . . . . . . . . . 36
Call Deflection . . . . . . . . . . . 68
Call displays
setting . . . . . . . . . . . . . 35
view . . . . . . . . . . . . . . 33
Call filter . . . . . . . . . . . . 24,51
set up a new number. . . . . . 24
setting . . . . . . . . . . . . . 25
using an existing number . . . 25
Call forwarding
activating. . . . . . . . . . . . 20
deactivating . . . . . . . . . . 21
viewing. . . . . . . . . . . . . 21
Call rerouting . . . . . . . . . . 20,68
activating. . . . . . . . . . . . 20
deactivating . . . . . . . . . . 21
viewing. . . . . . . . . . . . . 21
Call signalling . . . . . . . . . . . . 7
Call transfer . . . . . . . . . . . . 79
Call waiting. . . . . . . . . . . . . 77
inhibit / enable . . . . . . . . . 22
setting . . . . . . . . . . . . . 17
Call-Back on busy (CCBS) . . . . . 80
Caller list . . . . . . . . . . . . . . 71
delete entry . . . . . . . . . . 73
select entry. . . . . . . . . . . 73
setting the LED. . . . . . . . . 28
viewing entries . . . . . . . . . 71
Carrier prefix . . . . . . . . . . . . 51
CCBS (Call-Back on busy) . . . . . 80
Changing the label panel . . . . 10,12
Cleaning the telephone . . . . . . . 2
CLIP / CLIR . . . . . . . . . . . . 31
COLP / COLR . . . . . . . . . . . 31
Conference . . . . . . . . . . . . 78
Configuring a charge account for
each number (MSN) . . . . . . . . 42
Connecting the handset connecting
cord . . . . . . . . . . . . . . . . . 9
Connecting the ISDN cord . . . . . 9
Connecting the RS232 cable . . . 89
91
Page 96

Connecting to the PC . . . . . . . 89
Connection key . . . . . . . . . . 60
Contents of package . . . . . . . . 2
CTI. . . . . . . . . . . . . . . . . 84
D
Day-/ Night modes. . . . . . . . . 61
Dial control
changing the PIN. . . . . . . . 38
Direct call . . . . . . . . . . . . . 52
Direct dialing . . . . . . . . . . 29,49
activate. . . . . . . . . . . . . 30
deactivate . . . . . . . . . . . 30
function keys . . . . . . . . . . 51
programming direct dial
numbers . . . . . . . . . . . . 50
programming dtmf sequence . 50
programming function keys . . 52
programming keypad
sequences . . . . . . . . . . . 50
programming numbers. . . . . 29
Display . . . . . . . . . . . . . . . 4
Display phone number
CLIP / CLIR . . . . . . . . . . 31
COLP / COLR . . . . . . . . . 31
incoming . . . . . . . . . . . . 31
outgoing . . . . . . . . . . . . 31
Displays during call . . . . . . . . 33
Don't disturb feature . . . . . . . . 19
Downloading a new firmware . . . 86
from the telephone BIOS . . . . 87
via the RS232 interface. . . . . 87
DTMF dialing. . . . . . . . . . . . 81
E
elmeg T300 . . . . . . . . . . . . 10
changing the label panel . . . . 12
connecting . . . . . . . . . . . 11
programming. . . . . . . . . . 54
Emergency operation . . . . . . . 43
point-to-multipoint connection . 43
Enquiry call. . . . . . . . . . . . . 77
Expanded redialing. . . . . . . . . 68
F
Function keys. . . . . . . . . . 51,63
boss-secretary function . . . . 62
Call filter . . . . . . . . . . . . 51
Call rerouting. . . . . . . . . . 52
Carrier / Provider prefix. . . . . 51
connection keys . . . . . . . . 60
day-/ night modes . . . . . . . 61
Direct call . . . . . . . . . . . 52
intercom . . . . . . . . . . . . 62
intercom on/off. . . . . . . . . 62
line keys . . . . . . . . . . . . 59
message . . . . . . . . . . . . 61
message on/off . . . . . . . . 61
MSN assignment. . . . . . . . 51
team keys . . . . . . . . . . . 60
team log-in/ log-out . . . . . . 60
H
Hands free calling. . . . . . . . 75,76
Headset . . . . . . . . . . . . 27,75
activate/deactivate . . . . . . . 75
setting . . . . . . . . . . . . . 27
I
Installation of the telephone . . . . . 9
Intercom . . . . . . . . . . . . 62,77
Intercom inhibit . . . . . . . . . . 62
92
Page 97

K
Keyboard extension elmeg T300. . 10
changing the label panel . . . . 12
connecting . . . . . . . . . . . 11
Keypad . . . . . . . . . . . . . . 81
L
LEDs . . . . . . . . . . . . . . . . 7
Length of internal number . . . . . 57
Light Telephone Headset . . . . 27,75
activate/deactivate . . . . . . . 75
setting . . . . . . . . . . . . . 27
Line access digit (LAD). . . . . . . 58
Line key . . . . . . . . . . . . . . 59
Loading new firmware . . . . . . . 86
from the telephone BIOS . . . . 87
via the RS232 interface. . . . . 87
Log-in (team). . . . . . . . . . . . 60
Log-out (team) . . . . . . . . . . . 60
M
Maintenance . . . . . . . . . . . . 2
Malicious call identification
(MCID) . . . . . . . . . . . . . . . 80
after a call . . . . . . . . . . . 81
during an ongoing call . . . . . 81
Melody
for an MSN. . . . . . . . . . . 14
for directory entries. . . . . . . 48
Memo list . . . . . . . . . . . . . 71
add entry. . . . . . . . . . . . 73
delete entry . . . . . . . . . . 73
select entry. . . . . . . . . . . 73
viewing entries . . . . . . . . . 71
Message . . . . . . . . . . . . 61,76
Message inhibit . . . . . . . . . . 61
Microphone mute . . . . . . . . . 74
MSN . . . . . . . . . . . . . . . . 13
assigning a name . . . . . . . 15
changing . . . . . . . . . . . . 14
enter . . . . . . . . . . . . . . 13
entering . . . . . . . . . . . . 13
set charge account. . . . . . . 42
setting the melody . . . . . . . 14
Setting the volume . . . . . . . 14
MSN assignment. . . . . . . . . . 51
Mute . . . . . . . . . . . . . . . . 74
N
Number (MSN)
Set charge account . . . . . . 42
setting the melody . . . . . . . 14
Setting the Volume . . . . . . . 14
O
Open listening . . . . . . . . . . . 74
P
Park a call . . . . . . . . . . . . . 79
Pictographs . . . . . . . . . . . . . 7
PIN (password)
changing . . . . . . . . . . . . 38
for call control . . . . . . . . . 36
for configuration . . . . . . . . 39
Programming function keys . . . . 52
Programming the telephone
directory . . . . . . . . . . . . . . 45
deleting entries . . . . . . . . . 47
editing entries . . . . . . . . . 46
making entries . . . . . . . . . 45
reorganizing . . . . . . . . . . 47
93
Page 98

special ringing tone
(VIP ringing tone) . . . . . . . . 48
Programs of the WIN-Tools . . . . 86
Protecting the configuration . . . . 39
Provider prefix . . . . . . . . . . . 51
R
Read telephone firmware version . 85
Read type of telephone . . . . . . 85
Redialing. . . . . . . . . . . . . . 68
automatic . . . . . . . . . . . 70
expanded . . . . . . . . . . . 68
Reset . . . . . . . . . . . . . . . 88
Resetting the charge display . . . . 41
Resetting the telephone to
default state . . . . . . . . . . . . 88
Ringing tone melody
at an XCentric PABX . . . . . . 7
S
Safety instructions. . . . . . . . . . 1
Sec-function . . . . . . . . . . . . 62
Set charges
Account for each number
(MSN) . . . . . . . . . . . . . 42
Setting appointment dates . . . . . 23
Setting call display . . . . . . . . . 34
Setting charges . . . . . . . . . . 40
charge/ tariff factor . . . . . . . 40
currency . . . . . . . . . . . . 41
resetting the charge display . . 41
Setting for dialing with handset
in its cradle. . . . . . . . . . . . . 28
Setting hands-free mode. . . . . . 28
Setting phone number display
COLP / COLR . . . . . . . . . 32
Setting the charge rate factor . . . 40
Setting the currency . . . . . . . . 41
Setting the date . . . . . . . . . . 26
Setting the language . . . . . . . . 35
Setting the pabx system type . . . 58
Setting the park code (default) . . . 42
Setting the softkey display . . . . . 27
Setting the time . . . . . . . . . . 26
Setting the volume
handset . . . . . . . . . . . . 18
of the melody for a MSN . . . . 14
speaker . . . . . . . . . . . . 16
station guarding tone »Station
guarding« . . . . . . . . . . . 19
Special ringing tone
(VIP ringing tone ) . . . . . . . . . 48
Starting a call . . . . . . . . . . . 65
no number transmission
(CLIR) . . . . . . . . . . . . . 66
Station guarding . . . . . . . . . . 67
Suspending automatic redialing . . 70
Switching a call . . . . . . . . . . 79
Switching call variants . . . . . . . 61
T
TAPI . . . . . . . . . . . . . . . . 84
Telephone
changing the label panel . . . . 10
connecting the handset . . . . . 9
connecting the ISDN cord . . . 9
connecting to the PC. . . . . . 89
placing . . . . . . . . . . . . . 2
Telephone BIOS . . . . . . . . . . 87
Telephone number (MSN) . . . . . 13
94
Page 99

U
User interface . . . . . . . . . . . . 3
V
View/delete charges . . . . . . . . 82
for individual MSNs. . . . . . . 82
last call . . . . . . . . . . . . . 83
sum of the charges(MSN) . . . 83
VIP number . . . . . . . . . . . . 48
editing . . . . . . . . . . . . . 49
programming. . . . . . . . . . 48
VIP ringing tone
(special ringing tone) . . . . . . . . 48
W
WIN-Tools CD-ROM . . . . . . . 2,86
95
Page 100

96
 Loading...