

Page 1
User’s Guide
Wearable Pet Tracker with GPS and mobile network
Model: SCOUT2500
The features described in this User's Guide are subject to modifications without prior notice.
Page 2

Welcome...
to your new Motorola Pet Tracker!
Thank you for purchasing the Motorola Pet Tracker. With SCOU T2500 you
will always see where your dog or cat is located, safely around the house or
patrolling the streets. Set a Geo fence for your pet, and receive alerts on
your smart device if he or she leaves the defined perimeter.
Please retain your original dated sales receipt for your records.
For warranty service of your Motorola product, you will need to provide
a copy of your dated sales receipt to confirm warranty status. Registration
is not required for warranty coverage.
For product related questions, please call:
+44 (0) 844 557 0890 (UK only)
+44 (0) 8187 62092 (ROI)
On the Web: www.motorolahome.com
This User Guide provides you with all the information you need to get the
most from the product and is accurate at the time it was completed. As
part of our ongoing effort to improve our products, features and on-screen
displays may change from time to time.
We recommend you to visit our website www.motorolahome.com to
get the latest User Guide.
Before using this product:
• Visit our website www.motorolahome.com to get the latest User
Guide.
• Read and follow the instructions in the User Guide along with the
Safety Instructions on page 6.
• Upgrade the product’s app and firmware (see page 29).
Got everything?
• 1 x Pet Tracker (with integrated battery)
• 2 x Silicone Cover
• 1 x Power Adapter for the Pet Tracker
• 1 x User Guide
Page 3
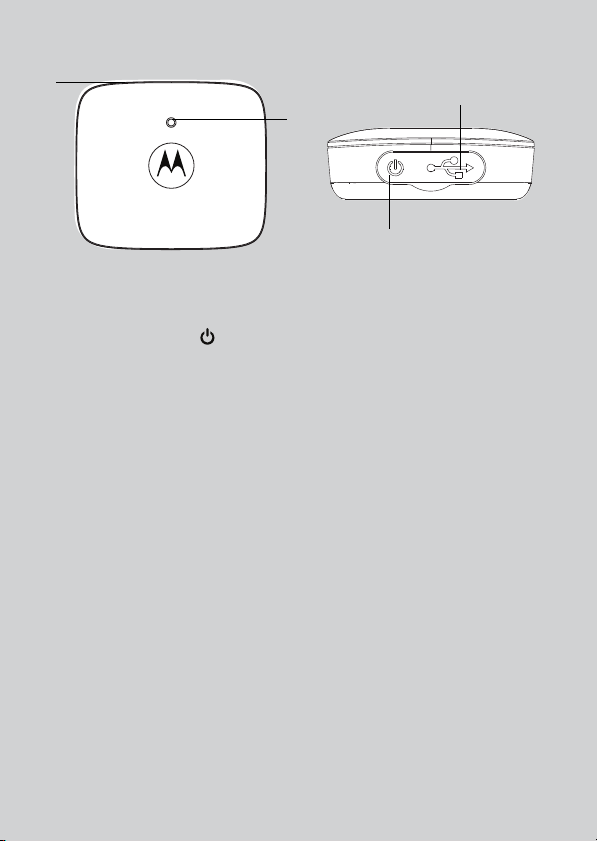
Overview of the Pet Tracker
1
2
3
4
1. LED indicator
2. Temperature sensor
3. Power On/Off button
(with waterproof cover)
4. Micro USB Charging Socket
(with waterproof cover)
Page 4

How the Pet Tracker works
The mobile network enabled Pet Tracker is integrated with GPS and
temperature sensor. It offers a quick and easy way for you to track the location
of your dog and receive notifications when they escape from the vir tual fence.
The Pet Tracker sends alerts to your smart device through an App called
"Hubble for Motorola Petcam".
Free 1-year Subscription for Mobile Network Connection
The Pet Tracker comes with a free 1-year subscription for mobile network
connection.
Important guidelines when using the Pet Tracker
• Do not make your dog wear the Pet Tracker for more than 12 hours
continuously to avoid skin irritation.
• Do not connect a leash to the Pet Tracker.
• When connecting a separate collar for the leash, make sure that it does not
add pressure on the Pet Tracker.
• Check the contact area on your dog’s neck for signs of irritation. If there is
a rash or sore, discontinue use until the skin is completely healed. See a
veterinarian if the condition persists.
• Use of other 2.4 GHz products, such as other wireless networks,
Bluetooth
product. Keep the Pet Tracker away from these types of products, or turn
them OFF if they appear to be causing interference.
• Always ensure that you have a mobile connection available.
®
systems or microwave ovens may cause interference with this
Page 5

Table of contents
1. Safety Instructions..................................................................................... 6
2. System Requirements ............................................................................... 7
3. Basic Setup ................................................................................................ 8
3.1 Charge the Pet Tracker...............................................................................8
3.2 Fit the Silicone Cover Over the Pet Tracker ..............................................8
3.3 Fit the Pet Tracker on your Dog’s Neck .....................................................9
3.4 Power On/Off the Pet Tracker..................................................................10
3.5 Behaviour of the Status Indicator LED......................................................10
4. Connecting Devices................................................................................ 11
4.1 User Account and Pet Tracker Setup on Android™ Devices..................12
4.2 Connect the Pet Tracker to another Android™ Device..........................13
4.3 Add another Pet Tracker to your Hubble Account ..................................13
4.4 User Account and Pet Tracker Setup on iOS® Devices...........................14
4.5 Connect the Pet Tracker to another iOS® Device...................................15
4.6 Add another Pet Tracker to your Hubble Account ..................................15
5. Overview of the Features in Hubble App...............................................16
5.1 Using the Pet Tracker when connected to the Mobile Network .............17
5.2 Pet Tracker Settings ..................................................................................19
5.3 Account Settings .......................................................................................21
5.4 Reset or remove a Pet Tracker from your Hubble Account.....................22
6. App and Firmware Upgrades.................................................................. 23
6.1 App Upgrade.............................................................................................23
6.2 Firmware Upgrade....................................................................................23
7. Disposal of the Device (Environment)....................................................24
8. Cleaning and Care .................................................................................. 25
9. Help..........................................................................................................25
10. Troubleshooting ......................................................................................26
11. General Information ................................................................................30
12. Technical Specifications .........................................................................35
ENGLISH
Table of contents 5
Page 6
1. Safety Instructions
WARNING:
As with any electrical device, supervision of your pet's usage should be
exercised until your pet is acclimated to the product. If your pet is prone
to chewing, we strongly recommend that you keep this and all other
electrical devices out of its reach.
RISK OF SKIN DAMAGE
• Determine a proper fit of the Pet Tracker on your dog’s neck.
If worn for too long or the fit is too tight, it may cause skin damage.
• Check your dog’s neck area daily for signs of skin irritation.
• Discontinue use immediately if a rash or sore is found on the neck area.
• AVOID wearing for more than 12 continuous hours a day.
• Clean your dog’s neck area and the Pet Tracker with a soft damp cloth
weekly.
WARNING
This Pet Tracker is compliant with all relevant electromagnetic field standards
and is, when handled as described in the User’s Guide, safe to use. Therefore,
always read the instructions in this User’s Guide carefully before using the
product.
• This product is not a toy. Do not allow children to play with it.
• This product is not a substitute for responsible supervision of your dog.
• Test this product and all its functions so that you are familiar with it prior to
actual use.
• Only use the Power Adapter provided.
• Do not use other power adapters as this may damage the device.
• Never use extension cords with Power Adapters.
• Do not touch the plug contacts with sharp or metal objects.
• Keep this User's Guide for future reference.
6 Safety Instructions
Page 7
2. System Requirements
Android™ System
• Version 4.2 or above
®
iOS
• Version 7.0 or above
ENGLISH
System Requirements 7
Page 8
3. Basic Setup
It takes about 6 hours to fully
charge the battery pack for
the first time.
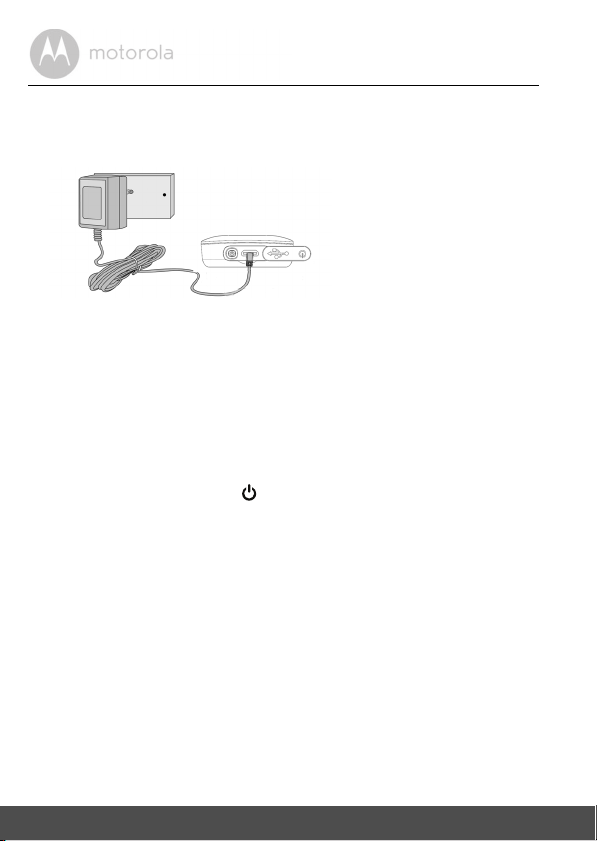
3.1 Charge the Pet Tracker
1. Connect the power adapter to a mains power socket and insert the plug
into the micro USB socket on the Pet Tracker. Only use the supplied power
adapter (5V DC / 1000mA) with the Micro USB plug.
2. The status indicator LED lights up solid red, which indicates that it is
charging.
Note
Only use the enclosed power adapter (5V DC / 1000mA).
The average battery life is up to 5 days, depending on how often you use it. The
Pet Tracker send alerts to the App when battery is low. To conserve battery life,
press and hold the POWER KEY to switch off the Pet Tracker when it is not in
use.
3.2 Fit the Silicone Cover Over the Pet Tracker
The silicone cover is moulded to form and fit tightly over the Pet Tracker.
Make sure that the section that is marked with a power button fits right over the
power button of the Pet Tracker so that you can operate the power button easily
through the cover.
8 Basic Setup
Page 9
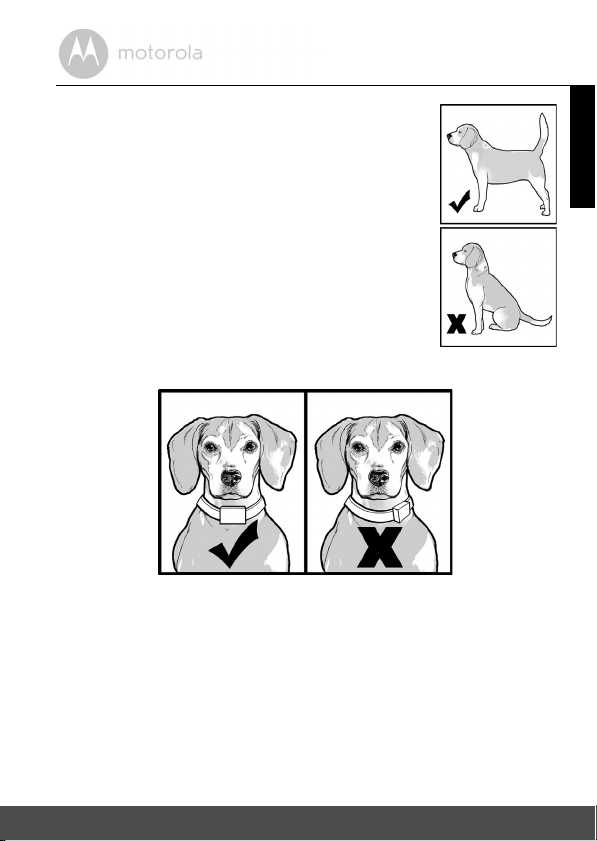
3.3 Fit the Pet Tracker on your Dog’s Neck
1. Have your dog stand in a balanced position on a flat,
even surface.
2. Put the strap over your dog’s neck, centering the
Pet Tracker underneath its neck and making sure
that the Motorola logo is upright facing you.
3. String the end of the strap through the strap buckle.
4. Pull the end of the strap until the desired level of
tightness is reached and push the retainer bar
through the nearest strap hole, then insert the strap
through the remaining strap buckle to secure it.
5. Check to ensure that the Pet Tracker is in the centre
underneath the neck of your dog.
6. Check the fit again after your dog has worn the Pet Tracker for several
minutes or as your dog gets more comfortable with it.
Note
The Pet Tracker should fit snugly on your dog’s neck such that you can only fit
two fingers underneath it. It should not be able to rotate around the neck.
ENGLISH
Basic Setup 9
Page 10
3.4 Power On/Off the Pet Tracker
To power on the Pet Tracker, press and hold the POWER KEY for about
3 seconds. The LED lights up in solid green.
To power off the Pet Tracker, press and hold the POWER KEY for at least
3 seconds. The LED lights up in solid green before it goes off.
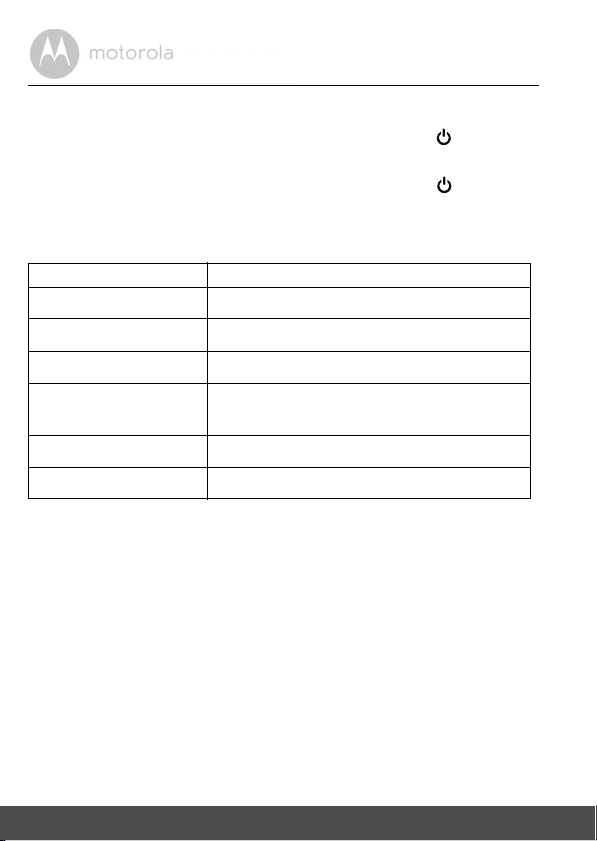
3.5 Behaviour of the Status Indicator LED
LED Behavior Description
Flashes Blue Device is connecting to mobile network.
Solid Blue Device is now connected to mobile network.
Flashes Green
Flashes Green (very
slowly)
Solid Green When switching the device ON/OFF.
Solid Red Device is charging when switched ON.
Note
All LEDs will cease to flash after 10 minutes of continuous flashing in any mode.
Device is searching for network connection.
Device is now idle.
10 Basic Setup
Page 11
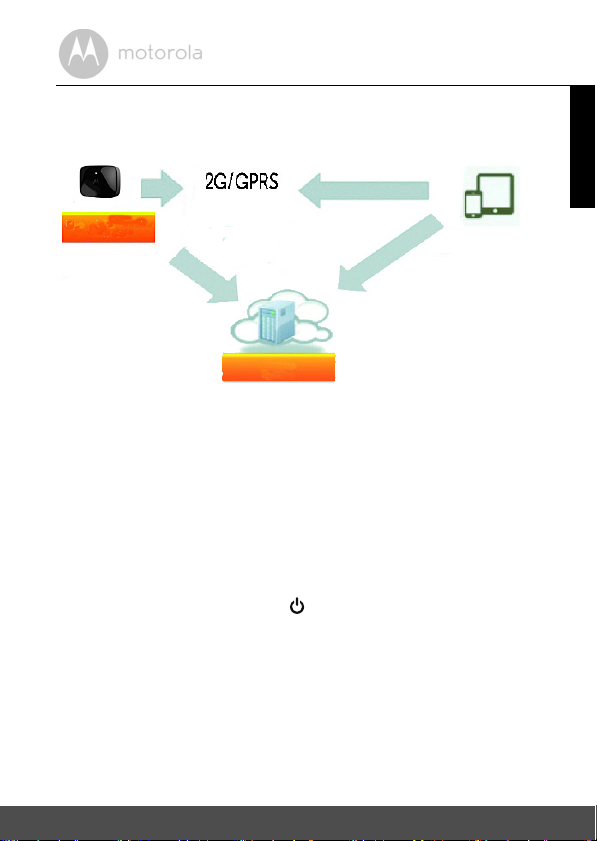
4. Connecting Devices
Pet Tracker
Hubble Service
Access your Pet
Tracker locally by
2.4Ghz wireless.
Receive alerts from
your Pet Tracker
from any
compatible
Android
TM
or iOS®
device remotely.
How does it work?
When a user tries to access the Pet Tracker, the Hubble server will authenticate
the user’s identity before it grants access to the Pet Tracker.
Important
Make sure that the battery level is more than 70% or the power adapter is
plugged in before starting installation. To check battery level, see “Pet Tracker
Settings” on page 19.
Setup
• Connect the power adapter to a mains power socket and insert the plug into
the micro USB socket on the Pet Tracker.
• Press and hold the POWER KEY for about 3 seconds to switch it on.
When switched on, the LED lights up in solid green.
Note
You can only setup via a compatible smart device, such as smartphone or
tablet, and not via a PC.
Connecting Devices 11
ENGLISH
Page 12
4.1 User Account and Pet Tracker Setup on Android™ Devices
What you need
• Pet Tracker
• Pet Tracker Power Adapter
• Device with Android™ system version 4.2 and above
4.1.1 Download Hubble for Motorola Petcam App
• On your Android™ device, go to Google Play™ Store to search for "Hubble
for Motorola Petcam".
• Download "Hubble for Motorola Petcam" App from Google Play™ Store
and install it on your Android™ device.
4.1.2 Run Hubble for Motorola Petcam App on Android™ Device
• Ensure that your Android™ device is connected to your Wi-Fi® router.
• Run "Hubble for Motorola Petcam" App.
• Tap Get Started, enter your account information, read through the Terms of
Service, then select "I agree to the Terms of Use" before you tap Create
account.
Note
If you already have a Hubble App account, please select Already have an
Account? to go to the next step.
4.1.3 Power On the Pet Tracker
• Connect the power adapter to a mains power socket and insert the plug into
the micro USB socket on the Pet Tracker.
• Press and hold the POWER KEY for about 3 seconds to switch it on.
• When switched on, the LED lights up in solid green.
12 Connecting Devices
Page 13

4.1.4 Add the Pet Tracker to your Account
• Tap on the top right corner of the screen to add Pet Tracker.
• The App will automatically search for the Pet Tracker.
• Tap to select the Pet Tracker (PetTracker-xxxxxxxxx).
• It will take a few minutes for the Pet Tracker to connect to your Hubble
Account.
• If connection fails, please tap Retry and repeat the steps starting from the
first bullet point.
4.2 Connect the Pet Tracker to another Android™ Device
To add the Pet Tracker to another Android™ device, repeat the steps starting
from 4.1.1.
4.3 Add another Pet Tracker to your Hubble Account
There is no limit on the number of Pet Trackers you can add to your Hubble
Account.
To add another Pet Tracker to your Hubble Account, repeat the steps starting
from 4.1.3.
ENGLISH
Connecting Devices 13
Page 14

4.4 User Account and Pet Tracker Setup on iOS® Devices
What you need
• Pet Tracker
• Pet Tracker Power Adapter
• Any iOS
4.4.1 Download Hubble for Motorola Petcam App
• On your iOS® device, go to the App Store to search for "Hubble for
• Download "Hubble for Motorola Petcam" App and install it on your iOS
4.4.2 Run Hubble App on your iOS® Device
• Ensure that your iOS® device is connected to your Wi-Fi® Router.
• Run the "Hubble for Motorola Petcam" App.
• Enter your account information, read through the Terms of Service, and then
Note
If you already have a Hubble App account, please select Already have an
Account? to go to the next step.
4.4.3 Power On the Pet Tracker
• Connect the power adapter to a mains power socket and insert the plug into
• Press and hold the POWER KEY for about 3 seconds to switch it on.
• When switched on, the LED lights up in solid green.
®
Device with iOS version 7.0 and above
Motorola Petcam".
device.
select "I agree to the Terms of Service" before you tap Create.
the micro USB socket on the Pet Tracker.
®
14 Connecting Devices
Page 15

4.4.4 Add the Pet Tracker to your Account
• Tap on the top right corner of the screen to add Pet Tracker.
• The Pet Tracker will automatically establish a 2.4Ghz connection with your
®
iOS
device. Once the connection is established, follow the onscreen
instructions.
• If connection fails, please tap Retry and repeat the steps starting from the
first bullet point.
4.5 Connect the Pet Tracker to another iOS® Device
To add the Pet Tracker to another iOS® device, repeat the steps starting from
4.4.1.
4.6 Add another Pet Tracker to your Hubble Account
There is no limit on the number of Pet Trackers you can add to your Hubble
Account.
To add another Pet Tracker to your Hubble Account, repeat the steps starting
from 4.4.3.
ENGLISH
Connecting Devices 15
Page 16

5. Overview of the Features in Hubble App
Geo Fencing (see Fence Settings in Section 5.2)
Set up virtual boundary and receive notifications when your dog ventures out of
the set boundary.
Location Tracking (see GPS Settings in Section 5.2)
The location of your pet is determined by GPS signals and the location of mobile
cell towers.
As it might take some time for reception of GPS signals, the current location of
your pet is tracked via the location of mobile cell towers first (with a wider
tolerance, which depends on the mobile network density). Once stable GPS
signal is received, the map will be automatically updated with a more accurate
location (with minimum tolerance) based on GPS signals.
Note that the location information is most accurate if GPS signal reception is
good. If GPS signal reception is not good or obstructed, e.g. your pet is indoors
or in a location where GPS signal cannot be received, the current location of
your pet will be triangulated/estimated based on the signal strength differences
between mobile cell towers.
To enable GPS tracking, make sure that
is set to
Tracking
.
Settings
Tap on
modify the settings. (see Section 5.2 Pet Tracker Settings)
icon to enter
GPS Notification
Pet Tracker Settings
is set to On and
>
GPS Settings
GPS Mode
to check or
16 Overview of the Features in Hubble App
Page 17

5.1 Using the Pet Tracker when connected to the Mobile
Network
• Run
Hubble for Motorola Petcam
Hubble account.
• If you have more than 1 Pet Tracker in your account:
• Tap in the centre of the screen to show the options available.
®
Devices, tap
For iOS
For And roid
the list
TM
Devices, tap >
Location
Tracking and
Geo Fencing
App on your smart device and log into your
Devices
to select a Pet Tracker from the list
Tracker
to select a Pet Tracker from
Ta p >
Note
The user's location is identified by a blue dot.
Location tracking will be based on the mobile
network first (with a wider tolerance, which
depends on the mobile network density), then
by GPS satellite (with minimum tolerance).
The red pin indicates the pet’s current location.
Due to mobile connection, there is a waiting
time before the location information is shown.
The waiting time varies depending on the
network. In case the device is out of network
coverage or is powered down, an error
message will appear indicating that connection
to the device is not available.
Ta p
Track
to activate location tracking.
to set the radius for Geo Fencing.
ENGLISH
Overview of the Features in Hubble App 17
Page 18

5.1.1 Free 1-year Subscription for Mobile Network Connection
The Pet Tracker comes with a free 1-year subscription for mobile network
connection.
The free subscription offers you 150 pings per month over 12 months after the
Pet Tracker has been activated.
A ping is a communication request with the Pet Tracker over the mobile
network. The following functions are enabled through ping requests when you
are connected to the Pet Tracker via the mobile network:
• Get the pet’s location
• Activate Geo Fence
• Receive alerts when your pet leaves the virtual boundaries
The ping counter starts at 150 every month and counts down each time you use
one of the above functions. Note that unused Pings w ill not be carried over to the
next month. The ping counter resets automatically to 150 at th e start of the billing
month, which is based on the activation date of th e Pet Tracker. If 150 pings have
been used up before the end of a month, mobile communication with the Pet
Tracker will be suspended until the start of the next billing month.
However, if you want to use mobile network connection beyond the free 150
pings per month, you may check out our paid subscription service, which is
available as an in-app purchase.
18 Overview of the Features in Hubble App
Page 19

5.2 Pet Tracker Settings
• Run
Hubble for Motorola Petcam
Hubble account.
• If you have more than 1 Pet Tracker in your account:
®
Devices, tap
For iOS
For And roid
TM
Devices, tap >
the list
Settings
• Tap on
icon to enter Pet Tracker Settings.
• Tap Save after you have modified the settings.
General
Settings
• Clock:
• Units:
• Email
App on your smart device and log into your
Devices
to select a Pet Tracker from the list
Tracker
to select a Pet Tracker from
12h
or
24h
Metre
or
Feet
ENGLISH
GPS Settings • GPS Notification:
• GPS Mode: Tap to select
On
or
Off
Battery Saving
or
Tracking
Note
When in
Battery Saving
mode, GPS is turned off
when it is not in use . This saves battery life, but will
take a longer time to get the GPS location (up to
several minutes).
When in
Tracking
mode, GPS is permanently on. It
consumes more battery, but GPS location can be
determined faster. By default, GPS is in
Tracking
mode.
To n es an d
Voice Message
• Warning tone
• Fence breach voice message
Notifications
Overview of the Features in Hubble App 19
Page 20

Fen cin g
Settings
Trac ker De ta il s
Set up virtual boundary and receive notifications
when your dog ventures out of the set boundary.
On
or
• Fence Notification:
• Narrow:
• Medium:
• Large:
• Tolerance:
50m to 100m
101m to 200m
301m to 500m
5m to 20m
Off
• Change tracker name
• Change snapshot of the Pet Tracker in your
Hubble account
Battery Level Check battery level on the Pet Tracker.
Updates
Logout
20 Overview of the Features in Hubble App
Shows the status of the software application.
Tap to logout of Hubble account.
Page 21

5.3 Account Settings
• Run
Hubble for Motorola Petcam
Hubble account.
®
• For iOS
Devices, tap
For And roid
TM
Devices, tap >
• You can modify the following settings:
Profile
Username
Email
Temperature
Password
Log out
Subscription Shows your subscription plan.
Notifications
Do Not Disturb
minutes
Notification frequency
minutes or disabled.
Notify me by sound
to enable or disable.
Notify me by vibration
checkbox to enable or disable
Notify me when on a call
checkbox to enable or disable
App on your smart device and log into your
Account
Account
: shows current username
: shows current user email
: choose Celsius or Fahrenheit
: change Password
:
: disabled, or from 1 minute to 180
: immediately, 1 minute to 60
: check or uncheck the checkbox
: check or uncheck the
: check or uncheck the
ENGLISH
Remote
Connection
Remote View Timeout:
check or uncheck the
checkbox to enable or disable
Setting
About Hubble View Terms and Conditions
Shows the current App version number.
Overview of the Features in Hubble App 21
Page 22

5.4 Reset or remove a Pet Tracker from your Hubble Account
• Go to Settings menu of the Pet Tracker you wish to remove (see Section
5.2).
• Tap the trash bin icon on the top right corner of the screen.
Yes
• Tap
• The Pet Tracker will be de-registered from your Hubble Account and all
to remove the Pet Tracker.
settings will be reset to default.
22 Overview of the Features in Hubble App
Page 23

6. App and Firmware Upgrades
6.1 App Upgrade
You can find the latest version of Hubble App by visiting your mobile device’s
app store (e.g.: iTunes App Store, Google Play
what's new with the app and install the latest version.
Occasionally, Hubble Server will also send you a notification that a latest version
of the app is available. While some of the upgrades simply keep your system
running efficiently, and some are critical to system functionality. We strongly
recommend that you complete the upgrade as soon as possible.
TM
). From there, you can see
6.2 Firmware Upgrade
The Pet Tracker is BLE-enabled and has over-the-air firmware upgrade
capability. Firmware updates will be sent to the Pet Tracker via Hubble App.
Please follow the app instructions for upgrade.
Note
Firmware upgrades will not be performed automatically. You need to confirm
the upgrade by following the procedures shown on the app.
ENGLISH
App and Firmware Upgrades 23
Page 24
7. Disposal of the Device (Environment)
At the end of the product life cycle, you should not dispose of
this product with normal household waste. Take this product to
a collection point for the recycling of electrical and electronic
equipment. The symbol on the product, user's guide and/or
box indicates this.
Some of the product materials can be reused if you take them to
a recycling point. By reusing some parts or raw materials from used products
you make an important contribution to the protection of the environment.
Please contact your local authorities in case you need more information on the
collection points in your area.
Dispose of the battery pack in an environmentally-friendly manner according to
your local regulations.
24 Disposal of the Device (Environmen t)
Page 25

8. Cleaning and Care
• Check your dog’s neck area for irritation and wash neck weekly.
• Every effort has been made to ensure high standards of reliability of your
Pet Tracker. However, if something does go wrong, please do not try to
repair it yourself – contact Customer Service for assistance.
9. Help
Noise interference
• Use of other 2.4 GHz products, such as Bluetooth® systems or microwave
ovens, may cause interference with this product. Keep the Pet Tracker at
least 1.5 metres (5 feet) away from these types of products, or turn them off if
they appear to be causing interference.
If you forgot your password
If you do not remember your password, tap Forgot Password to submit your
e-mail address. A new password will be sent to your e-mail address immediately.
ENGLISH
Cleaning and Care 25
Page 26

10. Troubleshooting
Category Problem Description /
Error
Account I am not able to login even
after registration.
Account I receive an error message
saying: "Email ID is not
registered".
Account What do I do if I forget my
password?
Account I did not receive a new
password although I have
used the "Forgot
Password" option.
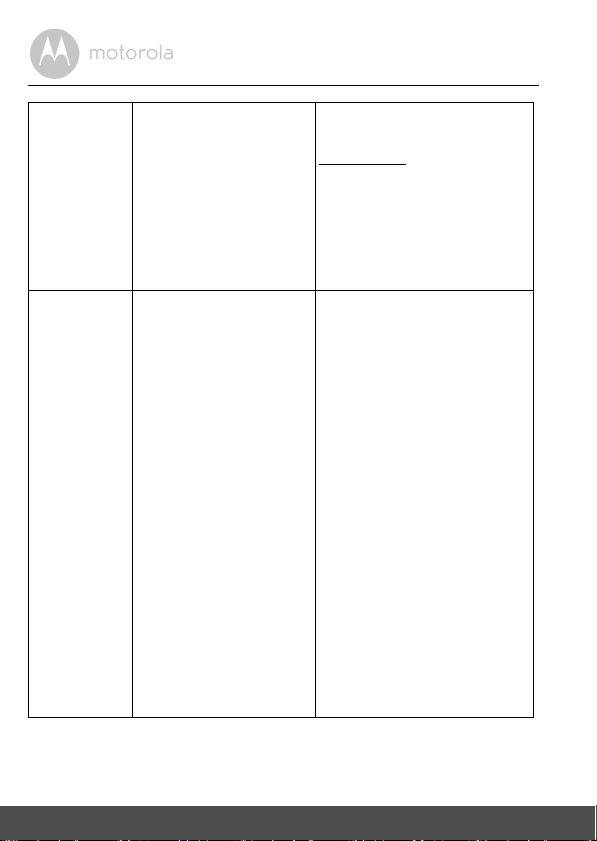
Pet Tracker When I try to view the
Tracker, I get a prompt for
Pet Tracker firmware
upgrade. What should I
do?
Solution
Please check your user name
and password.
Please ensure that you have
registered an account with us.
Tap Create Account to create
an account.
Click on the "
on the website http://
www.hubbleconnected.com/
motorola/login/ OR on your
Android™ or iOS application.
An email will be sent to your
registered email address.
1. The e-mail might have been
2. There might be a delay in
Please upgrade your firmware.
This takes around 5 minutes. We
push upgrades from time to time
to improve Pet Tracker features.
Forgot Password
sent to your
Please check your
Folder
getting your e-mail. Please
wait for a few minutes and
refresh your email account.
Junk Mail Folder
.
" link
Junk Mail
.
26 Troubleshooting
Page 27

Connectivity
Issues
I get a message: We are
having problems
accessing your Pet
Tracker. This could be due
to the lack of a mobile
connection. Please wait
and try again later.
Connectivity
Issues
I am not able to access my
Pet Tracker.
Features The sound alert setting
threshold is not right.
Features How many users can
access the Pet Tracker at
one time?
General Which platforms are
supported for access to my
Pet Tracker?
1. Please try again in a few
minutes. This could be due
to an issue with your mobile
connection.
2. If the problem persists,
please restart your Pet
Tracker to check if this fixes
the problem.
3. Rebooting your smart
phone/ smart device could
also resolve the problem.
Please check if the Pet Tracker is
within the mobile network.
You can adjust Sound Sensitivity
to trigger notifications under the
Settings menu. (See Section 5.2)
If you are accessing in local
mode, two users are supported.
If there are more than two users,
all tracking will go through the
remote server. This allows for
unlimited user access to a single
Pet Tracker at one time.
Android™ 4.2
®
iOS
Devices with iOS® version
7.0
ENGLISH
Troubleshooting 27
Page 28
General What is the significance of
LED flashing?
General How do I download the
Application for Android™
and iOS devices?
A flashing LED indicates the
following status:
Slow flashing: Your Pet Tracker is
in setup mode. You can add the
Pet Tracker to your account in
this mode. Out of the box, the
Pet Tracker is in Setup mode. To
reset to Setup mode, see Section
5.4.
Android™:
- Open the Google Play Store on
your Android™ device
- Select Search
- Type "Hubble for Motorola
Petcam"
- The results will show the
Hubble for Motorola Petcam
App
- Select to install it
iOS Device:
- Open the App Store
SM
- Select Search
- Type "Hubble for Motorola
Petcam"
- The results will show the
Hubble for Motorola Petcam
App
- Select to install it
28 Troubleshooting
Page 29

Setting Up While I am adding a new
Pet Tracker to my account,
I am not able to find any Pet
Tracker to add.
Setting Up During setup on devices
for Android™ and iOS, I
am not able to find my Pet
Tracker during the last step
and the setup fails.
If you are trying to add a Pet
Tracker which has previously
been added into your account or
another account, you will first
have to reset the Pet Tracker. To
reset the Pet Tracker, see
Section 5.4.
Please reset the Pet Tracker to
Setup mode and try again. To
reset the Pet Tracker, see
Section 5.4.
ENGLISH
Troubleshooting 29
Page 30

11. General Information
lf your product is not working properly....
1. Read this User's Guide.
2. Contact Customer Service:
+44 (0) 844 557 0890 (UK only)
+44 (0) 8187 62092 (ROI)
Consumer Products and Accessories Limited Warranty
Thank you for purchasing this Motorola branded product manufactured under
license by Binatone Electronics International LTD ("BINATONE").
What Does this Warranty Cover?
Subject to the exclusions contained below, BINATONE warrants that this
Motorola branded product ("Product") or certified accessory ("Accessory") sold
for use with this product that it manufactu red to be free from defects in materials
and workmanship under normal consumer usage for the period outlined below.
This Warranty is your exclusive warranty and is not transferable.
Who is covered?
This Warranty extends only to the first consumer purchaser, and is not transferable.
What will BINATONE do?
BINATONE or its authorised distributor at its option and within a commercially
reasonable time, will at no charge repair or replace any Products or Accessories
that does not conform to this Warranty. We may use functionally equivalent
reconditioned/ refurbished/ pre-owned or new Products, Accessories or parts.
30 General Information
Page 31

What Other Limitations Are There?
ANY IMPLIED WARRANTIES, INCLUDING WITHOUT LIMITATION THE
IMPLIED WARRANTIES OF MERCHANTABILITY AND FITNESS FOR A
PARTICULAR PURPOSE, SHALL BE LIMITED TO THE DURATION OF THIS
LIMITED WARRANTY, OTHERWISE THE REPAIR OR REPLACEMENT
PROVIDED UNDER THIS EXPRESS LIMITED WARRANTY IS THE EXCLUSIVE
REMEDY OF THE CONSUMER, AND IS PROVIDED IN LIEU OF ALL OTHER
WARRANTIES, EXPRESS OR IMPLIED. IN NO EVENT SHALL MOTOROLA OR
BINATONE BE LIABLE, WHETHER IN CONTRACT OR TORT (INCLUDING
NEGLIGENCE) FOR DAMAGES IN EXCESS OF THE PURCHASE PRICE OF
THE PRODUCT OR ACCESSORY, OR FOR ANY INDIRECT, INCIDENTAL,
SPECIAL OR CONSEQUENTIAL DAMAGES OF ANY KIND, OR LOSS OF
REVENUE OR PROFITS, LOSS OF BUSINESS, LOSS OF INFORMATION OR
OTHER FINANCIAL LOSS ARISING OUT OF OR IN CONNECTION WITH THE
ABILITY OR INABILITY TO USE THE PRODUCTS OR ACCESSORIES TO THE
FULL EXTENT THESE DAMAGES MAY BE DISCLAIMED BY LAW.
Some jurisdictions do not allow the limitation or exclusion of incidental or
consequential damages, or limitation on the length of an implied warranty, so
the above limitations or exclusions may not apply to you. This Warranty gives
you specific legal rights, and you may also have other rights that vary from one
jurisdiction to another.
ENGLISH
General Information 31
Page 32

Products Covered Length of Coverage
Consumer Products One (1) year from the date of the
products original purchase by the first
consumer purchaser of the product.
Consumer Accessories Ninety (90) days from the date of the
accessories original purchase by the
first consumer purchaser of the
product.
Consumer Products and Accessories
that are Repaired or Replaced
The balance of the original warranty or
for Ninety (90) days from the date
returned to the consumer, whichever is
longer.
Exclusions
Normal Wear and Tear. Periodic maintenance, repair and replacement of parts
due to normal wear and tear are excluded from coverage.
Batteries. Only batteries whose fully charged capacity falls below 80% of their
rated capacity and batteries that leak are covered by this Warranty.
Abuse & Misuse. Defects or damage that result from: (a) improper operation,
st orag e, mi suse or a buse , acc ide nt or negl ect, suc h as p hysi cal dama ge (c rack s,
scratches, etc.) to the surface of the product resulting from misuse; (b) contact
with liquid, water, rain, extreme humidity or heavy perspiration, sand, dirt or the
like, extreme heat, or food; (c) use of the Products or Accessories for
commercial purposes or subjecting the Product or Accessory to abnormal
usage or conditions; or (d) other acts which are not the fault of MOTOROLA or
BINATONE, are excluded from coverage.
Use of Non-Motorola branded Products and Accessories. Defects or damage
that result from the use of Non-Motorola branded or certified Products or
Accessories or other peripheral equipment are excluded from coverage.
Unauthorised Service or Modification. Defects or damages resulting from
service, testing, adjustment, installation, maintenance, alteration, or
modification in any way by someone other than MOTOROLA, BINATONE or its
authorised service centres, are excluded from coverage.
32 General Information
Page 33

Altered Products. Products or Accessories with (a) serial numbers or date
tags that have been removed, altered or obliterated; (b) broken seals or
that show evidence of tampering; (c) mismatched board serial numbers;
or (d) nonconforming or non-Motorola branded housings, or parts, are excluded
from coverage.
Communication Services. Defects, damages, or the failure of Products or
Accessories due to any communication service or signal you may subscribe to
or use with the Products or Accessories is excluded from coverage.
How to Obtain Warranty Service or Other Information?
To obtain service or information, please call:
+44 (0) 844 557 0890 (UK only)
+44 (0) 8187 62092 (ROI)
You will receive instructions on how to ship the Products or Accessories at your
expense and risk, to a BINATONE Authorised Repair Centre.
To obtain service, you must include: (a) the Product or Accessory; (b) the
original proof of purchase (receipt) which includes the date, place and seller of
the Product; (c) if a warranty card was included in your box, a completed
warranty card showing the serial number of the Product; (d) a written
description of the problem; and, most importantly; (e) your address and
telephone number.
These terms and conditions constitute the complete warranty agreement
between you and BINATONE regarding the Products or Accessories purchased
by you, and supersede any prior agreement or representations, including
representations made in any literature publications or promotional materials
issued by BINATONE or representations made by any agent employee or staff
of BINATONE, that may have been made in connection with the said purchase.
ENGLISH
General Information 33
Page 34

BINATONE Electronics International Ltd.
Floor 23A, 9Des Voeux Road West,
Sheung Wan, Hong Kong.
Tel: +852 28027388 Fax: +852 28028138
Website: www.binatonetelecom.com
________________________________________ .
EC Declaration of Conformity
We the manufacturer / Importer : BINATONE Telecom PLC
1 Apsley Way, London, NW2 7HF, UK
Declare under our sole responsibility that the following product
Type of equipment: Pet tracker
Model Name: Scout2500
Country of Origin: China
Brand: Motorola
complies with the essential protection requirements of R&TTE Directive 1999/5/EC on the approximation
of the laws of the Member States relating to Radio Spectrum Matters, the Council Directive /108/EC
on the approximation of the laws of the Member States relating to electromagnetic compatibility (EMC) and
the European Community Directive 2006/95/EC relating to Electrical Safety.
Assessment of compliance of the product with the requirements relating to the essential requirements
according to Article 3 R&TTE was based on Annex III of the Directive 1999/5/EC and the following
standard:
Applicable standards:
EN 301 489-17 V2.2.1(2012-09)
EN 301 489-7 V1.3.1 (2005-11)
EN 301 489-3 V1.6.1 (2013-08)
EN 301 489-1 V1.9.2 (2011-09)
EN 301 511 V9.0.2 (2003-03)
EN 62479:2010;
EN 60950-1:2006+A11:2009+A1:2010+A12:2011+A2:2013
EN 50566:2013;EN 62209-2:2010
EN 300 440-1 V1.6.1 (2010-08)
EN 300 440-2 V1.4.1 (2010-08)
Manufacturer / Importer
(signature of authorized person)
Signature:
Position: Product Manager
Full Name: Henry Leung
Date: 19 Sep 15
34 General Information
Page 35

12. Technical Specifications
Standard
Frequency Band
Location service
Operating Time (with
fully charged battery)
Charging Time
GSM Mobile network
GSM850/900/1800/1900
GPS receiver
Standby: approx. 100 hours
< 6 hours
ENGLISH
Electrical power
Technical Specifications 35
Build in Battery WX30 Li-ion 3.8V DC,
300mAh Battery Pack
Page 36

FCC statement
1.This device complies with Part 15 of the FCC Rules. Operation is subject to the
following two conditions:
(1) This device may not cause harmful interference.and
(2) This device must accept any interference received, including interference that
may cause undesired operation.
2.Changes or modifications not expressly approved by the party responsible for
compliance
could void the user's authority to operate the equipment.
NOTE:
This equipment has been tested and found to comply with the limits for a Class B
digital device, pursuant to Part 15 of the FCC Rules. These limits are designed to
provide reasonable protection against harmful interference in a residential installation.
This equipment generates uses and can radiate radio frequency energy and, if not
installed and used in accordance with the instructions, may cause harmful interference
to radio communications. However, there is no guarantee that interference will not occur
in a particular installation. If this equipment does cause harmful interference to radio or
television reception, which can be determined by turning the equipment off and on,
the user is encouraged to try to correct the interference by one or more of the following
measures:
Reorient or relocate the receiving antenna.
Increase the separation between the equipment and receiver.
Connect the equipment into an outlet on a circuit different from that to which the
receiver is connected.
Consult the dealer or an experienced radio/TV technician for help.
To comply with RF exposure requirements, a minimum separation distance of 20cm
must be maintained between the user’s body and this device including the antenna.
Page 37

IC statement
This device complies with Industry Canada licence-exempt RSS standard(s).
Operation is subject to the following two conditions:
(1) This device may not cause interference, and.
(2) This device must accept any interference, including interference that may
cause undesired operation of the device.
This equipment complies with FCC radiation exposure limits set forth for an
uncontrolled environment.
End user must follow the specific operating instructions for satisfying RF exposure
compliance.
This transmitter must not be co-located or operating in conjunction with any other
antenna or transmitter.
The mobile device is designed to meet the requirements for exposure to radio waves
established by the Federal Communications
Commission (USA). These requirements set a SAR limit of 1.6 W/kg, averaged over
one gram of tissue.The highest SAR value reported under. This standard during product
certification for use when properly worn on the neck is 0.718W/kg.
Le présent appareil est conforme aux CNR d'Industrie Canada applicables aux
appareils radio exempts de licence. L'exploitation est autorisée aux deux
conditions suivantes:
(1) l'appareil ne doit pas produire de brouillage, et
(2) l'utilisateur de l'appareil doit accepter tout brouillage radioélectrique subi,
même si le brouillage est
susceptible d'en compromettre le fonctionnement.
Cet équipement est conforme aux limites d'exposition aux rayonnements de
la FCC définies pour un environnement non contr?lé. L'utilisateur final doit
respecter les instructions de fonctionnement
spécifiques pour satisfaire la conformité aux expositions RF. Cet émetteur
Page 38

ne doit pas être co-localisées ou opérant en conjonction avec une autre antenne
ou émetteur.
L'appareil mobile est con?u pour répondre aux exigences en matière d'exposition
aux ondes radio établies
par la Federal Communications
Commission (Etats-Unis). Ces exigences définissent la valeur SAR limite à 1.6 W/kg,
en moyenne pour un
gramme de tissu. La valeur SAR la plus élevée signalée sous. Cette norme lors de la
certification de produit à utiliser est porté correctement sur le corps est de 0.718 W/kg.
IC Radiation Exposure Statement
This equipment complies with IC radiation exposure limits set forth for an uncontrolled
environment. This equipment should be installed and operated with minimum distances
20cm between the radiator include its antenna and your body
Page 39

Manufactured, distributed or sold by Binatone Electronics International LTD.,
official licensee for this product. MOTOROLA and the Stylised M logo are
trademarks or registered trademarks of Motorola Trademark Holdings, LLC.
and are used under license. Apple logo and Safari are trademarks of Apple Inc.,
registered in the U.S. and other countries. App Store is a service mark of Apple
Inc. Google Play, Android, and Chrome are trademarks of Google Inc. Wi-Fi is
a trademark of the Wi-Fi Alliance. Internet Explorer and Windows are
trademarks of the Microsoft group of companies. Firefox is a registered
trademark of the Mozilla Foundation. Adobe and Flash are either registered
trademarks or trademarks of Adobe Systems Incorporated. Java is a registered
trademark of Oracle and/or its affiliates. All other trademarks are the property
of their respective owners. © 2015 Motorola Mobility LLC. All rights reserved.
UK_EN Version 1.0
Printed in China
 Loading...