

Page 1
Baby Monitor
N30
User's Guide
Baby Monitor
User's Guide..........................1
Moniteur pour bébé
Guide de l'utilisateur..........17
Monitor para bebé
Guía de usuario..................35
Page 2

Page 3
English
ENGLISH
Read these instructions for use carefully and keep them
for later use, be sure to make them accessible to other
users and observe the information they contain.
Table of Contents
1. Getting to know your device .................................................................................. 2
2. Signs and symbols .................................................................................................... 2
3. Intended use ............................................................................................................. 2
4. Unit description ......................................................................................................... 6
5. Initial use .................................................................................................................... 8
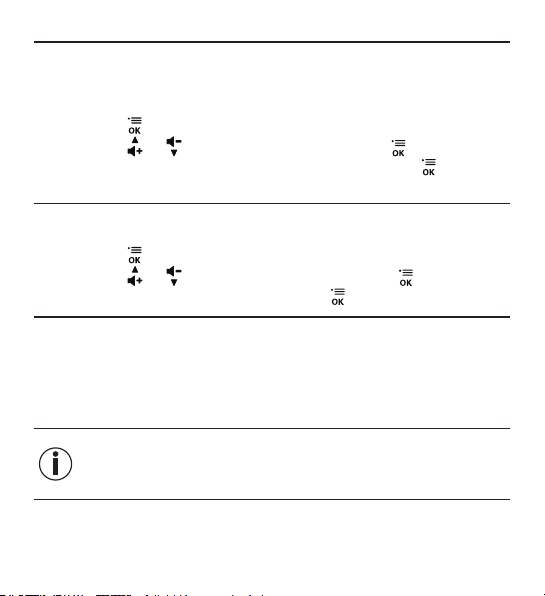
6. Settings ...................................................................................................................... 9
7. Useful information about the baby monitor ......................................................... 11
8. Replacing/charging the batteries
9. Storage and maintenance .................................................................................... 12
10. What if there are problems? ................................................................................. 13
11. Technical data ....................................................................................................... 14
Included in delivery
•
Baby monitor consisting of baby unit and parent unit
•
2 x Power Adapters for the Parent and Baby units
•
2 x NiMH batteries for the parent unit
•
User Guide
•
Guarantee and Service
........................................................................11
1
Page 4
1. Getting to know your instrument
Functions of the baby monitor
This baby monitor enables you to monitor your baby whilst you pursue
activities in other rooms or in the garden. The DECT 6.0 technology ensures
a virtually interference-free connection.
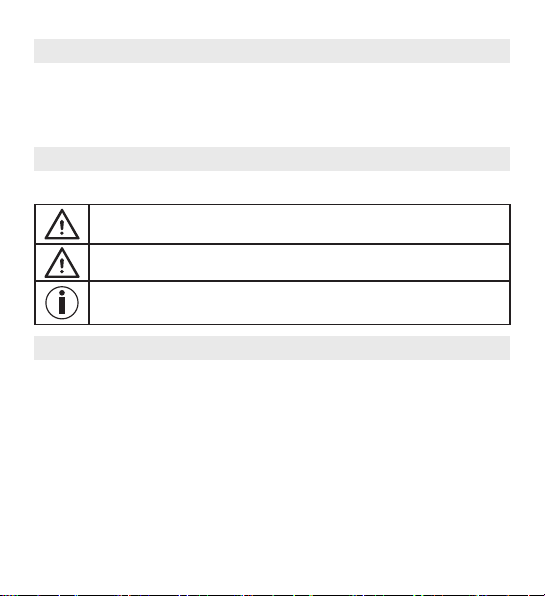
2. Signs and symbols
The following symbols appear in these instructions:
Warning
Warning instruction indicating a risk of injury or damage to health
Important
Safety note indicating possible damage to the unit/accessory
Note
Note on important information
3. Intended use
• This baby monitor is not a substitute for responsible adult supervision.
• The device is only intended for domestic/private use, not for
commercial use.
2
Page 5
English
• This device is not intended for use by people (including children) with restricted physical, sensory or mental skills or a lack of experience and/or a
lack of knowledge, unless they are supervised by a person who is responsible
for their safety or are instructed in how to use the device.
• Children should be supervised around the device to ensure they do not
play with it.
• Improper use can be dangerous.
Safety notes
Warning:
• Always position the device and power cord out of the reach of
children. The power cord could result in strangulation or cause
injury to children.
• Keep small parts out of the reach of children (risk of swallowing).
• Keep packaging material away from children (risk of
suffocation).
• Never place the baby unit in the crib or within the reach of your child.
• Place the baby unit 3 feet away from your baby.
• Make sure that cables are out of the reach of your child (risk of
electric shock).
• Always make sure that the devices are fully functioning before
use, and that the devices are sufciently charged when in
battery mode.
• Only use the power supply units included with the delivery (risk of
re and electric shock).
3
Page 6
Important: To avoid damage to the device, please observe the
following:
• Never submerge the devices in water or rinse them in running
water.
• Never use the devices in a damp environment.
• Do not use the cable to pull the adapter plug out of the connector.
• Disconnect the adapter plug from the mains when the device is
not in use.
• The device and the power supply unit should not come into
contact with hot surfaces or sharp objects.
• Do not use any additional parts that are not recommended by
the manufacturer or offered as equipment.
• The plug-in power unit must be operated only from a power sup-
ply as specied on it.
• The appliance should only be operated with the power unit provided.
• After use, before cleaning and changing any accessory parts,
the power unit should always be disconnected.
Notes on handling batteries
Warning:
• Swallowing batteries can be extremely dangerous. Keep
batteries out of the reach of small children. Should a battery be
swallowed, seek medical assistance immediately.
• Batteries must not be recharged, taken apart, thrown into an
open re or short circuited.
• Batteries can contain toxins that are harmful to health and the
environment. Always dispose of batteries in accordance with
applicable legal regulations. Do not dispose of batteries with
normal household waste.
• Do not expose the batteries to excessive heat such as sunlight,
re, etc.
4
Page 7

English
Important:
• Replace weak batteries before they discharge completely.
• Leaking batteries may damage the device. If you do not intend
to use the device for an extended period of time, remove the
batteries from the battery compartment.
• If a battery has leaked, put on protective gloves and clean the
battery compartment with a dry cloth.
General notes
• Repairs must only be carried out by Customer Services or authorized
suppliers. Under no circumstances should you open or repair
the device yourself, as faultless functionality could no longer
be guaranteed thereafter. Failure to comply will invalidate the
warranty.
• If you have any questions about using our devices, please
contact either your retailer or Customer Services.
5
Page 8
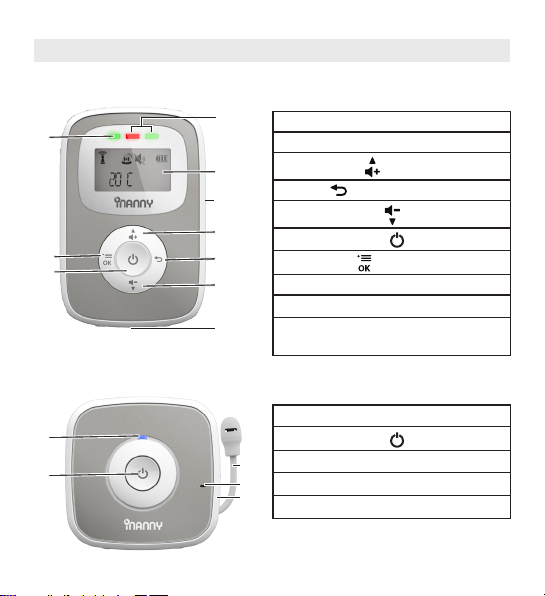
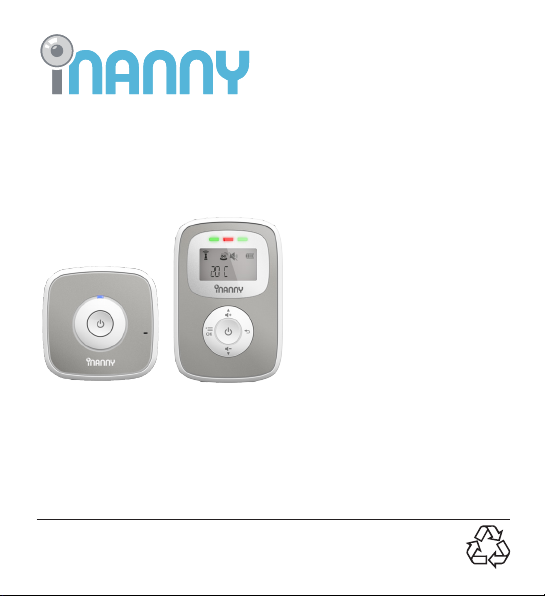
4. Unit description
Overview of parent unit
8
7
6
Overview of baby unit
1
2
1
1. Noise level light display
2. LCD display
3. Volume up
2
4. BACK
9
5. Volume down
3
6. Power ON/OFF button
4
7. MENU/OK
8. Link/Power LED
5
9. Speaker
10. Mains part connector
10
(underneath)
1. Power LED
2. Power ON/OFF
3. Microphone
5
4. Mains part connector (rear)
3
4
5. Temperature Sensor
6
button
Page 9
English
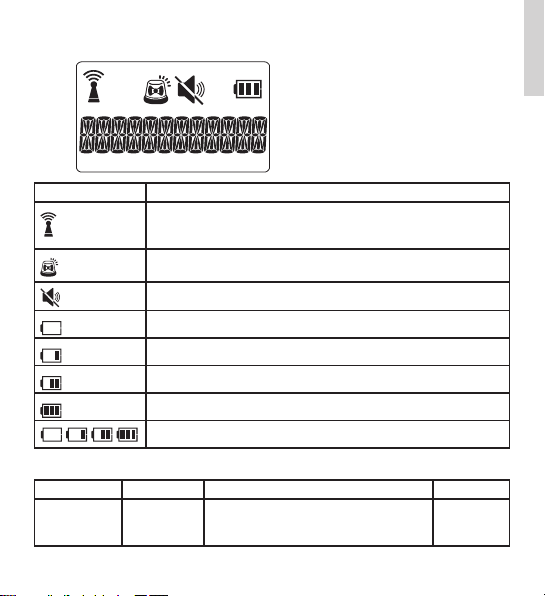
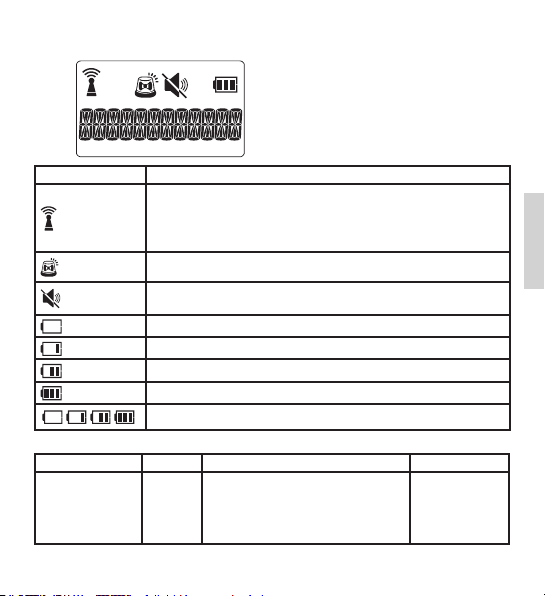
Parent unit Display
Icons Behaviour Description
On, when the parent unit is linked and in range of the
baby unit.
Flashes when no link or out of range.
On, when the sound alert is enabled.
Flashes when the sound alert is triggered.
On, when the speaker volume is turned off.
Battery empty, and needs to be charged.
1/3 battery level.
2/3 battery level.
Full battery level.
Cycles through when battery is charging.
Menu structure of the parent unit
MAIN MENU LANGUAGE SOUND ALERT RESET
SUB MENU ON? (if the current setting is Off)
or
OFF? (if the current setting is On)
7
CONFIRM
?
Page 10

5. Initial use
Baby unit
Position the baby unit not in proximity to any other devices that may
cause interference.
Connect the round plug of the power adapter to the baby unit and the
other end to the electrical outlet.
The device automatically switches on.
The power LED will light up green.
To switch the device off, press the ON/OFF button for at least 2 seconds or
unplug the power adapter from the electrical outlet. The power LED will
then turn off.
To switch the device on again, press the ON/OFF button for approx. 2
seconds.
Parent unit
Plug in the battery cells into the parent unit battery compartment with the
orientation according to the polarity marked in the compartment.
Battery operation – charging
To ensure optimal safety, the parent unit is designed so that it can
only be operated with batteries inserted.
The battery must be charged for at least 16 hours before the device can
be rst used.
Switch on the parent unit by pressing the button for 2 seconds. The power
LED of the parent unit will light up green to indicate that the device is active.
If the parent unit battery is low and not connected to electrical outlet,
then the unit will beep twice. it will switch off automatically after a short
period. The power LED will turn off.
8
Page 11

English
Operation with the power adapter
Connect the round plug of the power adapter to the parent unit (with
batteries installed) and the other end to the electrical outlet. The device
automatically switches on, and the power LED will light up green.
The standby time will depend on the battery charge status.
To switch the device off press the
the power LED will turn off.
If there is no connection between the devices (baby unit not
switched on or out of range), an acoustic warning will sound on
the parent unit.
button for approx. 2 seconds, and
6. Settings
Adjusting the volume
You can adjust the volume in 5 levels on the parent unit by pressing the
or button.
The sound intensity is also shown using an LED noise level light
display so that the device can also be used by those with a
hearing impairment.
Set the LCD language
You can choose the language to be displayed on the LCD.
• Press when the parent unit is not in use.
• Press or to scroll to LANGUAGE.
• Press or to choose your desired language for the LCD display.
• Press to conrm.
9
Page 12
Sound alert
When sound alert is set on and the parent unit volume is turned off, the
parent unit will emit a sound alert when the noise level from the baby unit
exceeds a set limit.
• Press when the parent unit is not in use.
• Press or to scroll to SOUND ALERT, and then press .
• When ON? or OFF? Displays, press to conrm.
Reset
The adjustable settings can be restored back to their original factory
settings.
• Press when the parent unit is not in use.
• Press or to scroll to RESET, and then press .
• When CONFIRM? Displays, press to conrm.
Temperature
The baby unit constantly monitors the temperature in your baby’s
room and alerts you if it gets too hot (higher than 39ºC) with the display
showing "HIGH TEMP" or too cold (lower than 14ºC) with "LOW TEMP". The
temperature is displayed clearly on the parent unit's idle screen.
This is only for reference, and there may be a small difference
between the displayed reading compared with the actual
temperature. Therefore, please check the actual temperature in
the room against the display reading.
10
Page 13
English
7. Useful information about the baby monitor
• Place the baby unit in a convenient location.
• Do not position the baby monitor near other devices (such as microwave
ovens, WLAN, etc.) that may emit radio waves, as they may interfere with
the transmission of the baby monitor.
• Factors might interfere with the indoor range of the units such as presence
of xture, walls and furniture.
8. Replacing/charging the batteries
If the batteries are fully discharged, the units will switch off automatically.
The batteries must then be replaced or recharged (see Initial use).
• When changing the batteries, use batteries of the same type,
make and capacity.
• Always replace all batteries at the same time.
• Use only batteries of the same type.
11
Page 14
9. Storage and maintenance
The service life of the devices depends on careful use.
Important:
• Remove the batteries from the parent unit if the unit is not in use
for an extended period.
• You will get the maximum capacity from your battery if you
run down the battery at least once every 6 months. To do this,
disconnect the device from the mains and run the battery down
through normal use. Then, fully charge the battery up again.
• The maximum battery capacity can only be reached after it has
been charged several times and is dependent on many factors
(battery state, ambient temperature, means and frequency of
charging, etc.).
• Protect the devices from knocks, damp, dust, chemicals, drastic
changes in temperature, electromagnetic elds and nearby
sources of heat (ovens, heaters).
• If dirty, wipe the device with a soft, dry cloth.
• Use only a dry cloth to clean the device. Do not use any
abrasive cleaning products.
12
Page 15

English
10. What if there are problems
Faults Actions
Power LED does
not light up after
switch-on.
An acoustic signal
sounds from the
parent unit.
No acoustic signal
sounds from the
parent unit.
The device
switches off
automatically.
The signal is weak,
the connection
keeps breaking
up or there is
interference.
Check whether
• The relevant adapter plug is properly plugged in,
• The batteries are full or the rechargeable battery
needs charging or is damaged (parent unit).
Check whether
• The maximum range has been exceeded
• The power supply unit for the baby unit is correctly
connected
• The baby unit is switched on
• The batteries are full or the rechargeable battery
needs charging or is damaged (parent unit).
• Adjust the volume on the parent unit.
• Replace the batteries or recharge the battery
(parent unit).
• Make sure the baby and parent units are not near
other electrical equipment,such as a television,
computer or cordless/mobile telephone.
• Try moving the parent unit and/or baby unit to
different positions in the rooms.
• lf the baby unit is too far away it may be out of range,
so move the baby unit closer to the parent unit.
?
13
Page 16
11. Technical data
• DECT 6.0 technology
• 1921.536 MHz - 1928.448 MHz frequency
• 5 digital channels
• Dimensions: Baby unit: Ø 95 x 36 mm, Parent unit: Ø 90 x 45 mm
• Weight: Baby unit: ~ 48 g,
• Range: 985 feet range with a clear view
Parent unit: 105 g, (with batteries)
Mains part (each): approx. 41 g
Operation Baby unit: Supplied power mains
Rechargeable battery life
(dependent on battery state,
ambient temperature, LCD display
etc.)
(6 V DC/400 mA)
Parent unit: NiMH rechargeable
battery
(2 x 1.2 V/400 mAh) and Supplied
power mains (6 V DC/400 mA)
Parent unit: 10 hours
14
Page 17

English
FCC and IC regulations (FCC Part 15)
NOTE: This equipment has been tested and found to comply with the
limits for a Class B digital device, pursuant to Part 15 of the Federal
Communications Commission (FCC) rules. These limits are designed
to provide reasonable protection against harmful interference in a
residential installation. This equipment generates, uses and can radiate
radio frequency energy and, if not installed and used in accordance
with the instructions, may cause harmful interference to radio
communications. However, there is no guarantee that interference will
not occur in a particular installation. If this equipment does cause harmful
interference to radio or television reception, which can be determined by
turning the equipment off and on, the user is encouraged to try to correct
the interference by one or more of the following measures:
• Reorient or relocate the receiving antenna.
• Increase the separation between the equipment and receiver.
• Connect the equipment into an outlet on a circuit different from that to
which the receiver is connected.
• Consult the dealer or an experienced radio/TV technician for help.
Changes or modications to this equipment not expressly approved by
the party responsible for compliance could void the user’s authority to
operate the equipment.
This device complies with Part 15 of the FCC rules. Operation is subject
to the following two conditions: (1) this device may not cause harmful
interference, and (2) this device must accept any interference received,
including interference that may cause undesired operation.
To ensure safety of users, the FCC has established criteria for the amount
of radio frequency energy that can be safely absorbed by a user or
bystander according to the intended usage of the product. This product
15
Page 18

has been tested and found to comply with the FCC criteria.
This Class B digital apparatus complies with Canadian ICES-003.
CAN ICES-3(B)/NMB-3(B)
WARNING
Changes or modications, to this equipment not expressively approved
by the party responsible for compliance could void the user’s authority to
operate the equipment.
The socket-outlet shall be installed near the equipment and shall be easily
accessible.
Industry Canada
This device complies with Industry Canada licence-exempt RSS
standard(s): Operation is subject to the following Two conditions:(1) this
device may not cause interference, and (2) this device must accept any
interference, including interference that may cause undesired operation
of the device.
The term "IC: " before the certication/registration number only signies
that the Industry Canada technical specications were met. This product
meets the applicable Industry Canada technical specications.
Le présent appareil est conforme aux CNR d’Industrie Canada
applicables aux appareils radio exempts de licence. L’exploitation
est autorisée aux deux conditions suivantes : (1) l’appareil ne doit pas
produire de brouillage, et (2) l’utilisateur de l’appareil doit accepter tout
brouillage radioélectrique subi, même si le brouillage est susceptible d’en
compromettre le fonctionnement.
Caution: To maintain the compliance with the FCC’s RF exposure
guideline, place the Baby unit at least 20 cm from nearby persons.
Changes or modications not expressly approved by the party responsible
for compliance could void the user's authority to operate the equipment.
16
Page 19

Français
FRANÇAIS
Lisez attentivement ce Guide de l'utilisateur, conservezle pour pouvoir le consulter ultérieurement, mettezle à la disposition des autre utilisateurs et suivez les
instructions qu'il contient.
Table des matières
1. Découvrezvotre appareil ........................................................................................18
2. Signes et symboles ...................................................................................................18
3. Usage prévu ..............................................................................................................18
4. Description de l'appareil .........................................................................................22
5. Première utilisation ...................................................................................................24
6. Réglages....................................................................................................................25
7. Informations utiles sur le moniteur pour bébé .......................................................27
8. Remplacement et charge des piles ......................................................................27
9. Stockage et entretien ..............................................................................................28
10. Que faire en cas de problème ?...........................................................................29
11. Caractéristiques techniques ..................................................................................30
Contenu de la boîte
•
Moniteur pour bébé comprenant une unité bébé et une unité parents
•
2 deux adaptateurs secteur pour l'unité parents et l'unité bébé
•
2 piles NiMH pour l'unité parents
•
Guide de l'utilisateur
•
Garantie et réparations
17
Page 20

1. Découvrez votre appareil
Fonctionnalités du moniteur pour bébé
Ce moniteur pour bébé vous permet de surveiller votre bébé pendant
que vous êtes occupé dans une autre pièce ou dans le jardin. La
technologie DECT 6.0 garantit une liaison pratiquement sans interférences.
2. Signes et symboles
Les symboles suivants sont utilisés dans ce guide :
Attention
Avertissement : risque de blessure ou d'atteinte à la santé
Important
Avertissement : risque de dommage à l'appareil ou accessoire
Remarque
Importantes informations
3. Usage prévu
• Cet appareil ne remplace pas la supervision d'un adulte responsable !
• L'appareil est destiné à un usage domestique / privé, et non à un usage
commercial.
18
Page 21

Français
• Cet appareil n'est pas destiné à être utilisé par des personnes (y compris
les enfants) dont les capacités physiques, sensorielles ou mentales sont
diminuées ou qui manquent d'expérience et/ou de connaissances, sauf
si elles sont supervisées par une personne responsable de leur sécurité
ou ont appris à utiliser l'appareil.
•Lesenfantsdoiventêtresurveillésandes'assurerqu'ilsnejouentpas
avec l'appareil.
• Une mauvaise utilisation peut être dangereuse.
Précautions de sécurité
Attention :
• Placez toujours l'appareil et le cordon d'alimentation hors de
portée des enfants. Le cordon d'alimentation pourrait étrangler
ou blesser les enfants.
• Tenez les petites pièces hors de portée des enfants (risque
d'ingestion).
• Tenez les emballages hors de portée des enfants (risque
d'étouffement).
• Ne placez jamais l'unité bébé dans le berceau ou à la portée
de votre enfant.
• Placez l'unité bébé à au moins 3 pieds (1 mètre) de votre bébé.
• Assurez-vous que les câbles sont hors de portée de votre enfant
(risque de choc électrique).
• Assurez-vous que les appareils sont pleinement opérationnels
avantdelesutiliser,etquelespilessontsufsammentchargées.
• Utilisez uniquement les adaptateurs secteur fournis avec
l'appareil (risque de choc électrique).
19
Page 22

Important : pour éviter d'endommager l'appareil, veuillez respecter
les consignes suivantes :
• Ne plongez jamais l'appareil dans l'eau et ne le rincez jamais à
l'eau courante.
• N'utilisez jamais l'appareil en milieu humide.
• Ne tirez pas sur le câble d'alimentation pour débrancher
l'adaptateur secteur.
• Débranchez l'adaptateur secteur lorsque vous n'utilisez pas
l'appareil.
• Ne mettez pas l'appareil et l'adaptateur secteur en contact
avec des surfaces chaudes ou des objets tranchants.
• N'utilisez aucune pièce supplémentaire qui ne serait pas
recommandée ou offerte par le fabricant.
• L'adaptateur secteur doit être branché à une source électrique
conformeauxindicationsspéciéessurcelui-ci.
• Utilisez uniquement les adaptateurs secteur fournis pour
alimenter les appareils.
• Débranchez toujours l'adaptateur secteur après utilisation et
avant de nettoyer l'appareil ou de changer un accessoire.
Précautions concernant les piles
Attention :
• Il est extrêmement dangereux d'avaler les piles. Tenez les piles
hors de portée des enfants. Si une pile a été avalée, consultez
immédiatement un médecin.
• Les piles ne doivent pas être rechargées, démontées, jetées au
feu ou court-circuitées.
• Les piles contiennent des substances toxiques nuisibles à la santé
et à l'environnement. Éliminez toujours les piles conformément à
la réglementation en vigueur. Ne jetez pas les piles aux vidanges.
• N'exposez pas les piles à une chaleur excessive telle que les
rayons du soleil, le feu, etc.
20
Page 23

Français
Important :
• Remplacez les piles faibles avant qu'elles ne soient
complètement déchargées.
• Les piles qui fuient peuvent endommager l'appareil. Retirez les
piles de leur logement si vous n'utilisez pas l'appareil pendant
une période prolongée.
• Si une pile a fui, mettez des gants de protection et nettoyez le
logement des piles à l'aide d'un chiffon sec.
Généralités
• Les réparations doivent être effectuées exclusivement par notre
service clientèle ou par un dépositaire agréé. Vous ne devez en
aucun cas tenter d'ouvrir ou de réparer l'appareil vous-même,
car son bon fonctionnement ne pourrait plus être garanti par la
suite. Par ailleurs, ceci annulerait automatiquement la garantie.
• Si vous avez des questions concernant l'utilisation de vos
appareils, adressez-vous à votre détaillant ou à notre service
clientèle.
21
Page 24

4. Description de l'appareil
Présentation de l’unité parents
8
7
6
Présentation de l’unité bébé
1
2
1
2
9
3
4
5
10
1. Indicateur de niveau de bruit
2. Écran LCD
3. Augmentation du volume
4. RETOUR
5. Diminution du volume
6. Touche MARCHE/ARRÊT
7. MENU/OK
8. DEL de liaison/alimentation
9. Haut-parleur
10. Prise de l'adaptateur secteur
(sous l'appareil)
1. DEL d’alimentation
2. Touche MARCHE/ARRÊT
3. Micro
5
4. Prise de l'adaptateur secteur
3
(au dos de l'appareil)
4
5. Capteur de température
22
Page 25

Français
Écran de l’unité parents
Icône Description
S'afchelorsquel’unitéparentsestsoustensionetestà
la portée de l’unité bébé.
Clignote lorsque la liaison est coupée ou que l’unité
parents est hors de portée de l’unité bébé.
S'afchelorsquel'alertesonoreestactivée.
Clignote lorsque l’alerte sonore se déclenche.
S'afchelorsquelehaut-parleurestdésactivé.
Piles épuisées, recharge nécessaire.
Niveau de charge 1/3.
Niveau de charge 2/3.
Piles complètement chargées.
S'anime lorsque les piles se chargent.
Arborescence des menus de l’unité parents
MENU PRINCIPAL LANGUE ALERTE SONORE RÉINITIALISATION
SOUS-MENU ACTIVER ? (si le réglage
actuel est DÉSACTIVÉ)
ou
DÉSACTIVER ? (si le réglage
actuel est ACTIVÉ)
23
CONFIRMEZ?
Page 26

5. Première utilisation
Unité bébé
Placezl'unitébébédansunendroitsufsammentéloignéd'autres
appareils susceptibles de provoquer des interférences.
Branchez la prise ronde de l'adaptateur secteur à l'unité bébé et
l'adaptateur à une prise de courant.
L'appareil s'allume automatiquement.
La DEL verte d’alimentation s’allume.
Pour éteindre l'appareil, appuyez sur la touche MARCHE/ARRÊT pendant
au moins 2 secondes, ou débranchez l'adaptateur secteur. La DEL
d'alimentation s'éteint.
Pour rallumer l'appareil, appuyez sur la touche MARCHE/ARRÊT pendant
environ 2 secondes.
Unité parents
Insérez les piles dans le logement des piles de l'unité parents en
respectant les polarités indiquées à l'intérieur.
Fonctionnement sur piles : charge
Andegarantirunesécuritéoptimale,l'unitéparentsnepeut
fonctionner que si les piles sont insérées.
Les piles doivent être chargées pendant au moins 16 heures avant la
première utilisation.
Allumez l'unité parents en appuyant sur la touche
La DEL d'alimentation de l'unité parents s'allume en vert pour indiquer
que l'appareil est en fonctionnement.
Lorsque les piles de l'unité parents sont faibles et que l'appareil
n'est pas branché au secteur, l'appareil émet deux bips. Il s'éteint
automatiquement peu après et la DEL d'alimentation s'éteint.
24
pendant 2 secondes.
Page 27
Français
Utilisation avec l'adaptateur secteur
Branchez la prise ronde de l'adaptateur secteur à l'unité parents (les piles
étant en place) et l'adaptateur à une prise de courant. L'appareil s'allume
automatiquement et la DEL d'alimentation s'allume en vert.
La durée de fonctionnement dépend du niveau de charge des piles.
Pour éteindre l'appareil, appuyez sur la touche
secondes : la DEL d'alimentation s'éteint.
Si il n'y a aucune liaison entre les appareils (unité bébé éteinte ou
hors de portée), une alerte sonore retentit sur l'unité parents.
pendant environ 2
6. Réglages
Réglage du volume
Vous pouvez régler le volume de l'unité parents sur 5 niveaux en
appuyant sur
Choixdelalangued'afchage
Vouspouvezchoisirlalangued'afchagepourl'écranLCD.
• Appuyez sur lorsque vous n’utilisez pas l’unité parents.
• Appuyez sur ou jusqu'à LANGUE.
• Appuyez sur ou pour sélectionner la langue désirée.
• Appuyez sur pourconrmer.
ou .
Le niveau sonore est également indiqué par une DEL, de
sorte que le dispositif peut également être utilisé par les
malentendants.
25
Page 28
Alerte sonore
Lorsque l'alerte sonore est activée et que le volume de l'unité parents est
coupé, l'unité parents émettra un bip lorsque le niveau du bruit capté par
l'unitébébédépasseraunelimitexée.
• Appuyez sur lorsque vous n’utilisez pas l’unité parents.
• Appuyez sur ou jusqu'à ALERTE SONORE, puis sur .
• Lorsque ACTIVER ? ou DÉSACTIVER ?s'afche,appuyezsur pour
conrmer.
Réinitialisation
Vous pouvez restaurer tous les réglages par défaut (d’usine) de l’appareil.
• Appuyez sur lorsque vous n’utilisez pas l’unité parents.
• Appuyez sur ou jusqu'à RÉINITIALISATION, puis sur .
• Lorsque CONFIRMEZ ?s'afche,appuyezsur pourconrmer.
Température
L’unité bébé mesure en permanence la température de la chambre et
vousalertesielleesttropélevée(plusde39°C/102°F)enafchant
« TEMP. ÉLEVÉE»outropbasse(moinsde14°C/57°F)enafchant
« TEMP. BASSE».Latempératures'afcheclairementsurl'écrandeveille
de l'unité parents.
Ceci est seulement à titre indicatif et il peut y avoir une légère
différenceentrelatempératureafchéeetlatempérature
réelle.Parconséquent,veuillezvérierlatempératureréelledela
chambreparrapportàlatempératureafchée.
26
Page 29

Français
7. Informations utiles sur le moniteur pour bébé
• Placez l'unité bébé dans un endroit pratique.
• Ne placez pas le moniteur pour bébé à proximité d'autres appareils
ou dispositifs (tels que fours à micro-ondes, WLAN, etc.) susceptibles
d'émettre des radiofréquences, car celles-ci peuvent interférer avec la
transmission du moniteur pour bébé.
• Divers facteurs peuvent également affecter la portée intérieure des
appareils, tels que les meubles et les murs.
8. Remplacement et charge des piles
Lorsque les piles sont complètement déchargées, les appareils s'éteignent
automatiquement. Les piles doivent être alors remplacées ou rechargées
(voir Première utilisation).
• Remplacez les piles par des piles de même type, marque et
capacité.
• Remplacez toujours toutes les piles en même temps.
• Utilisez uniquement des piles du même type.
27
Page 30

9. Stockage et entretien
La durée de vie des appareils dépend du soin que vous leur apportez.
Important :
• Retirez les piles de l'unité parents si vous ne l'utilisez pas pendant
une période prolongée.
• Vous obtiendrez la capacité maximale de vos piles si vous les
déchargez complètement au moins une fois tous les 6 mois.
Pourcela,ilvoussuftdedébrancherl'appareildusecteur
et de continuer à l'utiliser normalement. Ensuite, rechargez
complètement les piles.
• La capacité maximale des piles ne peut être atteinte que
lorsqu'elles ont été chargées à plusieurs reprises, et est tributaire
de nombreux facteurs tels que l'état des piles, la température
ambiante, le mode et la fréquence de charge, etc.).
• Protégez les appareils contre les chocs, l'humidité, la poussière,
les produits chimiques, les changements importants de
température, les champs électromagnétiques et les sources de
chaleur (fours, appareils de chauffage).
• Lorsque l'appareil est sale, essuyez-le à l'aide d'un chiffon doux
et sec.
• Utilisez uniquement un chiffon sec pour nettoyer l'appareil.
N'utilisez pas de produits de nettoyage abrasifs.
28
Page 31

Français
10. Que faire en cas de problème ?
Problème Solution
La DEL
d'alimentation ne
s'allume pas après
avoir mis l'appareil
sous tension.
L'unité parents
émet un bip.
Aucun son
provenant de
l'unité parents.
L'appareil s'éteint
automatiquement.
Le signal est
faible, la liaison
est fréquemment
coupée ou il y a
des interférences.
Vériezsi:
• L'adaptateur secteur est correctement branché,
• Les piles sont complètement chargées, ou ont
besoin d'être rechargées, ou sont endommagées
(unité parents).
Vériezsi:
• La portée maximale n'est pas dépassée
• L'adaptateur secteur de l'unité bébé est
correctement branché
• L’unité bébé est allumée
• Les piles sont complètement chargées, ou ont
besoin d'être rechargées, ou sont endommagées
(unité parents).
• Réglez le volume de l’unité parents.
• Remplacez ou rechargez les piles (unité parents).
• Assurez-vous que l'unité parents et l'unité
bébé ne sont pas trop près d'autres appareils
électriques tels que téléviseurs, ordinateurs ou
téléphonessansloucellulaires.
• Essayez de déplacer l'unité parents et/ou l'unité
bébé.
• Si l'unité bébé est trop éloignée, elle est peut-être
hors de portée : rapprochez-la de l'unité parents.
29
Page 32
11. Caractéristiques techniques
• Technologie DECT 6.0
• Gamme de fréquence 1921.536 MHz à 1928.448 MHz
• 5 canaux numériques
• Dimensions : Unité bébé : Ø 95 x 36 mm, unité parents : Ø 90 x 45 mm
• Poids : Unité bébé : ~ 48 g,
Unité parents : 105 g (piles incluses)
Adaptateurs secteur : environ 41 g chacun
• Portée : 985 pieds (300 mètres) sans obstacles
Alimentation Unité bébé : adaptateur secteur
Autonomie des piles
rechargeables (dépend
de l'état des piles, de la
température ambiante, de
l'utilisation de l'écran LCD, etc.)
6 V CC/400 mA fourni
Unité parents : 2 piles rechargeables
NiMH 1,2 V/400 mAh et adaptateur
secteur 6 V CC/400 mA fournis
Unité parents : 10 heures
30
Page 33

Français
Regulaciones de la Comisión federal de comunicaciones
(FCC) y de la Industria y ciencia de Canadá (IC)
Sección 15 de los reglamentos de la FCC
NOTA: Este equipo se ha puesto a prueba y se comprobó que cumple
con los límites para un dispositivo digital Clase B, en conformidad con la
Sección 15 de los reglamentos de la FCC. Estos límites están diseñados
para proporcionar cierta protección contra interferencias perjudiciales
en una instalación residencial. Este equipo genera, usa y puede irradiar
energía de radiofrecuencia y, si no es instalado y usado como lo
indican las instrucciones, puede causar interferencia perjudicial en las
radiocomunicaciones. Sin embargo, no hay garantía de que no suceda
una interferencia en una instalación en particular. Si este equipo causa
interferencia perjudicial en la recepción de radio o televisión, lo cual se
puede determinar al encender y apagar el equipo, le pedimos al usuario
que lleve a cabo una o varias de las siguientes medidas para intentar
corregir la interferencia:
• Cambie la orientación o el lugar de la antena receptora.
• Incremente la separación entre el equipo y el receptor.
• Conecte el equipo a un enchufe en un circuito diferente de donde está
conectado el receptor.
• Consulte a un distribuidor o técnico en radio y televisión experimentado
para obtener ayuda.
Loscambiosomodicacionesaesteequiponoexpresamenteaprobados
por la parte responsable del cumplimiento pueden anular la autoridad del
usuario para utilizar este equipo.
Este dispositivo cumple con la Sección 15 de los reglamentos de la FCC.
El funcionamiento está sujeto a las siguientes dos condiciones: (1) este
dispositivo no puede causar interferencia perjudicial y (2) este dispositivo
debe aceptar cualquier interferencia, incluyendo la interferencia que
31
Page 34

puede causar una operación indeseable del dispositivo.
Para garantizar la seguridad de los usuarios, la FCC ha establecido un
criterio para la cantidad de energía de radiofrecuencia que el usuario
o personas a su alrededor pueden absorber sin problemas de acuerdo
con el uso propuesto del producto. Este producto ha sido examinado y se
comprobó que cumple con el criterio de la FCC.
Este aparato digital clase B cumple con la norma canadiense ICES-003.
CAN ICES-3(B)/NMB-3(B)
PRECAUCIÓN
Loscambiosomodicacionesaesteequiponoexpresamenteaprobados
por la parte responsable del cumplimiento pueden anular la autoridad del
usuario para utilizar este equipo.
El tomacorriente debe estar instalado cerca del equipo y debe ser de fácil
acceso.
Industria de Canadá
Este dispositivo cumple con todo estándar RSS para productos exentos
de licencia de la Industria de Canadá: El funcionamiento está sujeto
a las siguientes Dos condiciones: (1) este dispositivo no puede causar
interferencia perjudicial y (2) este dispositivo debe aceptar cualquier
interferencia, incluyendo la interferencia que puede causar una
operación indeseable del dispositivo.
Eltérmino"IC":antesdelnúmerodecerticación/registrosólosignicaque
secumplióconlasespecicacionestécnicasdelaIndustriadeCanadá.
EsteproductocumpleconlasespecicacionestécnicasdelaIndustriade
Canadá.
32
Page 35

Français
Le présent appareil est conforme aux CNR d’Industrie Canada applicables
aux appareils radio exempts de licence. L’exploitation est autorisée aux
deux conditions suivantes : (1) l’appareil ne doit pas produire de brouillage,
et (2) l’utilisateur de l’appareil doit accepter tout brouillage radioélectrique
subi, même si le brouillage est susceptible d’en compromettre le
fonctionnement.
Avertissement : pour respecter la conformité aux directives de la FCC sur
les expositions aux radiofréquences (RF), placez l'unité bébé à au moins 20
cm de toute personne.
Tout changement ou modication non explicitement approuvés par la
partie responsable de la conformité pourrait priver l'utilisateur du droit
d'utiliser.
33
Page 36

Page 37

Español
ESPAÑOL
Lea estas instrucciones de uso detenidamente y
guárdelas para utilizarlas cuando las necesite, asegúrese
de que sean de fácil acceso para otros usuarios y tenga
en cuenta la información que contiene.
Índice
1. Conozca su dispositivo ............................................................................................36
2. Señales y símbolos ....................................................................................................36
3. Uso previsto ...............................................................................................................36
4. Descripción de la unidad ........................................................................................40
5. Primer uso ..................................................................................................................42
6. Conguraciones .......................................................................................................43
7. Información útil sobre el monitor para bebé ........................................................45
8. Remplazar/cargar las baterías ...............................................................................45
9. Guardado y mantenimiento ..................................................................................46
10. ¿Qué hago si se presenta algún problema? .......................................................47
11. Información técnica ..............................................................................................48
Se incluye en la entrega
•
Monitor para bebé que consta de una unidad para el bebé y una
unidad para los padres
•
2 Transformadores para la Unidad para los padres y para la
Unidad para el bebé
•
2 baterías de níquel e hidruro metálico para la unidad para los
padres
•
Guía de usuario
•
Garantía y Servicio al cliente
35
Page 38

1. Conozca su instrumento
Funciones del monitor para bebé
Este monitor para bebé le permite supervisar a su bebé mientras realiza
actividades en otras habitaciones o en el jardín. La tecnología DECT 6.0
garantiza una conexión prácticamente sin interferencias.
2. Señales y símbolos
Los siguientes símbolos aparecen en estas instrucciones:
Precaución
Aviso de advertencia por riesgo de lesiones o daño a la salud
Importante
Nota de seguridad que indica un posible daño a la unidad/
accesorio
Nota
Nota sobre información importante
3. Uso previsto
• ¡Este Monitor para bebé no remplaza su propia supervisión personal y
responsable!
• El dispositivo sólo está destinado para uso doméstico/privado, no para
uso comercial.
36
Page 39

Español
• Este dispositivo no está diseñado para que lo utilicen personas
(incluidos niños) cuyas habilidades físicas, sensoriales o mentales estén
restringidas, o con falta de experiencia/conocimiento, a menos que
sean supervisados por un adulto responsable de su seguridad o que
reciban instrucción sobre el uso del dispositivo.
• Se debe supervisar a los niños que se encuentren cerca del dispositivo
para asegurarse de que no jueguen con el mismo.
• Un uso inadecuado puede ser peligroso.
Recomendaciones de seguridad
Precaución:
• Siempre coloque el dispositivo y el cable de alimentación fuera del
alcance de los niños. El cable de alimentación podría provocar
estrangulamiento o causar alguna lesión a los niños.
• Mantenga las piezas pequeñas fuera del alcance de los niños (peligro
que las ingieran).
• Mantenga el material de embalaje alejado de los niños (peligro que se
asxien).
•
Nunca coloque la unidad para el bebé en la cuna o al alcance de su hijo.
• Coloque la unidad para el bebé a 3 pies (1 metro) de su bebé.
• Asegúrese de que los cables se encuentren fuera del alcance de su hijo
(peligro de descarga eléctrica).
• Asegúrese siempre de que los dispositivos estén funcionando plenamente
antes de utilizarlos y de que los dispositivos estén lo sucientemente
cargados cuando los utilice en modo batería.
• Utilice únicamente las fuentes de alimentación que se incluyen en la
entrega (peligro de incendio y descargas eléctricas).
37
Page 40
Importante: Para evitar daños en el dispositivo, tenga en cuenta
lo siguiente:
• Nunca sumerja los dispositivos en agua ni los lave bajo un
chorro de agua.
• Nunca utilice los dispositivos en un ambiente húmedo.
• No tire del cable para retirar el transformador del conector.
• Desconecte el transformador de la red eléctrica cuando no
utilice el dispositivo.
• El dispositivo y la fuente de alimentación no deben entrar en
contacto con supercies calientes ni objetos cortantes.
• No utilice ninguna pieza adicional que no esté recomendada
por el fabricante o que se ofrezca como parte del equipo.
• El enchufe conector se debe utilizar sólo con la fuente de
alimentación que se especica en el mismo.
• El aparato sólo se debe utilizar con el conector a corriente
eléctrica que se proporciona.
• Después de su uso, antes de limpiar y cambiar cualquier accesorio,
siempre debe desconectar la unidad de la corriente eléctrica.
Recomendaciones sobre la manipulación de las baterías
Precaución:
• La ingestión de las baterías puede ser extremadamente
peligrosa. Mantenga las baterías fuera del alcance de niños
pequeños. En caso que se trague una batería, busque ayuda
médica de inmediato.
• Las baterías no se deben recargar, desmontar ni arrojar al
fuego, y tampoco se debe provocar un cortocircuito en ellas.
• Las baterías pueden contener toxinas que son dañinas para
la salud y el medio ambiente. Siempre deseche las baterías
conforme a las normativas legales aplicables. No deseche las
baterías junto con los residuos domésticos ordinarios.
• No exponga las baterías al calor excesivo como luz solar,
fuego, etc.
38
Page 41

Español
Importante:
• Remplace las baterías gastadas antes de que se descarguen
por completo.
• Una batería con fuga puede dañar el dispositivo. Si usted no
piensa utilizar el dispositivo por un período prolongado, retire
las baterías del compartimento de la batería.
• Si una batería presenta una fuga, colóquese guantes de
protección y limpie el compartimento de la batería con un
paño seco.
Notas generales
• Las reparaciones sólo las debe realizar Servicio al cliente o
proveedores autorizados. Bajo ninguna circunstancia deberá
abrir o reparar el dispositivo usted mismo porque ya no se le
podría garantizar más un funcionamiento impecable. Si esto
no se cumple la garantía quedará inválida.
• Si usted tiene alguna pregunta sobre el uso de nuestros
dispositivos, por favor contáctese con su distribuidor o con
Servicio al cliente.
39
Page 42

4. Descripción de la unidad
Descripción general de la unidad para los padres
1. Indicador LED de nivel de ruido
1
8
7
6
Descripción general de la unidad para el bebé
2. Pantalla LCD
3. Subir volumen
4. ATRÁS
2
5. Bajar volumen
9
6. Botón de ENCENDIDO/
3
APAGADO
7. MENÚ/OK
4
8. LED de Enlace/Encendido
5
9. Altavoz
10. Entrada para conector a
corriente eléctrica (debajo)
10
1
2
1. LED de Encendido
2. Botón
APAGADO
5
3. Micrófono
3
4. Entrada para Conector a
4
corriente eléctrica (atrás)
5. Sensor de temperatura
40
de ENCENDIDO/
Page 43
Español
Pantalla de la unidad para los padres
Íconos Descripción de lo que indica
Encendido, cuando se estableció el enlace entre la unidad
para los padres y la del bebé y la unidad para los padres se
encuentra dentro del alcance de la unidad para el bebé.
Intermitente cuando no se estableció el enlace o se
encuentra fuera de alcance.
Encendido, cuando la alerta de sonido está activada.
Intermitente, cuando se activa la alerta de sonido.
Encendido, cuando el volumen del altavoz se encuentra
apagado.
Batería vacía, necesita carga.
1/3 del nivel de carga de la batería.
2/3 del nivel de carga de la batería.
Nivel máximo de carga de la batería.
Entra en movimiento cuando la batería se está cargando.
Estructura del menú de la unidad para los padres
MENÚ PRINCIPAL IDIOMA ALERTA DE SONIDO REINICIAR
SUBMENÚ ¿ACTIVAR? (si la conguración
actual es Desactivada)
o
¿DESACTIVAR? (si la conguración
actual es Activada)
41
¿CONFIRMAR
?
Page 44
5. Primer uso
Unidad para el bebé
Coloque la unidad para el bebé no próxima a ningún otro dispositivo
que pueda causar interferencia.
Conecte el enchufe redondo del transformador a la unidad para el
bebé y el otro extremo al tomacorriente.
El dispositivo se enciende automáticamente.
El LED de encendido se prenderá con una luz verde.
Para apagar el dispositivo, presione el botón de ENCENDIDO/APAGADO
por al menos 2 segundos o desenchufe el transformador de la corriente
eléctrica. Después se apagará el LED de encendido.
Para encender el dispositivo nuevamente, presione el botón de
ENCENDIDO/APAGADO por aproximadamente 2 segundos.
Unidad para los padres
Coloque la batería en el compartimento de la unidad para los padres
según la polaridad que se indica en el compartimento.
Funcionamiento con la batería – carga
Para garantizar una seguridad óptima, la unidad para los padres
está diseñada para que sólo pueda ser operada con baterías
colocadas.
Se debe cargar la batería por al menos 16 horas antes de utilizar el dispositivo
por primera vez.
Encienda la unidad para los padres presionando el botón por
2 segundos. El LED de encendido de la unidad para los padres se
encenderá con una luz verde para indicar que el dispositivo está activado.
Si el nivel de carga de la batería de la unidad para los padres es bajo,
y no está conectada a un tomacorriente, la unidad emitirá dos pitidos,
automáticamente se apagará después de un breve período. El LED de
encendido se apagará.
42
Page 45
Español
Funcionamiento con el transformador
Conecte el enchufe redondo del transformador a la unidad para los
padres (con las baterías colocadas) y el otro extremo al tomacorriente.
El dispositivo automáticamente se enciende, y el LED de encendido se
prende con una luz verde.
El tiempo que siga en funcionamiento dependerá del nivel de carga de la
batería.
Para apagar el dispositivo presione el botón
segundos, y el LED de encendido se apagará.
Si no hay conexión entre los dispositivos (la unidad para el bebé
no está encendida o está fuera de alcance), la unidad para los
padres emitirá un aviso sonoro.
por aproximadamente 2
6. Conguraciones
Ajustar el volumen
Puede ajustar el volumen según 5 niveles en la unidad para los padres
presionando el botón
La intensidad del sonido también se muestra a través de un
indicador LED de nivel de ruido de manera que el dispositivo
también pueda ser utilizado por aquellas personas con alguna
discapacidad auditiva.
Congurar el idioma de la pantalla LCD
Usted puede seleccionar el idioma de la información que aparecerá en
la pantalla LCD.
• Presione cuando la unidad para los padres no esté siendo utilizada.
• Presione o para desplazarse hasta IDIOMA.
• Presione o para seleccionar el idioma de su preferencia para la
pantalla LCD.
• Presione para conrmar.
o .
43
Page 46

Alerta de sonido
Cuando la alerta de sonido esté activada y el volumen de la unidad
para los padres esté apagado, la unidad para los padres emitirá una
alerta de sonido cuando el nivel de ruido que proviene de la unidad
para el bebé exceda el límite establecido.
• Presione cuando la unidad para los padres no esté siendo utilizada.
• Presione o para desplazarse hasta ALERTA DE SONIDO, y después
presione
•
Cuando aparezca ¿ACTIVAR? o ¿DESACTIVAR? presione para conrmar.
.
Reiniciar
Las conguraciones ajustables se pueden restablecer según sus ajustes
originales de fábrica.
• Presione cuando la unidad para los padres no esté siendo utilizada.
•
Presione o para desplazarse hasta REINICIAR, y después presione .
• Cuando aparece ¿CONFIRMAR? presione para conrmar.
Temperatura
La unidad para el bebé constantemente monitorea la temperatura de
la habitación de su bebé y le envía una alerta si se vuelve demasiado
calurosa (superior a los 39ºC) a través de una noticación en la pantalla
"TEMP ALTA" o si hace mucho frío (inferior a 14ºC) aparece "TEMP BAJA".
La temperatura aparece de forma clara en la pantalla en espera de la
unidad para los padres.
Esto sólo se debe tomar como referencia, es posible que exista
una pequeña diferencia entre la medición que aparece y la
temperatura real. Por lo tanto, por favor verique la temperatura
de la medición que aparece en la pantalla.
44
Page 47

Español
7. Información útil sobre el monitor para bebé
• Coloque la unidad para el bebé en una ubicación conveniente.
• No coloque el monitor para bebé cerca de otros dispositivos (como
hornos microondas, WLAN, etc.) que puedan emitir ondas de radio, ya
que podrían interferir en la transmisión del monitor para bebé.
• Existen factores que podrían interferir con el alcance de las unidades en
interiores, como por ejemplo accesorios, paredes y muebles.
8. Remplazar/cargar las baterías
Si las baterías están completamente descargadas, las unidades se
apagarán automáticamente. Deberá entonces remplazar o recargar las
baterías (ver Primer uso).
• Al cambiar las baterías utilice el mismo tipo, marca y
capacidad.
• Siempre remplace todas las baterías al mismo tiempo.
• Sólo utilice baterías del mismo tipo.
45
Page 48

9. Guardado y mantenimiento
La vida útil de los dispositivos depende de un uso cuidadoso.
Importante:
• Retire las baterías de la unidad para los padres si no va a
utilizar el dispositivo por un período prolongado.
• Obtendrá la capacidad máxima de su batería si la agota
por lo menos una vez cada 6 meses. Para ello, desconecte
el dispositivo de la corriente eléctrica y deje que la batería se
agote a través del uso normal del dispositivo. Luego, cargue la
batería completamente de nuevo.
• La capacidad máxima de la batería sólo se puede alcanzar
después de haber sido cargada varias veces y depende de
muchos factores (estado de la batería, temperatura ambiente,
medios y frecuencia de carga, etc.).
• Proteja los dispositivos de golpes, humedad, polvo, productos
químicos, cambios drásticos de temperatura, campos
electromagnéticos y fuentes cercanas de calor (hornos,
calefactores).
• Si se ensucia, limpie el dispositivo con un paño suave y seco.
• Sólo utilice un paño seco para limpiar el dispositivo. No utilice
ningún producto de limpieza abrasivo.
46
Page 49

Español
10. ¿Qué hago si se presenta algún problema?
Fallas Acciones
El LED de encendido
no se enciende
después de encender
la unidad.
La unidad para los
padres emite una
señal sonora.
La unidad para los
padres no emite una
señal sonora.
El dispositivo
se apaga
automáticamente.
La señal es débil, la
conexión se corta o
hay interferencia.
Verique si
• El transformador indicado está enchufado
adecuadamente,
• Las baterías están cargadas o si las baterías
recargables necesitan cargarse, o bien si están
dañadas (unidad para los padres).
Verique si
• Se ha superado el alcance máximo
• La fuente de alimentación de la unidad para el bebé
está conectada correctamente
• La unidad para el bebé está encendida
• Las baterías están cargadas o si las baterías
recargables necesitan cargarse, o bien si están
dañadas (unidad para los padres).
• Ajuste el volumen de la unidad para los padres.
• Remplace las baterías o cargue la batería (unidad
para los padres).
• Asegúrese de que la unidad para el bebé y la unidad
para los padres no estén cerca de otros equipos
eléctricos, como un televisor, una computadora o un
teléfono inalámbrico/móvil.
• Intente colocar la unidad para los padres y/o la
unidad para el bebé en diferentes posiciones en las
habitaciones.
• Si la unidad para el bebé se encuentra demasiado
lejos, posiblemente esté fuera del alcance, entonces
coloque la unidad para el bebé más cerca de la
unidad para los padres.
47
Page 50

11. Información técnica
• Tecnología FHSS DECT 6.0
• Frecuencia 1921.536 MHz - 1928.448 MHz
• 5 canales digitales
• Dimensiones: Unidad para el bebé: Ø 95 x 36 mm, Unidad para los
padres: Ø 90 x 45 mm
• Peso: Unidad para el bebé: ~ 48 g,
Unidad para los padres: 105 g, (con baterías)
Conector a corriente eléctrica (cada uno): aproximadamente 41 g
• Alcance: 985 pies (300 m) de alcance con una vista despejada
Funcionamiento Unidad para el bebé: Red eléctrica
Vida útil de la batería recargable
(que depende del estado de la
batería, la temperatura ambiente,
pantalla LCD, etc.)
suministrada (6 V CC/400 mA)
Unidad para los padres: Batería
recargable de níquel e hidruro metálico
(2 x 1.2 V/400 mAh) y Red eléctrica
suministrada (6 V CC/400 mA)
Unidad para los padres: 10 horas
48
Page 51

Español
Regulaciones de la Comisión federal de comunicaciones (FCC)
y de la Industria y ciencia de Canadá (IC)Sección 15 de los
reglamentos de la FCC
Sección 15 de los reglamentos de la FCC
NOTA: Este equipo se ha puesto a prueba y se comprobó que cumple
con los límites para un dispositivo digital Clase B, en conformidad con la
Sección 15 de los reglamentos de la FCC. Estos límites están diseñados
para proporcionar cierta protección contra interferencias perjudiciales
en una instalación residencial. Este equipo genera, usa y puede irradiar
energía de radiofrecuencia y, si no es instalado y usado como lo
indican las instrucciones, puede causar interferencia perjudicial en las
radiocomunicaciones. Sin embargo, no hay garantía de que no suceda
una interferencia en una instalación en particular. Si este equipo causa
interferencia perjudicial en la recepción de radio o televisión, lo cual se
puede determinar al encender y apagar el equipo, le pedimos al usuario
que lleve a cabo una o varias de las siguientes medidas para intentar
corregir la interferencia:
• Cambie la orientación o el lugar de la antena receptora.
• Incremente la separación entre el equipo y el receptor.
• Conecte el equipo a un enchufe en un circuito diferente de donde
está conectado el receptor.
• Consulte a un distribuidor o técnico en radio y televisión experimentado
para obtener ayuda.
Los cambios o modicaciones a este equipo no expresamente
aprobados por la parte responsable del cumplimiento pueden anular la
autoridad del usuario para utilizar este equipo.
Este dispositivo cumple con la Sección 15 de los reglamentos de la FCC.
49
Page 52

El funcionamiento está sujeto a las siguientes dos condiciones: (1) este
dispositivo no puede causar interferencia perjudicial y (2) este dispositivo
debe aceptar cualquier interferencia, incluyendo la interferencia que
puede causar una operación indeseable del dispositivo.
Para garantizar la seguridad de los usuarios, la FCC ha establecido un
criterio para la cantidad de energía de radiofrecuencia que el usuario
o personas a su alrededor pueden absorber sin problemas de acuerdo
con el uso propuesto del producto. Este producto ha sido examinado y
se comprobó que cumple con el criterio de la FCC. Este aparato digital
clase B cumple con la norma canadiense ICES-003.
CAN ICES-3(B)/NMB-3(B)
PRECAUCIÓN
Los cambios o modicaciones a este equipo no expresamente
aprobados por la parte responsable del cumplimiento pueden anular la
autoridad del usuario para utilizar este equipo.
El tomacorriente debe estar instalado cerca del equipo y debe ser de
fácil acceso.
Industria de Canadá
Este dispositivo cumple con todo estándar RSS para productos exentos
de licencia de la Industria de Canadá: El funcionamiento está sujeto
a las siguientes Dos condiciones: (1) este dispositivo no puede causar
interferencia perjudicial y (2) este dispositivo debe aceptar cualquier
interferencia, incluyendo la interferencia que puede causar una
operación indeseable del dispositivo.
El término "IC": antes del número de certicación/registro sólo
signica
que se cumplió con las especicaciones técnicas de la Industria de
50
Page 53

Español
Canadá. Este producto cumple con las especicaciones técnicas de la
Industria de Canadá.
Le présent appareil est conforme aux CNR d’Industrie Canada
applicables aux appareils radio exempts de licence. L’exploitation
est autorisée aux deux conditions suivantes : (1) l’appareil ne doit pas
produire de brouillage, et (2) l’utilisateur de l’appareil doit accepter tout
brouillage radioélectrique subi, même si le brouillage est susceptible d’en
compromettre le fonctionnement.
Advertencia: Para cumplir con las pautas de exposición a
radiofrecuencia (RF) de la Comisión federal de comunicaciones (FCC),
coloque la Unidad para el bebé a 20 cm como mínimo de toda persona
cercana.
Los cambios o modicaciones no expresamente aprobados por la parte
responsable del cumplimiento pueden anular la autoridad del usuario
para utilizar este equipo.
51
Page 54

©2015 Binatone Electronics International Limited
All rights reserved.
Printed in China Version 3.0
 Loading...