Binatone Electronics MDC300GW User Manual

EN


NL


FR


DE


PL


CZ


SK


ES


IT


DA


PT


SV


TR


RU


UA


AR


HB


TH


SC


TC


JA


KO

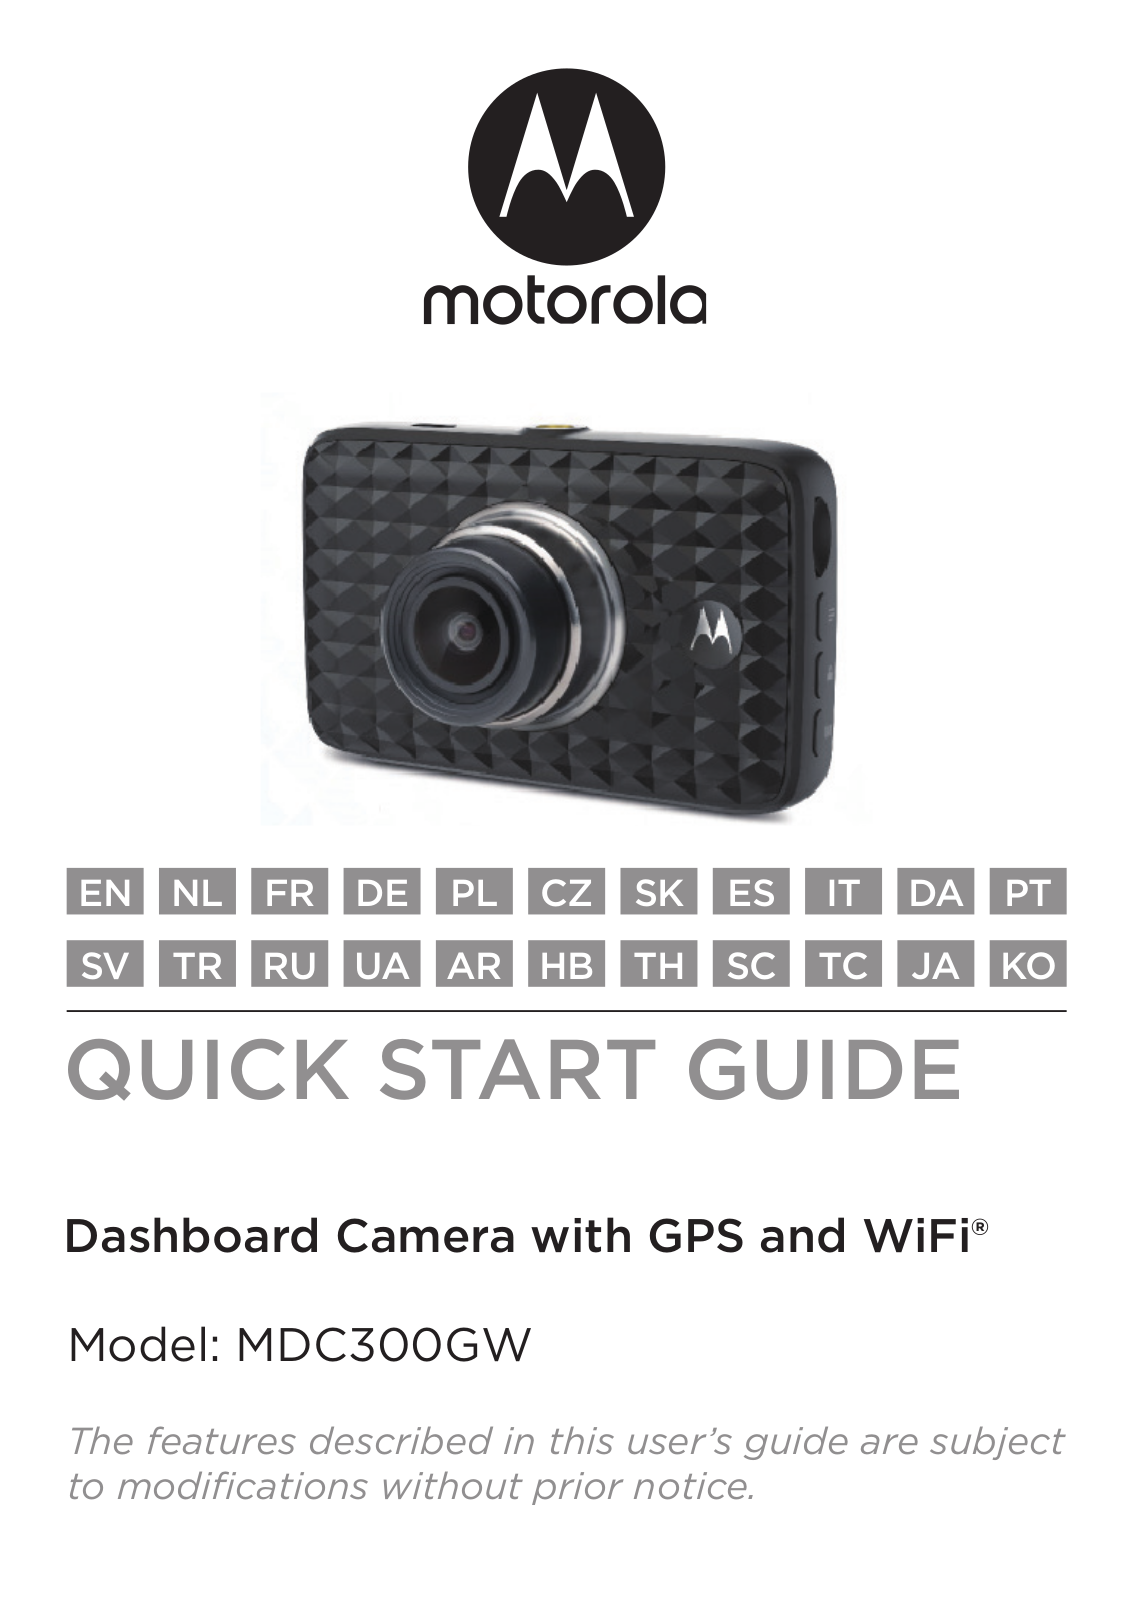
QUICK START GUIDE

Dashboard Camera with GPS and WiFi®

Model: MDC300GW

The features described in this user’s guide are subject to modifications without prior notice.

Binatone Electronics MDC300GW User Manual

GRAPH 1/ Grafiek 1/ GRAPHIQUE 1/ SCHAUBILD 1/ GRAFIKA 1/ GRAF 1/ GRAF 1/ GRÁFICO 1/ GRAFICO 1/ KURVE 1/ GRÁFICO 1/ GRAF 1/ GRAFİK 1/ ИЗОБРАЖЕНИЕ 1/ ЗОБРАЖЕННЯ 1/ 1/1/ 1/ 1/ 1/ גרף 1

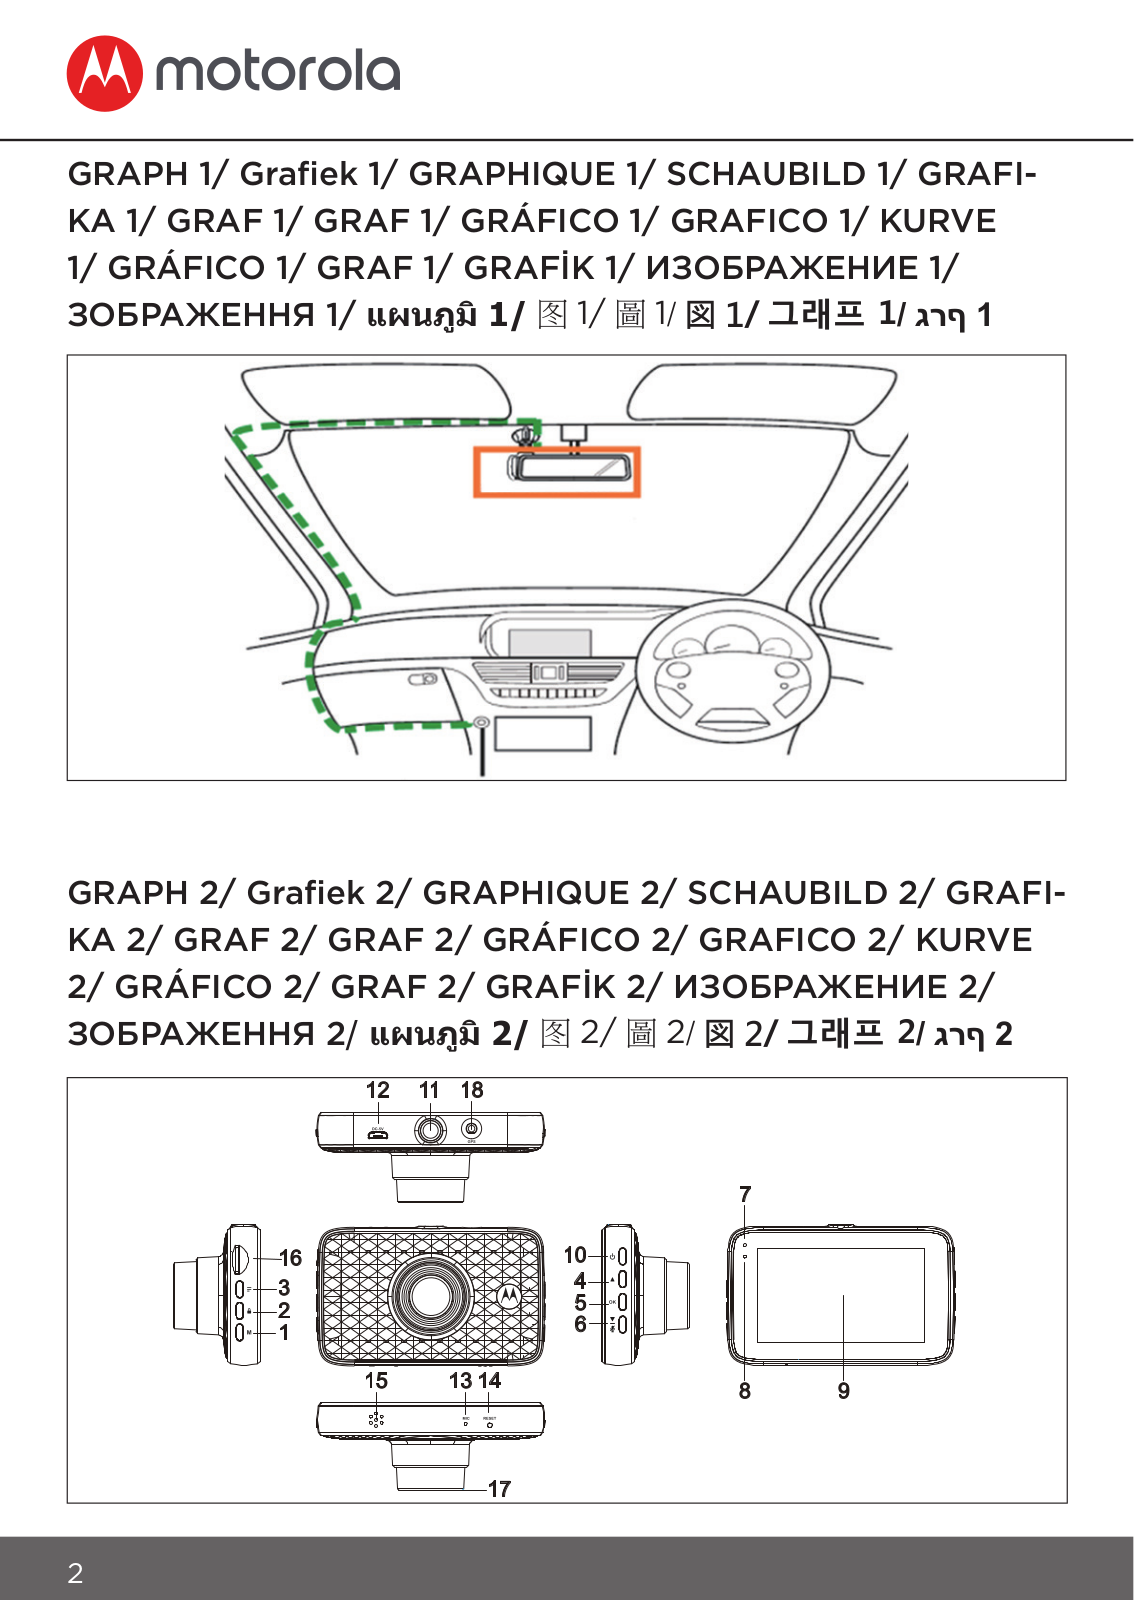
GRAPH 2/ Grafiek 2/ GRAPHIQUE 2/ SCHAUBILD 2/ GRAFIKA 2/ GRAF 2/ GRAF 2/ GRÁFICO 2/ GRAFICO 2/ KURVE 2/ GRÁFICO 2/ GRAF 2/ GRAFİK 2/ ИЗОБРАЖЕНИЕ 2/ ЗОБРАЖЕННЯ 2/ 2/2/ 2/ 2/ 2/ גרף 2

16

3

2

1

12

11

18


7


10


4


5


6


15


13 14

8

9


17

2


EN

Welcome! Have you got everything?

Dashboard Camera, Windshield Mount, Car Adapter, Quick Start Guide

1.Safety Instruction

WARNING

EN

It is the user’s responsibility to check the applicable laws before using the dash cam. We do not take any responsibility for wrong or unlawful use of the dash cam.

In some jurisdictions, the use of dash cams can be considered as an invasion of privacy as well as the mounting of the dash cam on the windshield.

2.Installing your Device (Graph 1)

Above illustration refers to right-hand drive car. For left-hand drive cars, please flip the position of the cable installation accordingly.

Install dashcam and suction mount together first. Clean the windshield near rear-view mirror area. Press suction cup of the mount to the cleaned windshield and press the lever to lock. Ensure the mount is safely attached to the cleaned windshield. We do not take any responsibility for inproper installation of mount.

Always connect micro USB plug of power cable into dashcam and connect another end to cigarette charger of vehicle for power supply. It is not designed to run on battery power alone. The battery inside dashcam is for backup purposes (parking mode) only. It will record automatically (once record mode is activated) with blue flashing LED as soon as it is connected to a power source.

3.First Use

In order to record video, a SD card (not provided) is recommended to insert into the SD card slot of dashcam before using.

Your dashboard camera accepts SD cards with up to 32GB capacity (class 10). You MUST format the SD card before recording.

You can power it ON or OFF manually by pressing the On/Off button.

Press the Menu/Back button to access Main Setting or Video Settings, press Up or Down to navigate, OK to confirm, and Menu/ Back to go back or cancel.

Safety Instruction

3


Parking Mode: After the car is parked, collision will activate the G-sensor and start video recording. Due to technical reasons, parking mode is disabled by default. You can enable it in settings.

You can switch between the Video and Playback mode by pressing the Mode button.

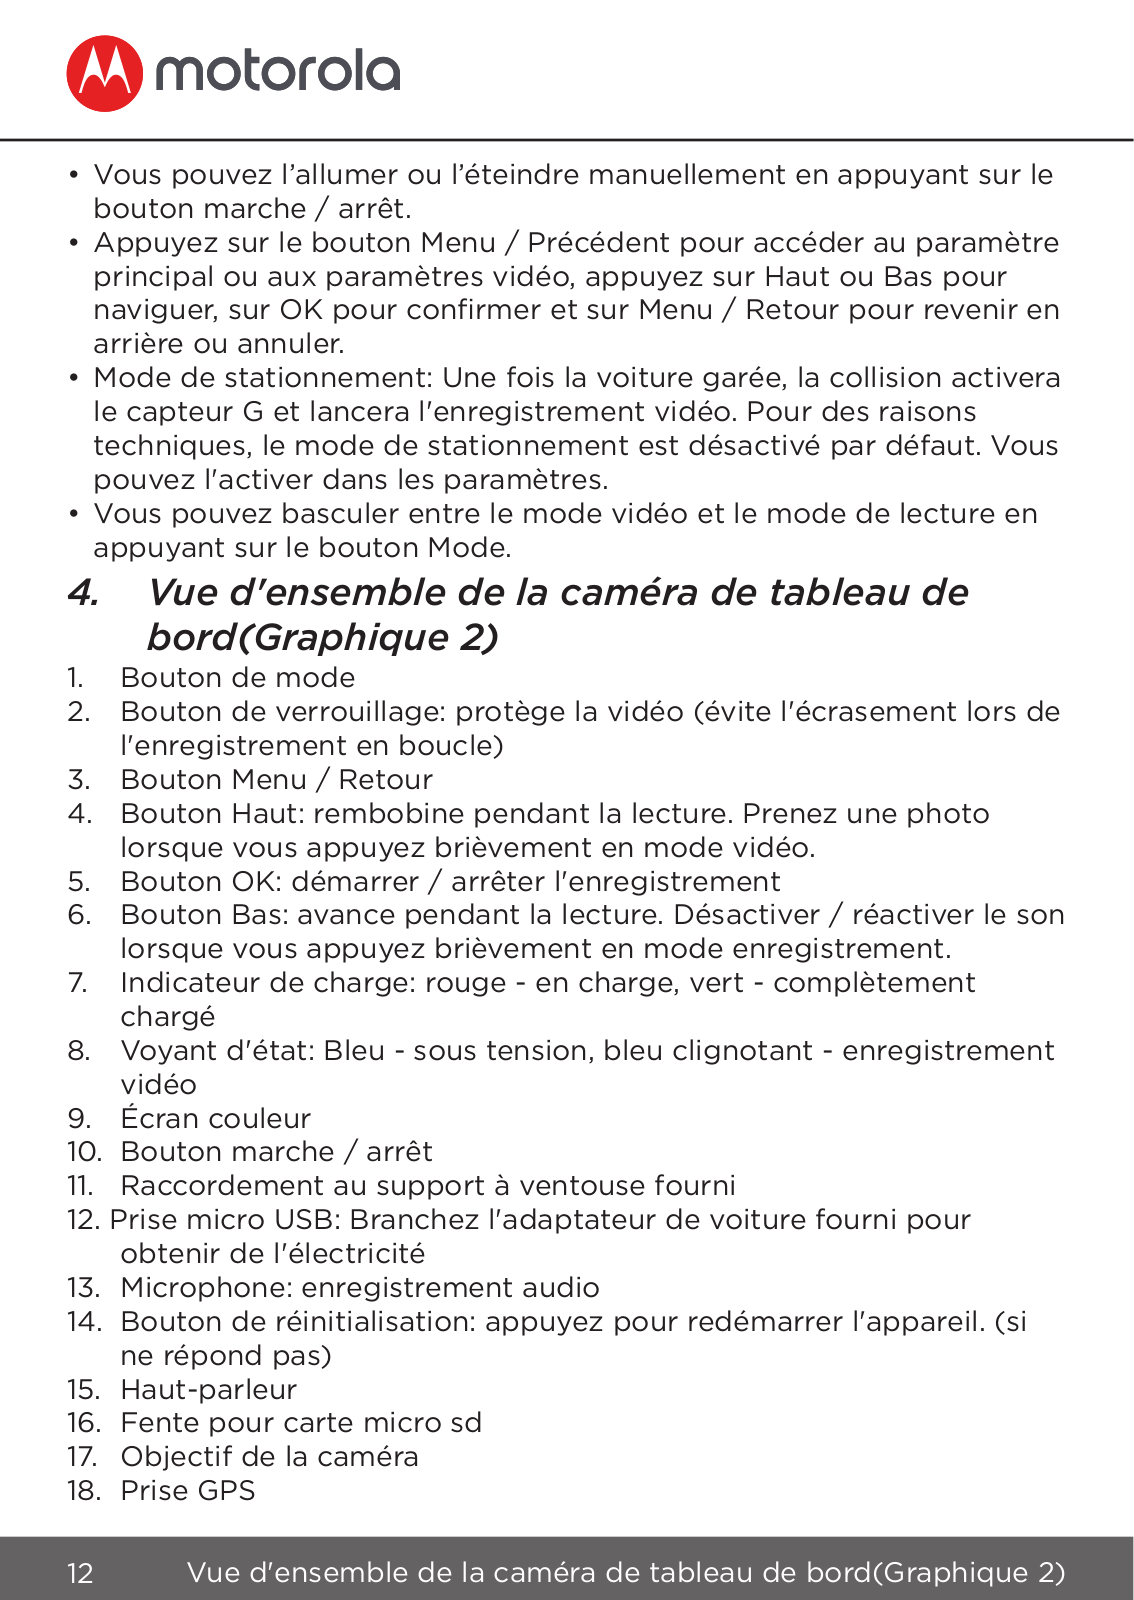
4.Dashcam Overview (Graph 2)

1.Mode Button

2.Lock Button: protect video (avoid over-written during loop recording)

3.Menu/Back Button

4.Up Button: Rewind during playback. Take photo when short press in video mode.

5.OK Button: Start/Stop recording

6.Down Button: Forward during playback. Mute/unmute when short press in recording mode.

7.Charge Indicator: Red - charging, Green - fully charged

8.Status Light: Blue - Power on, Flashing blue - Video recording

9.Color Screen

10.Power On/Off Button

11.Connection to Suction Mount provided

12.Micro USB Socket: Connect car adaptor provided to get electricity

13.Microphone: Audio recording

14.Reset Button: Press to restart device. (if unresponsive)

15.Speaker

16.Micro SD Card Slot

17.Camera Lens

18.GPS socket

5.Connection with Smartphone via WiFi

1.System Requirements Smartphones: Android™ (Android™ 5.0 – 8.0) and iOS® (iOS 10 or higher).

2.Install Hubble Dashcam APP Hubble Dashcam App is available for free download from Google Play Store (Android) and the Apple Store (iOS). The APP can easily be found by searching for "Hubble Dashcam (MDC300GW/MDC500GW)" published by Hubble Connected in both stores. Once installed, Hubble Dashcam App will be available on your smartphone.

3.WiFi of Dashcam is switched on as default. You can switch the WiFi on/off by long pressing on the “Lock” button.

4

Dashcam Overview (Graph 2)


4.

Connecting Dashcam to iOS® smartphone (iPhone) via WiFi: First, switch

EN


on the Dashcam. Then, connect it to smartphone via WiFi. You can do it by


going to the “WiFi” menu of “Setting” icon on smartphone. Select “MDCxxx_


xx_xx” from the list and enter default password “12345678”. (This password


can be changed later in “Modify” of “Dashcam settings” inside APP. This


default password can be restored after confirming the “Default Setting” in


Dashcam menu.) Afterwards, open the "Hubble Dashcam (MDC300GW/


MDC500GW)" APP on smartphone, click “Connect to the dashcam” and


follow the instruction inside.


5.

Connecting Dashcam to Android™ smartphone via WiFi: First, follow the


same procedures as the point 4 above. For Android™ smartphone, Hotspot


has to be used to display the Google Map and to view the Driving Statistics


in the recorded video from front camera. Otherwise, no Map related data


can be displayed. Please read “how to connect hotspot” on the front page


of Android™ APP to learn how to connect Dashcam with smartphone by


Hotspot.


6.

The default settings have been chosen for best performance. However, you


can also go into the “Dashcam Settings” on the top right-handed corner of


APP and change the setting based on your needs.


7.

In “Playback” mode, “Dashcam” column contains video/photo saved


in the SD card inside Dashcam. “Downloaded” column contains video/


photo saved inside smartphone. Video/photo can be downloaded into


smartphone’s memory by clicking “Download” of video/photo inside


“Dashcam” column. Besides, you can find more functions when clicking


recorded/saved video or photo.


8.

In “Driving Statistics” function, red line will be displayed for speed over


100km/h. Red dot will be displayed for acceleration over 8km/h in 1 second.


6.Disposal of the Device (environment)

At the end of the product life cycle, you should not dispose of this product with normal household waste. Take this product to

a collection point for the recycling of electrical and electronic equipment. The symbol on the product, user's guide and/or

box indicates this.

Some of the product materials can be re-used if you take them to a recycling point. By reusing some parts or raw materials from used products you make an important contribution to the protection of the environment.

Please contact your local authorities in case you need more information on the collection points in your area.

Disposal of the Device (environment)

5


FCC and IC regulations FCC Part l5

NOTE: This equipment has been tested and found to comply with the limits for a Class B digital device, pursuant to Part 15 of the Federal Communications Commission (FCC) rules. These limits are designed to provide reasonable protection against harmful interference in a residential installation. This equipment generates, uses and can radiate radio frequency energy and, if not installed and used in accordance with the instructions, may cause harmful interference to radio communications. However, there is no guarantee that interference

will not occur in a particular installation. If this equipment does cause harmful interference to radio or television reception, which can be determined by turning the equipment off and on, the user is encouraged to try to correct the interference by one or more of the following measures:

Reorient or relocate the receiving antenna.

Increase the separation between the equipment and receiver.

Connect the equipment into an outlet on a circuit different from that to which the receiver is connected.

Consult the dealer or an experienced radio/TV technician for help. Changes or modifications to this equipment not expressly approved by the party responsible for compliance could void the user’s authority to operate the equipment.

This device complies with Part 15 of the FCC rules. Operation is subject to the following two conditions: (1) this device may not cause harmful interference, and (2) this device must accept any interference received, including interference that may cause undesired operation.

To ensure safety of users, the FCC has established criteria for the amount of radio frequency energy that can be safely absorbed by a user or bystander according to the intended usage of the product. This product has been tested and found to comply with the FCC criteria. This Class B digital apparatus complies with Canadian ICES-003.

CAN ICES-3(B)/NMB-3(B)

WARNING

6

Disposal of the Device (environment)


The socket-outlet shall be installed near the equipment and shall be easily accessible.

Industry Canada

This device complies with Industry Canada licence-exempt RSS standard(s):

Operation is subject to the following. Two conditions: (1) this device may not cause interference, and (2) this device must accept any interference, including interference that may cause undesired operation of the device.

The term "IC: " before the certification/registration number only signifies that the Industry Canada technical specifications were met. This product meets the applicable Industry Canada technical specifications.

Le présent appareil est conforme aux CNR d’Industrie Canada applicables aux appareils radio exempts de licence. L’exploitation est autorisée aux deux conditions suivantes : (1) l’appareil ne doit pas produire de brouillage, et (2) l’utilisateur de l’appareil doit accepter tout brouillage radioélectrique subi, même si le brouillage est susceptible d’en compromettre le fonctionnement.

NL

Welkom! Heeft u alles?

Dashboardcamera, Voorruitbevestiging, Autoadapter, Snelstartgids

1.Veiligheidsinstructies

WAARSCHUWING

Het is de verantwoordelijkheid van de gebruiker om de toepasselijke wetgeving te controleren voordat de dashboardcamera wordt gebruikt. We nemen geen enkele verantwoordelijkheid voor verkeerd of onwettig gebruik van de dashboardcamera.

In sommige rechtsgebieden kan het gebruik van dashboardcamera’s en de montage van de dashboardcamera op de voorruit, worden beschouwd als een inbreuk op de privacy.

2.Uw apparaat installeren(Grafiek 1)

De bovenstaande afbeelding verwijst naar een auto met het stuur aan de rechterkant. Draai voor auto's met het stuur links de positie van de kabelinstallatie dienovereenkomstig om.

NL

Veiligheidsinstructies

7


Installeer eerst de dashcam en de zuignap samen. Reinig de voorruit nabij het gebied van de achteruitkijkspiegel. Druk de zuignap van de steun op de gereinigde voorruit en druk op de hendel om te vergrendelen. Zorg dat de houder veilig op de gereinigde voorruit is bevestigd. Wij aanvaarden geen enkele verantwoordelijkheid voor een onjuiste installatie van de houder.

Sluit altijd de micro USB stekker van de voedingskabel aan op de dashcam en sluit het andere uiteinde aan op de sigarettenlader van het voertuig voor stroomvoorziening. Het is niet ontworpen om alleen op batterijen te werken. De batterij in de dashcam is alleen voor backupdoeleinden (parkeermodus). Het neemt automatisch op (zodra de opnamemodus is geactiveerd) met blauwe knipperende LED, zodra het is aangesloten op een stroombron.

3.Eerste gebruik

Om video´s op te nemen, wordt aanbevolen om een SD kaart (niet meegeleverd) voor gebruik in de SD kaartsleuf van de dashcam te steken.

Uw dashboardcamera accepteert SD kaarten met een capaciteit tot 32 GB (klasse 10). U MOET de SD kaart formatteren voordat u gaat opnemen.

U kunt het handmatig inof uitschakelen door op de aan / uit knop te drukken.

Druk op de Menu / Terug knop voor toegang tot Hoofdinstelling of Videoinstellingen, druk op Omhoog of Omlaag om te navigeren, OK om te bevestigen en Menu / Terug om terug te gaan of te annuleren.

Parkeermodus: nadat de auto is geparkeerd, activeert een botsing de G-sensor en begint de video-opname. Om technische redenen is de parkeermodus standaard uitgeschakeld. U kunt het inschakelen in de instellingen.

U kunt schakelen tussen de videoen afspeelmodus door op de modusknop te drukken.

4.Dashcam overzicht(Grafiek 2)

1.Modusknop

2.Vergrendelknop: video beveiligen (vermijd overschrijven tijdens lusopname)

3.Menu / Terug knop

4.Omhoog knop: terugspoelen tijdens het afspelen. Maak een foto door kort in te drukken tijdens de videomodus.

8

Eerste gebruik


5.

OK knop: opname starten / stoppen


6.

Knop Omlaag: vooruitspoel tijdens het afspelen. Dempen / dempen


opheffen door kort in in te drukken tijdens de opnamemodus.


7.

Laadindicator: rood - opladen, groen - volledig opgeladen


8.

Statuslampje: blauw - inschakelen, knipperend blauw - video-opname

NL

9.

Kleurenscherm

10.

Aan / uit knop


11.

Verbinding van zuignap voorzien


12.

Micro USB aansluiting: sluit de meegeleverde auto-adapter aan om


elektriciteit te krijgen


13.

Microfoon: audio-opname


14.

Resetknop: indrukken om het apparaat opnieuw te starten. (indien


niet reagerend)


15.

Luidspreker


16.

Micro SD kaartsleuf


17.

Cameralens


18.

GPS aansluiting


5.Verbinding met smartphone via WiFi

1.Systeemvereisten Smartphones: Android ™ (Android ™ 5.0 - 8.0) en iOS® (iOS 10 of hoger).

2.Installeer de Hubble Dashcam app. De Hubble Dashcam app kan gratis worden gedownload via Google Play Store (Android) en de Apple Store (iOS). De APP kan gemakkelijk worden gevonden door in beide winkels naar "Hubble Dashcam (MDC300GW / MDC500GW)" te zoeken, gepubliceerd door Hubble Connected. Na installatie is de Hubble Dashcam app beschikbaar op uw smartphone.

3.De WiFi van Dashcam is standaard ingeschakeld. U kunt de WiFi in- / uitschakelen door lang op de knop "Vergrendelen" te drukken.

4.Dashcam verbinden met iOS® smartphone (iPhone) via WiFi: schakel eerst de Dashcam in. Verbind het vervolgens via WiFi met de smartphone. U kunt dit doen door naar het menu 'WiFi' op het pictogram 'Instellingen' op de smartphone te gaan. Selecteer "MDCxxx_xx_xx" in de lijst en voer het standaard wachtwoord "12345678" in. (Dit wachtwoord kan later worden gewijzigd in "Wijzigen" van "Dashcam instellingen"

in de APP. Dit standaard wachtwoord kan worden hersteld nadat de "Standaardinstelling" in het Dashcam menu is bevestigd.) Open daarna de "Hubble Dashcam (MDC300GW / MDC500GW)" APP op smartphone, klik op "Verbinden met de dashcam" en volg de weergegeven instructies.

Verbinding met smartphone via WiFi

9


5.Dashcam verbinden met Android ™ -smartphone via WiFi: volg eerst dezelfde procedures als punt 4 hierboven. Voor een Android ™ smartphone moet Hotspot worden gebruikt om de Google Map weer te geven en de rijstatistieken te bekijken in de opgenomen video van de camera aan de voorkant. Anders kunnen geen kaartgerelateerde gegevens worden weergegeven. Lees "hoe hotspot te verbinden" op de voorpagina van Android ™ APP om te begrijpen hoe de Dashcam met de Hotspot te verbinden met een smartphone.

6.De standaardinstellingen zijn gekozen voor de beste prestaties. U kunt echter ook naar de "Dashcam instellingen" in de

rechterbovenhoek van de APP gaan en de instellingen wijzigen op basis van uw behoeften.

7.In de modus "Afspelen" bevat de kolom "Dashcam" video / foto opgeslagen op de SD-kaart in de Dashcam. "Gedownloade" kolom bevat video / foto opgeslagen in smartphone. Video / foto kan in het geheugen van de smartphone worden gedownload door op "Download" van video / foto in de kolom "Dashcam" te klikken. Bovendien kunt u meer functies vinden wanneer u op opgenomen / opgeslagen video of foto klikt.

8.In de functie "Rijstatistieken" wordt een rode lijn weergegeven voor snelheden van meer dan 100 km per uur. Rode stip wordt weergegeven voor versnelling boven 8 km per uur in 1 seconde.

6.Verwijdering van het apparaat (milieu)

Aan het einde van de levenscyclus van het product dient u dit product niet met het normale huisvuil weg te gooien.

Breng dit product naar een inzamelpunt voor het recyclen van elektrische en elektronische apparatuur. Het symbool op het

product, de gebruikershandleiding en / of doos geeft dit aan. Sommige van de productmaterialen kunnen worden hergebruikt als u ze naar een recyclingpunt brengt. Door sommige onderdelen of grondstoffen van gebruikte producten te hergebruiken, levert u een belangrijke bijdrage aan de bescherming van het milieu.

Neem contact op met uw lokale autoriteiten voor het geval u meer informatie nodig hebt over de verzamelpunten in uw regio.

Some of the product materials can be re-used if you take them to a recycling point. By reusing some parts or raw materials from used products you make an important contribution to the protection of the

environment.

10

Verwijdering van het apparaat (milieu)


FR

Bienvenue! Avez-vous tout?

caméra de tableau de bord, montage pour pare-brise, adaptateur de voiture, guide de démarrage rapide

1.Consignes de sécurité

ATTENTION

Il incombe à l’utilisateur de vérifier les lois en vigueur avant d’utiliser la caméra de tableau de bord. Nous déclinons toute responsabilité en cas d’utilisation incorrecte ou illicite de la caméra de tableau de bord.

Dans certaines juridictions, l’utilisation de caméra de tableau de bord peut être considérée comme une atteinte à la vie privée ainsi que le montage de la caméra de tableau de bord sur le pare-brise.

2.Installer votre appareil(Graphique 1)

L’illustration ci-dessus fait référence à une voiture avec conduite à droite. Pour les voitures avec conduite à gauche, veuillez inverser la position de l’installation du câble en conséquence.

Installez d’abord la caméra de tableau de bord et le support à ventouse. Nettoyez le pare-brise près du rétroviseur. Appuyez la ventouse du support sur le pare-brise nettoyé et appuyez sur le levier pour verrouiller. Assurezvous que le support est correctement fixé au pare-brise nettoyé. Nous déclinons toute responsabilité pour une installation incorrecte du montage.

Connectez toujours la fiche micro-USB du câble d’alimentation à la caméra de tableau de bord et connectez une autre extrémité au

chargeur de cigarette du véhicule pour être alimenté. Il n’est pas conçu pour fonctionner uniquement sur batterie. La batterie à l’intérieur de la caméra de tableau de bord sert uniquement à la sauvegarde (mode stationnement). Il enregistrera automatiquement (une fois le mode d’enregistrement activé) avec le voyant bleu clignotant dès qu’il sera branché à une source d’alimentation.

3.Première utilisation

Pour enregistrer une vidéo, il est recommandé d'insérer une carte SD (non fournie) dans le lecteur de carte SD de la caméra de tableau de bord avant de l'utiliser.

Votre caméra de tableau de bord accepte les cartes SD d’une capacité maximale de 32 Go (classe 10). Vous DEVEZ formater la carte SD avant d’enregistrer.

FR

Consignes de sécurité

11


Vous pouvez l’allumer ou l’éteindre manuellement en appuyant sur le bouton marche / arrêt.

Appuyez sur le bouton Menu / Précédent pour accéder au paramètre principal ou aux paramètres vidéo, appuyez sur Haut ou Bas pour naviguer, sur OK pour confirmer et sur Menu / Retour pour revenir en arrière ou annuler.

Mode de stationnement: Une fois la voiture garée, la collision activera le capteur G et lancera l'enregistrement vidéo. Pour des raisons techniques, le mode de stationnement est désactivé par défaut. Vous pouvez l'activer dans les paramètres.

Vous pouvez basculer entre le mode vidéo et le mode de lecture en appuyant sur le bouton Mode.

4.Vue d'ensemble de la caméra de tableau de

bord(Graphique 2)

1.Bouton de mode

2.Bouton de verrouillage: protège la vidéo (évite l'écrasement lors de l'enregistrement en boucle)

3.Bouton Menu / Retour

4.Bouton Haut: rembobine pendant la lecture. Prenez une photo lorsque vous appuyez brièvement en mode vidéo.

5.Bouton OK: démarrer / arrêter l'enregistrement

6.Bouton Bas: avance pendant la lecture. Désactiver / réactiver le son lorsque vous appuyez brièvement en mode enregistrement.

7.Indicateur de charge: rouge - en charge, vert - complètement chargé

8.Voyant d'état: Bleu - sous tension, bleu clignotant - enregistrement vidéo

9.Écran couleur

10.Bouton marche / arrêt

11.Raccordement au support à ventouse fourni

12.Prise micro USB: Branchez l'adaptateur de voiture fourni pour obtenir de l'électricité

13.Microphone: enregistrement audio

14.Bouton de réinitialisation: appuyez pour redémarrer l'appareil. (si ne répond pas)

15.Haut-parleur

16.Fente pour carte micro sd

17.Objectif de la caméra

18.Prise GPS

12 Vue d'ensemble de la caméra de tableau de bord(Graphique 2)

5.Connexion au smartphone via WiFi

1.

Configuration requise du système smartphone: Android ™ (Android


™ 5.0 - 8.0) et iOS® (iOS 10 ou supérieur).


2.

Installer l'application Hubble Dashcam. L'application Hubble


Dashcam est disponible en téléchargement gratuit sur le Google


Play Store (Android) et l’Apple Store (iOS). Vous pouvez facilement


trouver l'application en recherchant "Hubble Dashcam (MDC300GW


/ MDC500GW)" publiée par Hubble Connected dans les deux


FR


magasins. Une fois installée, l'application Hubble Dashcam sera


disponible sur votre smartphone.


3.

Le Wi-Fi de la caméra du tableau de bord est activé par défaut.


Vous pouvez activer / désactiver le WiFi en appuyant longuement


sur le bouton « Verrouiller ».


4.

Connexion de la caméra du tableau de bord à un smartphone iOS®


(iPhone) via WiFi: Commencez par allumer la caméra du tableau de


bord. Ensuite, connectez-la au smartphone via WiFi. Vous pouvez le


faire en allant dans le menu « WiFi » de l’icône « Paramètres » sur le


smartphone. Sélectionnez « MDCxxx_xx_xx » dans la liste et entrez


le mot de passe par défaut « 12345678 ». (Ce mot de passe peut


être modifié ultérieurement dans « Modifier » des « Paramètres de


la caméra du tableau de bord » dans l’application. Ce mot de passe


par défaut peut être restauré après confirmation du « Paramètre


par défaut » dans le menu de la caméra du tableau de bord.)


Ensuite, ouvrez l’application « Hubble Dashcam (MDC300GW /


MDC500GW) » sur votre smartphone, cliquez sur « Connectez-vous


à la caméra du tableau de bord » et suivez les instructions à l’écran.


5.

Connexion de la caméra du tableau de bord à un smartphone


Android ™ via WiFi: Suivez d'abord les mêmes procédures que


celles décrites au point 4 ci-dessus. Pour le smartphone Android


™, un point d’accès doit être utilisé pour afficher la carte Google et


pour afficher les statistiques de conduite dans la vidéo enregistrée


à partir de la caméra frontale. Sinon, aucune donnée liée à la carte


ne peut être affichée. Veuillez lire « Comment connecter un point


d'accès » sur la page de couverture de l'application Android ™ pour


savoir comment connecter la caméra du tableau de bord au point


d’accès du smartphone.


6.

Les paramètres par défaut ont été choisis pour de meilleures


performances. Toutefois, vous pouvez également accéder aux


« Paramètres de la caméra du tableau de bord » situés dans le


Connexion au smartphone via WiFi

13


coin supérieur droit de l'application et modifier les paramètres en fonction de vos besoins.

7.En mode « Lecture », la colonne « Caméra du tableau de bord » contient les vidéos / photos enregistrées sur la carte SD dans la caméra du tableau de bord. La colonne « Télécharger » contient les vidéos / photos enregistrées dans le smartphone. Les vidéos / photos peuvent être téléchargées dans la mémoire du smartphone en cliquant sur « Télécharger » les vidéos / photos dans la colonne « Caméra du tableau de bord ». En outre, vous pouvez trouver plus de fonctions lorsque vous cliquez sur une vidéo ou une photo enregistrée / enregistrée.

8.Dans la fonction « Statistiques de conduite », une ligne rouge s'affiche pour les vitesses supérieures à 100 km / h. Un point rouge s'affiche pour une accélération supérieure à 8 km / h en 1 seconde.

6.Mise au rebut de l’appareil (environnement)

À la fin du cycle de vie du produit, vous ne devez pas jeter ce produit avec les déchets ménagers normaux. Apportez ce produit dans un point de collecte pour le recyclage des

équipements électriques et électroniques. Le symbole sur le produit, le guide de l'utilisateur et / ou la boîte l'indiquent.

Certains matériaux du produit peuvent être réutilisés si vous les apportez à un point de recyclage. En réutilisant certaines pièces ou matières premières provenant de produits usagés, vous apportez une contribution importante à la protection de l'environnement.

Veuillez contacter vos autorités locales au cas où vous auriez besoin de plus d’informations sur les points de collecte dans votre région.

DE

Herzlich willkommen! Haben Sie alles?

Dashboard-Kamera, Windschutzscheibenhalterung, Autoadapter, Schnellstartanleitung

1.Sicherheitsanweisung

ACHTUNG

Es liegt in der Verantwortung des Benutzers, die geltenden Gesetze zu überprüfen, bevor Sie die Dash-Kamera verwenden. Wir

übernehmen keine Verantwortung für die falsche oder rechtswidrige Verwendung der Dash-Kamera.

14

Mise au rebut de l’appareil (environnement)


In einigen Rechtsordnungen kann die Verwendung von Dash-Kameras als Verletzung der Privatsphäre angesehen werden, ebenso wie die Befestigung der Dash-Kamera an der Windschutzscheibe.

2.Installieren Sie Ihr Gerät(SCHAUBILD 1)

• Die obige Abbildung bezieht sich auf ein Auto mit Rechtslenkung.


Klappen Sie bei Fahrzeugen mit Linkslenkung die Position der


Kabelverlegung entsprechend um.


• Bauen Sie zuerst die Dash-Kamera und die Saughalterung


zusammen ein. Reinigen Sie die Windschutzscheibe in der Nähe


des Rückspiegelbereichs. Drücken Sie den Saugnapf der Halterung


auf die gereinigte Windschutzscheibe und drücken Sie den Hebel


zum Verriegeln. Stellen Sie sicher, dass die Halterung sicher an der

DE

gereinigten Windschutzscheibe befestigt ist. Wir übernehmen keine


Verantwortung für unsachgemäße Installation der Halterung.


• Schließen Sie immer den Micro-USB-Stecker des Stromkabels an


die Dash-Kamera an und verbinden Sie das andere Ende mit dem


Zigarettenladegerät des Fahrzeugs, um die Stromversorgung zu


gewährleisten. Es ist nicht für Batteriebetrieb ausgelegt. Die Batterie


in der Dash-Kamera dient nur zu Sicherungszwecken (Parkmodus). Es


wird automatisch (sobald der Aufnahmemodus aktiviert ist) mit einer


blau blinkenden LED aufgenommen, sobald es an eine Stromquelle


angeschlossen wird.


3.Erste Verwendung

Zum Aufnehmen von Videos wird empfohlen, eine SD-Karte (nicht im Lieferumfang enthalten) in den SD-Kartensteckplatz der DashKamera einzulegen, bevor Sie sie verwenden.

Ihre Dashboard-Kamera akzeptiert SD-Karten mit einer Kapazität von bis zu 32 GB (Klasse 10). Sie MÜSSEN die SD-Karte vor der Aufnahme formatieren.

Sie können es manuell einoder ausschalten, indem Sie die Ein- / Aus-Taste drücken.

Drücken Sie die Menü- / Zurück-Taste, um auf die Haupteinstellungen oder Videoeinstellungen zuzugreifen, drücken Sie die Nach-Oben- oder Nach-Unten-Taste zum Navigieren, OK zum Bestätigen und Menü / Zurück, um zurückzukehren oder abzubrechen.

Parkmodus: Nachdem das Auto geparkt ist, aktiviert eine Kollision den G-Sensor und startet die Videoaufnahme. Aus technischen Gründen ist der Parkmodus standardmäßig deaktiviert. Sie können es

Installieren Sie Ihr Gerät(SCHAUBILD 1)

15


in den Einstellungen aktivieren.

Sie können zwischen dem Videound dem Wiedergabemodus wechseln, indem Sie die Modustaste drücken.

4.Dashcam-Übersicht(SCHAUBILD 2)

1.Modustaste

2.Sperrknopf: Video schützen (Überschreiben während der Schleifenaufnahme vermeiden)

3.Menü / Zurück-Taste

4.Auf-Taste: Rücklauf während der Wiedergabe. Nehmen Sie ein Foto auf, wenn Sie im Videomodus kurz drücken.

5.OK-Taste: Aufnahme starten / stoppen

6.Abwärtstaste: Vorwärts während der Wiedergabe. Stummschalten / Stummschalten aufheben, wenn Sie im Aufnahmemodus kurz drücken.

7.Ladeanzeige: Rot - Aufladen, Grün - Voll aufgeladen

8.Statusanzeige: Blau - Einschalten, Blau blinkend - Videoaufnahme

9.Farbbildschirm

10.Ein- / Ausschalter

11.Anschluss an Saughalterung wird mitgeliefert

12.Micro-USB-Buchse: Schließen Sie den mitgelieferten Autoadapter an, um Strom zu erhalten

13.Mikrofon: Audioaufnahme

14.Reset-Taste: Drücken Sie diese Taste, um das Gerät neu zu starten. (wenn nicht mehr reagiert)

15.Sprecher

16.Micro SD-Kartensteckplatz

17.Kameraobjektiv

18.GPS-Anschluss

5.Verbindung mit Smartphone über WiFi

1.Systemanforderungen Smartphones: Android ™ (Android ™ 5.0 - 8.0) und iOS® (iOS 10 oder höher).

2.Installieren der Hubble Dashcam-App. Die Hubble DashcamApp kann kostenlos im Google Play Store (Android) und im Apple Store (iOS) heruntergeladen werden. Die APP kann leicht gefunden werden, indem in beiden Stores nach "Hubble Dashcam (MDC300GW / MDC500GW)" gesucht wird, die von Hubble

Connected veröffentlicht wurde. Nach der Installation ist die Hubble Dashcam App auf Ihrem Smartphone verfügbar.

16

Dashcam-Übersicht(SCHAUBILD 2)


3.

WiFi von Dashcam ist standardmäßig eingeschaltet. Sie können das


WLAN einund ausschalten, indem Sie lange auf die Schaltfläche


„Sperren“ drücken.


4.

Dashcam über WLAN mit iOS®-Smartphone (iPhone) verbinden:


Schalten Sie zuerst die Dashcam ein. Verbinden Sie es dann über


WLAN mit dem Smartphone. Sie können dies tun, indem Sie auf


dem Smartphone zum Menü „WiFi“ des Symbols „Setting“ wechseln.


Wählen Sie "MDCxxx_xx_xx" aus der Liste und geben Sie das


Standardkennwort "12345678" ein. (Dieses Passwort kann später in


"Ändern" von "Dashcam-Einstellungen" in APP geändert werden.


Dieses Standardpasswort kann wiederhergestellt werden, nachdem


die "Standardeinstellung" im Dashcam-Menü bestätigt wurde.) Öffnen


DE


Sie anschließend "Hubble Dashcam (MDC300GW / MDC500GW)".


APP auf dem Smartphone, klicken Sie auf "Mit der Dashcam


verbinden" und befolgen Sie die darin enthaltenen Anweisungen.


5.

Dashcam über WLAN mit Android ™ -Smartphone verbinden:


Befolgen Sie zunächst die gleichen Schritte wie unter Punkt 4


oben. Für Android ™ -Smartphones muss Hotspot verwendet


werden, um die Google-Karte anzuzeigen und die Fahrstatistik im


aufgezeichneten Video der Frontkamera anzuzeigen. Andernfalls


können keine kartenbezogenen Daten angezeigt werden. Lesen Sie


auf der Vorderseite der Android ™ -APP den Abschnitt „So verbinden


Sie einen Hotspot“, um zu erfahren, wie Sie eine Dashcam über einen


Hotspot mit einem Smartphone verbinden.


6.

Die Standardeinstellungen wurden für die beste Leistung ausgewählt.


Sie können jedoch auch in die „Dashcam-Einstellungen“ in der oberen


rechten Ecke der APP gehen und die Einstellung Ihren Bedürfnissen


entsprechend ändern.


7.

Im Wiedergabemodus enthält die Spalte „Dashcam“ Videos / Fotos,


die auf der SD-Karte in Dashcam gespeichert sind. Die Spalte


„Heruntergeladen“ enthält Videos / Fotos, die im Smartphone


gespeichert sind. Video / Foto kann in den Speicher des Smartphones


heruntergeladen werden, indem Sie in der Spalte "Dashcam" auf


"Download" von Video / Foto klicken. Außerdem finden Sie weitere


Funktionen, wenn Sie auf ein aufgenommenes / gespeichertes Video


oder Foto klicken.


8.

In der Funktion "Fahrstatistik" wird bei einer Geschwindigkeit über


100 km / h eine rote Linie angezeigt. Bei einer Beschleunigung über 8


km / h wird in 1 Sekunde ein roter Punkt angezeigt.


Verbindung mit Smartphone über WiFi

17


6.Entsorgung des Gerätes (Umwelt)

Am Ende des Produktlebenszyklus sollten Sie dieses Produkt nicht mit dem normalen Hausmüll entsorgen. Bringen Sie

dieses Produkt zu einer Sammelstelle für das Recycling von Elektround Elektronikgeräten. Das Symbol auf dem Produkt,

der Bedienungsanleitung und / oder der Verpackung weist darauf hin. Einige der Produktmaterialien können wiederverwendet werden, wenn Sie sie zu einer Recyclingstelle bringen. Durch die Wiederverwendung einiger Teile oder Rohstoffe aus gebrauchten Produkten leisten Sie einen wichtigen Beitrag zum Umweltschutz.

Bitte wenden Sie sich an Ihre örtlichen Behörden, falls Sie weitere Informationen zu den Sammelstellen in Ihrer Nähe benötigen.

PL

Witamy! Czy masz wszystko?

kamera na deskę rozdzielczą, mocowanie do przedniej szyby, adapter samochodowy, skrócona instrukcja obsługi

1.Instrukcja bezpieczeństwa

Ostrzeżenie

Obowiązkiem użytkownika jest zapoznanie się z obowiązującymi przepisami przed użyciem kamery samochodowej. Nie ponosimy żadnej odpowiedzialności za nieodpowiednie lub niezgodne z prawem używanie kamery samochodowej.

W niektórych krajach korzystanie z kamer samochodowych, a także montaż kamery na przedniej szybie, uznaje się za naruszenie prywatności.

2.Instalacja urządzenia(GRAFIKA 1)

Powyższa ilustracja odnosi się do samochodu z kierownicą po prawej stronie. W przypadku samochodów z kierownicą po lewej stronie prosimy odpowiednio zmienić pozycję instalacji kabla.

Najpierw zainstaluj kamerę samochodową i przyssawkę. Oczyść przednią szybę w okolicy obszaru lusterka wstecznego Dociśnij przystawkę uchwytu do oczyszczonej szyby przedniej i naciśnij dźwignię w celu zablokowania. Nie bierzemy odpowiedzialności za niewłaściwą instalację uchwytu.

18

Entsorgung des Gerätes (Umwelt)


Zawsze podłączaj wtyczkę micro USB kabla zasilającego do kamery samochodowej, a drugi koniec podłącz do ładowarki samochodowej w celu zasilania. Urządzenie nie jest przeznaczone do działania wyłącznie na baterii. Bateria w desce rozdzielczej służy wyłącznie do tworzenia kopii zapasowych (tryb parkowania). Będzie nagrywać automatycznie (po włączeniu trybu parkowania) wraz z niebieską migającą diodą LED, gdy tylko zostanie podłączona do źródła zasilania.

3. Pierwsze użycie

• Aby nagrywać wideo, przed użyciem kamery samochodowej


zalecamy włożyć kartę SD (brak w zestawie) do jej gniazda karty SD.


• Twoja kamera na deskę rozdzielczą akceptuje karty SD o pojemności


do 32 GB (klasy 10). MUSISZ sformatować kartę SD przed


przystąpieniem do nagrywania.


• Możesz włączyć lub wyłączyć urządzenie ręcznie, naciskając przycisk


PL

On/Off.

• Naciśnij przycisk Menu/Back, aby wejść w Ustawienia Główne lub


stawienia Wideo. Naciśnij przycisk w gór lub w dół, aby nawigować,


OK w celu potwierdzenia i Menu/Wstecz, aby powrócić lub anulować.


• Tryb parkowania: Po zaparkowaniu samochodu możliwa kolizja


spowoduje aktywację czujnika G i rozpocznie nagrywanie wideo. Ze


względów technicznych tryb parkowania jest domyślnie wyłączony.


Możesz włączyć go w ustawieniach.


• Możesz przechodzić między trybem Wideo a Odtwarzania.


4.Funkcje kamery samochodowej(GRAFIKA 2)

1.Przycisk trybu

2.Przycisk blokowania: ochrona wideo (zapobiega nadpisywaniu podczas nagrywania w pętli)

3.Przycisk Menu/Wstecz

4.Przycisk w górę: Przewija nagranie podczas odtwarzania. Zrób zdjęcie, naciskając krótko ten przycisk w trybie odtwarzania.

5.Przycisk OK: Rozpoczęcie/Zakończenie nagrywania

6.Przycisk w dół: Przewija nagranie na przód podczas odtwarzania.

Włącz/wyłącz wyciszenie, krótko naciskając ten przycisk w trybie nagrywania.

8.Wskaźnik ładowania: czerwony - ładowanie, zielony - pełne naładowanie

9.Ekran kolorów

Pierwsze użycie

19


10.Przycisk włączenia/wyłącznie zasilania

11.Podłączenie do załączonej przyssawki

12.Gniazdo micro USB: podłącz adapter samochodowy dołączony do zestawu, aby naładować urządzenie

13.Mikrofon: nagrywanie dźwięku

14.Przycisk resetowania: naciśnij, aby ponownie uruchomić urządzenie (jeżeli nie odpowiada)

15.Głośnik

16.Gniazdo karty micro USD

17.Obiektyw kamery

18.Gniazdo GPS

5.Połączenie ze smartfonem przez Wi-Fi

1.Wymagania systemowe Smartfony: Android™ (Android™ 5.0 – 8.0) i iOS® (iOS 10 lub wyższy).

2.Zainstaluj aplikację Hubble Dashcam. Aplikację Hubble Dashcam możesz pobrać za darmo ze sklepu Google Play (Android) i Apple Store (iOS). Aplikację łątwo znajdziesz, wyszukując „Hubble Dashcam (MDC300GW/MDC500GW)” opublikowaną przez Hubble Connected w obu sklepach. Po instalacji aplikacja Hubble Dashcam będzie dostępna na Twoim smartfonie.

3.Wi-Fi kamery na deskę rozdzielczą jest domyślnie włączone. Możesz włączyć/wyłączyć Wi-Fi za pomocą długiego przyciśnięcia przycisku blokady.

4.Podłączenie kamery na deskę rozdzielczą do smartfona iOS® (iPhone) przez Wi-Fi: najpierw włącz kamerę na deskę rozdzielczą. Następnie podłącz ją do smartfona przez Wi-Fi. Możesz to

zrobić, przechodząc do menu „Wi-Fi” ikony „Ustawienia” na smartfonie. Wybierz „MDCxxx_xx_xx” z listy i podaj domyślne hasło „12345678”. (To hasło możesz później zmienić w sekcji „Modyfikuj” ustawień kamery w aplikacji. Jest to domyśle hasło, które można przywrócić po potwierdzeniu ustawień domyślnych w menu kamery na deskę rozdzielczą). Następnie otwórz aplikację „Hubble Dashcam (MDC300GW/MDC500GW)” na smartfonie, kliknij „Połącz z kamerką na deskę rozdzielczą” i postępuj zgodnie z przedstawionymi instrukcjami.

20

Połączenie ze smartfonem przez Wi-Fi


5.

Podłącz kamerę na dskę rozdzielczą do smartfonu z


oprogramowaniem Android™ przez Wi-Fi. Najperw wykonaj te same


kroki - od czwartego w grę. W przypadku smartfonów Android™


Hotspot należy używać w celu wyświetlenia Google Maps i


podglądu statystyk prowadzenia pojazdu w wideo nagranym przez


kamerę przednią. W innym przypadku dane powiązane z mapami


mogą zostać wyświetlone. Przeczytaj sekcję „Jak podłączyć


hotspot” na przedniej stronie aplikacji Android™ i dowiedz się, w


jaki sposób podłączyć kamerę na deskę rozdzielczą ze smertfonem


przez hotspot.


6.

Aby zapewnić najlepszą wydajność, zastosowano domyślne


ustawienia. Możesz jednak wejść w „Ustawienia kamery na deskę


rozdzielczą” w prawym górnym rogu aplikacji, aby zmienić je w


zaelżności od potrzeby.


PL

7.

W trybie odtwarzania kolumna „Kamera na deskę rozdzielczą”


zawiera nagrania wideo/zdjęcia zapisane na karcie SD przez


kamerę. Kolumna „Pobrane” obejmuje nagrania wideo/zdjęcia


zapisane na smartfonie. Nagrania wideo/zdjęcia można pobrać na


smartfona, klikając „Pobierz” przy nagraniu/zdjęciu w kolumnie


„Kamera na desk rozdzielczą”. Możesz też znaleźć więcej funkcji,


klikając na nagrane/zapisane nagranie lub zdjęcie.


8.

W funkcji „statystyki prowadzenia pojazdu” pojawi si czerwona linia


dla prędkości ponad 100 km/h. Czerwona kropka będzie odnosić


się do przyspieszenia powyżej 8 km/h na 1 sekundę.


6.Utylizacja urządzenia (troska o środowisko)

Pod zakończeniu cyklu życia produktu nie należy wyrzucać go wraz ze zwykłymi odpadami komunalnymi. Oddaj produkt do punktu zbiórki recyklingu sprzętu elektronicznego i

elektrycznego. Wskazuje na to symbol na produkcie, informacji użytkownika i/lub pudełku.

Niektóre materiały produktu mogą być ponownie użyte, jeśli zabierzesz je do punktu recyklingu. Ponowne wykorzystanie niektórych części lub materiałów używanych produktów w istotny sposób przyczynia się do ochrony środowiska.

Skontaktuj się ze swoimi lokalnymi władzami, aby uzyskać więcej informacji na temat punktów zbiórki recyklingu w Twojej okolicy.

Utylizacja urządzenia (troska o środowisko)

21


CZ

Vítejte! Máte všechno?

kamera na panelu, držák na čelní sklo, adaptér do auta, rychlý návod

1.Bezpečnostní instrukce

UPOZORNĚNÍ

Je na odpovědnosti uživatele zkontrolovat platné zákony před použitím kamery na panelu. Neneseme žádnou odpovědnost za nesprávné či protiprávní používání kamery na panelu.

V některých jurisdikcích může být použití kamery na panelu považováno za narušení soukromí, jako i namontování kamery na panelu na čelní sklo.

2.Instalace vašeho zařízení(Graf 1)

Výše uvedená ilustrace odkazuje na auto s pravostranným řízením. Pro auta s levostranným řízením prosím odpovídajícím způsobem přehoďte umístění káblové instalace.

Nejdříve spolu nainstalujte kameru na panelu a sací úchyt. Očistěte čelní sklo poblíž oblasti zpětného zrcátka. Zatlačte sací část úchytu o vyčištěné sklo a stiskněte páku pro uzamčení. Ujistěte se, že je úchyt bezpečně připevněn k vyčištěnému sklu. Neneseme žádnou odpovědnost za nesprávnou instalaci úchytu.

Vždycky připojte mikro USB zásuvku napájecího kabelu do kamery na panelu a připojte další konec do nabíječky cigaret vozidla pro napájení. Není navrženo pro napájení ze samotné baterie. Baterie uvnitř kamery je pouze pro účely zálohování (režim parkování). Bude automaticky nahrávat (když je aktivovaný režim nahrávání) s modrým blikajícím LED světlem, když se připojí ke zdroji napájení.

3.První použití

Abyste nahráli video, doporučuje se před použitím vložit SD kartu (není součástí balení) do slotu pro SD kartu kamery na panelu.

Vaše kamera na panelu přijímá SD karty s kapacitou až do 32GB (třída 10). SD kartu MUSÍTE před nahráváním naformátovat.

Můžete ji manuálně ZAPNOUT nebo VYPNOUT stisknutím tlačítka zapnout/vypnout.

Stiskněte tlačítko Menu/Zpátky pro přístup k Hlavním nastavením nebo Nastavením videa, stiskněte Nahoru nebo Dolů pro navigování,

22

Bezpečnostní instrukce


OK pro potvrzení a Menu/Zpátky pro krok zpět nebo zrušení.

Režim parkování: Poté, co je auto zaparkované, kolize aktivuje G-senzor a začne nahrávání videa. Z technických důvodů je režim parkování podle výchozích nastavení zakázaný. Můžete jej povolit v nastaveních.

Můžete přepnout mezi režimem Videa a Přehrávání stisknutím tlačítka Režim.

4.Přehled kamery na panelu(Graf 2)

1.

Tlačítko Režimu


2.

Tlačítko uzamčení: chránit video (vyhnutí se přepsání v průběhu


nahrávání smyčky)


3.

Tlačítko Menu/Zpátky


4.

Tlačítko Nahoru: Pretočení v průběhu přehrávání. Udělejte fotku


krátkým stiknutím v režimu videa.


5.

Tlačíko OK: Začít/Zastavit nahrávání


6.

Tlačítko Dolů: Posunutí dopředu v průběhu nahrávání. Ztlumit/


Zrušit ztlumení při krátkém stisknutí v režimu nahrávání.


7.

Indikátor nabíjení: Červená - nabíjení, Zelená - plně nabité


8.

Stavové světlo: Modrá - Zapojené, Blikající modrá - Nahrávání videa


9.

Barevná obrazovka

CZ

10.

Tlačítko Zapnutí/Vypnutí

11.

Připojení k sacímu úchytu je součástí balení


12.

Mikro USB zásuvka: Připojte dodávaný adaptér do auta, abyste


získali elektřinu


13.

Mikrofon: Nahrávání zvuku


14.

Tlačítko Reset: Stiskněte pro restart zařízení. (pokud neodpovídá)


15.

Reproduktor


16.

Slot mikro SD karty


17.

Objektivy kamery


18.

GPS zásuvka


5.Spojení se smartfonem přes WiFi

1.Systémové požadavky Smartphony: Android™ (Android™ 5.0 - 8.0) a iOS® (iOS 10 nebo vyšší).

2.Nainstalujte aplikaci Hubble Dashcam APP Hubble Dashcam App je k dispozici ke stažení zdarma z Google Play Store (Android) a Apple Store (iOS). Aplikaci lze snadno najít vyhledáním „Hubble Dashcam (MDC300GW/MDC500GW)“ zveřejněného společností Hubble Connected v obou obchodech. Po instalaci bude Hubble Dashcam App k dispozici ve vašem smartfonu.

Přehled kamery na panelu(Graf 2)

23


Loading...
+ 53 hidden pages