

Page 1

QUICK USER GUIDE
UK
Wi-Fi Mobile
Internet Device
IVO
Page 2

2
1 BECAUSE WE CARE
Thank you for purchasing this product. This product has been designed
and assembled with utmost care for you and the environment. This is
why we supply this product with a quick installation guide to reduce the
number of paper (pages) and therefor save trees to be cut for making
this paper. A full and detailed user guide with all the features descripted
can be found on our website https://hubbleconnected.com/ Please
download the full user guide in case you want to make use of all the
advanced features of your product. To save the environment we ask you
not to print this full user guide. Thank you for supporting us to protect
our environment.
2 IMPORTANT SAFETY INSTRUCTIONS
When using your telephone equipment, basic safety precautions
should always be followed to reduce the risk of fire, electric shock and
injury, including the following:
1. Read and understand all the instructions.
2. Follow all warnings and instructions marked on the product.
3. Unplug this product from the wall outlet before cleaning. Do
not use liquid cleaners or aerosol cleaners. Use a damp cloth for
cleaning.
4. Keep your phone away from hot, humid conditions or strong
sunlight, and don‘t let it get wet or use this product near water (for
example, near a bath tub , kitchen sink, swimming pool).
5. Do not overload wall outlets and extension cords as this can result
in the risk of fire or electric shock.
6. Unplug this product from the wall outlet and refer servicing to our
Repair Centre under the following conditions:
• When the power supply cord or plug is damaged.
• If the product does not operate normally by following the
operating instructions.
• If the product has been dropped and the cabinet has been
damaged.
• If the product exhibits a distinct change in performance.
Page 3

3
7. NEVER use your phone outdoors during a thunderstorm-unplug
the base from the telephone line and the mains socket when there
are storms in your area. Damage caused by lightning is not covered
by the guarantee.
8. Do not use the telephone to report a gas leak in the vicinity of the
leak.
9. Use only the supplied battery! The operation periods for the
handsets are only applicable with the default battery capacities
10. The use of other battery types or non-rechargeable batteries/
primary cells can be dangerous. These may cause interference
and/or damage to the unit or surroundings. The manufacturer will
not be held liable for damage arising from such non-compliance.
11. Do not use third party charging bays. Damage may be caused to
the batteries.
12. Please ensure the batteries are inserted in the correct polarity.
13. Dispose of batteries safely. Do not immerse them in water, burn
them, or put them where they could get punctured.
3 INTENDED USE
This telephone is intended to be connected to a public analogue
telephone network or to an analogue extension of a compatible PBX
system.
UK
Page 4
4
P1
P2 P3
P4
Page 5
4 SETTING UP YOUR PHONE
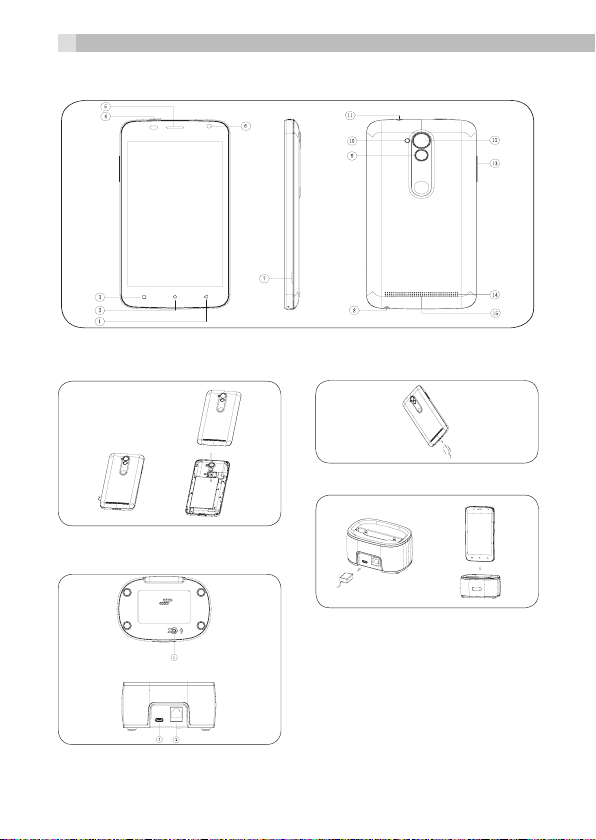
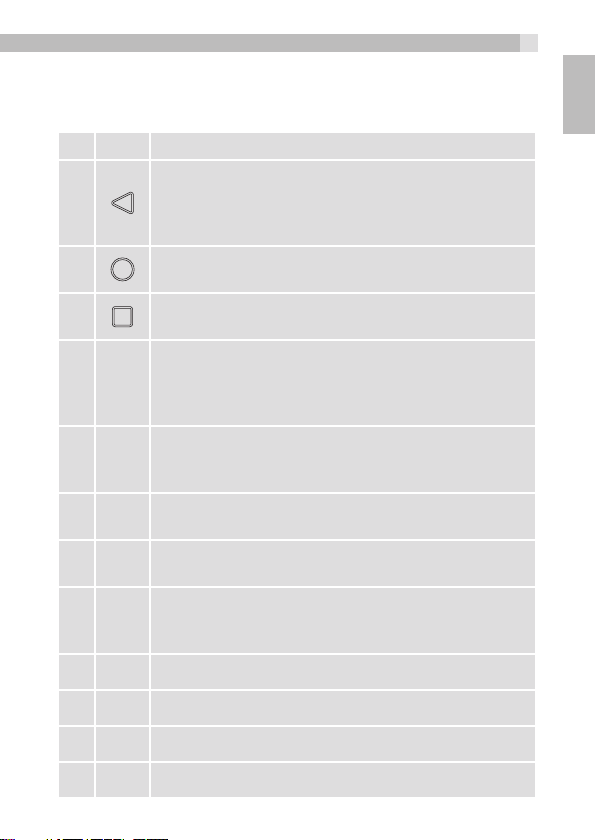
4.1 Handset overview (see P1)
# Meaning
Back
1
2
3
4
5
6
7
8
9
10
11
12
• Tap to return to the previous screen.
• Tap to hide the on-screen keyboard, dialogue box,
menu, or notification panel.
Home
• Tap to return to the Home screen.
Menu
• Tap to select Apps running.
Power Button
• Press and hold to turn the handset power on / off.
• Press briefly to put the handset in to or out of sleep
mode.
Earpiece
• Place your ear against this when making normal
phone calls.
Camera
• Front facing camera lens.
Remove Back Cover
• Use this slot to help take the back cover off.
Earphone Socket
• Plug in a headset with 3.5mm jack plug to listen
through earphones.
Function key
Supporting LED light
IR infra red transmitter
Rear camera 2M pixels
5
UK
Page 6
6
13
14
15
4.2 Inserting the Handset Battery (See P2)
To access the battery compartment, carefully remove the cover by
lifting from the small cut-out in the bottom corner as shown, Then
insert the battery into position and replace the cover.
4.3 Charge the Handset Battery (See P3)
When using your IVO Mobile Internet Device for the first
time, connect the supplied power cord to the handset or stand the
handset in a charger pod (if supplied), and charge for at least 6
hours.
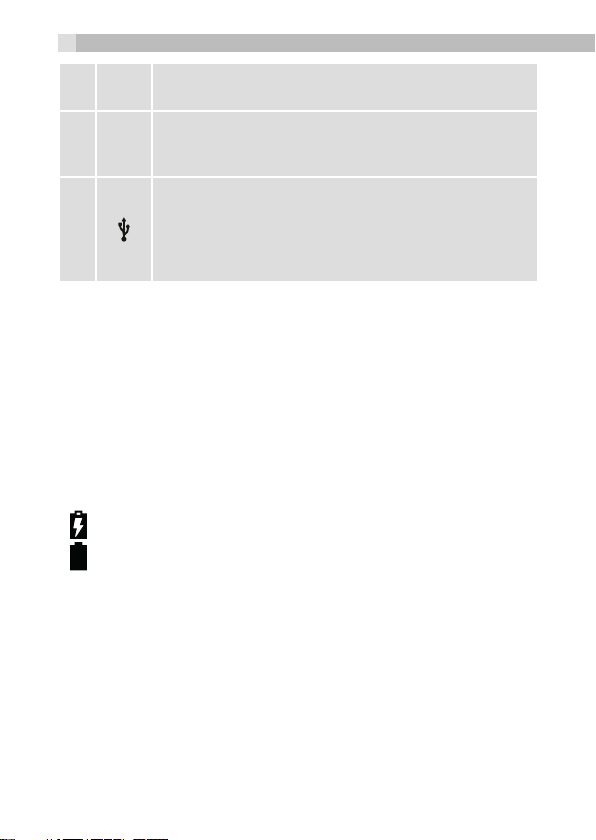
• Means the battery is still charging.
• Means the battery is fully charged.
4.4 Connect the Power Cable and Telephone Line Cord (See P4)
1. Plug the end of the power cable into Power Line In, and the mains
adapter plug into a mains power socket.
2. Plug one end of the phone cable into Phone Line In, and the other
end into a telephone wall socket.
1 Register Button
Press and hold this to register a new handset to the base.
2 Power Line In
Connect to the micro-USB plug of the base power adaptor.
3 Phone Line In
Plug your phone line into this socket.
Volume
• Adjust the volume up + / down -.
Loudspeaker
• Used in Speakerphone mode and when playing
music or videos.
Micro USB / Charging Port
• Connect your handset to your computer to transfer
files.
• Connect a 5V DC micro-USB socket AC Adaptor to
charge the phone.
Page 7

7
4.5 Switching Your Phone On
1. Press and hold Power on the top of the handset until the startup
image appears. It takes about one minute for the handset to power
up completely.
2. By default, the phone screen will be locked, tap and slide to
the right until shows.
3. The Home screen will be displayed.
4.6 Switching Your Phone Off
1. Press and hold the Power button.
2. Tap Power Off.
3. Tap OK to confrm.
4.7 Inserting a Memory Card (See P5)
Your handset supports micro SD cards up to 32GB.
You can store music, pictures, fles and applications on a memory
card and access them on the handset.
1. Turn your phone off.
2. To access the memory card slot, open the back case.
3. Insert the memory card by sliding the card firmly into the memory
card slot as shown in the diagram.
4. Put the cover back on.
5. Turn the phone on.
UK
Page 8

8
5 BASIC OPERATION
Tap once to access the dialler.
Tap once to answer a call.
Tap once to select Apps running.
Tap once to return to a previous screen.
Tap once to hide the on screen keyboard,
dialogue box, options menu or notifcations panel.
Tap to return to the home screen.
Tap the Program Launcher to access your APPS
and WIDGETS.
Page 9

6 USING THE TOUCHSCREEN
Action Function Operation
Select on-screen items
Tap
Tap &
Hold
Drag
Slide
such as applications and
settings icons.
Select on-screen buttons.
Type using the on-screen
keyboard.
Open other options for an
item, for example, tap and
hold a contact or a link on
a web page. Think of this
as using the right-click
button on a mouse.
Move items on screen or
switch between screens.
Move vertically or horizontally across the screen.
Gently tap an item on the
screen to select the item
that you wish to activate.
Tap an item on the screen
then hold in place for 2 ~
3 seconds.
Tap an item on the screen
then hold in place for 2 ~
3 seconds, then slide it to
desired position.
Slide finger across
screen.
9
UK
Flick
Zoom
Quickly browse a list of
items in a vertical direction.
Zoom in or out of the
screen to view a larger or
smaller part of the image.
Flick is similar to slide,
except that fl ick involves
swiping the screen
in lighter and quicker
strokes.
When viewing photos or a
web page, use two fingers
on the screen and pinch
together to zoom out or
spread apart to zoom in.
Page 10

10
7 WIRELESS CONNECTION (WI-FI®)
The handset Wi-Fi can be accessed at any time using the settings
menu. To use Wi-Fi, you must first make sure it is turned on.
1. From the Home screen, tap > Settings.
2. Slide bar next to Wi-Fi to the ON position.
3. Tap Wi-Fi and select a network you want to connect to.
• If the network is secured, you will be prompted to enter a
password.
• If your Wi-Fi network is not shown on the menu, try scanning for
it by tapping > Scan.
4. Tap on the Password edit box to launch the on-screen keyboard.
5. Enter the Wi-Fi network password and tap Done.
6. Tap Connect.
• The handset will search for the IP address of the network you
have selected. This may take a few minutes.
• When connected, appears on the status bar of the handset.
8 REGISTERING HANDSET TO BASE
Note: This should only be required if you want to register another
handset. The handset supplied with your base should already be
registered and not need registering again.
1. Press and hold the Register Button on the base for at least 5
seconds.
2. On the handset screen tap Run DECT manager app for setup.
Page 11

11
9 GUARANTEE AND SERVICE
The phone is guaranteed for 24 months from the date of purchase
shown on your sales receipt. This guarantee does not cover any faults
or defects caused by accidents, misuse, fair wear and tear, neglect,
faults on the telephone line, lightning, tampering with the equipment,
or any attempt at adjustment or repair other than through approved
agents.
Please keep your sales (till) receipt this is your proof of guarantee.
9.1 While the unit is under Guarantee
• Disconnect the base unit from the telephone line and the mains
electricity supply.
• Pack up all parts of your phone system, using the original package.
• Return the unit to the shop where you bought it, making sure you
take your sales receipt.
• Remember to include the mains adapter.
9.2 After the Guarantee has expired
If the unit is no longer under Guarantee, contact us via
https://hubbleconnected.com/
10 TECHNICAL SPECIFICATIONS
Operating System Android OS 6.0 (Marshmallow)
Battery Information Shenzhen JETECH Energy
Technology Co., Ltd.
Battery Model 465155
Battery Type 3.7V Li-ion, 1600mAh
Only use the provided battery
Screen Size 5” TFT LCD, HD, 1280x720 pixels
Panel Capacitive Multi Touch (5 Fingers)
Connectivity Bluetooth 4.0 (For Data transfer)
UK
Page 12

12
Supported
Memory Card
Handset port-type Micro-USB
Headphone 3.5mm jack
Handset Speaker Mono
Wi-Fi Connection 802.11b/g/n
Handset Camera Front facing VGA (640x480) and
Internal Memory 8GB
DECT Frequency
Band
Base Power
Adaptor
Manufacturer DongGuan MLF Tech. Co., Ltd.
Model MLF-A00060501000FE0021 / MLF MLF-
Input Rating 100~240VAC, 180mA
Output Rating 5VDC 1A
Micro-SD (not included) up to 32GB SDHC
rear 2M pixels camera
1921.536MHz-1928.448MHz
Only use the provided power adaptor
A00060501000FU0021
Page 13

13
11 CE DECLARATION
This product is in compliance with the essential requirements
and other relevant provisions of the R&TTE directive 1999/5/EC.
The Declaration of conformity can be found on:
https://hubbleconnected.com/
12 DISPOSAL OF THE DEVICE
(ENVIRONMENT)
At the end of the product lifecycle, you should not throw this
product into the normal household garbage but bring the product
to a collection point for the recycling of electrical and electronic
equipments. The symbol on the product, user guide and/or box
indicate this. Some of the product materials can be re-used if you bring
them to a recycling point. By reusing some parts or raw materials from
used products you make an important contribution to the protection
of the environment. Please contact your local authorities in case you
need more information on the collection points in your area.
Batteries must be removed before disposing of the device.
Dispose of the batteries in an environmental manner according to
your country regulations.
13 CLEANING AND CARE
Do not clean any part of your phone with benzene, thinners or other
solvent chemicals as this may cause permanent damage which is not
covered by the Guarantee.
When necessary, clean it with a damp cloth.
Keep your phone system away from hot, humid conditions or strong
sunlight, and don‘t let it get wet.
UK
Page 14

14
FCC Statement
1. This device complies with Part 15 of the FCC Rules. Operation is
subject to the following two conditions:
(1) This device may not cause harmful interference.
(2) This device must accept any interference received, including
interference that may cause undesired operation.
2. Changes or modifications not expressly approved by the party
responsible for compliance could void the user‘s authority to operate
the equipment.
NOTE:
This equipment has been tested and found to comply with the limits
for a Class B digital device, pursuant to Part 15 of the FCC ¬Rules.
These limits are designed to provide reasonable protection against
harmful interference in a residential installation.
This equipment generates uses and can radiate radio frequency energy
and, if not installed and used in accordance with the instructions,
may cause harmful interference to radio communications. However,
there is no guarantee that interference will not occur in a particular
installation. If this equipment does cause harmful interference to
radio or television reception, which can be determined by turning the
equipment off and on, the user is encouraged to try to correct the
interference by one or more of the following measures:
Reorient or relocate the receiving antenna.
Increase the separation between the equipment and receiver.
Connect the equipment into an outlet on a circuit different from that
to which the receiver is connected.
Consult the dealer or an experienced radio/TV technician for help.
SAR Information Statement
Your wireless phone is a radio transmitter and receiver. It is designed
and manufactured not to exceed the emission limits for exposure
to radiofrequency (RF) energy set by the Federal Communications
Commission of the U.S. Government. These limits are part of
comprehensive guidelines and establish permitted levels of RF energy
for the general population. The guidelines are based on standards
that were developed by independent scientific organizations through
periodic and thorough evaluation of scientific studies. The standards
include a substantial safety margin designed to assure the safety of
Page 15

15
all persons, regardless of age and health. The exposure standard for
wireless mobile phones employs a unit of measurement known as
the Specific Absorption Rate, or SAR. The SAR limit set by the FCC is
1.6 W/kg. * Tests for SAR are conducted with the phone transmitting
at its highest certified power level in all tested frequency bands.
Although the SAR is determined at the highest certified power level,
the actual SAR level of the phone while operating can be well below
the maximum value. This is because the phone is designed to operate
at multiple power levels so as to use only the power required to
reach the network. In general, the closer you are to a wireless base
station antenna, the lower the power output. Before a phone model
is available for sale to the public, it must be tested and certified to the
FCC that it does not exceed the limit established by the government
adopted requirement for safe exposure. The tests are performed in
positions and locations (e.g., at the ear and worn on the body) as
required by the FCC for each model. The highest SAR value for this
model phone when tested for use at the ear is 0.063W/Kg and when
worn on the body, as described in this user guide, is 0.043W/Kg(Bodyworn measurements differ among phone models, depending upon
available accessories and FCC requirements). The maximum scaled
SAR in hotspot mode is 0.043W/Kg. While there may be differences
between the SAR levels of various phones and at various positions,
they all meet the government requirement for safe exposure. The
FCC has granted an Equipment Authorization for this model phone
with all reported SAR levels evaluated as in compliance with the FCC
RFexposure guidelines. SAR information on this model phone is on
file with the FCC and can be found under the Display Grant section of
http://www.fcc.gov/ oet/fccid after searching on
FCC ID:VLJ-IVO Additional information on Specific Absorption Rates
(SAR) can be found on the Cellular Telecommunications Industry
Asso-ciation (CTIA) web-site at http://www.wow-com.com. * In the
United States and Canada, the SAR limit for mobile phones used by
the public is 1.6 watts/kg (W/kg) averaged over one gram of tissue.
The standard incorporates a sub-stantial margin of safety to give
additional protection for the public and to account for any variations
in measurements.
UK
Page 16

16
Body-worn Operation
This device was tested for typical body-worn operations. To comply
with RF exposure requirements, a minimum separation distance
of 10mm must be maintained between the user’s body and the
handset, including the antenna. Third-party belt-clips, holsters,
and similar accessories used by this device should not contain any
metallic components. Body-worn accessories that do not meet these
requirements may not comply with RF exposure requirements and
should be avoided. Use only the supplied or an approved antenna.
IC STATEMENT
This device complies with Industry Canada licence-exempt RSS
standard(s)
Operation is subject to the following two conditions:
(1) This device may not cause interference, and
(2) This device must accept any interference, including interference
that may cause undesired
operation of the device.
This equipment complies with IC radiation exposure limits set forth
for an uncontrolled
environment. End user must follow the specific operating instructions
for satisfying RF
exposure compliance. This transmitter must not be co-located or
operating in conjunction with
any other antenna or transmitter.
These requirements set a SAR limit of 1.6 W/kg averaged over one
gram of tissue.
The highest SAR value for this model phone when tested for use at
the ear is 0.120W/Kg and when worn on the body is 0.454W/Kg. The
maximum scaled SAR in hotspot mode is 0.454W/Kg This device
was tested for typical body-worn operations. To comply with RF
exposurerequirements, a minimum separation distance of 10mm must
be maintained between the user’s body and the handset, including
the antenna. Third-party belt-clips, holsters, and similar accessories
used by this device should not contain any metallic components.
Body-worn accessories that do not meet these requirements may not
comply with RF exposure requirements and should be avoided. Use
only the supplied or an approved antenna.
Page 17

17
Le présent appareil est conforme aux CNR d‘Industrie Canada
applicables aux appareils radio
exempts de licence.
Ce dispositif est conforme aux normes autoriser-exemptes du Canada
RSS d‘industrie
L‘exploitation est autorisée aux deux conditions suivantes :
(1) l‘appareil ne doit pas produire de brouillage, et
(2) l‘utilisateur de l‘appareil doit accepter tout brouillage
radioélectrique subi, même si le
brouillage est susceptible d‘en compromettre le fonctionnement.Cet
équipement
est conforme avec l‘exposition aux radiations IC définies pour un
environnement
non contrôlé. L‘utilisateur final doit respecter les instructions de
fonctionnement spécifiques pour satisfaire la conformité aux
expositions RF. Cet émetteur ne doit pas être co-localisées
ou opérant en conjonction avec une autre antenne ou transmetteur.
Ces exigences définissent
la valeur SAR limite à 1.6 W / kg en moyenne par gramme de tissu.La
valeur SAR la plus
élevée pour ce modèle de téléphone testé à l‘oreille est 0.120W/Kg
et lorsque porté
sur le corps est 0.454W/Kg. l‘échelle maximale sar en mode hotspot
est de 0.454W/Kg
Cet appareil a été testé pour des opérations portés sur le corps
typiques. Pour se conformer
aux exigences d‘exposition aux radiofréquences, une distance
minimale de 15 mm doit être
maintenue entre le corps de l‘utilisateur et le combiné, y compris
l‘antenne. Les pinces de
ceinture, les étuis et autres accessoires similaires utilisés par cet
appareil ne doivent pas
contenir de composants métalliques. Les accessoires portatifs qui ne
répondent pas à ces
exigences peuvent ne pas se conformer aux exigences d‘exposition
RF et doit être évitée.
Utilisez uniquement l‘antenne fournie ou une antenne approuvée
UK
Page 18

© 2017 Binatone Electronics International Limited
Subject to availability. Rights of modification reserved.
All rights reserved
https://hubbleconnected.com/
 Loading...