

Page 1
User’s Guide
MBP2000PU
Android Home Phone
Warning
Use only the power adapter, battery pack and
telephone line cord provided in the box.
Page 2

Welcome...
to your new Motorola Android Home Phone!
Please retain your original dated sales receipt for your records. For warranty service of your Motorola product,
you will need to provide a copy of your dated sales receipt to confirm warranty status. Registration is not required
for warranty coverage.
For product-related questions, please call:
US and Canada: 1-888-331-3383
On the Web: www.motorola.com
• Make and receive calls
• Receive telephone messages and record memos
using the digital answer machine
• Send and receive Emails
• Take photos and record videos
• Surf the Internet via wireless connection
• Listen to music via loud speaker or earphones
• View pictures, videos and slideshows
• Listen to Internet radio broadcasts
• Read and download eBooks
• Discover and download Android applications
• Check Stock Prices and Stock Information
• Check current weather and weather forecast
• Read News with RssFeed
• Check Calendar and Agenda
• Set alarm
• Perform simple Calculation
Page 3

This User's Guide provides you with all the information you need to get
the most from your phone.
Before you make your first call or surf the Internet, you will need to set
up your phone. Follow the simple instructions in 'Getting Started', on
the next few pages.
IMPORTANT
Only use the telephone line cord supplied.
This equipment is not designed to make emergency telephone calls during power failures. Alternative
arrangements should be made for access to emergency services.
Got everything?
• Handset
• Base
• Li-ion Rechargeable Battery Pack
• Handset Back Cover
• Power Adapter
• Telephone Line Cord
• Micro-USB cable
• User's Guide
• Quick Start Guide
Page 4

1. Getting started ..............................................12
1.1 Connecting the base......................................... 14
1.2 Installing and charging the handset
battery pack ...................................................... 14
1.3 Insert and Mount memory card......................... 15
1.4 Unmount and Remove memory card................ 16
1.5 Switch on your Motorola
1.6 Switch off your Motorola
MBP2000PU.............. 16
MBP2000PU.............. 16
2. Using the touchscreen .................................17
3. Using the onscreen keyboard .....................18
3.1 Enter text and numbers .................................... 18
3.2 Switch between input modes............................ 18
3.3 Change keyboard language ............................. 18
3.4 Modify keyboard settings.................................. 18
3.5 Add words to User dictionary............................ 18
3.6 Accept or Reject Dictionary Suggestions ......... 19
3.7 Edit text............................................................. 19
4. Set up your Motorola MBP2000PU with
Welcome Wizard ...........................................19
4.1 Display.............................................................. 20
4
4.2 Sound settings...................................................20
4.2.1 Phone ringtone .....................................20
4.2.2 Volume .................................................20
4.3 Wi-Fi settings.....................................................20
4.4 Date & time settings ..........................................21
4.4.1 Set time zone ....................................... 21
4.4.2 Set time ................................................21
4.4.3 Set time format .....................................21
4.4.4 Select date format ................................21
5. Set date and time.......................................... 22
5.0.1 Set Date ............................................... 22
5.0.2 Set Time ...............................................22
5.0.3 Select Time Zone .................................22
5.0.4 Select Time Format ..............................22
5.0.5 Select Date Format ..............................22
6. Getting to know your phone........................ 23
6.1 Overview of the handset....................................23
6.2 Handset LCD display.........................................25
6.3 Notifications panel ............................................. 25
6.4 Overview of the base .........................................26
Page 5

6.5 Home Screen .................................................... 26
6.6 Extended Home Screen ....................................26
6.7 Wake up the phone ...........................................26
6.8 Lock the screen of your Motorola
6.8.1 Lock with a pattern, PIN or password ....27
6.8.2 Disable screen unlock security ............. 27
6.9 Screen Rotation................................................. 27
6.10 Recalibrate the touch screen............................. 28
MBP2000PU.27
7. Personalizing your MBP2000PU.................. 28
7.1 Display Settings.................................................28
7.1.1 Set Wallpaper .......................................28
7.1.2 Adjust Screen Brightness ..................... 29
7.1.3 Set screen timeout ...............................29
7.1.4 Re-arrange items on your
home screen ........................................29
7.1.5 Add apps to your home screen ............29
7.1.6 Remove an item from your
home screen ........................................29
7.1.7 Add Folders to your home screen ........29
7.1.8 To rename a folder ............................... 30
7.1.9 Add items to the folders on your
7.2 Sound Settings .................................................. 30
home screen ........................................30
7.2.1 Set silent mode .................................... 30
7.2.2 Set volume ........................................... 30
7.2.3 Set Phone ringtone .............................. 31
7.2.4 Set Intercom ringtone ...........................31
7.2.5 Set Paging ringtone ............................. 31
7.2.6 Set default notification ringtone ............31
7.2.7 Enable or Disable Audible
Touch tones ......................................... 31
7.2.8 Enable or Disable Audible Selection ...... 32
7.2.9 Enable or Disable screen lock
sounds .................................................32
8. DECT Settings .............................................. 32
8.1 Handset Settings...............................................32
8.1.1 Registering your
base station .......................................... 32
8.1.2 Registering your
base station .......................................... 33
MBP2000PU to the
MBP2000PU to another
5
Page 6

8.1.3 Synchronize your
another base station ........................... 33
8.1.4 Rename Handset ................................ 33
8.1.5 Set Auto Answer .................................. 34
8.2 Base Settings ................................................... 34
8.2.1 Change PIN code ................................ 34
8.2.2 Deregister Handset ............................. 34
8.2.3 Reset Base Settings to Default ........... 34
8.2.4 Set Dialing Mode ................................. 34
8.2.5 Set Flash Duration ............................... 35
MBP2000PU with
9. Voicemail .......................................................35
9.1 Set Voicemail Number ...................................... 35
9.2 Listen to Voicemail ........................................... 35
10. Using the Phone Functions .........................36
10.1 Call another handset registered to the
same base station (Intercom) ........................... 36
10.2 Make an external call........................................ 36
10.2.1 In-call options ...................................... 36
10.3 Make an external call from Call Log ................. 37
10.4 Clear call log..................................................... 37
6
10.5 Make an external call from Contacts list ............37
10.6 Make an external call from Favorites.................37
10.7 Answer a call in earpiece mode.........................38
10.8 Answer a Call in Speakerphone mode ..............38
10.9 Reject a call .......................................................38
10.10 End a Call ........................................................38
10.11 Adjust volume level during a Call.....................38
10.12 Mute the microphone during a call...................38
10.13 Caller Identity Delivery (CID) ...........................38
10.14 Caller ID Directory Matching ............................39
11. Using the Answer Machine.......................... 39
11.1 Open Digital Answer Machine ...........................39
11.2 Switch Digital Answer Machine off ....................40
11.3 Set Number of Rings .........................................40
11.4 Set Remote Pin .................................................40
11.5 Playback recorded messages ...........................41
11.6 Delete recorded messages ...............................41
11.7 Memo Recording ...............................................41
11.8 Outgoing Message Setting ................................42
11.8.1 Select OGM Option ..............................42
Page 7

11.8.2 Record Personalized Outgoing
Message ............................................... 42
11.8.3 Playback Personalized Outgoing
Message ............................................... 43
11.8.4 Delete Personalized Outgoing
11.9 Remote Operation .............................................43
Message ............................................... 43
12. Contacts List................................................. 44
12.1 Open Contacts list .............................................44
12.2 Search for a contact in Contacts list.................. 44
12.3 Add an entry to Contacts list ............................. 44
12.4 Assign Ringtone to a Contact ............................45
12.5 Import/Export Contacts......................................46
12.6 Enable forwarding of calls to voicemail .............46
12.7 Add a Contact as Favorite .................................46
12.8 Edit a Contact in Contacts list ...........................46
12.9 Set display options ............................................ 47
12.10 Delete a Contact from Contacts list .................47
12.11 Link Picture to a Contact .................................47
12.11.1 Take photo ........................................... 47
12.11.2 Select from Gallery .............................. 48
12.11.3 Change picture of a Contact ................ 48
12.11.4 Remove picture of a Contact ...............48
12.12 Call a contact from contacts list....................... 49
13. Internet Function .......................................... 49
13.1 Register your Motorola MBP2000PU to a
Wi-Fi Network.................................................... 49
13.2 Set Number of Wi-Fi Network Channels ...........50
13.3 Select Wi-Fi Sleep Policy .................................. 51
13.4 Check Motorola
13.5 Configure Static IP Settings .............................. 51
MBP2000PU MAC Address..... 51
14. Using the Web Browser ............................... 52
14.1 Open Browser ................................................... 52
14.2 Set home page .................................................. 52
14.3 Open a web page.............................................. 52
14.4 Automatic screen rotation ................................. 52
14.5 Display web page in landscape only .................52
14.6 Zoom in and out of a webpage.......................... 53
14.7 Open a new browser window ............................53
14.8 Switch between browser windows .................... 53
7
Page 8

14.9 Finding text within a webpage .......................... 53
14.10 Selecting links in web pages........................... 53
14.10.1 Web page links .................................... 53
14.10.2 Email links ........................................... 53
14.11 Downloading web applications........................ 54
14.12 View your downloads ...................................... 54
14.13 Manage bookmarks ........................................ 54
14.13.1 To bookmark a web page .................... 54
14.13.2 To open a bookmark ........................... 54
14.14 Customize Browser Options ........................... 55
15. Email ..............................................................55
15.1 Open Email ....................................................... 55
15.2 Set up the first email account ........................... 56
15.3 Set up another email account ........................... 56
15.4 Combined Inbox ............................................... 57
15.5 Account settings ............................................... 57
15.5.1 Edit Account name .............................. 57
15.6 Compose and send email messages ............... 57
15.7 Read messages................................................ 58
15.8 Open an attached file ....................................... 58
8
15.9 Check for new messages ..................................59
15.10 Reply to an email message .............................59
15.11 Delete an email message ................................59
15.12 Forward an email message .............................59
15.13 Mark message as unread ................................60
15.14 Delete an email account ..................................60
16. TuneIn Radio ................................................. 60
16.1 Open TuneIn Radio ...........................................61
16.2 Listen to a Radio Broadcast ..............................61
16.3 Search Station by Name ................................... 61
16.4 Search Station by Location ...............................61
16.5 Search Station by Language .............................62
17. RssFeed ........................................................62
17.1 Open RssFeed ..................................................62
17.2 Add a category to the RssFeed Reader ............63
17.3 Selecting a Category for the Widget..................63
17.4 Adding an RSS Feed into a Category ...............63
18. Stock.............................................................. 64
18.1 Open Stock........................................................64
18.2 Add a stock to the Portfolio list ..........................64
Page 9

18.3 Delete a stock from the portfolio list .................. 64
18.4 View more information about a stock in
your portfolio ..................................................... 64
18.5 Get more information about a stock ..................65
19. Weather ......................................................... 65
19.1 Open Weather Application ................................65
19.2 Check the current weather of a city................... 65
19.3 Display the weather forecast of a city................ 66
19.4 Change Temperature Unit ................................. 66
19.5 Delete a city.......................................................66
20. Take photos and record videos ..................66
20.1 Open Camera.................................................... 66
20.2 Switch between camera and
camcorder mode ...............................................66
20.3 Take picture.......................................................66
20.4 Camera options ................................................. 67
20.5 View photos....................................................... 67
20.6 Record video ..................................................... 68
20.7 Video options.....................................................68
20.8 Play videos ........................................................ 69
21. Music ............................................................. 69
21.1 Listen to Music on your Motorola MBP2000PU. 69
21.1.1 Using earphones ..................................69
21.1.2 Using the speaker on the
21.2 Open Music application ..................................... 70
21.3 Music Library .....................................................70
21.4 Search for a song .............................................. 70
21.5 Party Shuffle all songs ...................................... 70
21.6 Turn party shuffle off ......................................... 71
21.7 Create playlists.................................................. 71
21.8 Add songs to current playlist ............................. 71
21.9 Play songs in a playlist ......................................71
21.10 Add songs to a playlist ....................................71
21.11 Remove a song from playlist ........................... 71
21.12 Delete a playlist ............................................... 72
21.13 Rename a playlist ............................................ 72
21.14 Set song as ringtone ....................................... 72
21.15 Set sound effects ............................................. 72
21.16 Delete current song ......................................... 72
21.17 Set current song as ringtone ........................... 73
base station .......................................... 69
9
Page 10

22. Gallery............................................................73
22.1 Open Gallery .................................................... 73
22.2 View pictures .................................................... 73
22.2.1 View pictures in full screen .................. 74
23. Clock ..............................................................74
23.1 Open Clock ....................................................... 74
23.2 Set an alarm ..................................................... 74
23.3 Activate an alarm setting .................................. 75
23.4 Deactivate an alarm setting .............................. 75
23.5 Activate alarm in silent mode............................ 75
23.6 Other Alarm Clock Settings .............................. 75
24. Calendar ........................................................76
24.1 Open Calendar ................................................. 76
24.2 View Agenda for the day .................................. 76
24.3 Go to Today's date ........................................... 76
24.4 Change Calendar view ..................................... 76
24.5 Modify Calendar Settings ................................. 77
24.6 Add new event .................................................. 77
24.7 View, dismiss, or snooze a reminder ................ 78
10
25. Performing Calculations .............................. 78
25.1 Open Calculator ................................................ 78
25.2 Perform Calculations .........................................78
26. Downloading and Reading eBooks ............79
26.1 Downloading and Reading eBooks ...................79
26.2 Open Aldiko ......................................................79
26.3 Start reading .....................................................79
26.4 Buy Books .........................................................80
26.5 Download Free Books .......................................80
26.6 Add eBooks from your SD card into
your Library .......................................................80
27. ES FILE EXPLORER .....................................81
27.1 Open ES File Explorer .......................................81
27.2 Open file as ....................................................... 81
27.3 Select all files in a directory ...............................81
27.4 Create a new folder ...........................................81
27.5 Rename a file ....................................................81
27.6 Copy a file to another location ...........................82
27.7 Move a file to another location .......................... 82
27.8 Delete a file .......................................................82
Page 11

27.9 Compress a file ................................................. 82
27.10 View file details ................................................82
27.11 Modify View Settings in ES File Explorer ........83
28. Discover and Download Android
Applications.................................................. 83
28.1 Open SlideME ...................................................83
28.2 Download an application ...................................84
28.3 Search by Top Apps .......................................... 84
28.4 Search by Latest Apps ......................................84
28.5 Search by Local Apps ....................................... 85
28.6 Search for Apps manually .................................85
29. Install apps.................................................... 86
30. Connect your handset to a computer......... 87
31. ES Task Manager.......................................... 88
31.1 Open ES Task Manager....................................88
32. Settings ......................................................... 88
33. Advanced Features ...................................... 89
33.1 Firmware Upgrade with SD card ....................... 89
33.2 Factory data reset ............................................. 90
34. Help ............................................................... 91
35. General information ..................................... 93
11
Page 12

Important safety instructions
Follow these safety precautions when using your phone to
reduce the risk of fire, electric shock, and injury to persons
or property:
1. Keep all vents and openings of the phone unblocked.
Do not set the phone on a heating register or over a
radiator. Ensure that proper ventilation is provided at the
installation site.
2. Do not use while wet or while standing in water.
3. Do not use this product near water (for example, near a
bath tub, kitchen sink, or swimming pool).
4. Do not allow anything to rest on the power cord. Place
the power cord so that it will not be walked on.
5. Never insert objects of any kind into the product vents
as that may result in fire or electric shock.
6. Unplug this product from the electrical outlet before
cleaning. Do not use liquid cleaners or aerosol cleaners.
Use a damp cloth for cleaning.
7. Do not disassemble this product. If service or repair
work is required, contact the customer service helpline
found in this User's Guide.
8. Do not overload wall outlets and extension cords.
9. Avoid using during an electrical storm. Use a surge
protector to protect the equipment.
10. Do not use this phone to report a gas leak, especially if
you are in the vicinity of the gas line.
CAUTION
To reduce the risk of fire, use only No. 26 AWG or larger UL
Listed or CSA Certified Telecommunication Line Cord.
SAVE THESE INSTRUCTIONS
Important safety instructions
11A
Page 13
1. Getting started
WARNING
Do not place your phone in the bathroom or other humid
areas.
Location
When choosing a location for your new phone, here are
some important guidelines you should consider:
• Avoid sources of noise and heat, such as motors,
fluorescent lighting, microwave ovens, heating
appliances and direct sunlight.
• Avoid areas of excessive dust, moisture and low
temperature.
• Avoid other cordless telephones or personal computers.
• Never install telephone wiring during a lightning storm.
• Never install telephone jacks in wet locations unless the
jack is specifically designed for wet locations.
12 Getting started
• Never touch non-insulated telephone wires or terminals,
unless the telephone line has been disconnected at the
network interface.
• Use caution when installing or modifying telephone lines.
Handset Range
The Android Home Phone has a range of up to 300 meters
for telephone calls, when there is clear line of sight between
the base and handset. Any obstruction between the base
and handset will reduce the range significantly. With the
base indoors and handset either indoors or outdoors, the
range will normally be up to 50 meters. Thick stone walls can
severely affect the range.
Signal Strength
The icon on your handset indicates when you are in
range of telephone calls.
When out of range of the base, the signal strength will drop
out. If you are on a call, the line will hang up. Move back
within range. The handset will automatically re-connect to
the base.
Page 14
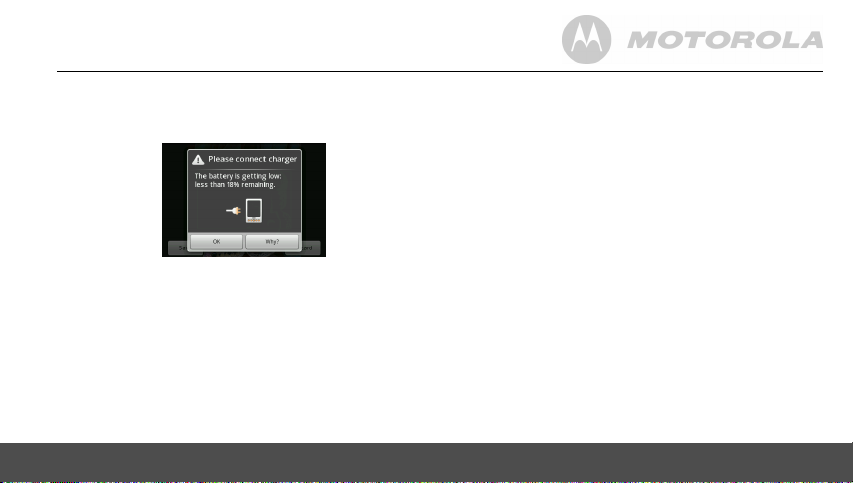
Battery low warning
If the following appears on the display, you will need to
charge the handset.
with time as they wear out, giving the handset lesser talk/
standby time. Eventually they will need to be replaced.
After charging your handset for the first time, subsequent
charging time will be about 6 hours a day. Batteries and
handset may become warm during charging. This is normal.
Setting up
IMPORTANT
The base must be plugged into an electrical outlet at all
times. Do not connect the telephone line cord into the
telephone wall jack until the handset is fully charged. Only
Battery performance
Note that new batteries will not reach full capacity until they
have been in normal use for several days.
To keep your batteries in the best condition, leave the
handset off the base for a few hours at a time.
Drain the batteries completely at least once a week before
charging will help to prolong battery life.
The charge capacity of rechargeable batteries will reduce
Getting started 13
use the adapter and telephone line cord supplied with the
product.
Page 15
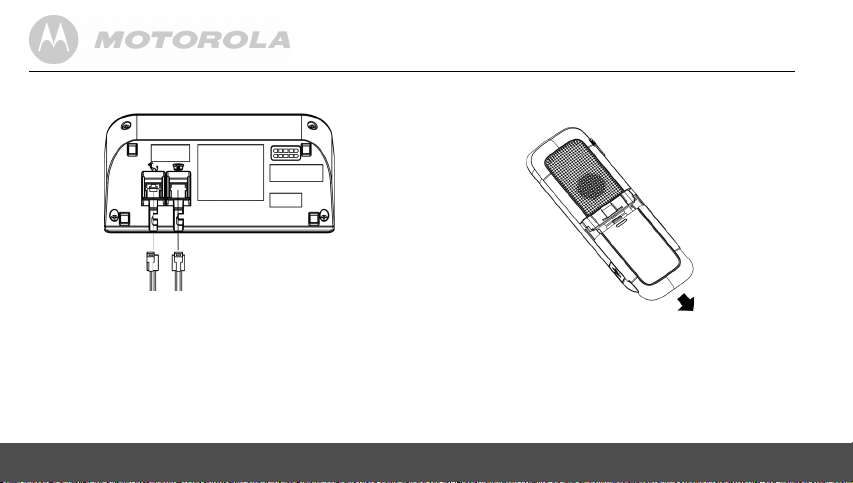
1.1 Connecting the base
1.2 Installing and charging the handset
battery pack
1. Plug one end of the power cable and telephone line cord
into the power jack and phone jack respectively on the
bottom of the base station.
2. Plug the other end into a power outlet and telephone
wall jack.
IMPORTANT
Use only the supplied power adapter.
14 Getting started
1. Hold the phone with both hands and the front panel
facing down. Gently press the back cover with your
thumbs, and then slide it down until it disengages from
the phone.
2. Remove the back cover completely.
Page 16
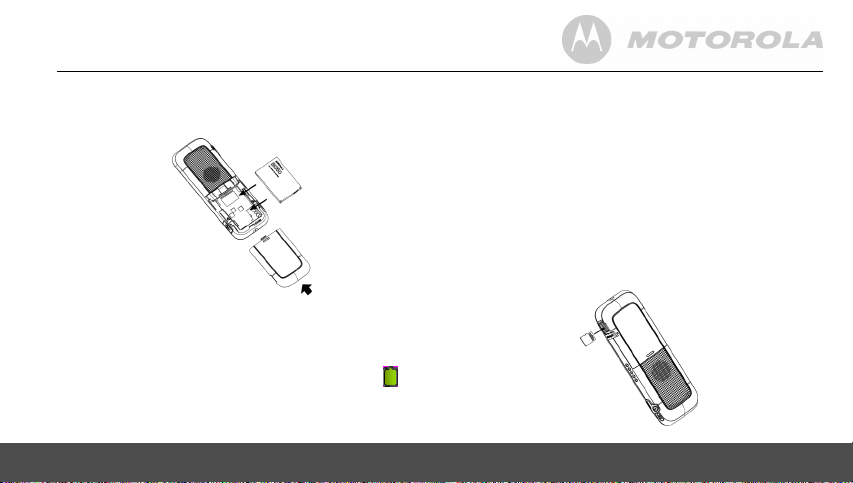
3. Place the supplied rechargeable battery pack in the
battery compartment, with the battery connector
plugged in, as shown.
4. Align the back cover tabs with the notches located at the
edges of the exposed back panel.
5. Slide up the back cover until it clicks in place.
6. Place the handset on the base station to charge for at
least 6 hours. When the handset is fully charged,
is displayed.
Getting started 15
Note
If the Red Charging LED did not light up, you need to re-align
the phone to get a good charging contact with the base
station.
IMPORTANT
Use only the rechargeable battery pack supplied with the
product.
1.3 Insert and Mount memory card
Your Motorola MBP2000PU supports micro SD cards.
You can store music, pictures, files and applications on a
memory card and access them on the phone.
Page 17
Insert the memory card by pushing the card firmly into the
slot with the metal contacts facing up, and in the direction as
indicated above.
- The phone will prepare the SD card for mounting and
perform media scanning.
If the SD card fails to mount on the phone, press
Settings > Storage > SD Card Settings > Mount SD card.
1.4 Unmount and Remove memory card
If the Motorola MBP2000PU is powered off
• Push the card gently inwards to eject the memory card.
If the Motorola
1. Press
Settings > Unmount SD card.
2. Remove the SD card by pushing the card gently inwards
to eject it.
1.5 Switch on your Motorola MBP2000PU
• Press and hold L on the side panel of the handset
until the LCD screen starts to display the Motorola logo.
- It takes about 1 minute for the phone to boot up.
16 Getting started
MBP2000PU is powered on
H and tap Settings > Storage > SD Card
H and tap
- The home screen is displayed.
• The Home screen provides access to all the features on
MBP2000PU. It displays application icons, widgets,
your
shortcuts, and other features. You can also customize
the Home screen with different wallpaper and display the
items you want (see “Display Settings” on page 28).
• Tap (Program launcher) at the bottom of the screen
to view all installed applications.
Note
If your Motorola
take a while to charge before you can power up the phone.
MBP2000PU is totally out of battery, it may
1.6 Switch off your Motorola MBP2000PU
1. Press and hold L on the side panel of the handset to
activate the Phone options menu.
2. Tap to select Power off.
3. Tap OK to confirm or press
B to cancel.
Page 18
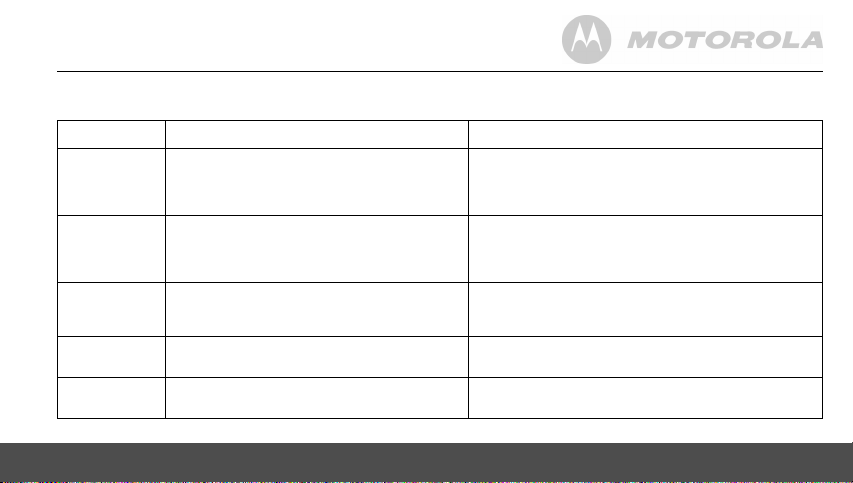
2. Using the touchscreen
Action Function Operations
Tap Select onscreen items such as application and
Tap and hold Open the available options for an item, for
Drag Move items on the screen or shift the view on
Slide Quickly move vertically or horizontally across
Flick Quickly browse a list of items in a vertical
Using the touchscreen 17
settings icons
Select onscreen buttons
Type using the onscreen keyboard
example, tap and hold a contact or a link on a
web page. Think of this as using the right-click
button on a mouse.
the screen.
the screen.
direction.
Gently tap an item on the screen to select the item that
you wish to activate.
Tap an item on the screen and hold in place for 2-3
seconds.
Apply light pressure against an item on the screen then,
without raising your finger, move it across the screen
until you have reached the target position.
Flick is similar to slide, except that flick involves swiping
the screen in lighter and quicker strokes.
Page 19

3. Using the onscreen keyboard
Your Motorola MBP2000PU features a Qwerty keyboard by
which the key arrangement is exactly the same as that of a
standard computer keyboard.
The onscreen keyboard lets you enter text, such as contact
information, email messages, etc. It appears automatically
when you launch certain applications or when you tap on a
text or number field.
To hide the onscreen keyboard, press
3.1 Enter text and numbers
• Tap on a text or number field to bring up the keyboard.
- When entering texts or numbers, each letter or
number will appear above the key you have pressed.
3.2 Switch between input modes
• Tap ABC (lower case), ⇑ (upper case), ?123 (number),
or ALT (symbols) on the onscreen keyboard to switch
between different input modes.
18 Using the onscreen keyboard
B.
3.3 Change keyboard language
1. From the home screen, press H.
2. Tap Settings > Language & keyboard > Select
language.
3. Scroll to your preferred keyboard language and tap to
select.
3.4 Modify keyboard settings
1. From the home screen, press H.
2. Tap Settings > Language & keyboard > Android
keyboard.
3. Tap to select or de-select the options and settings.
3.5 Add words to User dictionary
1. From the home screen, press H.
2. Tap Settings > Language & keyboard > User
dictionary.
3. Press
4. Enter the word in the edit box and tap OK.
H and tap Add.
Page 20

3.6 Accept or Reject Dictionary Suggestions
Depending on the application you are using, Motorola
MBP2000PU uses a dictionary to suggest corrections or
complete the word you are typing.
• To accept the suggested word, simply tap on the
suggested entry.
• To reject the suggested word, simply continue typing.
Note
User dictionary function needs to be set up separately. You
can do so by selecting Language & keyboard > User
dictionary in the Settings menu to add or remove words.
3.7 Edit text
• Tap and hold on the word you have typed to activate Edit
text options and tap to select an option.
Set up your Motorola MBP2000PU with Welcome Wizard 19
4. Set up your Motorola MBP2000PU
with Welcome Wizard
When you first power up the phone or after doing a factory
data reset (see “Factory data reset” page 90), the Welcome
Wizard will help you set up and personalize your phone,
such as language, date, time, Wi-Fi setting, etc.
1. To start, tap Select your language to select your
preferred language and then tap Next to begin phone
setup.
Note
If the Welcome Wizard did not appear when you power up
the phone, press
data reset to reset the phone (see “Factory data reset”
page 90).
H and tap Settings > Privacy > Factory
Page 21
4.1 Display
1. Tap Brightness.
2. Slide the brightness control bar right or left to increase
to decrease screen brightness.
3. Tap OK to confirm.
4.2 Sound settings
4.2.1 Phone ringtone
1. Tap Phone ringtone.
2. Tap to select a ringtone.
- The ringtone is played.
3. Tap OK to confirm.
4.2.2 Volume
1. Tap Vol ume.
2. Slide the volume bar right or left to increase or decrease
volume.
3. Tap to enable or disable Use incoming call volume for
notifications.
- If enabled,
4. Tap OK to confirm.
5. Tap Next to proceed with Wi-Fi settings.
20 Set up your Motorola MBP2000PU with Welcome Wizard
✓
appears next to the option.
4.3 Wi-Fi settings
1. Tap Wi-Fi settings.
2. Tap Turn on Wi-Fi.
3. Under Network notification, tap to enable Notify me
when an open network is available.
- If enabled,
- The screen displays a list of available Wi-Fi networks.
4. Tap to select the network you want to connect.
- If the network is secured, you will be prompted to
enter password.
- If you cannot find your favorite Wi-Fi network name,
press
5. Tap on the Password edit box to launch the onscreen
keyboard.
6. Enter password and tap Done.
7. Tap Connect.
- The phone will start to obtain the IP address of the
network you have selected.
- This may take a few minutes.
- When connected, appears on the status bar of the
handset.
8. Tap Next to proceed with date & time settings.
✓
appears next to the option.
H and then tap Scan.
Page 22

4.4 Date & time settings
1. Tap Date & time.
2. Tap Set date.
3. Tap + or - to set Month, Day and Year.
4. Tap Set to confirm.
4.4.1 Set time zone
1. Tap Select time zone.
2. Scroll to your time zone and tap to select.
4.4.2 Set time
1. Tap Set time.
2. Tap + or - to set hour and minutes.
3. Tap to select AM or PM.
Note
This option is not available if Use 24-hour format is
activated. See “Set time format” on page 21 for details.
4. Tap Set to confirm.
Set up your Motorola MBP2000PU with Welcome Wizard 21
4.4.3 Set time format
• Tap Use 24-hour format to enable it. Tap again to
disable.
- 24-hour format is activated when
the option.
✓
appears next to
4.4.4 Select date format
1. Tap to select your preferred date format.
You can configure your phone more thoroughly via Settings
menu (see “Settings” on page 88).
Your phone is now ready for use.
Page 23
5. Set date and time
Note:
If you remove the battery of your Motorola MBP2000PU,
you may need to set the date and time again.
5.0.1 Set Date
1. Press H and then tap Settings >Date & time.
2. Tap Set date and then tap + or - on each date field to
change the Month, Day and Year.
3. Tap Set to confirm date setting.
5.0.2 Set Time
1. Press H and then tap Settings > Date & time.
2. Tap Set time and then tap + or - on each time field to
change Hours and Minutes.
3. Tap AM/PM to select AM (morning) or PM (afternoon).
Tip:
This option is not available if 24-hour format is activated (see
“Select Date Format” on page 22).
4. Tap Set to confirm time setting.
22 Set date and time
5.0.3 Select Time Zone
1. Press H and then tap Settings > Date & time.
2. Tap Select time zone.
3. Scroll to your location and tap to select.
5.0.4 Select Time Format
1. Press H and then tap Settings > Date & time.
2. Tap Use 24-hour format to activate or deactivate it.
- 24-hour format is activated when
the option.
✓
appears next to
5.0.5 Select Date Format
1. Press H and then tap Settings > Date & time.
2. Tap Select date format.
3. Tap to select your preferred date format.
Page 24
6. Getting to know your phone
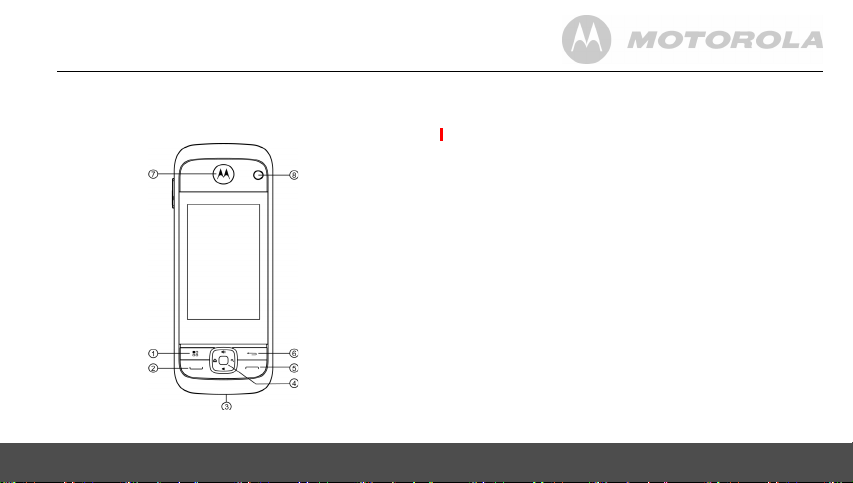
6.1 Overview of the handset
Getting to know your phone 23
1 H MENU key
Press once to access the menu options
2 C PHONE ON key
Press once to access the dialer.
Press once to make or answer a call.
3 Microphone
4 FUNCTION buttons
< HOME key
Press to return to the home screen.
> SEARCH key
On the homescreen: Open google search for
searching on your phone or the web
In other applications: Open a search box for searching
within the application
+ / - VOLUME UP/DOWN key
On the homescreen: Press to increase / decrease
ringtone volume; press and hold to increase / decrease
ringtone volume quickly
When a call is in progress: Press to increase /
decrease volume during a call
In other applications: Press to increase/decrease
media volume
5 D PHONE OFF key
Press once to end a call.
6 B BACK key
Press to return to previous screen.
Page 25
Press to hide the onscreen keyboard, dialog box, options
menu or notifications panel.
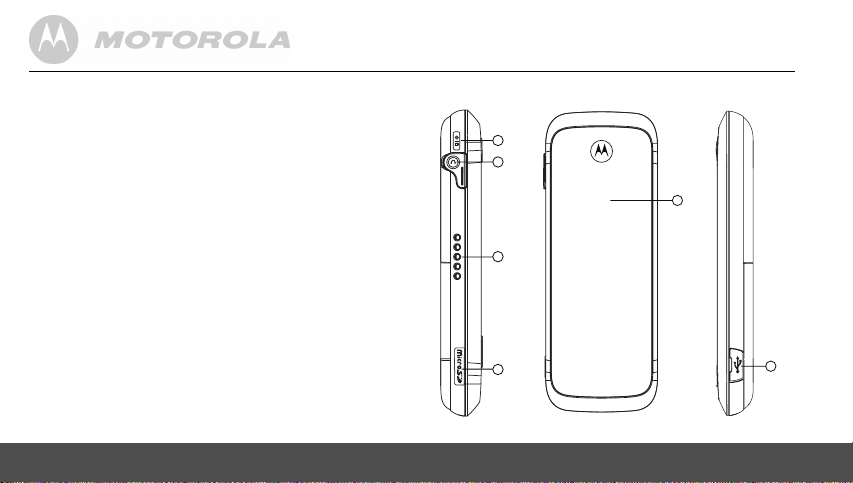
7Earpiece
8 Camera Lens
L Lock / Unlock / Power On & Off key
9
When the handset is off, press and hold for 2 seconds to turn
on the handset
When the handset is in operation, press and hold for 2
seconds to activate Phone options menu and power off the
phone.
During operation, press once to lock and unlock the
handset.
10 E Earphone Jack
Plug in a 3.5mm headset for listening to music.
11 Charge and Audio Output Contacts
S Micro SD card slot
12
13 Handset Speaker
U Micro USB port
14
For handset charging, internal storage and Micro-SD card
access.
9
10
13
11
12
14
24 Getting to know your phone
Page 26
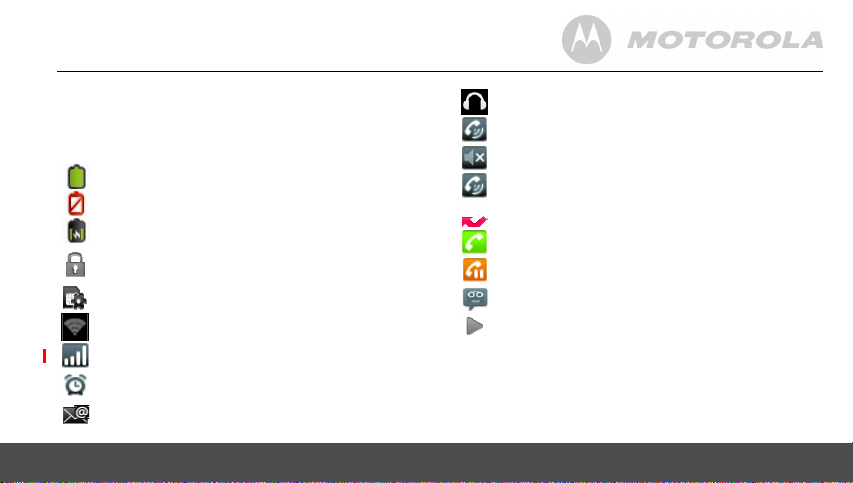
6.2 Handset LCD display
The Status bar at the top of the screen displays the time,
status of your phone, and notifications that you’ve received.
Status Icons
Battery is fully charged
Battery low
Battery is charging
Screen lock is activated
SD card is inserted
Wireless connection is on
Telephone connection signal strength
Alarm Clock is set
New email received
Getting to know your phone 25
Earphone is connected.
Speaker is on
Earphone is connected.
Silent mode is activated
Missed call
Call in progress
Call on hold
New answer machine message received
Song is playing
6.3 Notifications panel
When the status bar displays a Status icon, tap and hold the
status bar and slide downward to open the notifications panel.
You can also press
notifications panel.
H and tap Notifications to access
Page 27
To hide notifications panel, press
bottom bar of the notifications panel and then slide upward.
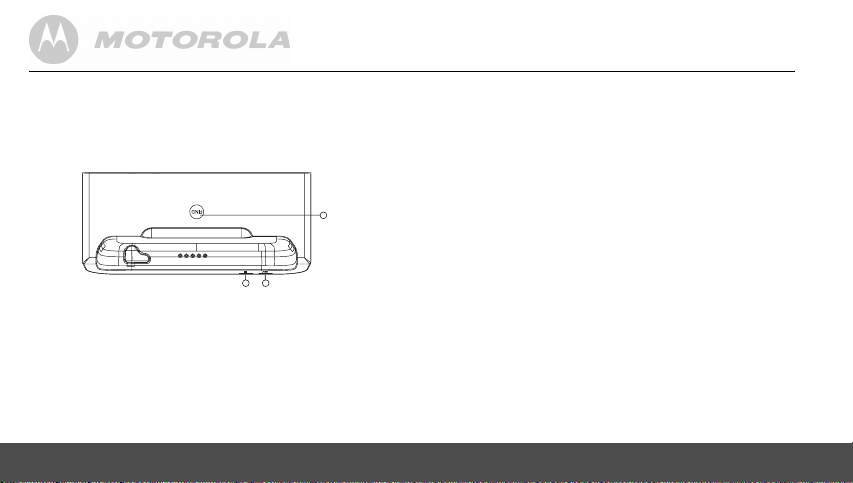
6.4 Overview of the base
1 CHARGE LED - RED
On when the handset is put into the base cradle for charging.
2 IN USE/MESSAGE LED - BLUE
On when the handset is in use or blink when a new message
is received.
3 N PAGE
Press to find / page all registered handsets. Press the button
again, or any key on the handset to turn off page signal.
26 Getting to know your phone
B or tap and hold the
3
1 2
6.5 Home Screen
• To return to the home screen at anytime, press <.
6.6 Extended Home Screen
The extended home screen lets you add more shortcuts and
widgets on your Motorola MBP2000PU so that you can
access the widgets and applications conveniently from the
home screen.
• Slide horizontally across the screen to go to the left or
right side of the extended Home screen.
• Small dots at the bottom left or right of the screen
indicate which screen you are viewing. Tap and hold the
small dots to view thumbnails of the Home screen and
the extended Home screens. Tap to open them.
6.7 Wake up the phone
The LCD screen dims to conserve battery when you don't
use it for a while.
1. Press any key to turn on the screen.
2. Drag the lock icon to the right.
- The last screen you were viewing opens.
Page 28

3. If you have locked your LCD screen with a pattern, PIN
or password, you must draw an unlock pattern or enter a
PIN or password to unlock it.
4. See “Lock the screen of your Motorola MBP2000PU”
on page 27.
6.8 Lock the screen of your Motorola
MBP2000PU
1. You can lock the screen of your phone such that
onscreen functions will not be accessed accidentally.
2. Press
6.8.1 Lock with a pattern, PIN or password
1. Press H.
2. Tap Settings > Security > Set up screen lock.
3. Tap to select Pattern, PIN or Password.
4. Follow the onscreen instructions to set up screen lock.
Getting to know your phone 27
L on the side of the handset to lock the screen.
Press again to unlock.
Note
If you set up screen lock with a pattern, PIN or password, you
need to draw the pattern, or enter the PIN or password each
time you unlock the screen. See “Wake up the phone” on
page 26.
6.8.2 Disable screen unlock security
1. Press H.
2. Tap Settings > Security > Set up screen lock.
3. Tap to select None.
6.9 Screen Rotation
The Motorola MBP2000PU has a tilt/orientation sensor,
which detects if you are holding it in Portrait or Landscape
mode. The screen will be adjusted accordingly.
Tip
Automatic screen rotation is enabled by default.
To disable automatic screen rotation, press
Settings > Display > Auto-rotate screen.
- Automatic screen rotation is disabled when
disappears.
H and then tap
✓
Page 29

To enable automatic screen rotation, press
Settings > Display > Auto-rotate screen again.
6.10 Recalibrate the touch screen
The Motorola MBP2000PU uses a built-in G-Sensor that
changes the screen orientation based on the way you hold
the phone.
If you feel that the screen orientation does not respond
properly to the way you hold the phone, you can recalibrate
the screen as follows:
H and then tap Settings > Display > G-Sensor
• Press
Calibration.
28 Personalizing your MBP2000PU
H and then tap
7. Personalizing your MBP2000PU
7.1 Display Settings
7.1.1 Set Wallpaper
1. From the home screen, press H.
2. Tap Wallpaper.
3. Tap to select Gallery, Live wallpapers or Wallpapers.
Tip:
If you select Live wallpapers or Wallpape rs, simply tap to
select a wallpaper from the list and tap Set wallpaper.
4. If you select Gallery, tap to select your desired picture.
- An image position box will appear at the center of the
picture.
- To resize the picture, tap and hold the edge of the box,
and drag inward or outward.
- To move the box to another area on the picture, tap
and hold inside the box, then drag it to the desired
position.
5. Tap Save to set the picture as wallpaper.
- You will see that the background image is now
changed to the picture you have selected.
Page 30

7.1.2 Adjust Screen Brightness
1. From the home screen, press H.
2. Tap Settings > Display > Brightness.
3. Drag the slider left or right to reduce or increase screen
brightness and tap OK to confirm.
7.1.3 Set screen timeout
This option lets you adjust the delay before the screen
automatically turns off.
1. From the home screen, press
2. Tap Settings > Display > Screen timeout.
3. Tap to select 15 seconds, 30 seconds, 1 minute, 2
minutes, 10 minutes or 30 minutes.
H.
7.1.4 Re-arrange items on your home screen
1. Tap and hold the item that you wish to re-arrange until it
turns bigger.
2. Slide to the position on which you wish to place the item
or slide and pause at the edge of the screen to drag the
item onto another Home screen.
3. Release the item when it is correctly placed.
Personalizing your MBP2000PU 29
7.1.5 Add apps to your home screen
1. Tap to open the launcher and view all your
applications.
2. Tap and hold an application icon until it turns bigger.
- The application icon will be placed on the home
screen.
Note
You can also add a shortcut or widget by pressing
the homescreen and then tap Add > Shortcuts or Widgets
or tap and hold any empty spot on the homescreen and then
select Shortcuts or Widgets.
H from
7.1.6 Remove an item from your home screen
1. Tap and hold the item that you wish to remove until it
turns bigger.
- A recycle bin appears at the bottom of the screen.
2. Drag and drop item into the trash bin.
- The item will be trashed.
7.1.7 Add Folders to your home screen
Folders allow you to organize your Home screen items, and
they can also contain all your contacts, contacts with phone
Page 31

numbers, or starred contacts. The folder contents are kept
up to date automatically.
1. From the home screen, press
2. Tap Add > Folders.
3. Tap to select New folder, All contacts, Contacts with
phone numbers or Starred contacts.
- A new folder will be added to your home screen.
Tip
You can also tap and hold any empty spot on the
homescreen and then select Folders.
H.
7.1.8 To rename a folder
1. Tap the folder to open it.
2. Tap and hold the folder’s title bar.
3. Enter a new name in the dialog that appears.
4. Tap OK.
7.1.9 Add items to the folders on your home
screen
1. Tap and hold the item until it turns bigger.
2. Drag the item to the folder in which you wish to place it.
30 Personalizing your MBP2000PU
7.2 Sound Settings
7.2.1 Set silent mode
This option enables you to mute all sounds except media
and alarms.
1. From the home screen, press
2. Tap Settings > Sound > Silent mode.
-
✓
appears next to the option to indicate that silent
mode is activated.
To turn silent mode off, tap Silent mode option again.
7.2.2 Set volume
This option enables you to set Ringtone, Media and Alarm
volume on your Motorola MBP2000PU.
1. From the home screen, press
2. Tap Settings > Sound > Vo lum e.
3. Drag the slider to the left or right to decrease or increase
volume and tap OK to confirm.
Note
If you wish to use incoming call volume for notifications as
well, tap to select the option.
option is selected.
H.
H.
✓
appears to indicate that the
Page 32

7.2.3 Set Phone ringtone
This option enables you to set the default ringtone on your
Motorola MBP2000PU.
1. From the home screen, press
2. Tap Settings > Sound > Phone ringtone.
3. Tap to select a ringtone from the list.
- The ringtone is played.
4. Tap OK to confirm.
7.2.4 Set Intercom ringtone
This option enables you to set the default incoming intercom
ringtone on your Motorola MBP2000PU.
1. From the home screen, press
2. Tap Settings > Sound > Intercom ringtone.
3. Tap to select a ringtone from the list.
- The ringtone is played.
4. Tap OK to confirm.
Personalizing your MBP2000PU 31
H.
H.
7.2.5 Set Paging ringtone
This option enables you to set the default incoming paging
ringtone on your Motorola MBP2000PU.
1. From the home screen, press
2. Tap Settings > Sound > Paging ringtone.
3. Tap to select a ringtone from the list.
- The ringtone is played.
4. Tap OK to confirm.
7.2.6 Set default notification ringtone
This option enables you to set the default notification
ringtone on your Motorola MBP2000PU.
1. From the home screen, press
2. Tap Settings > Sound > Notification ringtone.
3. Tap to select a ringtone from the list.
- The ringtone is played.
4. Tap OK to confirm.
7.2.7 Enable or Disable Audible Touch tones
This option lets you enable or disable the playing of touch
tones on your phone when using the dial pad.
H.
H.
Page 33

1. From the home screen, press
2. Tap Settings > Sound > Audible touch tones.
-
✓
appears next to the option to indicate that audible
touch tone is enabled.
3. To disable, tap Audible touch tones again.
7.2.8 Enable or Disable Audible Selection
This option lets you enable or disable the playing of sounds
on your phone when making screen selection.
1. From the home screen, press
2. Tap Settings > Sound > Audible selection.
-
✓
appears next to the option to indicate that audible
selection is enabled.
3. To disable, tap Audible selection again.
7.2.9 Enable or Disable screen lock sounds
This option lets you enable or disable the playing of sounds
when locking or unlocking the screen.
1. From the home screen, press
2. Tap Settings > Sound > Screen lock sounds.
-
✓
appears next to the option to indicate that screen
lock sound is enabled.
3. To disable, tap Screen lock sounds again.
32 DECT Settings
H.
H.
H.
8. DECT Settings
8.1 Handset Settings
Handset settings allows you to view and modify the settings
of your handset.
8.1.1 Registering your MBP2000PU to t he base station
Your Motorola MBP2000PU handset has been pre-registered
to the Base station by factory default. If you have another
MBP2000PU handset, you can follow the procedures
Motorola
here to register it to the same Base station to form a multiple
handset network.
1. Press and hold
seconds until the In Use / Message LED light turns on.
2. Release
3. On your Motorola
4. Tap Settings > Dect Settings > Handset Settings >
Registration.
5. Tap Base 1 and tap Register.
- Motorola
station.
6. Tap on Enter Pin box to launch the onscreen keyboard.
N on the base station for about 4
N.
MBP2000PU, press
MBP2000PU will start to search for the base
H.
Page 34

7. Enter the PIN code of the base station and tap Register.
- If successful, "Success" is displayed.
Note
If the PIN for the base station is set as "0000" (default),
MBP2000PU will register to the base station
Motorola
without prompting for the PIN.
8.1.2 Registering your MBP2000PU to another
base station
The base station to which you wish to register the Motorola
MBP2000PU handset must have a FREE Handset location.
You must also know the PIN code of the base.
1. Press and hold
seconds until the Talk/Message LED light turns on.
2. Release
3. On your Motoro
4. Tap Settings > Dect Settings > Handset Settings >
Registration.
5. Tap to select the base number and tap Register.
- Motorola
base station.
6. Tap on Enter Pin box to launch the onscreen keyboard.
DECT Settings 33
N on the base station for about 4
N.
la MBP2000PU, press
MBP2000PU will start to search for the
H.
7. Enter the PIN code of the base station and tap Register.
- If successful, "Success" is displayed.
Note
If the PIN of the base station is set as "0000" (default),
Moto
rola MBP2000PU will register to the base station
without prompting for the PIN.
8.1.3 Synchronize your MBP2000PU with another
base station
1. On your Motorola MBP2000PU, press H.
2. Tap to select Settings > Dect Settings > Handset
Settings > Select Base.
3. Tap to select the base number and tap Synchronize.
8.1.4 Rename Handset
1. On your Motorola MBP2000PU, press H.
2. Tap Settings > Dect Settings > Handset Settings >
Rename Handset.
3. Enter the handset name using the onscreen keyboard
and tap OK.
Page 35

8.1.5 Set Auto Answer
1. On your Motorola MBP2000PU, press H.
2. Tap Settings > Dect Settings > Handset Settings >
Auto Answer.
3. Tap to enable or disable auto answer.
-
✓
appears next to the option to indicate that auto
answer is enabled.
8.2 Base Settings
Base settings allows you to view and modify the settings on
your Motorola MBP2000PU base.
8.2.1 Change PIN code
1. On your Motorola MBP2000PU, press H.
2. Tap Settings > Dect Settings > Base Settings.
3. Enter the PIN code and tap Authenticate. (Note: The
default PIN code is 0000)
4. Tap Change Pin Code.
5. Enter the new pin code using the onscreen keyboard
and tap Modify.
34 DECT Settings
8.2.2 Deregister Handset
1. On your Motorola MBP2000PU, press H.
2. Tap Settings > Dect Settings > Base Settings.
3. Enter the PIN code and tap Authenticate. (Note: The
default PIN code is 0000)
4. Tap Deregister Handset.
5. Tap to select a handset and tap Deregister.
8.2.3 Reset Base Settings to Default
1. On your Motorola MBP2000PU, press H.
2. Tap Settings > Dect Settings > Base Settings.
3. Enter the PIN code and tap Authenticate. (Note: The
default PIN code is 0000)
4. Tap Reset to Default.
5. Tap Reset to confirm.
8.2.4 Set Dialing Mode
1. On your Motorola MBP2000PU, press H.
2. Tap Settings > Dect Settings > Base Settings.
3. Enter the PIN code and tap Authenticate. (Note: The
default PIN code is 0000)
Page 36

4. Tap Dialing Mode.
5. Tap to select Tone or Pulse.
8.2.5 Set Flash Duration
1. On your Motorola MBP2000PU, press H.
2. Tap Settings > Dect Settings > Base Settings.
3. Enter the PIN code and tap Authenticate. (Note: The
default PIN code is 0000)
4. Tap Flash Duration.
5. Tap to select Short, Normal or Long.
Voicemail 35
9. Voicemail
9.1 Set Voicemail Number
1. On your Motorola MBP2000PU, press H.
2. Tap Settings > Call Settings > Voicemail settings.
3. Enter the voicemail number and tap OK.
9.2 Listen to Voicemail
You can access your voicemail through your Motorola
MBP2000PU handset.
1. From the home screen, press
2. Tap Phone to access the phone tab.
3. Tap the voicemail icon .
C.
Page 37

10. Using the Phone Functions
10.1 Call another handset registered to
the same base station (Intercom)
1. From the home screen, press C.
2. Tap Intercom tab.
3. Tap to select a Handset Number (0 to 5) to call.
4. Press
10.2 Make an external call
Placing an external call using the Motorola MBP2000PU is
similar to dialing with a mobile phone.
1. From the home screen, press
2. Tap Phone tab to access the dial pad.
3. Enter the phone number.
4. Tap to dial the number.
5. Press
Tip
If you enter a wrong number, tap to delete the number
one by one. Tap and hold
36 Using the Phone Functions
D to hang up.
D to hang up.
C.
I
to erase the entire number.
I
10.2.1 In-call options
During a call, press H to access the following options:
Show dialpad
Displays dialpad
End call
End the current call
Mute
Mute the call
Speaker
Switch to speaker mode
Swap calls
Swap between 2 calls
Merge calls
Merge 2 calls to hold a conference call
Add call
Put the current call on hold and dial another number
Hold
Put the current call on hold
Page 38

Flash
Make a recall (for PBX and some network functions)
10.3 Make an external call from Call Log
The call log contains details of dialed, missed and received
calls.
1. From the home screen, press
2. Tap Call log tab to access the list of numbers and
contacts in the call log.
3. Tap next to the call log entry to call that number
again.
C.
10.4 Clear call log
1. From the home screen, press C.
2. Tap Call log tab.
3. Press
H and tap Clear call log.
10.5 Make an external call from Contacts
list
The Contacts list is like a phonebook that stores the name,
telephone numbers and other information of your contacts
Using the Phone Functions 37
on the phone. The person you want to call must have the
telephone number stored in the Contacts list.
(see “Add an entry to Contacts list” on page 44 for more
information on how to add contacts to the Contacts list)
1. From the home screen, press
2. Tap Contacts tab.
3. Select the contact in the contact list.
4. Tap to dial the number.
5. Press
10.6 Make an external call from Favorites
The Favorites list stores the name, telephone numbers and
other information of your favorite contacts on the Motorola
MBP2000PU.
(see “Add a Contact as Favorite” on page 46 for more
information on how to add contacts to the favorites list)
1. From the home screen, press
2. Tap Favorites tab.
3. Tap next to the favorite contact to dial the number.
4. Press
D to hang up.
D to hang up.
C.
C.
Page 39

10.7 Answer a call in earpiece mode
When the phone rings, press C to accept the call and
listen through the earpiece of the Motoro
la MBP2000PU.
10.8 Answer a Call in Speakerphone mode
1. When the phone rings, press C to accept the call.
2. Press
10.9 Reject a call
Press D to reject a call and stop the ringing.
10.10 End a Call
Press D to end the call.
10.11 Adjust volume level during a Call
During a call, press + or - to increase or decrease volume.
38 Using the Phone Functions
H, and then tap Speaker.
10.12 Mute the microphone during a call
During a call, press H, then tap Mute.
10.13 Caller Identity Delivery (CID)
Caller Identity Delivery (CID) feature lets you see who is
calling on the line. It also lets you know who called you in
your absence.
If you have subscribed to Caller ID, and provided the identity
of the caller is not withheld, the number of the caller will be
displayed together with the date and time of the call (if
provided by the network).
Note:
Information about incoming calls will vary by country and
network operator. Some operators may charge a
subscription for their Caller ID service.
Page 40

10.14 Caller ID Directory Matching
If you have subscribed to Caller ID and the caller's number
matches the telephone number you have stored in your
Contacts, it will display the name of the Contact rather than
the telephone number. If it is a missed call, when you review
the call log, it will display the name of the Contact as well.
11. Using the Answer Machine
Your Motorola MBP2000PU comes with a Digital Answer
Machine that is switched on by default to enable callers to
leave you a message when you are not available to answer
the call.
Callers will be prompted to leave a message or call back
later if a call is not answered after a preset number of rings.
Each message can be up to 2 minutes. The total recording
time available for all messages (including voice prompts) is
about 15 minutes.
The Digital Answer Machine can work through remote
connection to the base station as well as through direct
connection when docked.
The Message LED on the base station blinks if there are new
unread messages.
11.1 Open Digital Answer Machine
1. Tap > AnswerMachine.
2. Under ICM INFORMATION, the number of New
Messages and Total Messages are displayed.
Using the Answer Machine 39
Page 41

11.2 Switch Digital Answer Machine off
When the Digital Answer Machine is on, will appear on
the status bar. In the Digital Answer Machine screen, you will
see the icon indication TAM OFF.
1. Tap > AnswerMachine.
2. Tap TAM O FF to turn off Digital Answer Machine
function.
3. Tap TAM O N to turn it on again.
- The status bar shows
11.3 Set Number of Rings
You can customize the number of times (2 to 9 times) the
phone will ring before callers are greeted with the outgoing
message. Alternatively, you can choose Toll Saver option
such that the phone will ring 5 times if there is no message
and only 2 times if there are messages on the Digital
Answer Machine.
1. In the Digital Answer Machine screen, press
2. Tap TAM S ett ing > Number of Rings.
40 Using the Answer Machine
.
H.
3. Choose the number of times you would like the phone to
ring or select Toll Saver.
4. If you do not wish to make any changes to the current
setting, simply tap Cancel to exit.
11.4 Set Remote Pin
Set a remote pin code for your Motorola MBP2000PU to
improve the security of your personal messages. Once
enabled, users will need to enter the pin code to access
recorded messages on the Digital Answer Machine.
1. In the Digital Answer Machine screen, press
2. Tap TAM Setting > Set Remote Pin.
3. Enter the old pin code under Enter OLD Pin and then
enter the new pin code under Enter New Pin. (Note:
The default PIN code is 0000)
4. Enter the new pin code again under Retype New Pin to
verify the pin.
5. Tap OK to confirm pin change.
H.
Page 42

11.5 Playback recorded messages
When a new message is received, the Message LED on the
base station will blink and appears on the status bar.
1. Tap > AnswerMachine.
Tap to go to previous message
Tap to play message. The answer machine will
play all the new messages followed by old
messages.
Tap to go to next message
Tap to record memo
Tap to stop playing message
Tap to delete current message
TAM ON/
OFF
Using the Answer Machine 41
Tap to turn Digital Answer Machine on or off
DELETE
ALL
You can choose to playback the messages from the handset
or speaker.
1. During message playback, tap
2. Select Handset or Speaker playback.
Tap to delete all played messages
H.
11.6 Delete recorded messages
1. Tap > AnswerMachine.
2. Tap to start message playback.
3. To delete current message, tap .
4. To delete all old recorded messages, tap DELETE ALL.
- There will be a voice and message notification once
all the old messages have been deleted.
11.7 Memo Recording
You can record a memo that can be played back later. This
is useful when you wish to leave a message for other users
of the Motorola
MBP2000PU.
Page 43

Note
A memo will be played back along with other recorded
messages from external callers.
1. Tap > AnswerMachine.
2. Tap .
3. Record the memo you wish to leave for other users of
the Motorola
4. When you are done with the recording, tap .
- The Digital Answer Machine will playback your
memo once to confirm that all essential information
has been recorded.
11.8 Outgoing Message Setting
External callers are greeted with an outgoing message when
the call is answered by the Digital Answer Machine.
The Digital Answer Machine has pre-recorded default
messages for this purpose. You can also record a
personalized outgoing message for this greeting.
11.8.1 Select OGM Option
You can set the Digital Answer Machine to greet
unanswered calls with either an Answer & Record OGM or
42 Using the Answer Machine
MBP2000PU when prompted.
Answer Only OGM. With Answer & Record OGM, callers
will be asked to leave a message after the prompt. However,
with Answer Only OGM, callers will be asked to call back
and no message will be recorded.
1. Tap > AnswerMachine.
2. Press
3. Select Answer & Record or Answer Only.
Note
When the answer machine memory is full and cannot record
anymore new messages, it will automatically switch to
Answer Only OGM.
H and tap OGM Setting > Select OGM Option.
11.8.2 Record Personalized Outgoing Message
1. Tap > AnswerMachine.
2. Press
3. Choose to record a personalized message for Answer
4. Record your the personalized outgoing message when
H and tap OGM Setting > Record OGM.
& Record or Answer Only.
prompted.
Page 44

5. When you are done with the recording, tap Stop OGM.
If you are not satisfied with the message, tap Delete
OGM.
6. The Digital Answer Machine will repeat your
personalized outgoing message once before finalizing.
11.8.3 Playback Personalized Outgoing Message
1. Tap > AnswerMachine.
2. Press
3. Choose to play the personalized message for Answer &
4. Tap Stop OGM when you are done or let the message
H and tap OGM Setting > Play OGM.
Record or Answer Only.
play till the end.
11.8.4 Delete Personalized Outgoing Message
1. Tap > AnswerMachine.
2. Press
3. Choose to play the personalized message for Answer &
4. Tap Delete OGM to delete the personalized outgoing
Using the Answer Machine 43
H and tap OGM Setting > Play OGM.
Record or Answer Only.
message.
Note
Default OGM cannot be deleted.
11.9 Remote Operation
You can access your answer machine remotely from any
touchtone telephone. This allows you to listen to your
messages even when you are away from your phone.
To begin remote access, dial your telephone number. When
the answer machine answers and begins to play the OGM,
press * followed by your Remote PIN. When remote access
is successful, the phone will announce "Press 1 for main
menu".
You can perform the following functions using the dialing
keys on your keypad:
Dialing Key Function
1 Playback the Voice Prompt Help menu
2 Play or stop message playback
4 Go to previous message
Page 45

5 Delete current message
6 Go to next message
7 Turn On Answer Machine
9 Turn Off Answer Machine
12. Contacts List
The Contacts list is like a Phonebook that stores the name,
telephone numbers and other information of your contacts.
12.1 Open Contacts list
From the home screen, press C and tap Contacts tab.
12.2 Search for a contact in Contacts list
1. From the home screen, press C and tap Contacts
tab.
2. Press
3. Enter the name of the contact in the Search contacts
4. Press
H and tap Search.
box and tap Done.
B to return to the previous menu level.
12.3 Add an entry to Contacts list
1. From the home screen, press C and tap Contacts
tab.
2. Press
44 Contacts List
H and tap New contact.
Page 46

3. Tap on First name input box, enter the first name and
tap Next.
4. Enter the Last name of the contact and tap Next.
5. Proceed to enter the following information:
• Phone (tap Home label to switch between Home,
Mobile, Work, Work fax, Home fax, Pager, Other,
Custom, etc)
• Email (tap Home label to switch between Home, Work,
Other, Mobile or Custom)
• Postal address (tap Home label to switch between
Home, Work, Other or Custom)
• Organization (tap Work label to switch between Work,
Other or Custom)
Tip
To add an input field, tap +
To close an input field, tap -
Press
B to hide the onscreen keyboard.
6. Tap More to add more information about the contact,
such as IM, Notes, Website, Internet call.
Contacts List 45
7. Tap Done when finished.
- The new contact will be stored in your Contacts list.
12.4 Assign Ringtone to a Contact
1. From the home screen, press C and tap Contacts
tab.
2. Tap to select the contact from the contacts list.
3. Press
4. Tap to select a ringtone.
5. Tap OK to confirm.
Note
The default ringtone will be used if a specific ringtone is not
assigned to a contact.
H and tap Options > Ringtone.
- The ringtone is played.
Page 47

12.5 Import/Export Contacts
1. From the home screen, press C and tap Contacts
tab.
2. Press
3. Select Import from SD card, Export to SD card or
Note
Contacts can only be imported or exported in .vCard file
format.
H and tap Import/Export.
Share visible contacts.
12.6 Enable forwarding of calls to voicemail
1. From the home screen, press C and tap Contacts
tab.
2. Tap to select the contact from the contacts list.
3. Press
4. To cancel forwarding, tap Options > Incoming calls
46 Contacts List
H and tap Options > Incoming calls.
- Calls from the contact will be forwarded directly to
voicemail.
again.
12.7 Add a Contact as Favorite
1. From the home screen, press C and tap Contacts
tab.
2. Tap and hold a contact from the contacts list.
- A list of options appear on the screen.
3. Tap Add to favorites.
- The contact is saved to your favorites list.
12.8 Edit a Contact in Contacts list
1. From the home screen, press C and tap Contacts
tab.
2. Tap to select the contact from the contacts list.
3. Press
4. Go to the information field you wish to edit and tap + to
5. Tap Done when you are done with the changes.
Note
To discard the changes you have made, tap Revert.
H and tap Edit contact.
add input field.
Page 48

12.9 Set display options
1. From the home screen, press C and tap Contacts
tab.
2. Press
3. You can then choose the following:
Only contacts with phone
This will only display contacts with phone numbers
Sort list by
Sort contacts list by First name or Last name
View contact names as
View contact names as First name first or Surname first
H and tap Display options.
12.10 Delete a Contact from Contacts list
1. From the home screen, press C and tap Contacts
tab.
2. Tap to select the contact from the contacts list.
3. Press
4. Tap OK to confirm.
Contacts List 47
H and tap Delete contact.
12.11 Link Picture to a Contact
You can link a picture to your contact so that you can see the
picture of the contact when you search for the contact from
the Contacts list or when the contact calls you.
You can either take a photo or select it from Gallery.
12.11.1 Take photo
1. From the home screen, press C and tap Contacts
tab.
2. Tap to select a contact from the contacts list.
3. Press
4. Tap on the contact icon and tap Take photo.
5. Tap to take a picture and tap OK.
H and then tap Edit contact.
- The camera is activated.
- An image position box will appear at the center of the
picture.
- To resize the picture, tap and hold the edge of the box,
and drag inward or outward.
- To move the crop box to another area on the picture,
tap and hold inside the box, then drag it to the desired
position.
Page 49

6. Tap Save to link the picture to the contact.
7. Tap Done to save or Revert to cancel.
12.11.2 Select from Gallery
1. From the home screen, press C and tap Contacts
tab.
2. Tap to select a contact from the contacts list.
3. Press
4. Tap on the contact icon and tap Select photo from
5. Tap to select a picture from the Gallery.
6. Tap Save to link the picture to the contact.
7. Tap Done to save or Revert to cancel.
48 Contacts List
H and then tap Edit contact.
Gallery.
- An image position box will appear at the center of the
picture.
- To resize the picture, tap and hold the edge of the box,
and drag inward or outward.
- To move the crop box to another area on the picture,
tap and hold inside the box, then drag it to the desired
position.
12.11.3 Change picture of a Contact
1. From the home screen, press C and tap Contacts
tab.
2. Tap to select a contact from the contacts list.
3. Press
4. Tap on the contact icon and then tap Change icon.
5. Follow steps 5 to 7 of sections “12.11.1 Take photo” and
6. Tap Done to save or Revert to cancel.
H and tap Edit contact.
“12.11.2 Select from Gallery” to take photo or select
photo from gallery.
12.11.4 Remove picture of a Contact
1. From the home screen, press C and tap Contacts
tab.
2. Tap to select a contact from the contacts list.
3. Press
4. Tap on the contact icon and then tap Remove icon.
5. Tap Done to save or Revert to cancel.
H and tap Edit contact.
Page 50

12.12 Call a contact from contacts list
1. From the home screen, press C and tap Contacts
tab.
2. Tap to select the contact from the contacts list.
3. Tap next to the contact to call.
13. Internet Function
Before you can surf the Internet, send and receive emails,
listen to Internet radio broadcasts, check weather, stock
prices, etc., you must be joined to a Wi-Fi network that is
connected to the Internet.
For Wi-Fi networks that are not secured with a PIN code, you
can easily connect to them and access the Internet freely.
However, for Wi-Fi networks that are secured with wireless
password/key, you need to have the wireless password/key
to access the Internet.
13.1 Register your Motorola MBP2000PU
to a Wi-Fi Network
1. Press H.
2. Tap to select Settings > Wireless & networks.
- Tap Wi-Fi to activate Wi-Fi connection.
-
✓
appears to indicate that it is activated.
3. Tap Wi-Fi settings > Network notification to activate
notification.
Internet Function 49
Page 51

-
✓
appears to indicate that it is activated.
- The screen displays a list of available Wi-Fi networks.
4. Tap the Wi-Fi network that you want your Motorola
MBP2000PU to be connected to. If you cannot find your
favorite Wi-Fi network name, press
Scan.
- If the network is not secured with a wireless password/
key, Motorola
with it.
- If it is a secured network, you will be prompted to enter
the wireless password/key.
5. Tap on the password edit box to launch the onscreen
keyboard. Enter the wireless password/key and tap
Done.
6. Tap Connect.
- Your Motorola
to the network. Once it is established, appears on
the status bar of your home screen.
You can now use the Internet function.
50 Internet Function
MBP2000PU will start to establish a link
MBP2000PU will start to establish a link
H and then tap
Note
The connection speed is dependent on the capability of the
Wi-Fi network.
Once you have joined a Wi-Fi network manually, the
Motorola MBP2000PU will automatically connect to it
whenever the network is in range. If more than one
previously used network is in range, the Motor
MBP2000PU will join the one last used.
If you encounter problems connecting to the Wi-Fi network
using preconfigured settings, tap on the network and select
Forget to forget the "Remembered" network, then perform
setup again.
ola
13.2 Set Number of Wi-Fi Network Channels
Different regions utilize different channel schemes for their
Wi-Fi networks. For example, North America uses 11
channels, ETSI uses 13 channels while Japan uses 14
channels. It is recommended that you set up your Motorola
MBP2000PU according to your country's network scheme to
achieve optimum connection.
Page 52

1. Press
2. Tap to select Settings > Wireless & networks > Wi-Fi
3. Press
4. Tap Advanced > Regulatory domain.
5. Select from 11 channels, 13 channels or 14 channels.
13.3 Select Wi-Fi Sleep Policy
1. Press H.
2. Tap to select Settings > Wireless & networks > Wi-Fi
3. Press
4. Select Advanced > Wi-Fi sleep policy.
5. Select When screen turns off, Never when plugged
Internet Function 51
H.
settings.
H.
settings.
H.
in or Never.
13.4 Check Motorola MBP2000PU MAC
Address
For secured Wi-Fi network with MAC address filtering, you
will need to include the MAC address of your Motorola
MBP2000PU into the filter list before a connection can be
established.
To check the MAC address of your Motorola
1. Press
2. Tap to select Settings > Wireless & networks > Wi-Fi
3. Press
H.
settings.
H and tap Advanced.
MBP2000PU:
13.5 Configure Static IP Settings
1. Press H.
2. Tap to select Settings > Wireless & networks > Wi-Fi
settings.
3. Press
4. Select Advanced > Use Static IP.
5. Enter the Static IP Settings.
H.
Page 53

14. Using the Web Browser
YOU MUST JOIN A WI-FI NETWORK THAT IS
CONNECTED TO THE INTERNET BEFORE YOU CAN
SURF THE WEB VIA THE BROWSER APPLICATION.
SEE PAGE 49 ON HOW TO JOIN A WI-FI NETWORK.
You can use the Browser to surf the web. The Browser is
fully optimized and comes with advanced features that let
you enjoy Internet browsing on your Motorola
By default, the home page is www.google.com
14.1 Open Browser
Tap > Browser.
14.2 Set home page
1. In the Browser window, press H and tap More.
2. Tap Settings > Set home page.
3. Enter the home page address in the Set home page
input box and tap OK.
52 Using the Web Browser
MBP2000PU.
14.3 Open a web page
In the Browser window, enter the web address in the
address bar and tap Go.
Note
As you enter the address, matching web page addresses will
appear on the screen. Tap to select an address to go directly
to the web page or continue to enter the complete web page
address and tap Go.
14.4 Automatic screen rotation
The phone automatically changes the screen orientation
depending on how you are holding your phone.
Note
To enable/disable automatic screen orientation, from the
home screen, press
rotate screen.
H and tap Settings > Display > Auto-
14.5 Display web page in landscape only
1. When viewing a webpage, press H and tap More.
2. Tap Settings > Landscape-only display.
Page 54

14.6 Zoom in and out of a webpage
When viewing a webpage, double tap on the screen to zoom
in and out, or launch the zoom control by sliding your finger
across the screen in one direction and tap + to zoom in and
- to zoom out.
14.7 Open a new browser window
You can open multiple browser windows and switch between
different web pages.
In the Browser window, press
- A new browser window opens and enters the home
page.
H and tap New window.
14.8 Switch between browser windows
1. In the Browser window, press H and tap Windows.
2. Tap to select the browser window you wish to display.
14.9 Finding text within a webpage
1. When viewing a webpage, press H and tap More >
Find on page.
Using the Web Browser 53
2. Enter the text in the input box using the onscreen
keyboard and tap Next.
- Matching texts are highlighted on the screen.
3. Tap < or > to go to the previous or next matching text.
4. Tap x to close the search box.
14.10 Selecting links in web pages
14.10.1 Web page links
1. Tap to go to the link directly or tap and hold the link.
- A pop-up menu opens.
2. Tap to select Open, Open in new window, Bookmark
link, Save link or Copy link URL.
14.10.2 Email links
1. Tap on the link.
- The Email application will launch automatically.
2. Enter the subject using the onscreen keyboard, tap
Next.
3. Enter the message and then tap Send to send the
email, Save as draft or Discard. (for more information
on how to use the email application, see “Compose and
send email messages” on page 57).
Page 55

14.11 Downloading web applications
Before you can download web applications, you must first
enable downloading from the phone settings.
1. From the home screen, press
Settings > Applications.
2. Tap to select Unknown sources check box and tap OK.
Note
All downloaded applications are saved to the storage card.
Before you download an application from the web, make
sure that you have installed a storage card on your phone.
Warning!
Applications downloaded from the web can be from
unknown sources. To protect your phone and personal data,
download applications only from trusted sources such as
Android Market.
54 Using the Web Browser
H, and then select
14.12 View your downloads
In the Browser window, press H and then select More >
Downloads.
14.13 Manage bookmarks
You can store as many bookmarks as you want on your
phone.
14.13.1 To bookmark a web page
1. In the Browser window, go to the web page you want to
book mark.
2. Press
3. Tap Add and OK to confirm, or edit the bookmark name
4. Edit the location if needed, tap Done and OK.
H and then tap Bookmarks.
- The bookmark window opens.
and tap Next.
14.13.2 To open a bookmark
1. In the Browser window, press H and then tap
Bookmarks.
- The bookmark window opens.
2. Tap to select the bookmark to open it.
Page 56

14.14 Customize Browser Options
You can customize the Browser to suit your browsing
preferences by setting the display, privacy, and security
options.
1. In the Browser window, press
Settings to modify the browser settings according to
your preference.
- When
✓
appears next to the option, the setting is
enabled. To disable, tap the option again.
H, and then tap More >
15. Email
YOU MUST JOIN A WI-FI NETWORK THAT IS
CONNECTED TO THE INTERNET BEFORE YOU CAN
SETUP, SEND AND RECEIVE EMAILS. SEE PAGE 49 ON
HOW TO JOIN A WI-FI NETWORK.
IT IS IMPORTANT TO SET THE CORRECT DATE AND
TIME INFORMATION BEFORE YOU SET UP YOUR FIRST
EMAIL ACCOUNT AND START TO ACCESS YOUR
EMAILS.
The Mail application lets you send and receive emails and it
works with most popular email systems such as Google mail,
Hotmail as well as POP3 and IMAP accounts.
Free email accounts such as www.google.com/mail,
www.aol.com, etc. are available online if you do not have an
email account.
15.1 Open Email
1. Tap > Email.
Email 55
Page 57

15.2 Set up the first email account
1. Tap > Email.
2. Enter your Email address and tap Next.
3. Enter Password and tap Done.
4. Tap Next to proceed to the next step.
Note
If the account type you want to set up is not in the phone
database, you will be asked to enter more details. It is
recommended that you get all the necessary information for
the email account such as incoming/outgoing server settings
before you proceed.
For example, you need to enter the following to set up a
Gmail account:
POP3 server = pop.gmail.com
Port = 995
Security = SSL (if available)
SMTP server = smtp.gmail.com
Port = 465
Security = SSL (if available)
Authentication = Yes
56 Email
5. Tap OK.
- The email application will check your incoming and
outgoing server settings. It might take a few minutes.
6. Enter the Account name (optional) and tap Done.
7. Enter Your name (optional) to be displayed on outgoing
messages, and then tap Done.
- The email application will start to load your messages.
It might take a few minutes for the messages to load
completely.
15.3 Set up another email account
1. Press H, and then tap Accounts to go to the email
accounts window.
2. In the Accounts window, press
account.
3. Follow the onscreen instructions to set up your email
account.
Note
If you have set up more than one email account, your email
accounts will appear in the Accounts window. Your email
messages from the different accounts will be consolidated
into a Combined Inbox.
H, and then tap Add
Page 58

Tap to select the email account you wish to access.
15.4 Combined Inbox
If you have set up more than one email account, your
unread email messages from the different accounts will
be integrated into a Combined Inbox in the email
accounts window.
H, and then tap Accounts to go to the email
• Press
accounts window and tap Combined Inbox.
15.5 Account settings
15.5.1 Edit Account name
1. Tap > Email.
2. Tap to select an email account from the Accounts
window.
3. Press
• Account name • Email notifications
• Your name • Select ringtone
Email 57
H and tap Account settings to modify the
following settings:
• Signature • Inbox check frequency
• Incoming settings • Default account
• Outgoing settings
15.6 Compose and send email messages
You can send an email message to anyone who has an
email address. You can send the message to one person or
to a group of people.
1. Tap > Email.
2. Tap to select an email account from the Accounts
window.
3. Press
4. Enter the message recipient's email address in To field.
Tip
If you are sending the email to several recipients, separate
the email addresses with a comma. You can add as many
message recipients as you want.
H and tap Compose.
Page 59

If you want to send a carbon copy (Cc) or a blind carbon copy
(Bcc) of the email to other recipients, press
Add Cc/Bcc:.
5. Enter the subject in the Subject field, tap Next, and
then compose your message.
6. Tap Send.
Note
Tap Save as draft to save the message as a draft or tap
Discard to delete the message you have just composed.
Tip
If you exit the email application without saving the message
you have composed, the message will be automatically
saved as a draft in the Drafts folder of your email account.
58 Email
H and then tap
15.7 Read messages
1. Tap > Email.
2. In the Accounts window, tap on the folder icon next to
the email account you want to access.
- The available mailboxes are displayed.
3. Tap to select the folder you want to view.
- The messages are displayed.
4. Tap to select the message you want to view.
5. Tap < or > at the top of the message window to go to the
previous or next message.
15.8 Open an attached file
You can open and view some types of files and images
attached to messages you receive. Tap the attachment. It
downloads to the Motorola
If the format of an attached file is not supported by the
Motorola MBP2000PU, you can see the name of the file but
you can't open it.
MBP2000PU and then opens.
Page 60

15.9 Check for new messages
• In the mailbox window, press H and tap Refresh.
15.10 Reply to an email message
1. Tap > Email.
2. In the Accounts window, tap on the folder icon next to
the email account you want to access.
- The available folders are displayed.
3. Tap to select the folder you want to check.
- The messages are displayed.
4. Tap to select the message you want to reply.
5. Tap Reply or Reply all.
6. Compose your message and tap Send.
15.11 Delete an email message
1. Tap > Email.
2. In the Accounts window, tap on the folder icon next to
the email account you want to access.
- The available folders are displayed.
Email 59
3. Tap to select the folder you want to check.
- The messages are displayed.
4. Tap to select the message you want to delete.
5. Tap Delete to delete the message.
15.12 Forward an email message
1. Tap > Email.
2. In the Accounts window, tap on the folder icon next to
the email account you want to access.
- The available folders are displayed.
3. Tap to select the folder you want to check.
- The messages are displayed.
4. Tap to select the messagel you want to forward.
5. Press
6. Enter the message recipient's email address in To field.
7. Enter the subject in the Subject field, tap Next, and
8. Tap Send.
H and tap Forward to forward the message.
then compose your message.
Page 61

15.13 Mark message as unread
1. Tap > Email.
2. In the Accounts window, tap on the folder icon next to
the email account you want to access.
- The available folders are displayed.
3. Tap to select the folder you want to check.
- The messages are displayed.
4. Tap to select the message you want to mark as unread.
5. Press
H and tap Mark as unread to mark the
message.
15.14 Delete an email account
1. Tap > Email.
2. From the Accounts window, tap and hold the email
account you wish to delete until an option box appears.
3. Tap Remove Account and OK to delete the email
account.
60 TuneIn Radio
16. TuneIn Radio
YOU MUST JOIN A WI-FI NETWORK THAT IS
CONNECTED TO THE INTERNET BEFORE YOU CAN
LISTEN TO RADIO BROADCASTS FROM THE
INTERNET.
SEE PAGE 49 ON HOW TO JOIN A WI-FI NETWORK.
TuneIn Radio is an audio service transmitted via the
Internet. With this application, you can listen live to your
favorite radio stations and programs as well as find new
ones by genre, language or location.
TuneIn Radio also lists available podcasts from popular
stations such as the BBC, so you can catch up with
programs you missed on the live stream.
Note
Occasionally, the radio stations cannot be accessed if the
server or stations are not available.
Page 62

16.1 Open TuneIn Radio
Tap > TuneIn Radio.
- The screen displays a list of options by which you can
search for a radio station by genre, location, language
etc.
16.2 Listen to a Radio Broadcast
1. Tap > TuneIn Radio.
- The screen displays a list of options by which you can
search for a radio station by genre, location,
language, etc.
2. Tap to select an option.
- The screen displays a list of stations under the option
you have selected.
3. Tap to select a station and listen to the station
broadcast.
• To add a station to the favorites list for easy access in
future, tap [ ].
- The station is added to presets and you can access it
by tapping My Presets tab.
TuneIn Radio 61
• Tap or at the bottom of the screen to stop or
resume playback.
• Press
+ or - to increase to decrease volume.
• Press
• Press
B to return to the previous menu.
H , tap Exit and select OK to stop and exit.
16.3 Search Station by Name
1. Tap > Tun e I n Ra d i o.
- The screen displays a list of options for you to search
for a radio station by genre, location, language etc.
2. Press
3. Enter the station name in the search box and tap Done.
4. Tap to select a station and listen to the station
>.
- The screen displays the search results.
broadcast.
16.4 Search Station by Location
1. Tap > Tun e I n Ra d i o.
- The screen displays a list of options by which you can
search for a radio station by genre, location, language
etc.
Page 63

2. Tap By Location.
3. Follow the onscreen instructions to select the country or
region.
- The screen displays a list of options based on the
selected country or region.
4. Tap to select an option or station and listen to the station
broadcast.
16.5 Search Station by Language
1. Tap > TuneIn Radio.
- The screen displays a list of options by which you can
search for a radio station by genre, location, language
etc.
2. Tap By Language.
3. Follow the onscreen instructions to select a language.
- The screen displays a list of options based on the
selected language.
4. Tap to select an option or station and listen to the station
broadcast.
62 RssFeed
17. RssFeed
YOU MUST JOIN A WI-FI NETWORK THAT IS
CONNECTED TO THE INTERNET BEFORE YOU CAN
RECEIVE AND READ RSSFEED.
SEE PAGE 49 ON HOW TO JOIN A WI-FI NETWORK.
RSS Feed is a web feed used to publish frequently updated
works such as blog entries, news headlines and audio.
You can subscribe to timely updates from your favorite
websites by entering the Feed's URL or by clicking an RSS
icon in a web browser that initiates the subscription process.
The RSS Feed reader checks your subscribed feeds
regularly for new works, downloads any updates that it finds,
and provides a user interface to monitor and read the feeds.
17.1 Open RssFeed
Tap > RssFeed.
Page 64

17.2 Add a category to the RssFeed Reader
1. In the RssFeed window, tap Add Category and tap on
the input box to launch the onscreen keyboard.
2. Enter the new category in the input box, tap Done and
then tap Add.
17.3 Selecting a Category for the Widget
Adding a RssFeed widget lets you view RSS Feeds of your
choice straight on your home screen. You can change the
RSS feed category which is shown on the home screen
widget.
• In the RssFeed window, tap Settings and select a
category for the Widget.
17.4 Adding an RSS Feed into a Category
Follow the steps below to search and save the real Feed
path into the Category of your choice.
1. In the RssFeed window, tap to select a Category from
the list.
RssFeed 63
2. Tap Search Feed.
3. Enter the key words to search for relevant Rss Feeds on
the web, for example, News, Sports etc, tap Done and
then tap Search.
4. Tap Save Feed to save the selected feed into the
category.
Note
If you want to view or delete a Feed that you have saved
previously, simply tap and hold the selected feed in the list
and select View Feed or Delete Feed.
Page 65

18. Stock
YOU MUST JOIN A WI-FI NETWORK THAT IS
CONNECTED TO THE INTERNET BEFORE YOU CAN
CHECK STOCK PRICES.
SEE PAGE 49 ON HOW TO JOIN A WI-FI NETWORK.
The Stock reader shows updated quotes for the stocks in
your portfolio list. Quotes are updated every time you open
the Stock reader while connected to the Internet.
Note
Quotes may be delayed by up to 20 minutes.
18.1 Open Stock
Tap and tap Stock.
- The Portfolio list is opened by default.
- To get updated stock prices in your portfolio list, tap
Refresh.
64 Stock
18.2 Add a stock to the Portfolio list
1. In the Stock window, tap to select Portfolio List.
2. Tap on the input box to launch the onscreen keyboard.
3. Enter the name of the stock you wish to add and tap
Add.
- A list of query results appears.
4. Tap to select the stock you wish to add.
18.3 Delete a stock from the portfolio list
Tap x next to the stock in the portfolio list.
18.4 View more information about a stock
in your portfolio
1. In the Stock window, tap to select Portfolio List.
2. Tap on a stock symbol to enter the Get Quote tab to
view more information about the stock.
Page 66

18.5 Get more information about a stock
1. In the Stock window, tap to select Get Quote.
2. Tap on the Search input box to launch the onscreen
keyboard.
3. Enter the name of the stock you wish to check and tap
Search.
- A list of query results appears.
4. Tap to select the stock you wish to view more
information.
19. Weather
YOU MUST JOIN A WI-FI NETWORK THAT IS
CONNECTED TO THE INTERNET BEFORE YOU CAN
CHECK WEATHER.
SEE PAGE 49 ON HOW TO JOIN A WI-FI NETWORK.
The Weather application lets you view the current weather
as well as the weather forecast for the next four days of the
week. You can display the weather conditions in your current
location and the weather in up to ten cities.
19.1 Open Weather Application
Tap > Weather.
- The Current weather list is opened by default.
- To get updated weather condition, tap Refresh.
19.2 Check the current weather of a city
1. In Weather window, tap Current.
2. Enter the city in the input box and tap Search.
- The current weather of the city appears on the screen.
Weather 65
Page 67

19.3 Display the weather forecast of a city
1. In Weather window, tap Forecast.
2. Enter the city in the input box and tap Search.
- The 4-day weather forecast of the city appears on the
screen.
19.4 Change Temperature Unit
1. In Weather window, press H and tap Setting.
2. Tap to select Celsius or Fahrenheit and tap OK to
confirm.
Note
The temperature unit will change only when you tap Refresh.
19.5 Delete a city
In Weather window, tap x next to the city to delete it.
66 Take photos and record videos
20. Take photos and record videos
Note
To get clear photographs, wipe the lens clean with a soft, dry
cloth before you take photo.
20.1 Open Camera
Tap > Camera.
20.2 Switch between camera and camcorder mode
Drag slider to camera or camcorder icon to switch mode.
20.3 Take picture
Tap .
- A thumbnail of the photo you have just taken is shown.
- Tap on the thumbnail to view it in full screen.
Delete photo
Tap Delete > Confirm Delete.
Share photo via email
Tap Share > Email.
Page 68

Set photo as wallpaper or contact icon
Tap More > Set as > Wallpaper or Contact icon.
For more options such as Rotate, Crop, etc, tap More.
Press
B to return to viewfinder.
20.4 Camera options
Shows
thumbnail of
last photo
Drag up to
switch to
camcorder
Tap to take
photo
Drag slider to select zoom factor from 1x to 4x
Take photos and record videos 67
20.5 View photos
In the viewfinder, press H and tap Gallery.
Press
Tap to select white balance: Auto,
Incandescent, Daylight, Fluorescent, Cloudy
Select Incandescent or Fluorescent for indoor
lighting or Daylight or Cloudy for outdoor
lighting.
Tap to select exposure: +2, +1, 0, -1 or -2
- Thumbnail images of the photos you have taken are
displayed.
- Tap on a thumbnail to view it in full screen.
- Tap Delete to delete the photo.
- Tap Share to send the photo via email
- Tap More for other photo options such as rotate, crop,
set as wallpaper, etc.
B to return to viewfinder.
Page 69

20.6 Record video
1. Drag slider to camcorder icon.
2. Tap to start/stop video recording.
- A recording timer appears on the top left of the screen.
- A thumbnail of the video you have just recorded is
shown.
- Tap on the thumbnail to view it in full screen.
- Tap > and tap ES Video Player or Movies to play it.
- Tap Delete to delete the video.
- Tap Share to send the video via email
- Tap More for other video options.
B to return to viewfinder.
Press
68 Take photos and record videos
20.7 Video options
Tap to select video quality: High, Low, MMS,
You Tube
Select Low if sending the video via MMS, High if
storing the video on an SD card.
Tap to select white balance: Auto, Incandescent,
Daylight, Fluorsecent, Cloudy
Select Incandescent or Fluorescent for indoor
lighting or Daylight or Cloudy for outdoor
lighting.
Page 70

Tap to select color effect: None, Mono, Sepia,
Negative, Posterise, Aqua
Select Sepia for an "antique" look, Mono for
black and white, Negative to invert the video
image, etc.
20.8 Play videos
1. In the viewfinder, press H and tap Gallery.
- Thumbnail images of the photos and videos you have
taken are displayed.
2. Tap on a video thumbnail and tap ES Video Player or
Movies to play it.
Press
B to return to Gallery.
Music 69
21. Music
The Music application lets you play digital audio files stored
in a memory card. You must copy your audio files to a
memory card and insert it into the Motorola
before you launch the music application. See “Insert and
Mount memory card” on page 15.
21.1 Listen to Music on your Motorola
MBP2000PU
21.1.1 Using earphones
You can insert earphones (not included) into the Motorola
MBP2000PU earphone jack to listen to music.
21.1.2 Using the speaker on the base station
You can also listen to music using the speaker on the base
station of your Moto
Place the Motorola MBP2000PU handset on the cradle of
the base station
rola MBP2000PU.
MBP2000PU
Page 71

21.2 Open Music application
Tap > Music.
21.3 Music Library
Your music is organized into different categories such as
Artists, Albums, Songs and Playlists. Tap to select a
category and tap a song in the category to play it back.
Tap to select songs from the list.
Tap to turn shuffle on and off. (Shuffle is off when
button is gray)
Tap to cycle through the repeat modes:
Repeating all songs, Repeating current song,
Repeat is off.
Tap to pause or to resume playing the song.
Tap to rewind.
Tap to forward.
70 Music
Note
+ or - to adjust the playback volume
Press
If you do not see the playback controls, tap on the screen to
display the playback controls.
Tips
To return to the Music Library during music playback, press
H and tap Library.
To return to the playback window from the Music Library, tap
Now playing or the green playback button.
21.4 Search for a song
1. Press >.
2. Enter the song name and tap Go.
- A list of songs related to the song name is displayed.
- Tap to select and playback the song.
Tip
Press B to hide keyboard.
21.5 Party Shuffle all songs
Press H and tap Party shuffle.
Page 72

21.6 Turn party shuffle off
Press H and tap Party shuffle off.
21.7 Create playlists
You can use playlists to organize your music files. You can
create as many playlists as you want on your Motorola
MBP2000PU.
1. In the playback window, press
2. Tap Add to playlist.
3. Tap to select New.
4. Enter playlist name, tap Done and Save.
H.
21.8 Add songs to current playlist
1. In the playback window, press H.
2. Tap Add to playlist.
3. Tap to select Current playlist.
21.9 Play songs in a playlist
1. From the main music library, tap Playlists.
Music 71
2. Tap and hold the playlist that you wish to play.
- A pop-up options menu appears.
3. Tap Play.
21.10 Add songs to a playlist
1. From the main music library, tap to select a category
from which you wish to add songs to a playlist.
Tip
Go to Songs category to show all the available songs.
2. Tap and hold the song you wish to add to playlist.
- A pop-up options menu appears.
3. Tap Add to playlist.
4. Tap to select the playlist.
- The song is added to the selected playlist.
21.11 Remove a song from playlist
1. From the main music library, tap Playlists.
2. Tap to select the playlist from which you wish to remove
a song.
3. Tap and hold the song you wish to remove.
- A pop-up options menu appears.
Page 73

4. Tap Remove from playlist to remove the song from the
playlist.
21.12 Delete a playlist
1. From the main music library, tap Playlists.
2. Tap and hold the playlist that you wish to delete.
- A pop-up options menu appears.
3. Tap Delete to delete the playlist.
21.13 Rename a playlist
1. From the main music library, tap Playlists.
2. Tap and hold the playlist that you wish to delete.
- A pop-up options menu appears.
3. Tap Rename.
4. Enter playlist name and tap Save.
21.14 Set song as ringtone
You can use songs as your phone ringtone.
1. From the main music library, tap to select a category
from which you wish to use song as ringtone.
72 Music
Tip
Go to Songs category to show all the available songs.
2. Tap and hold the song you wish to use as ringtone.
- A pop-up options menu appears.
3. Tap Use as phone ringtone.
- The song is set as phone ringtone.
Note
To learn how to set phone ringtone, see “Set Phone
ringtone” on page 31.
21.15 Set sound effects
1. In the Playback window, press H and then tap Sound
effects.
2. Tap EQ preset or Bass boost and adjust the settings
accordingly.
21.16 Delete current song
1. In the Playback window, press H and then tap Delete.
2. Tap OK to confirm.
Page 74

WARNING
The song will be permanently deleted from the SD card.
21.17 Set current song as ringtone
In the Playback window, press H and then tap Use as
ringtone.
- The song is set as phone ringtone.
Gallery 73
22. Gallery
The Gallery application lets you view photos and videos on
the phone. It presents the pictures and videos on your SD
card, including those you have taken with Camera and those
you have downloaded from the web or other locations.
22.1 Open Gallery
Tap > Gallery.
- If you have stored your files in folders on the memory
card, the Gallery application will display these folders
as separate albums.
Note
Depending on the number of pictures stored on the memory
card, it may take a while for the application to load the
pictures on the screen.
22.2 View pictures
• When viewing pictures in Gallery, slide your finger up,
down, left or right across the screen to view more
albums. Tap to open an album.
Page 75

• Return to the main Gallery screen at any time, tap at
the top left of the screen.
• Drag the Album View switch to the right to
view the contents of the album in stacks.
22.2.1 View pictures in full screen
Tap on a thumbnail to view the picture in full screen.
Tap on the picture in full screen to launch the navigation and
zoom controls
The zoom control buttons appear when you view a picture in
full screen. When viewing pictures in full screen, you can:
• Swipe left or right to view the previous or next picture in
the album.
• Tap + to zoom in or - zoom out.
• Tap Slideshow to view the pictures in the album as a
slideshow.
• Tap More to access more options such as Crop, Rotate,
etc.
74 Clock
23. Clock
23.1 Open Clock
Tap > Clock.
23.2 Set an alarm
1. Tap > Clock.
2. Tap .
3. Tap Add alarm.
4. Tap + or - or the hour and minute fields to set the alarm
time.
5. Tap to select AM or PM.
Note
This option is not available if Use 24-hour format is
activated. See “Select Time Format” on page 22 for details.
6. Tap Set.
7. Tap Repeat to select the days of the week that you want
the alarm to ring and tap OK.
8. Tap Ringtone to select the alarm ringtone and tap OK.
Page 76

9. Tap Label to enter a name for the alarm and tap OK.
10. Tap Done to confirm setting.
23.3 Activate an alarm setting
1. Tap > Clock.
2. Tap .
- A list of alarm settings is displayed.
3. Tap on the alarm icon to activate an alarm setting.
- The alarm icon is underlined in green.
Note
When the alarm rings, tap Snooze or Dismiss to snooze or
dismiss the alarm.
23.4 Deactivate an alarm setting
1. Tap > Clock.
2. Tap .
- A list of alarm settings is displayed.
3. Tap on the alarm icon to deactivate an alarm setting.
- The alarm icon is not underlined in green.
Clock 75
23.5 Activate alarm in silent mode
4. You can set your alarm clock to sound an alarm even
when the phone is in silent mode.
1. Tap > Clock.
2. Tap .
3. Press
4. Tap Alarm in silent mode.
H and tap Settings.
-
✓
appears next to the option.
- To disable alarm in silent mode, tap the option again.
23.6 Other Alarm Clock Settings
1. Tap > Clock.
2. Tap .
3. Press
H and tap Settings.
Alarm volume Slide the volume bar left or right to
decrease or increase alarm volume.
Page 77

Snooze duration Select from 10 minutes, 15 minutes,
Volume and
Camera
76 Calendar
20 minutes, 25 minutes and 30
minutes.
Set the desired behavior of the buttons
when pressed during an alarm. Select
from None, Snooze and Dismiss.
24. Calendar
You can use the Calendar to create and manage events,
meetings, and appointments.
24.1 Open Calendar
Tap > Calendar.
Note
The last Calendar view opens by default.
24.2 View Agenda for the day
In any Calendar view, press H and tap Agenda.
24.3 Go to Today's date
In any Calendar view, press H and tap Today.
24.4 Change Calendar view
You can display the Calendar in daily, weekly, monthly, or
agenda view. To change Calendar view, press
Day, Week, Agenda, or Month.
H, then tap
Page 78

24.5 Modify Calendar Settings
1. In any Calendar view, press H and tap More >
Settings.
2. You can then modify the following calendar view and
reminder settings:
Hide declined
events
Set alerts &
notification
Select ringtone Select a ringtone and tap OK.
Default reminder
time
Tap to enable or disable
Select from Alert, Status bar
notification and Off
Select from 10 minutes, 15 minutes,
20 minutes, 25 minutes, etc.
24.6 Add new event
1. In any Calendar view, press H and tap More > New
event to open event details screen.
Calendar 77
2. Tap on Event name edit box to launch the onscreen
keyboard and enter event name.
3. If there is a time frame for the event, tap From and To to
set the date and time.
4. If it is a special occasion such as a birthday or a wholeday event, tap From to set date, and then select All day
check box.
5. Enter Event location and description.
6. If you have more than one calendar, tap the down arrow
on the right of L-Calendar to select the Calendar where
you want to save the event.
7. Enter email addresses of Guests.
8. Select the frequency of event recurrence in Repetition
and then select the event reminder time in Reminders.
Note
To add another reminder, tap Add reminder +.
9. When finished, tap Done.
Page 79

24.7 View, dismiss, or snooze a reminder
1. Tap on the status bar, then slide your finger down the
screen to open the Notifications panel.
2. Tap the upcoming event name to display the event.
Note
If you have other pending event reminders, these events will
also appear on the screen.
3. Tap Snooze all to snooze all event reminders for five
minutes.
4. Tap Dismiss all to dismiss all event reminders.
5. Press
78 Performing Calculations
B to keep the reminders pending in the
notifications area of the status bar.
25. Performing Calculations
You can use the Calculator to perform simple and advanced
arithmetical calculations.
25.1 Open Calculator
Tap > Calculator.
25.2 Perform Calculations
1. Tap on the numbers and mathematical operators to
perform simple calculations.
2. Press
3. Press
4. To clear calculation histories, press
H and tap Advanced panel to access advanced
operators such as sin, cos, tan, log etc.
H and tap Basic panel to return to basic
numbers and mathematical operators.
H and tap Clear
history.
Page 80

26. Downloading and Reading eBooks
Aldiko is an e-book reader application for Android devices.
You can browse, shop, download, read and organize
eBooks right from the application.
The e-book reader supports Adobe DRMed ePub and PDF
as well as non-encrypted ePub and PDF formats.
26.1 Downloading and Reading eBooks
Warning!
Some books available for download contain subject matters
that are not suitable for children. Parental guidance is
strongly advised for children under 18.
26.2 Open Aldiko
1. Tap > Aldiko.
- You will be presented with an opening message and
tips on Aldiko when you open it for the first time.
Otherwise, Aldiko keeps the last open book and the
last read positions for all opened books.
Downloading and Reading eBooks 79
26.3 Start reading
• Ta p to select a book from the bookshelf to start reading.
• You can scroll through the pages by swiping your finger
left to go to the next page and swiping right to go to the
previous page.
• You can also simply tap on the right side of the page to
move forward and the left side to move back.
• Alternatively, you can use the volume keys on your
device to scroll through the pages.
Tap on the centre of the page to launch a series of options.
<: Tap < on the top left of the screen to return to the "home
screen" of Aldiko where you can access Store, Bookshelf,
SD card etc.
>: Tap >on the top right of the screen to search for words
or phrases in the book you are currently reading.
Location Bar: The location bar at the bottom of the page
shows you how many pages into the book you have read.
You can move the bar to scroll through the book you are
reading.
Page 81

Go To: Tap to jump to a particular point in the book.
Day/Night: Tap to toggle between Day view and Night view.
It alternates the colour of the text and the colour of the
background depending on your preference.
Settings: Tap to adjust font, screen brightness, orientation,
etc.
More: Tap to share the book or access Help.
26.4 Buy Books
To browse the eBook store, select Store from the "home
screen" of Aldiko.
Note
You will need to create an Aldiko account before you are
able to purchase a book. You will also presumably have to
provide credit card details.
26.5 Download Free Books
To browse an eBook store, select Store from the "home
screen" of Aldiko.
1. Tap to select your desired category.
80 Downloading and Reading eBooks
2. Tap to select a book and tap Download.
- Yo
ur MBP2000PU begins to download the book in
the background. Once the download is complete, it
will appear as New content in your Aldiko library.
26.6 Add eBooks from your SD card into your Library
1. Tap < and then select SD card.
2. Scroll through your SD card and select the checkbox
next to the eBook you would like to add. Then select
Import to Aldiko (1).
Note
If you are importing Adobe DRM protected ePub and PDF
files, you need to authorize your Android Homephone with
an Adobe ID before import. To learn more about Adobe ID,
visit: http://www.adobe.com/products/digitaleditions/help/
http://www.adobe.com/products/digitaleditions/help/
Page 82

27. ES FILE EXPLORER
ES File Explorer is a free file manager for Android devices.
It allows you to browse files and folders stored on your
MBP2000PU, memory card, LAN and FTP.
Motorola
You can also copy/paste, rename, delete, create folder,
send file as email attachment features using ES File
Explorer.
27.1 Open ES File Explorer
Tap > ES File Explorer.
Tap to browse the files and folders in your Motorola
MBP2000PU or memory card.
Tap to go to the root directory.
Tap to search for files or folders.
Tap to go to the previous directory or folder.
For more information on the short cut keys, tap for help.
ES FILE EXPLORER 81
27.2 Open file as
1. Tap and hold the file you wish to open.
- A pop-up menu appears.
2. Tap Open As and select Text , Audio, Video or Image.
27.3 Select all files in a directory
1. Go to the directory that you want to select all files.
2. Press
H, tap Operations > Select All.
27.4 Create a new folder
1. In the SD card directory, go to the location that you wish
to create a new directory.
2. Press
3. Tap to select Folder.
4. Enter Folder Name and tap OK.
Note
You can only create new folders in the SD card directory.
H, then tap New.
27.5 Rename a file
1. Tap and hold the file you wish to rename.
- A pop-up menu appears.
Page 83

2. Tap Rename.
3. Enter the new file name and tap OK.
27.6 Copy a file to another location
1. Tap and hold the file you wish to copy.
- A pop-up menu appears.
2. Tap Copy to copy the file.
3. Go to another folder or directory that you wish to place a
copy of the file.
4. Press
H and tap Operations > Paste to paste the file
into the new location.
27.7 Move a file to another location
1. Tap and hold the file you wish to move.
- A pop-up menu appears.
2. Tap Cut.
3. Go to the folder or directory that you wish to place the
file.
4. Press
82 ES FILE EXPLORER
H and tap Operations > Paste to paste the file
into the new location.
27.8 Delete a file
1. Tap and hold the file you wish to delete.
- A pop-up menu appears.
2. Tap Delete and tap OK to delete the file.
27.9 Compress a file
1. Tap and hold the file you wish to compress.
- A pop-up menu appears.
2. Tap Compress.
3. Enter a name for the compress file, select the
compression mode and tap OK.
27.10 View file details
1. Tap and hold the file you wish to view details.
- A pop-up menu appears.
2. Tap Properties.
3. Tap OK to close the information box.
Page 84

27.11 Modify View Settings in ES File Explorer
1. In ES File Explorer window, press H and tap Settings.
2. You can then modify the follow settings:
• Theme Settings
• Layout Settings
• File Settings
• View
• Size
• Sort By
• Home Directory
• App Backup Directory
28. Discover and Download Android Applications
YOU MUST JOIN A WI-FI NETWORK THAT IS
CONNECTED TO THE INTERNET BEFORE YOU CAN
DISCOVER AND DOWNLOAD APPLICATIONS FROM
THE INTERNET.
SEE PAGE 49 ON HOW TO JOIN A WI-FI NETWORK.
SlideME Application Manager is an Android client that
facilitates the discovery and download of Android
applications to your phone. The catalog within the SlideMe
Application Manager contains both free and paid
applications.
28.1 Open SlideME
Tap > SlideME Market.
- When you launch SlideME market for the first time,
you will be presented with a User Agreement.
- Tap Agree to indicate acceptance.
Discover and Download Android Applications 83
Page 85

- The screen displays a list of categories by which you
can search for an application, such as Fun & Games,
Entertainment, Tools & Utilities, etc.
28.2 Download an application
1. Tap > SlideME Market.
- The screen displays a list of categories.
2. Tap to select a category.
- The screen displays a list of applications under the
category you have selected.
- Press H and tap Sort to sort the list by alphabetical
order, rating, price, etc.
3. Tap to select an application.
4. Tap Download > Install > OK to download the
application.
- Downloading starts.
5. Once the downloading is completed, tap Install to install
the application on your phone.
6. You may be prompted to enable Unknown sources in
Settings > Applications (see “Downloading web
applications” on page 54 for details).
84 Discover and Download Android Applications
28.3 Search by Top Apps
1. Tap > SlideME Market.
- The screen displays a list of categories.
2. Press
3. Tap to select an application.
4. Tap Download > Install > OK to download the
5. Once the downloading is completed, tap Install to install
6. You may be prompted to enable Unknown sources in
H and tap Top App s.
- The screen displays a list of top apps.
- Press
H and tap Sort to sort the list by alphabetical
order, rating, price, etc.
application.
- Downloading starts.
the application on your phone.
Settings > Applications (see “Downloading web
applications” on page 54 for details).
28.4 Search by Latest Apps
1. Tap > SlideME Market.
- The screen displays a list of categories.
Page 86

2. Press
3. Tap to select an application.
4. Tap Download > Install > OK to download the
5. Once the downloading is completed, tap Install to install
6. You may be prompted to enable Unknown sources in
28.5 Search by Local Apps
1. Tap > SlideME Market.
2. Press
Discover and Download Android Applications 85
H and tap Latest.
- The screen displays a list of the latest apps.
- Press
H and tap Sort to sort the list by alphabetical
order, rating, price, etc.
application.
- Downloading starts.
the application on your phone.
Settings > Applications (see “Downloading web
applications” on page 54 for details).
- The screen displays a list of categories.
H and tap Local Apps.
- The screen displays a list of the local apps.
- Press
H and tap Sort to sort the list by alphabetical
order, rating, price, etc.
3. Tap to select an application.
4. Tap Download > Install > OK to download the
application.
- Downloading starts.
5. Once the downloading is completed, tap Install to install
the application on your phone.
6. You may be prompted to enable Unknown sources in
Settings > Applications (see “Downloading web
applications” on page 54 for details).
28.6 Search for Apps manually
1. Tap > SlideME Market.
- The screen displays a list of categories.
2. Press
3. Enter the search text in the box and tap Go.
4. Tap to select an application.
H and tap Search.
- A search box appears at the top of the screen.
- A list of apps associated with the search text appears.
- Press
H and tap Sort to sort the list by alphabetical
order, rating, price, etc.
Page 87

5. Tap Download > Install > OK to download the
application.
- Downloading starts.
6. Once the downloading is completed, tap Install to install
the application on your phone.
7. You may be prompted to enable Unknown sources in
Settings > Applications (see “Downloading web
applications” on page 54 for details).
86 Install apps
29. Install apps
You can install the Apps (usually in .apk format) into your
MBP2000PU with a Micro-SD Card.
1. Copy the Apps files into a Micro-SD card
2. Insert the Micro-SD card into the card slot of the
handset
3. Run ES File Explorer.
4. Select the Apps inside the SD card and double-click to
run the Installation.
Note
You may be prompted to enable Unknown sources in
Settings > Applications. Tap Unknown sources to enable
downloading of non-Market applications (see “Downloading
web applications” on page 54 for details).
5. Tap Install to install the application.
Page 88

30. Connect your handset to a computer
You can transfer you pictures, videos, music, ringtones and
application from your computer to either the Micro-SD card
or Internal Phone Memory.
WARNING
When connecting your phone to a computer and mounting
its SD card, you must follow your computer’s instructions for
connecting and disconnecting USB devices, to avoid
damaging or corrupting the files on your SD card.
1. Connect one end of the Micro-USB cable to the handset
and the other end to the USB port on your computer.
- A pop up window appears on the screen.
- If the window did not appear, drag down the status bar
and then tap USB Connected.
2. Tap Turn on USB Storage.
- After a few seconds, USB storage in use appears.
Connect your handset to a computer 87
3. On My Computer windows, a new device
NANDStorage is displayed. This is the internal Phone
memory.
- You can store data in the Android folder of
NANDStorage.
- If a Micro-SD card is inserted into the handset, you will
find another device Removable Disk in My
Computer windows.
4. After you finished the data transfer/access, tap Tur n of f
USB storage on the handset to disconnect.
Page 89

31. ES Task Manager
This Android program helps you free memory, kill task, close
all the running applications, and speed up your Motorola
MBP2000PU.
31.1 Open ES Task Manager
1. Tap > ES Task Manager.
- A list of current tasks is displayed.
2. To clear a selected task, tap on the task and then tap
Kill Selected button.
3. Tap Refresh to display all current tasks again.
4. Tap Kill All to clear all current tasks.
88 ES Task Manager
32. Settings
From the home screen, press H and then tap Settings. You
can modify the different settings of your Motorola MBP2000PU.
Wireless & networksConfigure your phone's wireless
Call settings Set up voicemail.
Dect Settings View and configure base station and
Sound Set the phone and notification ring
Display Set screen calibration, brightness
Security Set screen unlock pattern or manage
Applications Manage applications and install new
connections, such as Wi-Fi.
handset settings.
tones, silent mode, etc.
and screen timeout, etc.
the phone's credential storage lock.
programs.
Page 90

Accounts & sync Select background data, auto-sync
Privacy Factory data reset
Storage Check the available storage card and
Language &
keyboard
Voice input &
output
Dock Enable or disable dock insertion
Date & time Set date, time, time zone & formats.
About phone Select this if you want to upgrade
Advanced Features 89
and add sync accounts.
phone memory, mount or unmount
SD card.
Select locale (language and region),
text input and auto-correction, etc.
Configure Text-to-speech settings
sound.
Firmware through memory Card and
view legal info, phone status and
software version.
33. Advanced Features
Advanced Features are for users who do more than using
the Motorola MBP2000PU for Telephony and Internet surfing.
It allows the user to perform advance operations.
WARNING
These Advanced Features are not for trial and error or
testing out the menu; some settings may cause your
Motorola
MBP2000PU to malfunction when set improperly.
33.1 Firmware Upgrade with SD card
You may need to upgrade the firmware of your Motorola
MBP2000PU from time to time to improve its performance
and enable other future features.
You can obtain new firmware releases from Binatone
website www.binatonetelecom.com
Firmware Upgrade can only be done via a memory card.
Internet Firmware Upgrade may be possible in the future.
Get the firmware (files) from Binatone and save these files
into a memory card - make sure that the files are not
when it is available.
Page 91

corrupted or infected with software virus. You need to insert
the memory card into your Motorola MBP2000PU.
Make sure that your Motorola MBP2000PU has been
sufficiently charged. If not, please put the Motorola
MBP2000PU into the base station to charge.
The software is compressed with the name "update.zip".
Put this file into the root directory of a Micro-SD card.
Insert the Micro-SD card into the handset.
1. Press
2. Tap Install system update.
3. Tap From SD card.
4. Tap Install now to proceed.
IMPORTANT
Do not remove the battery of your Motorola MBP2000PU
while performing the Firmware Upgrade.
90 Advanced Features
H and tap Settings > About Phone > System
updates.
- The firmware is now upgrading your Motorola
MBP2000PU software.
- This procedure may take up to 3~5 minutes.
5. After Firmware upgrade, the phone will power down
automatically.
6. Press and hold
33.2 Factory data reset
This erases all data from the phone's memory, and sets it
back to original factory settings. Make sure you have backed
up any important application-specific data to the SD card. It
does not erase data stored in the SD card.
1. Press
reset.
2. Tap Reset phone.
- The phone will power down automatically for reset.
3. The phone will automatically power up again and launch
Welcome Wizard to help you configure the basic
settings on your phone. See “Set up your Motorola
MBP2000PU with Welcome Wizard” on page 19 for
details.
L to power up the phone again.
H and tap Settings > Privacy > Factory data
Page 92

34. Help
My Motorola MBP2000PU does not turn on.
• Make sure the power adapter is securely connected
• Make sure you are using the power adapter that was
included with your Motorola MBP2000PU.
• Make sure the Motorola MBP2000PU is turned on.
My Motorola MBP2000PU does not recognize the
memory card.
• Make sure you have inserted a certified memory card.
• Make sure you have inserted the memory card correctly.
• See page 15 on how to insert a memory card.
My Motorola MBP2000PU shows a low-battery
warning
• The Motorola MBP2000PU is low on power and needs
to be charged before you can use it.
• See page 14 on how to charge your Motorola MBP2000PU.
I cannot send or receive emails or access the web
• Check the wireless signal indicator in the status bar at
the top of the screen. If there is no signal, you are not
connected.
Help 91
I cannot make or receive calls
• Your Motorola MBP2000PU may not be registered to a
base station.
• Check if the telephone cord and power adaptor are
connected properly.
The display freezes or does not respond
• Turn the Motorola MBP2000PU off and turn it on again.
is not scrolling when the handset is placed on the
base
• Incomplete battery contact - adjust the handset on the
base station.
• Dirty contact - clean the battery contact by wiping with an
alcohol moistened cloth.
• Battery is full - charging is not necessary at this time.
There is no sound when the headset is connected to
Motorola MBP2000PU
• Unplug and reconnect the headset. Make sure that the
connector is pushed in all the way.
• The volume may be deactivated or set too l
Page 93

I cannot register my Motorola MBP2000PU to the
base station
• Try resetting the base station. You can do this by:
• Holding
• Release
• The Talk/Message LED light should light up once more.
• Register your Motorola
My email could not be delivered due to connection
to the server on port 25 timed out
• You may need to change the port setting on an outgoing
I cannot access Internet radio broadcast
• Your Motorola MBP2000PU must join a Wi-Fi network
• For information about joining a Wi-Fi network, see
Interference
• Noise interference on your radio or television
92 Help
N on the base station for about 9 seconds until
the Talk/Message LED blinks.
N and press it again immediately.
See page 32 on how to register your Motorola
MBP2000PU to he base station.
mail server for one of your email accounts.
that is connected to the Internet.
page 49.
MBP2000PU to the base station.
• Your base may be too close. Move it as far away as
possible.
There is no dial tone
• Your Motorola MBP2000PU may not be registered to a
base station.
There is no ring tone
• The ring tone is deactivated, see page 31.
• Increase the volume.
Caller ID does not work
• Check your subscription with your network operator.
• If you subscribe to high-speed Internet service (Digital
Subscriber Line - DSL) through your telephone lines, you
must install a DSL filter between the base and the
telephone wall jack. The filter will prevent noise and
caller ID problems caused by DSL interference. Please
contact your DSL service provider for more information
about DSL filters.
A new contact cannot be stored
• The contacts list is full. Delete an entry to free memory.
Page 94

35. General information
If your product is not working properly...
1. Read this User's Guide.
2. Visit our website: www.motorola.com
3. Contact Customer Service in the US and Canada at
1-888-331-3383.
To order a replacement battery pack contact customer
service or visit our website.
Unplug this cordless phone immediately
from an outlet if:
• The power cord or plug is damaged or frayed.
• Liquid has been spilled on the product.
• The product has been exposed to rain or water. Do not
retrieve the handset or base until after you have
unplugged the power and phone from the wall. Then
retrieve the unit by the unplugged cords.
• The product has been dropped or the cabinet has been
damaged.
• The product exhibits a distinct change in performance.
General information 93
Installation Guidelines
1. Read all instructions and save them for future reference.
2. Follow all warnings and instructions marked on the
product.
3. Do not install this product near a bath tub, sink, or
shower.
4. Operate this phone using only the power source that is
indicated on the marking label. If you are unsure of the
power supply to your home, consult with your dealer or
local power company.
5. Do not place this product on an unstable cart, stand, or
table. This product may fall, causing serious damage to
the product.
6. Adjust only those controls that are covered by the
operating instructions. Improper adjustment of other
controls may result in damage and will often require
extensive work to restore the product to normal
operation.
7. Clean this product with a soft, damp cloth. Do not use
chemicals or cleaning agents to clean this phone.
Page 95

8. Use only the power supply that came with this unit.
Using other power supplies may damage the unit.
9. Because this phone operates on electricity, you should
have at least one phone in your home that operates
without electricity in case of a power outage.
10. To avoid interference to nearby appliances, do not place
the base of the phone on or near a TV, microwave oven,
or VCR.
CAUTION
To maintain compliance with the FCC's RF exposure
guidelines, place the base unit at least 20 cm from nearby
persons.
Battery Safety Instructions
• Do not burn, disassemble, mutilate, or puncture the
battery. The battery contains toxic materials that could be
released, resulting in injury.
94 General information
CAUTION
There is a risk of explosion if you replace the battery with an
incorrect battery type. Use only the battery pack that came
with your phone or an authorized replacement
recommended by the manufacturer.
• Keep battery packs out of the reach of children.
• Remove battery packs if storing over 30 days.
• Do not dispose of battery packs in fire, which could result
in explosion.
• The rechargeable battery packs that power this product
must be disposed of properly and may need to be
recycled. Refer to the battery label for battery type.
Contact your local recycling center for proper disposal
methods.
SAVE THESE INSTRUCTIONS
Page 96

Consumer Products and Accessories
Limited Warranty ("Warranty")
Thank you for purchasing this Motorola branded product
manufactured under license by Binatone Electronics
International LTD ("BINATONE").
What Does this Warranty Cover?
Subject to the exclusions contained below, BINATONE
warrants that this Motorola branded product ("Product") or
certified accessory ("Accessory") sold for use with this
product that it manufactured to be free from defects in
materials and workmanship under normal consumer usage
for the period outlined below. This Warranty is your exclusive
warranty and is not transferable.
Who is covered?
This Warranty extends only to the first consumer purchaser,
and is not transferable.
General information 95
What will BINATONE do?
BINATONE or its authorized distributor at its option and
within a commercially reasonable time, will at no charge
repair or replace any Products or Accessories that does not
conform to this Warranty. We may use functionally
equivalent reconditioned/ refurbished/ pre-owned or new
Products, Accessories or parts.
What Other Limitations Are There?
ANY IMPLIED WARRANTIES, INCLUDING WITHOUT
LIMITATION THE IMPLIED WARRANTIES OF
MERCHANTABILITY AND FITNESS FOR A PARTICULAR
PURPOSE, SHALL BE LIMITED TO THE DURATION OF
THIS LIMITED WARRANTY, OTHERWISE THE REPAIR
OR REPLACEMENT PROVIDED UNDER THIS EXPRESS
LIMITED WARRANTY IS THE EXCLUSIVE REMEDY OF
THE CONSUMER, AND IS PROVIDED IN LIEU OF ALL
OTHER WARRANTIES, EXPRESS OF IMPLIED. IN NO
EVENT SHALL MOTOROLA OR BINATONE BE LIABLE,
WHETHER IN CONTRACT OR TORT (INCLUDING
NEGLIGENCE) FOR DAMAGES IN EXCESS OF THE
PURCHASE PRICE OF THE PRODUCT OR ACCESSORY,
Page 97

OR FOR ANY INDIRECT, INCIDENTAL, SPECIAL OR
CONSEQUENTIAL DAMAGES OF ANY KIND, OR LOSS
OF REVENUE OR PROFITS, LOSS OF BUSINESS, LOSS
OF INFORMATION OR OTHER FINANCIAL LOSS
ARISING OUT OF OR IN CONNECTION WITH THE
ABILITY OR INABILITY TO USE THE PRODUCTS OR
ACCESSORIES TO THE FULL EXTENT THESE
DAMAGES MAY BE DISCLAIMED BY LAW.
Some jurisdictions do not allow the limitation or exclusion of
incidental or consequential damages, or limitation on the
length of an implied warranty, so the above limitations or
exclusions may not apply to you. This Warranty gives you
specific legal rights, and you may also have other rights that
vary from one jurisdiction to another.
96 General information
Page 98

Products Covered Length of Coverage
Consumer Products One (1) year from the date of the
Consumer Accessories Ninety (90) days from the date
Consumer Products and
Accessories that are
Repaired or Replaced
Exclusions
Normal Wear and Tear. Periodic maintenance, repair and
replacement of parts due to normal wear and tear are
excluded from coverage.
Batteries. Only batteries whose fully charged capacity falls
below 80% of their rated capacity and batteries that leak are
covered by this Warranty.
General information 97
products original purchase by the
first consumer purchaser of the
product.
of the accessories original
purchase by the first consumer
purchaser of the product.
The balance of the original
warranty or for ninety (90) days
from the date returned to the
consumer, whichever is longer.
Abuse & Misuse. Defects or damage that result from: (a)
improper operation, storage, misuse or abuse, accident or
neglect, such as physical damage (cracks, scratches, etc.)
to the surface of the product resulting from misuse; (b)
contact with liquid, water, rain, extreme humidity or heavy
perspiration, sand, dirt or the like, extreme heat, or food; (c)
use of the Products or Accessories for commercial purposes
or subjecting the Product or Accessory to abnormal usage or
conditions; or (d) other acts which are not the fault of
MOTOROLA or BINATONE., are excluded from coverage.
Use of Non-Motorola branded Products and
Accessories. Defects or damage that result from the use of
Non-Motorola branded or certified Products or Accessories
or other peripheral equipment are excluded from coverage.
Unauthorized Service or Modification. Defects or damages
resulting from service, testing, adjustment, installation,
maintenance, alteration, or modification in any way by
someone other than MOTOROLA, BINATONE or its
authorized service centers, are excluded from coverage.
Page 99

Altered Products. Products or Accessories with (a) serial
numbers or date tags that have been removed, altered or
obliterated; (b) broken seals or that show evidence of
tampering; (c) mismatched board serial numbers; or (d)
nonconforming or non-Motorola branded housings, or parts,
are excluded from coverage.
Communication Services. Defects, damages, or the failure
of Products or Accessories due to any communication
service or signal you may subscribe to or use with the
Products or Accessories is excluded from coverage.
How to Obtain Warranty Service or Other
Information?
To obtain service or information, please call:
US and Canada: 1-888-331-3383
You will receive instructions on how to ship the Products or
Accessories at your expense and risk, to a BINATONE
Authorized Repair Center.
To obtain service, you must include: (a) the Product or
Accessory; (b) the original proof of purchase (receipt) which
98 General information
includes the date, place and seller of the Product; (c) if a
warranty card was included in your box, a completed
warranty card showing the serial number of the Product; (d)
a written description of the problem; and, most importantly;
(e) your address and telephone number.
These terms and conditions constitute the complete
warranty agreement between you and BINATONE.
regarding the Products or Accessories purchased by you,
and supersede any prior agreement or representations,
including representations made in any literature publications
or promotional materials issued by BINATONE. or
representations made by any agent employee or staff of
BINATONE, that may have been made in connection with
the said purchase.
FCC, ACTA and IC regulations
FCC Part 15
This equipment has been tested and found to comply with
the requirements for a Class B digital device under Part 15
of the Federal Communications Commission (FCC) rules.
These requirements are intended to provide reasonable
Page 100

protection against harmful interference in a residential
installation. This equipment generates, uses and can radiate
radio frequency energy and, if not installed and used in
accordance with the instructions, may cause harmful
interference to radio communications. However, there is no
guarantee that interference will not occur in a particular
installation. If this equipment does cause harmful
interference to radio or television reception, which can be
determined by turning the equipment off and on, the user is
encouraged to try to correct the interference by one or more
of the following measures:
• Reorient or relocate the receiving antenna.
• Increase the separation between the equipment and
receiver.
• Connect the equipment into an outlet on a circuit different
from that to which the receiver is connected.
• Consult the dealer or an experienced radio/TV technician
for help.
"For body worn operation, this handset has been tested
and meets FCC RF exposure guidelines when used with
an accessory that contains no metal and that positions the
General information 99
handset a minimum of 0m from the body. Use of other
accessories may not ensure compliance with FCC RF
exposure guidelines."
Changes or modifications to this equipment not expressly
approved by the party responsible for compliance could void
the user's authority to operate the equipment.
This device complies with Part 15 of the FCC rules.
Operation is subject to the following two conditions: (1) this
device may not cause harmful interference, and (2) this
device must accept any interference received, including
interference that may cause undesired operation. Privacy of
communications may not be ensured when using this
telephone.
To ensure safety of users, the FCC has established criteria
for the amount of radio frequency energy that can be safely
absorbed by a user or bystander according to the intended
usage of the product. This product has been tested and
found to comply with the FCC criteria. The handset may be
safely held against the ear of the user. The telephone base
shall be installed and used such that parts of the user's body
 Loading...