

Binatone iDECT Eclipse Plus Single, iDECT, iDECT Eclipse Plus Twin, iDECT Eclipse Plus Triple, iDECT Eclipse Plus Quad User Manual
Page 1

USER GUIDE
Eclipse
EclipseEclipse
Eclipse Plus
Plus Plus
Plus
Single
SingleSingle
Single/Twin/Triple/Quad
/Twin/Triple/Quad/Twin/Triple/Quad
/Twin/Triple/Quad
DECT
DECTDECT
DECT Telephone
TelephoneTelephone
Telephone
with Answer
with Answerwith Answer
with Answering
inging
ing Machine
MachineMachine
Machine
Binatone Helpline
Binatone HelplineBinatone Helpline
Binatone Helpline
(for UK only)
(for UK only)(for UK only)
(for UK only)
Monday to Friday
from 9:00am to 5:00pm
Tel: 0845 345 9677**
**Please note that all calls are charged at local rate.
Or visit our websites: www.binatonetelecom.com
www.binatonetelecom.comwww.binatonetelecom.com
www.binatonetelecom.com
www.iDECTonline.com
www.iDECTonline.comwww.iDECTonline.com
www.iDECTonline.com
Before operating this set,
Before operating this set,Before operating this set,
Before operating this set,
please read these instructions carefully.
please read these instructions carefully.please read these instructions carefully.
please read these instructions carefully.
THIS
THISTHIS
THIS
EQUIPMENT
EQUIPMENTEQUIPMENT
EQUIPMENT
IS
ISIS
IS
NOT
NOTNOT
NOT
DESIGNED
DESIGNEDDESIGNED
DESIGNED
FOR
FORFOR
FOR
MAKING EMERGENCY
MAKING EMERGENCYMAKING EMERGENCY
MAKING EMERGENCY
TELEPHONE
TELEPHONETELEPHONE
TELEPHONE
CALLS
CALLSCALLS
CALLS
WITHOUT
WITHOUT WITHOUT
WITHOUT MAINS POWER.
MAINS POWER.MAINS POWER.
MAINS POWER.
ALTERNATIVE
ALTERNATIVEALTERNATIVE
ALTERNATIVE
ARRANGEMENTS
ARRANGEMENTSARRANGEMENTS
ARRANGEMENTS
SHOULD
SHOULDSHOULD
SHOULD
BE MADE
BE MADEBE MADE
BE MADE
FOR
FORFOR
FOR
ACCESS
ACCESSACCESS
ACCESS
TO
TOTO
TO
EMERGENCY
EMERGENCYEMERGENCY
EMERGENCY
SERVICES.
SERVICES.SERVICES.
SERVICES.
Page 2

1
TECHNICAL DETAILS
TECHNICAL DETAILSTECHNICAL DETAILS
TECHNICAL DETAILS
Standard
StandardStandard
Standard
Digital Enhanced Cordless
Telecommunication (DECT)
Frequency range
Frequency rangeFrequency range
Frequency range
1.88 to 1.9 GHz (bandwidth = 20 MHz)
Channel bandwidth
Channel bandwidthChannel bandwidth
Channel bandwidth
1.728 MHz
Operating range
Operating rangeOperating range
Operating range
Up to 300m outdoors; Up to 50m indoors
Operating time
Operating timeOperating time
Operating time
Standby:
230
hours
; Talking: 1
3 hours
Battery charge time:
15 hours
Temper
TemperTemper
Temper
ature range
ature rangeature range
ature range
Operating
: 0oC to 40
o
C; Storage
: -20oC to 60
o
C
Electrical power
Electrical powerElectrical power
Electrical power
Base unit
Base unitBase unit
Base unit
power adapter
power adapterpower adapter
power adapter
::::
Ten Pao: S003IB0600050 & S003IV0600050
Input 100-240Vac 50-60Hz; Output 6Vdc/500mA.
Charger unit
Charger unitCharger unit
Charger unit power adapter
power adapterpower adapter
power adapter::::
Ten Pao: S003IB0600015 & S003IV0600015
Input 100-240Vac 50-60Hz; Output 6Vdc/150mA.
Battery information
Battery informationBattery information
Battery information (each handset)
(each handset)(each handset)
(each handset)::::
2 X 1.2V AAA size, 650mAh NiMH (Rechargeable)
CCCCAUTION
AUTIONAUTION
AUTION
Risk of explosion if the battery is replaced by an incorrect type.
Dispose of used batteries according to the instructions.
Port specification
Port specificationPort specification
Port specification
The
port (connected to the mains power supply) is a SELV port with respect to
EN41003.
The port (connected to the telephone line) is a TNV port with respect to
EN41003.
CLEANING AND CARE
CLEANING AND CARECLEANING AND CARE
CLEANING AND CARE
Do not clean
Do not cleanDo not clean
Do not clean any part of your phone system with benzene, thinners or other
solvent chemicals as this may cause permanent damage, which is not covered by
the Guarantee.
When necessary, clean it with a damp cloth.
When necessary, clean it with a damp cloth.When necessary, clean it with a damp cloth.
When necessary, clean it with a damp cloth.
Keep your phone system away from hot, humid conditions or strong sunlight,
hot, humid conditions or strong sunlight,hot, humid conditions or strong sunlight,
hot, humid conditions or strong sunlight, and
don't
don't don't
don't let it get wet.
let it get wet.let it get wet.
let it get wet.
Every effort has been made to ensure high standards of reliability for your phone
system. However, if something does go wrong, please do not try to repair it
do not try to repair it do not try to repair it
do not try to repair it
yourself, but consult your supplier or
yourself, but consult your supplier oryourself, but consult your supplier or
yourself, but consult your supplier or call
callcall
call the Helpline.
the Helpline.the Helpline.
the Helpline.
Page 3

1
Table of Contents
Table of ContentsTable of Contents
Table of Contents
1 IMPORTANT SAFETY INSTRUCTIONS ................................................... 5
2 INSTALLING YOUR PHONE ................................................................... 8
2.1 Connecting the Base Station ....................................................... 8
2.2 Installing and Charging the Rechargeable Batteries in the Main
Eclipse Handset ........................................................................... 8
2.3 Installing and Charging the Rechargeable Batteries in an
Additional Handset ...................................................................... 9
2.4 Removing the back cover of the Main Eclipse Handset .............. 9
3 GETTING TO KNOW YOUR PHONE .................................................... 10
3.1 Overview of the Main Eclipse Handset and the Base Station .... 10
3.2 Display Icons and Symbols on the Main Eclipse Handset .......... 13
3.3 Overview of the Additional Handset and Charging Pod (for Twin,
Triple and Quad Models Only) ................................................... 15
3.4 Display Icons and Symbols on the Additional Handsets (for Twin,
Triple and Quad Models Only) ................................................... 18
3.5 Menu Map and Menu Navigation on the Main Eclipse Handset ...
................................................................................................... 20
3.6 Menu Map and Menu Navigation on the Additional Handsets
(for Twin, Triple and Quad Models only) ................................... 21
3.7 Text and Number Entry .............................................................. 22
3.7.1 Character Map of the Main Eclipse Handset .......................... 22
3.7.2 Character Map of the Additional Handsets (for Twin, Triple
and Quad Models Only) ......................................................... 23
4 USING YOUR PHONE ......................................................................... 24
4.1 Make a Call ................................................................................ 24
4.1.1 Pre-dialling ............................................................................. 24
4.1.2 Direct Dialling ......................................................................... 24
4.1.3 Call from the Redial List ......................................................... 24
4.1.4 Call from the Call Log ............................................................. 25
Page 4

2
4.1.5 Call from the Phonebook ....................................................... 25
4.2 Answer and End a Call ............................................................... 26
4.3 Handset Speakerphone ............................................................. 26
4.4 Adjust Earpiece Volume ............................................................. 26
4.5 Adjust Speaker Volume .............................................................. 26
4.6 Mute/Unmute the Microphone ................................................ 27
4.7 Paging ........................................................................................ 27
4.8 Switching the Handset On/Off ................................................... 27
4.9 To Lock/Unlock the Keypad ....................................................... 28
4.10 Make an Internal Call (Multi - handset models only) ........... 28
4.11 Initiate an Intercom Call ....................................................... 28
4.12 Answer an External Call during an Intercom Call .................. 29
4.13 Initiate an Intercom during a Call ......................................... 30
4.14 Transfer an External Call to another Handset ....................... 31
5 DIRECT ACCESS MEMORY ................................................................. 32
5.1 Add Direct Access Memory ....................................................... 32
5.2 Delete Direct Access Memory ................................................... 34
6 PHONEBOOK ..................................................................................... 35
6.1 Store a Contact in the Phonebook ............................................. 35
6.2 Access the Phonebook .............................................................. 37
6.3 Modify a Phonebook Entry ........................................................ 38
6.4 Delete a Phonebook Entry ......................................................... 39
6.5 Delete All Entries from the Phonebook List ............................... 40
7 CALLER DISPLAY (NETWORK DEPENDENT) ........................................ 41
7.1 Call Log ...................................................................................... 41
7.1.1 Access the Call Log ................................................................. 42
7.1.2 Save a Call Log Entry into the Phonebook .............................. 42
Page 5

3
7.1.3 Delete a Call Log Entry ........................................................... 43
7.1.4 Delete All Entries in the Call Log ............................................ 43
7.2 Redial List .................................................................................. 44
7.2.1 Access the Redial List ............................................................. 44
7.2.2 Save a Redial Number into the Phonebook ........................... 44
7.2.3 Edit a Redial Number ............................................................. 45
7.2.4 Delete a Redial Number ......................................................... 46
7.2.5 Delete All Entries from the Redial List .................................... 46
8 CLOCK AND ALARM SETTINGS .......................................................... 48
8.1 Date and Time Settings ............................................................. 48
8.1.1 Change the Time Format ....................................................... 50
8.1.2 Change the Date Format ........................................................ 51
8.2 Alarm Settings ........................................................................... 52
8.2.1 Set the Alarm Tone ................................................................. 53
9 PERSONAL SETTINGS ......................................................................... 55
9.1 Set the Ring Volume .................................................................. 55
9.2 Set the Ring Tone ....................................................................... 56
9.3 Set the Key Tone ........................................................................ 57
9.4 Rename the Handset ................................................................. 58
9.5 Set the Display Language ........................................................... 59
9.6 Set Auto Hang-up ...................................................................... 60
10 SETTINGS ................................................................................... 61
10.1 Handset Registration ............................................................ 61
10.2 Register Additional Handsets ................................................ 61
10.3 Deregister your Handset ....................................................... 62
10.4 Change the Master PIN ......................................................... 63
10.5 Set the First Ring (for Additional Handsets Only) ................. 64
Page 6

4
10.6 Change the Recall Time ........................................................ 65
10.7 Reset the Unit ....................................................................... 66
11 ANSWERING MACHINE .............................................................. 67
11.1 Turning the Answering Machine On/Off ............................... 67
11.2 Answer Mode ....................................................................... 68
11.2.1 Set Answer Mode ................................................................... 68
11.3 Answering Machine Settings ................................................ 69
11.3.1 Set the Ring Delay .................................................................. 69
11.3.2 Activate/Deactivate Remote Access ....................................... 70
11.3.3 Change the Voice Language ................................................... 71
11.4 Message Playback ................................................................. 72
11.5 Delete All Messages .............................................................. 73
11.6 Announcement ..................................................................... 74
11.6.1 Record a Personal Announcement ......................................... 74
11.6.2 Listen to an announcement ................................................... 75
11.6.3 Delete a Personal Announcement ......................................... 76
11.7 Remote Access ...................................................................... 78
11.7.1 Access the Answering Machine Remotely ............................. 78
12 TROUBLESHOOTING .................................................................. 82
13 DECLARATION OF CONFORMITY ............................................... 86
14 GUARANTEE AND SERVICE ........................................................ 87
14.1 While the unit is under Guarantee ....................................... 87
14.2 After the Guarantee has expired .......................................... 87
Page 7

5
1111 IMPORTANT SAFETY INSTRUCTIONS
IMPORTANT SAFETY INSTRUCTIONSIMPORTANT SAFETY INSTRUCTIONS
IMPORTANT SAFETY INSTRUCTIONS
Please follow these safety instructions when using your telephone
equipment to reduce risk of fire, electric shock and injury:
1) Read and understand all the instructions.
2) Follow all warnings and instructions marked on the product.
3) Unplug this product from the wall outlet before cleaning. Do not use
liquid cleaners or aerosol cleaners. Use a damp cloth for cleaning.
4) Keep this product away from hot, humid conditions or strong
sunlight, and don’t let it get wet or use it near water (for example,
near a bath tub, kitchen sink, or swimming pool).
5) Do not overload wall outlets and extension cords as this can result
in the risk of fire or electric shock.
6) Unplug this product from the wall outlet and obtain the service of
our Repair Centre under the following conditions:
• When the power supply cord or plug is damaged or frayed.
• If the product fails to operate normally despite following the
operating instructions.
• If the product has been dropped and the cabinet has been damaged.
• If the product exhibits a distinct change in performance.
7) NEVER use your phone outdoors during a thunderstorm. Unplug
the base from the telephone line and the mains socket when there
are storms in your area. Damage caused by lightning is not covered
by the guarantee.
8) Do not use the telephone to report a gas leak in the vicinity of the leak.
9) Use only the supplied NiMH (Nickel Metal Hydride) batteries that
came with your phone or an authorised replacement
recommended by the manufacturer. There is a risk of explosion if
you replace the battery with an incorrect battery type. The use of
other battery types or non-rechargeable batteries/primary cells
can be dangerous. They may cause interference and/or damage to
the unit or surroundings. The manufacturer will not be held liable
for damage arising from such non-compliance.
10) Do not use third party charging pods. Damage may be caused to the batteries.
11) Please ensure that the batteries are inserted in the correct polarity.
12) Dispose of batteries safely. Do not burn, immerse them in water,
disassemble, or puncture the batteries.
Page 8

6
Package Content for single model
Package Content for single modelPackage Content for single model
Package Content for single model
The package contains the following items:
• 1 Eclipse Handset
• 1 Base Station
• 1 Mains Power Adapter for the Base Station
• 1 Telephone Line Cord
• 2 AAA NiMH Rechargeable Batteries
• 1 Back Cover for the Eclipse Handset
• 1 Back Cover Unlock Tool
• 1 User Guide
Note:
Note: Note:
Note: If you have purchased a Twin, Triple or Quad system, you will also
have the corresponding extra handset(s) and batteries, a charging pod
and a back cover for each extra handset.
Connection and
Connection and Connection and
Connection and CCCConditions for
onditions for onditions for
onditions for UUUUse
sese
se
You can connect your phone to a direct exchange line (DEL) on a local
exchange with its own phone number; to an extension socket connected
to a DEL; or to an extension on an approved compatible PBX. Do not
connect as an extension to a pay phone.
The ringer equivalence numbers (REN) of all equipment (phones, fax
machines, modems, etc.) connected to an exchange line must not add up
to more than 4, otherwise one or more of them may not ring and/or
answer calls correctly. The phone has a REN of 1, and most other
telephones have a REN of 1 unless marked otherwise.
Page 9

7
Handset
Handset Handset
Handset &&&& Base Connection
Base ConnectionBase Connection
Base Connection
1) When purchased, all handsets are already registered to the base
unit and should link to it when they are all powered up.
2) To use your cordless handset and base unit together, you must be
able to establish a radio link between them. The signal between the
handset and the base unit is in accordance with the normal
standards for a DECT phone: Maximum range up to 300 metres
outdoors or 50 metres indoors. Be aware that:
> Large metal objects, such as refrigerators, mirrors or filing
cabinets, between the handset and the base unit may block the
radio signal.
> Solid structures, such as walls, may reduce the signal strength.
> Electrical equipment may cause interference and/or affect the
range.
3) Do not place the base unit close to another telephone, TV or audio
equipment - it may cause interference.
4) Putting the base unit as high as possible ensures the best signal.
5) If the sound in the earpiece becomes faint or distorted during a call,
you may be going out of range of the base unit. Move nearer to the
base unit within 20 seconds; otherwise the line may be cut off.
Page 10
8
2222 INSTALLING YOUR PHONE
INSTALLING YOUR PHONEINSTALLING YOUR PHONE
INSTALLING YOUR PHONE
2.1
2.12.1
2.1 Connecting the
Connecting the Connecting the
Connecting the BBBBase
ase ase
ase SSSStation
tationtation
tation
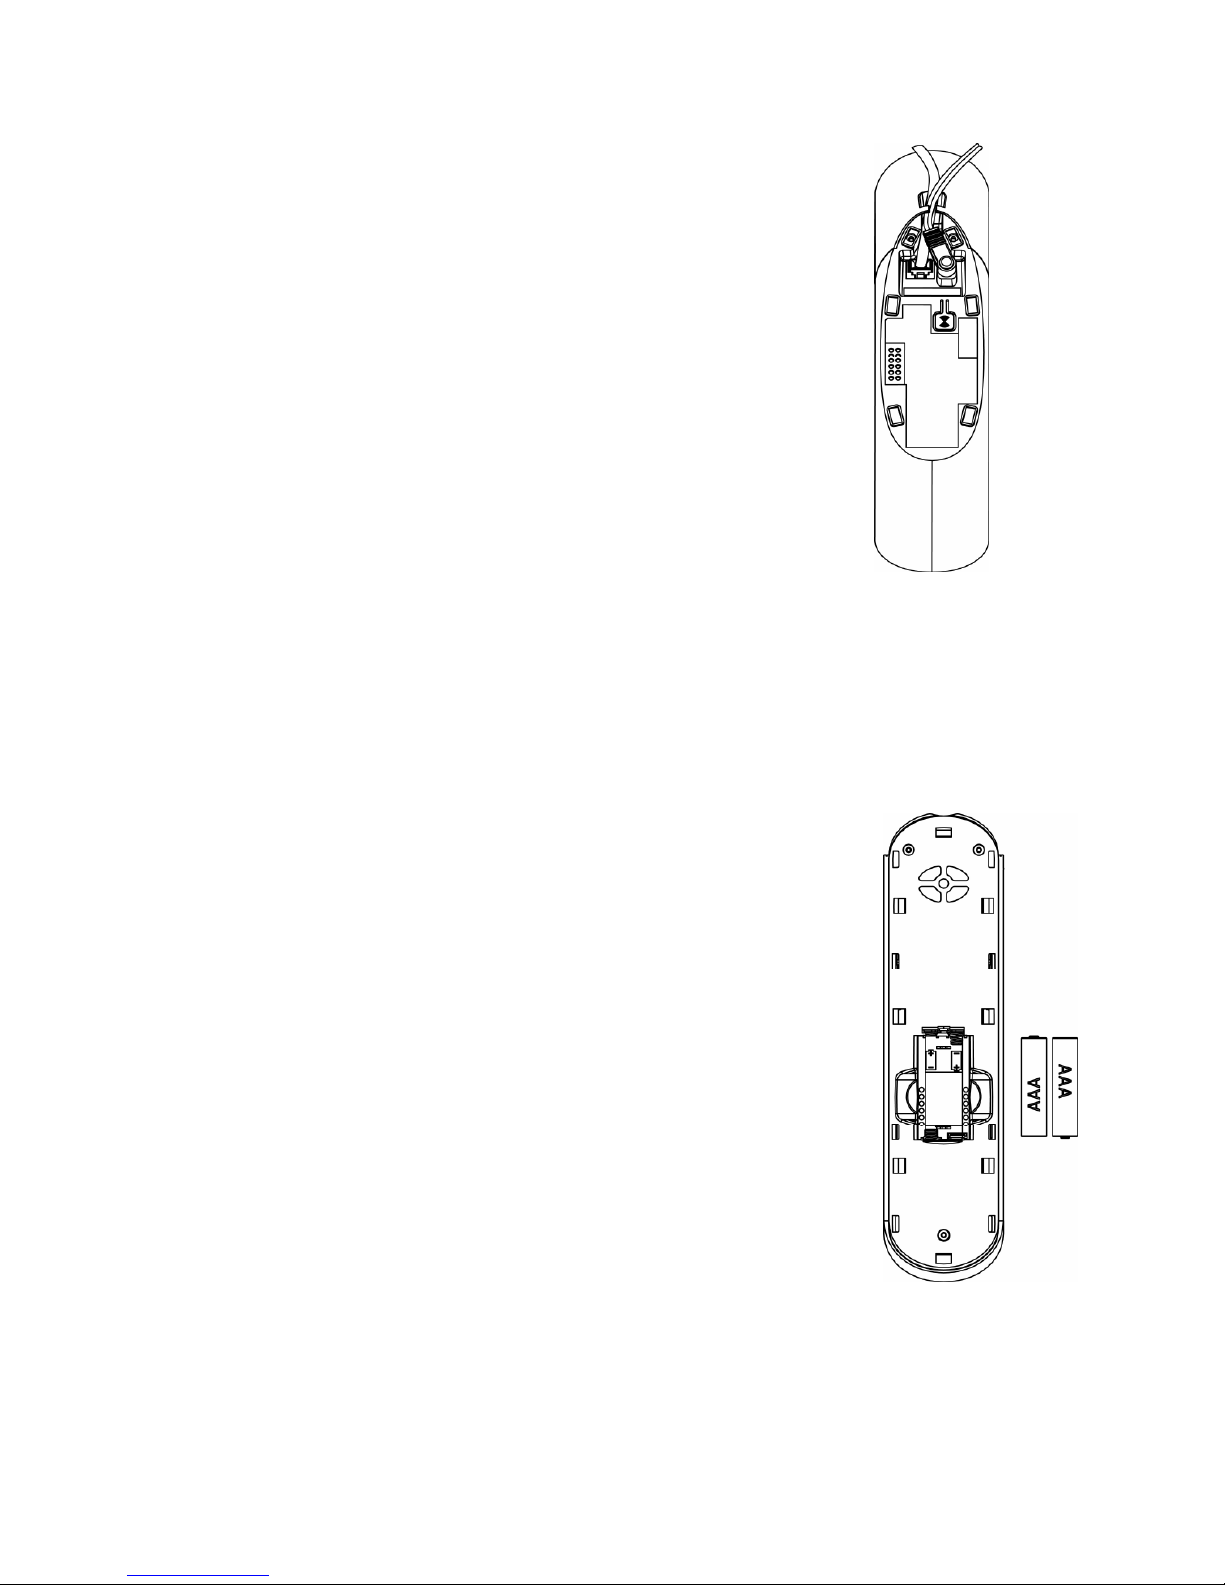
1) Plug the mains power cable and telephone
line cord
into the base station.
2) Plug the power adapter into a 100 - 240Vac,
50 - 60Hz mains power socket, and the
telephone line cord
into a telephone line socket.
Warning:
Warning:Warning:
Warning:
Always use the cables provided in the box.
Use only the supplied adaptor. Using other power
cables may damage the unit.
Note
NoteNote
Note::::
Place the base unit within easy reach of the mains power socket.
Never try to lengthen the mains power cable.
The base station needs mains power for normal operation, and the
cordless handsets will not work without it.
2.2
2.22.2
2.2 Installing and
Installing and Installing and
Installing and CCCCharging the
harging the harging the
harging the RRRRechargeable
echargeable echargeable
echargeable BBBBatteries
atteriesatteries
atteries in the Main
in the Main in the Main
in the Main
Eclipse Handset
Eclipse HandsetEclipse Handset
Eclipse Handset
1) Insert the 2 supplied batteries into the battery
compartment, observing the correct polarity
(see markings inside battery compartment).
Warning:
Warning:Warning:
Warning: Use only the supplied NiMH rechargeable
batteries.
2) Place the back cover over the back of the
handset and press down until it clicks into place.
3) Place the handset on the base and charge for 15
hours before using the handset for the first
time.
•
The handset will give a double beep when it
is properly placed on the base and the
battery charging indicator on the base
lights up to indicate charging.
Note:
Note:Note:
Note: The handset may become warm when the batteries are being
charged or during prolonged periods of use. This is normal and does not
indicate a fault.
T
o the
telephone
line socket
To the mains
power socket
Page 11
9
2.3
2.32.3
2.3 Installing and Charging the Rechargeable Batteries
Installing and Charging the Rechargeable BatteriesInstalling and Charging the Rechargeable Batteries
Installing and Charging the Rechargeable Batteries in an Additional
in an Additional in an Additional
in an Additional
Handset
HandsetHandset
Handset
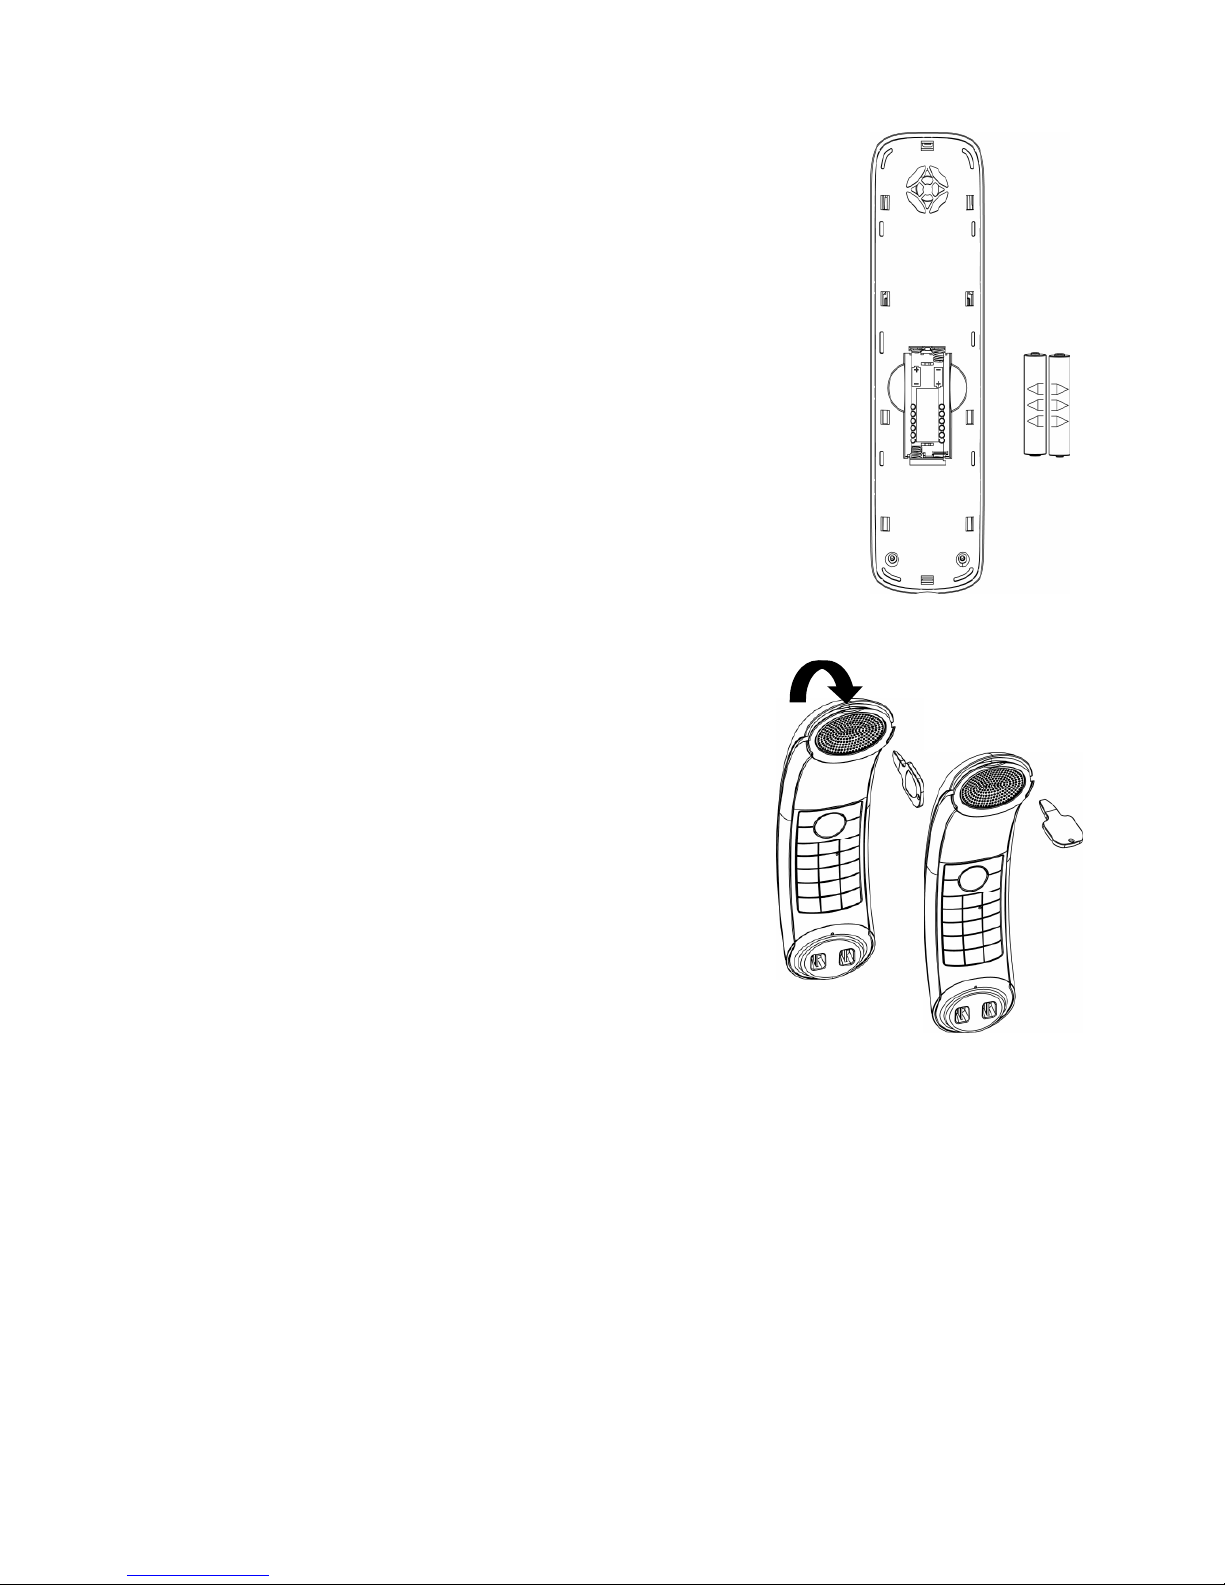
1) Insert the 2 supplied batteries into the battery
compartment, observing the correct polarity
(see markings inside battery compartment).
Warning:
Warning:Warning:
Warning: Use only the supplied NiMH rechargeable
batteries.
2) Place the back cover over the back of the
handset and press down until it clicks into
place.
3) Place the handset on the charging pod and
charge for 15 hours before using the handset
for the first time.
•
The handset will give a double beep when
it is properly placed on the charging pod
and the battery charging indicator on the charging pod lights
up to indicate charging.
2.4
2.42.4
2.4 Removing the back co
Removing the back coRemoving the back co
Removing the back cover
verver
ver of the Main
of the Main of the Main
of the Main
Eclipse Handset
Eclipse HandsetEclipse Handset
Eclipse Handset
Insert the supplied key into the groove as
indicated in the illustration and twist it
clockwise to release the back cover.
If you have a
If you have a If you have a
If you have a bbbbroadband line
roadband lineroadband line
roadband line
If you connect your telephone to a line with a
broadband connection, you will need to insert a
micro-filter between the telephone and the telephone line; otherwise
you may get interference between the telephone and the broadband,
which could cause problems.
In a home with broadband, every telephone must have a micro-filter
connected, not just the one at the telephone point that your modem is
connected to.
If you need more broadband micro-filters contact your broadband
supplier.
Page 12

10
3333 GETTING TO KNOW YOUR PHONE
GETTING TO KNOW YOUR PHONEGETTING TO KNOW YOUR PHONE
GETTING TO KNOW YOUR PHONE
3.1
3.13.1
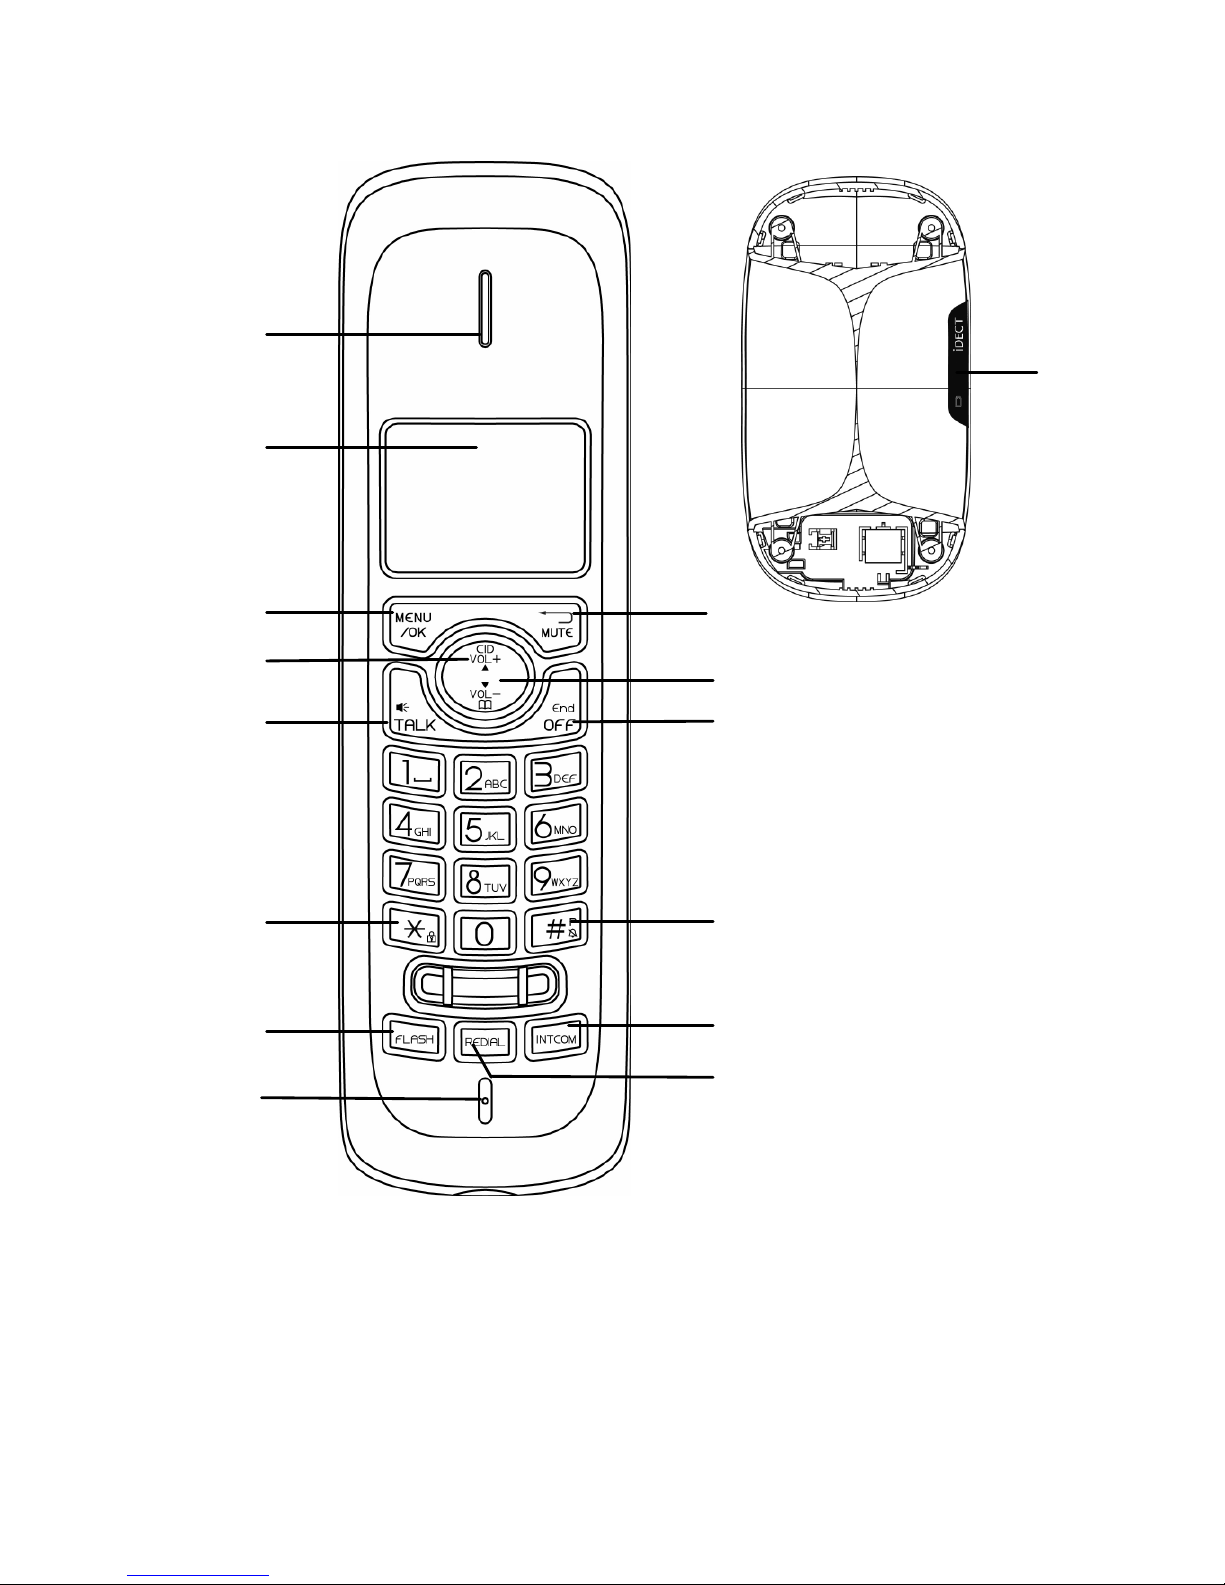
3.1 Overview of the
Overview of theOverview of the
Overview of the Main
MainMain
Main Eclipse Handset
Eclipse HandsetEclipse Handset
Eclipse Handset and
andand
and the
the the
the Base
Base Base
Base Station
StationStation
Station
①
②
③
④
⑤
⑥
⑦
⑧
⑨
⑩
⑪
⑫
⑬
⑭
Eclipse
Handset
Base station (top)
⑮
⑯
Base station (b
o
ttom
)
⑰
Page 13

11
①
EEEEARPIECE
ARPIECEARPIECE
ARPIECE
②
LCD D
LCD DLCD D
LCD DISPLAY
ISPLAYISPLAY
ISPLAY
Displays menus, phone numbers, handset
name, date/time and status icons.
③
M
In standby mode, press to enter the Main
Menu list.
Press to select an item, or to save an entry
or setting.
④
+
In menu mode, press to scroll up.
During a call or message playback, press
to increase the volume.
In standby mode, press to access the call
log
(CID)
.
⑤
T
In standby mode, p
ress to make or answer
a call.
During a call, press to send a Flash signal
(also called Recall) for network service
s.
⑥
*
In standby mode, p
ress and hold to switch
the key lock on or off.
⑦
F
In standby mode, press to make or answer
a call in speakerphone mode.
During a call or message playback, press
to switch between speakerphone and
earpiece.
⑧
MICROPHONE
MICROPHONEMICROPHONE
MICROPHONE
⑨
m
Press to cancel an action.
During pre-dialling, press to delete the last
digit entered.
During a call, press to mute the
microphone, and press again to resume
conversation.
⑩
-
In menu mode, press to scroll down.
During a call, or message playback, press
to decrease the volume.
In standby mode, press to access the
phonebook list.
Page 14
12
⑪
O
During a call, press to
end the call
.
During programming, press to cancel and
exit without making changes.
In standby mode, press and hold to power
the handset on/off.
⑫
#
In standby mode, p
ress and hold to turn the
handset ringer on/off.
Press and hold to add a dialling pause when
dialling or entering numbers into the
phonebook.
⑬
I
In standby mode or during a call, press to
initiate an intercom call or transfer a call.
⑭
R
In standby mode, press to access the redial
list.
⑮
Lights up in Green when the answering
machine is on.
Flashes if there are new messages.
Flashes rapidly if the answering machine
memory is full.
⑯
⑯⑯
⑯
Lights up in Red when a handset is on the
base to indicate it is charging.
⑰
⑰⑰
⑰
Press to find
/
page all registered handsets.
Press the button again, or any key on the
handset to turn off the page signal.
Press and hold to start registration process.
Page 15
13
3.2
3.23.2
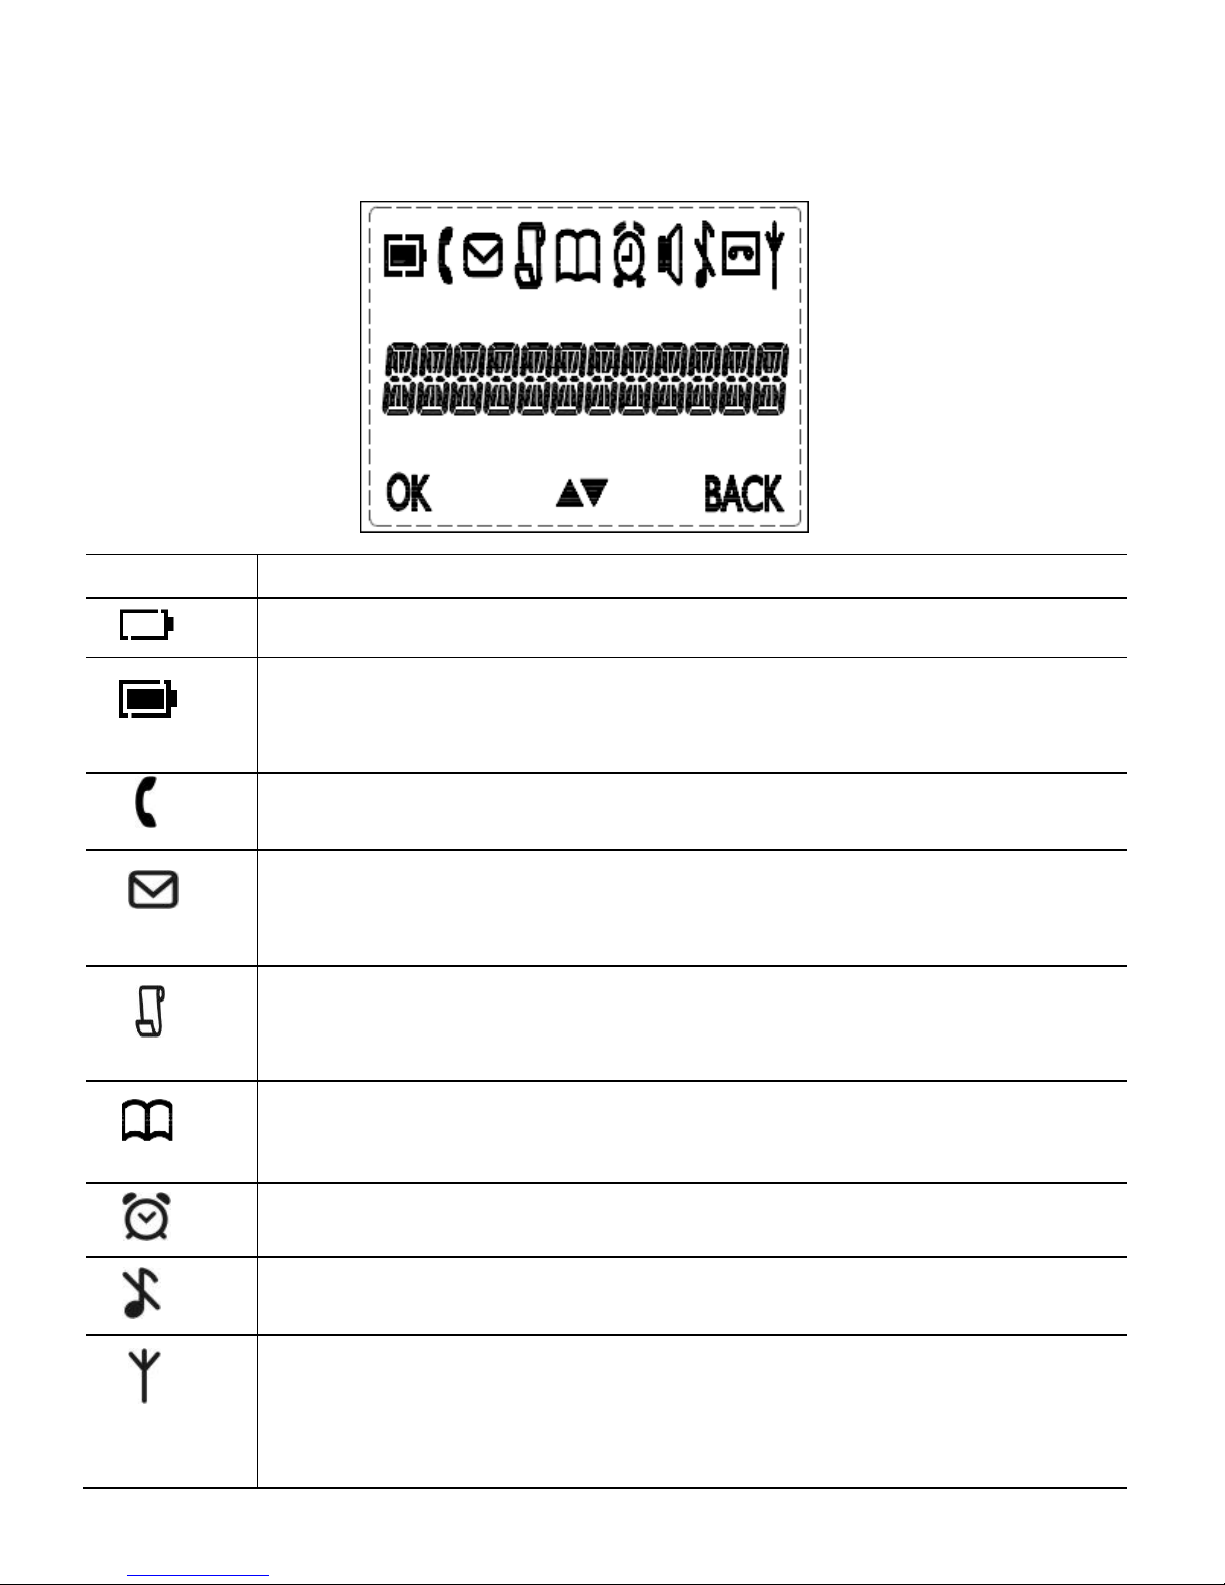
3.2 Display Icons and Symbols
Display Icons and SymbolsDisplay Icons and Symbols
Display Icons and Symbols on the
on theon the
on the Main
MainMain
Main Eclip
EclipEclip
Eclipse Handset
se Handsetse Handset
se Handset
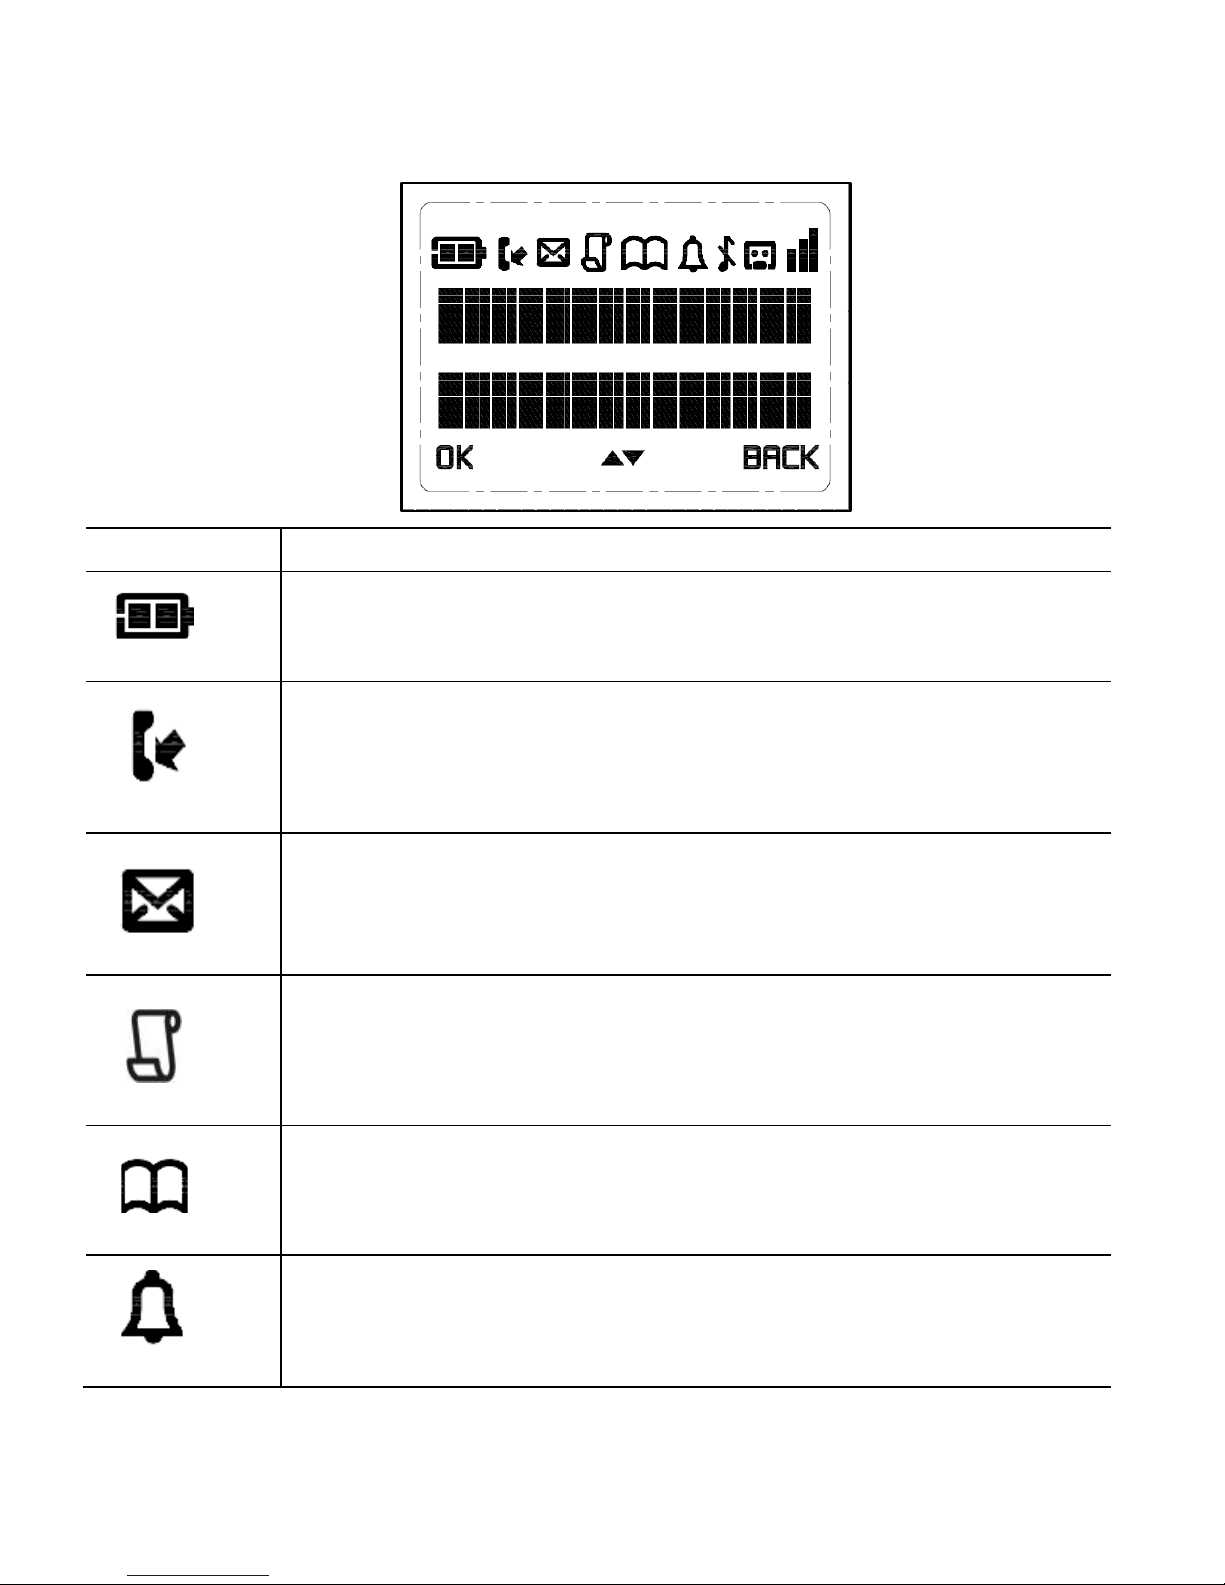
The home screen of the Main Eclipse Handset gives you information on
the current status of the phone.
Icon
IconIcon
Icon
Meaning
Meaning Meaning
Meaning
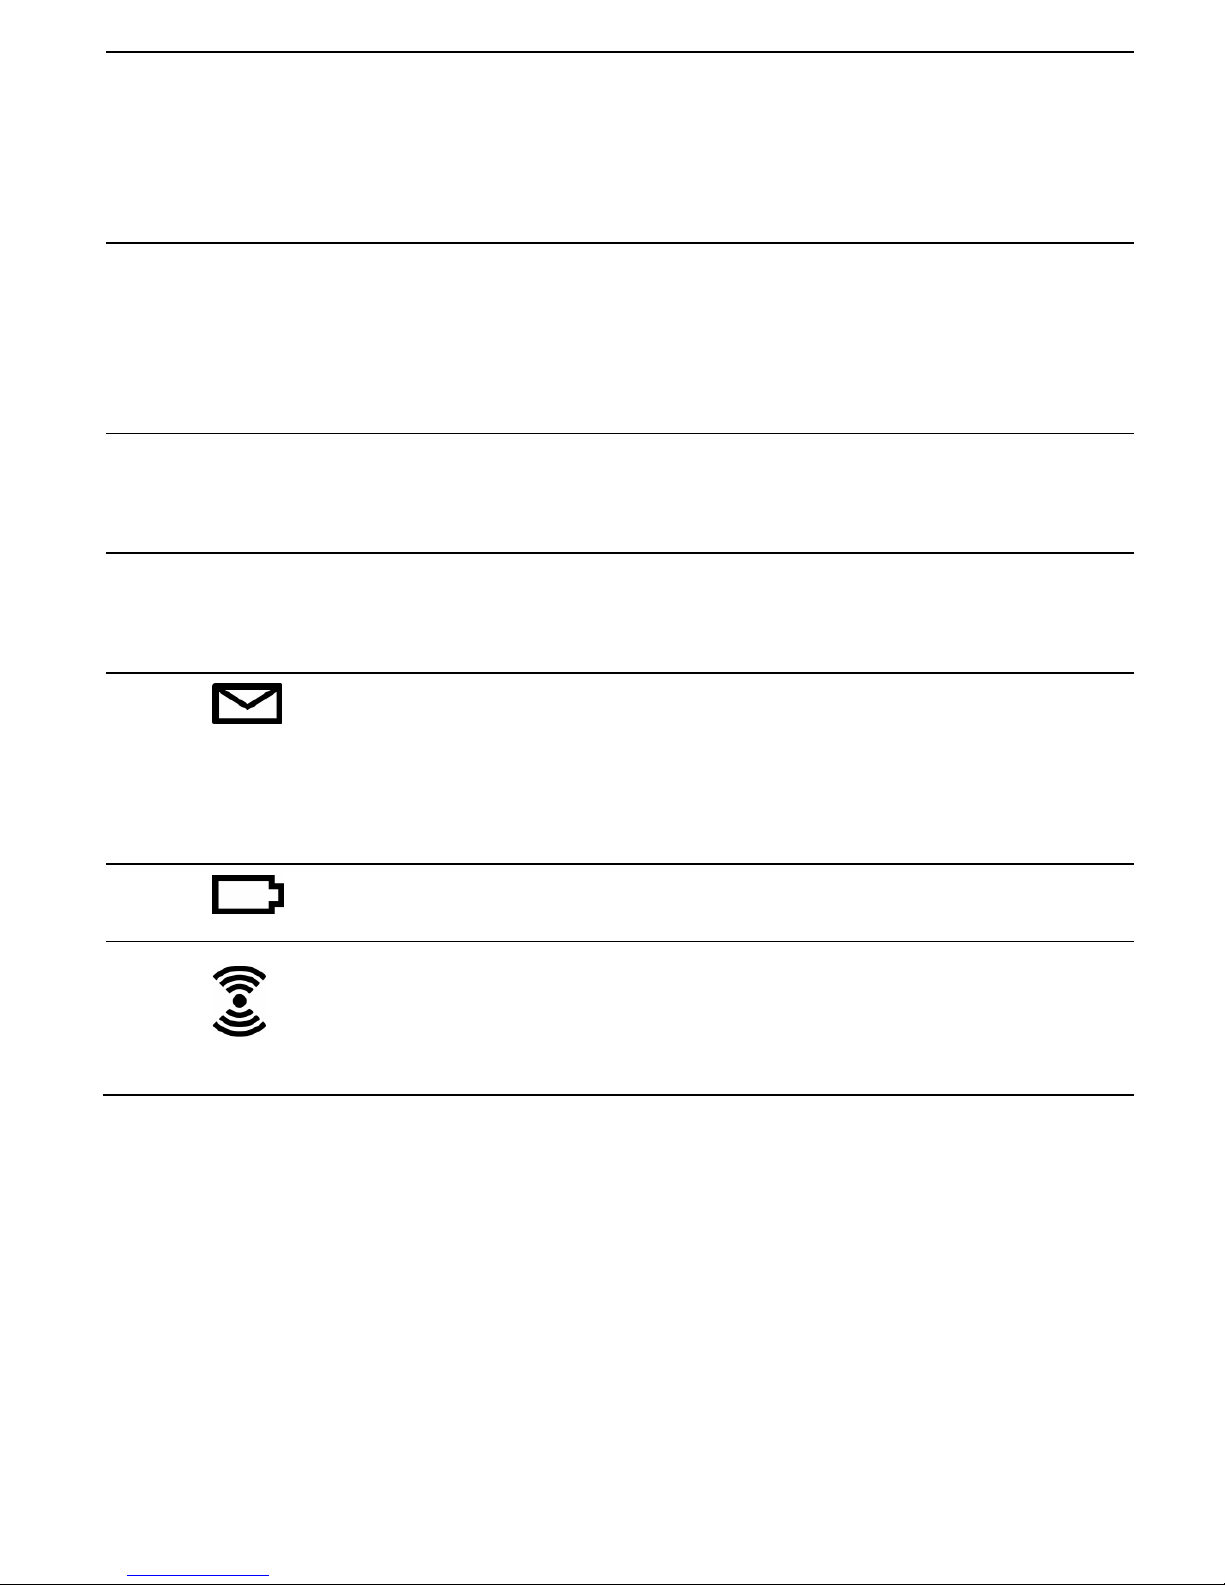
Displays when the battery is fully charged.
Internal segments cycle while charging.
Displays when the line is in u
se.
Flashes when there is an incoming call.
Flashes when you have a new voicemail message.
(This is
a caller display service and is not usually available from
UK network providers.)
Displays when you have new missed calls, or the call log
is being viewed.
Displays when the phonebook is accessed.
Displays when the alarm is set.
Page 16
14
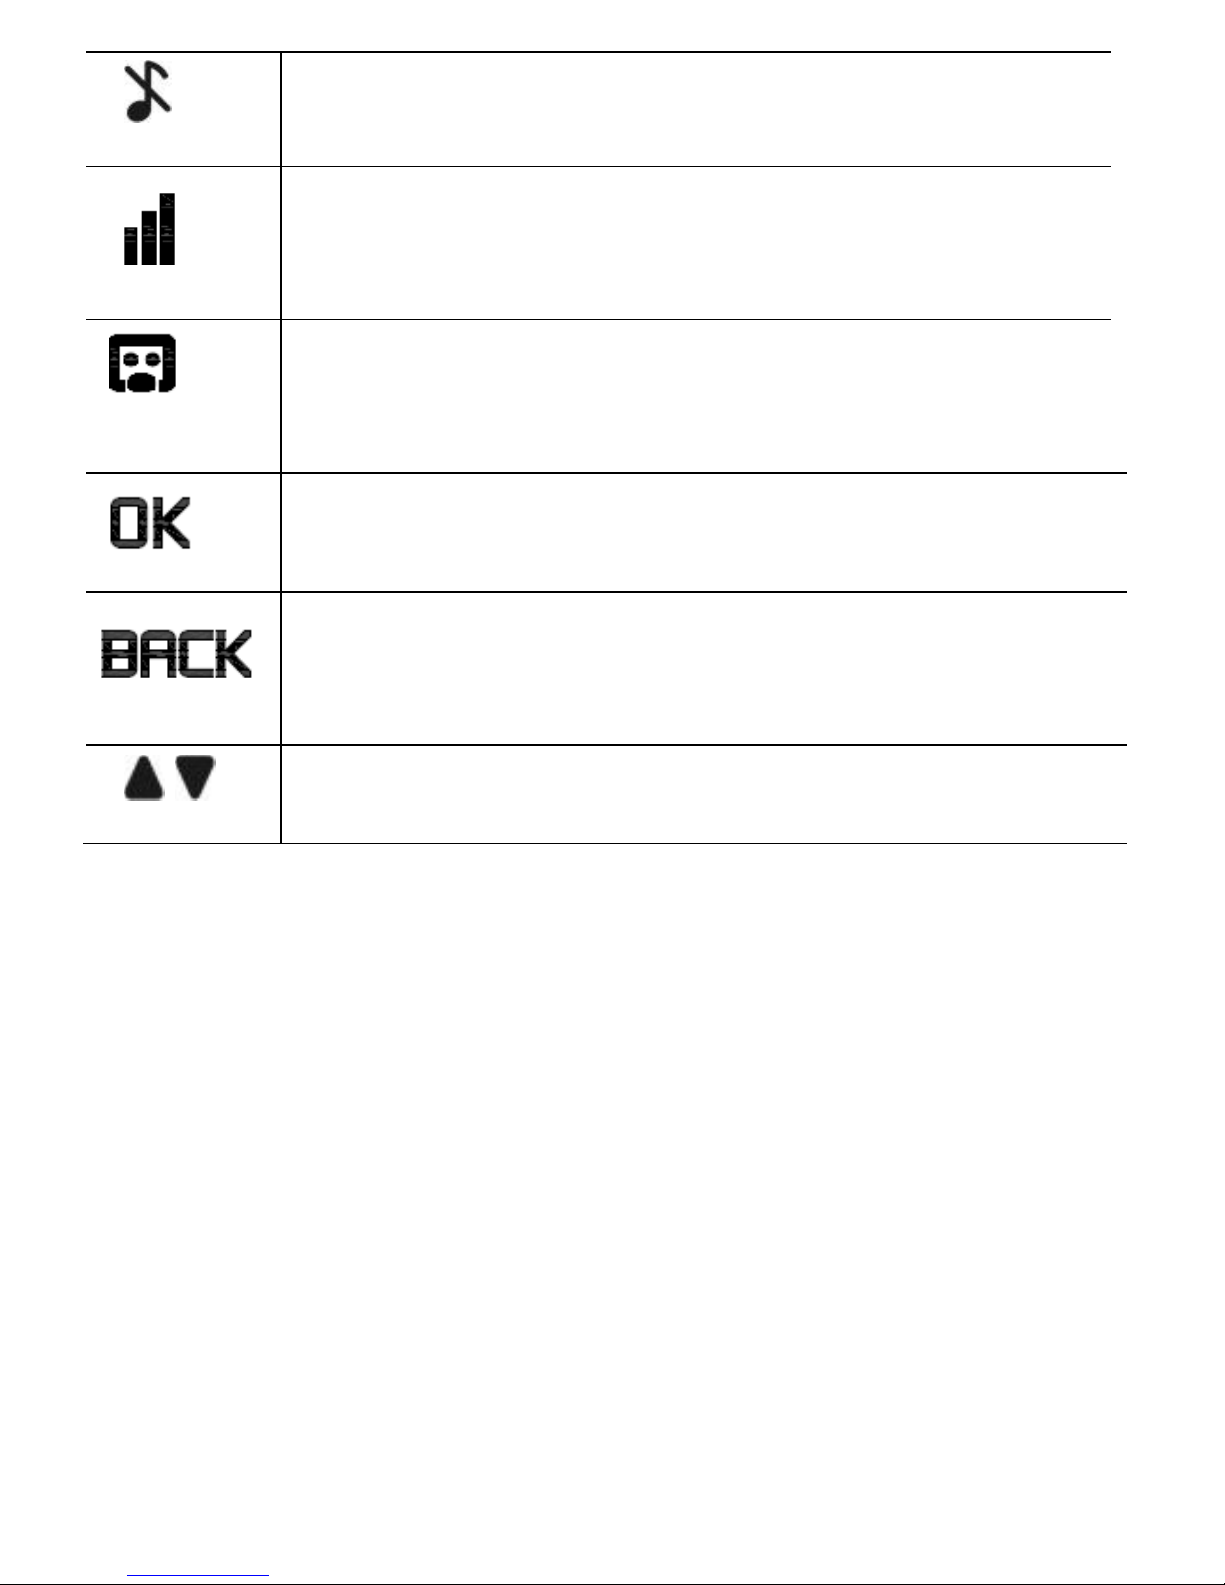
Displays when handset ringer is turned off.
Displays when the handset is registered and within
range of the base station.
Flashes when the handset is out of range and is
searching for a base.
Displays when the answering machine is on.
Flashes slowly when there are new answering machine
message(s) or when the answering machine memory is
full.
Turns on when confirmation of selection or programming
is available.
Turns on during phonebook editing mode to delete the
last digit.
Turns on during menu mode when you can return to the
previous state or previous step.
Turns on when the screen display is on.
Page 17
15
3.3
3.33.3
3.3 Overview of the Additional Handset and Charging Pod (f
Overview of the Additional Handset and Charging Pod (fOverview of the Additional Handset and Charging Pod (f
Overview of the Additional Handset and Charging Pod (for
or or
or TTTTwin,
win, win,
win,
TTTTriple and Quad Models Only)
riple and Quad Models Only)riple and Quad Models Only)
riple and Quad Models Only)
⑮
⑬
⑩
⑭
①
②
③
⑤
⑥
⑦
⑧
⑨
⑪
⑫
④
Page 18

16
①
EARPIECE
EARPIECEEARPIECE
EARPIECE
②
LCD DISPLAY
LCD DISPLAYLCD DISPLAY
LCD DISPLAY
Displays menus, phone numbers,
handset name and status icons.
③
M
In standby mode, press to enter the
Main Menu list.
Press to select an item, or to save an
entry or setting.
④
+
In menu mode, press to scroll up.
During a call or message playback,
press to increase the volume.
In standby mode, press to access the
call log (CID).
⑤
T
In standby mode, p
ress to make or
answer a call.
During a call or message playback,
press to switch between
speakerphone and earpiece.
⑥
*
In
standby mode, press and hold to
switch the key lock on or off.
⑦
F
During a call, press to send a Flash
signal (also called Recall) for network
services.
⑧
MICROPHONE
MICROPHONEMICROPHONE
MICROPHONE
⑨
m
Press to cancel an action.
During pre-dialling, press to delete
the last digit entered.
During a call, press to mute the
microphone, and press again to
resume conversation.
⑩
-
In menu mode, press to scroll down.
During a call, or message playback,
press to decrease the volume.
In standby mode, press to access the
phonebook list.
Page 19

17
⑪
O
During a call, press to end the call.
During programming, press to cancel
and exit without making changes.
In standby mode, press and hold to
power the handset on/off.
⑫
#
In standby mode, press and hold to
turn the handset ringer on/off.
Press and hold to add a dialling
pause when dialling or entering
numbers into the phonebook.
⑬
I
In standby mode or during a call,
press to initiate an intercom call or
transfer a call.
⑭
R
In standby mode, press to access the
redial list.
⑮
Lights up in Re
d when a handset is
on the charging pod to indicate it is
charging.
Page 20
18
3.4
3.43.4
3.4 Display
Display Display
Display IIIIcons and
cons and cons and
cons and SSSSymbols
ymbolsymbols
ymbols on
onon
on the Additional Handset
the Additional Handsetthe Additional Handset
the Additional Handsetssss (for
(for (for
(for TTTTwin,
win, win,
win,
TTTTriple and Quad Models Only)
riple and Quad Models Only)riple and Quad Models Only)
riple and Quad Models Only)
The home screen of the additional handsets gives you information on the
current status of the phone.
Icon
IconIcon
Icon
Meaning
Meaning Meaning
Meaning
Displays when the battery is almost empty.
Displays when the battery is fully charged.
Blinks (3s on / 1s off) when the battery is partly discharged.
Flashes (1s on / 1s off) when the battery level is low.
Display
s when the line is in use.
Flashes when there is an incoming call.
Flashes when you have a new voicemail message.
(This is a
caller display service and is not usually available from UK
network providers.)
Displays when you have new missed calls, or
the call log is
being viewed.
Displays when the phonebook is accessed.
Displays when the alarm is set.
Displays when handset ringer is turned off.
Displays when the handset is registered and within
range of
the base station.
Flashes when the handset is out of range and is searching
for a base.
Page 21
19
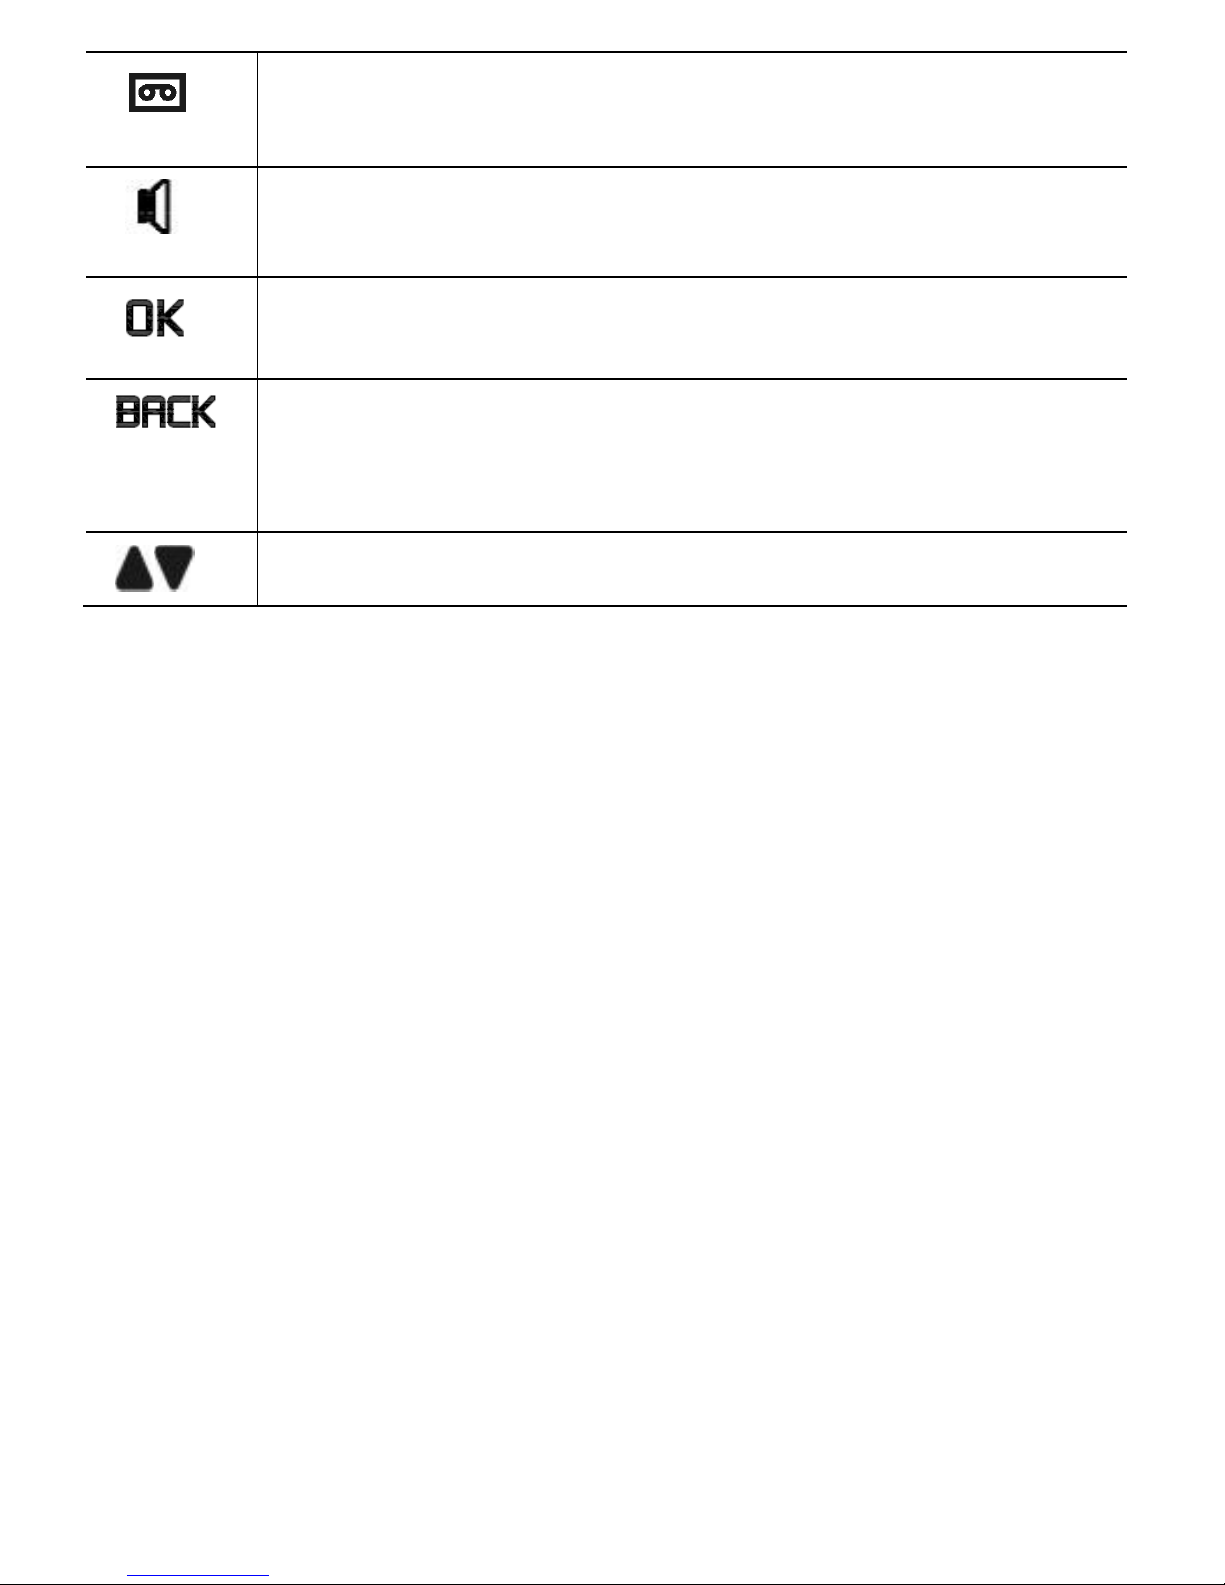
Displays when the answering machine is on.
Flashes slowly when there are new answering machine
message(s).
Displays when the handset is in speaker mode.
Turns on when confirmation of selection or programming is
available.
Turns on during phonebook editing mode to delete the last
digit.
Turns on during menu mode when you can return to the
previous state or previous step.
Turns on when the screen display is on.
Page 22

20
3.5
3.53.5
3.5 Menu
Menu Menu
Menu MMMMap
apap
ap and Menu Navigation
and Menu Navigationand Menu Navigation
and Menu Navigation on the
on theon the
on the Main
MainMain
Main Eclipse Handset
Eclipse HandsetEclipse Handset
Eclipse Handset
From the home screen of the Main Eclipse handset, press
M
to access
ANS. SYSTEM
ANS. SYSTEMANS. SYSTEM
ANS. SYSTEM, the first option in the Main Menu list.
Press
+ or - to go to other options in the menu list.
Press
M
to enter a sub-menu or function.
Press
m
to go back to the previous level.
Press
O
to cancel the current operation and return to the home screen.
Note:
Note:Note:
Note: If you do not press any key on the handset for 15 seconds, the
display will automatically return to the home screen.
ANS. SYSTEM
ANS. SYSTEMANS. SYSTEM
ANS. SYSTEM
PPPPHONEBOOK
HONEBOOKHONEBOOK
HONEBOOK CLOC
CLOCCLOC
CLOCK&ALARM
K&ALARMK&ALARM
K&ALARM HANDSET OPTS
HANDSET OPTSHANDSET OPTS
HANDSET OPTS
SETTINGS
SETTINGSSETTINGS
SETTINGS
PLAY
PLAYPLAY
PLAY
DELETE ALL
DELETE ALLDELETE ALL
DELETE ALL
ANS. ON/OFF
ANS. ON/OFFANS. ON/OFF
ANS. ON/OFF
ANNOUNCEMENT
ANNOUNCEMENTANNOUNCEMENT
ANNOUNCEMENT
ANSWER MODE
ANSWER MODEANSWER MODE
ANSWER MODE
ANS. SETTING
ANS. SETTINGANS. SETTING
ANS. SETTING
RING DELAY
RING DELAYRING DELAY
RING DELAY
REMOTE ACC.
REMOTE ACC. REMOTE ACC.
REMOTE ACC.
LANGUAGE
LANGUAGELANGUAGE
LANGUAGE
NEW ENTRY
NEW ENTRYNEW ENTRY
NEW ENTRY
VIEW ENTRIES
VIEW ENTRIESVIEW ENTRIES
VIEW ENTRIES
EDIT ENTRY
EDIT ENTRYEDIT ENTRY
EDIT ENTRY
DELETE
DELETEDELETE
DELETE
DELETE ALL
DELETE ALLDELETE ALL
DELETE ALL
DIRECT MEM.
DIRECT MEM.DIRECT MEM.
DIRECT MEM.
DATE
DATEDATE
DATE &
& &
& TIME
TIMETIME
TIME
SET FORMAT
SET FORMATSET FORMAT
SET FORMAT
TIME FORMAT
TIME FORMAT TIME FORMAT
TIME FORMAT
DATE FORMAT
DATE FORMATDATE FORMAT
DATE FORMAT
ALARM
ALARMALARM
ALARM
ALARM
ALARM ALARM
ALARM MELODY
MELODYMELODY
MELODY
HANDSET NAME
HANDSET NAMEHANDSET NAME
HANDSET NAME
RINGER&TONES
RINGER&TONESRINGER&TONES
RINGER&TONES
RING VOLUME
RING VOLUMERING VOLUME
RING VOLUME
RING TONE
RING TONERING TONE
RING TONE
KEY TONE
KEY TONEKEY TONE
KEY TONE
LANGUAGE
LANGUAGELANGUAGE
LANGUAGE
AUTO HANG
AUTO HANGAUTO HANG
AUTO HANG----UP
UPUP
UP
CHANGE PIN
CHANGE PINCHANGE PIN
CHANGE PIN
REGISTRATION
REGISTRATIONREGISTRATION
REGISTRATION
DEREGISTER
DEREGISTERDEREGISTER
DEREGISTER
RESET
RESETRESET
RESET
RECALL TIME
RECALL TIMERECALL TIME
RECALL TIME
Page 23

21
3.6
3.63.6
3.6 Menu Map and Menu Navigation
Menu Map and Menu NavigationMenu Map and Menu Navigation
Menu Map and Menu Navigation on the Additional Handsets (for
on the Additional Handsets (for on the Additional Handsets (for
on the Additional Handsets (for
Twin, Triple and Quad Models only)
Twin, Triple and Quad Models only)Twin, Triple and Quad Models only)
Twin, Triple and Quad Models only)
From the home screen of your additional handset, press
M
to access
PHONEBOOK
PHONEBOOKPHONEBOOK
PHONEBOOK, the first option in the Main Menu
Main MenuMain Menu
Main Menu list.
Press
+
or
-
to go to other options in the menu list.
Press
M
to enter a sub-menu or function.
Press
m
to go back to the previous level.
Press
O to cancel the current operation and return to the home screen.
Note:
Note:Note:
Note: If you do not press any key on the handset for 15 seconds, the
display will automatically return to the home screen.
PHONEBOOK
PHONEBOOKPHONEBOOK
PHONEBOOK
PERSONAL SET
PERSONAL SETPERSONAL SET
PERSONAL SET CLOCK&ALARM
CLOCK&ALARMCLOCK&ALARM
CLOCK&ALARM ADVANCED SET
ADVANCED SETADVANCED SET
ADVANCED SET
ANSW MACHINE
ANSW MACHINEANSW MACHINE
ANSW MACHINE
NEW ENTR
NEW ENTRNEW ENTR
NEW ENTRYYYY
LIST
LISTLIST
LIST
EDIT ENTRY
EDIT ENTRYEDIT ENTRY
EDIT ENTRY
DELETE
DELETEDELETE
DELETE
DELETE ALL
DELETE ALLDELETE ALL
DELETE ALL
DIRECT MEM
DIRECT MEMDIRECT MEM
DIRECT MEM....
HANDSET NAME
HANDSET NAMEHANDSET NAME
HANDSET NAME
HANDSET TONE
HANDSET TONEHANDSET TONE
HANDSET TONE
RING VOLUME
RING VOLUMERING VOLUME
RING VOLUME
RING TONES
RING TONESRING TONES
RING TONES
KEY BEEP
KEY BEEPKEY BEEP
KEY BEEP
LANGUAGE
LANGUAGELANGUAGE
LANGUAGE
AUTO HANG
AUTO HANGAUTO HANG
AUTO HANG----UP
UPUP
UP
DATE/TIME
DATE/TIMEDATE/TIME
DATE/TIME
SET FORMAT
SET FORMATSET FORMAT
SET FORMAT
TIME FORMAT
TIME FORMAT TIME FORMAT
TIME FORMAT
DATE FORMAT
DATE FORMATDATE FORMAT
DATE FORMAT
ALARM
ALARMALARM
ALARM
ALARM TONE
ALARM TONEALARM TONE
ALARM TONE
CHANGE PIN
CHANGE PINCHANGE PIN
CHANGE PIN
REGISTRATION
REGISTRATIONREGISTRATION
REGISTRATION
UNREGISTER
UNREGISTERUNREGISTER
UNREGISTER
RESET
RESETRESET
RESET
RECALL TIME
RECALL TIMERECALL TIME
RECALL TIME
FIRST RING
FIRST RINGFIRST RING
FIRST RING
PLAY
PLAYPLAY
PLAY
DELETE ALL
DELETE ALLDELETE ALL
DELETE ALL
ANSW. ON/OFF
ANSW. ON/OFFANSW. ON/OFF
ANSW. ON/OFF
RECORD OGM
RECORD OGMRECORD OGM
RECORD OGM
ANSWER MODE
ANSWER MODEANSWER MODE
ANSWER MODE
SETTINGS
SETTINGSSETTINGS
SETTINGS
RING DELAY
RING DELAYRING DELAY
RING DELAY
REMOTE ACC.
REMOTE ACC.REMOTE ACC.
REMOTE ACC.
LANGUAGE
LANGUAGELANGUAGE
LANGUAGE
Page 24

22
3.7
3.73.7
3.7 Text and
Text and Text and
Text and NNNNumber
umberumber
umber EEEEntry
ntryntry
ntry
The following table shows you where each letter and punctuation
character can be found, by using repeated presses of the alphanumeric
keypad. This will be helpful when storing a name in the phonebook or
renaming your handset.
For example, to enter the name Tom
TomTom
Tom:
TTTT
Press
8
once
OOOO
Press
6
three times
MMMM
Press
6
once
In editing mode, a cursor is displayed to indicate the current text entry
position.
It is positioned at the right of the last character entered.
Writing Tips:
Writing Tips:Writing Tips:
Writing Tips:
1. Once a character is selected, the cursor will move to the next
position after a short pause.
2. Press
m
(main Eclipse handset) or m (additional handset) to delete
the last letter or number.
3.7.1
3.7.13.7.1
3.7.1 Character
Character Character
Character MMMMap
apap
ap of
ofof
of the
thethe
the Main
MainMain
Main Eclipse Handset
Eclipse HandsetEclipse Handset
Eclipse Handset
Key
KeyKey
Key
1111
st
stst
st
press
presspress
press
2222
nd
ndnd
nd
press
presspress
press
3333
rd
rdrd
rd
press
presspress
press
4444
th
thth
th
press
presspress
press
5555
th
thth
th
press
presspress
press
6666
th
thth
th
press
presspress
press
1111
Space
1 _ < > *
2222
A B C 2
3333
D E F 3
4444
G H I 4
5555
J K L 5
6666
M N O 6
7777
P Q R S 7
8888
T U V 8 ?
9999
W X Y Z 9
0000
0 - / Space
# +
****
*
####
#
Page 25
23
3.7.2
3.7.23.7.2
3.7.2 Character Map
Character MapCharacter Map
Character Map of
ofof
of the Additional Handsets (for Twin, Triple and Quad
the Additional Handsets (for Twin, Triple and Quad the Additional Handsets (for Twin, Triple and Quad
the Additional Handsets (for Twin, Triple and Quad
Models Only)
Models Only)Models Only)
Models Only)
Key
KeyKey
Key
1111
st
stst
st
press
presspress
press
2222
nd
ndnd
nd
press
presspress
press
3333
rd
rdrd
rd
press
presspress
press
4444
th
thth
th
press
presspress
press
5555
th
thth
th
press
presspress
press
6666
th
thth
th
press
presspress
press
1111
Space
1 _ ( ) *
2222
A B C 2
3333
D E F 3
4444
G H I 4
5555
J K L 5
6666
M N O 6
7777
P Q R S 7
8888
T U V 8 ?
9999
W X Y Z 9
0000
0 - / \ o +
****
*
####
o
Page 26

24
4444 USING
USINGUSING
USING YOUR PHONE
YOUR PHONEYOUR PHONE
YOUR PHONE
4.1
4.14.1
4.1 Make a
Make a Make a
Make a CCCCall
allall
all
4.1.1
4.1.14.1.1
4.1.1 Pre
PrePre
Pre----dialling
diallingdialling
dialling
- On Your
On Your On Your
On Your Main
MainMain
Main Eclipse Handset
Eclipse HandsetEclipse Handset
Eclipse Handset
1.
Enter the phone number (maximum 24 digits).
If you make a mistake, press
m
to delete the last entered number.
2. Press
T
to dial the phone number.
- On Your Additional Handset
On Your Additional Handset On Your Additional Handset
On Your Additional Handset
1.
Enter the phone number (maximum 24 digits).
If you make a mistake, press
m
to delete the last entered number.
2. Press
T
to dial the phone number.
4.1.2
4.1.24.1.2
4.1.2 Direct Dialling
Direct DiallingDirect Dialling
Direct Dialling
1. Press
T
on your Main Eclipse Handset or T on your additional handset.
2. Dial the number.
Note:
Note:Note:
Note: If you make a mistake, you cannot correct it with
m
on your Main
Eclipse Handset or
m
on your additional handset.
Press
O
on your Main Eclipse Handset or O on your additional
handset and then press
m
on your Main Eclipse Handset or
m
on
your additional handset to return to the home screen.
4.1.3
4.1.34.1.3
4.1.3 Call from the
Call from the Call from the
Call from the RRRRedial
edial edial
edial LLLList
istist
ist
- On Your
On YourOn Your
On Your Main
MainMain
Main Eclipse Handset
Eclipse HandsetEclipse Handset
Eclipse Handset
1. Press
R
in standby mode.
•
The last number dialled is displayed.
2. Press + / -to select the desired entry in the redial list and
then press
T
to dial out the selected redial number.
Page 27

25
- On Your Additional Handset
On Your Additional Handset On Your Additional Handset
On Your Additional Handset
1. Press
R
in standby mode.
•
The last number dialled is displayed.
2. Press
+\-
to select the desired entry in the redial list and
then press
T to dial out the selected redial number.
4.1.4
4.1.44.1.4
4.1.4 Call from the
Call from the Call from the
Call from the CCCCall
all all
all LLLLog
ogog
og
- On Your
On YourOn Your
On Your Main
MainMain
Main Eclipse Handset
Eclipse HandsetEclipse Handset
Eclipse Handset
1. Press
+ in standby mode.
2. Press + / - to select the desired entry in the call log and
then press
T
to dial out the selected call log number.
- On Your Additional H
On Your Additional HOn Your Additional H
On Your Additional Handset
andset andset
andset
1. Press
+
in standby mode.
2. Press
+\-
to select the desired entry in the call log and
then press
T to dial out the selected call log number.
NNNNote
oteote
ote:::: You need to subscribe to Caller Line Identification service to be
able to see the caller’s number or name in the call log.
4.1.5
4.1.54.1.5
4.1.5 Call from the
Call from the Call from the
Call from the PPPPhonebook
honebookhonebook
honebook
- On Your
On YourOn Your
On Your Main
MainMain
Main Eclipse Handset
Eclipse HandsetEclipse Handset
Eclipse Handset
1. Press
- in standby mode.
2. Press + / - to select the desired entry in the phonebook
and then press
T
to dial out the selected phonebook number.
- On Your Additional Handset
On Your Additional Handset On Your Additional Handset
On Your Additional Handset
1. Press
-
in standby mode.
2. Press
+\-
to select the desired entry in the phonebook
and then press T to dial out the selected phonebook number.
Page 28

26
4.2
4.24.2
4.2 Answer and
Answer and Answer and
Answer and EEEEnd a
nd a nd a
nd a CCCCall
allall
all
1. When the phone rings, press
T
on your Main Eclipse Handset or
press T on your additional handset.
2. To end a conversation, press
O
on your Main Eclipse Handset or
press
O on your additional handset.
Warning:
Warning:Warning:
Warning: When the handset is ringing, please do not hold it too close to
your ear as the volume of the ringing tone may damage your hearing.
Note:
Note:Note:
Note: You can simply place the main Eclipse handset back on its base
station or the additional handset back on its charging pod to end the call,
provided you have not deactivated the Auto hang
Auto hangAuto hang
Auto hang----up
upup
up feature.
(See Set
Set Set
Set
Auto Hang
Auto HangAuto Hang
Auto Hang----up
upup
up on page 60.)
4.3
4.34.3
4.3 Handset Speakerphone
Handset SpeakerphoneHandset Speakerphone
Handset Speakerphone
During a call, you can press F on your Main Eclipse Handset or press
T on your additional handset to alternate between hands-free
speakerphone and handset earpiece.
4.4
4.44.4
4.4 Adjust
Adjust Adjust
Adjust EEEEarpiece
arpiecearpiece
arpiece VVVVolume
olumeolume
olume
There are 5555 levels of earpiece volume on your Main Eclipse Handset and
3333 levels on the additional handsets.
1. During a call, press
+ /- to select from VOLUME 1
VOLUME 1VOLUME 1
VOLUME 1 to
VOLUME
VOLUME VOLUME
VOLUME 5555 on your Main Eclipse Handset, or press
+\-
to
select from
VVVV
OLUME 1
OLUME 1OLUME 1
OLUME 1 to
VVVV
OLUME 3
OLUME 3OLUME 3
OLUME 3 on the additional handsets.
•
The current setting is shown.
•
When you end the call, the setting will remain at the last
selected level.
4.5
4.54.5
4.5 Adjust
Adjust Adjust
Adjust SSSSpeaker
peaker peaker
peaker VVVVolume
olumeolume
olume
There are 5555 levels of speaker volume on both the Main Eclipse Handset
and the additional handsets.
1. During a call, press + /- on your Main Eclipse Handset or
press
+\-
on the additional handsets to select from
VOLUME 1
VOLUME 1VOLUME 1
VOLUME 1 to VOLUME
VOLUMEVOLUME
VOLUME 5555.
•
The current setting is shown.
•
When you end the call, the setting will remain at the last selected level.
Page 29

27
4.6
4.64.6
4.6 Mute/Unmute the
Mute/Unmute the Mute/Unmute the
Mute/Unmute the MMMMicrophone
icrophoneicrophone
icrophone
When the microphone is muted, the handset displays MUTE ON
MUTE ONMUTE ON
MUTE ON, and
your caller cannot hear you.
During a call, press
m
(Main Eclipse handset) or press m (additional
handsets) to turn on/off the microphone.
4.7
4.74.7
4.7 Paging
PagingPaging
Paging
The paging feature enables you to locate a missing handset if the handset
is in range and contains charged batteries.
1. Press the
key under the base unit.
•
All the registered handsets that are in range will start to ring.
You can stop the paging by pressing any key on a handset or the key
under the base unit again.
4.8
4.84.8
4.8 Switching
Switching Switching
Switching the
the the
the HHHHandset
andset andset
andset OOOOn/
n/n/
n/OOOOff
ffff
ff
Press and hold
O
on your main Eclipse Handset or press O on the
additional handsets for more than 2 seconds to switch the handset on or
off in standby mode.
•
When first turned on, the display shows
SEARCHING
SEARCHINGSEARCHING
SEARCHING…………
until the
handset finds the base.
NNNNote:
ote:ote:
ote: You can switch the handset off to save battery life, if the handset is
not on the base or a charging pod and you do not want to use it for a
while.
IMPORTANT:
IMPORTANT:IMPORTANT:
IMPORTANT: When the handset is OFF, it cannot be used for making calls
including emergency calls. It will not ring when there is an incoming call.
To answer a call, you will need to switch it back on and it may take some
time for the handset to re-establish a radio link with the base unit.
Page 30

28
4.9
4.94.9
4.9 To
To To
To LLLLock/
ock/ock/
ock/UUUUnlock the
nlock the nlock the
nlock the KKKKeypad
eypadeypad
eypad
You can lock the keypad on your main Eclipse Handset or the additional
handset to avoid making calls or pressing the keys accidentally.
1. In standby mode, press and hold
* for 1 second to lock the keypad.
•
The handset displays
KEYS LOCKED
KEYS LOCKEDKEYS LOCKED
KEYS LOCKED
.
2. To turn the keypad lock off, press and hold *
again.
Note
NoteNote
Note:
: :
: Incoming calls can still be answered even if the keypad is locked.
4.10
4.104.10
4.10 Make an
Make an Make an
Make an IIIInternal
nternalnternal
nternal CCCCall (Multi
all (Multi all (Multi
all (Multi ---- handset
handset handset
handset model
modelmodel
models only)
s only)s only)
s only)
The system allows an intercom call between any two handsets registered
to the same telephone base. It also allows you to transfer external calls
from one handset to another, and set up a 3-way conference with two
handsets and an external call.
If you try to make a call while another handset is already on an external
call, you will be connected to the call in conference mode automatically,
without giving any warning to the other parties.
4.11
4.114.11
4.11 IIIInitiate an
nitiate an nitiate an
nitiate an IIIIntercom
ntercom ntercom
ntercom CCCCall
allall
all
1. In standby mode, press
I
on your Main Eclipse Handset, or
I
on the additional handset.
•
Intercom is established immediately if there are only 2
registered handsets.
•
If there are more than 2 registered handsets, the handset
numbers which
are available for intercom will be displayed.
2. Press the handset number you wish to call or press * to call all
handsets.
3. Press
T
(main Eclipse handset) or T (additional handsets) on a
called handset to answer the internal call, where both internal
callers can talk.
4. To end the intercom call, press
O
(main Eclipse handset) or O
(additional handsets) on either handset.
Page 31

29
Note:
Note:Note:
Note:
1) You can cancel the intercom call before it is answered by pressing
I (main Eclipse handset) / I (additional handsets), or
O
(main Eclipse handset) /
O
(additional handsets) on the
originating handset.
2) If there is no answer from the called handset within one minute, the
paging will be cancelled automatically.
3) If no other handset is registered to the base, 4 beeps will be heard
and it will return to standby mode.
4.12
4.124.12
4.12 AAAAnswer an
nswer an nswer an
nswer an EEEExternal
xternalxternal
xternal CCCCall
all all
all dddduring an
uring an uring an
uring an IIIIntercom
ntercom ntercom
ntercom CCCCall
allall
all
You will hear an alert tone when you receive an incoming external call
during an intercom call, and you can choose from the following options:
1) Press
O
(main Eclipse handset) or O (additional handsets) to
cancel the intercom call and let the handsets receive normal
incoming ringing.
2) Press
T
(main Eclipse handset) or T (additional handsets) to
answer the incoming call and end the intercom call.
3) Press I (main Eclipse handset) or I (additional handsets) to
answer the incoming call and put the intercom call on hold.
4) When the incoming external call is connected and the intercom call
is on hold, press and hold
I (main Eclipse handset) or I
(additional handsets) to start a three-party conference call with
both the incoming and the intercom parties.
5) When either the main Eclipse handset or the additional handset is
connected to an external call, you can press
T
(main Eclipse
handset) or T (additional handsets) to enter into a three-party
conference call directly.
Page 32

30
4.13
4.134.13
4.13 IIIInitiate an
nitiate an nitiate an
nitiate an IIIIntercom
ntercom ntercom
ntercom dddduring a
uring a uring a
uring a CCCCall
allall
all
You can intercom with another system handset during a call, or invite
another system handset to join in a conference call with you and the
external caller.
1. During the call, press I
(main Eclipse handset) or
I
(additional handsets) to put the external call on hold.
•
Intercom is established immediately if there are only 2
registered handsets.
•
If there are more than 2 registered handsets, the handset
numbers which
are available for intercom will be displayed.
2. Press the handset number you wish to call or press * to call all handsets.
Note:
Note: Note:
Note: If there is no answer from the called handset, or you wish to cancel
the intercom call before it is answered, press
I (main Eclipse handset)
or
I
(additional handsets) to return to the external call.
3. Press
T
or T on the called handset to answer the internal call,
where both internal callers can talk.
4. When the intercom call is connected, you can choose from the
following options on the originating handset:
1) Press and hold I (main Eclipse handset) or I (additional
handsets) for 2 seconds to connect both handsets to the call in
conference mode.
2) Press
T
or T on either handset to terminate the intercom on that
handset, and leave the external call connected to the other handset.
Page 33

31
4.14
4.144.14
4.14 Transfer an
Transfer an Transfer an
Transfer an EEEExternal
xternal xternal
xternal CCCCall to
all to all to
all to aaaanother
nother nother
nother HHHHandset
andsetandset
andset
1. During the call, press
I (main Eclipse handset) or I
(additional handsets) to put the external call on hold.
•
Intercom is established immediately if there are only 2
registered handsets.
•
If there are more than 2 registered handsets, the handset
numbers which
are available for intercom will be displayed.
2. Press the handset number you wish to call or press * to call all
handsets.
Note:
Note: Note:
Note: If there is no answer from the called handset, or you wish to cancel
the intercom call before it is answered, press
I
(main Eclipse handset)
or
I (additional handsets) to return to the external call.
3. Press
T
(main Eclipse handset) or T (additional handsets) on
the called handset to answer the internal call, where both internal
callers can talk.
4. Press
O
(main Eclipse handset) or O (additional handsets) on
the originating handset to transfer the external call to the called
handset.
•
The external call is transferred.
Page 34

32
5555 DIRECT ACCESS MEMORY
DIRECT ACCESS MEMORYDIRECT ACCESS MEMORY
DIRECT ACCESS MEMORY
In addition to the phonebook memory, there are 2 direct access
memories (Keys 1 & 2) on all handsets. A long press on the keys in
standby mode will automatically dial the stored phone number.
5.1
5.15.1
5.1 Add
Add Add
Add DDDDirect
irect irect
irect AAAAccess
ccess ccess
ccess MMMMemory
emoryemory
emory
- On Your
On YourOn Your
On Your Main
MainMain
Main EEEEclipse Handset
clipse Handsetclipse Handset
clipse Handset
1. From the home screen, press
M
.
2. Press
+/- to PHONEBOOK
PHONEBOOKPHONEBOOK
PHONEBOOK and then press
M
to select.
3. Press
+/-
to DIRECT MEM.
DIRECT MEM.DIRECT MEM.
DIRECT MEM. and then press
M
to select.
4. Press +/- to KEY 1
KEY 1KEY 1
KEY 1 or KEY 2
KEY 2KEY 2
KEY 2 and then press
M
to select.
•
The stored name is displayed, or
NO NUMBER
NO NUMBERNO NUMBER
NO NUMBER
if it is empty.
5. Press
M
to enter the DIRECT MEM.
DIRECT MEM.DIRECT MEM.
DIRECT MEM. menu to add/edit the name or
number.
6. Press
M
again to select EDIT NUMBER
EDIT NUMBEREDIT NUMBER
EDIT NUMBER.
•
The display shows the currently stored name or just
ENTER
ENTER ENTER
ENTER
NAME
NAMENAME
NAME
if it is empty.
7. Edit or enter the name of your contact and press
M
.
If you make a mistake, press
m
to delete the last character
entered.
•
The display shows the currently stored number or just
ENTER
ENTER ENTER
ENTER
NNNNUMBER
UMBERUMBER
UMBER
if it is empty
....
8. Edit or enter the number of your contact and press
M
.
If you make a mistake, press
m
to delete the last digit entered.
•
A confirmation tone is played.
9. Press
O
to return to standby mode.
Page 35

33
- On Your Additional Handset
On Your Additional HandsetOn Your Additional Handset
On Your Additional Handset
1. From the home screen, press
M
.
2. Press
M
again to select PHONEBOOK
PHONEBOOKPHONEBOOK
PHONEBOOK.
3. Press
+\-
to DIRECT MEM.
DIRECT MEM.DIRECT MEM.
DIRECT MEM. and then press
M
to select.
4. Press
+\-
to KEY 1
KEY 1KEY 1
KEY 1 or KEY 2
KEY 2KEY 2
KEY 2 and then press
M
to select.
•
The stored name is displayed, or
NO NUMBER
NO NUMBERNO NUMBER
NO NUMBER
if it is empty.
5. Press
M
to enter the DIRECT MEM.
DIRECT MEM.DIRECT MEM.
DIRECT MEM. menu to add/edit the name or
number.
6. Press
M
again to select EDIT NUMBER
EDIT NUMBEREDIT NUMBER
EDIT NUMBER.
•
The display shows the currently stored name or just
ENTER
ENTER ENTER
ENTER
NAME
NAMENAME
NAME
if it is empty.
Note:
Note:Note:
Note: If the main phonebook is already full, MEMORY FULL
MEMORY FULLMEMORY FULL
MEMORY FULL is displayed,
and you cannot store or edit a direct memory until a phonebook entry
has been deleted.
7. Edit or enter the name of your contact and press
M
.
If you make a mistake,
m
delete the last character entered.
•
The display shows the currently stored number or just
ENTER
ENTER ENTER
ENTER
NNNNUMBER
UMBERUMBER
UMBER
if it is empty.
8. Edit or enter the number of your contact and press
M
.
If you make a mistake, press
m
to delete the last digit entered.
•
A confirmation tone is played.
9. Press O to return to standby mode.
Page 36

34
5.2
5.25.2
5.2 Delete
Delete Delete
Delete DDDDirect
irect irect
irect AAAAccess
ccess ccess
ccess MMMMemory
emoryemory
emory
- On Your
On YourOn Your
On Your Main
MainMain
Main Eclipse Handset
Eclipse HandsetEclipse Handset
Eclipse Handset
1. From the home screen, press
M
.
2. Press
+/- to PHONEBOOK
PHONEBOOKPHONEBOOK
PHONEBOOK and then press
M
to select.
3. Press
+/-
to DIRECT MEM.
DIRECT MEM.DIRECT MEM.
DIRECT MEM. and then press
M
to select.
4. Press
+/-
to KEY 1
KEY 1 KEY 1
KEY 1 or KEY 2
KEY 2KEY 2
KEY 2 and then press
M
to select.
• NO NUMBER
NO NUMBERNO NUMBER
NO NUMBER
is displayed if it is empty. Otherwise, the stored
name is displayed.
5. Press
M
to enter the menu options.
6. Press
+/-
to DELETE
DELETE DELETE
DELETE and then press
M
to select.
• CONFIRM
CONFIRMCONFIRM
CONFIRM????
is displayed.
7.
Press
M
again to confirm.
•
A confirmation tone is played.
8. Press
O
to return to standby mode.
- On Your Additional Handset
On Your Additional Handset On Your Additional Handset
On Your Additional Handset
1. From the home screen, press
M
.
2. Press
M
again to select PHONEBOOK
PHONEBOOKPHONEBOOK
PHONEBOOK.
3. Press
+\-
to DIRECT MEM.
DIRECT MEM.DIRECT MEM.
DIRECT MEM. and then press
M
to select.
4. Press
+\-
to KEY 1
KEY 1 KEY 1
KEY 1 or KEY 2
KEY 2KEY 2
KEY 2 and then press
M
to select.
• NO NUMBER
NO NUMBERNO NUMBER
NO NUMBER
is displayed if it is empty. Otherwise, the stored
name is displayed.
5. Press
M
to enter the menu options.
6. Press
+\-
to DELETE
DELETE DELETE
DELETE and then press
M
to select.
• DELETE?
DELETE?DELETE?
DELETE?
is displayed.
7.
Press
M
again to confirm.
•
A confirmation tone is played.
8. Press O to return to standby mode.
Page 37

35
6666 PHONEBOOK
PHONEBOOKPHONEBOOK
PHONEBOOK
The Main Eclipse Handset can store up to 200 phonebook entries, and
each additional handset can store up to 100 phonebook entries. Each
phonebook entry can have a maximum of 24 digits for the phone number
and 12 characters for the name.
6.1
6.16.1
6.1 Store a
Store a Store a
Store a CCCContact in the
ontact in the ontact in the
ontact in the PPPPhonebook
honebookhonebook
honebook
- On Your
On YourOn Your
On Your Main
MainMain
Main Eclipse Handset
Eclipse HandsetEclipse Handset
Eclipse Handset
1. From the home screen, press
M
.
2. Press
+/- to PHONEBOOK
PHONEBOOKPHONEBOOK
PHONEBOOK and then press
M
to select.
3. Press
M
to select NEW ENTRY
NEW ENTRYNEW ENTRY
NEW ENTRY.
•
The screen displays
ENTER NAME
ENTER NAMEENTER NAME
ENTER NAME
.
4. Enter the name of the contact (maximum 12 characters) using the
keypad.
If you make a mistake, press
m
to delete the last character
entered.
5. Press
M
to confirm the name entry.
•
The screen displays
ENTER NUMBER
ENTER NUMBERENTER NUMBER
ENTER NUMBER
.
6. Enter the number of the contact (maximum 24 digits) using the
keypad.
If you make a mistake, press
m
to delete the last digit entered.
7. Press
M
to confirm.
•
A confirmation tone is played.
8. Press
O
to return to standby mode.
Page 38

36
- On Your Additional Handset
On Your Additional Handset On Your Additional Handset
On Your Additional Handset
1. From the home screen, press
M
.
2. Press
M
again to select PHONEBOOK
PHONEBOOKPHONEBOOK
PHONEBOOK.
3. Press
M
to select NEW ENTRY
NEW ENTRYNEW ENTRY
NEW ENTRY.
•
The screen displays
ENTER NAME
ENTER NAMEENTER NAME
ENTER NAME.
4. Enter the name of the contact (maximum 12 characters) using the
keypad.
If you make a mistake, press
m
to delete the last character
entered.
5. Press
M
to confirm the name entry.
•
The screen displays
ENTER
ENTER ENTER
ENTER NUMBER
NUMBERNUMBER
NUMBER.
6. Enter the number of the contact (maximum 24 digits) using the
keypad.
If you make a mistake, press
m
to delete the last digit entered.
7. Press
M
to confirm.
•
A confirmation tone is played.
8. Press O to return to standby mode.
Note:
Note:Note:
Note:
You cannot store a new phonebook entry when the memory is full. In this
case, you have to delete existing entries to make space for new ones.
When storing the number for a local call, you can enter only the 6 or
7-digit local number without STD
STD STD
STD (area) code, and it will still display the
name if there is an incoming call and you subscribe to caller display.
Page 39

37
6.2
6.26.2
6.2 Access the
Access the Access the
Access the PPPPhonebook
honebookhonebook
honebook
- On Your
On YourOn Your
On Your Main
MainMain
Main Eclipse Handset
Eclipse HandsetEclipse Handset
Eclipse Handset
1. From the home screen, press
- to open the phonebook list.
Alternatively, from the home screen, you can press
M
, then
+ /
-
to
PHONEBOOK
PHONEBOOKPHONEBOOK
PHONEBOOK
, then press
M
and
+ / -
to
VIEW
VIEW VIEW
VIEW
ENTRIES
ENTRIESENTRIES
ENTRIES
, then press
M
to open the phonebook list.
•
The phonebook entries are listed in alphabetical order.
2. Press + / - to scroll through the list of entries.
3. Press # to view the details of the selected entry.
4. Press
O
to return to standby mode.
- On Your Additional Handset
On Your Additional Handset On Your Additional Handset
On Your Additional Handset
1. From the home screen, press
-
to open the phonebook list.
Alternatively, from the home screen of the additional handsets, you can
press
M
twice to select
PHONEBOOK
PHONEBOOKPHONEBOOK
PHONEBOOK
, then press
+\-
to
LIST
LISTLIST
LIST
and press
M
again to open the phonebook list.
•
The phonebook entries are listed in alphabetical order.
2. Press
+\-
to scroll through the list of entries.
3. Press
M
to view the details of the selected entry.
4. Press O to return to standby mode.
Note:
Note:Note:
Note:
Instead of pressing
+ / - (main Eclipse handset) or
+\-
(additional handsets) to browse the phonebook entries, you can press the
numeric key corresponding to the first letter of the entry you wish to locate.
For example, pressing
2 will show the first entry starting with A. Pressing 2
again will show the first entry starting with B, and so on..., and then press + /
- (main Eclipse handset) or
+\-
(additional handsets) , if
necessary, to find the entry you want.
Page 40

38
6.3
6.36.3
6.3 Modify a
Modify a Modify a
Modify a PPPPhonebook
honebook honebook
honebook EEEEntry
ntryntry
ntry
- On Your
On YourOn Your
On Your Main
MainMain
Main Eclipse Handset
Eclipse HandsetEclipse Handset
Eclipse Handset
1. From the home screen, press
- to open the phonebook list.
2. Press
+/- to select the entry you want to modify.
3. Press
M
to open the phonebook menu options.
4. Press
+ / - to EDIT ENTRY
EDIT ENTRYEDIT ENTRY
EDIT ENTRY and then press
M
to select.
•
The current name is displayed.
5. Edit the name using the keypad, using
m
to delete characters.
6. Press
M
to confirm.
7. Edit the number and then press
M
to confirm.
•
A confirmation tone is played.
8. Press
O
to return to standby mode.
- On Your Additional Handset
On Your Additional Handset On Your Additional Handset
On Your Additional Handset
1. From the home screen, press
-
to open the phonebook list.
2. Press
+\-
to select the entry you want to modify.
3. Press
M
to open the phonebook menu options.
4. Press
+\-
to EDIT ENTRY
EDIT ENTRYEDIT ENTRY
EDIT ENTRY and then press
M
to select.
•
The current name is displayed.
5. Edit the name using the keypad, using m to delete characters.
6. Press
M
to confirm.
7. Edit the number and then press
M
to confirm.
•
A confirmation tone is played.
8. Press O to return to standby mode.
Page 41

39
6.4
6.46.4
6.4 Delete a
Delete a Delete a
Delete a PPPPhonebook
honebook honebook
honebook EEEEntry
ntryntry
ntry
- On Your
On YourOn Your
On Your Main
MainMain
Main Eclipse Handset
Eclipse HandsetEclipse Handset
Eclipse Handset
1. From the home screen, press
-to open the phonebook list.
2. Press
+ / - to select the entry you want to delete.
3. Press
M
to open the phonebook menu options.
4. Press
+ / - to DELETE
DELETE DELETE
DELETE and then press
M
to select.
• CONFIRM?
CONFIRM?CONFIRM?
CONFIRM?
is displayed.
5. Press
M
again to confirm.
•
A confirmation tone is played.
6. Press
O
to return to standby mode.
- On Your Additional Ha
On Your Additional HaOn Your Additional Ha
On Your Additional Handset
ndset ndset
ndset
1. From the home screen, press
-
to open the phonebook list.
2. Press
+\-
to select the entry you want to delete.
3. Press
M
to open the phonebook menu options.
4. Press
+\-
to DELETE
DELETE DELETE
DELETE and then press
M
to select.
• DELETE?
DELETE?DELETE?
DELETE?
is displayed.
5. Press
M
again to confirm.
•
A confirmation tone is played.
6. Press O to return to standby mode.
Page 42

40
6.5
6.56.5
6.5 Delete
Delete Delete
Delete AAAAll
ll ll
ll EEEEntries from the
ntries from the ntries from the
ntries from the PPPPhonebook
honebook honebook
honebook LLLList
istist
ist
- On Your
On YourOn Your
On Your Main
MainMain
Main Eclipse Handset
Eclipse HandsetEclipse Handset
Eclipse Handset
1. From the home screen, press
- to open the phonebook list.
2. Press
M
to open the phonebook menu options.
3. Press
+ / - to DELETE ALL
DELETE ALLDELETE ALL
DELETE ALL and then press
M
to select.
• CONFIRM?
CONFIRM? CONFIRM?
CONFIRM?
is displayed.
4. Press
M
again to confirm.
•
A confirmation tone is played.
5. Press
O
to return to standby mode.
- On Your Additional Handset
On Your Additional Handset On Your Additional Handset
On Your Additional Handset
1. From the home screen, press
-
to open the phonebook list.
2. Press
M
to open the phonebook menu options.
3. Press
+\-
to DELETE ALL
DELETE ALLDELETE ALL
DELETE ALL and then press
M
to select.
• DELETE?
DELETE?DELETE?
DELETE?
is displayed.
4. Press
M
again to confirm.
•
A confirmation tone is played.
5. Press O to return to standby mode.
Page 43

41
7777 CALLER DISPLAY (NETWORK DEPENDENT)
CALLER DISPLAY (NETWORK DEPENDENT)CALLER DISPLAY (NETWORK DEPENDENT)
CALLER DISPLAY (NETWORK DEPENDENT)
If you have subscribed to the Calling Line Identification (CLI) service with
your network service provider, the phone number of your caller will
appear on the handset display when there is an incoming call and then
stored in your Call Log
Call LogCall Log
Call Log.
If the caller’s number is stored in your phonebook along with a name, the
name will appear on the handset display when the call is received and in
the Call Log
Call LogCall Log
Call Log.
Note:
Note:Note:
Note:
If the call is from someone whose number is unavailable (e.g. an
international call or from a private exchange), the handset will display
UN
UNUN
UNAVAILABLE
AVAILABLEAVAILABLE
AVAILABLE when you receive the call and in the Call Log
Call LogCall Log
Call Log afterwards.
If the call is from someone whose number is withheld (e.g. by dialling
141), the handset will display WITHHELD
WITHHELDWITHHELD
WITHHELD when you receive the call and in
the Call Log
Call LogCall Log
Call Log afterwards.
If you have not subscribed to the Caller Line Identification service, the
handset will display UNKNOWN
UNKNOWNUNKNOWN
UNKNOWN when you receive the call when it is
received, and it will not be saved in the Call Log
Call LogCall Log
Call Log.
Information about incoming calls varies by country and network
operators.
7.1
7.17.1
7.1 Call Log
Call LogCall Log
Call Log
The Call Log
Call LogCall Log
Call Log stores the last 20 external calls for the Main Eclipse Handset
and the last 10 external calls for the additional handsets, whether or not
you have answered the call.
Only the most recent call is saved if there are repeat calls from the same
number.
When the Call Log
Call LogCall Log
Call Log is full, the next new call will replace the oldest entry.
Page 44

42
7.1.1
7.1.17.1.1
7.1.1 Access the Call Log
Access the Call LogAccess the Call Log
Access the Call Log
1. From the home screen, press + on your Main Eclipse Handset
or press
+
on the additional handset.
2. Press +/- (main Eclipse handset) or
+\-
(additional handsets) to browse through the call list.
•
The calls are displayed in chronological order with the most
recent call at the top of the list.
7.1.2
7.1.27.1.2
7.1.2 Save a Call Log
Save a Call Log Save a Call Log
Save a Call Log EEEEntry into the
ntry into the ntry into the
ntry into the PPPPhonebook
honebookhonebook
honebook
- On Your
On YourOn Your
On Your Main
MainMain
Main Eclipse Handset
Eclipse HandsetEclipse Handset
Eclipse Handset
1. From the home screen, press
+.
2. Press
+/- to select an entry and then press
M
.
3. Press
M
again to select SAVE NUMBER
SAVE NUMBERSAVE NUMBER
SAVE NUMBER.
4. Enter the name of the contact (maximum 12 characters) and then
press
M
to save.
5. Edit the number (if necessary) and then press
M
to save the entry.
•
A confirmation tone is played.
6. Press
O
to return to standby mode.
- On Your Additional Handset
On Your Additional Handset On Your Additional Handset
On Your Additional Handset
1. From the home screen, press
+
.
2. Press
+\-
to select an entry and then press
M
.
3. Press
M
again to select SAVE NUMBER
SAVE NUMBERSAVE NUMBER
SAVE NUMBER.
4. Enter the name of the contact (maximum 12 characters) and then
press
M
to save.
•
A confirmation tone is played.
5. Press O to return to standby mode.
Page 45

43
7.1.3
7.1.37.1.3
7.1.3 Delete a Call Log
Delete a Call Log Delete a Call Log
Delete a Call Log EEEEntry
ntryntry
ntry
- On Your
On YourOn Your
On Your Main
MainMain
Main Eclipse Handset
Eclipse HandsetEclipse Handset
Eclipse Handset
1. From the home screen, press
+.
2. Press +/- to select an entry and then press
M
.
3. Press
+/- to DELETE
DELETE DELETE
DELETE and then press
M
to select.
• CONFIRM
CONFIRMCONFIRM
CONFIRM????
is displayed.
4. Press
M
again to confirm.
•
A confirmation tone is played.
5. Press
O
to return to standby mode.
- On Your Additional Handset
On Your Additional Handset On Your Additional Handset
On Your Additional Handset
1. From the home screen, press
+
.
2. Press
+\-
to select an entry and then press
M
.
3. Press
+\-
to DELETE
DELETE DELETE
DELETE and then press
M
to select.
• DELETE?
DELETE?DELETE?
DELETE?
is displayed.
4. Press
M
again to confirm.
•
A confirmation tone is played.
5. Press O to return to standby mode.
7.1.4
7.1.47.1.4
7.1.4 Delete
Delete Delete
Delete AAAAll
ll ll
ll EEEEntries in the Call Log
ntries in the Call Logntries in the Call Log
ntries in the Call Log
- On Your
On YourOn Your
On Your Main
MainMain
Main Eclipse Handset
Eclipse HandsetEclipse Handset
Eclipse Handset
1. From the home screen, press
+.
2. Press
M
.
3. Press
+/- to DELE
DELEDELE
DELETE ALL
TE ALL TE ALL
TE ALL and then press
M
to select.
• CONFIRM
CONFIRMCONFIRM
CONFIRM????
is displayed.
4. Press
M
again to confirm.
•
A confirmation tone is played.
Page 46

44
- On Your
On Your On Your
On Your Additional
AdditionalAdditional
Additional Handset
Handset Handset
Handset
1. From the home screen, press or
+
.
2. Press
M
.
3. Press
+\-
to DELETE ALL
DELETE ALL DELETE ALL
DELETE ALL and then press
M
to select.
• DELETE?
DELETE?DELETE?
DELETE?
is displayed.
4. Press
M
again to confirm.
•
A confirmation tone is played.
7.2
7.27.2
7.2 Redial
RedialRedial
Redial LLLList
istist
ist
The redial list stores the last 10 numbers dialled for the Main Eclipse
Handset and the last 5 numbers dialled for the additional handsets. A
maximum of 24 digits can be displayed for each entry.
7.2.1
7.2.17.2.1
7.2.1 Access the
Access the Access the
Access the RRRRedial
edial edial
edial LLLList
istist
ist
1. From the home screen, press
R.
2. Press +/- on your Main Eclipse Handset or press
+\-
on the additional handset to browse the redial list.
•
The last dialled number will appear first in the redial list.
•
If the number has more than 14 digits on the Main Eclipse
Handset, press
#
to see other digits; if the number has more
than 12 digits on the additional handset, press
m
to see the
other digits.
7.2.2
7.2.27.2.2
7.2.2 Save a
Save a Save a
Save a RRRRedial
edial edial
edial NNNNumber into the
umber into the umber into the
umber into the PPPPhonebook
honebookhonebook
honebook
- On Your
On YourOn Your
On Your Main
MainMain
Main Eclipse Handset
Eclipse HandsetEclipse Handset
Eclipse Handset
1. From the home screen, press R.
2. Press +/- to select an entry and press
M
.
3. Press
M
again to select SAVE NUMBER.
SAVE NUMBER.SAVE NUMBER.
SAVE NUMBER.
4. Enter the name of the contact (maximum 12 characters) and then
press
M
.
5. Edit the number (if necessary) and then press
M
to save.
•
A confirmation tone is played.
6. Press
O
to return to standby mode.
Page 47

45
- On Your
On Your On Your
On Your Additional
AdditionalAdditional
Additional Handset
Handset Handset
Handset
1. From the home screen, press R.
2. Press
+\-
to select an entry and press
M
.
3. Press
M
again to select SAVE NUMBER.
SAVE NUMBER.SAVE NUMBER.
SAVE NUMBER.
4. Enter the name of the contact (maximum 12 characters) and then
press
M
.
•
A confirmation tone is played.
5. Press O to return to standby mode.
7.2.3
7.2.37.2.3
7.2.3 Edit a
Edit a Edit a
Edit a RRRRedial
edial edial
edial NNNNumber
umberumber
umber
- On Your
On YourOn Your
On Your Main
MainMain
Main Eclipse Handset
Eclipse HandsetEclipse Handset
Eclipse Handset
1. From the home screen, press R.
2. Press
+/- to select an entry and then press
M
.
3. Press
+/- to EDIT ENTRY
EDIT ENTRY EDIT ENTRY
EDIT ENTRY and then press
M
to select.
4. Edit the number and press
M
to confirm.
•
A confirmation tone is played.
5. Press
O
to return to standby mode.
- On Your Additional Handset
On Your Additional Handset On Your Additional Handset
On Your Additional Handset
1. From the home screen, press
R.
2. Press
+/-
to select an entry and then press
M
.
3. Press
+/-
to EDIT ENTRY
EDIT ENTRY EDIT ENTRY
EDIT ENTRY and then press
M
to select.
4. Edit the number and press
M
to confirm.
•
A confirmation tone is played.
5. Press O
to return to standby mode.
Page 48

46
7.2.4
7.2.47.2.4
7.2.4 Delete a
Delete a Delete a
Delete a RRRRedial
edial edial
edial NNNNumber
umberumber
umber
- On Your
On YourOn Your
On Your Main
MainMain
Main Eclipse Handset
Eclipse HandsetEclipse Handset
Eclipse Handset
1. From the home screen, press R.
2. Press
+/- to select an entry and then press
M
.
3. Press
+/- to DELET
DELETDELET
DELETE
E E
E and then press
M
to select.
• CONFIRM
CONFIRMCONFIRM
CONFIRM????
is displayed.
4. Press
M
again to confirm.
•
A confirmation tone is played.
5. Press
O
to return to standby mode.
- On Your Additional Handset
On Your Additional Handset On Your Additional Handset
On Your Additional Handset
1. From the home screen, press
R.
2. Press
+\-
and then press
M
.
3. Press
+\-
to DELETE
DELETE DELETE
DELETE and then press
M
to select.
• DELETE?
DELETE?DELETE?
DELETE?
is displayed.
4. Press
M
again to confirm.
•
A confirmation tone is played.
5. Press O to return to standby mode.
7.2.5
7.2.57.2.5
7.2.5 Delete
Delete Delete
Delete AAAAll
ll ll
ll EEEEntries from the
ntries from the ntries from the
ntries from the RRRRedial
edial edial
edial LLLList
istist
ist
- On Your
On YourOn Your
On Your Main
MainMain
Main Eclipse Handset
Eclipse HandsetEclipse Handset
Eclipse Handset
1. From the home screen, press
R.
2. Press
M
.
3. Press +/- to DELETE ALL
DELETE ALL DELETE ALL
DELETE ALL and then press
M
to select.
• CONFIRM
CONFIRMCONFIRM
CONFIRM????
is displayed.
4. Press
M
again to confirm.
•
A confirmation tone played.
Page 49

47
- On Your Additional Handset
On Your Additional Handset On Your Additional Handset
On Your Additional Handset
1. From the home screen, press R.
2. Press
M
.
3. Press
+\-
to DELETE ALL
DELETE ALL DELETE ALL
DELETE ALL and then press
M
to select.
• DELET
DELETDELET
DELETE?
E?E?
E?
is displayed.
4. Press
M
again to confirm.
•
A confirmation tone played.
Page 50

48
8888 CLOCK
CLOCKCLOCK
CLOCK AND ALARM
AND ALARM AND ALARM
AND ALARM SETTINGS
SETTINGSSETTINGS
SETTINGS
8.1
8.18.1
8.1 Date and
Date and Date and
Date and TTTTime
ime ime
ime SSSSettings
ettingsettings
ettings
If you have subscribed to the Calling Line Identification service, the time
and date settings will be automatically updated by the network when you
receive an incoming call, but you may still need to set the correct year.
You can also set the date and time manually.
- On Your
On YourOn Your
On Your Main
MainMain
Main Eclipse Handset
Eclipse HandsetEclipse Handset
Eclipse Handset
1. From the home screen, press
M
.
2. Press
+/- to CLOCK&ALARM
CLOCK&ALARM CLOCK&ALARM
CLOCK&ALARM and the press
M
to select.
3. Press
M
again to select DA
DADA
DATE &
TE & TE &
TE & TIME
TIMETIME
TIME.
•
The last stored date is displayed, with the third digit of the year
flashing.
4.
Enter the current date and press
M
to confirm.
Enter 03 May 2012 as [1], [2], [0], [5], [0], [3].
If you make a mistake, press
m
to delete the last digit entered.
5. Enter the current time and press
M
to confirm. The default time
format is 24 HOURS
24 HOURS24 HOURS
24 HOURS.
(To change time format, see Change the
Change the Change the
Change the DDDDate
ate ate
ate
FFFFormat
ormatormat
ormat on page 51.)
For 24-hour format, enter 1:30pm as [1], [3], [3], [0].
For 12-hour format, enter the time and then press
+
to select
am
am am
am , or press
-
to select pm
pmpm
pm.
If you make a mistake, press
m
to delete the last digit entered.
•
A confirmation tone is played.
6. Press
O
to return to standby mode.
Page 51

49
- On Your Additional Handset
On Your Additional HandsetOn Your Additional Handset
On Your Additional Handset
1. From the home screen, press
M
.
2. Press
+\-
to CLOCK&ALARM
CLOCK&ALARM CLOCK&ALARM
CLOCK&ALARM and the press
M
to select.
3. Press
M
again to select DATE/
DATE/DATE/
DATE/TIME
TIMETIME
TIME.
•
The last stored date is displayed, with the third digit of the year
flashing.
4.
Enter the current date and press
M
to confirm.
Enter 03 May 2012 as [1], [2], [0], [5], [0], [3].
If you make a mistake, press
m
to delete the last digit entered.
5. Enter the current time and press
M
to confirm. The default time
format is 24 HOURS
24 HOURS24 HOURS
24 HOURS.
(To change time format, see
Change the Time
Format
on page 50.)
For 24-hour format, enter 1:30pm as [1], [3], [3], [0].
For 12-hour format, enter the time and then press
+
to select
AM
AMAM
AM
, or
-
to select
PM
PMPM
PM
.
If you make a mistake, press
m
to delete the last digit entered.
•
A confirmation tone is played.
6. Press O to return to standby mode.
Page 52

50
8.1.1
8.1.18.1.1
8.1.1 Change the
Change the Change the
Change the TTTTime
ime ime
ime FFFFormat
ormatormat
ormat
The time can be displayed either as 12-hour or 24-hour. The default
setting is 24 HOURS
24 HOURS24 HOURS
24 HOURS.
- On Your
On YourOn Your
On Your Main
MainMain
Main Eclipse Handset
Eclipse HandsetEclipse Handset
Eclipse Handset
1. From the home screen, press
M
.
2. Press
+/- to CLOCK&ALARM
CLOCK&ALARM CLOCK&ALARM
CLOCK&ALARM and then press
M
to select.
3. Press
+/- to SET FORMAT
SET FORMAT SET FORMAT
SET FORMAT and then press
M
to select.
4. Press
M
again to select TIME FORMAT
TIME FORMATTIME FORMAT
TIME FORMAT.
•
The current setting is displayed.
5. Press +/- to select 12 HOURS
12 HOURS12 HOURS
12 HOURS or 24 HOURS
24 HOURS24 HOURS
24 HOURS and then press
M
to confirm.
•
A confirmation tone is played.
6. Press
O
to return to standby mode.
- On Your Additional Handset
On Your Additional HandsetOn Your Additional Handset
On Your Additional Handset
1. From the home screen, press
M
.
2. Press
+\-
to CLOCK&ALARM
CLOCK&ALARM CLOCK&ALARM
CLOCK&ALARM and then press
M
to select.
3. Press
+\-
to SET FORMAT
SET FORMAT SET FORMAT
SET FORMAT and then press
M
to select.
4. Press
M
again to select TIME FORMAT
TIME FORMATTIME FORMAT
TIME FORMAT.
•
The current setting is displayed.
5. Press
+\-
to select 12 HOURS
12 HOURS12 HOURS
12 HOURS or 24 HOURS
24 HOURS24 HOURS
24 HOURS and then press
M
to confirm.
•
A confirmation tone is played.
6. Press O to return to standby mode.
Page 53

51
8.1.2
8.1.28.1.2
8.1.2 Change the
Change the Change the
Change the DDDDate
ate ate
ate FFFFormat
ormatormat
ormat
The date can be displayed either as Month/Day or Day/Month. The
default setting is DD/MM
DD/MMDD/MM
DD/MM.
- On Your
On YourOn Your
On Your Main
MainMain
Main Eclipse Handset
Eclipse HandsetEclipse Handset
Eclipse Handset
1. From the home screen, press
M
.
2. Press
+/- to CLOCK&ALARM
CLOCK&ALARM CLOCK&ALARM
CLOCK&ALARM and then press
M
to select.
3. Press
+/- to SET FORMAT
SET FORMAT SET FORMAT
SET FORMAT and then press
M
to select.
4. Press
+/- to DATE FORMAT
DATE FORMAT DATE FORMAT
DATE FORMAT and then press
M
to select.
•
The current setting is displayed.
5. Press +/- to select DD
DDDD
DD////MM
MMMM
MM or MM
MMMM
MM////DD
DDDD
DD and then press
M
to confirm.
•
A confirmation tone is played.
6. Press
O
to return to standby mode.
- On Your
On Your On Your
On Your Additional
AdditionalAdditional
Additional Handset
HandsetHandset
Handset
1. From the home screen, press
M
.
2. Press
+\-
to CLOCK&ALARM
CLOCK&ALARMCLOCK&ALARM
CLOCK&ALARM and then press
M
to select.
3. Press
+\-
to SET FORMAT
SET FORMAT SET FORMAT
SET FORMAT and then press
M
to select.
4. Press
+\-
to DATE FORMAT
DATE FORMAT DATE FORMAT
DATE FORMAT and then press
M
to select.
•
The current setting is displayed.
5. Press
+\-
to select DD/MM
DD/MM DD/MM
DD/MM or MM/DD
MM/DDMM/DD
MM/DD and then press
M
to confirm.
•
A confirmation tone is played.
6. Press O to return to standby mode.
Page 54

52
8.2
8.28.2
8.2 Alarm
Alarm Alarm
Alarm SSSSettings
ettingsettings
ettings
An alarm can be set on a handset, to sound at a set time only once or
repeated each day.
When an alarm is set, the alarm icon is shown on the handset display.
When the alarm time is reached, the handset will flash ----ALARM
ALARMALARM
ALARM---- on the
display and sound an alarm for 1 minute, at the same volume setting as
the handset ringer. If the ringer is off, it will ring at volume setting 1.
When the alarm rings, you can press any key on the handset to stop the
ringing, even if the keylock is activated.
- On Your
On YourOn Your
On Your Main
MainMain
Main Eclipse Handset
Eclipse HandsetEclipse Handset
Eclipse Handset
1. From the home screen, press
M
.
2. Press
+/-to CLOCK&ALARM
CLOCK&ALARM CLOCK&ALARM
CLOCK&ALARM and then press
M
to select.
3. Press
+/- to ALARM
ALARM ALARM
ALARM and then press
M
to select.
4. Press
+/- to an alarm option.
OFF:
OFF: OFF:
OFF: Turn alarm off
ONCE
ONCEONCE
ONCE:
: :
: The alarm sounds once at the set time.
DAILY:
DAILY:DAILY:
DAILY: The alarm sounds daily at the set time.
5. Press
M
to select the option.
6. If ONCE
ONCEONCE
ONCE or DDDDAILY
AILY AILY
AILY is selected, enter the desired hour and minute.
Press + to select am
amam
am,
or press- to select pm
pmpm
pm if the time is
in 12-hour format.
7. Press
M
to confirm the alarm setting.
•
A confirmation tone is played.
8. Press
O
to return to standby mode.
Page 55

53
- On Your Additional Handset
On Your Additional HandsetOn Your Additional Handset
On Your Additional Handset
1. From the home screen, press
M
.
2. Press
+\-
to CLOCK&ALARM
CLOCK&ALARM CLOCK&ALARM
CLOCK&ALARM and then press
M
to select.
3. Press
+\-
to ALARM
ALARM ALARM
ALARM and then press
M
to select.
4. Press
+\-
to an alarm option.
OFF:
OFF: OFF:
OFF: Turn alarm off
ON ONCE:
ON ONCE: ON ONCE:
ON ONCE: The alarm sounds once at the set time.
ON DAILY:
ON DAILY: ON DAILY:
ON DAILY: The alarm sounds daily at the set time.
5. Press
M
to select the option.
6. If ON ONC E
ON ONC E ON ONC E
ON ONC E or ON DAILY
ON DAILY ON DAILY
ON DAILY is selected, enter the desired hour and
minute.
Press
+
to select AM
AMAM
AM, or press
-
to select PM
PMPM
PM if the time is
in 12-hour format.
7. Press
M
to confirm the alarm setting.
•
A confirmation tone is played.
8. Press O to return to standby mode.
8.2.1
8.2.18.2.1
8.2.1 Set the
Set the Set the
Set the Alarm T
Alarm TAlarm T
Alarm Tone
oneone
one
You can select from 3 alarm melodies.
- On Your
On YourOn Your
On Your Mai
MaiMai
Mainnnn Eclipse Handset
Eclipse HandsetEclipse Handset
Eclipse Handset
1. From the home screen, press
M
.
2. Press
+/-to CLOCK&ALARM
CLOCK&ALARM CLOCK&ALARM
CLOCK&ALARM and then press
M
to select.
3. Press +/- to ALARM
ALARM ALARM
ALARM MELODY
MELODYMELODY
MELODY and then press
M
to select.
4. Press +/- to select the desired alarm tone (each tone will
sound as it is selected) and then press
M
to confirm.
•
A confirmation tone is played.
5. Press
O
to return to standby mode.
Page 56

54
- On Your Additional Handset
On Your Additional HandsetOn Your Additional Handset
On Your Additional Handset
1. From the home screen, press
M
.
2. Press
+\-
to CLOCK&ALARM
CLOCK&ALARM CLOCK&ALARM
CLOCK&ALARM and then press
M
to select.
3. Press
+\-
to ALARM
ALARM ALARM
ALARM TONE
TONETONE
TONE and then press
M
to select.
4. Press
+\-
to select the desired alarm tone (each tone will
sound as it is selected) and then press
M
to confirm.
•
A confirmation tone is played.
5. Press O to return to standby mode.
Page 57

55
9999 PPPPERSONAL
ERSONAL ERSONAL
ERSONAL SETTINGS
SETTINGSSETTINGS
SETTINGS
Your phone comes with a selection of settings that you can change to
personalise your phone to the way you like it to work.
9.1
9.19.1
9.1 Set the
Set the Set the
Set the RRRRing
ing ing
ing VVVVolume
olumeolume
olume
You can set the handset ringer volume from Level 1 to Level 4 or turn the
ringer off.
- On Your
On YourOn Your
On Your Main
MainMain
Main Eclipse Handset
Eclipse HandsetEclipse Handset
Eclipse Handset
1. From the home screen, press
M
.
2. Press
+/- to HANDSET OPTS
HANDSET OPTSHANDSET OPTS
HANDSET OPTS and then press
M
to select.
3. Press
+/- to RINGER&TONES
RINGER&TONESRINGER&TONES
RINGER&TONES and then press
M
to select.
Press
M
again to select RING
RING RING
RING VVVVOLUME
OLUMEOLUME
OLUME.
4. Press
+/-to select the desired setting (each volume level
will play as it is selected) and then press
M
to confirm.
•
A confirmation tone is played.
5. Press
O
to return to standby mode.
- On Your Additional Handset
On Your Additional HandsetOn Your Additional Handset
On Your Additional Handset
1. From the home screen, press
M
.
2. Press
+\-
to PERSONAL SET
PERSONAL SETPERSONAL SET
PERSONAL SET and then press
M
to select.
3. Press
+\-
to HANDSET TONE
HANDSET TONEHANDSET TONE
HANDSET TONE and then press
M
to select.
4. Press
M
again to select RING VOLUME
RING VOLUMERING VOLUME
RING VOLUME.
5. Press
+\-
to select the desired setting (each volume level
will play as it is selected) and then press
M
to confirm.
•
A confirmation tone is played.
6. Press O to return to standby mode.
NNNNote
oteote
ote:
: :
: Press and hold
# to switch the ringer On
OnOn
On and Off
OffOff
Off when the
handset is in standby mode. The ringer off icon displays on the screen
when ringer off feature is activated.
Page 58

56
9.2
9.29.2
9.2 Set the
Set the Set the
Set the RRRRing
ing ing
ing Tone
ToneTone
Tone
You can select from 10 ringer melodies for both internal and external calls.
- On Your
On YourOn Your
On Your Main
MainMain
Main Eclipse Handset
Eclipse HandsetEclipse Handset
Eclipse Handset
1. From the home screen, press
M
.
2. Press
+/- to H
HH
HANDSET OPTS
ANDSET OPTSANDSET OPTS
ANDSET OPTS and then press
M
to select.
3. Press
+/- to RINGER&TONES
RINGER&TONES RINGER&TONES
RINGER&TONES and then press
M
to select.
4. Press
+/- to RING
RINGRING
RING TONE
TONE TONE
TONE and then press
M
to select.
5. Press
+/- to select the desired ringer melody
from 1 to 10
(each melody will play as it is selected) and then press
M
to confirm.
•
A confirmation tone is played.
6. Press
O
to return to standby mode.
- On Your Additional Handset
On Your Additional HandsetOn Your Additional Handset
On Your Additional Handset
1. From the home screen, press
M
.
2. Press
+\-
to PERSONAL SET
PERSONAL SETPERSONAL SET
PERSONAL SET and then press
M
to select.
3. Press
+\-
to HANDSET TONE
HANDSET TONEHANDSET TONE
HANDSET TONE and then press
M
to select.
4. Press
+\-
to RING TONES
RING TONESRING TONES
RING TONES and then press
M
to select.
5. Press
+\-
to select the desired melody from 1 to 10 (each
melody will play as it is selected) and then press
M
to confirm.
•
A confirmation tone is played.
6. Press O to return to standby mode.
Page 59

57
9.3
9.39.3
9.3 Set the
Set the Set the
Set the KKKKey
ey ey
ey Tone
ToneTone
Tone
The handset emits a tone with each key press. You can choose to turn
this tone on or off. The default setting is ON
ONON
ON.
- On Your
On YourOn Your
On Your Main
MainMain
Main Eclipse Handset
Eclipse HandsetEclipse Handset
Eclipse Handset
1. From the home screen, press
M
.
2. Press
+/- to HANDSET OPTS
HANDSET OPTSHANDSET OPTS
HANDSET OPTS and then press
M
to select.
3. Press
+/- to RINGER&TONE
RINGER&TONERINGER&TONE
RINGER&TONES
S S
S and then press
M
to select.
4. Press
+/- to KEY TONE
KEY TONE KEY TONE
KEY TONE and then press
M
to select.
5. Press
+/- to select ON
ON ON
ON or OFF
OFF OFF
OFF and then press
M
to confirm.
•
A confirmation tone is played.
6. Press
O
to return to standby mode.
- On Your Additional Handset
On Your Additional HandsetOn Your Additional Handset
On Your Additional Handset
1. From the home screen, press
M
.
2. Press
+\-
to PERSONAL SET
PERSONAL SETPERSONAL SET
PERSONAL SET and then press
M
to select.
3. Press
+\-
to HANDSET TONE
HANDSET TONEHANDSET TONE
HANDSET TONE and then press
M
to select.
4. Press
+\-
to KEY BEEP
KEY BEEPKEY BEEP
KEY BEEP and then press
M
to select.
5. Press
+\-
to select ON
ON ON
ON or OFF
OFF OFF
OFF and then press
M
to confirm.
•
A confirmation tone is played.
6. Press O to return to standby mode.
Page 60

58
9.4
9.49.4
9.4 Rename the
Rename the Rename the
Rename the HHHHandset
andsetandset
andset
You can personalise your handset by changing the name shown on the
handset in standby mode.
- On Your
On YourOn Your
On Your Main
MainMain
Main Eclipse Handset
Eclipse HandsetEclipse Handset
Eclipse Handset
1. From the home screen, press
M
.
2. Press
+/- to HANDSET OPTS
HANDSET OPTSHANDSET OPTS
HANDSET OPTS and then press
M
.
3.
Press
M
to select HANDSET NAME
HANDSET NAMEHANDSET NAME
HANDSET NAME.
•
The current handset name is displayed.
4. Press
m
to delete the letters one by one and enter the new name
(maximum 10 characters).
5. Press
M
to confirm.
•
A confirmation tone is played.
6. Press
O
to return to standby mode.
- On Your Addi
On Your AddiOn Your Addi
On Your Additional Handset
tional Handsettional Handset
tional Handset
1. From the home screen, press
M
.
2. Press
+\-
to PERSONAL SET
PERSONAL SETPERSONAL SET
PERSONAL SET and then press
M
to select....
3.
Press
M
to select HANDSET NAME
HANDSET NAMEHANDSET NAME
HANDSET NAME.
•
The current handset name is displayed.
4. Press m to delete the letters one by one and enter the new name
(maximum 10 characters).
5. Press
M
to confirm.
•
A confirmation tone is played.
6. Press O to return to standby mode.
Page 61

59
9.5
9.59.5
9.5 Set the
Set the Set the
Set the DDDDisplay
isplay isplay
isplay LLLLanguage
anguageanguage
anguage
You can change the display language on your handset. The default setting
is ENGLISH
ENGLISHENGLISH
ENGLISH.
- On Your
On YourOn Your
On Your Main
MainMain
Main Eclipse Handset
Eclipse HandsetEclipse Handset
Eclipse Handset
1. From the home screen, press
M
.
2. Press
+/- to HANDSET OPTS
HANDSET OPTSHANDSET OPTS
HANDSET OPTS and then press
M
to select.
3. Press
+/- to LANGUAGE
LANGUAGE LANGUAGE
LANGUAGE and then press
M
to select.
4. Press
+/- to select your preferred language and then
press
M
to confirm.
•
A confirmation tone is played.
5. Press
O
to return to standby mode.
- On Yo
On YoOn Yo
On Your Additional Handset
ur Additional Handsetur Additional Handset
ur Additional Handset
1. From the home screen, press
M
.
2. Press
+\-
to PERSONAL SET
PERSONAL SETPERSONAL SET
PERSONAL SET and then press
M
to select.
3. Press
+\-
to LANGUAGE
LANGUAGE LANGUAGE
LANGUAGE and then press
M
to select.
4. Press
+\-
to select your preferred language and then
press
M
to confirm.
•
A confirmation tone is played.
5. Press O to return to standby mode.
Note:
Note:Note:
Note: Once the display language is set, the handset will switch to display
in the selected language immediately.
Page 62

60
9.6
9.69.6
9.6 Set Auto Hang
Set Auto HangSet Auto Hang
Set Auto Hang----up
upup
up
This function enables you to end a call automatically by simply placing
the handset back on the base unit (main Eclipse handset) or charging pod
(additional handsets). By default, the Auto Hang
Auto HangAuto Hang
Auto Hang----up
up up
up feature is ON
ONON
ON, but it
can be turned off.
- On Your
On YourOn Your
On Your Main Eclipse Handset
Main Eclipse HandsetMain Eclipse Handset
Main Eclipse Handset
1. From the home screen, press
M
.
2. Press
+/- to HANDSET OPTS
HANDSET OPTSHANDSET OPTS
HANDSET OPTS and then press
M
to select.
3. Press
+/- to AUTO HANG
AUTO HANGAUTO HANG
AUTO HANG----UP
UP UP
UP and then press
M
to select.
4. Press
+/- to select ON
ON ON
ON or OFF
OFF OFF
OFF and then press
M
to confirm.
•
A confirmation tone is played.
5. Press
O
to return to standby mode.
- On Your Additional Handset
On Your Additional HandsetOn Your Additional Handset
On Your Additional Handset
1. From the home screen, press
M
.
2. Press
+\-
to PERSONAL SET
PERSONAL SET PERSONAL SET
PERSONAL SET and then press
M
to select.
3. Press
+\-
to AUTO HANG
AUTO HANGAUTO HANG
AUTO HANG----UP
UP UP
UP and then press
M
to select.
4. Press
+\-
to select ON
ON ON
ON or OFF
OFF OFF
OFF and then press
M
to confirm.
•
A confirmation tone is played.
5. Press O to return to standby mode.
Page 63

61
10
1010
10 SETTINGS
SETTINGSSETTINGS
SETTINGS
10.1
10.110.1
10.1 Handset
HandsetHandset
Handset Registration
RegistrationRegistration
Registration
IMPORTANT:
IMPORTANT:IMPORTANT:
IMPORTANT: When you purchase your phone system, all handsets are
already registered to your base, so you do not need to register them.
Handset registration is only necessary when you buy extra handsets or if
a handset has become faulty.
You can register up to four handsets to one base station, with each
handset’s number (1 to 4) shown on its display.
Note:
Note:Note:
Note: Each handset can only be registered to one base.
You need to enter the Master PIN before you can register or deregister
handsets. The default Master PIN is 0000
00000000
0000.
10.2
10.210.2
10.2 Register A
Register ARegister A
Register Additional
dditional dditional
dditional HHHHandsets
andsetsandsets
andsets
- For a
For aFor a
For a Main
MainMain
Main Eclipse
Eclipse Eclipse
Eclipse Type
Type Type
Type Handset
HandsetHandset
Handset
1. Press and hold the
key under the base unit for approximately 5 seconds.
•
The message indicator on the base will flash for up to 1 minute,
while it is in registration mode.
2. On the handset, press
M
.
3. Press
+/- to SETTINGS
SETTINGSSETTINGS
SETTINGS and then press
M
to select.
4. Press
+/- to REGISTRATION
REGISTRATIONREGISTRATION
REGISTRATION and then press
M
to select.
5. Enter the Master PIN and then press
M
to confirm.
- For an
For anFor an
For an Additional
Additional Additional
Additional Type
Type Type
Type Handset
HandsetHandset
Handset
1. Press and hold the
key under the main Eclipse base unit for
approximately 5 seconds.
•
The message indicator on the base will flash for up to 1 minute,
while it is in registration mode.
2. On the handset, press
M
.
3. Press
+\-
to ADVANCED SET
ADVANCED SETADVANCED SET
ADVANCED SET and then press
M
to select.
4. Press
+\-
to REGISTRATION
REGISTRATIONREGISTRATION
REGISTRATION and then press
M
to select.
5. Enter the Master PIN and then press
M
to confirm.
Page 64

62
Note:
Note:Note:
Note: After entering the Master PIN on either the Main Eclipse Handset
or the additional handset,
• WAITING
WAITINGWAITING
WAITING
flashes on the screen.
•
A confirmation tone is played to indicate successful registration,
and the handset returns to standby mode, with its handset
number displayed.
•
If no base is found with the entered PIN, error tones are played to
indicate failed registration and
PLS REG H/S
PLS REG H/SPLS REG H/S
PLS REG H/S
is displayed on the
screen. You will need to repeat from step 1 above.
•
During steps 2-5, if no key is pressed on the handset within 10
seconds, the registration
procedure will be aborted. If this happens,
repeat from step 1 above.
10.3
10.310.3
10.3 De
DeDe
Deregister your
register your register your
register your HHHHandset
andsetandset
andset
You can deregister the handset you are using, or any other handset
registered to the same base. The default Master PIN is 0000
00000000
0000.
- Using
UsingUsing
Using Your
YourYour
Your Main
MainMain
Main Eclipse Handset
Eclipse HandsetEclipse Handset
Eclipse Handset
1. From the home screen, press
M
.
2. Press +/- to SETTINGS
SETTINGSSETTINGS
SETTINGS and then press
M
to select.
3. Press
+/- to DEREGISTER
DEREGISTERDEREGISTER
DEREGISTER and then press
M
to select.
4. Enter the Master PIN and then press
M
to confirm.
5. Press
+/- to select the handset number you want to
deregister and then press
M
to confirm, or press
O
to cancel
the deregistration procedure.
- Using an
Using anUsing an
Using an Additional Handset
Additional HandsetAdditional Handset
Additional Handset
1. From the home screen, press
M
.
2. Press
+\-
to ADVANCED SET
ADVANCED SETADVANCED SET
ADVANCED SET and then press
M
to select.
3. Press
+\-
to UN
UNUN
UNREGISTER
REGISTERREGISTER
REGISTER and then press
M
to select.
4. Enter the Master PIN and then press
M
to confirm.
5. Press
+\-
to select the handset number you want to
un-register and then press
M
to confirm, or press O to cancel
the un-registration procedure.
Page 65

63
Note:
Note:Note:
Note: After confirming the handset you want to remove on either the
Main Eclipse Handset or the additional handset,
•
A confirmation tone is played to indicate successful
deregistration.
• PLS REG H/S
PLS REG H/SPLS REG H/S
PLS REG H/S
is displayed on the home screen of the
unregistered handset.
•
During steps 1-5, if no handset key is pressed within 10
seconds, the procedure will abort and the handset returns to
standby mode.
10.4
10.410.4
10.4 Change
Change Change
Change the
the the
the Master
MasterMaster
Master PIN
PINPIN
PIN
The Master PIN is used for registration/deregistration of handsets and
for accessing the answering machine remotely. The default Master PIN
number is 0000
00000000
0000. The maximum length of the Master PIN is 8 digits.
Note:
Note:Note:
Note: If you forget your PIN code, you can reset it to its default 0000
00000000
0000
using a handset Reset
ResetReset
Reset.
- On Your
On YourOn Your
On Your Main
MainMain
Main Eclipse Handset
Eclipse HandsetEclipse Handset
Eclipse Handset
1. From the home screen, press
M
.
2. Press +/- to SETTINGS
SETTINGSSETTINGS
SETTINGS and then press
M
to select.
3. Press
M
to select CHANGE PIN
CHANGE PINCHANGE PIN
CHANGE PIN.
4. Enter the current Master PIN and then press
M
to confirm.
•
The PIN will be shown as asterisks (*) on the screen as you
enter them.
5. Enter the new PIN and then press
M
to confirm.
•
A confirmation tone is played.
6. Press
O
to return to the home screen.
Page 66

64
- On Your Additional Handset
On Your Additional HandsetOn Your Additional Handset
On Your Additional Handset
1. From the home screen, press
M
.
2. Press
+\-
to ADVANCED SET
ADVANCED SETADVANCED SET
ADVANCED SET and then press
M
to select.
3. Press
M
to select CHANGE PIN
CHANGE PINCHANGE PIN
CHANGE PIN.
4. Enter the current Master PIN and then press
M
to confirm.
•
The PIN will be shown as asterisks (*) on the screen as you
enter them.
5. Enter the new PIN and then press
M
to confirm.
•
A confirmation tone is played.
6. Press O to return to the home screen.
10.5
10.510.5
10.5 Set
Set Set
Set the
the the
the First Ring
First RingFirst Ring
First Ring ((((ffffor Additiona
or Additionaor Additiona
or Additional Handsets Only)
l Handsets Only)l Handsets Only)
l Handsets Only)
If you have subscribed to Caller Line Identification service and do not
wish to hear the phone ring before the caller identification is displayed,
you can set the FIRST RING
FIRST RINGFIRST RING
FIRST RING to OFF
OFFOFF
OFF.
1. From the home screen of your additional handset, press
M
.
2. Press
+\-
to ADVANCED SET
ADVANCED SETADVANCED SET
ADVANCED SET and then press
M
to select.
3. Press
+\-
to FIRST RING
FIRST RINGFIRST RING
FIRST RING and then press
M
to select.
4. Press
+\-
to select ON
ONON
ON or OFF
OFFOFF
OFF and then press
M
to confirm.
•
A confirmation tone is played.
5. Press O to return to standby mode.
Page 67

65
10.6
10.610.6
10.6 Change
ChangeChange
Change the
thethe
the RRRRecall
ecall ecall
ecall TTTTime
imeime
ime
You may need to press
T
(main Eclipse handset) or F (additional
handsets) to send a Flash signal (also called Recall or Timed Break Recall)
if you are connected to a PBX or using certain network services. You
should normally leave the Recall Time at its default setting, Short
Short Short
Short
(100ms)
(100ms)(100ms)
(100ms), as this is the standard recall required in the UK telephone
network. However, it can be changed to Medium (270ms) or Long
(600ms) if your telephone is connected to a PBX that requires a different
recall time.
- On Your
On YourOn Your
On Your Main
MainMain
Main Eclip
EclipEclip
Eclipse Handset
se Handsetse Handset
se Handset
1. From the home screen, press
M
.
2. Press
+/- to SETTINGS
SETTINGSSETTINGS
SETTINGS and then press
M
to select.
3. Press
+/-to RECALL TIME
RECALL TIMERECALL TIME
RECALL TIME and then press
M
to select.
4. Press
+/- to select SHORT
SHORTSHORT
SHORT, MEDIUM
MEDIUMMEDIUM
MEDIUM or LONG
LONGLONG
LONG and then
press
M
to confirm.
•
A confirmation tone is played.
5. Press
O
to return to standby mode.
- On Your Additional Handset
On Your Additional HandsetOn Your Additional Handset
On Your Additional Handset
1. From the home screen, press
M
.
2. Press
+\-
to ADVANCED SET
ADVANCED SETADVANCED SET
ADVANCED SET and then press
M
to select.
3. Press
+\-
to RECALL TIME
RECALL TIMERECALL TIME
RECALL TIME and then press
M
(additional
handsets) to select.
4. Press
+\-
to select SHORT
SHORTSHORT
SHORT, MEDIUM
MEDIUMMEDIUM
MEDIUM or LONG
LONGLONG
LONG and then
press
M
to confirm.
•
A confirmation tone is played.
5. Press O to return to standby mode.
Page 68

66
10.7
10.710.7
10.7 Reset
Reset Reset
Reset the
the the
the UUUUnit
nitnit
nit
You can reset your phone to its default settings with this feature.
Note:
Note:Note:
Note: Upon reset, all your personal settings, call log and redial list entries
will be deleted and the phone will return to its default settings, including
the Master PIN. However, your phonebook will remain unchanged after
reset, and any recorded messages will remain unchanged, while all other
settings will be reset.
- On Your
On YourOn Your
On Your Main
MainMain
Main Eclipse Handset
Eclipse HandsetEclipse Handset
Eclipse Handset
1. From the home screen, press
M
.
2. Press +/- to SETTINGS
SETTINGSSETTINGS
SETTINGS and then press
M
to select.
3. Press
+/- to select RESET
RESETRESET
RESET and then press
M
to select.
4. Press
M
again to confirm.
•
A confirmation tone is played and the unit is reset to its default
settings.
- On Your Additional Handset
On Your Additional HandsetOn Your Additional Handset
On Your Additional Handset
1. From the home screen, press
M
.
2. Press
+\-
to ADVANCED SET
ADVANCED SETADVANCED SET
ADVANCED SET and then press
M
to select.
3. Press
+\-
to select RESET
RESETRESET
RESET and then press
M
to select.
4. Press
M
again to confirm.
•
A confirmation tone is played and the unit is reset to its default
settings.
Page 69

67
11
1111
11 ANSWERING MACHINE
ANSWERING MACHINEANSWERING MACHINE
ANSWERING MACHINE
Your phone includes a telephone answering machine that records
unanswered calls when it is on.
The answering machine can store up to 59 messages within the
maximum recording time of approximately 30 minutes and each message
can be up to 3 minutes long.
When the answering machine is on, calls are answered after the set RING
RING RING
RING
DELAY
DELAYDELAY
DELAY.
If you have selected RECORD MSGS
RECORD MSGSRECORD MSGS
RECORD MSGS (main Eclipse handset) or
ANSW.&RECORD
ANSW.&RECORDANSW.&RECORD
ANSW.&RECORD (additional handsets), then the caller can leave you a
message after hearing your announcement.
If you have selected ANSWER ONLY
ANSWER ONLYANSWER ONLY
ANSWER ONLY mode, the caller can only listen to
your announcement but cannot leave you a message.
If the answering machine memory is full, the answering machine LED
on the base flashes rapidly, the answering machine icon on the Main
Eclipse Handset flashes slowly, and the ANSWER ONLY
ANSWER ONLYANSWER ONLY
ANSWER ONLY announcement
will be played to new callers. You will have to delete some messages
before any new ones can be recorded.
11.1
11.111.1
11.1 Turning the
Turning the Turning the
Turning the AAAAnswering
nswering nswering
nswering MMMMachine
achineachine
achine OOOOn/
n/n/
n/OOOOff
ffff
ff
- On Your
On YourOn Your
On Your Main
MainMain
Main Eclipse Ha
Eclipse HaEclipse Ha
Eclipse Handset
ndsetndset
ndset
1. From the home screen, press
M
.
2. Press
M
again to select ANS. SYSTEM
ANS. SYSTEMANS. SYSTEM
ANS. SYSTEM.
3. Press
+/- to ANS. ON/OFF
ANS. ON/OFFANS. ON/OFF
ANS. ON/OFF and then press
M
to select.
4. Press
+/- to select ON
ON ON
ON or OFF
OFFOFF
OFF and then press
M
to confirm.
•
A confirmation tone is played.
5. Press
O
to return to standby mode.
- On
On On
On Your Additional Handset
Your Additional HandsetYour Additional Handset
Your Additional Handset
1. From the home screen, press
M
.
2. Press
+\-
to ANSW MACHINE
ANSW MACHINEANSW MACHINE
ANSW MACHINE and then press
M
to select.
3. Press
+\-
to ANSW. ON/OFF
ANSW. ON/OFF ANSW. ON/OFF
ANSW. ON/OFF and then press
M
to select.
4. Press
+\-
to select ON
ON ON
ON or OFF
OFFOFF
OFF and then press
M
to confirm.
•
A confirmation tone is played.
5. Press O to return to standby mode.
Page 70

68
Note:
Note:Note:
Note: If the answering machine is OFF
OFF OFF
OFF and the Master PIN is still set at its
default 0000
00000000
0000, the answering machine will not answer any incoming calls.
However, if the Master PIN has been changed and Remote Access is
activated, it will answer incoming calls after 14 rings to allow remote
access, and the ANSWER ONLY
ANSWER ONLYANSWER ONLY
ANSWER ONLY announcement will play.
(See
Remote
Remote Remote
Remote
Access
AccessAccess
Access
on page 78.)
11.2
11.211.2
11.2 Answer
Answer Answer
Answer MMMMode
odeode
ode
The phone comes with two pre-recorded announcements for the
respective answer modes: ANSWER ONLY
ANSWER ONLYANSWER ONLY
ANSWER ONLY and RECORD MSGS
RECORD MSGSRECORD MSGS
RECORD MSGS on the Main
Eclipse Handset or ANSWER ONLY
ANSWER ONLYANSWER ONLY
ANSWER ONLY and ANSW.&RECORD
ANSW.&RECORDANSW.&RECORD
ANSW.&RECORD on the additional
handsets.
By default, the answer mode is RECORD MSGS
RECORD MSGSRECORD MSGS
RECORD MSGS on the Main Eclipse
Handset or ANSW.&
ANSW.&ANSW.&
ANSW.&RECORD
RECORDRECORD
RECORD on the additional handsets, which allows a
caller to leave a message on the answering machine after hearing the
announcement. This can be changed to ANSWER ONLY
ANSWER ONLYANSWER ONLY
ANSWER ONLY mode, which does
not allow callers to leave any messages on the answering machine after
hearing the announcement.
11.2.1
11.2.111.2.1
11.2.1 Set
Set Set
Set AAAAnswer
nswer nswer
nswer MMMMode
odeode
ode
- On Your
On YourOn Your
On Your Main
MainMain
Main Eclipse Handset
Eclipse HandsetEclipse Handset
Eclipse Handset
1. From the home screen, press
M
.
2. Press
M
again to select ANS. SYSTEM
ANS. SYSTEMANS. SYSTEM
ANS. SYSTEM.
3. Press
+/- to ANSWER MODE
ANSWER MODEANSWER MODE
ANSWER MODE and then press
M
to select.
4. Press
+/- to select ANSWER ONLY
ANSWER ONLYANSWER ONLY
ANSWER ONLY or RECORD MSGS
RECORD MSGSRECORD MSGS
RECORD MSGS and
then press
M
to confirm.
•
A confirmation tone is played.
5. Press
O
to return to standby mode.
- On Your Additional Handset
On Your Additional HandsetOn Your Additional Handset
On Your Additional Handset
1. From the home screen, press
M
.
2. Press
+\-
to ANSW MACHINE
ANSW MACHINEANSW MACHINE
ANSW MACHINE and then press
M
to select.
3. Press
+\-
to ANSWER MODE
ANSWER MODEANSWER MODE
ANSWER MODE and then press
M
to select.
4. Press
+\-
to select ANSWER ONLY
ANSWER ONLYANSWER ONLY
ANSWER ONLY or ANSW.&RECORD
ANSW.&RECORDANSW.&RECORD
ANSW.&RECORD
and then press
M
to confirm.
•
A confirmation tone is played.
5. Press
O
to return to standby mode.
Page 71

69
11.3
11.311.3
11.3 Answering
Answering Answering
Answering MMMMachine
achine achine
achine SSSSettings
ettingsettings
ettings
11.3.1
11.3.111.3.1
11.3.1 Set
Set Set
Set the
the the
the RRRRing
ing ing
ing DDDDelay
elayelay
elay
You can select the number of rings before the answering machine
answers a call and starts playing the announcement.
You can set the delay from 2222 to 7
7 7
7 RINGS
RINGS RINGS
RINGS or TOLL SAVER
TOLL SAVERTOLL SAVER
TOLL SAVER on the Main
Eclipse Handset or ECONOMY
ECONOMYECONOMY
ECONOMY on the additional handset.
IMPORTANT:
IMPORTANT:IMPORTANT:
IMPORTANT: If your network voice messaging system (e.g. the 1571
service) is enabled, you must set your RING DELAY
RING DELAYRING DELAY
RING DELAY to less than 6 rings;
otherwise the network service will answer all your calls before the
answering machine of your telephone and prevent it from recording any
messages.
- On Your
On YourOn Your
On Your Main
MainMain
Main Eclipse Handset
Eclipse HandsetEclipse Handset
Eclipse Handset
1. From the home screen, press
M
.
2. Press
M
again to select ANS. SYSTEM
ANS. SYSTEMANS. SYSTEM
ANS. SYSTEM.
3. Press
+/-to ANS. S
ANS. SANS. S
ANS. SETTING
ETTING ETTING
ETTING and then press
M
.
4. Press
M
to select RING DELAY
RING DELAYRING DELAY
RING DELAY.
5. Press
+/- to select 2
222
RINGS
RINGSRINGS
RINGS – 7 RINGS
7 RINGS7 RINGS
7 RINGS or TOLL SAVER
TOLL SAVERTOLL SAVER
TOLL SAVER and
then press
M
to confirm.
•
A confirmation tone is played.
6. Press
O
to return to standby mode.
- On Y
On YOn Y
On Your Additional Handset
our Additional Handsetour Additional Handset
our Additional Handset
1. From the home screen, press
M
.
2. Press
+\-
to ANSW MACHINE
ANSW MACHINEANSW MACHINE
ANSW MACHINE and then press
M
to select.
3. Press
+\-
SETTINGS
SETTINGS SETTINGS
SETTINGS and press
M
to select.
4. Press
M
to select RING DELAY
RING DELAYRING DELAY
RING DELAY.
5. Press
+\-
select 2 RINGS
2 RINGS2 RINGS
2 RINGS – 7 RINGS
7 RINGS7 RINGS
7 RINGS or ECONOMY
ECONOMYECONOMY
ECONOMY and
then press
M
to confirm.
•
A confirmation tone is played.
6. Press O to return to standby mode.
Page 72

70
Note:
Note:Note:
Note: If you select TOLL SAVER
TOLL SAVERTOLL SAVER
TOLL SAVER on the Main Eclipse Handset or ECONOMY
ECONOMYECONOMY
ECONOMY
on the additional handset, the answering machine will answer an
incoming call on the fifth ring if you have no new messages and on the
third ring if you do.
When you call your answering machine to check messages, if it does not
answer on the third ring, then you can hang up immediately, knowing
that you have no new messages. This feature can save you the cost of a
long-distance call when you check your messages remotely.
11.3.2
11.3.211.3.2
11.3.2 AAAActivate/
ctivate/ctivate/
ctivate/DDDDeactivate
eactivate eactivate
eactivate RRRRemote
emote emote
emote AAAAccess
ccessccess
ccess
- On Your
On YourOn Your
On Your Main
MainMain
Main Eclipse Handset
Eclipse HandsetEclipse Handset
Eclipse Handset
1. From the home screen, press
M
.
2. Press
M
again to select ANS. SYSTEM
ANS. SYSTEMANS. SYSTEM
ANS. SYSTEM.
3. Press
+/-to ANS. SETTING
ANS. SETTING ANS. SETTING
ANS. SETTING and then press
M
to select.
2. Press
+/- to REMOT
REMOTREMOT
REMOTE ACC.
E ACC.E ACC.
E ACC. and then press
M
to select.
3. Press
+/- to select ACTIVATE
ACTIVATEACTIVATE
ACTIVATE or DEACTIVATE
DEACTIVATEDEACTIVATE
DEACTIVATE and then
press
M
to confirm.
•
A confirmation tone is played.
4. Press
O
to return to standby mode.
- On Your Additional Handset
On Your Additional HandsetOn Your Additional Handset
On Your Additional Handset
1. From the home screen, press
M
.
2. Press
+\-
to ANSW MACHI
ANSW MACHIANSW MACHI
ANSW MACHINE
NENE
NE and then press
M
to select.
3. Press
+\-
SETTINGS
SETTINGS SETTINGS
SETTINGS and press
M
to select.
4. Press
+\-
to REMOTE ACC.
REMOTE ACC.REMOTE ACC.
REMOTE ACC. and then press
M
to select.
5. Press
+\-
to select ACTIVATE
ACTIVATEACTIVATE
ACTIVATE or DEACTIVATE
DEACTIVATEDEACTIVATE
DEACTIVATE and then
press
M
to confirm.
•
A confirmation tone is played.
6. Press O to return to standby mode.
Page 73

71
Note:
Note:Note:
Note: Once the remote control access is activated, you can check the
messages on your answering machine when you are away from home, by
calling from another phone.
The Master PIN is used for accessing the answering machine remotely. If
your answering machine is off, you must change your Master PIN from its
default 0000
00000000
0000 before you can use the remote access feature to turn on
your answering machine.
11.3.3
11.3.311.3.3
11.3.3 Change
Change Change
Change the
the the
the Voice Language
Voice LanguageVoice Language
Voice Language
You may be able to select a different language for the answering
machine’s pre- recorded announcements. The default setting is ENGLISH
ENGLISHENGLISH
ENGLISH.
- On Your
On YourOn Your
On Your Main Eclipse Handset
Main Eclipse HandsetMain Eclipse Handset
Main Eclipse Handset
1. From the home screen, press
M
.
4. Press
M
again to select ANS. SYSTEM
ANS. SYSTEMANS. SYSTEM
ANS. SYSTEM.
5. Press
+/-to ANS. SETTING
ANS. SETTING ANS. SETTING
ANS. SETTING and then press
M
to select.
2. Press
+/- to LANGUAGE
LANGUAGELANGUAGE
LANGUAGE and then press
M
to select.
3. Press
+/- to select your preferred language (if available)
and then press
M
to confirm.
•
A confirmation tone is played.
4. Press
O
to return to standby mode.
Page 74

72
- On
On On
On Your Additional
Your Additional Your Additional
Your Additional Handset
HandsetHandset
Handset
1. From the home screen, press
M
.
2. Press
+\-
to ANSW MACHINE
ANSW MACHINEANSW MACHINE
ANSW MACHINE and then press
M
to select.
3. Press
+\-
to SETTINGS
SETTINGS SETTINGS
SETTINGS and then press
M
to select.
4. Press
+\-
to LANGUAGE
LANGUAGELANGUAGE
LANGUAGE and then press
M
to select.
5. Press
+\-
to select your preferred language (if available)
and then press
M
to confirm.
•
A confirmation tone is played.
6. Press O to return to standby mode.
11.4
11.411.4
11.4 Message Playback
Message PlaybackMessage Playback
Message Playback
When there are new messages on the answering machine, the tape icon
flashes on the handset screen.
- On Your
On YourOn Your
On Your Main
MainMain
Main Eclipse Handset
Eclipse HandsetEclipse Handset
Eclipse Handset
1. From the home screen, press
M
.
2. Press
M
again to select ANS. SYSTEM
ANS. SYSTEMANS. SYSTEM
ANS. SYSTEM.
3. Press
M
again to select PLAY
PLAYPLAY
PLAY.
•
Your messages will automatically playback through the
handset’s speakerphone.
•
The display will show the message number and the date and
time of the call.
•
Press
F
t
o listen to your messages privately through the
earpiece of your handset.
4. During playback, press
M
and then press +/- to access
the following options:
REPEAT
REPEATREPEAT
REPEAT
Repeat the currently playing message
NEXT
NEXTNEXT
NEXT
Play the next message
PREVIOUS
PREVIOUSPREVIOUS
PREVIOUS
Play the previous message
DELETE
DELETEDELETE
DELETE
Delete the current message
Note:
Note:Note:
Note: To return to the screen showing the message number and
date/time, press
m
.
5. Press
O
to return to standby mode.
Page 75

73
- On Your Additional Handset
On Your Additional HandsetOn Your Additional Handset
On Your Additional Handset
1. From the home screen, press
M
.
2. Press
+\-
to ANSW MACHINE
ANSW MACHINEANSW MACHINE
ANSW MACHINE and then press
M
to select.
3. Press
M
again to select PLAY
PLAYPLAY
PLAY.
•
Your messages will automatically playback through the
handset’s speakerphone.
•
The display will show the message number, and with the date
and time of the call alternating.
•
Press
T
t
o listen to your messages privately through the
earpiece of your handset.
4. During playback, press
M
and then press
+\-
to access the
following options:
REPEAT
REPEATREPEAT
REPEAT
Repeat the currently playing message
NEXT
NEXTNEXT
NEXT
Play the next message
PREVIOUS
PREVIOUSPREVIOUS
PREVIOUS
Play the previous message
DELETE
DELETEDELETE
DELETE
Delete the current message
Note:
Note:Note:
Note: You cannot exit from this menu list without stopping the playback.
5. Press O to return to standby mode.
11.5
11.511.5
11.5 Delete
Delete Delete
Delete AAAAll
ll ll
ll MMMMessages
essagesessages
essages
NNNNote
oteote
ote:::: Only old messages can be deleted. New messages must be played
before they can be deleted.
- On Your
On YourOn Your
On Your Main
MainMain
Main Eclipse Handset
Eclipse HandsetEclipse Handset
Eclipse Handset
1. From the home screen, press
M
.
2. Press
M
again to select ANS. SYSTEM
ANS. SYSTEMANS. SYSTEM
ANS. SYSTEM.
3. Press
+/- to select D
DD
DELETE ALL
ELETE ALLELETE ALL
ELETE ALL and then press
M
.
4. Press
M
again to confirm.
•
A confirmation tone is played.
5. Press
O
to return to standby mode.
Page 76

74
- On Your Additional Handset
On Your Additional HandsetOn Your Additional Handset
On Your Additional Handset
1. From the home screen, press
M
.
2. Press
+\-
to ANSW MACHINE
ANSW MACHINEANSW MACHINE
ANSW MACHINE and then press
M
to select.
3. Press
+\-
to select DELETE ALL
DELETE ALLDELETE ALL
DELETE ALL and then press
M
.
4. Press
M
again to confirm.
•
A confirmation tone is played.
5. Press O to return to standby mode.
11.6
11.611.6
11.6 Announcement
AnnouncementAnnouncement
Announcement
When the answering system answers a call, the pre-recorded
announcement is played to the caller unless you have recorded your own
announcement.
The phone comes with two pre-recorded announcements for the
respective answer modes: ANSWER ONLY
ANSWER ONLYANSWER ONLY
ANSWER ONLY and RECORD MSGS
RECORD MSGSRECORD MSGS
RECORD MSGS on the Main
Eclipse Handset or ANSWER ONLY
ANSWER ONLYANSWER ONLY
ANSWER ONLY and ANSW.&RECORD
ANSW.&RECORDANSW.&RECORD
ANSW.&RECORD on the additional
handsets. By default, the answer mode is RECORD MSGS
RECORD MSGSRECORD MSGS
RECORD MSGS on the Main
Eclipse Handset and ANSW.&RECORD
ANSW.&RECORDANSW.&RECORD
ANSW.&RECORD on the additional handsets, which
allows a caller to leave a message on the answering machine after
hearing the announcement. This can be changed to ANSWER ONLY
ANSWER ONLYANSWER ONLY
ANSWER ONLY mode,
which does not allow callers to leave any messages on the answering
machine after hearing the announcement.
11.6.1
11.6.111.6.1
11.6.1 Record a
Record a Record a
Record a PPPPersona
ersonaersona
ersonallll Announcement
AnnouncementAnnouncement
Announcement
You can choose to replace the default announcement with your own
personal announcements.
Note:
Note:Note:
Note: The maximum length of an announcement is 2 minutes.
- On Your
On YourOn Your
On Your Main
MainMain
Main Eclipse Handset
Eclipse HandsetEclipse Handset
Eclipse Handset
1. From the home screen, press
M
.
2. Press
M
again to select ANS. SYSTEM
ANS. SYSTEMANS. SYSTEM
ANS. SYSTEM.
3. Press +/- to ANNOUNCEMENT
ANNOUNCEMENTANNOUNCEMENT
ANNOUNCEMENT and then press
M
to select.
4. Press
+/- to select ANSWER ONLY
ANSWER ONLYANSWER ONLY
ANSWER ONLY or RECORD MSGS
RECORD MSGSRECORD MSGS
RECORD MSGS and
then press
M
to confirm.
5. Press +/- to RECORD ANN
RECORD ANNRECORD ANN
RECORD ANNCCCC and then press
M
.
•
A confirmation tone is played.
Page 77

75
6. Speak into the handset to start recording your new announcement
and press
M
again to end the recording.
•
A confirmation tone is played.
7. Press
O
to return to standby mode.
- On Your Additional Handset
On Your Additional HandsetOn Your Additional Handset
On Your Additional Handset
1. From the home screen, press
M
.
2. Press
+\-
to ANSW MACHINE
ANSW MACHINEANSW MACHINE
ANSW MACHINE and then press
M
to select.
3. Press
+\-
to RECORD OGM
RECORD OGMRECORD OGM
RECORD OGM and then press
M
to select.
4. Press
+\-
to select ANSWER ONLY
ANSWER ONLYANSWER ONLY
ANSWER ONLY or ANSW.&RECORD
ANSW.&RECORDANSW.&RECORD
ANSW.&RECORD
and then press
M
to confirm.
5. Press
+\-
to RECORD OGM
RECORD OGMRECORD OGM
RECORD OGM and then press
M
.
•
A confirmation tone is played.
6. Speak into the handset to start recording your new announcement
and press
M
again to end the recording.
•
A confirmation tone is played.
7. Press O to return to standby mode.
11.6.2
11.6.211.6.2
11.6.2 Listen to
Listen to Listen to
Listen to aaaannnn announcement
announcementannouncement
announcement
- On Your
On YourOn Your
On Your Main
MainMain
Main Eclipse Handset
Eclipse HandsetEclipse Handset
Eclipse Handset
1. From the home screen, press
M
.
2. Press
M
again to select ANS. SYSTEM
ANS. SYSTEMANS. SYSTEM
ANS. SYSTEM.
3. Press +/- to ANNOUNCEMENT
ANNOUNCEMENTANNOUNCEMENT
ANNOUNCEMENT and then press
M
to select.
4. Press
+/- to select ANSWER ONLY
ANSWER ONLYANSWER ONLY
ANSWER ONLY or RECORD MSGS
RECORD MSGSRECORD MSGS
RECORD MSGS, and
then press
M
to confirm.
5. Press
M
to select PLAY
PLAYPLAY
PLAY.
•
The announcement plays through the phone’s speaker.
•
Press
F
if you wish to listen to the announcement privately
over the earpiece.
6. Press
O
to return to standby mode.
Page 78

76
- On Your Additional Handset
On Your Additional HandsetOn Your Additional Handset
On Your Additional Handset
1. From the home screen, press
M
.
2. Press
+\-
to ANSW MACHINE
ANSW MACHINEANSW MACHINE
ANSW MACHINE and then press
M
.
3. Press
+\-
to RECORD
RECORD RECORD
RECORD OGM
OGMOGM
OGM and then press
M
to select.
4. Press
+\-
to select ANSWER ONLY
ANSWER ONLYANSWER ONLY
ANSWER ONLY or ANSW.&RECORD
ANSW.&RECORDANSW.&RECORD
ANSW.&RECORD,
and then press
M
to confirm.
5. Press
M
to select PLAY
PLAYPLAY
PLAY.
•
The announcement plays through the phone’s speaker.
•
Press
T
if you wish to listen to the announcement privately
over the earpiece.
6. Press O to return to standby mode.
11.6.3
11.6.311.6.3
11.6.3 Delete a
Delete aDelete a
Delete a Personal
Personal Personal
Personal Announcement
AnnouncementAnnouncement
Announcement
If you want to return to using the default announcement, simply delete
your personal announcement.
- On Your
On YourOn Your
On Your Main
MainMain
Main Eclipse Handset
Eclipse HandsetEclipse Handset
Eclipse Handset
1. From the home screen, press
M
.
2. Press
M
again to select ANS. SYSTEM
ANS. SYSTEMANS. SYSTEM
ANS. SYSTEM.
3. Press
+/- to ANNOUNCEMENT
ANNOUNCEMENTANNOUNCEMENT
ANNOUNCEMENT and then press
M
to select.
4. Press
+/- to select ANSWER ONLY
ANSWER ONLYANSWER ONLY
ANSWER ONLY or RECORD MSGS
RECORD MSGSRECORD MSGS
RECORD MSGS and
then press
M
to confirm.
5. Press
+/- to DELETE
DELETEDELETE
DELETE and press
M
to confirm.
•
The default pre-recorded announcement plays through the
phone’s speaker.
•
Press
F
if you wish to listen to the announcement privately
over the earpiece.
6. Press
O
to return to standby mode.
Page 79

77
- On Your Additional Handset
On Your Additional HandsetOn Your Additional Handset
On Your Additional Handset
1. From the home screen, press
M
.
2. Press
+\-
to ANSW MACHINE
ANSW MACHINEANSW MACHINE
ANSW MACHINE and then press
M
.
3. Press
+\-
to RECORD OGM
RECORD OGMRECORD OGM
RECORD OGM and then press
M
to select.
4. Press
+\-
to select ANSWER ONLY
ANSWER ONLYANSWER ONLY
ANSWER ONLY or ANSW.&RECORD
ANSW.&RECORDANSW.&RECORD
ANSW.&RECORD and
then press
M
to confirm.
5. Press
+\-
to DELETE
DELETEDELETE
DELETE and press
M
to confirm.
•
The default pre-recorded outgoing message plays through the
phone’s speaker.
•
Press
T
if you wish to listen to the message privately over the
earpiece.
6. Press O to return to standby mode.
Page 80

78
11.7
11.711.7
11.7 Remote Access
Remote AccessRemote Access
Remote Access
The phone lets you listen to the messages on your answering machine, or
otherwise operate your answering machine by calling in to your
answering machine from another touch-tone phone.
You need to enter a remote access code (same as your Master PIN) to
access your answering machine remotely.
The remote access code is used to prevent unauthorised access of your
answering machine.
Remote Access must be enabled if you want to use this feature.
(See
AAAActivate/
ctivate/ctivate/
ctivate/DDDDeactivate
eactivate eactivate
eactivate RRRRemote
emote emote
emote
Access
on page 70.)
11.7.1
11.7.111.7.1
11.7.1 Access the
Access the Access the
Access the AAAAnswering
nswering nswering
nswering MMMMachine
achineachine
achine RRRRemotely
emotelyemotely
emotely
1. Dial your phone number from any touch-tone phone.
2. When your answering machine answers your call and starts playing
your announcement, press the < # >
< # > < # >
< # > key.
•
The announcement will stop playing.
3. Enter your Remote Access Code (same as your Master PIN code) within 8
seconds using the numeric keypad on the touch-tone phone.
Note that the answering machine will drop the call if you do not
enter the Master PIN within 8 seconds.
4. If the code is accepted, you will hear a confirmation tone.
5. The answering machine will start to playback all the messages on
your answering machine, beginning with new messages, or if there
are no recorded messages you will hear four beeps.
6. Use the keypad on the touch-tone phone to carry out the following
operations:
Keys
KeysKeys
Keys
1111
Repeat the previous message.
2222
Playback messages
/ Repeat the current messa
ge.
3333
Skip to the next message.
6666
Delete the current message.
7777
Turn on the answering machine in
RECORD MSGS
RECORD MSGSRECORD MSGS
RECORD MSGS
mode
(main Eclipse handset) or ANSW.&RECORD
ANSW.&RECORDANSW.&RECORD
ANSW.&RECORD mode
(additional handsets).
8888
Stop message playback.
9999
Turn off the answering machine.
Page 81

79
7. When you have finished listening to your messages, simply hang up
the phone to end.
Note
NoteNote
Note::::
If your answering machine is off but Remote Access
Remote AccessRemote Access
Remote Access is activated
(See
AAAActivate/
ctivate/ctivate/
ctivate/DDDDeactivate
eactivate eactivate
eactivate RRRRemote
emote emote
emote
Access
on page 70 ),
the answering machine
will answer your call after 14 rings, so that you can access it remotely,
and the ANSWER ONLY
ANSWER ONLYANSWER ONLY
ANSWER ONLY announcement will play.
If you enter an incorrect Remote Access Code, you will hear a triple-beep
error tone, and you will need to enter the code again. If you enter the
wrong Remote Code twice consecutively, the call will end automatically.
Page 82

80
iDECT
iDECT iDECT
iDECT Eclipse
EclipseEclipse
Eclipse System
System System
System
Remote operation
Remote operationRemote operation
Remote operation
1. Using a tone-dialling phone, dial your home number.
2. While your announcement is playing, press <#>
<#><#>
<#>.
3. Key in your Remote Access Code
Remote Access CodeRemote Access Code
Remote Access Code. (Default value is 0000
00000000
0000.)
For details on how to set a new code, see
Change
Change Change
Change the
the the
the Master
MasterMaster
Master PIN
PINPIN
PIN on page
63 of the User Guide
.
Note:
Note:Note:
Note: The < # >
< # >< # >
< # > can be entered at any time after the announcement starts, and the
Remote Access Code
Remote Access CodeRemote Access Code
Remote Access Code should follow without any delay. If the Remote Access Code
Remote Access CodeRemote Access Code
Remote Access Code is
entered incorrectly twice consecutively, the call will end automatically.
4. Refer to the key operations on the reverse side of this card.
Note:
Note:Note:
Note: If your answering machine is off, but with Remote Access
Remote AccessRemote Access
Remote Access activated
(See
AAAActivate/
ctivate/ctivate/
ctivate/DDDDeactivate
eactivate eactivate
eactivate RRRRemote
emoteemote
emote
AAAAccess
ccessccess
ccess
on page 70 of the User Guide)
and Master PIN
Master PINMaster PIN
Master PIN
changed from its default, the phone will answer after 14 rings, and you can then
enter the Remote Access Code
Remote Access CodeRemote Access Code
Remote Access Code to access the Remote
RemoteRemote
Remote Access
Access Access
Access feature.
Page 83

81
Keys
KeysKeys
Keys
1111
Repeat the previous message.
2222
Playback
messages / Repeat current message.
3333
Skip to the next message.
6666
Delete the current message.
7777
Turn on the answering machine in
RECORD MSGS
RECORD MSGSRECORD MSGS
RECORD MSGS
mode (main Eclipse handset) or ANSW.&RECORD
ANSW.&RECORDANSW.&RECORD
ANSW.&RECORD
mode (additional handsets).
8888
Stop message playback.
9999
Turn off the answering machine.
Page 84

82
12
1212
12 TROUBLESHOOTING
TROUBLESHOOTINGTROUBLESHOOTING
TROUBLESHOOTING
ALWAYS check that:
ALWAYS check that:ALWAYS check that:
ALWAYS check that:
You have followed all the steps listed in the user guide to install and
set up your telephone.
All connectors are securely inserted into their sockets.
Mains power for the base unit is switched on at the socket.
The handset’s batteries are correctly and securely installed and are
sufficiently charged.
Everyday use
Everyday useEveryday use
Everyday use
“I cannot make or answer call
“I cannot make or answer call“I cannot make or answer call
“I cannot make or answer calls”
s”s”
s”
If the handset’s display is blank, it may have been switched off.
Press and hold
O
on the Main Eclipse Handset or press O
on
the additional handset to switch it back on.
Check that the base unit’s mains power adapter is plugged in and
power is switched on. The base unit needs mains power for normal
operation of the phone – not just for charging the handset batteries.
Make sure that you are using the telephone line cable supplied with
your phone. Other telephone line cables might not work.
Move the handset closer to the base unit.
Check the Battery Level symbol on the display. If it is low, put the
handset back on the base unit or charging pod to recharge the
batteries.
Switch off the power at the mains socket, wait for a short while and
then switch it back on. This may solve the problem.
“I cannot make call
“I cannot make call“I cannot make call
“I cannot make callssss””””
If the handset display shows KEYS LOCKED
KEYS LOCKEDKEYS LOCKED
KEYS LOCKED, press and hold * to
unlock it before you make a call.
Only one handset (or the base unit) can be connected to an external
line at a time. If the handset display shows , the base is already
being used by either the answering machine or another handset.
Page 85

83
“When I press on the keys, nothing happens”
“When I press on the keys, nothing happens”“When I press on the keys, nothing happens”
“When I press on the keys, nothing happens”
Make sure that the batteries are fitted in your handset. If the
Battery Level symbol on the display shows ‘low’, put your handset
back on the base unit or charging pod to charge.
“When I key in a number, it appears on the display, but I cannot make an
“When I key in a number, it appears on the display, but I cannot make an “When I key in a number, it appears on the display, but I cannot make an
“When I key in a number, it appears on the display, but I cannot make an
external
externalexternal
external call”
call”call”
call”
Try a different position for the base unit – somewhere higher if
possible, or further away from other electrical equipment.
“The phone does not ring”
“The phone does not ring”“The phone does not ring”
“The phone does not ring”
Check that the base unit’s mains power adapter is plugged in and
power is switched on.
The base unit needs mains power for normal operation of the
phone – not just for charging the batteries.
Make sure that you are using the telephone line cable that was
supplied with your phone.
Make sure that the ringer volume settings are not set to off.
Increase the ringer volume settings.
(See Set the
Set the Set the
Set the RRRRing
ing ing
ing VVVVolume
olumeolume
olume on
page 55.)
“My call was cut off when I went out of range. Now I can’t use my
“My call was cut off when I went out of range. Now I can’t use my “My call was cut off when I went out of range. Now I can’t use my
“My call was cut off when I went out of range. Now I can’t use my
handset.”
handset.”handset.”
handset.”
Move the handset closer to the base unit before you try to make a
call again.
“There is interference and noise on the line”
“There is interference and noise on the line”“There is interference and noise on the line”
“There is interference and noise on the line”
Move the handset closer to the base unit, or to a different position.
Try moving the base unit away from other electrical equipment,
such as a television or a computer.
You’ll get the best reception if you place the base unit as high as
possible. For example, in a two-floor building, the first-floor landing
is an ideal place.
“I hear ‘beeps’ from my handset while I’m on a call”
“I hear ‘beeps’ from my handset while I’m on a call”“I hear ‘beeps’ from my handset while I’m on a call”
“I hear ‘beeps’ from my handset while I’m on a call”
You may be moving out of range of the base unit. Move closer or
your call may be cut off.
Check the Battery Level symbol on the display. If it’s low, recharge
the batteries.
Page 86

84
“The Caller Display feature isn’t working”
“The Caller Display feature isn’t working”“The Caller Display feature isn’t working”
“The Caller Display feature isn’t working”
You need to subscribe to the Caller Line Identification service from
your network service provider.
The caller may have withheld their number by dialling 141. Or they
may be calling from a network that does not transmit the caller’s
number (e.g. if they are making international calls.)
“When I try to make a call, I hear busy tone”
“When I try to make a call, I hear busy tone”“When I try to make a call, I hear busy tone”
“When I try to make a call, I hear busy tone”
If you’re using a multi-handset system, check whether another
handset is already on a call.
“The volume in the earpiece is
“The volume in the earpiece is “The volume in the earpiece is
“The volume in the earpiece is low when I’m on a call”
low when I’m on a call”low when I’m on a call”
low when I’m on a call”
Make sure you’re holding the earpiece correctly over your ear.
Adjust the volume using + on the Main Eclipse Handset or
+
on the additional handset.
“I cannot store a phonebook entry”
“I cannot store a phonebook entry”“I cannot store a phonebook entry”
“I cannot store a phonebook entry”
The maximum number of 200 phonebook entries on your Main
Eclipse Handset or 100 phonebook entries on your additional
handset has been reached. You must delete existing entries to make
space for new ones.
Intercom and transfer
Intercom and transferIntercom and transfer
Intercom and transfer
“I can’t transfer a call”
“I can’t transfer a call”“I can’t transfer a call”
“I can’t transfer a call”
Make sure that the other handset is in range of the base unit.
Make sure that you have entered the correct number for the other handset.
Batteries
BatteriesBatteries
Batteries
“The handset’s battery cells are running low within an hour or two”
“The handset’s battery cells are running low within an hour or two”“The handset’s battery cells are running low within an hour or two”
“The handset’s battery cells are running low within an hour or two”
Before you first use the handset, you must leave it to charge on the
base unit or charging pod for at least 15 hours.
You may need to replace the batteries.
Check the connection between the base unit and the mains power socket.
“I try to recharge the batteries but I still get a warning that they are low”
“I try to recharge the batteries but I still get a warning that they are low”“I try to recharge the batteries but I still get a warning that they are low”
“I try to recharge the batteries but I still get a warning that they are low”
You need to replace the batteries. Dispose of used batteries safely –
do not burn, immerse them in water, disassemble, or puncture the batteries.
Do not use non-rechargeable batteries in your handset – they may
explode, causing damage.
Page 87

85
Registration
RegistrationRegistration
Registration
“I am not able
“I am not able “I am not able
“I am not able to
to to
to register another handset”
register another handset”register another handset”
register another handset”
The maximum number of 4 handsets has been reached. You will
need to unregister a handset in order to register a new one.
Answering Machine
Answering MachineAnswering Machine
Answering Machine
“The Answering machine does not record messages”
“The Answering machine does not record messages”“The Answering machine does not record messages”
“The Answering machine does not record messages”
Make sure that the answering machine is switched on.
Make sure that the Answer Mode
Answer ModeAnswer Mode
Answer Mode is set to RECORD MSGS
RECORD MSGSRECORD MSGS
RECORD MSGS.
(See Set
Set Set
Set
AAAAnswer
nswer nswer
nswer MMMMode
odeode
ode on page 68.)
The memory may be full. If so, you will need to delete some
messages.
“I cannot access my answering machine remotel
“I cannot access my answering machine remotel“I cannot access my answering machine remotel
“I cannot access my answering machine remotely”
y”y”
y”
Make sure that Remote Access is activated.
Make sure that you have entered the correct Remote Access PIN
(same as your Master PIN).
If the fault persists...
If the fault persists...If the fault persists...
If the fault persists...
Disconnect all other instruments connected to the same line and try
to make a call.
Disconnect the base unit from the telephone line and plug a
different phone into the Eclipse telephone socket. Try making a call.
If this works, the line is OK.
If the call does not work, and you are using a two-way socket
adapter, remove it and plug a telephone directly into the socket.
If the call now works, the adapter may be faulty.
If you cannot make a call, the fault may be on the exchange line.
Contact the service provider.
Page 88

86
13
1313
13 DECLARATION OF CONFORMITY
DECLARATION OF CONFORMITYDECLARATION OF CONFORMITY
DECLARATION OF CONFORMITY
We the manufacturer / Importer: Binatone Telecom Plc, 1 Apsley Way London,
NW2 7HF. Declare under our sole responsibility that the following product
Type of equipment:
Digital
C
ordless
T
elephone
Country of Origin
: China
Brand
: iDECT
Model name:
Eclipse
complies with the essential protection requirements of R&TTE Directive
1999/5/EC on the approximation of the laws of the Member States relating to
Radio Spectrum Matters
Radio Spectrum MattersRadio Spectrum Matters
Radio Spectrum Matters
, the Council Directive 2004/108/EC on the approximation
of the laws of the Member States relating to
Electromagnetic C
Electromagnetic CElectromagnetic C
Electromagnetic Compatibility (EMC)
ompatibility (EMC)ompatibility (EMC)
ompatibility (EMC)
and the European Community Directive 2006/95/EC relating to
Electrical Safety
Electrical SafetyElectrical Safety
Electrical Safety
.
Assessment of compliance of the product with the requirements relating to the
essential requirements according to Article 3 R&TTE was based on Annex III of the
Directive 1999/5/EC and the following standard:
Radio Spectrum: ETSI EN 301406: V 2.1.1 (2009-07)
EMC: ETSI EN 301489-6: V1.3.1 (2008-08)
ETSI EN 301489-1: V1.8.1 (2008-04)
Safety: EN60950-1:2006+A11:2009+A1:2010+A12:2011
Manufacturer / Importer
(signature of authorized
per
son)
Date
Signature
The conformity to the requirements is validated by the symbol.
NOTE:
NOTE:NOTE:
NOTE: In compliance with Directive 2002/96/EC, when you purchase a product that
comes with the symbol shown on the right, you are required to dispose of electrical and
electronic equipment by separate waste collection and you cannot
dispose of the product as normal waste.
This equipment and all its components, subsystems and consumable
materials form an integral part of this product and when you decide to
dispose of them you have to take them to a local recycling centre for
appropriate waste disposal, in compliance with the current regulations.
Details about the location of these centres can be obtained from your local authority.
Notes for battery disposal
Notes for battery disposalNotes for battery disposal
Notes for battery disposal
Your product contains batteries covered by the European Directive 2006/66/EC,
which must not be disposed of with normal household waste.
Please be aware of the local rules on separate collection of batteries. The correct
disposal of batteries helps protect the environment and prevent health hazards.
Page 89

87
14
1414
14 GUARANTEE AND SERVICE
GUARANTEE AND SERVICEGUARANTEE AND SERVICE
GUARANTEE AND SERVICE
The phone system is guaranteed for 12 months from the date of
purchase shown on your sales receipt. This guarantee does not cover any
faults or defects caused by accidents, misuse, fair wear and tear, neglect,
faults on the telephone line, lightning, tampering with the equipment, or
any attempt at adjustment or repair other than through approved
agents.
Please keep your sales (till) receipt th
Please keep your sales (till) receipt thPlease keep your sales (till) receipt th
Please keep your sales (till) receipt this is your guarantee.
is is your guarantee.is is your guarantee.
is is your guarantee.
You should also keep the original packaging material.
In the unlikely event that you need to return your phone system to our
Repair Centre while it is under guarantee, there may be a handling
charge.
14.1
14.114.1
14.1 While the unit is under Guarantee
While the unit is under GuaranteeWhile the unit is under Guarantee
While the unit is under Guarantee
1. Disconnect the base unit from the telephone line and the mains
electricity supply.
2. Pack up all parts of your phone system, using the original package.
3. Return the unit to the shop where you bought it, making sure you
take your sales receipt.
Remember to include the mains adapter.
14.2
14.214.2
14.2 After the Guarantee has expired
After the Guarantee has expiredAfter the Guarantee has expired
After the Guarantee has expired
If the unit is no longer under Guarantee, first follow steps 1 and 2 as for
repair under Guarantee. Then...
1. Call Helpline on 0845 345 9677 (for UK only) and ask for a quotation
of the repair charge and details of where to send your phone system
for repair.
2. Make sure you include with your phone system.
Your name and address
A cheque or postal order for the value of the repair
A brief description of the fault.
3. Return your phone system to the address given by the Service
Department.
* This does not affect your statutory rights.
 Loading...