

Page 1
U
SER
G
UIDE
HomeSurf Tablet 7
You may download this user guide at www.binatonetelecom.com
Warning
Before operating this set,
please read these instructions carefully
Use only the power adaptor supplied with your product.
Binatone Helpline: 0845 345 9677 (UK), 1300 768 112 (Australia), +91 7503011385 (India), +491805938802 (Europe)
Page 2

Page 3

WELCOME
1WELCOME
Thank you for purchasing our product!
You can use the HomeSurf Tablet to:
• Surf the web via wireless connection
• Send and receive emails
• Listen to music via loud speaker or earphone
• View pictures, videos and slideshows
• Search and view YouTube videos
• Read and download eBooks
• Set alarm clock
• Calculator
• Download, Install and play games
• Download, Install and Use Android Applications
This product is guaranteed for 12 months* from the date of purchase shown on your sales
receipt. The Guarantee does not cover damage by misuse or negligence, or by excessive
voltages - for example, lightning.
*The warranty period will vary depending on the country of your purchase.
Please keep your sales (till) receipt - this is your guarantee. You should also keep the
original packaging material.
The Binatone Help Line is available from 9.00am ~ 5.00 pm, Mondays to Fridays, 0845
345 9677 for UK, 0818762092 for Eire (Local call rate).
Please read this user guide carefully before using the product so that you can fully enjoy
its performance and functions. We hope you enjoy using our product.
Note
Before you can surf the Internet, send and receive emails, download content and
applications etc., you must join a Wi-Fi network that is connected to the Internet. For more
information on how to make a wireless connection, see Making a Wireless Connection
on page 33.
2IMPORTANT
Only use the power adapter supplied.
Binatone Helpline: 0845 345 9677 (UK), 1300 768 112 (Australia), +91 7503011385 (India), +491805938802 (Europe)
3
Page 4
WHAT'S IN THE BOX?
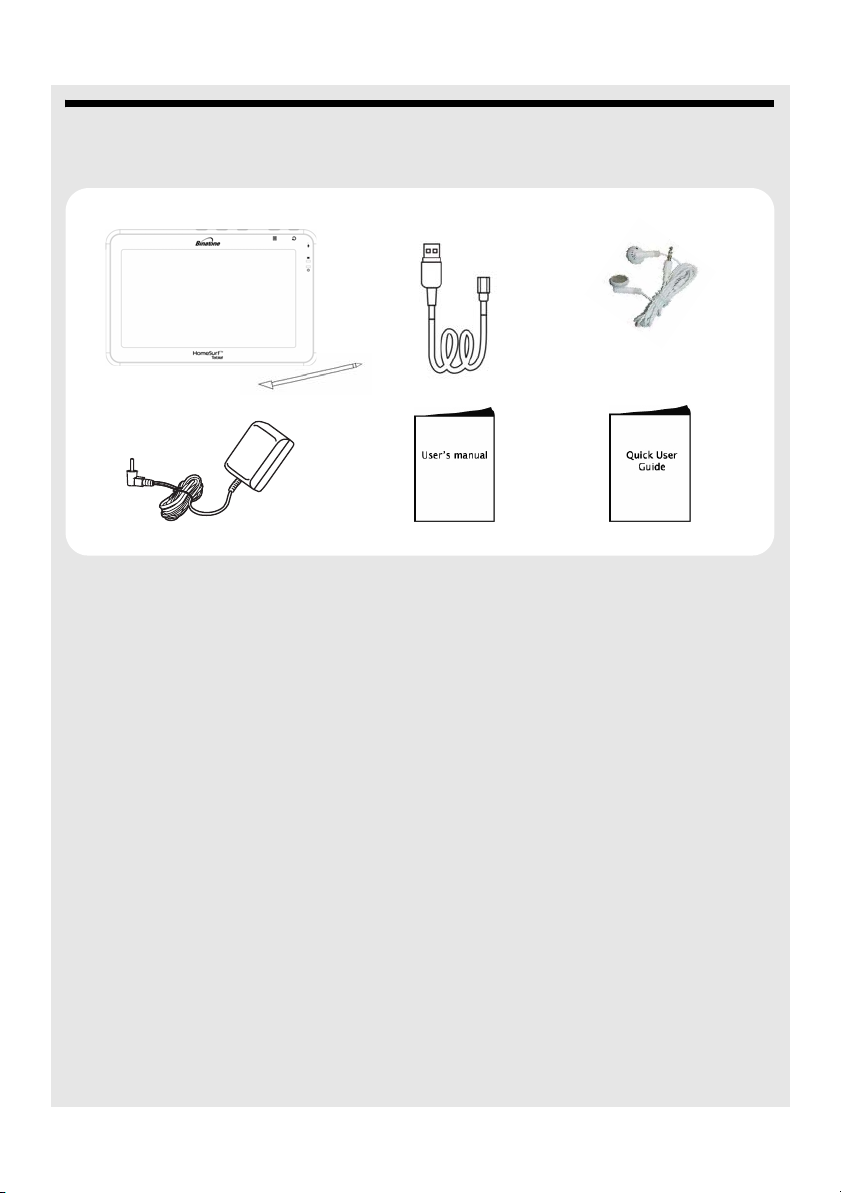
3 WHAT'S IN THE BOX?
The product pack includes:
• HomeSurf Tablet with stylus pen
• Power adapter (for charging)
• USB cable (for data transfer only)
• Earphone
• User’s Guide
• Quick Start Guide
4
Binatone Helpline: 0845 345 9677 (UK), 1300 768 112 (Australia), +91 7503011385 (India), +491805938802 (Europe)
Page 5
OVERVIEW OF THE PRODUCT
4 OVERVIEW OF THE PRODUCT
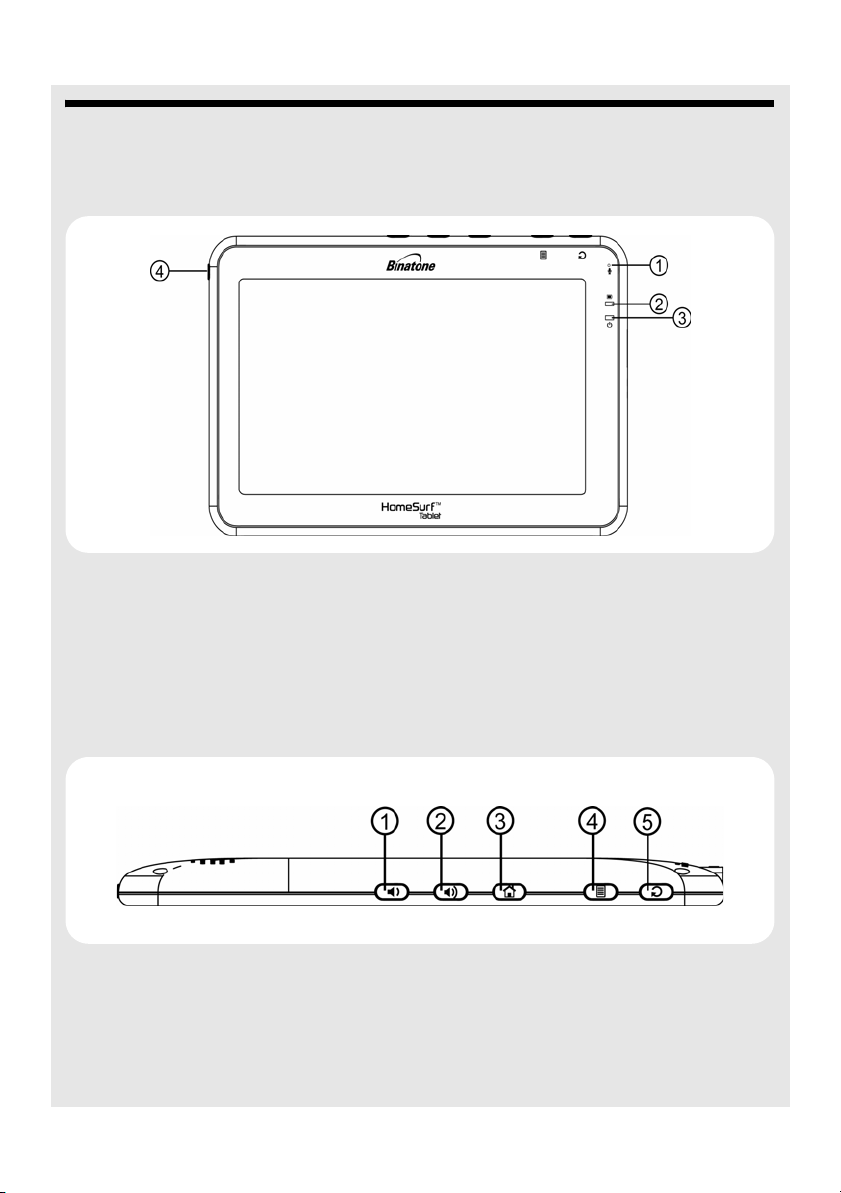
4.1 Front
1 Microphone
2Charge LEDTurns Red when charging
3Power LED Turns Blue when powered on
4
P
Press to power up or down
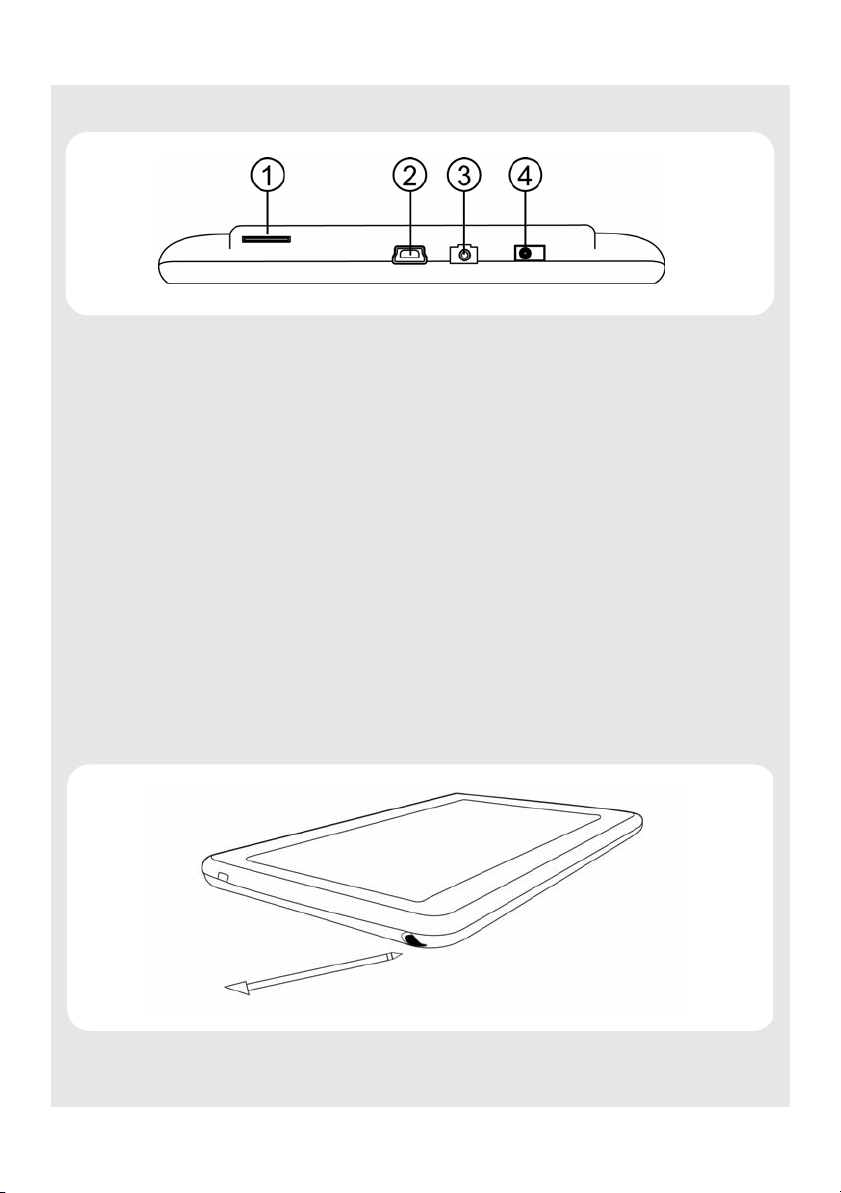
4.2 Top
1 - • Press - to reduce volume.
2
+ • Press + to increase volume.
3
H
Binatone Helpline: 0845 345 9677 (UK), 1300 768 112 (Australia), +91 7503011385 (India), +491805938802 (Europe)
• Press to return to the home screen.
• Press and hold for 1 second to switch between tasks.
5
Page 6
OVERVIEW OF THE PRODUCT
4 O • Press to open the options list.
• Press and hold (about 10 seconds) to calibrate the touch screen.
• Press and hold (about 3 seconds) to launch onscreen keyboard.
Press again to hide the keyboard.
B • Press to return to previous screen.
5
• Press to hide the onscreen keyboard.
• Press to exit a dialog box, options menu or notifications panel.
• Press to cancel an operation.
• Press and hold to access Bookmarks, Most visited and History
during web browsing.
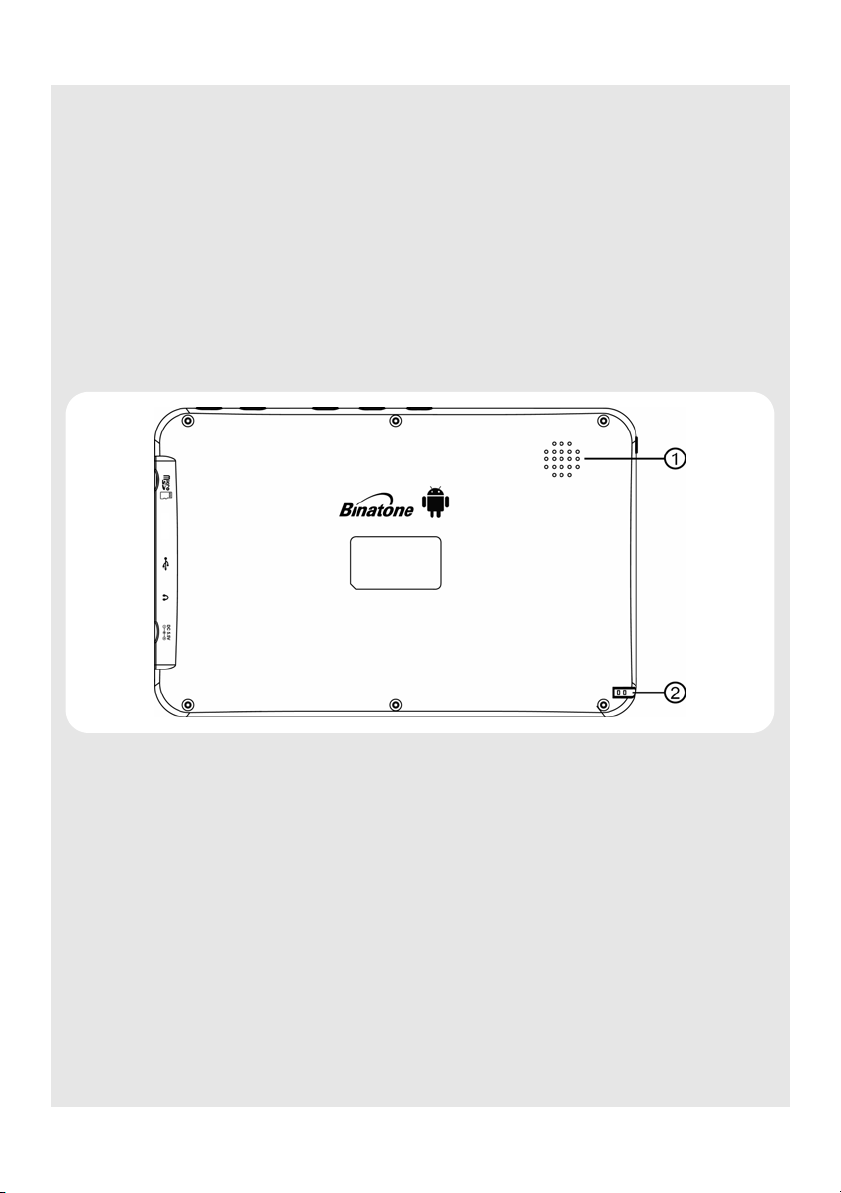
4.3 Back
1 Speakers
2Stylus Pen
6
Binatone Helpline: 0845 345 9677 (UK), 1300 768 112 (Australia), +91 7503011385 (India), +491805938802 (Europe)
Page 7
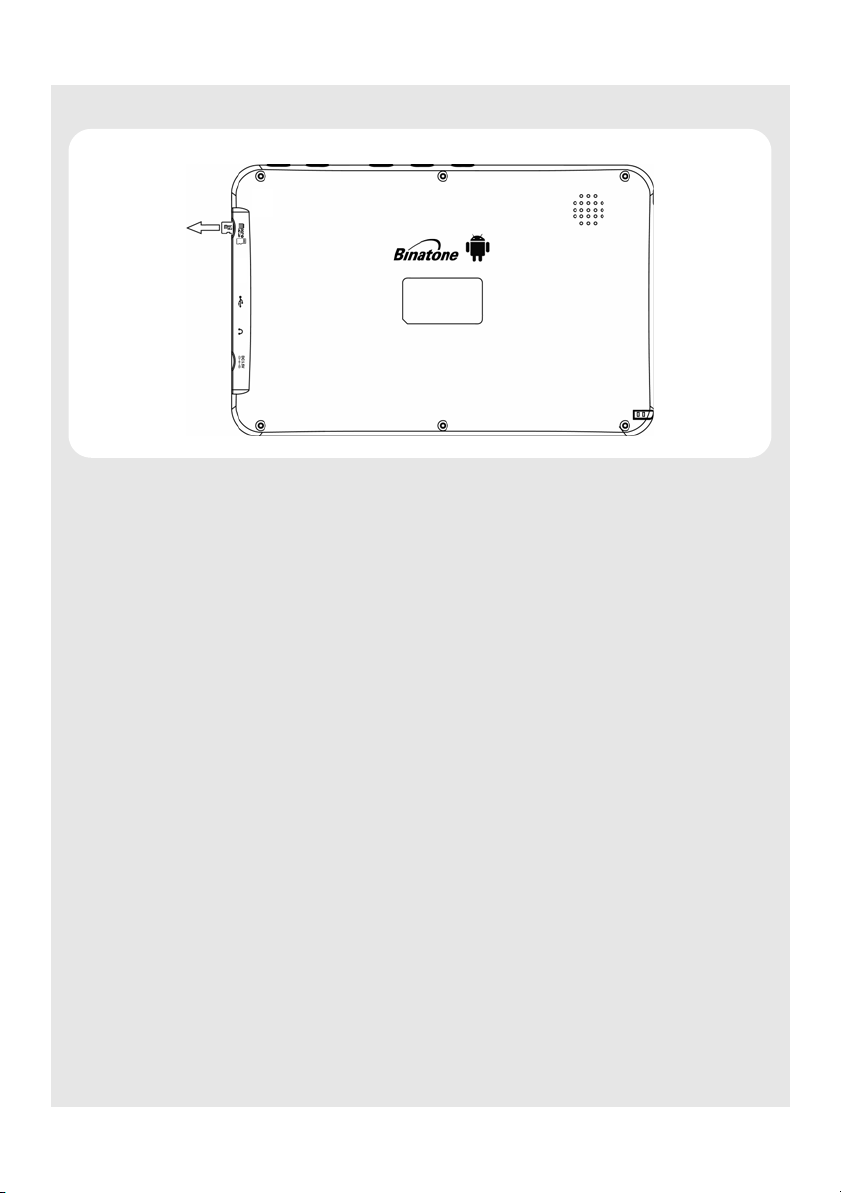
4.4 Side
U
OVERVIEW OF THE PRODUCT
1 Micro SD card
slot
2 • Plug in the USB cable for connection to a PC for data
3 Plug in a 3.5mm headset to listen to music and watch videos
Q
4 Power connector Plug in the power adaptor for charging
Insert your micro SD card
transfer.
Note
The USB port is for data transfer with a PC only. You cannot
use it for charging.
4.5 Basic operations of your Homesurf Tablet
You can operate the HomeSurf Tablet by touching the surface of the display using the
Stylus pen (included) or with your finger.
4.5.1 Using the stylus pen
The stylus pen is tucked away inside a holder.
To remove the stylus, simply pull out the pen.
Binatone Helpline: 0845 345 9677 (UK), 1300 768 112 (Australia), +91 7503011385 (India), +491805938802 (Europe)
7
Page 8

OVERVIEW OF THE PRODUCT
Whenever you want to replace the stylus back into the holder, make sure that the clip is
facing up and the pen is inserted with the tip first. Then, gently push the stylus into the
holder.
Familiarize yourself with the stylus actions until you can navigate the various screens on
your HomeSurf Tablet.
4.5.2 Using your finger
Action Function Operations
Tap • Select onscreen items such
as application and settings
icons
• Select onscreen buttons.
• Type using the onscreen
keyboard
• Gently tap an item on the screen to
select the item that you wish to
activate.
Tap and
hold
Drag • Move items on the screen or
Slide • Quickly move vertically or
Flick • Quickly browse a list of
• Open the available options
for an item, for example, tap
and hold a contact or a link on
a web page.
(Think of this as using the
right-click button on a mouse).
shift the view on the screen.
horizontally across the screen.
items in a vertical direction.
• Tap an item on the screen and hold in
place for 2-3 seconds.
• Apply light pressure against an item on
the screen then, without raising your
finger or the stylus, move it across the
screen until you have reached the
target position.
• Apply light pressure on the screen then,
without raising your finger, swipe
vertically or horizontally across the
screen until you have reached the target
screen position.
• Flick is similar to slide, except that flick
involves swiping the screen in lighter and
quicker strokes.
4.5.3 Calibrate the touch screen
1 Press and hold O for about 10 seconds to start touch screen calibration.
2 Use the stylus pen to press the center of the cross "+" as accurately as possible in the
four corners of the screen, and finally at the center of the screen.
8
Binatone Helpline: 0845 345 9677 (UK), 1300 768 112 (Australia), +91 7503011385 (India), +491805938802 (Europe)
Page 9
OVERVIEW OF THE PRODUCT
3 After touch screen calibration, your HomeSurf Tablet will save the new touch screen
data. This process might take up to a few minutes.
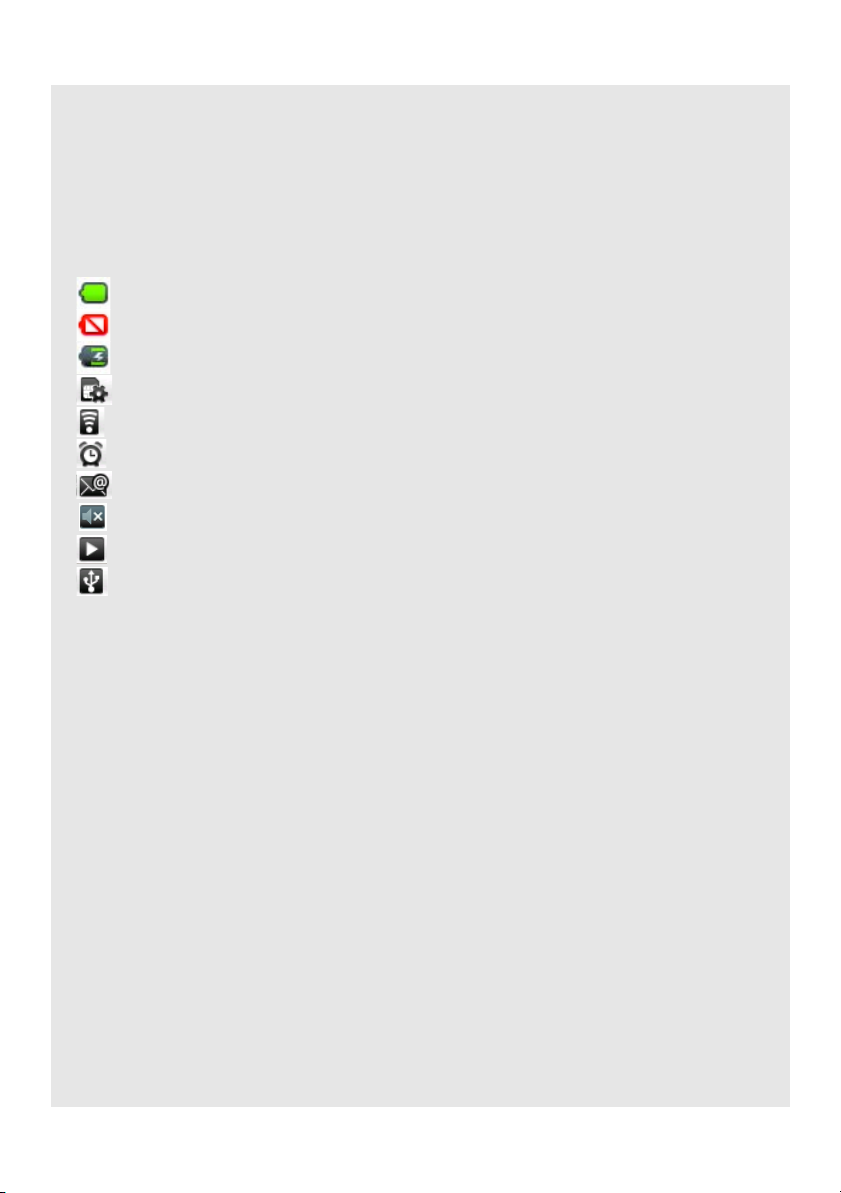
4.5.4 Status Icons
The icons in the status bar at the top of the screen give you information on the current
status of your HomeSurf Tablet.
Icon Description
Battery is fully charged
Battery low
Battery is charging
SD card is inserted
Wireless connection is on
Alarm clock is set
New email
Speaker is muted
Song is playing
USB connection is on
4.5.5 Notifications panel
When the status bar displays a STATUS icon, tap and hold the status bar and slide
downward to open the notifications panel. Tap Clear to clear notifications.
You can also press
To hide the notifications panel, press
panel and then slide upward.
Binatone Helpline: 0845 345 9677 (UK), 1300 768 112 (Australia), +91 7503011385 (India), +491805938802 (Europe)
O and tap Notifications to open the Notifications panel.
B or tap and hold the bottom bar of the notifications
9
Page 10

Table of contents
1 WELCOME........................................................................................ 3
2 IMPORTANT ..................................................................................... 3
3 WHAT'S IN THE BOX?..................................................................... 4
4 OVERVIEW OF THE PRODUCT ...................................................... 5
4.1 Front ..................................................................................................5
4.2 Top .................................................................................................... 5
4.3 Back ..................................................................................................6
4.4 Side ...................................................................................................7
4.5 Basic operations of your Homesurf Tablet ........................................7
5 GETTING STARTED ...................................................................... 14
5.1 Charging your HomeSurf Tablet...................................................... 14
5.2 Inserting a memory card..................................................................15
5.3 Removing a memory card ...............................................................16
5.4 Switching on your HomeSurf Tablet................................................ 16
5.5 Switching off your HomeSurf Tablet ................................................ 16
5.6 Home Screen .................................................................................. 17
5.7 Extended Home Screen ..................................................................17
5.8 Program Launcher...........................................................................18
5.9 Set Time Zone.................................................................................18
5.10 Screen Rotation...............................................................................21
6 Applications on your HomeSurf Tablet....................................... 23
7 USB Connection ............................................................................ 24
7.1 Connecting Homesurf Tablet to a PC.............................................. 24
7.2 Disconnecting Homesurf Tablet from a PC .....................................25
8 Personalizing your HomeSurf Tablet .......................................... 26
8.1 Display............................................................................................. 26
8.2 Sound ..............................................................................................30
9 Using the onscreen keyboard...................................................... 31
9.1 Enter text and numbers ...................................................................31
9.2 Switch between input modes...........................................................31
9.3 Accept or Reject Dictionary Suggestions ........................................31
9.4 Edit text ...........................................................................................32
9.5 Calibrate the touch screen ..............................................................32
10 Making a Wireless Connection .................................................... 33
10.1 Register your HomeSurf Tablet to a Wi-Fi Network ........................33
10
Binatone Helpline: 0845 345 9677 (UK), 1300 768 112 (Australia), +91 7503011385 (India), +491805938802 (Europe)
Page 11

11 Using the Web Browser................................................................ 35
11.1 Open Browser ................................................................................. 35
11.2 Setting your home page .................................................................. 35
11.3 Open a web page ............................................................................36
11.4 Refresh a web page ........................................................................ 36
11.5 Zoom in and out of a webpage........................................................37
11.6 Open a new browser window .......................................................... 37
11.7 Finding text within a webpage .........................................................38
11.8 Selecting links in web pages ...........................................................38
11.9 Downloading unknown applications from the web ..........................39
11.10 Manage bookmarks.........................................................................39
11.11 Customize Browser Options............................................................ 41
11.12 Exit Browser Application..................................................................42
12 Reading and Managing emails..................................................... 42
12.1 Open Email......................................................................................42
12.2 Set up the first email account on your HomeSurf Tablet................. 42
12.3 Set up another email account..........................................................45
12.4 Account settings .............................................................................. 45
12.5 Compose and send email messages ..............................................47
12.6 Read messages ..............................................................................49
12.7 Open an attached file ......................................................................49
12.8 Check for new messages ................................................................49
12.9 Reply to email messages ................................................................ 49
12.10 Delete an email message................................................................50
12.11 Forward an email message .............................................................50
12.12 Mark message as unread................................................................50
12.13 Delete an email account.................................................................. 51
12.14 Exit Email Application......................................................................51
13 Listening to Music......................................................................... 52
13.1 Listen to Music on your HomeSurf Tablet .......................................52
13.2 Open Music application ...................................................................52
13.3 Music Library ................................................................................... 52
13.4 Playback controls ............................................................................53
13.5 Search for a song ............................................................................ 53
13.6 Party Shuffle all songs..................................................................... 54
13.7 Turn party shuffle off .......................................................................54
13.8 Create playlists................................................................................54
13.9 Mute/Unmute music playback ......................................................... 56
13.10 Set current song as background music ...........................................56
13.11 Exit Music application......................................................................56
Binatone Helpline: 0845 345 9677 (UK), 1300 768 112 (Australia), +91 7503011385 (India), +491805938802 (Europe)
11
Page 12

14 Viewing Photos and Creating your own slideshows ................. 57
14.1 Open Gallery ...................................................................................57
14.2 View pictures and videos.................................................................57
14.3 View pictures in full screen.............................................................. 57
14.4 Rotate picture .................................................................................. 58
14.5 View pictures as slideshow ............................................................. 59
14.6 Modify display size of pictures and videos ......................................59
14.7 Modify sort order of pictures and videos ......................................... 60
14.8 View picture and video details.........................................................60
14.9 View pictures & videos in landscape mode .....................................60
14.10 Crop a picture..................................................................................60
14.11 Send pictures using Email application............................................. 61
14.12 Watch videos...................................................................................62
14.13 Send videos using Email application............................................... 62
14.14 Delete a picture ...............................................................................62
14.15 Use Picture as wallpaper.................................................................62
14.16 Exit Gallery ...................................................................................... 64
15 Downloading and Reading eBooks ............................................. 64
15.1 Open Aldiko.....................................................................................64
15.2 Download Free eBooks using Aldiko............................................... 65
15.3 Book Navigation ..............................................................................66
15.4 Importing EPUB files into Aldiko bookshelf .....................................68
15.5 Settings ........................................................................................... 68
15.6 Exit Aldiko........................................................................................69
16 Performing Calculations.............................................................. 69
16.1 Open Calculator ..............................................................................69
16.2 Perform Calculations .......................................................................69
16.3 Exit Calculator .................................................................................70
17 Using the tDigitalClock............................................................... 71
17.1 Open tDigitalClock...........................................................................71
17.2 Set Alarm Clock...............................................................................71
17.3 Deactivate Alarm Clock ...................................................................72
17.4 Change Font Setting .......................................................................72
17.5 Exit tDigitalClock .............................................................................72
18 Installing Android applications.................................................... 72
19 Installing non-Android applications............................................ 73
20 Removing applications from HomeSurf Tablet .......................... 74
12
Binatone Helpline: 0845 345 9677 (UK), 1300 768 112 (Australia), +91 7503011385 (India), +491805938802 (Europe)
Page 13

21 ES File Explorer............................................................................. 74
21.1 Open ES File Explorer.....................................................................75
21.2 Open file as .....................................................................................75
21.3 Select all files in a directory............................................................. 75
21.4 Create a new folder ......................................................................... 75
21.5 Rename a file ..................................................................................76
21.6 Copy a file to another location.........................................................76
21.7 Move a file to another location ........................................................76
21.8 Delete a file .....................................................................................76
21.9 Compress a file ...............................................................................76
21.10 Change Orientation ......................................................................... 77
21.11 Modify View Settings in ES File Explorer ........................................77
21.12 Exit ES File Explorer .......................................................................77
22 ES Task Manager........................................................................... 78
22.1 Open ES Task Manager.................................................................. 78
22.2 Exit ES Task Manager.....................................................................78
23 Main settings of your HomeSurf Tablet ...................................... 79
23.1 Exit Settings ....................................................................................79
24 HELP/TROUBLESHOOTING ......................................................... 80
25 IF YOU NEED HELP....................................................................... 81
26 SAFETY INSTRUCTIONS .............................................................. 81
26.1 Replacing batteries..........................................................................82
27 CLEANING THE DEVICE ............................................................... 82
28 DISPOSAL OF THE DEVICE (ENVIRONMENT) ........................... 82
29 GUARANTEE AND SERVICE ........................................................ 83
30 FCC Statement............................................................................... 83
31 TECHNICAL SPECIFICATIONS .................................................... 84
32 DECLARATION OF CONFORMITY ............................................... 85
Binatone Helpline: 0845 345 9677 (UK), 1300 768 112 (Australia), +91 7503011385 (India), +491805938802 (Europe)
13
Page 14
GETTING STARTED
5 GETTING STARTED
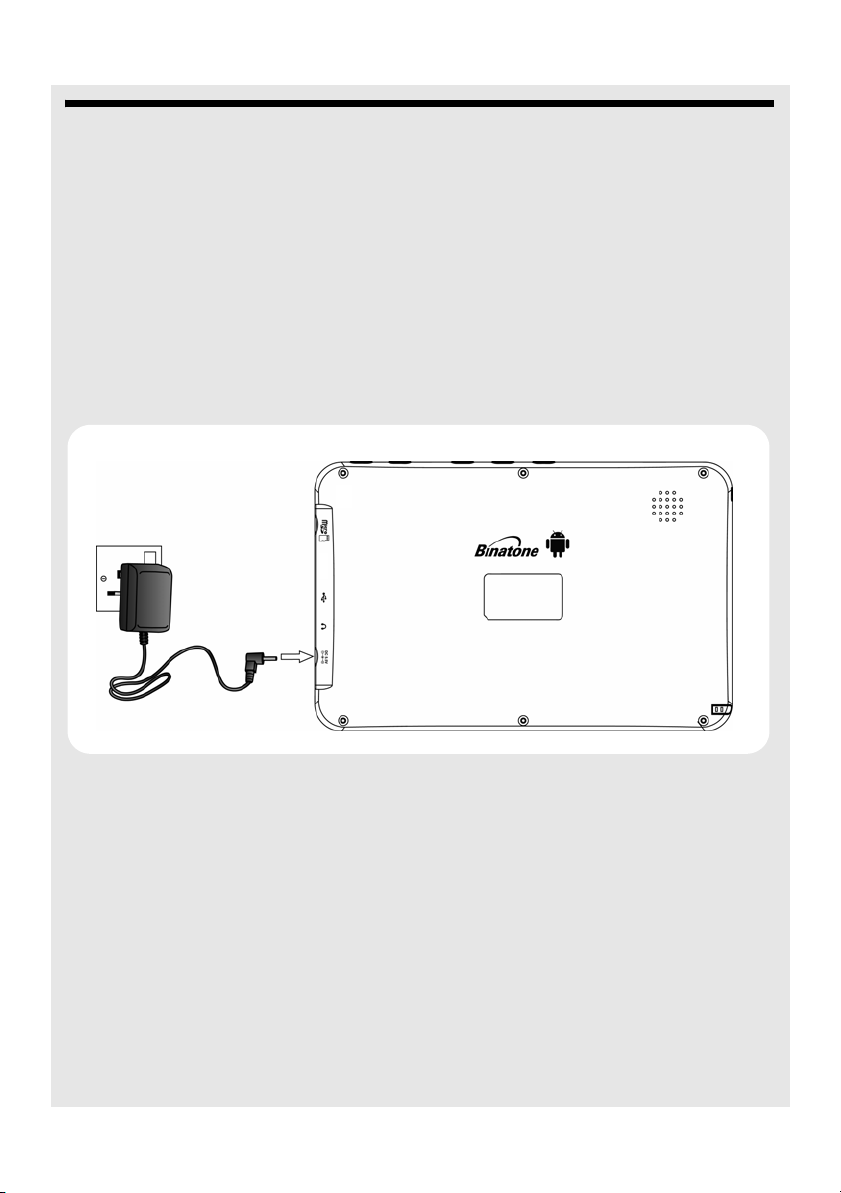
5.1 Charging your HomeSurf Tablet
Your HomeSurf Tablet comes with an integrated rechargeable battery.
New batteries are not charged when shipped. Before you start using your HomeSurf
Tablet, you need to charge the battery.
Follow the steps below to connect your HomeSurf Tablet to the power outlet and charge
the battery.
1 Plug one end of the AC power adaptor into the power jack on your HomeSurf Tablet.
2 Plug the other end into a power outlet.
Notes
• The Red charging LED will light up when the battery is charging.
• Once the battery is fully charged, the charging LED will turn OFF.
• If your HomeSurf Tablet is totally out of battery, it may take a while before you can
power up your HomeSurf Tablet.
• Battery performance depends on your usage patterns.
Tips to improve battery performance
As the device has a large screen, it will consume a lot of power. To extend battery life, you
can consider the following:
1 Reduce display brightness:
From the home screen, press
(reduce brightness);
14
Binatone Helpline: 0845 345 9677 (UK), 1300 768 112 (Australia), +91 7503011385 (India), +491805938802 (Europe)
O and tap Settings > Sound & display > Brightness
Page 15
GETTING STARTED
2 Reduce web search:
From the home screen, press
settings > Network notification (disable);
3 Turn off Wi-Fi:
From the home screen, press
Wi-Fi).
O and tap Settings > Wireless controls > Wi-Fi
O and tap Settings > Wireless controls > Wi-Fi (turn off
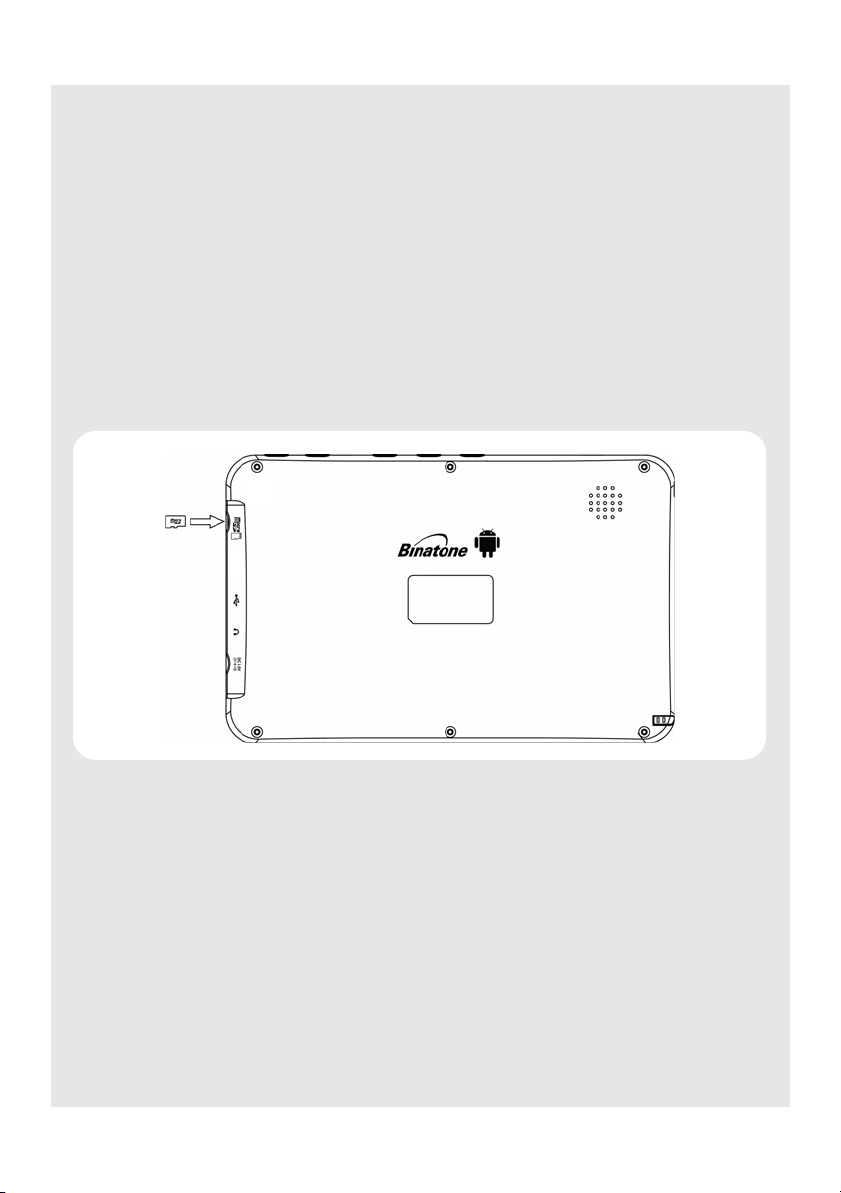
5.2 Inserting a memory card
Your HomeSurf Tablet supports micro SD cards.
You can operate music, pictures, files and applications on the HomeSurf Tablet through a
memory card.
When no MicroSD card inserted, your HomeSurf Tablet will read the internal memory.
1. Insert the memory card into the card slot in the direction as indicated above until it
clicks into place.
Binatone Helpline: 0845 345 9677 (UK), 1300 768 112 (Australia), +91 7503011385 (India), +491805938802 (Europe)
15
Page 16
GETTING STARTED
5.3 Removing a memory card
When the HomeSurf Tablet is off
1. Push in the memory card. The memory card will pop out from its slot.
When the HomeSurf Tablet is on
1. Press
2Tap SD card & internal storage and tap Unmount SD card.
3. Push in the memory card. The memory card will pop out from its slot.
O and tap Settings.
5.4 Switching on your HomeSurf Tablet
Press and hold P and release when blue power LED turns ON.
It takes about 1 minute for your HomeSurf Tablet to boot up.
5.5 Switching off your HomeSurf Tablet
Press and hold P and release when the screen shuts down.
16
Binatone Helpline: 0845 345 9677 (UK), 1300 768 112 (Australia), +91 7503011385 (India), +491805938802 (Europe)
Page 17

GETTING STARTED
5.6 Home Screen
To return to the home screen at anytime, press H.
Tip
You can also press
B continuously until you return to the home screen.
5.7 Extended Home Screen
The extended home screen lets you add more shortcuts and widgets on your HomeSurf
Tablet so that you can access the widgets and applications conveniently from the home
screen.
There are two additional home screens apart from the main home screen. Drag the stylus
pen or slide your finger horizontally across the screen to go to the left or right side of the
main home screen.
Binatone Helpline: 0845 345 9677 (UK), 1300 768 112 (Australia), +91 7503011385 (India), +491805938802 (Europe)
17
Page 18
GETTING STARTED
5.8 Program Launcher
Program
Launcher
Ta p Program Launcher to enter the applications window of your HomeSurf Tablet.
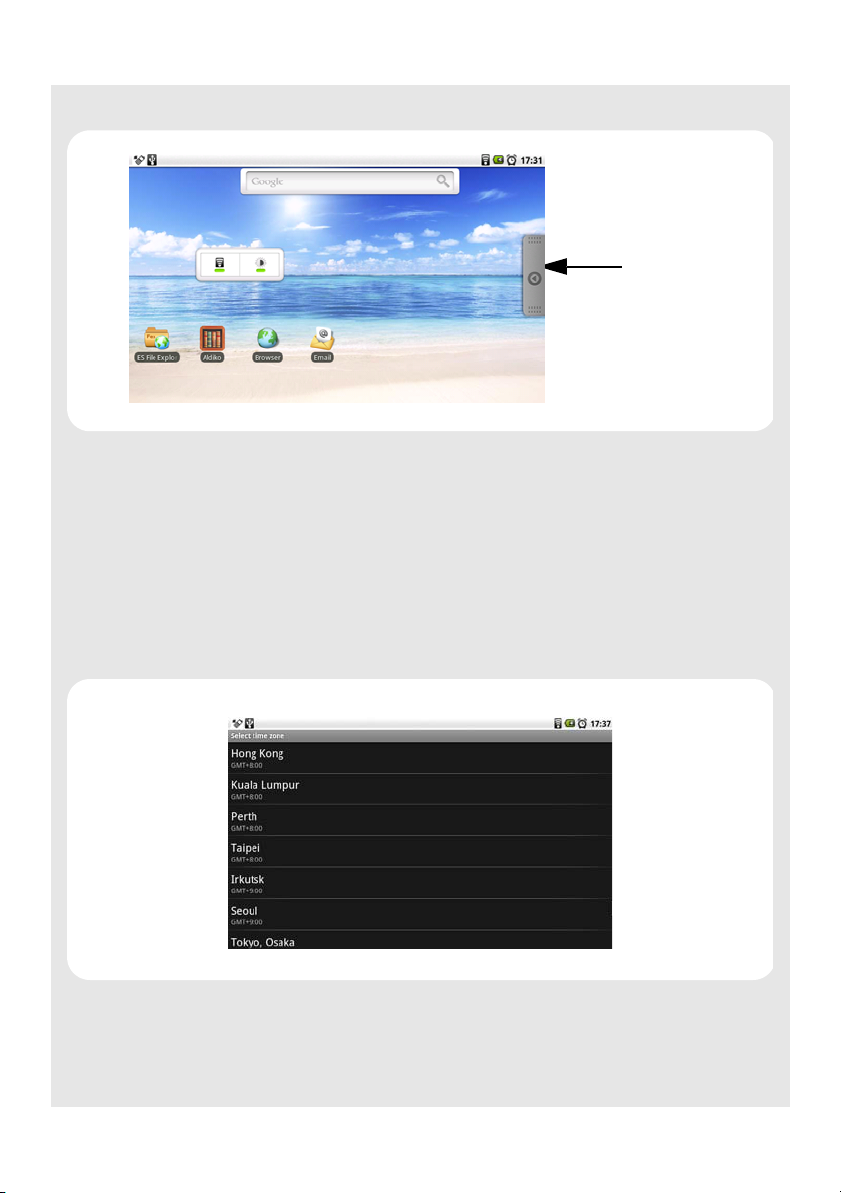
5.9 Set Time Zone
1 Press O.
2 Ta p Settings.
3 Tap to select Date & time.
4 Ta p Select time zone.
5 Slide your finger vertically across the screen to find your location.
6 Tap to select your time zone.
TIP
To sort the time zones in alphabetical order, press
18
Binatone Helpline: 0845 345 9677 (UK), 1300 768 112 (Australia), +91 7503011385 (India), +491805938802 (Europe)
O and tap Sort alphabetically.
Page 19
GETTING STARTED
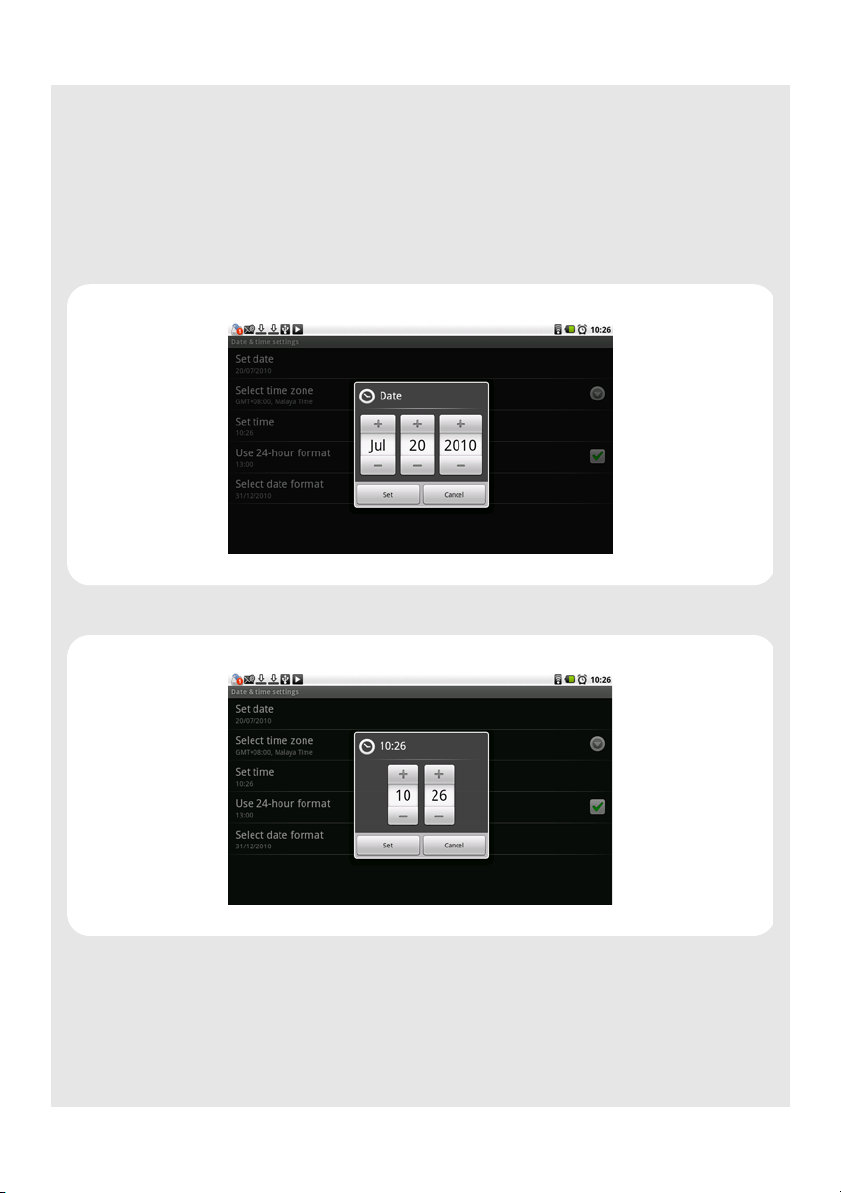
5.9.1 Set Date and Time
1 From the HOME screen, press O.
2 Ta p Settings.
3 Tap to select Date & time.
4 Ta p Set Date. Tap + or - on each date field to change the Month, Day and Year.
5 Ta p Set to confirm the date setting.
6 Tap to select Set time. Tap + or - on each time field to change the Hours and Minutes.
7 Ta p AM/PM to select AM (morning) or PM (afternoon).
Tip
This option is available only when 24-hour format is off.
8 Ta p Set to confirm the time setting.
9 Press
Binatone Helpline: 0845 345 9677 (UK), 1300 768 112 (Australia), +91 7503011385 (India), +491805938802 (Europe)
B to exit and return to the Home Screen.
19
Page 20
GETTING STARTED
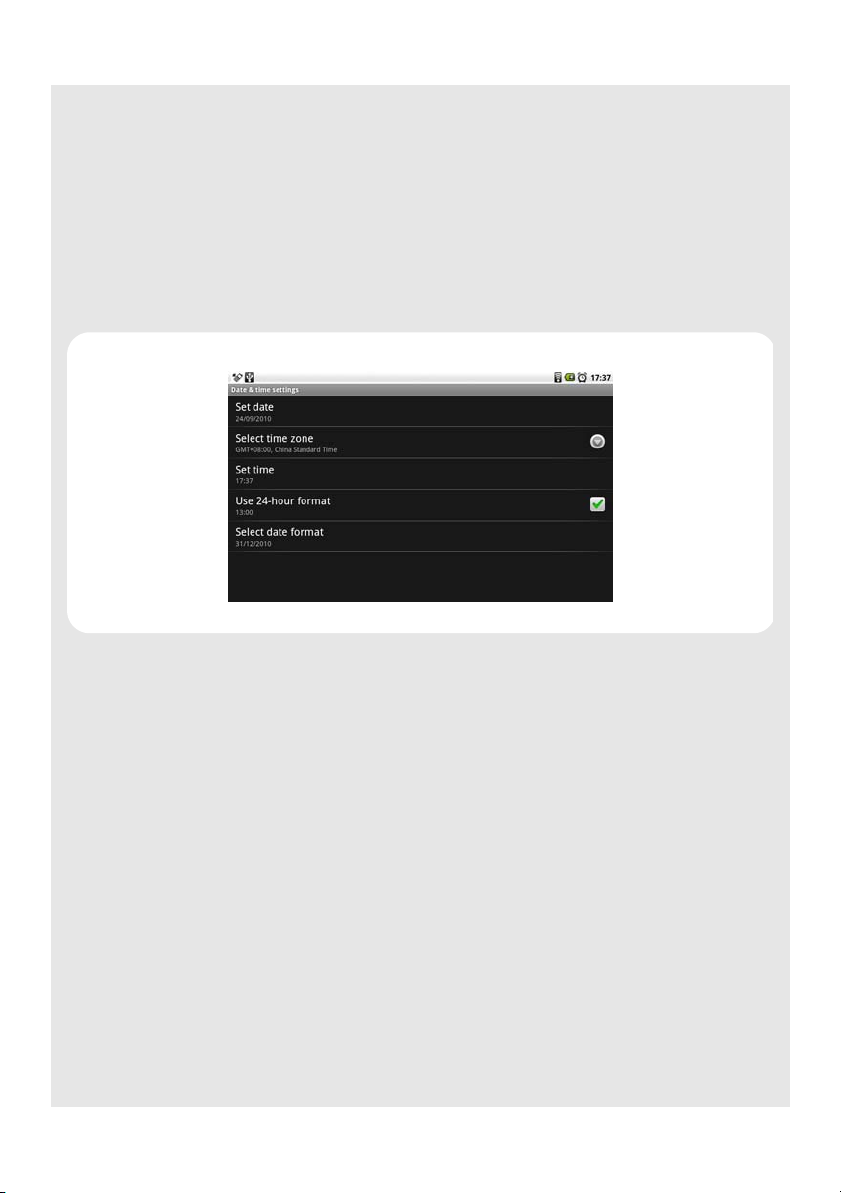
5.9.2 Set Time Format
1 Press O.
2 Ta p Settings.
3 Tap to select Date & time.
4 Ta p Use 24-hour format to activate or deactivate 24-hour format.
Tip
Use 24-hour format is activated when
12-hour format is activated when
✓appears next to the option.
✓disappears.
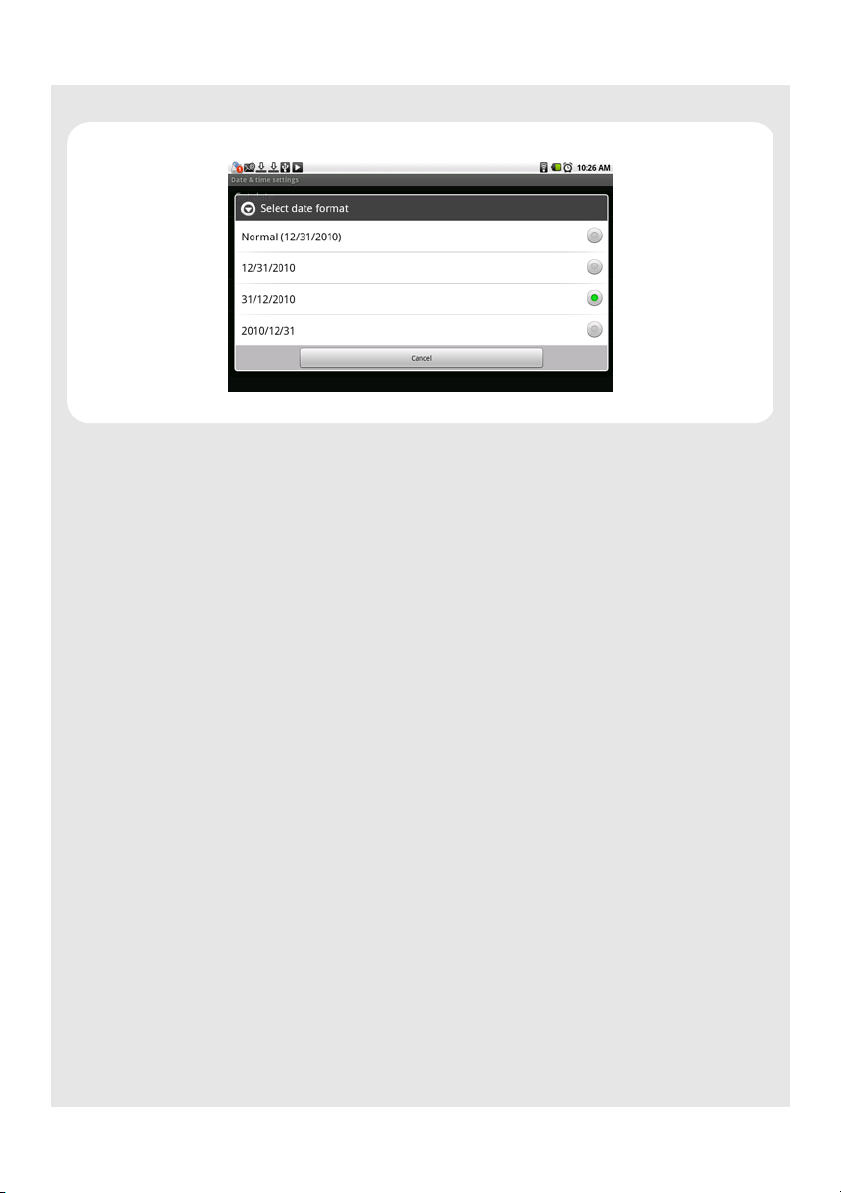
5.9.3 Set Date Format
1 Press O.
2 Ta p Settings.
3 Tap to select Date & time.
4 Ta p Select date format.
20
Binatone Helpline: 0845 345 9677 (UK), 1300 768 112 (Australia), +91 7503011385 (India), +491805938802 (Europe)
Page 21
GETTING STARTED
5 Tap to select the date format that you want to use.
5.10 Screen Rotation
The HomeSurf Tablet has a tilt or orientation sensor, which detects if you are holding it in
Portrait or Landscape mode. The screen is adjusted accordingly.
Note
The Home Screen and certain applications do not support automatic screen rotation.
Binatone Helpline: 0845 345 9677 (UK), 1300 768 112 (Australia), +91 7503011385 (India), +491805938802 (Europe)
21
Page 22

GETTING STARTED
Tip
Automatic screen rotation is enabled by default.
5.10.1 Enable/Disable automatic screen orientation
1 Press O.
2 Ta p Settings > Sound & display.
3 Ta p Orientation to disable automatic screen rotation.
Tip
Automatic screen rotation is disabled when
To enable automatic screen rotation again, tap to select Orientation.
✓disappears.
22
Binatone Helpline: 0845 345 9677 (UK), 1300 768 112 (Australia), +91 7503011385 (India), +491805938802 (Europe)
Page 23

Applications on your HomeSurf Tablet
6 Applications on your HomeSurf Tablet
The following applications are included with your HomeSurf Tablet. Tap Program
Launcher and then tap any application icon to launch the application.
Aldiko Download and read eBooks. page 64
Browser Browse any website over a Wi-Fi network. page 35
Calculator Perform simple and advanced calculations. page 69
ES File Explorer A file manager that allows you to browse files and folders
stored on your HomeSurf Tablet and micro SD card.
ES Task
Manager
Email Send and receive email using your existing email accounts. page 42
Gallery A library of all the images and videos on your HomeSurf
iDigitalClock Set alarm to remind you of your appointments. page 71
Music Listen to music. page 52
Settings Adjust all the settings of the HomeSurf Tablet in one
This Android program helps you free memory, kill task, close
all the running applications, and speed up your HomeSurf
Tablet.
Tablet.
convenient place.
Set your wallpaper, screen brightness, and settings for
network, mail, web, music, video, photos, and more.
Set auto-lock and a passcode for security.
page 74
page 78
page 57
page 79
Binatone Helpline: 0845 345 9677 (UK), 1300 768 112 (Australia), +91 7503011385 (India), +491805938802 (Europe)
23
Page 24
USB Connection
7 USB Connection
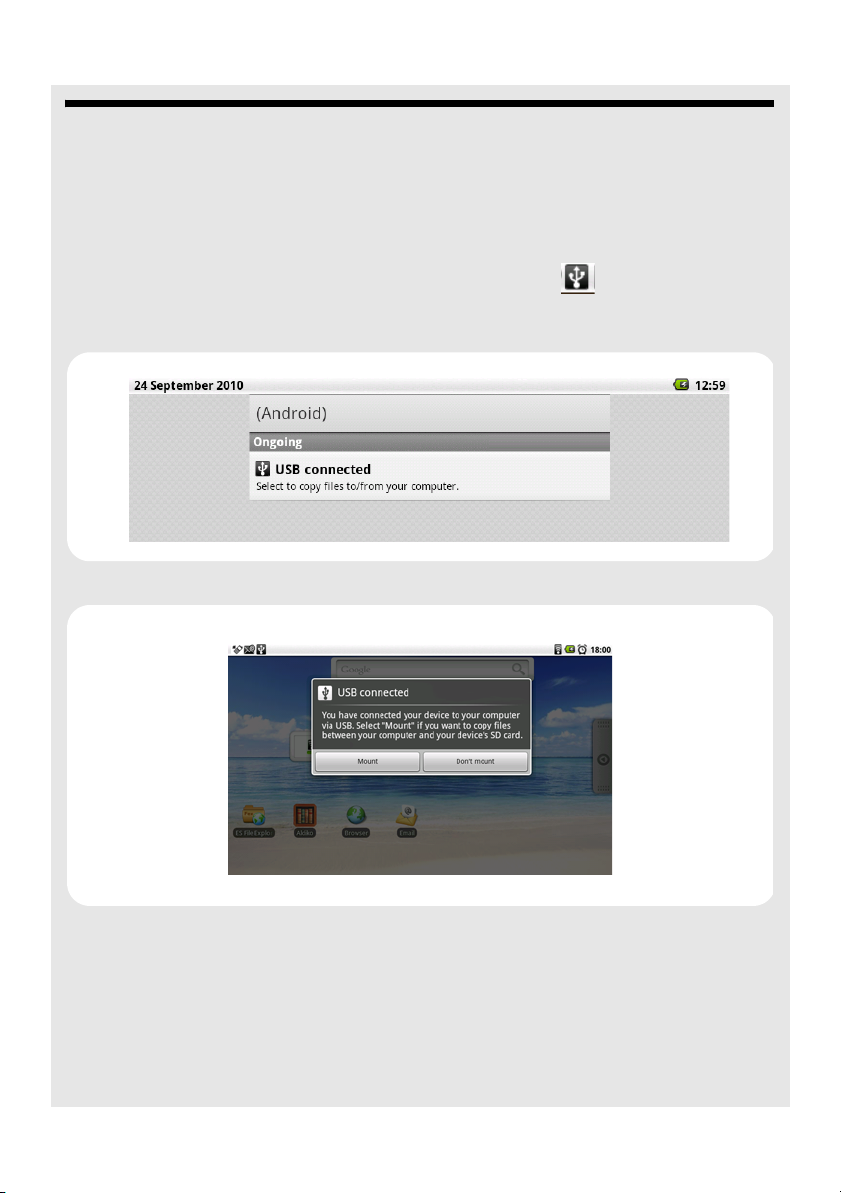
7.1 Connecting Homesurf Tablet to a PC
1 Plug one end of the USB cable to the USB port on your Homesurf Tablet and plug the
other end to your PC.
USB connected is displayed on your Homesurf Tablet and appears on the
Notifications panel.
2 Press
3 In the notifications panel, tap USB connected and then tap Mount.
O and then tap Notifications to open the notifications panel.
The internal memory or the MicroSD card memory on your Homesurf Tablet will be
mounted as a removable disk on your PC, by which you can read and write files
between your Homesurf Tablet and the PC.
Note
When a MicroSD card is inserted, the PC will only read the MicroSD card content.
24
Binatone Helpline: 0845 345 9677 (UK), 1300 768 112 (Australia), +91 7503011385 (India), +491805938802 (Europe)
Page 25
USB Connection
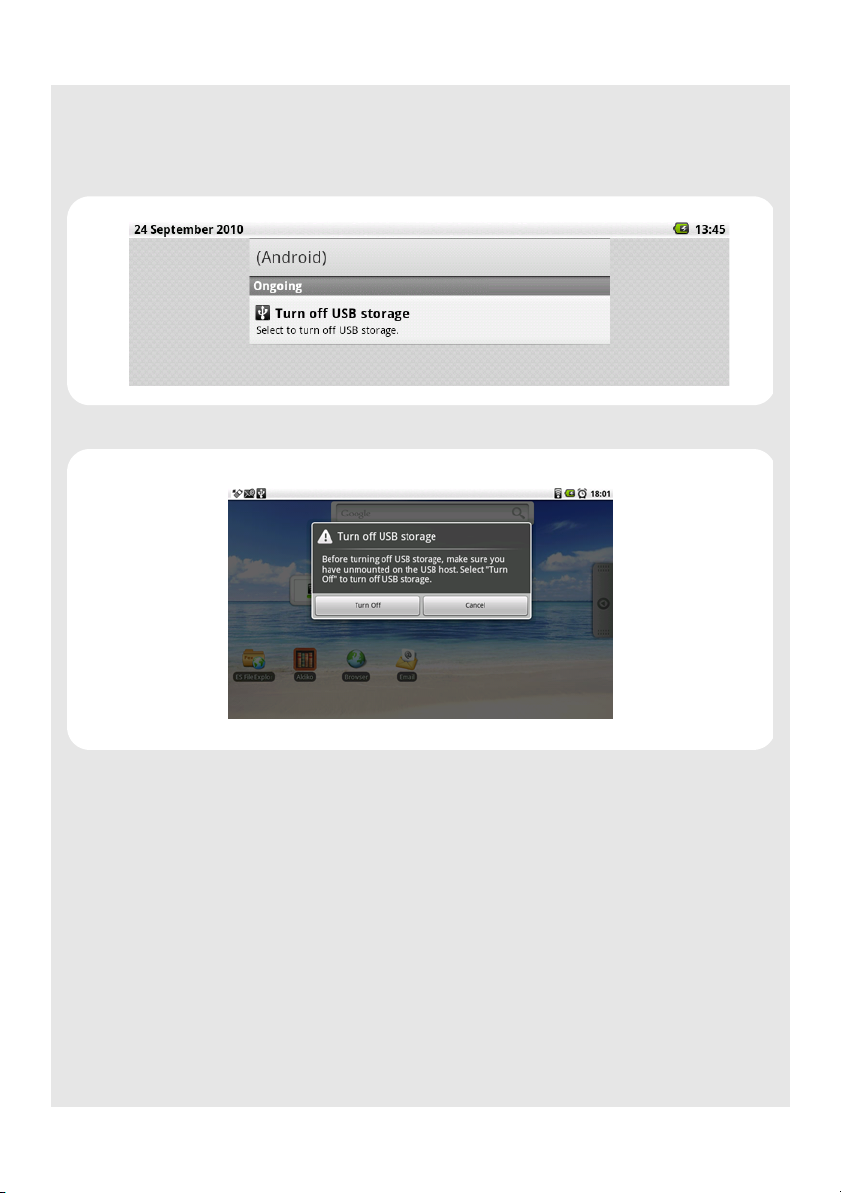
7.2 Disconnecting Homesurf Tablet from a PC
1 On your Homesurf Tablet, press O and then tap Notifications to open the
notifications panel.
2 In the notifications panel, tap Turn off USB Storage and then tap Tur n O f f .
3 Disconnect the USB cable from both your Homesurf Tablet and PC.
Binatone Helpline: 0845 345 9677 (UK), 1300 768 112 (Australia), +91 7503011385 (India), +491805938802 (Europe)
25
Page 26
Personalizing your HomeSurf Tablet
8 Personalizing your HomeSurf Tablet
8.1 Display
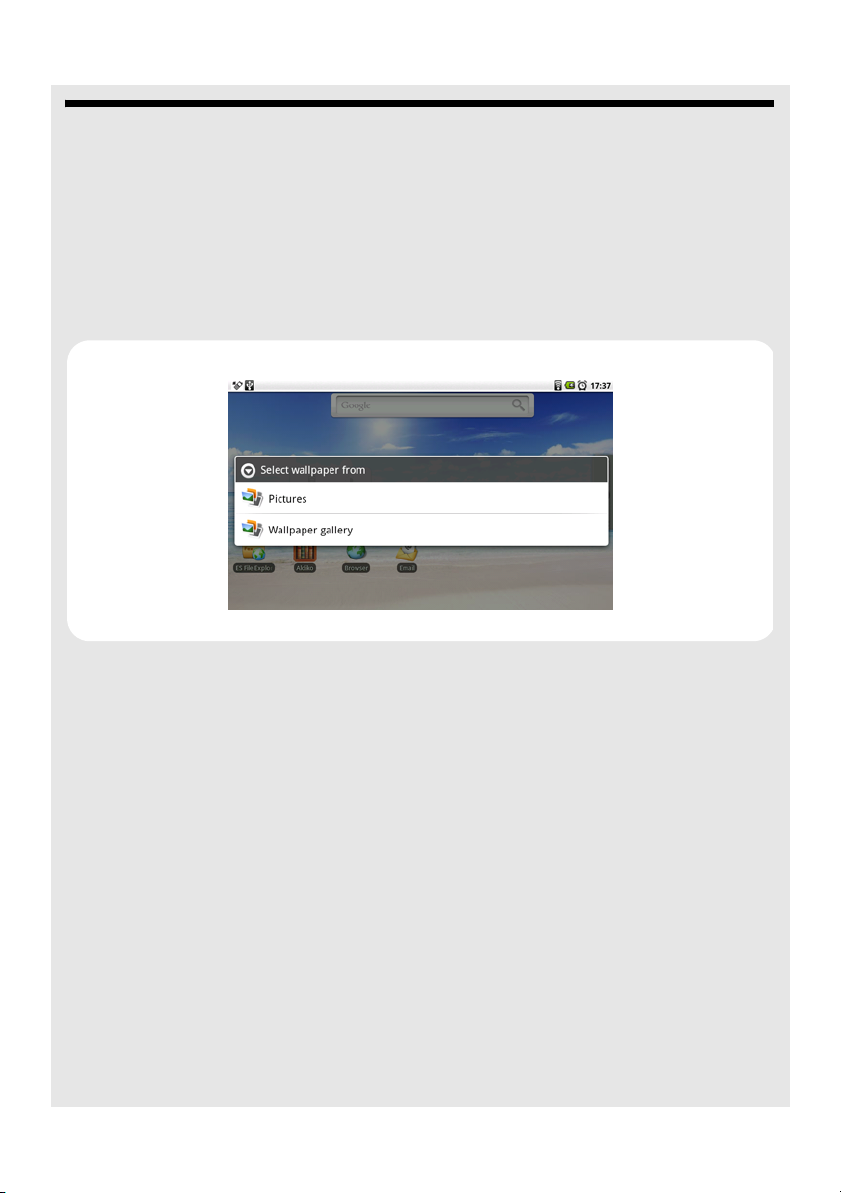
8.1.1 Change Wallpaper
1 From the home screen, press O and then tap Wallpaper.
2 Tap to select Pictures (pictures in your memory card) or Wallpaper gallery (preset
wallpapers on your HomeSurf Tablet).
Tip
If you select Wallpaper gallery, simply slide horizontally across the pictures to browse
them.
Tap to select a wallpaper and then tap Set wallpaper.
26
Binatone Helpline: 0845 345 9677 (UK), 1300 768 112 (Australia), +91 7503011385 (India), +491805938802 (Europe)
Page 27

Personalizing your HomeSurf Tablet
You will see that the background image is now changed to the picture you have
selected.
3 If you select Pictures, tap to select your desired picture.
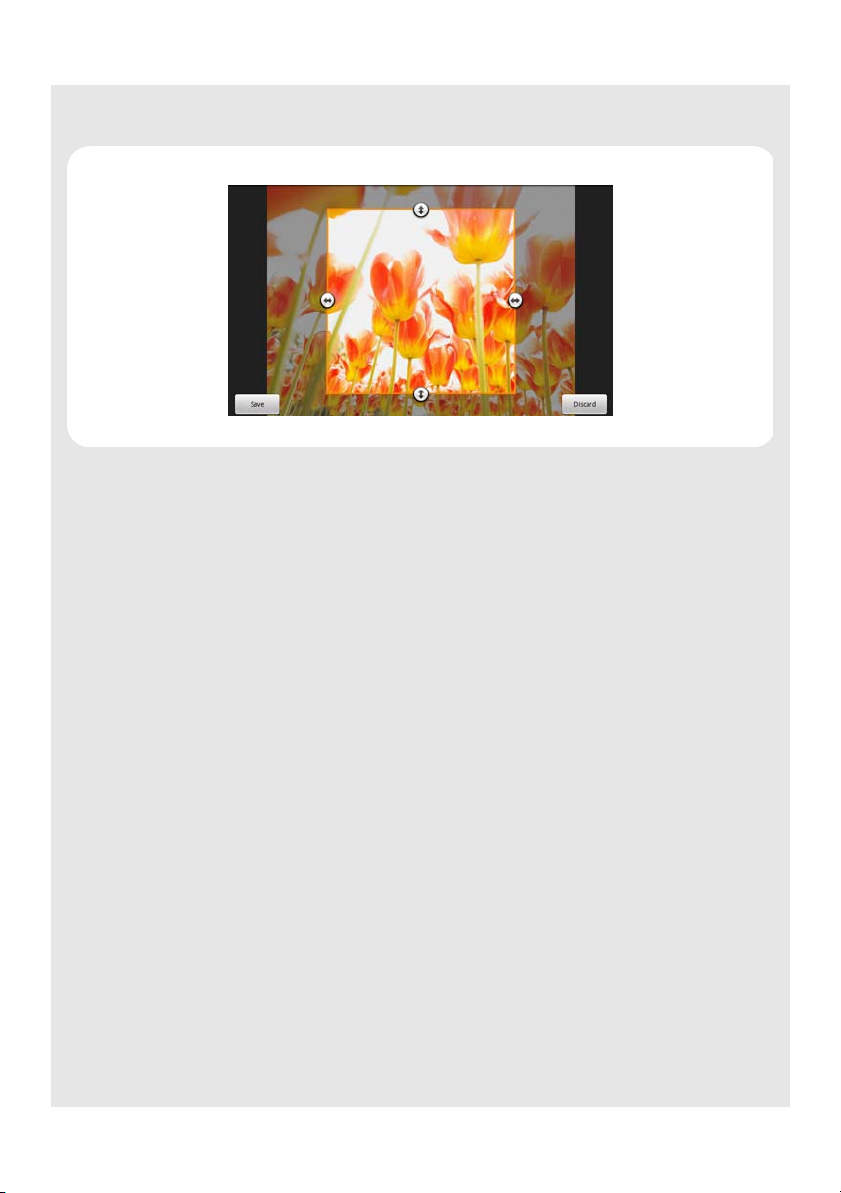
4 A crop box will appear at the center of the picture.
To resize the picture, tap and hold the edge of the crop box, and drag inward or
outward.
To move the crop box to another area on the picture, tap and hold inside the crop box,
then drag it to the desired position.
5 Ta p Save to set the picture as wallpaper.
You will see that the background image is now changed to the picture you have
selected.
Binatone Helpline: 0845 345 9677 (UK), 1300 768 112 (Australia), +91 7503011385 (India), +491805938802 (Europe)
27
Page 28

Personalizing your HomeSurf Tablet
8.1.2 Adjust Screen Brightness
1 From the home screen, press O and then tap Settings > Sound & display >
Brightness.
2 Slide across the brightness control bar to reduce or increase screen brightness and tap
OK to confirm.
8.1.3 Set screen timeout
You can adjust the delay before the screen dims into power saving mode automatically.
1 From the home screen, press
timeout.
2 Tap to select 30 seconds, 1 minute, 2 minutes, 10 minutes or Never timeout.
O and then tap Settings > Sound & display > Screen
8.1.4 Re-arrange the icons on your home screen
1 Tap and hold the icon that you wish to re-arrange until it wiggles.
2 Slide to the position on which you wish to place the icon.
3 Release when the icon is correctly placed.
8.1.5 Add shortcuts to your home screen
1 Ta p Program Launcher.
2 Tap and hold an application icon until it wiggles.
3 Drag the icon to the home screen.
A shortcut of the application will be automatically created and placed on the home
screen.
28
Binatone Helpline: 0845 345 9677 (UK), 1300 768 112 (Australia), +91 7503011385 (India), +491805938802 (Europe)
Page 29

Personalizing your HomeSurf Tablet
8.1.6 Remove items from your home screen
1 Tap and hold the item until it wiggles.
The Program Launcher will change into a recycle bin.
2 Drag it into Program Launcher.
The Recycle Bin turns red and the item is removed.
8.1.7 Add Widgets to your home screen
1 From the home screen, press O.
2 Ta p Add > Widgets.
3 You will be given a list of Widgets to add to your home screen.
4 Tap to select the widget that you wish to add to the home screen.
You will see that the widget is now on your home screen.
Binatone Helpline: 0845 345 9677 (UK), 1300 768 112 (Australia), +91 7503011385 (India), +491805938802 (Europe)
29
Page 30

Personalizing your HomeSurf Tablet
8.1.8 Add Folders to your home screen
1 From the home screen, press O.
2 Ta p Add > Folders.
3 Ta p New folder or select a folder.
A new folder is now added to your home screen.
8.1.9 Add items to the folders on your home screen
1 Tap and hold the item until it wiggles.
2 Drag the item to the folder in which you wish to place the item.
8.2 Sound
8.2.1 Set media volume
1 From the home screen, press O.
2 Ta p Settings > Sound & display > Media volume.
3 Slide across the volume control bar to reduce or increase media volume and tap OK to
confirm.
30
Binatone Helpline: 0845 345 9677 (UK), 1300 768 112 (Australia), +91 7503011385 (India), +491805938802 (Europe)
Page 31

Using the onscreen keyboard
9 Using the onscreen keyboard
Your HomeSurf Tablet features a Qwerty keyboard by which the keys arrangement are
exactly the same as that of a standard English computer keyboard.
The onscreen keyboard lets you enter text, such as passwords, filenames, email
messages, etc. It appears automatically when you launch certain applications or when
you tap on a text or number field.
To hide the onscreen keyboard, press
9.1 Enter text and numbers
1 Tap on a text or number field to bring up the keyboard.
2 When entering texts or numbers, each letter or number appear above the key you have
pressed.
B.
9.2 Switch between input modes
Ta p ABC (lower case), ⇑ (upper case), ?123 (number), or ALT (symbols) on the
onscreen keyboard to switch between different input modes.
Long press on the onscreen keyboard to show the accented characters.
9.3 Accept or Reject Dictionary Suggestions
Depending on the application you are using, the HomeSurf Tablet uses a dictionary to
suggest corrections or complete the word you are typing.
To accept the suggested word, simply tap on the suggested entry.
To reject the suggested word, simply continue typing.
Binatone Helpline: 0845 345 9677 (UK), 1300 768 112 (Australia), +91 7503011385 (India), +491805938802 (Europe)
31
Page 32

Using the onscreen keyboard
9.4 Edit text
Tap and hold on the word you have typed to activate the following edit text options:
Select all
Select text
Cut all
Copy all
Input Method
9.5 Calibrate the touch screen
1 Press and hold O for about 10 seconds to start touch screen calibration.
2 Use the stylus pen to press the center of the cross "+" as accurately as possible in the
four corners of the screen, and finally at the center of the screen.
3 After touch screen calibration, your HomeSurf Tablet will save the new touch screen
data. This process might take up to a few minutes.
32
Binatone Helpline: 0845 345 9677 (UK), 1300 768 112 (Australia), +91 7503011385 (India), +491805938802 (Europe)
Page 33

Making a Wireless Connection
10 Making a Wireless Connection
Before you can surf the Internet, send and receive emails, download content and
applications etc., you must join a Wi-Fi network that is connected to the Internet.
For Wi-Fi networks that are not secured with a PIN code, you can easily connect to them
and access the Internet freely. However, for Wi-Fi networks that are secured with
password, you need to have the password to access the Internet.
10.1 Register your HomeSurf Tablet to a Wi-Fi Network
1 From the homescreen, press O.
2 Ta p Settings > Wireless controls.
3 Ta p Wi-Fi to turn on wireless connection.
appears in the Wi-Fi checkbox.
4 Ta p Wi-Fi settings.
Your Homesurf Tablet will start to scan for the networks within range and display a list
of available Wi-Fi networks.
5 Tap the Wi-Fi network that you want your Homesurf Tablet to be connected with.
If the network is not secured with a password, your Homesurf Tablet will start to
establish a link with it.
If it is a secured network, you will be prompted to select the security option (for
networks secured with WEP) and enter the wireless password.
Binatone Helpline: 0845 345 9677 (UK), 1300 768 112 (Australia), +91 7503011385 (India), +491805938802 (Europe)
33
Page 34

Making a Wireless Connection
Tip
If you are not sure about the network security option, try the Share option and see if your
connection to the network is successful. If this doesn’t work, try the Open option. Make
sure that you have entered the correct password. (To cross check your password, tap
Show password checkbox as indicated below)
6 Tap on the password field to launch the onscreen keyboard. Enter the password and
tap Connect.
7 Your Homesurf Tablet will start to establish a link to the network. Once a connection
established, “Connected” will appear below the name of the Wi-Fi network.
8 Press
H to return to the home screen.
will appear on the status bar of your home screen.
You can now use the Internet function.
34
Binatone Helpline: 0845 345 9677 (UK), 1300 768 112 (Australia), +91 7503011385 (India), +491805938802 (Europe)
Page 35

Using the Web Browser
Note
The connection speed is dependent on the capability of the Wi-Fi network.
Once you have joined a Wi-Fi network manually, your HomeSurf Tablet will automatically
connect to it whenever the network is in range. If more than one previously used network
is in range, your HomeSurf Tablet will join the one last used.
11 Using the Web Browser
YOU MUST JOIN A WI-FI NETWORK THAT IS CONNECTED TO THE INTERNET
BEFORE YOU CAN SURF THE WEB VIA THE BROWSER APPLICATION.
SEE PAGE 33 ON HOW TO JOIN A WI-FI NETWORK.
You can use the Browser to surf the web. The Browser is fully optimized and comes with
advanced features that let you enjoy Internet browsing on your HomeSurf Tablet.
11.1 Open Browser
Ta p Program Launcher > Browser.
11.2 Setting your home page
By default, the home page is www.google.com
1 To set another home page, press
2 Ta p Settings > Set home page.
3 In the Set home page dialog box, tap on the URL input field to launch the onscreen
keyboard.
4 Enter the web address of the home page and tap Done.
5 Ta p OK to confirm.
Binatone Helpline: 0845 345 9677 (UK), 1300 768 112 (Australia), +91 7503011385 (India), +491805938802 (Europe)
O and tap More.
35
Page 36

Using the Web Browser
11.3 Open a web page
1 In the Browser window, press O and tap Go.
2 Enter the web address in the URL field using the onscreen keyboard and tap Go.
Note
As you enter the address, matching web page addresses will appear on the screen. Tap
an address to go directly to that web page or continue to enter the web page address.
11.4 Refresh a web page
1 On the web page, press O.
36
Binatone Helpline: 0845 345 9677 (UK), 1300 768 112 (Australia), +91 7503011385 (India), +491805938802 (Europe)
Page 37

Using the Web Browser
2 Ta p Refresh.
11.5 Zoom in and out of a webpage
1 Launch the zoom control by sliding across the screen in one direction.
2 Tap the zoom control icon to zoom in and zoom out.
11.6 Open a new browser window
You can open multiple browser windows and switch between different web pages.
1 In the Browser window, press
A new browser window opens and enters the home page.
Binatone Helpline: 0845 345 9677 (UK), 1300 768 112 (Australia), +91 7503011385 (India), +491805938802 (Europe)
O and tap New Window.
37
Page 38

Using the Web Browser
11.6.1 Switch between browser windows
1 In the Browser window, press O and tap Windows.
2 Tap to select the browser window you wish to display.
11.7 Finding text within a webpage
1 When viewing a webpage, press O and then tap More > Find on page.
2 Tap on the input field to launch the onscreen keyboard.
3 Enter the text using the onscreen keyboard and tap Done.
The matching texts are highlighted on the screen.
4 Ta p < or > to go to the previous or next matching text.
11.8 Selecting links in web pages
11.8.1 Web page links
1 Tap and hold the link.
A pop-up menu opens
2 Tap to select Open, Open in new window, Bookmark link, Save link, Share link or
Copy link URL.
11.8.2 Email links
1 Tap and hold the link.
A pop-up menu opens.
2 Tap to select Send email or Copy.
If you select Send email, the Email application will launch automatically.
38
Binatone Helpline: 0845 345 9677 (UK), 1300 768 112 (Australia), +91 7503011385 (India), +491805938802 (Europe)
Page 39

Using the Web Browser
3 Enter the recipient and subject using the onscreen keyboard and tap Next.
4 Enter the message and then tap Send to send the email, Save as draft or Discard.
(For more information on composing and sending email messages, see Compose and
send email messages on page 47.)
Tip
If you exit the email application without saving the message you have composed, the
message will be automatically saved as draft in the Draft folder of your default email
account.
11.9 Downloading unknown applications from the web
Before you can download web applications, you must first enable downloading from the
Settings menu.
1 Press
2 Ta p Unknown sources to enable or disable the downloading of unknown applications.
When enabled,
Warning!
Applications downloaded from the web can be from unknown sources. To protect your
HomeSurf Tablet and personal data, download applications only from trusted sources.
O, and then tap Settings > Applications.
✓appears next to the option.
11.9.1 View your downloads
1 In the Browser window, press O and then tap More > Downloads.
11.10 Manage bookmarks
You can store as many bookmarks as you want on your HomeSurf Tablet.
Binatone Helpline: 0845 345 9677 (UK), 1300 768 112 (Australia), +91 7503011385 (India), +491805938802 (Europe)
39
Page 40

Using the Web Browser
11.10.1 Bookmark a web page
1 In the Browser window, go to the web page you want to bookmark.
2 Press
3 Ta p Add bookmark and enter the bookmark name.
4 Edit the location if needed.
5 Ta p OK.
O and then tap Bookmarks.
The bookmark option opens.
11.10.2 Open a bookmark
1 In the Browser window, press O and then tap Bookmarks.
The bookmark option opens.
2 Tap to select the bookmark to open it.
40
Binatone Helpline: 0845 345 9677 (UK), 1300 768 112 (Australia), +91 7503011385 (India), +491805938802 (Europe)
Page 41

Using the Web Browser
11.11 Customize Browser Options
You can customize the Browser to suit your browsing preferences by setting the display,
privacy, and security options. In the Browser window, press
Settings to modify the following browser settings according to your preference.
Page content settings Text size
Default zoom
Text encoding
Block pop-up windows
Load images
Auto-fit pages
Enable JavaScript
Open in background
Set home page
Privacy settings Clear cache
Clear history
Accept cookies
Clear all cookie data
Remember form data
Clear form data
Security settings Remember passwords
Clear passwords
Show security warnings
Advanced settings Enable Gears
Gears settings
Reset to default
O and then tap More >
When
✓appears next to the option, the setting is enabled. To disable, tap the option
again.
Binatone Helpline: 0845 345 9677 (UK), 1300 768 112 (Australia), +91 7503011385 (India), +491805938802 (Europe)
41
Page 42

Reading and Managing emails
11.12 Exit Browser Application
Do one of the following:
• Press
• Press
B until you return to the home screen.
H.
12 Reading and Managing emails
YOU MUST JOIN A WI-FI NETWORK THAT IS CONNECTED TO THE INTERNET
BEFORE YOU CAN SURF THE WEB VIA THE BROWSER APPLICATION.
SEE PAGE 33 ON HOW TO JOIN A WI-FI NETWORK.
The Email application lets you send and receive emails and it works with most popular
email systems such as Google mail, Yahoo mail as well as POP3 and IMAP accounts.
Free email accounts such as www.google.com/mail, www.aol.com, etc. are available
online if you do not have an email account.
12.1 Open Email
Ta p Program Launcher > Email.
12.2 Set up the first email account on your HomeSurf
Tabl et
1 Ta p Program Launcher > Email.
2 In Your Accounts window, tap Next.
3 Enter your Email address and tap Next.
42
Binatone Helpline: 0845 345 9677 (UK), 1300 768 112 (Australia), +91 7503011385 (India), +491805938802 (Europe)
Page 43

4 Enter your Password and tap Next.
5 Tap to select POP3 account or IMAP account.
Reading and Managing emails
Note
If the account type you want to set up is not in the HomeSurf Tablet database, you will be
asked to use Manual Setup. For example, you need to enter the following to set up a
Gmail account:
POP3 server = pop.gmail.com
Port = 995
Security = SSL (if available)
SMTP server = smtp.gmail.com
Port = 465
Security = SSL (if available)
Authentication = Yes
It is recommended that you get all the necessary information for the email account such
as incoming/outgoing server settings before you proceed.
Binatone Helpline: 0845 345 9677 (UK), 1300 768 112 (Australia), +91 7503011385 (India), +491805938802 (Europe)
43
Page 44

Reading and Managing emails
Example of an incoming server setting:
Example of an outgoing server setting:
6 Ta p OK or Next.
44
Binatone Helpline: 0845 345 9677 (UK), 1300 768 112 (Australia), +91 7503011385 (India), +491805938802 (Europe)
Page 45

Reading and Managing emails
The email application will start to verify your incoming and outgoing server settings.
7 Enter the Account name (optional) and Yo u r n ame (optional) to be displayed on
outgoing messages, and then tap Done.
The email application will start to load your messages. It might take a few minutes for
the messages to load completely.
Notes
When you have set up an email account, the account will open by default when you open
Email.
If you have set up more than one email account, the email accounts will appear in Yo ur
accounts list. Tap to select the account you wish to access.
12.3 Set up another email account
Do one of the following:
• If you are in Your accounts list screen, press
• If you are in an email account, press
account.
Follow the onscreen instructions to set up your email account.
O and then tap Account settings > Add another
O and then tap Add account.
12.4 Account settings
12.4.1 Edit Account name
1 Ta p Program Launcher > Email.
2 Press
3 Enter your account name and tap OK.
Binatone Helpline: 0845 345 9677 (UK), 1300 768 112 (Australia), +91 7503011385 (India), +491805938802 (Europe)
O and tap Account settings > Account name.
45
Page 46

Reading and Managing emails
12.4.2 Edit Your name
1 Ta p Program Launcher > Email.
2 Press
3 Enter your name and tap OK.
O and tap Account settings > Your name.
12.4.3 Set default email account
1 Ta p Program Launcher > Email.
2 Press
O and tap Account settings > Default account.
✓ appears next to the option. Your emails will be sent from this account by default.
12.4.4 Set email check frequency
1 Ta p Program Launcher > Email.
2 Press
3 Tap to select Every 5 minutes, Every 10 minutes, Every 15 minutes, Every 30
O and tap Account settings > Email check frequency.
minutes or Every hour.
12.4.5 Set email notification on status bar
1 Ta p Program Launcher > Email.
2 Press
O and tap Account settings > Email notifications.
✓ appears next to the option. When a new email arrives, a notification will appear on
the status bar of your HomeSurf Tablet.
12.4.6 Set Ringtone for the arrival of new emails
1 Ta p Program Launcher > Email.
2 Press
3 Tap to select a ringtone from the list, Default ringtone or Silent.
4 Ta p OK to confirm.
O and tap Account settings > Select ringtone.
12.4.7 Modify incoming server settings
1 Ta p Program Launcher > Email.
2 Press
46
O and tap Account settings > Incoming settings.
Binatone Helpline: 0845 345 9677 (UK), 1300 768 112 (Australia), +91 7503011385 (India), +491805938802 (Europe)
Page 47

Reading and Managing emails
3 Modify the settings and tap Next to check and activate your new settings.
12.4.8 Modify outgoing server settings
1 Ta p Program Launcher > Email.
2 Press
3 Modify the settings and tap Next to check and activate your new settings.
O and tap Account settings > Outgoing settings.
12.5 Compose and send email messages
You can send an email message to anyone who has an email address. You can send the
message to one person or to a group of people.
1 Ta p Program Launcher > Email.
2 Press
3 Enter the message recipient’s email address in the To field and tap Next.
Binatone Helpline: 0845 345 9677 (UK), 1300 768 112 (Australia), +91 7503011385 (India), +491805938802 (Europe)
O and tap Compose.
47
Page 48

Reading and Managing emails
Tip
If you are sending the email to several recipients, separate the email addresses with a
comma. You can add as many message recipients as you want.
If you want to send a carbon copy (Cc) or a blind carbon copy (Bcc) of the email to other
recipients, press
4 Enter the subject in the Subject field and tap Next.
5 Compose your message and tap Done.
6 Ta p Send to send the message.
Note
Ta p Save as draft to save the message as a draft or tap Discard to delete the message
you have just composed.
O and then tap Add Cc/Bcc:.
Tip
If you exit the email application without saving the message you have composed, the
message will be automatically saved as draft in the Draft folder of your email account.
48
Binatone Helpline: 0845 345 9677 (UK), 1300 768 112 (Australia), +91 7503011385 (India), +491805938802 (Europe)
Page 49

12.6 Read messages
1 Ta p Program Launcher > Email.
The available mailboxes will be displayed.
2 Tap to select a mailbox.
The messages will be displayed.
3 Tap to select the message you want to view.
Reading and Managing emails
12.7 Open an attached file
You can open and view some types of files and images attached to messages you
receive. Tap the attachment. It downloads to HomeSurf Tablet and then opens.
If the format of an attached file is not supported by HomeSurf Tablet, you can see the
name of the file but you can’t open it.
12.8 Check for new messages
In the mailbox window, press O and tap Refresh.
12.9 Reply to email messages
1 Ta p Program Launcher > Email.
2 Tap to select the mailbox.
3 Tap to select the email you want to reply.
4 Ta p Reply or Reply all to reply to the email.
Binatone Helpline: 0845 345 9677 (UK), 1300 768 112 (Australia), +91 7503011385 (India), +491805938802 (Europe)
49
Page 50

Reading and Managing emails
12.10 Delete an email message
1 Ta p Program Launcher > Email.
2 Tap to select the mailbox.
3 Tap to select the email you want to delete.
4 Ta p Delete to delete the email.
Note
The email delete function is dependent on your mail server settings. For example, you
may not be allowed to delete email from your Homesurf Tablet Trash box.
12.11 Forward an email message
1 Ta p Program Launcher > Email.
2 Tap to select the mailbox.
3 Tap to select the email you want to forward.
4 Press
5 Enter the message recipient’s email address in the To field and tap Next.
Tip
If you are sending the email to several recipients, separate the email addresses with a
comma. You can add as many message recipients as you want.
If you want to send a carbon copy (Cc) or a blind carbon copy (Bcc) of the email to other
recipients, press
O and tap Forward to forward the email.
O and then tap Add Cc/Bcc:.
6 Enter the subject in the Subject field, tap Next.
7 Compose your message and tap Done.
8 Ta p Send to forward the message.
Note
Ta p Save as draft to save the message as a draft or tap Discard to delete the message
you have just composed.
Tip
If you exit the email application without saving the message you have composed, the
message will be automatically saved as draft in the Draft folder of your email account.
12.12 Mark message as unread
1 Ta p Program Launcher > Email.
2 Tap to select the mailbox.
3 Tap to select the email you want to mark as unread.
50
Binatone Helpline: 0845 345 9677 (UK), 1300 768 112 (Australia), +91 7503011385 (India), +491805938802 (Europe)
Page 51

Reading and Managing emails
4 Press
O and tap Mark as unread.
12.13 Delete an email account
1 Ta p Program Launcher > Email.
2 Press
3 In Your Accounts window, tap and hold on the email account that you wish to delete.
4 Ta p Remove account to delete the account.
O and tap Accounts.
12.14 Exit Email Application
Do one of the following:
• Press
• Press
B until you return to the home screen.
H.
Binatone Helpline: 0845 345 9677 (UK), 1300 768 112 (Australia), +91 7503011385 (India), +491805938802 (Europe)
51
Page 52

Listening to Music
13 Listening to Music
The Music application lets you play digital audio files stored in the internal memory or
memory card.
IMPORTANT
You must copy your audio files to the internal memory or memory card on your HomeSurf
Tablet before you launch the music application.
Note
Only MP3 (*.mp3) audio file format are supported. You may download freeware to convert
your audio files before copying them into your Homesurf Tablet.
13.1 Listen to Music on your HomeSurf Tablet
13.1.1 With earphone
You can plug in a earphone (not included) to listen to music.
• Insert the earphone jack into the earphone jack of your HomeSurf Tablet.
13.1.2 Using the speaker on your HomeSurf Tablet
13.2 Open Music application
Ta p Program Launcher > Music.
13.3 Music Library
Your music is organized into different categories such as Albums, Artists, Songs and
Playlists. Tap to select a category and tap a song in the category to start playback.
52
Binatone Helpline: 0845 345 9677 (UK), 1300 768 112 (Australia), +91 7503011385 (India), +491805938802 (Europe)
Page 53

Listening to Music
13.4 Playback controls
Ta p to select songs from the list.
Ta p to turn shuffle on and off. (Shuffle is off when button is gray.)
Tap to cycle through the repeat modes: Repeat all songs, Repeat current song,
Don’t repeat.
Tap to pause or to resume playing the song.
Ta p to rewind.
Ta p to forward.
Note
Press- or + to adjust the playback volume
If you do not see the playback controls, tap on the screen to show the playback controls.
Tips
To go back to the music library during music playback, press
To go back to the playback window from the music library, tap icon at the bottom of
the screen.
O and tap Library.
13.5 Search for a song
1 From the main music library, press O and tap Search.
2 Tap on the input field to launch the onscreen keyboard.
3 Enter the song name and tap icon.
A list of songs related to the song name is displayed. Tap to select and playback the
song.
Binatone Helpline: 0845 345 9677 (UK), 1300 768 112 (Australia), +91 7503011385 (India), +491805938802 (Europe)
53
Page 54

Listening to Music
13.6 Party Shuffle all songs
1 From the main music library, press O and tap Party shuffle.
13.7 Turn party shuffle off
1 In the playback window, press O.
2 Ta p Party shuffle off.
13.8 Create playlists
You can use playlists to organize your music files. You can create as many playlists as
you want on your HomeSurf Tablet.
1 In the playback window, press O.
2 Ta p Add to playlist.
3 Tap to select New.
54
Binatone Helpline: 0845 345 9677 (UK), 1300 768 112 (Australia), +91 7503011385 (India), +491805938802 (Europe)
Page 55

4 Enter playlist name and tap Save.
13.8.1 Add song to current playlist
1 In the playback window, press O.
2 Ta p Add to playlist.
3 Ta p Current playlist.
13.8.2 Play the songs in a playlist
1 From the main music library, tap Playlists.
2 Tap to select a playlist.
The screen displays a list of songs in the playlist.
Listening to Music
3 Tap to select a song to playback or press
the playlist.
O and tap Shuffle all to shuffle all songs in
13.8.3 Add songs to a playlist
1 From the main music library, tap to select a category from which you wish to add songs
to the playlist.
Tip
Select Songs category to show all the available songs.
2 Tap to select the song you wish to add to the playlist.
3 In the playback window, press
4 Tap to select the playlist that you wish to add the song to.
Binatone Helpline: 0845 345 9677 (UK), 1300 768 112 (Australia), +91 7503011385 (India), +491805938802 (Europe)
O, and then tap Add to playlist.
55
Page 56

Listening to Music
13.8.4 Remove a song from playlist
1 From the main music library, tap Playlists.
2 Tap to select the playlist from which you wish to remove a song.
3 Tap and hold the song you wish to remove.
A pop-up options menu appears.
4 Ta p Remove to remove the song from the playlist.
13.8.5 Delete a playlist
1 From the main music library, tap Playlists.
2 Tap and hold the playlist that you wish to delete.
A pop-up options menu appears.
3 Ta p Delete to delete the playlist.
13.9 Mute/Unmute music playback
1 In the playback window, press O and then tap More > Mute to mute music playback.
2 To unmute, press
O and then tap More > Mute Off.
13.10 Set current song as background music
In the playback window, press O and then tap More > Use as background music.
13.11 Exit Music application
Do one of the following:
• Press
• Press
56
B until you return to the home screen.
H.
Binatone Helpline: 0845 345 9677 (UK), 1300 768 112 (Australia), +91 7503011385 (India), +491805938802 (Europe)
Page 57

Viewing Photos and Creating your own slideshows
14 Viewing Photos and Creating your
own slideshows
The Gallery application lets you view photos, images and playback videos.
IMPORTANT
You must copy your photos, images and video files to the memory card and insert into the
HomeSurf Tablet before you launch the gallery application. Make sure that your files are
in the supported formats before copying them. The Homesurf Tablet can play video files in
MP4 format (.mp4) and images in JPEG format (.jpg). You may download freeware to
convert your photos or videos before copying them into your Homesurf Tablet.
14.1 Open Gallery
Ta p Program Launcher > Gallery.
If you have stored your files in folders on the memory card, the Gallery application will
display these folders as separate albums.
Note
Depending on the number of pictures stored on the memory card, it may take a while for
Gallery to load the pictures on the screen.
14.2 View pictures and videos
When viewing pictures in Gallery, swipe up, down, left or right to view more albums.
14.3 View pictures in full screen
1 Tap on a thumbnail to view the picture in full screen.
Binatone Helpline: 0845 345 9677 (UK), 1300 768 112 (Australia), +91 7503011385 (India), +491805938802 (Europe)
57
Page 58

Viewing Photos and Creating your own slideshows
2 Tap on the picture in full screen to launch the navigation and zoom controls.
3 Ta p < or > to view the previous or next picture in the album.
4 Ta p + to zoom in or - to zoom out.
14.4 Rotate picture
1 When viewing a picture, press O and then tap Rotate.
58
Binatone Helpline: 0845 345 9677 (UK), 1300 768 112 (Australia), +91 7503011385 (India), +491805938802 (Europe)
Page 59

Viewing Photos and Creating your own slideshows
2 Tap to select Rotate left or Rotate right.
14.5 View pictures as slideshow
1 In the main Gallery window, tap to open the album where the pictures you want to view
as a slideshow are in.
2 Tap to select a picture.
3 Press
O and tap Slideshow.
14.5.1 Set slideshow interval
1 In the main Gallery window, press O and tap Settings.
1 Ta p Slideshow interval and tap to select 2 seconds, 3 seconds or 4 seconds.
14.5.2 Set slideshow transition
1 In the main Gallery window, press O and tap Settings.
2 Ta p Slideshow transition and tap Fade in & out, Slide left - right, Slide up - down
or Random selection.
14.5.3 Enable Slideshow Shuffling
1 In the main Gallery window, press O and tap Settings.
2 Tap Shuffle slides to play slideshow in random order.
14.6 Modify display size of pictures and videos
You can select the display size of your pictures and videos.
1 In the main Gallery window, press
2 Ta p Display size and tap Large or Small.
Binatone Helpline: 0845 345 9677 (UK), 1300 768 112 (Australia), +91 7503011385 (India), +491805938802 (Europe)
O and tap Settings.
59
Page 60

Viewing Photos and Creating your own slideshows
Note
For best video playback performance, convert your video to a resolution of 720 x 480
pixels, in H.264 or X.264 format. You may download freeware (for example, the freeware
“Any Video Converter”) to convert your videos before copying them into your Homesurf
Ta bl e t.
14.7 Modify sort order of pictures and videos
You can select the sort order of your pictures and videos.
1 In the main Gallery window, press
2 Ta p Sort order and tap Newest first or Newest last.
O and tap Settings.
14.8 View picture and video details
1 In the main Gallery window, tap to open the album that contains the pictures you want
to view details.
2 Tap to select a picture.
3 Press
4 Ta p
O and tap More > Details.
B to exit.
14.9 View pictures & videos in landscape mode
Turn your HomeSurf Tablet sideways to view the picture in landscape mode. The picture
automatically adjusts its orientation.
Note
The Orientation check box in Settings > Sound & display needs to be selected for the
screen orientation to change automatically.
14.10 Crop a picture
1 When viewing a picture in full screen, press O and then tap Crop.
The cropper tool appears.
2 Do one of the following:
• To adjust the cropper size, tap and hold the edge of the cropper tool. When the cropper
arrows appear, drag inward to or outward from the center of the cropper to resize it.
60
Binatone Helpline: 0845 345 9677 (UK), 1300 768 112 (Australia), +91 7503011385 (India), +491805938802 (Europe)
Page 61
Viewing Photos and Creating your own slideshows
• To move the cropper to another area on the picture, tap and hold inside the cropper,
then drag it to the desired position.
3)Tap Save to apply the changes to the picture.
Note
The cropped picture is saved in the storage card as a copy. The original picture remains
unchanged.
14.11 Send pictures using Email application
1 In the main Gallery window, tap to open the album that contains the pictures you want
to send via email.
2 Tap to select a picture.
3 Press
Note
If you have multiple email accounts, the default email account will be used.
4 Add your recipient, enter subject, compose your message, and then tap Send.
Tip
If you exit the email application without saving the message you have composed, the
message will be automatically saved as draft in the Draft folder of your default email
account. For more information on composing and sending email messages, see
Compose and send email messages on page 47.
Binatone Helpline: 0845 345 9677 (UK), 1300 768 112 (Australia), +91 7503011385 (India), +491805938802 (Europe)
O and tap Share.
The picture is automatically added as an attachment to an email message.
61
Page 62

Viewing Photos and Creating your own slideshows
14.12 Watch videos
1 In the main Gallery window, tap a video album and then tap the video you want to
watch.
The video will start to start playback.
Note
For best video playback performance, convert your video to a resolution of 720 x 480
pixels, in H.264 or X.264 format. You may download freeware (for example, the freeware
“Any Video Converter”) to convert your videos before copying them into your Homesurf
Ta bl e t.
14.13 Send videos using Email application
1 In the main Gallery window, tap to open the album that contains the videos you want to
send.
2 Tap to select a video.
3 Press
Note
If you have multiple email accounts, the default email account will be used.
4 Add your recipient, enter subject, compose your message, and then tap Send.
Tip
If you exit the email application without saving the message you have composed, the
message will be automatically saved as draft in the Draft folder of your default email
account. For more information on composing and sending email messages, see
Compose and send email messages on page 47.
O and tap Share.
The video is automatically added as an attachment to an email message.
14.14 Delete a picture
1 In the main Gallery window, tap to open the album that contains the picture you want to
delete.
2 Tap to select a picture.
3 Press
4 Ta p OK to confirm delete.
O and tap Delete.
14.15 Use Picture as wallpaper
You can use a picture as wallpaper.
1 Ta p Program Launcher > Gallery.
62
Binatone Helpline: 0845 345 9677 (UK), 1300 768 112 (Australia), +91 7503011385 (India), +491805938802 (Europe)
Page 63

Viewing Photos and Creating your own slideshows
2 Tap to select a picture.
3 Press
4 To resize the picture, tap and hold the edge of the box, and drag inward or outward.
To move the box to another area on the picture, tap and hold inside the box, then drag it to
the desired position.
O and tap More > Set as.
An image position box will appear at the center of the picture.
5 Ta p Save to confirm.
The picture will be set as the wallpaper of your HomeSurf Tablet.
6 Press B to exit.
Note
Keep the file size of the wallpaper to 300kbytes or smaller.
Binatone Helpline: 0845 345 9677 (UK), 1300 768 112 (Australia), +91 7503011385 (India), +491805938802 (Europe)
63
Page 64

Downloading and Reading eBooks
14.16 Exit Gallery
Do one of the following:
• Press
• Press
B until you return to the home screen.
H.
15 Downloading and Reading eBooks
Aldiko is an e-book reader application for Android devices. It comes pre-loaded with Sun
Tzu’s Art of War and H. G. Well’s The Invisible Man. However, you can also browse and
load any books available on Feedbooks right from the application. The site contains
thousands of public domain and creative commons works.
Warning!
Some books available for download on Aldiko contain subject matters that are not suitable
for children. Parental guidance is strongly advised for children under 18.
15.1 Open Aldiko
Ta p Program Launcher > Aldiko.
64
Binatone Helpline: 0845 345 9677 (UK), 1300 768 112 (Australia), +91 7503011385 (India), +491805938802 (Europe)
Page 65

Downloading and Reading eBooks
15.2 Download Free eBooks using Aldiko
1 In the main screen, tap Download Books.
2 Ta p Free Public Domain Books or Free Original Books.
The application displays the thumbnails of the covers.
3 Tap the desired title.
Binatone Helpline: 0845 345 9677 (UK), 1300 768 112 (Australia), +91 7503011385 (India), +491805938802 (Europe)
65
Page 66

Downloading and Reading eBooks
4 Ta p Download.
Your HomeSurf Tablet begins to download the book in the background. Once the
download is complete, you will get a notification, and the book will appears on the
bookshelf.
15.3 Book Navigation
There are several ways to navigate through your book:
Fling
• Fling your finger to the left anywhere on the screen to turn to the next page.
• Fling to the right to turn back to the previous page
Tap
• Tap on the right half of the screen to turn to the next page.
• Tap on the left half of the screen to turn back to the previous page.
Volume Buttons
• Press
• Press
66
- to turn to the next page.
+ to turn to the previous page.
Binatone Helpline: 0845 345 9677 (UK), 1300 768 112 (Australia), +91 7503011385 (India), +491805938802 (Europe)
Page 67
Downloading and Reading eBooks
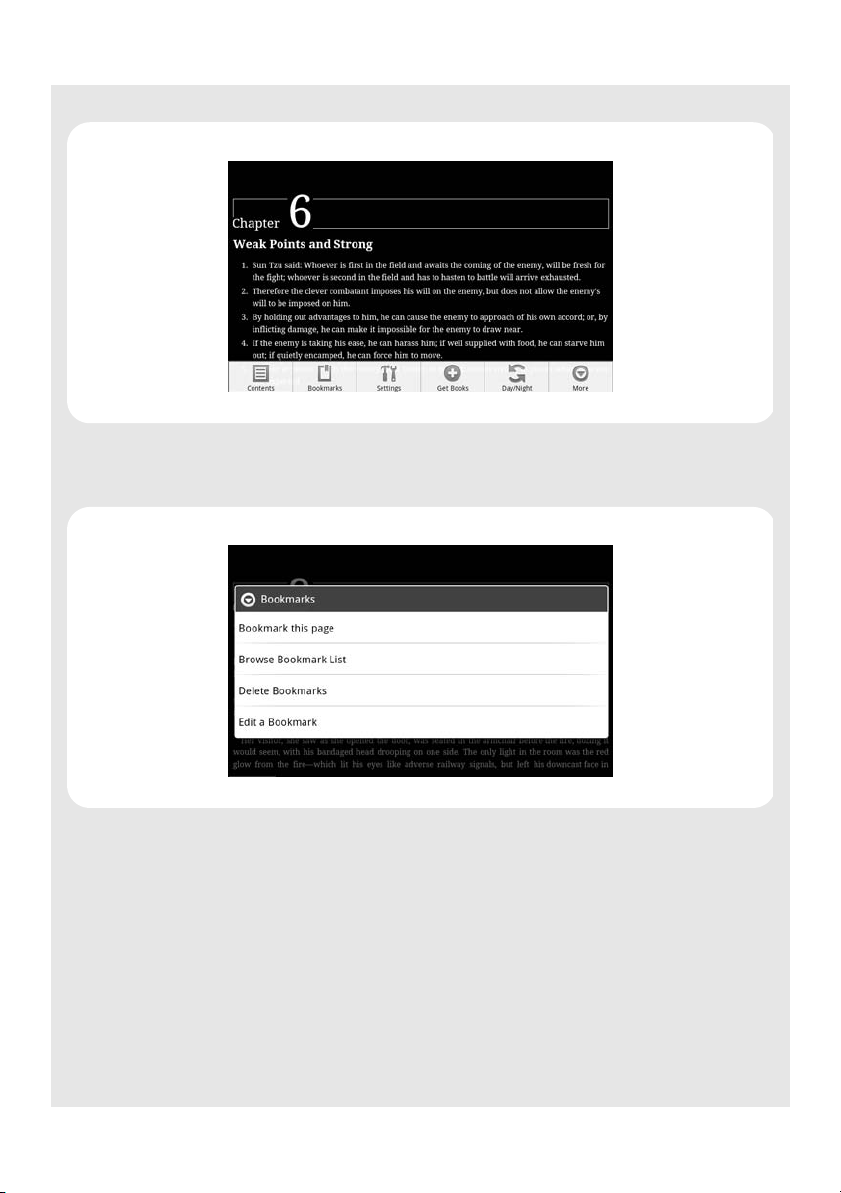
When reading an eBook, you can press
Content displays the chapters in the book.
Bookmarks allows you to create and use bookmarks in the book.
O to open a menu with a number of options:
Show Progress displays the section you are in, a thumbnail of the cover and a bar
displaying the overall progress and the progress within the chapter.
Binatone Helpline: 0845 345 9677 (UK), 1300 768 112 (Australia), +91 7503011385 (India), +491805938802 (Europe)
67
Page 68

Downloading and Reading eBooks
Day/Night toggles between a day time theme and a night theme.
15.4 Importing EPUB files into Aldiko bookshelf
You can import EPUB files into your Aldiko bookshelf.
1 Copy your EPUB files into your memory card (in the eBooks/import/ folder).
2 Select the Import option on the application’s home screen and it will automatically
scan and import your books.
15.5 Settings
You can customize the Look and Feel as well as the Scrolling behavior of your HomeSurf
Tablet when reading an eBook.
Color Themes. You can set the Font Color, Background Color and Link Color for two
themes; Day and Night.
Font & Layout. You can choose the Font Family including Arial, Georgia (default),
Courier, Times New Roman and Verdana. You can also choose the point size and weight
(Light, Normal, Bold and Bolder). You can select the Line Spacing (1-3, defaults to doublespaced) and the horizontal and vertical margin.
Navigation. You can change the navigation keys, page turn speed and choose whether
to display the progress bar.
Brightness. You can set the brightness, and choose the shortcut swipe to set brightness
while reading.
Display Orientation. You can lock or unlock display orientation while reading.
68
Binatone Helpline: 0845 345 9677 (UK), 1300 768 112 (Australia), +91 7503011385 (India), +491805938802 (Europe)
Page 69

Performing Calculations
15.6 Exit Aldiko
Do one of the following:
• Press
• Press
B until you return to the home screen.
H.
16 Performing Calculations
You can use the Calculator to perform simply and advanced arithmetical calculations.
16.1 Open Calculator
Ta p Program Launcher > Calculator.
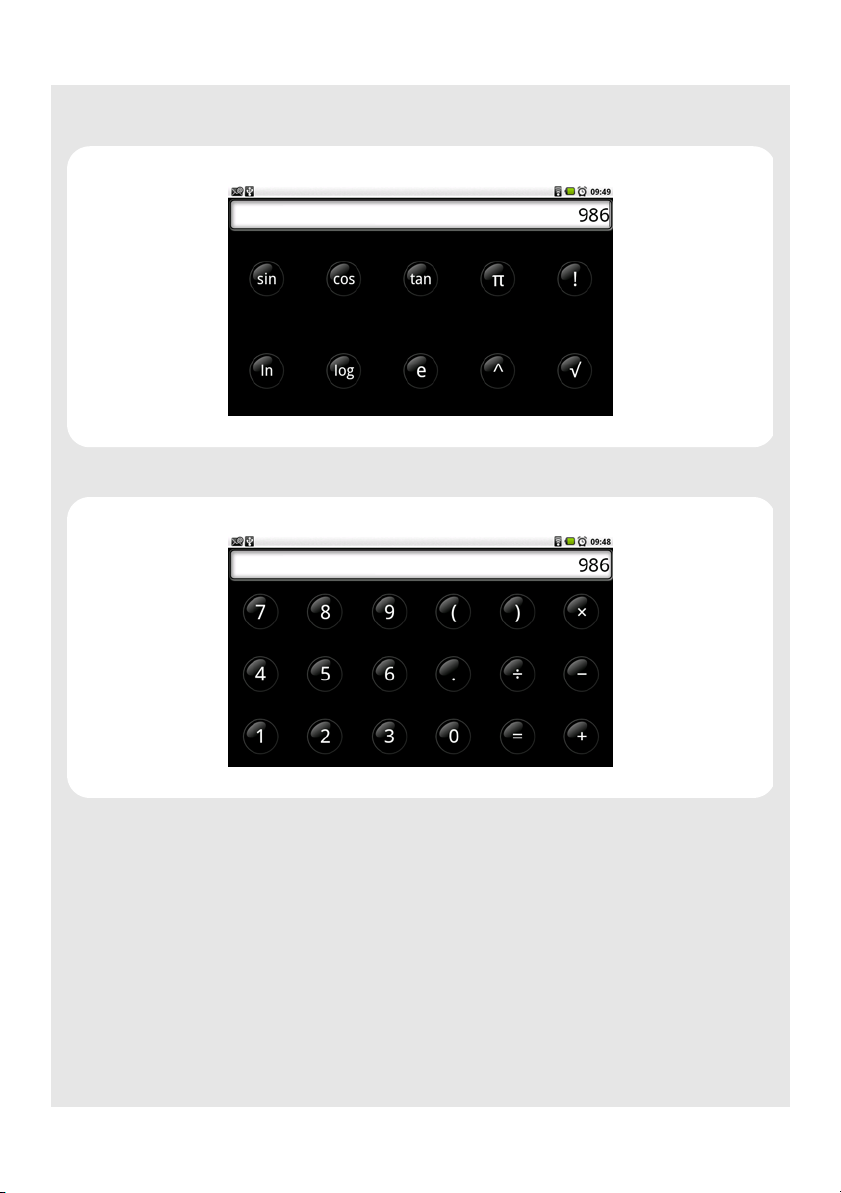
16.2 Perform Calculations
Tap on the numbers and mathematical operators to perform simple calculations.
Binatone Helpline: 0845 345 9677 (UK), 1300 768 112 (Australia), +91 7503011385 (India), +491805938802 (Europe)
69
Page 70
Performing Calculations
Press O and tap Advanced panel to access advanced operators such as sin, cos, tan,
log etc.
To clear calculation histories, tap =.
16.3 Exit Calculator
Do one of the following:
• Press
• Press
70
B until you return to the home screen.
H.
Binatone Helpline: 0845 345 9677 (UK), 1300 768 112 (Australia), +91 7503011385 (India), +491805938802 (Europe)
Page 71

Using the tDigitalClock
17 Using the tDigitalClock
17.1 Open tDigitalClock
1 Ta p Program Launcher > tDigital Clock.
17.2 Set Alarm Clock
1 Ta p Program Launcher > tDigitalClock.
2 Press
3 Ta p the Off button in Turn on alarm option to activate the alarm clock.
O and tap Alarm.
4 Ta p Time and tap + or - to set the hour and minute of the alarm time and tap OK.
5 Ta p Alarm tone and select the alarm ringtone from the Ringtone list or Audio file list
and tap OK.
6 Ta p Repeat to select the days of the week that you wish the alarm to ring and tap OK.
7 Ta p Snooze to select the snooze duration and tap OK.
8 Ta p Message and enter the message to be displayed on the alarm screen and tap OK.
9 Ta p Close to exit.
Note
✓ indicates that the option is activated.
Note
When the alarm rings, tap Snooze or Dismiss to snooze or dismiss the alarm.
Binatone Helpline: 0845 345 9677 (UK), 1300 768 112 (Australia), +91 7503011385 (India), +491805938802 (Europe)
71
Page 72

Installing Android applications
17.3 Deactivate Alarm Clock
1 Ta p Program Launcher > tDigitalClock.
2 Press
3 Ta p the On button in Turn on alarm option to deactivate the alarm clock.
O and tap Alarm.
17.4 Change Font Setting
1 Ta p Program Launcher > tDigitalClock.
2 Press
3 Select your preferred font color for the clock and date and tap Preview to preview your
O and tap Font setting.
setting (press B to return to font setting window) or tap OK to confirm.
17.5 Exit tDigitalClock
Do one of the following:
• Press
• Press
B until you return to the home screen.
H.
18 Installing Android applications
1 Download .apk files from www.androidfreeware.org or any other similar site to your
computer.
2 Copy the .apk files into a memory card.
3 Insert the memory card into your HomeSurf Tablet.
72
Binatone Helpline: 0845 345 9677 (UK), 1300 768 112 (Australia), +91 7503011385 (India), +491805938802 (Europe)
Page 73

Installing non-Android applications
4 Browse the .apk files through ES File Explorer and install them.
19 Installing non-Android applications
To install applications from other sources, you need go to the Settings menu to enable
downloading from Unknown sources.
1 From the home screen, press O and then tap Settings > Applications.
2 Ta p Unknown sources to enable or disable the downloading of unknown applications.
When enabled, ✓ appears next to the option.
Note
All downloaded applications are saved to the storage card. Before you download an
application from the web, make sure that you have installed a storage card on your HomeSurf
Tablet. See Inserting a memory card on page 15 on how to install a storage card.
Binatone Helpline: 0845 345 9677 (UK), 1300 768 112 (Australia), +91 7503011385 (India), +491805938802 (Europe)
73
Page 74

Removing applications from HomeSurf Tablet
Warning!
Applications downloaded from the web can be from unknown sources. To protect your
HomeSurf Tablet and personal data, download applications only from trusted sources.
20 Removing applications from
HomeSurf Tablet
1 From the home screen, press O.
2 Ta p Settings > Applications > Manage Applications.
A list of applications appear.
3 Tap to select the application you wish to uninstall and tap Uninstall.
21 ES File Explorer
ES File Explorer is a free file manager for Android devices. It allows you to browse files
and folders stored on your HomeSurf Tablet, sdcard, LAN and FTP.
You can also copy/paste, rename, delete, create folder and send file as email attachment
and install applications using ES File Explorer.
Your HomeSurf Tablet supports only one storage memory each time. When no MicroSD
card is inserted, it will read from the internal memory. Once a MicroSD card is inserted,
only the card memory will be read. In this case, you cannot copy files from internal
storage to the MicroSD card.
The internal memory cannot be read even though you remove the MicroSD card. To
activate internal memory again, you have to power On/Off the tablet after the MicroSD
card is removed.
74
Binatone Helpline: 0845 345 9677 (UK), 1300 768 112 (Australia), +91 7503011385 (India), +491805938802 (Europe)
Page 75

ES File Explorer
21.1 Open ES File Explorer
Ta p Program Launcher > ES File Explorer.
Tap to browse the files and folders in your HomeSurf Tablet or SD card.
Tap to go to the root directory.
Tap to search for files or folders.
Tap to go to the previous directory or folder.
For more information on the short cut keys, tap More > Help Center, and tap for
help.
21.2 Open file as
1 Tap and hold the file you wish to open.
A pop-up menu appears.
2 Ta p Open As and select Text, Audio, Image or Video.
21.3 Select all files in a directory
1 Go to the directory that you want to select all files.
2 Press MENU, tap Operations > Select All.
21.4 Create a new folder
1 Go to the location that you wish to create a new directory.
2 Press MENU, then tap New.
3 Tap to select Folder.
4 Enter Folder Name and tap OK.
Binatone Helpline: 0845 345 9677 (UK), 1300 768 112 (Australia), +91 7503011385 (India), +491805938802 (Europe)
75
Page 76

ES File Explorer
Note
You can only create new folders in the SD card directory.
21.5 Rename a file
1 Tap and hold the file you wish to rename.
A pop-up menu appears.
2 Ta p Rename.
3 Enter the new file name and tap OK.
21.6 Copy a file to another location
1 Tap and hold the file you wish to copy.
A pop-up menu appears.
2 Tap Copy to copy the file.
3 Go to another folder or directory that you wish to place a copy of the file.
4 Press O and tap Operations > Paste to paste the file into the new location.
21.7 Move a file to another location
1 Tap and hold the file you wish to move.
A pop-up menu appears.
2 Ta p Cut.
3 Go to the folder or directory that you wish to place the file.
4 Press O and tap Operations > Paste to paste the file into the new location.
21.8 Delete a file
1 Tap and hold the file you wish to delete.
A pop-up menu appears.
2 Ta p Delete and tap OK to delete the file.
21.9 Compress a file
1 Tap and hold the file you wish to compress.
A pop-up menu appears.
2 Ta p Compress.
3 Enter a name for the compress file, select the compression mode and tap OK.
76
Binatone Helpline: 0845 345 9677 (UK), 1300 768 112 (Australia), +91 7503011385 (India), +491805938802 (Europe)
Page 77

21.9.1 View file details
1 Tap and hold the file you wish to view details.
A pop-up menu appears.
2 Ta p Properties.
3 Ta p OK to close the information box.
21.10 Change Orientation
1 In ES File Explorer window, press O and tap More.
2 Tap to select Flip orientation.
21.11 Modify View Settings in ES File Explorer
1 In ES File Explorer window, press O and tap Settings.
2 You can then modify the following settings:
Display Settings Theme Settings
Layout Settings
File Settings
View Settings View
Size
Sort By
Directory Home Directory
App Backup Directory
ES File Explorer
21.12 Exit ES File Explorer
Do one of the following:
• Press
• Press
Binatone Helpline: 0845 345 9677 (UK), 1300 768 112 (Australia), +91 7503011385 (India), +491805938802 (Europe)
B until you return to the home screen.
H.
77
Page 78

ES Task Manager
22 ES Task Manager
This Android program helps you free memory, kill task, close all the running applications,
and speed up your HomeSurf Tablet.
22.1 Open ES Task Manager
1 Ta p Program Launcher > ES Task Manager.
A list of current Task will be displayed.
2 To clear a selected task, tap on the task and then tap theKill Selected button.
3 Ta p Refresh to display all current tasks again.
4 Ta p Kill All to clear all current tasks.
22.2 Exit ES Task Manager
Do one of the following:
• Press
• Press
78
B until you return to the home screen.
H.
Binatone Helpline: 0845 345 9677 (UK), 1300 768 112 (Australia), +91 7503011385 (India), +491805938802 (Europe)
Page 79

Main settings of your HomeSurf Tablet
23 Main settings of your HomeSurf Tablet
From the home screen, press O and then tap Settings. You can then modify the
different settings on your HomeSurf Tablet.
Wireless controls Configure your HomeSurf Tablet’s wireless connections, such as Wi-Fi
Sound & display Set the HomeSurf Tablet and notification ring tones, or set the screen
brightness and screen timeout.
Security & location Set My Location and screen unlock.
Applications Manage applications and install new programs.
SD card & Internal storage Show the available storage card memory (when MicroSD
card is inserted) or HomeSurf Tablet memory (when no MicroSD card is inserted).
Date & time Set date, time, time zone & formats
Locale & text Select locale (language and region), text input and auto-correction
Search Manage search settings and history
Accessibility Manage accessibility options
About Device View legal info, device status, software version
23.1 Exit Settings
Do one of the following:
• Press
• Press
Binatone Helpline: 0845 345 9677 (UK), 1300 768 112 (Australia), +91 7503011385 (India), +491805938802 (Europe)
B until you return to the home screen.
H.
79
Page 80

HELP/TROUBLESHOOTING
24 HELP/TROUBLESHOOTING
My HomeSurf Tablet does not turn on.
• Make sure that the power adapter is securely connected
• Make sure that you are using the power adapter that was included with your HomeSurf
Tablet.
• Make sure that the HomeSurf Tablet is turned on. See Switching on your HomeSurf
Tablet on page 16 on how to turn on your HomeSurf Tablet.
My HomeSurf Tablet does not recognize the memory card.
• Make sure that you have inserted a certified memory card.
• Make sure that you have inserted the memory card correctly. See Inserting a memory
card on page 15 on how to insert a memory card.
• With your memory card inserted, power off and reset the device.
My HomeSurf Tablet shows a low-battery warning
The HomeSurf Tablet is low on power and needs to be charged before you can use it.
See Charging your HomeSurf Tablet on page 14 on how to charge your HomeSurf
Ta bl e t.
I cannot access the web
Check the wireless signal indicator in the status bar at the top of the screen. If there is no
signal, you are not connected.
For information about joining a Wi-Fi network, see Making a Wireless Connection on
page 33.
The display freezes or does not respond
Press and hold
There is no sound coming from the HomeSurf Tablet
• Unplug and reconnect the headset. Make sure that the connector is pushed in all the
way.
• The volume may be deactivated or set too low. See Set media volume on page 30 on
how to adjust the volume on your HomeSurf Tablet.
I can’t open an attachment in an email
The file type may not be supported. You may download and install applications that may
support the file type.
80
Binatone Helpline: 0845 345 9677 (UK), 1300 768 112 (Australia), +91 7503011385 (India), +491805938802 (Europe)
P for 5 seconds to turn HomeSurf Tablet off and turn it on again.
Page 81

IF YOU NEED HELP...
My email could not be delivered due to connection to the server on port 25 timed
out
You may need to change the port setting on an outgoing mail server for one of your email
accounts.
25 IF YOU NEED HELP...
The Binatone Helpline is available from 9.00 am to 5.00 pm,
Mondays to Fridays, please call
0845 345 9677 for UK
+491805938802 for Europe
Australia customer service number 1300 768 112 or email to service@shriro.com.au
India customer service number +91 7503011385 or email to assist@binatonetelecom.in
26 SAFETY INSTRUCTIONS
• Please remove the earphones immediately when lightning occurs;
• Do not use the earphone at high volume to prevent hearing damage;
• Do not let the product come into contact with liquid. If it gets into water, switch off the
product immediately as continuous use may cause fire or electric shock;
• Do not expose the product to extreme high temperatures or humidity;
• Electrical equipment can cause serious injury if you use it when you are wet or standing
in water;
• Do not use the product near explosives or flammable gas as it may cause explosion;
• Do not let any metal or combustible materials get into the product through the memory
card slot or USB slot, as this may cause fire or electric shock;
• The product is a precision electronic device. Handle it with care as the screen may
become damaged when dropped;
• Unauthorised disassembling of the product in any manner may damage the device, and
is not covered by the warranty.
• Do not place the product close to anything with strong magnetic power. Strong magnets
may cause malfunction to the product or the screen. In addition, do not use the product
close to strong radio waves as this may damage the data in the product.
• Please insert the memory card correctly. If the memory card cannot be inserted, please
check whether the product supports it or the card is inserted in the correct direction.
• Forced insertion may damage the product.
Binatone Helpline: 0845 345 9677 (UK), 1300 768 112 (Australia), +91 7503011385 (India), +491805938802 (Europe)
81
Page 82

CLEANING THE DEVICE
26.1 Replacing batteries
CAUTION
RISK OF EXPLOSION IF BATTERY IS REPLACED BY AN INCORRECT TYPE.
DISPOSE OF USED BATTERIES ACCORDING TO THE INSTRUCTIONS.
If you think the battery needs replacing, please call the Binatone Helpline:
0845 345 9677 for UK, +491805938802 for Europe, 1300 768 112 for Australia,
+91 7503011385 for India.
27 CLEANING THE DEVICE
• Do not clean any part of the product with thinners or other solvents and chemicals as
this may cause permanent damage to the product which is not covered by the warranty.
• When necessary, clean it with a damp cloth.
• Keep your product away from hot, humid areas or strong sunlight, and do not let it get
wet.
• Every effort has been made to ensure high standards of reliability for your product.
However, if something does go wrong, please do not try to repair it yourself ñ contact
Customer Service for assistance.
28 DISPOSAL OF THE DEVICE
(ENVIRONMENT)
At the end of the product lifecycle, you should not dispose of this product with
normal household waste. Take this product to a collection point for the
recycling of electrical and electronic equipment. The symbol on the product,
user’s guide and/or box indicates this.
Some of the product materials can be re-used if you take them to a recycling point. By
reusing some parts or raw materials from used products you make an important
contribution to the protection of the environment.
Please contact your local authorities in case you need more information on the collection
points in your area.
82
Binatone Helpline: 0845 345 9677 (UK), 1300 768 112 (Australia), +91 7503011385 (India), +491805938802 (Europe)
Page 83

GUARANTEE AND SERVICE
29 GUARANTEE AND SERVICE
This product is guaranteed for 12 months* from the date of purchase shown on your sales
receipt. The Guarantee does not cover damage by misuse or negligence, or by excessive
voltages — for example, lightning.
*The warranty period will vary depending on the country of your purchase.
Please keep your sales (till) receipt — this is your guarantee. You should also keep
the original packaging material.
30 FCC Statement
This device complies with Part 15 Subpart B of the FCC Rules. Operation is subject to the
following two conditions: (1) this device may not cause harmful interference, and (2) this
device must accept any interference received, including interference that may cause
undesired operation.
This equipment has been tested and found to comply with the limits for a Class B digital
device, pursuant to Part 15 Subpart B of the FCC Rules. These limits are designed to
provide reasonable protection against harmful interference in a residential installation.
This equipment generates, uses, and can radiate radio frequency energy, and if not
installed and used in accordance with the instructions, may cause harmful interference to
radio communications. However, there is no guarantee that interference will not occur in a
particular installation. If this equipment does cause harmful interference to radio or
television reception, which can be determined by turning the equipment off and on, the
user is encouraged to try to correct the interference by one or more of the following
measures:
• Reorient or relocate the receiving antenna.
• Increase the separation between the equipment and receiver.
• Connect the equipment into an outlet on a circuit different from that to which the
receiver is connected.
• Consult the dealer or an experienced radio/TV technician for help.
WARNIN G
You are cautioned that changes or modifications not expressly approved by the party
responsible for compliance could void your authority to operate the equipment.
IMPORTANT NOTE:
Radiation Exposure Statement:
This equipment complies with FCC radiation exposure limits set forth for an uncontrolled
environment. End users must follow the specific operating instructions for satisfying RF
exposure compliance. To maintain compliance with FCC RF exposure compliance
Binatone Helpline: 0845 345 9677 (UK), 1300 768 112 (Australia), +91 7503011385 (India), +491805938802 (Europe)
83
Page 84

TECHNICAL SPECIFICATIONS
requirements, please follow operation instruction as documented in this manual. This
equipment complies with FCC / IC RSS-210 radiation exposure limits set forth for an
uncontrolled environment. This equipment should be installed and operated with
minimum distance 20cm between the radiator & your body.
FCC and Industry Canada
This device complies with Industry Canada and FCC Rules. Operation is subject to the
following two conditions: (1) this device may not cause harmful interference, and (2) this
device must accept any interference received, including interference that may cause
undesired operation.
Canadian DOC statement
• This Class B digital apparatus complies with Canadian ICES-003.
• Cet appareil numrique de la classe B est conforme la norme NMB-003 du Canada.
31 TECHNICAL SPECIFICATIONS
Display screen 7" 16:9 800x480 pixels
Supported image formats Jpeg
Supported video formats 720x480 H.264
Internal storage 2GB
Supported MicroSD card up to 16GB
Built-in battery capacity Li-polymer rechargeable battery
Speaker output 1W speaker
Power supply DC5.5V
Operating temperature 0 - 40ºC
Storage temperature 0 - 40ºC
84
Binatone Helpline: 0845 345 9677 (UK), 1300 768 112 (Australia), +91 7503011385 (India), +491805938802 (Europe)
Page 85

DECLARATION OF CONFORMITY
32 DECLARATION OF CONFORMITY
Binatone Telecom PLC
2!Bqtmfz!Xbz!
Mpoepo!
OX3!8IG!
Vojufe!Ljohepn!
Ejbm;!,55!)1*!319!:66!3815!
EC Declaration of Conformity
We the manufacturer / Importer : Binatone Telecom Plc
1 Apsley Way
United Kingdom
Declare under our sole responsibility that the following product
Type of equipment:
Model Name:
Country of Origin:
Brand:
Binatone
complies with the essential protection requirements of R&TTE Directive 1999/5/EC on the
approximation of the laws of the Member States relating to Radio Spectrum Matters, the
Council Directive /108/EC on the approximation of the laws of the Member States
relating to electromagnetic compatibility (EMC) and the European Community Directive
2006/95/EC relating to Electrical Safety.
Assessment of compliance of the product with the requirements relating to the essential
requirements according to Article 3 R&TTE was based on Annex III of the Directive
1999/5/EC and the following standard:
Radio Spectrum: EN 300328 V1.7.1:2006-10
EMC: EN 301489-1:V1.8.1:2008-04
EN 301489-17:V1.3.2;2008-04
SAR EN 50371:2002
Electrical Safety: EN 60950:2006+A11 2009
The product is labelled with the European Approval Marking CE as show. Any Unauthorized
Android Tablet
Homesurf Tablet 7/Homesurf Tablet 8
China
London
NW2 7HF
!
modification of the product voids this Declaration.
Manufacturer / Importer
(signature of authorized person)
Signature:
Position: Engineering Manager
Full Name:
Ifosz!Mfvoh
Date: 22 Sep 10
Binatone Helpline: 0845 345 9677 (UK), 1300 768 112 (Australia), +91 7503011385 (India), +491805938802 (Europe)
85
Page 86

 Loading...