

Page 1
Copies of the I/B. Please reproduce them without any
changes except under special instruction from Bimar (Italy).
The pages must be reproduced and folded in order to obtain
a booklet A5 (+/- 148.5 mm width x 210 mm height). When
folding, make sure you keep the good numbering when you
turn the pages of the I/B. Don’t change the page numbering.
Keep the language integrity.
1/40
Assembly page 1/16
Fax +32 030 9904733
LIBRETTO ISTRUZIONI
NOTICE D'INSTRUCTIONS
INSTRUCTION BOOKLET
BEDIENUNGSANLEITUNG
FOLLETO DE INSTRUCCIONES
VENTILATORE DA SOFFITTO
CEILING FAN
DECKENVENTILATOR
VENTILATEUR DE PLAFOND
VENTILADORES DE TECHO
type VSB10 (mod. DM52+4BEA)
type VSL10 (mod. DM52+4BEA)
Page 2
Copies of the I/B. Please reproduce them without any
changes except under special instruction from Bimar (Italy).
The pages must be reproduced and folded in order to obtain
a booklet A5 (+/- 148.5 mm width x 210 mm height). When
folding, make sure you keep the good numbering when you
turn the pages of the I/B. Don’t change the page numbering.
Keep the language integrity.
2/40
Assembly page 2/16
Fax +32 030 9904733
Questo simbolo vi invita a leggere attentamente queste istruzioni prima dell’uso
dell’apparecchio, ed eventualmente informare terzi, se necessario.
CONSERVARE IL LIBRETTO PER ULTERIORI CONSULTAZIONI.
Questo simbolo vi invita a prestare attenzione, ed a leggere gli specifici avvertimenti
sul libretto istruzioni.
AVVERTENZE GENERALI
• Questo apparecchio è destinato solo alla ventilazione di interni di ambienti domestici e
similari, e solo fissato e installto al soffitto: non utilizzarlo per altro scopo. Ogni altro uso è
da considerarsi improprio e pericoloso. Il costruttore non potrà essere ritenuto responsabile di
eventuali danni derivanti da uso improprio, erroneo e irresponsabile e/o da riparazioni
effettuate da personale non qualificato.
• L'uso di qualsiasi apparecchio elettrico comporta l'osservanza di alcune regole fondamentali,
tra le quali:
a) non deve essere toccato con mani bagnate o umide
b) non deve essere toccato a piedi nudi
c) non deve essere utilizzato da persone (bambini compresi) le cui capacità fisiche,
sensoriali o mentali siano ridotte, oppure con mancanza di esperienza o di conoscenza, a
meno che esse abbiano potuto beneficiare, attraverso l’intermediazione di una persona
responsabile della loro sicurezza, di una sorveglianza o di istruzioni riguardanti l’uso
dell’apparecchio. I bambini devono essere sorvegliati per sincerarsi che non giochino
con l’apparecchio.
• L’apparecchio può essere utilizzato da bambini di età non inferiore a 8 anni e da persone con
ridotte capacità fisiche, sensoriali o mentali, o prive di esperienza o della necessaria
conoscenza, purchè sotto sorveglianza oppure dopo che le stesse abbiano ricevuto istruzioni
relative all’uso sicuro dell’apparecchio e alla comprensione dei pericoli ad esso inerenti. I
bambini non devono giocare con l’apparecchio. La pulizia e la manutenzione destinata ad
essere effettuata dall’utilizzatore non deve essere effettuata da bambini senza sorveglianza.
• Spegnere l’interruttore generale dell’impianto:
- prima di collegare l’apparecchio alla corrente, assemblare, smontare e prima di pulire
l’apparecchio
- quando si rileva un’anomalia di funzionamento
- e si decide di non utilizzare per brevi o lunghi periodi l’apparecchio
• Non usare l’apparecchio se non funziona correttamente o se sembra danneggiato; in caso di
dubbio rivolgersi a personale professionalmente qualificato.
• Verificare periodicamente l'integrità dell'apparecchio. In caso d'imperfezioni o nel dubbio
rivolgersi a personale professionalmente qualificato.
• Non usare l’apparecchio in presenza di sostanze o vapori infiammabili (alcool, insetticidi,
benzine) o in ambienti particolarmente polverosi.
• Non utilizzare l’apparecchio in ambienti con temperatura superiore a 40°.
• Non lasciare l’apparecchio esposto agli agenti atmosferici (sole, pioggia, ecc.).
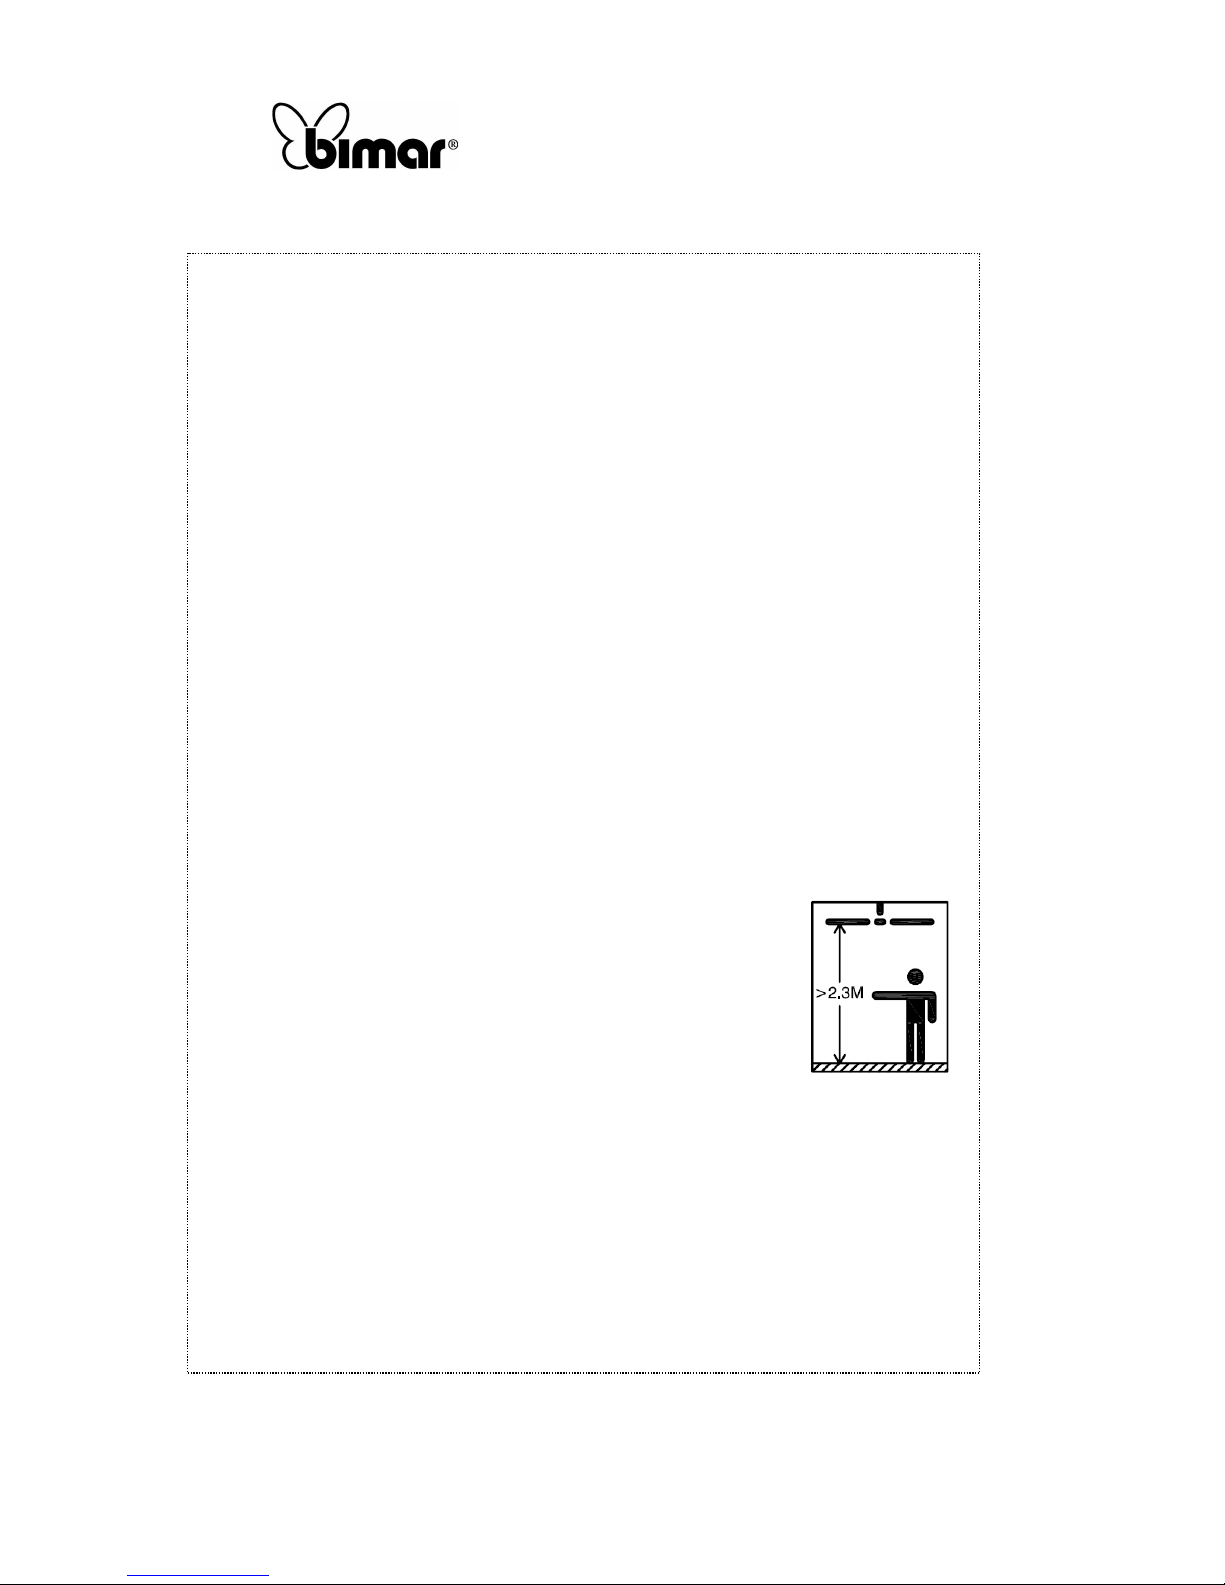
• Attenzione: il ventilatore deve essere installato in modo che le pale siano poste a più 2,3m
sopra il livello del pavimento, come in figura.
Page 3
Copies of the I/B. Please reproduce them without any
changes except under special instruction from Bimar (Italy).
The pages must be reproduced and folded in order to obtain
a booklet A5 (+/- 148.5 mm width x 210 mm height). When
folding, make sure you keep the good numbering when you
turn the pages of the I/B. Don’t change the page numbering.
Keep the language integrity.
3/40
Assembly page 3/16
Fax +32 030 9904733
• Attenzione: prima di accedere ai morsetti, tutti i circuiti d’alimentazione devono essere
scollegati.
• Se il cavo di alimentazione è danneggiato, esso deve essere sostituito dal costruttore o dal suo
servizio assistenza tecnica o comunque da una persona con qualifica similare, in modo da
prevenire ogni rischio.
• Qualsiasi modifica venga apportata all'attacco predisposto dal fabbricante o di altro genere, è
pericolosa e farà decadere la garanzia, e solleverà lo stesso da eventuali responsabilità.
INSTALLAZIONE
• L'installazione dell'apparecchio deve essere eseguita da parte di personale professionalmente
qualificato.
• Dopo aver tolto l’imballaggio, assicurarsi dell’integrità dell’apparecchio; in caso di dubbio
non utilizzarlo e rivolgersi a personale professionalmente qualificato. Gli elementi
d’imballaggio (sacchetti di plastica, polistirolo espanso, chiodi, ecc.) non devono essere
lasciati alla portata di mano di bambini in quanto potenziali fonti di pericolo, ma vanno
smaltiti secondo le norme vigenti negli appositi contenitori per la raccolta differenziata.
Attenzione: eventuali adesivi o fogli pubblicitari applicati sull agriglia, devono essere rimossi
prima dell’uso dell’apparecchio.
• Prima di collegare l’apparecchio controllare che:
a) i valori di tensione riportati sulla targa dati (230V~ 50Hz) corrispondano a quelli della rete
elettrica
b) l'impianto elettrico a cui l'apparecchio verrà collegato:
- sia conforme alle norme vigenti
- abbia cavi la cui sezione sia idonea alla potenza assorbita
- abbia un'efficace messa a terra e sia in conformità alle vigenti norme di sicurezza elettrica:
in caso di dubbio, richiedere un controllo accurato da parte di personale professionalmente
qualificato.
•
Per l'installazione occorre prevedere un'interruttore onnipolare con
distanza di apertura dei contatti uguale o superiore a 3mm.
• Installare l'apparecchio ad una distanza adeguata da pareti, oggetti,
fonte di calore, tessuti (tende, ecc.) o materiale volatile, e ad almeno
2,3m dal piano di calpestio.
• Installare l'apparecchio ad un soffitto/soletta in muratura o in
metallo e/o in materiale che dia garanzia di sostegno di un peso pari
ad almeno 8 volte il peso dell'apparecchio.
• Prima dell'installazione verificare:
a) che l’apparecchio sia in buono stato
b) che i cavi elettrici non siano danneggiati
c) che l'interruttore onnipolare della rete elettrica sia in posizione spento (OFF). Se
l'apparecchio cade o riceve forti colpi, verificare subito che nessuna parte sia
danneggiata. In caso di dubbio rivolgersi a personale professionalmente qualificato.
• Non allacciare l’apparecchio a sistemi di controllo termico o programmatore o timer o ad
altro dispositivo che possa accendere l’apparecchio automaticamente, evitando così rischi di
danni a persone, animali o cose.
Page 4
Copies of the I/B. Please reproduce them without any
changes except under special instruction from Bimar (Italy).
The pages must be reproduced and folded in order to obtain
a booklet A5 (+/- 148.5 mm width x 210 mm height). When
folding, make sure you keep the good numbering when you
turn the pages of the I/B. Don’t change the page numbering.
Keep the language integrity.
4/40
Assembly page 4/16
Fax +32 030 9904733
• In caso di guasto o cattivo funzionamento spegnere l’apparecchio e farlo controllare da
personale professionalmente qualificato; le riparazioni effettuate da personale non qualificato
possono essere pericolose e fanno decadere la garanzia.
Accertatevi di avere a disposizione tutti i componenti prima di procedere all'installazione.
• Per evitare danni, assemblare l'apparecchio su una superfice piana e morbida, prima di
asperità, al fine di non danneggiare o scalfire il ventilatore.
• Il ventilatore può essere utilizzato solo se completamente e correttamente assemblato. Nel
caso di dubbio far controllare o eseguire l’operazione da personale professionalmente
qualificato.
Per l’assemblaggio si prenda come riferimento le figure (come riferimento delle parti
strutturali), che è bene visionare prima dell'assemblaggio.
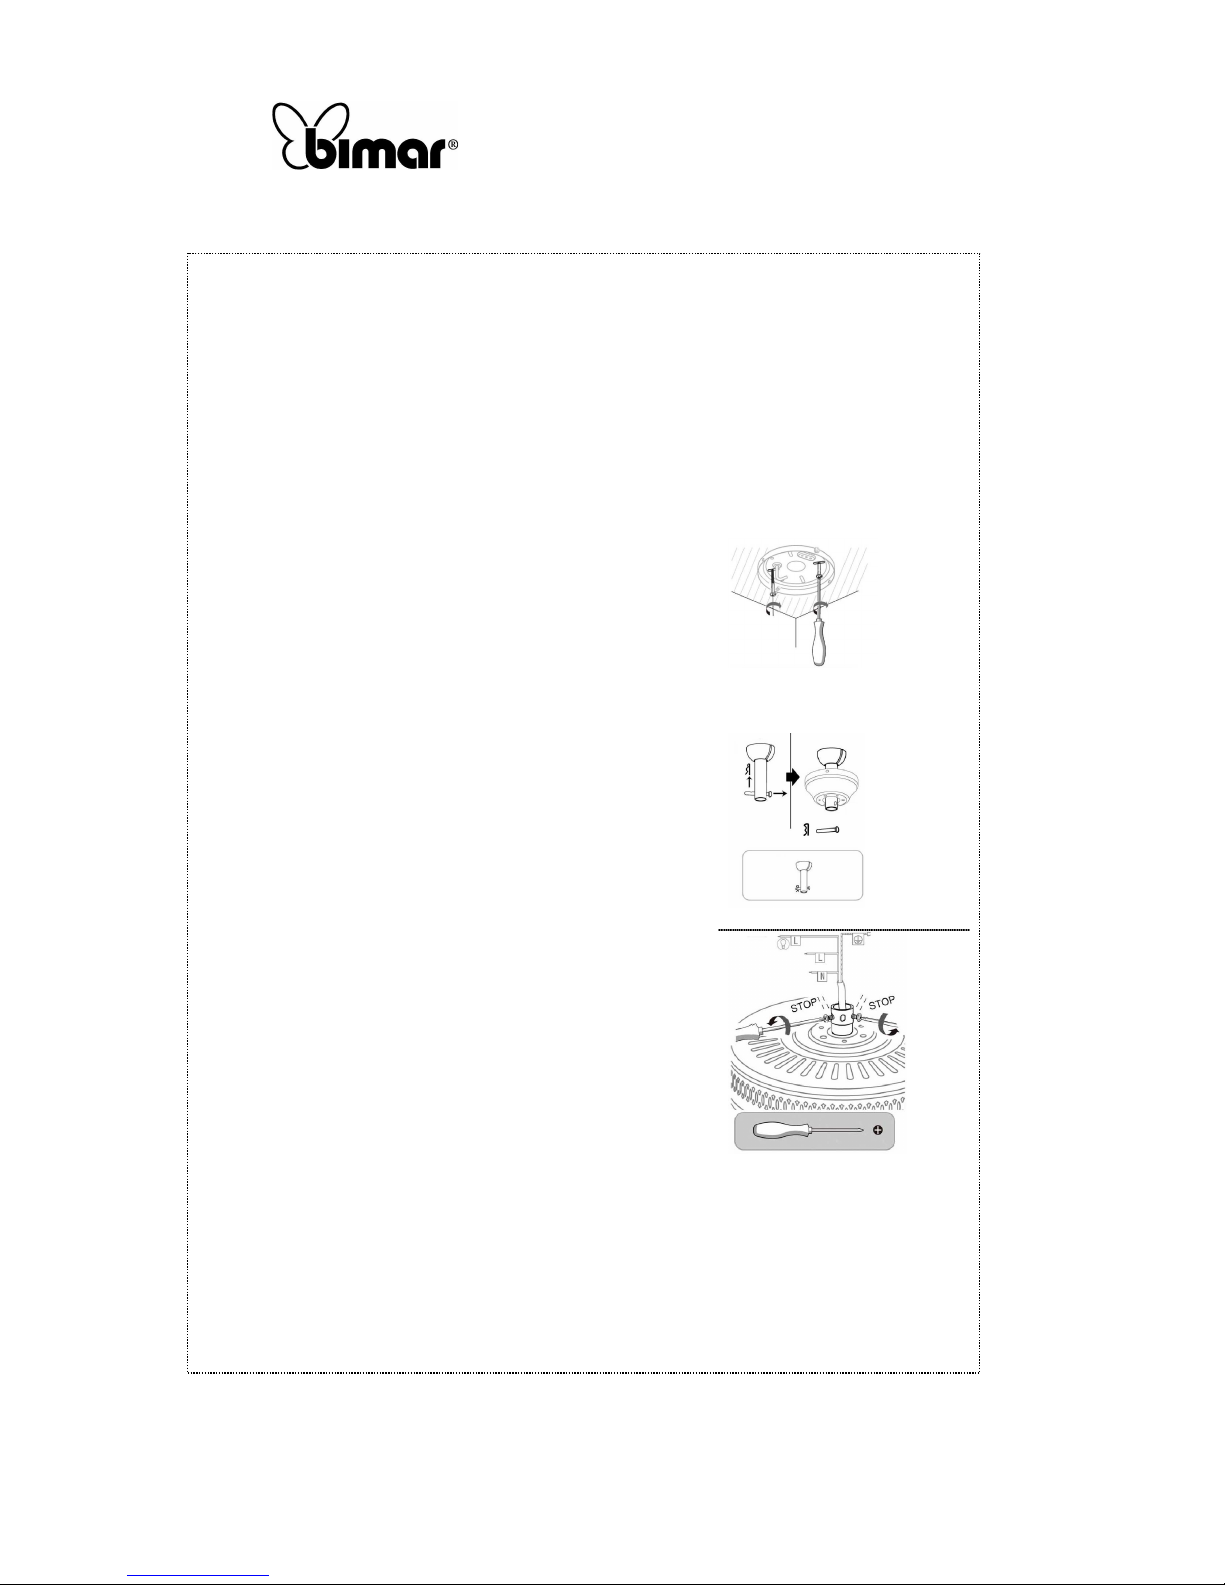
Per l’assemblaggio si proceda nel modo seguente:
1. Fissare la piastra di sostegno al soffitto: eseguire i fori
facendo attenzione a non danneggiare alcuna tubazione
all'interno della muratura (prima verificare se tubi acqua e
gas, ecc.. o cavi elettrici sono incorporati nelle parete);
mediante i tasselli di fissaggio ad espansione, e le viti con
rosetta fissare la piastra. Verificare la solidità del fissaggio,
quindi applicare alla piastra un peso 4 volte superiore a
quello del ventilatore e verificare che la piastra rimanga
perfettamente fissa alla soletta.
2. Infilare l'asta di sostegno attraverso la calotta superiore e
inserire i cavetti elettrici attraverso la cavità dell'asta. I fili
vanno inseriti dal basso verso l'alto.
3. Inserire l'estremità inferiore dell'asta sul perno del supporto
motore, in modo che i fori risultino coassiali e inserire
l'apposito perno di fissaggio.
4. Inserire la rosetta sul perno e fissare il perno tramite la
coppiglia che deve essere completamente inserita e poi
piegata in modo da impedire che sia perno che coppiglia
possano sfilarsi.
5. Assicurare ulteriormente il suppurto motore all'asta
stringendo la /le vite/i di sicurezza.
6. Appendere provvisoriamente il ventilatore al gancio della piastra di sostegno. Eseguire il
collegamento elettrico così come spiegato nel successivo paragrafo "Collegamento
Elettrico" e si proceda poi nel modo seguente.
7. Togliere il ventilatore dal gancio della piastra di sostegno, tenerlo sollevato sia per non
strappare/danneggiare i collegamenti elettrici. Verificare che i fili elettrici siano liberi e
alloggiati nel modo corretto e posizionare la calotta superiore in prossimità della piastra di
sostegno. Avvitare la vite e serrarla in modo adeguato.
Page 5
Copies of the I/B. Please reproduce them without any
changes except under special instruction from Bimar (Italy).
The pages must be reproduced and folded in order to obtain
a booklet A5 (+/- 148.5 mm width x 210 mm height). When
folding, make sure you keep the good numbering when you
turn the pages of the I/B. Don’t change the page numbering.
Keep the language integrity.
5/40
Assembly page 5/16
Fax +32 030 9904733
8. Fissare i sostegni reggipala alle pale utilizzando viti con rosette e dadi in dotazione, e
serrare in modo appropriato. Per alcuni modelli le pale non sono reversibili, quindi fissare il
sostegno al lato corretto della pala. Per alcuni modelli i dadi non sono necessari e pertanto
non sono forniti in dotazione.
9. Assemblare le pale al motore, posizionandole nel modo corretto (fare attenzione al lato
della pala), e avvitare il reggipala con viti e rosette in dotazione. Verificare che tutte le viti
siano serrate nel modo corretto, sia ai fini della sicurezza, ma anche per evitare che il
ventilatore possa oscillare in modo eccessivo durante il funzionamento.
10. Alcuni ventilatori possono avere in dotazione la luce. La luce posta sotto il motore può
essere già assemblata e collegata, oppure è fornita in kit da collegare ed assemblare.
In questo caso, necessita semplicemente avvitare la lampadina (non fornita in dotazione)
corrispondente alle specifiche indicazioni riportate sulla targa dati e/o sulla targhetta in
prossimità del portalampada. Per il type VSL10 e VSB10 (4xMax60W, attacco E14)
Inserire il paralume in vetro e fissarlo tramite le viti in dotazione da serrare leggermente al
fine di non rompere il vetro.
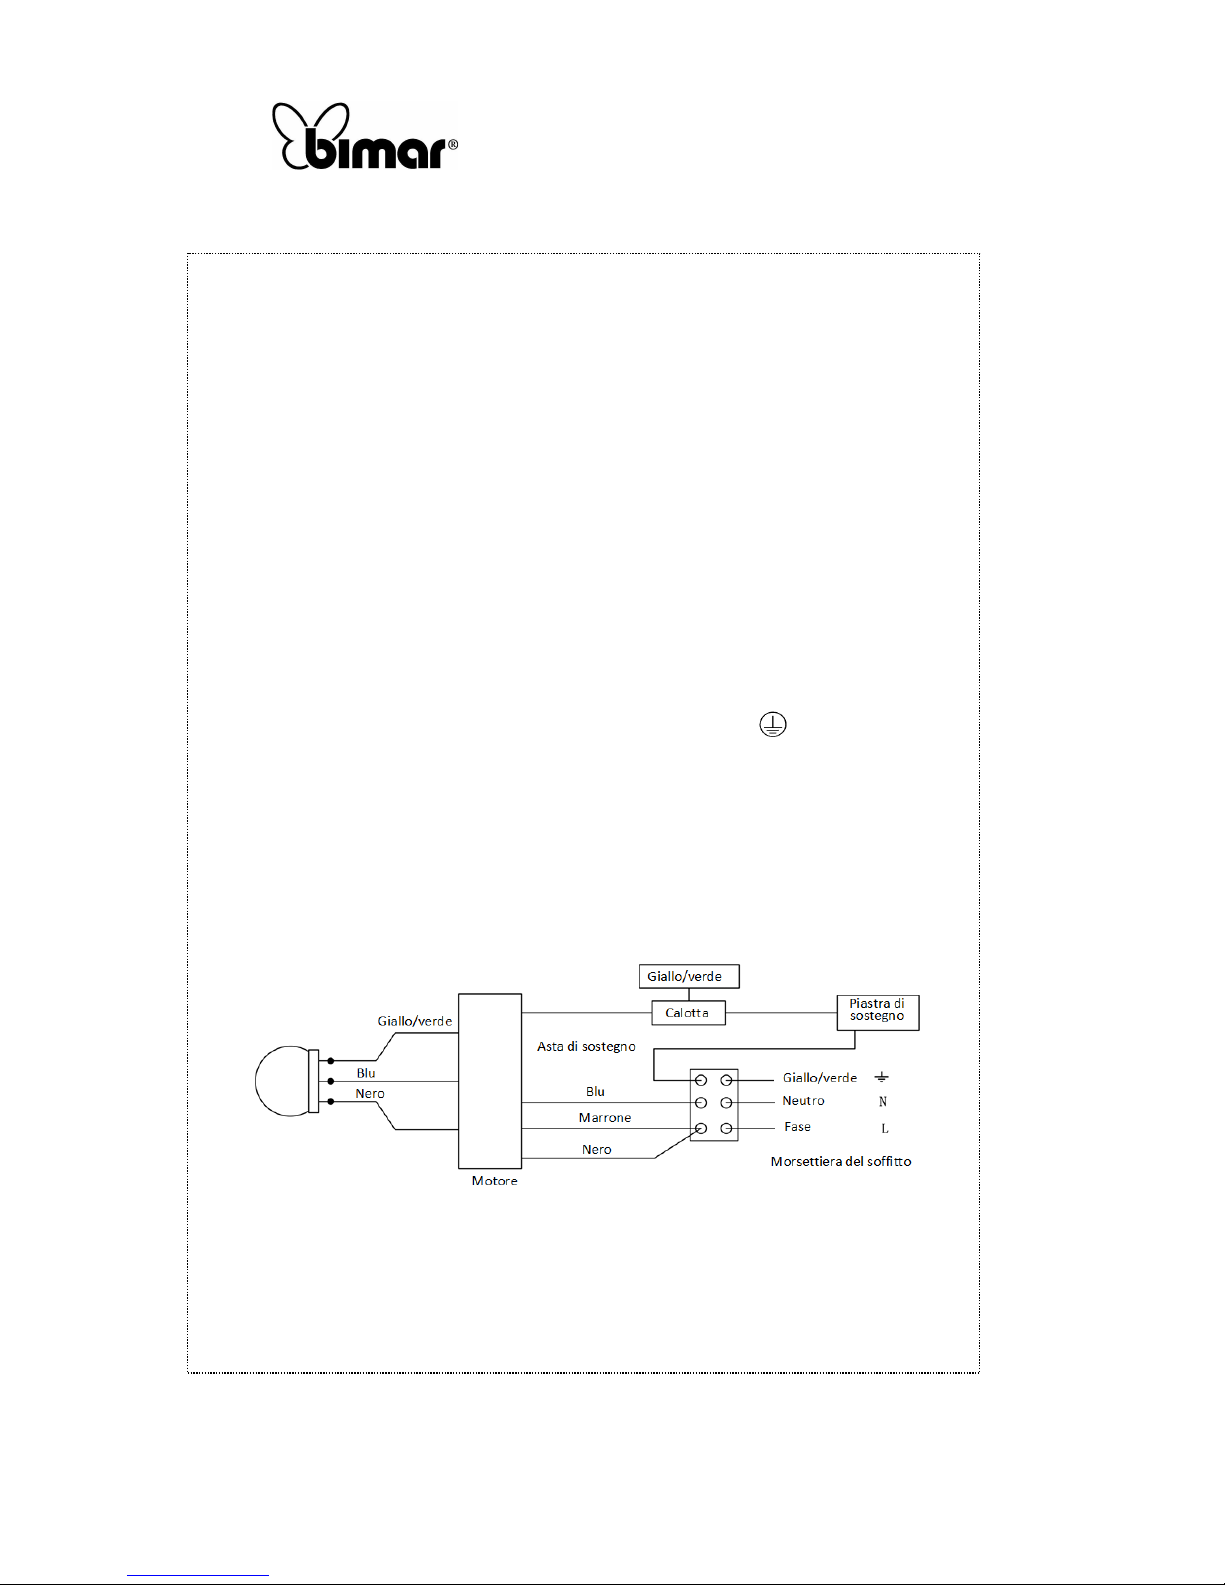
Collegamento elettrico
Effettuare il collegamento elettrico seguendo lo schema di seguito illustrato e descritto.
- filo MARRONE “LIVE”: fase per motore
- filo BLU “NEUTRAL”: Neutro comune motore e luci
- filo NERO “LIGHT”: fase per luce
- filo GIALLO/VERDE: Messa a Terra, corrispondente al simbolo
Collegare i fili del ventilatore e quelli provenienti dal soffitto con la morsettiera fornita in
dotazione secondo lo schema elettrico seguente: il ventilatore e la luce sono comandati da un
commutatore.
La versione senza luce non è corredata dall'interruttore a tirante per il comando della luce. In
questo caso il cavetto rosso, se presente, non deve essere collegato.
Il ventilatore è comandato dal commutatore a tirante posto sul ventilatore. La luce è comandata
da un interruttore a parete "S" (non fornito). Attenzione: si raccomanda di selezionare "acceso"
l'interuttore a tirante della luce, posto sul ventilatore. Nella versione senza luce il cavetto rosso,
se presente, non va collegato.
Page 6
Copies of the I/B. Please reproduce them without any
changes except under special instruction from Bimar (Italy).
The pages must be reproduced and folded in order to obtain
a booklet A5 (+/- 148.5 mm width x 210 mm height). When
folding, make sure you keep the good numbering when you
turn the pages of the I/B. Don’t change the page numbering.
Keep the language integrity.
6/40
Assembly page 6/16
Fax +32 030 9904733
Uso
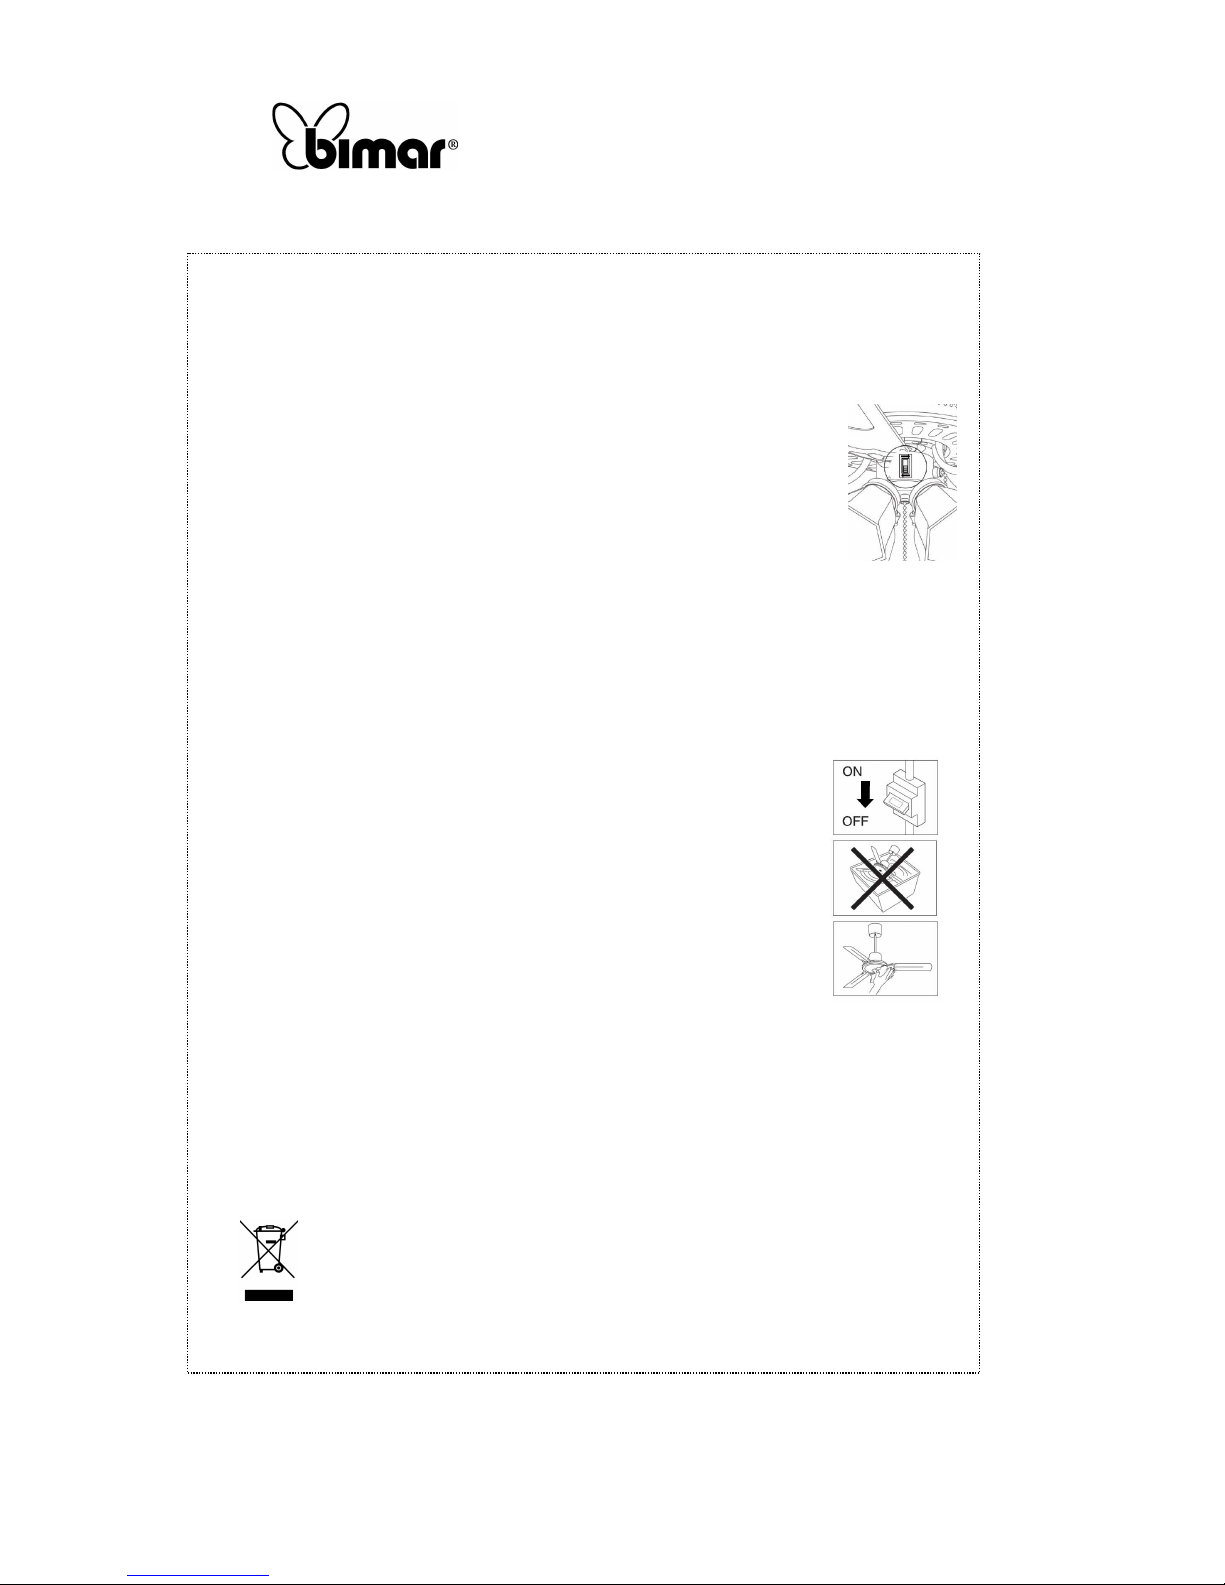
Il ventilatore è dotato dei seguenti elementi di comando:
- commutatore di velocità a tirante posto sul ventilatore si agisce tirando la catenella che in
successione attiva 0/min/med/max
- selettore per la rotazione del motore in senso orario o anti-orario, al fine di
avere un flusso d'aria diretto dal centro verso l'esterno o viceversa (tale
funzione è presente solo su alcuni modelli), vedi figura a lato
- commutatore a tirante posto sul ventilatore per accendere e spegnere la luce (nei modelli con
questo optional) si agisce tirando la catenella per accendere e spegnere la luce
PULIZIA E MANUTENZIONE
Attenzione: prima di eseguire le normali operazioni di pulizia, spegnere il ventilatore,
spegnere la luce del ventilatore (se presente), e togliere l'alimentazione della rete elettrica
spegnendo l'interruttore onnipolare (pos. 0/OFF).
•
Per la pulizia utilizzare un panno morbido, leggermente inumidito; non
utilizzare prodotti abrasivi o corrosivi. Fare attenzione a non danneggiare
l'apparecchio, le pale, i collegamenti elettrici, o compromettere i fissaggi.
• Non immergere o bagnare nessuna parte del ventilatore in acqua o altro
liquido: nel caso dovesse succedere per prima cosa verificare d'aver tolta
l'alimentazione alla rete elettrica, e poi asciugare con cura l’apparecchio
e verificare che tutte le parti elettriche siano perfettamente asciutte: in
caso di dubbio rivolgersi a personale professionalmente qualificato.
• E’ indispensabile mantenere i fori di aerazione del motore liberi da
polvere e lanugine.
• Non disperdere nell’ambiente prodotti non biodegradabili, ma smaltirli nel rispetto delle
norme vigenti. Alla fine della sua vita utile il prodotto non deve essere smaltito insieme ai
rifiuti urbani. Può essere consegnato presso gli appositi centri di raccolta differenziata
predisposti dalle amministrazioni comunali, oppure presso i rivenditori che forniranno questo
servizio all’acquisto di un nuovo apparecchio. Smaltire separatamente un elettrodomestico
consente di evitare possibili conseguenze negative per l’ambiente e per la salute derivanti da
un suo smaltimento inadeguato e permette di recuperare i materiali di cui è composto al fine
di ottenere un importante risparmio di energia e risorse. Per rimarcare l’obbligo di smaltire
separatamente gli elettrodomestici, sul prodotto è riportato il marchio del contenitore di
spazzatura mobile barrato.
Page 7
Copies of the I/B. Please reproduce them without any
changes except under special instruction from Bimar (Italy).
The pages must be reproduced and folded in order to obtain
a booklet A5 (+/- 148.5 mm width x 210 mm height). When
folding, make sure you keep the good numbering when you
turn the pages of the I/B. Don’t change the page numbering.
Keep the language integrity.
7/40
Assembly page 7/16
Fax +32 030 9904733
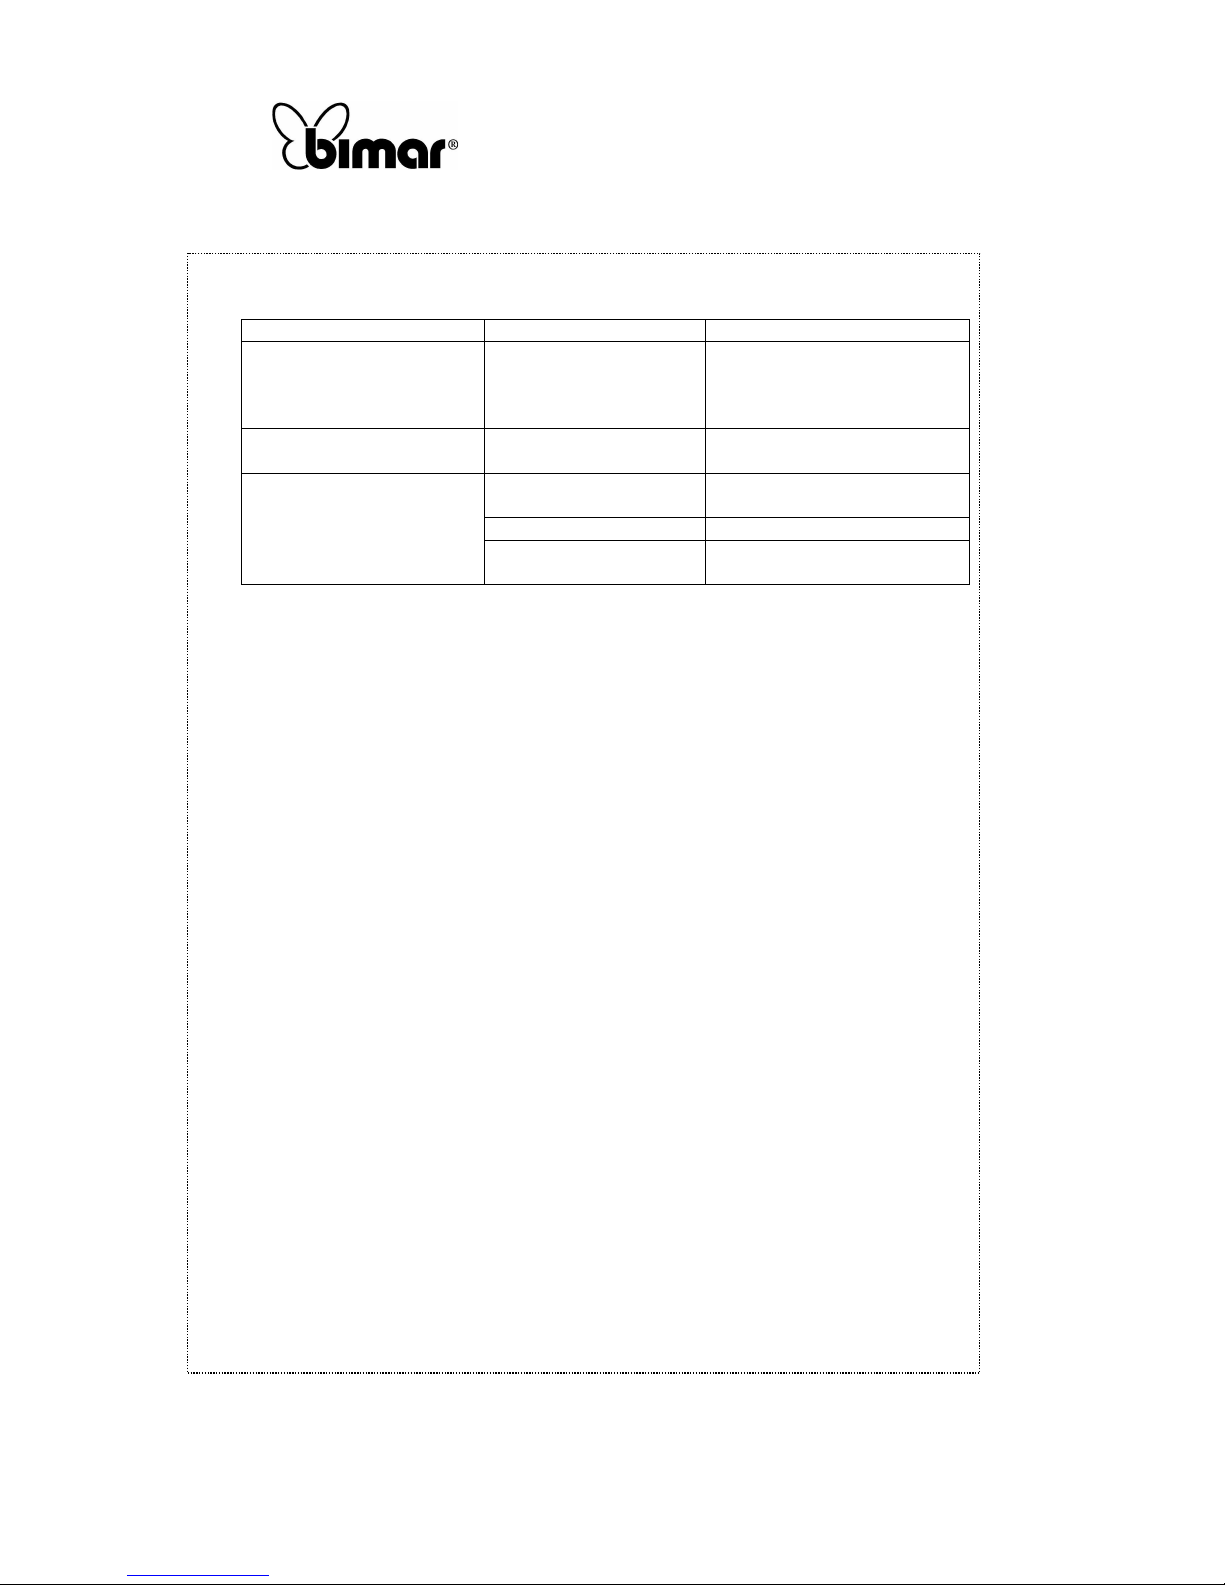
PROBLEMA CAUSA POSSIBILE RIMEDIO
Apparecchio
completamente spento
Mancanza di corrente Controllare l’interruttore
generale dell’impianto o il
collegamento elettrico
sbagliato.
L’apparecchio non
funziona regolarmente
Motore guasto Rivolgersi ad un Centro
Assistenza Tecnico autorizzato.
Il ventilatore oscilla
eccessivamente
Pale montate non
correttamente serrate.
Serrare adeguatamente tutte le
viti
Pale piegate Sostituire le pale.
Viti di ancoraggio pale
non correttamente serrate.
Bloccare adeguatamente tutte le
viti.
Page 8
Copies of the I/B. Please reproduce them without any
changes except under special instruction from Bimar (Italy).
The pages must be reproduced and folded in order to obtain
a booklet A5 (+/- 148.5 mm width x 210 mm height). When
folding, make sure you keep the good numbering when you
turn the pages of the I/B. Don’t change the page numbering.
Keep the language integrity.
8/40
Assembly page 8/16
Fax +32 030 9904733
Please read these instructions carefully before using the appliance, and instruct other
persons using it, too, when necessary.
KEEP BOOKLET HANDY FOR FURTHER USE.
This symbol invites you to use caution and to read the specific warnings in the
instruction handbook.
GENERAL NOTICES
• This device is intended for home use only, to ventilate rooms, and in the manner described
in this manual: do not use it for any other purpose. Any other use is to be considered
inappropriate and therefore dangerous. The manufacturer cannot be held responsible for
eventual damage caused by inappropriate, improper or irresponsible use and/or for repairs
made to the product by unauthorised personnel.
• The use of any electrical appliance implies the observance of some basic rules, including
a) should not be touched with wet hands
b) do not touch with bare feet
c) This appliance is not intended for use by persons (including children) with reduced
physial, sensory or mental capabilities, or lack of experience and knowledge, unless they
have been given supervision or instruction concerning use of the appliance by a person
responsible for their safety.. Children should be supervised to ensure that they do not
play with the appliance.
• This appliance can be used by children aged from 8 years and above and persons with
reduced physical, sensory or mental capabilities or lack of experience and knowledge if they
have been given supervision or instruction concerning use of the appliance in a safe way and
if they understand the hazards involved. Children shall not play with the appliance. Cleaning
and user maintenance shall not be made by children without supervision.
• Switch off the master switch:
- Before connecting the appliance to the mains, during assembly, disassembly and before
cleaning the appliance
- When a malfunction is detected
- if the appliance will be out of use for short or long periods
• Do not use the appliance if it is not operating correctly or seems damaged; if in doubt,
contact professionally qualified personnel.
• Periodically check the integrity of the appliance. In case of imperfections or if in doubt
contact a qualified technician.
• Do not use the appliance in the presence of flammable vapors or substances (alcohol,
insecticides, gasoline) or in dusty environments.
• Do not use the device at room temperatures above 40 °C.
• Do not leave the device exposed to the weather (sun, rain, etc.).
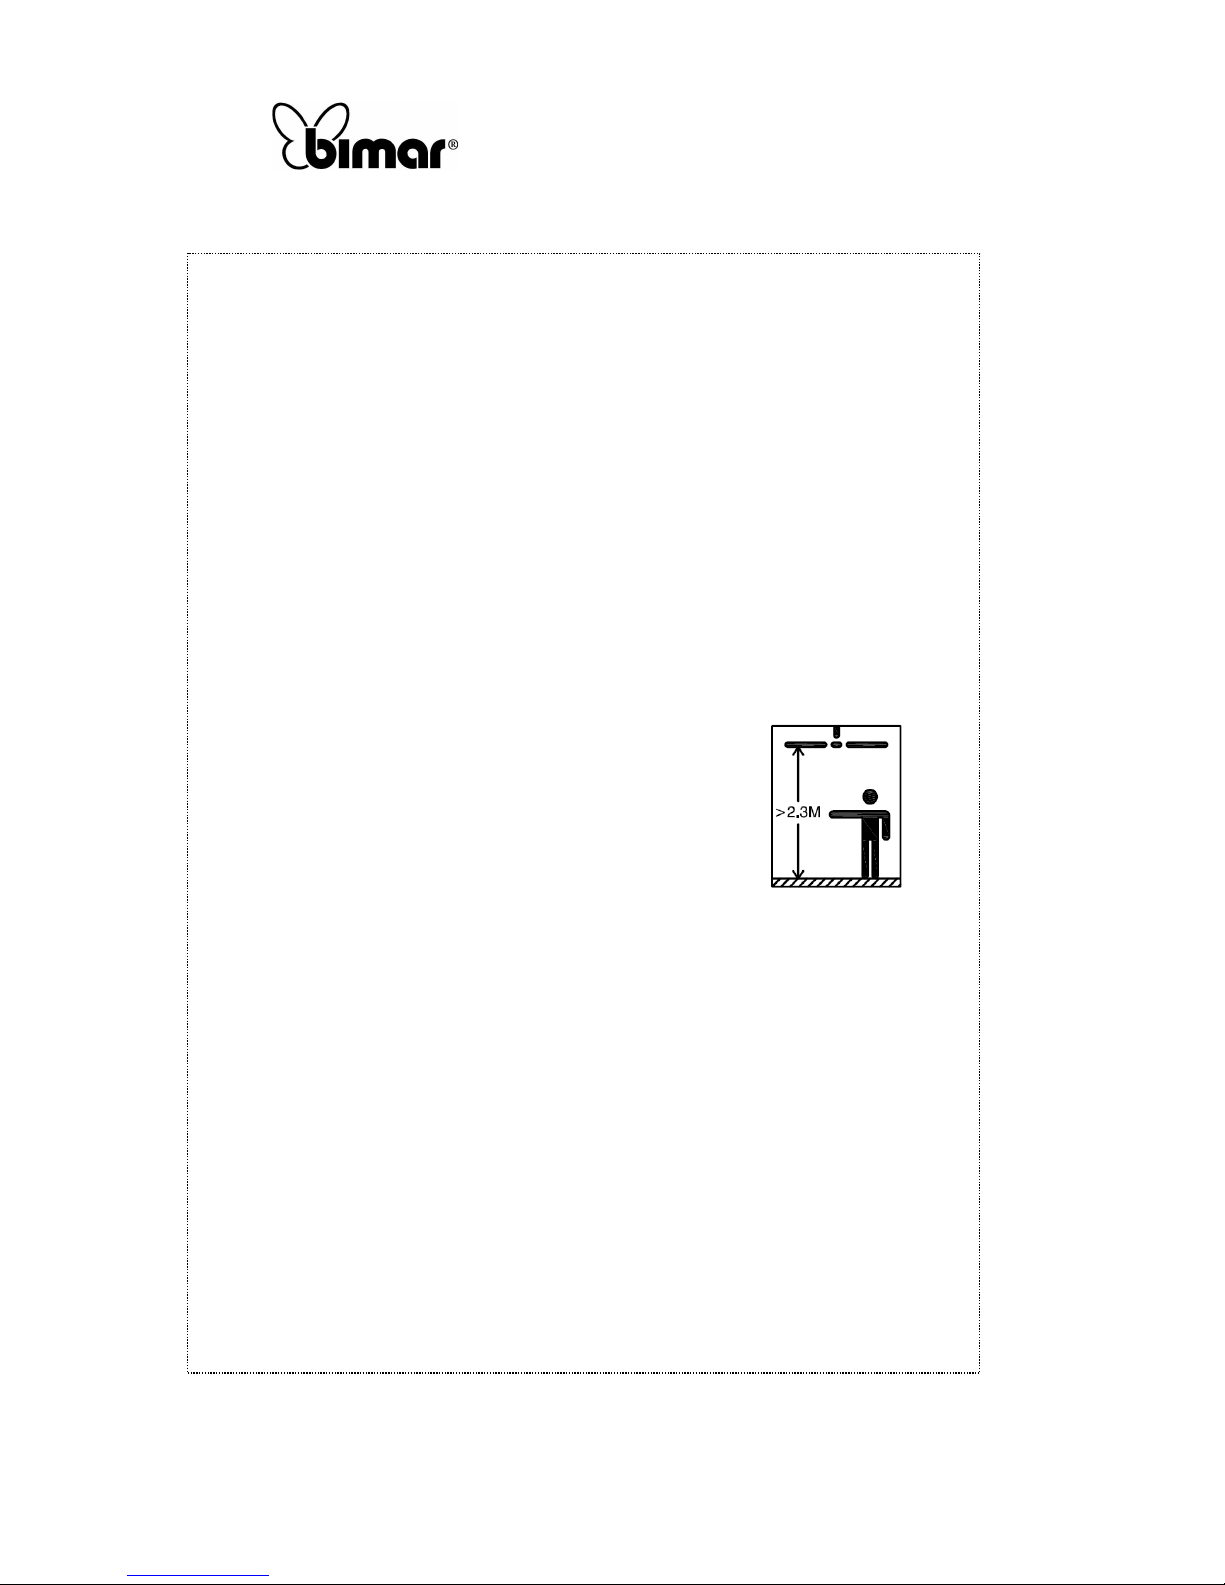
• Attention: The fan must be installed so that the blades are more than 2.3 m above the
flooring level, as shown.
• Attention: If the supply cord is damaged, it must be replaced by a special cord or assembly
available from the manufacturer or its service agent.
Page 9
Copies of the I/B. Please reproduce them without any
changes except under special instruction from Bimar (Italy).
The pages must be reproduced and folded in order to obtain
a booklet A5 (+/- 148.5 mm width x 210 mm height). When
folding, make sure you keep the good numbering when you
turn the pages of the I/B. Don’t change the page numbering.
Keep the language integrity.
9/40
Assembly page 9/16
Fax +32 030 9904733
• If the supply cord is damaged, it must be replaced by the manufactuer, its service agent or
similarly qualified persons in order to avoid a hazard.
• Any changes made to the plug prepared by the manufacturer, or otherwise, is dangerous and
will void the warranty, and relieve the same from any liability.
INSTALLATION
• Installation must be performed by qualified personnel.
• After removing the packing materials, check the integrity of the appliance; if you are unsure,
do not use it and ask for qualified professional help. The packing materials (plastic bags,
polystyrene foam, nails, etc.) must be kept out the reach of children because they are
potential sources of danger, but must be disposed of in accordance with regulations in the
appropriate containers for recycling.
• Before connecting the appliance, check:
a) that the voltage values shown on the data plate (230V~ 50Hz) correspond to those of the
electricity supply network
b) the electrical system to which the appliance will be connected must:
- Conform to current standards
- Have cables with an adequate diameter for the power consumption
- Have effective grounding and be in accordance with the applicable electrical safety
standards: in case of doubt, request an accurate check from professionally qualified
personnel.
•
For installation, it is necessary to provide an omnipolar switch
with a contact opening distance equal to or greater than 3mm.
• Install the appliance at an appropriate distance from walls,
objects, heat sources, textiles (curtains, etc..) or volatile material,
and at least 2.3 m from the floor level.
• Install the appliance to a masonry or metal ceiling / slab and / or
material that guarantees a support of a weight equal to at least 8
times the weight of the appliance.
• Before installation, check the following:
a) that the appliance is in good condition
b) that the elettric cables are not damaged
c) that the omnipolar switch of the electrical network is in the off position (OFF). If the
appliance falls or receives a heavy blow, immediately check all components for
damage. If in doubt, have the appliance checked or assembled by a qualified
professional person.
• Do not use the appliance with a timer or a programmer or with a system that can switch on
the appliance automatically, this avoiding the risk of damage to persons, animals or things.
• In the event of a breakdown or poor operation, turn the fan heater off and ask for
professionally qualified help: repairs made by unqualified persons can be dangerous and
render void the warranty.
Make sure you have all the components before installation.
• To prevent damage, assemble the appliance on a flat, smooth surface, without any
roughness, in order to avoid damage or scratches to the fan.
• Attention: the fan can be used only when completely and correctly assembled. If in doubt,
have the appliance checked or assembled by a qualified professional person.
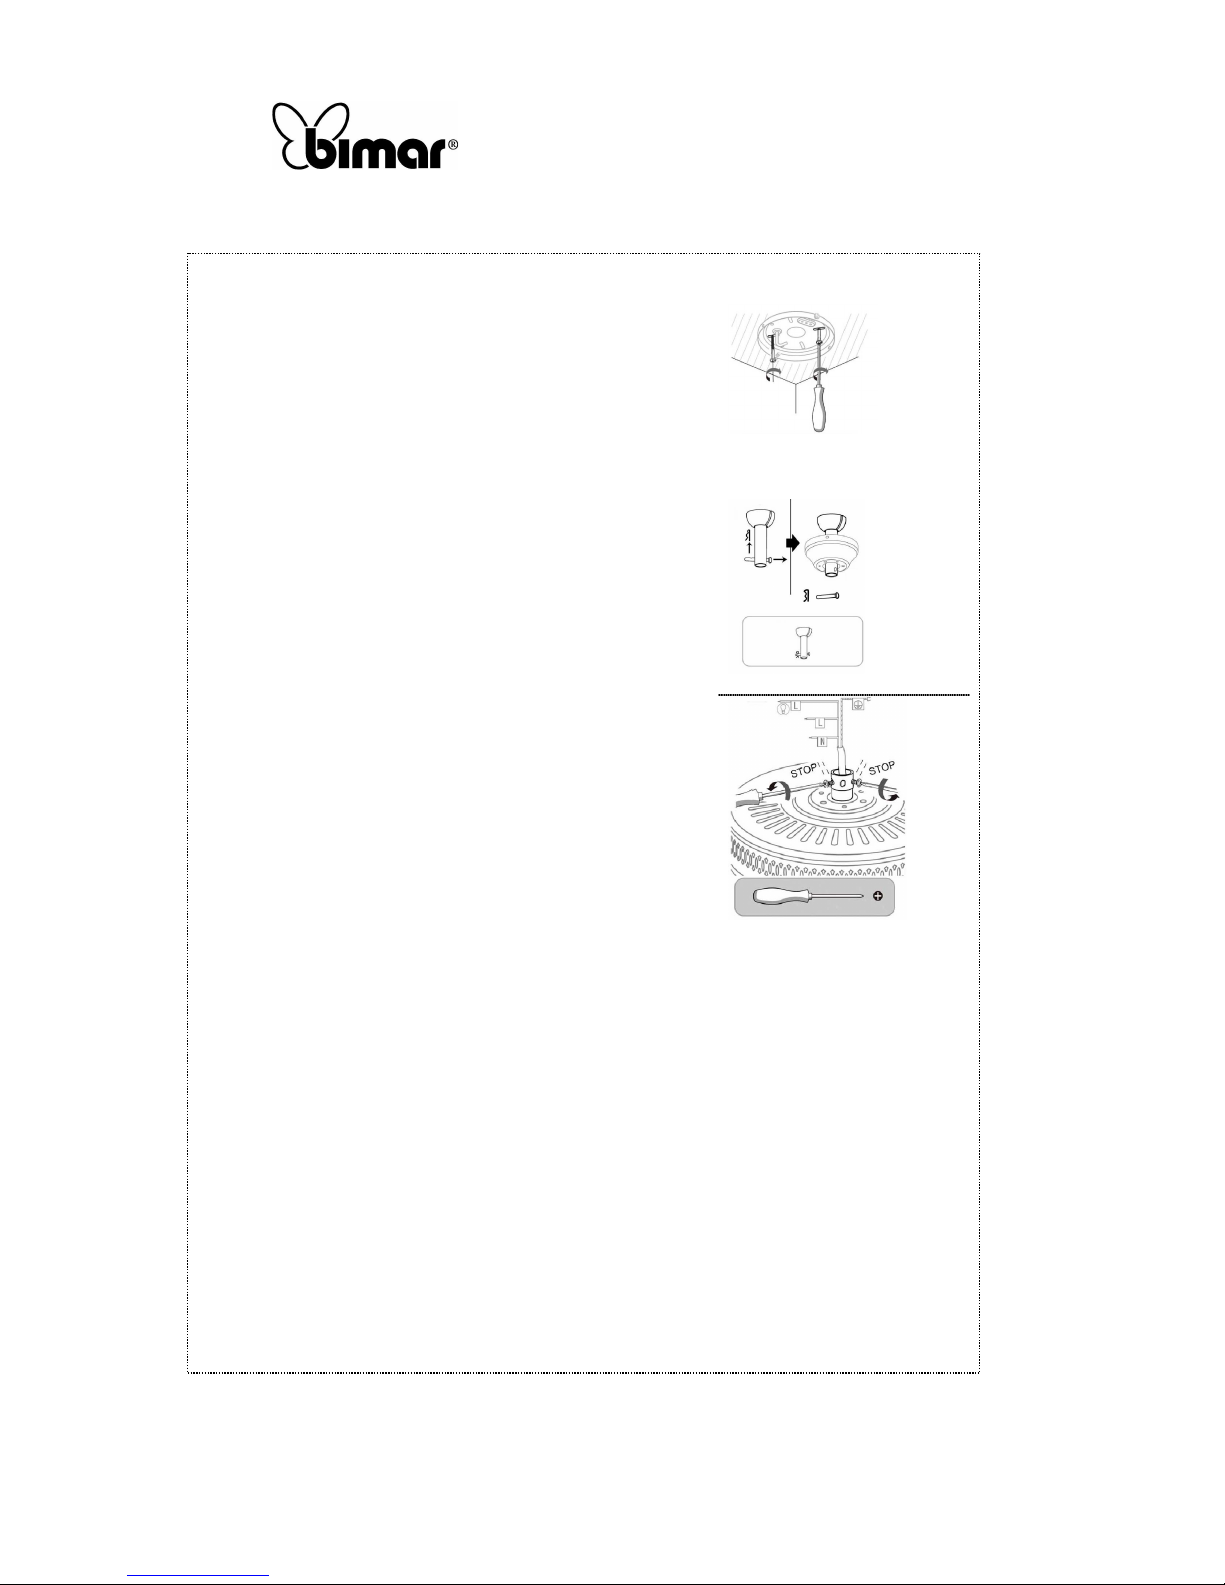
For the assembly , use the folowing figures as a reference (as a reference of the structural
parts), which is should be read before assembly.
For assembly, proceed as follows:
Page 10
Copies of the I/B. Please reproduce them without any
changes except under special instruction from Bimar (Italy).
The pages must be reproduced and folded in order to obtain
a booklet A5 (+/- 148.5 mm width x 210 mm height). When
folding, make sure you keep the good numbering when you
turn the pages of the I/B. Don’t change the page numbering.
Keep the language integrity.
10/40
Assembly page 10/16
Fax +32 030 9904733
1. Attach the mounting plate to the ceiling: drill the holes,
taking care not to damage any piping inside the wall (first
check if there are water or gas pipes etc. .. or electrical wires
embedded in the wall); use expansion dowels and screws
with washers to attach the plate. Make sure it is firmly
attached, then apply a weight to the plate 4 times higher
than that of the fan and check that the plate remains
perfectly fixed to the base.
2. Insert the support rod through the top cap and insert the
electrical cables through the hollow shaft. The wires are
inserted from bottom to top.
3. Insert the lower end of the rod into the motor support pin,
so that the holes are coaxial and insert locking pin.
4. Place the washer on the pin and secure the pin using the
cotter pin which must be fully inserted and then bent so as
to prevent both the pin and cotter pin from slipping off.
5. Fix the motor support further to the rod by tightening the
safety screw
6. Temporarily hang the fan on the hook on the support plate Make the electrical connections
as explained in the "Electrical Connection" section and then proceed as follows.
7. Remove the fan from the hook on the support plate hold it up so as not to tear / damage
the electrical connections. Check that the wires are free and housed in the correct way and
position the top cap near the support plate. Tighten the screw properly.
8. Attach the blade supports to the blades using screws with washers and nuts, and tighten
appropriately. For some models, the blades are not reversible, so fix the support to the right
side of the blade. For some models nuts are not needed and are therefore not provided.
9. Mount the blades to the motor, placing them in the correct way (pay attention to the side of
the blade), and screw on the blade supports with the screws and washers supplied. Check
that all screws are tightened in the correct way, both for safety purposes, but also to prevent
the fan from swinging excessively during operation.
10. Some fans may be supplied with a lamp. The lamp placed under the motor can be
assembled and connected in advance, or it will be supplied in a kit to connect and assemble.
In this case, simply screw the bulb (not included) corresponding to the specific details given
on the nameplate and / or on the data plate near the socket. To type VSL10 e VSB10
(4xMax60W, lamp holder E14).
Page 11
Copies of the I/B. Please reproduce them without any
changes except under special instruction from Bimar (Italy).
The pages must be reproduced and folded in order to obtain
a booklet A5 (+/- 148.5 mm width x 210 mm height). When
folding, make sure you keep the good numbering when you
turn the pages of the I/B. Don’t change the page numbering.
Keep the language integrity.
11/40
Assembly page 11/16
Fax +32 030 9904733
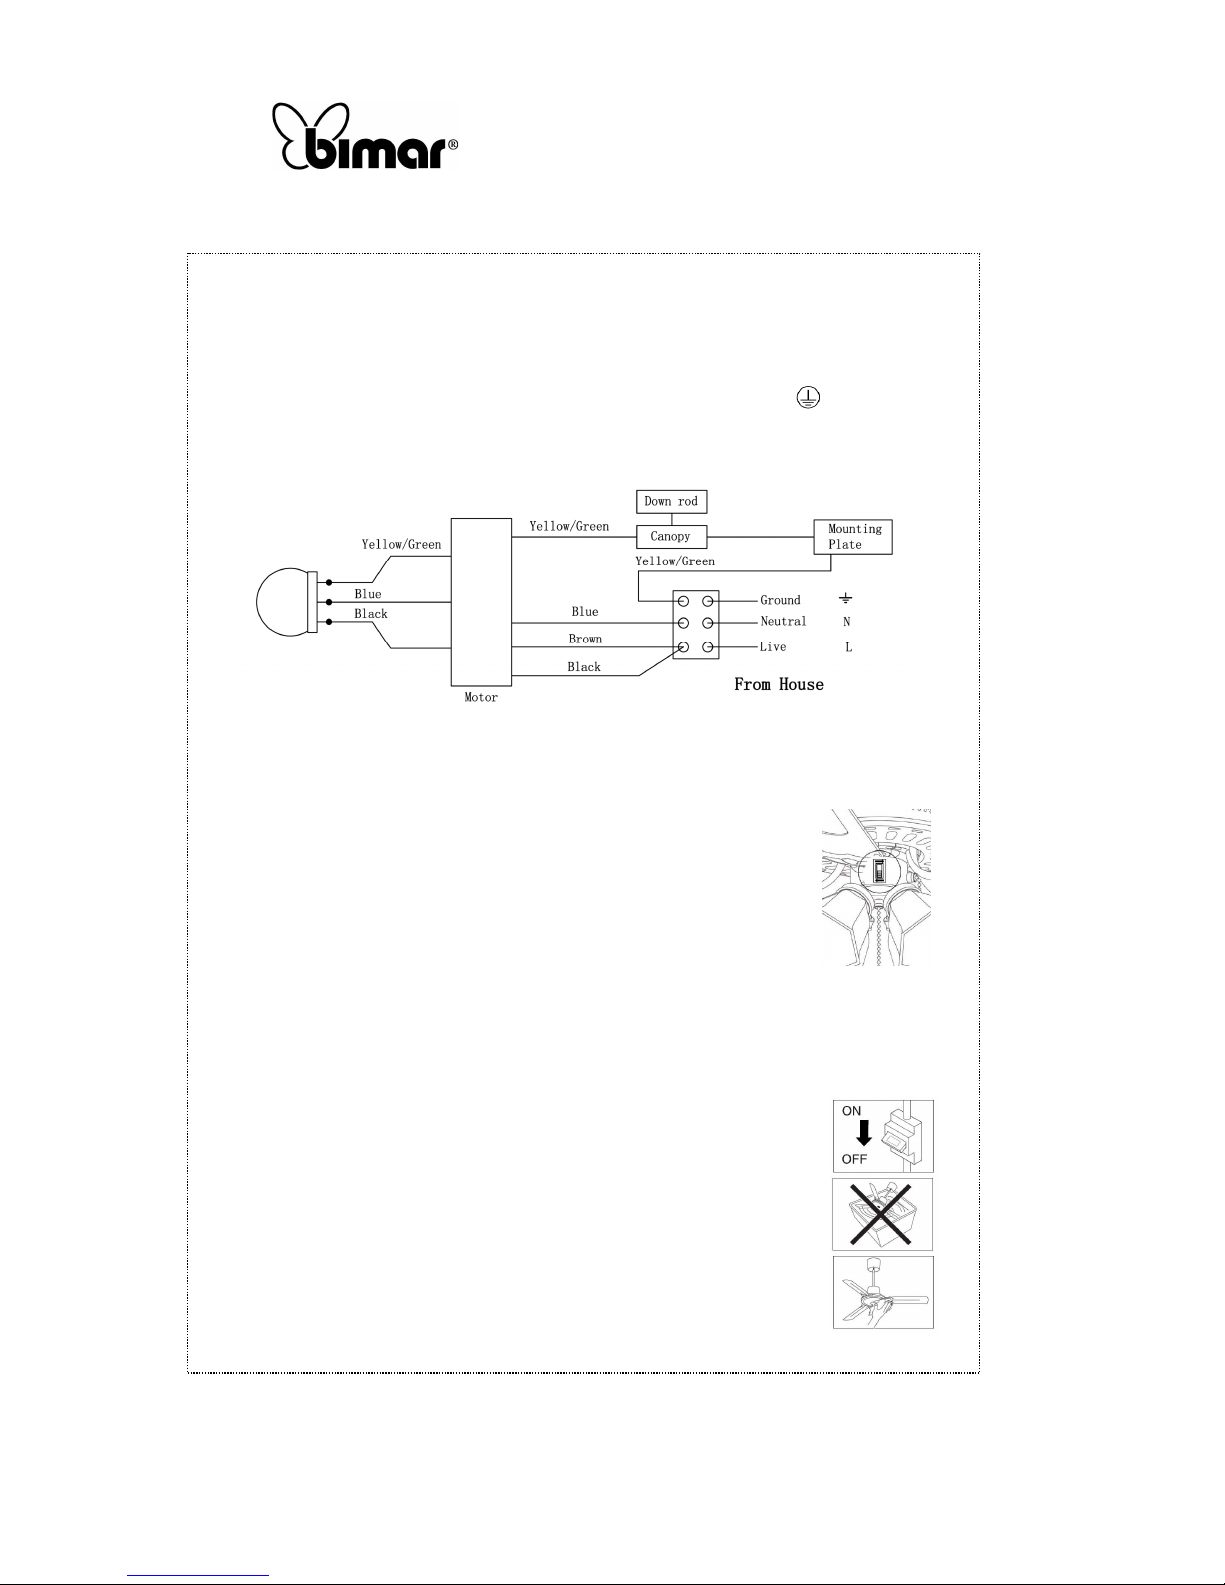
Electrical connections
Carry out electrical connections according to the diagram shown and described below.
- BROWN wire “LIVE”: motor phase
- BLUE wire “NEUTRAL”: common neutral for motor and lamps
- BLACK wire “LIGHT”: lamp phase
- GREEN / YELLOW wire: Grounding, corresponding to the symbol
Connect the wires to the fan and those coming from the ceiling with the supplied terminal
block according to the wiring diagrams provided below: the fan and lamp are controlled by a
switch.
Use
The fan is equipped with the following operating elements:
- Wall-mounted control switch which works by rotating the knob to select 0/min/med/max
- Switch for the motor rotation in a clockwise or anti-clockwise direction
in order to have a direct air flow from the centre to the outside or vice
versa (this feature is only present on some models).
- Switch to turn the lamp on and off (on models with this option) and it works by pressing the 0
/ I switch on models with wall control
CLEANING AND MAINTENANCE
Attention: before normal cleaning operations, turn the fan off, turn the fan lamp off (if
present), and disconnect from mains power by turning off the isolating switch ( pos. 0/OFF).
•
For cleaning, use a soft, slightly damp cloth; do not use abrasive or
corrosive products. Be careful not to damage the equipment, blades,
electrical connections, or impair the hardware.
• Do not immerse or soak any part of the fan in water or any other liquid;
in the event that this happens, first ensure the fan is disconnected from
the mains power supply, and then wipe the appliance off carefully,
making sure that all electrical parts are perfectly dry: in case of doubt,
consult a qualified professional.
• It is important to keep the air vents of the motor free of dust and lint.
Page 12
Copies of the I/B. Please reproduce them without any
changes except under special instruction from Bimar (Italy).
The pages must be reproduced and folded in order to obtain
a booklet A5 (+/- 148.5 mm width x 210 mm height). When
folding, make sure you keep the good numbering when you
turn the pages of the I/B. Don’t change the page numbering.
Keep the language integrity.
12/40
Assembly page 12/16
Fax +32 030 9904733
• Do not dispose of non-biodegradable products into the environment. Ensure they are
disposed of in accordance with local regulations. At the end of its useful life, the product
must not be disposed of with household waste. It can be taken to a special waste collection
centres provided by local government, or to a dealer who will provide this service with the
purchase of a new appliance. Disposing of this household appliance separately avoids
possible negative consequences for the environment and human health deriving from
inappropriate disposal and enables the materials of which it is composed to be recovered in
order to obtain significant savings in energy and resources. As a reminder to dispose of
household appliances separately, the product is marked with a wheeled bin symbol.
PROBLEM POSSIBLE CAUSE SOLUTION
Appliance completely off
No power Check the master switch or for
incorrect wiring.
The appliance does not
operate normally
Motor fault Contact an authorized
Technical Assistance Centre.
The fan is oscillating
excessively
Blades not tightened
properly.
Tighten all screws properly
Bent blades Replace blades.
Blade anchoring screws
do not properly tightened.
Lock all screws properly.
Dieses Symbol weist darauf hin, dass diese Anleitung vor Verwendung des Geräts
aufmerksam durchgelesen und, falls notwendig, dritte Personen darüber informiert
werden müssen.
DAS HANDBUCH ZUM NACHSCHLAGEN AUFBEWAHREN.
Dieses Symbol weist darauf hin, mit Vorsicht vorzugehen und die spezifischen
Vorsichtsmaßregeln im Handbuch durchzulesen.
ALLGEMEINE VORSICHTSMASSREGELN
• Dieses Gerät ist nur zum Belüften von privaten und ähnlichen Räumen und nur für die
Befestigung und Montage an der Decke vorgesehen. Jede davon abweichende Verwendung
wird als unsachgemäß und gefährlich angesehen. Der Hersteller kann nicht für eventuelle
Schäden bei unsachgemäßer, falscher und unverantwortlicher Verwendung und/oder bei von
unqualifiziertem Personen durchgeführten Reparaturen haftbar gemacht werden.
• Bei Verwendung von gleichwelchen elektrischen Geräten müssen einige grundsätzliche
Regeln eingehalten werden, wie u.a.:
Page 13
Copies of the I/B. Please reproduce them without any
changes except under special instruction from Bimar (Italy).
The pages must be reproduced and folded in order to obtain
a booklet A5 (+/- 148.5 mm width x 210 mm height). When
folding, make sure you keep the good numbering when you
turn the pages of the I/B. Don’t change the page numbering.
Keep the language integrity.
13/40
Assembly page 13/16
Fax +32 030 9904733
a) Sie dürfen nicht mit nassen oder feuchten Händen angefasst werden.
b) Sie dürfen nicht angefasst werden, wenn man nackte Füße hat.
c) Sie dürfen nicht von Personen verwendet werden (einschl. Kindern) deren körperlichen,
sensoriellen oder geistigen Fähigkeiten vermindert sind oder denen die Erfahrung oder
die Kenntnisse fehlen, außer wenn sie über eine für ihre Sicherheit verantwortliche
Person oder eine Beaufsichtigung Anweisungen für die Verwendung des Gerätes
erhalten haben. Kinder müssen immer beaufsichtigt werden, um sicherzustellen, dass sie
nicht mit dem Gerät spielen.
• Das Gerät darf nicht von Kindern unter 8 Jahren oder von Personen mit verminderten
körperlichen, sensoriellen oder geistigen Fähigkeiten oder von Personen, denen die Erfahrung
oder die notwendigen Kenntnisse fehlen benutzt werden, außer wenn sie beaufsichtigt
werden bzw. die Anweisungen und bei Kindern des Verständnisses für die sichere
Verwendung des Geräts erhalten haben. Kinder dürfen nicht mit dem Gerät spielen. Die vom
Benutzer auszuführende Säuberung und die Wartung darf nicht von unbeaufsichtigten
Kindern durchgeführt werden.
• Den Hauptschalter der Anlage ausschalten:
- Vor Stromanschluss des Geräts, vor dem Zusammenbau, dem Ausbau und vor
Säuberung des Geräts.
- Beim Auftreten von Funktionsstörungen.
- Wenn das Gerät für kurze oder lange Zeit nicht benutzt wird.
• Das Gerät nicht verwenden, wenn es nicht korrekt funktioniert oder wenn angenommen wird,
dass es beschädigt ist. Sich im Zweifelsfall an qualifizierte Fachleute wenden.
• In regelmäßigen Abständen die Funktionstüchtigkeit des Geräts prüfen. Sich bei Fehlern oder
im Zweifelsfall an qualifizierte Fachleute wenden.
• Das Gerät nicht in Anwesenheit von entzündbaren Stoffen oder Dämpfen (Alkohol,
Insektenvertilgungsmittel, Benzine) oder in besonders staubigen Umgebungen benutzen.
• Das Gerät nicht in Umgebungen mit einer Temperatur über 40°C benutzen.
• Das Gerät darf keinen Witterungseinflüssen (Sonne, Regen, usw.) ausgesetzt werden.
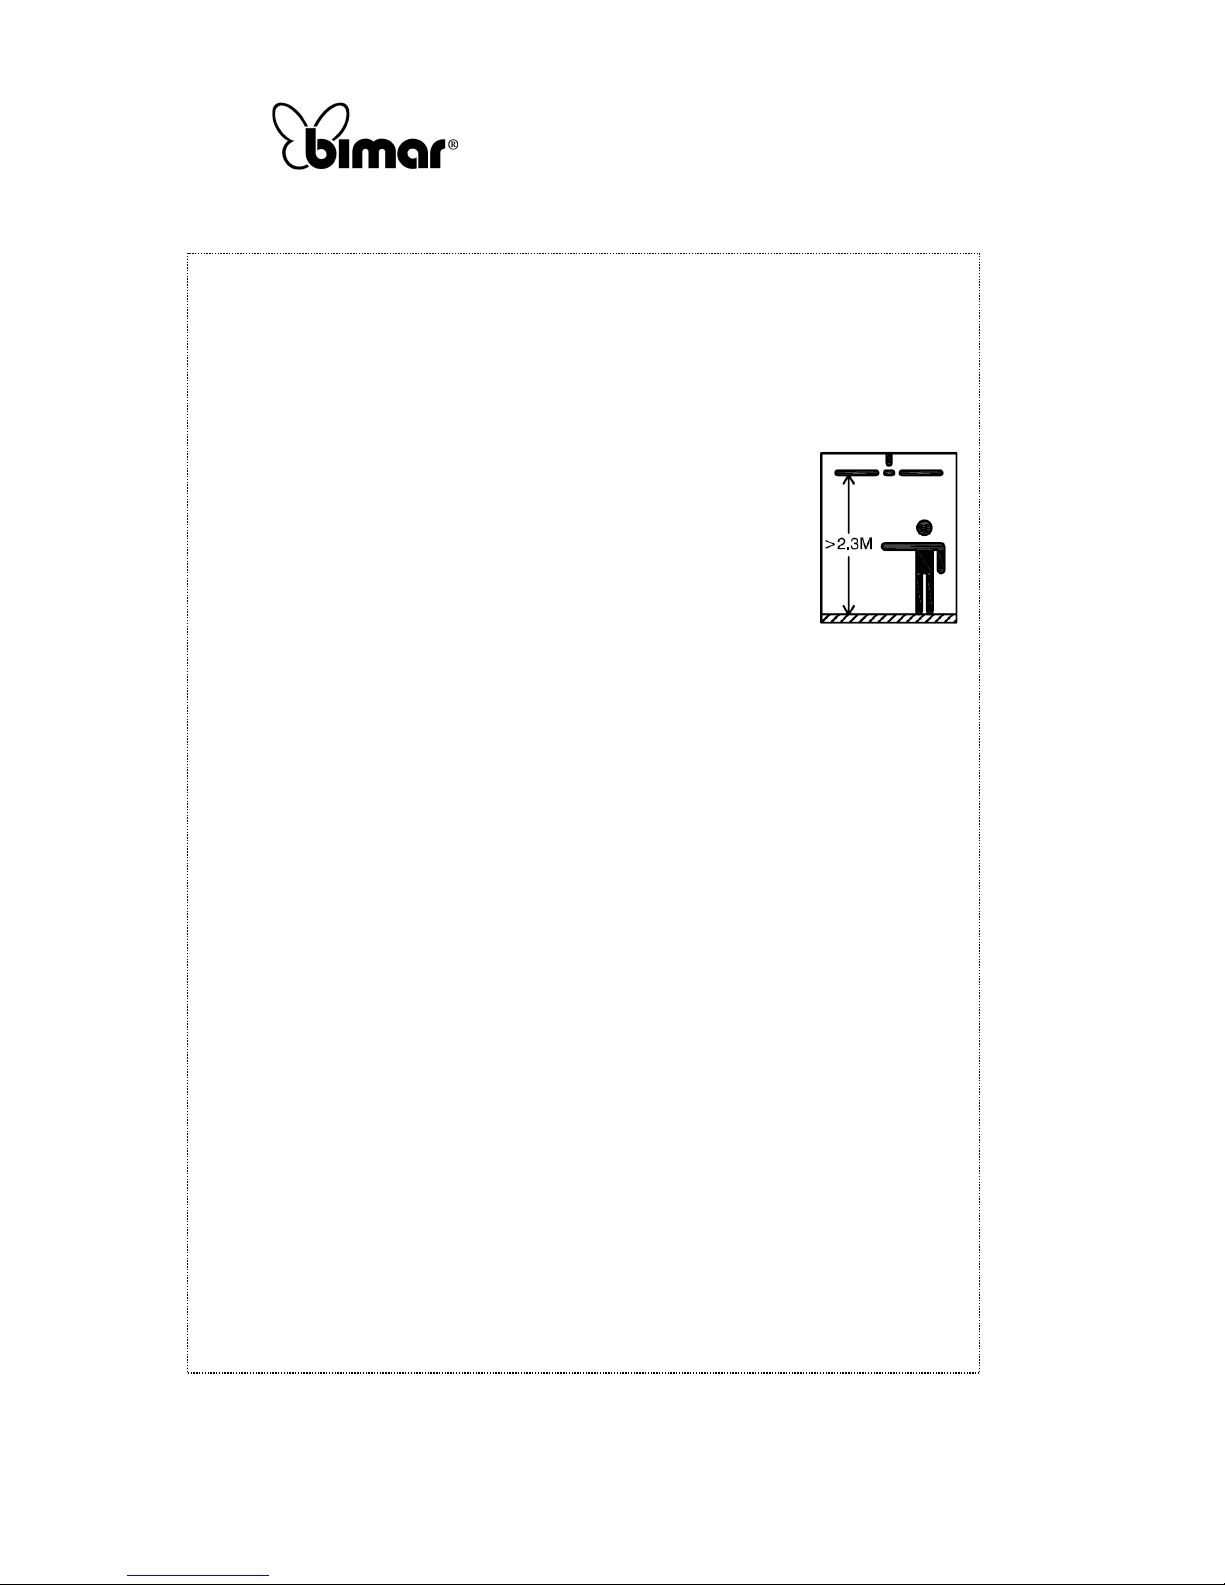
• Achtung: Der Ventilator muss so installiert werden, dass er sich in einer Höhe von mehr als
2,3 m über dem Boden befindet, so wie es in der Abbildung gezeigt wird.
• Achtung: Vor Zugriff auf die Klemmen müssen alle Speisekreise unterbrochen werden.
• Wenn das Stromkabel beschädigt ist, muss es vom Hersteller oder seinem technischen
Kundendienst ausgetauscht werden bzw. immer von einer Person mit ähnlicher
Qualifizierung, damit jegliches Risiko vermieden wird.
• Jede Änderung an der vom Hersteller vorgesehenen Befestigung oder anderen Befestigungen
ist gefährlich. Außerdem verfällt in diesem Fall die Garantie und jegliche Haftung durch den
Hersteller.
MONTAGE
• Die Montage des Geräts muss von qualifizierten Fachleuten durchgeführt werden.
• Nach Entfernen der Verpackung prüfen, ob das Gerät unversehrt ist. Es im Zweifelsfall nicht
verwenden und sich an qualifizierte Fachleute wenden. Die Verpackungsteile
(Kunststoffbeutel, Polystyrol, Nägel, usw.) dürfen nicht in die Hände von Kindern gelangen,
da sie potentielle Gefahrenquellen darstellen, sondern müssen nach den gültigen Gesetzen in
den entsprechenden Behältern für die getrennte Müllsammlung entsorgt werden Achtung:
Eventuelle am Gitter angebrachte Aufkleber oder Werbezettel sind vor der Benutzung des
Geräts zu entfernen.
Page 14
Copies of the I/B. Please reproduce them without any
changes except under special instruction from Bimar (Italy).
The pages must be reproduced and folded in order to obtain
a booklet A5 (+/- 148.5 mm width x 210 mm height). When
folding, make sure you keep the good numbering when you
turn the pages of the I/B. Don’t change the page numbering.
Keep the language integrity.
14/40
Assembly page 14/16
Fax +32 030 9904733
• Vor dem Anschluss des Geräts kontrollieren:
a) Ob die auf dem Datenschild enthaltenen Spannungswerte (230V~ 50Hz) mit denen des
Stromnetzes übereinstimmen.
b) Ob die elektrische Anlage, an die das Gerät angeschlossen wird
- den gültigen Normen entspricht.
- über Kabel mit einem Querschnitt verfügt, der für die aufgenommene Leistung geeignet ist.
- über eine effiziente Erdung verfügt und den gültigen Normen zur elektrischen Sicherheit
entspricht. Im Zweifelsfall eine sorgfältige Kontrolle durch qualifizierte Fachleute
vornehmen lassen.
•
Für die Montage muss ein omnipolarer Schalter mit einem
Öffnungsabstand der Kontakte von über oder gleich 3 mm vorgesehen
werden.
• Das Gerät muss in einem angemessenen Abstand von Wänden,
Gegenständen, Wärmequellen, Gewebe (Gardinen, usw.) oder
flüchtigem Material und mindestens 2,3 m von der Gehfläche entfernt
angebracht werden.
• Das Gerät an der Decke aus Mauerwerk oder Metall und/oder einem
anderen Material anbringen, das eine ausreichende Stärke hat, um
mindestens ein 8 Mal so hohes Gewicht wie das des Geräts tragen zu
können.
• Vor der Montage prüfen:
a) Ob das Gerät in einem guten Zustand ist.
b) Ob die Kabel Beschädigungen aufweisen.
c) Ob der omnipolare Schalter des Stromnetzes ausgeschaltet wurde (AUS). Wenn das
Gerät herunterfällt oder starken Stößen ausgesetzt wurde, alle Teile sofort auf Schäden
überprüfen. Sich im Zweifelsfall an qualifizierte Fachleute wenden.
• Das Gerät nicht an Systeme für die Temperaturüberwachung, Programmiergeräte oder Timer
bzw. andere Vorrichtungen anschließen, die das Gerät automatisch einschalten. Auf diese
Weise werden Schäden an Personen, Tieren oder Sachgegenständen vermieden.
• Bei Defekten oder Störungen das Gerät ausschalten und es von einem qualifizierten
Fachmann überprüfen lassen. Von nicht qualifizierten Personen durchgeführte Reparaturen
können gefährlich sein und führen zum Verfall der Garantie.
Vor Beginn der Montage prüfen, ob alle Teile vorhanden sind.
• Zur Vermeidung von Schäden das Gerät auf einer flachen und weichen Fläche, ohne
Rauheit, zusammenbauen, damit der Ventilator nicht beschädigt oder verschrammt wird.
• Der Ventilator darf nur dann verwendet werden, wenn er vollständig und ordnungsgemäß
zusammengebaut wurde. Das Gerät im Zweifelsfall von qualifizierten Fachleuten
kontrollieren oder zusammenbauen lassen.
Zum Zusammenbauen die Abbildungen (als Bezugspunkte der Strukturteile) zur Hilfe nehmen.
Die Abbildungen sollten vor dem Zusammenbau angesehen werden.
Zum Zusammenbauen wie folgt vorgehen:
Page 15
Copies of the I/B. Please reproduce them without any
changes except under special instruction from Bimar (Italy).
The pages must be reproduced and folded in order to obtain
a booklet A5 (+/- 148.5 mm width x 210 mm height). When
folding, make sure you keep the good numbering when you
turn the pages of the I/B. Don’t change the page numbering.
Keep the language integrity.
15/40
Assembly page 15/16
Fax +32 030 9904733
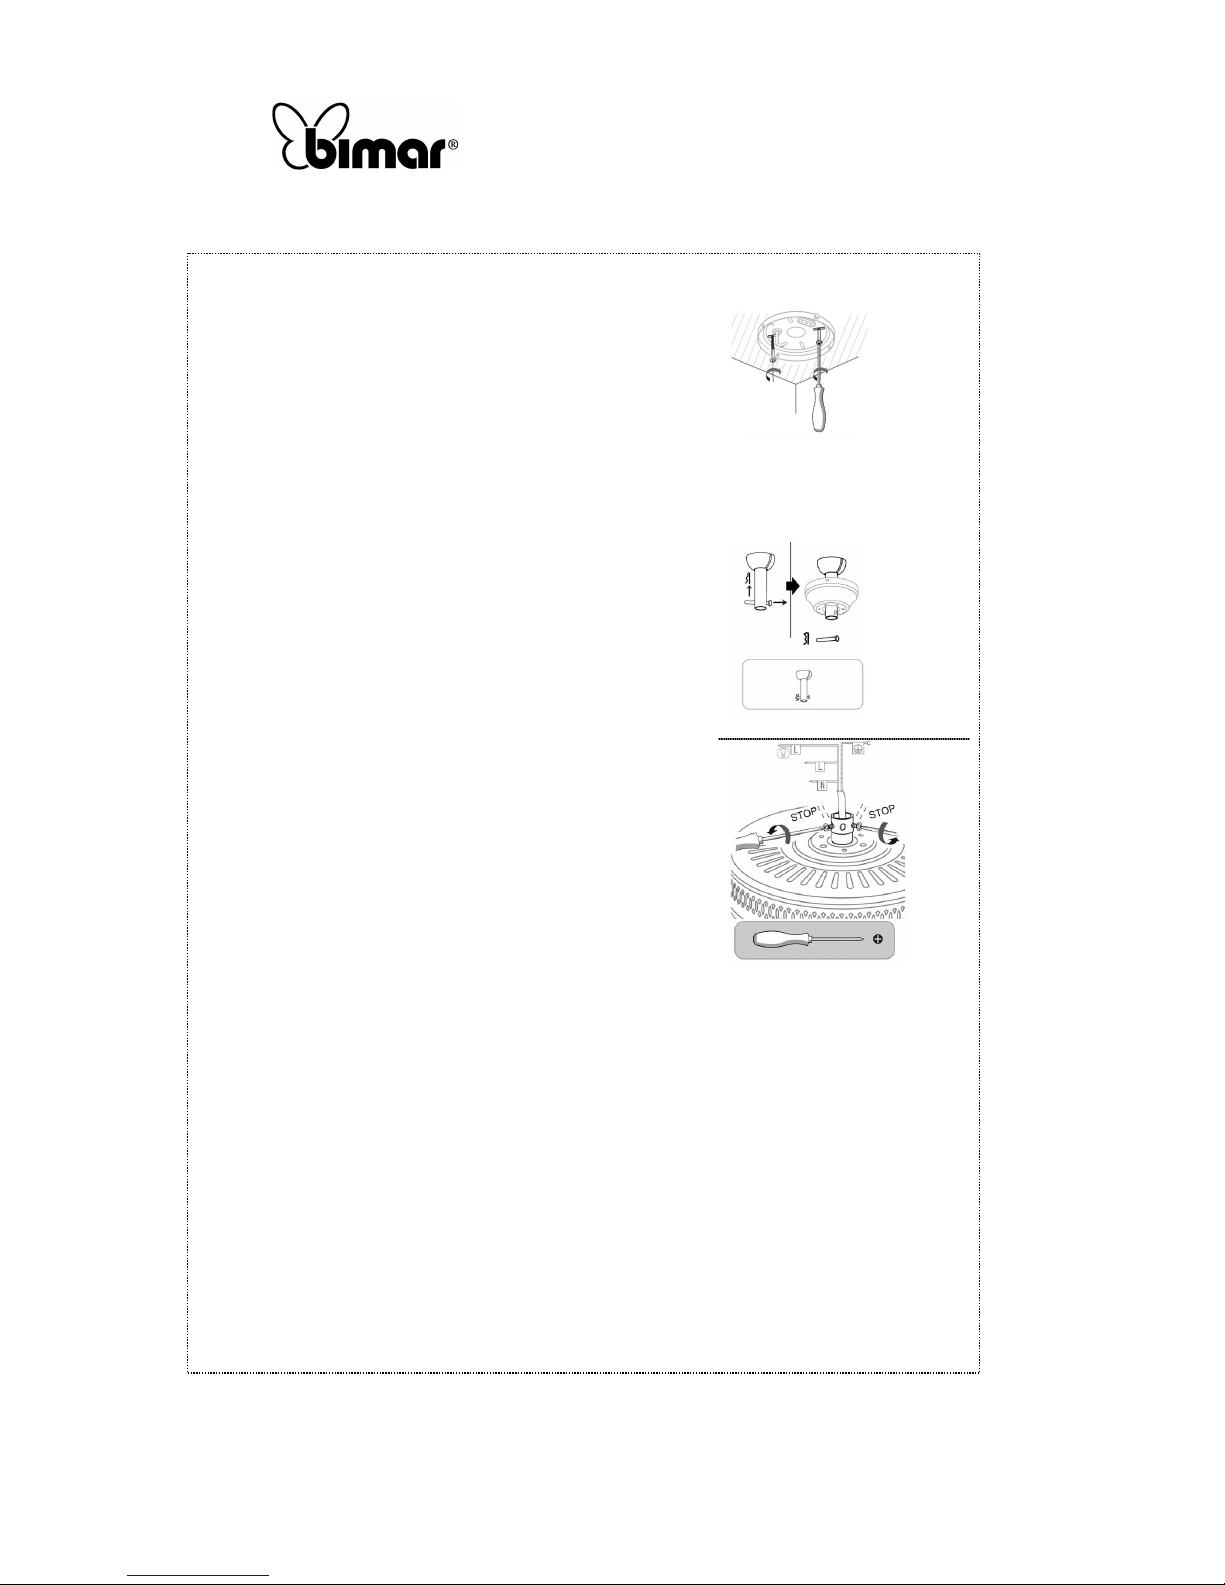
1) Die Halteplatte an der Decke befestigen: Beim Bohren
darauf achten keine Leitungen in der Mauer zu beschädigen
(vorher prüfen, ob sich in der Wand Wasser-, Gas- oder
Elektroleitungen usw. befinden). Die Platte mit den
Befestigungsexpansionsdübeln und den Schrauben mit
Unterlegscheiben befestigen. Die Sicherheit der Befestigung
prüfen. Dazu an der Platte eine Gewicht anbringen, dass 4
Mal höher ist als das Gewicht des Ventilators.
Kontrollieren, ob die Platte hundertprozentig fest an der
Decke bleibt.
2) Die Haltestange in die obere Kappe und die Kabel in den
Hohlraum der Stange schieben. Die Kabel müssen von
unten nach oben eingeschoben werden.
3) Das untere Ende der Stange auf den Bolzen der
Motorhalterung setzen, so dass die Bohrungen auf der
gleichen Achse sind, und den entsprechenden
Befestigungsbolzen anbringen.
4) Die Unterlegscheibe auf den Bolzen setzen und den
Bolzen über den Splint befestigen. Dieser muss
vollständig eingesetzt und dann umgebogen werden, damit
sich der Bolzen und der Splint nicht lösen können.
5) Die Anbringung des Motors an der Stange zusätzlich
durch Festziehen der Sicherheitsschraube/n absichern.
6) Den Ventilator provisorisch an den Haken der Halteplatte
hängen. Den elektrischen Anschluss vornehmen, so wie es
im nachfolgenden Abschnitt "Elektrischer Anschluss"
erklärt wird. Dann wie folgt weitermachen.
7) Den Ventilator vom Haken der Halteplatte abnehmen. Den Ventilator hochhalten, damit
die elektrischen Verbindungen nicht abreißen bzw. beschädigt werden. Prüfen, ob die
Kabel frei und in der richtigen Stellung sind. Dann die obere Kappe an die Halteplatte
schieben. Die Schraube anschrauben und gut befestigen.
8) Die Halterungen des Flügelhalters an den Flügeln befestigen. Dazu die mitgelieferten
Schrauben mit Unterlegscheiben und die Muttern benutzen und sie fest anziehen. Bei
einigen Modellen sind die Flügel nicht umdrehbar. Also darauf achten, dass die Halterung
an der richtigen Seite des Flügels befestigt wird. Bei einigen Modellen sind die Muttern
nicht notwendig und werden deshalb nicht mitgeliefert.
9) Die Flügel am Motor anbauen. Sie richtig positionieren (auf die Flügelseite achten) und
den Flügelhalter mit den mitgelieferten Schrauben mit Unterlegscheiben befestigen.
Prüfen, ob alle Schrauben fest angezogen sind, sowohl aus Sicherheitsgründen, aber auch
um zu vermeiden, dass der Ventilator während des Betriebs zu stark pendelt.
10) Einige Ventilatoren verfügen über eine Beleuchtung. Die Leuchte, die sich unter dem
Motor befindet kann entweder schon zusammengebaut und angeschlossen sein oder wird
als zusammenzubauender und anzuschließender Bausatz mitgeliefert.
Page 16
Copies of the I/B. Please reproduce them without any
changes except under special instruction from Bimar (Italy).
The pages must be reproduced and folded in order to obtain
a booklet A5 (+/- 148.5 mm width x 210 mm height). When
folding, make sure you keep the good numbering when you
turn the pages of the I/B. Don’t change the page numbering.
Keep the language integrity.
16/40
Assembly page 16/16
Fax +32 030 9904733
In diesem Fall muss nur die Birne (wird nicht mitgeliefert) eingeschraubt werden. Diese muss
den spezifischen Angaben auf dem Datenschild und/oder dem Schild in der Nähe der
Birnenfassung: type VSL10 e VSB10 (4xMax60W, Fassung E14).
Elektrischer Anschluss
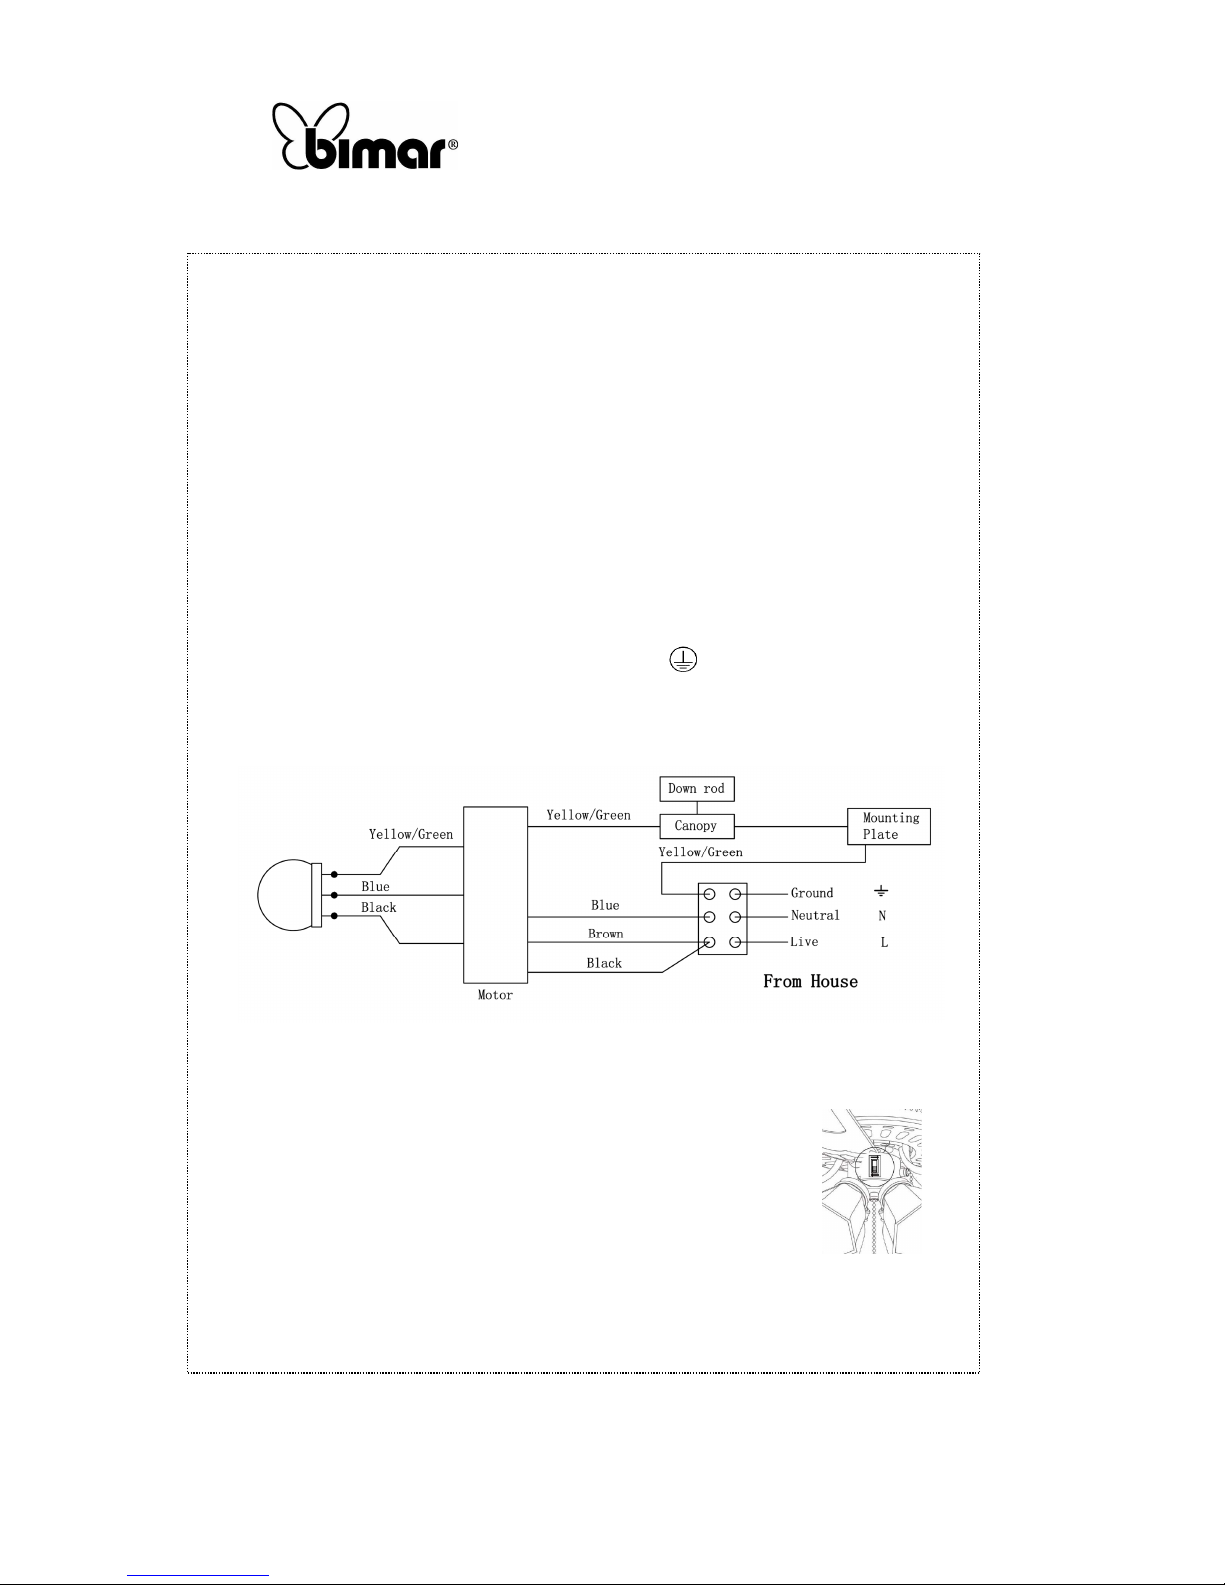
Den elektrischen Anschluss nach dem nachfolgend beschriebenen Plan durchführen.
- BRAUNES Kabel “LIVE“: Motorphase
- BLAUES Kabel “NEUTRAL“: Gemeinsamer Nullleiter für den Motor und die Leuchte
- SCHWARZ Kabel “LIGHT“: Phase für die Leuchte
- GRÜN-GELBES KABEL: Erdung, die dem Symbol entspricht
Die Kabel des Ventilators und die von der Decke kommenden Kabel an dem mitgelieferten
Klemmenbrett anschließen, unter Beachtung des nachfolgenden Schaltplans: Der Ventilator
und die Leuchte werden durch einen Umschalter gesteuert.
Benutzung
Der Ventilator verfügt über die folgenden Steuerelemente:
- Wählschalter mit Steuerung an der Wand. Wird durch Drehen des Einstellgriffs, in der
Reihenfolge 0/min./mitt./max. betätigt.
- Wählschalter zur Einschaltung des Vorlaufs/Rücklaufs des Motors,
damit ein Luftstrom von der Mitte nach außen oder umgekehrt erzielt
wird (diese Funktion ist nur in einigen Modellen vorhanden).
- Schalter zum Ein- oder Ausschalten des Lichts (in den Modellen mit Leuchte) durch
Betätigung des 0/I-Schalters bei den Modellen mit Steuerung an der Wand.
Page 17
Copies of the I/B. Please reproduce them without any
changes except under special instruction from Bimar (Italy).
The pages must be reproduced and folded in order to obtain
a booklet A5 (+/- 148.5 mm width x 210 mm height). When
folding, make sure you keep the good numbering when you
turn the pages of the I/B. Don’t change the page numbering.
Keep the language integrity.
17/40
Assembly page 17/16
Fax +32 030 9904733
SÄUBERUNG UND WARTUNG
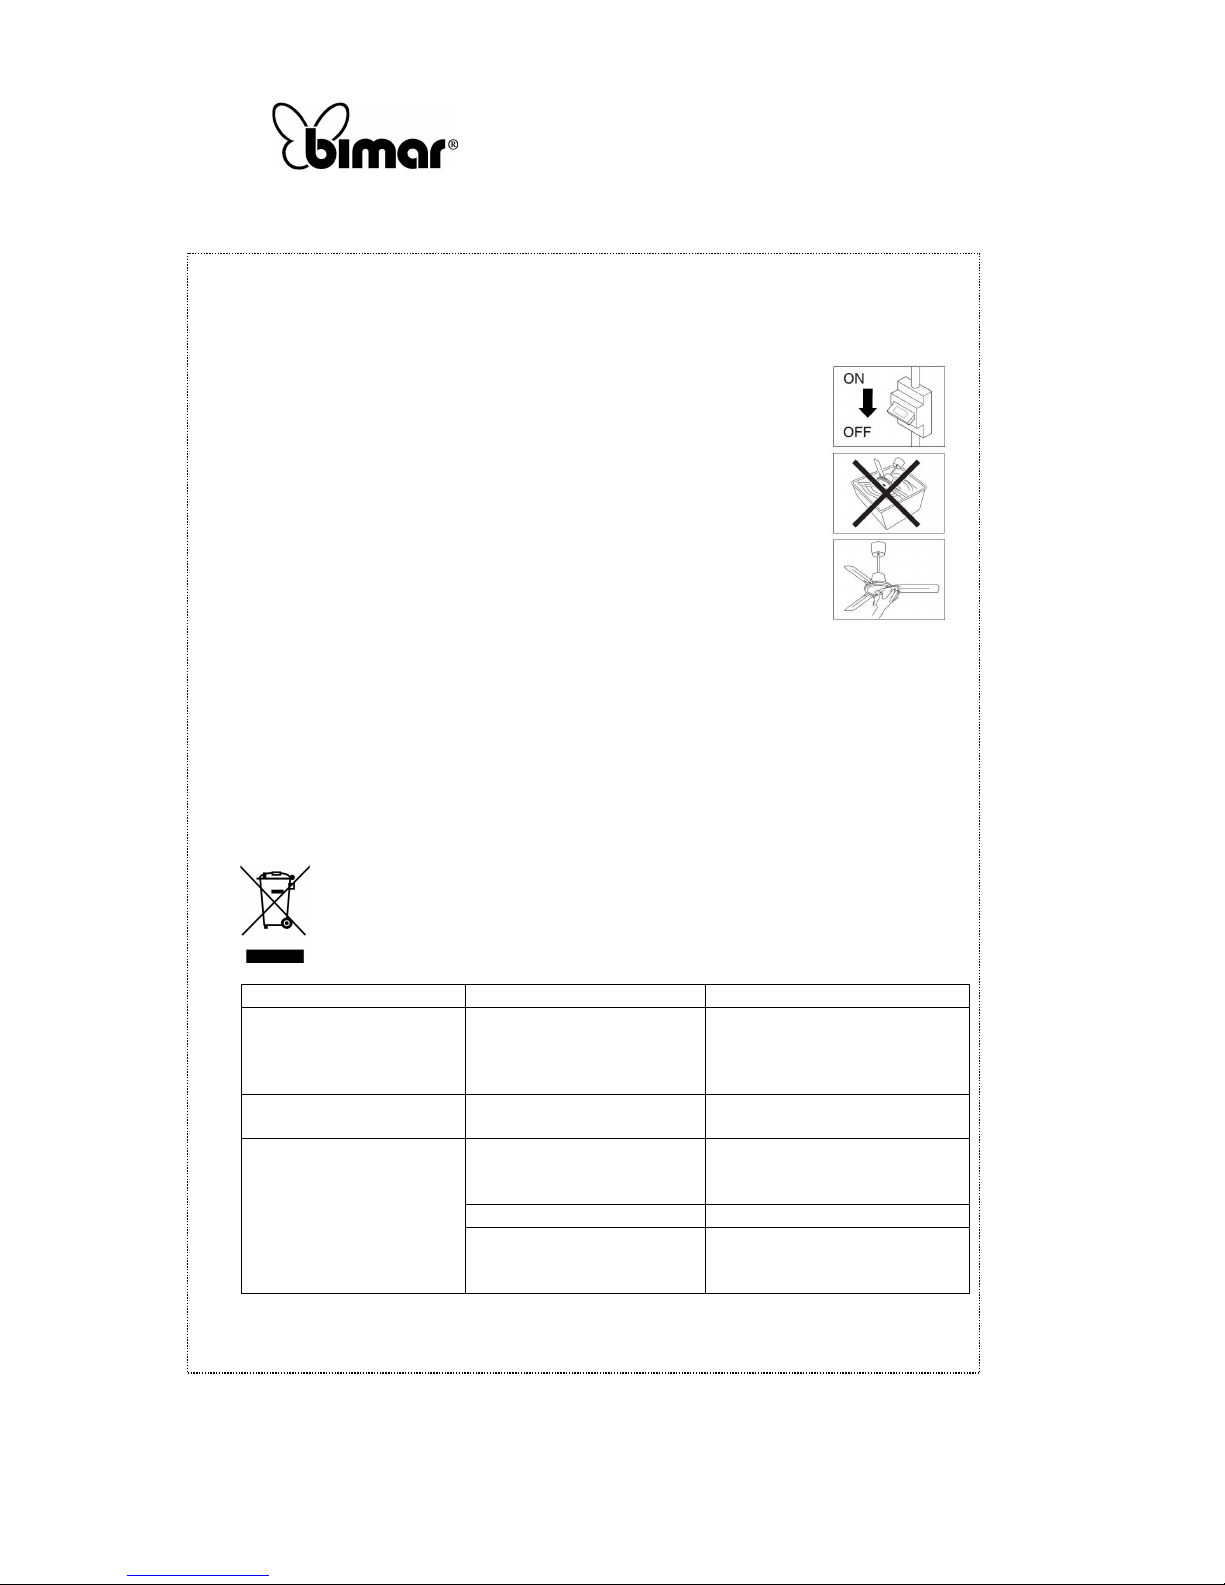
Achtung: Vor Durchführung der normalen Säuberung den Ventilator ausschalten. Das Licht
(falls vorhanden) ausschalten. Den omnipolaren Schalter ausschalten (Pos. 0/AUS) und so die
Netzspeisung unterbrechen.
•
Zum Säubern einen weichen, etwas feuchten Lappen benutzen. Keine
reibenden oder korrosiven Mittel benutzen. Darauf achten das Gerät, die
Flügel und die elektrischen Anschlüsse oder die Befestigungen nicht zu
beschädigen.
• Die Teile des Ventilators niemals in Wasser oder eine andere Flüssigkeit
eintauchen. Falls es passieren sollte, als erstes prüfen, ob die
Stromspeisung unterbrochen wurde. Dann das Gerät sorgfältig abtrocken
und kontrollieren, ob die elektrischen Teile vollkommen trocken sind.
Sich im Zweifelsfall an qualifizierte Fachleute wenden.
• Es ist unerlässlich die Belüftungsöffnungen des Motors frei von Staub
und Schmutz zu halten.
• Biologisch nicht abbaubare Produkte nicht in die Umwelt gelangen lassen, sondern sie unter
Einhaltung der gültigen Vorschriften entsorgen. Am Ende seines Betriebslebens darf das
Produkt nicht als Hausmüll entsorgt werden. Es ist in einer der entsprechenden von den
Stadtverwaltungen eingerichteten Stellen für die getrennte Müllsammlung abzugeben bzw.
bei einem Händler, der diesen Service beim Kauf eines neuen Geräts zur Verfügung stellt.
Durch die getrennte Entsorgung eines Haushaltsgeräts wird die durch eine unangemessene
Entsorgung entstehende Belastung der Umwelt und der Gesundheit vermieden und die
Rückgewinnung von Werkstoffen ermöglicht, mit einer wichtigen Energie - und RessourcenErsparnis. Der Hinweis für die Pflicht der getrennten Entsorgung von Haushaltsgeräten wird
durch das Symbol der durchgestrichenen Mülltonne gezeigt.
PROBLEM MÖGLICHE URSACHE BESEITIGUNG
Das Gerät ist vollständig
ausgeschaltet.
Der Strom fehlt. Den Hauptschalter der Anlage
oder den elektrischen Anschluss
(der falsch sein kann)
kontrollieren.
Das Gerät funktioniert
nicht ordnungsgemäß.
Der Motor ist defekt Sich an den technischen
Vertragskundendienst wenden.
Der Ventilator pendelt
zu stark.
Die angebauten Flügel
wurden nicht richtig
verschraubt
Alle Schrauben fest anziehen.
Die Flügel sind verbogen. Die Flügel auswechseln.
Die Befestigungsschrauben
der Flügel sind nicht richtig
verschraubt.
Alle Schrauben fest anziehen.
Page 18
Copies of the I/B. Please reproduce them without any
changes except under special instruction from Bimar (Italy).
The pages must be reproduced and folded in order to obtain
a booklet A5 (+/- 148.5 mm width x 210 mm height). When
folding, make sure you keep the good numbering when you
turn the pages of the I/B. Don’t change the page numbering.
Keep the language integrity.
18/40
Assembly page 18/16
Fax +32 030 9904733
Nous vous prions de lire attentivement ces instructions avant d’utiliser l'appareil et
de les divulguer à toutes les personnes qui pourraient en avoir besoin.
CONSERVER CE MANUEL POUR Référence FUTURE.
Ce symbole vous invite à faire preuve de prudence et de lire les avertissements
spécifiques dans le manuel d'instruction.
AVERTISSEMENTS GÉNÉRAUX
• Cet appareil est exclusivement destiné à l’usage domestique pour la ventilation des espaces
intérieurs : ne l’utilisez pour aucune autre fin. Tout autre usage est considéré comme
inopportun et donc dangereux. Le constructeur décline toute responsabilité pour les
détériorations dues à une utilisation inappropriée, incorrecte ou non conforme au mode
d’emploi et/ou pour des réparations effectuées par du personnel non qualifié.
• L’utilisation de tout appareil électrique comporte le respect de certaines règles
fondamentales, notamment
a) ne pas toucher l’appareil avec les mains mouillés ou humides
b) ne doit pas être touché avec les pieds nus
c) l'appareil doit être utilisé par des personnes adultes responsables ;
les enfants et les personnes aux capacités mentales réduites doivent, pour leur sécurité,
utiliser l’appareil sous la surveillance d’un adulte responsable ;les enfants ne doivent pas
utiliser l’appareil comme un jeu, son utilisation doit toujours avoir lieu sous la
surveillance d’un adulte responsable
• Ce produit ne peut être utilisé par des enfants de moins de 8 ans ou par des personnes
possédant des capacités physiques, sensorielles ou mentales réduites, sans expérience ni
connaissances suffisantes, à moins qu’elles ne se trouvent sous la surveillance de quelqu’un
ou qu’elles aient reçu les instructions nécessaires relatives à l’utilisation en toute sécurité de
l’appareil et à leur compréhension. Les enfants ne doivent en aucun cas jouer avec l’appareil.
• Le nettoyage et l’entretien à la charge de l’utilisateur ne doivent pas être effectués par des
enfants sans surveillance.
• Eteindre l’interrupteur principal de la machine :
-
avant de mettre l’appareil sous tension, de le monter, de le démonter et avant de nettoyer
la machine
-
quand on détecte un défaut de fonctionnement
-
et quand on décide de ne pas utiliser l’appareil pendant des périodes courtes ou longues
• N'utilisez pas l’appareil s’il ne fonctionne pas correctement ou s’il semble endommagé ; en
cas de doute, adressez-vous à un technicien spécialisé.
• Vérifier régulièrement l’intégrité de l’appareil. En cas de défaut ou en cas de doute, il faut
s’adresser à du personnel qualifié.
• Ne pas utiliser l'appareil en présence de substances ou de vapeurs inflammables (alcool,
insecticide, essence) ou dans des endroits particulièrement poussiéreux.
• N’utilisez pas l’appareil à une température ambiante supérieure à 40°C.
• N’exposez pas l’appareil aux agents atmosphériques (soleil, pluie. etc.).
Page 19
Copies of the I/B. Please reproduce them without any
changes except under special instruction from Bimar (Italy).
The pages must be reproduced and folded in order to obtain
a booklet A5 (+/- 148.5 mm width x 210 mm height). When
folding, make sure you keep the good numbering when you
turn the pages of the I/B. Don’t change the page numbering.
Keep the language integrity.
19/40
Assembly page 19/16
Fax +32 030 9904733
A
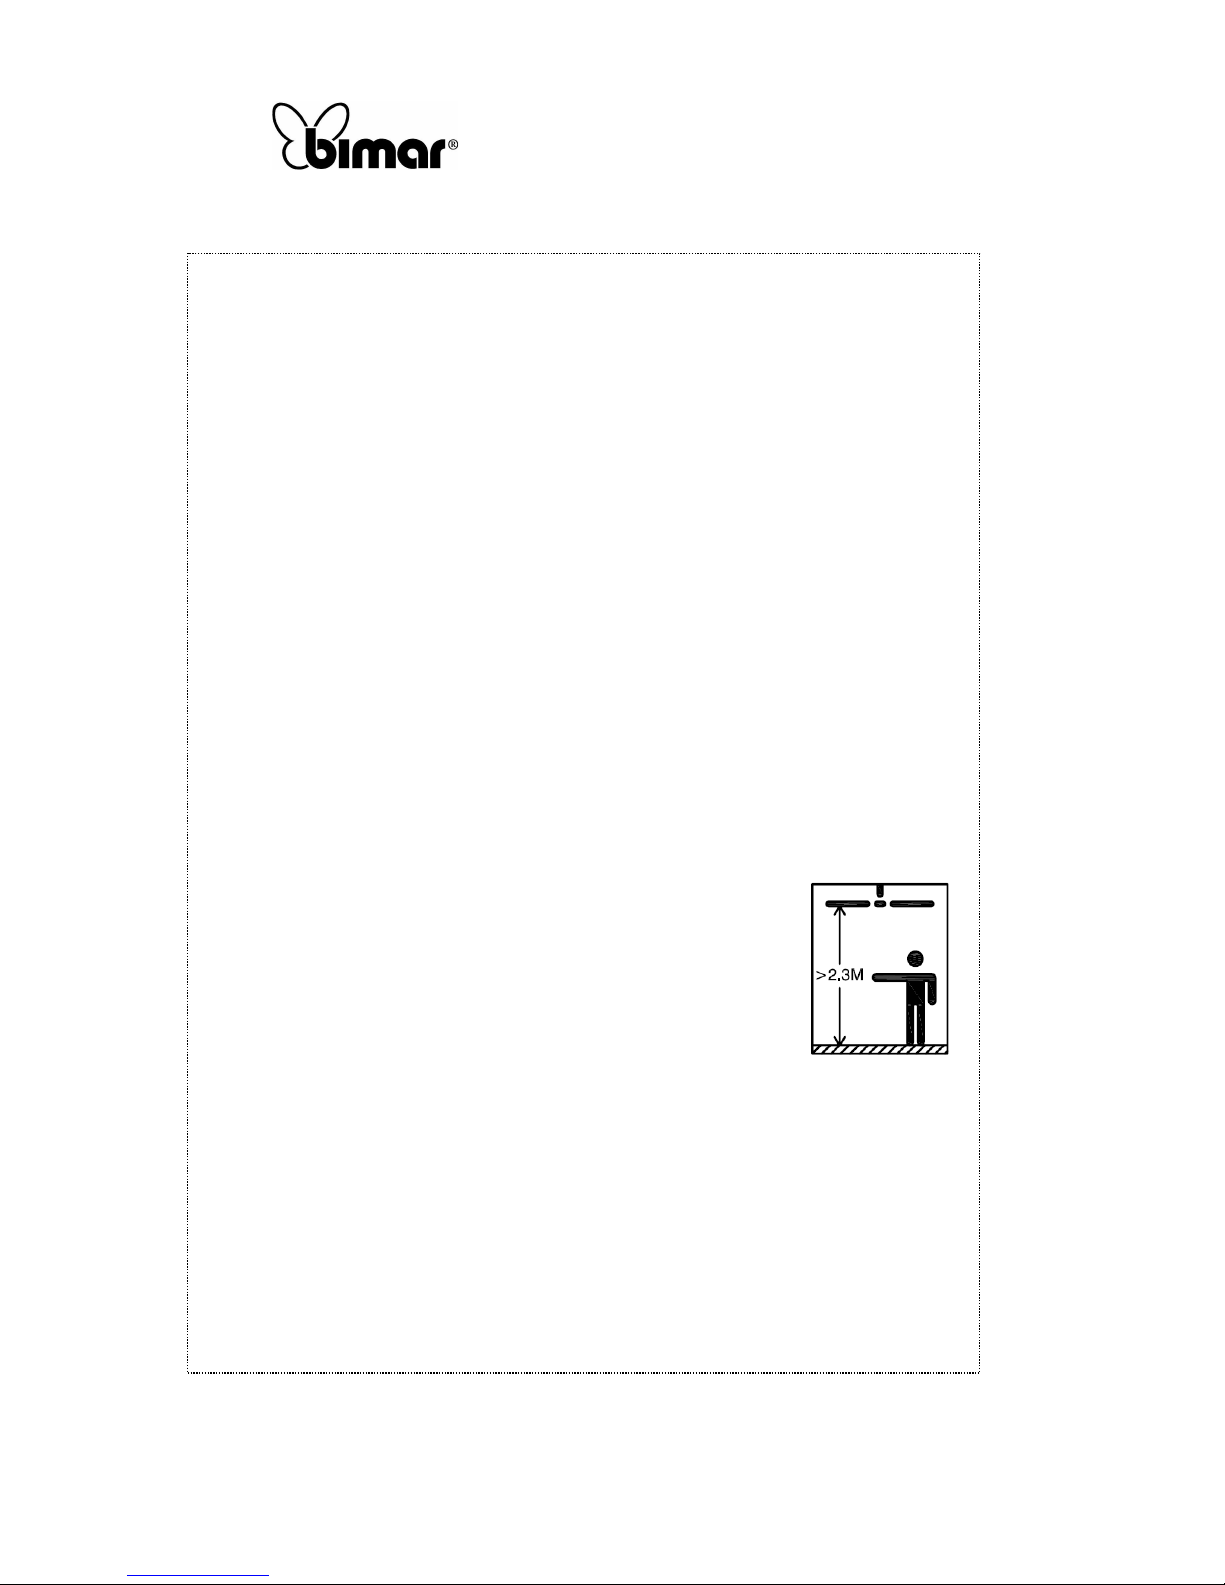
ttention : le ventilateur doit être installé de sorte que les lames soient placées à plus de 2,3 m
au-dessus du niveau du sol, comme c’est indiqué sur le schéma.
A
ttention : avant d'accéder aux bornes, tous les circuits d'alimentation doivent être
débranchés.
• Si le câble est endommagé, il doit être obligatoirement remplacé par le constructeur ou son
service d’assistance technique, ou bien par une personne qualifiée, de façon à prévenir tout
éventuel risque.
• Toute modification qui serait apportée à l'attache mise en place par le fabricant ou toute
autre modification d’ailleurs, serait dangereuse et annulerait la garantie. Le fabricant serait
aussi exempt de toute responsabilité.
INSTALLATION
• L'installation de l’appareil doit être faite par un personnel qualifié.
• Après avoir déballé l'appareil vérifier son intégrité. En cas de doute ne pas utiliser l’appareil
et contacter exclusivement un personnel qualifié. Les éléments d’emballage (sacs en
plastique, polystyrène, agrafes métalliques, etc.) doivent être gardés hors de la portée des
enfants dans la mesure où ils représentent des sources possibles de danger., mais doivent
être éliminés conformément à la réglementation dans les conteneurs appropriés pour la
collecte sélective.
• Avant d'utiliser l'appareil, vérifiez que :
a) la tension du réseau (230V~ 50Hz) corresponde bien à celle indiquée sur la plaque
signalétique de l'appareil
b) l'installation électrique à laquelle l'appareil sera connecté devra :
- être conforme aux normes en vigueur
- avoir des câbles dont la section devra être adaptée à la puissance absorbée
- avoir une prise de terre efficace et qui devra être conforme aux normes de sécurité
électrique en vigueur : en cas de doute, demander un contrôle précis par du personnel
qualifié.
•
Pour installer un interrupteur, il faudra prévoir un interrupteur
omnipolaire avec une distance d'ouverture des contacts égale ou
supérieure à 3 mm.
• Installer l'appareil à une bonne distance des murs, des objets, des
sources de chaleur, des tissus (rideaux, etc.) ou des matières volatiles
et à au moins 2,3 m du sol.
• Installer l'appareil à un plafond maçonnerie/plancher en béton ou en
métal et/ou dans un matériau qui garantit un bon soutien pour un
poids au moins égal à 8 fois le poids de l'appareil.
• Avant de procéder à l’installation, vérifier :
a) que l'équipement est en bon état
b) que les câbles électriques ne sont pas endommagés
c) que l’interrupteur omnipolaire du réseau électrique soit éteint (OFF). Si l'appareil
tombe ou s’il reçoit des coups violents, vérifier immédiatement qu’aucun composant ne
soit endommagé. En cas de doute, adressez-vous à un technicien spécialisé.
• Ne branchez pas l’appareil à des systèmes de contrôle thermique, à un programmateur, une
minuterie ou tout autre dispositif susceptible de mettre l'appareil automatiquement en
marche, afin d’éviter tout risque envers les personnes, animaux et objets.
Page 20
Copies of the I/B. Please reproduce them without any
changes except under special instruction from Bimar (Italy).
The pages must be reproduced and folded in order to obtain
a booklet A5 (+/- 148.5 mm width x 210 mm height). When
folding, make sure you keep the good numbering when you
turn the pages of the I/B. Don’t change the page numbering.
Keep the language integrity.
20/40
Assembly page 20/16
Fax +32 030 9904733
• En cas de panne ou de mauvais fonctionnement, éteignez l’appareil et faites-le contrôler par
un personnel professionnellement qualifié ; les réparations effectuées par un personnel
incompétent peuvent être dangereuses et entrainer l’annulation de la garantie.
• Assurez-vous que vous disposez de toutes les pièces avant de commencer l'installation.
• Pour éviter tout dommage, monter l'appareil sur une surface plane et molle et sans aspérité
afin de ne pas endommager ou rayer le ventilateur.
• Le ventilateur ne peut être utilisé que s'il est entièrement et correctement assemblé
En cas de doute, faites contrôler ou effectuer l’opération par du personnel qualifié. Pour
procéder au montage, il faut se référer aux schémas (comme référence des parties
structurales) qu’il faut bien regarder avant le montage.
Pour le montage, il faut procéder ainsi :
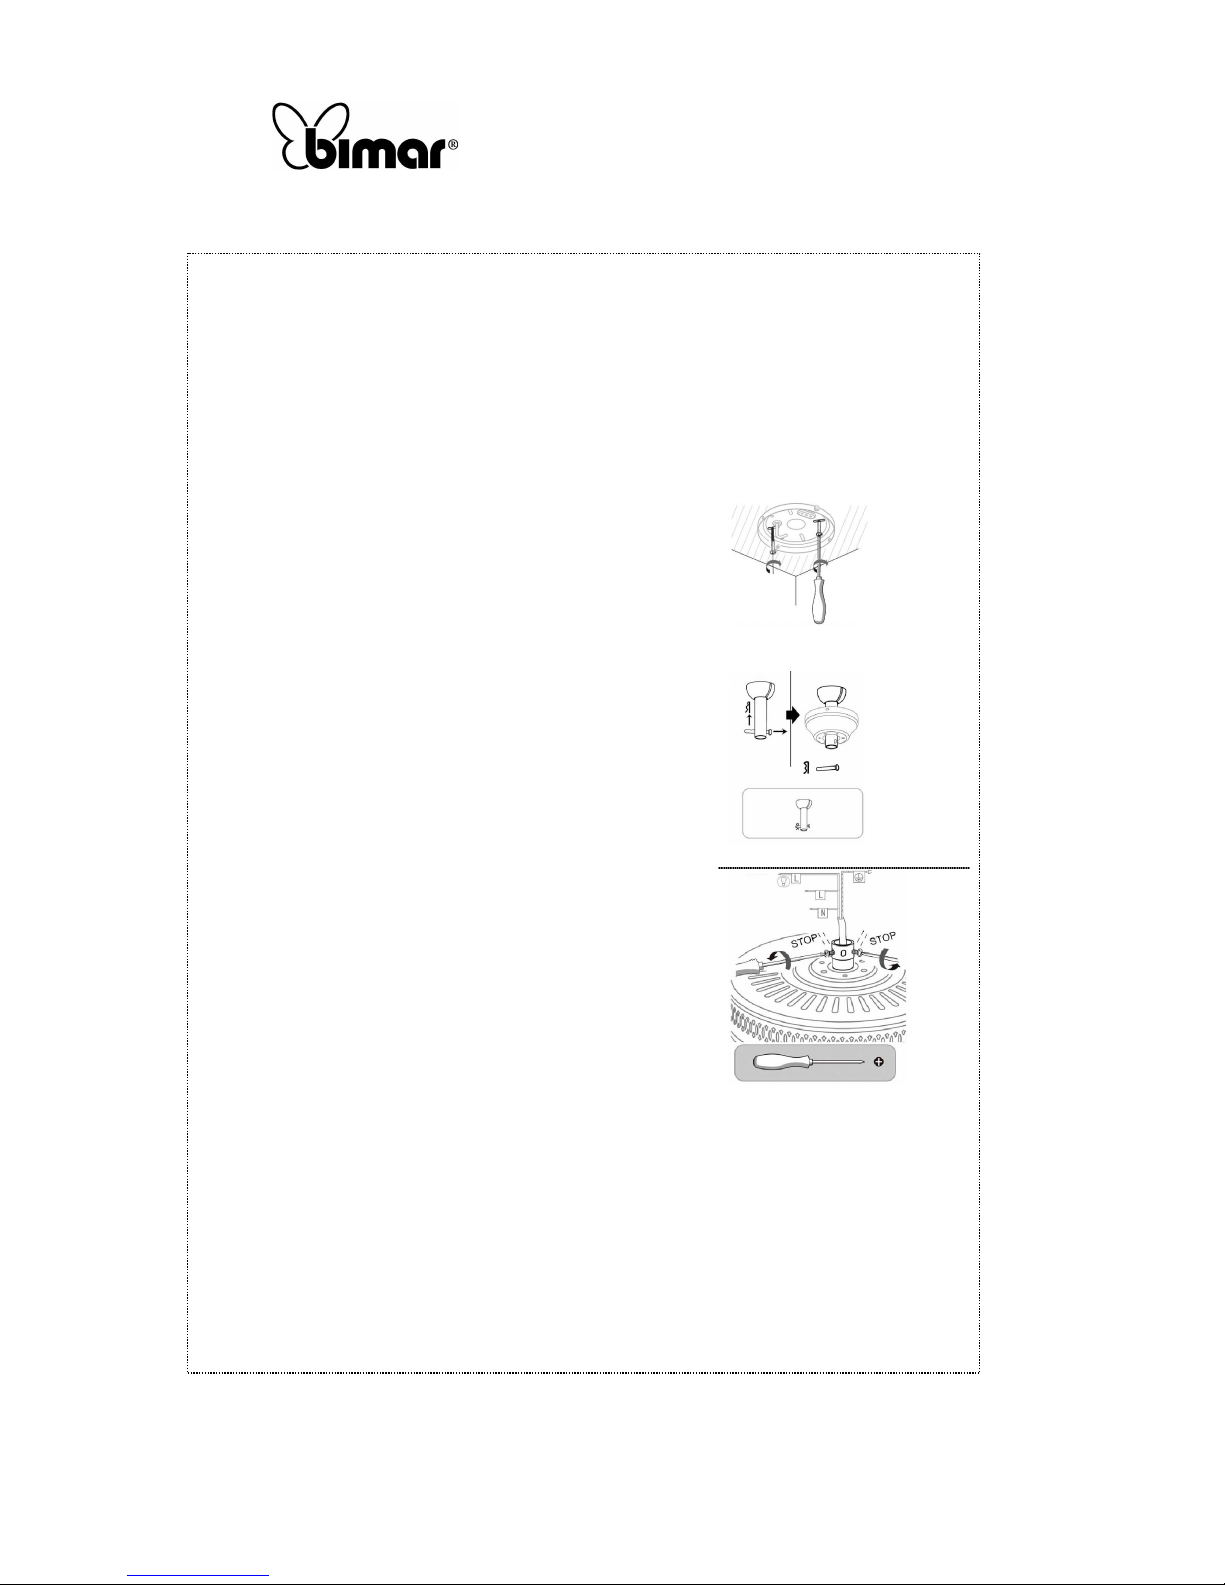
1) Fixez la plaque de soutien au plafond: faire les trous, en
prenant soin de ne pas endommager les tuyaux dans le mur
(vérifier tout d’abord s’il y a des tuyaux d’eau et de gaz,
etc... ou des câbles électriques intégrés dans le mur), au
moyen de chevilles de fixation à expansion et de vis avec
une rondelle pour fixer la plaque. Il faut s’assurer que la
plaque de soutien est bien fixée en accrochant à cette
dernière un poids 4 fois plus lourd que celui du ventilateur et
il faut vérifier que la plaque soit bien fixée à la base aussi.
2) Insérer la tige de support à travers la calotte supérieure et
insérer les petits câbles électriques à travers la cavité de la
tige. Les fils doivent être insérés de bas en haut..
3) Insérer l'extrémité inférieure de la tige sur l’axe de support
du moteur, de sorte que les trous soient coaxiaux et mettre
alors l'écrou de blocage spécial.
4) Placez la rondelle sur l'axe et fixer l'axe avec la goupille, qui
doit être complètement insérée, puis pliée de manière à
éviter que la goupille ou l’axe glissent
5) Fixer ultérieurement le support moteur à la tige en serrant la
vis de sécurité
6) Accrocher provisoirement le ventilateur au crochet de la
plaque de soutien. Effectuer les raccordements électriques
comme c’est expliqué dans le paragraphe suivant qui
s’intitule « Raccordements électriques », puis procéder
comme suit
7) Retirer le ventilateur du crochet de la plaque de soutien, le maintenir en place pour ne pas
déchirer / endommager les raccordements électriques. Il faut s’assurer que les fils
électriques sont libres et installés correctement puis placer la calotte supérieure à côté de la
plaque de soutien. Serrer la vis et il faut vraiment bien la serrer.
8) Fixez les supports qui servent à régler les lames aux lames en utilisant des vis avec des
rondelles et des écrous fournis et bien serrés. En ce qui concerne certains modèles, les
lames ne sont pas réversibles : il faut donc fixer le support de soutien du bon côté de la
lame. Pour certains modèles, les écrous ne sont pas nécessaires et ils ne sont donc pas
fournis.
9) Assembler les lames au moteur, en les plaçant correctement (faire attention au côté de la
lame), et visser ce qui sert à régler les lames avec des vis et des rondelles qui sont fournies.
Page 21
Copies of the I/B. Please reproduce them without any
changes except under special instruction from Bimar (Italy).
The pages must be reproduced and folded in order to obtain
a booklet A5 (+/- 148.5 mm width x 210 mm height). When
folding, make sure you keep the good numbering when you
turn the pages of the I/B. Don’t change the page numbering.
Keep the language integrity.
21/40
Assembly page 21/16
Fax +32 030 9904733
Il faut s’assurer que toutes les vis sont bien serrées, pour des raisons de sécurité mais aussi
pour empêcher le ventilateur de trop se balancer pendant le fonctionnement de l’appareil.
10) Certains ventilateurs peuvent être fournis avec de la lumière. La lumière
placée sous le moteur peut déjà être assemblée et connectée ou elle est fournie dans un kit à
assembler et à connecter. Dans ce cas, il faut tout simplement visser l'ampoule (non
fournie) et qui correspond aux instructions spécifiques indiquées sur la plaque signalétique
et / ou sur la petite plaque près de la prise type VSL10 e VSB10 (4xMax60W, attache E14).
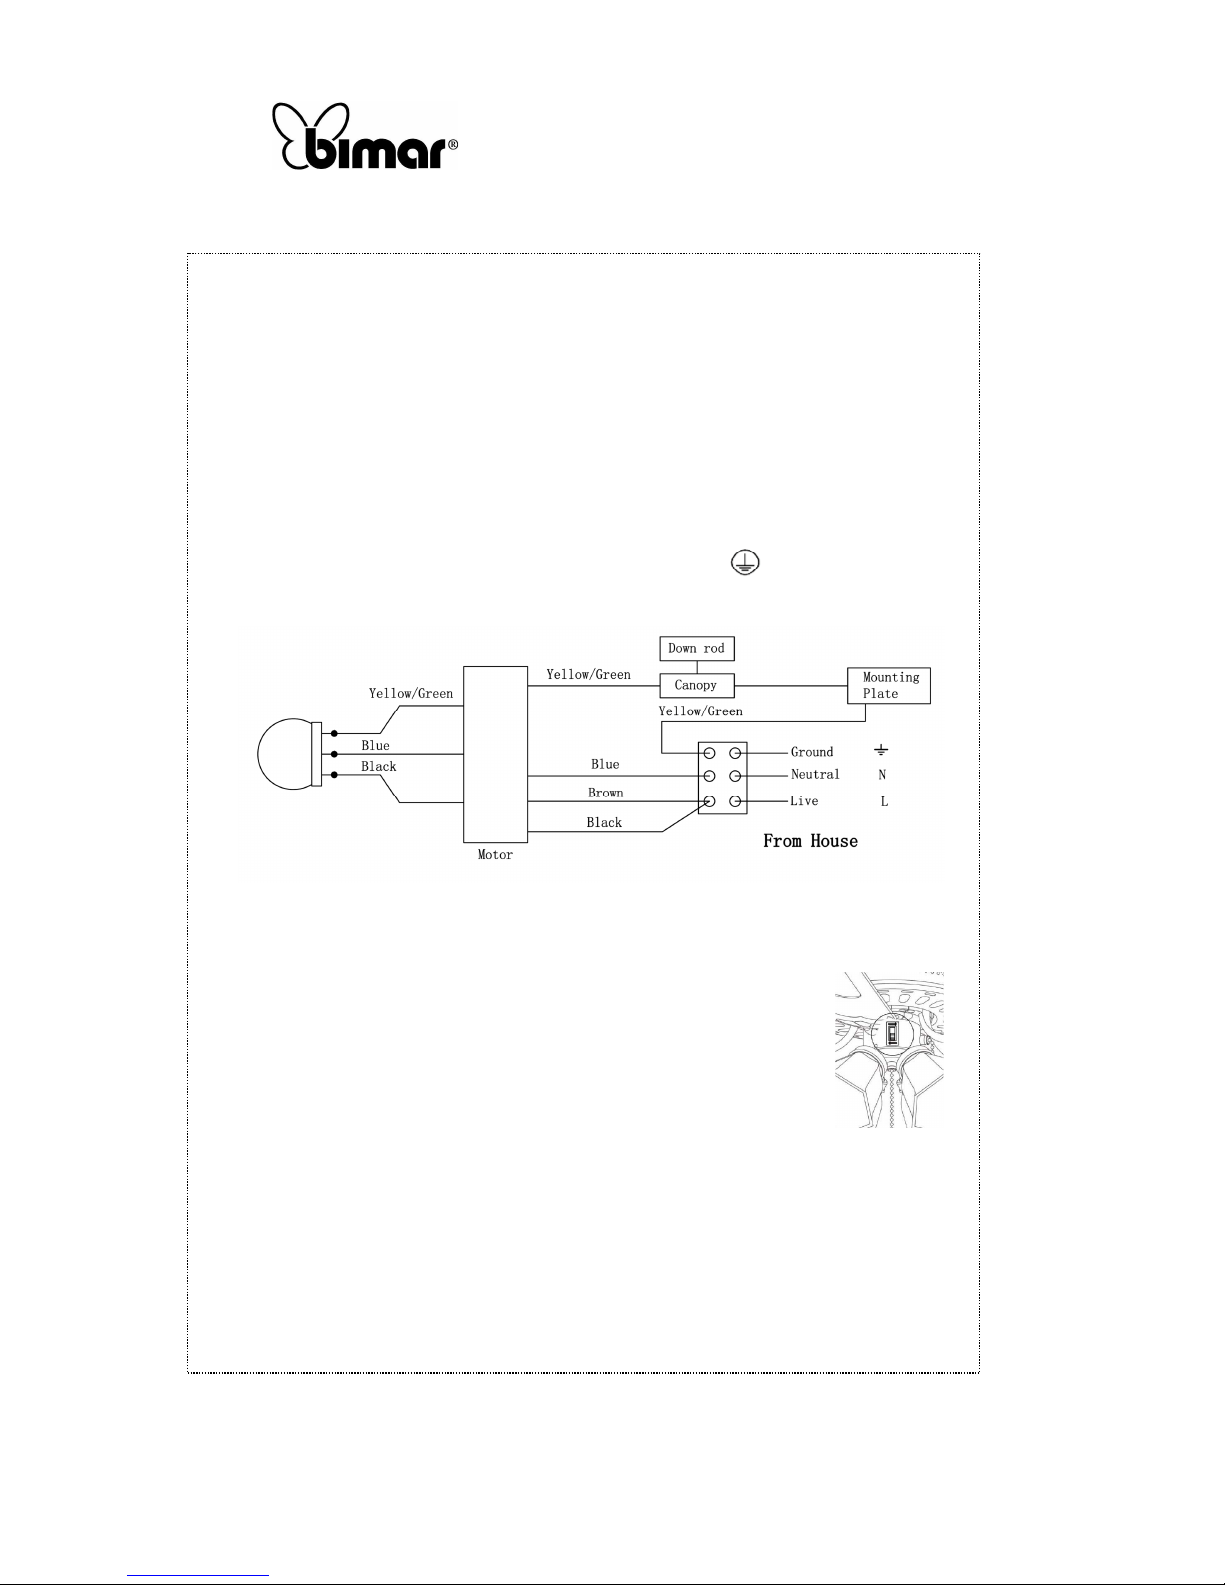
Raccordement électrique
Faire les connexions électriques selon le schéma indiqué et décrit ci-dessous.
-
fil MARRON “LIVE” : phase pour moteur
-
fil BLEU “NEUTRAL”: Neutre et commun au moteur et aux lumières
-
fil NOIR “LIGHT”: phase pour lumière
-
fil JAUNE/VERT : Prise de terre, qui correspond au symbole
Connectez les fils du ventilateur à ceux qui viennent du plafond avec le bornier fourni selon le
schéma électrique suivant : le ventilateur et la lumière sont contrôlés par un interrupteur.
Utilisation
Le ventilateur est équipé des commandes suivantes :
-
interrupteur avec des commandes au mur. On le commande en tournant le bouton de sélection
qui active successivement 0/min/med/max
-
interrupteur pour tourner le moteur dans le sens des aiguilles d’une
montre ou dans le sens contraire des aiguilles d’une montre pour avoir
un flux d’air direct du centre vers l’extérieur et vice-versa (cette fonction
n’est présente que sur certains modèles)
-
interrupteur pour allumer et éteindre la lumière (pour les modèles qui ont cette option) et il
fonctionne quand on sélectionne 0 ou 1 sur l’interrupteur pour les modèles avec commande
murale
NETTOYAGE ET ENTRETIEN
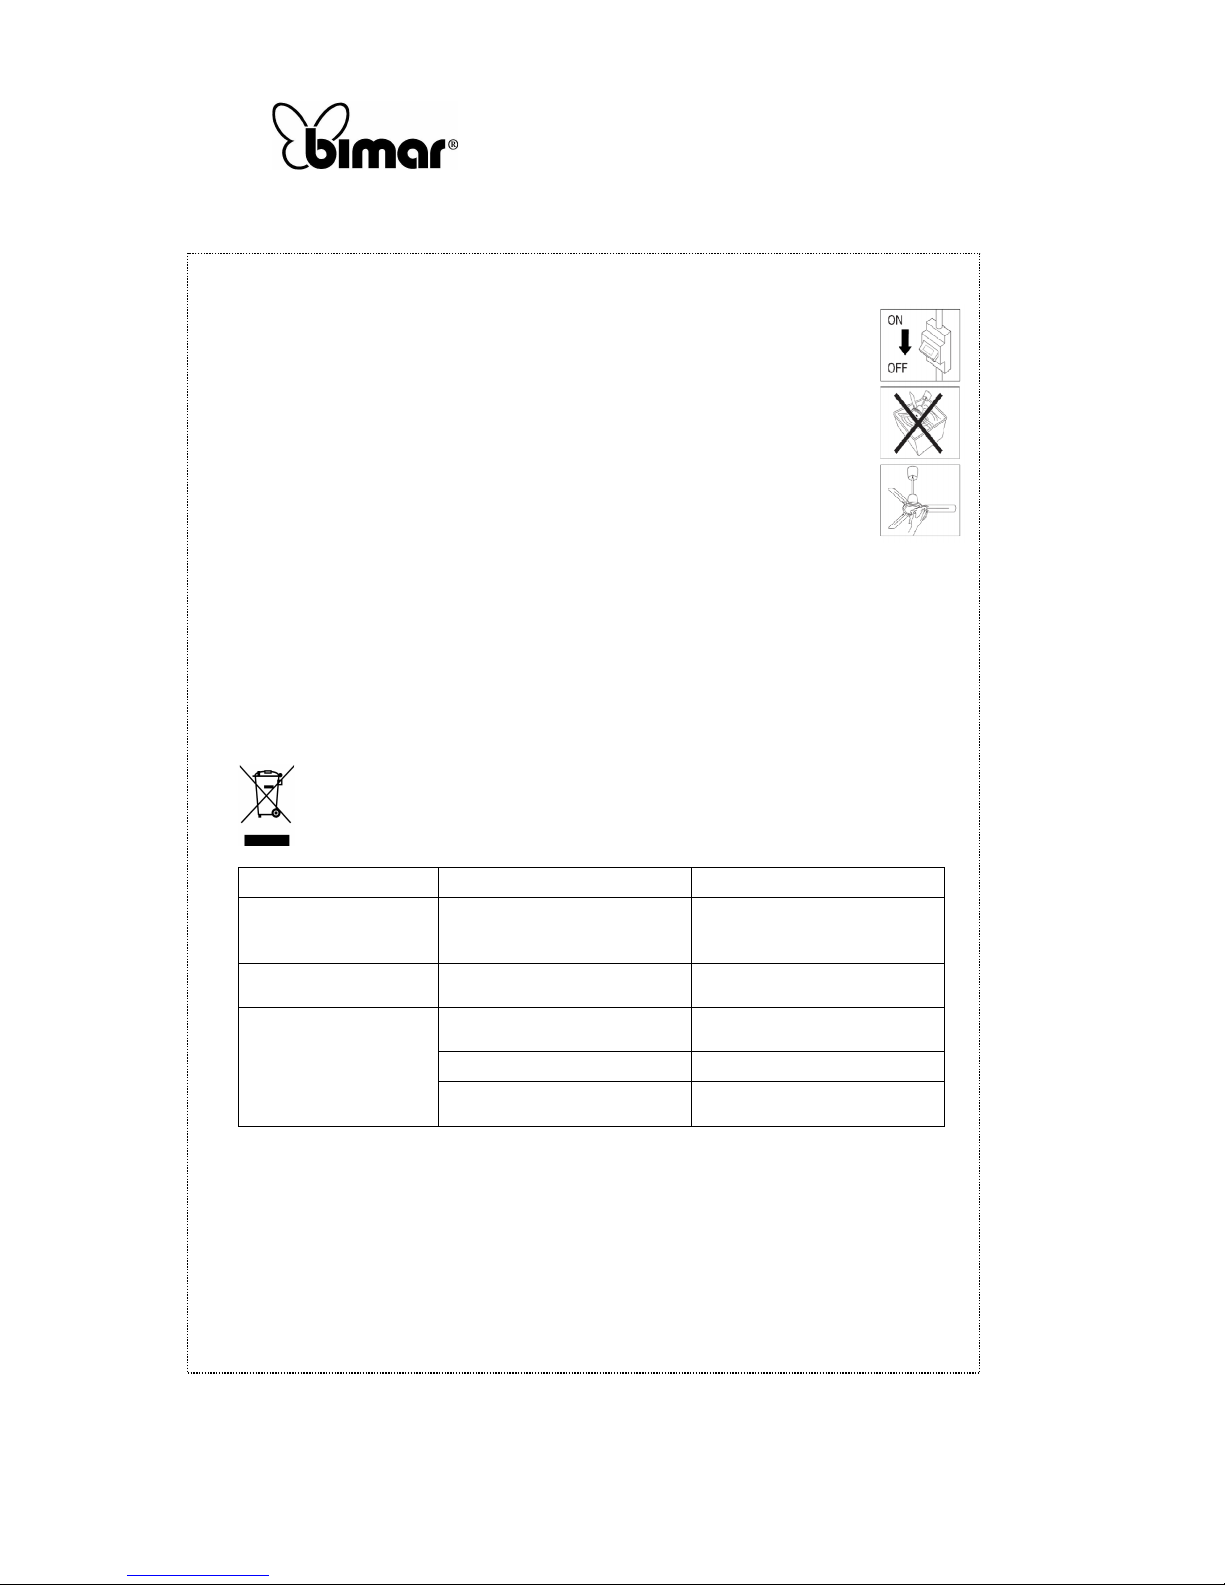
Attention: avant d'exécuter les opérations de nettoyage ordinaires éteindre le ventilateur,
éteindre la lumière du ventilateur (s’il y en a une) et couper l'alimentation du réseau électrique
en éteignant l’interrupteur omnipolaire (position 0/OFF).
Page 22
Copies of the I/B. Please reproduce them without any
changes except under special instruction from Bimar (Italy).
The pages must be reproduced and folded in order to obtain
a booklet A5 (+/- 148.5 mm width x 210 mm height). When
folding, make sure you keep the good numbering when you
turn the pages of the I/B. Don’t change the page numbering.
Keep the language integrity.
22/40
Assembly page 22/16
Fax +32 030 9904733
•
Pour nettoyer, utilisez un chiffon doux, légèrement humide, ne pas utiliser de
produits abrasifs ou corrosifs. Faire attention à ne pas endommager l'appareil, les
pelles, les raccords électriques ou à ne pas détériorer le matériel.
•
Ne pas faire tremper ou mettre une partie du ventilateur dans l'eau ou dans d’autres
liquides : au cas où cela se produirait, vérifier tout d'abord que vous avez coupé
l’électricité et que vous avez tout débranché, puis essuy
ez soigneusement l'appareil
et vérifier que toutes les pièces électriques sont parfaitement sèches : en cas de
doute, s’adresser à un professionnel qualifié.
•
Il est important de garder les trous d’aération du moteur sans poussière ni duvet.
• Ne pas jeter de produits non biodégradables dans la nature mais il faut s’en débarrasser
conformément à la réglementation en vigueur. Lorsqu’il ne fonctionne plus, le produit ne
doit pas être jeté avec les ordures ménagères. Il peut être mis dans des endroits spéciaux de
collecte des déchets prévus par les communes ou auprès de concessionnaires qui fourniront
ce service à l'achat d'une nouvelle machine. Jeter un appareil électroménager séparément
permet d'éviter d’éventuelles conséquences négatives pour l'environnement et pour la santé
qui découleraient d’une élimination inappropriée et qui permet de récupérer les matériaux
qui le composent afin de faire des économies significatives d'énergie et de ressources. Pour
rappeler à l’utilisateur la nécessité de jeter séparément les appareils ménagers, il y a le
symbole d’une grande poubelle sur roulette barrée.
PRBLEME CAUSE POSSIBLE QUE FAIRE :
Appareil entièrement
éteint
Coupure de courant Vérifier l’interrupteur p
rincipal
du système ou le raccordement
électrique erroné.
L’appareil ne fonctionne
pas normalement
Moteur en panne
S’adresser à un Centre
d’Assistance Technique agrée.
Le ventilateur fluctue trop
Les lames montées ne sont pas
serrées correctement
Bien serrer toutes les vis
Lames pliées Remplacer les lames
Vis d’ancrage des lames pas bien
serrées
Bien serrer toutes les vis
Page 23
Copies of the I/B. Please reproduce them without any
changes except under special instruction from Bimar (Italy).
The pages must be reproduced and folded in order to obtain
a booklet A5 (+/- 148.5 mm width x 210 mm height). When
folding, make sure you keep the good numbering when you
turn the pages of the I/B. Don’t change the page numbering.
Keep the language integrity.
23/40
Assembly page 23/16
Fax +32 030 9904733
Este símbolo lo invita a leer cuidadosamente estas instrucciones antes del empleo
del aparato, y eventualmente informar a terceros en caso de necesidad.
CONSERVAR EL MANUAL PARA ULTERIORES CONSULTAS.
Este símbolo lo invita a prestar atención, y a leer las específicas advertencias en el
presente manual de instrucciones.
ADVERTENCIAS GENERALES
• Este aparato esta destinado solo a la ventilación de ambientes internos domésticos y/o
similares, y solo fijado e instalado al techo. No lo use para ningún otro propósito. Cualquier
otro tipo de uso debe considerarse impropio y peligroso. El fabricante no se hace responsable
de eventuales daños causados por uso inapropiado, erróneo e irresponsable y/o reparaciones
realizadas por personal no técnico.
• El uso de cualquier aparato eléctrico implica la observancia de algunas reglas fundamentales,
tales como:
d) no debe ser tocado con las manos húmedas o mojadas
e) d) no debe ser tocado con los pies descalzos
f) este aparato no está diseñado para ser utilizado por personas (incluidos niños) con
capacidades físicas, sensoriales o mentales reducidas, o con falta de experiencia y
conocimiento, a menos que hayan recibido supervisión o instrucción relativas al uso del
aparato por una persona responsable de su seguridad. Los niños deben ser supervisados
para asegurarse que no jueguen con el aparato.
• Este aparato puede ser utilizado por los niños a partir de 8 años, y por personas con
capacidades físicas, sensoriales o mentales reducidas o con falta de experiencia y
conocimientos, a condición de que estén bajo supervisión o hayan recibido instrucciones
sobre el uso seguro del aparato y estén enterados de los riesgos existentes. Los niños no
deben jugar con el aparato. Los niños no deben realizar la limpieza y el mantenimiento,
destinado a ser realizado por el usuario, sin supervisión.
• Apagar el interruptor general del sistema:
- antes de conectar el aparato a la corriente eléctrica, ensamblar, desmontar y antes de limpiar
el aparato
- cuando se detecta una anomalía de funcionamiento
- si decide de no utilizar por períodos cortos o largos el aparato
• No use el aparato si no funciona correctamente o si parece dañado; ante cualquier duda
póngase en contacto con personal técnico capacitado.
• Verificar periódicamente la integridad del aparato. En caso de imperfecciones o dudas
póngase en contacto con personal técnico capacitado.
• No utilizar el aparato en presencia de sustancias o vapores inflamables (alcohol, insecticidas,
bencinas) o en ambientes particularmente polvorientos.
• No utilizar el aparato en ambientes con temperatura superior a los 40°.
• No dejar el aparato expuesto a los agentes atmosféricos (sol, lluvia, etc.).
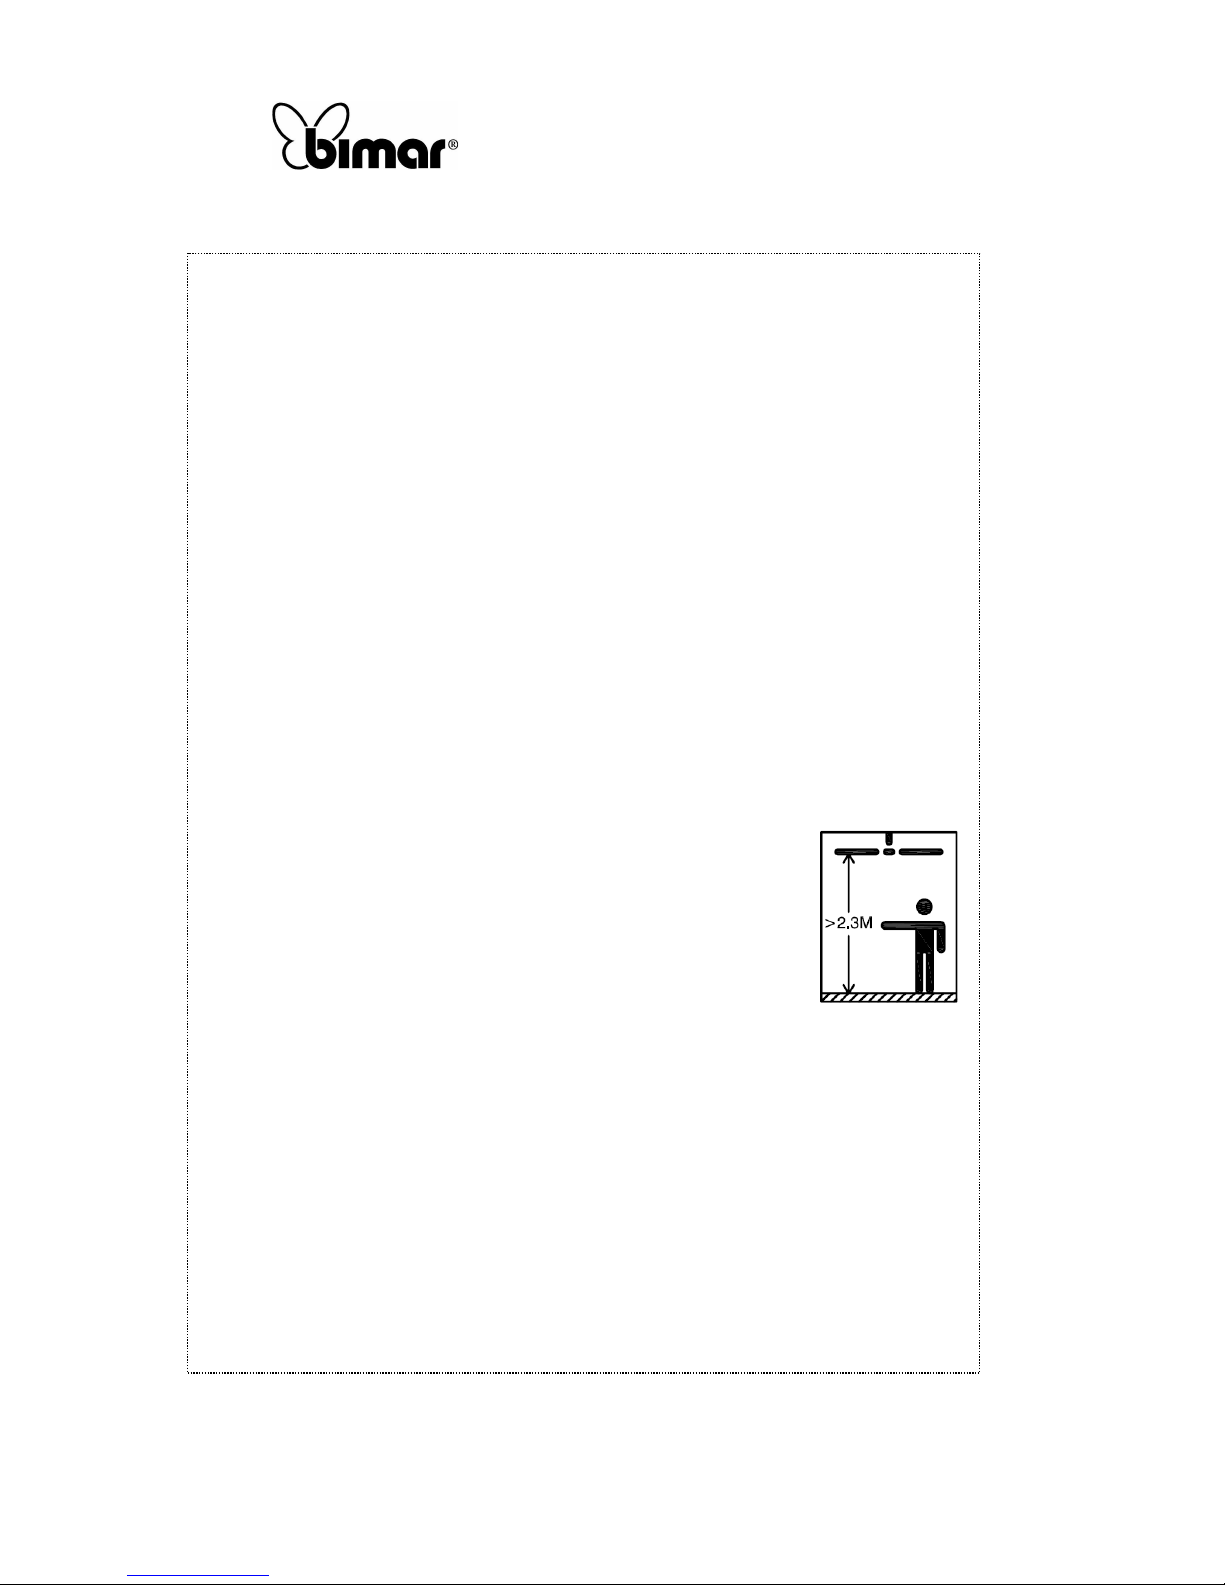
• Atención: el ventilador debe ser instalado en modo que las paletas se encuentren a más de
2,3m sobre el nivel del suelo, como se muestra en la figura.
• Atención: antes de acceder a los terminales, todos los circuitos de alimentación deben ser
desconectados.
Page 24
Copies of the I/B. Please reproduce them without any
changes except under special instruction from Bimar (Italy).
The pages must be reproduced and folded in order to obtain
a booklet A5 (+/- 148.5 mm width x 210 mm height). When
folding, make sure you keep the good numbering when you
turn the pages of the I/B. Don’t change the page numbering.
Keep the language integrity.
24/40
Assembly page 24/16
Fax +32 030 9904733
• Si el cable eléctrico esta dañado, debe ser sustituido por el fabricante o por el servicio de
asistencia técnica o por personal técnico capacitado, en modo de prevenir cualquier tipo de
riesgo.
• Cualquier modificación realizada en el enganche predispuesto o por el fabricante u otro,
puede ser peligroso y anulará la garantía, y eximirá al fabricante de eventuales
responsabilidades.
INSTALACIÓN
• La instalación del aparato debe ser efectuada por parte de personal profesionalmente
capacitado.
• Luego de haber quitado el embalaje, asegurarse de la integridad del aparato; en caso de dudas
no utilizarlo y póngase inmediatamente en contacto con personal técnico capacitado. Los
elementos de embalaje (bolsas de plástico, espuma de poliestireno, clavos, etc.) deben estar
fuera del alcance de los niños ya que son fuentes potenciales de peligro y deben ser
eliminadas de acuerdo con las normas vigentes en los correspondientes contenedores para su
reciclaje. Atención: eventuales pegatinas u hojas publicitarias aplicadas en la rejilla, deben
ser retiradas antes de usar el aparato.
• Antes de conectar el aparato controlar que:
los valores de tensión indicados en la placa de identificación (230V~ 50Hz) correspondan a
aquellos de la red eléctrica
b) la instalación eléctrica a la cual el aparato vendrá conectado
- sea de conformidad con las normas vigentes
- cuente con cables cuya sección sea idónea a la potencia total de consumo
- cuente con una eficaz puesta a tierra de acuerdo con las normativas vigentes de seguridad
eléctrica: en caso de dudas, solicitar un preciso control por parte de personal técnico
profesionalmente capacitado.
•
Para la instalación es necesario proveer un interruptor seccionador
unipolar con distancia de abertura de los contactos igual o superior a 3
mm.
• Instalar el aparato a una distancia apropiada de las paredes, objetos,
fuentes de calor, tejidos (cortinas, etc..), o material volátil, y al menos a
2,3 m del suelo.
• Instalar el aparato a un techo/losa de mampostería o metálico y/o
material que garantice el soporte de un peso igual a al menos 8 veces el
peso del aparato.
• Antes de la instalación verificar:
d) que el aparato se encuentre en buen estado
e) que los cables eléctricos no se encuentren dañados
f) que el interruptor seccionador unipolar de la red eléctrica se encuentre en posición de
apagado (OFF). Si el aparato cae o recibe fuertes golpes, verificar rápidamente que
ninguna de sus partes se encuentre dañada. En caso de dudas póngase en contacto con
personal técnico capacitado.
• No conectar el aparato a los sistemas de control térmico o programador o temporizador u
otro dispositivo que pueda encender el aparato automáticamente, evitando así el riesgo de
daños a personas, animales o cosas.
• En caso de avería o malfuncionamiento apagar el aparato y hacerlo controlar por personal
técnico capacitado; las reparaciones efectuadas por personal no capacitado pueden ser
peligrosas y anularán la garantía.
Asegurarse de tener a disposición todos los componentes antes de proceder a la instalación.
Page 25
Copies of the I/B. Please reproduce them without any
changes except under special instruction from Bimar (Italy).
The pages must be reproduced and folded in order to obtain
a booklet A5 (+/- 148.5 mm width x 210 mm height). When
folding, make sure you keep the good numbering when you
turn the pages of the I/B. Don’t change the page numbering.
Keep the language integrity.
25/40
Assembly page 25/16
Fax +32 030 9904733
• Para evitar daños, montar el aparato en una superficie plana y suave, sin rugosidad, a fin de
no dañar o rayar el ventilador.
• el ventilador puede ser utilizado solo si está completa y correctamente montado. En caso de
dudas hacer controlar o efectuar la operación por personal técnico capacitado.
Para el montaje tome como referencias las figuras (como referencia de las partes estructurales),
es necesario observarlas antes de realizar dicho procedimiento.
Para el montaje proceder de la siguiente manera:
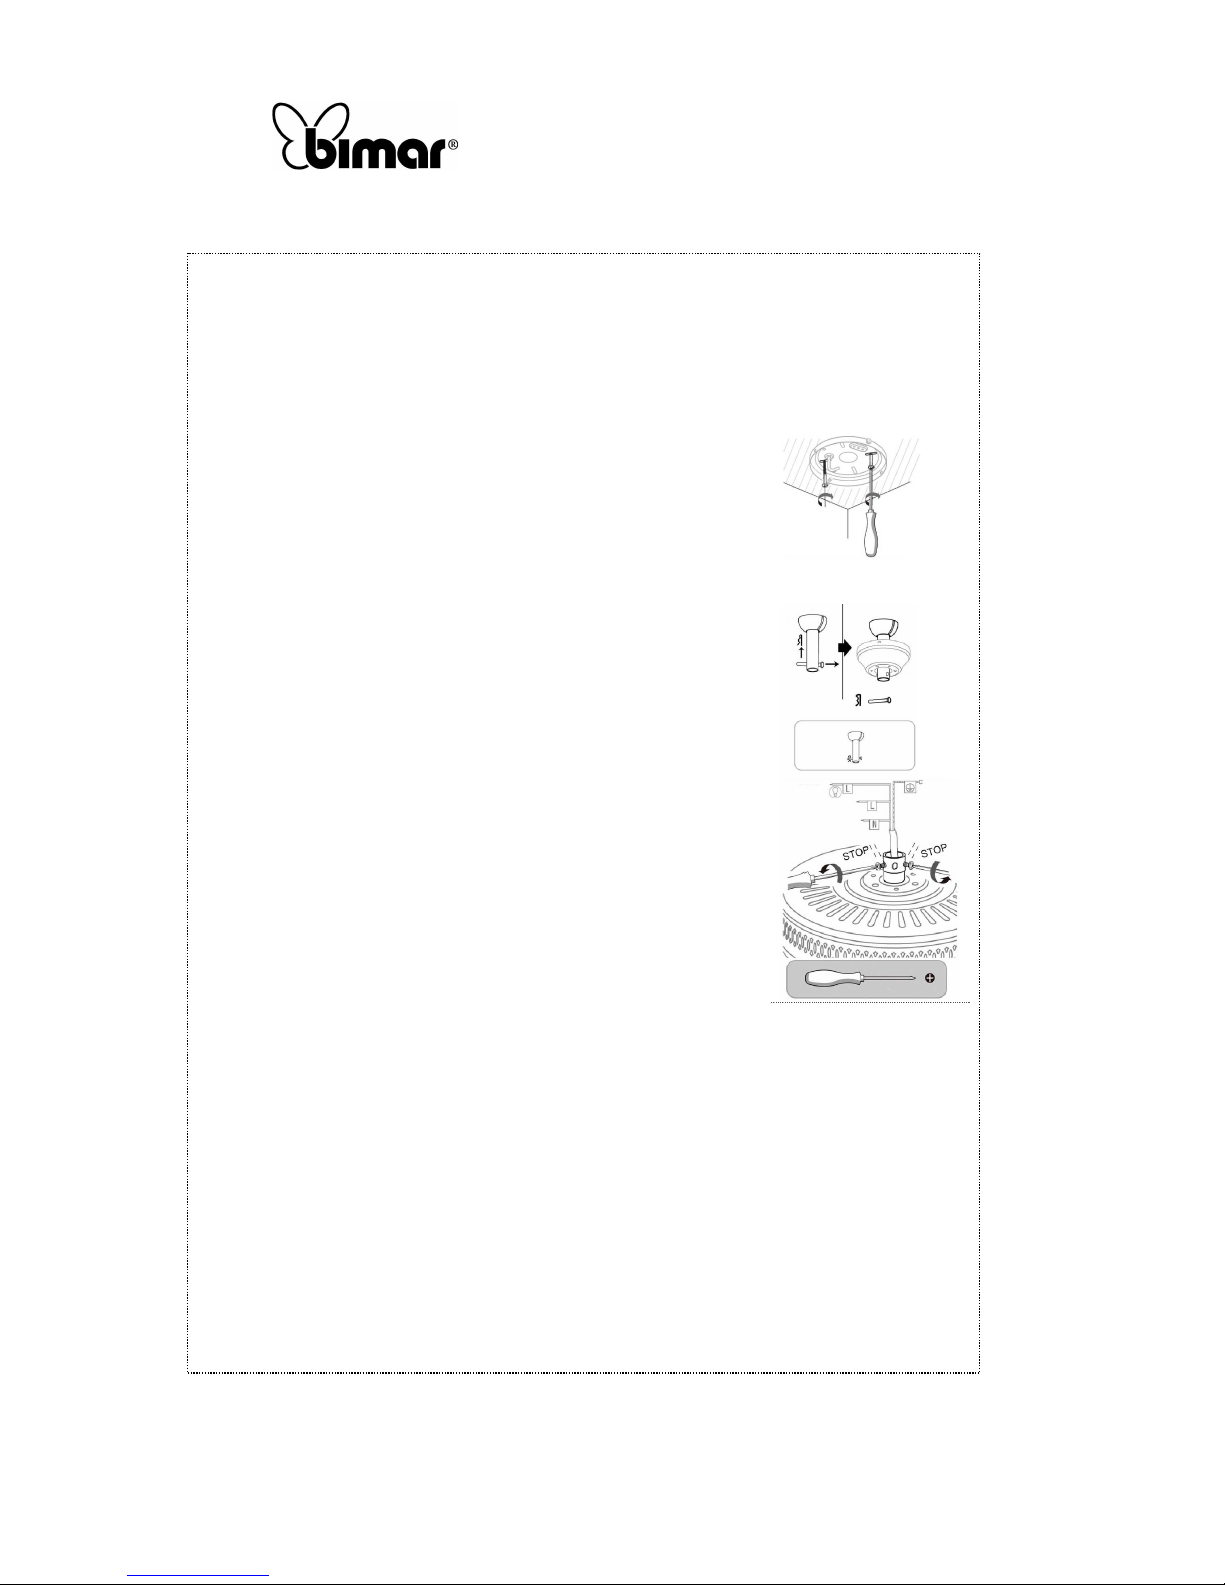
1. Fijar la placa de soporte al techo: efectuar los orificios poniendo
especial atención en no dañar los caños al interno de la
mampostería (primero verificar si caños de agua y gas, etc. o cables
eléctricos están incorporadas en la pared); mediante los tacos de
fijación a expansión, y los tornillos roscados fijar la placa.
Comprobar la solides de la fijación, luego aplicar a la placa un peso
4 veces superior a aquel del ventilador y verificar que la placa
permanezca perfectamente fijada a la losa.
2. Insertar la barra de soporte a través del casquillo superior y pasar
los cables eléctricos a través del hueco de la barra. Los cables
deben introducirse desde abajo hacia arriba.
3. Insertar la extremidad inferior de la barra en el pivote de soporte
del motor, de modo que los orificios resulten coaxiales e introducir
el correspondiente pivote de seguridad.
4. Introducir la rosca en el pivote y fijarlo mediante el pasador que
debe ser completamente introducido y luego doblado en modo de
impedir que tanto el pivote como el pasador puedan salirse.
5. Asegurar ulteriormente el soporte motor a la barra apretando el/los
tonillos de seguridad.
6. Colgar provisoriamente el ventilador al gancho de la placa de
soporte.
Efectuar la conexión eléctrica siguiendo las instrucciones indicadas
en el siguiente párrafo “Conexión Eléctrica” procediendo de la
siguiente manera.
7. Quitar el ventilador del gancho de la placa de soporte, mantenerlo elevado para no
romper/dañar las conexiones eléctricas Comprobar que los cables eléctricos se encuentren
libres y alojados en el modo correcto y posicionar el casquillo superior en proximidad de la
placa de soporte. Atornillar el tornillo apretando adecuadamente.
8. Fijar los soportes de las paletas a las paletas utilizando los tornillos con rosca y tuercas
provistas, apretar adecuadamente. Para algunos modelos las paletas no son reversibles, por
lo tanto fijar el soporte del lado correcto de la paleta. Para algunos modelos las tuercas no
son necesarias y por lo tanto no han sido provistas.
9. Ensamblar las paletas al motor, posicionándolas en el modo correcto (prestar atención al
lado de la paleta), y atornillar el soporte de las mismas con los tornillos y roscas provistos.
Comprobar que todos los tornillos estén bien apretados en el modo correcto tanto a efectos
de la seguridad, como también para evitar que el ventilador pueda oscilar excesivamente
durante el funcionamiento.
Page 26
Copies of the I/B. Please reproduce them without any
changes except under special instruction from Bimar (Italy).
The pages must be reproduced and folded in order to obtain
a booklet A5 (+/- 148.5 mm width x 210 mm height). When
folding, make sure you keep the good numbering when you
turn the pages of the I/B. Don’t change the page numbering.
Keep the language integrity.
26/40
Assembly page 26/16
Fax +32 030 9904733
10. Algunos ventiladores pueden tener en dotación la luz. La luz colocada debajo del motor
puede estar ya montada y conectada, o bien es suministrada en un Kit que debe ser
conectado y montado.
En este caso, necesita simplemente enroscar la bombilla (no suministrada) correspondiente
a las especificas indicaciones indicadas en la placa de datos y/o en la placa en proximidad
del portalámparas VSL10 e VSB10 (4xMax60W, enganche E14).
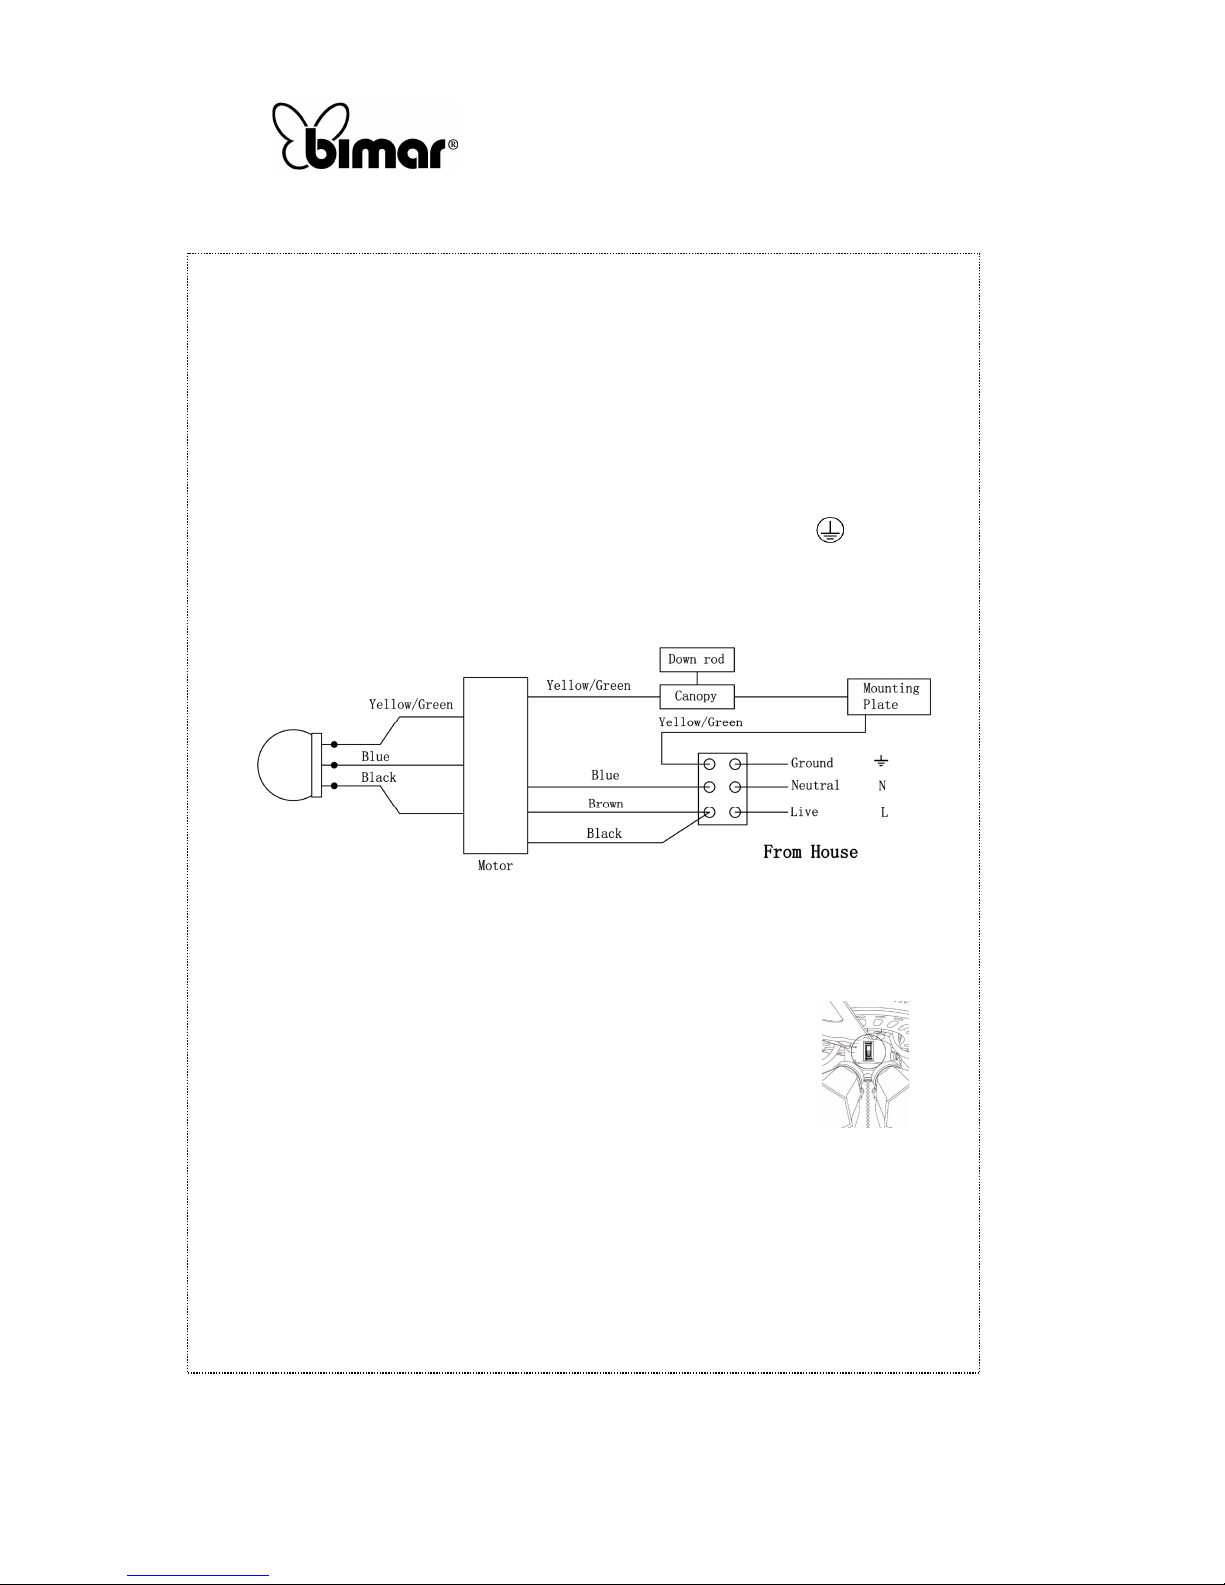
Conexión eléctrica
Efectuar las conexiones eléctricas siguiendo el esquema que se muestra a continuación.
- cable MARRÓN “LIVE”: fase para motor
- cable AZUL “NEUTRAL”: Neutro común al motor y luz
- cable NEGRO “LIGHT”: fase para luz
- cable AMARILLO/VERDE: Puesta a Tierra, correspondiente al símbolo
Conectar los cables del ventilador y aquellos provenientes del techo con la caja de conexiones
suministrada según el siguiente esquema eléctrico: el ventilador y la luz están comandados por
un conmutador.
USO
El ventilador está dotado de los siguientes elementos de mando:
- selector con mando de pared: se actúa girando la perilla selectora que a su vez activa
0/min/med/máx.
- selector para la rotación del motor en sentido horario o antihorario, a
fin de tener un flujo de aire directo desde el centro hacia el exterior o
viceversa (tal función está presente solo en algunos modelos)
- interruptor para encender o apagar la luz (en los modelos con este opcional) y se actúa
presionando el interruptor O/I en los modelos con mando de pared.
LIMPIEZA Y MANTENIMIENTO
Atención: antes de efectuar las normales operaciones de limpieza, apagar el ventilador,
apagar la luz del ventilador (si presente) y cortar la alimentación de la red eléctrica apagando el
interruptor unipolar (pos O/OFF).
Page 27
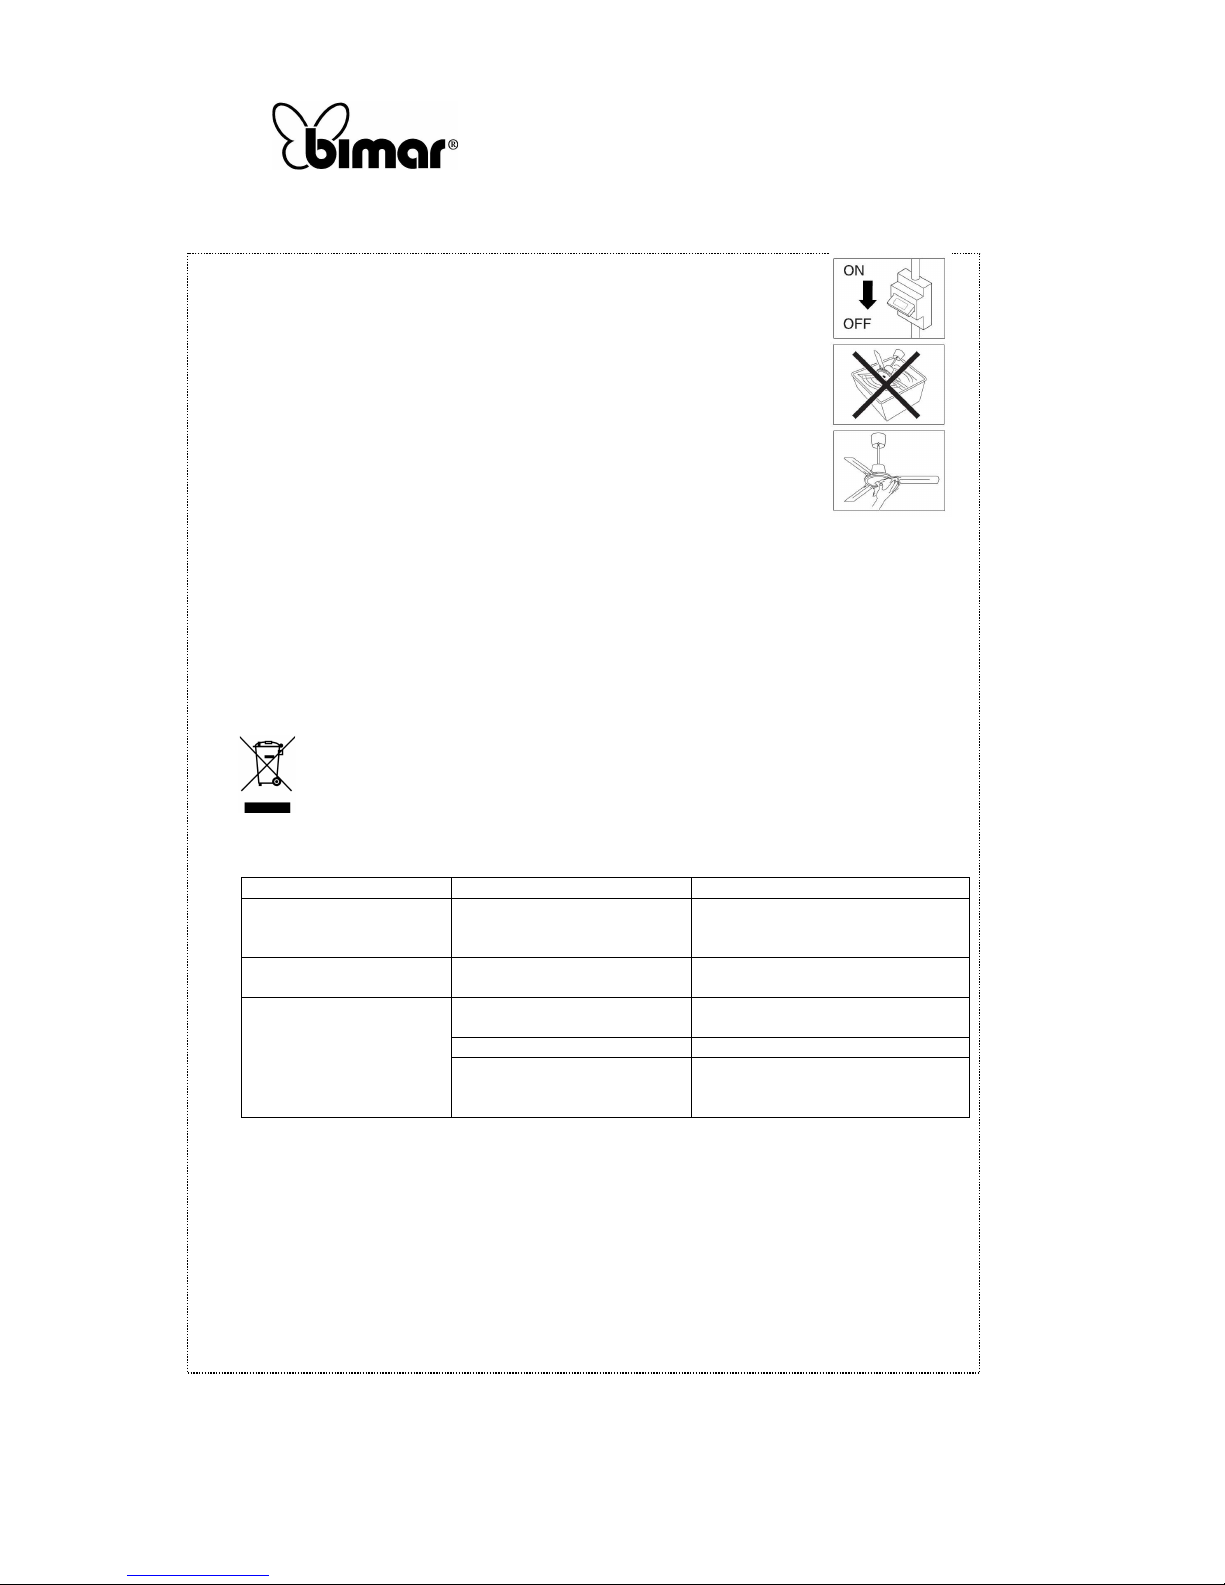
Copies of the I/B. Please reproduce them without any
changes except under special instruction from Bimar (Italy).
The pages must be reproduced and folded in order to obtain
a booklet A5 (+/- 148.5 mm width x 210 mm height). When
folding, make sure you keep the good numbering when you
turn the pages of the I/B. Don’t change the page numbering.
Keep the language integrity.
27/40
Assembly page 27/16
Fax +32 030 9904733
•
Para la limpieza utilizar un paño suave, ligeramente humedecido: no
utilizar productos abrasivos o corrosivos. Prestar atención en no dañar el
aparato, las paletas, las conexiones eléctricas, o comprometer la fijación.
• No sumergir o mojar ninguna parte del ventilador en agua u otro liquido:
en el caso que sucediera asegúrese de haber cortado la alimentación de la
red eléctrica y luego secar con cuidado el aparato y verificar que todas
las partes eléctricas se encuentren perfectamente secas: en caso de dudas
póngase en contacto con personal técnico capacitado.
• Es indispensable mantener los orificios de aireación del motor libres de
polvos y pelusas.
•
No dispersar en el ambiente productos no biodegradables, eliminarlos según las normas
vigentes locales. Al final de su vida útil, el producto no debe eliminarse con los residuos
domésticos. Puede ser entregado en los correspondientes centros de recolección diferenciada
predispuestos por las administraciones municipales, o bien en la sede del distribuidor que
ofrecerá este servicio a la compra de una nueva máquina. Eliminar separadamente un
electrodoméstico permite evitar posibles consecuencias negativas para el ambiente y para la
salud que derivan de una eliminación inadecuada y permite recuperar los materiales de los
que se compone a fin de conseguir un importante ahorro de energía y recursos. Para destacar
la obligación de eliminar separadamente los electrodomésticos, en el producto aparece un
contenedor de basura móvil tachado
PROBLEMA CAUSA POSIBLE SOLUCIÓN
Aparato completamente
apagado
Falta de corriente eléctrica Controlar el interruptor general de la
instalación o que la conexión
eléctrica sea correcta
El aparato no funciona
regularmente
Motor averiado Dirigirse a un Centro de Asistencia
Técnica autorizado.
El ventilador oscila
excesivamente
Paletas montadas no
correctamente apretadas.
Apretar adecuadamente todos los
tornillos.
Paletas curvadas Sustituir las paletas
Tronillos de fijación de las
paletas no apretados
correctamente.
Bloquear adecuadamente todos los
tornillos.
Page 28
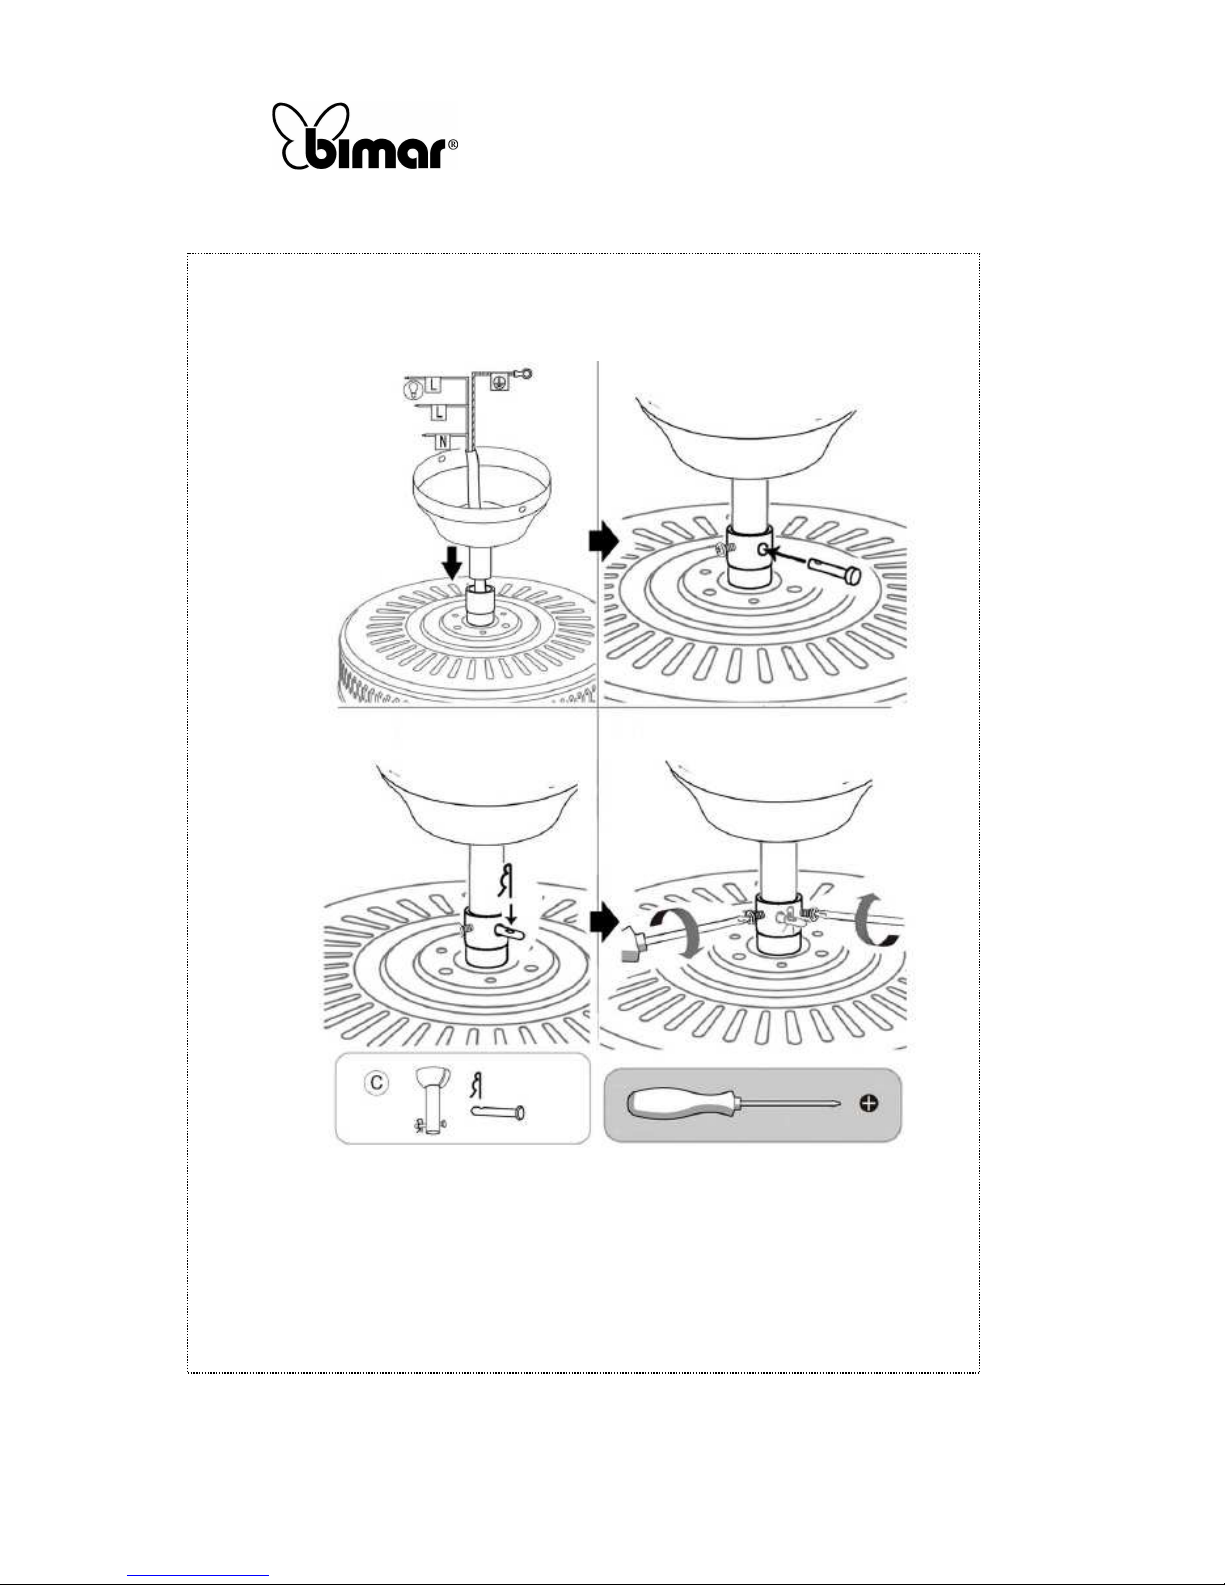
Copies of the I/B. Please reproduce them without any
changes except under special instruction from Bimar (Italy).
The pages must be reproduced and folded in order to obtain
a booklet A5 (+/- 148.5 mm width x 210 mm height). When
folding, make sure you keep the good numbering when you
turn the pages of the I/B. Don’t change the page numbering.
Keep the language integrity.
28/40
Assembly page 28/16
Fax +32 030 9904733
Page 29
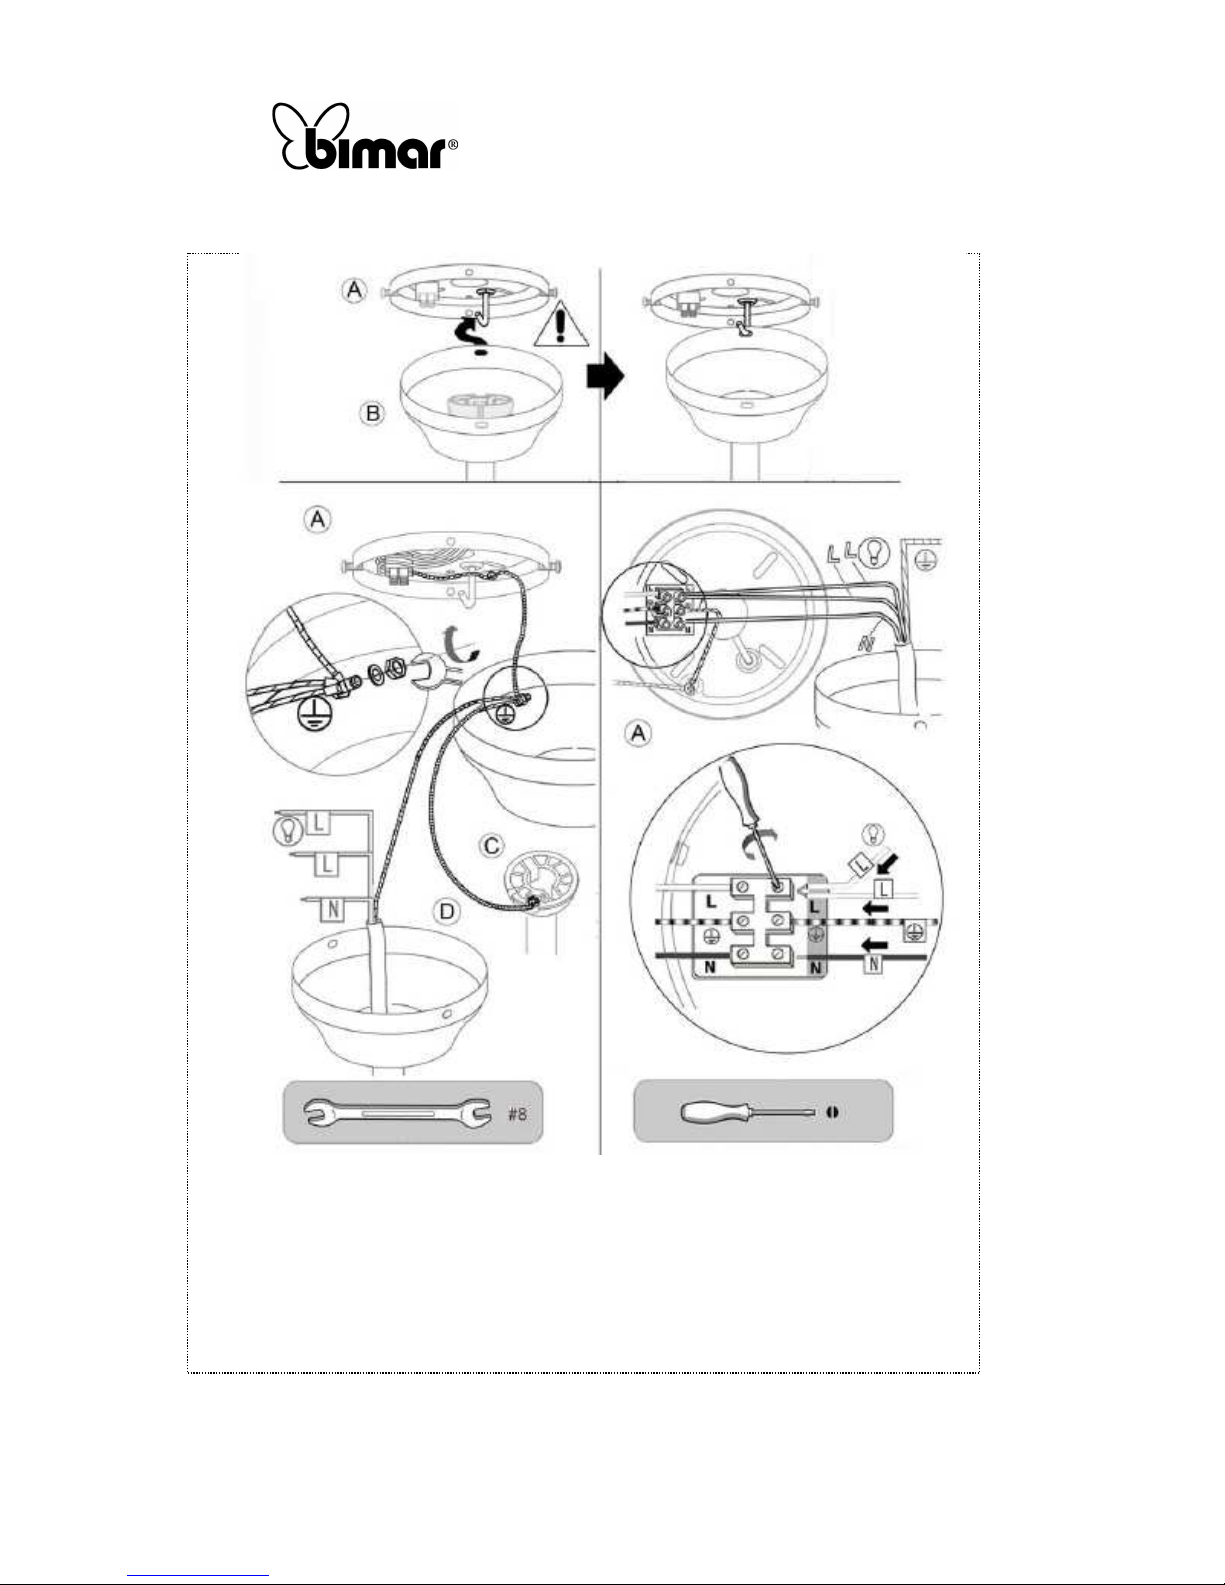
Copies of the I/B. Please reproduce them without any
changes except under special instruction from Bimar (Italy).
The pages must be reproduced and folded in order to obtain
a booklet A5 (+/- 148.5 mm width x 210 mm height). When
folding, make sure you keep the good numbering when you
turn the pages of the I/B. Don’t change the page numbering.
Keep the language integrity.
29/40
Assembly page 29/16
Fax +32 030 9904733
Page 30
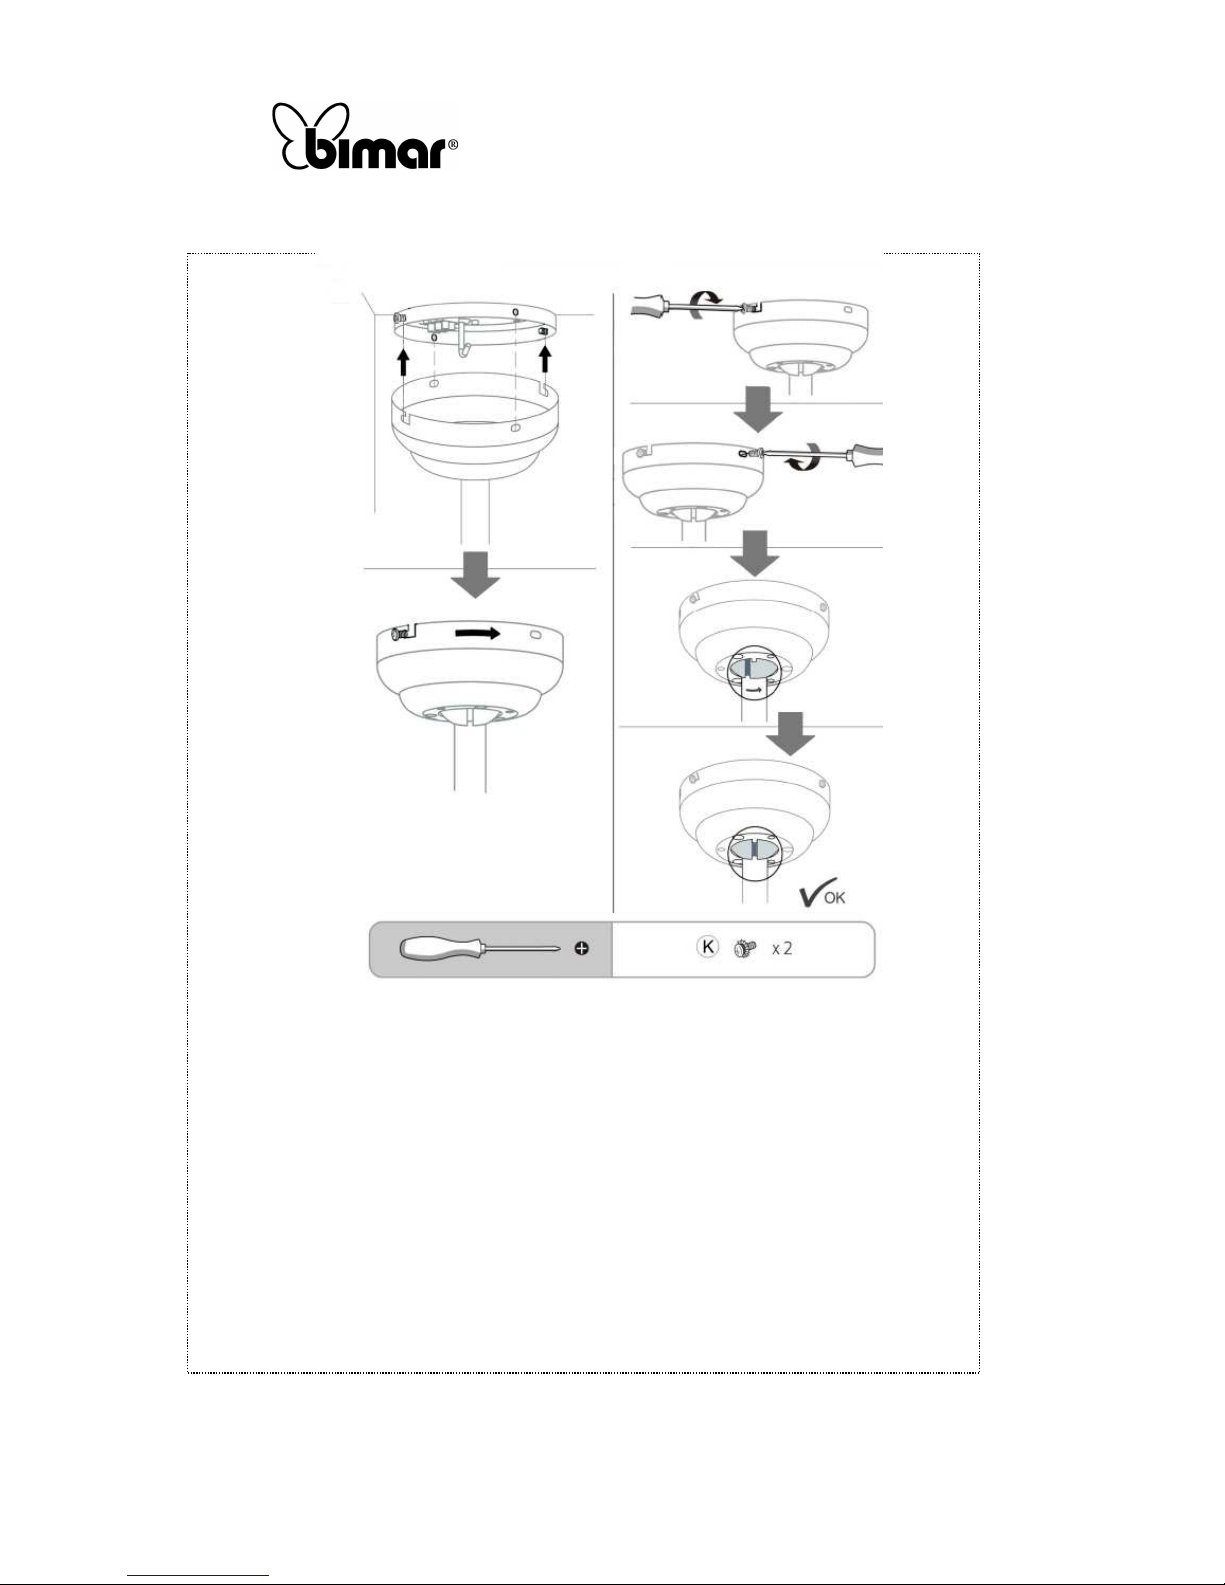
Copies of the I/B. Please reproduce them without any
changes except under special instruction from Bimar (Italy).
The pages must be reproduced and folded in order to obtain
a booklet A5 (+/- 148.5 mm width x 210 mm height). When
folding, make sure you keep the good numbering when you
turn the pages of the I/B. Don’t change the page numbering.
Keep the language integrity.
30/40
Assembly page 30/16
Fax +32 030 9904733
Page 31
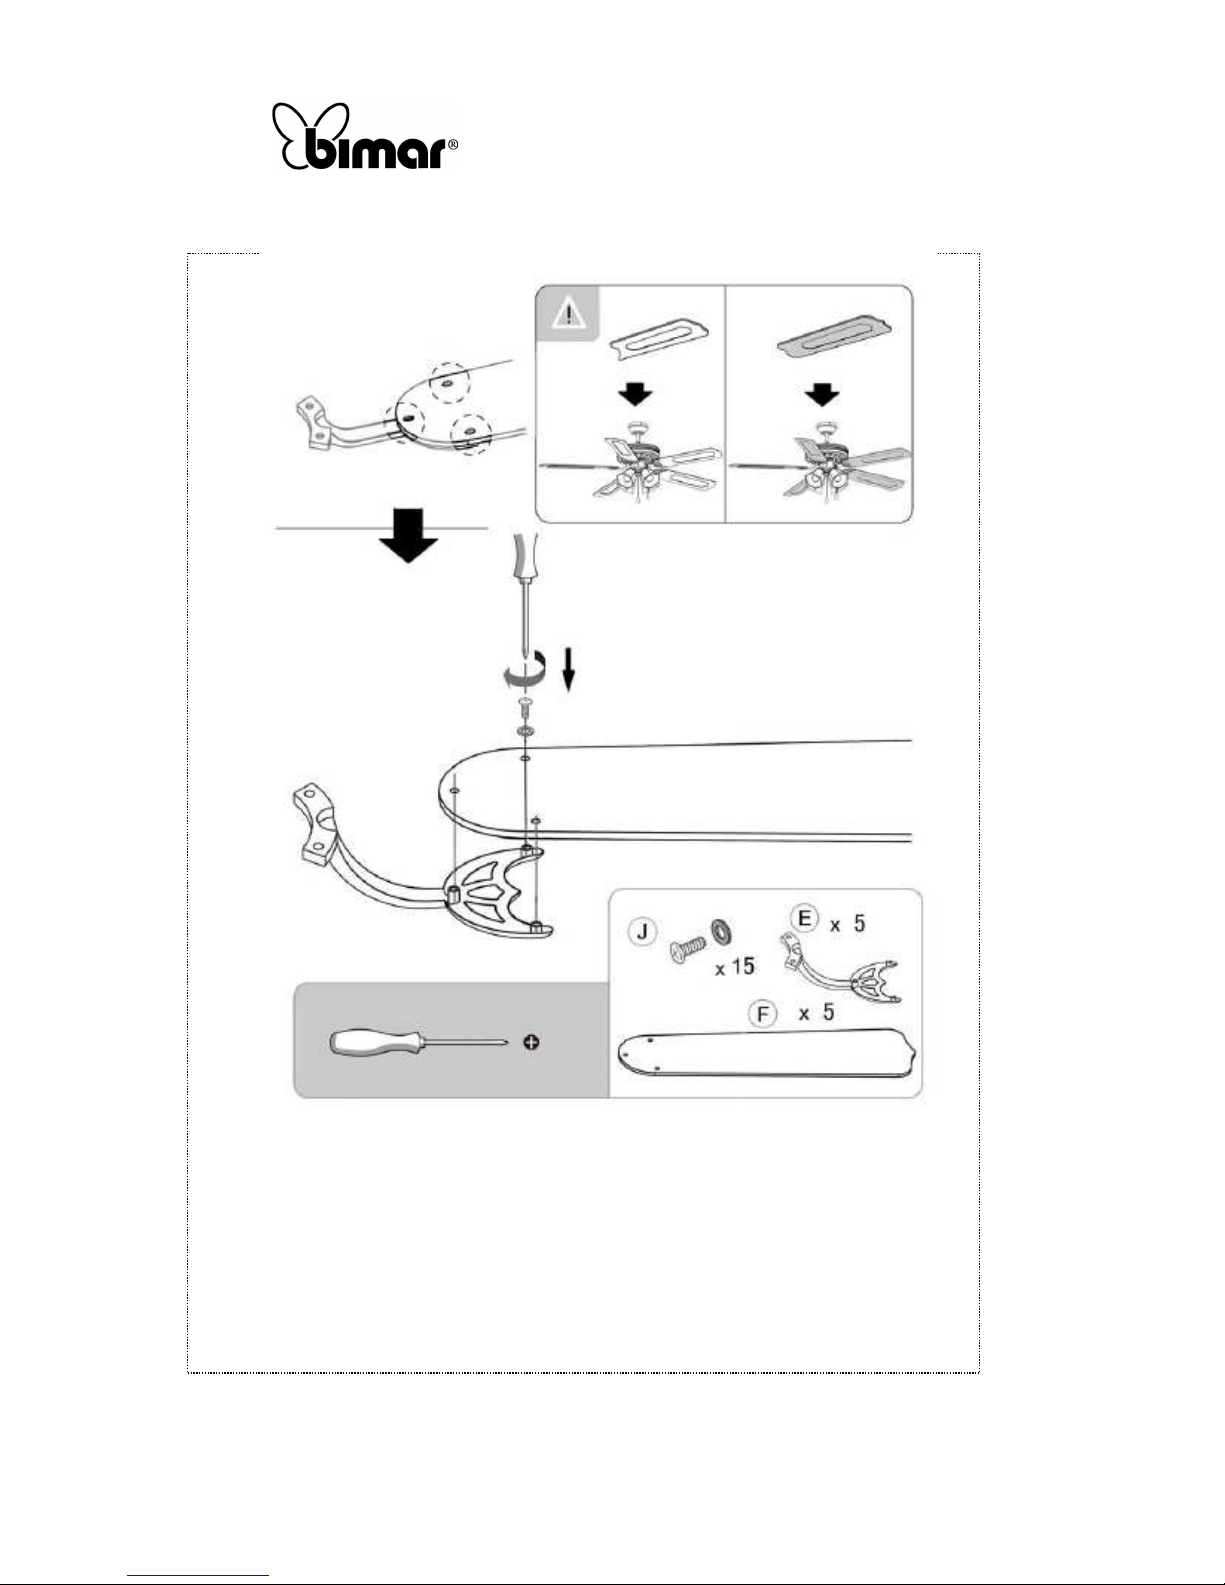
Copies of the I/B. Please reproduce them without any
changes except under special instruction from Bimar (Italy).
The pages must be reproduced and folded in order to obtain
a booklet A5 (+/- 148.5 mm width x 210 mm height). When
folding, make sure you keep the good numbering when you
turn the pages of the I/B. Don’t change the page numbering.
Keep the language integrity.
31/40
Assembly page 31/16
Fax +32 030 9904733
Page 32
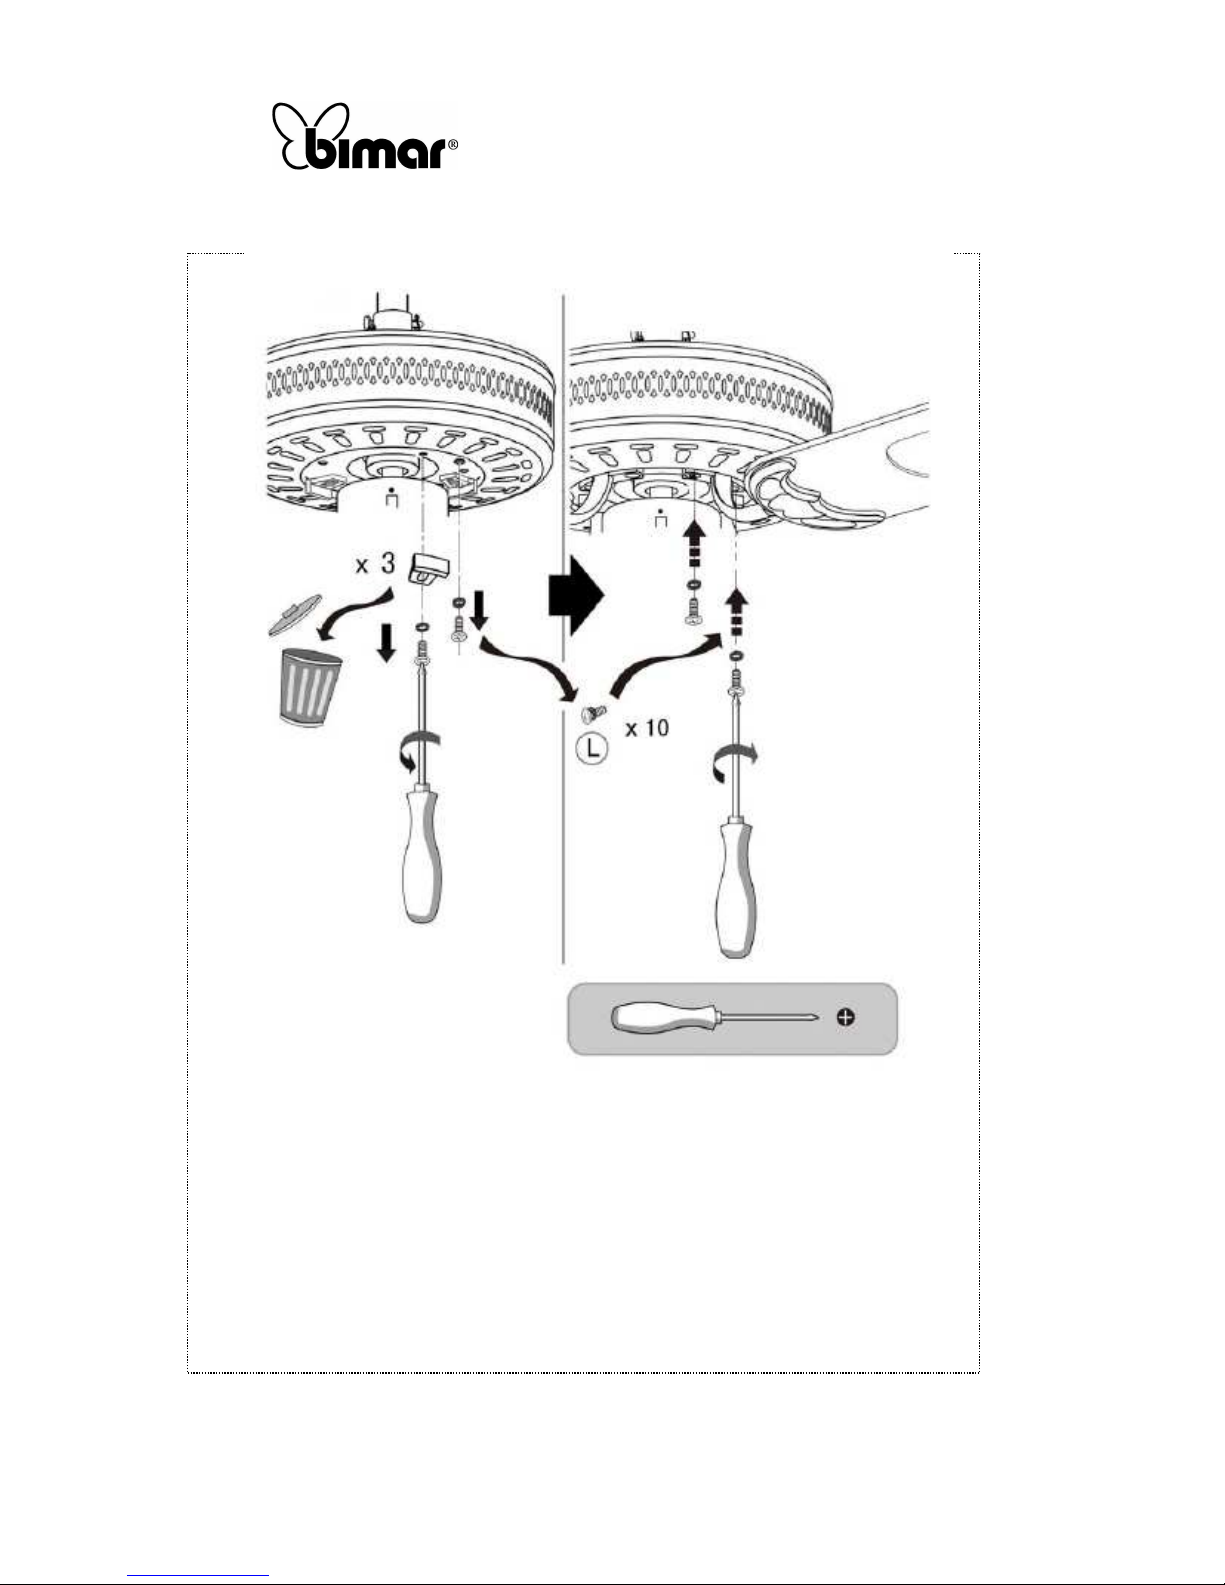
Copies of the I/B. Please reproduce them without any
changes except under special instruction from Bimar (Italy).
The pages must be reproduced and folded in order to obtain
a booklet A5 (+/- 148.5 mm width x 210 mm height). When
folding, make sure you keep the good numbering when you
turn the pages of the I/B. Don’t change the page numbering.
Keep the language integrity.
32/40
Assembly page 32/16
Fax +32 030 9904733
Page 33
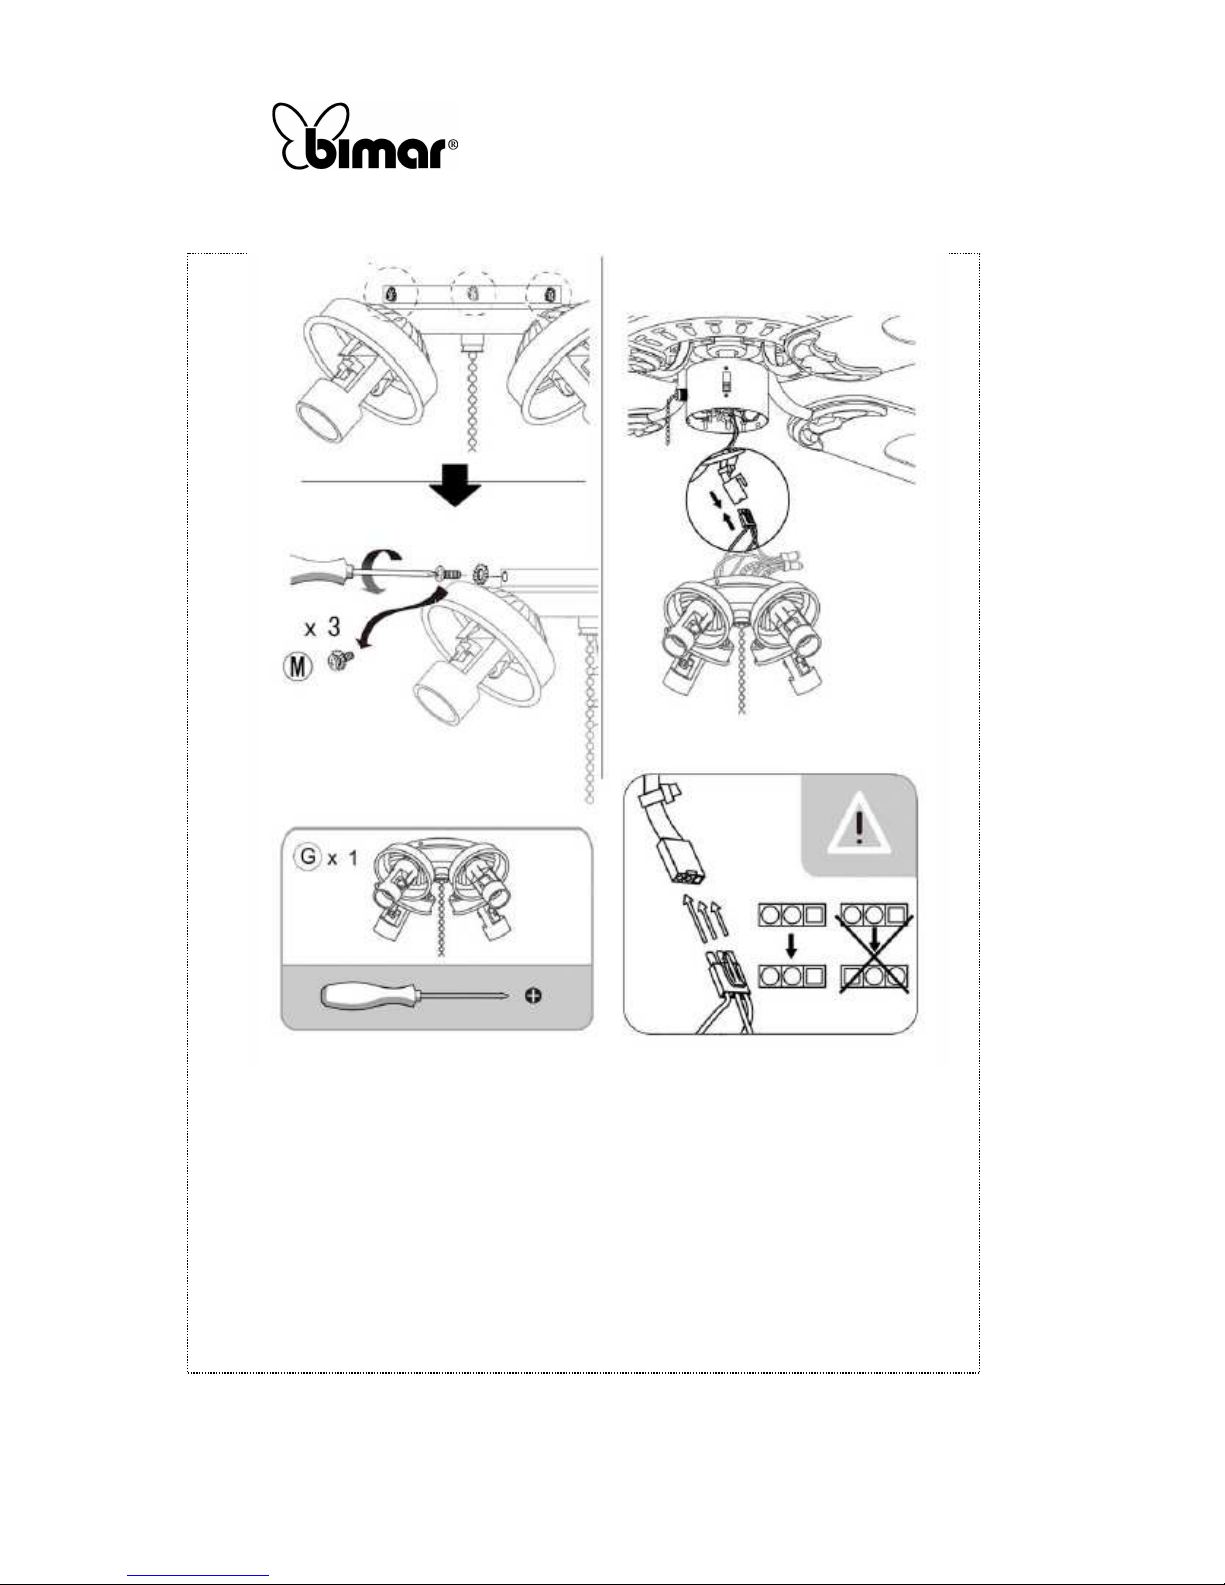
Copies of the I/B. Please reproduce them without any
changes except under special instruction from Bimar (Italy).
The pages must be reproduced and folded in order to obtain
a booklet A5 (+/- 148.5 mm width x 210 mm height). When
folding, make sure you keep the good numbering when you
turn the pages of the I/B. Don’t change the page numbering.
Keep the language integrity.
33/40
Assembly page 33/16
Fax +32 030 9904733
Page 34
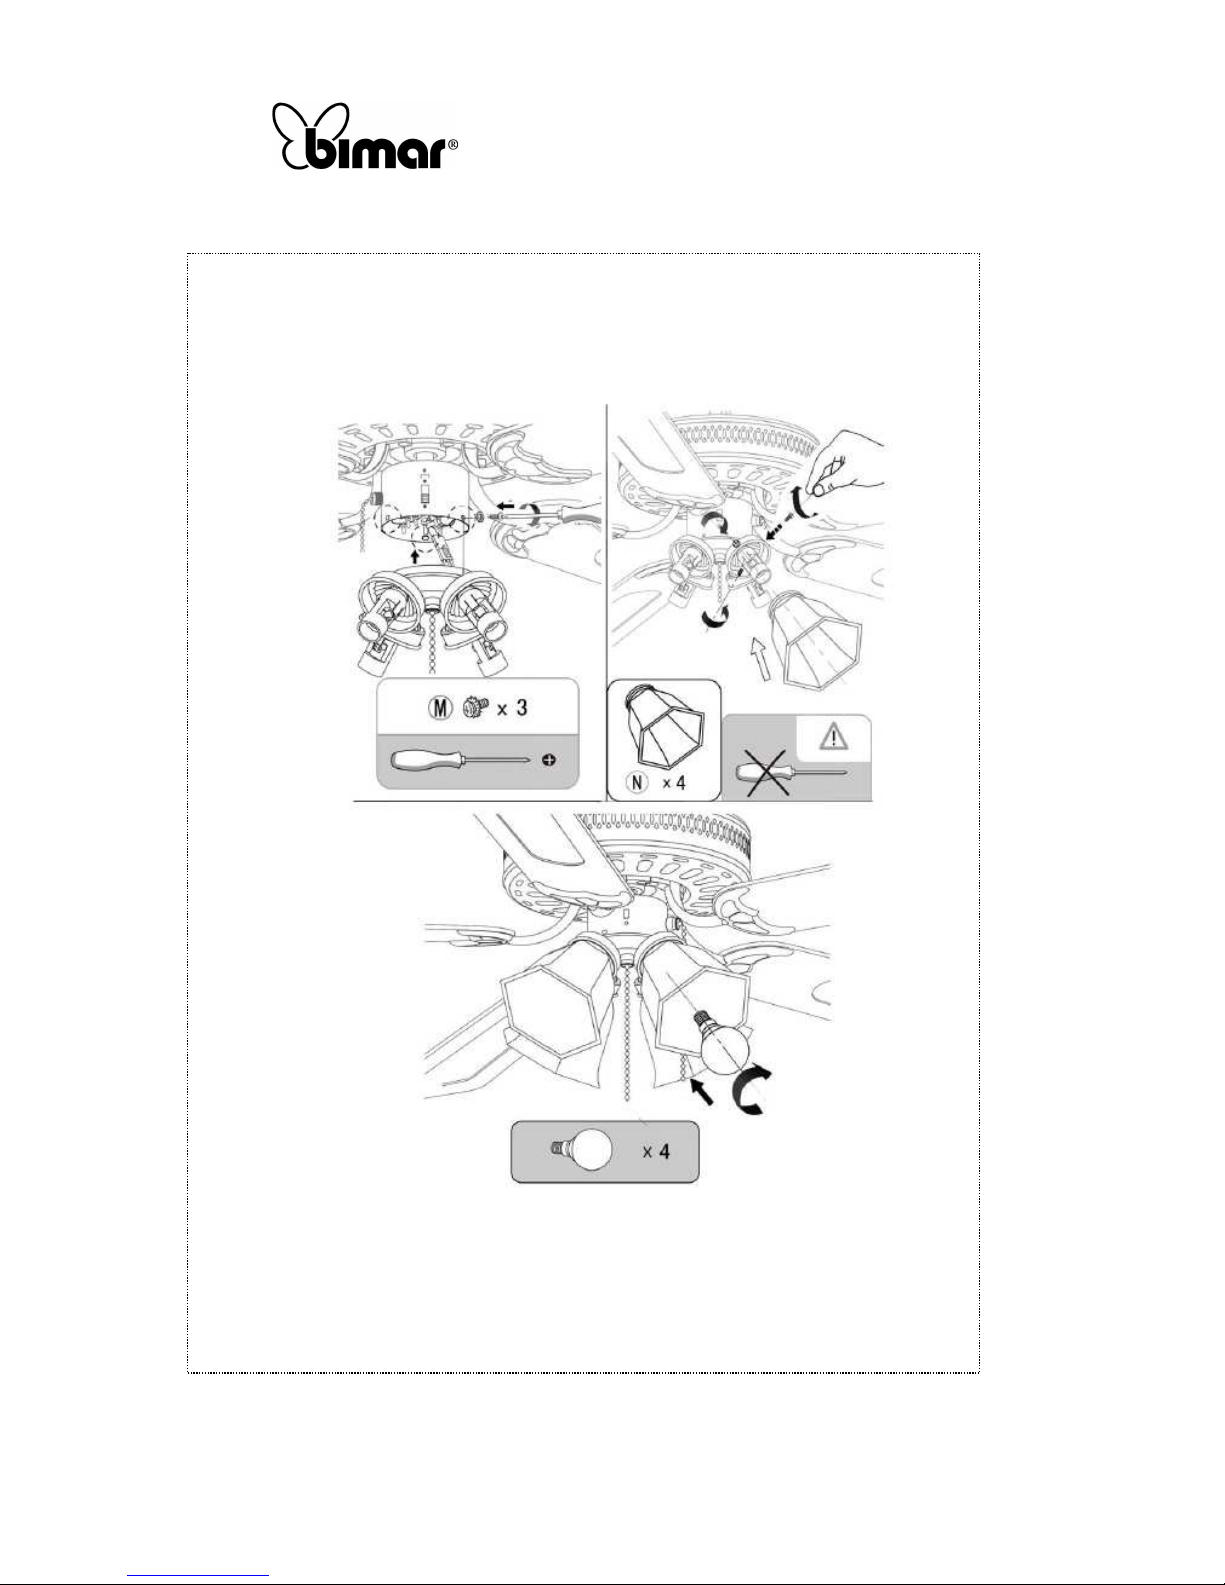
Copies of the I/B. Please reproduce them without any
changes except under special instruction from Bimar (Italy).
The pages must be reproduced and folded in order to obtain
a booklet A5 (+/- 148.5 mm width x 210 mm height). When
folding, make sure you keep the good numbering when you
turn the pages of the I/B. Don’t change the page numbering.
Keep the language integrity.
34/40
Assembly page 34/16
Fax +32 030 9904733
Page 35
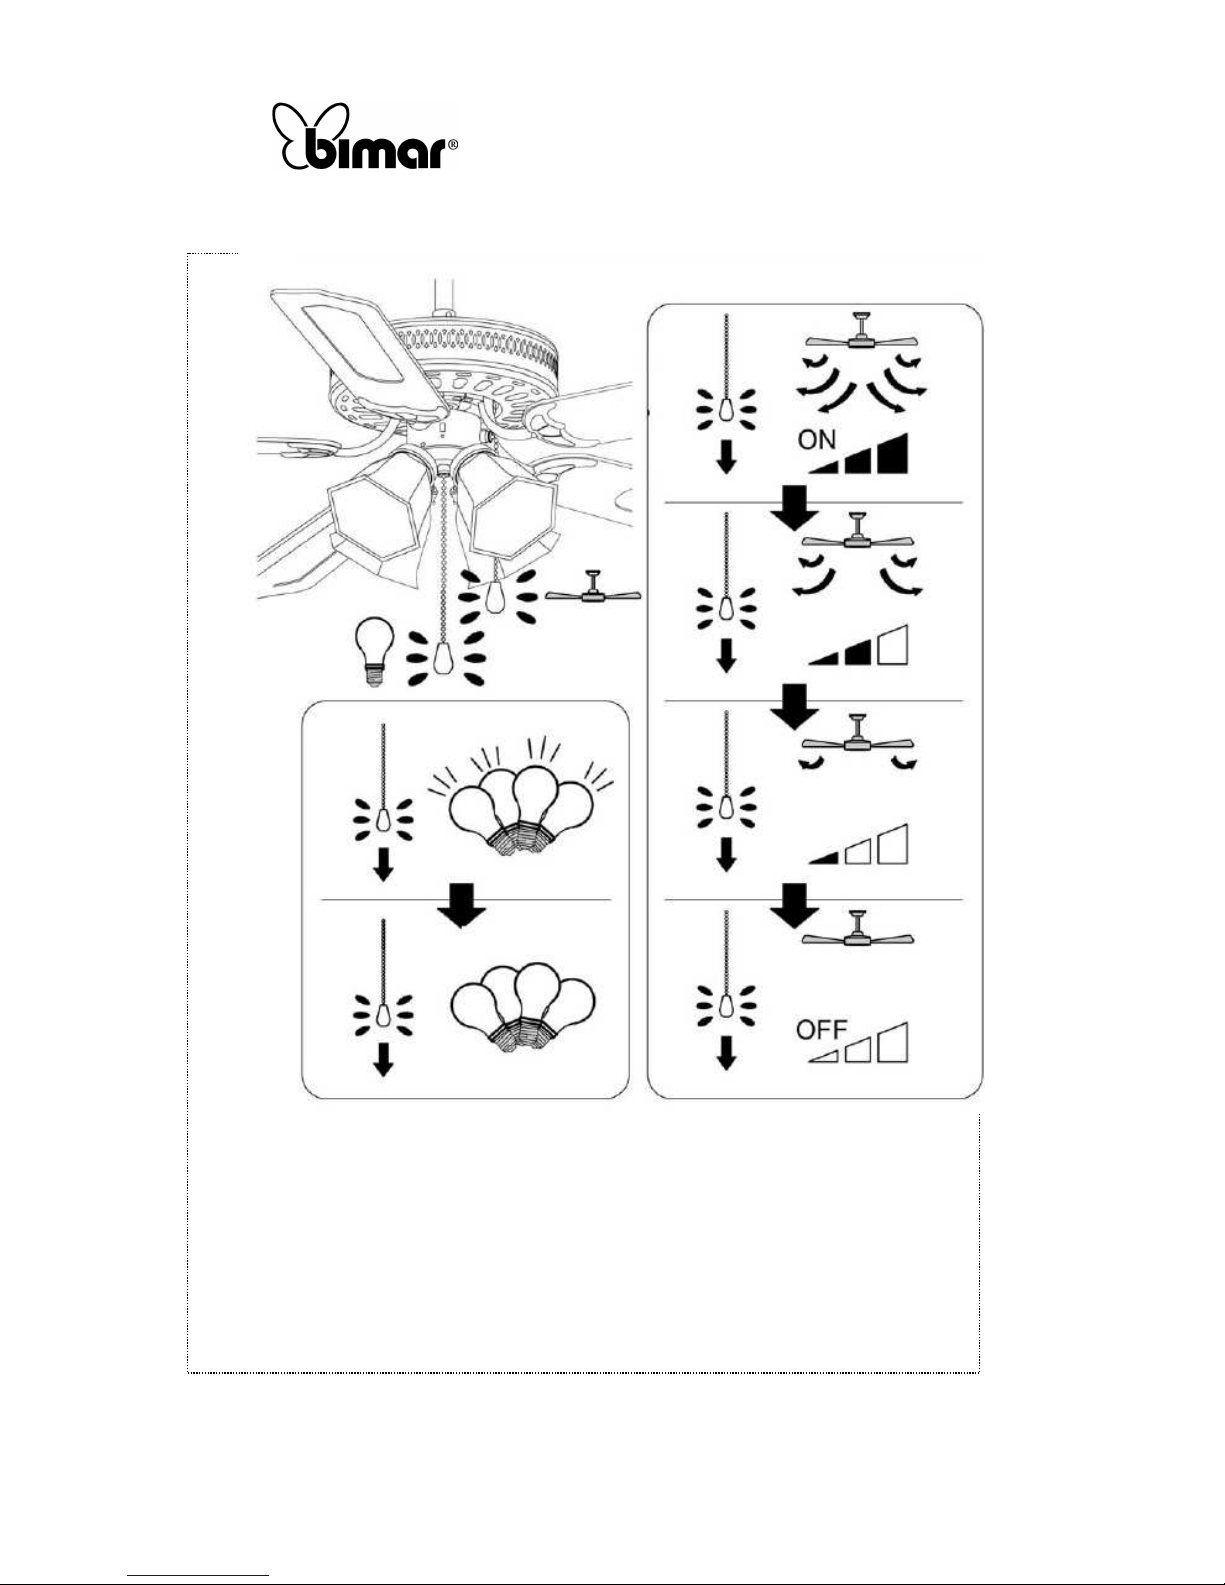
Copies of the I/B. Please reproduce them without any
changes except under special instruction from Bimar (Italy).
The pages must be reproduced and folded in order to obtain
a booklet A5 (+/- 148.5 mm width x 210 mm height). When
folding, make sure you keep the good numbering when you
turn the pages of the I/B. Don’t change the page numbering.
Keep the language integrity.
35/40
Assembly page 35/16
Fax +32 030 9904733
Page 36
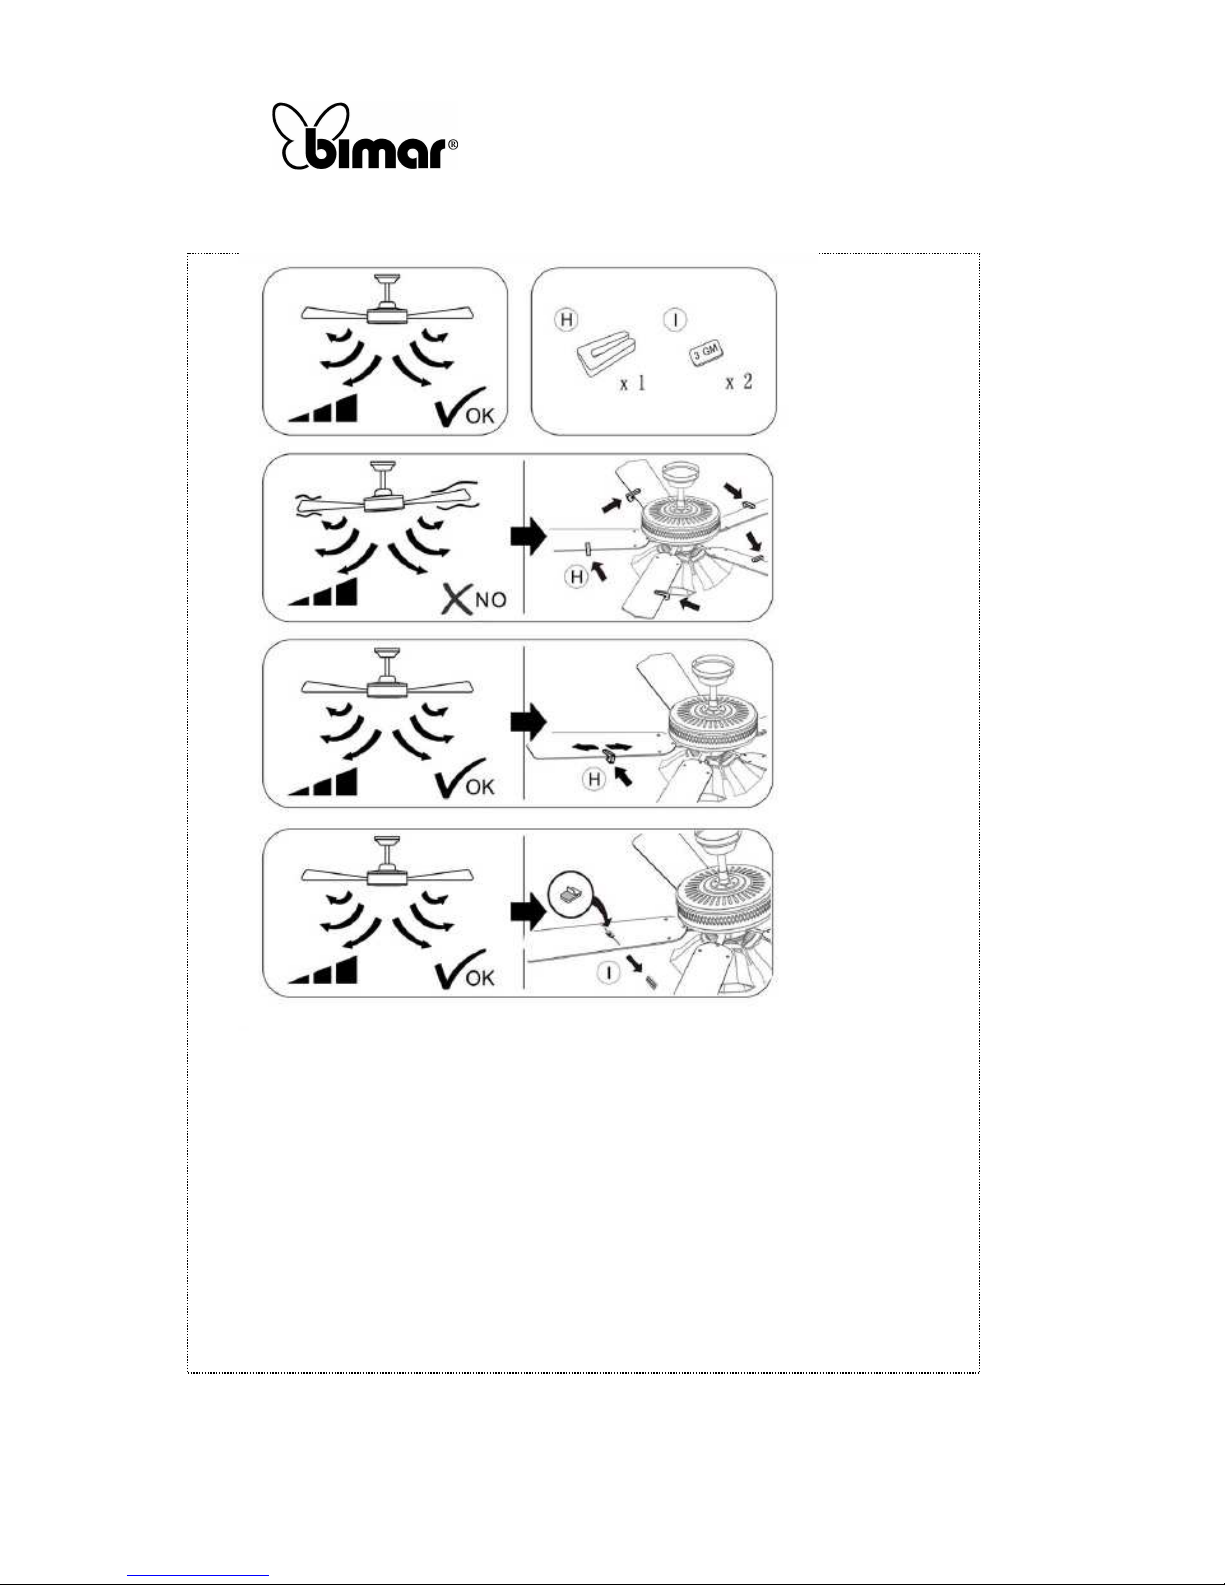
Copies of the I/B. Please reproduce them without any
changes except under special instruction from Bimar (Italy).
The pages must be reproduced and folded in order to obtain
a booklet A5 (+/- 148.5 mm width x 210 mm height). When
folding, make sure you keep the good numbering when you
turn the pages of the I/B. Don’t change the page numbering.
Keep the language integrity.
36/40
Assembly page 36/16
Fax +32 030 9904733
Page 37
Copies of the I/B. Please reproduce them without any
changes except under special instruction from Bimar (Italy).
The pages must be reproduced and folded in order to obtain
a booklet A5 (+/- 148.5 mm width x 210 mm height). When
folding, make sure you keep the good numbering when you
turn the pages of the I/B. Don’t change the page numbering.
Keep the language integrity.
37/40
Assembly page 37/16
Fax +32 030 9904733
Prescrizioni relative alle informazioni/Information requirements/
Informations/Informationsanforderungen/ Disposiciones relativas a las informaciones
Descrizione/Description/ Description/
Beschreibung/ Descripción
Simbolo/Sym
bol/ Symbol/
Símbolo
Valore/Value/ Valeur/
Wert/Valor
Unità/Unit/
Unité/ Einheit/
Símbolo
Portata massima d’aria/Maximum fan
flow rate/ Puissance de ventilation
maximale/ Maximaler Luftdurchsatz des
Lüfters/ Capacidad máxima de aire
F 117.42
m³/min
Potenza assorbita del ventilatore/Fan
power input/ Puissance d’entrée
ventilateur/ Eingangsleistung des Lüfters/
Potencia absorbida por el ventilador
P 54 W
Valori di esercizio/Service value/ Valeur
de fonctionnement/ Betriebswert/
Valores de funcionamiento
SV 2.17 (m³/min)/W
Consumo elettrico in modo
“attesa”/Standby power consumption/
Consommation électrique en veille/
Standby-Leistungsverbrauch/ Consumo
eléctrico en modalidad “reposo”
PSB - W
Livello di potenza sonora del
ventilatore/Fan sound power level/
Niveau sonore ventilateur/
Geräuschpegel des Lüfters/ Nivel de
potencia acústica del ventilador
LWA 49.80 dB(A)
Velocità massima dell’aria/Maximum air
velocity/ Vitesse maximale de l’air/
Maximale Luftstromgeschwindigkeit/
Velocidad máxima del aire
c 1.61 m/sec
Norme di misura per il valore di
esercizio/Measurement standard for
service value/ Valeur standard de
fonctionnement/
Messnorm für Betriebswert/ Normativas
de medición para valores de
funcionamiento
Regolamento/Commission Regulation/ Valeur standard de
fonctionnement / Kommissionsvorschrift / Reglamento: (UE)
n.206/2012
Page 38
Copies of the I/B. Please reproduce them without any
changes except under special instruction from Bimar (Italy).
The pages must be reproduced and folded in order to obtain
a booklet A5 (+/- 148.5 mm width x 210 mm height). When
folding, make sure you keep the good numbering when you
turn the pages of the I/B. Don’t change the page numbering.
Keep the language integrity.
38/40
Assembly page 38/16
Fax +32 030 9904733
Page 39
Copies of the I/B. Please reproduce them without any
changes except under special instruction from Bimar (Italy).
The pages must be reproduced and folded in order to obtain
a booklet A5 (+/- 148.5 mm width x 210 mm height). When
folding, make sure you keep the good numbering when you
turn the pages of the I/B. Don’t change the page numbering.
Keep the language integrity.
39/40
Assembly page 39/16
Fax +32 030 9904733
Page 40
Copies of the I/B. Please reproduce them without any
changes except under special instruction from Bimar (Italy).
The pages must be reproduced and folded in order to obtain
a booklet A5 (+/- 148.5 mm width x 210 mm height). When
folding, make sure you keep the good numbering when you
turn the pages of the I/B. Don’t change the page numbering.
Keep the language integrity.
40/40
Assembly page 40/16
Fax +32 030 9904733
Via G.Amendola, 16/18
25019 Sirmione (BS) – ITALY
HTU
www.bimar-spa.it
UTH
e-mail:
HTU
UTH
Servizio clienti Bimar: 8955895542
 Loading...