

Page 1
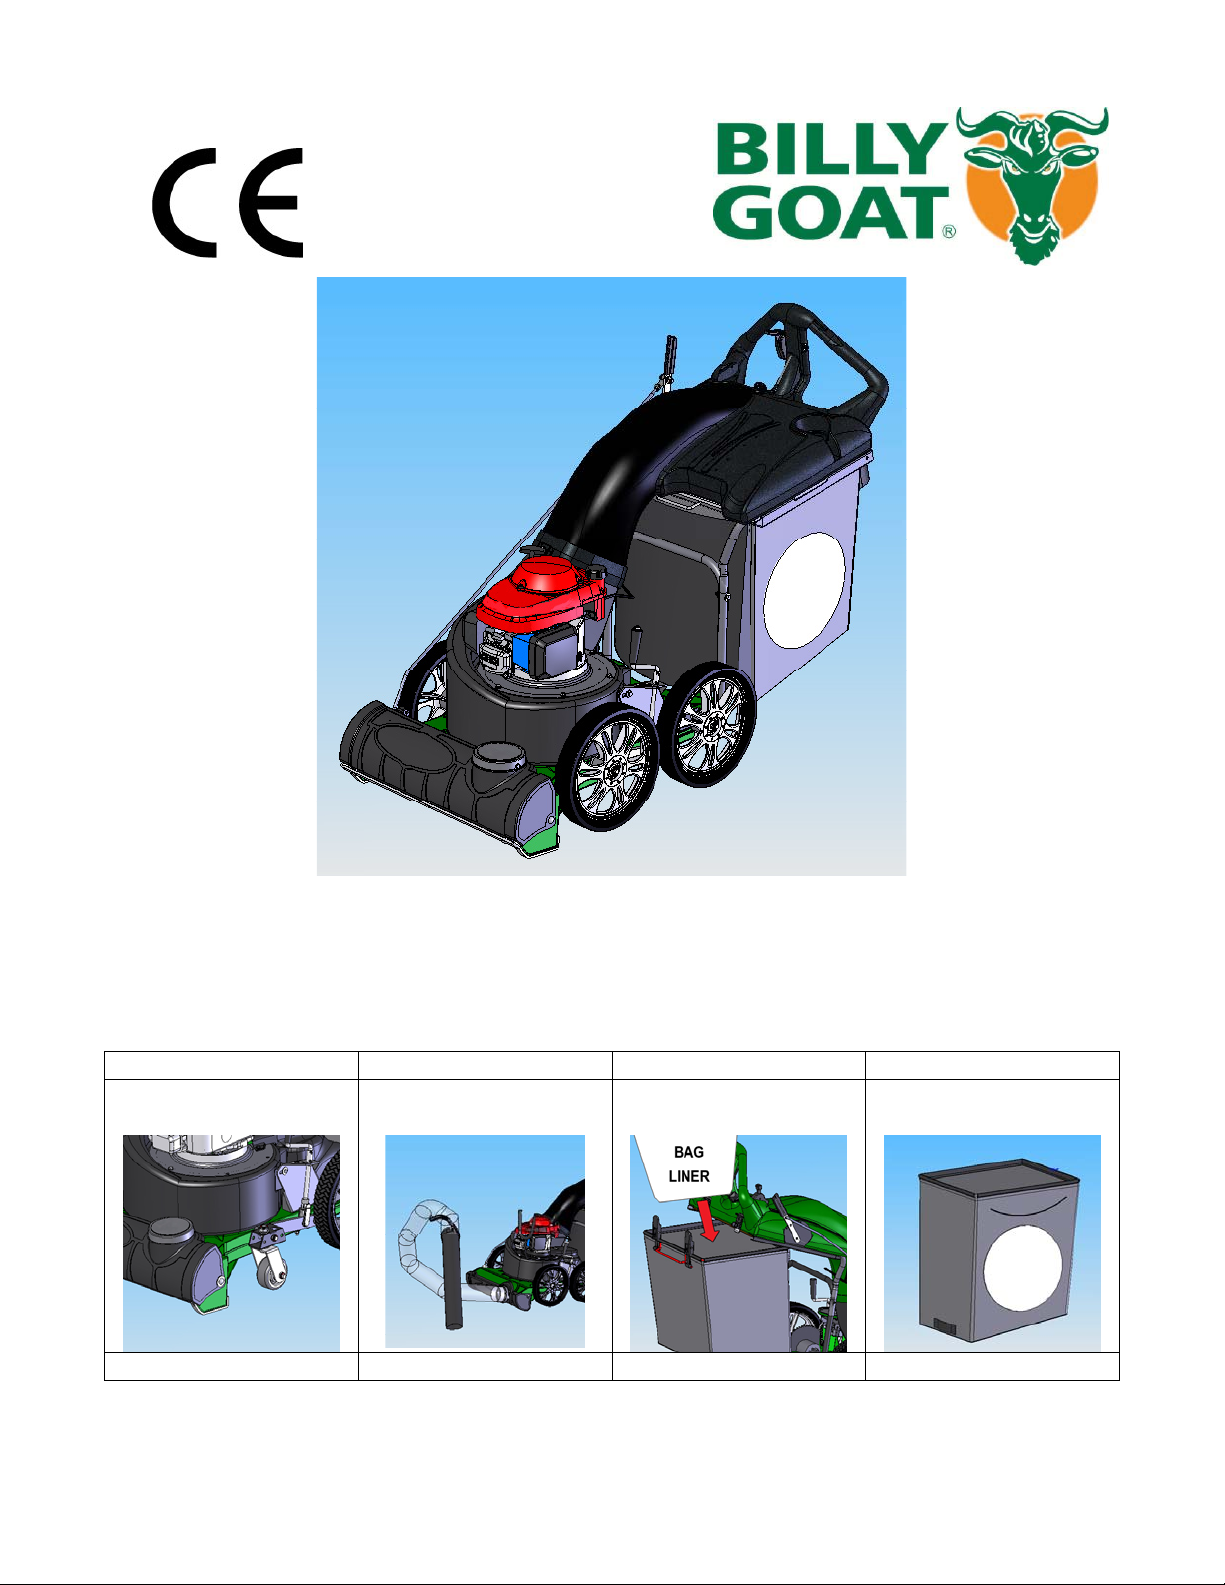
MV650H PUSH Vacuum Owner’s Manual
BILLY GOAT ® MV650H PUSH Vacuum
Owner’s Manual
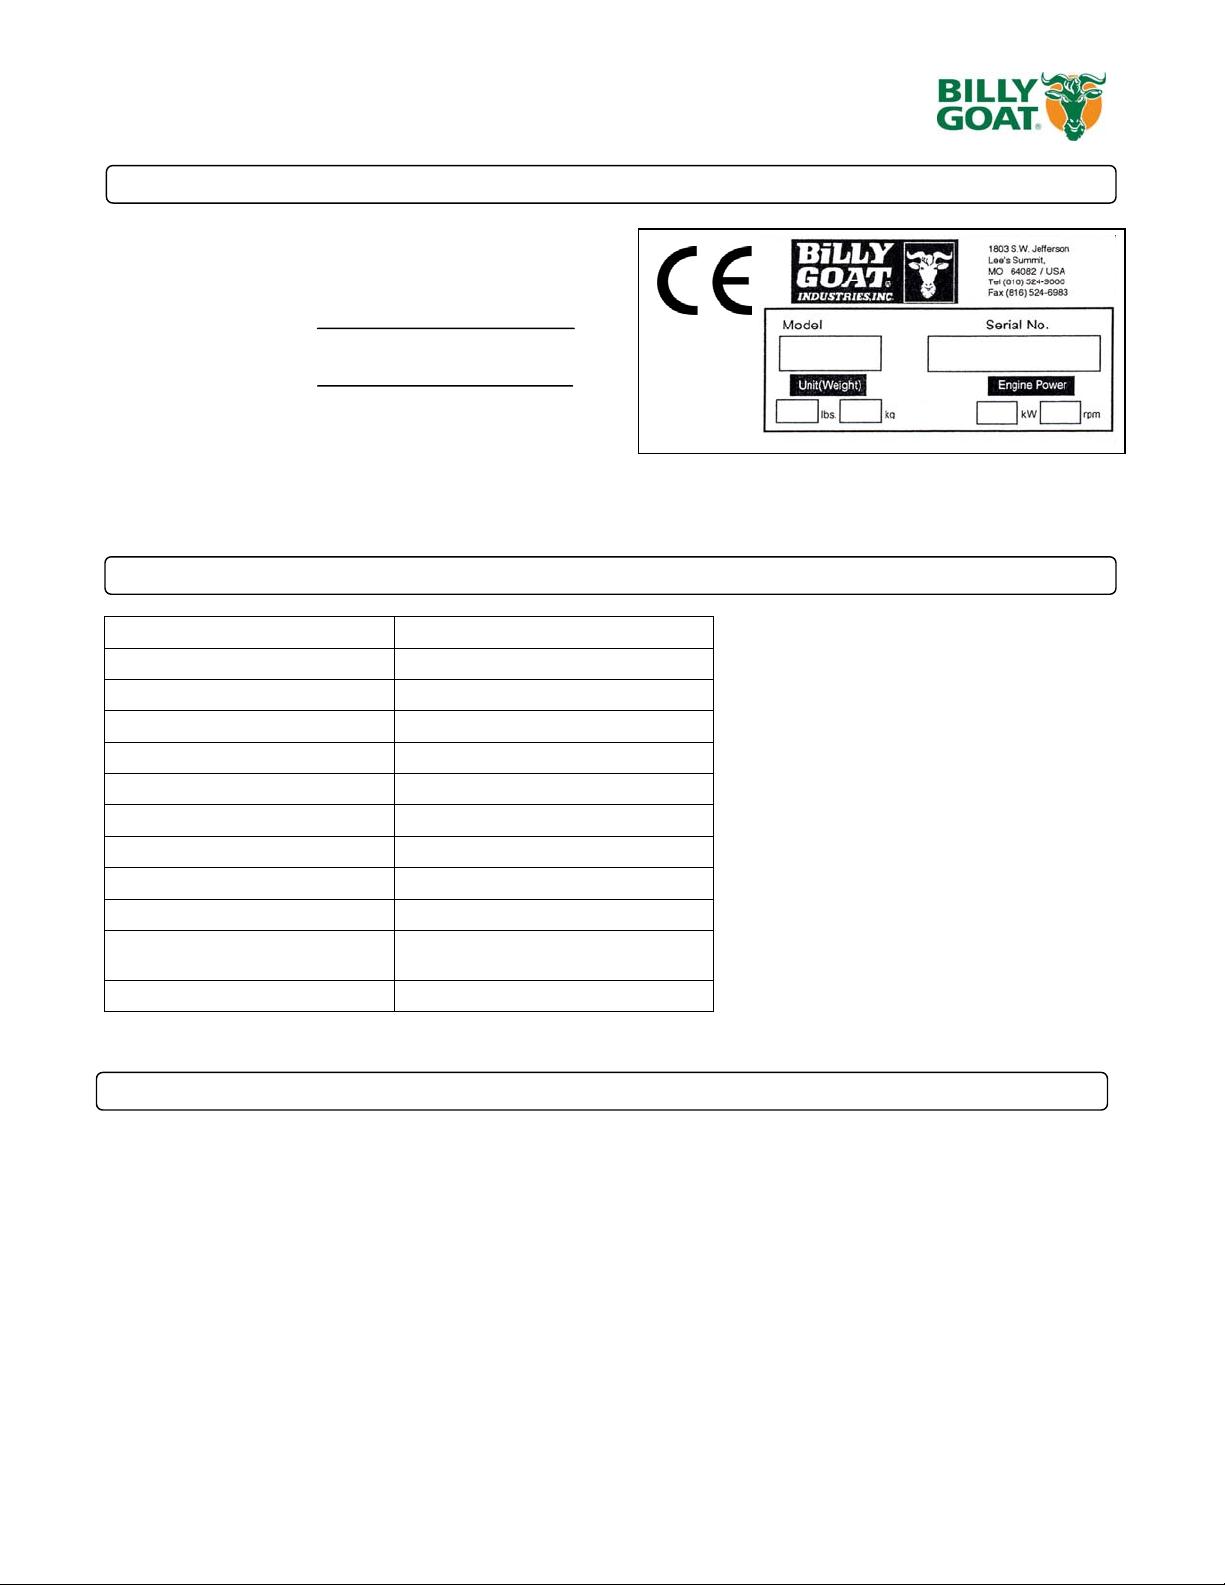
Accessories
Caster Kit Hose Kit Bag Liner Kit Felt Bag Kit
Use on hard surface
for maneuverability.
For vacuuming hard
to reach areas.
To collect leaves,
thatch, and grass.
Use on all dusty
conditions.
P/N 840129 P/N 840116 P/N 840134 P/N 840194
Part No 840186 1 Form No F030409A
Page 2

MV650H PUSH Vacuum Owner’s Manual
ABOUT THIS MANUAL
THANK YOU for purchasing a BILLY GOAT
manufactured to provide years of reliable and productive service. This manual provides complete operating and
maintenance instructions that will help to maintain your MV Vacuum in top running order. Read this manual
carefully before assembling, operating, or servicing your equipment.
®
MV Vacuum. Your new machine has been carefully designed and
CONTENTS
Serial Plate Data ............................................................................................................................................... 3
Specifications .................................................................................................................................................... 3
Common Replacement Parts ............................................................................................................................ 3
General Safety Instructions and Symbols ......................................................................................................... 4-5
Sound Data ....................................................................................................................................................... 6
Vibration Data .................................................................................................................................................... 6
Intended Use ..................................................................................................................................................... 6
Instruction Labels .............................................................................................................................................. 7
Engine Labels .................................................................................................................................................... 7
Assembly Instructions ....................................................................................................................................... 8-11
Operation ........................................................................................................................................................... 12
Operator Controls ....................................................................................................................................... 13
Starting ........................................................................................................................................................ 13
Height/Nozzle Door Adjustment .................................................................................................................. 14-16
Handling and Transporting ................................................................................................................................ 17
Storage .............................................................................................................................................................. 17
Maintenance ...................................................................................................................................................... 18
Periodic Maintenance ................................................................................................................................. 18
Impeller Removal......................................................................................................................................... 18
Wiring Diagrams .......................................................................................................................................... 19
Troubleshooting ................................................................................................................................................. 19
Engine Maintenance and Repair ....................................................................................................................... 20
Warranty Claim Procedure ................................................................................................................................ 20
Maintenance Record ......................................................................................................................................... 21
Illustrated Parts List ........................................................................................................................................... 22-28
Part No 840186 2 Form No F030409A
Page 3
MV650H PUSH Vacuum Owner’s Manual
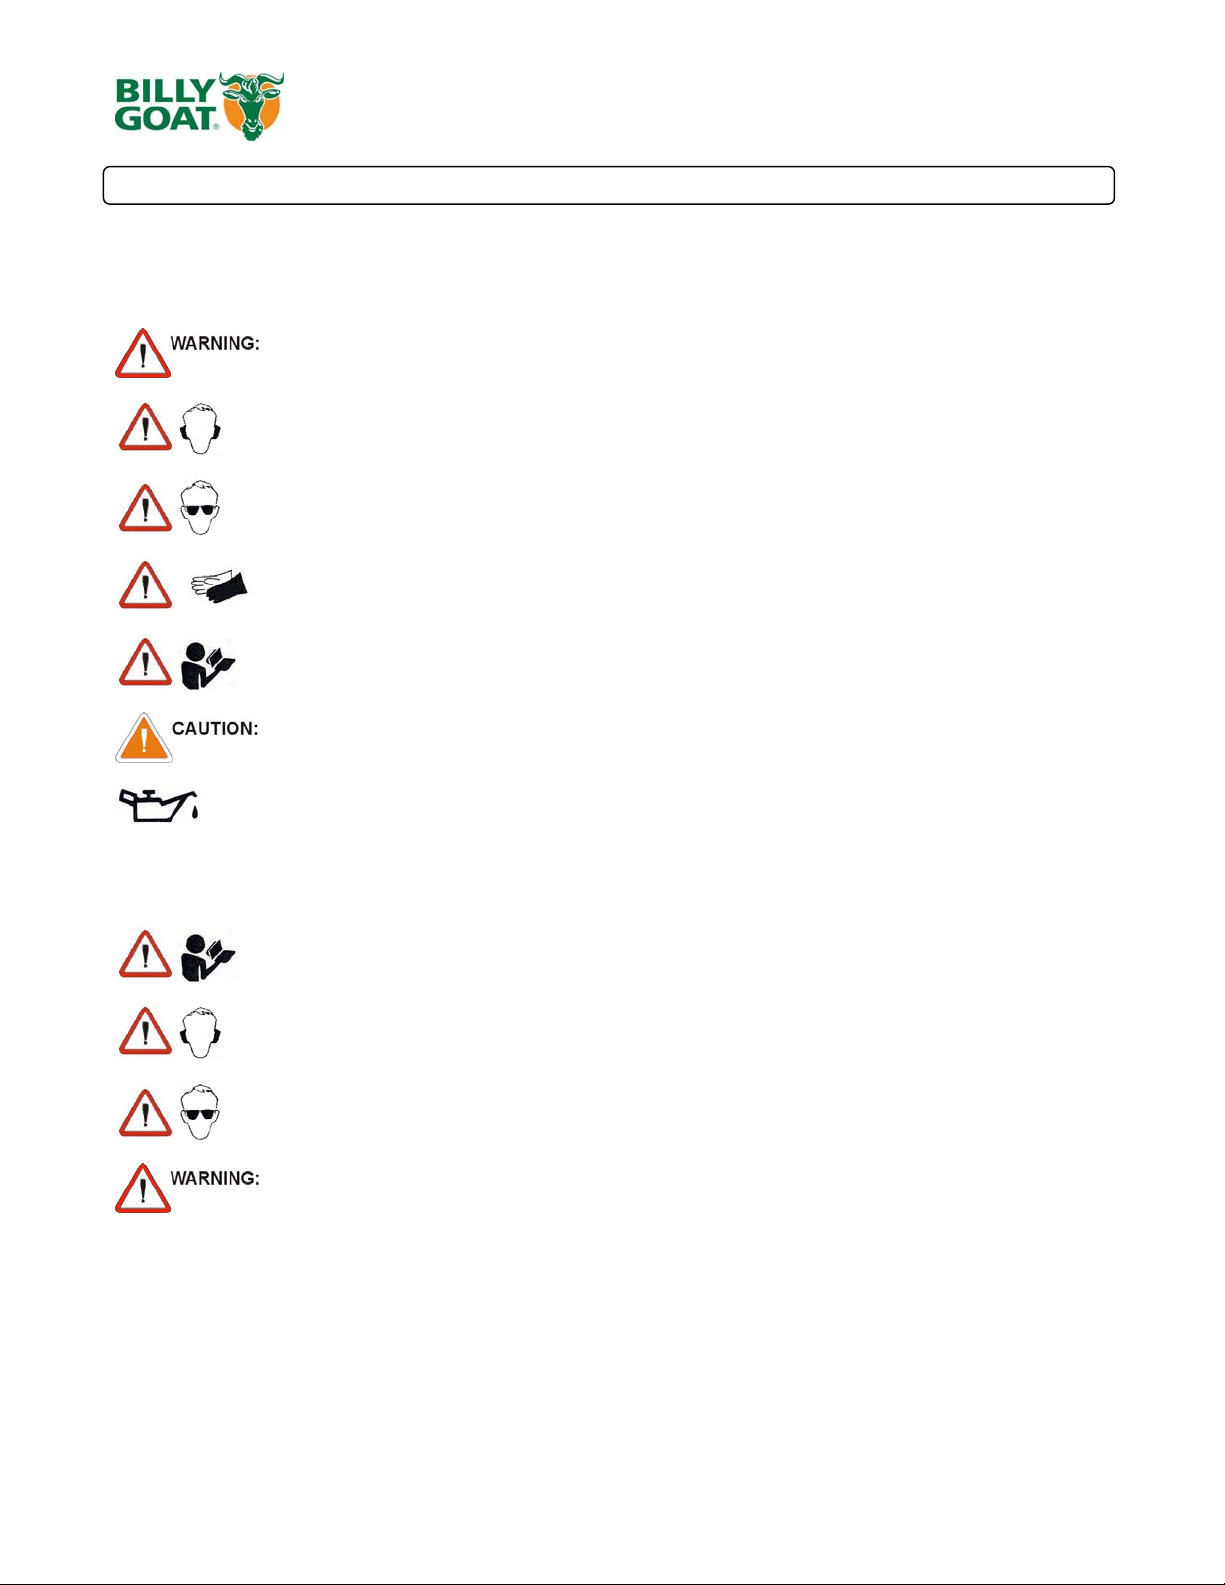
SERIAL PLATE DATA
Record the model number, serial number, date of
purchase, and where purchased.
Purchase Date:
Purchased From:
MV 650 SERIES SPECIFICATIONS
MV650
Engine Type Honda GSV190AA1A
Horsepower 6.5 (4.85 kW)
Fuel Capacity 1.6 qt (1.5 L)
Oil Capacity 0.69 qt (0.65L)
Engine Weight 28 lbs (12.7 kg)
Unit Weight 157 lbs (71.2 kg)
Shipping Weight 180 lbs (81.7 kg)
Overall Dimensions 28” Wide x 62.5” Long x 45.5” High
Maximum Operating Slope 20°
In accordance with 2000/14/EEC
standards
Sound at Operators ear 83 dB(a) at 3320 rpm
103 dB(a) at 3320 rpm
COMMON REPLACEMENT PARTS
• Bag. P/N 840189. Original equipment replacement bag.
• Skid. P/N 840041. Nozzle wear guard skid.
Form No F030409A 3 Part No 840186
Page 4
MV650H PUSH Vacuum Owner’s Manual
GENERAL SAFETY INSTRUCTIONS and SYMBOLS
The safety symbols shown below are used throughout this manual. You should become familiar with them
before assembling, operating or servicing this equipment.
This symbol indicates important information that will prevent injury to yourself or others.
This symbol indicates ear protection is recommended when operating this equip ment.
This symbol indicates eye protection is recommended when operating this equipment.
This symbol indicates gloves should be worn when servicing this equipment.
This symbol indicates that this manual and the engine manufacturer’s manual should be read
carefully before assembling, operation, or servicing this equipment.
This symbol indicates important information that will prevent damage to your BILLY GOAT ®
MV Vacuum.
This symbol indicates the engine oil level should be checked before operating this
equipment.
Read and make sure you thoroughly understand the following safety precautions before a sse mbling, operating
or servicing this equipment:
READ this manual and the engine manufacturer’s manual carefully before assembling,
operating, or servicing this equipment.
EAR PROTECTION is recommended when operating this equipment.
EYE PROTECTION is recommended when operating this equipment.
EXHAUST from this product contains chemicals known to the State of California to cause
cancer, birth defects or other reproductive harm.
DO NOT operate this equipment on any unimproved forested, brushy, or grass covered land
unless a spark arrester is installed on the muffler as required by Section 4442 of the
California Public Resources Code. The arrester must be maintained in good working order.
Other states may have similar laws. Federal laws apply on federal lands.
DO NOT run engine in an enclosed area. Exhaust gases contain carbon monoxide, an
odorless and possibly fatal poison.
Part No 840186 4 Form No F030409A
Page 5
MV650H PUSH Vacuum Owner’s Manual
DO NOT run this equipment indoors or in any poorly ventilated area. Refueling outdoors
is recommended.
DO NOT refuel this equipment while the engine is running. Allow engine to cool for at
least two minutes before refueling.
DO NOT store gasoline near an open flame.
DO NOT remove gas cap while engine is running.
DO NOT start or operate engine if strong odor of gasoline is present.
DO NOT start or operate engine if gasoline is spilled. Move equipment away from spill
until gasoline has completely evaporated.
DO NOT smoke while filling the fuel tank.
DO NOT check for spark with spark plug or spark plug wire removed. Use an approved
spark tester.
DO NOT operate engine without a muffler. Inspect muffler periodically and replace if
necessary. If equipped with muffler deflector, inspect deflector periodically and replace if
necessary.
DO NOT operate engine with grass, leaves or other combustible material near the
muffler.
DO NOT touch muffler, cylinder, or cooling fins when hot. Contact with hot surfaces may
cause severe burns.
DO NOT leave equipment unattended while in operation.
DO NOT park equipment on a steep grade or slope.
DO NOT operate equipment with bystanders in or near the work area.
DO NOT allow children to operate this equipment.
DO NOT operate equipment with guards removed.
DO NOT operate equipment near hot or burning debris or any toxic or explosive
materials.
DO NOT operate equipment on slopes greater than specified in Specifications section of
this manual.
ALWAYS remove spark plug wire when servicing equipment to prevent accidental
starting.
ALWAYS check fuel lines and fittings frequently for cracks or leaks. Replace if
necessary.
ALWAYS keep hands and feet away from moving or rotating parts.
ALWAYS store fuel in approved safety containers.
Form No F030409A 5 Part No 840186
Page 6
MV650H PUSH Vacuum Owner’s Manual
SOUND DATA
SOUND LEVEL 103 Dba at Operator Position
Sound tests were conducted in accordance with 2000/14/EC, as well as ISO 11094, and were performed on 517-2005 under the conditions listed below.
Sound power level listed is the highest value for any model covered in this manual. Please refer to
serial plate on the unit for the sound power level for your model.
General Conditions: Sunny
Temperature: 66.2
Wind Speed: 8.5 mph (13.7kph)
Wind Direction: South Southwest
Humidity: 59%
Barometric Pressure: 29.9” Hg (101.35kPa
o
F (19oC)
)
VIBRATION DATA
VIBRATION LEVEL 1.43g(14.00m/s2)
Vibration levels at the operator’s handles were measured in the vertical, lateral and longitudinal directions using
calibrated vibration test equipment. Tests were performed on 5-24-2006 under the conditions listed below.
General Conditions: Sunny
Temperature: 73.7
Wind Speed: 8.05 mph (3.6m/s)
Wind Direction: South
Humidity: 83.5%
Barometric Pressure: 29.91” Hg (101.31 kPa)
o
F (23.2oC)
INTENDED USE
Your BILLY GOAT ® MV Vacuum is designed for vacuuming leaves, grass clippings, and other types of organic
litter, as well as, debris mixed with cans, bottles and small amounts of sand; however, vacuuming cans, bottles
and sand will affect the longevity of your machine.
Like all mechanical tools, reasonable care must be used when operating the machine.
Do not operate if excessive vibration occurs. If excessive vibration occurs, shut engine off immediately and
check for damaged or worn impeller, loose impeller bolt, loose impeller key, loose engine or lodged foreign
objects. Note: See impeller removal section for bolt torque specifications. (page 18).
Part No 840186 6 Form No F030409A
Page 7
MV650H PUSH Vacuum Owner’s Manual
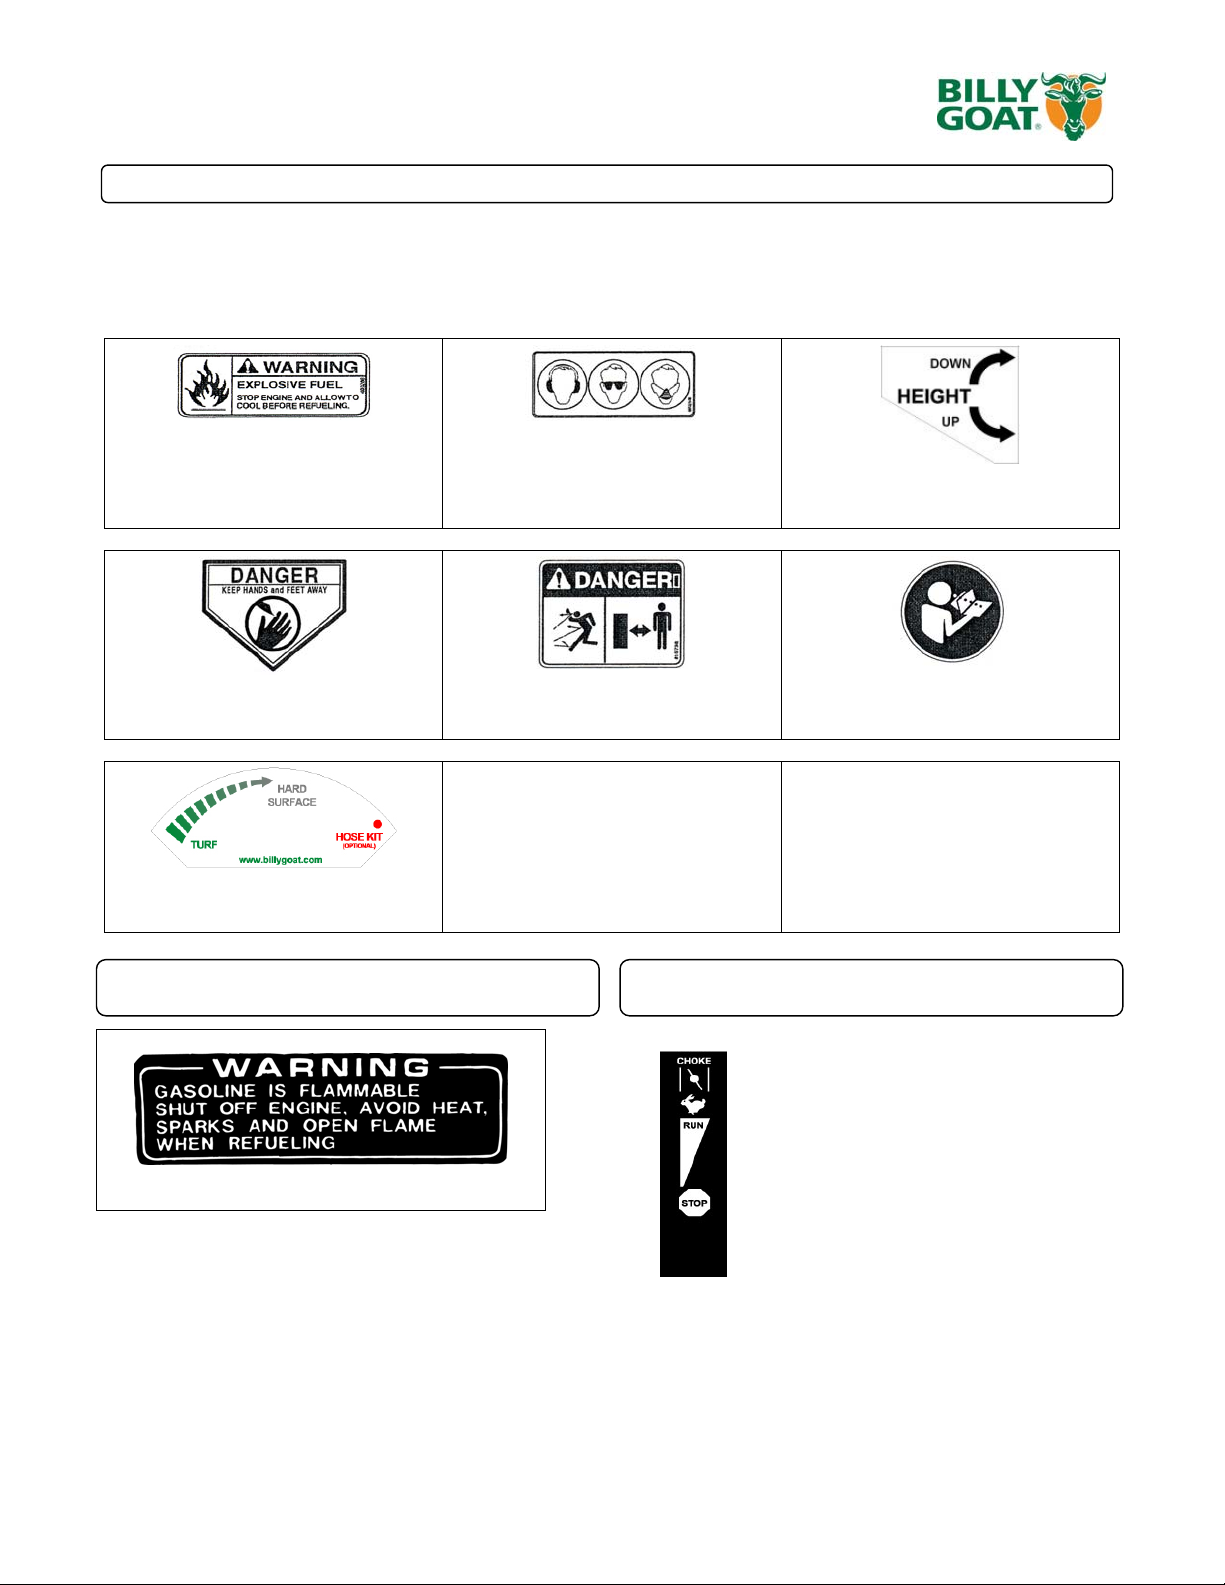
INSTRUCTION LABELS
The labels shown below were installed on your BILLY GOAT
missing, replace them before operating this equipment. Item numbers from the Illustrated Parts List and part
numbers are provided for convenience in ordering replacement labels. The correct position for each label may
be determined by referring to the Figure and Item numbers shown.
®
MV Vacuum. If any labels are damaged or
PN 400268
(See Figure 3 Item 55)
PN 890254
(See Figure 4 Item 162)
PN 400424
(See Figure 1 Item 11)
PN 840080
(See Figure 4 Item 175)
PN 810736
(See Figure 4 Item 174)
ENGINE LABELS CONTROLS
PN 840054
(See Figure 1 Item 34)
PN 890301
(See Figure 4 Item 163)
PN 840045
(See Figure 3 Item 57)
Form No F030409A 7 Part No 840186
Page 8
MV650H PUSH Vacuum Owner’s Manual
MV Vacuum Assembly Drawing
Part No 840186 8 Form No F030409A
Page 9
MV650H PUSH Vacuum Owner’s Manual
PARTS LIST
Form No F030409A 9 Part No 840186
Page 10

MV650H PUSH Vacuum Owner’s Manual
ASSEMBLY INSTRUCTIONS
Your BILLY GOAT
Handle Assembly. Mounting hardware for the Hood/Upper Handle Assembly is temporarily installed on the lower
handle and the Housing assembly.
Remove unit from carton. Make sure the following items that have been packed with unit:
Parts bag P/N 840190
Owner’s Manual, P/N 840186
Declaration of Conformity, P/N 840204
Honda Engine Manual
Warranty Card, P/N 400972
Ty-Wraps (2 ea)
Hardware Bag P/N 840190
1. Attach hood assembly to the housing then hold in
place during the step 2.
NOTE: BE SURE ALL CABLES ARE ROUTED ON
THE UNDERSIDE OF THE HOOD AND HOUSING.
®
MV Vacuum was shipped in one carton, completely assembled except for the Hood/Upper
READ all safety instructions before assembling unit.
TAKE CAUTION when removing the unit from the box the Hood/Upper Handle Assembly is
attached to the unit by cables.
DISCONNECT spark plug wire before assembling unit.
2. Install item #170 center bolt first when aligned with a nut
on the housing.
3. Attach rest of hood assembly to the housing using
corresponding hardware.
NOTE: You will have to insert the bolt/washer from the
inside by reaching through the hood.
- Two 7/16” wrenches.
Part No 840186 10 Form No F030409A
Page 11

MV650H PUSH Vacuum Owner’s Manual
4. Attach upper handle brace to lower handle using
corresponding hardware. Then repeat this step on the
other side.
- Two 1/2” wrenches.
5. Attach rod end (164) to the nozzle door rod then
secure in place by tightening jam nut.
6. Attach nozzle door rod to the nozzle door using
corresponding hardware.
NOTE: It is easier to do this with nozzle door closed.
- Two 9/16” wrenches.
7. Attach rod end to rod (as in step 5).
8. Attach nozzle door rod to the lever with
nozzle door closed and lever in hose kit
position.
NOTE: Check to see nozzle door open and
close all the way (see page 15). Tighten or
loosen the rod end (164) for any
adjustments.
Two 9/16”
wrenches.
9. Install cable ty wraps.
10. Reconnect spark plug wire.
11. Attach the bag.
Form No F030409A 11 Part No 840186
Page 12

OPERATION
MV650H PUSH Vacuum Owner’s Manual
DO NOT run engine in an enclosed area. Exhaust gases contain carbon monoxide, an
odorless and possibly fatal poison.
DO NOT start or operate engine if strong odor of gasoline is present.
DO NOT start or operate engine if gasoline is spilled. Move equipment away from spill
until gasoline has completely evaporated.
DO NOT operate engine without a muffler. Inspect muffler periodically and replace if
necessary. If equipped with muffler deflector, inspect deflector periodically and replace
if necessary.
DO NOT operate engine with grass, leaves, or other combustible material near the
muffler.
DO NOT touch muffler, cylinder or cooling fins while engine is running. Contact with hot
surfaces may cause severe burns.
DO NOT operate equipment with bystanders in or near the work area.
DO NOT operate equipment with guards removed.
DO NOT operate equipment in areas containing rock, glass, string-like material, wire,
rags, cans, metal, or other non-organic material.
DO NOT operate equipment on slopes greater than specified in Specifications section
of this manual.
DO NOT operate equipment near hot or burning debris or any toxic or explosive
materials.
DO NOT allow children to operate this equipment.
ALWAYS keep hands and feet away from moving or rotating parts.
EAR PROTECTION is recommended when operating this equipment.
EYE PROTECTION is recommended when operating this equipment.
Part No 840186 12 Form No F030409A
Page 13

MV650H PUSH Vacuum Owner’s Manual
OPERATOR CONTROLS
The operator’s position is at the rear of the machine between the handlebars. The operator should STAND in a
position to allow both handlebars to be grasped firmly, which allows sufficient leverage to steer the machine.
Operator’s controls are shown below.
2
3
4
1
Operator Control Locations
1 Nozzle Door Adjuster 4 Throttle Control
2 Bag Latch
3 Pull Starter
STARTING
CHECK engine oil level before operating machine.
1. Place equipment on a level, firm surface that is free of rocks or other debris.
2. Place throttle in CHOKE position.
Throttle
DO NOT START equipment without the debris bag in place.
Form No F030409A 13 Part No 840186
Page 14

MV650H PUSH Vacuum Owner’s Manual
3. Secure the unit with left hand at the handle then pull starter rope with right hand to start engine.
PULL ROPE
STARTER WITH
RIGHT HAND
SECURE UNIT AT
THE HANDLE
WITH LEFT HAND
DURING START
PULL STARTER CORD slowly until resistance is felt. Then pull cord rapidly to avoid
kickback.
4. Move throttle control back to RUN position and allow engine to reach correct operating speed.
VACUUM NOZZLE HEIGHT ADJUSTMENT
FOR MAXIMUM PICKUP: Adjust nozzle height as close to debris as possible, but without blocking airflow into
the nozzle. NOTE: Never bury nozzle into debris. The vacuum nozzle is raised and lowered by turning the crank
handle clockwise and counter-clockwise.
Part No 840186 14 Form No F030409A
Page 15

MV650H PUSH Vacuum Owner’s Manual
VACUUM NOZZLE DOOR ADJUSTMENT
The vacuum nozzle door adjusts for the maximum performance under various a pplications.
Nozzle fully opened. This is ideal for turf application
Nozzle half way opened. This is ideal for hard surface application
Nozzle closed for OPTIONAL hose kit. This is ideal TO USE WITH THE HOSE KIT.
Form No F030409A 15 Part No 840186
Page 16

MV650H PUSH Vacuum Owner’s Manual
VACUUMING OPERATION
This machine is designed for vacuuming leaves, grass clippings, and other types of organic litter.
Debris mixed with cans, bottles, and small amounts of sand can be vacuumed; however, it is not this
machine's primary purpose. Vacuuming cans, bottles, and sand will affect the longevity of your machine. In
dusty conditions it maybe necessary to purchase Felt Bag Kit (P/N 840022).
Do not operate if excessive vibration occurs. If excessive vibration occurs, shut engine off immediately and
check for damaged or worn impeller, loose impeller bolt, loose impeller key, loose engine or lodged foreign
objects. Note: See parts list for proper impeller bolt torque specifications. (See trouble shooting section on
page 22).
SHUT DOWN
1. Pull Throttle Control all the way back to the STOP position.
CLEARING A CLOGGED NOZZLE
DISCONNECT spark plug wire before servicing unit.
1. Shut engine off and wait for impeller to stop completely.
2. Disconnect spark plug wire.
3. Wearing durable gloves, remove clog.
WEAR durable gloves. Clog may contain sharp materials.
4. Reconnect spark plug wire.
DEBRIS BAG
Debris bags are normal replaceable wear items.
Frequently empty debris to prevent bag overloading with more weight than you
can lift.
Bag liners are available for use in various conditions where debris will be vacuumed. (see Bag Liner Options
shown on page 1).
DO NOT place bag on or near hot surface, such as engine.
Be sure engine has come to a complete stop before removing or emptying bag!!.
This vacuum is designed for picking up trash, organic material and other similar debris (see Safety
Warnings page 4-5).
Many vacuums are used where dust is mixed with trash. Your unit can intermittently vacuum in dusty areas.
However, following these rules will help maintain your machine's ability to vacuum in dusty conditions:
•Run machine at idle to quarter throttle.
•Machine or pressure-wash debris bag if normal cleaning does not fully clean bag. Bag should be
thoroughly dry before use.
Part No 840186 16 Form No F030409A
Page 17

MV650H PUSH Vacuum Owner’s Manual
Having one or more spare bags (840189) is a good way to reduce down tim e while dirty bags are being
cleaned.
Felt Bag (840194) accessory is great when used in dusty conditions.
Hint!
HANDLING and TRANSPORTING
Using two people to lift unit is recommended. Lift holding the handle and front of nozzle. Make sure equipment
is properly secured before transporting. See MV650 series specifications on page 3 for unit weight.
NEVER lift the machine while the engine is running.
STORAGE
DO NOT store engine in an enclosed or poorly ventilated area where fuel fumes may
reach an open flame or spark from a furnace, water heater, clothes dryer or similar
devices.
DO NOT drain fuel in an enclosed or poorly ventilated area.
DO NOT smoke when draining fuel.
DO NOT remove gas cap while engine is running.
DO NOT park equipment on a steep grade or slope.
ALWAYS remove spark plug wire when servicing equipment to prevent accidental
starting.
ALWAYS keep hands and feet away from moving or rotating parts.
ALWAYS store fuel in approved safety containers.
If the equipment will not be used for 30 days or more, prepare as follows:
1. Make sure engine is cool.
2. Drain gasoline from carburetor and fuel tank to prevent formation of gum dep osits.
3. Run engine until tank is empty and engine runs out of gas.
Fuel stabilizer (such as Sta-Bil
gum deposits during storage. Add stabilizer to gasoline in storage container or fuel tank. Follow
TM
) is an acceptable alternative for minimizing the formation of
stabilizer manufacturer’s instructions to determine proper mix ratio. Run engine at least 10
minutes after adding stabilizer to allow it to reach carburetor.
Form No F030409A 17 Part No 840186
Page 18

MV650H PUSH Vacuum Owner’s Manual
MAINTENANCE
PERIODIC MAINTENANCE
Periodic maintenance should be performed at the following intervals:
Maintenance Operation Every Use Daily or Every 5
Inspect for worn or damaged parts.
Check for excessive vibration
Inspect for loose parts.
Clean Debris Bag
Lubricate throttle control cable and linkage.
NOTE: Use white lithium grease or equivalent
z
z
Hours
z
z
IMPELLER REMOVAL
READ all safety instructions before servicing unit.
Every 25 Hours Every 50
Hours
z
Every 100-150
Hours
DISCONNECT spark plug wire before servicing unit.
Tools required:
- 1/2” socket, 3/8” drive and 3/8” ratchet
- drive extension, 3/8” drive
- universal joint, 3/8” drive
- pry bar or long screwdriver
- jack stands or similar device adeq uate to support weight of machine.
1. Wait for engine to cool and disconnect spark plug.
2. Drain fuel and oil from the engine.
3. Remove engine, impeller and mounting plate by removing bolts around outside of housing.
4. Leaving engine fastened to plate, remove impeller bolt and lock washer and slide impeller off crankshaft
(A puller may be required). CAUTION: Do not drop impeller.
5. If impeller does not slide off crankshaft, place two crowbars between impeller and housing on opposite
sides. Pry impeller away from engine until it loosens. Using a penetrating oil can help loosen a stuck
impeller.
6. If the impeller cannot be loosened, obtain a 3/8-24x3 ¾” longer bolt of the same diameter and thread type
as the impeller bolt. Invert engine and impeller and support engine above ground to prevent recoil
damage. Thread longer bolt by hand into the crankshaft until bolt bottoms. Using a suitable gear or
wheel puller against the bolt head and the impeller back-plate (near the blades), remove impeller from
shaft.
7. To reinstall impeller, use a new impeller bolt and lockwasher
8. Tighten impeller bolt. Torque impeller bolt to 33-38 Ft. Lbs. (45-51 N.m).
9. Reinstall engine, impeller, and mounting plate onto housing in reverse order of removal.
10. Before connecting spark plug wire, slowly pull engine starting rope to insure that impeller rotates freely.
11. Reconnect spark plug wire.
Part No 840186 18 Form No F030409A
Page 19

MV650H PUSH Vacuum Owner’s Manual
WIRING DIAGRAMS
Bag Switch Circuit Schematic Diagram
TROUBLESHOOTING
Problem Possible Cause Solution
Will not vacuum or has poor vacuum
performance.
Abnormal vibration. · Loose or out of balance impell er. · Check impeller and replace if requi red.
Engine will not start. · Throttle in off position. · Check throttle control (see page 13).
Engine is locked, will not pull over. · Impeller plugged or clogged. · Remove debris (see page 16).
· Dirty or full debris bag or filt er. · Clean debris bag and filter. Shake bag clean or
wash.
· Nozzle height set too high or too low. · Adjust nozzle height (see page 14).
· Hose kit cap mis sing. · Check for hose kit cap.
· Clogged nozzle or exhaust. · Unclog nozzle or exhaust (see page 16)
· Excessive quantity of debris . · Allow air to feed with debris.
· Loose engine. · Check engine (see page 24 ).
· Engine not in full choke posi tion. · Chec k throttle, choke position (see page 13).
· Out of gasoline or bad, old gasoline. · Check gasoline.
· Spark Plug wire disconnected. · Connect spark pl ug wire.
· Gas valve off. · Turn on gas valve.
· Dirty air cleaner. · Clean or replace air cleaner. Contact a quali fied
service person.
· Safety Interlock di sengaged on bag plate. · Latch the bag properly or check thr bag rod to s ee
if it's bent.
· Engine problem. · Contact an engine servicing dealer for engine
problems.
Form No F030409A 19 Part No 840186
Page 20

MV650H PUSH Vacuum Owner’s Manual
ENGINE MAINTENANCE AND REPAIR
Refer to the engine manufacturer’s manual for maintenance and service information. Warranty coverage o n the
engine is the responsibility of the engine manufacturer. If your engine requires warranty repair contact your local
servicing engine dealer. Have your engine model number and serial number ready when you contact the dealer.
If you cannot locate a servicing dealer in your area, you may contact the manufacturer’s national service
organization at the following numbers:
American Honda (800) 426-7701
WARRANTY CLAIM PROCEDURE
Should a BILLY GOAT
warranty claim as follows:
• The machine must be taken to the dealer from whom it was purchased or to an authorized Servicing
BILLY GOAT Dealer.
®
machine fail due to a defect in material and/or workmanship, the owner should make a
• The owner must present the remaining half of the Warranty Registration Card, or, if this is not available,
the invoice or receipt.
• The Warranty Claim will be completed by the authorized BILLY GOAT Dealer and submitted to their
respective BILLY GOAT Distributor for their territory Attention: Service Manager. Any parts replaced
under warranty must be tagged and retained for 90 days. The model number and serial number of the
unit must be stated in the Warranty Claim.
• The distributor service manager will sign off on the claim and submit it to BILLY GOAT for consideration.
• The Technical Service Department at BILLY GOAT will study the claim and may request parts to be
returned for examination. BILLY GOAT will notify their conclusions to the distributor service manager
from whom the claim was received.
• The decision by the Technical Service Department at BILLY GOAT to approve or reject a Warranty
Claim is final and binding.
Part No 840186 20 Form No F030409A
Page 21

MV650H PUSH Vacuum Owner’s Manual
MAINTENANCE RECORD
Date Service Performed
Form No F030409A 21 Part No 840186
Page 22

MV650H PUSH Vacuum Owner’s Manual
ILLUSTRATED PARTS LIST
Nozzle Assembly
Figure 1
Part No 840186 22 Form No F030409A
Page 23

MV650H PUSH Vacuum Owner’s Manual
Nozzle Assembly Parts List
PART
ITEM NO.
1 350127 YOKE 1/2 - 20 1
2 350128 PIN YOKE 1/2" 1
3 8024060 BOLT CARRIAGE 3/8-16X1 1/2" ZP 2
4 8172009 WASHER 3/8" SAE ZP 2
5 8161042 NUT LOCK 3/8-16 LT WT THIN ZP 2
6 8041038 SCREWCAP 5/16 -18 x 3 1/2 1
7 8160002 NYLON INSERT LOCKNUT 5/16-18 UNC 3
8 8172020 WASHER FLAT FENDER 5/16 1
9 8161044 NYLON INSERT LOCKNUT 1/2-13 UNC THIN 2
10 8171002 WASHER 1/4" FC ZP 3
11 400424 LABEL WARNING OPEI 1
12 8024050 BOLTCARRIAGE 5\16-18X3 1\2 2
13 520156 ROLL PIN 1/4 X 1 LONG 2
14 8172011 WASHER 1/2" SAE ZP 2
15 840118 NOZZLE MV VAC ASSEMBLY 1
16 840019 CAP 5 IN HOSE VAC 1
17 840024 HANDLE LOWER MV VAC 1
18 840101 WHEEL 14" ASSEMBLY WITH BEARING AND TIRE 2
19 840104 AXLE FRONT WA MV VAC 1
20 840155 HGT ADJ WA W/LABEL MV VAC 1
21 8041004 SCREWCAP 1/4 - 20 x 0.75 HWH 1
22 840034 LINK HGT ADJ MV VAC 1
23 840041 BRACKET NOZZLE WEAR GUARD MV VAC 2
24 840029 ROD CONNECT HGT ADJ 1
25 840073 BUSHING 0.5" ID 0.625 OD X X 0.250 1
26 840119 ROD HANDLE CRANK ASSEMBLY 1
27 840057 HANDLE CRANK 0.5 ID X 3.72 LONG 1
28 840078 BUSHING 3/8" ID 1/2" OD X 3/8" LONG 2
29 840158 WASHER LOCK 1/4" TWISTED TOOTH 1
30 840207 NUT PAL 0.5" ID X 0.75 OD 2
31 840135 NOZZLE COVER MV VAC 1
32 840055 LABEL PRODUCT DECAL MV 1
33 840035 SCREW PLASTIC 8
34 840054 LABEL HGT ADJ MV VAC 1
35 8122082 SCREW SELF-TAP 5/16 NC X 3/4 HEX 2
36 840088 BRACKET NOZZLE COVER REINFORMENT MV 1
37 8024021 BOLT CARRIAGE 1/4-20X0.75 3
38 900455 NUT FLANGE 1/4-20 3
208 840017 MV WHEEL BEARING 2
NUMBER DESCRIPTION
MV650H
QTY.
Form No F030409A 23 Part No 840186
Page 24

MV650H PUSH Vacuum Owner’s Manual
Engine Assembly
Figure 3
Part No 840186 24 Form No F030409A
Page 25

MV650H PUSH Vacuum Owner’s Manual
Engine Assembly Parts List
ITEM
NO.
50 840069 ENGINE HONDA 6.5 VERTICAL GSV190 1
51 840137 IMPELLER ASSEMBLY PUSH MV VAC 1
52 840111 TOP PLATE ASSEMBLY PUSH M V V AC 1
53 840205 HOUSING PLASTIC VAC 1
54 400502 WASHER LOCK 3/8 TWISTED TOOTH 1
55 400268 LABEL HOT ENGINE 1
56 9201087 SQ KEY 2.125 X .187 1
57 840220 BRACKET COVER TOP PLATE VAC 1
58 890359 SCREW 1/4"-20 X 5/8" HWH 2
59 8172007 WASHER 1/4" SAE ZP 6
60 8172019 WASHER FENDER 1/4 ZP 6
61 8041004 SCREWCAP 1/4 - 20 x 0.75 HWH 6
62 790167 SCREWCAP 3/8-24X2 3/4" W/PATCH LOCK 1
63 900564 SCREWCAP 3/8"-16X2 1/2" TAPTITE 3
64 8177010 WASHER SPLIT LOCK 1/4" 6
65
66
67 840083 SPACER 1.50OD X .875ID X .5 THK 1
80 840215
81 840213
PART
NUMBER DESCRIPTION
TERM IN A L 1 8 -14 BLUE T-TAP
SCRE WCAP 1/4-20 X 5/8 GR. 5
MV650H
QTY.
1
6
Form No F030409A 25 Part No 840186
Page 26

MV650H PUSH Vacuum Owner’s Manual
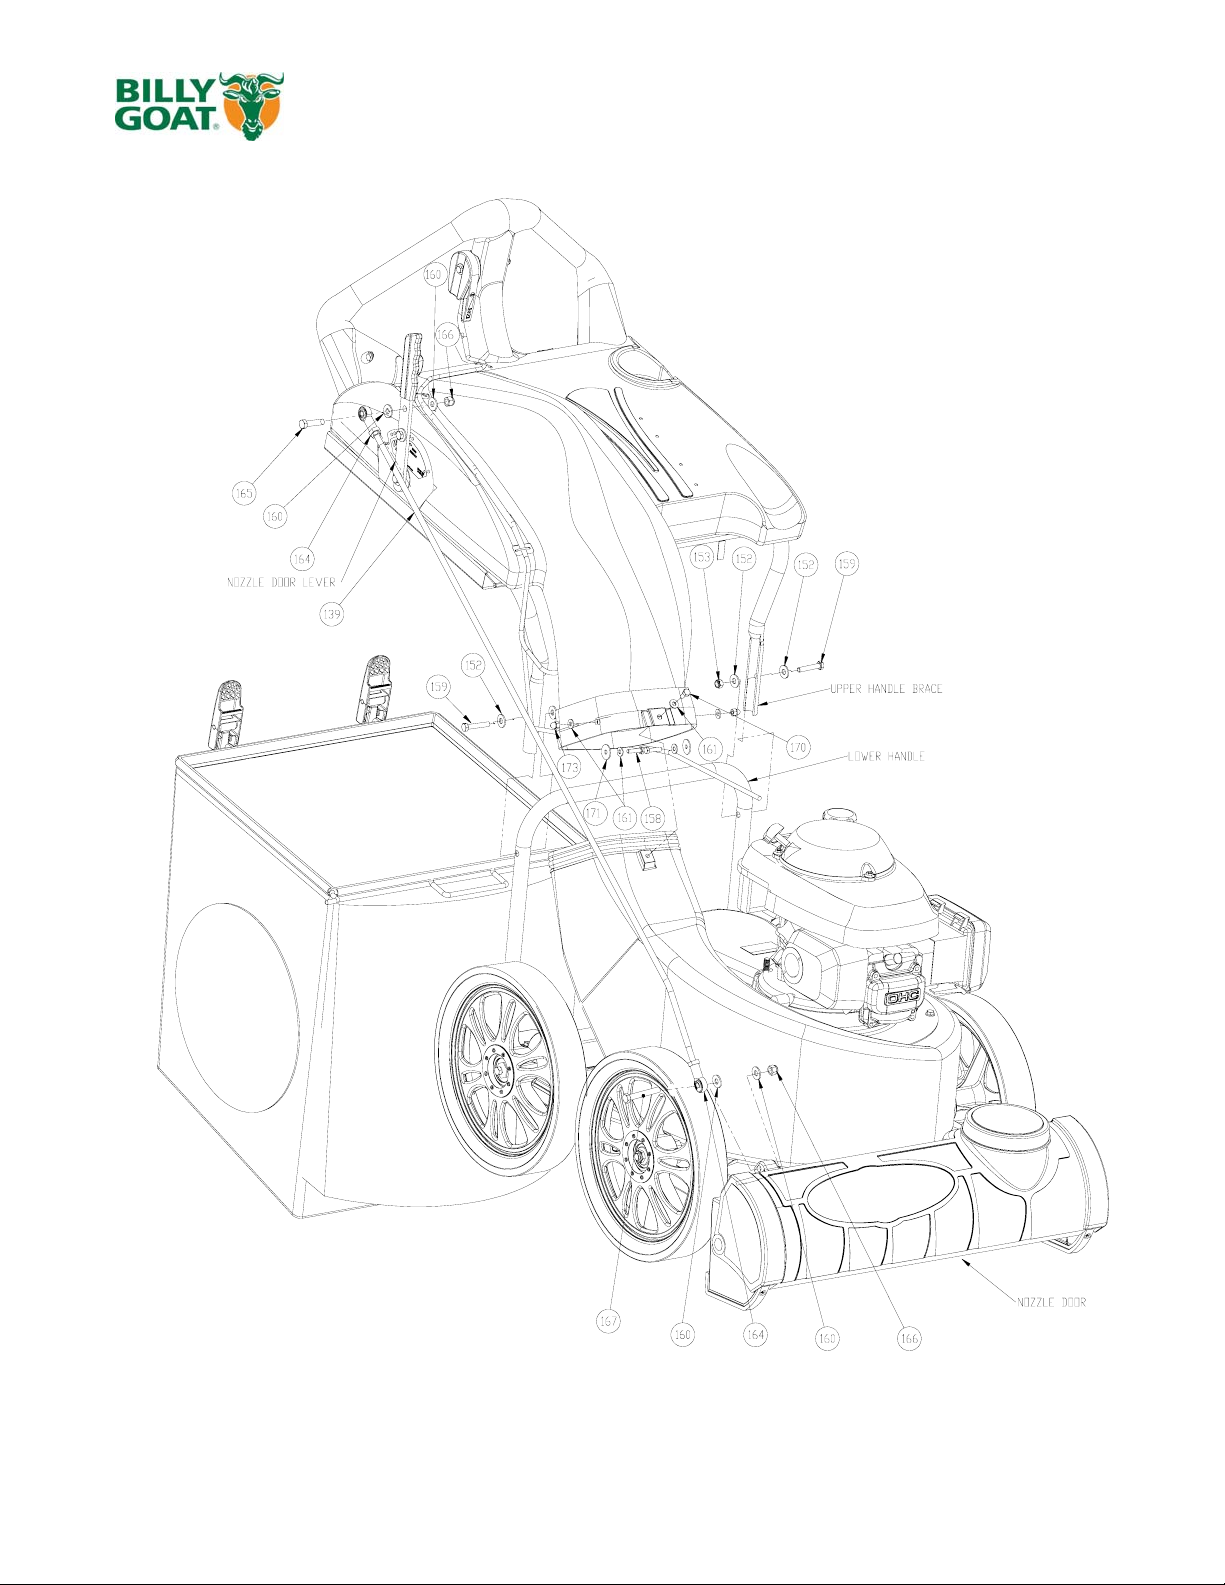
Hood Assembly
Figure 4
Part No 840186 26 Form No F030409A
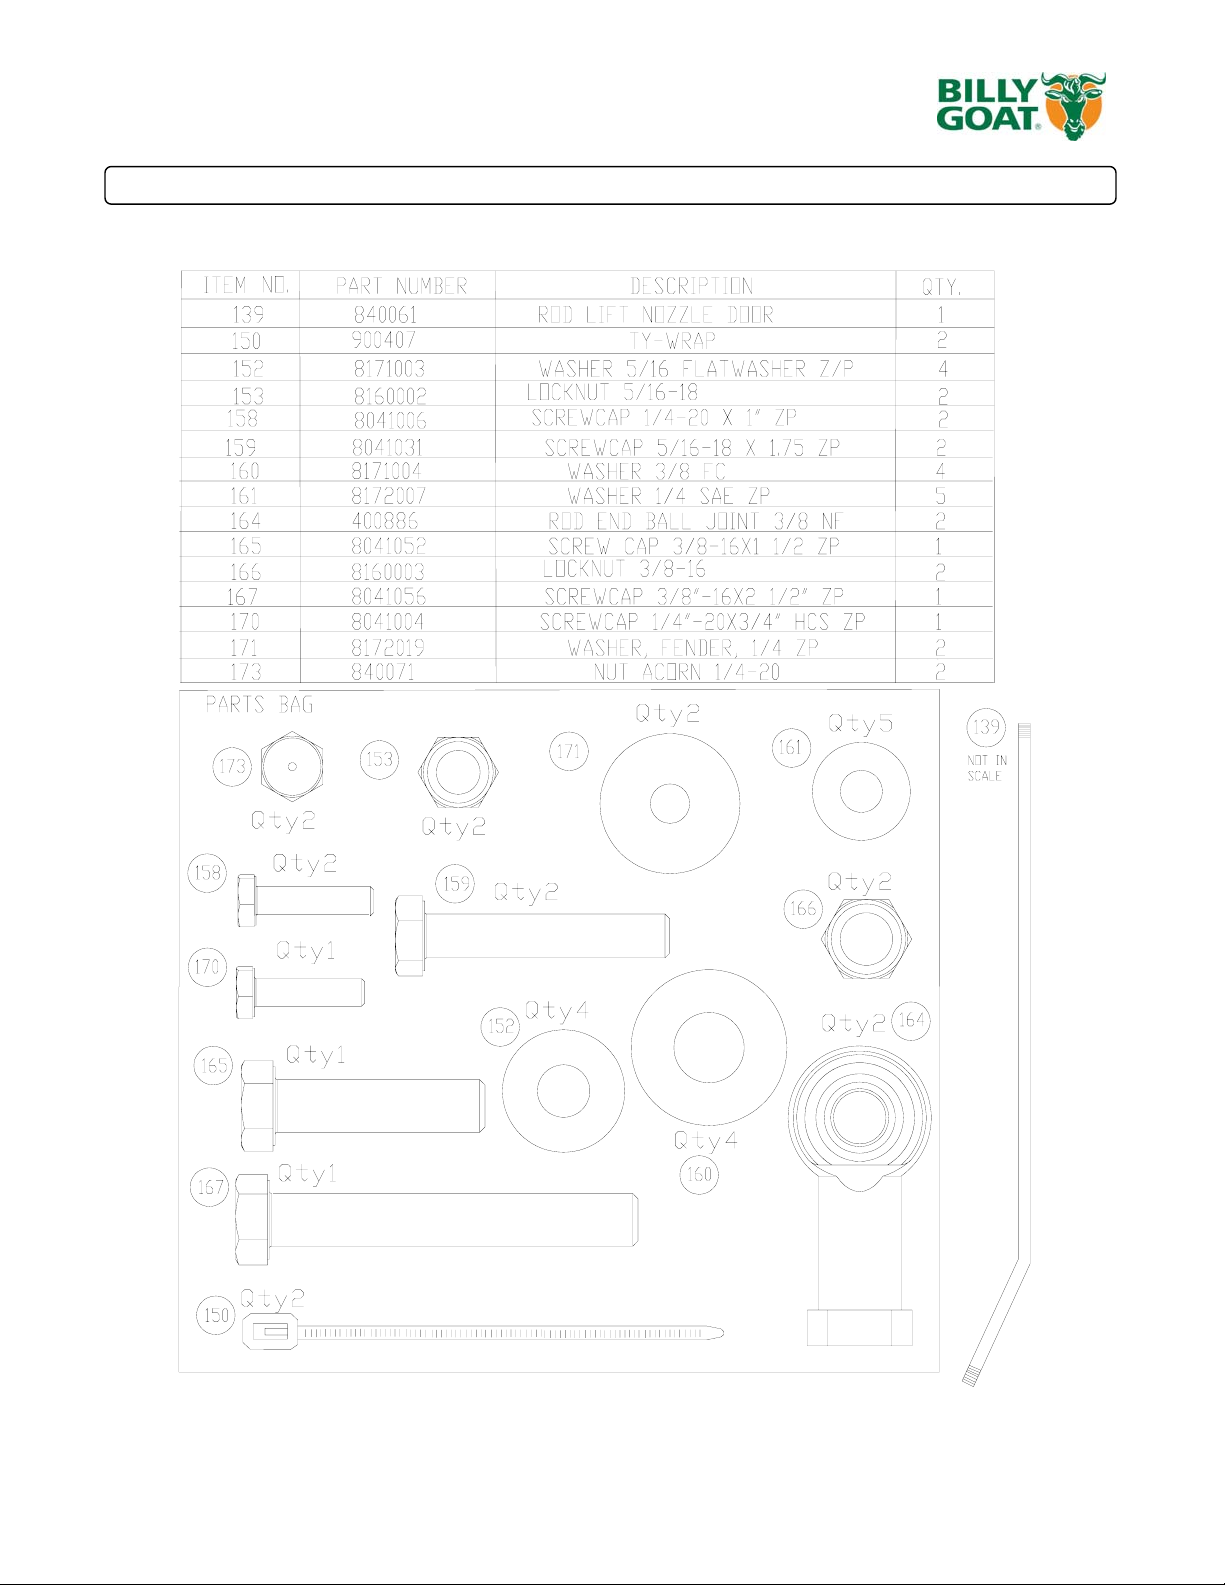
Page 27

MV650H PUSH Vacuum Owner’s Manual
Hood Assembly
IT E M
NO.
57 840045 CONT R O L T HR O T T LE MV V AC 1
130 840141 HOO D ASSY W/ LABEL MV VAC 1
131 840153 BRACKET BAG CHAN NEL RH W/SEAL MV VAC 1
132 840196 SEAL BAG MV VAC 1
133 840037 TUBE HAND LE BRACE R H M V VAC 1
134 840038 TUBE HAND LE BRACE LH MV VAC 1
135 840154 BRACKET BAG CHAN NEL RH W/SEAL MV VAC 1
136 840152 BRACKET NO ZZLE DO O R AD J W/LABEL MV VAC 1
137 840195 BAG ASSEMBLY M V VAC 1
138 840138 BAR LIFT NOZZLE DO O R W/ GRIP MV VAC 1
139 840061 RO D LIFT NO ZZ LE D OO R SP V AC 1
140 840062 PLATE BAG LA TC H MV VA C 2
141 840191 G R IP LEVE R LIFT 1
142 840058 SW ITCH INTERLOCK VAC 1
143 840077 HARNESS WIRE ASSY MV VAC 1
144 8024025 BOLT C ARR IAGE 1/4-20 X 1.75 7
145 8171002 W ASH ER 1/4" FC ZP 14
146 8160001 NYLON INSE RT LOC KN UT 1/4-20 UNC 13
147 520018 S CR E W H E X H EA D #1 0-24 X 1" 4
148 8172005 W AS HE R #10 S AE Z P 8
149 8164005 NYLON INSERT LOCKNUT 10-24 UNC 4
150 900407 TY WRAP 6
151 610347 PIN SCRE W 1/4-28 1
152 8171003 W AS HER 5/16 FLATWASHER Z/P 7
153 8160002 NYLON INSE RT LOC KN UT 5/16-18 UNC 3
154 610429 SPRING LEVER GZ 1
155 610348 FIBRE WASH ER 1
156 8041032 SCREWCAP 5/16"-18 X 2 ZP 1
157
158 8041006 SCREWCAP 1/4-20X1" ZP 2
159 8041031 SC RE WCAP 5/16-18 X 1.75 ZP 2
160 8171004 W AS HE R 3/8" FC 4
161 8172007 WASHER 1/4" SAE ZP 6
162 890254 LABEL EAR EYE BREATHING 1
163 890301 LABEL READ 1
164 400886 RO D E ND BA LL JO INT 3/8 NF 2
165 8041052 SC RE W CAP 3/8-16X1 1/2 ZP 1
166 8160003 NYLON INSE RT LOC KN UT 3/8-16 UNC 2
167 8041056 SCREWCAP 3/8"-16X2 1/2" ZP 1
168 840197 SEAL BAG FRON T HO OD 20.5 LONG 1
169 8149003 NU T RE G 3/8-24 NF 2
170 8041004 SCREWCAP 1/4"-20X3/4" HCS Z P 1
171 8172019 WASHER FENDER 1/4 ZP 7
172 8041018 SCREWCAP 1/4"-20X4" HCS ZP 1
173 840071 N U T A CO R N 1/4-20 2
174 810736 LABEL DANGER FLYING DEBRIS 1
175 840080 LABEL NOZZLE DOO R MV VAC 1
178 8024021 BOLT C ARR IAGE 1/4-20 X 3/4" 5
180 840214 BRACKET HO O D FRO NT ST RAIGHTENER 1
188 840113 P LU G SN AP R IVET 0.166 DIA 2
189 840114 P LU G SN AP R IVET 0.232 DIA
190 840040 RO D B AG WA MV VAC 1
191 840139 LATCH RUBBER ASSEMBLY MV VAC 2
192 360203 PAL NU T 0.312 2
193 840189 BAG DEBRIS MV VAC 1
PART
NUMBER
DESCRIPTION
M V650H
QTY.
Form No F030409A 27 Part No 840186
Page 28

MV650H PUSH Vacuum Owner’s Manual
Rear Axle Assembly Parts List
Rear Axle Assembly
Figure 2
ITEM
NO.
200 8172011 WASHER FLAT 1/2" SAE 2
201 8024046 BOLT CARRIAGE 5/16-18X2 1/2 4
202 8171002 WASHER 1/4" FC ZP 4
203 8160002 NYLON INSERT LOCKNUT 5/16-18 UNC 4
204 8161044 NYLON INSERT LOCKNUT 1/2-13 UNC THIN 2
205 840091 SHAFT REAR AXLE PUSH VAC 1
206 840090 BRACKET REAR AXLE MOUNT PUSH MV VAC 2
207 840101 WHEEL 14" ASSEMBLY WITH BEARING AND TIRE 2
208 840017 MV WHEEL BEARING 2
PART
NUMBER DESCRIPTION
MV650H
QTY.
Part No 840186 28 Form No F030409A
 Loading...