

Page 1

1
AET60 Owner’s Manual
TINE REPLACEMENT
Replacement tip for aerating tines.
P/N 381588
AERATOR 60” Owner's Manual
AET60
Replacement Parts
Part No 100384 Form No F080114D
Page 2

2
AET60 Owner’s Manual
CONTENTS
SPECIFICATIONS_____________________ ___ 3
SAFETY AND WARNINGS_____________ ___ 4-5
INSTRUCTION LABELS, PACKING CHECKLIST, & ASSEMBLY _____6
OPERATION _7
MAINTENANCE AND TROUBLE SHOOTING _ 8
ILLUSTRATED PARTS & PARTS LIST 9-10
Part No 100384 Form No F080114D
Page 3

3
AET60 Owner’s Manual
Total Unit
Weight:
440# (200 Kg)
Width
37”-48”-60”
Max.
operating
slope
15o
Specifications
AET60
Part No 100384 Form No F080114D
Page 4

4
AET60 Owner’s Manual
This symbol indicates important information that will prevent injury to yourself or others.
This symbol indicates ear protection is recommended when operating this equipment.
This symbol indicates eye protection is recommended when operating this equipment.
This symbol indicates gloves should be worn when servicing this equipment.
This symbol indicates that this manual and the engine manufacturer’s manual should be read carefully
before assembling, operation, or servicing this equipment.
This symbol indicates important information that will prevent damage to your BILLY GOAT ®
Machine.
READ this manual and the engine manufacturer’s manual carefully before assembling, operating, or
servicing this equipment.
EAR PROTECTION is recommended when operating this equipment.
EYE PROTECTION is recommended when operating this equipment.
GENERAL SAFETY SYMBOLS
The safety symbols shown below are used throughout this manual. You should become familiar with them before assembling,
operating, or servicing this equipment.
Read and make sure you thoroughly understand the following safety precautions before assembling, operating or servicing this
equipment:
Part No 100384 Form No F080114D
Page 5

5
AET60 Owner’s Manual
DO NOT leave equipment unattended while in operation.
DO NOT park equipment on a steep grade or slope.
DO NOT operate equipment with bystanders in or near the work area.
DO NOT allow children to operate this equipment.
DO NOT operate equipment with guards removed.
DO NOT place hands or feet underneath unit, or near any moving parts
DO NOT operate under the influence of drugs or alcohol.
DO NOT use near drop offs, ditches, or embankments.
ALWAYS stop and raise the tines when crossing gravel drive, walks, or roads.
ALWAYS operate only in daylight or good artificial light
ALWAYS wear substantial footwear and gloves when performing maintenance on unit.
ALWAYS keep hands and feet away from moving or rotating parts.
Warning Important
DO identify and mark all fixed objects to be avoided during work, such as sprinkler heads, water valves, buried
cables, or clothes line anchors, etc.
DO remove all rocks, wire, string, plastic, etc. that can present a hazard during work prior to starting.
SAFETY INSTRUCTION
INTENDED USE
AERATOR
This machine is designed for aerating established lawns and large grass covered areas. The machine should not be used for any
other purpose than that stated above.
DO NOT OPERATE IF EXCESSIVE VIBRATION OCCURS! If excessive vibration occurs, stop use
of the unit immediately and check for damaged or worn reel, loose hardware, or lodged debris.
HANDLING & TRANSPORTING
Always use four or more people to lift this machine. Lift holding on either side of the machine, using the handles and the frame.
Secure in place during transportation. See specifications for unit weight.
For safety use gloves when lifting.
Part No 100384 Form No F080114D
Page 6
6
AET60 Owner’s Manual
READ all safety instructions before assembling unit.
TAKE CAUTION when removing the unit from the box.
1. The machine is fully assembled; you will need to attach to a vehicle in the desired configuration (see operation
section for details).
Boxing Parts
Checklist
Owner’s Manual
100384
PARTS BAG &
LITERATURE ASSY
Warranty card P/N- 400972, Owner’s Manual P/N-100384
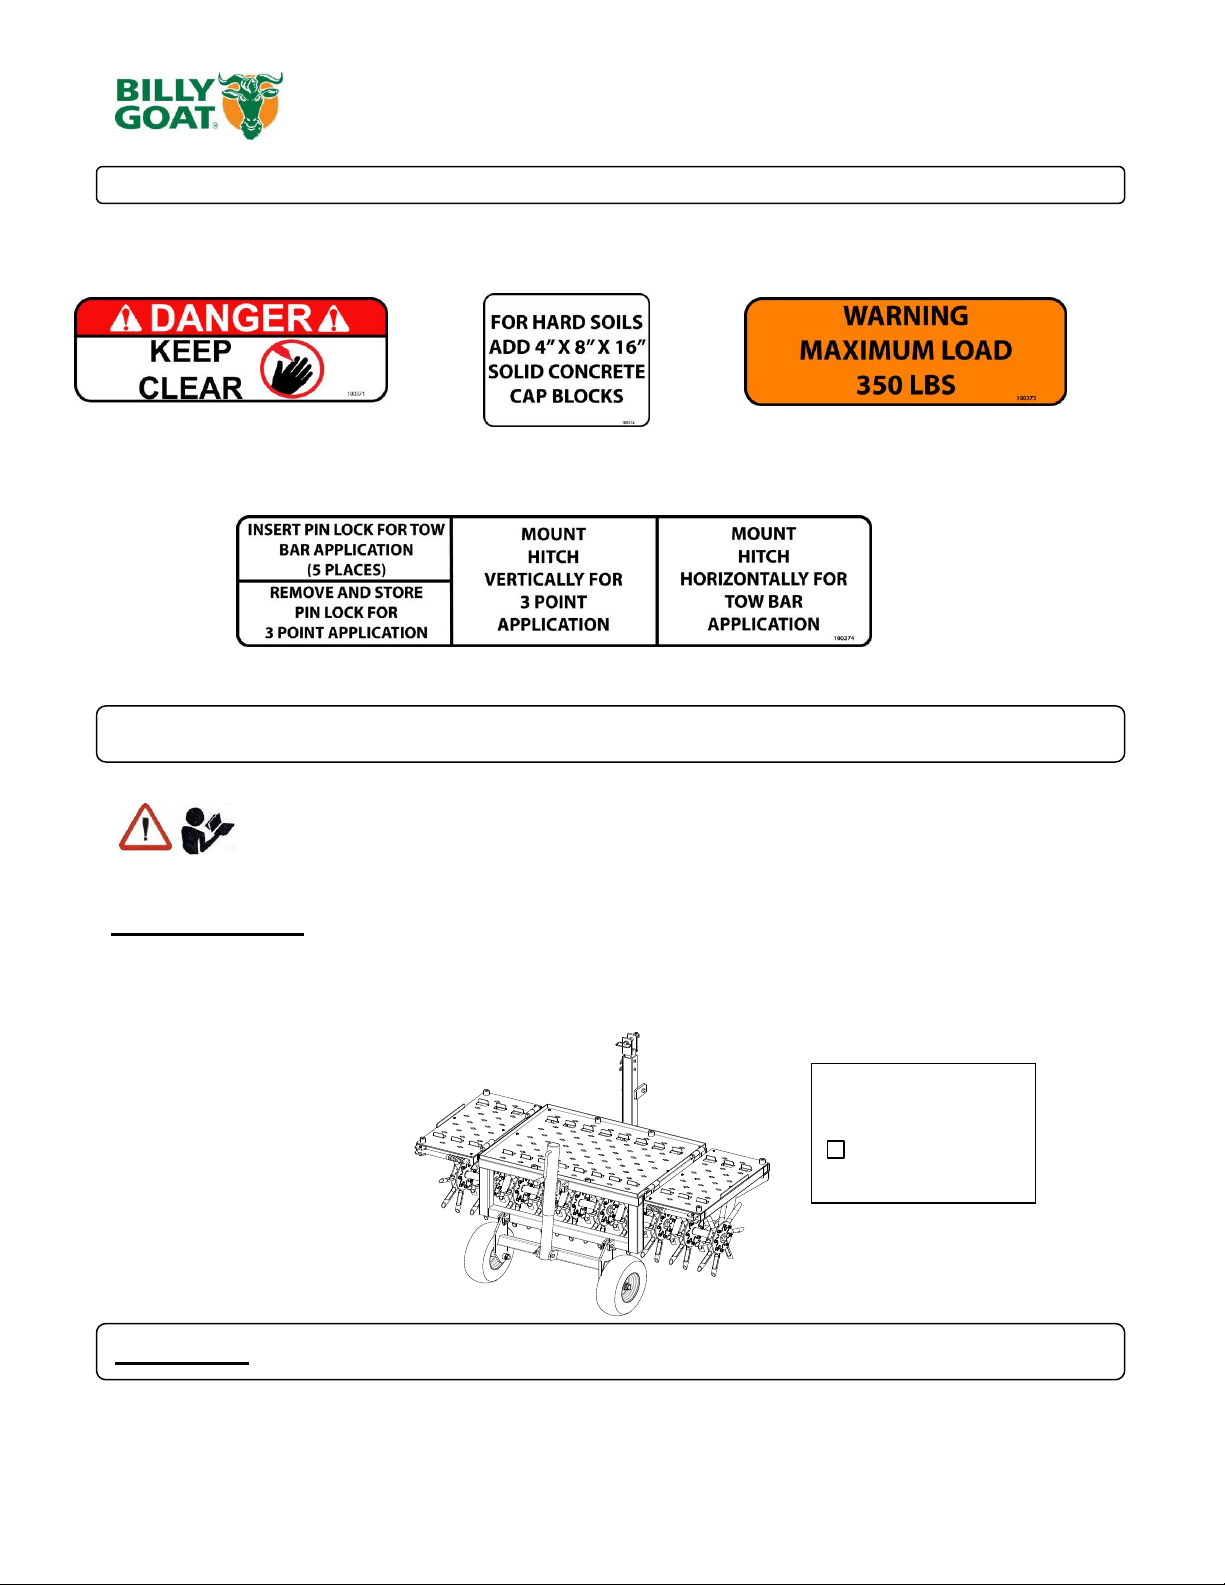
INSTRUCTION LABELS
The labels shown below were installed on your BILLY GOAT ® Aerator. If any labels are damaged or missing, replace them before operating this
equipment. Part numbers from the Illustrated Parts List are provided for convenience in ordering replacement labels. The correct position for
each label may be determined by referring to the part numbers shown.
LABEL DANGER CLEAR LABEL HARD SOIL LABEL MAX LOAD
P/N 100311 P/N 100372 P/N 100356
LABEL HITCH MOUNT
P/N 100374
PACKING CHECKLIST
Your Billy Goat is shipped from the factory in one carton, completely assembled.
ASSEMBLY
Part No 100384 Form No F080114D
Page 7

7
AET60 Owner’s Manual
TINES RAISING/LOWERING
The tines are raised or lowered into the ground by operating the crank on the cylinder to raise or lower the tines to the desired
depth. Tine penetration is very dependent on surface preparation. READ the entire operation section before aerating.
MOW: Mow the lawn to its normal cut height.
WATER: For the best performance and maximum tine penetration the lawn should be thoroughly watered the day before
aeration.
INSPECT lawn before beginning work. Remove all rocks, wire, string, or other objects that can present a hazard during work
prior to starting.
IDENTIFY and mark all fixed objects to be avoided during work, such as sprinkler heads, water valves, buried cables, or clothes
line anchors, etc.
OPERATING INSTRUCTIONS
The AET60 is a combination of a tow-behind aerator and a 3-point aerator with two wings for adjustable aeration widths. When
used behind a tractor in the 3-point application, there are pins on each tine assembly that can be removed to allow tines to
swivel, enabling the tractor to turn while still aerating with the tines in the ground. When being towed, the tine assemblies must
be locked in place for proper tracking.
AERATING OPERATION
WHEN USED AS A TOW-BEHIND
When using this machine as a towable aerator, the tow link should be in the down position and attached to the frame of the
aerator using the two clevis pins (item 19). The tow behind is telescoping so that it can be extended to accommodate various
vehicles. Make sure all five lock pins (item 21) are in place on the axle assembly to prevent the assembly from swiveling. When
operating, the wings can either be up or down depending on the width of aeration desired. In normal conditions, there will be
adequate weight for proper penetration when the wings are up; when the wings are down, additional weight may be required.
WHEN USED IN A 3 POINT APPLICATION
When used with a tractor and a 3-point hook up, the inner and outer tow link should slide together and be in the upright position
holding it to the frame with the two clevis pins (item 19). The two table on the outer tow link are for the center link on the 3-point.
Remove the five lock pins (item 21) from the tine axle to allow the assembly to swivel.
SET THE TINE DEPTH: With the aerator in the work area, lower the tines into the ground by rotating the crank at the rear.
TRANSPORT: Be sure to raise tines out of the ground before transporting away from the work area.
AERATING TIPS
SLOPES: Do not operate the aerator on steep slopes (exceeding 150). Use extreme caution when operating on any sloped
surface. For lesser sloped areas operate the unit, traversing up and down at a 45 degree angle to the slope rather than straight
across.
PARKING
NEVER PARK THIS UNIT ON A SLOPE OF ANY KIND. Always keep tines in the up position when parking the unit.
OPERATION
Part No 100384 Form No F080114D
Page 8

8
AET60 Owner’s Manual
Maintenance Operation
Every Use (daily)
Every 10 hrs
Every 50 Hrs
Inspect for loose, worn or damaged parts.
Thoroughly clean all debris from unit and tines
Grease wheel bearings
Problem Possible Cause Solution
Abnormal vibration. Damaged or missing tines. Loose bolts.
Stop work immediately. Replace any
damaged or missing tines. Tighten all
loose bolts and nuts.
INDIVIDUAL TINE REPLACEMENT
1. Remove the bolt, washer and nut (items 46, 47, and 48) holding the bracket (item 10) that retains the tine (item 33)
3. Replace the tine and then secure it in place with the bracket and hardware previously removed.
NOTE: Tines are a normal wear item and should be inspected regularly for signs of wear or damage.
MAINTENANCE
PERIODIC MAINTENANCE
Periodic maintenance should be performed at the following intervals:
ENGINE MUST BE LEVEL WHEN CHECKING OR FILLING OIL
Troubleshooting
Part No 100384 Form No F080114D
Page 9

9
AET60 Owner’s Manual
PARTS DRAWING AET60
Part No 100384 Form No F080114D
Page 10
10
AET60 Owner’s Manual
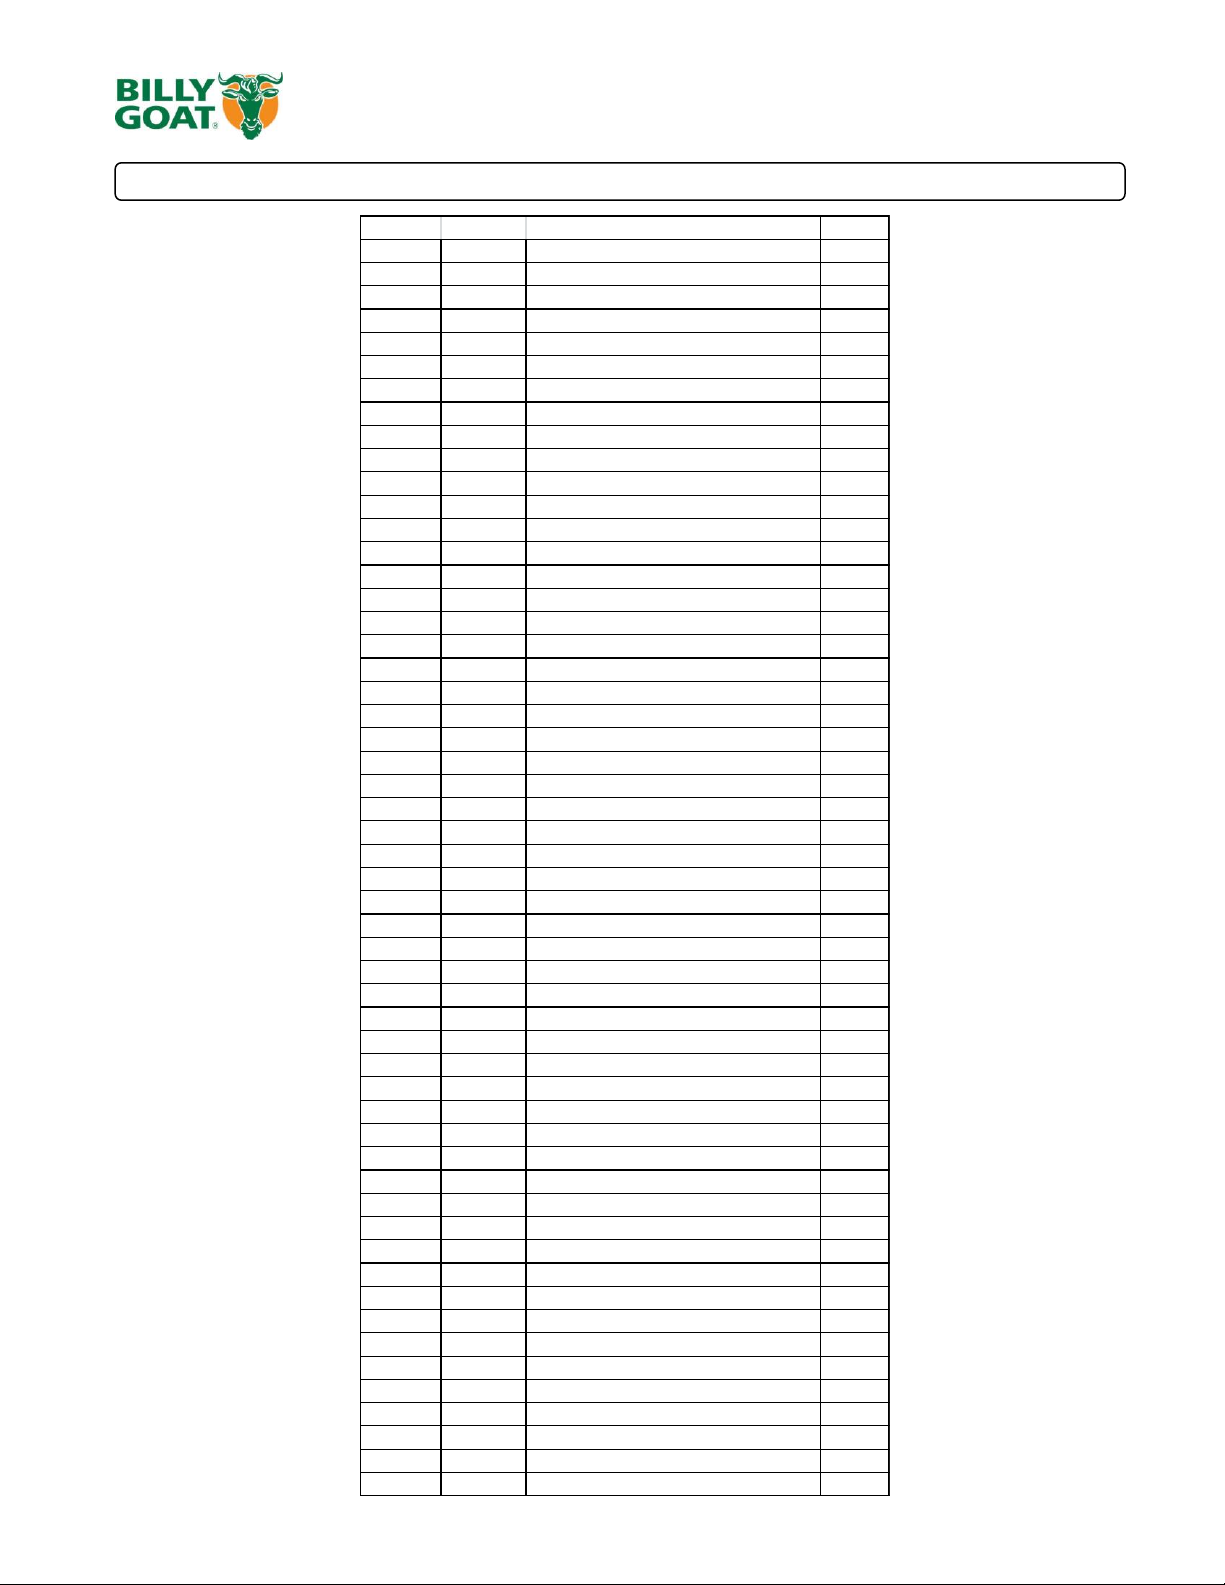
PARTS LIST AET60
AET60
ITEM # PART # DESCRIPTION QTY
1 381556 BASE FRAME WELDMENT 1
2 381157 LEFT WING FRAME WELDMENT 1
3 381158 RIGHT WING FRAME WELDMENT 5
4 381559 TINE AXLE WELDMENT 1
5 381560 WHEEL ASSEMBLY 1
6 381561 JACK ASSEMBLY 1
7 381562 OUTER TOW LINK 1
8 381563 INNER TOW LINK 1
9 381564 TINE HUB PLATE 20
10 381565 TINE HUB C-CLIP 80
11 381566 ARM SWIVEL STOP 5
12 381567 WING HANDLE 2
13 381568 BASE LOAD PAN 1
14 381569 WING LOAD PAN 2
15 381570 TINE SHOULDER BUSHING 20
16 8172017 WASHER 1/2" FLAT 10
17 381572 COTTER PIN 1/8" X 1.5" 10
18 381573 TINE ARM SHOULDER BUSHING 10
19 381574 CLEVIS PIN 7/16" X 3.5" 2
20 381575 RUBBER HANDLE GRIP 2
21 381576 LOCK PIN 3/8" X 2.5" 5
22 381577 CLEVIS PIN 3/4" X 3.5" 1
23 381578 CLEVIS PIN 7/8" X 3" 2
24 381579 CLEVIS PIN 5/8" X 1.75" 2
25 8041175 SCREWCAP 3/4"-10 X 5 1/2" HCS ZP 2
26 381581 NUT JAM 3/4"-10 2
27 381582 CLEVIS PIN 5/8" X 5" 1
28 381583 CLEVIS PIN 5/8" X 3.5" 1
29 381584 COTTER HAIR PIN 1/8" FOR 3/4 TO 7/8" 3
30 381585 HITCH PIN 5/8" X 4" W/LYNCH PIN 3
31 381586 COTTER HAIR PIN 1/8" FOR 7/16 TO 5/8 8
32 381587 CLEVIS PIN 7/16" X 2.5" 2
33 381588 TINE 3/4" CLOSED SPOON 14 GA. 80
34 381589 CLEVIS PIN 5/8" X 4" 4
35 381590 RUBBER BUMPER 1.5" X .75" THK 4
36 381591 RUBBER BUMPER 1.0" X 1.0" THK 8
37 8050057 SHCS 10-32 X 1/2" 14
38 8171008 WASHER 3/4" SAE 2
39 381158 SHCS 10-32 X 1.25" 8
40 381595 RUBBER BUMPER 1.5" X 1.5" THK 2
41 381596 SHCS 1/4"-20 X 1.5" 2
42 381597 SHCS 1/4"-20 X .75" 4
43 381598 BELLEVILLE WASHER .25 X .69" THK 4
44 8041058 SCREWCAP 3/8"-16 X 3" HCS ZP 5
45 381440 WHEEL 13" 2
46 8041031 BOLT HEX HEAD 5/16"-18 X 1 3/4 80
47 8160002 NUTLOCK 5/16"-18 80
48 8171003 WASHER 5/16" FLAT 80
49 8160003 NUTLOCK 3/8"-16 HEX ZP 5
50 8041010 SCREWCAP 1/4"-20 X 2" HCS ZP 2
51 8160001 NUTLOCK 1/4"-20 HEX ZP 4
52 8197031 COTTER PIN 1/8" X 1" 4
53 8172020 WASHER FENDER 5/16" 8
Part No 100384 Form No F080114D
 Loading...